

Personal Audio
Getting started
System
Operating Instructions
Listening to a CD
Listening to the radio
Listening to a file on a USB
device
Listening to music with
optional audio components
Listening to music through a
BLUETOOTH connection
Listening to music via a
wireless network
Additional information
About “SongPal”
Troubleshooting
Precautions/Specifications
CMT-X7CD / CMT-X7CDB
WARNING
To reduce the risk of fire, do not cover the
ventilation opening of the appliance with
newspapers, tablecloths, curtains, etc.
Do not expose the appliance to naked flame
sources (for example, lighted candles).
To reduce the risk of fire or electric shock, do not
expose this appliance to dripping or splashing,
and do not place objects filled with liquids, such as
vases, on the appliance.
As the main plug is used to disconnect the unit
from the mains, connect the unit to an easily
accessible AC outlet. Should you notice an
abnormality in the unit, disconnect the main plug
from the AC outlet immediately.
Do not install the appliance in a confined space,
such as a bookcase or built-in cabinet.
Do not expose batteries or appliances with
battery-installed to excessive heat, such as
sunshine and fire.
The unit is not disconnected from the mains as
long as it is connected to the AC outlet, even if the
unit itself has been turned off.
This equipment has been tested and found to
comply with the limits set out in the EMC Directive
using a connection cable shorter than 3 meters.
The nameplate is located on the bottom exterior.
CAUTION
The use of optical instruments with this product
will increase eye hazard.
This appliance is classified as a CLASS 1 LASER
product. This marking is located on the bottom
exterior.
CAUTION
Danger of explosion if battery is incorrectly
replaced.
Replace only with the same or equivalent type.
Notice for customers: the following
information is only applicable to
equipment sold in countries applying EU
directives.
This product has been manufactured by or on
behalf of Sony Corporation, 1-7-1 Konan Minato-ku
Tokyo, 108-0075 Japan. Inquiries related to product
compliance based on European Union legislation
shall be addressed to the authorized
GB
2
representative, Sony Deutschland GmbH,
Hedelfinger Strasse 61, 70327 Stuttgart, Germany.
For any service or guarantee matters, please refer
to the addresses provided in the separate service
or guarantee documents.
Hereby, Sony Corp., declares that this equipment is
in compliance with the essential requirements and
other relevant provisions of Directive 1999/5/EC.
For details, please access the following URL:
http://www.compliance.sony.de/
Disposal of Old Electrical &
Electronic Equipment
(Applicable in the European
Union and other European
countries with separate
collection systems)
This symbol on the product or on its packaging
indicates that this product shall not be treated as
household waste. Instead it shall be handed over
to the applicable collection point for the recycling
of electrical and electronic equipment. By ensuring
this product is disposed of correctly, you will help
prevent potential negative consequences for the
environment and human health, which could
otherwise be caused by inappropriate waste
handling of this product. The recycling of materials
will help to conserve natural resources. For more
detailed information about recycling of this
product, please contact your local Civic Office, your
household waste disposal service or the shop
where you purchased the product.
Europe Only
Disposal of waste batteries
(applicable in the European
Union and other European
countries with separate
collection systems)
This symbol on the battery or on the packaging
indicates that the battery provided with this
product shall not be treated as household waste.
On certain batteries this symbol might be used in
combination with a chemical symbol. The chemical
symbols for mercury (Hg) or lead (Pb) are added if
the battery contains more than 0.0005% mercury
or 0.004% lead.
By ensuring these batteries are disposed of
correctly, you will help prevent potentially negative
consequences for the environment and human
health which could otherwise be caused by
inappropriate waste handling of the battery. The
recycling of the materials will help to conserve
natural resources.
In case of products that for safety, performance or
data integrity reasons require a permanent
connection with an incorporated battery, this
battery should be replaced by qualified service
staff only.
To ensure that the batter y will be treated properly,
hand over the product at end-of-life to the
applicable collection point for the recycling of
electrical and electronic equipment.
For all other batteries, please view the section on
how to remove the battery from the product
safely. Hand the battery over to the applicable
collection point for the recycling of waste
batteries.
For more detailed information about recycling of
this product or battery, please contact your local
Civic Office, your household waste disposal service
or the shop where you purchased the product.
Before operating this system
Malfunctions that occur during the
normal use of the system will be repaired
by Sony in accordance with the
conditions defined in the limited
warranty for this system. However, Sony
will not be liable for any consequences
arising from a failure to play caused by a
damaged or malfunctioning system.
Music discs encoded with
copyright protection technologies
This product is designed to playback discs
that conform to the Compact Disc (CD)
standard. Recently, various music discs
encoded with copyright protection
technologies are marketed by some record
companies.
Please be aware that among those discs,
there are some that do not conform to the
CD standard and may not be playable by
this product.
Note on DualDiscs
A DualDisc is a two sided disc product which
mates DVD recorded material on one side
with digital audio material on the other side.
However, since the audio material side does
not conform to the Compact Disc (CD)
standard, playback on this product is not
guaranteed.
GB
3

Table of Contents
Before operating this system................................................................. 3
Getting started
Location and Function of Controls.........................................................6
Setting the clock.....................................................................................9
Listening to a CD
Playing a CD-DA/MP3 disc....................................................................10
To change the play mode ................................................................10
Creating your own program (Program Play) ......................................... 11
Listening to the radio
Tuning in a radio station .......................................................................13
Presetting radio stations.......................................................................13
Running the DAB Automatic Scan manually (CMT-X7CDB only)............14
Listening to a file on a USB device
Playing a file on a USB device................................................................15
Listening to music with optional audio
components
Playing back the music of optional audio components .......................16
Listening to music through a BLUETOOTH
connection
Pairing the system with a BLUETOOTH device and listening to
music .................................................................................................17
Listening to music through a registered device..................................18
Listening to music by one-touch action (NFC)......................................19
Playing with high quality sound codec (AAC/aptX)............................. 20
GB
4

Listening to music via a wireless network
Preparing: setting up for a network .....................................................21
Connecting with PC ........................................................................21
Connecting with a wired network.....................................................23
Listening to music on an Xperia™/Xperia Tablet
(WALKMAN® application) ..................................................................23
Listening to music on iPhone, iPad, iPod or iTunes (AirPlay)............... 24
Listening to music on Windows 8/Windows 7 (Home network)..........25
Using Internet music streaming (Music Services)................................ 26
Additional information
Setting the Automatic Standby function..............................................27
Setting the BLUETOOTH/Network Standby mode............................... 28
Setting the wireless BLUETOOTH signal ON/OFF................................. 28
Adjusting the sound ............................................................................ 29
Using the timers................................................................................... 29
Setting the Sleep Timer.................................................................. 29
Setting the Play Timer.................................................................... 29
Updating the software..........................................................................31
Changing the battery ............................................................................31
About “SongPal”.................................................................................33
Troubleshooting
Troubleshooting .................................................................................. 34
Messages............................................................................................. 38
Precautions/Specifications
Precautions.......................................................................................... 40
Compatible devices and versions.........................................................41
iPhone/iPad/iPod touch.................................................................41
DLNA device..................................................................................41
USB device ....................................................................................41
BLUETOOTH wireless technology ........................................................ 42
Specifications....................................................................................... 43
Important information on software......................................................47
GB
5
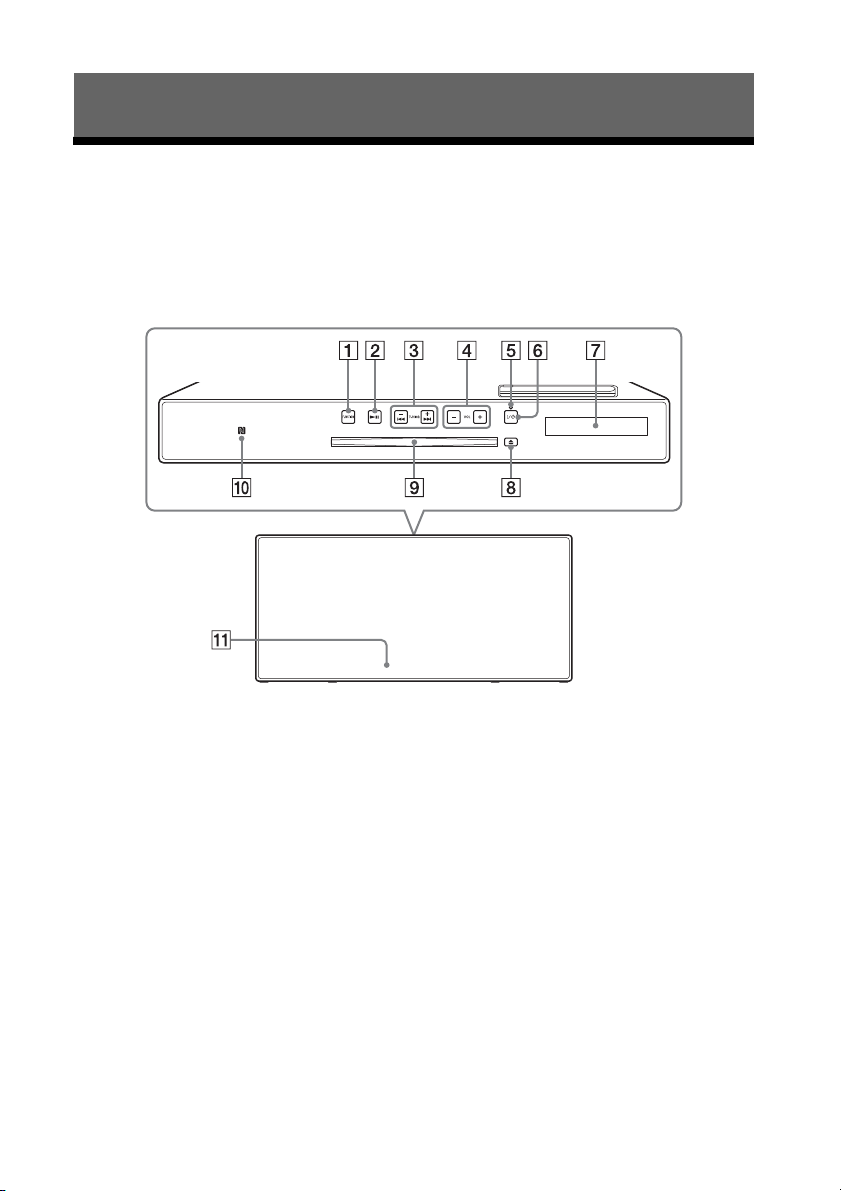
Getting started
Top
Front
Location and Function of Controls
Note
This manual mainly explains operations using the remote, but the same operations can also
be performed using the buttons on the unit having the same or similar names.
Unit (front/top)
FUNCTION button(S)
Press to change the source. Each press
changes to the next source in the
following sequence:
CD USB BT AUDIO DAB* FM
AUDIO IN NETWORK
* DAB is for CMT-X7CDB only.
(play/pause) button
Use to start or pause playback.
/ (fast-rewind / fast-forward) /
TUNING +/– buttons
Use to cue to the beginning of a track
or file, or fast-forward or fast-rewind
the track or file.
Use to tune in a desired radio station.
VOL +/– button
Use to adjust the volume.
GB
6
Standby indicator
Lights in green when the power is turned
on.
Lights in red when the power is turned
off. The indicator flashes in red if the
system detects an abnormality (page 34).
When the system in BLUETOOTH/
Network standby mode, the indicator
lights up in orange.
/ (power) button
Use to turn the power on or off.
Display window
(eject) button
Use to eject a CD.
Disk slot
Insert a CD.

N-Mark
Place a smartphone/tablet equipped
with the NFC function close to this mark
to perform BLUETOOTH registration,
connection or disconnection by a onetouch action (page 19).
Remote sensor
The IR mark is not indicated on the
unit.
Remote
/ (power) button
Use to turn the power on or off.
SOUND button
Use to control the sound quality
(page 29).
TIMER button
Use to set the clock or play timer (page 9,
29).
// (enter) button
Press / to select an item, then press
to enter.
+/– button
Use to select a folder (album) on an MP3
disc or USB device.
CLEAR button
Use to delete a programmed track or
folder (page 12).
(play/pause) button
Use to start or pause playback.
/ (previous/next)/PRESET +/–
buttons
Use to cue the beginning of a track or
file.
Use to select a preset number of the
radio station tuned in.
/ (fast-rewind/fast-forward)/
TUNING +/– buttons
Use to fast-rewind or fast-forward a
track or file.
Use to tune-in a desired radio station.
VOL +/– button
Use to adjust the volume.
(stop) button
Use to stop playback.
RETURN button
Use to return to the previous status.
MENU button
Use to display the menu. Press / to
select the items in the menu.
FUNCTION –/+ button(s)
Press to change the functions. Each press
of the + button changes to the next
function in the following sequence:
CD USB BT AUDIO DAB*
FM AUDIO IN NETWORK
*DAB is for CMT-X7CDB only.
DISPLAY button
Use to change the information displayed
in the display window when the power is
on. An underscore “_” is displayed in the
place of an unrecognizable character.
If you press this button when the power
is turned off, the clock time is displayed.
Getting started
GB
7
When you use the remote for the
Note
Note
first time
The battery is factory-installed in the remote.
Before using the remote for the first time,
remove the insulation sheet attached to the
battery holder. For details, see “Changing the
battery” (page 31).
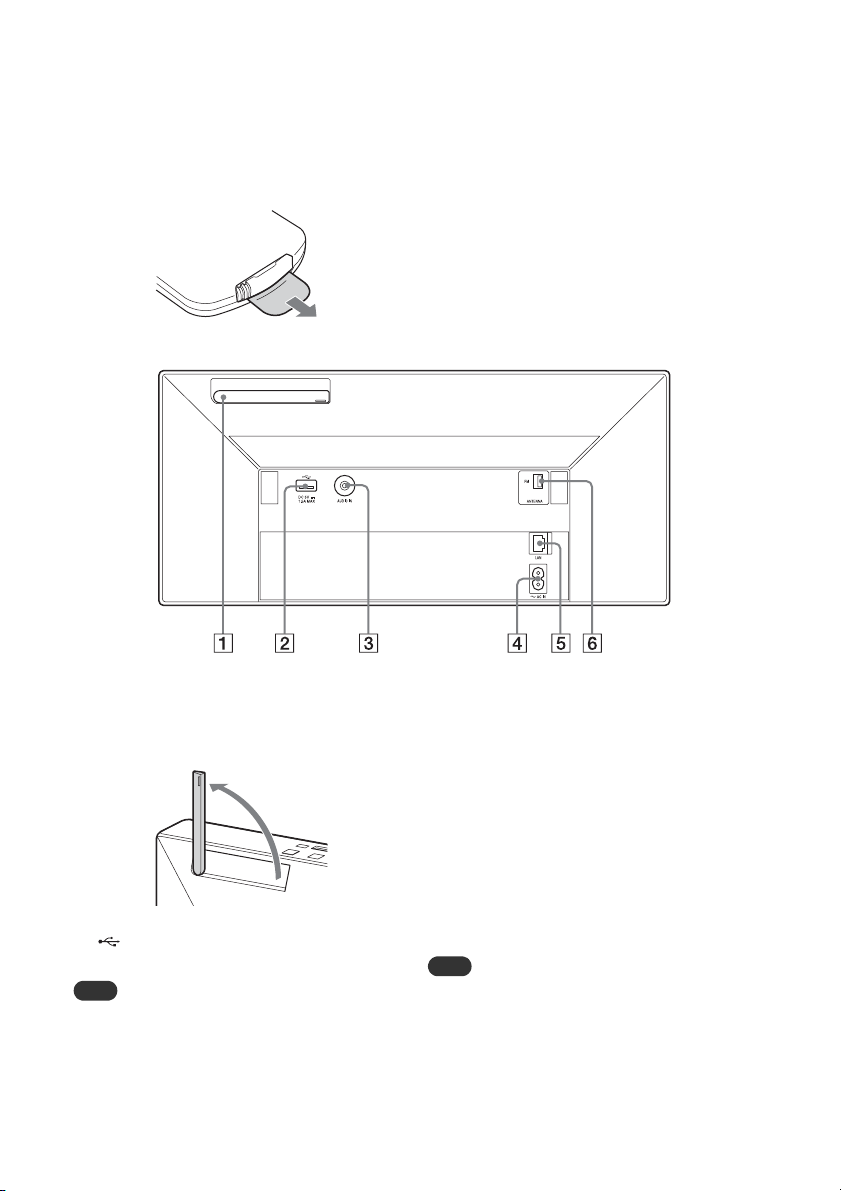
Unit (back)
Wireless LAN antenna
If you use the wireless network function,
set the antenna as shown in the
illustration.
(USB) port
Connect a USB device (page 15).
You can use your iPhone/iPod with this system
via Bluetooth or AirPlay connection only.
AUDIO IN (external input) jack
Connect optional external equipment
with an audio connecting cable (not
supplied).
GB
8
~ AC IN (220-240 V AC) input
Connect the power cord (supplied) to the
wall outlet.
LAN connector
Connect network equipment with
network cable (not supplied) (page 23).
FM ANTENNA
(for CMT-X7CD only)/
DAB/FM ANTENNA
(for CMT-X7CDB only)
Connect the FM or DAB/FM antenna.
* The illustration above is for CMT-X7CD.
Find a location and an orientation that provide
good reception, and then fix the antennas to a
stable surface (window, wall, etc.).
Secure the end of the FM lead antenna with
adhesive tape.

Setting the clock
Note
Press / to turn on the system.
1
Press TIMER.
2
If “PLAY SET” is displayed, press / to
select “CLOCK,” then press .
Press / to set the hour, then
3
press .
Press / to set the minutes,
4
then press .
Complete the clock setting.
The clock settings are reset when you
disconnect the power cord or if a power failure
occurs.
To display the clock when the
system is off
Press DISPLAY repeatedly to display the
clock. The clock is displayed for about 8
seconds.
If the BLUETOOTH/Network Standby mode is
on, the clock does not appear by pressing
DISPLAY.
Getting started
GB
9
Note
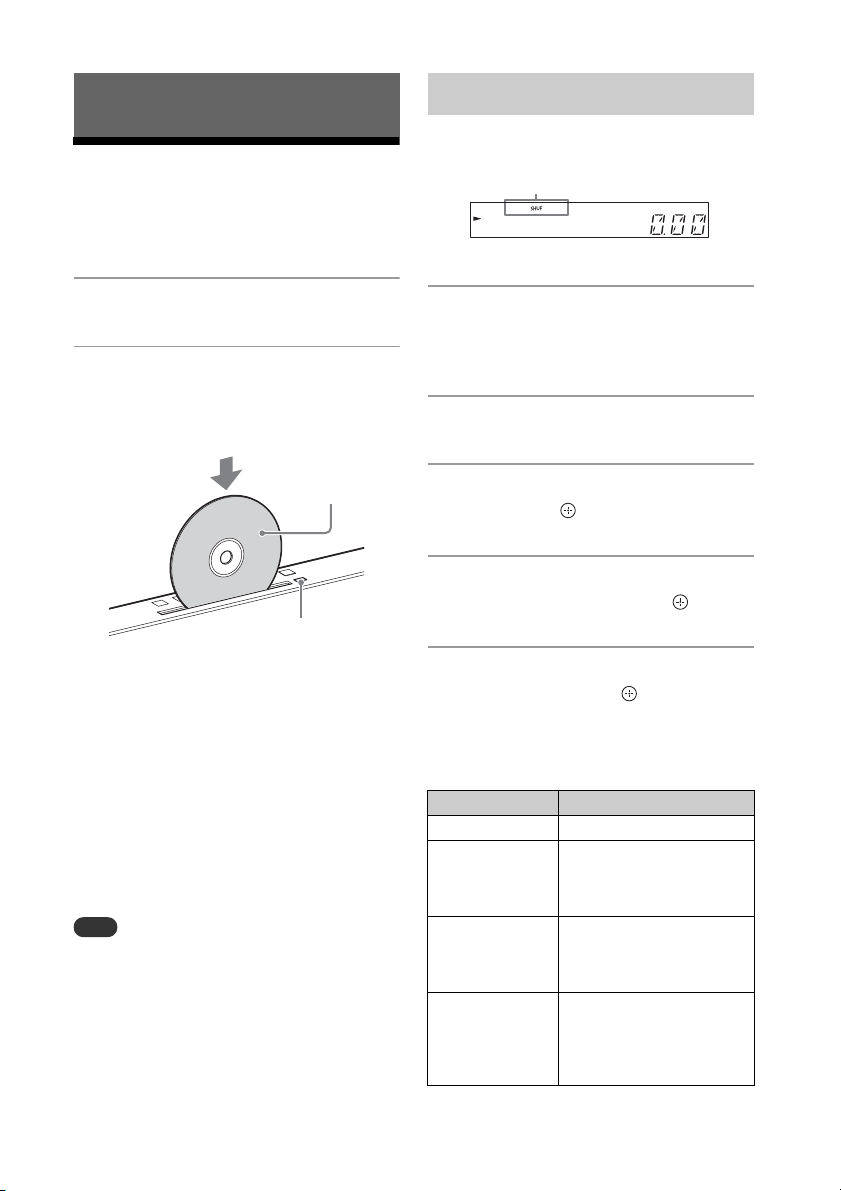
Listening to a CD
Label side
(printed side)
(eject)
Play mode
Playing a CD-DA/MP3 disc
Press FUNCTION to select “CD.”
1
Insert a CD to the disc slot at the
2
top of the unit.
Load a CD with the label side (printed
side) toward you.
To change the play mode
Play mode enables you to playback the
same music repeatedly or shuffle-play.
Press to stop playback.
1
If you select “REPEAT” in step 4, you do
not have to stop playback.
Press MENU.
2
Press / to select “CD MENU,”
3
then press .
Press / to select “PLAYMODE”
4
or “REPEAT,” then press .
Plays back automatically.
If you switch the function to “CD” from
another function when a CD is already
inserted in the slot, press after
“READING” has disappeared from the
display window.
The button of the remote or the unit
enables you to fast-rewind/fastforward, select a track, file or folder (for
MP3 disc), etc.
To eject the CD
Press (eject) on the unit.
8 cm CDs cannot be used with this system.
Do not load a CD with non-standard shapes
(e.g., heart, square, star). Doing this may cause
irreparable damage to the system.
Do not use a CD with tape, stickers or paste on it
as this may cause malfunction.
When you remove a disc, do not touch the
surface of the disc.
GB
10
Press / to select the play
5
mode, then press .
You can select the following play
modes.
PLAYMODE
Play mode Effect
NORMAL Plays a track or file.
FOLDER* Plays all tracks in the
SHUFFLE Plays all tracks or files in
FLDR.SHUF* Plays all tracks or files in
selected folder. “FLDR”
lights up in the display
window.
random order. “SHUF”
lights up in the display
window.
the selected folder in
random order. “FLDR.
SHUF” lights up in the
display window.
Play mode Effect
Selected track
or file number
Tot al p la yi ng ti m e o f
the selected track or
file
PROGRAM Plays the programmed
* This play mode is applicable only for playing an
MP3 disc.
tracks or files. “PGM” lights
up in the display window.
For details, see “Creating
your own program
(Program Play)” (page 11).
REPEAT
Play mode Effect
ALL (Repeat
plays all tracks)
ONE (Repeat
plays one track)
OFF Cancels repeat playback.
The system plays all tracks
in a disc or folder
repeatedly. “ ” lights up
in the display window.
The system plays the
selected track repeatedly.
“ 1” lights up in the
display window.
Note on playing MP3 discs
Do not save unnecessary folders or files
on a disc that has MP3 files.
Folders that have no MP3 files are not
recognized on the system.
The system can only play MP3 files that
have a file extension of “.mp3.”
Even when file name has the “.mp3” file
extension, if it is not an audio MP3 file,
playing this file may generate a loud
noise, which could cause damage of the
system.
The maximum number of MP3 folders and
files compatible with this system is:
999* folders (including the root folder)
999 files
250 files in a single folder
8 folder levels (in the tree structure of
files)
* This includes folders that have no MP3 or
other files. The number of folders that the
system can recognize may be less than actual
number of folders, depending on the folder
structure.
Compatibility with all MP3 encoding/
writing software, CD-R/RW drive and
recording media cannot be guaranteed.
Incompatible MP3 discs may produce
noise or interrupted audio or may not play
at all.
Creating your own program (Program Play)
Plays the programmed track or file in a CD.
Select “PROGRAM” in step 5 of
1
“To change the play mode”
(page 10), then press .
When using an MP3 disc, press
2
+/– to select the folder
containing the tracks or files that
you want to program.
If you want to play all tracks or files in
the folder, press .
Press / to select a
3
desired track or file, then select
.
Repeat the steps above to program
additional tracks or files.
Press .
4
Your program of tracks or files starts
playback.
To cancel program play
In step 1, select “NORMAL” for “PROGRAM,”
then press .
Listening to a CD
11
GB

To delete a programmed track or
Tip
Note
file
Press CLEAR while the play is stopped. Each
time you press the button, the last
programmed track or file will be deleted.
When all the programmed tracks or files are
deleted, “NO STEP” appears.
Up to 25 tracks or files can be programmed. If
you attempt to program more than 25 tracks or
files, “FULL” will be displayed. In this case, delete
unnecessary tracks.
To play the same program again, press .
When the disc is ejected or the power cord is
disconnected after programming, all the
programmed tracks and files are deleted.
12
GB

Tip
Tip
Listening to the radio
Preset number
Presetting radio
Tuning in a radio station
Press FUNCTION to select “FM” or
1
“DAB*” (CMT-X7CDB).
Press and hold PRESET +/– until
2
the frequency indication in the
display window starts changing,
then release the button.
Tuning stops automatically when a FM
stereo broadcast is received
(Automatic Scanning).
“ST” lights up in the display window.
* DAB is for CMT-X7CDB only.
Manual tuning
Press PRESET +/– repeatedly to tune-in the
desired station.
Note on DAB/DA B+ stations (CMT-X7CDB only)
When you tune in a station that provides
RDS services, information such as the
service name or station name is provided
by broadcasts.
When tuning in a DAB/DAB+ station, it
may take a few seconds before you hear
any sound.
Primary service is automatically received
when secondary service ends.
This tuner does not support data services.
If reception of an FM stereo broadcast is noisy,
press MENU and select “TUNE:MENU,” “FM
MODE” and “MONO” in turn, to select monaural
reception. This reduces noise.
stations
You can preset your desired radio stations.
Tune in the desired station, then
1
press MENU.
Press / to select
2
“TUNE:MENU,” then press .
Press / to select “MEMORY,”
3
then press .
Press / to select “OK,” then
4
press .
Press / to select the preset
5
number, then press .
“COMPLETE” appears in the display
window and the radio station is
registered with the preset number.
Repeat the steps above to register
further radio stations.
Press / to turn off the power,
6
then press / again to turn on
the power.
You can preset up to 20 FM, or 20 DAB/DAB+
and 20 FM stations (CMT-X7CDB).
If you select an already-registered preset
number in step 5, the preset radio station is
replaced by the currently tuned-in radio station.
Listening to the radio
13
GB

To tune in to a preset radio
Note
station
Press PRESET +/– to select the preset
number to which the desired station is
registered.
Running the DAB Automatic Scan manually (CMT-X7CDB only)
Before you can tune in DAB/DAB+ stations,
you must perform a DAB Initial Scan.
When you have moved to another area, also
perform the DAB Initial Scan manually to
update the DAB/DAB+ service information.
Press MENU.
1
Press / to select
2
“TUNE:MENU,” then press .
Press / to select “INIT:SCAN,”
3
then press .
Press / to select “OK,” then
4
press .
Scanning begins. The scanning
progress is indicated by asterisks
(*******). Depending on the DAB/DAB+
services available in your area,
scanning may take a few minutes.
If your country or region does not support DAB/
DAB+ broadcast,“NO SERV” appears.
This procedure clears all previously stored
presets.
Before unplugging the DAB/FM lead antenna,
make sure the system is turned off to preserve
your own DAB/DAB+ settings.
GB
14
Tip
Note
Listening to a file on a USB device
Playing a file on a USB device
You can play audio files stored on a USB
device such as WALKMAN® or digital media
player, on this system by connecting a USB
device to the system.
For details on compatible USB devices, see
“Compatible devices and versions”
(page 41).
Press FUNCTION to select “USB.”
1
Connect the USB device to the
2
(USB) port on the rear of the unit.
Connect the USB device directly, or via
the USB cable supplied with the USB
device, to the (USB) port.
Wait until “READING” disappears.
Press .
3
Starts playback.
You can operate fast-rewind/fastforward, selecting a track or file or
selecting folder with the remote or the
button of the unit.
When playing the USB device, the play mode
can be selected. Press MENU, then select “USB
MENU.” Select “PLAYMODE” or “REPEAT.”
For details, see “To change the play mode”
(page 10). When a file on a USB device is playing,
programmed playback cannot be played.
If a USB device is connected to the unit, battery
charging starts automatically. Even when the
system is off, the USB device can be charged.
If the USB device cannot be charged, disconnect
and reconnect it. For details on the charging
status of the USB device, see the operating
manual of the USB device.
The playback order for the system may differ
from the playback order of the connected digital
music player.
Be sure to turn off the system before removing
the USB device. Removing the USB device while
the system is turned on may corrupt the data on
the USB device.
When USB cable connection is necessary,
connect the USB cable supplied with the USB
device to be connected. For details on
connection, refer to the operation manual
supplied with the USB device to be connected.
It may take time before “READING” appears after
connecting, depending on the type of USB
device connected.
Do not connect the USB device through a USB
hub.
When the USB device is connected, the system
reads all the files on the USB device. If there are
many folders or files on the USB device, it may
take a long time to finish reading the USB
device.
With some connected USB devices, it may take a
long time to transmit signals from the system or
to finish reading the USB device.
Compatibility with all encoding/writing software
cannot be guaranteed. If audio files on the USB
device were originally encoded with
incompatible software, those files may produce
noise or may malfunction.
The maximum number of folders and files on
the USB device compatible with this system is:
1,000* folders (including the root folder)
3,000 files
250 files in a single folder
8 folder levels (in the tree structure of files)
* This includes folders that have no playable
audio files and empty folders. The number of
folders that the system can recognize may be
less than actual number of folders,
depending on the folder structure.
The system does not necessarily support all the
functions provided in a connected USB device.
Folders that have no audio files are not
recognized.
The audio formats that you can listen to with this
system are as follows:
MP3: file extension “.mp3”
WMA**: file extension “.wma”
AAC**: file extension “.m4a,” “.mp4” or “.3gp”
Note that even when file name has the correct file
extension, if the actual file differs, the system may
produce noise or may malfunction.
** Files with DRM (Digital Rights Management)
copyright protection or files downloaded from
an online music store cannot be played on this
system. If you try to play one of these files, the
system plays the next unprotected audio file.
15
Listening to a file on a USB device
GB

Note
Note
Listening to music with optional audio components
Playing back the music of optional audio components
You can play a track of optional audio
components connected to the unit.
Beforehand, press the VOL – to turn down the
volume.
Press FUNCTION to select “AUDIO
1
IN.”
Connect its audio connecting
2
cord to the AUDIO IN jack on the
rear of the unit and the output
terminal of the optional external
equipment.
Start playback of the connected
3
component.
Adjust the volume on the connected
component during playback.
Press VOL +/– on the remote to
4
adjust the volume.
The system may enter Standby mode
automatically if the volume level of the
connected component is too low. For details, see
“Setting the Automatic Standby function”
(page 27).
GB
16

Note
Tip
Note
Listening to music through a BLUETOOTH connection
Pairing the system with a BLUETOOTH device and listening to music
You can listen to music from BLUETOOTH
device over a wireless connection.
Before using the BLUETOOTH function,
perform pairing to register your BLUETOOTH
device.
Place the BLUETOOTH device to be connected
within one meter of the system.
If your BLU ETOOTH device is compliant with
touch (NFC), skip the next procedure. See
“Listening to music by one-touch action (NFC)”
(page 19).
Search for this system with the
6
BLUETOOTH device.
A list of the devices found may appear
on the BLUETOOTH device display.
Select [SONY:CMT-X7CD] or
7
[SONY:CMT-X7CDB] (this system).
If prompted to enter a passkey on the
BLUETOOTH device, enter “0000.”
If this system is not shown in the
display window of the device, proceed
from step 1 again.
When pairing is completed, the display
changes to the connected BLUETOOTH
device name from “PAIRING” and the
BLUETOOTH indicator lights up.
Press .
8
Starts playback.
Depending on the BLUETOOTH device,
press again. Also, you may have to
start up a music player on the
BLUETOOTH device.
Listening to music through a BLUETOOTH connection
Press FUNCTION to select “BT
1
AUDIO.”
Press MENU.
2
Press / to select “BT MENU,”
3
then press .
Press / to select “PAIRING,”
4
then press .
Press / to select “OK” then
5
press .
When “PAIRING” starts flashing in the
display window, the system changes to
pairing mode.
Press VOL +/– to adjust the
9
volume.
If the volume cannot be changed on
the system, adjust it on your
BLUETOOTH device.
Operation such as fast-rewind/fastforward, selecting music and selecting
a folder can be operated with the
remote or buttons of the unit.
You can perform a pairing operation or attempt
to make a BLUETOOTH connection with another
BLUETOOTH device while the BLUETOOTH
connection is established with one BLUETOOTH
device. The currently established BLUETOOTH
connection is canceled when BLUETOOTH
connection with another device is successfully
established.
The operations described above may not be
available for certain BLUETOOTH devices. In
addition, the actual operations may differ
depending on the connected BLUETOOTH
device.
17
GB

Once a pairing operation is performed, it does
Note
not have to be performed again. In the following
cases, however, a pairing operation must be
performed again:
Pairing information was erased when the
BLUETOOTH device was repaired.
You attempt to pair the system with more
than 10 BLUETOOTH devices.
This system can pair with up to 9 BLUETOOTH
devices. If you pair another BLUETOOTH
device after pairing with 9 devices was
performed, pairing information of the device
that was connected with the system first is
overwritten with that of the new device.
Pairing registration information of this system
is erased from the connected device.
If you initialize the system or erase the
pairing history with the system, all the
pairing information will be erased.
The sound of this system cannot be sent to a
BLUETOOTH speaker.
“Passkey” may be called “Passcode,” “PIN code,”
“PIN number” or “Password,” etc.
To check the address of a
connected BLUETOOTH device
Press DISPLAY while the name set on the
connected BLUETOOTH device is shown in
the display window. The BLUETOOTH device
address appears in two lines in the display
window for 8 seconds.
To cancel the connection with the
BLUETOOTH device
Disconnect the BLUETOOTH connection on
the BLUETOOTH device. “BT AUDIO” appears
in the display window.
Listening to music through a registered device
After step 1 on “Pairing the system with a
BLUETOOTH device and listening to music,”
operate the BLUETOOTH device to connect
with the system, then press of the unit
to start playback.
To erase the pairing registration
information
1
Select “DEL LINK” after step 3 on “Pairing
the system with a BLUETOOTH device and
listening to music” (page 17), then press
.
2
Press / to select “OK,” then press .
“COMPLETE” appears in the display window and
all the pairing information is erased.
If you have erased the pairing information, you
cannot make a BLUETOOTH connection unless
pairing is performed again.
GB
18
Listening to music by
Tip
Note
one-touch action
(NFC)
NFC is a technology for short-range wireless
communication between various devices
such as a mobile phone and IC tag.
Just touch your smartphone/tablet on the
system. The system is turned on
automatically, and pairing and BLUETOOTH
connection are established.
Beforehand, turn the NFC settings to on.
Touch your smartphone/tablet
1
on the N-mark on the unit.
Touch the smartphone/tablet on the
unit and maintain contact until the
smartphone/tablet vibrates.
Refer to the user’s guide of your
smartphone/tablet for the part of your
smartphone/tablet used as touch
contact.
After completing the connection,
2
press .
Starts playback.
To disconnect the established
connection, touch your smartphone/
tablet on the N-Mark on the unit.
When you touch an NFC-compliant smartphone/
tablet on the unit while another BLUETOOTH
device is connected with this system, the
BLUETOOTH device is disconnected and the
system is connected with the smartphone/
tablet.
In some countries and regions, NFC-compliant
application may not be downloaded.
Listening to music through a BLUETOOTH connection
Compatible smartphones are those equipped
with the NFC function (compatible operating
system: Android version 2.3.3 or later with the
exception of Android 3.x).
Check the website below for information on
compatible devices.
For customers in Europe:
http://support.sony-europe.com/
For customers in other countries/regions:
http://www.sony-asia.com/support
If the smartphone/tablet does not respond even
though it is touched to the unit, download “NFC
Easy Connect” to your smartphone/tablet and
run it. Then touch to the unit again. “NFC Easy
Connect” is a free application for exclusive use
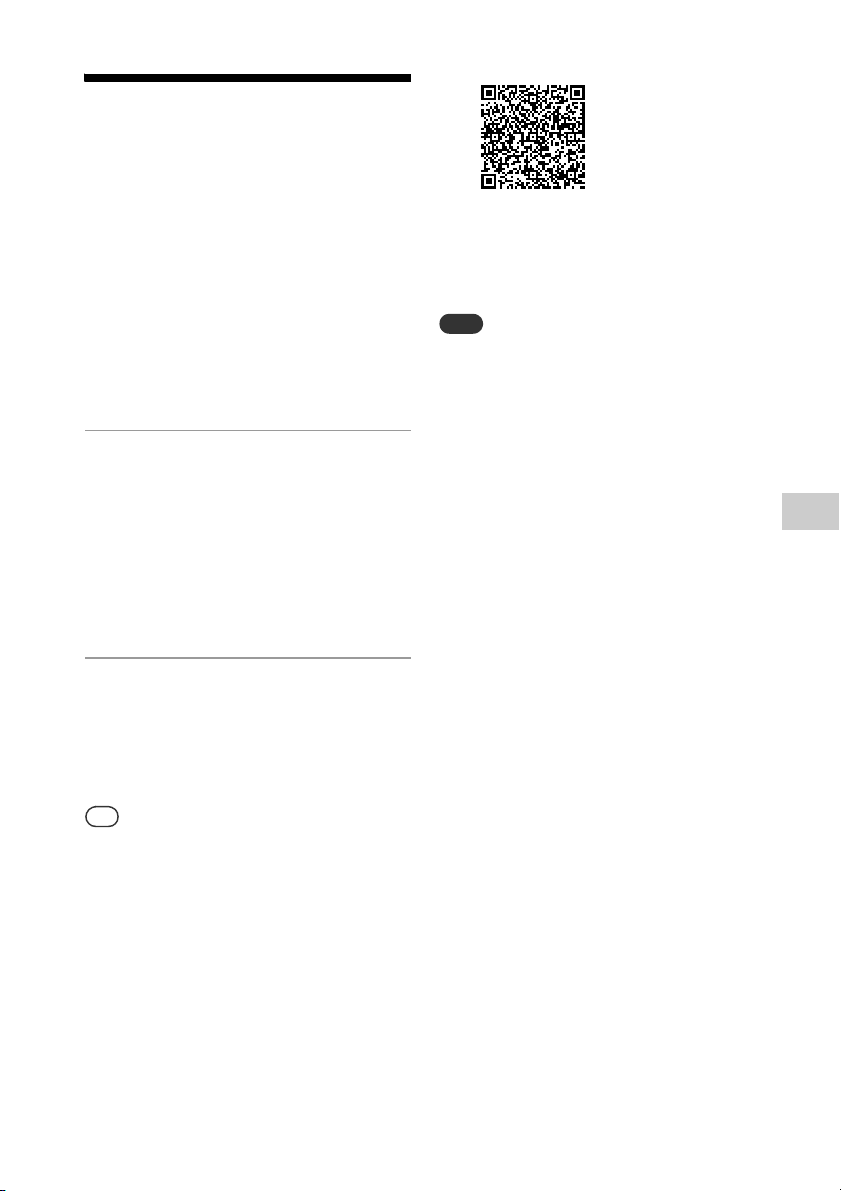
with Android™. Scan the following 2D Code.
19
GB

Playing with high
Note
quality sound codec
(AAC/aptX)
You can receive the data in AAC or aptX
codec format from a BLUETOOTH device. It
provides the playback with a higher quality
sound.
The factory settings of “BT AAC” and “BT
APTX” are “ON.”
Press MENU.
1
Press / to select “BT MENU,”
2
then press .
Press / to select “BT AAC”
3
(AAC codec) or “BT APTX” (aptX
codec), then press .
Press / to select “ON,” then
4
press .
If you initiate setup during BLUETOOTH
connection, the connection is cut.
If sound is interrupted during reception in AAC
code c format, set to “OFF” in step 4 to cancel the
settings. In this case, the system receives SBC
codec.
GB
20

Tip
Note
Note
Listening to music via a wireless network
Preparing: setting up for a network
Connecting with PC
Be aware that your Wi-Fi network will not be
protected until the setting is complete. After the
setting is complete, your Wi-Fi network will be
protected again when you set a wireless LAN
security.
If you connect this system to a network, you
can enjoy this system in various ways.
Depending on your network environment,
setting up methods are different. Check
your network environment beforehand.
For setting the fixed IP address, use the screen in
step 6 of “Connecting with PC” (page 21).
Connecting to the wireless network and the
wired network simultaneously is not possible.
When you connect to the wireless network, be
sure to disconnect the network (LAN) cable from
the system.
When setting up a wireless network, SSID
(Wireless Network Name) and Security Key (WEP
or WPA key) may be required. The security key
(or network key) uses encryption to limit the
devices with which communication can occur. It
is used to provide higher security for devices
communicating via a wireless LAN router/access
point.
Method for using smartphone/
tablet
Use the SongPal application for exclusive
use with a smartphone/tablet. For details,
see Quick Start Guide.
Method for using the access point
supporting WPS
Using the WPS access button to connect.
See Quick Start Guide.
Method for using PC
See “Connecting with PC” (page 21).
Have the wireless network name
1
(SSID) and Security Key of the
wireless LAN router/access point
to be used available for
reference.
SSID (Wireless Network Name)
Security Key (WEP or WPA key)
For the SSID and Security Key, refer to
the operating instructions of the
wireless LAN router/access point.
Press / to turn on the system.
2
Connect the unit to a Mac or PC.
3
For Windows 8 (Windows UI)
Turn on PC.
Move the mouse pointer to the top-
right (or bottom-right) corner on the
Start screen to display the charms,
and select [Settings].
With a touch panel, display the
charms by swiping from the right
end of the Start screen, and select
[Settings].
Select or tap the or icon.
Select [Sony_Wireless_Audio_Setup]
from the network list.
Listening to music via a wireless network
Method for using wired network
See “Connecting with a wired network”
(page 23).
21
GB

For Windows 8/Windows 7
Note
Network Settings
SSID
Turn on PC.
Click or tap the desktop on the Start
screen.
Select the or icon on the
bottom of the screen.
Select [Sony_Wireless_Audio_Setup]
from the network list.
For Windows Vista
Turn on PC.
Click the icon on the bottom of
the screen.
Select [Connect to a network].
Select [Sony_Wireless_Audio_Setup]
from the network list.
For Mac OS X
Turn on Mac .
Select the ico n on the top of the
screen.
Select [Sony_Wireless_Audio_Setup]
from the network list.
Access the [Sony Network Device
4
Setting] screen.
For PC
Start the browser and input either of
the following URLs into the browser’s
address bar.
http:/ /19 2.168.100.1
For Mac
Start Safari and select [Bonjour] under
([Bookmarks]), then select
[SONY:CMT-X7CD] or [SONY:CMTX7CDB].
Select the desired language
5
when the [Language Setup]
screen appears.
Select the SSID of the wireless
7
LAN router/access point, then
select [Apply].
If necessary, input the security key.
When the confirmation screen displays,
press [OK].
Press / to turn off the power,
8
then press / again to turn on
the power.
Connect the Mac or PC to the
9
wireless LAN router/access point
to be used.
This procedure needs to be completed within 10
minutes. If you cannot complete, reset your
computer (page 38).
GB
22
Select [Network Settings] from
6
the menu.

Note
Connecting with a wired network
Listening to music on
Usually, the DHCP setting is set to ON when
you connect your computer to the network.
For details, refer to the manual of your
computer.
Check whether your computer
1
and router are turned on.
Connect the system and the
2
router using a network (LAN)
cable (not supplied).
Connect the router and your
3
computer using a second
network (LAN) cable (not
supplied) or a wireless LAN
connection.
Turn the system on.
4
lights up in the display window
when the connection is made.
an Xperia™/Xperia
Tablet (WALKMAN®
application)
Using the WALKMAN® application, you can
play music stored in an (Xperia/Xperia
tablet).
Make sure that the Xperia device is connected to
the network beforehand, and update its Android
OS to the latest version before using it with this
system.
Connect the system to the
1
network.
For details, see “Preparing: setting up
for a network” (page 21).
Launch the WALKMAN®
2
application on the Xperia device.
Select the icon at the upper
3
right on the Xperia device.
The list of the devices which can be
connected with the system are
displayed.
Listening to music via a wireless network
Select [SONY:CMT-X7CD] or
4
[SONY:CMT-X7CDB] (this system).
Start playing back audio content
5
on the Xperia device.
The system enters the “HOME NET”
function mode and the selected audio
content is played back.
If playback does not start, perform the
procedure again from step 1.
23
GB

Tip
Refer to the operating manual of your Xperia
Note
device for details.
For details on the use of the Android OS, refer to
Help of Android OS.
This system can play back music stored in some
WALKMAN® models using the Music Throw
function. For details on the Music Throw
function, refer to the operation manual supplied
with your WALKMAN®.
Listening to music on iPhone, iPad, iPod or iTunes (AirPlay)
Using AirPlay, you can play music stored in
iPhone, iPad, iPod touch or in a Mac or
computer equipped with iTunes.
For details on the compatible iPhone, iPad,
iPod touch or iTunes, see “Compatible
devices and versions” (page 41).
Connect an iPhone/iPad/iPod touch or
computer equipped with iTunes to the network,
and update iOS or iTunes to the latest version
before using with this system.
Connect the system to the
1
network.
For details, see “Preparing: setting up
for a network” (page 21).
Launch the application of your
2
iPhone, iPad, iPod touch, or
iTunes.
24
GB
Select the icon of the control
3
center of the iPhone, iPad or iPod
touch screen or iTunes window.
The list of the devices which can be
connected with the system are
displayed.
Select [SONY:CMT-X7CD] or
4
[SONY:CMT-X7CDB] (this system).

Start playing back audio content
Tip
Tip
Note
5
on an iPhone, iPad, iPod touch or
iTunes.
The system enters the AirPlay function
mode and the selected audio content is
played back.
If the playback does not start, perform
the process again from step 1.
Listening to music on Windows 8/ Windows 7 (Home network)
Very loud sound may output from this system
when you set the volume too high using iPhone,
iPad, iPod touch or iTunes.
The volume level of iPhone, iPad, iPod touch or
iTunes may not be able to be linked with the
volume level of this system.
Refer to the operating manual of your device for
details on operating iPhone, iPad, iPod touch,
iTunes or AirPlay.
You can play back tracks on DLNA-compliant
servers such as the computer application
Media Go, Windows Media Player, etc., on
this system. For details, see the website
below.
For customers in Europe:
http://support.sony-europe.com/
For customers in other countries/regions:
http://www.sony-asia.com/support
You can use a smartphone/tablet as a
controller with the SongPal application for
exclusive use with your smartphone/tablet.
For information on compatible DLNA
devices, see “Compatible devices and
versions” (page 41).
To play music from a computer equipped with
Windows Vista or Windows XP, a controller is
needed for the operation. For details, see
operating manual of your computer.
The system can play audio content stored on the
server in MP3, Linear PCM, WMA, AAC, WAV,
FLAC, ALAC and AIFF audio formats. (The system
can play AAC files with the extension of “.m4a,”
“.mp4,” or “.3gp” only.)
When using a wireless connection, the system
may not play back some audio files.
This system cannot play back files in WMA
format with DRM copyright protection. If a WMA
file cannot be played back on this system, rightclick the file on your computer. If there is a
“License” tab, the file is protected by DRM.
Generally, it may take a while to recognize each
DLNA-compliant device currently used when you
enjoy audio content via a home network.
You may not be able to play back some content
with DLNA CERTIFIED products.
Listening to music via a wireless network
25
GB

Using Internet music
Tip
Note
streaming (Music
Services)
You can use various Internet music
streaming offered on the Internet, using
SongPal installed on a smartphone/tablet as
the controller without using a computer.
Depending on the smartphone/tablet, the
following operation may differ. For details,
refer to the operating manual of your
smartphone/tablet.
Download SongPal to the
1
smartphone/tablet, then run
SongPal.
SongPal is an application for exclusive
use with a smartphone/tablet. A
dedicated App for this model is
available on both Google Play™ and
the App Store and install it following
the instructions displayed on the
smartphone/tablet.
Select the desired playable
4
content and start playback.
Select the playable music.
When playback starts, the selected
music service appears in the display
window.
If playback does not start, perform the
process again from step 3.
Depending on the service, you have to enter
your ID and password when logging in. To delete
your ID and password, reset the unit (page 38).
Very loud sound may output from this unit when
you set the volume too high using an
smartphone/tablet or iOS.
For details on the use of the Android OS or iOS,
refer to Help of each OS.
For details on the use of “SongPal,” tap/click on
the Help icon or Option icon of it.
Depending on the country and regions, services
and the period of availability may differ. A
separate registration is required for certain
services. An upgrade of the device may be
required.
26
Follow the instructions displayed
2
on the smartphone/tablet,
connect the system to the
network.
For details, see Quick Start Guide.
Select a music service from the
3
source list of SongPal.
The selected music service starts.
Then a list of playable music is
displayed.
GB

Tip
Note
Additional information
Setting the Automatic Standby function
The system enters Standby mode
automatically in about 15 minutes when
there is no operation or audio signal output
(Automatic Standby function).
By default, the Automatic Standby function
is turned on.
Press MENU.
1
Press / to select “STBY:MODE,”
2
then press .
when a USB device is connected in USB
function
when a button on the remote or unit is
pressed
* DAB is for CMT-X7CDB only.
Press / to select “AUTO:STBY,”
3
then press .
Press / to select “ON” or “OFF,”
4
then press .
2 minutes before entering Standby mode,
“AUTOSTBY” displays in the display window.
The Automatic Standby function is invalid for the
tuner function (FM/DAB
enabled it.
The system may not enter Standby mode
automatically in the following cases:
while using the FM or DAB* function
while an audio signal is being detected
during playback of audio tracks or files
while the Play Timer or Sleep Timer is being
used
The system counts down the time (about
15 minutes) again until it enters Standby mode,
even when Automatic Standby function is
enabled in the following cases:
*
), even when you have
27
Additional information
GB

Setting the
Tip
Note
Tip
Setting the wireless
BLUETOOTH/Network
Standby mode
When BLUETOOTH/Network Standby mode
is enabled, the system enters Wait mode for
BLUETOOTH or network connection even
when the system is turned off. This mode is
disabled by default.
Press MENU.
1
Press / to select “STBY:MODE,”
2
then press .
Press / to select “BTNW:STBY,”
3
then press .
Press / to select “ON” or “OFF,”
4
then press .
Press / to turn off the system.
5
When this function is set to “ON” and you
connect to the system from a BLUETOOTH or
AirPlay device, the system turns on
automatically and you can listen to music by
using the BLUETOOTH or AirPlay connection.
The system cannot be turned on by a DLNA
device or by using a Music Services connection.
BLUETOOTH signal
ON/OFF
When the unit is turned on, you can control
a wireless network or BLUETOOTH signal.
The default setting is ON.
Turn on th e unit.
1
If flashes in the display
2
window, press and hold and
/ of the unit.
After “RF OFF” (wireless
3
BLUETOOTH signal is off) or “RF
ON” (wireless BLUETOOTH signal
is on) appears, release the
button.
When this setting is set to OFF, the wireless
network function and BLUETOOTH function are
not available.
When this setting is off, the unit is turned on by
the smartphone/tablet by one-touch action
(NFC) on the unit.
When this setting is off, the BLUETOOTH/
Network Standby mode cannot be set.
When the BLUETOOTH/Network Standby mode
is on and the unit is turned off, the BLUETOOTH/
Network Standby mode turns off.
When this setting is off, the unit and
BLUETOOTH device cannot be paired.
Even when this setting is off, a wired connection
can still be used.
28
GB

Adjusting the sound
Note
Tip
Note
Using the timers
You can set the bass and treble or adjust the
tone to your preferences.
Press SOUND.
1
Press / to select “CA+,” “P-EQ”
2
(sound effect), or “WIDE ST”
(stereo effect), then press .
CA+: Set to the recommended sound
quality of Sony.
P-EQ (EQUALIZER): Select the desired
sound from the following styles:
“R AND B/HIP HOP,” “ROCK,” “POPS,”
“CLASSIC,” “JAZZ,” “FLAT,” “CUSTOM”
WIDE ST (WIDE STEREO): Select “HIGH”
or “NORMAL,” then press . If you
want to adjust to a more natural stereo
sound, select “NORMAL.”
The system offers Sleep Timer and Play
Timer.
The Sleep Timer has priority over the Play Timer.
Setting the Sleep Timer
At the specified time, the system is turned
off automatically.
Press MENU.
1
Press / to select “SLEEP,” then
2
press .
Press / to select the specified
3
time, then press .
You can select from “10MIN” (10
minutes) to “90MIN” (90 minutes) in 10minute increments.
To check the remaining time of Sleep Timer,
perform steps 1 and 2 above.
The Sleep Timer works even if the clock is not
set.
Additional information
To cancel the Sleep Timer
Select “OFF” in step 3 above.
Setting the Play Timer
Make sure you have set the clock before setting
the timer (page 9).
Play Timer
You can listen to a CD, USB device or radio
every day at a preset time.
The Play Timer setting remains as long as
the setting is not canceled.
29
GB

Prepare the sound source.
Tip
Note
1
Press TIMER.
2
Press / to select “PLAY SET,”
3
then press .
The start time flashes in the display
window.
Press / to select time, then
4
press .
Follow the same procedure to set
“MINUTE” of the time to start operation,
then “HOUR” and “MINUTE” of the time
to stop the operation.
Press / to select the desired
5
sound source, then press .
The confirmation display for the Play
Timer appears.
Scanning (AUTO) or Manual Tuning (MANUAL),
and you change the radio frequency or band
after setting the timer, the radio station setting
for the timer will also be changed.
When the sound source for a Play Timer is set to
a radio station tuned from a preset radio station,
and you change the frequency of the radio
station or band after setting the timer, the radio
station setting for the timer will not change. The
radio station tuning for the timer is fixed at the
frequency you set.
To check the setting
1
Press TIMER.
2
Press / to select “SELECT,” then press
.
3
Press / to select “TIMER SEL,” and then
press .
4
Press / to select “PLAY SEL,” and then
press .
The timer setting appears in the display
window.
To cancel the timer
After step 3 on “To check the setting”
(page 30), select “OFF,” then press .
Press / to turn off the system.
6
Before the preset time, the system automatically
turns on.
for FM or DAB*: about 15 seconds before the
preset time
for a CD or USB device: about 90 seconds
before the preset time
When the sound source is a CD, you can
preprogram the Play Timer. See “Creating your
own program (Program Play)” (page 11).
When the sound source is radio, make sure to
tune-in the radio station in advance (page 13).
To change the timer setting, perform the
procedures from the beginning again.
* DAB is for CMT-X7CDB only.
The Play Timer does not work if the system is
already on at the preset time. Be careful not to
operate the system until it is turned on and
starts play with the timer.
When the sound source for a Play Timer is set to
a radio station that you set using Automatic
GB
30

Updating the
Note
+ facing up
Battery holder
Changing the battery
software
When a new software version is detected,
this system is updated when it is connected
to the internet, and “UPDATE” appears in the
display window.
In this case, follow the procedures below to
update to the latest version.
Press MENU.
1
Press / to select “NETWORK,”
2
then press .
Press / to select “UPDATE,”
3
then press .
Press / to select “OK,” then
4
press .
Updating begins.
After completing the update,
“COMPLETE” is displayed. Press / to
turn off the unit, and then press it again
to turn on.
Usually it may take about 3 to 10 minutes for the
system to finish the update. More time may be
needed, depending on the network
environment.
Do not operate the unit or the remote during
updating. Moreover, do not turn off the system
or disconnect the power cord during updating.
The working distance of the remote
shortens as the battery becomes exhausted.
When the remote no longer operates the
unit, replace the battery with a new CR2025
lithium battery (not supplied).
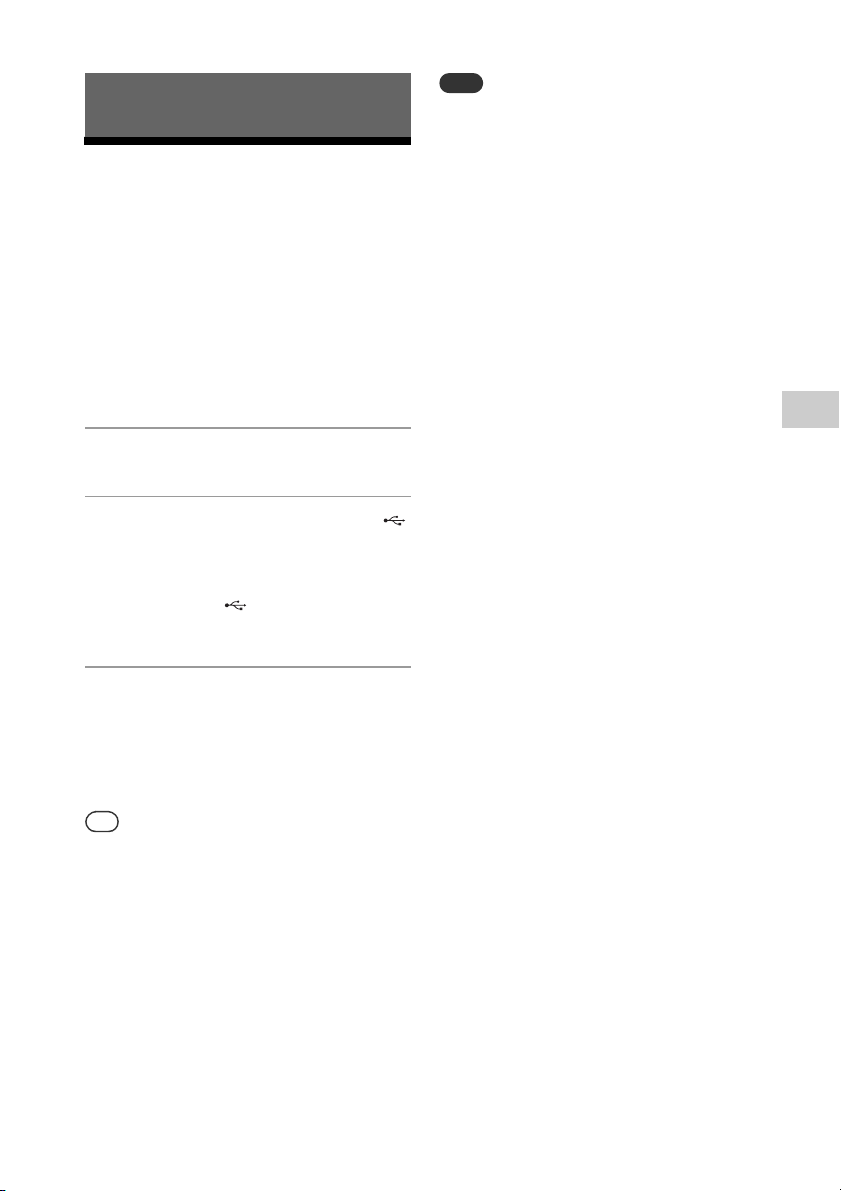
Push and hold at the rear of
1
the remote, then pull out the
battery holder in the direction of
the arrow.
Replace the battery with the “+”
2
facing up, then insert the battery
holder into the slot.
Additional information
31
GB

Note
Wipe the battery with a dry cloth to assure a
good contact.
Do not hold the battery with metallic tweezers,
otherwise a short-circuit may occur.
Use of batteries other than the CR2025 may
cause a fire or explosion.
32
GB

About “SongPal”
Device Select
Select a “SongPal” compatible device.
Settings of the connected device
Various sound/network settings are displayed.
This menu can be displ ayed from any screen by
flicking right.
Home screen
Displays funct ions of selected device, music
services, and apps installed on your smartphone/
iPhone.
Mini player
Controller for selected function.
Sound settings
You can easily customize your sound, or use
Sony’s recommended settings “CA+.”
Music service
You can enjoy various music services.
Controlling devices on your home net work
You can play music stored in your PC or
DLNA server over your network.
Controlling a CD inserted in the unit, or a
device connected via USB
You can play a CD that is inserted in the unit
or music in a device connected to the USB
connector.
What you can control with “SongPal” varies
depending on the connected device.
The specification and design of the app may
change without notice.
About “SongPal”
33
GB

Troubleshooting
Troubleshooting
General
The system does not turn on.
Make sure you have connected the power
cord to a wall outlet correctly.
If a problem occurs while operating the
system, follow the steps described below
before consulting your nearest Sony dealer.
If an error message appears, be sure to
make a note of the contents for reference.
1
Check to see if the problem is listed
in this “Troubleshooting” section.
2
Check the following customer
support websites.
For customers in Europe:
http://support.sony-europe.com/
For customers in other countries/
regions:
http://www.sony-asia.com/support
You will find the latest support
information and a FAQ at these
websites.
3
If, after steps 1 and 2, you still
cannot solve the problem, consult
your nearest Sony dealer.
If the problem persists after doing all of
the above, consult your nearest Sony
dealer.
When bringing the product in for
repairs, be sure to bring in the entire
system (main unit and remote).
This product is a system product, and
the entire system is needed to
determine the section requiring repair.
If the standby indicator flashes
Immediately unplug the power cord, and
make sure the power cord is not
connected to a wall outlet other than AC
220 V.
After the standby indicator stops
flashing, plug the power cord again,
and turn on the system. If the issue
persists, contact your nearest Sony
dealer.
The system has entered Standby mode
unexpectedly.
This is not a malfunction. The system enters
Standby mode automatically in about 15
minutes when there is no operation or audio
signal output. See “Setting the Automatic
Standby function” (page 27).
The clock setting or the Play Timer operation
has been canceled unexpectedly.
If about a minute elapses with no operation,
the clock setting or Play Timer setting is
canceled automatically. Perform the operation
again from the beginning.
There is no sound.
Turn up the volume on the unit.
Make sure an external component is
connected correctly to the AUDIO IN jack and
set the function to AUDIO IN.
The specified station may have temporarily
stopped broadcast.
Severe hum or noise occurs.
Move the system away from sources of noise.
Connect the system to a different wall outlet.
Use of an AC power tap with a noise filter (not
supplied) is recommended.
The remote does not function.
Remove any obstacles between the remote
and the remote sensor on the unit, and
position the unit away from fluorescent lights.
Point the remote at the remote sensor on the
unit.
Move the remote closer to the system.
Replace the new batteries.
34
GB
CD-DA/MP3 disc
“LOCKED” appears in the display window
and the disc cannot be removed from the
disc slot.
Consult your nearest Sony dealer or local
authorized Sony service facility.
The disc or file will not play.
The disc has not been finalized (a CD-R or CDRW disc to which data can be added).
The sound skips, or the disc will not play.
The disc may be dirty or scratched. When the
disc is dirty, wipe it clean.
Move the system to a location away from
vibration (for example, on top of a stable
stand).
Play does not start from the first track or file.
Make sure the current play mode is correct. If
the play mode is “SHUFFLE” or “PROGRAM”,
change the setting (page 10).
Starting playback takes more time than
usual.
The following discs can increase the time it
takes to start playback:
a disc recorded with a complicated tree
structure
a disc recorded in multi-session format
a disc that has many folders
USB device
For details on compatible USB devices, see
“Compatible devices and versions”
(page 41).
An unsupported USB device is connected.
The following problems may occur.
The USB device is not recognized.
File or folder names are not displayed on
this system.
Playback is not possible.
The sound skips.
There is noise.
A distorted sound is output.
There is no sound.
The USB device is not connected correctly.
Turn off the system, and then reconnect the
USB device.
There is noise, skipping, or distorted sound.
An unsupported USB device is connected.
Connect a supported USB device.
Turn off the system, then reconnect the USB
device and turn on the system.
The music data itself contains noise, or the
sound is distorted. Noise may have been
entered when creating music data due to the
conditions of the computer. In this case,
delete the file and send the music data again.
The bit rate used when encoding the files was
low. Send files encoded with higher bit rates
to the USB device.
“READING” is displayed for an extended
time, or it takes a long time before playback
starts.
The reading process may take a long time in
the following cases.
There are many folders or files on the USB
device.
The file structure is extremely complex.
Not enough free space in the memory.
The internal memory is fragmented.
The file or folder name (album name) is not
displayed correctly.
Send the music data to the USB device again,
as the data stored in the USB device may have
been corrupted.
The character code that can be displayed by
this system are as follows:
Upper cases (A to Z).
Numbers (0 to 9).
Symbols (< > * +, [ ] @ \ _).
Other characters appear as “_.”
The USB device is not recognized.
Turn off the system and reconnect the USB
device, then turn on the system.
An incompatible USB device may be
connected.
The USB device does not work properly. Refer
to the operating manual supplied with the
USB device for how to deal with this problem.
Troubleshooting
35
GB

Play does not start.
Turn off the system and reconnect the USB
device, then turn on the system.
An incompatible USB device may be
connected.
If you have moved to another area, some
services/frequencies may have changed and
you may not be able to tune into your usual
broadcast. Perform the DAB Automatic Scan
procedure to re-register the contents of
broadcasts. (Performing this procedure clears
all previously stored presets.)
Play does not start from the first track.
Set the play mode to “NORMAL” play mode.
The USB device cannot be charged.
Make sure the USB device is connected
securely to the (USB) port.
The USB device may not be supported by this
system.
Disconnect the USB device and then reconnect
it. For details on the charging status of the
USB device, see the operating manual of the
USB device.
Tuner
Severe hum or noise occurs (“STEREO”
flashes in the display window), or
broadcasts cannot be received.
Connect the antenna properly.
Find a location and an orientation that provide
good reception, and then set up the antenna
again.
Keep the antennas away from the unit or
other AV components to avoid picking up
noise.
Turn off nearby electrical equipment.
Several radio stations can be heard at the
same time.
Find a location and an orientation that provide
good reception, and then set up the antenna
again.
Bundle the antenna cables using
commercially available cord clips and adjust
the cable lengths.
DAB/DAB+ radio station is not received
properly.
Check all antenna connections, then perform
the DAB Automatic Scan procedure. See
“Running the DAB Automatic Scan manually
(CMT-X7CDB only)” (page 14).
The current DAB/DAB+ service may not be
available.
Press TUNING +/– to select a different service.
GB
36
The DAB/DAB+ broadcast has been
interrupted.
Check the location of the system or adjust the
orientation of the antenna to increase the
indicated value of the signal quality.
Network connection
The system cannot connect to the network.
(Other equipment on the network cannot
find or recognize the system.)
Check that is lit in the display window.
It takes about 1 minute for the system to
acquire an IP address when the system is
turned on in a communication environment
without a router.
When you use a fixed IP address, the same IP
address may be used by other equipment. Use
a different IP address.
The system cannot connect to the network
via a wireless LAN connection.
If a network (LAN) cable is connected to the
system, the system automatically operates to
establish a wired LAN connection. If you wish
to use a wireless LAN connection, do not
connect a network (LAN) cable to the system.
Check the settings of the wireless LAN router/
access point. If the SSID stealth mode is set to
“ON” on the access point, set it to “OFF.” For
details on the settings of the access point of
the wireless router, refer to the operating
manual for the access point.
The system cannot connect to the network
using WPS.
Set up your network after searching the access
point using the access point scan.
You cannot connect to a network using WPS
when your access point is set to WEP.
Update the firmware of the wireless LAN
router/access point to the latest version.

Music Services
the operating manual for your router/access
point.
The system cannot connect to Music
Services.
Make sure the wireless LAN router/access
point is turned on.
Check that appears in the display window.
If not, set up a wireless network again. For
details, see Quick Start Guide.
When the system is connected to a wireless
network, place the wireless LAN/access point
and the system closer together and perform
the setup again.
Depending on the providers, only one
connection to Internet is allowed. In that case,
the system cannot be connected if connection
is occupied. Please consult your carrier or
service provider.
When you turn on your mobile phone
(Android device, Xperia device, or iPhone/iPod
touch) after a moment of power off, try to
restart the “SongPal” application.
Home Network
The controller (the operating device) cannot
find this system. (The controller cannot
browse the contents of this system.)
Make sure that the controller is connected to
the home network.
The multicast control on the access point is
enabled.
Music started automatically.
This system may be controlled by another
component. To reject the control, set the
BLUETOOTH/Network Standby mode to off
(page 28).
The sound is interrupted.
The DLNA server is overloaded. Quit all
running applications.
Wireless signal condition is poor. Stop using
your microwave oven.
The communications speed of the wireless
LAN may become slower for IEEE802.11ncompliant wireless LAN routers/access points
if the security method is set to WEP or WPA/
WPA2-PSK (TKIP). If the speed becomes lower,
change the security method to WPA/WPA2PSK (AES).
The encryption (security) scheme varies
depending on the device. For details, refer to
Tuning or playback cannot be performed.
Confirm that the audio file is improper or has
been deleted from the server. Refer to the
operating manual of the server.
The server tries to play the audio file in an
audio format that the system does not
support. Check the audio format information
on the server.
Disable the multicast control on the wireless
LAN router/access point. If it is enabled, it may
take several minutes to output the audio. For
details, refer to the operating manual of the
wireless LAN router/access point.
The access from this system is not permitted
by the server. Change the settings on the
server to allow access from this system. For
details, refer to the operating manual of the
server.
AirPlay
For details on compatible iPhone/iPad/iPod
touch, see “Compatible devices and
versions” (page 41).
The system cannot be found from an
iPhone/iPad/iPod Touch.
See “Network connection – The system cannot
connect to the network” (page 36).
Make sure the iPhone/iPad/iPod touch or the
computer with iTunes is connected to your
home network.
Before using with the system, update iOS or
iTunes to the latest version.
Music started automatically.
This system may be controlled by another
component. To reject the control, set the
BLUETOOTH/Network Standby mode to off
(page 28).
The sound is interrupted during playback.
The server is overloaded. Quit all running
applications.
This unit cannot be operated.
Update the software version of the iPhone/
iPad/iPod touch or iTunes to the latest
version.
Troubleshooting
37
GB

To reset the system to factory
Note
settings
If the system still does not operate properly,
reset the system to factory settings.
Use buttons on the unit to reset the system
to its factory default settings.
1
Disconnect the power cord and confirm
that the standby indicator is not lit. Then
reconnect the power cord and turn on the
system.
2
Press and hold FUNCTION and / on the
unit until “ALL RESET” appears in the
display window.
All user-configured settings, such as the preset
radio stations, clock, timer, and network, are
deleted. Also, your login ID and password of the
internet music streaming (Music Services) will
be deleted.
If the problem persists after doing all of the
above, consult your nearest Sony dealer.
If you dispose of the unit or give it to another
person, reset the unit for security.
Messages
The following messages may appear or
flash during operation.
CANNOT DOWNLOAD
The system failed downloading the update
data while performing the software update.
Enter the setting menu and update the
software again.
CAN’T PLAY
You have set a disc that cannot be
played back on this system, such as CD-
ROM and DVD disc.
COMPLETE
The station preset operation ended
normally.
DATA ERROR
You tried to play an unplayable file.
ERROR
You operated the system during
initialization. Wait for a while until the
initialization is completed.
FULL
You tried to program more than 25 tracks or
files.
38
INITIAL
The system is initializing the network
settings. Some buttons of the system
cannot be operated during this process.
LOCKED
The disc slot is locked and you cannot
remove the disc. Contact your nearest Sony
dealer.
NO CONNECT
The system cannot be connected to the
network.
NO DEVICE
No USB device is connected or the
connected USB device has been removed.
NO DISC
There is no disc in the player, or you have
loaded a disc that cannot be played.
GB

NO MEMORY
The memory media is not inserted in the
USB device, or the system does not identify
the memory media.
NO STEP
All of the programmed tracks have been
erased.
NO SUPPORT
The system does not support the connected
USB device.
NO TRACK
There are not playable files on the USB
device or disc.
NOT IN USE
You pressed an unplayable button.
OVER CURRENT
Remove the USB device from the port and
turn off the system then turn on the system.
PUSH STOP
You attempted to change the play mode
during playback in the CD or USB function.
READING
The system is reading the information on
the CD or USB device. Some buttons do not
work during reading.
TIME NG
The Play Timer start and end times are set to
the same time.
UPDATE ERROR
The system cannot update the software.
Turn off the system, and then turn it on
again. The system will try to update the
software. If the same message appears,
contact your nearest Sony dealer.
39
Troubleshooting
GB

Precautions/Specifications
Precautions
Discs that this system CAN play
Audio CD-DA discs
CD-R/CD-RW (audio data of CD-DA tracks
and MP3 files)
Do not use a CD-R/CD-RW disc with no data
stored. Doing so may damage the disc.
Discs that this system CANNOT play
CD-ROM
CD-R/CD-RW other than those recorded
in music CD format or format conforming
to ISO9660 Level 1/Level 2, Joliet
CD-R/CD-RW recorded in multi-session
format and not closed the session
CD-R/CD-RW of poor recording quality,
CD-R/CD-RW that have scratches or are
dirty, or CD-R/CD-RW recorded with an
incompatible recording device
CD-R/CD-RW which is finalized incorrectly
CD-R/CD-RW containing files other than
MPEG 1 Audio Layer-3 (MP3) files
8 cm disc
Discs of non-standard shape (for
example, heart, square, star)
Discs that have adhesive tape, paper, or
sticker attached to them
Rental or used discs with attached seals
where the glue extends beyond the seal
Discs that have labels printed using ink
that feels tacky when touched
Note on CD-DA discs
Before playing, wipe the disc with a
cleaning cloth from the center out to the
edge.
Do not clean discs with solvents, such as
benzine, thinner, or commercially
available cleaners or antistatic spray
intended for vinyl LPs.
Do not expose discs to direct sunlight or
heat sources such as hot air ducts, nor
leave it in a car parked in direct sunlight.
On safety
Completely disconnect the power cord
(mains lead) from the wall outlet (mains) if
it is not going to be used for an extended
period of time. When unplugging the
system, always grip the plug. Never pull
the cord itself.
Should any solid object or liquid get into
the system, unplug the system, and have
it checked by qualified personnel before
operating it again.
The AC power cord can be changed only
by a qualified service facility.
On placement
Do not place the system in an inclined
position or in locations that are extremely
hot, cold, dus ty, d irt y, or hum id o r lacking
adequate ventilation, or subject to
vibration, direct sunlight or a bright light.
Be careful when placing the system on
surfaces that have been specially treated
(for example, with wax, oil, polish) as
staining or discoloration of the surface
may result.
If the system is brought directly from a
cold to a warm location or is placed in a
very damp room, moisture may condense
on the lens inside the CD player, and
cause the system to malfunction. In this
situation, remove the disc, and leave the
system turned on for about an hour until
the moisture evaporates. If the system
still does not operate, even after an
extended period, consult your nearest
Sony dealer.
On heat buildup
Heat buildup on the unit during charging
or operation over a long period of time is
normal and not cause for alarm.
Do not touch the cabinet if it has been
used continuously at a high volume
because the cabinet may have become
hot.
Do not obstruct the ventilation holes.
Cleaning the cab inet
Clean this system with a soft cloth slightly
moistened with a mild detergent solution.
Do not use any type of abrasive pads,
scouring powder, or solvents, such as
thinner, benzine, or alcohol.
40
GB

Compatible devices and versions
iPhone/iPad/iPod touch
Check the websites below for details on the
latest supported versions of the compatible
devices:
For customers in Europe:
http://support.sony-europe.com/
For customers in other countries/regions:
http://www.sony-asia.com/support
Compatible models AirPlay Bluetooth®
iPhone 5s
iPhone 5c
iPhone 5
iPhone 4s
iPhone 4
iPhone 3GS
iPad Air*
iPad mini with Retina
display*
iPad
(4th generation)*
iPad mini*
iPad
(3rd generation)*
iPad 2*
iPad*
iPod touch
(5th generation)
iPod touch
(4th generation)
iPod touch
(3rd generation)*
iPod nano
(7th generation)*
AirPlay works with iPhone, iPad, and iPod
touch with iOS 4.3.3 or later, Mac with OS X
Mountain Lion, and Mac and PC with iTunes
10.2.2 or later.
Bluetooth technology works with iPhone 5s,
iPhone 5c, iPhone 5, iPhone 4s, iPhone 4,
iPhone 3GS, iPod touch (5th generation),
iPod touch (4th generation).
DLNA device
Check the websites below for details on the
latest supported versions of the compatible
devices:
For customers in Europe:
http://support.sony-europe.com/
For customers in other countries/regions:
http://www.sony-asia.com/support
USB device
Check the websites below for details on the
latest supported versions of the compatible
devices:
For customers in Europe:
http://support.sony-europe.com/
For customers in other countries/regions:
http://www.sony-asia.com/support
Precautions/Specifications
* “SongPal” does not support iPod touch (3rd
generation), iPod classic, and iPod nano.
“SongPal” does not support iPad as of January
2014.
41
GB

BLUETOOTH wireless
Note
Note
technology
BLUETOOTH wireless technology is a shortrange wireless technology linking digital
devices, such as personal computers and
digital still cameras. Using the BLUETOOTH
wireless technology, you can operate the
units involved within a range of about 10
meters.
The BLUETOOTH wireless technology is
commonly used between two devices, but a
single device can be connected to multiple
devices.
You do not need wires to get connected as
you do with a USB connection, and you do
not need to place the devices face to face as
you do with wireless infrared technology.
You can use the technology with one
BLUETOOTH device in your bag or pocket.
BLUETOOTH wireless technology is a global
standard supported by thousands of
companies. These companies produce
products that meet the global standard.
Supported BLUETOOTH version and profiles
Profile refers to a standard set of capabilities
for various BLUETOOTH product capabilities.
See “Specifications” (page 43) for details on
the supported BLUETOOTH version and
profiles.
To use a BLUETOOTH device connected to this
system, the device must support the same
profile as this system. Note that the functions of
the BLUETOOTH device may be different
depending on the specifications of the device,
even if it has the same profile as this system.
Because of the properties of BLUETOOTH
wireless technology, playback on this system is
slightly delayed compared with audio playback
on the transmitting device.
Effective communication range
BLUETOOTH devices should be used within
approximately 10 meters (unobstructed
distance) of each other.
The effective communication range may
become shorter under the following
conditions.
When a person, metal object, wall or
other obstruction is between the
devices with a BLUETOOTH connection
Locations where a wireless LAN is
installed
Around microwave ovens that are in
use
Locations where other electromagnetic
waves occur
Effects of other devices
BLUETOOTH devices and wireless LAN
(IEEE802.11b/g) use the same frequency
band (2.4 GHz). When using your
BLUETOOTH device near a device with
wireless LAN capability, electromagnetic
interference may occur.
This could result in lower data transfer rates,
noise, or inability to connect. If this
happens, try the following remedies:
Try connecting this system and
BLUETOOTH mobile phone or
BLUETOOTH device when you are at
least 10 meters away from the wireless
LAN equipment.
Turn off the power to the wireless LAN
equipment when using your
BLUETOOTH device within 10 meters
Effects on other devices
The radio waves broadcast by this system
may interfere with the operation of some
medical devices. Since this interference may
result in malfunction, always turn off the
power on this system, BLUETOOTH mobile
phone and BLUETOOTH device in the
following locations:
In hospitals, on trains, and in airplanes
Near automatic doors or fire alarms
This system supports security functions that
comply with the BLUETOOTH specification as a
means of ensuring security during
communication using BLUETOOTH technology.
However, this security may be insufficient
depending on the setting contents and other
factors, so always be careful when performing
communication using BLUETOOTH technology.
Sony cannot be held liable in any way for
damages or other loss resulting from
information leaks during communication using
BLUETOOTH technology.
BLUETOOTH communication is not necessarily
guaranteed with all BLUETOOTH devices that
have the same profile as this system.
42
GB

BLUETOOTH devices connected with this system
must comply with the BLUETOOTH specification
prescribed by the BLUETOOTH SIG, Inc., and
must be certified to comply. However, even
when a device complies with the BLUETOOTH
specification, there may be cases where the
characteristics or specifications of the
BLUETOOTH device make it impossible to
connect, or may result in different control
methods, display or operation.
Noise may occur or the audio may cut off
depending on the BLUETOOTH device connected
with this system, the communications
environment, or surrounding conditions.
Specifications
Amplifier section
Power output (rated):
16 watts + 16 watts (at 8 ohms, 1 kHz, 1%
THD)
RMS power outp ut (reference):
20 watts + 20 watts (per channel at 8 ohms,
1kHz)
Inputs/Outputs
AUDIO IN:
AUDIO IN (external input) jack:
Stereo mini jack, sensitivity 700 mV,
impedance 47 kilohms
USB:
USB port: Type A, 5 V DC 1.5 A
CD-DA/MP3 player section
Syste m:
Compact disc and digital audio system
Laser Diode Properties:
Emission Duration: Continuous
Laser Output*: Less than 44.6 μW
* This output is the value measurement at a
distance of 200mm from the objective lens
surface on the Optical Pick-up Block with 7mm
aperture.
Frequency response:
20 Hz – 20 kHz
Signal-to-noise ratio:
More than 90 dB
Dynamic range:
More than 90 dB
Precautions/Specifications
Tuner section
FM tuner section:
FM stereo, FM superheterodyne tuner
Tuning range:
87.5 MHz – 108.0 MHz (50 kHz step)
Antenna:
FM lead antenna
43
GB
Antenna terminals:
75 ohms unbalanced
DAB/DAB+ tuner section (CMT-X7CDB only):
FM stereo, DAB/FM superheterodyne tuner
Frequency range:
Band-III:
174.928 (5A) MHz – 239.200 (13F) MHz*
Antenna:
DAB/FM lead antenna:
DAB/DAB+ frequency table (Band-III):
Frequency Label
174.928 MHz 5A
176.640 MHz 5B
178.352 MHz 5C
180.064 MHz 5D
181.936 MHz 6A
183.648 MHz 6B
185.360 MHz 6C
187.072 MHz 6D
188.928 MHz 7A
190.640 MHz 7B
192.352 MHz 7C
Frequency Label
213.360 MHz 10C
215.072 MHz 10D
216.928 MHz 11A
218.640 MHz 11B
220.352 MHz 11C
222.064 MHz 11D
223.936 MHz 12A
225.648 MHz 12B
227.360 MHz 12C
229.072 MHz 12D
230.784 MHz 13A
232.496 MHz 13B
234.208 MHz 13C
235.776 MHz 13D
237.488 MHz 13E
239.200 MHz 13F
* Frequencies are displayed to two decimal places
on this system.
194.064 MHz 7D
195.936 MHz 8A
197.648 MHz 8B
199.360 MHz 8C
201.072 MHz 8D
202.928 MHz 9A
204.640 MHz 9B
206.352 MHz 9C
208.064 MHz 9D
209.936 MHz 10A
211.648 MHz 10B
GB
44
Speaker section
Speaker system:
Full-range speaker
Passive radiator
Rated impedance:
8ohms
BLUETOOTH section
Communication system:
BLUETOOTH Standard version 3.0
Output:
BLUETOOTH Standard Power Class 2
Maximum communication range:
Line of sight approx. 10 m
*1

Frequency band:
2.4 GHz band (2.4000 GHz - 2.4835 GHz)
Modulation method:
FHSS
Compatible BLUETOOTH profiles*2:
A2DP (Advanced Audio Distribution Profile)
AVRCP (Audio Video Remote Control Profile)
Supported content protection method
SCMS-T method
Supported codec
SBC (Sub Band Codec), AAC, aptX
Transmission bandwidth
20 Hz – 20,000 Hz (with 44.1 kHz sampling)
*1The actual range will vary depending on factors
such as obstacles between devices, magnetic
fields around a microwave oven, static
electricity, reception sensitivity, antenna’s
performance, operating system, software
application, etc.
2
*
BLUETOOTH standard profiles indicate the
purpose of BLUETOOTH communication
between devices.
Network section
LAN port:
RJ-45
10BASE-T/100BASE-TX
(The communication speed may vary
depending on the communication
environment. This system does not
guarantee the communication speed and
quality of 10BASE-T/100BASE-TX.)
Wireless LAN:
Compatible standards:
IEEE 802.11 b/g (WEP 64 bit, WEP 128 bit)
Frequency band 2.4 GHz band (2.4000 GHz -
2.4835 GHz)
Available channels ch1 to ch13
WPA/WPA2-PSK (AES)
WPA/WPA2-PSK (TKIP)
Mass:
Approx. 2.7 kg
Supplied accessories:
Remote (RM-AMU197) (1), CR2025 lithium
battery (1), AC power cord (1), FM lead
antenna (1) (CMT-X7CD only), DAB/FM lead
antenna (1) (CMT-X7CDB only), Quick Setup
Guide (1), Operating Instructions (this
manual) (1)
Design and specifications are subject to
change without notice.
Standby power consumption: 0.5 W (all wireless
network ports off)
Networked Standby mode: 6 W (all wireless
network ports on)
Precautions/Specifications
General
Power requi remen ts:
AC 220 V - 240 V, 50 Hz/60 Hz
Power consumption:
27 watts
Dimensions (W/H/D) (incl. projecting parts):
Approx. 385 mm × 178 mm × 81 mm
45
GB

Trademarks, etc.
Windows, the Windows logo, and Windows
Media are either registered trademarks or
trademarks of Microsoft Corporation in the
United States and/or other countries.
This product is protected by certain intellectual
property rights of Microsoft Corporation. Use or
distribution of such technology outside of this
product is prohibited without a license from
Microsoft or an authorized Microsoft subsidiary.
Apple, the Apple logo, AirPlay, iPad, iPhone,
iPod, iPod classic, iPod nano, iPod touch, iTunes,
Mac, iOS and OS X are trademarks of Apple Inc.,
registered in the U.S. and other countries. App
Store is a service mark of Apple Inc.
“Made for iPod,” “Made for iPhone,” and “Made
for iPad” mean that an electronic accessory has
been designed to connect specifically to iPod,
iPhone or iPad, respectively, and has been
certified by the developer to meet Apple
performance standards. Apple is not responsible
for the operation of this device or its compliance
with safety and regulatory standards. Please
note that the use of this accessory with iPod,
iPhone or iPad may affect wireless performance.
“ ” is a mark of the Wi-Fi Alliance.
Wi-Fi®, Wi-Fi Protected Access® and Wi-Fi
Alliance® are registered marks of the Wi-Fi
Alliance.
Wi-Fi CERTIFIED™, WPA™, WPA2™ and Wi-Fi
Protected Setup™ are marks of the Wi-Fi
Alliance.
DLNA™, the DLNA Logo and DLNA CERTIFIED™
are trademarks, service marks, or certification
marks of the Digital Living Network Alliance.
“WALKMAN” and “WALKMAN” logo are
registered trademarks of Sony Corporation.
MPEG Layer-3 audio coding technology and
patents licensed from Fraunhofer IIS and
Thomson.
© 2013 CSR plc and its group companies.
The aptX® mark and the aptX logo are trade
marks of CSR plc or one of its group companies
and may be registered in one or more
jurisdictions.
The BLUETOOTH® word mark and logos are
registered trademarks owned by BLUETOOTH
SIG, Inc. and any use of such marks by Sony
Corporation is under license.
The N Mark is a trademark or registered
trademark of NFC Forum, Inc. in the United
States and in other countries.
Android and Google Play are trademarks of
Google Inc.
“Xperia” and “Xperia Tablet” are trademarks of
Sony Mobile Communications AB.
The system names and product names indicated
in this manual are generally the trademarks or
registered trademarks of the manufacturer.
™ and ® marks are omitted in this manual.
This product incorporates Spotify software
which is subject to 3rd party licenses found here:
http://www.spotify.com/connect/third-partylicenses
Spotify and Spotify logos are trademarks of the
Spotify Group.
46
GB

Important information on software
This sect io n covers t he software used by this
system.
ALAC
Apache License
Version 2.0, January 2004
http://www.apach e.org/licenses/
TERMS AND CONDITIONS FOR USE, REPRODUCTION, AND
DISTRIBUTION
1. Definitions.
“License” shall mean the terms and conditions for use,
reproduction, and di stribution as defined by Sections 1 throug h 9 of
this document.
“Licensor” shall mean the copyright owner or entity authorized by
the copyright owner that is granting the License.
“Legal Entity” shall mean the union of the acting entity and all other
entities that control, are controlled by, or are under common control
with that entity. For the purposes of this definition, “control” means
(i) the power, direct or in direct, to cause the direction or
management of such entity, whether by contract or otherwise, or (ii)
ownership of fifty percent (50%) or more of the outstanding shares,
or (iii) beneficial ownership of such entity.
“You” (or “Your”) shall mean an individual or Legal Entity exercising
permissions granted by this License.
“Source” form shall mean the preferred form for making
modifications, including but not limited to software source code,
documentation source, and configuration files.
“Object” form shall mean any form resulting from mechanical
transformation or translation of a Source form, including but not
limited to compiled object code, generated documentation, and
conversions to othe r media types.
“Work” shall mean the work of authorship, whether in Source or
Object form, ma de available under the License, as indicated by a
copyright notice that is included in or attached to the work (an
example is provi ded in the Appendix below ).
“Derivative Works” shall mean any work, whether in Source or
Object form, that is based on (or derived from) the Work and for
which the editorial revisions, annotations, elaborations, or other
modifications represent, as a whole, an original work of authorship.
For the purposes of this License, Derivative Works shall not include
works that re main separable from, or m erely link (or bind by na me)
to the inter faces of, the Work and Derivative Works the reof.
“Contribution” shall mean any work of authorship, including the
original version of the Work and any modifications or additions to
that Work or Derivative Works thereof, that is intentionally
submitte d to Licensor for in clusion in the Work b y the copyright
owner or by an individual or Legal Entity authorized to submit on
behalf of the copyright owner. For the purposes of this definition,
“submitted” means any form of electronic, verbal, or written
communication sent to the Licensor or its representatives, including
but not limited to communication on electronic mailing lists, source
code control systems, and issue tracking systems that are managed
by, or on behalf of, the Licensor for the purpose of discussing and
improving the Work, b ut excluding communication that is
conspicuously marked or otherwise designated in writing by the
copyright owner as “Not a Contribution.”
“Contributor” shall mean Licensor and any individual or Legal Entity
on behalf of whom a Contribution has been received by Licensor
and subseque ntly incorporated within the Work.
2. Grant of Copyright License. Subject to the terms and conditions of
this License, each Contributor hereby grants to You a perpetual,
worldwide, non-exclusive, no-charge, royalty-free, irrevocable
copyright license to reproduce, prepare Derivative Works of, publicly
display, publicly perform, sublicense, and distribute the Work and
such Derivative Works in Source or Object form.
3. Grant of Pate nt License. Subject to the terms and co nditions of this
License, each Contributor hereby grants to You a perpetual,
worldwide, non-exclusive, no-charge, royalty-free, irrevocable
(except as stated in this section) patent license to make, have made,
use, offer to sell , sell, import, and other wise transfer the Work,
where such license applies only to those patent c laims licensable b y
such Contributor that are necessarily infringed by their
Contribution(s) alone or by combination of their Contribution(s) with
the Work to which such Contribution(s) was submitted. If You
institute patent litigation against any entity (including a cross-claim
or counterclaim in a lawsuit) alleging that the Work or a Contribution
incorporate d within the Work cons titutes direct or con tributory
patent infringement, then any patent licenses granted to You under
this License for that Work shall terminate as of the date such
litigation is fi led.
4. Redistribution. You may reproduce and distribute copies of the
Work or Derivat ive Works thereof in any m edium, with or witho ut
modifications, and in Source or Object form, provided that You meet
the following conditions :
(a) You must give any other recipients of the Work or Derivative
Works a copy of this Licens e; and
(b) You must cause any modified files to carry prominent notices
stating that You changed the files; and
(c) You must retain, in the Source form of any Derivati ve Works that
You distribute, all copyright, patent, trademark, and attribution
notices from the Source form of the Work, excluding those
notices that do not pertain to any part of the Derivative Works;
and
(d) If the Wor k includes a “ NOTICE” text fil e as part of its distributi on,
then any Derivative Works that You distribute must include a
readable copy of the attribution notices contained within such
NOTICE file, excluding those notices that do not pertain to any
part of the Derivative Works, in at least one of the following
places: within a N OT ICE text file distributed as part of the
Derivative Works; within the Source form or documentation, if
provided along with the Derivative Works; or, within a display
generated by the Derivative Works, if and wherever such thirdparty notices normally appear. The contents of the NOTICE file
are for informat ional purposes only and do not modify the
License. You may add Your own attribution notices within
Derivative Works tha t You distribute, along side or as an
addend um to the NOTICE text from the Work , provided that such
additional attribution notice s cannot be construed as modifying
the Licens e.
You may add Your own copyright statement to Your modifications
and may provide additional or different license terms and
conditions for use, reproduction, or distribution of Your
modifications, or for any such Derivative Works as a whole, provided
Your use, reproduction, and distribution of the Work otherwise
complies with the conditions stated in this License.
5. Submission of Con tributions. Unless You explicitly state o therwise,
any Contributio n intentionally subm itted for inclusion in the Work by
You to the Licensor shall be under the terms and conditions of this
License, without any additional terms or conditions.
Notwithstand ing the above, nothing herein shall supersede or
modify the terms of any separate license agreement you may have
executed with Licensor regarding such Contributions.
6. Trademarks. This License does not grant permission to use the trade
names, trademarks, service marks, or product names of the
Licensor, except as required for reasonable and customary use in
describing the origin of the Work and reproducing the content of
the NOTICE fi le.
7. Disclaimer of Warranty. Unless required by applicable law or agreed
to in writing, Licensor provides the Work (and each Contributor
provides its Contrib utions) on an “AS IS” BASIS, WITHOUT
WARRANTIES OR CONDITIONS OF ANY KIND, either expre ss or
implied, including, without limitation, any warranties or conditions
of TITLE, NON-INFRINGEMENT, MERCHANTABILITY, or FITNESS FOR A
PARTICULAR PURP OSE. You are solely responsibl e for determining
the appropriateness of using or redistributing the Work and assume
any risks associat ed with Your exercise of permissions unde r this
License.
8. Limitation of Liability. In no event and under no legal theory,
whether in tort (including negligence), contract, or otherwise, unless
required by applicable law (such as deliberate and grossly negligent
acts) or agreed to in writing , shall any Contributor be l iable to You
for damages, including any direct, indirect, special, incidental, or
consequential damages of any character arising as a result of this
License or out of the use or inability to use the Work (including but
not limited to da mages for loss of goodwill, work stoppag e,
47
GB

computer failure or malfunction, or any and all other commercial
damages or lo sses), even if such Contributor has been advi sed of
the possibilit y of such damages.
9. Acceptin g Warranty or Additio nal Liability. While redistributing the
Work or Derivative Works thereof, You may choose to offer, and
charge a fee for, acceptance of support, warranty, indemnity, or
other liability obligations and/or rights consistent with this License.
However, in accepting such obligations, You may act only on Your
own behalf and on Your sole responsibility, not on behalf of any
other Contributor, and only if You agree to indemnify, defend, and
hold each Contributor harmless for any liability incurred by, or
claims asserted against, such Contributor by reason of your
accepting any such warranty or additional liability.
END OF TERMS AND CONDITIONS
APPENDIX : How to apply the Apache License to yo ur work.
To apply the Apache License to your work, attach the following
boilerplate notice, with the fields enclosed by brackets “[]” replaced
with your own identifying information. (Don’t include the brackets! )
The text should be enclosed in the appropriate comment syntax for the
file format. We also recommend that a file or class name and
description of purpose be included on the sam e “printed page” as the
copyrigh t notice for easier id entification with in third-party archi ves.
Copyright [yyyy] [name of copyr ight owner]
Licensed under the Apache License, Version 2.0 (the “License”); you
may not use this file except in compliance with the License.
You may obtain a copy of the License at
http://www.apach e.org/licenses/LICENSE-2.0
Unless required by applicable law or agreed to in w riting, software
distributed und er the License is distributed on a n “AS IS” BA SIS,
WITHOUT WARRANTIES OR CONDITIONS OF ANY KIND, either express or
implied.
See the License for the specific language governing permissions and
limitations under the License.
mDNSResponder
Apache License
Version 2.0, January 2004
http://www.apach e.org/licenses/
TERMS AND CONDITIONS FOR USE, REPRODUCTION, AND
DISTRIBUTIO N
1. Definitions .
“License” shall m ean the terms and conditions for use,
reproduction, and distribution as defined by Sections 1 through 9 of
this document.
“Licensor” shall mean the copyright owner or entity authorized by
the copyright owner that is granting the License.
“Legal Entity” shall mean the union of the acting entity and all other
entities that control, are controlled by, or are under common control
with that entity. For the purposes of this definition, “control” means
(i) the powe r, direct or indirect, to cause the direction or
management of such entity, whether by contract or otherwise, or (ii)
ownership of fifty percent (50%) or more of the outstanding shares,
or (iii) beneficial ownership of such entity.
“You” (or “Your”) shall mean an individual or Legal Entity exercising
permissions grante d by this License.
“Source” form shall mea n the preferred form for makin g
modifications, in cluding but not limited to software sou rce code,
documentation source, and configuration files.
“Object” form shall mean any form resulting from mechanical
transformation or trans lation of a Source form, including but not
limited to c ompiled object cod e, generated docume ntation, and
conversions to other media types.
“Work” shall mean the work of authorship, whether in Source or
Object form, ma de available under the License, as indicated by a
copyrigh t notice that is incl uded in or attached to the work (an
example is provid ed in the Appendix below).
“Derivative Works” shall mean any work, whether in Source or
Object form, that is based on (or derived from) the Work and for
which the editorial revisions, annotations, elaborations, or other
modifications represent, as a whole, an original work of authorship.
For the purposes of this License, Derivative Works shall not include
works that remain se parable from, or merely link (or bind by n ame)
to the interfaces of, the Work and Derivative Works thereof.
“Contribution” shall mean any work of authorship, including the
original version of the Work and any modifications or additions to
GB
48
that Work or Derivative Works thereof, that is intentionally
submitted to Licensor for inclusion in the Work by the copyright
owner or by an individual or Legal Entity authorized to submit on
behalf of the copyright owner. For the purposes of this definition,
“submitted” means any form of electronic, verbal, or written
communication se nt to the Licensor or its represent atives, including
but not limited to communication on electronic mailing lists, source
code control systems, and issue tracking systems that are managed
by, or on behalf of, the Licensor for the purpose of discussing and
improving the Work, but excluding communication that is
conspicuously marked or otherwise design ated in writing by the
copyright owner as “Not a Contribution.”
“Contributor” shall mean Licensor and any individual or Legal Entity
on behalf of whom a Contribution has been rece ived by Licensor
and subsequ ently incorporated within the Work.
2. Grant of Co pyright License. Subjec t to the terms and co nditions of
this License, each Contributor hereby grants to You a perpetual,
worldwide, n on-exclusive, no-charge, roy alty-free, irrevocable
copyright licens e to reproduce, prepare Derivative Wor ks of, publicly
display, publicly perform, sublicense, and distribute the Work and
such Derivative Works in Source or Object form.
3. Grant of Patent License. Subject to the terms and conditions of this
License, each Contributor hereby grants to You a perpetual,
worldwide, n on-exclusive, no-charge, roy alty-free, irrevocable
(except as stated in this section) patent license to make, have made,
use, offer to sell, sell, import, and otherwise transfer the Work,
where such license applies only to those patent cl aims licensable by
such Contributor that are necessarily infringed by the ir
Contribution(s) alone or by combination of their Contribution(s) with
the Work to which such Contribution(s) was submitted. If You
institute patent litigation against any entity (including a cross-claim
or counterclaim in a lawsuit) alle ging that the Work or a Con tribution
incorporated within the Work constitutes direct or contributory
patent infringement, then any patent licenses granted to You under
this License for that Work shall terminate as of the date such
litigation is filed.
4. Re distribution. You may reproduce and distribute co pies of the
Work or Derivative Works thereof in any medium, with or without
modifications, and in Source or Object form, provided that You meet
the follow ing conditions:
(a) You must give any other recipients of the Work or Derivative
Works a copy of this License; and
(b) You must cause any modified files to carry prominent notices
stating that You changed the files; and
(c) You must retain, in the Source form of any Derivative Works that
You distribute, all copyright, patent, trademark, and attribution
notices from the Source form of the Work, excluding those
notices that do not pertain to any part of the Derivative Works;
and
(d) If the Work includes a “ NOTICE” text file as part of its distribution ,
then any Derivative Works that You distribute must include a
readable copy of the attribution notices contained within such
NOTICE file, excluding those notices that do not pertain to any
part of the Derivative Works, in at least one of the following
places: w ithin a NOTICE text fi le distributed as part of t he
Derivative Works; within the Source form or documentation, if
provided along with the Derivative Works; or, within a display
generated by the Derivative Works, if and wherever such thirdparty notices normally appear. The contents of the NOTICE file
are for informational purposes only and do not modify the
License. You may add Your own attribution notices within
Derivative Works that You distribute, alongside or as an
addendum to the NOTICE text from the Work, provided that such
additional attribution notices cannot be construed as modifying
the License.
You may add Your own copyright statement to Your modifications
and may provide additional or different license terms and
conditions for use, reproduction, or distribution of Your
modifications, or for any such Derivative Works as a whole, provided
Your use, reproduction, and distribution of the Work otherwise
complies with the conditions stated in this License.
5. Submission of Contributi ons. Unless You explicitly state other wise,
any Contribution intentionally submitted for inclusion in the Work by
You to the Lice nsor shall be under the terms and conditions of this
License, without any additional terms or conditions.
Notwithstanding the above, nothing herein shall supersede or
modify the ter ms of any separate license agreeme nt you may have
executed with Licens or regarding such Contribution s.
6. Trademar ks. This License do es not grant permiss ion to use the trade
names, trademarks, service marks, or product names of the
Licensor, except as required for reasonable and customary use in

describing the origin of the Work and reproducing the content of
the NOTICE file.
7. Disclaim er of Warranty. Unless required by applicabl e law or agreed
to in writing, Licensor provides the Work (and each Contributor
provides its Contributions) on an “AS IS” BASIS, WITHOUT
WARRANTIES OR CONDITIONS OF ANY KIND, either express or
implied, inclu ding, without limitation , any warranties or conditions
of TITLE, NON-INFRINGEMENT, MERCHANTABILITY, or FITNESS FOR A
PARTICULAR PURPOSE. You are solely responsible for determining
the appropri ateness of using or redistrib uting the Work and assume
any risks associated with Your exercise of permissions under this
License.
8. Limitation of Liability. In no event and under no legal theory,
whether in tort (including negligence), contract, or otherwise, unless
required by applicab le law (such as deliberate and grossly n egligent
acts) or agreed to in writing, shall any Contributor be liable to You
for damage s, including any direct, in direct, special, incidenta l, or
consequential damages of any character arising as a result of this
License or out of the use or inability to use the Work (including but
not limited to damages for loss of goodwill, work stoppage,
computer failure or malfunction, or any and all other comme rcial
damages or losse s), even if such Contributor ha s been advised of
the possibility of such damages.
9. Acce pting Warranty or Additional Lia bility. While redistributing th e
Work or Derivative Works thereof, You may choose to offer, and
charge a fee for, acceptance of support, warranty, indemnity, or
other liability obligations and/or rights cons istent with this License.
However, in accepting such obligations, You may act only on Your
own behalf and on Your sole responsibility, not on behalf of any
other Contributor, and only if You agree to indemnify, defend, and
hold each Contributor harmless for any liability incurred by, or
claims asserted against, such Contributor by reason of your
accepting any such warranty or additional liability.
END OF TERMS AND CONDITIONS
APPENDIX: How to apply the Apache License to your work.
To apply the Ap ache License to you r work, attach th e following
boilerplate notice, with the fields enclosed by brackets “[]” replaced
with your own identifying information. (Don’t include the brackets! )
The text s hould be enclo sed in the appro priate commen t syntax for the
file format. We also recom mend that a file or class name and
description of purpose be included on the sa me “printed page” as the
copyright notice for easier identification within third-party archives.
Copyright [yyyy] [name of copyright owner]
Licensed under the Apache License, Version 2.0 (the “License”); you
may not use this f ile except in compliance with the Licen se.
You may obtain a copy of the License at
http://www.apach e.org/licenses/LICENSE-2.0
Unless required by applicable law or agreed to in w riting, software
distributed under the License is distributed on an “AS IS” BASIS,
WITHOUT WARRANTIES OR CONDITIONS OF ANY KIND, either express or
implied.
See the License for the specific language governing permissions and
limitations under the License.
libFLAC
Copyright (C) 2000, 2001, 2002, 2003, 2004, 2005, 2006, 2007 Josh
Coalson
Redistribution and use in source and binary forms, with or without
modification, are permitted provid ed that the followi ng conditions are
met:
Redistributions of source code must retain the above copyright
notice, this list of conditions and the following disclaimer.
Redistribut ions in binary form must reproduce t he above copyright
notice, this list of condition s and the following disclaim er in the
documentation and/or other materials provided with the
distribution.
Neither the name of the Xiph.org Foundation nor the names of its
contributors may be used to endorse or promote products derived
from this software without specific prior written permission.
THIS SOFTWARE IS PROVIDED BY THE COPYRIGHT HOLDERS AND
CONTRIBUTORS “AS IS” AND ANY EXPRESS OR IMPLIED WARRANTIES,
INCLUDING, BUT NOT LIMITED TO, THE IMPLIED WARR ANTIES OF
MERCHANTABILITY AND FITNESS FOR A PARTICULAR PURPOSE ARE
DISCLAIMED. IN NO EVENT SHALL THE FOUNDATION OR CONTRIBUTORS
BE LIABLE FOR ANY DIRECT, INDIRECT, INCIDENTAL, SPECIAL,
EXEMPLARY, OR CONSEQUENTIAL DAMAGES (INCLUDING, BUT NOT
LIMITED TO, PROCUREM ENT OF SUBSTITUTE GOODS OR SERVICES; LOSS
OF USE, DATA, OR PROFITS; OR BUSINESS INTERRUPTIO N) HOWEVER
CAUSED AND ON ANY THEORY OF LIABILITY, WHE THER IN CONTRACT,
STRICT LIABILITY, OR TORT (INCLUDING NEGLIGENCE OR OTHERWISE)
ARISING IN ANY WAY OUT OF THE USE OF THIS SOFTWA RE, EVEN IF
ADVISED OF THE POSS IBILITY OF SUCH DAMAGE.
WPA Supplicant
==============
Copyright (c) 2003-201 3, Jouni Malinen < j@w1.fi> and contributors
All Rights Reserved.
This program is lice nsed under the BSD license ( the one with
advertisement clause removed).
If you are submitti ng changes to th e project, please see
CONTRIBUTIONS file for more in structions.
License
-------
This software may b e distributed, used, and modifie d under the terms
of BSD license:
Redistribution and use in source and binary forms, with or without
modification, are permitted provided that the following conditions are
met:
1. Redistributions of source code must retain the above copyright
notice, this li st of conditions and the following discl aimer.
2. Redistributions in binary form must reproduce the above copyright
notice, this list of co nditions and the following disclaimer in the
documentation and/or other materials provided with the
distribution.
3. Neither the name(s) of the above-listed copyright holder(s) nor the
names of its contributors may be used to endorse or promote
products derived from this software without specific prior written
permission.
THIS SOFTWARE IS PROVIDED BY THE COPYRIGHT HOLDERS AND
CONTRIBUTORS “AS IS” AND ANY EXPRES S OR IMPLIED WARRANTIES,
INCLUDING, BUT NOT LIMITED TO, THE IMPLIED WARRANTIES OF
MERCHANTABILITY AND FITNESS FOR A PARTICULAR PURPOSE ARE
DISCLAIMED. IN NO EVENT SHALL THE COPYRIGHT OWNER OR
CONTRIBUTORS BE LIABLE FOR ANY DIRECT, INDIRECT, INCIDENTAL,
SPECIAL, EXEMPLARY, OR CONSEQUENTIAL DAMAGES (INCLUDING, BUT
NOT LIMITED TO, PROCUREMENT OF SUBSTITUTE GOODS OR SERVICES;
LOSS OF USE, DATA, OR PROFITS; OR BUSINESS INTERRUPTION)
HOWEVER CAUSED AND ON ANY THEORY OF LIABILITY, WHETHER IN
CONTRACT, STRICT LIABILITY, OR TORT (INCLUDING NEGLIGENCE OR
OTHERWISE) ARISING IN ANY WAY OUT OF THE USE OF THIS SOFTWARE,
EVEN IF ADVISED OF THE POSSIBILITY OF SUCH DAMAGE.
Expat
Copyright (c) 1998, 1999, 2000 Thai Open Source Software Center Ltd
and Clark Cooper
Copyright (c) 2001, 2002, 2003, 2004, 2005, 2006 Expat maintai ners.
Permission is hereby granted, free of charge, to any person obtaining a
copy of this software and associated documentation files (the
Software), to deal in the Software without restriction, including without
limitation the rights to use, copy, modify, merge, publish, distribute,
sublicense, and/ or sell copies of the Soft ware, and to permit perso ns to
whom the Soft ware is furnished to do so, subj ect to the following
conditions:
The above copyright notice and this permission notice shall be
included in all copies or subs tantial port ions of the Software.
THE SOFTWARE IS PROVIDED “AS IS”, WITHOUT WARRANTY OF ANY
KIND, EXPRESS OR IMPLIED, INCLUDING BUT NOT LIMITED TO THE
WARRANTIES OF MERCHANTABILITY, FITNESS FOR A PARTICULAR
PURPOSE AND NONINFRINGEMENT.
IN NO EVENT SHALL THE AUTHORS OR COPYRIGHT HO LDERS BE LIABLE
FOR ANY CLAIM, DAMAGES OR OTHER LIABILITY, WHETHER IN AN
ACTION OF CONTRACT, TORT OR OTHERWISE, ARISING FROM, OUT OF
OR IN CONNECTION WITH THE SOFTWARE OR THE USE OR OTHER
DEALINGS IN THE SOFTWARE.
This product in corporates Spotify software wh ich is subject to 3rd par ty
licenses found here:
www.spotify.com/connect/third-party-licenses
Boost
http://www.boost.org/
Boost Software License - Version 1.0 - August 17th, 2003
49
GB

Permission is hereby granted, free of charge, to any person or
organization obtaining a copy of the software and accompanying
documentation covered by this license (the “Software”) to use,
reproduce, displa y, distribute, execute, and transmi t the Software, and
to prepare derivative works of the Software, and to permit third-parties
to whom t he Software is fu rnished to do so , all subject to the following:
The copyright notices in the Software and this entire statement,
including t he above license grant, this re striction and the followin g
disclaimer, mus t be included in all co pies of the Software, in whole or in
part, and all derivative works of the Software, unless such copies or
derivative works are solely in t he form of machine-executable o bject
code generated by a source language processor.
THE SOFTWARE IS PR OVIDED “AS IS”, WITHOUT WARRANTY OF ANY
KIND, EXPRESS OR IMPLIED, INCLUDING BUT NOT LIMITED TO T HE
WARRANTIES OF MERCHANTABILITY, FITNESS FOR A PARTICULAR
PURPOSE, TITLE AND NON-INFRINGEMENT. IN NO EVENT SHALL THE
COPYRIGHT HOLDERS OR ANYONE DISTRIBUTING THE SOFTWARE BE
LIABLE FOR ANY DAMAGES OR OTHER LIABILITY, WHETHER IN
CONTRACT, TORT OR OTHERWISE, ARISING FROM, OUT OF OR IN
CONNECTION WITH THE SOFTWARE OR THE USE OR OTHER D EALINGS
IN THE SOFTWARE.
Expat
http://www.jclark.com/xml/expat.html
Expat License. Copyright (c) 1998, 1999, 2000 Thai Open Source
Software Center Ltd
Permissio n is hereby gra nted, free of ch arge, to any per son obtaining a
copy of this software and associated documentation files (the
“Software”), to deal in the Software without restriction, including
without limitation the rights to use, copy, modify, merge, publish,
distribute, subli cense, and/or sell copies of the S oftware, and to permit
persons to whom the Software is furnished to do so, subject to the
following conditions:
The above copyright notice a nd this permission notice shall be
included in al l copies or sub stantial portions of the Software.
THE SOFTWARE IS PR OVIDED “AS IS”, WITHOUT WARRANTY OF ANY
KIND, EXPRESS OR IMPLIED, INCLUDING BUT NOT LIMITED TO T HE
WARRANTIES OF MERCHANTABILITY, FITNESS FOR A PARTICULAR
PURPOSE AND NONINFRINGEMENT. IN NO EVENT SHALL THE AUTHORS
OR COPYRIGHT HOLDERS BE LIABLE FOR ANY CLAIM, DAMAGES OR
OTHER LIABILITY, WHETHER IN AN ACTION OF CONTRACT, TORT OR
OTHERWISE, ARISING FROM, OUT OF OR IN CONNECTION WITH THE
SOFTWARE OR THE USE OR OTHER DEALINGS IN THE SOFTWARE.
FastDele gate
http://www.codeproject.com/KB/cpp/FastDelegate.aspx
THE WORK (AS DEFINED BELOW) IS PROVIDED UNDER THE TERMS OF
THIS CODE PROJECT OP EN LICENSE (“LICENSE”). THE WORK IS
PROTECTED BY COPYRIGHT AND/OR OTHER APPLICABLE LAW. ANY USE
OF THE WORK OTHER THAN AS AUTHORIZED UNDER THIS LICENSE OR
COPYRIGHT LAW IS PROHIBITED.
BY EXERCISING ANY RIGHTS TO THE WORK PROVIDED HEREIN, YOU
ACCEPT AND AGREE TO BE BOUND BY THE TERMS OF THIS LICENSE. THE
AUTHOR GRANTS YOU THE RIGHTS CONTAINED HEREIN IN
CONSIDERATION OF YOUR ACCEPTANCE OF SUCH TERMS AND
CONDITIONS. IF YOU DO NOT AGREE TO ACCEPT AND BE BOUND BY THE
TERMS OF THIS LICENSE, YOU CANNOT MAKE ANY USE OF THE WORK.
Definitions.
“Articles” means, collec tively, all articles written by A uthor whic h
describes how t he Source Code and Executable Files for the Wo rk may
be used by a user.
“Author” means the individual or entity that offers the Work under the
terms of th is License.
“Derivative Work” means a work based upon the Work or upon the
Work and othe r pre-existing works.
“Executable File s” refer to the executables, bina ry files, configuration
and any required data files included in the Work.
“Publisher” means the provider of the website, magazine, CD-RO M,
DVD or other medium from or by which the Work is obtained by You.
“Source Code” refers to the collection of source code and configuration
files used to create the Executable Files.
“Standard Version” refers to such a Work if it has not been modified, or
has been modifie d in accordance with the consent of the Aut hor, such
consent being in the full discretion of the Author.
“Work” refers to the collection of files distributed by the Publisher,
including the Source Code, Executable Files, bi naries, data files,
documentation, whitepapers and the Articles.
“You” is you, an individual or entity wishing to use the Work and
exercise your rights under this License.
GB
50
Fair Use/Fair Use Rights. Nothing in this License is intended to reduce,
limit, or restrict any rights ar ising from fair use, f air dealing, first s ale or
other limitations on the exclusive rights of the copyright owner under
copyright law or other applicable laws.
License Grant. Subject to the terms and conditions of this License, the
Author hereby g rants You a worldwi de, royalty-free, non-exclusive,
perpetual (for the duration of the applicable copyright) license to
exercise the right s in the Work as stated below:
You may use the standard version of the Source Code or Executable
Files in Your own app lications.
You may apply bug fixes, portabil ity fixes and other modifications
obtained from the Public Domain or from the Author. A Work modified
in such a way sh all still be considered the stan dard version and will be
subject to this License.
You may otherwise m odify Your copy of this Work (excluding th e
Articles) in any way to create a Derivative Work, provided that You
insert a prominent notice in each changed file stating how, when and
where You changed that file.
You may distribute the standard version of the Executable Files and
Source Code or Derivative Work in aggregate with other (possibly
commercial) programs as part of a larger (possibly commercial)
software distribution.
The Articles di scussing the Work published in any for m by the author
may not be distributed or repu blished without t he Author's conse nt.
The author retains copyright to any such Articles. You may use the
Executable Files and Source Code pursuant to this License but you may
not repost or republish or otherwise distribute or make available the
Articles, without the prior written consent of the Author.
Any subroutines or modules supplied by You and linked into the Source
Code or Executabl e Files this Work shall not be considere d part of this
Work and will not be subject to the terms of this License.
Patent License. Subject to the terms and conditions of this License,
each Author hereby grants to You a perpetual, worldwide, nonexclusive, no-ch arge, royalty-free, irrevocable (except a s stated in this
section) patent license to make, have made, use, import, and
otherwise transfer the Work.
Restrictions. The license granted in Section 3 above is expressly made
subject to and limited by the following restrictions:
You agree not to re move any of the ori ginal copyright, pa tent,
trademark, and attribution notices and associated disclaimers that may
appear in the Source Code or Executable Files.
You agree not to advertise or in any way imply that this Work is a
product of Your own.
The name of t he Author may not be used to en dorse or promote
products derived from the Wor k without the pri or written consen t of
the Author.
You agree not to sell, lease, or rent any part of the Work. This does not
restrict you from including the Work or any part of the Work inside a
larger softwa re distribution that itself is being sold. The Work by itse lf,
though, cannot be sold, leased or rented.
You may distribute the Executable Files and Source Code only under
the terms of this License, and You must include a copy of, or the
Uniform Res ource Identifier for, this License with e very copy of the
Executable File s or Source Code You distribute and ensure that anyon e
receiving such Execut able Files and Source Code agrees that th e terms
of this License apply to such Executable Files and/or Source Code. You
may not offer or impose any terms on the Work that alter or restrict the
terms of this License or the recipients' exercise of the rights granted
hereunder. You may not sublicense the Work. You must keep intact all
notices that refer to this License and to the disclaimer of warranties.
You may not distribute the Executable Files or Source Code with any
technological measures that control access or use of the Work in a
manner inconsistent with the terms of this License.
You agree not to use the Wor k for illegal, immoral or imp roper
purposes, or on pages containing illegal, immoral or improper material.
The Work is subj ect to applicable export laws. You agree to comply with
all such laws and regulations that may apply to the Work after Your
receipt of the Work.
Representati ons, Warranties and Disclaime r. THIS WORK IS PROV IDED
“AS IS”, “WHERE IS” AND “AS AVAILABLE”, WITHOUT ANY EXPRESS OR
IMPLIED WARRANTIES OR CONDITIONS OR GUARANTEES. YOU, THE
USER, ASSUME ALL RISK IN ITS USE, INCLUDING COPY RIGHT
INFRINGEMENT, PATENT INFRINGEMENT, SUITABILITY, ETC. AUTHOR
EXPRESSLY DISCLAIMS ALL EXPRESS, IMPLIED OR STATUTORY
WARRANTIES OR CONDITIONS, INCLUDING WITHOUT LIMITATION,
WARRANTIES OR CONDITIONS OF MERCHANTABILITY, MERCHANTABLE
QUALITY OR FITNESS FOR A PARTICULAR PURPOSE, OR ANY
WARRANTY OF TITL E OR NON-INFRINGEMEN T, OR THAT THE WORK (O R
ANY PORTION THE REOF) IS CORRECT, USEFUL, BUG-FREE OR FR EE OF
VIRUSES. YOU MUST PASS THIS DISCLAIMER ON WHENEVER YOU
DISTRIBUTE THE WORK OR DERIVAT IVE WORKS.
Indemnity. You agree to defend, indemnify and hold harmless the
Author and the Publisher from and against any claims, suits, losses,
damages, liabilities, costs, and expenses (including reasonable legal or
attorneys’ fees) resultin g from or relating to any use of the Work by
You .
Limitation on Liability. EXCEPT TO THE EXTENT REQUIRED BY
APPLICABLE LAW, IN NO EVENT WILL THE AUTHOR OR THE PUBLISHER

BE LIABLE TO YOU ON ANY LEGAL THEORY FOR ANY SPECIAL,
INCIDENTAL, CONSEQUENTIAL, PUNITIVE OR EXEMPLARY DAMAGES
ARISING OUT OF THIS LICENSE OR THE USE OF THE WORK OR
OTHERWISE, EVEN IF THE AUTHOR O R THE PUBLISHER HAS BEEN
ADVISED OF THE POSSIBILITY OF SUCH DAMAGES.
Termination.
This License and the rights granted hereunder will terminate
automatically upon any breach by You of any term of this License.
Individuals or entities who have received Derivative Works from You
under this License, however, will not have their licenses terminated
provided such individuals or entities remain in full compliance with
those licenses. Sections 1, 2, 6, 7, 8, 9, 10 and 11 will survive any
termination of this Licens e.
If You bring a copyright, trademark, patent or any other infringement
claim against any contributor over infringements You claim are made
by the Work, y our License from su ch contributor to the Work ends
automatically.
Subject to the above terms and conditions, this License is perpetual (for
the duration of the applicable copyright in the Work). Notwithstanding
the above, the A uthor reserves the right to release the Work under
different license terms or to stop distributing the Work at any time;
provided, howe ver that any such election wil l not serve to withdraw
this License (or any other license that has been, or is required to be,
granted under the terms of this License), and this License will continue
in full force and effect unless terminated as stated above.
Publisher. The parties hereby confirm that the Publisher shall not,
under any circumstances, be responsible for and shall not have any
liability in respect of the subject matter of this License. The Publisher
makes no warranty whatsoever in connection with the Work and shall
not be liable to You or any party on any legal theory for any damages
whatsoever, including without limitation any general, special,
incidental or consequential damages arising in connection to this
license. The Publisher reserves the right to cease making the Work
available to You at any time without notice
Miscellaneous
This License shall be governed by the laws of the location of the head
office of the Author or if the Author is an individual, the laws of location
of the principal place of residence of the Author.
If any provision of this License is invalid or unenforceable under
applicable law, it shall not affect the validity or enforceability of the
remainder of the terms of this License, and without further action by
the parties to this License, such provision shall be reformed to the
minimum extent necessary to make such provision valid and
enforceable.
No term or provision of this License shall be deemed waived and no
breach consented to u nless such waiver or consent shall b e in writing
and signed by the party to be charged with such waiver or consent.
This License constitutes the entire agreement between the parties with
respect to the Work licensed herein. There are no understandings,
agreements or re presentations with respect to t he Work not specified
herein. The Author shall not be bound by any additional provisions that
may appear in any communication from You. This License may not be
modified without the mutual written agreement of the Author and You
libogg
http://www.xiph.org/ogg/
Copyright (c) 2002, Xiph.org Foundation
Redistribution and use in source and binary forms, with or without
modification, are permitted provid ed that the followi ng conditions are
met:
Redistributions of source code must retain the above copyright notice,
this list of conditions and the following disclaimer.
Redistributions in binary form must reproduce the above copyright
notice, this list o f conditions and the follow ing disclaimer in the
documentation and/or other materials provided with the distribution.
Neither the name of the Xiph.org Foundation nor the names of its
contributors may be used to endorse or promote products derived
from this softwa re without specific prior wr itten permission.
THIS SOFTWARE IS PROVIDED BY THE COPYRIGHT HOLDERS AND
CONTRIBUTORS “AS IS” AND ANY EXPRESS OR IMPLIED WARRANTIES,
INCLUDING, BUT NOT LIMITED TO, THE IMPLIED WARR ANTIES OF
MERCHANTABILITY AND FITNESS FOR A PARTICULAR PURPOSE ARE
DISCLAIMED. IN NO EVENT SHALL THE FOUNDATION OR CONTRIBUTORS
BE LIABLE FOR ANY DIRECT, INDIRECT, INCIDENTAL, SPECIAL,
EXEMPLARY, OR CONSEQUENTIAL DAMAGES (INCLUDING, BUT NOT
LIMITED TO, PROCUREM ENT OF SUBSTITUTE GOODS OR SERVICES; LOSS
OF USE, DATA, OR PROFITS; OR BUSINESS INTERRUPTION) HOWEVER
CAUSED AND ON ANY THEORY OF LIAB ILITY, WHETHER IN CONTRACT,
STRICT LIABILITY, OR TORT (IN CLUDING NEGLIGENCE OR OTHERWISE)
ARISING IN ANY WAY OUT OF THE USE OF THIS SOFTWARE, EVEN IF
ADVISED OF THE POSSIBILITY OF SUCH DAMAGE.
libvorbis
http://w ww.xiph.org/vorb is/
Copyright (c) 2002-20 04 Xiph.org Foundation
Redistribution and use in source and binary forms, with or without
modification, are permitted provided that the following conditions are
met:
Redis tributio ns of source code must retain the a bove copy right noti ce,
this list of cond itions and the following di sclaimer.
Redistributions in binary form must reproduce the above copyright
notice, this list o f conditions a nd the following disclaime r in the
documentation and/or other materials provided with the distribution.
Neither the name of the Xiph.org Foundation nor the names of its
contributors m ay be used to endorse or promote products derived
from this software without specific prior written permission.
THIS SOFTWARE IS PROVIDED BY THE COPYRIGHT HOLDERS AND
CONTRIBUTORS “AS IS” AND ANY EXPRES S OR IMPLIED WARRANTIES,
INCLUDING, BUT NOT LIMITED TO, THE IMPLIED WARRANTIES OF
MERCHANTABILITY AND FITNESS FOR A PARTICULAR PURPOSE ARE
DISCLAIMED. IN NO EVENT SHALL THE FO UNDATION OR CONTRIBUTORS
BE LIABLE FOR ANY DIRECT, INDIRECT, INCIDENTAL, SPECIAL,
EXEMPLARY, OR CONSEQUENTIAL DAMAGES (INCLUDING, BUT NOT
LIMITED TO, PROCUREMENT OF SUBSTITUTE GOODS OR SERVICES; LOSS
OF USE, DATA, OR PROFITS; OR BUSINESS INTERRUPTIO N) HOWEVER
CAUSED AND ON ANY THEORY OF LIABILITY, WHE THER IN CONTRACT,
STRICT LIABILITY, OR TORT (INCLUDING NEGLIGENCE OR OTHERWISE)
ARISING IN ANY WAY OUT OF THE USE OF THIS SOFTWA RE, EVEN IF
ADVISED OF THE POSS IBILITY OF SUCH DAMAGE.
Trem olo
http://wss.co.uk/pinknoise/tremolo
Copyright (C) 2002-2009 Xiph.org Foundation Changes Copyright (C)
2009-2010 Robin Watts for Pinknoise Productions Ltd
Redistribution and use in source and binary forms, with or without
modification, are permitted provided that the following conditions are
met:
Redistributi ons of source code must retain the abo ve copyright
notice, this list of conditions and the follo wing disclaimer.
Redistributions in binary form must reproduce the above copyright
notice, this list of conditions and the follo wing disclaimer in the
documentation and/or other materials provided with the
distribution.
Neither the name of the Xiph.org Foundation nor the names of its
contributors may be used to endorse or promote products derived
from this softwa re without specific prior wri tten permission.
THIS SOFTWARE IS PROVIDED BY THE COPYRIGHT HOLDERS AND
CONTRIBUTORS “AS IS” AND ANY EXPRES S OR IMPLIED WARRANTIES,
INCLUDING, BUT NOT LIMITED TO, THE IMPLIED WARRANTIES OF
MERCHANTABILITY AND FITNESS FOR A PARTICULAR PURPOSE ARE
DISCLAIMED. IN NO EVENT SHALL THE FO UNDATION OR CONTRIBUTORS
BE LIABLE FOR ANY DIRECT, INDIRECT, INCIDENTAL, SPECIAL,
EXEMPLARY, OR CONSEQUENTIAL DAMAGES (INCLUDING, BUT NOT
LIMITED TO, PROCUREMENT OF SUBSTITUTE GOODS OR SERVICES; LOSS
OF USE, DATA, OR PROFITS; OR BUSINESS INTERRUPTIO N) HOWEVER
CAUSED AND ON ANY THEORY OF LIABILITY, WHE THER IN CONTRACT,
STRICT LIABILITY, OR TORT (INCLUDING NEGLIGENCE OR OTHERWISE)
ARISING IN ANY WAY OUT OF THE USE OF THIS SOFTWA RE, EVEN IF
ADVISED OF THE POSS IBILITY OF SUCH DAMAGE.
Trem or
http://wiki.xiph.org/index.php/Tremor
Copyright (c) 2002, X iph.org Foundation
Redistribution and use in source and binary forms, with or without
modification, are permitted provided that the following conditions are
met:
Redistributi ons of source code must retain the abo ve copyright
notice, this list of conditions and the follo wing disclaimer.
Redistributions in binary form must reproduce the above copyright
notice, this list of conditions and the follo wing disclaimer in the
documentation and/or other materials provided with the
distribution.
Neither the name of the Xiph.org Foundation nor the names of its
contributors may be used to endorse or promote products derived
from this softwa re without specific prior wri tten permission.
51
GB

THIS SOFTWARE IS PROVIDED BY THE COPYRIGHT HOLDERS AND
CONTRIBUTORS “AS IS” AND ANY EXPRESS OR IMPLIED WARRANTIES,
INCLUDING, BUT NOT LIMITED TO, THE IMPLIED WARRANTIES OF
MERCHANTABILITY AND FITNESS FOR A PARTICULAR PURPOSE ARE
DISCLAIMED. IN NO EVENT SHALL THE FOUNDATION OR CONTRIBUTORS
BE LIABLE FOR ANY DIRECT, INDIRECT, INCIDENTAL, SPECIAL,
EXEMPLARY, OR CONSEQ UENTIAL DAMAGES (INCLUDING, BUT NOT
LIMITED TO, PROCUREMENT OF SUBSTITUTE GOODS OR SERVICES; LOSS
OF USE, DATA, OR PROFITS; OR BUSINESS INTERRUPTION) HOWEVER
CAUSED AND ON ANY THEORY OF LIABILITY, WHETHER IN CONTRACT,
STRICT LIABILITY, OR TORT (INCLUDING NEGLIGENCE OR OTHERWISE)
ARISING IN ANY WAY OUT OF THE USE OF THIS SOFTWARE, EVEN IF
ADVISED OF THE POSSIBILITY OF SUCH DAMAGE.
Mersenne Twister
http://www.math.sci.hiroshima-u.ac.jp/~m-mat/MT/MT2002/CODES/
mt19937ar.c
Copyright (C) 1997 - 2 002, Makoto Matsumoto and Takuji Nishimura,
All rights reser ved.
Redistribution and use in source and binary forms, with or without
modification, a re permitted p rovided that the following condi tions are
met:
Redistributions of source code must retain the above copyright notice,
this list of cond itions and the following d isclaimer.
Redistributions in binary form must reproduce the above copyright
notice, this list of conditions and the follo wing disclaimer in the
documentation and/or other materials provided with the distribution.
The names of its contributors may not be used to endorse or promote
products derive d from this software without spec ific prior written
permission.
THIS SOFTWARE IS PROVIDED BY THE COPYRIGHT HOLDERS AND
CONTRIBUTORS “AS IS” AND ANY EXPRESS OR IMPLIED WARRANTIES,
INCLUDING, BUT NOT LIMITED TO, THE IMPLIED WARRANTIES OF
MERCHANTABILITY AND FITNESS FOR A PARTICULAR PURPOSE ARE
DISCLAIMED. IN NO EVENT SHALL THE COPYRIGHT OWNER OR
CONTRIBUTORS BE LIABLE FOR ANY DIRECT, INDIRECT, INCIDENTA L,
SPECIAL, EXEMPLARY, OR CONS EQUENTIAL DAMAGES (INCLUDING, BUT
NOT LIMITED TO, PROCUREMENT OF SUBSTITUTE GOODS OR SERVICES;
LOSS OF USE, DATA, OR PROFITS; OR BUSINESS INTERRUPTION)
HOWEVER CAUSED AND ON ANY THEORY OF LIABILITY, WHETHER IN
CONTRACT, STRICT LIABILITY, OR TORT (INCLUDING NEGLIGENCE OR
OTHERWISE) ARISING IN ANY WAY OUT OF THE USE OF THIS SOFTWARE,
EVEN IF ADVISED O F THE POSSIBILITY OF SUCH DAMAGE.
THE SOFTWARE IS PROVIDED “AS IS”, WITHOUT WARRANTY OF ANY
KIND, EXPRESS OR IMPLIED, INCLUDING BUT NOT LIMITED TO THE
WARRANTIES OF MERCHANTAB ILITY, FITNESS FOR A PARTICULAR
PURPOSE AND NONINFRINGEMENT OF THIRD PARTY RIGHTS. IN NO
EVENT SHALL THE AUTHORS OR COPYRIGHT HOLDE RS BE LIABLE FOR
ANY CLAIM, DAMAGES OR OTHER LIABILITY, WHETHER IN AN ACTION
OF CONTRACT, TORT OR OTHERWISE, ARISING FROM, OUT OF OR IN
CONNECTION WITH THE SOFTWARE OR THE USE OR OTHER DEALINGS
IN THE SOFTWARE.
Except as contained in this notice, the name of a copyright holder shall
not be used in ad vertising or otherwise to promote the sale, use or
other dealing s in this Software without pr ior written authorization o f
the copyright holder.
c-ares
http://c-ares.haxx.se
Copyright 1998 by the Massachusetts Institute of Technology.
Permission to use, copy, modi fy, a nd distribute this software and its
documentation for any purpose and without fee is hereby granted,
provided that the above copyright notice appear in all copies and that
both that copyright notice and this permission notice appear in
supporting documentation, and that the name of M.I.T. not be used in
advertising or publicity pertaining to distribution of the software
without specific, written prior permission. M.I.T. makes no
representations about the suitability of this software for any purpose. It
is provided “as is” w ithout express or implied warrant y.
zlib
http://www.zlib.net/
zlib.h -- interface o f the ‘zlib’ general purpose com pression library
version 1.2.3, July 18th, 2005
Copyright (C) 1995-2004 Jean-loup Gailly and Mark Adler
This software is provided ‘as-is’, without any express or implied
warranty. In no event will the authors be held liable for any damages
arising from the use of this software.
Permission is granted to anyon e to use this software for any p urpose,
including commercial applications, and to alter it and redistribute it
freely, subject to the following res trictions:
The origin of this software must not be misrepresented; you must not
claim that you wrote the original software. If y ou use this software in a
product, an acknowledgment in the product documentation would be
appreciated but is not required.
Altered source versions must be plainly marked as such, and must not
be misrepresented as being the original software.
This notice may not be re moved or altered from any source
distribution.
Jean-loup Ga illy jloup@gzip.org, Mar k Adler
madler@alum ni.caltech.edu
cURL
http://curl.haxx.se
COPYRIGHT AND P ERMISSION NOTICE
Copyright (c) 1996 - 2011, Daniel Stenberg, <daniel@haxx.se>.
All rights reser ved.
Permission to use, copy, modify, and distribute this software for any
purpose with or without fee is hereby granted, provided that the above
copyright notice and this permission notice appear in all copies.
GB
52


©2014 Sony Corporation Printed in China 4-528-297-12(1)
 Loading...