


Home Audio System
Operating Instructions
Getting started
Operations
Network connections
Additional information
Troubleshooting
Precautions/Specifications
CMT-SBT300W/SBT300WB

WARNING
To reduce the risk of fire, do not
cover the ventilation opening of
the appliance with newspapers,
tablecloths, curtains, etc.
Do not expose the appliance to
naked flame sources (for
example, lighted candles).
To reduce the risk of fire or
electric shock, do not expose this
appliance to dripping or
splashing, and do not place
objects filled with liquids, such
as vases, on the appliance.
As the main plug is used to
disconnect the unit from the
mains, connect the unit to an
easily accessible AC outlet.
Should you notice an
abnormality in the unit,
disconnect the main plug from
the AC outlet immediately.
Do not install the appliance in a
confined space, such as a
bookcase or built-in cabinet.
Do not expose batteries or
appliances with battery-installed
to excessive heat, such as
sunshine and fire.
The unit is not disconnected
from the mains as long as it is
connected to the AC outlet, even
if the unit itself has been turned
off.
This equipment has been tested
and found to comply with the
limits set out in the EMC
Directive using a connection
cable shorter than 3 meters.
CAUTION
The use of optical instruments
with this product will increase
eye hazard.
For customers in Australia
This equipment should be
installed and operated with at
least 20 cm and more between
the radiator and person's body
(excluding extremities: hands,
wrists, feet and ankles).
For customers in Europe
Properly shielded and grounded
cables and connectors must be
used for connection to host
computers and/or peripherals.
Excessive sound pressure from
earphones and headphones can
cause hearing loss.
Notice for customers: the
following information is
only applicable to
equipment sold in
countries applying EU
directives.
This product has been
manufactured by or on behalf of
Sony Corporation, 1-7-1 Konan
Minato-ku Tokyo, 108-0075
Japan. Inquiries related to
product compliance based on
European Union legislation shall
be addressed to the authorized
representative, Sony
Deutschland GmbH, Hedelfinger
Strasse 61, 70327 Stuttgart,
Germany. For any service or
guarantee matters, please refer
to the addresses provided in the
separate service or guarantee
documents.
Hereby, Sony Corp., declares that
this equipment is in compliance
with the essential requirements
and other relevant provisions of
Directive 1999/5/EC.
For details, please access the
following URL:
http://www.compliance.sony.de/
This appliance is classified as a
CLASS 1 LASER product. This
marking is located on the rear
exterior.
GB
2

Disposal of Old
Electrical &
Electronic
Equipment
(Applicable in
the European
Union and other European
countries with separate
collection systems)
This symbol on the product or on
its packaging indicates that this
product shall not be treated as
household waste. Instead it shall
be handed over to the applicable
collection point for the recycling
of electrical and electronic
equipment. By ensuring this
product is disposed of correctly,
you will help prevent potential
negative consequences for the
environment and human health,
which could otherwise be
caused by inappropriate waste
handling of this product. The
recycling of materials will help to
conserve natural resources. For
more detailed information about
recycling of this product, please
contact your local Civic Office,
your household waste disposal
service or the shop where you
purchased the product.
Europe Only
Disposal of
waste batteries
(applicable in the
European Union
and other
European countries with
separate collection
systems)
This symbol on the battery or on
the packaging indicates that the
battery provided with this
product shall not be treated as
household waste.
On certain batteries this symbol
might be used in combination
with a chemical symbol. The
chemical symbols for mercury
(Hg) or lead (Pb) are added if the
battery contains more than
0.0005% mercury or 0.004%
lead.
By ensuring these batteries are
disposed of correctly, you will
help prevent potentially negative
consequences for the
environment and human health
which could otherwise be
caused by inappropriate waste
handling of the battery. The
recycling of the materials will
help to conserve natural
resources.
In case of products that for
safety, performance or data
integrity reasons require a
permanent connection with an
incorporated battery, this battery
should be replaced by qualified
service staff only.
To ensure that the battery will be
treated properly, hand over the
product at end-of-life to the
applicable collection point for
the recycling of electrical and
electronic equipment.
For all other batteries, please
view the section on how to
remove the battery from the
product safely. Hand the battery
over to the applicable collection
point for the recycling of waste
batteries.
For more detailed information
about recycling of this product or
battery, please contact your local
Civic Office, your household
waste disposal service or the
shop where you purchased the
product.
GB
3

Before operating this system
Malfunctions that occur during the
normal use of the system will be
repaired by Sony in accordance with the
conditions defined in the limited
warranty for this system. However, Sony
will not be liable for any consequences
arising from a failure to play caused by a
damaged or malfunctioning system.
Music discs encoded with
copyright protection
technologies
This product is designed to playback discs
that conform to the Compact Disc (CD)
standard. Recently, various music discs
encoded with copyright protection
technologies are marketed by some record
companies.
Please be aware that among those discs,
there are some that do not conform to the
CD standard and may not be playable by
this product.
Note on DualDiscs
A DualDisc is a two sided disc product which
mates DVD recorded material on one side
with digital audio material on the other side.
However, since the audio material side does
not conform to the Compact Disc (CD)
standard, playback on this product is not
guaranteed.
GB
4

Table of Contents
Before operating this system ................................................................ 4
Features of this system.......................................................................... 8
Enjoying music from various sources ................................................ 8
Enjoying music via networks ............................................................ 8
Getting started
Location and Function of Controls......................................................... 9
Unit (Front)..................................................................................... 9
Remote ........................................................................................10
Connections..........................................................................................12
Connecting the antennas, speakers and power cord..........................12
Connecting the iPod/iPhone/iPad or USB device ..............................13
Preparing a wireless LAN antenna....................................................14
Attaching speaker pads........................................................................15
Inserting the batteries ..........................................................................16
Setting the clock ................................................................................... 17
Operations
Playing a CD-DA/MP3 disc....................................................................18
Creating your own program (Program Play)........................................ 20
Playing an iPod/iPhone/iPad...............................................................22
Compatible iPod/iPhone/iPad models.............................................22
Charging an iPod/iPhone/iPad .......................................................23
Playing a file on a USB device .............................................................. 24
Charging a USB device....................................................................25
Preparing for a BLUETOOTH connection ..............................................27
Pairing the system with a BLUETOOTH device .................................. 28
Connecting by one-touch action (NFC)............................................ 29
Listening to music through a BLUETOOTH connection........................ 31
GB
5

Network connections
How to connect your network.............................................................. 33
Setting up for a wireless network ........................................................ 34
Option 1: Method for using an application for smartphones or Tablets
(Android device/iPhone/iPod touch/iPad)
Option 2: Manual setting method using an Access Point Scan
(for PC/Mac)
Option 3: Method for using a WPS push button at the access point
supporting WPS
............................................................................. 35
....................................................................... 37
Setting up wired networks................................................................... 38
Option 4: DHCP method................................................................. 38
Listening to audio content using DLNA
(Digital Living Network Alliance) ......................................................39
Listening to audio content on a computer with Windows 8................ 39
Listening to audio content on a computer with Windows 7 ................ 43
Listening to audio content on a computer with Windows Vista .......... 45
Using AirPlay ........................................................................................ 47
Using “WALKMAN” application on an Xperia/Xperia Tablet ...............49
Additional information
Listening to the radio...........................................................................50
Tuning in a radio station.................................................................50
Presetting radio stations.................................................................51
Running the DAB Automatic Scan manually (CMT-SBT300WB only).....51
Using optional audio components ...................................................... 52
Setting the Automatic Standby function ............................................. 53
Setting the BLUETOOTH/Network Standby mode .............................. 54
Setting the wireless signal ON/OFF ..................................................... 55
Updating the software......................................................................... 56
Adjusting the sound............................................................................. 57
Changing the display ........................................................................... 58
Using the timers................................................................................... 59
Setting the Sleep Timer.................................................................. 59
Setting the Play Timer....................................................................59
.................................. 34
GB
6

Troubleshooting
Troubleshooting ...................................................................................61
Messages............................................................................................. 66
Precautions/Specifications
Precautions.......................................................................................... 68
BLUETOOTH wireless technology........................................................ 70
Specifications........................................................................................72
GB
7
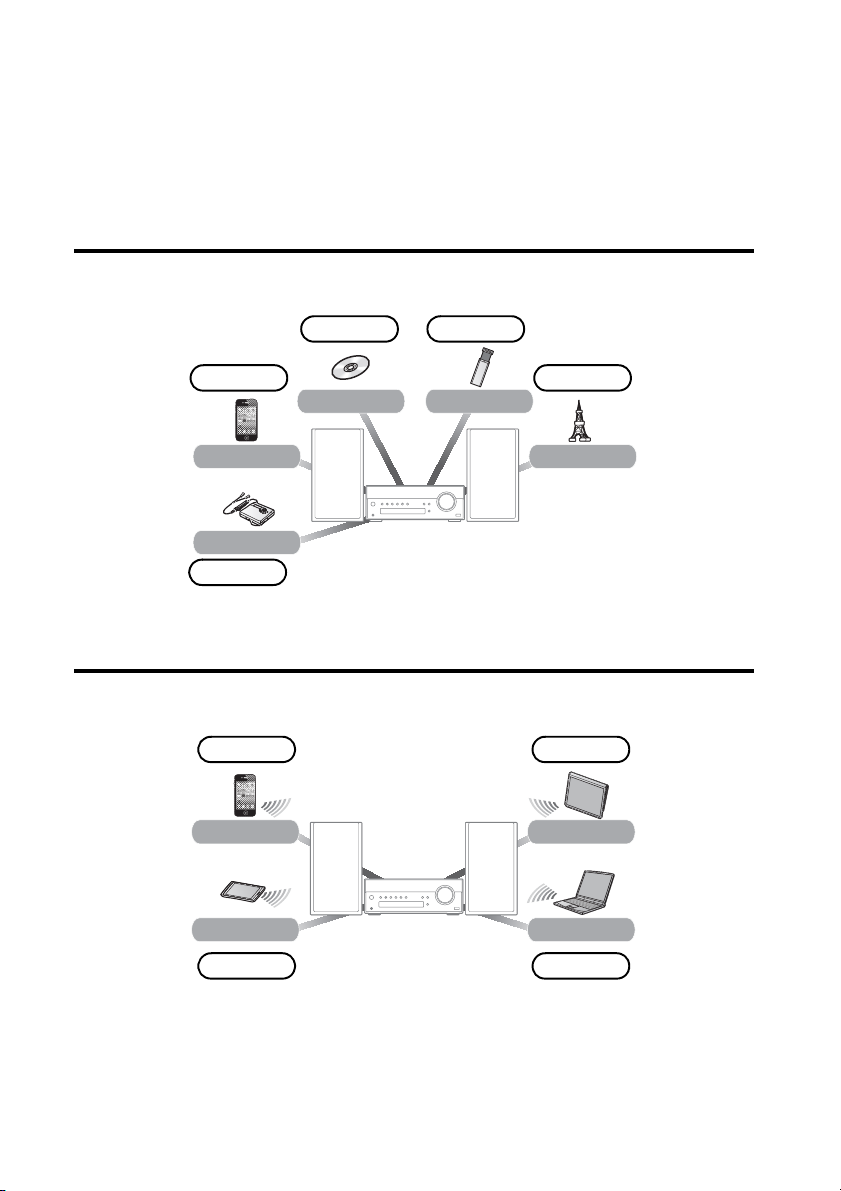
Features of this system
iPod/iPhone/iPad
Music CD
USB device
External component
FM/AM/DAB*
page 22
page 52
page 18 page 24
page 50
page 47 page 49
page 27 page 39
AirPlay
BLUETOOTH/NFC
Xperia/Xpe ria Tablet
DLNA
Enjoying music from various sources
* AM is available for CMT-SBT300W only, or DAB is for CMT-SBT300WB only.
Enjoying music via networks
Tip
This system is equipped with the DSEE function, to reproduce clear treble despite
degradation caused by compression.
It reproduces sound from highly compressed sources such as MP3, with natural and
expansive sound close to the original.
The DSEE function is activated automatically by recognizing the format of the sound source.
GB
8

Getting started
Location and Function of Controls
Unit (Front)
Note on the Automatic Standby function
This system enters Standby mode automatically in about 15 minutes if there is no operation
or audio signal output. By default, the Automatic Standby function is activated. To
deactivate the function, see page 53.
Getting started
GB
9
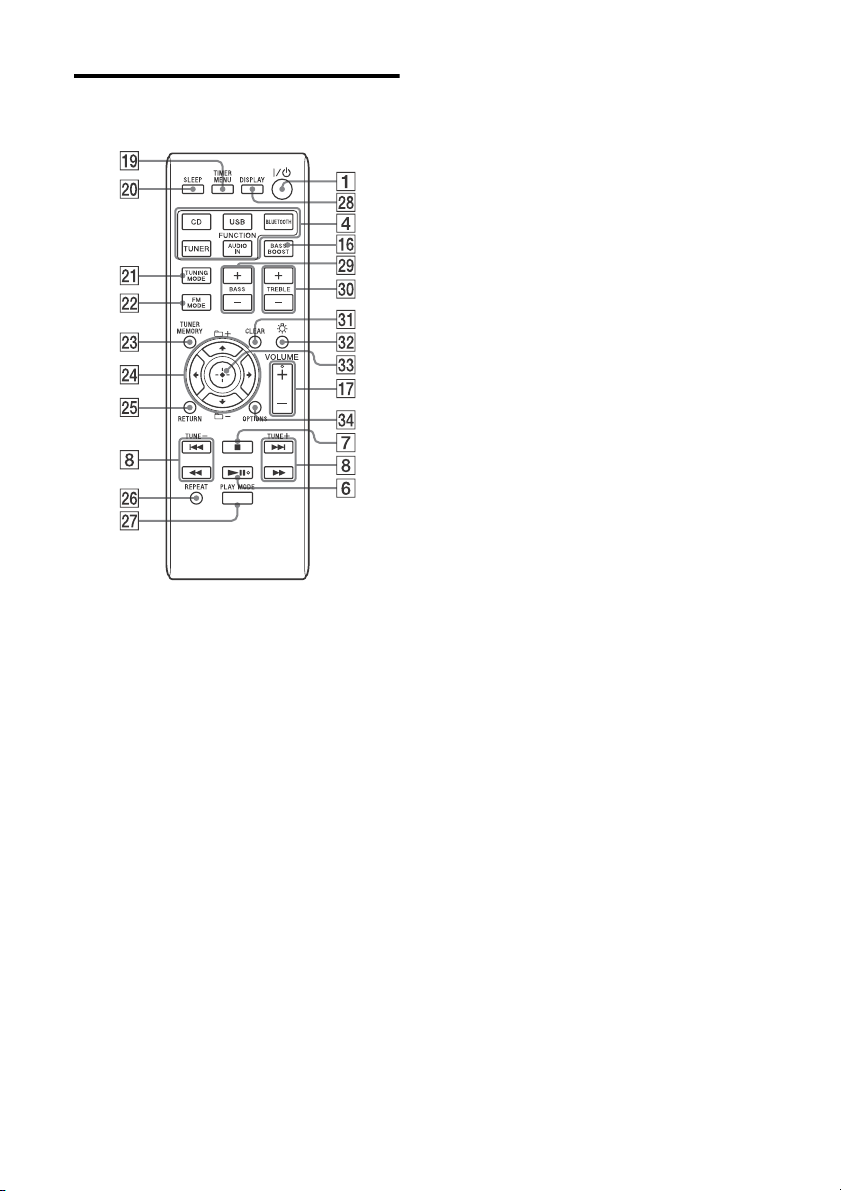
Remote
This manual mainly explains operations
using the remote, but the same operations
can also be performed using the buttons on
the unit having the same or similar names.
/ (power) button
Use to turn the power on or off.
STANDBY indicator
Lights when the power is turned off. The
indicator flashes when the unit detects
abnormality. See “If the STANDBY
indicator flashes” (page 61).
Remote sensor
FUNCTION button(s)
Unit: FUNCTION button
Each time you press the button, the
function is switched to CD, USB,
BLUETOOTH, DAB*, TUNER FM, TUNER
AM* and AUDIO IN.
* AM is available for CMT-SBT300W only, or
DAB is for CMT-SBT300WB only.
Remote: CD, USB, BLUETOOTH, TUNER
and AUDIO IN FUNCTION buttons
Press the corresponding function button
you want to activate.
BLUETOOTH button/indicator
Use to connect/disconnect with a
BLUETOOTH device or to perform pairing
operation (page 28, 29, 32).
The center lamp indicates the connection
status of BLUETOOTH. For details, see
“About the BLUETOOTH indicator”
(page 27).
(play/pause) button
Use to start or pause playback of a CDDA or MP3 disc, or a file on the
connected iPod/iPhone/iPad, USB
device or BLUETOOTH device.
(stop) button
Use to stop playback of a CD-DA or MP3
disc, or a file on the connected iPod/
iPhone/iPad, USB device or BLUETOOTH
device.
Radio presetting/music operation
buttons
Unit: TUNE +/– and / buttons
• TUNE +/– buttons
Use to tune in a desired radio station or
to select a preset number of the
registered radio station.
• / buttons
Use to cue the beginning of a track or
file. While holding down the button,
you can fast-forward or fast-rewind the
track or file.
Remote: TUNE +/–, / and /
buttons
• TUNE +/– buttons
Use to tune in a desired radio station or
to select a preset number of the radio
station tuned in.
• / buttons
Use to cue the beginning of a track or
file.
• / buttons
Use to fast-rewind or fast-forward a
track or file.
N-Mark
Place a smartphone equipped with the
NFC function close to this mark to
perform BLUETOOTH registration,
connection or disconnection by onetouch action. For this operation, a setting
is required beforehand (page 30).
Display window
Displays the setting information of the
unit.
10
GB

(headphone) jack
Use to connect headphones.
Disc tray
Use to load a CD-DA or MP3 disc
(page 18).
Effect indicator
Informs the operating status of this
system.
EQ button
Use to select bass or treble for sound
adjustment (page 57).
(open/close) button
Use to open/close the disc tray (page 18).
BASS BOOST button
Use to turn on or off the bass boost
(page 57).
Volume dial/button
Unit: VOLUME dial
Use to adjust the volume turning left or
right.
Remote: VOLUME +/– button
Use to adjust the volume pressing the +
or – button.
USB port
Use to connect an iPod/iPhone/iPad.
For details, see “Connecting the iPod/
iPhone/iPad or USB device” (page 13).
TIMER MENU button
Use to set the clock or Play Timer
(page 17, 59).
SLEEP button
Use to set the sleep timer (page 59).
TUNING MODE button
Use to select the tuning mode. Each time
you press the button, the mode changes
to AUTO, PRESET or MANUAL (page 50).
FM MODE button
Use to select FM stereo or monaural
reception (page 50).
TUNER MEMORY button
Use to preset radio stations (page 51).
Operation buttons
• /// buttons
Use to select an item or change the
setting.
• +/– buttons
Use to select a folder (album) on an
MP3 disc or USB device.
RETURN button
Use to return to the previous status.
REPEAT button
Use to select repeat play (page 19, 24).
PLAY MODE button
Use to select the play mode (page 19, 20,
21, 25).
DISPLAY button
Use to change information displayed in
the display window (page 17, 32, 58).
BASS +/– buttons
Use to control the bass sound (page 57).
TREBLE +/– buttons
Use to control the treble sound
(page 57).
CLEAR button
Use to delete a programmed track or
folder (page 21).
(effect indicator) button
Use to turn on/off the effect indicator .
(enter) button
Use to enter a selected item or setting.
OPTIONS button
Use to display an option menu. Press
/ to select the next option menu.
DEL LINK: For deleting the BLUETOOTH
pairing information (page 29).
BT/NW STBY: For setting BLUETOOTH/
Network Standby mode (page 54).
AUTO STBY: For setting Automatic
Standby mode (page 53).
BT
AAC: For receiving data in AAC codec
format from a BLUETOOTH device
(page 28).
WPS: For connecting to a network using
a WPS-compliant network device
(page 37).
NW RESET: For initializing the network
connection (page 35, 48).
UPDATE: For updating software
(page 56).
The available menus may differ
depending on the function in use.
Getting started
11
GB
Connections
red
Rear of the speaker
Connecting the antennas, speakers and power cord
Power input (AC IN)
After all equipments are connected, connect
the power cord to the wall outlet.
Speakers (left/right) connectors
Firmly connect the right speaker cord to
R, and the left speaker cord to L.
AUDIO IN (external input) jack
Connect optional external equipment with
an audio connecting cable (not supplied).
GB
12
LAN connector
Connect a network cable (not supplied).
Antennas
AM loop antenna (supplied)
(CMT-SBT300W only)
FM lead antenna (supplied)
(CMT-SBT300W only)
DAB/FM lead antenna (supplied)
(CMT-SBT300WB only)

To receive radio broadcasts, connect
Rewind an antenna cord
wound around the
antenna and raise the
antenna stand.
Stand the antenna and
secure it to the slit until it
clicks.
To prepare the AM loop antenna
antennas.
Find a location and an orientation that
provide good reception, and then fix the
antennas to a stable surface (window, wall,
etc.).
Keep the antennas away from the unit,
power cord and other AV components to
avoid picking noise.
Secure the end of the FM lead antenna with
adhesive tape.
Connecting the iPod/iPhone/iPad or USB device
Connect an iPod/iPhone/iPad or USB device to the USB port .
Getting started
For connecting an iPod/iPhone/iPad* to the
USB port, use a USB cable supplied with
your iPod/iPhone/iPad.
* For the iPod/iPhone/iPad you can use with this
system, see “Compatible iPod/iPhone/iPad
models” (page 22).
13
GB
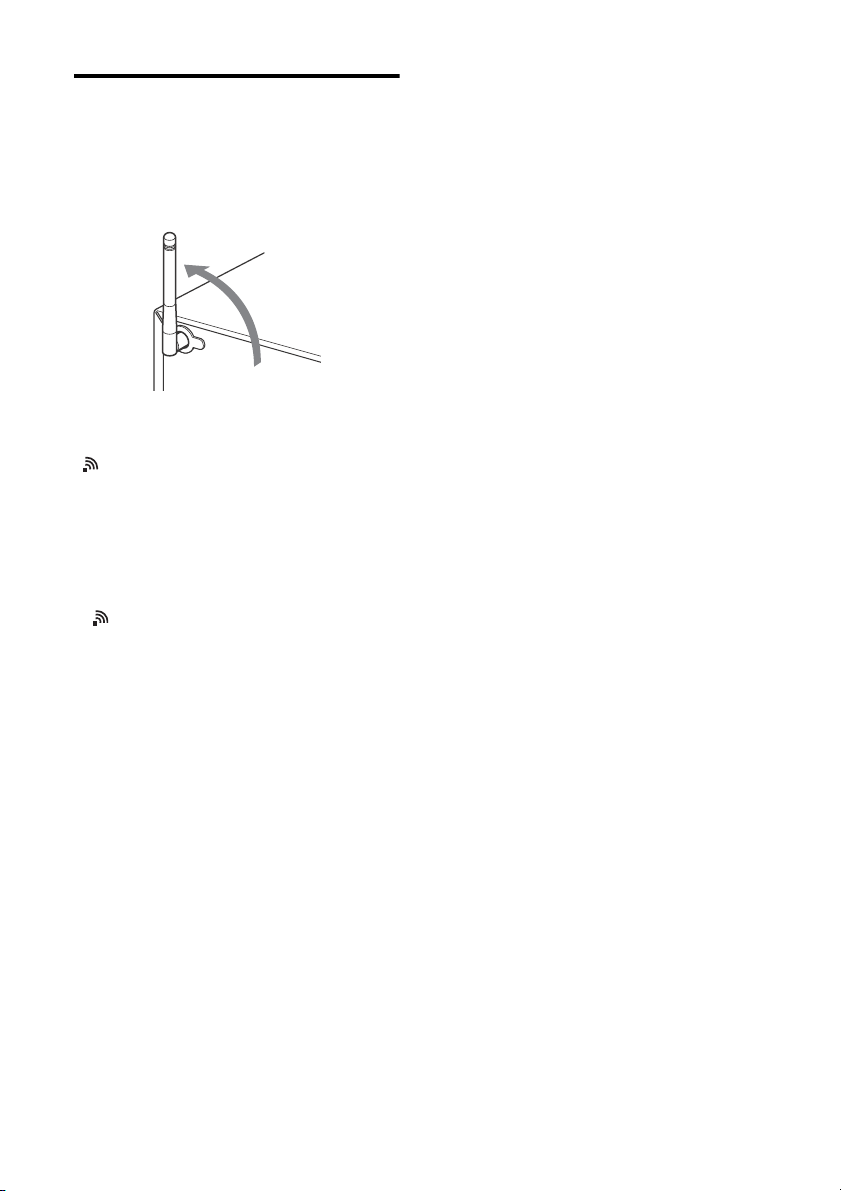
Preparing a wireless LAN antenna
When making a wireless connection, set the
wireless antenna on the back of the unit in
the upright position.
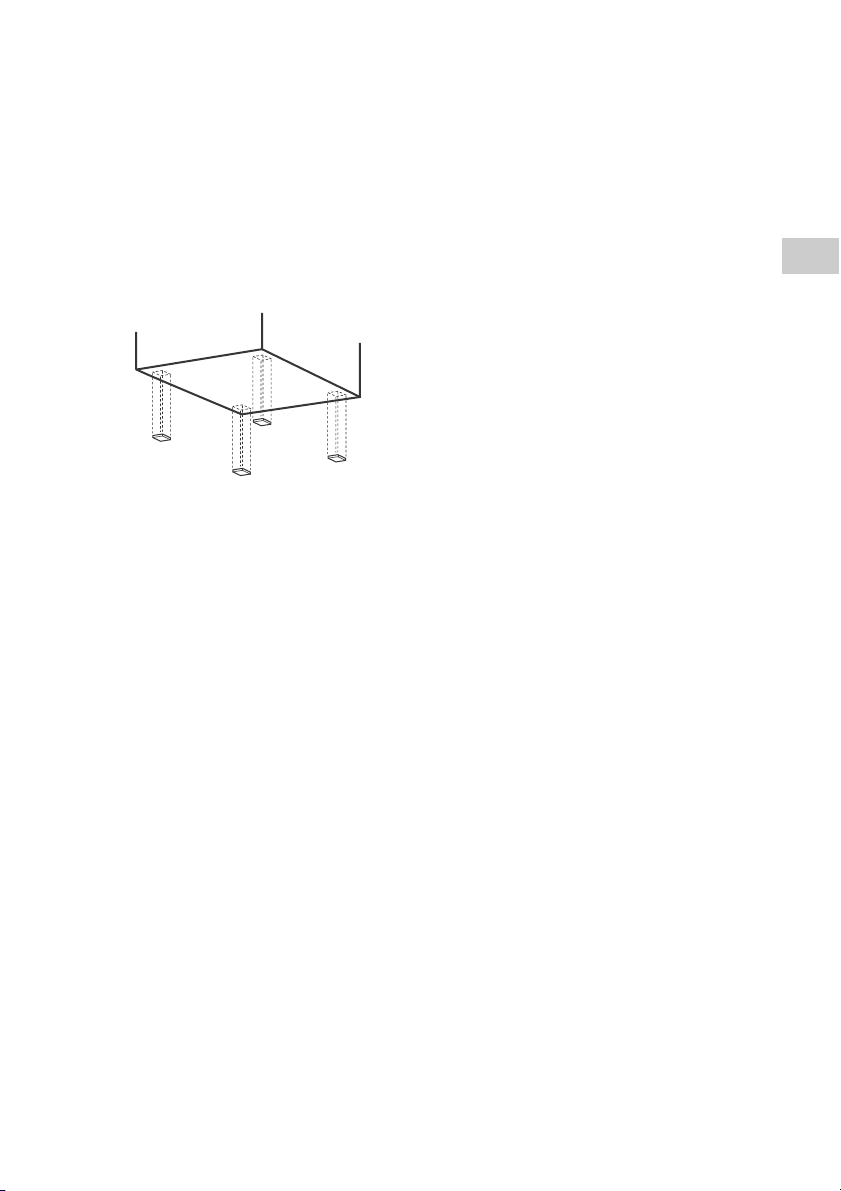
Note on the wireless LAN signal strength
indicator
“ ” lights up in the display when the
system is turned on and the wireless LAN
connection to the access point is
established.* Check the reception status of
the wireless LAN signal and install the
system where the received signal is strong.
The more segments there are, the stronger
the signal.
* is also displayed for a network (LAN) cable
connection.
14
GB
Attaching speaker pads
Attach the supplied speaker pads to the
bottom of the speakers to prevent slipping.
Getting started
15
GB

Inserting the batteries
Insert two supplied R6 (size AA) batteries,
side first, matching the polarities shown
below.
Notes
• With normal use, the batteries should last for
about 6 months.
• Do not mix an old battery with a new one or mix
different types of batteries.
• If you do not use the remote for a long period of
time, remove the batteries to avoid damage
from battery leakage and corrosion.
16
GB

Setting the clock
Set the clock using the buttons on the
remote.
Press / (power) to turn on
1
the system.
Press TIMER MENU to select
2
the clock set mode.
If “PLAY SET” flashes, press /
repeatedly to select “CLOCK,” and then
press (enter) .
Note
The clock settings are reset when you disconnect
the power cord or if a power failure occurs.
To display the clock when the
system is off
Press DISPLAY repeatedly to display the
clock. The clock is displayed for about 8
seconds.
If the system is in BLUETOOTH/Network
Standby mode, the clock does not appear
by pressing DISPLAY .
Getting started
Press / repeatedly to set
3
the hour, then press (enter)
.
Use the same procedure to set
4
the minutes.
17
GB

Operations
Label side (printed side)
(open/close)
Playing a CD-DA/MP3 disc
Press the (open/close) button
4
to close the disc tray .
1
2
3
GB
18
Press CD FUNCTION .
Press FUNCTION on the unit
repeatedly until “CD” appears in the
display .
Press the (open/close) button
to open the disc tray .
Load a disc with the label side
facing up.
Press (play/pause) button
5
.
Playback starts.
When “NO DISC” appears in the display
No disc is set in the disc tray or a disc
that cannot be played on this system is
set. See “Precautions” (page 68) and
set a playable disc.
Notes
• If you cannot remove a disc and “LOCKED”
appears in the display , contact your nearest
Sony dealer.
• Do not load a disc with non-standard shapes
(e.g., heart, square, star). Doing this may cause
irreparable damage to the system.
• Do not use a disc with tape, stickers or paste on
it as this may cause malfunction.
• When you remove a disc, do not touch the
surface of the disc.

Other operations
Play mode
To Do the following:
Pause playback Press . To resume
Stop playback Press .
Select a track or
file
Find a point in a
track or file
Select Repeat
Play
Select a folder
on an MP3 disc
Remove a disc Press
play, press the button
again.
Press / .
Hold down /
(or / on the
unit) during playback,
and release the button at
the desired point.
Press REPEAT
repeatedly until “ ”(all
tracks or files) or“ 1”
(single track or file)
appears.
Press +/
repeatedly.
on the unit.
To change the play mode
Press PLAY MODE repeatedly while the
player is stopped. You can select Normal
Play mode (no indication or “FLDR”*
appears), Shuffle Play mode (“SHUF” or
“FLDR SHUF”* appears), or Program Play
mode (“PGM” appears).
* When “FLDR” or “FLDR SHUF” appears, all the
files in the selected folder on the MP3 disc will
be played.
When playing a CD-DA disc, the system
performs the same operation as Normal Play
(no indication) or Shuffle Play “SHUF.”
When “PUSH ST OP” appears
You cannot change the play mode during
playback. Stop playback then change the
play mode.
Note on the play mo de
If the power cord is disconnected when the
system is on, the play mode returns to
Normal Play.
Notes on Repeat Play
• “ ” indicates that all tracks or files will
be repeated until you stop playback.
• “ 1” indicates that a single track or file
will be repeated until you stop playback.
• If the power cord is disconnected when
the system is on, Repeat Play is cancelled.
Notes on Shuffle Play mod e
• When Shuffle Play mode is set to “SHUF,”
the system shuffle-plays all tracks or files
on the disc. When Shuffle Play mode is
set to “FLDR SHUF,” the system shuffleplays all tracks or files in the selected
folder.
• When you turn off the system, the
selected Shuffle Play mode (“SHUF” or
“FLDR SHUF”) is cleared and the play
mode returns to Normal Play mode (no
indication or “FLDR”).
Notes on playing MP3 discs
• Do not save unnecessary folders or files
on a disc that has MP3 files.
• Folders that have no MP3 files are not
recognized on the system.
• The system can only play MP3 files that
have a file extension of “.mp3.”
• Even when file name has the “.mp3” file
extension, if it is not an audio MP3 file,
playing this file may generate a loud
noise, which could cause damage of the
system.
• The maximum number of MP3 folders and
files compatible with this system is:
– 999* folders (including the root folder)
– 999 files
– 250 files in a single folder
– 8 folder levels (in the tree structure of
files)
• Compatibility with all MP3 encoding/
writing software, CD-R/RW drive and
recording media cannot be guaranteed.
Incompatible MP3 discs may produce
noise or interrupted audio or may not
play at all.
* This includes folders that have no MP3 or other
files. The number of folders that the system can
recognize may be less than actual number of
folders, depending on the folder structure.
19
Operations
GB

Creating your own program (Program Play)
Selected track
or file number
Total playing time of
the selected track or
file
Program the selected tracks or files using
the buttons on the remote.
Select the desired track or file
4
number.
Press / repeatedly until the
desired track or file number appears.
Press .
5
“- -.- -” appears when the total playing
time exceeds 100 minutes for a CD-DA
or when you program MP3 files.
20
GB
Press CD FUNCTION .
1
Press FUNCTION on the unit
repeatedly until “CD” appears in the
display .
Press PLAY MODE repeatedly
2
until “PGM” appears to select the
Program Play mode while the
player is stopped.
Select a folder (MP3 disc only).
3
•
Press +/ repeatedly to select
the desired folder.
• Press if you want to program
all files in the folder.
Repeat steps 3 through 5 to
6
program additional tracks or
files.
Up to 25 tracks or files can be
programmed.
If “STEP FUL L” appears
You attempt to program 26 tracks or
files.
Delete a programmed track or file and
program the new track or file again.
See “To delete the program” (page 21).

Press .
7
Your program of tracks or files starts
playback.
• The programmed files or tracks
remain available until you remove the
disc from the disc tray or unplug the
power cord.
• To play the same program again,
press .
To cancel Program Play
Press PLAY MODE repeatedly until “PGM”
disappears while the player is stopped.
To delete the program
Press CLEAR while the play is stopped.
Each time you press the button, the last
programmed track or file will be deleted.
When all the programmed tracks or files are
deleted, “NO STEP” appears.
Notes
• If the disc is ejected after programming, all the
programmed tracks or files are deleted.
• If the power cord is disconnected when the
system is on, the programmed tracks or files are
deleted.
Operations
21
GB

Playing an iPod/iPhone/iPad
You can play an iPod/iPhone/iPad by
connecting it to the system. You can
operate your iPod/iPhone/iPad using the
buttons on this system.
Compatible iPod/iPhone/ iPad models
For latest compatible models, refer to the
support information for your system in the
following support home page.
For customers in Europe:
http://support.sony-europe.com/
For customers in other countries/regions:
http://www.sony-asia.com/support
Compatible
model
iPhone 5s
iPhone 5c
iPhone 5
iPhone 4s
iPhone 4
iPhone 3GS
iPad Air
iPad mini with
Retina display
iPad
(4th generation)
iPad mini
iPad
(3rd generation)
iPad 2
iPad
iPod touch
(5th generation)
iPod touch
(4th generation)
iPod touch
(3rd generation)
GB
22
USB AirPlay
Compatible
model
iPod classic —
iPod nano
(7th generation)
iPod nano
(6th generation)
iPod nano
(5th generation)
iPod nano
(4th generation)
“Made for iPod,” “Made for iPhone,” and
“Made for iPad” mean that an electronic
accessory has been designed to connect
specifically to iPod, iPhone, or iPad,
respectively, and has been certified by the
developer to meet Apple performance
standards. Apple is not responsible for the
operation of this device or its compliance
with safety and regulatory standards. Please
note that the use of this accessory with
iPod, iPhone, or iPad may affect wireless
performance.
USB AirPlay
—
—
—
—

Press USB FUNCTION .
1
Press FUNCTION on the unit
repeatedly until “USB” appears in the
display .
Connect the USB cable supplied
2
with the iPod/iPhone/iPad to the
USB port on the unit.
• Do not carry the system with an iPod/iPhone/
iPad connected to the system. Doing so may
cause a malfunction.
• To adjust the volume level, use VOLUME +/
on the remote or VOLUME dial on the unit.
• To use an iPod/iPhone/iPad, refer to the user’s
guide of your iPod/iPhone/iPad.
• Sony cannot accept responsibility in the event
that data recorded to iPod/iPhone/iPad is lost
or damaged when using an iPod/iPhone/iPad
with this system.
Connect the USB cable supplied
3
with the iPod/iPhone/iPad to the
iPod/iPhone/iPad.
The function indicator in the display
changes from “USB” to “iPod.”
When “iPod” appears in the
4
display , press to start
playback.
Other operations
You can perform the following operations
using the buttons on the remote or unit of
the system.
To Do the following:
Pause playback Press or .
Stop playback Press .
Select a track or
chapter of
audiobook/
podcast
Find a point in a
track or chapter
of audiobook/
podcast
Notes
• The performance of the system may vary
depending on the specifications of your iPod/
iPhone/iPad.
To resume play, press
the button again.
Press / .
Hold down /
(/ on the
unit) during playback,
and release the button
at the desired point.
Charging an iPod/iPhone/ iPad
Charging begins automatically when you
connect an iPod/iPhone/iPad to this system
and the system is turned on.
Turn the power of the system on.
1
Press / (power) to turn on the
system.
Connect the iPod/iPhone/iPad to
2
the USB port on the unit.
For details on connection, see page 13.
Charging the iPod/iPhone/iPad begins.
For details, refer to the user’s guide of
your iPod/iPhone/iPad.
To stop charging the iPod/iPhone/iPad
Press / to turn off the system, and
then disconnect the iPod/iPhone/iPad.
Notes on charging
• You cannot charge an iPod/iPhone/iPad when
the system is off.
• If the system enters Standby mode during
charging of an iPod/iPhone/iPad, the charging
stops in progress. Before charging, turn off the
Automatic Standby function. For details, see
“Setting the Automatic Standby function”
(page 53).
• To see whether charging is operating or not,
check the battery icon on the iPod/iPhone/iPad
display.
Operations
23
GB