

Page 1
3-229-247-12 (2)
Mobile Telephone
User Guide
CMD-MZ5
2001 by Sony Corporation
GB
TM
Page 2

My CMD-MZ5 Information
For easy reference, please record the following identification numbers for
your phone and SIM Card. This information will assist you in customer
inquiries to your retail dealer, manufacturer or Network Operator/Service
Provider.
In case of loss or theft of your phone and/or SIM Card, call your Network
Operator/Service Provider immediately to prevent misuse.
My Mobile Phone Number:
Operator Customer Service Number:
My SIM Card Number:
(Printed on your SIM Card)
My Phone's ID Number (IMEI):
(Printed on the label underneath the
battery pack)
GB
GB
2
2
Page 3

Safety Precautions
• Turn off your mobile phone in places where mobile phones are
prohibited including aircraft and hospitals.
• Turn off your mobile phone in places where there is a possibility of fires
or explosions due to electrical discharge.
• Turn off your mobile phone in the presence of fuels, caustic/harsh
chemicals or dust and in such locations as petrol stations.
• Do not expose your mobile phone to excessive humidity and extreme
temperatures, dusty places, rain or wet places and direct sunlight.
• Note that in some countries using a cellular phone without a hands-free
kit while driving is not allowed.
• Do not allow children to play with your phone.
• Take special care in the disposal of your battery, using a special facility
where available. Do not puncture, burn, or short circuit your battery.
• Limit the distance between the mains socket and the phone when
charging for easy accessibility.
• Consult your physician or the manufacturer of personal medical devices
(pacemakers, hearing aids. etc.) regarding any restrictions on the use of
a mobile telephone.
• Use only Sony-approved CMD-MZ5 batteries and accessories with your
phone.
• Do not take apart or modify your phone. For repairs or inspections of
your phone, please see your Sony dealer or the store where you bought
the phone.
• Do not put your mobile phone in a microwave oven, this may cause
damage either to the oven or the phone.
Warning
• Preventing hearing damage: Do not use headphones/earphones at high
volume. Hearing experts advise against continuous, loud and extended
play. If you experience a ringing in your ears, reduce volume or
discontinue use.
• Unauthorised batteries, chargers, and accessories will invalidate any
approvals and warranty given for your phone and may be dangerous.
• For use in the car, please connect your GSM mobile phone to an external
antenna. The external antenna can be connected to your mobile phone
with the appropriate accessory, e.g. Hands-free Kit. Please contact your
car manufacturer concerning the appropriate position of the external
antenna on your car.
GB
3
Page 4

Table of Contents
Welcome to Sony
CMD-MZ5
Getting Started
Basic Operation
Using the
Phonebook
What's Included in Your Kit................................... 6
Parts and Controls ................................................... 7
The Basic Features of Your Phone ......................... 8
Icon Glossary...........................................................11
Menu Overview ..................................................... 12
Inserting the SIM Card.......................................... 14
Inserting the Battery Pack .................................... 15
Charging the Battery Pack.................................... 15
Inserting the “MagicGate Memory Stick”.......... 17
Connecting the Remote and the Headphones... 18
Switching on Your Phone ..................................... 19
Connecting to the Network.................................. 20
Making Calls .......................................................... 21
Answering/Ending Calls ..................................... 22
During a Call .......................................................... 23
Standard Text Input............................................... 27
T9 Text Input .......................................................... 29
Text Edit .................................................................. 31
About the Phonebook ........................................... 32
Creating Entries in the Phonebook ..................... 33
Saving Phonebook Entries from Standby Mode 34
Making Calls from the Phonebook ..................... 35
Grouping................................................................. 36
Editing the Phonebook ......................................... 37
Custom .................................................................... 38
Voice Mail ............................................................... 39
Phonebook Menu................................................... 40
GB
4
Page 5

Main Menu
Operations
Messages ................................................................. 44
Ringer ...................................................................... 49
Schedule .................................................................. 54
Clock ........................................................................ 56
Divert....................................................................... 59
Calculator................................................................ 61
Call History ............................................................ 62
Settings .................................................................... 64
Memo....................................................................... 76
Welcome to
Sony CMD-MZ5
Started
Getting
Extras Menu
Operations
Appendix
“MagicGate Memory Stick” ................................. 80
Music ....................................................................... 83
Browser ................................................................... 93
E-mail ...................................................................... 98
Games.................................................................... 101
MS viewer ............................................................. 102
Troubleshooting ................................................... 103
Error Messages on the Music Function ............ 104
Unblocking the SIM Card................................... 106
Technical Specifications ...................................... 107
Glossary ................................................................ 108
Index .......................................................................110
Basic
Operation
Using the
Phonebook
Operations
Main Menu
Operations
Extras Menu
Appendix
GB
5
Page 6
Welcome to Sony CMD-MZ5
Welcome to the Sony CMD-MZ5 designed for use in the worldwide
network of GSM (Global System for Mobile Communications). Your
phone is fully equipped with the Advanced Jog Dial and a visual menu for
easy access and navigation - with only one hand! Furthermore, the
supplied “MagicGate Memory Stick” allows you to record and play back
sound data.
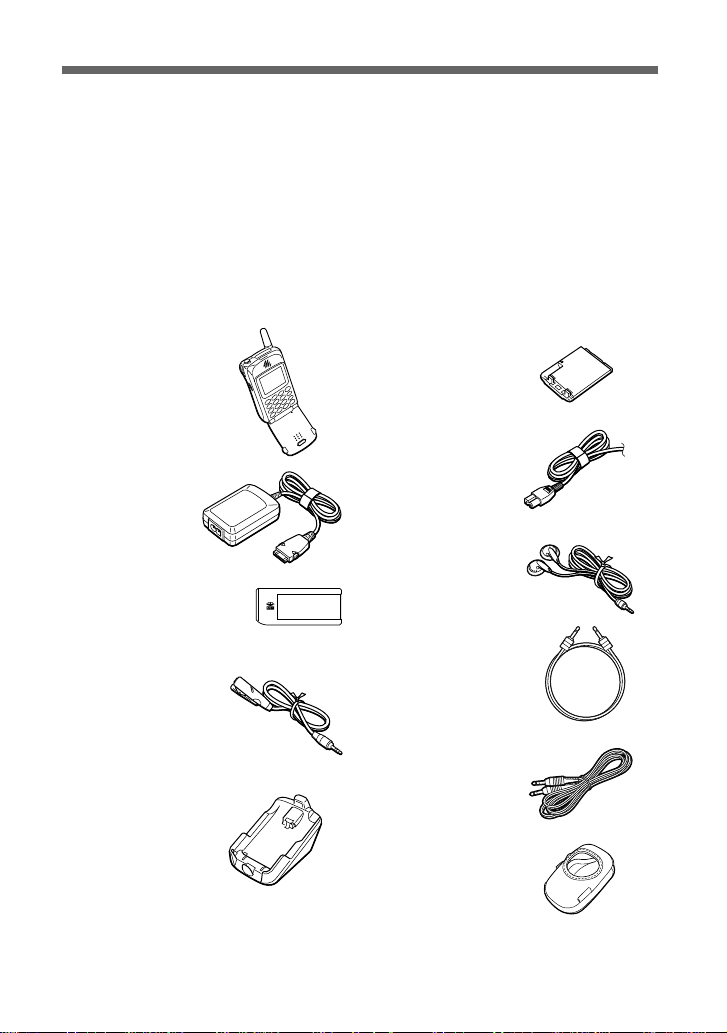
What's Included in Your Kit
The kit should include the following:
• Mobile phone (1)
• AC adaptor (1)
• “MagicGate
Memory Stick” (1)
• Remote with
microphone (1)
• Lithium ion standard
battery pack (1)
• AC cable (1)
• Headphones (1)
• Optical recording
cable (1)
• Analog audio cable (1)
• Desktop holder (1)
• Carrying case (1)
• This manual (1)
If one of these parts is missing, please contact your retail dealer
immediately.
GB
6
Page 7
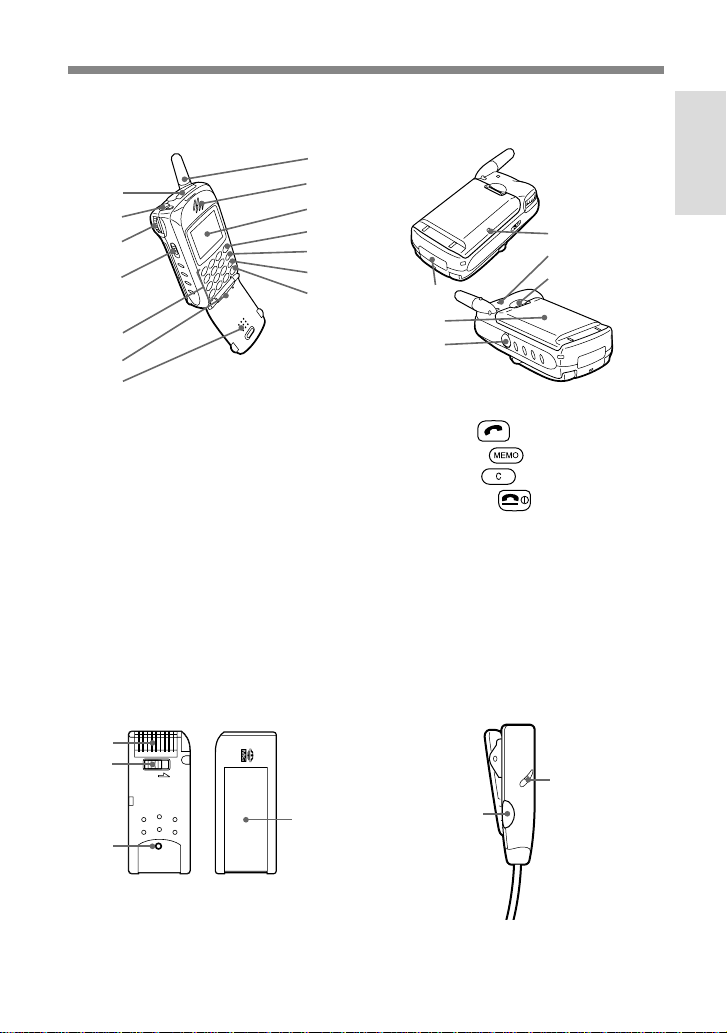
Parts and Controls
LOCK
Mobile phone
1
2
3
4
5
6
7
1 Memory Stick slot
2 Remote with microphone/
headphone jack
3 Advanced Jog Dial
4 EJECT lever
5 Keys (alphanumeric keys)
6 Microphone
7 Flip
8 Antenna
9 Ear piece
MagicGate Memory Stick
8
9
0
qa
qs
qd
qf
qk
ql
qg
qh
qj
0 Display
qa Send key
qs Memo key
qd Clear key
qf On/Off key
qg External connector
(Charging and Accessories)
qh Battery pack
qj LINE IN (OPTICAL) jack
qk Charging indicator
ql Ringer
w; Battery release hook
w;
Remote with microphone
Welcome to
Sony CMD-MZ5
1
2
3
1 Connector
2 Erasure prevention switch
3 Distinctive protrusion of
“MagicGate Memory Stick”
4 Label space
4
2
1
1 Answering/ending call button
2 Microphone
GB
7
Page 8
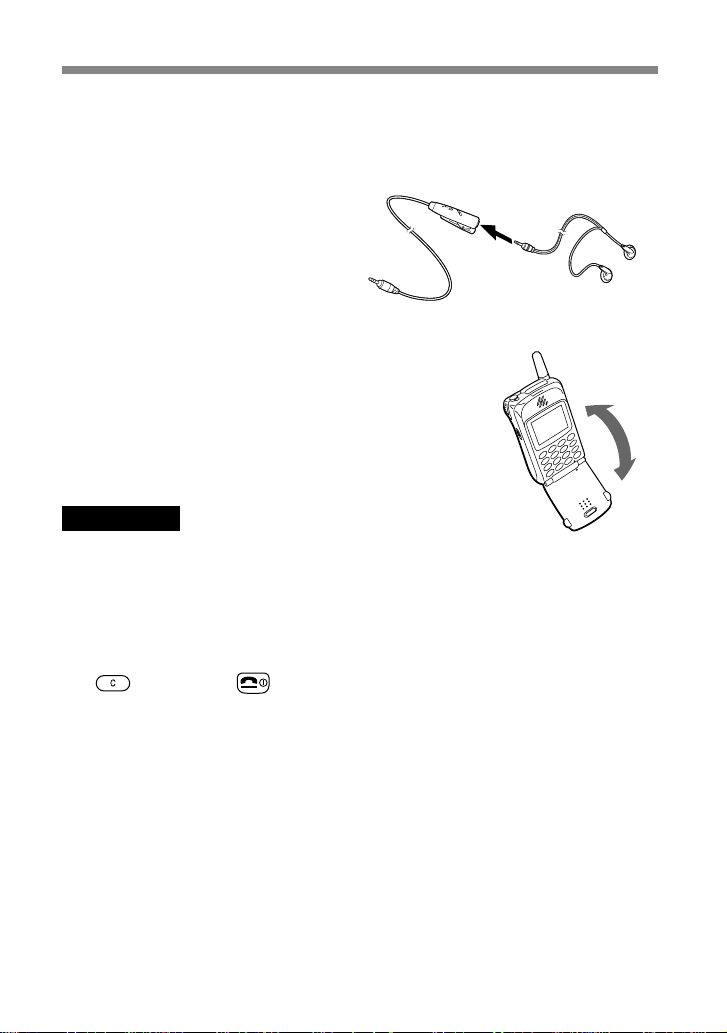
To connect the headphones to the remote
To connect the headphones, plug into the headphone
jack on the remote firmly.
No sound will be heard if the connection is loose.
The Basic Features of Your Phone
• Flip call
You can answer a call by opening the flip cover.
This feature can be set up by the menu operation.
Important
Opening and closing the flip cover may cause the screen to flicker, however this is
not a defect.
• Tag window
You can still see tags on the display even with the flip cover closed.
Information corresponding to each tag can be displayed. To clear the tag,
use
, Jog Dial, or .
GB
8
Page 9
Received SMS To review the details of the received SMS, open
the flip cover. Pressing the Jog Dial allows you
to see the message. You can then keep
pressed to call back the person who sent the
SMS.
Missed call To see the caller's number, open the flip cover.
Press
to call the number.
Schedule The first event for the day is displayed from the
start of that day.
Later events are displayed at their scheduled
times.
To review the contents of the event, open the
flip cover.
Received local To display the contents, rotate the Jog Dial.
area info
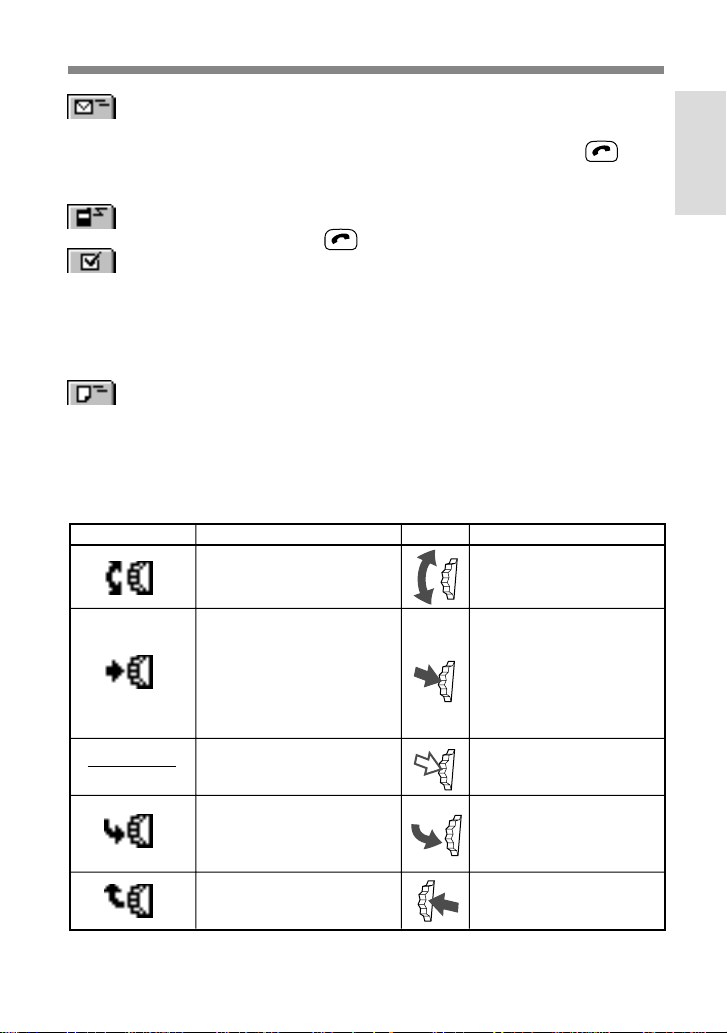
• Advanced Jog Dial
The Jog Dial provides one-handed operation navigation.
“Jog Dial” in this manual is the “Advanced Jog Dial”.
Display Icon Operation Function
Rotate the Jog Dial clockwise
or counter-clockwise.
Scrolls through menu
options.
Welcome to
Sony CMD-MZ5
Press the Jog Dial straight
into the phone.
Keep the Jog Dial pressed.
Press the Jog Dial forward.
Press the Jog Dial backward.
Confirms the selected
(highlighted) in the
option
. Accepts an entry
display
made with keys. Takes
incoming calls when the
flip cover is closed.
Dials the phone number
selected.
Exits from one menu to the
previous screen. Also ends
a call.
Opens the “pop up menu”.
Also opens help.
GB
9
Page 10
• Phonebook
You can open the Phonebook from standby mode by rotating the Jog Dial.
You can easily make a call from the Phonebook or a variety of other
operations including searching by Group and saving such information as
e-mail addresses. (see “Phonebook” page 32).
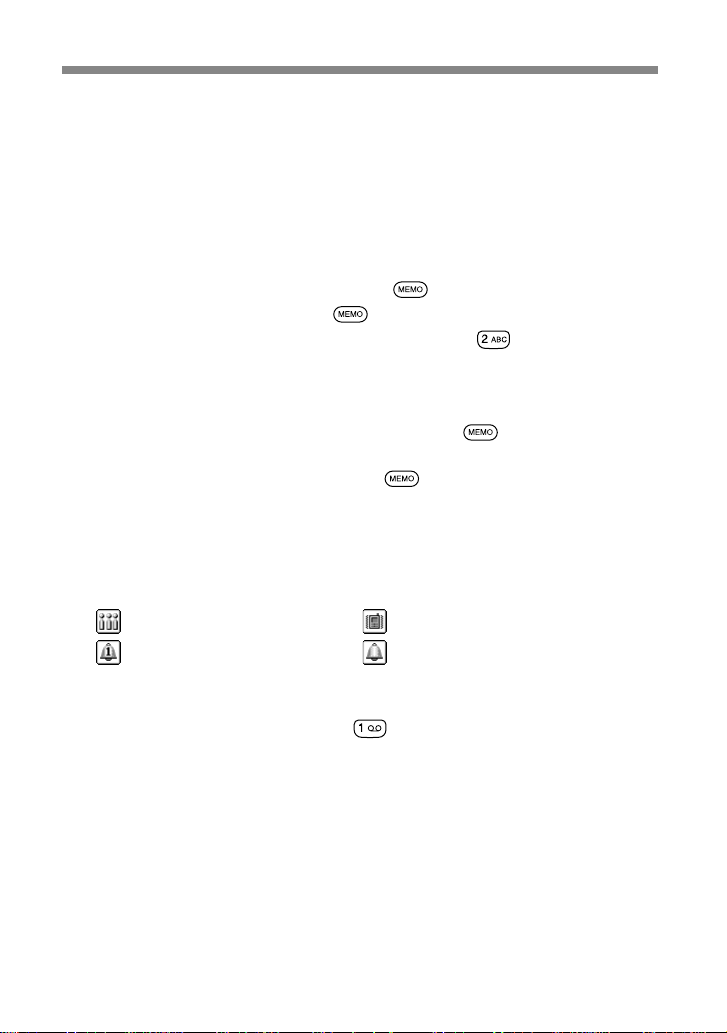
• Memo/Answering machine
In standby mode
• To listen to the Voice memo — press
• To record your voice — keep pressed
• To open the Answering machine menu — keep
• To turn on your Answering machine to accept all calls when the flip
cover is closed — keep the Jog Dial pressed
When receiving a call
• To turn on your Answering machine — press
During a call
• To record the conversation — press
• Manner mode
You can set the Manner mode by pressing the Jog Dial backward while in
the standby mode when the flip cover is closed. Select the following icon
and press the Jog Dial:
•
— Silent • — Vibra alert only
— Single beep • — Manner off
•
pressed
• Voice mail
To speed dial your Voice mail, keep
your “Personal answering service” to listen to messages, etc. (see “Using
the Phonebook-Voice mail” page 39).
GB
10
pressed to automatically dial
Page 11
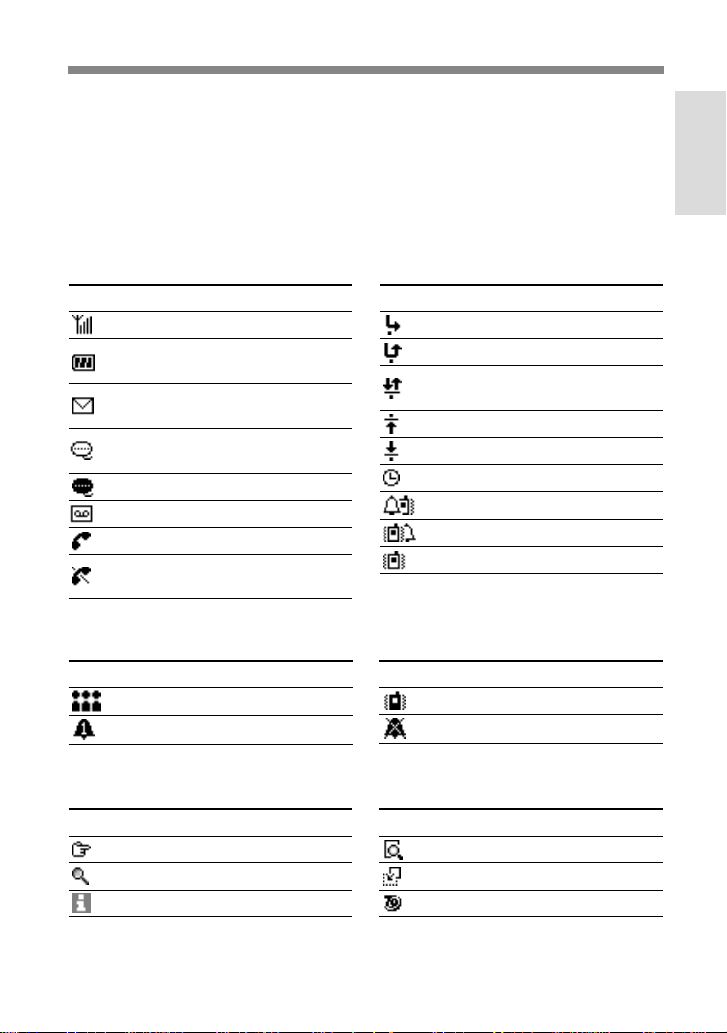
Icon Glossary
Your phone lets you see at a glance if you have missed calls, have
messages waiting and the status of options you have selected (for example
if you have diverted your phone or turned the ringer off). Sony has
developed the following icons to provide you with a quick overview of
your mobile activity:
Status
Icon Explanation
Network signal strength
Battery strength
(flashing=battery level low)
SMS message waiting
(flashing=message storage full)
Answering machine
notification
Answering machine on
Network voice mail
Active call
Network not available
(no calls possible)
Manner
Icon Explanation
Silent
Single beep
Icon Explanation
Divert option activated
Missed call
Barring service in/out
activated
Barring service out activated
Barring service in activated
Alarm
Ringer b Vibra alert
Vibra alert b Ringer
Vibra alert on
Icon Explanation
Vibra alert only
Ringer off
Welcome to
Sony CMD-MZ5
Function
Icon Explanation
Go to
Search
Help notification
Icon Explanation
View
Paste
T9 (Text editing system)
11
GB
Page 12
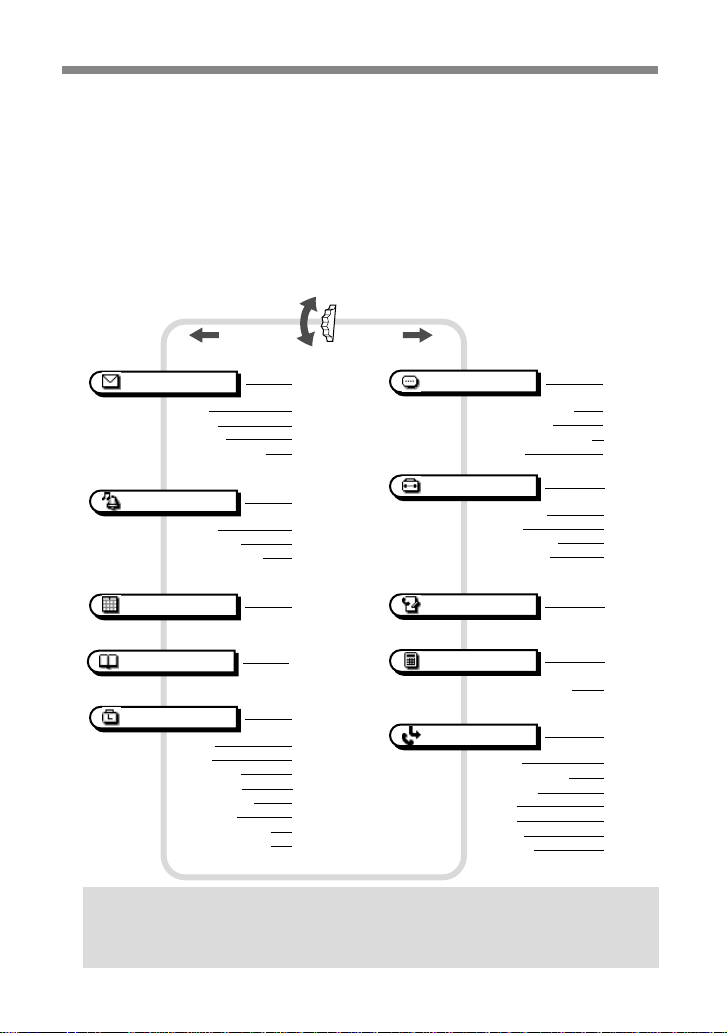
Menu Overview
Your phone has two menus; Main menu and Extras menu. The Main
menu manages the functions related to the phone and the Extras menu
manages the functions related to The Music, Browser, E-mail, Games and
MS viewer.
Main menu
Press the Jog Dial from standby mode to access the Main menu:
12
Messages
Read p44
Create p46
Settings p46
Local area info p48
Ringer
Ringer p49
Vibra alert p53
Manner mode p53
Schedule
Phonebook
Clock
Alarm p56
Timer p56
World clock
Time signal p57
Clock format p58
Analogue p58
Auto power off p58
Set the day/time p58
p44
p49
p54
p32
p56
p57
Memo
Voice memo box p76
Record voice p77
Answering machine p77
Capture p78
Settings
Preferences p64
Security p66
Call time, cost p70
Call settings p72
Call history
Calculator
Rate conversion p61
Divert
All calls p59
If not reachable p59
If no reply p59
If busy p59
All fax p59
All data p59
Cancel all p59
Tip
•When you press the Jog Dial backward at the Main menu, the last 5
items which are displayed on the Main menu are shown.
GB
p76
p64
p62
p61
p59
Page 13

Extras menu
Press the Jog Dial backward from standby mode to access the Extras
menu:
Welcome to
Sony CMD-MZ5
Browser p93
Home p93
Favourites p93
Settings p95
Music p83
Playing back sound data
List of Titles p91
Play p91
Edit p91
Delete p91
Play settings p90
Bass p90
Repeat p90
AVLS p90
Record to Stick p86
Rec settings p87
Bitrate p87
Sync. record p87
Auto track mark
Stick Info p92
Format stick p92
p88
p87
E-mail p98
Reading p98
Writing p99
Settings p99
Games p101
Disk golf p101
Mole hitting p101
Clay shooting p101
Sport fishing p101
MS viewer p102
13
GB
Page 14
Getting Started
Inserting the SIM Card
Your SIM card contains a computer chip with your service details and
phone number. The SIM card should be kept secure in the same way as a
credit card. Also, do not bend, scratch or expose it to moisture, and protect
it from contact with static electricity.
Important
To avoid corrupting the memory of the SIM card, always switch off your phone
before removing or inserting your SIM card.
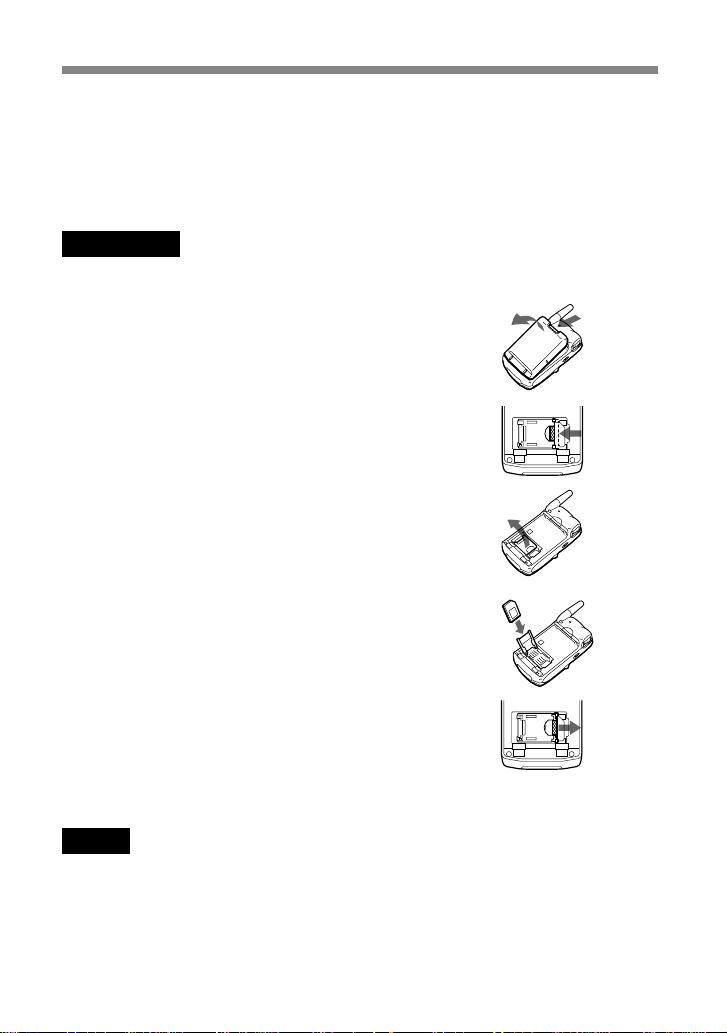
1 Remove the battery pack.
2 Slide the tab in the direction of the arrow
to unlock the tray.
3 Lift up the tray and slide the SIM card into
the tray.
(You can also find a brief explanation on
the SIM card holder.)
4 Close the tray with the SIM card inserted.
5 Slide the tab in the direction of the arrow
to lock the tray.
6 Replace the battery pack.
Note
Position the SIM card with the gold contacts facing up and the angled corner to the
upper left as you insert it into the SIM card holder.
To remove the SIM card
Follow steps 1 to 6 above, removing the SIM card from the tray in step 3.
GB
14
Page 15
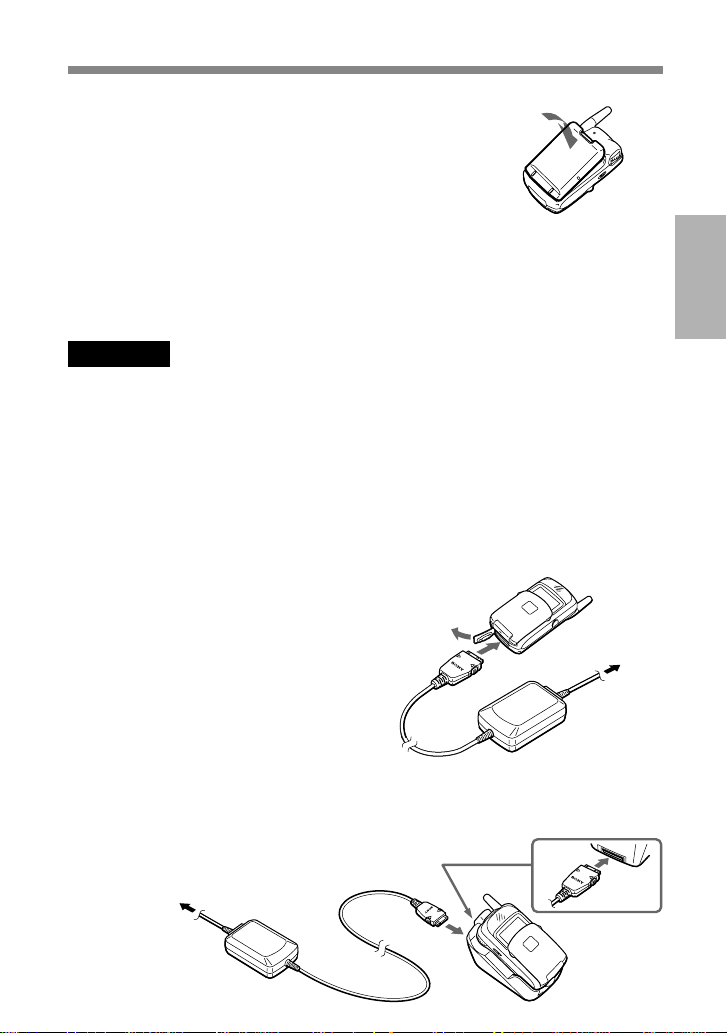
Inserting the Battery Pack
1 Unwrap the battery pack.
2 Press the battery pack firmly into place
and check that it snaps closed.
To remove the battery pack
First turn the power off and wait until the display goes blank. Press the
battery release hook down and remove the battery.
Warning
• If the battery is removed from the phone (at constant temperature) for approx. 3
days, the clock will be reset.
• Do not remove the battery pack from the phone when the power is on. Doing so
may cause settings or data to be deleted or changed.
Charging the Battery Pack
As supplied, your battery pack will not be fully charged.
You can select one of the following three ways to charge the battery pack:
1 Directly connect the phone to the AC
adaptor. Be sure to position the plug
with the SONY logo side facing up
when connecting.
To mains
Started
Getting
2 Use the desktop holder to charge the
battery pack. Be sure to position the plug
with the SONY logo side facing up when
connecting.
To mains
15
GB
Page 16
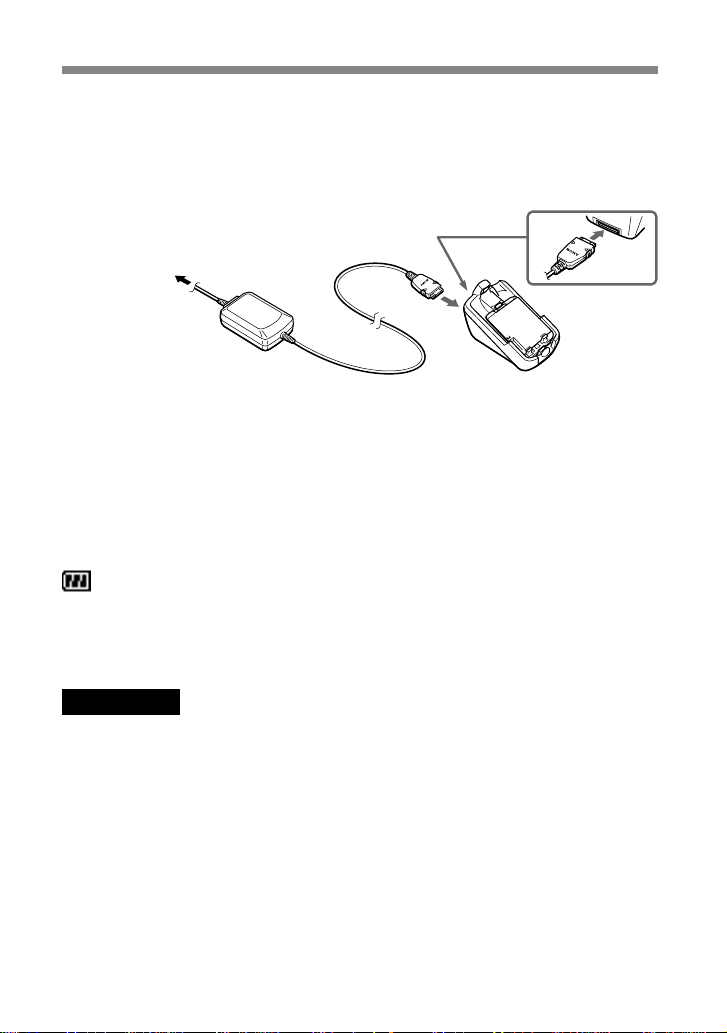
3 Charge the battery pack independently.
Make sure that the back of the battery pack (the side with the
label) is facing towards you. Align the battery with the desktop
holder and insert the battery pack all the way to the end until it
is locked. Be sure to position the plug with the SONY logo side
facing up when connecting.
To mains
Charging indicator on the battery pack
A red light comes on when charging starts. The light turns green,
after about 3 hours, when charging is complete. But, it may vary
depending on certain conditions e.g. If your phone is switched on or
temperature is beyond operational range. As an energy saving
measure, disconnect the AC adaptor from the mains socket and from
the phone after charging.
The battery icon on the display indicates charging status. When the
battery is almost completely charged, the battery icon shows all bars.
However, this display shows an approximate indication only, check the
indicator on the battery pack (refer to the above) to confirm whether or not
the battery pack is fully charged.
Important
• If the red light on the battery pack blinks, reconnect the AC adaptor and reinsert
the phone (or the battery pack). If you repeat this process several times and the
indicator continues blinking, the battery pack might be defective. Stop charging
the battery pack immediately and replace it.
• Use only the Sony-specified CMD-MZ5 battery pack and charger. Your battery is
equipped with short circuit protection. If you short your battery accidentally,
charge the battery immediately to unlock the short circuit protection.
Usage time
When your battery pack is nearly discharged the battery icon on the
display blinks and the phone beeps to inform you that only a short
amount of calling time remains.
GB
16
Page 17
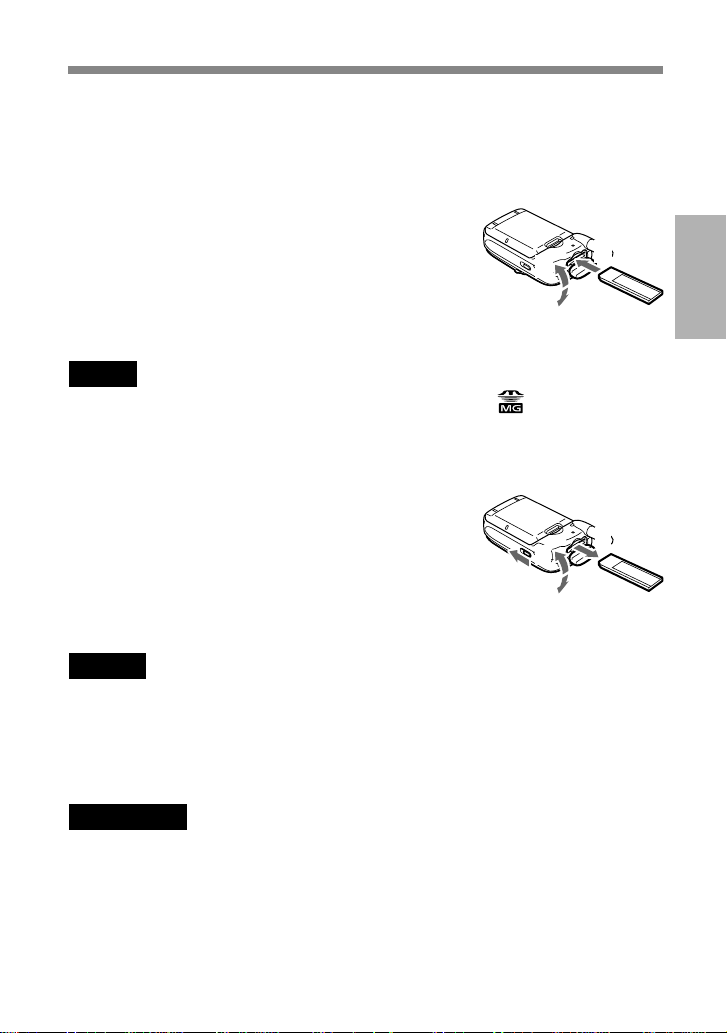
Inserting the “MagicGate Memory Stick”
To use the Music features, insert the “MagicGate Memory Stick” into your
phone beforehand.
1 Open the cover of the Memory Stick slot.
2 Insert the “MagicGate Memory Stick”
into the Memory Stick slot until it clicks.
2
3
1
3 Close the cover of the Memory Stick slot.
Note
Be sure to position the “MagicGate Memory Stick” with the logo side facing up
when inserting.
To remove the “MagicGate Memory Stick”
1 Open the cover of the Memory Stick slot.
2 Slide the EJECT lever in the direction of
the arrow. The “MagicGate Memory
Stick” ejects.
3 Take out the “MagicGate Memory Stick”.
4
2
1
4 Close the cover of the Memory Stick slot.
Notes
• Do not remove the “MagicGate Memory Stick” when the Music menu is in use. If
the “MagicGate Memory Stick” is removed while recording, playing or
formatting, data on the “MagicGate Memory Stick” may be damaged.
• When transporting the “MagicGate Memory Stick,” place it in the supplied
storage case.
Important
If you have inserted the “MagicGate Memory Stick” upside down mistakenly,
remove it manually and then slide the EJECT lever.
3
Started
Getting
17
GB
Page 18

Connecting the Remote and the Headphones
To enjoy music using the Music menu, connect the headphones to the
remote and then connect the remote to your phone. You can only listen to
music through the headphones.
To connect the remote to the phone
1 Open the cover of the remote/headphone
jack.
2 Connect the remote plug to the remote/
headphone jack firmly.
To remove the remote
Disconnect the remote plug and close the cover of the remote/headphone
jack.
2
1
18
GB
Page 19
Switching on Your Phone
To switch your phone on/off, keep pressed.
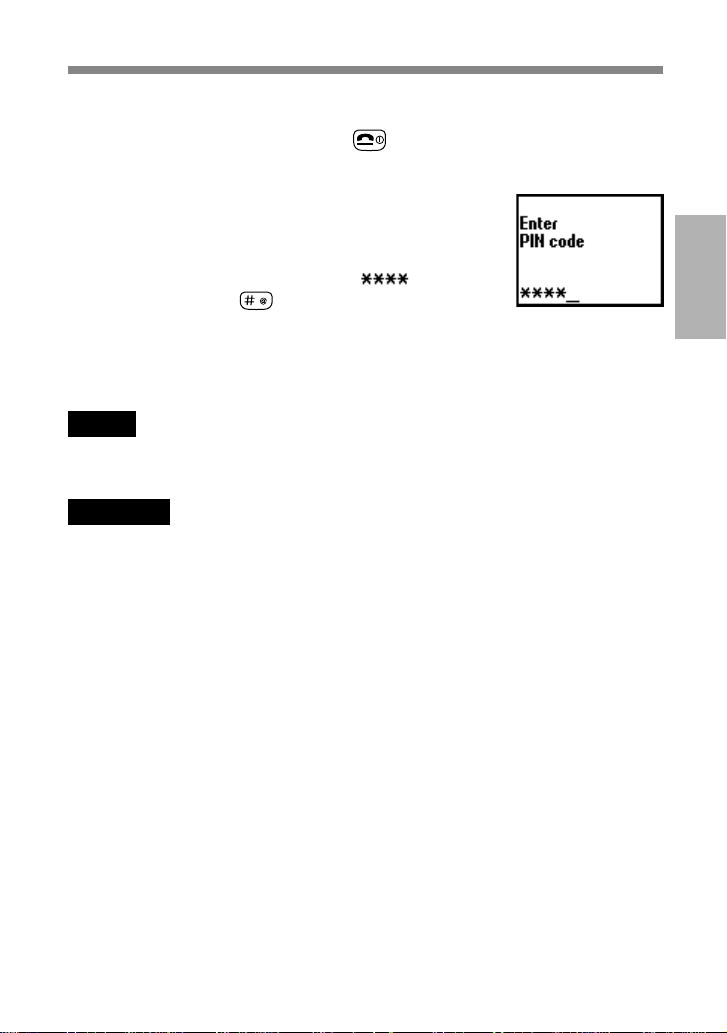
Entering PIN
For security reasons, your SIM card is protected with
a Personal Identification Number (PIN), which is
supplied with your SIM card. Enter your PIN with
the keys (the PIN appears in code as ) and
press the Jog Dial (or
If you do not enter a PIN code, your phone will automatically switch off
after approximately 2 minutes. It is possible but not recommended to
disable the PIN code prompt (see “Main Menu Operations-SettingsSecurity” page 66).
Note
If the Personal lock has been set, there are some cases that you need to additionally
input the security code.
Warning
You only have 3 attempts to enter the correct PIN. After the third attempt, your SIM
is blocked and you must enter your PUK code (Personal Unblocking Key). (see also
“Troubleshooting” page 103).
If necessary, you can obtain your PUK code from your Network Operator/Service
Provider.
Emergency calls
Emergency calls (112, 999, etc.) are possible when you have network
coverage even if there is no SIM card in the phone (even if the keys are
locked). The support of this feature depends on the Network Operator.
) to confirm your entry.
Started
Getting
19
GB
Page 20
Connecting to the Network
After successfully entering your PIN code, your phone searches for an
available GSM network. The network search is automatic, but may take a
few seconds (see also “Main Menu Operations-Settings-Preferences” page
64).
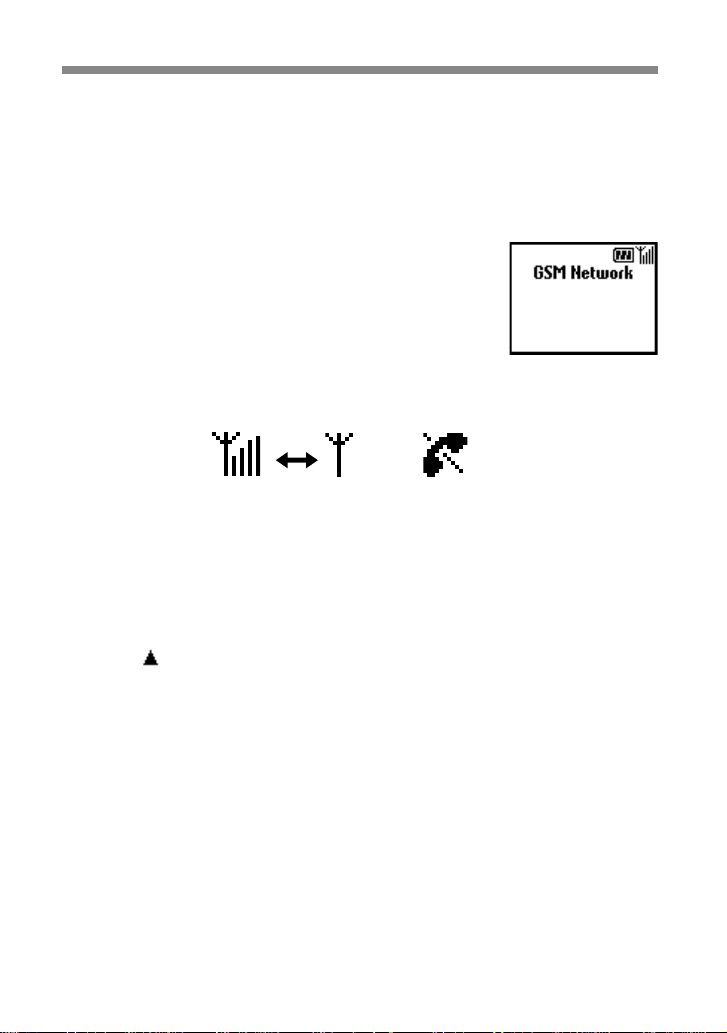
You are ready to make and receive calls when the
Network Operator's name appears on the display.
The following indicates the strength of the received network signal. If the
signal is very weak, there is a risk of losing service.
Strong signal Weak signal No service
If you cannot obtain service
One reason for failure to obtain network service is that the reception
strength may be too weak. Try moving to a higher elevation, to a window
or open space. Make sure that there is nothing obstructing the antenna.
Roaming
If you are out of range of your “Home” Network Operator, especially
when you are abroad, another Network Operator may be selected
automatically, subject to signal strength and roaming agreements between
Network Operators. Contact your Network Operator/Service Provider for
details.
20
GB
Page 21
Basic Operation
Making Calls
The operator’s name must appear on the display and the flip must be
opened in order to make a call (except emergency calls).
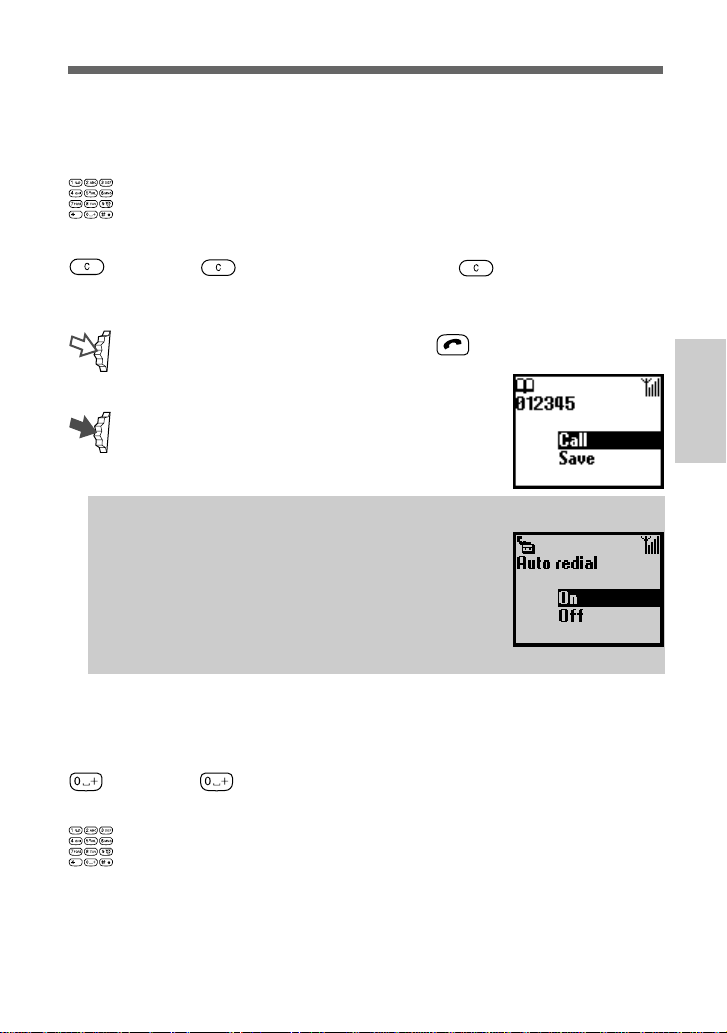
1 Dial the complete number of the party you want to call
(including the area code even when dialling locally).
2 Press to correct any errors. Keep pressed to clear the
entire number.
3 Keep the Jog Dial pressed (or press ) to call the number
displayed.
or
Press the Jog Dial to save the number to
the Phonebook.
Tip
• If the Auto redial option is on (see page 73) and
the number you have called is engaged, your
phone automatically displays the Auto redial
option to call the number repeatedly at
progressive intervals until the call is connected.
However, if there is an incoming call, the Auto
redial option will be cancelled.
Basic
Operation
International calls
Each country has an individual international access code for dialling
abroad.
1 Keep pressed until “+ ” appears.
2 Enter the country code, followed by the area code and the
number.
21
GB
Page 22
Answering/Ending Calls
When the flip is open, incoming calls are indicated by a ringing tone as
well as the incoming call indicator icon on the display. Press the Jog Dial
(or ) to accept the call.
If the caller is using the Caller ID feature, the caller’s name appears on the
display if the number is saved in the called person’s Phonebook. Only the
number appears on the display if the number is not saved in the
Phonebook.
If you do not wish to answer the call, press
ringing. The call is rejected (the caller hears a busy tone or is diverted if a
divert has been set). If you do not answer the call, the missed call icon
appears on the display in standby mode. Press
select the Call history from the Main menu for information about the
missed call.
When the flip cover is closed, press the Jog Dial to start a call. If you do
not wish to answer, press the Jog Dial forward while the phone is ringing
to reject the call.
The operation is the same when the flip cover is opened, but the missed
call icon appears in the Tag window if you do not answer. (For details see
“Tag window” page 8)
Ending calls
Press or press the Jog Dial forward to end a call.
Flip call
When Flip call is set (see page 73) and you receive a call, you can accept it
by opening the flip cover.
Close the flip cover to end the call.
Memo
When you receive a call with the flip cover opened, you can press to
start your announcement and to turn on the Answering machine.
Note
If you have a call waiting, press to end the current call and accept the call
waiting by pressing (see also “Call settings-Call waiting” page 72).
GB
22
while the phone is
in standby mode or
Page 23
During a Call
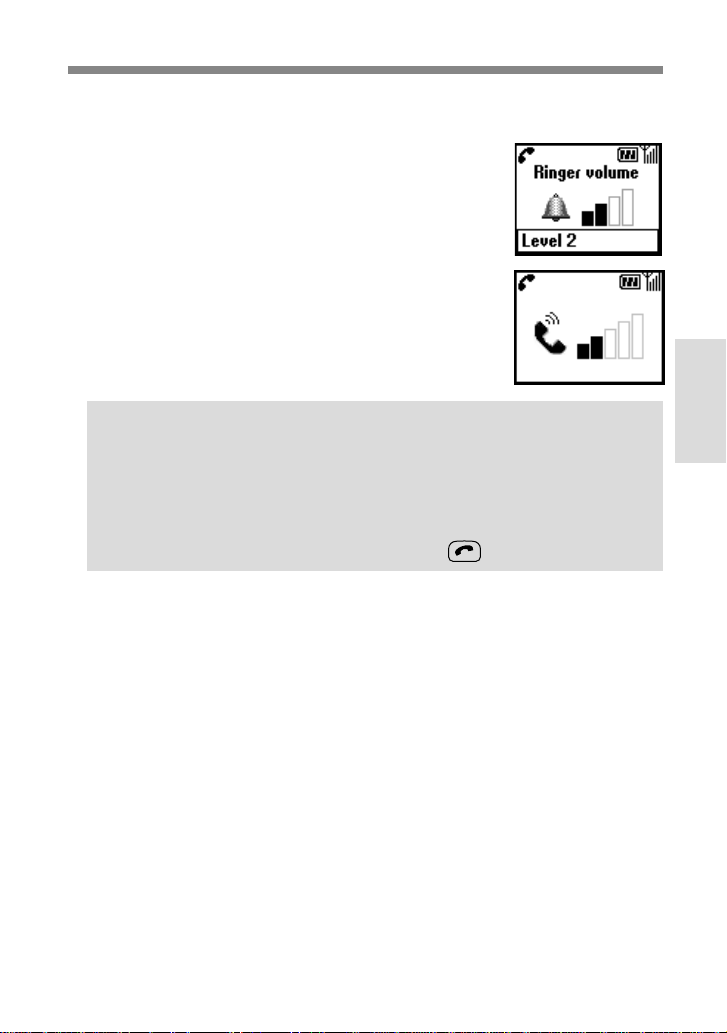
Adjusting the ringer/speaker volume
When your phone is ringing, you can adjust the
ringer volume by rotating the Jog Dial.
During a call, you can adjust the speaker volume by
rotating the Jog Dial. Rotate up to increase the
volume and down to decrease the volume.
Tips
•During a call, use your phone as a notepad to enter a phone number. If
you make a second call simultaneously, the active call is put on hold
(see also “Call hold”). Even when the call is ended, the number you
entered reappears on the display.
•Press the Jog Dial for the option to save the number in the Phonebook
or simply keep the Jog Dial pressed (or press ) to call the number.
23
Basic
Operation
GB
Page 24
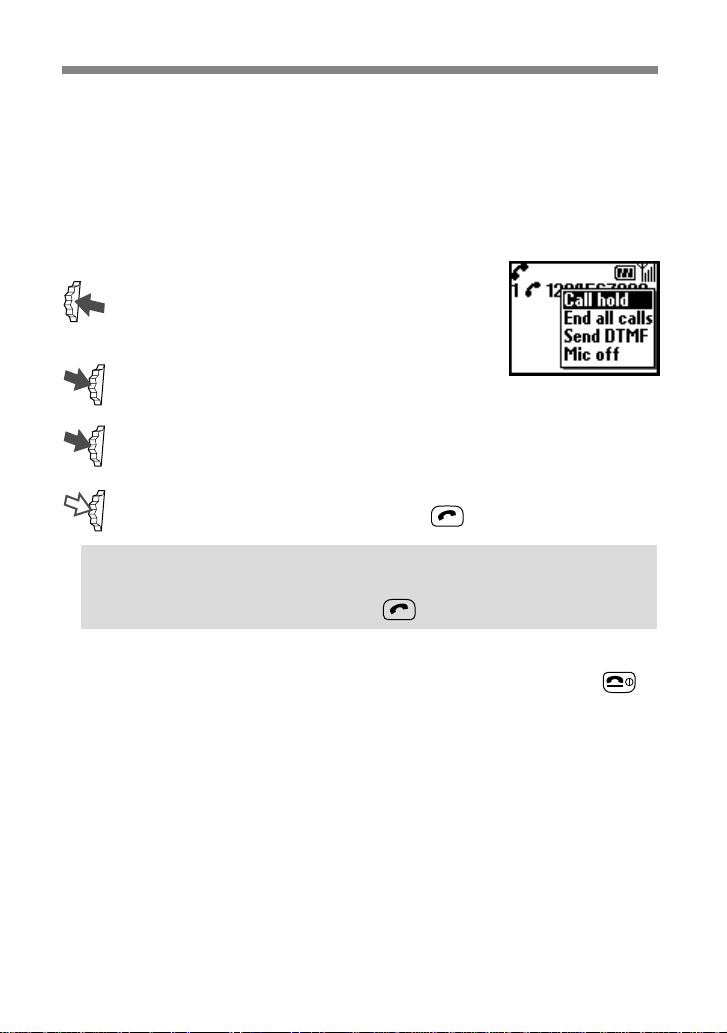
Call hold
Call hold allows you to manage 2 calls at the same time. For example, if
you are speaking to someone on your phone and you want to make
another call, you can put the current or active call on hold in order to call
someone else. Check with your Network Operator/Service Provider for
details about this service.
One active call
1 Press the Jog Dial backward and select
Call hold.
2 Press the Jog Dial to confirm your selection.
3 Press the Jog Dial again to access the Phonebook to retrieve a
number or use the keys to enter a number.
4 Keep the Jog Dial pressed (or press ) to make a call.
Tip
• You can also put a call on hold automatically. Simply use the Notepad
and make a second call; or just press .
End all calls
Press the Jog Dial backward and select End all calls or simply press
any time to end both the active call and the call on hold.
at
Send DTMF
Press the Jog Dial backward and select this option during a call to Send
DTMF tones (e.g. from a Phonebook entry) which are tones designed to
respond to menu prompts e.g. in your Voice mail or other services.
Mic off/Mic on
Press the Jog Dial backward and select the Mic off/Mic on option to mute
and unmute the microphone.
GB
24
Page 25
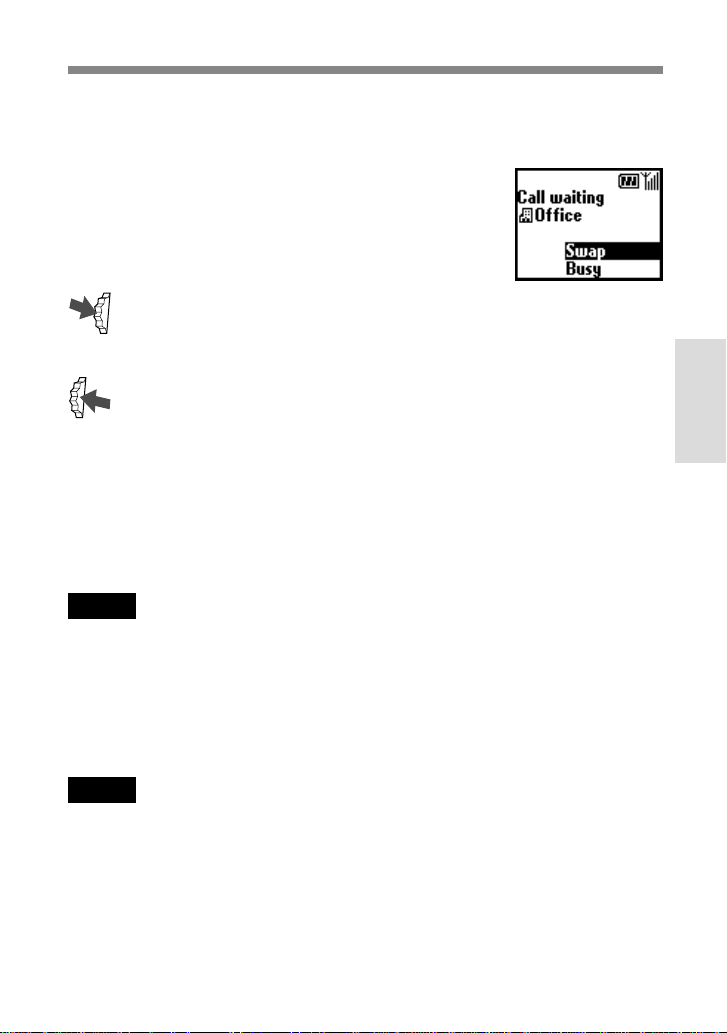
One active call (or one call on hold) and one call waiting
When your phone alerts you (beep) that a call is waiting, there are several
options available.
1 The display automatically offers you call
waiting options.
2 Select Swap to put the active call on hold
and connect the waiting call.
or
Press the Jog Dial backward and select
one of the following options.
Swap to alternate between the active call and the call on hold.
Busy to indicate to the calling party that your line is engaged.
Replace to end the active call and retrieve the call waiting.
End all calls to end all established calls and accept the call
waiting.
Mic off/Mic on to mute/unmute the microphone.
Note
In step 1 select Busy to indicate to the calling party that your line is engaged.
Basic
Operation
Conference call
A call with more than 2 participants.
To set up a conference call, press the Jog Dial backward to open the Call
menu then select Join from the Call menu.
Note
It is possible to talk with a maximum of 5 callers. Contact your Network Operator
for details.
25
GB
Page 26

Memo during a call
You can record the conversation for up to 20 seconds. Also, you can play
back the pre-recorded Voice memos, to let the caller hear them, during
conversation.
Pressing
records a Voice memo. To playback a memo, open Memo
from the Main Menu. Then open the Voice memo box and select the memo
you want to playback for the caller.
Important
Obtain permission from the other party beforehand if you want to record the
conversation. Also, be aware that the recorded contents can be listened to by third
parties if they have access to your phone.
26
GB
Page 27

Standard Text Input
The Jog Dial provides a quick alternative to enter standard characters.
Simply press a key once and then rotate the Jog Dial to move the cursor to
the desired character on the preview bar. Press the Jog Dial or wait a
moment to confirm. However, standard character entry is still possible if
you prefer; press the corresponding key several times until the character
appears.
Character Table
Key Lower Case Characters Upper Case Characters Numeric
[ SPACE ]
< SHIFT >
< SYMBOL PAGE >
0
1
2
3
4
5
6
7
8
9
< SHIFT >
Basic
Operation
Tip
• Keep pressed to change to T9 mode for easy text entry (see also
“T9 Text Input” page 29).
27
GB
Page 28
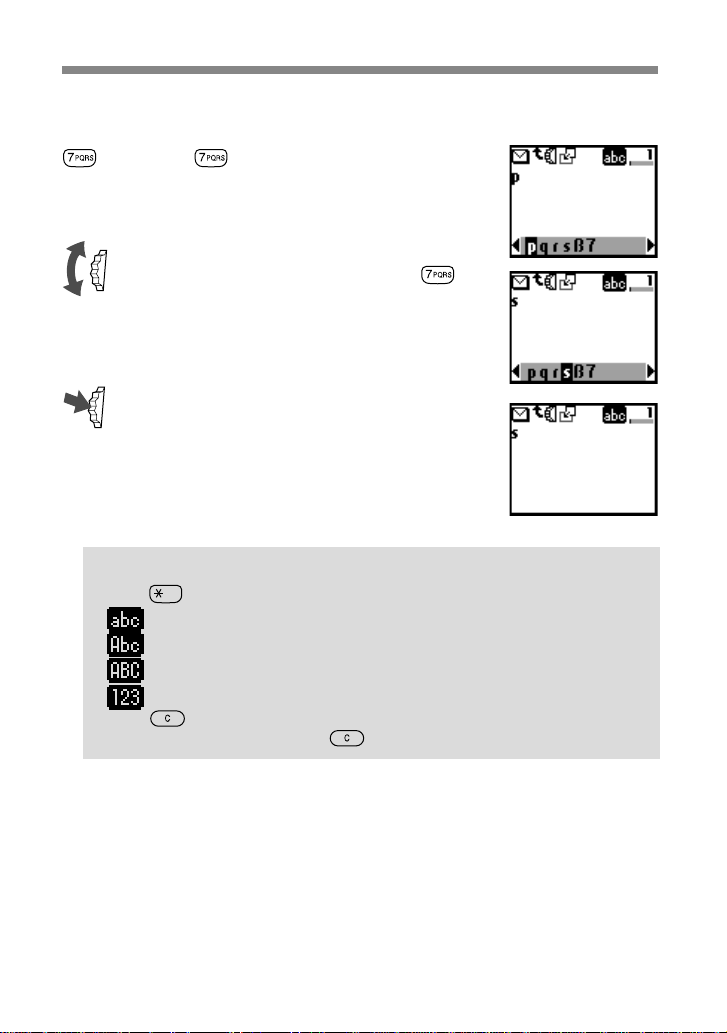
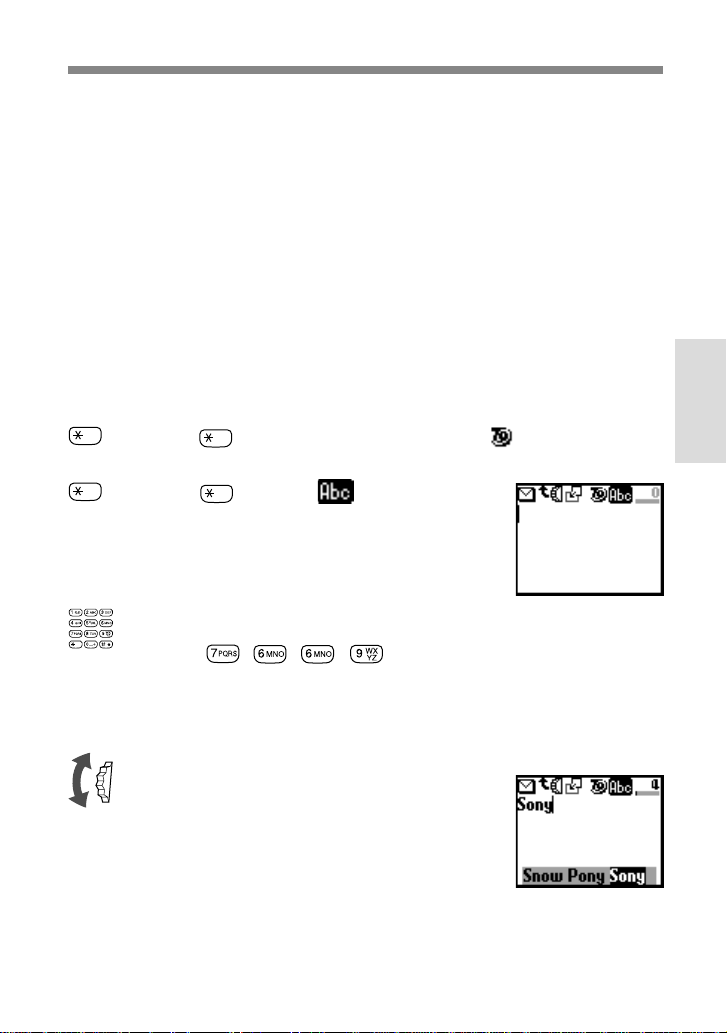
Example:
To enter “s” when creating a message.
1 Press .
A character or number appears.
2 Rotate the Jog Dial to “s”(or press
three more times).
3 Press the Jog Dial (or wait for a moment).
Tips
•Press to shift between:
......lower case letters permanently
......an upper case letter and then revert back to lower case
......upper case letters permanently
......numbers
•Press to clear the character or number just before the cursor.
To clear the entire text, keep pressed.
28
GB
Page 29
T9 Text Input
In addition to the standard method of entering text messages in which you
press a key a certain number of times until the desired letter appears, Sony
has equipped your phone with an additional feature called T9 Text Input.
T9 Text Input and the Jog Dial make writing messages quicker and easier.
Just type a word by tapping each key once per letter. After you have
finished typing to the end of the word, T9 Text Input gives you several
words to select from in the preview bar based on the key combination you
entered.
(see page 28 on how to enter lower-case letters, upper-case letters and
numbers).
Making a sample entry with T9 Text Input
To insert the word “Sony” when creating a message.
1 Keep pressed to switch to T9 mode if does not appear.
2 Press to shift to .
3 To type the word “Sony”, press each of the following keys in
order:
, , , .
Basic
Operation
4 At the end of the word, check the preview bar to see possible
combinations of the keys you typed.
5 Rotate the Jog Dial to select “Sony”. If
your desired word is first on the list, just
press the Jog Dial to select it.
29
GB
Page 30
Note
If the word you intended to type does not appear in the list, keep pressed to
switch to the standard text input mode (see page 27) and type the word using the
standard text entry method. Once you have finished, keep pressed to return to
T9 mode. This new word will automatically be added to the T9 memory so that next
time you type the word it will appear in T9 mode. This process is applied to editing
text as well.
However, Bulgarian, Croatian, Czech, Greek, Hungarian, Polish, Romanian,
Slovakian, Slovenian, Turkish, Norwegian and Finnish are not supported.
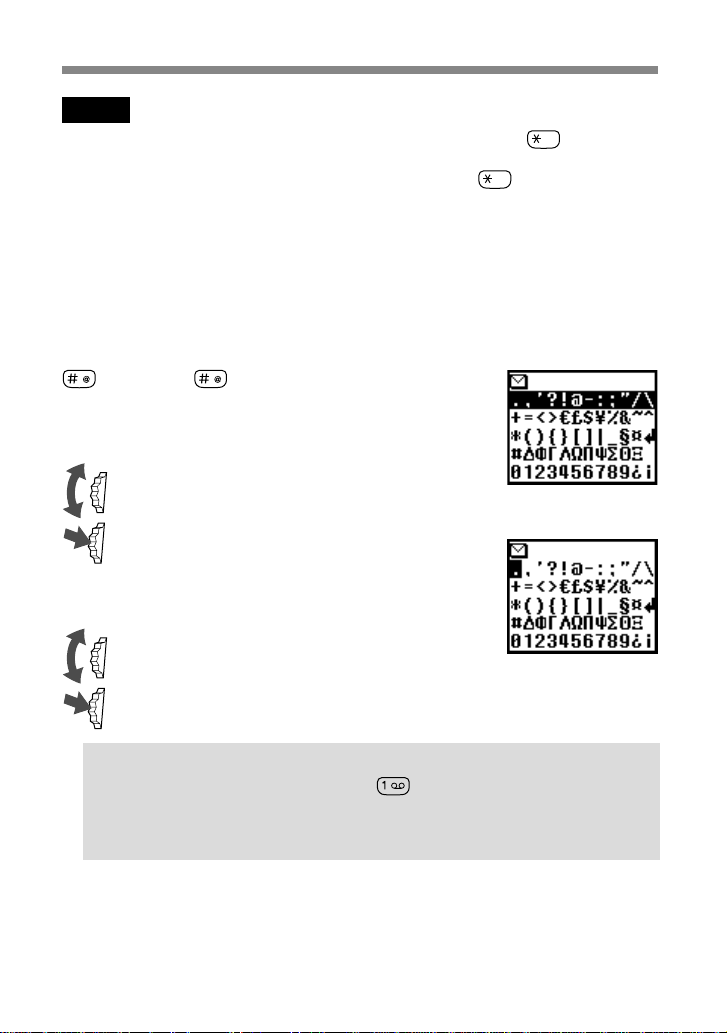
Adding a symbol or punctuation
To insert a symbol when creating a message.
1 Press .
2 Use the Jog Dial to scroll from row to row.
3 Press the Jog Dial to select a row.
4 Rotate the Jog Dial to scroll within the row.
30
5 Press the Jog Dial to select a symbol.
Tip
• For “Smart Punctuation”, just press where you would add a
fullstop, hyphen or apostrophe and T9 will automatically insert the
most likely punctuation symbol. You just keep on typing and T9 will
punctuate for you!
GB
Page 31

Text Edit
When making text entries, press the Jog Dial backward to enter text edit
which provides the following features:
Time
To edit the current time and paste it.
Date
To edit the current date and paste it.
Phonebook
To paste saved information in the Phonebook.
Template
To paste a sentence that is already prepared.
Last message
To attach the last edited SMS.
Event
To paste events from the schedule.
Phrase
To save several commonly used phrases by pasting the saved words.
You can also delete the saved words.
If you would like to save a new word, select ”New word”. (You can
save up to 10 words/phrases each having up to 32 characters.)
If you would like to delete a saved word, select ”Delete”.
Top
To return the cursor to the top of the text.
Character, Timer
To select the length of time for number or letters to be accepted before
the next key can be pressed for the Standard text input mode.
Basic
Operation
31
GB
Page 32

Using the Phonebook
1
2
3
About the Phonebook
It is very convenient to save frequently-used
phone numbers and e-mail addresses. You can
save up to 500 names in the Phone memory.
The number of names that you can save to the
Phonebook in the SIM card depends on the
capacity and specifications of the SIM card.
Note
• You can make the same set up as Phone memory for names and numbers which
are saved in SIM card, however, information other than names and numbers is
saved in Phone memory. You can save these data in only one SIM card.
• Names stored in the Phone memory with several phone numbers are in the
Phone memory.
• Names stored in the SIM card with several phone numbers are in the SIM card.
The Phonebook has the following features:
Group (above illustration 1)
If you classify a name group by group, you can easily perform
searches. You can save up to 10 groups with each group having its
own name and icon.
Name/Number (above illustration 2)
You can save up to 3 numbers and icons for each name. An icon
indicating where the name is saved, either to the SIM card or to the
Phone memory is displayed to the left of the name.
— SIM card — Phone memory
Custom (above illustration 3)
You can save up to 120 characters such as addresses, e-mail
addresses and company names in each entry. And, one name can
have up to 2 entries.
Priority entry
When you open the Phonebook, the 9 most frequently used entries
are separately displayed from the ABC sort list. All of these 9
entries are saved in the SIM card.
32
GB
Page 33

Important
Entries might be changed or deleted due to malfunctions, repairs or other
circumstances.
To limit the risk of losing data make a copy of important entries such as phone
numbers. Also note that, we can not take responsibility for entries that are changed
or deleted.
Creating Entries in the Phonebook
1 Rotate the Jog Dial in standby mode to
open the Phonebook.
2 Select Phonebook menu and press the Jog Dial.
3 Select New entry and press the Jog Dial.
4 Select SIM card to save the entry to the SIM card memory or
Phone memory, press the Jog Dial to confirm.
This step is skipped if “Choice” is not selected for the “Memory
in use” in the Phonebook menu (see page 41).
33
Using the
GB
Phonebook
Page 34

5 Enter the phone number. Press the Jog Dial to confirm.
6 Rotate the Jog Dial to select the phone type icon and press the
Jog Dial.
7 Enter the name, press the Jog Dial to confirm.
(For more details, see “Basic Operation-Standard Text Input”
page 27 or T9 Text Input page 29).
8 Press the Jog Dial and wait for a moment to return to the
Phonebook again.
Note
Phonebook memory size (number of memory spaces and maximum number of
letters and digits) depends on your SIM card. When you save to the SIM card, the
number of names and phone numbers depends on the SIM card.
When you save to the Phone memory, you can save up to 500 names. You can enter
up to 20 characters for the name and up to 40 digits for the number.
Saving Phonebook Entries from Standby Mode
1 Enter the phone number.
2 Press the Jog Dial to call or to save the
number.
34
3 Rotate the Jog Dial to select Save.
4 Press the Jog Dial to confirm your selection.
Finish saving the Phonebook entry by following steps 4 to 8 in the
previous section “Creating Entries in the Phonebook.”
GB
Page 35

Making Calls from the Phonebook
Making calls from the ABC sort list
You can select the name from the ABC sort list to
make a call.
Rotate the Jog Dial in standby mode to open the
Phonebook, use the Jog Dial to display the ABC sort
list. If several numbers are displayed after selecting
the person's name, select the number to be dialed.
Note
If you have saved several numbers for one name, the first number on the list is
displayed in the pop up window.
Tips
•To search in the Phonebook, press a key to advance to that letter in
the Phonebook. E.g. to advance to entries beginning with “M”, press
.
•You can also do a name search in the Phonebook menu.(see page 41)
Making calls from the group sort list
In the ABC sort list, pressing the Jog Dial backward displays the Group
sort list.
Select the group from the Group sort list and then
select the name to make a call.
Using the
Phonebook
Making calls from the speed dial
You can easily make a call to the phone number saved in the SIM card by
pressing its registration number and then keeping the
key pressed in
standby mode.
For example, if you press the
key, key and then keep the
key pressed in standby mode, the phone number assigned to number 10 in
the SIM card is called up.
For the Priority list (first nine names), the first phone number under each
name is automatically assigned to No. 1 through 9 on the SIM card.
35
GB
Page 36

Grouping
Group setting
Create new group or change the name or icon of
existing groups.
Set group
You can change the group.
1 Select the Name/Number of the group
that you want to change from the ABC
sort list or the Group sort list, then press
the Jog Dial.
2 Select the group name and press the Jog
Dial.
3 Rotate the Jog Dial to select the group
name.
4 Press the Jog Dial to confirm your
selection.
Note
You can change the group for entries in the SIM card. However, if you reset the set
group in another SIM card, that group information in the previous SIM card is
deleted.
36
GB
Page 37

Editing the Phonebook
The Jog Dial and the Phonebook make it easy to keep all your contacts up
to date and easy to access with flexibility in customizing. Following the
steps below you can call, edit, delete or copy entries. You can edit entries
in the Phonebook by Number, Name, Group or by Custom.
Editing a name
You can edit, delete and copy names.
1 Rotate the Jog Dial in standby mode to open the Phonebook.
2 Rotate the Jog Dial to select the name you want to edit.
3 Press the Jog Dial.
The saved numbers of that person are
displayed.
Selecting the name allows you to do the
following.
• Select Edit to change the name.
• Select Delete entry to delete the selected name, its saved
number (or numbers in case more than one number is saved
under that name) and custom.
• Select Copy entry to copy the selected name, its saved
number (or numbers in case more than one number is saved
under that name) and custom.
Using the
Phonebook
4 Press the Jog Dial to confirm your selection.
37
GB
Page 38

Editing a number
1 Follow step 1 to 2 in Editing a name.
2 Select the number you want to edit and
press the Jog Dial for a menu of editing
options.
• Select Call to call the number.
• Select Edit to change the selected number.
• Select Delete to erase the selected
number from the Phonebook.
• Select Copy to copy the entry from one memory location to
another.
3 Press the Jog Dial to confirm your selection.
Custom
Custom edit
The “Custom” is similar to a memo pad for additional information as
e-mail or postal addresses.
1 Follow steps 1-2 in Editing a Name.
2 Select the Custom entry you want to edit.
38
GB
Page 39

3 Press the Jog Dial for a menu of editing options.
• Select Edit to change the Custom entry.
• Select Delete to delete the Custom entry from the Phonebook.
• Select Copy to copy the entry from one memory location to
another.
4 Press the Jog Dial to confirm your selection.
Voice Mail
The first entry in the Phonebook is reserved for your Voice mail number.
Like other Phonebook entries, you can save and edit your Voice mail
number here.
For your convenience, there is also quick access to your Voice mail via
- just keep pressed to dial your Voice mail without even opening
the Phonebook!
For more information, please contact your Network Operator.
To set up your Voice mail
1 Rotate the Jog Dial in standby mode to open the Phonebook.
2 Rotate the Jog Dial to select Voice mail
and press the Jog Dial.
Using the
Phonebook
3 Enter the number at the prompt.
4 Press the Jog Dial to confirm your entry.
Tip
•Once you set the Voice mail, you can listen to your Voice mail by
selecting Voice mail in step 2 and pressing .
39
GB
Page 40

The Voice mail icon (or the envelope icon depending on the network)
appears in the display to inform you when you have new voice messages
waiting. Contact your Network Operator/Service Provider for details. To
listen to your messages, just keep
pressed to call your Voice mail!
Phonebook Menu
Own number
The first entry in the Phonebook menu is for you own numbers, use it for
quick reference or as a reminder in case you forget them.
You can make up to 3 entries in the phone memory, and more in the SIM
depending on its capacity.
To display own numbers
1 Rotate the Jog Dial in standby mode to open the Phonebook.
2 Select Phonebook menu and press the Jog Dial.
3 Press the Jog Dial to select own number.
4 Rotate the Jog Dial to select the name of
the own number.
5 Press the Jog Dial to display the number.
6 Press to exit.
Note
To save an own number entry, select a memory space using the Jog Dial. Press the
Jog Dial and enter the number at the prompt.
Tip
•You can call, edit, delete and copy your own numbers.
GB
40
Page 41

Name search
You can search for a name with Name search in the Phonebook menu.
Input the character of the name you want to search and press the Jog Dial,
entries beginning with that letter appear. Choose the one you want by
rotating the Jog Dial.
Service numbers
The service numbers provided by your operator may not be displayed
depending on the SIM. These numbers can not be edited.
Memory status
You can display how much memory is available (memory status) for SIM,
Phone memory and the Custom.
Memory in use
Set the location of the memory. Select Choice and you can specify the
location of each entry.
Fixed numbers
This section of the Phonebook may contain Fixed Dialling Numbers (SIM
card dependant). To add an entry to the Fixed numbers, rotate the Jog Dial
down to “New entry” in the Fixed numbers and proceed as in “Creating
Entries in the Phonebook”. You can call, edit, delete and copy the Fixed
numbers.
You need a PIN2 code to edit, delete and copy.
The fixed numbers may not be displayed depending on the SIM.
Using the
Phonebook
Fixed number only
When you select Fixed numbers and turn this feature on, you only
have access to numbers stored in the Fixed Dialling Numbers (FDN)
section of your Phonebook. This feature can help you to control
outgoing calls. For example, if you lend your phone to someone they
will need your PIN2 code to make outgoing calls. For more details,
contact your Network Operator/Service Provider.
41
GB
Page 42

Delete all entries
You can delete all entries. Each entry is a space in memory for the name
and numbers . One person may have more than 3 numbers in their entry.
All entries are erased from the phone memory, including the phone
numbers, customs and all own numbers. Names and numbers in the SIM
are not erased. However, the framework of entries in the SIM is erased.
Each number remains listed individually under its name. Therefore,
names are listed repeatedly for each number that was entered under them.
42
GB
Page 43

Main Menu Operations
The menu system provides you with an easy overview of your options
grouped into separate menu points. An icon represents each menu point
for easy recognition and the icons rotate as you scroll using the Jog Dial.
Some menu options are network dependant. Please contact your Network
Operator/Service Provider for information about which options are
available in your network.
Selecting a menu item with the Jog Dial
1 Press the Jog Dial to select the main menu
from standby mode and rotate the Jog
Dial to scroll through the menu options.
2 Press the Jog Dial to select the menu
option in the centre.
3 Press the Jog Dial forward (or press ) to exit a menu.
Note
Your phone automatically defaults to standby mode after more than 3 minutes of
inactivity.
Selecting a menu item with the short-cut key.
You can go to each menu by pressing the short-cut key (
the Main menu.
— Messages • — Ringer
•
•
— Schedule • — Phonebook
•
— Clock • — Divert
— Calculator • — Call history
•
•
— Settings • — Memo
~ ) from
Operations
Main Menu
Tip
indicates that an option is on.
indicates that an option is off.
indicates that an option is not set.
43
GB
Page 44

READ , CREATE , SETTINGS
LOCAL AREA INFO
Messages
Choose Messages from the Main menu for
correspondence options to create, send and read
short messages (SMS). You can use short messages to
send another mobile phone user a text message. The
Jog Dial makes it easy to enter characters using the
preview bar together with the keys.
Read
You hear a beep which sounds different from the
single beep of the ringer and see the message icon
when a new message arrives. Short messages can
be received in standby mode or during a phone call.
1 Select Read from the Messages menu.
2 Scroll through the list of messages to select the message you
want to read. The first line of the message appears in the pop
up window.
3 Press the Jog Dial to confirm. The message appears on the
display.
<
4 Press the Jog Dial for options to Reply, Forward, Delete, or Call
back the number in the text.
Tip
• You can switch between All list and Call history by pressing the Jog
Dial backward when you are in the Read list.
Note
The capacity for storing incoming and outgoing messages depends on your SIM
card. The message memory is full when the envelope icon blinks in the display.
If you try to save a message when the SIM memory is full “Memory full” appears
and you cannot save the message. Delete old messages in order to free memory
space for new messages.
GB
44
Page 45

READ , CREATE , SETTINGS
LOCAL AREA INFO
<
SMS list icons indicate the properties of the message
: Received message (unread)
: Received message (read)
: Created message (stored in the SIM)
: This incoming message is only stored in the phone’s memory, not in
the SIM memory. If you switch off the phone the message is
deleted. If you want to save this message, see below. (see “Memory
class” page 47)
: Result report
: Voice mail message
To delete a message
Follow the steps 1-4 in Reading messages and select Delete. After selecting
the message you want to delete, select Yes.
To reply to or edit a message
Follow the steps 1-4 in Reading messages and select Reply. Then, select a
message with the Jog Dial and edit it for the Reply message.
To forward a message
Follow the steps 1-4 in Reading messages and select Forward. After
entering the phone number you want to send the message to, edit it for
Forward message. You can also choose a number from the Phonebook.
To call back the sender of a message or a number in the message text
Follow the steps 1-4 in Reading messages and select Call back. Select a
number that you want to call back from the numbers (up to 3) appearing
in the SMS. You can call back one of the SMS numbers of the person that
sent the SMS.
45
Operations
Main Menu
GB
Page 46

READ , CREATE , SETTINGS
LOCAL AREA INFO
Create
You can create a new message.
1 Select Create from the Messages menu.
2 Create your message and, when finished,
press the Jog Dial.
On how to input the Character Table and
T9 Text, see “Basic Operation-Standard
Text Input” (see page 27).
3 Enter the number to which you want to send the message using
the keys and press the Jog Dial to confirm.
You can select the number from the Phonebook by pressing the
Jog Dial backward.
4 Select Send, Save, Settings or Cancel and press the Jog Dial to
confirm your selection.
Tips
• Press the Jog Dial backward during the text input for the pop up menu
to appear. (see "Basic Operation- Text Edit" page 31)
• If you are interrupted (e.g. incoming call) while creating a message,
select Last message to retrieve the message and complete it continuing
from step 2.
<
Settings
Settings allows you to customize outgoing messages including the format,
confirmation report, etc. Some of these options may be networkdependant. Contact your Network Operator/Service Provider for details.
Select Settings from the Messages menu, then select a Settings option
using the Jog Dial.
GB
46
Page 47

READ , CREATE , SETTINGS
LOCAL AREA INFO
<
Service centre
Before you can send short messages, you must
register your Service centre number via the Service
centre option in the Messaging menu.
Contact your Network Operator/Service Provider
for details.
You can open the SMS menu and select the number
registered in your Service centre by pressing the Jog
Dial. Then, select “Set default” to make the selected
number the default number. You can also enter the
Service centre number manually.
Message tone
Select a tone type that alerts you to reception of SMS. You can select 2
different tones or no tone (silent).
Note
If the ringer is set to Vibra alert then it overrides any other message tone
settings in the Message tone.
Memory class
You have the following options:
SIM to save the message on the recipient’s SIM card.
Phone to save the message in the recipient’s phone.
Screen to display the message directly on the recipient’s
display without saving to the SIM or the phone. It is not
recommended to send confidential messages using the Screen
option.
Operations
Main Menu
Validity period
You can specify how long messages are stored in the service centre by
selecting: 1 hour, 6 hours, 24 hours, 1 week, 4 weeks. The default validity
period is 24 hours.
47
GB
Page 48

READ , CREATE , SETTINGS
Reply cost
Choose Reply cost and select On if you would like to pay for the recipient
to respond to your message.
Result report
Choose Result report and select On if you would like to receive
confirmation that your messages are transmitted to the recipient
successfully.
Message format
Choose Message format if you would like to specify how your message is
transmitted: SMS, E-Mail, Fax, Telex, Voice (if available). The default
setting is SMS.
Signature
You can create your own signature of up to 32 characters, and choose
whether or not to attach it when you send SMS.
LOCAL AREA INFO
<
Local area info
Local area info allows you to receive cell broadcast messages or general
messages like weather reports, traffic reports, etc. broadcast to a group of
phones in a certain area. Some of these options may be networkdependant. Contact your Network Operator/Service Provider for details.
1 Select Local area info from the Messages menu.
48
2 Select one of the following options:
Received info to view cell broadcast messages.
Select channel to add or delete a broadcast channel.
Receive to choose whether or not to receive cell
broadcast messages.
3 Press the Jog Dial to confirm your selection.
GB
Page 49

RINGER , VIBRA ALERT
MANNER MODE
<
Ringer
You can set the Manner mode or the Vibra alert.
Also, you can select the ringer type and adjust the
volume and tone.
Ringer
You can adjust the ringer volume, select the ringer type and edit and save
your favourite melody.
Ringer volume
You can select one of the 6 levels of the ringer volume or turn the ringer
off.
Jog Up
Icon
Pop up
window
Jog Down
Off
Level 1
Level 2 Level 3 Level 4 Step up Step down
Select the ringer volume from the Ringer menu and then select from
among the 7 ringer volume levels using the Jog Dial.
Tip
• appears in standby mode to remind you when you have turned the
ringer off (level 0).
You can also quickly turn the ringer on/off or to single beep by
pressing the Jog Dial or adjust the volume during an incoming call
(while ringing) by rotating the Jog Dial.
Note
Even if you set the Vibra alert (see page 53), when the Ringer volume is off the
Ringer volume icon has priority in the display.
49
Operations
Main Menu
GB
Page 50

RINGER , VIBRA ALERT
MANNER MODE
<
Ringer tone
You can select from among 30 different pre-set ringer tones in the ringer
tone setting. You can even add 3 more ringer tones using the ringer
composer.
You can compose and save up to 3 melodies (see also “Ringer composer”
below). Select ringer tone from the Ringer menu. The current setting for
the tone is displayed. Select from among 30 tone types using the Jog Dial.
You can listen to the sound of the ringer tone type by moving the cursor to
the selection.
Group ringer tone
You can set the ringer tone for every group saved in the Phonebook.
However, you can not set the ringer tone for every name or number.
Ringer composer
You can compose your favorite melodies.
The Ringer composer menu has the following functions:
Compose to input your favorite melody using musical notes.
Edit title to add the title to the saved melody.
Play to play the melody.
Compose
50
GB
Number of Tone
Key Board, "P" = Pause
Cursor Area
Select Item Area
Entered Music
Page 51

RINGER , VIBRA ALERT
MANNER MODE
1 Select Composer in the ringer composer mode and press the Jog
Dial.
2 Rotate the Jog Dial to select the tone and press the Jog Dial.
• To hear the following 3 octaves, rotate the Jog Dial.
C — Octave lower
C — Original tone
C — Octave higher
• The half-tone is displayed in grey.
• To enter a musical pause, select “P” from the keys.
3 Select the musical length and press the Jog Dial.
If you selected musical pause in step 2, select the length.
4 By repeating steps 1 through 3, you can create various
melodies.
5 After entering the melody, press the Jog Dial backward to
display the Sub menu. Select “Save”.
Tip
•You can display the Sub menu by pressing the Jog Dial backward while
entering the melody.
Play:To play the melody. You can play a melody while composing.
Move:To move the position of the cursor.
Tempo:To set the tempo of the melody. The default setting is
Moderate.
Save:To save the entered melody.
Cancel:To cancel the entered melody.
<
Operations
Main Menu
51
GB
Page 52

RINGER , VIBRA ALERT
MANNER MODE
You can directly enter the melody with the keys by pressing the Jog
Dial.
Entering tones
Change the octave by pressing
each key a number of times.
<
C# D# F# G# A#
CDEFGAB
Original Tone
Musical length =
Change the length by pressing
several times.
Original Tone
An Octave Higher-Tone
An Octave Lower-Tone
Entering musical pause =
Change the pause by pressing
several times.
Edit title
Attach a title to the entered melody (see “Standard Text Input” page 27).
Play
To play the entered melody.
52
GB
Page 53

RINGER , VIBRA ALERT
MANNER MODE
<
Vibra alert
You can set the vibration of the Vibra alert indicating a call. This feature is
available for Alarm and Message tone.
On: Vibra alert is set to on.
Off: Vibra alert is set to off.
t : After the Ringer rings, the Ringer mode changes to the
Vibrator mode.
t : After the phone vibrates, the Vibrator mode changes to
the Ringer mode.
Note
• Changing the mode between Ringer and Vibra alert takes 3 seconds.
• If Vibra alert is on, the Message tone and Alarm as well as the Vibra alert
function.
• Even if you set the Vibra alert, when the Ringer volume (see page 49) is off the
Ringer volume icon has priority in the display.
Manner mode
Select one from 3 types of Manner modes.
Select Manner mode from the Ringer menu and then select one of the
following manner modes using the Jog Dial:
Silent : Ringer is off. Also Vibra alert is off.
Single beep : Ringer beeps only once.
Vibra alert only : Vibra alert is set to on. Ringer is off. SMS
alarm can be also informed by Vibra alert.
Manner off : Manner mode is off. The icon is not
displayed in the top icon area.
Operations
Main Menu
Note
Once you have set the Manner mode, the Ringer and Vibra alert modes do not work
even if you set them.
53
GB
Page 54

Schedule
The schedule has many features. You can display the
calendar, save your daily schedule and set alarms for
important meetings or tasks.
The window of the monthly calendar is displayed as
follows.
(light gray) : Sundays.
7
(dark gray) : An event is scheduled for that day.
7
Tip
•When the Calender is displayed, press the Jog Dial backward to display
the Menu. The Menu has detailed scheduling functions.
Event list
To review all your events in a list.
Month
To display the specified monthly calendar.
Week
To display the monthly calendar including the specified week.
Today
To return the cursor to the Today window.
Go to
To directly input and display the current date.
Memory
To display the amount of memory being used for your saved
schedules.
Delete all
To entirely delete all schedules both current and old.
SCHEDULE
54
GB
Page 55

SCHEDULE
Daily event list
You can display your daily schedule, which holds up
to 4 events. Then, check it by rotating the Jog Dial.
Select the day from the calendar and press the Jog
Dial. Then select New event and press the Jog Dial
to save a new event.
Schedule menu
You can edit or delete events that are already saved.
Select the Daily item from the Daily event list and select Menu item by
press the Jog Dial.
Alarm
To set the alarm. You can also set 5 minutes before the specified time.
Edit
To edit the time, icon and details.
Delete
To delete the displayed schedule.
Repeat
To repeat recurring events weekly, monthly or yearly.
When repeat is set, the icon is displayed.
Note
Up to 4 events each day and a total maximum of 500 events can be saved.
55
Operations
Main Menu
GB
Page 56

ALARM , TIMER , WORLD CLOCK
… < TIME SIGNAL
<
Clock
The clock has many features. You can set an Alarm or a Time to
automatically switch off your phone every day. It also displays the current
date and time in standby mode.
Alarm
Select Alarm from the Clock menu. Use the Jog Dial and the keys in the set
mode to enter the time you want the alarm to ring.
Repeat daily allows you to repeat the alarm at the same time every
day.
Alarm tone allows you to select the alarm tone.
Note
When you set the Silent mode in Manner mode, the alarm does not ring even
though the alarm has been set.
If the Vibra alert in the Ringer has already been set to on, the Vibra alert overrides
any setting for the Alarm tone.
Tip
• The alarm rings for about 40 seconds. Press any key to turn off the
alarm. The alarm does not ring during a call, it switches to the vibrator,
and then rings on completion of the call. The alarm rings even when
the power is off (and the battery is inserted).
Timer
Select Timer from the Clock menu. Use the Jog Dial and the keys to set the
timer. When stop is selected or the time is up, a bell rings.
GB
56
Page 57

ALARM , TIMER , WORLD CLOCK
… < TIME SIGNAL
<
World clock
This phone has a World clock function.
Select World clock from the Clock menu and press
the Jog Dial to display the world map.
You can select city by rotating the Jog Dial. The name
of the city and its phone code are displayed in the
pop up window.
This status changes to the standby mode with the phone code by pressing
.
The time in your home city is displayed on the top-left of the screen.
Tip
•You can select city directly by pressing the Jog Dial backward from the
world map. Save up to 6 cities by selecting Add city.
Press the Jog Dial to display the following menu when in the world
map screen.
City name: To change the name and location of the city.
Clock: To change the time.
Phone code: To change the country code and the dialling code.
Summer time: To change to summer time. If summer time has been
selected, it will be active from the last Sunday in March to the last
Sunday in October and the standard time will be one hour ahead.
Set home: To set as the home city.
Delete: To delete.
Note
You cannot change or delete the times for the pre-set cities.
Time signal
You can set your phone to ring or vibrate on the hour.
57
Operations
Main Menu
GB
Page 58

ALARM , TIMER , WORLD CLOCK
… < TIME SIGNAL
<
Clock format
Select the style of time to be displayed and it appear in standby mode.
Analogue
Set whether or not to show an analogue clock when the flip cover is
closed.
Auto power off
The Auto power off function turns your phone off at a specified time.
Activate Auto power off once, and the phone turns off at the same time
every day.
Set Auto power off from the Clock menu. Use the Jog Dial and the keys to
enter the time in the set mode you want to turn off your phone.
Note
If auto power off occurs during a call, the phone does not turn off until after the call
is completed.
Set the day/time
Select set from the Clock list menu. Use the Jog Dial and the keys to enter
the day, month, year (DDMM20YY). Enter the hour and minutes (HHMM
in a 24 hour clock format) and then select “OK”. To correct the entry, press
.
58
GB
Page 59

ALL CALLS , IF NOT REACHABLE
… < IF NO REPLY
<
Divert
Choose Divert, also known as “Call forwarding”,
from the Main menu to forward incoming calls to
another phone number depending on certain
conditions in which you do not answer the call e.g.
divert to your Voice mail if you are not reachable.
You may need to register for this service with your
Network Operator/Service Provider.
All calls
To divert all calls unconditionally (the phone will not even ring).
If not reachable
To divert incoming calls when your phone is switched off or out of
network coverage.
If no reply
To divert incoming calls if you do not answer the call after a certain period
of time.
If busy
To divert incoming calls when you are on the phone (line engaged).
All fax
To divert all fax calls (the phone will not even ring).
All data
To divert all data calls (the phone will not even ring).
Cancel all
To clear all active diverts.
Operations
Main Menu
Note
appears in standby mode when a divert is set.
59
GB
Page 60

ALL CALLS , IF NOT REACHABLE
Setting a divert
… < IF NO REPLY
<
1 Select the Divert menu from the Main menu.
2 Select a Divert option using the Jog Dial (e.g. If not reachable).
3 Select Activate to set the chosen divert
condition.
4 Select Voice mail to divert calls to your Voice mail or Other
number to choose a number from the Phonebook. You can also
enter the number manually using the keys.
5 Wait for confirmation from the network.
In step 3, you also have the option to cancel or check status. Select
“Cancel” to cancel the divert; then wait for the network response. Select
the option “Check status” to check the divert settings. Wait for the
network response and then you can view the current status on the display.
Note
If the returned response is “Failed”, the network was unable to set, clear or check
the selected Divert.
60
GB
Page 61

CALCULATOR
Calculator
The Calculator can perform addition (+), subtraction (–), multiplication (x)
and division (÷), and even percentage (%) calculation.
•Press to go through the mathematical operations of +, –, x, and ÷
in that order.
•Press to display “%”.
•Press
•Press the
Rate conversion
You can also use the calculator as a currency calculator as an easy way to
convert prices from one currency to another.
Display the pop up menu by pressing the Jog Dial backward and select the
desired Currency exchange rate. Press the Jog Dial to display the
converted price on the Calculator.
Also, the exchange rate has the following functions in Settings on the pop
up menu list. Make sure of specifying the rate whenever adding a new
currency.
to clear the entered value and the result.
to start a new calculation while using the calculator.
1 Select Calculator from the Main menu. The assigned keys will
be displayed.
2 Enter a number.
3 Press to select the operand and then enter another number.
4 Press to select = for the result.
In this example we are going to subtract 20% from 120.
1 2 0 2 0
Home currency to set your home currency.
Foreign currency to set foreign currency.
Currency list to list currency and to enter
currency newly up to 5 currencies included
original’s.
Operations
Main Menu
61
GB
Page 62

CALL HISTORY
Call History
Call history tracks a total of 30 received and dialed calls. (The number of
received or dialed calls may vary depending on your Network Operator/
Service Provider). The caller's name is displayed in Call history if their
name is in your Phonebook.
1 Select the Call history from the Main menu or press in
standby mode.
2 Scroll up or down using the Jog Dial to
highlight the desired number or name
from the list. The time stamp for the
selected Call history appears in the pop up
window.
3 Keep the Jog Dial pressed if you find the number that you are
looking for.
Select Delete all to delete all lists at the end of the list.
Tip
•Press the Jog Dial backward to select between All calls list, Last dialled
numbers list or Missed/Received calls list in Step 1.
Outgoing call
Outgoing call (Voice memo)
Incoming call
Incoming call (Voice memo)
Missed call
Answering machine
Note
Support of the Call history entries requires Caller ID (Caller Line Identification).
When the Call history memory is full, the oldest number is deleted automatically to
provide space for a new entry.
GB
62
Page 63

CALL HISTORY
Call history menu
To save, copy, etc. numbers from the Call history, select the Call history
menu then press the Jog Dial.
Call
To call the displayed number.
Save
To save the new name in the Phonebook. Also, to copy the numbers
displayed in the Phonebook.
Change
To change the displayed phone number.
Delete
To delete the number and name displayed.
Voice memo
To play the saved Voice memo.
63
Operations
Main Menu
GB
Page 64

PREFERENCES , SECURITY
CALL SETTINGS < CALL TIME, COST <
Settings
Preferences
Choose Preferences from the Main menu settings and unpack the bag of
options to personalize your phone according to your preferences like
which language your phone speaks, even how the keys sound!
When you receive your phone, it has the following default settings.
item default reference page
Language Auto Language 64
Key click sound Key click Key click sound 65
Greeting message Off Greeting message 65
ScreenSaver Off ScreenSaver 65
Animation Stream Animation 65
Backlight On Backlight 65
LCD contrast — LCD contrast 65
Select network Auto Select network 65
Priority list — Priority list 65
Factory reset — Factory reset 65
Language
The Language setting allows you to select the language in which all
options appear.
Select Language from the Preferences menu and then use the Jog Dial to
select the appropriate language.
Select automatic and the display changes to the language set in the SIM.
64
Tip
• As a short cut, you can also select the language by pressing #00
(country code) #. Select your default language by pressing #0000#.
GB
Page 65

PREFERENCES , SECURITY
CALL SETTINGS < CALL TIME, COST <
Key click sound
You can adjust the key sounds to DTMF tones, Key click or Silent in the
Key sound settings.
Greeting message
The Greeting message menu allows you to turn on/off or to edit the
greeting text which appears when you turn your phone on.
Animation
You can choose one of 3 animations to display when you turn on the
phone.
ScreenSaver
You can set ScreenSavers only when the flip cover is open.
Backlight
Use this setting. You can choose to turn the Backlight of the keys and
display on or off. If the Backlight is switched off, your phone’s battery
charge lasts longer.
LCD contrast
You can set the contrast of the LCD to be brighter or darker.
Select network
This feature gives you the option to select a network automatically when
you turn on your phone or manually from a list of available networks.
Priority list
Choose Priority list to edit the automatic network selection priority list.
This feature is helpful for example to prioritize roaming partners, etc.
Add network to add a network operator to the list.
Move to adjust the order in which the names appear in the list.
Delete to remove a network operator from the list.
Factory reset
The Factory reset allows you to perform a master reset of all of your
phone’s settings back to the factory settings except Phonebook, Schedule
and Network or SIM card-based settings. Note that this will restart your
phone.
Operations
Main Menu
65
GB
Page 66

PREFERENCES , SECURITY
CALL SETTINGS < CALL TIME, COST <
Security
The Security options allow you to control who uses your phone as well as
their calling privileges. However, emergency calls (SOS) are always
possible regardless of the restrictions/codes you set.
PIN code
Your Network Operator/Service Provider provides a
PIN number with your SIM card. The menu offers
you the possibility to change your PIN code or to
enable/disable the PIN code prompt.
Important
You only have 3 attempts to enter the correct PIN code. If the third try fails, your
PIN is blocked and you must enter your PUK (Personal Unblocking Key) also
provided with your SIM card. You have 10 attempts to enter the PUK code
correctly. After the tenth wrong entry, your SIM card is completely blocked and you
must contact your Network Operator/Service Provider.
Enabling/Disabling the PIN code
When the PIN code is enabled, your phone prompts you to enter the
PIN code each time you turn on the phone.
1 Select PIN code from the Security menu and press the Jog
Dial to confirm your selection.
66
2 Select On/Off to enable/disable the PIN code.
3 Enter the PIN code and press the Jog Dial to confirm. The
PIN is enabled/disabled.
GB
Page 67

PREFERENCES , SECURITY
CALL SETTINGS < CALL TIME, COST <
Changing the PIN code
You can change your PIN code to any 4-8 digit number. Your PIN
code can only be changed if the PIN control is switched on.
1 Select PIN code from the Security menu.
2 Select Change.
3 Enter the old PIN code at the prompt and press the Jog Dial
(or
) to confirm your entry.
4 Enter your new PIN code (4-8 digits) and press the Jog Dial
to confirm.
5 Repeat the new PIN code entry for verification and press
the Jog Dial to confirm. If successfully verified, the new
PIN is effective immediately.
Note
If the PIN code is disabled, the risk of unauthorised use of your phone is greater.
The disabling of the PIN control is SIM card dependent. Contact your Network
Operator/Service Provider for details.
PIN2 code
PIN2 is a code provided by your Network Operator/Service Provider and
is required for access to some features such as FDN Phonebook or Call
costs. These features are not supported by all networks. Contact your
Network Operator/Service Provider for details.
67
Operations
Main Menu
GB
Page 68

PREFERENCES , SECURITY
CALL SETTINGS < CALL TIME, COST <
Barring service
Choose Call barring service from the Security menu to bar calls made from
your phone. This feature can be especially useful e.g. if you lend your
phone to someone else but do not want them to make international calls.
The restrictions in the Call barring service menu require the Barring
password; contact your Network Operator/Service Provider for details.
All outgoing calls
To restrict all outgoing calls except emergency calls (112, 999, etc.).
International
To restrict all international calls.
Int. except home
To restrict all outgoing international calls except those to your home
country.
All incoming calls
To restrict all incoming calls.
If abroad
To restrict all incoming calls when you are outside of the coverage
from your registered Network Operator e.g. when abroad.
Cancel all
To cancel all settings of Call barring service.
Barring password
Some of the restrictions in the Security menu are controlled in the network
e.g. Call barring. Your Network Operator/Service Provider provides a
(Network) password if you register for one or more of these network call
restrictions (Call barring).
Select Barring password from the Security menu to change the barring
password. Use the Jog Dial to enter the old password and then enter your
new password (4 digits). Enter the new password again and press the Jog
Dial.
GB
68
Page 69

PREFERENCES , SECURITY
CALL SETTINGS < CALL TIME, COST <
Note
If the message “Invalid” appears, the password you entered is incorrect.
If you have difficulties, please contact your Network Operator/Service Provider.
Personal lock
The Phone lock prevents unauthorized use of your phone if it is stolen or
if the SIM card is exchanged. The security code is not set when you buy
the phone. You can change the security code (0000) to any four-to-eight
digit code.
Note
A security code is required for the functions “Call time reset”, “Factory reset” and
“Delete all entries”.
On
If the phone lock is set to “on”, you are requested to enter the all
phone lock code every time you turn on the phone.
Off
The security code is not used.
If other SIM
This setting is necessary when you are using a different SIM card.
Change code
The security code is changed.
69
Operations
Main Menu
GB
Page 70

PREFERENCES , SECURITY
CALL SETTINGS < CALL TIME, COST <
Call time, cost
The Call time, cost option offers ways to track or control how long you are
on the phone and the cost of calls you have made. So that Call costs can be
used as a security measure e.g. when you lend your phone to someone,
you must use your PIN2 as a security code when you set or change
options. Some of the options in the Call costs menu may not be supported
in your network. Contact your Network Operator/Service Provider for
details.
Call time
To check the duration of your last call and total calls (incoming and
outgoing)
Select Call time from the Call Data menu. Rotate the Jog Dial to select the
time you want to check.
Call cost
To check the cost of your last call, total calls and remaining credit.
Select Call cost from the Call Data menu. Use the Jog Dial to select the cost
you want to check.
Call time reset
Select Call time reset and enter your security code at the prompt. Then
press the Jog Dial to reset the Call time.
Note
Enter the security code to reset the call time.
GB
70
Page 71

PREFERENCES , SECURITY
CALL SETTINGS < CALL TIME, COST <
Call cost setting
Select Charge rate to set the currency and price per unit which your phone
uses to calculate the call cost.
Charge rate
Select Charge rate and enter your PIN2 code at the prompt. Enter a
monetary denomination and the price per unit using the keys (To
enter a decimal point, press
or ).
Charge limit
Select Charge limit to set a unit figure at which your phone will not
allow any more phone calls to be made. (If you have selected Unit in
the Charge rate menu (see above), enter the Unit value. In case of
Currency, enter the Currency value.)
Select Call cost setting from the Call Data menu. Enter your PIN2 code
at the prompt, then set the charge limit using the Jog Dial.
Call cost reset
Select Call cost reset from the Call cost setting, enter your PIN2 code
and then reset the call cost.
Note
Reset the Call cost counter or enter a higher limit in order to be able to make phone
calls again.
71
Operations
Main Menu
GB
Page 72

PREFERENCES , SECURITY
CALL SETTINGS < CALL TIME, COST <
Call settings
You can set the related functions for calling.
Caller ID
Caller ID allows you to choose whether or not you want the party you are
calling to see your phone number. This feature may not appear in some
networks.
Select Caller number from the Call settings menu. Use the Jog Dial to
select On, Off or Default (network default).
Note
Some networks do not allow you to turn off Caller number. Contact your Network
Operator/Service Provider for details.
Call waiting
Set the Call waiting feature for your phone to alert you (beep) that a call is
waiting so that you don’t miss any calls. You may need to subscribe to this
service. Contact your Network Operator/Service Provider for details.
Select Call waiting from the Call settings menu. Use the Jog Dial to
activate Call waiting and then wait for the response to appear.
Tip
• See also the chapter During a Call for options such as Call hold for tips
on how to handle 2 calls at the same time.
Any key answer
Any key answer lets you answer a call by pressing any key.
Select Any key answer from the Call settings menu. Use the Jog Dial to
select On or Off.
Note
You cannot use , to answer a call.
GB
72
Page 73

PREFERENCES , SECURITY
CALL SETTINGS < CALL TIME, COST <
1 minute beep
You can turn on the 1 minute beep setting to be reminded (beep) in
1 minute intervals while you are on the phone.
Auto redial
The Auto redial setting offers you the option of automatically redialling an
engaged line until it is no longer busy. Select Off if you do not want to
have the Auto redial option appear each time you call a number which is
busy. This feature may not appear in some networks.
Note
An incoming call will interrupt the Auto redial feature.
Show call time
You can set whether or not to display the elapsed time of your call.
Auto answer
Auto answer programs your phone to answer an incoming call.
Auto answer only works together with the Handsfree car kit or the
Headset accessory.
DTMF tones
You can choose to turn on or off the DTMF tones which are emitted when
pressing a key during menu prompts e.g. during your Voice mail or other
services.
Flip call
Flip call allows you to answer incoming calls by opening the flip cover
and to end the call by closing it.
Operations
Main Menu
73
GB
Page 74

PREFERENCES , SECURITY
CALL SETTINGS < CALL TIME, COST <
Data services
You can send and receive faxes and data when the phone is connected to
the optional EasyCom or PC Card accessory (see also the operating
instructions of the accessory for use with the CMD-MZ5).
Speech then fax
Switch the Speech then Fax setting to On to make a phone call and
then send a fax. When the phone is not connected to the EasyCom or
PC Card accessory, Off should be selected.
Select Data services from the Call settings menu. Select Speech and
then Fax. Use the Jog Dial to select On or Off.
Serial speed
Select Data services from the Call settings and then select Serial speed.
Tip
• Select Automatic for automatic detection of the Serial speed. In order
for the phone to detect the Serial speed correctly, enter an “AT”
command, whereafter the phone responds with “OK”. For a list of
“AT” commands, please refer to the operating instructions supplied
with the PC Card or EasyCom accessory.
74
GB
Page 75

PREFERENCES , SECURITY
CALL SETTINGS < CALL TIME, COST <
Select line
Select line is a feature offered by some Network Operators giving you the
possibility to select between two separate phone lines on your SIM card.
This can be useful if for example you want to use your SIM card for both
business and private calls but you want to keep the costs separate. You
can even divert your business line to your Mailbox after business hours
and only receive private calls. This feature may not appear in some
networks. To make a line selection in standby mode, keep
pressed
and use the Jog Dial to make your selection. 1 or 2 will appear in standby
mode so that you always know which line is active.
For more details, contact your Network Operator.
Note
Some menu items may not appear in your phone in some networks unless you
specifically subscribe for them. The following settings (e.g. Divert, Security, Ringer
type, Call waiting and Voice mail) will apply to the currently selected line. Some
items such as your own number entry and Voice mail entry may not be edited. All
calls made will be billed to the currently selected line. The Call time, Call cost
settings, however, will always show the total time or cost of both lines.
75
Operations
Main Menu
GB
Page 76

VOICE MEMO BOX , RECORD VOICE
CAPTURE < ANSWERING MACHINE
<
Memo
The Memo function programs your phone to play the Answering message
when you receive an incoming call and record the message of the caller.
Tip
•You can save up to a total of 10 messages and Voice memos. Each
message and Voice memo can be up to 20 seconds long.
Voice memo box
Voice memo box allows you to play the recorded Voice memo.
1 Select Voice memo box from the Memo
menu.
2 Rotate the Jog Dial to select the already
recorded item. If the other party is a
subscriber of the number display service,
the number is displayed in the pop up
window.
3 Pressing the Jog Dial allows you to do the following.
Play to play the recorded Voice memo.
Stop to stop playing the Voice memo.
Delete to delete the saved Voice memo one by one.
76
Delete All displayed on the bottom line of the list to delete all
recorded Voice memos.
Tip
• In the standby mode, you can playback memos by pressing .
GB
Page 77

VOICE MEMO BOX , RECORD VOICE
CAPTURE < ANSWERING MACHINE
Record voice
You can save memos.
1 Select Record voice from the Memo menu.
2 Select Record and press the Jog Dial.
3 Select Stop when you finish your recording and then press the
Jog Dial.
Tips
• You can record the conversation during a call by pressing .
• In the standby mode, you can record a memo by keeping
pressed.
Answering machine
You can set the Answering machine.
It is possible to save an announcement message of up to 20 seconds.
Use the Jog Dial to Save, Play and Stop.
1 Select Answering machine from the Memo menu.
2 Rotate the Jog Dial to select the followings.
On to turn on the answering machine.
Off to clear the Answering machine setting. This setting
also turns off the ringer.
Announce to record the message on the Answering
machine.
Set delay to set the time from the ringing until the message
is announced.
In the Answering machine “On” display, press the Jog Dial and
select whom you want to answer by rotating the Jog Dial.
All calls to set the answering machine to answer all
incoming calls automatically.
Group to set the Answering machine to answer a specified
group.
Number to set the Answering machine to answer a
specified number.
<
77
Operations
Main Menu
GB
Page 78

VOICE MEMO BOX , RECORD VOICE
CAPTURE < ANSWERING MACHINE
<
3 Press the Jog Dial to confirm your selection.
Tips
• You can turn on the Answering machine in the standby mode by
keeping pressed. When the flip cover is closed, keep the Jog Dial
pressed to turn on the answering machine.
• If you want to turn on the Answering machine while the phone is
ringing, press . The caller hears your announcement. It only works
when you have already recorded an announcement message.
Important
• You are responsible for the confidentiality of the recording.
• You must ask the person you are on the phone with for permission before
recording.
Notes
• The Answering machine is not available when you are outside the service area.
• Before using the Answering machine, you have to record your announcement
message.
• Assign caller is not available for incoming calls that do not have a caller ID
function.
• If you select “0 seconds” in “Set delay”, the phone does not ring.
Capture
You can easily capture up to 30 pictures, like taking notes, from your
Browser, E-mail or Games and save them in the phone using the Capture
function.
1 Press the Jog Dial to select Capture and rotate the Jog Dial until
the desired picture is displayed.
2 You can use the following functions for the displayed picture.
Delete
To delete the displayed picture.
Edit title
To enter a title for the displayed picture or edit the title.
GB
78
Page 79

Extras Menu Operations
Your phone has the Extras menu consisting of “Music,” “Browser,” “Email,” “Games” and “MS viewer.”
To enjoy music, be sure to insert a “MagicGate Memory Stick” beforehand.
It is necessary to register with a service provider in order to use this
telephone as a browser or for E-mail. In some cases registration has
already been completed.
Check with your service provider in advance to confirm whether or not
this phone has access to these services. Also, check with your service
provider when using this phone overseas.
Note
When access to SIM card service is available, the menu is displayed in Extras. For
further details, you need to check with your network operator.
Selecting a menu item in Extras menu
1 Press the Jog Dial backward in standby
mode.
The Extras menu appears.
2 Rotate the Jog Dial to select the desired
menu.
3 Press the Jog Dial to enter the menu
choice.
79
GB
Operations
Extras Menu
Page 80

“MagicGate Memory Stick”
What is a “Memory Stick”?
A “Memory Stick” is a new compact, portable and versatile integrated
circuit recording medium with a data capacity that exceeds a floppy disk.
The “Memory Stick” is specially designed for exchanging and sharing
digital data among “Memory Stick” compatible products. Because it is
removable, the “Memory Stick” can also be used for external data storage.
Types of “Memory Stick”
There are two types of “Memory Stick”:
– “MagicGate Memory Stick” that is equipped with “MagicGate”
copyright protection technology.
– “Memory Stick” that is not equipped with “MagicGate” copyright
protection technology.
Use a “MagicGate Memory Stick” with this mobile phone.
A 64MB “MagicGate Memory Stick” is supplied with this product.
When you purchase a spare “Memory Stick” for your mobile phone, be
sure to ask for a “MagicGate Memory Stick,” which is distinguished by
the logo.
Cannot be usedCan be used
80
GB
Page 81

What is “MagicGate”?
“MagicGate” is a copyright protection technology for “MagicGate
Memory Stick” and compliant products, such as this mobile phone.
Authentication ensures that protected content is transferred only between
compliant devices and “MagicGate Memory Stick,” and that protected
content is recorded and transferred in an encrypted format to prevent
unauthorized copying or playback.
Note
is terminology denoting the copyright protection system developed
by Sony. It does not guarantee conversion among other media.
Formatting the “MagicGate Memory Stick”
The “MagicGate Memory Stick” is shipped with a FAT (File Allocation
Table) as the standard format.
To format the “MagicGate Memory Stick,” please use devices compatible
with the “MagicGate Memory Stick.” When using this mobile phone,
please follow the instructions in “Format stick” on page 92 to format the
“MagicGate Memory Stick.”
Handling the “MagicGate Memory Stick”
• You can use a “MagicGate Memory Stick” with a capacity of up to
128MB with this mobile phone.
• Only a “MagicGate Memory Stick” marked with the logo can be
used.
• Do not touch the “MagicGate Memory Stick” connector with your finger
or metallic objects.
• To avoid damaging data, do not
– release the “MagicGate Memory Stick” or unplug the AC power
adaptor during reading or writing of data.
– remove the battery pack during reading or writing of data.
– use the “MagicGate Memory Stick” in a location subject to static
electricity or electric noise.
• When the “MagicGate Memory Stick” erasure prevention switch is set to
“LOCK,” data cannot be recorded, erased or edited.
Operations
Extras Menu
81
GB
Page 82

• Do not attach any other material than the supplied label on the label
space. Attach the label so that it does not stick out from the proper
attachment location.
• Do not bend, drop or apply strong shock to the “MagicGate Memory
Stick.”
• Do not disassemble or modify the “MagicGate Memory Stick.”
• Do not allow the “MagicGate Memory Stick” to be exposed to moisture.
• Do not use or store the “MagicGate Memory Stick” in a location that is
subject to:
– Extremely high temperature, such as in a car parked in the sun
– Direct sunlight
– High humidity or places with corrosive substances
• If you format the “MagicGate Memory Stick” using the computer,
further operation with this mobile phone is not guaranteed.
Copyright Protection
Restrictions on sound data
Some sound data is distributed with restrictions on recording or playback
of the data to maintain the copyrights of its holders.
This mobile telephone employs copyright protection technology (Secure
Digital Music Initiative) that enables you to record or play music within
the limits determined by the copyright holders. For example, songs which
have playback period restrictions can be played back only within the
given period of time.
Note
The recorded music is limited to private use only. Use of the music
beyond this limit requires permission of the copyright holders.
Sony is neither liable nor responsible for any misuse of recorded communication.
You should only record conversations with the prior consent of the people involved.
You are solely responsible to any individuals and/or governing authorities for
communication recorded without the prior consent of the parties involved. Also, it is your
responsibility to obey and abide by all obligations, rules and laws, particularly those
regarding confidentiality.
GB
82
Page 83

Music
The Music function allows you to record sound data onto the “MagicGate
Memory Stick” and playback. Also, you can edit a title and artist of songs,
erase songs on the “MagicGate Memory Stick” or format the “MagicGate
Memory Stick,” etc.
Important
• SONY is not responsible for music files that are not saved on your computer or
mobile telephone due to unsuccessful recording from other devices or music
downloading, and for music files that are damaged or erased due to misuse or
malfunction of your computer, mobile telephone or other devices.
• The digital to digital recording which allows you to record the digital signal as it
is can be performed only for one generation determined by SCMS (Serial Copy
Management System). For example, an MD which was recorded with the digital
format directly from a CD cannot be recorded on this mobile telephone as a
digital input signal.
Notes
• You cannot make a call during playback or recording.
• You can receive an incoming call and a short message during playback but not
while recording.
• If the power of the audio device is turned off during digital signal recording, the
phone stops recording. If the power is turned off during analog signal recording,
the phone continues recording without sound. We recommend you connect the
audio device to mains.
• Depending on certain audio devices, such as DVD player and computer,
recording may not be performed.
• The sampling frequency of this phone is 41.1 kHz. If the sampling frequency of
the audio device is other than 41.1 kHz, recording cannot be performed.
• Depending on the audio devices, unwanted music files may be made while
recording. Remove them after recording.
• Do not remove or insert the “MagicGate Memory Stick” while recording.
• You cannot make an analog recording of less than 6 seconds.
• Disable the particular functions for playback, e.g., Repeat, Shuffle, Random on
the audio device when recording.
Operations
Extras Menu
83
GB
Page 84

Recording sound data onto a “MagicGate Memory Stick”
The “Record to Stick” function allows you to record sound data onto a
“MagicGate Memory Stick” from audio devices such as a CD, MD,
cassette tape, etc.
Before recording, connect the audio device to your phone. Also, we
recommend you set the “Rec Settings” consisting of “Bitrate”, “Sync.
record” and “Auto track mark” which are convenient and useful settings
for recording (see page 87).
Connecting an audio device
Connecting an audio device to this phone allows you to record sound data
onto the “MagicGate Memory Stick” in this phone.
Digital signal recording
1 Insert the “MagicGate Memory Stick” into the phone (see
page 17).
2 Connect the phone to the AC adaptor and the power plug
to mains (see page 15).
3 Connect the LINE IN (OPTICAL) jack on the phone to the
optical digital output jack on the audio device using the
supplied optical recording cable.
84
To Mains
GB
To the external
connector
AC adaptor
(supplied)
Optical
mini-plug
To the LINE IN
(OPTICAL) jack
Optical recording cable
(supplied)
Optical
mini-plug
e.g., CD player equipped
with the optical digital
output jack
To the optical
digital output
jack
Page 85

Analog signal recording
1 Insert the “MagicGate Memory Stick” into the phone (see
page 17).
2 Connect the phone to the AC adaptor and the power plug
to mains (see page 15).
3 Connect the LINE IN (OPTICAL) jack on the phone to the
line output jacks or headphone jack on the audio device
using the commercially available line cable (stereo miniplug y 2-pin plug) or the supplied analog audio cable.
To the line
output jacks
2-pin plug
To the
headphone
jack
Stereo
mini-plug
e.g.,
stereo system,
cassette deck,
not equipped
with the optical
digital output jack
e.g.,
radio-cassette deck
not equipped with
the optical digital
output jack
To the external
connector
To Mains
AC adaptor
(supplied)
Line cable
(commercially
available)
Stereo
mini-plug
To the LINE IN
(OPTICAL) jack
Stereo
mini-plug
Analog
audio cable
(supplied)
Notes
• As the maximum recording time of the “MagicGate Memory Stick” is 120 min.
(at 66kbps), please connect the AC adaptor to the phone when recording.
• You can only record the digital signal of 44.1 kHz sampling frequency.
• The analog signal recording may not be performed due to an incomplete
connection depending on the line cables which are commercially available.
However, the recording performance is confirmed using the following cable.
• Stereo mini-plug y 2-pin plug ––––––– SonyRK-G136+PC-63S
Operations
Extras Menu
85
GB
Page 86

Record to Stick
1 Enter the Music menu by pressing the
Jog Dial backward in playback mode,
and rotate the Jog Dial to select
“Record to Stick,” then press the Jog
Dial.
The display shows recording menu.
2 Press the Jog Dial to enter the
recording pause mode (
).
3 Press the Jog Dial to start recording.
Set the audio device to play.
Tips
•Up to 2 hours of music can be recorded on the supplied 64MB
“MagicGate Memory Stick”.
•The number of songs recorded differs depending on the playing time
of the song and the bitrate that you select for the recording.
Notes
• If the recording cable is disconnected during Sync. record, the phone stops
recording. However, if the line cable or stereo mini-plug cable is disconnected
during analog signal recording, the phone continues recording without sound
unless you stop the recording.
• If the Sync. record is set to “On” when recording a digital signal, set the phone to
the recording pause mode and start playback on a digital audio device.
Recording will start simultaneously with playback.
• When recording an analog signal, monitor the sound volume in recording pause
mode.
Warning
Do not remove the “MagicGate Memory Stick” while playing. Doing so
may damage recorded data on the “MagicGate Memory Stick.”
GB
86
Page 87

Rec Settings
The “Rec Settings” function allows you to set the recording sound quality
(Bitrate), use the synchronized recording (Sync. record) and insert the
track mark (Auto track mark) for each song.
Enter the Music menu by pressing the Jog Dial backward in playback
mode. Then rotate the Jog Dial to select “Rec Settings” and press the Jog
Dial.
Bitrate
You can set the sound quality for recording.
Bitrate Sound quality Maximum recording time*
132kbps High 60 min.
105kbps Middle 80 min.
66kbps Low 120 min.
* Approximate maximum recording time when using 64MB “MagicGate
Memory Stick.”
Notes
• Selecting a higher bitrate reproduces better sound quality but shortens the
recordable time.
• A maximum recording time shows a guide when all the songs to be recorded are
set to the same bitrate. If the bit rate differs for songs, the maximum recording
time will be different from that on the table.
Sync. (Synchronized) record
The phone automatically starts recording when a digital audio device
connected to this phone starts playback.
Auto track mark
When a sound muted part is detected, recording stops temporarily
and when a sound part is detected, recording starts with the next
track number.
87
GB
Operations
Extras Menu
Page 88

Playing back sound data
You can play sound data recorded on the “MagicGate Memory Stick.”
The continuous playing time is up to about 6 hours.
1 Select the Music in the Extras menu by
following the procedure on page 79.
The display shows the playback.
2 Press the Jog Dial to start playback.
3 To stop playback, press the Jog Dial.
Additional operations
The display shows the playback control icons (
These icons are displayed in stop mode. To display them in playback
mode, press the Jog Dial backward.
To
Go to the beginning of the
current track
Go to the previous track
Go to the next track
Go backward
Go forward
Operation of the Jog Dial
Rotate the Jog Dial to select and press the
Jog Dial once.
Rotate the Jog Dial to select and press the
Jog Dial repeatedly until the desired track
number appears.
Rotate the Jog Dial to select and press the
Jog Dial repeatedly until the desired track
number appears.
While playing, rotate the Jog Dial to select
and keep pressing the Jog Dial until you reach
the desired location.
While playing, rotate the Jog Dial to select
and keep pressing the Jog Dial until you reach
the desired location.
, , , ).
88
GB
Page 89

To
Stop
Adjust the sound volume level
Operation of the Jog Dial
Rotate the Jog Dial to select and press the Jog
Dial. To resume play, rotate the Jog Dial to select
and press the Jog Dial. Play starts from the
point where you stopped play.
While playing, rotate the Jog Dial. The sound
volume level can be selected from Level 0 to 10.
A few seconds later, the display returns to
playback mode.
Closing the flip
You can close the flip while playing. The display shows only the track
title and playing time (playback display with the Flip closed).
Answering an incoming call during playback
When you receive an incoming call during playback, you can answer
using the answering/ending call button on the remote.
• Incoming call
To answer: Press the answering/ending call button and speak into
the microphone on the remote.
To reject the call: Keep the answering/ending call button pressed.
• During a call
To end: Keep the answering/ending call button pressed for 2
seconds or more.
To hold: Press the answering/ ending call button. Press again to
resume.
Playing with the remote
You can start and stop playback by simply pressing the answering/
ending call button when the Browser or E-mail is not in use.
Note
When speaking into the microphone, maintain a distance to the microphone of no
more than 20 cm.
Warning
Do not remove the “MagicGate Memory Stick” while playing. Doing so
may damage recorded data on the “MagicGate Memory Stick.”
89
GB
Operations
Extras Menu
Page 90

Play Settings
The “Play Settings” function is used for playback. This allows you to set
the bass sound level (Bass), repeat mode (Repeat) and AVLS (Automatic
Volume Limiter System).
Enter the Music menu by pressing the Jog Dial backward in playback
mode. Then rotate the Jog Dial to select “Play Settings” and press the Jog
Dial. The “Play Settings” menu appears.
Bass
Bass function intensifies low frequency sound for richer quality audio
reproduction.
Setting Sound quality Display indication
Off Normal playback None
Level 1 Bass (moderate effect)
Level 2 Bass (strong effect)
Repeat
You can play songs repeatedly in three ways; repeat all, shuffle and
one.
Setting Playback mode Display indication
Off Normal playback None
All All tracks are played repeatedly.
Shuffle All tracks are played repeatedly
One The current track is played
in random order.
repeatedly.
AVLS
The AVLS function limits the maximum volume to protect your ears
from excessive volume and to prevent sound leakage.
Note
If you attempt to adjust the volume over a certain level when the AVLS function is
set to “Limit,” the display shows “AVLS.”
GB
90
Page 91

Other settings
List of Titles
The “List of Titles” function allows you to play a song by specifying its
title, edit a title/artist name and delete songs recorded on the “MagicGate
Memory Stick.”
Enter the Music menu by pressing the Jog Dial backward while in
playback mode but not playing.
If there are songs without a title, only the track number is displayed.
From the List of Titles, rotate the Jog Dial to select the title and press the
Jog Dial. Then select one of the functions below.
Play
The specified song plays.
Edit
You can edit a title and artist name for songs.
Select “Title” or “Artist” to be edited and press the Jog Dial. Enter the
title or artist name by referring to pages 27 to 30.
Tip
•You can view details of the sound data such as title, artist name and
playing time for each track by pressing the Jog Dial backward from the
List of Titles display.
Delete
You can delete a song or all the songs recorded on the “MagicGate
Memory Stick” as follows:
To delete a song
Select “Delete” and press the Jog Dial. Then select “Yes” and press the
Jog Dial.
To delete all the songs
Select “Delete all” from the end of the title list and press the Jog Dial.
Then select “Yes” and press the Jog Dial.
91
GB
Operations
Extras Menu
Page 92

Format stick
If you need to format the “MagicGate Memory Stick,” be sure to use the
“Format stick” function.
If formatted, all data previously recorded on the “MagicGate Memory
Stick” is erased. Be sure to check the data before formatting (data recorded
using other devices is also erased).
Notes
• Do not remove the “MagicGate Memory Stick” or disconnect the AC adaptor
while formatting.
• You cannot use a ”MagicGate Memory Stick” that is formatted by a computer.
• Even if you receive an incoming call while formatting, formatting the “MagicGate
Memory stick” is not interrupted.
• If the erasure prevention switch of the “MagicGate Memory Stick” is set to
“Lock,” you cannot format the “MagicGate Memory Stick.”
• The “MagicGate Memory Stick” which is supplied and also those which are
commercially available have already been formatted.
Stick info
You can get the “MagicGate Memory Stick” information. The display
shows the data amount, the number of recorded tracks and the total
recorded time.
92
GB
Page 93

Browser
You can visit various information sites on the Mobile Internet Service and
Intranet information of your company. It is possible to access a variety of
information such as news or weather reports from around the world, as
well as regular sites on the Internet.
Tip
•You can save the picture in the Capture memory while browsing (See
page 78). When the desired picture is displayed, press .
Notes
• Internet access is limited to the sites that are configured in HTML or WML.
WML’s site is accessed using Wap (the Wireless Application Protocol created for
Internet service through mobile phones).
• You cannot make phone calls while accessing the Internet.
Launching your browser
Press the Jog Dial after selecting the Browser from Extras menu.
Home
Access your homepage.
Launching the Browser from Favourites
Access, edit, and delete URL’s that are chosen as
Favourites.
To select Favourites press the Jog Dial while in the
Browser menu. A list of saved URLs is displayed.
Rotate the Jog Dial to select the URL, then press it
to display the following menu.
Note
To create a Favourite during a Wap session, enter “wsp://” and then the URL.
93
GB
Operations
Extras Menu
Page 94

Go :
Connect to the selected URL.
Move :
Change the order of your Favourites list.
Edit :
Edit the Favourites name and URL.
Delete :
Delete the Favourites.
Navigating in the Browser
Scroll through menu options (Hyperlinks and tag).
Jump to selected Hyperlink or highlighted button.
Exit from one link to a previous link.
Go back to the previous menu.
Change the options in the selection menu.
Open the Info menu.
94
GB
Page 95

Tip
To open the menu, press the while in the browser.
Home :
Access your home site.
Refresh :
Refresh the displayed page.
Add Favourites :
Save the current site.
Favourites :
Access a URL from Favourites.
Manual URL :
Access a URL by manually entering the address.
Quit :
Close your browser and return to standby mode.
Settings
To select settings press the Jog Dial while in the
Browser menu.
Be sure to make these settings before using this
service.
The complete range of settings is displayed. The
icon indicates the site that you have set as your
home site. To change your home site, select “Set home” from the
menu after you choose a site with the Jog Dial.
Select “Edit” and the following items can be set.
You may find your operator’s setting pre-sorted here.
Name :
Name of the service.
95
GB
Operations
Extras Menu
Page 96

Homepage :
Browser access to this URL when you select “Home”.
You do not need to type “http://”.
Server type :
Please select the content type. (WAP or HTML)
You can access the contents of both WAP and HTML servers with this
browser.
Bearer Service :
“Data” is used by most operators.
Provider
Dial-up number :
The phone number to dial-up your provider.
User name :
The user name to log on to your provider.
Password :
The password to access your provider.
Note
It is necessary to enter the Security code before the password screen
appears.
Refer to page 66 for details about the password and security code. The
default value is 0000.
Data call type :
ISDN (V110) and Analogue (V32).
96
GW server :
The numeric IP address of the gateway server on the Internet.
Security :
Set whether to use a secure connection (WTLS) or not.
This icon is displayed in a secure connection.
GB
Page 97

Service centre :
The number for the service centre that is designated when you select
SMS for your bearer service.
Proxy :
The proxy server that is set when you select HTML as the server type.
Detail
Timeout :
The maximum time limit of non-activity with the network before
the mobile automatically disconnects.
Cookies :
The cookie setting when HTML is selected.
DNS server :
The setting for DNS (Domain Name System) server.
Notes
• The items that can be set depend on the server type.
• Refer to page 31 for details on the Text edit.
To enter “.” press .
Closing the Browser
Press the end key to disconnect (this is only when the bearer service is
set to data). Pressing the end key or closing the flip cover also closes
the Browser.
97
GB
Operations
Extras Menu
Page 98

E-mail
You can send and read E-mail by accessing your office E-mail server or
your Internet service provider on the Internet (POP3 and SMTP are
supported).
Contact your service provider or operator directly for complete details for
setting information, as some service providers or operators do not provide
this service.
Be sure to make your settings before you start using E-mail.
Tip
•You can save the text data of the E-mail in the Capture memory as a
graphic data (See page 78). When the E-mail is displayed, press .
Note
The maximum size of E-mail that can be sent or received is 2 Kbytes, including the
header.
Reading E-mail
After selecting E-mail from Extras select “Read” to connect to your server
and display a list of incoming mail. Rotate the Jog Dial to highlight the Email that you want to read, press the Jog Dial to read it.
Next :
Read the next E-mail.
Prev :
Read the previous E-mail.
Reply :
Reply to the E-mail by pressing the Jog Dial after selecting the sender.
98
GB
Page 99

Writing E-mail
After selecting E-mail from Extras, select “Send” and you can compose an
E-mail.
To :
Enter the address.
Subject :
Enter the subject.
Body :
Compose the text of your E-mail.
Press the Jog Dial and select “Send” to send the E-mail.
Note
When entering an E-mail address you can use those stored in the phonebook.
Settings
To send and receive E-mail you need to make the following settings.
Enter your E-mail address correctly as indicated by your mail-server
manager or your provider.
Provider
Dial-up number :
The phone number to dial-up your provider.
User name :
The user name to access your provider.
Password :
The password to access your provider.
Note
It is necessary to enter the Security code before the password screen
appears.
Refer to page 66 for details about the password and security code. The
default value is 0000.
99
GB
Operations
Extras Menu
Page 100

POP3 server :
The address of the mail server for receiving E-mail.
SMTP server :
The address of the mail server for sending E-mail.
Data call type :
ISDN (V110) and Analogue (V32).
E-mail
User name :
The user name to access your mail server.
Password :
The password to access your mail server.
E-mail address :
Your E-mail address
Detail
POP3 port :
The number of the port for the POP3 mail server. It is normally the
regular 110.
SMTP port :
The number of the port for the SMTP mail server. It is normally the
regular 25.
Timeout :
Set the amount of time allowed to connect to your mail server.
DNS server :
Set the DNS server according to the provider.
Licensing
Part of the software included in this product is © Copyright STNC Ltd.
1994 - 1999 All rights reserved.
Part of the software included in this product is © Copyright Microsoft
Corporation 1999 - 2000 All rights reserved.
GB
100
 Loading...