

Page 1
Quick Reference
快捷參考
CECHH06
CECHH07
CECHH12
3-285-687-51(1)
Page 2
About the PS3™ system documentation
The PS3™ system documentation includes the following:
• Safety and Support
Before using the product, carefully read this document fi rst. It contains safety information
related to use of the PS3™ system, troubleshooting, specifi cations and other information.
• Quick Reference (this document)
This document contains information on setting up the PS3™ system, preparing for use and
basic hardware operations.
• User’s Guide (http://manuals.playstation.net/document/)
This online document is accessed through the Internet and contains detailed information
related to the use of the PS3™ system software ( page 29).
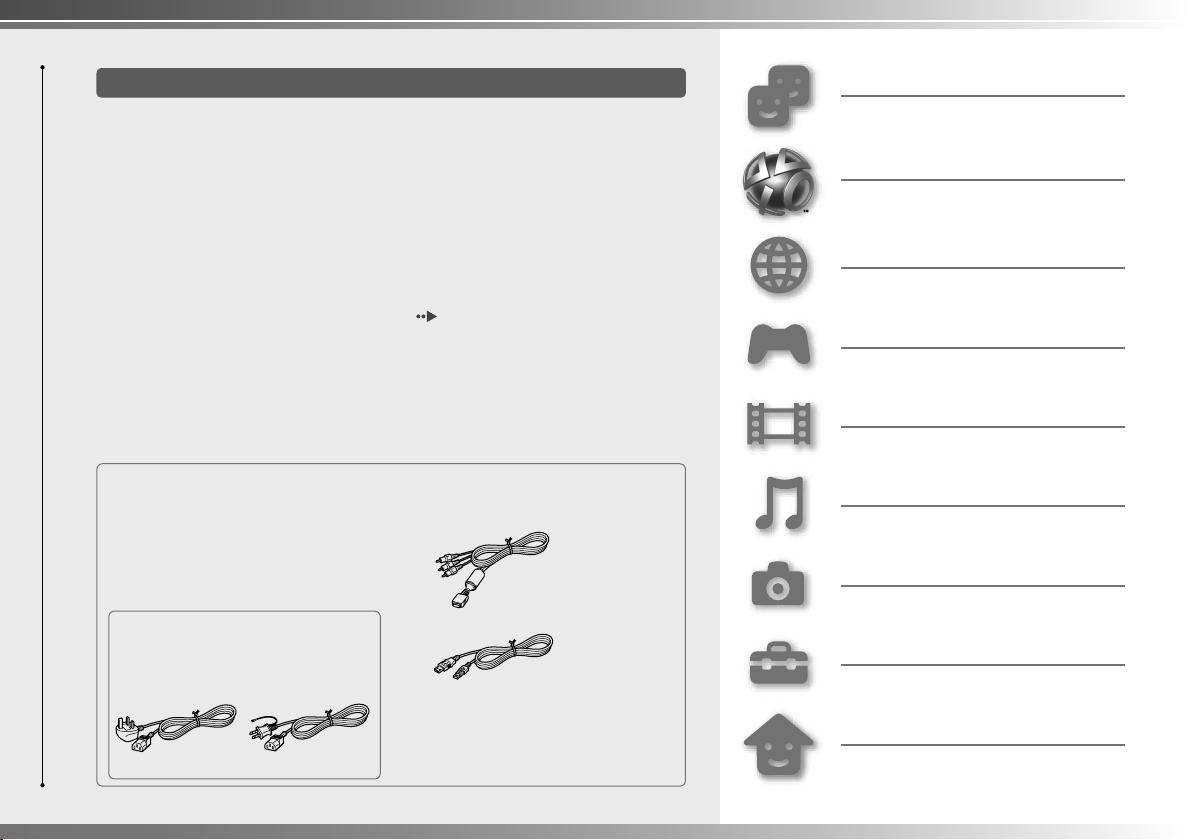
Check that you have all of the following items. If any items are missing, contact
the PS3™ service line at the number listed on your warranty card for assistance.
s PLAYSTATION®3 system
s SIXAXIS™ wireless controller
s Printed materials
s AC power cord
One of the following two cable types
is supplied with the system. The
plug confi guration varies depending
on the country or region.
s AV cable
s USB cable
Friends
Chatting and exchanging messages
PLAYSTATION®Network
Using PLAYSTATION®Network services
Network
Connecting to the Internet
Game
Playing games
Video
Playing video
Music
Playing music
Photo
Displaying images
Settings
Adjusting PS3™ system settings
Users
Selecting users to log in to the PS3™
system
2
Page 3
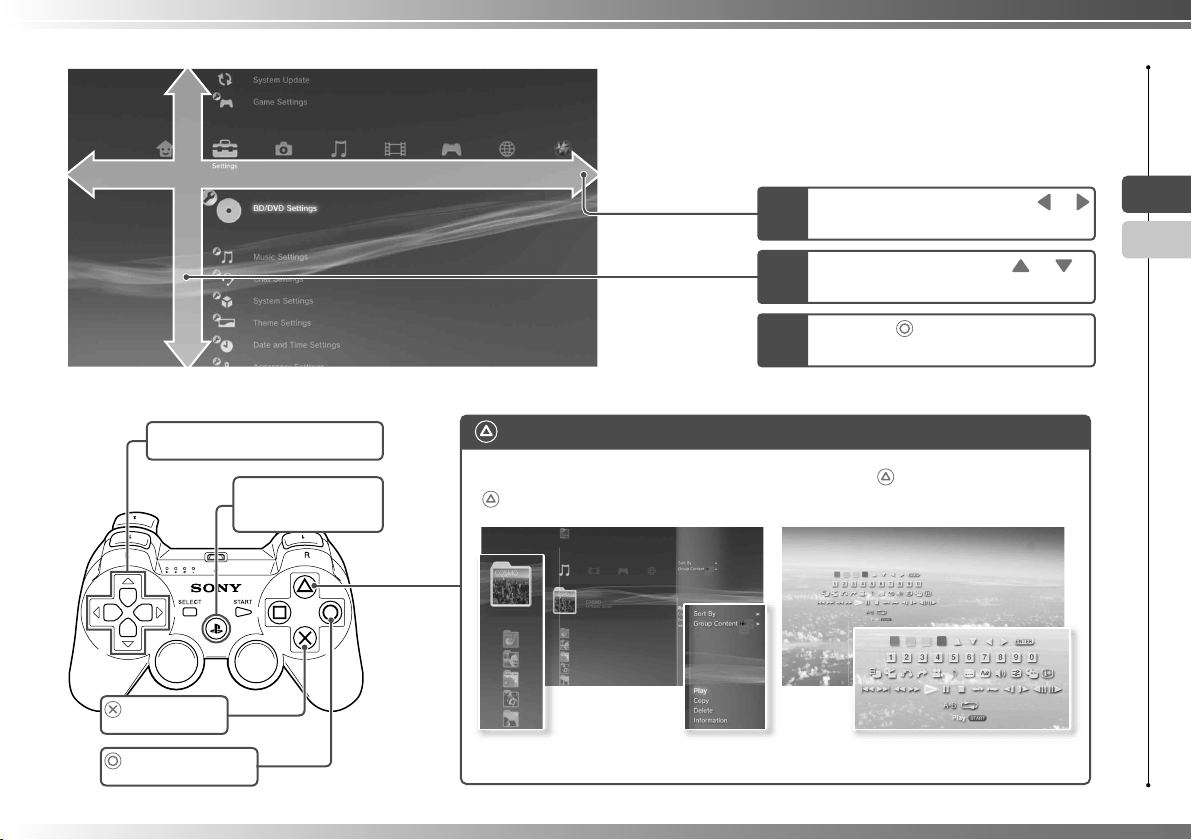
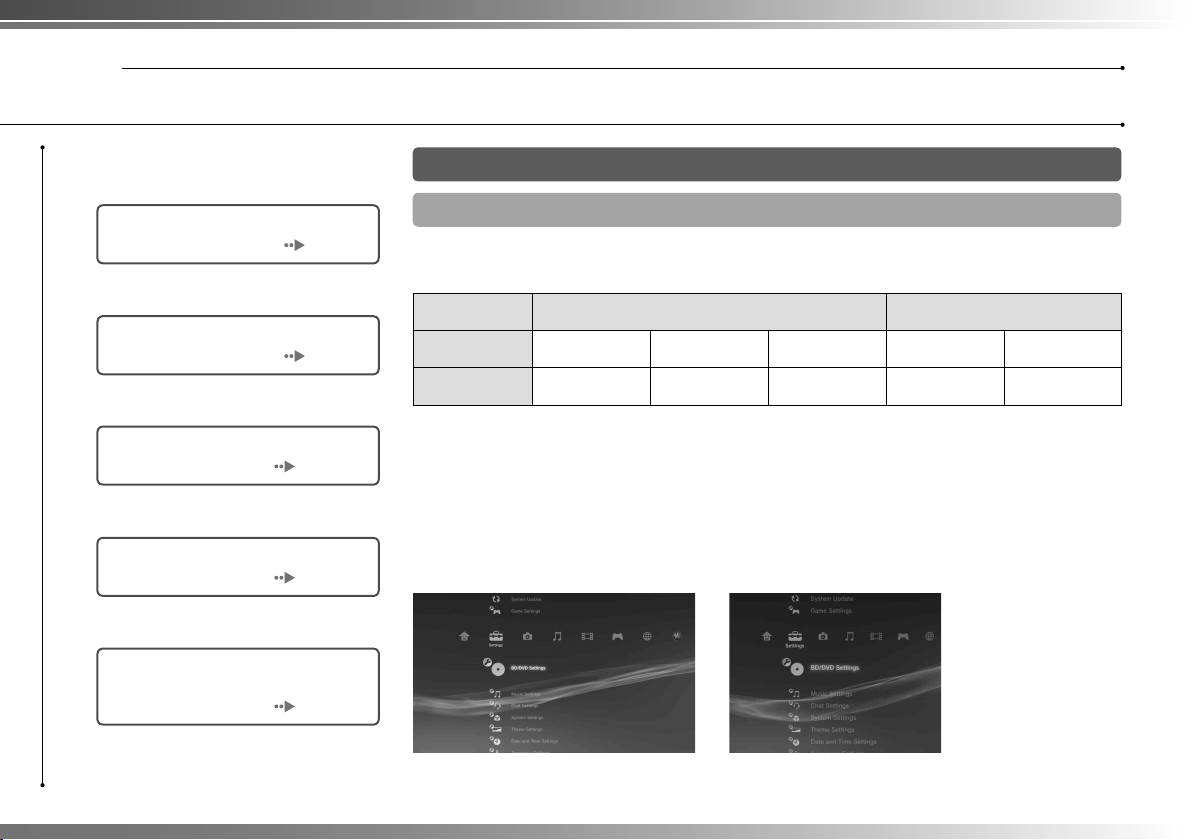
Item
Home menu
Category
Using "XMB" (XrossMediaBar)
The PS3™ system includes a user interface called "XMB"
(XrossMediaBar). The main screen for "XMB" is called the "home
menu".
Select a category using the or
1
button.
Select an item using the
2
button.
Press the
3
selected item.
button to confi rm the
or
EN
CT
Directional buttons:
Used to select on-screen categories/items
PS button:
Displays the home menu
Turns the system on/off
button:
Cancels an operation
button:
Confi rms the selected item
button: Displays the options menu/control panel
Selecting an icon and pressing the
button will display the options menu.
Icons Options menu
Pressing the
playback will display the control panel.
button during content
Control panel
3
Page 4
Getting started
01
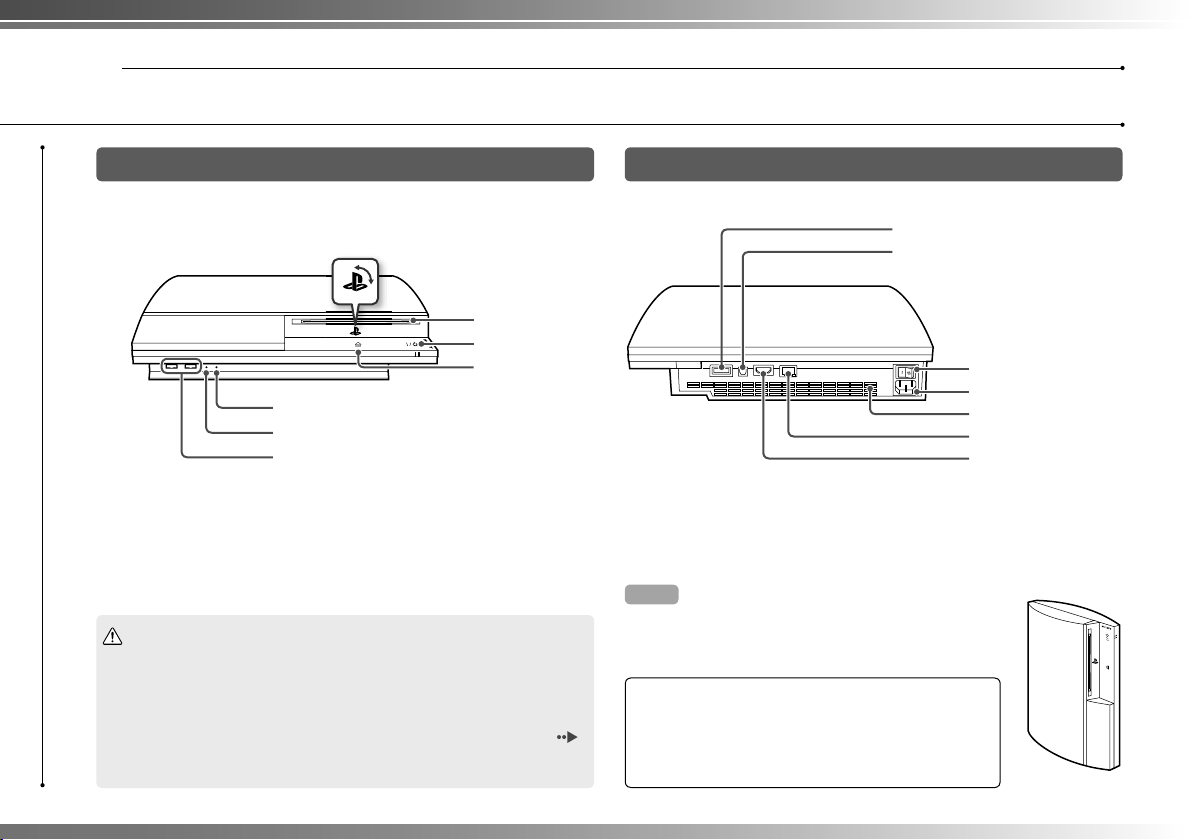
System front
• Do not use the system in a closed cabinet or other locations where heat
• If the system’s internal temperature becomes elevated, the power indicator
Part names
PS family logo
Can be rotated to match the
position of the system
Disc slot
Power button
Eject button
WLAN access indicator
HDD access indicator
USB connectors
Caution
may build up. Doing so may cause the system to overheat and may lead to
fi re, injury or malfunction.
will fl ash alternately in red and green. In this case, turn off the system (
page 16) and leave it unused for a while. After the system cools down,
move it to a location with good ventilation, and then resume use.
System rear
AV MULTI OUT connector
DIGITAL OUT (OPTICAL) connector
MAIN POWER switch
AC IN connector
Vent
LAN connector
HDMI OUT connector
Hint
The system can be set in a horizontal or vertical position.
Set as shown in the diagram at right when setting in the
vertical position.
Notice
Do not place the system in an area subject to excessive
dust or cigarette smoke. Dust build-up or cigarette
smoke residue on the internal components (such as the
lens) may cause the system to malfunction.
4
Page 5
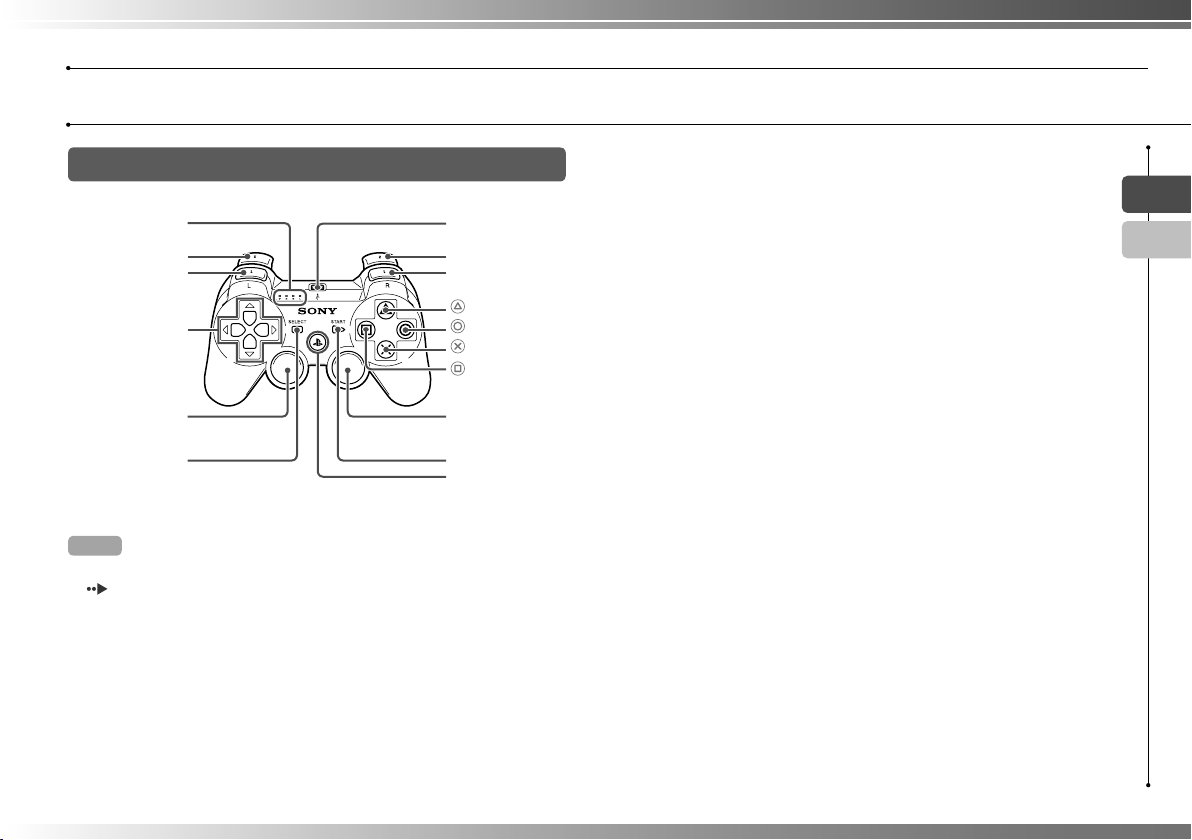
SIXAXIS™ wireless controller
Port indicators
L2 button
L1 button
Directional
buttons
USB connector
R2 button
R1 button
button
button
button
button
Getting started
Part names
EN
CT
Left stick/
L3 button*
SELECT button
* The L3 and R3 buttons function when the sticks are pressed.
Hints
• For details on the wireless controller, see "Using the wireless controller"
page 17).
(
• The SIXAXIS™ wireless controller that is supplied with this system is not
equipped with a vibration function.
Right stick/
R3 button*
START button
PS button
5
Page 6
Getting started
02
Setting up the PS3™ system
Procedure fl ow for setting up the
system
Step 1: Connect to a TV.
Page 6
m
Step 2: Connect digital audio
devices. Page 9
m
Step 3: Connect an Ethernet
cable. Page 10
m
Step 4: Connect the AC power
cord. Page 11
m
Step 5: Perform initial setup of
the system software.
Page 11
Step 1: Connect to a TV
Video output on the PS3™ system
The PS3™ system can output two types of resolution: HD and SD. Refer to the instruction manual
for the TV in use to check which video mode is supported.
(High Defi nition)
HD
Video mode *
Aspect ratio
*1 This number indicates the number of scan lines. Note that "i" stands for "interlace" and "p" stands for
"progressive". Using progressive results in high-quality video with minimal fl ickering.
2
*
SD resolution varies depending on the model of the PS3™ system in use and the content that is being played.
3
The video output setting on the system will display as "Standard (NTSC)".
*
4
The video output setting on the system will display as "Standard (PAL)".
*
1*2
1080p 1080i 720p
16:9 16:9 16:9
(Standard Defi nition)
SD
480p
576p
16:9
4:3
480i *
576i *
16:9
4:3
3
4
Screens showing the difference in resolution
HD screen SD screen
6
Page 7

Getting started
Setting up the PS3™ system
Video output cable types
The resolution displayed on the TV varies depending on the input connectors on the TV and the type of cable in use. Select a cable to match
the TV in use.
Cable type Input connector on the TV Supported video modes *1*
2
EN
CT
HDMI cable
(sold separately)
Component AV cable
(sold separately)
HDMI IN
connector
Component
VIDEO IN
connector
COMPONENT VIDEO IN AUDIO IN
YLRPR/CRPB/CB
S VIDEO cable
(sold separately)
S VIDEO IN
connector
AV cable
(supplied)
*1 Depending on the type of TV or content to be played, some video modes may not be supported.
2
*
SD resolution varies depending on the model of the PS3™ system in use and the content that is being played.
3
The video output setting on the system will display as "Standard (NTSC)".
*
4
The video output setting on the system will display as "Standard (PAL)".
*
VIDEO IN
connector
(composite)
S VIDEO L-AUDIO-R
VIDEO L-AUDIO-R
1080p, 1080i, 720p, 480p / 576p
1080p, 1080i, 720p, 480p / 576p, 480i *3 / 576i *
480i *3 / 576i *
480i *3 / 576i *
4
4
4
7
Page 8
Getting started
Setting up the PS3™ system
Connection methods
Caution
• Do not plug the AC power cord for the system into an electrical outlet until
you have made all other connections.
• The socket-outlet shall be installed near the equipment and shall be easily
accessible.
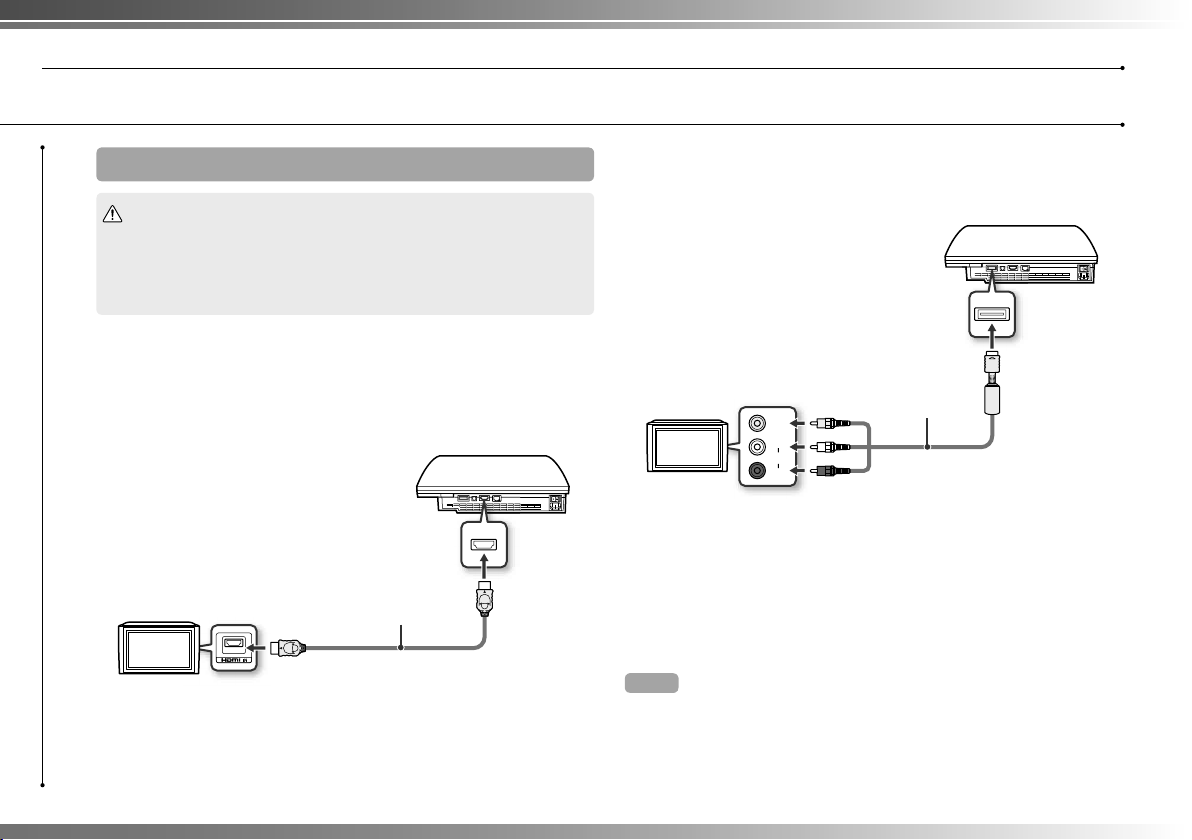
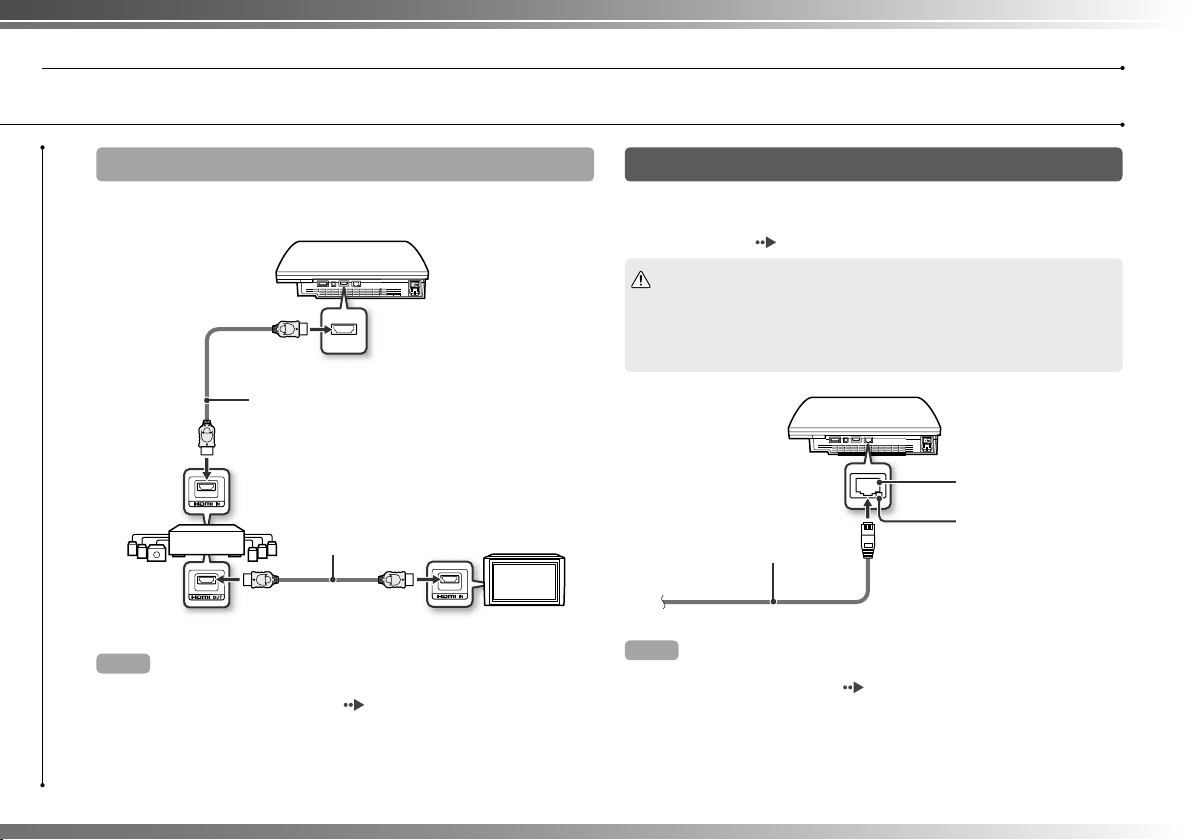
Connecting to a TV using an HDMI cable
Connect the system to the TV using an HDMI cable (sold separately).
An HDMI cable can output both video and audio and enables you to
enjoy digital-quality video and audio with minimal loss of picture
quality.
HDMI OUT connector
TV
HDMI IN connector
HDMI cable (sold separately)
Connecting with other types of cables
Connect cables other than the HDMI cable to the AV MULTI OUT
connector on the system.
AV MULTI OUT connector
TV
Example: When using the supplied AV cable
Hint
If you change the type of cable used to connect the system, video may not be
displayed. If this happens, turn off the system and then turn it on again by
touching the power button on the system front for at least fi ve seconds (until the
system beeps twice). The video output setting will then be reset to the standard
resolution.
VIDEO
L
AUDIO
R
VIDEO IN connector
AV cable (supplied)
8
Page 9
Getting started
Setting up the PS3™ system
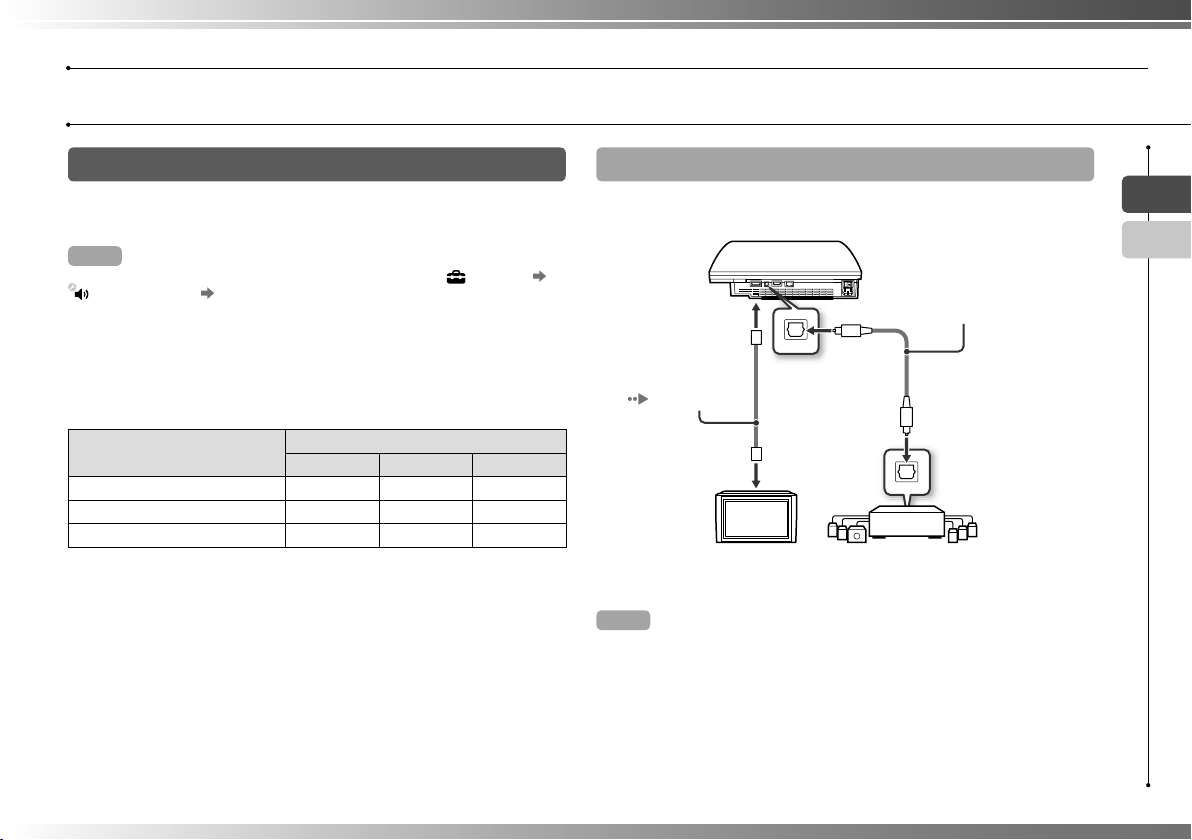
Step 2: Connect digital audio devices
You can connect audio devices that support digital audio output,
such as an AV receiver for home entertainment use.
Hint
When connecting a digital audio device to the system, go to (Settings)
(Sound Settings) "Audio Output Settings", and then adjust the settings as
necessary for the audio device.
Audio output on the PS3™ system
The supported channels may vary depending on the output
connector to be used.
PS3™ system output connectors
AV MULTI OUT connector
Digital out (optical) connector
HDMI OUT connector
*1 A device compatible with Linear PCM 7.1 Ch. is required to output 7.1 Ch.
audio from the HDMI OUT connector.
2
*
This system does not support output from the DTS-HD 7.1 Ch.
DTS-HD 7.1 Ch. audio is output from a 5.1 or lower channel.
Channels that can be used for output
2 Ch. 5.1 Ch. 7.1 Ch.
*
Connecting with an optical cable
Audio will be output from the optical cable. Video will be output from
the video output cable.
Optical cable for audio
(sold separately)
Video output cable
for the TV in use
page 7)
(
1*2
TV
Hint
Normally, audio cannot be output simultaneously from multiple output
connectors. For example, if your PS3™ system is connected to a TV via an
HDMI cable and to an audio device via a digital optical cable and "Digital Out
(Optical)" is set under "Audio Output Settings", audio will no longer be output
from the TV and will only be output from the audio device.
Digital audio device
such as an AV receiver
EN
CT
9
Page 10
Getting started
Setting up the PS3™ system
10
Connecting with an HDMI cable
Both audio and video will be output from the HDMI cable. You can
output the TV picture via an audio device.
HDMI cable (sold separately)
Digital audio device such
as an AV receiver
HDMI cable (sold separately)
TV
Hints
• If your TV is not equipped with an HDMI input connector, use a video output
cable of the correct type for your TV (
system directly.
• If a device is connected to the PS3™ system via an HDMI cable, do not turn
off the device while the system is turned on (power indicator is lit solid
green). Doing so may cause sound distortions or produce abnormal sounds.
page 7) to connect it to the PS3™
Step 3: Connect an Ethernet cable
Using a commercially available Ethernet cable, you can connect the
system to the Internet. For details on network settings, see "Adjusting
network settings" ( page 24).
Caution
The system supports 10BASE-T, 100BASE-TX and 1000BASE-T networks. Do
not connect a standard telephone line or other types of cords or cables that
are not compatible with the system directly to the LAN connector on the
system, as this may cause heat build-up, fi re or malfunction.
LAN connector
Commercially available
Ethernet cable
Hint
You can connect to the Internet without using an Ethernet cable. For details,
see "Using a wireless connection" (
page 25).
LAN access indicator
Page 11
Getting started
Setting up the PS3™ system
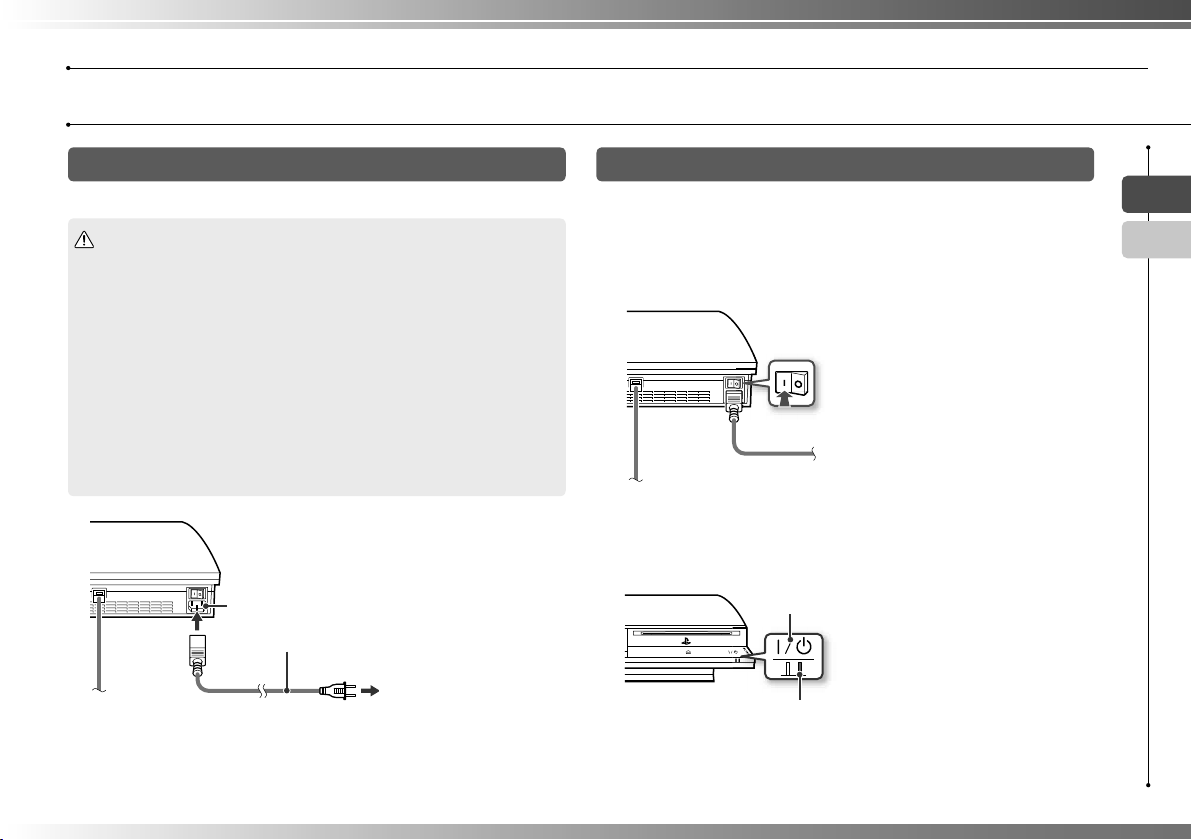
Step 4: Connect the AC power cord
Connect the AC power cord.
Caution
• Do not plug the AC power cord for the system into an electrical outlet until
you have made all other connections.
• The socket-outlet shall be installed near the equipment and shall be easily
accessible.
• If the supplied AC power cord includes a ground wire, follow the steps
below.
– Before plugging the AC power cord into the electrical outlet, be sure to
connect the ground wire fi rst.
– If the ground wire is not connected, it may cause electrical shock. If the
wire cannot be connected, contact an electrician to complete this step.
– When removing the AC power cord from the outlet, be sure to remove
the ground wire as the last step.
AC IN connector
AC power cord (supplied)
To the electrical outlet
Step 5: Perform initial setup of the system software
After turning on the system, perform initial setup.
1 Turn on the TV.
2 Turn on the main power switch.
Main power switch
The power indicator turns solid red to indicate that the system has entered
standby mode.
3 Touch the power button.
Power button
Power indicator
The power indicator turns green and the picture is displayed on the TV
screen.
EN
CT
11
Page 12
Getting started
Setting up the PS3™ system
12
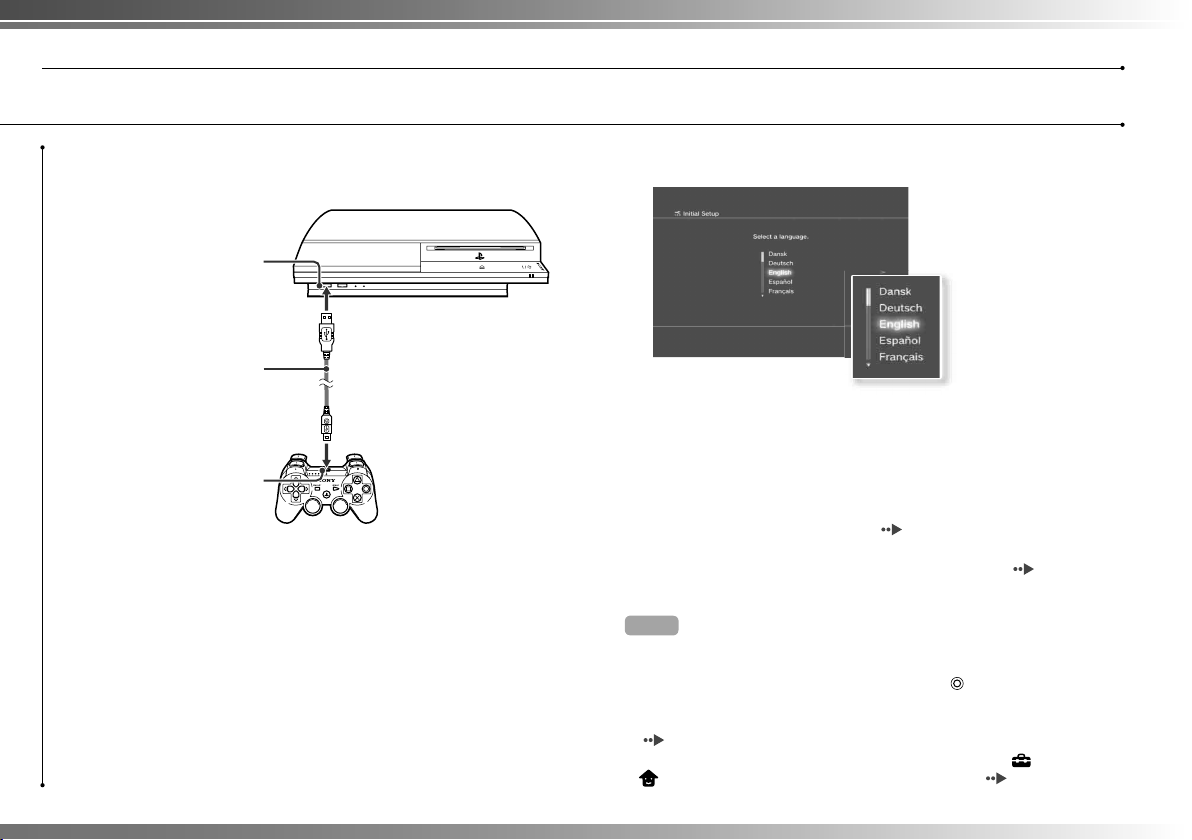
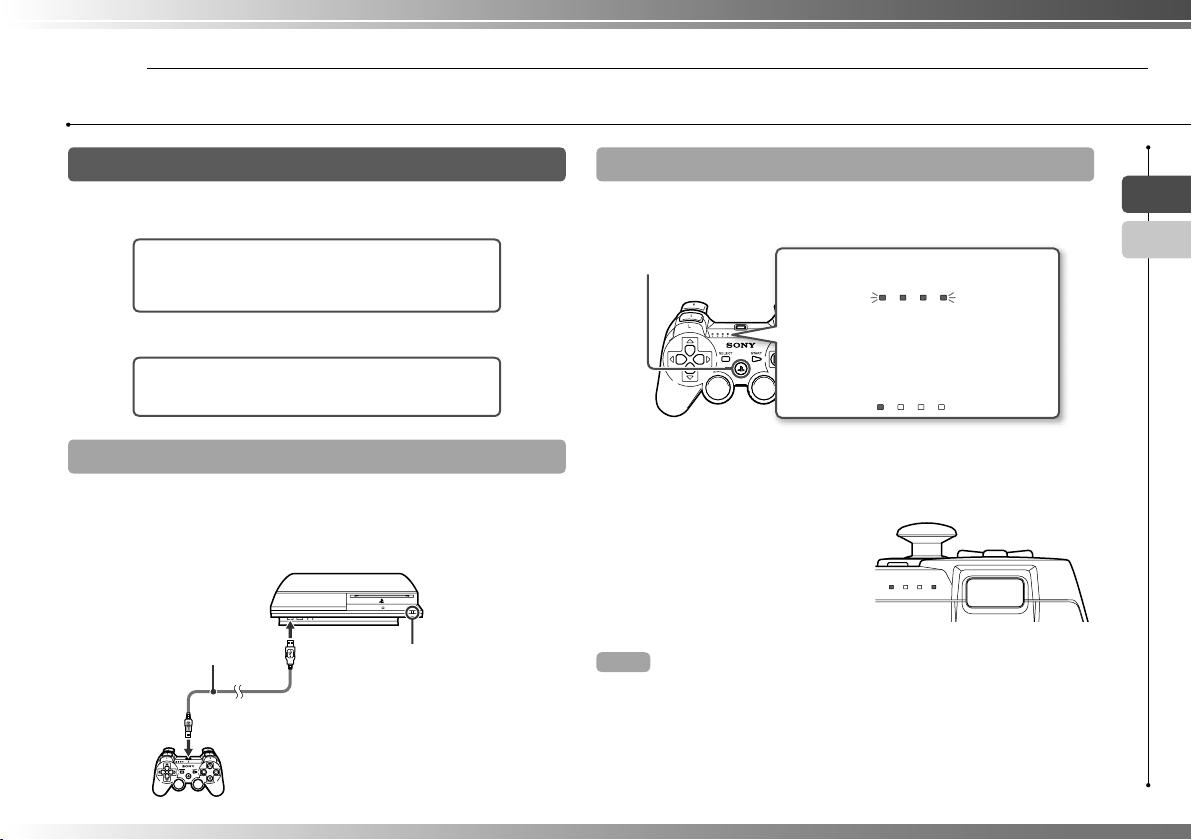
4 Connect the wireless controller to the system using a USB
cable.
USB connector
USB cable (supplied)
USB connector
5 Press the PS button of the controller.
The system will recognize the controller. After it has recognized the
controller, the initial setup screen will be displayed.
6 Perform initial setup.
Follow the on-screen instructions to enter settings for system language,
time zone, date and time and user name. After initial setup is complete, the
screen for setting up the Internet connection will be displayed.
When connecting using an Ethernet cable, basic settings will be selected
automatically if you follow the on-screen instructions. When connecting
over a wireless LAN, follow the instructions starting with step 4 under
"Setting up the Internet connection" (
After the settings have been completed, the home menu (
be displayed on the TV screen.
Hints
• When using an HDMI cable to connect the system to the TV, a screen for
changing the video output resolution will be displayed during initial setup. If
you select "Yes" on the screen and then press the
output resolution will be selected automatically.
• For details on entering text, see "Using the on-screen keyboard"
page 32).
(
• Settings entered during initial setup can be changed under (Settings) or
(Users). For details, refer to the online user’s guide (
page 26) to set up the connection.
page 3) will
button, the optimal
page 29).
Page 13
Getting started
Setting up the PS3™ system
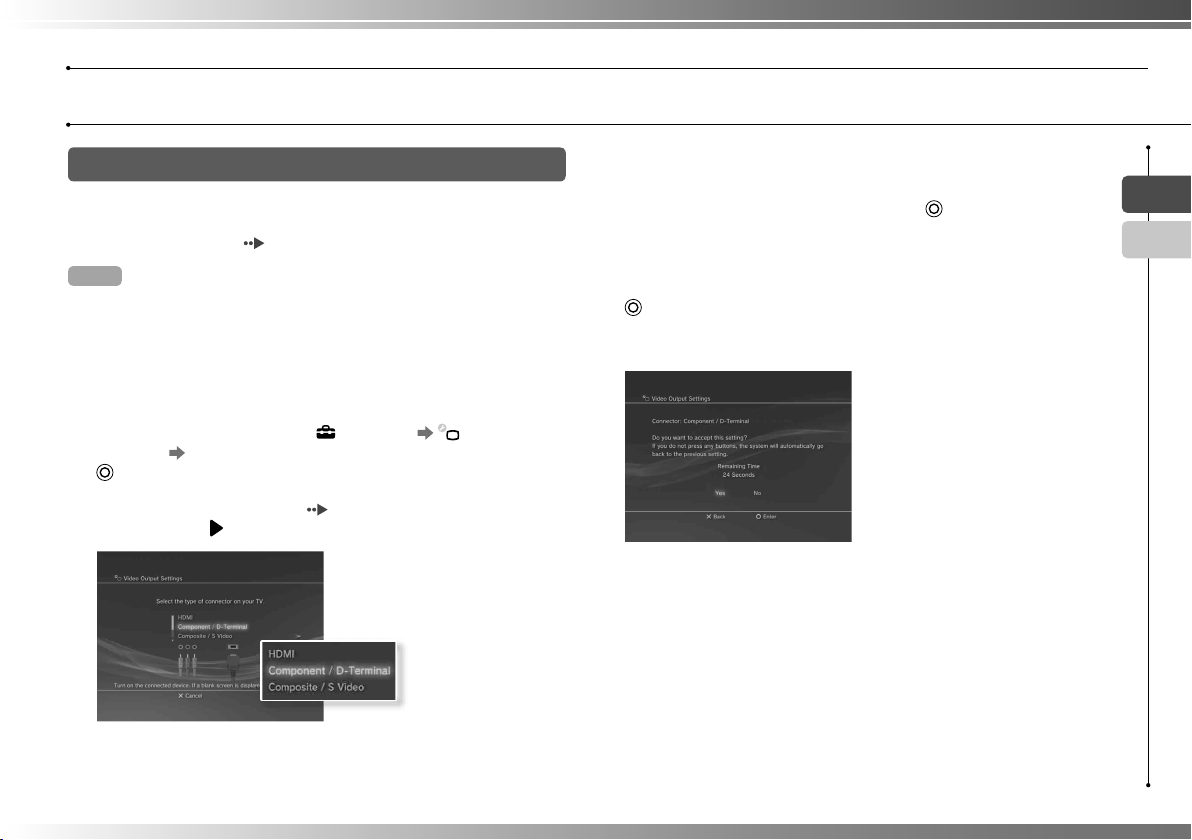
Adjusting video output settings
Depending on the type of cables and the connectors used, you may
need to adjust the PS3™ system’s video output settings to display
video at HD resolutions ( page 6) on a TV.
Hint
If video is not displayed on the TV, perform the following operations:
• Switch the video input of the TV to match the input connector used to
connect to the system.
• Turn off the system, and then turn it on again by touching the power button
on the system front for at least fi ve seconds (until the system beeps twice).
The video output setting will then be reset to the standard resolution.
1 From the home menu, select (Settings) (Display
Settings) "Video Output Settings", and then press the
button.
2 Select the input connector ( page 7) in use on the TV, and
then press the button.
If you select "AV MULTI / SCART", you must choose the type of output
signal on the next screen. In most cases, select "Y Pb/Cb Pr/Cr".
3 Confi rm the screen, and then press the button.
If you changed the connector in step 2, a screen for confi rming the change
will be displayed.
4 Confi rm the settings, select "Yes", and then press the
button.
If you changed the connector in step 2, a screen for confi rming the
settings will be displayed.
EN
CT
If you select "HDMI", you will have the option to choose "Automatic" or
"Custom" on the next screen. In most cases, select "Automatic", and video
output settings will be completed automatically.
13
Page 14
Getting started
Setting up the PS3™ system
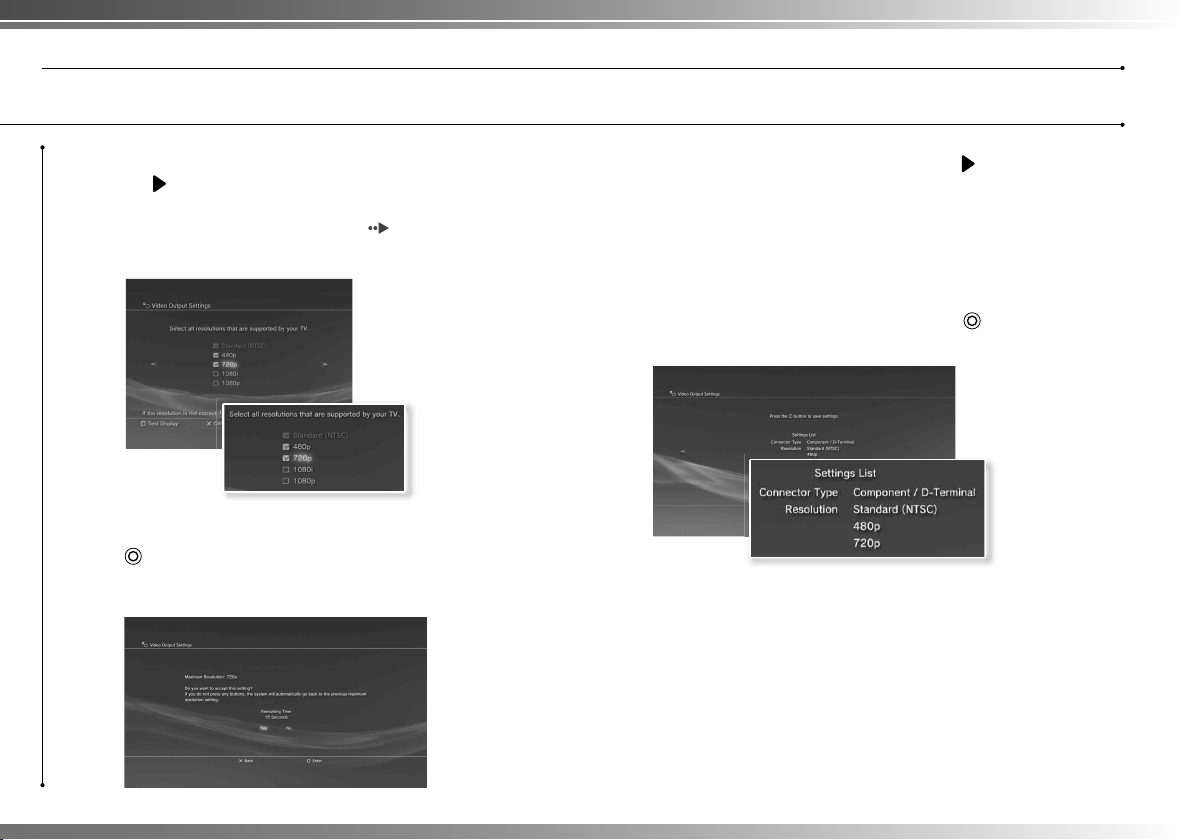
5 Select the resolutions supported by the TV, and then press
the button.
The resolution displayed on the TV varies depending on the input
connector and the type of cable used (
you selected will be used for video output. Depending on the connector
selected in step 2, this screen may not be displayed.
page 7). The highest resolution
6 Confi rm the settings, select "Yes", and then press the
button.
Depending on the connector selected in step 2 and the resolutions
selected in step 5, this screen may not be displayed.
7 Select the type of TV, and then press the button.
If you selected an SD resolution or "480p" in step 5, a screen for selecting
the TV screen size will be displayed. Adjust the setting to match the TV in
use.
If you selected "720p" or a higher resolution in step 5, the TV type will
automatically be set to 16:9 and the screen for selecting the TV screen size
will not be displayed.
8 Confi rm the settings, and then press the button.
The video output settings will be saved on the system.
14
Page 15
9 Adjust audio output settings.
Continue on to adjust audio output settings. Adjust settings to match the
TV or audio device in use.
If you select "HDMI", you will have the option to choose "Automatic" or
"Manual" on the next screen. In most cases, select "Automatic". If using a
cable other than an HDMI cable to output audio from the TV, select "Audio
Input Connector / SCART / AV MULTI". If using a digital optical cable to
output audio, select "Digital Out (Optical)" and choose the output format on
the next screen.
10 Confi rm the settings, and then press the button.
The audio output settings will be saved on the system.
Hint
You can adjust audio output settings under (Settings) (Sound
Settings)
"Audio Output Settings".
Getting started
Setting up the PS3™ system
EN
CT
15
Page 16
Basic operations
03
Turning the PS3™ system on and off
Using a wireless controller
Press the PS button.
PS button
Using the system button
1 Touch the power button.
Power button
Power indicator
2 Press the PS button of the wireless controller.
A controller number is assigned.
Turning off the system
Press and hold down the PS button for
one second or longer. When the message
"Turn Off the System" is displayed on the
screen, select it, and then press the
button.
Hint
Before using a wireless controller, you must fi rst
pair it with the system (
Power indicator status
Solid green
Flashing green
Solid red
Off
page 17).
System turned on
System turning off
System off (in standby mode)
Main power switch off
Turning off the system
Touch the power button for two seconds
or longer.
Notice
Do not use the main power switch on the
system rear to turn off a system that is not in
standby mode (power indicator red), as
doing so may cause data loss or damage to
the system.
16
Page 17
Basic operations
04
Using the wireless controller
Preparing for use
To use a wireless controller, you must fi rst register or "pair" the
controller with the PS3™ system and assign a number to the controller.
Step 1: Pair the system and the controller.
• When using for the fi rst time
• When using with a different PS3™ system
m
Step 2: Assign a controller number.
Every time the system is turned on
Step 1: Pair the system and the controller
When using the controller for the fi rst time or when using with a
different PS3™ system, you must fi rst pair the devices. If you turn on
the system and connect the controller using a USB cable, the pairing
will be completed automatically.
USB cable (supplied)
Check that the system is turned on
(power indicator is lit solid green).
Step 2: Assign a controller number
Each time you turn on the system, a number must be assigned to the
controller.
Press the PS button.
All of the port indicators fl ash.
1 234
m
When the controller has been assigned a
number, the port indicators for the
assigned number turn solid red.
You can connect up to 7 controllers at one time. The controller
number is shown by the number above the port indicators. For
numbers 5-7, add the numbers of the lit indicators.
Example: Controller number 5 has
been assigned.
Hints
• Pairing and assigning controller numbers can only be done when the system
is turned on (power indicator is lit solid green).
• When a paired controller is used with another PS3™ system, the pairing with
the original system is cleared. Pair the controller with the system again if the
controller has been used with another system.
• If the controller or the system is turned off, the port indicators on the
controller will turn off and the assigned number will be cleared.
1234
11234
EN
CT
17
Page 18
Basic operations
Using the wireless controller
Using the controller wirelessly
If you disconnect the USB cable, you can use the controller
wirelessly. To use it wirelessly, the controller’s battery must be
charged.
Hints
• The USB cable can be connected or disconnected while the controller and
the system are turned on.
• If the controller does not function, press the PS button, and then reassign the
controller number.
Charging the controller
With the system turned on (power indicator is lit solid green), connect
the controller to the system using a USB cable. The port indicators of
the controller fl ash slowly and charging begins.
When charging has completed, the port indicators stop fl ashing.
Hints
• The controller can be used while charging.
• Charge in an environment where the temperature range is between
10°C - 30°C (50°F - 86°F). Charging may not be as effective when performed
in other environments.
• The battery has a limited lifespan. Battery duration will gradually decrease
with repeated usage and age.
• Battery life also varies depending on the storage method, usage state,
environment and other factors.
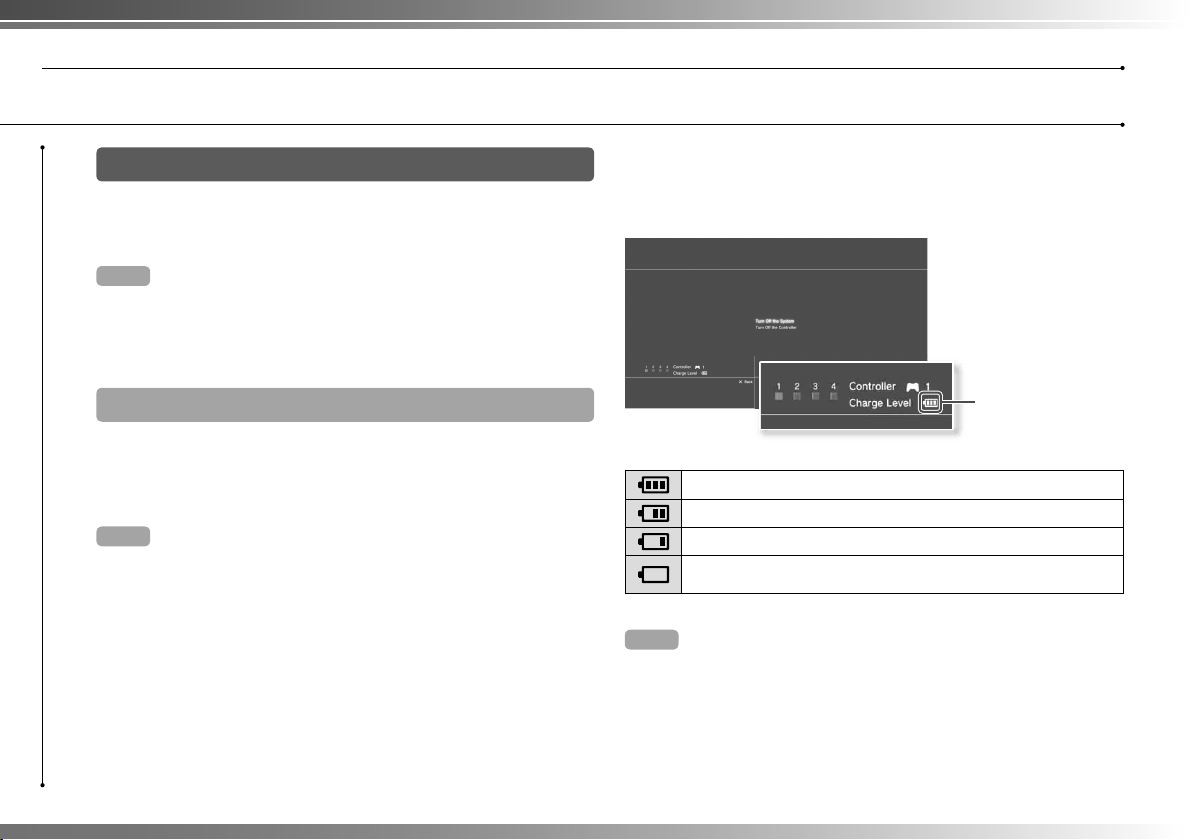
Battery charge level
If you press and hold down the PS button for more than one second,
you can check the battery charge level on the screen.
Charge level
The battery has plenty of charge.
The battery has started losing its charge.
The battery charge level is low.
The battery has no charge. The port indicators of the controller fl ash
rapidly. Charge the controller.
Hint
Depending on the environment or the conditions of use, the remaining charge
level may not display correctly and the battery duration may vary.
18
Page 19
Basic operations
05
Playing content
Blu-ray Disc (BD)/DVD/CD
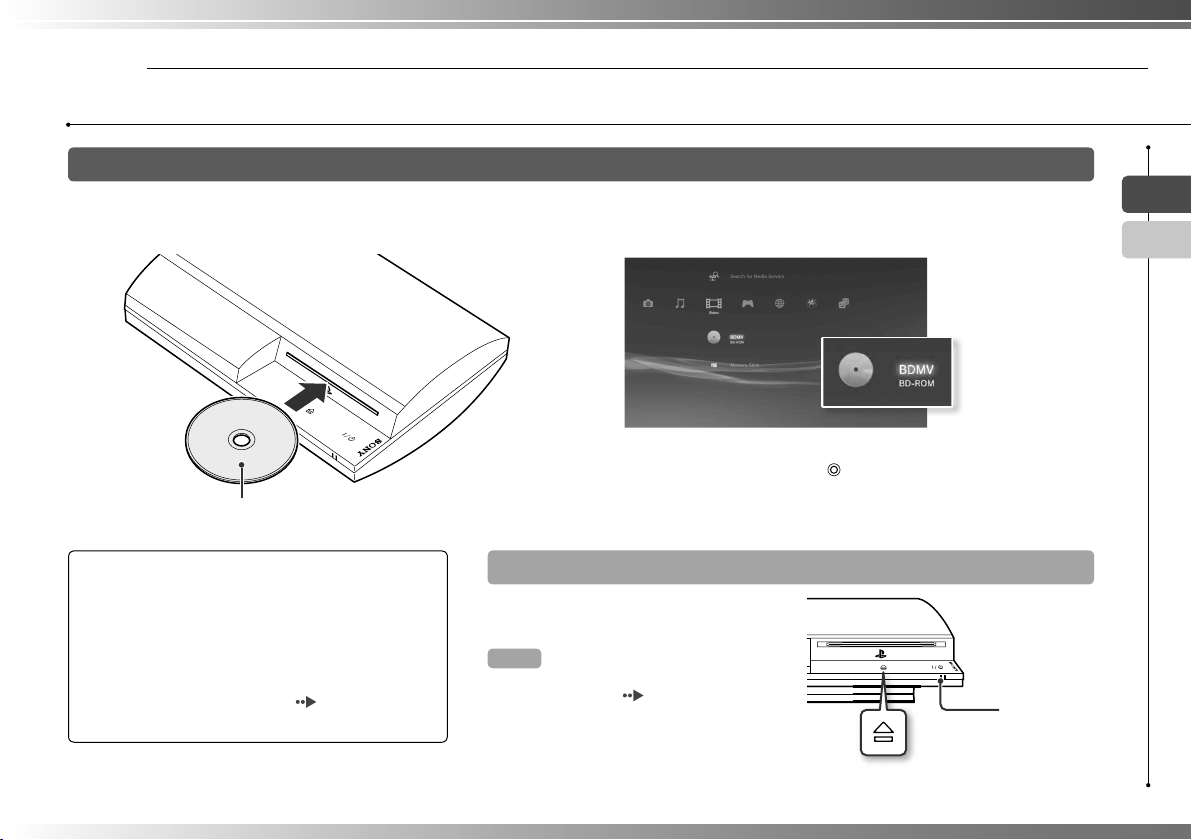
1 Insert the disc.
Insert the disc with the
label side facing up.
Notices
• Discs that are not compatible with the system cannot
be played. For details, refer to the "Safety and Support"
document.
• To play commercially available BD video software, in
some cases the encryption key* may need to be
renewed. The encryption key can be renewed when
the system software is updated (
* AACS (Advanced Access Control System) key
page 30).
2 An icon is displayed in the home menu, and playback of the
disc begins.
If the disc does not automatically start, select the icon for the disc from the
home menu, and then press the
Ejecting a disc
Stop playback, and then touch
the eject button.
Hint
For instructions on how to quit games,
see "Playing games" (
page 21).
EN
CT
button.
Eject indicator
Eject button
19
Page 20
Basic operations
Playing content
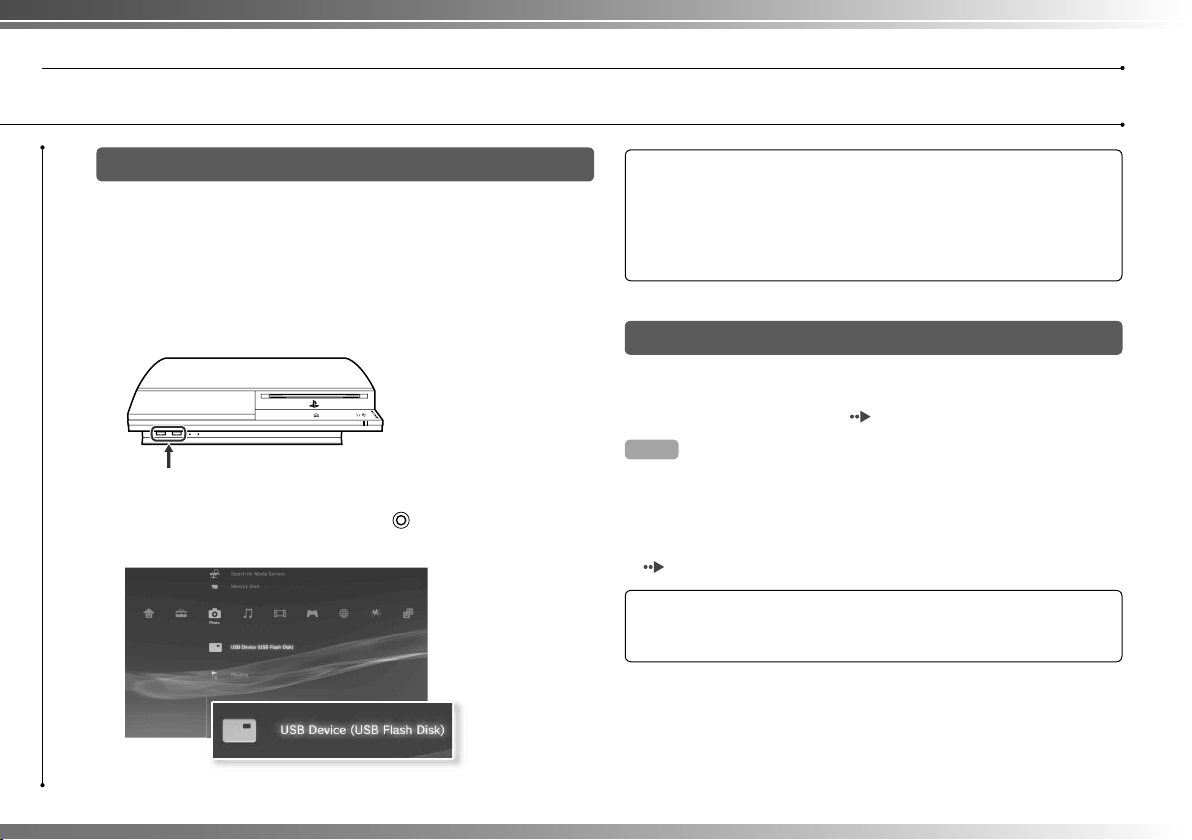
USB devices
You can connect external devices, such as devices that are
compatible with USB Mass Storage Class, using a USB cable.
Devices can be connected while the system is turned on. Refer also
to the instructions supplied with the device.
1 Connect the USB device.
An icon is displayed in the home menu.
External device such as a digital camera
2 Select the icon, and then press the button.
A list of playable content is displayed.
Notices
• Do not remove USB devices or turn off the system while data is being
saved, loaded or deleted. Doing so may cause data loss or corruption.
• When using a USB fl ash drive with a write-protect switch, do not operate
the switch when the device is connected to the system. Doing so may
cause data loss or corruption.
File formats that can be played or viewed
File formats that can be played or viewed on this system include
ATRAC, MP3, AAC, JPEG and MPEG-4. For the latest information,
refer to the online user’s guide ( page 29).
Hints
• Only fi les that are playable or viewable on the PS3™ system are displayed in
the column for the compatible category (Example: Image data is displayed in
the Photo category).
• Depending on the storage media, only a subset of the folders on the media
may be displayed. If you select "Display All" from the options menu
page 3), all folders saved on the media will be displayed.
(
Notice
For information on backing up fi les saved on the hard disk, refer to the
Safety and Support document.
20
Page 21
Game
06
Playing games
Games that can be played on this system
PLAYSTATION®3 format software
PlayStation
PlayStation
* Operation of all PlayStation
http://asia.playstation.com/status for the latest information on software that
can be played on this system.
format software
®
2 format software Cannot be played on this system
®
format software titles is not guaranteed. Visit
®
Can be played on this system *
Playing games
Starting a game
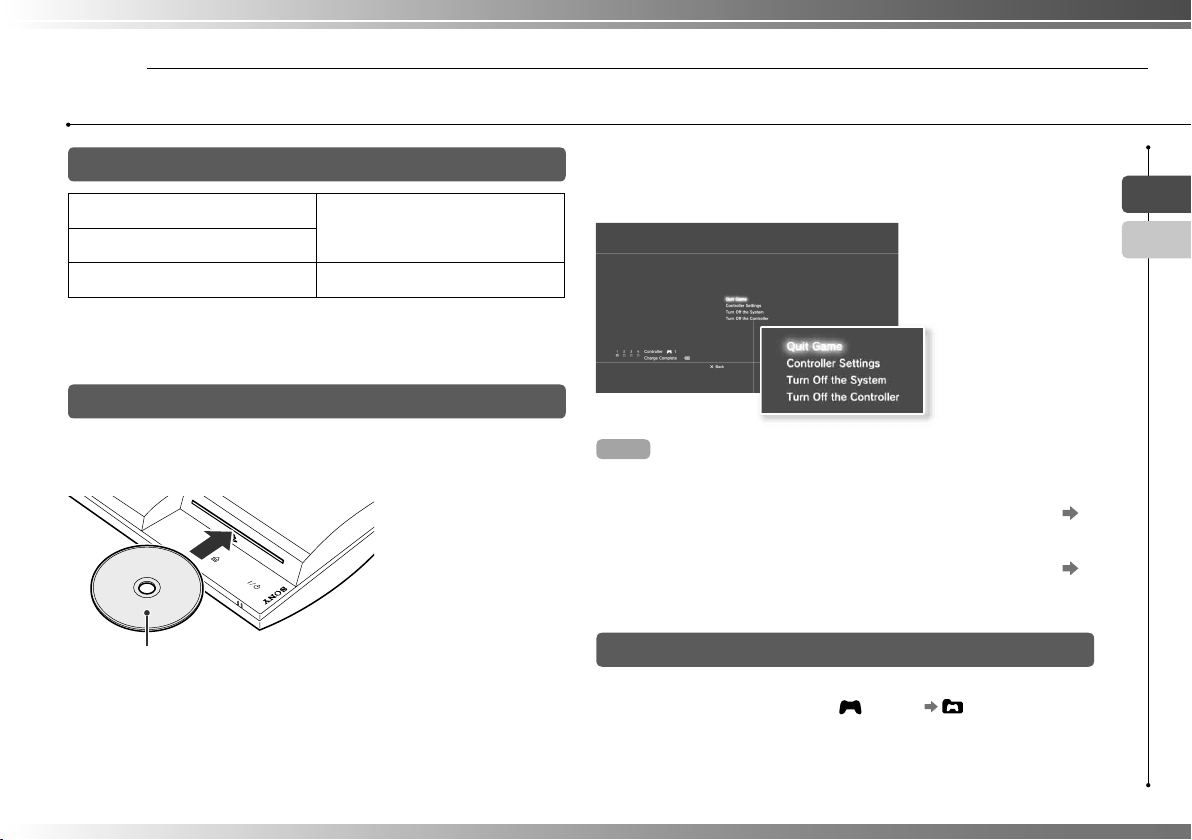
When you insert a disc, the game starts automatically.
Insert the disc with the label side facing up.
Quitting a game
During gameplay, press the PS button of the Wireless Controller. Then
select "Quit Game" from the screen that is displayed.
Hint
Use the following methods when playing software titles that specify the
controller mode and controller port to use.
− Press the PS button of the wireless controller, select "Controller Settings"
"Switch Analog Mode", and then select the appropriate mode. With some
software, the mode is switched automatically.
− Press the PS button of the wireless controller, select "Controller Settings"
"Reassign the Controller", and then assign the appropriate controller port.*
* You cannot assign controller port 2-D using this system.
Saved data for PS3™ format software
EN
CT
Saved data for PS3™ format software is saved on the system’s hard
disk. The data is displayed under (Game) (Saved Data
Utility).
21
Page 22

Game
Playing games
Saved data for PlayStation® format software
To save data from PlayStation® format software, you must create
internal memory cards on the hard disk and assign the cards to slots.
Step 1: Create an internal memory card.
Create an internal memory card within the hard disk as a replacement
for the actual memory card.
Memory card
Internal memory card (PS)
Step 2: Assign a slot.
Insert the internal memory card in the internal slot on the hard disk instead
of a memory card slot.
MEMORY CARD slots
Internal slots
22
Notice
This system does not support playback of PlayStation®2 format software.
Even if you create an internal memory card for PlayStation
software, you will not be able to use it to play games.
2 format
®
Step 1: Create an internal memory card
1 Select (Memory Card Utility (PS/PS2)) under (Game) in
the home menu, and then press the button.
2 Select (New Internal Memory Card), and then press the
button.
3 Select "Internal Memory Card (PS)", and then press the
button.
Assign a name for the internal memory card, and then save the card.
Hint
Even if you create an "Internal Memory Card (PS2)" in step 3, you will not be
able to use it to play PlayStation
2 format software.
®
Page 23

Game
Playing games
Step 2: Assign a slot
1 Select (Memory Card Utility (PS/PS2)) under (Game) in
the home menu, and then press the button.
2 Select the internal memory card that you want to use, and
then press the button.
Assign a slot.
Hints
• Depending on the software, slots may be preassigned. For details, refer to
the instructions supplied with the software.
• You can assign slots during gameplay. Press the PS button of the wireless
controller, and then select "Assign Slots" from the screen that is displayed.
Using saved data on a memory card
You can copy saved data on a memory card (8MB) (for PlayStation®2)
or a memory card to the hard disk using a memory card adaptor
(sold separately).
1 Select (Memory Card Utility (PS/PS2)) under (Game) in
the home menu, and then press the button.
2 Connect the memory card adaptor to the system, and then
insert the memory card.
The icon for (Memory Card (PS)) or (Memory Card (PS2)) is
displayed.
4 Select "Copy", and then press the button.
Follow the on-screen instructions to complete the operation.
Hints
• Even if you copy saved data from PlayStation®2 format software to the hard
disk, you cannot play a game using this saved data.
• If the amount of saved data to copy is large, the system will automatically
create multiple internal memory cards (PS).
• You can copy data saved on the hard disk to a memory card (8MB) (for
PlayStation
drive, etc.). Select the saved data, and then select "Copy" from the options
menu (
• Some saved data may have restrictions that prevent copying of the data. In
this case, select "Move" in step 4. The saved data is moved to the hard disk
and deleted from the memory card.
2), a memory card or a USB mass storage device (USB fl ash
®
page 3).
EN
CT
3 Select the saved data that you want to copy, and then press
the button.
23
Page 24

Network
07
Adjusting network settings
Using a wired connection
The following instructions explain how to connect to the Internet using
a commercially available Ethernet cable.
Example of a wired network confi guration
The network confi guration and connection method may vary
depending on the equipment in use and the network environment.
Network gateway device
such as an ADSL or
cable modem
ETHERETHER
To the Internet line
Router
Not necessary if the ADSL or cable
modem or other network device has
built-in router functionality
WAN LAN1 LAN2 LAN3 LAN4
Commercially available
Ethernet cable
PC
Preparing the required items
The following items are required for a wired connection to the
Internet.
• A broadband Internet connection via a device such as an ADSL or
cable modem (connection of multiple devices may require
additional hardware)
• Commercially available Ethernet cable
Hint
User is responsible for Internet service fees.
Setting up the Internet connection
Internet connection settings vary according to the network
environment and the devices in use. The following procedure
describes a typical setup.
1 Connect a commercially available Ethernet cable to the
system.
2 Select (Network Settings) "Internet Connection
Settings" under (Settings) in the home menu, and then
press the button.
When a message stating that the Internet connection will be terminated is
displayed, select "Yes", and then press the
button.
24
Hint
A router is a device that enables multiple devices to be connected to one
Internet line. A router is necessary if a PC and a PS3™ system will be
connected to the Internet at the same time using one Internet connection.
Page 25

Network
Adjusting network settings
3 Select "Easy", and then press the button.
A list of settings is displayed after the network confi guration is checked.
Easy
Custom
Basic settings are set automatically.
You can manually enter detailed settings information. For
information on settings, refer to the instructions supplied
by the Internet service provider or with the network device.
4 Check the settings, and then press the button.
For detailed information on network settings, refer to the online user’s guide
(
page 29).
Hint
For some network environments, screens for setting options such as PPPoE,
proxy server, and IP address may be displayed during this procedure. If this
happens, refer to the instructions supplied by your Internet service provider to
set the required items.
Using a wireless connection
The following instructions explain how to connect to the Internet using
a wireless connection.
Example of a wireless network confi guration
The network confi guration and connection method may vary
depending on the equipment in use and the network environment.
Network gateway device
such as an ADSL or
cable modem
ETHERETHER
To the Internet line
Hints
• An access point is a device that allows you to connect to a network
wirelessly.
• A wireless router is a device that adds access point functionality to a router.
A router is necessary if a PC and a PS3™ system will be connected to the
Internet at the same time using one Internet connection.
Access point or wireless router
WAN LAN1 LAN2 LAN3 LAN4
PCPC
EN
CT
25
Page 26

Network
Adjusting network settings
Preparing the required items
The following items are required to set up the system to connect
wirelessly to the Internet.
• A broadband Internet connection via a device such as an ADSL or
cable modem (connection of multiple devices may require
additional hardware)
• An access point or wireless router
• Settings information for the access point (SSID, WEP key, WPA key)
Hints
• SSID, WEP key, and WPA key are types of security information that are
required when connecting to an access point.
• When connecting to the Internet wirelessly, signal interference may occur
depending on the usage condition of the wireless network devices. If Internet
data transfer speed is decreased or the wireless controller does not function
properly, use a commercially available Ethernet cable to connect to the
Internet.
• Depending on the access point in use, you may need the MAC address for
your system when connecting to the Internet. You can fi nd the MAC address
for the system by going to
Information".
• User is responsible for Internet service fees.
(Settings) (System Settings) "System
Setting up the Internet connection
Internet connection settings vary according to the network
environment and the devices in use. The following procedure
describes a typical setup.
1 Check that an Ethernet cable is not connected to the system.
2 Select (Network Settings) "Internet Connection
Settings" under (Settings) in the home menu, and then
press the
When a message stating that the Internet connection will be terminated is
displayed, select "Yes", and then press the
button.
button.
3 Select "Easy", and then press the button.
Easy
Custom
Basic settings are set automatically.
You can manually enter detailed settings information. For
information on settings, refer to the instructions supplied
by the Internet service provider or with the network device.
26
Page 27

Network
Adjusting network settings
4 Select "Wireless", and then press the button.
5 Select "Scan", and then press the button.
The system will search for access points within range and display them as
a list.
Hint
When using an access point that supports automatic setup, select "Automatic"
and follow the on-screen instructions. The required settings will be completed
automatically. For information on access points that support automatic setup,
contact the access point manufacturers.
6 Select the access point that you want to use, and then press
the button.
An SSID is a code or a name that is assigned to the access point. If you do
not know which SSID to use or if the SSID is not displayed, contact the
person who set up or maintains the access point.
7 Confi rm the SSID for the access point, and then press the
button.
EN
CT
27
Page 28

Network
Adjusting network settings
8 Select the security settings as necessary, and then press the
button.
Security settings vary depending on the access point in use. To determine
which settings to use, contact the person who set up or maintains the
access point.
9 Enter the encryption key, and then press the button.
The encryption key fi eld will display an asterisk (*) for each character you
enter. If you do not know the key, contact the person who set up or
maintains the access point.
After you have fi nished entering the encryption key and the network
confi guration has been checked, a list of settings will be displayed.
10 Check the settings, and then press the button.
For detailed information on network settings, refer to the online user’s guide
(
page 29).
Hint
For some network environments, screens for setting options such as PPPoE,
proxy server, and IP address may be displayed during this procedure. If this
happens, refer to the instructions supplied by your Internet service provider to
set the required items.
28
Page 29

Network
08
If network settings are already completed, the PS3™ system will
automatically connect to the Internet when the system is turned on.
The connection will remain active as long as the system is on.
Connecting to the Internet
Using the Internet browser
1 Select (Internet Browser) under (Network) in the home
menu, and then press the button.
The Internet browser opens. A busy icon is displayed while the page is
loading.
Busy icon
Basic operations of the Internet browser
Directional buttons
Right stick
L1 button
START button
button
Move the pointer to a link.
Scroll in the desired direction.
Go back to the previous page.
Enter an address.
Switch between displaying and not displaying
the menu.
Viewing the user’s guide
You can use the Internet browser to view the online user’s guide for
the PS3™ system. Select (Online Instruction Manuals) under
(Network) in the home menu, and then press the button.
PLAYSTATION®3 system user’s guide
http://manuals.playstation.net/document/
The guide can also be viewed using your PC’s Web browser.
Creating a PLAYSTATION®Network account
By creating a PLAYSTATION®Network account, you can enjoy
chatting under (Friends) or download games or videos from
(PLAYSTATION®Store). Go to (PLAYSTATION®Network), select
(Sign Up for PLAYSTATION®Network), and then press the
button. The screen for creating an account will be displayed.
Hints
• An Internet connection is required to create an account.
• PLAYSTATION®Network service content may vary depending on the region.
EN
CT
29
Page 30

Updates
09
PS3™ system updates
By updating the PS3™ system software, you can add features and/or
security patches. Frequently update your system to use the latest
version of the system software. For the latest information on updates,
visit http://asia.playstation.com
Use the update data to overwrite the
existing system software.
Notices
• During an update, do not turn off the system or remove media. If an
update is cancelled before completion, the system software may become
damaged, and the system may require servicing or exchange.
• During an update, the power button on the system front and PS button of
the controller are inactive.
• Depending on the content, you may not be able to play without fi rst
updating the system software.
• After you have updated the system software, you cannot go back to an
earlier version.
The system software is updated.
Checking the system software version
You can check system version information by selecting (Settings)
(System Settings) "System Information". The current version is
displayed in the "System Software" fi eld.
Update methods
You can perform an update in any of the ways described below.
Network update
You can update by downloading the update data from the Internet.
The latest update is automatically downloaded.
Select
(Settings) (System Update) "Update via Internet".
Update using storage media
You can update using the update data saved on a USB fl ash drive or
other media.
Select (Settings) (System Update) "Update via Storage
Media".
Update using disc media
Update data may also be contained in some game discs and other
types of disc media. When you play a disc that contains update data,
a screen will be displayed to guide you through the update process.
Hint
If you cannot perform an update in any of the ways described above, contact
the PS3™ service line at the number listed on your warranty card for
assistance.
30
Page 31

Security settings
10
The PS3™ system includes a parental control feature. You can use
this feature to set a password and limit the playback of content
restricted by a parental control level (games, videos and other
content). By setting the parental control level on the system, you can
prevent the playback of restricted content by children.
Setting the parental control level
Changing the security settings
You can set a parental control level for games or Blu-ray Discs or
other content under (Settings) (Security Settings).
A password is required to change parental control settings. You can
set a password under
The password is set to "0000" in the default settings.
(Security Settings) "Change Password".
Parental control levels for games
You can set the parental control level for games under (Security
Settings) "Parental Control". Select from "Off" or one of 11 levels.
Play any content regardless of parental control level.
Off
Set the parental control level based on the number. Note that the lower
11-1
the number, the tighter the restriction.
The combination of the parental control levels of both the PS3™
system and the content determine whether the content can be
played.
Example: If the parental control level of the system is set to "7",
content with a level from "1" to "7" can be played on the system.
For the latest information about ratings, call the PS3™ service line at
the number listed on your warranty card for assistance.
Other security settings
You can set parental control limitations on content other than games
under (Security Settings), as described below.
BD Parental
Control
DVD Parental
Control
Internet Browser
Start Control
When playing a BD with parental control settings, restrict
playback based on the age you have set. The lower the
setting, the tighter the restriction.
When playing a DVD with parental control settings, restrict
playback based on the level you have set.
Select from "Off" or one of eight levels.
The lower the number, the tighter the restriction.
Restrict the ability to start the Internet Browser with a
password.
EN
CT
31
Page 32

Keyboard
11
Cursor
Using the on-screen keyboard
Displays predictive
options
Text entry fi eld
Operation keys
Displays when predictive
mode is on
Input mode display
List of keys
Keys that are displayed vary depending on the input mode and other
conditions.
Keys Explanation
Inserts a line break
Moves the cursor
Deletes the character to the left of the cursor
Inserts a space
Switches the input mode
Confi rms characters that have been typed and
exits the keyboard
Switches to the mini-size keyboard
/
/
Inserts a symbol or emoticon
Switches the type of characters to be input
32
Page 33

Entering characters
Using predictive mode, you can enter the fi rst few letters of the word,
which will bring up a list of commonly used words that start with these
letters. You can then use the directional buttons to select the word
that you want. After you have fi nished entering text, select the "Enter"
key to exit the keyboard.
Hints
• The languages you can use for text entry are the supported system
languages. You can set the system language by going to
(System Settings) "System Language".
Example: If "System Language" is set to "Français", you can enter text in
French.
• Emoticons can be entered only when creating a message under
(Friends).
Using an external keyboard
You can enter characters using a commercially available USB
keyboard or Bluetooth®-compatible keyboard. While the text entry
screen is displayed, if any key on the connected keyboard is
pressed, the text entry screen will enable you to use the keyboard.
Hint
You cannot use predictive mode when using an external keyboard.
(Settings)
Keyboard
Using the on-screen keyboard
EN
CT
33
Page 34

關於 PS3™ 主機基本⽂書
好友
PS3™ 主機基本⽂書包含以下項⽬:
• 安全與⽀援
使⽤本產品前,請先詳細閱讀本資料。本⽂件包含使⽤ PS3™ 主機時各項安全資訊、故障檢
修、規格簡介和其他資訊。
• 快捷參考(本⽂書)
本⽂件含有關於設置 PS3™ 主機、準備使⽤和基本硬件(硬體)操作的資訊。
• ⽤⼾指南(http://manuals.playstation.net/document/)
此線上⽂件需透過網際網路(互聯網)存取,且包含了使⽤ PS3™ 主機軟件時的相關詳細資
訊( 第 61 ⾴)。
請檢查和確認箱⼦內是否具備以下物品。如果⽋缺任何物品,請打電話給保證書
上記載的 PS3™ 消費者服務中⼼。
s PLAYSTATION
s SIXAXIS™ 無線控制器
s 說明書等
s 交流電源線
本主機僅隨附以下的其中⼀種連
接線。接頭之形狀會因國家或區
域⽽異。
3 主機
®
s AV 連接線
s USB 連接線
聊天與交換訊息
PLAYSTATION®Network
使⽤ PLAYSTATION®Network 服務
網路
連接網際網路(互聯網)
遊戲
玩遊戲
影像
播放影像
⾳樂
播放⾳樂
相⽚
顯⽰圖像
設定
調整 PS3™ 主機設定
34
使⽤者
選擇登⼊ PS3™ 主機的使⽤者
Page 35

項⽬
主選單
分類
使⽤"XMB"(XrossMediaBar)
PS3™ 主機含有稱為"XMB"(交叉媒體廊)的使⽤者介⾯。"XMB"
的主畫⾯稱為"⾃家選單"。
1
使⽤ 或 按鈕選擇分類。
2
使⽤
或 按鈕選擇項⽬。
EN
CT
⽅向按鈕:
⽤於選擇畫⾯上的分類/項⽬
PS按鈕:
顯⽰⾃家選單
開啟/關閉主機電源
按鈕:
取消操作
按鈕:
確認選擇的項⽬
按鈕:顯⽰選項選單/控制介⾯
選擇圖⽰後按下 按鈕會顯⽰選項選
單。
圖⽰ 選項選單
按下
3
播放內容時按下
⾯。
控制介⾯
按鈕確認選擇的項⽬。
按鈕會顯⽰控制介
35
Page 36

⼊⾨指南
01
主機前⾯
• 請勿放置在封閉的櫃⼦或其他可能積熱的場所中使⽤。否則可能會導致主機
• 主機內部溫度逐漸昇⾼後,電源指⽰燈會紅、綠燈交互閃爍。遇此情形時,
零件名稱
PS 家族徽章
可配合主機位置⽽縱橫旋轉
無線 LAN 讀取燈
HDD 讀取燈
USB 連接埠
注意
過熱並引發⽕災、⼈⾝傷害或故障。
請⽴即關閉主機電源(
後,才將主機搬移⾄通⾵良好的場所並繼續使⽤。
第 48 ⾴)並暫時中⽌使⽤。待主機確實冷卻
光碟槽
電源按鈕
退出按鈕
主機背⾯
AV 多重輸出端⼦
光纖數碼輸出端⼦
主電源開關
交流電源輸⼊端⼦
通⾵孔
LAN 連接埠
HDMI 輸出端⼦
提⽰
您可橫放或直放主機。垂直放置時,請遵循圖⽰正確放置。
重要
請勿將主機放置在有很多灰塵或⾹煙煙霧的場所。在內部
零件(例如透鏡)中堆積的灰塵或⾹煙煙霧,可能會導致
主機故障。
36
Page 37

SIXAXIS™ 無線控制器
埠指⽰燈
L2 按鈕
L1 按鈕
⽅向按鈕
USB 連接埠
R2 按鈕
R1 按鈕
按鈕
按鈕
按鈕
按鈕
⼊⾨指南
零件名稱
EN
CT
左操作桿/
L3 按鈕*
SELECT(選擇)
按鈕
* L3 按鈕和 R3 按鈕僅會於按壓操作桿時發⽣作⽤。
提⽰
• 有關無線控制器的詳細資訊,請參閱"使⽤無線控制器"( 第 49 ⾴)。
• 主機隨附的 SIXAXIS™ 無線控制器不對應震動功能。
右操作桿/
R3 按鈕*
START(開始)按鈕
PS 按鈕
37
Page 38

⼊⾨指南
02
主機的設置流程
步驟 1:連接電視
步驟 2: 連接數位⾳響裝置
步驟 3: 連接⼄太網路連接線
步驟 4: 連接交流電源線
步驟 5: 執⾏主機軟件的初始設
設置 PS3™ 主機
第 38 ⾴
m
第 41 ⾴
m
第 42 ⾴
m
第 43 ⾴
m
定
第 43 ⾴
步驟 1:連接電視
PS3™ 主機的影像輸出
PS3™ 主機可以輸出「HD」和「SD」兩種解析度。請參閱電視的使⽤說明書,以確認⽀援何種影像模
式。
(⾼解析度)
HD
影像模式*
縱橫⽐ 16:9 16:9 16:9
*1 數字代表掃描線的數⽬。請注意,"i"代表"隔⾏",⽽"p"代表"逐⾏"。使⽤逐⾏掃描可隨著最低程度的閃爍,呈
2
*
3
*
4
*
1*2
現⾼⽔準的影像品質。
SD 解析度的變換可能因您使⽤之 PS3™ 機型和播放之內容⽽異。
主機的影像輸出設定會顯⽰為"標準(NTSC)"。
主機的影像輸出設定會顯⽰為"標準(PAL)"。
1080p 1080i 720p
(標準解析度)
SD
480p
576p
16:9
4:3
480i*
576i*
16:9
4:3
3
4
顯⽰解析度差異的畫⾯
38
HD 畫⾯ SD 畫⾯
Page 39

影像輸出連接線的種類
電視顯⽰之解析度會因電視的輸⼊端⼦與使⽤之連接線種類⽽異。選擇與您使⽤之電視相容的連接線。
連接線種類 電視的輸⼊端⼦
HDMI 連接線(另售)
影像⾊差連接線(另售)
HDMI 輸⼊
端⼦
影像⾊差
輸⼊端⼦
COMPONENT VIDEO IN AUDIO IN
YLRPR/CRPB/CB
1080p, 1080i, 720p, 480p / 576p
1080p, 1080i, 720p, 480p / 576p, 480i*3 / 576i*
⽀援的影像模式*
⼊⾨指南
設置 PS3™ 主機
1*2
4
EN
CT
S 視頻連接線(另售)
AV 連接線(隨附)
*1 部分影像模式可能因電視類型與播放內容⽽出現不⽀援的情形。
2
SD 解析度的變換可能因您使⽤之 PS3™ 機型和播放之內容⽽異。
*
3
*
主機的影像輸出設定會顯⽰為"標準(NTSC)"。
4
主機的影像輸出設定會顯⽰為"標準(PAL)" 。
*
S 影像輸⼊
端⼦
影像輸⼊端⼦
(⼀體化)
S VIDEO L-AUDIO-R
VIDEO L-AUDIO-R
480i*3 / 576i*
480i*3 / 576i*
4
4
39
Page 40

⼊⾨指南
設置 PS3™ 主機
連接⽅式
注意
• 請先進⾏所有其他連接後再將主機的交流電源線插⼊電源插座。
• 應慎選靠近主機設備且容易插拔的電源插座。
使⽤ HDMI 連接線連接電視時
使⽤ HDMI 連接線(另售)將主機連接⾄電視。HDMI 連接線能同步輸
出影像與聲⾳,讓您享受到數碼(數位)品質的影像與聲⾳,且能讓影
像之失真現象降低⾄最低程度。
HDMI 輸出端⼦
電視
HDMI 輸⼊端⼦
HDMI 連接線(另售)
使⽤其他種類的連接線連接時
將 HDMI 連接線以外的連接線插⼊主機的 AV 多重輸出端⼦。
AV 多重輸出端⼦
電視
例:使⽤隨附的 AV 連接線時
提⽰
變更連接主機的連接線類型後,可能暫時無法顯⽰影像。遇此情形時,請關閉主
機電源,等待約 5 秒鐘後再碰觸主機前⾯的電源按鈕重新啓動,並按住該按鈕超
過 5 秒鐘以上(直到主機發出嗶聲)。影像輸出設定隨後會恢復爲標準解析度。
VIDEO
L
AUDIO
R
影像⾊差輸⼊端⼦
AV 連接線(隨附)
40
Page 41

⼊⾨指南
設置 PS3™ 主機
步驟 2:連接數位⾳響裝置
您可利⽤家庭娛樂⽤途之 AV 接收器(擴⼤機)等⽀援數碼(數位)聲
⾳輸出的⾳響裝置連接。
提⽰
將數碼(數位)⾳響裝備連接⾄主機時,需進⼊ (設定) (聲⾳設
"聲⾳輸出設定",並配合⾳響裝置之需要調整設定。
定)
PS3™ 主機的聲⾳輸出
⽀援聲道可能因使⽤之輸出端⼦⽽異。
PS3™ 主機的輸出端⼦
AV 多重輸出端⼦
光纖數碼輸出端⼦
HDMI 輸出端⼦
*1 需要與 Linear PCM 7.1 Ch. 相容的裝置,以透過 HDMI 輸出端⼦輸出
7.1 Ch. ⾳訊。
2
*
本主機不⽀援 DTS-HD 7.1 Ch. 的輸出。DTS-HD 7.1 Ch. ⾳訊僅能透過 5.1
或更低聲道輸出。
可使⽤之聲道輸出
2 Ch. 5.1 Ch. 7.1 Ch.
1*2
*
使⽤光纖連接線連接時
聲⾳將會透過光纖連接線,影像則會透過影像輸出連接線輸出。
光纖聲⾳輸出線(另售)
電視使⽤之影像輸出連
接線(
提⽰
聲⾳普通無法同時透過多重輸出端⼦輸出。例如,當您的 PS3™主機透過 HDMI
連接線連接電視機並經由數碼光纖線連接⾳響裝置,且"聲⾳輸出設定"調整為"光
纖"為,可能無法從電視機輸出並只能從⾳響裝置輸出聲⾳。
第 39 ⾴)
電視
AV 接收器(擴⼤機)等
數碼(數位)⾳響裝置
EN
CT
41
Page 42

⼊⾨指南
設置 PS3™ 主機
使⽤ HDMI 連接線連接時
HDMI 連接線能同步輸出影像與聲⾳,且您能透過⾳響裝置輸出電視圖
像。
HDMI 連接線(另售)
AV 接收器(擴⼤機)等
數碼(數位)⾳響裝置
HDMI 連接線(另售)
電視
提⽰
• 假如您的電視並未配備 HDMI 輸⼊端⼦,請為您的電視選擇正確的影像輸出連
接線(
• 使⽤ HDMI 連接線連接裝置與 PS3™ 主機時,請勿於啟動 PS3™ 主機電源時關
閉該裝置的電源(電源指⽰燈持續亮綠燈)。此舉可能會導致聲⾳失真或引發
異常噪⾳。
第 39 ⾴),直接與 PS3™ 主機連接。
步驟 3:連接⼄太網路連接線
使⽤市⾯上銷售的⼄太網路線,您可讓主機與網際網路(互聯網)連
線。有關網路設定之詳細資訊,請參閱"調整網路設定"
( 第 56 ⾴)。
注意
本主機⽀援 10BASE-T、100BASE-TX 和 1000BASE-T 網路。切勿使⽤⼀般家庭
的標準電話線或上述類型以外的連接線直接插⼊主機的 LAN 連接埠,否則可能
會導致過熱、⽕災或是故障。
LAN 連接埠
LAN 讀取燈
市⾯上銷售的⼄太網路連接線
提⽰
您可不使⽤⼄太網路連接線即直接與網路連線。相關的詳細資訊,請參閱"使⽤無
線連接"(
第 57 ⾴)。
42
Page 43

⼊⾨指南
設置 PS3™ 主機
步驟 4:連接交流電源線
連接交流電源線。
注意
• 請先進⾏所有其他連接後再將主機的交流電源線插⼊電源插座。
• 應慎選靠近主機設備且容易插拔的電源插座。
• 若隨附於箱中的交流電源線尚追加了地線,請遵守以下步驟。
- 將交流電源線插⼊電源插座前,需先確認是否已連接地線。
- 若未連接地線,可能會導致觸電。無法順利連接時,請聯絡電⼯或電氣技
師,以完成此項步驟。
- 從電源插座拔下交流電源線時,最後務必需確認地線是否已正確拔除。
交流電源輸⼊端⼦
交流電源線(隨附)
⾄電源插座
步驟 5:執⾏主機軟件的初始設定
啟動主機電源後,執⾏初始設定。
1 啟動電視。
2 啟動主電源開關。
主電源開關
電源指⽰燈持續顯⽰紅燈,代表主機已進⼊待機模式。
3 觸碰電源按鈕。
電源按鈕
電源指⽰燈
電源指⽰燈亮起綠燈,且電視螢幕上會顯⽰圖像。
EN
CT
43
Page 44

⼊⾨指南
設置 PS3™ 主機
4 使⽤ USB 連接線將無線控制器連接⾄主機。
USB 連接埠
USB 連接線(隨附)
USB 連接埠
5 按下控制器的 PS 按鈕。
主機將會開始辨識無線控制器。辨識控制器後,則會顯⽰初始設定畫⾯。
6 執⾏初始設定。
遵循畫⾯上的指⽰輸⼊「系統語⾔」、「時區」、「⽇期與時間」和「使⽤
者名稱」。初始設定完成後,螢幕會顯⽰設定網路的畫⾯。
當使⽤⼄太網路線,若您遵循畫⾯指⽰正確設定,初始設定會被⾃動選擇。
若使⽤無線 LAN,請遵循"設置網路連線"的步驟 4,(
必需之設定。
設定完成後,電視螢幕上會顯⽰⾃家選單(
提⽰
• 使⽤ HDMI 連接線連接主機和電視機時,變更影像輸出解析度的畫⾯將會以初
期設定的解析度顯⽰。選擇畫⾯上的"是"並按下
適切的輸出解析度。
• 有關輸⼊⽂字的詳細資訊,請參閱"使⽤螢幕中的鍵盤"(
• 進⾏初始設定時改變的設定可於進⼊
更(
第 61 ⾴)。
第 35 ⾴)。
(設定)或 (使⽤者)後⾃由變
第 58 ⾴)調整
按鈕後,即會⾃動選擇最
第 64 ⾴)。
44
Page 45

⼊⾨指南
設置 PS3™ 主機
調整影像輸出設定
您可能需要配合您連接的連接線和連接端類型,調整 PS3™主機的影
像輸出設定,才能讓電視機以 HD 解析度顯⽰影像( 第 38 ⾴)。
提⽰
螢幕上未顯⽰於任何影像時,請進⾏以下操作。
• 配合跟主機連接之連接端,調整電視機的影像輸⼊設定。
• 關閉主機電源後,按下主機前⽅的主電源按鈕超過 5 秒鐘以上(直到主機發出
兩次嗶聲),以重新啓動電源。影像輸出設定隨後會恢復爲標準解析度。
1 選擇主選單的 (設定) (顯⽰器設定) "影像輸出設
定"後,按下 按鈕。
2 選擇電視機⽬前使⽤的輸⼊端⼦( 第 39 ⾴)後,按下 按
鈕。
選擇"HDMI"後,您可進⼊下⼀個畫⾯選擇"⾃動"或"⼿動"選項。通常請選
擇"⾃動",如此即會⾃動完成影像輸出設定。
選擇"AV MULTI / SCART"後,您可進⼊下⼀個畫⾯選擇輸出訊號的種類。通
常請選擇"Y Pb/Cb Pr/Cr"。
3 確認畫⾯後,按下 按鈕。
若於步驟 2 時改變了電視機的連接端,則此時會顯⽰確認變更的畫⾯。
4 確定設定後,選擇"是"並按下 按鈕。
若於步驟 2 時改變了電視機的連接端,則此時會顯⽰確認設定的畫⾯。
EN
CT
45
Page 46

⼊⾨指南
設置 PS3™ 主機
5 選擇電視機的解析度後,按下 按鈕。
電視機顯⽰的解析度會因輸⼊端⼦和使⽤的連接線種類⽽異( 第 39
⾴)。會適⽤影像輸出設定時選擇的最⾼解析度。於步驟 2 選擇某些端⼦
後,可能不會顯⽰此畫⾯。
6 確認設定內容後,選擇"是"並按下 按鈕。
於步驟 2 選擇某些端⼦或於步驟 4 選擇特定解析度後,可能不會顯⽰此畫
⾯。
7 選擇電視機類型後按下 按鈕。
於步驟 5 選擇 SD 解析度或"480p"後,會顯⽰選擇電視機螢幕尺⼨的畫⾯。
請配合您使⽤的電視機調整設定。
於步驟 5 選擇"720p"或更⾼解析度後,電視機類型將會⾃動設定為 16:9,
且不會顯⽰選擇電視機螢幕尺⼨的這個畫⾯。
8 確認設定後,按下 按鈕。
影像輸出設定被保存⾄主機中。
46
Page 47

9 調整聲⾳輸出設定。
接著能調整聲⾳輸出設定。請配合您使⽤的電視機或⾳響裝置調整設定。
選擇"HDMI"後,您可進⼊下⼀個畫⾯選擇"⾃動"或"⼿動"選項。通常請選
擇"⾃動",如此即會⾃動完成影像輸出設定。要使⽤ HDMI 連接線以外的連
接線從電視機輸出聲⾳時,請選擇"聲⾳輸出端⼦ / SCART / AV MULTI"。使
⽤光纖連接線輸出聲⾳時,請選擇"光纖"並進⼊下⼀個畫⾯選擇輸出格式。
10 確認設定後,按下 按鈕。
聲⾳輸出設定被保存⾄主機中。
提⽰
您可選擇 (設定) (聲⾳設定) "聲⾳輸出設定",以調整聲⾳輸出
設定。
⼊⾨指南
設置 PS3™ 主機
EN
CT
47
Page 48

基本操作
03
使⽤無線控制器
按下 PS 按鈕。
使⽤主機按鈕
1 觸碰電源按鈕。
啟動和關閉 PS3™ 主機電源
關閉主機電源
PS 按鈕
電源指⽰燈狀態
電源按鈕
電源指⽰燈
PS 按鈕持續按住⼀秒鐘以上。畫⾯上顯
⽰"關閉主機電源"後,再按下 按鈕。
提⽰
開始使⽤無線控制器前,您必須先將它配置⾄主
機上(
持續綠燈 主機電源打開
閃爍綠燈 主機電源正關閉中
持續紅燈 主機關閉(待機模式)
熄滅 已關閉主電源開關
第 49
⾴)。
關閉主機電源
電源按鈕持續觸碰兩秒鐘以上。
重要
請勿在主機進⼊預備狀態(電源指⽰燈亮紅
燈)前,按下主機後⽅的主電源開關以停⽌主
機動作,否則可能會導致資料消失或主機故
障。
48
2 按下無線控制器的PS按鈕。
指定控制器編號。
Page 49

基本操作
04
使⽤無線控制器
使⽤前的準備
使⽤無線控制器前,您必須先登錄或"配置"控制器⾄ PS3™ 主機上,並
替控制器設定⼀組編號。
步驟 1:配置主機與控制器。
• 第⼀次使⽤時
• 使⽤另⼀台 PS3™ 主機時
m
步驟 2:指定⼀組控制器編號。
每次啓動主機時
步驟 1:配置主機與控制器
⾸次使⽤該控制器或在不同 PS3™ 主機上使⽤時,您必須先配置⾄裝
置。假如您啓動主機電源時已使⽤ USB 連接線連接控制器,則主機將
會⾃動完成配置。
USB 連接線(隨附)
確認主機是否已啓動電源(電源指⽰
燈持續亮綠燈)
步驟 2:指定⼀組控制器編號
每次啓動主機,都需替控制器指定⼀組編號。
按下 PS 按鈕。
所有埠指⽰燈不斷閃爍。
1 234
m
控制器已指定編號時,唯有該指定編號之
埠指⽰燈會持續亮紅燈。
1234
您⼀次最多可連接 7 個控制器。控制器之編號將如埠指⽰燈顯⽰的編
號。編號爲 5~7 時,需相加亮紅燈之指⽰燈編號。
例: 控制器編號指定爲 5 時。
提⽰
• 配置和指定控制器編號只能在啟動主機電源後執⾏(電源指⽰燈持續亮綠
燈)。
• 在另⼀台 PS3™ 主機上使⽤已配置之控制器後,將會消除與原先主機之配置。
當需要使⽤已在另⼀台主機上使⽤之控制器時,請再次進⾏與該主機間的控制
器配置。
• 控制器或主機電源關閉後,控制器之埠指⽰燈亦會熄滅並清除指定之編號。
11234
EN
CT
49
Page 50

基本操作
使⽤無線控制器
使⽤無線控制器
您需先拔取 USB 連接線,才能使⽤無線控制器。且無線使⽤前,必先
替控制器的電池充飽電。
提⽰
• 控制器與主機的電源皆啓動後,始可連接或拔取 USB 連接線。
• 控制器無法正常動作時,請按下 PS 按鈕並指定控制器編號。
替控制器充電
啟動主機電源(電源指⽰燈持續亮綠燈)時,始可使⽤ USB 連接線將
控制器連接⾄主機上。此時控制器上的埠指⽰燈會緩慢閃爍紅燈並逐漸
充電。
充電結束後,埠指⽰燈即會停⽌閃爍。
提⽰
• 充電時亦可使⽤該控制器。
• 僅能於 10℃~30℃ 的溫度範圍內替電池充電。若在其他環境中進⾏,可能會
出現充電情形不佳的現象。
• 電池的壽命有限。電池續航⼒(使⽤時間)會因重複使⽤的次數與時間⽽不斷
減少。
• 電池的壽命會因保管⽅法、使⽤情形、環境以及其他要素⽽出現差異。
電池充電量
PS 按鈕持續按住⼀秒鐘以上後,即可從螢幕上確認電池的剩餘充電
量。
剩餘充電量
電池電⼒充⾜。
電池的保有充電量開始逐漸減低。
電池殘餘充電量低。
電池電⼒已耗盡。埠指⽰燈不斷閃爍時,請替電池充電。
提⽰
環境或使⽤狀況可能會導致無法正確顯⽰剩餘充電量或電池續航⼒出現差異的現
象。
50
Page 51

基本操作
05
播放內容
Blu-ray Disc (BD)/DVD/CD
1 插⼊光碟。
插⼊光碟時需標籤⾯朝上。
注意
• 本主機無法播放不相容⽀援的光碟。詳細請參閱"安全與⽀
援"⽂件。
• 要播放市⾯上銷售的 BD Video 時,可能需要更新加密
鍵*。加密鍵會透過系統軟件的昇級⽽不斷更新。
第 62 ⾴)。
(
* AACS(Advanced Access Control System)鍵
2 主選單上顯⽰圖⽰後,即能開始播放該光碟。
光碟無法⾃動啟動時,請選擇主選單上的光碟圖⽰,並按下 按鈕。
退出光碟
停⽌播放後,觸碰退出按鈕。
提⽰
如何離開遊戲的詳細說明,請參閱"玩
遊戲"(
第 53 ⾴)。
EN
CT
退出指⽰燈
退出按鈕
51
Page 52

基本操作
播放內容
USB 裝置
您可使⽤ USB 連接線,連接符合 USB Mass Storage Class(USB
MSC,USB ⼤容量儲存等級)等外接裝置。此類裝置需於啓動主機電源
時連接。請同時參閱該裝置隨附的使⽤說明書。
1 連接 USB 裝置。
出現⾃家選單並顯⽰圖⽰。
數碼(數位)相機等外接裝置
2 選擇圖⽰後,按下
顯⽰可播放內容的⽬錄。
按鈕。
重要
• 請勿於保存、載⼊或刪除資料時拔取 USB 裝置或關閉主機電源,否則可能
會導致資料遺失或毀損。
• 使⽤具防寫保護開關的 USB 隨⾝碟(Flash Drive)時,請勿在該隨⾝碟插
⼊ PS3™ 主機時調整開關。否則可能會導致資料遺失或毀損。
可播放或閱覽之檔案規格
可播放或閱覽之檔案規格包括 ATRAC、MP3、AAC、JPEG 和 MPEG-4。若
您想了解最新之詳細資訊,請參閱線上⽤⼾指南( 第 61 ⾴)。
提⽰
• 唯有能在 PS3™ 主機上播放或閱覽之檔案始會顯⽰於相容類別之⾏列中
(例:圖像資料會顯⽰於相⽚類別中)。
• 部分儲存媒體僅會顯⽰媒體資料夾下的⼦集。若您進⼊選項選單(
⾴)並選擇了"全部顯⽰",則會顯⽰所有保存於媒體中的資料夾。
重要
如何爲保存於硬碟之檔案製作備份之詳細資訊,請參閱"安全與⽀援"。
第 35
52
Page 53

遊戲
06
玩遊戲
本主機能遊玩的遊戲
PLAYSTATION®3 規格軟件
®
PlayStation
PlayStation
*不保證所有 PlayStation
最新情形,請瀏覽以下網站:http://asia.playstation.com/status
規格軟件
®
2 規格軟件
®
規格軟件皆能正確動作。若想確認本主機⽬前⽀援的
能於本主機上播放*
不能於本主機上播放
玩遊戲
開始遊戲
插⼊光碟後,插⼊光碟後,會⾃動啟動遊戲。
插⼊光碟時需標籤⾯朝上。
退出遊戲
於遊玩途中,按下無線控制器的 PS 按鈕,再選擇畫⾯上顯⽰的"離開
遊戲"。
提⽰
要遊玩已預先指定控制器模式和插⼝的軟件時,請選擇以下⽅法。
- 按下無線控制器的 PS 按鈕,選擇"設定控制器"
切的模式。部分軟件可能會⾃動調整此模式的設定。
- 按下無線控制器的 PS 按鈕,選擇"設定控制器"
定控制器編號。*
* 使⽤本主機時無法指定控制器編號為 2-D。
"調整類⽐模式"並選擇適
"指定控制器",並適切指
PS3™ 規格之軟件的保存資料
PS3™ 規格之軟件的保存資料均被保存於主機的硬碟中。且此類資料會
顯⽰於 (遊戲) (保存資料管理)中。
EN
CT
53
Page 54

遊戲
玩遊戲
PlayStation® 規格之軟件的保存資料
若要保存 PlayStation® 規格之軟件的進度資料,您必須於硬碟中新
建"內置記憶卡"並為該虛擬記憶卡指定插⼝。
步驟 1:建⽴"內置記憶卡"。
在硬碟中建⽴"內置記憶卡"以取代實質的 Memory Card(記憶卡)。
Memory Card(記憶卡)
步驟 2:指定"插⼝"。
選擇插⼊硬碟之內置插⼝中的內置記憶卡,以取代 MEMORY CARD(記憶卡)
插⼝。
MEMORY CARD(記憶卡)插⼝
內置記憶卡(PS)
內置插⼝
注意
本主機不⽀援或兼容 PlayStatiion®2 規格軟件。即使您已建⽴
PlayStation
2 規格軟件的內置記憶卡,仍無法使⽤它遊玩遊戲。
®
步驟 1:建⽴"內置記憶卡"
1 進⼊⾃家選單之 (遊戲)並選擇 (記憶卡管理(PS/
PS2))後,按下 按鈕。
2 選擇 (新建內置記憶卡)後,按下
3 選擇"內置記憶卡(PS)"後,按下
指定內置記憶卡的名稱並保存該記憶卡。
提⽰
即使您已於步驟 3 新建"內置記憶卡(PS2)",仍無法使⽤它遊玩
PlayStatiion
2 規格的軟件。
®
按鈕。
按鈕。
54
Page 55

遊戲
玩遊戲
步驟 2:指定"插⼝"
1 進⼊⾃家選單之 (遊戲)並選擇 (記憶卡管理(PS/
PS2))後,按下 按鈕。
2 選擇您想使⽤之"內置記憶卡"後,按下 按鈕。
指定插⼝。
提⽰
• 部分軟件可能會預先指定插⼝。詳細請參閱軟件隨附之使⽤說明書。
• 您可於遊玩時指定插⼝。按下無線控制器的 PS 按鈕,再選擇畫⾯上顯⽰的"指
定插⼝"。
使⽤「Memory Card(記憶卡)」之保存資料
要將 PlayStation®2 專⽤ Memory Card(記憶卡)(8MB)或 Memory
Card(記憶卡)上的保存資料複製⾄硬碟時,需使⽤ memory card
adaptor(記憶卡轉接器)(另售)。
1 進⼊⾃家選單之 (遊戲)並選擇 (記憶卡管理(PS/
PS2))後,按下 按鈕。
2 將記憶卡轉接器插⼊主機,並插⼊記憶卡。
顯⽰ (記憶卡(PS))或 (記憶卡(PS2))圖⽰。
3 選擇要複製的保存資料後,按下 按鈕。
4 選擇"複製"後,按下
請遵循畫⾯指⽰,正確操作。
提⽰
• 即使將 PlayStatiion®2 規格軟件的保存資料複製⾄硬碟,您仍無法使⽤該保
存資料遊玩遊戲。
• 需複製之保存資料容量過⼤時,主機將會⾃動新建複數的"內置記憶卡
(PS)"。
• 您可將保存於硬碟的資料複製⾄ PlayStation
卡)(8MB)、Memory Card(記憶卡)或 USB ⼤容量儲存裝置(USB 隨⾝碟
等)。選擇已保存的資料後,再進⼊選項選單(
• 部分保存資料可能會為了避免資料的無謂複製⽽設限。遇此情形時,請於步驟
4 時選擇"移動"。該保存資料即會從 Memory Card(記憶卡)刪除並移動⾄硬
碟中。
按鈕。
®
2 專⽤ Memory Card(記憶
第 35 ⾴)選擇"複製"。
EN
CT
55
Page 56

網路
07
調整網路設定
使⽤有線連接
以下說明將解釋如何使⽤市⾯上販售之⼄太網路連接線與網際網路(互
聯網)連線。
有線網路設置範例
網路連線設備與連線⽅法可能因使⽤裝備和網路裝備⽽有所不同。
ADSL 或纜線數據機等網
路裝置
ETHERETHER
連接網路線
路由器
ADSL、纜線數據機或其他網路裝置已
內建路由器機能時不需要此項設備。
WAN LAN1 LAN2 LAN3 LAN4
市⾯上銷售的⼄太
網路連接線
需要準備的物品
進⾏網際網路的有線連接時,需要以下物品。
• 經由 ADSL 或纜線數據機等裝置連接的寬頻網路連線(連接多種裝置
時可能需要另準備其他主機)。
• 市⾯上銷售的⼄太網路連接線。
提⽰
⽤⼾需⽀付與網路連線之服務費⽤。
設置網際網路連線
網路連線設定可能因網路環境和使⽤的裝置⽽異。以下說明最常⾒的典
型設定。
1 將市⾯上銷售的⼄太網路連接線與本主機連接。
2 進⼊⾃家選單下之 (設定) (網路設定) "網路連線
設定",按下 按鈕。
顯⽰正與網際網路(互聯網)開始連線的訊息時,請選擇「是」並按下
按鈕。
電腦
56
提⽰
路由器(Router)乃是能讓數種裝置同時與同⼀條網路線連線的裝置。當電腦與
PS3™ 主機需要同時並使⽤同⼀條網路線與網際網路(互聯網)連線時,即需要
準備路由器。
Page 57

網路
調整網路設定
3 選擇"簡易"後,按下 按鈕。
確認網路狀態後,即會顯⽰設定清單。
簡易 ⾃動設定基本設定。
⾃訂
您可⼿動輸⼊設定之詳細內容。有關這些設定之詳細資訊,
請參閱您的網路服務商或網路裝置隨附之使⽤說明書。
4 確認設定後,按下 按鈕。
若您想了解"網路設定"之詳細資訊,請參閱線上⽤⼾指南(
提⽰
某些網路環境可能會於此步驟時,於畫⾯中顯⽰ PPPoE、Proxy 伺服器和 IP 位
址等設定選項。遇此情形時,請參閱您的網路服務商提供的相關資料,設定必需
項⽬。
第 61 ⾴)。
使⽤無線連接
以下說明將解釋如何與網路網路(互聯網)無線連線。
無線網路設置範例
網路連線設備與連線⽅法可能因使⽤裝備和網路裝備⽽有所不同。
無線基地台或路由器
ADSL 或纜線數據機等網路裝置
ETHERETHER
連接網路線
提⽰
• 無線基地台(Access Point,亦稱存取點)乃是能讓您與網路無線連線的裝
置。
• 無線路由器是⼀種讓無線基地台搭載路由器機能的裝置。當電腦與 PS3™ 主機
需要同時並使⽤同⼀條網路線與網路網路(互聯網)連線時,即需要準備路由
器。
WAN LAN1 LAN2 LAN3 LAN4
電腦電腦
EN
CT
57
Page 58

網路
調整網路設定
需要準備的物品
替主機設置與網路間的無線連線時,需要以下物品。
• 經由 ADSL 或纜線數據機等裝置連接的寬頻網路連線(連接多種裝置
時可能需要另準備其他主機)。
• 無線基地台(Access Point,亦稱存取點)或無線路由器。
• 基地台(SSID、WEP 鍵、WPA 鍵)等設定資訊
提⽰
• SSID、WEP 鍵和 WPA 鍵皆為與無線基地台連線時可能需要輸⼊的加密資訊。
• 與網路無線連線時,訊號⼲擾情形之強弱可能會因無線網路裝置之使⽤狀況⽽
異。網路資料之傳輸速度逐漸降低或無線控制器無法正常動作時,請使⽤市⾯
上銷售的⼄太網路連接線與網路連線。
• 您可能會需配合使⽤之無線基地台,於每次與網路連線時,替您的主機輸⼊
MAC 位址。進⼊
主機的 MAC 位址。
• ⽤⼾需⽀付與網路連線之服務費⽤。
(設定) (主機設定) "系統資訊",您即可發現
設置網路連線
網路連線設定可能因網路環境和使⽤的裝置⽽異。以下說明最常⾒的典
型設定。
1 確認⼄太網路連接線是否尚未連接本主機。
2 進⼊⾃家選單下之 (設定) (網路設定) "網路連線設
定",按下 按鈕。
顯⽰正與網際網路(互聯網)開始連線的訊息時,請選擇「是」並按下
按鈕。
3 選擇"簡易"後,按下 按鈕。
簡易 ⾃動設定基本設定。
⾃訂
您可⼿動輸⼊設定之詳細內容。有關這些設定之詳細資訊,
請參閱您的網路服務商或網路裝置隨附之使⽤說明書。
58
Page 59

網路
調整網路設定
4 選擇"無線"後,按下 按鈕。
5 選擇"掃描"後,按下 按鈕。
主機將會搜尋範圍內的無線基地台,並顯⽰⼀覽⽬錄。
提⽰
當使⽤⽀援⾃動設定的無線基地台,請選擇“基地台個別⾃動設定”並遵循畫⾯
指⽰,正確操作。所需設定將會⾃動完成。關於⽀援⾃動設定的無線基地台,請
洽詢無線基地台製造商。
6 選擇您想使⽤之無線基地台後,按下
SSID 乃是無線基地台指定之代碼或名稱。若您不了解該使⽤何種 SSID 或
SSID 並未顯⽰時,請聯絡設置或維修無線基地台之⼈員。
按鈕。
7 確認無線基地台之 SSID 後,按下 按鈕。
EN
CT
59
Page 60

網路
調整網路設定
8 選擇必要之加密設定後,按下 按鈕。
加密設定因使⽤之無線基地台⽽異。若想確認您使⽤何種設定,請聯絡設置
或維修無線基地台之⼈員。
9 輸⼊加密鍵後,按下 按鈕。
您輸⼊的每個加密鍵,都僅會於加密鍵輸⼊欄位顯⽰星號(*)。若您不知道
正確的加密鍵,請聯絡設置或維修無線基地台之⼈員。
完成加密鍵的輸⼊並確認網路狀態後,將會顯⽰設定清單。
10 確認設定後,按下 按鈕。
若您想了解"網路設定"之詳細資訊,請參閱線上⽤⼾指南(
提⽰
某些網路環境可能會於此步驟時,於畫⾯中顯⽰ PPPoE、Proxy 伺服器和 IP 位
址等設定選項。遇此情形時,請參閱您的網路服務商提供的相關資料,設定必需
項⽬。
第 61 ⾴)。
60
Page 61

網路
08
網路設定已正確完成後,PS3™ 主機即會於主機電源啓動後,⾃動與網
路網路(互聯網)連線。此項連線僅會於主機電源啓動時有效。
連接網際網路(互聯網)
使⽤網路瀏覽介⾯
1 進⼊⾃家選單之 (網路),並選擇 (網路瀏覽介⾯)後,
按下 按鈕。
開啓網路瀏覽介⾯。載⼊網⾴時會顯⽰忙碌圖⽰。
忙碌圖⽰
網路瀏覽介⾯的基本操作
⽅向按鈕 將指標移往超連結
右操作桿 朝希望之⽅向捲動
L1 按鈕 回到上⼀⾴
START(開始)按鈕 輸⼊網址
按鈕
顯⽰/隱藏選單
閱覽⽤⼾指南
您可使⽤"網路瀏覽介⾯",閱覽 PS3™ 主機的線上⽤⼾指南。進⼊主
選單的 (網路)並選擇 (網上說明)後,按下 按鈕。
PLAYSTATION®3 主機⽤⼾指南
http://manuals.playstation.net/document/
此指南亦可使⽤您府上之電腦的網路瀏覽器閱覽。
新建⼀個 PLAYSTATION® 網路帳⼾
新建 PLAYSTATION® 網路帳⼾後,您可進⼊ (好友)享受聊天樂趣
或⾃ (PLAYSTATION®Store)下載的遊戲或影像。進⼊
(PLAYSTATION®Network)
後,按下 按鈕,螢幕上即會顯⽰帳⼾新建中的訊息。
提⽰
• 每條網路連線最少需新建⼀個帳號。
• PLAYSTATION® 網路服務之內容因區域⽽異。
並選擇 (登⼊
PLAYSTATION®Network)
EN
CT
61
Page 62

更新
09
PS3™ 主機更新
更新 PS3™ 的系統軟件,您可追加機能或彌補安全性漏洞。建議經常
替主機的系統軟件更新為最新版本。若欲取得最新的更新情報,請瀏覽
以下網站:
使⽤更新資料覆寫已存在的主機軟件。 主機軟件完成更新。
重要
• 進⾏更新時,請勿關閉主機電源或移除媒體。若於完成前取消了更新的繼續
• 進⾏更新時,主機前⾯的的主電源按鈕和控制器的 PS 按鈕會暫時失效。
• 若未事先更新系統軟件,您可能因內容限制⽽無法進⾏播放。
• 系統軟件⼀旦更新,即無法恢復為原先的早期版本。
http://asia.playstation.com
進⾏,可能會導致系統軟件受損,且可能需維修或更換主機。
確定系統軟件的版本
選擇 (設定) (主機設定) "系統資訊",即可確認系統版本
之相關資訊。⽬前之版本序號會標⽰於"系統軟件"之顯⽰欄位。
更新⽅法
您可透過以下任何⼀種⽅法執⾏更新。
網路更新
從網際網路(互聯網)下載更新資料後您即可執⾏更新。
如下述選擇項⽬後,即能⾃動下載最新的更新資料。
(設定) (系統更新) "透過網際網路更新"。
使⽤儲存媒體執⾏更新
如下述選擇項⽬後,您即能使⽤保存於 USB 快閃記憶體或其他儲存媒
體的更新資料執⾏更新。
(設定) (系統更新) "透過儲存媒體更新"。
經由光碟媒體更新
部份遊戲光碟以及其他種類的光碟媒體可能內建更新資料。當您要開始
遊玩內建更新資料的光碟時,螢幕上可能會顯⽰更新的相關導引資訊。
請遵循畫⾯指⽰,正確執⾏更新。
提⽰
若您無法執⾏上述任何更新⽅式,請聯絡您保證書上所記載之 PS3™ 客服專線。
62
Page 63

加密設定
10
PS3™ 具備視聽年齡限制機能。您可使⽤此機能設定密碼,並透過
(遊戲、影像與其他內容的)視聽年齡限制等級,限制內容的播放。經
由主機的視聽年齡限制設定,您可避免孩童擅⾃播放不適當的內容。
設定視聽年齡限制
改變視聽年齡限制
選擇 (設定) (加密設定),您即可設定遊戲、BD 光碟或其
他內容的視聽年齡限制等級。
要變更視聽年齡限制前,需先輸⼊密碼。選擇
密碼",您即可設定⼀組密碼。最初設定的罵碼為"0000"。
(加密設定) "變更
遊戲的視聽年齡限制
選擇 (加密設定) "視聽年齡限制",您即可設定遊戲的視聽年齡
限制。請從"關"或 11 種等級中選擇。
關 不受視聽年齡限制影響,播放所有內容。
11-1 依據等級⼤⼩設定視聽年齡限制。數字愈⼩,代表限制愈嚴格。
PS3™ 與內容的視聽年齡限制組合會決定內容可否播放。
例如:當主機的視聽年齡限制為"7"時,此主機可播放等級設定為"1"⾄
"7"的內容。
若您想取得年齡分級的最新資訊,請打電話給保證書上記載的 PS3™
消費者服務中⼼。
其他加密設定
選擇 (加密設定),您可如前述般,設定遊戲以外其他內容的視聽
年齡限制。
BD 視聽年齡限制
DVD 視聽年齡
限制
網路瀏覽介⾯啟
動限制
播放內建視聽年齡限制的 Blu-ray Disc(藍光光碟)時,
會隨您設定之年齡⽽限制播放。數字愈⼩,代表限制愈嚴
格。
播放內建視聽年齡限制的 DVD 時,會隨您設定之年齡⽽限
制播放。請從"關"或 8 種等級中選擇。
數字愈⼩,代表限制愈嚴格。
透過密碼,限制網路瀏覽介⾯的啟動機能。
EN
CT
63
Page 64

鍵盤
11
使⽤螢幕中的鍵盤
游標
⽂字輸⼊欄位
操作按鍵
僅於啟動預測模式時顯⽰
顯⽰預測選項
顯⽰輸⼊模式
按鍵⼀覽
各鍵之顯⽰與否會因輸⼊模式或其他狀況⽽異。
按鍵 說明
插⼊⼀⾏
移動游標
刪除游標左邊的字元
插⼊空格
更換輸⼊模式
確認已鍵⼊但尚未輸⼊的字元後,離開鍵盤
更換為迷你⼩鍵盤
/
/ / /
插⼊記號或表情符號
選擇輸⼊法
64
Page 65

輸⼊字元
使⽤預測模式,您即可在輸⼊單字最初的數個拼字後,從起頭為這些拼
字的常⽤單字名單中擷取您想要的單字。此時您需使⽤⽅向按鈕以選擇
您想要的單字。若您已結束單字的輸⼊,請選擇"確定"鍵以離開鍵盤。
提⽰
• 您輸⼊字元時使⽤之語⾔皆屬主機已⽀援之系統語⾔。
• 表情符號僅可於
(設定) (主機設定) "系統語⾔",您即可設定系統語⾔。
進⼊
例:若"系統語⾔"設定為"Français",您即可使⽤法⽂輸⼊字元。
(好友)下傳送訊息時輸⼊。
使⽤外接鍵盤
您可使⽤市⾯上銷售的 USB 鍵盤或藍芽鍵盤輸⼊字元。顯⽰字元輸⼊
畫⾯時,只要按下鍵盤的任何按鍵,字元輸⼊畫⾯即會更改為使⽤鍵
盤。
提⽰
使⽤外接鍵盤時,您無法使⽤預測模式。
鍵盤
使⽤螢幕中的鍵盤
EN
CT
65
Page 66

Page 67

Page 68

" ", "PlayStation" and "PLAYSTATION" are registered trademarks of Sony Computer Entertainment Inc. Also, "PS3" and "SIXAXIS" are trademarks of the same company.
"XMB" and "xross media bar" are trademarks of Sony Corporation and Sony Computer Entertainment Inc.
"SONY" and "
"Blu-ray Disc" is a trademark.
HDMI, the HDMI logo and High-Defi nition Multimedia Interface are trademarks or registered trademarks of HDMI Licensing, LLC.
All other trademarks are the properties of their respective owners.
"
"XMB"和"xross media bar"為 Sony Corporation 與 Sony Computer Entertainment Inc. 之商標。
"SONY"和"
"Blu-ray Disc"為商標。
HDMI、HDMI 標誌和 High-Definition Multimedia Interface 為 HDMI Licensing, LLC. 之商標或註冊商標。
所有其他商標皆屬相關原著作權⼈所有。
Information about system functionality and images published in this document may vary from those for your PS3™ system, depending on the system software version in use.
本⽂書中介紹的系統機能與圖像可能因使⽤之系統軟件的版本先後,⽽與您持有之 PS3™ 主機不同。
" are registered trademarks of Sony Corporation. Also, "ATRAC" is a registered trademark or trademark of the same company.
"、"PlayStation"和"PLAYSTATION"為 Sony Computer Entertainment Inc. 之註冊商標。"PS3"和"SIXAXIS"亦為該公司之商標。
"為 Sony Corporation 之註冊商標。此外,"ATRAC"亦同為該公司之註冊商標或商標。
© 2007 Sony Computer Entertainment Inc. All rights reserved.
Printed in China
 Loading...