

Page 1
Quick Reference
Aide-mémoire
Referencia rápida
3-212-098-12(1)
Page 2
About the PS3™ system documentation
Friends
The PS3™ system documentation includes the following:
• Safety and Support
Before using the product, carefully read this document fi rst. It contains safety information
related to use of the PS3™ system, troubleshooting, specifi cations and other information.
• Quick Reference (this document)
This document contains information on setting up the PS3™ system, preparing for use and
basic hardware operations.
• User’s Guide (http://manuals.playstation.net/document/)
This online document is accessed through the Internet and contains detailed information
related to the use of the PS3™ system software ( page 27).
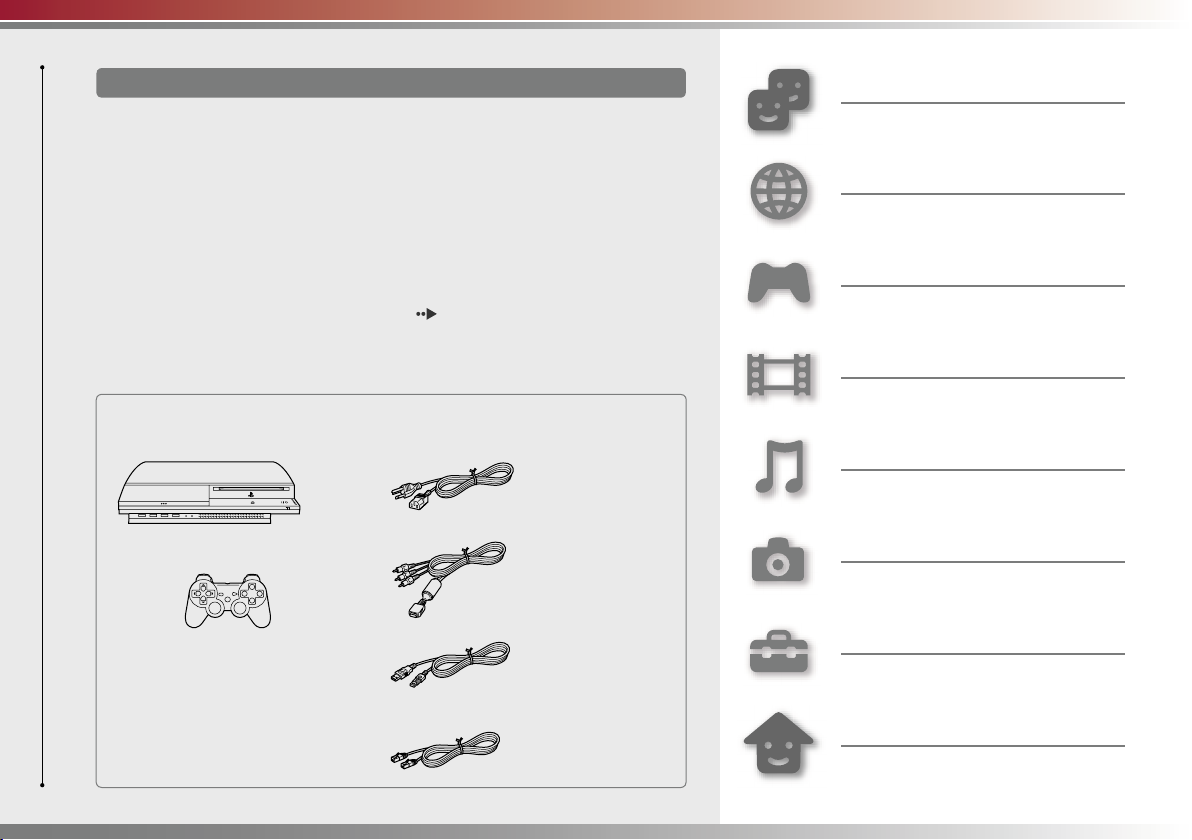
Check that you have all of the following items. If any items are missing, contact
SCEA Consumer Services at 1-800-345-7669.
s AC power cord
s PLAYSTATION
s SIXAXIS™ wireless controller
s Printed materials
3 system
®
s AV cable
s USB cable
Chatting and exchanging messages
Network
Connecting to the Internet
Game
Playing games
Video
Playing video
Music
Playing music
Photo
Displaying images
Settings
Adjusting PS3™ system settings
Users
s Ethernet cable
Selecting users to log in to the PS3™
system
2
Page 3
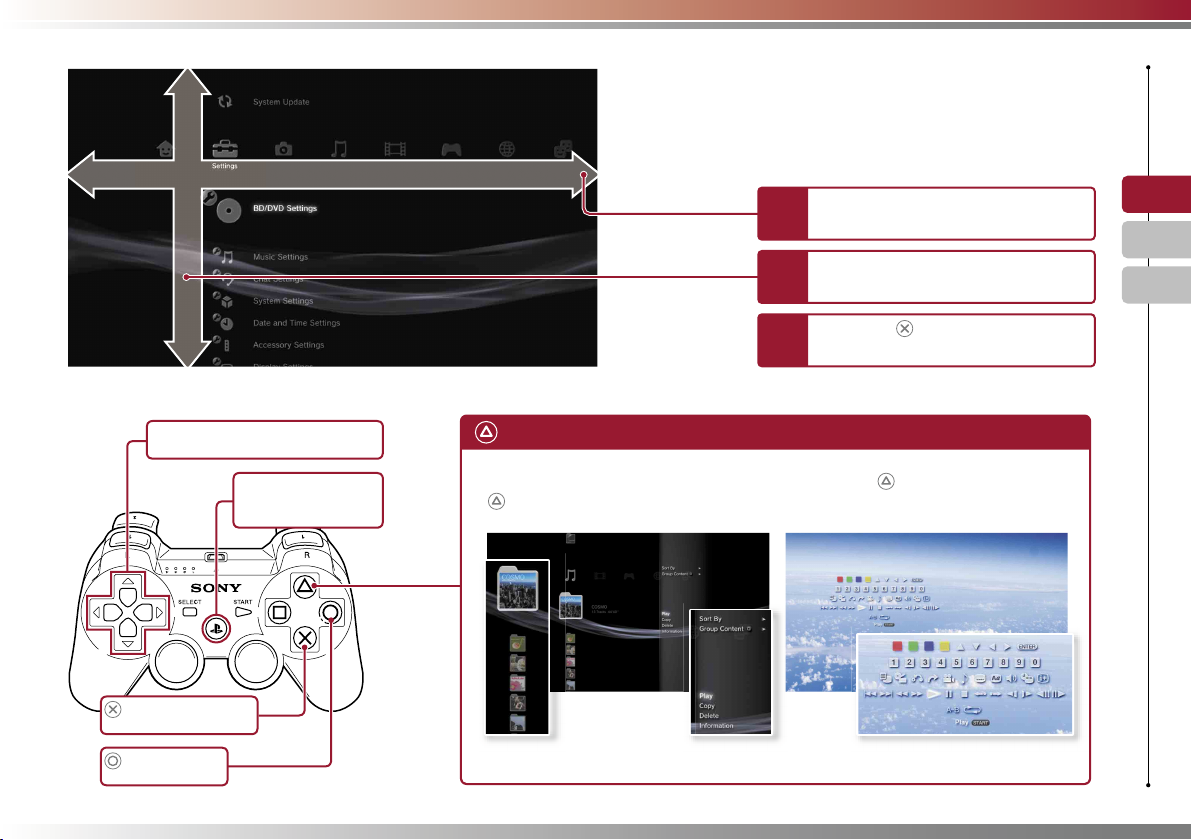
Item
Home menu
Category
Using "XMB" (XrossMediaBar)
The PS3™ system includes a user interface called “XMB”
(XrossMediaBar). The main screen for “XMB” is called the
“home menu”.
Select a category using the left or
1
right button.
Select an item using the up or
2
down button.
Press the
3
selected item.
button to confi rm the
US
FR
ES
Directional buttons:
Used to select on-screen categories/items
PS button:
Displays the home menu
Turns the system on/off
button:
Confi rms the selected item
button:
Cancels an operation
button: Displays the options menu/control panel
Selecting an icon and pressing the
button will display the options menu.
Icons Options menu
Pressing the button during content
playback will display the control panel.
Control panel
3
Page 4
Getting started
01
*1 CompactFlash
*2 Secure Digital
• Do not use the system in a closed cabinet or other locations where heat
• If the system’s internal temperature becomes elevated, the power indicator
4
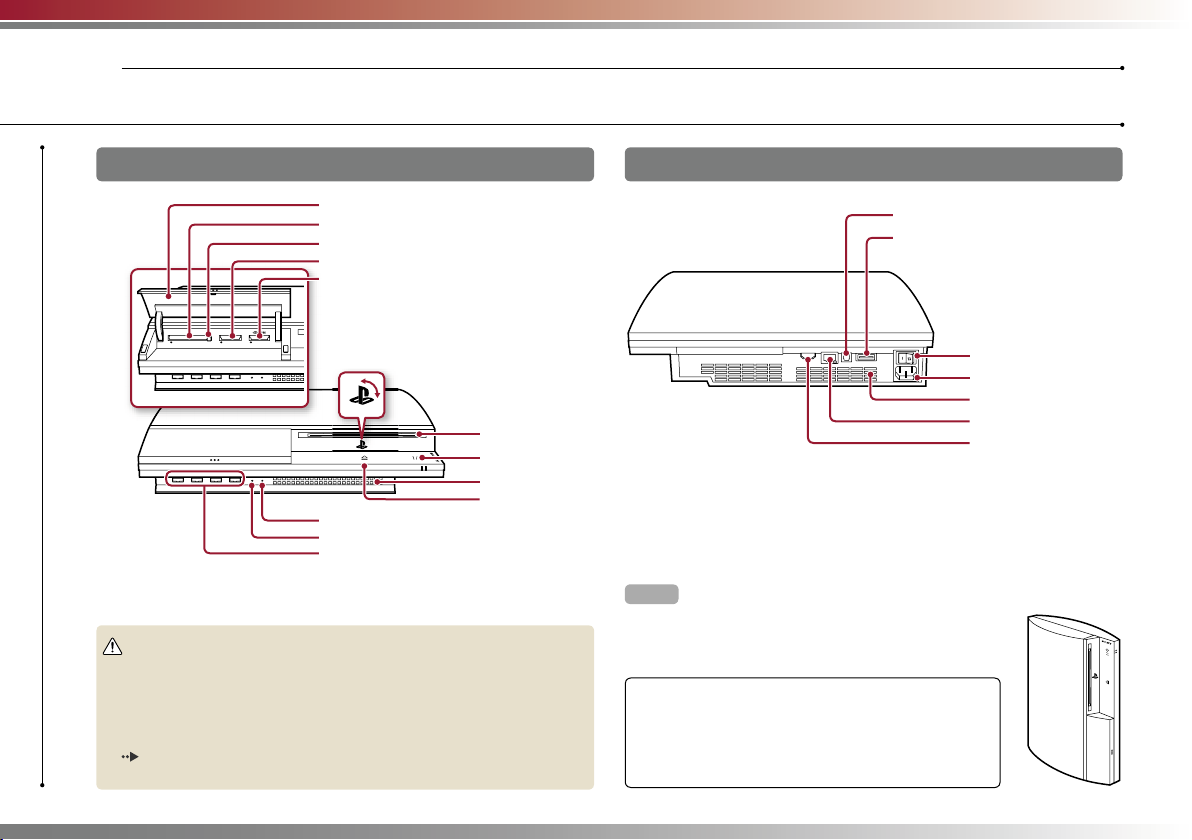
Part names
System front
Slot cover
1
CF*
slot
Eject button
2
Memory Card slot
SD*
Memory Stick™ slot
CF SD/miniSD
®
Caution
may build up. Doing so may cause the system to overheat and may lead to
fi re, injury or malfunction.
will fl ash alternately in red and green. In this case, turn off the system
page 13) and leave it unused for a while. After the system cools down,
(
move it to a location with good ventilation, and then resume use.
PS family logo
Can be rotated to match the
position of the system
WLAN access indicator
HDD access indicator
USB connectors
Disc slot
Power button
Vent
Eject button
System rear
DIGITAL OUT (OPTICAL) connector
AV MULTI OUT connector
MAIN POWER switch
AC IN connector
Vent
LAN connector
HDMI OUT connector
Hint
The system can be set in a horizontal or vertical position.
Set as shown in the diagram at right when setting in the
vertical position.
Notice
Do not place the system in an area subject to excessive
dust or cigarette smoke. Dust build-up or cigarette
smoke residue on the internal components (such as the
lens) may cause the system to malfunction.
Page 5
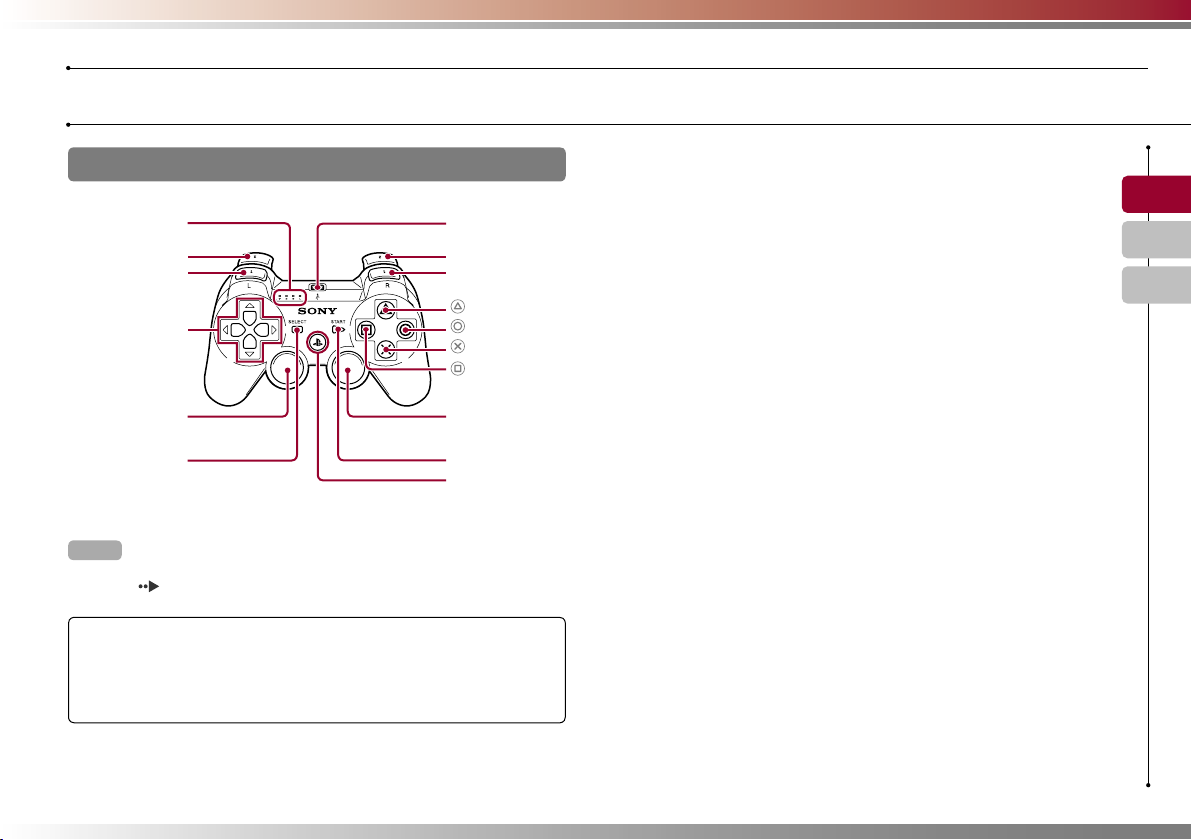
SIXAXIS™ wireless controller
Port indicators
L2 button
L1 button
Directional
buttons
USB connector
R2 button
R1 button
button
button
button
button
Getting started
Part names
US
FR
ES
Left stick/
L3 button*
SELECT button
* The L3 and R3 buttons function when the sticks are pressed.
Hint
For details on the wireless controller, see "Using the SIXAXIS™ wireless
controller" (
page 14).
Right stick/
R3 button*
START button
PS button
Notice
Some PlayStation® and PlayStation®2 peripherals such as the analog
controller (DUALSHOCK
compatible with the PS3™ system. For details,
visit http://www.us.playstation.com.
) and analog controller (DUALSHOCK®2) are not
®
5
Page 6

Getting started
02
Setting up the PS3™ system
Procedure fl ow for setting up the
system
Step 1: Connect to a TV.
Page 6
m
Step 2: Connect digital audio
devices. Page 9
m
Step 3: Connect the Ethernet
cable. Page 10
m
Step 4: Connect the AC power
cord. Page 11
m
Step 5: Perform initial setup of
the system software.
Page 11
Step 1: Connect to a TV
Video output on the PS3™ system
The PS3™ system can output two types of resolution: HD and SD. Refer to the instruction manual
for the TV in use to check which video mode is supported.
(High Defi nition)
HD
Video mode *
Aspect ratio
*1 This number indicates the number of scan lines. Note that "i" stands for "interlace" and "p" stands for
"progressive". Using progressive results in high-quality video with minimal fl ickering.
2
The video output setting on the system will display as "Standard (NTSC)".
*
1
1080p 1080i 720p 480p 480i *
16:9 16:9 16:9
(Standard Defi nition)
SD
16:9
4:3
16:9
4:3
2
Screens showing the difference in resolution
HD screen SD screen
6
Page 7
Getting started
Setting up the PS3™ system
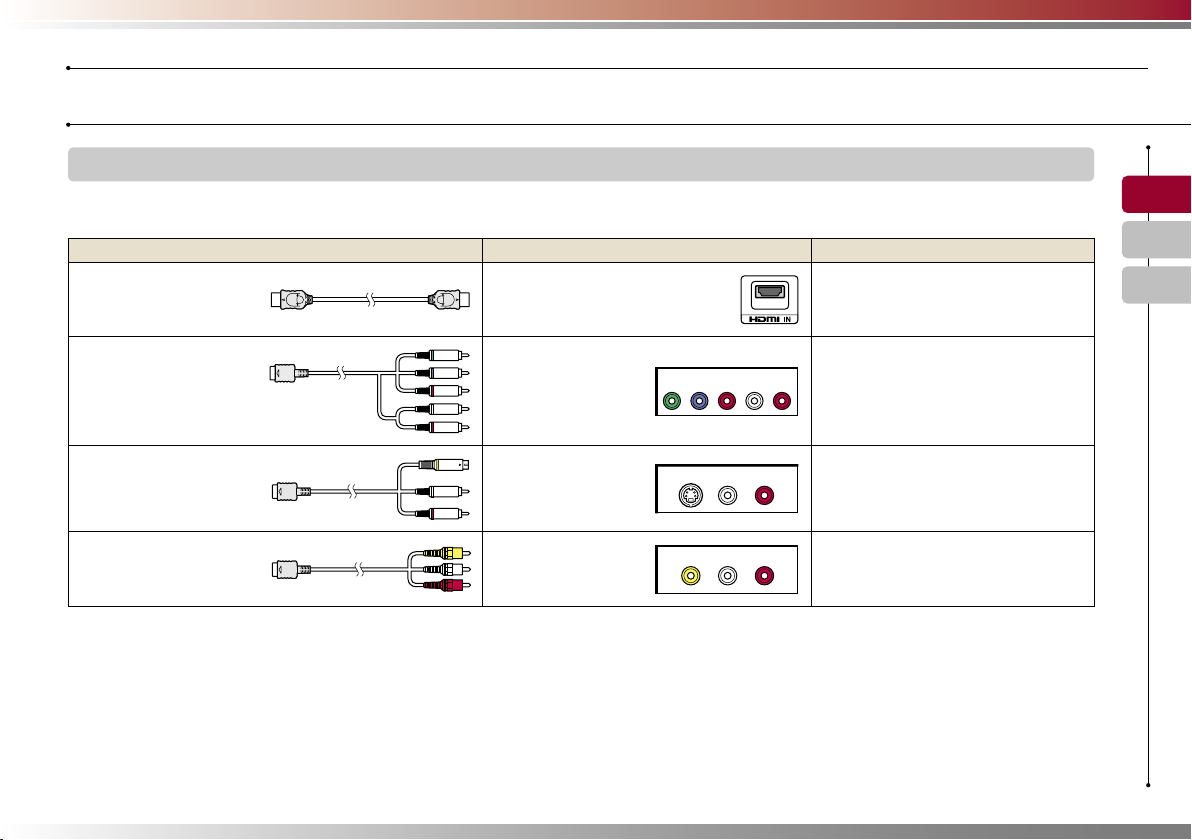
Video output cable types
The resolution displayed on the TV varies depending on the input connectors on the TV and the type of cable in use. Select a cable to match
the TV in use.
Cable type Input connector on the TV Supported video modes *
1
US
FR
HDMI cable
(sold separately)
Component AV cable
(sold separately)
HDMI IN connector
Component VIDEO IN
connector
COMPONENT VIDEO IN AUDIO IN
YLRPR/CRPB/CB
1080p / 1080i / 720p / 480p
1080p / 1080i / 720p / 480p / 480i*
S VIDEO cable
(sold separately)
S VIDEO IN connector
AV cable
(supplied)
*1 Depending on the type of TV or content to be played, some video modes may not be supported.
If a device that is not compatible with the HDCP (High-bandwidth Digital Content Protection) standard is connected to the system using an HDMI cable, video
and/or audio cannot be output from the system.
Copyright-protected Blu-ray video discs can only be output at 1080p using an HDMI cable connected to a device that is compatible with the HDCP (Highbandwidth Digital Content Protection) standard.
2
The video output setting on the system will display as "Standard (NTSC)".
*
VIDEO IN connector
(composite)
S VIDEO L-AUDIO-R
VIDEO L-AUDIO-R
480i*
480i*
ES
2
2
2
7
Page 8
Getting started
Setting up the PS3™ system
Connection methods
Caution
• Do not plug the AC power cord for the system into an electrical outlet until
you have made all other connections. Make sure the TV or other
component is unplugged from the electrical outlet prior to connecting it to
the system.
• Any TV or component connected to the system must be functioning
properly and free of defects. If a TV or component connected to the system
is faulty or defective, it may cause damage to the TV or component, or to
the system itself.
• The socket-outlet shall be installed near the equipment and shall be easily
accessible.
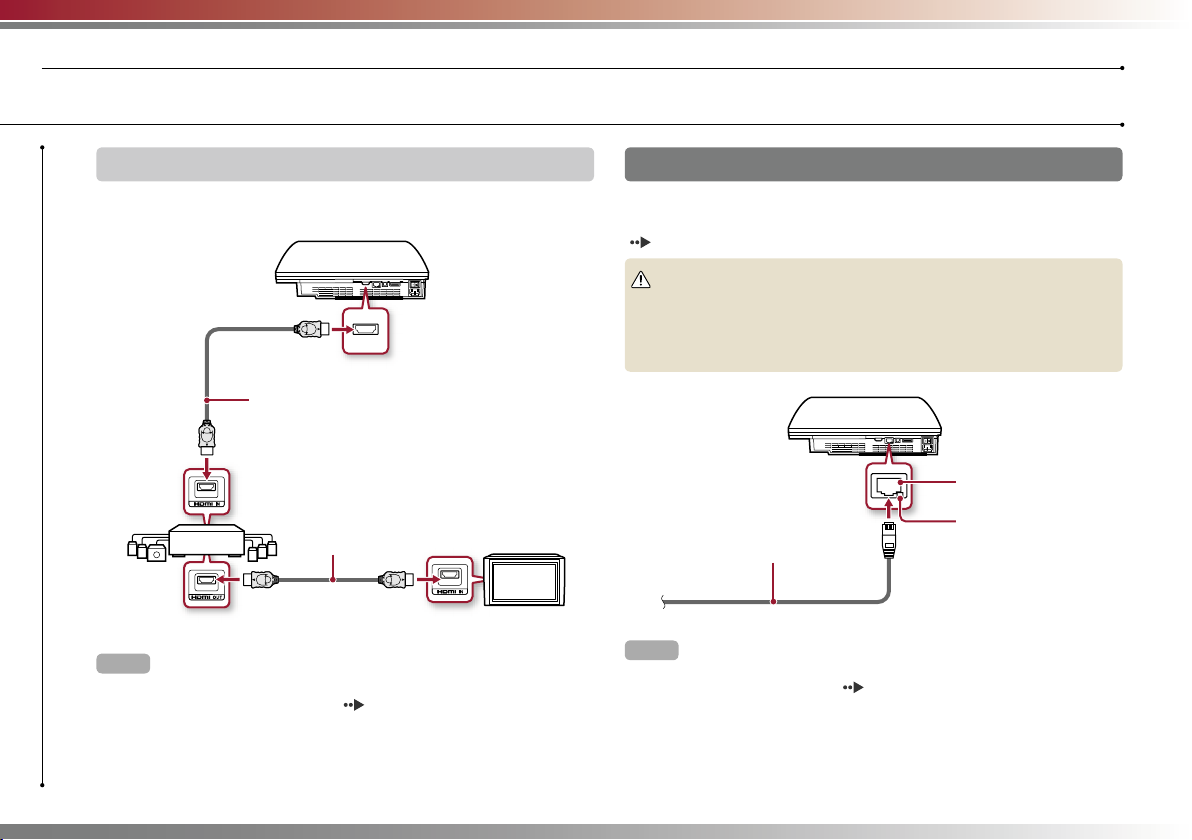
Connecting to a TV using an HDMI cable
Connect the system to the TV using an HDMI cable (sold separately).
An HDMI cable can output both video and audio and enables you to
enjoy digital-quality video and audio with minimal loss of picture
quality.
HDMI OUT connector
TV
HDMI IN connector
HDMI cable (sold separately)
8
Connecting with other types of cables
Connect cables other than the HDMI cable to the AV MULTI OUT
connector on the system.
AV MULTI OUT connector
TV
Example: When using the supplied AV cable
Hint
If you change the type of cable used to connect the system, the picture may
not be displayed. If this happens, turn off the system and then turn it on again
by touching the power button on the system front until it makes a small beep
(about 5 seconds). The picture will be displayed at the system’s default
resolution.
VIDEO
L
AUDIO
R
VIDEO IN connector
AV cable (supplied)
Page 9
Getting started
Setting up the PS3™ system
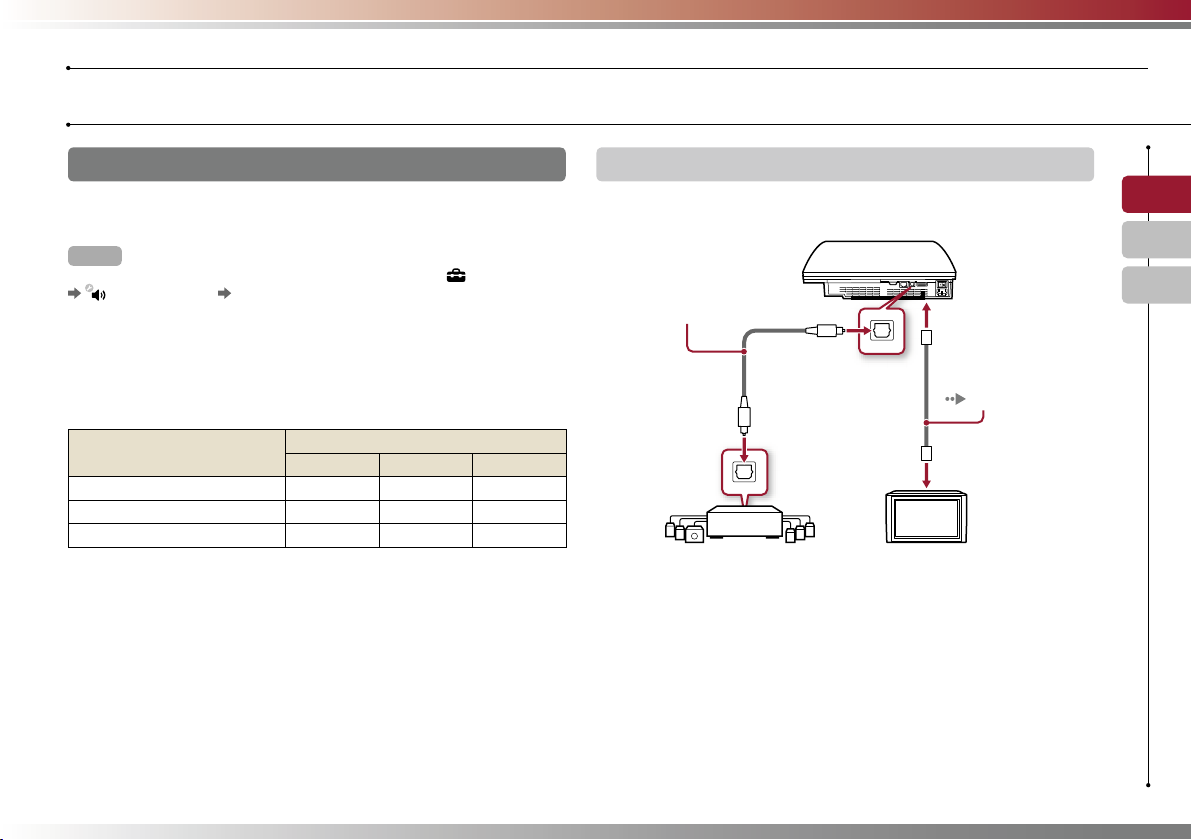
Step 2: Connect digital audio devices
You can connect audio devices that support digital audio output,
such as an AV receiver for home entertainment use.
Hint
When connecting a digital audio device to the system, go to (Settings)
(Sound Settings) "Audio Output Settings", and adjust the settings as
necessary for the audio device.
Audio output on the PS3™ system
The supported channels may vary depending on the output
connector to be used.
PS3™ system output connectors
AV MULTI OUT connector
Digital out (optical) connector *
HDMI OUT connector
*1 Audio from a Super Audio CD cannot be output from the digital out (optical)
connector. Multi-channel content from Super Audio CDs can only be output
from the HDMI OUT connector.
2
*
A device compatible with Linear PCM 7.1 Ch. is required to output 7.1 Ch.
audio from the HDMI OUT connector.
3
This system does not support output from the DTS-HD 7.1 Ch. DTS-HD 7.1
*
Ch audio is output from a 5.1 or lower channel.
Channels that can be used for output
2 Ch. 5.1 Ch. 7.1 Ch.
1
2*3
*
Connecting with an optical cable
The audio will be output from the optical cable. The picture will be
output from the video output cable.
Optical cable for audio
(sold separately)
Video output cable
for the TV in use
page 7)
(
Digital audio device
such as an AV receiver
TV
US
FR
ES
9
Page 10
Getting started
Setting up the PS3™ system
10
Connecting with an HDMI cable
Both audio and video will be output from the HDMI cable. You can
output the TV picture via an audio device.
HDMI cable (sold separately)
Digital audio device such
as an AV receiver
HDMI cable (sold separately)
TV
Hints
• If your TV is not equipped with an HDMI input connector, use a video output
cable of the correct type for your TV (
system directly.
• If a device is connected to the PS3™ system via an HDMI cable, do not turn
off the device while the PS3™ system is turned on (power indicator is lit
green). Doing so may cause sound distortions or produce abnormal sounds.
page 7) to connect it to the PS3™
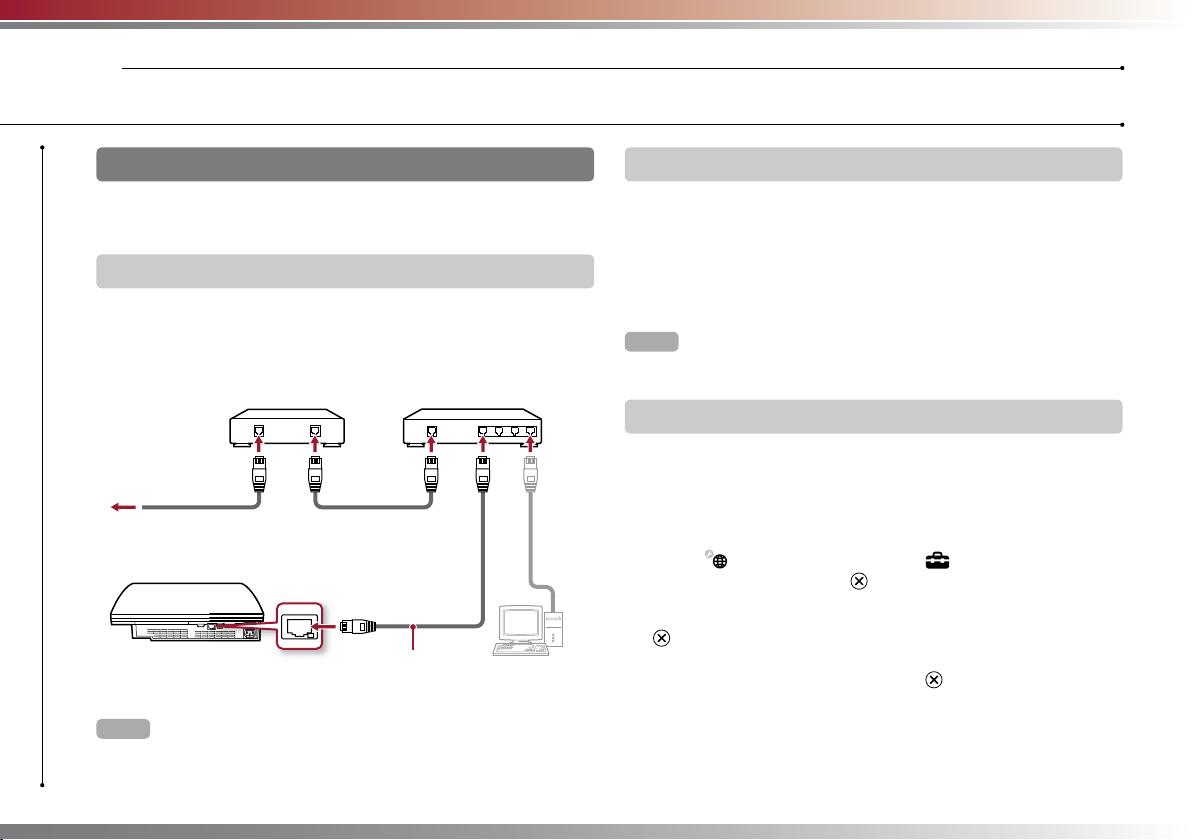
Step 3: Connect the Ethernet cable
Using an Ethernet cable, you can connect the system to the Internet.
For details on network settings, see "Adjusting network settings"
( page 22).
Caution
The system supports 10BASE-T, 100BASE-TX and 1000BASE-T networks. Do
not connect a standard telephone line or other types of cords or cables that
are not compatible with the system directly to the LAN connector on the
system, as this may cause heat build-up, fi re or malfunction.
LAN connector
LAN access indicator
Ethernet cable (supplied)
Hint
You can connect to the Internet without using an Ethernet cable. For details,
see "Using a wireless connection" (
page 23).
Page 11
Getting started
Setting up the PS3™ system
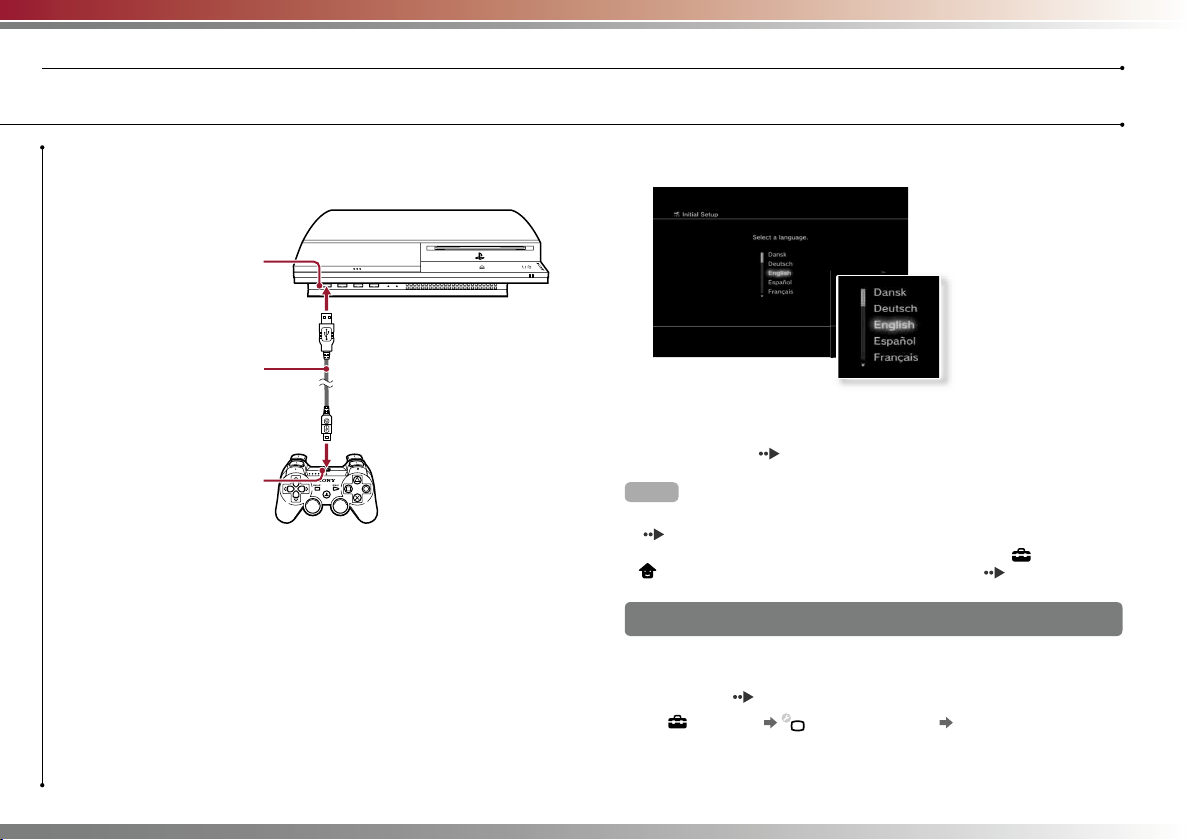
Step 4: Connect the AC power cord
Connect the AC power cord.
Caution
• Do not plug the AC power cord for the system into an electrical outlet until
you have made all other connections.
• To avoid possible damage to the system or a connected TV or component,
the AC power cord must be plugged into a polarized, three-prong,
electrical outlet that is properly wired and grounded.
• The socket-outlet shall be installed near the equipment and shall be easily
accessible.
AC IN connector
AC power cord (supplied)
To the electrical outlet
Step 5: Perform initial setup of the system software
After turning on the system, perform initial setup.
1 Turn on the TV.
2 Turn on the main power switch.
Main power switch
The power indicator will turn solid red to indicate that the system has
entered standby mode.
3 Touch the power button.
Power button
Power indicator
The power indicator turns green and the picture is displayed on the TV
screen.
US
FR
ES
11
Page 12
Getting started
Setting up the PS3™ system
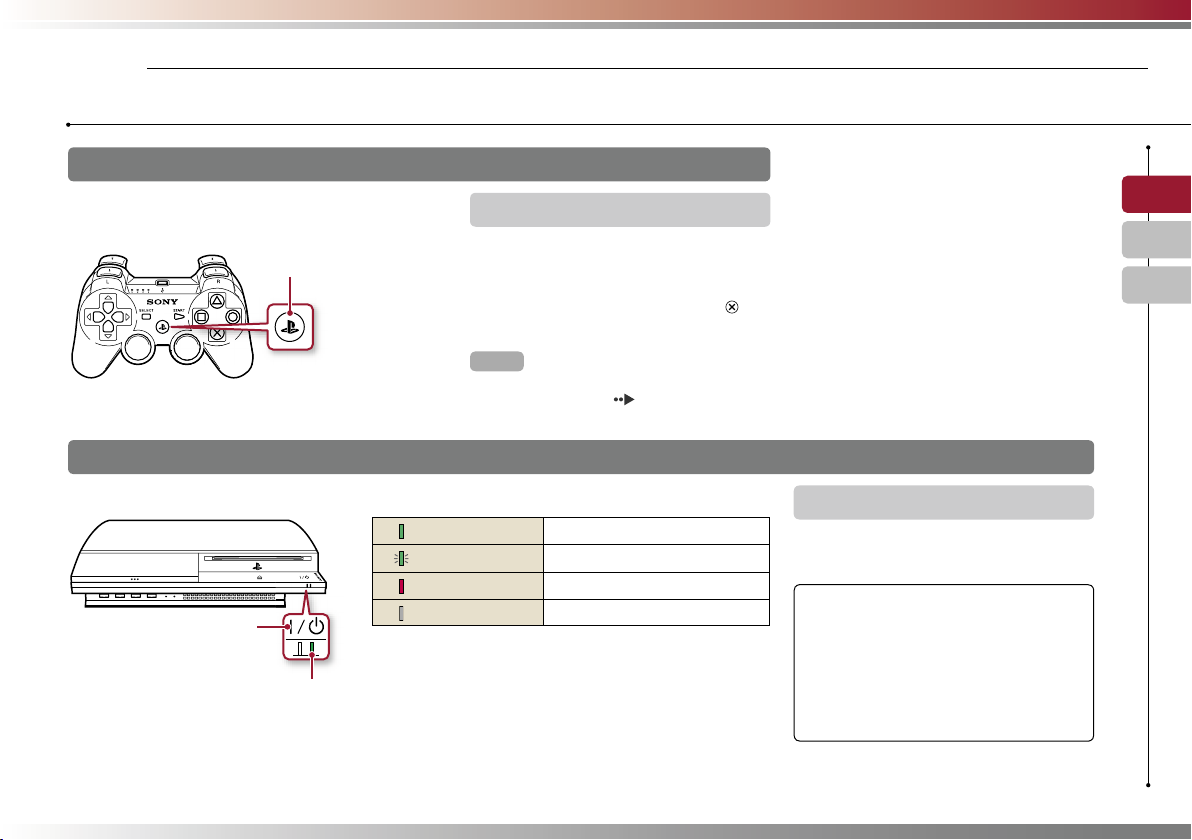
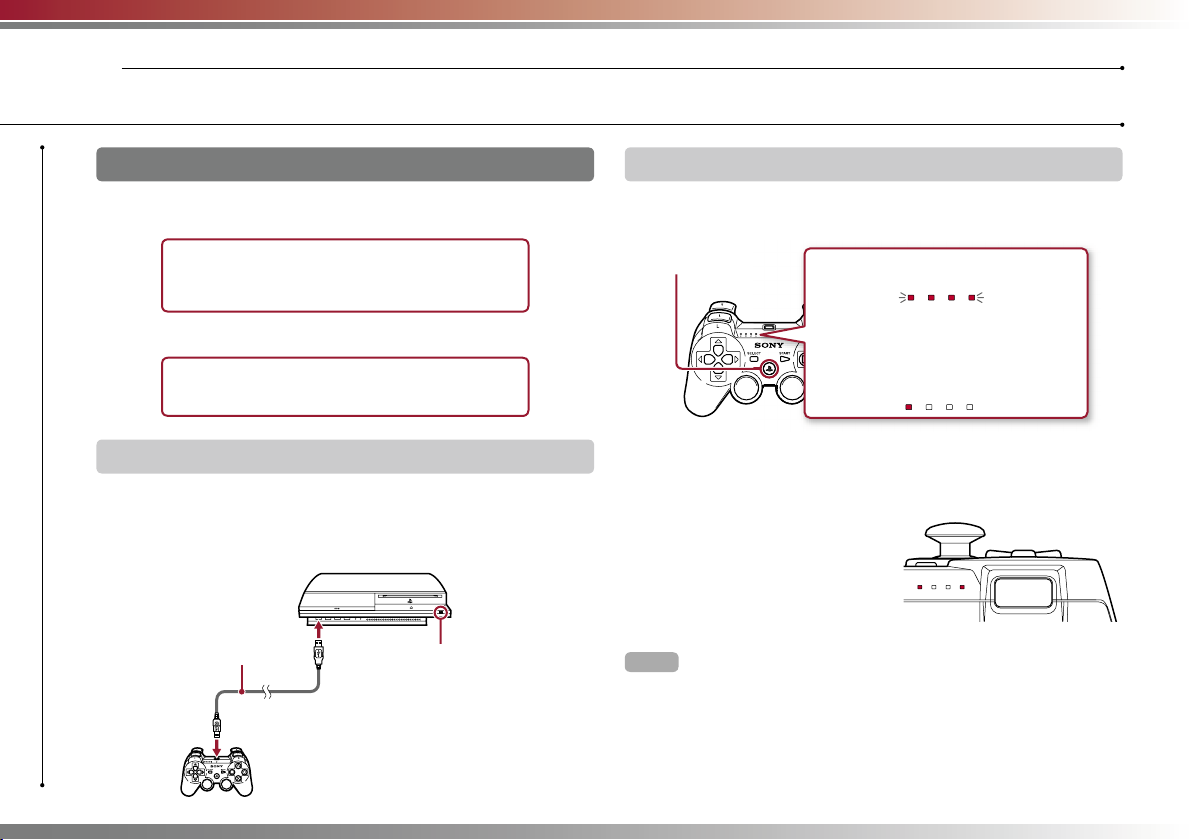
4 Connect the wireless controller to the system using a USB
cable.
USB connector
USB cable (supplied)
USB connector
5 Press the PS button on the controller.
The system will recognize the wireless controller. After it has recognized
the controller, the initial setup screen will be displayed.
6 Perform initial setup.
Follow the on-screen instructions to enter settings for system language,
time zone, date and time and user name. After initial setup is completed,
the home menu (
Hints
• For details on entering text, see "Using the on-screen keyboard"
page 30).
(
• Settings entered during initial setup can be changed under (Settings) or
(Users). For details, refer to the online user’s guide (
Adjusting video output settings
Depending on the connector and the type of cable used, video
output settings may need to be adjusted to display HD resolution on
the TV screen ( page 6).
Go to
and follow the on-screen instructions to adjust the settings.
(Settings) (Display Settings) "Video Output Settings"
page 3) will be displayed on the TV screen.
page 27).
12
Page 13
Basic operations
03
Turning the PS3™ system on and off
Using a SIXAXIS™ wireless controller
Press the PS button.
PS button
Using the system button
1 Touch the power button.
Power button
Power indicator
Power indicator status
2 Press the PS button of the wireless controller.
A controller number is assigned.
Turning off the system
Press and hold down the PS button for
one second or longer. When the message
"Turn Off the System" is displayed on the
screen, select it and then press the
button.
Hint
Before using a wireless controller you must fi rst
pair it with the system (
Solid green
Flashing green
Solid red
Off
System turned on
System turning off
System off (in standby mode)
Main power switch off
page 14).
US
FR
ES
Turning off the system
Touch the power button for two seconds
or longer.
Notice
Check that the system is in standby mode
(power indicator red) before turning it off
using the main power switch on the system
rear. If you turn off the system using the main
power switch when it is not in standby
mode, it may cause malfunction, data loss or
corruption, or damage to the system.
13
Page 14
Basic operations
04
14
Using the SIXAXIS™ wireless controller
Preparing for use
To use a wireless controller, you must fi rst register or "pair" the
controller with the PS3™ system and assign a number to the controller.
Step 1: Pair the system and the controller.
• When using for the fi rst time
• When using with a different PS3™ system
m
Step 2: Assign a controller number.
Every time the system is turned on
Step 1: Pair the system and the controller
When using the controller for the fi rst time or when using with a
different PS3™ system, you must fi rst pair the devices. If you turn on
the system and connect the controller using a USB cable, the pairing
will be completed automatically.
USB cable (supplied)
Check that the system is turned on
(power indicator is lit solid green).
Step 2: Assign a controller number
Each time you turn on the system, a number must be assigned to the
controller.
Press the PS button.
You can connect up to 7 controllers at one time. The controller
number is shown by the number above the port indicators. For
numbers 5-7, add the numbers of the lit indicators.
Hints
• Pairing and assigning controller numbers can only be done when the system
is turned on (when the power indicator is lit solid green).
• When a paired controller is used with another PS3™ system, the pairing with
the original system is cleared. Pair the controller with the system again if the
controller has been used with another system.
• If the controller or the system is turned off, the port indicators on the
controller will turn off and the assigned number will be cleared.
All of the port indicators fl ash.
When the controller has been assigned a
number, the port indicators for the
assigned number turn solid red.
Example: Controller number 5 has
been assigned.
1 234
m
1234
11234
Page 15
Basic operations
Using the SIXAXIS™ wireless controller
Using the controller wirelessly
If you disconnect the USB cable, you can use the controller
wirelessly. To use it wirelessly, the controller’s battery must be
charged.
Hints
• The USB cable can be connected or disconnected while the controller and
the system are turned on.
• If the controller does not function, press the PS button and reassign the
controller number.
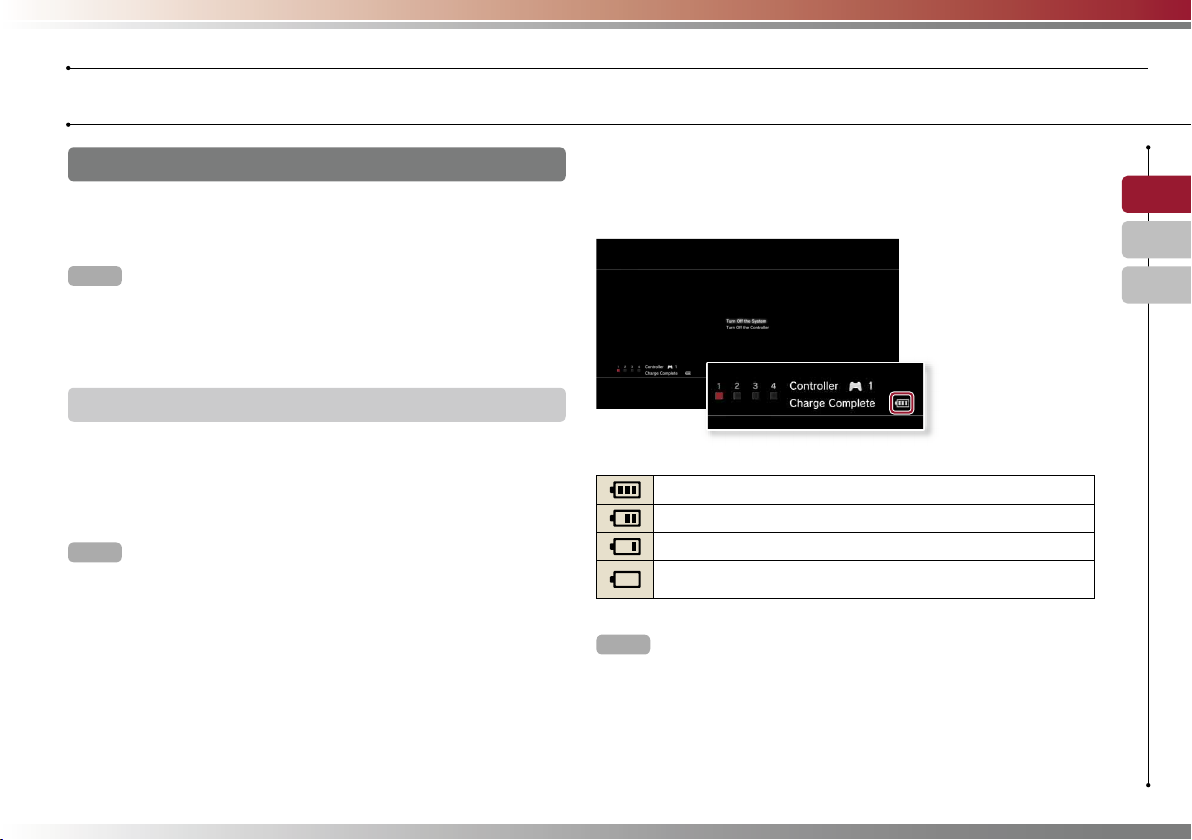
Charging the controller
With the system turned on (power indicator is lit green), connect the
controller to the system using a USB cable. The port indicators of the
controller fl ash slowly and charging begins.
When charging has completed, the port indicators stop fl ashing.
Hints
• The controller can be used while charging.
• Charge in an environment where the temperature range is between
10°C - 30°C (50°F - 86°F). Charging may not be as effective when performed
in other environments.
• The battery has a limited lifespan. Battery duration will gradually decrease
with repeated usage and age.
• Battery life also varies depending on the storage method, usage state,
environment and other factors.
Battery charge level
If you press and hold down the PS button for more than one second,
you can check the battery charge level on the screen.
The battery has plenty of charge.
The battery has started losing its charge.
The battery charge level is low.
The battery has no charge. The port indicators of the controller fl ash
rapidly. Charge the controller.
Hint
Depending on the environment or the conditions of use, the remaining charge
level may not display correctly and the battery duration may vary.
US
FR
ES
15
Page 16
Basic operations
05
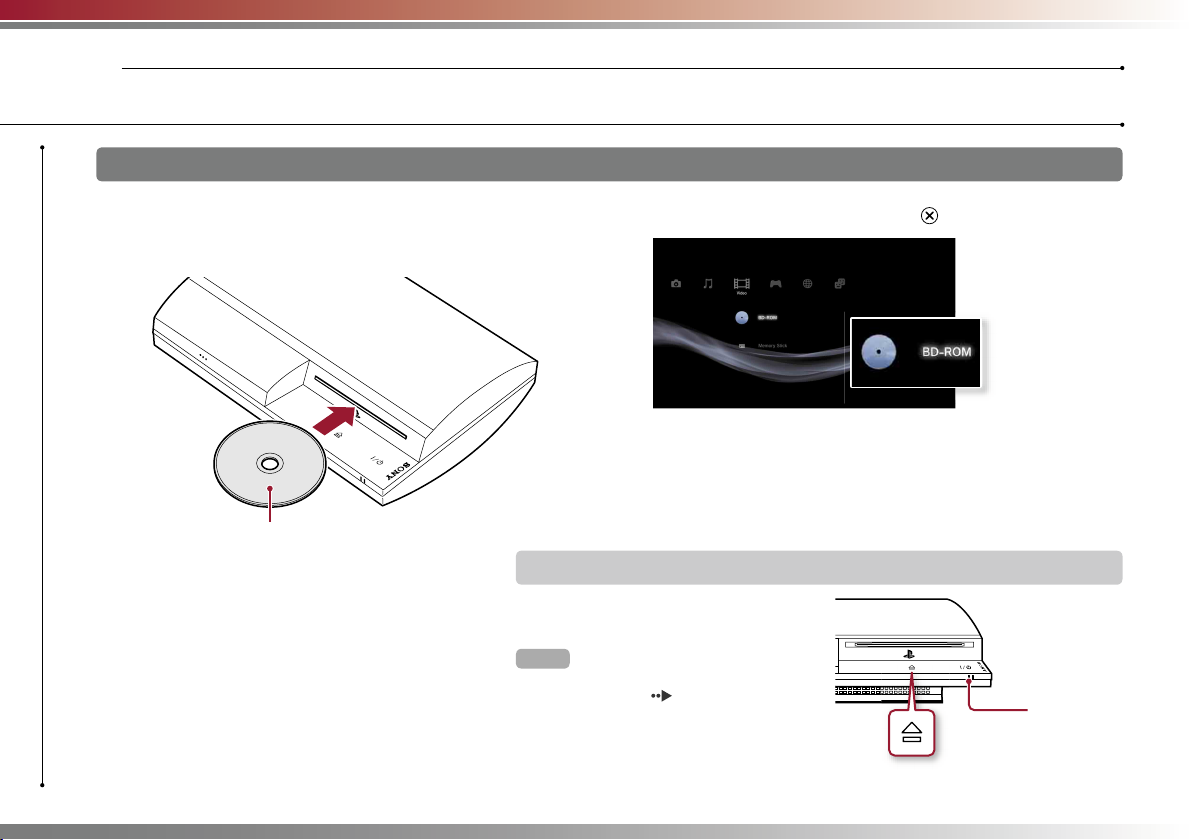
Blu-ray Disc (BD)/DVD/CD
1 Insert the disc.
Playing content
An icon is displayed in the home menu.
Insert the disc with the
label side facing up.
2 Select the icon, and then press the button.
Playback begins.
Depending on the disc, a list of playable content may be displayed.
Ejecting a disc
Stop playback, and then touch
the eject button.
Hint
For instructions on how to quit games,
see "Playing games" (
page 19).
Eject indicator
16
Eject button
Page 17
Basic operations
Playing content
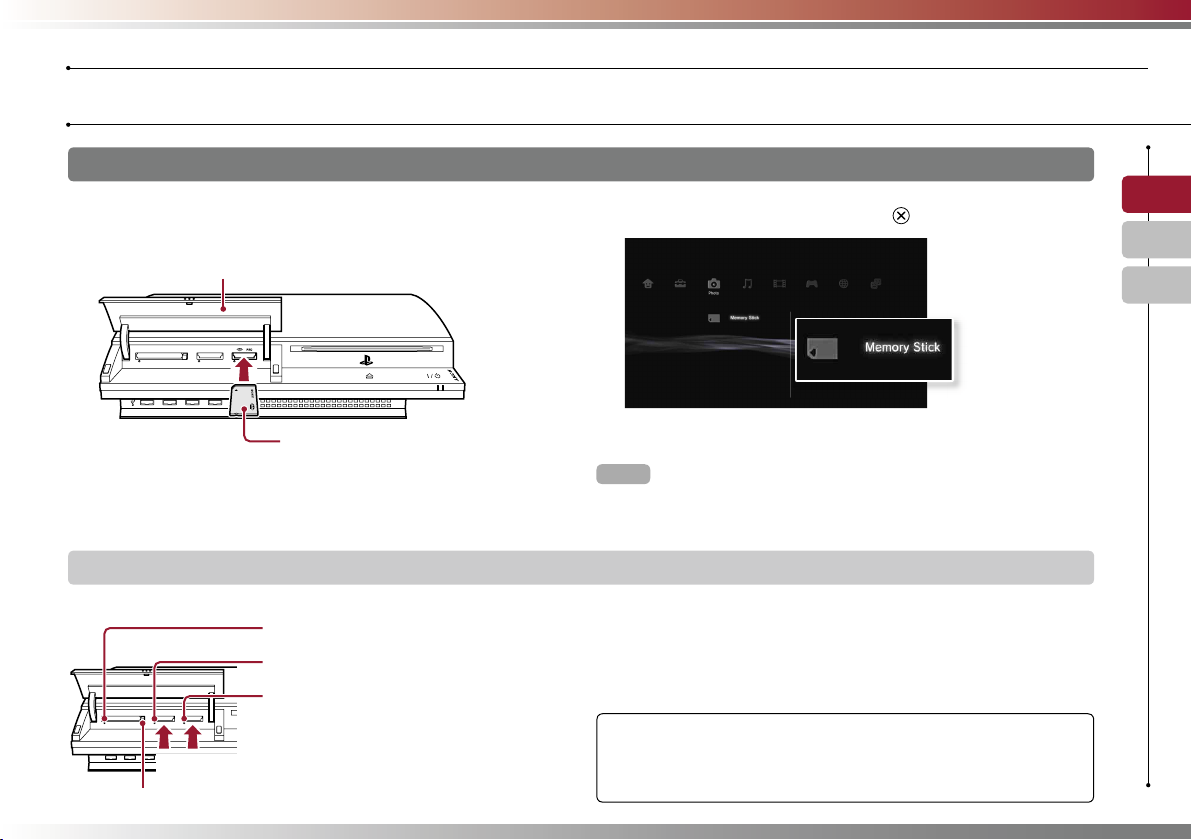
Memory Stick™/SD Memory Card/CompactFlash
1 Insert the storage media.
An icon is displayed in the home menu.
Open the slot cover.
CF SD/miniSD
Front side
Example: When inserting a Memory Stick™
Ejecting media
Check that the access indicator is not fl ashing, and then eject.
CF access indicator
SD Memory Card access indicator
Memory Stick™ access indicator
Press the media in the
direction of the arrows.
Press the CF eject button.
®
US
2 Select the icon, and then press the button.
FR
ES
A list of playable content is displayed.
Hint
When using a Memory Stick Duo™/miniSD™ card with the PS3™ system, you
can insert the media without using an adaptor.
Notice
When the access indicator is fl ashing, data is being saved, loaded or
deleted. When the access indicator is fl ashing, do not remove the storage
media or turn off the system.
17
Page 18
Basic operations
Playing content
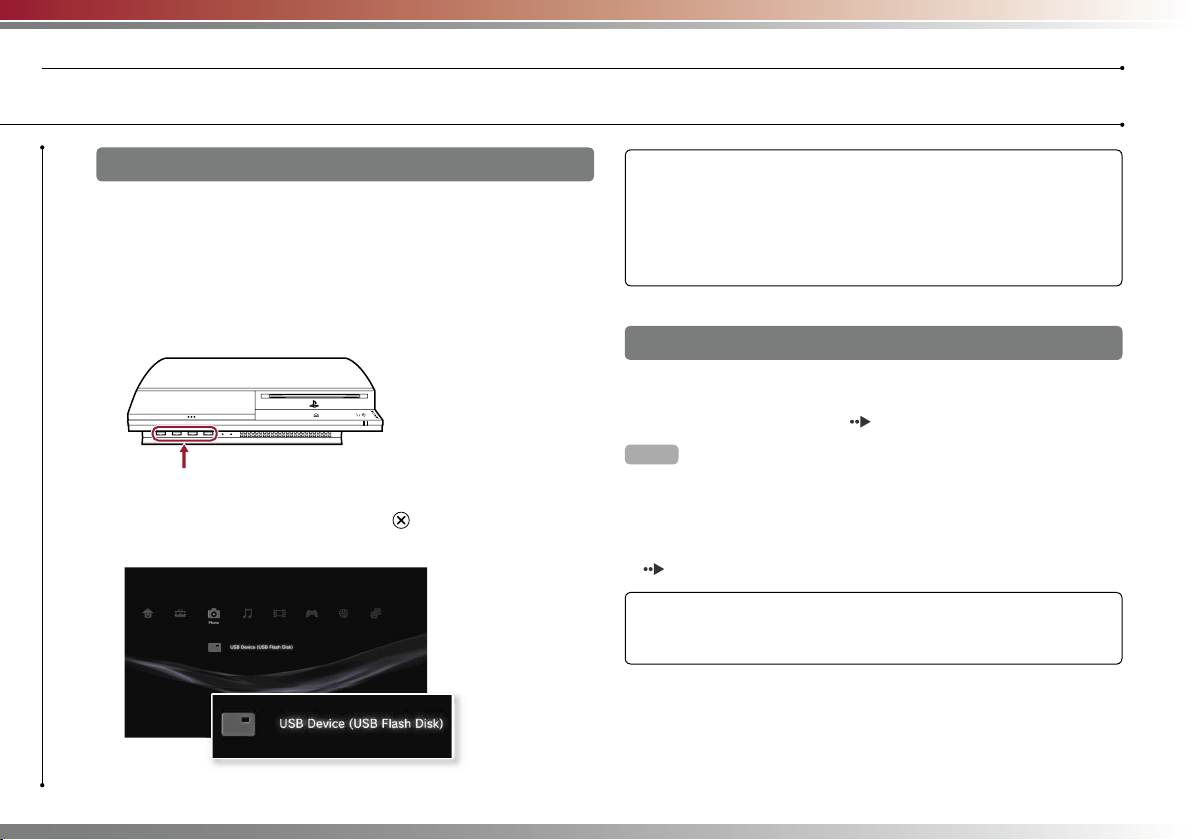
USB devices
You can connect external devices, such as devices that are
compatible with USB Mass Storage Class using a USB cable.
Devices can be connected while the system is turned on. Refer also
to the instructions supplied with the external device to be connected.
1 Connect the USB device.
An icon is displayed in the home menu.
External device such as a digital camera
2 Select the icon, and then press the button.
A list of playable content is displayed.
Notices
• Do not remove USB devices or turn off the system while data is being
saved, loaded or deleted. Doing so may cause data loss or corruption.
• When using a USB fl ash drive with a write-protect switch, do not operate
the switch when the device is connected to the PS3™ system. Doing so
may cause data loss or corruption.
File formats that can be played or viewed
File formats that can be played or viewed on this system include
ATRAC, MP3, AAC, JPEG and MPEG-4. For the latest information,
refer to the online user’s guide ( page 27).
Hints
• Only fi les that are playable or viewable on the PS3™ system are displayed in
the column for the compatible category (Example: Image data is displayed in
the Photo category).
• Depending on the storage media, only a subset of the folders on the media
may be displayed. If you select "Display All" from the options menu
page 3), all folders saved on the media will be displayed.
(
Notice
For information on backing up fi les saved on the hard disk, refer to the
Safety and Support document.
18
Page 19
Game
06
Playing games
Starting/quitting a game
This product has limited backward compatibility with PlayStation® and
PlayStation®2 format software. Many PlayStation® and PlayStation®2
format software titles operate, but full compatibility is not guaranteed.
Updating the system software may improve compatibility.
Visit http://www.us.playstation.com for system software updates. To
check whether a specifi c PlayStation®2 format software title is
compatible with the PS3™ system, visit
http://www.us.playstation.com/Support/CompatibleStatus.
Starting a game
Insert a disc, select the icon, and then press the button
( page 16).
Quitting a game
During gameplay, press the PS button of the wireless controller. Then
select “Quit Game” from the screen that is displayed.
When you start or quit PlayStation®2 format software, the assigned controller
number is cleared. Follow the steps listed below to assign a controller
number.
• After starting a game: Press the PS button when content from the game
• After quitting a game: Press the PS button when the home menu is
software is displayed on the screen.
displayed on the screen.
Hint
To save PlayStation®2/PlayStation® format software data, you must create
internal memory cards (
page 20).
Controller settings
You can adjust controller settings during gameplay. Press the PS
button, and then select a settings item from the screen that is
displayed.
Switching analog mode
When playing PlayStation®2/PlayStation® format software, you can
change the mode of the controller. Switch to the mode supported by
the software. With some software, the mode is switched automatically.
Changing controller numbers
You can change the number assigned to a controller. When the
controller port for use is specifi ed by the software, change to the
supported controller number.*
* You cannot assign controller port 2-D using the PS3™ system.
Hint
You can check the currently assigned controller number by pressing the PS
button during gameplay.
Saved data for PS3™ format software
US
FR
ES
Saved data for PS3™ format software is saved on the system’s hard
disk. The data is displayed under (Game) (Saved Data
Utility).
19
Page 20
Game
Playing games
Saved data for PlayStation®2/PlayStation® format
software
To save data from PlayStation®2/PlayStation® format software, you
must create internal memory cards on the hard disk and assign the
cards to slots.
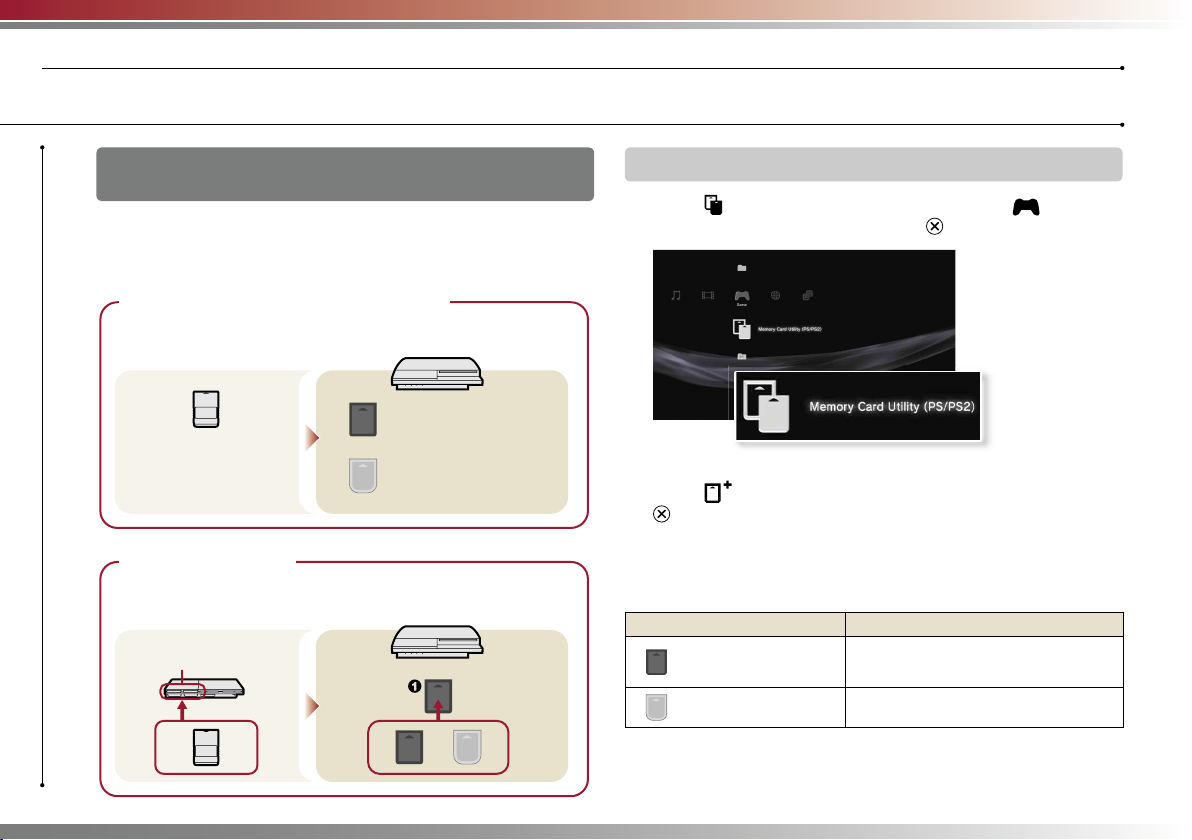
Step 1: Create an internal memory card.
Create an internal memory card within the hard disk as a replacement
for the memory card (8MB) (for PlayStation
• Memory card (8MB)
(for PlayStation
2)
®
• Memory card
Step 2: Assign a slot.
Insert the internal memory card in the internal slot on the hard disk instead
of a memory card slot on the PlayStation
MEMORY CARD slots
2) or memory card.
®
Internal memory card (PS2)
Internal memory card (PS)
2 or PlayStation® console.
®
Internal slots
Step 1: Create an internal memory card
1 Select (Memory Card Utility (PS/PS2)) under (Game) in
the home menu, and then press the button.
2 Select (New Internal Memory Card), and then press the
button.
Follow the on-screen instructions to create the internal memory card.
Internal memory card types
Type Data type that can be saved
Internal memory card
(PS2)
Internal memory card
(PS)
Saved data from PlayStation®2 format
software (Saved data from PlayStation®
format software cannot be saved.)
Saved data from PlayStation® format
software
20
Page 21
Game
Playing games
Step 2: Assign a slot
1 Select (Memory Card Utility (PS/PS2)) under (Game) in
the home menu, and then press the button.
2 Select the internal memory card that you want to use, and
then press the button.
Assign a slot.
Hints
• Depending on the software, slots may be preassigned. For details, refer to
the instructions supplied with the software.
• You can assign slots during gameplay. Press the PS button of the wireless
controller, and then select "Assign Slots" from the screen that is displayed.
Using saved data on a memory card (8MB)
(for PlayStation
To use saved data on a memory card (8MB) (for PlayStation®2) or a
memory card, you must copy the data to an internal memory card
within the hard disk. You must use a memory card adaptor (sold
separately) to copy the data.
2) or a memory card
®
1 Select (Memory Card Utility (PS/PS2)) under (Game) in
the home menu, and then press the button.
2 Connect the memory card adaptor to the system.
3 Insert the memory card that you want to copy in the adaptor.
The icon for (Memory Card (PS)) or (Memory Card (PS2)) is
displayed.
4 Select the icon, and then press the button.
Follow the on-screen instructions to copy the data.
Hints
• Depending on the type, saved data from a memory card (8MB)
(for PlayStation
shown below.
Memory card (8MB)
(for PlayStation
Memory card
* If the amount of saved data to copy is large, the system will automatically
create multiple internal memory cards (PS).
• You can copy data saved on the hard disk to Memory Stick™ media, an SD
Memory Card, CompactFlash
drive, etc.). Select the saved data, and then select "Copy" from the options
menu (
(8MB) (for PlayStation
• Some saved data may have restrictions that prevent copying of the data.
2) or a memory card is copied to an internal memory card as
®
Saved data from PlayStation
format software
2)
®
page 3). Note that you cannot copy the data to a memory card
Saved data from PlayStation®
format software
or a USB mass storage device (USB fl ash
®
2) or a memory card.
®
2
®
Internal memory
card (PS2)
Internal memory
card (PS)*
US
FR
ES
21
Page 22
Network
07
Adjusting network settings
Using a wired connection
The following instructions explain how to connect to the Internet using
an Ethernet cable.
Example of a wired network confi guration
The network confi guration and connection method may vary
depending on the equipment in use and the network environment.
Network gateway
device such as a DSL
or cable modem
ETHERETHER
To the Internet line
Router
Not necessary if the DSL or cable
modem or other network device has
built-in router functionality
WAN LAN1 LAN2 LAN3 LAN4
Ethernet cable
(supplied)
PC
Preparing the required items
The following items are required for a wired connection to the
Internet.
• A broadband Internet connection via a device such as a DSL or
cable modem (connection of multiple devices may require
additional hardware)
• Ethernet cable (supplied)
Hint
User is responsible for Internet service fees.
Setting up the Internet connection
When making a wired connection to the Internet, usually you do not
need to adjust any of the default settings. If you cannot use the
default settings to connect, follow the instructions below to adjust the
settings.
1 Select (Network Settings) under (Settings) in the home
menu, and then press the button.
2 Select "Internet Connection Settings", and then press the
button.
When a message stating that the Internet connection will be terminated is
displayed, select “Yes”, and then press the
button.
22
Hint
A router is a device that enables multiple devices to be connected to one
Internet line. A router is necessary if a PC and a PS3™ system will be
connected to the Internet at the same time using one Internet connection.
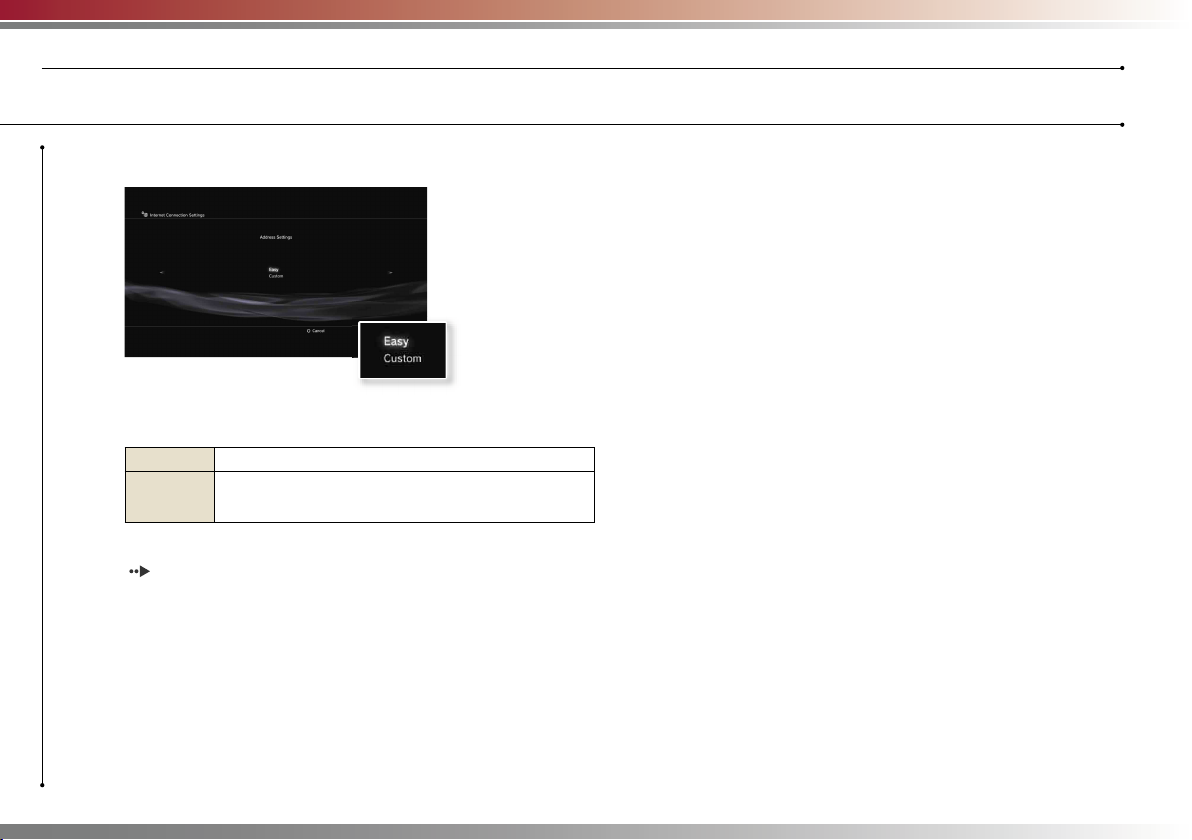
3 Select "Wired Connection", and then press the right button.
Page 23
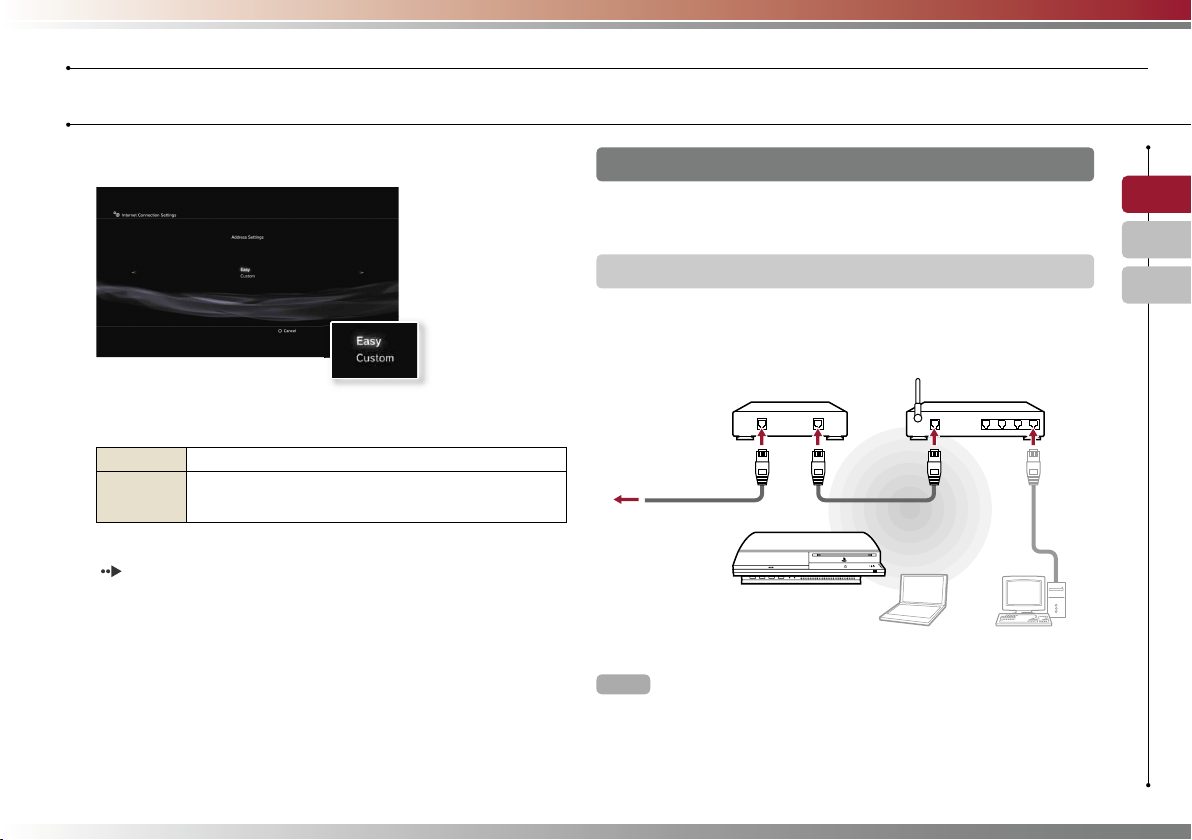
Network
Adjusting network settings
4 Select "Easy" or "Custom" and adjust settings as necessary.
Follow the on-screen instructions to adjust the required settings.
Easy
Custom
For detailed information on network settings, refer to the online user’s guide
page 27).
(
Basic settings are set automatically.
You can manually enter detailed settings information. For
information on settings, refer to the instructions supplied
by the Internet service provider or with the network device.
Using a wireless connection
The following instructions explain how to connect to the Internet using
a wireless connection.
Example of a wireless network confi guration
The network confi guration and connection method may vary
depending on the equipment in use and the network environment.
Network gateway device
such as a DSL or cable
modem
ETHERETHER
To the Internet line
Hints
•
An access point is a device that allows you to connect to a network wirelessly.
• A wireless router is a device that adds access point functionality to a router.
A router is necessary if a PC and a PS3™ system will be connected to the
Internet at the same time using one Internet connection.
Access point or wireless router
WAN LAN1 LAN2 LAN3 LAN4
PCPC
US
FR
ES
23
Page 24
Network
Adjusting network settings
Preparing the required items
The following items are required to set up the system to connect
wirelessly to the Internet.
• A broadband Internet connection via a device such as a DSL or
cable modem (connection of multiple devices may require
additional hardware)
• An access point or wireless router
• Settings information for the access point (SSID, WEP key, WPA key)
Hints
• SSID, WEP key, and WPA key are types of security information that are
required when connecting to an access point.
• When connecting to the Internet wirelessly, signal interference may occur
depending on the usage condition of the wireless network devices. If Internet
data transfer speed is decreased or the wireless controller does not function
properly, use an Ethernet cable to connect to the Internet.
• Depending on the access point in use, you may need the MAC address for
your system when connecting to the Internet. You can fi nd the MAC address
for the system by going to
Information".
• User is responsible for Internet service fees.
(Settings) (System Settings) "System
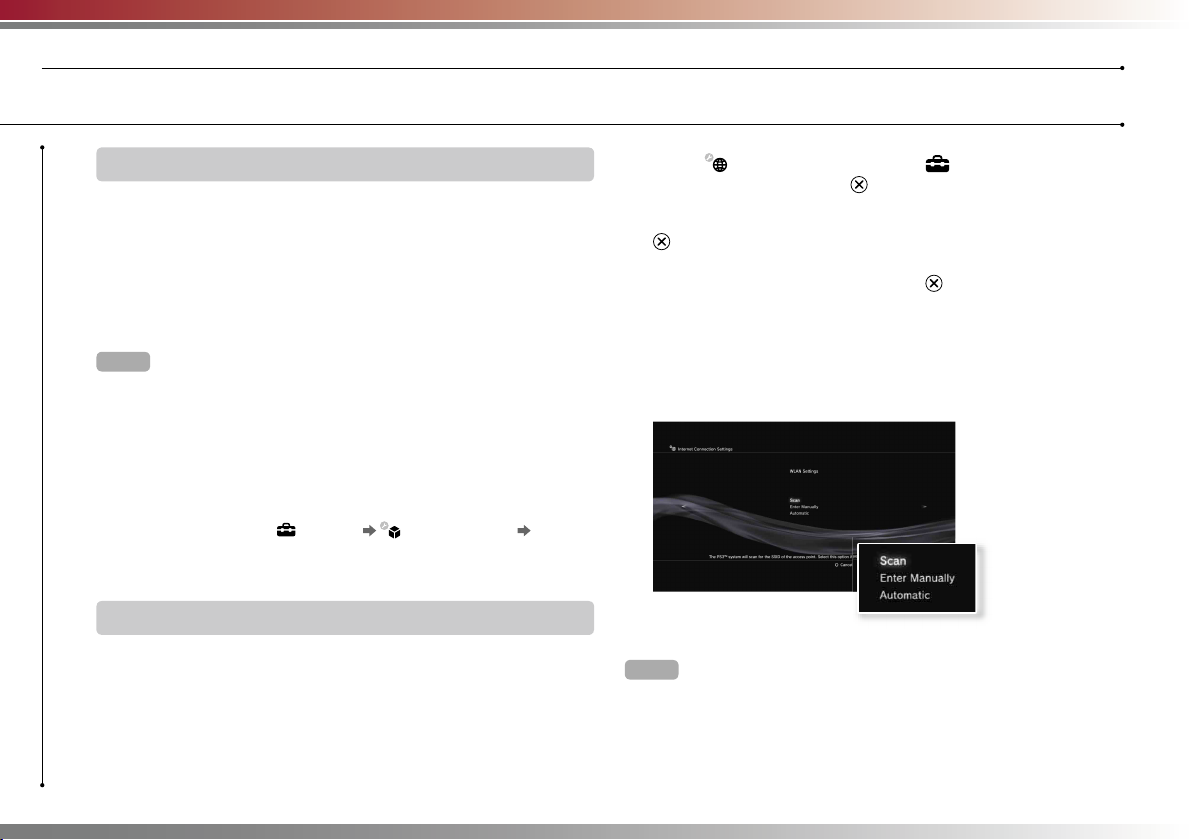
Setting up the Internet connection
When connecting wirelessly to the Internet, you must fi rst adjust
network settings.
Network settings may vary depending on the type of access point
and the network environment. The following instructions explain the
most common network confi guration.
1 Select (Network Settings) under (Settings) in the home
menu, and then press the button.
2 Select "Internet Connection Settings", and then press the
button.
When a message stating that the Internet connection will be terminated is
displayed, select “Yes”, and then press the
button.
3 Select "Wireless", and then press the right button.
4 Select "Scan", and then press the right button.
The system will search for access points within range and display them as
a list.
Hint
When using an access point that supports automatic setup, select "Automatic"
and follow the on-screen instructions. The required settings will be completed
automatically. For information on access points that support automatic setup,
contact the access point manufacturers.
24
Page 25
Network
Adjusting network settings
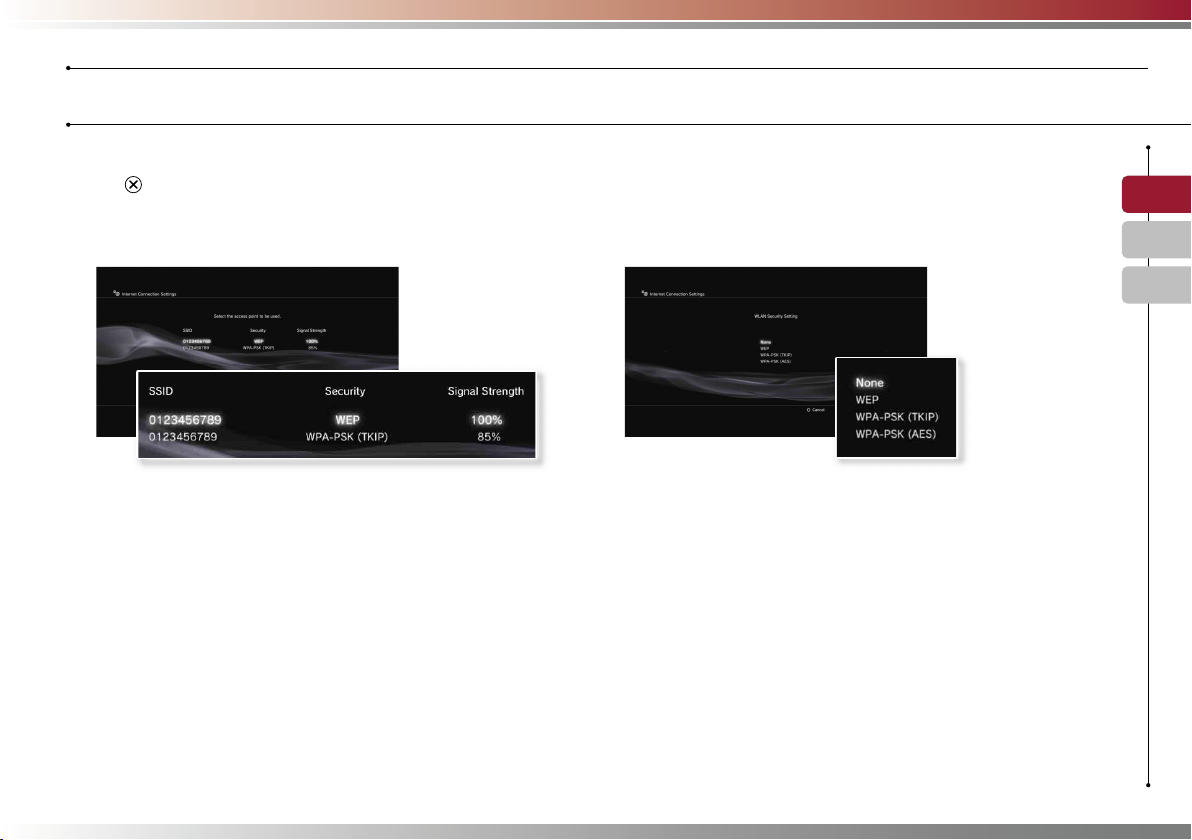
5 Select the access point that you want to use, and then press
the button.
An SSID is a code or a name that is assigned to the access point. If you do
not know which SSID to use or if the SSID is not displayed, contact the
person who set up or maintains the access point.
6 Confi rm the SSID for the access point, and then press the
right button.
7 Select the security settings as necessary, and then press the
right button.
Security settings vary depending on the access point in use. To determine
which settings to use, contact the person who set up or maintains the
access point.
8 Enter the encryption key, and then press the right button.
The encryption key fi eld will display an asterisk (*) for each character you
enter. If you do not know the key, contact the person who set up or
maintains the access point.
US
FR
ES
25
Page 26
Network
Adjusting network settings
9 Select "Easy" or "Custom" and adjust settings as necessary.
Follow the on-screen instructions to adjust the required settings.
26
Easy
Custom
For detailed information on network settings, refer to the online user’s guide
page 27).
(
Basic settings are set automatically.
You can manually enter detailed settings information. For
information on settings, refer to the instructions supplied
by the Internet service provider or with the network device.
Page 27
Network
08
If network settings are already completed, the PS3™ system will
automatically connect to the Internet when the system is turned on.
The connection will remain active as long as the system is on.
Connecting to the Internet
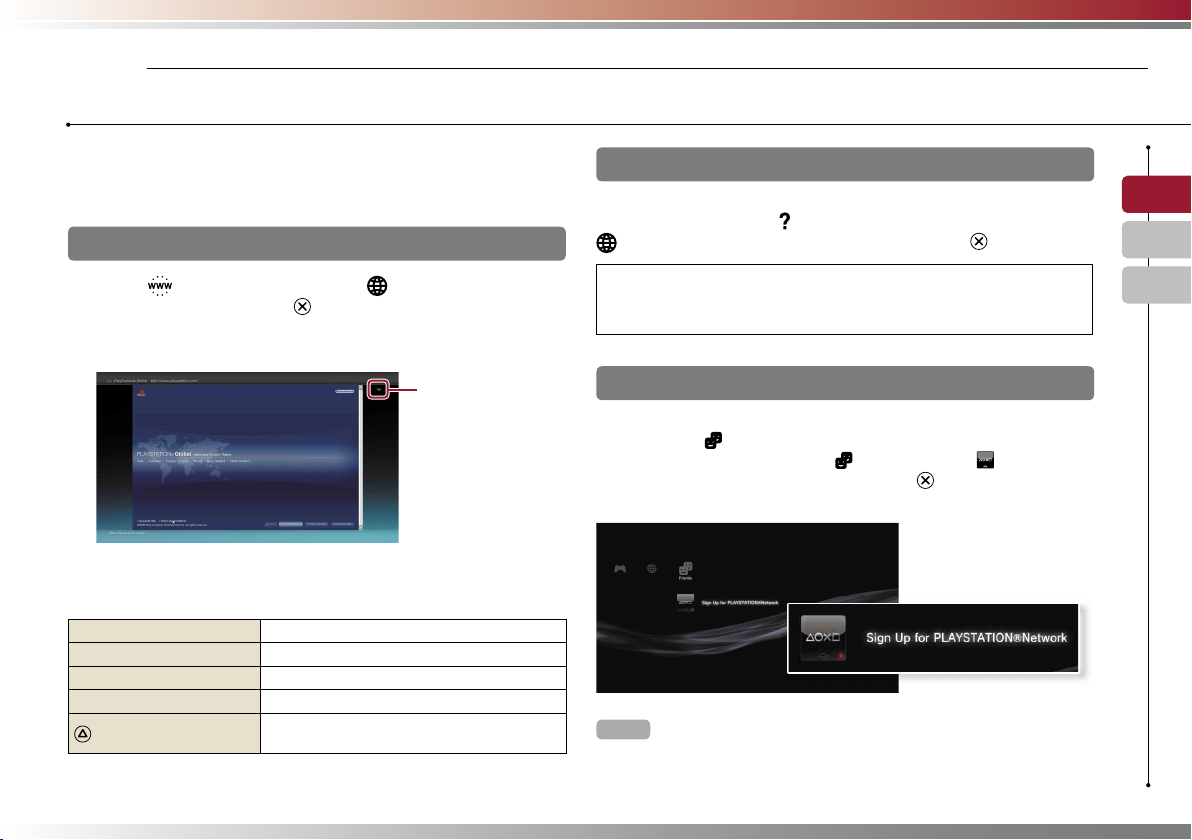
Using the Internet browser
1 Select (Internet Browser) under (Network) in the home
menu, and then press the button.
The Internet browser opens. A busy icon is displayed while the page is
loading.
Busy icon
Basic operations of the Internet browser
Directional buttons
Right stick
L1 button
START button
button
Move the pointer to a link
Scroll in the desired direction
Go back to the previous page
Enter an address
Switch between displaying and not displaying
the menu
Viewing the user’s guide
You can use the Internet browser to view the online user’s guide for
the PS3™ system. Select (Online Instruction Manuals) under
(Network) in the home menu, and then press the button.
PLAYSTATION®3 system user’s guide
http://manuals.playstation.net/document/
The guide can also be viewed using your PC’s Web browser.
Creating a PLAYSTATION®Network account
By creating a PLAYSTATION®Network account, you can enjoy
chatting under (Friends) or use the PS3™ system’s online network
service and other features. Go to (Friends), select (Sign Up for
PLAYSTATION®Network), and then press the button. The screen
for creating an account will be displayed.
Hints
• An Internet connection is required to create an account.
• PLAYSTATION®Network service content may vary depending on the region.
US
FR
ES
27
Page 28
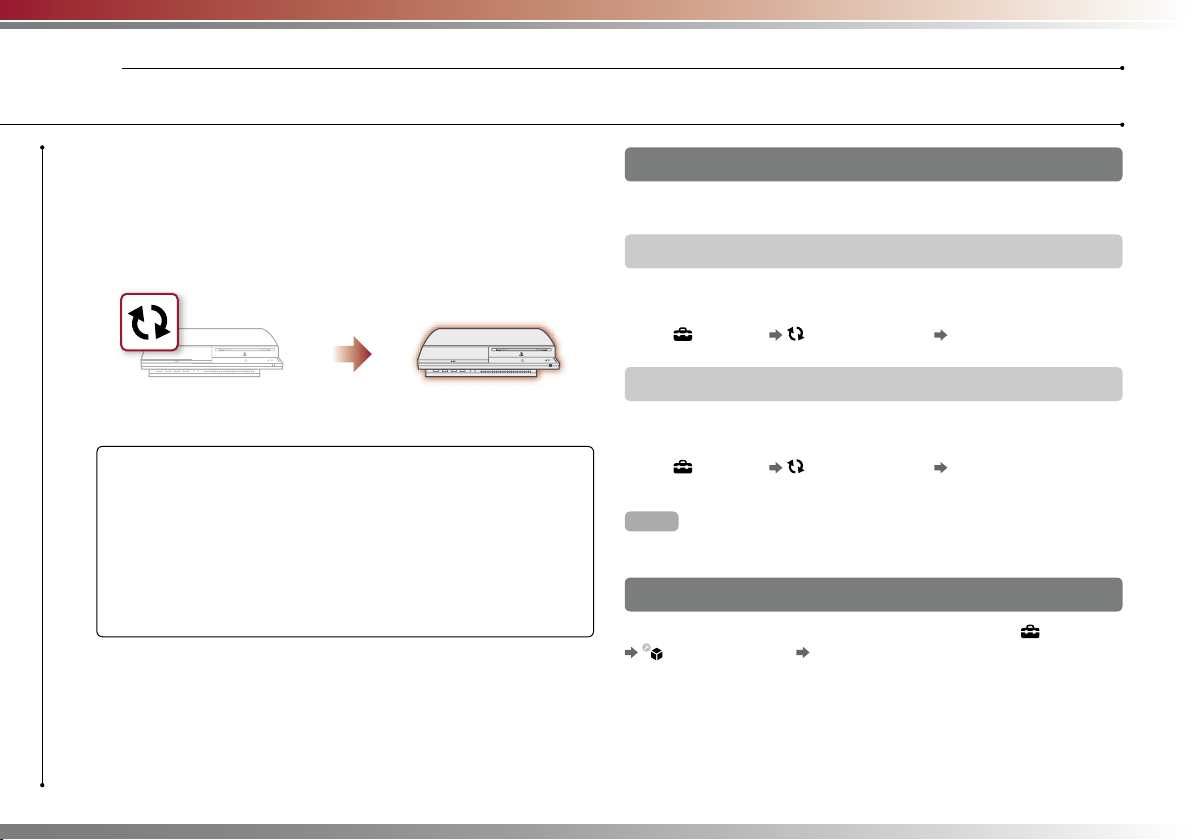
Updates
09
PS3™ system updates
By updating the PS3™ system software, you can add features and/or
security patches. Frequently update your system to use the latest
version of the system software.
For the latest information on updates, visit
http://www.us.playstation.com.
Use the update data to overwrite the
existing system software.
Notices
• During an update, do not turn off the system or remove media. If an
update is cancelled before completion, the system software may become
damaged, and the system may require servicing or exchange.
• During an update, the power button on the system front is inactive.
• Depending on the content, you may not be able to play without fi rst
updating the system software.
• After you have updated the system software, you cannot go back to an
earlier version.
The system software is updated.
Update methods
You can perform an update in any of the ways described below.
Network update
You can update by downloading the update data from the Internet.
The latest update is automatically downloaded.
Select
(Settings) (System Update) "Update via Internet".
Update using storage media
You can update using the update data saved on a Memory Stick™ or
other media.
Select
Media".
Update data can also be contained in some game discs.
(Settings) (System Update) "Update via Storage
Hint
Checking the system software version
You can check system version information by selecting (Settings)
(System Settings) "System Information". The current version is
displayed in the System Software fi eld.
28
Page 29
Security Settings
10
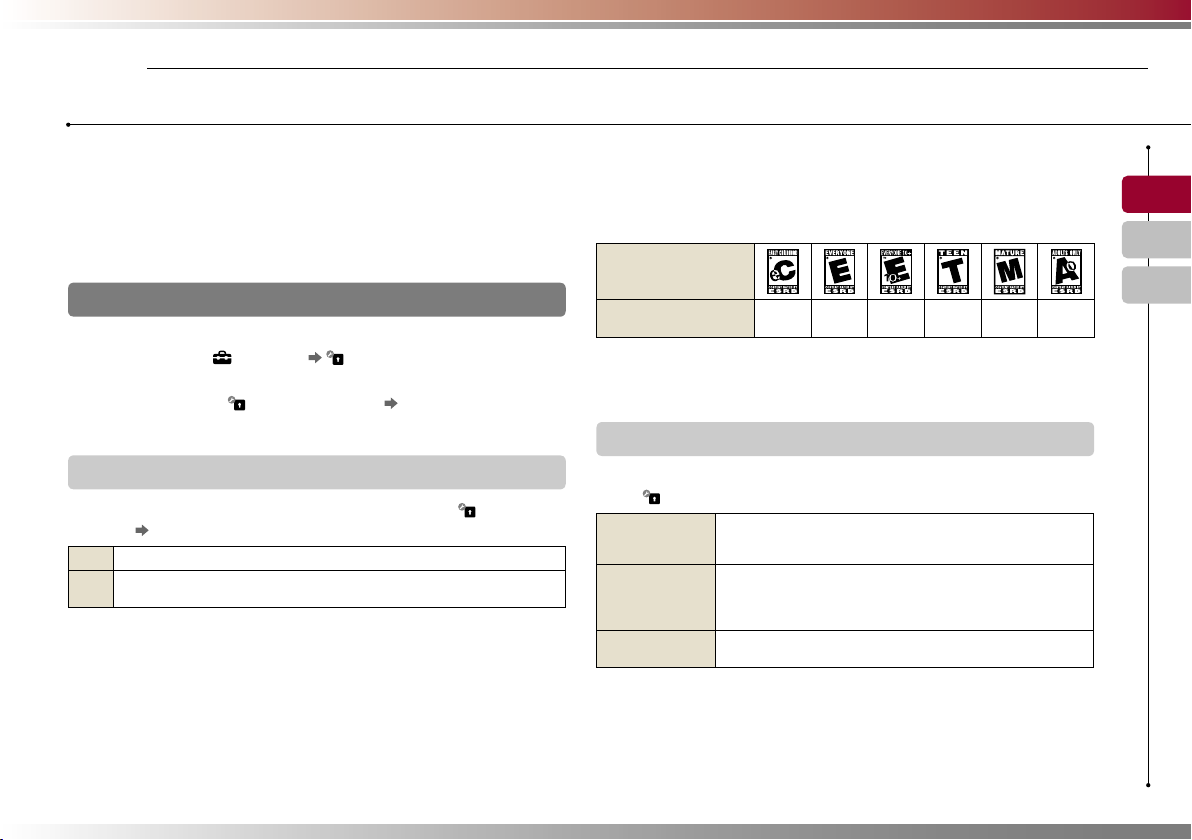
The PS3™ system includes a parental control feature. You can use
this feature to set a password and limit the playback of content
restricted by a parental control level (games, videos and other
content). By setting the parental control level on the system, you can
prevent the playback of restricted content by children.
Setting the parental control level
Changing the security settings
You can set a parental control level for games or Blu-ray Discs or
other content under (Settings) (Security Settings).
A password is required to change parental control settings. You can
set a password under
The password is set to “0000” in the default settings.
(Security Settings) “Change Password”.
Parental control levels for games
You can set the parental control level for games under (Security
Settings) “Parental Control”. Select from “Off” or one of 11 levels.
Play any content regardless of parental control level.
Off
Set the parental control level based on the number. Note that the lower
11-1
the number, the tighter the restriction.
The combination of the parental control levels of both the PS3™
system and the content determine whether the content can be
played.
Example: If the parental control level of the system is set to “7”,
content with a level from “1” to “7” can be played on the system.
Game rating marks
Most game packaging displays a symbol to indicate the age group
that is appropriate to play the game. The symbols correspond to the
parental control levels set on the games as shown below:
Age group
Game parental control
level
As of March 2007. For information about games and related ESRB ratings, visit our
Web site at http://www.us.playstation.com/psp. For the latest information about
the ESRB rating system, visit http://www.esrb.org.
2345910
Other security settings
You can set parental control limitations on content other than games
under (Security Settings), as described below.
BD Parental
Control
DVD parental
control
Internet Browser
Start Control
When playing a BD with parental control settings, restrict
playback based on the age you have set. The lower the
setting, the tighter the restriction.
When playing a DVD with parental control settings, restrict
playback based on the level you have set.
Select from “Off” or one of eight levels.
The lower the number, the tighter the restriction.
Restrict the ability to start the Internet Browser with a
password.
US
FR
ES
29
Page 30

Keyboard
11
Cursor
Using the on-screen keyboard
Displays predictive
options
Text entry fi eld
Operation keys
Displays when predictive
mode is on
Input mode display
List of keys
Keys that are displayed vary depending on the input mode and other
conditions.
Keys Explanation
Inserts a line break
Moves the cursor
Deletes the character to the left of the cursor
Inserts a space
Switches the input mode
Confi rms characters that have been typed and
exits the keyboard
Switches to the mini-size keyboard
Inserts a symbol
/
Switches the type of characters to be input
30
Page 31

Entering characters
Using predictive mode, you can enter the fi rst few letters of the word,
which will bring up a list of commonly used words that start with these
letters. You can then use the directional buttons to select the word
that you want. After you have fi nished entering text, select the "Enter"
key to exit the keyboard.
Hint
The languages you can use for text entry are the supported system languages.
You can set the system language by going to
Settings)
Example: If "System Language" is set to "Français", you can enter text in
French.
"System Language".
(Settings) (System
Using a USB keyboard
You can enter characters using a USB keyboard (sold separately).
While the text entry screen is displayed, if any key on the connected
USB keyboard is pressed, the text entry screen will enable you to use
the USB keyboard.
Hint
You cannot use the predictive mode when using a USB keyboard.
Keyboard
Using the on-screen keyboard
US
FR
ES
31
Page 32

32
A propos de la documentation du système PS3™
La documentation du système PS3™ comprend les éléments suivants :
• Sécurité et support technique
Avant d'utiliser le produit, lisez d'abord attentivement ce document. Il contient des
informations de sécurité liées à l'utilisation du système PS3™, à son dépannage, à ses
caractéristiques, ainsi que d'autres données.
• Aide-mémoire (le présent document)
Le présent document contient des informations sur la configuration du système PS3™, sur
sa préparation à l'utilisation et sur les opérations de base du matériel.
• Mode d'emploi (http://manuals.playstation.net/document/)
Ce document en ligne est accessible par le biais d'Internet et contient des informations
détaillées relatives à l'utilisation du logiciel du système PS3™ ( page 57).
Amis
Salons de discussion et échange de
messages
Réseau
Connexion à Internet
Jeu
Utilisation de jeux
Vidéo
Lecture de vidéos
Musique
Lecture de musique
Photo
Affichage d'images
Paramètres
Réglage des paramètres du système
PS3™
Utilisateurs
Sélection des utilisateurs qui peuvent
se connecter au système PS3™
Vérifiez que vous disposez de tous les éléments suivants. S'il manque des
éléments, appelez le Service consommateurs SCEA au 1-800-345-7669.
s Système PLAYSTATION®3
s Manette sans fil SIXAXIS™
s Cordon
d'alimentation
s Câble AV
s Câble USB
s Câble Ethernet
s Documentation
Page 33

33
US
FR
ES
Menu d'accueil
Catégorie
Option
Utilisation de la barre "XMB"
(XrossMediaBar)
Le système PS3™ possède une interface utilisateur appelée "XMB"
(XrossMediaBar). L'écran principal de l'interface "XMB" est appelé
"menu d'accueil".
1
2
3
Sélectionnez une option à l'aide
de la touche haut ou bas.
Appuyez sur la touche
pour
confirmer l'option sélectionnée.
Touche : Affiche le menu d'options/panneau de commandes
Si vous sélectionnez une icône et
appuyez sur la touche , le menu
d'options s'affiche.
Icônes Menu d'options
Si vous appuyez sur la touche
pendant la lecture de contenu, le
panneau de commandes s'affiche.
Panneau de commandes
Touche
:
Annule une opération
Touches de navigation :
Permettent de sélectionner les catégories/
options affichées
Touche :
Valide l'option sélectionnée
Sélectionnez une catégorie à l'aide
de la touche gauche ou droite.
Touche PS :
Affiche le menu d'accueil
Met le système sous/hors tension
Page 34

34
Préparation
Nom des pièces
01
Avant du système
CF SD/miniSD
Fente pour disque
Fente pour CF*
1
Fente pour SD*2 Memory Card
Fente pour Memory Stick™
Couvercle de fente
Touche d'alimentation
Grille d'aération
Connecteurs USB
Indicateur d'accès disque dur
Indicateur d'accès WLAN
Logo de la gamme PS
Vous pouvez le faire pivoter pour
adapter la position du système
Touche d'éjection
Touche d'éjection
*1 CompactFlash® *2 Secure Digital
Attention
• N'utilisez pas le système dans une armoire refermée ou à tout endroit où la
chaleur peut s'accumuler. Ceci pourrait provoquer la surchauffe du
système et mener à des incendies, des blessures ou des défaillances.
• Si la température interne du système est élevée', l'indicateur d'alimentation
clignote alternativement en rouge et en vert. Dans ce cas, éteignez le
système ( page 43) et ne l'utilisez pas pendant un certain temps. Après
que le système a refroidi, déplacez-le vers un endroit bien ventilé et
recommencez à l'utiliser.
Arrière du système
Prise AC IN
Connecteur AV MULTI OUT
Connecteur DIGITAL OUT (OPTICAL)
Interrupteur
d'alimentation principal
MAIN POWER
Connecteur HDMI OUT
Grille d'aération
Connecteur LAN
Conseil
Le système peut être installé en position horizontale ou
verticale. Placez-le tel qu'indiqué dans le schéma à droite
en position verticale.
Avis
Ne placez pas le système dans une zone soumise à
une poussière excessive ou à de la fumée de cigarette.
L'accumulation de poussière ou les résidus de fumée
de cigarette sur les composants internes (tels que les
lentilles) peut entraîner un dysfonctionnement du
système.
Page 35

35
US
FR
ES
Manette sans fil SIXAXIS™
Touche
SELECT
(sélection)
Connecteur USB
Touche L2
Touche L1
Touches de
navigation
Joystick
gauche/
touche L3*
Touche START
(mise en marche)
Touche R2
Touche R1
Touche
Touche
Touche
Touche
Joystick droit/
touche R3*
Touche PS
Indicateurs
de port
* Les touches L3 et R3 fonctionnent lorsque vous appuyez sur les joysticks.
Conseil
Pour plus de détails sur la manette sans fil, consultez la section "Utilisation de
la manette sans fil SIXAXIS™" (
page 44).
Avis
Certains périphériques PlayStation® et PlayStation®2 tels que les manettes
analogiques (DUALSHOCK®) et les manettes analogiques (DUALSHOCK®2)
ne sont pas compatibles avec le système PS3™. Pour plus de détails,
visitez le site Web http://www.us.playstation.com.
Préparation
Nom des pièces
Page 36

36
Préparation
Configuration du système PS3™
02
Etape 1 : Connexion à un téléviseur
Sortie vidéo sur le système PS3™
Le système PS3™ peut reproduire deux types de résolution : HD et SD. Pour déterminer le mode
vidéo pris en charge, reportez-vous au mode d'emploi du téléviseur que vous utilisez.
*1 Ce nombre indique le nombre de lignes de balayage. Remarquez que "i" est l'abréviation de "interlace" et "p"
de "progressive". L'utilisation du mode progressive reproduit des données vidéo de haute qualité, avec un
scintillement minimal.
*2 Le paramètre de sortie vidéo du système, "Standard (NTSC)", s'affiche.
HD
(High Definition)
SD
(Standard Definition)
Mode vidéo *
1
1080p 1080i 720p 480p
480i *
2
Rapport d'aspect
16:9 16:9 16:9
16:9
4:3
16:9
4:3
Captures d'écrans illustrant la différence de résolution
Ecran HD Ecran SD
Procédure de configuration du
système
Etape 1 : Connexion à un téléviseur
Page 36
m
Etape 2 : Connexion de périphériques
audio numériques
Page 39
Etape 4 : Connexion du cordon
d'alimentation
Page 41
Etape 5 : Configuration initiale du
logiciel du système
Page 41
m
m
m
Etape 3 : Connexion d'un câble
Ethernet
Page 40
Page 37

37
US
FR
ES
Préparation
Configuration du système PS3™
Types de câbles de sortie vidéo
La résolution affichée sur le téléviseur varie selon les connecteurs d'entrée disponibles sur le téléviseur et le type de câble utilisé. Sélectionnez
un câble adapté au téléviseur utilisé.
Type de câble Connecteur d'entrée sur le téléviseur Modes vidéo pris en charge*
1
Câble HDMI
(vendu séparément)
Connecteur HDMI IN
1080p / 1080i / 720p / 480p
Câble AV composant
(vendu séparément)
Connecteur VIDEO IN
composant
Y L RPR/CRPB/CB
COMPONENT VIDEO IN AUDIO IN
1080p / 1080i / 720p / 480p / 480i*
2
Câble S VIDEO
(vendu séparément)
Connecteur S VIDEO IN
S VIDEO L-AUDIO-R
480i*
2
Câble AV
(fourni)
Connecteur VIDEO IN
(composite)
VIDEO L-AUDIO-R
480i*
2
*1 Selon le type de téléviseur ou de contenu affiché, il est possible que certains modes vidéo ne soient pas pris en charge.
Si vous connectez un périphérique non compatible avec la norme HDCP (High-bandwidth Digital Content Protection) au système à l'aide d'un câble HDMI, les
données vidéo et/ou audio ne peuvent pas être reproduites à partir du système.
Les disques vidéos protégés par droits d'auteur Blu-ray peuvent être reproduits à 1080p en utilisant un câble HDMI connecté à un périphérique compatible avec
la norme de protection des contenus numériques en haute définition HDCP (High-bandwidth Digital Content Protection).
*2 Le paramètre de sortie vidéo du système, "Standard (NTSC)", s'affiche.
Page 38

38
Préparation
Configuration du système PS3™
Méthodes de connexion
Attention
• Ne branchez pas le cordon d'alimentation du système sur une prise
électrique aussi longtemps que vous n'avez pas établi toutes les autres
connexions. Assurez-vous que le téléviseur ou autre appareil est
débranché de la prise électrique avant de le connecter au système.
• Tout téléviseur ou appareil connecté au système doit fonctionner
correctement et ne présenter aucun défaut. Si un téléviseur ou appareil
connecté au système est défectueux ou fonctionne mal, ce dernier peut
entraîner des dommages au téléviseur ou appareil, ou au système luimême.
• La prise de courant doit être installée près de l'équipement et doit être
facile d'accès.
Connexion à un téléviseur à l'aide d'un câble HDMI
Connectez le système au téléviseur à l'aide d'un câble HDMI (vendu
séparément). Un câble HDMI peut reproduire à la fois les données
vidéo et audio. Il vous permet de profiter de sons et de vidéos de
qualité numérique avec une perte de qualité d'image minimale.
Téléviseur
Connecteur HDMI IN
Câble HDMI (vendu séparément)
Connecteur HDMI OUT
Connexion à l'aide d'autres types de câbles
Connectez les câbles autres que le câble HDMI au connecteur AV
MULTI OUT du système.
VIDEO
AUDIO
L
R
Téléviseur
Connecteur VIDEO IN
Câble AV (fourni)
Connecteur AV MULTI OUT
Exemple : En cas d'utilisation du câble AV fourni
Conseil
Si vous changez le type de câble utilisé pour connecter le système, l'image ne
s'affi che pas. Dans ce cas, mettez le système hors tension, puis remettez-le
sous tension en appuyant sur la touche d'alimentation à l'avant du système
jusqu'à ce qu'il émette un bref signal sonore (d'environ 5 secondes). L'image
s'affi che dans la résolution par défaut du système.
Page 39

39
US
FR
ES
Etape 2 : Connexion de périphériques audio numériques
Vous pouvez raccorder des périphériques audio prenant en charge
la sortie audio numérique, tels qu'un récepteur AV pour l'utilisation
d'un système home cinéma.
Conseil
Si vous connectez un périphérique audio numérique au système, accédez à
(Paramètres) (Paramètres son) "Paramètres de sortie audio", puis
définissez éventuellement les paramètres en fonction du périphérique audio.
Sortie audio sur le système PS3™
Les canaux pris en charge peuvent varier selon le connecteur de
sortie utilisé.
Connecteurs de sortie du système
PS3™
Canaux pouvant être utilisés pour la sortie
2 canaux 5.1 canaux 7.1 canaux
Connecteur AV MULTI OUT
Connecteur DIGITAL OUT
(OPTICAL) *
1
Connecteur HDMI OUT
*2 *
3
*1 Le son provenant d'un Super Audio CD ne peut pas être reproduit à partir du
connecteur DIGITAL OUT (OPTICAL). Le contenu multicanal du Super Audio
CD peut uniquement être reproduit à partir du connecteur HDMI OUT.
*2 Vous devez disposer d'un périphérique compatible avec PCM linéaire 7.1
canaux pour reproduire du son 7.1 canaux à partir du connecteur HDMI
OUT.
*3 Ce système ne prend pas en charge la sortie DTS-HD 7.1 canaux. Le son
DTS-HD 7.1 canaux est reproduit par un système 5.1 canaux ou inférieur.
Connexion à l'aide d'un câble optique
Le son est reproduit à partir du câble optique. L'image est reproduite
à partir du câble de sortie vidéo.
Câble optique pour le son
(vendu séparément)
Périphérique audio numérique,
tel qu'un récepteur AV
Téléviseur
Câble de sortie
vidéo adapté au
téléviseur utilisé
( page 37)
Préparation
Configuration du système PS3™
Page 40

40
Préparation
Configuration du système PS3™
Connexion à l'aide d'un câble HDMI
Le son et la vidéo sont reproduits à partir du câble HDMI. Vous
pouvez reproduire l'image du téléviseur par l'intermédiaire d'un
périphérique audio.
Câble HDMI (vendu séparément)
Périphérique audio numérique,
tel qu'un récepteur AV
Câble HDMI (vendu séparément)
Téléviseur
Conseils
• Si votre téléviseur n'est pas équipé d'un connecteur d'entrée HDMI, utilisez
un câble de sortie vidéo de type adapté au téléviseur (
page 37) afin de
le raccorder directement au système PS3™.
• Si un périphérique connecté à la console PS3™ par un câble HDMI,
n'éteignez pas le périphérique tandis que le PS3™ est en marche
(l'indicateur d'alimentation est vert). En faisant cela pourrait provoquer des
distorsions sonores ou des sons anormaux.
Etape 3 : Connexion d'un câble Ethernet
A l'aide d'un câble Ethernet, vous pouvez connecter le système à
Internet. Pour plus de détails sur les paramètres réseau, consultez la
section "Définition des paramètres du réseau" ( page 52).
Attention
Le système prend en charge les réseaux 10BASE-T, 100BASE-TX et
1000BASE-T. Ne raccordez pas directement au connecteur LAN du système
une ligne téléphonique standard ou d'autres types de cordons ou câbles non
compatibles avec le système, car cela pourrait entraîner la formation de
chaleur, un incendie ou un dysfonctionnement.
Connecteur LAN
Câble Ethernet (fourni)
Indicateur d'accès LAN
Conseil
Vous pouvez vous connecter à Internet sans utiliser de câble Ethernet. Pour
plus de détails, consultez la section "Utilisation d'une connexion sans fil"
( page 53).
Page 41

41
US
FR
ES
Préparation
Configuration du système PS3™
Etape 4 : Connexion du cordon d'alimentation
Connectez le cordon d'alimentation.
Attention
• Ne branchez pas le cordon d'alimentation du système sur une prise
électrique aussi longtemps que vous n'avez pas établi toutes les autres
connexions.
• Afin d'éviter des dommages potentiels au système ou au téléviseur ou
appareil connecté, le cordon d’alimentation doit être raccordé à une prise
électrique à trois bornes respectant les polarités et comportant une mise à
la terre dûment raccordée.
• La prise de courant doit être installée près de l'équipement et doit être
facile d'accès.
Prise AC IN
Cordon d'alimentation (fourni)
Vers la prise électrique
Etape 5 : Configuration initiale du logiciel du système
Une fois le système sous tension, procédez à la configuration initiale.
1 Mettez le téléviseur sous tension.
2 Activez l'interrupteur d'alimentation principal MAIN POWER.
Interrupteur d'alimentation
principal MAIN POWER
L'indicateur d'alimentation vire au rouge pour indiquer que le système est
passé en mode veille.
3 Appuyez sur la touche d'alimentation.
Indicateur d'alimentation
Touche d'alimentation
L'indicateur d'alimentation vire au vert et l'image s'affiche sur l'écran du
téléviseur.
Page 42

42
Préparation
Configuration du système PS3™
4 Connectez la manette sans fil au système à l'aide d'un câble
USB.
Connecteur USB
Câble USB (fourni)
Connecteur USB
5 Appuyez sur la touche PS de la manette.
Le système reconnaît la manette sans fil. Une fois la manette reconnue,
l'écran de configuration initiale s'affiche.
6 Exécution de la configuration initiale.
Conformez-vous aux instructions affichées pour définir les paramètres
langue système, fuseau horaire, date et heure, ainsi que nom d'utilisateur.
Une fois la configuration initiale terminée, le menu d'accueil (
page 33)
s'affiche sur l'écran du téléviseur.
Conseils
• Pour plus de détails sur la saisie de texte, consultez la section "Utilisation du
clavier virtuel" (
page 60).
• Les paramètres saisis pendant la configuration initiale peuvent être modifiés
sous (Paramètres) ou (Utilisateurs). Pour plus de détails, reportezvous au Mode d'emploi en ligne ( page 57).
Réglage des paramètres de sortie vidéo
Selon le connecteur et le type de câble utilisé, il se peut que les
paramètres de sortie vidéo doivent être réglés pour afficher la
résolution HD sur l'écran du téléviseur ( page 36).
Accédez à (Paramètres) (Paramètres affichage)
"Paramètres de sortie vidéo" et conformez-vous aux instructions
affichées pour définir les paramètres.
Page 43

43
US
FR
ES
Opérations de base
Mise sous et hors tension du système PS3™
03
Utilisation d'une manette sans fil SIXAXIS™
Mise hors tension du système
Maintenez la touche PS enfoncée
pendant au moins une seconde. Lorsque
le message "Eteindre le système"
s'affiche, sélectionnez-le, puis appuyez
sur la touche .
Conseil
Avant d'utiliser une manette sans fil, vous devez
l'associer au système ( page 44).
Appuyez sur la touche PS.
Touche PS
Utilisation de la touche du système
Vert
Le système est sous tension
Vert clignotant
Le système se met hors tension
Rouge
Le système est hors tension (en
mode veille)
Eteint
L'interrupteur d'alimentation
principal MAIN POWER est
désactivé
Etat de l'indicateur d'alimentation
Avis
Vérifi ez que le système est en mode veille
(indicateur d'alimentation de couleur rouge)
avant de l'éteindre à l'aide de l'interrupteur
d'alimentation principal MAIN POWER situé à
l'arrière du système. Si vous mettez le
système hors tension à l'aide de l'interrupteur
MAIN POWER alors qu'il n'est pas en mode
veille, cela risque de l'endommager, de
mettre en péril son fonctionnement, d'altérer
ou de supprimer des données.
Mise hors tension du système
Appuyez sur la touche d'alimentation
pendant au moins deux secondes.
1 Appuyez sur la touche
d'alimentation.
Touche d'alimentation
Indicateur d'alimentation
2 Appuyez sur la touche PS de la manette sans fil.
Un numéro de manette est affecté.
Page 44

44
Opérations de base
Utilisation de la manette sans fil SIXAXIS™
04
Préparation à l'utilisation
Pour utiliser une manette sans fil, vous devez d'abord enregistrer ou
"associer" la manette au système PS3™, puis lui attribuer un numéro.
Etape 1 : Associez le système à la manette.
• Lors de la première utilisation
• Lors de l'utilisation avec un autre système PS3™
m
Etape 2 : Attribuez un numéro à la manette.
A chaque mise sous tension du système
Etape 1 : Associez le système à la manette
Lorsque vous utilisez la manette pour la première fois ou avec un
autre système PS3™, vous devez d'abord associer ces
périphériques. Si vous mettez le système sous tension et connectez
la manette à l'aide d'un câble USB, le processus d'association
s'exécute automatiquement.
Etape 2 : Attribuez un numéro à la manette
A chaque démarrage du système, un numéro doit être attribué à la
manette.
Appuyez sur la touche PS.
Tous les indicateurs de port clignotent.
Lorsque vous avez attribué un numéro à la
manette, les indicateurs de port correspondant
à ce numéro s'allument en rouge.
1 2 3 4
1 2 3 4
m
Vous pouvez raccorder jusqu'à 7 manettes simultanément. Le
numéro de la manette est indiqué par le chiffre situé au-dessus des
indicateurs de port. Pour les numéros 5 à 7, additionnez les chiffres
des indicateurs de port allumés.
112 3 4
Exemple : Le numéro 5 est
attribué à la manette.
Conseils
• L'association et l'attribution des numéros de manette ne peuvent s'effectuer
que lorsque le système est sous tension (l'indicateur d'alimentation est vert).
• Lorsqu'une manette associée est utilisée avec un autre système PS3™,
l'association avec le système d'origine est annulée. Associez à nouveau la
manette au système si vous l'avez utilisée avec un autre système.
• Si la manette ou le système est hors tension, les indicateurs de port situés
sur la manette s'éteignent et le numéro qui lui est attribué est annulé.
Vérifiez que le système est sous
tension (l'indicateur d'alimentation
est allumé en vert).
Câble USB (fourni)
Page 45

Opérations de base
Utilisation de la manette sans fil SIXAXIS™
45
US
FR
ES
Utilisation de la manette sans fil
Si vous déconnectez le câble USB, vous pouvez utiliser la manette
sans fil. Pour cela, la batterie de la manette doit être chargée.
Conseils
• Le câble USB peut être branché ou débranché alors que la manette et le
système sont sous tension.
• Si la manette ne fonctionne pas, appuyez sur la touche PS et réaffectez le
numéro de la manette.
Chargement de la manette
Lorsque le système est en marche (l'indicateur d'alimentation est
allumé en vert), la batterie se charge en connectant la manette au
système avec le câble USB. Les indicateurs de port de la manette
clignotent lentement et le chargement commence.
Lorsque le chargement est terminé, les indicateurs de port cessent
de clignoter.
Conseils
• La manette peut être utilisée pendant la charge.
• Chargez la batterie dans un environnement où la température est comprise
entre 10 °C et 30 °C (50 °F et 86 °F). Sinon, il se peut que la charge ne soit
pas aussi efficace.
• La batterie possède une durée de vie limitée. L'autonomie de la batterie
diminue au fil du temps, suite à son vieillissement et à son utilisation répétée.
• La durée de vie de la batterie varie également en fonction de la méthode de
stockage, des conditions d'utilisation, de l'environnement et d'autres
facteurs.
Niveau de charge de la batterie
Si vous maintenez la touche PS enfoncée pendant plus d'une
seconde, le niveau de charge de la batterie s'affiche à l'écran.
La batterie est complètement chargée.
La batterie a commencé à perdre sa charge.
Le niveau de charge de la batterie est faible.
La batterie est déchargée. Les indicateurs de port de la manette
clignotent rapidement. Charger la manette.
Conseil
Selon l'environnement ou les conditions d'utilisation, il est possible que le
niveau de charge restant ne s'affiche pas correctement, et l'autonomie de la
batterie peut varier.
Page 46

46
Opérations de base
Lecture de contenu
05
Blu-ray Disc (BD)/DVD/CD
1 Insérez le disque.
Une icône s'affiche dans le menu d'accueil.
Insérez le disque en orientant la
face de l'étiquette vers le haut.
2 Sélectionnez l'icône, puis appuyez sur la touche .
La lecture commence.
Selon le disque, la liste du contenu lisible peut s'afficher.
Ejection d'un disque
Arrêtez la lecture, puis appuyez
sur la touche d'éjection.
Conseil
Pour obtenir des instructions relatives
à la fermeture des jeux, consultez la
section "Utilisation de jeux"
( page 49).
Indicateur d'éjection
Touche d'éjection
Page 47

Opérations de base
Lecture de contenu
47
US
FR
ES
Memory Stick™/SD Memory Card/CompactFlash
®
1 Insérez le support de stockage.
Une icône s'affiche dans le menu d'accueil.
CF SD/miniSD
Ouvrez le couvercle de fente.
Face avant
Exemple : Lors de l'insertion d'un Memory Stick™
2 Sélectionnez l'icône, puis appuyez sur la touche .
La liste du contenu lisible s'affiche.
Conseil
Si vous utilisez un Memory Stick Duo™/carte miniSD™ avec le système PS3™,
vous pouvez insérer le support sans utiliser d'adaptateur.
Ejection du support
Vérifiez que l'indicateur d'accès ne clignote pas, puis appuyez sur la touche d'éjection.
Avis
Lorsque l'indicateur d'accès clignote, cela signifie que des données sont en
cours d'enregistrement, de chargement ou de suppression. Lorsque
l'indicateur d'accès clignote, ne retirez pas le support de stockage ou ne
mettez pas le système hors tension.
Appuyez sur la touche d'éjection CF.
Indicateur d'accès CF
Indicateur d'accès SD Memory Card
Indicateur d'accès Memory Stick™
Appuyez sur le support
dans le sens des flèches.
Page 48

48
Opérations de base
Lecture de contenu
Périphériques USB
Vous pouvez connecter des périphériques externes, tels que des
périphériques compatibles USB Mass Storage Class à l'aide d'un
câble USB. Vous pouvez connecter des périphériques alors que le
système est sous tension. Reportez-vous également aux instructions
fournies avec le périphérique externe à raccorder.
1 Connectez le périphérique USB.
Une icône s'affiche dans le menu d'accueil.
Périphérique externe, tel qu'un appareil photo numérique
2 Sélectionnez l'icône, puis appuyez sur la touche .
La liste du contenu lisible s'affiche.
Avis
• Ne retirez pas les périphériques USB ou ne mettez pas le système hors
tension pendant l'enregistrement, le chargement ou le retrait des
données. Cela peut entraîner la perte ou l'altération des données.
• En utilisant une mémoire flash USB avec un interrupteur de protection
d'écriture, n'utilisez pas l'interrupteur lorsque le périphérique est branché
au système PS3™ car cela pourrait entraîner la perte ou l'altération des
données.
Formats de fichiers lisibles ou affichables
Les formats de fichiers suivants peuvent être lus ou affichés sur ce
système : ATRAC, MP3, AAC, JPEG et MPEG-4. Pour obtenir les
dernières informations, reportez-vous au Mode d'emploi en ligne
( page 57).
Conseils
• Seuls les fichiers lisibles ou affichables sur le système PS3™ apparaissent
dans la colonne de la catégorie compatible (exemple : les données image
s'affichent dans la colonne Photo).
• Selon le support de stockage, il se peut que seul un sous-ensemble des
dossiers enregistrés sur le support s'affiche. Si vous sélectionnez "Afficher
tout" dans le menu d'options ( page 33), tous les dossiers enregistrés sur
le support s'affichent.
Avis
Pour plus d'informations sur la sauvegarde des fichiers enregistrés sur le
disque dur, reportez-vous au document Sécurité et support technique.
Page 49

49
US
FR
ES
Jeu
Utilisation de jeux
06
Lancement/fermeture d'un jeu
La compatibilité rétroactive de ce produit avec les logiciels au format
PlayStation® et PlayStation®2 est limitée. Bien que de nombreux titres
logiciels au format PlayStation® et PlayStation®2 fonctionnent, la
compatibilité totale de leurs capacités n'est pas garantie. La mise à
jour du logiciel système peut améliorer la compatibilité.
Aller à http://www.us.playstation.com pour les mises à jour du logiciel
système. Pour vérifier si un titre logiciel au format PlayStation®2 est
compatible avec votre système PS3™, consulter
http://www.us.playstation.com/Support/CompatibleStatus.
Lancement d'un jeu
Insérez un disque, sélectionnez l'icône, puis appuyez sur la touche
( page 46).
Fermeture d'un jeu
Pendant le jeu, appuyez sur la touche PS de la manette sans fil.
Sélectionnez ensuite "Quitter le jeu" depuis l'écran affiché.
Lorsque vous démarrez ou quittez un logiciel au format PlayStation®2, le
numéro de manette associé est annulé. Veuillez suivre les étapes suivantes
suivantes afin d'associer un numéro à la manette.
• Après le démarrage du jeu : appuyez sur la touche PS lorsque le contenu
du logiciel de jeu apparaît à l'écran.
• Après avoir quitté le jeu : appuyez sur la touche PS lorsque le menu
principal apparaît à l'écran.
Conseil
Pour sauvegarder les données du logiciel au format PlayStation®2/PlayStation®,
vous devez créer des memory cards (cartes mémoires) internes
( page 50).
Paramètres de la manette
Vous pouvez régler les paramètres de la manette pendant le jeu
Appuyez sur la touche PS, puis sélectionnez un paramètre dans
l'écran affiché.
Changement au mode analogique
En jouant le logiciel au format PlayStation®2/PlayStation®, vous
pouvez changer le mode de la manette. Le changement de mode est
compatible avec le logiciel. Avec certains logiciels, le changement
de mode n'est pas automatique.
Changement des numéros de manette
Vous pouvez changer les numéros associés à la manette. Lorsque le
port de la manette à utiliser est précisé par le logiciel, changez au
numéro compatible avec la manette.*
* Il n'est pas possible d'associer le port de manette 2-D à l'aide d'un système
PS3™.
Conseil
Vous pouvez vérifier le numéro actuellement effectué à la manette en appuyant
sur la touché PS pendant le jeu.
Données enregistrées pour le logiciel au format PS3™
Les données enregistrées pour le logiciel au format PS3™ sont
mémorisées sur le disque dur du système. Les données s'affichent
sous (Jeu) (Utilitaire des données sauvegardées).
Page 50

50
Jeu
Utilisation de jeux
Données enregistrées pour le logiciel au format
PlayStation®2/PlayStation
®
Pour sauvegarder les données du logiciel au format PlayStation®2/
PlayStation®, vous devez créer des Memory Cards internes sur le
disque dur et les affecter à des fentes.
• Memory card
(carte mémoire) (8MB)
(pour PlayStation®2)
• Memory card
(carte mémoire)
Etape 1 : Création d'une Memory Card interne.
Créez une Memory Card interne sur le disque dur afin qu'elle remplace la
carte mémoire (8 MB) (pour PlayStation
®
2) ou une carte mémoire.
Memory Card (PS2)
interne
Memory Card (PS)
interne
Etape 2 : Attribution d'une fente.
Insérez une Memory Card interne dans la fente interne du disque dur
plutôt que d'utiliser la fente pour carte mémoire de la console
PlayStation®2 ou PlayStation®.
Fentes pour MEMORY
CARD (carte mémoire)
Fentes internes
Etape 1 : Création d'une Memory Card interne
1 Sélectionnez (Utilitaire de Memory Card (PS/PS2)) sous
(Jeu) dans le menu d'accueil, puis appuyez sur la
touche .
2 Sélectionnez l'icône, (Nouvelle Memory Card interne),
puis appuyez sur la touche .
Conformez-vous aux instructions affichées pour créer la Memory Card
interne.
Types de Memory Cards internes
Type Type de données pouvant être enregistrées
Memory Card (PS2)
interne
Données enregistrées à partir du logiciel
au format PlayStation®2 (les données
enregistrées à partir du logiciel au format
PlayStation® ne peuvent pas être
mémorisées)
Memory Card (PS)
interne
Données enregistrées à partir du logiciel
au format PlayStation
®
Page 51

51
US
FR
ES
Jeu
Utilisation de jeux
Etape 2 : Attribution d'une fente
1 Sélectionnez (Utilitaire de Memory Card (PS/PS2)) sous
(Jeu) dans le menu d'accueil, puis appuyez sur la
touche .
2 Sélectionnez la Memory Card interne de votre choix, puis
appuyez sur la touche .
Attribuez-lui une fente.
Conseils
• Selon le logiciel, il se peut que les fentes soient préattribuées. Pour plus de
détails, reportez-vous aux instructions qui accompagnent le logiciel.
• Vous pouvez assigner des fentes pendant le jeu. Appuyez sur la touche PS
de la manette sans fil, puis sélectionnez "Assigner fentes" dans l'écran
affiché.
Utilisation des données enregistrées sur la memory
card (carte mémoire) (8 MB) (pour PlayStation®2) ou
d'une memory card (carte mémoire)
Pour utiliser les données enregistrées sur une carte mémoire (8 MB)
(pour PlayStation®2) ou une carte mémoire, vous devez copier les
données sur une Memory Card interne située sur le disque dur. Vous
devez utiliser un adaptateur pour memory card (carte mémoire)
(vendu séparément) pour copier les données.
1 Sélectionnez (Utilitaire de Memory Card (PS/PS2)) sous
(Jeu) dans le menu d'accueil, puis appuyez sur la
touche .
2 Connectez l'adaptateur pour memory card (carte mémoire) au
système.
3
Insérez la Memory Card que vous désirez copier dans
l'adaptateur.
L'icône de (Memory Card (PS) ou (Memory Card (PS2)) s'affiche.
4
Sélectionnez l'icône, puis appuyez sur la touche .
Conformez-vous aux instructions affichées pour copier les données.
Conseils
• Selon le type, les données enregistrées sur une carte mémoire (8 MB) (pour
PlayStation®2) ou une carte mémoire sont copiées sur une Memory Card
interne de la manière indiquée ci-dessous.
Memory card
(carte mémoire) (8 MB)
(pour PlayStation®2)
Memory card
(carte mémoire)
Données enregistrées à partir du
logiciel au format PlayStation
®
2
Memory Card
(PS2) interne
Memory Card
(PS) interne*
Données enregistrées à partir du
logiciel au format PlayStation
®
* Si la quantité de données enregistrées à copier est volumineuse, le système
crée automatiquement plusieurs Memory Cards (PS) internes.
• Vous pouvez copier des données du disque dur sur un support Memory
Stick™, SD Memory Card, CompactFlash
®
, ou un périphérique de stockage
de masse USB (clé USB à mémoire flash, etc.). Sélectionnez les données
enregistrées, puis sélectionnez "Copier" dans le menu d’options (
page
33). Remarquez que vous ne pouvez pas copier les données sur une
memory card (carte mémoire) (8 MB) (pour PlayStation
®
2) ou encore sur une
memory card (carte mémoire).
• Certaines données enregistrées peuvent s'accompagner de restrictions qui
empêchent leur copie.
Page 52

52
Réseau
Définition des paramètres du réseau
07
Utilisation d'une connexion par câble
Les instructions suivantes expliquent comment se connecter à
Internet à l'aide d'un câble Ethernet.
Exemple de configuration réseau câblée
La configuration réseau et la méthode de connexion peuvent varier
en fonction de l'appareil utilisé et de l'environnement réseau.
WAN LAN1 LAN2 LAN3 LAN4
ETHERETHER
Périphérique de
passerelle réseau,
tel qu'un modem
DSL ou câble
Routeur
Pas nécessaire si le modem DSL ou câble
ou l'autre périphérique réseau possède
des fonctionnalités de routeur intégrées
Vers la ligne Internet
Câble Ethernet
(fourni)
PC
Conseil
Un routeur est un périphérique permettant de connecter plusieurs
périphériques à une ligne Internet. Un routeur est nécessaire si un PC et un
système PS3™ doivent se connecter à Internet simultanément à l'aide d'une
même connection Internet.
Préparation des éléments nécessaires
Les éléments suivants sont nécessaires pour une connexion câblée à
Internet.
• Une connexion Internet haut débit par l'intermédiaire d'un
périphérique de type modem DSL ou câble (la connexion de
plusieurs périphériques peut nécessiter du matériel
supplémentaire)
• un câble Ethernet (fourni)
Conseil
L'utilisateur est responsable des frais des services Internet.
Configuration de la connexion à Internet
Lors de l'établissement d'une connexion câblée à Internet, il n'est
généralement pas nécessaire de modifier les paramètres par défaut.
Si vous ne parvenez pas à utiliser les paramètres par défaut pour
vous connecter, conformez-vous aux instructions ci-dessous pour
réinitialiser les paramètres.
1 Sélectionnez (Paramètres réseau) sous (Paramètres)
dans le menu d'accueil, puis appuyez sur la touche .
2 Sélectionnez "Paramètres connexion Internet", puis appuyez
sur la touche .
Lorsqu'un message indiquant que la connexion Internet sera interrompue
s'affiche, choisissez "Oui", puis appuyez sur la touche
.
3 Sélectionnez "Connexion par câble", puis appuyez sur la
touche droite.
Page 53

53
US
FR
ES
4 Sélectionnez "Facile" ou "Personnalisé", puis modifiez les
paramètres le cas échéant.
Conformez-vous aux instructions affichées pour modifier les paramètres
nécessaires.
Facile
Les paramètres de base sont définis automatiquement.
Personnalisé
Vous pouvez saisir manuellement des informations
détaillées sur les paramètres. Pour plus d'informations sur
les paramètres, reportez-vous aux instructions délivrées
par le fournisseur de services Internet ou qui
accompagnent le périphérique réseau.
Pour obtenir des informations détaillées sur les paramètres réseau,
reportez-vous au Mode d'emploi en ligne (
page 57).
Réseau
Définition des paramètres du réseau
Utilisation d'une connexion sans fil
Les instructions suivantes expliquent comment se connecter à
Internet à l'aide d'une connexion sans fil.
Exemple de configuration réseau sans fil
La configuration réseau et la méthode de connexion peuvent varier
en fonction de l'appareil utilisé et de l'environnement réseau.
WAN LAN1 LAN2 LAN3 LAN4
ETHERETHER
Périphérique de passerelle réseau,
tel qu'un modem DSL ou câble
Vers la ligne Internet
Point d'accès ou routeur sans fil
PCPC
Conseils
• Un point d'accès est un périphérique qui vous permet de vous connecter à
un réseau sans fil.
• Un routeur sans fil est un périphérique qui ajoute la fonctionnalité de point
d'accès à un routeur. Un routeur est nécessaire si un PC et un système
PS3™ doivent se connecter à Internet simultanément à l'aide d'une même
connexion Internet.
Page 54

54
Réseau
Définition des paramètres du réseau
Préparation des éléments nécessaires
Les éléments suivants sont nécessaires pour configurer le système
en vue de la connexion sans fil à Internet.
• Une connexion Internet haut débit par l'intermédiaire d'un
périphérique de type modem DSL ou câble (la connexion de
plusieurs périphériques peut nécessiter du matériel
supplémentaire)
• un point d'accès ou un routeur sans fil
• les valeurs des paramètres du point d'accès (SSID, clé WEP, clé
WPA)
Conseils
• SSID, la clé WEP et la clé WPA sont des types d'informations de sécurité
requis pour se connecter à un point d'accès.
• Lors de la connexion à Internet sans fil, des interférences dans les signaux
peuvent survenir selon les conditions d'usage des appareils du réseau sans
fil. Si la vitesse de transfert des données Internet diminue ou si la manette
sans fil ne fonctionne pas correctement, connectez-vous à Internet par
l'intermédiaire d'un câble Ethernet.
• Selon le point d'accès utilisé, il se peut que vous deviez disposer de
l'adresse MAC de votre système lors de la connexion à Internet. Pour
déterminer l'adresse MAC du système, accédez à
(Paramètres)
(Paramètres système) "Informations système".
• L'utilisateur est responsable des frais des services Internet.
Configuration de la connexion à Internet
Lors de la connexion sans fil à Internet, vous devez d'abord définir
les paramètres réseau.
Les paramètres réseau peuvent varier en fonction du type de point
d'accès et de l'environnement réseau. Les instructions suivantes
expliquent la configuration réseau la plus courante.
1 Sélectionnez (Paramètres réseau) sous (Paramètres)
dans le menu d'accueil, puis appuyez sur la touche .
2 Sélectionnez "Paramètres connexion Internet", puis appuyez
sur la touche .
Lorsqu'un message indiquant que la connexion Internet sera interrompue
s'affiche, choisissez "Oui", puis appuyez sur la touche
.
3 Sélectionnez "San fil", puis appuyez sur la touche droite.
4 Sélectionnez "Scan", puis appuyez sur la touche droite.
Le système recherche les points d'accès proches et les affiche sous forme
de liste.
Conseil
Si vous utilisez un point d'accès prenant en charge la configuration
automatique, sélectionnez "Automatique" et conformez-vous aux instructions
affichées. Les paramètres nécessaires sont définis automatiquement. Pour plus
d'informations sur les points d'accès prenant en charge la configuration
automatique, contactez les fabricants des points d'accès.
Page 55

Réseau
Définition des paramètres du réseau
55
US
FR
ES
5 Sélectionnez le point d'accès que vous souhaitez utiliser,
puis appuyez sur la touche .
Un SSID est un code ou un nom attribué au point d'accès. Si vous ne
savez pas quel SSID utiliser ou si le SSID ne s'affiche pas, contactez la
personne qui a configuré ou qui gère le point d'accès.
6 Vérifiez le SSID du point d'accès, puis appuyez sur la touche
droite.
7 Le cas échéant, sélectionnez les paramètres de sécurité, puis
appuyez sur la touche droite.
Les paramètres de sécurité varient selon le point d'accès utilisé. Pour
déterminer les paramètres à utiliser, contactez la personne qui a configuré
ou qui gère le point d'accès.
8 Utilisez la clé de chiffrement, puis appuyez sur la touche
droite.
Le champ de la clé de chiffrement affiche un astérisque (*) pour chaque
caractère saisi. Si vous ne connaissez pas la clé, contactez la personne
qui a configuré ou qui gère le point d'accès.
Page 56

56
Réseau
Définition des paramètres du réseau
9 Sélectionnez "Facile" ou "Personnalisé", puis modifiez les
paramètres le cas échéant.
Conformez-vous aux instructions affichées pour modifier les paramètres
nécessaires.
Facile
Les paramètres de base sont définis automatiquement.
Personnalisé
Vous pouvez saisir manuellement des informations
détaillées sur les paramètres. Pour plus d'informations sur
les paramètres, reportez-vous aux instructions délivrées
par le fournisseur de services Internet ou qui
accompagnent le périphérique réseau.
Pour obtenir des informations détaillées sur les paramètres réseau,
reportez-vous au Mode d'emploi en ligne (
page 57).
Page 57

57
US
FR
ES
Si les paramètres réseau sont déjà définis, le système PS3™ se
connecte automatiquement à Internet, une fois le système mis sous
tension. La connexion reste active aussi longtemps que le système
est allumé.
Utilisation du navigateur Internet
1 Sélectionnez (Navigateur Internet) sous (Réseau) dans
le menu d'accueil, puis appuyez sur la touche .
Le navigateur Internet s'ouvre. Une icône Occupé s'affiche pendant le
chargement de la page.
Icône Occupé
Opérations de base du navigateur Internet
Touches de navigation
Déplacer le pointeur vers un lien
Joystick droit
Faire défiler dans le sens souhaité
Touche L1
Revenir à la page précédente
Touche START
Saisir une adresse
Touche
Afficher/masquer le menu
Affichage du Mode d'emploi
Vous pouvez utiliser le navigateur Internet pour afficher le Mode
d'emploi en ligne du système PS3™. Sélectionnez (Mode d'emploi
en ligne) sous (Réseau) dans le menu d'accueil, puis appuyez sur
la touche .
Mode d'emploi du système PLAYSTATION®3
http://manuals.playstation.net/document/
Vous pouvez également le consulter à l'aide du navigateur Web de votre
PC.
Compte PLAYSTATION®Network
En créant un compte PLAYSTATION®Network, vous pouvez utiliser le
chat sous (Amis) ou utiliser le service réseau en ligne du système
PS3™ et autres fonctions. Rendez-vous à (Amis), choisissez
(S'inscrire au PLAYSTATION®Network), puis appuyez sur la touche
. L'écran de création du compte sera affiché.
Conseils
• Il faut une connexion Internet pour créer le compte.
• Le contenu du service PLAYSTATION
®
Network peut varier selon la région.
Réseau
Connexion à Internet
08
Page 58

58
En mettant à jour le logiciel du système PS3™, vous pouvez ajouter
des fonctionnalités et/ou des correctifs de sécurité. Mettez
fréquemment à jour votre système afin d'utiliser la dernière version du
logiciel du système.
Pour obtenir les dernières informations sur les mises à jour, visitez le
site Web http://www.us.playstation.com.
Utilisez les données de mise à jour pour
écraser le logiciel existant du système.
Le logiciel du système est mis à jour.
Avis
• Pendant une mise à jour, ne mettez pas le système hors tension et ne
retirez pas le support. Si une mise à jour est annulée avant d'être
terminée, le logiciel système risque d'être endommagé et peut exiger la
réparation ou l'échange du système.
• Pendant une mise à jour, la touche d'alimentation du système est inactif.
• Selon le contenu, il se peut que vous ne puissiez pas procéder à la
lecture sans effectuer auparavant la mise à jour du logiciel du système.
• Une fois le logiciel du système mis à jour, vous ne pouvez pas revenir à
une version antérieure.
Méthodes de mise à jour
Vous pouvez procéder à une mise à jour d'une des manières décrites
ci-dessous.
Mise à jour réseau
Vous pouvez effectuer la mise à jour en téléchargeant les données
de mise à jour à partir d'Internet. La dernière mise à jour est
automatiquement téléchargée.
Sélectionnez (Paramètres) (Mise à jour système) "Mise à
jour par Internet".
Mise à jour à l'aide d'un support de stockage
Vous pouvez effectuer la mise à jour à l'aide des données de mise à
jour enregistrées sur un Memory Stick™ ou sur un autre support.
Sélectionnez (Paramètres) (Mise à jour système) "Mise à
jour par support de stockage".
Conseil
Des données de mise à jour peuvent également être contenues dans certains
disques de jeux.
Vérification de la version du logiciel du système
Vous pouvez vérifier les informations sur la version du système en
sélectionnant (Paramètres) (Paramètres système)
"Informations système". La version actuelle s'affiche dans le champ
Logiciel système.
Mises à jour
Mises à jour du système PS3™
09
Page 59

59
US
FR
ES
Paramètres de sécurité
Définition du niveau de contrôle parental
10
Le système PS3™ possède une fonction de contrôle parental. Celleci vous permet de définir un mot de passe et de limiter la lecture des
contenus concernés par un niveau de contrôle parental (jeux, vidéos
et autres contenus). En définissant le niveau de contrôle parental sur
le système, vous pouvez empêcher vos enfants de lire du contenu
qui ne leur est pas destiné.
Modification des paramètres de sécurité
Vous pouvez définir un niveau de contrôle parental pour les jeux, les
disques Blu-ray Disc ou tout autre contenu sous (Paramètres)
(Paramètres sécurité).
Un mot de passe est nécessaire pour modifier les paramètres de
contrôle parental. Vous pouvez définir un mot de passe sous
(Paramètres sécurité) "Changer le mot de passe".
Le mot de passe par défaut est "0000".
Niveaux de contrôle parental pour les jeux
Vous pouvez définir le niveau de contrôle parental pour les jeux sous
(Paramètres sécurité) "Contrôle parental". Sélectionnez "Non" ou
un des 11 niveaux.
Non
Lit n'importe quel contenu quel que soit le niveau de contrôle
parental.
11-1
Sélectionne le niveau de contrôle parental correspondant au numéro
choisi. Veuillez noter que plus le numéro est petit, plus la restriction
est stricte.
La combinaison des niveaux de contrôle parental du système PS3™
et du contenu détermine si le contenu peut être lu.
Exemple : Si le niveau de contrôle parental du système est réglé sur
"7", le contenu dont le niveau est compris entre "1" et "7" peut être
affiché sur le système.
Jeux
La plupart des emballages de jeux portent un symbole indiquant le
groupe d'âges auquel s'adresse le jeu. Les symboles correspondent
au niveau de contrôle parental du jeu, comme suit :
Groupe d'âges
Niveau de contrôle
parental du jeu
2 3 4 5 9 10
En date de mars 2007. Pour obtenir des informations sur les jeux et les
classifications ESRB, visitez notre site Web http://www.us.playstation.com/psp.
Pour plus d'informations sur le système de classification ESRB, visitez
http://www.esrb.org.
Autres paramètres de sécurité
Vous pouvez définir des restrictions de contrôle parental sur un
contenu autre que les jeux sous (Paramètres sécurité), comme
décrit ci-dessous.
Contrôle parental
BD
Lors de la lecture d'un BD avec paramètres de contrôle
parental, limitez la lecture en fonction de l'âge défini. Plus le
numéro est petit, plus la restriction est stricte.
Contrôle parental
DVD
Lors de la lecture d'un DVD avec paramètres de contrôle
parental, limitez la lecture en fonction du niveau défini.
Sélectionnez "Non" ou un des huit niveaux.
Plus le numéro est petit, plus la restriction est stricte.
Contrôle de
démarrage du
navigateur
Internet
Limitez la capacité à démarrer le navigateur Internet à
l'aide d'un mot de passe.
Page 60

60
Clavier
Utilisation du clavier virtuel
11
Liste des touches
Les touches qui s'affichent varient selon le mode de saisie et d'autres
conditions.
Touches Explication
Insère un saut de ligne
Déplace le curseur
Supprime le caractère situé à gauche du
curseur
Insère un espace
Fait basculer le mode de saisie
Confirme les caractères saisis et ferme le
clavier
Bascule vers le clavier compact
Insère un symbole
/
Permute le type de caracères à saisir
Curseur
Touches
d'opérations
S'affiche lorsque le mode de
saisie prédictive est activé
Champ de
saisie de texte
Affichage des options de
saisie prédictive
Affichage du
mode de saisie
Page 61

Clavier
Utilisation du clavier virtuel
61
US
FR
ES
Saisie de caractères
Le mode de saisie prédictive vous permet de saisir les premières
lettres du mot et d'afficher ainsi la liste des mots les plus courants
commençant par ces lettres. Vous pouvez ensuite choisir le mot
voulu à l'aide des touches de navigation. Lorsque vous avez terminé
de saisir du texte, sélectionnez la touche "Entrer" pour quitter le
clavier.
Conseil
Les langues que vous pouvez utiliser pour la saisie de texte sont les langues
système prises en charge. Vous pouvez définir la langue système en accédant
à (Paramètres) (Paramètres système) "Langue système".
Exemple : Si "Langue système" a la valeur "Français", vous pouvez saisir du
texte en français.
Utilisation d'un clavier USB
Vous pouvez saisir des caractères à l'aide d'un clavier USB
disponible (vendu séparément). Pendant l'affichage de l'écran de
saisie de texte, si vous appuyez sur une touche du clavier USB
connecté, l'écran de saisie de texte vous permettra d'utiliser le
clavier USB.
Conseil
Le mode de saisie prédictive n'est pas disponible lors de l'utilisation d'un
clavier USB.
Page 62

62
Acerca de la documentación del sistema PS3™
La documentación del sistema PS3™ incluye lo siguiente:
• Seguridad y soporte técnico
Antes de utilizar el producto, lea detenidamente este documento. Contiene información
sobre la seguridad relacionada con el uso del sistema PS3™, resolución de problemas,
especificaciones y otra información.
• Referencia rápida (este documento)
Este documento contiene información sobre la configuración del sistema PS3™, la
preparación para su uso y la realización de operaciones básicas con el hardware.
• Guía del usuario (http://manuals.playstation.net/document/)
Se puede acceder a este documento online a través de Internet. Este documento contiene
información detallada relacionada con el uso del software del sistema PS3™
( página 87).
Amigos
Conversación e intercambio de
mensajes
Red
Conexión a Internet
Juego
Jugar a juegos
Vídeo
Reproducción de vídeos
Música
Reproducción de música
Foto
Visualización de imágenes
Ajustes
Configuración de los ajustes del
sistema PS3™
Usuarios
Selección de los usuarios que podrán
iniciar sesión en el sistema PS3™
Compruebe que dispone de los siguientes elementos. Si falta algún elemento,
póngase en contacto con el servicio de atención al cliente SCEA a través del
número de teléfono 1 -800-345-7669 (EE. UU.).
s Sistema PLAYSTATION®3
s Mando inalámbrico SIXAXIS™
s Cable de
alimentación AC
s Cable AV
s Cable USB
s Cable Ethernet
s Materiales impresos
Page 63

63
US
FR
ES
Menú principal
Categoría
Elemento
Uso de la barra "XMB" (XrossMediaBar)
El sistema PS3™ incluye una interfaz de usuario llamada "XMB"
(XrossMediaBar). La pantalla principal de "XMB" se denomina
"menú principal"
1
2
3
Seleccione una categoría mediante
el botón izquierda/derecha.
Seleccione un elemento con el
botón arriba/abajo.
Pulse el botón para confirmar
el elemento seleccionado.
Botón : muestra las opciones del menú/panel de control
Si selecciona un icono y pulsa el
botón , aparecerá el menú de
opciones.
Iconos Menú de opciones
Si pulsa el botón durante la
reproducción del contenido, aparecerá
el panel de control.
Panel de control
Botón :
confirma el elemento seleccionado
Botón PS
muestra el menú principal
enciende/apaga el sistema
Botón :
cancela una operación
Botones direccionales:
se utilizan para seleccionar categorías/
elementos en pantalla.
Page 64

64
Procedimientos iniciales
Nombres de los componentes
01
Parte frontal del sistema
CF SD/miniSD
Ranura para disco
Ranura para CF*
1
Ranura para SD*2 Memory Card
Ranura para Memory Stick™
Tapa de la ranura
Botón de encendido
Rejilla de ventilación
Conectores USB
Indicador de acceso disco duro
Indicador de acceso WLAN
Logotipo de la familia PS
Se puede girar para que coincida
con la posición del sistema
Botón extraer
Botón extraer
*1 CompactFlash
®
*2 Secure Digital
Precaución
• No use el sistema en un armario cerrado ni en otras ubicaciones en las
que pueda acumularse calor. Si lo hace el sistema puede sobrecalentarse
y provocar incendios, lesiones o averías.
• Si la temperatura interna del sistema aumenta demasiado, el indicador de
encendido parpadeará alternativamente en rojo y verde. En ese caso,
apague el sistema ( página 73) y no lo utilice durante un tiempo.
Cuando el sistema se enfríe, trasládelo a una ubicación bien ventilada y
luego reanude su uso.
Parte posterior del sistema
Conector AC IN
Conector AV MULTI OUT
Conector DIGITAL OUT (OPTICAL)
Interruptor principal
Conector HDMI OUT
Rejilla de ventilación
Conector LAN
Sugerencia
El sistema puede situarse en posición horizontal o vertical.
Siga el diagrama de la derecha para colocarlo en posición
vertical.
Aviso
No coloque el sistema en un área donde haya exceso
de polvo o humo de cigarrillos. La acumulación de
suciedad o residuos de humo de cigarrillos en los
componentes internos (como los lectores ópticos)
puede ocasionar fallos en el sistema.
Page 65

65
US
FR
ES
Mando inalámbrico SIXAXIS™
Botón SELECT
(selección)
Conector USB
Botón L2
Botón L1
Botones
direccionales
Joystick izquierdo/
botón L3*
Botón START (inicio)
Botón R2
Botón R1
Botón
Botón
Botón
Botón
Joystick derecho/
botón R3*
Botón PS
Indicadores de
puerto
* Los botones L3 y R3 funcionan cuando se pulsan los joysticks.
Sugerencia
Para obtener más información acerca del mando inalámbrico, consulte "Uso
del mando inalámbrico SIXAXIS™" ( página 74).
Aviso
Algunos periféricos de PlayStation® y PlayStation®2, como el control
analógico (DUALSHOCK®) y el control analógico (DUALSHOCK®2) no son
compatibles con el sistema PS3™. Para obtener más detalles, visite la
página Web http://www.us.playstation.com.
Procedimientos iniciales
Nombres de los componentes
Page 66

66
Procedimientos iniciales
Configuración del sistema PS3™
02
Paso 1: conecte el sistema a un televisor
Salida de vídeo del sistema PS3™
El sistema PS3™ puede mostrar dos tipos de resoluciones: HD y SD. Consulte el manual de
instrucciones del televisor que está utilizando para comprobar el modo de vídeo compatible.
*1 Este número indica el número de líneas de exploración. Tenga en cuenta que "i" significa "entrelazar" y "p" significa
"progresivo". El uso del modo progresivo da como resultado vídeo de alta calidad con parpadeo mínimo.
*2 Los ajustes de salida de vídeo del sistema se mostrarán como "Estándar (NTSC)".
HD (Alta definición) SD (Definición estándar)
Modo de vídeo *
1
1080p 1080i 720p 480p 480i *
2
Formato
16:9 16:9 16:9
16:9
4:3
16:9
4:3
Pantallas que muestran la diferencia en la resolución
Pantalla HD
Pantalla SD
Flujo de procedimiento para
configurar el sistema
Paso 1: conecte el sistema a un
televisor Página 66
m
Paso 2: conecte los dispositivos
de sonido digital
Página 69
Paso 4: conecte el cable de
alimentación AC
Página 71
Paso 5: configuración inicial del
software del sistema
Página 71
m
m
m
Paso 3: conecte el cable
Ethernet Página 70
Page 67

67
US
FR
ES
Procedimientos iniciales
Configuración del sistema PS3™
Tipos de cable de salida de vídeo
La resolución que se muestra en el televisor varía en función de los conectores de entrada del televisor y el tipo de cable que se esté
utilizando. Seleccione un cable que corresponda con el televisor que utiliza.
Tipo de cable Conector de entrada del televisor Modos de vídeo compatible *
1
Cable HDMI
(se vende por separado)
Conector HDMI IN
1080p / 1080i / 720p / 480p
Cable AV por componentes
(se vende por separado)
Conector VIDEO IN de
entrada de vídeo
componente
Y L RP
R
/
C
R
P
B
/
C
B
COMPONENT VIDEO IN AUDIO IN
1080p / 1080i / 720p / 480p / 480i*
2
Cable S VIDEO
(se vende por separado)
Conector S VIDEO IN
S VIDEO L-AUDIO-R
480i*
2
Cable AV
(suministrado)
Conector VIDEO IN
(compuesto)
VIDEO L-AUDIO-R
480i*
2
*1 Es posible que algunos modos de vídeo no se reconozcan según el tipo de televisor o el contenido reproducido.
Si se conecta un dispositivo no compatible con el estándar HDCP (High-bandwidth Digital Content Protection, Protección de contenido digital de alto ancho de
banda) al sistema mediante un cable HDMI, no se podrá emitir vídeo ni audio.
Discos de video Blu-ray protegidos por derechos de autor solo pueden enviar señal a 1080p utilizando un cable HDMI conectado a un dispositivo que sea
compatible con la norma de Protección de Contenido Digital de banda ancha).
*2 Los ajustes de salida de vídeo del sistema se mostrarán como "Estándar (NTSC)".
Page 68

68
Procedimientos iniciales
Configuración del sistema PS3™
Métodos de conexión
Precaución
• No enchufe el cable de alimentación AC del sistema en una toma de
corriente eléctrica hasta haber realizado todas las conexiones. Asegúrese
de que el TV u otros dispositivos estén desconectados de la toma de
corriente eléctrica antes de enchufar el sistema.
• Cualquier TV u otro dispositivo conectados al sistema deben funcionar
correctamente y estar libres de defectos. Si un TV u otro dispositivo
conectado al sistema tienen fallas o defectos, pueden causar daños al TV
u otro dispositivo, o al sistema en si.
• La toma de corriente debe estar instalada cerca de los aparatos y debe
ser fácilmente accesible.
Conexión a un televisor con un cable HDMI
Conecte el sistema al televisor mediante un cable HDMI (se vende
por separado). Un cable HDMI permite emitir vídeo y audio, así como
disfrutar de vídeo y audio de calidad digital con un deterioro mínimo
de la calidad de imagen.
Televisor
Conector HDMI IN
Cable HDMI
(se vende por separado)
Conector HDMI OUT
Conexión con otro tipo de cables
Conecte cables que no sean HDMI al conector AV MULTI OUT del
sistema.
VIDEO
AUDIO
L
R
Televisor
Conector VIDEO IN
Cable AV (suministrado)
Conector AV MULTI OUT
Ejemplo: si utiliza el cable AV suministrado
Sugerencia
Si cambia el tipo de cable utilizado para conectar el sistema, es posible que no
se visualice la imagen. Si esto ocurre, apague el sistema y vuelva a encenderlo
mediante el botón de encendido en la parte delantera del sistema hasta que
emita un breve pitido (de unos cinco segundos). La imagen se visualizará en la
resolución predeterminada del sistema.
Page 69

69
US
FR
ES
Paso 2: conecte los dispositivos de sonido digital
Es posible conectar dispositivos de audio que admitan la salida de
audio digital, como un receptor de AV para fines de entretenimiento
doméstico.
Sugerencia
Cuando conecte un dispositivo de audio digital al sistema, vaya a
(Ajustes) (Ajustes de sonido) "Ajustes de salida de audio" y
configure los ajustes que sean necesarios para el dispositivo de audio.
Salida de audio del sistema PS3™
Los canales admitidos pueden variar en función del conector de
salida que se vaya a utilizar.
Conectores de salida del sistema
PS3™
Canales que se pueden utilizar para la salida
2 canales 5.1 canales 7.1 canales
Conector AV MULTI OUT
Conector DIGITAL OUT
(OPTICAL) *
1
Conector HDMI OUT
*2 *
3
*1 El audio de un Super Audio CD no se puede emitir desde el conector
DIGITAL OUT (OPTICAL). El contenido multicanal de discos Super Audio CD
sólo se puede emitir desde el conector HDMI OUT.
*2 Es necesario un dispositivo compatible con el PCM lineal de 7.1 canales
para emitir audio de 7.1 canales desde el conector HDMI OUT.
*3 Este sistema no admite la emisión desde el formato DTS-HD de 7.1 canales.
El audio DTS-HD de 7.1 canales se emite desde 5.1 o un canal inferior.
Conexión con un cable óptico
El audio se emitirá a través del cable óptico. La imagen se emitirá
por el cable de salida de vídeo.
Cable óptico para audio
(se vende por separado)
Dispositivo de audio digital
como, por ejemplo, un
receptor de AV
Televisor
Cable de salida
de vídeo para
el televisor
utilizado
( página 67)
Procedimientos iniciales
Configuración del sistema PS3™
Page 70

70
Procedimientos iniciales
Configuración del sistema PS3™
Conexión con un cable HDMI
Tanto el audio como el vídeo se emitirán a través del cable HDMI. La
imagen del televisor puede emitirse a través de un dispositivo de
audio.
Cable HDMI (se vende
por separado)
Dispositivo de audio digital
como un receptor de AV
Cable HDMI (se vende por separado)
Televisor
Sugerencias
• Si el televisor no está equipado con un conector de entrada HDMI, utilice un
tipo de cable de salida de vídeo adecuado para el televisor ( página 67)
para conectarlo al sistema PS3™ directamente.
• Si se conecta un dispositivo al sistema PS3™ mediante un cable HDMI, no
apague el dispositivo mientras el sistema PS3™ esté encendido (indicador
de encendido iluminado en verde). No encienda ni apague el dispositivo que
esté conectado al sistema con el cable HDMI, ya que esto podría causar
distorsiones de sonido o producir sonidos anormales.
Paso 3: conecte el cable Ethernet
Si utiliza el cable Ethernet, podrá conectar el sistema a Internet. Para
obtener más información sobre la configuración de la red, consulte
"Configuración de los ajustes de red" ( página 82).
Precaución
El sistema es compatible con las redes 10BASE-T, 100BASE-TX y
1000BASE-T. No conecte una línea de teléfono estándar ni cables de otro
tipo que no sean compatibles con el sistema directamente al conector LAN,
ya que podría ocasionar sobrecalentamiento, un incendio o un fallo en el
funcionamiento del sistema.
Cable Ethernet (suministrado)
Conector LAN
Indicador de acceso
LAN
Sugerencia
Puede conectarse a Internet sin usar un cable Ethernet. Para obtener más
información, consulte "Utilización de una conexión inalámbrica"
( página 83).
Page 71

71
US
FR
ES
Procedimientos iniciales
Configuración del sistema PS3™
Paso 4: conecte el cable de alimentación AC
Conecte el cable de alimentación AC.
Precaución
• No enchufe el cable de alimentación AC del sistema en una toma de
corriente eléctrica hasta haber realizado todas las conexiones.
• Para evitar posibles daños al sistema, al TV u otro dispositivo conectado,
el cable de alimentación AC debe de estar enchufado a una toma de
corriente eléctrica polarizada de tres puertos, con el cableado correcto y
con conexión a tierra.
• La toma de corriente debe estar instalada cerca de los aparatos y debe
ser fácilmente accesible.
Conector AC IN
A la toma de corriente eléctrica
Cable de alimentación AC (suministrado)
Paso 5: configuración inicial del software del sistema
Después de encender el sistema, efectúe la configuración inicial.
1 Encienda el televisor.
2 Encienda el interruptor principal.
Interruptor principal
El indicador de encendiendo se iluminará en rojo intenso para indicar que
el sistema ha pasado al modo de espera.
3 Pulse el botón de encendido.
Botón de encendido
Indicador de encendiendo
El indicador de encendiendo se ilumina en verde y la imagen se muestra
en la pantalla del televisor.
Page 72

72
Procedimientos iniciales
Configuración del sistema PS3™
4 Conecte el mando inalámbrico al sistema mediante un cable
USB.
Conector USB
Cable USB
(suministrado)
Conector USB
5 Pulse el botón PS del mando.
El sistema reconocerá el mando inalámbrico. Una vez reconocido el
mando, aparecerá la pantalla de configuración inicial.
6 Realice la Configuración inicial.
Siga las instrucciones en pantalla para introducir la configuración del
idioma del sistema, zona horaria, fecha y hora y nombre de usuario. Una
vez finalizada la configuración inicial, aparecerá el menú principal
( página 63) en la pantalla del televisor.
Sugerencias
• Para obtener información acerca de cómo introducir texto, consulte
"Utilización del teclado en pantalla" ( página 90).
• Los ajustes introducidos durante la configuración inicial se pueden cambiar
en (Ajustes) o (Usuarios). Para obtener más información, consulte la
guía del usuario online ( página 87).
Configuración de los ajustes de salida de vídeo
En función del conector y el tipo de cable utilizado, es posible que
sea necesario configurar los ajustes de salida de vídeo para
visualizar la resolución HD en la pantalla del televisor ( página 66).
Vaya a
(Ajustes) (Ajustes de pantalla) "Ajustes de salida
de vídeo" y siga las instrucciones en pantalla para configurar los
ajustes.
Page 73

73
US
FR
ES
Operaciones básicas
Encendido y apagado del sistema PS3™
03
Utilización de un mando inalámbrico SIXAXIS™
Pulse el botón PS.
Apagado del sistema
Mantenga pulsado el botón PS durante un
segundo o más. Cuando se muestre el
mensaje "Apague el sistema" en la
pantalla, selecciónelo y, a continuación,
pulse el botón ( ).
Sugerencia
Antes de utilizar un mando inalámbrico, primero
debe emparejarlo con el sistema
( página 74).
Botón PS
Utilización del botón del sistema
Estado del indicador de encendiendo
Verde intenso
Sistema encendido
Verde
intermitente
El sistema se está apagando
Rojo intenso
Sistema apagado (en modo de
espera)
Apagado
Interruptor principal apagado
Apagado del sistema
Pulse el botón de encedido durante dos
segundos o más.
Aviso
Compruebe que el sistema está en modo de
espera (indicador de encendido rojo) antes de
apagarlo mediante el interruptor principal
MAIN POWER situado en la parte posterior del
sistema. Si apaga el sistema mediante el
interruptor principal MAIN POWER cuando no
se encuentra en modo de espera, puede
provocar un fallo de funcionamiento, la pérdida
o corrupción de datos o daños en el sistema.
1 Pulse el botón de encendido.
Botón de encendido
Indicador de encendido
2 Pulse el botón PS del mando inalámbrico.
Se asigna un número de mando.
Page 74

74
Operaciones básicas
Uso del mando inalámbrico SIXAXIS™
04
Preparación para su utilización
Para utilizar un mando inalámbrico, primero debe registrar o
"emparejar" el mando con el sistema PS3™ y asignarle un número.
Paso 1: Empareje el sistema y el mando.
• Cuando se utiliza por primera vez
• Cuando se utiliza con un sistema PS3™ diferente
m
Paso 2: Asigne un número de mando.
Cada vez que el sistema se enciende
Paso 1: empareje el sistema y el mando
Cuando utilice el mando por primera vez o con un sistema PS3™
diferente, primero deberá emparejar los dispositivos. Si enciende el
sistema y conecta el mando mediante un cable USB, el
emparejamiento finalizará.
Cable USB
(suministrado)
Verifique que el sistema esté
encendido (que el indicador de
encendiendo esté iluminado en
verde intenso).
Paso 2: asigne un número de mando
Cada vez que encienda el sistema, deberá asignar un número al
mando.
Pulse el botón PS.
Todos los indicadores de puerto
parpadean.
Cuando se haya asignado un número al
mando, los indicadores de puerto del
número asignado cambiarán a rojo intenso.
1 2 3 4
1 2 3 4
m
Es posible conectar hasta 7 mandos al mismo tiempo. El número del
mando es el que se encuentra en la parte superior de los
indicadores del puerto. Para los números del 5 al 7, añada los
números de los indicadores encendidos.
112 3 4
Ejemplo: se ha asignado el
mando número 5.
Sugerencias
• El emparejamiento y la asignación de números del mando se pueden realizar
sólo cuando el sistema está encendido (cuando el indicador de
encendiendo está iluminado en verde intenso).
• Cuando se utiliza un mando emparejado con otro sistema PS3™, se elimina
el emparejamiento con el sistema original. Empareje el mando con el sistema
nuevamente si el mando se ha utilizado con otro sistema.
• Si se apaga el mando o el sistema, los indicadores de puerto situados en el
mando se apagarán y se borrará el número asignado.
Page 75

75
US
FR
ES
Utilización del mando de manera inalámbrica
Si desconecta el cable USB, podrá utilizar el mando de forma
inalámbrica. Para ello, la batería del mando debe estar cargada.
Sugerencias
• El cable USB se puede conectar o desconectar con el mando y el sistema
encendidos.
• Si el mando no funciona, pulse el botón PS y vuelva a asignar el número del
mando.
Carga del mando
Con el sistema encendido (indicador de encendido iluminado en
verde), conecte el mando al sistema mediante un cable USB. Los
indicadores del puerto del mando parpadean lentamente y comienza
la carga.
Cuando la carga se ha completado, los indicadores del puerto dejan
de parpadear.
Sugerencias
• El mando se puede utilizar durante la carga.
• Realice la carga en un lugar donde la temperatura ambiente oscile entre
10 °C y 30 °C (50 °F y 86 °F). Es posible que la carga no sea tan efectiva si
se realiza en otros entornos.
• La batería tiene una vida útil limitada. La duración de la batería disminuirá
gradualmente con el uso y el paso del tiempo.
• La vida útil de la batería también varía en función del método de
almacenamiento, el estado de uso, el entorno y otros factores.
Nivel de carga de la batería
Si mantiene pulsado el botón PS durante más de un segundo, podrá
comprobar el nivel de carga de la batería en la pantalla.
La batería tiene mucha carga.
La batería ha empezado a perder su carga.
El nivel de carga de la batería es bajo.
La batería no tiene carga. Los indicadores del puerto del mando
parpadean rápidamente. Cargue el mando.
Sugerencia
En función del entorno o de las condiciones de uso, es posible que el nivel de
carga restante no se muestre correctamente y que la duración de la batería
varíe.
Operaciones básicas
Uso del mando inalámbrico SIXAXIS™
Page 76

76
Operaciones básicas
Reproducción del contenido
05
Blu-ray Disc (BD)/DVD/Discos CD
1 Inserte el disco.
Aparece un icono en el menú principal.
Introduzca el disco con la etiqueta
orientada hacia arriba.
2 Seleccione el icono y, a continuación, pulse el botón .
Comienza la reproducción.
En función del disco, es posible que aparezca una lista del contenido que
se puede reproducir.
Expulsión de un disco
Botón extraer
Indicador
extraer
Detenga la reproducción y, a
continuación, pulse el botón extraer.
Sugerencia
Para obtener instrucciones sobre cómo salir
de los juegos, consulte "Jugar a juegos"
( página 79).
Page 77

77
US
FR
ES
Memory Stick™/SD Memory Card/CompactFlash
®
1 Inserte el soporte de almacenamiento.
Aparece un icono en el menú principal.
CF SD/miniSD
Abra la tapa de la ranura.
Parte frontal
Ejemplo: cuando se inserta un Memory Stick™
2 Seleccione el icono y, a continuación, pulse el botón .
Aparecerá una lista del contenido que se puede reproducir.
Sugerencia
Cuando utilice un Memory Stick Duo™/tarjeta miniSD™ con el sistema PS3™,
podrá insertar el soporte sin utilizar un adaptador.
Extracción del soporte
Compruebe que el indicador de acceso no parpadea y, a continuación, expulse el soporte.
Aviso
Cuando el indicador de acceso parpadea, significa que se están
guardando, cargando, o eliminando los datos. Si el indicador de acceso
parpadea, no extraiga el soporte de almacenamiento ni apague el sistema.
Pulse el botón extraer CF.
Indicador de acceso CF
Indicador de acceso SD Memory Card
Indicador de acceso Memory Stick™
Introduzca el soporte en la
dirección de las flechas.
Operaciones básicas
Reproducción del contenido
Page 78

78
Dispositivos USB
Puede conectar dispositivos externos, como, por ejemplo,
dispositivos compatibles con la clase de almacenamiento masivo
USB mediante un cable USB. Es posible conectar dispositivos con el
sistema encendido. Consulte también las instrucciones
suministradas con el dispositivo externo que se conectará.
1 Conecte el dispositivo USB.
Aparece un icono en el menú principal.
Dispositivo externo como, por ejemplo, una cámara digital
2 Seleccione el icono y, a continuación, pulse el botón .
Aparecerá una lista del contenido que se puede reproducir.
Avisos
• No extraiga dispositivos USB ni apague el sistema mientras se guardan,
cargan o eliminan datos. Si lo hace, puede que los datos se pierdan o
resulten dañados.
• Si utiliza un dispositivo de memoria USB con interruptor de protección
contra escritura, no accione el interruptor cuando el dispositivo esté
conectado al sistema PS3™. Si lo hace, puede que los datos se pierdan
o resulten dañados.
Formatos de archivo que se pueden reproducir o visualizar
Entre los formatos de archivo que se pueden reproducir o visualizar
en este sistema, se incluyen ATRAC, MP3, AAC, JPEG y MPEG-4.
Para obtener información actualizada, consulte la guía del usuario
online ( página 87).
Sugerencias
• Sólo los archivos que se pueden reproducir o visualizar en el sistema PS3™
aparecen en la columna de la categoría compatible (ejemplo: los datos de
imagen aparecen en la categoría Foto).
• En función del soporte de almacenamiento, sólo se puede mostrar un
subconjunto de las carpetas que contiene el soporte. Si selecciona "Mostrar
todo" en el menú de opciones ( página 63), se mostrarán todas las
carpetas guardadas en el soporte.
Aviso
Para obtener más información acerca de copias de seguridad de archivos
guardados en el disco duro, consulte el documento de Seguridad y soporte
técnico.
Operaciones básicas
Reproducción del contenido
Page 79

79
US
FR
ES
Juego
Jugar a juegos
06
Iniciar o salir de un juego
Este producto tiene compatibilidad limitada con títulos de software
de formato PlayStation® y PlayStation®2. Muchos títulos de software
de formato PlayStation® y PlayStation®2 funcionan, pero la
compatibilidad completa no esta garantizada. Actualizar el software
del sistema puede mejorar la compatibilidad. Visite
http://www.us.playstation.com para descargar actualizaciones del
software del sistema. Para verificar si un título de software de formato
PlayStation®2 específico es compatible con el sistema PS3™,
consulte en http://www.us.playstation.com/Support/CompatibleStatus.
Iniciar un juego
Inserte un disco, seleccione el icono, y a continuación, pulse el
botón ( página 76).
Salir de un juego
Mientras juega, pulse el botón PS del mando inalámbrico. A
continuación, seleccione "Salir del juego" en la pantalla que aparece.
Cuando se inicia o se sale del software de formato PlayStation®2, se
cancela el número de mando asignado. Siga los pasos que aparecen a
continuación para asignar un número de mando.
• Tras iniciar un juego: pulse el botón PS cuando aparezca contenido del
software del juego en la pantalla.
• Tras salir de un juego: pulse el botón PS cuando aparezca el menú
principal en la pantalla.
Sugerencia
Para guardar datos de software de formato PlayStation®2/PlayStation® debe
crear Memory Cards internas (
página 80).
Ajustes del mando
Puede cambiar los ajustes del mando durante un juego. Pulse el
botón PS y, a continuación, seleccione una opción de los ajustes en
la pantalla que aparece.
Cambio al modo analógico
Al jugar a software de formato PlayStation®2/PlayStation® debe
cambiar el modo del mando. Cambie al modo compatible con el
software. En algún software el modo se cambia automáticamente.
Cambio de los números del mando
Es posible cambiar el número asignado a un mando. Cuando el
software especifica el puerto del mando que debe usarse, cambie al
número del mando compatible.*
* No puede asignar el puerto del mando 2-D usando el sistema PS3™.
Sugerencia
Para comprobar el número del mando asignado actualmente, pulse el botón
PS mientras juega.
Datos guardados del software de formato PS3™
Los datos guardados para el software de formato PS3™ se guardan
en el disco duro del sistema. Los datos se muestran en (Juego)
(Herramienta de datos guardados).
Page 80

80
Juego
Jugar a juegos
Datos guardados del software de formato
PlayStation®2/PlayStation
®
Para guardar datos de software de formato PlayStation®2/
PlayStation®, debe crear tarjetas Memory Card internas en el disco
duro y asignarlas a las ranuras.
• Memory card (tarjeta de
memoria) (8MB) (para
PlayStation®2)
• Memory card (tarjeta de
memoria)
Paso 1: cree una Memory Card interna.
Cree una Memory Card interna en el disco duro en sustitución de la
Memory Card (8 MB) (para PlayStation
®
2) o Memory Card.
Memory Card (PS2)
interna
Memory Card (PS)
interna
Paso 2: asigne una ranura.
Inserte la Memory Card interna en la ranura interna del disco duro en lugar
de en la ranura para Memory Card de la consola PlayStation
®
2 o PlayStation®.
Ranura para memory card
(tarjeta de memoria)
Ranuras
internas
Paso 1: cree una Memory Card interna
1 Seleccione (Herramienta de Memory Card (PS/PS2)) en
(Juego) en el menú principal y, a continuación, pulse el
botón .
2 Seleccione (Nueva Memory Card interna) y, a
continuación, pulse el botón .
Siga las instrucciones en pantalla para crear la Memory Card interna.
Tipos de Memory Card internas
Tipo Tipos de datos que se pueden guardar
Memory Card (PS2)
interna
Datos guardados del software de formato
PlayStation®2 (los datos guardados del
software de formato PlayStation® no se
pueden guardar).
Memory Card (PS)
interna
Datos guardados del software de formato
PlayStation
®
Page 81

81
US
FR
ES
Juego
Jugar a juegos
Paso 2: asigne una ranura
1 Seleccione (Herramienta de Memory Card (PS/PS2)) en
(Juego) en el menú principal y, a continuación, pulse el
botón .
2 Seleccione la Memory Card interna que desea utilizar y, a
continuación, pulse el botón .
Asigne una ranura.
Sugerencias
• En función del software, es posible que las ranuras estén asignadas
previamente. Para obtener más información, consulte las instrucciones
suministradas con el software.
• Puede asignar ranuras durante un juego. Pulse el botón PS del mando
inalámbrico y, a continuación, seleccione "Asignar ranuras" en la pantalla
que aparece.
Utilización de datos guardados en una memory card
(tarjeta de memoria) (8MB) (para PlayStation®2) o una
memory card (tarjeta de memoria)
Para utilizar los datos guardados en una Memory Card (8 MB) (para
PlayStation®2) o una Memory Card, debe copiar los datos en una
Memory Card interna en el disco duro. Debe utilizar un adaptador
para memory card (tarjeta de memoria) (se vende por separado)
para copiar los datos.
1 Seleccione (Herramienta de Memory Card (PS/PS2)) en
(Juego) en el menú principal y, a continuación, pulse el
botón .
2 Conecte el adaptador para Memory Card (tarjeta de memoria)
al sistema.
3 Inserte la Memory Card (tarjeta de memoria) que desea copiar
en el adaptador.
Se muestra el icono para (Memory Card (PS)) o (Memory Card (PS2))
4 Seleccione el icono y, pulse el botón .
Siga las instrucciones en pantalla para copiar los datos.
Sugerencias
• Según el tipo de datos, éstos se guardan en una Memory Card (8 MB) (para
PlayStation®2) o una Memory Card y se copiarán en la Memory Card interna
como se muestra a continuación.
Memory card
(tarjeta de memoria)
(8MB) (para PlayStation®2)
Memory card
(tarjeta de memoria)
Datos guardados del software
de formato PlayStation
®
2
Memory Card
(PS2) interna
Memory Card
(PS) interna*
Datos guardados del software
de formato PlayStation
®
* Si la cantidad de datos guardados que se copiará es demasiado grande, el
sistema creará automáticamente varias Memory Card (PS) internas.
• Es posible copiar los datos guardados en el disco duro a un soporte Memory
Stick™, SD Memory Card, CompactFlash
®
o dispositivo de almacenamiento
masivo USB (unidad USB Flash, etc.) Seleccione los datos guardados y, a
continuación, seleccione "Copiar" del menú de opciones ( página 63).
Tenga en cuenta que no es posible copiar los datos a una memory card
(tarjeta de memoria) (8MB) (para PlayStation®2) o a una memory card (tarjeta
de memoria).
• Es posible que algunos datos guardados tengan restricciones de protección
contra copia.
Page 82

82
Red
Configuración de los ajustes de red
07
Utilización de una conexión por cable
Las siguientes instrucciones explican cómo conectarse a Internet
mediante un cable Ethernet.
Ejemplo de la configuración de una red por cable
La configuración de la red y el método de conexión pueden variar en
función del equipo que utilice y del entorno de la red.
WAN LAN1 LAN2 LAN3 LAN4
ETHERETHER
A la línea de Internet
Cable Ethernet
(suministrado)
Ordenador
Dispositivo de puerta de
acceso a redes como, por
ejemplo, un módem DSL o
de cable
Router
No es necesario si el módem DSL o de
cable u otro dispositivo de red dispone
de la función de router incorporada
Sugerencia
Un router es un dispositivo que permite la conexión de varios dispositivos a
una línea de Internet. Es necesario disponer de un router si desea conectar un
ordenador y un sistema PS3™ a Internet al mismo tiempo utilizando solo una
conexión a Internet.
Preparación de los elementos necesarios
Se requieren los siguientes elementos para realizar la conexión por
cable a Internet.
• Conexión a Internet de banda ancha a través de un dispositivo
como un DSL o cable módem (la conexión de dispositivos
múltiples puede requerir hardware adicional)
• Cable Ethernet (suministrado)
Sugerencia
Los usuarios son los responsables del pago de los servicios de Internet.
Configuración de la conexión a Internet
Cuando se establece una conexión por cable a Internet,
generalmente no es necesario configurar ningún ajuste
predeterminado. Si no puede utilizar los ajustes predeterminados
para conectarse, siga las instrucciones facilitadas a continuación
para restablecerlos.
1 Seleccione (Ajustes de red) en (Ajustes) en el menú
principal y, a continuación, pulse el botón .
2 Seleccione "Ajustes de conexión a Internet" y, a
continuación, pulse el botón .
Cuando aparezca un mensaje que diga que la conexión a Internet se
terminará, seleccione "Sí", y luego presione el botón
.
3 Seleccione "Por cable" y, a continuación, pulse el botón hacia
la derecha.
Page 83

83
US
FR
ES
4 Seleccione "Fáciles" o "Personalizados" y configure los
ajustes según sea necesario.
Siga las instrucciones en pantalla para configurar los ajustes necesarios.
Fáciles
Los ajustes básicos se establecen automáticamente.
Personalizados
Puede introducir información detallada sobre los ajustes.
Para obtener más información sobre los ajustes, consulte
las instrucciones suministradas por el proveedor de
servicios de Internet o con el dispositivo de red.
Para obtener información detallada sobre los ajustes de red, consulte la
guía del usuario online ( página 87).
Utilización de una conexión inalámbrica
Las siguientes instrucciones explican cómo conectarse a Internet
mediante una conexión inalámbrica.
Ejemplo de la configuración de una red inalámbrica
La configuración de la red y el método de conexión pueden variar en
función del equipo que utilice y del entorno de la red.
WAN LAN1 LAN2 LAN3 LAN4
ETHERETHER
Dispositivo de puerta de
acceso a redes como, por
ejemplo, un módem DSL o
de cable
Punto de acceso
o router inalámbrico
A la línea de Internet
Ordenador Ordenador
Sugerencias
• Un punto de acceso es un dispositivo que le permite conectarse a una red
de manera inalámbrica.
• Un router inalámbrico es un dispositivo que añade la funcionalidad de un
punto de acceso a un router. Es necesario disponer de un router si desea
conectar un ordenador y un sistema PS3™ a Internet al mismo tiempo
utilizando solo una conexión a Internet.
Red
Configuración de los ajustes de red
Page 84

84
Red
Configuración de los ajustes de red
Preparación de los elementos necesarios
Los elementos siguientes son necesarios para configurar el sistema
para que se conecte de forma inalámbrica a Internet.
• Conexión a Internet de banda ancha a través de un dispositivo
como un DSL o cable módem (la conexión de dispositivos
múltiples puede requerir hardware adicional)
• Punto de acceso o router inalámbrico
• Información sobre los ajustes para el punto de acceso (SSID, clave
WEP, clave WPA)
Sugerencias
• SSID, clave WEP y clave WPA son tipos de información de seguridad
necesarios para la conexión a un punto de acceso.
• Al conectarse a Internet de forma inalámbrica, pueden producirse
interferencias de señal en función de la condición de uso de los dispositivos
de la red inalámbrica. Si se experimenta una velocidad de transferencia de
datos de Internet lenta, o si el mando inalámbrico no funciona
adecuadamente, utilice un cable Ethernet para establecer una conexión a
Internet.
• En función del punto de acceso que utilice, es posible que deba utilizar la
dirección MAC de su sistema cuando se conecte a Internet. Podrá encontrar
la dirección MAC para el sistema si va a
(Ajustes) (Ajustes del
sistema) "Información del sistema".
• Los usuarios son los responsables del pago de los servicios de Internet.
Configuración de la conexión a Internet
Cuando se conecte a Internet de forma inalámbrica, primero debe
realizar los ajustes de red.
Los ajustes de red pueden variar en función del tipo de punto de
acceso y del entorno de la red. Las siguientes instrucciones explican
la configuración de red más frecuente.
1 Seleccione (Ajustes de red) en (Ajustes) en el menú
principal y, a continuación pulse el botón .
2 Seleccione "Ajustes de conexión a Internet" y, a
continuación, pulse el botón .
Cuando aparezca un mensaje que diga que la conexión a Internet se
terminará, seleccione "Sí", y luego presione el botón
.
3 Seleccione "Inalámbrico" y, a continuación, pulse el botón
hacia la derecha.
4 Seleccione "Escanear" y, a continuación, pulse el botón hacia
la derecha.
El sistema buscará los puntos de acceso dentro de un rango y los
mostrará en una lista.
Page 85

85
US
FR
ES
Red
Configuración de los ajustes de red
Sugerencia
Cuando utilice un punto de acceso que admita una configuración automática,
seleccione "Automático" y siga las instrucciones en pantalla. Los ajustes
necesarios se completarán automáticamente. Para obtener más información
sobre los puntos de acceso que admiten una configuración automática,
póngase en contacto con los fabricantes del punto de acceso.
5 Seleccione el punto de acceso que desee utilizar y, a
continuación, pulse el botón .
SSID es un código o nombre que se asigna al punto de acceso. Si
desconoce el SSID que debe utilizar o éste no aparece, póngase en
contacto con la persona que configura o mantiene el punto de acceso.
6 Confirme el SSID para el punto de acceso y, a continuación,
pulse el botón derecho.
7 Seleccione los ajustes de seguridad según sea necesario y, a
continuación, pulse el botón derecho.
Los ajustes de seguridad varían en función del punto de acceso que se
utilice. Para determinar los ajustes, póngase en contacto con la persona
que configura o mantiene el punto de acceso.
8 Introduzca la clave de cifrado y, a continuación, pulse el
botón hacia la derecha.
El campo de la clave de cifrado mostrará un asterisco (*) por cada
carácter que introduzca. Si no conoce la clave, póngase en contacto con
la persona que configura o mantiene el punto de acceso.
Page 86

86
Red
Configuración de los ajustes de red
9 Seleccione "Fáciles" o "Personalizados" y configure los
ajustes según sea necesario.
Siga las instrucciones en pantalla para configurar los ajustes necesarios.
Fáciles
Los ajustes básicos se establecen automáticamente.
Personalizados
Puede introducir información detallada sobre los ajustes.
Para obtener más información sobre los ajustes, consulte
las instrucciones suministradas por el proveedor de
servicios de Internet o con el dispositivo de red.
Para obtener información detallada sobre los ajustes de red, consulte la
guía del usuario online ( página 87).
Page 87

87
US
FR
ES
Si los ajustes de la red ya están completados, el sistema PS3™ se
conectará automáticamente a Internet cuando se encienda el
sistema. La conexión permanecerá activa siempre que el sistema
esté encendido.
Utilización del navegador de Internet
1 Seleccione (Navegador de Internet) en (Red) en el
menú principal y, a continuación, pulse el botón .
Se abre el navegador de Internet. Aparece un icono de ocupado mientras
se carga la página.
Icono Ocupado
Operaciones básicas del navegador de Internet
Botones direccionales
Mueven el cursor a un vínculo
Joystick derecho
Permiten desplazarse en la dirección que
desee
Botón L1
Permite volver a la página anterior
Botón START
Introduce una dirección
Botón
Permite alternar entre la opciones de mostrar u
ocultar el menú
Visualización de la guía del usuario
Puede utilizar el navegador de Internet para ver la guía del usuario
online del sistema PS3™. Seleccione (Manuales de instrucciones
online) en (Red) en el menú principal y, a continuación, pulse el
botón .
Guía del usuario del sistema PLAYSTATION®3
http://manuals.playstation.net/document/
La guía también se puede ver mediante el navegador Web del ordenador.
Crear una cuenta PLAYSTATION®Network
Al crear una cuenta PLAYSTATION®Network, podrá chatear en
(Amigos) o utilizar el servicio de red online del sistema PS3™ y
otras funciones. Vaya a (Amigos), seleccione (Registrarse en
PLAYSTATION®Network), y luego presione el botón . Se mostrará la
pantalla para crear una cuenta.
Sugerencias
• Para crear una cuenta es necesaria una conexión a Internet.
• El contenido del servicio de PLAYSTATION
®
Network puede variar en función
de la región.
Red
Conexión a Internet
08
Page 88

88
Mediante la actualización del software del sistema PS3™, puede
añadir funciones o revisiones de seguridad. Actualice su sistema
periódicamente para utilizar la versión más reciente del software del
sistema.
Para obtener información actualizada sobre las actualizaciones,
visite la página Web http://www.us.playstation.com.
Utilice los datos de actualización para
sobrescribir el software existente del
sistema.
El software del sistema está
actualizado.
Avisos
• Durante una actualización, no desactive el sistema ni extraiga el soporte.
Si se cancela una actualización antes de completarse, el software del
sistema puede resultar dañado y se puede precisar una reparación o
intercambio del sistema.
• Durante una actualización, el botón de encendido de la parte frontal del
sistema está inactivo.
• En función del contenido, es posible que no pueda jugar sin primero
actualizar el software del sistema.
• Después de actualizar el software del sistema, no es posible volver a una
versión anterior.
Métodos de actualización
Puede llevar a cabo una actualización de cualquiera de las formas
descritas a continuación.
Actualización de la red
Puede realizar la actualización mediante la descarga de los datos de
actualización de Internet. Las actualizaciones más recientes se
descargan automáticamente.
Seleccione (Ajustes) (Actualización del sistema)
"Actualizar mediante Internet".
Actualización mediante soporte de almacenamiento
Puede realizar una actualización mediante los datos de actualización
guardados en un Memory Stick™ u otro soporte.
Seleccione (Ajustes) (Actualización del sistema)
"Actualizar mediante un soporte de almacenamiento".
Sugerencia
Algunos discos de juego también pueden contener datos de actualización.
Comprobación de la versión del software del sistema
Puede comprobar la información de la versión del sistema mediante
la selección de (Ajustes) (Ajustes del sistema)
"Información del sistema". La versión actual se muestra en el
campo Software del sistema.
Actualizaciones
Actualizaciones del sistema PS3™
09
Page 89

89
US
FR
ES
Ajustes de seguridad
Configuración del nivel de control paterno
10
El sistema PS3™ incluye una función de control paterno. Es posible
utilizar esta función para establecer una contraseña y limitar la
reproducción de contenido restringido mediante un nivel de control
paterno (juegos, vídeos y otro contenido). Mediante el ajuste del nivel
de control paterno en el sistema, puede impedir la reproducción del
contenido restringido a los niños.
Cambio de los ajustes de seguridad
Es posible ajustar el nivel de control paterno para juegos, discos
Blu-ray Disc u otros contenidos en (Ajustes) (Ajustes de
seguridad).
Para cambiar el ajuste de control paterno es necesario introducir una
contraseña. Es posible establecer una contraseña en (Ajustes de
seguridad) "Cambiar contraseña".
La contraseña viene ajustada en "0000" de manera predeterminada.
Nivel de control paterno para juegos
Puede ajustar el nivel de control paterno para juegos en (Ajustes
de seguridad) "Control paterno". Seleccione "No" o uno de los 11
niveles.
No
Permite reproducir cualquier contenido sin tener en cuenta el nivel de
control paterno.
11-1
Ajuste el nivel de control paterno según el número. Tenga en cuenta
que cuanto menor sea el número, mayor será la restricción.
La combinación de los niveles de control paterno del sistema PS3™
y del contenido determina los contenidos que se pueden reproducir.
Ejemplo: si el nivel de control paterno del sistema está ajustado en
"7", es posible visualizar en el sistema el contenido con un nivel del
"1" al "7".
Juego
En la mayoría de embalajes de juegos aparece un símbolo que
indica el grupo de edades para el que es adecuado el juego. Los
símbolos corresponden al nivel de control paterno de los juegos
como se indica a continuación:
Edad
Nivel de control
paterno de juegos
2 3 4 5 9 10
A partir de marzo de 2007. Para obtener información sobre los juegos y las
clasificaciones ESRB, visite nuestra página Web en
http://www.us.playstation.com/psp. Para obtener la información más reciente
sobre el sistema de clasificaciones ESRB, visite http://www.esrb.org.
Otros ajustes de seguridad
Es posible ajustar las limitaciones del control paterno en contenido
distinto de juegos en (Ajustes de seguridad), tal y como se
describe a continuación.
Control paterno
de BD
Al reproducir un BD con ajustes de control paterno, es
posible restringir la reproducción según la edad que se ha
ajustado. Cuanto menor sea el número, mayor será la
restricción.
Control paterno
de DVD
Al reproducir un DVD con ajustes de control paterno, es
posible restringir la reproducción según el nivel que se ha
ajustado. Seleccione "No" o uno de los ocho niveles.
Cuanto menor sea el número, mayor será la restricción.
Control de inicio
del navegador
de Internet
Es posible restringir la capacidad de iniciar el navegador de
Internet con una contraseña.
Page 90

90
Teclado
Utilización del teclado en pantalla
11
Lista de teclas
Las teclas que se muestran varían en función del modo de entrada y
otras condiciones.
Teclas Explicación
Inserta un salto de línea
Mueve el cursor
Elimina el carácter situado a la izquierda del
cursor
Inserta un espacio
Cambia el modo de entrada
Confirma los caracteres que se han escrito y
permite salir del teclado
Cambia al teclado de tamaño mini
Introduce un símbolo
/
Cambia el tipo de caracteres que se van a
introducir
Cursor
Campo de
introducción de texto
Muestra las opciones
predictivas
Teclas de
operación
Muestra cuando el modo
predictivo está activado
Visualización del
modo de entrada
Page 91

91
US
FR
ES
Introducción de caracteres
El modo predictivo permite introducir las primera letras de una
palabra para que aparezca una lista de palabras frecuentes que
comiencen con esas letras. A continuación, mediante los botones
direccionales podrá seleccionar la palabra deseada. Una vez
introducido el texto, seleccione la tecla "Aceptar" para salir del
teclado.
Sugerencia
Los idiomas que puede utilizar para la introducción de texto son los idiomas
compatibles con el sistema. Puede configurar el idioma del sistema en
(Ajustes) (Ajustes del sistema) "Idioma del sistema".
Ejemplo: si "Idioma del sistema" está configurado en "Français", podrá
introducir texto en francés.
Utilización de un teclado USB
Es posible introducir caracteres mediante un teclado USB (se vende
por separado). Si pulsa alguna tecla del teclado USB (una vez
conectado) mientras se visualiza la pantalla de introducción de texto,
ésta le permitirá utilizar el teclado USB.
Sugerencia
No es posible utilizar el modo predictivo con un teclado USB.
Teclado
Utilización del teclado en pantalla
Page 92

Page 93

Page 94

Page 95

" ", "PlayStation" and "PLAYSTATION" are registered trademarks of Sony Computer Entertainment Inc. Also, "PS3" and "SIXAXIS" are trademarks of the same company.
“XMB” and “xross media bar” are trademarks of Sony Corporation and Sony Computer Entertainment Inc.
"SONY" and " " are registered trademarks of Sony Corporation. Also, "Memory Stick", "Memory Stick Duo", " " and "ATRAC" are registered trademarks or trademarks of the same
company.
"Blu-ray Disc" is a trademark.
HDMI, the HDMI logo and High-Definition Multimedia Interface are trademarks or registered trademarks of HDMI Licensing, LLC.
Sony Computer Entertainment Inc. is an authorized licensee of the CompactFlash® registered trademark.
All other trademarks are the properties of their respective owners.
" ", "PlayStation" et "PLAYSTATION" sont des marques déposées de Sony Computer Entertainment Inc. "PS3" et "SIXAXIS" sont également des marques commerciales de la même société.
“XMB” et “xross media bar” sont des marques commerciales de Sony Corporation et Sony Computer Entertainment Inc.
"SONY" et " " sont des marques déposées de Sony Corporation. "Memory Stick", "Memory Stick Duo", " " et "ATRAC" sont également des marques déposées ou des marques de la
même société.
"Blu-ray" est une marque commerciale.
HDMI, le logo HDMI et High-Definition Multimedia Interface sont des marques commerciales ou des marques déposées de HDMI Licensing, LLC.
Sony Computer Entertainment Inc. est un concédant de licence autorisé de la marque déposée CompactFlash
®
.
Toutes les autres marques commerciales sont la propriété des détenteurs respectifs.
" ", "PlayStation" y "PLAYSTATION" son marcas comerciales registradas de Sony Computer Entertainment Inc. Asimismo, "PS3" y "SIXAXIS" son marcas comerciales de dicha compañía.
"XMB" y “xross media bar” son marcas comerciales de Sony Corporation y de Sony Computer Entertainment Inc.
"SONY" y " " son marcas comerciales registradas de Sony Corporation. "Memory Stick", "Memory Stick Duo", " " y "ATRAC" también son marcas comerciales registradas o marcas
comerciales de dicha compañía.
"Blu-ray Disc" es una marca comercial.
HDMI, el logotipo de HDMI y High-Definition Multimedia Interface son marcas comerciales o marcas comerciales registradas de HDMI Licensing, LLC.
Sony Computer Entertainment Inc. es titular de la licencia de la marca comercial registrada CompactFlash
®
.
Todas las demás marcas comerciales pertenecen a sus respectivos propietarios.
Information about system functionality and images published in this document may vary from those for your PS3™ system, depending on the system software version in use.
Les informations relatives aux fonctionnalités du système et les images publiées dans le présent document peuvent être différentes de celles de votre système PS3™, selon la version du
logiciel du système utilisée.
La información sobre la funcionalidad del sistema y las imágenes publicadas en este documento pueden variar de lo que aparece en su sistema PS3™, en función de la versión de software
que utilice.
Page 96

© 2007 Sony Computer Entertainment Inc. All rights reserved.
Printed in China
www.us.playstation.com
 Loading...