

Page 1
4-595-966-71(1)
FM/AM
Compact Disc Player
Owner’s Record
The model and serial numbers are located on the
bottom of the unit.
Record the serial number in the space provided below.
Refer to these numbers whenever you call upon your
Sony dealer regarding this product.
Model No. CDX-G1200U
Serial No.
To cancel the demonstration (DEMO) display, see
page 11.
For the connection/installation, see page 21.
Pour annuler l’affichage de démonstration (DEMO),
reportez-vous à la page 10.
Pour le raccordement/l’installation, reportez-vous à
la page 21.
Para cancelar la pantalla de demostración (DEMO),
consulte la página 10.
Para la conexión/instalación, consulte la página 21.
Operating Instructions
Mode d’emploi
Manual de instrucciones
GB
FR
ES
CDX-G1200U
Page 2

For safety, be sure to install this unit in the
dashboard of the car as the rear side of
the unit becomes hot during use.
For details, see “Connection/Installation”
(page 21).
The nameplate indicating operating voltage,
etc., is located on the bottom of the chassis.
Warning
FOR THE CUSTOMERS IN THE USA.
NOT APPLICABLE IN CANADA,
INCLUDING IN THE PROVINCE OF
QUEBEC.
POUR LES CLIENTS AUX ÉTATS-UNIS.
NON APPLICABLE AU CANADA, Y
COMPRIS LA PROVINCE DE QUÉBEC.
This equipment has been tested and
found to comply with the limits for a Class
B digital device, pursuant to Part 15 of the
FCC Rules.
These limits are designed to provide
reasonable protection against harmful
interference in a residential installation.
This equipment generates, uses, and can
radiate radio frequency energy and, if not
installed and used in accordance with the
instructions, may cause harmful
interference to radio communications.
However, there is no guarantee that
interference will not occur in a particular
installation. If this equipment does cause
harmful interference to radio or television
reception, which can be determined by
turning the equipment off and on, the
user is encouraged to try to correct the
interference by one or more of the
following measures:
– Reorient or relocate the receiving
antenna.
– Increase the separation between the
equipment and receiver.
– Connect the equipment into an outlet
on a circuit different from that to which
the receiver is connected.
– Consult the dealer or an experienced
radio/TV technician for help.
You are cautioned that any changes or
modifications not expressly approved in
this manual could void your authority to
operate this equipment.
2GB
Page 3

CAUTION
The use of optical instruments with this
product will increase eye hazard.
For the State of California, USA only
Perchlorate Material – special handling may
apply, See
www.dtsc.ca.gov/hazardouswaste/
perchlorate
WARNING: Do not ingest
battery, Chemical Burn Hazard.
The remote commander contains a
coin/button cell battery. If the coin/button
cell battery is swallowed, it can cause severe
internal burns in just 2 hours and can lead to
death.
Keep new and used batteries away from
children. If the battery compartment does
not close securely, stop using the product
and keep it away from children.
If you think batteries might have been
swallowed or placed inside any part of the
body, seek immediate medical attention.
Note on the lithium battery
Do not expose the battery to excessive heat
such as direct sunlight, fire or the like.
Warning if your car’s ignition has no
ACC position
Be sure to set the AUTO OFF function
(page 11). The unit will shut off completely
and automatically in the set time after the
unit is turned off, which prevents battery
drain. If you do not set the AUTO OFF
function, press and hold OFF until the
display disappears each time you turn the
ignition off.
Disclaimer regarding services offered
by third parties
Services offered by third parties may be
changed, suspended, or terminated without
prior notice. Sony does not bear any
responsibility in these sorts of situations.
3GB
Page 4

Table of Contents
Warning . . . . . . . . . . . . . . . . . . . . . . . . . . . . . 2
Guide to Parts and Controls. . . . . . . . . . . . . 5
Getting Started
Detaching the Front Panel . . . . . . . . . . . . . . 7
Resetting the Unit. . . . . . . . . . . . . . . . . . . . . 7
Setting the Clock. . . . . . . . . . . . . . . . . . . . . . 7
Connecting a USB Device . . . . . . . . . . . . . . . 8
Connecting Other Portable Audio
Device . . . . . . . . . . . . . . . . . . . . . . . . . . . 8
Listening to the Radio
Listening to the Radio . . . . . . . . . . . . . . . . . 8
Using Radio Data System (RDS). . . . . . . . . . 9
Playback
Playing a Disc . . . . . . . . . . . . . . . . . . . . . . . . 9
Playing a USB Device . . . . . . . . . . . . . . . . . . 9
Searching and Playing Tracks . . . . . . . . . . 10
Settings
Canceling the DEMO Mode . . . . . . . . . . . . . 11
Basic Setting Operation . . . . . . . . . . . . . . . . 11
General Setup (GENERAL) . . . . . . . . . . . . . . 11
Sound Setup (SOUND) . . . . . . . . . . . . . . . . 12
Display Setup (DISPLAY). . . . . . . . . . . . . . . 13
Connection/Installation
Cautions . . . . . . . . . . . . . . . . . . . . . . . . . . . . 21
Parts List for Installation . . . . . . . . . . . . . . . 21
Connection . . . . . . . . . . . . . . . . . . . . . . . . . 22
Installation . . . . . . . . . . . . . . . . . . . . . . . . . 24
Additional Information
Updating the Firmware . . . . . . . . . . . . . . . 14
Precautions . . . . . . . . . . . . . . . . . . . . . . . . . 14
Maintenance . . . . . . . . . . . . . . . . . . . . . . . . 15
Specifications . . . . . . . . . . . . . . . . . . . . . . . 15
Troubleshooting . . . . . . . . . . . . . . . . . . . . . 17
Messages. . . . . . . . . . . . . . . . . . . . . . . . . . . 19
4GB
Page 5

Guide to Parts and Controls
Main unit
Front panel release button
SRC (source)
Turn o n th e powe r.
Change the source.
OFF
Press and hold for 1 second to turn the
source off and display the clock.
Press and hold for more than 2 seconds
to turn off the power and the display.
If the unit is turned off and the display
disappears, operation by the remote
commander is not available.
Control dial
Rotate to adjust the volume.
PUSH ENTER
Enter the selected item.
MENU
Open the setup menu.
Disc slot
Display window
/ (SEEK –/+)
Tune in radio stations automatically.
Press and hold to tune manually.
/ (prev/next)
/ (fast-reverse/fast-forward)
(disc eject)
PTY (program type)
Select PTY in RDS.
(browse) (page 10)
Enter the browse mode during playback.
(Not available when a USB device in
Android™ mode is connected.)
EQ (equalizer)
Select an equalizer curve.
(back)
Return to the previous display.
MODE (page 8)
Receptor for the remote commander
Number buttons (1 to 6)
Receive stored radio stations. Press and
hold to store stations.
ALBUM /
Skip an album for audio device. Press and
hold to skip albums continuously.
(Not available when a USB device in
Android mode is connected.)
(repeat)
(Not available when a USB device in
Android mode is connected.)
(shuffle)
(Not available when a USB device in
Android mode is connected.)
(play/pause)
5GB
Page 6
EXTRA BASS
Reinforces bass sound in synchronization
with the volume level. Press to change
the EXTRA BASS setting: [1], [2], [OFF].
AUX input jack
DSPL (display)
Change display items.
SCRL (scroll)
Press and hold to scroll a display item.
USB port
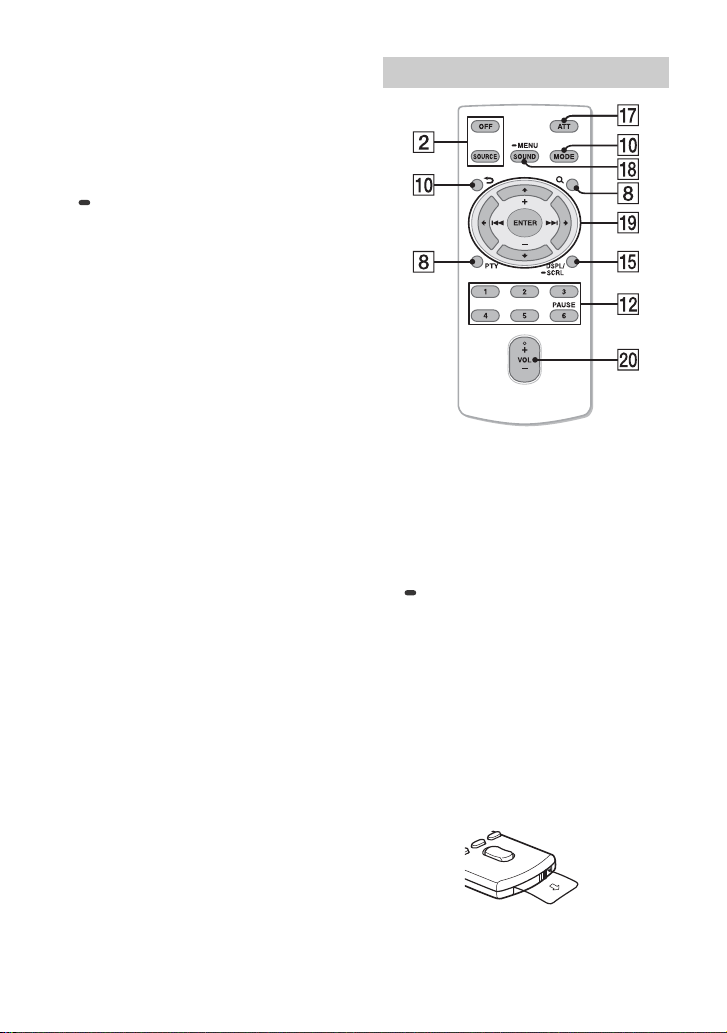
RM-X211 Remote commander
The VOL (volume) + button has a tactile dot.
ATT (attenuate)
Attenuate the sound. Press again to
cancel the attenuation.
SOUND
Open the SOUND menu directly.
MENU
Press and hold to open the setup menu.
///
Select a setup item, etc.
ENTER
Enter the selected item.
/ (prev/next)
+/– (album +/–)
VOL (volume) +/–
6GB
Remove the insulation film before use.
Page 7
Getting Started
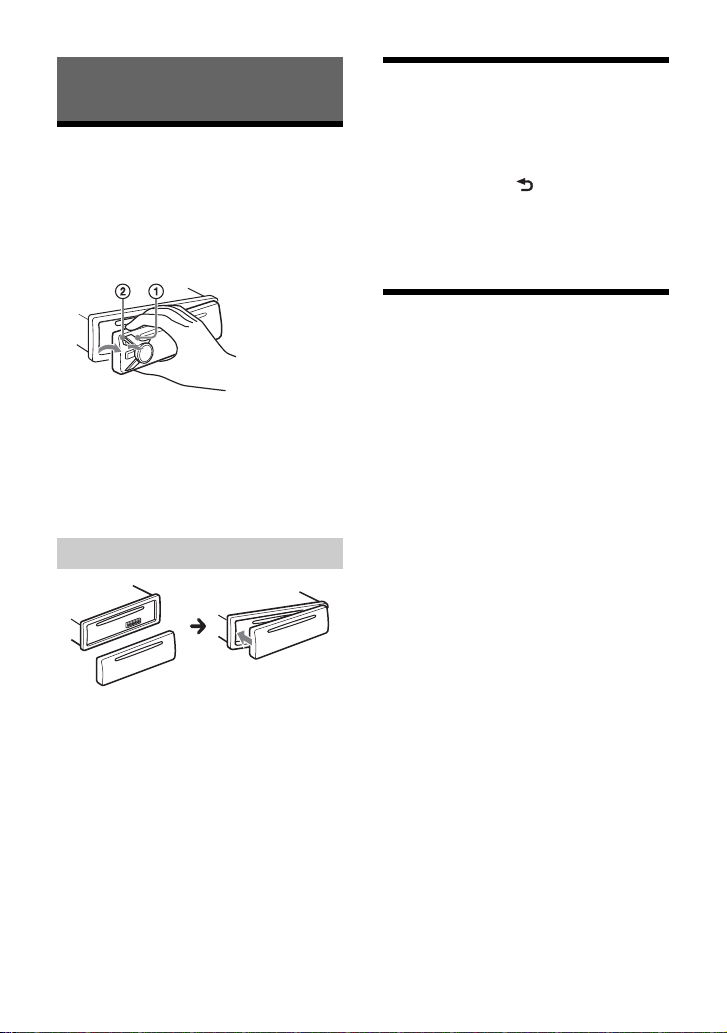
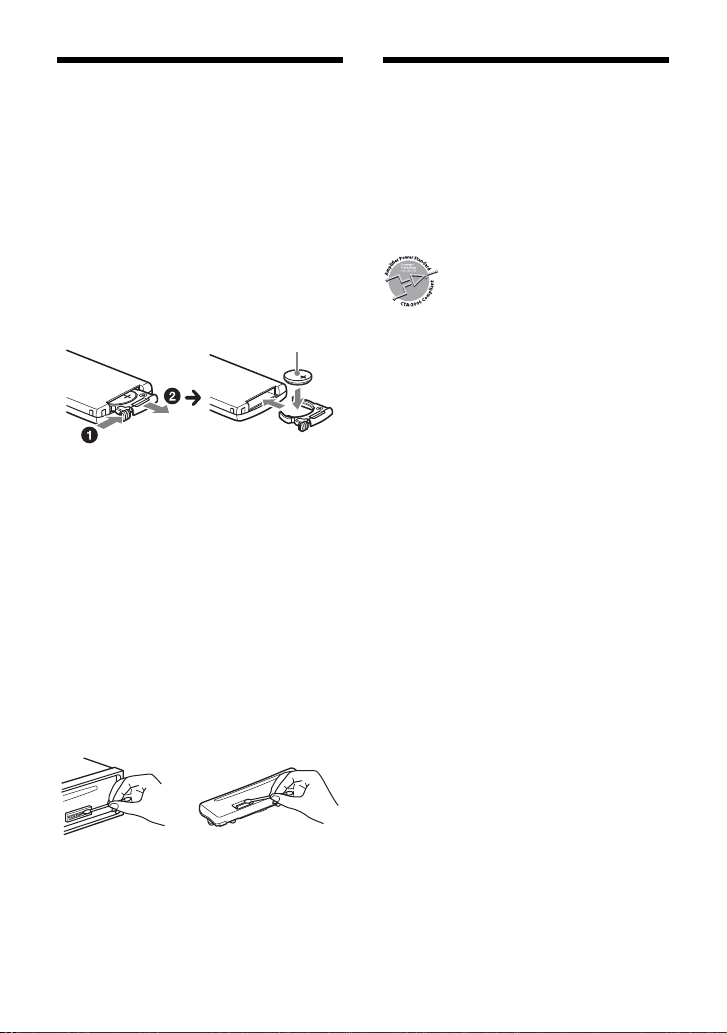
Detaching the Front Panel
You can detach the front panel of this unit to
prevent theft.
1 Press and hold OFF until the unit
turns off, press the front panel
release button , then pull the panel
towards you to remove.
Caution alarm
If you turn the ignition switch to the OFF
position without detaching the front panel,
the caution alarm will sound for a few
seconds. The alarm will only sound if the
built-in amplifier is used.
Attaching the front panel
Resetting the Unit
Before operating the unit for the first time,
or after replacing the car battery or
changing connections, you must reset the
unit.
1 Press DSPL and (back)/MODE for
more than 2 seconds.
Note
Resetting the unit will erase the clock setting and
some stored contents.
Setting the Clock
1 Press MENU, rotate the control dial to
select [GENERAL], then press it.
2 Rotate the control dial to select [SET
CLOCK-ADJ], then press it.
The hour indication flashes.
3 Rotate the control dial to set the hour
and minute.
To move the digital indication, press SEEK
+/–.
4 After setting the minute, press MENU.
The setup is complete and the clock
starts.
To di splay th e clock
Press DSPL.
7GB
Page 8
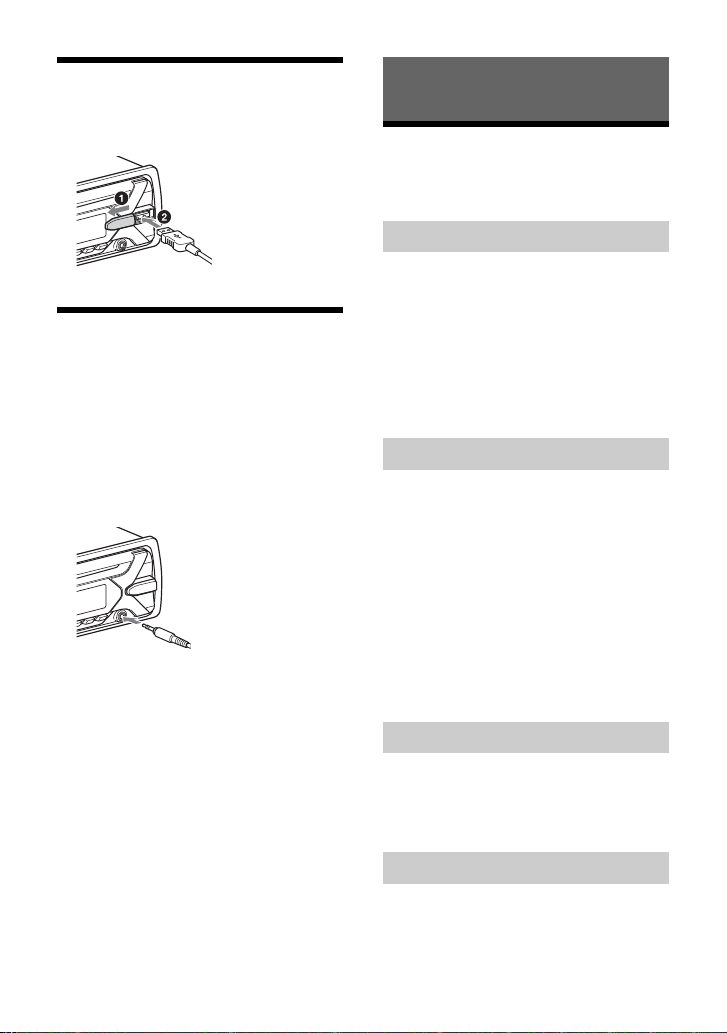
Connecting a USB Device
1 Turn down the volume on the unit.
2 Connect the USB device to the unit.
Connecting Other Portable
Audio Device
1 Turn off the portable audio device.
2 Turn down the volume on the unit.
3 Connect the portable audio device to
the AUX input jack (stereo mini jack)
on the unit with a connecting cord
(not supplied)*.
* Be sure to use a straight type plug.
4 Press SRC to select [AUX].
To match the volume level of the
connected device to other sources
Start playback of the portable audio device
at a moderate volume, and set your usual
listening volume on the unit.
Press MENU, then select [SOUND] [SET AUX
VOL] (page 13).
Listening to the Radio
Listening to the Radio
To listen to the radio, press SRC to select
[TUNER].
Storing automatically (BTM)
1 Press MO DE to chan ge th e band (F M1,
FM2, FM3, AM1 or AM2).
2 Press MENU, rotate the control dial to
select [GENERAL], then press it.
3 Rotate the control dial to select [SET
BTM], then press it.
The unit stores stations in order of
frequency on the number buttons.
Tuning
1 Press MO DE to chan ge th e band (F M1,
FM2, FM3, AM1 or AM2).
2 Perform tuning.
To tune manually
Press and hold SEEK +/– to locate the
approximate frequency, then press SEEK
+/– repeatedly to fine adjust to the
desired frequency.
To tune automatically
Press SEEK +/–.
Scanning stops when the unit receives a
station.
Storing manually
1 While receiving the station that you
want to store, press and hold a
number button (1 to 6) until [MEM]
appears.
8GB
Receiving the stored stations
1 Select the band, then press a number
button (1 to 6).
Page 9
Using Radio Data System
(RDS)
Playback
Selecting program types (PTY)
1 Press PTY during FM reception.
2 Rotate the control dial until the
desired program type appears, then
press it.
The unit starts to search for a station
broadcasting the selected program type.
Type of program s
NEWS (News), INFORM (Information), SPORTS
(Sports), TAL K (Talk), ROCK (Rock), CLS ROCK
(Classic Rock), ADLT HIT (Adult Hits), SOFT RCK
(Soft Rock), TOP 40 (Top 40), COUNTRY
(Country), OLDIES (Oldies), SOFT (Soft),
NOSTALGA (Nostalgia), JAZZ (Jazz), CLASSICL
(Classical), R & B (Rhythm and Blues), SOFT R&B
(Soft Rhythm and Blues), LANGUAGE (Foreign
Language), REL MUSC (Religious Music), REL
TAL K (Religious Talk), PERSNLTY (Personality),
PUBLIC (Public), COLLEGE (College), HABL ESP
(Spanish Talk), MUSC ESP (Spanish Music), HIP
HOP (Hip-Hop), WEATHER (Weather)
Setting clock time (CT)
The CT data from the RDS transmission sets
the clock.
1 Set [SET CT-ON] in [GENERAL]
(page 12).
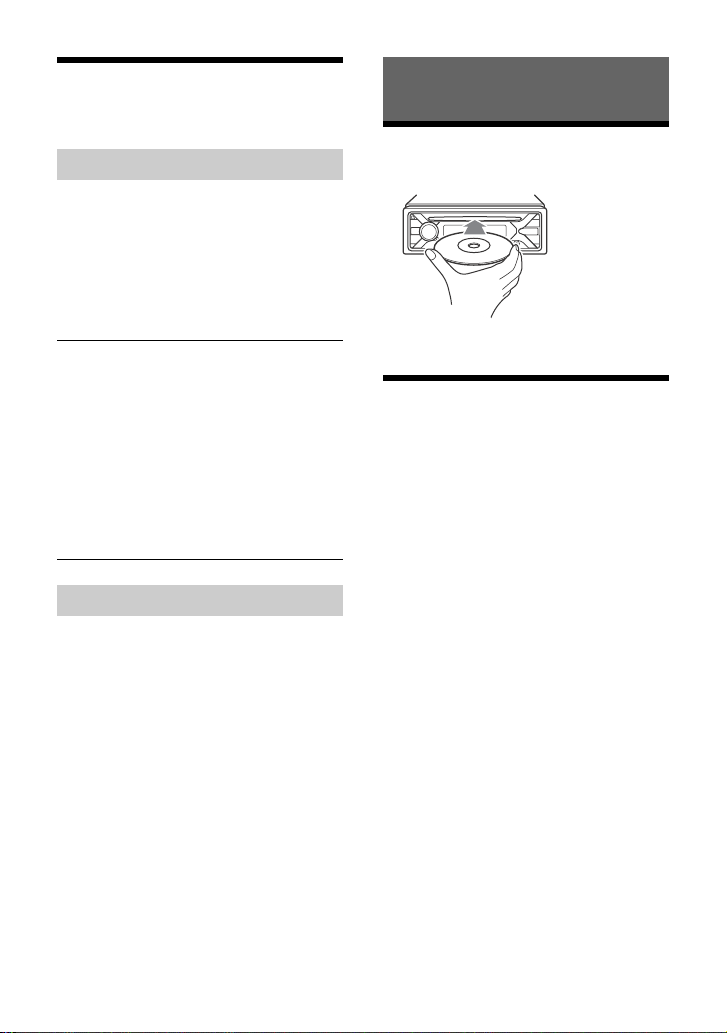
Playing a Disc
1 Insert the disc (label side up).
Playback starts automatically.
Playing a USB Device
AOA (Android Open Accessory) 2.0, MSC
(Mass Storage Class) and MTP (Media
Transfer Protocol) type USB devices*
compliant with the USB standard can be
used. Depending on the USB device, the
Android mode or MSC/MTP mode can be
selected on the unit.
Some digital media players or Android
smartphones may require setting to MTP
mode.
* e.g., a USB flash drive, digital media player,
Android smartphone
Notes
• For details on the compatibility of your USB device,
visit the support site on the back cover.
• Smartphones with Android OS 4.1 or higher
installed support Android Open Accessory 2.0
(AOA 2.0). However, some smartphones may not
fully support AOA 2.0 even if Android OS 4.1 or
higher is installed.
For details on the compatibility of your Android
smartphone, visit the support site on the back
cover.
• Playback of the following files is not supported.
MP3/WMA/FLAC:
– copyright-protected files
– DRM (Digital Rights Management) files
– Multi-channel audio files
MP3/WMA:
– lossless compression files
9GB
Page 10
Before making a connection, select the USB
mode (Android mode or MSC/MTP mode)
depending on the USB device (page 12).
1 Connect a USB device to the USB port
(page 8).
Playback starts.
If a device is already connected, to start
playback, press SRC to select [USB].
2 Adjust the volume on this unit.
To stop playback
Press and hold OFF for 1 second.
To remove t he device
Stop playback, then remove the device.
Searching and Playing
Tracks
Repeat play and shuffle play
Not available when a USB device in Android
mode is connected.
1 During playback, press (repeat) or
(shuffle) repeatedly to select the
desired play mode.
Playback in the selected play mode may
take time to start.
Available play modes differ depending on
the selected sound source.
Searching a track by name (QuickBrowZer™)
Not available when a USB device in Android
mode is connected.
1 During CD or USB playback, press
(browse)* to display the list of search
categories.
When the track list appears, press
(back) repeatedly to display the desired
search category.
* During USB playback, press (browse) for
more than 2 seconds to directly return to the
beginning of the category list.
2 Rotate the control dial to select the
desired search category, then press it
to confirm.
3 Repeat step 2 to search the desired
track.
Playback starts.
To exit the Quick-BrowZer mode
Press (browse).
Searching by skipping items
(Jump mode)
Not available when a USB device in Android
mode is connected.
1 Press (browse).
2 Press SEEK +.
3 Rotate the control dial to select the
item.
The list is jumped in steps of 10 % of the
total number of items.
4 Press ENTER to return to the Quick-
BrowZer mode.
The selected item appears.
5 Rotate the control dial to select the
desired item, then press it.
Playback starts.
10GB
Page 11
Settings
Canceling the DEMO Mode
You can cancel the demonstration display
which appears when the source is off and
the clock is displayed.
1 Press MENU, rotate the control dial to
select [GENERAL], then press it.
2 Rotate the control dial to select [SET
DEMO], then press it.
3 Rotate the control dial to select [SET
DEMO-OFF], then press it.
The setting is complete.
4 Press (back) twice.
The display returns to normal reception/
play mode.
Basic Setting Operation
You can set items in the following setup
categories:
General setup (GENERAL), Sound setup
(SOUND), Display setup (DISPLAY)
1 Press MENU.
2 Rotate the control dial to select the
setup category, then press it.
The items that can be set differ
depending on the source and settings.
3 Rotate the control dial to select the
options, then press it.
To return to the previous display
Press (back).
General Setup (GENERAL)
DEMO (demonstration)
Activates the demonstration: [ON], [OFF].
CLOCK-ADJ (clock adjust) (page 7)
CAUT ALM (caution alarm)
Activates the caution alarm: [ON], [OFF]
(page 7).
(Available only while the source is off and
the clock is displayed.)
BEEP
Activates the beep sound: [ON], [OFF].
AUTO OFF
Shuts off automatically after a desired
time when the unit is turned off: [ON]
(30 minutes), [OFF].
STEERING
Registers/resets the setting of the
steering wheel remote control.
(Available when connected with the
connection cable (not supplied).)
(Available only while the source is off and
the clock is displayed.)
STR CONTROL (steering control)
Selects the input mode of the connected
remote control. To prevent a malfunction,
be sure to match the input mode with the
connected remote control before use.
CUSTOM
Input mode for the steering wheel
remote control
PRESET
Input mode for the wired remote
control excluding the steering wheel
remote control (automatically selected
when [RESET CUSTOM] is performed.)
11GB
Page 12

EDIT CUSTOM
Registers the functions (SOURCE, ATT,
VOL +/–, SEEK +/–) to the steering wheel
remote control:
Rotate the control dial to select the
function you want to assign to the
steering wheel remote control, then
press it.
While [REGISTER] is blinking, press and
hold the button on the steering wheel
remote control you want to assign the
function to. When registration is
complete, [REGISTERED] is displayed.
To register other functions, repeat
steps and .
(Available only when [STR CONTROL] is
set to [CUSTOM].)
RESET CUSTOM
Resets the setting of the steering wheel
remote control: [YES], [NO].
(Available only when [STR CONTROL] is
set to [CUSTOM].)
Notes
• While making settings, only button operation
on the unit is available. For safety, park your car
before making this setting.
• If an error occurs while registering, all the
previously-registered information remains.
Restart registration from the function where
the error occurred.
• This function may not be available on some
vehicles. For details on the compatibility of
your vehicle, visit the support site on the back
cover.
USB MODE
Changes the USB mode: [ANDROID],
[MSC/MTP].
(Available only when the USB source is
selected.)
CT (clock time)
Activates the CT function: [ON], [OFF].
BTM (best tuning memory) (page 8)
(Available only when the tuner is
selected.)
FIRMWARE
(Available only while the source is off and
the clock is displayed.)
Checks/updates the firmware version. For
details, visit the support site on the back
cover.
FW VERSION (firmware version)
Displays current firmware version.
FW UPDATE (firmware update)
Enters firmware update process: [YES],
[NO].
Updating the firmware takes a few
minutes to complete. During the update,
do not turn the ignition to the OFF
position, nor remove the USB device.
Sound Setup (SOUND)
This setup menu can also be opened by
pressing SOUND.
EQ10 PRESET
Selects an equalizer curve from 10
equalizer curves or off:
[OFF], [R&B], [ROCK], [POP], [HIP-HOP],
[ELECTRONICA], [JAZZ], [SOUL],
[COUNTRY], [KARAOKE]*, [CUSTOM].
The equalizer curve setting can be
memorized for each source.
* [KARAOKE] reduces the vocal sound but
cannot be fully removed during playback. Also,
using a microphone is not supported.
EQ10 CUSTOM
Sets [CUSTOM] of EQ10.
Setting the equalizer curve: [BAND1] 32
Hz, [BAND2] 63 Hz, [BAND3] 125 Hz,
[BAND4] 250 Hz, [BAND5] 500 Hz,
[BAND6] 1 kHz, [BAND7] 2 kHz, [BAND8] 4
kHz, [BAND9] 8 kHz, [BAND10] 16 kHz.
The volume level is adjustable in 1 dB
steps, from -6 dB to +6 dB.
BALANCE
Adjusts the sound balance: [RIGHT-15] –
[CENTER] – [LEFT-15].
12GB
Page 13

FAD ER
Adjusts the relative level: [FRONT-15] –
[CENTER] – [REAR-15].
S.WOOFER (subwoofer)
SW LEVEL (subwoofer level)
Adjusts the subwoofer volume level:
[+6 dB] – [0 dB] – [-6 dB].
([ATT] is displayed at the lowest setting.)
SW PHASE (subwoofer phase)
Selects the subwoofer phase: [NORM],
[REV].
LPF FREQ (low pass filter frequency)
Selects the subwoofer cut-off frequency:
[80Hz], [100Hz], [120Hz].
HPF FREQ (high pass filter frequency)
Selects the front/rear speaker cut-off
frequency: [OFF], [80Hz], [100Hz], [120Hz].
AUX VOL (AUX volume level)
Adjusts the volume level for each
connected auxiliary device: [+18 dB] –
[0 dB] – [-8 dB].
This setting negates the need to adjust
the volume level between sources.
(Available only when the AUX is selected.)
Display Setup (DISPLAY)
DIMMER
Changes the display brightness: [ON],
[OFF], [CLK].
To set this function to be active only
during a fixed period, select [CLK], then
set the start and end times.
– To set the brightness when the dimmer
function is activated:
Set [DIMMER] to [ON], then adjust
[BRIGHTNESS].
– To set the brightness when the dimmer
function is deactivated:
Set [DIMMER] to [OFF], then adjust
[BRIGHTNESS].
The brightness setting is stored and
applied when the dimmer function is
activated or deactivated.
BRIGHTNESS
Adjusts the display brightness. The
brightness level is adjustable: [1] – [10].
SND SYNC (sound synchronization)
Activates the synchronization of the
illumination with the sound: [ON], [OFF].
AUTO SCR (auto scroll)
Scrolls long items automatically: [ON],
[OFF].
(Not available when the AUX or tuner is
selected.)
13GB
Page 14
Additional Information
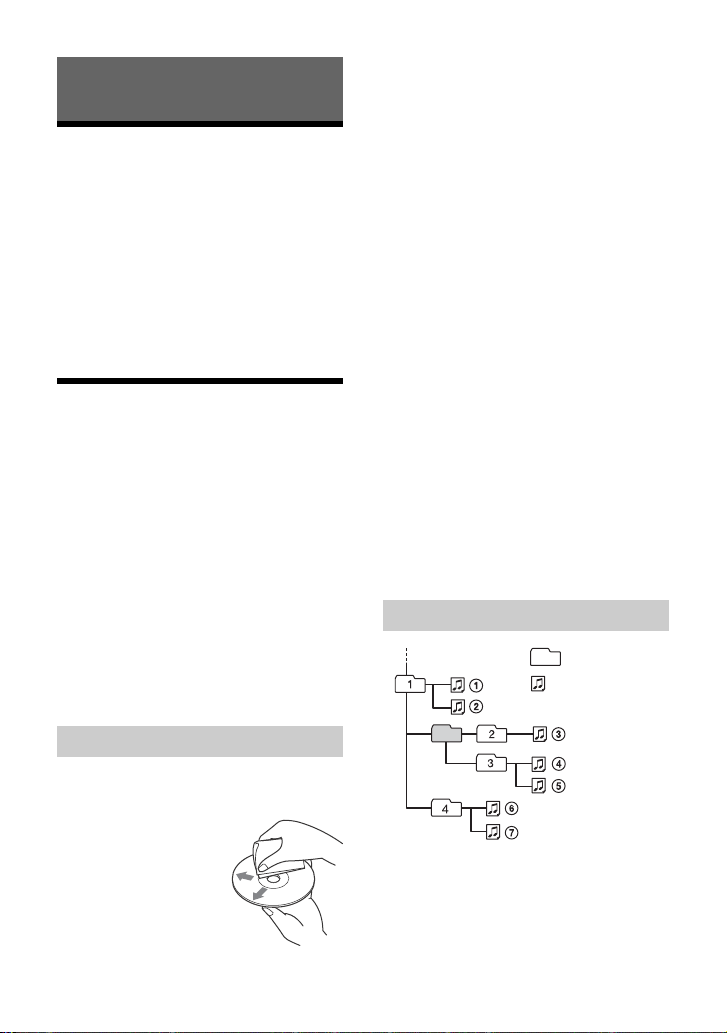
Folder (album)
Audio file (track)
Updating the Firmware
To update the firmware, visit the support site
on the back cover, then follow the online
instructions.
Notes
• Using a USB device (not supplied) is required for
updating the firmware. Store the updater in the
USB device, and connect the device to the USB
port, then perform the update operation.
• Updating the firmware takes a few minutes to
complete. During the update, do not turn the
ignition to the OFF position, nor remove the USB
device.
Precautions
• Cool off the unit beforehand if your car has
been parked in direct sunlight.
• Do not leave the front panel or audio
devices brought in inside the car, or it may
cause malfunction due to high
temperature in direct sunlight.
• Power antenna (aerial) extends
automatically.
Moisture condensation
Should moisture condensation occur inside
the unit, remove the disc and wait for about
an hour for it to dry out; otherwise the unit
will not operate properly.
To maintain high sound quality
Do not splash liquid onto the unit or discs.
• This unit is designed to play discs that
conform to the Compact Disc (CD)
standard. DualDiscs and some of the music
discs encoded with copyright protection
technologies do not conform to the
Compact Disc (CD) standard, therefore,
these discs may not be playable by this
unit.
•Discs that this unit CANNOT play
– Discs with labels, stickers, or sticky tape
or paper attached. Doing so may cause a
malfunction, or may ruin the disc.
– Discs with non-standard shapes (e.g.,
heart, square, star). Attempting to do so
may damage the unit.
–8 cm (3
1
/4 in) discs.
Notes on CD-R/CD-RW discs
• If the multi-session disc begins with a CDDA session, it is recognized as a CD-DA
disc, and other sessions are not played.
•Discs that this unit CANNOT play
– CD-R/CD-RW of poor recording quality.
– CD-R/CD-RW recorded with an
incompatible recording device.
– CD-R/CD-RW which is finalized
incorrectly.
– CD-R/CD-RW other than those recorded
in music CD format or MP3 format
conforming to ISO9660 Level 1/Level 2,
Joliet/Romeo or multi-session.
Playback order of audio files
Notes on discs
• Do not expose discs to direct sunlight or
heat sources such as hot air ducts, nor
leave it in a car parked in direct sunlight.
• Before playing, wipe
the discs with a
cleaning cloth from the
center out. Do not use
solvents such as
benzine, thinner,
commercially available
cleaners.
14GB
If you have any questions or problems
concerning your unit that are not covered in
this manual, consult your nearest Sony
dealer.
Page 15
Maintenance
+ side up
Specifications
Replacing the lithium battery of the
remote commander
Under normal conditions, the battery will
last approximately 1 year. (The service life
may be shorter, depending on the
conditions of use.)
When the battery becomes weak, the range
of the remote commander becomes shorter.
CAUTION
Danger of explosion if battery is incorrectly
replaced. Replaced only with the same or
equivalent type.
Notes on the lithium battery
• Keep the lithium battery out of the reach of
children. Should the battery be swallowed,
immediately consult a doctor.
• Wipe the battery with a dry cloth to ensure a good
contact.
• Be sure to observe the correct polarity when
installing the battery.
• Do not hold the battery with metallic tweezers,
otherwise a short-circuit may occur.
Cleaning the connectors
The unit may not function properly if the
connectors between the unit and the front
panel are not clean. In order to prevent this,
detach the front panel (page 7) and clean
the connectors with a cotton swab. Do not
apply too much force. Otherwise, the
connectors may be damaged.
Notes
• For safety, turn off the ignition before cleaning the
connectors, and remove the key from the ignition
switch.
• Never touch the connectors directly with your
fingers or with any metal device.
FOR THE CUSTOMERS IN THE USA. NOT
APPLICABLE IN CANADA, INCLUDING IN
THE PROVINCE OF QUEBEC.
POUR LES CLIENTS AUX ÉTATS-UNIS.
NON APPLICABLE AU CANADA, Y
COMPRIS LA PROVINCE DE QUÉBEC.
AUDIO POWER SPECIFICATIONS
CTA2006 Standard
Power Output: 20 Watts RMS × 4
at 4 Ohms < 1% THD+N
SN Ratio: 80 dBA
(reference: 1 Watt into 4 Ohms)
Tuner section
FM
Tuning range: 87.5 MHz – 107.9 MHz
Antenna (aerial) terminal:
External antenna (aerial) connector
Intermediate frequency:
FM CCIR: -1,956.5 kHz to -487.3 kHz and
+500.0 kHz to +2,095.4 kHz
Usable sensitivity: 7 dBf
Selectivity: 75 dB at 400 kHz
Signal-to-noise ratio: 73 dB
Separation: 50 dB at 1 kHz
Frequency response: 20 Hz – 15,000 Hz
AM
Tuning range: 530 kHz – 1,710 kHz
Antenna (aerial) terminal:
External antenna (aerial) connector
Sensitivity: 26 µV
CD Player section
Signal-to-noise ratio: 95 dB
Frequency response: 10 Hz – 20,000 Hz
Wow and flutter: Below measurable limit
The maximum number of: (CD-R/CD-RW
only)
– folders (albums): 150 (including root
folder)
– files (tracks) and folders: 300 (may less
than 300 if folder/file names contain many
characters)
– displayable characters for a folder/file
name: 32 (Joliet)/64 (Romeo)
Corresponding codec: MP3 (.mp3) and WMA
(.wma)
15GB
Page 16

USB Player section
Interface: USB (Full-speed)
Maximum current: 500 mA
The maximum number of recognizable
tracks:
– folders (albums): 256
– files (tracks) per folder: 256
Compatible Android Open Accessory
protocol (AOA): 2.0
Corresponding codec:
MP3 (.mp3)
Bit rate: 8 kbps – 320 kbps (Supports
VBR (Variable Bit Rate))
Sampling rate: 16 kHz – 48 kHz
WMA (.wma)
Bit rate: 32 kbps – 192 kbps (Supports
VBR (Variable Bit Rate))
Sampling rate: 32 kHz, 44.1 kHz,
48 kHz
FLAC (.flac)
Bit depth: 16 bit, 24 bit
Sampling rate: 44.1 kHz, 48 kHz
Power amplifier section
Output: Speaker outputs
Speaker impedance: 4 – 8
Maximum power output: 55 W × 4 (at 4 )
General
Outputs:
Audio outputs terminal (REAR, SUB)
Power antenna (aerial)/Power amplifier
control terminal (REM OUT)
Inputs:
Remote controller input terminal
Antenna (aerial) input terminal
AUX input jack (stereo mini jack)
USB port
Power requirements: 12 V DC car battery
(negative ground (earth))
Rated current consumption: 10 A
Dimensions:
Approx. 178 mm × 50 mm × 177 mm
1
(7
/8 in × 2 in × 7 in) (w/h/d)
Mounting dimensions:
Approx. 182 mm × 53 mm × 160 mm
1
(7
/4 in × 2 1/8 in × 6 5/16 in) (w/h/d)
Mass: Approx. 1.2 kg (2 lb 11 oz)
Package contents:
Main unit (1)
Remote commander (1): RM-X211
Parts for installation and connections
(1 set)
Optional accessories/equipment:
Cable for steering wheel remote input:
RC-SR1
Your dealer may not handle some of the
above listed accessories. Please ask the
dealer for detailed information.
Design and specifications are subject to
change without notice.
Copyrights
Windows Media is either a registered
trademark or trademark of Microsoft
Corporation in the United States and/or
other countries.
This product is protected by certain
intellectual property rights of Microsoft
Corporation. Use or distribution of such
technology outside of this product is
prohibited without a license from Microsoft
or an authorized Microsoft subsidiary.
MPEG Layer-3 audio coding technology and
patents licensed from Fraunhofer IIS and
Thomson.
Android is a trademark of Google Inc.
libFLAC
Copyright (C) 2000-2009 Josh Coalson
Copyright (C) 2011-2013 Xiph.Org Foundation
Redistribution and use in source and binary
forms, with or without modification, are
permitted provided that the following
conditions are met:
– Redistributions of source code must retain
the above copyright notice, this list of
conditions and the following disclaimer.
– Redistributions in binary form must
reproduce the above copyright notice, this
list of conditions and the following
disclaimer in the documentation and/or
other materials provided with the
distribution.
16GB
Page 17

– Neither the name of the Xiph.org
Foundation nor the names of its
contributors may be used to endorse or
promote products derived from this
software without specific prior written
permission.
THIS SOFTWARE IS PROVIDED BY THE
COPYRIGHT HOLDERS AND CONTRIBUTORS
“AS IS” AND ANY EXPRESS OR IMPLIED
WARRANTIES, INCLUDING, BUT NOT LIMITED
TO, THE IMPLIED WARRANTIES OF
MERCHANTABILITY AND FITNESS FOR A
PARTICULAR PURPOSE ARE DISCLAIMED. IN
NO EVENT SHALL THE FOUNDATION OR
CONTRIBUTORS BE LIABLE FOR ANY DIRECT,
INDIRECT, INCIDENTAL, SPECIAL,
EXEMPLARY, OR CONSEQUENTIAL DAMAGES
(INCLUDING, BUT NOT LIMITED TO,
PROCUREMENT OF SUBSTITUTE GOODS OR
SERVICES; LOSS OF USE, DATA, OR PROFITS;
OR BUSINESS INTERRUPTION) HOWEVER
CAUSED AND ON ANY THEORY OF LIABILITY,
WHETHER IN CONTRACT, STRICT LIABILITY,
OR TORT (INCLUDING NEGLIGENCE OR
OTHERWISE) ARISING IN ANY WAY OUT OF
THE USE OF THIS SOFTWARE, EVEN IF
ADVISED OF THE POSSIBILITY OF SUCH
DAMAGE.
Troubleshooting
The following checklist will help you remedy
problems you may encounter with your unit.
Before going through the checklist below,
check the connection and operating
procedures.
For details on using the fuse and removing
the unit from the dashboard, see
“Connection/Installation” (page 21).
If the problem is not solved, visit the support
site on the back cover.
General
No power is being supplied to the unit.
If the unit is turned off and the display
disappears, the unit cannot be operated
with the remote commander.
–Turn on the unit.
No sound or the sound is very low.
The position of the fader control [FADER]
is not set for a 2-speaker system.
The volume of the unit and/or connected
device is very low.
– Increase the volume of the unit and
connected device.
No beep sound.
An optional power amplifier is connected
and you are not using the built-in
amplifier.
The contents of the memory have been
erased.
The power supply lead or battery has
been disconnected or not connected
properly.
Stored stations and correct time are
erased.
The fuse has blown.
Makes a noise when the position of the
ignition is switched.
The leads are not matched correctly with
the car’s accessory power connector.
17GB
Page 18
During playback or reception, the
demonstration mode starts.
If no operation is performed for 5 minutes
with [DEMO-ON] set, the demonstration
mode starts.
– Set [DEMO-OFF] (page 11).
The display disappears from/does not
appear in the display window.
The dimmer is set to [DIM-ON] (page 13).
The display disappears if you press and
hold OFF.
– Press OFF on the unit until the display
appears.
The connectors are dirty (page 15).
The display/illumination flashes.
The power supply is not sufficient.
– Check that the car battery supplies
enough power to the unit. (The power
requirement is 12 V DC.)
The operation buttons do not function.
The disc will not eject.
Press DSPL and (back)/MODE for more
than 2 seconds to reset the unit.
The contents stored in memory are
erased.
For your safety, do not reset the unit while
you are driving.
Radio reception
Stations cannot be received.
The sound is hampered by noises.
The connection is not correct.
– If your car has built-in radio antenna
(aerial) in the rear/side glass, connect an
REM OUT lead (blue/white striped) or
accessory power supply lead (red) to the
power supply lead of a car’s antenna
(aerial) booster.
– Check the connection of the car antenna
(aerial).
– If the auto antenna (aerial) will not
extend, check the connection of the
power antenna (aerial) control lead.
Preset tuning is not possible.
The broadcast signal is too weak.
RDS
PTY displays [- - - - - - - -].
The current station is not an RDS station.
RDS data has not been received.
The station does not specify the program
type.
CD playback
The disc does not play.
Defective or dirty disc.
The CD-R/CD-RW is not for audio use
(page 14).
MP3/WMA files cannot be played.
The disc is incompatible with the MP3/
WMA format and version. For details on
playable discs and formats, visit the
support site on the back cover.
MP3/WMA files take longer to play than
others.
The following discs take a longer time to
start playback.
– A disc recorded with a complicated tree
structure.
– A disc recorded in Multi Session.
– A disc to which data can be added.
The sound skips.
Defective or dirty disc.
USB device playback
You cannot play items via a USB hub.
This unit cannot recognize USB devices via
a USB hub.
A USB device takes longer to play.
The USB device contains files with a
complicated tree structure.
The sound is intermittent.
The sound may be intermittent at a high-
bit-rate.
DRM (Digital Rights Management) files
may not be playable in some cases.
18GB
Page 19
Audio file cannot be played.
USB device formatted with file systems
other than FAT16 or FAT32 are
unsupported.*
* This unit supports FAT16 and FAT32, but some USB
device may not support all of these FAT. For
details, refer to the operating instruction of each
USB device or contact the manufacturer.
Operations for skipping an album,
skipping items (Jump mode), and
searching a track by name (QuickBrowZer) cannot be performed.
These operations cannot be performed
when a USB device in Android mode is
connected.
– Set [USB MODE] to [MSC/MTP] (page 12).
The USB mode of the device is not set to
the appropriate mode.
– Make sure that the USB mode of the
device is set to MSC/MTP mode.
The sound cannot be output during
playback in Android mode.
While the unit is in Android mode, the
sound outputs only from the Android
smartphone.
– Check the status of the audio playback
application on the Android smartphone.
– Playback may not perform properly
depending on the Android smartphone.
Messages
The following messages may appear or flash
during operation.
CD ERROR: The disc cannot be played. The
disc will be ejected automatically.
Clean or insert the disc correctly, or make
sure the disc is not blank or defective.
CD NO MUSIC: There is no playable file. The
disc will be ejected automatically.
Insert a disc containing playable files
(page 15).
CD PUSH EJT: The disc could not be ejected
properly.
Press (eject).
HUB NO SUPRT: USB hubs are not
supported.
INVALID
The selected operation could be invalid.
NOT SUPPORT - ANDROID MODE
A USB device not supporting AOA
(Android Open Accessory) 2.0 is
connected to the unit while [USB MODE] is
set to [ANDROID].
– Set [USB MODE] to [MSC/MTP] (page 12).
OVERLOAD: The USB device is overloaded.
Disconnect the USB device, then press SRC
to select another source.
The USB device has a fault, or an
unsupported device is connected.
READ: Now reading information.
Wait until reading is complete and
playback starts automatically. This may
take some time depending on the file
organization.
USB ERROR: The USB device cannot be
played.
Connect the USB device again.
USB NO DEV: A USB device is not connected
or recognized.
Make sure the USB device or USB cable is
securely connected.
USB NO MUSIC: There is no playable file.
Connect a USB device containing playable
files (page 16).
USB NO SUPRT: The USB device is not
supported.
For details on the compatibility of your
USB device, visit the support site on the
back cover.
or : The beginning or the end
of the disc has been reached.
(underscore): The character cannot be
displayed.
19GB
Page 20

For steering wheel remote control
operation:
ERROR: An error occurred during the
function registration.
Register again from the function where
the error occurred (page 12).
TIMEOUT: The function registration failed
due to a timeout.
Try completing the registration while
[REGISTER] is blinking (about 6 seconds)
(page 12).
If these solutions do not help improve the
situation, consult your nearest Sony dealer.
If you take the unit to be repaired because of
CD playback trouble, bring the disc that was
used at the time the problem began.
20GB
Page 21
Connection/Installation
× 4
5 × max. 8 mm
(7/32 × max. 5/16 in)
× 2
Cautions
• Run all ground (earth) leads to a
common ground (earth) point.
• Do not get the leads trapped under a
screw, or caught in moving parts (e.g., seat
railing).
• Before making connections, turn the car
ignition off to avoid short circuits.
•Connect the yellow and red power supply
leads only after all other leads have been
connected.
• Be sure to insulate any loose unconnected
leads with electrical tape for safety.
Precautions
• Choose the installation location carefully so
that the unit will not interfere with normal
driving operations.
• Avoid installing the unit in areas subject to
dust, dirt, excessive vibration, or high
temperature, such as in direct sunlight or
near heater ducts.
• Use only the supplied mounting hardware
for a safe and secure installation.
Note on the power supply lead (yellow)
When connecting this unit in combination with
other stereo components, the amperage rating of
the car circuit to which the unit is connected must
be higher than the sum of each component’s fuse
amperage rating.
Mounting angle adjustment
Adjust the mounting angle to less than 45°.
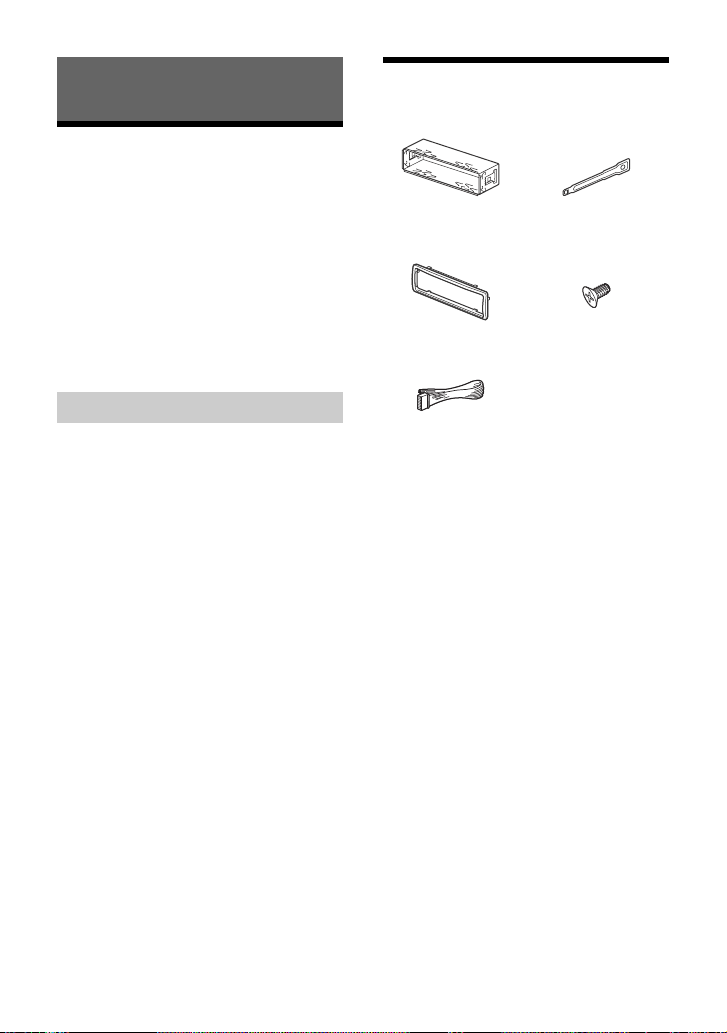
Parts List for Installation
•This parts list does not include all the
package contents.
•The bracket and the protection collar
are attached to the unit before shipping.
Before mounting the unit, use the release
keys to remove the bracket from the
unit. For details, see “Removing the
protection collar and the bracket”
(page 24).
•Keep the release keys for future use as
they are also necessary if you remove the
unit from your car.
21GB
Page 22

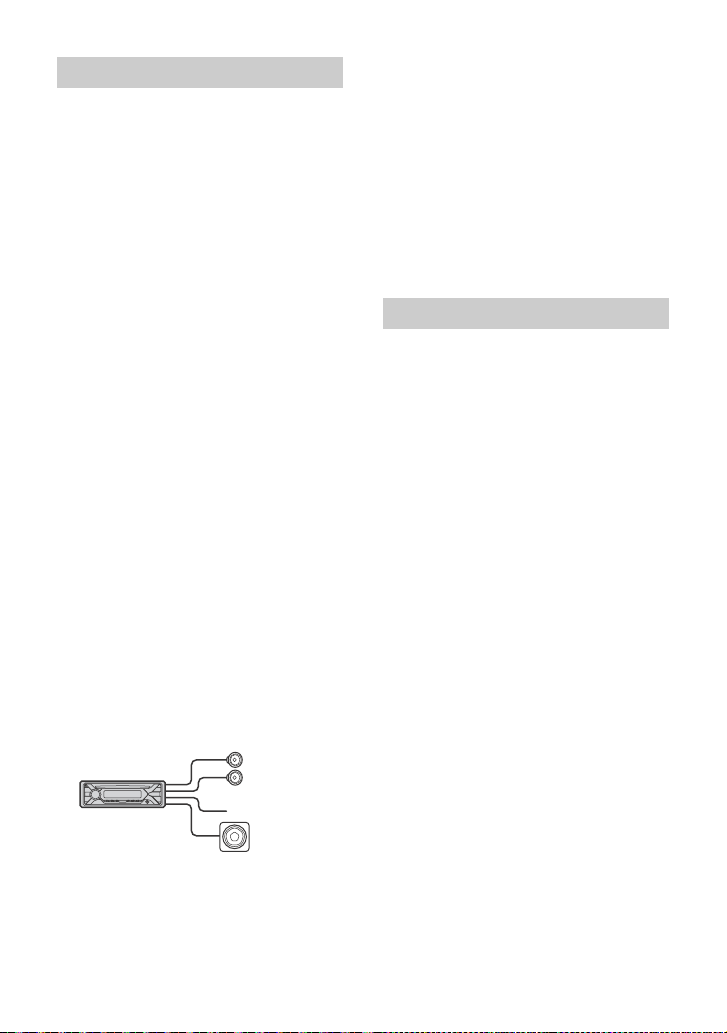
Connection
from a wi red remote control
(not supplied)*
4
White
White/black striped
Gray
Black
Yel lo w
Red
Blue/white striped
from a car antenna (aerial)
Front speaker*1*
2
Rear speaker*1*
2
Gray/black striped
Green
Green/black striped
Purple
Purple/black striped
*
3
*
3
Subwoofer*
1
For details, see “Makin g
connections” (page 23).
Power amplifier*
1
*1 Not supplied
*2 Speaker impedance: 4 – 8 × 4
*3 RCA pin cord (not supplied)
*4 Depending on the type of car, use an adaptor for
a wired remote control (not supplied). For details
on using the wired remote control, see “Using
the wired remote control” (page 23).
22GB
Page 23
Making connections
Front speaker
Subwoofer
To a common ground (earth) point
First connect the black ground (earth)
lead, then connect the yellow and red
power supply leads.
To the +12 V power terminal which is
energized at all times
Be sure to first connect the black ground
(earth) lead to a common ground (earth)
point.
To the +12 V power terminal which is
energized when the ignition switch is
set to the accessory position
If there is no accessory position, connect
to the +12 V power (battery) terminal
which is energized at all times.
Be sure to first connect the black ground
(earth) lead to a common ground (earth)
point.
To the power antenna (aerial) control
lead or the power supply lead of the
antenna (aerial) booster
It is not necessary to connect this lead if
there is no power antenna (aerial) or
antenna (aerial) booster, or with a
manually-operated telescopic antenna
(aerial).
To AMP REMOTE IN of an optional
power amplifier
This connection is only for amplifiers and
a power antenna (aerial). Connecting any
other system may damage the unit.
Subwoofer Easy Connection
You can use a subwoofer without a power
amplifier when it is connected to a rear
speaker cord.
Memory hold connection
When the yellow power supply lead is
connected, power will always be supplied to
the memory circuit even when the ignition
switch is turned off.
Speaker connection
•Before connecting the speakers, turn the
unit off.
• Use speakers with an impedance of 4 to
8 , and with adequate power handling
capacities to avoid damage.
Using the wired remote control
When using the steering wheel remote
control
Installation of the connection cable RC-SR1
(not supplied) is required before use.
1 To enable the steering wheel remote
control, select [SET STEERING] [EDIT
CUSTOM] to make the re gistration (page 1 2).
When the registration completes, the
steering wheel remote control becomes
available.
Notes on installing the connection cable
RC-SR1 (not supplied)
• Refer to the support sites on the back cover for
details, then connect each lead properly to the
appropriate leads. Making an improper
connection may damage the unit.
• Depending on the type of car, be sure to insulate
the unused leads with electrical tape for safety.
• Do not connect t his cable when the steering wh eel
remote control is not used.
• Consulting the dealer or an experienced
technician for help is recommended.
When using the wired remote control
1
To enable the wired remote control, set [STR
CONTROL] in [SET STEERING] to [PRESET]
(page 11).
Note
Use a subwoofer with an impedance of 4 to 8 ,
and with adequate power handling capacities to
avoid damage.
23GB
Page 24

Installation
Face the hook inwards.
Screw
Box
182 mm (7 1/4 in)
53 mm (2 1/8 in)
Catch
Removing the protection collar
and the bracket
Before installing the unit, remove the
protection collar and the bracket from
the unit.
1 Pinch both edges of the protection
collar , then pull it out.
Mounting the unit in the
dashboard
•Before installing, make sure the catches on
both sides of the bracket are bent
inwards 2 mm (
•For Japanese cars, see “Mounting the unit
in a Japanese car” (page 25).
3
/32 in).
1 Position the bracket inside the
dashboard, then bend the claws
outward for a tight fit.
2 Insert both release keys until they
click, and pull down the bracket ,
then pull up the unit to separate.
Note
Before installing this unit, remove the screw and
box on the back of the unit. Do not use the previous
parts you removed when installing the unit.
24GB
2 Mount the unit onto the bracket ,
then attach the protection collar .
Notes
• If the catches are straight or bent outwards, the
unit will not be installed securely and may spring
out.
• Make sure the 4 catches on the protection collar
are properly engaged in the slots of the unit.
Page 25

Mounting the unit in a Japanese car
to dashboard/center console
Existing parts supplied
with you r car
Bracket
Bracket
to dashboard/center console
Existing parts supplied
with you r car
Bracket
Bracket
Fuse (10 A)
You may not be able to install this unit in
some makes of Japanese cars. In such a
case, consult your Sony dealer.
TOYOTA
NISSAN
Detaching and attaching the front
panel
For details, see “Detaching the Front Panel”
(page 7).
Resetting the unit
For details, see “Resetting the Unit” (page 7).
Fuse replacement
When replacing the fuse,
be sure to use one
matching the amperage
rating stated on the
original fuse. If the fuse
blows, check the power
connection and replace the
fuse. If the fuse blows again after
replacement, there may be an internal
malfunction. In such a case, consult your
nearest Sony dealer.
Note
To prevent malfunction, install only with the
supplied screws .
25GB
Page 26

Pour plus de sécurité, installez cet
appareil dans le tableau de bord du
véhicule, car la section arrière de
l’appareil devient chaude en cours de
fonctionnement.
Pour plus de détails, reportez-vous à la
section « Raccordement/Installation »
(page 21).
La plaque signalétique indiquant la tension
d’alimentation, etc. se trouve sur le dessous
du châssis.
Avertissement
ATTENTION
L’utilisation d’instruments optiques avec ce
produit augmente les risques pour les yeux.
AVERTISSEMENT : Ne pas
ingérer la pile – risque de
brûlure chimique.
La télécommande contient une pile de type
bouton/en forme de pièce de monnaie.
L’ingestion de la pile de type bouton/en
forme de pièce de monnaie peut causer en
seulement 2 heures des brûlures internes
très graves risquant de provoquer la mort.
Gardez les piles neuves et usées hors de la
portée des enfants. Si le compartiment de
pile ne se ferme pas correctement, cessez
d’utiliser le produit et gardez-le hors de la
portée des enfants.
Si vous pensez que des piles ont pu être
avalées ou placées dans une partie du corps
quelconque, demandez des soins médicaux
sans tarder.
Remarque sur la pile au lithium
N’exposez pas la pile à une chaleur
excessive comme à la lumière directe du
soleil, au feu ou autre.
Avertissement si le contact de votre
véhicule ne comporte pas de position
ACC
Veillez à régler la fonction AUTO OFF
(page 11). L’appareil s’éteint
complètement et automatiquement après
le laps de temps choisi une fois l’appareil
arrêté afin d’éviter que la batterie ne se
décharge. Si vous ne réglez pas la
fonction AUTO OFF, appuyez sur la touche
OFF et maintenez-la enfoncée jusqu’à ce
que l’affichage disparaisse chaque fois
que vous coupez le contact.
Avis d’exclusion de responsabilité
relatif aux services proposés par des
tiers
Les services proposés par des tiers peuvent
être modifiés, suspendus ou clôturés sans
avis préalable. Sony n’assume aucune
responsabilité dans ce genre de situation.
2FR
Page 27

Table des matières
Avertissement . . . . . . . . . . . . . . . . . . . . . . . . 2
Guide des pièces et commandes . . . . . . . . 4
Préparation
Retrait de la façade. . . . . . . . . . . . . . . . . . . . 6
Réinitialisation de l’appareil . . . . . . . . . . . . 6
Réglage de l’horloge . . . . . . . . . . . . . . . . . . 7
Raccordement d’un périphérique USB. . . . 7
Raccordement d’un autre appareil audio
portatif. . . . . . . . . . . . . . . . . . . . . . . . . . . 7
Écoute de la radio
Écoute de la radio. . . . . . . . . . . . . . . . . . . . . 8
Utilisation du RDS (système de
radiocommunication de données) . . . . 8
Lecture
Lecture d’un disque . . . . . . . . . . . . . . . . . . . 9
Lecture d’un périphérique USB . . . . . . . . . . 9
Recherche et lecture des plages . . . . . . . . . 9
Réglages
Annulation du mode DEMO. . . . . . . . . . . . 10
Configuration de base . . . . . . . . . . . . . . . . 10
Configuration générale (GENERAL) . . . . . . . 11
Configuration sonore (SOUND) . . . . . . . . . 12
Configuration d’affichage (DISPLAY). . . . . 13
Raccordement/Installation
Mises en garde . . . . . . . . . . . . . . . . . . . . . . . 21
Liste des pièces nécessaires à
l’installation . . . . . . . . . . . . . . . . . . . . . . 21
Raccordement . . . . . . . . . . . . . . . . . . . . . . 22
Installation . . . . . . . . . . . . . . . . . . . . . . . . . 24
Informations complémentaires
Mise à jour du micrologiciel. . . . . . . . . . . . 13
Précautions . . . . . . . . . . . . . . . . . . . . . . . . . 13
Entretien . . . . . . . . . . . . . . . . . . . . . . . . . . . 15
Caractéristiques techniques . . . . . . . . . . . 15
Dépannage . . . . . . . . . . . . . . . . . . . . . . . . . 17
Messages. . . . . . . . . . . . . . . . . . . . . . . . . . . 19
3FR
Page 28

Guide des pièces et commandes
Appareil principal
Touche de déverrouillage de la façade
SRC (source)
Permet de mettre l’appareil en marche.
Permet de changer la source.
OFF
Appuyez sur la touche et maintenez-la
enfoncée pendant 1 seconde pour
désactiver la source et afficher l’horloge.
Appuyez sur la touche et maintenez-la
enfoncée pendant plus de 2 secondes
pour éteindre l’appareil et l’affichage.
Si l’appareil est éteint et que l’affichage
disparaît, le fonctionnement par
télécommande est désactivé.
Molette de réglage
Tournez pour régler le volume.
PUSH ENTER
Permet d’entrer l’élément sélectionné.
MENU
Permet d’ouvrir le menu de
configuration.
Fente d’insertion des disques
Fenêtre d’affichage
4FR
/ (SEEK –/+)
Permet de syntoniser automatiquement
des stations de radio. Appuyez sur la
touche et maintenez-la enfoncée pour
syntoniser des stations manuellement.
/ (précédente/suivante)
/ (retour rapide/avance rapide)
(éjection du disque)
PTY (type d’émission)
Permet de sélectionner PTY en mode
RDS.
(navigation) (page 10)
Permet d’accéder au mode de navigation
pendant la lecture.
(Non disponible lorsqu’un périphérique
USB en mode Android™ est raccordé.)
EQ (égaliseur)
Permet de sélectionner une courbe de
l’égaliseur.
(retour)
Permet de retourner à l’écran précédent.
MODE (page 8)
Récepteur de télécommande
Page 29

Touches numériques (1 à 6)
Permettent de capter des stations de
radio mémorisées. Appuyez sur la touche
et maintenez-la enfoncée pour
mémoriser des stations.
ALBUM /
Permet de sauter un album sur un
appareil audio. Appuyez sur la touche et
maintenez-la enfoncée pour sauter des
albums en continu.
(Non disponible lorsqu’un périphérique
USB en mode Android est raccordé.)
(répétition)
(Non disponible lorsqu’un périphérique
USB en mode Android est raccordé.)
(aléatoire)
(Non disponible lorsqu’un périphérique
USB en mode Android est raccordé.)
(lecture/pause)
EXTRA BASS
Permet d’accentuer les graves en
synchronisation avec le niveau de
volume. Appuyez sur la touche pour
modifier le réglage EXTRA BASS : [1], [2],
[OFF].
Prise d’entrée AUX
DSPL (affichage)
Permet de changer les éléments
d’affichage.
SCRL (défilement)
Appuyez sur la touche et maintenez-la
enfoncée pour faire défiler un élément
d’affichage.
Port USB
Télécommande RM-X211
La touche VOL (volume) + comporte un point
tactile.
ATT (atténuation du son)
Permet d’atténuer le son. Appuyez à
nouveau pour annuler l’atténuation.
SOUND
Permet d’ouvrir le menu SOUND
directement.
MENU
Appuyez sur la touche et maintenez-la
enfoncée pour ouvrir le menu de
configuration.
///
Permet de sélectionner un élément de
configuration, etc.
ENTER
Permet d’entrer l’élément sélectionné.
/ (précédente/suivante)
+/– (album +/–)
VOL (volume) +/–
5FR
Page 30

Retirez la feuille de protection avant
l’utilisation.
Préparation
Retrait de la façade
Vous pouvez retirer la façade de cet appareil
pour le protéger du vol.
1 Appuyez sur la touche OFF et
maintenez-la enfoncée jusqu’à ce
que l’appareil s’éteigne. Appuyez sur
la touche de déverrouillage de la
façade , puis retirez la façade en la
tirant vers vous.
Alarme d’avertissement
Si vous mettez la clé de contact en position
OFF sans retirer la façade, l’alarme
d’avertissement retentit pendant quelques
secondes. L’alarme retentit uniquement
lorsque l’amplificateur intégré est utilisé.
Installation de la façade
6FR
Réinitialisation de l’appareil
Avant la première utilisation de l’appareil ou
après avoir remplacé la batterie du véhicule
ou modifié les raccordements, vous devez
réinitialiser l’appareil.
1 Appuyez sur DSPL et (retour)/
MODE pendant plus de 2 secondes.
Remarque
La réinitialisation de l’appareil efface le réglage de
l’heure et certaines informations mémorisées.
Page 31

Réglage de l’horloge
1 Appuyez sur MENU, tournez la
molette de réglage pour sélectionner
[GENERAL], puis appuyez dessus.
2 Tournez la molette de réglage pour
sélectionner [SET CLOCK-ADJ], puis
appuyez dessus.
L’indication des heures clignote.
3 Tournez la molette de réglage pour
régler l’heure et les minutes.
Appuyez sur SEEK +/– pour déplacer
l’indication numérique.
4 Appuyez sur MENU après avoir réglé
les minutes.
Le réglage est terminé et l’horloge
démarre.
Affichage de l’horloge
Appuyez sur la touche DSPL.
Raccordement d’un
périphérique USB
1 Réduisez le volume de l’appareil.
2 Raccordez le périphérique USB à
l’appareil.
Raccordement d’un autre
appareil audio portatif
1 Éteignez l’appareil audio portatif.
2 Réduisez le volume de l’appareil.
3 Raccordez l’appareil audio portatif à
la prise d’entrée AUX (mini-prise
stéréo) de l’appareil à l’aide d’un
câble de raccordement (non fourni)*.
* Veillez à utiliser une fiche droite.
4 Appuyez sur SRC pour sélectionner
[AUX].
Pour faire correspondre le niveau de
volume de l’appareil raccordé à celui
des autres sources
Démarrez la lecture sur l’appareil audio
portatif avec un niveau de volume modéré,
puis réglez votre appareil sur le volume
d’écoute habituel.
Appuyez sur MENU, puis sélectionnez
[SOUND] [SET AUX VOL] (page 12).
7FR
Page 32

Écoute de la radio
Écoute de la radio
Pour écouter la radio, appuyez sur SRC pour
sélectionner [TUNER].
Mémorisation automatique (BTM)
1 Appuyez sur MODE pour changer de
bande (FM1, FM2, FM3, AM1 ou AM2).
2 Appuyez sur MENU, tournez la
molette de réglage pour sélectionner
[GENERAL], puis appuyez dessus.
3 Tournez la molette de réglage pour
sélectionner [SET BTM], puis appuyez
dessus.
L’appareil mémorise les stations sur les
touches numériques en respectant
l’ordre des fréquences.
Syntonisation
1 Appuyez sur MODE pour changer de
bande (FM1, FM2, FM3, AM1 ou AM2).
2 Réglez la fréquence.
Pour syntoniser des stations
manuellement
Appuyez sur la touche SEEK +/– et
maintenez-la enfoncée pour localiser la
fréquence approximativement, puis
appuyez plusieurs fois sur SEEK +/– pour
régler la fréquence souhaitée avec
précision.
Pour syntoniser des stations
automatiquement
Appuyez sur SEEK +/–.
Le balayage s’interrompt lorsque
l’appareil capte une station.
Réception des stations
mémorisées
1 Sélectionnez la bande, puis appuyez
sur une touche numérique (1 à 6).
Utilisation du RDS (système
de radiocommunication de
données)
Sélection des types d’émission
(PTY)
1 Appuyez sur PTY pendant la
réception FM.
2 Tournez la molette de réglage jusqu’à
ce que le type d’émission souhaité
apparaisse, puis appuyez dessus.
L’appareil commence à chercher une
station diffusant le type d’émission
sélectionné.
Type d’émission
NEWS (nouvelles), INFORM (information),
SPORTS (sports), TALK (infovariétés), ROCK
(rock), CLS ROCK (rock classique), ADLT HIT
(succès adultes), SOFT RCK (rock détente), TOP
40 (palmarès), COUNTRY (country), OLDIES
(anciens succès), SOFT (détente), NOSTALGA
(nostalgie), JAZZ (jazz), CLASSICL (classique),
R&B (rhythm and blues), SOFT R&B (rhythm
and blues léger), LANGUAGE (langue
étrangère), REL MUSC (musique religieuse), REL
TAL K (infovariétés religieuses), PERSNLTY
(personnalités), PUBLIC (publique), COLLEGE
(collège), HABL ESP (infovariétés espagnoles),
MUSC ESP (musique espagnole), HIP HOP (hiphop), WEATHER (météo)
Mémorisation manuelle
1 Lorsque vous captez la station que
vous souhaitez mémoriser, appuyez
sur une touche numérique (1 à 6) et
maintenez-la enfoncée jusqu’à ce
que [MEM] apparaisse.
8FR
Réglage de l’heure (CT)
Les données CT de la transmission RDS
règlent l’horloge.
1 Réglez l’appareil à [SET CT-ON] dans
[GENERAL] (page 11).
Page 33

Lecture
Lecture d’un disque
1 Insérez le disque (côté imprimé vers
le haut).
La lecture démarre automatiquement.
Lecture d’un périphérique
USB
Vous pouvez utiliser des périphériques USB*
de type AOA (Android Open Accessory) 2.0,
MSC (stockage de masse) et MTP (protocole
de transfert des médias) conformes à la
norme USB. Selon le périphérique USB, le
mode Android ou le mode MSC/MTP peut
être sélectionné sur l’appareil.
Certains lecteurs média numériques ou
téléphones intelligents Android peuvent
nécessiter le réglage au mode MTP.
* par exemple, mémoire flash USB, lecteur média
numérique, téléphone intelligent Android
Remarques
• Pour plus de détails sur la compatibilité de votre
périphérique USB, visitez notre site d’assistance à
l’adresse indiquée sur la couverture arrière.
• Les téléphones intelligents avec Android OS 4.1 ou
supérieur installé prennent en charge Android
Open Accessory 2.0 (AOA 2.0). Toutefois, certains
téléphones intelligents pourraient ne pas
entièrement prendre en charge AOA 2.0 si Android
OS 4.1 ou supérieur est installé.
Pour plus de détails sur la compatibilité de votre
téléphone intelligent Android, visitez notre site
d’assistance à l’adresse indiquée sur la couverture
arrière.
• La lecture des fichiers suivants n’est pas prise en
charge.
MP3/WMA/FLAC :
– fichiers avec protection des droits d’auteur
– fichiers DRM (Gestion des droits numériques)
– fichiers audio multicanal
MP3/WMA :
– fichiers avec compression sans perte
Avant d’effectuer un raccordement,
sélectionnez le mode USB (mode Android ou
mode MSC/MTP), selon le périphérique USB
(page 11).
1 Raccordez un périphérique USB au
port USB (page 7).
La lecture commence.
Si un périphérique est déjà raccordé,
appuyez sur SRC pour sélectionner [USB]
afin de lancer la lecture.
2 Réglez le volume sur cet appareil.
Pour arrêter la lecture
Appuyez sur la touche OFF et maintenez-la
enfoncée pendant 1 seconde.
Pour retirer le périphérique
Arrêtez la lecture, puis retirez le
périphérique.
Recherche et lecture des
plages
Lecture répétée et lecture
aléatoire
Non disponible lorsqu’un périphérique USB
en mode Android est raccordé.
1 En cours de lecture, appuyez
plusieurs fois sur (répétition) ou
(aléatoire) pour sélectionner le
mode de lecture souhaité.
La lecture dans le mode de lecture
sélectionné peut prendre un instant à
démarrer.
Les modes de lecture disponibles diffèrent
selon la source sonore sélectionnée.
9FR
Page 34

Recherche d’une plage par nom
(Quick-BrowZer™)
Non disponible lorsqu’un périphérique USB
en mode Android est raccordé.
1 En cours de lecture CD ou USB,
appuyez sur (navigation)* pour
afficher la liste des catégories de
recherche.
Lorsque la liste de plages apparaît,
appuyez plusieurs fois sur (retour)
pour afficher la catégorie de recherche
souhaitée.
* En cours de lecture USB, appuyez sur
(navigation) pendant plus de 2 secondes
pour retourner directement au début de la liste
des catégories.
2 Tournez la molette de réglage pour
sélectionner la catégorie de
recherche de votre choix, puis
appuyez pour valider.
3 Répétez l’étape 2 pour rechercher la
plage souhaitée.
La lecture commence.
Pour quitter le mode Quick-BrowZer
Appuyez sur (navigation).
Recherche d’éléments par saut
(mode Saut)
Non disponible lorsqu’un périphérique USB
en mode Android est raccordé.
1 Appuyez sur (navigation).
2 Appuyez sur SEEK +.
3 Tournez la molette de réglage pour
sélectionner l’élément.
L’appareil effectue des sauts dans la liste
par incréments de 10 % du nombre total
d’éléments.
4 Appuyez sur ENTER pour retourner au
mode Quick-BrowZer.
L’élément sélectionné apparaît.
5 Tournez la molette de réglage pour
sélectionner l’élément de votre choix,
puis appuyez dessus.
La lecture commence.
Réglages
Annulation du mode DEMO
Vous pouvez désactiver l’affichage de
démonstration qui apparaît lorsque la
source est désactivée et que l’horloge est
affichée.
1 Appuyez sur MENU, tournez la
molette de réglage pour sélectionner
[GENERAL], puis appuyez dessus.
2 Tournez la molette de réglage pour
sélectionner [SET DEMO], puis
appuyez dessus.
3 Tournez la molette de réglage pour
sélectionner [SET DEMO-OFF], puis
appuyez dessus.
Le réglage est terminé.
4 Appuyez deux fois sur (retour).
La fenêtre d’affichage retourne au mode
de réception/lecture normal.
Configuration de base
Vous pouvez configurer des paramètres
dans les catégories de configuration
suivantes :
Configuration générale (GENERAL),
Configuration sonore (SOUND),
Configuration d’affichage (DISPLAY)
1 Appuyez sur MENU.
2 Tournez la molette de réglage pour
sélectionner la catégorie de
configuration, puis appuyez dessus.
Les paramètres peuvent être réglés selon
la source et le réglage.
3 Tournez la molette de réglage pour
sélectionner les options, puis
appuyez dessus.
Pour retourner à l’écran précédent
Appuyez sur (retour).
10FR
Page 35

Configuration générale
(GENERAL)
DEMO (démonstration)
Permet d’activer le mode de
démonstration : [ON], [OFF].
CLOCK-ADJ (réglage de l’horloge) (page 7)
CAUT ALM (alarme d’avertissement)
Permet d’activer l’alarme
d’avertissement : [ON], [OFF] (page 6).
(Disponible uniquement lorsque la source
est désactivée et que l’horloge est
affichée.)
BEEP
Permet d’activer le bip : [ON], [OFF].
AUTO OFF
Permet d’éteindre automatiquement
après un laps de temps souhaité lors de
l’arrêt de l’appareil : [ON] (30 minutes),
[OFF].
STEERING
Permet d’enregistrer/de réinitialiser le
réglage de la télécommande du volant.
(Disponible lors du raccordement à l’aide
du câble de raccordement (non fourni).)
(Disponible uniquement lorsque la source
est désactivée et que l’horloge est
affichée.)
STR CONTROL (commande du volant)
Permet de sélectionner le mode d’entrée
de la télécommande raccordée. Pour
éviter un problème de fonctionnement,
assurez-vous de faire correspondre le
mode d’entrée avec la télécommande
raccordée avant l’utilisation.
CUSTOM
Mode d’entrée pour la télécommande
du volant
PRESET
Mode d’entrée pour la télécommande
filaire, excluant la télécommande du
volant (sélectionné automatiquement
lorsque vous effectuez [RESET
CUSTOM].)
EDIT CUSTOM
Permet d’enregistrer les fonctions
(SOURCE, ATT, VOL +/–, SEEK +/–) sur la
télécommande du volant :
Tournez la molette de réglage pour
sélectionner la fonction que vous
souhaitez assigner à la télécommande
du volant, puis appuyez dessus.
Pendant que [REGISTER] clignote,
maintenez enfoncée la touche de la
télécommande du volant à laquelle
vous souhaitez assigner la fonction.
Lorsque l’enregistrement est terminé,
[REGISTERED] s’affiche.
Pour enregistrer d’autres fonctions,
répétez les étapes et .
(Disponible uniquement lorsque [STR
CONTROL] est réglé à [CUSTOM].)
RESET CUSTOM
Permet de réinitialiser le réglage de la
télécommande du volant : [YES], [NO].
(Disponible uniquement lorsque [STR
CONTROL] est réglé à [CUSTOM].)
Remarques
• Pendant que vous effectuez les réglages, seul
le fonctionnement à l’aide des touches de
l’appareil est disponible. Par mesure de
sécurité, stationnez votre voiture avant
d’effectuer ce réglage.
• Lorsqu’une erreur se produit pendant
l’enregistrement, toutes les informations
enregistrées précédemment sont conservées.
Recommencez l’enregistrement à partir de la
fonction où l’erreur s’est produite.
• Cette fonction pourrait ne pas être disponible
sur certains véhicules. Pour plus de détails sur
la compatibilité de votre véhicule, visitez notre
site d’assistance à l’adresse indiquée sur la
couverture arrière.
USB MODE
Permet de modifier le mode USB :
[ANDROID], [MSC/MTP].
(Disponible uniquement lorsque la source
USB est sélectionnée.)
CT (heure)
Permet d’activer la fonction CT : [ON],
[OFF].
BTM (mémorisation des meilleurs accords)
(page 8)
(Disponible uniquement lorsque le
récepteur est sélectionné.)
11FR
Page 36

FIRMWARE
(Disponible uniquement lorsque la source
est désactivée et que l’horloge est
affichée.)
Permet de vérifier/mettre à jour la version
du micrologiciel. Pour plus de détails,
visitez le site d’assistance à l’adresse
indiquée sur la couverture arrière.
FW VERSION (version du micrologiciel)
Affiche la version de micrologiciel
actuelle.
FW UPDATE (mise à jour du micrologiciel)
Permet d’accéder au processus de mise à
jour du micrologiciel : [YES], [NO].
La mise à jour du micrologiciel prend
quelques minutes. Pendant la mise à jour,
ne mettez pas la clé de contact en
position OFF et ne retirez pas le
périphérique USB.
Configuration sonore
(SOUND)
Vous pouvez également ouvrir ce menu de
configuration en appuyant sur SOUND.
EQ10 PRESET
Permet de sélectionner une courbe
d’égaliseur parmi 10 courbes d’égaliseur
ou de désactiver la fonction :
[OFF], [R&B], [ROCK], [POP], [HIP-HOP],
[ELECTRONICA], [JAZZ], [SOUL],
[COUNTRY], [KARAOKE]*, [CUSTOM].
Le réglage de courbe d’égaliseur peut
être mémorisé pour chaque source.
* [KARAOKE] réduit le son de la voix, mais ne
peut pas le supprimer entièrement pendant la
lecture. De plus, l’utilisation d’un microphone
n’est pas prise en charge.
EQ10 CUSTOM
Permet de sélectionner l’option [CUSTOM]
de la fonction EQ10.
Réglage de la courbe d’égaliseur :
[BAND1] 32 Hz, [BAND2] 63 Hz, [BAND3]
125 Hz, [BAND4] 250 Hz, [BAND5] 500 Hz,
[BAND6] 1 kHz, [BAND7] 2 kHz, [BAND8]
4 kHz, [BAND9] 8 kHz, [BAND10] 16 kHz.
Le niveau de volume peut être réglé par
incréments de 1 dB, de -6 dB à +6 dB.
BALANCE
Permet de régler l’équilibre du son :
[RIGHT-15] – [CENTER] – [LEFT-15].
FADER
Permet de régler le niveau relatif :
[FRONT-15] – [CENTER] – [REAR-15].
S.WOOFER (caisson de graves)
SW LEVEL (niveau du caisson de graves)
Permet de régler le volume du caisson de
graves : [+6 dB] – [0 dB] – [-6 dB].
([ATT] est affiché au réglage le plus bas.)
SW PHASE (phase du caisson de graves)
Permet de sélectionner la phase du
caisson de graves : [NORM], [REV].
LPF FREQ (fréquence de filtre passe-bas)
Permet de sélectionner la fréquence de
coupure du caisson de graves : [80Hz],
[100Hz], [120Hz].
HPF FREQ (fréquence de filtre passe-haut)
Permet de sélectionner la fréquence de
coupure du haut-parleur avant/arrière :
[OFF], [80Hz], [100Hz], [120Hz].
AUX VOL (niveau de volume AUX)
Permet de régler le niveau de volume de
chaque périphérique auxiliaire raccordé :
[+18 dB] – [0 dB] – [-8 dB].
Ce réglage évite de régler le niveau de
volume entre les sources.
(Disponible uniquement lorsque AUX est
sélectionné.)
12FR
Page 37

Configuration d’affichage
(DISPLAY)
Informations complémentaires
DIMMER
Permet de modifier la luminosité de la
fenêtre d’affichage : [ON], [OFF], [CLK].
Pour régler cette fonction afin de l’activer
uniquement pendant une période
déterminée, sélectionnez [CLK], puis
réglez les heures de début et de fin.
– Pour régler la luminosité utilisée lorsque
la fonction de gradateur est activée :
Réglez [DIMMER] à [ON], puis réglez
[BRIGHTNESS].
– Pour régler la luminosité utilisée lorsque
la fonction de gradateur est désactivée :
Réglez [DIMMER] à [OFF], puis réglez
[BRIGHTNESS].
Le réglage de luminosité est mémorisé et
appliqué lorsque la fonction de gradateur
est activée ou désactivée.
BRIGHTNESS
Permet de régler la luminosité de la
fenêtre d’affichage. Le niveau de
luminosité est réglable : [1] – [10].
SND SYNC (synchronisation sonore)
Permet d’activer la synchronisation de
l’éclairage avec le son : [ON], [OFF].
AUTO SCR (défilement automatique)
Permet de faire défiler automatiquement
les éléments longs : [ON], [OFF].
(Non disponible lorsque AUX ou le
récepteur est sélectionné.)
Mise à jour du micrologiciel
Pour mettre à jour le micrologiciel, visitez le
site d’assistance à l’adresse indiquée sur la
couverture arrière, puis suivez les
instructions en ligne.
Remarques
• L’utilisation d’un périphérique USB (non fourni) est
requise pour la mise à jour du micrologiciel.
Enregistrez le logiciel de mise à jour sur le
périphérique USB, raccordez le périphérique au
port USB, puis effectuez la mise à jour.
• La mise à jour du micrologiciel prend quelques
minutes. Pendant la mise à jour, ne mettez pas la
clé de contact en position OFF et ne retirez pas le
périphérique USB.
Précautions
•Si votre véhicule est resté stationné en
plein soleil, laissez l’appareil refroidir avant
de l’utiliser.
• Ne laissez pas la façade ou les appareils
audio à l’intérieur du véhicule, car la
température élevée résultant du
rayonnement direct du soleil pourrait
causer un problème de fonctionnement.
•L’antenne électrique se déploie
automatiquement.
Condensation
Si de la condensation s’est formée dans
l’appareil, retirez le disque et attendez
environ une heure pour que l’appareil puisse
sécher; sinon, il ne fonctionnera pas
correctement.
Pour conserver un son de haute qualité
Ne renversez pas de liquide sur l’appareil ou
sur les disques.
13FR
Page 38

Remarques sur les disques
Dossier (album)
Fichier audio (plage)
• N’exposez pas les disques au rayonnement
direct du soleil ou à des sources de chaleur
telles que des conduits d’air chaud, et ne
les laissez pas dans un véhicule stationné
en plein soleil.
• Avant la lecture,
essuyez les disques
avec un chiffon de
nettoyage en partant
du centre vers
l’extérieur. N’utilisez
pas de solvants tels
que de l’essence, du
diluant ou des
nettoyants disponibles sur le marché.
• Cet appareil est conçu pour la lecture des
disques conformes à la norme Compact
Disc (CD). Les DualDiscs et certains disques
de musique encodés avec des
technologies de protection des droits
d’auteur ne sont pas conformes à la norme
Compact Disc (CD). Par conséquent, il est
possible que ces disques ne soient pas lus
par cet appareil.
• Disques ne pouvant PAS être lus sur cet
appareil
– Les disques sur lesquels sont collés des
étiquettes, des autocollants, du ruban
adhésif ou du papier. De tels disques
peuvent provoquer des problèmes de
fonctionnement ou être endommagés.
– Les disques de forme non standard
(notamment en forme de cœur, de carré
ou d’étoile). Vous risquez d’endommager
votre appareil si vous essayez de lire ces
types de disques.
– Les disques de 8 cm (3
Remarques sur les disques CD-R/
CD-RW
• Si le disque multisession commence avec
une session CD-DA, il est reconnu comme
un disque CD-DA et les autres sessions ne
sont pas lues.
• Disques ne pouvant PAS être lus sur cet
appareil
– CD-R/CD-RW dont la qualité
d’enregistrement est mauvaise.
– CD-R/CD-RW enregistrés avec un
appareil d’enregistrement non
compatible.
1
/4 po).
– CD-R/CD-RW n’ayant pas été finalisés
correctement.
– CD-R/CD-RW autres que ceux enregistrés
au format CD audio ou MP3
conformément à la norme ISO9660
Level 1/Level 2, Joliet/Romeo ou
multisession.
Ordre de lecture des fichiers
audio
Si vous avez des questions ou des
problèmes concernant cet appareil qui ne
sont pas abordés dans ce mode d’emploi,
contactez votre détaillant Sony le plus
proche.
14FR
Page 39

Entretien
Pôle + vers le haut
Caractéristiques techniques
Remplacement de la pile au lithium de
la télécommande
Sous des conditions normales d’utilisation,
la pile durera environ 1 an (selon les
conditions d’utilisation, la durée de vie utile
peut être réduite).
Lorsque la pile est faible, la portée de la
télécommande diminue.
ATTENTION
La pile pourrait exploser si elle n’est pas
remplacée correctement. Remplacez-la
uniquement avec le même type de pile ou
un type équivalent.
Remarques sur la pile au lithium
• Tenez la pile au lithium hors de la portée des
enfants. En cas d’ingestion de la pile, consultez
immédiatement un médecin.
• Essuyez la pile avec un chiffon sec pour assurer un
bon contact.
• Veillez à respecter la polarité lors de l’installation
de la pile.
• Ne tenez pas la pile avec des pinces métalliques,
car cela pourrait causer un court-circuit.
Nettoyage des connecteurs
L’appareil peut ne pas fonctionner
correctement si les connecteurs entre
l’appareil et la façade sont sales. Pour éviter
cette situation, retirez la façade (page 6) et
nettoyez les connecteurs avec un cotontige. N’exercez pas une pression trop forte,
car vous pourriez endommager les
connecteurs.
Remarques
• Pour plus de sécurité, coupez le contact avant de
nettoyer les connecteurs et retirez la clé de
contact.
• Ne touchez jamais les connecteurs directement
avec les doigts ou avec un objet métallique.
Radio
FM
Plage de syntonisation : 87,5 MHz à
107,9 MHz
Borne d’antenne :
Connecteur d’antenne externe
Fréquence intermédiaire :
FM CCIR : -1 956,5 kHz à -487,3 kHz et
+500,0 kHz à +2 095,4 kHz
Sensibilité utile : 7 dBf
Sélectivité : 75 dB à 400 kHz
Rapport signal/bruit : 73 dB
Séparation : 50 dB à 1 kHz
Réponse en fréquence : 20 Hz à 15 000 Hz
AM
Plage de syntonisation : 530 kHz à 1 710 kHz
Borne d’antenne :
Connecteur d’antenne externe
Sensibilité : 26 µV
Lecteur CD
Rapport signal/bruit : 95 dB
Réponse en fréquence : 10 Hz à 20 000 Hz
Pleurage et scintillement : En dessous du
seuil mesurable
Nombre maximal de : (CD-R/CD-RW
uniquement)
– dossiers (albums) : 150 (y compris le
répertoire racine)
– fichiers (plages) et dossiers : 300 (lorsque
les noms de dossier/fichier contiennent un
grand nombre de caractères, ce nombre
peut être inférieur à 300)
– caractères affichables pour un nom de
dossier/fichier : 32 (Joliet)/64 (Romeo)
Codecs correspondants : MP3 (.mp3) et
WMA (.wma)
Lecteur USB
Interface : USB (haute vitesse)
Courant maximal : 500 mA
Nombre maximal de plages
reconnaissables :
– dossiers (albums) : 256
– fichiers (plages) par dossier : 256
Protocole Android Open Accessory (AOA)
compatible : 2.0
15FR
Page 40

Codecs correspondants :
MP3 (.mp3)
Débit binaire : 8 kbits/s à 320 kbits/s
(Prise en charge du débit binaire
variable (VBR))
Fréquence d’échantillonnage : 16 kHz
à 48 kHz
WMA (.wma)
Débit binaire : 32 kbits/s à 192 kbits/s
(Prise en charge du débit binaire
variable (VBR))
Fréquence d’échantillonnage : 32 kHz,
44,1 kHz, 48 kHz
FLAC (.flac)
Résolution : 16 bits, 24 bits
Fréquence d’échantillonnage :
44,1 kHz, 48 kHz
Amplificateur de puissance
Sorties : Sorties de haut-parleurs
Impédance des haut-parleurs : 4 Ω à 8 Ω
Puissance de sortie maximale : 55 W × 4
(à 4 )
Généralités
Sorties :
Borne de sorties audio (REAR, SUB)
Borne de commande de relais d’antenne
électrique/d’amplificateur de
puissance (REM OUT)
Entrées :
Borne d’entrée de télécommande
Borne d’entrée de l’antenne
Prise d’entrée AUX (mini-prise stéréo)
Port USB
Alimentation requise : Batterie de véhicule
12 V CC (masse négative)
Consommation de courant nominale : 10 A
Dimensions :
Environ 178 mm × 50 mm × 177 mm
1
(7
/8 po × 2 po × 7 po) (l/h/p)
Dimensions de montage :
Environ 182 mm × 53 mm × 160 mm
1
(7
/4 po × 2 1/8 po × 6 5/16 po) (l/h/p)
Poids : Environ 1,2 kg (2 lb 11 oz)
Contenu de l’emballage :
Appareil principal (1)
Télécommande (1) : RM-X211
Composants destinés à l’installation et
aux raccordements (1 jeu)
Accessoires/appareils en option :
Câble pour entrée de télécommande du
volant : RC-SR1
Il est possible que votre détaillant ne
dispose pas de certains accessoires énoncés
ci-dessus. Veuillez vous adresser à lui pour
tout renseignement complémentaire.
La conception et les caractéristiques
techniques sont sujettes à modification sans
préavis.
Droits d’auteur
Windows Media est une marque déposée ou
une marque de commerce de Microsoft
Corporation aux États-Unis et/ou dans les
autres pays.
Ce produit est protégé par des droits de
propriété intellectuelle de Microsoft
Corporation. Toute utilisation ou diffusion de
la technologie décrite sortant du cadre de
l’utilisation de ce produit est interdite sans
licence accordée par Microsoft ou une filiale
autorisée de Microsoft.
Licence de la technologie de codage audio
MPEG Layer-3 et des brevets obtenue de
Fraunhofer IIS et Thomson.
Android est une marque de Google Inc.
libFLAC
Copyright (C) 2000-2009 Josh Coalson
Copyright (C) 2011-2013 Fondation Xiph.Org
La redistribution et l’utilisation sous formes
binaire et source, avec ou sans modification,
sont permises sous réserve des conditions
suivantes :
– Les redistributions du code source doivent
conserver l’avis de droit d’auteur
ci-dessus, cette liste de conditions et la
renonciation suivante.
– Les redistributions sous forme binaire
doivent reproduire l’avis de droit d’auteur
ci-dessus, cette liste de conditions et la
renonciation suivante dans la
documentation et/ou tout autre matériel
fourni lors de la distribution.
16FR
Page 41

– Ni le nom de la Fondation Xiph.org ni les
noms de ses contributeurs ne doivent être
utilisés pour endosser ou promouvoir les
produits dérivés de ce logiciel sans
autorisation écrite préalable.
CE LOGICIEL EST FOURNI « TEL QUEL » PAR
LES DÉTENTEURS DE DROITS D’AUTEUR ET
CONTRIBUTEURS, ET TOUTES LES GARANTIES
EXPRESSES OU IMPLICITES, Y COMPRIS,
SANS EN EXCLURE D’AUTRES, LES
GARANTIES IMPLICITES DE VALEUR
MARCHANDE ET D’ADAPTATION À UN USAGE
PARTICULIER SONT DÉCLINÉES. LA
FONDATION OU LES CONTRIBUTEURS NE
PEUVENT EN AUCUN CAS ÊTRE TENUS
RESPONSABLES DES DOMMAGES DIRECTS,
INDIRECTS, ACCESSOIRES, SPÉCIAUX,
EXEMPLAIRES OU CONSÉCUTIFS (Y COMPRIS,
SANS EN EXCLURE D’AUTRES,
L’APPROVISIONNEMENT DE BIENS OU DE
SERVICES DE REMPLACEMENT; LA PERTE
D’UTILISATION, DE DONNÉES OU DE
PROFITS; OU L’INTERRUPTION D’ACTIVITÉS
COMMERCIALES) QUELLES QU’EN SOIENT LA
CAUSE ET LA THÉORIE DE RESPONSABILITÉ,
PAR CONTRAT, RESPONSABILITÉ ABSOLUE
OU CIVILE (Y COMPRIS LA NÉGLIGENCE OU
AUTRE) SURVENANT DE QUELQUE FAÇON
QUI SOIT DE L’UTILISATION DE CE LOGICIEL,
MÊME SI AVERTIS DE LA POSSIBILITÉ DE TELS
DOMMAGES.
Dépannage
La list e de vér ification suivante vou s aidera à
remédier aux problèmes que vous pourriez
rencontrer avec cet appareil.
Avant de passer en revue la liste ci-dessous,
vérifiez les procédures de raccordement et
d’utilisation.
Pour plus de détails sur l’utilisation du
fusible et le retrait de l’appareil du tableau
de bord, reportez-vous à « Raccordement/
Installation » (page 21).
Si vous ne parvenez pas à régler le
problème, visitez le site d’assistance à
l’adresse indiquée sur la couverture arrière.
Généralités
L’appareil n’est pas alimenté.
Si l’appareil est éteint et que l’affichage
disparaît, il est impossible de commander
l’appareil avec la télécommande.
– Mettez l’appareil en marche.
Aucun son n’est émis ou le son est très
faible.
La position de la commande d’équilibre
avant/arrière [FADER] n’est pas réglée
pour un système à 2 haut-parleurs.
Le volume de l’appareil et/ou du
périphérique connecté est très faible.
– Augmentez le volume de l’appareil et du
périphérique connecté.
Aucun bip n’est émis.
Un amplificateur de puissance en option
est raccordé et vous n’utilisez pas
l’amplificateur intégré.
Le contenu de la mémoire a été effacé.
Le câble d’alimentation ou la batterie a été
déconnecté(e) ou n’est pas raccordé(e)
correctement.
Les stations mémorisées sont effacées et
l’heure est remise à zéro.
Le fusible est grillé.
Émission d’un bruit lorsque la position de
la clé de contact est modifiée.
Les câbles ne sont pas raccordés
correctement au connecteur
d’alimentation du véhicule destiné aux
accessoires.
17FR
Page 42

Pendant la lecture ou la réception, l’écran
du mode de démonstration apparaît.
Si aucune opération n’est effectuée
pendant 5 minutes alors que le réglage
[DEMO-ON] est sélectionné, l’écran du
mode de démonstration apparaît.
– Sélectionnez le réglage [DEMO-OFF]
(page 11).
L’affichage disparaît de la fenêtre
d’affichage ou il n’apparaît pas.
Le régulateur de luminosité est réglé à
[DIM-ON] (page 13).
L’affichage est désactivé si vous
maintenez la touche OFF enfoncée.
– Maintenez enfoncée la touche OFF de
l’appareil jusqu’à ce que l’affichage
apparaisse.
Les connecteurs sont sales (page 15).
L’affichage/éclairage clignote.
L’alimentation est insuffisante.
– Vérifiez que la batterie du véhicule
fournit une alimentation suffisante à
l’appareil. (L’alimentation requise est
12 V CC.)
Les touches de commande ne
fonctionnent pas.
Impossible d’éjecter le disque.
Appuyez sur DSPL et (retour)/MODE
pendant plus de 2 secondes pour
réinitialiser l’appareil.
Les contenus de la mémoire sont effacés.
Pour votre sécurité, ne réinitialisez pas
l’appareil pendant que vous conduisez.
Réception radio
Impossible de capter les stations.
Le son est parasité.
Le raccordement est incorrect.
– Si votre véhicule est équipé d’une
antenne de radio intégrée dans la
fenêtre arrière ou latérale, raccordez un
câble REM OUT (rayé bleu/blanc) ou un
câble d’alimentation d’accessoires
(rouge) au câble d’alimentation de
l’amplificateur d’antenne du véhicule.
– Vérifiez le raccordement de l’antenne du
véhicule.
– Si l’antenne automatique ne se déploie
pas, vérifiez le raccordement du câble
de commande d’antenne électrique.
Impossible de capter une station
présélectionnée.
Le signal capté est trop faible.
RDS
PTY affiche [- - - - - - - -].
La station captée n’est pas une station
RDS.
Aucune donnée RDS n’a été reçue.
La station ne spécifie pas le type
d’émission.
Lecture de CD
La lecture du disque ne commence pas.
Le disque est défectueux ou sale.
Les CD-R/CD-RW ne sont pas destinés à
un usage audio (page 14).
Impossible de lire des fichiers MP3/WMA.
Le disque n’est pas compatible avec le
format et la version MP3/WMA. Pour plus
de détails sur les formats et disques
pouvant être lus, visitez le site
d’assistance à l’adresse indiquée sur la
couverture arrière.
18FR
Page 43

Certains fichiers MP3/WMA exigent un
délai plus long que d’autres avant le
début de la lecture.
La lecture des types de disques suivants
exige un délai de démarrage plus long :
– Disques comportant une hiérarchie de
dossiers complexe.
– Disques enregistrés en multisession.
– Disques auxquels il est possible
d’ajouter des données.
Le son est saccadé.
Le disque est défectueux ou sale.
Lecture de périphérique USB
Impossible de lire des éléments à l’aide
d’un concentrateur USB.
Cet appareil ne peut pas reconnaître les
périphériques USB raccordés au moyen
d’un concentrateur USB.
La lecture sur un périphérique USB exige
un délai de démarrage plus long.
Le périphérique USB contient des fichiers
avec une hiérarchie de dossiers complexe.
Le son est intermittent.
Il est possible que le son soit intermittent
à un débit binaire élevé.
La lecture des fichiers DRM (Gestion des
droits numériques) pourrait être
impossible dans certains cas.
Impossible de lire le fichier audio.
Les systèmes de fichier autres que FAT16
ou FAT32 d’un périphérique USB ne sont
pas pris en charge.*
* Cet appareil prend en charge les systèmes FAT16
et FAT32. Par contre, certains périphériques USB
pourraient ne pas prendre en charge ces systèmes
FAT. Pour plus de détails, reportez-vous au mode
d’emploi de chacun des périphériques USB ou
communiquez avec le fabricant.
Des opérations de saut d’un album, de
saut d’éléments (mode Saut) et de
recherche d’une piste par nom (QuickBrowZer) ne peuvent pas être effectuées.
Ces opérations ne peuvent pas être
effectuées lorsqu’un périphérique USB en
mode Android est raccordé.
– Réglez [USB MODE] à [MSC/MTP]
(page 11).
Le mode USB du périphérique n’est pas
réglé au mode approprié.
– Assurez-vous que le mode USB du
périphérique est réglé au mode
MSC/MTP.
Le son n’est pas émis pendant la lecture
en mode Android.
Pendant que l’appareil est en mode
Android, le son est émis uniquement par
le téléphone intelligent Android.
– Vérifiez l’état de l’application de lecture
audio sur le téléphone intelligent
Android.
– La lecture pourrait ne pas s’effectuer
correctement, selon le téléphone
intelligent Android.
Messages
Les messages suivants peuvent apparaître
ou clignoter pendant le fonctionnement.
CD ERROR : Le disque ne peut pas être lu. Le
disque sera éjecté automatiquement.
Nettoyez le disque ou insérez-le
correctement. Assurez-vous que le disque
est exempt de défaut et qu’il n’est pas
vierge.
CD NO MUSIC : Il n’y a aucun fichier à lire. Le
disque sera éjecté automatiquement.
Insérez un disque avec des fichiers lisibles
(page 15).
CD PUSH EJT: Le disque n’a pas pu être
éjecté correctement.
Appuyez sur (éjecter).
HUB NO SUPRT : Les concentrateurs USB ne
sont pas pris en charge.
19FR
Page 44

INVALID
L’opération sélectionnée pourrait être
invalide.
NOT SUPPORT - ANDROID MODE
Un périphérique USB ne prenant pas en
charge AOA (Android Open Accessory) 2.0
est raccordé à l’appareil pendant que [USB
MODE] est réglé à [ANDROID].
– Réglez [USB MODE] à [MSC/MTP]
(page 11).
OVERLOAD : Le périphérique USB est
saturé.
Débranchez le périphérique USB, puis
changez la source en appuyant sur SRC.
Le périphérique USB présente une
défaillance ou un périphérique non pris en
charge est raccordé.
READ : En cours de lecture.
Attendez que la lecture soit terminée et la
lecture commence automatiquement.
Selon l’organisation des fichiers, cette
opération peut prendre quelques instants.
USB ERROR : Le périphérique USB ne peut
pas être lu.
Raccordez le périphérique USB de
nouveau.
USB NO DEV : Le périphérique USB n’est pas
raccordé ni reconnu.
Assurez-vous que le périphérique USB ou
son câble est solidement raccordé.
USB NO MUSIC : Il n’y a aucun fichier à lire.
Raccordez un périphérique USB avec des
fichiers lisibles (page 15).
USB NO SUPRT : Le périphérique USB n’est
pas pris en charge.
Pour plus de détails sur la compatibilité de
votre périphérique USB, visitez notre site
d’assistance à l’adresse indiquée sur la
couverture arrière.
ou : La fin du disque ou le
début a été atteint.
(trait de soulignement) : Impossible
d’afficher le caractère.
Pour l’utilisation de la télécommande
du volant :
ERROR : Une erreur s’est produite pendant
l’enregistrement de la fonction.
Enregistrez de nouveau à partir de la
fonction où l’erreur s’est produite
(page 11).
TIMEOUT : Échec de l’enregistrement de la
fonction dans le temps alloué.
Essayez de compléter l’enregistrement
pendant que [REGISTER] clignote (environ
6 secondes) (page 11).
Si ces solutions ne permettent pas
d’améliorer la situation, contactez votre
détaillant Sony le plus proche.
Si vous devez faire réparer l’appareil en
raison d’un problème de lecture de CD,
apportez le disque utilisé au moment où le
problème s’est produit.
20FR
Page 45

Raccordement/Installation
×4
5×max. 8mm
(7/32 ×max. 5/16 po)
×2
Mises en garde
• Rassemblez tous les câbles de mise à la
masse en un point de masse commun.
• Évitez de fixer des vis sur les câbles ou de
coincer ceux-ci dans les pièces mobiles
(par exemple, le rail du siège).
• Avant d’effectuer les raccordements,
coupez le contact du véhicule pour éviter
un court-circuit.
• Raccordez les câbles d’alimentation jaune
et rouge seulement après avoir terminé le
raccordement de tous les autres câbles.
• Pour des raisons de sécurité, veillez à isoler
avec du ruban isolant tout câble libre non
raccordé.
Précautions
• Choisissez soigneusement l’emplacement
d’installation pour que l’appareil ne gêne
pas le conducteur pendant la conduite.
• Évitez d’installer l’appareil à un endroit
exposé à la poussière, à la saleté, à des
vibrations excessives ou à des
températures élevées comme en plein
soleil ou à proximité de conduits de
chauffage.
• Pour garantir un montage sûr, n’utilisez
que la quincaillerie fournie.
Remarque concernant le câble d’alimentation
(jaune)
Lorsque cet appareil est raccordé à d’autres
éléments stéréo, la valeur nominale du circuit du
véhicule sur lequel l’appareil sera raccordé doit être
supérieure à la somme des fusibles de chaque
élément.
Réglage de l’angle de montage
Réglez l’inclinaison à un angle inférieur à
45 degrés.
Liste des pièces nécessaires
à l’installation
•Cette liste de pièces ne comprend pas tout
le contenu de l’emballage.
•Le support et le tour de protection
sont fixés en usine. Avant l’installation de
l’appareil, utilisez les clés de déblocage
pour détacher le support de l’appareil.
Pour plus de détails, reportez-vous à la
section « Retrait du tour de protection et
du support » (page 24).
•Conservez les clés de déblocage pour
une utilisation ultérieure, car vous en aurez
également besoin pour retirer l’appareil du
véhicule.
21FR
Page 46

Raccordement
d’une télécommande filaire
(non fournie)*
4
Blanc
Rayé blanc/noir
Gris
Noir
Jaune
Rouge
Rayé bleu/blanc
d’une antenne de véhicule
Haut-parleur avant*1*
2
Haut-parleur arrière*1*
2
Rayé gris/noir
Vert
Rayé vert/noir
Violet
Rayé violet/noir
*
3
*
3
Caisson de graves*
1
Pour plus de détails, reportezvous à la section
« Raccordements » (page 23).
Amplificateur de
puissance*
1
*1 Non fourni
*2 Impédance des haut-parleurs : 4 à 8 × 4
*3 Cordon à broche RCA (non fourni)
*4 Selon le type de véhicule, utilisez un adaptateur
pour une télécommande filaire (non fourni). Pour
plus de détails sur l’utilisation de la
télécommande filaire, reportez-vous à la section
« Utilisation de la télécommande filaire »
(page 23).
22FR
Page 47

Raccordements
Haut-parleur
avant
Caisson de
graves
À un point de mise à la masse commun
Raccordez d’abord le câble de mise à la
masse noir et ensuite les câbles
d’alimentation jaune et rouge.
À la borne d’alimentation +12 V qui est
alimentée en permanence
Raccordez d’abord le câble de mise à la
masse noir à un point de mise à la masse
commun.
À la borne d’alimentation +12 V qui est
alimentée lorsque la clé de contact est
à la position accessoires
S’il n’y a pas de position accessoires,
raccordez la borne d’alimentation
(batterie) +12 V qui est alimentée en
permanence.
Raccordez d’abord le câble de mise à la
masse noir à un point de mise à la masse
commun.
Au câble de commande d’antenne
électrique ou au câble d’alimentation
de l’amplificateur d’antenne
Il n’est pas nécessaire de raccorder ce
câble s’il n’y a pas d’antenne électrique ni
d’amplificateur d’antenne ou avec une
antenne télescopique manuelle.
Au niveau de AMP REMOTE IN de
l’amplificateur de puissance en option
Ce raccordement s’applique uniquement
aux amplificateurs et à une antenne
électrique. Le raccordement de tout autre
système risque d’endommager l’appareil.
Raccordement facile d’un caisson
de graves
Vous pouvez utiliser un caisson de graves
sans amplificateur de puissance lorsque
vous effectuez le raccordement au cordon
de haut-parleur arrière.
Remarque
Utilisez un caisson de grave avec une impédance de
4 à 8 avec une capacité électrique adéquate
pour éviter de l’endommager.
Raccordement pour la conservation
de la mémoire
Lorsque le câble d’alimentation jaune est
raccordé, le circuit de la mémoire est
alimenté en permanence même si la clé de
contact est à la position d’arrêt.
Raccordement des haut-parleurs
•Avant de raccorder les haut-parleurs,
éteignez l’appareil.
•Utilisez des haut-parleurs avec une
impédance de 4 à 8 avec une capacité
électrique adéquate pour éviter de les
endommager.
Utilisation de la télécommande
filaire
Lors de l’utilisation de la
télécommande du volant
L’installation du câble de raccordement
RC-SR1 (non fourni) est requise avant
l’utilisation.
1 Pour activer la télécommande du volant,
sélectionnez [SET STEERING] [EDIT
CUSTOM] pour effectuer l’enregistrement
(page 11).
Une fois l’enregistrement terminé, la
télécommande du volant devient disponible.
Remarques sur l’installation du câble de
raccordement RC-SR1 (non fourni)
• Reportez-vous aux sites d’assistance indiqués sur
la couverture arrière pour obtenir plus de détails,
puis raccordez chaque câble correctement aux
câbles adéquats. Un raccordement incorrect
pourrait endommager l’appareil.
• Selon le modèle de voiture et par mesure de
sécurité, assurez-vous d’isoler les fils non utilisés
avec du ruban isolant.
• Ne raccordez pas ce câble lorsque la
télécommande du volant n’est pas utilisée.
• Il est recommandé de consulter le détaillant ou un
technicien spécialisé pour obtenir de l’aide.
Lors de l’utilisation de la
télécommande filaire
Pour activer la télécommande filaire, réglez
1
[STR CONTROL] dans [SET STEERING] à
[PRESET] (page 11).
23FR
Page 48

Installation
Tourner le crochet vers l’intérieur.
Vis
Boîtier
182 mm (71/4 po)
53 mm (21/8 po)
Loquet
Retrait du tour de protection et du
support
Avant d’installer l’appareil, retirez le tour de
protection et le support de l’appareil.
1 Pincez les deux bords du tour de
protection , puis sortez-le.
2 Insérez les clés de déblocage en
même temps jusqu’au déclic. Tirez le
support vers le bas, puis tirez sur
l’appareil vers le haut pour les
séparer.
Installation de l’appareil dans le
tableau de bord
•Avant l’installation, assurez-vous que les
loquets des deux côtés du support sont
bien pliés de 2 mm (
•Pour les véhicules japonais, consultez
« Installation de l’appareil dans un véhicule
japonais » (page 25).
3
/32 po) vers l’intérieur.
1 Positionnez le support à l’intérieur
du tableau de bord, puis pliez les
griffes vers l’extérieur pour assurer
une prise correcte.
2 Insérez l’appareil dans le support ,
puis fixez le tour de protection .
Remarque
Avant d’installer cet appareil, retirez la vis et le
boîtier à l’arrière de l’appareil. N’utilisez pas les
pièces retirées précédemment lors de l’installation
de l’appareil.
24FR
Remarques
• Si les loquets sont droits ou pliés vers l’extérieur,
l’appareil ne peut pas être fixé solidement et peut
se détacher.
• Assurez-vous que les 4 loquets situés sur le tour
de protection sont correctement engagés dans
les fentes de l’appareil.
Page 49

Installation de l’appareil dans un
vers le tableau de bord/
la console centrale
Pièces existantes
fournies avec la voiture
Support
Support
vers le tableau de bord/
la console centrale
Pièces existantes
fournies avec la voiture
Support
Support
Fusible (10 A )
véhicule japonais
Cet appareil ne peut pas être installé dans
certaines voitures japonaises. Dans ce cas,
consultez votre détaillant Sony.
TOYOTA
NISSAN
Retrait et fixation de la façade
Pour plus de détails, reportez-vous à la
section « Retrait de la façade » (page 6).
Réinitialisation de l’appareil
Pour plus de détails, reportez-vous à la
section « Réinitialisation de l’appareil »
(page 6).
Remplacement du fusible
Lorsque vous remplacez le
fusible, veillez à utiliser un
fusible dont l’intensité, en
ampères, correspond à la
valeur indiquée sur le
fusible original. Si le fusible
grille, vérifiez le
raccordement de l’ali mentation et remplacez
le fusible. Si le fusible neuf grille également,
il est possible que l’appareil soit défectueux.
Dans ce cas, consultez votre détaillant Sony
le plus proche.
Remarque
Pour éviter tout problème de fonctionnement,
utilisez uniquement les vis fournies pour
l’installation.
25FR
Page 50

Para mayor seguridad, asegúrese de
instalar esta unidad en el panel del auto
ya que la parte trasera de la unidad se
calienta durante el uso.
Para obtener más información, consulte
“Conexión/Instalación” (página 21).
La placa de características que indica el
voltaje de funcionamiento, etc., está situada
en la parte inferior del chasis.
PRECAUCIÓN
El uso de instrumentos ópticos con este
producto aumenta el riesgo de sufrir daños
oculares.
ADVERTENCIA: no ingiera las
baterías, riesgo de quemaduras
químicas.
El control remoto contiene baterías del tipo
botón/moneda. Si la batería del tipo botón/
moneda se ingiere, podría causar
quemaduras internas severas en apenas 2
horas, y podría causar la muerte.
Mantenga las baterías nuevas y usadas
fuera del alcance de los niños. Si el
compartimento de la batería no cierra
correctamente, deje de utilizar el producto y
manténgalo fuera del alcance de los niños.
Si considera que las baterías podrían haber
sido ingeridas o colocadas dentro de
cualquier parte del cuerpo, busque atención
médica de inmediato.
Nota sobre la pila de litio
No exponga la pila a fuentes de calor
excesivo como luz solar directa, fuego o
similar.
Advertencia: si el encendido del
automóvil no dispone de una
posición ACC
Asegúrese de ajustar la función AUTO OFF
(página 11). La unidad se apagará
completa y automáticamente en el
tiempo establecido después de apagarla,
lo cual evita que se agote la batería. Si no
ajusta la función AUTO OFF, mantenga
presionado OFF hasta que se apague la
pantalla cada vez que apague el motor.
Exención de responsabilidad sobre los
servicios prestados por otros
proveedores
Los servicios prestados por otros
proveedores están sujetos a cambios,
anulaciones o interrupciones sin previo
aviso. Sony no asume responsabilidad
alguna en estas situaciones.
2ES
Page 51

Tabla de contenidos
Guía para las partes y los controles . . . . . . 4
Procedimientos iniciales
Extracción del panel frontal . . . . . . . . . . . . . 6
Reinicio de la unidad . . . . . . . . . . . . . . . . . . 6
Ajuste del reloj . . . . . . . . . . . . . . . . . . . . . . . 7
Conexión de un dispositivo USB . . . . . . . . . 7
Conexión de otro dispositivo de audio
portátil . . . . . . . . . . . . . . . . . . . . . . . . . . . 7
Escuchar la radio
Escuchar la radio. . . . . . . . . . . . . . . . . . . . . . 8
Usar el RDS (Sistema de datos de
radio) . . . . . . . . . . . . . . . . . . . . . . . . . . . . 8
Reproducción
Reproducción de un disco . . . . . . . . . . . . . . 9
Reproducción de un dispositivo USB . . . . . 9
Búsqueda y reproducción de pistas . . . . . . 9
Ajustes
Cancelación del modo DEMO . . . . . . . . . . 10
Operación básica de ajustes . . . . . . . . . . . 10
Configuración General (GENERAL) . . . . . . . 11
Configuración del Sonido (SOUND). . . . . . 12
Configuración de Pantalla (DISPLAY) . . . . 13
Conexión/Instalación
Advertencias. . . . . . . . . . . . . . . . . . . . . . . . . 21
Lista de piezas para la instalación . . . . . . . 21
Conexión. . . . . . . . . . . . . . . . . . . . . . . . . . . 22
Instalación . . . . . . . . . . . . . . . . . . . . . . . . . 24
Información complementaria
Actualizar el Firmware . . . . . . . . . . . . . . . . 13
Precauciones. . . . . . . . . . . . . . . . . . . . . . . . 13
Mantenimiento . . . . . . . . . . . . . . . . . . . . . . 15
Especificaciones . . . . . . . . . . . . . . . . . . . . . 15
Solución de problemas . . . . . . . . . . . . . . . 17
Mensajes . . . . . . . . . . . . . . . . . . . . . . . . . . . 19
3ES
Page 52

Guía para las partes y los controles
Unidad principal
Botón de desbloqueo del panel frontal
SRC (fuente)
Para encender la unidad.
Para cambiar la fuente.
OFF
Manténgalo presionado durante
1 segundo para apagar la fuente y
mostrar el reloj en la pantalla.
Manténgalo presionado durante más de
2 segundos para apagar la unidad y la
pantalla.
Si se apaga la unidad y la pantalla
desaparece, la operación mediante el
control remoto no se encuentra
disponible.
Selector de control
Gírelo para ajustar el volumen.
PUSH ENTER
Ingresar el elemento seleccionado.
MENU
Para abrir el menú de configuración.
Ranura del disco
Ventana de visualización
4ES
/ (SEEK –/+)
Para sintonizar emisoras de radio en
forma automática. Manténgalo
presionado para sintonizarlas en forma
manual.
/ (anterior/siguiente)
/ (avance rápido/retroceso
rápido)
(expulsión de disco)
PTY (tipo de programa)
Seleccione PTY en RDS.
(navegar) (página 10)
Para entrar al modo de navegación
durante la reproducción.
(No disponible cuando un dispositivo
USB en modo Android™ está conectado).
EQ (ecualizador)
Seleccione una curva de ecualización.
(volver)
Para volver a la pantalla anterior.
MODE (página 8)
Receptor para el control remoto
Page 53

Botones numéricos (1 al 6)
Para recibir las emisoras almacenadas.
Manténgalo presionado para
almacenarlas en forma manual.
ALBUM /
Para saltearse un álbum en el dispositivo
de audio. Manténgalo apretado para
saltear álbumes en forma continua.
(No disponible cuando un dispositivo
USB en modo Android está conectado).
(repetir)
(No disponible cuando un dispositivo
USB en modo Android está conectado).
(reproducción aleatoria)
(No disponible cuando un dispositivo
USB en modo Android está conectado).
(reproducir/pausar)
EXTRA BASS
Refuerza los sonidos graves en sincronía
con el nivel del volumen. Presione para
cambiar los ajustes de EXTRA BASS: [1],
[2], [OFF].
Toma de entrada AUX
DSPL (pantalla)
Cambiar los elementos en pantalla.
SCRL (desplazamiento)
Manténgalo apretado para desplazarse a
un elemento de pantalla.
Puerto USB
Control remoto RM-X211
El botón VOL (volumen) + tiene un punto
sensible al tacto.
ATT (atenuar)
Atenúe el sonido. Vuelva a presionar para
cancelar la atenuación.
SOUND
Abra el menú SOUND directamente.
MENU
Manténgalo presionado para abrir el
menú de configuración.
///
Seleccione un elemento de
configuración, etc.
ENTER
Ingresar el elemento seleccionado.
/ (anterior/siguiente)
+/– (álbum +/–)
VOL (volumen) +/–
5ES
Page 54

Retire la película de aislamiento antes del
uso.
Procedimientos iniciales
Extracción del panel frontal
Es posible extraer el panel frontal de la
unidad para evitar que la roben.
1 Mantenga presionado OFF hasta
que la unidad se apague, presione el
botón de desbloqueo del panel
frontal , luego deslice el panel
hacia usted para quitarlo.
Alarma de precaución
Si gira el interruptor de la llave de encendido
hasta la posición OFF sin haber extraído el
panel frontal, la alarma de precaución
sonará durante unos segundos. La alarma
sonará solamente si se utiliza el amplificador
incorporado.
Colocación del panel frontal
6ES
Reinicio de la unidad
Antes de operar la unidad por primera vez, o
luego de remplazar la batería del automóvil
o cambiar las conexiones, debe reiniciar la
unidad.
1 Presione DSPL y (volver)/MODE
durante más de 2 segundos.
Nota
Al reiniciar la unidad, borrará los ajustes del reloj y
algunos contenidos almacenados.
Page 55

Ajuste del reloj
1 Presione MENU, gire el selector de
control para seleccionar [GENERAL] y,
a continuación, presiónelo.
2 Gire el selector de control para
seleccionar [SET CLOCK-ADJ] y, a
continuación, presiónelo.
La indicación de la hora parpadea.
3 Gire el selector de control para ajustar
la hora y los minutos.
Para mover la indicación digital, presione
SEEK +/–.
4 Una vez ajustados los minutos,
presione MENU.
El ajuste se co mpleta y el reloj se pone en
funcionamiento.
Para visualizar el reloj
Presione DSPL.
Conexión de otro
dispositivo de audio portátil
1 Apague el dispositivo de audio
portátil.
2 Baje el volumen de la unidad.
3 Conecte el dispositivo de audio
portátil a la toma de entrada AUX
(minitoma estéreo) en la unidad con
un cable de conexión (no
suministrado)*.
* Asegúrese de utilizar un tapón de respiradero.
Conexión de un dispositivo
USB
1 Baje el volumen de la unidad.
2 Conecte el dispositivo USB a la
unidad.
4 Presione SRC para seleccionar [AUX].
Coincidencia del nivel de volumen del
dispositivo conectado con otras fuentes
Comience la reproducción del dispositivo de
audio portátil en un nivel moderado y
configure su nivel habitual de volumen en la
unidad.
Presione MENU, luego seleccione [SOUND]
[SET AUX VOL] (página 12).
7ES
Page 56

Escuchar la radio
Escuchar la radio
Para escuchar una estación de radio,
presione SRC para seleccionar [TUNER].
Recepción de las emisoras
almacenadas
1 Seleccione la banda y, a continuación,
presione un botón numérico (de 1 a
6).
Almacenamiento automático
(BTM)
1 Presione MODE para cambiar la
banda de radio (FM1, FM2, FM3, AM1
o AM2).
2 Presione MENU, gire el selector de
control para seleccionar [GENERAL] y,
a continuación, presiónelo.
3 Gire el selector de control para
seleccionar [SET BTM] y, a
continuación, presiónelo.
La unidad almacena las emisoras en el
orden de frecuencia en los botones
numéricos.
Sintonización
1 Presione MODE para cambiar la
banda de radio (FM1, FM2, FM3, AM1
o AM2).
2 Realice la sintonización.
Para realizar la sintonización manual
Mantenga presionado SEEK +/– para
ubicar la frecuencia aproximada y, a
continuación, presiónelo repetidas veces
para ajustar la frecuencia deseada con
mayor precisión.
Para realizar la sintonización automática
Presione SEEK +/–.
La búsqueda se detiene cuando la
unidad recibe una emisora.
Usar el RDS (Sistema de
datos de radio)
Selección de tipos de programa
(PTY)
1 Presione PTY durante la recepción
FM.
2 Gire el selector de control hasta que
aparezca el tipo de programa
deseado y, a continuación,
presiónelo.
La unidad comienza a buscar una
estación que emita el tipo de programa
seleccionado.
Tipos de programas
NEWS (Noticias), INFORM (Información),
SPORTS (Deportes), TAL K (Debate), ROCK
(Rock), CLS ROCK (Rock clásico), ADLT HIT
(Música para adultos), SOFT RCK (Rock suave),
TOP 40 (Los 40 mejores), COUNTRY (Música
Country), OLDIES (Música de décadas pasadas),
SOFT (Lentos), NOSTALGA (Nostalgia), JAZZ
(Jazz), CLASSICL (Clásica), R & B (Ritmo y Blues),
SOFT R&B (Ritmo suave y Blues), LANGUAGE
(Idioma extranjero), REL MUSC (Música
religiosa), REL TALK (Programa religioso),
PERSNLTY (Personalidad), PUBLIC (Público),
COLLEGE (Univ.), HABL ESP (Hablar español),
MUSC ESP (Música en español), HIP HOP (Hip
hop), WEATHER (Clima)
Almacenamiento manual
1 Mientras recibe la emisora que desea
almacenar, mantenga presionado un
botón numérico (de 1 a 6) hasta que
aparezca [MEM].
8ES
Ajuste de la hora del reloj (CT)
Los datos CT de la transmisión RDS ajustan
el reloj.
1 Establezca [SET CT-ON] en [GENERAL]
(página 11).
Page 57

Reproducción
Reproducción de un disco
1 Inserte el disco (etiqueta hacia
arriba).
La reproducción se inicia
automáticamente.
Reproducción de un
dispositivo USB
Se pueden utilizar dispositivos de tipo USB*
compatibles con el estándar USB, de tipo
AOA (Android Open Accessory) 2.0, MSC
(Clase de Almacenamiento Masivo) y MTP
(Protocolo de Transferencia Multimedia).
Según el dispositivo USB, se podrá
seleccionar el modo Android o el modo
MSC/MTP en la unidad.
Algunos reproductores de medios digitales
o smartphones con Android podrían requerir
configuración en modo MTP.
* por ejemplo, una unidad flash USB, un
reproductor de medios digitales, un smartphone
con Android
Notas
• Para obtener más información acerca de la
compatibilidad del dispositivo USB, visite el sitio
web de soporte técnico que figura en la cubierta
posterior.
• Los smartphones que tengan instalado el sistema
operativo Android 4.1 o superior son compatibles
con Android Open Accessory 2.0 (AOA 2.0). Sin
embargo, es posible que algunos smartphones no
sean totalmente compatibles con AOA 2.0,
aunque tengan instalado Android OS 4.1 o
superior.
Para obtener más información acerca de la
compatibilidad del smartphone con Android, visite
el sitio web de soporte técnico que figura en la
contratapa.
• No es posible reproducir los archivos que se
indican a continuación.
MP3/WMA/FLAC:
– archivos protegidos por derechos de autor
– archivos DRM (Gestión de derechos digitales)
– archivos de audio de canales múltiples
MP3/WMA:
– archivos con formato de compresión sin pérdida
Antes de establecer una conexión,
seleccione el modo USB (modo Android o
modo MSC/MTP) en función del dispositivo
USB (página 11).
1 Conecte el dispositivo USB a al puerto
USB (página 7).
Se inicia la reproducción.
Si ya está conectado un dispositivo, para
iniciar la reproducción presione SRC para
seleccionar [USB].
2 Ajuste el volumen de esta unidad.
Para detener la reproducción
Mantenga presionado OFF por 1 segundo.
Para extraer el dispositivo
Detenga la reproducción y extraiga el
dispositivo.
Búsqueda y reproducción de
pistas
Reproducción repetida y aleatoria
No disponible cuando se conecta un
dispositivo USB en modo Android.
1 Durante la reproducción, presione
(repetir) o (aleatorio)
repetidamente para seleccionar el
modo de reproducción deseado.
La reproducción en el modo de
reproducción seleccionado puede tardar
en comenzar.
Los modos de reproducción disponibles
varían en función de la fuente de sonido
seleccionada.
9ES
Page 58

Búsqueda de una pista por
nombre (Quick-BrowZer™)
No disponible cuando se conecta un
dispositivo USB en modo Android.
1 Durante la reproducción de los
dispositivos de CD o USB, presione
(navegar)* para que aparezca la
lista de categorías de búsqueda.
Cuando aparece la lista de pistas,
presione (volver) repetidamente
hasta que aparezca la categoría de
búsqueda deseada.
* Durante la reproducción USB, presione
(navegar) durante más de 2 segundos para
volver directamente al inicio de la lista de
categorías.
2 Gire el selector de control para
seleccionar la categoría de búsqueda
deseada y, a continuación, presiónelo
para confirmarla.
3 Repita el paso 2 para buscar la pista
deseada.
Se inicia la reproducción.
Para salir del modo Quick-BrowZer
Presione (navegar).
Buscar salteando elementos
(Modo saltar)
No disponible cuando se conecta un
dispositivo USB en modo Android.
1 Presione (navegar).
2 Presione SEEK +.
3 Gire el selector de control para
seleccionar el elemento.
Se realizan omisiones en pasos del 10 %
de la cantidad total de elementos
presentes en la lista.
4 Presione ENTER para volver al modo
Quick-BrowZer.
Aparecerá el elemento seleccionado.
5 Gire el selector de control para
seleccionar el elemento deseado y, a
continuación, presiónelo.
Se inicia la reproducción.
Ajustes
Cancelación del modo DEMO
Puede cancelar la pantalla de muestra que
aparece cuando la fuente está apagada y se
muestra el reloj.
1 Presione MENU, gire el selector de
control para seleccionar [GENERAL] y,
a continuación, presiónelo.
2 Gire el selector de control para
seleccionar [SET DEMO] y, a
continuación, presiónelo.
3 Gire el selector de control para
seleccionar [SET DEMO-OFF] y, a
continuación, presiónelo.
El ajuste finalizó.
4 Presione (volver) dos veces.
La pantalla vuelve al modo de recepción/
reproducción normal.
Operación básica de ajustes
Puede seleccionar elementos de las
siguientes categorías de configuración:
Configuración general (GENERAL),
Configuración de sonido (SOUND),
Configuración de pantalla (DISPLAY)
1 Presione MENU.
2 Gire el selector de control para
seleccionar la categoría de
configuración y, a continuación,
presiónela.
Los elementos que pueden establecerse
difieren según la fuente y los ajustes.
3 Gire el selector de control para
seleccionar las opciones y, a
continuación, presiónelas.
Para regresar a la pantalla anterior
Presione (volver).
10ES
Page 59

Configuración General
(GENERAL)
DEMO (demostración)
Activa la demostración: [ON], [OFF].
CLOCK-ADJ (ajuste del reloj) (página 7)
CAUT ALM (alarma de precaución)
Activa la alarma de precaución: [ON],
[OFF] (página 6).
(Disponible solamente mientras la fuente
esté apagada y se muestre el reloj).
BEEP
Activa el sonido de los pitidos: [ON],
[OFF].
AUTO OFF
Se apaga automáticamente luego un
período establecido cuando la unidad
está apagada: [ON] (30 minutos), [OFF].
STEERING
Registros/reinicios de la configuración del
control remoto del volante.
(Disponible cuando se conecta con el
cable de conexión (no suministrado)).
(Disponible solamente mientras la fuente
esté apagada y se muestre el reloj).
STR CONTROL (control del volante)
Selecciona el modo de entrada del control
remoto conectado. Para evitar un mal
funcionamiento, asegúrese de que el
modo de entrada coincida con el control
remoto conectado antes de usarlo.
CUSTOM
Modo de entrada para el control
remoto del volante
PRESET
Modo de entrada para el control
remoto conectado con excepción del
control remoto del volante
(seleccionado de forma automática al
realizar [RESET CUSTOM]).
EDIT CUSTOM
Registra las funciones (SOURCE, ATT,
VOL +/–, SEEK +/–) para el control remoto
del volante:
Gire el selector de control para
seleccionar la función que quiere
asignar al control remoto del volante,
luego presiónela.
Mientras [REGISTER] está
parpadeando, mantenga presionado
el botón en el control remoto del
volante al que quiera asignar esta
función. Cuando el registro está
completo, se muestra [REGISTERED].
Para registrar otras funciones, repita
los pasos y .
(Solo estará disponible cuando [STR
CONTROL] está configurado en
[CUSTOM]).
RESET CUSTOM
Reinicia la configuración del control
remoto del volante: [YES] [NO].
(Solo estará disponible cuando [STR
CONTROL] está configurado en
[CUSTOM]).
Notas
• Cuando realice ajustes, sólo está disponible en
la unidad el botón de operación. Por seguridad,
estacione su automóvil antes de realizar este
ajuste.
• Si ocurre un error durante el registro, toda la
información registrada anteriormente
permanece. Reinicie el registro desde la
función de donde se produjo el error.
• Esta función puede no estar disponible en
ciertos automóviles. Para detalles acerca de la
compatibilidad de su automóvil, visite el sitio
web de soporte técnico que figura en la
cubierta posterior.
USB MODE
Cambia el modo USB: [ANDROID],
[MSC/MTP].
(Solo estará disponible cuando la fuente
USB está seleccionada).
CT (hora del reloj)
Activa la función CT: [ON], [OFF].
BTM (memoria de la mejor sintonía)
(página 8)
(Solamente estará disponible cuando la
sintonización esté seleccionada).
11ES
Page 60

FIRMWARE
(Disponible solamente mientras la fuente
esté apagada y se muestre el reloj).
Revisa/Actualiza la versión del firmware.
Para obtener más información, visite el
sitio de soporte técnico que figura en la
contratapa.
FW VERSION (versión del firmware)
Muestra la versión actual del firmware.
FW UPDATE (actualización del firmware)
Ingresa el proceso de actualización del
firmware: [YES], [NO].
La actualización del firmware tardará
unos minutos en finalizar. Durante la
actualización, no ponga el encendido en
la posición OFF, ni retire el dispositivo
USB.
Configuración del Sonido
(SOUND)
Este menú de configuración también se
puede abrir al presionar SOUND.
EQ10 PRESET
Selecciona una curvas de ecualización de
las 10 disponible o entre:
[OFF], [R&B], [ROCK], [POP], [HIP-HOP],
[ELECTRONICA], [JAZZ], [SOUL],
[COUNTRY], [KARAOKE]*, [CUSTOM].
El ajuste de la curva de ecualizador se
puede memorizar para cada fuente.
* [KARAOKE] reduce el sonido vocal, aunque no
puede ser omitido en su totalidad durante la
reproducción. Además, no se admite el uso de
micrófonos.
EQ10 CUSTOM
Ajuste [CUSTOM] de EQ10.
Ajuste de la curva de ecualización:
[BAND1] 32 Hz, [BAND2] 63 Hz, [BAND3]
125 Hz, [BAND4] 250 Hz, [BAND5] 500 Hz,
[BAND6] 1 kHz, [BAND7] 2 kHz, [BAND8]
4 kHz, [BAND9] 8 kHz, [BAND10] 16 kHz.
El nivel de volumen puede ajustarse en
intervalos de 1 dB entre -6 dB y +6 dB.
BALANCE
Permite ajustar el balance de sonido:
[RIGHT-15] – [CENTER] – [LEFT-15].
FADER
Permite ajustar el nivel relativo:
[FRONT-15] – [CENTER] – [REAR-15].
S.WOOFER (altavoz potenciador de graves)
SW LEVEL (nivel del subwoofer)
Ajusta el nivel de volumen del altavoz
potenciador de graves:
[+6 dB] – [0 dB] – [-6 dB].
([ATT] aparece en pantalla con el ajuste
más bajo).
SW PHASE (fase de altavoz potenciador
de graves)
Selecciona la fase del altavoz potenciador
de graves: [NORM], [REV].
LPF FREQ (frecuencia de filtro de paso
bajo)
Selecciona la frecuencia de corte del
altavoz potenciador de graves: [80Hz],
[100Hz], [120Hz].
HPF FREQ (frecuencia de filtro de paso alto)
Seleccionar la frecuencia de corte de los
altavoces frontales y posteriores: [OFF],
[80Hz], [100Hz], [120Hz].
AUX VOL (nivel de volumen AUX)
Ajusta el nivel de volumen de cada
dispositivo auxiliar conectado: [+18 dB] –
[0 dB] – [-8 dB].
Este ajuste elimina la necesidad de
ajustar el nivel de volumen entre fuentes.
(Solo estará disponible cuando AUX está
seleccionado).
12ES
Page 61

Configuración de Pantalla
(DISPLAY)
Información complementaria
DIMMER
Cambia el brillo de la pantalla: [ON],
[OFF], [CLK].
Para activar esta función solo por un
tiempo determinado, seleccione [CLK], y
luego configure la hora de inicio y fin.
– Para ajustar el brillo una vez que se
activa la función de atenuación:
Configure [DIMMER] a [ON] y luego
ajuste el [BRIGHTNESS].
– Para ajustar el brillo una vez que se
desactiva la función de atenuación:
Configure [DIMMER] a [OFF] y luego
ajuste el [BRIGHTNESS].
La configuración de brillo se almacenan y
aplican cuando la función de atenuación
está activada o desactivada.
BRIGHTNESS
Ajusta el brillo de la pantalla. El nivel de
brillo se puede ajustar: [1] – [10].
SND SYNC (sincronización de sonidos)
Activa la sincronía de la iluminación con el
sonido: [ON], [OFF].
AUTO SCR (desplazamiento automático)
Permite desplazarse por los elementos de
la pantalla automáticamente: [ON], [OFF].
(No disponible cuando está seleccionado
el AUX o sintonizador).
Actualizar el Firmware
Para actualizar el firmware, visite el sitio de
soporte técnico que figura en la contratapa y
siga las instrucciones en línea.
Notas
• Se debe utilizar un dispositivo USB (no
suministrado) para actualizar el firmware. Guarde
el archivo de actualización en el dispositivo USB, y
conecte el dispositivo al puerto USB, luego realice
la operación de actualización.
• La actualización del firmware tardará unos
minutos en finalizar. Durante la actualización, no
ponga el encendido en la posición OFF, ni retire el
dispositivo USB.
Precauciones
•Deje que la unidad se enfríe antes de
usarla si el automóvil ha estado
estacionado bajo la luz directa del sol.
• No deje el panel frontal o los dispositivos
de audio dentro del vehículo o podría
causar fallas en el funcionamiento debido
a las altas temperaturas bajo la luz directa
del sol.
•La antena de alimentación se extiende
automáticamente.
Condensación de humedad
Si se produce condensación de humedad en
el interior de la unidad, extraiga el disco y
espere una hora aproximadamente hasta
que se haya secado por completo la unidad.
De lo contrario, la unidad no funcionará
correctamente.
Para mantener una alta calidad de
sonido
No derrame ningún tipo de líquido sobre la
unidad o los discos.
13ES
Page 62

Notas sobre los discos
Carpeta (álbum)
Archivo de audio
(pista)
• No exponga los discos a la luz solar directa
ni a fuentes de calor como por ejemplo,
conductos de aire caliente, ni los deje en el
automóvil estacionado bajo la luz solar
directa.
• Antes de reproducir los
discos, límpielos con
un paño de limpieza.
Hágalo desde el centro
hacia los bordes. No
utilice disolventes
como bencina,
diluyentes ni productos
de limpieza
disponibles en el mercado.
• Esta unidad se diseñó para reproducir
discos que cumplen con el estándar
Compact disc (CD). Los DualDisc y otros
discos de música codificados con
tecnologías de protección de derechos de
autor no cumplen el estándar Compact
disc (CD), por lo que no podrán
reproducirse con esta unidad.
• Discos que NO se pueden reproducir en
esta unidad
– Discos con etiquetas, autoadhesivos o
cinta adhesiva o papeles adheridos. Si
utiliza este tipo de discos, puede
provocar una falla de funcionamiento o
dañar el disco.
– Discos con formas no estandarizadas
(por ejemplo, formas de corazón,
cuadrado o estrella). Si lo intenta, puede
dañar la unidad.
–Discos de 8 cm.
Notas sobre los discos CD-R/CD-RW
• Si un disco multisesión empieza con una
sesión CD-DA, se reconoce como un disco
CD-DA y las otras sesiones no se
reproducen.
• Discos que NO se pueden reproducir en
esta unidad
– CD-R/CD-RW de calidad de grabación
deficiente.
– CD-R/CD-RW grabados con un
dispositivo de grabación no compatible.
– CD-R/CD-RW no finalizados
correctamente.
– CD-R/CD-RW que no se hayan grabado
en formato CD de música o en formato
MP3 que cumpla la norma ISO9660
Level 1/Level 2, Joliet/Romeo o
multisesión.
Orden de reproducción de los
archivos de audio
Si desea realizar alguna consulta o
solucionar algún problema relativo a la
unidad que no se traten en este manual,
póngase en contacto con el distribuidor
Sony más cercano.
14ES
Page 63

Mantenimiento
Lado + hacia arriba
Especificaciones
Sustitución de la pila de litio del control
remoto
Bajo condiciones normales, la batería durará
aproximadamente 1 año. (La vida útil puede
ser más corta, dependiendo de las
condiciones de uso).
El alcance del control remoto disminuye a
medida que se agota la pila.
PRECAUCIÓN
Peligro de explosión si la batería se
reemplaza incorrectamente. Reemplazarla
solamente con una igual o equivalente.
Notas sobre la pila de litio
• Mantenga la pila de litio fuera del alcance de los
niños. Si se ingiere, póngase en contacto
inmediatamente con un médico.
• Limpie la batería con un paño seco para asegurar
un buen contacto.
• Asegúrese de respetar la polaridad al instalarla.
• No sujete la pila con pinzas metálicas, ya que
podría producirse un cortocircuito.
Limpieza de los conectores
Es posible que la unidad no funcione
correctamente si los conectores entre esta y
el panel frontal están sucios. Para evitar esta
situación, extraiga el panel frontal (página 6)
y limpie los conectores con un hisopo de
algodón. Realice esta operación con
suavidad. De lo contrario, los conectores
pueden dañarse.
Notas
• Por razones de seguridad, apague el motor antes
de limpiar los conectores y extraiga la llave del
interruptor de la llave de encendido.
• No toque nunca los conectores directamente con
los dedos ni con ningún dispositivo metálico.
Sección del sintonizador
FM
Rango de sintonización: 87,5 MHz –
107,9 MHz
Terminal de antena:
Conector de antena externa
Frecuencia intermedia:
FM CCIR: -1 956,5 kHz a -487,3 kHz y
+500,0 kHz a +2 095,4 kHz
Sensibilidad útil: 7 dBf
Selectividad: de 75 dB a 400 kHz
Relación señal-ruido: 73 dB
Separación: de 50 dB a 1 kHz
Respuesta de frecuencia: 20 Hz – 15 000 Hz
AM
Rango de sintonización: 530 kHz – 1 710 kHz
Terminal de antena:
Conector de antena externa
Sensibilidad: 26 µV
Sección Reproductora de CD
Relación señal-ruido: 95 dB
Respuesta de frecuencia: 10 Hz – 20 000 Hz
Fluctuación y trémolo: inferior al límite
medible
Número máximo de: (solamente CD-R/
CD-RW)
– carpetas (álbumes): 150 (incluida la
carpeta raíz)
– archivos (pistas) y carpetas: 300 (si los
nombres de carpeta o archivo contienen
muchos caracteres, este número puede
ser inferior a 300)
– caracteres que se pueden visualizar en el
nombre de una carpeta o archivo:
32 (Joliet)/64 (Romeo)
Códec correspondiente: MP3 (.mp3) y
WMA (.wma)
Sección Reproductora de USB
Interfaz: USB (velocidad máxima)
Corriente máxima: 500 mA
La cantidad máxima de pistas reconocibles:
– carpetas (álbumes): 256
– archivos (pistas) por carpeta: 256
Accesorio de protocolo abierto de Android
(AOA) compatible: 2.0
15ES
Page 64

Códec correspondiente:
MP3 (.mp3)
Velocidad de transferencia: 8 kbps –
320 kbps (compatible con VBR
(Velocidad de transferencia
variable))
Velocidad de muestreo: 16 kHz –
48 kHz
WMA (.wma)
Velocidad de transferencia: 32 kbps –
192 kbps (compatible con VBR
(Velocidad de transferencia
variable))
Velocidad de muestreo: 32 kHz,
44,1 kHz, 48 kHz
FLAC (.flac)
Profundidad de bits: 16 bits, 24 bits
Velocidad de muestreo: 44,1 kHz –
48 kHz
Sección del amplificador de corriente
Salida: salidas de altavoz
Impedancia del altavoz: 4 – 8
Salida de potencia máxima: 55 W × 4 (a 4 )
Generales
Salidas:
Terminal de salidas de audio: (REAR, SUB)
Antena de alimentación/Terminal de
control del amplificador de potencia
(REM OUT)
Entradas:
Terminal de entrada del control remoto
Terminal de entrada de la antena
Toma de entrada AUX (minitoma estéreo)
Puerto USB
Requisitos de alimentación: batería de
automóvil de cc 12 V (masa negativa)
Tasa de consumo actual: 10 A
Dimensiones:
Aprox. 178 mm × 50 mm × 177 mm
(an/al/prf)
Dimensiones de montaje:
Aprox. 182 mm × 53 mm × 160 mm
(an/al/prf)
Masa: Aprox. 1,2 kg
Contenidos del paquete:
Unidad principal (1)
Control remoto (1): RM-X211
Componentes de instalación y
conexiones (1 juego)
Equipo/accesorios opcionales:
Cable para entrada del mando en el
volante de dirección: RC-SR1
Es posible que su distribuidor no
comercialice algunos de los accesorios que
figuran en la lista anterior. Solicite
información detallada.
El diseño y las especificaciones están sujetos
a cambios sin previo aviso.
Derechos de autor
Windows Media es una marca comercial
registrada o una marca comercial de
Microsoft Corporation en los EE. UU. y otros
países.
Este producto está protegido por los
derechos de propiedad intelectual de
Microsoft Corporation. Queda prohibido el
uso o la distribución de esta tecnología
fuera de este producto si no se dispone de
una licencia de Microsoft o una división
autorizada de Microsoft.
Tecnología de codificación de audio MPEG
Layer-3 y patentes bajo licencia de
Fraunhofer IIS y Thomson.
Android es una marca comercial de Google
Inc.
libFLAC
Copyright (C) 2000-2009 Josh Coalson
Copyright (C) 2011-2013 Xiph.Org Foundation
La redistribución y el uso en formas binarias
y de fuente, con o sin modificación, están
permitidos siempre y cuando se cumplan las
siguientes condiciones:
– Las redistribuciones de los códigos fuente
deben retener la nota de copyright antes
mencionada, esta lista de condiciones y el
siguiente aviso.
– Las redistribuciones en forma binaria
deben reproducir la noticia de copyright
antes mencionada, la lista de condiciones
y el siguiente aviso en el documento u
otros materiales provistos con la
distribución.
16ES
Page 65

– Ni el nombre de Xiph.org Foundation o los
nombres de sus contribuidores deben
utilizarse para promocionar o publicitar los
productos derivados de este software sin
la autorización previa por escrito.
ESTE SOFTWARE ES PROVISTO POR LOS
DUEÑOS Y CONTRIBUIDORES DEL
COPYRIGHT “COMO ES” Y CUALQUIER
GARANTÍA EXPRESA O IMPLÍCITA, QUE
INCLUYE PERO NO SE LIMITA, A LAS
GARANTÍAS IMPLÍCITAS DE
MERCANTIBILIDAD O APTITUD PARA UN
PROPÓSITO PARTICULAR ESTÁN
DENEGADAS. BAJO NINGÚN PUNTO DE VISTA
DEBERÁN LOS CONTRIBUIDORES SER
RESPONSABLES POR CUALQUIER DAÑO
DIRECTO, INDIRECTO, ESPECIAL, EJEMPLAR O
COMO CONSECUENCIA (LO QUE INCLUYE
PERO NO SE LIMITA A LA ADQUISICIÓN DE
BIENES SUSTITUTOS O SERVICIOS; PÉRDIDA
DE USO, INFORMACIÓN O GANANCIAS; O
INTERRUPCIÓN COMERCIAL) SIN IMPORTAR
CUAL SEA LA CAUSA Y EN CUALQUIER
TEORÍA DE RESPONSABILIDAD, YA SEA POR
CONTRATO, RESPONSABILIDAD ESTRICTA O
RESPONSABILIDAD EXTRACONTRACTUAL (LO
QUE INCLUYE NEGLIGENCIA U OTROS) QUE
SURJA DE CUALQUIER MANERA DEL USO DE
ESTE SOFTWARE, AÚN SI HA SIDO
ADVERTIDO DE LA POSIBILIDAD DE TAL
DAÑO.
Solución de problemas
La siguiente lista de comprobación le
ayudará a solucionar los problemas que
puedan producirse con la unidad.
Antes de consultarla, revise los
procedimientos de conexión y de
funcionamiento.
Para más detalles sobre el uso del fusible y
sobre cómo quitar la unidad del tablero, ver
“Conexión/Instalación” (página 21).
Si el problema no se resuelve, visite el sitio
web de soporte técnico que figura en la
cubierta posterior.
Generales
La unidad no recibe alimentación.
Si la unidad está apagada y la pantalla
desaparece, no se puede operar con el
control remoto.
– Encienda la unidad.
No hay sonido o el sonido es muy bajo.
La posición del control de equilibrio
[FADER] no está ajustada para un sistema
de 2 altavoces.
El volumen de la unidad o dispositivo
conectado es muy bajo.
– Aumente el volumen de la unidad o del
dispositivo conectado.
No se escuchan pitidos.
Se encuentra conectado un amplificador
de potencia opcional y no está usando el
amplificador integrado.
El contenido de la memoria se borró.
Se desconectó la batería o el cable de
fuente de alimentación, o no están
conectados correctamente.
Las emisoras almacenadas y la hora
correcta se borraron.
El fusible se fundió.
Se escucha un ruido cuando se cambia la
posición de la llave de encendido.
Los cables no se conectaron de forma
correcta al conector de alimentación
auxiliar del automóvil.
17ES
Page 66

Durante la reproducción o la recepción, el
modo demostración se inicia.
Si no se realiza ninguna operación durante
5 minutos y la opción [DEMO-ON] está
ajustada, se iniciará el modo de
demostración.
– Ajuste [DEMO-OFF] (página 11).
Las indicaciones desaparecen del
visualizador o no aparecen en él.
El atenuador está ajustado en [DIM-ON]
(página 13).
La pantalla se apaga si mantiene
presionado OFF.
– Presione OFF en la unidad hasta que se
ilumine la pantalla.
Los conectores están sucios (página 15).
La pantalla/iluminación parpadeará.
La fuente de alimentación no es
suficiente.
– Revise si la batería del coche le
suministra la energía necesaria a la
unidad. (El requerimiento de potencia es
de 12 V cc).
Los botones de operación no funcionan.
El disco no sale expulsado.
Presione DSPL y (volver)/MODE por
más de 2 segundos para reiniciar la
unidad.
Los contenidos almacenados en la
memoria son eliminados.
Por su seguridad, no realice la
restauración de la unidad mientras
maneja.
Recepción de radio
No es posible recibir emisoras.
El sonido está obstaculizado por los
ruidos.
La conexión no es correcta.
– Si su automóvil cuenta con una antena
de radio incluida en el vidrio lateral o
posterior, conecte un cable REM OUT
(con rayas azules y blancas) o un cable
de fuente de alimentación accesorio
(rojo) al cable de fuente de alimentación
del amplificador de señal de la antena
del automóvil.
– Compruebe la conexión de la antena del
automóvil.
– Si la antena automática no se extiende,
compruebe la conexión del cable de
control de la antena motorizada.
No es posible utilizar la sintonización
programada.
La señal de emisión es demasiado débil.
RDS
PTY muestra [- - - - - - - -].
La emisora actual no es una emisora RDS.
No se recibieron datos RDS.
La emisora no especifica el tipo de
programa.
Reproducción de CD
No se inicia la reproducción.
Disco defectuoso o sucio.
Los discos CD-R/CD-RW no son para
audio (página 14).
No se pueden reproducir archivos MP3/
WMA.
El disco es incompatible con el formato y
la versión de MP3/WMA. Para más
información acerca de los formatos y
discos aptos para reproducir, visite el sitio
de asistencia en la contratapa.
18ES
Page 67

Los archivos MP3/WMA demoran más en
reproducirse que los otros.
El inicio de la reproducción de los
siguientes discos tarda algo más de
tiempo.
– Disco grabado con una estructura de
árbol complicada.
– Disco grabado en Multi Session.
– Disco al que es posible añadir datos.
Se producen saltos de sonido.
Disco defectuoso o sucio.
Reproducción en dispositivo USB
No es posible reproducir elementos a
través de un concentrador USB.
Esta unidad no puede reconocer
dispositivos USB a través de un
concentrador USB.
El dispositivo USB tarda en reproducirse.
El dispositivo USB contiene archivos con
una estructura de árbol compleja.
El sonido es discontinuo.
El sonido puede ser intermitente si la
velocidad de transferencia es elevada.
En algunos casos es posible que los
archivos DRM (Gestión de derechos
digitales) no se reproduzcan.
Un archivo de audio no puede
reproduc irse.
Los dispositivos USB formateados con
sistemas de archivos distintos a FAT16 o
FAT32 no son soportados.*
* Esta unidad sopor ta FAT16 y FAT32, pero algunos
dispositivos USB pueden no soportar todos estos
FAT. Para detalles, refiérase a la instrucción de
operación de cada dispositivo USB o contacte al
fabricante.
Las operaciones para saltar un álbum,
saltar artículos (Modo saltar) y buscar una
pista por su nombre (Quick-BrowZer) no
se pueden realizar.
Estas operaciones no se pueden realizar al
conectar un dispositivo USB en modo
Android.
– Establecer [USB MODE] a [MSC/MTP]
(página 11).
El modo USB del dispositivo no está
configurado en el modo apropiado.
– Asegúrese de que el modo USB del
dispositivo esté configurado en modo
MSC/MTP.
El sonido no se emitirá durante la
reproducción en modo Android.
Mientras la unidad está en modo Android,
el sonido se emite solo desde el
smartphone con Android.
– Verifique el estado de la aplicación de
reproducción de audio en el smartphone
con Android.
– La reproducción podría no realizarse
correctamente, dependiendo del
smartphone con Android.
Mensajes
El siguiente mensaje puede aparecer o
parpadear durante la operación.
CD ERROR: No puede reproducirse el disco.
El disco será expulsado automáticamente.
Limpie o inserte el disco correctamente, o
asegúrese de que el disco no esté en
blanco o defectuoso.
CD NO MUSIC: No hay ningún archivo apto
para reproducir. El disco será expulsado
automáticamente.
Inserte un disco que contenga archivos
aptos para reproducir (página 15).
CD PUSH EJT: No puede expulsarse el disco
correctamente.
Presione (expulsar).
HUB NO SUPRT: Los concentradores USB no
son compatibles.
19ES
Page 68

INVALID
Puede que la operación seleccionada no
sea válida.
NOT SUPPORT - ANDROID MODE
Un dispositivo USB que no admite AOA
(Android Open Accessory) 2.0 estará
conectado a la unidad mientras [USB
MODE] se encuentre configurado en
[ANDROID].
– Establecer [USB MODE] a [MSC/MTP]
(página 11).
OVERLOAD: El dispositivo USB se encuentra
sobrecargado.
Desconecte el dispositivo USB, luego
presione SRC para seleccionar otra fuente.
El dispositivo USB tiene una falla, o se ha
conectado un dispositivo incompatible.
READ: Leyendo información.
Espere hasta que finalice la lectura y se
inicie la reproducción automáticamente.
Esto puede demorar un poco según la
estructura de la información.
USB ERROR: No puede reproducirse el
dispositivo USB.
Conecte el dispositivo USB nuevamente.
USB NO DEV: No reconoce un dispositivo
USB o no está conectado.
Asegúrese de que el dispositivo USB o el
cable USB esté conectado de forma
segura.
USB NO MUSIC: No existe un archivo
reproducible.
Conecte un dispositivo USB que contenga
archivos reproducibles (página 15).
USB NO SUPRT: El dispositivo USB no es
compatible.
Para obtener más información acerca de la
compatibilidad del dispositivo USB, visite
el sitio web de soporte técnico que figura
en la cubierta posterior.
o : Ha llegado al comienzo o
al final del disco.
(guion bajo): el carácter no puede
visualizarse.
Para funcionamiento con control
remoto de mando:
ERROR: Ocurrió un error durante el registro
de la función.
Realice el registro nuevamente desde la
función donde ocurrió el error (página 11).
TIMEOUT: Falló el registro de la función
debido a que se agotó el tiempo de espera.
Intente completar el registro mientras
[REGISTER] parpadea (alrededor de
6 segundos) (página 11).
Si estas soluciones no ayudan a solucionar
el problema, póngase en contacto con el
distribuidor Sony más cercano.
Si entrega la unidad para su reparación a
causa de problemas en la reproducción de
CD, lleve el disco que se utilizó cuando se
produjo el problema.
20ES
Page 69

Conexión/Instalación
× 4
5 × máx. 8 mm
× 2
Advertencias
• Conecte todos los cables hacia un punto
a tierra en común.
• No deje que los cables queden atrapados
debajo de un tornillo o que se enganchen
en piezas móviles.
• Antes de hacer conexiones, apague el auto
para evitar cortocircuitos.
• Conecte los cables amarillo y rojo del
sistema de alimentación únicamente
después de que todos los demás cables
hayan sido conectados.
• Asegúrese de aislar cualquier cable suelto
sin conexión con cinta aislante para mayor
seguridad.
Precauciones
• Elija la ubicación de la instalación con
cuidado para que la unidad no interfiera
con las operaciones de conducción
normales.
• Evite instalar la unidad en áreas expuestas
a polvo, tierra, vibración excesiva o alta
temperatura, como luz solar directa o cerca
de calefactores.
• Utilice solamente el hardware de montaje
suministrado para obtener una instalación
segura.
Observe el cable del sistema de alimentación
(amarillo)
Cuando conecte esta unidad junto con otros
componentes estéreo, la capacidad nominal de la
corriente del circuito del auto al cual la unidad se
encuentra conectada debe ser mayor que la suma
de la capacidad nominal del fusible de cada
componente.
Montar el ajuste del ángulo
Ajustar el ángulo de montaje a menos de
45°.
Lista de piezas para la
instalación
• Esta lista de piezas no incluye todo el
contenido del paquete.
•El soporte y el marco de protección
se unen a la unidad antes del envío. Antes
de montar la unidad, utilice las claves de
liberación para quitar el soporte de la
unidad. Para obtener más información,
consulte “Quitar el marco de protección y el
soporte” (página 24).
•Conserve las claves de liberación para
un uso futuro ya que son también
necesarias si quita la unidad de su auto.
21ES
Page 70

Conexión
desde u n control rem oto
conectado (no suministrado)*
4
Blanco
Blanco/negro a rayas
Gris
Negro
Amarillo
Rojo
Azul/blanco a rayas
desde una antena de auto
Altavoz frontal*1*
2
Altavoz posterior*1*
2
Gris/n egro a rayas
Verde
Verde/negro a rayas
Púrpura
Púrpura/negro a rayas
*
3
*
3
Subwoofer*
1
Para obtener más información,
consulte “Hacer conexiones”
(página 23).
Amplificador de
potencia*
1
*1 No suministrado
*2 Impedancia del altavoz: 4 – 8 × 4
*3 Cable con clavija RCA (no suministrado)
*4 Dependiendo del tipo de automóvil, utilice un
adaptador para u n control remoto conectado (no
suministrado). Para más información sobre el
uso de l control remoto co nectado, co nsulte “Uso
del control remoto conectado” (página 23).
22ES
Page 71

Hacer conexiones
Altavoz frontal
Subwoofer
Para un punto de puesta a tierra
Primero conecte el conector a tierra,
luego conecte los cables amarillo y rojo
del sistema de alimentación.
A la terminal de potencia +12 V que se
encuentra energizada en todo
momento
Asegúrese de conectar primero el cable a
tierra negro a un punto de puesta a tierra.
A la terminal de potencia +12 V que se
encuentra energizada cuando el
interruptor de encendido se encuentra
fijo en la posición accesorio
Si no exis te la posi ción acce sorio, co necte
la terminal de potencia +12 V (batería) la
cual se encuentra energizada en todo
momento.
Asegúrese de conectar primero el cable a
tierra negro a un punto de puesta a tierra.
Al cable de control de la antena
motorizada o al cable de la fuente de
alimentación del amplificador
No es necesario conectar este cable si no
hay antena motorizada o al amplificador
de la antena, o con una antena
telescópica operada manualmente.
Para AMP REMOTE IN de un
amplificador de potencia opcional
Esta conexión se usa solamente para
amplificadores y para una antena
motorizada. Conectar cualquier otro
sistema puede dañar la unidad.
Conexión fácil de subwoofer
Puede utilizar un subwoofer sin un
amplificador de potencia cuando está
conectado al cable del altavoz posterior.
Conexión para sostener la memoria
Cuando el cable de la fuente de
alimentación amarillo está conectado, la
alimentación siempre abastecerá al circuito
de la memoria incluso cuando el interruptor
de encendido se encuentre apagado.
Conexión del altavoz
• Antes de conectar los altavoces, apague la
unidad.
•Utilice altavoces con una impedancia de
4 a 8 que cuenten con las capacidades
adecuadas para el manejo de la
alimentación para evitar daños.
Uso del control remoto conectado
Cuando use el control remoto del
volante
El cable de conexión RC-SR1 (no
suministrado) debe estar instalado antes de
poder ser usado.
1 Para habilitar el control remoto del volante,
seleccione [SET STEERING] [EDIT CUSTOM]
para realizar el registro (página 11).
Una vez finalizado el registro, el control
remoto del volante estará disponible.
Notas sobre la instalación del cable de
conexión RC-SR1 (no suministrado)
• Refiérase a los sitios de soporte técnico que
figuran en la cubierta posterior para obtener
detalles, luego conecte adecuadamente cada
cable con los cables correspondientes. Una
conexión incorrecta puede dañar la unidad.
• Según el tipo de vehículo, asegúrese de aislar los
cables que no se utilizan con cinta aislante para
mayor seguridad.
• No conecte este cable cuando no se utiliza el
control remoto del volante.
• Se recomienda consultar con el vendedor o un
técnico experimentado para obtener ayuda.
Cuando se usa el control remoto
conectado
Para habilitar el control remoto conectado,
1
ajuste [STR CONTROL] en [SET STEERING] en
[PRESET] (página 11).
Nota
Utilice un altavoz potenciador de graves con una
impedancia de 4 a 8 que cuente con las
capacidades adecuadas para el manejo de la
alimentación para evitar daños.
23ES
Page 72

Instalación
Coloque el gancho hacia adentro.
Tor nil lo
Compartimento
182 mm
53 mm
Pestillo
Quitar el marco de protección y el
soporte
Antes de instalar la unidad, quite el marco
de protección y el soporte de la
unidad.
1 Apriete ambos ejes del marco de
protección , luego retírelo.
2 Inserte ambas llaves hasta que
hagan clic y empuje el soporte ,
luego retire la unidad para separar.
Nota
Antes de in stalar esta unida d, extraiga el tornill o y el
compartimento que se encuentran en la parte
posterior de la unidad. No utilice las piezas
anteriores que extrajo al instalar la unidad.
Montar la unidad en el panel
•Antes de efectuar la instalación, asegúrese
de que los pestillos en ambos lados del
soporte estén doblados hacia adentro
2 mm.
• Para los automóviles japoneses, consulte
“Montar la unidad en un auto japonés”
(página 25).
1 Coloque el soporte dentro del
panel, luego doble las pinzas hacia
afuera hasta que queden bien
ajustadas.
2 Monte la unidad dentro del soporte
, luego una el marco de protección
.
Notas
• Si los pestillos están derechos o doblados hacia
afuera, la unidad no se ins talará de manera segura
y se puede salir.
• Asegúrese de que los 4 pestillos en el marco de
protección se encuentren sujetados
correctamente a las ranuras de la unidad.
24ES
Page 73

Montar la unidad en un auto
para panel/consola central
Partes existentes
suministradas con su
auto
Soporte
Soporte
para panel/consola central
Partes existentes
suministradas con su
auto
Soporte
Soporte
Fusible (10 A)
japonés
Tal vez no pueda instalar esta unidad en
algunas marcas de autos japoneses. En
dicho caso, consulte con su distribuidor
Sony.
TOYOTA
NISSAN
Desenganchar y enganchar el
panel frontal
Para obtener más información, consulte
“Extracción del panel frontal” (página 6).
Reinicio de la unidad
Para obtener más información, consulte
“Reinicio de la unidad” (página 6).
Reemplazo del fusible
Cuando reemplace el
fusible, asegúrese de
utilizar uno que coincida
con la capacidad nominal
del fusible original. Si el
fusible se quema, verifique
la conexión eléctrica y
reemplace el fusible. Si el fusible se quema
nuevamente después de reemplazarlo,
puede haber un mal funcionamiento
interno. En dicho caso, consulte con su
distribuidor Sony más cercano.
Nota
Para evitar el mal funcionamiento, instale la unidad
solamente con los tornillos suministrados .
25ES
Page 74

Page 75

Page 76

http://esupport.sony.com/
Support site
If you have any questions or for the
latest support information on this
product, please visit the web site
below:
Site d’assistance
Si vous avez des questions ou si
vous souhaitez consulter les toutes
dernières informations techniques
sur ce produit, rendez-vous sur le
site Web suivant :
Sitio Web de soporte
técnico en línea
Para resolver cualquier duda u obtener
la información más reciente sobre el
soporte técnico de este producto,
visite el siguiente sitio Web:
If you have any questions/problems
regarding this product, try the following:
1
Read Troubleshooting in these
Operating Instructions.
2
Please contact (U.S.A. only);
Call
1-800-222-7669
URL
http://www.SONY.com
©2016 Sony Corporation Printed in Thailand http://www.sony.net/
 Loading...