

Page 1

4-542-302-51(1)
FM/AM
Compact Disc
Player
For the connection/installation, see page 15.
연결/설치에 대한내용은 15페이지를 참조하십시오.
Operating Instructions
사용 설명서
GB
KR
To switch the FM/AM tuning step, see page 5.
To cancel the demonstration (DEMO) display, see page 9.
FM/AM 튜닝 단위를 전환하려면 5페이지를 참조하십시오.
데모(DEMO) 표시를 취소하려면 9페이지를 참조하십시오.
CDX-G1151U/CDX-G1150U
Page 2

For safety, be sure to install this unit in the
dashboard of the car as the rear side of the unit
becomes hot during use.
For details, see “Connection/Installation”
(page 15).
Laser Diode Properties
Emission Duration: Continuous
Laser Output: Less than 53.3 W
(This output is the value measurement at a distance
of 200 mm from the objective lens surface on the
Optical Pick-up Block with 7 mm aperture.)
The nameplate indicating operating voltage, etc., is
located on the bottom of the chassis.
Note on the lithium battery
Do not expose the battery to excessive heat such as
direct sunlight, fire or the like.
Warning if your car’s ignition has no ACC
position
Be sure to set the AUTO OFF function (page 9).
The unit will shut off completely and
automatically in the set time after the unit is
turned off, which prevents battery drain. If you
do not set the AUTO OFF function, press and hold
OFF until the display disappears each time you
turn the ignition off.
2GB
Page 3
Table of Contents
Guide to Parts and Controls . . . . . . . . . . . . . . . . . . 4
Getting Started
Detaching the Front Panel. . . . . . . . . . . . . . . . . . . . 5
Switching the FM/AM Tuning Step . . . . . . . . . . . . . 5
Setting the Clock . . . . . . . . . . . . . . . . . . . . . . . . . . . 6
Connecting a USB Device . . . . . . . . . . . . . . . . . . . . 6
Connecting Other Portable Audio Device . . . . . . . 6
Listening to the Radio
Listening to the Radio . . . . . . . . . . . . . . . . . . . . . . . 7
Using Radio Data System (RDS) . . . . . . . . . . . . . . . 7
Playback
Playing a Disc . . . . . . . . . . . . . . . . . . . . . . . . . . . . . . 8
Playing a USB Device . . . . . . . . . . . . . . . . . . . . . . . . 8
Searching and Playing Tracks . . . . . . . . . . . . . . . . . 8
Settings
Canceling the DEMO Mode . . . . . . . . . . . . . . . . . . . 9
Basic Setting Operation . . . . . . . . . . . . . . . . . . . . . . 9
General Setup (GENERAL) . . . . . . . . . . . . . . . . . . . . 9
Sound Setup (SOUND) . . . . . . . . . . . . . . . . . . . . . . . 9
Display Setup (DISPLAY) . . . . . . . . . . . . . . . . . . . . 10
Additional Information
Precautions . . . . . . . . . . . . . . . . . . . . . . . . . . . . . . . 10
Maintenance. . . . . . . . . . . . . . . . . . . . . . . . . . . . . . . 11
Specifications . . . . . . . . . . . . . . . . . . . . . . . . . . . . . . 11
Troubleshooting. . . . . . . . . . . . . . . . . . . . . . . . . . . . 12
Connection/Installation
Cautions . . . . . . . . . . . . . . . . . . . . . . . . . . . . . . . . . . 15
Parts List for Installation . . . . . . . . . . . . . . . . . . . . . 15
Connection . . . . . . . . . . . . . . . . . . . . . . . . . . . . . . . 16
Installation . . . . . . . . . . . . . . . . . . . . . . . . . . . . . . . . 17
3GB
Page 4
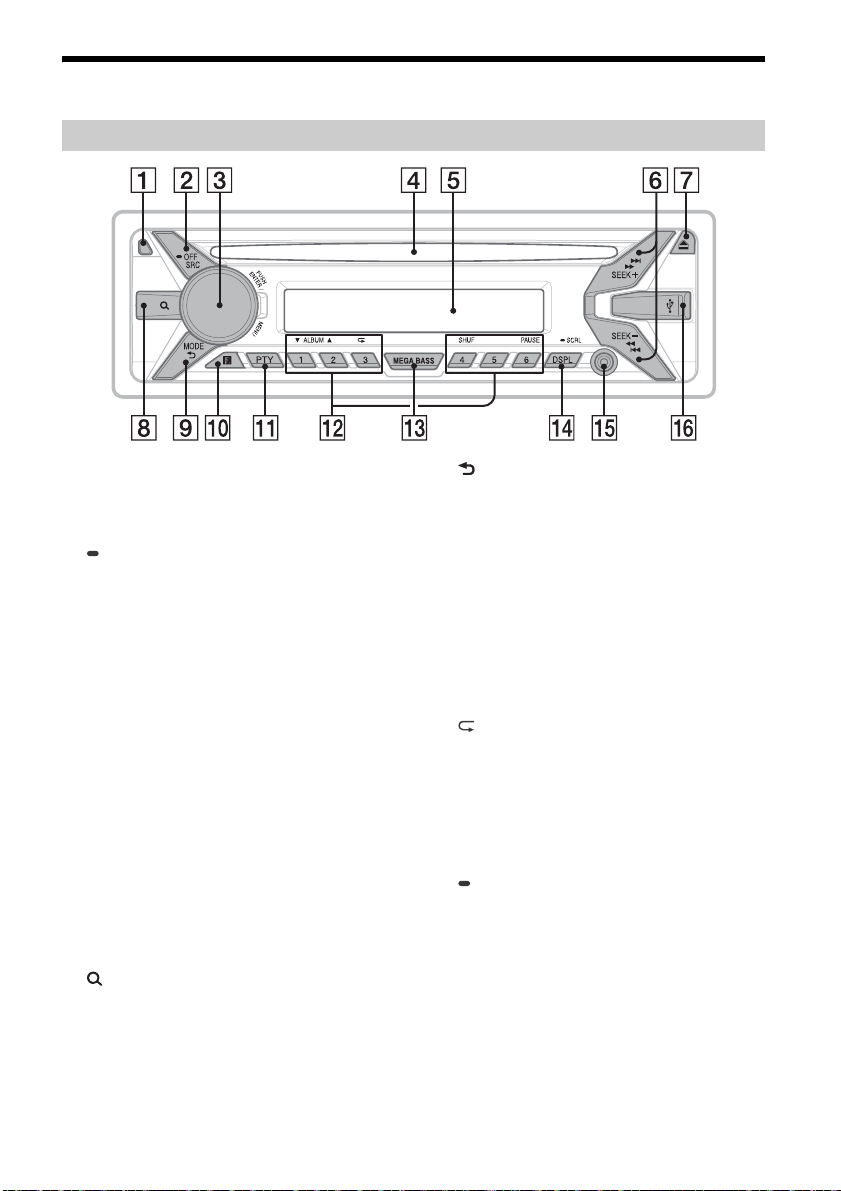
Guide to Parts and Controls
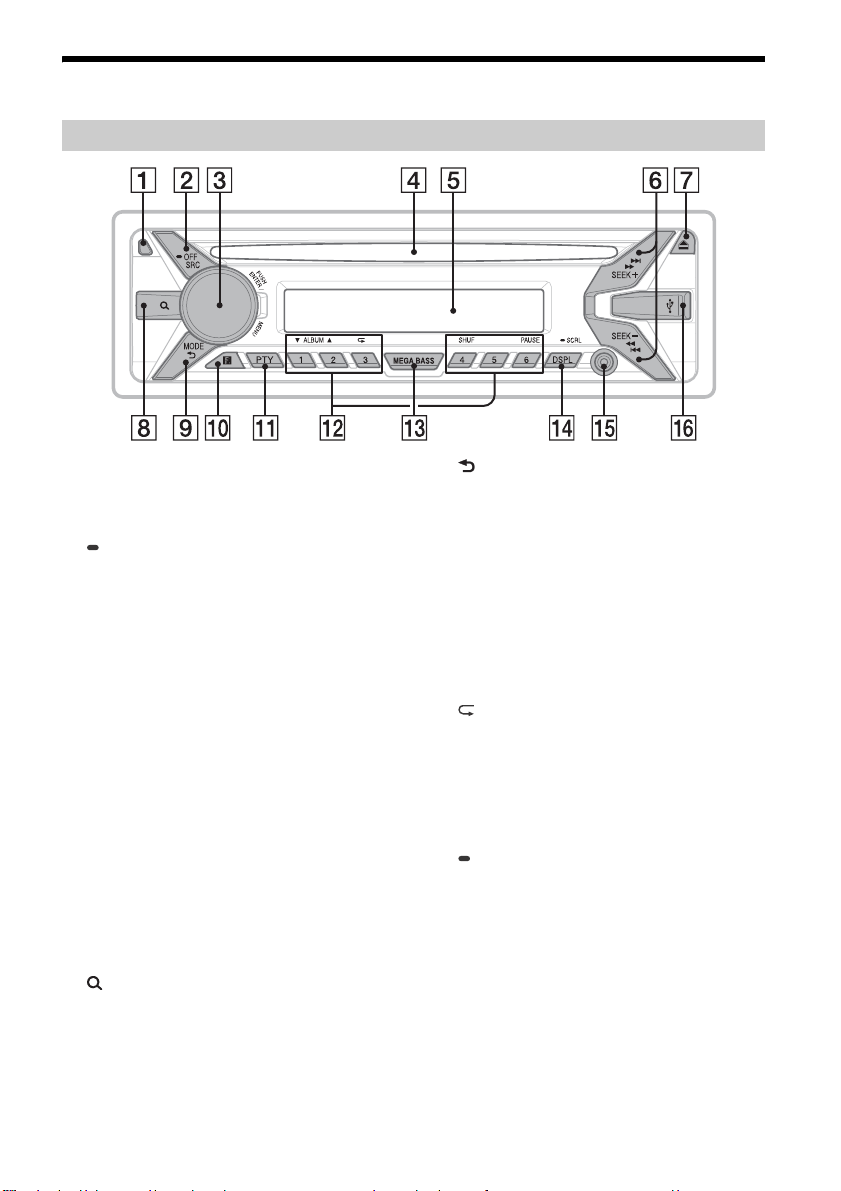
Main unit
Front panel release button
SRC (source)
Turn on th e powe r.
Change the source.
OFF
Press and hold for 1 second to turn off the
power.
Press and hold for more than 2 seconds to turn
off the power and the display.
If the unit is turned off and the display
disappears, operation by the remote
commander is not available.
Control dial
Rotate to adjust the volume.
PUSH ENTER
Enter the selected item.
MENU
Open the setup menu.
Disc slot
Display window
SEEK +/–
Tune in radio stations automatically. Press and
hold to tune manually.
/ (prev/next)
/ (fast-reverse/fast-forward)
(disc eject)
(browse) (page 8)
Enter the browse mode during playback.
(back)
Return to the previous display.
MODE (page 7)
Receptor for the remote commander
PTY (program type)
Select PTY in RDS.
Number buttons (1 to 6)
Receive stored radio stations. Press and hold to
store stations.
ALBUM /
Skip an album for audio device. Press and hold
to skip albums continuously.
(repeat)
SHUF (shuffle)
PAU SE
MEGA BASS
Press to turn on/off the MEGA BASS function.
DSPL (display)
Press to change display items.
SCRL
Press and hold to scroll a display item.
AUX input jack
USB port
4GB
Page 5

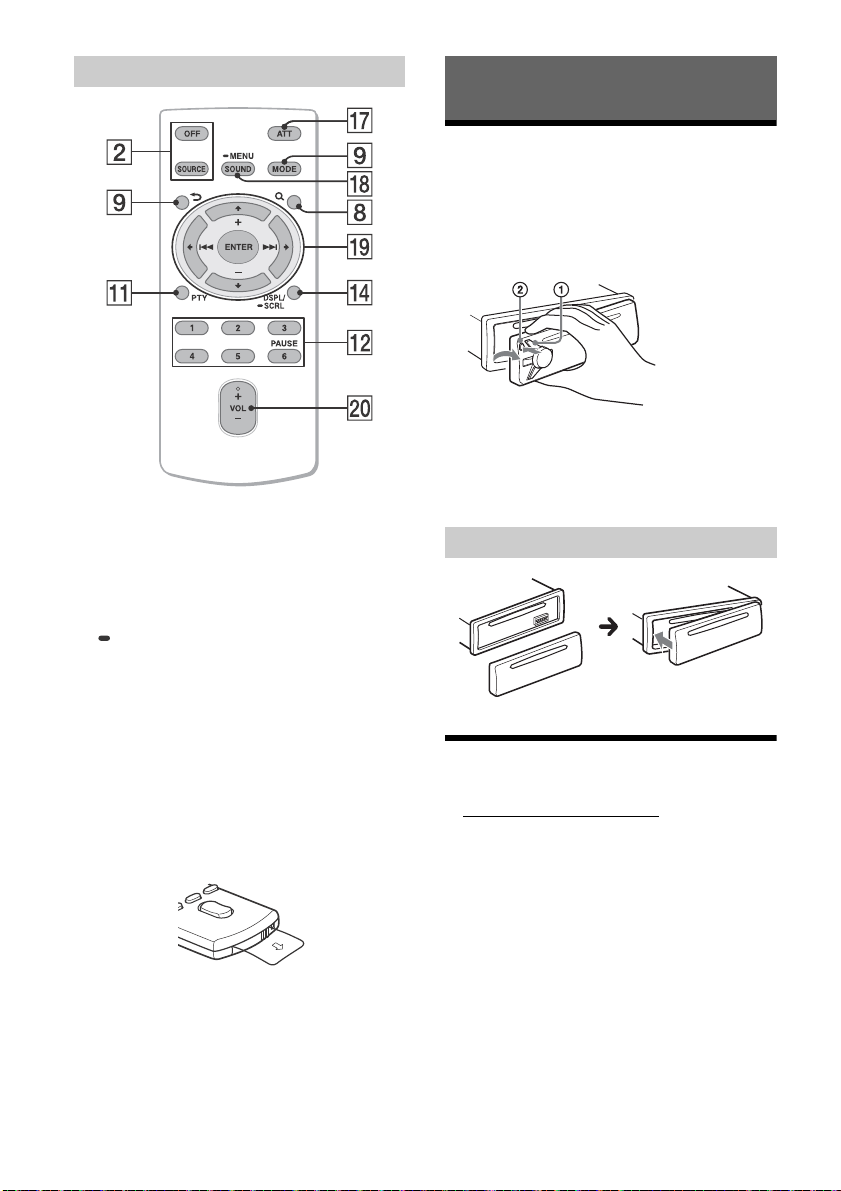
RM-X211 Remote commander
The VOL (volume) + button has a tactile dot.
ATT (at tenu ate)
Attenuate the sound. Press again to cancel the
attenuation.
SOUND
Open the SOUND menu directly.
MENU
Press and hold to open the setup menu.
///
Select a setup item, etc.
ENTER
Enter the selected item.
/ (prev/next)
+/– (album +/–)
VOL (Volume) +/–
Remove the insulation film before use.
Getting Started
Detaching the Front Panel
You can detach the front panel of this unit to
prevent theft.
1 Press and hold OFF until the unit turns
off, press the front panel release button
, then pull the panel towards you to
remove.
Caution alarm
If you turn the ignition switch to the OFF position
without detaching the front panel, the caution
alarm will sound for a few seconds. The alarm will
only sound if the built-in amplifier is used.
Attaching the front panel
Switching the FM/AM Tuning
Step
Set the FM/AM tuning step of your country. This
setting appears only when this unit is turned off.
1 Press MENU, rotate the control dial to
select [GENERAL], then press it.
2 Rotate the control dial to select [TUNER-
STP], then press it.
3 Rotate the control dial to select from
[50K/9K], [100K/10K] or [200K/10K], then
press it.
5GB
Page 6

Setting the Clock
1 Press MENU, rotate the control dial to
select [GENERAL], then press it.
2 Rotate the control dial to select [CLOCK-
ADJ], then press it.
The hour indication flashes.
3 Rotate the control dial to set the hour
and minute.
To move the digital indication, press SEEK +/–.
4 After setting the minute, press MENU.
The setup is complete and the clock starts.
To display the clock
Press DSPL.
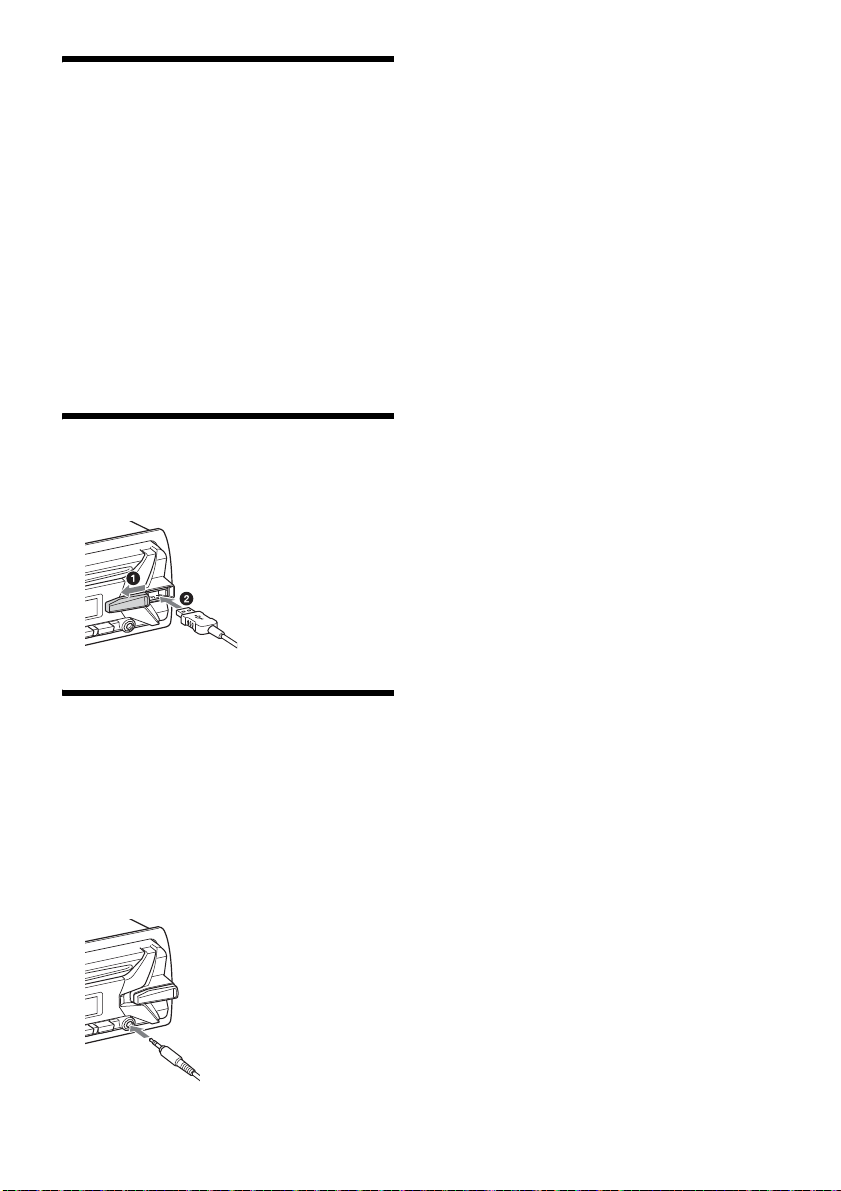
Connecting a USB Device
1 Turn down the volume on the unit.
2 Connect the USB device to the unit.
4 Press SRC to select [AUX].
To match the volume level of the connected
device to other sources
Start playback of the portable audio device at a
moderate volume, and set your usual listening
volume on the unit.
Press MENU, then select [SOUND] [AUX VOL]
(page 9).
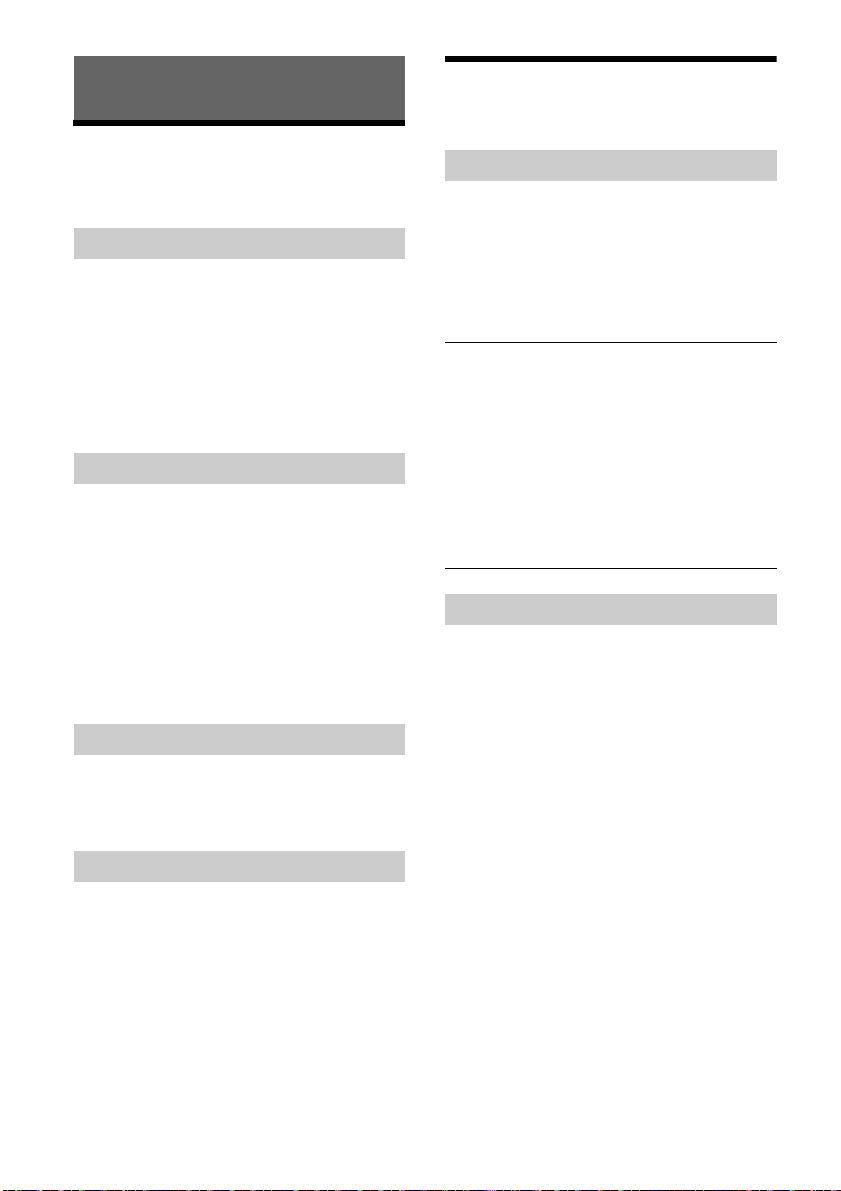
Connecting Other Portable
Audio Device
1 Turn off the portable audio device.
2 Turn down the volume on the unit.
3 Connect the portable audio device to the
AUX input jack (stereo mini jack) on the
unit with a connecting cord (not
supplied)*.
* Be sure to use a straight type plug.
6GB
Page 7

Listening to the Radio
Using Radio Data System (RDS)
Listening to the Radio
Tuning step setting is required (page 5).
To listen to the radio, press SRC to select [TUNER].
Storing automatically (BTM)
1 Press MODE to change the band (FM1,
FM2, FM3, AM1 or AM2).
2 Press MENU, rotate the control dial to
select [GENERAL], then press it.
3 Rotate the control dial to select [BTM],
then press it.
The unit stores stations in order of frequency on
the number buttons.
Tuning
1 Press MODE to change the band (FM1,
FM2, FM3, AM1 or AM2).
2 Perform tuning.
To tune manually
Press and hold SEEK +/– to locate the
approximate frequency, then press SEEK +/–
repeatedly to fine adjust to the desired
frequency.
To tune automatically
Press SEEK +/–.
Scanning stops when the unit receives a station.
Selecting program types (PTY)
1 Press PTY during FM reception.
2 Rotate the control dial until the desired
program type appears, then press it.
The unit starts to search for a station
broadcasting the selected program type.
Type of programs
NEWS (News), AFFAIRS (Current Affairs), INFO
(Information), SPORT (Sports), EDUCATE
(Education), DRAMA (Drama), CULTURE (Culture),
SCIENCE (Science), VARIE D (Varied), POP M (Pop
Music), ROCK M (Rock Music), EASY M (M.O.R.
Music), LIGHT M (Light classical), CLASSICS (Serious
classical), OTHER M (Other Music), WEATHER
(Weather), FINANCE (Finance), CHILDREN
(Children’s program), SOCIAL A (Social Affairs),
RELIGION (Religion), PHONE IN (Phone In), TRAVEL
(Travel), LEISURE (Leisure), JAZZ (Jazz Music),
COUNTRY (Country Music), NATION M (National
Music), OLDIES (Oldies Music), FOLK M (Folk Music),
DOCUMENT (Documentary)
Setting clock time (CT)
The CT data from the RDS transmission sets the
clock.
1 Set [CT-ON] in [GENERAL] (page 9).
Storing manually
1 While receiving the station that you want
to store, press and hold a number button
(1 to 6) until [MEM] appears.
Receiving the stored stations
1 Select the band, then press a number
button (1 to 6).
7GB
Page 8

Playback
Searching and Playing Tracks
Playing a Disc
1 Insert the disc (label side up).
Playback starts automatically.
Playing a USB Device
MSC (Mass Storage Class) and MTP (Media Transfer
Protocol) type USB devices (such as a USB flash
drive, digital media player, Android™ phone)
compliant with the USB standard can be used.
Depending on the digital media player or Android
phone, setting the USB connection mode to MTP is
required.
Notes
For details on the compatibility of your USB device,
visit the support site on the back cover.
Playback of the following MP3/WMA files is not
supported.
lossless compression files
copyright-protected files
DRM (Digital Rights Management) files
Multi-channel audio files
1 Connect a USB device to the USB port
(page 6).
Playback starts.
If a device is already connected, to start
playback, press SRC to select [USB].
2 Adjust the volume on this unit.
To stop playback
Press and hold OFF for 1 second.
To remove the device
Stop playback, then remove the device.
Repeat play and shuffle play
1 During playback, press (repeat) or
SHUF repeatedly to select the desired
play mode.
Playback in the selected play mode may take
time to start.
Available play modes differ depending on the
selected sound source.
Searching a track by name (QuickBrowZer™)
1 During CD or USB playback, press
(browse)* to display the list of search
categories.
When the track list appears, press (back)
repeatedly to display the desired search
category.
* During USB playback, press (browse) for more
than 2 seconds to directly return to the beginning
of the category list.
2 Rotate the control dial to select the
desired search category, then press it to
confirm.
3 Repeat step 2 to search the desired track.
Playback starts.
To exit the Quick-BrowZer mode
Press (browse).
Searching by skipping items
(Jump mode)
1 Press (browse).
2 Press SEEK +.
3 Rotate the control dial to select the item.
The list is jumped in steps of 10% of the total
number of items.
4 Press ENTER to return to the Quick-
BrowZer mode.
The selected item appears.
5 Rotate the control dial to select the
desired item, then press it.
Playback starts.
8GB
Page 9

Settings
Canceling the DEMO Mode
You can cancel the demonstration display which
appears while this unit is turned off.
1 Press MENU, rotate the control dial to
select [DISPLAY], then press it.
2 Rotate the control dial to select [DEMO],
then press it.
3 Rotate the control dial to select [DEMO-
OFF], then press it.
The setting is complete.
4 Press (back) twice.
The display returns to normal reception/play
mode.
Basic Setting Operation
You can set items in the following setup categories:
General setup (GENERAL), Sound setup (SOUND),
Display setup (DISPLAY)
1 Press MENU.
2 Rotate the control dial to select the setup
category, then press it.
The items that can be set differ depending on
the source and settings.
3 Rotate the control dial to select the
options, then press it.
To return to the previous display
Press (back).
General Setup (GENERAL)
CLOCK-ADJ (clock adjust) (page 6)
TUNER-STP (tuner step) (page 5)
(Available only when the unit is turned off.)
CAUT ALM (caution alarm)
Activates the caution alarm: [ON], [OFF] (page 5).
(Available only when the unit is turned off.)
BEEP
Activates the beep sound: [ON], [OFF].
AUTO OFF
Shuts off automatically after a desired time
when the unit is turned off: [NO], [30S] (30
seconds), [30M] (30 minutes), [60M] (60
minutes).
AUX-A (AUX audio)
Activates the AUX source display: [ON], [OFF].
(Available only when the unit is turned off.)
CT (clock time)
Activates the CT function: [ON], [OFF].
BTM (page 7)
Sound Setup (SOUND)
MEGABASS (mega bass)
Reinforces bass sound in synchronization with
the volume level: [ON], [OFF].
EQ5 PRESET
Selects an equalizer curve from 10 equalizer
curves or off:
[OFF], [R AND B], [ROCK], [POP], [DANCE], [HIPHOP], [ELECTRONICA], [JAZZ], [REGUETON],
[SALSA], [CUSTOM].
The equalizer curve setting can be memorized
for each source.
EQ5 SETTING
Sets [CUSTOM] of EQ5.
BASE
Selects a preset equalizer curve as a basis for
further customizing: [BAND1] (low frequency),
[BAND2] (mid-low frequency), [BAND3] (mid
frequency), [BAND4] (mid-high frequency),
[BAND5] (high frequency).
The volume level is adjustable in 1 dB steps,
from -10 dB to +10 dB.
BALANCE
Adjusts the sound balance: [RIGHT-15] –
[CENTER] – [LEFT-15].
FADER
Adjusts the relative level: [FRONT-15] – [CENTER]
– [REAR-15].
SW LEVEL (subwoofer level)
Adjusts the subwoofer volume level:
[+2 dB] – [0 dB] – [-2 dB].
AUX VOL (AUX volume level)
Adjusts the volume level for each connected
auxiliary device: [+18 dB] – [0 dB] – [-8 dB].
This setting negates the need to adjust the
volume level between sources.
9GB
Page 10
Display Setup (DISPLAY)
DEMO (demonstration)
Activates the demonstration: [ON], [OFF].
BLK OUT (black out)
Turns off the illumination automatically for any
source (e.g., during radio reception/CD
playback, etc.) if no operation is performed for 5
seconds: [ON], [OFF].
To turn the light back on, press any button on
the unit or the remote commander.
DIMMER
Changes the display brightness: [ON], [OFF].
SND SYNC (sound synchronization)
Selects the color with sound synchronization:
[ON], [OFF].
AUTO SCR (auto scroll)
Scrolls long items automatically: [ON], [OFF].
M.DISPLAY (motion display)
Shows moving patterns: [ON], [OFF].
Additional Information
Precautions
Cool off the unit beforehand if your car has been
parked in direct sunlight.
Do not leave the front panel or audio devices
brought in inside the car, or it may cause
malfunction due to high temperature in direct
sunlight.
Power antenna (aerial) extends automatically.
Moisture condensation
Should moisture condensation occur inside the
unit, remove the disc and wait for about an hour for
it to dry out; otherwise the unit will not operate
properly.
To maintain high sound quality
Do not splash liquid onto the unit or discs.
Notes on discs
Do not expose discs to direct sunlight or heat
sources such as hot air ducts, nor leave it in a car
parked in direct sunlight.
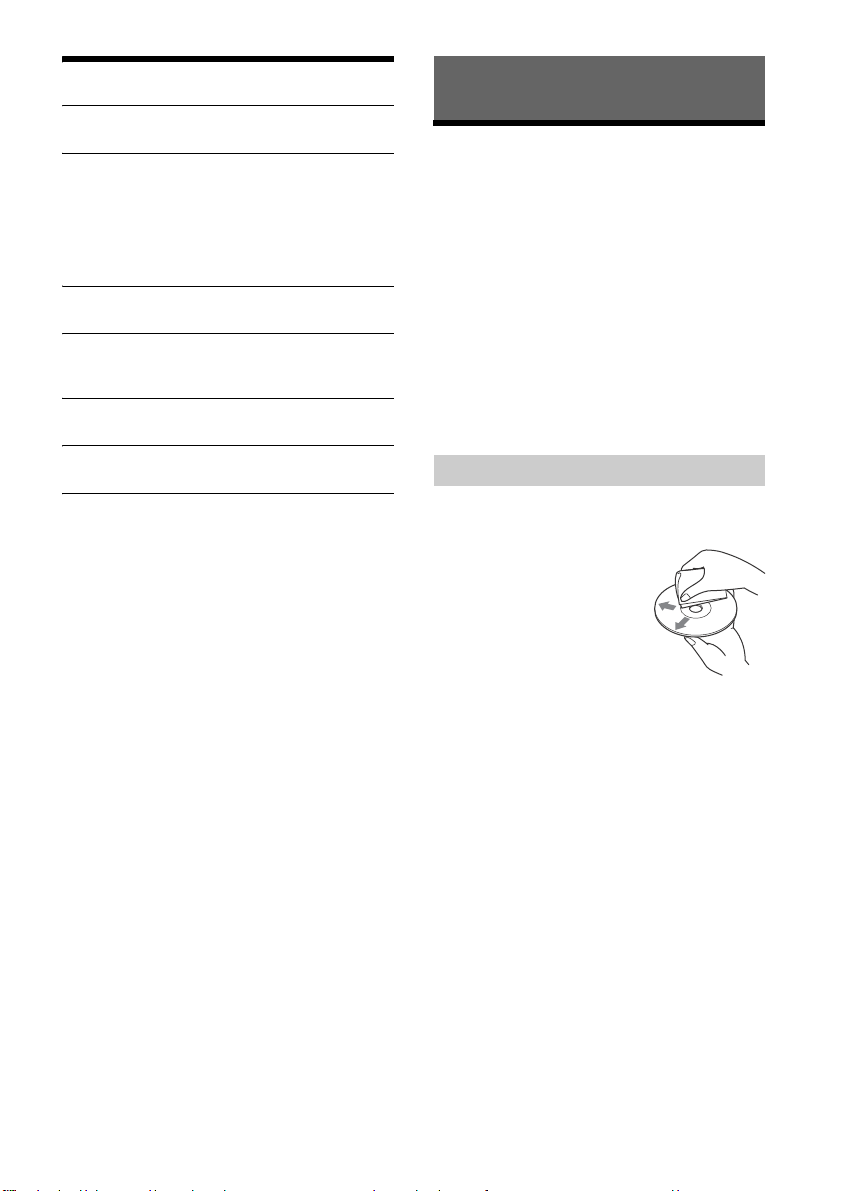
Before playing, wipe the discs
with a cleaning cloth from the
center out. Do not use
solvents such as benzine,
thinner, commercially
available cleaners.
This unit is designed to play
back discs that conform to the
Compact Disc (CD) standard.
DualDiscs and some of the music discs encoded
with copyright protection technologies do not
conform to the Compact Disc (CD) standard,
therefore, these discs may not be playable by this
unit.
Discs that this unit CANNOT play
Discs with labels, stickers, or sticky tape or
paper attached. Doing so may cause a
malfunction, or may ruin the disc.
Discs with non-standard shapes (e.g., heart,
square, star). Attempting to do so may damage
the unit.
8 cm (3
Notes on CD-R/CD-RW discs
If the multi-session disc begins with a CD-DA
session, it is recognized as a CD-DA disc, and
other sessions are not played back.
Discs that this unit CANNOT play
CD-R/CD-RW of poor recording quality.
CD-R/CD-RW recorded with an incompatible
CD-R/CD-RW which is finalized incorrectly.
1
/4 in) discs.
recording device.
10GB
Page 11

CD-R/CD-RW other than those recorded in
MP3/WMA
Folder (album)
MP3/WMA file (track)
+ side up
music CD format or MP3 format conforming to
ISO9660 Level 1/Level 2, Joliet/Romeo or multisession.
Playback order of MP3/WMA files
If you have any questions or problems concerning
your unit that are not covered in this manual,
consult your nearest Sony dealer.
Maintenance
Replacing the lithium battery of the remote
commander
Under normal conditions, the battery will last
approximately 1 year. (The service life may be
shorter, depending on the conditions of use.)
When the battery becomes weak, the range of the
remote commander becomes shorter.
CAUTION
Danger of explosion if battery is incorrectly
replaced. Replaced only with the same or
equivalent type.
Notes on the lithium battery
Keep the lithium battery out of the reach of children.
Should the battery be swallowed, immediately
consult a doctor.
Wipe the battery with a dry cloth to ensure a good
contact.
Be sure to observe the correct polarity when installing
the battery.
Do not hold the battery with metallic tweezers,
otherwise a short-circuit may occur.
WARNING
Battery may explode if mistreated. Do not
recharge, disassemble, or dispose of in fire.
Cleaning the connectors
The unit may not function properly if the
connectors between the unit and the front panel
are not clean. In order to prevent this, detach the
front panel (page 5) and clean the connectors with
a cotton swab. Do not apply too much force.
Otherwise, the connectors may be damaged.
Notes
For safety, turn off the ignition before cleaning the
connectors, and remove the key from the ignition
switch.
Never touch the connectors directly with your fingers
or with any metal device.
Specifications
Tuner section
FM
Tuning range:
87.5 – 108.0 MHz (at 50 kHz step)
87.5 – 108.0 MHz (at 100 kHz step)
87.5 – 107.9 MHz (at 200 kHz step)
FM tuning step:
50 kHz/100 kHz/200 kHz switchable
Antenna (aerial) terminal:
External antenna (aerial) connector
Intermediate frequency:
FM CCIR: -1,956.5 to -487.3 kHz and
+500.0 to +2,095.4 kHz
Usable sensitivity: 7 dBf
Selectivity: 75 dB at 400 kHz
Signal-to-noise ratio: 73 dB
Separation: 50 dB at 1 kHz
Frequency response: 20 – 15,000 Hz
AM
Tuning range:
531 – 1,602 kHz (at 9 kHz step)
530 – 1,710 kHz (at 10 kHz step)
AM tuning step:
9 kHz/10 kHz switchable
Antenna (aerial) terminal:
External antenna (aerial) connector
Sensitivity: 26 µV
11GB
Page 12
CD Player section
Signal-to-noise ratio: 95 dB
Frequency response: 10 – 20,000 Hz
Wow and flutter: Below measurable limit
The maximum number of: (CD-R/CD-RW only)
folders (albums): 150 (including root folder)
files (tracks) and folders: 300 (may less than 300
if folder/file names contain many characters)
displayable characters for a folder/file name: 32
(Joliet)/64 (Romeo)
Corresponding codec: MP3 (.mp3) and WMA (.wma)
USB Player section
Interface: USB (Full-speed)
Maximum current: 500 mA
The maximum number of recognizable tracks:
folders (albums): 256
files (tracks) per folder: 256
Corresponding codec:
MP3 (.mp3) and WMA (.wma)
Power amplifier section
Output: Speaker outputs
Speaker impedance: 4 – 8 ohms
Maximum power output: 55 W × 4 (at 4 ohms)
General
Outputs:
Audio outputs terminal (rear, sub)
Power antenna (aerial)/Power amplifier control
terminal (REM OUT)
Inputs:
Remote controller input terminal
Antenna (aerial) input terminal
AUX input jack (stereo mini jack)
USB port
Power requirements: 12 V DC car battery (negative
ground (earth))
Dimensions:
Approx. 178 mm × 50 mm × 177 mm
1
(7
/8 in × 2 in × 7 in) (w/h/d)
Mounting dimensions:
Approx. 182 mm × 53 mm × 160 mm
1
(7
/4 in × 2 1/8 in × 6 5/16 in) (w/h/d)
Mass: Approx. 1.2 kg (2 lb 11 oz)
Package contents:
Main unit (1)
Remote commander (1): RM-X211
Parts for installation and connections (1 set)
Your dealer may not handle some of the above
listed accessories. Please ask the dealer for detailed
information.
Design and specifications are subject to change
without notice.
Copyrights
Windows Media is either a registered trademark or
trademark of Microsoft Corporation in the United
States and/or other countries.
This product is protected by certain intellectual
property rights of Microsoft Corporation. Use or
distribution of such technology outside of this
product is prohibited without a license from
Microsoft or an authorized Microsoft subsidiary.
MPEG Layer-3 audio coding technology and patents
licensed from Fraunhofer IIS and Thomson.
Android is a trademark of Google Inc.
Troubleshooting
The following checklist will help you remedy
problems you may encounter with your unit.
Before going through the checklist below, check
the connection and operating procedures.
For details on using the fuse and removing the unit
from the dashboard, see “Connection/Installation”
(page 15).
If the problem is not solved, visit the support site on
the back cover.
General
No power is being supplied to the unit.
If the unit is turned off and the display
disappears, the unit cannot be operated with the
remote commander.
Turn o n the u nit.
No sound.
The position of the fader control [FADER] is not
set for a 2-speaker system.
No beep sound.
An optional power amplifier is connected and
you are not using the built-in amplifier.
The contents of the memory have been erased.
The power supply lead or battery has been
disconnected or not connected properly.
Stored stations and correct time are erased.
The fuse has blown.
Makes a noise when the position of the ignition
is switched.
The leads are not matched correctly with the car’s
accessory power connector.
12GB
Page 13
During playback or reception, the demonstration
mode starts.
If no operation is performed for 5 minutes with
[DEMO-ON] set, the demonstration mode starts.
Set [DEMO-OFF] (page 10).
The display disappears from/does not appear in
the display window.
The dimmer is set to [DIM-ON] (page 10).
The display disappears if you press and hold OFF.
Press OFF on the unit until the display appears.
The connectors are dirty (page 11).
The display disappears while the unit is
operating.
The Black Out function is set to on (page 10).
The operation buttons do not function.
The disc will not eject.
Press DSPL and (back)/MODE for more than 2
seconds to reset the unit.
The contents stored in memory are erased.
For your safety, do not reset the unit while you
are driving.
Radio reception
Stations cannot be received.
The sound is hampered by noises.
The connection is not correct.
If your car has built-in radio antenna (aerial) in
the rear/side glass, connect an REM OUT lead
(blue/white striped) or accessory power supply
lead (red) to the power supply lead of a car’s
antenna (aerial) booster.
Check the connection of the car antenna
(aerial).
If the auto antenna (aerial) will not extend,
check the connection of the power antenna
(aerial) control lead.
The tuning step setting has been erased.
Set the tuning step again (page 5).
Preset tuning is not possible.
The broadcast signal is too weak.
RDS
PTY displays [- - - - - - - -].
The current station is not an RDS station.
RDS data has not been received.
The station does not specify the program type.
CD playback
The disc does not play back.
Defective or dirty disc.
The CD-R/CD-RW is not for audio use (page 10).
MP3/WMA files cannot be played back.
The disc is incompatible with the MP3/WMA
format and version. For details on playable discs
and formats, visit the support site on the back
cover.
MP3/WMA files take longer to play back than
others.
The following discs take a longer time to start
playback.
A disc recorded with a complicated tree
structure.
A disc recorded in Multi Session.
A disc to which data can be added.
The sound skips.
Defective or dirty disc.
USB device playback
You cannot play back items via a USB hub.
This unit cannot recognize USB devices via a USB
hub.
A USB device takes longer to play back.
The USB device contains files with a complicated
tree structure.
The sound is intermittent.
The sound may be intermittent at a high-bit-rate
of more than 320 kbps.
Audio file cannot be played back.
USB device formatted with file systems other
th an FAT 16 or FAT32 are u nsupp orted.*
* This unit supports FAT16 and FAT32, but some USB
device may not support all of these FAT. For details,
refer to the operating instruction of each USB device
or contact the manufacturer.
Error displays/Messages
ERROR: The disc or USB device cannot be played.
Clean or insert the disc correctly, or make sure the
disc is not blank or defective.
Connect the USB device again.
HUB NO SUPRT: USB hubs are not supported.
NO DEV: A USB device is not connected or
recognized.
Make sure the USB device or USB cable is securely
connected.
NO MUSIC: There is no playable file.
Insert a disc or connect a USB device containing
playable files (page 12).
13GB
Page 14
OVERLOAD: The USB device is overloaded.
Disconnect the USB device, then press SRC to
select another source.
The USB device has a fault, or an unsupported
device is connected.
PUSH EJT: The disc could not be ejected properly.
Press (eject).
READ: Now reading information.
Wait until reading is complete and playback
starts automatically. This may take some time
depending on the disc structure.
USB NO SUPRT: The USB device is not supported.
For details on the compatibility of your USB
device, visit the support site on the back cover.
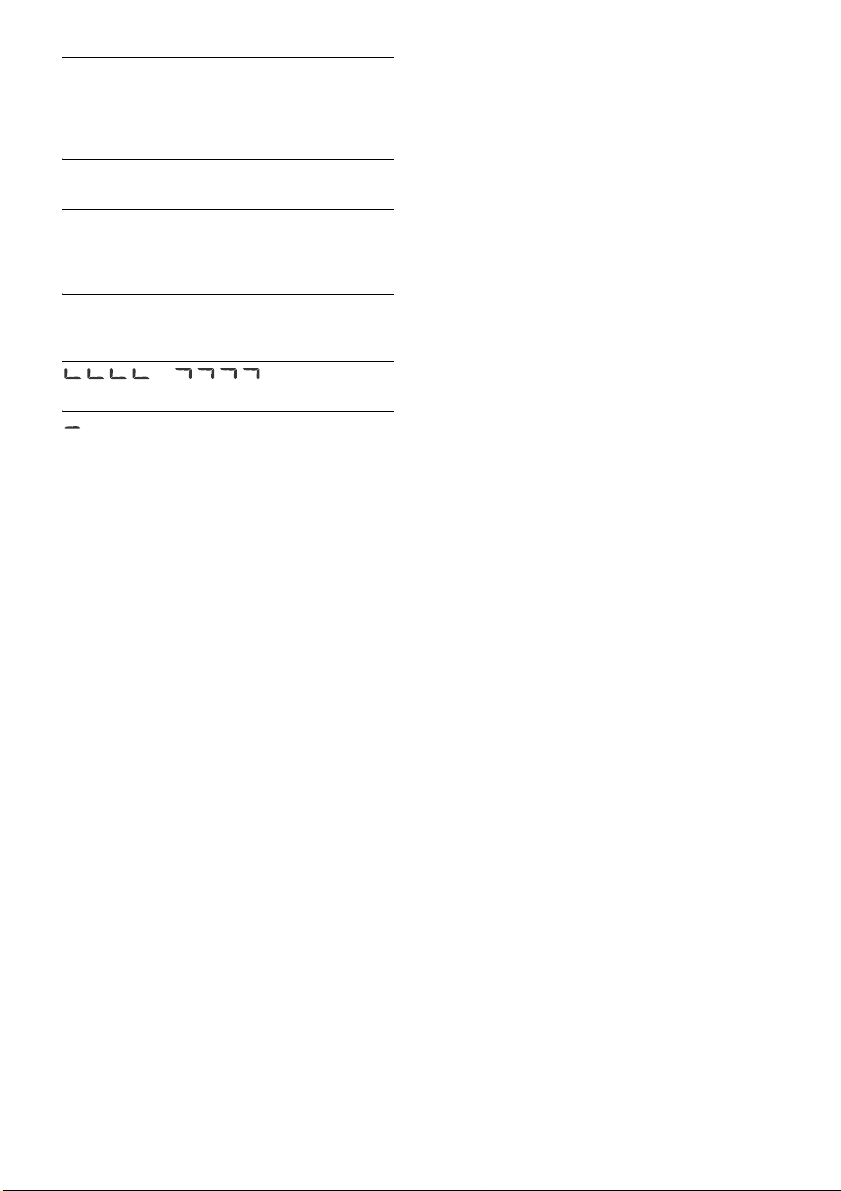
the end of the disc has been reached.
: The character cannot be displayed.
If these solutions do not help improve the situation,
consult your nearest Sony dealer.
If you take the unit to be repaired because of CD
playback trouble, bring the disc that was used at
the time the problem began.
or : The beginning or
14GB
Page 15
Connection/Installation
× 4
5 × max. 8 mm
(7/32 × max. 5/16 in)
× 2
Cautions
Run all ground (earth) leads to a common
ground (earth) point.
Do not get the leads trapped under a screw, or
caught in moving parts (e.g., seat railing).
Before making connections, turn the car ignition
off to avoid short circuits.
Connect the yellow and red power supply leads
only after all other leads have been connected.
Be sure to insulate any loose unconnected leads
with electrical tape for safety.
Precautions
Choose the installation location carefully so that
the unit will not interfere with normal driving
operations.
Avoid installing the unit in areas subject to dust,
dirt, excessive vibration, or high temperature,
such as in direct sunlight or near heater ducts.
Use only the supplied mounting hardware for a
safe and secure installation.
Note on the power supply lead (yellow)
When connecting this unit in combination with other
stereo components, the amperage rating of the car
circuit to which the unit is connected must be higher
than the sum of each component’s fuse amperage
rating.
Mounting angle adjustment
Adjust the mounting angle to less than 45°.
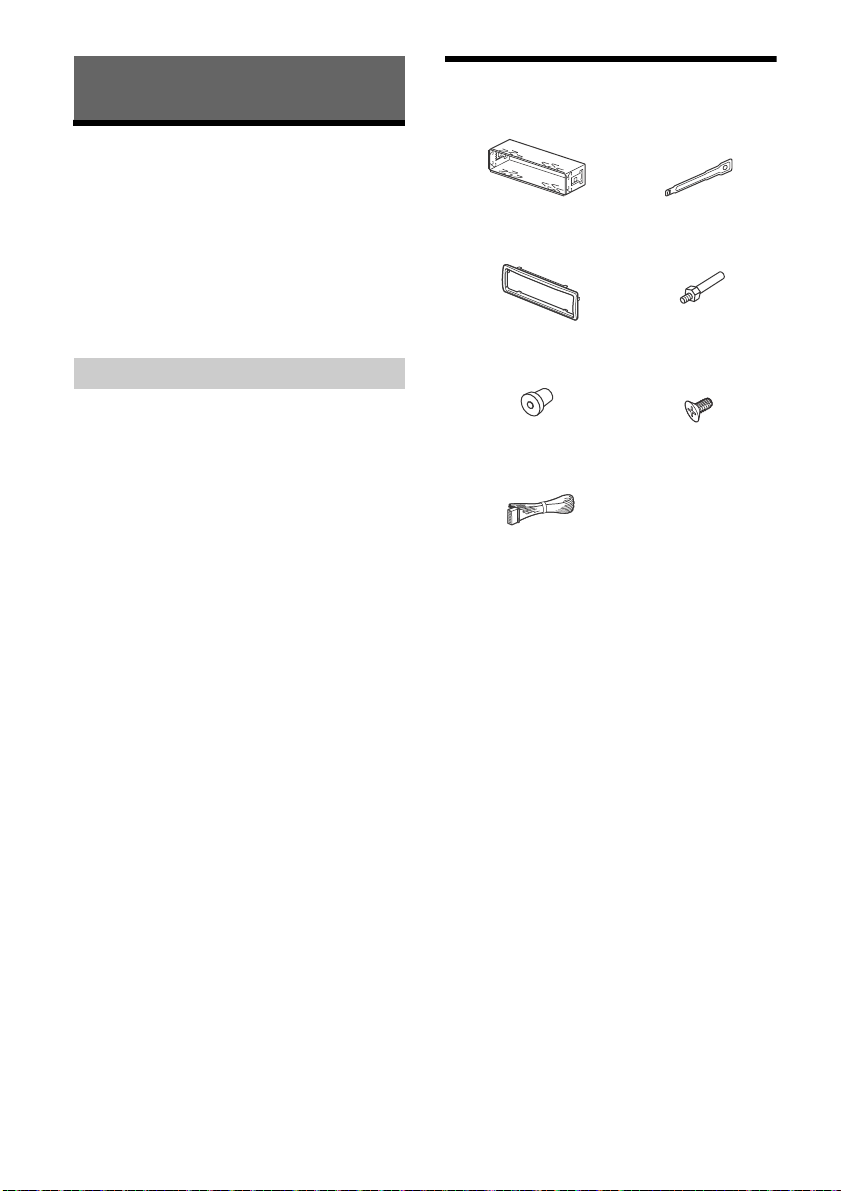
Parts List for Installation
This parts list does not include all the package
contents.
The bracket and the protection collar are
attached to the unit before shipping. Before
mounting the unit, use the release keys to
remove the bracket from the unit. For details,
see “Removing the protection collar and the
bracket” (page 17).
Keep the release keys for future use as they are
also necessary if you remove the unit from your
car.
15GB
Page 16
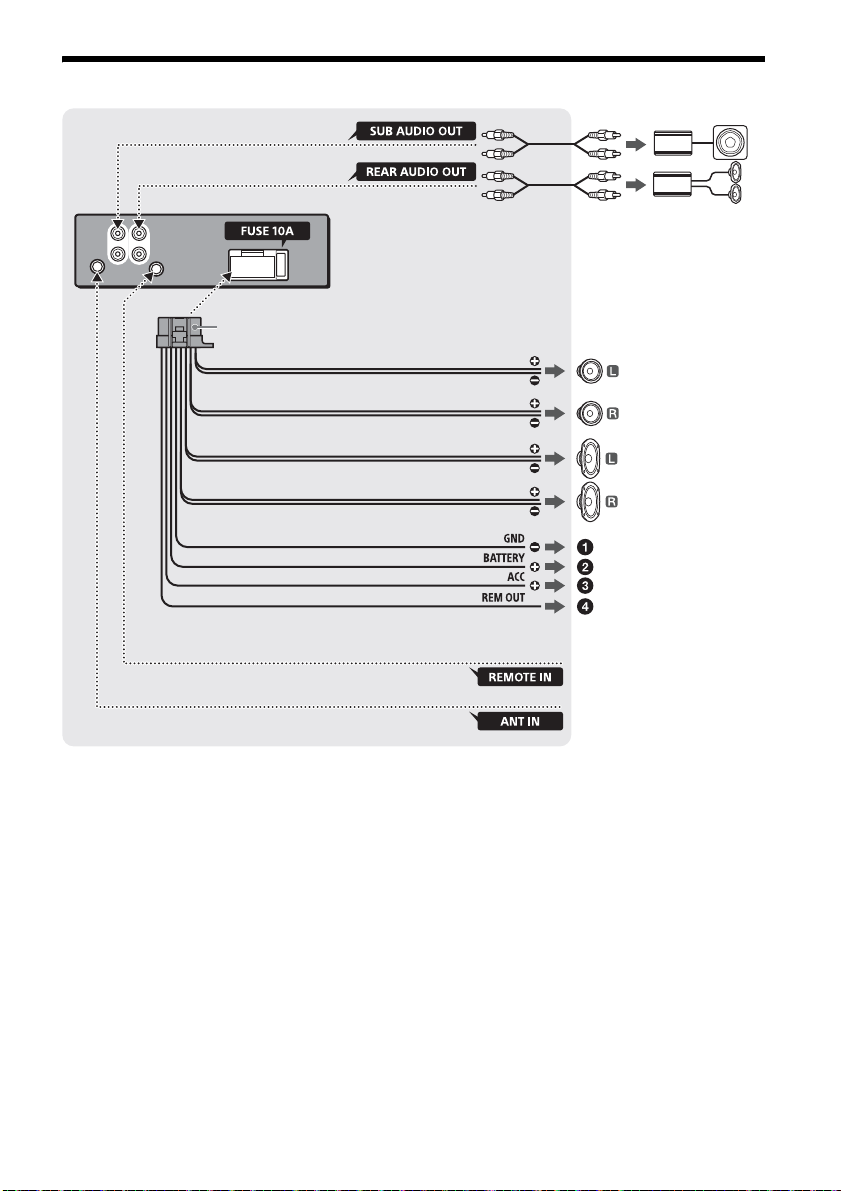
Connection
Front speaker*1*
2
White
White/black striped
Gray
Black
Yel l o w
Red
Blue/white striped (MAX 0.4A)
from a wired remote control
(not supplied)*
4
For details, see “Making
connections” (page 17).
Gray/black strip ed
Green
Green/black striped
Purple
Purple/black striped
*
3
*
3
Subwoofer*
1
Power amplifier*
1
from a car antenna (aerial)
Rear speaker
*1*2
*1 Not supplied
*2 Speaker impedance: 4 – 8 × 4
*3 RCA pin cord (not supplied)
*4 Depending on the type of car, use an adaptor for a
wired remote control (not supplied).
16GB
Page 17
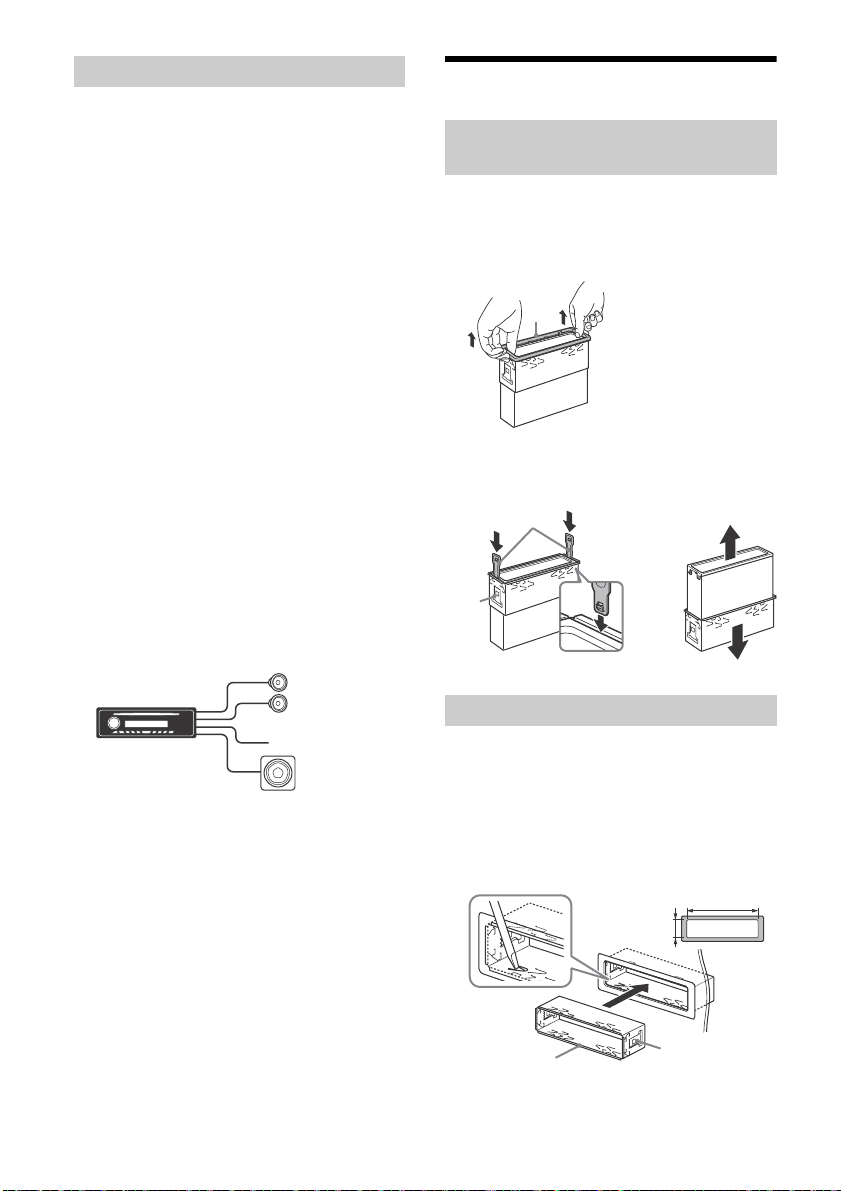
Making connections
Front speaker
Subwoofer
Face the hook inwards.
182 mm (7 1/4 in)
53 mm (2 1/8 in)
Catch
To a common ground (earth) point
First connect the black ground (earth) lead, then
connect the yellow and red power supply leads.
To the +12 V power terminal which is
energized at all times
Be sure to first connect the black ground (earth)
lead to a common ground (earth) point.
To the +12 V power terminal which is
energized when the ignition switch is set to
the accessory position
If there is no accessory position, connect to the
+12 V power (battery) terminal which is
energized at all times.
Be sure to first connect the black ground (earth)
lead to a common ground (earth) point.
To the power antenna (aerial) control lead or
the power supply lead of the antenna (aerial)
booster
It is not necessary to connect this lead if there is
no power antenna (aerial) or antenna (aerial)
booster, or with a manually-operated telescopic
antenna (aerial).
To AMP REMOTE IN of an optional power
amplifier
This connection is only for amplifiers and a
power antenna (aerial). Connecting any other
system may damage the unit.
Subwoofer Easy Connection
You can use a subwoofer without a power amplifier
when it is connected to a rear speaker cord.
Installation
Removing the protection collar and the
bracket
Before installing the unit, remove the protection
collar and the bracket from the unit.
1 Pinch both edges of the protection collar
, then pull it out.
2 Insert both release keys until they
click, and pull down the bracket , then
pull up the unit to separate.
Note
Use a subwoofer with an impedance of 4 to 8 ohms,
and with adequate power handling capacities to avoid
damage.
Memory hold connection
When the yellow power supply lead is connected,
power will always be supplied to the memory circuit
even when the ignition switch is turned off.
Speaker connection
Before connecting the speakers, turn the unit off.
Use speakers with an impedance of 4 to 8 ohms,
and with adequate power handling capacities to
avoid damage.
Mounting the unit in the dashboard
Before installing, make sure the catches on both
sides of the bracket are bent inwards 2 mm (
in). When mounting in a Japanese car, see
“Mounting the unit in a Japanese car” (page 18).
1 Position the bracket inside the
dashboard, then bend the claws outward
for a tight fit.
3
/32
17GB
Page 18
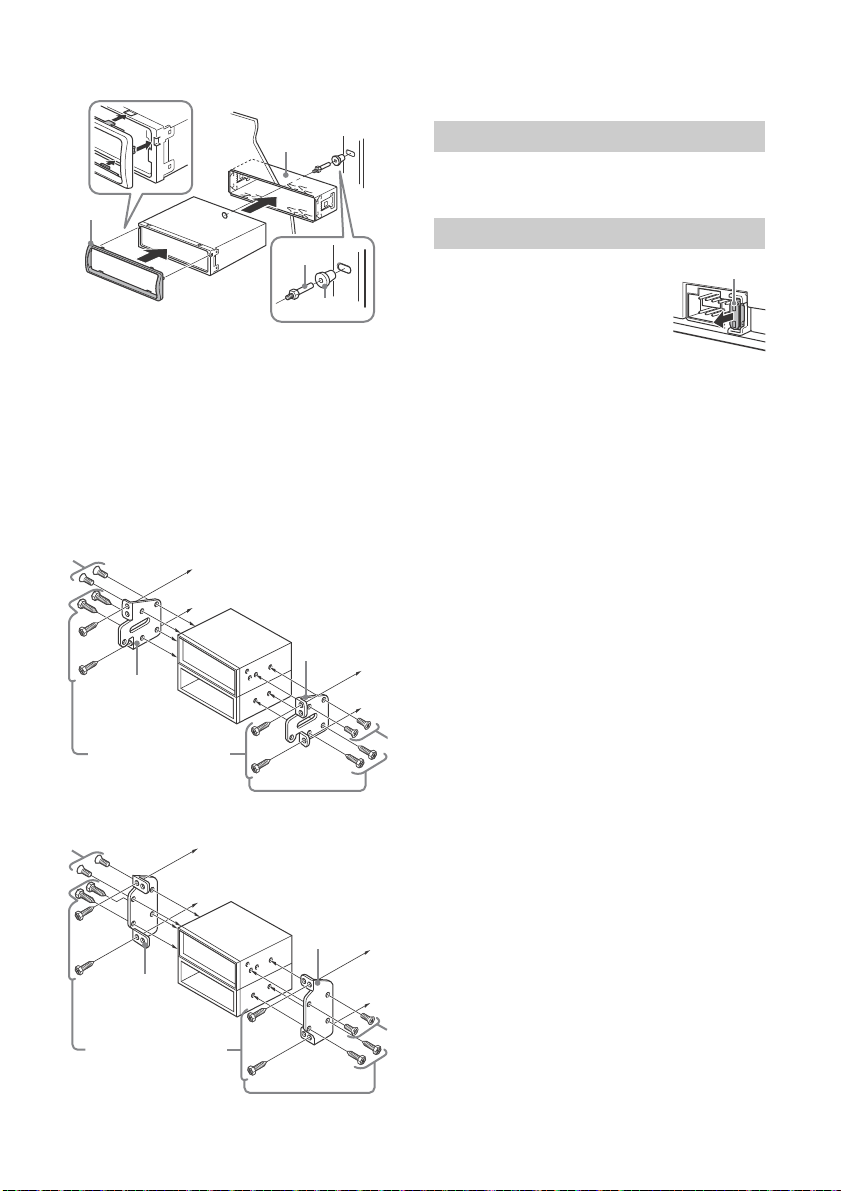
2 Mount the unit onto the bracket , then
to dashboard/center console
Existing parts supplied with
your car
Bracket
Bracket
to dashboard/center console
Existing parts supplied with
your car
Bracket
Bracket
Fuse (10 A)
attach the protection collar .
Notes
If the catches are straight or bent outwards, the unit
will not be installed securely and may spring out.
Make sure the 4 catches on the protection collar
are properly engaged in the slots of the unit.
Mounting the unit in a Japanese car
You may not be able to install this unit in some
makes of Japanese cars. In such a case, consult your
Sony dealer.
TOYOTA
Note
To prevent malfunction, install only with the supplied
screws .
Detaching and attaching the front panel
For details, see “Detaching the Front Panel”
(page 5).
Fuse replacement
When replacing the fuse, be sure
to use one matching the
amperage rating stated on the
original fuse. If the fuse blows,
check the power connection and
replace the fuse. If the fuse blows
again after replacement, there
may be an internal malfunction. In such a case,
consult your nearest Sony dealer.
NISSAN
18GB
Page 19

Page 20
사용 중에 기기 뒤쪽이 뜨거워지므로 안전을 위해
차의 대시보드에 본 기기를 설치하십시오.
자세한 내용은 "연결/설치"(15페이지)를 참조하십
시오.
기자재명칭: FM/AM COMPACT DISC PLAYER
이 기기는 업무용(A급) 전자파적합기기로서 판매자
또는 사용자는 이 점을 주의하시기바라며, 가정외의
지역에서 사용하는 것을 목적으로 합니다.
레이저 다이오드 속성
방사 지속시간: 연속
레이저 출력: 53.3 W 미만
(이 출력은 Optical Pick up Block의 대물 렌즈 표면에서
7 mm 조리개를 사용하여 200 mm의 거리에서 측정한
값입니다.)
작동 전압 등을 표시하는 기명판은 섀시 밑면에 있습니
다.
리튬 배터리에 대한 주의점
직사광선, 화기 등과 같은 뜨거운 열기에 배터리를 노출
시키지 마십시오.
자동차 시동키에 ACC 위치가 없을 경우의 경고
AUTO OFF 기능을 설정하십시오(9페이지). 기기가
꺼지고 설정된 시간이 지나면 자동으로 완전히 종료
되므로 배터리 소모가 방지됩니다. AUTO OFF 기능
을 설정하지 않은 경우 시동키를 끌 때마다 디스플
레이가 사라질 때까지 OFF를 누르고 계십시오.
2KR
Page 21
목차
각부 명칭 및 컨트롤 . . . . . . . . . . . . . . . . . . . . . . . . . 4
시작하기
전면 패널 분리하기 . . . . . . . . . . . . . . . . . . . . . . . . . . 5
FM/AM 튜닝 단위 전환하기 . . . . . . . . . . . . . . . . . . . 5
시계 설정하기 . . . . . . . . . . . . . . . . . . . . . . . . . . . . . . 6
USB 장치 연결하기 . . . . . . . . . . . . . . . . . . . . . . . . . . 6
다른 휴대용 오디오 장치 연결하기 . . . . . . . . . . . . . . 6
라디오 듣기
라디오 듣기 . . . . . . . . . . . . . . . . . . . . . . . . . . . . . . . . 7
RDS(Radio Data System) 사용하기 . . . . . . . . . . . . . 7
재생
디스크 재생하기 . . . . . . . . . . . . . . . . . . . . . . . . . . . . 8
USB 장치 재생하기 . . . . . . . . . . . . . . . . . . . . . . . . . . 8
트랙 검색 및 재생하기. . . . . . . . . . . . . . . . . . . . . . . . 8
설정
DEMO 모드 취소하기 . . . . . . . . . . . . . . . . . . . . . . . . 9
기본 설정 작업. . . . . . . . . . . . . . . . . . . . . . . . . . . . . . 9
일반 설정(GENERAL) . . . . . . . . . . . . . . . . . . . . . . . . . 9
사운드 설정(SOUND). . . . . . . . . . . . . . . . . . . . . . . . . 9
디스플레이 설정(DISPLAY) . . . . . . . . . . . . . . . . . . . 10
추가 정보
사용전 주의 사항 . . . . . . . . . . . . . . . . . . . . . . . . . . . 10
유지 관리 . . . . . . . . . . . . . . . . . . . . . . . . . . . . . . . . . . 11
주요 제원 . . . . . . . . . . . . . . . . . . . . . . . . . . . . . . . . . . 11
문제 해결 . . . . . . . . . . . . . . . . . . . . . . . . . . . . . . . . . . 12
연결/설치
주의 . . . . . . . . . . . . . . . . . . . . . . . . . . . . . . . . . . . . . . 15
설치용 부품 목록 . . . . . . . . . . . . . . . . . . . . . . . . . . . . 15
연결 . . . . . . . . . . . . . . . . . . . . . . . . . . . . . . . . . . . . . 16
설치 . . . . . . . . . . . . . . . . . . . . . . . . . . . . . . . . . . . . . . 17
3KR
Page 22
각부 명칭 및 컨트롤
본체
전면 패널 해제 버튼
SRC(소스)
전원을 끕니다.
소스를 변경합니다.
OFF
전원을 끄려면 1초간 길게 누릅니다.
전원과 디스플레이를 끄려면 2초 이상 길게 누릅
니다.
기기가 꺼지고 디스플레이가 사라지면 리모컨으로
조작할 수 없습니다.
컨트롤 다이얼
돌려서 볼륨을 조절합니다.
PUSH ENTER
선택한 항목을 입력합니다.
MENU
설정 메뉴를 엽니다.
디스크 슬롯
디스플레이 창
SEEK +/–
라디오 방송국을 자동으로 튜닝합니다. 수
튜닝하려면 길게 누릅니다.
/(이전/다음)
/(뒤로 감기/빨리 감기)
(디스크 꺼내기)
(탐색)(8페이지)
재생 중에 탐색 모드로 들어갑니다.
동으로
(뒤로)
이전 화면으로 돌아갑니다.
MODE(7페이지)
리모컨 수신부
PTY(프로그램 유형)
RDS에서 PTY를 선택합니다.
숫자 버튼(1 – 6)
저장된 라디오 방송국을 수신합니다. 길게 누르면
방송국이 저장됩니다.
AL
BUM /
오디오 장치용 앨범을 건너 뜁니다. 길게 누르면
앨범을 계속 건너 뜁니다.
(반복)
SHUF(셔플)
PAU SE
MEGA BASS
MEGA BASS 기능을 켜거나 끄려면 누릅니다.
DSPL(디스플레이)
디스플레이 항목을 변경하려면 누릅니다.
SCRL
길게 누르면 디스플레이 항목이 스크롤됩니다.
AUX 입력 잭
USB 포트
4KR
Page 23
RM-X211 리모컨
VOL(볼륨) + 버튼에는 돌기가 있습니다.
시작하기
전면 패널 분리하기
도난 방지를 위해 본 기기의 전면 패널을 분리할 수 있
습니다.
1 기기가 꺼질 때까지 OFF 를 길게 누르고
전면 패널 해제 버튼 을 누른 다음 패널을
앞으로 당겨 제거합니다.
경고성 알람
전면 패널을 분리하지 않고 시동키를 OFF 쪽에 놓을 경
우 경고성 알람이 몇 초간 울립니다. 알람은 내장 앰프
가 사용된 경우에만 울립니다.
ATT (감소)
소리를 줄입니다. 감소를 취소하려면 다시 누릅니다.
SOUND
SOUND 메뉴를 바로 엽니다.
MENU
길게 누르면 설정 메뉴가 열립니다.
///
설정 항목 등을 선택합니다.
ENTER
선택한 항목을 입력합니다.
/(이전/다음)
+/–(앨범 +/–)
VOL(볼륨) +/–
사용 전에 절연 필름을 제거하십시오.
전면 패널 부착하기
FM/AM 튜닝 단위 전환하기
해당 국가의 FM/AM 튜닝 단위를 설정합니다. 이 설정
은 본
기기의 전원이 꺼진 경우에만 나타납니다.
1 MENU를 누르고 컨트롤 다이얼을 돌려
[GENERAL]을 선택한 다음 누릅니다.
2 컨트롤 다이얼을 돌려 [TUNER-STP]를 선택
한 다음 누릅니다.
3 컨트롤 다이얼을 돌려 [50K/9K],
[100K/10K] 또는 [200K/10K]를 선택한 다음
누릅니다.
5KR
Page 24
시계 설정하기
1 MENU를 누르고 컨트롤 다이얼을 돌려
[GENERAL]을 선택한 다음 누릅니다.
2 컨트롤 다이얼을 돌려 [CLOCK-ADJ]를 선택
한 다음 누릅니다.
시간 표시가 깜박입니다.
3 컨트롤 다이얼을 돌려 시간과 분을 설정합
니다.
디지털 표시를 이동하려면 SEEK +/–를 누릅니다.
4 분을 설정한 후 MENU를 누릅니다.
설정이 완료되었으며 시계가 시작됩니다.
시계를 표시하려면
DSPL을 누릅니다.
USB 장치 연결하기
1 기기의 볼륨을 낮춥니다.
2 USB 장치를 기기에 연결합니다.
4 SRC를 눌러 [AUX]를 선택합니다.
연결된 장치의 볼륨 레벨을 다른 소스와 일치시키
려면
적당한 볼륨으로 휴대용 오디오 장치의 재생을 시작하
고 평상시 청취 볼륨을 기기에서 설정합니다.
MENU를 누른 다음 [SOUND] [AUX VOL]을 선택합니
다(9페이지).
다른 휴대용 오디오 장치
연결하기
1 휴대용 오디오 장치를 끕니다.
2 기기의 볼륨을 낮춥니다.
3 연결 코드(별매품)*를 사용하여 휴대용 오디
오 장치를 기기의 AUX 입력 잭(스테레오 미
니 잭)에 연결합니다.
* 직선형 플러그를 사용해야 합니다.
6KR
Page 25
라디오 듣기
라디오 듣기
튜닝 단위를 설정해야 합니다(5페이지).
라디오를 들으려면 SRC를 눌러 [TUNER]를 선택합니다.
자동으로 저장하기(BTM)
1 MODE를 눌러 대역을 변경합니다(FM1,
FM2, FM3, AM1 또는 AM2).
2 MENU를 누르고 컨트롤 다이얼을 돌려
[GENERAL]을 선택한 다음 누릅니다.
3 컨트롤 다이얼을 돌려 [BTM]을 선택한 다음
누릅니다.
숫자 버튼의 주파수 순서대로 방송국이 저장됩니다.
튜닝
1 MODE를 눌러 대역을 변경합니다(FM1,
FM2, FM3, AM1 또는 AM2).
2 튜닝을 수행합니다.
수동으로 튜닝하려면
SEEK +/–를 길게 눌러 근접 주파수를 찾은 다음
SEEK +/–를 반복적으로 눌러 원하는 주파수를 미세
조정합니다.
자동으로 튜닝하려면
SEEK +/–를 누릅니다.
방송국이 수신되면 스캔이 중지됩니다.
RDS(Radio Data System)
사용하기
프로그램 유형(PTY) 선택하기
1 FM 수신 중에 PTY를 누릅니다.
2 원하는 프로그램 유형이 나타날 때까지 컨트
롤 다이얼을 돌린 다음 누릅니다.
선택된 프로그램 유형을 방송하는 방송국이 검색
되기 시작합니다.
프로그램 유형
NEWS(뉴스), AFFAIRS(시사), INFO(정보),
SPORT(스포츠), EDUCATE(교육), DRAMA(드라마),
CULTURE(문화), SCIENCE(과학), VARI ED(종합),
POP M(팝 음악), ROCK M(락 음악), EASY M(M.O.R.
음악), LIGHT M(가벼운 클래식), CLASSICS(정통 클래
식), OTHER M(기타 음악), WEATHER(날씨),
FINANCE(금융), CHILDREN(어린이 프로그램),
SOCIAL A(사회), RELIGION(종교), PHONE IN(전화 참
여), TR
AVEL(여행), LEISURE(레저), JAZZ(재즈 음악),
COUNTRY(컨트리 음악), NATION M(민속 음악),
OLDIES(추억의 명곡), FOLK M(포크 음악),
DOCUMENT(다큐멘터리)
시계 시간(CT) 설정하기
RDS 전송에 포함된 CT 데이터는 시계를 설정합니다.
1 [GENERAL]에서 [CT-ON]을 설정합니다(9페
이지).
수동으로 저장하기
1 저장할 방송국이 수신되는 상태에서 [MEM]
이 나타날 때까지 숫자 버튼(1 – 6)을 길게
누릅니다.
저장된 방송국 수신하기
1 대역을 선택하고 숫자 버튼(1 – 6)을 누릅니다.
7KR
Page 26
재생
트랙 검색 및 재생하기
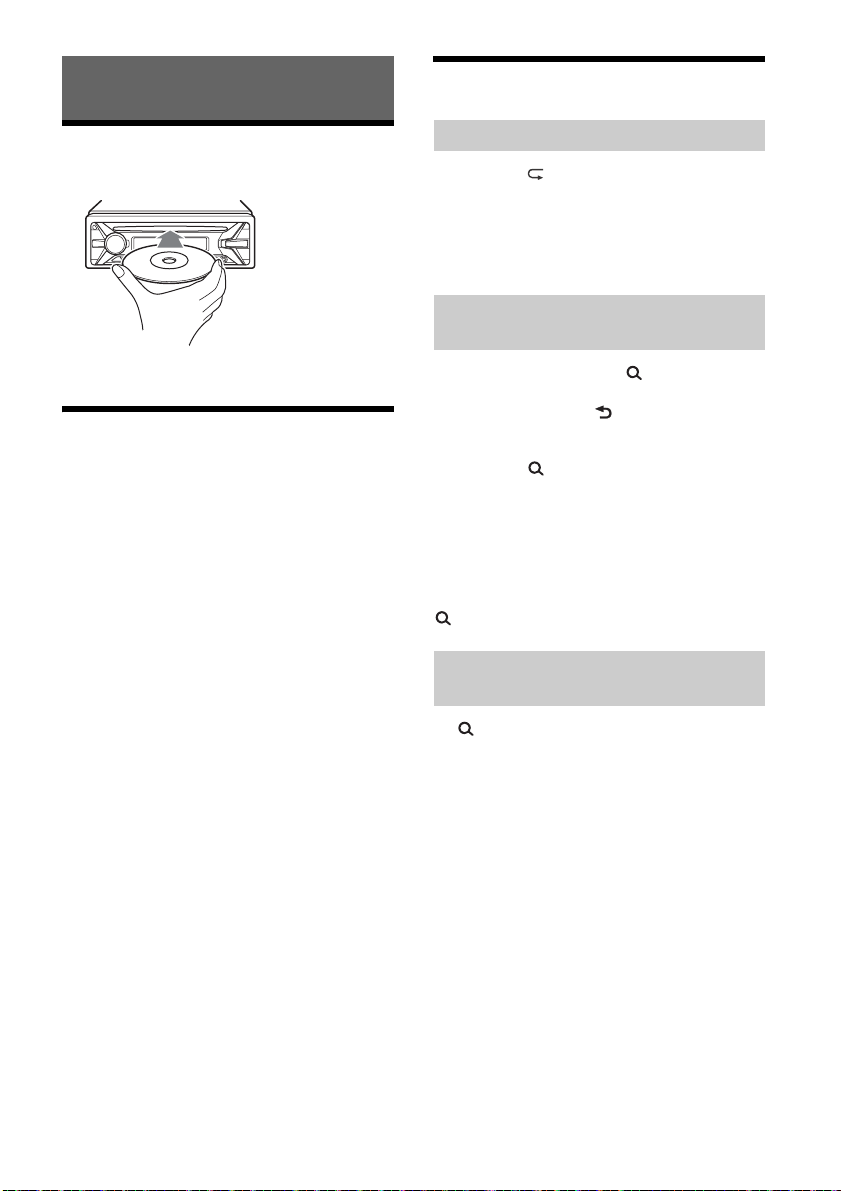
디스크 재생하기
1 디스크를 넣습니다(라벨 면이 윗면).
자동으로 재생이 시작됩니다.
USB 장치 재생하기
USB 표준과 호환되는 MSC(Mass Storage Class) 및
MTP(Media Transfer Protocol) 유형 USB 장치(USB
플래시 드라이브, 디지털 미디어 플레이어, Android™
폰 등)를 사용할 수 있습니다.
디지털 미디어 플레이어 또는 Android 폰에 따라 USB
연결 모드를 MTP로 설정해야 합니다.
참고
USB 장치의 호환성에 대한 자세한 내용은 뒤표지의 지원
사이트를 참조하십시오.
다음 MP3/WMA 파일의 재생은 지원되지 않습니다.
무손실 압축 파일
저작권으로 보호된 파일
DRM(Digital Rights Management) 파일
멀티 채널 오디오 파일
1 USB 장치를 USB 포트에 연결합니다(6페이지).
재생이 시작됩니다.
장치가 이미 연결된 경우 재생을 시작하려면 SRC
를 눌러 [USB]를 선택합니다.
2 본 기기에서 볼륨을 조절합니다.
재생을 중지하려면
OFF를 1초 동안 누릅니다.
장치를 제거하려면
재생을 중지한 다음 장치를 제거합니다.
반복 재생 및 셔플 재생
1 재생 중에 (반복) 또는 SHUF를 반복적으로
눌러 원하는 재생 모드를 선택합니다.
선택한 재생 모드로 재생을 시작하는 데 시간이
걸릴 수 있습니다.
사용 가능한 재생 모드는 선택한 음원에 따라 다릅니다.
이름으로 트랙 검색하기(QuickBrowZer™)
1 CD 또는 USB 재생 중에 (탐색)*을 눌러
검색 범주 목록을 표시합니다.
트랙 목록이 나타나면 (뒤로)를 반복해서 눌러
원하는 검색 범주를 표시합니다.
* 범주 목록의 시작 부분으로 바로 돌아가려면 USB
재생 중에 (탐색)을 2초 이상 누릅니다.
2 컨트롤 다이얼을 돌려 원하는 검색 범주를
선택한 다음 눌러서 확인합니다.
3 2단계를 반복하여 원하는 트랙을 검색합니다.
재생이 시작됩니다.
Quick-BrowZer 모드를 종료하려면
(탐색)을 누릅니다.
항목을 건너뛰는 방식으로 검색하기
(점프 모드)
1 (탐색)을 누릅니다.
2 SEEK +를 누릅니다.
3 컨트롤 다이얼을 돌려 항목을 선택합니다.
총 항목 수의 10%씩 목록을 점프합니다.
4 Quick-BrowZer 모드로 돌아가려면 ENTER
를 누릅니다.
선택한 항목이 나타납니다.
5 컨트롤 다이얼을 돌려 원하는 항목을 선택하
고 누릅니다.
재생이 시작됩니다.
8KR
Page 27
설정
DEMO 모드 취소하기
기기의 전원이 꺼질 때 표시되는 데모를 취소할 수 있습
니다.
1 MENU를 누르고 컨트롤 다이얼을 돌려
[DISPLAY]를 선택한 다음 누릅니다.
2 컨트롤 다이얼을 돌려 [DEMO]를 선택한 다음
누릅니다.
3 컨트롤 다이얼을 돌려 [DEMO-OFF]를 선택
한 다음 누릅니다.
설정이 완료되었습니다.
4 (뒤로)를 두 번 누릅니다.
디스플레이가 일반 수신/재생 모드로 돌아갑니다.
기본 설정 작업
다음 설정 범주에서 항목을 설정할 수 있습니다:
일반 설정(GENERAL), 사운드 설정(SOUND), 디스플레
이 설정(DISPLAY)
1 MENU를 누릅니다.
2 컨트롤 다이얼을 돌려 설정 범주를 선택한
다음 누릅니다.
설정할 수 있는 항목은 소스 및 설정에 따라 다릅
니다.
3 컨트롤 다이얼을 돌려 옵션을 선택한 다음
누릅니다.
이전 화면으로 돌아가려면
(뒤로)를 누릅니다.
일반 설정(GENERAL)
CLOCK-ADJ(시계 조정)(6페이지)
TUNER-STP(튜너 단계)(5페이지)
(기기가 꺼진 경우에만 사용 가능합니다.)
CAUT ALM(경고성 알람)
경고성 알람 활성화: [ON], [OFF](5페이지). (기기가
꺼진 경우에만 사용 가능합니다.)
BEEP
비프음 활성화: [ON], [OFF].
AUTO OFF
원하는 시간 후에 기기가 자동으로 꺼집니다: [NO],
[30S](30초), [30M] (30분), [60M](60분).
AUX-A(AUX 오디오)
AUX 소스 표시 활성화: [ON], [OFF]. (기기가 꺼진
경우에만 사용 가능합니다.)
CT(시계 시간)
CT 기능 활성화: [ON], [OFF].
BTM(7페이지)
사운드 설정(SOUND)
MEGABASS(저음 보강)
볼륨 레벨로 동기화에서 저음 강화: [ON], [OFF].
EQ5 PRESET
10개의 이퀄라이저 커브 중에서 선택 또는 OFF 선택:
[OFF], [R AND B], [ROCK], [POP], [DANCE], [HIPHOP], [ELECTRONICA], [JAZZ], [REGUETON],
[SALSA], [CUSTOM].
각 소스에 대한 이퀄라이저 커브 설정을 기억시켜
놓을 수 있습니다.
EQ5 SETTING
EQ5의 [CUSTOM]을 설정합니다.
BASE
사전 설정된 이퀄라이저 커브를 추가 사용자 지정
을 위한 기본으로 선택합니다: [BAND1](저주파수),
[BAND2](중저주파수), [BAND3](중주파수),
[BAND4](중고주파수), [BAND5](고주파수).
볼륨 레벨은 -10 dB – +10 dB 사이에서 1dB 단위로
조정할 수 있습니다.
BALANCE
사운드 밸런스 조정: [RIGHT-15] – [CENTER] –
[LEFT-15].
FADER
상대 레벨 조정: [FRONT-15] – [CENTER] – [REAR15].
SW LEVEL(서브우퍼 레벨)
서브우퍼 볼륨 레벨 조정:
[+2 dB] – [0 dB] – [-2 dB].
AUX VOL(AUX 볼륨 레벨)
연결된 각 보조 장치의 볼륨 레벨 조정: [+18 dB] –
[0 dB] – [-8 dB].
이 설정을 사용하면 소스 간의 볼륨 레벨을 조정할
필요가 없습니다.
9KR
Page 28
디스플레이 설정(DISPLAY)
DEMO(데모)
데모 활성화: [ON], [OFF].
BLK OUT(블랙 아웃)
5초간 조작하지 않으면 소스(예: 라디오 수신/CD
재생 도중) 조명 자동 끄기: [ON], [OFF].
조명을 다시 켜려면 기기 또는 리모컨에서 아무 버튼
이나 누릅니다.
DIMMER
디스플레이 밝기 변경: [ON], [OFF].
SND SYNC(사운드 동기화)
사운드 동기화로 색상 선택: [ON], [OFF].
AUTO SCR(자동 스크롤)
긴 항목을 자동으로 스크롤: [ON], [OFF].
M.DISPLAY(동작 표시)
움직이는 패턴 표시: [ON], [OFF].
추가 정보
사용전 주의 사항
자동차를 직사광선이 내리쬐는 곳에 주차한 경우
기기를 미리 식혀 주십시오.
뜨거운 직사광선으로 인해 오작동이 발생할 수 있으
므로 전면 패널 또는 오디오 장치를 자동차 안에 두지
마십시오.
전원 안테나는 자동 연장됩니다.
결로 현상
기기 안에 결로 현상이 발생한 경우 기기가 올바로 작동
되지 않을 수 있으므로 디스크를 꺼내고 마를 때까지
한 시간 정도 기다리십시오.
높은 음질 수준을 유지하려면
기기나 디스크에 액체가 튀지 않도록 주의하십시오.
디스크에 관한 주의
디스크를 직사광선이나 열 통풍구와 같은 열원에 노
출시키거나 직사광선이 내리쬐는 곳에 주차한 자동
차 내부에 두지 마십시오.
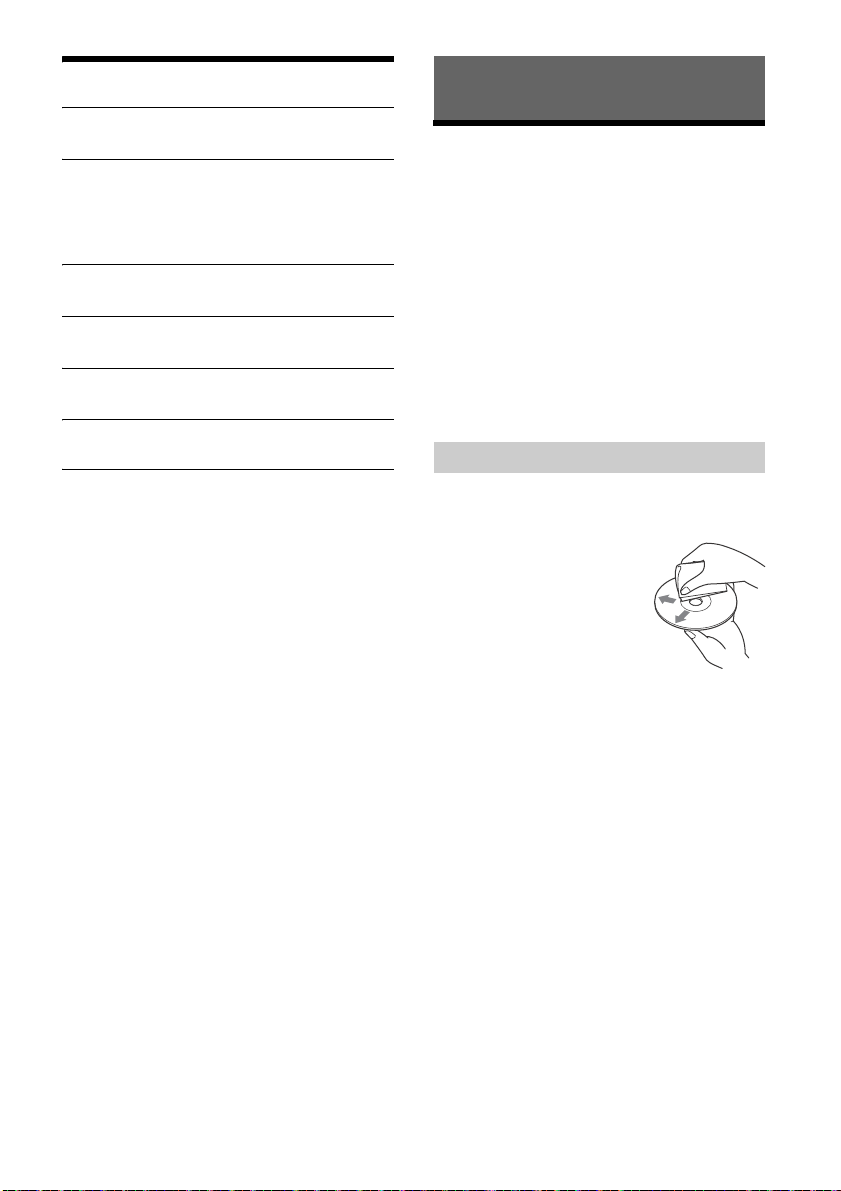
재생하기 전에 클리닝 헝겊을
사용하여 중심에서 바깥쪽으로
디스크를 닦아내십시오. 벤젠,
시너, 시판되는 클리너 등과 같
은 용제를 사용하지 마십시오.
본 기기는 콤팩트 디스크(CD)
규격에 준거한 디스크를 재생하
도록 디자인되어 있습
얼 디스크나 저작권 보호 기술을 사용하여 인코딩된
일부 음악 디스크의 경우 콤팩트 디스크(CD) 규격을
준수하지 않으므로 본 기기에서 재생하지 못할 수 있
습니다.
본 기기에서 재생할 수 없는 디스크
라벨, 스티커 또는 접착 테이프나 종이가 부착된
디스크. 이러한 디스크를 재생하면 오작동이 발생
하거나 디스크가 손상될 수 있습니다.
비표준 모양의 디스
양). 재생을 시도하면 기기가 손상될 수 있습니다.
8 cm 디스크.
CD-R/CD-RW 디스크에 대한 주의점
멀티 세션 디스크는 CD-DA 세션으로 시작될 경우
CD-DA 디스크로 인식되고 다른 세션은 재생되지
않습니다.
본 기기에서 재생할 수 없는 디스크
기록 품질이 나쁜 CD-R/CD-RW.
호환되지 않는 기록 장치로 기록된 CD-R/CD-RW.
제대로 파이널라이즈되지 않은 CD-R/CD-RW.
ISO9660 Level 1/Level 2, Joliet/Romeo 또는 멀티
세션에 준거한 음악 CD 형식이나 MP3 형식으로
녹음되지 않은 CD-R/CD-RW.
니다. 듀
크(예: 하트 모양, 사각형, 별 모
10KR
Page 29
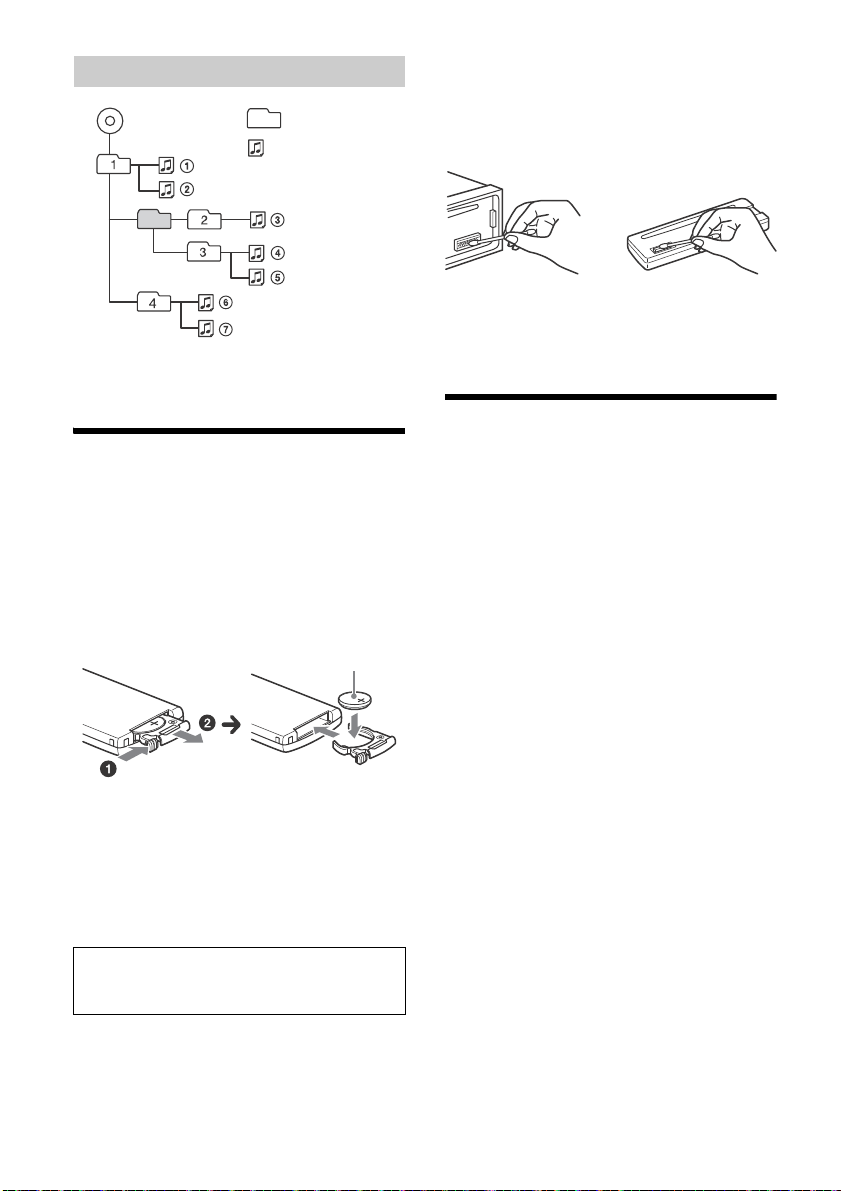
MP3/WMA 파일의 재생 순서
MP3/WMA
폴더(앨범)
MP3/WMA 파일(트랙)
+ 면이 위로
본 사용 설명서에서 다루지 않은 기기에 관한 문의 사항
이나 문제점은 가까운 Sony 대리점에 문의하십시오.
유지 관리
리모컨의 리튬 배터리 교체하기
정상 조건에서 배터리의 수명은 약 1년입니다. (사용 조
건에 따라 서비스 수명이 더 짧을 수 있습니다.)
배터리의 성능이 약해지면 리모컨의 작동 범위가 짧아
집니다.
주의
배터리를 잘못 교체하면 폭발할 위험이 있습니다. 동일
유형 또는 동등한 유형으로만 교체하십시오.
리튬 배터리에 대한 주의점
리튬 배터리는 어린이의 손이 닿지 않는 곳에 두십시오.
배터리를 삼켰을 경우 즉시 의사의 진찰을 받으십시오.
접촉이 잘되도록 하려면 마른 헝겊으로 배터리를 닦으십
시오.
배터리를 넣을 때 극성이 올바른 방향인지 확인하십시오.
단락될 수 있으므로 금속 핀셋을 사용하여 배터리를 집지
마십시오.
경고
배터리를 잘못 취급하면 폭발할 수 있습니다. 충전
또는 분해하거나 불에 넣어 폐기하지 마십시오.
커넥터 청소하기
기기와 전면 패널 사이의 커넥터가 깨끗하지 않은 경우
기기가 올바르게 작동하지 않을 수 있습니다. 이를 방
지하려면 전면 패널을 분리하고(5페이지) 면봉으로 커
넥터를 닦으십시오. 힘을 너무 세게 주지 마십시오. 커
넥터가 손상될 염려가 있습니다.
참고
안전을 위해 커넥터를 닦기 전에 시동키를 끄고 시동키에
서 키를 제거하십시오.
손이나 금속 장치로 커넥터를 직접 만지지 마십시오.
주요 제원
튜너 부문
FM
튜닝 범위:
87.5 – 108.0 MHz(50 kHz 단위)
87.5 – 108.0 MHz(100 kHz 단위)
87.5 – 107.9 MHz(200 kHz 단위)
FM 튜닝 단위:
50 kHz/100 kHz/200 kHz 전환 가능
안테나 단자:
외부 안테나 커넥터
중간 주파수:
FM CCIR: -1,956.5에서 -487.3 kHz 및
+500.0에서 +2,095.4 kHz
유효 감도: 7 dBf
선택도: 400 kHz에서 75 dB
신호대 잡음비: 73 dB
분할: 1 kHz에서 50 dB
주파수 응답: 20 – 15,000 Hz
AM
튜닝 범위:
531 – 1,602 kHz(9 kHz 단위)
530 – 1,710 kHz(10 kHz 단위)
AM 튜닝 단위:
9 kHz/10 kHz 전환 가능
안테나 단자:
외부 안테나 커넥터
감도: 26 µV
11KR
Page 30
CD 플레이어 부문
신호대 잡음비: 95 dB
주파수 응답: 10 – 20,000 Hz
워우 플러터: 측정 한계치 미만
최대 개수:(CD-R/CD-RW에만 해당)
폴더(앨범): 150(루트 폴더 포함)
파일(트랙) 및 폴더: 300(폴더/파일에 포함된 문자
가 많은 경우 300보다 작을 수 있음)
파일/폴더 이름에 표시 가능한 문자: 32(Joliet)/
64(Romeo)
해당 코덱: MP3(.mp3) 및 WMA(.wma)
USB 플레이어 부문
인터페이스: USB(최대 속도)
최대 전류: 500 mA
인식 가능한 최대 트랙 수:
폴더(앨범): 256
폴더당 파일(트랙): 256
해당 코덱:
MP3(.mp3) 및 WMA(.wma)
전원 앰프 부문
출력: 스피커 출력
스피커 임피던스: 4 – 8 ohms
최대 전원 출력: 55 W × 4(4 ohms에서)
일반
출력:
오디오 출력 단자(후면, 서브)
파워 안테나/파워 앰프 컨트롤 단자(REM OUT)
입력:
리모컨 입력 단자
안테나 입력 단자
AUX 입력 잭(스테레오 미니 잭)
USB 포트
필요 전력: 12 V DC 자동차 배터리(음극 접지)
외형 치수:
약 178 mm × 50 mm × 177 mm(가로/세로/두께)
장착 치수:
약 182 mm × 53 mm × 160 mm(가로/세로/두께)
무게: 약 1.2 kg
패키지 내용물:
본체(1)
리모컨(1) : RM-X211
설치 및 연결용 부품(1세트)
상기에 열거한 액세
습니다. 자세한 내용은 대리점으로 문의하여 주십시오.
디자인 및 주요 제원은 사전 통보 없이 변경될 수 있습
니다.
서리를 취급하지 않는 대리점도 있
저작권
Windows Media는 미국 및/또는 그 밖의 나라에서 등
록된 Microsoft Corporation의 등록 상표 또는 상표입
니다.
본 제품은 Microsoft Corporation의 특정 지적 재산권
으로 보호됩니다. Microsoft 또는 공인 Microsoft 계열
사로부터의 적정 라이센
기술을 사용 또는 배포하는 것은 금지되어 있습니다.
Fraunhofer IIS 및 Thomson으로부터 인가된 MPEG
Layer-3 오디오 코딩 기술 및 특허.
Android는 Google Inc.의 상표입니다.
스 없이 본 제품 외에 이러한
문제 해결
다음 점검 목록은 기기에서 발생할 수 있는 문제를 해
결하는 데 도움이 됩니다.
아래의 점검 목록을 진행하기 전에 연결 및 조작 절차
를 확인하십시오.
퓨즈 사용 및 기기 대시보드에서 기기 제거에 대한 자
세한 내용은 "연결/설치"(15페이지)를 참조하십시오.
문제가 해결되지 않은 경우 뒤표지의 지원 사이트를
참조하십시오.
일반
기기에 전원이 공급되지 않는다.
기기가 꺼지고 디스플레이가 사라진 경우 리모컨으
로 기기를 조작할 수 없습니다.
기기를 켭니다.
소리가 나지 않는다.
페이더 컨트롤 [FADER]의 위치가 2-스피커 시스템
용으로 설정되지 않았습니다.
비프음이 들리지 않는다.
옵션 전원 앰프가 연결되었고 내장 앰프를 사용하고
있지 않습니다.
메모리 내용이 지워졌다.
전원 공급 리드선 또는 배터리가 분리되었거나 올바
르게 연결되지 않았습니다.
저장된 방송국과 정확한 시간이 지워진다.
퓨즈가 끊어졌다.
시동키 위치를 전환하면 소음이 발생한다.
리드선이 자동차의 액세서리 전원 커넥터에 제대로
연결되어 있지 않습니다.
재생 또는 수신 중에 데모 모드가 시작된다.
[DEMO-ON]이 설정된 상태로 5분간 조작하지 않으
면 데모 모드가 시작됩니다.
[DEMO-OFF]를 설정합니다(10페이지).
12KR
Page 31
디스플레이가 디스플레이 창에서 사라지거나 나타나지
않는다.
조광등이 [DIM-ON]으로 설정되었습니다(10페이지).
OFF를 길게 누르면 디스플레이가 사라집니다.
디스플레이가 표시될 때까지 기기에서 OFF를 누릅
니다.
커넥터가 더러워졌습니다(11페이지).
기기가 작동하는 중에 디스플레이가 사라진다.
블랙 아웃 기능이 설정되었습니다(10페이지).
조작 버튼이 작동하지 않는다.
디스크가 꺼내지지 않는다.
DSPL 및 (뒤로)/MODE를 2초 이상 눌러 기기를
재설정합니다.
메모리에 저장된 내용이 지워집니다.
안전을 위해 운전 중에 기기를 재설정하지 마십시오.
라디오 수신
방송국을 수신할 수 없다.
잡음이 섞인다.
연결이 올바르지 않습니다.
자동차 뒷면/옆면 유리에 내장 라디오 안테나가
있으면 REM OUT 리드선(파란색/흰색 스트립) 또
는 액세서리 전원 공급 리드선(빨간색)을 자동차
의 안테나 부스터의 전원 공급 리드선에 연결합
니다.
자동차 안테나의 연결을 확인합니다.
자동 안테나가 올라오지 않을 경우 전원 안테나
컨트롤 리드선의 연결을 확인합
튜닝 단위 설정이 지워졌습니다.
튜닝 단위를 다시 설정합니다(5페이지).
프리셋 튜닝이 불가능하다.
방송 신호가 너무 약합니다.
니다.
RDS
PTY에 [- - - - - - - -]가 표시된다.
현재 방송국이 RDS 방송국이 아닙니다.
RDS 데이터가 수신되지 않았습니다.
방송국에서 프로그램 유형을 지정하지 않습니다.
CD 재생
디스크가 재생되지 않는다.
결함이 있거나 더러운 디스크입니다.
오디오용 CD-R/CD-RW가 아닙니다(10페이지).
MP3/WMA 파일을 재생할 수 없다.
디스크가 MP3/WMA 형식 및 버전과 호환되지 않습
니다. 재생 가능한 디스크 및 형식에 대한 자세한 내
용을 보려면 뒷면의 지원 사이트를 방문하십시오.
MP3/WMA 파일이 다른 파일에 비해 재생하는 데 시간이
오래 걸린다.
다음과 같은 디스크는 재생을 시작하는 데 시간이
많이 걸립니다.
복잡한 트리 구조를 사용하여 기록된 디스크.
멀티 세션으로 기록된 디스크.
데이터를 추가할 수 있는 디스크.
사운드를 건너뛴다.
결함이 있거나 더러운 디스크입니다.
USB 장치 재생
USB 허브를 통해 항목을 재생할 수 없다.
본 기기에서는 USB 허브를 통해 USB 장치를 인식할
수 없습니다.
USB 장치를 재생하는 데 오래 걸린다.
트리 구조가 복잡한 파일이 USB 장치에 포함되어
있습니다.
사운드가 끊어진다.
320kbps 이상의 높은 비트 전송률에서는 사운드가
끊어질 수 있습니다.
오디오 파일이 재생되지 않는다.
FAT16 또는 FAT32 이외의 미지원 파일 시스템에서
USB 장치를 포맷했습니다.*
* 본 기기는 FAT16 및 FAT32 를 지원하지만 일부 USB 장치
중에는 이러한 FAT를 지원하지 않는 것도 있습니다. 자세
한 내용은 각 USB 장치의 사용설명서를 참조하거나 제조
사에 문의하십시오.
오류 표시/메시지
ERROR: 디스크 또는 USB 장치를 재생할 수 없습니다.
디스크를 닦거나 바르게 삽입하십시오. 또는 디스크
가 비어 있거나 손상되지 않았는지 확인하십시오.
USB 장치를 다시 연결하십시오.
HUB NO SUPRT: USB 허브가 지원되지 않습니다.
NO DEV: USB 장치가 연결되지 않았거나 인식되지 않습
니다.
USB 장치 또는 USB 케이블이 단단히 연결되었는지
확인하십시오.
NO MUSIC: 재생 가능한 파일이 없습니다.
디스크를 삽입하거나 재생 가능한 파일이 있는 USB
장치를 연결하십시오(12페이지).
OVERLOAD: USB 장치가 과부하 상태입니다.
USB 장치를 분리한 다음 SRC를 눌러 다른 소스를
선택하십시오.
USB 장치에 결함이 있거나 지원되지 않는 장치를
연결했습니다.
13KR
Page 32
PUSH EJT: 디스크를 제대로 꺼낼 수 없습니다.
(꺼내기)를 누릅니다.
READ: 정보를 읽는 중입니다.
읽기가 완료되어 자동으로 재생이 시작될 때까지 기
다립니다. 디스크 구조에 따라 약간 시간이 걸릴 수
있습니다.
USB NO SUPRT: USB 장치가 지원되지 않습니다.
USB 장치의 호환성에 대한 자세한 내용은 뒤표지의
지원 사이트를 참조하십시오.
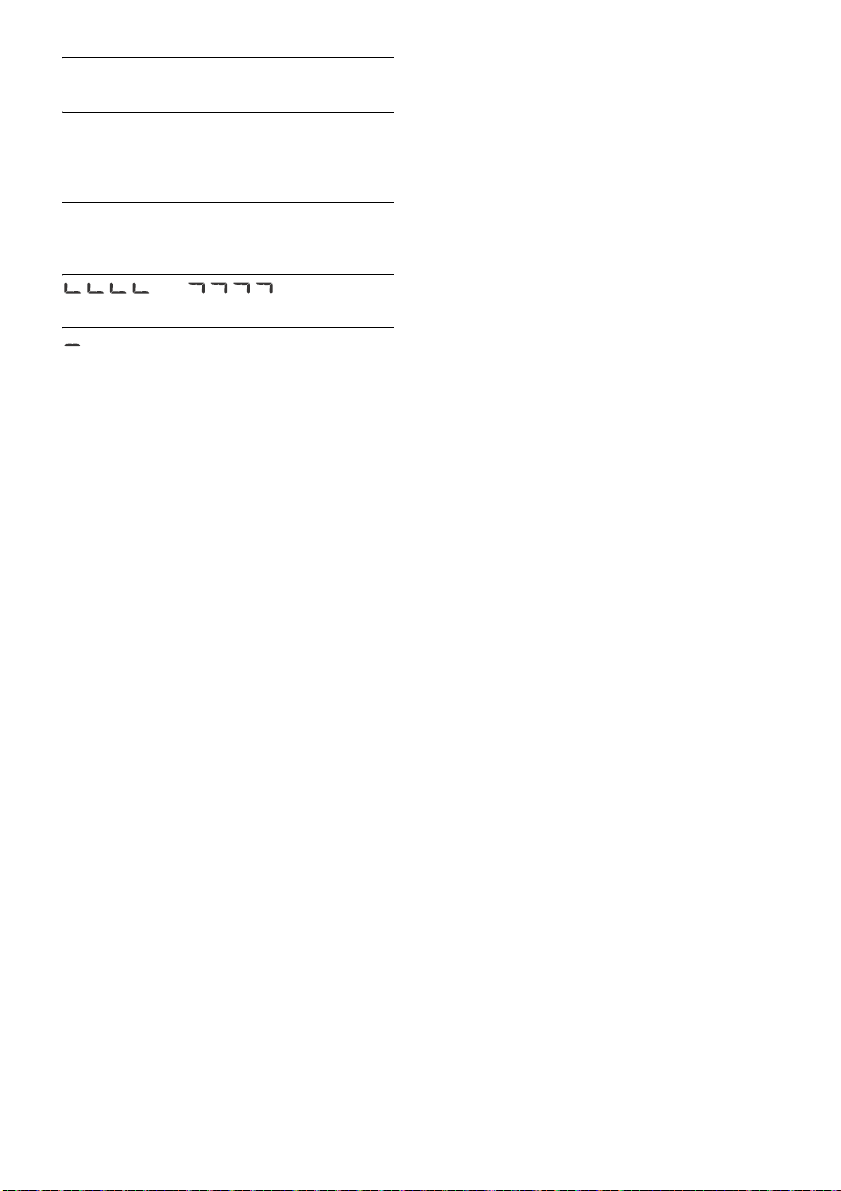
끝에 도달했습니다.
: 문자를 표시할 수 없습니다.
또는 : 디스크 시작 또는
이러한 해결 방법으로 문제가 해결되지 않는 경우 가까
운 Sony 대리점에 문의하십시오.
CD 재생 문제로 인해 기기 수리를 받으려면 문제가
발생할 때 사용했던 디스크를 가져오십시오.
14KR
Page 33
연결/설치
× 4
5 × 최대 8 mm
× 2
주의
모든 접지 리드선을 공통 접지 지점에 연결하십시오.
리드선이 나사 아래에 걸리거나 움직이는 부품(시트
레일링 등)에 끼지 않게 하십시오.
연결하기 전에 시동을 꺼서 단락을 방지하십시오.
노란색 및 빨간색 전원 공급 장치 리드선은 다른 리드
선을 모두 연결한 후에만 연결하십시오.
안전을 위해 연결되지 않은 느슨한 리드선은 절연 테
이프로 감으십시오.
사용전 주의 사항
기기
로 인해 정상적인 작동에 방해가 되지 않도록 설
치 위치를 주의하여 선택하십시오.
먼지, 분진, 과도한 진동 또는 직사광선이나 히터 덕트
등 고온에 취약한 장소에 기기를 설치하지 마십시오.
안전하고 안정된 설치를 위해 부속된 장착 하드웨어
만 사용하십시오.
전원 공급 리드선(노란색)에 대한 주의 사항
본 기기를 다른 스테레오 컴포넌트와 함께 연결할 경우, 기
기가 연결되어 있는 자동차 회로의 암페어 등급이 각 컴포
넌트의 퓨즈 암페어 등급의 합보다 높아야 합니다.
장착 각도 조정
장착 각도를 45° 미만으로 조정하십시오.
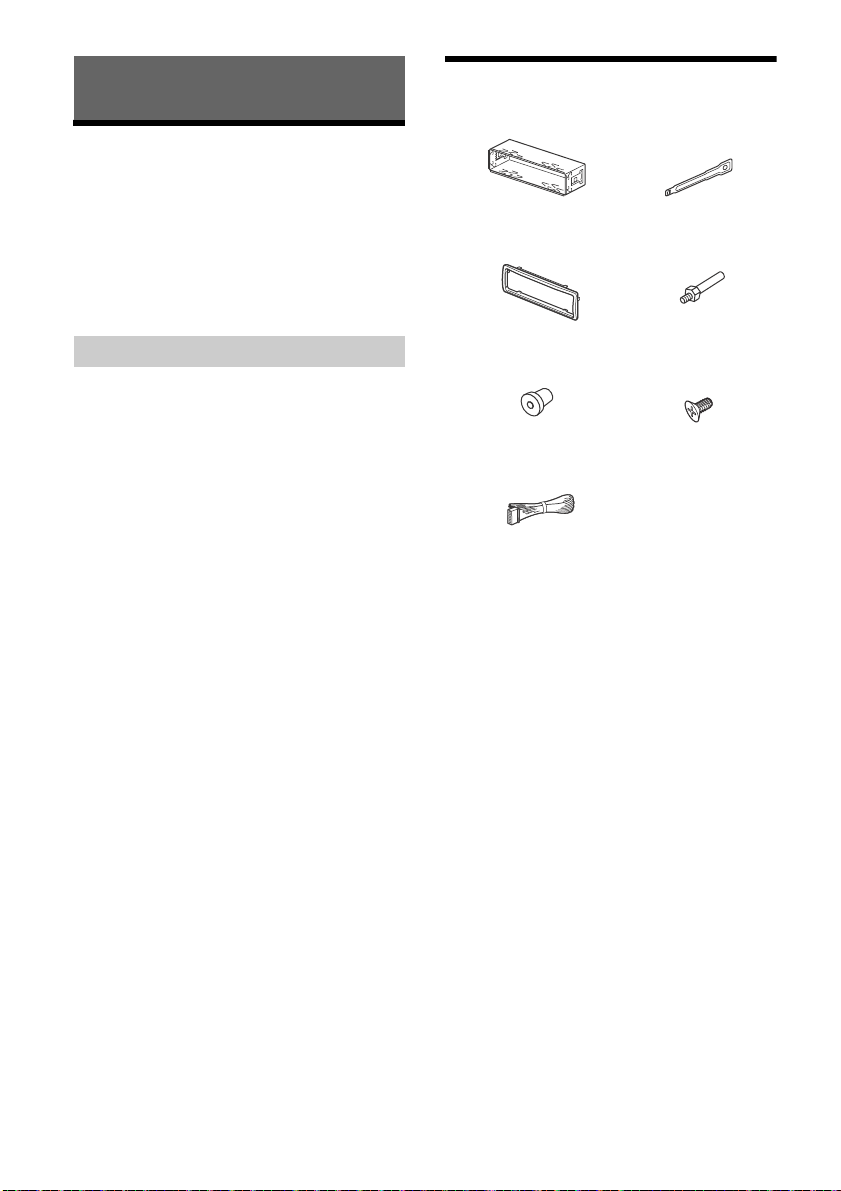
설치용 부품 목록
이 부품 목록에는 패키지 내용물 중 일부만 나와 있습
니다.
브래킷 및 보호대 는 출고 시 기기에 부착됩니
다. 기기를 장착하기 전에 해제 키 를 사용하여 기
기에서 브래킷 을 제거하십시오. 자세한 내용은
"보호대 및 브래킷 제거하기"(17페이지)를 참조하십
시오.
자동차에서 기기를 제거하는 경우에도 필요하므로
나중에 사용할 수 있도
시오.
록 해제 키 를 보관하십
15KR
Page 34
연결
전면 스피커*1*
2
흰색
흰색/검은색 줄무늬
회색
검은색
노란색
빨간색
파란색/흰색 줄무늬(MAX 0.4A)
유선 리모컨(별매품)에서*
4
자세한 내용은 "연결하
기"(17페이지)를 참조하
십시오.
회색/검은색 줄무늬
녹색
녹색/검은색 줄무늬
자주색
자주색/검은색 줄무늬
*
3
*
3
서브우퍼*
1
전원 앰프*
1
자동차 안테나에서
후면 스피커
*1*2
*1 별매품
*2 스피커 임피던스: 4 – 8 × 4
*3 RCA 핀 코드(별매품)
*4 자동차 유형에 따라 유선 리모컨용 어댑터(별매품)를
사용하십시오.
16KR
Page 35
연결하기
전면 스피커
서브우퍼
고리를 안쪽으로 끼웁니다.
182 mm
53 mm
캐치
공동 접지 지점에 연결
먼저 검은색 리드선을 연결한 다음 노란색 및 빨간
색 전원 공급 리드선을 연결합니다.
항상 전원이 공급되는 +12 V 전원 단자에 연결
먼저 검은색 리드선을 공통 지점에 연결합니다.
점화 스위치가 액세서리 위치로 설정된 경우에 전원
이 공급되는 +12 V 전원 단자에 연결
액세서리 위치가 없는 경우, 항상 전원이 공급되는
+12 V 전원(배터리) 단자에 연결합니다.
먼저 검은색 리드
전원 안테나 제어 리드선 또는 안테나 부스터의
전원 공급 리드선에 연결
전원 안테나 또는 안테나 부스터가 없거나 수동으
로 작동하는 신축식 안테나가 있는 경우 이 리드선
을 연결할 필요가 없습니다.
옵션 전원 앰프의 AMP REMOTE IN에 연결
이 연결은 앰프와 전원 안테나에만 해당됩니다. 다
른 시스템을 연결하면 기기가 손상
선을 공통 지점에 연결합니다.
될 수 있습니다.
서브우퍼 간편 연결
서브우퍼를 후면 스피커 코드에 연결하면 파워 앰프
없이 서브우퍼를 사용할 수 있습니다.
설치
보호대 및 브래킷 제거하기
기기를 설치하기 전에 기기에서 보호대 및 브래킷
을 제거합니다.
1 보호대 양쪽 가장자리를 잡고 당겨서 뺍
니다.
2 딸깍 소리가 날 때까지 양쪽 해제 키 를 삽
입하고 브래킷 을 아래로 누르고 기기를
위로 들어올려 분리합니다.
참고
손상을 방지하려면 임피던스가 4에서 8 ohm이고 전원 처리
용량이 적합한 서브우퍼를 사용하십시오.
메모리 홀드 연결
노란색 전원 공급 리드선이 연결된 경우, 시동 스위치가
꺼져 있더라도 메모리 회로에 항상 전원이 공급됩니다.
스피커 연결
스피커를 연결하기 전에 기기를 끄십시오.
손상을 방지하려면 임피던스가 4에서 8 ohm이고
전원 처리 용량이 적합한 스피커를 사용하십시오.
대시보드에 기기 장착하기
설치하기 전에 브래킷 양쪽의 캐치가 안쪽으로 2 mm
구부러졌는지 확인하십시오. 일본산 자동차에서 장착
하는 경우 "일본산 자동차에서 기기 장착하기"(18페이
지)를 참조하십시오.
1 대시보드 내부에 브래킷 을 배치한 다음
고리를 바깥쪽으로 구부려 단단히 고정시킵
니다.
17KR
Page 36
2 기기를 브래킷 에 장착한 다음 보호대 를
대시보드/중앙 콘솔에 연결
자동차에 부속된 기존 부품
브래킷
브래킷
대시보드/중앙 콘솔에 연결
자동차에 부속된 기존 부폼
브래킷
브래킷
퓨즈(10 A)
부착합니다.
참고
캐치가 똑바로 펴져 있거나 바깥쪽으로 구부러져 있으면
기기가 단단히 설치되지 않고 튀어나올 수 있습니다.
보호대 에 있는 4개의 캐치가 기기의 슬롯에 정확히
끼워졌는지 확인하십시오.
일본산 자동차에서 기기 장착하기
일부 일본산 자동차에서는 본 기기를 설치하지 못할 수도
있습니다. 이러한 경우에는 Sony 대리점에 문의하십시오.
TOYOTA
참고
고장을 방지하려면 부속된 나사 로만 설치하십시오.
전면 패널 분리 및 부착하기
자세한 내용은 "전면 패널 분리하기"(5페이지)를 참조
하십시오.
퓨즈 교체
퓨즈 교체 시 반드시 원래의 퓨즈에
명시된 정격 전류량과 일치하는 퓨
즈를 사용하십시오. 퓨즈가 끊긴 경
우 전원 연결을 확인하고 퓨즈를 교
체하십시오. 교체 후에 퓨즈가 다시
끊기면 내부 고장일 수 있습니다.
이러한 경우에는 가까운 Sony 대리
점에 문의하십시오.
NISSAN
18KR
Page 37

Page 38

Page 39

Page 40
http://www.sony-asia.com/section/support
http://www.sony-asia.com/caraudio/
http://scs.sony.co.kr/
http://www.sony.net/
©2014 Sony Corporation Printed in Thailand
 Loading...