

Page 1
Video Camera
Recorder
Operating Instructions
Before operating the unit, please read this manual thoroughly,
and retain it for future reference.
Manual de instrucciones
Antes de emplear la unidad, lea detenidamente este manual y
consérvelo para realizar consultas en el futuro.
3-856-204-12 (1)
CCD-TR3300E
CCD-TR2200E/TR3300E H
©1996 by Sony Corporation
CCD-TR2200E/TR3300E 3-856-204-12 (1)
Page 2

English
Español
Welcome!
Congratulations on your purchase of this Sony
Handycam® camcorder. With your Handycam
you can capture life’s precious moments with
superior picture and sound quality.
Your Handycam is loaded with advanced
features, but at the same time it is very easy to
use. You will soon be producing home video that
you can enjoy for years to come.
WARNING
To prevent fire or shock hazard, do not expose
the unit to rain or moisture.
To avoid electrical shock, do not open the
cabinet.
Refer servicing to qualified personnel only.
NOTICE ON THE SUPPLIED AC POWER
ADAPTOR FOR CUSTOMERS IN THE
UNITED KINGDOM
A moulded plug complying with BS1363 is fitted
to this equipment for your safety and
convenience.
Should the fuse in the plug supplied need to
be replaced, a 5 AMP fuse approved by ASTA
or BSI to BS1362, (i.e., marked with 2 or @
mark) must be used.
¡Bienvenido!
Enhorabuena por la adquisición de esta
videocámara Handycam® Sony. Con su
Handycam podrá captar esos preciosos
momentos de la vida con una calidad de imagen
y sonido superior.
Esta videocámara Handycam dispone de un gran
número de funciones avanzadas, pero a la vez
resulta de fácil manejo. Pronto estará realizando
vídeos domésticos de los que disfrutará durante
muchos años.
ADVERTENCIA
Para evitar el riesgo de incendios o
electrocución, no exponga la unidad a la lluvia
ni a la humedad
Para evitar descargas eléctricas, no abra la
unidad.
Solicite asistencia técnica sólo a personal
especializado.
If the plug supplied with this equipment has a
detachable fuse cover, be sure to attach the
fuse cover after you change the fuse. Never
use the plug without the fuse cover. If you
should lose the fuse cover, please contact your
nearest Sony service station.
2
CCD-TR2200E/TR3300E 3-856-204-12 (1)
Page 3

English
Table of contents
Before you begin
Using this manual................................................... 5
Checking supplied accessories ............................. 7
Getting started
Charging and installing the battery pack............ 8
Inserting a cassette................................................ 12
Basic operations
Camera recording ................................................. 13
Using the zoom feature ..................................... 16
Hints for better shooting ..................................... 18
Checking the recorded picture ........................... 20
Connections for playback .................................... 21
Playing back a tape............................................... 23
Advanced operations
Using alternative power sources ........................ 27
Using the mains ................................................. 27
Using the battery case ....................................... 29
Using a car battery ............................................. 30
Changing the mode settings ............................... 31
— for camera recording —
Recording with the date or time......................... 35
Fade-in and fade-out ............................................ 36
Overlapping two pictures
(CCD-TR3300E only) ......................................... 37
Wiping away a still picture
(CCD-TR3300E only) ......................................... 39
Enjoying picture effect ......................................... 41
Recording a still picture
(CCD-TR3300E only) ......................................... 43
Recording still pictures successively
(CCD-TR3300E only) ......................................... 44
Superimposing a moving picture on a still
picture (CCD-TR3300E only) ........................... 45
Re-recording a picture in the middle of a
recorded tape ...................................................... 47
Using the wide mode function ........................... 49
Selecting the START/STOP mode ..................... 51
Superimposing a title ........................................... 52
Making your own original titles......................... 55
Releasing the STEADY SHOT function............. 56
Checking the tape condition before recording
(ORC) ................................................................... 57
Using manual mode ............................................. 67
Using slow shutter (CCD-TR3300E only) ......... 70
Tips for manual adjustment ................................ 71
Shooting with backlighting ................................. 73
Adjusting the brightness of the picture ............. 74
Adjusting the white balance ............................... 75
— for playing back/editing —
Searching the boundaries of recorded date ...... 78
Returning to a pre-registered position .............. 80
Locating the marking position............................ 81
Writing the RC Time code on a recorded
tape....................................................................... 86
Editing onto another tape.................................... 88
Additionanl information
Changing the lithium battery in the
camcorder ........................................................... 90
Resetting the date and time................................. 92
Usable cassettes and playback modes ............... 93
Tips for using the battery pack ........................... 95
Maintenance information and precautions....... 99
Using your camcorder abroad .......................... 104
Trouble check ...................................................... 105
Specifications....................................................... 113
Identifying the parts........................................... 115
Warning indicators ............................................. 125
Index ..................................................................... 126
Before you begin / Antes de comenzar
— for manual adjustment —
Selecting automatic/manual adjustment
modes .................................................................. 58
Focusing manually ............................................... 60
Using the PROGRAM AE function.................... 62
About the PROGRAM AE function ................ 62
Using the aperture priority mode ................... 63
Using the shutter priority mode ...................... 64
Using the twilight mode ................................... 66
3
CCD-TR2200E/TR3300E 3-856-204-12 (1)
Page 4

Español
Indice
Antes de comenzar
Uso de este manual ................................................ 5
Comprobación de los accesorios suministrados..
Procedimientos iniciales
Carga e instalación del paquete de batería ......... 8
Inserción de videocassettes ................................. 12
Operaciones básicas
Grabación con la cámara ..................................... 13
Uso de la función de zoom ............................... 16
Consejos para filmar mejor ................................. 18
Comprobación de imágenes grabadas .............. 20
Conexiones para la reproducción....................... 21
Reproducción de cintas........................................ 23
Operaciones avanzadas
Uso de fuentes de alimentación alternativas .... 27
Uso de corriente doméstica .............................. 27
Uso del estuche de pilas.................................... 29
Uso de batería de automóvil ............................ 30
Cambio de los ajustes de modo .......................... 31
— para grabación con cámara —
Grabación con la fecha o la hora ........................ 35
Aparición y desaparición gradual de
imágenes ............................................................. 36
Superposición de dos imágenes
(sólo CCD-TR3300E).......................................... 37
Desplazamiento en pantalla de imágenes fijas
(sólo CCD-TR3300E).......................................... 39
Uso del efecto de imagen..................................... 41
Grabación de imágenes fijas
(sólo CCD-TR3300E).......................................... 43
Grabación sucesiva de imágenes fijas
(sólo CCD-TR3300E).......................................... 44
Superposición de imágenes en movimiento
sobre imágenes fijas (sólo CCD-TR3300E) ..... 45
Inserción de imágenes en el medio de una
cinta grabada ...................................................... 47
Uso de la función de modo panorámico ........... 49
Selección del modo de inicio/parada START/
STOP .................................................................... 51
Superposición de títulos ...................................... 52
Creación de títulos................................................ 55
Desactivación de la función STEADY SHOT ... 56
Comprobación del estado de la cinta antes
de la grabación (ORC) ....................................... 57
Uso de la función PROGRAM AE...................... 62
Acerca de la función PROGRAM AE.............. 62
7
Uso del modo de prioridad de apertura ........ 63
Uso del modo de prioridad de obturación .... 64
Uso del modo crepuscular................................ 66
Uso del modo manual.......................................... 67
Uso del obturador a baja velocidad
(sólo CCD-TR3300E).......................................... 70
Consejos relativos a ajustes manuales ............... 71
Filmación a contraluz........................................... 73
Ajuste del brillo de la imagen ............................. 74
Ajuste del balance de blancos ............................. 75
— para reproducción/edición —
Búsqueda de los límites de las fechas de
grabación ............................................................. 78
Localización de posiciones previamente
registradas........................................................... 80
Localización de posiciones marcadas ................ 81
Escritura del código de tiempos RC en una
cinta grabada ...................................................... 86
Edición en otra cinta............................................. 88
Información complementaria
Cambio de la pila de litio de la videocámara ... 90
Reajuste de la fecha y hora .................................. 92
Videocassettes utilizables y modos de
reproducción ...................................................... 93
Consejos para el uso del paquete de batería..... 95
Información y precauciones sobre
mantenimiento ................................................... 99
Uso de la videocámara en el extranjero........... 104
Solución de problemas....................................... 109
Especificaciones .................................................. 114
Identificación de los componentes ................... 115
Indicadores de aviso .......................................... 125
Indice alfabético .................................................. 127
— para ajuste manual —
Selección del modo de ajuste manual o
automático .......................................................... 59
Enfoque manual.................................................... 60
4
CCD-TR2200E/TR3300E 3-856-204-12 (1)
Page 5

Before you begin Antes de comenzar
Using this manual Uso de este manual
The instructions in this manual are for the two
models listed below. Before you start reading this
manual and operating the unit, check your model
number by looking at the bottom of your
camcorder. The CCD-TR3300E is the model used
for illustration purposes. Otherwise, the model
name is indicated in the illustrations. Any
differences in operation are clearly indicated in
the text, for example, “CCD-TR3300E only.” As
you read through this manual, buttons and
settings on the camcorder are shown in capital
letters.
e.g. Set the POWER switch to CAMERA.
As indicated with ≥ in the illustrations, you can
hear the beep sound to confirm your operation.
Type of differences
Model number
Viewfinder
Slow Shutter
Overlap/Wipe
Digital Effect
CCD-TR2200E
B/W
—
—
—
CCD-TR3300E
Colour
•
•
3 modes
Las instrucciones de este manual se aplican a los
dos modelos enumerados a continuación. Antes
de comenzar la lectura de este manual y de
emplear la unidad, compruebe su número de
modelo situado en la parte inferior de la
videocámara. El modelo que aparece en las
ilustraciones es el CCD-TR3300E. El nombre del
modelo se especifica en las ilustraciones y
cualquier diferencia de funcionamiento aparece
claramente indicada en el texto, por ejemplo,
“sólo CCD-TR3300E”. Como comprobará al leer
el manual, los botones y ajustes de la
videocámara aparecen en mayúsculas.
Ejemplo: Ajuste el interruptor POWER en
CAMERA.
Como se indica con el símbolo ≥ en las
ilustraciones, la unidad emite un pitido para
confirmar operaciones.
Tipo de diferencias
Número de
modelo
Visor electrónico
Obturación a
baja velocidad
Superposición/
Desplazamiento
de imágenes
fijas
Efecto digital
CCD-TR2200E
B/W
—
—
—
CCD-TR3300E
Color
•
•
3 modos
Before you begin / Antes de comenzar
Note on TV colour systems
TV colour systems differ from country to
country. To view your recordings on a TV, you
need a PAL system-based TV.
Precaution on copyright
Television programmes, films, video tapes, and
other materials may be copyrighted.
Unauthorized recording of such materials may
be contrary to the provision of the copyright
laws.
Nota sobre sistemas de
televisión en color
Los sistemas de televisión en color varían en
función del país. Para visualizar grabaciones en
un televisor, éste debe estar basado en el sistema
PAL.
Precaución sobre los derechos
de autor (copyright)
Los programas de televisión, películas, cintas de
vídeo y otros materiales pueden estar protegidos
por el copyright. La grabación no autorizada de
tales materiales puede ir en contra de lo
dispuesto en las leyes de copyright.
5
CCD-TR2200E/TR3300E 3-856-204-12 (1)
Page 6
Uso de este manualUsing this manual
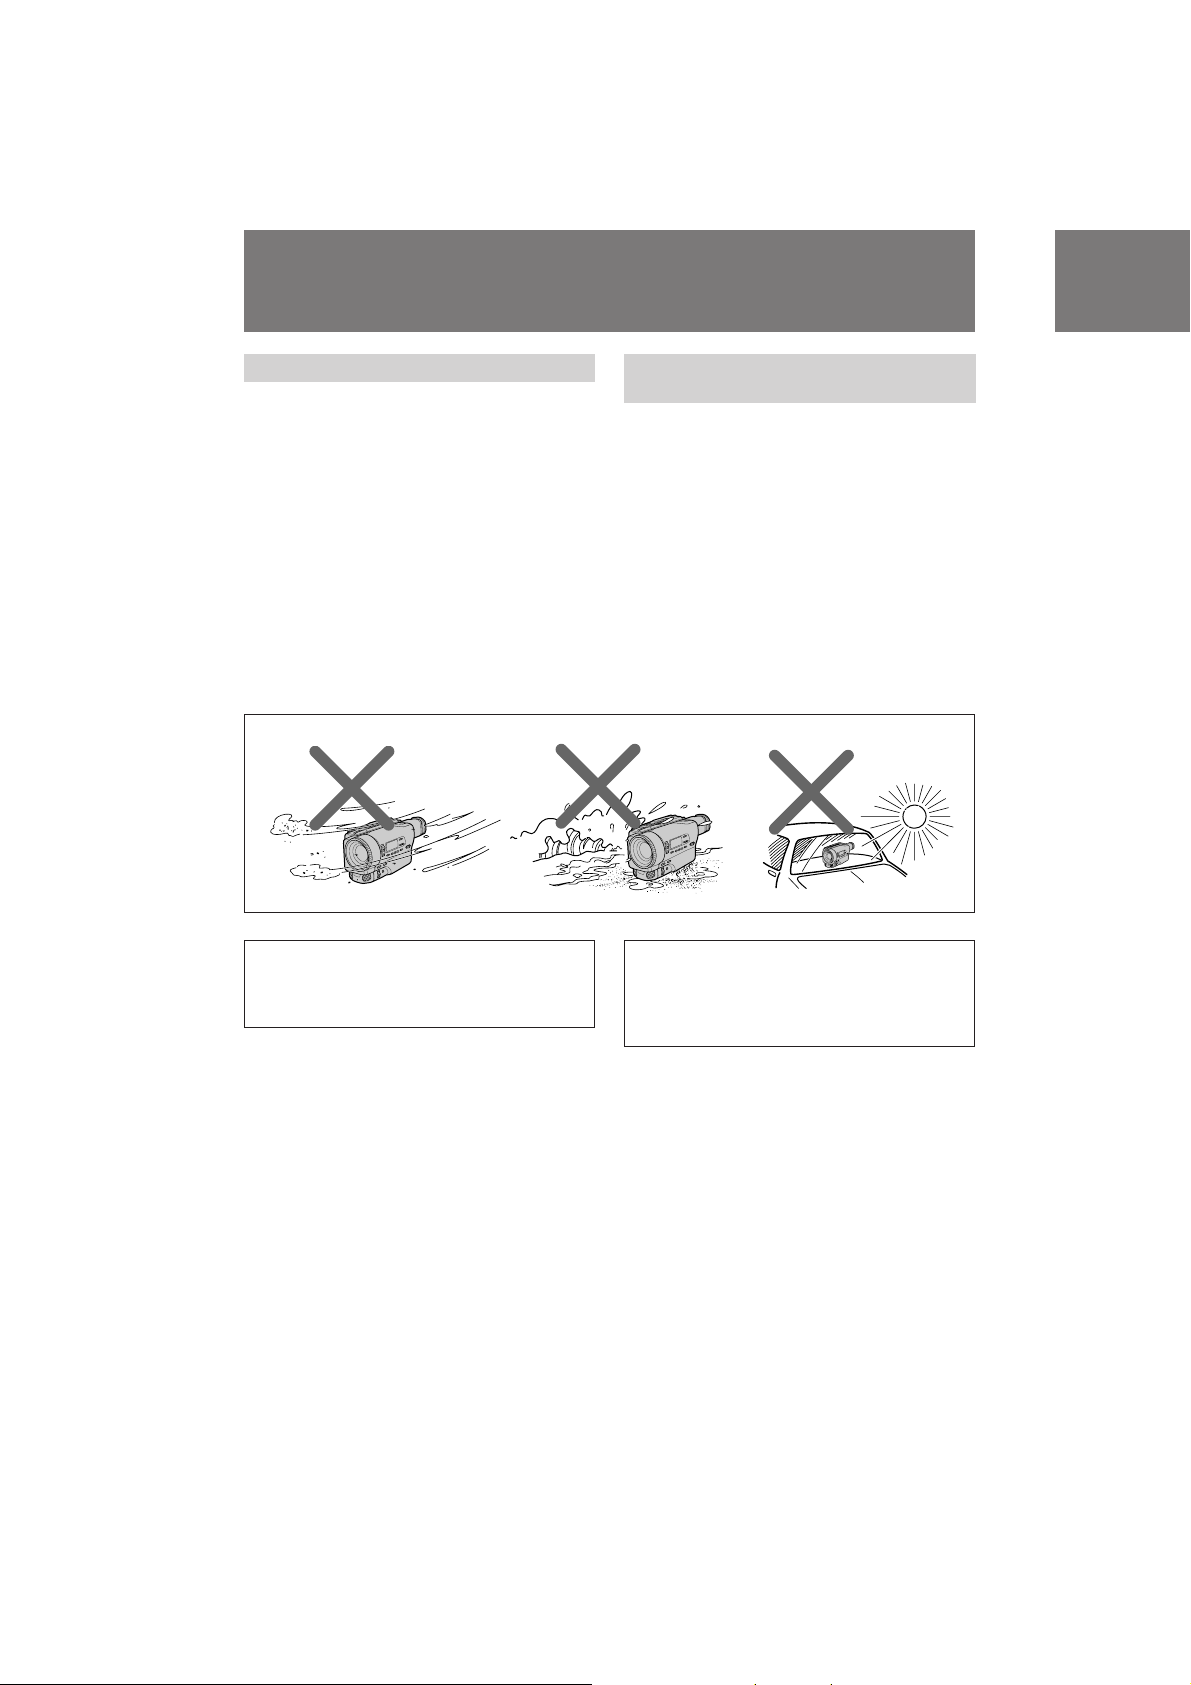
Precautions on camcorder care
•Do not let sand get into the camcorder.
When you use the camcorder on a sandy
beach or in a dusty place, protect it from the
sand or dust. Sand or dust may cause the
unit to malfunction, and sometimes this
malfunction cannot be repaired [a].
•Do not let the camcorder get wet. Keep the
camcorder away from rain and sea water.
Letting the camcorder get wet may cause
the unit to malfunction, and sometimes this
malfunction cannot be repaired [b].
•Never leave the camcorder exposed to
temperatures above 60°C (140°F ), such as in
a car parked in the sun or under direct
sunlight [c].
Precauciones sobre el cuidado
de la videocámara
•Evite que se introduzca arena en la
videocámara. Si la utiliza en una playa de
arena o en un lugar polvoriento, protéjala de
la arena y del polvo; estos elementos
pueden provocar fallos de funcionamiento
que a veces no sea posible reparar [a].
•Evite que la videocámara se moje.
Manténgala alejada de la lluvia y del agua
marina; si la unidad se moja pueden
producirse fallos de funcionamiento que a
veces no sea posible reparar [b].
•No exponga la unidad a temperaturas
superiores a 60°C (140°F ), como en un
automóvil aparcado al sol o bajo la luz solar
directa [c].
[a] [b] [c]
Contents of the recording cannot be
compensated if recording or playback is not
made due to a malfunction of the camcorder,
video tape, etc.
6
El contenido de la grabación no podrá
corregirse si no es posible realizar la grabación
o la reproducción debido a algún fallo de
funcionamiento de la videocámara, cinta de
vídeo, etc.
CCD-TR2200E/TR3300E 3-856-204-12 (1)
Page 7
Checking supplied accessories
Comprobación de los
accesorios suministrados
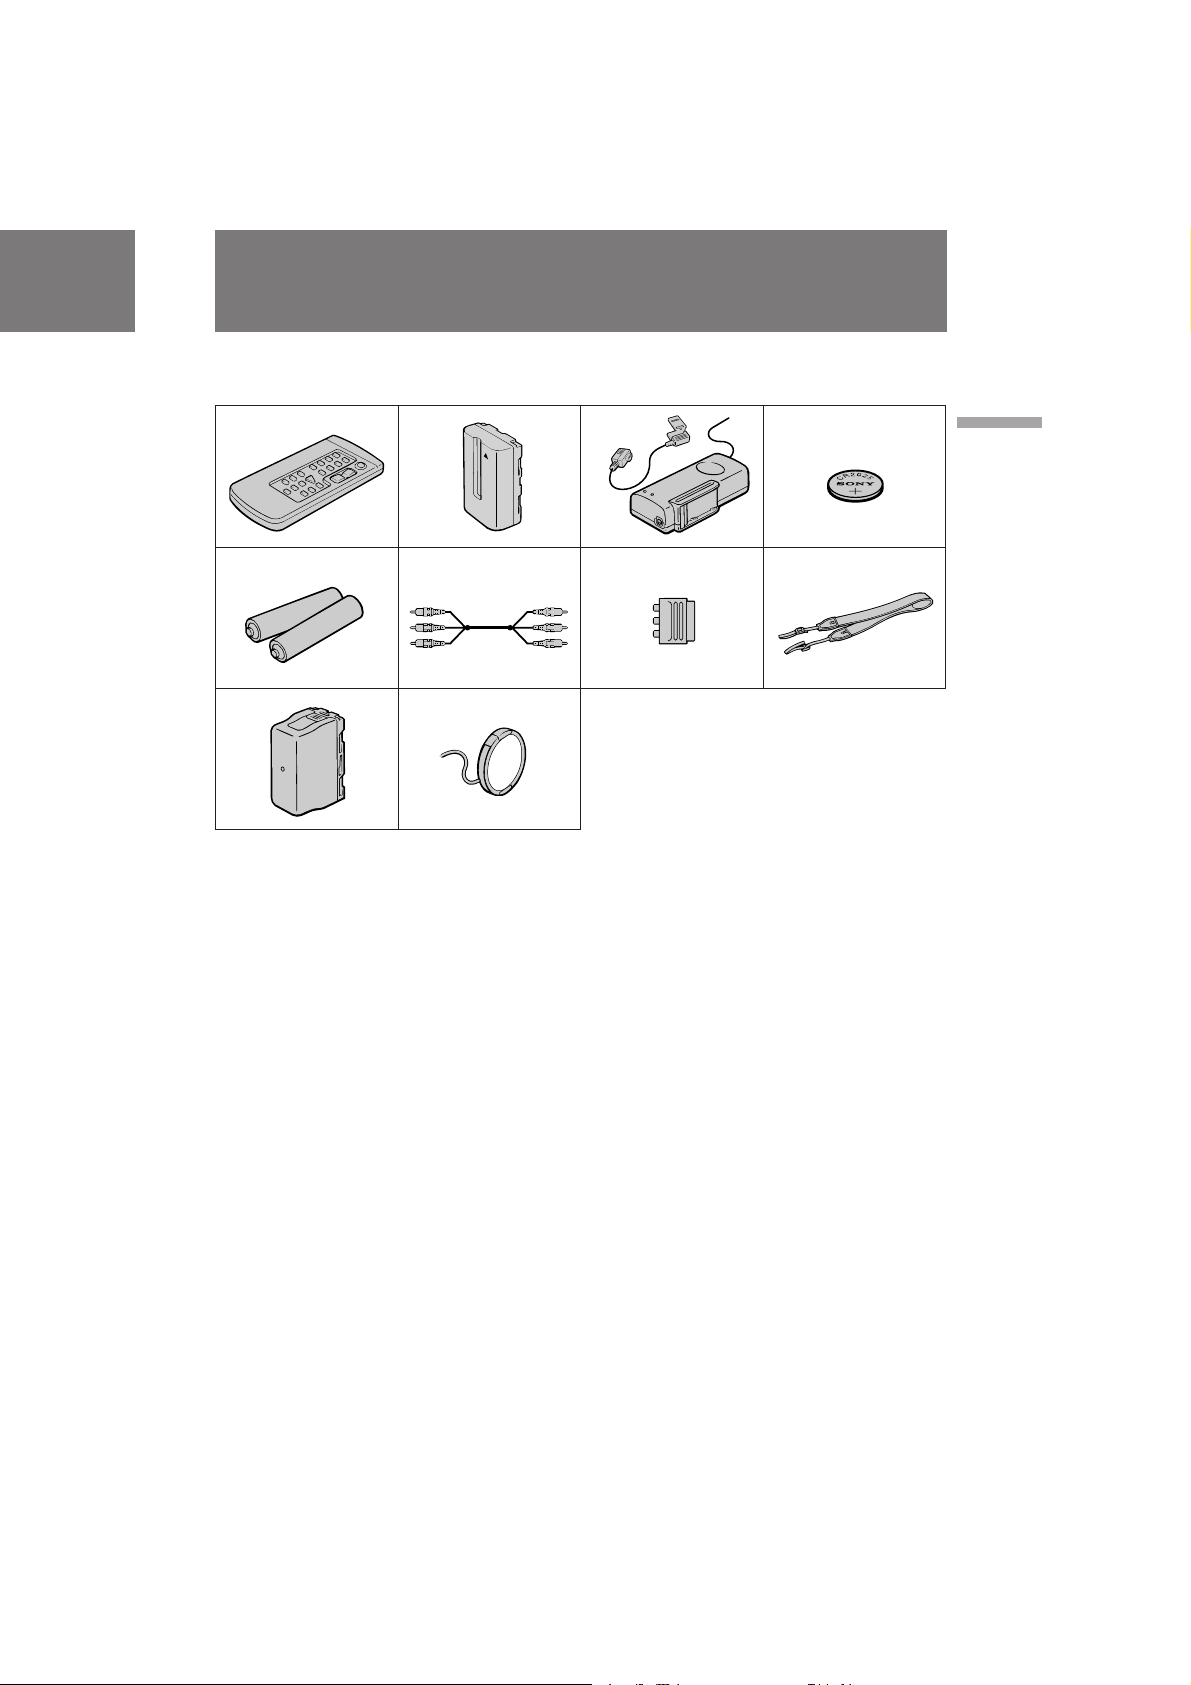
Check that the following accessories are supplied
with your camcorder.
132
Compruebe que los siguientes accesorios están
incluidos junto con la videocámara:
4
5678
9!º
1 Wireless Remote Commander (1) (p.120)
2 NP-F530 Battery pack (1) (p.8)
3 AC power adaptor (1) (p.8, 27)
4 CR2025 Lithium Battery (1) (p.90)
The lithium battery is already installed in
your camcorder.
5 R6 (size AA) battery for Remote
Commander (2) (p.121)
6 A/V connecting cable (1) (p.21, 22)
7 21 pin adaptor (1) (p.22)
8 Shoulder strap (1) (p.122)
9 Battery case (1) (p.29)
!º Lens cap (1) (p.13, 77)
This lens cap is already set on your
camcorder.
1 Mando a distancia inalámbrico (1) (pág. 120)
2 Paquete de batería NP-F530 (1) (pág. 8)
3 Adaptador de alimentación de CA (1)
(pág. 8, 27)
4 Pila de litio CR2025 (1) (pág. 90)
La pila de litio ya se encuentra instalada en la
videocámara.
5 Pila R6 (tamaño AA) para el mando a
distancia (2) (pág. 121)
6 Cable de conexión de A/V (1) (pág. 21, 22)
7 Adaptador de 21 pines (1) (pág. 22)
8 Asa de hombro (1) (pág. 122)
9 Estuche de pilas (1) (pág. 29)
!º Tapa del objetivo (1) (pág. 13, 77)
Esta tapa ya se encuentra fijada a la
videocámara.
Before you begin / Antes de comenzar
CCD-TR2200E/TR3300E 3-856-204-12 (1)
7
Page 8

Getting started Procedimientos iniciales
Charging and installing the battery pack
Before using your camcorder, you first need to
charge and install the battery pack. To charge the
battery pack, use the supplied AC power
adaptor.
This camcorder operates with the
“InfoLITHIUM” battery labeled
such as NP-F530/F730. If you use any other
battery to operate your camcorder, the camcorder
may not operate or the battery life may be
shortened.
“InfoLITHIUM” is a trademark of Sony
Corporation.
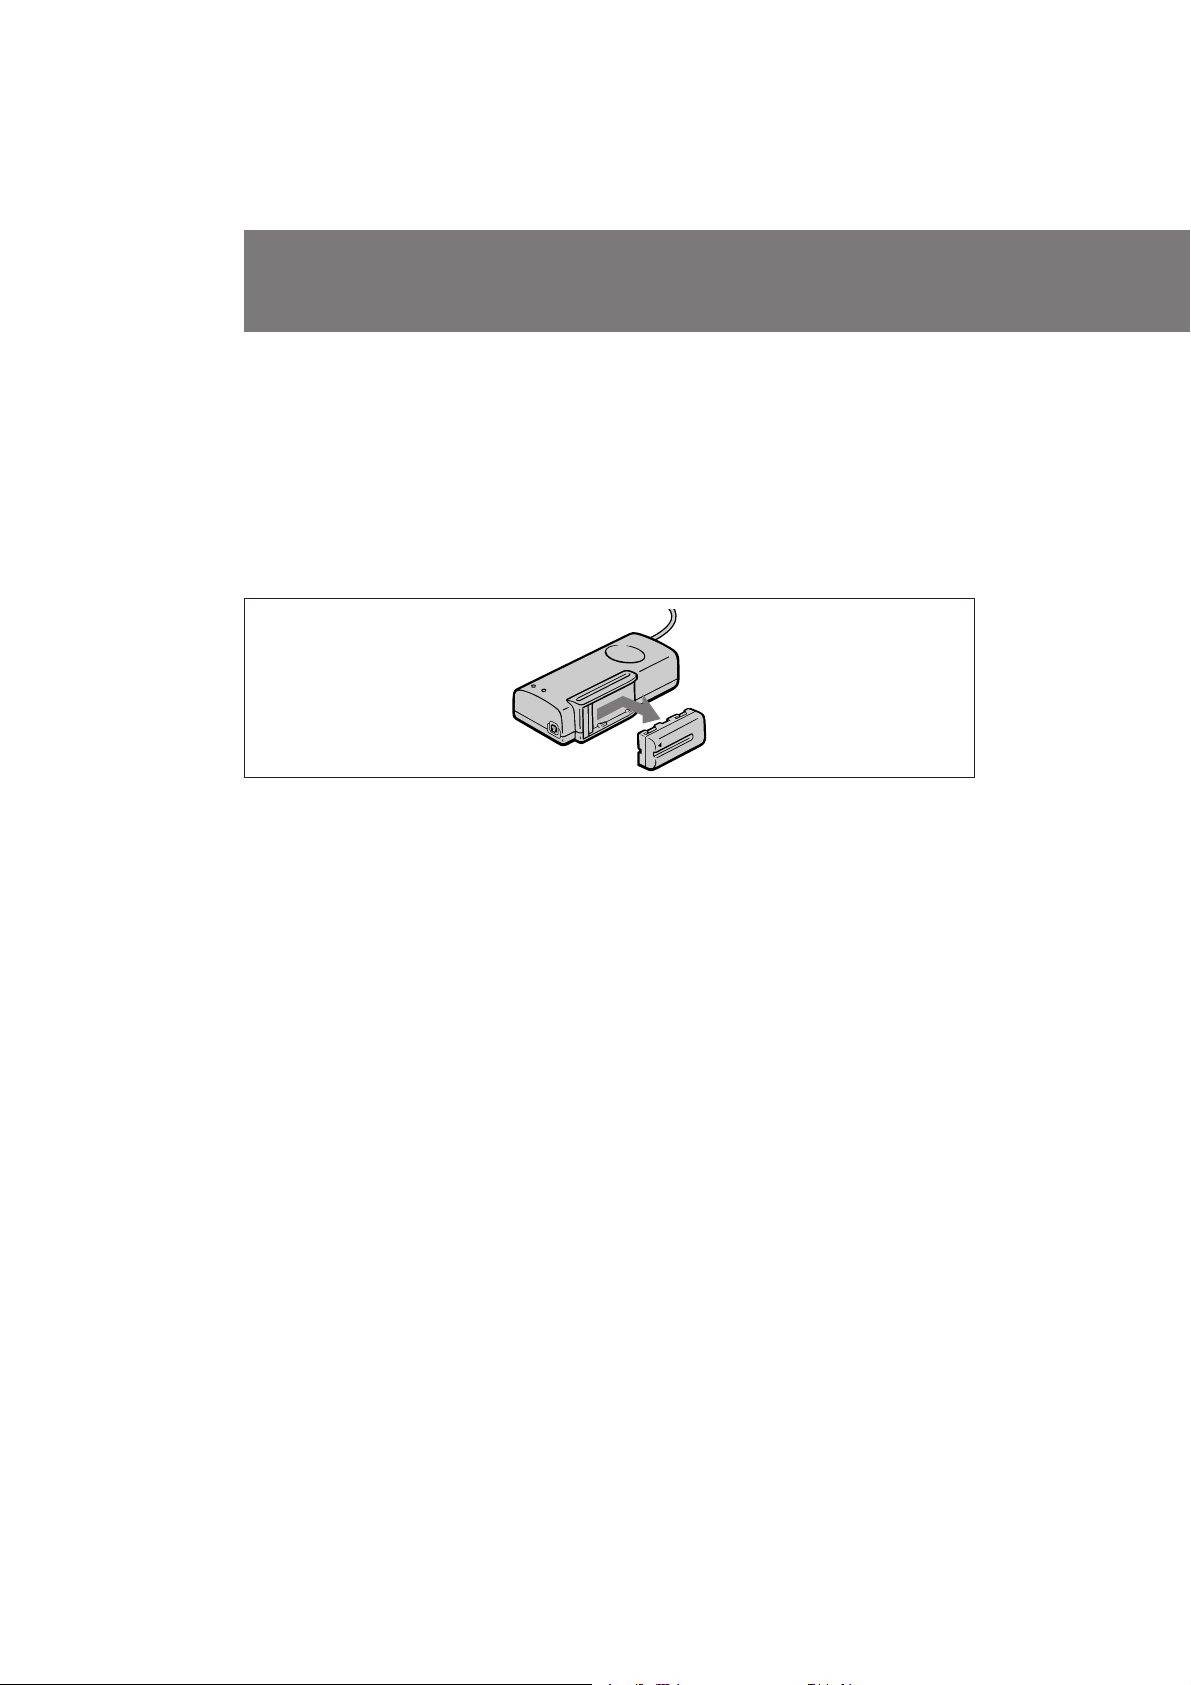
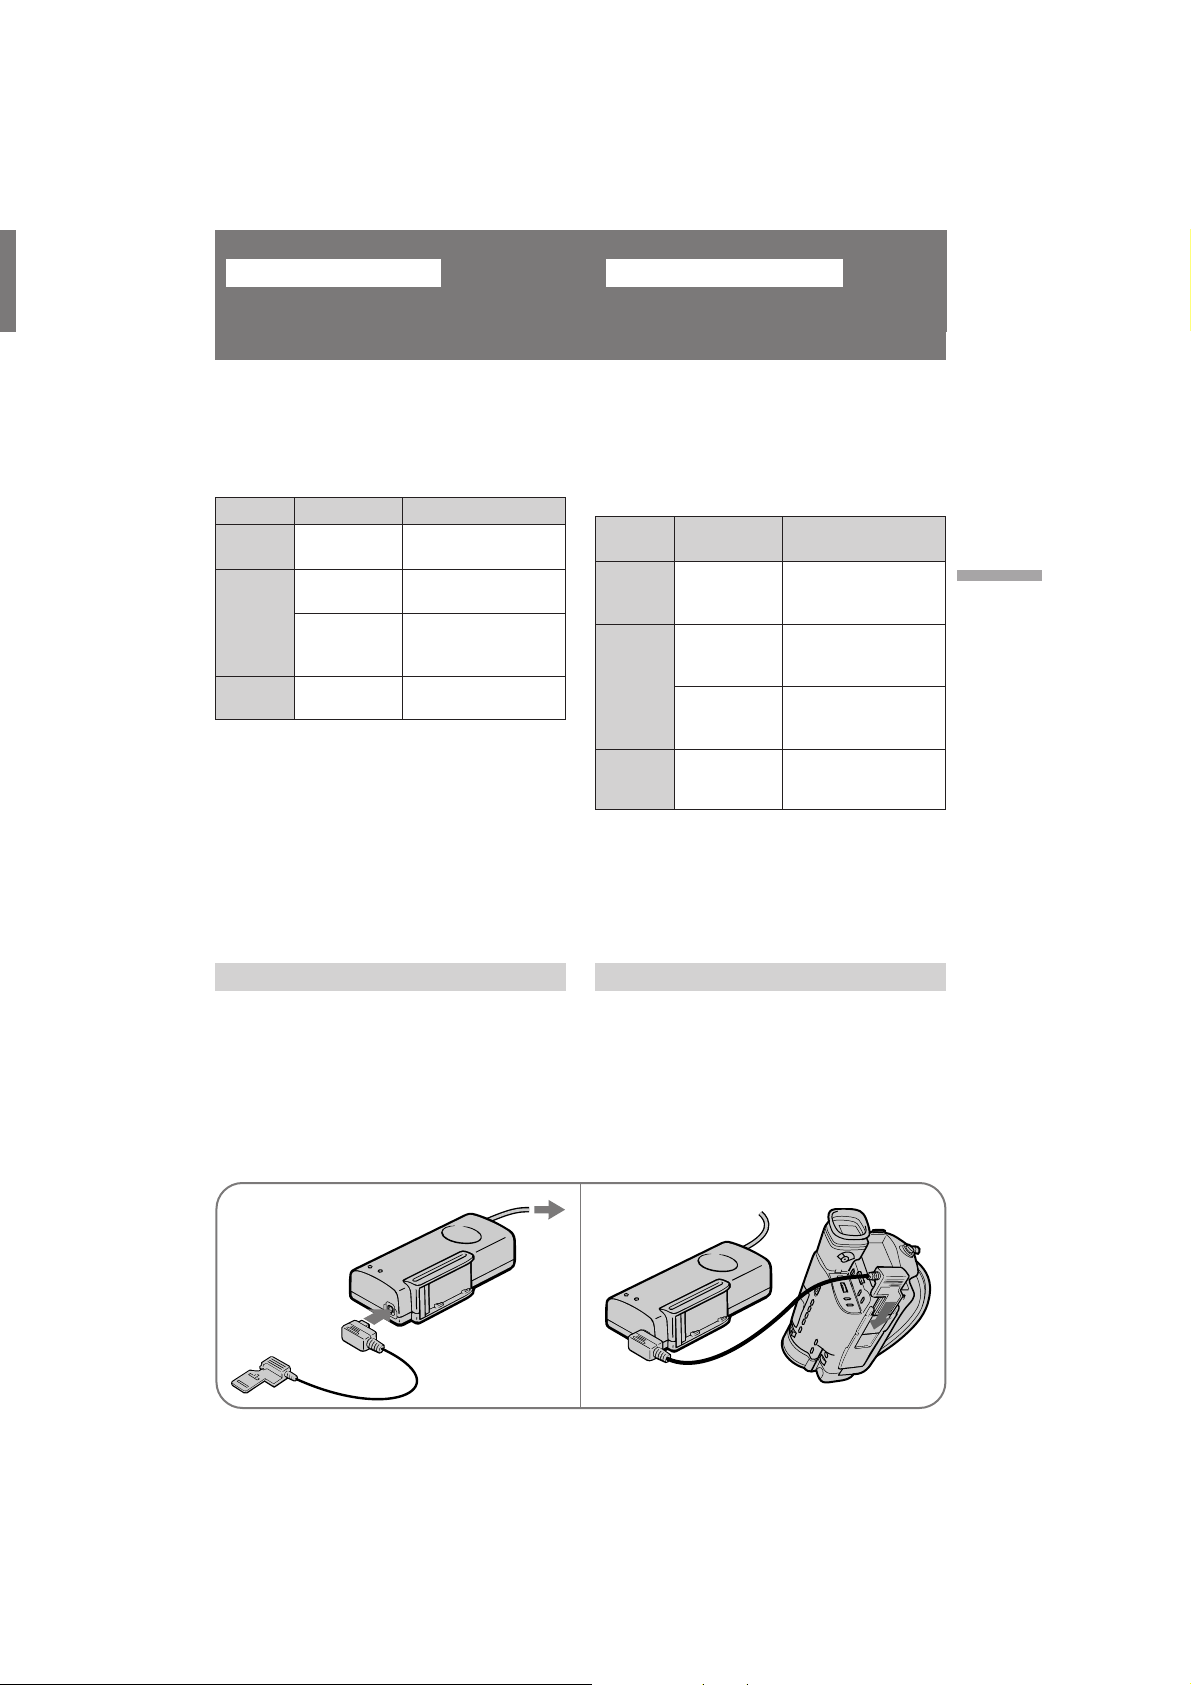
Charging the battery pack
Charge the battery pack on a flat surface without
vibration.
(1)Connect the mains lead to mains.
(2)Align the surface of the battery pack indicated
by the z mark with the edge of the terminal
shutter of the AC power adaptor. Then fit and
slide the battery pack in the direction of the
arrow. The CHARGE lamp (orange) lights up.
Charging begins.
When charging is completed, the CHARGE lamp
goes out. If the battery pack is used right after the
CHARGE lamp goes out, it will last for a normal
period (normal charge). If allowed to charge for
an additional hour or so, the battery pack will
last for a longer period (full charge). Unplug the
unit from the mains, then remove the battery
pack and install it into the camcorder. You can
also use the battery pack before it is completely
charged.
Carga e instalación del
paquete de batería
Antes de emplear la videocámara, es necesario
cargar e instalar el paquete de batería. Para
cargarlo, utilice el adaptador de alimentación de
CA suministrado.
Esta videocámara funciona con pilas
“InfoLITHIUM” que presenten la etiqueta
, como la NP-F530/F730. Si emplea la
videocámara con otro tipo de pila, es posible que
dicha videocámara no funcione o que la duración
de la pila se reduzca.
“InfoLITHIUM” es una marca comercial de Sony
Corporation.
Carga del paquete de batería
Realice la carga del paquete de batería sobre una
superficie plana sin vibraciones.
(1)Conecte el cable de alimentación a la toma de
corriente.
(2)Alinee la superficie, indicada mediante la
marca z, del paquete de batería con el
extremo del terminal del obturador del
adaptador de alimentación de CA. A
continuación, encaje y deslice el paquete de
batería en la dirección de la flecha. El
indicador CHARGE (naranja) se ilumina y
comienza la carga.
Una vez finalizada la carga, el indicador
CHARGE se apaga. Si utiliza el paquete de
batería inmediatamente después de apagarse
dicho indicador, su duración será la normal
(carga normal). Si lo carga durante
aproximadamente una hora más, su duración
será mayor (carga total). Desenchufe la unidad
de la toma de corriente, extraiga el paquete de
batería e instálelo en la videocámara. También es
posible utilizar el paquete de batería antes de que
esté completamente cargado.
12
8
CCD-TR2200E/TR3300E 3-856-204-12 (1)
Page 9
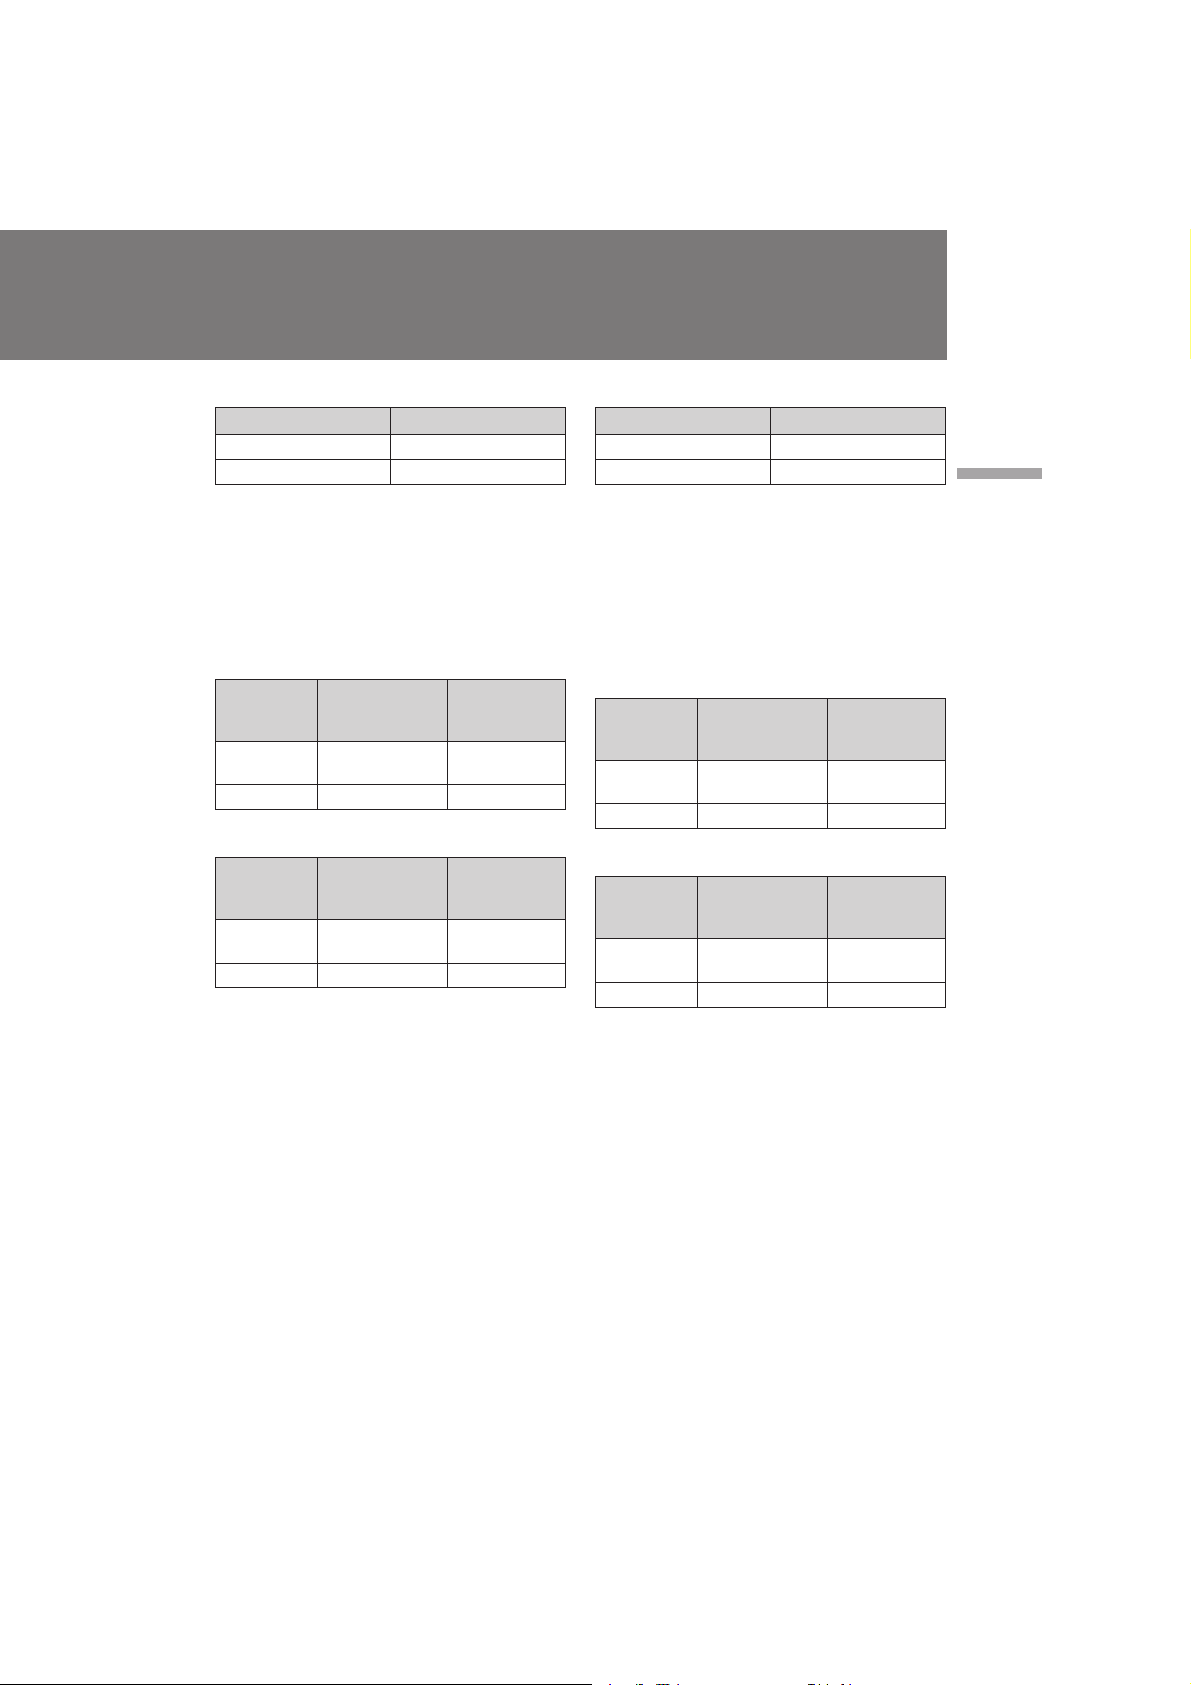
Charging time
Battery pack Charging time* (min.)
NP-F530 (supplied) 170 (110)
NP-F730 250 (190)
* Approximate minutes to charge an empty
battery pack using the supplied AC power
adaptor (full charge). (Lower temperatures
require a longer charging time.)
The time required for a normal charge is
indicated in parentheses.
Battery life
— CCD-TR3300E
Battery pack
NP-F530
(supplied)
NP-F730
Continuous
recording time
(min.)
105 (95)
240 (215)
— CCD-TR2200E
Continuous
Battery pack
NP-F530
(supplied)
NP-F730
recording time
(min.)
110 (95)
245 (220)
The available time for a fully charged battery is
indicated outside parentheses. The available time
for normal charged battery is indicated in
parentheses.
Battery life will be shorter if you use the
camcorder in a cold environment.
1) Approximate continuous recording time
indoors.
2) Approximate minutes when recording while
you repeat recording start/stop, zooming and
turning the power on/off. The actual battery
life may be shorter.
Typical
1)
recording time
(min.)
145 (130)
Typical
1)
recording time
(min.)
145 (130)
65 (55)
65 (55)
Tiempo de carga
Paquete de batería Tiempo de carga* (min.)
NP-F530 (suministrado) 170 (110)
NP-F730 250 (190)
* Minutos aproximados para cargar un paquete
de batería agotado con el adaptador de
alimentación de CA suministrado (carga total).
(A bajas temperaturas, el tiempo de carga
necesario es mayor.)
El tiempo necesario para obtener una carga
normal se indica entre paréntesis.
Duración del paquete de batería
— CCD-TR3300E
2)
Paquete de
batería
NP-F530
(suministrado)
NP-F730
— CCD-TR2200E
2)
Paquete de
batería
NP-F530
(suministrado)
NP-F730
El tiempo disponible de un paquete de batería
completamente cargado se indica a la izquierda,
mientras que el correspondiente a un paquete
con carga normal se indica entre paréntesis.
La duración del paquete de batería será inferior si
utiliza la videocámara en lugares fríos.
1) Tiempo aproximado de grabación continua
en interiores.
2) Minutos aproximados al grabar con repetición
de las operaciones de inicio/parada de
grabación, zoom y activación y desactivación
de la alimentación. Es posible que la duración
real del paquete de batería sea inferior.
Tiempo de
grabación
continua1) (min.)
105 (95)
240 (215)
Tiempo de
grabación
continua1) (min.)
110 (95)
245 (220)
Tiempo de
grabación
normal2) (min.)
Tiempo de
grabación
normal2) (min.)
Getting started / Procedimientos iniciales
65 (55)
145 (130)
65 (55)
145 (130)
CCD-TR2200E/TR3300E 3-856-204-12 (1)
9
Page 10
Charging and installing the
battery pack
Carga e instalación del
paquete de batería
Note on remaining battery time indication
during recording
When you use the InfoLITHIUM battery pack
NP-F530 or NP-F730, remaining battery time is
displayed in the viewfinder. However, the
indication may not be displayed properly,
depending on using conditions and
circumstances.
To remove the battery pack
Slide the battery pack in the direction of the
arrow.
Notes on charging the battery pack
•The CHARGE lamp will remain lit for a while
even if the battery pack is removed and the
mains lead is unplugged after charging the
battery pack. This is normal.
•If the CHARGE lamp does not light, disconnect
the mains lead. After about one minute,
reconnect the mains lead again.
•You cannot operate the camcorder using the
AC power adaptor while charging the battery
pack.
•When a fully charged battery pack is installed,
the CHARGE lamp will light once, then go out.
Nota sobre la indicación de tiempo de batería
restante durante la grabación
Si utiliza el paquete de batería NP-F530 o NPF730 InfoLITHIUM, el tiempo de batería restante
aparece en el visor electrónico. No obstante, la
indicación puede no mostrarse correctamente en
función de las condiciones y circunstancias de
uso.
Extracción del paquete de batería
Deslice el paquete de batería en la dirección de la
flecha.
Notas sobre la carga del paquete de batería
•El indicador CHARGE permanecerá iluminado
durante unos momentos aunque haya extraído
el paquete de batería y haya desenchufado el
cable de alimentación después de cargar dicho
paquete. Esto es normal.
•Si el indicador CHARGE no se ilumina,
desconecte el cable de alimentación.
Transcurrido un minuto aproximadamente,
vuelva a conectarlo.
•No es posible utilizar la videocámara con el
adaptador de alimentación de CA mientras se
carga el paquete de batería.
•Al instalar un paquete de batería totalmente
cargado, el indicador CHARGE se ilumina una
vez y, a continuación, se apaga.
10
CCD-TR2200E/TR3300E 3-856-204-12 (1)
Page 11
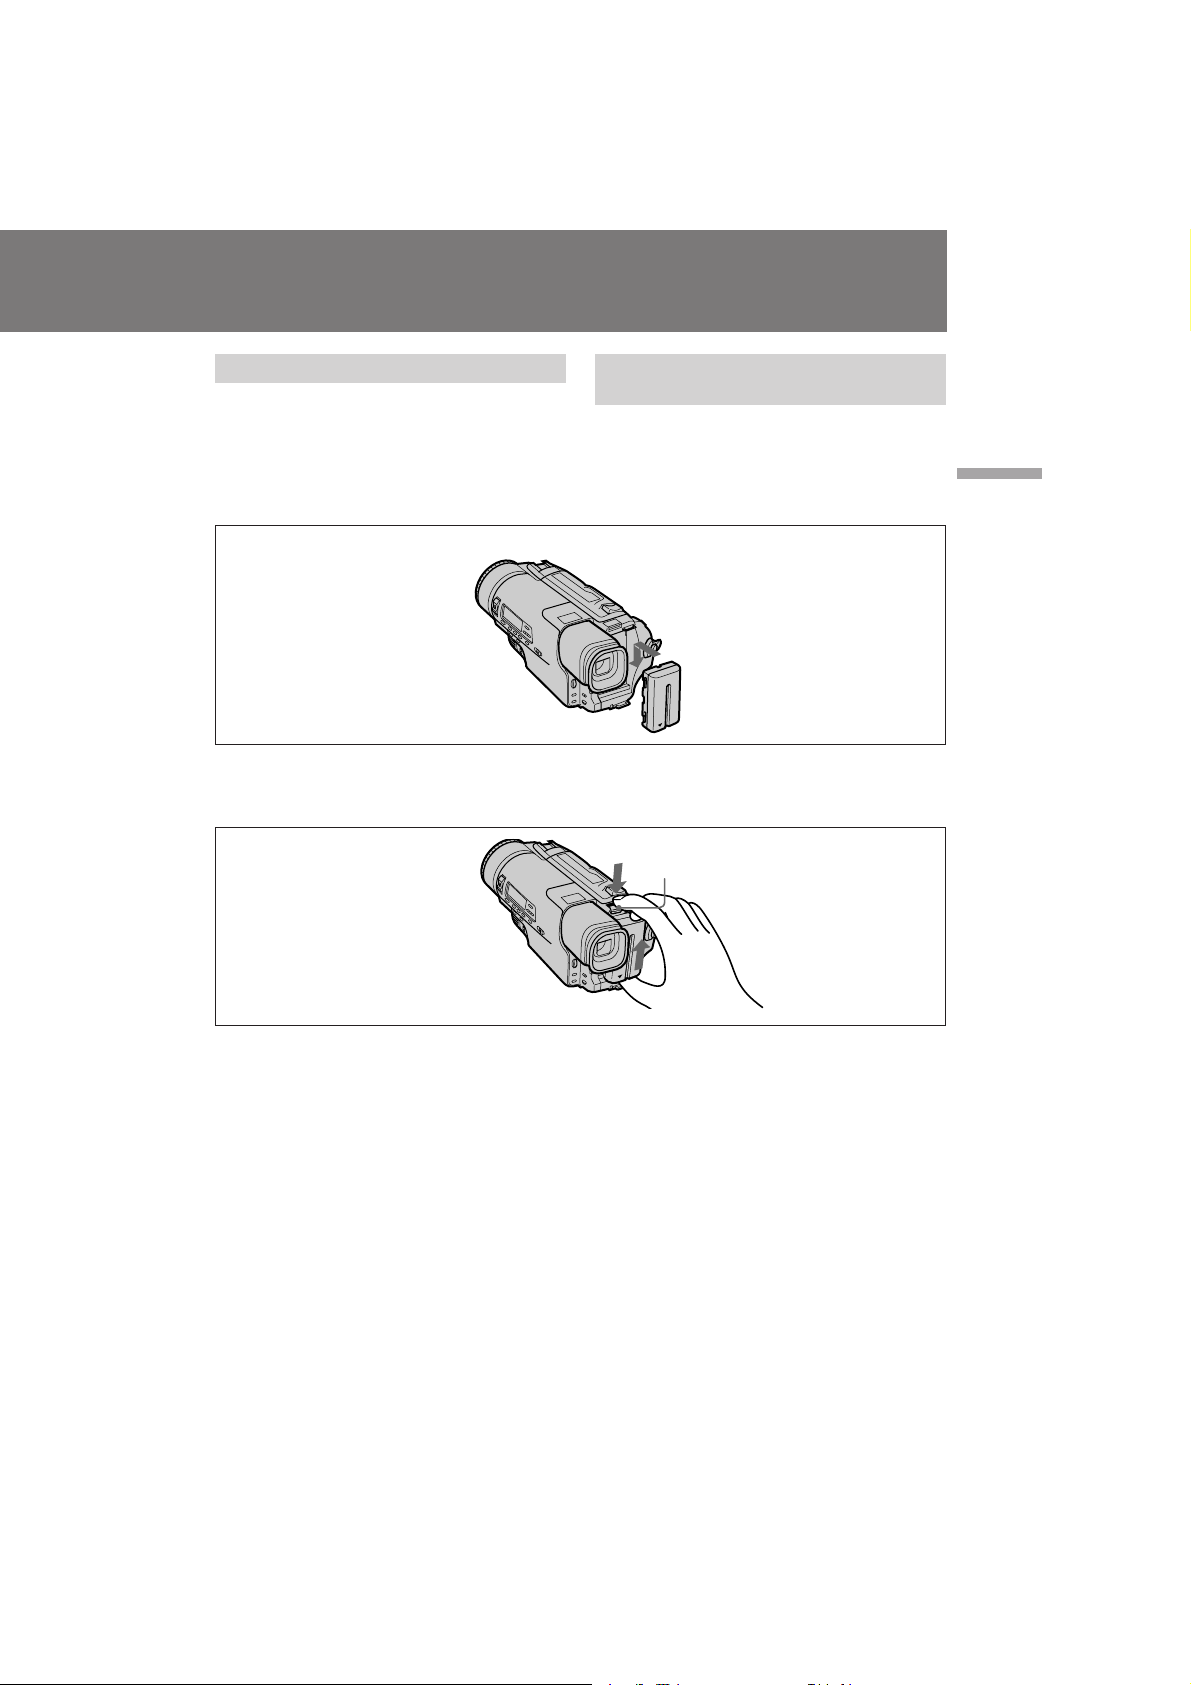
Installing the battery pack
Align the grooves of the battery pack with the
receptacles of the camcorder and slide the battery
pack down until it catches on the battery release
lever and clicks.
Instalación del paquete de
batería
Alinee las ranuras del paquete de batería con los
receptáculos de la videocámara y deslice dicho
paquete hacia abajo hasta que quede retenido en
la palanca de liberación del paquete y se oiga un
chasquido.
Getting started / Procedimientos iniciales
To remove the battery pack
While pressing BATT (battery) PUSH, slide the
battery pack in the direction of the arrow.
Para extraer el paquete de batería
Deslícelo en la dirección de la flecha mientras
pulsa BATT (batería) PUSH.
BATT PUSH
CCD-TR2200E/TR3300E 3-856-204-12 (1)
11
Page 12

Inserting a cassette
Inserción de
videocassettes
Make sure that the power source is installed.
When you want to record in the Hi8 system, use
Hi8 video cassette H.
(1)While pressing the small blue button on the
EJECT switch, slide it in the direction of the
arrow. The cassette compartment
automatically lifts up and opens.
(2)Insert a cassette with the window facing out.
(3)Close the cassette compartment by pressing
the “PUSH” mark on the cassette
compartment. The cassette compartment
automatically goes down.
Asegúrese de que la fuente de alimentación está
instalada. Si desea grabar con el sistema Hi8,
emplee videocassettes H.
(1)Deslice el interruptor EJECT en la dirección de
la flecha mientras pulsa el botón azul pequeño
del mismo. El compartimiento de
videocassettes se eleva y se abre
automáticamente.
(2)Inserte un videocassette con la ventana
orientada hacia fuera.
(3)Cierre el compartimiento de videocassettes
presionando la marca “PUSH” del mismo.
Este descenderá automáticamente.
123
To eject the cassette
While pressing the small blue button on the
EJECT switch, slide it in the direction of the
arrow.
Para expulsar el videocassette
Deslice el interruptor EJECT en la dirección de la
flecha mientras pulsa el botón azul pequeño del
mismo.
PUSH
To prevent accidental erasure
Slide the tab on the cassette to expose the red
mark. If you insert the cassette with the red mark
exposed and close the cassette compartment, the
beeps sound for a while. If you try to record with
the red mark exposed, the L and 6 indicators
flash in the viewfinder, and you cannot record.
To re-record on this tape, slide the tab back out
covering the red mark.
12
Para evitar borrados accidentales
Deslice la lengüeta del videocassette de forma
que la marca roja quede al descubierto. Si inserta
el videocassette con la marca roja al descubierto y
cierra el compartimiento de videocassettes, la
unidad emitirá pitidos durante unos instantes. Si
intenta grabar con la marca roja al descubierto,
los indicadores L y 6 parpadearán en el visor
electrónico y no será posible grabar.
Para volver a grabar en esta cinta, deslice la
lengüeta para cubrir la marca roja.
CCD-TR2200E/TR3300E 3-856-204-12 (1)
Page 13
Basic operations
Operaciones básicas
Camera recording
Make sure that the power source is installed and
a cassette is inserted. Before you record one-time
events, you may want to make a trial recording
to make sure that the camcorder is working
correctly.
When you use the camcorder for the first time,
power on it and reset the date and time to your
time before you start recording. (p.92) To save
battery power, the picture in the viewfinder
appears only when you bring your face close to
the viewfinder with STANDBY up (Finder
power save). (CCD-TR3300E only)
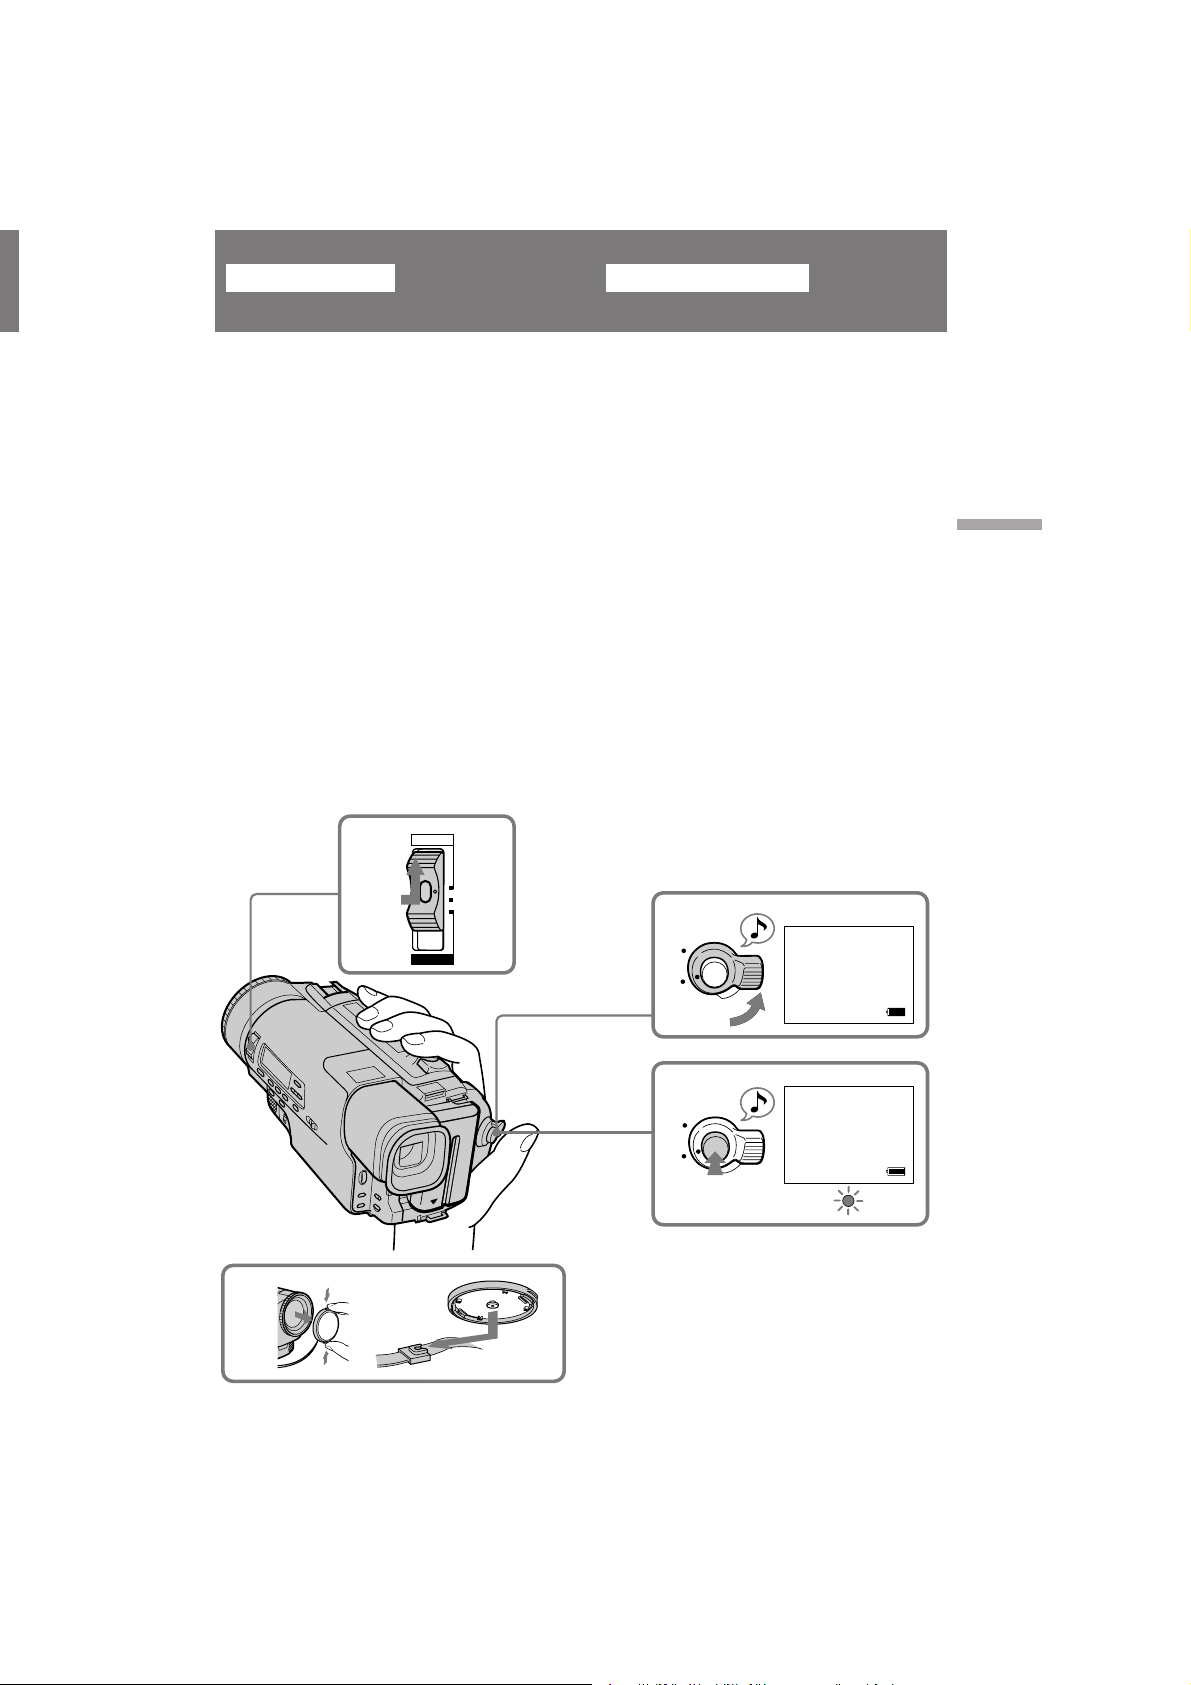
(1)Remove the lens cap.
(2)While pressing the small green button on the
POWER switch, set it to CAMERA.
(3)Turn STANDBY up.
(4)Press START/STOP. The camcorder starts
recording. The “REC” indicator appears and
the red lamp lights up in the viewfinder. The
camera recording/battery lamps located on
the front light up.
POWER
CAMERA
2
Grabación con la cámara
Asegúrese de que ha instalado la fuente de
alimentación y de que ha insertado un
videocassette. Antes de grabar acontecimientos
únicos, es posible que desee realizar una
grabación de prueba para cerciorarse de que la
videocámara funciona correctamente.
Cuando utilice la videocámara por primera vez,
actívela y ajuste la fecha y hora antes de
comenzar la grabación (pág. 92). Para ahorrar
energía del paquete de batería, el visor
electrónico mostrará la imagen sólo cuando
acerque el rostro a dicho visor con el interruptor
STANDBY hacia arriba (ahorro de energía del
visor electrónico) (sólo CCD-TR3300E).
(1)Retire la tapa del objetivo.
(2)Ajuste el interruptor POWER en CAMERA
mientras pulsa el botón verde pequeño del
mismo.
(3)Gire STANDBY hacia arriba.
(4)Pulse START/STOP para que la videocámara
inicie la grabación. El indicador “REC”
aparece y el indicador rojo se ilumina en el
visor electrónico. Los indicadores de batería y
grabación de la cámara situados en la parte
frontal se iluminarán.
Basic operations / Operaciones básicas
1
PLAYER
OFF
3
4
K
C
O
L
S
T
A
Y
N
B
D
K
C
O
L
S
T
A
Y
N
B
D
0:00:00
40min
0:00:01
40min
STBY
REC
13
CCD-TR2200E/TR3300E 3-856-204-12 (1)
Page 14
Camera recording Grabación con la cámara
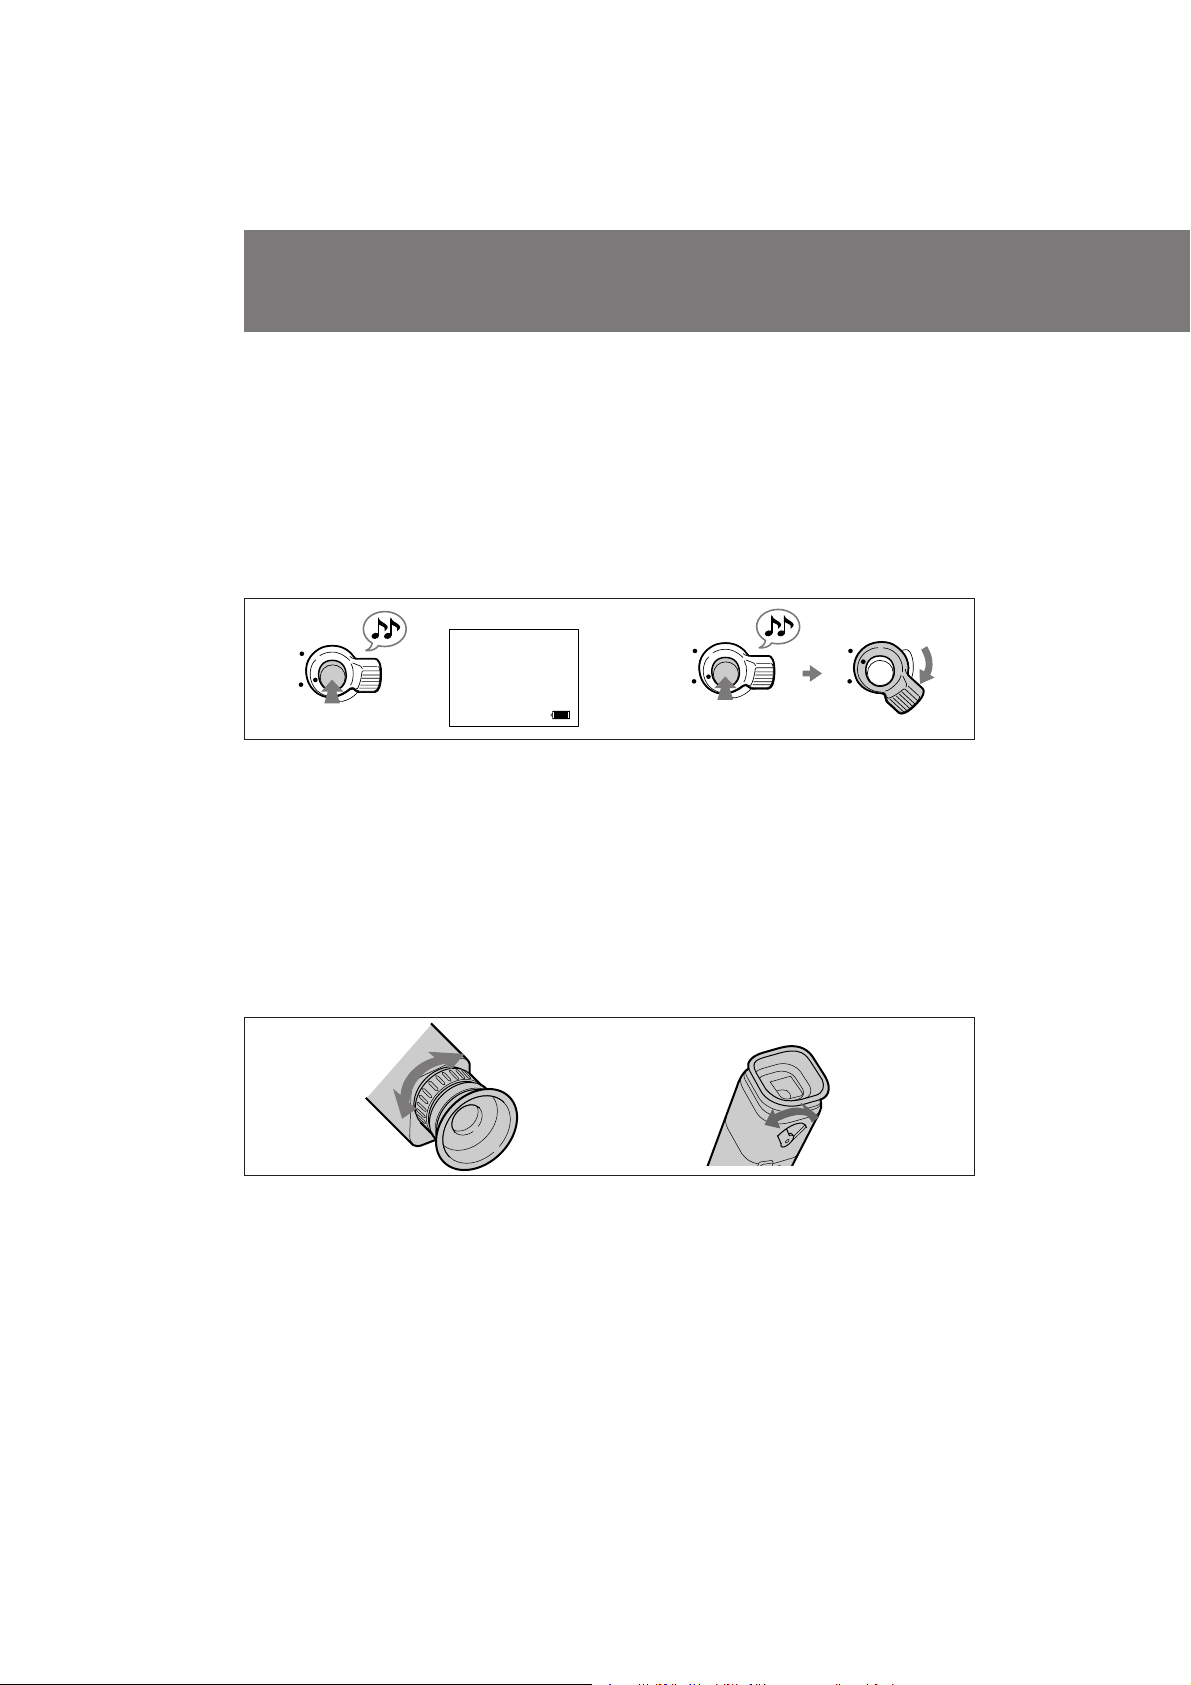
To stop recording momentarily [a]
Press START/STOP again. The “STBY” indicator
appears in the viewfinder (Standby mode).
To finish recording [b]
Press START/STOP again. Turn STANDBY
down and set the POWER switch to OFF. Then,
eject the cassette, remove the battery pack and
put the lens cap on the lens.
[a]
K
C
O
L
S
T
A
Y
N
B
D
40min
STBY
0:35:20
To focus the viewfinder lens
If you cannot see the indicators in the viewfinder
clearly, or after someone else has used the
camcorder, focus the viewfinder lens. When
using a monochrome viewfinder, turn the
viewfinder lens adjustment ring so that the
indicators in the viewfinder come into sharp
focus [a] (CCD-TR2200E). When using a colour
viewfinder, move the viewfinder lens adjustment
lever so that the indicators in the viewfinder
come into sharp focus [b] (CCD-TR3300E).
Para detener la grabación
momentáneamente [a]
Vuelva a pulsar START/STOP. El indicador
“STBY” aparece en el visor electrónico (modo de
espera).
Para finalizar la grabación [b]
Vuelva a pulsar START/STOP. Gire STANDBY
hacia abajo y ajuste el interruptor POWER en
OFF. A continuación, expulse el videocassette,
extraiga el paquete de batería y coloque la tapa
del objetivo sobre el mismo.
[b]
K
C
O
L
S
T
A
Y
N
B
D
K
C
O
L
S
T
A
Y
N
B
D
Para enfocar el objetivo del visor
electrónico
Si no puede ver con claridad los indicadores del
visor electrónico o si alguien ha utilizado la
videocámara, enfoque el objetivo. Si emplea un
visor electrónico monocromo, gire el anillo de
ajuste de objetivo del visor electrónico de forma
que los indicadores de éste queden nítidamente
enfocados [a] (CCD-TR2200E). Si emplea un
visor electrónico en color, desplace la palanca de
ajuste de objetivo del visor electrónico de forma
que los indicadores de éste queden nítidamente
enfocados [b] (CCD-TR3300E).
[a] CCD-TR2200E [b] CCD-TR3300E
Note on Standby mode
If you leave the camcorder in Standby mode for 5
minutes while the cassette is inserted, the
camcorder turns off automatically. This prevents
wearing down the battery and wearing out the
tape. To resume Standby mode, turn STANDBY
down once and then up again. To start recording,
press START/STOP.
Nota sobre el modo de espera
Si deja la videocámara en modo de espera
durante 5 minutos mientras el videocassette se
encuentra insertado, la videocámara se apagará
automáticamente para evitar el desgaste del
paquete de batería y de la cinta. Para reanudar el
modo de espera, gire STANDBY hacia abajo una
vez y, a continuación, hacia arriba. Para iniciar la
grabación, pulse START/STOP.
14
CCD-TR2200E/TR3300E 3-856-204-12 (1)
Page 15

Notes on recording mode
•This camcorder records and plays back in SP
(standard play) mode and in LP (long play)
mode. The playback quality in LP mode,
however, will not be as good as that in SP
mode.
•When a tape recorded on this camcorder in LP
mode is played back on other types of 8 mm
camcorders or VCRs, the playback quality may
not be as good as that on this camcorder.
Note on recording
When you record from the beginning of a tape,
run the tape for about 15 seconds before starting
the actual recording. This will ensure that you
won’t miss any start-up scenes when you play
back the tape.
Notes on the tape counter
•The tape counter indicates the recording or
playback time. Use it as a guide. There will be a
time lag of several seconds from the actual
time. To set the counter to zero, press
COUNTER RESET.
•If the tape is recorded in SP and LP modes
mixed, the tape counter shows incorrect
recording time. When you intend to edit the
tape using the tape counter, record in same (SP
or LP) mode.
Note on the beep sound
As indicated with ≥ in the illustrations, a beep
sounds when you turn the power on or when
you start recording, and two beeps sound when
you stop recording, confirming the operation.
Several beeps also sound as a warning of any
unusual condition of the camcorder.
Note that the beep sound is not recorded on the
tape. If you do not want to hear the beep sound,
select “OFF” in the menu system.
Notas sobre el modo de grabación
•Esta videocámara graba y reproduce en los
modos SP (reproducción estándar) y LP
(reproducción de larga duración). No obstante,
la calidad de reproducción en modo LP no será
tan satisfactoria como en modo SP.
•Cuando una cinta grabada en esta videocámara
en modo LP se reproduce en otros tipos de
videograbadoras o videocámaras de 8 mm, la
calidad de reproducción puede ser inferior a la
obtenida en esta videocámara.
Nota sobre la grabación
Si graba desde el principio de la cinta, deje que
ésta avance durante 15 segundos
aproximadamente antes de comenzar la
grabación. De esta forma se evitará perder
escenas iniciales al reproducir la cinta
Notas sobre el contador de cinta
•El contador de cinta indica el tiempo de
grabación o reproducción. Empléelo como
referencia. Suele marcar una diferencia de
varios segundos con respecto al tiempo real.
Para ajustar el contador a cero, pulse
COUNTER RESET.
•Si la cinta se ha grabado mezclando los modos
SP y LP, el contador de cinta mostrará un
tiempo de grabación incorrecto. Cuando desee
editar la cinta utilizando el contador de cinta,
grabe en el mismo modo (SP o LP).
Nota sobre los pitidos
Como se indica con el símbolo ≥ en las
ilustraciones, la unidad emite un pitido al activar
la alimentación o al iniciar la grabación, y dos
pitidos al detener ésta para confirmar la
operación. Igualmente, la unidad emite varios
pitidos como aviso de cualquier condición
anormal de la videocámara.
Observe que los pitidos no se graban en la cinta.
Si no desea oír los pitidos, seleccione “OFF” en el
sistema de menú.
Basic operations / Operaciones básicas
CCD-TR2200E/TR3300E 3-856-204-12 (1)
15
Page 16
Camera recording Grabación con la cámara
Notes on finder power save
— CCD-TR3300E only
•The recording continues even when the picture
in the viewfinder disappears during recording.
•If you set VF PW-SAVE to OFF in the menu
system, the picture in the viewfinder does not
disappear even when you turn your face away
from the viewfinder.
When moving from indoors to outdoors (or
vice versa)
Turn STANDBY up and point the camcorder at a
white object for about 15 seconds so that the
white balance is properly adjusted.
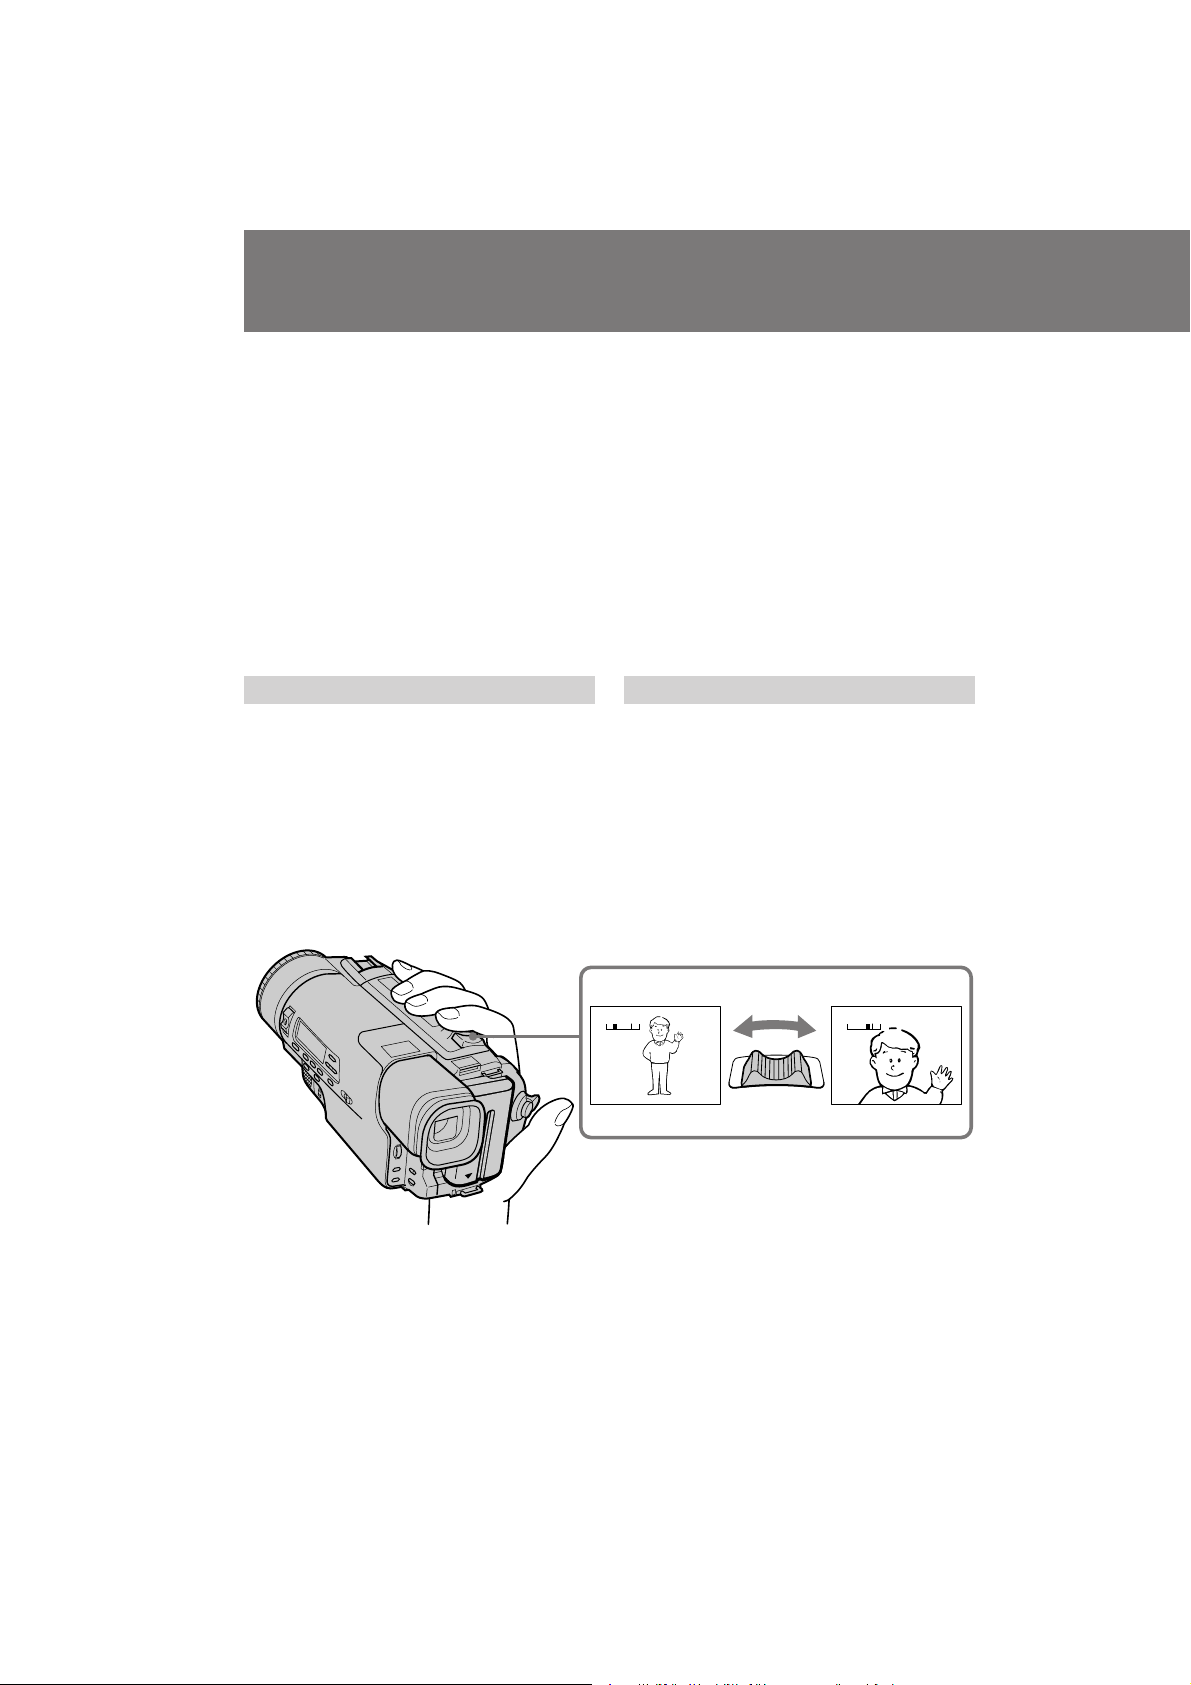
Using the zoom feature
Zooming is a recording technique that lets you
change the size of the subject in the scene.
For more professional-looking recordings, use
the zoom function sparingly.
“T” side: for telephoto (subject appears closer)
“W” side: for wide-angle (subject appears farther
away)
Notas sobre el ahorro de energía del visor
electrónico
— Sólo CCD-TR3300E
•La grabación seguirá realizándose aunque la
imagen del visor electrónico desaparezca
durante la grabación.
•Si ajusta VF PW-SAVE en OFF en el sistema de
menú, la imagen del visor electrónico no
desaparecerá aunque aleje su rostro de éste.
Cuando se desplace de interiores a exteriores
(o viceversa)
Gire STANDBY hacia arriba y dirija la
videocámara hacia un objeto blanco durante unos
15 segundos para ajustar correctamente el
balance de blancos.
Uso de la función de zoom
El zoom es una técnica de grabación que permite
modificar el tamaño del objeto de la escena. Para
que las grabaciones adquieran una apariencia
más profesional, emplee la función de zoom con
moderación.
Lado “T”: para telefoto (el objeto aparece más
próximo)
Lado “W”:para gran angular (el objeto aparece
más alejado)
16
TW TW
W
CCD-TR2200E/TR3300E 3-856-204-12 (1)
TWT
Page 17

Zooming speed (Variable speed
zooming)
Move the power zoom lever a little for a slower
zoom, move it further for a faster zoom.
When you shoot a subject using a telephoto
zoom
If you cannot get a sharp focus while in extreme
telephoto zoom, move the power zoom lever to
the “W” side until the focus is sharp. You can
shoot a subject that is at least about 80 cm (about
2 5/8 feet) away from the lens surface in the
telephoto position, or about 1cm (about 1/2 inch)
away in the wide-angle position.
Notes on digital zoom
•More than 21x zoom is performed digitally
(42x), and the picture quality deteriorates as
you go toward the “T” side. If you do not want
to use the digital zoom, set the D ZOOM
function to OFF in the menu system.
•The right side [a] in the power zoom indicator
shows the digital zooming zone, and the left
side [b] shows the optical zooming zone. If you
set the D ZOOM function to OFF, the [a] zone
disappears.
Velocidad de zoom (Zoom de
velocidad variable)
Desplace ligeramente la palanca de alimentación
del zoom para obtener un efecto de zoom más
lento. Si desea obtener un efecto de zoom más
rápido, desplace dicha palanca en mayor medida.
Cuando filme un objeto con un zoom telefoto
Si no puede enfocar nítidamente cuando utilice el
zoom telefoto en su posición extrema, desplace la
palanca de alimentación del zoom al lado “W”
hasta obtener un enfoque nítido. Es posible
filmar un objeto que se encuentre a una distancia
de al menos 80 cm (aproximadamente 2 5/8 pies)
de la superficie del objetivo en la posición de
telefoto, o de 1 cm (aproximadamente 1/2
pulgada) en la posición de gran angular.
Notas sobre el zoom digital
•El zoom de más de 21x se realiza digitalmente
(42x) y la calidad de imagen se deteriora a
medida que se avanza hacia el lado “T”. Si no
desea utilizar el zoom digital, ajuste la función
D ZOOM en OFF en el sistema de menú.
•El lado derecho [a] del indicador de
alimentación del zoom muestra el área de zoom
digital, mientras que el izquierdo [b] muestra el
área de zoom óptico. Si ajusta la función D
ZOOM en OFF, el área [a] desaparecerá.
Basic operations / Operaciones básicas
TW
TW
[a][b]
17
CCD-TR2200E/TR3300E 3-856-204-12 (1)
Page 18
Hints for better shooting
Consejos para filmar mejor
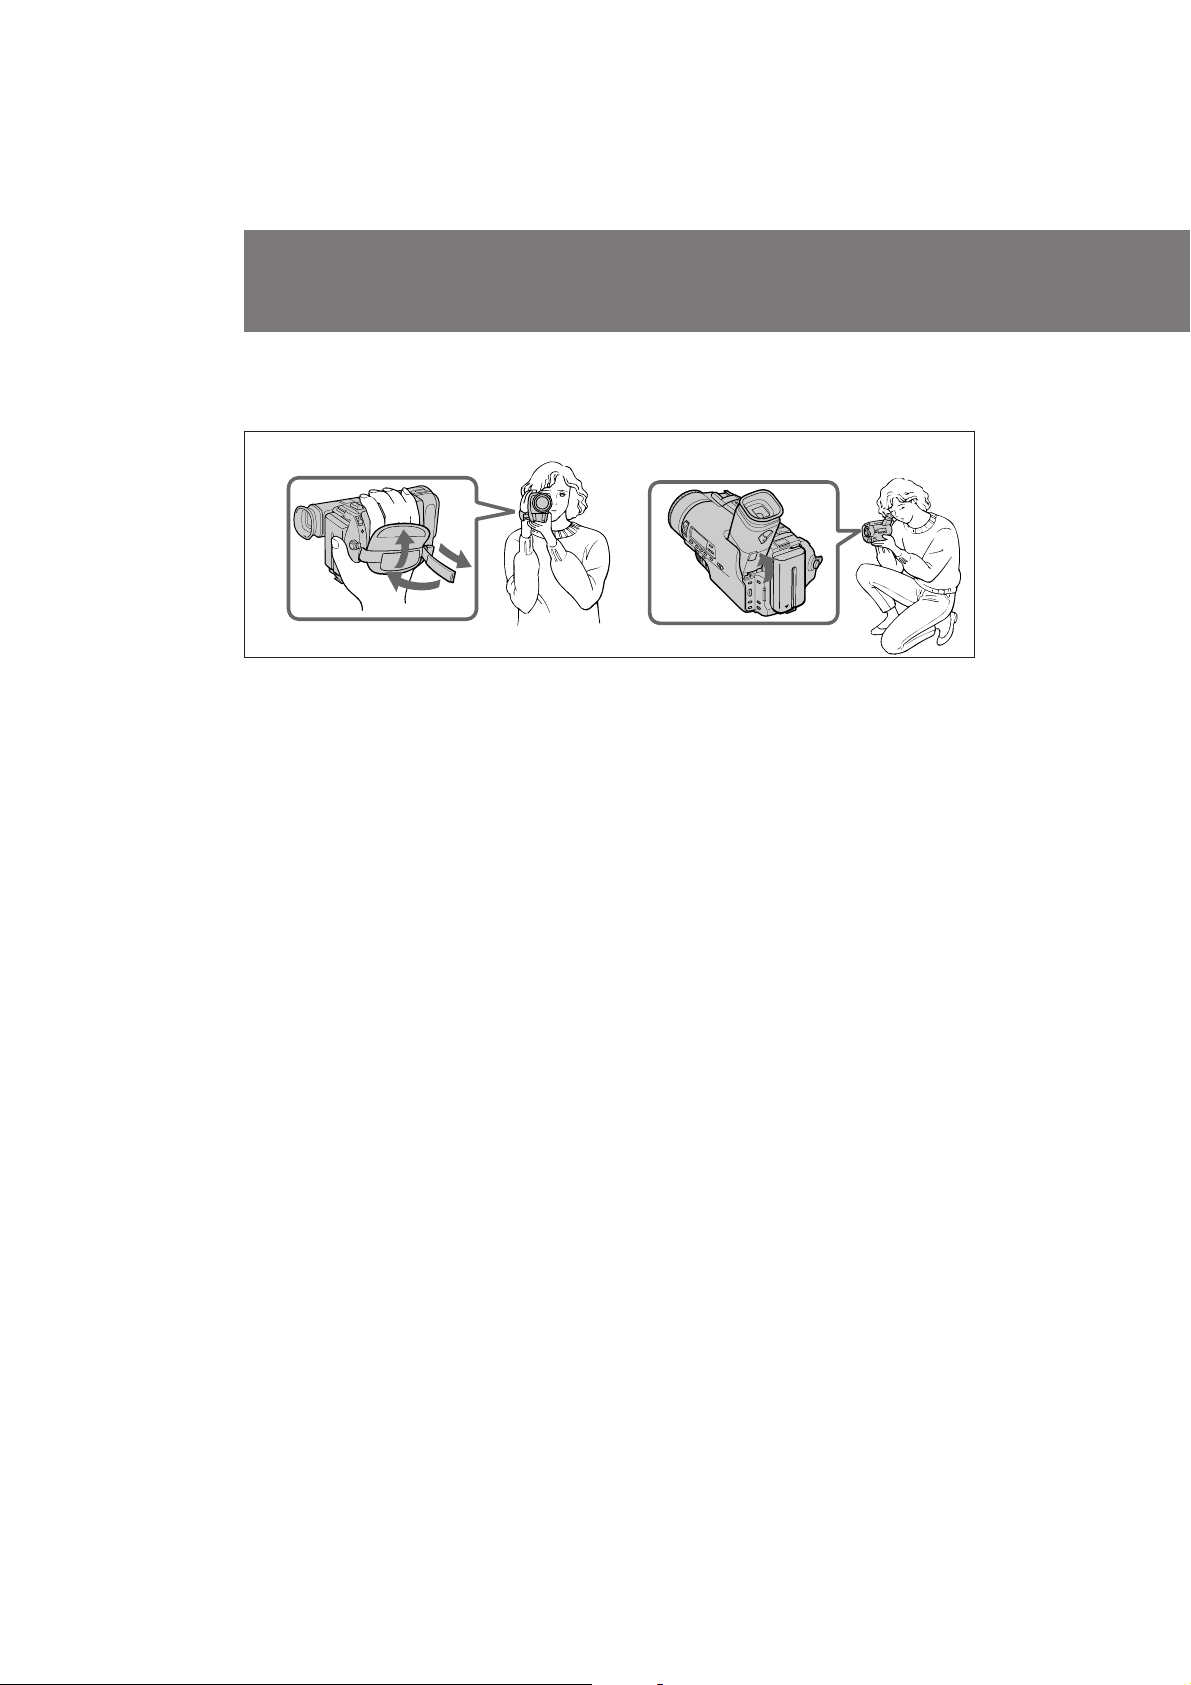
For hand-held shots, you’ll get better results by
holding the camcorder according to the following
suggestions:
[a] [b]
1
2
3
•Hold the camcorder firmly and secure it with
the grip strap so that you can easily manipulate
the controls with your thumb [a].
•Place your right elbow against your side.
•Place your left hand under the camcorder to
support it. Be sure to not touch the built-in
microphone.
•Place your eye firmly against the viewfinder
eyecup.
•Use the viewfinder frame as a guide to
determine the horizontal plane.
•You can also record in a low position to get an
interesting angle. Lift the viewfinder up for
recording from a low position [b].
Place the camcorder on a flat surface or use a
tripod
Try placing the camcorder on a table top or any
other flat surface of suitable height. If you have a
tripod for a still camera, you can also use it with
the camcorder.
When attaching a non-Sony tripod, make sure
that the length of the tripod screw is less than 6.5
mm (9/32 inch). Otherwise, the screw may
damage the inner parts of the camcorder.
Para filmar con la cámara en las manos, obtendrá
mejores resultados si sujeta la videocámara según
las siguientes sugerencias:
•Sujete la videocámara firmemente y fíjela con la
correa para poder manejar los controles
fácilmente con el pulgar [a].
•Mantenga el brazo con el que sujeta la
videocámara pegado al costado.
•Coloque la mano izquierda debajo de la
videocámara para sostenerla. Evite tocar el
micrófono incorporado.
•Apoye el ocular del visor electrónico
firmemente contra su ojo.
•Emplee el cuadro del visor electrónico como
referencia para determinar el plano horizontal.
•También es posible grabar desde posiciones
bajas para obtener un ángulo interesante.
Levante el visor electrónico para grabar desde
posiciones bajas [b].
Coloque la videocámara sobre una superficie
plana o emplee un trípode
Sitúe la videocámara sobre una mesa o cualquier
otra superficie plana con la altura adecuada. Si
dispone de un trípode para cámara fija, también
puede utilizarlo con la videocámara.
Al fijar un trípode que no sea Sony, compruebe
que la longitud del tornillo de trípode sea inferior
a 6,5 mm (9/32 de pulgada), ya que en caso
contrario el tornillo puede dañar los
componentes internos de la videocámara.
18
CCD-TR2200E/TR3300E 3-856-204-12 (1)
Page 19
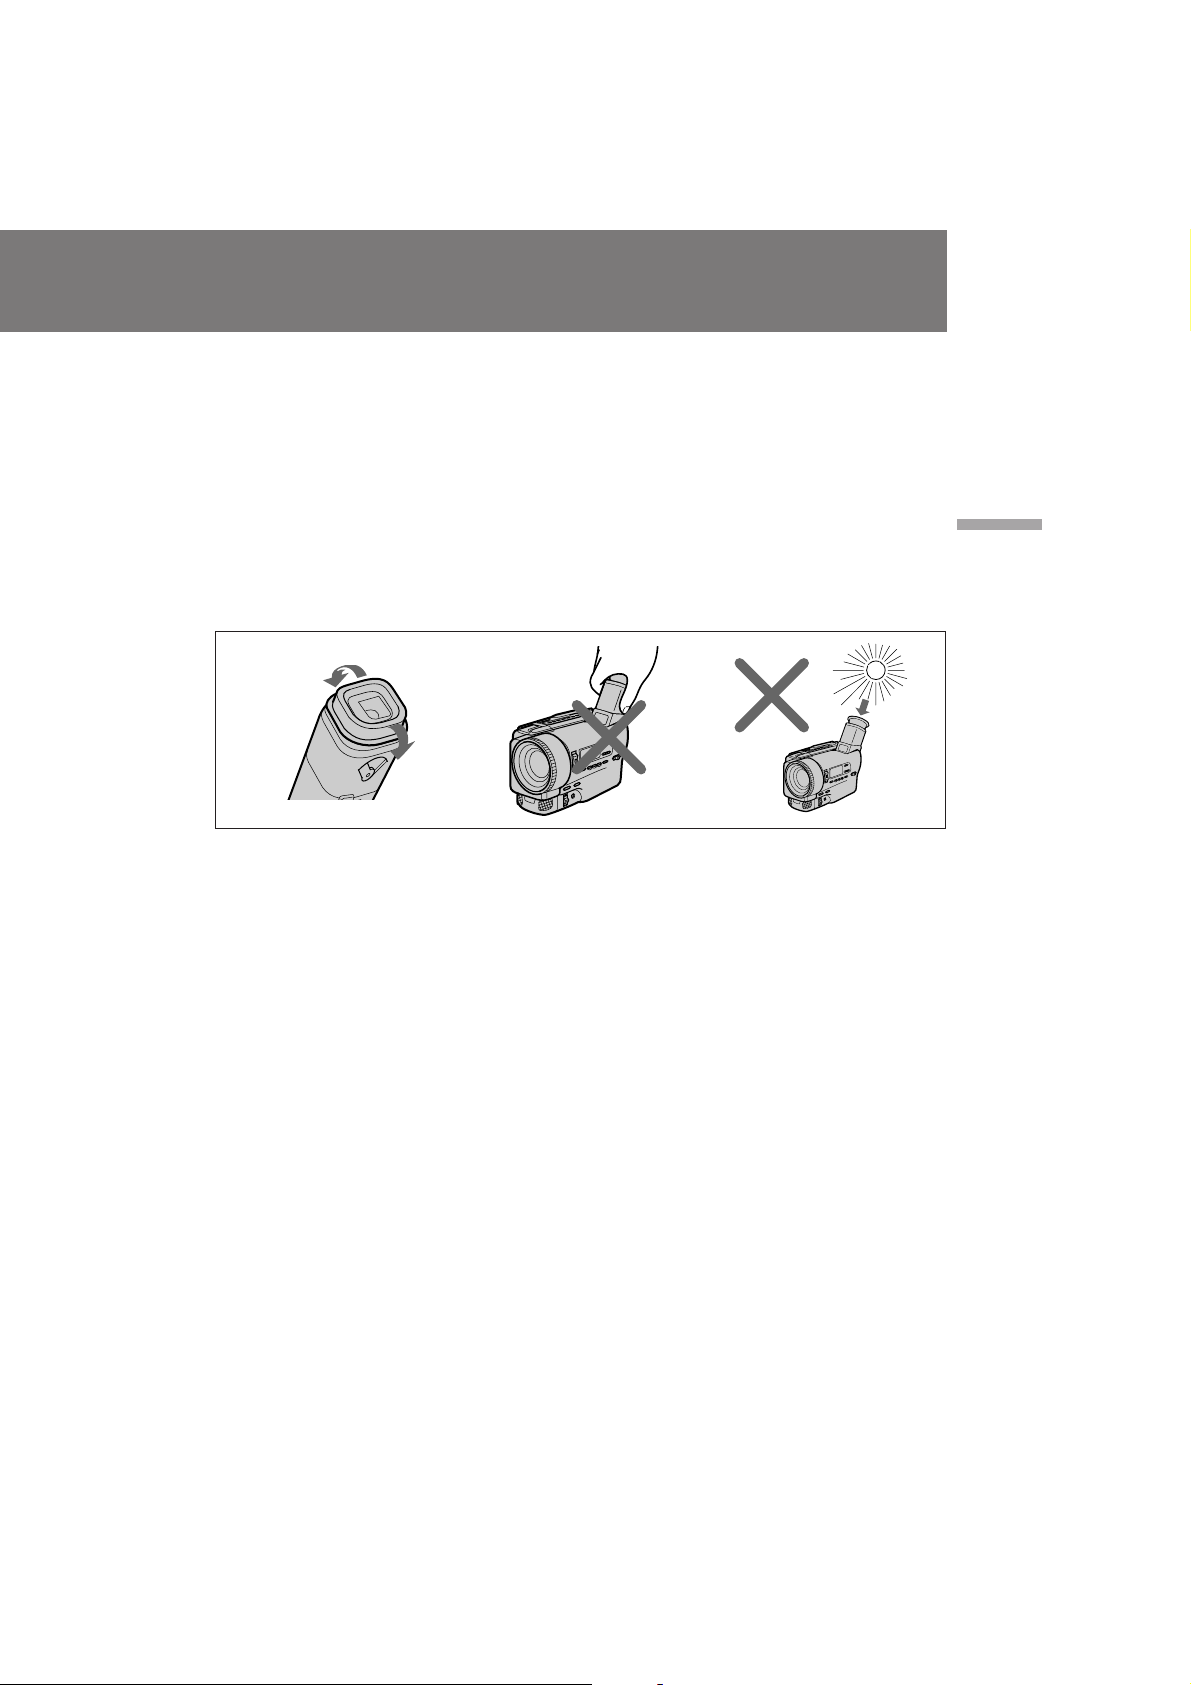
If you wear glasses
You can bend back the eyecup to get a better
view of viewfinder [c].
Cautions on the viewfinder
•Do not pick up the camcorder by the
viewfinder [d].
•Do not place the camcorder so as to point the
viewfinder toward the sun. The inside of the
viewfinder may be damaged. Be careful when
placing the camcorder under sunlight or by a
window [e].
[c] [e][d]
Si utiliza gafas
Es posible doblar hacia atrás el ocular con el fin
de obtener una mejor visualización del visor
electrónico [c].
Precauciones sobre el visor electrónico
•No coja la videocámara por el visor electrónico
[d].
•Sitúe la videocámara de forma que el visor
electrónico no quede orientado hacia el sol. En
caso contrario, el interior de dicho visor puede
dañarse.
Tenga cuidado cuando sitúe la videocámara
bajo la luz solar o junto a una ventana [e].
Basic operations / Operaciones básicas
Notes on the colour viewfinder
— CCD-TR3300E only
•The colour viewfinder employs LCD screen
made with high-precision technology.
However, black points or bright points of light
(red, blue, or green) may appear constantly on
the colour viewfinder screen. These points are
not recorded on the tape. This is not a
malfunction. (Effective dots : more than
99.99%).
•The finder power save function sometimes does
not operate due to the effects of sunlight or
fluorescent light.
•In direct sunlight, the picture in the viewfinder
looks brighter by the lighting aperture. The
colour of the picture in the viewfinder is
variable in such a case.
Notas sobre el visor electrónico en color
— sólo CCD-TR3300E
•El visualizador electrónico en color utiliza una
pantalla LCD realizada con tecnología de alta
precisión. No obstante, pueden aparecer puntos
negros o brillantes (rojos, azules o verdes) de
forma constante en la pantalla del visualizador
electrónico en color.
Estos puntos no se registran en la cinta y no
indican anomalía de funcionamiento.
(Puntos efectivos: más del 99,99%).
•La función de ahorro de energía del visor
electrónico no se activa en determinadas
ocasiones debido al efecto causado por la luz
solar o las luces fluorescentes.
•Con luz solar directa, el brillo de la imagen del
visor electrónico aumenta por la apertura de
iluminación. En este caso, el color de dicha
imagen será variable.
19
CCD-TR2200E/TR3300E 3-856-204-12 (1)
Page 20
Checking the recorded picture
Comprobación de
imágenes grabadas
Using EDITSEARCH, you can review the last
recorded scene or check the recorded picture in
the viewfinder.
(1)While pressing the small green button on the
POWER switch, set it to CAMERA.
(2)Turn STANDBY up.
(3)Press the РΠside of EDITSEARCH
momentarily; the last few seconds of the
recorded portion play back (Rec Review).
Hold down the – side of EDITSEARCH until
the camcorder goes back to the scene you
want. The last recorded portion is played
back. To go forward, hold down the + side
(Edit Search).
POWER
CAMERA
1
OFF
PLAYER
Con la función EDITSEARCH, es posible revisar
la última escena grabada o comprobar la imagen
grabada en el visor electrónico.
(1)Ajuste el interruptor POWER en CAMERA
mientras pulsa el botón verde pequeño del
mismo.
(2)Gire STANDBY hacia arriba.
(3)Pulse momentáneamente el lado – Œ de
EDITSEARCH para reproducir los últimos
segundos de la parte grabada (revisión de
grabación).
Mantenga pulsado el lado – de EDITSEARCH
para que la videocámara retroceda hasta la
escena que desee. La última parte grabada se
reproduce. Para avanzar, mantenga pulsado
el lado + (búsqueda de edición).
3
2
K
C
O
L
S
T
A
Y
N
B
D
EDITSEARCH
Œ
To stop playback
Release EDITSEARCH.
To begin re-recording
Press START/STOP. Re-recording begins from
the point you released EDITSEARCH. Provided
you do not eject the tape, the transition between
the last scene you recorded and the next scene
you record will be smooth.
20
Œ
EDITSEARCH
Œ
Para detener la reproducción
Suelte EDITSEARCH.
Para reanudar la grabación
Pulse START/STOP para reanudar la grabación a
partir del punto donde ha dejado de pulsar
EDITSEARCH. Siempre que no expulse la cinta,
la transición entre la última escena grabada y la
siguiente se realizará con uniformidad.
CCD-TR2200E/TR3300E 3-856-204-12 (1)
Page 21
Connections for playback
Conexiones para la
reproducción
You can use this camcorder as a VCR by
connecting it to your TV for playback. There are
some ways to connect the camcorder to your TV.
When monitoring the playback picture by
connecting the camcorder to your TV, we
recommend you to use mains for the power
source.
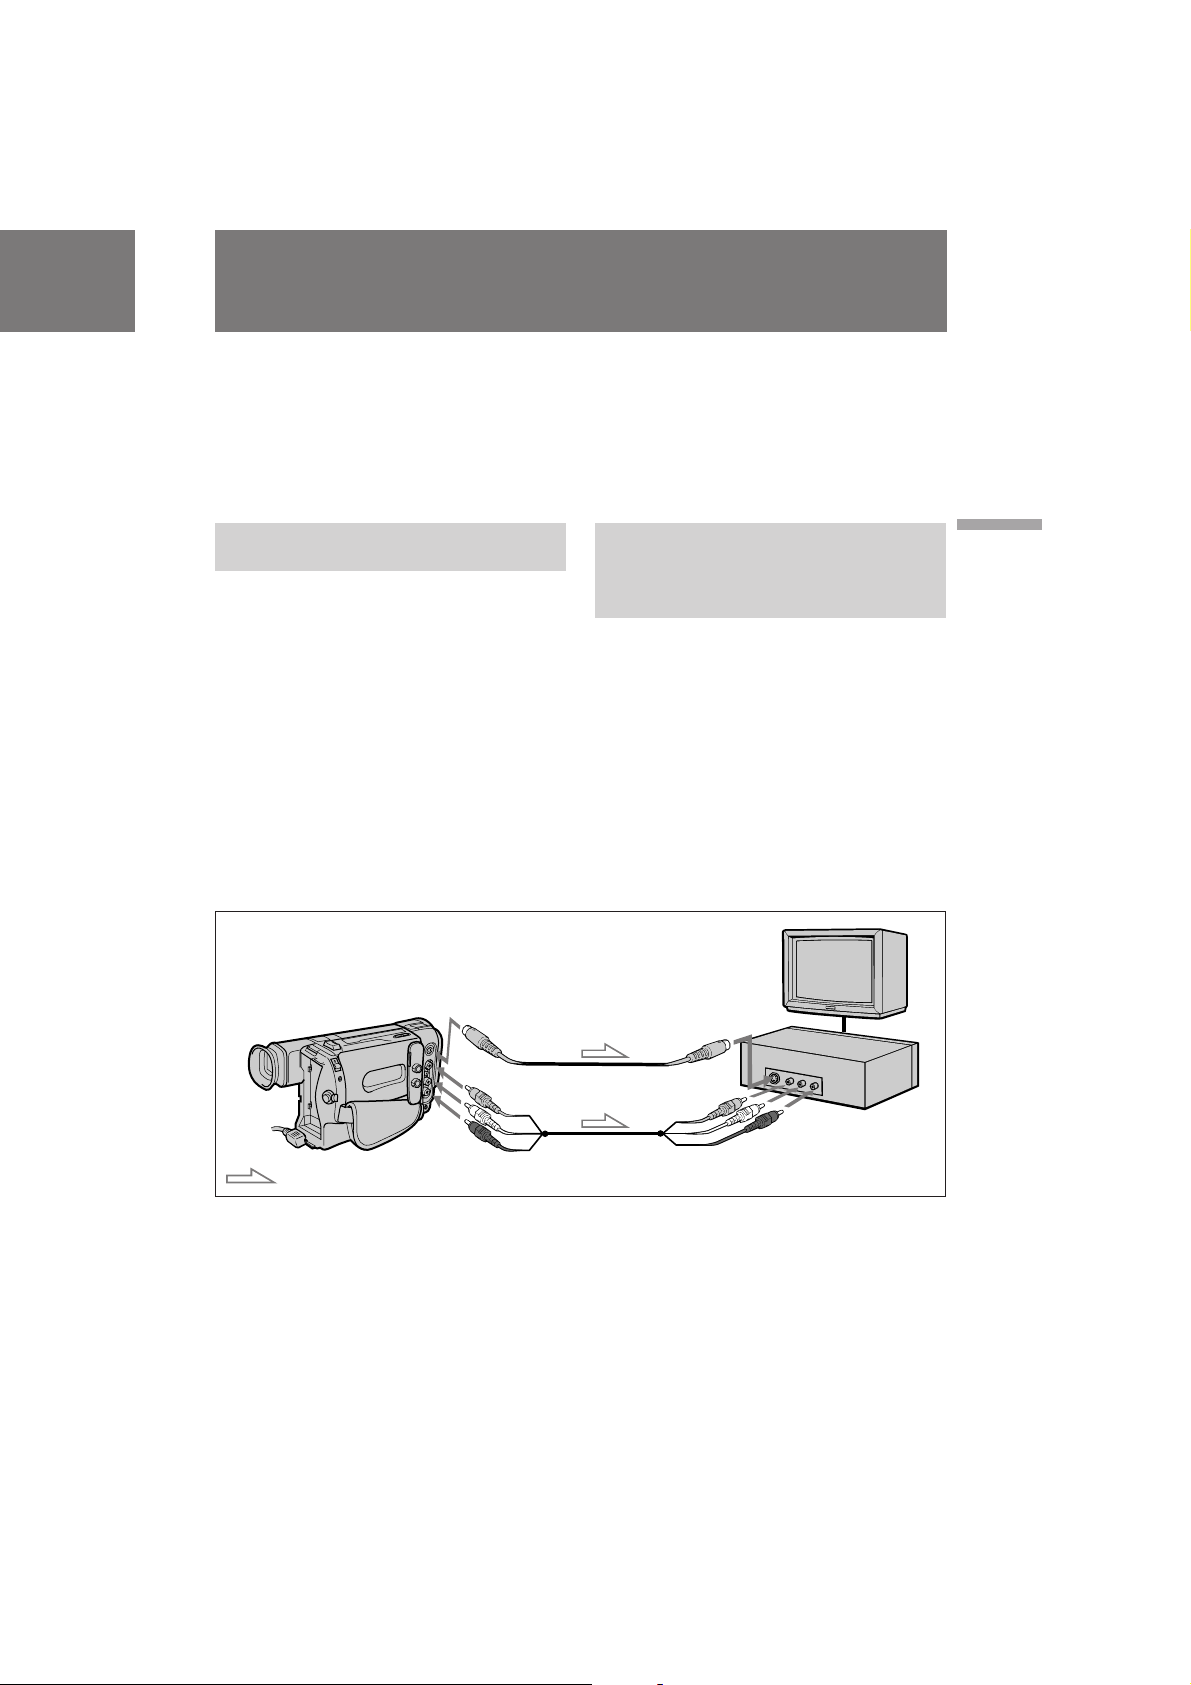
Connecting directly to a VCR/TV
with Video/Audio input jacks
If your TV is already connected to a
VCR
Open the jack cover and connect the camcorder
to the LINE IN inputs on the VCR by using the
supplied A/V connecting cable. Set the input
selector on the VCR to LINE. Set the TV/VCR
selector on the TV to VCR.
If you are going to connect the camcorder using
the S video cable (not supplied) [a], you do not
need to connect the yellow (video) plug of the A/
V connecting cable [b].
If you use a monaural A/V connecting cable, you
will get monaural sound.
Es posible emplear esta videocámara como una
videograbadora para realizar reproducciones si
la conecta al televisor. Existen varias formas para
conectar la videocámara al televisor. Para
controlar la imagen de reproducción mediante la
conexión de la videocámara al televisor, se
recomienda emplear una toma de red como
fuente de alimentación.
Conexión directa a una
videograbadora/televisor con
tomas de entrada de audio/
vídeo
Si ya ha conectado el televisor a una
videograbadora
Abra la cubierta de la toma y conecte la
videocámara a las entradas LINE IN de la
videograbadora con el cable de conexión de A/V
suministrado. Ajuste el selector de entrada de la
videograbadora en LINE y el selector TV/VCR
del televisor en VCR.
Si va a conectar la videocámara con el cable de S
vídeo (no suministrado) [a], no es preciso
conectar el enchufe amarillo (vídeo) del cable de
conexión de A/V [b].
Si emplea un cable de conexión de A/V
monofónico, el sonido será monofónico.
Basic operations / Operaciones básicas
[a]
S
-
V
[b]
V
AUDIO
: Signal flow/Flujo de señales
(not supplied)/
(no suministrado)
I
D
E
O
I
D
E
O
TV
S-VIDEO IN
VIDEO IN
CCD-TR2200E/TR3300E 3-856-204-12 (1)
VCR
AUDIO IN
21
Page 22
Connections for playback
Conexiones para la
reproducción
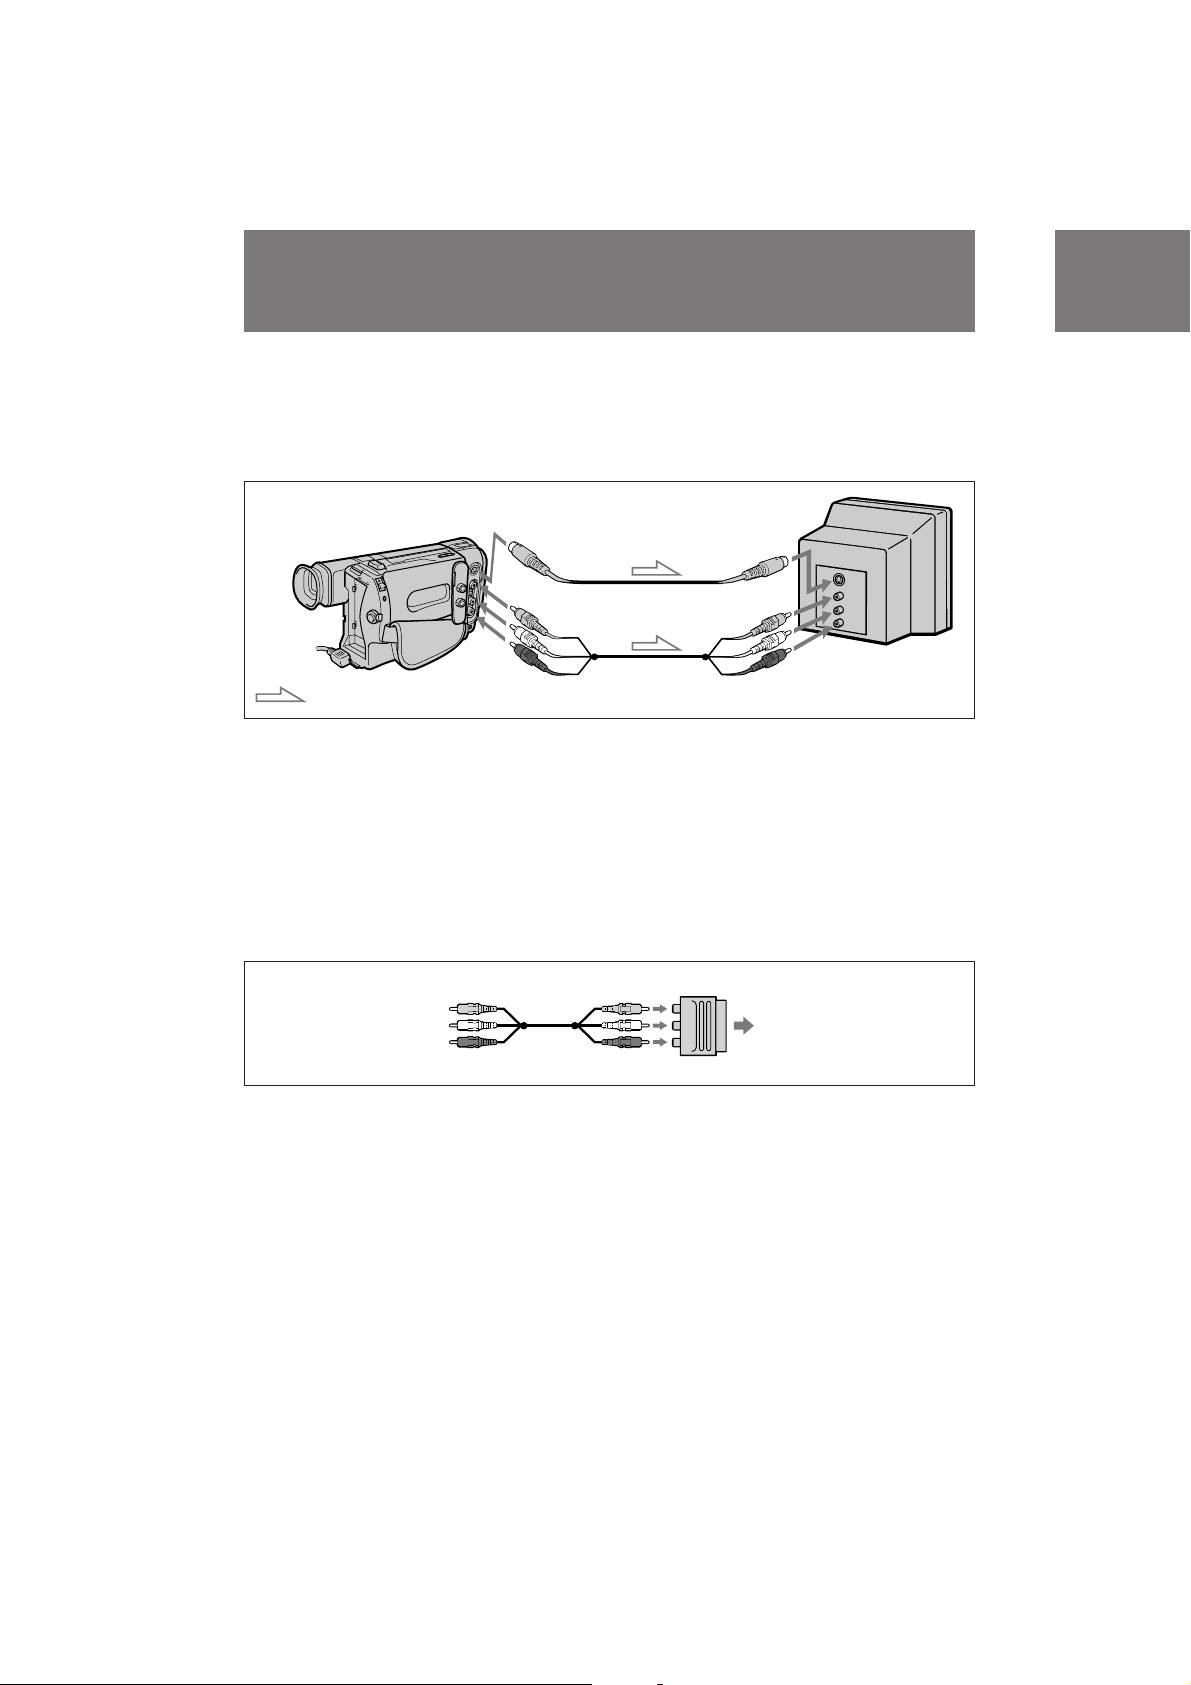
If you connect directly to TV
Open the jack cover and connect the camcorder
to the inputs on the TV by using the supplied A/
V connecting cable. Set the TV/VCR selector on
the TV to VCR.
[a]
S
-
V
I
D
E
O
(not supplied)/
(no suministrado)
[b]
V
I
D
E
O
AUDIO
: Signal flow/Flujo de señales
If your VCR or TV is a monaural type
Connect only the white plug for audio on both
the camcorder and the VCR or the TV. With this
connection, the sound is monaural.
If your VCR/TV has a 21-pin connector
(EUROCONNECTOR)
Use the supplied 21-pin adaptor.
Si realiza la conexión directamente al
televisor
Abra la cubierta de la toma y conecte la
videocámara a las entradas del televisor con el
cable de conexión de A/V suministrado. Ajuste
el selector TV/VCR del televisor en VCR.
TV
S-VIDEO IN
VIDEO IN
AUDIO IN
Si la videograbadora o el televisor es
de tipo monofónico
Conecte sólo el enchufe blanco de audio de la
videocámara y de la videograbadora o del
televisor. Con esta conexión, el sonido será
monofónico.
Si la videograbadora o el televisor
dispone de un conector de 21 pines
(EUROCONNECTOR)
Utilice el adaptador de 21 pines suministrado.
To connect to a VCR or TV without
Video/Audio input jacks
Use an RFU adaptor (not supplied).
22
TV
Para realizar la conexión a una
videograbadora o a un televisor sin
tomas de entrada de audio/vídeo
Utilice un adaptador RFU (no suministrado).
CCD-TR2200E/TR3300E 3-856-204-12 (1)
Page 23
Playing back a tape
Reproducción de
cintas
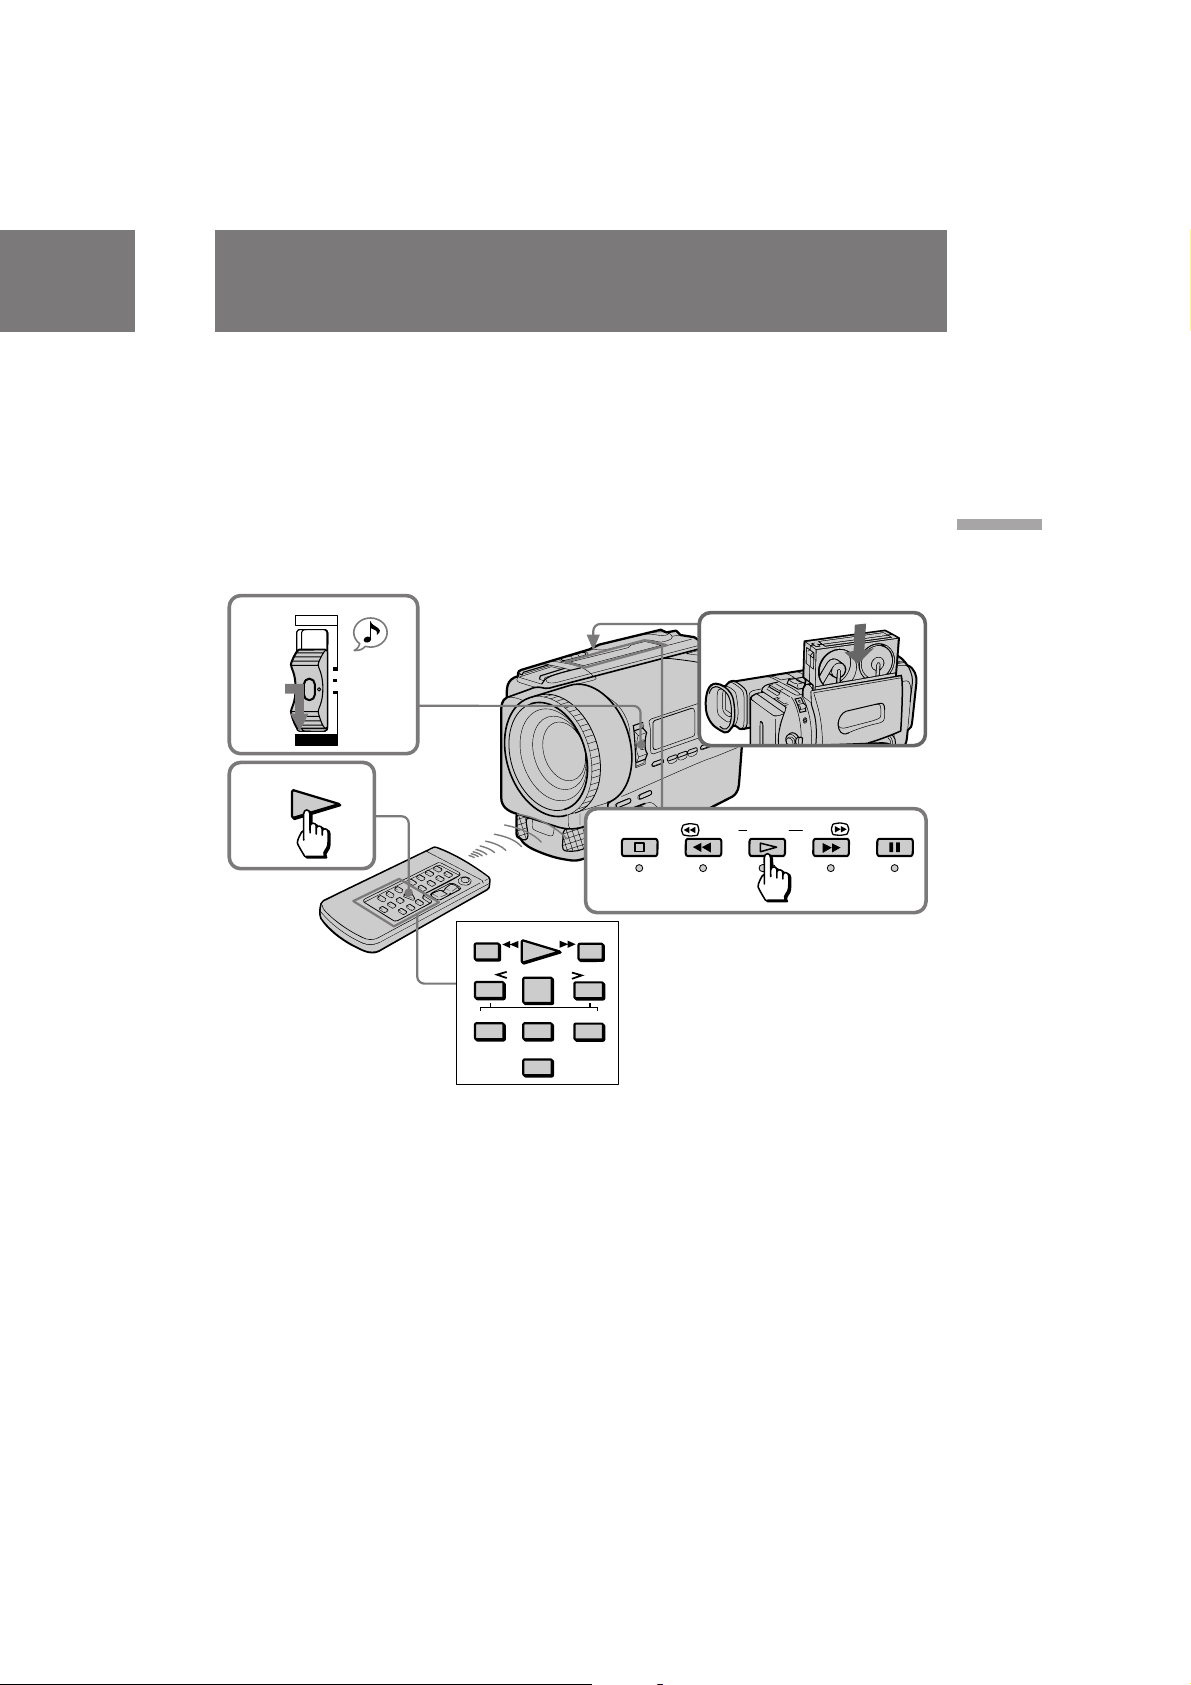
You can monitor the playback picture in the
viewfinder. You can also monitor a picture on a
TV screen, after connecting the camcorder to a
TV or VCR.
(1)While pressing the small green button on the
POWER switch, set it to PLAYER. The tape
transport buttons light up.
(2)Insert the recorded tape with the window
facing out.
(3)Press · to start playback.
POWER
1
3
CAMERA
PLAYER
PLAY
OFF
3
PLAYREW
Es posible controlar la imagen de reproducción
en el visor electrónico. También es posible
controlar imágenes en la pantalla de un televisor
después de conectar la videocámara a un
televisor o a una videograbadora.
(1)Ajuste el interruptor POWER en PLAYER
mientras pulsa el botón verde pequeño del
mismo. Los botones de transporte de cinta se
iluminan.
(2)Inserte la cinta grabada con la ventana
orientada hacia fuera.
(3)Pulse · para iniciar la reproducción.
2
3
#
FF
REW FF PAUSESTOP PLAY
Basic operations / Operaciones básicas
7
PAUSEPSLOW
DISPLAY
To stop playback, press π.
To rewind the tape, press 0.
To fast-forward the tape rapidly, press ).
STOP
7
& × 2
Para detener la reproducción, pulse π.
Para rebobinar la cinta, pulse 0.
Para que la cinta avance rápidamente, pulse
).
23
CCD-TR2200E/TR3300E 3-856-204-12 (1)
Page 24

Playing back a tape Reproducción de cintas
Using the remote commander
You can control playback using the supplied
Remote Commander. Before using the Remote
Commander, insert the R6 (size AA) batteries.
To display the viewfinder screen indicators on
the TV
Press DISPLAY on the Remote Commander. To
erase the indicators, press DISPLAY again.
To monitor the sound while viewing the
playback picture in the viewfinder
Connect headphones (not supplied) to the 2 jack.
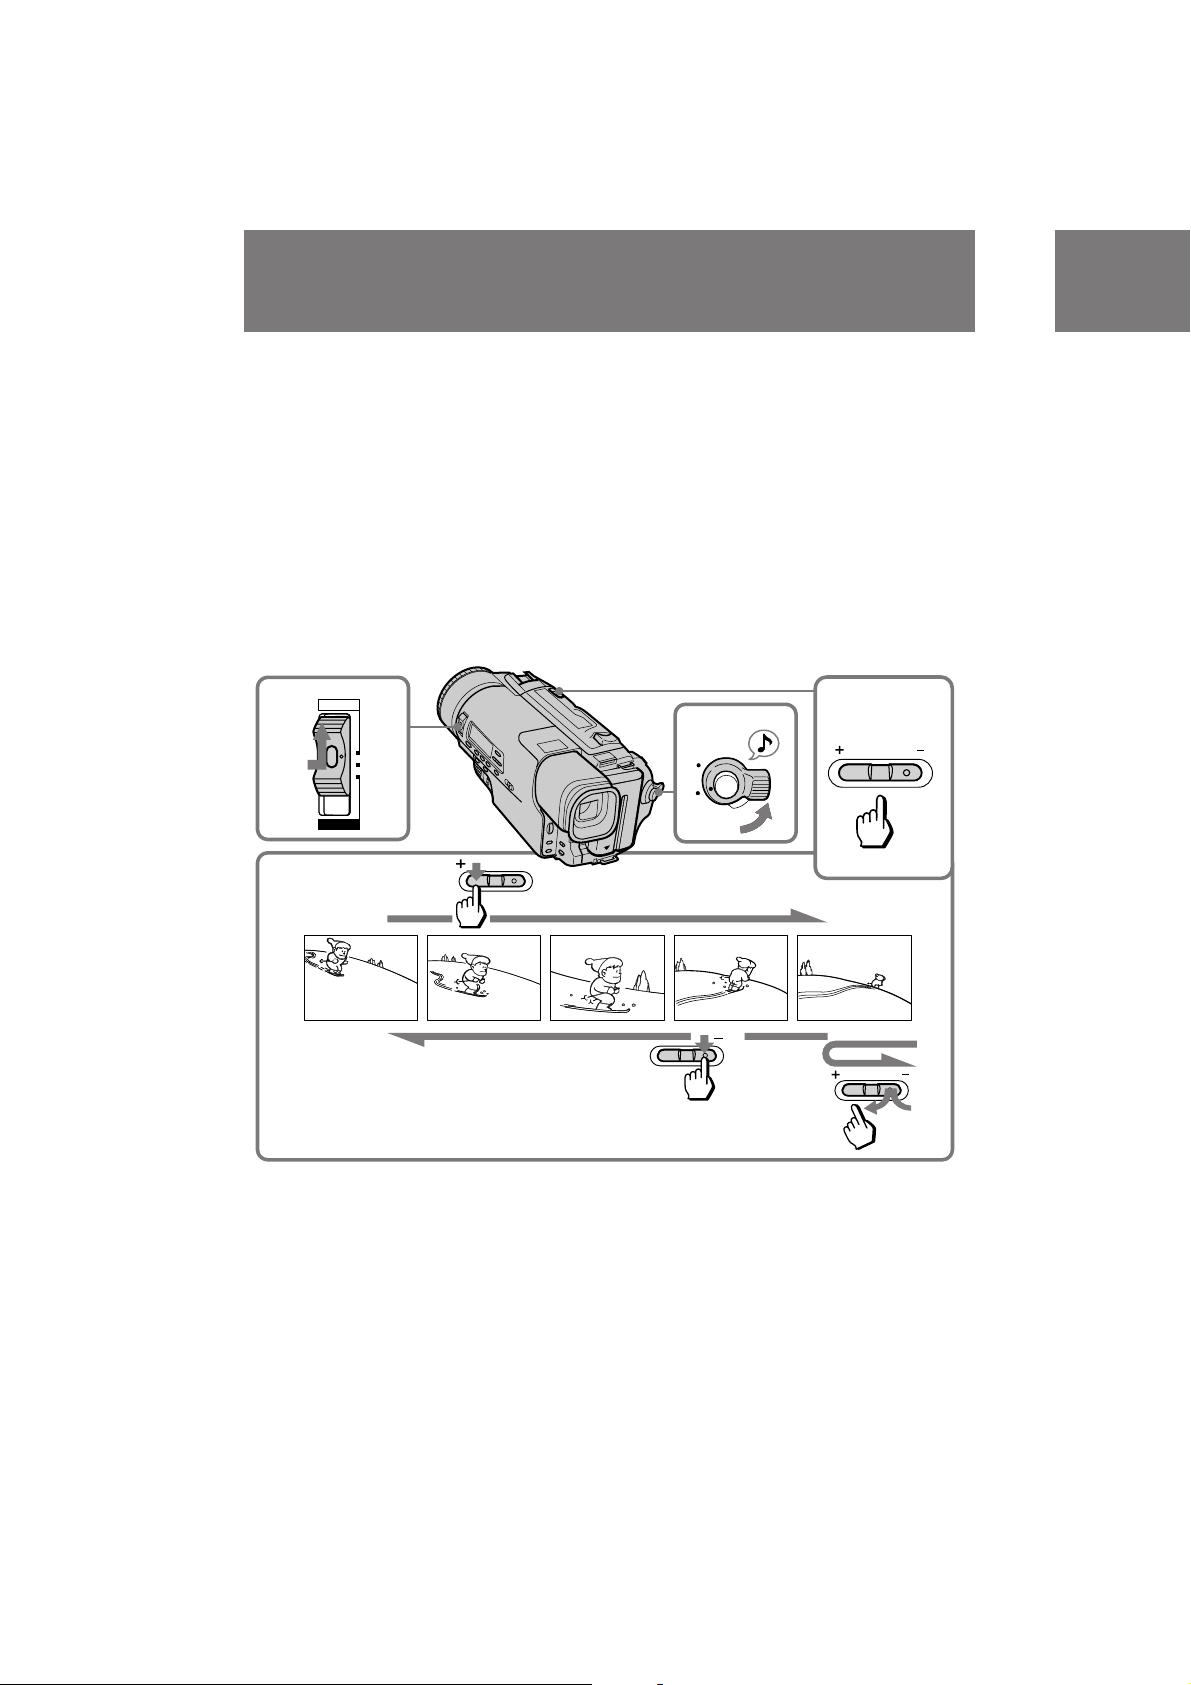
Various playback modes
To view a still picture (playback
pause)
Press P during playback. To resume playback,
press P or ·.
To locate a scene (picture search)
Keep pressing 0 or ) during playback. To
resume normal playback, release the button.
To monitor the high-speed picture
while advancing the tape or
rewinding (skip scan)
Keep pressing 0 while rewinding or ) while
advancing the tape. To resume normal playback,
press ·.
To view the picture at 1/5 speed
(slow playback)
Press SLOW & on the Remote Commander
during playback. To resume normal playback,
press ·. If slow playback lasts for about 1
minute, it shifts to normal speed automatically.
To view the picture at double speed
For double speed playback in the reverse
direction, press <, then press x2 on the
Remote Commander during playback. For
double speed playback in the forward direction,
press >7, then press x2 during playback. To
resume normal playback, press ·.
24
Uso del mando a distancia
Es posible controlar la reproducción con el
mando a distancia suministrado. Antes de
emplearlo, inserte las pilas R6 (tamaño AA).
Para mostrar los indicadores de pantalla del
visor electrónico en el televisor
Pulse DISPLAY en el mando a distancia. Para
que los indicadores desaparezcan, vuelva a
pulsar DISPLAY.
Para controlar el sonido mientras visualiza la
imagen de reproducción en el visor electrónico
Conecte los auriculares (no suministrados) a la
toma 2.
Diversos modos de reproducción
Para visualizar imágenes fijas (pausa
de reproducción)
Pulse P durante la reproducción. Para reanudar
ésta, pulse P o ·.
Para localizar una escena (búsqueda
de imágenes)
Mantenga pulsado 0 o ) durante la
reproducción. Para reanudar la reproducción
normal, suelte el botón.
Para controlar la imagen a alta
velocidad mientras avanza o
rebobina la cinta (exploración con
omisión)
Mantenga pulsado 0 mientras rebobina o )
mientras avanza la cinta. Para reanudar la
reproducción normal, pulse ·.
Para visualizar la imagen a un 1/5 de
la velocidad normal (reproducción
lenta)
Pulse SLOW & en el mando a distancia durante
la reproducción. Para reanudar la reproducción
normal, pulse ·. Si la reproducción lenta dura 1
minuto aproximadamente, ésta cambiará
automáticamente a velocidad normal.
Para visualizar la imagen a velocidad
doble
Para realizar la reproducción a velocidad doble en
sentido regresivo, pulse < y, a continuación,
x2 en el mando a distancia durante la
reproducción. Para realizar la reproducción a
velocidad doble en sentido progresivo, pulse >7
y, a continuación, x2 durante la reproducción. Para
reanudar la reproducción normal, pulse ·.
CCD-TR2200E/TR3300E 3-856-204-12 (1)
Page 25

To view the picture frame-by-frame
Press < or >7 on the Remote
Commander in playback pause mode. If you
keep pressing the button, you can view the
picture at 1/25 speed. To resume normal
playback, press ·.
To change the playback direction
Press < on the Remote Commander for
reverse direction or > 7 on the Remote
Commander for forward direction during
playback. To resume normal playback, press ·.
To select the playback sound
Change the “HiFi SOUND” mode setting in the
menu system.
Notes on playback
•Streaks appear and the sound is muted in the
various playback modes.
•When playback pause mode lasts for 5 minutes,
the camcorder automatically enters stop mode.
•Horizontal noise appears at the centre of the
screen when you play back a tape in reverse or
in various speed if the RC time code or the Data
Code is displayed on the screen. This is normal.
•The playback picture may be shaken up and
down in slow playback. This is normal.
Para visualizar la imagen fotograma
a fotograma
Pulse < o >7 en el mando a distancia
durante el modo de pausa de reproducción. Si
mantiene el botón pulsado, podrá visualizar la
imagen a 1/25 de la velocidad normal. Para
reanudar la reproducción normal, pulse ·.
Para cambiar el sentido de
reproducción
Pulse < en el mando a distancia para
cambiar al sentido regresivo o > 7 para
cambiar al sentido progresivo durante la
reproducción.
Para reanudar la reproducción normal, pulse ·.
Para seleccionar el sonido de
reproducción
Cambie el ajuste de modo de “HiFi SOUND” en
el sistema de menú.
Notas sobre la reproducción
•En los diferentes modos de reproducción
aparecen rayas y el sonido desaparece.
•Si el modo de pausa de reproducción dura 5
minutos aproximadamente, la videocámara
introduce automáticamente el modo de parada.
•Si el código de tiempos RC o el código de datos
se muestra en pantalla, aparece ruido
horizontal en el centro de la pantalla cuando se
reproduce una cinta en sentido regresivo o a
distintas velocidades. Esto es normal.
•La imagen de reproducción puede presentar
vibraciones arriba y abajo durante el modo de
reproducción lenta. Esto es normal.
Basic operations / Operaciones básicas
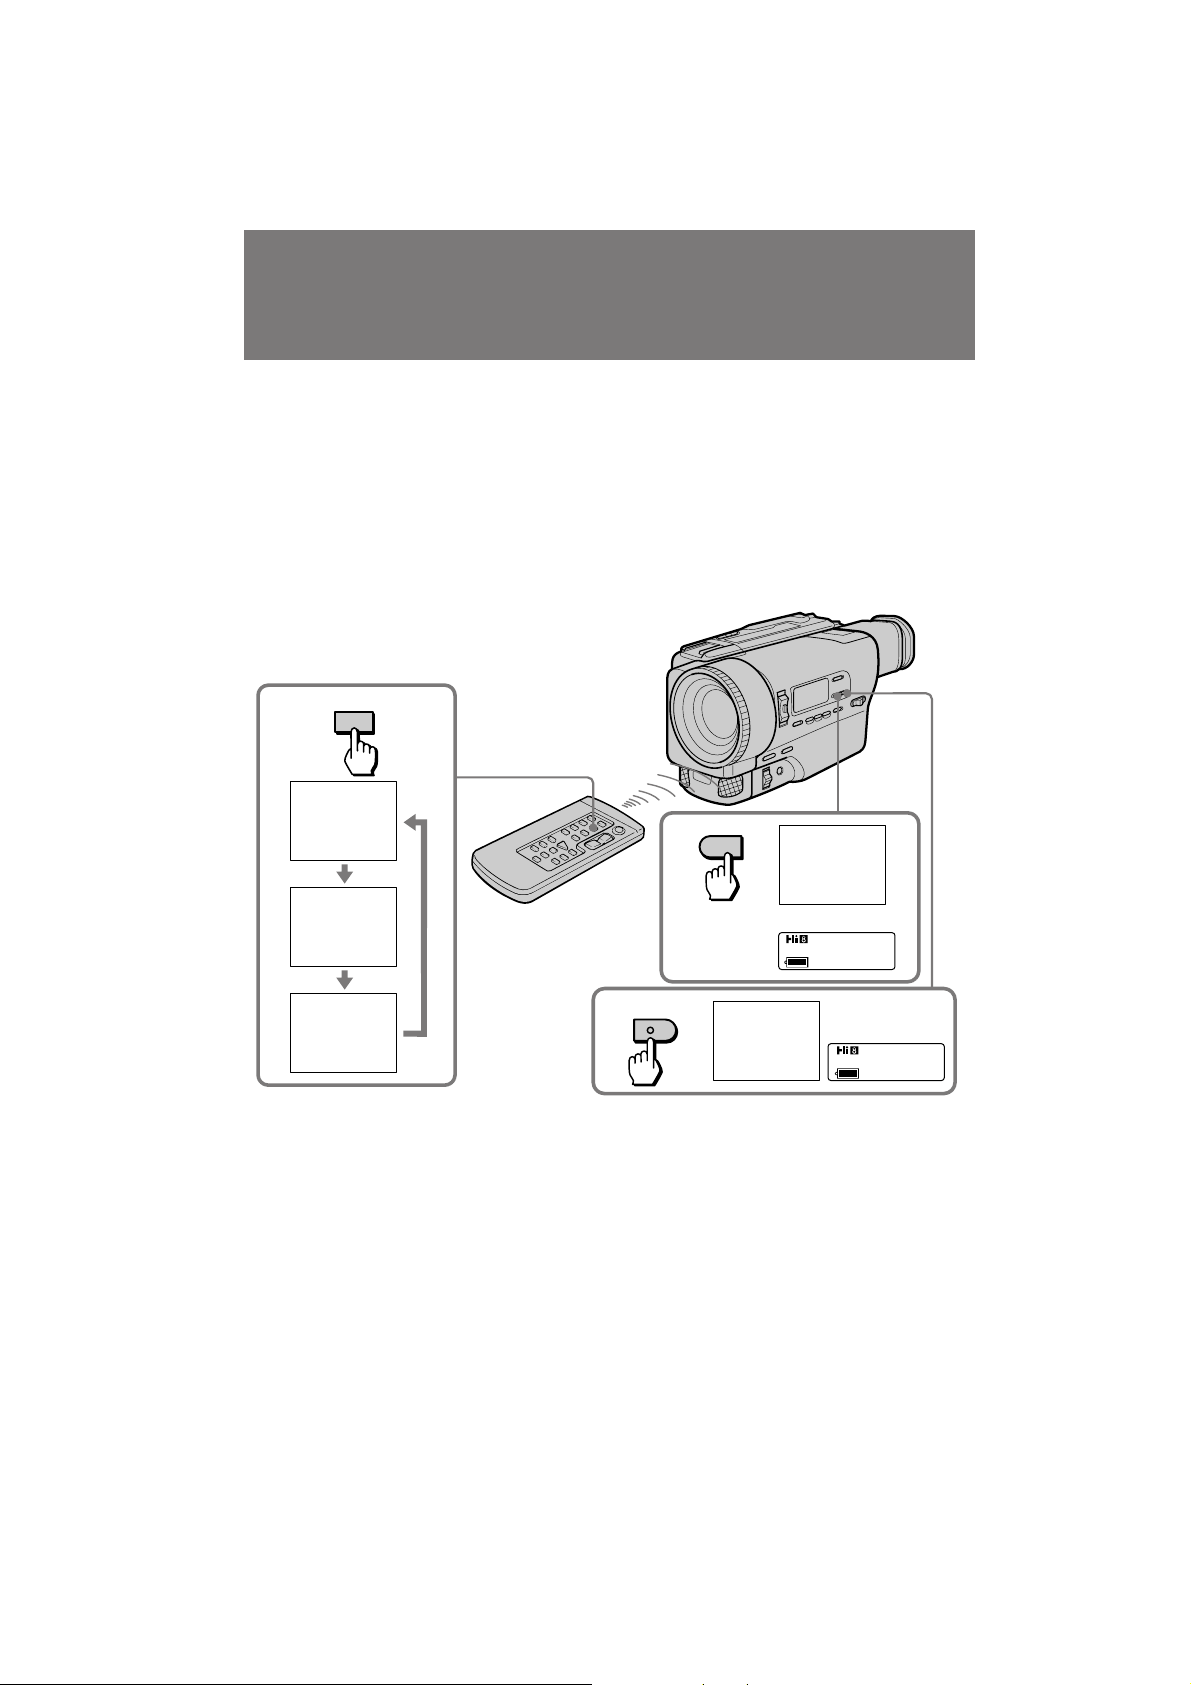
Displaying the date or time
when you recorded – data code
function
Even if you did not record the date or time when
you were recording, you can display the date or
time when you recorded (Data Code) on the TV
during playback or editing. The Data Code is also
displayed in the viewfinder and the display
window.
Visualización de la fecha o la
hora de grabación – función de
código de datos
Es posible mostrar la fecha o la hora de grabación
(código de datos) en el televisor durante la
reproducción o la edición, aunque no haya
registrado dichos elementos durante la
grabación. El código de datos también aparece en
el visor electrónico y en el visor principal.
25
CCD-TR2200E/TR3300E 3-856-204-12 (1)
Page 26
Playing back a tape Reproducción de cintas
To display the date when you
recorded
Press DATE on the camcorder, or press DATA
CODE on the Remote Commander. To make the
date disappear, press DATE again or DATA
CODE twice.
To display the time when you
recorded
Press TIME on the camcorder, or press DATA
CODE on the Remote Commander twice. To
make the time disappear, press it again.
DATA CODE
4 7 1996
10:13:02
Para mostrar la fecha de grabación
Pulse DATE en la videocámara o DATA CODE
en el mando a distancia. Para que la fecha
desaparezca, vuelva a pulsar DATE o DATA
CODE dos veces.
Para mostrar la hora de grabación
Pulse TIME en la videocámara o DATA CODE en
el mando a distancia dos veces. Para que la hora
desaparezca, vuelva a pulsar dichos botones.
DATE
4 7 1996
Display window/Visor principal
04:07:96
When bars (––:––:––) appear
•A blank portion of the tape is being played
back.
•The tape was recorded by a camcorder without
the Data Code function.
•The tape was recorded by a camcorder without
having date and time set.
•The tape is unreadable due to tape damage or
noise.
•The tape was recorded in LP mode.
•The tape is being played back in variable speed
(Slow Playback, etc.)
•An index signal is marked, the RC time code is
written, or PCM after recording is made on the
tape.
26
TIME
Display window/
Visor principal
10:13:02
10:13:02
t
Si aparecen barras (––:––:––)
•Se está reproduciendo una parte sin grabación
de la cinta.
•La cinta se ha grabado con una videocámara
desprovista de la función de código de datos.
•La cinta se ha grabado sin haber ajustado la
fecha y la hora en la videocámara.
•La cinta es ilegible debido a daños o ruido de
dicha cinta.
•La cinta se ha grabado en modo LP.
•La cinta está reproduciéndose a velocidad
variable (reproducción lenta, etc.)
•Se ha marcado una señal de índice, se ha
introducido el código de tiempos RC o se ha
reproducido la cinta en modo PCM después de
la grabación.
CCD-TR2200E/TR3300E 3-856-204-12 (1)
Page 27
Advanced operations
Operaciones avanzadas
Using alternative power sources
You can choose any of the following power
sources for your camcorder: battery pack, mains,
and 12/24 V car battery. Choose the appropriate
power source depending on where you want to
use your camcorder.
Place
Indoors
Outdoors
In the car
Note on power sources
Disconnecting the power source or removing the
battery pack during recording or playback may
damage the inserted tape. If this happens, restore
the power supply again immediately.
Power source
Mains
Battery pack
LR6 (Size AA)
Sony Alkaline
battery
12 V or 24 V
car battery
Accessory to be used
Supplied AC power
adaptor
Battery pack NP-F530
(supplied), NP-F730
Battery case (supplied)
Car battery charger
DC-V515
Uso de fuentes de
alimentación alternativas
Es posible elegir cualquiera de las siguientes
fuentes de alimentación para la videocámara:
paquete de batería, corriente doméstica y batería
de automóvil de 12/24 V. Elija la fuente de
alimentación adecuada en función del lugar
donde desee emplear la videocámara.
Lugar
Interiores
Exteriores
En el
automóvil
Nota sobre las fuentes de alimentación
Si desconecta la fuente de alimentación o si retira
el paquete de batería durante la grabación o la
reproducción, es posible que dañe la cinta
insertada. Si esto ocurre, restablezca el
suministro de alimentación inmediatamente.
Fuente de
alimentación
Toma de red
Paquete de
batería
Pila alcalina
LR6 (tamaño
AA) Sony
Batería de
automóvil de
12 V o 24 V
Accesorio necesario
Adaptador de
alimentación de CA
suministrado
Paquete de batería NPF530 (suministrado),
NP-F730
Estuche de baterías
(suministrado)
Cargador de batería de
automóvil DC-V515
Advanced Operations / Operaciones avanzadas
Using the mains
To use the supplied AC power adaptor:
(1)Connect the AC mains lead to mains, then
connect the connecting cord to the DC OUT
jack on the AC power adaptor.
(2)Insert the connecting plate into the guides at
the bottom of the camcorder.
Uso de corriente doméstica
Para emplear el adaptador de alimentación de
CA suministrado:
(1)Conecte el cable de alimentación de CA a una
toma de red y, a continuación, el cable de
conexión a la toma DC OUT del adaptador de
alimentación de CA.
(2)Inserte la placa de conexión en las guías
situadas en la parte inferior de la
videocámara.
12
DC OUT
CCD-TR2200E/TR3300E 3-856-204-12 (1)
27
Page 28

Using alternative power
sources
Uso de fuentes de
alimentación alternativas
Charging the battery pack
After connecting the mains lead to the mains and
setting the POWER switch on the camcorder to
OFF, you can charge the battery pack in either of
the following two ways:
(When charging begings, the CHARGE lamp
lights.)
•Charging the battery attached to the camcorder
Leave the battery pack attached to the
camcorder. (The NP-F530 battery pack requires
about 210 minutes for a full charge and about
150 minutes for a normal charge.)
•Charging two battery packs at the same time
Attach one battery pack to the AC power
adaptor and other to the camcorder. Both are
charged simultaneously. When charged, both
lamps go out (normal charge). If either lamp is
still lit, both batteries are not charged (the NPF530 battery packs require about 240 minutes
for a full charge and about 180 minutes for a
normal charge).
Notes on the VTR/CAMERA lamp
•The VTR/CAMERA lamp will remain lit for a
while even if the unit is unplugged after use.
This is normal.
•If the VTR/CAMERA lamp does not light,
disconnect the mains lead. After about 1
minute, reconnect the mains lead.
To remove the connecting plate
Pull out the connecting plate by the plate. Never
pull the connecting cord itself.
WARNING
The mains lead must only be changed at a
qualified service shop.
PRECAUTION
The set is not disconnected from the AC power
source (mains) as long as it is connected to the
mains, even if the set itself has been turned off.
Carga del paquete de batería
Después de conectar el cable de alimentación a la
toma de corriente y de ajustar el interruptor
POWER de la videocámara en OFF, es posible
cargar el paquete de batería de cualquiera de las
siguientes formas:
(Al iniciarse la carga, el indicador CHARGE se
ilumina.)
•Cargar el paquete fijado a la videocámara. Deje
el paquete fijado a la videocámara. (El paquete
de batería NP-F530 requiere 210 minutos
aproximadamente para la carga completa y 150
minutos aproximadamente para la normal.)
•Cargar simultáneamente dos paquetes de
batería. Fije un paquete de batería al adaptador
de alimentación de CA y el otro a la
videocámara. De esta forma, los dos se cargarán
simultáneamente. Una vez cargados, los dos
indicadores se apagarán (carga normal). Si
alguno de los indicadores permanece
encendido significa que los dos paquetes no se
han cargado (los paquetes de batería NP-F530
requieren unos 240 minutos para la carga
completa y unos 180 minutos para la normal).
Notas sobre el indicador VTR/CAMERA
•Este indicador permanecerá iluminado durante
unos segundos tras desenchufar la unidad
después de su uso. Esto es normal.
•Si este indicador no se ilumina, desconecte el
cable de alimentación y vuelva conectarlo
después de 1 minuto aproximadamente.
Para extraer la placa de conexión
Tire de ella y nunca del propio cable de conexión.
ADVERTENCIA
El cable de alimentación debe ser sustituido
únicamente en un centro de asistencia técnica
especializado.
PRECAUCION
La unidad no estará desconectada de la fuente de
alimentación de CA (toma de red) mientras esté
conectada a la toma de corriente, aunque la haya
apagado.
28
CCD-TR2200E/TR3300E 3-856-204-12 (1)
Page 29
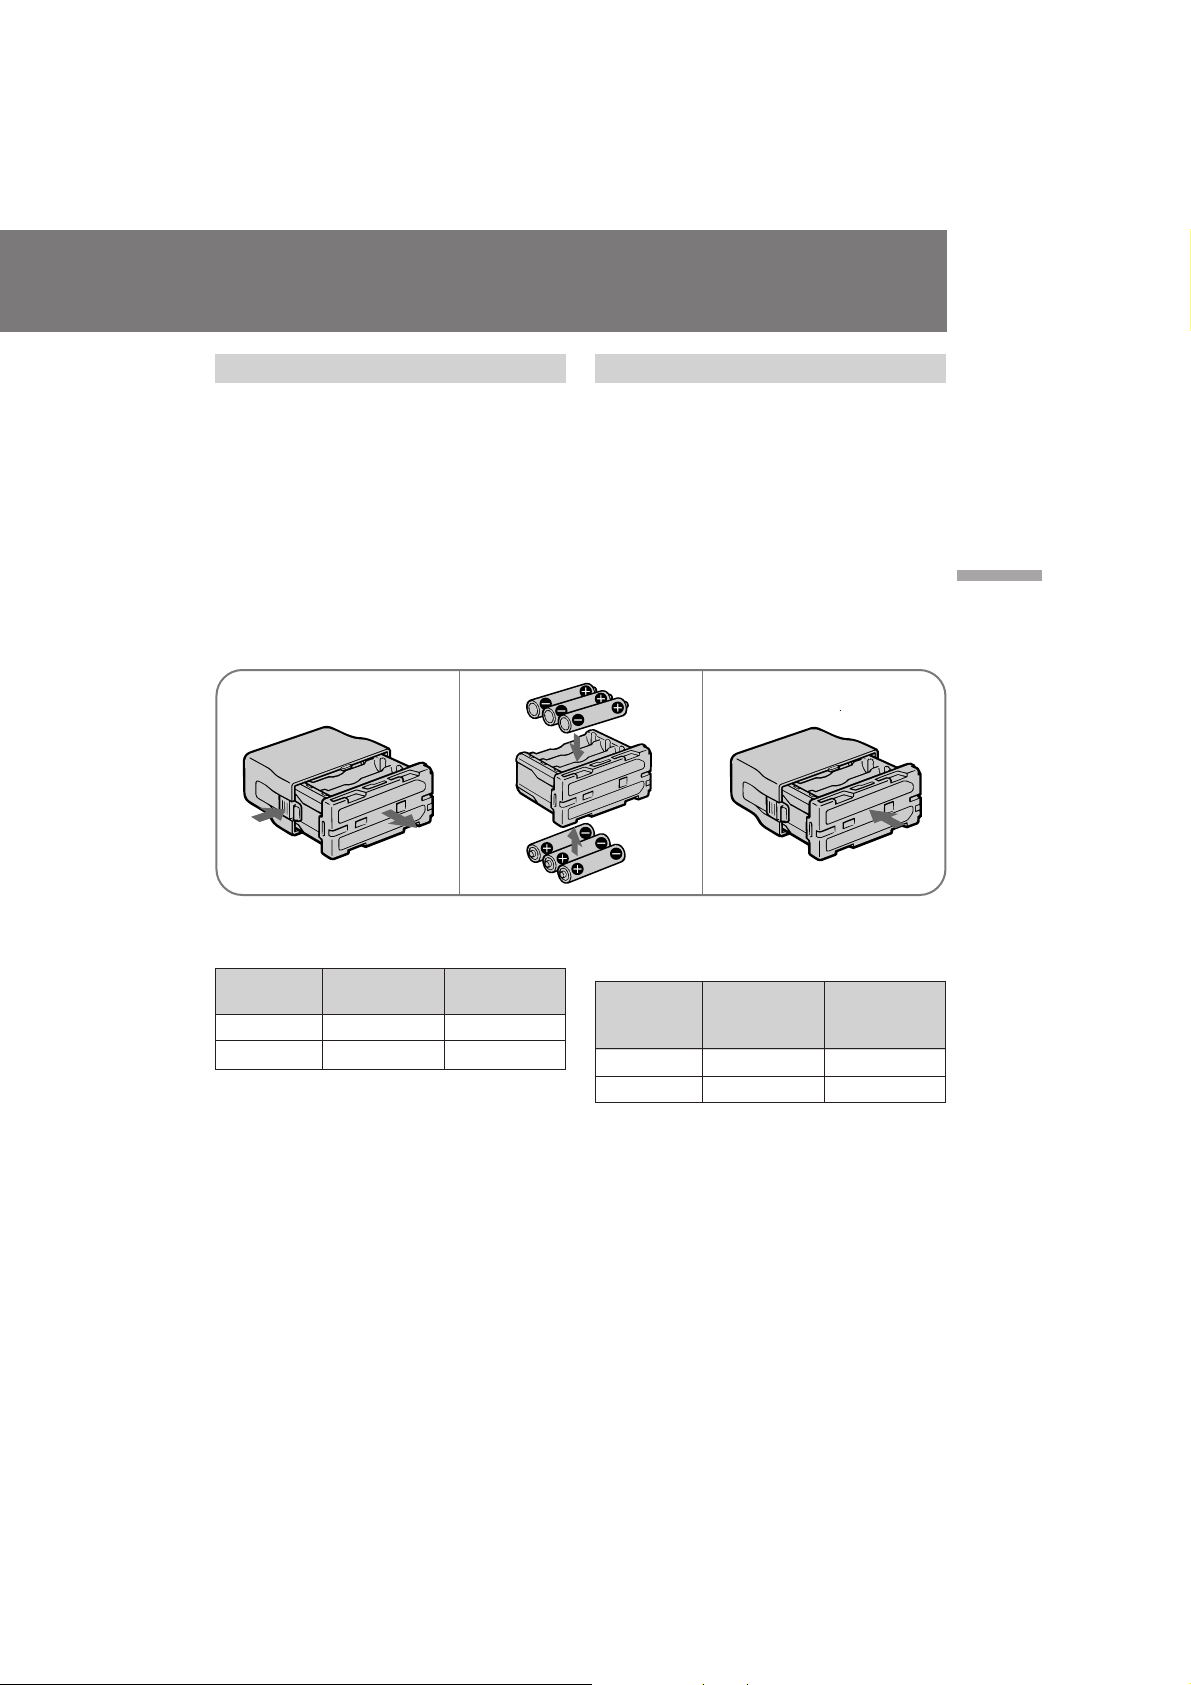
Using the battery case
Use the battery case (supplied) and six LR6 (size
AA) Sony Alkaline batteries (not supplied).
(1)Remove the battery holder from the battery
case.
(2)Insert six new alkaline batteries into the
battery holder, following the marking on the
holder to be sure the batteries are installed in
the correct direction.
(3)Insert the battery holder with the alkaline
batteries.
(4)Insert the battery case with the alkaline
batteries to the battery mounting surface of
the camcorder in the same way as the battery
pack.
Uso del estuche de pilas
Emplee este estuche (suministrado) con seis pilas
alcalinas Sony LR6 (tamaño AA) (no
suministradas).
(1)Extraiga el portapilas del estuche de pilas.
(2)Inserte seis pilas alcalinas nuevas en el
portapilas observando las marcas existentes
en el mismo con el fin de instalar las pilas en
la dirección correcta.
(3)Inserte el portapilas con las pilas alcalinas.
(4)Inserte el estuche de pilas con las pilas
alcalinas en la superficie de montaje de pilas
de la videocámara de la misma forma que el
paquete de batería.
123
Advanced Operations / Operaciones avanzadas
Battery life
Using Sony alkaline batteries at 25°C (77°F).
Model
CCD-TR3300E
CCD-TR2200E
Notes on the battery life
•The battery life may be shorter depending on
the using environment.
•The battery lives are estimates. The battery life
may be shorter depending on the storage
condition of the battery before being purchased
and temperature.
•You may not use the battery case in cold
environment.
Continuous
recording time
75 min.
80 min.
Typical
recording time
45 min.
50 min.
Duración de las pilas
Empleo de pilas alcalinas Sony a una
temperatura de 25°C (77°F).
Tiempo de
Modelo
CCD-TR3300E
CCD-TR2200E
Notas sobre la duración de las pilas
•La duración de las pilas puede reducirse en
función del lugar de empleo.
•El tiempo de duración de las pilas es
aproximado. Su duración puede reducirse en
función de la temperatura y de las condiciones
de almacenamiento de la pila antes de su
adquisición.
•Es posible que no pueda emplear el estuche de
pilas en ambientes fríos.
CCD-TR2200E/TR3300E 3-856-204-12 (1)
grabación
continua
75 min.
80 min.
Tiempo de
grabación
normal
45 min.
50 min.
29
Page 30

Using alternative power
sources
Uso de fuentes de
alimentación alternativas
To remove the battery case
The battery case is removed in the same way as
the battery pack.
Using a car battery
Use the DC-V515 car battery charger (not
supplied). Connect the car battery cord to the
cigarette lighter socket of a car (12 V or 24 V).
Connect the car battery cord to the camcorder in
the same way as you connect the AC power
adaptor.
This mark indicates that this
product is a genuine accessory for
Sony video products.
When purchasing Sony video products, Sony
recommends that you purchase accessories with
this “GENUINE VIDEO ACCESSORIES” mark.
Para extraer el estuche de pilas
El estuche de pilas se extrae de la misma forma
que el paquete de batería.
Uso de batería de automóvil
Emplee el cargador de batería de automóvil DCV515 (no suministrado). Conecte el cable de
batería de automóvil a la clavija del encendedor
del automóvil (12 V o 24 V). Conecte dicho cable
a la videocámara de la misma forma que conecta
el adaptador de alimentación de CA.
Esta marca indica que este
producto es un accesorio genuino
para los productos de vídeo Sony.
Al adquirir productos de vídeo Sony, se
recomienda que los accesorios adquiridos
presenten la marca “GENUINE VIDEO
ACCESSORIES”.
30
CCD-TR2200E/TR3300E 3-856-204-12 (1)
Page 31

Changing the mode settings
Cambio de los ajustes de modo
You can change the mode settings in the menu
system to further enjoy the features and
functions of the camcorder.
(1)Press MENU to display the menu.
(2)Turn the control dial so that the desired item
is highlighted white.
(3)Press the control dial. The setting menu
appears.
(4)Turn the control dial to highlight a setting,
and press the control dial to select it.
(5)If you want to change the other modes, repeat
steps 2 to 4.
(6)Press MENU to erase the menu display.
1
MENU
CAMERA PLAYER
MENU
WIND
COMMANDER
Hi8
COUNTER
ORC TO SET
REC MODE
TITLE COL
[MENU] : END
OFF
MENU
COMMANDER OFF
EDIT
HiFi SOUND
COUNTER
NTSC PB
REC MODE
TBC
[MENU] : END
Es posible cambiar los ajustes de modo en el
sistema de menú para disfrutar en mayor medida
de las características y funciones de la
videocámara.
(1)Pulse MENU para que aparezca el menú.
(2)Gire el dial de control para resaltar en blanco
el elemento que desee.
(3)Pulse el dial de control para que aparezca el
menú de ajustes.
(4)Gire el dial de control para resaltar un ajuste
y, a continuación, púlselo para seleccionarlo.
(5)Si desea cambiar los otros modos, repita los
pasos 2 a 4.
(6)Pulse MENU para que el menú desaparezca.
2
3
MENU
WIND OFF
COMMANDER
Hi8
MENU
COUNTER
ORC TO SET
WIND
REC MODE
COMMANDER
TITLE COL
Hi8
COUNTER
[MENU] : END
ORC TO SET
REC MODE
TITLE COL
[MENU] : END
MENU
BEEP
ON
MENU
BEEP
[MENU] : END
ON
OFF
ON
Advanced Operations / Operaciones avanzadas
5
[MENU] : END
4
MENU
BEEP
[MENU] : END
ON
OFF
CCD-TR2200E/TR3300E 3-856-204-12 (1)
31
Page 32

Cambio de los ajustes de
modoChanging the mode settings
Selecting the mode setting of
each item
Items for both CAMERA and PLAYER
modes
COUNTER <NORMAL/TIME CODE>
•Normally select NORMAL.
•Select TIME CODE to display the RC time code
in order to edit more precisely.
COMMANDER <ON/OFF>
•Select ON when using the supplied Remote
Commander for the camcorder.
•Select OFF when not using the Remote
Commander.
BEEP <ON/OFF>
•Select ON so that beeps sound when you start/
stop recording, etc.
•Select OFF when you do not want to hear the
beep sound.
VF BRIGHT*(CCD-TR3300E only)
Select this item to adjust the brightness of the
viewfinder. The viewfinder becomes brighter
when you turn the control dial up, and darker
when you turn the control dial down.
VF PW-SAVE* <ON/OFF> (CCD-TR3300E only)
•Select ON to activate finder power save
function.
•Select OFF to not use finder power save
function.
Items for CAMERA mode only
WIND <ON/OFF>
•Select ON to reduce wind noise when recording
in strong wind.
•Normally select OFF.
Hi8 <AUTO/OFF>
•Normally select AUTO to have the camcorder
automatically set the recording mode (Hi8 or
standard 8 mm) depending upon the cassette
type being used.
•Select OFF to record a Hi8 tape in standard 8
mm format.
Selección del ajuste de modo de
cada elemento
Elementos de los modos CAMERA y
PLAYER
COUNTER <NORMAL/TIME CODE>
•Normalmente, seleccione NORMAL.
•Seleccione TIME CODE para mostrar el código
de tiempos RC con el fin de editar con mayor
precisión.
COMMANDER <ON/OFF>
•Seleccione ON cuando emplee el mando a
distancia suministrado para controlar la
videocámara.
•Seleccione OFF cuando no emplee el mando a
distancia.
BEEP <ON/OFF>
•Seleccione ON para que la unidad emita pitidos
al iniciar o detener la grabación, etc.
•Seleccione OFF si no desea oír los pitidos.
VF BRIGHT*(sólo CCD-TR3300E)
Seleccione este elemento para ajustar el brillo del
visor electrónico. El brillo del visor electrónico
aumentará al girar el dial de control hacia arriba
y disminuirá al girar dicho control hacia abajo.
VF PW-SAVE* <ON/OFF> (sólo CCD-TR3300E)
•Seleccione ON para activar la función de ahorro
de energía del visor electrónico.
•Seleccione OFF si no desea emplear dicha
función.
Elementos del modo CAMERA
solamente
WIND <ON/OFF>
•Seleccione ON para reducir el ruido del viento
cuando grabe con viento fuerte.
•Normalmente seleccione OFF.
Hi8 <AUTO/OFF>
•Normalmente seleccione AUTO para que la
videocámara ajuste automáticamente el modo
de grabación (Hi8 u 8 mm estándar) en función
del tipo de videocassette que se emplee.
•Seleccione OFF para grabar una cinta Hi8 en el
formato estándar de 8 mm.
32
CCD-TR2200E/TR3300E 3-856-204-12 (1)
Page 33

ORC TO SET* <ORC ON>
Select ORC ON to automatically adjust the
recording condition to get the best possible
recording.
REC MODE* <SP/LP>
•Select SP when recording in SP (standard play)
mode.
•Select LP when recording in LP (long play)
mode.
D ZOOM* <ON/OFF>
•Select ON to activate digital zooming.
•Select OFF to not use the digital zoom. The
camera goes back to 21x zoom.
REC LAMP* <ON/OFF>
•Select OFF when you do not want the camera
recording/battery lamp at the front of the unit
to light up.
•Normally select ON.
AE SHIFT*
Select this item to adjust the brightness of the
picture.
TITLE COL* <BLUE/ GREEN/ CYAN/ RED/
VIOLET/ YELLOW/ WHITE>
Select the colour of the title.
TITLE POS* <CENTER/BOTTOM>
•Select CENTER to centre the title in the picture.
•Select BOTTOM to position the title at the
bottom of the picture.
TITLE LANG* <ENGLISH/ FRANÇAIS/ ESPAÑOL/
PORTUGUÊS/ DEUTSCH/ NEDERLANDS/
ITALIANO>
Select the language of the preset titles.
TITLE 1 SET* TITLE 2 SET*
Select to store your own original titles.
ORC TO SET* <ORC ON>
Seleccione ORC ON para ajustar
automáticamente la condición de grabación con
el fin de obtener los mejores resultados posibles
de grabación.
REC MODE* <SP/LP>
•Seleccione SP cuando grabe en modo SP
(reproducción estándar).
•Seleccione LP cuando grabe en modo LP
(reproducción de larga duración).
D ZOOM* <ON/OFF>
•Seleccione ON para activar el zoom digital.
•Seleccione OFF si no desea emplear el zoom
digital. La cámara volverá al zoom de 21x.
REC LAMP* <ON/OFF>
•Seleccione OFF si no desea que se ilumine el
indicador de batería y grabación de la cámara
situado en la parte frontal de la unidad.
•Normalmente seleccione ON.
AE SHIFT*
Seleccione este elemento para ajustar el brillo de
la imagen.
TITLE COL* <BLUE/ GREEN/ CYAN/ RED/
VIOLET/ YELLOW/ WHITE> (azul/verde/cian/
rojo/violeta/amarillo/blanco)
Seleccione el color del título.
TITLE POS* <CENTER/BOTTOM>
•Seleccione CENTER para centrar el título en la
imagen.
•Seleccione BOTTOM para situar el título en la
parte inferior de la imagen.
TITLE LANG* <ENGLISH/ FRANÇAIS/ ESPAÑOL/
PORTUGUÊS/DEUTSCH/ NEDERLANDS/
ITALIANO>
Seleccione el idioma de los títulos definidos.
Advanced Operations / Operaciones avanzadas
CLOCK SET*
Select this item to reset the date or time.
TITLE 1 SET* TITLE 2 SET*
Realice la selección para almacenar sus propios
títulos.
CLOCK SET*
Seleccione este elemento para reajustar la fecha o
la hora.
33
CCD-TR2200E/TR3300E 3-856-204-12 (1)
Page 34

Cambio de los ajustes de
modoChanging the mode settings
Items for PLAYER mode only
EDIT <ON/OFF>
•Select ON to minimize picture deterioration
when editing.
•Normally select OFF.
HiFi SOUND <STEREO/1/2>
•Normally select STEREO.
•Select 1 or 2 to play back a dual sound track
tape.
NTSC PB <ON PAL TV/NTSC 4.43>
•Normally select ON PAL TV.
•Select NTSC 4.43 when playing back a tape
recorded in the NTSC colour system. If you
have a multi-system TV, you can see an NTSCrecorded tape also on the TV.
TBC* <ON/OFF>
•Select ON to correct for jitter.
•Select OFF to not correct for jitter. The picture
may not be steady when you playback.
DNR* <ON/OFF>
•Select ON to reduce picture noise.
•Select OFF to not reduce noise.
* These settings are retained even when the
battery is removed, as long as the lithium
battery is in place.
Elementos del modo PLAYER
solamente
EDIT <ON/OFF>
•Seleccione ON para minimizar el deterioro de
imagen al editar.
•Normalmente seleccione OFF.
HiFi SOUND <STEREO/1/2>
•Normalmente seleccione STEREO.
•Seleccione 1 o 2 para reproducir cintas de pistas
de sonido dual.
NTSC PB <ON PAL TV/NTSC 4.43>
•Normalmente seleccione ON PAL TV.
•Seleccione NTSC 4.43 cuando reproduzca cintas
grabadas en el sistema de color NTSC. Si
dispone de un televisor de sistema múltiple,
también es posible visualizar en él cintas
grabadas en el sistema NTSC.
TBC* <ON/OFF>
•Seleccione ON para corregir vibraciones.
•Seleccione OFF si no es preciso corregir
vibraciones. Es posible que la imagen sea
inestable al realizar la reproducción.
DNR* <ON/OFF>
•Seleccione ON para reducir el ruido de imagen.
•Seleccione OFF si no es preciso reducir el ruido
de imagen.
Note on TBC setting
Set TBC to OFF when playing back:
•A tape you have dubbed over.
•A tape on which you recorded the signal of a
TV game or similar machine.
34
* Estos ajustes se mantienen aunque extraiga la
batería, siempre que no retire la pila de litio.
Nota sobre el ajuste TBC
Ajuste TBC en OFF cuando reproduzca:
•Una cinta copiada.
•Una cinta en la que haya grabado la señal de un
juego de televisión o de un aparato similar.
CCD-TR2200E/TR3300E 3-856-204-12 (1)
Page 35

Recording with the date or time
Grabación con la
fecha o la hora
Before you start recording or during recording,
press DATE or TIME. You can record the date or
time displayed in the viewfinder with the
picture. You cannot record the date and time at
the same time. Except for the date or time
indicator, no indicator in the viewfinder is
recorded.
The clock is already set at the factory; to London
time for United Kingdom and to Paris time for
the other European countries. You can reset the
clock in the menu system.
DATE
4 7 1996
TIME
17:30:00
Antes de iniciar la grabación o durante ésta,
pulse DATE o TIME. Es posible grabar la fecha o
la hora que aparece en el visor electrónico junto
con la imagen. No es posible grabar
simultáneamente la fecha y la hora. Excepto el
indicador de fecha u hora, no se grabará ningún
indicador del visor electrónico.
Aunque el reloj está ajustado de fábrica a la hora
de Londres para el Reino Unido y a la hora de
París para el resto de países europeos, es posible
reajustarlo en el sistema de menú.
Advanced Operations / Operaciones avanzadas
To stop recording with the date or
time
Press DATE or TIME again. The date or time
indicator disappears. The recording continues.
Note on the date or time indicator
If you press DATE or TIME while you are
recording in CINEMA mode, the indicators in the
viewfinder move upwards.
Para detener la grabación con la
fecha o la hora
Vuelva a pulsar DATE o TIME. El indicador de
fecha u hora desaparecerá y la grabación
continuará.
Nota sobre el indicador de fecha u hora
Si pulsa DATE o TIME durante la grabación en
modo CINEMA, los indicadores del visor
electrónico se desplazan hacia arriba.
35
CCD-TR2200E/TR3300E 3-856-204-12 (1)
Page 36

Fade-in and fade-out
Aparición y desaparición
gradual de imágenes
You can fade in or out to give your recording a
professional appearance.
When fading in, the picture gradually fades in
from black or mosaic while the sound increases.
When fading out, the picture gradually fades to
black or mosaic while the sound decreases.
When fading in [a]
(1)While the camcorder is in Standby mode,
press FADER/OVERLAP (only for CCDTR3300E), or FADER (only for CCDTR2200E). The fade indicator starts flashing.
(2)Press START/STOP to start recording. The
fade indicator stops flashing.
When fading out [b]
(1)During recording, press FADER/OVERLAP
(only for CCD-TR3300E), or FADER (only for
CCD-TR2200E). The fade indicator starts
flashing.
(2)Press START/STOP to stop recording. The
fade indicator stops flashing, and then
recording stops.
[a]
Emplee esta función para dar a las grabaciones
un aspecto profesional.
Con la aparición gradual, la imagen aparece
gradualmente desde el negro o mosaico mientras
el sonido aumenta. Con la desaparición gradual,
la imagen se funde gradualmente en negro o
mosaico mientras el sonido disminuye.
Aparición gradual [a]
(1)Mientras la videocámara se encuentra en
modo de espera, pulse FADER/OVERLAP
(sólo CCD-TR3300E) o FADER (sólo CCDTR2200E). El indicador de atenuación
comenzará a parpadear.
(2)Pulse START/STOP para iniciar la grabación.
El indicador de atenuación dejará de
parpadear.
Desaparición gradual [b]
(1)Durante la grabación, pulse FADER/
OVERLAP (sólo CCD-TR3300E) o FADER
(sólo CCD-TR2200E). El indicador de
atenuación comenzará a parpadear.
(2)Pulse START/STOP para detener la
grabación. El indicador de atenuación dejará
de parpadear y, a continuación, la grabación
se detendrá.
RECSTBY
36
FADER
M.FADER
[b]
1
FADER/OVERLAP
CCD-TR3300E
FADER
M.FADER
OVERLAP
WIPE
RECSTBY
2
K
C
O
L
S
T
A
Y
N
B
D
CCD-TR2200E/TR3300E 3-856-204-12 (1)
Page 37

Note on fade indicator
–CCD-TR2200E only
Each time you press FADER, the fade indicator
changes: FADER n M.FADER n no indicator,
cyclically.
To cancel the fade-in/fade-out
function
Before pressing START/STOP, press FADER/
OVERLAP (only for CCD-TR3300E), or FADER
(only for CCD-TR2200E) until the fade indicator
disappears.
When the date or time indicator is displayed
The date or time indicator does not fade in or
fade out.
Note on fade-in/fade-out
Fade-in/fade-out function is cancelled after
executing this function.
When the title is displayed
You cannot use the FADER function. When
FADER is set, you cannot superimpose a title.
Nota sobre el indicador de atenuación
– sólo CCD-TR2200E
Cada vez que pulse FADER, el indicador de
atenuación cambia cíclicamente de la siguiente
forma: FADER n M.FADER n ningún
indicador.
Para cancelar la función de aparición
y desaparición gradual de imágenes
Antes de pulsar START/STOP, pulse FADER/
OVERLAP (sólo CCD-TR3300E) o FADER (sólo
CCD-TR2200E) hasta que el indicador de
atenuación desaparezca.
Si se visualiza el indicador de fecha u hora
Este indicador no aparece ni desaparece
gradualmente.
Nota sobre la función de aparición y
desaparición gradual
Esta función se cancelará una vez empleada.
Cuando se visualice un titulo
No podrá utilizar la función FADER. Cuando
FADER esté activada, no podrá superponer un
título.
Advanced Operations / Operaciones avanzadas
Overlapping two pictures
(CCD-TR3300E only)
When you switch from one scene to another, you
can overlap the two pictures. With this function,
the first scene turns to the second one gradually.
You can hear the sound of the second scene
gradually as you start recording the second
scene.
Superposición de dos
imágenes (sólo CCDTR3300E)
Al pasar de una escena a otra, es posible
superponer las dos imágenes. Con esta función,
la primera escena cambia gradualmente a la
segunda. Es posible escuchar gradualmente el
sonido de la segunda escena al iniciar la
grabación de la misma.
37
CCD-TR2200E/TR3300E 3-856-204-12 (1)
Page 38

Overlapping two pictures (CCD-TR3300E only)
Superposición de dos
imágenes (sólo CCD-TR3300E)
(1)While the camcorder is in Standby mode,
press FADER/OVERLAP repeatedly so that
the OVERLAP indicator appears in the
viewfinder.
(2)Press START/STOP to record the next scene.
The OVERLAP indicator disappears after the
overlapping.
1
FADER/OVERLAP
Notes on overlap
•You cannot use the following functions while
using the overlap function. Also, while using
the following functions, you cannot use the
overlap function.
– Digital effect
– Slow shutter
– Title
•You can select overlap during recording.
•When you select the overlap function after
using the following operations, the camcorder
memorizes the image on the tape. As the image
is being memorized, the OVERLAP indicator
flashes quickly, and the picture you are
shooting disappears from the viewfinder. You
may not record a clear picture depending on
the condition of the tape.
– Turn STANDBY down
– Set the POWER switch to OFF
– Eject a tape
– Edit search
– Fading out
– Digital effect
– Slow shutter
– Title
FADER
M.FADER
OVERLAP
WIPE
38
OVERLAP
(1)Mientras la videocámara se encuentra en
modo de espera, pulse FADER/OVERLAP
varias veces de forma que el indicador
OVERLAP aparezca en el visor electrónico.
(2)Pulse START/STOP para grabar la siguiente
escena. El indicador OVERLAP desaparecerá
después del proceso de superposición.
2
K
C
O
L
S
T
A
Y
N
B
D
Notas sobre la superposición
•No es posible emplear las funciones que se
indican a continuación mientras se utiliza la
función de superposición y viceversa:
– Efecto digital
– Obturación a baja velocidad
– Titulación
•Es posible seleccionar la función de
superposición durante la grabación.
•Si selecciona la función de superposición
después de realizar las operaciones
mencionadas a continuación, la videocámara
memoriza la imagen de la cinta. Al
memorizarse la imagen, el indicador OVERLAP
parpadea rápidamente y la imagen que esté
filmando desaparece del visor electrónico. Es
posible que no pueda grabar imágenes nítidas
dependiendo del estado de la cinta.
– Girar STANDBY hacia abajo
– Ajustar el interruptor POWER en OFF
– Expulsar una cinta
– Búsqueda de edición
– Desaparición gradual
– Efecto digital
– Obturación a baja velocidad
– Titulación
CCD-TR2200E/TR3300E 3-856-204-12 (1)
Page 39

Wiping away a still picture (CCD-TR3300E only)
Desplazamiento en
pantalla de imágenes fijas
(sólo CCD-TR3300E)
When you switch from one scene to another, you
can wipe away the still picture. With this
function, the first still picture is wiped away from
the centre to reveal the moving picture
underneath.
You can hear the sound of the second scene as
you start recording the second scene.
(1)While the camcorder is in Standby mode,
press FADER/OVERLAP repeatedly so that
the WIPE indicator appears in the viewfinder.
(2)Press START/STOP to record the next scene.
The WIPE indicator disappears after wiping
away.
WIPE
1
FADER/OVERLAP
FADER
M.FADER
OVERLAP
WIPE
Al pasar de una escena a otra, es posible
desplazar la imagen fija. Con esta función, la
primera imagen fija se desplaza a partir del
centro para mostrar la imagen en movimiento
que se encuentra debajo. Es posible escuchar el
sonido de la segunda escena al iniciar la
grabación de ésta.
(1)Mientras la videocámara se encuentra en
modo de espera, pulse FADER/OVERLAP
varias veces para que el indicador WIPE
aparezca en el visor electrónico.
(2)Pulse START/STOP para grabar la siguiente
escena. El indicador WIPE desaparecerá una
vez realizado el proceso de desplazamiento.
2
K
C
O
L
Advanced Operations / Operaciones avanzadas
S
T
A
Y
N
B
D
CCD-TR2200E/TR3300E 3-856-204-12 (1)
39
Page 40

Wiping away a still picture
(CCD-TR3300E only)
Desplazamiento en pantalla de
imágenes fijas (sólo CCD-TR3300E)
Notes on wipe
•You cannot use the following functions while
using the wipe function. Also, while using the
following functions, you cannot use the wipe
function.
– Digital effect
– Slow shutter
– Title
•You can select wipe during recording.
•When you select the wipe function after using
the following operations, the camcorder
memorizes the image on the tape. As the image
is being memorized, the WIPE indicator flashes
quickly, and the picture you are shooting
disappears from the viewfinder.You may not
record a clear picture depending on the
condition of the tape.
– Turn STANDBY down
– Set the POWER switch to OFF
– Eject a tape
– Edit search
– Fading out
– Digital effect
– Slow shutter
– Title
Notas sobre el desplazamiento
•No es posible emplear las funciones que se
indican a continuación mientras se emplea la
función de desplazamiento y viceversa:
– Efecto digital
– Obturación a baja velocidad
– Titulación
•Es posible seleccionar la función de
desplazamiento durante la grabación.
•Si selecciona la función de desplazamiento
después de realizar las operaciones
mencionadas a continuación, la videocámara
memoriza la imagen de la cinta. Al
memorizarse la imagen, el indicador WIPE
parpadea rápidamente y la imagen que esté
filmando desaparece del visor electrónico. Es
posible que no pueda grabar imágenes nítidas
dependiendo del estado de la cinta.
– Girar STANDBY hacia abajo
– Ajustar el interruptor POWER en OFF
– Expulsar una cinta
– Búsqueda de edición
– Desaparición gradual
– Efecto digital
– Obturación a baja velocidad
– Titulación
40
CCD-TR2200E/TR3300E 3-856-204-12 (1)
Page 41

Enjoying picture effect
Uso del efecto de imagen
Selecting picture effect
You can make pictures like those of television
with the Picture Effect function.
[a] [b] [c]
MOSAIC [a]
The picture is mosaic.
SOLARIZE [b]
The light intensity is more clear, and the picture
looks like an illustration.
B&W
The picture is monochrome (black and white).
SEPIA
The picture is sepia.
NEG. ART [c]
The picture is reversed.
PASTEL [d]
The contrast of the picture is emphasized, and
the picture looks like an animated cartoon.
Selección del efecto de imagen
Con la función de efecto de imagen, es posible
obtener imágenes como las de televisión.
[d]
MOSAIC [a]
La imagen aparece con efecto mosaico.
SOLARIZE [b]
La intensidad de iluminación es mayor y la
imagen parece una ilustración.
B&W
La imagen es monocromo (blanco y negro).
SEPIA
La imagen aparece en sepia.
NEG. ART [c]
La imagen se invierte.
PASTEL [d]
El contraste de la imagen se enfatiza y dicha
imagen parece un dibujo animado.
[e] [f]
Advanced Operations / Operaciones avanzadas
SLIM [e]
The picture expands vertically.
STRETCH [f]
The picture expands horizontally.
SLIM [e]
La imagen se expande verticalmente.
STRETCH [f]
La imagen se expande horizontalmente.
41
CCD-TR2200E/TR3300E 3-856-204-12 (1)
Page 42

Enjoying picture effect Uso del efecto de imagen
Using picture effect function
(1)Press PICTURE EFFECT.
(2)Turn the control dial to select the desired
picture effect mode.
12
To turn off picture effect
Press PICTURE EFFECT to highlight the picture
effect indicator, and press the button again. The
indicator in the viewfinder goes out.
Note on the picture effect
When you turn the power off, the camcorder
returns automatically to normal mode.
PICTURE
EFFECT
Uso del efecto de imagen
(1)Pulse PICTURE EFFECT.
(2)Gire el dial de control para seleccionar el
modo de efecto de imagen que desee.
MOSAIC
SOLARIZE
B & W
SEPIA
NEG. ART
PASTEL
SLIM
STRETCH
Para desactivar el efecto de imagen
Pulse PICTURE EFFECT para resaltar el
indicador de efecto de imagen; a continuación,
pulse el botón. El indicador del visor electrónico
se apaga.
Nota sobre el efecto de imagen
Al desactivar la alimentación, la videocámara
vuelve automáticamente al modo normal.
42
CCD-TR2200E/TR3300E 3-856-204-12 (1)
Page 43

Recording a still picture (CCD-TR3300E only)
Grabación de imágenes
fijas (sólo CCD-TR3300E)
You can record a still picture like those of still
camera or shoot a moving picture with
superimposing a still picture while the sound is
recorded normally.
(1)Press DIGITAL EFFECT and turn the control
dial to select the still indicator.
(2)Press the control dial to select still mode.
The still indicator and still bars appear in the
viewfinder, and still picture is stored in
memory.
(3)Turn the control dial to adjust the rate of the
still picture you want to superimpose on a
moving picture.
The rate of the still picture increases by the
number of the still bars.
(4)Press START/STOP to start recording a
moving picture with a still picture
superimposed on. When you stop recording,
press START/STOP again.
DIGITAL
1
EFFECT
STILL
FLASH
Es posible grabar imágenes fijas similares a las de
cámara fija o filmar imágenes en movimiento con
superposición de imágenes fijas mientras el
sonido se graba con normalidad.
(1)
Pulse DIGITAL EFFECT y gire el dial de control
para seleccionar el indicador de imagen fija.
(2) Pulse el dial de control para seleccionar el
modo de imagen fija. El indicador y barras de
imagen fija aparecen en el visor electrónico
mientras la imagen fija se almacena en la
memoria.
(3) Gire el dial de control para ajustar la duración
de la imagen fija que desee sobreponer sobre
la imagen en movimiento.
La duración de la imagen fija aumenta según
el número de barras de imagen fija.
(4) Pulse START/STOP para iniciar la grabación
de imágenes en movimiento con una imagen
fija superpuesta. Si desea detener la
grabación, vuelva a pulsar START/STOP.
2
STILL IIIIII
3
Advanced Operations / Operaciones avanzadas
LUMI.
To cancel still mode
Press DIGITAL EFFECT to highlight the still
indicator, and press the button again. The still
indicator in the viewfinder disappears.
Notes on still mode
•You cannot use the following functions while
recording a still picture.
– Fade-in or fade-out
– Mosaic fader
– Overlap
– Wipe
– Slow shutter
•When you turn the power off, still mode will be
cancelled automatically.
4
K
C
O
L
S
T
A
Y
N
B
D
Para cancelar el modo de imagen fija
Pulse DIGITAL EFFECT para resaltar el
indicador de imagen fija; a continuación, pulse el
botón. El indicador de imagen fija del visor
electrónico desaparecerá.
Notas sobre el modo de imagen fija
•No es posible emplear las funciones que se
relacionan a continuación mientras graba una
imagen fija:
– Aparición o desaparición gradual
– Efecto mosaico
– Superposición
– Obturación a baja velocidad
– Desplazamiento de imágenes
•Al desactivar la alimentación, el modo de
imagen fija se cancelará automáticamente.
CCD-TR2200E/TR3300E 3-856-204-12 (1)
43
Page 44

Recording still pictures
successively (CCD-TR3300E only)
Grabación sucesiva de imágenes
fijas (sólo CCD-TR3300E)
Using the Flash motion function, you can record
still pictures successively at constant intervals.
You can select intervals by adjusting the flash
bars with the control dial. The sound is recorded
normally during Flash motion.
(1)Press DIGITAL EFFECT and turn the control
dial to select the flash motion indicator.
(2)Press the control dial to select flash mode.
The flash motion indicator and flash motion
bars appear in the viewfinder.
(3)Turn the control dial to adjust the interval of
flash motion.
(4)Press START/STOP. Flash motion recording
starts. To stop recording, press START/STOP
again.
[a]normal recording
[b]flash motion recording
DIGITAL
1
EFFECT
STILL
FLASH
Mediante la función de movimiento por
impulsos, es posible grabar imágenes fijas de
forma sucesiva a intervalos constantes. Es posible
seleccionar los intervalos ajustando las barras de
movimiento por impulsos con el dial de control.
El sonido se graba con normalidad durante el
movimiento por impulsos.
(1)Pulse DIGITAL EFFECT y gire el dial de
control para seleccionar el indicador de
movimiento por impulsos.
(2)Pulse el dial de control para seleccionar el
modo de movimiento por impulsos.
El indicador y barras de movimiento por
impulsos aparecen en el visor electrónico.
(3)Gire el dial de control para ajustar el intervalo
de movimiento por impulsos.
(4)Pulse START/STOP para iniciar la grabación
con movimiento por impulsos. Para detener la
grabación, vuelva a pulsar START/STOP.
[a]grabación normal
[b]grabación con movimiento por impulsos
2
FLASH III
III
LUMI.
[a]
[b]
To cancel the flash motion
Press DIGITAL EFFECT to highlight the flash
motion indicator, and press the button again. The
flash motion indicator in the viewfinder
disappears.
44
3
4
K
C
O
L
S
T
A
Y
N
B
D
Para cancelar el movimiento por
impulsos
Pulse DIGITAL EFFECT para resaltar el
indicador de movimiento por impulsos; a
continuación, pulse el botón. El indicador de
movimiento por impulsos desaparece del visor
electrónico.
CCD-TR2200E/TR3300E 3-856-204-12 (1)
Page 45

Notes on the flash motion
•The following functions does not work during
the flash motion.
– Fade-in or fade-out
– Overlap
– Mosaic fader
– Wipe
– Slow shutter
•When you turn the power off, flash motion
mode will be cancelled automatically.
Notas sobre el movimiento por impulsos
•Las siguientes funciones no se activan durante
el movimiento por impulsos:
– Aparición y desaparición gradual
– Superposición de imágenes
– Efecto mosaico
– Obturación a baja velocidad
– Desplazamiento de imágenes
•Al desactivar la alimentación, el modo de
movimiento por impulsos se cancelará
automáticamente.
Advanced Operations / Operaciones avanzadas
Superimposing a moving
picture on a still picture
(CCD-TR3300E only)
Using the Luminancekey function, you can
replace a brighter colour scheme portion of a still
picture by a moving picture.
For example, you can superimpose the favorite
scene on the background if you store the picture
in memory as a still picture, such as a person in
the bright background. The sound is recorded
normally during Luminancekey function.
Superposición de imágenes en
movimiento sobre imágenes fijas
(sólo CCD-TR3300E)
Mediante la función de luminancia, es posible
reemplazar una parte de una imagen fija que
presente colores con mayor brillo por una imagen
en movimiento.
Por ejemplo, es posible superponer la escena que
prefiera en el fondo si almacena la imagen en la
memoria como imagen fija, por ejemplo una
persona con fondo brillante. El sonido se graba
con normalidad durante la función de
luminancia.
CCD-TR2200E/TR3300E 3-856-204-12 (1)
45
Page 46

Superposición de imágenes en
Superimposing a still picture on a moving picture (CCD-TR3300E only)
movimiento sobre imágenes fijas
(sólo CCD-TR3300E)
(1)Press DIGITAL EFFECT and turn the control
dial to select the luminancekey indicator.
(2)Press the control dial to select luminancekey
mode.
The luminancekey indicator and the
luminancekey bars appear in the viewfinder,
and still picture is stored in memory.
(3)Turn the control dial to adjust the colour
scheme of the still picture.
The rate of the still picture increases by the
number of the luminancekey bars.
(4)Press START/STOP. Luminancekey recording
starts. To stop recording, press START/STOP
again.
Still picture/
Imagen fija
DIGITAL
1
EFFECT
STILL
FLASH
LUMI.
Moving picture/
Imagen en
movimiento
(1)Pulse DIGITAL EFFECT y gire el dial de
control para seleccionar el indicador de
luminancia.
(2)Pulse el dial de control para seleccionar el
modo de luminancia.
El indicador y barras de luminancia aparecen
en el visor electrónico y la imagen fija se
almacena en la memoria.
(3)Gire el dial de control para ajustar el juego de
colores de la imagen fija.
La duración de la imagen fija aumenta según
el número de barras de luminancia.
(4)Pulse START/STOP para iniciar la grabación
con movimiento por impulsos. Para detener la
grabación, vuelva a pulsar START/STOP.
2
LUMI. III
III
3
4
K
C
O
L
S
T
A
Y
N
B
D
To cancel the luminancekey
Press DIGITAL EFFECT to highlight the
luminancekey indicator, and press the button
again. The luminancekey indicator in the
viewfinder disappears.
Note on the luminancekey
The following functions does not work during
luminancekey.
•Fade-in or fade-out
•Mosaic fader
•Overlap
•Wipe
•Slow shutter
46
Para cancelar la función de luminancia
Pulse DIGITAL EFFECT para resaltar el
indicador de luminancia; a continuación, pulse el
botón. El indicador de luminancia desaparece del
visor electrónico.
Nota sobre la función de luminancia
Las siguientes funciones no se activan durante el
modo de luminancia:
•Aparición o desaparición gradual
•Efecto mosaico
•Superposición
•Obturación a baja velocidad
•Desplazamiento de imágenes
CCD-TR2200E/TR3300E 3-856-204-12 (1)
Page 47

Re-recording a picture in the middle of a recorded tape
Inserción de imágenes en el
medio de una cinta grabada
You can insert a scene in the middle of a
recorded tape by setting the starting and ending
points. The previous recorded portion will be
erased. If the RC time code appears in the
viewfinder, set COUNTER to NORMAL in the
menu system to display the tape counter.
(1)While the camcorder is in Standby mode,
keep pressing the + (forward playback) or –
(reverse playback) side of EDITSEARCH, and
release the button where you want to end the
insertion [b]. The camcorder enters Standby
mode again.
(2)Press COUNTER RESET. The counter resets
to zero.
(3)Keep pressing the – side of EDITSEARCH and
release the button at the point where you
want to start the insertion [a].
(4)Press ZERO MEM on the Remote
Commander. The ZERO MEM indicator
flashes.
(5)Press START/STOP to start recording. The
recording stops automatically at the counter
zero point.
[a]
Es posible insertar escenas en el medio de una
cinta grabada mediante la definición de los
puntos de inicio y final. De esta forma, la parte
previamente grabada se borrará. Si el código de
tiempos RC aparece en el visor electrónico, ajuste
COUNTER en NORMAL en el sistema de menú
para visualizar el contador de cinta.
(1)Mientras la videocámara se encuentra en
modo de espera, mantenga pulsado el lado +
(reproducción progresiva) o – (reproducción
regresiva) de EDITSEARCH, y suelte el botón
donde desee finalizar la inserción [b]. La
videocámara vuelve a introducir el modo de
espera.
(2)Pulse COUNTER RESET para poner el
contador a cero.
(3)Mantenga pulsado el lado – de EDITSEARCH
y suelte el botón en el punto donde desee
iniciar la inserción [a].
(4)Pulse ZERO MEM en el mando a distancia. El
indicador ZERO MEM parpadeará.
(5)Pulse START/STOP para iniciar la grabación.
Esta se detendrá automáticamente cuando el
contador alcance el punto cero.
[b]
Advanced Operations / Operaciones avanzadas
1
EDITSEARCH
COUNTER RESET
2
0:00:00
STBY
Œ
EDITSEARCH
Œ
3
K
C
O
5
L
S
T
A
Y
N
B
D
STBY
-0:01:22
ZERO MEM
47
ZERO MEM
4
STBY
-0:01:23
ZERO MEM
CCD-TR2200E/TR3300E 3-856-204-12 (1)
Page 48

Re-recording a picture in the
middle of a recorded tape
Inserción de imágenes en el
medio de una cinta grabada
To change the end point
Press ZERO MEM to erase the ZERO MEM
indicator, then repeat steps 2 to 5.
Note on re-recording
The picture and the sound may be distorted at
the end of the inserted portion when it is played
back.
Para cambiar el punto final
Pulse ZERO MEM para que desaparezca el
indicador ZERO MEM y, a continuación, repita
los pasos 2 a 5.
Nota sobre la inserción de imágenes
Es posible que la imagen y el sonido se
distorsionen al final de la parte insertada al
reproducirse.
48
CCD-TR2200E/TR3300E 3-856-204-12 (1)
Page 49

Using the wide mode function
Uso de la función de
modo panorámico
Selecting the desired mode
You can record a cinemalike picture (CINEMA)
or a 16:9 wide picture to watch on the 16:9 widescreen TV (16:9 FULL).
[b]
CINEMA
[a]
16:9 FULL
[d]
CINEMA
[c]
[e]
16:9 FULL
[f]
Selección del modo deseado
Es posible grabar imágenes similares a las de cine
(CINEMA) o imágenes panorámicas de 16:9 para
visualizarlas en un televisor de pantalla
panorámica de 16:9 (16:9 FULL).
Advanced Operations / Operaciones avanzadas
CINEMA
Black bands appear at the top and the bottom of
the screen, and the viewfinder [a] and a normal
TV screen [b] look wide. You can also watch the
picture without black bands on a wide-screen TV
[c].
16:9 FULL
The picture in the viewfinder [d] or on a normal
TV [e] is horizontally compressed. You can
watch the picture of normal images on a widescreen TV [f].
CINEMA
Aparecen bandas negras en las partes superior e
inferior de la pantalla, mientras el visor
electrónico [a] y la pantalla normal del televisor
[b] aparecen con forma panorámica. También es
posible visualizar la imagen sin bandas negras en
un televisor de pantalla panorámica [c].
16:9 FULL
La imagen del visor electrónico [d] o de un
televisor normal [e] se comprime
horizontalmente. Es posible visualizar imágenes
normales en un televisor de pantalla panorámica
[f].
49
CCD-TR2200E/TR3300E 3-856-204-12 (1)
Page 50

Using the wide mode
function
Uso de la función de modo
panorámico
Using the wide mode function
While the camcorder is in Standby mode, press
16:9WIDE repeatedly so that the desired mode
indicator appears in the viewfinder.
To cancel wide mode
Press 16:9WIDE repeatedly until the wide mode
indicator disappears.
To watch the tape recorded in wide
mode
To watch the tape recorded in CINEMA mode,
set the screen mode of the wide-screen TV to
zoom mode. To watch the tape recorded in 16:9
FULL mode, set it to full mode. For details, refer
to the instruction manual of your TV.
Note that the picture recorded in 16:9 FULL
mode looks compressed on a normal TV.
Notes on wide mode
•When you record in 16:9 FULL mode, the date
or time indicator will be widened on the widescreen TV.
•If you dub a tape, the tape is copied in the same
mode as the original recording.
•The wide mode is cancelled automatically 5
minutes after you remove the power source.
Uso de la función de modo
panorámico
Mientras la videocámara se encuentra en modo
de espera, pulse 16:9WIDE varias veces para que
el visor electrónico muestre el indicador del
modo que desee.
CINEMA
16:9WIDE
Para cancelar el modo panorámico
Pulse 16:9WIDE varias veces hasta que
desaparezca el indicador de modo panorámico.
Para visualizar la cinta grabada en
modo panorámico
Para visualizar la cinta grabada en modo
CINEMA, ajuste el modo de pantalla del
televisor de pantalla panorámica en modo de
zoom. Para visualizar la cinta grabada en modo
16:9 FULL, realice el ajuste en modo total (FULL).
Para obtener más información, consulte el
manual de instrucciones del televisor. Observe
que la imagen grabada en modo 16:9 FULL
aparece comprimida en un televisor normal.
Notas sobre el modo panorámico
•Si graba en modo 16:9 FULL, el indicador de
fecha u hora aparecerá ampliado en el televisor
de pantalla panorámica.
•Si copia una cinta, ésta se copiará en el mismo
modo de la grabación original.
•El modo panorámico se cancelará
automáticamente 5 minutos después de retirar
la fuente de alimentación.
16:9 FULL
50
CCD-TR2200E/TR3300E 3-856-204-12 (1)
Page 51

Selecting the START/ STOP mode
Selección del modo de
inicio/parada START/STOP
Your camcorder has two modes besides normal
start/stop mode. These modes enable you to take
a series of quick shots resulting in a lively video.
(1)Set the START/STOP MODE switch to the
desired mode.
: Recording starts when you press START/
STOP, and stops when you press it again
(normal mode).
: The camcorder records only while you
press down START/STOP.
5 SEC: When you press START/STOP, the
camcorder records for 5 seconds and
then stops automatically.
(2)Turn STANDBY up and press START/STOP.
Recording starts.
If you selected 5 SEC, five dots appear in the
viewfinder. The dots disappear at a rate of one
per second. When 5 seconds elapse and all the
dots disappear, the camcorder switches to
Standby mode automatically.
If you select , the camcorder records as long as
you hold down START/STOP.
1
START/
STOP
MODE
SEC
5
2
K
C
O
L
S
T
A
Y
N
B
D
La videocámara dispone de dos modos además
del normal de inicio y detención. Estos modos
permiten realizar la filmación en varias tomas
rápidas para obtener un vídeo con ritmo.
(1)Ajuste el interruptor START/STOP MODE en
el modo que desee.
:La grabación se inicia al pulsar START/
STOP, y se detiene si vuelve a pulsarlo
(modo normal).
:La videocámara graba sólo mientras pulsa
START/STOP.
5 SEC: Si pulsa START/STOP, la videocámara
graba durante 5 segundos y, a
continuación, se detiene
automáticamente.
(2)Gire STANDBY hacia arriba y pulse START/
STOP. La grabación se iniciará.
Si ha seleccionado 5 SEC, aparecerán cinco
puntos en el visor electrónico, que desaparecerán
a un ritmo de uno por segundo. Si transcurren 5
segundos y desaparecen todos los puntos, la
videocámara introducirá automáticamente el
modo de espera.
Si selecciona , la videocámara grabará
mientras mantenga pulsado START/STOP.
K
C
O
L
S
T
A
Y
N
B
D
0:00:00
40min
REC
40min
REC
0:00:04
Advanced Operations / Operaciones avanzadas
To extend the recording time in 5
SEC mode
Press START/STOP again before all the dots
disappear. Recording continues for about 5
seconds from the moment you pressed START/
STOP.
To return to normal recording
Set the START/STOP MODE switch to . If you
set the switch while recording, recording
continues.
Note on 5 SEC recording and mode
You cannot use FADER/OVERLAP (only for
CCD-TR3300E) or FADER (only for CCDTR2200E) if you select 5 SEC or .
Para aumentar el tiempo de
grabación en modo 5 SEC
Vuelva a pulsar START/STOP antes de que
desaparezcan todos los puntos. La grabación
continuará durante 5 segundos
aproximadamente a partir del momento en que
pulsó START/STOP.
Para volver a la grabación normal
Ajuste el interruptor START/STOP MODE en
. Si ajusta el interruptor durante la grabación,
ésta continuará realizándose.
Nota sobre la grabación 5 SEC y el modo
Si selecciona 5 SEC o , no es posible emplear
FADER/OVERLAP (sólo CCD-TR3300E) o
FADER (sólo CCD-TR2200E).
51
CCD-TR2200E/TR3300E 3-856-204-12 (1)
Page 52

Superimposing a title
Superposición de
títulos
You can select one of eight preset titles. You can
also select the language, position, and colour of
titles in the menu system.
Selecting the language
(1)While the camcorder is in Standby mode,
press MENU to display the menu.
(2)Turn the control dial to select TITLE LANG,
then press the dial.
(3)Turn the control dial to select the desired
language, then press the dial.
(4)Press MENU to erase the menu display.
1
MENU
2
3
Es posible realizar la selección entre ocho títulos
predefinidos. También es posible seleccionar el
idioma, la posición y el color de los títulos en el
sistema de menú.
Selección del idioma
(1)Mientras la videocámara se encuentra en
modo de espera, pulse MENU para que
aparezca el menú.
(2)Gire el dial de control para seleccionar TITLE
LANG y, a continuación, pulse el dial.
(3)Gire el dial de control para seleccionar el
idioma que desee y, a continuación, pulse el
dial.
(4)Pulse MENU para que el menú desaparezca.
MENU
MENU
COUNTER
ORC TO SET
REC MODE
TITLE COL
TITLE POS
TITLE LANG
TITLE1 SET
[MENU] : END
MENU
MENU
TITLE LANG
[MENU] : END
ENGLISH
ENGLISH
FRANÇAIS
ESPAÑOL
PORTUGUÊS
DEUTSCH
NEDERLANDS
ITALIANO
MENU
TITLE LANG
[MENU] : END
MENU
COUNTER
ORC TO SET
REC MODE
TITLE COL
TITLE POS
TITLE LANG
TITLE1 SET
[MENU] : END
ENGLISH
FRANÇAIS
ESPAÑOL
PORTUGUÊS
DEUTSCH
NEDERLANDS
ITALIANO
ITALIANO
52
CCD-TR2200E/TR3300E 3-856-204-12 (1)
Page 53

Using titles
Uso de los títulos
To add the title from the beginning
(1)While the camcorder is in Standby mode,
press TITLE repeatedly until the desired title
appears.
Each time a new title appears, it flashes. When
the desired title appears, wait for it to stop
flashing.
Titles cycle as follows.
Original title 1 n Original title 2 n HELLO!
n HAPPY BIRTHDAY n HAPPY
HOLIDAYS n CONGRATULATIONS! n
OUR SWEET BABY n WEDDING n
VACATION n THE END
After “THE END” the title indicator goes off
once and returns to Original title 1 again.
The titles are displayed in the language you
selected in the menu system.
(2)Press START/STOP to start recording.
(3)When you want to stop recording the title,
press TITLE again.
Note on titles
The contents and the order of titles are different
depending on the laguages.
If you have not stored any original titles
The titles begin from “HELLO!”.
Para introducir el título desde el
principio
(1)Mientras la videocámara se encuentra en
modo de espera, pulse TITLE varias veces
hasta que aparezca el título que desee.
Cada vez que aparezca un nuevo título, éste
parpadeará.
Cuando aparezca el título que desee, espere
hasta que deje de parpadear.
Los títulos aparecen cíclicamente de la
siguiente forma:
Título original 1 n Título original 2 n HELLO! n
HAPPY BIRTHDAY n HAPPY HOLIDAYS n
CONGRATULATIONS! n OUR SWEET BABY n
WEDDING n VACATION n THE END
Después de que el indicador del título “THE
END” desaparezca, volverá a aparecer el
título original 1.
Los títulos aparecerán en el idioma
seleccionado en el sistema de menú.
(2)Pulse START/STOP para iniciar la grabación.
(3)Si desea detener la grabación del título,
vuelva a pulsar TITLE.
Nota sobre los títulos
El contenido y el orden de los títulos difieren en
función de los idiomas.
Si no ha almacenado ningún título original
Los títulos comenzarán a partir de “HELLO!”.
Advanced Operations / Operaciones avanzadas
To add the title while you are
recording
(1)While in Standby mode, press TITLE
repeatedly until the desired title appears to
cycle through the titles.
Each time a new title appears, it flashes.
(2)When the desired title appears, wait for it to
stop flashing, and press TITLE again to erase
the title from the display.
(3)Start recording.
(4)When you reach the point where you want to
add the title, press TITLE.
(5)When you want to stop recording the title,
press TITLE again.
TITLE
Para introducir el título durante la
grabación
(1)
Durante el modo de espera, pulse TITLE varias
veces hasta que aparezca el título que desee.
Cada vez que aparezca un nuevo título, éste
parpadeará.
(2)Cuando aparezca el título que desee, espere
hasta que deje de parpadear; a continuación,
vuelva a pulsar TITLE para que el título
desaparezca.
(3)Inicie la grabación.
(4)Cuando llegue al punto donde desee
introducir el título, pulse TITLE.
(5)Si desea detener la grabación del título,
vuelva a pulsar TITLE.
CCD-TR2200E/TR3300E 3-856-204-12 (1)
53
Page 54

Superimposing a title Superposición de títulos
To select the colour of the title
(1)While in Standby mode, press MENU to
display the menu.
(2)Turn the control dial to select TITLE COL and
press the control dial to select it.
The colour menu appears.
(3)Turn the control dial to highlight a colour,
and press the control dial to select it.
(4)Press MENU to erase the menu display.
MENU
23
COMMANDER
Hi8
COUNTER
ORC TO SET
REC MODE
TITLE COL
TITLE POS
[MENU] : END
WHITE
MENU
TITLE COL
[MENU] : END
WHITE
YELLOW
VIOLET
RED
CYAN
GREEN
BLUE
To select the position of the title
(1)While in Standby mode, press MENU to
display the menu in the viewfinder.
(2)Turn the control dial to select TITLE POS and
press the control dial to select it.
The position menu appears.
(3)Turn the control dial to highlight CENTER or
BOTTOM, and press the control dial to select
it.
(4)Press MENU to erase the menu display.
MENU
23
Hi8
COUNTER
ORC TO SET
REC MODE
TITLE COL
TITLE POS
TITLE LANG
[MENU] : END
CENTER
MENU
TITLE POS
[MENU] : END
CENTER
BOTTOM
Para seleccionar el color del título
(1)Durante el modo de espera, pulse MENU para
que aparezca el menú.
(2)Gire el dial de control para seleccionar TITLE
COL y púlselo para seleccionarlo.
Aparece el menú de colores.
(3)Gire el dial de control para resaltar un color y,
a continuación, púlselo para seleccionarlo.
(4)Pulse MENU para que el menú desaparezca.
MENU
TITLE COL
[MENU] : END
WHITE
YELLOW
VIOLET
RED
CYAN
GREEN
BLUE
MENU
COMMANDER
Hi8
COUNTER
ORC TO SET
REC MODE
TITLE COL
TITLE POS
[MENU] : END
YELLOW
Para seleccionar la posición del título
(1)Durante el modo de espera, pulse MENU para
que el visor electrónico muestre el menú.
(2)Gire el dial de control para seleccionar TITLE
POS y púlselo para seleccionarlo.
Aparece el menú de posiciones.
(3)Gire el dial de control para resaltar CENTER o
BOTTOM y, a continuación, púlselo para
seleccionarlo.
(4)Pulse MENU para que desaparezca el menú.
MENU
TITLE POS
[MENU] : END
CENTER
BOTTOM
MENU
Hi8
COUNTER
ORC TO SET
REC MODE
TITLE COL
TITLE POS
TITLE LANG
[MENU] : END
BOTTOM
CENTER
Notes on selecting a title
•You cannot select a title while you are
recording.
•You cannot select fade-in/fade-out while you
are adding a title.
•You cannot record a title while you are
recording with the date or time.
54
BOTTOM
HELLO
HELLO
Notas sobre la selección de títulos
•No es posible seleccionar títulos durante la
grabación.
•No es posible seleccionar la función de
aparición y desaparición gradual mientras
introduce un título.
•No es posible registrar títulos mientras graba
con la fecha o la hora.
CCD-TR2200E/TR3300E 3-856-204-12 (1)
Page 55

Making your own original titles
Creación de títulos
You can make up to two titles and store them in
the camcorder.
Eject the cassette before you begin. Your title can
have up to 22 letters.
(1)While in Standby mode, press MENU to
display the menu.
(2)Turn the control dial to select TITLE 1 SET or
TITLE 2 SET, then press the dial.
(3)Turn the control dial to highlight a letter, and
press the control dial to select it.
(4)Repeat step 3 until you finish the title.
(5)When you are finished, turn the control dial
to highlight S and press the control dial to
select it.
The title is stored.
(6)Press MENU to erase the menu display.
MENU
1
2
MENU
35
TITLE1 SET
[MENU] : END
Es posible crear un máximo de dos títulos y
almacenarlos en la videocámara. Expulse el
videocassette antes de comenzar. El título puede
componerse de un máximo de 22 letras.
(1)Durante el modo de espera, pulse MENU para
que aparezca el menú.
(2)Gire el dial de control para seleccionar TITLE
1 SET o TITLE 2 SET y, a continuación,
púlselo.
(3)Gire el dial de control para resaltar una letra
y, a continuación, púlselo para seleccionarla.
(4)Repita el paso 3 hasta completar el título.
(5)Una vez finalizado el proceso, gire el dial de
control para resaltar S y púlselo para
seleccionarlo.
El título queda almacenado.
(6)Pulse MENU para que el menú desaparezca.
>
MENU
[MENU] : END
MENU
TITLE1 SET
[MENU] : END
TITLE1 SET
NEW YORK
L
M
N
––––––––
O
P
–
.
A
S
>
N
C
D
E
–––––––
F
G
MENU
ORC TO SET
REC MODE
TITLE COL
TITLE POS
TITLE LANG
TITLE1 SET
TITLE2 SET
[MENU] : END
>
––––––
Advanced Operations / Operaciones avanzadas
>
To edit a title you have stored
In step 2, select TITLE 1 SET or TITLE 2 SET,
whichever title you want to edit is stored in.
Then change the title.
Instead of selecting S in step 5 to store the
title
You can do one of the following:
•Enter 22 letters.
•Press MENU.
If you do nothing more than 5 minutes
The power goes off automatically. Turn
STANDBY down once, turn it again up and
proceed from step 3.
Para editar títulos almacenados
En el paso 2, seleccione TITLE 1 SET o TITLE 2
SET en función de donde se encuentre
almacenado el título que desee editar. A
continuación, cámbielo.
En lugar de seleccionar S en el paso 5 para
almacenar el título
Es posible realizar una de las siguientes
operaciones:
•Introducir 22 letras.
•Pulsar MENU.
Si no realiza ninguna operación en un período
superior a 5 minutos
La alimentación se desactivará automáticamente.
Gire STANDBY hacia abajo una vez, vuelva a
girarlo hacia arriba y comience el procedimiento
a partir del paso 3.
CCD-TR2200E/TR3300E 3-856-204-12 (1)
55
Page 56

Making your own original
titles Creación de títulos
To delete a title
At the leftmost character position, select S and
press TITLE. Do not erase the title by selecting
empty spaces. If you do so, a title full of empty
spaces is stored.
Releasing the STEADY SHOT function
When you shoot, the indicator appears in the
viewfinder. This indicates that the Steady Shot
function is working and the camcorder
compensates for camera-shake.
Set STEADY SHOT to OFF.
Para eliminar títulos
Seleccione S y pulse TITLE en la posición de
caracteres del extremo izquierdo. No borre el
título mediante la selección de espacios vacíos, ya
que si lo hace se almacenará un título lleno de
espacios vacíos.
Desactivación de la
función STEADY SHOT
Durante la filmación, el indicador aparece en
el visor electrónico para indicar que la función de
estabilización de imagen (Steady Shot) se
encuentra activada, por la que la videocámara
compensa las sacudidas de la cámara.
Ajuste STEADY SHOT en OFF.
To activate the Steady Shot function
again
Set STEADY SHOT to ON.
Notes on the Steady Shot function
•The Steady Shot function will not correct
excessive camera-shake.
•If you install a wide conversion lens (not
supplied), the camcorder may cause minor
shading when STEADY SHOT is set to ON.
In this case, set STEADY SHOT to OFF.
56
STEADY SHOT
ON
OFF
Para volver a activar la función
Steady Shot
Ajuste STEADY SHOT en ON.
Nota sobre la función Steady Shot
•Esta función no corregirá sacudidas excesivas
de la cámara.
•Si instala un objetivo de conversión panorámica
(no suministrado), la videocámara puede
producir un nivel mínimo de sombreado
cuando STEADY SHOT esté ajustado en ON.
En este caso, ajuste STEADY SHOT en OFF.
CCD-TR2200E/TR3300E 3-856-204-12 (1)
Page 57

Checking the tape condition before recording (ORC)
Comprobación del estado de
la cinta antes de la grabación
(ORC)
Use this feature to check the tape condition
before recording, so that you can get the best
possible picture.
(1)While in Standby mode, press MENU to
display the menu.
(2)Turn the control dial to highlight ORC TO
SET and press the control dial to select it.
“START/STOP KEY” appears.
(3)Press START/STOP.
The camcorder takes about 5 seconds to check
the condition of the tape head and the
cassette.
1
MENU
2
Emplee esta función para comprobar el estado de
la cinta antes de la grabación con el fin de
obtener la mejor calidad de imagen posible.
(1)Durante el modo de espera, pulse MENU para
que aparezca el menú.
(2)Gire el dial de control para resaltar ORC TO
SET y, a continuación, púlselo para
seleccionarlo. Aparece “START/STOP KEY”.
(3)Pulse START/STOP.
La videocámara tardará unos 5 segundos en
comprobar el estado del cabezal de cinta y del
videocassette.
MENU
WIND
COMMANDER
Hi8
COUNTER
ORC TO SET
REC MODE
TITLE COL
[MENU] : END
START/STOP
KEY
Display window/Visor principal
=ORC STBY=
K
3
C
O
L
S
T
A
Y
N
B
D
ORC
Display window/Visor principal
== ORC ⁄ == == STBY ==
Advanced Operations / Operaciones avanzadas
Each time you insert the cassette
Perform the above procedures.
To see if you have performed ORC
Perform steps 1 and 2 above. If “ORC ON” is
displayed, the tape condition has been checked.
When the tab on the cassette exposes the red
mark
You can not use ORC.
Note on ORC TO SET setting
When you set ORC TO SET, the recording on the
tape is erased for about 0.1 second so that the
camcorder can check the tape condition. Be
careful when you use a recorded tape. The 0.1
second blank is erased if you record from the
point where you set ORC TO SET for more than 2
seconds, or if you record over the blank. You
cannot set ORC TO SET for a cassette with its tab
out (red).
The indicator rotates in performing ORC./
El indicador gira al realizar ORC.
Cada vez que inserte el videocassette
Realice los procedimientos descritos
anteriormente.
Para comprobar si ha realizado la función ORC
Efectúe los pasos 1 y 2 anteriores. Si aparece la
indicación “ORC ON” significa que se ha
comprobado el estado de la cinta.
Si la lengüeta del videocassette muestra la
marca roja
No será posible emplear la función ORC.
Nota sobre el ajuste ORC TO SET
Al definir ORC TO SET, la grabación de la cinta
se borra durante 0,1 segundos aproximadamente,
de forma que la videocámara pueda comprobar
la condición de la cinta. Tome precauciones
cuando emplee una cinta grabada. El espacio en
blanco de 0,1 segundos se borra si realiza la
grabación desde el punto en que ha definido
ORC TO SET durante más de 2 segundos, o si ha
grabado encima del espacio en blanco. No es
posible definir ORC TO SET para una cinta sin
lengüeta de seguridad (rojo).
CCD-TR2200E/TR3300E 3-856-204-12 (1)
57
Page 58

English
Selecting automatic/manual adjustment modes
The camcorder’s automatic functions offer you worry-free operation under most shooting conditions.
But in some circumstances, manual adjustment is better for creative recording.
You can adjust focus, aperture, shutter speed, gain, and white balance automatically or manually. Also,
you can use the PROGRAM AE function in particular circumstances, and adjust the brightness of the
picture with the AE shift function.
Here’s the overview of each manual adjustment. See the following pages for detailed information.
To focus manually
Set FOCUS to MANUAL. You can adjust the focus regardless of the position of the AUTO LOCK/
HOLD switch. When you want to focus automatically, set FOCUS to AUTO.
To manually adjust aperture, shutter speed, gain, and white balance
Set AUTO LOCK/HOLD to the centre position. You can adjust each item independently. When you
want to adjust each item automatically, set AUTO LOCK/HOLD to AUTO LOCK.
To manually adjust the brightness
Use AE SHIFT in the menu system.
Note on the previous settings
Once you adjust the settings manually, they are stored in memory in the following cases as long as the
lithium battery is in place.
•when you return to automatic adjustment mode.
•when you set the POWER switch to OFF.
•in five minutes after you remove the power source as long as the lithium battery is installed in the
camcorder.
PROGRAM AE
Shutter
priority
mode
Automatically
adjusted
according to the
shutter speed
Manual
Automatic
Twilight mode
Automatic
1/50
Automatic
Manual
adjustment
Automatic or
manual
1/50 or manual
Automatic or
manual
Aperture
Shutter
speed
Gain
White
balance
AE shift*
Focus
Automatic
adjustment
Automatic
1/50
Automatic
Automatic
Effective
Automatic or manual according to the position of the FOCUS switch
Aperture
priority
mode
Manual
Automatically
adjusted
according to the
aperture
Automatic
Changes each time you turn the control dial after pressing WHT BAL
Automatic (no indication) or ∑ (one push white balance) ˜ w (outdoor) ˜
e (indoor)
Effective Effective Effective Effective
* You cannot change AE shift while adjusting the aperture manually.
58
CCD-TR2200E/TR3300E 3-856-204-12 (1)
Page 59

Español
Selección del modo de ajuste manual o automático
Con las funciones automáticas de la videocámara no es necesario preocuparse por las operaciones en la
mayoría de las condiciones de filmación. No obstante, en algunas circunstancias resulta más útil
emplear el ajuste manual para realizar grabaciones creativas.
Es posible ajustar de forma manual o automática el enfoque, la apertura, la velocidad de obturación, la
ganancia y el balance de blancos. Asimismo, puede emplear la función PROGRAM AE en
determinadas circunstancias y ajustar el brillo de la imagen con la función de desplazamiento AE.
A continuación, se proporciona una descripción general de cada ajuste manual. Para obtener
información detallada, consulte las páginas siguientes.
Para realizar el enfoque manualmente
Ajuste FOCUS en MANUAL. Es posible ajustar el enfoque independientemente de la posición del
interruptor AUTO LOCK/HOLD. Si desea realizar el enfoque automáticamente, ajuste FOCUS en
AUTO.
Para ajustar manualmente la apertura, la velocidad de obturación, la
ganancia y el balance de blancos
Ajuste AUTO LOCK/HOLD en la posición central. Es posible ajustar cada elemento por separado. Si
desea ajustar automáticamente cada elemento, ajuste AUTO LOCK/HOLD en AUTO LOCK.
Para ajustar el brillo manualmente
Emplee la función AE SHIFT en el sistema de menú.
Nota sobre los ajustes anteriores
Una vez realizados los ajustes manualmente, éstos quedan almacenados en la memoria en los
siguientes casos siempre que no retire la pila de litio:
•si vuelve al modo de ajuste automático.
•si ajusta el interruptor POWER en OFF.
•cinco minutos después de retirar la fuente de alimentación siempre que la pila de litio esté instalada
en la videocámara.
PROGRAM AE
Apertura
Velocidad de
obturación
Ganancia
Balance de
blancos
Desplazamiento
AE*
Enfoque
Ajuste
automático
Automático
1/50
Automático
Automático
Efectivo
Automático o manual en función de la posición del interruptor FOCUS
Modo de
prioridad de
apertura
Manual
Ajustado
automáticamente
en función de la
apertura
Automático
Cambia cada vez que gire el dial de control después de pulsar WHT BAL
Automático (sin indicación) o ∑ (balance de blancos con un solo
movimiento) ˜ w (exteriores) ˜ e (interiores)
* No es posible modificar el desplazamiento AE durante el ajuste manual de la apertura.
Modo de
prioridad de
obturación
Ajustado
automáticamente
en función de la
velocidad de
obturación
Manual
Automático
Modo
crepuscular
Automático
1/50
Automático
Ajuste manual
Automático o
manual
1/50 o manual
Automático o
manual
EfectivoEfectivoEfectivoEfectivo
Advanced Operations / Operaciones avanzadas
59
CCD-TR2200E/TR3300E 3-856-204-12 (1)
Page 60

Focusing manually
Enfoque manual
When to use manual focus
In the following cases you should obtain better
results by adjusting the focus manually.
Cuándo emplear el enfoque
manual
En los siguientes casos se obtienen mejores
resultados mediante el ajuste manual del
enfoque.
[a] [b] [c] [d]
•Insufficient light [a]
•Subjects with little contrast – walls, sky, etc. [b]
•Too much brightness behind the subject [c]
•Horizontal stripes [d]
•Subjects through frosted glass
•Subjects beyond nets, etc.
•Bright subject or subject reflecting the light
•Shooting a stationary subject when using a
tripod
•Iluminación insuficiente [a]
•Objetos con poco contraste – paredes, el cielo,
etc. [b]
•Demasiado brillo detrás del objeto [c]
•Rayas horizontales [d]
•Objetos situados detrás de vidrios con escarcha
•Objetos situados detrás de redes, etc.
•Objetos brillantes o que reflejan luz
•Filmación de objetos sin movimiento con un
trípode
60
CCD-TR2200E/TR3300E 3-856-204-12 (1)
Page 61

Focusing manually
Enfoque manual
When focusing manually, first focus in telephoto
before recording, and then reset the shot length.
(1)Set FOCUS to MANUAL. The f indicator
appears in the viewfinder.
(2)Move the power zoom lever to the “T” side
until the lever reaches the end.
(3)Turn the focus ring to achieve a sharp focus.
Be sure to not touch the built-in microphone
when you turn the focus ring.
(4)Set the desired shot length using the power
zoom lever.
FOCUS
1
AUTO
MANUAL
INFINITY
3
Al enfocar manualmente, enfoque en primer
lugar en la posición de telefoto antes de la
grabación y, a continuación, ajuste la distancia de
filmación.
(1)Ajuste FOCUS en MANUAL. El indicador f
aparece en el visor electrónico.
(2)Desplace la palanca de alimentación del zoom
hacia el lado “T” hasta que dicha palanca
llegue al final.
(3)Gire el anillo de enfoque para obtener un
enfoque nítido. Asegúrese de no tocar el
micrófono incorporado al girar el anillo.
(4)Ajuste la distancia de filmación que desee con
la palanca de alimentación del zoom.
2
4
W
W
TWT
TWT
TW
TW
Advanced Operations / Operaciones avanzadas
To return to autofocus mode
Set FOCUS to AUTO. The f indicator in the
viewfinder disappears.
Shooting in relatively dark places
Shoot at wide-angle after focusing in the
telephoto position.
Note on the focus ring
The focus ring does not have a stop position.
To shoot with autofocus
momentarily
When you want to switch to autofocus
momentarily while recording in manual focus
mode, press PUSH AUTO down. Autofocus
functions while PUSH AUTO is held down.
when it is released, manual focus mode will be
resumed.
Para volver al modo de enfoque
automático
Ajuste FOCUS en AUTO. El indicador f
desaparece del visor electrónico.
Filmación en lugares relativamente oscuros
Realice la filmación en gran angular después de
enfocar en la posición de telefoto.
Nota sobre el anillo de enfoque
Este anillo no dispone de posición de parada.
Para filmar momentáneamente con
el enfoque automático
Si desea cambiar momentáneamente al enfoque
automático durante la grabación en el modo de
enfoque manual, pulse PUSH AUTO. El modo de
enfoque automático permanece activado
mientras mantiene pulsado PUSH AUTO. Si
suelta este botón, se reanudará el modo de
enfoque manual.
61
CCD-TR2200E/TR3300E 3-856-204-12 (1)
Page 62

Enfoque manualFocusing manually
To record a very distant subject
Push FOCUS down to INFINITY. The lens
focuses on the most distant subject while FOCUS
is held down.
When it is released, manual focus mode is
resumed. Use this function when shooting
through a window or a screen, to focus on a more
distant subject.
Note on manual focusing
The f indicator will change to the followings:
:When recording an infinitely distant subject.
: When there is something too close to focus on.
Using the PROGRAM AE function
About the PROGRAM AE
function
You can select from three PROGRAM AE modes
to fit the shooting situation. Set AUTO LOCK/
HOLD to the centre position. Press PROGRAM
AE, then select the desired mode by turning the
control dial. Each time you turn the dial, the
indicator in the viewfinder changes:
(Aperture Priority) ˜AE S (Shutter Priority)
˜ Å (Twilight).
AE
A
Para grabar objetos muy distantes
Pulse FOCUS hasta alcanzar la posición
INFINITY. El objetivo enfoca los objetos más
distantes mientras mantiene pulsado FOCUS.
Al soltarlo, se reanuda el modo de enfoque
manual. Emplee esta función al filmar a través de
una ventana o una pantalla con el fin de enfocar
objetos más distantes.
Nota sobre el enfoque manual
El indicador f cambiará en los siguientes casos:
:Al grabar objetos infinitamente distantes.
: Si existe algún objeto demasiado cerca
enfocado.
Uso de la función
PROGRAM AE
Acerca de la función PROGRAM
AE
Es posible seleccionar el modo PROGRAM AE,
de los tres existentes, que mejor se adapte a la
situación de filmación. Ajuste AUTO LOCK/
HOLD en la posición central. Pulse PROGRAM
AE y, a continuación, seleccione el modo que
desee girando el dial de control. Cada vez que
gire el dial, el indicador del visor electrónico
cambia de la siguiente forma: AE A (Prioridad
de apertura) ˜ AE S (Prioridad de obturación)
˜ Å (Modo crepuscular).
AUTO LOCK HOLD
Note on recording in PROGRAM AE
We recommend that you adjust the focus and
white balance manually.
62
PROGRAM
AE
Display window/Visor principal
Nota sobre la grabación con la función
PROGRAM AE
Se recomienda ajustar manualmente el enfoque y
el balance de blancos.
CCD-TR2200E/TR3300E 3-856-204-12 (1)
AE A
AE S
AE A
AE S
Page 63

Using the aperture priority
mode
Uso del modo de prioridad de
apertura
You can select the aperture to determine the
desired depth of focus field. The shutter speed is
automatically set (between 1/50 and 1/1750)
according to the aperture value to maintain
appropriate exposure.
(1)Set AUTO LOCK/HOLD to the centre
position.
(2)Press PROGRAM AE so that the indicator
appears in the viewfinder.
(3)Turn the control dial to select AE A, then
press the dial.
(4)Turn the control dial to select the desired
aperture value. You can select from the
following 15 values: F1.6, F2, F2.4, F2.8, F3.4,
F4, F4.8, F5.6, F6.8, F8, F9. 6, F11, F14, F16, Fl9.
For a smaller aperture, select a higher value.
1
AUTO LOCK HOLD
2
PROGRAM
AE
Es posible seleccionar la apertura para determinar
la profundidad que desee correspondiente al
campo de enfoque. La velocidad de obturación se
ajusta automáticamente (entre 1/50 y 1/1750) en
función del valor de apertura para mantener la
exposición adecuada.
(1)Ajuste AUTO LOCK/HOLD en la posición
central.
(2)Pulse PROGRAM AE para que el indicador
aparezca en el visor electrónico.
(3)Gire el dial de control para seleccionar AE A
y, a continuación, púlselo.
(4)Gire el dial de control para seleccionar el valor
de apertura que desee. Es posible realizar la
selección de alguno de los 15 valores
siguientes: F1.6, F2, F2.4, F2.8, F3.4, F4, F4.8,
F5.6, F6.8, F8, F9. 6, F11, F14, F16, Fl9. Para
obtener una apertura menor, seleccione un
valor mayor.
3
4
AE A
AE A
1000
F5.6
AE A
215
F11
Advanced Operations / Operaciones avanzadas
To return to automatic adjustment
mode
Set AUTO LOCK/HOLD to AUTO LOCK, or
press PROGRAM AE so that no indicator
appears in the viewfinder.
About the depth of focus field
The depth of focus field is the in-focus range
measured from the distance behind a subject to
the distance in front. The depth of focus field can
vary with the aperture value and the focal length.
Lowering the F value (larger aperture) reduces
the depth of focus field. Raising the F value
(smaller aperture) provides a larger depth of
focus field. Zooming in telephoto position offers
a smaller depth of focus field while the depth of
focus field in wide-angle position is greater.
Para volver al modo de ajuste
automático
Ajuste AUTO LOCK/HOLD en AUTO LOCK, o
pulse PROGRAM AE hasta que el visor
electrónico no muestre ningún indicador.
Acerca de la profundidad del campo de enfoque
La profundidad del campo de enfoque es el área
que se encuentra dentro del enfoque, medida a
partir de la distancia existente detrás y delante
del objeto. Esta profundidad puede variar con el
valor de apertura y la distancia focal. Si
disminuye el valor F (apertura mayor), la
profundidad del campo de enfoque se reduce,
mientras que si aumenta (apertura menor), la
profundidad del campo de enfoque se amplía. El
uso del zoom en la posición de telefoto
proporciona una menor profundidad del campo
de enfoque, mientras que dicha profundidad será
mayor en la posición de gran angular.
CCD-TR2200E/TR3300E 3-856-204-12 (1)
63
Page 64

Using the PROGRAM AE
Function
Uso de la función
PROGRAM AE
Using the shutter priority mode
You can select the shutter speed between 1/50
and 1/10000. When you select a faster shutter
speed, movement appears clearer with less
shaking. The aperture value is automatically
adjusted according to the selected shutter speed
to maintain appropriate exposure. This mode is
most effective when you shoot the picture with
high-speed movement.
Note that the shutter speed is indicated in the
viewfinder as, for example, “100” for 1/100
shutter speed.
(1)Set AUTO LOCK/HOLD to the centre
position.
(2)Press PROGRAM AE so that the indicator
appears in the viewfinder.
(3)Turn the control dial to select AE S, then
press the dial.
(4)Turn the control dial to select the desired
shutter speed. You can select from the
following 16 speeds: 1/50, 1/75, 1/100, 1/120,
1/150, 1/215, 1/300, 1/425, 1/600, 1/1000,
1/1250, 1/1750, 1/2500, 1/3500, 1/6000,
1/10000. For a faster shutter speed, select a
larger value indicator in the viewfinder.
Uso del modo de prioridad de
obturación
Es posible seleccionar la velocidad de obturación
entre 1/50 y 1/10000. Si selecciona una velocidad
de obturación mayor, el movimiento aparece con
más nitidez y con menos vibración. El valor de
apertura se ajusta automáticamente según la
velocidad de obturación seleccionada para
mantener la exposición adecuada. Este modo
resulta más efectivo cuando filme imágenes con
movimientos a alta velocidad.
Observe que la velocidad de obturación aparece
indicada en el visor electrónico, como por
ejemplo “100” para la velocidad de obturación de
1/100.
(1)Ajuste AUTO LOCK/HOLD en la posición
central.
(2)Pulse PROGRAM AE para que el indicador
aparezca en el visor electrónico.
(3)Gire el dial de control para seleccionar AE S
y, a continuación, púlselo.
(4)
Gire el dial de control para seleccionar la
velocidad de obturación que desee. Es posible
realizar la selección de alguna de las 16
velocidades de obturación siguientes: 1/50,
1/75, 1/100, 1/120, 1/150, 1/215, 1/300,
1/425, 1/600, 1/1000, 1/1250, 1/1750, 1/2500,
1/3500, 1/6000, 1/10000. Para obtener una
velocidad de obturación mayor, seleccione un
indicador del visor electrónico de valor mayor.
1
AUTO LOCK HOLD
2
PROGRAM
AE
To return to automatic adjustment
mode
Set AUTO LOCK/HOLD to AUTO LOCK, or
press PROGRAM AE so that no indicator
appears in the viewfinder.
64
3
4
AE S
AE S
1000
F5.6
AE S
215
F11
Para volver al modo de ajuste
automático
Ajuste AUTO LOCK/HOLD en AUTO LOCK, o
pulse PROGRAM AE hasta que el visor
electrónico no muestre ningún indicador.
CCD-TR2200E/TR3300E 3-856-204-12 (1)
Page 65

When the aperture value is automatically
adjusted to F1.6
We recommend shooting in sunlight or using a
video light (not supplied).
Si el valor de apertura se ajusta
automáticamente en F1.6
Se recomienda filmar con luz solar o con una
lámpara de vídeo (no suministrada).
When shooting a very bright subject
A vertical band (smear) may appear on the
screen if the shutter speed is set too high.
To select the best shutter speed
Subject
•A golf swing or tennis match in fine
weather (to view the hit ball clearly
in still picture mode, set to 1/1000 to
1/3500)
•A landscape shot from a moving car
•A moving roller coaster in overcast
days
•An athletic scene, marathon, etc.
•Indoor sports
•Replacement for the ND2 filter (to
have the exposure)
•Recording pictures with less flicker
under a fluorescent lamp
•In sunny weather (to avoid an outof-focus picture due to a small
aperture)
Shutter
speed
1/600 –
1/10000
1/120 –
1/425
1/100
1/75
Cuando filme objetos muy brillantes
Es posible que aparezca una banda vertical
(mancha) en la pantalla si ha ajustado la
velocidad de obturación en valores demasiado
altos.
Para seleccionar la velocidad de
obturación más adecuada
Objeto
•Un golpe de golf o un partido de
tenis con buenas condiciones
atmosféricas (para visualizar con
nitidez el golpe de la pelota en el
modo de imagen fija, ajuste una
velocidad comprendida entre 1/
1000 y 1/3500)
•La filmación de un paisaje desde
un automóvil en movimiento
•Una montaña rusa en
movimiento en días descubiertos
•Una escena de atletismo,
maratón, etc.
•Deportes en interiores
•Sustitución para el filtro ND2
(para obtener la exposición)
•Grabación de imágenes con
menor parpadeo bajo una
lámpara fluorescente
•Con tiempo soleado (para evitar
el desenfoque de la imagen
debido a una pequeña apertura)
Velocidad de
obturación
1/600 –
1/10000
1/120 –
1/425
1/100
1/75
Advanced Operations / Operaciones avanzadas
CCD-TR2200E/TR3300E 3-856-204-12 (1)
65
Page 66

Using the PROGRAM AE
Function
Uso de la función
PROGRAM AE
Using the twilight mode
You can record a bright subject in a dark place
without ruining the atmosphere. The aperture is
automatically adjusted to maintain the
appropriate exposure. The shutter speed is fixed
at 1/50. This mode is effective when you record
night views, neon signs or fireworks.
(1)Set AUTO LOCK/HOLD to the centre
position.
(2)Press PROGRAM AE so that the indicator
appears in the viewfinder.
(3)Turn the control dial to select Å indicator.
1
AUTO LOCK HOLD
PROGRAM
2
AE
To return to automatic adjustment
mode
Set AUTO LOCK/HOLD to AUTO LOCK, or
press PROGRAM AE so that no indicator
appears in the viewfinder.
Uso del modo crepuscular
Es posible grabar objetos brillantes en lugares
oscuros sin estropear el ambiente. La apertura se
ajusta automáticamente para mantener la
exposición adecuada, mientras que la velocidad
de obturación se fija en 1/50. Este modo resulta
efectivo al grabar vistas nocturnas, letreros de
neón o fuegos artificiales.
(1)Ajuste AUTO LOCK/HOLD en la posición
central.
(2)Pulse PROGRAM AE para que el indicador
aparezca en el visor electrónico.
(3)Gire el dial de control para seleccionar el
indicador Å.
3
Para volver al modo de ajuste
automático
Ajuste AUTO LOCK/HOLD en AUTO LOCK, o
pulse PROGRAM AE para que el visor
electrónico no muestre ningún indicador.
When shooting an excessively bright subject
Autofocus may not work effectively. Focus
manually then.
66
Al filmar objetos excesivamente brillantes
Es posible que el modo de enfoque automático
no resulte efectivo. En este caso, realice el
enfoque manualmente.
CCD-TR2200E/TR3300E 3-856-204-12 (1)
Page 67

Using manual mode
Uso del modo manual
The manual mode features an advanced
recording technique by controlling the exposure
with a combination of adjustments of the
aperture value, shutter speed and gain level.
When to use manual mode
[b] [c] [d][a]
•When the background is too bright
(backlighting) [a], open the aperture (lower F
value).
•When the subject is bright with dark
background [b], close the aperture (higher F
value).
•When the subject moves at high speed [c], set
the shutter speed value faster.
•When a dark scene is shot overexposed [d],
lower the gain.
Variation
exposure
0.5 EV
0.5 EV
1.0 EV
0.5 EV
Aperture
Shutter
speed
Item
Gain
CCD-
TR3300E
only
Selectable
steps
16 steps
Fast:
16 steps
Slow:
4 steps
8 steps
Note on recording in manual mode
We recommend that you adjust the focus and
white balance manually.
Brighter
of
˜ ˜ ˜ ˜ ˜
Darker
F1.6
F19
(CLOSE)
1/50
1/10000
1/3
1/25
+18 dB
–3 dB
El modo manual ofrece una avanzada técnica de
grabación, que permite controlar la exposición
con una combinación de ajustes del valor de
apertura, velocidad de obturación y nivel de
ganancia.
Cuándo emplear el modo
manual
•Si el fondo es demasiado brillante (iluminación
a contraluz) [a], abra la apertura (valor F más
bajo).
•Si el objeto presenta brillo con un fondo oscuro
[b], cierre la apertura (valor F más alto).
•Si el objeto se mueve a alta velocidad [c], ajuste
la velocidad de obturación en un valor mayor.
•Si filma una escena oscura con exceso de
exposición [d], disminuya la ganancia.
Más
de
brillante
˜ ˜ ˜ ˜ ˜
Más
oscuro
F1.6
F19
(CLOSE)
1/50
1/10000
1/3
1/25
+18 dB
–3 dB
16
8
Variación
exposición
0,5 EV
0,5 EV
1,0 EV
0,5 EV
Elemento
Apertura
Velocidad
de
obturación
Ganancia
sólo
CCD-
TR3300E
Intervalos
seleccionables
intervalos
Rápido: 16
intervalos
Lento: 4
intervalos
intervalos
Nota sobre la grabación en modo manual
Se recomienda ajustar manualmente el enfoque y
el balance de blancos.
Advanced Operations / Operaciones avanzadas
CCD-TR2200E/TR3300E 3-856-204-12 (1)
67
Page 68

Using manual mode Uso del modo manual
Shooting in manual mode
In manual mode, you can adjust the aperture,
shutter speed and gain independently. Use the
graph on page 71 for your reference to set a value
of each item.
(1)Set AUTO LOCK/HOLD to the centre
position.
(2)Press the button of the item you want to
adjust (IRIS, SHUTTER SPEED, or GAIN).
(3)Turn the control dial to adjust the selected
item.
1
AUTO LOCK HOLD
Filmación en modo manual
En este modo, es posible ajustar por separado la
apertura, la velocidad de obturación y la
ganancia. Para ajustar el valor de cada elemento,
emplee como referencia el gráfico de la página
71.
(1)Ajuste AUTO LOCK/HOLD en la posición
central.
(2)Pulse el botón del elemento que desee ajustar
(IRIS, SHUTTER SPEED o GAIN).
(3)Gire el dial de control para ajustar el elemento
seleccionado.
2
F8
IRIS
Display window/Visor principal
IRIS SHTR
GAIN
0 dB
Display window/Visor principal
GAIN
SHUTTER SPEED
F8
0 dB
50
50
Adjustment of each item
To adjust the aperture
You can select the aperture from the following
16 values: F1.6, F2, F2.4, F2.8, F3.4, F4, F4.8, F5.6,
F6.8, F8, F9.6, F11, F14, F16, F19, CLOSE. To open
the aperture (larger aperture), select a lower
value.
68
3
Ajuste de cada elemento
Para ajustar la apertura
Es posible seleccionar la apertura entre los 16
valores siguientes: F1.6, F2, F2.4, F2.8, F3.4, F4,
F4.8, F5.6, F6.8, F8, F9.6, F11, F14, F16, F19,
CLOSE. Para abrir la apertura (apertura mayor),
seleccione un valor inferior.
CCD-TR2200E/TR3300E 3-856-204-12 (1)
Page 69

To adjust the shutter speed
You can select the shutter speed from the
following 20 (CCD-TR3300E), or 16 (CCDTR2200E) speeds:
— CCD-TR3300E:
1/3, 1/6, 1/12, 1/25, 1/50, 1/75, 1/100, 1/120,
1/150, 1/215, 1/300, 1/425, 1/600, 1/1000,
1/1250, 1/1750, 1/2500, 1/3500, 1/6000, 1/10000.
— CCD-TR2200E:
1/50, 1/75, 1/100, 1/120, 1/150, 1/215, 1/300,
1/425, 1/600, 1/1000, 1/1250, 1/1750, 1/2500,
1/3500, 1/6000, 1/10000.
To increase the shutter speed, select a smaller
setting (larger value indicator in the viewfinder).
To adjust the gain
You can select the gain from the following
8 levels: –3 dB, 0 dB, +3 dB, +6 dB, +9 dB, +12 dB,
+15 dB, +l8 dB. To increase the gain to brighten
the picture, select a higher level.
If you adjusted the aperture manually prior to
adjusting the gain, the gain level is set according
to the aperture setting.
To change the setting
Press the button of the item you want to change
so that the selected item indicator highlights in
the viewfinder. Turn the control dial to change to
the desired setting.
To lock the manual settings
After adjusting the setting, set AUTO LOCK/
HOLD to HOLD. The IRIS, SHUTTER SPEED,
GAIN, WHT BAL buttons and the control dial do
not work in these manual settings.
To return to automatic adjustment
mode
Press repeatedly the button of the item you want
to return to automatic adjustment mode until the
indicator disappears in the viewfinder. To return
all the items to automatic mode, set AUTO
LOCK/HOLD to AUTO LOCK.
Note on gain level
When you select a gain level that is too high, the
picture may be distorted.
Para ajustar la velocidad de obturación
Es posible seleccionar la velocidad de obturación
entre las 20 (CCD-TR3300E) o 16 (CCD-TR2200E)
velocidades siguientes:
— CCD-TR3300E:
1/3, 1/6, 1/12, 1/25, 1/50, 1/75, 1/100, 1/120,
1/150, 1/215, 1/300, 1/425, 1/600, 1/1000,
1/1250, 1/1750, 1/2500, 1/3500, 1/6000, 1/10000.
— CCD-TR2200E:
1/50, 1/75, 1/100, 1/120, 1/150, 1/215, 1/300,
1/425, 1/600, 1/1000, 1/1250, 1/1750, 1/2500,
1/3500, 1/6000, 1/10000
Para aumentar la velocidad de obturación,
seleccione un ajuste menor (indicador de valor
mayor del visor electrónico).
Para ajustar la ganancia
Es posible seleccionar la ganancia entre los 8
niveles siguientes: –3 dB, 0 dB, +3 dB, +6 dB,
+9 dB, +12 dB, +15 dB, +18 dB. Para aumentar la
ganancia con el fin de incrementar el brillo de la
imagen, seleccione un nivel mayor.
Si ajusta manualmente la apertura antes de
ajustar la ganancia, el nivel de ésta se define en
función del ajuste de apertura.
Para cambiar el ajuste
Pulse el botón correspondiente al elemento que
desee cambiar de forma que el indicador del
elemento seleccionado aparezca resaltado en el
visor electrónico. Gire el dial de control para
cambiar al ajuste que desee.
Para bloquear los ajustes manuales
Después de realizar el ajuste, sitúe AUTO
LOCK/HOLD en HOLD. Los botones IRIS,
SHUTTER SPEED, GAIN, WHT BAL y el dial de
control no funcionarán en estos ajustes manuales.
Para volver al modo de ajuste
automático
Pulse varias veces el botón del elemento que
desee recuperar en modo de ajuste automático
hasta que el indicador desaparezca del visor
electrónico. Para recuperar todos los elementos
en modo automático, ajuste AUTO LOCK/
HOLD en AUTO LOCK.
Advanced Operations / Operaciones avanzadas
Nota sobre el nivel de ganancia
Si selecciona un nivel de ganancia demasiado
alto, la imagen puede distorsionarse.
CCD-TR2200E/TR3300E 3-856-204-12 (1)
69
Page 70

Using slow shutter (CCD-TR3300E only)
Uso del obturador a baja
velocidad (sólo CCD-TR3300E)
If you want to record a dark picture brightly, or
represent the movement of the subject lively, set
the shutter speed to 1/25, 1/12, 1/6 or 1/3 (Slow
shutter).
(1)Set AUTO LOCK/HOLD to the centre
position.
(2)Press SHUTTER SPEED.
The shutter speed value indicator appears in
the display.
(3)Turn the control dial to select the desired
shutter speed (1/25, 1/12, 1/6 or 1/3). As the
indicator in the viewfinder becomes smaller,
the shutter speed becomes slower.
1
AUTO LOCK HOLD
2
SHUTTER SPEED
Display window/Visor principal
50
50
SHTR
Si desea grabar con brillo una imagen oscura o
representar vivamente el movimiento del objeto,
ajuste la velocidad de obturación en 1/25, 1/12,
1/6 o 1/3 (Obturación a baja velocidad).
(1)Ajuste AUTO LOCK/HOLD en la posición
central.
(2)Pulse SHUTTER SPEED.
El visor muestra el indicador de valor de
velocidad de obturación.
(3)Gire el dial de control para seleccionar la
velocidad de obturación que desee (1/25,
1/12, 1/6 o 1/3). Esta será más lenta según
disminuye el indicador del visor electrónico.
3
To return to automatic adjustment
mode
Press SHUTTER SPEED repeatedly until the
shutter speed value indicator disappears in the
viewfinder.
When recording with slow shutter
function
•You cannot use flash motion, overlap, wipe,
still or luminauncekey function.
•Autofocus may not be effective. Focus
manually using a tripod.
70
Para volver al modo de ajuste
automático
Pulse SHUTTER SPEED varias veces hasta que el
indicador de valor de velocidad de obturación
desaparezca del visor electrónico.
Si graba con la función de obturador
a baja velocidad
•No es posible emplear las funciones de
movimiento por impulsos, superposición,
desplazamiento de imágenes, imagen fija ni de
luminancia.
•El enfoque automático puede no ser efectivo.
Realice el enfoque manualmente empleando un
trípode.
CCD-TR2200E/TR3300E 3-856-204-12 (1)
Page 71

Tips for manual adjustment
Consejos relativos a ajustes manuales
When you shoot in manual adjustment mode, we
recommend you to keep the exposure fixed to
make a clear picture. This section shows you
what the exposure is and how to adjust each item
with the exposure fixed.
Understanding the exposure
Exposure is determined by aperture, shutter
speed and gain, and is measured in EV (exposure
value) as shown below.
Total EV =EV from aperture control
+ EV from shutter speed control
+ EV from gain control
The total exposure value can be varied or
maintained at a constant level by controlling the
aperture, gain and shutter speed.
Use the following graph to select the setting. One
scale corresponds to 0.5 EV.
[a] Vertical axis: Aperture value (F value)
[b] Horizontal axis: Shutter speed
(per second)
[c] Diagonal axis: Gain level (dB)
Si filma en modo de ajuste manual, se
recomienda mantener fija la exposición con el fin
de obtener imágenes nítidas. En esta sección se
describe el concepto de exposición y el
procedimiento de ajuste de cada elemento con la
exposición fijada.
Concepto de exposición
La exposición se determina mediante la apertura,
velocidad de obturación y ganancia, y se mide en
EV (valor de exposición) como se muestra a
continuación.
EV total= EV del control de apertura
+ EV del control de velocidad de
obturación
+ EV del control de ganancia
El valor total de exposición puede modificarse o
mantenerse en un nivel constante mediante el
control de la apertura, ganancia y velocidad de
obturación.
Utilice el siguiente gráfico para seleccionar el
ajuste. Una escala corresponde a un EV de 0,5.
[a] Eje vertical: Valor de apertura (valor F)
[b] Eje horizontal:Velocidad de obturación
(por segundo)
[c] Eje diagonal: Nivel de ganancia (dB)
Advanced Operations / Operaciones avanzadas
[a]
(F)
1.6
2
2.4
2.8
3.4
4
4.8
5.6
6.8
8
9.6
11
14
16
19
: Brighter/Más brillante
[c] (dB)
0
+6
+9
–3
+3
+12
+15
+18
1
2
3
12
5075100
25
6
425
215
1000
1750
3500
1250
300
150
2500
600
[b] (1/sec) (1/seg)
10000
6000
71
CCD-TR2200E/TR3300E 3-856-204-12 (1)
Page 72

Tips for manual adjustment
Consejos relativos a ajustes
manuales
Creating a desired picture
without changing the exposure
When the aperture value is F11, the shutter
speed is 1/50, and the gain level is 0 dB, adjust
the aperture value manually to F5.6, as an
example.
If you change the aperture value from F11 to F5.6
in the above example, the exposure from
aperture control becomes brighter by +2 EV.
Adjust the shutter speed and the gain so that the
exposure becomes darker by –2 EV to not change
the total exposure.
Example 1: changing only the shutter
speed
To reduce the exposure by –2 EV using the
shutter speed, you should change the shutter
speed from 1/50 to 1/215 (1). (5 steps increase)
Example 2: setting the shutter speed
to 1/425 and changing the gain level
When the shutter speed is changed from 1/50 to
1/425, the EV from the shutter speed control
changes to –3 EV. To maintain total exposure,
+1 EV (2 steps) should be added by increasing
the gain level. Change the gain level from 0 dB to
+6 dB (2). Note that when you set the gain level
higher, the picture may be distorted.
Notes on manual adjustment
•When recording outdoors, the brightness of a
subject may be affected by weather.
•When recording conditions change, we
recommend that you reset each item.
Creación de una imagen
determinada sin cambiar la
exposición
Si el valor de apertura es F11, la velocidad de
obturación 1/50 y el nivel de ganancia 0 dB,
ajuste manualmente el valor de apertura en
F5.6 a modo de ejemplo.
Si varía el valor de apertura de F11 a F5.6 en el
ejemplo anterior, la exposición del control de
apertura será más brillante en +2 EV. Ajuste la
velocidad de obturación y la ganancia de forma
que la exposición se oscurezca en –2 EV y la
exposición total no varíe.
Ejemplo 1: Modificación sólo de la
velocidad de obturación
Para reducir la exposición en –2 EV empleando la
velocidad de obturación, cambie ésta de 1/50 a
1/215 1. (incremento de 5 intervalos)
Ejemplo 2: Ajuste de la velocidad de
obturación en 1/425 y cambio del
nivel de ganancia
Si cambia la velocidad de obturación de 1/50 a
1/425, el valor EV del control de dicha velocidad
cambia a –3 EV. Para mantener la exposición
total, debe añadirse el valor +1 EV (2 intervalos)
incrementando el nivel de ganancia. Cambie éste
de 0 dB a +6 dB 2. Observe que si ajusta el nivel
de ganancia en un valor superior, la imagen
puede distorsionarse.
Notas sobre el ajuste manual
•Si graba en exteriores, el brillo del objeto puede
verse afectado por las condiciones
meteorológicas.
•Si las condiciones de grabación cambian, se
recomienda ajustar cada elemento.
72
CCD-TR2200E/TR3300E 3-856-204-12 (1)
Page 73

Shooting with backlighting
Filmación a
contraluz
When you shoot a subject with the light source
behind the subject or a subject with a light
background, use the BACK LIGHT function.
Press BACK LIGHT. The c indicator appears in
the viewfinder.
[a]Subject is too dark because of backlight.
[b]Subject becomes bright with backlight
compensation.
After shooting
Be sure to release this adjustment condition by
pressing BACK LIGHT again. The c indicator
disappears. Otherwise, the picture will be too
bright under normal lighting conditions.
This function is also effective under following
conditions:
•On snow, e.g. at a ski resort
•At the beach under strong sunshine
•A subject with a light source nearby or a mirror
reflecting light
•A white subject against a white background.
Especially when you shoot a person wearing
shiny clothes made of silk or synthetic fiber, his
or her face tends to become dark if you do not
use this function.
Note on the backlight function
If you press IRIS, SHUTTERSPEED or GAIN, the
backlight function is cancelled.
Si filma un objeto con la fuente luminosa situada
detrás de él, o bien un objeto con un fondo
luminoso, emplee la función BACK LIGHT.
Pulse BACK LIGHT. El indicador c aparece en el
visor electrónico.
[a]
[b]
BACK LIGHT
[a]El objeto presenta demasiada oscuridad
debido a la iluminación de fondo.
[b]El objeto presenta más brillo con la
compensación de la iluminación de fondo.
c
Tras la filmación
Asegúrese de cancelar este ajuste; para ello,
vuelva a pulsar BACK LIGHT. El indicador c
desaparecerá. En caso contrario, la imagen
presentará demasiado brillo en condiciones
normales de iluminación.
Esta función resulta también efectiva en las
siguientes condiciones:
•En la nieve, por ejemplo, en una estación de
esquí
•En la playa con intensa iluminación solar
•Objetos con fuentes de iluminación cercanas o
con espejos que reflejen luz
•Objetos blancos con fondo blanco.
Especialmente si filma una persona cuyas
prendas de vestir sean brillantes y
confeccionadas con seda o fibras sintéticas, su
rostro tenderá a oscurecerse si no emplea esta
función.
Advanced Operations / Operaciones avanzadas
Nota sobre la función de filmación a contraluz
Si pulsa IRIS, SHUTTERSPEED o GAIN, esta
función se cancelará.
CCD-TR2200E/TR3300E 3-856-204-12 (1)
73
Page 74

Adjusting the brightness of the picture
Ajuste del brillo de la imagen
When you shoot in a snowfield or on a beach in
the mid-summer and the subject may become
dark because of the extreme brightness, you can
change the brightness of the picture in the menu
system. You can also use this function when the
subject is too bright — subjects on stages, night
views, etc.
(1)While the camcorder is in Standby mode,
press MENU to display the menu in the
viewfinder.
(2)Turn the control dial to select AE SHIFT, then
press the control dial.
(3)Turn the control dial to adjust the brightness
of the picture. The picture becomes brighter
when you turn the control dial up, and darker
when you turn the control dial down. (Three
levels for each direction.)
(4)Press MENU. The menu display disappears
and the AE shift indicator appears in the
viewfinder.
1
MENU
2
MENU
WIND
COMMANDER
Hi8
COUNTER
ORC TO SET
REC MODE
TITLE COL
[MENU] : END
MENU
TITLE POS
TITLE LANG
TITLE1 SET
TITLE2 SET
D ZOOM
AE SHIFT
BEEP
[MENU] : END
OFF
Cuando filme en una zona nevada o en una playa
en pleno verano y el objeto se oscurezca debido
al exceso de brillo, es posible cambiar el brillo de
la imagen en el sistema de menú. Igualmente
puede emplear esta función si el objeto presenta
demasiado brillo — objetos sobre escenarios,
vistas nocturnas, etc.
(1)Mientras la videocámara se encuentra en
modo de espera, pulse MENU para que el
menú aparezca en el visor electrónico.
(2)Gire el dial de control para seleccionar AE
SHIFT y, a continuación, púlselo.
(3)Gire el dial de control para ajustar el brillo de
la imagen. El brillo de ésta aumentará al girar
el dial hacia arriba, y disminuirá al girarlo
hacia abajo. (Tres niveles para cada dirección.)
(4)Pulse MENU. El menú desaparecerá, mientras
que el indicador de desplazamiento AE
aparecerá en el visor electrónico.
3
4
MENU
MENU
AE SHIFT
[MENU] : END
AS +3
To cancel the AE shift
Set AE SHIFT to the centre position in the menu
system.
When adjusting the brightness
We recommend you to connect the camcorder to
a TV so that you can monitor the brightness on
the TV.
Note on the AE shift
You cannot change AE shift while adjusting the
aperture manually.
74
Para cancelar el desplazamiento AE
Ajuste AE SHIFT en la posición central en el
sistema de menú.
Al ajustar el brillo
Se recomienda conectar la videocámara a un
televisor para poder controlar el brillo en éste.
Nota sobre el desplazamiento AE
No es posible cambiar el desplazamiento AE
mientras ajusta manualmente la apertura.
CCD-TR2200E/TR3300E 3-856-204-12 (1)
Page 75

Adjusting the white balance
Ajuste del balance de blancos
White balance is the adjustment to make white
subjects look white and to obtain a more natural
colour balance.
Selecting the appropriate mode
Select the appropriate white balance mode under
the following conditions:
Este ajuste se realiza para que los objetos blancos
parezcan blancos y para obtener un balance de
color más natural.
Selección del modo adecuado
Seleccione el modo adecuado de balance de
blancos en la siguientes condiciones:
[a] [b] [c] [d]
∑
∑ One push white balance mode
•Shooting with the lighting condition on the
subject set and with the white balance set in a
particular condition
•Monochromatic subject or background [a]
∑ Modo de balance de blancos con
un solo movimiento
•Filmación con la condición de iluminación del
objeto ajustada y con el balance de blancos
ajustado en una determinada condición
•Objeto o fondo monocromático [a]
w Outdoor mode
•Under a colour matching fluorescent lamp
•Recording a sunset/sunrise, just after sunset,
just before sunrise [b], neon signs, or fireworks
[c]
e Indoor mode
•Lighting condition changes quickly. [d]
•Too bright place such as photography studios
•Under sodium lamps or mercury lamps
When you shoot under a fluorescent lamp,
however, we recommend you to adjust the white
balance automatically. You may not get an
appropriate white balance when you record in
the indoor mode.
w Modo de exteriores
•Bajo una lámpara fluorescente con
concordancia de colores
•Grabación de puestas y salidas del sol,
inmediatamente después de la puesta de sol,
inmediatamente antes de la salida del sol [b],
letreros de neón o fuegos artificiales [c]
e Modo de interiores
•La condición de iluminación cambia
rápidamente. [d]
•Lugares con demasiada iluminación, como
estudios fotográficos
•Con lámparas de sodio o de mercurio
No obstante, se recomienda ajustar el balance de
blancos automáticamente cuando filme con
lámparas fluorescentes. Es posible que no
obtenga un balance de blancos adecuado cuando
grabe en el modo de interiores.
Advanced Operations / Operaciones avanzadas
CCD-TR2200E/TR3300E 3-856-204-12 (1)
75
Page 76

Ajuste del balance de
blancosAdjusting the white balance
Setting the white balance mode
(1)Set AUTO LOCK/HOLD to the centre
position.
(2)Press WHT BAL so that the white balance
indicator appears in the viewfinder.
(3)Turn the control dial to select the desired
mode.
When you select one push white balance
mode, press the control dial after selecting the
one push white balance indicator.
1
AUTO LOCK HOLD
WHT BAL
2
Ajuste del modo de balance de
blancos
(1)Ajuste AUTO LOCK/HOLD en la posición
central.
(2)Pulse WHT BAL para que el visor electrónico
muestre el indicador de balance de blancos.
(3)Gire el dial de control para seleccionar el
modo que desee.
Si selecciona el modo de balance de blancos
con un solo movimiento, pulse el dial de
control después de seleccionar el indicador de
balance de blancos con un solo movimiento.
3
∑
w
e
Display window/Visor principal
WHT BAL ∑
WHT BAL
w
e
WHT BAL
To return to automatic white balance
mode
Press WHT BAL so that the white balance
indicator disappears, or set AUTO LOCK/HOLD
to AUTO LOCK.
When the light source changes
Adjust the white balance again. You cannot select
the one push white balance mode when you are
recording.
•When you record in manual adjustment mode,
set AUTO LOCK/HOLD to AUTO LOCK once,
then set it to the centre position again.
•When you record in automatic adjustment
mode, or when you replace the battery pack,
point the lens toward a white object for approx.
10 seconds, then start recording.
76
Para volver al modo automático de
balance de blancos
Pulse WHT BAL hasta que desaparezca el
indicador de balance de blancos, o ajuste AUTO
LOCK/HOLD en AUTO LOCK.
Si la fuente de iluminación cambia
Vuelva a ajustar el balance de blancos. No es
posible seleccionar el modo de balance de
blancos con un solo movimiento durante la
grabación.
•Cuando grabe en modo de ajuste manual, ajuste
AUTO LOCK/HOLD en AUTO LOCK una vez
y, a continuación, vuelva a ajustarlo en la
posición central.
•Cuando grabe en modo de ajuste automático, o
después de haber sustituido el paquete de
batería, oriente el objetivo hacia un objeto
blanco durante unos 10 segundos y, a
continuación, inicie la grabación.
CCD-TR2200E/TR3300E 3-856-204-12 (1)
Page 77

Adjusting white balance
manually (One push white
balance mode)
You can set the white balance for a particular
lighting condition manually. When the white
balance is set manually, the colours of the object
being shot will continue to look natural as long
as the lighting conditions remain the same.
When a particular colour is shot under different
lighting sources, the colour often seems to change
color. When shooting subjects under changing
lighting conditions, set the white balance to the
AUTO mode; the subject colours will remain
consistent even under changing lighting
conditions.
(1)Set AUTO LOCK/HOLD to the centre
position.
(2)Press WHT BAL, then turn the control dial to
select one push white balance indicator.
(3)Attach the supplied white lens cap and point
the camcorder at a subject if you are shooting
outdoors or at a source of light if shooting
indoors.
(4)Press the control dial.
The one push white balance indicator starts to
flash quickly. Once the white balance is set,
the indicator stops flashing.
When you are shooting under studio lighting or a
video light, we recommend you to record in
indoor mode.
Ajuste manual (modo de
balance de blancos con un solo
movimiento)
Es posible ajustar manualmente el balance de
blancos para determinadas condiciones de
iluminación. Si lo ajusta manualmente, los
colores del objeto que esté filmando continuarán
mostrándose naturales siempre que las
condiciones de iluminación no cambien. Si filma
un determinado color con fuentes de iluminación
diferentes, a menudo dicho color parece cambiar.
Cuando filme objetos bajo condiciones de
iluminación cambiantes, ajuste el balance de
blancos en modo AUTO; de esta forma, los
colores del objeto permanecerán estables aunque
dichas condiciones sean cambiantes.
(1)Ajuste AUTO LOCK/HOLD en la posición
central.
(2)Pulse WHT BAL y, a continuación, gire el dial
de control para seleccionar el indicador de
balance de blancos con un solo movimiento.
(3)Fije la tapa blanca del objetivo suministrada y
oriente la videocámara hacia un objeto si filma
en exteriores o hacia una fuente de
iluminación si filma en interiores.
(4)Pulse el dial de control.
El indicador de balance de blancos con un
solo movimiento comienza a parpadear
rápidamente. Una vez ajustado el balance de
blancos, el indicador dejará de parpadear.
Cuando filme con iluminación de estudio o con
una lámpara de vídeo, se recomienda grabar en
modo de interiores.
Advanced Operations / Operaciones avanzadas
1 3
AUTO LOCK HOLD
WHT BAL
2
∑
CCD-TR2200E/TR3300E 3-856-204-12 (1)
4
77
Page 78

Ajuste del balance de
blancosAdjusting the white balance
To return to automatic white balance
adjustment mode
Press WHT BAL so that the one push white
balance indicator disappears in the viewfinder.
Note on the one push white balance mode
indicator
Slowly flashing indicator: white balance has not
been set.
Quickly flashing indicator: white balance is being
adjusted with the control dial.
Lighting: white balance has been set.
Note on the one push white balance mode
setting
The white balance setting for one push white
balance mode is retained even when you turn the
power off or change white balance mode, as long
as the power source is installed in the camcorder.
The setting is retained for about 1 hour even
when you disconnect the power source if the
lithium battery is installed in the camcorder.
If the one push white balance indicator does
not stop flashing when you press the control
dial
The lighting is probably insufficient or you have
forgotten to put the white lens cap on. If this
appears to be the case, increase the lighting or
attach the white cap and try again. If the
indicator still continues to flash after trying this,
press WHT BAL to set the camcorder to the
automatic white balance mode (no indicator) or
set AUTO LOCK/HOLD to AUTO LOCK.
Para volver al modo de ajuste
automático del balance de blancos
Pulse WHT BAL para que el indicador de balance
de blancos con un solo movimiento desaparezca
del visor electrónico.
Nota sobre el indicador de modo de balance
de blancos con un solo movimiento
Indicador con parpadeo lento: No se ha ajustado
el balance de blancos. Indicador con parpadeo
rápido: El balance de blancos está ajustándose
con el dial de control.
Iluminado: El balance de blancos se ha ajustado.
Nota sobre el ajuste del modo de balance de
blancos con un solo movimiento
Este ajuste se mantiene aunque desactive la
alimentación o cambie el modo de balance de
blancos, siempre que la fuente de alimentación
esté instalada en la videocámara. El ajuste se
conserva durante 1 hora aproximadamente
aunque desconecte la fuente de alimentación si la
pila de litio está instalada en la videocámara.
Si el indicador de balance de blancos con un
solo movimiento no deja de parpadear al
pulsar el dial de control
Probablemente la iluminación es insuficiente o ha
olvidado colocar la tapa blanca del objetivo. Si
este es el caso, aumente la iluminación o fije la
tapa blanca y vuelva a intentarlo. Si aún así el
indicador sigue parpadeando, pulse WHT BAL
para ajustar la videocámara en el modo
automático de balance de blancos (sin indicador)
o ajuste AUTO LOCK/HOLD en AUTO LOCK.
Searching the boundaries
of recorded date
You can search for the boundary between
recording dates using the Date Code
automatically recorded on the tape.
There are two modes:
•Searching for the beginning of a specific date,
and playing back from there (Date Search)
•Searching for the beginning of all days, one
after another, playing back about 10 seconds of
each (Date Scan)
Each time you press DATE SEARCH, the mode
changes as follows:
Date Search n Date Scan n nothing
78
n
Búsqueda de los límites
de las fechas de
grabación
Es posible buscar los límites de las fechas de
grabación mediante el uso del código de fecha
grabado automáticamente en la cinta. Existen dos
modos:
•Búsqueda de una fecha específica para iniciar la
reproducción a partir de ella (Búsqueda de
fechas)
•Búsqueda del comienzo de todos los días, una
tras otro, para reproducir 10 segundos
aproximadamente de cada uno de ellos
(Exploración de fechas)
Cada vez que pulse DATE SEARCH, el modo
cambia de la siguiente forma:
Búsqueda
Date Search n Date Scan n nothing
de fechas
n
CCD-TR2200E/TR3300E 3-856-204-12 (1)
Exploración
de fechas
nada
Page 79

To search for the beginning of a
specific date
(1) Set the POWER switch to PLAYER. The tape
transport buttons light up.
(2)
Press DATE SEARCH on the Remote Commander.
(3) When the current position is [b], press 0 to
search towards [a] or press ) to search
towards [c].
To scan the beginning of all days
(1) Set the POWER switch to PLAYER.
(2) Press DATE SEARCH on the Remote
Commander twice.
(3) Press 0 or ). Date Scan starts.
4 7 19963 7 1996 7 7 1996
[a] [b] [c]
Para buscar una fecha específica
(1)
Ajuste el interruptor POWER en PLAYER. Los
botones de transporte de cinta se iluminan.
(2)
Pulse DATE SEARCH en el mando a distancia.
(3)Cuando la posición actual sea [b], pulse 0
para realizar la búsqueda hacia [a] o ) para
realizar la búsqueda hacia [c].
Para explorar el comienzo de todos
los días
(1)Ajuste el interruptor POWER en PLAYER.
(2)Pulse DATE SEARCH en el mando a distancia
dos veces.
(3)
Pulse 0 o ). Se inicia la exploración de fechas.
Advanced Operations / Operaciones avanzadas
POWER
1
To stop searching or scanning
Press one of the following tape transport buttons:
·, π, 0 or ).
To view pictures during searching or scanning
Press · and then press 0 or ).
Notes on Date Search and Date Scan mode
•If a day’s recording is not longer than 2
minutes, the camcorder may not accurately find
its boundaries.
•Date Search and Date Scan do not function on a
tape recorded by a camcorder without the Data
Code function. Your camcorder has the Data
Code function.
•When searching the boundaries of date on the
tape, the forwarded or reversed picture appears
in the viewfinder. Visual noise also appears
during this searching. This is not a mulfunction.
CAMERA
OFF
PLAYER
SEARCH
2
DATE INDEX
Display window/Visor principal
REW FF
3
Para detener la búsqueda o la exploración
Pulse alguno de los siguientes botones de
transporte de cinta: ·, π, 0 o ).
Para visualizar las imágenes durante la
búsqueda o la exploración
Pulse · y, a continuación, 0 o ).
Notas sobre los modos de búsqueda y
exploración de fechas
•Si la grabación de un día no es superior a 2
minutos, es posible que la videocámara no
localice sus límites con precisión.
•Las funciones de búsqueda y exploración de
fechas no se activan si la cinta se ha grabado
con una videocámara desprovista de la función
de código de datos. Esta videocámara dispone
de dicha función.
•
Al buscar los límites de fechas en la cinta, el visor
electrónico muestra la imagen posterior o anterior.
Durante esta búsqueda, aparece también ruido
visual; esto no es un fallo de funcionamiento.
DATE
SEARCH
DATE SEARCH
#
3
)
0
79
CCD-TR2200E/TR3300E 3-856-204-12 (1)
Page 80

Returning to a preregistered position
Localización de posiciones
previamente registradas
Using the Remote Commander, you can easily go
back to the desired point on a tape after
playback. Use the tape counter. If the RC time
code appears in the viewfinder, set COUNTER to
NORMAL in the menu system to display the tape
counter.
(1)During playback, press COUNTER RESET at
the point you later want to locate. The counter
shows “0:00:00” in the viewfinder.
(2)Press π when you want to stop playback.
(3)Press ZERO MEM on the Remote
Commander. The ZERO MEM indicator
flashes in the viewfinder.
(4)Press 0 to rewind or press ) to fast-
forward the tape to the counter’s zero point.
The tape stops automatically when the
counter reaches approximately zero.
COUNTER RESET
STOP
2
0:00:00
Mediante el uso del mando a distancia, es posible
retroceder fácilmente al punto que desee de la
cinta tras la reproducción. Para ello, emplee el
contador de cinta. Si el código de tiempos RC
aparece en el visor electrónico, ajuste COUNTER
en NORMAL en el sistema de menú para
visualizar el contador de cinta.
(1)Durante la reproducción, pulse COUNTER
RESET en el punto que desee localizar
posteriormente. El contador mostrará
“0:00:00” en el visor electrónico.
(2)Pulse π cuando desee detener la
reproducción.
(3)Pulse ZERO MEM en el mando a distancia. El
indicador ZERO MEM parpadeará en el visor
electrónico.
(4)Pulse 0 para rebobinar la cinta o ) para
que avance rápidamente hasta el punto cero
del contador. La cinta se detendrá
automáticamente cuando el contador llegue
aproximadamente a cero.
31
ZERO MEM
0:12:34
ZERO MEM
Notes on the tape counter
•Something must be recorded on the tape in
order for the tape counter to function. Tape
counter does not work on a blank tape.
•There may be a discrepancy of several seconds
from the actual time.
Notes on ZERO MEM
•When you press ZERO MEM, the counter’s
zero point is memorized. Press ZERO MEM
again before rewinding to cancel the memory.
•This function is cancelled automatically once
the tape is rewound or advanced to the point
you pre-registered.
•ZERO MEM does not function during
recording or playing back.
80
4
Notas sobre el contador de cinta
•Para que este contador se active, es preciso que
la cinta contenga alguna grabación. Este
contador no se activará si la cinta es virgen.
•Es posible que exista una diferencia de algunos
segundos con respecto a la hora real.
Notas sobre ZERO MEM
•Si pulsa ZERO MEM, el punto cero del
contador se memorizará. Vuelva a pulsar ZERO
MEM antes de rebobinar para cancelar la
memoria.
•Esta función se cancela automáticamente una
vez que la cinta se rebobina o se avanza hasta el
punto previamente registrado.
•ZERO MEM no se activa durante la grabación o
la reproducción.
CCD-TR2200E/TR3300E 3-856-204-12 (1)
0
3
REW
Page 81

Locating the marking position
Localización de
posiciones marcadas
You can locate the beginning of a desired
programme easily by marking an index signal
during recording or playback and searching for it
later.
Marking an index signal
You can mark an index signal during recording
or playback.
When marking at the beginning of
recording or playback
Press INDEX MARK on the Remote Commander
in recording standby or playback pause mode.
The INDEX MARK indicator appears in the
viewfinder with the MARK indicator flashing.
When recording or playback starts, the MARK
indicator stops flashing. This shows that the
index signal is being marked. Then the INDEX
MARK indicator will disappear.
When marking during recording or
playback
Press INDEX MARK on the Remote Commander
at the point you want to locate later.
Es posible localizar fácilmente el comienzo del
programa que desee mediante la introducción de
una señal de índice durante la grabación o la
reproducción y buscarla más adelante.
Introducción de señales de
índice
Es posible introducir señales de índice durante la
grabación o la reproducción.
Introducción de señales en el
comienzo de la grabación o
reproducción
Pulse INDEX MARK en el mando a distancia
durante el modo de pausa de reproducción o de
espera de grabación. El indicador INDEX MARK
aparecerá en el visor electrónico con el indicador
MARK parpadeando. Al iniciarse la grabación o
la reproducción, el indicador MARK dejará de
parpadear. Esto indica que la señal de índice está
registrándose. A continuación, el indicador
INDEX MARK desaparecerá.
Introducción de señales durante la
grabación o la reproducción
Pulse INDEX MARK en el mando a distancia en
el punto que desee localizar más adelante.
Advanced Operations / Operaciones avanzadas
INDEX
MARK ERASE
INDEX
MARK
81
CCD-TR2200E/TR3300E 3-856-204-12 (1)
Page 82

Locating the marking
position
Localización de posiciones
marcadas
Notes on marking
•Make sure you mark index signals at more than
two-minute intervals. Otherwise, you may not
be able to search for them correctly.
•If you stop recording while the index signal is
being marked (the INDEX MARK indicator
lights in the viewfinder), the search may not be
completed correctly.
•If you mark an index signal on the tape with the
Data Code recorded, the Data Code will be
erased at the point on which the index signal is
marked. When playing back this tape, the
camcorder keeps displaying the Data Code
immediately before the erased one.
•A black band appears when you mark index
signal during playback, and the sound is not
recorded. This does not affect the picture and
the sound that are already recorded.
•You cannot mark an index signal on a tape with
the red mark on the cassette exposed, or on a
tape recorded in LP mode.
•You cannot mark an index signal on an NTSCrecorded tape.
Notas sobre la introducción de señales
•Asegúrese de introducir las señales de índice a
intervalos superiores a dos minutos, ya que en
caso contrario es posible que no pueda
localizarlas correctamente.
•Si detiene la grabación mientras la señal de
índice está registrándose (el indicador INDEX
MARK se ilumina en el visor electrónico), es
posible que la búsqueda no se realice
correctamente.
•Si introduce una señal de índice en una cinta
provista del código de datos, éste se borrará en
el punto que introduzca la señal de índice. Al
reproducir esta cinta, la videocámara mostrará
el código de datos inmediatamente anterior al
borrado.
•Si introduce señales de índice durante la
reproducción, aparecerá una banda negra y el
sonido no se grabará. Esto no afectará a la
imagen ni al sonido ya grabados.
•No es posible introducir señales de índice en
una cinta con la marca roja del videocassette al
descubierto, ni en una cinta grabada en modo
LP.
•No es posible introducir señales de índice en
cintas grabadas en el sistema NTSC.
82
CCD-TR2200E/TR3300E 3-856-204-12 (1)
Page 83

Scanning the beginning of each
marking position – index scan
Use the Remote Commander. To view the picture
on a TV, press DISPLAY.
(1)Press INDEX on the Remote Commander
during normal playback.
(2)Press 0 or ). The tape rewinds or
advances rapidly and plays back for
approximately 10 seconds form the point on
which the index signal was marked. If you
want to continue playback, press ·. When
you do not press any button, the tape is
automatically scanned to the next
programme.
SEARCH
1
DATE INDEX
INDEX 00
SCAN
Exploración del principio de
cada posición marcada
– exploración de índices
Emplee el mando a distancia. Si desea visualizar
la imagen en un televisor, pulse DISPLAY.
(1)Pulse INDEX en el mando a distancia durante
la reproducción normal.
(2)Pulse 0 o ). La cinta se rebobina o
avanza rápidamente y se reproduce durante
aproximadamente 10 segundos a partir del
punto en que ha introducido la señal de
índice. Si desea continuar la reproducción,
pulse ·. Si no pulsa ningún botón, la unidad
explorará la cinta automáticamente hasta el
siguiente programa.
Advanced Operations / Operaciones avanzadas
To cancel index scan mode
Press ·. Normal playback resumes.
2
REW FF
0
#
3
)
INDEX 00
SCAN
Para cancelar el modo de exploración
de índices
Pulse · para reanudar la reproducción normal.
CCD-TR2200E/TR3300E 3-856-204-12 (1)
83
Page 84

Locating the marking
position
Localización de posiciones
marcadas
Locating the desired marking
position – index search
(1)Press INDEX on the Remote Commander
during stop or playback mode.
(2)Press INDEX repeatedly until the index
number of the desired programme is
displayed in the viewfinder.
(3)Press 0 or ). Playback starts from the
beginning of the desired programme.
[a] the current position
[b] the INDEX number
SEARCH
1
DATE INDEX
2
DATE INDEX
SEARCH
INDEX 00
SCAN
INDEX 02
SEARCH
Localización de la posición
marcada que desee – búsqueda
de índices
(1)Pulse INDEX en el mando a distancia durante
el modo de parada o de reproducción.
(2)Pulse INDEX varias veces hasta que el visor
electrónico muestre el número de índice
correspondiente al programa que desee.
(3)Pulse 0 o ). La reproducción se inicia
desde el principio del programa seleccionado.
[a] posición actual
[b] número de índice
[a][b]
#
3
REW FF
3
0
)
To stop index search mode
Press ·. Normal playback resumes.
Note on the index number
The index number (1, 2, etc.) indicates the
distance from the point you are now viewing [a],
regardless of the direction.
84
Para detener el modo de búsqueda
de índices
Pulse · para reanudar la reproducción normal.
Nota sobre los números de índice
El número de índice (1, 2, etc.) indica la distancia
a partir del punto que visualiza actualmente [a],
independientemente del sentido.
CCD-TR2200E/TR3300E 3-856-204-12 (1)
Page 85

Erasing an index signal
Borrado de señales de índice
(1)Locate the index signal to be erased using the
index scan or index search function.
(2)Press INDEX ERASE on the Remote
Commander within 2 to 10 seconds while the
desired programme plays back. After the
index signal is erased, the camcorder returns
to index scan or index search mode,
whichever was used in step 1.
SEARCH
DATE INDEX
1
INDEX
MARK ERASE
2
Notes on erasing
•Press INDEX ERASE more than 2 seconds after
the playback of the desired programme begins.
•You cannot erase the index signal on a tape
with the red mark on the cassette exposed.
•While the index signal is being erased, the
sound cannot be heard and a black band
appears at the bottom of the picture. This will
not affect the recorded sound or picture.
•The camcorder can detect index signals marked
with VCRs, but cannot erase them. VCRs with
an index function can detect index signals
marked with this camcorder but cannot erase
them.
•An index signal may be erased when making
PCM after recording on another VCR in the
portion where the index signal is marked.
Note on and Data Code
When an index signal is erased, Data Code on the
same portion of the tape is also erased.
REW FF
0
#
3
)
(1)Localice la señal de índice que desee borrar
mediante la función de búsqueda o de
exploración de índices.
(2)Pulse INDEX ERASE en el mando a distancia
en un intervalo de 2 a 10 segundos durante la
reproducción del programa que desee. Una
vez borrada la señal de índice, la videocámara
vuelve al modo de búsqueda o de exploración
de índices según el empleado en el paso 1.
Advanced Operations / Operaciones avanzadas
Notas sobre el borrado de señales de índice
•Pulse INDEX ERASE durante más de 2
segundos después de comenzar la reproducción
del programa que desee.
•No es posible borrar señales de índice en una
cinta con la marca roja del videocassette al
descubierto.
•Durante el borrado de la señal de índice, no
será posible escuchar el sonido y aparecerá una
banda negra en la parte inferior de la imagen.
Esto no afecta a la imagen ni al sonido
grabados.
•La videocámara puede detectar señales de
índice introducidas con videograbadoras,
aunque no puede borrarlas. Las
videograbadoras provistas de la función de
índice pueden detectar señales de índice
introducidas con esta videocámara, aunque no
pueden borrarlas.
•Es posible que se borren señales de índice al
emplear el modo PCM después de efectuar la
grabación en otra videograbadora en la parte
donde se ha introducido la señal de índice.
Nota sobre el código de datos
Al borrar una señal de índice, el código de datos
situado en la misma parte de la cinta también se
borrará.
CCD-TR2200E/TR3300E 3-856-204-12 (1)
85
Page 86

Writing the RC Time code on a recorded tape
Escritura del código de tiempos
RC en una cinta grabada
You can write the RC time code on a recorded
tape. Use the Remote Commander.
(1)While pressing the small green button on the
POWER switch, set it to PLAYER.
(2)Rewind the tape to the beginning and set the
camcorder to playback pause mode.
(3)Press TIME CODE WRITE on the Remote
Commander. The TIME CODE WRITE
indicator appears in the viewfinder with the
WRITE indicator flashing.
(4)Press · or P to start playback. The WRITE
indicator stops flashing and the RC time code
writing starts from 0:00:00:00.
POWER
1
2
CAMERA
PLAYER
REW
0
OFF
3
Es posible escribir el código de tiempos RC en
una cinta grabada. Para ello, emplee el mando a
distancia.
(1)Ajuste el interruptor POWER en PLAYER
mientras pulsa el botón verde pequeño del
interruptor.
(2)Rebobine la cinta hasta el principio y ajuste la
videocámara en modo de pausa de
reproducción.
(3)Pulse TIME CODE WRITE en el mando a
distancia. El indicador TIME CODE WRITE
aparecerá en el visor electrónico con el
indicador WRITE parpadeando.
(4)Pulse · o P para iniciar la reproducción. El
indicador WRITE dejará de parpadear y se
iniciará la escritura del código de tiempos RC
a partir de 0:00:00:00.
TIME CODE
3
WRITE
-:--:--:--
TIMECODE
WRITE
PAUSE
PLAY
P
To stop writing the RC time code
Press π (or any tape transport button).
86
PAUSE
4
PLAY
P
0:00:00:01
TIMECODE
WRITE
Para detener la escritura del código
de tiempos RC
Pulse π o cualquier botón de transporte de cinta.
CCD-TR2200E/TR3300E 3-856-204-12 (1)
Page 87

To write the RC time code from the
end of the RC time code recorded
portion
Rewind the tape to the portion on which the RC
time code has been written and set the camcorder
to playback pause mode. Then follow steps 3 and
4 above. The RC time code is written
continuously.
Para escribir el código de tiempos RC
a partir de la parte final de
grabación de dicho código
Rebobine la cinta hasta la parte en que ha escrito
el código de tiempos RC y ajuste la videocámara
en modo de pausa de reproducción. Después,
siga los pasos 3 y 4 anteriores. El código de
tiempos RC se escribirá de forma continua.
Notes on writing the RC time code
•The RC time code writing stops when:
– you press TIME CODE WRITE again before
starting playback.
– you press INDEX before starting playback.
– you change from playback mode to another
mode.
•When you are writing the RC time code from
the middle of a tape without the time code
written, writing starts several frames before the
current picture.
•If you write the RC time code on a recorded
tape, the Data Code is erased.
•You cannot mark the RC time code on the tape
that is recorded in LP mode. Though you can
mark the RC time code on a tape recorded both
in LP mode and SP mode, the RC time code
written in LP mode, however, may not be read
correctly.
•You cannot mark the RC time code on an
NTSC-recorded tape.
•While the index signal is being erased, the
sound cannot be heard and a black band
appears at the bottom of the picture. This will
not affect the recorded sound or picture.
Note on --:--:--:-- indicator
The --:--:--:-- indicator appears during playback
if:
•nothing is recorded.
•the RC time code is unreadable because of the
damage of the tape or because of the noise.
•you recorded using another VCR without RC
time code function.
•you erase the index signal or make PCM after
recording on another VCR in the portion on
which the RC time code is written.
In this case, we recommend you to rewrite the
RC time code.
Notas sobre la escritura del código de tiempos
RC
•El proceso de escritura de este código se
detendrá si:
– vuelve a pulsar TIME CODE WRITE antes del
inicio de la reproducción.
– pulsa INDEX antes del inicio de la
reproducción.
– cambia del modo de reproducción a otro.
•Si escribe el código de tiempos RC desde la
mitad de una cinta sin dicho código, el proceso
de escritura se iniciará a partir de varios
fotogramas anteriores a la imagen actual.
•Si escribe el código de tiempos RC en una cinta
grabada, el código de datos se borrará.
•No es posible introducir el código de tiempos
RC en cintas grabadas en modo LP. Aunque es
posible introducir el código de tiempos RC en
una cinta grabada tanto en modo LP como SP,
el código escrito en modo LP puede no leerse
correctamente.
•No es posible introducir el código de tiempos
RC en cintas grabadas en el sistema NTSC.
•No es posible borrar señales de índice en una
cinta con la marca roja del videocassette al
descubierto.
Nota sobre el indicador --:--:--:--
Este indicador aparece durante la reproducción
si:
•no ha grabado nada.
•el código de tiempos RC es ilegible debido a
que la cinta está dañada o a ruido.
•ha grabado con otra videograbadora carente de
la función de código de tiempos RC.
•borra la señal de índice o emplea el modo PCM
después de grabar en otra videograbadora en la
parte en que ha escrito el código de tiempos
RC.
En este caso, se recomienda volver a escribir el
código de tiempos RC.
Advanced Operations / Operaciones avanzadas
CCD-TR2200E/TR3300E 3-856-204-12 (1)
87
Page 88

Editing onto another tape
Edición en otra cinta
You can create your own video programme by
editing with any other h 8 mm, H Hi8, j
VHS, k S-VHS, VHSC,
or l Betamax VCR that has video/audio inputs.
K
S-VHSC
Before editing
Connect the camcorder to the VCR as described
in “Connections for playback” on page 21.
Set the input selector on the VCR to LINE, if
available.
(1)While pressing the small green button on the
POWER switch, set it to PLAYER.
(2)Set EDIT to ON in the menu system.
POWER
1
CAMERA
OFF
PLAYER
Es posible crear su propio programa de vídeo
mediante la edición con cualquier
videograbadora h 8 mm, H Hi8, j VHS,
k S-VHS, VHSC,
Betamax que disponga de entradas de vídeo/
audio.
K
S-VHSC o l
Antes de editar
Conecte la videocámara a la videograbadora
como se describe en el apartado “Conexiones
para la reproducción” de la página 21. Ajuste el
selector de entrada de la videograbadora en
LINE, si se encuentra disponible.
(1)Ajuste el interruptor POWER en PLAYER
mientras pulsa el botón verde pequeño del
interruptor.
(2)Ajuste EDIT en ON en el sistema de menú.
88
: Signal flow/Flujo de señales
123
MENU
2
CCD-TR2200E/TR3300E 3-856-204-12 (1)
MENU
EDIT OFF
[MENU] : END
ON
Page 89

Starting editing
Inicio de la edición
(1)Insert a blank tape (or a tape you want to
record over) into the VCR, and insert your
recorded tape into the camcorder.
(2)Play back the recorded tape on the camcorder
until you locate the point where you want to
start editing, then press P to set the
camcorder in playback pause mode.
(3)On the VCR, locate the recording start point
and set the VCR in recording pause mode.
(4)Press P on the camcorder and VCR
simultaneously to start editing.
To edit more scenes
Repeat steps 2 to 4.
To stop editing
Press π on both the camcorder and the VCR.
Note on the DISPLAY function
If you have displayed the viewfinder screen
indicators on the TV, erase the indicators by
pressing DISPLAY on the Remote Commander
so that they will not be superimposed on the
edited tape.
(1)Inserte una cinta virgen (o una cinta sobre la
que desee grabar) en la videograbadora, e
inserte la cinta grabada en la videocámara.
(2)Reproduzca la cinta grabada en la
videocámara hasta localizar el punto donde
desee iniciar la edición; a continuación, pulse
P para ajustar la videocámara en modo de
pausa de reproducción.
(3)Localice en la videograbadora el punto de
inicio de grabación y ajuste dicha
videograbadora en modo de pausa de
grabación.
(4)Pulse P en la videocámara y en la
videograbadora simultáneamente para iniciar
la edición.
Para editar más escenas
Repita los pasos 2 a 4.
Para detener la edición
Pulse π en la videocámara y en la
videograbadora.
Nota sobre la función DISPLAY
Si ha mostrado en el televisor los indicadores de
pantalla del visor electrónico, bórrelos pulsando
DISPLAY en el mando a distancia para que no se
sobreimpresionen en la cinta editada.
Advanced Operations / Operaciones avanzadas
CCD-TR2200E/TR3300E 3-856-204-12 (1)
89
Page 90

Additional Information
Información complementaria
Changing the lithium battery in the camcorder
Your camcorder is supplied with a lithium
battery installed. When the battery becomes
weak or dead, the I indicator flashes in the
viewfinder for about 5 seconds when you set the
POWER switch to CAMERA. In this case, replace
the battery with a Sony CR2025 lithium
battery. Use of any other battery may present
a risk of fire or explosion.
The lithium battery for the camcorder lasts for
about 1 year under normal operation. (The
lithium battery that comes installed at the factory
may not last 1 year.)
Note on lithium battery
The lithium battery has positive (+) side and
negative (–) side as illustrated. Be sure to insert
the lithium battery with the positive side
facing out.
Cambio de la pila de
litio de la videocámara
La videocámara se suministra con una pila de
litio instalada. Cuando ésta se debilite o se agote,
el indicador I parpadeará en el visor electrónico
durante unos 5 segundos si ajusta el interruptor
POWER en CAMERA. En este caso, sustitúyala
por una pila de litio Sony CR2025. El uso de
otro tipo de pila puede presentar el riesgo de
incendios o explosiones.
La duración de la pila de litio de la videocámara
es de 1 año aproximadamente en condiciones
normales de uso. (La pila instalada de fábrica
puede no durar 1 año.)
4 7 1996
Nota sobre la pila de litio
Esta pila tiene una cara positiva (+) y otra
negativa (–) como muestra la ilustración.
Asegúrese de insertarla con la cara positiva
hacia fuera.
(+) (--)-
WARNING
The battery may explode if mistreated. Do not
recharge, disassemble, or dispose of in fire.
Caution
Keep the lithium battery out of the reach of
children. Should the battery be swallowed,
consult a doctor immediately.
90
AVISO
La pila puede explotar en caso de uso incorrecto.
No la recargue, desmonte ni la arroje al fuego.
Precaución
Mantenga la pila de litio fuera del alcance de
los niños. En caso de ingestión, póngase
inmediatamente en contacto con un médico.
CCD-TR2200E/TR3300E 3-856-204-12 (1)
Page 91

Changing the lithium battery
Sustitución de la pila de litio
When replacing the lithium battery, keep the
battery pack or other power source attached.
Otherwise, you will need to reset the date, time
and other items in the menu system retained by
the lithium battery.
(1)Open the lid of the lithium battery
compartment.
(2)Push the battery down once and pull it out
from the holder.
(3)Install the lithium battery with the positive (+)
side facing out. Close the lid.
123
Al sustituir la pila, mantenga conectado el
paquete de batería u otra fuente de alimentación.
En caso contrario, será necesario volver a ajustar
en el sistema de menú la fecha, hora y otros
elementos que se mantienen gracias a la pila de
litio.
(1)Abra la tapa del compartimiento de la pila de
litio.
(2)Presione hacia abajo la pila una vez y sáquela
del portapila.
(3)Instale la pila de litio con la cara positiva (+)
hacia fuera. Cierre la tapa.
2
1
Additional Information / Información complementaria
CCD-TR2200E/TR3300E 3-856-204-12 (1)
91
Page 92

Resetting the date and time
Reajuste de la fecha y hora
You can set the date and time in the menu
system.
(1) Press MENU to display the menu in the
viewfinder.
(2) Turn the control dial to highlight CLOCK
SET, and press the control dial to select it.
(3) Turn the control dial to adjust the year, and
then press the control dial.
(4) Set the month, day, hour, and minutes by
turning the control dial and then pressing the
control dial.
(5) Press MENU to erase the menu display.
1
MENU
3
1
2
MENU
WIND
COMMANDER
Hi8
COUNTER
ORC TO SET
REC MODE
TITLE COL
[MENU] : END
OFF
MENU
CLOCK SET
MENU
CLOCK SET
MENU
CLOCK SET
2
12
1997 1 1
1997 1 1
1997 1 1
12 00
Es posible ajustar la fecha y la hora en el sistema
de menú.
(1)Pulse MENU para visualizar el menú en el
visor electrónico.
(2)Gire el dial de control para resaltar CLOCK
SET, y púlselo para seleccionarlo.
(3)Gire el dial de control para ajustar el año y, a
continuación, púlselo.
(4)Ajuste el mes, día, hora y minutos girando el
dial de control y, a continuación, pulsándolo.
(5)Pulse MENU para que desaparezca el menú.
MENU
D ZOOM
AE SHIFT
BEEP
VF BRIGHT
VF PW-SAVE
REC LAMP
CLOCK SET
[MENU] : END
1
4
2
3
4
1996 1 1
12:00:00
CLOCK SET
[MENU] : END
CLOCK SET
[MENU] : END
CLOCK SET
[MENU] : END
CLOCK SET
[MENU] : END
MENU
CLOCK SET
[MENU] : END
1997 7 1
12 00
1997 7 4
12 00
1997 7 4
17 00
1997 7 4
17 30
1996 1 1
12 00
To correct the date and time setting
Repeat the above procedure.
92
Para corregir el ajuste de fecha y
hora
Repita el procedimiento anterior.
CCD-TR2200E/TR3300E 3-856-204-12 (1)
Page 93

To check the preset date and time
Press DATE to display the date indicator in the
viewfinder.
Press TIME to display the time indicator.
When you press the same button again, the
indicator goes off.
The year indicator changes as follows:
1996 1997 2029
Note on the time indicator
The internal clock of this camcorder operates on
a 24-hour cycle.
••••
Para comprobar la fecha y hora
predefinidas
Pulse DATE para que aparezca el indicador de
fecha en el visor electrónico.
Pulse TIME para que aparezca el indicador de
hora.
Si vuelve a pulsar el mismo botón, el indicador se
desactivará.
El indicador de año cambia de la siguiente
forma:
1996 1997 2029
Nota sobre el indicador de hora
El reloj interno de esta videocámara emplea el
ciclo de 24 horas.
••••
Additional Information / Información complementaria
Usable cassettes and
playback modes
Selecting cassette types
This Hi8 system is an extension of the standard 8
mm system, and was developed for higherquality pictures.
You can use Hi8 video and standard 8 mm
cassettes. When you want to record in the Hi8
system, use only Hi8 video cassettes. You cannot
record on standard 8 mm cassettes in the Hi8
system.
If you are going to play back the tape using a
standard 8 mm video recorder/player, you
should record the tape on a standard 8 mm
system.
If you want to use a Hi8 cassette with the
standard 8 mm video recorder system, set Hi8 to
OFF in the menu system before recording.
To play
back in
Hi8
Standard 8
Record using
cassette type
H
H
h
Set Hi8
setting to
AUTO
OFF
AUTO
(or OFF)
Videocassettes
utilizables y modos de
reproducción
Selección de los tipos de
videocassette
Este sistema Hi8 se ha desarrollado a partir del
sistema de 8 mm estándar para proporcionar
imágenes de calidad superior.
Es posible emplear videocassettes Hi8 y de 8 mm
estándar. Si desea grabar en el sistema Hi8,
utilice sólo videocassettes Hi8. No es posible
grabar en videocassettes de 8 mm estándar en el
sistema Hi8.
Si va a reproducir la cinta en una
videograbadora/reproductora de 8 mm estándar,
deberá grabar dicha cinta en un sistema de 8 mm
estándar.
Si desea utilizar un videocassette Hi8 con el
sistema de videograbadora de 8 mm estándar,
ajuste Hi8 en OFF en el sistema de menú antes de
realizar la grabación.
Para
reproducir
en
Hi8
8 estándar
Grabe con un
videocassette de
tipo
H
H
h
Realice el ajuste
de Hi8 en
AUTO
OFF
AUTO
(u OFF)
93
CCD-TR2200E/TR3300E 3-856-204-12 (1)
Page 94

Usable cassettes and playback modes
Videocassettes utilizables y
modos de reproducción
When you play back
The playback mode (SP/LP or Hi8/standard 8
mm) is selected automatically according to the
format in which the tape has been recorded. The
quality of the recorded picture in LP mode,
however, will not be as good as that in SP mode.
Note on AFM HiFi stereo
When you play back a tape, the sound will be in
monaural if:
•You record the tape using this camcorder, then
play it back on an AFM HiFi monaural video
recorder/player.
•You record the tape on an AFM HiFi monaural
video recorder, then play it back on this
camcorder.
Recording mode
When you play back a tape, the SP/LP indicator
in the viewfinder shows the recording mode
LP/SP.
Foreign 8 mm video
Because the TV colour systems differ from
country to country, you may not be able to play
back foreign pre-recorded tapes. Refer to the list
of “Using your camcorder abroad” to check the
TV colour system of foreign countries.
Playing back an NTSC-recorded tape
You can play back tapes recorded in the NTSC
video system using the SP mode on the
viewfinder of this camcorder. If the tape is
recorded in the AFM HiFi system, the AFM HiFi
sound is reproduced. However, note that the
following will occur during playback of an
NTSC-recorded tape.
•When playing back a tape on a TV screen, you
may not get the original colour depending on
the TV.
•You cannot play back a tape recorded in NTSC
video system with LP mode neither on the
viewfinder nor on a TV screen.
•If a tape has portions recorded in PAL and
NTSC video systems, the tape counter reading
is not correct. This discrepancy is due to the
difference between the counting cycle of the
two video systems.
•You cannot edit the NTSC-recorded tape onto
another VCR.
•When you play back on a Multi System TV, set
NTSC PB to the desired mode in the menu
system.
94
Al reproducir
El modo de reproducción (SP/LP o Hi8/8 mm
estándar) se selecciona automáticamente en
función del formato de grabación de la cinta. La
calidad de las imágenes grabadas en modo LP no
será tan buena como en modo SP.
Nota sobre el sistema estéreo AFM
HiFi
Al reproducir una cinta, el sonido será
monofónico si:
•Graba la cinta en esta videocámara y después la
reproduce en una videograbadora/
reproductora monofónica AFM HiFi.
•Graba la cinta en una videograbadora
monofónica AFM HiFi y después la reproduce
en esta videocámara.
Modo de grabación
Al reproducir una cinta, el indicador SP/LP del
visor electrónico muestra el modo de grabación
LP/SP.
Videocassettes de 8 mm extranjeros
Debido a que los sistemas de televisión en color
varían en función del país, es posible que no pueda
reproducir cintas extranjeras previamente grabadas.
Consulte la lista que aparece en el apartado “Uso de
la videocámara en el extranjero” para ver el sistema
de televisión en color de otros países.
Reproducción de cintas grabadas en el sistema
NTSC
Es posible reproducir cintas grabadas en el
sistema de vídeo NTSC con el modo SP en el visor
electrónico de esta videocámara. Si la cinta se ha
grabado en el sistema AFM HiFi, se reproducirá
el sonido AFM HiFi. No obstante, tenga en cuenta
que durante la reproducción de cintas grabadas
en el sistema NTSC se producirá lo siguiente:
•Si reproduce cintas en la pantalla del televisor,
es posible que no obtenga el color original en
función del televisor.
•No es posible reproducir cintas grabadas en el
sistema de vídeo NTSC con el modo LP ni en el
visor electrónico ni en la pantalla del televisor.
•Si la cinta presenta partes grabadas en los
sistemas de vídeo PAL y NTSC, la lectura del
contador de cinta no será correcta. Esta
incorrección se debe a la diferencia entre el ciclo
de conteo de los dos sistemas de vídeo.
•No es posible editar la cinta grabada en el
sistema NTSC en otra videograbadora.
•Si realiza la reproducción en un televisor de
sistema múltiple, ajuste NTSC PB en el sistema
de menú en el modo que desee.
CCD-TR2200E/TR3300E 3-856-204-12 (1)
Page 95

Tips for using the battery pack
Consejos para el uso
del paquete de batería
This section shows you how you can get the most
out of your battery pack.
Preparing the battery pack
Always carry additional batteries
Have sufficient battery pack power to do 2 to 3
times as much recording as you have planned.
Battery life is shorter in a cold
environment
Battery efficiency is decreased, and the battery
will be used up more quickly, if you are
recording in a cold environment.
To save battery power
Turn STANDBY down when not recording to
save battery power.
A smooth transition between scenes can be made
even if recording is stopped and started again.
While you are positioning the subject, selecting
an angle, or looking through the viewfinder lens,
the lens moves automatically and the battery is
used. The battery is also used when a tape is
inserted or removed.
When to replace the battery
pack
While you are using your camcorder, the
remaining battery indicator in the viewfinder
decreases gradually as battery power is used up.
When you use the NP-F530/F730
“InfoLIHTIUM” battery, the minute indicators
appear with the remaining battery indicator
while recording.
En esta sección se describe cómo obtener el
máximo rendimiento del paquete de batería.
Preparación del paquete de
batería
Tenga siempre a disposición pilas
adicionales
Tenga a disposición suficientes pilas como para
poder alimentar la videocámara el doble o el
triple del tiempo planeado.
La duración del paquete se reduce en
ambientes fríos
La eficacia del paquete disminuirá y se agotará
con mayor rapidez, cuando grabe en ambientes
fríos.
Para ahorrar energía del paquete
Gire STANDBY hacia abajo cuando no grabe con
el fin de ahorrar la energía del paquete.
Es posible obtener una transición uniforme entre
escenas aunque detenga y vuelva a iniciar la
grabación. Mientras sitúa el objeto, selecciona un
ángulo o mira por el objetivo del visor
electrónico, dicho objetivo se desplaza
automáticamente, con lo que utiliza la energía del
paquete. Este también se emplea al insertar o
expulsar una cinta.
Cuándo sustituir el paquete de
batería
Mientras emplea la videocámara, el indicador de
batería restante del visor electrónico disminuye
gradualmente a medida que se agota el paquete.
Cuando utilice la pila NP-F530/F730
“InfoLIHTIUM”, los indicadores de los minutos
aparecen junto con el indicador de batería
restante durante la grabación.
Additional Information / Información complementaria
CCD-TR2200E/TR3300E 3-856-204-12 (1)
95
Page 96

Tips for using the battery
pack
Consejos para el uso del
paquete de batería
When the remaining battery indicator reaches the
lowest point, the i indicator appears and starts
flashing in the viewfinder. When you use the NPF530/F730 battery, the i indicator may flash
even if there are still 5 to 10 minutes of charge
remaining.
When the i indicator in the viewfinder changes
from slow flashing to rapid flashing while you
are recording, set the POWER switch to OFF on
the camcorder and replace the battery pack.
Leave the tape in the camcorder to obtain a
smooth transition between scenes after the
battery pack has been replaced.
Notes on the rechargeable
battery pack
Caution
Never leave the battery pack in temperatures
above 60°C (140°F), such as in a car parked in the
sun or under direct sunlight.
The battery pack heats up
During charging or recording, the battery pack
heats up. This is caused by energy that has been
generated and a chemical change that has
occurred inside the battery pack. This is not
cause for concern, and is normal.
About batteries
The InfoLITHIUM is a lithium ion battery pack
which can exchange data with compatible video
equipment about its battery consumption. Sony
recommends that you use the InfoLITHIUM
battery pack with video equipment having the
mark.
When you use this battery pack with video
equipment having the mark, the
video equipment will indicate the remaining
battery time in minutes*. However, if you use it
with video equipment not having this mark, the
remaining battery capacity will not be indicated
in minutes.
* The indication may not be accurate depending
on the condition and environment which the
equipment is used under. If the indication is not
accurate, use the battery pack completely and
then charge it fully. The indication will become
accurate. However, the indication may not
become accurate if you use or leave the battery
pack in a warm place for a long time, or after
you have used the battery pack many times.
96
Cuando el indicador de batería restante alcance
el punto más bajo, aparecerá el indicador i y
comenzará a parpadear en el visor electrónico. Si
utiliza la pila NP-F530/F730, es posible que el
indicador i parpadee aunque haya una carga
restante de 5 a 10 minutos.
Si el parpadeo del indicador i del visor
electrónico pasa de lento a rápido durante la
grabación, ajuste el interruptor POWER de la
videocámara en OFF y sustituya el paquete de
batería. Deje la cinta en la videocámara para
obtener una transición uniforme entre escenas
después de haber sustituido el paquete de
batería.
Notas sobre el paquete de
batería recargable
Precaución
No exponga nunca el paquete a temperaturas
superiores a 60°C (140°F), como en un automóvil
aparcado al sol o bajo la luz solar directa.
Calentamiento del paquete de batería
Durante los procesos de carga y grabación, el
paquete de batería se calienta. Esto se debe a la
energía generada y a cambios químicos
producidos en el interior del paquete. Esto no es
motivo de preocupación, ya que es normal.
Paquete de batería
InfoLITHIUM es un paquete de batería de ion de
litio que puede intercambiar datos con equipos
de vídeo compatibles sobre su consumo de
energía. Sony recomienda el uso de paquetes de
batería InfoLITHIUM con equipos de vídeo que
presenten la marca .
Cuando emplee este paquete de batería con un
equipo de vídeo que presente la marca
, éste indicará el tiempo restante de
energía en minutos*. No obstante, si lo utiliza con
un equipo de vídeo que no presente dicha marca,
la capacidad de energía restante no se indicará en
minutos.
* La indicación puede no mostrarse con precisión
en función de la condición y del entorno en los
que emplee el equipo. Si la indicación no se
muestra con precisión, agote el paquete de
batería y, a continuación, cárguelo por
completo; de esta forma, dicha indicación será
precisa. Sin embargo, es posible que la
indicación no llegue a mostrarse con precisión
si emplea o deja el paquete de batería en un
lugar cálido durante mucho tiempo, o después
de haberlo utilizado muchas veces.
CCD-TR2200E/TR3300E 3-856-204-12 (1)
Page 97

Battery pack care
•Remove the battery pack from the
camcorder after using it, and keep it in a cool
place. When the battery pack is installed to the
camcorder, a small amount of current flows to
the camcorder even if the POWER switch is set
to OFF. This shortens battery life.
•The battery pack is always discharging even
when it is not in use after charging. Therefore,
you should charge the battery pack right before
using the camcorder.
The switch on the battery pack
This switch is provided so that you can mark the
charged battery pack. Set the switch to the “green
mark” position when charging is completed.
(When removed from the charging adaptor, the
switch exposes the green mark. When removed
from your camcorder, no mark is indicated.)
Cuidados del paquete de batería
•Extraiga el paquete de la videocámara después
de usarlo y guárdelo en un lugar fresco.
Mientras el paquete está instalado en la
videocámara, una pequeña cantidad de
corriente fluye hacia ésta aunque el interruptor
POWER esté ajustado en OFF. Esto reduce la
duración del paquete.
•El paquete de batería siempre se descargará
aunque no lo utilice después de haberlo
cargado. Por tanto, debe cargarse
inmediatamente antes de emplear la
videocámara.
Interruptor del paquete de batería
Este interruptor posibilita marcar el paquete de
batería cargado. Ajuste el interruptor en la
posición de la “marca verde” una vez finalizado
el proceso de carga. (Al retirarse del adaptador
de carga, el interruptor muestra la marca verde,
mientras que al retirarse de la videocámara no
muestra ninguna marca.)
Additional Information / Información complementaria
The life of the battery pack
If the battery indicator flashes rapidly just after
turning on the camcorder with a fully charged
battery pack, the battery pack should be replaced
with a new fully charged one.
Charging temperature
You should charge batteries at temperatures
from 10°C to 30°C (from 50°F to 86°F). Lower
temperatures require a longer charging time.
Notes on charging
A brand-new battery pack
A brand-new battery pack is not charged. Before
using the battery pack, charge it completely.
Recharge the battery pack whenever
you like
You do not have to discharge it before
recharging. If you charged the battery pack fully
but you did not use it for a long time, it becomes
discharged. Then recharge the battery pack
before use.
Duración del paquete de batería
Si el indicador de batería parpadea rápidamente
inmediatamente después de encender la
videocámara provista de un paquete de batería
completamente cargado, éste deberá sustituirse
por otro nuevo completamente cargado.
Temperatura de carga
El paquete debe cargarse a temperaturas
comprendidas entre 10°C y 30°C (50°F a 86°F).
Las temperaturas bajas requieren un tiempo de
carga superior.
Notas sobre la carga
Paquetes de batería nuevos
Los paquetes de baterías nuevos no están
cargados. Antes de emplearlos, es necesario
cargarlos por completo.
Recargue el paquete de batería
cuando desee
No es preciso descargarlo antes de recargarlo. El
paquete se descargará si lo ha cargado por
completo pero no lo ha utilizado durante un
largo período de tiempo. En este caso, recárguelo
antes de usarlo.
CCD-TR2200E/TR3300E 3-856-204-12 (1)
97
Page 98

Tips for using the battery
pack
Consejos para el uso del
paquete de batería
Notes on the terminals
If the terminals (metal parts on the back) are
not clean, the battery charge duration will be
shortened.
When the terminals are not clean or when the
battery pack has not been used for a long time,
repeatedly install and remove the battery pack a
few times. This improves the contact condition.
Do not put any foreign objects such as dust or
sand in the ‘ and ’ terminals.
Be sure to observe the following
•Keep the battery pack away from fire.
•Keep the battery pack dry.
•Do not open nor try to disassemble the battery
pack.
•Do not expose the battery pack to any
mechanical shock.
Notes on the battery case
•Use only with alkaline batteries. You cannot
use the battery case with manganese
batteries or LR6 (size AA) rechargeable NiCd
batteries.
•Using with Sony alkaline batteries is
preferable.
•Battery life is remarkably shorter in a cold
environment (lower than 10°C/50°F).
•Keep the metal part clean. If it gets dirty, wipe
it with a soft cloth.
•Do not disassemble or try to disassemble the
battery case.
•Do not expose the battery case to any
mechanical shock.
•During recording, the battery case heats up.
This is not cause for concern.
•Prevent the electrode in the battery case from
coming in contact with a metal object.
•If you will not use the battery case for a long
time, detach the battery case from the
camcorder and remove the batteries from the
battery case.
Notas sobre los terminales
Si los terminales (componentes metálicos
situados en la parte trasera) no están limpios,
la duración de la carga se reducirá.
Si los terminales no están limpios o si no ha
utilizado el paquete de batería durante mucho
tiempo, instálelo y extráigalo varias veces. De
esta forma mejorará la condición de contacto. No
coloque ningún objeto extraño como polvo o
arena en los terminales ‘ y ’.
Asegúrese de tener en cuenta lo
siguiente:
•Mantenga el paquete de batería alejado del
fuego.
•Manténgalo seco.
•No lo abra ni lo desmonte.
•No lo exponga a golpes mecánicos.
Notas sobre el estuche de pilas
•Empléelo sólo con pilas alcalinas. No es
posible utilizar el estuche con pilas de
manganeso ni con pilas recargables de
níquel-cadmio tipo LR6 (tamaño AA).
•Utilice preferiblemente pilas alcalinas Sony.
•La duración de las pilas se reduce notablemente
en ambientes fríos (temperaturas inferiores a
10°C/50°F).
•Mantenga limpio el componente metálico. Si se
ensucia, límpielo con un paño suave.
•No intente desmontar el estuche de pilas.
•No exponga el estuche de pilas a golpes
mecánicos.
•Durante la grabación, el paquete de pilas se
calienta. Esto es normal.
•Evite que el electrodo del estuche de pilas entre
en contacto con objetos metálicos.
•Si no va a utilizar el estuche durante mucho
tiempo, extráigalo de la videocámara y retire las
pilas del mismo.
98
CCD-TR2200E/TR3300E 3-856-204-12 (1)
Page 99

Notes on alkaline batteries
To avoid possible damage from battery leakage
or corrosion, observe the following.
•Be sure to insert the batteries in the correct
direction.
•Alkaline batteries are not rechargeable.
•Do not use a combination of new and old
batteries.
•Do not use different types of batteries.
•The batteries slowly discharge while not in use.
•Do not use a battery that is leaking.
Notas sobre las pilas alcalinas
Para evitar posibles daños producidos por fugas
o corrosión, tenga en cuenta lo siguiente:
•Asegúrese de insertar las pilas en el sentido
correcto.
•Las pilas alcalinas no son recargables.
•No emplee pilas nuevas junto con viejas.
•No emplee diferentes tipos de pilas.
•Las pilas se descargan lentamente cuando no
las utilice.
•No emplee pilas que presenten fugas.
If battery leakage occurred
•Wipe off the liquid in the battery case carefully
before replacing the batteries.
•If you touch the liquid, wash it off with water.
•If the liquid get into your eyes, wash your eyes
with a lot of water and then consult a doctor.
Maintenance information and precautions
Moisture condensation
If the camcorder is brought directly from a cold
place to a warm place, moisture may condense
inside the camcorder, on the surface of the tape,
or on the lens. In this condition, the tape may
stick to the head drum and be damaged or the
unit may not operate correctly. To prevent
possible damage under these circumstances, the
camcorder is furnished with moisture sensors.
Please, take the following precautions.
Inside the camcorder
If there is moisture inside the camcorder, the
beep sounds and the { indicator flashes. If this
happens, none of the functions except cassette
ejection will work. Open the cassette
compartment, turn off the camcorder, and leave
it about 1 hour. When 6 indicator flashes at the
same time, the cassette is inserted in the
camcorder. Eject the cassette, turn off the
camcorder, and leave also the cassette about 1
hour.
Si se producen fugas
•Limpie cuidadosamente el líquido del estuche
de pilas antes de insertar las pilas.
•Si toca el líquido, límpieselo con agua.
•Si el líquido entra en contacto con los ojos,
límpieselos con abundante agua y consulte con
un médico.
Información y
precauciones sobre
mantenimiento
Condensación de humedad
Si traslada la videocámara directamente de un
lugar frío a otro cálido, es posible que se
condense humedad en su interior, en la
superficie de la cinta o sobre el objetivo. En este
caso, la cinta puede adherirse al tambor del
cabezal y dañarse o la unidad puede no
funcionar correctamente. Para evitar posibles
daños en estas circunstancias, la videocámara
está equipada con sensores de humedad. Tome
las siguientes precauciones.
Interior de la videocámara
Si se condensa humedad en el interior de la
videocámara, la unidad emitirá un pitido y el
indicador { parpadeará. Si esto ocurre, ninguna
de las funciones se activará, excepto la de
expulsión de videocassettes. Abra el
compartimiento de videocassettes, apague la
videocámara y no la utilice durante 1 hora
aproximadamente. Si el indicador 6 también
parpadea, significa que hay un videocassette
insertado en la videocámara. Expúlselo, apague
la videocámara y tampoco utilice el videocassette
durante 1 hora aproximadamente.
Additional Information / Información complementaria
99
CCD-TR2200E/TR3300E 3-856-204-12 (1)
Page 100

Maintenance information
and precautions
Información y precauciones
sobre mantenimiento
On the lens
If moisture condenses on the lens, no indicator
appears, but the picture becomes dim. Turn off
the power and do not use the camcorder for
about 1 hour.
How to prevent moisture
condensation
When bringing the camcorder from a cold place
to a warm place, put the camcorder in a plastic
bag and allow it to adapt to room conditions over
a period of time.
(1)Be sure to tightly seal the plastic bag
containing the camcorder.
(2)Remove the bag when the air temperature
inside it has reached the temperature
surrounding it (after about 1 hour).
Video head cleaning
To ensure normal recording and clear pictures,
clean the video heads. When the v indicator and
“ CLEANING CASSETTE” message appear
one after another in the viewfinder or playback
pictures are “noisy” or hardly visible, the video
heads may be dirty.
Sobre el objetivo
Si se condensa humedad en el objetivo, no
aparecerá ningún indicador y la imagen se
atenuará. Desactive la alimentación y no emplee
la videocámara durante 1 hora
aproximadamente.
Cómo evitar la condensación de
humedad
Cuando traslade la videocámara de un lugar frío
a otro cálido, introdúzcala en una bolsa de
plástico y deje que se adapte a las condiciones de
la sala durante algún tiempo.
(1)Asegúrese de cerrar herméticamente la bolsa
de plástico.
(2)Retire la bolsa cuando la temperatura de su
interior haya alcanzado la temperatura que la
rodea (después de aproximadamente 1 hora).
Limpieza de los cabezales de
vídeo
Para garantizar grabaciones normales e imágenes
nítidas, limpie los cabezales de vídeo. Si el
indicador v y el mensaje “ CLEANING
CASSETTE” aparecen uno detrás del otro en el
visor electrónico o si las imágenes de
reproducción presentan “ruido” o apenas
pueden verse, es posible que los cabezales de
vídeo estén sucios.
[a] [b]
[a] Slightly dirty
[b] Very dirty
If this happens, clean the video heads with the
Sony V8-25CLH cleaning cassette (not supplied).
After checking the picture, if it is still “noisy,”
repeat the cleaning. (Do not repeat cleaning more
than 5 times in one session.)
100
[a] Ligeramente sucios
[b] Muy sucios
Si esto ocurre, limpie los cabezales de vídeo con
el cassette limpiador V8-25CLH de Sony (no
suministrado). Si la imagen presenta “ruido”
después de comprobarla, repita la limpieza. (No
realice la limpieza más de 5 veces en una misma
sesión.)
CCD-TR2200E/TR3300E 3-856-204-12 (1)
 Loading...