

Page 1

a Lenses
Page 2

a creation
Stellar choices for photographic expression
Photography is creative. A photographer must make a number of critical
choices that will determine the outcome. One of the most influential
choices is the lens itself. What is being photographed, under what lighting
conditions, and where? What lens will provide the necessary control over
composition and perspective, or how motion is captured? Which areas
of the image are to be in sharp focus and which are to be out of focus?
How will the lens function with filters that might be needed to change the
characteristics of the captured light? There is no single right answer for every
photographer and subject. The only certainties are that a choice must be
made and that more high-quality options mean more creative freedom.
So ny’s a lens lineup offers everything the creative photographer needs to
realize their vision. Economy, luxury, versatility, precision, legendary optical
performance… it’s all there. The choice is yours.
Page 3

Contents
Lenses: How they capture and control light 06
Projecting an image 06
A look inside/Read your lenses 07
Lens mount and sensor formats 08
Aperture, f-numbers and depth of field 09
Focal length, angle of view and perspective 10
Macro photography 11
Hoods and filters 12
Carl Zeiss® optics 13
Making sense of MTF 14
Choosing the right lens 15
lens technology 16
a
A-mount Lenses
Zoom Lenses 18
DT 11–18mm F4.5–5.6 SAL1118 19
DT 16–50mm F2.8 SSM SAL1650 20
DT 16–105mm F3.5–5.6 SAL16105 21
DT 18–55mm F3.5–5.6 SAM SAL1855 22
DT 18–200mm F3.5–6.3 SAL18200 23
DT 18–250mm F3.5–6.3 SAL18250 24
28–75mm F2.8 SAM SAL2875 25
DT 55–200mm F4–5.6 SAM SAL55200-2 26
75–300mm F4.5–5.6 SAL75300 27
Fixed Focal Length Lenses 28
16mm F2.8 Fisheye SAL16F28 29
20mm F2.8 SAL20F28 30
28mm F2.8 SAL28F28 31
DT 35mm F1.8 SAM SAL35F18 32
50mm F1.4 SAL50F14 33
DT 50mm F1.8 SAM SAL50F18 34
85mm F2.8 SAM SAL85F28 35
135mm F2.8 [T4.5] STF SAL135F28 36
DT 30mm F2.8 Macro SAM SAL30M28 37
50mm F2.8 Macro SAL50M28 38
100mm F2.8 Macro SAL100M28 39
G Lenses 40
70–200mm F2.8 G SAL70200G 41
70–300mm F4.5–5.6 G SSM SAL70300G 42
70–400mm F4–5.6 G SSM SAL70400G 43
35mm F1.4 G SAL35F14G 44
300mm F2.8 G SAL300F28G 45
Teleconverters
1.4x Teleconverter SAL14TC 46
2x Teleconverter SAL20TC 46
Carl Zeiss® Lenses 47
Vario-Sonnar T* 16–35mm F2.8 ZA SSM SAL1635Z 48
Vario-Sonnar T* DT 16–80mm F3.5–4.5 ZA SAL1680Z 49
Vario-Sonnar T* 24–70mm F2.8 ZA SSM SAL2470Z 50
Distagon T* 24mm F2 ZA SSM SAL24F20Z 51
Planar T* 85mm F1.4 ZA SAL85F14Z 52
Sonnar T* 135mm F1.8 ZA SAL135F18Z 53
E-mount Lenses
Exclusive to E-mount cameras
54
E 16mm F2.8 SEL16F28 56
Fisheye Converter VCL-ECF1 57
Ultra Wide Converter VCL-ECU1 57
Sonnar T* E 24mm F1.8 ZA SEL24F18Z 58
E 18–55mm F3.5–5.6 OSS SEL1855 59
E 18–200mm F3.5–6.3 OSS SEL18200 60
E 55–210mm F4.5–6.3 OSS SEL55210 61
E 50mm F1.8 OSS SEL50F18 62
E 30mm F3.5 Macro SEL30M35 63
Main specifications of a lenses 64
lens accessories 65
a
Ultra wide angle
11m m (16m m)
A-mount
E-mount
Wide angle
28mm (42mm)
35mm F1.4 G SAL35F14G
Distago n T* 24mm F2 ZA SSM SAL 24F20Z
Vario-Sonnar T* 16–35mm F2.8 ZA SSM SAL1635Z
Vario-S onnar T* DT 16–80mm F3.5 –4.5 ZA SAL1680Z
Vario-S onnar T* 24–70mm F2.8 ZA SSM S AL2470Z
16mm F2.8 Fisheye SAL16F28
20mm F2.8 SAL 20F28
DT 11–18mm F4.5–5.6 SAL1118
DT 16–50mm F2.8 SSM S AL1650
DT 16–105mm F3.5–5.6 SAL16105
DT 18–55mm F3.5– 5.6 SAM SAL1855
DT 18–200mm F3.5– 6.3 SAL18200
DT 18–250mm F3.5–6. 3 SAL18250
E 16mm F2.8 SEL16F28 Sonnar T * E 24mm F1.8 Z A SEL24F18Z E 50mm F1.8 OSS SEL50 F18
E 18–55mm F3.5– 5.6 OSS SEL1855
E 18–200mm F3.5– 6.3 OSS SEL18200
28–75mm F2.8 SAM SAL 2875
28mm F2.8 SA L28F28
DT 30mm F2.8 Mac ro SAM SAL30M28
DT 35mm F1.8 SAM SAL3 5F18
E 30mm F3.5 Mac ro SEL30M35
Normal
50mm (75mm)
Planar T * 85mm F1.4 ZA SAL8 5F14Z
50mm F1.4 SAL50F14
50mm F2.8 Mac ro SAL50M28
DT 50mm F1.8 SAM SAL5 0F18
DT 55–200 mm F4–5.6 SAM SAL5520 0-2
DT 55–200 mm F4–5.6 SAM SAL5520 0-2
E 55–210mm F 4.5–6.3 O SS SEL55210
Mid-range Telephoto
85mm (128mm)
85mm F2.8 SAM S AL85F28
Mid-range Telephoto
100 mm (150 mm)
70–200m m F2.8 G SAL70200 G
75–300 mm F4.5–5.6 SAL75300
70–30 0mm F4.5–5.6 G SSM SAL70 300G
70–40 0mm F4–5.6 G SSM SAL7040 0G
Sonnar T * 135 mm F1.8 Z A SAL13 5F18 Z
135mm F2.8 [T4.5] ST F SA L135F2 8
100mm F2.8 Macr o SAL10 0M28
Telephoto
200mm (300mm)
Telephoto
300mm (450mm)
300mm F2.8 G S AL300F28G
Super Telephoto
400mm (600mm)
Zoom Lenses
Fixed Focal Length Lenses
G Lenses
Carl Zeis s Lenses
E-mount Lenses
* Numbers shown in parentheses
represent the effective focal length
equivalent in 35mm full-frame format
when shooting with APS-C format
interchangeable-lens digital cameras.
1.4x Teleconver ter
SA L14TC
Fisheye Converter
VC L-ECF 1
10mm (15m m
2x Teleconverter
SAL20TC
Ultra Wide Converter
VC L-ECU 1
)
12mm (18m m
)
Page 4
Lenses: How they capture and control light
A look inside
The linguistic roots of the word “photography” are the Greek words meaning “light” and “drawing.” Photography is “drawing
with light,” and lenses are the brushes. After their imagination, lenses are the photographer’s primary creative tools. The way
a lens captures and presents an image to the camera’s sensor determines the visual outcome more than any other factor.
The ability to choose the right lens and use it well is one of the most important skills an aspiring photographer should acquire.
In this brief guide we’ll look at some of the basics that will help you to choose lenses that are suited to your needs, and
make the most out of them to create truly satisfying photographs.
Projecting an image
Our eyes do it, cameras do it, even a simple
light-tight box with a tiny hole in one end will
do it: the feat of turning light into an image
can only be accomplished by first capturing
the light from a scene and projecting it onto
a surface. That surface, the “image plane,”
can be a wall, a piece of film, a sensor, or
the retina in our eye. In all cases the image
is projected upside-down and horizontally
reversed. Let’s take a look at the precursor of
modern cameras, the simplest camera of all:
the pinhole camera. In a pinhole camera a tiny
hole is all that’s needed to project an image.
To make this easier to understand, remember
that light normally travels in straight lines, then try
to imagine the subject being photographed as
being made up of a multitude of points of light of
appropriate brightness and color.
In the example in Figure 1, light from a point at
the top of the tree travels in a straight line
through the pinhole and reaches a point at
the bottom of the image plane, whereas light
from a point at the bottom of the tree ends up
at the top of the image plane after passing
through the pinhole.
The real-world scene becomes an image
projected on the image plane, upside-down
and reversed left-to-right.
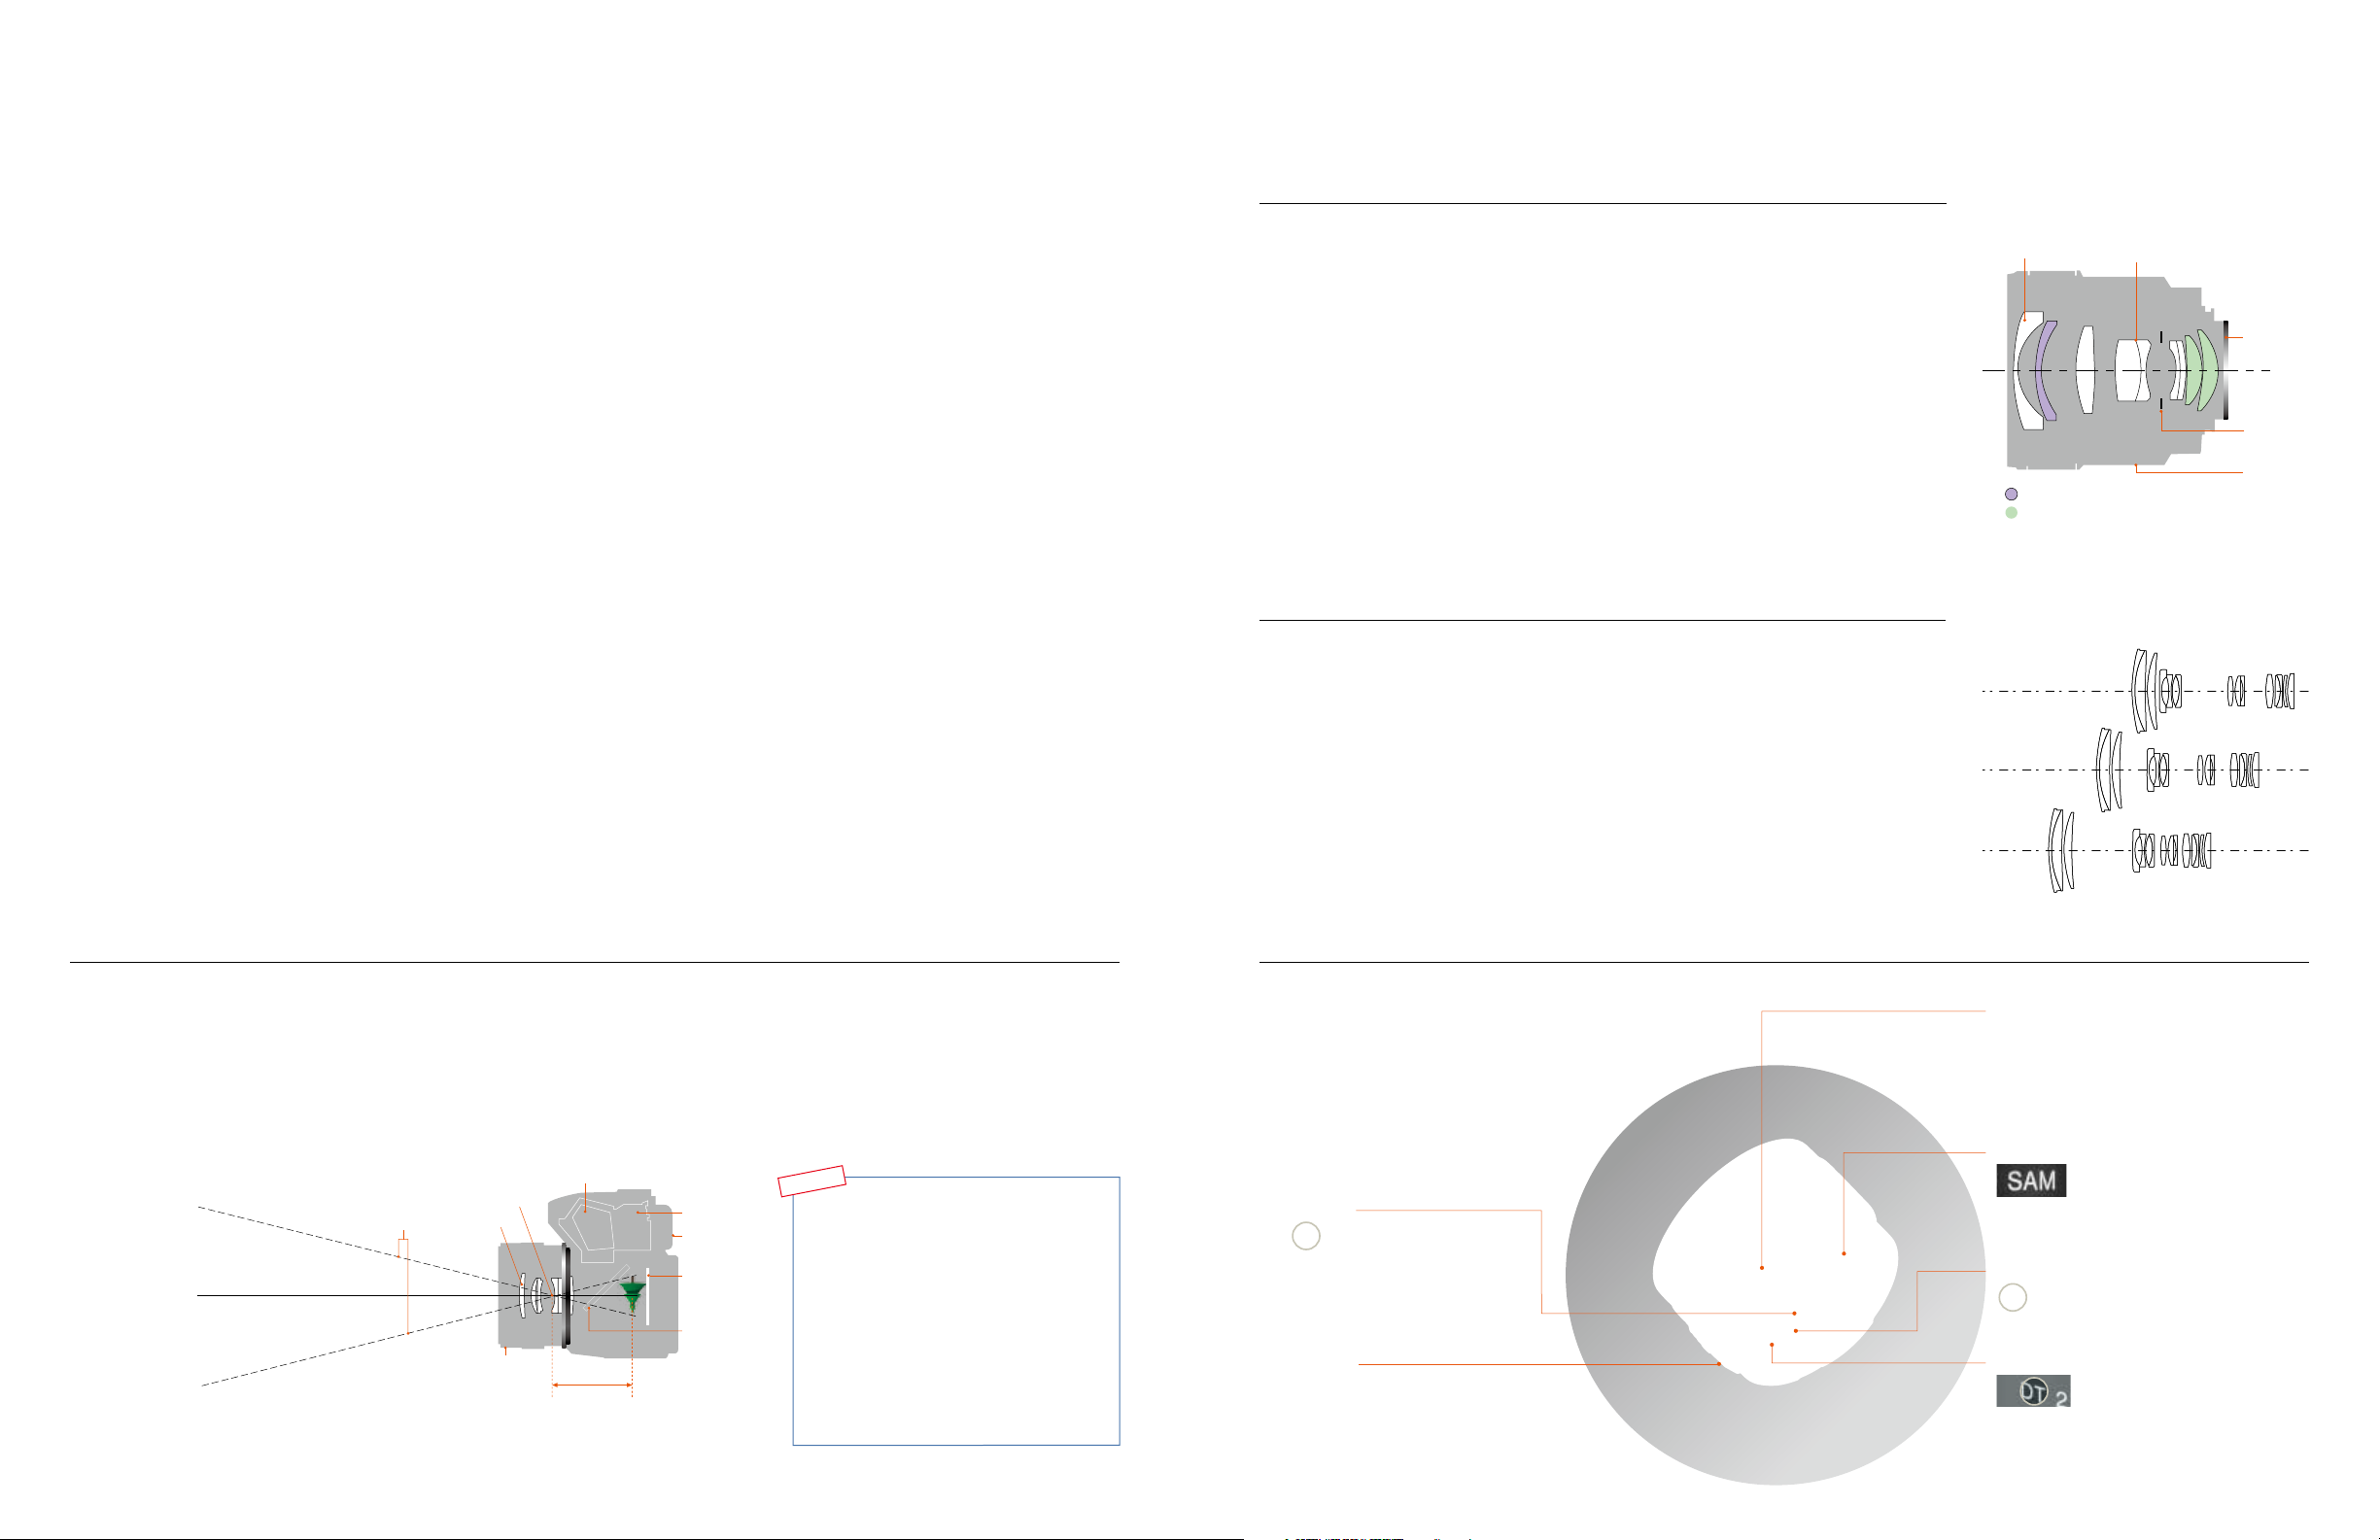
Elements and groups
All modern photographic lenses are “compound”
lenses that use a number of lens “elements”
precisely mounted along the same optical axis.
The use of multiple elements allows lens designers
to effectively reduce optical aberrations so you
get nice sharp, clean images.
“Elements” are the individual pieces of specially
shaped glass that make up the lens. A “group”
consists of two or three elements that have been
glued together to function as a unit. Sometimes
groups consist of different types of glass that
have been combined in order to control some
form of aberration. Lenses are sometimes
described in terms of the number of elements
and groups they contain. You’ll hear terms such
as “7-group 9-element lens.”
Zoom and focus mechanisms
The job of varying focal length in a zoom lens
requires a fairly complex mechanism that
translates zoom ring rotation into precise group
movement along the optical axis of the lens. Zoom
mechanisms must be precisely manufactured
to exacting tolerances so that all elements and
groups stay in perfect alignment throughout the
zoom range.
Fixed focal length lenses, also known as “prime”
lenses, generally have the simplest construction
with the fewest groups and elements. Zoom
lenses require a larger number of groups/
elements to support the zoom functionality.
While most lens elements are “spherical,”
meaning that one or more surfaces form part
of a sphere, some lenses include “aspherical”
elements. Aspherical elements have more
complex shapes than simple spherical elements,
and are much more difficult and more expensive
to produce. Aspherical elements are sometimes
used in wide-angle and fast standard lenses,
where they can be effective in reducing certain
types of aberration.
Focusing is sometimes accomplished by moving
the entire lens closer to or further away from
the image sensor plane, although some lenses
employ a “floating construction” in which groups
of elements move independently in order to
maintain optimum optical performance at all
shooting distances.
Lens configura tion exa mple: 7 groups/9 elements
Lens element Lens group
Mount
Aperture
Lens barrel
Aspherical lens (see pag e 16 for more details
ED glass (see pag e 16 for more details
How len s elements and grou ps move in a zoom le ns
Wide
Medium
)
)
A pinhole camera is basically a light-tight box
with a small hole in one end
Figure 1. A simple pinhole of appropriate size
is capable of projecting a sharp but dim image
If a little hole can do all of this, why do we need lenses?
Pinholes can “project” images, but they are limited and inflexible. In
order for the projected image to be sufficiently sharp, the hole must be
very small, but this also means that the projected image is very dim.
In principle, lenses work similarly to the pinhole, but they are capable
of capturing more light from each point on the subject, and therefore
project a much brighter image. A lens can also bring more light into
sharp focus. That’s helpful because it means we can use short sub-
A simp lified cro ss sec tion o f a modern lens and a ty pica l SLR (Single Lens Reflex) type digital camera
Pentaprism (flips the image so it can viewed in proper or ientation
Focal point
Light Lens element
Subject
Optical axis
Interchangeable-lens
(
objective lens
Light reflected by the subject is ef fecti vely collected
and focused by the l ens elements to p roject an
image on the cam era’s image sensor p lane.
)
Focal length
second exposures rather than having to make sure that both the
camera and subject stay perfectly still for many minutes or even hours,
which is usually the case with a pinhole camera. Other advantages are
that lenses can be made in a variety of focal lengths from wide-angle to
capture expansive scenes or telephoto to photograph distant subjects.
Modern lenses are precision optical devices that give photographers
boundless freedom to realize their creative vision by “drawing with light.”
Viewfinder
Camera
Image
sensor plane
Mirror
Figure 2. A lens uses the principle of “refraction”
to gather more light from the subject and project
a sharp, bright image
)
TECH TALK
Refraction: bending light
The physical principle that allows lenses to
gather and focus light is c alled “refraction.”
Refraction causes lightwaves to change speed
and dire ction when they pass from one medium
(
air, for example) to anothe r (glass, for example),
and allows lenses to be designed to “bend” light
in a contro lled way. The “refract ive index” of an
optically transparent medium is a measure of
the spe ed of lig ht in that medium, and the refore
the deg ree to which light will be “bent” by that
medium. Optical materials that have different
refractive indices—conventional optical glass and
ED glass, for example—are sometimes combined
in lenses to achieve the desired characteristics.
Read your lenses
There is a lot of pertinent information
printed or engraved on the outside of
lenses that can help you understand their
characteristics and how to best use them.
Here are a few examples.
Focal length
This is the most basic, most important
characteristic of any lens. Focal length plays
a primary role i n determ ining what ty pes of
subjects and compositions the lens is suitable
for (see pag e 10 for more details).
AF/MF switch
This switch lets yo u switch betwee n
autofocus and manual focus modes.
Telephoto
Distance scale
The distance scale indicates the
approximate distance from the
camera’s image plane to the object
that the camera i s focuse d on.
Autofocus drive type
Lenses m arked “SAM” or ”SS M” feature
built-in motors that drive the lens’s
focusing mechanism. Lenses that
don’t ha ve intern al motors are driven
by a motor in the camera body
(
see pag e 17 for more detail s).
Maximum aperture
This number represents the maximum
aper ture, or “ f-number,” of the lens
and tells you how “bright” the lens is
(
see pag e 9 for more details).
Lens format
Sony len ses marked “DT” (Digital
Technology) have been specifically
designed for use on APS -C fo rmat
A-mount cameras (see pag e 8 for
more details).
6 7
Page 5
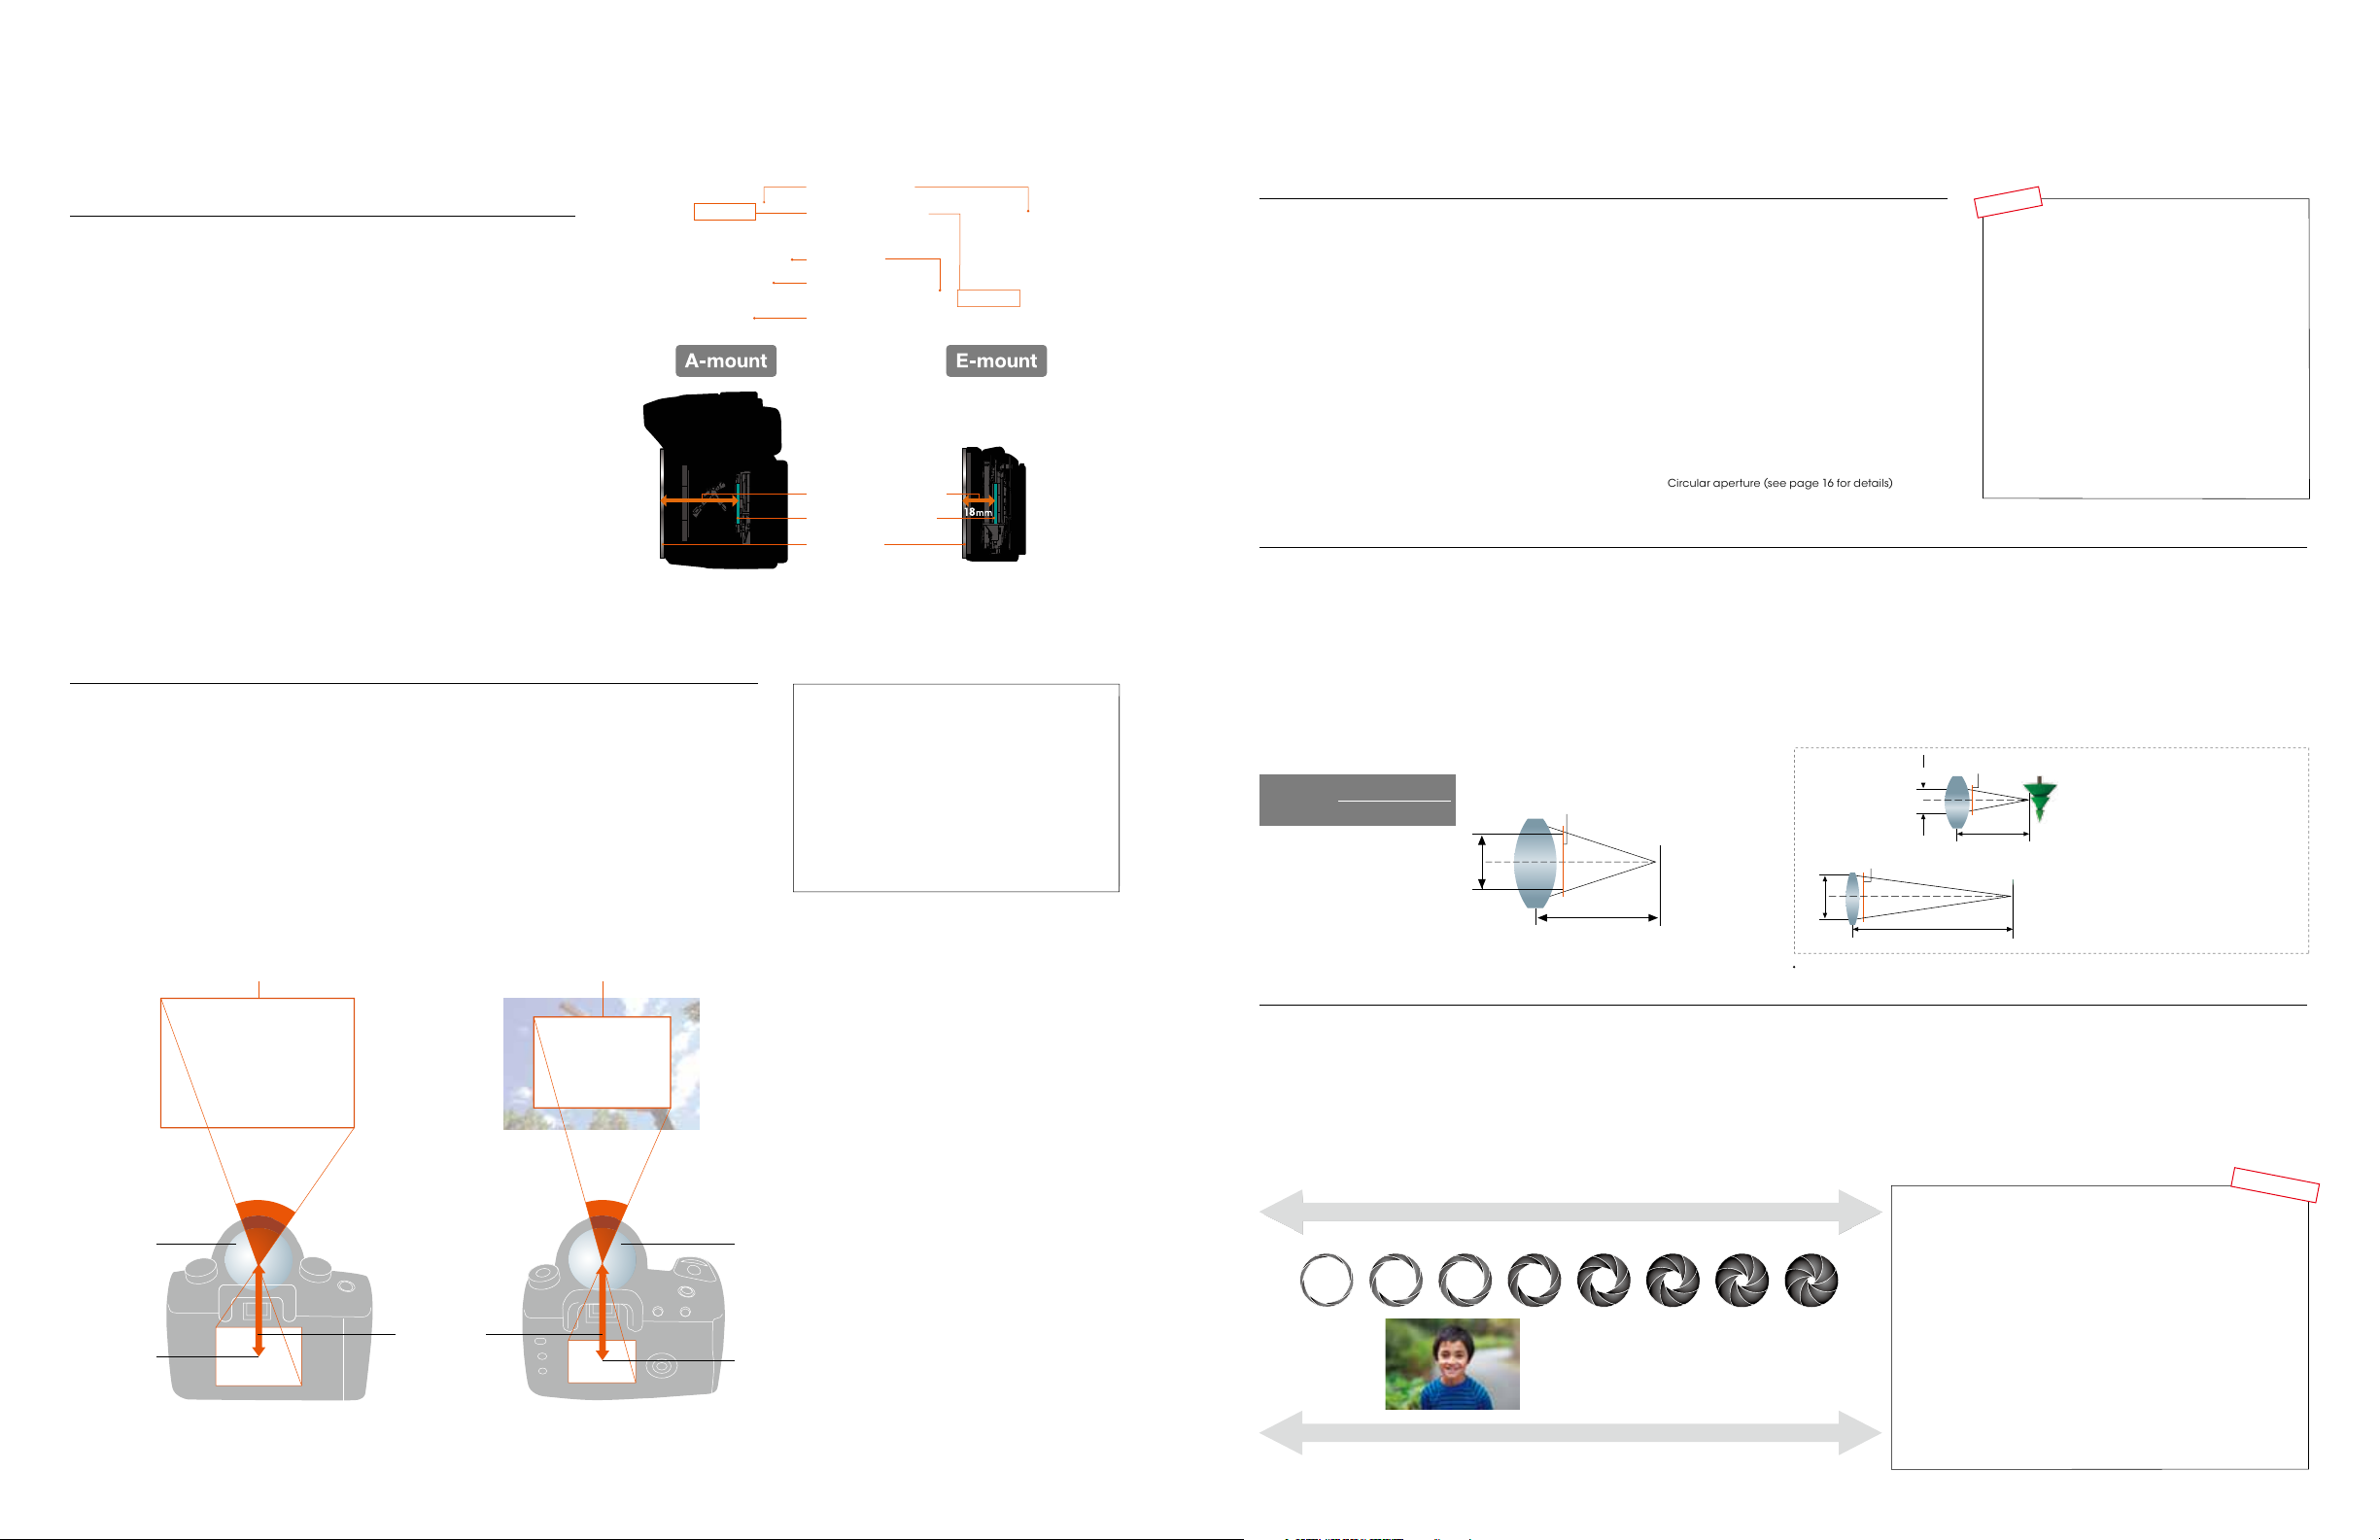
Lens mount and sensor formats
Aperture, f-numbers and depth of field
Sony A-mount and E-mount systems
Sony a series interchangeable-lens digital cameras are currently produced
in two categories, each of which uses a different lens mount and different
types of lenses. A-mount SLR (single lens reflex) type cameras have a more
traditional shape and utilize moving mirrors or advanced translucent
mirrors. Ultra-compact E-mount cameras don’t use reflex mirrors at all.
Despite their remarkable compactness and portability, E-mount cameras
feature APS-C format sensors and are capable of delivering image quality
on a par with A-mount cameras.
In addition to overall size, the main difference between A-mount and
E-mount lenses is their “flange back distance.” The flange back distance is
the distance from the rear of the lens to the image (sensor) plane. Since
many A-mount cameras have a reflex mirror between the rear of the lens
and the sensor, precipitating the need to have a flange back distance
that allows space for the mirror. E-mount cameras, on the other hand, are
mirror-less and therefore can be designed with a much shorter flange
back distance, allowing the body of the camera to be much smaller and
consequently the lenses as well.
Sensor formats: 35mm full frame and APS-C
You may have heard the term “full-frame” in reference to cameras, but did you know it refers to the
frame size of 35mm film? The image area of a frame of 35mm film is approximately 36mm x 24mm
(
“35mm” is the width of the strip of film), and that’s the size of the image sensor in a 35mm full-frame
format camera. Many interchangeable-lens digital cameras use slightly smaller “APS-C” format sensors
that measure approximately 24mm x 16mm or less. There are a number of other sensor formats,
including smaller sensors in digital point-and-shoot type cameras, but APS-C and 35mm full-frame
formats are the two most commonly used in interchangeable-lens cameras.
It is important to understand that there are two “formats” for A-mount interchangeable lenses as well.
Lenses with an image circle large enough to cover a 35mm full-frame sensor, and lenses with a smaller
image circle that is sufficient for APS-C format sensors. Sony lenses that have “DT” in the model name
are compatible with APS-C format SLR cameras only, while all other lenses will work with both APS-C and
35mm full-frame format cameras.
Image area with
35 mm full-frame image sensor
Image area with
APS-C type sensor
Alignment mark
Electrical contacts
Locking pin
Aperture lever
AF coupler
Flange back distance
Image sensor plane
Lens mou nt
Sony DT lenses
Lenses m arked “DT” (Digital Technology) should
only be used on AP S- C format camera s because
their image circle isn’ t large e nough to f ully
cover a 35mm full frame sensor. If you do us e a
DT lens on a full- frame camera, ex pect to se e
a darkening of the i mage towa rds the edges of
the fram e (vignetting). Although only E-mount
lenses can be directly mounted on E -mount
camera s, DT lenses can be mounted on t hese
cameras via an optional adaptor.
Aperture and exposure
The aperture in a lens—also known as the
“diaphragm” or “iris”—is an ingenious piece
of mechanical engineering that provides a
variable-size opening in the optical path often
used to control the amount of light that passes
through the lens. Aperture and shutter speed are
the two primary means of controlling exposure. For
a given shutter speed, dimmer lighting will require
a larger aperture to allow more light to reach the
image sensor plane, while brighter light will require
a smaller aperture to achieve optimum exposure.
Alternatively, you could keep the same aperture
setting and change the shutter speed to achieve
similar results. The size of the opening provided by
the aperture also determines how “collimated” the
light passing through the lens is. Since this directly
“F-numbers” or “f-stops”
All lenses have a maximum and minimum
aperture, expressed as “f-numbers,” but it is the
maximum aperture that is most commonly quoted
in lens specifications. Take the Sony SAL35F14G,
for example. This is a 35mm F1.4 lens: 35mm is the
focal length and F1.4 is the maximum aperture.
But what exactly does “F1.4” mean? See the
“F-number math” box for some technical details,
but for a practical understanding it’s enough to
F-number =
Focal length
Effective aperture
Effective aperture
(
size of the e ntrance pu pil
Aperture
)
Focal length
Aperture and depth of field
affects depth of field, you’ll need to be in control of
both aperture and shutter speed to create images
that look the way you want them to.
Circular aperture (see pag e 16 for details
)
know that smaller f-numbers correspond to larger
apertures, and that F1.4 is about the largest
maximum aperture you’re likely to encounter on
general-purpose lenses. Lenses with a maximum
aperture of F1.4, F2, or F2.8 are generally
considered to be “fast” or “bright.”
The standard f-numbers you’ll use with camera
lenses are, from larger to smaller apertures:
Effective aperture
25 mm
F4
50 mm
Aperture and focal length values in the illustration are approximate.
200 mm
TECH TALK
F-number math
The f-numbe r is the foc al length of the l ens div ided
by the ef fective diamete r of the ap erture. So in the
case of the SAL3514G lens, when the aper ture is
set to its ma ximum of F1.4, the effective diameter of
the aperture will be 35 ÷ 1.4 = 25mm. Note th at as
the focal length of the lens changes, the diameter
of the aperture at a given f-number will change
too. For example, an aperture of F1.4 in a 30 0mm
telephoto lens would require an effective aperture
diameter of 30 0 ÷ 1.4 ≈ 214mm! That would end up
being a huge, bul ky and ve ry exp ensive l ens, which
is why you do n’t see to o many lon g telephoto
lenses with ver y large maximum aper tures. T here’s
really n o need for the photo grapher to know what
the actual aperture diameter is, but it’s helpful to
understand the principle.
1.4, 2, 2.8, 4, 5.6, 8, 11, 16, 22 and sometimes 32
(
for you mathematicians those are all powers of
the square root of 2). Those are the full stops, but
you’ll also see fractional stops that correspond to a
half or a third of the full stops. Increasing the size of
the aperture by one full stop doubles the amount
of light that is allowed to pass through the lens.
Decreasing the size of the aperture by one stop
halves the amount of light reaching the sensor.
F4
Shorter focal lengths only require
moderate effective apertures for
sufficient brightness
100 mm
Longer focal lengths require
proportionately larger effective apertures
for the same “f-number” and brightness
“Depth of field” refers to the range between the nearest and farthest objects
in a scene that appear acceptably sharp. In extreme examples of narrow
depth of field, the in-focus depth might be just a few millimeters. At the
opposite extreme, some landscape photographs show very deep depth
of field with everything in sharp focus from just in front of the camera to
many kilometers away. Controlling depth of field is one of the most useful
techniques you have for creative photography.
47° angle
Lens Lens
Image s ensor
plane
*The angle of view values in this example correspond to those of a 50mm lens.
8 9
of view
Same foc using
distance (50 mm
)
32° angle
of view
Image s ensor
plane
Open (large
F2 F2.8 F4 F5.6 F8 F 11 F16 F22
Shallow Depth of field Deep
)
Aperture Close (small
Basically, larger apertures produce a narrower depth of field, so if you want to
shoot a portrait with a nicely defocused background you’ll want a wider aperture
(
lower F-number). There are times when other factors come into play. Lenses of
longer focal lengths are generally capable of producing narrower depth of field.
This is partly because an F1.4 aperture in an 85mm lens, for example, is physically
larger than an F1.4 aperture in a wide-angle 24mm lens. Additionally, the
distance between objects in the scene being photographed will have an effect
on the perceived depth of field as well.
SHOOTING TIP
)
Three keys to effective defocusing
There’s actually more to shooting images with beautifully defocused
backgrounds than simply choosing a bright lens and opening
the aperture up all the way. That’s the first “key,” but sometimes
a large ap erture alone won’t pro duce th e desire d resu lts. The
second key is the distance b etween your subject and t he
background. If the background is ver y close to your subject it
might fall withi n the depth of field, or be so close th at the am ount
of defocusing isn’t suf fici ent. When ever possible, keep plenty of
distance between your subject a nd the background you want to
defocu s. The third key is the focal len gth of the lens you u se. As
mentio ned above, it’s eas ier to get a narrow depth of field with
longer focal lengths, so take advantage of that characteristic as
well. Many photographers find that focal lengths betwe en abou t
75mm and 100mm are ideal for shooting portraits with nicely
blurred backgrounds.
Page 6
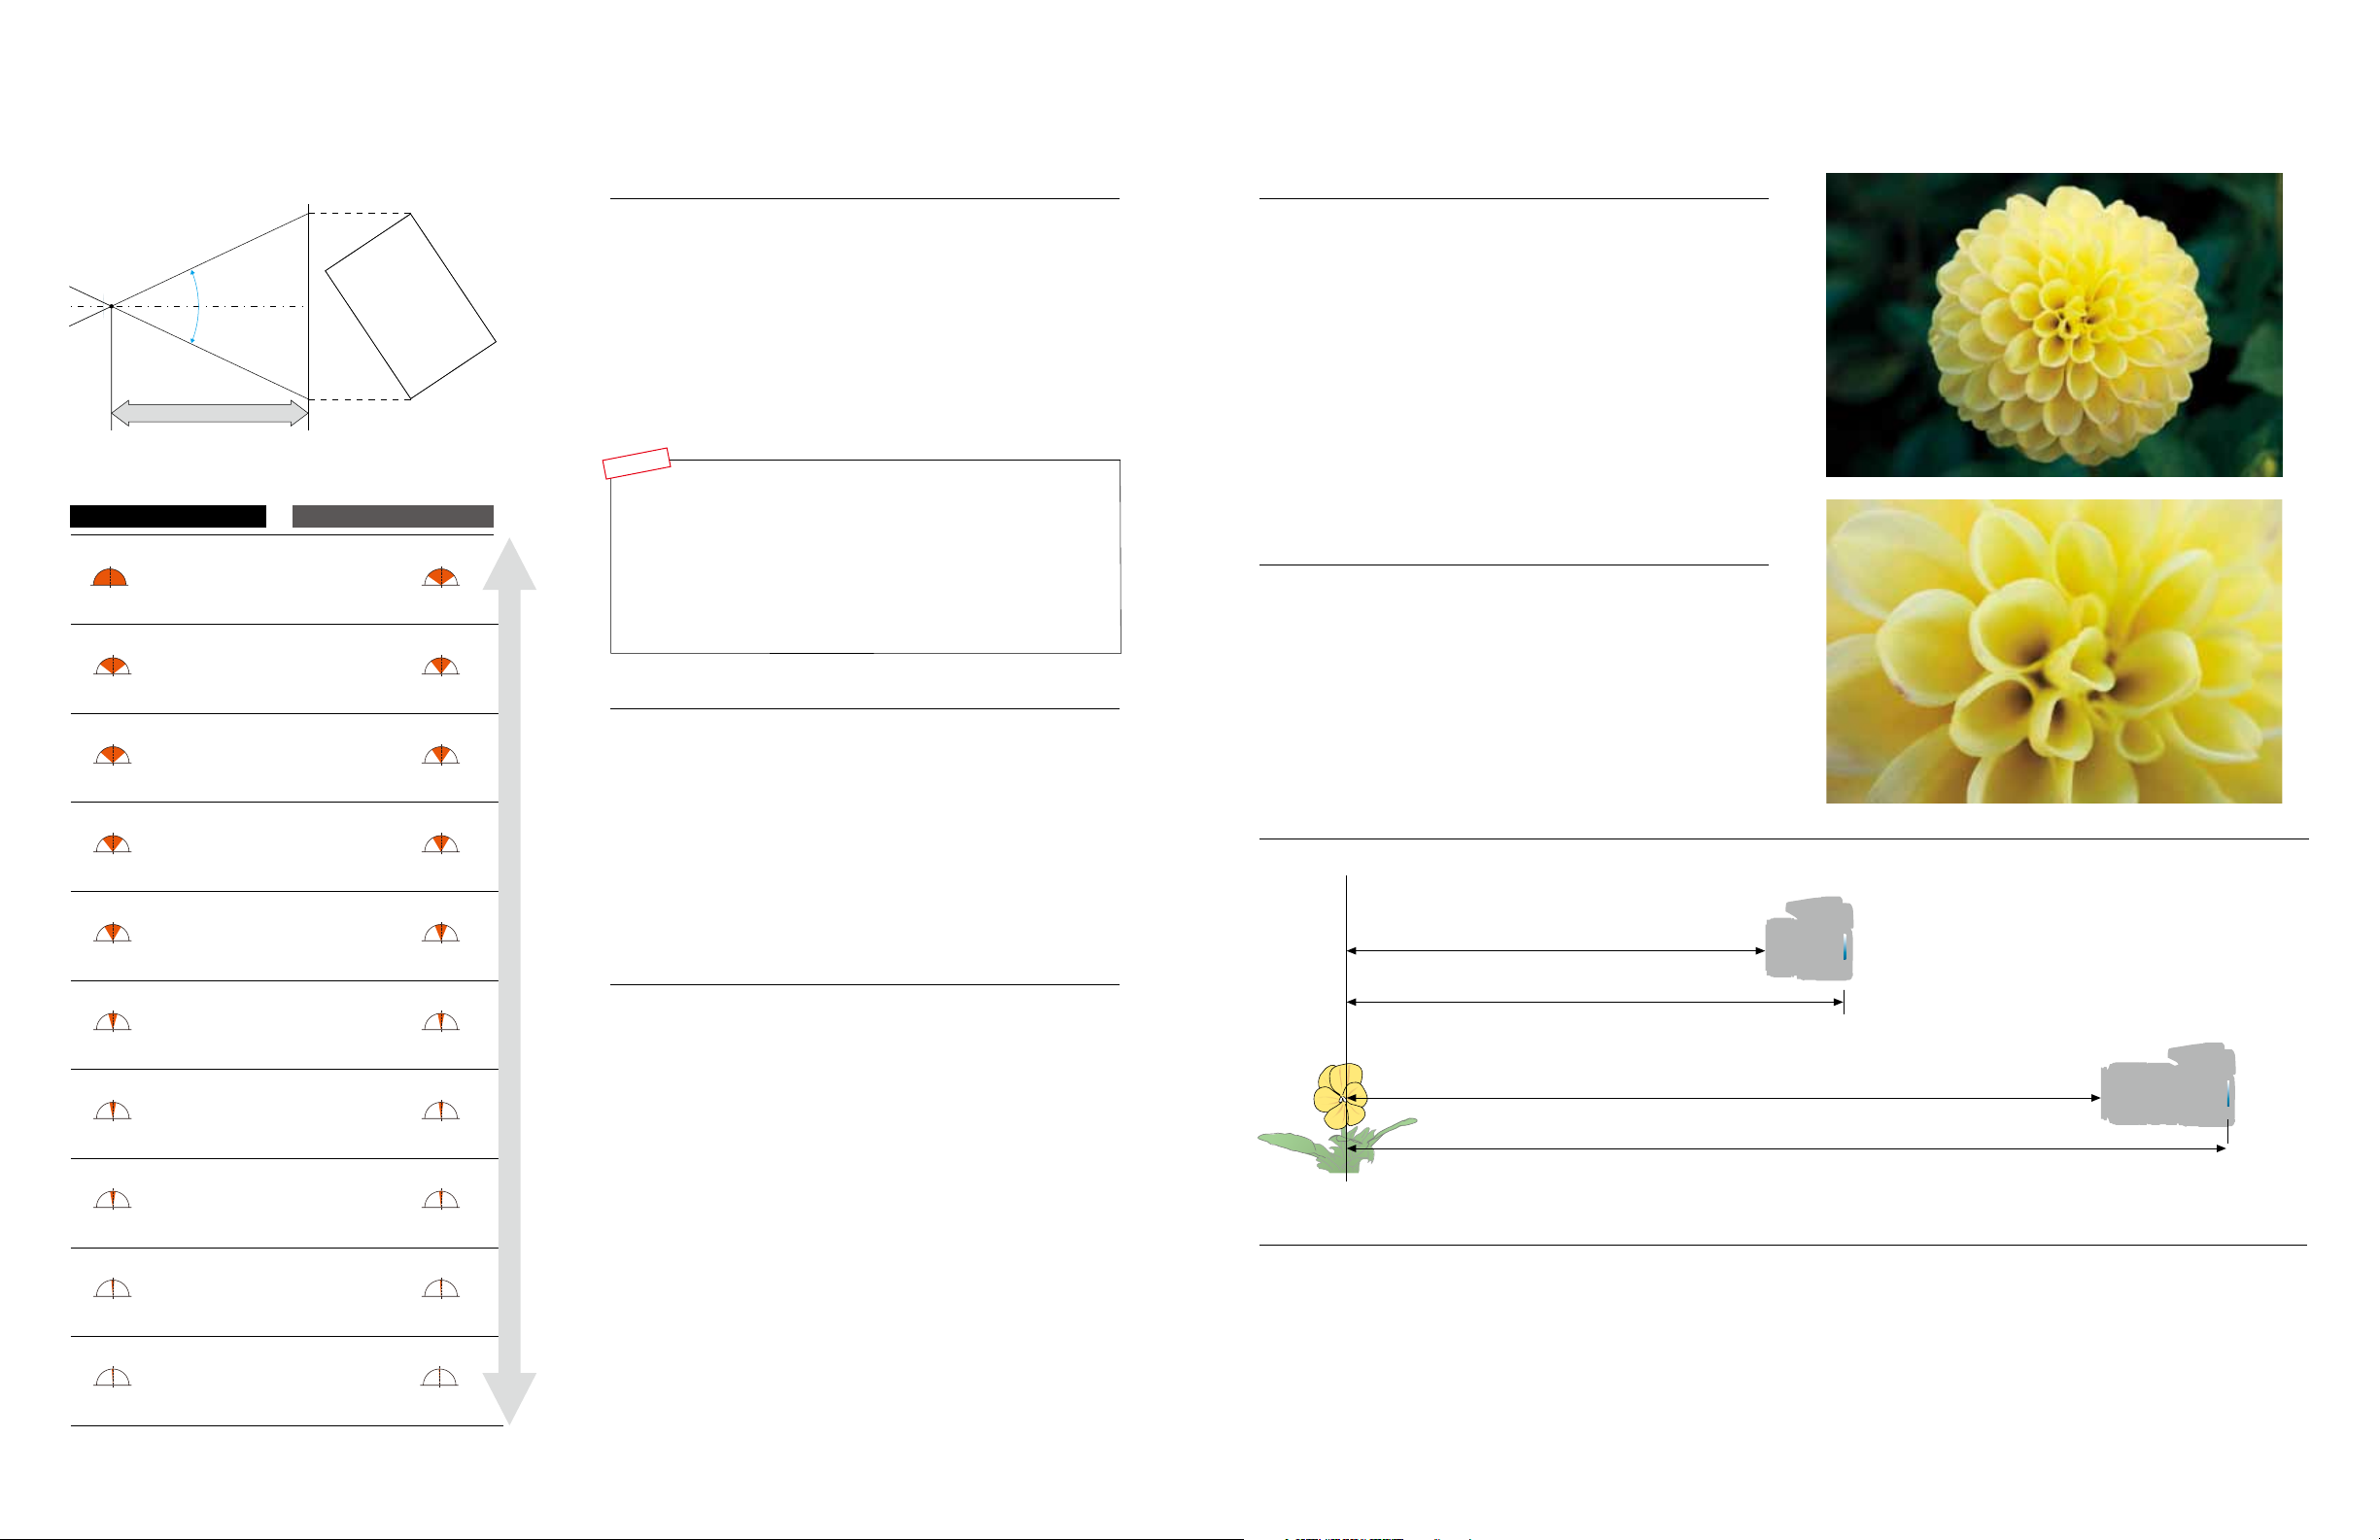
Focal length, angle of view and perspective
Macro photography
Focal plane (image sensor plane
Angle of view
(
measured diagonally
Focal length
Secondary principal point of lens
Focal l engt h vs. angle of view
With 35mm full-frame image sensor Wit h APS- C type im age sensor
16 mm
Fisheye
16 mm 16 mm
18 mm 18 mm
24 mm 24 mm
35 mm 35 mm
70 mm 70 mm
100 mm 100 mm
135 mm 135 mm
250 mm 250 mm
400 mm 400 mm
* Focal len gth in ( ): equivalent focal length when mounted on
interchangeable-lens digital cameras with 35mm full-frame sensors.
)
)
16 mm
Fisheye
(
24 mm
(
27 mm
(
36 mm
(
105 m m
(
150 mm
(
205.5 mm
(
375 mm
(
600 mm
Focal length
Focal length, or focal length range in the case of zooms, will usually be the
foremost consideration when choosing a lens for a specific photograph or
type of photography. The focal length of a lens determines two characteristics
that are very important to photographers: magnification and angle of view.
Maximum magnification ratio
As mentioned on the previous page, the magnification of any lens is
determined by its focal length. For macro photography we are also concerned
with how close we can get to our subject. These two factors, focal length and
minimum focusing distance, determine the lens’s maximum magnification
ratio, sometimes referred to as “reproduction ratio.” The closer you can get to
Longer focal lengths correspond to higher magnification, and vice-versa.
Wide-angle lenses with short focal lengths have low magnification, which
your subject with a lens of a given focal length, the higher the magnification
ratio you’ll achieve.
means you have to get physically close to an average-size subject to fill the
frame. But that also means you can fit large subjects in the frame without
having to shoot from a distance. Telephoto lenses with long focal lengths
have high magnification, so you can fill the frame with subjects that are
further away from the camera.
The classic definition of a macro lens is one that has a maximum magnification
ratio of at least 1:1, or “1x” in lens specifications. This means that a subject can
be reproduced at full size on the camera’s image sensor: a 10mm object can
be projected onto the sensor as a 10mm image when the lens is sufficiently
close to the subject. A maximum magnification ratio of 1:2 or “0.5x” would
mean that the maximum size that an image of the same 10mm object could
TECH TALK
A technical definition of focal length
The focal length of a lens is d efine d as the distance from its secondary prin cipal
point to it s rear focal point w hen focus is set to infinit y. The secondary principal
point is o ne of six “cardinal points” that are us ed as points of reference in a n
optical lens (front and rear focal points, primary and secondary nodal points
Wide Mid-range Telephoto
and primary and secondary principal points). There’s no predefined location
for the secondary principal point in a compound lens—it could be somewhere
inside the lens barrel o r at some p oint out side th e barrel, depending on the
design of the lens—so there’s no easy way to accurately measure the focal
length of a lens yourself.
be projected onto the sensor would be 5mm, or just half its true size.
0.35x
Other macro lens characteristics you should know about
Macro lenses are specifically designed to deliver optimum optical performance
at very short focusing distances, and will usually be sharpest at close range,
but that doesn’t mean that you can only use them for macro photography.
Many macro lenses are also capable of excellent performance when shooting
normal subjects at normal distances as well.
)
Focal length and angle of view
“Angle of view” describes how much of the scene in front of the camera will
be captured by the camera’s sensor. In slightly more technical terms, it is the
angular extent of the scene captured on the sensor, measured diagonally.
)
It is important to remember that angle of view is entirely determined by both
the focal length of the lens and the format of the camera’s sensor, so the
angle of view you get from any given lens will be different on 35mm full frame
Another important characteristic of macro lenses used at short range is that
they have very narrow depth of field. That means they have to be focused very
carefully to get the desired details in perfect focus. A tripod can make focusing
easier in some situations. You might have to stop the aperture down quite a bit
to achieve sufficient depth of field with some subjects. But shallow depth of
field can be an advantage, emphasizing the essential in-focus detail while
defocusing and de-emphasizing distracting background.
1.0 x
and APS-C format cameras. Different lenses of equal focal length will always
have the same angle of view when used with the same-size sensor.
)
The “Focal length vs. angle of view” comparison to the left illustrates this
30mm M acro lens (SAL30M28
)
relationship for both 35mm full frame and APS-C format cameras.
Working distance (approx. 2 cm/0.8 in. at 1x magnification
)
Perspective
With long focal lengths, foreground and background objects will often appear
Minimum focusing distance (approx. 13 cm/5.1 in. at 1x magnification
to be closer together in the final image. This effect is sometimes called “telephoto
compression,” although it is not actually caused by the lens itself. What really
)
happens is that when using a telephoto lens, you will need to be further away
from your subjects. As such, the distance of the subject from the background
relative to the subject’s distance from the camera lens becomes smaller and
Working distance (approx. 16 cm/6.3 in. at 1x magnification
smaller the further away the photographer stands. From that perspective
they actually are closer together! Another way of saying this is that since both
)
the foreground and background objects are at a considerable distance
Minimum focusing distance (approx. 35 cm/13.8 in. at 1x magnification
from the camera, their relative sizes in the final image will be closer to reality.
When shooting with a wide-angle lens you normally need to get close to the
foreground subject so that it is sufficiently large in the frame, which is why
more distant objects look comparatively smaller. The difference in apparent
)
perspective is actually a result of how far you are from your subject.
Minimum focus and working distance
The “minimum focusing distance” lens specification can be confusing.
Minimum focusing distance is measured from the subject to the rear focal
point of the lens, which is at the image sensor plane in the camera body.
)
The term “working distance” is used to describe the distance between the
subject and the front element of the lens.
If a lens is specified as having an 0.2 meter (20 centimeter) minimum
focusing distance, for example, depending on the thickness of the
)
24mm focal length,*
84° angle of view
* 35mm format equivalent
300mm focal length,*
8° angle of view
camera body and the length of the lens, you might only have a few
)
Image sensor plane
)
)
100mm Macro lens (SA L10 0 M2 8
Image sensor plane
centimeters of working distance when focused at the minimum focusing
distance in order to take a 1:1 macro shot. Being that close to your
subject can make lighting difficult (special macro flashes and ring lights
are available to overcome this type of lighting problem), focusing can
be difficult if the subject or camera moves even slightly, and you’re likely
to scare away living subjects at such close distances. If any of those
problems occur, you need to choose a macro lens that has a longer focal
length for more working distance.
)
10 11
Page 7
Hoods and filters
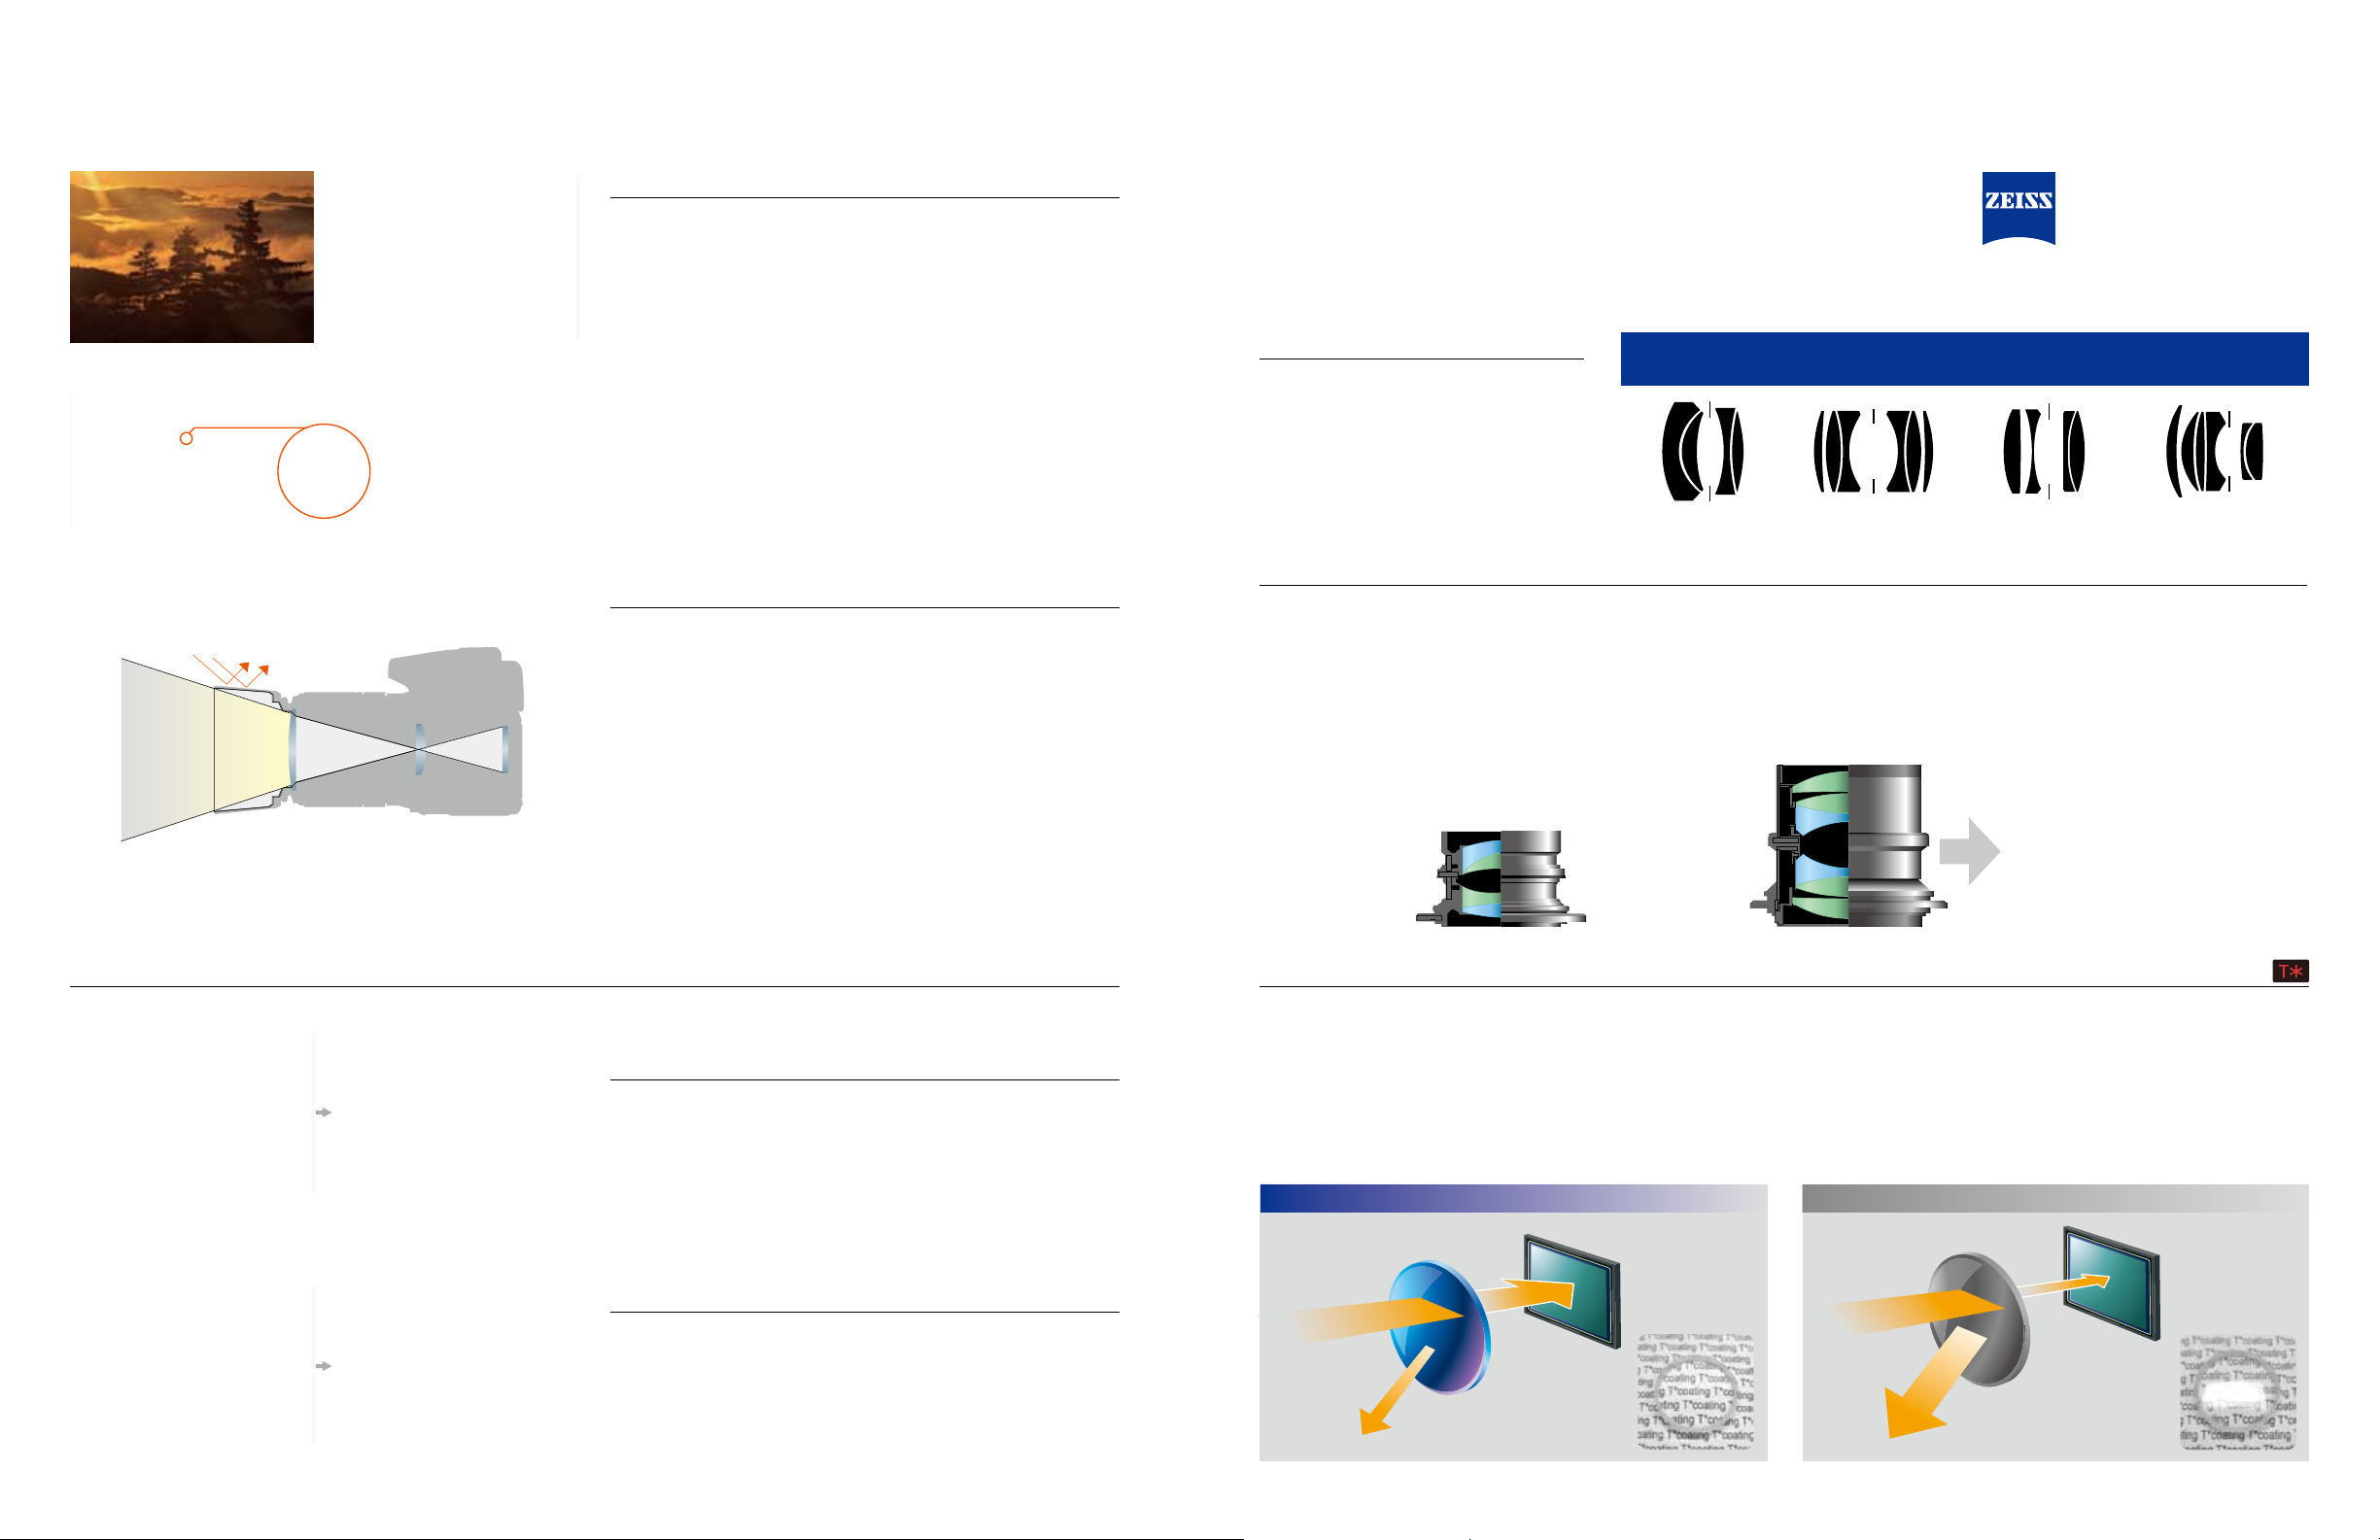
Carl Zeiss® optics
Without lens hood (flare, poor contrast
Visible ghosts
How len s hoods work
Extraneous light
Light needed for
image formation
Lens hood
)
With lens hood (no flare, high contrast
Enlarged view No ghosts
Use your lens hood!
The lens hoods provided with most interchangeable-lenses are not just
accessories to be used occasionally. They are an important part of the lens’s
optical system and should always be used in order to ensure optimum
performance. There are exceptions, such as when an on-camera flash is
used and the lens hood casts a shadow, but for most shooting situations
the lens hood should be on the lens, not in your bag. If your lens has a
built-in extending hood, it should be extended when you’re shooting.
)
Even though a lenses are uncompromisingly designed with multi-coated
elements and other internal features that minimize flare and ghosting, these
problems can still occur if extraneous light is allowed to enter the lens. And
although the effects of flare might not be obvious in all images, it can subtly
degrade contrast and prevent you from capturing the strongest possible
image. Strong backlighting, particularly near the edge of the image, can
cause ghosts even when a lens hood is used. In such situation the only
solution is to reframe the shot so that the problematic light source is excluded.
Lens hoods block extraneous light
Any light entering the lens that does not come directly from the scene being
photographed is extraneous light that needs to be eliminated. Light that
grazes the front element at a steep angle or bounces around inside the lens
barrel will degrade image quality. A lens hood that is properly designed for
the lens on which it is used will effectively block extraneous light that does
not contribute directly to the image, ensuring that the lens will deliver the
highest resolution and contrast it is capable of. Although most lens hoods
for normal to telephoto focal lengths are basic round designs, lens hoods
for wide angle lenses often have a “petal” shape that is designed to block
unwanted light without intruding into the corners of image area.
For many photo enthusiasts, Carl Zeiss lenses have long been the ultimate
choice. Many models are available, but the only autofocus Zeiss lenses
currently available for use on interchangeable-lens digital cameras are
those that have been created through close cooperation between Carl Zeiss
AG and Sony for the a series cameras.
The scientific approach
It was Ernst Abbe of Carl Zeiss AG who first
applied scientific principles to lens design, rather
than relying on trial-and-error experience. A
significant portion of the history of photographic
lens development centers on the Protar, Planar
and Sonnar designs that featured advanced
optical paths based on those principles. In many
ways the history of Carl Zeiss AG is the history
of photographic lenses.
Protar
(
189 0 -
®
)
Planar®
(
1896 -
)
The Carl Zeiss lenses that started it all
Protar
Developed by Dr. Paul Rudolph in 1890, this
lens was one of the original Anastigmat series.
The design was named “Protar” (from the Latin
“proto,” or “first”/”origin”) in 1900. The front
group was a standard achromatic combination
of low-refractive-index crown glass and high-
refractive-index flint glass, but the rear group
was an innovative achromatic doublet using
Jena glass, with high-refractive-index crown
glass and low-refractive-index flint glass. The front
and rear elements were located on either side
of the diaphragm,
effectively suppressing
chromatic aberration.
This design evolved to
become the Unar lens
and later the Tessar.
Planar
Another Paul Rudolph design, developed in 1897.
Initially this design was called the “Anastigmat
Series IA.” It features a symmetrical 6 -element
4-group Gaussian design that facilitates the use
of large apertures. The “Planar” name is derived
from the flatness of the image. Planar lenses are
appreciated for their superb image depth and
rich color reproduction.
Tessar®
(
)
1902-
The Carl Zeiss traditions of innovative technology
and uncompromising quality are alive in
today’s
series lenses as well.
a
Sonnar®
(
)
192 9 -
Petal hood Round hood
The unmatched T* (T-star) coating
The fact that lens coating technology—vapor deposition of a thin, even
Circular polarizing filters for
improved contrast and color
Circular polarizing (PL) filters can be used to eliminate reflections and glare
from reflective surfaces such as glass and water, but landscape photographers
find them most useful for increasing contrast and saturation in skies, foliage and
other icons of the landscape genre. In all cases the filter works by eliminating
reflections, but in the latter, it is eliminating reflections from airborne dust and
Without circular PL filter
(
reduced contrast
)
With circular PL filter
(
increased contrast and deep saturation
water vapor, thus removing a veil of glare and allowing the true colors of the
scene to come through.
)
Neutral density filters
Sometimes the light is so bright that you’re forced to use smaller apertures or
faster shutter speeds than you want to. Neutral density (ND) filters reduce the
amount of light entering the lens without affecting the color or tonal balance
in any way, and can be very useful in this type of situation. Suppose you
want to shoot a waterfall using a shutter speed that’s slow enough to blur the
moving water and create a sense of motion, but the lighting at the scene is
Without ND filter With ND filter
12 13
(
reduce d light for slower shutter speed
too bright. An ND filter will reduce the light intensity so that you can use the
relatively slow shutter speed required to achieve the desired effect.
)
coating on the lens surface to reduce reflections and maximize transmission—
was originally a Carl Zeiss patent is well known. The Carl Zeiss company also
developed and proved the efficacy of multi-layer coatings for photographic
lenses, and this is the technology that became the T* coating.
Until the introduction of coated lenses, the lens surface would reflect a large
percentage of the incoming light, thus reducing transmission and making
it difficult to use multiple elements in lens designs. Effective coatings made
Light source
Image sensor
Reduced reflection
it possible to design more complex optics that delivered significantly
improved performance. Reduced internal reflection contributed to minimum
flare and high contrast.
The Carl Zeiss T* coating is not simply applied to any lens. The T* symbol
only appears on multi-element lenses in which the required performance
has been achieved throughout the entire optical path, and it is therefore a
guarantee of the highest quality.
Uncoated lensCarl Zeiss coated lens
Light source
Image sensor
Uncontrolled reflection
Page 8
Making sense of MTF
Choosing the right lens
Those MTF (Modulation Transfer Function) graphs that often accompany
lens specifications are really not as impenetrable as they look, and they can
give you a good idea of how a lens will perform, so it might be worth taking
a few minutes to learn what they mean.
MTF describes a lens’s ability to resolve finely spaced black and white lines
printed on a test target. As the lines get closer together they start to blur and
blend together as the limits of the lens’s resolving ability are reached. MTF
is plotted for multiple levels of subject detail (Y axis) at a number of points
from the optical center of the lens to its periphery (X axis). The more lines per
millimeter the lens can resolve, the better the resolution and contrast of the
lens.* This resolving power is expressed as line pairs per millimeter (lp/mm),
and sometimes as the more scientific sounding “spatial frequency.”
* For more info about these closely related terms, refer to the “Resolution, contrast
and sharpness” column below.
Take a look at the sample chart below to see how it all works to describe
lens performance. The solid green line shows radial contrast values for 10
lp/mm detail with the lens wide open. The line is almost flat, indicating
that resolution is constant at approximately 93% from the center to the
periphery of the lens. Very good. The solid red line shows contrast with the
same parameters except that the aperture has been stopped down to F8.
The red line is higher than the green line, indicating that stopping down has
improved resolution somewhat.
Basically, the higher and flatter the line, the better the performance for the
corresponding set of parameters. The smaller the distance between the
green and red lines, the more consistent the performance of the lens is over
a range of aperture settings. The smaller the gap between the solid and
dotted lines, the more attractive the defocusing is likely to be.
That’s really all you need to know to glean useful information from an MTF
chart. Just remember that comparing MTF graphs of different lenses is really
only meaningful if both lenses have similar focal lengths.
Green: Contrast value at maximum aperture
Y
The X (horizontal) and Y (vertical) axes of the chart
correspond to the following values:
• X: Distance from the optical center of the lens to
a point near its periphery, measured in millimeters.
• Y: The degree of contrast measured at each point,
expressed as a percentage.
A number of parameters are represented by different line types on
the MTF chart, as defined by a legend that accompanies each
chart. Those parameters are:
• Two lp/mm values: often 10 lines per millimeter and 30 lines
per millimeter.
• Two different aperture settings: lens wide open and F8.
• Two orientations of line pairs in relation to the lens: “R” (radial =
lines parallel to the radius of the lens), and “T” (tangential = lines
perpendicular to the radius of the lens).
All of the MTF char ts that accompany the lens descriptions in the latter part of this brochure follow these conventions.
Indicates excellent performance
with high contrast and resolution
at the center of the lens.
Indicates the level to which
resolution and contrast are
maintai ned at the periphery
of the lens.
100
80
60
40
20
Contrast (%)
048121620
Distan ce from optical center of le ns (mm
Spatial frequency
10 line pairs/mm
30 line pairs/mm
Resolution, contrast and sharpness
Although it is possible to have high resolution and low contrast, or vice versa, in the
context of MTF measurements these terms mean almost the same thing. Both good
resolution and contrast are necessary for a lens to be perceived as “sharp.” We’re
talking about “micro-contrast” here, which is the ability of a lens to differentiate
between tiny details that have similar tonal values. Micro-contrast is different from
global contrast, the overall range of tones in an image that people usually associate
with the term “contrast.” MTF measurements are useful because they show us the
relationship between a lens’s resolution and contrast in graphic form that makes it
easy to judge how the lens will perform in real-world applications.
Red: Contrast value at F8
Max. aperture
R RT T
F8 aperture
Portraits
For most portraits, the person
being photographed is the
most important element of
the photograph, so it can be
effective to de-emphasize
other non-essential elements.
The usual way of doing this is
to defocus the background so the viewer gets a sense of location without
being distracted from the main subject by too much surrounding detail.
Choose a lens that has a large maximum aperture and a focal length
between about 75mm and 150mm for flattering perspective, and so that
you don’t have to get uncomfortably close to your subject. The Planar T*
85mm F1.4 ZA (SAL8514Z), DT 50mm F1.8 SAM (SAL50F18), 85mm F2.8 SAM
(
SAL85F28), 135mm F2.8 [T4.5] STF (SAL135F28) and E-mount 50mm F1.8
(
SEL50F18) are excellent choices for this type of photography.
Landscapes
Although you can use
anything from wide angle to
telephoto lenses for landscape
photography, you’ll probably
get the most use out of wide
lenses that can capture the
grandeur and scale of nature
at its best. A wide-angle zoom such as the Vario-Sonnar T* 16-35mm F2.8 ZA
X
)
SSM (SAL1635Z) would be an excellent choice because it covers a range
of focal lengths that are extremely useful for landscape photography with
outstanding resolution and contrast. Stopped down to F8 or F11 lenses in
this focal length range will give you sufficient depth of field to keep the entire
scene in sharp focus. Hint: include prominent foreground objects to give your
landscape images a greater sense of scale.
Snapshots
The term “snapshot” refers to
any photo opportunity that
arises spontaneously. You’re
shooting snapshots when you
take your camera for a walk
in the park, or on vacation, or
even when you’re in “serious”
street-shooting mode. The key is to capture the moment, and that requires
mobility and speed. Some photographers prefer to use a prime lens with a
TECH TALK
focal length they’re comfortable with for this type of shooting: a “simple is
faster and better” approach. Others choose a compact mid-range zoom like
the 28-75mm F2.8 SAM (SAL2875) for maximum versatility. If you’re going to
be shooting snaps indoors or in evening or early morning light you’ll want to
choose a lens with a large maximum aperture.
In the product pages that follow, this star icon identifies lenses: prime lenses that offer outstanding value in
compact, lightweight designs that are ideal for photographers at all levels. Each lens in the series is suited for a
particular type of photography, such as portraiture or macro, for example.
Macro and close-ups
“True” macro lenses that can
be used to shoot extremely
clear, detailed images of very
tiny subjects have a maximum
magnification ratio of 1:1 (1x),
and that limits your choices.
Use the DT 30mm F2.8 Macro
SAM (SAL30M28), 50mm F2.8 Macro (SAL50M28), or E-mount 30mm F3.5
(
SEL30M35) for stationary subjects that you can get very close to, or the
100mm F2.8 Macro (SAL100M28) where a bit more working distance is
required. You can also shoot impressive close-ups such as flowers with any
lens that has a maximum magnification ratio of about 0.25x or more and a
sufficiently short minimum focusing distance. The 75-300mm F4.5-5.6 zoom
(
SAL75300) is good for this type of close-up shooting, or you could use the
70-300mm F4.5-5.6 G SSM (SAL70300G) for truly stunning image quality.
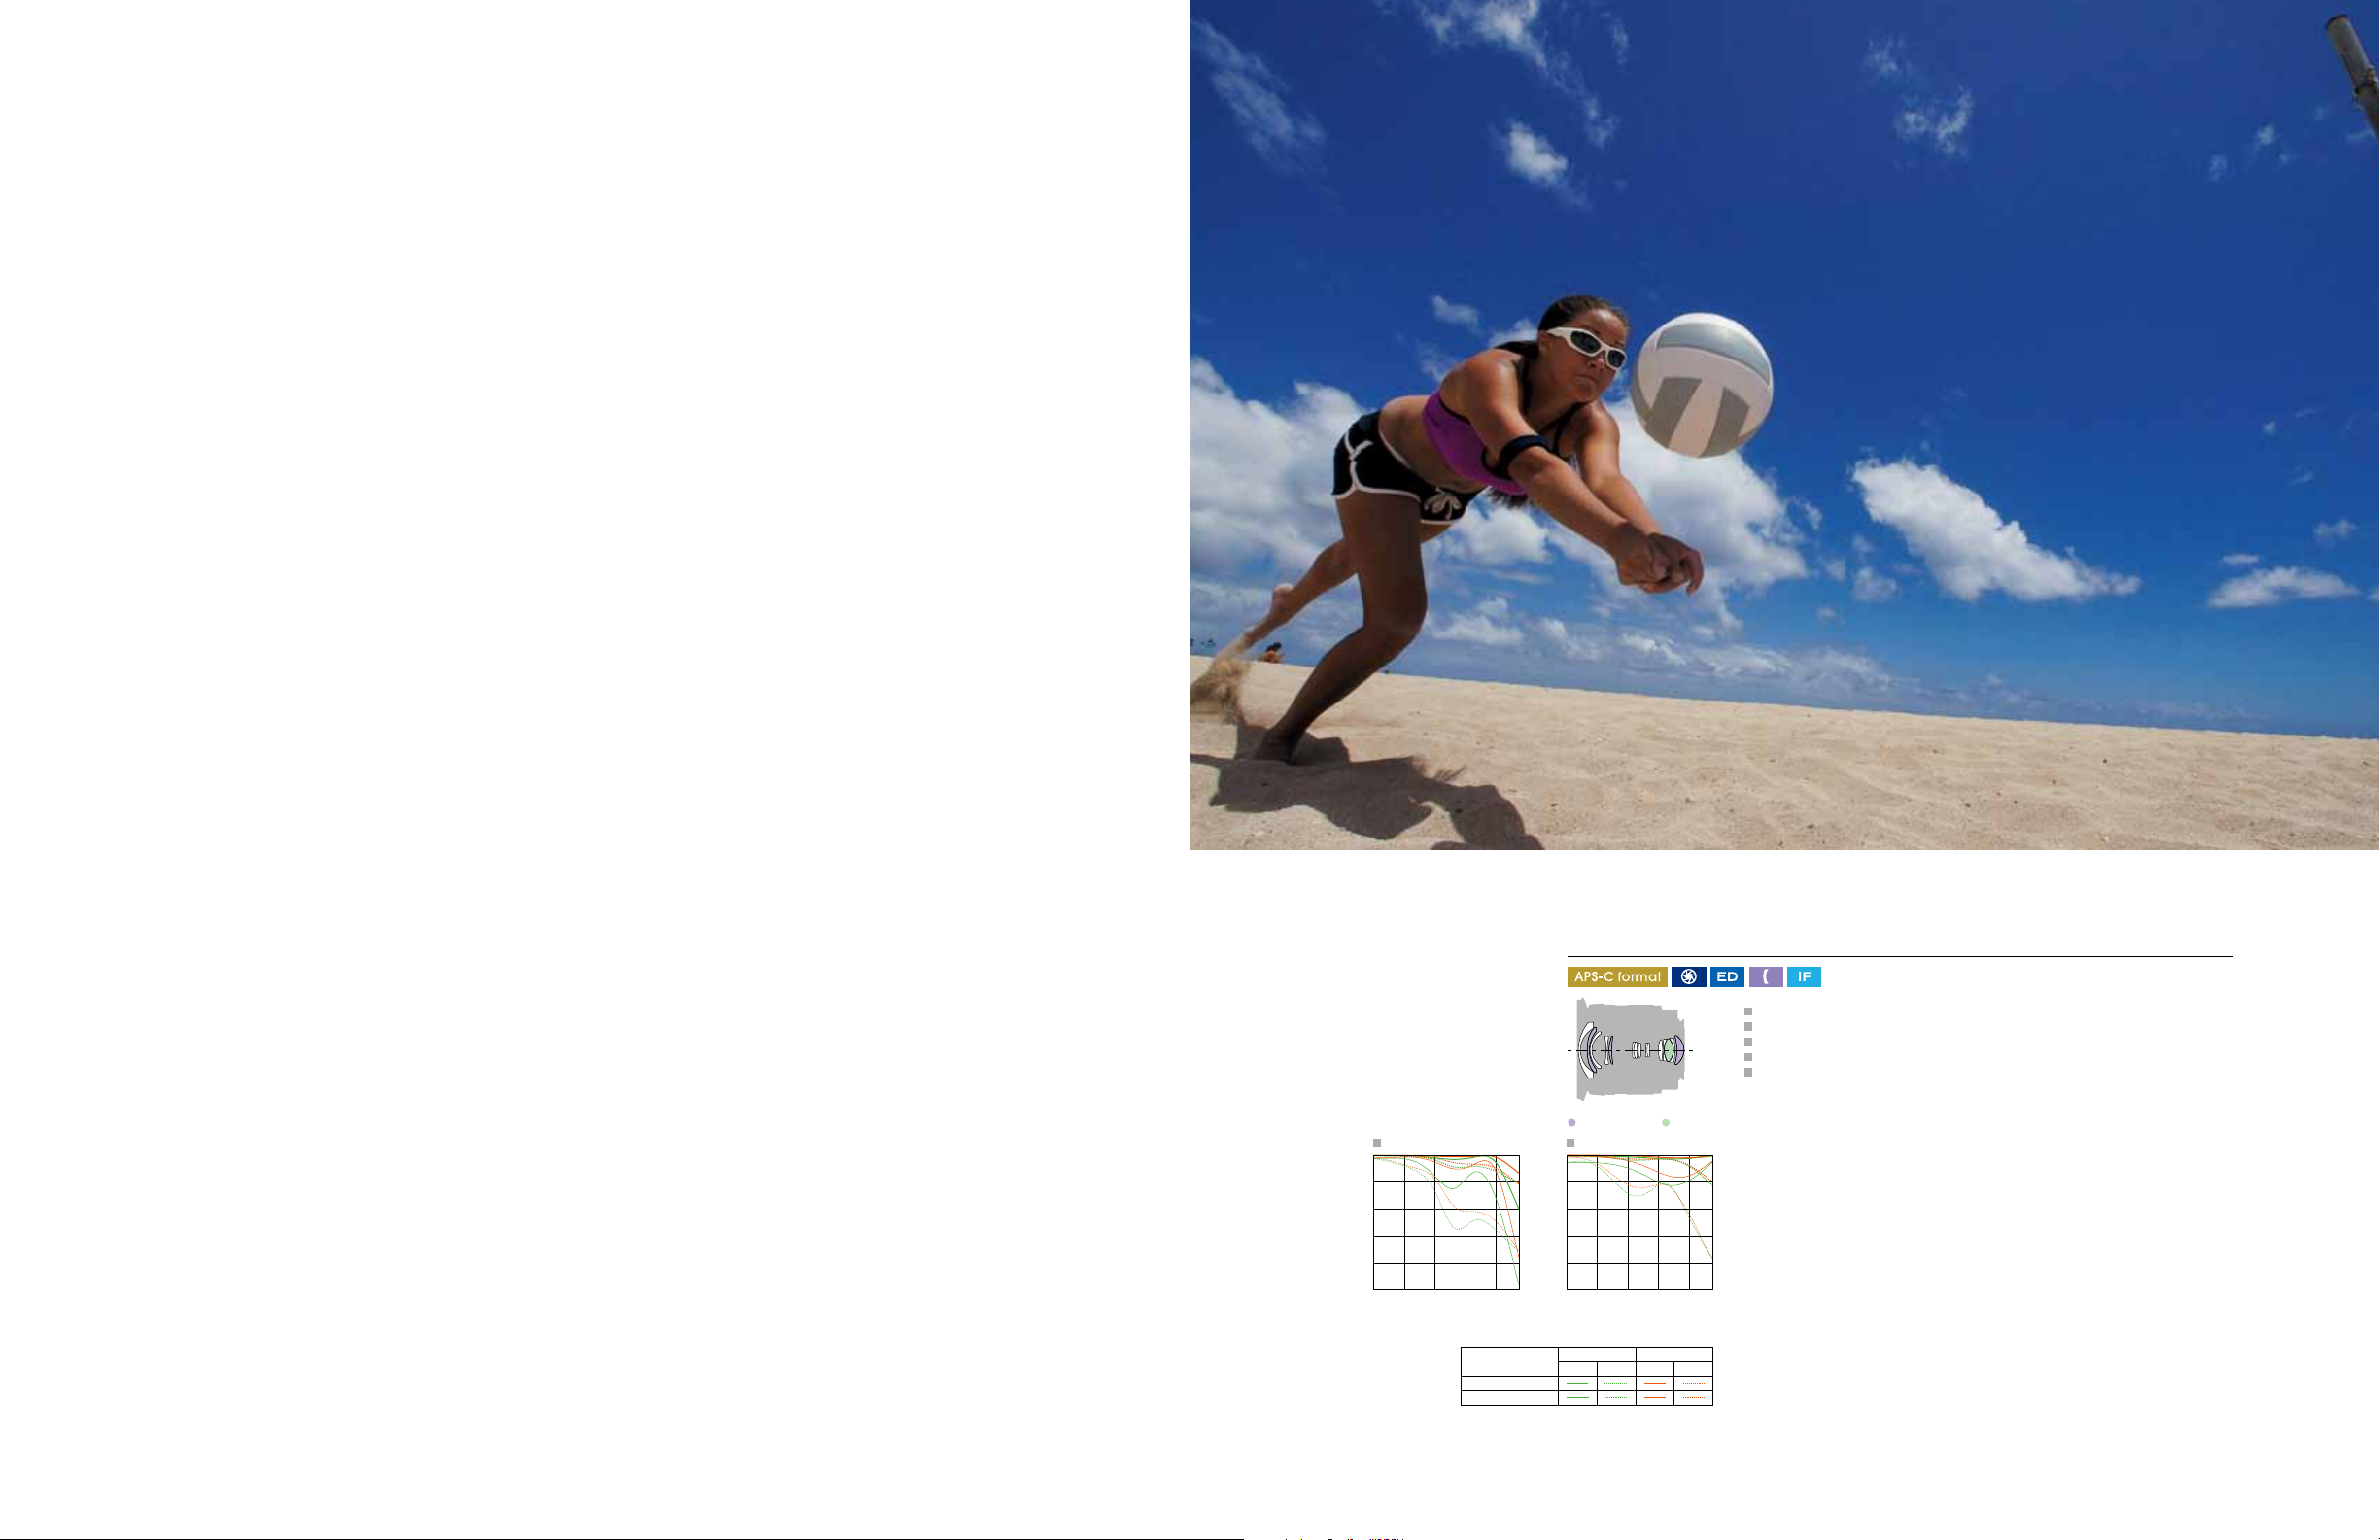
Sports
Since sports almost invariably
involve fast action, usually at
a distance, you’ll want to use
a telephoto lens that’s “fast”
enough to allow the use of
action-freezing shutter speeds.
The 300mm F2.8 G telephoto
prime (SAL300F28G) is an outstanding choice for this genre, but if you want
the framing versatility of a zoom the 70-200mm F2.8 G (SAL70200G) is a great
alternative. You could even use the SAL14TC 1.4x Teleconverter or SAL20TC 2x
Teleconverter with either of these lenses to provide more reach for distance
subjects or to grab close-ups of the action. Of course there are always
exceptions: if you can get close to the action you might be able to use a fast
wide-angle prime or zoom to capture a more dynamic perspective.
Wildlife
Since you can rarely get close,
super-telephoto is the first focal
length choice for shooting
wildlife. Of course you won’t
need that much magnification
if you’re shooting pets at
home, but in the wild you’ll
want to be as far away as possible, to avoid scaring off your subject and for
safety. The 300mm F2.8 G telephoto prime (SAL300F28G) with the 1.4x or 2x
Teleconverter (SAL14TC or SAL20TC) is probably the most suitable choice.
Not only does that combination give you the reach you’ll need, but the quiet,
responsive operation of the SSM autofocus drive will be an advantage as
well. Hint: the above lens/teleconverter combination will give you even more
reach when used on an APS-C format body.
14 15
Page 9
lens technology
a
The technology required to produce first-class interchangeable camera lenses is very sophisticated indeed, and that
applies to every phase of the production process from design through precision parts manufacturing and assembly to
stringent quality assurance testing and more. Sony brings a distinguished history of excellence in all of these areas to
bear in producing the a lenses. You’ll feel the difference in the way a lenses handle, and you’ll see the difference in
the superior image quality they deliver.
Aspherical lens elements
Spherical aberration, slight misalignment at
the image plane between light that has passed
through the center and periphery of a simple
spherical lens, can become a noticeable
problem in large-aperture lenses. The most
effective solution is to use one or more specially
shaped aspherical elements near the aperture
stop to restore perfect alignment at the image
plane, thus maintaining high contrast even
with the aperture wide open. Aspherical lenses
arranged far from the aperture stop can minimize image distortion and flatness
of the image plane. Well-designed aspherical lens can reduce the number of
elements in the lens for less overall size and weight.
Aspherical lens ED glass
Image
sensor
plane
Image
sensor
plane
ED and Super ED glass
Chromatic aberration in conventional
optical glass elements can reduce contrast,
resolution, and color fidelity, particularly at
longer focal lengths. ED (Extra-low Dispersion)
and Super ED glass were developed with
refractive index and dispersion characteristics
specially tailored to counter this problem.
Lenses that include ED or Super ED glass
elements provide superior contrast and
resolution throughout the image even at
large aperture settings.
Conventional glassSpherical lens
Image s ensor
plane
Image s ensor
plane
Super ED glass
Image s ensor
plane
Internal focusing mechanism
In this type of lens, focusing is achieved by moving only the internal elements.
The overall length of the lens remains constant, and the filter mounting
thread at the front of the lens remains stationary during focusing. The latter
characteristic is an advantage when using a polarizing filter. Other advantages
include fast autofocus response and reduced minimum focusing distances.
Rear focusing mechanism
This focusing configuration has similar advantages to internal focusing,
described above, but focusing is achieved by moving the rear lens elements
rather than the internal elements.
SSM (Super Sonic wave Motor
SSM is an advanced direct-drive piezoelectric motor that is capable of
delivering high torque even at low speeds, with almost instantaneous start/
stop response. Its fast response and low-noise operation translate directly into
quick, quiet autofocus operation. SSM lenses also include position detection
for enhanced focusing precision. Other advantages of this advanced drive
system are that the focus ring does not rotate during autofocus operation, and
you can directly switch to manual focusing by simply rotating the focus ring.
)
SAM (Smooth Autofocus Motor
SAM is another type of internal lens motor for autofocus drive. While the SSM
motor described above is piezoelectric, the SAM motor is electromagnetic in
operation, but provides similar benefits: responsive autofocus operation that
does not require mechanical coupling from the camera body.
)
STF lens
A unique a lens feature currently available only in the SAL135F28, STF
(
Smooth Trans Focus) is an optical technology that is aimed specifically at
creating the smoothest, most visually pleasing defocusing effect possible
while retaining full resolution and contrast at in-focus areas. STF technology
employs a special “apodization” element that causes the intensity of
defocused point light sources to fade out radially so that no sharply defined
edges or geometry remain. The result is extraordinarily creamy defocusing
that goes beyond the capabilities of conventional lens technology.
STF lens
Apodization optical element
A
a
b
c
Auto clutch
The auto clutch mechanism decouples the focus ring so that it does not
rotate during autofocus operation. This allows the lens to be cradled in one
hand without interfering with autofocus operation, for improved shooting
comfort and versatility.
Circular aperture
Standard lens apertures appear as a flat-sided polygon when the lens is
stepped down, the number of sides corresponding to the number of blades
in the aperture. This results in the familiar polygonal out-of-focus highlights
seen in many photographs. Almost all a lenses feature a unique circular
aperture that contributes to smooth, natural defocusing.
Comparison of aperture design
Conventional aperture Circular aperture
Floating lens mechanism
This focusing feature is particularly important in certain lenses that are
designed for close focusing. It maintains optimum lens performance and
therefore maximum sharpness right down to the minimum focusing distance
by moving “floating” elements independently when focusing, rather than
moving the entire optical assembly as a whole.
Focus hold button
Press this button to lock focus at the current
setting. The focus hold button is on the lens
barrel right under your fingertip for convenient,
fast operation.
Focus range limiter
This feature can be used to limit focus range
when you need the quickest possible autofocus
response. On some lenses a single “limit” range will
match the characteristics of the lens (near focus
limit on macro lenses, for example), while some
lenses have a “near/far” limit range switch.
Piezoelectric
AC voltage,
Phase B
AC voltage,
RotorStator
SSM con sists of a rotor (left), and a stator (right) on which plexoelectric
elements are mounted.
Phase A
element
Stator
Rotor
Conventional lens
A
Defocu sing of STF lens
(
around focus point “a”
a
b
Defocusing of conventional
lens (around focus point “a”
)
c
)
16 17
Page 10
Zoom Lenses
The advent of the digital age—both in terms of photography
itself and the tools used for optical design—has made highperformance zoom lenses more accessible and easier to
use than ever before. Not only are zoom lenses a great way
to be ready for any photo opportunity, but the freedom to
rapidly change framing and composition without having
to change the camera position offers creative flexibility
that is just too appealing to ignore. In many situations, that
speed and freedom can be the key to grabbing shots that
would otherwise be missed. Advanced Sony design and
manufacturing technology delivers outstanding image
quality with unparalleled zoom versatility and convenience.
At 11 mm
100
80
60
40
20
Contrast (%)
036912
Distance from optical center
of lens (mm)
Spatial frequency
10 line pairs/mm
30 line pairs/mm
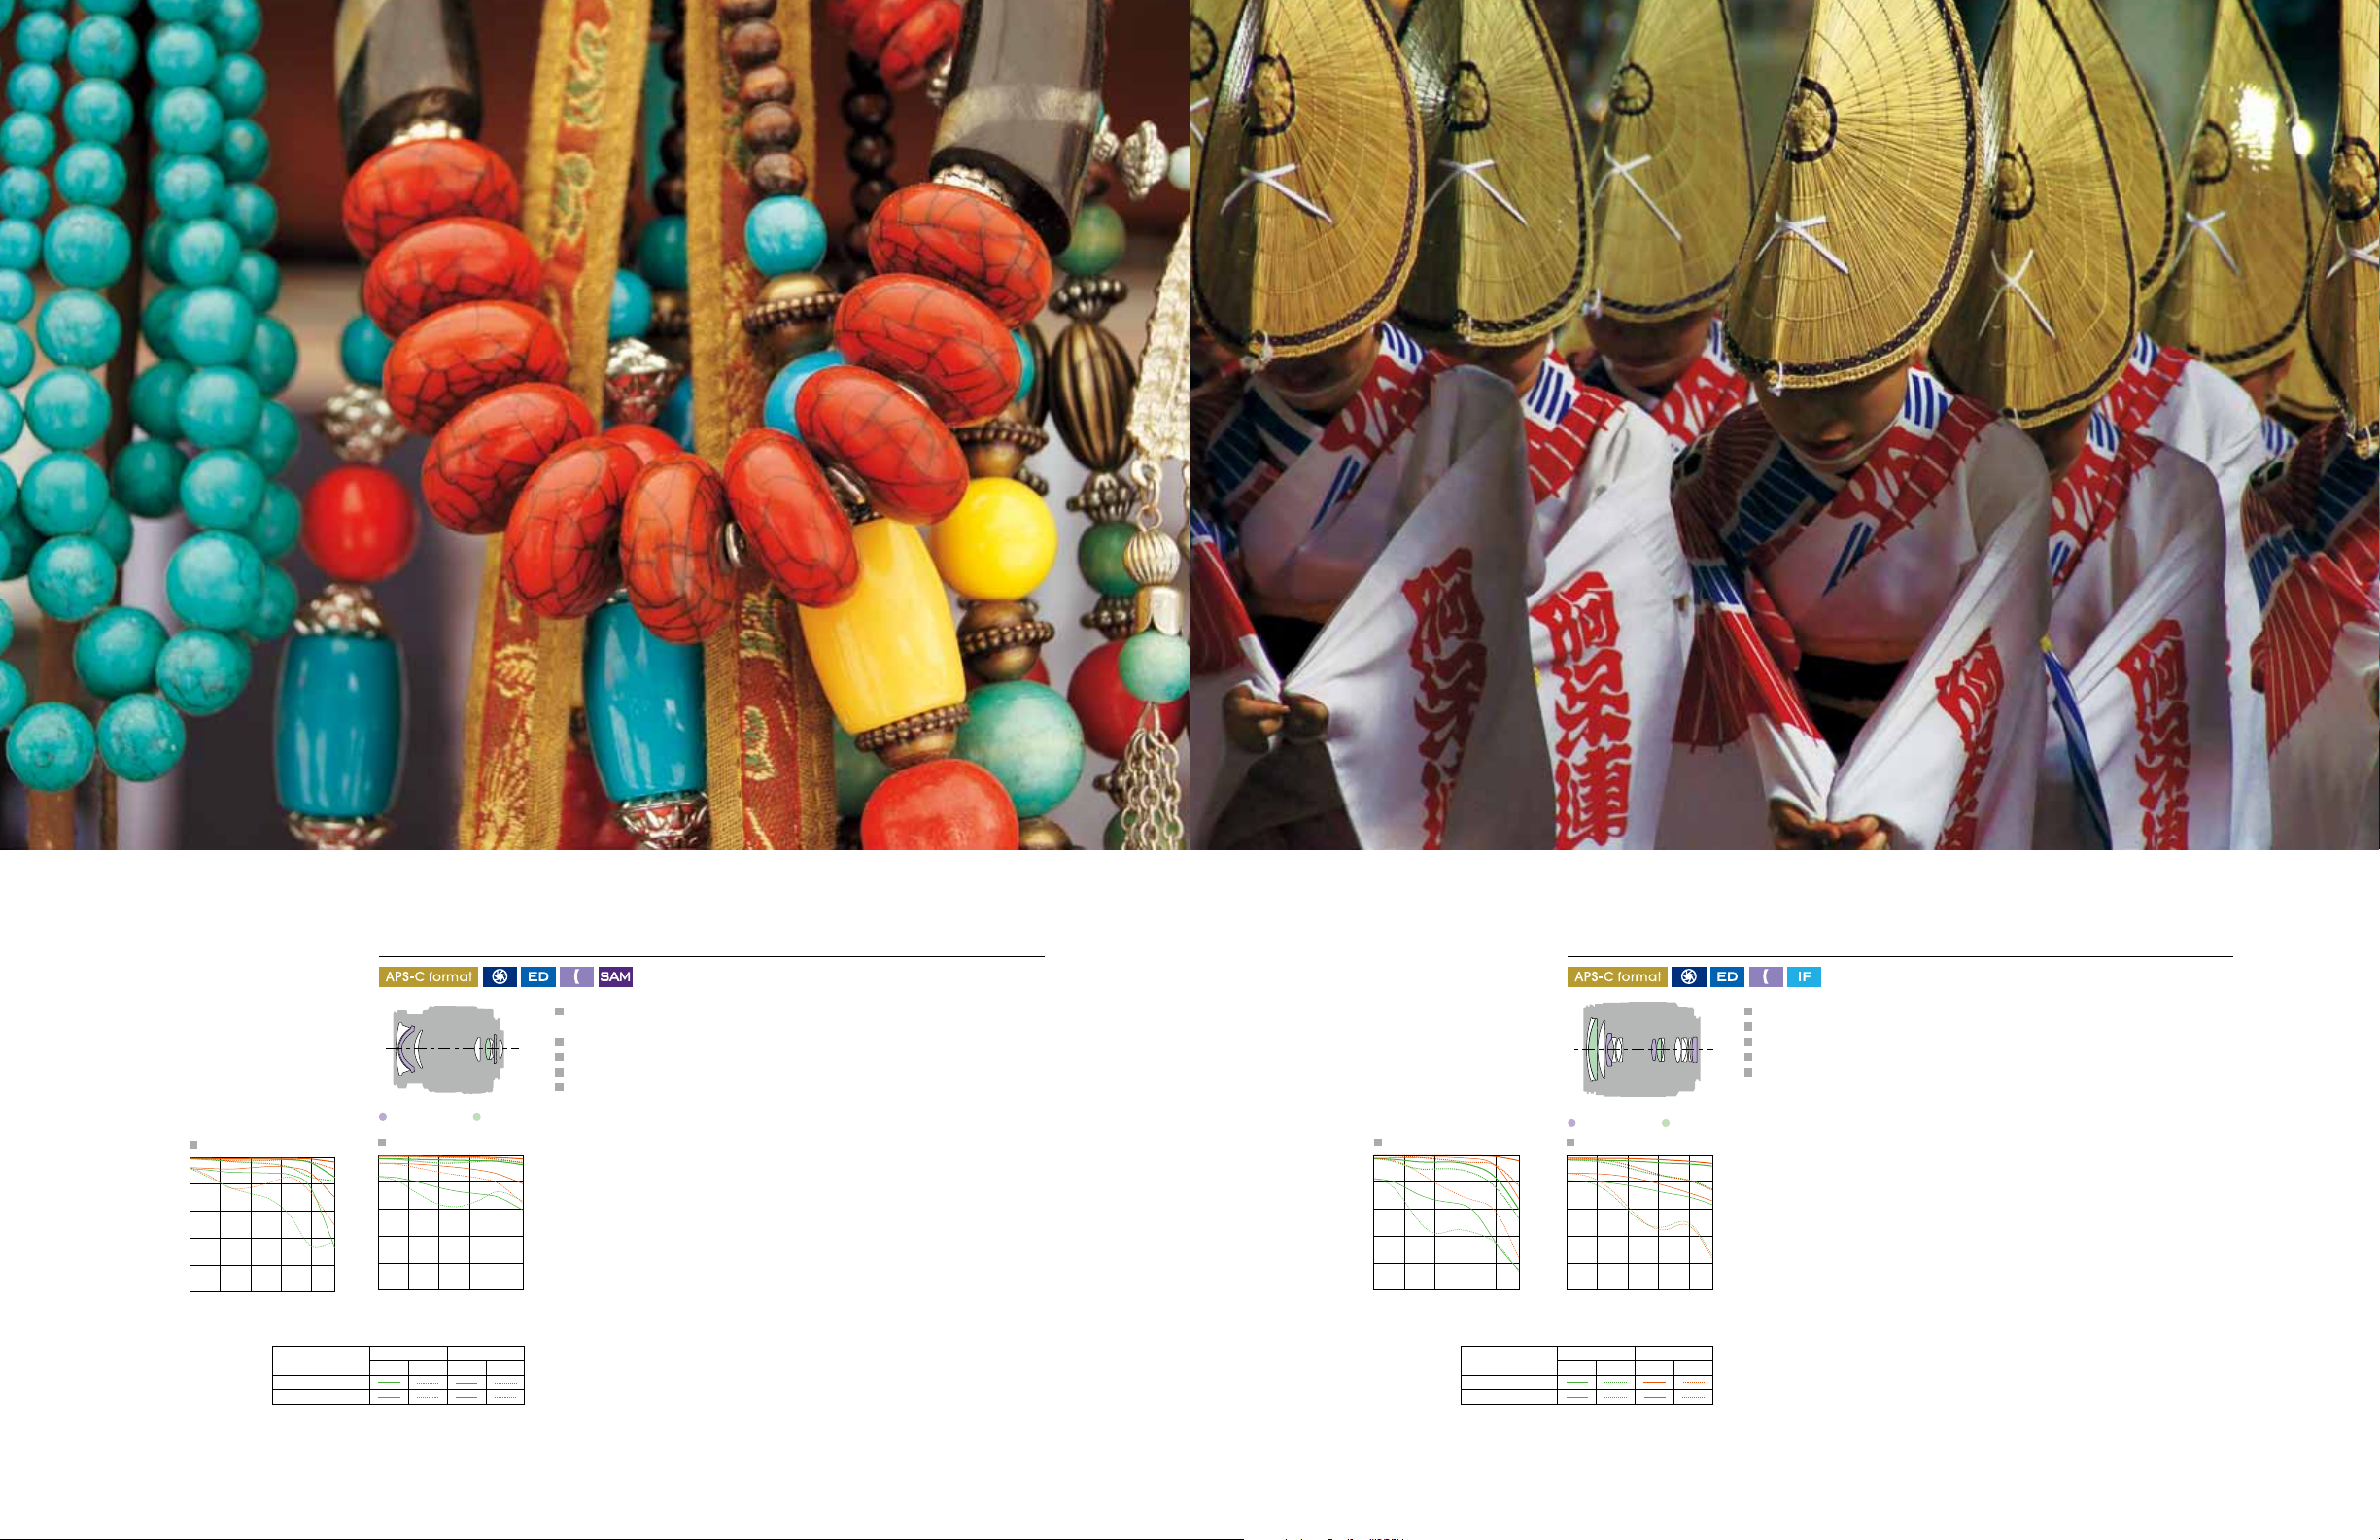
Wide-angle zoom
DT 11–18mm F4.5– 5.6 S A L1118
One ED glass ele ment and three aspheri cal ele ments for superior image quality
High contrast throughout zoom range
Flare and aberrations effectively subdued
Circular aperture for attractive defocusing
35mm equivalent focal length: 16.5–27mm
Aspherical lens ED glass
At 18 mm
100
80
60
40
20
Contrast (%)
036912
Distance from optical center
of lens (mm)
Max. aperture
R RT T
R: Radial values T: Tangential values
F8 aperture
This lens fits squarely in the “wide zoom” category, offering a range of
focal lengths that are indispensable for serious indoor and architectural
photography as well as any other situation that demands wide-angle
coverage. City scenes, crowded markets, historical ruins… all of these are
subjects that can benefit from the wide perspectives this lens provides.
It’s also a great lens for shooting dynamic images with deep perspective.
Although wide angles present more opportunities for image-degrading
lens flare, the SAL1118 features special elements and design that reduce
flare and aberrations to a minimum for crisp, high-contrast images even
under difficult conditions.
• Weight (approx): 360 g
• Dimensions (Dia. x L): 83 x 80.5 mm
• Max. magnification ratio: 0.125x
M mode, 1/1250 sec., F8, ISO 20 0, Auto white balan ce; Photo: Goh F ujimaki
19
Page 11
M mode , 1/250 sec., F5.6, I SO 400, Manual w hite bal ance
M mode, 1/100 sec., F8, ISO 200, Da ylight w hite bal ance, Landscap e Creative Styl e; Photo: Nori fumi In agaki
At 16 mm
100
80
60
40
Contrast (%)
20
036912
Distance from optical center
of lens (mm)
Spatial frequency
10 line pairs/mm
30 line pairs/mm
Mid-range zoom
DT 16–50mm F2.8 SSM SAL16 50
Three ED gl ass ele ments and two as pheri cal elements fo r superior image qual ity
Bright constant F2.8 maximum aperture
SSM (Super Sonic wave Motor) for fast, quiet autofocus operation
Circular aperture for attractive defocusing
Dust and weather resistant desi gn
35mm equivalent focal length: 24–75mm
Aspherical lens ED glass
At 50 mm
100
80
60
40
Contrast (%)
20
036912
Distance from optical center
of lens (mm)
Max. aperture
R RT T
R: Radial values T: Tangential values
F8 aperture
The SAL1650 packs first-class optical performance and a versatile
zoom range into a lens that is remarkably compact and lightweight.
At the wide end you have a 16mm focal length that is ideal for
interiors, sweeping landscapes, or creating visual impact with powerful
perspective. Zoom out to the 50mm end for mid-range telephoto reach
that can bring details and distant subjects closer. What’s more, you have
a constant F2.8 maximum aperture throughout the entire zoom range.
That makes shooting in low light easy, especially when the lens is used
with a body that includes SteadyShot INSIDE™ body-integrated image
stabilization. A large maximum aperture also provides plenty of margin
to stop down for increased depth of field or to freeze fast motion. The
SAL1650 additionally features a circular aperture that, combined with
the F2.8 maximum aperture, contributes to beautiful defocusing effects.
• Weight (approx): 577 g
• Dimensions (Dia. X L): 81 x 88 mm
• Max. magnification ratio: 0.2x
At 16 mm
100
80
60
40
Contrast (%)
20
036912
Distance from optical center
of lens (mm)
Spatial frequency
10 line pairs/mm
30 line pairs/mm
Mid-range zoom
DT 16–105mm F3.5–5.6 SAL1610 5
O ne ED gla ss elem ent and t wo asph erica l elements for superior
image quality
High resolution and contrast throughout zoom range
Circular aperture for attractive defocusing
Focus ring with auto clutch does not rotate during autofocus
35mm equivalent focal length: 24–157.5mm
Aspherical lens ED glass
At 105 mm
100
80
60
40
Contrast (%)
20
036912
Distance from optical center
of lens (mm)
Max. aperture
R RT T
R: Radial values T: Tangential values
F8 aperture
Zoom range can be a very subjective and personal choice, hinging on
individual shooting style and preferred subjects. The 16–105mm range
of this lens is a “sweet spot” for many photographers, wide enough at
the 16mm end to capture indoor scenes and long enough at 105mm
to fill the frame with relatively distant subjects. Comfortable handling is
another plus, facilitated by a compact, lightweight design and an autoclutch mechanism that prevents focus ring rotation during autofocus
operation, so you can comfortably cradle the lens in your hand while
shooting. Of course comfort isn’t everything. A precision optical design
delivers superb image quality throughout the entire zoom range.
• Weight (approx): 470 g
• Dimensions (Dia. x L): 72 x 83 mm
• Max. magnification ratio: 0.23x
2120
Page 12
A mode, 1/80 sec., F5.6, ISO 100, Day light wh ite bala nce; Photo: No rifum i Inagaki
S mode, 1/250 sec., F6.3, +1.0 EV, ISO 3200, Auto white balance; P hoto: Shinya M orimoto
At 18 mm
100
80
60
40
Contrast (%)
20
036912
Distance from optical center
of lens (mm)
Spatial frequency
10 line pairs/mm
30 line pairs/mm
Mid-range zoom
DT 18–55mm F3.5–5.6 SAM SAL185 5
O ne ED gla ss elem ent and t wo asph erica l elements for superior
image quality
0.25m min. focus plus 0.34x max. magnification for close-ups
Responsive internal SAM (Smooth Autofocus Motor) autofocus drive
Circular aperture for attractive defocusing
35mm equivalent focal length: 27–82.5mm
Aspherical lens ED glass
At 55 mm
100
80
60
40
Contrast (%)
20
036912
Distance from optical center
of lens (mm)
Max. aperture
R RT T
R: Radial values T: Tangential values
F8 aperture
If you’re the kind of photo enthusiast who likes to carry a camera at all times,
whether actively shooting or not, you probably want one small, lightweight
lens that won’t be a burden while walking around but will deliver top quality
and versatility when a photographic opportunity arises. The SAL1855 is the
smallest and lightest zoom in this series, weighing in at only 210 grams while
offering an 18–55mm focal length range that will cover most day-to-day
subjects. It also features a minimum focusing distance of just 25 centimeters
that, combined with 0.34x maximum magnification, will let you get close
and explore details. If you want to be prepared for a wider range of subjects
the SAL1855 is the perfect companion for the SAL55200-2, the pair providing
excellent optical performance from 18mm to 200mm.
• Weight (approx): 210 g
• Dimensions (Dia. x L): 69.5 x 69 mm
• Max. magnification ratio: 0.34x
High magnification zoom
DT 18–200mm F3.5–6.3 SA L182 0 0
Two ED glass elements and three aspherical eleme nts for superior image qualit y
Broad zoom range in a compact, lightweight lens
Circular aperture for attractive defocusing
Internal focusing for fast autofocus and short min. focus distance
35mm equivalent focal length: 27–300mm
At 18 mm
100
80
60
40
Contrast (%)
20
036912
Distance from optical center
of lens (mm)
Spatial frequency
10 line pairs/mm
30 line pairs/mm
Aspherical lens ED glass
At 200 mm
100
80
60
40
Contrast (%)
20
036912
Distance from optical center
of lens (mm)
Max. aperture
R RT T
R: Radial values T: Tangential values
F8 aperture
It will take you from a wide scene-spanning 18mm to far-reaching
200mm telephoto that will let you zoom in on distant subjects, yet the
SAL18200 weighs only 405 grams and is no larger than many zooms
of more limited range. For these reasons it is an excellent choice for
photographers who want to cover as many situations as possible
without having to change lenses. In addition to being an outstanding
one-lens solution, it features a refined optical design that ensures
excellent sharpness and contrast throughout the image at all focal
lengths, so you can shoot with confidence in any situation that arises.
• Weight (approx): 405 g
• Dimensions (Dia. x L): 73 x 85.5 mm
• Max. magnification ratio: 0.27x
22 23
Page 13

P mode, 1/125 sec., F5.6, +0.3 EV, ISO 100, Auto white balanc e, Portrait Creative Style; Photo: No rifumi Inagak i
A mode, 4 se c., F9.0, -1.0 EV, ISO 200, Day light white balance; Photo: Kazu Kob ayashi
At 18 mm
100
80
60
40
Contrast (%)
20
036912
Distance from optical center
of lens (mm)
Spatial frequency
10 line pairs/mm
30 line pairs/mm
High magnification zoom
DT 18–250mm F3.5–6.3 SAL1825 0
Two ED glass elements and two aspherical elements for superior image quality
Extra-broad zoom range in a compact, lightweight lens
Circular aperture for attractive defocusing
Internal focusing for fast autofocus and short min. focus distance
35mm equivalent focal length: 27–375mm
Aspherical lens ED glass
At 250 mm
100
80
60
40
Contrast (%)
20
036912
Distance from optical center
of lens (mm)
Max. aperture
R RT T
R: Radial values T: Tangential values
F8 aperture
Although similar to the SAL18200 in zoom range and performance, the
SAL18250 offers a bit more “reach” at the long end that can make a
significant difference if you’re shooting sports or wildlife, for example.
The tradeoff is a small increase in weight and size, but if you need the
extra range the difference is worth it. You get the same outstanding
clarity and contrast from the wide 18mm end to full 250mm telephoto,
making this lens one of the most useful and versatile for APS-C format
cameras and an extremely wide spectrum of subjects.
• Weight (approx): 440 g
• Dimensions (Dia. x L): 75 x 86 mm
• Max. magnification ratio: 0.29x
Mid-range zoom
28–75mm F2.8 SAM SAL2875
Aspherical lens ED glass
At 28 mm
100
80
60
40
Contrast (%)
20
04812 16 20 048121620
Distance from optical center
of lens (mm)
Spatial frequency
10 line pairs/mm
30 line pairs/mm
At 75 mm
100
80
60
40
Contrast (%)
20
Distance from optical center
of lens (mm)
Max. aperture
R RT T
R: Radial values T: Tangential values
F8 aperture
Three ED glass elements and four apherical
elements for superior image quality
Bright constant F2.8 maximum aperture
Responsive internal SAM (Smooth Autofocus
Motor) autofocus drive
Circular aperture for attractive defocusing
* The SAL2875 received the
2010 TIPA Best Expert Lens award.
If you use a 35mm full frame format camera body, this award-winning* lens
offers an ideal balance of brightness, zoom range and image quality for a
wide range of situations you’re likely to encounter in everyday shooting. The
fact that it features a constant, bright F2.8 maximum aperture at all focal
lengths offers significant advantages for hand held and low light shooting,
as well as for creating gorgeous defocused backgrounds. But you never
know when you might need to go a bit longer, so if there’s room in your
bag consider taking the 75–300mm SAL75300 along as well: the SAL2875
plus SAL75300 combination gives you a full-frame focal length range from
28mm to 300mm.
• Weight (approx): 565 g
• Dimensions (Dia. x L): 77.5 x 94 mm
• Max. magnification ratio: 0.22x
24 25
Page 14
S mode, 1/3200 sec., F9, ISO 800, Au to white balance
A mode, 1/1250 sec., F5.6, +0.3 E V, ISO 200, Au to white ba lance, Vivid Crea tive St yle; Photo: Takes hi Hiraya ma
At 55 mm
100
80
60
40
Contrast (%)
20
03 6912
Distance from optical center
of lens (mm)
Spatial frequency
10 line pairs/mm
30 line pairs/mm
Telephoto zoom
DT 55–200mm F4–5.6 SAM SAL55200-2
One ED glass ele ment for superior image quality
Mediu m to telephoto range in a light weight lens
9-blade circular aperture for attractive defocusing
Responsive internal SAM (Smooth Autofocus Motor) autofocus drive
35mm equivalent focal length: 82.5–300mm
ED glass
At 200 mm
100
80
60
40
Contrast (%)
20
03 6912
Distance from optical center
of lens (mm)
Max. aperture
R RT T
R: Radial values T: Tangential values
F8 aperture
Covering the medium to telephoto stretch of the “standard” zoom range
with ample F5.6 brightness at the 200mm end, this lens is a lightweight,
easy handling choice for shooting sports and other subjects that require
some telephoto reach. On an APS-C format camera the 35mm equivalent
focal length at the telephoto end is 300mm, which is long enough to
capture tight shots of the action. In terms of compact, lightweight design
and optical performance, the SAL55200-2 is an ideal companion for the
18–55mm SAL1855. The pair is light enough to be carried comfortably,
providing outstanding image quality from 18mm to 200mm.
• Weight (approx): 305 g
• Dimensions (Dia. x L): 71.5 x 85 mm
• Max. magnification ratio: 0.29x
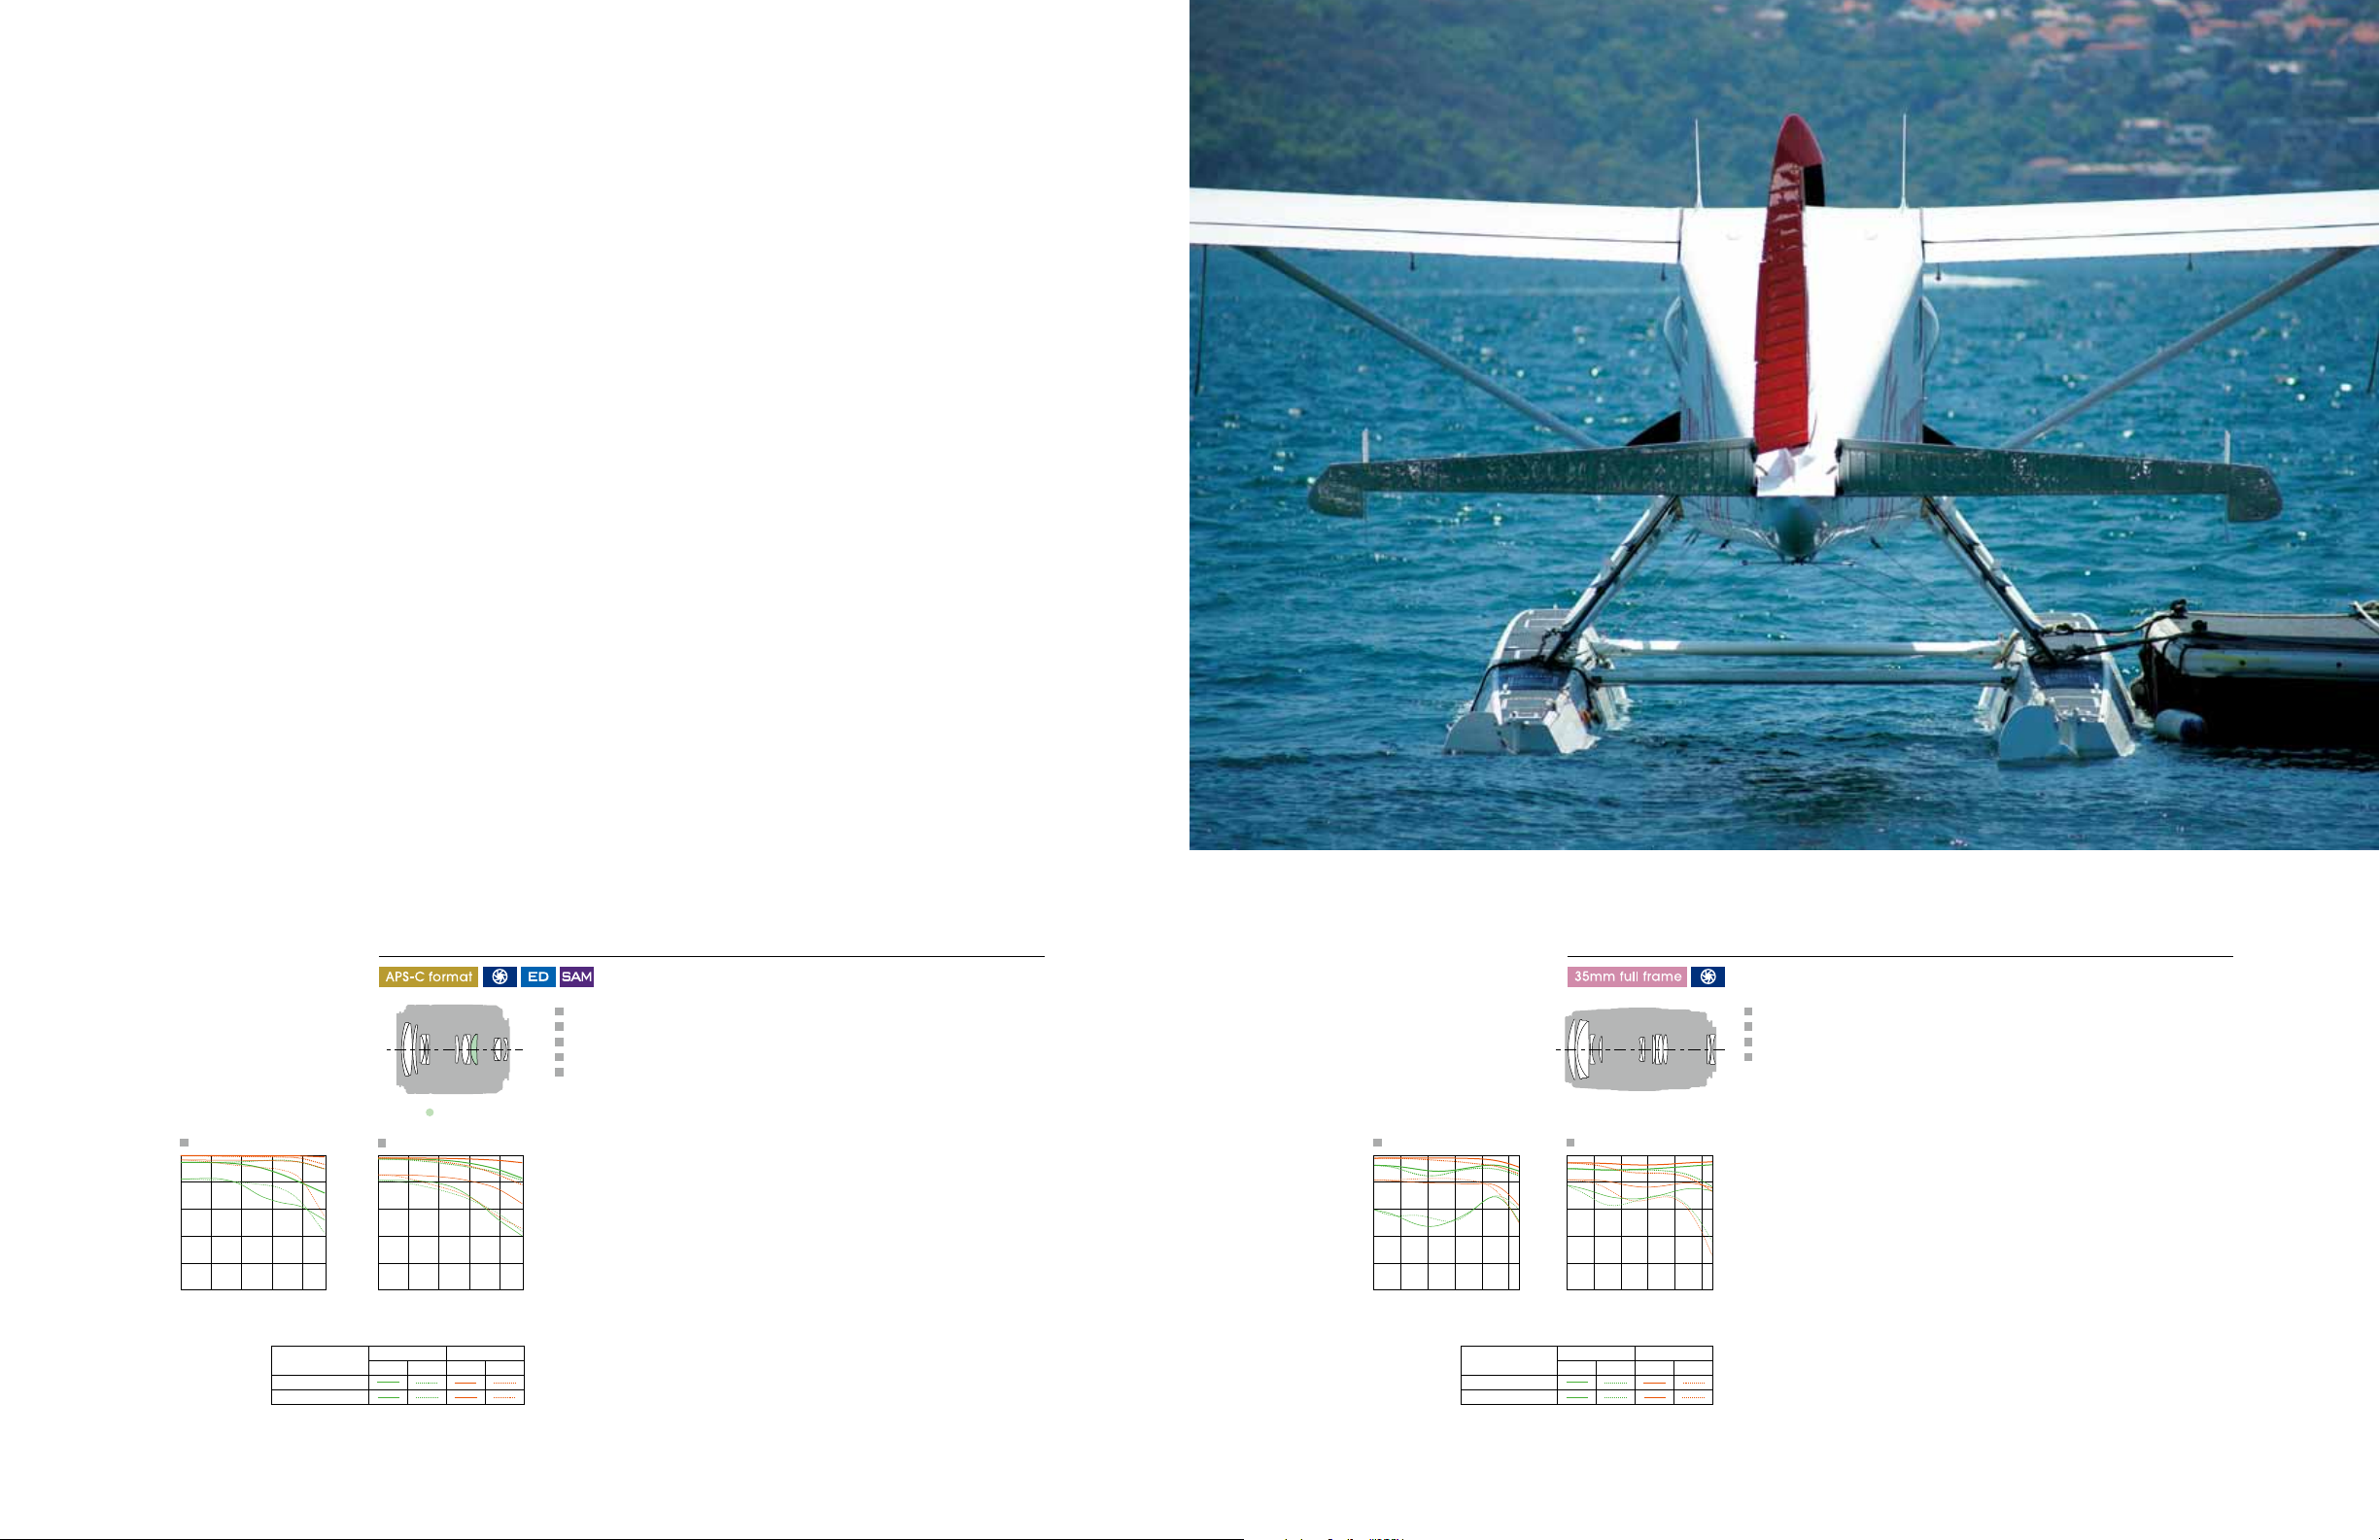
Telephoto zoom
75–300mm F4.5–5.6 SAL7530 0
Extra-broad zoom range for full-frame cameras
High optical performance at all focal lengths
Circular aperture for attractive defocusing
Double telephoto configuration achieves compact dimensions
At 75 mm
100
80
60
40
Contrast (%)
20
03 6912
Distance from optical center
of lens (mm)
Spatial frequency
10 line pairs/mm
30 line pairs/mm
At 300 mm
100
80
60
40
Contrast (%)
20
03 691220 20
Distance from optical center
of lens (mm)
Max. aperture
R RT T
R: Radial values T: Tangential values
F8 aperture
Going out to shoot sports, wildlife, or other distant subjects with a 35mm
full frame format camera? Be sure to take this lens along. Its 75–300mm
zoom range will let you go from medium perspectives that provide a
comprehensive view of the action to tight close-up of individual image
elements in an instant. If you want to be ready for just about every
conceivable shooting situation, take the 28–75mm SAL2875 along as
well, and you’ll have every focal length from 28mm to 300mm covered
in a portable two-lens kit that will deliver admirable image quality on
high-performance full-frame bodies.
• Weight (approx): 460 g
• Dimensions (Dia. x L): 71 x 122 mm
• Max. magnification ratio: 0.25x
26 27
Page 15

Fixed Focal Length Lenses
Fixed focal length lenses, commonly known as "prime lens"
or simply as "primes," can complement your photographic
vision in a number of ways. Although most of the focal
lengths offered are also available with zoom lenses, some
special-purpose lenses are only available as primes: fisheye
lenses and most true macro lenses are examples. And
since the optical path only needs to work at one focal
length, it can be optimized to deliver a level of optical
performance that is a cut above the average zoom. But
many photographers like working with a fixed focal length
simply because it always gives them the same angle of view
and perspective, making it easier to pre-visualize what the
camera will see and thus providing the most consistent,
intuitive shooting experience.
Fisheye
16mm F2.8 Fisheye S AL16 F28
At 16 mm
100
80
60
40
Contrast (%)
20
03691220
Distance from optical center of lens (mm)
Spatial frequency
10 line pairs/mm
30 line pairs/mm
Max. aperture
R RT T
R: Radial values T: Tangential values
F8 aperture
A mode, 1/200 sec., F7.1, -0.3 EV, ISO 200, Au to white balance; Photo: Yuji Nukui
180° angle of view on full-frame cameras
Curvilinear perspective for unique, expansive images
Crisp image quality throughout the focus range
Four selectable internal filter settings
Once a scientific tool but now a favorite of creative photographers,
fisheye lenses forgo the restraints of rectilinear perspective—the
complex “correction” that is required to keep straight lines looking
straight—to deliver expansive images that cover an extremely wide
angle of view with curvilinear perspective. The SAL16F28 provides
an extremely wide 180° angle of view on 35mm full-frame format
cameras (110° on APS-C format cameras). In addition to eye-catching
interpretations of reality, it offers extended depth of field so that you
can capture huge vistas in which everything from 20 centimeters to
infinity is sharp, even at maximum aperture. Since the bulging front
element and wide angle of view prevent the use of external screw-in
filters, four selectable internal filter settings are provided: normal, O56
monochrome, B12 red reduction and A12 blue reduction.
• Weight (approx): 400 g
• Dimensions (Dia. x L): 75 x 66.5 mm
• Max. magnification ratio: 0.15x
29
Page 16

M mode, 1/125 sec., F11, ISO 200, La ndscape Creati ve Style; Photo: Yuji Nuk ui M mode, 1/125 sec., F11, ISO 200, La ndscape Creati ve Style; Photo: Yuji Nuk ui
Ultra wide angle
20mm F2.8 SAL20F28
At 20 mm
100
80
60
40
Contrast (%)
20
036912 20
Distance from optical center of lens (mm)
Spatial frequency
10 line pairs/mm
30 line pairs/mm
Max. aperture
R RT T
R: Radial values T: Tangential values
F8 aperture
Wide 94° angle of view on full -fra me cameras
Precisely corrected for natural perspective
Aberration effectively suppressed throughout the focus range
Rear-focusing mechanism for fast autofocus response
Circular aperture for attractive defocusing
This rigorously corrected lens gives you a wide angle of view for images
that benefit from dramatic perspective with minimum distortion. It’s an ideal
choice for covering spread-out scenes that you can’t get far enough way
from to cover with a “normal” lens. But there’s more: since it has extended
depth of field that can keep everything from 25 centimeters to infinity in crisp
focus, you can create exaggerated perspective by including very close and
very distant objects in the frame. Close objects will loom large, while distant
objects appear to recede markedly into the distance. Meticulous attention
has been paid to minimizing flare and internal reflections in this advanced
design, with the result that excellent sharpness and contrast are maintained
through the image.
• Weight (approx): 285 g
• Dimensions (Dia. x L): 78 x 53.5 mm
• Max. magnification ratio: 0.13x
Wide angle
28mm F2.8 SAL28F28
At 28 mm
100
80
60
40
Contrast (%)
20
036912 20
Distance from optical center of lens (mm)
Spatial frequency
10 line pairs/mm
30 line pairs/mm
Max. aperture
R RT T
R: Radial values T: Tangential values
F8 aperture
Excellent contrast and resolution
Compact, lightweight design
Built-in slide- out lens hood
An outstanding choice for 35mm full-frame and APS-C format cameras
28 millimeters is an extremely versatile focal length that can be useful in
a wide variety of situations on both full frame and APS-C format cameras.
On a 35mm full frame format camera, 28mm is wide enough to allow
comfortable shooting indoors or on the street without producing forced
perspective. On an APS-C format camera 28mm is equivalent to a focal
length of 42mm, which is close to “normal” in terms of angle-of-view and
perspective. For photo enthusiasts who use either or both types of bodies,
this lens is a must-have! It’s compact and lightweight, and is a versatile,
convenient choice for use either as a main or second lens.
• Weight (approx): 185 g
• Dimensions (Dia. x L): 65.5 x 42.5 mm
• Max. magnification ratio: 0.13x
30 31
Page 17

M mode, 1/320 sec., F5.6, IS O 200, Cloudy wh ite bala nce (-1); Photo: Kentaro Fu kuda
A mode, 1/320 sec., F2, +0.3 EV, ISO 200, Manual white balance
Normal
DT 35mm F1.8 SAM SAL35F18
At 35 mm
100
80
60
40
Contrast (%)
20
036912
Distance from optical center of lens (mm)
Spatial frequency
10 line pairs/mm
30 line pairs/mm
Max. aperture
R RT T
R: Radial values T: Tangential values
F8 aperture
Excellent sharpness and contrast throughout the image
Circular aperture for attractive defocusing
Responsive internal SAM (Smooth Autofocus Motor) autofocus drive
Bri ght enou gh for handheld shooting in low light
35mm equivalent focal length: 52.5mm
There’s a very good reason why 35mm is one of the most popular focal
lengths for use on APS-C format cameras. The full-frame equivalent
focal length is 52.5mm, providing “normal” perspective—similar to that
experienced with the naked eye—and an angle of view that is suitable
for an extremely wide range of subjects. You can shoot anything from
landscapes to portraits with this lens, without ever feeling that the
perspective is too forced or too flat, or that objects appear distorted. The
large F1.8 maximum aperture is another advantage: bright enough to
allow hand-held shooting in low light, and capable of producing smooth
defocusing effects that can add depth and artistic elegance to your
images. As a bonus, the SAL35F18 weighs a mere 170 grams, making it
unobtrusive on the camera, in a bag, or even in a pocket!
• Weight (approx): 170 g
• Dimensions (Dia. x L): 70 x 52 mm
• Max. magnification ratio: 0.25x
Normal
50mm F1.4 SAL50 F14
At 50 mm
100
80
60
40
Contrast (%)
20
036912 20
Distance from optical center of lens (mm)
Spatial frequency
10 line pairs/mm
30 line pairs/mm
Max. aperture
R RT T
R: Radial values T: Tangential values
F8 aperture
Flare effectively controlled for high contrast
Outstanding corner-to-corner resolution
Bright F1.4 max. aper ture facilitates hand -held shoot ing in low l ight
Circular aperture for attractive defocusing
50mm focal length with a maximum aperture of F1.4: this quintessential
fast “normal” lens formula has produced some of the greatest
photographic masterpieces in history, and continues to serve as a
photographic standard to this day. Of course not all 50mm F1.4 lenses
are created equal, and the stunning clarity and contrast delivered
by the SAL50F14 proves that it is one of the finest in its class. While the
in-focus plane is sharp from corner to corner, the combination of F1.4
maximum aperture and circular aperture design makes it possible to elicit
silky-smooth defocusing effects to enhance dimensionality and isolate
important visual elements. This is a lens that should be part of every
serious photo enthusiast’s palette.
• Weight (approx): 220 g
• Dimensions (Dia. x L): 65.5 x 43 mm
• Max. magnification ratio: 0.15x
32 33
Page 18

M mode, 1/800 sec., F8, ISO 40 0, Auto white balanc e M mode, 1/640 sec., F2.8, - 0.3EV, ISO 200, Man ual white balanc e
Mid-range telephoto
DT 50mm F1.8 SAM SAL5 0F18
At 50 mm
100
80
60
40
Contrast (%)
20
036912
Distance from optical center of lens (mm)
Spatial frequency
10 line pairs/mm
30 line pairs/mm
Max. aperture
R RT T
R: Radial values T: Tangential values
F8 aperture
Compact, lightweight and eminently portable
Circular aperture for attractive defocusing
Responsive internal SAM (Smooth Autofocus Motor) autofocus drive
Bright enough for handh eld sho oting in l ow light
35mm equivalent focal length: 75mm
On APS-C format cameras, for which it is specifically designed, the
SAL50F18 functions as a moderate telephoto lens (equivalent to 75mm on
a full-frame camera) that can be ideal for shooting portraits as well as for
framing and isolating areas of interest in broader, busier scenes. Not only
can you isolate the desired subject matter by framing, but you can also
take advantage of the lens’s large F1.8 maximum aperture and circular
aperture design to isolate your subject from the background by using
defocusing. The large maximum aperture also facilitates shooting in low
light, a capability that is further enhanced by SteadyShot INSIDE™ image
stabilization featured in a series bodies.
• Weight (approx): 170 g
• Dimensions (Dia. x L): 70 x 45 mm
• Max. magnification ratio: 0.2x
Mid-range telephoto
85mm F2.8 SAM SAL85F28
At 85 mm
100
80
60
40
Contrast (%)
20
048121620
Distance from optical center of lens (mm)
Spatial frequency
10 line pairs/mm
30 line pairs/mm
Max. aperture
R RT T
R: Radial values T: Tangential values
F8 aperture
Compact, lightweight and eminently portable
Excellent corner-to-corner sharpness
Large maximum aperture plus circular aperture design for smooth defocusing
Responsive internal SAM (Smooth Autofocus Motor) autofocus drive
Photographers often choose a large-aperture 85mm lens for portraits for
two compelling reasons. First, the 85mm focal length makes it easy to fill
the frame with the subject from a comfortable distance, without getting
so close that unflattering distortion occurs. And second, a large maximum
aperture works with the medium-long focal length to create beautifully
defocused backgrounds, so that the subject seems to “pop” out of the
image. The SAL85F28 is just such a lens. But it’s not just limited to portraits. It’s
a great choice for any situation where you want a bit more magnification
than a “standard” focal length provides. And the fact that it is light and
compact means that it’s easy to take along as a second lens.
• Weight (approx): 175 g
• Dimensions (Dia. x L): 70 x 50 mm
• Max. magnification ratio: 0.2x
34 35
Page 19

A mode, 1/400 sec., F4.5, I SO 200 , 5300 K color temperature; Photo: Chu kyo Ozawa P mode, 1/200 sec., F4. 5, ISO 100, Au to white ba lance; Ph oto: Kentaro Fuku da
Telephoto
135mm F2.8 [T4.5] STF SAL135F28
At 135 mm
100
80
60
40
Contrast (%)
20
036912 20
Distance from optical center of lens (mm)
Spatial frequency
10 line pairs/mm
30 line pairs/mm
Max. aperture
R RT T
R: Radial values T: Tangential values
F8 aperture
Unique Smooth Trans Focus design featuring apodization optics
Sharp in-focus areas with extra-smooth background and
foreground defocusing
Smooth, natural highlight diffusion
Manual focus and manual aperture ring
This unique lens has been specifically designed to deliver smooth
transitions between crisp in-focus areas and creamily defocused
background and foreground areas. It uses special apodization* optics
to produce images that seem to have an extra dimension, with high
resolution at the plane of focus, gradually melting away to beautifully
diffused out of focus rendition. With some lenses highlights in defocused
areas can be distracting, but with this unique Smooth Trans Focus design
they retain their natural shape in a way that doesn’t detract from the
defocused background or foreground, and there’s no ugly double-line
defocusing. The SAL135F28 promises a one-of-a-kind photographic
experience. A manual aperture ring is provided for direct, hands-on
defocusing control.
• Weight (approx): 730 g
• Dimensions (Dia. x L): 80 x 99 mm
• Max. magnification ratio: 0.25x
* “Apodization” is the technical term for changing the shape of a mathematical
function; in this case the optical transmission characteristics of the lens.
• For details of STF technology. See pg.17.
Macro
DT 30mm F2.8 Macro SAM SAL30M28
At 30 mm
100
80
60
40
Contrast (%)
20
036912
Distance from optical center of lens (mm)
Spatial frequency
10 line pairs/mm
30 line pairs/mm
Max. aperture
R RT T
R: Radial values T: Tangential values
F8 aperture
2cm working distance lets you get really clos e
Precision optics deliver excellent sharpness and contrast
Compact, lightweight, portable design
Responsive internal SAM (Smooth Autofocus Motor) autofocus drive
35mm equivalent focal length: 45mm
If you shoot with an APS-C format camera and want a lightweight,
compact lens that will handle snapshots and portraits plus macro
photography as well, this is it. The 35mm equivalent focal length of this
lens is a distinctly “normal” 45mm, making it a good choice for general
photography. But when an exquisite little detail catches your eye, you can
move in as close as 2 centimeters from your subject to capture macro
images with up to 1:1 magnification. The details you focus on will be
astonishingly sharp, while the out-of-focus background dissolves into a
creamy blur that can really make the details stand out. The SAL30M28 is
only 45 millimeters long and weighs a discreet 150 grams, so it can stay
on your camera or in your bag at all times without getting in the way.
• Weight (approx): 150 g
• Dimensions (Dia. x L): 70 x 45 mm
• Max. magnification ratio: 1.0x
36 37
Page 20

M mode, 1/50 sec., F2.8, ISO 400, Auto white balance; Photo: Shinya Mo rimoto P mode, 1/160 sec., F2.8, ISO 40 0, Auto white balan ce; Photo: Kentaro Fukuda
Macro
50mm F2.8 Macro SAL50M28
At 50 mm
100
80
60
40
Contrast (%)
20
036912 20
Distance from optical center of lens (mm)
Spatial frequency
10 line pairs/mm
30 line pairs/mm
Max. aperture
R RT T
R: Radial values T: Tangential values
F8 aperture
High-performance macro and everyday shooting with one lens
Accurate autofocus from 1:1 magnification to infinity
Double floating design contributes to outstanding image quality
Circular aperture for attractive defocusing
Focus ring with auto clutch does not rotate during autofocus
Photographers who are attracted to details need a lens that lets them
get in close when necessary, filling the frame with their diminutive but
fascinating subjects. A lens like the SAL50M28, with a minimum focusing
distance of just 20 centimeters and up to 1:1 magnification, can open
up a world of creative possibilities. But there’s no need to change
lenses when you want to go back to shooting at normal distances.
The SAL50M28 offers outstanding optical performance for general
photography as well, and its 50mm focal length is a very versatile choice
for 35mm full frame format cameras. On APS-C format cameras you get a
little more reach, which can be advantageous for some normal subjects
as well as macro shooting.
• Weight (approx): 295 g
• Dimensions (Dia. x L): 71.5 x 60 mm
• Max. magnification ratio: 1.0x
Macro
100mm F2.8 Macro SAL10 0 M28
At 100 mm
100
80
60
40
Contrast (%)
20
036912 20
Distance from optical center of lens (mm)
Spatial frequency
10 line pairs/mm
30 line pairs/mm
Max. aperture
R RT T
R: Radial values T: Tangential values
F8 aperture
Stunning macro shots from a comfortable distance
Autofocus from 1:1 magnification to infinity
Double floating design contributes to outstanding close-up image quality
9-blade circular aperture for attractive defocusing
Focus hold button, focus range limiter
Focus ring with auto clutch does not rotate during autofocus
Doing macro photography outdoors “in the wild” often means that you
can’t get too close to your subject and lighting can’t be easily controlled.
That’s when you need a telephoto macro lens like the SAL100M28. Greater
working distance means you can capture tight macro shots of small-scale
wildlife without scaring it away, and you’re not so close that you need
special lighting to illuminate your subject. Of course the SAL100M28 is a first
class telephoto lens for normal shooting too, and can be a good choice for
portraits or other subjects that require a bit more reach than a normal lens.
• Weight (approx): 505 g
• Dimensions (Dia. x L): 75 x 98.5 mm
• Max. magnification ratio: 1.0x
38 39
Page 21

G Lenses
Sony G Lenses are an exceptional breed. They inherit a
distinguished pedigree from the original Minolta® lens line,
with industry-leading Sony design and quality assurance
technology added to push their performance to the forefront
of twenty-first century photography. G Lenses impart a visual
elegance to every aspect of the images they produce:
extraordinary presence at in-focus areas, smoothly dissolving
to luscious out-of-focus rendering that can provide a beautiful
foundation for captivating photographic art. Their handling is
extraordinary too, with intimate operation and response that
seamlessly connect the process of taking photographs to the
photographer’s imagination.
Telephoto zoom
70–200mm F2.8 G SAL70200G
ED glass
At 70 mm
100
80
60
40
Contrast (%)
20
048121620
Distance from center of image (mm) Distance from center of image (mm)
Spatial frequency
10 line pairs/mm
30 line pairs/mm
At 200 mm
100
80
60
40
Contrast (%)
20
048121620
Max. aperture
R RT T
R: Radial values T: Tangential values
F8 aperture
A mode, 1/60 sec., F11, ISO 100, Daylig ht white ba lance
Four ED glass elements effectively suppress aberration
Constant F2.8 maximum aperture
Outstanding sharpness and contrast throughout the zoom range
SSM (Super Sonic wave Motor) for fast, quiet autofocus operation
Circular aperture for attractive defocusing
Focus hold and focus range switches offer precision focusing control
The range from 70 to 200 millimeters is where much of the telephoto action
occurs. The ability to cover that range with a constant F2.8 aperture affords
some significant photographic advantages, and the outstanding clarity and
contrast offered by the SAL70200G multiplies those advantages many times
over. Although the large F2.8 maximum aperture does make it easier to
create beautifully defocused backgrounds, there are important advantages
for shooting moving subjects as well. Larger apertures—often referred to as
“fast” as well as “bright”—allow you to use faster shutter speeds to achieve
equivalent exposure, making it possible to capture motion that might end
up as a blur with a slower lens. The SAL70200G does it all with characteristic
G Lens refinement and class.
• Weight (approx): 1340 g
• Dimensions (Dia. x L): 87 x 196.5 mm
• Max. magnification ratio: 0.21x
• Tripod mount supplied
41
Page 22

A mode, 1/400 sec., F13, ISO 40 0, Auto white balance; Photo: Ma rk Tille r Continuous Pri ority A E, 1/1250 sec., F5.6, - 0.7 EV, ISO 100, Daylight white balance (+1); Photo: Goh Fujimaki
Telephoto zoom
70–300mm F4.5–5.6 G SSM SAL70300G
ED glass
At 70 mm
100
80
60
40
Contrast (%)
20
048121620
Distance from center of image (mm) Distance from center of image (mm)
Spatial frequency
10 line pairs/mm
30 line pairs/mm
At 300 mm
100
80
60
40
Contrast (%)
20
048121620
Max. aperture
R RT T
R: Radial values T: Tangential values
F8 aperture
One ED glass element contributes to minimal aberration
Outstanding sharpness and contrast throughout the zoom range
SSM (Super Sonic wave Motor) for fast, quiet autofocus operation
Circular aperture for attractive defocusing
Focus hold and focus range switches offer precision focusing control
The SAL70300G is the smallest and lightest zoom in the current G Lens series,
offering an appealing combination of extended zoom range and handling,
plus image quality that will satisfy the most demanding photo enthusiast or
pro. An ED lens element collaborates with an advanced optical path design
to achieve exceptionally low aberration right out to the maximum 300mm
focal length, so that your telephoto images benefit from impressive clarity
and depth. 300mm is generally considered to be the point at which the
“medium” telephoto range ends and the “super” telephoto range begins.
Long focal lengths like this require careful handling to prevent camera shake,
but SteadyShot INSIDE™ image stabilization featured in a series bodies
will help you capture clear, blur-free images in a wider range of handheld
shooting situations than would normally be possible.
• Weight (approx): 760 g
• Dimensions (Dia. x L): 82.5 x 135.5 mm
• Max. magnification ratio: 0.25x
• Tripod mount supplied
At 70 mm
100
80
60
40
Contrast (%)
20
048121620
Distance from center of image (mm)
Spatial frequency
10 line pairs/mm
30 line pairs/mm
Super telephoto zoom
70–400mm F4–5.6 G SSM SAL70400G
Manual focus only
Two ED glass elements effectively suppress aberration
Outstanding sharpness and contrast throughout the zoom range
SSM (Super Sonic wave Motor) for fast, quiet autofocus operation
Circular aperture for attractive defocusing
Focus hold and focus range switches offer precision focusing control
ED glass
At 400 mm
100
80
60
40
Contrast (%)
20
048121620
Distance from center of image (mm)
Max. aperture
R RT T
R: Radial values T: Tangential values
F8 aperture
Covering an extremely wide telephoto range with ample brightness, this
award-winning* lens can, for example, take you from an elegant 70mm
portrait to a stunning 400mm wildlife shot in an instant without having to
change lenses and potentially miss a great shot. This is an extraordinarily
wide zoom range for a lens in this class, but range isn’t its only feature.
Being a high-end G Lens with a precision optical path that includes two
ED glass elements, you can be sure that it will deliver excellent sharpness
and contrast right out to the edges of the image at all focal lengths.
And although long telephoto shots usually require a very steady hand
or even a tripod to achieve optimum quality, SteadyShot INSIDE image
stabilization featured in a series bodies will vastly improve your chances
of capturing stunning handheld telephoto images.
• Weight (approx): 1500 g
• Dimensions (Dia. x L): 94.5 x 196 mm
• Max. magnification ratio: 0.27x
• Tripod mount supplied
* The SAL70400G received the 2009 TIPA Best Expert Lens award and the
2009-2010 EISA Zoom Lens award.
42 43
Page 23

A mode, 1/250 sec., F1.4, ISO 200, Viv id Creative Sty le; Photo: Yuji Nukui S mode, 1/80 sec., F14, ISO 100, Fl ash; Photo: N ick Webster
Spatial frequency
10 line pairs/mm
30 line pairs/mm
Wide-angle prime
35mm F1.4 G SAL35F14G
One aspherical element contributes to outstanding image quality
even at maximum aperture
High resolution and contrast throughout the image area
Circular aperture for attractive defocusing
Focus ring with auto clutch does not rotate during autofocus
Focus hold and focus range switches offer precision focusing control
Aspherical lens
At 35 mm
100
80
60
40
Contrast (%)
20
048121620
Distance from center of image (mm)
Max. aperture
R RT T
R: Radial values T: Tangential values
F8 aperture
35mm prime lenses are a staple for many photographers. The angle of
view provided by this focal length is one of the most comfortable and
versatile on both 35mm full frame format and APS-C format cameras, and
with that, this lens can be used for anything from close-ups to landscapes.
The SAL35F14G, with its superb optics and large F1.4 maximum aperture, is
one of the finest fast 35mm lenses in its class. In addition to no-compromise
G Lens construction and quality throughout, it features an optical design
that includes an aspherical lens element that contributes to consistently
superior, low-distortion image quality right up to the F1.4 maximum aperture.
You can shoot wide open in low light knowing that the entire scene will
be captured with equally superb clarity and contrast. The large maximum
aperture and circular aperture design are also an advantage when you
want to isolate your subject from a busy background, for example, allowing
you to defocus unwanted detail so your subject stands out.
• Weight (approx): 510 g
• Dimensions (Dia. x L): 69 x 76 mm
• Max. magnification ratio: 0.2x
Spatial frequency
10 line pairs/mm
30 line pairs/mm
Telephoto prime
300mm F2.8 G SAL300F28G
Three ED glass elements effectively suppress aberration
Exceptional sharpness and contrast throughout the image area
SSM (Super Sonic wave Motor) for fast, quiet autofocus operation
Circular aperture for attractive defocusing
Focus hold and focus range switches offer precision focusing control
ED glass
At 300 mm
100
80
60
40
Contrast (%)
20
048121620
Distance from center of image (mm)
Max. aperture
R RT T
R: Radial values T: Tangential values
F8 aperture
If you’re serious about shooting sports, nature, or wildlife, or just about any
subject that moves and needs to be shot from a distance, this is a lens
that you’ll want to have in your kit. 300mm is the sweet spot for a wide
range of telephoto applications, and its large F2.8 maximum aperture
makes it possible to use motion-stopping shutter speeds when shooting
fast action, as well as to control depth-of-field for creative defocusing.
Chromatic aberration can be a problem in telephoto lenses, but the
SAL300F28G uses three ED elements in a top-class optical design that
reduces aberration to a minimum, ensuring high resolution, high contrast
image quality at all aperture settings. A minimum focusing distance of just
2 meters is another advantage that is rare in a lens of this type, letting you
take advantage of telephoto characteristics at close range.
• Weight (approx): 2310 g
• Dimensions (Dia. x L): 122 x 242.5 mm
• Max. magnification ratio: 0.18x
• Tripod mount supplied
44 45
Page 24

Vario-Sonnar
Distagon
Vario-Sonnar
Vario-Sonnar
Sonnar
Teleconverters
1.4x Teleconverter
SAL14TC
2.0x Teleconverter
SAL20TC
SAL7030 0G wit h SAL20TC, A mode, 1/500 sec., F6. 3, -0.3 E V, ISO 200, Daylight white balance; Photo: Kazu Kobayas hi
Optics designed to deliver uncompromised image quality
Increase focal length without degrading resolution or contrast
Compatible with: SAL7020 0G (AF and MF m odes), SAL30 0F28G (AF and MF m odes),
SAL70400G (MF mode only) and SAL135F28 (MF mode only).
The SAL14TC and SAL20TC teleconverters are a great way to extend your telephoto
range without having to carry more large lenses. The SAL14TC provides a 1.4x
increase in focal length with a 1-stop light loss, so when used with the SAL300F28G, for
example, you have the equivalent of a 420mm lens with a maximum aperture of F4.
The SAL20TC doubles focal length with a 2-stop light loss, so the same SAL300F28G
lens becomes a 600mm super-telephoto with a maximum aperture of F5.6. For sports,
wildlife and landscapes, the SAL14TC and SAL20TC teleconverters can give you
maximum reach with minimum gear to carry.
1.0 x 1.4x 2.0x
• Images manipulated to simulate teleconverter magnification.
Carl Zeiss® Lenses
Carl Zeiss AG, founded in 1846, is a legend in the field
of camera optics. The company was responsible for
many of the innovations that have raised the quality of
photographic imaging to the high standard we enjoy
today, and is revered for its unswerving dedication to
delivering nothing less than the best. Sony is proud
and honored to be working with Carl Zeiss AG on the
development and production of top-class lenses for Sony
series cameras. In fact, these are the only autofocus
a
Carl Zeiss lenses currently available for use on digital singlelens reflex cameras, meaning that Sony camera users have
exclusive access to legendary image quality that many
consider to be the ultimate in photographic expression.
Planar
46
Page 25

A mode, 1/50 sec., F8, - 0.3 EV, ISO 20 0, Daylight white balanc e, B/W Creati ve Styl e; Photo: Kentaro Fu kuda A mode, 1/800 sec., F8, +0.7EV, ISO 200 , Manual w hite bal ance
At 16 mm - Open
100
80
60
40
Contrast (%)
20
048121620
Distance from center of image (mm)
At 30 mm - Ope n
100
80
60
40
Contrast (%)
20
048121620
Distance from center of image (mm)
Wide-angle zoom
Vario-Sonnar T* 16–35mm F2.8 ZA SSM SAL1635Z
One Super ED glass element, one ED glass element and three aspherical
elements for superior image quality
Carl Zeiss T* coating effectively controls flare and glare
Constant F2.8 maximum aperture
Outstanding sharpness and contrast at all aperture settings
Quiet, responsive interna l SSM (Super Sonic wave Motor) autofocus drive
Aspherical lens ED glass
Super ED glass
At 16 mm - F8
100
80
60
40
Contrast (%)
20
048121620
Distance from center of image (mm)
At 30 mm - F8
100
80
60
40
Contrast (%)
20
048121620
Distance from center of image (mm)
Focus mode switch and focus hold button offer precision focus control
Although it is a wide-angle zoom, and an ideal supplement to a highperformance mid-range zoom, the 16–35mm range of this lens will satisfy
the core focal length requirements of many photographers who shoot
primarily indoors or in the city. At the other end of the spectrum it can
be a great choice for spacious landscapes as well. Regardless of where
or how the SAL1635Z is used, its advanced coated optical path delivers
exceedingly crisp images with striking contrast, without the aberration
and peripheral light falloff that commonly plague wide-angle zooms.
That same superlative quality is maintained throughout the zoom range,
even at the maximum F2.8 aperture.
• Weight (approx): 860 g
• Dimensions (Dia. x L): 83 x 114 mm
• Max. magnification ratio: 0.24x
At 16 mm - Open
100
80
60
40
Contrast (%)
20
048121620
Distance from center of image (mm)
At 80 mm - Ope n
100
80
60
40
Contrast (%)
20
048121620
Distance from center of image (mm)
Mid-range zoom
Vario-Sonnar T* DT 16–80mm F3.5–4.5 ZA SAL1680 Z
Two aspherical elements for outstanding image quality at all apertures
Carl Zeiss T* coating effectively controls flare and glare
Outstanding sharpness and contrast at all focal lengths
Circular aperture for attractive defocusing
Compact, lightweight high-performance zoom
35mm equivalent focal length: 24–120mm
Aspherical lens
At 16 mm - F8
100
80
60
40
Contrast (%)
20
048121620
Distance from center of image (mm)
At 80 mm - F8
100
80
60
40
Contrast (%)
20
048121620
Distance from center of image (mm)
Because it has been designed specifically for APS-C format cameras,
the SAL1680Z is the lightest and most compact zoom in the Carl Zeiss
lineup. It also offers the greatest zoom range in the lineup, making it a
superb single-lens solution for many APS-C format photographers. Its
35mm equivalent focal length range of 24–120mm may be all you’ll
ever need for day-to-day shooting. And of course it delivers acclaimed
Carl Zeiss optical performance and handling, with image quality that
rivals the best prime lenses at any focal length. Although the maximum
aperture isn’t as large as the 35mm full-frame format lenses in this series,
circular aperture design makes it possible to get creative with beautifully
smooth defocusing effects. The SAL1680Z is quite simply the most versatile,
economical way to experience Carl Zeiss quality on an a series APS-C
format body.
• Weight (approx): 445 g
• Dimensions (Dia. x L): 72 x 83 mm
• Max. magnification ratio: 0.24x
48 49
Page 26

A mode, 1/30 sec., F11, +0.7 EV, ISO 100, Auto white balance; P hoto: Mike Jon es M mode, 1/500 se c., F8, -1.7 EV, ISO 200, Suns et Creati ve Styl e, D- Range O ptimize r Lv2; Photo: Kentaro Fukuda
At 24 mm - Open
100
80
60
40
Contrast (%)
20
048121620
Distance from center of image (mm)
At 70 mm - Open
100
80
60
40
Contrast (%)
20
048121620
Distance from center of image (mm)
Mid-range zoom
Vario-Sonnar T* 24–70mm F2.8 ZA SSM SAL2470Z
Two ED glass elements and two aspherical elements for superior image quality
Carl Zeiss T* coating effectively controls flare and glare
Constant F2.8 maximum aperture
Outstanding sharpness and contrast at all aperture settings
Quiet, res ponsive internal SSM (Super Sonic wave Motor) autofocus drive
Focus mode switch and focus hold button offer precision focus control
Aspherical lens ED glass
At 24 mm - F8
100
80
60
40
Contrast (%)
20
048121620
Distance from center of image (mm)
At 70 mm - F8
100
80
60
40
Contrast (%)
20
048121620
Distance from center of image (mm)
If you insist on prime-lens image quality but envy the convenience of
variable focal length, here’s a lens that brings the best of both worlds
together. For many discriminating photographers it is a lens that will
stay on the camera most of the time. Its versatile 24mm to 70mm zoom
range covers a wide gamut of shooting situations, and its extraordinary
sharpness and contrast are fully retained at all focal lengths and
apertures. Whether you’re shooting a tight indoor scene at 24mm, a
portrait at 70mm, or anything in between, you’ll feel and see legendary
Carl Zeiss quality in every shot.
• Weight (approx): 955 g
• Dimensions (Dia. x L): 83 x 111 mm
• Max. magnification ratio: 0.25x
Wide-angle prime
Distagon T* 24mm F2 ZA SSM SAL24F20Z
Aspherical lens ED glass
At 24 mm - Ope n
100
80
60
40
Contrast (%)
20
04812 16 20 048121620
Distance from optical center
of lens (mm)
At 24 mm - F8
100
80
60
40
Contrast (%)
20
Distance from optical center
of lens (mm)
Two ED glass elements and two aspherical elements for superior image quality
Carl Zeiss T* coating effectively controls flare and glare
Quiet, res ponsive internal SSM (Super Sonic wave Motor) autofocus drive
Focus ring with auto clutch does not rotate during autofocus
9-blade circular aperture for attractive defocusing
Representing the wide end of the A-mount Carl Zeiss prime lens range, the
24mm focal length of this model provides a wide perspective on 35mm
full-frame format cameras, and a closer-to-normal equivalent focal length
of 36mm on APS-C format cameras. Photographers who value a singleprime approach to general shooting will love this lens, as will those who
appreciate the subtle but tangible quality advantage that a first-class
prime provides. Use it indoors, on the street, or in the wild for images that
can bring your artistic vision to life. In addition to unimpeachable optical
performance and refined overall handling, this lens offers particularly
responsive, quiet autofocus operation and a minimum focusing distance
of just 19 centimeters that lets you explore your subjects at close range.
• Weight (approx): 555 g
• Dimensions (Dia. x L): 78 x 76 mm
• Max. magnification ratio: 0.29x
50 51
Page 27

A mode, 1/320 sec., F2, ISO 200, 5300K co lor temp erature; Photo: Chukyo Ozawa
M mode, 1/160 sec., F4.0, - 0.3 EV, ISO 200, Custom white bala nce; Photo: Ch ukyo Ozawa
At 85 mm - Ope n
100
80
60
40
Contrast (%)
20
04812 16 20
Distance from center of image (mm)
Mid-range telephoto prime
Planar T* 85mm F1.4 ZA SAL85F14Z
Outstanding sharpness and contrast at all aperture settings
Carl Zeiss T* coating effectively controls flare and glare
9-blade circular aperture for attractive defocusing
Focus ring with auto clutch does not rotate during autofocus
Focus mode switch and focus hold button offer precision focus control
At 85 mm - F8
100
80
60
40
Contrast (%)
20
04812 16 20
Distance from center of image (mm)
85mm focal length, F1.4 maximum aperture and precision Carl Zeiss T*
coated Planar optics: it all adds up to superlative performance and
handling for portraiture or medium-telephoto landscapes. The delicate,
nuanced “drawing” of the Planar design makes it possible to capture
subtleties of light and texture that can give images extraordinary depth and
presence. Graceful reproduction of skin tones and textures is a characteristic
that is prized by photographers and subjects alike. Shooting comfort is
another feature of this refined lens. A wide focus ring with auto clutch
mechanism does not rotate during autofocus operation, and a focus hold
button on the lens itself lies right under your fingertips for easy access.
• Weight (approx): 640 g
• Dimensions (Dia. x L): 81 x 75 mm
• Max. magnification ratio: 0.13x
At 135 mm - Open
100
80
60
40
Contrast (%)
20
04812 16 20
Distance from center of image (mm)
Telephoto prime
Sonnar T* 135mm F1.8 ZA SAL135F18Z
Two ED glass elements for superior im age quality
Carl Zeiss T* coating effectively controls flare and glare
Excellent corner-to-corner sharpness and high contrast
Focus ring with auto clutch does not rotate during autofocus
Focus hold button provides conveniently placed focus hold control
ED glass
At 135 mm - F8
100
80
60
40
Contrast (%)
20
04812 16
Distance from center of image (mm)
F1.8 is a relatively large maximum aperture for a 135mm telephoto lens,
and the consistently outstanding performance of this lens throughout
its aperture range lets you take full advantage of the extra speed and
brightness it provides. Whether you need the large aperture to shoot in
low light, to achieve suitable shutter speeds for shooting action, or for
creative control of background defocusing, the SAL135F18Z will reward
20
you with stunning resolution and contrast where it counts. In addition to
portraits and landscapes with natural proportions and perspective, the
135mm focal length of this lens is often a good choice for indoor sports.
135mm is well within telephoto territory, and usually requires careful
handling to avoid image blurring due to camera shake, but on a series
bodies with SteadyShot INSIDE™ image stabilization you’ll find it easier
than ever to capture crisp images when shooting hand held.
• Weight (approx): 995 g
• Dimensions (Dia. x L): 88 x 114.5 mm
• Max. magnification ratio: 0.25x
52 53
Page 28

E-mount Lenses
These compact, high-performance lenses are the cornerstone
of a new category of still and video cameras that attest to the
paradigm-shifting power of Sony innovation. They have been
designed from the ground up to be used with the newest
generation of ultra-compact APS-C format Sony camera and
camcorder bodies, delivering big-camera image quality
and features in astonishingly small but capable packages.
In addition to advanced optics and sophisticated handling,
the E-mount zooms incorporate proven Optical SteadyShot™
image-stabilization technology from Sony camcorders that
can significantly reduce blur due to camera movement in
both stills and movies. Sony E-mount lenses are windows to a
new world of imaging freedom and quality.
Page 29

Auto mode, . 6 sec., F2.8, +0. 25 EV, ISO 800, Auto white b alanc e; Photo: Davi d McCla in
SEL16F28 with VCL-ECF1, E 16mm F2.8 with Ultra W ide Converter, 1/3200 sec, F/6.3, ISO 20 0, Auto white balance
100
80
60
40
Contrast (%)
20
Spatial frequency
10 line pairs/mm
30 line pairs/mm
Wide-angle prime
E 16mm F2.8 SEL16F28
Ultra-slim (22.5 mm) and lightweight with high-quality metal exterior
5-element design with one aspherical element for top-class optical performance
Ideal for shooting stills or movies
Circular aperture for attractive defocusing
Built-in motor delivers smooth, quiet autofocus operation
35mm equivalent focal length: 24mm
Aspherical lens
At 16 mm
Combine this compact wide-angle prime lens with any E-mount camera
for a totally new photographic experience. Mounted on any of the slim
bodies for which it is designed it becomes part of an extraordinarily
compact, portable photographic system that can slip comfortably into a
coat pocket, ready to shoot at any time. In action it gives you wide 16mm
coverage (equivalent to a 24mm lens on a full-frame 35mm camera) for
comfortable shooting in situations ranging from cramped indoor settings
to sweeping landscapes, and the large F2.8 maximum aperture is ideal
036912
Distance from optical center
of lens (mm)
Max. aperture
R RT T
R: Radial values T: Tangential values
F8 aperture
for handheld shooting in low light. The SEL16F28 is an excellent choice
for both stills and movies, particularly since its quiet autofocus/aperture
operation will contribute to high-quality movie sound.
• Weight (approx): 67 g
• Dimensions (Dia. x L): 62 x 22.5 mm
• Max. magnification ratio: 0.078x
Fisheye Converter
VCL-ECF1
Ultra Wide Converter
VCL-ECU1
Without converter
Fisheye and Ultra Wide Converters
Although the 16mm SEL16F28 is a wide-angle lens, these converters can give you an even wider view.
The VCL-ECF1 Fisheye Converter goes a step further with a 180° angle of view that is equivalent to a
15mm lens on a 35mm full-frame format camera, with fascinating curvilinear “fisheye perspective.”
The VCL-ECU1 Ultra Wide Converter provides an angle of view equivalent to that of an 18mm lens
on a 35mm full-frame format camera, making it possible to shoot dramatic wide-angle scenes with
extended depth of field. Both converters attach securely with bayonet mounts, ensuring optimum
optical alignment and image quality. Furthermore, these converters cause no light loss so f-stop values
remain unchanged.
With Fisheye Converter
With Ultra Wide Converter
5756
Page 30

S mode, 1/125 sec., F4, ISO 1600, Au to white balance
M mode, 1/320 sec., F4.5, IS O 200, Au to white ba lance, Vivid Crea tive St yle; Photo: Yayoi Sawada
At 24 mm - Ope n
100
80
60
40
Contrast (%)
20
036912
Distance from optical center
of lens (mm)
Wide-angle prime
Sonnar T* E 24mm F1.8 ZA SEL 24F18Z
High-performance Carl Zeiss wide-angle prime with elegant black metal exterior
One ED glass element and two aspherical elements
Innovative optical design achieves outstanding corner-to-corner sharpness
Ideal for shooting stills or movies
Aspherical lens ED glass
At 24 mm - F8
100
80
60
40
Contrast (%)
20
036912
Distance from optical center
of lens (mm)
Carl Zeiss quality really shows off the capabilities of the E-mount system, with
outstanding resolution and contrast that can add legendary Zeiss depth and
dimensionality to your images. This wide-angle prime lens delivers superior
corner-to-corner sharpness even at the maximum F1.8 maximum aperture,
with minimum distortion and coma. It also focuses as close as 16 centimeters,
providing an unusual combination of close focus and wide-angle perspective
for 1:4 macro photography. The 24mm focal length, equivalent to 36mm on
a 35mm format camera, is an excellent choice for general shooting. Many
photographers will be happy to leave this lens on their camera most of the
time, especially since its F1.8 maximum aperture facilitates handheld shooting
even in challenging low-light situations. Movie makers will love this lens too,
because smooth, low-noise autofocus and aperture operation mean they
can take advantage of its outstanding optical characteristics without worrying
about mechanical noise infiltrating the soundtrack.
• Weight (approx): 225 g
• Dimensions (Dia. X L): 63 x 65.5 mm
• Max. magnification ratio: 0.25x
At 18 mm
100
80
60
40
Contrast (%)
20
036912
Distance from optical center
of lens (mm)
100
80
60
40
Contrast (%)
20
Spatial frequency
10 line pairs/mm
30 line pairs/mm
Mid-range zoom
E 18–55mm F3.5–5.6 OSS S EL185 5
Compact, lightweight 3x zoom with high-quality metal exterior
Three aspherical elements for top-class optical performance
Ideal for shooting stills or movies
Internal OSS (Optical SteadyShot™) image stabilization
Circular aperture for attractive defocusing
Built-in motor delivers smooth, quiet autofocus operation
Aspherical lens ED glass
At 55 mm
036912
Distance from optical center
of lens (mm)
Max. aperture
R RT T
R: Radial values T: Tangential values
F8 aperture
35mm equivalent focal length: 27–82.5mm
This lens offers a superb balance of form and function: ample zoom
range in a compact design that weighs only 194 grams yet is remarkably
comfortable to hold and operate. The 18–55mm zoom range, corresponding
to 27–82.5mm on a 35mm full-frame format camera, is ideally designed for
comfortable framing and capture of most subjects encountered in daily life
or on vacation, and a built-in Optical SteadyShot image stabilization system
makes it possible to produce sharp images even when shooting handheld
in low light. The OSS system is so effective that you’ll be able to capture
blur-free images at shutter speeds up to four steps slower than would be
possible without image stabilization. And thanks to extremely smooth,
quiet autofocus and aperture operation, you don’t have to worry about
unwanted camera and lens noise infiltrating your movie soundtracks.
• Weight (approx): 194 g
• Dimensions (Dia. x L): 62 x 60 mm
• Max. magnification ratio: 0.3x
58 59
Page 31

A mode, 1/3200 sec., F5.6, -0.7 EV, ISO 2 00, Auto w hite bal ance; Photo: Chukyo Oza wa
A mode, 1/20 sec., F5, - 0.3EV, ISO 80 0, Auto white balan ce
At 18 mm
100
80
60
40
Contrast (%)
20
036912
Distance from optical center
of lens (mm)
100
80
60
40
Contrast (%)
20
Spatial frequency
10 line pairs/mm
30 line pairs/mm
High magnification zoom
E 18–200mm F3.5–6.3 OSS SEL182 0 0
Versatile extended-range 11x zoom with high-quality metal exterior
Four aspherical elements for top-class optical performance right out
to the image edges
Ideal for shooting stills or movies
Internal OSS (Optical SteadyShot™) image stabilization with Active Mode
Circular aperture for attractive defocusing
Aspherical lens ED glass
At 200 mm
036912
Distance from optical center
of lens (mm)
Max. aperture
R RT T
R: Radial values T: Tangential values
F8 aperture
Built-in motor delivers smooth, quiet autofocus and aperture operation
35mm equivalent focal length: 27–300mm
If you’re a photographer/videographer who needs maximum speed,
versatility and mobility to rapidly respond to a wide range of shooting
situations, from portraits and snapshots to sports, this is a lens you
should consider. It features an extensive 11x zoom range, from wide
18mm to 200mm telephoto with impressive image quality all the way.
The advanced Optical SteadyShot image stabilization system included
in this lens will not only make it easier to shoot blur-free stills at long
focal lengths, but it also has an automatic Active Mode that will help
keep your movie images steady as you move around with the camera
while shooting at the wide end of the zoom range. Another feature
that contributes to high-quality movie production is extremely quiet
autofocus and aperture operation that will keep your soundtracks free
of unwanted camera noise.
• Weight (approx): 524 g
• Dimensions (Dia. x L): 75.5 x 99 mm
• Max. magnification ratio: 0.35x
At 55 mm
100
80
60
40
Contrast (%)
20
036912
Distance from optical center
of lens (mm)
100
80
60
40
Contrast (%)
20
Spatial frequency
10 line pairs/mm
30 line pairs/mm
Telephoto zoom
E 55–210mm F 4.5–6.3 OSS SEL55210
Compact, lightweight 3.8x telephoto zoom with high-quality metal exterior
Two ED glass elements and two aspherical elements for superior image quality
Ideal for shooting stills or movies
Internal OSS (Optical SteadyShot™) image stabilization
Built-in motor delivers smooth, quiet autofocus and aperture operation
Circular aperture for attractive defocusing
Aspherical lens
At 210 m m
036912
Distance from optical center
of lens (mm)
Max. aperture
R RT T
R: Radial values T: Tangential values
F8 aperture
35mm equivalent focal length: 82.5mm–315mm
An ideal complement to the 18-55mm zoom range of the SEL1855, this
3.8x zoom lens takes you from 55mm out to 210mm with consistently
outstanding optical performance all the way. In 35mm full-frame
equivalent terms that’s a wide zoom range of 82.5mm to 315mm,
providing plenty of reach for outdoor sports or nature photography.
Built-in Optical SteadyShot (OSS) image stabilization is a huge
advantage when shooting at longer focal lengths or in low light,
making it easy to capture crisp, stable images at up to four shutter
speeds lower than would normally be possible. And if you shoot movies
as well as stills, the built in motor contributes to quiet yet responsive
autofocus and aperture operation that keep your movie soundtrack
free from mechanical noise.
• Weight (approx): 330 g
• Dimensions (Dia. X L): 63.8 x 108 mm
• Max. magnification ratio: 0.225x
60 61
Page 32

A mode, 1/800 sec., F2.0 , ISO 100, Au to white ba lance
Auto mode, 1/1000 se c., F3.5, ISO 20 0, Auto white balan ce
100
80
60
40
Contrast (%)
20
Spatial frequency
10 line pairs/mm
30 line pairs/mm
Mid-range telephoto
E 50mm F1.8 OSS S EL5 0F18
Compact, lightweight mid-range telephoto prime with high-quality metal exterior
Ideal for shooting stills or movies
Bright F1.8 maximum aperture
Internal OSS (Optical SteadyShot™) image stabilization
Built-in motor delivers smooth, quiet autofocus and aperture operation
Circular aperture for attractive defocusing
35mm equivalent focal length: 75mm
At 50 mm
A focal length that is perfect for portraiture and a range of other
subjects, a bright F1.8 maximum aperture, Optical SteadyShot (OSS)
image stabilization and impressive image quality. Put it all together
in a lens that is surprisingly compact and lightweight and you have
a winning combination: the SEL50F18. The large maximum aperture
and Optical SteadyShot are worthy features in their own right, but
working together they make it possible to shoot crisp, clear images
under low-light conditions that would be beyond the capabilities of a
036912
Distance from optical center
of lens (mm)
Max. aperture
R RT T
R: Radial values T: Tangential values
F8 aperture
conventional lens. The F1.8 maximum aperture and a circular aperture
design also join forces to create gorgeous defocusing effects. Add
responsive, quiet autofocus and aperture operation, and you have a
lens that is ideally suited to shooting movies as well as stills.
• Weight (approx): 202 g
• Dimensions (Dia. X L): 62 x 62 mm
• Max. magnification ratio: 0.16x
100
80
60
40
Contrast (%)
20
Spatial frequency
10 line pairs/mm
30 line pairs/mm
Macro
E 30mm F3.5 Macro SEL30M35
Compact, lightweight 1:1 macro lens with high-quality metal exterior
O ne ED gla ss elem ent and t wo asph erica l elements for superior image qualit y
Ideal for shooting stills or movies
Internal focus: the minimum working distance does not change
Built-in motor delivers smooth, quiet autofocus and aperture operation
Circular aperture for attractive defocusing
Aspherical lens ED glass
At 30 mm
036912
Distance from optical center
of lens (mm)
Max. aperture
R RT T
R: Radial values T: Tangential values
F8 aperture
35mm equivalent focal length: 45mm
Macro photography can be a creative, educational and thoroughly
enjoyable pursuit. The SEL30M35 has been designed to offer versatile,
high-performance macro capabilities in a lens that is compact,
lightweight and easy to use. At the time of release the SEL30M35 is, in
fact, the lightest interchangeable 1:1 macro lens available anywhere!
It is a true 1:1 macro lens with a 2.4 centimeter minimum working
distance that allows tiny subjects and details to be rendered with
excellent resolution and contrast. But it also functions as an excellent
“normal” lens for day-to-say shooting, and a smooth, quiet internal lens
drive system makes it suitable for shooting movies as well. The SEL30M35
is a great choice for a second lens that will let you explore the world
in creative new ways. A dedicated lens hood that won’t get in the way
when shooting close is included.
• Weight (approx): 138 g
• Dimensions (Dia. X L): 62 x 55.5 mm
• Max. magnification ratio: 1x
62 63
Page 33

Main specifications of
lenses
a
Mount Category Page Description Model name
19 DT 11–18mm F4.5 –5.6
20 DT 16–50mm F2.8 SSM SAL16 50 13/16 24-75 83°-32° — 7 (circular aperture
21 DT 16–105mm F3.5 –5.6
22 DT 18–55mm F3. 5–5. 6 SAM SA L185 5 7/8 27–8 2.5 76 °–2 9° — 7 (circular aperture
Zoom Lens
Fixed Focal
Length Lens
A-mount
G Lens
Teleconverter
Carl Zeiss Lens
E-mount E -Mount Lens
1: With interchangeable-lens digital cameras incorporating APS-C type image sensors. 2: Exclusively designed for use with APS-C format interchangeable-lens digital cameras. Use with 35mm full-frame
digital cameras
5: Exclusive to SEL16F28.
(
900/a850) not guaranteed. 3: Lens compatibility: operation in AF and MF modes with SAL70200G/SAL300F28G, MF only with SAL135F28/SAL70400G. 4: Without tripod mount.
a
23 DT 18–200 F3.5 –6.3
24 DT 18–250 F3.5– 6.3
25 28–75 mm F2 .8 SAM SAL2875 14/16 4 2–112 .5 5 4°– 21° 75°–32 ° 7 (circular aperture
26 DT 55–20 0mm F4 –5.6 SAM
27 75–300mm F4.5–5.6 SAL 75300 10/13 112.5 –4 50 21°– 5°20 ' 32°–8°10 ' 7 (circular aperture
29 16mm F2.8 Fisheye SAL16 F28
30 20mm F2.8 SAL20 F28 9/10 30 70° 94° 7 (circular aperture
31 28mm F.28 SAL28F28 5/5 42 54° 75° 7 22 0 .13 0.3 — 49
32 DT 35mm F1.8 SAM
33 50 mm F1. 4 SA L5 0F14 6/7 75 32° 47° 7 (circular aperture
34 DT 50mm F1.8 SAM
35 85mm F2.8 SAM
135mm F.28 [T4.5] STF
36
(
MF operation only
37 DT 30m m F2.8 Macro SAM
38 50mm F2.8 Macro SAL50M28 6/7 75 32° 47° 7 (circular aperture
39 100mm F2.8 Macro SA L10 0M2 8 8/8 150 16° 24° 9 (circular aperture
41 70 –200 mm F2.8 G SAL70200 G 16/19 105–300 23°–8 ° 34°–12°30' 9 (circular aperture
42 70–3 00mm F4.5–5.6 G SSM SAL7030 0G 11/ 16 105 –4 50 23°–5° 20' 34°–8 °10' 9 (circular aperture
43 70–40 0mm F4–5.6 G SSM SAL70400G 12/18 10 5– 600 23°–4 °10' 3 4°6°10 ' 9 (circular aperture
44 35mm F1.4 G SAL35F14G 8/10 52.5 4 4° 63° 9 (circular aperture
300 mm F2.8 G
45
(
Built to order
46 1.4x Teleconverter
46 2x Teleconverter
Vario-Sonnar T*
48
16–35mm F2.8 ZA SSM
Vario-Sonnar T*
49
DT 16–80mm F3.5– 4.5 ZA
Vario-Sonnar T*
50
24–70mm F2.8 Z A SSM
51 Dis tagon T* 24mm F2 ZA SSM SAL24F20Z 7/9 36 61° 84° 9 (circular aperture
52 Plana r T* 85mm F1.4 ZA SAL85F14Z 7/ 8 1 27.5 19 ° 29° 9 (circular aperture
53 Sonnar T* 135mm F1.8 ZA SA L135 F18 Z 8 /11 202.5 12 ° 18 ° 9 (circular aperture
56 E 16mm F2.8 SE L16F 28 5/5 24 83° — 7 (circular aperture
57 Fisheye Converter
57 Ultra Wide Converter
58 Sonnar T* E 24m m F1.8 ZA S EL 24 F18Z 7/ 8 36 61° — 7 (circular aperture
59 E 18–55m m F3.5–5.6 OSS SE L1855 9/ 11 2 7–8 2.5 76°–29 ° — 7 (circular aperture
60 E 18–200mm F3.5 –6.3 OSS SEL1 82 00 12/ 17 27–300 76°– 8° — 7 (circular aperture
61 E 5 5–210mm F 4.5 –6.3 OS S SEL 55210 9/13 82. 5–315 29 °–7°30' — 7 (circular aperture
62 E 50mm F1.8 OSS SE L5 0F18 8/9 75 32° — 7 (circular aperture
63 E 30mm F3.5 Ma cro SEL30M35 6/7 45 50° — 7 (circular aperture
2
2
2
2
2
2
2
2
)
2
)
3
3
2
5
5
SA L1118 12/15 16.5 –27 104°–76° — 7 (circular aperture
SA L1610 5 11/1 5 2 4–1 57.5 8 3°–15 ° — 7 (circular aperture
SA L182 00 13/15 27–300 76°– 8° — 7 (circular aperture
SA L182 50 13/16 27–375 76°– 6° 30' — 7 (circular aperture
SAL55200-2 9/13 82.5–300 29 °–8° — 9 (circular aperture
SAL35F18 5/6 52.5 44° — 7 (circular aperture
SA L5 0F 18 5/6 75 32 ° — 7 (circular aperture
SAL85 F28 4/5 1 27.5 19 ° 29° 7 (circular aperture
SA L135 F28
SAL30M28 5/6 45 50° — 7 (circular aperture
SAL30 0F28G
SA L14T C 4/5 — — — — — — — — — 6 4 x 20 2-1/2 x 13/16 170 6 case
SAL2 0TC 5/6 — — — — — — — — — 64 x 4 3.5 2 -1/ 2 x 1- 11/16 20 0 7- 1/1 6 case
SA L163 5Z 13 /17 24– 52.5 83°–4 4° 107°–63° 9 (circular aperture
SA L168 0Z 10/ 14 24 –120 83°–20° — 7 (circular aperture
SAL2470Z 13/ 17 36 –105 61°– 23 ° 84°–34° 9 (circular aperture
VCL-ECF1 4/4 15 — — — — 0. 62 0 .13 — — — 66 x 44 2-5/8 x 1-3/4 15 0 5 -1/4 case
VCL- ECU1 3/3 18 — — — — 0 .75 0.18 — — — 6 6 x 44 2- 5/8 x 1-3/4 12 5 4 -3/8 case
Lens configuration
(
group/element
8/ 11
(
incl. 1x filte r
6/8 (incl. APD
element 1/2)
12/13
(
incl. 1x filte r
35mm equivalent
focal length
)
)
)
1
(
)
APS-C
24 110 ° 18 0° 7 22 0.15 0.2 —
202.5 12 ° 18 °
450 5°2 0' 8°10' 9 (circular aperture
(mm
)
Angle of view
1
(
)
APS-C
Angle of view
(
35mm full-frame
No. of aperture blades
)
9 (auto)
10 (manual
)
)
)
)
)
)
)
)
)
)
)
)
)
)
)
)
)
)
)
)
)
)
)
)
)
)
)
)
)
)
)
)
)
)
)
)
)
Max.
magnification
)
ratio (x
Min. focus (m
0.3 (wide)–
)
0.5 (tele
)
Distance
Filter dia.
(mm)
encoder
72 peta l 81 x 88 3 -1/4 x 3 - 1/2 577 20 hood (AL C- SH117
55 round/bayonet 6 9.5 x 69 2 - 3/4 x 2 -3 /4 210 7- 1/2
67 petal/bayonet 77. 5 x 94 3-1/8 x 3-3/4 565 20 hood (ALC -S H109
55 round/bayonet 71 x 122 2-13/16 x 4 -13/16 460 16 -1/4 hood (ALC-SH0007
4x kind
(
integrated
55 round/bayonet 6 5.5 x 43 2 -9/16 x 1-11/16 220 7-3 /4 hood (AL C- SH 0011
55 — 71.5 x 60 2 -13/16 x 2- 3/8 295 10- 3/8 —
55 round/bayonet 75 x 98. 5 3 x 4 505 18 hood (ALC-SH0007
77 petal/bayonet 87 x 196.5 3-1/2 x 7-3/4 1,3 40
62 petal/bayonet 82.5 x 135.5 3- 3/8 x 5 -3/8 76 0 2 6 -3 /4 hood (ALC -S H103), case
77 petal/bayonet 94.5 x 196 3- 3/4 x 7- 3/4 1,5 00
55 petal/bayonet 69 x 76 2- 3/4 x 3 510 18 hood (ALC-SH0001), case
42
(
exclusive
77 petal/bayonet 83 x 114 3 -3/8 x 4-1/2 860 30 -3/8 hood (ALC -S H106), case
77 petal/bayonet 8 3 x 111 3- 3/8 x 4 -3/ 8 955 3 3-1/ 4 hood (ALC -S H101), case
72 petal/bayo net 78 x 76 3 -1/8 x 3 555 19- 5/8 hood (AL C- SH11 0), case
72 round/bayonet 87 x 75 3 -1/4 x 2-7/8 6 40 22- 5/8 hood (ALC-SH0002), case
77 round/bayonet 88 x 114.5 3-1/2 x 4-5/8 995 35 -1/8 hood (ALC-SH0003), case
49 — 62 x 22 .5 2-1/2 x 29/32 67 2- 3/8 —
49 petal/bayonet 62 x 60 2-1/2 x 2-3/8 194 6- 7/8 hood (AL C- SH11 2
67 petal/bayonet 75.5 x 9 9 3 x 4 524 18 -1/ 2 hood (ALC -S H109
Hood shape/mount
petal/fixed 75 x 66.5 2-15/16 x 2 -5/8 400 1 4 -1/ 8 —
)
roun d/
integrated
round/clip-on 122 x 242.5 5 -1/16 x 9-3/8 2,310
)
Dimensions:
Dia. x L (mm
65.5 x 42.5 2- 9/16 x 1 -11/16 18 5 6 -1/2 —
)
Dimensions:
Dia. x L (in.
Weight:
)
(
approx.) (g
Weight:
)
(
)
approx.) (oz.
4
47 -1/4 hood (ALC -S H0 010), case
4
53 hood (ALC -S H107), case
4
81 -1/ 2
Provided
accessories
(
optional)
hood (ALC -S H108
hood, slot-in circular polarizing filter,
lens strap, hard case
)
)
)
)
)
)
)
)
)
)
)
)
)
)
)
Min. aperture
(
F-Stop
22–29 0.125 0.25 77 petal/bayonet 83 x 80.5 3- 3/8 x 3-1/4 360 12- 3/4 hood (ALC-SH0009
22 0.2 0.3
22–36 0.23 0.4 62 petal/bayonet 72 x 83 2-7/8 x 3 -3/8 470 16- 9/16 hood (ALC -S H105
22–36 0.34 0.25
22–40 0.27 0.4 5 62 petal/bayonet 73 x 85.5 2 -7/8 x 3- 3/8 405 14 - 5/16 hood (ALC-SH0008
22–40 0.29 0.45 62 petal/bayonet 75 x 86 3 x 3-3/8 440 15 -1/2 hood (ALC -S H104
32 0.22 0.38
32–45 0.29 0.95 55 petal/bayonet 71.5 x 85 2-7/8 x 3- 3/8 305 10 -3/4 hood (ALC -S H102
32–28 0.25 1.5
22 0.13 0.25 — 72 petal/bayonet 78 x 53.5 3 -1/ 16 x 2 -1/ 8 285 1 0 -1/16 hood (ALC -SH 0013
22 0.25 0.23 55 round/bayonet 70 x 52 2-7/8 x 2-1/8 170 6 hood (AL C- SH111
22 0.15 0.45
22 0.2 0.34 49 p etal/bayonet 70 x 45 2-7/8 x 1-13/16 170 6 —
22 0.2 0.6 55 round/bayonet 70 x 52 2- 7/8 x 2-1/8 175 6 -1/8 hood (AL C- SH111
31 (T32)0.25 0. 87 — 72 round/bayonet 8 0 x 99 3 -1/8 x 3-7/8 730 25 -3/4 hood (ALC -SH 0014), case
22 1.0 0 .129 49 — 70 x 45 2-7/8 x 1-13/16 15 0 5 -1/4 —
32 1.0 0.2
32 1.0 0.35
32 0.21 1. 2
22–29 0.25 1. 2
22–32 0.27 1. 5
22 0.2 0.3
32 0.18 2.0
22 0.24 0.28
22–29 0.24 0.35 62 petal/bayonet 72 x 83 2 -7/8 x 3- 3/8 445 15 -3/4 hood (ALC-SH0005), case
22 0.25 0.34
22 0.29 0 .19
22 0.13 0.85
22 0.25 0.72
22 0.078 0.24
22 0.25 0.016 — 49 — 63 x 65. 5 2-3/8 x 2-1/2 225 8 fro nt & rear cap s
22–32 0.3 0.25
22–40 0.35
22–32 0.225 1 — 49 round/bayonet 63.8 x 10⁸ 2-1/2 x 4-1. 4 330 12 fro nt & rear caps, lens hood
22 0.16 0.39 — 49 — 62 x 62 2- 1/2 x 2 -1/ 2 202 7 front & rear caps
22 1.0 0.0 95 — 49 cap ty pe 62 x 55.5 2 -1/2 x 2 - 1/4 138 5 front & rear cap s, lens ho od (AL C- SH11 3
• When mounted o n a series cameras with APS -C type sen sors, th e actual a ngle of v iew will b e equal to t he one obta ined at t he focal l ength ap prox. 1.5 times l onger t han state d.
• In principl e, amount o f light co ming into a l ens will d ecrea se at imag e perip hery. If it b ecome s too dark , adjust the aper ture set ting by 1 or 2 s tops down.
Specifications are based on the latest information available at the time of printing, and are subject to change without notice.
)
Page 34

lens accessories
a
Carl Zeiss® filter
High-grade Carl Zeiss filters with exclusive T* coating optimize the superb performance of your lenses,
effectively reducing flare and ghosting. A thin profile also prevents vignetting.
Circular PL Filter
Circular polarizing filters improve contrast
in overly bright light, and remove glare
and reflections.
VF-49CPAM
VF -55CPA M
VF - 62CPAM
(
49mm)
(
55mm)
(
62mm
)
VF - 67CPAM
VF -72CPAM
VF -77CPAM
(
67mm
(
72mm)
(
77mm
Lens Cap
Front Lens Cap
With logo.
Filter di a. 4 9/55/62/67/72/77m m
ALC -F49A
ALC- F55A
ALC- F62A
AL C - F 67A
ALC-F72A
AL C - F 77A
G Front Lens Cap
Filter dia. 55/62/77mm
ALC- F62G
Lens Hood
Petal shape
(
Photo: ALC-SH0001
) (
Lens Case
ND Filter
Neutral density filers attenuate light to allow
a longer exposure or larger aperture than
required, without affecting colors (type: ND8).
)
)
VF- 49NDAM
VF- 55NDAM
VF- 62NDAM
(
49mm)
(
55mm
(
62mm)
ALC - F77G
Round shape
Photo: ALC-SH0003
For model numbers, see pg. 65
)
VF - 67NDAM
VF - 72NDAM
VF - 77NDA M
(
67mm
(
72mm)
(
77mm
Carl Zeiss Front Lens Cap
Filte r dia. 62/72/77mm
ALC- F62Z
ALC-F77ZALC- F55G
ALC-F72Z
Mount Adaptor
)
Mount Adaptor
LA- E A1
)
)
Rear Lens Cap
ALC-R55
MC Protector
Multi-coated protectors are coated on both
sides, protecting lenses from damage without
causing unwanted flare or reflections.
VF -49MPAM
VF-55MPAM
VF - 62MPAM
(
49mm)
(
55mm)
(
62mm
)
VF - 67M PAM
VF -72MPAM
VF -77M PAM
(
67mm
(
72mm
(
77mm
(Diameter size)
)
)
)
Rear Lens Cap
ALC-R1EM
Both the L A-EA1 and EA2 adaptors allow you
to attach A-mount lenses to your E-mount
camera. The LA-EA2 is the world’s first adaptor
to leverage Sony’s exclusive Translucent Mirror
Technology to provide super fast and accurate
Phase Detection AF as well. The LA-EA2 adaptor
has a translucent mirror built-in between the
two mounts that directs a small por tion of the
light to the phase detection AF sensor in the
bottom of the unit.
* NEX-3, NEX-5, NEX-C3 and NEX-VG10 require firmware
update to use LA-EA2 adaptor. www.esuppor t.sony.com
LCL - 60AM
Fits all l enses
up to (L) 80 mm*,
(
Dia.) 80mm
Trademarks & Remarks
• a is a trademark of Sony Corporation.
• SteadyShot INSIDE, Optical SteadyShot and G Lens are trademarks of Sony Corporation.
• Carl Zeiss is a registered trademark of Carl Zeiss AG.
• All other company and product names mentioned herein are used for identification purpose
only, and may be the trademarks or registered trademarks of their respective owners.
LCL - 90AM
Fits all l enses
up to (L) 110 mm*,
(
Dia.)90 mm
LCL - 140AM
Fits all l enses
up to (L) 16 0 mm*,
(
Dia.) 110 mm
* With hood and cap attached
Mount Adaptor
LA-EA2
NEW
Page 35

© 2011 Sony Electroni cs Inc. All r ights rese rved. Reproduct ion in whole or in pa rt with out writ ten permission i s prohibi ted.
Features and specifications are subject to change without notice.
Sony Electronics
Digital Imaging Division
16530 Via Esprillo Drive
San Diego, CA 92127
DI11012
 Loading...