


T H E S O N I C F R O N T I E R S L I N E S E R I E S P R E A M P L I F I E R S
OWNER’S MAN UAL
I N E 1 P R E A M P L I F I E R
I N E 2 P R E A M P L I F I E R |
A N D P O W E R S U P P L Y |
I N E 3 P R E A M P L |
I F I E R A N D P O W E R S U P P L Y |
OPERATING MANUAL FOR THE SONIC FRONTIERS
LINE SERIES PREAMPLIFIERS
We at Sonic Frontiers hope you will derive many years of listening pleasure with your new LINE Series Preamplifier. This Operating Manual contains important information regarding the operation and care of these Preamplifiers. Be sure to read this manual carefully and follow these instructions in order to keep them performing and sounding their best. Please contact Sonic Frontiers if you have any questions - a Customer Service Representative will be pleased to assist you.
CONTENTS |
|
Unpacking ........................................................................................................ |
1 |
Operation, Connection and Control Diagrams ........................................................ |
2 |
Control and Connection Functions ........................................................................ |
4 |
Preamplifier Set-up .............................................................................................. |
6 |
Tube Insertion .................................................................................................... |
6 |
Chassis Placement .............................................................................................. |
7 |
Connecting External Equipment ............................................................................ |
7 |
Power Connections ............................................................................................ |
8 |
Home Theatre Accessories.................................................................................... |
8 |
Powering On and Startup Procedures .................................................................... |
9 |
Remote Control Functions .................................................................................. |
10 |
Tube Replacement ............................................................................................ |
11 |
Trouble Shooting .............................................................................................. |
11 |
Fuse Location .................................................................................................. |
11 |
Safety Instructions.............................................................................................. |
12 |
Warranty ........................................................................................................ |
12 |
Technical Specifications .................................................................................... |
13 |
Remote Control Battery Replacement .................................................................... |
14 |
This symbol is intended to alert the user to the presence of uninsulated “dangerous voltages” within the product’s enclosure that may be of sufficient magnitude to constitute a risk of electric shock to persons.
This symbol is intended to alert the user to the presence of important operating and maintenance (servicing) instructions in the literature accompanying the appliance.

UNPACKING
At this point we assume that you have successfully opened the box flaps and found this manual. These boxes were designed to ensure the safe transport of the LINE Series Preamplifiers. Sonic Frontiers strongly recommends the storage of these boxes in a safe dry place. In the event that the Line 1, Line 2, or Line 3 may have to be shipped in the future, the original boxes are the best means for the protection and safety of the preamplifier during transportation.
Here is a chart listing what you will find in the box:
Tube Complement |
|
• Line 1 and Line 2 |
6 - 6922 |
• Line 3 |
10 - 6922 |
|
2 - 6GH8A |
Phillips Screwdriver |
1 |
Screws |
18 or 36* |
Power Cord |
1 |
Cotton Gloves |
1 pair |
Extra Fuses |
2 |
Line 1, Line 2, or Line 3 Preamplifier |
1 |
*Line 2 or Line 3 Power Supply |
1 |
Preamplifier Top Cover |
1 |
*Power Supply Top Cover |
1 |
Remote Control |
1 |
Warranty Card |
1 |
Operating Manual |
1 |
If after your inspection of the contents there is a discrepancy, contact your dealer or Sonic Frontiers immediately.
* Only for Line 2 or Line 3 owners.

OPERATION, CONNECTIONS AND CONTROL FUNCTIONS
LINE 1, LINE 2, AND LINE 3 FRONT PANEL
Note: This diagram applies to ALL LINE Series preamplifiers, as they all have identical front panel functions.
A |
B |
C D E |
F G H |
I |
J |
|
K |
|
L |
Figure 1 - Line 1, Line 2, and Line 3 Front Panel
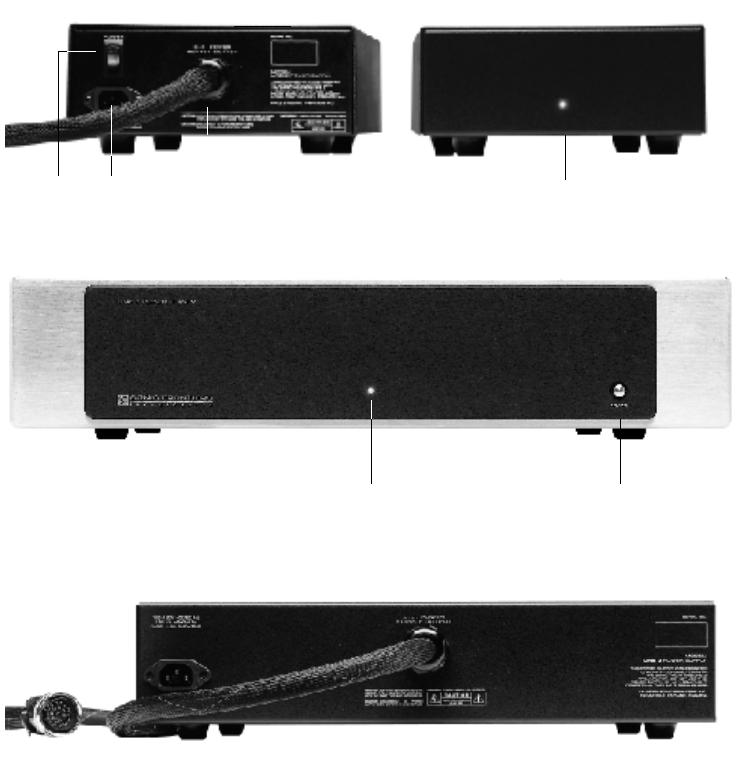
LINE 1 REAR PANEL
M N O P Q R S T U V W
Figure 2 - Line 1 Rear Panel
LINE 2 AND LINE 3 REAR PANEL
X |
O |
P |
Q |
R |
|
S |
|
T |
|
U |
|
V |
W |
Figure 3 - Line 2 and Line 3 Rear Panel
2
OPERATION, CONNECTIONS AND CONTROL FUNCTIONS CONT’D
LINE 2 POWER SUPPLY REAR AND FRONT PANELS
M N Y
Z
Figure 4 - Line 2 Power Supply Rear and Front Panels
LINE 3 POWER SUPPLY FRONT PANEL
Z |
AA |
Figure 5 - Line 3 Power Supply Front Panel
LINE 3 POWER SUPPLY REAR PANEL
Y N
Figure 6 - Line 3 Power Supply Rear Panel
CONTROL AND CONNECTION FUNCTIONS |
|
|
A - X L R Balanced Input Buttons (BAL 1, BAL 2) - |
ly and safely. Depending upon the methods used in |
|
These buttons will select a balanced input signal connected |
producing the recording, the user may prefer listening to a |
|
to one of the XLR Balanced Inputs. When selected the LED |
given recording in either phase position. |
|
display window will light BAL 1 or BAL 2. Input volume levels |
G - LED Display Window - The Display window gives the |
|
can be preset and saved in memory. See “K” below. |
||
N o t e : Whenever you select a new input, there is a ramp up in volume as the preamp resets |
operating status of the Preamplifier. There are four levels of |
|
to your saved level. The duration of the ramp up is dependent on the output level. |
light intensity available plus OFF. This is adjustable only with |
|
B - Single-Ended Input Buttons (SE 1 - SE 4) - |
the remote control DISP (display) button. See page 10. |
|
H - Balance Buttons - These buttons control the relative bal- |
||
These buttons will select a single-ended input signal connect- |
||
ed to that specific single-ended input. The selected input will |
ance of the left and right channels to compensate for any dis- |
|
be displayed in the LED display window. Preset input volume |
crepancies caused by speaker placement, source imbalance, |
|
levels can be saved in memory. See “K” below. |
etc. The balance between the left and right channel can be |
|
Note: Whenever you select a new input, there is a ramp up in volume as the pre- |
changed by pressing the BALANCE LEFT or BALANCE RIGHT |
|
amp resets to your saved level. The duration of the ramp up is dependent on |
button. When the left balance button is pressed, the R I G H T |
|
the output level. |
channel will be decreased in 0.5dB increments. When the |
|
C - Tape Input Button - This button toggles the Tape moni- |
right balance button is pressed the LEFT channel will decrease |
|
in 0.5 dB increments. To reset to an equal balance either |
||
tor ON/OFF and will display TAPE in the LED display win- |
adjust until the volume levels are equal again or select any |
|
dow. All other preamp display functions remain active and |
other input - then reselect this input to recall the preset (default) |
|
the same. |
settings. For setting default levels see “K” below |
Note: Whenever you select this function there is a ramp up in volume as the preamp resets to your saved level. The duration of the ramp up is dependent on the output level.
Note: To reset the volume levels to equal values on both channels, simply press and hold the Mode button for a minimum of 1.5 seconds. The volume level will then revert to the higher of the two channels.
D - SSP (Surround Sound Processor) Input Button -
This button selects the Surround Sound Processor (SSP) input signal. When selected, SSP will light in the LED display window and all other displays will blank indicating that all preamp functions are completely disabled. The SSP signal is directly connected to all the preamp’s single-ended and balanced outputs. Note: The XLR outputs become a single-ended signal. Non-inverting polarity (0˚) is automatically selected. The only way to deselect SSP mode is to press the SSP button a second time.
Note: Whenever you deselect this function there is a ramp up in volume as the preamp resets to the level of the previously selected input. The duration of the ramp up is dependent on the output level.
E - H e a d R o o m™ Headphone Output - H e r e you can insert the plug from your headphones into the front panel headphone jack. When headphones are plugged in MUTE will be displayed in the LED display window. All functions remain operational. All the linestage main outputs will be MUTED except the TAPE. Use the volume control to set a desired level. When the Headphone plug is removed the volume levels will all return to their preset or default settings.
Note: Whenever you remove your headphone plug there is a ramp up in volume as the preamp resets to the default input and saved level. The duration of the ramp up is dependent on the output level.
Note: When headphones are plugged in, the output to your amplifier is muted (as indicated in the front panel LED display window). However a second MUTE function is still available (by pressing the MUTE button) for the headphones.
Note: Headphones will not work when SSP mode is selected.
F - Phase Button - This button allows the user to invert the system phase polarity by 180˚ (relative to the input signal) easi-
I- Mode Button - The LINE Series Preamplifiers can operate in one of two modes: MONO or STEREO. Only the MONO mode is indicated in the LED display window. Switching between MONO and STEREO is done by pressing the mode button on the front panel or remote control. Mono is available for any input (balanced or single-ended), including TAPE OUT.
Note: A secondary feature of the Mode button is its ability to reset the channel balance to an equal setting on both channels. Simply press and hold the Mode button for 1.5 seconds to perform this operation.
J - Mute Button - The Line Stage main output can be muted by pressing the MUTE button. When the signal is muted it will be indicated in the LED display window. The TAPE OUT function is not affected. A secondary “volume control” MUTE function is still available while listening with headphones.
Note: Whenever you deselect this function there is a ramp up in volume as the preamp resets to your saved level. The duration of the ramp up is dependent on the output level.
K - Precision Balanced Volume Attenuator Control -
This continuous rotation knob controls the balanced attenuator. It gives precise control over left and right channel levels in 0.5 dB steps - 191 levels of attenuation from 00.0 to 95.5. Turning the control knob clockwise will increase the volume. Once the end of each range (00.0 or 95.5) is reached, the knob will continue to rotate without any further change in volume setting - a reverse in direction will immediately begin changing the volume level in the other direction.
Setting Default Volume Levels - Volume/Balance levels for individual inputs (except SSP) can be pre-set and stored in memory.
4
 Loading...