

Page 1
EOLIS WIREFREE RTS SENSOR
Installation and Operating Instructions
DESCRIPTION
The Eolis WireFree RTS Sensor is a battery powered, 2-axis vibration sensor that detects vibration of an awning caused by excessive wind. It will transmit a
radio command to retract an awning when the vibration due to wind is greater than the set point. It comes packaged in a weather resistant enclosure and is
meant to mount on the front bar of the awning. The Eolis WireFree RTS Sensor is not compatible with awnings that have moveable front valences.
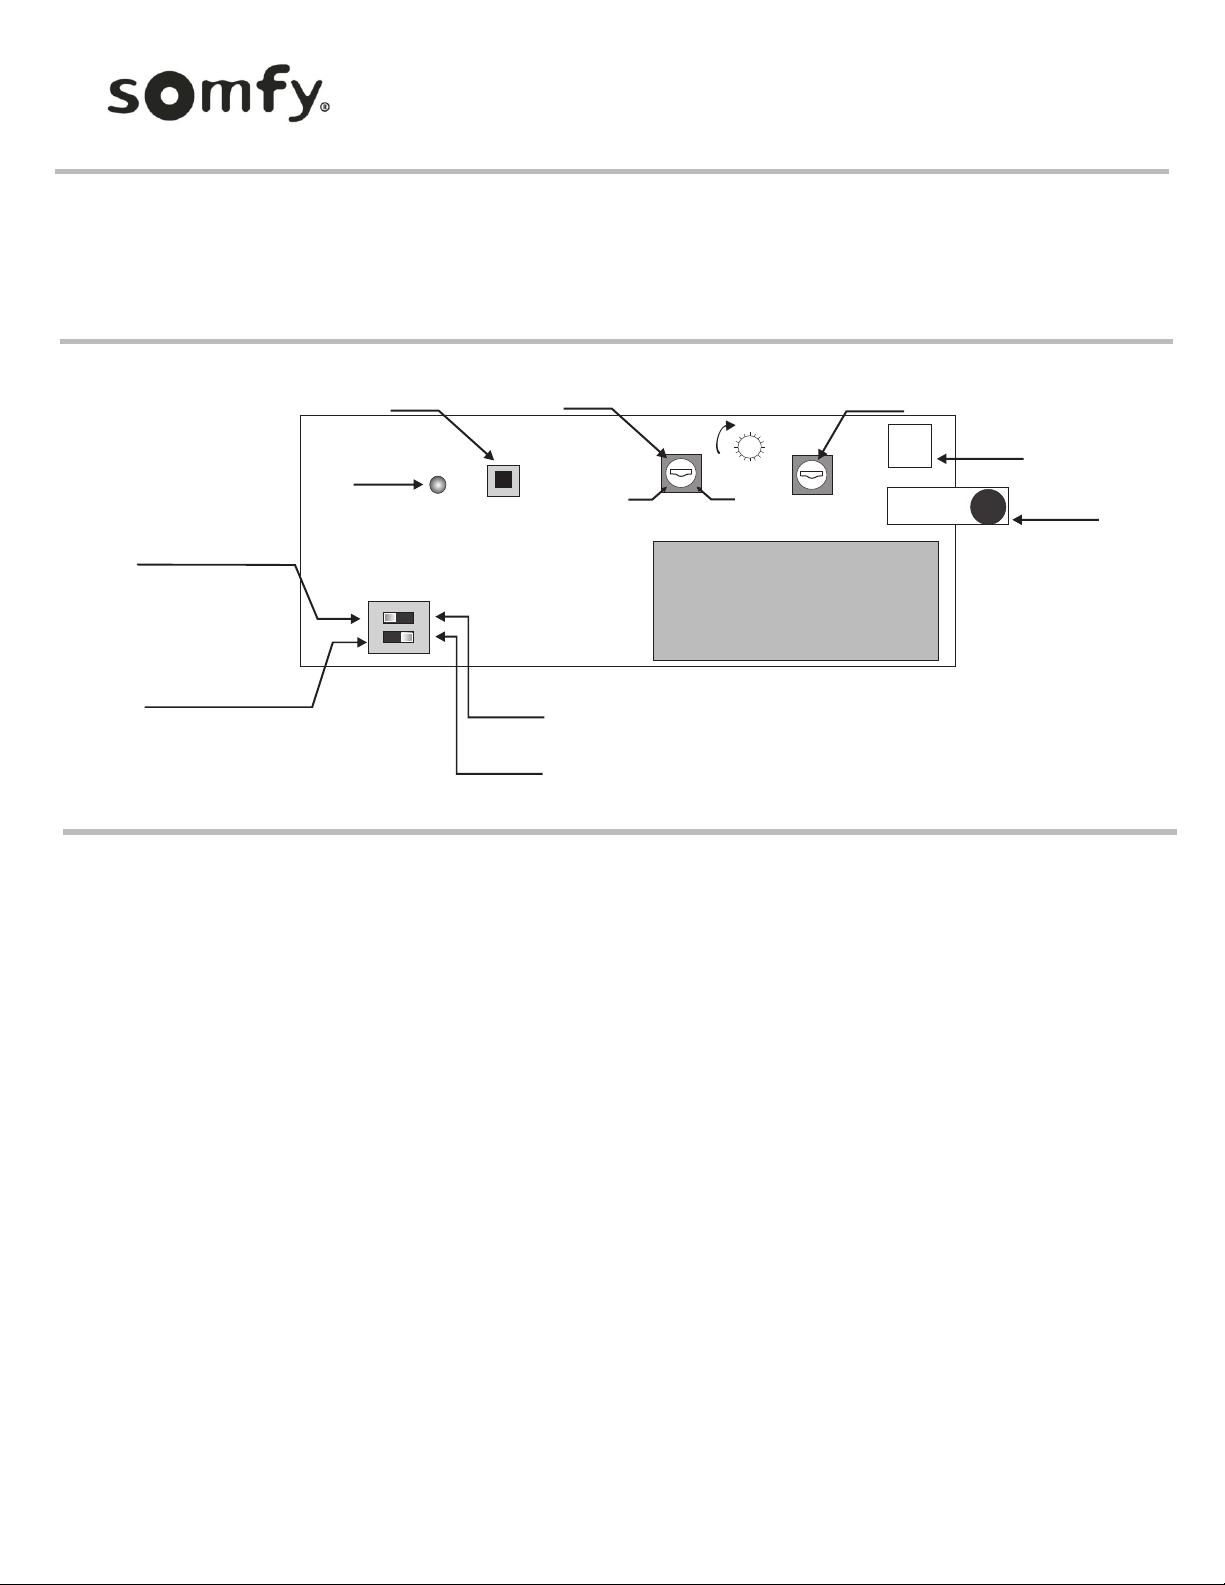
Slide Switch #2 to this
position for awning
travel time between
60 and 90 seconds.
Slide Switch #1 to this
position for Test Mode
Programming
Button
Transmit
LED
Dip
Switch
ON
Sensor A
Adjustment
1 2
Slide Switch #2 to this
position for awning
travel time less than
60 seconds.
Slide Switch #1 to this
position for normal mode.
“0”
Least
Sensitive
Increasing
Sensitivity
Sensitive
+
“F”
Most
9
8
7
A
6
B
5
4
3
E
2
F
0
1
Sensor B
Adjustment
C
D
Battery
CR123A
Sensor B
Sensor A
-
SYSTEM SET UP
A
1. Apply power to a motorized awning already installed on a dwelling.
2. Press the UP button on a Telis or similar transmitter already memorized. The awning should retract. If this is incorrect, follow the directions included with the
transmitter to reverse the motor direction. FAILURE TO CORRECT THIS ERROR WILL CAUSE THE AWNING TO EXTEND DURING
WINDY CONDITIONS AND MAY CAUSE SERIOUS DAMAGE.
3. Measure the time it takes the awning to travel from fully retracted to fully extended. Set Dip Switch 2 to the ON position for travel time between 60 and 90 seconds.
Set Dip Switch 2 to the OFF (near the battery) position for travel time less than 60 seconds.
These steps should be performed prior to mounting the sensor
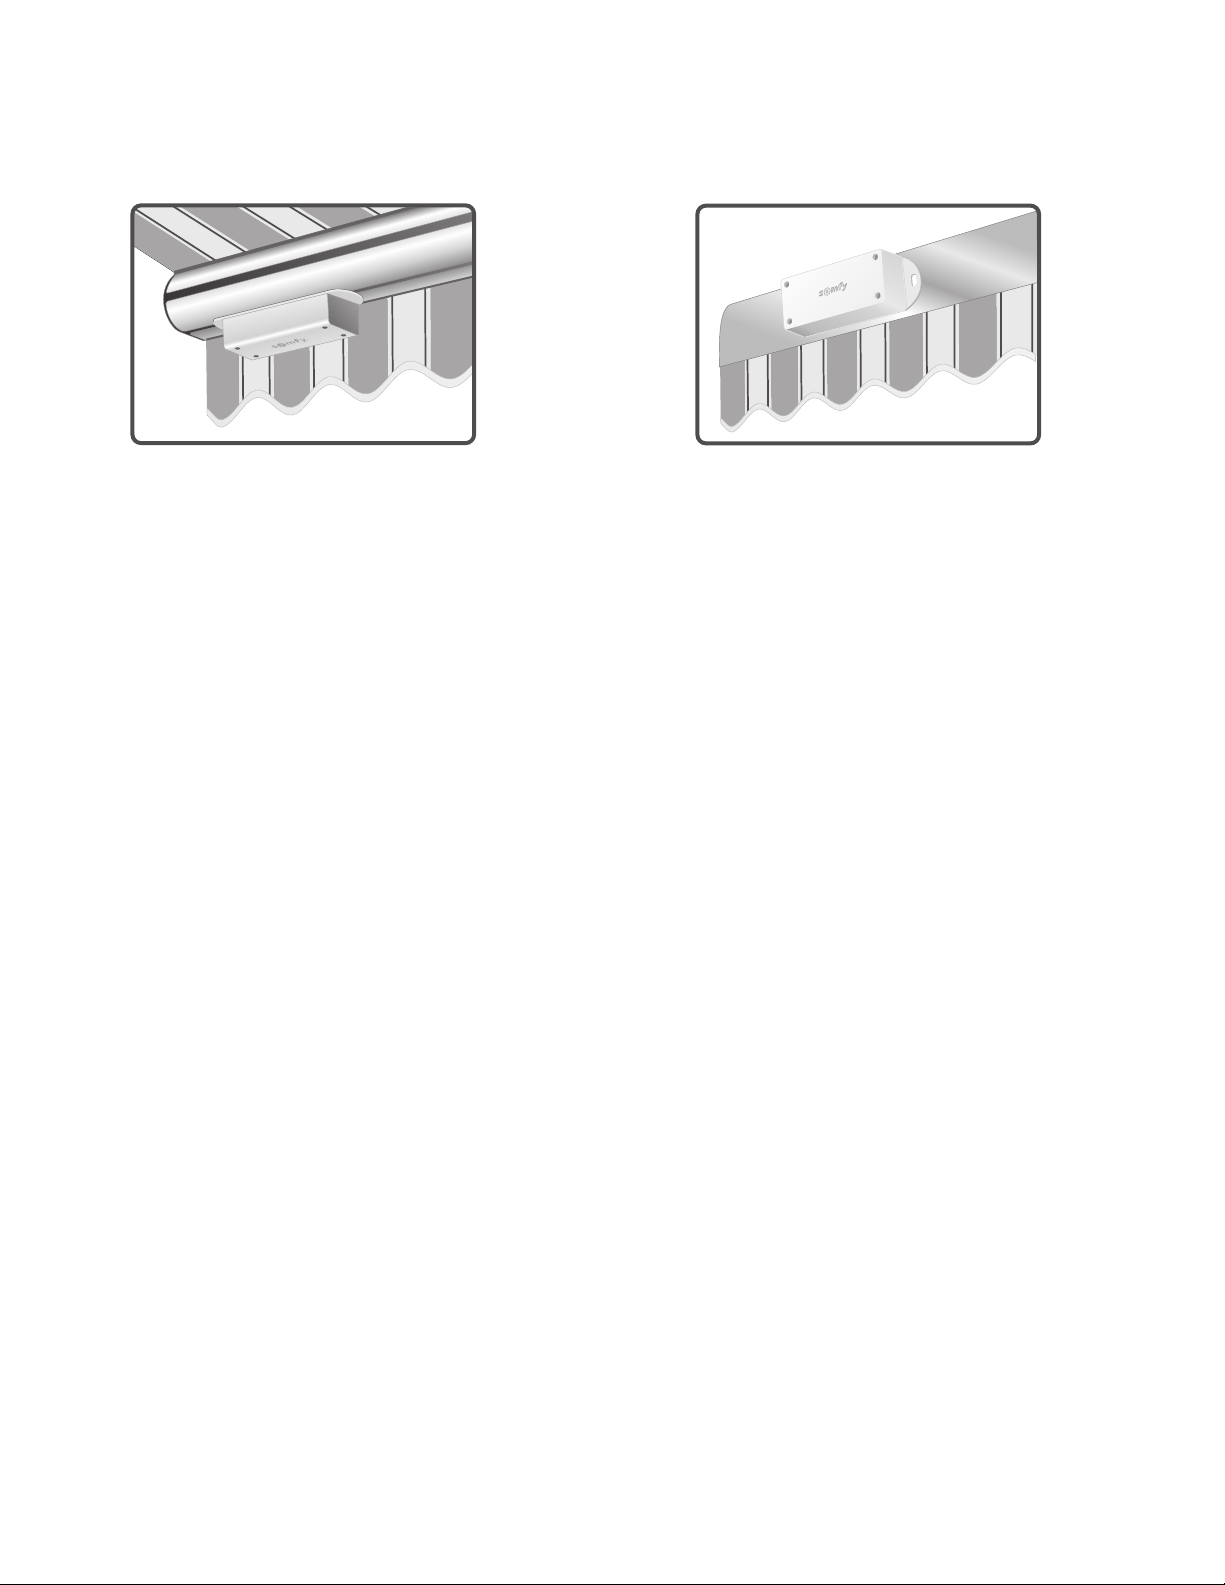
MOUNTING CONSIDERATIONS
B
With the awning extended, the Eolis Wirefree Sensor should be mounted on the front bar. The preferred locations are on the face of the front bar, behind the front bar
or under the awning front bar. The awning arms can be used but are not recommended. If the sensor must be mounted on the awning arms, be sure to avoid
damaging the internal cables when using the self drilling screws. Care must be exercised, particularly with cassette awnings, to make sure the sensor is not crushed
when the awning is retracted. For proper operation, the awning should be rigidly mounted to avoid excessive vibration. For best reception the EWF should be
mounted on the side which is closest to the motor head.
Page 2
INITIAL SENSITIVITY ADJUSTMENT
C
1. Bottom Mount (underneath awning front bar) 2. Front Mount (on the face or behind awning front bar)
Set Sensor A sensitivity to 8. Set Sensor B sensitivity to 0. Set Sensor A sensitivity to 0. Set Sensor B sensitivity to 8.
BINDING THE SENSOR TO THE MOTOR
D
1. Put the RTS motor in programming mode by depressing the program button on the original transmitter. The motor should jog. Push the
programming button on the sensor. The motor will jog again, the sensor is now memorized by the motor.
2. Disconnect the awning from power. Mount the sensor to the awning using the hardware provided. Do not install the cover of the sensor yet.
3. To remove the sensor from the memory of the motor, first put the RTS motor in programming mode by depressing the program button on a
transmitter already memorized. The motor will jog. Press the programming button on the Eolis Wirefree Sensor. The motor will jog again,
indicating the sensor is removed from memory.
TESTING THE SENSOR
E
F
Must have hand-held transmitter to complete testing.
1. With the sensor cover removed, extend the awning using a Telis or similar transmitter.
2. Set Dip Switch 1 to the ON position, the awning will jog. The 60/90 second delay is not active.
3. Pull the front bar down about 4 inches twice within 10 seconds to simulate a windy condition. The awning will begin to retract. Stop and extend
the awning with the transmitter after 5 seconds. Do not try to activate the awning until after the 5 seconds has elapsed.
4. If there are any doors near the awning, open and close them to make sure the awning does not retract. If it does, turn the sensor adjustment knob
(previously set at “8”) two positions counter clockwise and retest. Repeat this procedure until the slamming door does not activate the awning.
Make sure to have the hand-held transmitter available to stop the motor, as adjusting the sensitivity will likely activate the sensor. If the awning
activates, stop the motor using the transmitter and wait 30 seconds before testing the new settings.
5. Once the proper sensitivity is set, remove power from the awning. Return Dip Switch 1 to the OFF position (toward the battery). Replace the
cover of the Eolis Wirefree and restore power.
6. Final Test: *NOTE: At this time the EWF has been bumped and jolted a number of times while the power was off. It is best to retract the awning
first, wait a few minutes then do the final test. Pull the front bar down 4 inches and release. Wait the period of time as set by Dip Switch 2. Again
pull the front bar down 4 inches and release. The awning should retract.
7. The awning is now ready to use.
THEORY OF OPERATION
1. When the awning extends, the sensor will ignore any vibrations for the period of time set in Dip Switch 2.
2. When the wind is strong enough to cause the awning to vibrate, the sensor will retract the awning. All commands will be ignored for a period of
up to 2 minutes depending on the 60/90 setting.
3. If the awning is stopped before extending fully and a subsequent down command is given, the Eolis WireFree Sensor will view the movement as
a wind vibration and retract the awning. The user will have to wait up to 30 seconds before the awning can be activated again.
Page 3

TROUBLE SHOOTING NOTES
G
- If the Eolis Wirefree Sensor is removed from the awning, but not the motor memory (See section D3), the awning will keep retracting every hour.
- If the battery is near discharged, the awning will retract and cannot be operated until the battery is replaced. Replace the battery with model CR123A.
- When replacing the battery, be sure the polarity is respected. If the battery is inserted incorrectly, the Wirefree Sensor will not operate.
- If the awning extends and retracts immediately, wait 1 minute before attempting to extend awning again.
- If the awning retracts when a door is slammed, simply adjust the sensitivity of the sensor as described in section E4.
- During testing, it is possible for the motor to overheat after several operations and not react to any commands. It is necessary to wait about 5
minutes before continuing with testing.
MECHANICAL SPECIFICATIONS
3
Overall Dimensions: L: 4 in. D: 1 /4 in.
W: 1 /4 in.
Frequency Range (optimal conditions): 25 ft.
1
ELECTRICAL SPECIFICATIONS
ORDERING INFORMATION
Description
White Enclosure
Sand Enclosure
Brown Enclosure
3v Lithium Battery
Part Number
9013911
9013993
9013994
56700160
Power: 3V Lithium battery, CR123A
Frequency: 433.42 Mhz
FCC Information
This device complies with Part 15 of the FCC Rules. Operation is subject to the following two conditions:
1. This device may not cause harmful interference, and
2. This device must accept any interference received, including interference that may cause undesired operation.
Note: This equipment has been tested and found to comply with the limits for a CLASS B digital device, pursuant to Part 15 of the FCC rules. These limits are designed to provide
reasonable protection against harmful interference when the equipment is operated in a commercial environment. This equipment generates uses and can radiate radio frequency energy
and, if not installed and used in accordance with the instructions, may cause harmful interference to radio communications. However, there is no guarantee that interference will not
occur in a particular installation. If this equipment does cause harmful interference to radio or television reception, which can be determined by turning the equipment off and on, the
user is encouraged to try and correct the interference by one or more of the following measures:
1.1 Reorient or relocate the receiving antenna.
1.2 Increase the separation between the equipment and receiver.
1.3 Connect the equipment into an outlet on a circuit different from that to which the receiver is connected.
1.4 Consult the dealer or experienced radio/TV technician for help.
SOMFY CANADA
6315 Shawson Drive, Unit #1
Mississauga, Ontario L5T1J2
905-564-6446
SOMFY SYSTEMS, INC. reserves the right to change,
update or improve this document without prior notice.
SOMFY SYSTEMS, INC.
47 Commerce Drive
Cranbury, NJ 08512
800-647-6639
Ref. No. 2500911C
SOMFY MEXICO S.A. De C.V.
Temazcal No. 19-B, Col La Loma
Tlalnepantla, Estado de Mexico
54130, Mexico
52-55-5390-5664
SOMFY SYSTEMS, INC. 6/07
C
 Loading...