

Page 1

OWNER’S MANUAL
SM9.3P, SM9.3HR, SM9.3AB, SM9.3HRAB, SM9.3ST, SM9.3HRST
treadmillbynet.com
advancedfitness.com
And other Internet Web sites authorized
By internetfitness.com
The Fitness Superstores
-
SALES: (888) 9TREADS
(888) 987-3237
SERVICE: (888) 340-0482
SMOOTH is a registered trademark of
Internetfitness.com
Mt. Laurel, NJ
OWNER MANUAL PART #15-0083
Page 2
TABLE OF CONTENTS
Table of Contents 2
Model Name Descriptions 3
Model Specifications 4
Important Safety Information 5
Before You Start 6
Warm Up Exercises 7
Assembly Instructions 8
Assembly Instructions Diagram 9
Power Requirements 10
Console Functions and Descriptions 9.3P, 9.3ST 11
Console Functions and Descriptions 9.3HR, 9.3HRAB,
and 9.3HRST
Console Functions and Descriptions SM9.3AB 13
Quick Reference Operating Instructions 14
Manual Program Operating Instructions 15
Pre-set Program Operating Instructions 16
Pre-Set Program Profiles and Descriptions 17
Pre-Set Program Levels: Default Values 18
User Program Operating Instructions 19
Heart Rate Interactive Programming Introduction and
Program Overview
Heart Rate Interactive Programming: How it Works 21
Target Heart Rate Programs Operating Instructions 22, 23
Interval Training 24, 25, 26
Target Heart Rate Chart 27
12
20
Belt Adjustments and Tension 28
Maintenance Instructions 29
Troubleshooting Guide 30
Warranty and Registration 31
2
Page 3

MODEL NAME DESCRIPTIONS
Product Name Definitions
Each Smooth treadmill has a model name and unique serial number. The serial number label is located on the front
of the treadmill frame below the motor hood cover.
Model name sample: SM9.3HRAB This model name is a Smooth 9.3 treadmill with Heart Rate Interactive programming and an AeroBelt.
SM—Smooth
9.3—Series number
P— Programmable
HR—Heart Rate Interactive programming
AB—Programmable treadmill with AeroBelt (thicker, shock-absorbing, orthopedic-style belt)
ST—Stretch (extra long deck)
Smooth Treadmill combinations
SM9.3P—Standard 9.3 model with programs
SM9.3HR—Standard 9.3 model with programs and Heart Rate Interactive program
SM9.3AB—Standard 9.3 model with programs and AeroBelt
SM9.3HRAB—Standard 9.3 model with programs, Heart Rate Interactive program, and AeroBelt
SM9.3ST—Stretch 9.3 model with programs
SM9.3HRST—Stretch 9.3 model with programs, Heart Rate Interactive program, and Stretch deck.
IMPORTANT! PLEASE READ!
The serial number label indicates the model of the treadmill. To avoid confusion, the SM9.3HRAB will have
the SMOOTH 9.3HR overlay on the console. Refer to the serial number label for proper identification.
There are three (3) console overlays used to make all of the treadmill versions above.
The SMOOTH 9.3P overlay is used for models SM9.3P and SM9.3ST.
The SMOOTH 9.3HR overlay is used for models SM9.3HR, SM9.3HRAB, and SM9.3HRST.
The SMOOTH 9.3AB overlay is used only for the SM9.3AB treadmill.
This manual covers operating instructions for all models shown above.
3
Page 4

MODEL SPECIFICATIONS
MODEL SM9.3P SM9.3HR SM9.3AB SM9.3HRAB SM9.3ST SM9.3HRST
Horsepower
Continuous
Display Three Multi-
Pre-set Programs 4 4 4 4 4 4
Custom Programs 2 2 2 2 2 2
Heart Rate Interactive NO YES NO YES NO YES
Incline Range 0 to 15% 0 to 15% 0 to 15% 0 to 15% 0 to 15% 0 to 15%
Speed Range .6 to 12 MPH .6 to 12 MPH .6 to 12 MPH .6 to 12 MPH .6 to 12 MPH .6 to 12 MPH
Belt Type 2-Ply 2-Ply AeroBelt
Belt Size
(Width x Length) in
inches
Residential Motor
Warranty
Residential Parts
Warranty
Residential Frame
Warranty
Residential Labor
Warranty
Light Institutional
Warranty
Width x Length in inches 30” X 70” 30” X 70” 30” X 70” 30” X 70” 30” X 76” 30” X 76”
3.0HP
Baldor
function LED
Windows, One
Multi-function
Dot Matrix
20” x 56.5” 20” x 56.5” 20” x 56.5” 20” x 56.5” 20” x 62.5” 20” x 62.5”
10 Years 10 Years 10 Years 10 Years 10 Years 10 Years
3 Years 3 Years 3 Years 3 Years 3 Years 3 Years
Lifetime Lifetime Lifetime Lifetime Lifetime Lifetime
1 Year 1 Year 1 Year 1 Year 1 Year 1 Year
3 Year Motor,
Parts, Frame,
1 Year Labor
3.0HP
Baldor
Three Multi-
function LED
Windows, One
Multi-function
Dot Matrix
3 Year Motor,
Parts, Frame,
1 Year Labor
3.0HP
Baldor
Three Multi-
function LED
Windows, One
Multi-function
Dot Matrix
2-Ply
3 Year Motor,
Parts, Frame,
1 Year Labor
3.0HP
Baldor
Three Multi-
function LED
Windows, One
Multi-function
Dot Matrix
AeroBelt
2-Ply
3 Year Motor,
Parts, Frame,
1 Year Labor
3.0HP
Baldor
Three Multi-
function LED
Windows, One
Multi-function
Dot Matrix
2-Ply 2-Ply
3 Year Motor,
Parts, Frame,
1 Year Labor
3.0HP
Baldor
Three Multi-
function LED
Windows, One
Multi-function
Dot Matrix
3 Year Motor,
Parts, Frame,
1 Year Labor
User Weight 400 lbs. 400 lbs. 400 lbs. 400 lbs. 400 lbs. 400 lbs.
4
Page 5

Important Safety Information
NING!
1) WARNING: Before using this treadmill or starting any exercise program, consult your physician. This is especially
important for persons over the age of 35 and/or persons with pre-existing health problems. The manufacturer or
distributor assumes no responsibility for personal injury or property damage sustained by or through the use of this
product.
2) WARNING:
to review this manual and the following precautions before operation.
To reduce the risk of electrical shock, burns, fire, or other possible injuries to the user, it is important
SAFETY PRECAUTIONS AND TIPS
It is the owner’s responsibility to ensure that all users of this treadmill have read the Owner’s Manual and are familiar
with warnings and safety precautions.
All treadmills have a user maximum capacity of 400 pounds.
The treadmill should only be used on a level surface and is intended for indoor use only. The treadmill should not
be placed in a garage, patio, or near water and should never be used while you are wet. Smooth recommends a
treadmill mat be placed under the treadmill to protect floor or carpet and for easier cleaning.
Follow safety information in regards to plugging in your treadmill. Keep the power cord away from the incline wheels
and do not run the power cord underneath your treadmill. Do not operate the treadmill with a damaged or frayed
power cord.
Wear comfortable, good-quality walking or running shoes and appropriate clothing. Do not use the treadmill with
bare feet, sandals, socks or stockings.
Always straddle the belt and allow it to start moving before stepping onto the belt.
Hold on to handrails when adjusting speed, incline, or other controls.
Always examine your treadmill before using to ensure all parts are in working order.
Allow the belt to fully stop before dismounting.
Pets should never be allowed near or on the treadmill.
Do not leave children unsupervised near or on the treadmill.
Never operate the treadmill where oxygen is being administered, or where aerosol products are being used.
Never insert any object or body parts into any opening.
For safety and to prevent damage to your treadmill, no more than one person should use the treadmill at a time.
Always unplug the treadmill before cleaning and/or servicing. Service to your treadmill should only be performed by
an authorized service representative, unless authorized and/or instructed by the manufacturer. Failure to follow
these instructions will void the treadmill warranty.
Never leave the treadmill unattended while it is running.
5
Page 6

Before You Start
Thank you for purchasing a SMOOTH treadmill! The premium quality treadmill you
have chosen was designed to meets your needs for cardiovascular exercise.
Before you start, please read the Owner’s Manual and become familiar with the
•
operation of your new treadmill.
Remember to take the time to perform the stretching exercises prior to using
•
treadmill to avoid injury.
Do not stand on the walking belt while pressing the Power button or Start/Stop button.
•
Always adjust the speed of the treadmill in small increments as this treadmill is capable
•
of high speeds.
• If you are taking medication, consult your physician to see if the medication will affect
your exercise heart rate.
• If you have heart problems, you are not active, and/or are over the age of 50 years, do
not use the pre-set treadmill programs or start an exercise program without first
contacting and receiving approval from your physician.
To avoid the risk of electrical shock, always keep the console dry. Do not spill liquids
•
on the console. The manufacturer recommends a sealed water bottle for beverages
consumed while using the treadmill.
6
Page 7

Warm Up Exercises
EXERCISE GUIDELINES
WARNING
This is especially important for individuals over the age of 35 or individuals with pre-existing health
problems.
gen to the muscles and raising body temperature. Begin each workout with 5 to 10 minutes of
stretching and light exercise to warm up. The photos on this page show several forms of basic
stretching you may perform before your workouts. In order to achieve an adequate warm-up, perform each stretch three times.
TOE TOUCH STRETCH
Stand bending your knees slightly and slowly
bend forward from your hips. Allow your back
and shoulders to relax as you reach down toward your toes as far as possible. Hold for 15
counts, then relax. This will stretch your hamstrings, back of knees , and back.
HAMSTRING STRETCH
Sit with one leg extended. Bring the sole of the
opposite foot toward you and rest it against the
inner thigh of your extended leg. Reach toward
your toes as far as possible. Hold for 15
counts, then relax. This will stretch your hamstrings, lower back, and groin.
CALF/ACHILLES STRETCH
With one leg in front of the other, reach forward
and place your hands against a wall. Keep your
back leg straight and your back foot flat on the
floor. Bend your front leg, lean forward and
move your hips toward the wall. Hold for 15
counts, then relax. To cause further stretching
of the Achilles tendons, bend your back leg as
well. This will stretch your calves, Achilles tendons, and ankles.
QUADRICEPS STRETCH
With one hand against a wall for balance,
reach back and grasp one foot with your other
hand. Bring your heel as close to your buttocks
as possible. Hold for 15 counts, then relax.
This will stretch your quadriceps and hip muscles.
! Before beginning this or any exercise program, you should consult your physician.
Warming up prepares the body for the exercise by increasing circulation, supplying more oxy-
7
Page 8

Assembly Instructions
The 9.3 treadmill is shipped in one box with two pieces, the base frame and the upright/console
assembly. The following steps should be followed for assembling the treadmill:
Remove any packing materials from the treadmill. Do not throw away any packing materials until
assembly is completed. You should find the following:
1. Base Frame
2. Double triangular upright assembly with console
3. Two plastic boots to cover gap between upright assembly and base (see Diagram next page).
There is one for the left side, and one for the right side.
4. Two plastic roller end caps.
5. Owner’s Manual Packet contains:
Owner’s Manual,
•
Eight pieces: pan head #8 x 3/4” assembly screws for boots and roller end caps
•
Six pieces: #18 x 5/16” x 3/4” Button head bolts for upright/base assembly (3 each side)
•
Two pieces: #8 5/8” Phillips pad head screws for front of upright/base attachment
•
Allen wrench for belt adjustment
•
Plastic Allen wrench holder with tape side (to attach to treadmill frame)
•
Chest Strap Transmitter (for Heart Rate HR models only)
•
Place the base on a clean, level surface. Make sure the electrical cord will easily reach an electrical
outlet. It is recommended to use two people to assemble the upright assembly on to the base frame.
WARNING: Do not plug treadmill in until assembly is complete. Failure to follow this warning
could result in electrical shock and/or injury.
1. Before beginning, read all instructions before starting and become familiar with the parts. In addition, look at the motor controller circuit board on the base and find the slot where the wire harness
plugs in before beginning.
2. Have one person lift the upright assembly.
3. Have the other person find the wire harness exiting from the left upright. Plug wire harness into
motor controller circuit board. (See Diagram next page).
4. Slowly lower the upright assembly on to the base while aligning up the bolt holes.
5. Install upright / base bolts loosely using #18 x 5/16” x 3/4” Button head bolts (3 each side).
6. Install the plastic boots to cover gaps between upright assembly and base with #8 x 3/4” pan head
screws (see Diagram next page).
7. Install plastic roller end caps with #8 x 3/4” pan head screws (see diagram for orientation).
8. Securely tighten all bolts and screws.
9. Assembly is now complete.
10. Be sure that the treadmill is level to the floor. The rear feet can be adjusted to level the treadmill.
Assembly is now complete!
8
Page 9

Assembly Instructions—Diagram
Upright Assembly
Boot
Roller End Caps
(to be assembled)
Base
9
Page 10
Power Requirements
WARNING!
IMPROPER CONNECTION OF THE EQUIPMENT GROUNDING CONNECTOR CAN RESULT
IN A RISK OF AN ELECTRIC SHOCK. CHECK WITH A QUALIFIED ELECTRICIAN OR
SERVICE MAN IF YOU ARE IN DOUBT AS TO WHETHER THE PRODUCT IS PROPERLY
GROUNDED. DO NOT MODIFY THE PLUG PROVIDED WITH THE PRODUCT, IF IT WILL
NOT FIT THE OUTLET, HAVE A PROPER OUTLET INSTALLED BY A QUALIFIED
ELECTRICIAN.
This treadmill can be seriously damaged by sudden voltage changes in your home’s electrical power. Voltage
spikes, surges, and noise interference can result from weather conditions or from other appliances being turned on or
off. To reduce the possibility of treadmill damage, always use a surge protector (not included) with your treadmill.
Surge protectors can be purchased at most hardware stores. The manufacturer recommends a single outlet surge
protector with a UL 1449 rating as a Transient Voltage Surge Suppressor (TVSS) with a UL suppressed voltage
rating of 400V or less and an electrical rating of 120VAC, 15 amps.
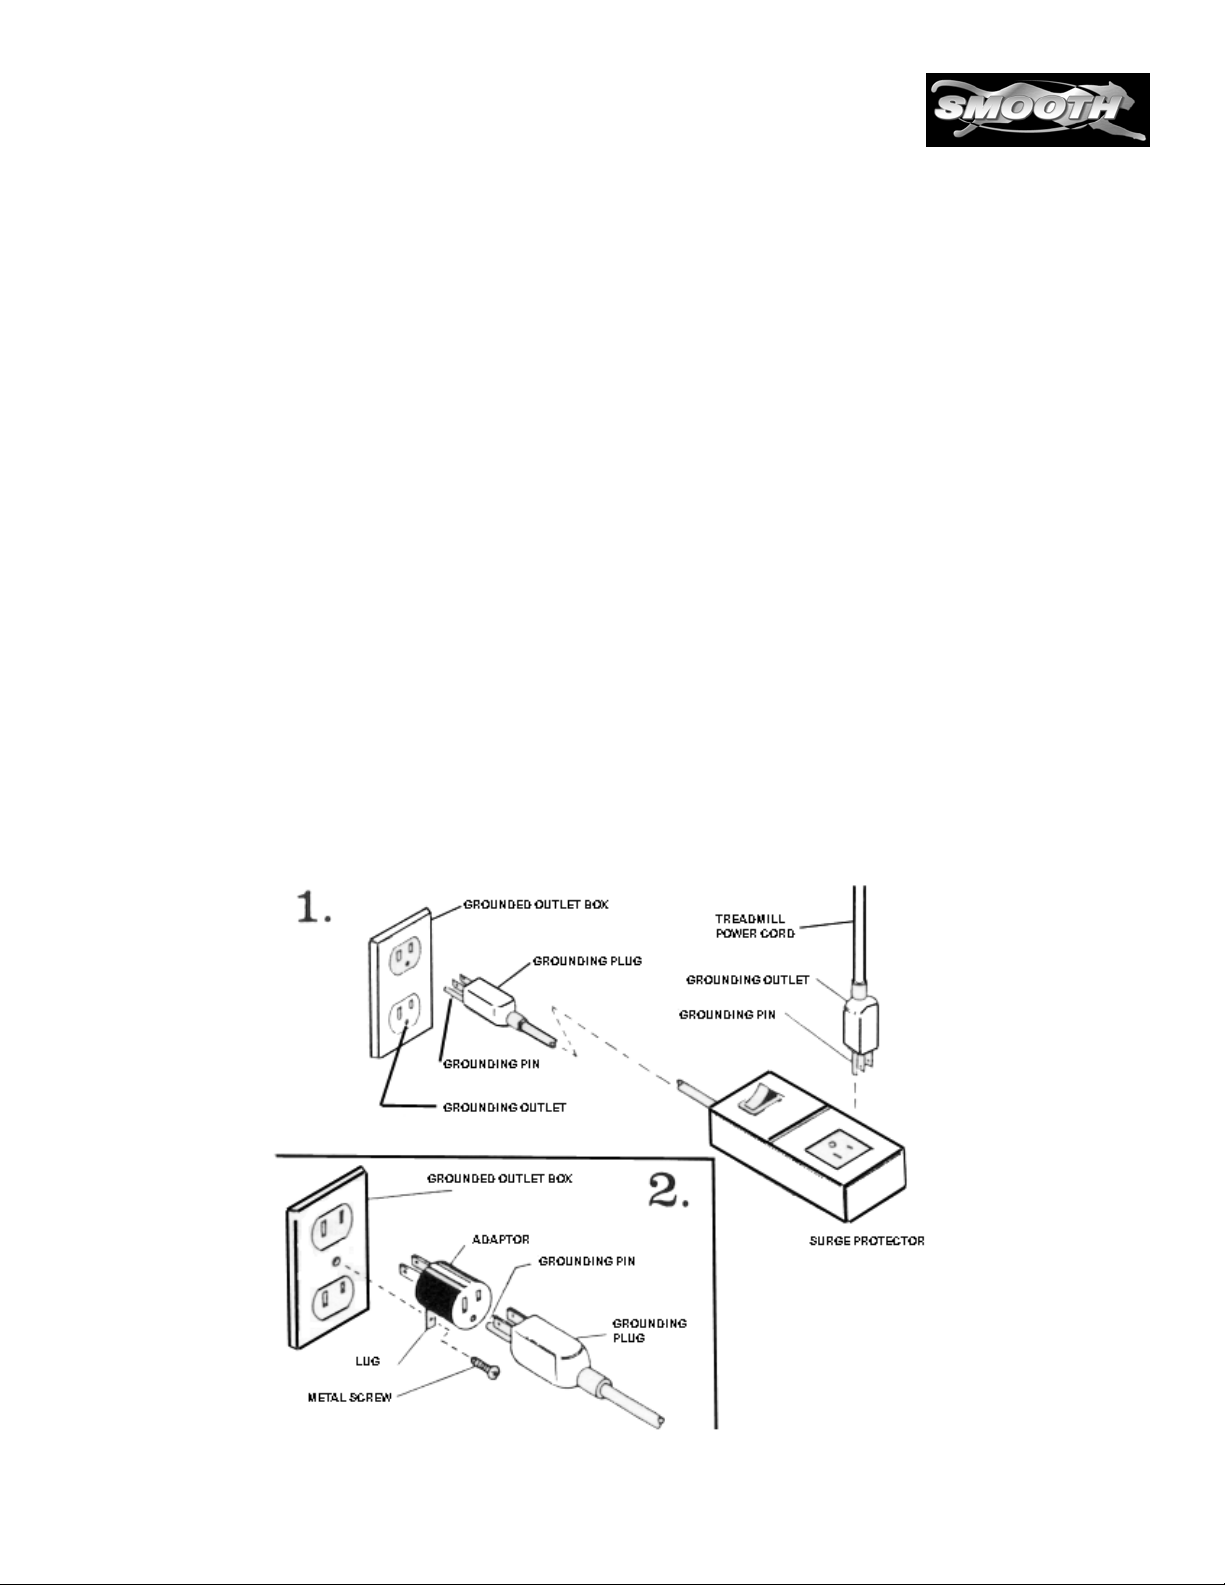
This treadmill must be grounded to reduce the risk of electrical shock. Grounding provides a path of least resistance
for electric current, should the treadmill malfunction. This treadmill comes with an electrical cord having an
equipment-grounding conductor and a grounding plug. Always plug the power cord into a surge protector, and plug
the surge protector into an appropriate outlet that is properly installed and grounded in accordance with all local
codes and ordinances.
This product is for use on a nominal 120-volt circuit, and has a grounding plug that looks like the plug illustrated in the
drawing (1) below.
10
Page 11

Console Functions and Descriptions,
Smooth Models 9.3P, 9.3ST
PROGRAMS:
Button scrolls between
4 pre-set and 3 user
programs. PROGRAM LEVEL:
Scrolls 1-9 program
levels, where 1 is the
easiest, and 9 is the
most difficult.
SPEED:
Indicates miles per
hour starting at .6 MPH
up to 12.0 MPH in
.1 MPH increments. PACE:
Indicates amount of
time required to com-
plete 1 mile at current
speed.
ENTER/MODE:
Used to enter Weight,
and to enter Time and
Distance countdown
parameters. During
+ -
SPEED
(plus/minus):
Adjusts the speed in
.1 MPH increments
during programming
operation, Mode will
toggle between
Speed and Pace.
or during use. Also
used to enter
Weight, to set Time
to countdown, and
+
INFORMATION CENTER:
(Long rectangular box near
bottom of console). Pro-
vides instructions prior to
starting. After starting, indi-
cates Grade, Time, Speed
or Pace. DOT MATRIX:
In manual mode, indicates
Lap Counter in 1/4 mile
increments. In program
mode, indicates progress
of program as a blinking
TIME:
Indicates elapsed time
after pressing “Start
Reset” in minutes and
seconds (0-99 minutes,
GRADE:
Indicates incline in per-
cent of grade, starting
at 0% up to 15%,
diode and shows program
0-59 seconds).
profile.
in .5% increments.
SPEED 2-10:
One touch speed but-
tons to change MPH in
1 MPH increments from
2 MPH to 10 MPH. For
speed greater than 10
MPH, use the Speed
STOP:
Stops the motion of the
treadmill at any point dur-
ing a workout.
Also used as a Pause
function, retaining infor-
mation in all windows
unless safety key is re-
INCLINE 2-10:
One touch in-
cline buttons to
change percent
grade from 2% to
10%. For incline
greater than
10%, use the UP
UP/DOWN:
Adjusts the percent
grade during pro-
gramming or during
use. Also can be
used during pro-
gramming to scroll
through programs.
button.
moved. If held for 5 sec-
onds, will Reset all func-
button.
tions to “0”.
WINDOWS
DISTANCE:
Indicates miles traveled
in .01 mile increments
up to 9.99, and .1 mile
increments above 10
miles. Countdown func-
tion available, see pro-
gramming section.
START/RESET:
Starts the tread-
mill belt in motion
after a 3-second
delay. For the
Reset function,
hold the button
down for 3 sec-
onds to reset
Time, Distance,
and Calories.
11
Page 12

Console Functions and Descriptions
Smooth Models 9.3HR, 9.3HRAB, 9.3HRST
PROGRAMS:
Button scrolls between
4 pre-set and 3 user
programs. PROGRAM LEVEL:
Scrolls 1-9 program
levels, where 1 is the
easiest, and 9 is the
most difficult.
SPEED:
Indicates miles per
hour starting at .6 MPH
up to 12.0 MPH in
.1 MPH increments. PACE:
Indicates amount of
time required to com-
plete 1 mile at current
speed.
ENTER/MODE:
Used to enter Weight,
and to enter Time and
Distance countdown
parameters. During
+ -
SPEED
(plus/minus):
Adjusts the speed in
.1 MPH increments
during programming
operation, Mode will
toggle between
Speed and Pace.
or during use. Also
used to enter
Weight, to set Time
to countdown, and
+
PULSE
SPEED 2-10:
One touch speed but-
tons to change MPH in
1 MPH increments from
2 MPH to 10 MPH. For
speed greater than 10
MPH, use the Speed
button.
INFORMATION CENTER:
(Long rectangular box near
bottom of console). Pro-
vides instructions prior to
starting. After starting, indi-
cates Grade, Time, Speed
or Pace. DOT MATRIX:
In manual mode, indicates
Lap Counter in 1/4 mile
increments. In program
mode, indicates progress
of program as a blinking
diode and shows program
profile.
STOP:
Stops the motion of the
treadmill at any point dur-
ing a workout.
Also used as a Pause
function, retaining infor-
mation in all windows
unless safety key is re-
moved. If held for 5 sec-
onds, will Reset all func-
tions to “0”.
TIME:
Indicates elapsed time
after pressing “Start
Reset” in minutes and
seconds (0-99 minutes,
0-59 seconds).
HEART RATE TARGET
UP + / DOWN — :
Used to Select Heart Rate
Target
INCLINE 2-10:
One touch in-
cline buttons to
change percent
grade from 2% to
10%. For incline
greater than
10%, use the UP
button.
HEART RATE MODE:
Used to Select Heart
Rate Programs
GRADE:
Indicates incline in per-
cent of grade, starting
at 0% up to 15%,
in .5% increments.
UP/DOWN:
Adjusts the percent
grade during pro-
gramming or during
use. Also can be
used during pro-
gramming to scroll
through programs.
WINDOWS
DISTANCE:
Indicates miles traveled
in .01 mile increments
up to 9.99, and .1 mile
increments above 10
miles. Countdown func-
tion available, see pro-
gramming section.
START/RESET:
Starts the tread-
mill belt in motion
after a 3-second
delay. For the
Reset function,
hold the button
down for 3 sec-
onds to reset
Time, Distance,
12
and Calories.
Page 13

Console Functions and Descriptions
Smooth Model SM9.2AB only
PROGRAMS:
Button scrolls between
4 pre-set and 3 user
programs. PROGRAM LEVEL:
Scrolls 1-9 program
levels, where 1 is the
easiest, and 9 is the
most difficult.
SPEED:
Indicates miles per
hour starting at .6 MPH
up to 12.0 MPH in
.1 MPH increments. PACE:
Indicates amount of
time required to com-
plete 1 mile at current
speed.
ENTER/MODE:
Used to enter Weight,
and to enter Time and
Distance countdown
parameters. During
+ -
SPEED
(plus/minus):
Adjusts the speed in
.1 MPH increments
during programming
operation, Mode will
toggle between
Speed and Pace.
or during use. Also
used to enter
Weight, to set Time
to countdown, and
+
SPEED 2-10:
One touch speed but-
tons to change MPH in
1 MPH increments from
2 MPH to 10 MPH. For
speed greater than 10
MPH, use the Speed
button.
INFORMATION CENTER:
(Long rectangular box near
bottom of console). Pro-
vides instructions prior to
starting. After starting, indi-
cates Grade, Time, Speed
or Pace. DOT MATRIX:
In manual mode, indicates
Lap Counter in 1/4 mile
increments. In program
mode, indicates progress
of program as a blinking
diode and shows program
profile.
STOP:
Stops the motion of the
treadmill at any point dur-
ing a workout.
Also used as a Pause
function, retaining infor-
mation in all windows
unless safety key is re-
moved. If held for 5 sec-
onds, will Reset all func-
tions to “0”.
TIME:
Indicates elapsed time
after pressing “Start
Reset” in minutes and
seconds (0-99 minutes,
0-59 seconds).
INCLINE 2-10:
One touch in-
cline buttons to
change percent
grade from 2% to
10%. For incline
greater than
10%, use the UP
button.
GRADE:
Indicates incline in per-
cent of grade, starting
at 0% up to 15%,
in .5% increments.
UP/DOWN:
Adjusts the percent
grade during pro-
gramming or during
use. Also can be
used during pro-
gramming to scroll
through programs.
WINDOWS
DISTANCE:
Indicates miles traveled
in .01 mile increments
up to 9.99, and .1 mile
increments above 10
miles. Countdown func-
tion available, see pro-
gramming section.
START/RESET:
Starts the tread-
mill belt in motion
after a 3-second
delay. For the
Reset function,
hold the button
down for 3 sec-
onds to reset
Time, Distance,
13
and Calories.
Page 14

Quick Reference Operating Instructions
The following Quick Reference is a simple overview of basic operating instructions in MANUAL and
PROGRAMMING modes of your Smooth treadmill.
For more detailed information and operating instructions, see topics later in this manual for MANUAL, PRE-SET, USER, and HEART RATE INTERACTIVE programming options.
BASICS
Straddle belt
•
Insert Safety Key and attach to clothing
•
QUICK START IN MANUAL MODE ONLY:
Press the START/RESET button
•
Adjust Speed using the Speed “+” or ”-” buttons, or use the Speed One Touch buttons labeled
•
2—10
Adjust Incline using the Incline “+” or ”-” buttons, or use the Incline One Touch buttons labeled
•
2—10
PRE-SET PROGRAMS:
Set Weight using the Speed “+” or ”-” buttons
•
Press the ENTER/MODE button
•
Scroll to the desired program using the PROGRAM button, or scroll using the INCLINE UP or
•
DOWN buttons
Set Program Level Using PROGRAM LEVEL “+” or “-” buttons
•
Press ENTER/MODE button to enter the program
•
Set the Time using the SPEED “+” or “-” buttons (15:00 to 99:00 minutes)
•
Press ENTER/MODE button to enter the program time
•
Press the START/RESET button to begin
•
TO END WORKOUT:
Slow the treadmill to 2 MPH or below using the Speed “-” button, or the Speed One Touch “2”
•
button
Press the STOP button
•
TO PAUSE WORKOUT:
Slow the treadmill to 2 MPH or below using the Speed “-” button, or the Speed One Touch “2”
•
button
Press the STOP button to Pause
•
14
Page 15

Manual Operating Instructions
BASICS
Straddle belt
Insert Safety Key and attach to clothing
QUICK START IN MANUAL MODE
ONLY:
Press the START/RESET button
•
Adjust Speed using the Speed “+” or ”-” but-
•
tons, or use the Speed One Touch buttons
labeled 2—10
Adjust Incline using the Incline “+” or ”-” but-
•
tons, or use the Incline One Touch buttons
labeled 2—10
BASIC START-UP
Plug treadmill into a grounded 110 VAC out-
•
let. Be sure the power cord does not interfere
with the incline mechanism rollers below the
motor housing.
Step onto the treadmill.
•
Straddle the treadmill belt.
•
Insert the Safety Key into the center of the
•
console behind the handlebar.
Warning: When the Safety Key is inserted,
the treadmill will return to 0% incline. Please
keep the area under the treadmill free of obstructions.
Connect the other end (clothing clip) of the
•
Safety Key to your clothing about waist high.
Do not operate treadmill without the Safety
Key attached to your clothing.
The Information window will read the following:
ADJUST WEIGHT + PRESS MODE
PRESS START
The DOT MATRIX window will read out the last
entered weight. Use the Speed “+ -” buttons to
change to the desired weight and press ENTER/
MODE.
MANUAL MODE
The Information window will now read:
MANUAL
EDIT - MODE
NEXT UP/DOWN
PRESS START
Press the START/RESET button to start the
treadmill belt moving.
Hold the handlebar and carefully step onto
•
the treadmill belt and begin walking. Warning: It is not recommended to exceed 2.0
mph when getting started on your workout.
Speed and Incline grade may be adjusted
•
anytime by using the Speed “+ -” buttons or
One Touch “2 through 10” buttons for Speed,
and the “Up and Down” buttons or the One
Touch “2 through 10” buttons for Incline.
To stop or pause your workout: Slow the
•
treadmill belt to 2 MPH or below by using the
Speed “-” button, then Press STOP. This will
stop the treadmill belt and retain all workout
information.
To reset distance, time, and calories: Dur-
•
ing use: Press and hold START/RESET approximately 5 seconds or until zeros appear
in the distance, calories, and information window for time. To reset when not in use, press
and hold the STOP button for 5 seconds.
Countdown Feature for time and distance:
•
After enter weight with ENTER/MODE button, the message will read:
ADJUST TIME + NEXT ENTER
ADJ DISTANCE
NEXT ENTER
PRESS START
The Dot Matrix window show time. Adjust time
using the “+ -” Speed buttons, then press ENTER. The Dot Matrix window will now show distance. Adjust distance using the “+ -” Speed buttons. Press start to begin countdown.
Note: Once the elapsed time or distance has
been reached (countdown to zero), the function
will begin counting up.
15
Page 16

Pre-set Program Operating Instructions
BASIC START-UP
Plug treadmill into a grounded 110 VAC out-
•
let. Be sure the power cord does not interfere
with the incline mechanism rollers below the
motor housing.
Step onto the treadmill and Straddle the
•
treadmill belt.
Insert the Safety Key into the center of the
•
console behind the handlebar.
Warning: When the Safety Key is inserted,
the treadmill will return to 0% incline. Please
keep the area under the treadmill free of obstructions.
Connect the other end (clothing clip) of the
•
Safety Key to your clothing about waist high.
Do not operate treadmill without the Safety
Key attached to your clothing.
The Information window will read the following:
ADJUST WEIGHT + PRESS MODE
PRESS START
The DOT MATRIX window will read out the last
entered weight. Use the Speed “+ -” buttons to
change weight and press ENTER/MODE.
PROGRAM MODE
Please review and become familiar with the Preset Program Profiles and the Program Level
Default Values on the following two pages be-
fore beginning Program Mode.
The Information window now reads
NEXT UP/
DOWN. To select a program, use the UP or
DOWN incline buttons to select a program, or
use the
PROGRAM
button to scroll through the
following programs:
MANUAL
HILL INTERVAL
WEIGHT LOSS
CV WORKOUT
SPEED INTERVAL
You do not have to enter the program, just scroll
until you see the desired program in the Information window. After selecting program, the Information window will now read:
ADJUST LEVEL + NEXT UP/DOWN
PRESS START
Select the Level (shown in the Calorie window)
of the program by using the Program Level “+ -”
buttons. Press ENTER to select the level. After
program and level have been selected, set the
program time duration by pressing the SPEED
“+ -” buttons to program from 15:00 to 99:00
minutes.
Press the START/RESET button to start the
treadmill belt moving.
Hold the handlebar and carefully step onto
•
the treadmill belt and begin walking. Warning: It is not recommended to exceed 2.0
mph when getting started on your workout.
Speed and Incline grade may be adjusted
•
anytime by using the Speed “+ -” buttons or
One Touch “2 through 10” buttons for Speed,
and the “Up and Down” buttons or the One
Touch “2 through 10” buttons for Incline.
To stop or pause your workout:
•
Slow the
treadmill belt to 2 MPH or below by using the
Speed “-” button, then Press STOP. This will
stop the treadmill belt and retain all workout
information.
To reset distance, time, and calories:
•
During use: Press and hold START/RESET approximately 5 seconds or until zeros appear
in the distance, calories, and information window for time. To reset when not in use, press
and hold the STOP button for 5 seconds.
To change Level during workout:
Use the
Program Level “+ -” buttons to select new Level,
and Press ENTER.
Note:
Once the elapsed time has been reached
zero, the time will begin counting up. All programs can be set from 15:00 to 99:00 minutes.
Default value if no time is entered is 30:00 minutes.
Note:
You may change a program while the
treadmill is in use by scrolling the PROGRAM
button and pressing ENTER. Workout will resume workout from the original time entered.
16
Page 17

Pre-set Program Profiles and Descriptions
HILL INTERVAL PROGRAM
The Hill Interval Program is designed to have a constant speed throughout the entire program while incrementally
increasing the incline grade through half of the program, then decreasing the incline grade through the second half
of the program. The Shaded Area is the Speed, and the Solid Line is the Incline Grade.
WEIGHT LOSS PROGRAM
The Weight Loss Program is designed to have a constant speed throughout the entire program while alternating the incline grade throughout the program. The Shaded Area is the Speed, and the Solid Line is the Incline Grade.
CARDIOVASCULAR WORKOUT PROGRAM
The Cardiovascular Workout Program is designed to gradually increase incline grade and speed to a plateau, then to
gradually decrease the incline grade and speed. The Shaded Area is the Speed, and the Solid Line is the Incline Grade.
SPEED INTERVAL PROGRAM
The Speed Interval Program is designed to have a constant incline grade throughout the entire program while alternating
the speed throughout the program. PLEASE NOTE: The Shaded Area is now the Grade, and the Solid Line is the
Speed on this program profile pictured above.
17
Page 18

Pre-set Program Levels: Default Values
HILL INTERVAL PROGRAM
SPEED
MPH
LEVEL MAX MAX
1 2.4 4.0
2 2.8 5.0
3 3.2 6.0
4 3.6 7.0
5 4.2 8.0
6 4.6 9.0
7 5.0 10.0
8 5.4 11.0
9 6.0 12.0
INCLINE
CARDIOVASCULAR WORKOUT PROGRAM
WEIGHT LOSS PROGRAM
SPEED
MPH
LEVEL MAX MAX
1 2.6 2.0
2 2.8 3.0
3 3.0 4.0
4 3.2 5.0
5 3.4 6.0
6 3.6 7.0
7 3.8 8.0
8 4.0 9.0
9 4.2 10.0
INCLINE
SPEED INTERVAL PROGRAM
SPEED
MPH
LEVEL MAX MAX
1 2.4 4.0
2 2.8 5.0
3 3.2 6.0
4 3.6 7.0
5 4.2 8.0
6 4.6 9.0
7 5.0 10.0
8 5.4 11.0
9 6.0 12.0
INCLINE
SPEED
MPH
LEVEL MAX MAX
1 2.4 4.0
2 2.8 5.0
3 3.2 6.0
4 3.6 7.0
5 4.2 8.0
6 4.6 9.0
7 5.0 10.0
8 5.4 11.0
9 6.0 12.0
INCLINE
18
Page 19

User Program Operating Instructions
USER PROGRAM MODE
The User Program allows up to 50 changes to be made to speed and/or incline. The treadmill is
equipped with 3 User programs. One speed and grade change can be made for every :30 second
time block i.e.: (0—:30, :30—1:00, 1:00—1:30, etc.). If you wish your program to end a zero speed,
your last :30 second entry should be zero speed when you stop the treadmill.
Note: To insure that you start the program at a desired speed and incline level, there is a 3-
•
second delay after pressing the START button. Within the 3-seconds, press the desired starting
speed and starting incline using the One Touch Buttons prior to the belt moving. If this is not
done prior to belt movement, the starting speed and incline will default to speed .6 MPH, and 0%
grade incline.
Complete a manually-controlled workout.
•
Press STOP.
•
Press and Hold the ENTER/MODE until SAVE USER1 appears.
•
Press the UP Incline button until USER 1, 2, OR 3 message appears. When you have selected
•
which user file you want to save to, press and hold the ENTER/MODE button SAVE USER 1, 2
OR 3 appears.
Your user program is now saved.
•
IMPORTANT NOTE:
•
You must REMOVE THE SAFETY KEY for the information to be entered
into the computer, otherwise the user program will not be saved!
19
Page 20

Heart Rate Interactive Programming Introduction and
Overview (HR models only)
INTRODUCTION
The Smooth Heart Rate Interactive system is designed to maximize your workout by monitoring
and adjusting the treadmill incline grade to maintain your target heart rate. Once you enter your
individual parameters for target heart rate, time,
distance, or maximum incline, the treadmill’s
computer takes over and automatically changes
the incline grade to keep you near your target
heart rate.
Warning: Consult your physician to determine your target heart rate.
RECOMMENDATIONS
Before selecting a Heart Rate Interactive program or workout, it is important to use the treadmill several times in Manual mode while monitoring your heart rate. A Heart Rate Chest Strap
Transmitter is included with all HR models.
It is suggested for the Chest Strap
Transmitter
transmitter as close to your heart as possible,
against the skin, 1-2 inches below the pectoral
muscles. For best results, moisten the back of
the transmitter with saline solution for a better
contact. The PULSE diode on the console will
blink when the unit is receiving from the Chest
Strap Transmitter.
Smooth Heart Rate Programs Overview
There are a total of 14 different Heart Rate Programs, divided into 3 groups, available on the
Smooth HR treadmills. The following is a brief
description of each the 3 groups.
Group 1—Time Based Target Heart Rate
Training
(HR Workouts 1 through 5)
These 5 programs are time based. You may
preset your target heart rate, maximum incline,
and time of workout. The distance traveled will
vary depending on speed.
Group 2—Distance Based Target Heart Rate
Training
(2 Mile, 4 Mile, 5K, and 10K)
These 4 programs are distance based. You may
that you position the rectangular
your target heart rate, and maximum incline.
The duration of the workout will depend upon
your speed.
Group 3—Interval Time Based Target Heart
Rate Training
(Interval HR Programs 1 through 5)
Interval heart rate training takes your workout to
a new level. This type of training allows you to
program periods of rest between periods of
work. For each workout, you enter target heart
rate, maximum incline, duration of workout, and
duration of work and rest intervals. These time
based workouts will vary the distance traveled
depending upon your speed.
Heart Rate Monitoring Available in all other
programs (not interactive)
In addition to the Heart Rate Interactive programs in Groups 1 through 3, all other programs
allow heart rate monitoring. Whether you
choose Manual, Hill or Speed Intervals, Cardiovascular Workout, or User Programs, the Chest
Strap Transmitter will send a signal to allow
heart rate monitoring.
How the Heart Rate Interactive System
Works: Incline Grade Changes
To increase your heart rate toward your target,
the treadmill will gradually increase incline to the
maximum you set, in .5% increments.
To decrease your heart rate toward your target,
the treadmill will gradually decrease incline to
0%, in .5% increments.
Note: The Heart Rate Interactive programs
store your parameters once you have completed
a HR program. You do not need to re-enter data.
To quick start a previously completed program,
insert the Safety Key, select the program, and
press START.
20
Page 21

Smooth Heart Rate Interactive Programming: How it Works
(HR models only)
The Smooth Heart Rate Interactive System is safe and simple and easy to understand. The user
first sets the maximum for grade. This allows the user to customize and create a variety of workouts
in a safe way. Once the data is entered, along with workout time and target heart rate, the user is
ready to start their Heart Rate Interactive workout.
The Heart Rate Interactive System is divided into 3 stages: Warm Up, Heart Rate Interactive,
and Cool Down. In the Warm Up stage, the treadmill is basically in manual mode while the user adjusts speed and incline. The user can take as much time during the Warm Up stage to approach
their Target Heart Rate. The Warm Up stage ends when the user’s pulse or heart rate is within 10
beats of the pre-set target heart rate.
Upon reaching within 10 beats of the pre-set target heart rate, the user now enters the Heart
Rate Interactive stage. The treadmill’s computer takes over from here, adjusting incline to maintain
your heart rate near the target heart rate. To increase your heart rate toward your target, the treadmill will gradually increase incline to the maximum you set, in .5% increments. To decrease your
heart rate toward your target, the treadmill will gradually decrease incline to 0%, in .5% increments.
21
Page 22

Target Heart Rate Programs Operating Instructions
Group 1 and Group 2
(HR models only)
Operating Instructions
Attach the Heart Rate Chest Strap Transmit-
•
ter following the directions on page 20.
Plug treadmill into a grounded 110 VAC out-
•
let. Be sure the power cord does not interfere
with the incline mechanism rollers below the
motor housing.
Step onto the treadmill and Straddle the
•
treadmill belt.
Insert the Safety Key into the center of the
•
console behind the handlebar.
Warning: When the Safety Key is inserted,
the treadmill will return to 0% incline. Please
keep the area under the treadmill free of obstructions.
Connect the other end (clothing clip) of the
•
Safety Key to your clothing about waist high.
Do not operate treadmill without the Safety
Key attached to your clothing.
The Information window will read the following:
ADJUST WEIGHT + PRESS MODE
PRESS START
The DOT MATRIX window will read out the last
entered weight. Use the Speed “+ -” buttons to
change weight and press ENTER/MODE.
The Smooth Treadmill Heart Rate Interactive
function works three stages:
1) Warm Up Stage
2) Target Heart Rate Interactive Stage
3) Cool Down Stage
TO USE TARGET HEART RATE PROGRAMS
Press the HEART RATE MODE button to scroll
to the desired program. The following Group 1
and Group 2 programs can be chosen:
Group 1 - Time Programs
Target Heart Rate Workouts 1 through 5
Group 2 - Distance Programs
2 MILE, 4 MILE, 5K, 10K
The Information window will read:
EDIT/ENTER or MODE
NEXT UP/DOWN
PRESS START (only when your ready to begin)
Note: Check the Heart Rate Target in the Calo-
ries/Pulse window before beginning a Heart
Rate Interactive program.
Press ENTER (MODE) button and the message
will read in the Information window:
ADJUST TARGET + NEXT MODE
PRESS START
Using the Heart Rate Target “+ -” buttons, edit
your Target Heart Rate, then Press ENTER.
The Information window will read:
ADJTIME + NEXT MODE
PRESS START
Using the Speed “+ -” buttons, adjust time, then
Press ENTER.
Note:
Time is not entered for Group 2 Distance
programs 2 Mile, 4 Mile, 5K, 10K.
The Information window will read:
ADJMXGRADE + NEXT MODE
PRESS START
Using the Speed “+ -” buttons, adjust incline
grade. You are now ready to begin your workout.
Press START to begin workout.
Note: If you accidentally pressed ENTER again,
the Pulse Window will flash. Press START to begin workout.
WARM UP STAGE
The treadmill will operate like it would in MANUAL mode. By controlling speed and incline
grade yourself, you allow warm up at your own
pace. The incline grade may not exceed your
pre-set maximum incline grade set during heart
rate programming. Gradually increase the
speed or incline grade or both to get within 10
beats of your heart rate target.
(Continued on page 23)
22
Page 23

Target Heart Rate Programs Operating Instructions
Group 1 and Group 2 (Continued)
(HR models only)
You may use the One Touch Speed and/or Incline buttons to perform the gradual increase.
Note: Warming up too fast may cause you to
overshoot your target. If this occurs, it may take
several minutes for the computer to start interactivity.
When your heart rate is within 15 beats from the
target, the information window will read:
APPROACHING TARGET XXX
Note: If you believe you selected a target too
high or too low during warm up stage, press the
HEART RATE MODE button and change your
target.
HEART RATE INTERACTIVE STAGE
When your heart rate is 10 beats away from target, the information window will read
BEGINNING
TARGET HR
HANDS FREE
The computer takes over the treadmill at this
point for incline grade. The time window will reset and begin descending from the time you programmed earlier. The treadmill will gradually increase incline grade until you reach your selected target heart rate. When your heart rate is
plus or minus 2 beats from your target, the information window will read:
AT TARGET
Note: Do not touch incline grade button before
pressing HEART RATE MODE or ENTER first,
otherwise the computer will automatically exit
you from heart rate interactive mode to cool
down stage.
The computer will gradually increase or decrease incline grade to maintain your heart rate
target. If your incline grade reaches your pre-set
maximums, MAXGRADE will be displayed.
Note: If you need to change your selected target
during heart rate interactive stage, press the
HEART RATE MODE button and change your
target with the HEART RATE TARGET buttons.
COOL DOWN STAGE
When the time is elapsed and the Heart Rate Interactive stage has completed, the information
window will read:
COOL DOWN
DIST XXX
CALS XXXX
TIME XX:XX
COOL DOWN
COOL DOWN will remain in the information window to remind you that you are in the cool down
mode.
The treadmill will now operate in the manual
mode. The time will reset to zero and begin
counting up. You will be in control of any speed
and incline changes. Spend at least 2 minutes
or more, or an equal time to warm up.
Press STOP to finish.
Note: Workout totals of average heart rate, distance, and calories will be displayed at the end
of your workout. Each time you press STOP, the
information will above will display again.
23
Page 24

Interval Target Heart Rate Programming
(HR models only)
TO USE INTERVAL TARGET HEART RATE
PROGRAMMING
Interval Workouts offer variety and help you attain higher levels of conditioning in a shorter period of time. It is recommended that you do not
do an interval workout until you have used your
treadmill on a regular basis and have a working
knowledge of your target heart rate and condition level.
Operating Instructions
Attach the Heart Rate Chest Strap Transmit-
•
ter following the directions above
Plug treadmill into a grounded 110 VAC out-
•
let. Be sure the power cord does not interfere
with the incline mechanism rollers below the
motor housing.
Step onto the treadmill and Straddle the
•
treadmill belt.
Insert the Safety Key into the center of the
•
console behind the handlebar.
Warning: When the Safety Key is inserted,
the treadmill will return to 0% incline. Please
keep the area under the treadmill free of obstructions.
Connect the other end (clothing clip) of the
•
Safety Key to your clothing about waist high.
Do not operate treadmill without the Safety
Key attached to your clothing.
The Information window will read the following:
ADJUST WEIGHT + PRESS MODE
PRESS START
The DOT MATRIX window will read out the last
entered weight. Use the Speed “+ -” buttons to
change weight and press ENTER/MODE.
TO USE TARGET HEART RATE PROGRAMS
Press the HEART RATE MODE button to scroll
to the desired Interval program 1 through 5.
The Information window will read:
EDIT/ENTER or MODE
NEXT UP/DOWN
PRESS START
(only when your ready to begin)
Note:
Check the Heart Rate Target in the Calories/Pulse window before beginning a Heart
Rate Interactive program.
Press ENTER (MODE) button and the message
will read in the Information window:
ADJUST TARGET + NEXT MODE
PRESS START
Using the Heart Rate Target “+ -” buttons, edit
your Target Heart Rate, then Press ENTER.
The Information window will read:
ADJTIME + NEXT MODE
PRESS START
Using the Speed “+ -” buttons, adjust time, then
Press ENTER.
The Information window will read:
ADJWORK + NEXT MODE
PRESS START
Using the Speed “+ -” buttons, adjust your desired work interval time. You may adjust work interval from :30 seconds to 3 minutes in :05 second segments, then Press ENTER.
The Information window will read:
ADJREST + NEXT MODE
PRESS START
Using the Speed “+ -” buttons, adjust your desired rest interval time. You may adjust rest interval from :30 seconds to 3 minutes in :05 second segments, then Press ENTER.
The Information window will read:
ADJMXGRADE + NEXT MODE
PRESS START
Using the Speed “+ -” buttons, adjust incline
(Continued on page 25)
24
Page 25

Interval Target Heart Rate Programming continued
(HR models only)
grade. You are now ready to begin your workout.
Press START to begin workout.
Note: If you accidentally pressed ENTER again,
the Pulse Window will flash. Press START to begin workout.
The Information window will read:
STARTING3
STARTING2
STARTING1
ADJSPEED + ADJGRADE + WARM UP
TARGET XXX
WARM UP STAGE
The treadmill will operate like it would in MANUAL mode. By controlling speed and grade
yourself, you allow warm up at your own pace.
The Grade may not exceed your pre-set maximum grade set during heart rate programming.
Gradually increase the speed or incline grade or
both to get within 10 beats of your heart rate target.
You may use the One Touch Speed and/or Incline buttons to perform the gradual increase.
Note: Warming up too fast may cause you to
overshoot your target. If this occurs, it may take
several minutes for the computer to start interactivity.
When your heart rate is within 15 beats from the
target, the information window will read:
APPROACHING TARGET XXX
Note: If you believe you selected a target too
high or too low during warm up stage, press the
HEART RATE MODE button and change your
target.
INTERVALHEART RATE INTERACTIVE
STAGE
When your heart rate is 10 beats away from tar-
get, the information window will read
BEGINNING
INTERVAL HR
HANDS FREE
The computer takes over the treadmill at this
point for grade. The time window will reset and
begin descending from the time you programmed earlier. The treadmill will gradually increase incline grade until you reach your selected target heart rate.
Note: Do not touch incline grade button before
pressing HEART RATE MODE or ENTER first,
otherwise the computer will automatically exit
you from heart rate interactive mode to cool
down stage.
The computer will gradually increase or decrease incline grade to maintain your heart rate
target. If your incline grade reaches your pre-set
maximums, MAXGRADE will be displayed.
Note: If you need to change your selected target
during heart rate interactive stage, press the
HEART RATE MODE button and change your
target with the HEART RATE TARGET buttons.
When your heart rate is plus or minus 2 beats
from your target, the information window will
read:
AT TARGET
The Information window will now read WORKINT XX:XX. Time will decrease from the work in-
terval time you entered. When you reach zero,
the information window will read RESTINT XX:
XX. The time will decrease from the rest interval
time you entered.
As your heart rate increases or decreases from
your target, the treadmill will automatically make
the adjustments in incline grade to keep your
heart rate near your target only in the work interval.
When you return to the work interval, your incline grade will return to a calculated average of
the grades which were used in previous work in-
(Continued on page 26)
25
Page 26

Interval Target Heart Rate Programming continued
(HR models only)
tervals. Your grade may increase or decrease
while you are in work interval. This averaging
allows you to return to a work level which will
bring you back near your heart rate target.
To end your workout, press STOP.
COOL DOWN STAGE
When the time is elapsed and the Heart Rate Interactive stage has completed, the information
window will read:
COOL DOWN
DIST XXX
CALS XXXX
TIME XX:XX
COOL DOWN
COOL DOWN will remain in the information window to remind you that you are in the cool down
mode.
The treadmill will now operate in the manual
mode. The time will reset to zero and begin
counting up. You will be in control of any speed
and incline changes. Spend at least 2 minutes
or more, or an equal time to warm up.
Press STOP to finish.
Note: Workout totals of average heart rate, distance, and calories will be displayed at the end
of your workout. Each time you press STOP, the
information will above will display again.
26
Page 27

WARNING!
DO NOT USE THE HEART RATE INTERACTIVE PROGRAM PRIOR TO AUTHORIZATION
FROM YOUR PHYSICIAN.
Consult your physician for advise before starting any exercise program.
•
The chart shown above is only given as a reference for an average person in good health that
•
exercises regularly.
Please consult with your physician to determine your target heart rate. In addition, let your
•
physician know of any medications you are taking that could effect your exercise stamina and
that could effect your heart rate.
27
Page 28

Belt Adjustment and Tension
WARNING! Do not overtighten rollers! This will cause premature roller
bearing failure!
Belt adjustment and tension performs two functions: adjustment for tension
and centering. Your new treadmill comes pre-adjusted from the factory for
tension and centering. Please follow the procedures below if the belt shifts
to the left or right or while walking:
WALKING BELT IS SHIFTING TO THE LEFT (Diagram 1)
First, turn treadmill on to run at 1 mph. Using the hex key provided, turn
the left rear roller adjustment bolt ¼ turn in the clockwise direction. Next,
run the treadmill at 2.5 mph. You should see the belt start to correct itself,
moving back towards the center. Repeat the above procedure until the
walking belt is centered. It may be necessary to set walking belt tension
once you have completed this procedure if the belt feels like it is slipping
while walking. Refer below to the “Walking Belt Slipping” instructions.
WALKING BELT IS SHIFTING TO THE RIGHT (Diagram 2)
First, turn the treadmill on to run at 1 mph. Using the hex key provided, turn
the right rear roller adjustment bolt ¼ turn in the clockwise direction. Next,
run the treadmill at 2.5 mph. You should see the belt start to correct itself,
moving back towards the center. Repeat the above procedure until the
walking belt is centered. It may be necessary to set walking belt tension
once you have completed this procedure if the belt feels like it is slipping
while walking. Refer below to the “Walking Belt Slipping” instructions.
WALKING BELT IS SLIPPING DURING USE (Diagram 3)
First, unplug the power cord from the surge protector. Using the hex key
provided, turn both left and right rear roller adjustment bolts the same
distance, usually a ¼ turn in the clockwise direction. Plug the power cord
back into the surge protector and run the treadmill at 2.5 mph. You should
now walk on the belt to determine if the belt is still slipping. Repeat the
above procedure until the walking belt is not slipping. The tension should
be just tight enough not to slip.
Turning the hex key counter clockwise brings the rear rollers and belt
♦
towards you. Turning the hex key clockwise pushes the rear roller and
belt away form you.
28
Page 29

Maintenance Instructions
WARNING!
protector.
CLEANING
Routine cleaning of your Smooth treadmill will extend the life of your treadmill. WARNING! To prevent electrical
shock, be sure the power to the treadmill is OFF and the unit unplugged from the wall electrical outlet before
attempting any cleaning or maintenance.
AFTER EACH WORKOUT: Wipe off the console and other treadmill surfaces with a clean, water dampened soft
cloth to remove excess perspiration. USE NO CHEMICALS.
WEEKLY: Use of a treadmill mat is recommended for ease of cleaning. Dirt from your shoes contacts the belt and
eventually makes it to underneath the treadmill. Vacuum underneath treadmill once a week.
DECK LUBRICATION
The walking belt has been pre-lubricated at the factory. However, it is recommended that the walking board be
checked periodically for lubrication to ensure optimal treadmill performance.
Every 30 days or 30 hours of operation, lift the sides of the walking belt and feel the top surface of the walking board
as far under as you can reach. If you feel signs of silicone, no further lubrication is required. If it feels dry to the touch,
follow the instructions below.
Smooth recommends “Lube N Walk” for cleaning and lubricating the treadmill belt and deck. You may also use
silicone such as “Napa 8300” (available at most stores).
TO APPLY LUBRICANT TO THE WALKING BOARD
1) Position the walking belt so that the seam is located on top and in the center of the center of the walking board.
2) Insert the spray nozzle into the spray head of the lubricant can.
3) While lifting the side of the walking belt, position the spray nozzle between the walking belt and the board
approximately 6” from the front of the treadmill. Apply the silicone spray to the walking board, moving from the front of
the treadmill to the rear. Repeat this on the other side of the belt. Spray approximately 4 seconds on each side.
4) Allow the silicone to ‘set’ for one minute before using the treadmill.
WARNING: Do not overlubricate the walking board. Excess lubricant should be wiped off with a clean towel
Before performing any maintenance to your treadmill, always unplug the power cord from the surge
.
29
Page 30

Troubleshooting Guide
Treadmill will not start.
1) Make sure the power cord is plugged into a surge protector, the surge protector is plugged into a
properly grounded outlet, and the surge protector is turned on. (Refer to “Power Requirements”)
2) Check the circuit breaker located on the front of the treadmill. If the switch protrudes, it has tripped.
Wait five minutes and then press the switch back in.
3) Check the house electrical breaker box and the circuit breaker for the room the treadmill is located in.
If it has tripped, reset or have an electrician replace the breaker in home.
4) Have an electrician check for inadequate voltage at the outlet.
Treadmill looses power during use.
1) Check the circuit breaker located on the front of the treadmill. If the switch protrudes, it has tripped.
Wait five minutes and then press the switch back in.
2) Check the house electrical breaker box and the circuit breaker for the room the treadmill is located in.
If it has tripped, reset or have an electrician replace the breaker in home.
If treadmill still will not operate, please call Technical Service at (888) 340-0482.
Treadmill walking belt slows during use.
1) Check to make sure the treadmill is securely plugged into an UL-listed surge protector, rated at 15
amps, with a 14-guage cord of five feet or less and the surge protector is securely plugged into the
outlet.
If treadmill still will not operate, please call Technical Service at (888) 340-0482.
Treadmill walking belt slips or is not centered on rear roller.
1) Refer to “Belt Adjustment and Tension” section.
2) Need help? Call Technical Service at (888) 340-0482.
Treadmill Error Messages.
Your treadmill is equipped with a software package that enables error messages to be displayed when
there is a problem. To avoid possible damage to the treadmill and the possibility of injury, do not
operate the treadmill until the problem is corrected.
30
Page 31

SMOOTH Treadmills – LIMITED WARRANTY
CONSULT YOUR PHYSICIAN BEFORE USING THIS PRODUCT.
DENTIAL warranty period to the original purchaser is (lifetime) on the frame, (10) years on the motor, (3) years on parts, and (1) year labor. This warranty does not cover wear and
tear, only manufacturer defects for the periods specified. LIGHT INSTITUTIONAL WARRANTY is limited to specific settings (see below) and includes an original purchaser warranty
of (3) years on the Frame, Motor, Parts, and (1) year labor.
Smooth warrants that the Product you have purchased for non-commercial, personal, family, or household use from Smooth or from an authorized Smooth reseller is
free from defects in materials or workmanship under normal use during the warranty period. Your sales receipt, showing the date of purchase of the Product, is your proof of the
date of purchase. This warranty only extends to you, the original purchaser. It is not transferable to anyone who subsequently purchases the Product from you. It excludes
expendable parts. This Limited Warranty becomes VALID ONLY if the treadmill is purchased from a Smooth Fitness authorized dealer unless otherwise authorized by Smooth
Fitness in writing (if anyone other than a Smooth Fitness authorized dealer sells a Smooth Fitness treadmill, the warranty will be void unless accompanied by written authorization by
Smooth Fitness).
During the warranty period Smooth will at no additional charge, repair or replace (at Smooth’ option) the part or product if it becomes defective, malfunctions, or
otherwise fails to conform with this Limited Warranty under normal non-commercial, personal, family or household use. In repairing the Product, Smooth may replace defective
parts, or at the option of Smooth, serviceable used parts that are equivalent to new parts in performance. All exchanged parts and Products replaced under this warranty will
become the property of Smooth. Smooth reserves the right to change manufacturers of any part to cover any existing warranty.
To obtain warranty service, you must contact a Smooth authorized service technician or Smooth Fitness at our phone numbers located in this manual. Any parts
determined to be defective must be returned to Smooth to obtain warranty service. You must prepay any shipping charges, export taxes, custom duties and taxes, or any other
charges associated with transportation of the parts or Product. In addition, you are responsible for insuring any parts or Product shipped or returned. You assume the risk of loss
during shipment. You must present Smooth with proof-of-purchase documents (including the date of purchase). Any evidence of alteration, erasing or forgery of proof-of-purchase
documents will be cause to void this Limited Warranty.
This warranty does not extend to any product not purchased from Smooth or from an authorized Smooth reseller. This Limited Warranty does not extend to any Product
that has been damaged or rendered defective; (a) as a result of accident, misuse, or abuse; (b) by the use of parts not manufactured or sold by Smooth; (c) by modification of the
Product or normal wear and tear; (d) operation on incorrect power supplies; or (e) as a result of service by anyone other than Smooth, or an authorized Smooth warranty service
provider. Product on which the serial number has been defaced or removed is not eligible for warranty service. Should any Product be submitted for warranty service be found
ineligible therefore, an estimate of repair cost will furnished and the repair will be made if requested by you upon Smooth’s receipt of payment or acceptable arrangements for
payment.
plexes), police departments, fire departments, corporate wellness centers and the like. Any setting or application where usage would be more than six (6) hours per day will void the
warranty. Health clubs, fitness centers, spas, and the like that have a membership fee are excluded as light-institutional settings, whereas the Product will carry no warranty in these
settings. Written authorization from Smooth Fitness must be obtained regarding any other light-institutional uses.
EXCEPT AS EXPRESSLY SET FORTH IN THIS WARRANTY, SMOOTH MAKES NO OTHER WARRANTIES, EXPRESSED OR IMPLIED, INCLUDING ANY IMPLIED
WARRANTIES OF MERCHANTABILITY AND FITNESS FOR A PARTICULAR PURPOSE. SMOOTH EXPRESSLY DISCLAIMS ALL W ARRANTIES NOT STATED IN THIS
LIMITED WARRANTY. ANY IMPLIED WARRANTIES THAT MAY BE IMPOSED BY LAW ARE LIMITED TO THE TERMS OF THIS LIMITED WARRANTY. NEITHER SMOOTH
NOR ANY OF ITS AFFILIATES SHALL BE RESPONSIBLE FOR INCIDENTAL OR CONSEQUENTIAL DAMAGES. SOME STATES DO NOT ALLOW LIMITATIONS ON HOW
LONG AN IMPLIED WARRANTY LASTS OR THE EXCLUSION OR LIMITATION OF INCIDENTAL OR CONSEQUENTIAL DAMAGES, SO THE ABOVE LIMITATIONS OR
EXCLUSION MAY NOT APPLY TO YOU. This Limited Warranty gives you specific legal rights and you may also have other rights that may vary from state to state. This is the only
express warranty applicable to Smooth-branded products. Smooth neither assumes nor authorizes anyone to assume for it any other express warranty.
PLEASE MAIL WARRANTY CARD TO: SMOOTH FITNESS, PO BOX 551239, DALLAS, TX 75355
SMOOTH TREADMILL WARRANTY REGISTRATION
This Limited Warranty applies in the United States to products manufactured or distributed by Smooth Fitness (“Smooth”) under the SMOOTH brand name. The RESI-
LIGHT INSTITUTIONAL SETTINGS
as defined here include hotel, motel, hospital or rehabilitation centers, multi-family dwellings (condominium or apartment com-
.
TELEPHONE
FIRST
CITY
DATE OF PURCHASE
Name of store or company where
purchased:
How do you plan to use the treadmill?
Walk____ Run_____ Both_____
Who will use the treadmill?
Male____ Female_____ Both_____
How many family members? _____
AGE: 15-24____ 25-34____
35-44____ 45-54____
55-64____ 65 +_____
M.I.
LAST
STATE
MODEL NO.
SM9.3
Where did you learn about treadmills?
TV____ Radio____ Friend____
In Store Display____ Salesperson___
Print ad/flyer____ Internet______
Why did you purchase a treadmill?
Dr.’s Orders____ Loose Weight____
In-home convenience____
Improve Cardiovascular Fitness___
Safety from outdoors____
Other __________________________
31
APT. NO. ADDRESS
ZIP
SERIAL NO.
How important are each feature:
Least Most
Unique Features
Horsepower
Warranty
Price
Look/Design
Folding Feature
Smooth Fitness respects the rights of your privacy. Our
company will not sell or distribute to others the information
above. This information is used to track our product
quality and to contact you in the event of a product safety
concern. It may be used to offer you future product
offerings only from Smooth. Please check here if wish not
to receive any additional information.
Other Comments:
_______________
_______________
_______________
_______________
 Loading...