

Page 1
SMA DC-Disconnect
Accessories for PV Inverters
Version: 1.1 Mat.-Nr. DB-DC-DISCON
Please check the Installation Guide delivered with your Sunny Boy. If the Installation Guide version
is earlier than 2.1 (for example 1.2 or 1.3), then please read this information carefully and follow
the instructions below. If your Sunny Boy Installation Guide has the version 2.1 you may disregard
this additional information.
The SMA DC-Disconnect is a DC circuit breaker disconnecting the PV generator from the inverter.
The SMA DC-Disconnect is NOT an AC circuit breaker.
This Additional Information describes the wiring of the DC-Disconnect. This instruction does NOT replace the Sunny Boy Installation Guide. Pay attention to all operation and safety instructions listed
in the Installation Guide of the Sunny Boy. The Installation Guide describes how to connect the DCDisconnect and provides information on the torque of the cable connection.
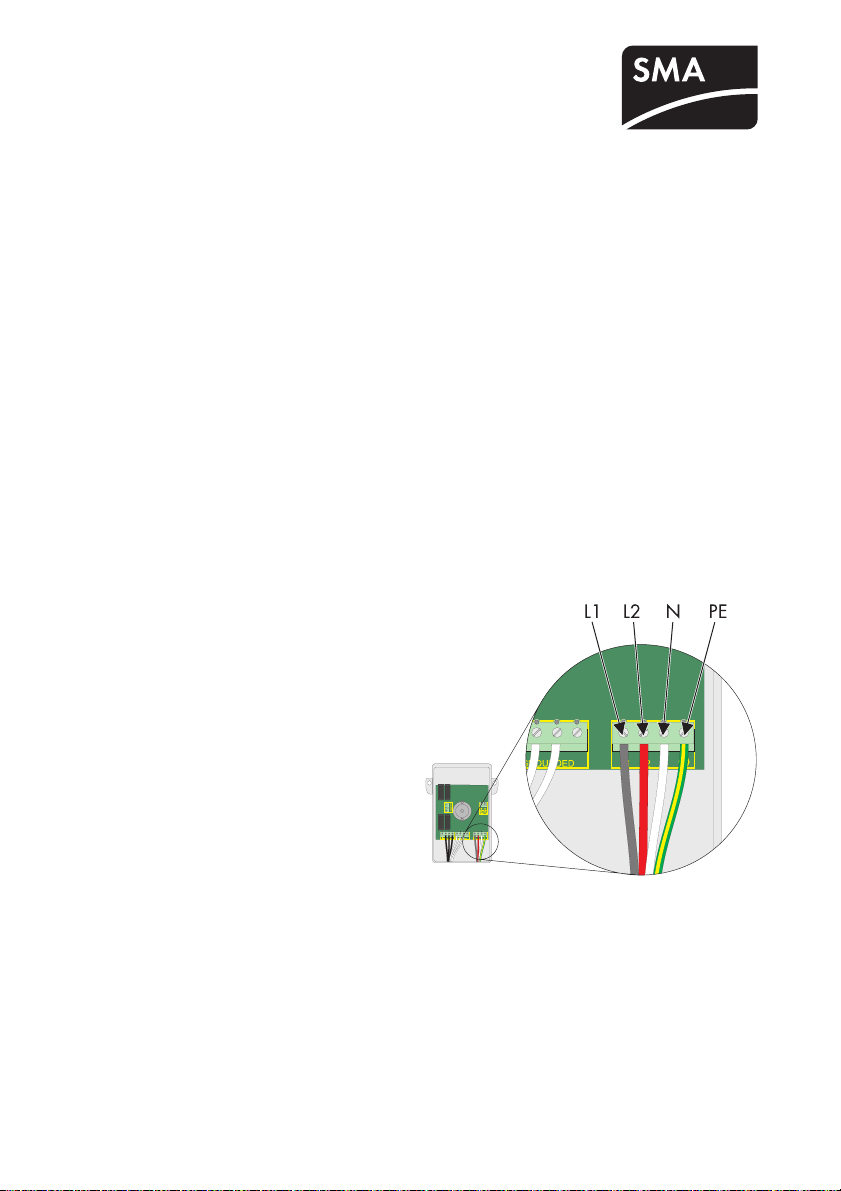
AC Wiring with SMA DC-Disconnect
The Sunny Boy 3000US and 4000US are suitable for the connection to a 208 V and 240 V grid.
The Sunny Boy 5000US, 6000US and 7000US are suitable for the connection to a 208 V, 240
V and 277 V grid.
Pay attention to all operation and safety instructions listed in the Installation Guide of the Sunny Boy.
This instruction does NOT replace the Sunny Boy Installation Guide.
L1 Connect the black L1 (AC line 1 or UN-
GROUNDED) wire to the terminal labeled L1 in the SMA DC-Disconnect
L2 Connect the red L2 (AC line 2) to the ter-
minal labeled L2 in the SMA DC-Disconnect.
Only for 277 V:
L2 terminal not used!
N Connect the white N (AC line N) wire to
the terminal labeled N in the SMA DCDisconnect.
PE Connect the green-yellow AC equip-
ment-ground wire to the PE terminal labeled in the SMA DC-Disconnect.
DC_Disc-IUS082311 1 / 4 Additional Information for Installation
Page 2
SMA Solar Technology AG
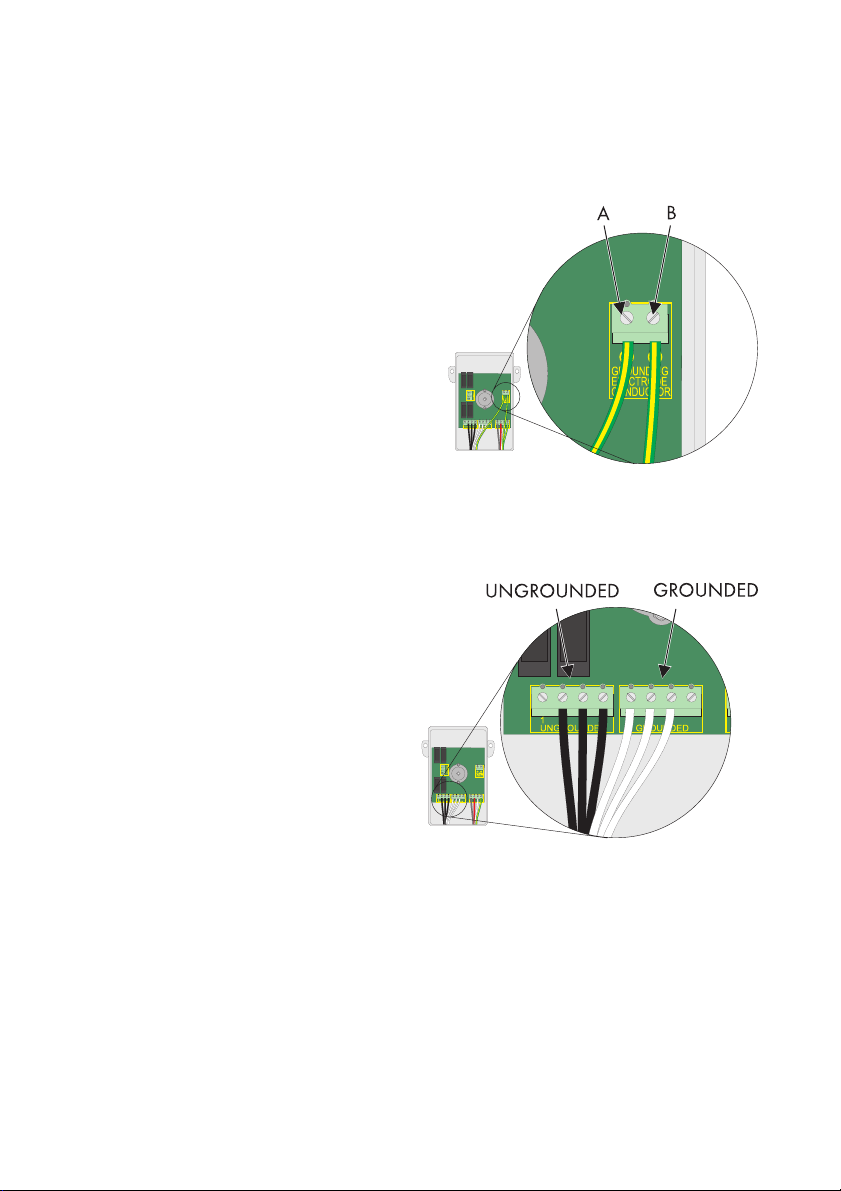
DC Ground Wiring With SMA DC-Disconnect
Pay attention to all operation and safety instructions listed in the Installation Guide of the Sunny Boy.
This instruction does NOT replace the Sunny Boy Installation Guide.
A Connect the grounding electrode
conductor with the grounding electrode.
B Connect the PV generator grounding to
the grounding electrode.
DC Wiring With SMA DC-Disconnect
Pay attention to all operation and safety instructions listed in the Installation Guide of the Sunny Boy.
This instruction does NOT replace the Sunny Boy Installation Guide.
Negative Grounding
Connect the positive DC wires to the terminal labeled PV UNGROUNDED in the SMA DC-Disconnect.
Connect the negative DC wires to the terminal labeled PV GROUNDED in the SMA DC-Disconnect.
Positive Grounding
Connect the negative DC wires to the terminal labeled PV UNGROUNDED in the SMA DC-Disconnect.
Connect the positive DC wires to the terminal labeled PV GROUNDED in the SMA DC-Disconnect.
DC_Disc-IUS082311 2 / 4 Additional Information for Installation
Page 3

SMA Solar Technology AG
DC Wiring With Additional DC Distribution
When combining strings outside of the SMA DC-Disconnect, and when the combined input of a single source circuit is greater than 15 A, use the terminal labeled COMBINED for the ungrounded
conductor. DO NOT use the terminals 1 - 4 labeled UNGROUNDED in this case.
Additional DC Source Circuit
Note: This circuit will no longer be fused so additional DC source circuit fusing may be
required in order to meet UL and NEC.
Pay attention to all operation and safety instructions listed in the Installation Guide of the Sunny Boy.
This instruction does NOT replace the Sunny Boy Installation Guide.
Negative Grounding
Connect the positive DC wire to the terminal labeled COMBINED in the SMA DC-Disconnect.
Connect the negative DC wire to the terminal labeled PV GROUNDED in the SMA DC-Disconnect.
Positive Grounding
Connect the negative DC wire to the terminal labeled COMBINED in the SMA DC-Disconnect.
Connect the positive DC wire to the terminal labeled PV GROUNDED in the SMA DC-Disconnect.
For connecting the DC wires to the Sunny Boy, see Installation Guide of the Sunny Boy.
Torque Values and Wire Sizes SMA DC-Disconnect
Terminal in-lbs Nm. Wire Size
AC & DC Terminal Blocks 15 1.7 6 - 10 AWG
Combined Terminal Block Spring Terminal Spring Terminal 6 - 10 AWG
Grounding Electrode Conductor Block 15 1.7 6 - 10 AWG
DC_Disc-IUS082311 3 / 4 Additional Information for Installation
Page 4

SMA Solar Technology AG
AC Wiring in the Sunny Boy
Pay attention to all operation and safety instructions listed in the Installation Guide of the Sunny Boy.
This instruction does NOT replace the Sunny Boy Installation Guide.
L1 Connect the black L1 (AC line 1 or
UNGROUNDED) wire of the SMA DCDisconnect to the terminal labeled L1 in
the Sunny Boy.
L2 Connect the red L2 (AC line 2) wire of
the SMA DC-Disconnect to the terminal
labeled L2 in the Sunny Boy.
Only for 277 V:
L2 terminal not used!
N Connect the white N (AC line N) wire of
the SMA DC-Disconnect to the terminal
labeled N in the Sunny Boy.
PE Connect the green-yellow AC
equipment-ground wire of the SMA DCDisconnect to the PE terminal labeled
in the Sunny Boy.
DC_Disc-IUS082311 4 / 4 Additional Information for Installation
 Loading...