

Page 1
1
cÇ"
3"
r-
Г-
_v
------
iAAAAAAAAAAAAWAA^AAA''«AAA.UAAAAAAAAAAAÄAAAAAAAAAAAAAAAÄAAAAAAÄAAAAA/iAAAÄÄ,*,r
vVmvVVVVVvmV V v vv v v v v v v v v v v V v v i/v v v v v v v v v v v v v v v v v v v v v v v v v v v v v v v v v y v v v v v v
--------
—
-л>
1
1
1
\
>
1
1
1
1
1
1
1
1
M Л A A A A A A A A A A A A A A» A A A A A A A A A A A A A A A A A A A A A A A A A A A A A A» *» A n A A A A A A A A A A ДДДДДД ДДД А A ДД A
j î v v v v v v v v v v v v v v v v v v v v v v v v v v v v v v v v v v v v v v v v v v v v v v v v v v v v v v v v v v V V v V V V V y V V v Y y V v
a:
Ш
O
Z
U)
Page 2

Page 3

Libretto istruzioni per macchina
per cucire SINGER* modelli iiiH e iiBH
Copyright © 1982 THE SINGER COMPANY
Diritti riservati in tutto il mondo
La Compagnia SINGER, per assicurare alla
Clientela un prodotto sempre moderno e attuale
nelle prestazioni, si riserva il diritto di apportare,
in ogni momento, modifiche alla estetica, alla
tecnica ed agli accessori di questa macchina
per cucire.
Un marchio di fabbrica di THE SINGER COMPANY
Gebrauchsanweisung für SINGER*
Nähmaschinen Modelle iiiH und IIBH
Copyright © 1982 THE SINGER COMPANY
Alle Rechte in der Welt Vorbehalten
Um zu gewährleisten, daß die Maschine stets
den modernsten Nähanwendungen entspricht,
behält sich die SINGER Company das Recht auf
Änderungen im Entwurf, in der Gestaltung und
im Zubehör vor.
' Warenzeichen THE SINGER COMPANY
Instruction Book for the SINGER*
Sewing Machines Models iiiH and IIBH
Copyright © 1982 THE SINGER COMPANY
All rights reserved throughout the world
To ensure that you are always provided with the
most modern sewing capabilities, THE SINGER
COMPANY reserves the right to change the
appearance, design or accessories of this
sewing machine when considered necessary.
' A Trademark of THE SINGER COMPANY
Page 4

ARGOMENTI
INHALTSVERZEICHNIS
1. Impariamo a conoscere la macchina .... 4
Parti principali
Accessori
2. Cucire con facilità................................................... 8
Scelta e cambio degli accessori
Scelta dell’ago e del filo........................................12
Funzionamento della macchina
con motore elettrico..........................................14
a pedale..............................................................16
Il filo della bobina..................................................18
avvolgimento della bobina
sistemazione della bobina ..............................
Come infilare la macchina....................................22
Come portare sopra il filo delia bobina .... 24
3. Impuntura diritta e cucitura a zig-zag .... 26
Posizionamento dei selettori................................26
Regolazione pressione del piedino
Regolazione tensione del filo dell’ago .... 28
Regolazione lunghezza punto ........ 30
Retromarcia
Come eseguire una cucitura
Punto passato........................................................34
Rammendo.............................................................36
Applicazione delle cerniere
Applicazioni
Costure per biancheria - Tessuti che
sfilacciano........................................................ 40
........................................................
................................................................
....................
...........................
...............................
.....................
...........................................................
................................
..................................
.........................................................
8,10
14
18
20
28
30
32
38
38
1. Lernen Sie Ihre Nähmaschine kennen .... 4
4
6
Wichtige Teile..........................................................4
Zubehör ................................................................. 6
2. Nähvorbereitungen
Auswahlen und Wechseln des Zubehörs . 8,10
Auswahl von Nadel und Garn....................... 12
Das Inbetriebsetzen der Maschine
mit Motor.................................................... 14
mit Fußbetrieb
Der Unterfaden
das Aufspulen
das Einfädeln der Spulenkapsel .... 20
Das Einfädeln des Garnes
Das Hochziehen des Unterfadens
3. Gerade Naht und Zickzacknähe
Einstellung der Wähler
Einstellung des Nähfußdruckes
Einstellung der Oberfadenspannung . . . . 28
Einstellung der Stichlänge . 30
Rückwärtsnähen............................................
Das Nähen einer Naht
Raupennähte.................................................. 34
Stopfen........................................................... 36
Einnähen von Reißverschlüssen ...... 38
Applikationen................................................. 38
Wäschenähte - Zickzack - Kantennähte . . 40
................................................
..............
...........................................
..............................................
.......................................
............................
...................
.................................
...................
...................................
....
...............
14
16
18
. 18
22
24
26
26
28
...
30
32
8
4. Punti della macchina.............................................42
Tabella dei punti
Cuciture su tessuti elastici...................................44
Cuciture elastiche
Punto invisibile per orli.........................................48
Zig-Zag multiplo
5. Occhielli e Bottoni................................................ 52
Occhielli in quattro tempi
Come regolare la densità del punto
Bottoni....................................................................56
6. Come aver cura delia macchina
7. Come cucire a braccio libero
2
..................................................
................................................
..................................................
...............................
....................
58,60,62
42
46
50
52,54
54
64
4. Maschinenstichmuster
Stichmuster-Ubersicht................................ 42
Sticheinsteilung nach Stretch Stoff-Art ... 44
Elastische Stretchnähte
Blindstichsäume
Trikotstich............................................................ 50
5. Knopflöcher und Knopfannähen ...... 52
Knopflochnähen in vier Stufen
Veränderung der Stichdichte
Knöpfe annähen.......................................... 56
6. Pflege der Maschine
7. Nähen mit dem Freiarm
...............................
.............................
..................................................
................
.....................
..................................
..............................
42
46
52,54
54
58,60,62
64
48
Page 5

CONTENTS
1. Getting to Know Your Machine
Principal Parts
Accessories
2. Getting Ready to Sew 9
Choosing and Changing Accessories . . 9,11
Choosing Needle and Thread.............................. 13
Operating the Machine......................................... 15
with Electric Motor
with Foot Treadle ,
The Bobbin Thread............................................... 19
Winding the Bobbin
Threading the Bobbin Case
Threading the Machine
Raising the Bobbin Thread
3. Straight and Basic Zig-Zag Stitching ... 27
Setting Selectors.................................................. 27
Regulating Presser Foot Pressure
Adjusting Needle-Thread Tension
Adjusting Stitch Length
Reverse Stitching
Sewing a Seam
Satin Stitching...................................................... 35
Darning.................................................................. 37
Zipper Insertion
Appliqué
Lingerie Seams - Zig-Zag Seam Finishes . . 41
.........................................................
.............................................................
...........................................
...........................................
.........................................
........................................
................................................
.....................................................
....................................................
................................................................
..............................
............................
.................................
.....................
......................
......................................
15
17
19
21
23
25
29
29
31
31
33
39
39
4
4
7
Note
Notizen
Notes
4. Machine Stitch Patterns....................................... 42
Stitch Pattern Chart.............................................. 42
Stitching on Stretch Fabrics
Elastic stretch....................................................... 47
Blindstitch Hems.................................................. 49
Multi Stitch Zig-Zag
5. Buttonhole and Buttons
Four-Step Buttonholing
. Adjusting Stitch Density..................................... 55
Buttons.................................................................. 57
6. Caring for Your Machine
7. Free-Arm Sewing.................................................. 64
.............................................
...............................
......................................
...................................
.......................
59,61.63
45
51
53
53,55
Page 6

1. Impariamo a conoscere la macchina
1. Lernen Sie ihre Nähmaschine kennen
1. Getting to Know Your Machine
Parti principali
1. Tendifilo aspatoio
2. Leva tendifilo
3. Regolatore pressione del
piedino
4. Regolatore tensione
5. Luce controllo cucitura
6. Leva alza piedino
7. Tagliatilo
8. Vite morsetto ago
9. Guidatilo
10. Piedino di pressione
11. Bobina trasparente
12. Placca ago
13. Trasportatore
14. Fermo cassa bobina
15. Placca scorrevole
16. Collegamenti elettrici e
reostato
17. Interruttore motore e
luce
18. Selettore lunghezza punto
ed occhiellatore
19. Bottone retromarcia e
Bilanciamento punto
20. Selettore ampiezza punto
21. Selettore punti
22. Aspatoio
23. Manopola disinnesto
volantino
24. Volantino
25. Portarocchetto telescopico
e feltrino
26. Maniglia
27. Selettore posizione ago
Wichtige Teile
1. Spulervorspannung
2. Fadengeber
3. Nähfußdruckwähler
4. Oberfadenspannungs-
- Wähler
5. Licht
6. Nähfußlüfter
7. Fadenabscheider
8. Nadelklammer
9. Fadenführer
10. Nähfuß
11. Klarsichtspule
12. Stichplatte
13. Transporter
14. Klarsichtspule
15. Schieber
16. Anlasser mit Kabel und
Steckern
17. Sicherheitsschalter für
Motor und Licht
18. Stichlängen und Knopfloch
Wähler
19. Rückwärtsstich und
Stichausgleichwähler
20. Stichbreitenwähler
21. Stichmusterwähler
22. Spulerspindel
23. Handradauslöseschraube
24. Handrad
25. Ausziehbarer Garnrollen
stift und Filscheibe
26. Tragegriff
27. Stichlagenwähler
Principal parts
1. Bobbin Winder Tension Disc
2. Take-up Lever
3. Pressure Dial
4. Needle Thread Tension
Dial
5. Light
6. Presser Foot Lifter
7. Thread Cutter
8. Needle Clamp
9. Thread Guides
10. Presser Foot
11. Transparent Bobbin
12. Needle Plate
13. Feed
14. Bobbin Case Holder
15. Slide Plate
16. Electrical Connections and
Speed Controller
17. Power and Light
Switch
18. Stich Length Selector and
Buttonhole Dial
19. Reverse Stitch Button and
Stitch Balance Dial
20. Stitch Width Selector
21. Pattern Selector
22. Bobbin Winder Spindle
23. Hand Wheel Knob
24. Hand Wheel
25. Telescopic Spool Pin and
Felt
26. Carrying Handle
27. Needle Position Selector
con Modello 7184
28. Allungabase
4
mit Modell 7184
28. Anschiebetisch
with model 7184
28. Extension Bed
Page 7
hLIL
Page 8

Accessori
Zubehör
Gli accessori che vengono forniti con la mac
china sono stati creati ed elaborati per rende
re agevoli e perfetti tutti i lavori di cucito.
1. Bobine trasparenti (n. 172336)
2. Aghi
• Cat. 2020, per eseguire cuciture in ge
nere.
• Cat. 2045, per cuciture su tessuti di
maglia, elastici ed elasticizzati.
3. Piedino per occhieiii, serve per eseguire
in quattro tempi occhielli con travette di
qualsiasi lunghezza.
4. Piedino di pressione speciaie. Usato per
tutti i tipi di cuciture decorative a zig-zag.
5. Piedino per cerniere iampo, si usa per
applicare le cerniere ed eseguire cordo-
nature.
6. Piedino di pressione normaie, montato
sulla macchina, si usa per tutti i tipi di
cuciture di utilità pratica sia diritte che a
zig-zag.
7. Prolunga per portarocchetto, usata per
rocchetti o spolette di grosse dimensioni.
8. Feltrino, per facilitare lo svolgimento del
filo in modo uniforme.
9. Guida per punto invisibile, si usa con il
piedino di pressione normale e serve per
posizionare e guidare l’orlo.
Das Ihrer Nähmaschine beigefügte Zubehör
dient dazu, viele verschiedene Näharbeiten
leicht auszuführen.
1. Klarsichtspulen (Nr. 172336).
2. Nadeln
• Typ 2020, die Nadel, die mit Ihrer Ma
schine geliefert wird, ist eine Univer
salnadel für die verschiedensten Nä
harbeiten.
• Typ 2045 ist geeignet für das Nähen
von Synthetiks, Stretchgeweben und
elastischen Stoffen.
3. Knopflochfuß wird gebraucht für die
Fertigung von Knopflöchern und deren
Verriegelung in leichten und mittleren
Stoffarten.
4. Universal-Nähfuß für alle Arten von de
korativen Zickzack-Nähten.
5. Reißverschlußfuß für das Einsetzen von
Reißverschlüssen und für Kantensteppar
beiten.
6. Zickzack-Nähfuß, mit Ihrer Nähmaschine
geliefert, wird gebraucht für alle normalen
Näharbeiten, entweder gerade oder Zick
zack-Nähte.
7. Garnrollenstift-Verlängerung für große
Garnrollen.
8. Filz zum weichen Abspulen.
9. Blindstichführung ermöglicht mit dem
Zickzackfuß eine genaue Kontrolle beim
Nähen von Blindstichsäumen.
con Modello 7174
IOa. Placca ago normale, montata sulla mac
china, si usa con tutti i piedini di pressio
ne.
Ha. Molletta solleva placca d’ago, per attac
care i bottoni ed eseguire lavori a movi
mento libero.
con Modello 7184
lOb. Placca ago normale, montata sulla mac
china, si usa con tutti i piedini di pressio
ne.
11b. Copri trasportatore a scatto, per attac
care i bottoni ed eseguire lavori a movi
mento libero.
6
mit Modell 7174
10a. Die Zickzackstichplatte an Ihrer Maschi
ne kann mit allen Nähfüßen verwendet
werden.
11 a. Stichplattensteg für Knopfannähen und
Freihandarbeiten.
mit Modell 7184
10b. Die Zickzackstichplatte an Ihrer Maschi
ne kann mit allen Nähfüßen verwendet
werden.
11b. Einrastbare Transporteurabdeckplatte
für Knöpfe annähen und Frei-Hand Arbei
ten.
Page 9
Accessories
The accessories that come withy our sewing
machine are designed to help you do many
kinds of sewing easily.
1. Transparent Bobbins (No. 172336).
2. Needles
• Style 2020 in your machine when de
livered is for general sewing.
• Style 2045 is used for sewing knits,
stretch fabrics and elastic.
3. Buttonhole Foot is used to make bar tack
buttonholes of any length in four steps.
4. Special Purpose Foot. Used for all kinds
of decorative zig-zag stitching.
5. Zipper Foot for inserting zippers and
stitching corded seams.
6. General Purpose Foot on your machine
when delivered, is used for all utility
sewing, with either straight or zig-zag
stitching.
IIIH 1/04
7. Spool Pin Extension used for tubes of
thread.
8. Felt to help thread unwind smoothty.
9. Blindstitch Hem Guide. Use this with the
general purpose foot to position and
guide the hem.
with model 7174
10a. General Purpose Needle Plate on your
machine when delivered is used with all
presser feet.
11a. Needle Plate Raising Shim for button
sewing and free-motion work.
with model 7184
10b. General Purpose Needle Plate on your
machine when delivered is used with all
presser feet.
11b. Snap-in Feed Cover for button sewing
and free-motion work.
Page 10

2. Cucire con facilità
2. Nähvorbereitungen
2. Getting Ready to Sew
SOSTITUZIONE DEI PIEDINI
DI PRESSIONE
I piedini di pressione a scatto, forniti con ia
macchina, vengono agganciati e sganciati dal
proprio gambo, mediante uno scatto.
Portare l’ago nella sua posizione più alta ruo
tando il volantino verso sè stessi. Alzare II pie
dino di pressione.
Come togliere e rimettere
il piedino di pressione
1a. Spingere verso l’alto, il più possibile, la
parte anteriore del piedino.
1 b. Farlo scattare verso II basso per toglierlo.
2. Centrare il nuovo piedino sotto il gambo A
ed abbassare la leva di pressione del piedi
no in modo che il gambo si adatti sopra il
pernotto del piedino.
3. Premere con decisione sulla vite del piedi
no finché questo non scatti in posizione.
DAS AUSWECHSELN VON NÄHFÜSSEN
Einrastbare Nähfüße
Der Nähfuß, der sich an Ihrer Maschine befin
det, ist in dem Nähfußschaft einrastbar.
Bringen Sie die Nadel und den Fadengeberhe
bel in die höchste Steliung, indem Sie das
Handrad auf sich zu drehen. Nähfuß hochstel
len.
Entfernen und Wiedereinsetzen
des Nähfußes
1a. Nähfuß vorne soweit wie möglich nach
oben drücken.
1 b. Dann löst er sich aus dem Schaft.
2. Legen Sie den neuen Nähfuß unter die
Öffnung des Schaftes A, und senken Sie
dann den Schaft mit Hilfe des Lüfterhe
bels.
3. Zuletzt die Schraube des Nähfußes nach
unten drücken bis der Fuß richtig
einrastet.
CAMBIO DELL’AGO
• Sollevare l’ago nella posizione più alta gi
rando, a mano, il volantino verso sè stessi.
Allentare la vite del morsetto B e togliere
l’ago.
• Inserire il nuovo ago nel morsetto C che ac
coglierà l’ago soltanto se inserito nel modo
esatto, cioè con la parte piatta rivolta poste
riormente. Spingere l’ago verso l’alto fino in
fondo.
• Serrare la vite del morsetto.
COME MONTARE LA GUIDA PER IL
PUNTO INVISIBILE
• Alzare il piedino di pressione, allentare la
vite del piedino con una monetina e far
scorrere la guida per il punto invisibile tra la
vite ed il gambo del piedino di pressione
normale.
• Accertarsi che la guida non tocchi la placca
scorrevole o la punta del piedino.
• Stringere la vite con una monetina.
8
•
DAS AUSWECHSELN DER NADEL
• Nadel In die höchste Stellung bringen, in
dem Sie das Handrad auf sich zu drehen.
Lösen Sie dann die Nadeikiammerschraube
B,
und entfernen Sie die Nadel.
• Die neue Nadei wird in die Nadelklammer C
soweit wie möglich hineingeschoben, und
zwar mit der flachen Seite nach hinten.
• Zum Schiuß Nadelklammerschraube wieder
festziehen.
BEFESTIGEN DER
BLINDSTICHFÜHRUNG
Nähfuß anheben und die Schraube am Näh
fuß lösen.
Dann die Blindstichführung zwischen die
Schraube und den Schaft des Zickzacknäh
fußes schieben.
Vergewissern Sie sich, daß der Nähfuß frei
zu bewegen ist. Die Schraube mit einer
Münze wieder anziehen.
Page 11
1b
la
CHANGING PRESSER FEET
Snap-on Presser Feet
The presser feet furnished with your machine
snap on and off a common shank.
Raise needle to highest position by turning the
hand wheel toward you. Raise presser foot.
To Remove and Replace Foot
1a. Press toe of presser foot upward as far as
it will go.
1 b. Then snap down to remove.
2. Centre the new presser foot under the
shank A and lower the presser foot lifter so
that the shank fits the presser foot pin.
3. Press presser foot screw down firmly until
foot snaps into place.
CHANGING THE NEEDLE
• Raise needle to its highest point by turning
the hand wheel toward you. Loosen needle
clamp screw B and remove the needle.
• Insert new needle up into clamp C as far as
it will go. with the flat side of the needle to
the back.
• Tighten needle clamp screw.
ATTACHING BLINDSTITCH
HEM GUIDE
• Raise presser foot, loosen presser foot
screw with a coin and slip blindstitch hem
guide between screw and shank of the gen
eral purpose foot.
• Be sure underside of the guide clears the
slide plate and front of foot.
•
• Tighten screw with a coin.
Page 12

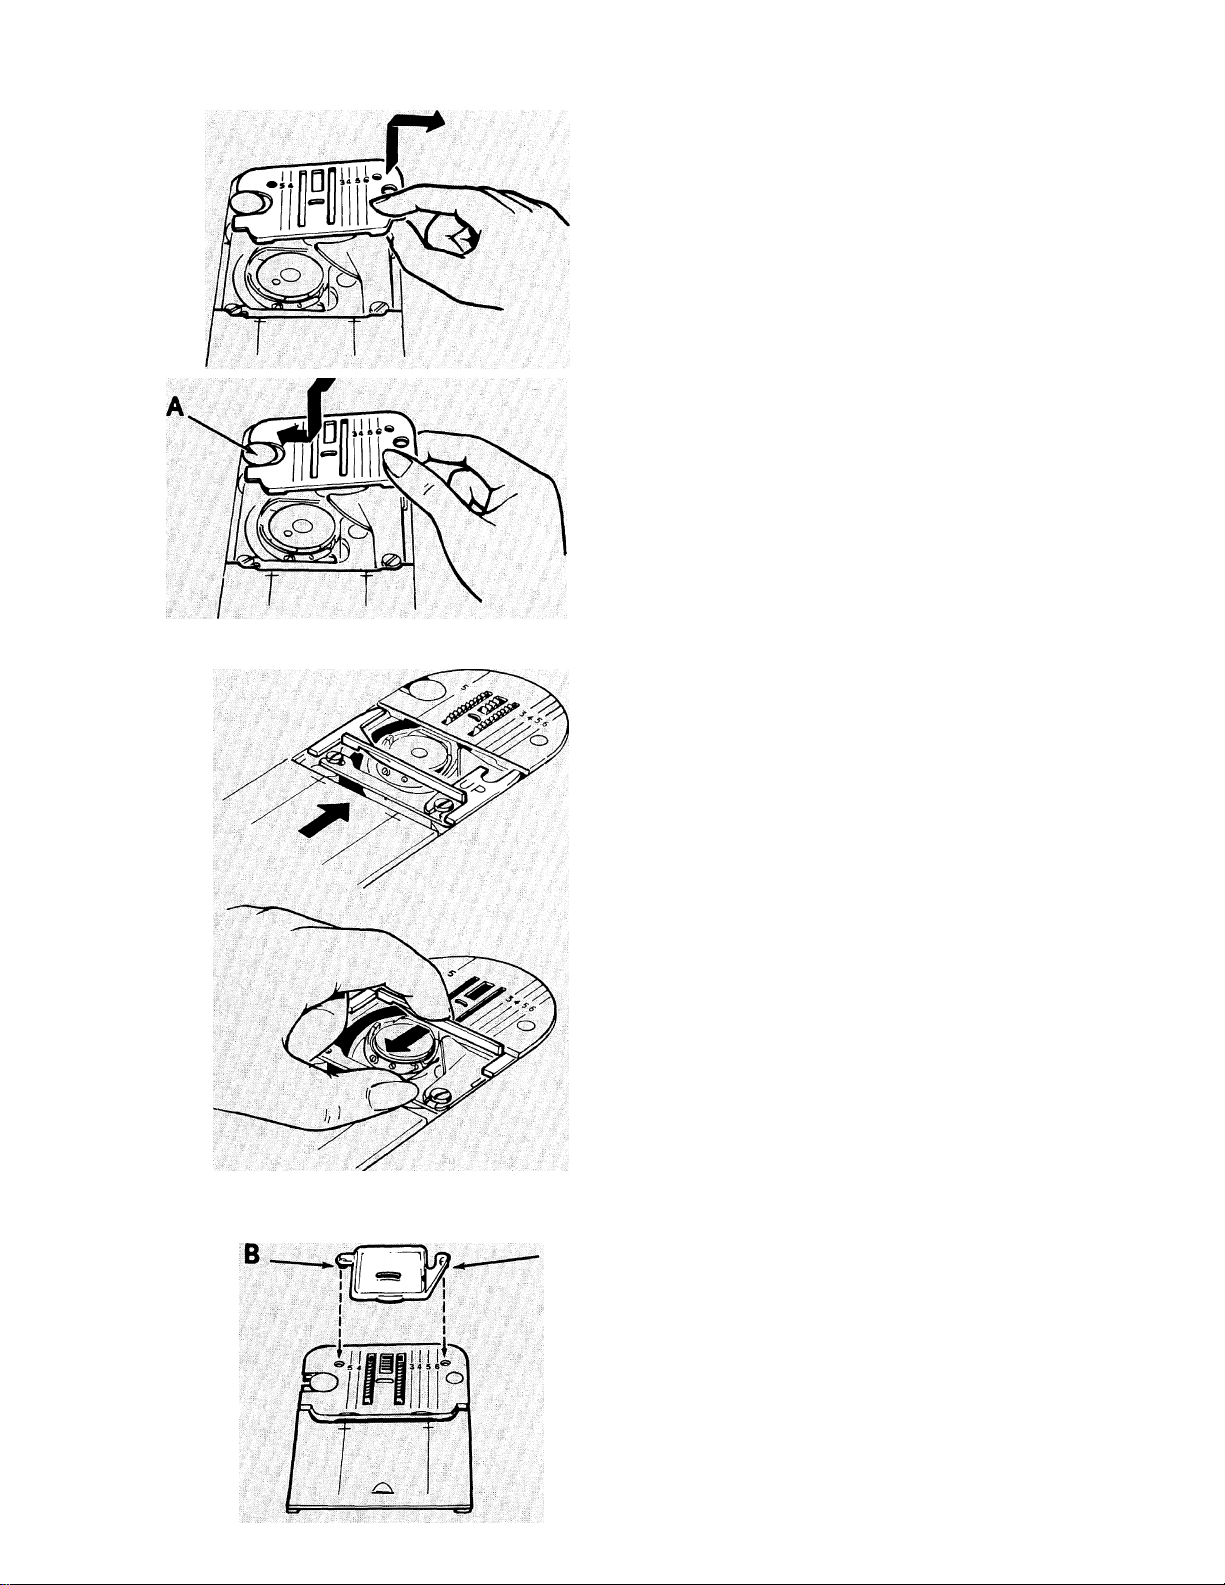
COME TOGLIERE E RIMETTERE LA
PLACCA AGO
ENTFERNEN UND WIEDEREINSETZEN
DER STICHPLATTE
• Alzare il piedino di pressione
• Portare l’ago nella sua posizione più alta
• Aprire la placca scorrevole. Inserire il pollice
sotto il lato destro della placca d’ago, solle
varla e sfilarla facendola scorrere verso de
stra.
• Per rimettere la placca d’ago, sistemarla
sotto il bottone di fermo A, spingerla legger
mente verso sinistra e premere verso il bas
so fino a che non si sia inserita con un lieve
scatto.
MOLLETTA SOLLEVA PLACCA AGO
(con modello 7174)
1. Per inserirla, aprire la placca scorrevole,
mettere la molletta sulle guide laterali, quin
di chiudere la placca scorrevole come illu
strato.
• Nähfuß anheben.
• Nadel und Fadengeberhebel durch Drehen
des Handrades in die höchste Stellung brin
gen.
• Schieber öffnen. Legen Sie den Daumen un
ter die rechte Seite der Stichplatte, heben
Sie sie hoch und ziehen sie nach rechts her
aus.
• Stichplatte wieder einsetzen unter den Be
festigungsstift A, leicht nach links schieben
und herunterdrücken bis die Platte einra
stet.
STICHPLATTENSTEG
(mit Modell 7174)
1. Um den Steg einzusetzen, öffnen Sie den
Schieber, schieben den Steg in die
Gleitbahn ein und schließen den Schieber
wie veranschaulicht.
• La molletta si inserirà sotto la placca d’ago
che si solleverà al di sopra del trasportatore.
2. Per toglierla, aprire la placca scorrevole e
tirare la molletta verso sè stessi
COME APPLICARE LA PLACCA COPRI
TRASPORTATORE A SCATTO
(con modello 7184)
• Alzare il piedino di pressione
• Portare l’ago nella sua posizione più alta
ruotando il volantino verso se stessi. Aprire
la placca scorrevole.
•
• Far scorrere la placca copri trasportatore
nella direzione opposta all’operatore portan
dola sopra la placca d’ago finché i punti B e
C non si trovino direttamente posizionati so
pra i fori della placca d’ago come Illustrato.
Far scattare in posizione il punto B. Quindi
spingere il punto C verso la placca scorre
vole. Per togliere il copri trasportatore, apri
re la placca scorrevole quindi sollevare
semplicemente il bordo del copri trasporta
tore ed estrarlo.
10
• Der Steg wird dann in die richtige Lage un
ter der Stichplatte gleiten, die über den
Transporteur angehoben wird.
2. Um den Steg zu entfernen, den Schieber
öffnen und den Steg in der Gleitbahn nach
vorne ziehen.
ANBRINGEN DER EINRASTBAREN
TRANSPORTEURABDECKPLATTE
(mit Modell 7184)
• Heben Sie den Nähfuß an, und setzen Sie
die Zickzackstichplatte ein.
• Bringen Sie die Nadel In die höchste
Stellung, indem Sie das Handrad zu sich hin
drehen. Schieber öffnen.
• Schieben Sie die Transporteurabdeckplatte
über die Stichplatte, bis die Punkte B und C
genau über den Löchern der Stichplatte
liegen - siehe Abbildung.
Punkt B einrasten. Dann Transporteurabde
ckplatte den Schieber öffnen und die vorde
re Ecke der Abdeckplatte einfach hochhe
ben.
Page 13
REMOVING AND REPLACING
NEEDLE PLATE
Raise presser foot
Raise needle to highest position.
Open slide plate. Place thumb under right
side of needle plate, lift it up and withdraw it
to right.
Replace needle plate under clamping pin A,
push it gently to the left and press down
until it snaps into place.
NEEDLE PLATE RAISING SHIM
(with model 7174)
1. To insert, open the slide plate, place the
raising shim in the slideway and close the
slide plate as shown.
• The raising shim will slide into place under
the needle plate, raising it above the feed.
2. To remove, open the slide plate and pull the
raising shim forward in the slideway.
ATTACHING SNAP-IN FEED COVER
(with model 7184)
• Raise presser foot.
• Raise needle to highest position by turning
hand wheel toward you. Open slide plate.
•
• Slide snap-in feed cover away from you
over needle plate until points B and C are
positioned directly over holes in needle pla
te as illustrated. Snap in point B. Then push
point C in toward point B until it snaps into
place. Close slide plate. To remove, open
slide plate then simply lift up front edge of
feed cover.
11
Page 14
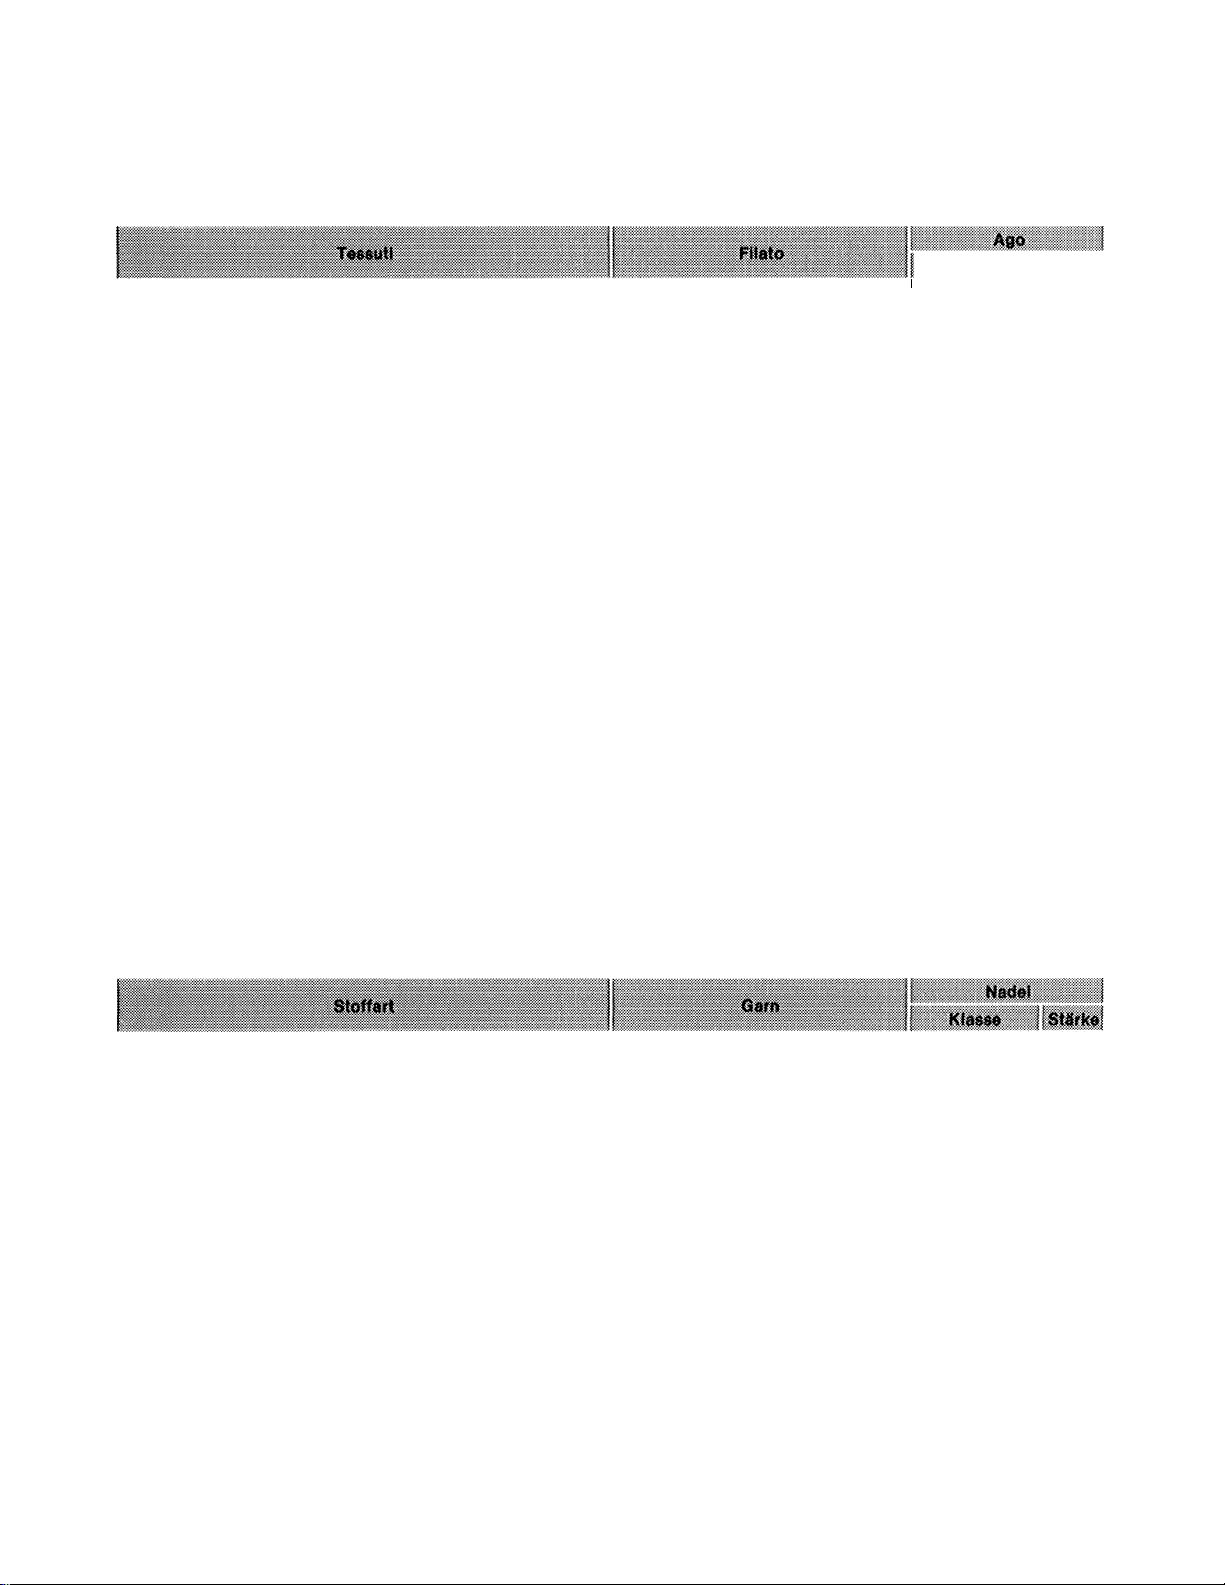
Scelta dell’ago e del filo
La scelta dell'ago e del filo dipende dai tipo di tessuto sul quale sì deve cucire. La tabella qui ripor
tata è una pratica guida per effettuare tale scelta. Consultarla prima di iniziare a cucire. Si racco
manda di usare lo stesso tipo e misura dì filato sia nell’ago che nella bobina. Per ottenere i migliori
risultati usare sempre un ago SINGER nuovo.
Delicati - tulle, chiffon, pi^^o fine, organza
Leggeri - batista, organdis, jersey, voile, taffetà,
crespo, venuto chiffon, tessuti di plastica
Medio peso * percalle, piquet. lino, chintz, faille,
rasatello. velluto a coste leggero, velluto, maglieria,
tessuti pelosi, tessuti vinilici
Medio pesanti - gabardine, tvtioed, tessuti per soprabt*
ti, canapa, tessuti da arredamento, vinilici, tessuti
pelosi
Pesanti - tessuti per cappotti, per tendaggi, tela olona
Di qualsiasi peso - impunture decorative
Tessuti di maglia sintetici ed elastici ^ doppia maglia
in poliestere, maglieria di nylon, jersey, maglia ciré,
velluto panne, tessuti con rinforzo
Pelle - Camoscio, capretto, polii foderate
ir Da usare con cotone mercerizzato n. 60 o seta nella bobina.
Auswahl von Nadel und Garn
Cotone mercerizzato fine
Filo sintetico fine
Cotone mercerizzato n. 60 ~ Seta
Filo sintetico fine
Cotone mercerizzato n. 60
Cotone n. 60
Filo sintetico * Seta
Filato grosso mercerizzato *
Filo di cotone dal n. 40 al n. 60 *
Filato grosso mercer* - Filo di cotone
dai n, 20 al n* 40 ~ Filo sintetico
Cotone mercerizzato n. 60 • Seta
Cotone mercerizzato n. 60 - Seta
Filo sintetico
Seta per occhielli ☆
Filo sintetico
Filo sintetico
<^^0 !
Catalogo 2020
Catalogo 2020
Catalogo 2020
Catalogo 2020
Catalogo 2020
Catalogo 2020
Catalogo 2046
(con striscia
giallo)
Catalogo 2032
1
9
11
14
16
18
16 0 18
14
11
14
16
Die Auswahl der Nadel und des Nähgarnes richtet sich nach dem Stoff. Für die Wahl der richtigen Nadel
und des passenden Fadens gibt Ihnen die nachstehende Tabelle praktische Hinweise. Ziehen Sie die
Tabelle vor dem Beginn der Näharbeit zu Rate. Achten Sie darauf, daß Sie gleiches Garn als Ober-und
Unterfaden verwenden. Mit einer neuen Singer Nadel werden Sie die besten Ergebnisse erzielen.
Sehr döftfies Malerlat
Organdy
Leichtes Material - Batist, Organdy, Jersey, Seidentri- Merzerisiertes Garn Stärke 60, Seide 9090
kot, Taft, leichter, leichte synthetische Stoffe feiner synthetischer Faden vy
Mittleres Material - Baumwollstoff, leinen, Kattun.
Satin, Chintz, Samt, gewirkte Stoffe, Vinyl, langftorige
Gewebe
Mlttetschweres Material - Gaberdine, Tv/eed, SegeF
tuch, Mantelstoffe, Dekorationsstoffe
Schweres Material - Mantelstoffe, Köper, Möbelstoffe,
Segeltuch
Mittleres bis schwares Material * Ziersteppnähte
Synthetische, gewirkte Stoffe - Nylontrikot, Jersey,
Pannesamt. Ciré, Vistram
Leder - Ziegenieder, Lammleder. Lederfutter
ir Merzerisiertes Garn Stärke 50 oder Seide in der Spule verwenden*
Tüll, Chiffon, feine Seide,
Feines, merzerisiertös Garn,
feiner synthetischer Faden
Merzerisiertes Garn Stärke 60,
Obergarn Stärke 60,
Seide synthetischer Faden
Starkes merzerisieertes Garn,
Obergarn Stärke 40-60.
synthetischer Faden
Starkes merzerisiertes Garn,
Obergarn Stärke 24-40,
synthetischer Faden
Knopflochlwist ir
Synthetischer Faden,
Merzerisertes Garn
Stärke 60, Seide
Merzerisiertes Garn Stärke 60,
synthetischer Faden. Seide
Katalog 2020
Katalog 2020 14
Katalog 2020 16
Katalog 2020 is
Katalog 2020 18
Katalog 2020
(Rundspitzö.
Gelbring)
Katalog 2032
9
11
14
11
14
16
12
Page 15

Choosing needle and thread
The needle thread you choose will depend upon the fabric being stitched. The table below is a prac
tical guide to needle and thread selection. Refer to it before starting to sew. Be sure to use the same
size and type of thread in both needle and bobbin. For best results use a new SINGER needle.
Delicate « tulio, chiffon, fine lace, organza
lightweight - batiste, organdy, fersey, voile, taffeta,
crepe, chiffon velvet* plastic film
Medium Weight - gingham, percale, pique, linen,
chintz, faille, satin, fine corduroy, veivet, suitings.
Knits, deep^pile fabrics, vinyl
Medium Heavy * gabardine, tweed, sailcloth, denim,
coatings, drapery, vinyl, cieep'Pile fabrics
Heavy ' overcoatings, dungaree, upholstery fabrics,
canvas
Atl Weights * decorative topstitching Buttonhole twist ☆
Synthetic Knits and Stretch Fabrics - polyester
doubleknit, nylon tricot, jersey, ciré, panne velvet,
bonded fabrics, raschel
leather - suede, kldskln, lined leathers
Use with 60 merceriiied cotton or silk in bobbin.
Fine mercerized cotton
Fine synthetic thread
50 mercerized cotton - silk
Fine synthetic thread
50 mercerized cotton
60 cotton
Synthetic thread
Heavy-duty mercerized cotton
40 to 60 cotton - Synthetic thread
Heavy-duty merceflzed cotton
:>4 to 40 cotton » Synthetic thread
Synthetic thread -
60 mercerized cotton -
50 mercerized cotton
Synthetic thread - Silk
Silk
style 2020
Style 2020
Style 2020
Style 2020
Style 2020
Style 2020
Style 2046
Bali Point
{Yellow Band')
Style 2032
9
11
14
16
18
16 or 18
14
11
14
16
13
Page 16

FUNZIONAMENTO DELLA MACCHINA
DAS INBETRIEBSETZEN DER MASCHINE
con motore elettrico e reostato
Funzionamento delia macchina
• Prima di eseguire il collegamento elettrico
della macchina, assicurarsi che i dati elettri
ci riportati sulla targhetta A corrispondano a
quelli segnati sul contatore dell’energia
elettrica.
• Collegare il connettore B alla macchina ed
inserire la spina C nella presa di corrente.
• L’interruttore agisce sul riflettore e sul mo
tore. Azionare come indicato, acceso (D),
spento (E).
• Per mettere in funzione la macchina e re
golarne la velocità premere col piede sul
reostato F. Più a fondo si preme più veloce
mente la macchina cuce.
Mit Motor und Anlasser
Bevor Sie die Maschine an das Stromnetz
anschließen, überzeugen Sie sich, daß die
unter dem Handrad A angegebenen Daten
mit denen des von der örtlichen Elektrizitäts
gesellschaft installierten Zählers überein
stimmen.
• Stecker B mit Maschine verbinden
und
Stecker C mit Steckdose.
• Um den Sicherheitsschalter ein- (D) oder
aus- (E) zuschalten, den Schalter betätigen,
wie veranschaulicht.
• Um die Maschine in Bewegung zu setzen
und die Geschwindigkeit zu regulieren, mit
dem Fuß auf den Anlasser F drücken. Je
stärker der Druck, desto schneller näht die
Maschine.
ATTENZIONE: Togliere la spina dalla presa di
corrente prima di sostituire i’ago, il piedino di
pressione o la placca d'ago, e quando non si la
vora a macchina.
Questa accortezza è importante perchè può ca
pitare di premere inavvertitamente il reostato ed
azionare la macchina.
IMPORTANTE
La macchina viene venduta per uso fa
miliare.
Essa è fornita di isolamento speciale
completo a norma del D.M. 20-11-1968.
Al fine di renderla ancora più sicura è
stata anche dotata dei dispositivi di si
curezza (salvadita e copricinghia per
motorino elettrico) previsti dal D.P.R.
1955 n. 547.
Se adoperata da personale domestico,
ovvero a scopi commerciali o di inse
gnamento 0 di addestramento ii Co
struttore ricorda ai responsabili di pre
tendere che i dispositivi di sicurezza
siano applicati, onde evitarsi le penalità
previste dal citato D.P.R..
ACHTUNG: Ziehen Sie den Netzstecker aus der
Wandsteckdose, bevor Sie Nadein, Nähfüße
oder Stichplatten auswechseln oder die Maschi
ne unbeaufsichtigt lassen. Dies schließt die
Gefahr eines versehentlichen Ingangsetzens der
Maschine durch Drücken des Fußanlassers aus.
14
Page 17
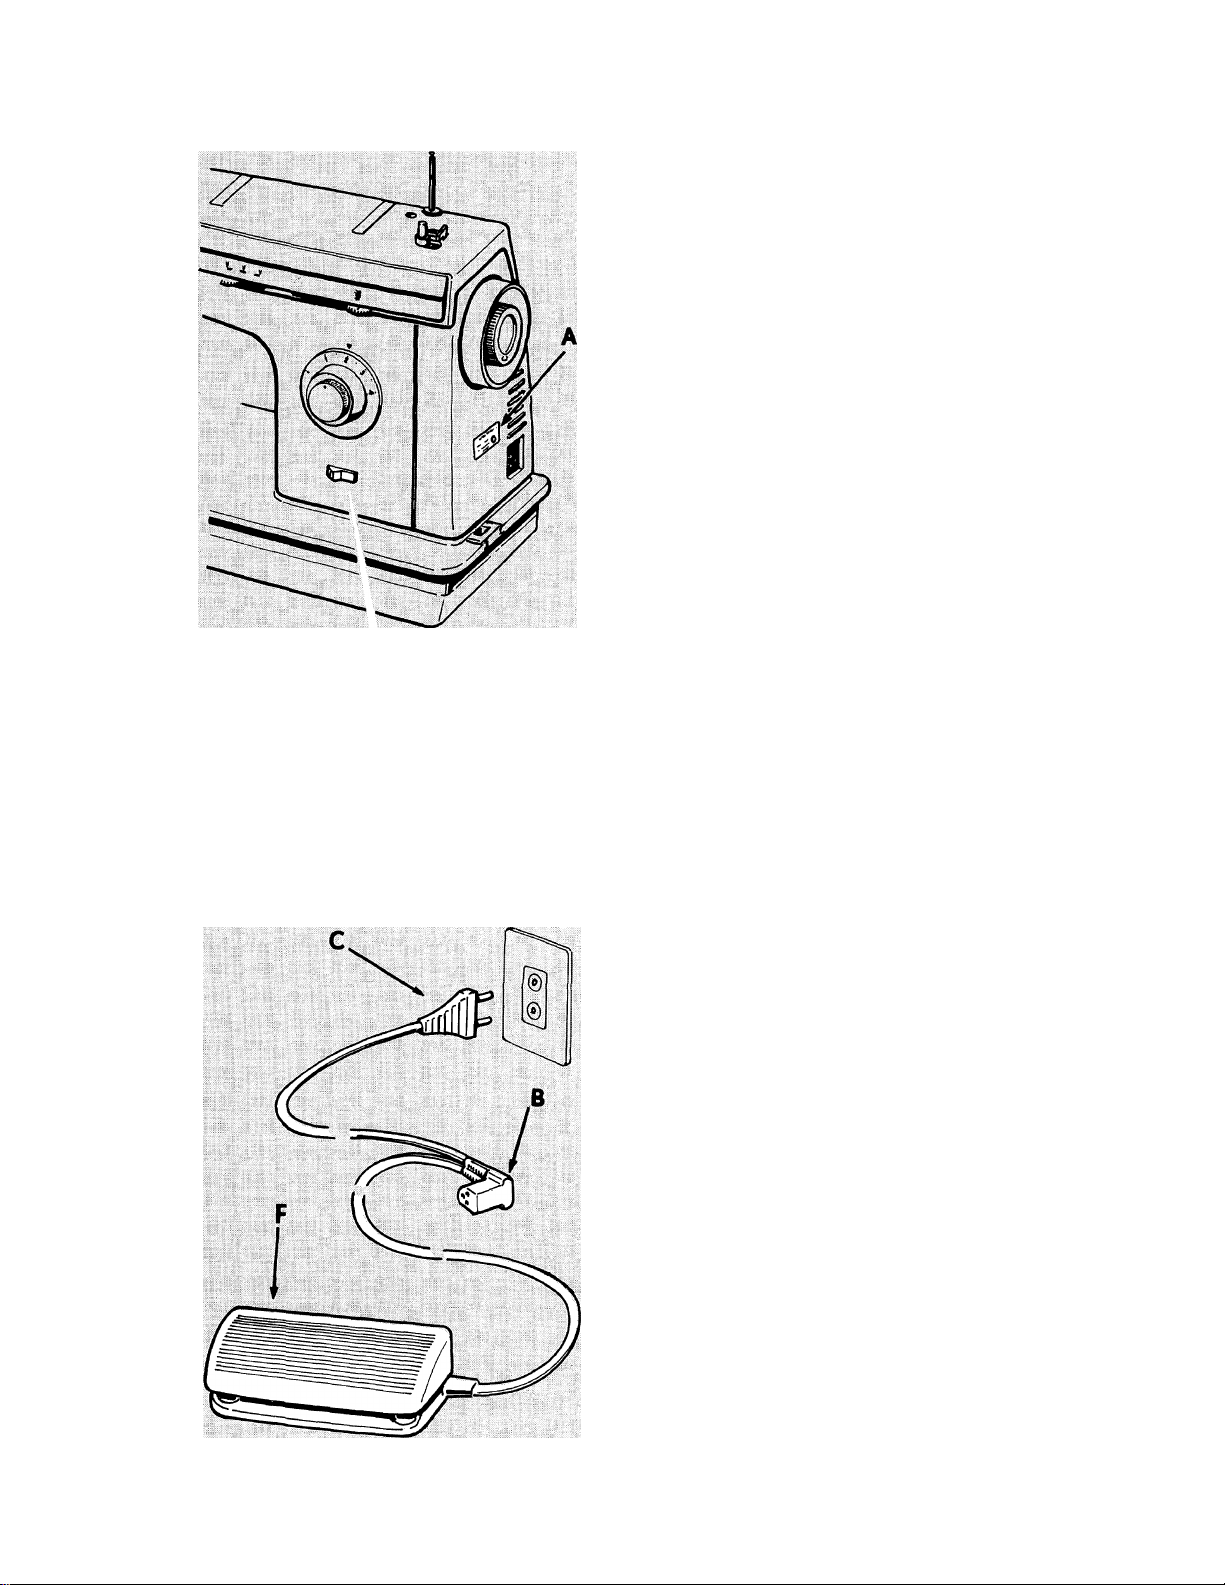
OPERATING THE MACHINE
With Electric Motor and Speed Controiier
Connecting machine
• Before plugging in your machine, be sure
the electrical information on the side of the
machine A, beiow the hand wheel agrees
with the range marked on your electrical
meter.
• Connect plug B to machine and plug C to
your socket outlet.
• To turn the machine and iight on (D) or
off (E), press switch as shown.
• To run the machine and controi speed,
press the speed controller F with your foot.
The harder you press, the faster the ma
chine will sew.
DIS
CAUTION: Disconnect the power line plug from
the socket outlet when changing needles, feet
or needle plates or when leaving the machine
unattended. This eliminates the possibility of
starting the machine by accidentally pressing
the speed controller.
IMPORTANT
Machines for Great Britain and some other
countries having similar wiring standards
are shipped from the factory without a plug
for connection to the mains.
The wires in this mains lead are coloured in
accordance with the following code:
Blue - Neutral (N) Brown - Live (L)
As the colours of the wires in the mains
lead of this appliance may not correspond
with the coloured markings identifying the
terminals in your plug, proceed as follows:
The wire which is coloured blue must be
connected to the terminal which is marked
with the letter N or coloured black.
The wire which is coloured brown must be
connected to the terminal which is marked
with the letter
If a 13 Amp. (BS 1363) plug is used a 3
Amp. fuse must be fitted, or if any other
type of plug is used a 5 Amp. fuse must be
fitted either in the plug or adaptor or at the
distribution board.
L or coloured red.
15
Page 18

FUNZIONAMENTO A PEDALE
(con modello 7174)
MASCHINE MIT FUSSBETRIEB
(nur 7174 Modell)
Per posizionare ia cinghia del pedale
• Svitare e rimuovere la vite A ed il copricinghia B.
• Rimuovere la connessione per la spina del
motore C.
• Allentare di un giro completo la vite D della
staffa del motore, alzare il motore agendo
sulla puleggia E ed estrarre la cinghia F
dalla puleggia stessa. Togliere la cinghia
dalla macchina, e stringere la vite D.
• Posizionare la cinghia del pedale attorno
alla parte alta del volantino nella sua scana
latura.
• Riposizionare il copricinghia B e stringere la
vite A.
Non rimettere la connessione per la spina C.
Per mettere e per rimuovere la cinghia.
La cinghia deve essere rimossa quando non si
usa la macchina.
Anbringen des Riemens
• Schraube A lösen und Deckel B entfernen.
• Motorstecker C herausziehen.
• Motorhalteschraube D eine ganze Umdre
hung lockern, Motor an der Riemenscheibe
E anheben und Motorriemen F von der
Riemenscheibe abnehmen. Motorriemen von
der Maschine abnehmen und Halteschraube
D festziehen.
• Fußtreibriemen oben über das Handrad füh
ren und in die Rille des Handrades legen.
• Beckel B wieder anbringen und Schraube A
festziehen.
Motorstecker C nicht einstecken.
Auflegen und Abnehmen des Antriebriemens
Der Riemen kann nur abgenommen werden,
wenn die Maschine nicht in Betrieb ist.
Per mettere la cinghia, girare il volantino ver
so sè stessi mentre si guida la cinghia dentro
la gola della puleggia nei mobile.
Per rimuovere la cinghia, spostarla verso de
stra mentre si aziona il pedale lentamente.
PER AZIONARE IL PEDALE
Annullare il movimento dell’ago allentando la
manopola di disinnesto del volantino. Poggiare
i piedi sul pedale. Girare il volantino verso sè
stessi e lasciare che i piedi si muovano leg
germente con il movimento del pedale. Più ve
locemente si muovono i piedi, più velocemente
la macchina cuce. Esercitarsi ad azionare il
pedale in modo da riuscire a regolare la velo
cità, ad avviare la macchina ed a farla funzio
nare facendo sempre ruotare il volantino verso
sè stessi. Successivamente serrare la mano
pola di disinnesto volantino ed esercitarsi ad
azionare il pedale con del tessuto sotto il pie
dino.
Um den Riemen aufzuiegen, das Handrad auf
sich zu drehen und Riemen dabei auf das
große Schwungrad führen.
Um den Riemen abzunehmen, den Fußtritt
langsam in Bewegung setzen und den Riemen
nach rechts abwerfen.
DAS BEWEGEN DES FUSSTRITTES
Handrad festhalten und die HandradAuslöseschraube lösen, indem man sie auf
sich zu dreht. Beide Füße auf den Fußtritt stel
len, Handrad auf sich zu drehen und die Füße
frei und leicht der Bewegung des Fußtrittes
anpassen. Je schneller Sie Ihre Füße
bewegen, desto schneller wird die Maschine
nähen. Üben Sie diese Bewegung, bis Sie die
Geschwindigkeit regulieren und die Maschine
wieder in Gang setzen und mit Ihrer
Fußbewegung das Handrad auf Sich zu laufen
fassen können. Ziehen Sie die Auslöseschraube fest, und üben Sie mit einem
Stoffrest unter dem Nähfuß.
16
Page 19
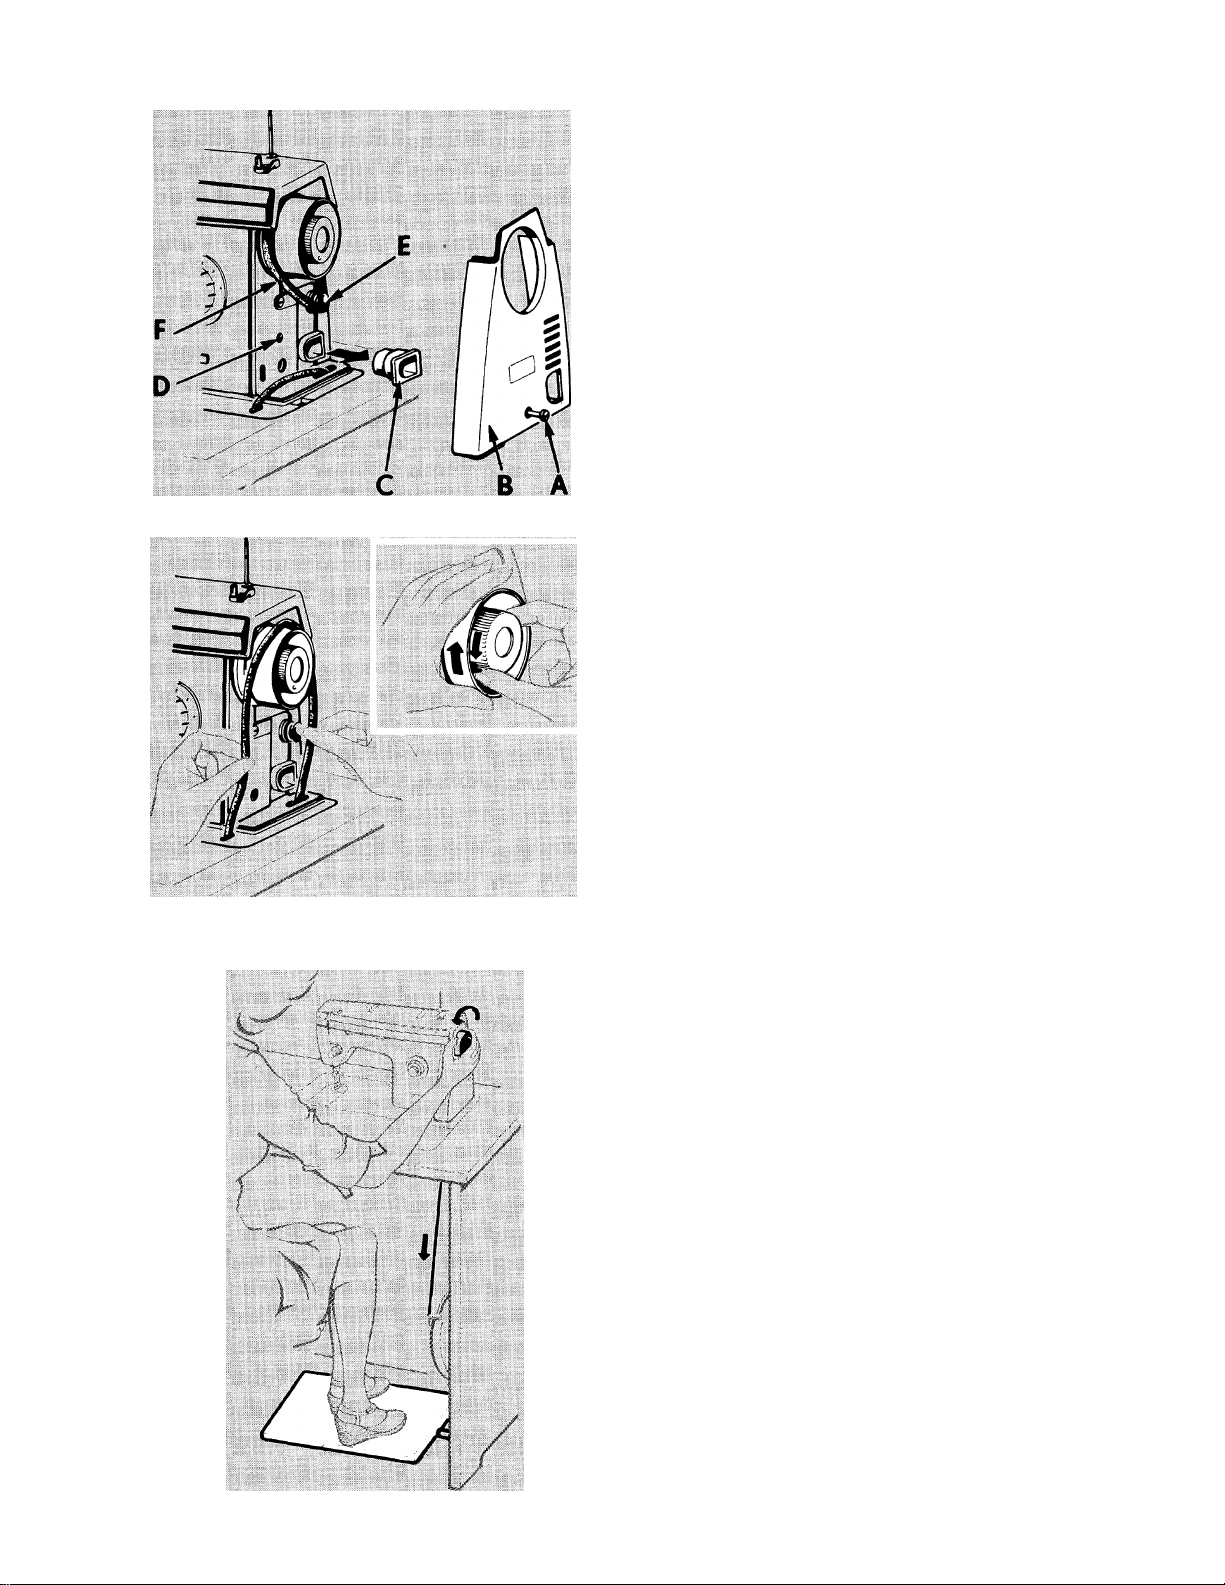
OPERATING MACHINE WITH
FOOT TREADLE
(model 7174 only)
Attaching Treadle Beit to Machine
• Loosen and remove screw A and remove
cover B.
• Disconnect motor plug adaptor C.
• Loosen motor bracket screw D one full turn,
raise motor at pulley E and slip motor belt F
off pulley. Remove motor belt from machine,
then tighten bracket screw D.
• Slip treadle belt around top of hand wheel
and into hand wheel groove.
• Replace cover B and tighten screw A.
Do not replace adaptor plug C.
Engaging and disengaging drive belt
Disengage belt when not in use.
To engage belt, turn hand wheel toward you
while guiding belt onto large wheel in cabinet
or stand.
To disengage belt, operate treadle slowly and
shift belt off to the right.
OPERATING THE TREADLE
Hold hand whell and loosen hand wheel knob
by turning it toward you. Place both feet on
treadle. Turn hand wheel toward you and allow
feet to move freely to follow motion of treadle.
The faster you move your feet, the faster the
machine will sew. Practice this motion until
you are able to regulate speed and are able to
start and keep hand wheel turning toward you.
Then tighten hand wheel knob and prac
tice treadle motion with fabric under the
presser foot.
17
Page 20

Il filo della bobina
Der Unterfaden
La macchina per cucire utilizza due fili per for
mare i punti della cucitura. Il filo superiore che
proviene dal rocchetto o spagnoletta e che
viene infilato nell’ago ed il filo inferiore che
proviene dalla bobina. La bobina deve essere
riempita prima di infilare la macchina.
AVVOLGIMENTO BOBINA
Operazioni preliminari
1. Sollevare il piedino e ruotare il volantino
verso sè stessi, finché l’ago non si trovi nella
sua posizione più alta.
2. Allentare la manopola A di disinnesto volan
tino ruotandola verso sè stessi con la mano
destra mentre si tiene bloccato il volantino
con la mano sinistra.
3. Aprire la placca scorrevole ed estrarre la
bobina.
4. Sistemare il feltrino sul portarocchetto.
Ihre Maschine näht mit zwei Fäden. Der Ober
faden kommt von der Garnrolle und wird durch
das Öhr der Nadel gefädelt. Der Unterfaden
kommt von der Klarsichtspule in der Spulen
kapsel. Unter dem Schieber Ihrer Maschine
befindet sich eine leere Spule.
Es empfiehlt sich, vor dem Einfädeln der Ma
schine die Spule aufzuspulen.
DAS AUFSPULEN
Vorbereitung
1. Den Nähfuß anheben und das Handrad auf
sich zu drehen, bis Nadel und Fadenanzugs
hebel ihren höchsten Punkt erreicht haben.
2. Die Handrad-Auslöseschraube A lösen,
indem man sie mit der rechten Hand auf
sich zu dreht und dabei das Handrad mit der
linken Hand festhält.
3. Die Schieberplatte öffnen und die Spule
herausheben.
4. Garnrollenfilz auf den Stift stecken.
Esecuzione
• Mettere un rocchetto sul portarocchetti
avendo l’avvertenza che il taglio di trattenu
ta del filo B si trovi verso l’alto. Se si stà
usando una spagnoletta (con interno un
tubo di cartone) sistemare sul portarocchet
to il prolungamento.
• Sistemare il filo attraverso i dischi di tensio
ne C deH’avvolgimento bobina e poi infilarlo
dentro al piccolo foro della bobina (dall’In
terno all’esterno).
• Mettere la bobina sul perno dell’aspatoio e
spingerla verso destra.
• Tenere il capo del filo, come indicato in fi
gura ed avviare la macchina. Tagliare il
capo del filo dopo che sono state avvolte al
cune spire di filo.
• Quando la quantità di filo occorrente è stata
avvolta (l’avvolgimento si arresta automati
camente quando la bobina è piena), fermare
la macchina e tagliare il filo.
Aufspulen
• Die Garnrolle so auf den Garnrollenstift
setzen, daß Fadenhalteschlitz B nach oben
zeigt. Wenn Sie eine hohe Garnrolle
verwenden, stecken Sie das GarnrollenVerlängerungsstück auf den Stift, um einen
gleichmäßigen Ablauf des Fadens zu
gewährleisten.
• Den Faden um die Spulerspannungsscheibe
C herum, dann in der Spule durch das klei
ne Loch von innen nach außen führen.
• Die Spule auf die Spindel setzen und nach
rechts drücken.
• Das Fadenende, wie veranschaulicht, halten
und die Maschine in Bewegung setzen.
Nach einigen Umdrehungen das Fadenende
abschneiden.
• Wenn genug Faden aufgespult ist (das
Aufspulen stoppt automatisch, wenn die
Spule voll ist), die Maschine anhalten und
den Verbindungsfaden durchschneiden.
• Spingere bobina e perno verso sinistra e to
gliere la bobina dal perno.
•
• Mantenere fermo il volantino e riavvitare
manopola di disinnesto volantino.
18
la
• Die Spule nach links bewegen und von der
Spindel abnehmen.
• Handrad festhalten und die HandradAuslöseschraube wieder festziehen.
Page 21

The bobbin thread
Your sewing machine uses two threads to
form a stitch. The upper thread comes from
the spool and is threaded through the eye of
the needle. The lower thread comes from the
bobbin. Wind the bobbin before threading the
machine.
WINDING THE BOBBIN
Preparation Steps
1. Raise the presser foot and turn hand wheel
toward you until needle is in highest position.
2. Loosen hand wheel knob A by turning it
toward you with the right hand while holding
hand wheel with the left hand.
3. Open slide plate and lift out bobbin.
4. Place spool pin felt on pin.
Winding Steps
• Place thread spool on spool pin with thread
retaining slit B on top. (Break paper at the
end of spool if necessary). If you are using
a tube of thread affix spool pin extension to
spool pin to ensure even flow of thread.
• Lead thread around bobbin winder tension
disc C and through small hole in bobbin
from inside out.
• Place bobbin on spindle and push bobbin to
right to engage bobbin winder.
• Hold thread end as shown and start the
machine. Cut off thread end after a few
coils have been wound.
• When required amount of thread has been
wound (winding will stop when bobbin is
full), stop the machine and cut connecting
thread.
• Push bobbin to left and remove bobbin from
spindle.
•
• Hold hand wheel and tighten hand wheel
knob.
19
Page 22

SISTEMAZIONE BOBINA
DAS EINFÄDELN DER SPULENKAPSEL
1.
Tenere la bobina in modo che ii filo si svol
ga nella direzione illustrata in figura ed
inserire la bobina nella scatola bobina.
2. Portare il filo nella tacca A, tirarlo verso il
dietro sotto la molla di tensione e dentro la
tacca B.
1. Die Spule so halten, daß der Faden in der
abgebildeten Richtung verläuft, und die
Spule in die Spulenkapsel einsetzen.
2. Den Faden in die Kerbe A ziehen, dann
nach hinten unter die Spannungsfeder und
zurück in den Schlitz B.
3. Tirare circa 10 cm. di filo sopra la bobina.
4. Chiudere la placca scorrevole sistemando il
filo nella fessura tra la placca d’ago e la
placca scorrevole.
3. Ungefähr 10 cm Faden quer über die Spule
ziehen.
4. Schieber schließen, und zwar so, daß der
Faden im Schlitz zwischen Stichplatte und
Schieber hindurchläuft.
20
Page 23

THREADING THE BOBBIN CASE
1. Hold bobbin so that thread unwinds in the
direction shown, and put bobbin into bobbin
case.
2. Pull thread into notch A, draw it back under
the tension spring and back into slot B.
3. Draw approximately 10 cm (4 inches) of
thread across the bobbin.
4. Close slide plate allowing thread to enter
slot between the needle plate and slide
plate.
21
Page 24

Come infilare ia macchina
Das Einfädeln des Garnes an der
Maschine
• Sollevare il piedino in modo da far allargare
i dischi della tensione superiore ed assicu
rarsi che l’ago si trovi nella posizione più
alta.
• Sistemare una spagnoletta o un rocchetto
sul porta rocchetto, sopra il feltrino, avendo
l’avvertenza di far si che il taglio
A, utilizza
to per fermare il filo quando non si adopera
il rocchetto, si trovi nella parte superiore.
• Prendere, con la mano destra, il filo per
sistemarlo nei vari punti seguendo lo sche
ma dell’infilatura.
• Agganciare il filo nel guidafilo 1.
• Passare il filo per il punto 2.
• Sistemare il filo nel gruppo tensione 3. Far
scivolare il filo fra i dischi metallici che for
mano il gruppo tensione.
Guidare il filo attorno al gruppo tensione ed
agganciare la molletta tirando il filo verso
l’alto (vedi illustrazione).
•
• Portare il filo verso destra per farlo nuova
mente passare per il punto 2.
• Guidare il filo attraverso il punto 4 e fino al
punto 6 come illustrato.
• Den Nähfußlüfter anheben, wodurch die
Oberfaden-Spannungsscheiben gelöst wer
den. Darauf achten, daß sich die Nadel und
der Fadenanzugshebel in ihrer höchsten
Stellung befinden.
• Die Garnrolle auf den Garnrollenstift über
die Filzunterlegscheibe setzen, wobei der
Fadenhalteschlitz A nach oben gerichtet
sein muß.
• Den Faden
in die obere Fadenführung 1
ziehen.
• Den Faden durch Punkt 2 ziehen.
• Die Oberfadenspannung 3 einfädeln. Faden
zwischen die Spannungsscheiben führen,
dann unten herum und wieder aufwärts -fest
nach oben ziehen-; Faden muß in der Kerbe
sitzen, oberhalb der Spannungsfeder.
• Faden nach rechts hinter Bügel 2 ziehen,
dann nach oben zum Fadenanzugshebel.
• Den Faden durch die markierten Punkte 4
bis 6 ziehen, wie veranschaulicht.
• Die Nadel von vorn nach hinten einfädeln
und ungefähr 10 cm Faden durch das
Nadelöhr ziehen.
• Infilare l’ago dal davanti verso il dietro e far
passare una decina di centimetri di filo at
traverso ia cruna dell’ago.
22
Page 25

Threading the machine
• Raise the presser foot to release tension
discs and make sure needle and take-up
lever are in highest position.
• Place spool pin felt from accessories over
spool pin, and place spool of thread on
spool pin with slit A on top.
•
• Keep right hand on spool of thread to hold
firmly in place while threading machine.
• Snap thread into upper thread guide 1.
• Pass thread through point 2.
• Thread the needle thread tension 3. Slide
thread over metal plate into tension discs.
Lead thread under needle thread tension and
through tension wire by firmly pulling thread
straight up.
• Pull thread to right behind point 2 guiding
thread up toward take-up lever.
• Pass thread through points 4 to 6 as shown.
• Thread needle from front to back and draw
about 10 cm (4 inches) of thread through eye
of needle.
23
Page 26

PER PORTARE SOPRA IL FILO
DELLA BOBINA
DAS HOCHZIEHEN DES UNTERFADENS
Dopo aver avvolta e sistemata la bobina ed
aver infilato l’ago, occorre portare sopra il filo
della bobina facendolo passare attraverso il
foro della placca ago.
1. Tenere il filo dell’ago leggermente con la
mano sinistra e ruotare a mano, lentamen
te, il volantino verso sé stessi in modo che
l’ago entri nella placca d’ago.
2. Continuare a ruotare il volantino e a tenere
il filo dell’ago finché l’ago non risalga por
tando su in un cappio il filo della bobina.
Nachdem Sie nun die Spule aufgespult und
die Nadel eingefädelt haben, müssen Sie den
unterfaden nach oben ziehen.
1. Halten Sie den Nadelfaden in der linken
Hand. Drehen Sie das Handrad langsam auf
sich zu, bis die Nadel in die Stichplatte ein
sticht.
2. Drehen Sie das Handrad weiter und halten
Sie den Nadelfaden, bis die Nadel sich
anhebt und dabei den Unterfaden in Form
einer Schlinge nach oben zieht.
3. Disfare il cappio con le dita.
4. Porre entrambi i fili dell’ago e della bobina
sotto il piedino e tirarli verso la parte po
steriore della macchina.
3. Die Schlinge dann mit den Fingern öffnen.
4. Den Unter- und Oberfaden unter dem
Nähfuß nach hinten legen.
24
Page 27

RAISING THE BOBBIN THREAD
Now that you have wound the bobbin and
threaded the needle, raise the bobbin thread
through the hole in the needle plate.
1. Hold needle thread lightly with left hand
and turn hand wheel slowly toward you so
that needle enters needle plate.
2. Continue turning hand wheel and holding
needle thread until needle rises and brings
up bobbin thread in a loop.
3. Undo the loop with your fingers.
4. Place both needle and bobbin threads
under the foot and draw them to back on
machine.
25
Page 28

3. impuntura diritta e Cuciture a zig-zag
3. Gerade Naht und Z
3. Straight and Basic Zig-Zag Stitching
Prima di spostare i selettori, assicurarsi che
l’ago sia fuori dal tessuto.
Come regolare i selettori per una
impuntura diritta
• Posizione ago:
• Ampiezza punto;
• Lunghezza punto: 0,5 -4 secondo il tessuto
nuit
Come regolare i selettori per un
punto zig-zag
• Selettore punti: ^
• Posizione ago:
• Ampiezza punto: :
Lunghezza punto: 0,5 - 4 secondo il tessuto
mi
Achten Sie vor dem Bewegen des Wählers
darauf, daß sich die Nadel über dem Stoff
befindet.
Einstellung der Wähler für eine
gerade Naht
• Stichlagenwähler: J.
• Stichbreitenwähler:
• Stichlängenwähler: 0,5 bis 4 je nach Stoffart
JL;-L
Ili
Einsteliung der Wähler für das
Zickzacknähen
• Stichmusterwähler: 5
• Stichlage:
• Stichbreite: ;
• stichlänge: zwischen 0,5 und 4, je nach Stoff
* •
Hl
1. SELETTORE AMPIEZZA PUNTO
Per eseguire uno zig-zag semplice o un punto
decorativo, si deve spostare il selettore am
piezza punto dalla posizione d’impuntura dirit
ta j su una delle cinque posizioni a destra. Più
il selettore verrà spostato verso destra, più il
punto sarà ampio.
2. SELETTORE POSIZIONE AGO
La maggior parte dei punti zig-zag si eseguo
no con l’ago al centroX
Le posizioni a sinistra X ® ^ destra JL , sono
usate per eseguire particolari lavori: ad esem
pio l’attaccatura dei bottoni.
3. SELETTORE PUNTI
Per ottenere lo zig-zag semplice porre il se
lettore su ^ .
26
1. STICHBREITENWÄHLER
Zur Herstellung eines einfachen Zickzacksti
ches oder einer Ziernaht muß der Stichbrei
tenwähler von seiner Geradstichstellung i auf
eine seiner vier anderen Stellungen bewegt
werden. Je weiter Sie den Wähler nach rechts
bewegen, desto breiter wird der Stich.
2. STICHLAGENWAHLER
In den meisten Fällen wird Zickzacknähen mit
zentraler X Stichlage ausgeführt.
Links- X und rechtsseitige X Stichlagen wer
den für Spezialarbeiten, wie z. B. Knopfan-
nähen, verwendet.
3. STICHMUSTERWÄHLER
Für einfache Zickzacknaht den Stichmuster
wähler auf 5 stellen.
Page 29

I
Before moving selectors, make sure needle is
out of the fabric.
How to set selectors for straight
stitching
• Needle Position: Lilia
• stitch Width: ili{|| | f ^
• Stitch Length: .5 - 4 to suit fabric
How to set selectors for zig-zag
stitching
• Pattern Selector: %
•
• Needle Position: Lilia
• Stitch Width:
• Stitch Length: .5 - 4 to suit fabric
1. STITCH WIDTH SELECTOR
To produce a plain zig-zag or a decorative
stitch, the stitch width selector is moved from
its straight stitch position i to any of its other
five positions. The further you move the
selector lever toward the right, the wider your
stitch will be.
2. NEEDLE POSITION SELECTOR
Most of your zig-zag stitching will be done in
centre Jm needle position.
Left 1. and right J, setting are used for
special stitch placement, as in button sewing.
III
3. STITCH PATTERN SELECTOR
For plain zig-zag stitching, slide pattern
selector to 5 .
27
Page 30

REGOLAZIONE PRESSIONE DEL PIEDINO
EINSTELLUNG DES NAHFUSSDRUCKES
Il regolatore della pressione del piedino con
sente di variare la pressione che il piedino
esercita sul tessuto. Una corretta pressione è
importante per un trasporto corretto ed unifor
me del tessuto e per evitare che il tessuto
stesso rimanga segnato.
La regolazione NORM (normale) è di uso ge
nerale e può essere adoperata per una grande
varietà di stoffe di varia grossezza e tipo di
tessitura. Vi sono altri punti di regolazione in
termedi al di sopra ed al di sotto di NORM.
Qualora sia necessaria una pressione partico
larmente elevata per cucire tessuti molto pe
santi o grossi, usare la regolazione MAX
(massimo).
Abbassare il piedino prima di regolare la pres
sione.
• Per aumentare la pressione ruotare il rego
latore da NORM verso MAX.
• Per diminuire ia pressione, ruotare il rego
latore da NORM verso ^
• Per rammendare disporre il regolatore su ^
REGOLAZIONE DELLA TENSIONE
DEL FILO DELL’AGO
Die Nähdruckwählscheibe reguliert den Druck,
den der Nähfuß auf den Stoff ausübt. Der rich
tige Druck ist deshalb wichtig, weil dadurch
der Stoff glatt und gleichmäßig transportiert
wird.
Die Einstellung NORM, (normal) ist eine Mehr
zweck-Einstellung, die für eine große Zahl von
Stoffen verschiedener Stärken und Gewebe
arten verwendet kann. Über und unter NORM,
sind weitere Einstellungen vorhanden Je nach
Art des von Ihnen verwendeten Stoffes muß
der Nähdruck entweder verstärkt oder
verringert werden.
Vor der Regulierung des Druckes den Nähfuß
herablassen.
• Um den Druck zu verstärken, die Wähl
scheibe von NORM, in Richtung MAX. dre
hen.
• Um den Druck zu verringern, die Wähl
scheibe von NORM, in Richtung ^ drehen.
• Zum Stopfen die Wählscheibe auf stel
len.
EINSTELLUNG DER
OBERFADENSPANNUNG
Una tensione corretta è indispensabile per ot
tenere una buona cucitura, poiché una tensio
ne troppo lenta o troppo forte rende la cucitu
ra debole oppure fa arricciare il tessuto.
La cucitura a zig-zag richiede una tensione
del filo d’ago inferiore a quella per la cucitura
diritta.
Eseguire un campione di prova con il tessuto
ed il filo che si intendono usare, in modo da
poter regolare la tensione correttamente.
Un punto perfetto, come mostrato nell’illustra
zione A, è eseguito con le tensioni, superiore
ed inferiore, perfettamente bilanciate ovvero il
filo dell’ago e quello della bobina sono anno
dati fra i due strati di tessuto senza che si for
mino cappi nè sopra nè sotto e senza che il
tessuto si errici.
Il regolatore di tensione del filo dell’ago regola
il grado di tensione di questo filo. Esso va di
sposto secondo il tipo di tessuto e di filo usati.
I numeri segnati sul regolatore eliminano di
dover procedere a tentativi quando si vuole ri
petere una tensione stabilita in precedenza.
Se il tessuto si arriccia B, diminuire la tensio
ne:*
Se i punti del campione di prova appaiono len
ti C, aumentare la tensione del filo dell’ago.
• Per diminuire la tensione, ruotare il regola
tore verso i numeri più bassi.
• Per aumentare la tensione, ruotare il regola
tore verso i numeri più alti.
28
Die richtig eingestellte Fadenspannung ist
wichtig, weil zuwenig oder zuviel Spannung
Ihre Nähte schwächen oder dazu beitragen
kann, den Stoff zu kräuseln.
Zickzacknähen erfordert weniger Oberfaden
spannung als Geradstichnähen.
Stellen Sie mit dem Faden und Stoff, den Sie
zu verwenden beabsichtigen, eine Musternaht
her, damit Sie die Spannung richtig einstellen
können.
Bei einem einwandfreien Stich verschlingen
sich Ober-und Unterfaden in der Mitte des
Stoffes. Es entstehen dann keine Schlingen
an der Ober-oder Unterseite des Stoffes und
der Stoff kräuselt sich nicht (siehe Abb. A).
Wenn der Stoff sich kräuselt B, die Spannung
vermindern. Wenn die Stiche zu lose aussehen
C, die Oberfadenspannung erhöhen.
• Um die Fadenspannung zu verringern, Wähl
scheibe auf eine kleinere Zahl drehen.
• Um die Fadenspannung zu verringern, Wähl
scheibe auf eine kleinere Zahl drehen.
Page 31

REGULATING PRESSER FOOT PRESSURE
The pressure dial regulates the pressure that
the presser foot exerts on the fabric. Correct
pressure is important because it enabies the
fabric to feed smoothly and evenly, without
being marked.
The NORM (normai) setting is an all purpose
setting that can be used for sewing a wide
variety of fabrics of different weights and
textures. Intermediate notched settings above
and below NORM (normal) are also provided.
When you need extra control to sew, regulate
the setting to heavier or lighter pressure to
suit the fabric being used.
Lower the foot before setting pressure.
• To increase pressure, turn dial from NORM
toward MAX.
• To decrease pressure, turn dial from NORM
toward .
• For darning, set dial on ^ .
ADJUSTING NEEDLE THREAD TENSION
Correct tension is important because too
much or too littie will weaken your seams or
cause your fabric to pucker.
Zig-Zag stitching requires less needle thread
tension than straight stitching.
Make a test sample with the fabric and thread
you plan to use so that you can adjust the
tension properly.
A well balanced stitch, as shown in illustration
A, wiii have the needle and bobbin threads
locked between the two layers of fabric with
no loops on top or bottom and no puckers.
The tension dial regulates the degree of
tension on your needle thread. Set it
according to the type of thread and fabric you
use. The numbers on the dial eliminate guess
work.
If the fabric puckers B, decrease tension, if
the stitches in your test sample look loose C,
increase needie thread tension.
• To decrease tension, turn dial to lower
number.
•
• To increase tension, turn dial to higher
number.
29
Page 32

REGOLAZIONE DELLA LUNGHEZZA
DEL PUNTO
DIE EINSTELLUNG DER
STICHLÄNGE
Il selettore della lunghezza del punto serve a
variare la lunghezza del punto. I numeri se
gnati sull’esterno del selettore esprimono la
lunghezza del punto in mm: quanto più basso è
il numero tanto più corto è il punto. In genere I
punti più corti sono più adatti per tessuti leg
geri mentre quelli più lunghi vanno bene per
tessuti più pesanti.
Lo spazio tra 0 e 1 sul selettore deve essere
usato per la regolazione del punto passato
che è costituito da una serie molto ravvicinata
di punti a zig-zag che formano una superficie
liscia e satinata.
Per regolare il selettore
• Ruotare il selettore in modo che la lunghez
za del punto desiderato si trovi in corrispon
denza del punto di riferimento ▼.
• Per diminuire la lunghezza del punto, ruo
tare il selettore verso destra su un numero
più basso.
• Per aumentare la lunghezza del punto, ruo
tare il selettore verso sinistra su un numero
più alto.
Der Stichlängenwähler reguliert die Stichlänge.
Die um den Rand der Scheibe befindlichen
Zahlen geben die Stichlänge in mm an. Je nie
driger die Zahl, desto kürzer der Stich. Im allge
meinen eignen sich kürzere Stiche am besten
für leichte Stoffe und längere Stiche für
schwere Stoffe.
Der Bereich zwischen 0 und 1 auf dem Wähler
wird für die Regulierung des ZickzackRaupenstiches verwendet, d.h. eng aneinan
derliegende Zickzackstiche, die eine glatte,
satinähnliche Oberfläche bilden.
Die Einstellung
• Wähler drehen, bis die gewünschte Stich
länge unter dem Symbol T eingestellt ist.
• Um die Stichlänge zu verkürzen, die Wähl
scheibe im Uhrzeigersinn auf eine kleinere
Zahl drehen.
• Um die Stichlänge zu erhöhen, die Wähl
scheibe im entgengesetzten Uhrzeigersinn
auf eine höhere Zahl drehen.
INVERSIONE DI MARCIA
Per eseguire la marcia indietro, premere II
bottone situato nel centro del selettore e te
nerlo premuto fino a che la cucitura a marcia
indietro non è stata completata; quindi rila
sciare il bottone. Il bottone può essere premu
to mentre si sta cucendo.
30
RUCKWARTSNAHEN
Zum Rückwärtsnähen den in der Mitte der
Wählscheibe befindlichen Knopf eindrücken
und festhalten, bis die Rückwärtsnaht fertig
genäht ist, dann den Knopf loslassen. Der
Rückwärtsstichknopf kann während des Nä
hens betätigt werden.
Page 33

ADJUSTING STITCH LENGTH
The stitch length dial controls the length of
stitches. The numbers around the edge of the
dial express stitch length in mm; the lower the
number, the shorter the stitch. Generally, short
er stitches are best for lightweight fabric;
longer stitches for heavy fabric.
The area between 0 and 1 on the dial, is used
for the adjustment of zig-zag satin stitching, a
series of closely spaced plain zig-zag stitches
that form a smooth, satin-like surface.
Setting the Dial
• Turn dial so that stitch length desired is
positioned under ▼ symbol.
0-1 1
• To shorten stitch length, turn dial toward
right to a lower number.
• To lengthen stitch length, turn dial toward
left to a higher number.
REVERSE STITCHING
For reverse stitching, depress push button
located in centre of dial, hold in until reverse
stitching is completed, then release push but
ton. Push button can be depressed while ma
chine is sewing.
31
Page 34

Come eseguire una cucitura
Das Nähen einer Naht
• Posizione ago: LiXiJ
Ampiezza punto:
• Lunghezza punto: secondo il tessuto
• Placca ago normale
• Piedino di pressioné normale
ÍIIIS
1. Alzare il piedino di pressione. Guidare il filo
sotto il piedino e verso il dietro lasciando
circa 10 cm. di filo
2. Posizionare l’ago a circa 1 cm. dal margine
del tessuto. Abbassare il piedino di pres
sione e lavorare in retromarcia quasi fino al
margine del tessuto per rinforzare i’inizio
della cucitura. Le istruzioni suli’uso della
marcia indietro sono indicate a pag. 30.
Cucire normalmente fino a al termine deila
cucitura e fermarsi prima del termine deila
linea di cucitura (non cucire oltre il margine
del tessuto).
• Stichlage: liliX
• stichbreite:
• stichlänge: je nach Stoffart
• Zickzackstichplatte
• Zickzacknähfuß
mt
1. Nähfuß anheben.
Die Fäden unter dem
Nähfuß ca. 10 cm
nach hinten ziehen.
2. Die Nadei ungefähr 1 cm vor der Stoff
kante einstechen lassen. Dann den Nähfuß
senken und zur Verstärkung der Naht fast
bis zur Kante des Stoffes zurücknähen, um
dann wieder in die entgegengesetzte
Richtung zu arbeiten. Ausführliche Informa
tionen über das Rückwärtsnähen finden Sie
auf Seite 30.
Vorwärtsnähen bis zum Ende der Naht,
aber rechtzeitig vor dem Ende der Nahtlinie
stoppen (nicht über die Stoffkante hinaus
nähen).
3. Sollevare l’ago ruotando il volantino verso
sè stessi. Premere ii bottone per eseguire la
marcia indietro e cucire per circa 1 cm.
rinforzando in tal modo il termine della cuci
tura.
4. Soilevare l’ago ruotando il volantino verso
sè stessi; alzare il piedino e togiiere il tes
suto guidandolo verso il dietro e a sinistra.
Tagliare i fiii con il tagliatilo situato dietro la
barra di pressione.
COME MANTENERE LA CUCITURA
DIRITTA
Per mantenere diritta la cucitura, servirsi di
una deile linee di guida numerate segnate suiia piacca d’ago. In figura è espressa la distan
za di ogni linea guida.
3. Heben Sie die Nadel an durch Drehen des
Handrades auf sich zu.
Den Rückwärtsknopf drücken und ca. 1 cm
zurücknähen, um das Ende der Naht zu
befestigen.
4. Nadel durch Zu-sich-drehen des Handrades
anheben, ebenfalls den Nähfuß heben, und
dann den Stoff nach hinten iinks wegzie
hen.
Zuletzt Fäden mit Hilfe des Abschneiders
an der Stoffdrückerstange abschneiden.
ERZIELEN EINER GERADEN NAHT
Um eine gerade Naht zu erhalten, benutzt man
am besten eine der numerierten Führungsli
nien auf der Stichplatte, deren Abstände in
der Zeichnung dargestellt sind.
ATTENZIONE: Mentre si usa la macchina si
deve porre attenzione al lavoro che si sta ese
guendo osservando il movimento dell’ago e l’a
vanzamento del tessuto.
32
ACHTUNG: Wegen der Auf- und Abbewegung
der Nadel müssen Sie vorsichtig arbeiten und in
dem Nähbereich größte Aufmerksamkeit walten
lassen, wenn die Maschine in Betrieb ist.
Page 35

Sewing a seam
« Needle Position; JL ; X i Jt
• Stitch Width: jjllll | f 2|
» Stitch Length: To suit fabric
« General Purpose Needle Plate
• General Purpose Foot
1. Raise prosser foot. Pull thread back under
presser foot leaving at least 10 cm (4
inches) of thread.
2. Position needle approximately 1 cm (1/2
inch) from fabric edge. Then lower presser
foot and backstitch almost to the edge of
the fabric for reinforcement by stitching in
reverse direction. For additional information
on reverse stitching refer to page 29.
Stitch forward to end of seam and stop ma
chine before the end of stitching line. (Do
not sow beyond edge of fabric).
«M 13/4*’I
19
m» I5/8"1
IS
m« 0/2”)
12
«« <3/8”i
S
3. Raise needle by turning hand wheel toward
you.
Press reverse stitch push button and
back stitch 1 cm (1/2 inch) to reinforce
end of stitching.
4. Raise needle by turning hand wheel toward
you.
Raise foot and remove fabric by
drawing it to the back and to the left. Cut
threads on thread cutter at rear of presser
bar.
KEEPING THE SEAM STRAIGHT
To keep the seam straight, use one of the
numbered guidelines on the needle plate. The
dimensions they represent are shown in the il
lustration.
CAUTION: Because of the up and down move
ment of the needle, you must work carefully and
watch the sewing area when operating the ma
chine.
33
Page 36

Punto passato
Raupennähte
Fare prima un campione di prova in moda da
poter regolare opportunamente la lunghezza
del punto e la tensione del filo. I tessuti molto
soffici possono richiedere una felina di rinfor
zo, in modo da assicurare la buona esecuzio
ne del lavoro. A questo scopo si possono uti
lizzare teline di organdis o di batista.
Accessori e regolazioni dei selettori
• Selettore punti; ^
• Selettore posizione ago su: J.
• Selettore ampiezza punto su; j
• Lunghezza punto: da 0 a 1
• Placca ago normale
• Piedino speciale
.........
I
Fertigen Sie vor der Herstellung einer Raupen
naht eine Probearbeit an, damit Sie die Stich
länge und Fadenspannung richtig einstellen
können. Bel dünnen Geweben empfiehlt sich
die Verwendung einer Unterlage aus steifem
Organdy oder Leinen.
Zubehör und Wählereinstellungen
• Stichmusterwähler:
• Stitchlage: J.
• Stitchbreite: |
• Stichlänge: 0-1
• Zickzackstichplatte
• Universal-Nähfuß
mi:
REGOLAZIONE DELLA LUNGHEZZA
DEL PUNTO
• Predisporre il selettore della lunghezza del
punto su 1.
• Far funzionare lentamente la macchina e
gradualmente ruotare il selettore verso de
stra finché i punti non siano debitamente
ravvicinati e formino una superficie unifor
me.
REGOLAZIONE DELLA TENSIONE
DEL FILO DELL’AGO
Il punto passato richiede una tensione inferio
re a quella dell’impuntura diritta o dello zig
zag aperto. Inoltre, quanto più ampio è il punto
tanto più leggera deve essere la tensione.
Esaminare il punto sul campione di prova, se
il tessuto si è arricciato (figura A) diminuire la
tensione del filo dell’ago ruotando il regolatore
della tensione su numeri più bassi fino ad
ottenere un punto come in figura B.
EINSTELLUNG DER
STICHLÄNGE
• Stichlängenwählscheibe auf 1 drehen.
• Maschine langsam laufen lassen und die
Stichlängenwählscheibe im Uhrzeigersinn
drehen, bis die Stiche eng aneinanderliegen
und eine glatte Fläche bilden.
EINTELLUNG DER
OBERFADENSPANNUNG
Für Raupennähte ist eine lockerere
Fadenspannung als für Geradstich oder offene
Zickzacknähte erforderlich. Je breiter die
Raupennaht, desto lockerer muß die
Spannung sein. Beobachten Sie die Naht in
Ihrer Probearbeit. Wenn sich der Stoff kräuselt
(Abb. A), verringern Sie die Spannung, indem
Sie die Spannungswählscheibe auf eine nie
drigere Zahl drehen. Eine richtige Raupennaht
ist in Abb. B dargestellt.
34
Page 37

Satin stitching
When you wish to produce a satin stitch make
a test sample first so you can adjust stitch
length and thread tension property. Soft fabric
may require a backing to ensure a firm stitch.
Crisp organdy, lawn or a fusible interfacing are
suitable for this purpose.
Accessory and Selector Settings
• Pattern Selector;
» Needle Position: X. ; X • «1
• Stitch Width: i |f||
• Stitch Length: 0 to 1
« General Purpose Needle Plate
• Special Purpose f-oot
ADJUSTING STITCH LENGTH
• Turn length selector dial to 1.
• Run the machine at a slow speed and grad
ually turn stitch length dial toward right until
stitches are closely spaced and forrn- a
smooth surface.
ADJUSTING NEEDLE THREAD
TENSION
Satin stitching requires less tension than
straight stitching or open zig-zag stitching.
Furthermore, the wider the stitch, the lighter the
tension on the thread must be. Notice the
stitching on your sample, if the fabric is
puckered {illustration A), lower the needle
thread tension by turning the tension dial to a
lower number. A correct satin stitching is
shown in illustration 8.
35
Page 38

Applicazioni con punto diritto
Anwendungen mit gerade Naht
RAMMENDO
Con cerchietto per ricamo
• Posizione ago: i.
• Ampiezza punto:
• Lunghezza punto: 0
• Molletta solleva placca ago (con Modello 7174)
• Copri trasportatore a scatto (con Modello 7184)
• Nessun piedino di pressione
• Barra di pressione abbassata
111
• Inserire la molletta solleva placca ago come
spiegato a pag. 10 (copri trasportatore a
scatto con Modello 7184).
• Rifilare i bordi dell’area da rammendare e si
stemare questa parte ai centro dei cerchiet
to per ricamo disegnato apposta per poter
essere usato con la macchina per cucire.
STOPFEN
Mit Stickrahmen
• Stichlage: J» ;X: J.
• Stichbreite: :|:||| ^ ^ ^
• Stichlänge 0
• Stichplattensteg (mit 7174)
• Einrastbare Transporteurabdeckplatte (mit 7184)
• Kein Nähfuß
• Stoffdrückerstange senken
• Den Stichplattensteg einsetzen wie auf Sei
te 10 gezeigt (Einrastbare Trasporteurabdeckplatte mit 7184 Modell).
• Verschlissene Kanten abschneiden und die
Stopfplatte in die Mitte des für maschinellen
Gebrauch vorgesehenen Stickrahmens ein
spannen.
• Sistemare il cerchietto sotto l’ago e abbas
sare la barra di pressione per ristabilire la
tensione del filo. Tenere lento il filo dell’ago
con la mano sinistra, ruotare il volantino per
portare il filo della bobina sopra il tessuto.
Tenere entrambi i capi del filo ed abbassare
l’ago nel tessuto. Tagliare i capi del filo vici
no al tessuto.
• Eseguire sul contorno dell’area da rammen
dare una fila di punti quale rinforzo.
• Cucire l’apertura muovendo il cerchietto
sotto l’ago in modo che formi un angoio da
sinistra verso destra. Tenere le linee dei
punti molto vicine e di uguale lunghezza.
Quando si è coperta tutta l’apertura, ripas
sare con deile linee trasversali.
Questo metodo di controilo del movimento del
tessuto tramite un cerchietto può essere adot
tato per eseguire lavori di ricamo o mono
grammi.
• Den Stickrahmen unter die Nadel bringen
und die Stoffdrückerstange herablassen.
Oberfaden mit der linken Hand festhaiten,
Handrad auf sich zu drehen und Unterfaden
nach oben durch das Nähgut ziehen. Beide
Fadenenden festhaiten und wenige Stiche
nähen. Überhängende Fäden abschneiden.
• Zur Verstärkung rings um die Stopfstelle mit
Geradstich nähen.
• Dann vor- und rückwärts über die Stopfstel
le nähen, indem man den Rahmen von vorne
links nach hinten rechts hin und her bewegt.
Die Stichreihen müssen eng aneinanderlie
gen und von gleichmäßiger Länge sein.
Wenn die Stopfsteile ausgefüllt ist, quer
darüber hinwegnähen.
Diese Methode zur Kontrolle der Bewegung
des Stopfens mittels eines Stickrahmens kann
für Stick- und Monogrammarbeiten verwendet
werden.
36
Page 39

Applications with straight stitching
DARNING
With Embroidery Hoop
• Needle Position: L • X: J.
• Stitch Width: ^ ^ ^
• Stitch Length: 0
• Needle Plato Raising Shim (with model! 7174)
• Snap-in Feed Cover (with model 7184)
• No Prosser Foot or Prosser Foot Shank
« Presser Bar; Lowered
. .. . ■ . .
• Insert needle plate raising shim as instruct
ed on page 11 (Snap-in Feed Cover with
7184 Model).
« Trim ragged edges from area to be darned
and centre worn section in embroidery hoop
designed for machine use.
• Position hoop under the needle and lowor
presser bar to engage tension. Hold needle
thread loosely with left hand, turn hand
wheel over and draw bobbin thread up
through fabric. Hold both thread ends and
lower needle into fabric. Take a few stitches
to secure.
Snip off thread ends close to fabric.
• Outline area to be darned with straight
stitches for reinforcement.
• Stitch across opening, moving hoop under
needle at a slight angle from lower left to
upper right. Keep lines of stitching closely
spaced and even in length. When opening is
filled, cover area with crosswise lines of
stitching.
This method of controlling fabric movement
with an embroidery hoop may be used to do
embroidering or monogramming.
37
Page 40

APPLICAZIONE DELLE CERNIERE
EINNAHEN VON REiSSVERSCHLUSSEN
• Posizione ago: i» • X : »I
• Ampiezza punto:
m Lunghezza punto: secondo il tessuto
® Placca ago normale
• Piedino per cerniere
till
Sistemazione cerniere
Quando la cerniera è alla destra dell’ago
• Prima di inserire il piedino per cerniera, far
scorrere verso sinistra il blocco di regolazio
ne (illustrazione A).
• Agganciare il piedino come da istruzioni a
pag. 8.
• Stabilire la posizione del piedino abbassan
do l’ago nell’incavo laterale del piedino
stesso, in modo che non batta contro di
esso.
Quando la cerniera è sulla sinistra dell’ago,
sistemare nello stesso modo il piedino sulla
destra (illustrazione B).
• Stichlage: X ; X : A
• Stichbreite: i j : {|| f ^ ^
• Stichlänge: je nach Stoffart
• Zickzackstichplatte
• Reißverschlußnähfuß
Einstellen des Reißverschlußnähfußes
Wenn der Reißverschluß rechts von der Nadel
liegt.
• Vor dem Anbringen des Reißverschlußfußes
den Feststellblock nach links schieben
(Zeichnung A).
• Reißverschlußfuß einrasten (Seite 8).
• Prüfen Sie die Lage des Fußes durch Sen
ken der Nadel in die seitliche Kerbe des Fu
ßes, daß die Nadel den Fuß nicht berührt.
Falls der Reißverschluß links von der Nadel
liegt, stellen Sie den Nähfußblock in entspre
chender Weise nach rechts (Zeichnung B).
Applicazioni con punto zig-zag
• Selettore punti: 5
• Selettore posizione ago su:
• Selettore ampiezza punto: secondo il tessuto
• Lunghezza punto: tra 0 e 1
• Placca ago normale
• Piedino speciale
• Ritagliare accuratamente, vicino alla cucitu
ra a punto diritto precedentemente eseguita,
il tessuto eccedente.
• Predisporre la macchina come detto.
• Cucire a punto passato su tutto il profilo del
disegno. La rifinitura apparirà uniforme e sa
tinata e non occorrerà ulteriormente rifilare.
38
Applikationen mit Zickzackstich
• Stichmusterwähler: ^
• Stichlage: X iX; X
• Stichbreite: Je nach Stoff
• Stichlänge zwischen 0 und 1
• Zickzackstichplatte
• Universal-Nähfuß
• Die überstehenden Ränder dicht an der Geradstichnaht des Musters abschneiden.
• Maschine einstellen, wie oben empfohlen.
• Die Kante des Musters mit Zickzackstich
umnähen. Man erzielt auf diese Weise eine
glatte, feste Kante, die man nicht mehr zu
beschneiden braucht.
Page 41

ZIPPER INSERTION
« Needle Position: 1» i X: X
« Stitch Width: ; j
9 stitch Length: To suit fabric
« General Purpose Needle Plate
® Zipper F-oot
Adjusting the Zipper Foot
When the zipper is to the right of the neecHe.
e Before attaching the zipper foot slide the
adjusting spacer to the left (illustration A).
# Snap on the zipper foot as instructed on
page 9.
e Check the position of the foot by towering
the needle into the side notch of the foot,
making sure it clears the foot.
When zipper is to the left of the needle, adjust
the foot to the right of the needle in the same
way (illustration B).
Applications with zig-zag stitching
APPLIQUÉ
9 Pattern Selector: |
9 Needle Position; i
9 Stitch Width: To suit fabric
9 Stitch Length: Between 0 and 1
9 General Purpose Needle Plate
1
9 Special Purpose Foot
« Trim outside fabric edges close to straight
stitch outline of design.
9 Set machine as code recommends.
9 Overedgo the design with appliqué stitching.
This step will produce a smooth, lustrous
finish that requires no additional trimming.
39
Page 42

COSTURE PER BIANCHERIA
WASCHENAHTE
Se si cuce un tessuto di maglia di nylon, usa
re un ago tipo 2045.
» Selettore punti: $
® Selettore posizione ago su: j.
• Selettore ampiezza punto su: ;
• Lunghezza punto: da 1 a 1,5
• Placca ago normale
• Piedino normale
1
I
• Eseguire un’impuntura diritta sul rovescio
del tessuto.
• Stirare ambedue i margini sullo stesso lato.
• Sulla parte diritta, eseguire una cucitura con
un punto a zig-zag di media larghezza in
modo che l’ago entri alternativamente nella
linea di cucitura, precedentemente fatta, e
nei margini della cucitura stessa (usare uno
zig-zag di ampiezza 1 o 1,5).
Zum Nähen von Nylon-Stoff setzen Sie vor
dem Beginn des Nähvorgangs die Nadel Typ
2045 ein.
• Stichmusterwähler:
• Stichlage:
• Stichbreite: •
• Stichlänge 1 bis 1,5
• Zickzackstichplatte
• Zickzacknähfüß
lii
I
• Mit Geradstich eine Nahtlinie auf der Unter
seite des Stoffes nähen.
• Bügeln Sie beide Nahtzugaben in dieselbe
Richtung.
• Auf der Vorderseite des Stoffes nun eine
schmale Zickzacknaht nähen, wobei die Na
del abwechselnd über die Nahtlinie und das
umgebügelte Saummaterial sticht; (geringe
Stichbreite, Stichlänge 1 bis 1,5).
TESSUTI CHE SFILACCIANO
• Selettore punti: ^
• Selettore posizione ago su: J« : J> : J.
• Seiettore ampiezza punto su: | {||:f ^ ^
• Lunghezza punto: da 1 a 3, secondo il tessuto
• Placca ago normale
• Piedino normale
Metodo 1 - Rifinitura con margini ritagliati
• Regolare l’ampiezza e la lunghezza del pun
to in modo da ottenere un punto sufficientemente ’’aperto” che non lasci sfilacciare i
margini. Evitare punti troppo fitti.
• Cucire vicino ai margini di cucitura e quindi
rifilare accuratamente dopo aver cucito.
Metodo 2 - Rifinitura o sopraggitto
• Regolare la tensione del filo dell’ago, l’am
piezza e la lunghezza del punto secondo il
tessuto.
• Rifilare accuratamente i margini della cuci
tura.
• Sistemare il margine rifilato sotto il piedino
ed eseguire il sopraggitto come illustrato.
40
ZICKZACKKANTENNÄHTE
• Stichmusterwähler: ^
• Stichlage: J. ; X ; ^
• Stichbreite: | {|
• Stichlänge: 1 bis 3 je nach Stoffart
• Zickzackstichplatte
• Zickzacknähfuß
Methode 1: Beschneiden der Nähkante nach
dem Nähen
• Stellen Sie die Stichbreite und Stichlänge
so ein, daß Sie einen möglichst ’’offenen”
Stich zum Versäubern der Kanten erhalten,
vermeiden Sie hartes Übernähen.
• Nähen Sie so nah wie möglich an der Kante
der Nahtzugabe, und beschneiden Sie nach
dem Nähen die Stoffkante gleichmäßig.
Methode 2: Überstechen der Stoffkante
• Oberfadenspannung, Stichbreite und Stich
länge nach Stoffart einstellen.
• Stoffkanten gleichmäßig sauber abschneiden.
• Die abgeschnittene Kante unter den Nähfuß
legen, und die Nahtzugabe übernähen wie
veranschaulicht.
Page 43

LINGERIE SEAMS
When seaming nylon tricot insert a 2045
needle in the machine before you begin to
sew.
• Pattern Selector; %
0 Needle Position: X
• Stitch Width; i f
ft Stitch Length: 1 to 1.5
ft General Purpose Needle Plate
ft General Purpose Foot
X; J.
ft Straight stitch the seam line on wrong side
of fabric.
ft Press both seam ailowances in the same
direction.
ft From the right side, topstitch with narrow
zig-zag stitching, letting the needle alternate
ly enter the seam line and seam thickness.
(Stitch width narrow; stitch length 1 to 1.5).
ZIG-ZAG SEAM FINISHES
ft Pattern Selector: %
ft Needle Position; X • X: J,
9 Stitch Width; i | j
ft Stitch Length: 1 to 3 to suit fabric
ft General Purpose Needle Plate
ft General Purpose Foot
Method 1 - Trimmed Seam Finish
ft Adjust stitch width and length to give you
the most «open» stitch that will secure the
fabric edge; avoid harsh overstitching.
ft Stitch near the edge of seam allowance,
and trim seam edges evenly after stitching.
Method 2 - Overedged Seam Finish
ft Adjust needle thread tension, stitch width,
and stitch length to suit fabric.
ft Trim seam edges evenly.
ft Place trimmed seam under the foot and
overedge the seam allowance as illustrated.
41
Page 44

k Pi
4. Maschiiienstichmuster
Tavola dei punti
La tavola dei punti qui sotto
riportata vi aiuterà a selezio
nare il punto adatto al tipo di
tessuto ed ai lavoro da ese
guire.
vvvvvvvv
Zig-Zag
Zig-Zag
Zig-Zag
lachine
Stichmuster
Übersicht
Diese Tabelle wird dabei
behilflich sein, das richtige
Stichmuster für Ihren Stoff
und Ihre Nähtätigkeit zu
finden.
.5 -4
ilN
[krt.fet'äi
Stitch pattern chart
The table below will help you
to select the correct pattern
for your fabric and sewing job.
« Usato per cuciture efastiche in genere barret
te, fiiiniture, ricamo e appiicazioni
# Bel altgomeinen Arbeiten wie Strerchnähte,
Riegel, Kanten nähte, Stickereien und Appllka*
tionen'
0 Used for general purpose stretch sewing, bar
tacks, finishing seams, embroidery and appli
que.
¡mmmrni
42
Punto invisibile
Bllnclstich
Blindstitch
Multi zig-zag
Trikotstich
Muitì-Zig-Zag Stitch
Punto elastico
TIastik-Zickzackstich
Elastic Stretch Stitch
1-2.5
.5-1
lili
i iis
Barretta colorata
Farbige
1-1.5 Markierung
Coloured
Bar
• » 0 Per rifiniture ed esecuzione costure
: ; 0 Zum Baunìen und Hersteilen von Leiternahten
0 Por blindhernming and ladder seams
• Per riparare, uaire e rinfofzafe
• Zuip Awabessarn, Verbinden iind Verstarken
• bets you mend, join and reinforce
• Per tessuti eiasticizzati ed appitc. elastici
• Für Stretcb-Materiaiien
• Por stretch fabrics and elastic
Page 45

REGOLAZIONE SELETTORE PUNTO
EINSTELLEN DER MUSTERWÄHLER
Prima di muovere i selettori, assicurarsi che l'a
go sia fuori dal tessuto.
I
• Predisporre il selettore ampiezza a i . Posi
zionare il selettore punti sul tipo di punto
desiderato.
• Regolare la lunghezza del punto, la posizio
ne dell’ago, l’ampiezza del punto e la ten
sione del filo, come indicato nelle pagine
seguenti e nella tavola dei punti.
SETTING PATTERN SELECTOR
Before moving pattern selectors, make sure
needle is out of fabric.
• Slide stitch width selector to i, then set the
pattern group selector as required, under
the desired stitch.
• Adjust stitch length, stitch placement, stitch
width and needlethread tension as instruc
ted on the following pages and on the stitch
pattern chart.
Acten Sie vor dem Bewegen der Wähler darauf,
daß die Nadel sich nicht im Material befindet.
• Schieben Sie den Stichbreitnwähler auf
das I . Symbol, und setzen Sie dann den
Stichgruppenwähler wie erforderlich unter
den gewünschten Stich.
• Stellen Sie die Stichlänge, Stichver
lagerung, Stichbreite und Nadel fadenspannung nach den Hinweisen auf den
nächsten Seiten und nach der StichmusterTabelle ein.
I
43
Page 46

Come cucire su tessuti eiastici
Sticheinsteiiung nach
Stretchstoff-A rt
COME GUDARE E SOSTENERE
IL TESSUTO
Per la maggior parte dei tessuti elastici o di
maglia è sufficiente guidare il tessuto davanti
al piedino quando si esegue un punto elastico.
Tuttavia alcuni tessuti - maglia di nylon e tes
suti elasticizzati, per esempio - richiedono di
essere sostenuti.
• Per maglia di nylon e tessuti simili di maglia
sintetica, dare una leggera tensione soste
nendo la cucitura davanti e dietro al piedino
mentre si cuce (figura A).
• Sui tessuti elasticizzati, pizzi elastici e tes
suti di maglia particolarmente elastici, dare
una tensione ben ferma davanti e dietro al
piedino in modo da tendere la cucitura men
tre si eseguono i punti (figura B).
ATTENZIONE: Non tirare il tessuto mentre si
cuce perchè ciò può causare la rottura dell’ago.
FÜHREN DES STOFFES
Die meisten Stretch- und Wirkgew/ebe müssen
beim Nähen von Stretchstichen nur vor dem
Nähfuß geführt werden. Einige Stoffarten, z.B.
Nylontrikot und elastische Stoffe, müßen wäh
rend des Nähvorgangs unterstützt werden.
• Nylontrikot und ähnliche synthetische Ge
webe müßen durch Halten der Stoffkante
vor und hinter dem Nähfuß leicht gespannt
werden, während man näht. (Zeichnung A).
• Elastische Stoffe, Stretch-Spitze und gewirk
te Stoffe mit einer besonders großen Dehn
barkeit erfordern eine festere Straffung
während des Nähens, damit die Naht sich
dem elastischen Gewebe anpassen kann.
(Zeichnung B).
BEACHTE: Ziehen Sie während des Nähens
nicht einseitig am Stoff, da die Nadel sonst
verbiegen oder brechen kann.
REGOLAZIONE DELLA PRESSIONE
PER I TESSUTI DI MAGLIA ED ELASTICI
Alcuni tessuti di maglia o elasticizzati richie
dono, a causa della loro struttura, una pres
sione più o meno forte per poter essere tra
sportati in maniera scorrevole ed uniforme.
• Per i tessuti di maglia spessi, soffici o molto
elasticizzati, diminuire la pressione ruotando
il regolatore da NORM verso M .
•
• Per i tessuti di maglia di nylon, ciré e tessuti
simili di maglia sintetica dura, aumentare la
pressione ruotando il regolatore da NORM
verso MAX.
44
EINSTELLUNG DES NAHDRUCKS BEIM
NÄHEN VON STRETCH-UND WIRKGEWEBEN
Manche gewirkte und elastische Stoffe erfor
dern, bedingt durch ihre besondere Struktur,
entweder mehr oder weniger Nähdruck als
normal (NORM), um einen glatten und gleich
mäßigen Transport des Nähgutes zu garan
tieren.
• Bei dicken, weichen oder sehr dehnbaren
Geweben den Nähdruck durch Drehen der
Wählscheibe von NORM, auf ö verringern.
• Bei Nylontrikot, Ciré und ähnlich hartflächi
gen Synthetiks sollte der Nähdruck durch
Drehen des Wählers von NORM, auf MAX.
erhöht werden.
Page 47

Adjusting stitches to suit
stretch fabrics
GUIDING AND SUPPORTING FABRIC
Most fabrics of stretch or knit construction
need only to bo guided in front of the presser
foot when you use one of the stretch stitches.
Some fabrics ~ nylon tricot and elasticized
fabrics, for example - do require support while
being stitched.
• For nyion tricot and similar synthetic knits,
apply gentle tension by holding the seam in
front and back of the pressor foot as you
sew (illustration A).
• For elasticized fabric, stretch lace, and knits
with an unusual amount of elasticity, apply
firm tension in front and back of the presser
foot to stretch the seam as the stitches are
being placed (illustration 8).
CAUTION: Do not pull the fabric while you are
stitching as this may deflect the needle, causing
it to break.
B
ADJUSTING PRESSURE WHEN
SEWING KNIT AND STRETCH FABRIC
Some knit and stretch fabrics, because of
their structure, require either more of less than
normal (NORM) presser bar pressure to feed
smoothly and evenly.
« For thick, soft or very stretchy knits, de
crease pressure by turning dial from NORM
toward Jli .
9 For nylon tricot, ciré and similar hard sur
face synthetic knits, increase pressure by
turning dial NORM toward MAX.
45
Page 48

CUCITURE ELASTICHE (Punto Alpino)
Uno stretto e ravvicinato punto elastico è l’i
deale per cucire tessuti di maglia ed elasticiz
zati. Esso può essere adoperato al posto del
l’impuntura diritta in modo che il tessuto man
tenga la sua elasticità ed è particolarmente
indicato in quei punti, come il giro manica ed il
cavallo del pantaloni, laddove una certa ela
sticità è essenziale. Il punto elastico è inoltre
ideale sia per l’applicazione di elastici sia
come punto decorativo.
ELASTISCHE STRETCHNAHTE
Ein schmaler, eng aneinanderliegender Ela-
stik-Zickzack-Stich eignet sich ganz beson
ders für gewirkte und elastische Stoffe. Er
kann anstelle des Geradstiches verwendet
werden, damit der Stoff seine Elastizität be
hält und ist für Unterarm- und Schrittnähte,
die nachgeben müssen, in erster Linie empfe
hlenswert zum Annähen von Gummiband und
für Zierarbeiten.
Cuciture elastiche normali
• Selettore punti: Punto elastico
• Selettore posizione ago su: 1
• Selettore ampiezza punto su: | Barretta colorata
• Lunghezza punto: da 1 a 1,5
• Placca ago normale
• Piedino normale
• Fare un campione di prova.
• Imbastire il capo sulla linea di cucitura agendo
come di consueto.
• Dopo aver fatto le necessarie prove, sistemare
il tessuto sotto al piedino. Cucire in modo che i
punti a sinistra penetrino lungo la linea di
cucitura imbastita.
/vA
1:1
Einlache Stretchnähte
• Stichmusterwähler: Elastik-Zickzack-Stich /vA
• Stichlage: 1:1:1
• Stichbreite: | Farbige Markierung
• Stichlänge 1-1,5
• Stichplatte für allgemeine Arbeiten
• Nähfuss für allgemeine Arbeiten
* •
• Zunächst eine Probearbeit anfertigen.
• Die Kleidungsstücke zusammenheften und in
der üblichen Weise anpassen.
• Nach Vornahme der erforderlichen Einstel
lung die Naht unter den Nähfuss legen und so
nähen, dass die Einstiche auf der linken Seite
des Musters die Heftnaht treffen.
• Stirare dopo aver cucito, e tagliar via il tessuto
eccedente, vicino alla cucitura. Quando si è
fatta una cucitura soggetta a tensione, non
tagliare l’eccedente tessuto e stirare la cuci
tura aprendo il tessuto nel modo usuale.
Questo punto può essere utilizzato anche per
cucire e sopraggittare con una sola operazione.
Per questa operazione seguire le seguenti istru
zioni.
• Fare un campione di prova.
• Imbastire il capo sulla linea di cucitura lascian
do cm. 1,5 per la cucitura. Provare il capo e fare
le eventuali correzioni.
• Dopo le correzioni tagliare lungo il bordo della
linea di cucitura a 5 mm. dalla linea stessa.
• Sistemare il tessuto sotto al piedino seguendo
la linea di cucitura in modo che i punti a zig-zag
cadano oltre il bordo del tessuto.
46
• Nach dem Nähen überbügeln und die Saum
zugabe beschneiden.
Dieser Stich kann auch dazu verwendet werden,
Nähte in einem Arbeitsgang zu nähen und zu
versäubern.
Dies geschieht wie folgt:
• Fertigen Sie zunächst eine Probenaht an.
• Die Kleidungstücke zusammenheften und da
zu eine Nahtzugabe von 1,5 cm versehen; dann
in der üblichen Weise anpassen.
• Nach Vornahme der erforderlichen Einstel
lungen die Nahtkante gleichmässig bis auf 5
mm von der Heftnaht abschneiden.
• Die abgeschnittene Naht so unter den Nähfuss
legen, dass die Zickzackstiche über die Naht
kante stechen.
Page 49

< P' ^
ELASTIC STRETCH STITCH (Alpine)
^ A narrov/, closely spaced elastic stretch stitch is ideal for seaming knit and stretch fabrics. It can be "
' used in place of straight stitching to retain fabric elasticity and Is particularly appropriate for unde- *
farm and crotch seams v/hero stretch and give are essentiaL The elastic stretch stitch is also eifec- >
, five for attaching elastic and decorative sewing. ''
< >
'WTWWT WV'
Plain stretch Seams
9 Pattern Selector; Elastic Stretch Stitch
9 Needle Position:
9 Stitch Width: | Coloured Bar
9 Stitch Length: 1 to 1.5
9 General Purpose Needle Plate
JL; «J.
/vA
9 General Purpose Foot
® Make a test sample.
# Baste the garment together on the seam fine
and fit in the usual way.
# After making any necessary adjustments, place
seam under foot. Stitch so that the stitches on
the left side of the pattern penetrate the basted
seam line.
# Press after stitching and trim away excess
fabric to produce a narrow seam edge. When
the seam supports the garment, omit the
trimming step and press seam open in the usual
way.
This stitch can also be used to join and neaten
seams in one operation.
To do so, follow the procedure below.
# Make a test sample.
® Baste the garment together on the seam line
allowing for 1.5 cm (5/8 inch) seam allowance
and fit in the usual way.
« After making any necessary adjustments, trim
seam edge evenly to a scant 5 mm (1/4 inch)
from seam line basting.
» Place trimmed seam under the foot so that the
zig-zag
stitches fall over the seam edge.
47
Page 50

r ■
i
■V"'V" VV"’VV"VV
PUNTO INVISIBILE PER ORLI
i>
t
Il punto invisibile ha molti usi pratici e fun
I
zionali. Viene più comunemente usato per
la realizzazione di un durevole orlo rifinito,
I
ma in ogni caso le possibilità di ottenere
I
ornamenti, o applicazioni pratiche, di que
>
sto punto, sono molteplici.
<:
<:
■ V " V " V " ' V V " V
■V'V
DER BLINDSTICH
I
I
I
I
l
Der Blindstich ist besonders praktisch und
I
zweckmäßig. Seine normale Anwendung
:>
bringt eine haltbare Saumbefestigung. An
I
I
dererseits sind den schöpferischen Möglich
keiten, die in der Anwendung dieses Sti
>
ches liegen, keine Grenzen gesetzt.
<;
I
I
I
I
-A__A__ A..A..A-_A-.A..A.
Orli a punto invisibile
• Selettore punti: Punto invisibile
• Selettore posizione ago su
• Selettore ampiezza punto: | ^
• Lunghezza punto: da 1 a 2,5
• Placca ago normale
• Piedino normale
• Guida punto invisibile
L XU
1. Alzare il piedino, allentare la vite del piedi
no e inserire, dal davanti, la guida per il
punto invisibile tra la vite ed il gambo del
piedino normale. Assicurarsi che la parte
sottostante della guida non tocchi la placca
scorrevole ed il piedino. Stringere la vite
con una moneta.
2. Segnare, rivoltare e stirare l’orlo nel modo
consueto. Imbastire l’orlo perchè rimanga a
posto a 1 cm sotto il margine dell’orlo.
3. Con il rovescio del lavoro rivolto in alto, vol
tare l’orlo in sotto, formando una piega
morbida a circa 6 mm dal margine superio
re dell’orlo. Stirare leggermente.
4. Sistemare l’orlo sotto il piedino in modo
che la piega morbida rimanga aderente alla
guida per punto invisibile. Assicurarsi che
la flangia della guida rimanga tra la piega
morbida e il margine superiore dell’orlo
come nell’illustrazione.
5. Abbassare il piedino e cucire in modo che i
punti diritti cadano sul margine dell’orlo,
mentre i punti laterali entrino appena nella
piega morbida. Mentre si cuce mantenere di
ritto il margine dell’orlo e far si che la piega
morbida rimanga ben aderente alla guida.
48
Blindstichsäume
• Stichmusterwähler: Blindstich
• Stichlage:
• Stichbreite: | {|i| | ;
• Stichlänge 1 bis 2,5
• Zickzackstichplatte
• Zickzacknähfuß
• Blindstichsaumführung
X XU
1. Nähfuß heben, Schraube losdrehen, und die
Blindstichsaumführung von vorne zwischen
die Schraube und den Nähfußschaft schie
ben. Beachten Sie dabei, daß sich dei Un
terseite der Führungswange nicht am
Schieber oder an der Vorderseite des Näh
fußes verklemmt. Schraube wieder fest
anziehen.
2. Den Saum in der üblichen Weise vorberei
ten. Es ist ratsam, den Saum vorzuheften.
Die Heftstiche dabei mindestens 1 cm unter
der Kante der Nahtzugabe anbringen, damit
sich die Führungswange während des
Nähens nicht im Heftfaden verhängt.
3. Mit der Stoffinnenseite nach oben den Saum
Umschlagen, sodaß eine weiche Falte an der
Saumkante entsteht.
4. Den Saum so unter den Nähfuß legen, daß
die weiche Falte gegen die Führungswange
zu liegen kömmt. Dabei muß sich diese Füh
rungswange zwischen der Falte und der
Saumoberseite befinden, wie aus der
Zeichnung ersichtlich.
5. Den Nähfuß senken und beim Nähen den
Stoff so führen, daß die Geradstiche auf der
Saumzugabe genäht werden, während die
Zickzackstiche jeweils die weiche Falte er
fassen. Die Stichbreite nach Bedarf einstel
len. Beim Nähen die Saumkante sorgfältig
geradeaus führen, und die Falte gleichmäßig
an der Blindstichsaumführung entlangführen.
Page 51

■y
.....
V'--V'""V'"V
................
V'''"V
V'-“V’”
■V“''V
.......‘V.....
■"V
....
BLINDSTITCH
y The blindstitch has many practical and functional uses. Its most common use provides
! a durable hem finish. However, the creative ways that one might apply this stitch are [
'p,
unending.
i [
I. A..... A..... ...A.
...
.A... -.. A.... -A
....
A...„ A-,. „ A
......
./V...... .AA.... ,.A „... ,A. „... A,.... A.... „ ..A. „ „ ,1
Blindstitch Hems
« Pattern Selector: Blindstitch
1
t
<
• Needle Position:
« Stitch Width: j
» Stitch Length: 1 to 2.5
e General Purpose Needle Plate
» General Purpose Foot
• Blindstitch hem guide
1. Raise foot, loosen screw, and slip blind
stitch hem guide from the front between the
screw and the shank of the foot. Make sure
the underside of the guide clears the slide
plate and the front of the foot. Tighten
screw with coin.
2. Prepare hem in the usual way. It is advis
able to baste the hem. Place the basting at
least 1 cm (1/2 inch) below the edge of the
hem allowance to avoid catching the flange
of the guide as you stitch.
3. With the wrong side of the work uppermost,
turn the hem under, creating a soft fold
from the top edge of the hem.
1
X u
f
4. Position the hem under the foot with the
soft fold resting against the wall of the
guide. Make sure the flange of the guide is
between the soft fold and top of hem, as
shown.
5. Lower the foot and stitch so that the
straight stitches fall on the hem allowance
and the j:ig-2ag stitches pierce the soft fold
of the work. Adjust stitch width if
necessary. While stitching guide the hem
edge in a straight line and feed the soft fold
evenly against the wall of the guide.
49
Page 52

^ ^ ^ ^ ✓ s
/ ^ ^ \ / S ^ V
V V V
ZIG-ZAG MULTIPLO
/ Lo zig-zag multiplo è un punto estremamente
versatile. Permette di rammendare, giuntare o
'> rinforzare senza causare spessore. Con que-
/ sto punto si possono attaccare elastici e pizzi
elastici, confezionare biancheria e costumi da
> bagno, e rifinire le cuciture, oltre a molte altre
utili applicazioni.
✓
< A A A A, /S A A ^
\ 'k / \ /* * ^ / \/
V v v VV V" V V
Barrette
/V ^ \ / V / % / \ /'S
\ г s ^ s
TRIKOTSTICH
Der Trikotstich ist ein besonders vielseitiger
Stich. Verwenden Sie diesen Stich zum Aus- /
bessern. Verbinden von Stoffteilen und für
Verstärkungen. Sie können damit Gummi- '>
band und dehnbare Spitzen annähen, Wäschestücke und Badeanzüge nähen und
auch Nähte versäubern. Außerdem gibt es
noch eine Menge anderer Anwendungsmög- <'
C A A A A A A
lichkeiten.
V ^ \ / \ /'S / *,
S ^ S ^ \ / \ f S / s / s
S/ s/ 'V W s/
Verriegelungen
AA AA.
• Selettore punti: Zig-Zag multiplo ;>
>
• Posizione ago: J-. • X : -1
• Ampiezza punto: j ||i| f ^ ^ : • Stichbreite: j ^|i| ^ ^ ^ j
• Lunghezza punto: 0,5 -1
• Placca ago normale
• Piedino normale
Si raccomanda di eseguire un campione di prova
con un ritaglio del tessuto che si vuole utilizzare,
avendo l’avvertenza di mettere in doppio tessuto.
1. Segnare la posizione dove dovrà trovarsi la
estremità del passante sul tessuto.
• Stichmusterwähler: Trikot-Stich
• Stichlage: i. :J>; «i
• Stichlänge: 0 bis 1
• Zickzackstichplatte
• Zickzacknähfuß
Es ist empfehlenswert, zuerst ein Muster mit
dem von Ihnen verwendeten Stoff, und zwar mit
allen Stofflagen, anzufertigen.
1. Kennzeichnen Sie auf dem Stoff die Lage für
das fertige Ende der Gürtelschlaufe.
• Gürtelschlaufe an die richtige Stelle legen
• Sistemare il passante, lato rovescio in alto,
ed eseguire una cucitura diritta mantenendo
l’estremità del passante a 3 mm dal margine
dell’indumento; non cucire oltre i bordi del
passante. Tagliare la parte eccedente vicino
alla cucitura e stirare.
2. Piegare il passante sulla linea di cucitura e sti
rare.
• Predisporre la macchina come detto sopra.
• Cucire a 3 mm dalla piega utilizzando il punto
zig-zag multiplo.
(siehe 1.), die Unterseite dabei nach oben,
und mit Geradstich das beschnittene Ende
ca. 3 mm vor der Kante des Kleidungs
stückes annähen; dabei nicht über die
Kanten der Schlaufe hinwegnähen.
2. Gürtelschlaufe an der Stichlinie zurückfalten
und bügeln.
• Die Maschine auf die oben angegebenen
Positionen für Trikotstich einstellen.
• Mit dem Trikotstich ca. 3 mm von der um
gefalteten Kante verriegeln.
3. Dann das zweite Ende einfalten und ebenfalls
verriegeln.
3. Piegare l’altra estremità del passante e saldare
con il punto zig-zag multiplo.
Rammendare uno strappo
• Rifilare i bordi.
• Mettere un rinforzo sul rovescio del tessuto
strappato. (Non imbastire nè appuntare il rinfor
zo dato che i lembi dello strappo vengono uniti
nella prossima operazione).
• Cucire dal diritto, tenendo uniti i lembi dello
strappo. Ridurre la lunghezza del punto alle
estremità ed agli angoli per rinforzare maggior
mente.
• Rifilare il rinforzo.
50
Ausbessern eines Stoffrisses
• Ausgefranste Kanten beschneiden.
• Auf der Stoff Unterseite zwecks Verstärkung
ein anderes Stück Stoff unterlegen (die Un
terlage nicht heften oder mit Nadeln fest
stecken, da Sie ohnehin im nächsten
Arbeitsgang die Kanten des Risses zusam
menbringen).
• Nun auf der rechten Seite nähen und damit
die Rißkanten verbinden. Die Stichlänge am
Beginn und am Ende des Risses verkürzen,
um eine bessere Verstärkung zu erhalten.
• Die Unterlage am Schluß soweit wie möglich
abschneiden.
*>
Page 53

/V ^ ^ VS ^ \ y ^ ^ ^ ^ ^ ^ y V <" ^
s / S ii' *>> >' \ / s y' ’► v "s ^ S / “S ^ \ ^ \ * V/' <► / S 4)^ V
^ s/ V V V V V V" V V V s/ V V V V ^
jA A A A A A A A A A A
™,rcH.o-.a
y"'
The mutti-stitch zig-zag is an extremely versatile stitch. Use it to mend, join or reinforce ",
<, without bulk. With this stitch you may attach elastic and stretch lace, construct lingerie
y
and swimsuits and finish seams. There are many other useful applications for the multi- <,
^
stitch zig-zag. ,'
S A A zs ^A >% A A A A ^A A A^ ^A^ A A A A
\ /s <i^S /s >»s \ ^ \ y\ \ \ é \ * \ /f \ y ZS, f \ /
\ /f \ fi \ / S / S if i> ^ \ ^ y ^ ^ V ^ s z S y V
s/ V V V V V V V V V V" V V*
Bar Tacks
• Pattern Selector: Multi Stitch Zig-Zag
• Needle Position:
• Stitch Width: | {|
• Stitch Length: 0,S -1
• General Purpose Needle Plate
• General Purpose Foot
X . • X ; J .
Make a test sample, using scraps of your ma
terial, and duplicating all garment thickness.
1. Mark position for the finished end of belt loop
on the fabric.
• Place belt loop, wrong side up, straight
stitch with cut end 3 mm (1/8 inch) from
edge of garment; do not stitch beyond
edges of the belt loop. Trim the end close
to the stitching and press.
?
2. Fold belt loop back on the stitching line and
press.
• Set your machine according to the code
above.
• Stitch 3 mm (1/8 inch) from the fold using
the muiti-stitch zig zag stitch.
3. Fold over second part and bar tack.
Mending a Tear
• Trim ragged edges.
• Place underlay on the wrong side of tear for
reinforcement. (Do not baste or pin the under
lay, since you will be bringing the edges to
gether in the next step).
• Stitch on the right side, bringing the edges of
the tear together. Shorten stitch length at
ends and corners to give extra strength.
• Trim underlay.
51
Page 54

5. Occhielli e bottom'
5. Knopflöcher und Knopfannähen
5. Buttonholes and Buttons
Occhielli
• Selettore punti: ^
• Bilanciamento punti: posizione neutra
• Piedino per occhielli
Eseguire sempre un campione di occhiello su
un ritaglio del tessuto che si sta cucendo..
Accertarsi che sia in doppio ed abbia una tela
di rinforzo. Se le due linee di punti nell’oc
chiello campione non sono di uguale densità,
consultare la pagina seguente.
Porre il lavoro sotto il piedino per occhielli, al
lineare il contrassegno centrale dell’occhiello
A con la linea rossa sul piedino, e allineare il
contrassegno di termine dell’occhiello B con la
linea orizzontale sul piedino. Non abbassare
l’ago.
Knopflöcher
• Stichmuster: \
• Stichausgleichwähler: Neutral
• Knopflochfuß
Stellen Sie immer erst ein Versuchsknopfloch
auf einem Stück Ihres Stoffes her. Achten Sie
darauf, daß der Stoff doppelt liegt und verwended Sie eine Zwischenlage.
Wenn die beiden Stichreihen in ihrer Dichte
ungleichmäßig ausfallen, können Sie dies mit
Hilfe der Erläuterungen auf der nächsten Seite
korrigieren.
Legen Sie Ihre Arbeit unter den Knopflochnäh
fuß und richten Sie die Markierung der Knopf
lochmitte A auf die rote Linie am Fuß und die
Endmarkierung des Knopfloches B auf die
waagerechte Linie am Fuß aus. Laßen Sie die
Nadel noch nicht in das Material einstechen.
•
OCCHIELLO A QUATTRO TEMPI
Prima fase: Barretta (cordoncino)
Ruotare il selettore occhielli verso destra fino
alla fase 1. Porre l’ago nel tessuto al punto A.
Abbassare il piedino e cucire fino alla fine
dell’occhiello (punto
Il termine della marcatura deve essere allinea
to con la linea orizzontale del piedino.
Seconda fase: travetta
Sollevare l’ago dal tessuto ruotando il volanti
no verso sè stessi. Ruotare il selettore degli
occhielli, verso sinistra fino alla seconda fase.
Eseguire quattro o cinque punti (punto C).
B).
VIER-STUFENKNOPFLÖCHER
Stufe 1: Raupennaht
Drehen Sie die Knopfloch-Wählscheibe im
Uhrzeigersinn auf Stufe 1. Lassen Sie die Na
del am Punkt A in den Stoff einstechen. Sen
ken Sie den Knopflochfuß ab und nähen Sie
bis zum Ende des Knopfloches. (Punkt
Endmarkierung sollte sich nun mit der waage
rechten Linie des Knopflochfußes decken.
Stufe 2: Riegel
Ziehen Sie die Nadel aus dem Stoff, indem
Sie das Handrad zu sich hin drehen.
Drehen Sie die Knopflochwählscheibe im
Uhrzeigersinn weiter auf Stufe 2. Nähen Sie
vier bis fünf Stiche. (Punkt B).
B) Die
52
Page 55

Buttonholes
9 Pattern Selector; %
B
9
Stitch Balance Dial: Neutral position
9
Buttonhole Foot
Always make a test buttonhole on a sample in
your fabric. Be sure to duplicate thickness of
garment and include interfacing.
If the two lines of stitching in your sample are
of unequal density refer to the next page.
Place work under buttonhole foot, align centre
marking of buttonhole A with red line on foot,
and align end marking of buttohole B with
horizontal line on foot. Do not lower the
needle.
FOUR-STEP BUTTONHOLING
Step 1: Side Stitching
Turn buttonhole dial toward right to step 1.
Position needle in fabric at point A. Lower foot
and stitch to end of buttonhole (point 8). End
marking should be aligned with
horizontal
line
on foot.
Step 2: Bar Tack
Raise needle above fabric by turning hand to
ward you.
Turn buttonhole dial toward left to step 2. Take
four or five stitches (point C).
53
Page 56

OCCHIELLO A QUATTRO TEMPI
(seguito)
VIER-STUFENKNOPFLOCHER
(Fortsetzung)
Terza fase: Barrette (cordoncino)
Sollevare l’ago dal tessuto ruotando il volanti
no verso sè stessi.
Ruotare il selettore degli occhielli, verso sini
stra, fino alla terza fase.
Cucire fino a pochi punti dal termine deli’oc-
chiello (punto D).
Quarta fase: travetta
Soilevare l’ago dal tessuto ruotando il volanti
no verso sè stessi.
Ruotare il selettore degli occhielli verso sini
stra fino alla quarta fase. Eseguire quattro o
cinque punti (punto E).
Togliere il lavoro, portare i fili finali sul retro
del lavoro, legarli e tagiiarii.
Stufe 3: Raupennaht
Ziehen Sie die Nadel in der übiichen Weise
aus dem Stoff. Drehen Sie die KnopflochWählscheibe im Uhrzeigersinn auf Stufe 3.
Nähen Sie nun bis kurz vor dem Ende des
Knopfloches. (Punkt D).
Stufe 4: Riegel
Ziehen Sie die Nadel in der üblichen Weise
aus dem Stoff. Drehen Sie die KnopflochWählscheibe im Uhrzeigersinn auf Stufe 4.
Nähen Sie vier bis fünf Stiche. (Punkt E).
Arbeit entfernen. Fäden nach unten ziehen,
befestigen und abschneiden.
PER EQUILIBRARE LE DUE
BARRETTE (cordoncini)
Con tessuti diversi si può avere diversità nella
densità deile due barrette, destra o sinistra,
deli’occhiello. Si può effettuare la regolazione
con facilità ruotando leggermente la manopola
di bilanciamento dei punto: un lievo sposta
mento produrrà un cambiamento notevoie.
• Eseguire un occhiello di prova con ia mano
pola di bilanciamento in posizione neutra
(l’indicatore direttamente sotto il simbolo T).
1. Se i punti sul lato destro dell’occhiello sono
troppo radi, ruotare la manopola verso de
stra per aumentare la densità dei punti.
2. Se sono i punti sul lato sinistro ad essere
troppo radi, ruotare la manopola verso sini
stra.
Quando i’occhieilo è completato, rimettere la
manopola sulla posizione neutra (l’indicatore
direttamente sotto il simbolo T).
AUSGLEICHEN DER BEIDEN
KNOPFLOCH-RAUPEN
Unterschiede in der Stichdichte zwischen der
rechten und linken Seite des Knopfloches
(Vorwärts- und Rückwärtsnähen) können durch
Verstellen des Druckknopfes für den Rück
wärtsstich ausgeglichen werden. Schon eine
ieichte Drehung dieses Knopfes bringt eine
deutiiche Veränderung.
• Nähen Sie ein Musterknopfloch, wobei der
besagte Knopf sich in seiner Neutralsteliung
befinden sollte. (Der Punkt genau unterhalb
des T Symbols.)
1. Wenn die Stiche der rechten Knopflochrau
pe zu offen sind, muß der Druckknopf im
Uhrzeigersinn aus seiner neutralen Stellung
verdreht werden, um eine größere Stichdich
te zu erreichen.
2. Wenn die Stiche der linken Knopflochraupe
zu offen sind, muß der Druckknopf entgegen
dem Uhrzeigersinn aus seiner neutraien
Stellung verdreht werden, um eine größere
Stichdichte zu erreichen.
54
Nach Abschluß des Knopflochnähens muß der
Druckknopf wieder in seine neutrale Stellung
gebracht werden, (der Punkt befindet sich
dann genau unterhalb des T Symbols.)
Page 57

FOUR-STEP BUTTONHOLING
(Cont’d.)
Step 3: Side Stitching
Raise the needle above the fabric.
Turn buttonhole dial toward left to step
Stitch to within a few stitches of the end
3.
of
the buttonhole (point D).
Step 4: Bar Tack
Raise the needle above the fabric.
Turn buttonhole dial toward left to step 4.
Take four or five stitches (point E).
Remove the work, draw threads to the under
side, tie, and trim.
ADJUSTING STITCH DENSITY
BALANCE
Differences in stitch density between the right
and left sides of the buttonhole (forward and
reverse stitching) are equalized by adjusting
the reverse stitch push button. A very slight
rotation of the button will produce a noticeable
change.
• Make a test buttonhole with the push button
in neutral position (indicator dot directly be
low T symbol).
1. If stitches on right side of the buttonhole
are too open, rotate the push button toward
right from its neutral position to increase
density of stitching.
2. If stitches on left side of the buttonhole are
too open, rotate the push button toward left
from its neutrai position to increase density
of stitching.
After buttonhoie stitching is completed, return
push button to its neutral position (indicator
dot directly below T symbol).
55
Page 58

Attaccatura dei bottoni
Knopfannähen
• Selettore punti; ^
• Selettore posizione ago:
• Selettore ampiezza punto: secondo il bottone
• Unnghezza punto: 0
• Molletta solleva placca ago (Modello 7174)
• Copri trasportatore a scatto (Modello 7184)
• Piedino normale
Lì 1 Л
PROCEDIMENTO
I bottoni piatti possono essere attaccati a
macchina utilizzando il punto zig-zag.
• Inserire la molletta solleva placca ago
come da istruzioni a pag. 10 (copri tra
sportatore a scatto con Modello 7184).
1. Porre il selettore ampiezza punto su i .
• Porre il selettore posizione ago a sini
stra .
• Sistemare il bottone sotto al piedino in
modo che l’ago entri nel foro di sinistra
del bottone.
2. Regolare il selettore ampiezza punto per ot
tenere uno zig-zag di ampiezza media.
• Continuare a ruotare il volantino fino a
che l’ago non entri nel foro destro del
bottone, correggere l’ampiezza dello zig
zag in modo che l’ago entri ed esca
esattamente nel centro del foro del bot
tone.
• Fare 5 о 6 punti a zig-zag e terminare
con l’ago a sinistra.
Stichmusterwähler:
Stitchlage:
• Stitchbreite: Passend zum Knopf
• Stichlänge: 0
• Stichplattensteg (mit 7174)
• Einrastbare Transporteurabdeckplatte (mit 7184)
• Zickzack-Nähfuß
il; 1 1
* •
DAS ANNÄHEN EINES KNOPFES
Durch die Verwendung des einfachen Zickzack
stiches können fiache Knöpfe angenäht
werden.
• Den Stichplattensteg einsetzen wie auf
Seite 10 gezeigt (Einrastbare Trasporteurabdeckplatte mit 7184 Modell).
1. Stichlagenwähler auf j einstellen.
• Stichlagenwähler auf JL (links) einstel
len.
• Knopf unter den Fuß legen und die Nadel
in die Mitte des linken Loches einstechen
lassen.
• Nähfuß herablassen.
• Handrad auf sich zu drehen, bis sich die
Nadel gerade über den Fuß hebt.
2. Den Stichbreitenwähler für mittelbreiten
Zickzackstich einstellen.
• Das Handrad weiterdrehen, sich die Na
del über dem rechten Loch befindet. Kor
rigieren Sie die Stichbreite, bis die Nadel
in die Mitte des rechten Loches einsticht.
3. Portare il selettore ampiezza punto su j e
fare alcuni punti nel foro di sinistra del bot
tone per fermare i fili.
• Portare i fili sul retro del lavoro, annodarli
fra loro e tagliarli con le forbici.
56
• Sechs oder mehr Zickzackstiche ausfüh
ren und mit der Nadel links aufhören.
3. Stichbreitenwähler auf j stellen und zur
Befestigung der Fäden einige Stiche nähen.
• Die Fadenenden nach der Unterseite des
Stoffes ziehen, dicht am Stoff zusam
menbinden und die losen Fadenenden
abschneiden.
Page 59

Buttons
• Pattern Selector: ^
• Needle Position: jl>; X X
• Stitch Width: To suit button
• Stitch Length: 0
• Needle Plate Raising Shim (with modell 7174)
• Snap-in Feed Cover (with modell 7184)
• General Purpose Foot
•
ATTACHING A BUTTON
Flat buttons can be sewn on by machine using
the zig-zag stitch.
• Insert needle plate raising shim as in
structed on page. 11 (Snap-in Feed
Cover with 7184 Model).
1. Set stitch width selector at i.
I
• Set needle position at left X. ■
• Place button positioned on fabric under
foot and lower needle into centre of left
hole.
• Lower presser foot.
• Turn hand wheel toward you until the
needle rises out of button hole and is
just above the presser foot.
2. Set stitch width selector to a medium width
zig-zag setting.
• Continue turning hand wheel until the
needle Is above right hole, adjust stitch
width, as necessary, until needle enters
the centre of the right hole.
• Take six or more zig-zag stitches and fin
ish with the needle on the left.
3. Move stitch width selector to j and take a
few stitches to fasten threads.
• Pull thread ends through to back of gar
ment knot close to fabric and snip off
loose ends of thread.
57
Page 60

6. Come aver cura della macchina
6. Pflege der Maschine
Carina Fof Y«
MANUTENZIONE
ATTENZIONE: Prima di procedere alla pulizia
della macchina staccare la presa di corrente.
Con un panno morbido o con uno spazzolino,
puiire tutti i punti indicati dalle frecce, specialmente l’area della scatola bobina e quelia del
trasportatore. Pulire pure ie parti esterne.
Se necessario, usare una soluzione leggera di
acqua e sapone per togliere macchie tenaci.
Per pulire la macchina non usare altri solventi
e detersivi.
In condizioni normali la macchina non richiede
lubrificazioni; comunque, dopo la pulizia, lubri
ficare con alcune gocce di olio le aree indica
te.
REINIGEN DER MASCHINE
BEACHTE: Vor dem Reinigen Ihrer Maschine
stets den Netzstecker aus Wandsteckdose zie
hen.
Mit Flusenbürste oder weichem Tuch alle in
der rechten Abbildung mit Pfeilen markierten
Stellen reinigen, insbesondere den Bereich um
die Spulenkapsel und den Stofftransporteur
und auch die Außenflächen.
Zur Entfernung von hartnäckigem Schmutz kann
eine milde Seifenlauge nützlich sein. Ihre Ma
schine benötigt unter normalen Bedingungen
kein Ölen, man kann jedoch nach dem Reini
gen je einen Tropfen Öl auf die angedeuteten
Stellen geben.
58
Page 61

CLEANING YOUR MACHINE
CAUTION: Before cleaning your machine, dis
connect power line plug from your socket out
let
With a soft cloth or lint brush, clean all points
indicated by arrows, especially the bobbin
case area and feed. Also, clean exposed parts.
If necessary a mild solution of soap and water
may be used to remove stubborn stains. No
other cleaning liquid or powder should be
used.
Periodically apply a drop of oil only to the
areas indicated after cleaning.
solo Modello 7174 nur 7174 Modell
model 7174 only
59
Page 62

COME TOGLIERE E RIMETTERE
IL COPERCHIO SUPERIORE
ABNEHMEN UND WIEDERANBRINGEN
DES ARMDECKELS
• Alzare la maniglia.
• Per rimuovere il coperchio allentare e ri
muovere le viti A e le viti B, posizionate sot
to la maniglia, quindi sollevare il coperchio.
• Rimettere il coperchio, inserire le viti e ser
rarle a fondo.
COME TOGLIERE E RIMETTERE
LA BASE DELLA VALIGETTA
(solo con Modello 7174)
• Rovesciare la macchina sul dietro e togliere
le viti C della base. Rimettere in piedi la
macchina e, sollevandola, estrarla dalla
base.
• Mettere la macchina nella base. Rovesciarle
entrambe sul dietro. Rimettere le viti C e
serrarle a fondo.
• Handgriff Hochstellen.
• Schrauben A zuerst entfernen, danach
Schrauben B entfernen.
• Beim Anbringen zuerst die Schrauben B be
festigen, danach die Schrauben A festzichen.
ENTFERNEN UND ANBRINGEN
DER BETTPLATTE
(nur 7174 Modell)
• Maschine nach hinten kippen und Schrauben
C entfernen. Sockel von der Maschine ab
nehmen.
• Sockel wieder an der Maschine anbringen,
Schrauben C einsetzen und festziehen.
COME TOGLIERE LA PLACCA FRONTALE
Allentare la vite D (non toglierla).
Rimuovere la vite E della placca frontale, quin
di estrarre la placca tirandola verso sè stessi.
Rimettere la placca frontale facendola scorre
re in su, in modo che il bordo superiore si in
serisca sotto il coperchio della macchina. Ser
rare le viti E e D.
COME RICOLLOCARE LA PLACCA
SCORREVOLE
Mettere la placca scorrevole nel senso di
scorrimento con il bordo frontale vicino alla
molletta F senza però coprirla. Con un piccolo
cacciavite, sollevare ciascuna estremità della
molletta ed inserirla nelle scanalature laterali
situate sotto i lati della placca scorrevole. Gui
dare la placca scorrevole verso sè stessi in
modo che la molletta entri completamente nel
le scanalature. Chiudere la placca scorrevole.
ENTFERNEN DES KOPFDECKELS
Schraube D lösen (nicht entfernen).
Die Schraube E entfernen, dann können Sie
den Kopfdeckel abziehen.
Kopfdeckel wieder anbringen, indem man den
oberen Rand unter die Kante des Armdeckels
schiebt. Schraube E und D festziehen.
EINSETZEN DES SCHIEBERS
Schieber in seiner Gleitbahn ganz dicht vor die
Haltefeder F bringen. Mit einem kleinen
Schraubenzieher die Federenden anheben und
in die Nuten auf der Unterseite des Schiebers
setzen. Dann den Schieber schließen.
60
Page 63

REMOVING AND REPLACING
TOP COVER
• Raise handle.
• To remove top cover, loosen and remove
screws A and screws B, positioned under
the handle, and lift it.
• To replace cover; replace and tighten screws.
REMOVING AND REPLACING
BOTTOM COVER
(model 7174 only)
• Tilt machine over on its back and remove
screws C from the bottom cover. Remove
cover from machine.
• Replace by fitting bottom cover to machine,
then replace and tighten screws C.
REMOVING FACE PLATE
Loosen screw D (do not remove).
Remove face plate screw E then remove face
plate by drawing it toward you. Replace face
plate by sliding top edge of plate under edge
of arm top cover. Tighten screws E and D.
REPLACING SLIDE PLATE
Place slide plate in slide way with the front
edge close to, but not covering, the retaining
spring F. With a small screwdriver, lift each
end of the spring into each of the side grooves
on the under slide plate. Draw the slide plate
gently toward you to fully engage the spring.
Close slide plate.
61
Page 64

COME TOGLIERE LA SCATOLA BOBINA
HERAUSNEHMEN DER SPULENKAPSEL
Alzare l’ago, aprire la placca scorrevole, to
gliere la placca d’ago e la bobina.
Spostare completamente verso il dietro il fer
mo scatola bobina A.
Togliere la scatola bobina B.
COME RICOLLOCARE LA SCATOLA
BOBINA
Inserire la scatola bobina con un movimento in
avanti e indietro, in modo che la parte anterio
re della scatola bobina si inserisca sotto la
placca di posizione C. Ruotare il fermo scatola
bobina in avanti per bloccarla.
Ricollocare la placca d’ago e chiudere la plac
ca scorrevole.
Die Nadel in höchste Stellung bringen, Schie
ber öffnen, Stichplatte entfernen und die Spu
le herausnehmen.
Den Halter der Spulenkapsel A soweit wie
möglich nach hinten drehen, und dann die
Spulenkapsel B entnehmen.
EINSETZEN DER SPULENKAPSEL
Die Spulenkapsel durch leichtes Hin- und Her
bewegen einsetzen und zwar so, daß die Vor
derseite der Kapsel unter dem Punkt C der
Halteplatte liegt. Den Halter A ganz nach vor
ne drehen, damit die Spulenkapsel sitzen
bleibt.
Die Stichplatte wieder einsetzen und den
Schieber schließen.
COME SOSTITUIRE LA LAMPADINA
ATTENZIONE: Prima di sostituire la lampadina,
assicurarsi che la presa di corrente sia stata
tolta.
ATTENZIONE: Su questa macchina si possono
montare lampadine, solo del tipo a baionetta di
15 watt al massimo.
1. Come togliere la lampadina
• Con il pollice della mano destra spingere
verso l’interno ed in giù la linguetta del ri
flettore ed abbassarlo.
• Non tentare di svitare la lampadina.
• Spingere la lampadina nel portalampada e,
nello stesso tempo, ruotare la lampadina nel
senso indicato in figura in modo che i pernetti della lampadina si sblocchino dal por
talampada.
2. Come rimettere ia lampadina
• Spingere la lampadina nel porlampada fa
cendo in modo che i pernetti della lampadi
na entrino nelle scanalature del portalampa
da.
• Ruotare la lampadina nel senso indicato
nell’illustrazione.
• Spingere il gruppo del riflettore in su finché
non scatti in posizione.
62
AUSWECHSELN DER GLÜHLAMPE
BEACHTE: Vor dem Lampenwechsel den Netz
stecker aus der Wandsteckdose ziehen!
BEACHTE: Für diese Maschine dürfen Sie Glüh
birnen bis maximal 15 Watt verwenden!
1. Entfernen der Glühbirne
• Mit dem Daumen der rechten Hand den An
schlag am Ende der Lampenlinse abwärts
drücken und den Lampenhalter herunter
schwenken.
• Drücken Sie die Birne in die Fassung hinein
und drehen. Sie sie in der veranschaulich
ten Richtung: dann aus der Fassung her
ausnehmen.
. Wiedereinsetzen der Glühbirne
Die neue Birne wird in die Fassung gedrückt,
daß der Stift in den Führungsschlitz der
Fassung gleitet.
Drehen Sie die Birne in der veranschaulich
ten Richtung, bis sie einrastet.
Die gesamte Halterung nach oben drücken,
bis sie einschnappt.
Page 65

REMOVING BOBBIN CASE
Raise needle, open slide plate, remove needle
plate and lift out bobbin.
Turn bobbin case holder A to back as far as it
will go.
Lift out bobbin case B.
REPLACING BOBBIN CASE
Insert bobbin case with a back and forth mo
tion, so that front of the case is under the po
sition plate C. Turn holder all the way forward
to lock bobbin case.
Replace needle plate and close slide plate.
CHANGING THE LIGHT BULB
CAUTION: Before changing light bulb make sure
you have disconnected power line plug from
socket outlet.
CAUTION: This machine is designed to use a 15
watt maximum bayonet base bulb only.
1. Removing Bulb
• With thumb of right hand push in and down on
tab of light lens and lower the light bracket.
• Do not attempt to unscrew the bulb.
• Press it up into the socket and at the same
time turn bulb over in direction shown to un
lock the bulb pin and guide out of socket.
2. Replacing Buib
• Press new bulb into socket, with bulb pins
entering slots of socket.
• Turn it over in direction shown to lock bulb
in position.
• Push entire assembly up until it snaps in
position.
63
Page 66

cucire a braccio lìbero (con ModGiio 7i84)
7. Nähen mit dem Freiarm (mit 7184 Mociciil)
In ** /yìÉi ! (wiih m<:xlel 7184 on!y)
9
Pe r t r a s f o r m a r e l a m a c c h i n a i n b r a c c i o l i b e
ro , ba s t a so ll e v a r e il pi a n o di e s t e n s i o n e e
sf i l a r l o d a l l a m a c c h i n a c o m e i l l u s t r a t o .
• Z u r U m w a n d l u n g i n e i n e Fr e i a r m m a s c h i n e
he b e n S i e e i n f a c h de n T i s c h a n un d z i e h e n
ih n v o n d e r M a s c h i n e w e g , w i e a b g e b i l d e t .
9
To co n v e r t ma c h i n e t o f r ee - a r m s e w i n g ,
si m p l y l i f t th e e x t e n s i o n b e d up a n d of f t h e
ma c h i n e a s i l l u s t r a t e d .
Applicazioni
Maniche Ärmelarbelten
Anwendungen
Sleeves Bottoni
Knopfe
Buttons
Passanti Piegei
64
Bar Tacks
Finiture bordi Kantennähte Edge Finishes
 Loading...