


M612 Series
User Manual
• This user manual includes a product warranty.
• Please read the user manual before using this
product and keep the manual in a convenient
location.

Safety Instructions
BE SURE TO OBSERVE THE FOLLOWING INSTRUCTIONS WHEN USING THE DEVICE.
Warning: Failure to observe the instructions may lead to death or serious
.
injury.
Directly plug the power cord in the receptacle on the wall. Do not use extension cord.
If the power cable or plug is worn or damaged, pull out the power plug
In order to prevent electric shock or exposure to laser radiation (in case of a laser device),
do not remove the cover or screw not stated in the user manual.
Turn off power and pull out the power plug in the following situations.
- If something is spilled on the device
- When considering the service or repair request on the device
- When the device cover is damaged
In case of a device using toner, do not burn the spilled toner or the waste toner.
If a toner particle is exposed to the screen, it may be ignited.
In case of disposal, contact our company’s seller use the proper collection place.
In case of not using the product for a long time or when leaving the office after business
hours, turn off the power. Otherwise, it may cause an abrupt fire accident.
Caution: Failure to observe the instructions may cause serious and
slight injuries or property damages.
Protect the device from a humid or wet condition including rain, snow, and so on.
Pull the power cord off from the receptacle on the wall before moving the device.
Be careful not to damage the power cord while the device is being moved.
Be sure not to pull the cable when pulling the power cord off from the wall receptacle. Be sure
to pull out with the plug
Be sure not to have a clip, a staple, or another small metal object fell inside the device.
Be careful of a safety accident when servicing the inside of the device including the removal of
paper jam, cleaning of the inside of the device, and so on.
In case of the device using toner, keep the toner and the toner container in the place not
reached by a child.
Do not dispose of the device or consumables in the place treating household waste.
In case of disposal, contact our company’s seller use the proper collection place.
The inside of the device may be very hot. Do not touch the part with the “Careful! Very Hot!”
label attached or the spot around the part. Otherwise, it may cause burn.
Our company’s product conforms to the quality standards and performance.
It is recommended to use only the genuine parts possibly purchased from an authorized
distributor.

Before Use
Really thank you for purchasing our product.
In this user manual, how to use the device correctly and how to repair the device
simply are described in details to maintain the product in optimal state at all times
and contribute to the rationalization and efficiency of the office work of your company.
Carefully read the user manual before using the device and keep it close at hand. In
order to use the device safely and correctly, be sure to read the caution on the safe
use before using it.
Prohibition and Limitation on Duplication
1. The details of the user manual can be changed without a prior notice. Our company
is not responsible for the direct and/or indirect loss or damages caused by results
of handling or operating the product in any case and for the results occurring from
user’s negligence.
2. The act of duplicating or printing a bill, revenue stamp, bond, share certificate, bank
draft, check, passport, and driver’s license distributed at home and abroad is prohibited according to a law.
3. The copyrighted literary works such as books, cores, figures, maps, drawings, and
photos can be duplicated and used for personal use or household use and within the
same scope. In other cases, it is prohibited according to a law.
4. The above details present only a part of the applicable laws and regulations. The
details of the law are not stated as they are. Our company is not responsible for
correctness and completeness. Receive a legal consulting service to check if the
duplication or printing of an object is legal.

Contents
Before Using the Machine
1. Preface -------------------------------------------------------------------------------------------- 1
2. How to Read This Manual -------------------------------------------------------------------- 2
3. Safety Information ------------------------------------------------------------------------------ 3
4. Notices --------------------------------------------------------------------------------------------- 5
5. Precautions against the Machine ----------------------------------------------------------- 8
M612 Series ---------------------------------------------------------------------------------- 8
6. Handling Consumables ------------------------------------------------------------------------ 10
7. Precautions in Using the Machine ---------------------------------------------------------- 11
8. Ventilation ----------------------------------------------------------------------------------------- 12
9. Disposal of Used Battery ---------------------------------------------------------------------- 13
Symbols ---------------------------------------------------------------------------------------- 2
Installation ------------------------------------------------------------------------------------- 8
Moving the Machine ------------------------------------------------------------------------ 9
Chapter1 Preparation for Using the Machine
1. Specifications of MFP -------------------------------------------------------------------------- 1-2
2. Major Functions --------------------------------------------------------------------------------- 1-3
Basic Copying -------------------------------------------------------------------------------- 1-3
Copying Multiple Sheets ------------------------------------------------------------------- 1-3
Combined Copy (Multiple Pages onto A Single Sheet) ---------------------------- 1-3
Copying ID/Card/OHP ---------------------------------------------------------------------- 1-3
ⅰ
Contents
Copying ---------------------------------------------------------------------------------------- 1-3
Scanner ---------------------------------------------------------------------------------------- 1-3

Scanning from Computer ------------------------------------------------------------------ 1-3
Scanning from MFP Base Unit ----------------------------------------------------------- 1-3
Printing from Computer -------------------------------------------------------------------- 1-3
Printing from USB Memories ------------------------------------------------------------- 1-4
Basic Faxing ---------------------------------------------------------------------------------- 1-4
Advance Faxing ------------------------------------------------------------------------------ 1-4
3. Overview and Functions of the Machine -------------------------------------------------- 1-5
4. Control Panel ------------------------------------------------------------------------------------ 1-9
5. Power Switch and Energy Saver Mode ------------------------------------------------- 1-11
Printing ----------------------------------------------------------------------------------------- 1-3
Faxing ------------------------------------------------------------------------------------------ 1-4
Names and Functions of Each Part(Front view) ------------------------------------- 1-5
Names and Functions of Each Part (Rear view) ------------------------------------ 1-7
Names and Functions of Each Part (Interior View) --------------------------------- 1-8
The meaning of lamp ----------------------------------------------------------------------- 1-9
Buttons ----------------------------------------------------------------------------------------- 1-9
Power Switch --------------------------------------------------------------------------------- 1-11
6. Unpacking ----------------------------------------------------------------------------------------- 1-13
7. Cartridge Preparation -------------------------------------------------------------------------- 1-14
8. Cartridge Installation --------------------------------------------------------------------------- 1-16
9. Print Paper Loading ---------------------------------------------------------------------------- 1-17
10. Original Documents ---------------------------------------------------------------------------- 1-24
Automatic Document Feeder(ADF) ----------------------------------------------------- 1-24
Energy Saver Mode ------------------------------------------------------------------------- 1-11
Loading in the Tray -------------------------------------------------------------------------- 1-17
Loading to the Multi-purpose Tray ------------------------------------------------------ 1-20
Installation of Paper Support ------------------------------------------------------------- 1-23
Types of Original Supported -------------------------------------------------------------- 1-24
Contents
ⅱ

Exposure Glass ------------------------------------------------------------------------------ 1-24
11. Placing the Original ----------------------------------------------------------------------------- 1-25
12. Installing Optional Tray 2 ---------------------------------------------------------------------- 1-28
13. Connecting Cables ----------------------------------------------------------------------------- 1-30
14. Installing MFP Driver --------------------------------------------------------------------------- 1-32
15. Checking MFP Settings ----------------------------------------------------------------------- 1-34
16. Tray and Paper Specifications --------------------------------------------------------------- 1-38
Placing on Automatic Document Feeder ---------------------------------------------- 1-25
Placing Document on Exposure Glass ------------------------------------------------- 1-27
Installing the Machine and Tray 2 ------------------------------------------------------- 1-29
Connecting USB Cables ------------------------------------------------------------------- 1-30
Connecting Network Cables -------------------------------------------------------------- 1-31
Updating Options Available from the MFP Driver ----------------------------------- 1-32
Switching on MFP --------------------------------------------------------------------------- 1-34
Printing System Report -------------------------------------------------------------------- 1-34
Printing Network Report ------------------------------------------------------------------- 1-36
17. Paper ----------------------------------------------------------------------------------------------- 1-39
Feeding Order -------------------------------------------------------------------------------- 1-39
18. Information on Installation and Operation ------------------------------------------------- 1-40
ⅲ
Contents
Automatic Feeding -------------------------------------------------------------------------- 1-39
Driver CD and User Manual -------------------------------------------------------------- 1-40
Quick Guide and User Manual ---------------------------------------------------------- 1-40
Sindoh Website ------------------------------------------------------------------------------ 1-40

Chapter2 Copying
1. How to Copy -------------------------------------------------------------------------------------- 2-2
2. Basic Copying ------------------------------------------------------------------------------------ 2-6
3. Advanced Copying ------------------------------------------------------------------------------ 2-12
Basic Operation ------------------------------------------------------------------------------ 2-2
Copy Settings Table ------------------------------------------------------------------------- 2-3
Detailed Description of Copy Settings ------------------------------------------------- 2-3
Changing Copy Default Settings--------------------------------------------------------- 2-5
Selecting Paper/Original Size ------------------------------------------------------------ 2-7
Setting Copy Mode and Density --------------------------------------------------------- 2-8
Adjusting Copy Density -------------------------------------------------------------------- 2-9
Auto Copy Density -------------------------------------------------------------------------- 2-9
Adjusting Copy Scale ----------------------------------------------------------------------- 2-10
Paper Size Scale(Auto Scale) ------------------------------------------------------------ 2-10
Preset Scale ---------------------------------------------------------------------------------- 2-11
Custom Scale(Zoom) ----------------------------------------------------------------------- 2-11
Combined Copy ----------------------------------------------------------------------------- 2-12
Setting ---------------------------------------------------------------------------------------- 2-13
Making A 2-sided Copy--------------------------------------------------------------------- 2-14
Preparation for Scanning A3 Documents ---------------------------------------------- 2-16
OHP Copy ------------------------------------------------------------------------------------- 2-14
Collated Copy -------------------------------------------------------------------------------- 2-14
Duplex ------------------------------------------------------------------------------------------ 2-14
Copy Quality ---------------------------------------------------------------------------------- 2-15
Reduction Copy of A3 to Letter ---------------------------------------------------------- 2-16
Contents
ⅳ

Chapter3 Scanner, Printer and Fax
1. Driver Installation -------------------------------------------------------------------------------- 3-2
For Windows Users ------------------------------------------------------------------------- 3-2
2. Scanning from Computer --------------------------------------------------------------------- 3-4
3. Scanning A3 Documents ---------------------------------------------------------------------- 3-8
4. Scanning from MFP ---------------------------------------------------------------------------- 3-9
Setting E-mail Server ---------------------------------------------------------------------- 3-13
Updating Options Available from the MFP Driver ------------------------------------ 3-2
Scanning Documents from PC ----------------------------------------------------------- 3-4
Preparation for A3 Document Scan ---------------------------------------------------- 3-8
Scanning to USB Memory ----------------------------------------------------------------- 3-9
E-mailing the Scanned Files ------------------------------------------------------------- 3-11
Sending the Scanned files Directly to FTP -------------------------------------------- 3-15
Sending the Scanned Files Directly to Shared Folders ---------------------------- 3-16
Scan Setting Table -------------------------------------------------------------------------- 3-18
Detailed Description of Scan Setting --------------------------------------------------- 3-19
5. Printing from Computer ------------------------------------------------------------------------ 3-20
Cancelling with Buttons on the Control Panel --------------------------------------- 3-20
Cancel from My Computer --------------------------------------------------------------- 3-20
6. Changing Print Settings of the MFP Driver ----------------------------------------------- 3-22
For Windows Users ------------------------------------------------------------------------- 3-22
Print Setting Tab ----------------------------------------------------------------------------- 3-23
Paper Tab-------------------------------------------------------------------------------------- 3-27
ⅴ
Contents
Printing ----------------------------------------------------------------------------------------- 3-20
Cancelling Print Jobs ----------------------------------------------------------------------- 3-20
Entering Print Default Settings ----------------------------------------------------------- 3-22
Help --------------------------------------------------------------------------------------------- 3-23
Advanced Functions per Each Tab ------------------------------------------------------ 3-23

Advanced Tab -------------------------------------------------------------------------------- 3-30
Print Quality Tab ----------------------------------------------------------------------------- 3-38
7. Printing from USB Memory ------------------------------------------------------------------ 3-41
8. Basic Faxing -------------------------------------------------------------------------------------- 3-43
9. Advanced Faxing -------------------------------------------------------------------------------- 3-46
10. Faxing from the Computer -------------------------------------------------------------------- 3-49
11. Programming ------------------------------------------------------------------------------------- 3-50
Preparation for Print from the USB Memory ------------------------------------------ 3-41
Changing Default Settings ---------------------------------------------------------------- 3-43
Basic Operation ------------------------------------------------------------------------------ 3-44
Broadcast Transmission( Broadcast Tx) ----------------------------------------------- 3-46
Polling Tx (Polling Transmission) -------------------------------------------------------- 3-47
Delay Transmission(Delay Tx) ----------------------------------------------------------- 3-47
A3 Tx ------------------------------------------------------------------------------------------- 3-48
On-Hook Dial --------------------------------------------------------------------------------- 3-48
Registering functions in the program --------------------------------------------------- 3-50
Changing the name of the saved program -------------------------------------------- 3-51
Calling for the saved program ------------------------------------------------------------ 3-52
Delete the saved program ----------------------------------------------------------------- 3-53
Chapter4 Settings and changes of each function and additional functions
1. Settings with Web Image Monitor ----------------------------------------------------------- 4-2
2. Paper Settings ----------------------------------------------------------------------------------- 4-4
Configuration --------------------------------------------------------------------------------- 4-2
Functions Available ------------------------------------------------------------------------- 4-3
Paper Settings -------------------------------------------------------------------------------- 4-4
Paper Setting Table ------------------------------------------------------------------------- 4-5
Contents
ⅵ

Detailed Description on Paper Settings ------------------------------------------------ 4-6
3. Copy Settings ------------------------------------------------------------------------------------ 4-7
4. Scan Settings ------------------------------------------------------------------------------------ 4-10
5. Print Settings ------------------------------------------------------------------------------------- 4-13
6. General Settings -------------------------------------------------------------------------------- 4-15
Setting ------------------------------------------------------------------------------------------ 4-7
Copy Settings Table ------------------------------------------------------------------------- 4-8
Description on Copy Settings------------------------------------------------------------- 4-8
Setting ------------------------------------------------------------------------------------------ 4-10
Scan Setting Table -------------------------------------------------------------------------- 4-11
Description on Scan Settings ------------------------------------------------------------- 4-11
Setting ------------------------------------------------------------------------------------------ 4-13
Print Settings Table ------------------------------------------------------------------------- 4-14
Description on Print Settings ------------------------------------------------------------- 4-14
Basic Settings Table ------------------------------------------------------------------------ 4-15
Description on Basic Settings ------------------------------------------------------------ 4-15
ⅶ
Contents
Reset to Factory Default Settings ------------------------------------------------------- 4-16
Firmware Update ---------------------------------------------------------------------------- 4-18
Check RollerMark --------------------------------------------------------------------------- 4-18
Printing System Report -------------------------------------------------------------------- 4-19
Printing Network Report ------------------------------------------------------------------- 4-20
Printing Fax TCR Report ------------------------------------------------------------------ 4-21
Printing Fax Tx/Rx Report ----------------------------------------------------------------- 4-23
Printing Mem File List ---------------------------------------------------------------------- 4-24
Printing Error Report ------------------------------------------------------------------------ 4-25
Printing Fuser Clean Print ----------------------------------------------------------------- 4-27
Printing Font List ----------------------------------------------------------------------------- 4-28
Report Print Table --------------------------------------------------------------------------- 4-30
Language Setting ---------------------------------------------------------------------------- 4-30

Language Settings Table ----------------------------------------------------------------- 4-30
7. Fax Settings -------------------------------------------------------------------------------------- 4-32
Station ID -------------------------------------------------------------------------------------- 4-33
Station Number ------------------------------------------------------------------------------ 4-33
ECM -------------------------------------------------------------------------------------------- 4-34
Line Monitor ---------------------------------------------------------------------------------- 4-34
Volume ----------------------------------------------------------------------------------------- 4-34
TX Settings table ---------------------------------------------------------------------------- 4-35
Resolution ------------------------------------------------------------------------------------- 4-35
Image Type ----------------------------------------------------------------------------------- 4-36
Fax Density ----------------------------------------------------------------------------------- 4-36
Auto Density ---------------------------------------------------------------------------------- 4-36
Auto Density Level -------------------------------------------------------------------------- 4-37
Setting ------------------------------------------------------------------------------------------ 4-32
Fax Settings Table --------------------------------------------------------------------------- 4-32
Description on General Settings --------------------------------------------------------- 4-32
General Settings Table --------------------------------------------------------------------- 4-33
Description on TX Settings ---------------------------------------------------------------- 4-35
Original Size ----------------------------------------------------------------------------------- 4-35
Prefix Setting -------------------------------------------------------------------------------- 4-37
Auto Redial ----------------------------------------------------------------------------------- 4-38
TTI ---------------------------------------------------------------------------------------------- 4-38
Confidential Tx (Transmission) ---------------------------------------------------------- 4-39
Normal Scan Wait --------------------------------------------------------------------------- 4-39
Duplex Scan ---------------------------------------------------------------------------------- 4-39
Rx Settings Table---------------------------------------------------------------------------- 4-40
Fax Forward ---------------------------------------------------------------------------------- 4-40
Confidential Rx ------------------------------------------------------------------------------ 4-41
No. of Rings ---------------------------------------------------------------------------------- 4-41
Auto Reduction ------------------------------------------------------------------------------ 4-41
Description on Rx Settings ---------------------------------------------------------------- 4-40
Contents
ⅷ

Tray --------------------------------------------------------------------------------------------- 4-42
Print Mode ------------------------------------------------------------------------------------ 4-42
Duplex Print ---------------------------------------------------------------------------------- 4-42
Reports Settings Table --------------------------------------------------------------------- 4-43
TCR Report Setting ------------------------------------------------------------------------- 4-43
Report Print Set ----------------------------------------------------------------------------- 4-44
8. Network Setting ---------------------------------------------------------------------------------- 4-45
Wireless Network Connection ------------------------------------------------------------ 4-53
IP Address Setting --------------------------------------------------------------------------- 4-56
Wireless Network Connection ------------------------------------------------------------ 4-57
9. Address Book ------------------------------------------------------------------------------------ 4-61
Description on Reports --------------------------------------------------------------------- 4-43
Network Settings Table --------------------------------------------------------------------- 4-45
Description on Network Settings--------------------------------------------------------- 4-47
Wired Network Setting --------------------------------------------------------------------- 4-51
Wireless Network Setting ------------------------------------------------------------------ 4-53
Wifi Direct Access --------------------------------------------------------------------------- 4-57
Setting E-mail Transmission -------------------------------------------------------------- 4-59
Status E-mail Alert --------------------------------------------------------------------------- 4-59
10. A3 Panorama Setting -------------------------------------------------------------------------- 4-66
11. ID Copy -------------------------------------------------------------------------------------------- 4-71
Copying ID/Card ----------------------------------------------------------------------------- 4-71
ix
Contents
How to Register ------------------------------------------------------------------------------ 4-61
Group Registration -------------------------------------------------------------------------- 4-62
Remove Address Book --------------------------------------------------------------------- 4-63
Search Address Book ---------------------------------------------------------------------- 4-64
Address Book Table ------------------------------------------------------------------------- 4-65
Copying ---------------------------------------------------------------------------------------- 4-66
Scanning --------------------------------------------------------------------------------------- 4-67
Faxing ------------------------------------------------------------------------------------------ 4-69

12. Job Manager ------------------------------------------------------------------------------------- 4-72
13. Brower --------------------------------------------------------------------------------------------- 4-74
14. Administrator Setting --------------------------------------------------------------------------- 4-80
Using control Panel ------------------------------------------------------------------------- 4-81
Using Control Panel ------------------------------------------------------------------------ 4-82
Going into the mode ------------------------------------------------------------------------ 4-72
Executing Web Browser ------------------------------------------------------------------- 4-74
Moving to Homepage ----------------------------------------------------------------------- 4-75
Using Bookmark ----------------------------------------------------------------------------- 4-75
Using Web Page Print ---------------------------------------------------------------------- 4-77
Setting Web Browser ----------------------------------------------------------------------- 4-78
Closing Web Browser ---------------------------------------------------------------------- 4-79
Administrator Menu Table ----------------------------------------------------------------- 4-80
Access to Administrator Mode------------------------------------------------------------ 4-81
Change Password --------------------------------------------------------------------------- 4-82
Address Book --------------------------------------------------------------------------------- 4-83
Using Control Panel ------------------------------------------------------------------------ 4-83
Chapter5 Maintenance and Troubleshooting
1. Maintenance of Consumables --------------------------------------------------------------- 5-2
2. MFP Maintenance------------------------------------------------------------------------------- 5-3
3. Consumables Change ------------------------------------------------------------------------- 5-5
Status of Consumables -------------------------------------------------------------------- 5-2
Saving Consumables ----------------------------------------------------------------------- 5-3
Ordering Consumables -------------------------------------------------------------------- 5-3
Cartridge Ordering -------------------------------------------------------------------------- 5-4
Cartridge Storaging ------------------------------------------------------------------------- 5-4
Toner Cartridge ------------------------------------------------------------------------------- 5-5
Contents
x

Drum Cartridge ------------------------------------------------------------------------------- 5-5
Replacement --------------------------------------------------------------------------------- 5-6
4. Cleaning ------------------------------------------------------------------------------------------- 5-14
ADF, Flatbed, Flatbed Cover, and Pad Cleaning ------------------------------------ 5-15
ADF Cleaning -------------------------------------------------------------------------------- 5-15
ADF Pad Cleaning -------------------------------------------------------------------------- 5-15
5. Understanding of MFP Messages ---------------------------------------------------------- 5-17
6. Paper Jam Removal --------------------------------------------------------------------------- 5-21
Toner Cartridge Replacement ------------------------------------------------------------ 5-6
Drum Cartridge Replacement ------------------------------------------------------------ 5-9
ADF Pad Replacement -------------------------------------------------------------------- 5-13
Outer Surface Cleaning -------------------------------------------------------------------- 5-14
Scanner Area Cleaning -------------------------------------------------------------------- 5-14
Printer Area Cleaning ----------------------------------------------------------------------- 5-16
Document Jam ------------------------------------------------------------------------------- 5-21
Paper Jam Location Indicated by the Error Code ----------------------------------- 5-24
7. Paper Jam Removal ---------------------------------------------------------------------------- 5-25
8. Troubleshooting --------------------------------------------------------------------------------- 5-34
xi
Contents
Paper Jam Location Indicated by the Error Code ----------------------------------- 5-25
104/105 Paper Jam (Under the Cartridge) -------------------------------------------- 5-26
106 Paper Jam (Exit Area Cover) ------------------------------------------------------- 5-27
Removal of The jammed paper Visible in Exti Area -------------------------------- 5-28
Removal of the jammed paper Invisible in Exit Area ------------------------------- 5-28
107 Paper Jam(Paper jam at the bottom side of MFP, Duplex paper jam) ----- 5-30
101 Paper Jam ( at Tray 1 area) --------------------------------------------------------- 5-31
102 Paper Jam (at Tray 2 area) --------------------------------------------------------- 5-32
103 Paper Jam (at Tray 3 area)---------------------------------------------------------- 5-33
In case the machine does not work ----------------------------------------------------- 5-34
Cannot Send the Fax ----------------------------------------------------------------------- 5-36

In case you cannot receive Fax ---------------------------------------------------------- 5-37
9. Power Shutdown -------------------------------------------------------------------------------- 5-41
10. Basic Printer Troubleshooting ---------------------------------------------------------------- 5-42
11. When the Problem Is Not Resolved ------------------------------------------------------- 5-50
Image Quality Problem --------------------------------------------------------------------- 5-38
Network Problems --------------------------------------------------------------------------- 5-40
Power Shutdown ----------------------------------------------------------------------------- 5-41
Operation While Power Is Off ------------------------------------------------------------ 5-41
Memory Backup ------------------------------------------------------------------------------ 5-41
Control Panel Troubleshooting ----------------------------------------------------------- 5-42
Printer Troubleshooting -------------------------------------------------------------------- 5-42
Print Quality Troubleshooting ------------------------------------------------------------- 5-45
Tray 2 Troubleshooting --------------------------------------------------------------------- 5-49
Other Troubleshooting---------------------------------------------------------------------- 5-50
Customer Support --------------------------------------------------------------------------- 5-50
Chapter6 Appendix
1. Main Body Specifications --------------------------------------------------------------------- 6-2
Main Body Specifications ------------------------------------------------------------------ 6-2
Copy Specifications ------------------------------------------------------------------------- 6-3
Fax Specifications --------------------------------------------------------------------------- 6-3
Scanner Specifications --------------------------------------------------------------------- 6-3
Printer Specifications ----------------------------------------------------------------------- 6-4
ADF --------------------------------------------------------------------------------------------- 6-4
Tray 2 (Option) ------------------------------------------------------------------------------- 6-5
Contents


Before Using the Machine
1. Preface
This User Manual describes detailed explanations and points to note in connection with operating and using
the machine. Please read the User Manual well enough for users` safety and ease of use before using ma-
chine, and keep it near within your reach to refer to it quickly later
- The content of the User Manual is subject to change without any prior notification.
Sindoh shall not be responsible for any consequent damages or losses, indirect, special, contingent
- The User Manual may include a little different descriptions of the machine from the actual one.
- In some countries some specific types may not be used.
Please consult your local sales office.
- This User Manual uses two measuring units and the metric unit is applicable for this machine.
Important
handling or operations of the machine in whatsoever. Copying or printing to reproduce what is pro-
hibited by statute is not allowed. Any reproductions of the bank currencies, revenue stamps, bonds,
stock certificates, promissory notes, checks, passports, drivers` licenses is mostly illegal and prohib-
ited by local law. The above list is only some exemplary and not all inclusive, and no liability is as-
sumed for either its completeness or accuracy. In case of doubt, please contact your legal counsel.
Note
Some options may not be usable depending on the countries. Please consult your local sales/dis-
tributor office for the above cases. Some units can be an optional based on in which country you are
now. Please consult your local service/support office.
1

Before Using the Machine
2. How to Read This Manual
Symbols
This manual uses the following symbols and meanings.
Indicates importance safety notes.
Ignoring these notes could result in serious injury or death.
Be sure to read these notes carefully for your safe operations of the machine.
Indicates important safety notes.
Ignoring these notes could result in minor injury, or damage to the machine or to property.
Be sure to read these notes for your safe operations of the machine.
Indicates points to pay attention to when using the machine, and explanations of likely causes of paper
Be sure to read these explanations
Indicates supplementary explanations of the machine`s functions, and instructions on resolving user er-
Warning
Caution
Important
misfeeds, damage to originals, or loss of data.
Note
rors.
This symbol is located at the end of sections. It indicates where you can find further relevant information.
[ ]
Indicates the messages or menus that appear on the machine`s LCD display panel.
【】
Indicates the names of each function key on the machine control panel and the display window.
Reference
2

Before Using the Machine
3. Safety Information
Plug the power cord into a properly grounded outlet which is near and quickly accessible from the machine.
Do not use or place the machine in wet or humid environment.
- The machine uses laser technologies. Use of controls, adjustments, or execution of procedures
The product uses a method heating the printing media so that gas may be emitted from paper due
- The inside of the machine may be hot. Do not touch any hot part before it is cooled down to avoid
- To prevent from any personal injuries or machine damages you need to follow the below instructions
Do not lift the optional feeder and the MFP machine together at the same time. Lift only the
Caution
other than those specified in this manual can result in hazardous radiation exposure.
to heating. In order to prevent the emission of harmful gas, the section addressing the details on the
printing media in the operating instructions should be understood.
Caution
from any injury owing to the heated part.
Caution
before moving the machine. Turning the power switch off and then unplug the power cords from the
power outlet. Unplug and release all the cords and cables before moving the machine.
machine first, and then the feeder by using grips available at both sides. Always use only the power
cords provided with this machine or the one approved by the manufacturer.
Injuries
Heated Surfaces
Injuries
- Proceed your work after turning off the machine and unplugging the power cord from the outlet in
- This product has been designed, tested and approved to meet strict safety requirements
Caution
case of accessing the system board, or installing hardware or optional memory devices after having
already installed MFP machine. If the machine is connected with any other device, turn it off and
separate the cables from the machine.
Caution
of international safety standard. Some safety features of parts may not clearly work. The
corresponding manufacturer of the machine shall not be responsible for usage of any other
replacement parts.
Electrical Shock
Electrical Shock
3

Before Using the Machine
- Do not twist, fold, step or place heavy objects on the powercord. Be careful with the power cord
- Disconnect the power cord and all the cables connected to the machine to prevent from any
Caution
peeled off or overloaded. Do not make the power cord jammed into objects such as furniture or
walls. Misusing the cord could result in fire or electrical shock. Check the cord regularly. Unplug the
cord from the outlet for inspection. Please consult a licensed electrician for services or repairs not
stated in this User Manual.
Caution
electrical shock when cleaning the outside of the machine.
Injuries
Electrical Shock
4
Before Using the Machine
4. Notices
Noise Emission Level
The following are measured in accordance of ISO 7779 and reported to meet ISO 9296. Some modes
may not be available in your purchased products.
Average Sound Pressure at 1 Meter Away
Printing 51dBA
Copying 55dBA
Standby under 30 dBA
Temperature
Operating Temperature 15.6 C~32.2 C
Shipping and Storage Temperature -40.0
Disposal of The Products
Do not dispose the machine and consumables in the same way as normal garbage.
For disposal or recycling, contact your local sales office.
Laser Notice
This machine is certified in the U.S. to conform to the requirements of DHHS 21 CFR Subchapter J, and
certified elsewhere as Class 1 laser products conforming to the requirements of IEC 60825-1. The Class
1 laser products are not considered to be hazardous. The machine includes laser Class IIIb(3b) of GA
with nominal 5 mW working in 770~795 nanometer electromagnetic wave rage inside of the machine. The
laser system and machine are designed not to expose laser radiation above Class 1 level to any users
during normal operation, user maintenance or prescribed service conditions.
C~60.0 C
Class 1 Laser Product
5

Before Using the Machine
EMI(Electromagnetic Interference) Notice
This machine complies with the limits for Class A.
Class A Device: This machine is EMI compatible device complying with the limits for use in non-residen-
tial/non-domestic environments.
Power Consumption
Power Consumption of the Products
The below table shows power consumption. Some modes may not be available in the product you have
purchased.
Mode Description
Printing A device is printing paper documents from electronic input data Less 780W
Standby A device is standing by print jobs. Less 130W
PWR Saving A device is in energy saving mode Less 6.5W
Power Off A power plug is plugged into the outlet with its switch off Less 0.05W
The above power consumption is the hourly average value.
Instant power consumption can be much higher than the average value.
Power Saver Mode
The machine is designed for power saver mode. The power saver mode is corresponding to EPA sleep
mode. The power saver mode save energy by reducing power consumption during specific time period of
not using the machine. The machine automatically enters into the power saver mode in case not used for
a specific while called Power Saver Mode time, which is specified by default when shipped out from the
factory. In the configuration menu the power saver mode time can be adjustable between 1~240 minutes.
If it is set to lower values, the energy consumption reduces, but the response time increases. If it is set to
higher values, quicker response time can remain, but more energy consumed.
Deactivated Mode
Power
Consumption(W)
The machine consumes power even in the deactivated mode. Unplug the power cord to stop the power
consumption to the full.
Total Energy Usage
It would be useful to calculate the Total energy usage of the machine.
Since the electricity bill is charged by Watt, you have to multiply time spent in each mode with power con-
sumption in order to calculate the energy use.
Total energy usage is the sum of energy used in each mode.
6

Before Using the Machine
Wireless LAN Specifications
The competent wireless device may be affected by electromagnetic interference so it should not be used
for life saving services.
Condensation
Dramatic change of the ambient temperature may produces fine drops of water on interior and exterior of
the machine. Wipe the water drops on the outer surface, but wait until the drops inside the machine dry
off with the platen or ADF open.
7
Before Using the Machine
5. Precautions against the Machine
Please comply with the following instructions together with "Safety Information" provided when you purchase
the products.
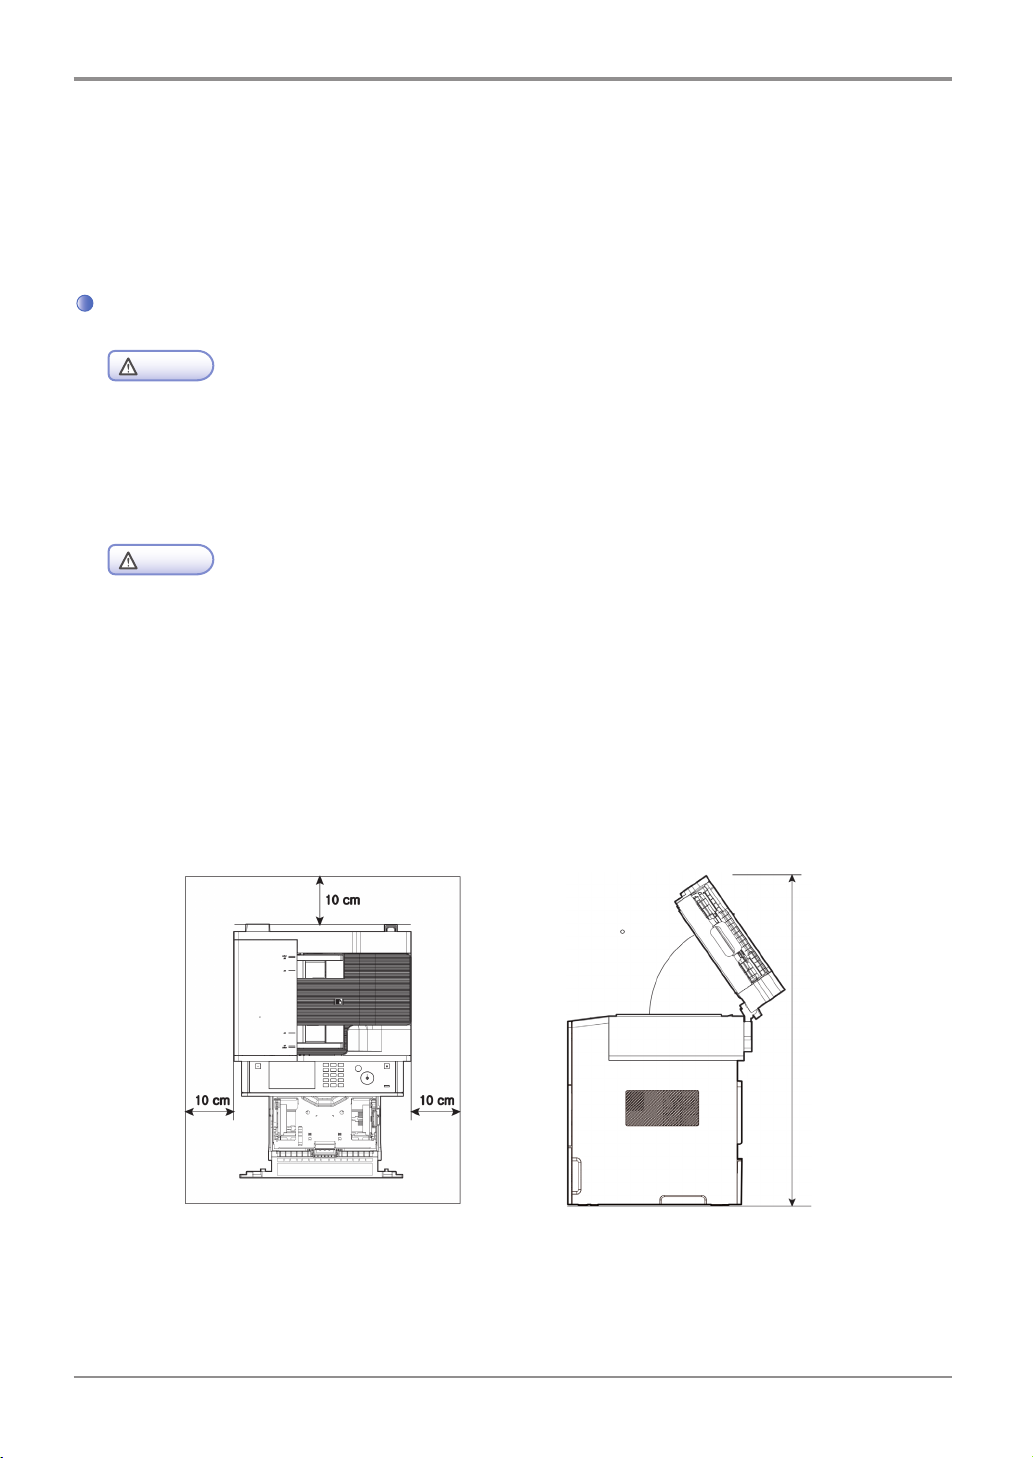
Installation
- Install the machine where good ventilation is provided.
- Install the machine with its vents spaced at least 10 cm away from walls and other equipments.
- Secure properly sufficient space around the machine for easy ventilation and operation.
- Use the machine at temperatures of 10 C ~ 32 C and relative humidity of 20% ~ 80%.
- Do not install or use the machine outdoor.
- Place the machine to secure 15 cm backspace from the wall in order to scan A3 originals.
Warning
Ozone can be generated while the machine is operating although the amount is not so dan gerous.
Sufficient ventilation must be required in case the machine is used for a long time or printing a large
number of sheets without proper ventilation.
Caution
M612 Series
55
8

Moving the Machine
Before Using the Machine
- Before moving the machine, be sure to unplug the power cord from the outlet. At least two people
- Separate the toner cartridge when moving the machine.
- Hold the bottom handles of the machine when moving it.
Bend your knees enough to protect your spine when lifting the machine.
Warning
help together with moving the machine.
9

Before Using the Machine
6. Handling Consumables
- Do not burn toner or drum cartridges. The remainder of toner can cause a large fire or burns.
- Do not open toner or other consumables by force. Do not inhale toner powder and keep it away from
- Do not touch the green surface of the drum inside the cartage or expose it to the direct sunlight.
- Do not keep drum cartridges or toner cartridges upside down or store them in the slanted place. This
- Do not dismantle drum cartridges or toner cartridges.
- Keep drum cartridges and toner cartridges away from physical impact or vibration.
- Do not unpack drum cartridges and toner cartridges until you are just ready to use them.
Caution
Warning
your skin. Keep toner away from children. If your skin happens to contact toner, remove it with flow-
ing water and soap. If you have any skin problem, consult your doctor.
Important
This may affect printing quality.
may affect printing quality.
10

Before Using the Machine
7. Precautions in Using the Machine
Plug the power cord into a properly grounded outlet which is near and quickly accessible from the machine.
Do not use or place the machine in wet or humid environment.
- The fusing unit and its surroundings are very hot while the machine is operating. Make sure not to
- Prevent your eyes or mouth from toner power while removing paper jams or replacing toner cartridges.
- Make sure your hands or clothes are not stained with toner. Wash toner away with cold water if your
- Use the machine only for functions described in this manual.
Warning
touch the fusing unit while removing paper jams or checking inside of the machine. This may cause
burns.
If toner gets in your eyes or mouth, wash them away with clean water and consult your doctor.
hands or clothes are stained with toner. If hot water is used, the stains may remain.
11

Before Using the Machine
8. Ventilation
- Use the machine in a place with good ventilation. If the machine is used in a place without good
- Do not block vents. Inappropriate cooling may lead to high temperatures inside the machine,
- In general, a new machine produces a little amount of gas. So, provide good ventilation for the first
Warning
ventilation, this may be harmful for your health. Ventilate it at regular basis.
resulting in malfunctions.
use of the machine. If the machine is operating for a long time, it is recommended you should not
stay where the machine is installed as long as possible.
12

9. Disposal of Used Battery
Before Using the Machine
- Ni-MH batteries are installed for the backup memory. Dispose batteries in an environment-friendly way
Warning
according to manufacturer’s instruction. To replace batteries, consult a qualified service technician.
13


M612 Series
User Manual
Preparation for
Using the Machine
1

Preparation for Using the Machine
1. Specifications of MFP
Product
Class
M612 Series
Model Name M612/617
Printing Speed 47ppm
Memory 1GB
Printing Resolution 1200 dpi
Interface 1 USB/Ethernet: Ethernet 100/1000 Base-TX
1 USB/Wi-Fi(Wireless LAN) : IEEE 802.11 b/g/n Wireless
Network
Wireless security certification: Open system, WEP, WPA,
WPA2, WPS
Encrypted : WEP64, WEP128, TKIP, AES
Emulation PCL5e/6, PS3, PDF
Protocols Supported TCP/IP(IPv4, IPv6), Port9100, DHCP/DHCPv6, DNS, SNMP,
SMTP, HTTP, TELNET, SSL, WebDav, CIFS, FTP, IPP, MDNS
Added
Tray 500 sheets
MPT 50 sheets
Cartridge M612: 3000 sheets (enclosed)
M617: 6000 sheets (enclosed)
2-sided Printing Automatic 2-sided printing (Duplexer included)
Scan Type Color CIS
Scan Resolution 600X600dpi
ADF Loading Capacity 50 sheets (20lb standard)
Scanning Speed 40spm
Dimension(WxDxH) 418×391×515 mm / 16.5×15.4×20.3 in
Weight 19.9 Kg / 43.9 lb (IC included)
1-2

Preparation for Using the Machine
2. Major Functions
Copying
Basic Copying
Various sizes of originals can be copied to paper with desirable sizes.
For more information refer to 「Basic Copying」 (P. 2-6).
Copying Multiple Sheets
The original scanned once can be copied up to 99 sheets. For more information refer to to 「Basic Copying」
(P. 2-6).
Combined Copy (Multiple Pages onto A Single Sheet)
Two or 4 pages of the originals can be copied on a single sheet of paper.
For more information refer to 「Multiple Pages onto A Single Sheet」 (P. 2-12)
1
Copying ID/Card/OHP
Both sides of the ID or business card can be copied into the one sheet.
Originals can be copied into OHP.
For more information, refer to 「ID Copy」 (P. 4-71).
Scanning
Scanning from Computer
Using TWAIN compatible programs, you can scan to your computer. The scanned file is transferred to the ap-
plication program and can be directly edited and stored in that
application program.
For more information, refer to 「Scanning from Computer」 (P. 3-4).
Scanning from MFP Base Unit
Using the control panel in the base unit of the machine, the scanned image can be saved in USB memories,
directly emailed or saved on the FTP server. The files are stored in JPG, PDF, or TIFF.
For more information, refer to「 Scanning to a USB Memory」 (P. 3-9).
Printing
Printing from Computer
You can use the MFP as your printer once installing the driver on your PC.
For more information, refer to 「Updating Options Available from the MFP Driver」 (P. 3-2).
1-3

Preparation for Using the Machine
Printing from USB Memories
You can print saved files from a USB memory by connecting it directly to the machine.
The printable files are PDF documents and image file formats such as JPG and PNG.
For more information, refer to 「Print from a USB Memory」 (P. 3-41).
- Some image files may not be supported upon their compression method.
Note
Faxing
Basic Faxing
By entering receiver`s phone numbers you can fax the documents placed on the contact glass or ADF.
For more information, refer to 「Basic Faxing」 (P. 3-43).
Advance Faxing
You can fax more conveniently and efficiently by using advanced faxing functions.
For more information, refer to 「Advanced Faxing」 (P. 3-46).
1-4

Preparation for Using the Machine
3. Overview and Functions of the Machine
Names and Functions of Each Part(Front view)
1
No Name of Part Description
1 Tray 1 500 sheets of paper (Based on 75g/m (20lb) paper)
2 Tray 2 Optional paper tray for 500 sheets.
3 MPT A feeder for plain paper, labels, envelopes or so by opening the
4 Front Cover The cover can be opened for installing the cartridges or checking
5 Output Bin A tray for printed output paper.
6 Front Cover Opening
Lever
7 Output Tray Copied or printed paper exits to this tray.
8 Handle Use this handle to grip for moving the machine or installing the
9 ADF(Auto Document
Feeder) Cover
10 ADF Guide Adjust or guide the document alignment for ADF feeding.
(Based on 75g/m (20lb) paper) : Need to purchase this tray
separately unless it is provided by default.
extension support.
inside of the machine.
A lever for opening the front cover.
optional feeder.
Open this cover to remove jammed paper.
1-5

Preparation for Using the Machine
No Name of Part Description
11 ADF Output Tray A tray for output of the original documents from ADF.
12 Control Panel Consisting of various function keys and LCD windows.
13 ADF Input Tray ADF input tray for up to 50 sheets of the original documents.
14 USB Memory Port A port to connect USB memory modules.
1-6

Names and Functions of Each Part (Rear view)
No Name of Part Description
Preparation for Using the Machine
1
1 Vent Ventilate the heat from inside.
2 Telephone Terminal Terminal for the telephone line
3 Telephone Jack A port for an additional phone line
4 Power Switch The switch for the main power on or off.
5 Power Cord
Connector
6 USB Connector Use this connector to connect the machine to a computer.
7 Ethernet Port
8 2-sided Printer
A connector for the power cord.
Ethernet port for an internet connection.
Automatic duplex printing(installed inside the machine)
1-7

Preparation for Using the Machine
Names and Functions of Each Part (Interior View)
1
2
3
No Name of Part Description
4
5
1 ADF The original documents from ADF Input Tray are scanned here
2 Document Pad Press the original document to the exposure glass(glass flat bed).
3 Exposure Glass Place the document here face down to the glass.
4 Fusing Unit Lever Press this lever and open the Fusing Unit cover to remove jammed
paper in Fusing Unit.
5 Output Unit
Cover
Open this cover to remove jammed paper in Output Unit.
1-8

4. Control Panel
Preparation for Using the Machine
In control panel there are one 5 inch TFT LCD, 19 buttons, 4 touch keys and one indication light showing the
job status of the printer.
The meaning of lamp
The lamp shows the machin`s current status.
Lamp Lamp Status Machine Status
White
On
Blink
Standby
-
1
Red
Green
On
Blink
On -
Blink Operating
status of error
status of PCU alert
Buttons
Use these buttons to respond to the machine`s messages when selecting menus, getting the machine to start
to work or changing the settings of the machine.
1-9

Preparation for Using the Machine
Buttons Functions
Press 【
The job currently set starts.
Delete the messages(error messages or so) on the display panel.
Try again after removing the jammed paper.
Press 【
or [Copying] mode.
】 Press 【 】 button to switch to the standby window from menu settings.
【
】
【
【A3/11"×17"
START】
【PAUSE/REDIAL】 This button works as [PAUSE] function while entering recipient`s FAX numbers
Press [
mode,
and return to the preparation mode if it is in one of power saving mode.
Short press: Power saving mode
Long press(over 2 seconds): Maximum power saving mode.
Processing the following work, the printer power save mode is released. Press
[
], the power button.
Press 【A3/11"×17" START】 button to copy A3/11"×17" or fax A3/11"×17" paper
based on the current function selected. By default, press 【A3/11"×17" START】
button to copy A3/11"×17" paper.
and works as [REDIAL] without any number entered, and you can select any
number from the latest 10 recipient number list.
】 button to start the operation currently set.
】 button to cancel either one of the current jobs - [Printing], [Scanning]
] button to activate the power saving or maximum power saveing
【ON-Hook】 Use this button in both transmissions or receptions to dial at [On-Hook] mode
【RESET】 Used when initializing the settings to the default values.
【LOGOUT】 Used when logging out the machine after completing the jobs..
【PROGRAM】 The settings frequently used such as copy, scan, fax functions can be stored in
when making a call to a receiver for sending [FAX].
the memory and later called for the quick use.
1-10

Preparation for Using the Machine
5. Power Switch and Energy Saver Mode
Power Switch
Be sure that the power cord is securely plugged to the receptacle before turning on the Power Switch, and
then press the Power Switch on the right-rear side of the machine to“ ㅡ” position (On).
To turn the power off press the Power Switch to“ ○” position (Off).
1
- Do not insert or pull off the power plug, or touch the Power Switch with wet hands.
It may cause electrical shock.
- Wait for over 3 seconds to reboot once turning the power off.
- Turn the power off and unplug the power cord when the machine is not used for a long time or
- Mount the core which is enclosed with the power cord as the picture.
Warning
Important
moved to another place.
Energy Saver Mode
When the machine is not operated for a certain period of time, it is automatically switched to Energy Saver
Mode to reduce electric power consumption.
In the Energy Saver Mode, only the LED indicator of 【
off.
The waiting time for switching to Energy Saver Mode can be set in between 1~240 minutes.
Press 【
You can set up the time to switch to Energy Saver Mode automatically once the set up time has passed over.
】 button to terminate Energy Saver Mode by manual.
】 button is turned on and the other LEDs and LCD are
1-11

Preparation for Using the Machine
- Even in the Energy Saver Mode, reserved FAX sending and receiving, printing jobs from a PC and
- In the following cases, the machine is not switched to Energy Saver Mode:
- In the following cases, the machine exits from Energy Saver Mode automatically:
Note
receiving scanned jobs can be carried out.
Scanning documents
Copying or printing fax documents, or
Printing documents from a PC.
Sending a fax at reserved time
Receiving a fax
Receiving a print job from a computer, or
Receiving a call for scan jobs from a PC.
1-12

6. Unpacking
Preparation for Using the Machine
1
Unpack and install the machine where good ventilation is provided.
Nothing should be placed 8cm(3 inches) away from the right side of the machine for proper operation of
cooling fan. Avoid the following locations:
A. Where exposed to the direct sunray
B. Where close to heating equipment or air-conditioner
C. Where dusty and dirty
2
Pull the machine and all other peripheral components out of the box.
Keep the box and buffer materials just in case you need to pack the devices.
3
Remove tapes in and out of the machine and the packing material from the tray.
4
Check if the following components are included.
2. Cartridge(for enclosed)
3. Power cord
4. USB cable
1
5. Quick guide
6. Driver CD (User manual CD included)
8. Line cord
9. Core(used in the network cables)
1. Tray1 (default 500 sheets)
5
If any of components are missing or damaged, contact the dealer from that you have purchased the
machine.
1-13

Preparation for Using the Machine
7. Cartridge Preparation
Unpack and install the cartridge according to the following steps.
1
Cut the bag to the cutting guideline to open it and pull out the cartridge.
- If the unpacked cartridge is exposed to direct sunrays or strong light, it may be damaged.
place the unpacked cartridge in the shade or cover it with something like an old newspaper.
- Do not touch the green drum of the cartridge. Use the handles.
2
- Do not touch the green drum at the bottom of the cartridge.
Caution
Remove the packing materials
Caution
1-14

Preparation for Using the Machine
3
Hold the unpacked cartridge by the handles and shake it lightly so that the toner can be evenly
distributed.
1
- Be careful not to be stained with black toner powder.
- Do not touch the green drum at the bottom of the cartridge.
Caution
1-15

Preparation for Using the Machine
8. Cartridge Installation
1
Press the button on the left side to open the front cover.
2
Install the cartridge according to the following steps.
A. Hold the cartridge by the handles. (Facing down the back of your hands)
B. Align the frontal guides (arrow sticker) of the cartridge to the guide groove (arrow sticker) of the ma-
chine.
C. Push the cartridge towards the machine until it clicks shut.
3
Close the front cover. Make sure that both side ends of the cover click shut. If not, the machine may not
work properly.
- Check if the MPT is also closed.
Caution
Closing the front cover with the MPT open may cause malfunctions.
1-16

9. Print Paper Loading
Preparation for Using the Machine
This machine has a paper tray with a capacity of 550 sheets. In case of adding 2 large optional trays(tray 2),
the print capacity increases up to 1550 sheets.
For more information on capacity or supported size and media, see the below table.
Class. Sheet Supported Size Supported Media
Tray 1
(Basic tray)
Tray 2 (Large
optional tray)
Multi-purpose
Tray
500 'A4,A5,B5,Folio,Letter,statement,Legal,
Executive, US Foilo, Quatro,G.Legal,G.Letter
500 'A4,A5,B5,Folio,Letter,statement,Legal,
Executive, US Foilo, Quatro,G.Legal,G.Letter
50 A4,B5,A5,B6,A6,Legal,Letter,
Statement,Executive,US folio,
Quatro, G Legal, G Letter, Postcard
100x148, Postcard 148x200, Com9, Com10
Monarch,C5,C6,Dr
Plain paper, Thick paper
Plain paper, Thick paper
Plain paper, Transparency, Paper
Label, Vinyl Label
Loading in the Tray
Load the paper to the basic or optional tray according to the following steps.
1
- Make sure you have changed the media type and size for the tray in the machine driver when you
1
Important
change the paper for the tray 1.
Pull out the tray.( The handles are located at both sides of the tray)
1-17

Preparation for Using the Machine
2
Hold both width guide tab and width guide, and then push them to the right.
3
Hold both length guide tab and length guide, and then extend them to the maximum position.
4
Fix the length guide wall to meet the selected paper size. The position to fix is indicated at the bottom
side of the tray.
5
Loosen and flex the paper and then blow air to the paper.
Do not fold or wrinkle paper
Make the edges of paper flat and arrayed.
- Do note load paper in the tray over the maximum height indicated in the tray unit.
- Do not mix different media types in the same tray.
6
Important
Load paper with the print side faced down, and push the paper forward.
1-18

7
Stack the paper up to the mark of limit
Preparation for Using the Machine
1
- For Labels, thick paper, paper under A5 size stack the paper up to the limit line(thick) at mid inside
8
9
1
0
Caution
of the tray.
Hold both width guide tab and width guide together, and push them to the end of the paper.
Hold both length guide tab and length guide together, and push them to the end of paper.
Push the tray back to the end of the machine.
1-19

Preparation for Using the Machine
Loading to the Multi-purpose Tray
You can manually load appropriate paper to print from the multi-purpose tray before selecting the paper size
and type on your computer and sending the print jobs to the machine.
Also, it can be used as the standard tray for automatic printing.
Load paper to the multi-purpose tray according to the following steps.
1
Hold the top of the multi-purpose tray to pull it open.
2
Pull out the extension support.
Extension Support
Extension Support
1-20

3
Unfold the Extension Support.
Preparation for Using the Machine
1
4
Push both Width Guides outward a little wider than the paper size to be loaded.
Width Guide
5
Loosen and flex the paper and then blow air to the paper.
Do not fold or wrinkle paper
Make the edges of paper flat and arrayed.
1-21

Preparation for Using the Machine
- Do not overload Multi-purpose Tray so that the paper tightly fits to Width Guide. It may cause paper
6
Do not use crushed or wrinkled paper.
7
8
Important
jams.
Load the paper at the center of Multi-purpose Tray in a way that the printable side is faced up.
Push the paper slightly to the machine.
Push Width Guide slightly to the paper.
1-22

Installation of Paper Support
Preparation for Using the Machine
The Paper Support holds and stacks paper coming from the machine with a certain angle without paper
falling.
Unfold the Paper Support after installing the machine.
1
1-23

Preparation for Using the Machine
10. Original Documents
Types of Original Supported
Automatic Document Feeder(ADF)
Copy, Scan and Fax
Max. Size(W×H) 216×356 mm
Min. Size(W×H) 140×148 mm
Max. No. of Doc. at a Time 60 ~ 80 g/m2 : 50 sheets
81 ~ 105 g/m2 : 35 sheets
Thickness 0.08 mm ~ 0.15 mm
Quality High quality paper or equivalent paper
Exposure Glass
Max. Size(W×H) 216×297 mm
Min. Size Not limited.
With A3/11X17 Function(W×H) 297×420 mm (A3 size)
11×17 in (11×17 size)
1-24

11. Placing the Original
Placing on Automatic Document Feeder
1
Adjust the guide to the original document width.
2
Push the original with the scan side faced up until it stops.
Preparation for Using the Machine
1
3
Adjust the guide to the original document width.
1-25

Preparation for Using the Machine
- The below original are not used for ADF.
Note
Original torn or with holes
Original wrinkled or bent
Wet original or attached with each other due to electrostatic
Carbon or non-carbon originals
Texture or metal paper
Original with staples, clips or adhesive tapes
Glued original
Glossy or specially coated original
1-26

Preparation for Using the Machine
Placing Document on Exposure Glass
1
Lift ADF
Always lift ADF more than 20°
If you lift it less than 20°, the size of the original may not be detected.
2
Place the original faced down on Exposure Glass with the original laid to a grid at the upper left
corner on the glass of scanner.
1
3
Lower ADF
- In case the original remains on ADF, the original on Exposure Glass is not scanned.
- When you copy a book, do not press it toward the glass too hard.
Note
- Any sharp jut may leave dents or scratches on the exposure glass.
1-27

Preparation for Using the Machine
12. Installing Optional Tray 2
The machine supports Optional Tray 2 (500 sheets).
Optional Tray 2 consists of a support and a tray.
- To install Optional Tray 2 after installing the machine, make sure to turn the power off, unplug the
1
2
3
Warning
power cord and disconnect all the cables at the rear side of the machine.
Remove all packing materials and tapes.
Pull the tray unit outward (the handle grips to pull out the tray are located on both sides).
Hold both ends of the support and put it in the place where the machine will be located.
1-28

Preparation for Using the Machine
4
Reinstall the tray. Push the tray back until it fits completely into the support.
Installing the Machine and Tray 2
Use the handle grips on both sides of the machine to lift and place it where to be installed.
To install the machine on the tray 2, follow the instructions below.
1
Align the tab, grooves and connectors of the tray 2 with the bottom side of the machine.
1
2
Place the machine onto the tray 2. Make sure to place it exactly onto the tray 2.
Connector
Tab
Groove
Handles
1-29

Preparation for Using the Machine
13. Connecting Cables
The machine can be directly connected to a computer through a USB cable.
- Do not connect or disconnect any type of communication ports if the power of the machine is on.
Caution
Connecting USB Cables
The machine can be connected via the USB cable and the USB port supports the USB standard.
1
Make sure that all the power connected to the machine is off.
2
Connect the machine to the computer via the USB cable. The USB port may need a USB cable.
Make sure both symbols on the machine and the cables match each other.
1-30

Preparation for Using the Machine
Connecting Network Cables
This machine can be directly connected to the network via the standard network cable.
Follow instructions below to connect the machine to the network.
1
- Most networks supports the standard 10BaseT/100BaseTX Fast Ethernet port.
1
2
3
Note
Make sure the power connected to the machine, computer and other devices is off.
Use the standard cable compatible with the user network to connect the device to the LAN or hub.
Turn on the power of the machine.
1-31

Preparation for Using the Machine
14.
Installing MFP Driver
The MFP driver is a software enabling communications between a PC and the machine.
There are the scanner driver and the printer driver provided for using the MFP.
The software is mostly installed during the initial setting of the machine. Follow the instructions below to install
the software.
1
Close all open software programs on your PC.
2
Insert the CD for the software and the manual
3
Click on [Install] in the basic installation dialogue window.
4
Follow the instructions on the screen.
Updating Options Available from the MFP Driver
After installing software and options, you may need to install additional options manually to do print jobs.
For Windows Users
1
Click Start and then click Execute.
2
Press Start and type “ control printers” into the execution dialog box.
3
Press Enter or click OK to open the printer folder.
Or follow instructions below to open it.
Click Start from Windows menu.
- Windows 2000: Select Configuration > Printers.
- Window XP/2003: Select Printers and Fax.
- Window 2008/Vista: Control Panel > Hardware and Sound > Printers.
- Window 7: Control Panel > Hardware and Sound > Devices and Printers.
- Window Server 2008 R2: Control Panel > Hardware > Devices and Printers.
4
Select SINDOH M612_617 Series.
5
Mouse right-click on SINDOH M612_617 Series.
1-32

Preparation for Using the Machine
6
Window XP/2003/2008/Vista: Click on Print Default Settings.
Window 7, Window Server 2008 R2: Click Print Default Setting from each menu.
7
Click the device setting tab.
8
Add installed hardware options from available options.
9
Click Apply.
1
1-33

Preparation for Using the Machine
15. Checking MFP Settings
Switching on MFP
1
Connect the end of the power cord to the port on the rear side of the machine and plug the power cord to
the properly grounded wall outlet.
2
Switch on the machine.
When initial warm-up is completed, [Select the function to use] message appears to indicate that the machine
is ready to receive data. If other message than [Select the function to use] appears.
refer to P. 5-17 「Understanding MFP Messages」
3
Check your PC and make sure that other peripheral equipments are on.
4
Move to the next step.
Printing System Report
You can print the system reports to see initial settings and check if all options are properly installed.
1
Make sure the machine is on.
2
Check the tray and the paper type.
3
Press [Settings] button.
1-34

4
Enter into [General Settings]
5
Press [Report]
Preparation for Using the Machine
1
6
Press [System Report]
7
It returns to the home screen and starts to print
1-35

Preparation for Using the Machine
Printing Network Report
Print the Network Report to check the network settings of the machine.
Change the settings with referring to network settings such as IP included in the network report.
1
Make sure the machine is on.
2
Check the tray and the paper type.
3
Pres
s [Settings]
4
Press [General Settings]
5
Press [Report]
1-36

6
Press [Network Report] button.
7
It returns to the home screen and starts to print
Preparation for Using the Machine
1
- Enter the correct IP in the port field in the machine driver settings to print from the network.
- Your computer and the machine have identical addresses in "Netmask" and "Gateway".
- In case the machine`s IP address is set as an automatic setting(DHCP), no separate setting is
- If DHCP is selected, the IP address is subject to change upon the network environments. If the ma-
Note
required.
chine is not connected to the network, check the allocated IP address first and consult your network
administrator in case the IP address keeps changing.
1-37

Preparation for Using the Machine
16. Tray and Paper Specifications
In this section information on the paper types and specifications, and the paper trays is provided. For more
information refer to MFP Paper Instructions especially cardstocks or labels.
Tray Unit Load per Media Paper Size Weight
Tray 1
(Basic Tray)
Tray 2
(Large Optional
Tray)
MPT
(Multi-purpose
Tray)
Remark1 : For labels or thick paper in tray 1 stack the paper up to the limit line at mid inside of the tray.
The number of paper loaded in the tray can vary upon the thickness of the paper.
For labels or thick paper in tray 2 stack the paper up to the limit line at mid inside of the tray.
The number of paper loaded in the tray can vary upon the thickness of the paper.
The following are for 2-sided printing.
Plain paper 500 sheets
Thick paper: specified
thickness(marked on
the label)
Plain paper 500 sheets
Thick paper: specified
Thickness(marked on
the label)
Plain paper 50 sheets
Envelope 5 sheets
Label 15 sheets
Cardstock 5 sheets
A4,A5,B5,Folio,Letter,stateme
nt,Legal,Executive, US Foilo,
Quatro,G.Legal,G.Letter
A4,A5,B5,Folio,Letter,statement,L
egal,
Executive, US Foilo, Quatro,G.
Legal,G.Letter
A4,B5,A5,B6,A6,Legal,Letter,
Statement,Executive,US folio,
Quatro, G Legal, G Letter, Postcard 100x148, Postcard 148x200,
Com9, Com10 Monarch,C5,C6,Dr
60~105g/m²
(16~28lb)
60~163g/m²
(16~44lb)
60~166g/m²
(16~44lb)
Cardstock 90lb
Paper size Weight Paper Output
A4 (210X297)
Letter paper (216X279)
- The loading capacity of Multi-purpose Tray is basically 50 sheets of the plain paper, with more
quantity within 10 sheets upon the paper thickness. However, load 50 or less sheets for the best
feeding performance.
Caution
Plain paper 60~90g/m (16~24lb) Basic output tray
1-38

17. Paper
Preparation for Using the Machine
Automatic Feeding
When the current printing encounters out of paper from one tray, the machine switches automatically to other
tray with identical paper size and type loaded in, and continues printing.
Feeding Order
When automatic feeding is set, the trays are switched in the following order:
Tray 1 → Tray 2 (Option) → MPT
1
1-39

Preparation for Using the Machine
18. Information on Installation and Operation
For more information on installation and operation, refer to the enclosed CD or the website.
You can see detailed information on the machine installation and un-installation, supply installation and re-
placement, paper feeding, and CD for driver and utility installation.
Driver CD and User Manual
The driver CD contains the printer driver and scanner driver necessary to operate the machine.
Also, it contains utilities, relevant documents and manuals for the machine.
Quick Guide and User Manual
Quick Guide easily shows how to install and use the machine. The manual in the CD fully provides general
messages and explanation to the functions and removal of jammed paper as well as installation and usage of
the machine.
Sindoh Website
You can refer to www.sindoh.com to download and update the drivers and utilities, various documents in the
CD and more information on Multiple Function Printers.
1-40

Copying
M612 Series
User Manual
2
Copying
2
2-1

Copying
1. How to Copy
Basic Operation
Place the original on Exposure Glass or ADF. For more information, refer to P. 1-25 「Placing the Original」
1
2
Press [Copy] in the window to go into the copy setting mode.
3
Select necessary settings.
You can specify settings for the original size, paper source (paper size), type of original, copy density, auto
density, scale, N-up, collate, duplex settings and copy quality. For more information, refer to P. 2-6 ~ P.
2-11.
To make multiple copies of the scanned original, specify the number of copies using the ten keys or rotat-
4
ing the No. of Copies dial. Or you can change the number by pressing the image button 【+】【 -】 for the
number of copies.
5
Press
- Press 【
- Press [reset] button to reset to the default values.
】
【
button to start copying.
Note
】 button to cancel copying.
2-2

Copy Settings Table
Copy Settings
Copying
No of Copies
Original Size
2
Paper source paper size
Original Types
Copy Density
Auto Density
Scale
Combined
Collate
Duplex Settings
Copy Quality
Detailed Description of Copy Settings
Menu Objectives Values
No of Copies Copy the original as many number of
sets as specified.
Original Size Specify the size of the original
document.
Paper Source Select a tray for the paper size to
use.
* 1~ up to 99 sheets.
* A4, A5_SEF, A5_LEF, B5, Letter, Legal,
Executive, Statement, US Folio
* ADF, Tray 1, Tray 2,
Tray 3, MPT.
- Tray 2 and Tray 3 are activated only
Note
when Tray option is mounted.
2-3

Copying
Menu Objectives Values
Paper Size Trays per paper sizes for copying When selecting Tray1, Tray2 or Tray3 in
[Paper Source]
* Auto, A4, A5 SEF, A5 LEF, B5SEF,
Letter, Legal, Executive, Statement,
US Folio, Quatro, G.Letter, G.Legal
When selecting MPT in [Paper Source]
* A4, A5 SEF, A5 LEF, A6, B5, B6, Letter,
Legal,
Executive, Statement, US Folio, Quatro,
G.Letter, G.Legal, Postcard 100x148,
Postcard 148x200, Postcard 200x148,
Monarch Envelop, Com9 Envelop, Com10
Envelop, C5 Envelop, C6 Envelope, DL
Envelop
Note
- [Paper Size] can be set per tray in the
paper setting in [Paper]
- Tray 2 and Tray 3 are activated only
when tray option is mounted.
Original Type Contents type of the original Text, * Text/Photo, Photo
Copy Density Darkness of copied paper 1~9
Auto Density Automatic change of darkness on
copied paper
Scale Zoom scale of copied paper * Auto Scale, Preset Scale, Custom Scale
Combine Multiple pages onto a single paper * Standard copy, 2 pages onto 1 paper, 4
Collate Multiple pages into a set. * On, Default
Duplex Settings for 2-sided copy * 1-sided scan-> 1-sided copy
Copy Quality
(*) Factory default settings.
Scan resolution for copy quality or
copy output
* On, Off
(50-200%)
pages onto 1 paper.
1-sided scan-> 2-sided copy
2-sided scan-> 1-sided copy
2-sided scan-> 2-sided copy.
*Standard quality, high quality
2-4

Changing Copy Default Settings
1
Press [Settings] when the machine is ready.
2
Press Copy Settings in the [Settings] screen
3
Copy settings menu appears on the screen.
Copying
2
4
Press 【▲】【 ▼】 to select the wanted items, and then change the settings to your environment.
5
When the changes are completed, press Save in the upper right side of the screen.
Press Cancel to cancel the changes.
2-5

Copying
2. Basic Copying
1
Press Copy to go into Copying window.
2
To make multiple copies of the scanned original, specify the number of copies using the ten key or rotating
the dial of No of Copies in Copy window. You can change the number by pressing the 【+】【 -】image
button and the number ranges 1~99.
2-6

Selecting Paper/Original Size
Select a tray with paper to be used and then start copying.
1
Place the original
2
Press Copy to go to the copy mode setting menu.
3
Press Original.
Copying
2
4
Select the size of the original document and then press OK
5
Press Paper
2-7

Copying
6
Select paper tray.
7
Paper Size is basically specified per each tray in Settings, and select a tray and change the paper size of
the selected tray, and then press OK.
8
Select the scale settings to adjust copy sizes. If the settings are not selected, the copies are automatically
reduced or enlarged according to the sizes of the original and the paper.
9
Enter the number of copies.
1
0
Press 【
】 button to start copying.
Setting Copy Mode and Density
Set the copy mode and density according to the structures and contents of the original.
1
Press Copy to go to the copy mode setting menu.
2
Press Original Type.
[Text] - copy with suitable settings for text documents.
[Text/Photo] - copy with suitable settings for the documents consisting of texts and images.
[Photo] - copy with suitable settings for the documents consisting of photos and images.
3
The selected original document type is set.
2-8

Adjusting Copy Density
1
Press Copy Density.
2
Select the desired values, and then press OK.
Copying
Auto Copy Density
The machine scans density of the original and automatically adjust the density of images.
Heavy textures of the originals(news paper or recycled paper) are copied without copying the background.
1
Press Copy Density.
2
Select On/Off in Auto Density, and then press 【OK】 button.
2
2-9

Copying
Adjusting Copy Scale
You can make copies to the paper sizes by adjusting the copy scales. One of the zooming scales is called
Auto Scale making copies with automatic reduction/enlargement of the original document and paper sizes,
and the other one is called Preset Sale making copies with preset zoom ratio of reduction/enlargement based
on the original document and paper sizes, and another one is called Custom Scale with using any zoom ratio
defined by the user.
Auto Scale(based on paper sizes)
75%50%
Custom Scale (by 1% ratio)
100%
200%150%
Paper Size Scale(Auto Scale)
The copy is made upon the specified paper size with auto selecting the scale.
1
Press Copy to go to the copy mode setting menu.
2
Select the sizes of the original and the paper, and the paper tray by setting menus of Original Size, Paper
source and Paper Size.
3
Press [Scale] menu.
4
Press Auto Scale.
5
Press 【
】 button to start to copy.
2-10

Copying
Preset Scale
Select and use a zoom ratio from the scale ratio list frequently used in general.
1
Press Copy to go to the copy mode setting menu.
2
Press [Scale] menu.
3
Press Reduce/Enlarge and select wanted scale.
4
Press 【
】 button to start to copy.
Custom Scale(Zoom)
In order to provide advanced scalable copy function, you can specify the zoom raio by `1% in the range of
50% ~ 200%.
1
Press Copy to go to the copy mode setting menu.
2
2
Select the sizes of the original and the paper, and the paper tray by setting menus of Original Size, Paper
source and Paper Size.
3
Press [Scale] menu.
4
Press Reduce/Enlarge and then press Direct Input.
5
Enter the wanted scale using the ten key and then press OK.
6
Press OK again. Copy with a custom defined scale.
2-11

Copying
3. Advanced Copying
Combined Copy
Several pages can be placed onto one sheet of paper.
Two pages onto one sheet
- Two or four pages can be combined to be printed onto one sheet of paper.
- Copied images can be truncated according to the size of the original document and paper.
- If the number of page of the original document is less than that of combined copy, the shorted pages are
Note
printed blank.
4 pages onto one sheet
2-12

Setting
1
Place the original and press Copy to go to the copy setting menu.
2
Press Extended menu at the upper right side and press [Combine].
3
Setup the original, combine type and print upon necessity, and then press Extended.
Copying
2
4
Press
5
After scanning is completed, “Continue<Start>, Complete<#>” messages appear.
6
Press
7
To place more than 3 pages onto a single sheet, repeat the step. 5~6.
- In case of using ADF, step 5~7 are not necessary.
【
【
】
】
button.
button again
2-13

Copying
OHP Copy
In case of scanning or printing on OHP film there remains roller marks or shade images.
To prevent the roller marks or shade images, place a book and white LETTER paper over the OHP to make
copies.
Collated Copy
Make sets of copies in the page order.
Duplex
Two pages of the original documents can be printed on both sides of paper.
Making A 2-sided Copy
1
Press Copy to go to the copy mode setting menu.
2
Press Duplex on the screen.
2-14

Copying
3
Select Duplex for the original and the paper, and press OK.
4
When using the flatbed scanner, if Duplex output is selected, “Scan Next Page” appears after scanning
the documents. Now, place the other side of the Original Contact Glass and press 【 】 button. The original
is scanned again and automatically printed on the other side. The first scanned page is copied on the front
side of paper.
5
In case of scanning with ADF, the odd numbered page is copied onto the front side, and even numbered
page onto the rear side.
2
- Duplex can be used only when specifying the output paper size to “A4” or “Letter”.
- Duplex can be used with the combined copy function together.
Note
Copy Quality
Select the scan resolution of the originals. High quality provides excellent print quality compared to the general
quality, but the scanning takes longer.
1
Press Copy to go to the copy setting mode
2
Press Extended on the upper right side in the screen and press Copy Quality
3
Select either one of Standard quality or High quality, and press Close.
2-15

Copying
Reduction Copy of A3 to Letter
A3 documents can be reduced to A4 size.
Preparation for Scanning A3 Documents
1
Place A3 original to the A4 scan fiducial point
ADF (Automatic Document Feeder)
2
Lower down the ADF unit slowly.
3
Press 【A3】 button. The scanned document is reduced to print on A4 paper.
Due to the margin, the reduction ratio of height or width can be a little different.
2-16

Copying
2
- When you scan, fax or copy A3 documents, a slight mismatch of images may occur in the overlap-
- If you scan A3 documents more than twice in a row, the leading edge may be misaligned due to dis-
- If the A3 document is thick or slippery, some part at the rear edge may not be scanned. In this
Caution
ping part. So, this function may not be suitable for the document copies that require accuracy.
placement. So, fix A3 document to the A4 scan fiducial point and do it again.
case, clean the roller with alcohol or clean water, and then try again.
2-17


M612 Series
User Manual
Scanner, Printer
and Fax
3

Scanner, Printer and Fax
1. Driver Installation
The MFP driver is a software enabling communication between PC and the machine.
In general, the software is installed during initial setting of the machine. To install software, follow the instruc-
tions below.
1
Close all open programs on your PC.
2
Insert the software/installation CD.
3
Click [Install] on the basic installation dialogue window.
4
Follow the instructions on the screen.
Updating Options Available from the MFP Driver
After installing MFP software and options, you may need to install additional options manually to do the print
jobs.
For Windows Users
1
Click Start and click Execute.
2
Press Start and type control printers into the execution dialog box.
3
Press Enter or click OK to open the printer folder.
Or follow the instructions below.
Click Start from the Window menu.
- Window 2000: Select Printer.
- Window XP/2003: Select Printer and Fax.
- Window 2008/Vista: Go to Control Panel > Hardware and Sound > Printer.
- Window 7: Go to Control Panel > Hardware and Sound > Device and Printer.
- Window Server 2008 R2: Go to Control Panel > Hardware > Device and Printer.
4
Select SINDOH M612_617 Series.
5
Right-click on SINDOH M612_617 Series.
3-2

6
Window XP/2003/2008/Vista: Click Print Default Setting.
Window 7, Window Server 2008 R2: Click Print Default Setting from each menu.
7
Click the device setting tab.
8
Add installed hardware options from available options.
9
Click Apply.
Scanner, Printer and Fax
3
3-3

Scanner, Printer and Fax
2. Scanning from Computer
With the TWAIN compatible program installed, you can use the machine as a scanner.
The scanned files can be edited and processed with using the application program installed on your PC.
Scanning Documents from PC
With the TWAIN compatible program, you can transfer the scanned the original data to your PC.
1
Run the TWAIN compatible program.
Scan the document using the application program. Scanning procedures vary by program.
2
For more information, refer to the program manual.
Select a scanner.
3
Select“ SINDOH M600 Series Twain Driver”.
Check the scan settings from the scanner driver.
4
For more information, refer to 「Scan Driver Setting Menu」 (P. 3-6).
Place the original on the flatbed or ADF.
5
For more information, refer to 「Placing the Original」(P.1-25).
If you want to scan a part of the original, press 【Preview】 button on the scan driver window to scan it at a lower
6
resolution. To scan the whole document, go to the step 8 .
Select the scanning area in the preview window.
7
Press 【Scan】 button to start scanning.
8
The scanned image is transferred to the application program.
9
- [Preview] is available only when [Original Set Type] is set to [Flatbed].
Note
3-4

[Twain Scanner Driver Window for M600 Series]
Scanner, Printer and Fax
3
3-5

Scanner, Printer and Fax
Scan Driver Setting Menu
Setting Group Setting Menu Options Description
Original Set
Type
Standard
Presets
Advanced Resolution
Original Size
Original
Orientation
General
Photo
Document
Flatbed,
ADF, Duplex,
A3 Unit
Letter, Statement,
Legal, Executive,
Folio
A4, A5, B5,
Custom Size
Portrait,
Landscape
Select Button Resolution in “Advanced Settings” is to "
Select Button Resolution in “Advanced Settings” is to "
Select Button Resolution in “Advanced Settings” is to "
75x75dpi Select the resolution of the scan job. The
100x100dpi
150x150dpi
Select the location where the original is
placed.
Select the size of the original to be scanned.
Legal and Folio are available only when ADF
is selected.
Max. custom size:
Width 215mm, Height 297mm
Default is "Portrait" and activated only
when “Standard Preset" is set to "A5" or
"Statement”.
300x300dpi”, Color type to “Gray”.
300x300dpi”, Color type to “Color”.
150x150dpi”, Color type to “Black/white” and
Halftone mode to "Threshold".
higher resolution gives the higher quality of
images, but larger file sizes instead.
3-6
Color Type
Brightness
Halftone
Mode
200x200dpi
300x300dpi
600x600dpi
Black/White Select the color of the images to scan.
Gray Scale
Color
-100~100 Setup brightness of the scan images.
Threshold Activated only when the color type is set to
Select it upon the color type and purpose.
The larger the value is, the brighter it is.
"Black/White".

Setting Group Setting Menu Options Description
Error Diffusion In general, [Threshold] is suitable for
scanning documents with only texts.
[Error Diffusion] is suitable for documents
with both texts and images or images only.
Preview Select Button Use this to see the scan output in advance
or select the scan area.
Scan Select Button Select this menu to start scanning.
Scanner, Printer and Fax
End Select Button Select this menu to end the scan driver.
Version Select Button Information on the scan driver version.
3
3-7

Scanner, Printer and Fax
3. Scanning A3 Documents
The A3 document can be scanned and saved as the scan images in a PC.
Preparation for A3 Document Scan
1
Place A3 paper on the exposure glass with its upper-left corner at the A4 scan fiducial point indicated on
the scanner.
ADF
2
Lower the ADF unit slowly.
Select the scanner.
3
Select“ SINDOH M600 Series Twain Driver”.
Set the original set type to A3 unit in the Scan Setting of the scanner driver.
4
Press 【Scan】 button to start scanning.
5
The scanned image is transferred to the application program.
6
- When you scan, fax or copy A3 documents, a slight mismatch of images may occur in the overlap-
- If you scan A3 documents more than twice in a row, they may be misaligned due to displacement. So, fix
- If A3 document is thick or slippery, its later part may not be scanned. In this case, clean the roller
Caution
ping part. So, this function may not be suitable for the documents that require accuracy.
the A3 document at the LT scan point page after page basis.
with alcohol or clean water, and then retry.
3-8

Scanner, Printer and Fax
4. Scanning from MFP
The scanned image can be saved on the USB memory, e-mailed or saved on the FTP server.
Scanning to USB Memory
The scan image can be saved quickly in a USB memory once the USB memory is inserted to the machine.
1
Insert the USB memory to the machine.
3
2
Place the original documents.
3
Press 【Scan】 button.
3-9

Scanner, Printer and Fax
4
Press Scan to USB
5
Set the File Save to Yes.
6
Setup the original size, resolution and file type upon necessity.
7
Press 【
- The scanned image is saved in a format of YYMMDDMMSS. For example, if a scan job took place
】 button to save in the USB memory or or transmit the scanned document.
Note
at 12:30:20, January 1, 2014. The file name will include “140101_123020” and the extension file
name upon the file type.
3-10

E-mailing the Scanned Files
If the device is connected to the network, you can e-mail the scanned image directly.
Set the e-mail server in [Network Settings] before e-mailing the scanned images.
Set the SMTP server to send your e-mail.
1
Place the original.
2
Press 【Scan】 button.
Scanner, Printer and Fax
3
3
Press [Address Book ]or Direct Input button.
① Search Address Book: Search and select address using tabs, and then press 【Close】.
3-11

Scanner, Printer and Fax
② Direct Input: if selecting e-mail among `e-mail`, `FTP` and `Shared folder`, you can enter e-mail infor-
mation.
4
Setup Content, Contrast, resolution, scan size and scale upon necessity.
5
Press button to start the job.
6
The scan job is proceeded and the e-mail is sent to the specified address.
7
The scanned file is delivered as attached to the sent out e-mail.
You can access to the machine web to set the e-mail server and edit e-mail address book. For how to access
to the machine web refer to 「Setting with Web Image Monitor」 (P. 4-2).
Follow the instructions below to make settings in the control panel.
3-12
 Loading...