


A611dn
Table of contents
 Loading...
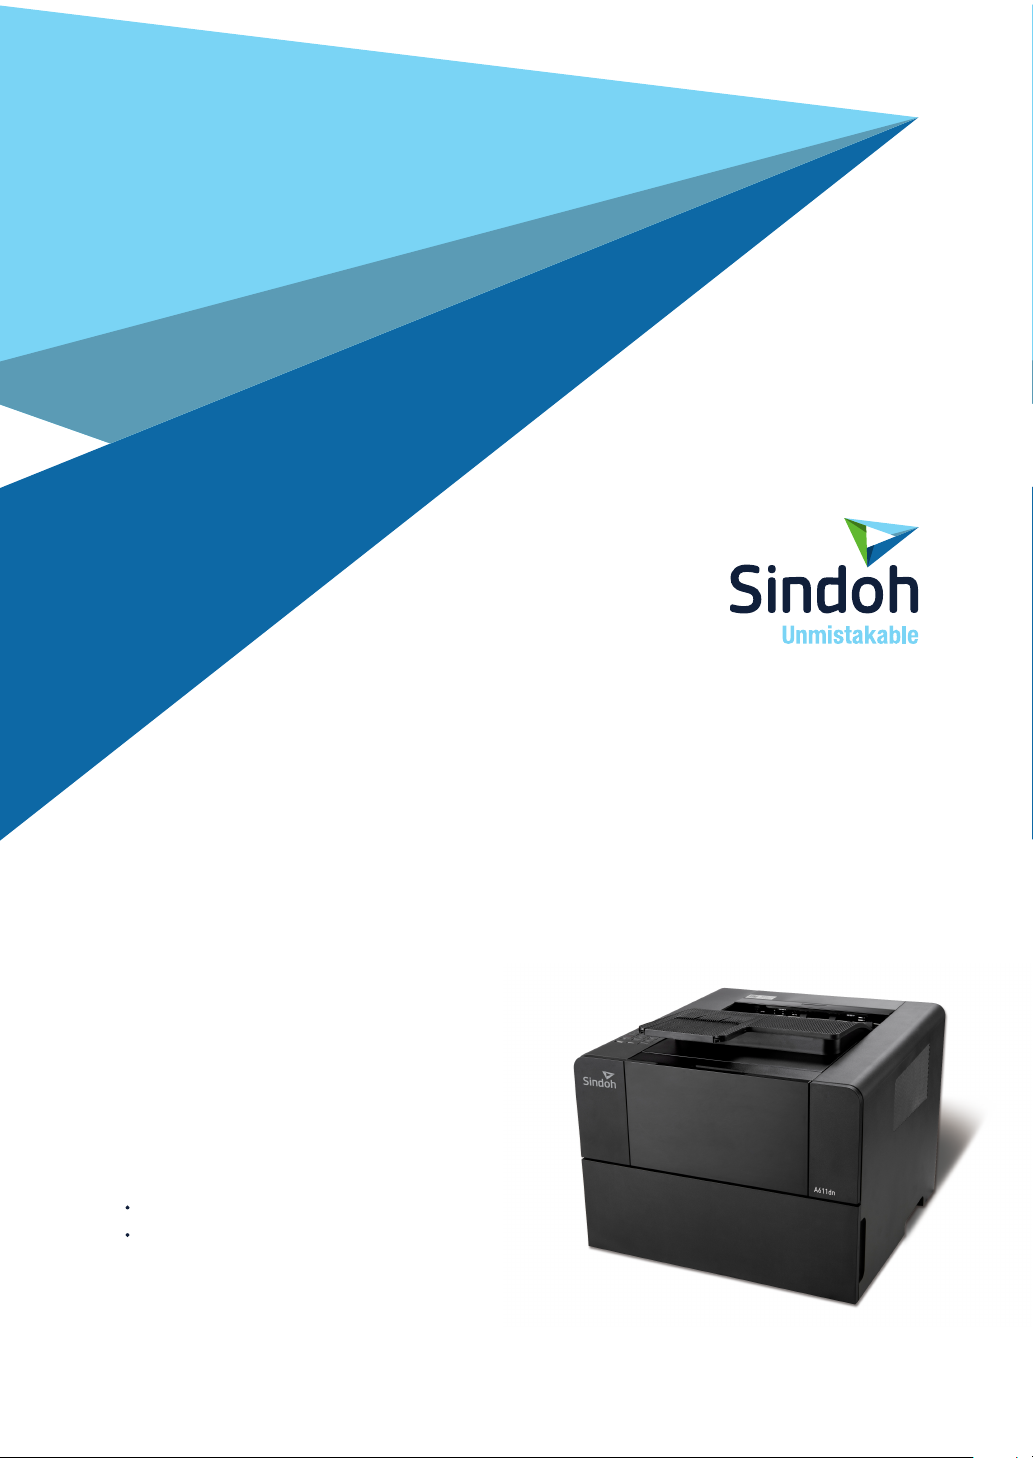
A611 Series
User Manual
This user manual includes a product warranty.
Please read the user manual before using this
product and keep the manual in a convenient
location.

Safety Precautions
PLEASE FOLLOW THE INSTRUCTIONS BELOW WHEN USING THIS DEVICE.
Warning: Failure to follow the instructions may cause death or critical injuries.
You must plug in the power cord directly into the wall outlet. Do NOT use an extension cord.
If the power cable or plug has been eroded or damaged, pull the plug to remove it.
Do NOT remove covers or screws unless otherwise stated in this manual in order to avoid
electric shock or exposure to laser radiation (for laser devices).
For the following situations, turn off device and pull the plug to remove the power plug.
- Something has been spilled on the device
- Considering making a request for repair of the device
- Cover of the device has been damaged
If the device uses toner, do NOT burn spilled or discarded toner.
Toner particles may ignite when exposed to a flame.
Use designated store or recycle location to discard the device.
Turn off when not using the device for a long time or before leaving work.
Failure to do so may cause unexpected fire.
Caution: Failure to follow the instructions may cause minor to critical injury or property damage.
Protect device from damp or wet places exposed to rain, snow, etc.
Remove the power cord from the wall outlet before moving the device.
Be careful NOT to damage the power cord while device is being moved.
When unplugging the power cord from the wall outlet, do not pull by the cable. Pull by the plug.
Do NOT let paper clips, staples or other small metal objects fall into the device.
Take caution when removing jammed paper or cleaning inside the device.
For devices that use toner, store toner and cartridge out of reach of children.
Do NOT discard the device or consumables in garbage disposal areas for households.
Use designated store or recycle location to discard the device.
Inside of the device may be extremely hot. Do NOT touch parts labeled “Caution: HOT” or
anywhere near the parts. You may suffer a burn.
This product meets the Standards for High Quality and Performance.
It is strongly recommended to use ONLY authentic parts available at our designated stores.

Before Use
Thank you for purchasing a Sindoh product.
This manual provides detailed instructions on the correct use and maintenance of
the device for best quality and to contribute to making your office smooth and efficient.
Please read this manual carefully before using the device and keep it close at hand.
You MUST read the safety precautions before using the device for safe and correct use.
Copyrights and Restrictions
1. The contents of this user manual may be subject to change without prior notice. The
Company is not liable for indirect, incidental, or consequential damage caused by the UNIT
handling and operation in any case.
2. Copying or printing paper money in circulation, revenue stamp, bond, stock, bank bill,
check, passport, or driver’s license is forbidden by local laws.
3. Copying or printing of books, scores, pictures, maps, floor plans, photographs with
copyright may be copied for personal use or at home or within the scope permitted by law.
Other illegal reproduction is prohibited by law.
4. The above mentioned list an example only and it may not include the whole content. The
Company holds no liability, whether or not the above list is the whole or correct one. Should
you have questions about the legality of the copying or printing of an object, please seek
legal advice.

Table of Contents
Before Use
1. Introduction -------------------------------------------------------------------------------------------- 1
2. How to Read the User Manual -------------------------------------------------------------------- 2
3. Safety Information ----------------------------------------------------------------------------------- 3
4. Notice --------------------------------------------------------------------------------------------------- 5
Symbols -------------------------------------------------------------------------------------------- 2
Chapter 1. Printer Introduction
1. Printer Specifications -------------------------------------------------------------------------------- 1-2
2. Device Overview ------------------------------------------------------------------------------------- 1-3
3. Explanation on Each Printer Model -------------------------------------------------------------- 1-5
4. Information on Installation and Usage --------------------------------------------------------- 1-6
Name and Function of Each Part (Front) --------------------------------------------------- 1-3
Name and Function of Each Part (Back) --------------------------------------------------- 1-4
5. Printer Paper Feed Specification ---------------------------------------------------------------- 1-7
6. Product Certification --------------------------------------------------------------------------------- 1-8
ⅰ
Table of Contents
Driver CD ------------------------------------------------------------------------------------------- 1-6
Quick Installation Guide and User Manual ------------------------------------------------- 1-6
Sindoh Website ----------------------------------------------------------------------------------- 1-6
Energy Saving Mark ----------------------------------------------------------------------------- 1-8

Chapter 2. Printer Installation
1. Unpacking the Printer ------------------------------------------------------------------------------- 2-2
2. Cartridge Preparation ------------------------------------------------------------------------------- 2-3
3. Cartridge Installation -------------------------------------------------------------------------------- 2-5
4. Loading Paper ---------------------------------------------------------------------------------------- 2-6
5. Installing Optional Tray 2 --------------------------------------------------------------------------- 2-11
6. Cable Connection ------------------------------------------------------------------------------------ 2-13
USB Cable Connection ------------------------------------------------------------------------- 2-13
Network Cable Connection -------------------------------------------------------------------- 2-13
7. Print Driver Installation ------------------------------------------------------------------------------ 2-15
8. Printer Settings Check ------------------------------------------------------------------------------ 2-18
Loading Paper on Tray -------------------------------------------------------------------------- 2-6
Loading Paper on Multipurpose Tray -------------------------------------------------------- 2-8
Installing Paper Support ------------------------------------------------------------------------ 2-10
Installing Printer on Tray 2 --------------------------------------------------------------------- 2-12
Connecting USB Cable/Network Cable/Wi-Fi --------------------------------------------- 2-13
Updating Options Available for Printer Driver --------------------------------------------- 2-17
Switch On ------------------------------------------------------------------------------------------ 2-18
System Report Printing ------------------------------------------------------------------------- 2-18
Network Report Printing ------------------------------------------------------------------------ 2-19
Table of Contents
ⅱ

Chapter 3. Printer Operation
1. Using the Control Panel ---------------------------------------------------------------------------- 3-2
2. Understanding the Printer Settings Menu------------------------------------------------------ 3-4
3. Cancelling Print Jobs -------------------------------------------------------------------------------- 3-6
4. Menu ---------------------------------------------------------------------------------------------------- 3-7
Understanding Power Save Button & Lamps -------------------------------------------- 3-2
Buttons --------------------------------------------------------------------------------------------- 3-3
Changing Printer Settings with Printer Settings Menu ---------------------------------- 3-4
Restoring to Factory Settings ----------------------------------------------------------------- 3-4
Printing System Report Page ---------------------------------------------------------------- 3-5
Cancelling with Button on the Control Panel --------------------------------------------- 3-6
Cancelling on My Computer ------------------------------------------------------------------ 3-6
Paper Settings ------------------------------------------------------------------------------------ 3-9
General Menu Setting --------------------------------------------------------------------------- 3-10
Print Settings -------------------------------------------------------------------------------------- 3-10
Network Settings --------------------------------------------------------------------------------- 3-11
Report ----------------------------------------------------------------------------------------------- 3-13
5. Understanding Printer Messages ---------------------------------------------------------------- 3-14
6. Network Settings ------------------------------------------------------------------------------------ 3-17
SSID Setting
ⅲ
Table of Contents
Wire Network Settings -------------------------------------------------------------------------- 3-17
Wireless Network Settings --------------------------------------------------------------------- 3-18
Wireless Network Connection
IP Address Settings
Wi-Fi Direct Connection
Encryption Method Setting
Password Setting
------------------------------------------------------------------------------ 3-20
--------------------------------------------------------------------------------------- 3-22
--------------------------------------------------------------------------------- 3-22
----------------------------------------------------------------- 3-18
------------------------------------------------------------------------ 3-21
--------------------------------------------------------------------- 3-22

7. Changing Print Settings in Print Driver -------------------------------------------------------- 3-23
Windows Users ----------------------------------------------------------------------------------- 3-23
8. Printing from USB Memory ----------------------------------------------------------------------- 3-44
Entering Default Print Settings ---------------------------------------------------------------- 3-23
Using Help ----------------------------------------------------------------------------------------- 3-24
Using Advanced Functions in Each Tab ---------------------------------------------------- 3-25
Print Settings Tab Functions
Paper Tab Functions
Advanced Tab Functions
Print Quality Tab Functions
Preparations for Printing from USB Memory --------------------------------------------- 3-44
------------------------------------------------------------------- 3-25
---------------------------------------------------------------------------- 3-30
----------------------------------------------------------------------- 3-34
-------------------------------------------------------------------- 3-42
Chapter 4. Printer Management
1. Maintenance of Consumables -------------------------------------------------------------------- 4-2
Checking Consumables Conditions --------------------------------------------------------- 4-2
2. Printer Maintenance --------------------------------------------------------------------------------- 4-3
3. Replacing Cartridges -------------------------------------------------------------------------------- 4-5
4. Print Paper Guidelines ------------------------------------------------------------------------------ 4-13
Saving Consumables ---------------------------------------------------------------------------- 4-3
Ordering a Consumable ------------------------------------------------------------------------ 4-3
Ordering a Cartridge ----------------------------------------------------------------------------- 4-4
Storing a Cartridge ------------------------------------------------------------------------------- 4-4
Removing Used Cartridge --------------------------------------------------------------------- 4-5
Cartridge Replacement ------------------------------------------------------------------------- 4-8
Cleaning the Printer ----------------------------------------------------------------------------- 4-11
Replacing Fuser Cleaning Roller ------------------------------------------------------------- 4-12
Paper ------------------------------------------------------------------------------------------------ 4-13
Table of Contents
ⅳ

Tracing Paper (OHP) ---------------------------------------------------------------------------- 4-13
Envelope ------------------------------------------------------------------------------------------- 4-14
Label Paper --------------------------------------------------------------------------------------- 4-15
Card Stock ----------------------------------------------------------------------------------------- 4-15
Chapter 5. Troubleshooting
1. Paper Jam Removal -------------------------------------------------------------------------------- 5-2
104/105 Paper Jam (Under the Cartridge) ------------------------------------------------- 5-3
106 Paper Jam (in Back Exit Area) ---------------------------------------------------------- 5-5
Removing Paper Visible in Exit Area -------------------------------------------------------- 5-5
Removing Paper Not Visible in Exit Area -------------------------------------------------- 5-5
107 Paper Jam (under Printer/Duplex) ----------------------------------------------------- 5-7
101 Paper Jam (in Tray 1) --------------------------------------------------------------------- 5-8
102/103 Paper Jams (in Trays 2/3) ---------------------------------------------------------- 5-9
100 Paper Jam (in MPT) ----------------------------------------------------------------------- 5-10
2. Basic Printer Troubleshooting --------------------------------------------------------------------- 5-11
v
Table of Contents
Control Panel Troubleshooting ---------------------------------------------------------------- 5-12
Printer Troubleshooting ------------------------------------------------------------------------- 5-12
Printer Quality Troubleshooting --------------------------------------------------------------- 5-15
Tray 2 Troubleshooting ------------------------------------------------------------------------- 5-19
Others ---------------------------------------------------------------------------------------------- 5-19
Customer Support -------------------------------------------------------------------------------- 5-19

Before Use
. Introduction
1
The user manual provides detailed explanation and precautions on the operation and usage of the device.
Read the manual carefully before operating the device for user safety and convenience.
Keep the user manual nearby for quick reference.
- The descriptions of the user manual may be modified without prior notice. Sindoh is not
responsible for any indirect, special, supplementary, and resultant damages caused by the device
handling and operation.
Duplication or printing to produce an illegal duplicate is strictly prohibited.
Generally, the duplication or printing of bills, revenue stamps, bonds, share certificates, bank drafts,
checks, passports, driver’s licenses, and so on is prohibited in the local law.
The above list is just an example. The details of the above list are not all. The company is not
responsible for whether the above list is the total or correct list. Seek local advice should you have
questions about the legality of duplicating or printing of an object.
- The features of the user manual may be different from those of the actual device.
Some options may not be available in certain countries
Contact your local sales representative or dealer regarding the above.
Some units may be optional depending on the country.
Contact an authorized local service depot near you regarding the above.
- Certain types may not be available in some countries.
Contact your local sales representative for details.
Important
Note
- This user manual uses two measurement systems,
This device uses the metric system
- Control, adjustment, or operation in an order NOT specified in this user manual may lead to exposure
to harmful laser emissions.
Warning
1
Before Use
. How to Read the User Manual
2
Symbols
This user manual uses the following symbols.
The following are important safety precautions.
Failure to follow the precautions may result in death or critical injury.
Please read the instructions below. Refer to the safety precautions for safe use of this device.
The following are important safety precautions.
Failure to follow the precautions may result in minor injuries or property damage.
Please read the instructions below. Refer to the safety precautions for safe use of this device.
Precautions for using the device including paper feeding errors, damaging of original data or
data loss have been specified. Please read carefully.
Symbols refer to information required before operating the device.
Symbol refers to description of functions and actions for user errors.
Warning
Caution
Important
Note
This symbol is at the end of a paragraph. It refers to the location of related detail.
[ ]
This indicates messages or menu displayed on the LCD display on the device.
【 】
This refers to name of each function key shown on the control panel and the display.
Reference
2

Before Use
Safety Information
3.
Plug the power cord to the wall outlet which is near the device, which is easily accessible and properly grounded.
Do not use or store the device in a wet or humid environment.
- This product uses laser. The control, adjustment, or operation may result in exposure to harmful
laser emissions.
This product uses a printing media heating method so that gas may be emitted from paper due to
heating. In order to prevent the emission of harmful gas, the section addressing the details on the
selection of printing media in the operating instructions should be understood.
- Inside of the printer may be extremely hot. Let the surface cool before handling to avoid injuries.
- Follow the below instructions to prevent personal injuries or printer damage before moving the printer.
Switch off the printer using the power switch and unplug the power cord.
Remove all cords and cables from the printer before moving it.
Do not lift the optional feeder and printer at the same time. Lift the printer first, and then use both
side handles to lift the feeder.
Use only the power cord provided with this printer or the one approved by the manufacturer.
Caution
Caution
Caution
Injury Risks
High Surface Temperature
Injury Risks
- When accessing the system board or installing a memory option device after installing the printer,
proceed after turning off the printer and unplugging the power cord.
If another device is con nected to the printer, turn off the device and separate the cable from the printer.
- The design test of the product was passed and approved by using components meeting strict
international safety standards. The safety function of a part may not be clear.
The corresponding manufacturer is not responsible for the usage of another replacement part.
Caution
Caution
Electrical Shock Hazard
Electrical Shock Hazard
3

Before Use
- Do not twist, bend, step on or put heavy objects on the power cord. Be careful not to have the power
cord stripped off or overloaded. Do not have the power cord get jammed into the gap of an object such
as furniture or a wall. Misuse of the power cord may cause fire or electric shock.
Check the power cord regularly. Unplug the power cord from the receptacle for inspection.
Contact a service specialist about a service or repair problem not stated in the user manual.
- When cleaning the surface of the printer, disconnect the power cord from the receptacle and all the
Caution
Caution
cables connected to the printer to prevent electric shock.
Injury Risks
Electrical Shock Hazard
4
Notice
Class 1 Laser Product
4.
Temperature Information
Operating Temperature 15.6 C~32.2 C
Before Use
Shipping and Storage
Temperature
※ Using the duplex for a long time in high temperature may result in blurred images.
※ Using device in low temperature (below 15℃) may result in blurred images or contamination.
Product Disposal
Do NOT dispose of the printer and consumables as you would dispose of normal household objects.
Contact the store regarding disposal or recycling of this product.
Notice Regarding Laser Products
This printer meets the requirements in DHHS 21 CFR Subchapter J of the United States of America,
and has been approved as a Class I laser product that meets the requirements in IEC 60825-1 in other
regions.
Class I laser products are not defined as a hazardous product.
This printer contains Class IIIb (3b) laser, a 5 mW GaAs laser that operates in electromagnetic wave
field of 770~795 nm. This laser system and the printer were designed to protect users from exposure to
laser emissions of over
Class I when used or repaired in normal conditions.
-20.0℃ ~ 40.0℃
Notice Regarding Electromagnetic Interference
This product is a Class B device.
Class B device: This device is registered as the electromagnetically suitable household device.
It can be used in all areas including residential areas.
5

Before Use
Power Consumption
Product Power Consumption
The table below shows power consumption of the printer. Some modes may not be included in your product.
Mode Description Power Consumption (W)
Printing Creating paper document from
electronic input data.
Ready Ready for printing 110W
Power Save Mode In Energy Saving Mode Under 6W
OFF Plugged into outlet but power has been
switched off
Power consumptions above are average measurements taken by the hour.
Instant power consumption may be significantly higher than average.
Power Save Mode
This product is designed to provide energy saver mode named Power Save Mode.
The Power Save Mode reduces power consumption when the printer is not used so as to save energy.
If this product is not used for a certain period of time, it automatically enters Power Save Mode.
Time before entering the Power Save Mode is set to default factory setting. With this menu,
you can change the time before entering Power Save Mode to between 1 and 240 minutes.
Setting the time short will save more energy but decrease the product’s response time.
Setting the time long will help maintain shorter response time but use more energy.
750W
Under 0.05W
Deactivate Mode
Products with Deactivate mode may still consume small amount of power.
To completely stop power consumption, unplug the power cord from the outlet.
Total Energy Consumption
Calculating the total energy consumption of the product may be useful.
Because electricity bills are charged by watt, you must multiply the time the product spent in each mode
by the power consumption.
Total energy consumption is the sum of energy consumption in each mode.
Wireless LAN Standard
This mobile device may cause airwave interference. and as such cannot be used for emergency calls.
6
Before Use
EMC Notice
Information to the User
This equipment has been tested and found to comply with the limits of a Class B digital device,
pursuant to part 15 of the FCC Rules. These limits are designed to provide reasonable
protection against harmful interference in a residential installation. This equipment generates,
user and can radiate radio frequency energy and, if not installed and used in accordance with
the instructions, may cause harmful interference to radio communications. However, there is no
guarantee that interference will not occur in a particular installation, if this equipment does
cause harmful interference to radio or television reception, which can be determined by turning
the equipment off and on, the user is encouraged to try to correct the interference by one or
more of the following measures:
1. Reorient / Relocate the receiving antenna.
2. Increase the separation between the equipment and receiver.
3. Connect the equipment into an outlet on a circuit difference from that to which the receiver is
connected.
4. Consult the dealer or an experienced radio / TV technician for help.
- Change or modifications not expressly approved by the manufacturer could void the user’s
authority to operate the equipment.
This device complies with part 15 of the FCC Rules. Operation is subject to the following two
conditions: (1) this device may not cause harmful interference, and (2) this device must accept
any interference received, including interference that may cause undesired operation.
Cet appareil num
Caution
FCC Compliance Statement
This Class [B] digital apparatus complies with Canadian ICES-003.
rique de la classe [B] est conforme la norme NMB-003 du Canada.
WLAN Notice
Exposure to radio frequency radiation
The following notice is applicable if your printer has a wireless network card installed.
The radiated output power of this device is far below the FCC radio frequency exposure limits.
A minimum separation of 20 cm (8 inches) must be maintained between the antenna and any
persons for this device to satisfy the RF exposure requirements of the FCC.
7


A611
User Manual
Introduction
Series
1
1

Introduction
1. Specification
Product
Items
A611 Series
Model Name A611(s), A616(s)
Output Speed 47ppm(A4), 49ppm(LT)
Memory 512MB
Resolution 1200dpi
1 USB/Ethernet : Ethernet 10/100/1000 Base-TX
1 USB/Wi-Fi (Wireless LAN): IEEE 802.11 b/g/n Wireless Network
Wireless Security
Authentication: Open system, WEP, WPA, WPA2, WPS
Encoding: WEP64, WEP128, TKIP, AES
Emulation SDAPL, PCL5e/6, PS3
Support Protocols TCP/IP(IPv4, IPv6), Port9100, DHCP/DHCPv6, DNS, SNMP, SMTP, HTTP,
TELNET
Tray 500 sheets
Multipurpose tray (MPT) 50 sheets
Cartridge 6,000 sheets enclosed: A611
9,000 sheets enclosed: A616
Duplex (2-sided) print
function
Product size
(W x D x H)
Power rating 220V-240V~,50/60Hz, 4.1A
Weight 13 Kg
Auto 2-sided printing (Duplex installed)
383 X 386 X 306(mm)
1-2
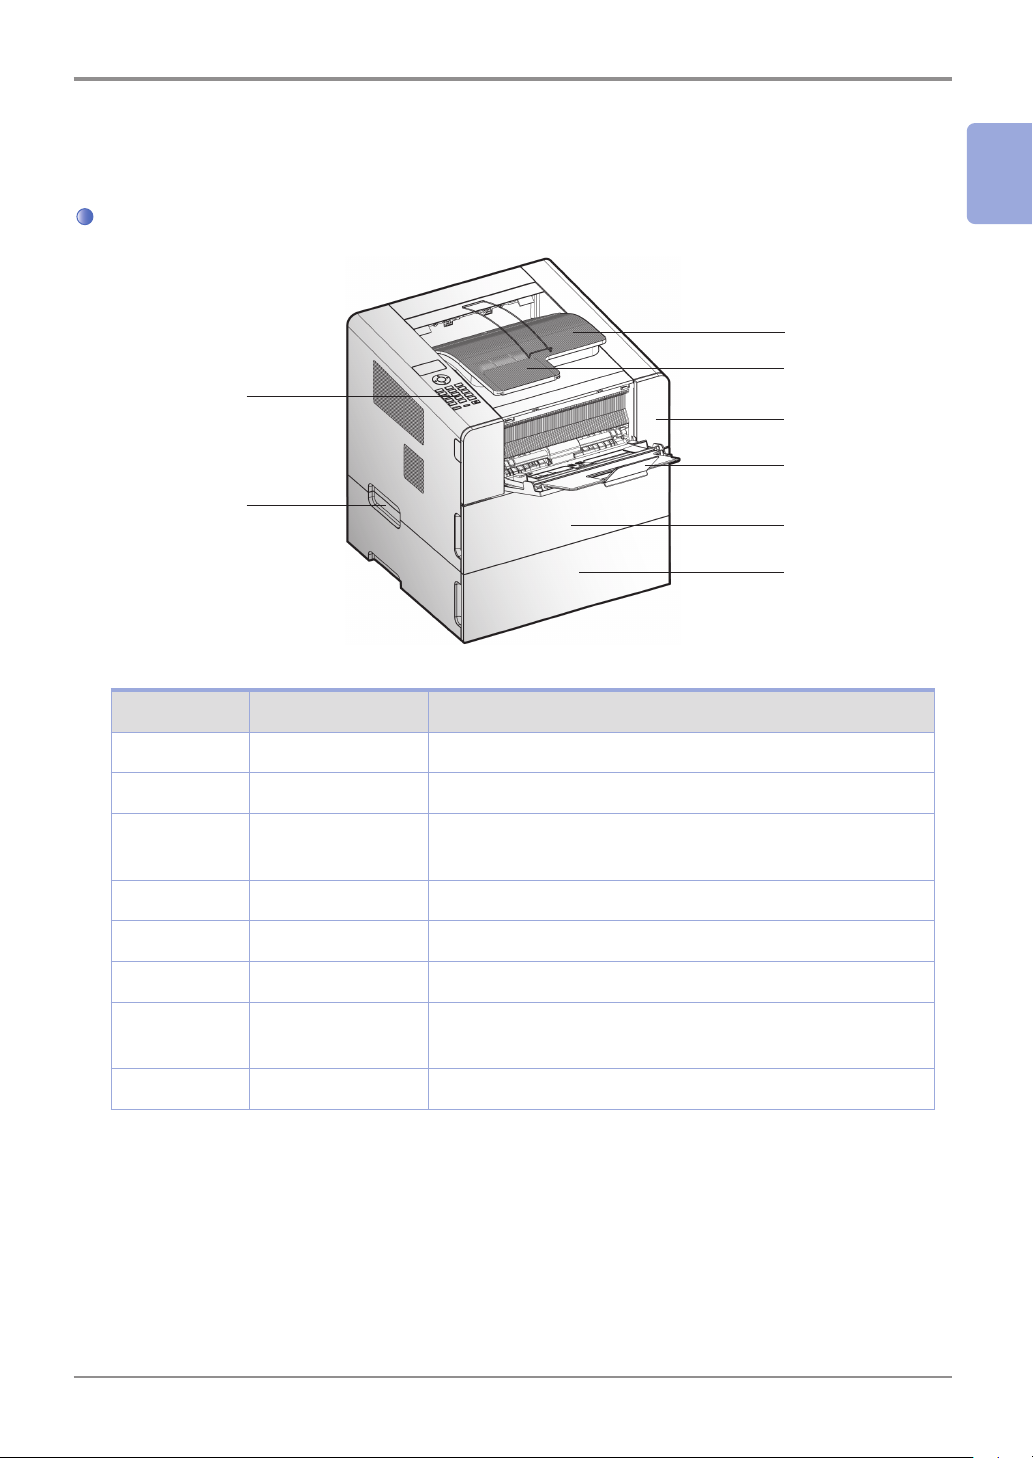
2. Names and Functions of the Components
Names and Functions of the Components (Front)
5
Introduction
1
7
6
4
3
8
Description Names of each part Functions
1
2
3
4
5
6
7
Tray 1 Holds 500 sheets .(75g/m²(20lb))
Tray 2 Optional trays can also hold 500 sheets
Multipurpose tray Spread extension tray for standard paper, label paper or
envelops.
Front Cover Open the cover to install the cartridge or check the device.
Control Panel Buttons, lamp, and LCD display necessary for operation
Paper Support Prevents printed paper from falling.
Output Bin Paper is dispensed with the printed side facing down.
Printed sheets can be stacked up to 250. (75g/m²(20lb))
1
2
8
Handle Use it to move the printer or install the optional tray.
1-3
Introduction
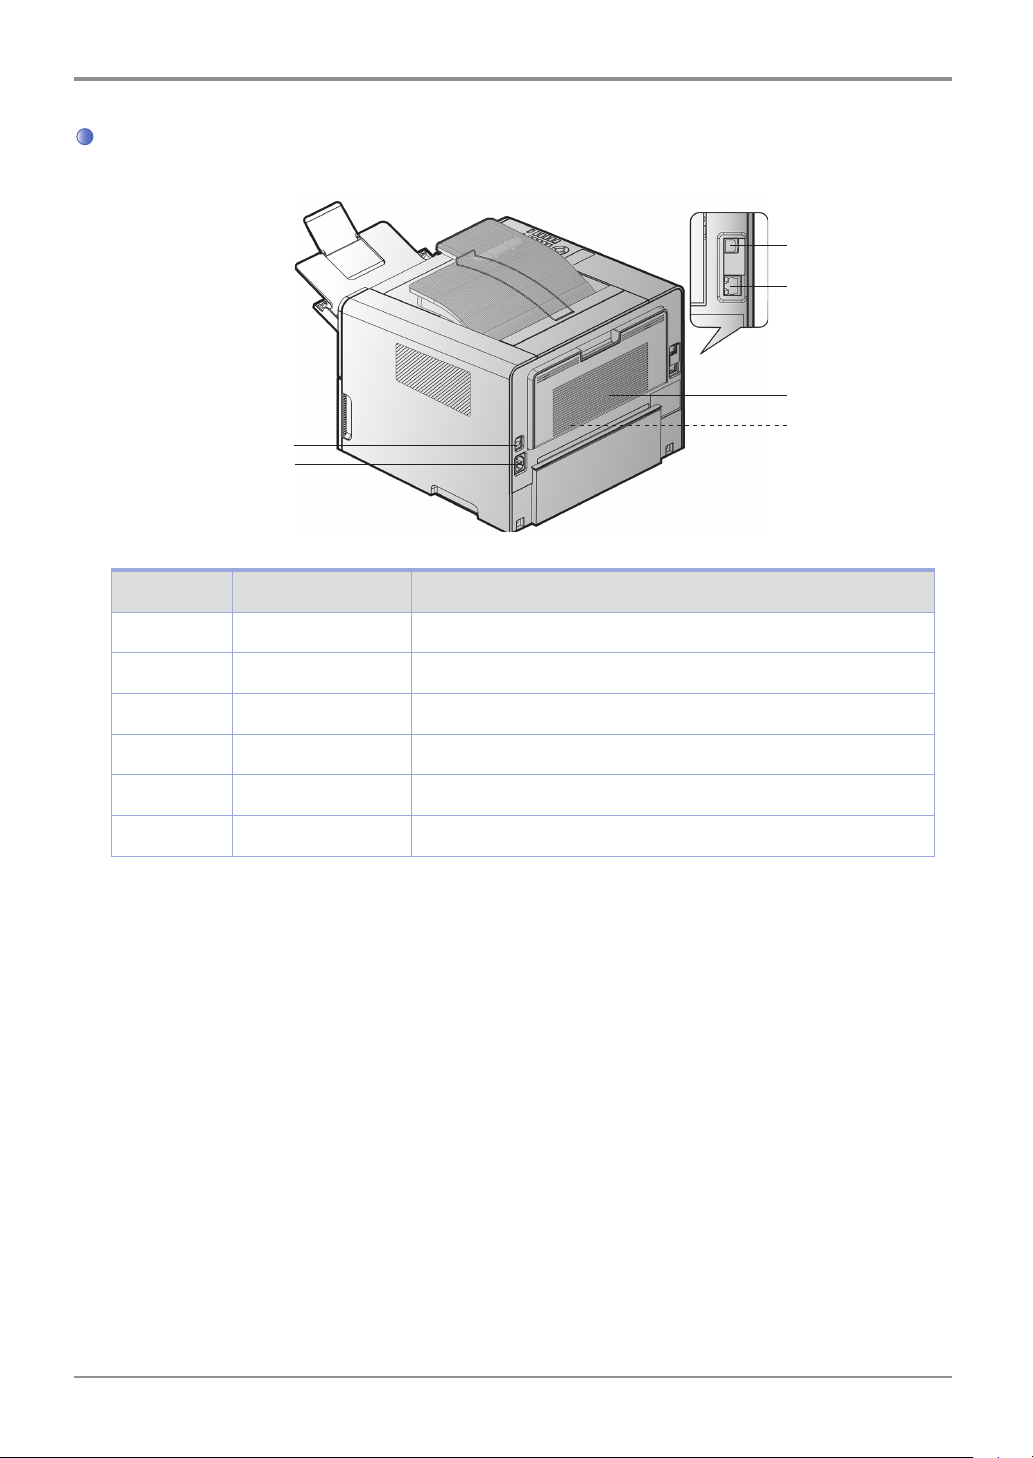
Name and Function of Each Part (Back)
10
9
Description Name of Each Part Functions
9 Power connector For plugging in the power cord
11
12
13
14
10 Power button Button for turning on the printer
11 USB Port connector Connects UBS ports of computer and printer
12 Ethernet connector
13 Back cover
14
2-sided printer Automatically prints 2 sides (installed inside the device)
For plugging in the Ethernet cord
It can be used to remove jammed paper or check inside the printer.
1-4

3. Printer Description by Model
Introduction
Sindoh A611 series offers 500 sheet option in addition to the basic configuration.
* Basic configuration: Tray 1 (500 sheets) + Multipurpose tray (50 sheets)
* Large Option Tray 1 (500 sheets*2)
1
1-5

Introduction
4. Installation and Use
Refer to the enclosed CD or our website for more details on installing or using the printer.
Detailed instructions on installing or disassembling the printer, installing and replacing consumables,
feeding paper, or using the driver CD for driver and utilities installation are available.
Driver CD
The driver CD contains the printer driver required to operate your printer.
The CD also contains information on printer utilities, printer-related documents, and the user manual.
Quick Installation Guide and User Manual
The quick installation guide offers easy instructions for installing and using the printer. The user manual
in the CD offers details such as printer installation instructions, how to use the printer as well as
messages, functions, and how to handle paper jams.
general
Sindoh Website
The printer driver or utilities updates, various documents in the driver CD, and other printer-related
information can be downloaded from the Sindoh website: www.sindoh.com
1-6
Introduction
5. Specification for Printer Paper & Feeding
1
This is an introduction of specifications for each type of printer paper used in the printer and paper feeding.
Refer to the printer paper guidelines on pages 4-15, especially on card stock or label paper.
Feeder Feeding per paper type Paper size Weight
Tray 1 Standard paper: 500 sheets
Thick paper: Up to set
height (marked by label)
Tray 2 (Large
option tray)
Multipurpose
tray
Duplex (2-sided) printing is as follows.
Paper size Weight Feeder
A4(210X297)
Letter (216X279)
Caution
- Multipurpose input tray can hold up to 50 sheets of paper or up to 10 more based on thickness.
Standard paper: 500 sheets
Thick paper: Up to set
height (marked by label)
Standard paper: 50 sheets
Envelope: 5 sheets
Label: 15 sheets
Card stock: 5 sheets
Standard paper
60~90 g/m² (16~24lb)
A4, A5, JIS B5,
Folio, Letter, Legal, Executive
A4, A5, JIS B5,
Folio, Letter, Legal, Executive
Paper size between
76.2 X 127mm (3 x 5 inch) min.
216 X 355.6mm (8.5 x 14 inch) max.
Output to default output tray
60~163 g/m²
(16~60lb)
60~163 g/m²
(16~44lb)
60~166 g/m²
(16~44 lb)
Card stock 90lb
1-7

Introduction
6. Product Certification
Certified Energy Saving Device
This product has been designed and manufactured for efficient energy use. The energy saving mark is only
given to qualifying products. This mark indicates that the product satisfies energy saving requirements of
the Korean government and is registered as an energy saving product with the Korea Energy Management
Corporation. Products with this mark are 30 - 50% more energy efficient than other products.
1-8

Printer Installation
A611
User Manual
Printer Installation
Series
2
2-1

Printer Installation
1. Unpacking the Printer
1
Unpack and install the printer in a well ventilated area.
In order for proper operation of the cooling fan, nothing should be in the space within 8cm(3 inches)
from the left, right, and back of the product. Avoid the following places;
A. Exposed to the direct sunlight
B. Close to heating equipment or air-conditioner
C. Dusty place
2
Pull out the printer and other components from the box.
Keep the box and buffer materials in case you need to pack the printer.
3
Remove tape in and on the printer and remove the packing material from the tray.
4
Check if the following components are included.
2. Enclosed cartridge
3. Power cord
4. USB cable
5. Quick Installation Guide
1. Tray 1 (500 sheets by default)
5
Should you require assistance during installation or if any of components are missing or damaged,
contact the store of purchase.
6
Install printer on a flat surface.
- Installing the printer on an uneven floor may cause machine failure or lead to printing of abnormal images.
Caution
6. The driver CD and
the user manual CD included
7. Warranty
8. CORE (used for the network cable)
Model Name: 28A2029~0A0
2-2
Printer Installation
2. Cartridge Preparation
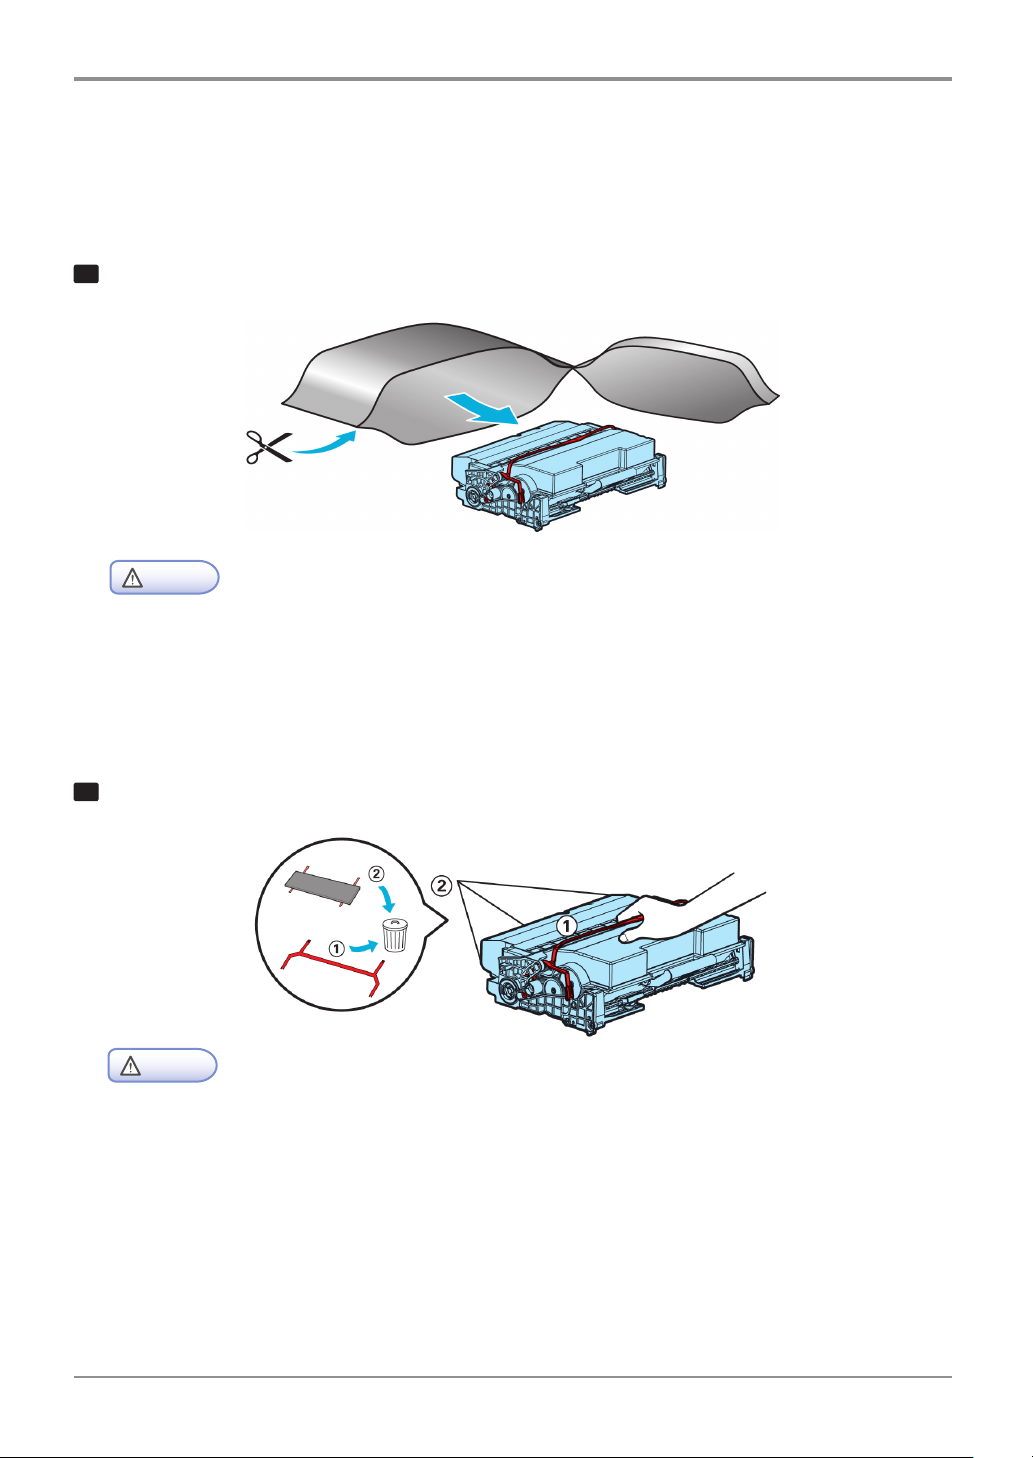
Unpack and install the cartridge in the following order.
1
Cut the bag to the guideline to open it and pull out the cartridge.
- If the unpacked cartridge is exposed to direct sunray or strong light, it may be damaged.
Keep the unpacked cartridge in the shade or cover it with newspaper.
Caution
- Do not touch the green drum. Use the handle.
- Lay a sheet of paper down and put the cartridge on it to prevent the cartridge from being damaged.
2
Remove packing materials from the cartridge.
- Do not touch the drum beneath the cartridge.
Caution
2-3

Printer Installation
3
Hold the unpacked cartridge and shake it so that toner is evenly distributed.
- Be careful not to touch the black toner powder
- Do not touch the green drum beneath the cartridge.
Caution
2-4

3. Cartridge Installation
1
Press the Unlock button on the left side to open the front cover.
Printer Installation
2
Install the cartridge in the following order.
A. Hold the cartridge handle. (The back of your hand should be facing down)
B. Align the guides(arrow sticker) of the cartridge to the groove(arrow sticker) of the printer.
C. Push the cartridge into the printer until you hear a click
3
Close the front cover. A click will occur if the cover is properly closed.
If not, the printer may not work properly.
- Check if the multipurpose tray is closed.
If you close the front cover while the multipurpose tray is open, it may cause malfunction.
Caution
2-5

Printer Installation
4. Loading Print Paper
The printer has trays with a capacity of 550 sheets.
If the tray 2 and 2 large option trays are added, capacity is increased to 1550 sheets.
For more information on capacity, supported size or type, see the table below.
Type Number of sheets Supported size Supported type
Tray 1
(Default Tray)
Tray 2 (Large
option trays)
Multipurpose Tray 50 Paper size between
500 A4, A5, B5, folio, letter,
legal, executive
500 A4, A5, B5, folio, letter, legal,
executive
76.2X127mm(3x5inch) min.
216X355.6mm (8.5x14inch)
max.
Standard paper, Thick paper
Standard paper, Thick paper
Standard paper, Label paper,
Envelope, Card stock
Loading on the Tray
Load paper on the default or optional tray in the following order.
- When you change paper for Tray 1, check if paper type and size have been changed
correctly in the driver.
1
Important
Remove the tray. (Handles for removing the tray are on either side of the tray)
2-6
Loading...