

Sindoh 3D WOX 5X, 3D WOX 7X User guide
USER MANUAL
Read the User Manual before operating the
product, and keep the manual at a convenient
place near the product.
3dprinter.sindoh.com

Safety Instructions
Be sure to observe the followIng instructions when using the device.
Warning:
Directly plug the power cord in the receptacle on the wall. Do not use extension cord.
If the power cable or plug is worn or damaged, pull out the power plug.
The exposure of the interior of the machine can cause electric shock or burns.
Do not remove covers or screws other than specified in this manual.
Please be cautious. In the process of printing, the temperature of the nozzle and the heated
bed rise higher than 100 degrees Celsius.
Do not place the machine in a highly moist environment as it may cause deformation and
malfunction.
Avoid contact of electrical terminal with metal product such as necklaces, coins, keys,
watches, etc.
Do not hold the shaft for lifting or moving of the printer.
For the following situations turn off power and pull out the power plug
-
When in contact with liquid
-
When in need for a service or repair request
-
When the device cover is damaged
For the method of disposal contact local service center or use a proper collection site.
Please turn off power when leaving the office after business hours or in circumstances where
machine is unoccupied for a long period of time as it may cause abrupt fire accidents.
Failure to observe the instructions may lead to death or serious injury.
Caution:
Protect device from humid or wet conditions eg. rain, snow, etc
Remove power cord from receptacle on the wall before moving device.
Be careful not to damage power cord while device is being translocated.
When removing the power cord, please pull the plug and not the power cable.
Be cautious of clips, staples and any other small metal objects from falling inside the device.
Please be cautious on safety when touching the interior of the machine, e.g. cleaning the
interior.
Do not dispose of device or consumables together with household waste.
For the method of disposal, please contact local service center or use a proper collection site.
Interior of device may be very hot. Please do not touch the part with “Caution: High
Temperature” sign or its surrounding areas as it may cause burns.
Our product maintains high quality standards and performance.
It is recommended to use genuine components only, components can be acquired from any
authorized distributors.
This machine is not suitable for use in areas that are easily accessible by children.
Failure to observe instructions may cause injuries or damages to property.

Before use
Thank you for purchasing our product.
This user manual contains detailed information about correct use of device and easy
maintenance to maintain the optimal state, and to contribute to the rationalization of office
work of your company.
Carefully read the user manual before using the device and keep close at hand.
In order to use device correctly and safely, please carefully note the precautions before use.
Prohibition and limitation
1. This User Manual has been created for the convenience of the user, actual product
may differ from image and explanations shown.
2. The contents of this user manual is subject to change without notice. We are not
responsible for the direct and/or indirect loss or damages caused by results of handling
or operating the product in any case and for results occurring from user’s negligence.
3. The copyrighted literary works can be duplicated and used for personal use or
household use and within the same parameter. In other cases than the
aforementioned, it is prohibited by law.
4. The above details present only a part of the applicable laws and regulations.
Details on these laws/regulations may not be stated as they are. We do not guarantee
its correctness and completeness. Please consult a legal advisor to check if the object
you intend to print is legal.
5. User is responsible for all loss derived from modification of the product executed by
the user or third party.
6. Font used in the printer GUI and the user manual is the “NANUM” font provided by NAVER.

Contents
Before using the Machine
1. Preface -------------------------------------------------------------------------------------------------------------------------- 1
2. Conventions ------------------------------------------------------------------------------------------------------------------ 2
Symbols ------------------------------------------------------------------------------------------------------------------------ 2
Other Information ------------------------------------------------------------------------------------------------------------- 2
3. Safety Information ----------------------------------------------------------------------------------------------------------3
4. Precautions ------------------------------------------------------------------------------------------------------------------- 5
4.1 Installation ---------------------------------------------------------------------------------------------------------------------- 5
4.2 Moving the Machine ---------------------------------------------------------------------------------------------------------- 6
4.3 Power Switch ------------------------------------------------------------------------------------------------------------------- 7
5. Consumables Handling ---------------------------------------------------------------------------------------------------8
5.1 PLA ----------------------------------------------------------------------------------------------------------------------------- 8
5.2 ABS ----------------------------------------------------------------------------------------------------------------------------- 8
5.3 Flexible -------------------------------------------------------------------------------------------------------------------------- 9
5.4 PVA, PVA+ ---------------------------------------------------------------------------------------------------------------------- 9
6. Instructions for Use ------------------------------------------------------------------------------------------------------ 10
7. Ventilation ------------------------------------------------------------------------------------------------------------------- 11
8. Notices ----------------------------------------------------------------------------------------------------------------------- 12
9. Disposal of Used Battery ---------------------------------------------------------------------------------------------- 14
10. Wifi Module Disclaimer ------------------------------------------------------------------------------------------------- 15
11. USB Memory Disclaimer ----------------------------------------------------------------------------------------------- 17
Chapter 1 Preparations for Machine Operation
1. Machine Specifications ------------------------------------------------------------------------------------------------ 1-2
1.1 Printing ----------------------------------------------------------------------------------------------------------------------- 1-2
1.2 Temperature/Speed ------------------------------------------------------------------------------------------------------ 1-2
1.3 Machine ---------------------------------------------------------------------------------------------------------------------- 1-2
1.4 Software/Support --------------------------------------------------------------------------------------------------------- 1-2
1.5 Default Setting of Print layer Width ----------------------------------------------------------------------------------- 1-3
2. Basic Components ------------------------------------------------------------------------------------------------------ 1-4
3. Understanding the Device Parts ------------------------------------------------------------------------------------ 1-5
4. Installation (Product connection, Cartridge Setup and includes Software Installation) -------- 1-7
4.1 Device Connection -------------------------------------------------------------------------------------------------------- 1-7
4.2 Program Installation ------------------------------------------------------------------------------------------------------ 1-7

Chapter 2 UI Menu Functions
1. UI Home Screen Functions -------------------------------------------------------------------------------------------- 2-2
1.1 Device Status Display ----------------------------------------------------------------------------------------------------- 2-2
1.2 UI Function Control -------------------------------------------------------------------------------------------------------- 2-2
1.3 Changing Screen / Application Functions ---------------------------------------------------------------------------- 2-3
Programs --------------------------------------------------------------------------------------------------------------------- 2-3
2. UI Menu Function description ---------------------------------------------------------------------------------------- 2-4
2.1 PRINTE ----------------------------------------------------------------------------------------------------------------------- 2-5
USB ------------------------------------------------------------------------------------------------------------------------- 2-5
FILES STORED ----------------------------------------------------------------------------------------------------------- 2-6
2.2 CARTRIDGE ---------------------------------------------------------------------------------------------------------------- 2-7
LOAD ------------------------------------------------------------------------------------------------------------------------- 2-8
UNLOAD -------------------------------------------------------------------------------------------------------------------- 2-9
UNLOCK -------------------------------------------------------------------------------------------------------------------2-14
2.3 CLOUD ---------------------------------------------------------------------------------------------------------------------2-17
2.4 Settings -------------------------------------------------------------------------------------------------------------------2-18
Extruder ---------------------------------------------------------------------------------------------------------------------2-19
Bed Leveling ---------------------------------------------------------------------------------------------------------------2-20
Z Offset ---------------------------------------------------------------------------------------------------------------------2-22
Nozzle Control -------------------------------------------------------------------------------------------------------------2-23
X, Y, Z -----------------------------------------------------------------------------------------------------------------------2-35
NETWORK -----------------------------------------------------------------------------------------------------------------2-36
Bed Lowering --------------------------------------------------------------------------------------------------------------2-40
Cleaning Case ------------------------------------------------------------------------------------------------------------2-41
OPEN MATERIAL --------------------------------------------------------------------------------------------------------2-43
Test Print --------------------------------------------------------------------------------------------------------------------2-45
S/W Update -----------------------------------------------------------------------------------------------------------------2-47
General Setting ------------------------------------------------------------------------------------------------------------2-48
FAQ -------------------------------------------------------------------------------------------------------------------------2-53
2.5 Information -----------------------------------------------------------------------------------------------------------------2-55
Quick Guide ---------------------------------------------------------------------------------------------------------------2-57
Chapter 3 Printing
1. Printing ---------------------------------------------------------------------------------------------------------------------- 3-2
1.1 Printing from USB Flash Drive ----------------------------------------------------------------------------------------- 3-2
1.2 Printing Via PC ------------------------------------------------------------------------------------------------------------- 3-8
1.3 CLOUD Printing ----------------------------------------------------------------------------------------------------------- 3-8

1.4 Print Job Management -------------------------------------------------------------------------------------------------3-13
1.5 Printing with Two Types of Filamentst ------------------------------------------------------------------------------3-14
1.6 Changing Filaments ----------------------------------------------------------------------------------------------------3-14
Chapter 4 Printed Output Check
1. Printed Output Check --------------------------------------------------------------------------------------------------- 4-2
1.1 Detaching Printed Output ----------------------------------------------------------------------------------------------- 4-2
1.2 PVA(PVA+) Filament Removal Guide ------------------------------------------------------------------------------- 4-4
1.3 Improving Printing Quality ---------------------------------------------------------------------------------------------- 4-4
2. If problems persist ------------------------------------------------------------------------------------------------------ 4-5
Chapter 5 Maintenance
1. Machine Cleaning ------------------------------------------------------------------------------------------------------- 5-2
1.1 Cleaning Case Maintenance ------------------------------------------------------------------------------------------- 5-2
1.2 Printer Interior Cleaning ------------------------------------------------------------------------------------------------- 5-2
1.3 Periodical Inspection ----------------------------------------------------------------------------------------------------- 5-2
Oil/Grease Inspection ----------------------------------------------------------------------------------------------------- 5-2
1.4 Flexible bed and Nozzle Cleaning ------------------------------------------------------------------------------------ 5-2
1.5 Cleaning the inside of the Nozzle -------------------------------------------------------------------------------------- 5-3
1.6 Nozzle Tip Cleaning ------------------------------------------------------------------------------------------------------5-10
2. Error Message and Solutions --------------------------------------------------------------------------------------5-13
3. Problems and Solutions ---------------------------------------------------------------------------------------------5-15
3.1 In Cases where Filament is Cut Between the Extruder and Nozzle -----------------------------------------5-15
3.2 When Filament End is Visible Outside the Cartridge After Unloading --------------------------------------5-15
3.3 Solution for Notification 401, 601 -------------------------------------------------------------------------------------5-16
4. Replenishing Consumables ----------------------------------------------------------------------------------------5-19
4.1 Bed Replacement --------------------------------------------------------------------------------------------------------5-19
Removing Flexible Bed -------------------------------------------------------------------------------------------------5-19
Installing Flexible Bed ---------------------------------------------------------------------------------------------------5-19
4.2 Filter Replacement -------------------------------------------------------------------------------------------------------5-19
4.3 Cartridge Replacement -------------------------------------------------------------------------------------------------5-21
4.4 Nozzle Replacement ----------------------------------------------------------------------------------------------------5-21
Chapter 6 Appendix
1. Type of Filaments (Material, Color) ------------------------------------------------------------------------------- 6-2
2. Using an open material ----------------------------------------------------------------------------------------------- 6-3
2.1 Installing from the front -------------------------------------------------------------------------------------------------- 6-3
2.2 Installing from the top ---------------------------------------------------------------------------------------------------- 6-6

Before using the Machine
1. Preface
This User Manual describes detailed explanations and points to note in connection with operating and using
the machine. Please read the User Manual carefully before using machine, and keep it for reference purpose.
Sindoh shall not be liable for consequential, special, indirect damages or losses caused by the handling or
operating of the machine or by the user’s negligence.
law.
may not be stated as they are. Sindoh is not responsible for its correctness and completeness.
Please consult your legal advisor to check if the object you intend to print is legal.
Important
-
The content of the User Manual is subject to change without any prior notification.
-
Copyrighted works can be printed and used for home and/or personal use; other usage is prohibited by
-
The above details present only a part of the applicable laws and regulations and the details of the law
Note
Some options may not be available in some countries. Please contact local distributor for details.
Some standard units are optional in some countries.
Please consult your local service center.
Please consult your local sales office.
-
The User Manual may include a little different descriptions of the machine from the actual one.
-
In some countries some models are not available.
-
Naver Nanum font is applied to the GUI of the device and the user manual.
1
Before using the Machine
2. Conventions
Symbols
This manual uses the following symbols and meanings.
Ignoring these notes could result in serious injury or death.
Be sure to read these notes carefully for your safe operations of the machine.
Ignoring these notes could result in minor injury, or damage to the machine or to property.
Be sure to read these notes for your safe operations of the machine.
misfeeds, damage to originals, or loss of data.
Be sure to read these explanations before operating the machine.
Warning
-
Indicates importance safety notes.
Caution
-
Indicates important safety notes.
Important
-
Indicates points to pay attention to when using the machine, and explanations of likely causes of filament
Note
-
Indicates supplementary explanations of the machine`s functions, and instructions on resolving user errors.
Reference
-
This symbol is located at the end of sections. It indicates where you can find further relevant information.
[ ]
Indicates the messages or menus that appear on the machine`s LCD display panel.
Indicates the names of each function key on the machine control panel and the display window.
Some of the pictures used in this manual have been omitted to make it easier to see.
The contents of the UI in this manual may differ from what it actually appears.
Other Information
2

Before using the Machine
3. Safety Information
Plug the power cord into a properly grounded outlet which is near and quickly accessible from the machine.
Do not use or place the machine in wet or humid environment.
Caution
-
When you touch your body with this part, you are burned.
-
To avoid burns, follow the instructions below.
The inside of the machine may be hot. To reduce the risk of injury from a hot
Hot Surface
component, allow some time to cool down.
(Please be cautious of getting burns during printing as the Nozzle and the heating
bed will maintain a high temperature of over 100 degrees.)
Do not put any portion of your body or objects on any part during machine operation as the motor and
bed can be in very high temperature and can cause burns/injuries. Please be cautious.
When the power is on, do not let any of your body touch the machine except the bed.
If you have to touch the bed while the power is on, please do so after the bed temperature has been
lowered to room temperature.
If you have to touch any parts other than the bed, please do so after the bed and nozzle temperature
have been lowered to room temperature.
After the printer has finished printing, check the LCD screen and built-in speaker.
Do not touch the bed or the bed handle unitl you are told you can touch the bed.
Caution
-
Contact with this part may result in electric shock.
-
To avoid electric shock, follow the instructions below.
Proceed your work after turning off the machine and unplugging the power cord
Electric Shock
from the outlet in case of accessing the system board, or installing hardware or
optional memory devices. If the machine is connected with other device, turn it off
and separate the cables from the machine.
This product has been designed, tested and approved to meet strict safety
requirementsof international safety standard. Some safety features of parts may not be guaranteed.
Sindoh is not liable for problems caused by using an unauthorized spare parts or consumables.
Disconnect the power cord and all the cables connected to the machine to prevent from any electrical
shock when cleaning the outside or inside of the machine.
Be sure to turn off the power before removing the nozzle from the machine. Electrical damage to the
internal parts of the nozzle may occur.
Caution
-
Do not twist, fold, step or place heavy objects on the power cord.
-
Be careful with the power cord peeled off or overloaded.
-
Do not let the power cord pinched by furniture or walls.
-
Misusing the cord could result in fire or electrical shock.
-
Check the cord regularly. When checking the cord, unplug the cord from the outlet first.
-
Please consult a qualified engineer for services or repairs not stated in this User Manual.
Pain
3

Before using the Machine
Caution
-
To prevent personal injuries or damages to the machine, you need to follow the
Pain
below instructions before moving the machine.
Do not open the front and top door during machine operation.
When the power is on, do not let any of your body touch the machine except
the bed.
If you have to touch any parts other than the bed, please do so after turning the power off, removing
the power cord from the plug and after the bed and nozzle temperature have been lowered to room
temperature.
Turn the power switch off, then unplug the power cord from the power outlet.
Unplug and release all the cords and cables before moving the machine.
Only use the power cords provided with this machine or cords that are approved by the manufacturer.
Do not put any portion of your body or objects during machine operation, as the bed, motor, nozzle
will be in operation and moving. Small objects such as neckless, hair, etc may cause personal injuries
or damages to the machine.
If any problems occur(malfunction, body part being caught inside the machine, etc) during machine
operation, quickly press the [Pause] or [stop] button on the touch screen.
Nozzle
Bed
UI
Caution
-
When you put the head in the machine during operation, it may cause pain.
-
To prevent pain or damage to the equipment, follow the instructions below.
This part moves up and down. Do not put the head in the machine during operation.
Do not open the front door during printing.
If you have to get in the machine for maintenance, please do so after turning the power off, removing
Pain
the power cord from the plug and after the bed and nozzle temperature have been lowered to room
temperature.
Caution
-
When working on the top of the machine, you may get caught or fall and cause pain.
-
To prevent pain or damage to the equipment, follow the instructions below.
Caution
-
Contact with this part may cause pain.
Be careful not to fall when operating the top door or nozzles from the top of the machine.
Be careful of pain or nozzle tube jamming when closing the top door.
Pain
Pain
- To prevent injury or damage to the equipment, keep away from this part during operation.
4

4. Precautions
4.1 Installation
Before using the Machine
You can small odor during machine operation. It should not be harmful; however, if the area of where the
machine is located is not ventilated, make sure to ventilate the area appropriately time to time.
Secure properly sufficient space around the machine for easy ventilation and operation.
Use the machine at temperatures of 16 °C ~ 29 °C and relative humidity of 20% ~ 70%.
Do not install or use the machine outdoor.
Warning
-
Install the machine in a well ventilated area.
Important
-
Install the machine with its vents spaced at least 10 cm away from walls and other equipments.
Top View Side View
100 mm
100 mm 100 mm 500 mm
1300 mm
853 mm
100 mm
1690 mm
5
Before using the Machine
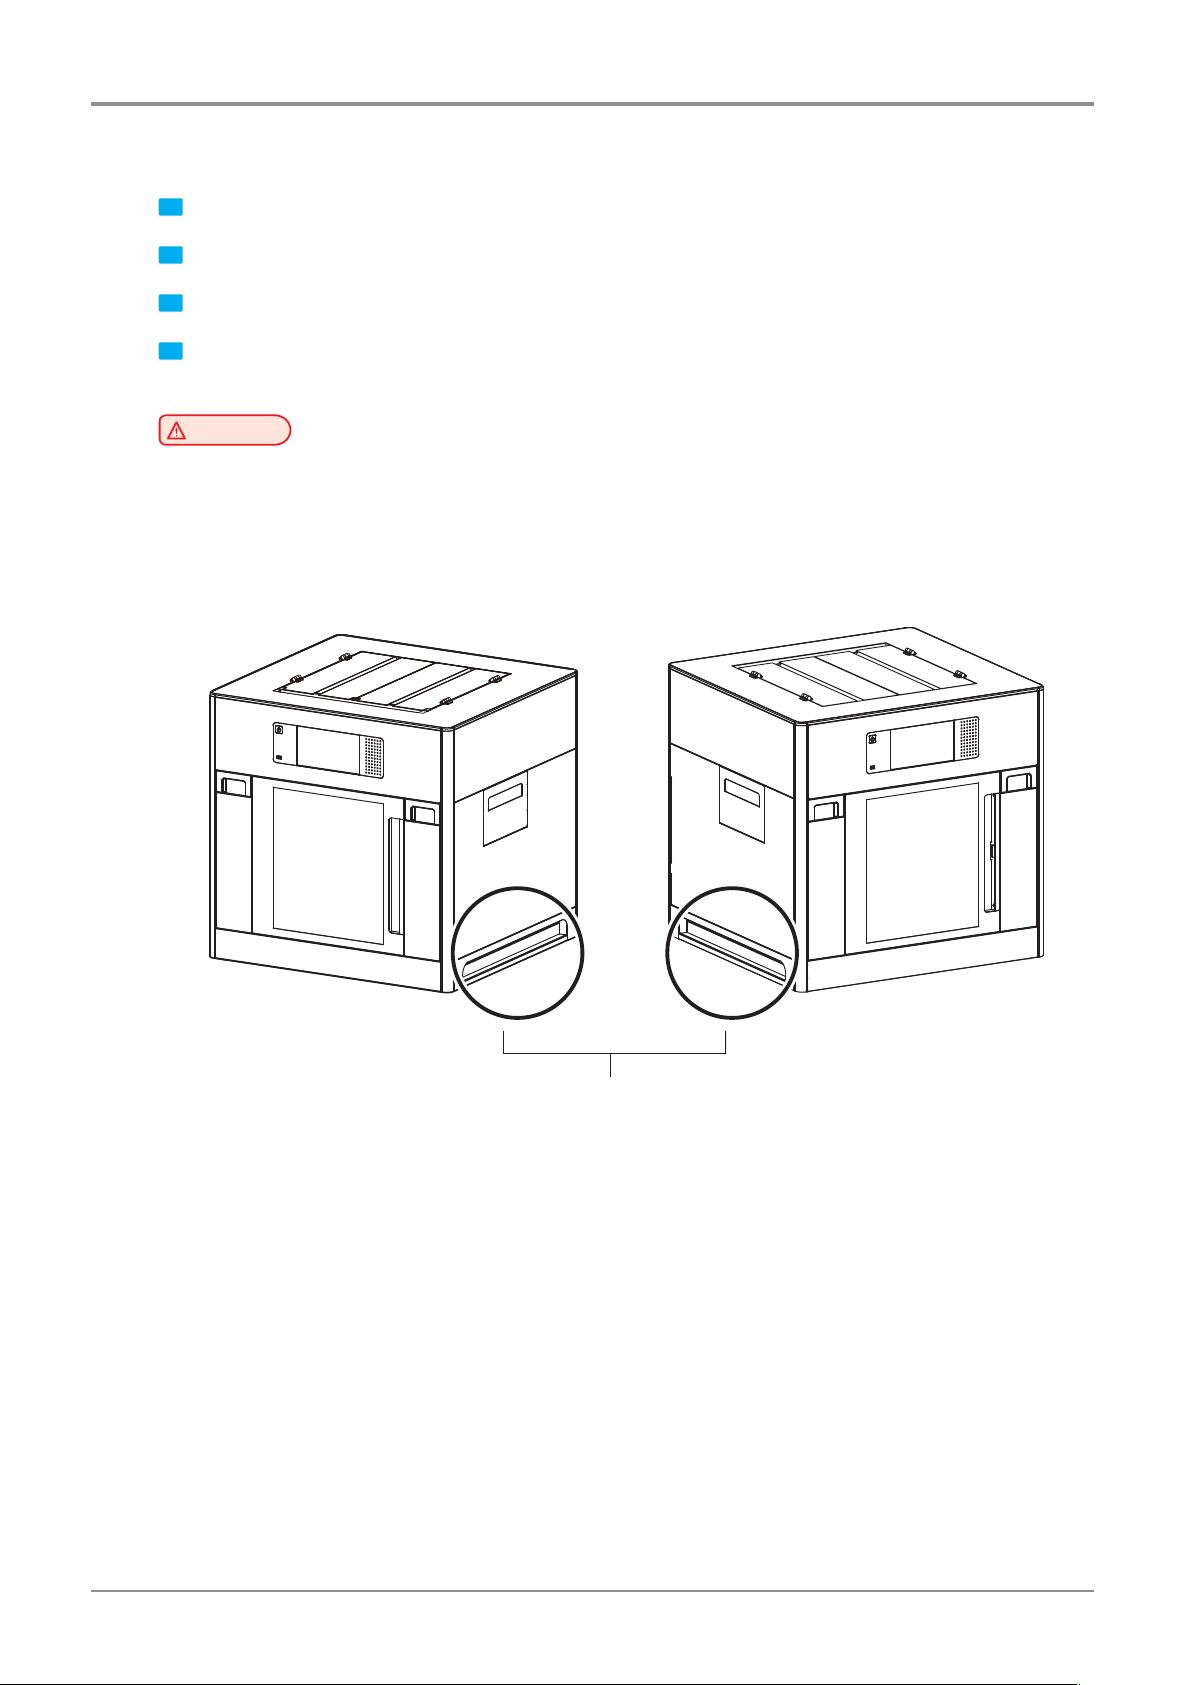
4.2 Moving the Machine
down.
When moving the printer, it is recommended that two people lift and move the printer for safety.
Bend your knees enough to protect your spine when lifting the machine.
1 Power off the device.
2 Disconnect the power cord and cables from the device.
3 Make sure that the FLEXIBLE bed and cartridge are installed in the device, and close the front and top doors.
4 Four people are required to hold the transport handles on both sides to move the device with the bottom facing
Warning
-
Before moving the machine, be sure to unplug the power cord from the outlet.
-
Hold the bottom handles of the machine when moving it.
-
The unit is heavy. Make sure to carry with four or more people.
Handle
6
Before using the Machine
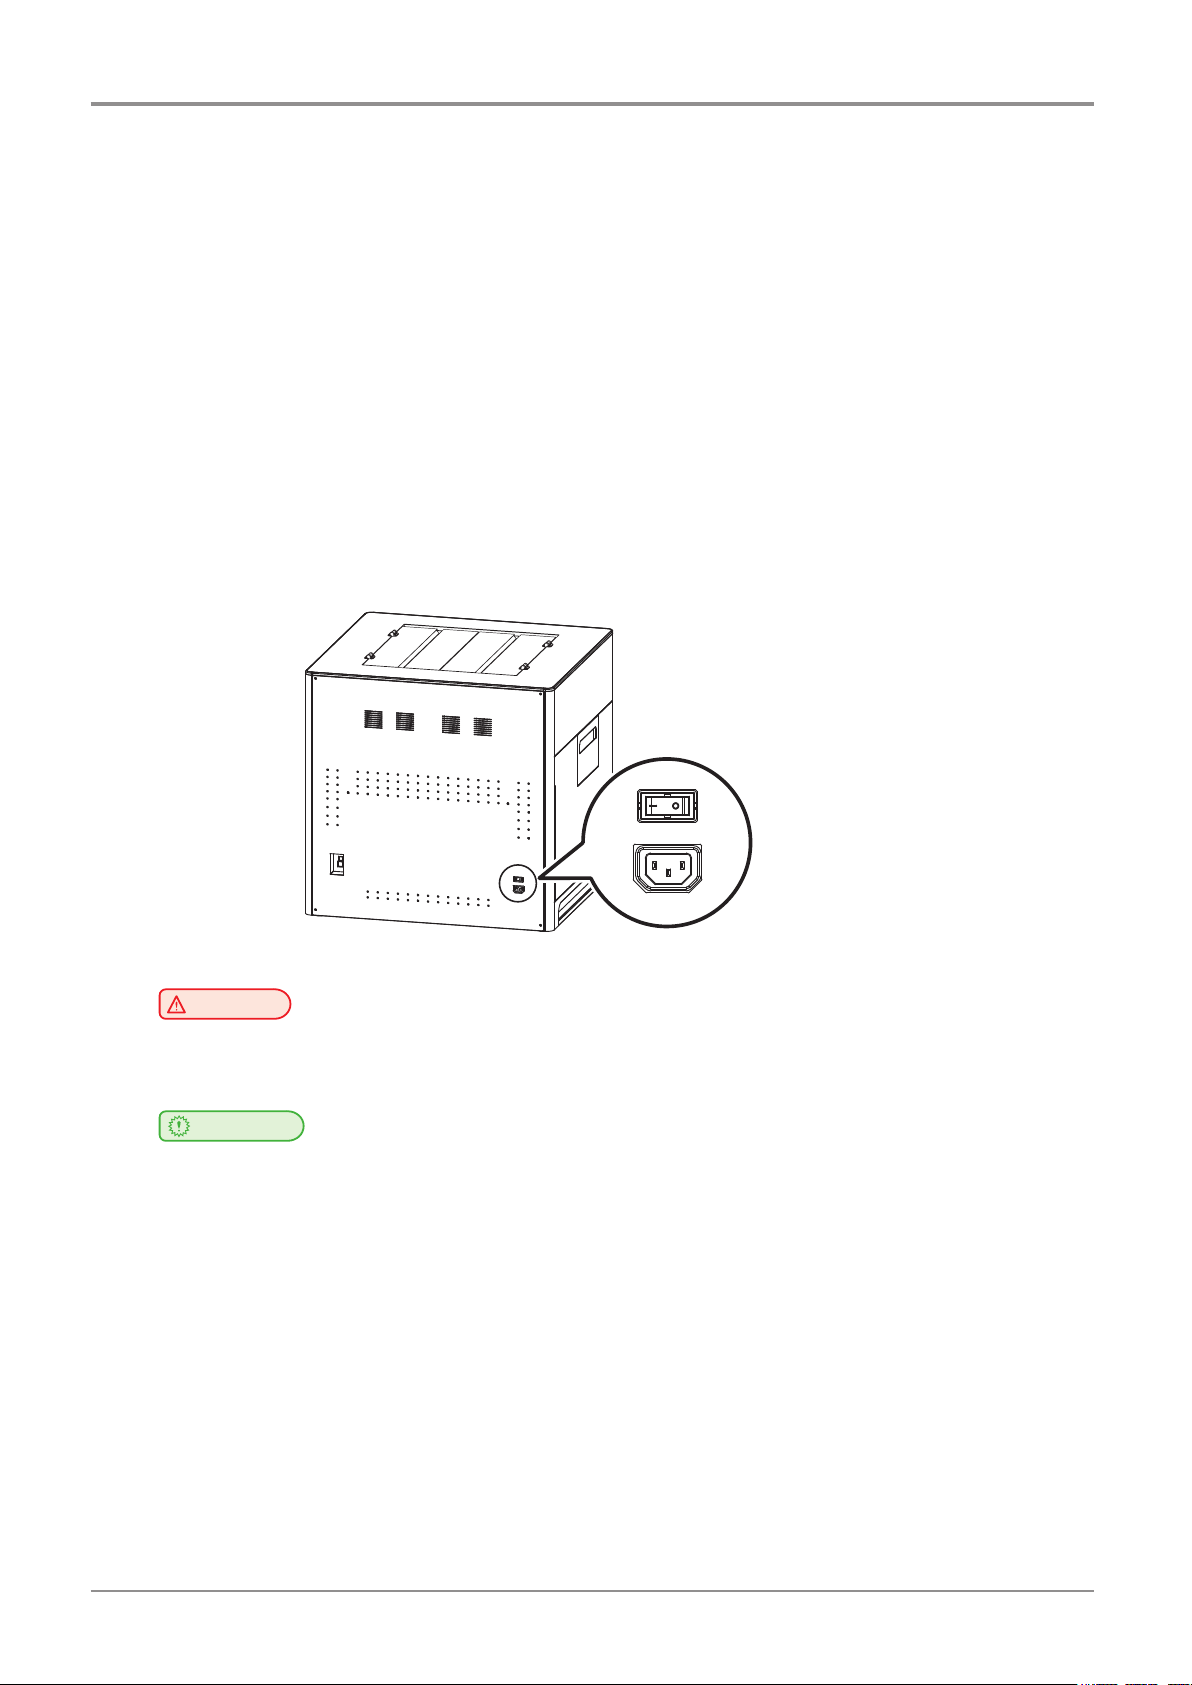
4.3 Power Switch
Before turning the power switch on, check that the power cord is connected to the socket tightly. Then, turn the power
onbypushthepowerswitchto“│”(ON)positionattherightonrearsideoftheMachine.Toturnthepoweroff,push
thepowerswitchto“○”(OFF)position.
│for“ON”IEC60417-5007(DB:2002-10)
○for“OFF”IEC60417-5008(DB:2002-10)
The Switch used for this machine meets the requirements on the symbols and complies with its standard. But the
horizontalstraightbarismeaningthePower“ON”becauseitsorientationisturned90ºtothecounterclockwise.Plea
sedon’tconfusethemeaningofthehorizontalstraightbar“─”.
Switch standard
IEC 61058-1
Symbolforthe“OFF”positionorthedirectionofactuationtothe“OFF”position–circle,○
Symbolforthe“ON”positionorthedirectionofactuationtothe“ON”position-straightbar,│
electrical shock.
power cord from the outlet.
Warning
-
Do not plug or unplug the power cord or touch the power switch with wet hands. It may cause an
Important
-
Onceyouturnthepoweroff,wait5secondsorlongertoturnthepoweronagain.
-
If you are not using the device for a long time or if you are moving the device, turn the power off and unplug the
7

Before using the Machine
5. Consumables Handling
Warning
-
Do not burn the Cartridge unit or filament. It may be a cause of big fire or burn by ignition.
Caution
-
Keep them out of the reach of children.
-
If skin irritation occurs after touching the filament, please see a doctor.
Important
-
Do not keep the cartridge unit in the following places.
Exposed to fire
Exposed to direct sunlight;
Where temperature or humidity may rise;
Where sharp change of temperature may occur;
Covered with dust;
Inside a vehicle for extended time.
-
Keep cartridges away from physical impact or vibration.
-
Do not unpack cartridges until you are just ready to use them.
5.1 PLA
It is a material that can be easily printed by the users using the 3D printer for the first time. You can easily print va-
rious colors and complex shapes. Ambient temperatures above 50 ° C can cause material properties to change,
causing the material to expand or scatter. PVA can be used as a support material.
Nozzle temperature: 200 ° C
Bed temperature: 55 ° C
Recommended direction of the bed : Side A
Color: White, Black, Gray, Red, Yellow, Green, Blue, Pink, Purple
Storage : Store in cartridges with the silica gel that was included in the purchase.
5.2 ABS
Widely used in 3D printers, it has more rigidity and heat resistance than PLA. Due to the high temperature of the
nozzle and the air when printing, printing are not available with other materials. ABS material can be deformed by
shrinkage when the temperature in the cabin drops during printing. Particularly when printing a wide output surface to
the bed, shrinkage may occur at the corners.
IfprintingABSmaterialonSideAofthebedsheet,thePrintedOutputmaynotdetachedfromthebedsheeteasily.
It is recommended to using Side B of the bed sheet when printing ABS material.
(IfusingSideBonthebedsheet,adjusttheprofileintheslicerprogramtocreateaG-code.)
Nozzle temperature: 230 ° C
Bed temperature:90°C(SideA),100°C(SideB)
Color: white, black, gray, red, yellow, green, blue
Storage: Store in cartridges with the silica gel that was included in the purchase.
8

5.3 Flexible
When using flexible materials, clean the inside of the nozzle after the filament load. Even if the inside of the nozzle is
cleaned,iftheinsideofthenozzlehasdebris,thenozzlemaybecloggedorthefilamentmaybetransported.(Refer
toP.5-3“1.5CleaningtheInsideoftheNozzle”.)
Be careful because it is difficult to set the output condition compared with PLA and ABS materials. Warp or spider
web may occur at output.
Flexiblematerialscancausetwistsintheextruderorinsidethecartridgerollers.(RefertoP.5-16“3.3Solutionfor
Notification401”.)
Nozzle temperature: 235 ° C
Bed temperature: 60 ° C
Recommended direction of the bed : Side A
Color: white, red, yellow, green, black, orange
Storage: Store in cartridges with the silica gel that was included in the purchase.
5.4 PVA, PVA+
PVA is a water-soluble support material. PVA can be used with PLA and it can be removed from the print by
dissolvingitunderthewater(refertoP.4-4“1.2PVAFilamentRemovalGuide”).
Before using the Machine
This material is very sensitive to moisture, so it should only be used in environments with humidity below 50%.
Becarefulwhenusinginahumidenvironmentbecauseitmaycauseproblemsinfilamenttransport(refertoP.5-16
“3.5SolutionforNotification401”.).
Carbonization may occur inside the nozzle during long hour printing. Please periodically clean the inside of the nozzle
(refertoP.5-3“1.5CleaningtheinsideoftheNozzle”).
Storage:Whennotinuse,putthePVAfilamentandsilicagelinthezipperbagthatwasincludedinthepurchase,
and keep it away from outside air. If the PVA filament is already exposed to moisture for a long time, it
shouldbestoredfor48hoursormorewithsilicagelinasealedcontainer.
Nozzle temperature:215°C(PVA),200°C(PVA+),
Bed temperature:55°C
Recommended direction of the bed : Side A
and risk.
We are not responsible for the use and handling of PVA filaments other than those described in this manual.
PVA filament specifications can be changed without any notice.
Important
-
Please note that you shall follow our technical information or support in this manual at your own discretion
9
Before using the Machine
6. Instructions for Use
Please be cautious not to touch the nozzle or the bed during removal of the printed objected or during
inspection of the machine inside. It may become the cause of injuries or burns.
reproductive harm. This appliance and its accessories can cause low-level exposure to chemicals
during operation, which can be reduced by operating the appliance in a well ventilated area.
personal injuries of damages.
the instructions below.
Caution
-
The nozzle and the bed that are inside the machine are very hot during machine operation.
-
Never operate the machine in the way this manual does not specifically instruct.
Notification for California customers, USA
Warning
-
This product uses chemicals known to the State of California to cause cancer and birth defects or other
Caution
-
Do not open the side cover or touch any parts of the extruder unit during machine operation to prevent
-
If you need inspection of the extruder unit, turn off the power and disconnect the power cord and follow
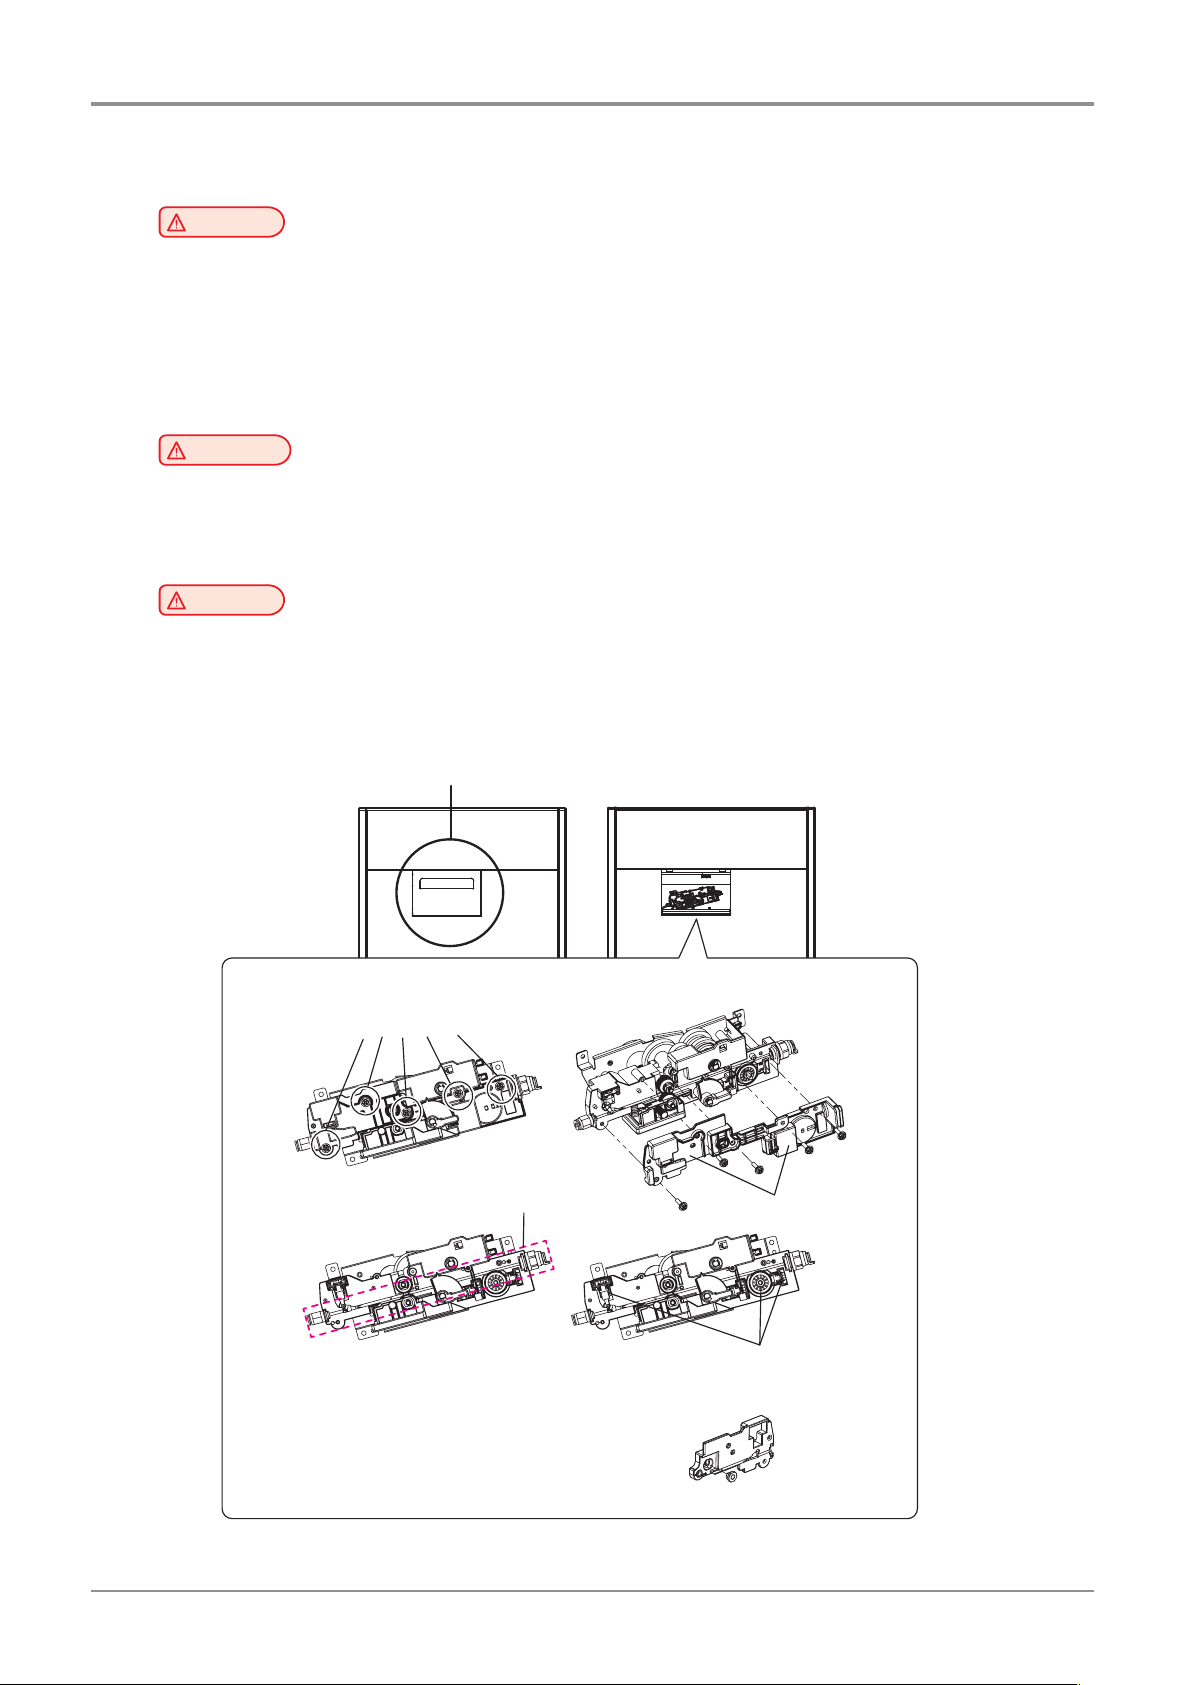
Openthesidedoor.
If the filament is clogged in the extruder while using the device, follow the instructions below.
① ②
③ ④
Remove 5 screws.
Removing filaments in the path
Removing filaments in the path
Make sure that there are no missing parts
during filament removal, then reassemble
* If the brass bushing comes out of the cover,
insert the bushing as shown in the right figure
and then assemble the cover.
Remove 2 covers
10

7. Ventilation
Before using the Machine
ventilation, this may be harmful for your health. Ventilate it on a regular basis.
ventilation when the machine is used for the first time. If the machine is in operation for an extended
time, do not stay in the same room for a long time.
Caution
-
Use the machine in a place with good ventilation. If the machine is used in a place without good
-
Do not block vents. Inappropriate cooling may lead to high temperatures inside the machine.
-
In general, a new machine may produce small amount of gaseous components, so ensure good
11

Before using the Machine
8. Notices
❖
ThefollowingaremeasuredinaccordanceofISO7779andreportedtomeetISO9296.
Some modes may not be available in your purchased products.
Do not dispose the machine and consumables together with household wastes.
For disposal or recycling, contact your local sales office.
This machine complies with the limits for Class A.
ClassA(IndustrialDevice):ThisisaclassAproduct.Inadomesticenvironmentthisproductmaycauseradio
interference in which case the user may be required to take adequate measures.
Noise Emission Level
Average Sound Pressure at 1 Meter Away
Printing 55dBA(NormalPrintCondition-Printingspeed40mm/s,Travelspeed130mm/s)
Standby under40dBA
Temperature/Humidity
❖
Operation 16 °C ~ 29 °C 20%RH~70%RH
Storage -30°C~40°C,15%RH~85%RH(Nocondensation,mustnottouchthefloor)
Disposal of The Products
❖
EMI(Electromagnetic Interference) Notice
❖
Thisdevicecomplieswithpart15oftheFCCRules.Operationissubjecttothefollowingtwoconditions:
(1)Thisdevicemaynotcauseharmfulinterference,and(2)thisdevicemustacceptanyinterference
received, Including interference that may cause undesired operation.
This equipment has been tested and found to comply with the limits for a Class A digital device, pursuant to
part 15 of the FCC Rules. These limits are designed to provide reasonable protection against harmful
interference in a residential installation.
accordance with the instructions, may cause harmful interference to radio communications. However, there
is no guarantee that interference will not occur in a particular installation. If this equipment does cause harmful
interference to radio or television reception, which can be determined by turning the equipment off and on, the
userisencouragedtotrytocorrecttheinterferencebyonemoreofthefollowingmeasures:
- Reorient or relocate the receiving antenna.
Any changes or modifications not expressly approved by the manufacturer responsible for compliance
could void the user’s authority to operate the equipment.
FCC COMPLIANCE STATEMET
INFORMATION TO USER
This equipment generates uses and can radiate radio frequency energy and, if not installed and used in
-
Increase the separation between the equipment and receiver.
-
Connect the equipment into an outlet on a circuit different from that to which the receiver is connected.
-
Consult the dealer or an experienced radio/TV technician for help.
CAUTION
The wireless device may be affected by electromagnetic interference so it should not be used for life
saving services.
DECLARATION OF CONFORMITY (DOC Letter): 12page
Wireless LAN Specifications
❖
12

Before using the Machine
Exposure to radio frequency radiation
The following notice is applicable if your printer has a wireless network card installed.
The radiated output power of this device is far below the FCC radio frequency exposure limits.
Aminimumclearanceof20cm(8inches)mustbemaintainedbetweentheantennaandanypersonsfor
this device to satisfy the RF exposure requirements of the FCC.
Power Consumption of the Products
The below table shows power consumption.
The above power consumption is the hourly average value.
Instant power consumption can be much higher than the average value.
WLAN Notice
❖
Power Consumption
❖
Mode Description Power Consumption(W)
Printing A device is printing using electronic input data. Max. 1000W
Standby A device is in standby mode. Max. 750W
Power On A power plug is plugged into the outlet with the machine’s
switch on.
Power Off A power plug is plugged into the outlet with the machine’s
switch off .
15W
0.5W
Deactivated Mode
The machine consumes power even in the deactivated mode. Unplug the power cord to completely stop the
power consumption.
Total Energy Usage
It would be useful to calculate the Total energy usage of the machine.
Since the electricity bill is charged in Watt unit, you have to multiply time spent in each mode by power
consumption in order to calculate the energy use.
Total energy usage is the sum of energy used in each mode.
Condensation
Dramatic change of the ambient temperature may produces water droplets on the interior and exterior of the
machine.
door and cover opened.
Wipe the water droplets on the outer surface, but for the inside please let them dry off by leaving front
13

Before using the Machine
9. Disposal of Used Battery
Control board uses a Lithium battery.
Please discard used batteries following the environmentally friendly procedure stated on the manufacturer
guidelines.
To replace batteries, please contact a qualified service engineer.
14
10. Wifi Module Disclaimer
Before using the Machine
❖
to human lives.
This module includes a Wifi module, compatible only with Sindoh 3DWOX models.
Important
-
This Wifi module can cause radio interference, therefore it should not be used for any purposes related
-
Do not expose this product to water, humidity or liquid.
-
Do not expose this product to direct light, hot temperature or fire.
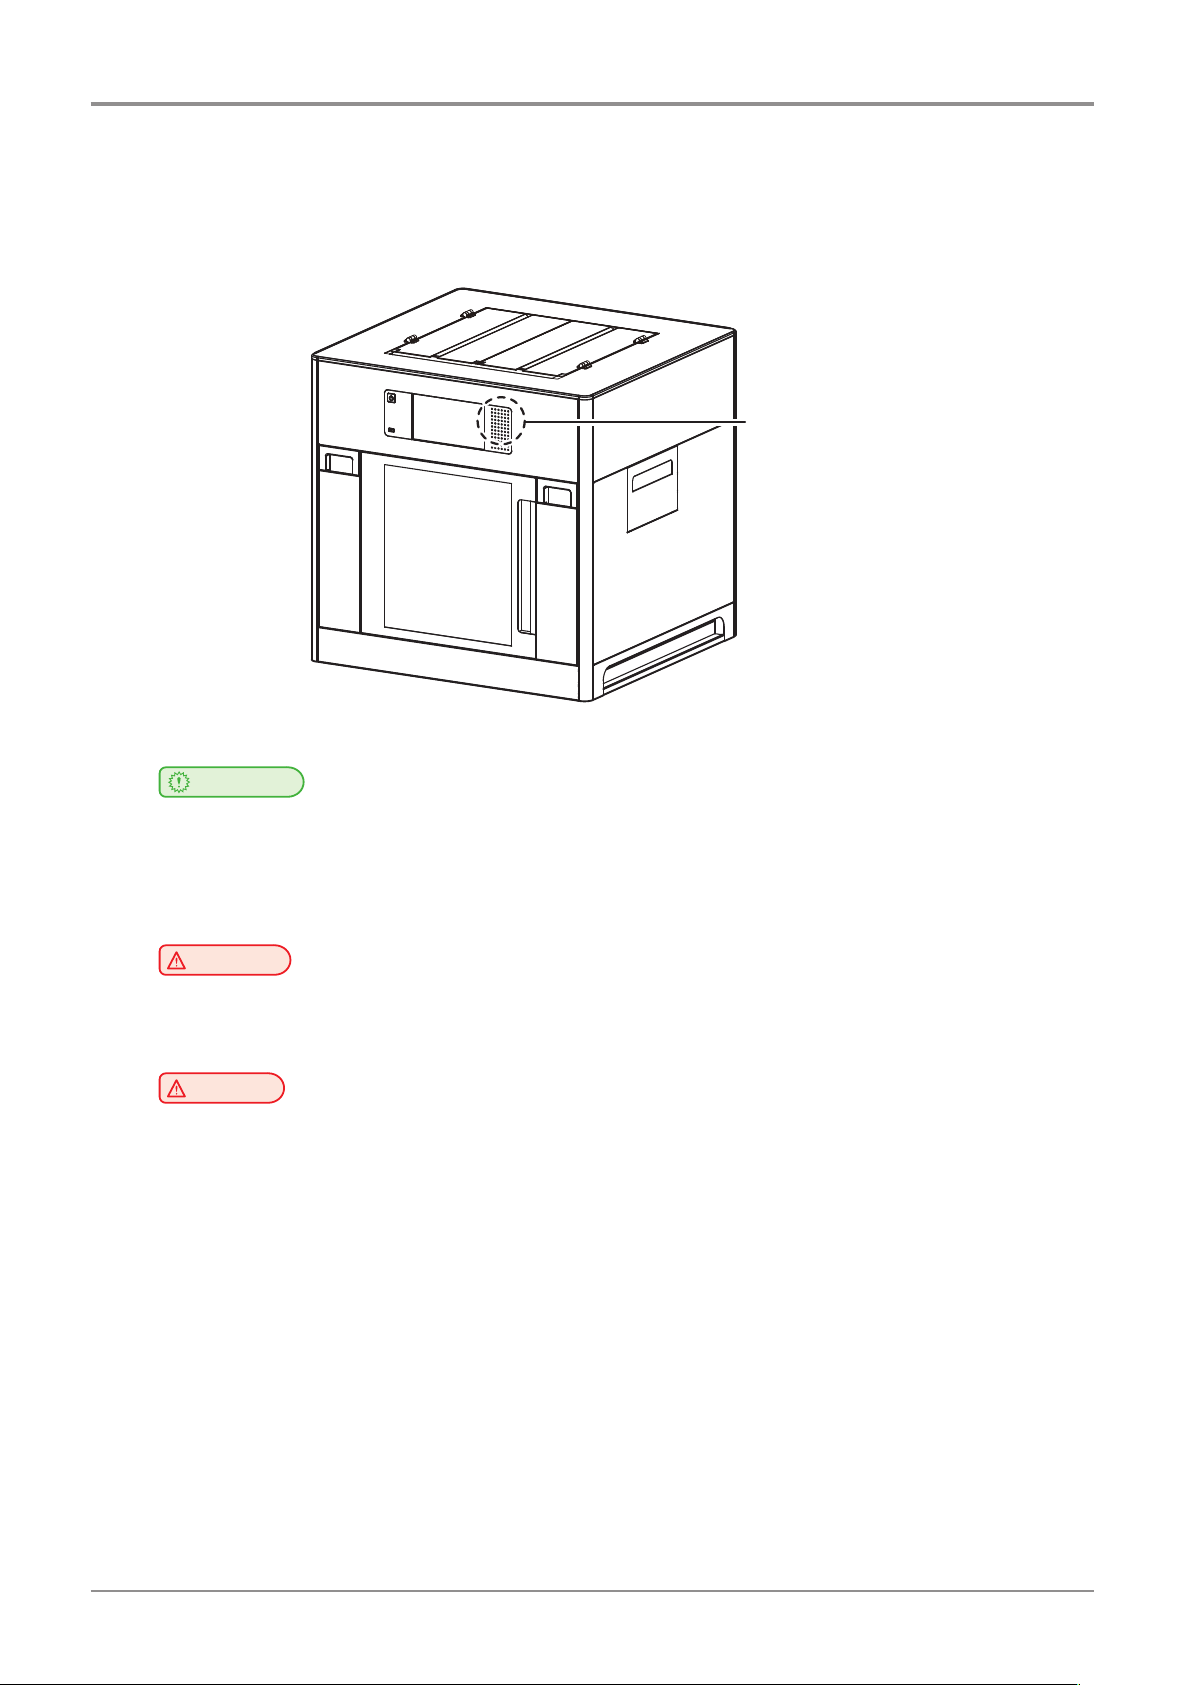
Wifi module inside
machine trouble or failure.
has been mounted in a place that minimizes human access.
Warning
- If the machine has been modified by an unauthorized personnel, Sindoh is not liable for the
Caution
-
To prevent RF signals that exceed FCC RF exposure limits from being exposed to human, this module
15

Before using the Machine
❖
Frequency
Antenna Power Density IEEE802.11b:10mW(10dbm)/MHz
No. of Channels IEEE802.11b:11
Modulation IEEE802.11b:DSSS/CCK
Power Consumption 5V500mA(Maximum)
Precautions
IEEE802.11b:2412MHz~2462MHz
IEEE802.11g:2412MHz~2462MHz
IEEE802.11n(20MHz):2412MHz~2462MHz
IEEE802.11n(40MHz):2422MHz~2452MHz
IEEE802.11g:10mW(10dbm)/MHz
IEEE802.11n(20MHz):10mW(10dbm)/MHz
IEEE802.11n(40MHz):10mW(10dbm)/MHz
IEEE802.11g:11
IEEE802.11n(20MHz):11
IEEE802.11n(40MHz):7
IEEE802.11g:OFDM
IEEE802.11n(20MHz):OFDM
IEEE802.11n(40MHz):OFDM
Dimension 37.0mm X 28.0mm X 3.7 mm
Operation Temperature 0 ~ 60 °C
Storage Temperature -10 ~ 80 °C
16

11. USB Memory Disclaimer
Before using the Machine
❖
Thisdevicecomplieswithpart15oftheFCCRules.Operationissubjecttothefollowingtwoconditions:
(1)thisdevicemaynotcauseharmfulinterference,and(2)thisdevicemustaccept
any interference received, including interference that may cause undesired operation.
This equipment has been tested and found to comply with the limits for a Class B digital device, pursuant
to part 15 of the FCC Rules. These limits are designed to provide reasonable protection against harmful
interference in a residential installation.
This equipment generates, uses and can radiate radio frequency energy and, if not installed and used in
accordance with the instructions, may cause harmful interference to radio communications.
However, there is no guarantee that interference will not occur in a particular installation.
If this equipment does cause harmful interference to radio or television reception, which can be determined by
turning the equipment off and on, the user is encouraged to try to correct the interference by one more of the
followingmeasures:
FCC COMPLIANCE STATEMENT
INFORMATION TO USER
❖
-
Reorient or relocate the receiving antenna.
-
Increase the separation between the equipment and receiver.
-
Connect the equipment into an outlet on a circuit different from that to which the receiver is connected.
-
Consult the dealer or an experienced radio/TV technician for help.
❖
Any changes or modifications not expressly approved by the manufacturer responsible for compliance
could void the user’s authority to operate the equipment.
❖
- Please use the enclosed USB flash drive.
The3DWOX3DprinterdoesnotsupportUSBflashdrivesinNTFSformat.
CAUTION
Specification of compatible USB flash drive for 3DWOX
-
The enclosed USB flash drive is in FAT32 format.
-
The warranty will not be valid if a 3rd party USB drive is used.
17

Before using the Machine
IC Identification on Class of ITE
❖
CANICES-3(B)/NMB-3(B)
Productname:USBFlashDrive
name:8GB-WJ004,4GB-WJ004
Model
FCCRules:TestedtocomplywithFCCPart15,Class
Environment:ForHOMEOROFFICEUSE
thisdevicemaynotcauseharmfulinterference,and(2)thisdevicemustacceptanyinterference
ARTY
America,
Operating
FCC COMPLIANCE STATEMENT
Thisdevicecomplieswithpart15oftheFCCRules.Operationissubjecttothefollowingtwoconditions:
(1)
received, including interference that may cause undesired operation.
RESPONSIBLE P
Name:Sindoh
Address:6047TyvolaGlenCircle,Suite#115,Charlotte,NC28217
PhoneNo.:1-704-414-6690
We hereby declare that the above specified equipment with the trade name and model number was tes
ted conforming to the applicable FCC Rules under the most accurate measurement standards possible,
and that all the necessary steps have been taken and are in force to assure that production units of the
same equipment will continue to comply with the Commission’
Manufacturer:SindohCo.,Ltd.
Address:3,Seongsuiro24(isipsa)-gil,Seongdong-gu,Seoul,04797REPUBLICOFKOREA
DECLARATION OF CONFORMITY
A
Ltd.
-
s requirements.
18

3DWOX 5X / 7X
USER MANUAL
Preparations for
Machine Operation
1
Preparations for Machine Operation
1
1. Machine Specifications
1.1 Printing
Printing Method Fused Filament Fabrication
Max. Print Length(mm) 5X : W(max):350, D(max):350, H(max):350
7X : W(max):370, D(max):390, H(max):450
W(max):380, D(max):390, H(max):450 (Expanded print mode)
Print Layer Thickness Setting 0.05~0.4mm
Basic Nozzle diameter 0.4mm
Filament width 1.75mm
Printable materials * Sindoh : PLA, ABS, FLEXIBLE, PVA(Water-soluble) PVA+(Water-soluble)
* Open Material : PLA, ABS, FLEXIBLE, PVA(Water-soluble), ASA, PETG, etc
Printable color White, Black, Gray, Red, Yellow, Green, Blue, Pink(PLA), Purple(PLA)
Bed leveling Auto leveling
Print Head Two Nozzle
* Using filament containing abrasive additives (e.g. metal component, carbon fiber) may cause the breakdown
of the machine and will shorten its life time drastically.
1.2 Temperature/Speed
Continuous Nozzle Usage/ Maximum
Temperature
Continuous Bed Usage/ Maximum
Temperature
Recommended printing speed/
maximum speed
* Continuous operation at maximum temperature can cause malfunction, Please use in case of nozzle clogging or
other troubles.
Recommended Temperature(Nozzle): PLA 200℃, ABS 230℃, Flexible
235℃, PVA 215℃, PVA+ 200℃ / Max 250℃
Recommended Temperature(Bed): PLA 55℃, ABS(Side A) 90℃,
ABS(Side B) 100℃, Flexible 55℃ , PVA(PVA+) 55℃ / Max 110℃
PLA 80mm/s, ABS 80mm/s, PVA(PVA+) 25mm/s,
FLEXIBLE 30mm/s Recommended / 200mm/s max
1.3 Machine
Power Max. 1000W
Dimensions 864 x 810 x 1690(W x D x H)
Weight 167kg (excluding cartridge)
Port USB Device, USB Host , Wifi, Ethernet
Cartridge Auto Load / Unload
1.4 Software/Support
Supported Software Sindoh Exclusive Slicer
Supported File Format *.stl, *.ply, *.obj, *.gcode, *.amf
Supported Operating System Windows 7 or above, Mac OSX 10.10 or above
Recommended Memory Requirements DRAM 8 GB+ / VRAM 2 GB+ (5X, 7X model only)
details on how to use.(https://3dprinter.sindoh.com/support/downloads)
Note
-
Graphics must support OpenGL 2.0 or higher.
-
This product can be utilized with Alexa Echo for hands-free control. Please refer to the below URL for more
1-2

1.5 Default Setting of Print layer Width
Nozzle Width 0.4mm
Print Layer Width 0.2mm
Preparations for Machine Operation
1
1-3

Preparations for Machine Operation
1
2. Basic Components
Please check all basic components are in the box.
Caution
-
Please keep the box and packaging material; they are needed for product exchange or repair service.
3D Printer
*Spool holder
Table
USB Cable
Cartridge
Power Cable(3EA)
Z-offset Calibration
Sheet(2EA)
Tube for
Cleaning(4EA)
*Included only on 7X model.
- The blades of the scrapper can be very sharp. Please be cautious. Please do not use for other than
removing printables.
Please do not touch the blade of the scrapper.
Warning
Encoder
Cleaning Brush
ScrapperReference Guide
Nozzle Cleaner
Spring Nozzle
Cleaner
USB Drive
Nozzle Cleaning Pads
(5EA for replacement)
1-4

3. Understanding the Device Parts
Preparations for Machine Operation
1
<Front> <Rear>
5
4
3
2
1
6
8
7
9
10
12
11
13
No. Part Name Description
1 Front door handle A handle to open the front door.
2
USB port
Connect USB flash drive containing printing information and print directly from
USB flash drive.
3 LCD Control panel Screen used to control printer.
Caution
-
Usage of printer is recommended after removing the protection film on LCD control panel.
If the film is not removed, the touch screen may not work properly.
4 Power Button
Briefly press this button to turn on printer.
Press and hold for 2 seconds to turn off the printer
Power Button Indicator Lamp On Power is On.
1 second interval flickering Can be turned on instantly.
(power cable is connected)
Caution
-
If in case of not using the printer for long period of time,
please unplug the power cord.
-
The lamp may flicker for a few seconds after the
power cord is disconnected.
Lamp Off Inactive Mode. (Power cord is unplugged)
5 Top door handle A handle to open top door.
6 Ventilator fan(Odor re-
moving filter)
Discharges heat from interior.
Filters out odor created through printing.
7 Lan Port Allows a device to connect to a network using a LAN cable.
8 USB Port Used to connect printer to computer with a USB cable.
9 Power port Power cord connector.
10 Carrying Handles Handles to use when moving the printer.
11 Extruder door Door for maintaining extruder unit.
12 Nozzle tube guiding rod Prevents the nozzle tube from twisting.
13 Main power switch (l /O) Turn the power on or off by pressing “I” (ON) or “O” (OFF).
1-5
Preparations for Machine Operation
1
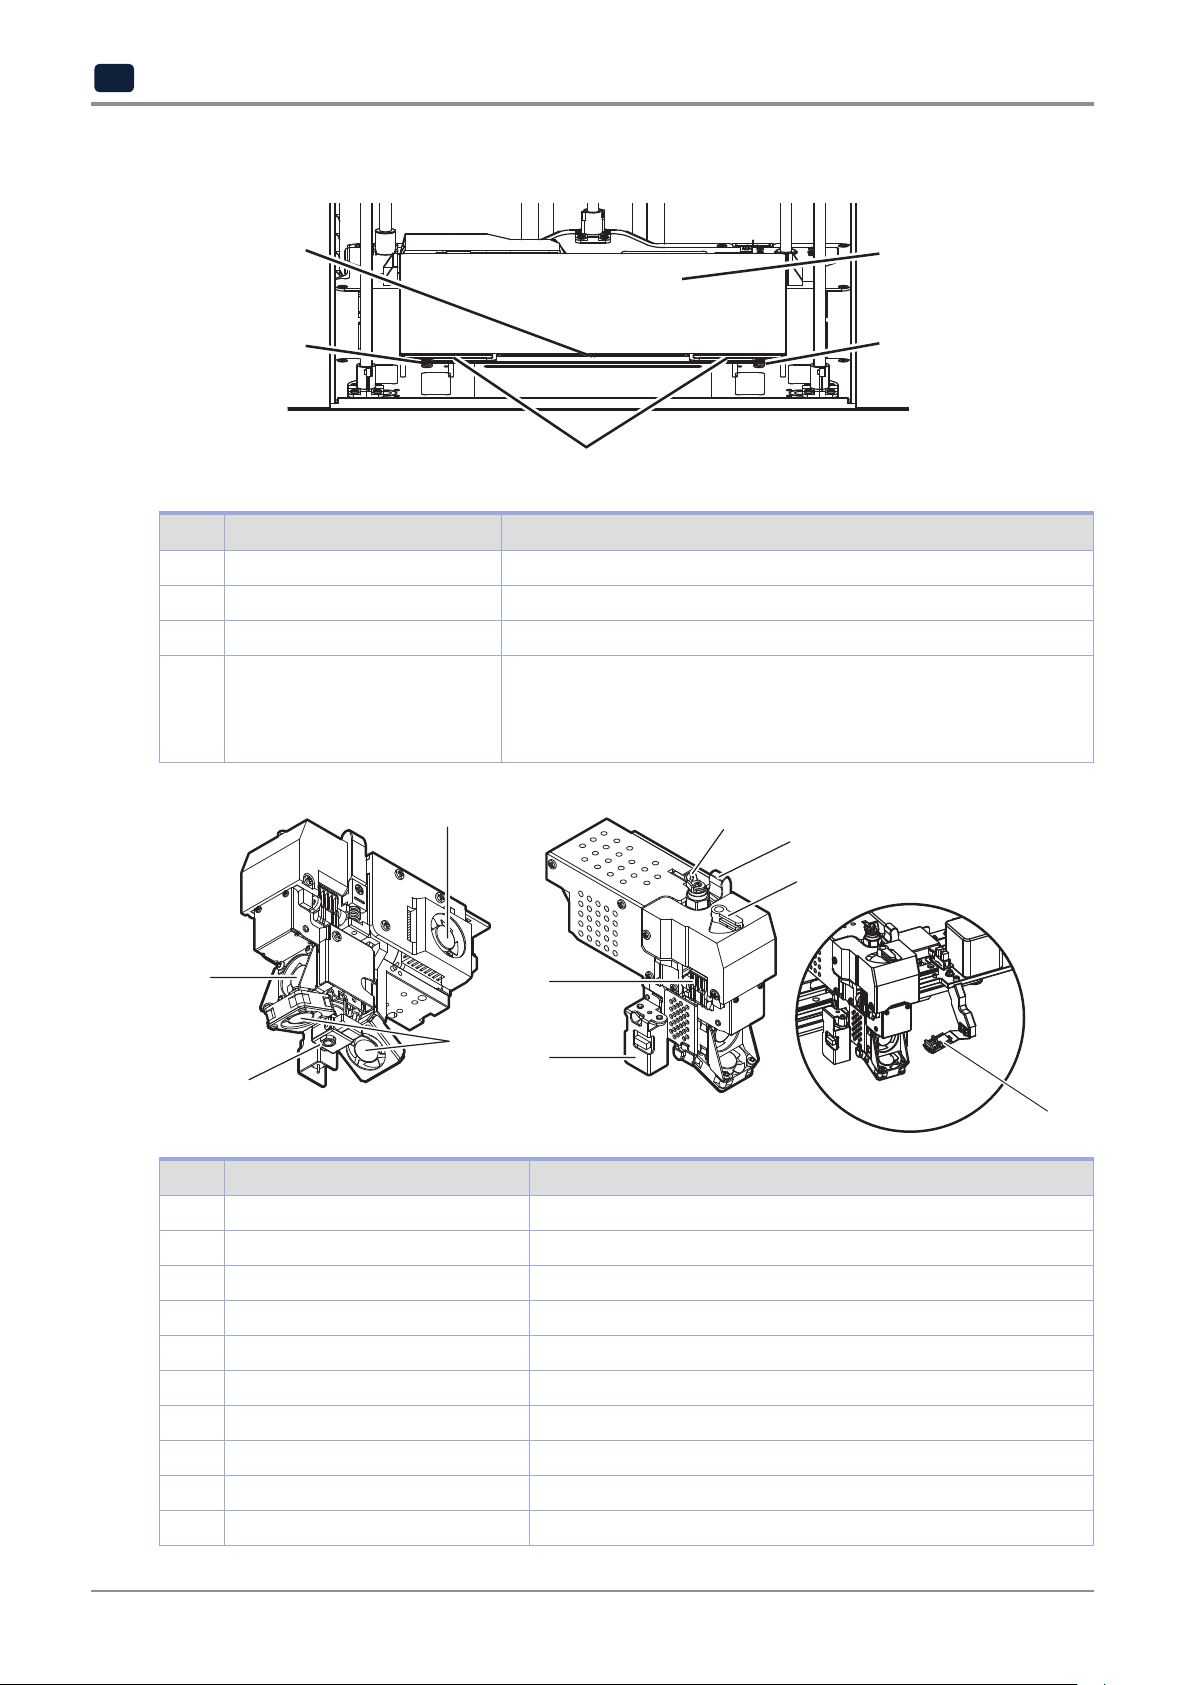
<Interior>
3
1
2
No. Part Name Description
1 Bed height adjustment Knob Used to level the Flexible bed.
2 Removable bed handle Used to assemble and dismantle Flexible bed
3 Bed heater Heats the printables' bottom surface to stabilize it on the bed.
4 Flexible bed (bed sheet) Seating space for printable. It has both sides of A and B.
- Side A is a general purpose sheet for various materials.
- Side B is recommended for printing materials which requires high
temperature of the bed, such as ABS etc.
<Nozzle>
3
9
8
7
4
1
2
1
4
No. Part Name Description
1 Fan 1 Used to cool down models
2 Fan 2 Used to cool down the heat sink of the nozzle part
3 Fan 3 Used to cool down the nozzle motor
4 Nozzle Used to print.
5 Sensor Used to level the bed
6 Nozzle mount hook Used to mount and fix the nozzle
7 Nozzle fixing handle Used to fix the nozzle
8 Nozzle drive pressurization handle Pressurizing handle to drive the filament
9 Depressurization handle lever Used to depressurize the nozzle drive pressurization handle
10 Nozzle cleaning pads These are used for removing foreign matters from the nozzle.
6
5
10
1-6
 Loading...