

Page 1
SIMPLESHARE NAS 1.1 USER’S GUIDE
NETWORK ATTACHED STORAGE DRIVE
Includes setup, file access, drive
management, and troubleshooting
information for your SimpleShare NAS
network drive
Page 2

Disclaimers
Information in this User’s Guide is subject to change without notice and does not represent a commitment on the part of SimpleTech. SimpleTech assumes no responsibility for any inaccuracies
that may be contained in this User’s Guide.
SIMPLETECH, INC. PROVIDES NO WARRANTY WITH REGARD TO THIS DOCUMENT OR ANY OTHER INFORMATION CONTAINED HEREIN AND HEREBY EXPRESSLY DISCLAIMS ANY
IMPLIED WARRANTIES OF MERCHANTABILITY OR FITNESS FOR ANY PARTICULAR PURPOSE WITH REGARD TO ANY OF THE FOREGOING. SIMPLETECH ASSUMES NO LIABILITY
FOR ANY DAMAGES INCURRED DIRECTLY OR INDIRECTLY FROM ANY TECHNICAL OR TYPOGRAPHICAL ERRORS OR OMISSIONS CONTAINED HEREIN. IN NO EVENT SHALL
SIMPLETECH BE LIABLE FOR ANY INCIDENTAL, CONSEQUENTIAL, SPECIAL, OR EXEMPLARY DAMAGES, WHETHER BASED ON TORT, CONTRACT OR OTHERWISE, ARISING OUT
OF OR IN CONNECTION WITH THIS DOCUMENT OR ANY OTHER INFORMATION CONTAINED HEREIN OR THE USE THEREOF.
Copyright
®
©2006 by SimpleTech
information protected by copyright, and this User’s Guide and all accompanying software and documentation are
, Inc. All rights reserved. The products and programs described in this User’s Guide are licensed products of SimpleTech, Inc. This User’s Guide contains proprietary
protected by copyright
.
No part of this document, including but not limited to any instructions, descriptions and product specifications shall be modified, used, copied, reproduced, translated to another language or
disclosed in whole or in part, in any form or by any means, electronic or mechanical, for any purpose other than the purchaser’s personal use, without the written consent of SimpleTech.
Trademark Information
The SimpleTech name, logo and design are registered trademarks, and SimpleShare and iShare are trademarks of SimpleTech, Inc. Other product and corporate names mentioned in this
document are used for identification purposes only and may be trademarks or registered trademarks of their respective companies.
FCC Compliance
This equipment has been tested and found to comply with the limits for a Class B digital device, pursuant to Part 15 of the FCC Rules. Operation is subject to the following conditions:
• This device may not cause harmful interference
• This device must accept any interference received including interference that may cause undesired operation.
WARNING: Changes or modifications made to this device void the user’s warranty.
EU Declaration of Conformity
This equipment carries the CE marking in accordance with European Directives EN 50081-1:1992, EN 55022:1998, IEC .61000-3-2:2000, IEC .61000-3-3:1995, EN 55024:1998, IEC
61000-4-2:1995, IEC 61000-4-3:1995, IEC .61000-4-4:1995, IEC .61000-4-5:1995, IEC .61000-4-6:1996, IEC .61000-4-8:1993, IEC .61000-4-11:1994
Manufacturer Warranty
The SimpleShare NAS drive is warranted for a period of 3 years from the date of retail purchase. A full text version of the SimpleTech’s warranty policy is available online at www.simpletech.com/
warranty.
GPL Statement
Portions of the firmware used in the SimpleShare NAS drive use software licensed under the GNU General Public License (GPL). For information concerning the terms of the license, please visit
the FAQ section of our website at www.simpletech.com/support. To obtain a copy of our open source software, send your request to SimpleTech Technical Support. Go to www.simpletech.com/
support, click on Return Merchandise (RMA), and then select Need Technical Support.
Page 3

CONTENTS
Getting Started
What You Should Have........................................................................................................................................................................................................................................................ 1
About the NASFinder Quick Setup CD ......................................................................................................................................................................................................................... 2
About the Backup Application CD ................................................................................................................................................................................................................................2
Upgrading from Retrospect Express ..................................................................................................................................................................................................................... 2
About SimpleShare Guides and Online Help.......................................................................................................................................................................................................................2
About This Guide.......................................................................................................................................................................................................................................................... 2
Typographic Conventions ..................................................................................................................................................................................................................................... 2
Symbols and Notations ......................................................................................................................................................................................................................................... 3
Minimum System Requirements .......................................................................................................................................................................................................................................... 3
Windows PCs and Compatibles ................................................................................................................................................................................................................................... 3
Macintosh Computers................................................................................................................................................................................................................................................... 3
Installation Requirements ....................................................................................................................................................................................................................................................3
Network................................................................................................................................................................................................................................................................................ 3
Caring for Your SimpleShare Drive......................................................................................................................................................................................................................................4
General Precautions..................................................................................................................................................................................................................................................... 4
Cleaning Instructions ....................................................................................................................................................................................................................................................4
Getting Help.........................................................................................................................................................................................................................................................................4
Technical Support From SimpleTech ........................................................................................................................................................................................................................... 4
Installing Your Network Drive
Choosing a Location ............................................................................................................................................................................................................................................................ 5
Taking a Visual Tour............................................................................................................................................................................................................................................................6
Front ............................................................................................................................................................................................................................................................................ 6
Back ............................................................................................................................................................................................................................................................................. 6
|i
Page 4

Installing Your Network Drive............................................................................................................................................................................................................................................... 6
Handling Precautions....................................................................................................................................................................................................................................................6
Installing the Vertical Stands ........................................................................................................................................................................................................................................7
Connecting to the Network ...........................................................................................................................................................................................................................................7
Connecting AC Power ..................................................................................................................................................................................................................................................7
Using the Security Slot .................................................................................................................................................................................................................................................8
Powering SimpleShare On and Off...............................................................................................................................................................................................................................8
Turning SimpleShare On.......................................................................................................................................................................................................................................8
Turning SimpleShare Off....................................................................................................................................................................................................................................... 8
Restarting SimpleShare................................................................................................................................................................................................................................................ 8
Restarting SimpleShare Using the Power Button..................................................................................................................................................................................................8
Restarting SimpleShare Using SimpleShare Administrator .................................................................................................................................................................................. 8
Using External USB Drives ..................................................................................................................................................................................................................................................9
Understanding External Drive Support .........................................................................................................................................................................................................................9
About Foreign Disk Support ..................................................................................................................................................................................................................................9
About Blank Disk Support .....................................................................................................................................................................................................................................9
Connecting a USB Drive............................................................................................................................................................................................................................................... 9
Safely Removing a USB Drive......................................................................................................................................................................................................................................9
Networking a USB Printer ..................................................................................................................................................................................................................................................10
Connecting a USB Printer...........................................................................................................................................................................................................................................10
Setting Up a USB Printer on a Windows PC ..............................................................................................................................................................................................................11
Setting Up a USB Printer on a Macintosh Computer..................................................................................................................................................................................................12
Setting Up and Registering Your Drive
Setting Up SimpleShare for the First Time.........................................................................................................................................................................................................................15
Setting Up SimpleShare Using a Windows PC...........................................................................................................................................................................................................15
Running NASFinder On a PC..............................................................................................................................................................................................................................15
Running the Initial Setup Wizard On a PC ..........................................................................................................................................................................................................17
ii |
Page 5

Setting Up SimpleShare Using a Macintosh Computer.............................................................................................................................................................................................. 19
Running NASFinder On a Mac ...........................................................................................................................................................................................................................19
Running the Initial Setup Wizard On a Mac ........................................................................................................................................................................................................ 21
Registering Your SimpleShare NAS Drive ................................................................................................................................................................................................................. 23
Setting Up iShare for the First Time...................................................................................................................................................................................................................................24
Before You Begin .......................................................................................................................................................................................................................................................24
Running the Setup Wizard.......................................................................................................................................................................................................................................... 24
Accessing Shared Network Folders
Accessing SimpleShare Locally......................................................................................................................................................................................................................................... 25
Accessing Folders Locally From a Windows PC ........................................................................................................................................................................................................25
Accessing Folders Using My Computer .............................................................................................................................................................................................................. 25
Accessing Folders Using My Network Places.....................................................................................................................................................................................................26
Accessing Folders Using Internet Explorer ......................................................................................................................................................................................................... 26
Accessing Folders Locally From a Macintosh Computer ........................................................................................................................................................................................... 27
Accessing Folders from the Desktop .................................................................................................................................................................................................................. 27
Accessing Folders Using Connect to Server ...................................................................................................................................................................................................... 28
Organizing Your Files Using ShareSorter .................................................................................................................................................................................................................. 29
Saving Files to the Organizer Folder ..................................................................................................................................................................................................................29
Accessing SimpleShare Remotely..................................................................................................................................................................................................................................... 30
Viewing the iShareGallery Web Site...........................................................................................................................................................................................................................30
Viewing the Contents of Directory Page..................................................................................................................................................................................................................... 31
Retrieving (Downloading) Files Over the Internet.......................................................................................................................................................................................................31
Saving Files to SimpleShare Over the Internet ..........................................................................................................................................................................................................32
Saving Files Back to SimpleShare ......................................................................................................................................................................................................................32
Uploading Files to SimpleShare..........................................................................................................................................................................................................................32
|iii
Page 6

Using SimpleShare Manager
About SimpleShare Manager .............................................................................................................................................................................................................................................33
Launching SimpleShare Manager on a Windows PC.................................................................................................................................................................................................34
Launching SimpleShare Manager on a Macintosh Computer ....................................................................................................................................................................................34
Using SimpleShare Manager Utilities.................................................................................................................................................................................................................................36
Running the Initial Setup Wizard ................................................................................................................................................................................................................................36
Running the iShare Remote Access Setup Wizard ....................................................................................................................................................................................................39
Checking Network Status ...........................................................................................................................................................................................................................................46
Running the Create Share Wizard .............................................................................................................................................................................................................................. 46
Share Security Management Wizard ..........................................................................................................................................................................................................................49
Accessing SimpleShare Advanced Features (Advanced Setup)................................................................................................................................................................................51
Advanced Setup and Management
About SimpleShare Administrator ......................................................................................................................................................................................................................................53
Administration ....................................................................................................................................................................................................................................................................53
Changing Basic Setup Parameters.............................................................................................................................................................................................................................53
Machine Name Setting ........................................................................................................................................................................................................................................54
Administration Username and Password Settings..............................................................................................................................................................................................54
Date and Time Settings.......................................................................................................................................................................................................................................54
Time Zone Setting ...............................................................................................................................................................................................................................................55
Upgrading SimpleShare Firmware..............................................................................................................................................................................................................................55
Restoring SimpleShare Default Settings ....................................................................................................................................................................................................................56
Performing a Basic Reset....................................................................................................................................................................................................................................57
Performing a Full Reset.......................................................................................................................................................................................................................................57
Setting Up Alert Notification........................................................................................................................................................................................................................................57
Setting the Windows Workgroup Configuration ..........................................................................................................................................................................................................58
Changing the iShare Remote Access Configuration ..................................................................................................................................................................................................58
iv |
Page 7

Share Management ...........................................................................................................................................................................................................................................................61
Setting Remote Access Rights ...................................................................................................................................................................................................................................61
Setting System Level (Global) Remote Access Rights ....................................................................................................................................................................................... 61
Setting Share Level Remote Access Rights.......................................................................................................................................................................................................61
Creating a Folder........................................................................................................................................................................................................................................................ 61
Deleting a Folder ........................................................................................................................................................................................................................................................ 62
Renaming a Folder .....................................................................................................................................................................................................................................................62
Setting Folder Security ............................................................................................................................................................................................................................................... 62
Creating the Organizer Special Function Folder ........................................................................................................................................................................................................63
Disk Management ..............................................................................................................................................................................................................................................................63
Viewing Disk Information ............................................................................................................................................................................................................................................63
Viewing Basic Disk Information...........................................................................................................................................................................................................................64
Viewing Disk Health Information ......................................................................................................................................................................................................................... 64
Running the Disk Self-Test Routine ........................................................................................................................................................................................................................... 65
Erasing (Wiping) a Disk ..............................................................................................................................................................................................................................................65
Viewing Foreign Disk Information...............................................................................................................................................................................................................................66
Viewing Basic Foreign Disk Information .............................................................................................................................................................................................................66
Viewing Detailed Foreign Disk Information.........................................................................................................................................................................................................67
Setting Up Disk Power Management.......................................................................................................................................................................................................................... 67
Networking and Printers..................................................................................................................................................................................................................................................... 68
Changing the Network Configuration..........................................................................................................................................................................................................................68
Setting Networking Parameters .......................................................................................................................................................................................................................... 68
Enabling Printer Services ........................................................................................................................................................................................................................................... 69
Viewing Printer Status ................................................................................................................................................................................................................................................ 70
|v
Page 8

Appendix A - Remote Networking with iShare
Introduction ..........................................................................................................................................................................................................................................................................1
The Internet..........................................................................................................................................................................................................................................................................1
What You Need to Know About IP Addresses.....................................................................................................................................................................................................................2
Static Versus Dynamic IP Addressing ..........................................................................................................................................................................................................................2
Network Address Translation (NAT) .............................................................................................................................................................................................................................2
Static and Dynamic NAT...............................................................................................................................................................................................................................................2
What You Need to Know About the TCP Ports and Routers ............................................................................................................................................................................................... 3
TCP Ports .....................................................................................................................................................................................................................................................................3
Port Address Translation (PAT) ....................................................................................................................................................................................................................................3
What You Need to Know About Port Forwarding................................................................................................................................................................................................................. 4
A Closer Look at Port Forwarding.................................................................................................................................................................................................................................4
What You Need to Know About Internet Domain Names ....................................................................................................................................................................................................5
The HTTP Prefix ...........................................................................................................................................................................................................................................................5
The WWW Prefix ..........................................................................................................................................................................................................................................................5
Second Level Domains................................................................................................................................................................................................................................................. 5
Domain Registration ..................................................................................................................................................................................................................................................... 5
What You Need to Know About ActiveX Controls................................................................................................................................................................................................................5
Appendix B - Troubleshooting
Appendix C - Drive Specifications
Index
vi |
Page 9
GETTING STARTED
Congratulations on purchasing the SimpleShare NAS drive from SimpleTech.
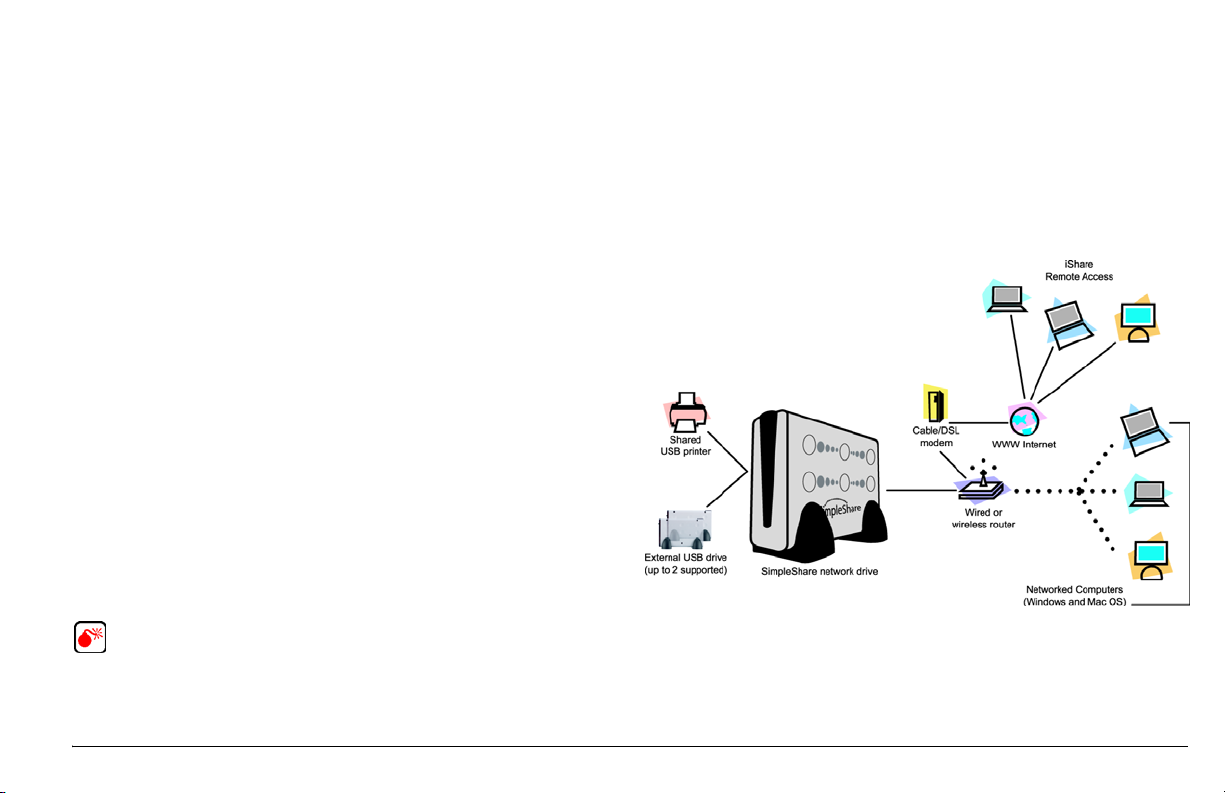
SimpleShare NAS (Network Attached Storage) makes it possible for you to easily add
high-performance storage to your home or small business network. SimpleShare NAS is
ideal for sharing data files, music, digital photos, and videos with local and remote network
users. In addition, with SimpleShare NAS, everyone on the network has instant access to
extra storage.
Features of your SimpleShare NAS drive include:
• Easy setup wizard
®
• Windows
and Mac OS® compatibility
• Remote access to SimpleShare NAS using iShare™
• ShareSorter (automated drag and drop file sorting)
• Integrated USB printer sharing
• HTML-based management utility
• 10/100Base-T Ethernet connectivity
• User and group level access security
• 500GB internal storage capacity
• Expandable storage capacity—add up to 1 Terabyte
• SMART drive monitoring
• Supports Universal Plug and Play (UPnP) for automatic device discovery,
configuration and peer-to-peer data transfer over IP networks
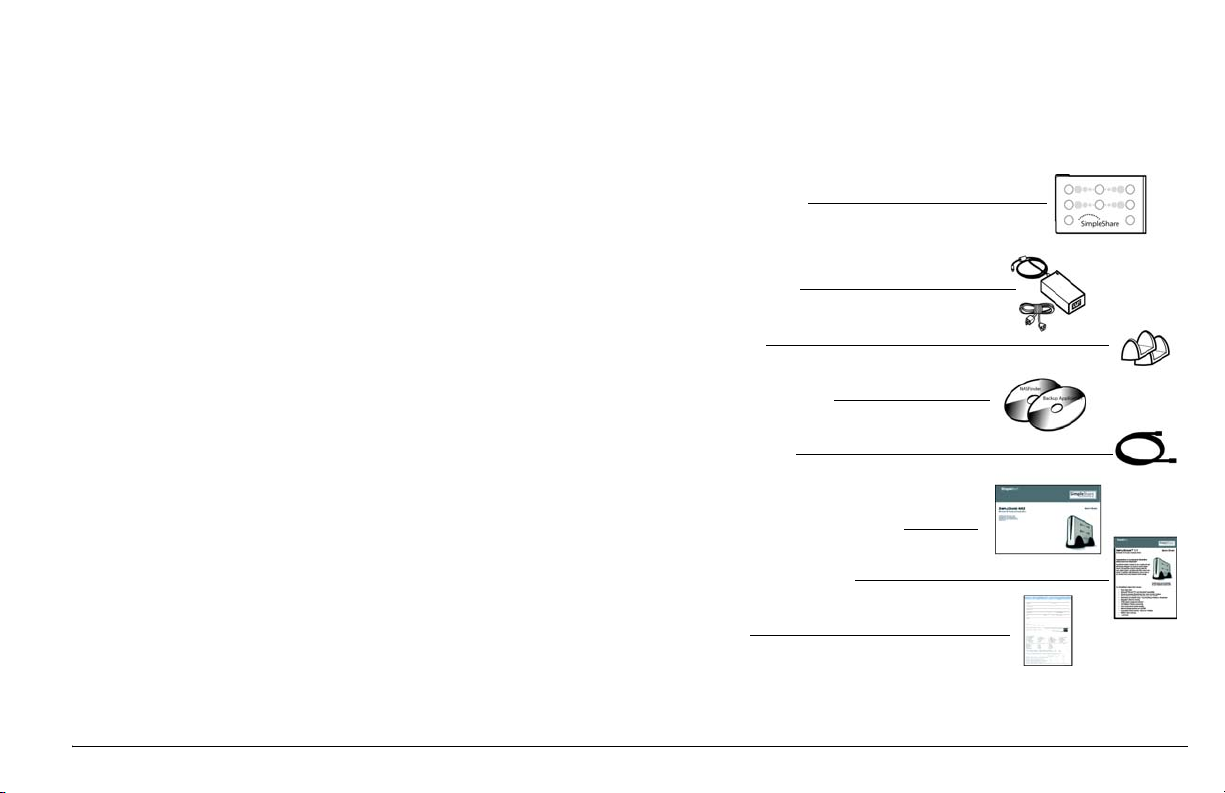
WHAT YOU SHOULD HAVE
The following items are included with SimpleShare.
SimpleShare NAS drive
12V AC power adapter
Vertical stand (2)
NASFinder Quick Setup CD
Backup Application CD
CAT5e Ethernet cable
SimpleShare User’s Guide (this guide)
SimpleShare Quick Start Guide
Warranty card
If any item is missing or damaged, contact your local reseller or
retailer for replacement. If you bought your SimpleShare NAS
drive directly from SimpleTech, contact SimpleTech Customer
Support.
Getting Started What You Should Have | 1
Page 10
About the NASFinder Quick Setup CD
The NASFinder Quick Setup CD contains the NASFinder discovery utility, the
SimpleShare NAS User’s Guide and other reference materials to assist you in using your
SimpleShare NAS drive. The CD also contains the iShareGallery installation program.
The NASFinder program automatically loads when it is inserted into the CD-ROM drive
on your computer. The NASFinder Welcome screen provides access to the following
items on the disk:
• SimpleShare User’s Guide (this guide in PDF format)
• iShareGallery installation software
• SimpleShare online registration
• Frequently Asked Questions (PDF document)
• Publishing Photos on the Internet (PDF document)
• NASFinder discovery utility
About the Backup Application CD
The Backup Application CD contains your copy of EMC Insignia® Retrospect® Express
backup software. Retrospect Express is designed for home environments. It protects your
Windows or Macintosh desktop or notebook computer by allowing you to back up your
data to internal and external hard drives, and CD/DVDs. The Backup Application CD also
contains a printable copy of the Retrospect Express Quick Start guide in PDF format.
Upgrading from Retrospect Express
Retrospect Express users can extend protection to more than one computer and add tape
backup capabilities by upgrading to Retrospect 7 for Windows Professional edition or
Retrospect for Macintosh. To view Retrospect upgrade options, visit the Upgrade Matrix
on EMC Insignia’s Web site at www.emcinsignia.com.
ABOUT SIMPLESHARE GUIDES AND ONLINE HELP
• SimpleShare Quick Start Guide - Provides general instructions on installing and
setting up your SimpleShare NAS drive for the first time. It also contains
instructions on how to access the folders on your SimpleShare NAS drive from
Windows and Macintosh computers.
• SimpleShare User’s Guide - Provides detailed information about the
SimpleShare NAS drive, along with instructions on using SimpleShare Manager
and SimpleShare Administrator to configure and manage the drive. This guide
also includes instructions for installing and using Retrospect Express to backup
the data on your computer to SimpleShare.
• SimpleShare Administrator Online Help - Provides detailed online instructions
for configuring and managing your SimpleShare NAS drive.
• NASFinder Quick Setup Online Help - Provides instructions and tips on using
NASFinder to locate the SimpleShare NAS drive on your local network.
About This Guide
This guide contains safety, regulatory and warranty information, instructions for setting
up, accessing and managing your SimpleShare NAS drive, troubleshooting tips and
frequently asked questions (FAQs). To obtain the latest versions of the documents on
SimpleShare, visit the Support section on SimpleTech’s Web site at
www.simpletech.com/support.
The images and text in this guide may differ slightly from the on screen images and text
displayed in NASFinder and SimpleShare Administrator. These changes are minor and
should not affect the setup or use of the drive.
Typographic Conventions
The following conventions are used throughout this guide:
Bold Identifies menu, command and keyboard selections.
Currier Identifies screen text and values you enter.
Italics Identifies Web site URLs (Universal Resource Locators) and new or unique
terms.
2 | Getting Started About SimpleShare Guides and Online Help
Page 11
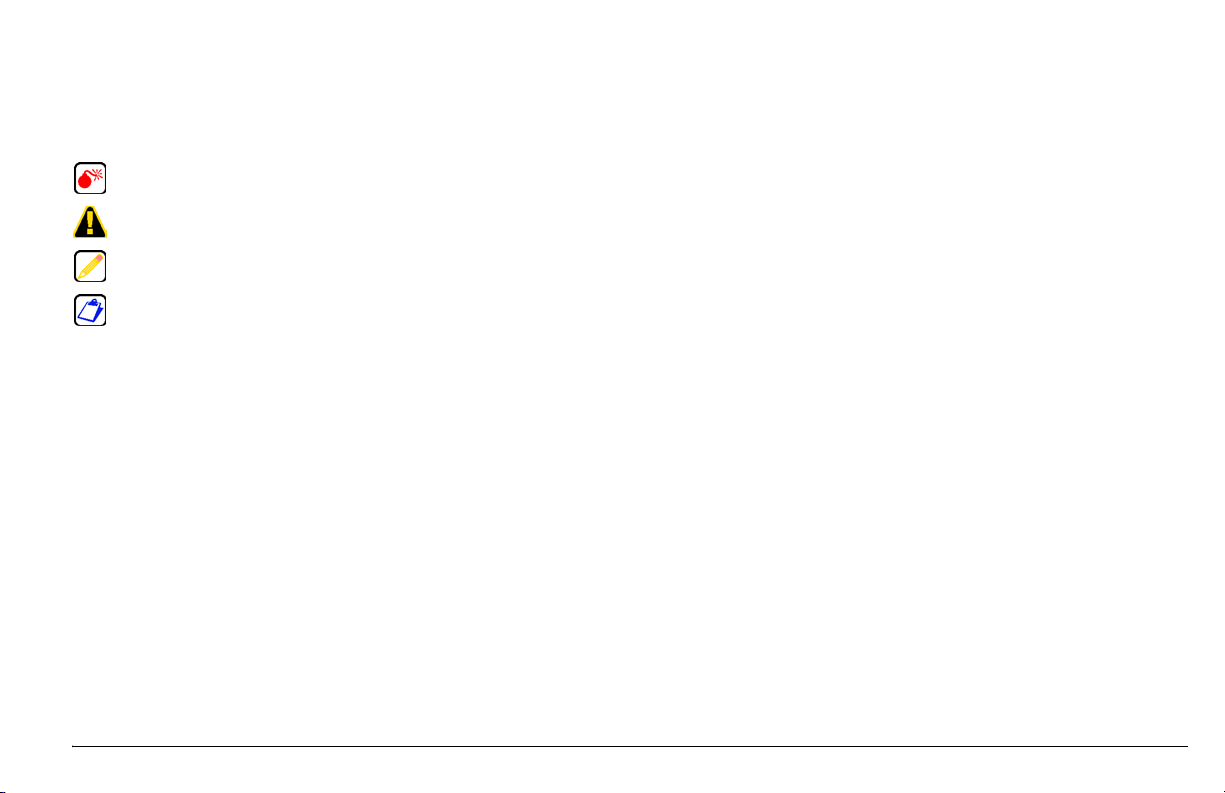
Symbols and Notations
Symbols are used throughout this document to identify important supplemental
information that you should be aware of when using your SimpleShare NAS drive. This
information should be read carefully and fully understood to ensure the proper use of the
drive. The following symbols are used within this document.
WARNING: This icon indicates the existence of a hazard that could result in serious bodily
injury or death if the safety instruction is not observed.
CAUTION: This icon indicates the existence of a hazard that could result in equipment or
property damage, equipment failure or loss of data if the safety instruction is not observed.
NOTE: This icon identifies information that relates to the proper operation of the equipment
or related items.
TIP: This icon identifies important information that helps you make better use of the
equipment or related items.
Macintosh Computers
• iMac®, G3, G4, G5 or iBook
• 256 MB RAM (or as required by Mac OS)
®
• Mac OS
X (version 10.3 or later recommended)
• CD-ROM drive
• Safari™ (version 2.0 or later recommended)
• Available Ethernet port
• Internet connection to use iShare and download firmware updates
®
INSTALLATION REQUIREMENTS
No drivers, special tools or equipment are required to install and setup your SimpleShare
NAS drive.
MINIMUM SYSTEM REQUIREMENTS
NETWORK
• TCP/IP-compliant network
Windows PCs and Compatibles
• Pentium® III-class, 500 MHz processor or equivalent
• 256 MB RAM (or as required by Windows)
• Windows
• CD-ROM drive
• Web browser (Microsoft
• Available Ethernet port
®
2000, 2003 or XP
®
Internet Explorer version 6.0 or later recommended)
• Web browser (PC Users: Microsoft Internet Explorer 6.0 or later recommended;
Macintosh Users: Safari version 2.0 recommended)
• 10/100 TCP/IP-compliant network with DHCP (Dynamic Host Control Protocol)
and DNS (Domain Name System) servers
• Network hub, switch or router (wired or wireless) with an available 10/100
Ethernet port
• File and printer sharing enabled on each computer that will access the
SimpleShare NAS drive
• Internet connection required to use iShare and download firmware updates
Getting Started Minimum System Requirements | 3
Page 12
CARING FOR YOUR SIMPLESHARE DRIVE
The following guidelines are designed to help ensure your safety and protect your
SimpleShare NAS drive and working environment from potential damage.
The SimpleShare NAS drive does not contain any user service able parts. Except as described
in this document, do not attempt to service the SimpleShare NAS drive yourself. Such actions
will void your warranty.
General Precautions
These guidelines will help you avoid personal injury and damage to your drive.
• To help avoid the potential hazard of electrical shock:
– Plug the drive into a properly grounded electrical outlet. The power cable is
equipped with a 3-prong plug to help ensure proper grounding. Do not use adapter
plugs or remove the grounding prong from the cable. If you must use an extension
cable, use a 3-wire cable with properly grounded plugs.
– Do not use your SimpleShare NAS drive during an electrical storm.
– Do not connect or disconnect any cable or perform maintenance or configuration
of this product during an electrical storm.
• To help avoid possible damage to the drive, wait 5 seconds after turning off the drive
before disconnecting it from the network.
• To avoid shorting the drive when disconnecting the network cable, unplug the cable
from the network connector on the back of the drive first, and then from the network
jack. When reconnecting a network cable to the drive, reverse the order—plug the
cable into the network jack first, and then into the network adapter on the drive.
• To help protect your drive from sudden, transient increases and decreases in electrical
power, use a surge suppressor, line conditioner or uninterruptible power supply
(UPS).
• Ensure that nothing rests on your drive’s cables and that the cables are not located
where they can be stepped on or tripped over.
• Keep the drive away from radiators and other heat sources. Also, do not block the
drive’s cooling vents or place the drive in a enclosed cabinet.
• Avoid spilling food or liquids on the drive. If the drive gets wet, disconnect the power
source immediately.
Cleaning Instructions
Before you clean your drive, disconnect it from the electrical outlet. Clean the drive with a
polishing cloth or a soft dry cloth. Do not use liquid or aerosol cleaners, which may contain
flammable substances. Never clean with furniture wax, benzine, insecticides or other
volatile liquids, since they may corrode the case.
GETTING HELP
This guide describes how to install and access the SimpleShare NAS drive in typical home
and small office/home office (SOHO) network environments. If you are unable find the
answer to your question in this guide, please refer to the other documents included on the
NASFinder Quick Setup CD. There’s a good chance that the information you need can be
found there. You should also refer to the online help provided with each SimpleShare
application.
After referring to these documents, if you need further assistance, you can go online or
call and speak with one of our technical support representatives.
Technical Support From SimpleTech
SimpleTech provides unlimited technical support for the SimpleShare NAS drive and any
third-party software included with the drive for the life of the product, Monday through
Friday from 6:30 am until 5:30 pm Pacific Standard Time. You can contact our Technical
Support team through our Web site, by email or by phone.
Email Response: Go to www.simpletech.com/support, click Return Merchandise
Online Chat: Go to www.simpletech.com/support, click Contact Support, and
Phone: To speak to a technical support representative by phone,
(RMA), and then click Need Technical Support.
.
then click
dial 800-945-3444 or 949-476-1180.
4 | Getting Started Caring for Your SimpleShare Drive
Page 13
This chapter contains information you’ll need to know about your SimpleShare NAS drive.
It describes the major components of the drive and contains instructions for installing the
drive on a Local Area Network (LAN). To ensure a successful installation, complete the
steps as described in this chapter.
CHOOSING A LOCATION
The SimpleShare drive can be used in a variety of home or office environments. When
choosing a location for your SimpleShare NAS drive, consider placing the drive where it
will be easy to reach. Make sure the area is large enough for the drive and any other items
you need to use, such as a printer or additional external storage. To avoid overheating,
leave enough space around the drive and other equipment to allow adequate ventilation.
The work area must be free from:
• Dust, moisture and direct sunlight.
• Equipment that generates a strong electromagnetic field, such as large stereo
speakers or speakerphones.
• Rapid changes in temperature or humidity and sources of temperature change
such as air conditioner vents or heaters.
• Extreme heat, cold or humidity. Operate your SimpleShare NAS drive within a
temperature range of 41
non-condensing humidity.
• Liquids and corrosive chemicals.
If you spill liquid into the SimpleShare NAS drive, turn it off, unplug it from the AC power
source, and let it dry out completely before turning it on again.
If the drive does not operate correctly after you turn it back on, contact SimpleTech Technical
Support.
° to 95° Fahrenheit (5° to 35° Celsius) and 20% to 80%
INSTALLING YOUR NETWORK DRIVE
Installing Your Network Drive Choosing a Location | 5
Page 14
TAKING A VISUAL TOUR
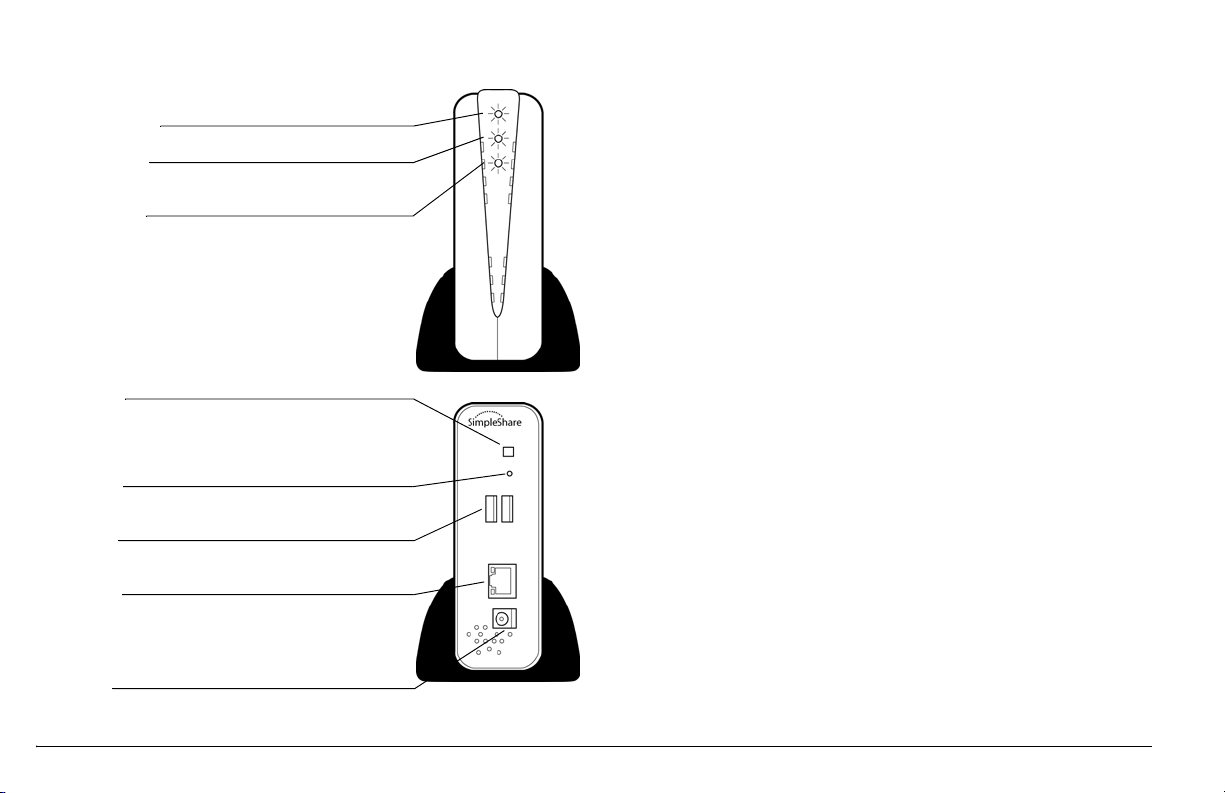
Front
Power LED (Amber)
Illuminates when the SimpleShare NAS drive is On.
Ready LED (Blue)
Illuminates when the SimpleShare NAS drive is in Ready
(active) mode.
HDD LED (Green)
Flashes to indicate disk drive read/write activity.
Security Lock Slot (not shown)
Located on the lower side of the case, this slot allows you to
attach a security cable or device (optional) to the SimpleShare
NAS drive.
Back
Power Button
If SimpleShare is On, pressing the Power button turns the
drive Off. Pressing the Power button for 10 seconds restarts
the drive. If SimpleShare is Off, pressing the Power button
turns the drive On.
Reset Button
Pressing the Reset for 8 seconds restores the SimpleShare
NAS drive to factory default settings.
USB Port (2)
Use the USB ports to connect external USB disk drives or a
USB printer.
Network Port
Use to network port to connect the SimpleShare NAS drive to
the LAN. Includes integrated activity LEDs.
• Link LED (amber) indicates network connectivity.
• Activity LED (green) indicates network traffic.
DC-IN Jack
Use the DC-In jack to connect the 12V AC power adapter.
INSTALLING YOUR NETWORK DRIVE
This section contains information and instructions for connecting the SimpleShare NAS
drive to your local network. For information on SimpleShare installation requirements, see
“Installation Requirements” on page 3.
Handling Precautions
Handle your SimpleShare NAS drive with care! Failing to adhere to the following
precautions can result in damage to the drive and may void your warranty (see the
SimpleTech Product Warranty statement inside the rear cover of this guide for details).
The following precautions can prevent damage to the drive and loss of data:
• Do not bump, jar, drop or move the drive while it is in operation.
• Do not stack drives more than two high.
• Do not position the SimpleShare NAS drive vertically without using the vertical
stands (the drive may tip over and be damaged).
• Before disconnecting any device (USB drive or printer) connected to the
SimpleShare NAS drive, make sure to power off the device first.
• Do not set any liquids or drinks on the SimpleShare NAS drive. Liquids will
damage the drive’s internal electronics.
• Do not open SimpleShare’s case. The drive does not contain any user
serviceable parts. Opening the case voids your warranty.
6
Page 15
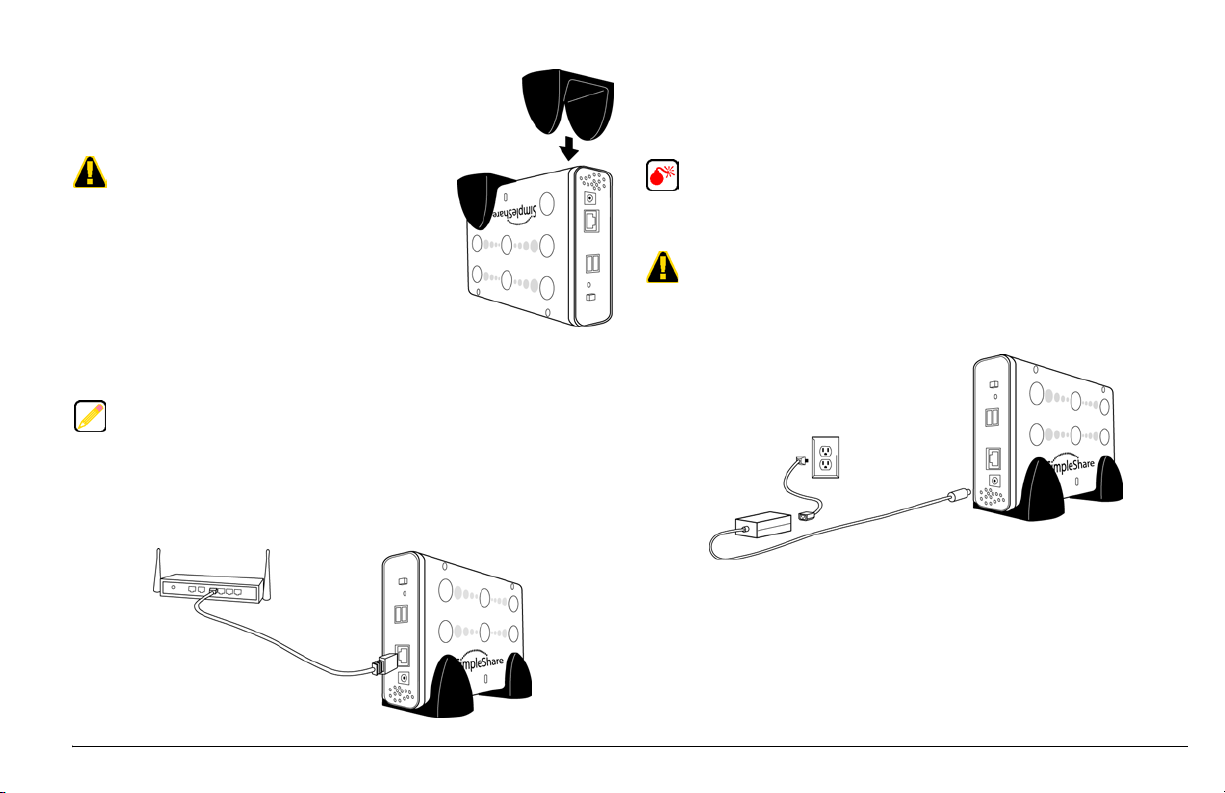
Installing the Vertical Stands
Depending on the amount of space available in your work
area, you can position your SimpleShare NAS drive
horizontally or vertically. When positioning the drive vertically,
make sure to use the vertical stands included in your kit.
Do not set the SimpleShare NAS drive vertically without
using the vertical stands. Otherwise, the drive may tip over
and be damaged.
1
Position the SimpleShare NAS drive upside down.
2
Align one of the stands with the “dimple” at the end of the
case, and then press the stand onto the case until it snaps
in place.
3
Repeat step 2 to install the second stand at the other end
of the case.
Connecting to the Network
Installing SimpleShare to a local network requires the following:
• 10/100-compliant network with DNS and DHCP servers
• An available Ethernet port on the network, switch or router
• TCP/IP enabled on each computer accessing the drive
• File and Print sharing enabled on each computer accessing the drive
1
Plug one end of the Ethernet cable (provided) into an available port on your network,
switch or router.
2
Connect the other end of the Ethernet cable to the network port on the SimpleShare
NAS drive.
3
Route the Ethernet cable so that it does not pose a hazard.
Connecting AC Power
The following suggestions will help you avoid personal injury and equipment damage:
• Always plug the power cables into grounded, three-hole outlets.
• Use a power filter/surge protector (not included) for AC power connections to your
equipment.
• In the event of a severe electrical storm, disconnect all power cables.
Only use the power adapter that came with your SimpleShare NAS drive. Using a different
power adapter may damage the drive and voids your warranty.
1
Connect the DC cable connector on the power adapter to the DC-IN jack on the
SimpleShare NAS drive.
2
Plug the three-pin socket on the power cable into the power adapter.
3
Plug the AC power plug on the opposite end of the power cable to a live 120/240V
electrical outlet, surge protector or UPS (uninterruptible power supply).
4
Route the power cable so that it does not pose a hazard.
Installing Your Network Drive Installing Your Network Drive | 7
Page 16

Using the Security Slot
The SimpleShare NAS drive has a security slot on the
lower side of the drive’s case. The security slot can be
used to attach an optional security cable to the drive
for securing it to a heavy object. The security slot is
compatible with most security cables and devices.
Powering SimpleShare On and Off
Turning SimpleShare On
The SimpleShare NAS drive powers on as
soon as AC power is applied. However, if the
drive has been turned off manually,
momentarily pressing the Power button will
turn the drive back on.
The amber Power light comes on immediately,
indicating the internal disk drive is receiving
power. As the system initializes, the green
HDD light flashes, indicating disk activity. After
initialization completes, the blue Ready light
comes on. SimpleShare takes about 1 minute to
complete its power on routine.
Turning SimpleShare Off
To avoid potentially damaging or corrupting your files, make sure you always turn
SimpleShare off properly. To turn the drive off, momentarily press, then release the
Power button. The blue Ready light goes off immediately. The green HDD light flashes
as files are closed, indicating disk read/write activity. When the amber Power light goes
off, the drive is off.
Power button
Restarting SimpleShare
Only in rare circumstances will it be necessary to restart your SimpleShare NAS drive.
Typically, configuration changes to SimpleShare are applied without requiring the drive to
be restarted.
Restarting SimpleShare Using the Power Button
If you lose your network connection to SimpleShare, but have direct access to the drive,
you can restart the drive using the Power button.
To restart the SimpleShare NAS drive,
press and hold the Power button for
10 seconds, then release the button.
Restarting SimpleShare Using SimpleShare Administrator
1
Open the Administration menu
and click Basic.
2
On the Administration-Bas ic page,
click Reboot.
The blue Ready light goes off
immediately and the green HDD light
flashes as files are closed and the
internal drive re-initializes. When
reboot completes, the Ready light
comes back on. The entire process
takes less than 2 minutes to complete.
Power button
8 | Installing Your Network Drive Installing Your Network Drive
Page 17

USING EXTERNAL USB DRIVES
The USB ports on the back of your SimpleShare NAS drive can be used to connect up to
two external USB drives, like SimpleTech’s SimpleDrive
MusicVault™. This section contains information and instructions on using external USB
drives to expand SimpleShare’s storage capacity.
Understanding External Drive Support
Depending on how the external USB drive is formatted, SimpleShare will recognize the
drive as one of the following disk types:
• Foreign Disk
• Blank Disk
®
, SimpleDrive® Deluxe and
Connecting a USB Drive
You can connect a USB drive to the SimpleShare NAS drive when it is on or off. If
SimpleShare is on, it automatically recognizes the USB drive and makes it available to
authorized network users. If SimpleShare is off, the USB drive will be recognized the next
time you turn on the drive.
1
Connect one end of a USB cable to the USB host port on the USB drive.
2
Connect the other end of the cable to one of the USB ports on SimpleShare.
3
Connect AC power to the USB drive according to the instructions provided by the
manufacturer.
4
Route the USB and power cables so that they do not pose a hazard.
5
If necessary, power on the USB drive.
About Foreign Disk Support
USB drives formatted with the FAT or NTFS file system are recognized by SimpleShare
as a “Foreign Disk.” Folders created on a foreign disk are considered “foreign shares.”
Foreign disks are visible, and their data accessible, the moment the USB drive is
connected to the SimpleShare NAS drive, with the following restrictions:
• Drives formatted with NTFS file system are read-only. To enable read/write
access, format the USB drive as a FAT32 volume before connecting it to
SimpleShare.
• Only share level access is supported on foreign shares (user based security,
domain member and domain controller security are not supported).
About Blank Disk Support
Unformatted USB drives and USB drives with formats not recognized by SimpleShare are
recognized as a “Blank Disk.” Before a blank disk can be used with SimpleShare, it must
be formatted as a FAT or NTFS volume (see, “About Foreign Disk Support”, above).
Installing Your Network Drive Using External USB Drives | 9
Safely Removing a USB Drive
1
Save all unsaved documents and close any programs running on the external USB
drive you want to disconnect.
Disconnecting an external USB drive from SimpleShare without performing a safe removal
can result in damaged or corrupted files.
2
If not already running, start SimpleShare Manager (for instructions, see “Accessing
SimpleShare Advanced Features (Advanced Setup)” on page 51.
3
On the SimpleShare Manager Welcome page, click on the Advanced Setup.
Page 18

4
Open the Disk Management menu and click Basic.
5
Scroll to the bottom of the Disk Management-Basic page, and then click on the
Safely Remove Disk button for the external USB drive you want to disconnect.
6
In the confirmation box, click OK.
7
Unplug the USB drive from SimpleShare’s USB port.
NETWORKING A USB PRINTER
Either USB port on the back of the drive can be used to connect a USB printer—allowing
you to share the printer with the other users on your local network. You may connect a
USB printer to SimpleShare when the drive is on or off. If SimpleShare is on, it
automatically recognizes the printer and immediately makes it available to authorized
users on the network. If SimpleShare if off, the printer will be recognized the next time you
turn on the drive.
SimpleShare supports the basic printing functions of most network capable USB printers.
For example, if you connect a multifunction printer with printer/fax/scanner and copy
functions, only the print function will be supported. SimpleShare automatically recognizes
the printer and immediately makes it available to authorized users on the network. The
connected printer is listed in the Printers and Faxes folder.
Connecting a USB Printer
1
Connect one end of a USB cable to the USB host port on the printer.
2
Connect the other end of the USB cable to one of the USB ports on SimpleShare.
Parallel printers are not supported. Do not use a USB conversion kit to connect a parallel
printer to SimpleShare.
3
Connect AC power and power on the printer according to the instructions provided
by the printer manufacturer.
4
Enable printer services on SimpleShare. For instructions see “Enabling Printer
Services” on page 69.
10 | Installing Your Network Drive Networking a USB Printer
Page 19

Setting Up a USB Printer on a Windows PC
To print to the USB printer connected to your SimpleShare NAS drive from a Windows
PC, you must install the printer driver on each computer that will access the printer.
1
Open the Start menu and select Control Panel.
2
In Control Panel, double-click on Printers and Faxes.
3
Under Printer Tasks, click Add a printer.
4
On the Add Printer Wizard welcome screen, click Next.
Add a printer
5
Under Select the option that describes the printer you want to use, select A network
printer, or a printer attached to another computer, and then click Next.
6
In the Specify a Printer window, under What printer do you want to connect to?, select
Connect to this printer, then complete one of these steps:
• If you know the printer name, in the Name field type
\\simpleshare_name\network_name
(where simpleshare_name is name
of your SimpleShare NAS drive and network_name is manufacturer’s name of the
printer). Click Next to continue.
Installing Your Network Drive Networking a USB Printer | 11
Page 20

• If you don’t know the printer name, leave the Name field empty and click Next to
browse to the printer. In the Browse for Printer window, navigate to your
SimpleShare NAS drive, and then double-click on your printer.
7
In the Default Printer window, choose whether or not to set the USB printer as your
default printer, and then click Next.
8
Click Finish to close the wizard.
Setting Up a USB Printer on a Macintosh Computer
1
Open the Apple menu and select System Preferences.
2
In the System Preferences window, click Print & Fax.
3
On the Print & Fax screen, click
Printing, and then click the Add
(+) button to open the Printer
Browser screen.
12 | Installing Your Network Drive Networking a USB Printer
Page 21

4
In the Printer Browser window,
click More Printers to browse to
the printer.
To print to the USB printer
connected to your SimpleShare
NAS drive from a Macintosh
computer, you must setup the
printer on each computer that will
access the printer.
5
Open the upper pull-down list and
select Windows Printing. Open
the lower pull-down list and select
Workgroup.
6
From the list of available devices
that appears, select your
SimpleShare NAS drive, and then
click Choose.
7
In the authentication dialog box, enter
your SimpleShare administration
username and password. If you have not
changed SimpleShare’s login information,
enter the default username “admin” and
password “simple.” Click OK to
continue.
8
The printer browser lists the
printer(s) currently connected to
your SimpleShare NAS drive.
Select the printer you want to
connect to from the list. Open the
Printer Model pull-down list and
select your printer make. From the
list that appears, select the your
printer model.
9
Click Add to connect to the printer.
Installing Your Network Drive Networking a USB Printer | 13
Page 22

14
Page 23

SETTING UP AND REGISTERING YOUR DRIVE
SETTING UP SIMPLESHARE FOR THE FIRST TIME
Setting Up SimpleShare Using a Windows PC
NASFinder is an easy-to-use utility that searches your network for connected
SimpleShare NAS drives. This section contains instructions for using NASFinder to locate
and setup your SimpleShare NAS drive for the first time. After locating your SimpleShare
drive, NASFinder opens SimpleShare Manager so you can run the Initial Setup Wizard.
This wizard will guide you through basic configuration tasks like naming your network
drive, changing its administration username and password, and assisting you with
mapping the shared network folders on SimpleShare to your computer.
Running NASFinder On a PC
To avoid possible software conflicts while running NASFinder, you must temporarily disable
all non-Windows firewalls and security software running on your computer. After NASFinder
setup completes, your may turn the software back on.
1
Insert the NASFinder Quick Setup CD into your computer’s CD-ROM drive. The
NASFinder program starts automatically.
If NASFinder does not start automatically, open the Start menu and select the Run
option. In the Run dialog box, type x:nasfinder.exe (where x is the drive
letter of the CD-ROM drive), and then click OK.
2
On the Welcome to NASFinder
page, click Run NASFinder to
start the discovery process.
Setting Up and Registering Your Drive Setting Up SimpleShare for the First Time | 15
Page 24

3
In the Security Warning dialog
box, click Install to allow setup to
run ActiveX controls required to
set SimpleShare’s IP address.
To complete the basic setup
routine, NASFinder must run active
content (ActiveX controls) on your
computer. ActiveX controls allow
the web-based setup wizard to
behave like a native executable
program and perform interactive
operations on your computer.
NASFinder displays the connection status, machine name, and IP address of each
SimpleShare NAS drive on your network.
4
If there are multiple SimpleShare servers installed on the network, choose the one
you want to setup. Click Next to continue.
5
In the login request box, in the User name field, enter the default administration
username “admin.” In the Password field, enter the default administrative
password “simple.” Click OK.
SimpleShare Manager Welcome page
6
Continue to “Running the Initial Setup Wizard On a PC” on page 17.
16 | Setting Up and Registering Your Drive Setting Up SimpleShare for the First Time
Page 25

Running the Initial Setup Wizard On a PC
1
On the Welcome page, click Initial Setup Wizard.
2
On the Server Name
Setup page, in the
Machine Name field,
enter a descriptive name
for your SimpleShare NAS
drive or accept the default
name “SimpleShare.”
Click Next to continue.
The name you assign SimpleShare is very important. This name uniquely identifies your
SimpleShare NAS drive on the network. Choose a name that is easy to remember. For
example, you can use your last name, a description of the type of data you plan to store on
the drive, or where the drive is located. If there is only one SimpleShare NAS drive on the
network, you may choose to keep the default name, “SimpleShare.”
3
On the Administration Security Setup page, in the Administration Username field,
you may change the administration username or choose to keep the current one. In
the Administration Password field, you may change the administration password
or choose to keep the current one. If you change the password, re-enter the new
password in the Confirm Password field. Click Next to continue.
Passwords can be up to eight characters long and may contain any combination of
alphabetical (a-z and A-Z), numerical (1-9) and special characters such as &, $, and >. Spaces
are not allowed.
.
There are several ways to create a network of computers. Most home and small office
environments use peer-to-peer networking, or workgroups. By default, the SimpleShare
NAS drive is added as a member of the workgroup domain named “Workgroup.” The
Windows Workgroup Setup page allows you to change this setting.
4
In the Workgroup Name
field, you may change the
workgroup in which
SimpleShare will be a
member or choose to accept
the current assignment. Click
Next to continue.
Setting Up and Registering Your Drive Setting Up SimpleShare for the First Time | 17
Page 26

5
If prompted, in the Information Bar dialog box, click OK. Then, right-click on the
yellow banner at the top of the screen and select Install ActiveX Control.
To setup your SimpleShare NAS drive, setup must run active content (ActiveX controls) on
your computer. ActiveX controls allow the web-based setup wizard to behave like a native
executable program and perform interactive operations on your computer.
When shipped, the SimpleShare NAS drive has one shared network folder, named
NetFolder which is immediately accessible through My Network Places. However, to
make it easier to access NetFolder, the setup wizard can assist you with mapping
NetFolder to a drive letter on your computer—making it possible to access the folder
through My Computer.
6
On the Assigning Drive Letters to
Network Folders page, you may
choose to map the folder to the drive
letter currently displayed in the Map
to Local Drive pull-down list or
choose a different letter. If you don’t
want NetFolder mapped to your
computer, select None from the pulldown list. Click Next to continue.
7
Click Done to exit the wizard and
return to SimpleShare Manager.
Your SimpleShare NAS drive is ready
for use. For information on setting
SimpleShare’s advanced configuration
options, see “Advanced Setup and
Management” on page 53.
18 | Setting Up and Registering Your Drive Setting Up SimpleShare for the First Time
Page 27

Setting Up SimpleShare Using a Macintosh Computer
NASFinder is an easy-to-use utility that searches your network for connected
SimpleShare NAS drives. This section contains instructions for using NASFinder to locate
and setup your SimpleShare NAS drive for the first time. After locating your SimpleShare
drive, NASFinder opens SimpleShare Manager so you can run the Initial Setup Wizard.
This wizard will guide you through basic configuration tasks like naming your network
drive, changing its administration username and password, and assisting you with
mapping the shared network folders on SimpleShare to your computer.
Running NASFinder On a Mac
To avoid possible software conflicts while running NASFinder, you must temporarily
disable all non-Windows firewalls and security software running on your computer. After
NASFinder setup completes, your may turn the software back on.
1
Insert the NASFinder Quick Setup CD into your computer’s CD-ROM drive.
2
Double-click on the NASFinder
CD-ROM desktop icon.
3
In the NASFinder folder that
appears, double-click on the
NASFinder.htm application icon.
4
On the Welcome to NASFinder
page, click Run NASFinder to
start the discovery process.
Setting Up and Registering Your Drive Setting Up SimpleShare for the First Time | 19
Page 28

5
In the Verify Certificate dialog box, click Yes.
To setup your SimpleShare NAS drive, setup must run active content (ActiveX controls) on
your computer. ActiveX controls allow the web-based setup wizard to behave like a native
executable program and perform interactive operations on your computer.
When discovery completes, NASFinder displays the connection status, machine name,
and IP address of each SimpleShare NAS drive on your network.
6
If there are multiple SimpleShare NAS drives installed on the network, choose the
one you want to setup and then click Next to continue.
7
In the login request box, in the User name field, enter SimpleShare’s default user
name “admin.” In the Password field, enter the default password “simple.” Click
OK to log onto your SimpleShare NAS drive and launch SimpleShare Manager.
SimpleShare Manager Welcome page
8
Continue to “Running the Initial Setup Wizard On a Mac” on page 21.
20 | Setting Up and Registering Your Drive Setting Up SimpleShare for the First Time
Page 29

Running the Initial Setup Wizard On a Mac
1
On the SimpleShare Manager Welcome page, click Initial Setup Wizard.
2
On the Server Name Setup page, in the Machine Name field, enter a descriptive
name for your SimpleShare NAS drive or accept the default name “SimpleShare.”
Click Next to continue.
3
On the Administration Security Setup page, in the Administration Username field,
you may change the administration user name or choose to keep the current one. In
the Administration Password field, you may change the administration password
or choose to keep the current one. If you change the password, re-enter the new
password in the Confirm Password field. Click Next to continue.
Passwords can be up to eight characters long and may contain any combination of
alphabetical (a-z and A-Z), numerical (1-9) and special characters such as &, $, and >. Spaces
are not allowed.
.
The name you assign SimpleShare is very important. This name uniquely identifies your
SimpleShare NAS drive on the network. Choose a name that is easy to remember. For
example, you can use your last name, a description of the type of data you plan to store on
the drive, or where the drive is located. If there is only one SimpleShare NAS drive on the
network, you may choose to keep the default name, “SimpleShare.”
Setting Up and Registering Your Drive Setting Up SimpleShare for the First Time | 21
Page 30

There are several ways to create a network of computers. Most home and small office
environments use peer-to-peer networking, or workgroups. By default, the SimpleShare
NAS drive is added as member of the workgroup domain named “Workgroup.” The
Windows Workgroup Setup page allows you to change this setting.
4
In the Workgroup Name field, you may change the workgroup in which SimpleShare
will be a member or choose to accept the current assignment. Click Next to continue.
When shipped, the SimpleShare NAS drive has one shared network folder, named
NetFolder. On Macintosh computers, users are required to connect to network resources,
such as NetFolder, each time the computer is started. To make it easier to access
NetFolder, setup can place a permanent shortcut to NetFolder on your desktop.
5
If prompted, in the Verify Certificate dialog box, click Yes to allow setup to run ActiveX
controls on your computer.
To create a desktop shortcut for NetFolder, the setup wizard must run active content (ActiveX
controls) on your computer. ActiveX controls allow the web-based setup wizard to behave
like a native executable program and perform interactive operations on your computer.
6
On the Creating Link to Network Folders page, select the folders for which you want
desktop shortcuts created. If you don’t want the folder(s) mapped to your computer,
leave all check boxes unchecked. Click Next to continue.
7
Click Done to exit the wizard
and return to SimpleShare
Manager.
Your SimpleShare NAS drive is
ready for use. For information on
setting SimpleShare’s advanced
configuration options, see
“Advanced Setup and
Management” on page 53.
22 | Setting Up and Registering Your Drive Setting Up SimpleShare for the First Time
Page 31

Registering Your SimpleShare NAS Drive
Your registration, and your opinions about SimpleShare are very important and help us
continue to serve our customers’ needs. We encourage you to register your SimpleShare
NAS drive. In addition to registering your network drive, completing the registration form
provides SimpleTech with the information we need to email your Retrospect Express
license code. If you plan to setup iShare remote access on SimpleShare, registering your
drive is the easiest way to register your domain name with SimpleTech.
To register your SimpleShare NAS drive, complete these steps:
During registration, you will be
asked to provide the serial number
of your SimpleShare NAS drive.
The serial number is located on the
back of the drive, above the Power
pushbutton.
Serial Number
3
Read the SimpleShare
End-User License
Agreement. Click Accept, if
you accept the terms of the
Agreement.
4
Complete the SimpleShare
Product Registration form, and
then click Submit.
1
If not already running, start NASFinder Quick Setup.
When the NASFinder Quick Setup CD is inserted into your computer’s CD-ROM
drive, the program starts automatically. If it does not, open the Start menu and select
Run. In the dialog box, type x:nasfinder.exe (where x is the drive letter of
the CD-ROM drive).
2
On the Welcome to NASFinder
After processing your information, if
requested, SimpleTech will send your
Retrospect product license code and
iShare registration key to the email
address you specified in the
registration form.
page, click Register Your
SimpleShare.
Setting Up and Registering Your Drive Setting Up SimpleShare for the First Time | 23
Page 32

SETTING UP iSHARE FOR THE FIRST TIME
Before You Begin
Make sure the following tasks are completed before launching the iShare Remote Access
Wizard:
• Your network is fully functional
– Make sure you have a 10/100 TCP/IP-compliant network with DHCP
(Dynamic Host Control Protocol) and DNS (Domain Name System) servers
– Make sure you have a wired or wireless router with an available 10/100
Ethernet port
• You are connected to the Internet. Launch your web browser to confirm that you
have access to the Internet. If access is denied, contact your Internet Service
Provider (ISP) for assistance.
• You have completed the SimpleShare basic setup
• You have configured your router to support port forwarding to your SimpleShare
NAS drive. For instructions on setting up port forwarding on your router, refer to
the manufacturer’s documentation.
SimpleTech also recommends that you register your SimpleShare NAS drive before
setting up iShare. The registration form contains a section for requesting the iShare
registration key. This key is required to setup remote access on your drive. For information
on registering your SimpleShare NAS drive, see “Registering Your SimpleShare NAS
Drive” on page 23.
Running the Setup Wizard
1
Launch SimpleShare Manager (for instructions see “Launching SimpleShare
Manager on a Windows PC” or “Launching SimpleShare Manager on a Macintosh
Computer” on page 34).
2
Run the iShare Remote Access Setup Wizard (for instructions, see “Running the
iShare Remote Access Setup Wizard” on page 39).
The iShare Remote Access Wizard guides you through the following tasks:
• Preparing for iShare Setup on page 39
• Assigning a Static IP Address on page 41
• Registering the Domain Name on page 42
• Setting Up the HTTP Communications Port on page 42
24 | Setting Up and Registering Your Drive Setting Up iShare for the First Time
Page 33

ACCESSING SHARED NETWORK FOLDERS
ACCESSING SIMPLESHARE LOCALLY
The network folders on your SimpleShare NAS drive can be accessed by authorized local
network and remote (Internet) users whether they are using a Windows or Macintosh
computer.
Any number of users can simultaneously open the same file on SimpleShare. The drive doe s
not provide write protection for documents that are already opened by other users. If multiple
users are editing a document, each subsequent save operation over-writes previous edits to
the document and users can potentially lose their saved work.
Some programs, like Microsoft Excel®, control user access to files. Such programs allow
only one person at a time to use a file. If another user tries to open a file already in use, an
alert message may appear or the user may only be granted limited read-only access. Unless
the program you are running provides similar write protection for files used in a multi-user
environment, consider placing these files in a password protected network folder to limit
access.
Accessing Folders Locally From a Windows PC
This section contains instructions for accessing the folders on your SimpleShare NAS
drive through My Computer, My Network Place and Internet Explorer.
1
Open the Start menu and click My
Computer.
2
Under Network Drives, click on the
drive icon of the network folder you
want to access.
You can assign a mapped folder to a
different drive letter by
disconnecting from the folder and
then reassigning it to a different
drive letter. For more information on
using My Computer to map network
drives, refer to your Windows
documentation or Help.
Accessing Folders Using My Computer
If the folder you want to access is mapped to a drive letter on your computer, you can
access the folder through My Computer, just as you would any drive or network resource
that is mapped to your computer.
3
If a password request box appears, in the
User name field, enter the name of the folder
you want to access. In the Password field,
enter the share password required to access
the folder. Click OK.
Accessing Shared Network Folders Accessing SimpleShare Locally | 25
Page 34

Accessing Folders Using My Network Places
My Network Places provides a view of all the shared computers, files and folders, printers,
and other resources on the network to which your computer is connected. If the network
folder you want to access is not mapped to your computer, you can access the folder
through My Network Places.
My Network Places presents a view of the network similar to the view of your computer
presented by Windows Explorer. Use My Network Places when you want to see all the
resources available on the network, when you know where the resource you want is located,
or when you want to copy files and folders from one network location to another.
Accessing Folders Using Internet Explorer
If the network folder you want to access is not mapped to your computer, you can access
the folder as a guest user through Internet Explorer.
1
Open the Start menu and select Run.
2
In the Run box, in the Open field, type
\\simpleshare_name
(where
simpleshare_name is name of your
SimpleShare NAS drive), and then click OK.
1
Open the Start menu and click My Network Places.
2
Under Local Network,
double-click on the
network folder you want
Always use the backslash (\) character when
specifying the location of a folder on the
SimpleShare NAS drive. Using forward slash (/)
character directs the browser to open
SimpleShare Manager.
to access.
3
In the login request box, in the Password field,
enter the administrative password for
SimpleShare. If you have not changed the
password, enter the default password
“simple.” Click OK.
3
If a password request box appears, in the
User name field, enter the name of the folder
you want to access. In the Password field,
enter the share password required to access
the folder. Click OK.
To make it easier to access the folder in the future,
consider mapping the folder to a drive letter on
your computer. For instructions on assigning a
drive letter to a network folder, refer to your
Windows documentation or Help.
26 | Accessing Shared Network Folders Accessing SimpleShare Locally
Page 35

4
In the Explorer window that
appears, double-click on the
network folder you want to
access.
5
If a password request box appears, in the User
name field, enter the name of the folder you
want to access. In the Password field, enter
the share password required to access the
folder. Click OK.
To make it easier to access the folder in the future,
consider mapping the folder to a drive letter on
your computer. For instructions on assigning a
drive letter to a network folder, refer to your
Windows documentation or Help.
Accessing Folders Locally From a Macintosh Computer
Using the Finder, you can connect to the network folders on your SimpleShare NAS drive
over TCP/IP, whether you are on a small home network or a large corporate network.
Accessing Folders from the Desktop
If during setup, NASFinder installed a shortcut to the network folder, double-click on the
icon to open the folder on the desktop.
2086r1-211
Accessing Shared Network Folders Accessing SimpleShare Locally | 27
Page 36

Accessing Folders Using Connect to Server
1
Open the Go menu and click Connect to Server.
2
In the Connect to Server window, complete one of these steps:
• In the Server Address field, type
smb://simpleshare_name
(where simpleshare_name is
name of your SimpleShare NAS
drive).
• Click Browse to locate the SimpleShare NAS drive.
4
In the dialog box that appears,
open the pull-down list and select
the network folder you want to
access. Click OK.
5
If the folder you want to access is
password protected, in the
Password field, in the SMB/CIFS
File System Authentication box,
enter the folder’s share password.
Otherwise, click OK to connect to
the folder.
The connected folder opens on
the desktop.
3
Click Connect.
28 | Accessing Shared Network Folders Accessing SimpleShare Locally
Page 37

Organizing Your Files Using ShareSorter
ShareSorter is the SimpleShare feature that automatically organizes files saved to your
network drive, based on the file type (file name extension). ShareSorter creates a special
function folder at the root of SimpleShare’s internal drive named Organizer along with
several subfolders. Whenever a file is saved to the Organizer special function folder,
ShareSorter automatically places the file in the appropriate subfolder.
ShareSorter recognizes more than 100 common file types. The following table lists the
subfolders with the Organizer special function folder, along with the file types supported
by each subfolder. Uncommon file types that are not recognized by ShareSorter are
placed in the Misc subfolder.
Organizer Subfolder File Type/Extension
DOCUMENTS .doc, .txt, .rtf, .dot, .htm, .html, .xml, .mhtml, .mht, .pdf, .ppt,
.pot, .pps, .pothtml, .ppthtml, .chm , .xlw, .xls, .xlt, .wk?, .wq1,
.prn, .csv, .dothtml, .edn, .frm, .wpd, .wpg, .wpt, .htw, .obt,
.obd, .pwd, .pwt, .ppv, .psw, .pxl, .pxt, .pqw, .wb1, .wb2,
.wb3, .utx, .vcf, .wbk, .wri, .vsd, .vdx, .vss, .vst, .vsw, .vsw,
.vsx, .vtx
MOVIES .mpg, .3gp, .3gpp, .3gpp2, .d vr-ms, .mpeg, .mp2, .wmv, .avi,
.asf, .asx, .m1v, .m2v, .mp2v, .mpa, .mpv2, .vob
MUSIC .mp3, .aac, .m4p, .m4a, .ogg, .midi, .mid, .rmi, .wav, .au,
.snd, .aif, .aifc, .aiff, .ac3, .wma
PICTURES .jpg, .jpeg, .jpe, .gif, .bmp, .rle, .dib, .tiff, .tif, .pcx,.pcd, .pct,
.pict, .png, .raw, .tga, .wbmp, .wbm, .jfif, .wmf, .pst
MISC Uncommon file types and file types not recognized by
ShareSorter
The Organizer folder can only be accessed by users on your local network. For
instructions on creating the Organizer folder, see “Creating the Organizer Special
Function Folder” on page 63.
Saving Files to the Organizer Folder
The following example illustrates how ShareSorter works. The example assumes you
have Microsoft Word, MPEG video, JPEG image, MP3 music and AutoCAD graphics files
that you want to save to the SimpleShare NAS drive.
1
Select the files you want to save to SimpleShare.
ShareSorter uses the file extension to organize your files. To use ShareSorter, you must
select each individual file, not the folder in which the file(s) resides.
2
Complete one of these steps:
• Windows users: Select the files you want to save to your SimpleShare NAS drive.
Drag and drop (or save) the files onto the Organizer drive icon.
Make sure you have access to the Organizer folder through My Computer, My
Network Places or your Web browser. For instructions on accessing the Organizer
folder, see “Accessing Folders Locally From a Windows PC” on page 25.
• Macintosh users: Select the files you want to save to your SimpleShare NAS
drive. Drag and drop (or save) the files onto the Organizer desktop icon.
Make sure the Organizer folder is available on your desktop. For instructions on
connecting to the Organizer folder, see “Accessing Folders Locally From a Macintosh
Computer” on page 27.
The files are automatically sorted into the appropriate subfolders:
– The Microsoft Word file is saved to Documents
– The MPEG video file is saved to Movies
– The JPEG image file is saved to Pictures
– The MP3 music file is saved to Music
– The AutoCAD graphics file is saved to Misc
Accessing Shared Network Folders Accessing SimpleShare Locally | 29
Page 38

ACCESSING SIMPLESHARE REMOTELY
iShare makes it possible for remote users to use their Web browser to access the folders
on the SimpleShare NAS drive over the Internet. By default, iShare setup creates two
network folders specifically configured for remote access—My Home and My Share. The
My Home folder, which is the designed to store your personal iShareGallery Web site,
supports read-only access rights, whereas the My Share folder, which can be used to
store and share files of any type, supports read and write remote access rights. These
rights are permanently set and cannot be changed. In addition, neither network folder can
be deleted by remote users.
This section contains instructions for viewing the iShareGallery Web site and for retrieving
and saving files remotely through the Contents of Directory page.
Except as otherwise noted, the procedures for remotely accessing the SimpleShare NAS
drive are the same on both Windows and Macintosh computers. The procedures in this
section show Windows XP screens and prompts. However, non-Windows XP and Macintosh
users will see similar screens and prompts.
Viewing the iShareGallery Web Site
To access the iShareGallery photo
gallery Web site on SimpleShare, in the
Address bar of your Web browser type
name.simpleshare.com
name.simpleshare.com is the domain
name of your SimpleShare NAS drive),
and then press Enter.
(where
30 | Accessing Shared Network Folders Accessing SimpleShare Remotely
Page 39

Viewing the Contents of Directory Page
The Contents of Directory page displays the network folders on SimpleShare that are
configured for remote access. To view the Contents of Directory Page, in the Address bar
of your Web browser type
name.simpleshare.com is the domain name of your SimpleShare NAS drive and shares
specifies the root directory on the drive), and then press Enter.
To access a folder over the Internet, the folder must be configured for remote access (see
“Setting Remote Access Rights” on page 61).
Any number of users can simultaneously open the same file on the SimpleShare NAS drive.
SimpleShare does not provide write protection for documents that are already opened by
other users. If multiple users are editing the same document, each subsequent save
operation over-writes previous edits to the document and users can potentially lose their
saved work.
Some programs, like Microsoft Excel®, control user access to files. Such programs allow
only one person at a time to use a file. If another user tries to open a file already in use, an
alert message may appear or the user may be only granted limited read-only access. Unless,
the program you are running provides similar write protection for files used in a multi-user
environment, consider placing these files in a password protected network folder to limit
access.
name.simpleshare.com/shares
(where
Retrieving (Downloading) Files Over the Internet
1
Using your browser, go to the Contents of Directory page on your SimpleShare NAS
drive (see “Viewing the Contents of Directory Page” for instructions).
2
Click on the network folder containing the file you want to retrieve.
3
If a password request box appears, in the
User name field, enter the name of the folder
you want to access. In the Password field,
enter the share password required to access
the folder. Click OK.
The Contents of Directory page displays the
hierarchical structure of folders and files in the
selected network folder. You will also notice
that the page title now includes the name of
the network folder you are currently
accessing.
4
Click on the file you want to open.
Depending on the software installed on your computer and how the browser is configured,
retrieving a file either opens the file or opens a File Download dialog box, prompting the
user to download the file. For example, clicking on a music or video file launches the
computer’s default media player and plays the selected song or video, whereas selecting
an unrecognized file type opens the File Download dialog box.
Accessing Shared Network Folders Accessing SimpleShare Remotely | 31
Page 40

Saving Files to SimpleShare Over the Internet
Saving Files Back to SimpleShare
To save a file that was downloaded from the SimpleShare NAS drive, but not saved to
your computer, save the file as you would any other document. Your computer will
remember, and automatically save the file to the SimpleShare NAS drive. To save the file
to a different location, choose the application’s Save as option.
Uploading Files to SimpleShare
If the file you want to save to the SimpleShare NAS drive is located on your computer’s
internal drive, a drive directly connected to your computer or a drive on the LAN to which
you have access, complete these steps:
1
On the Contents of Directory/shares page, click on the network folder where the
file is to be uploaded (saved).
2
If necessary, scroll to the
bottom of the page to view
file upload controls.
3
In the File to Upload into
this Directory field, enter
the location of the file you
want to upload to the
SimpleShare NAS drive or
click the Browse button to
locate the file.
To create a new subfolder within selected network folder, in the Name of directory
to create field, enter the name of the network folder you want to create, and then click
Create Directory.
4
Click Upload File to save the file to SimpleShare,
5
On the Upload Results page, click Continue.
32 | Accessing Shared Network Folders Accessing SimpleShare Remotely
Page 41

USING SIMPLESHARE MANAGER
ABOUT SIMPLESHARE MANAGER
SimpleShare Manager is the central dashboard for launching the wizards and utilities you
will use to manage your SimpleShare NAS drive.
SimpleShare Manager Welcome page
For instructions on launching SimpleShare Manager, see “Launching SimpleShare
Manager on a Windows PC” or “Launching SimpleShare Manager on a Macintosh
Computer” on page 34.
The following management wizards and utilities are included in SimpleShare Manager.
Utility Description
INITIAL SETUP
WIZARD
iSHARE REMOTE
ACCESS SETUP
WIZARD
NETWORK STATUS Network Status is a great tool for checking the current network
CREATE SHARE
WIZARD
SHARE SECURITY
MANAGEMENT
ADVANCED SETUP SimpleShare Administrator is a platform-independent, web-based
The Initial Setup Wizard is a handy tool for setting up your
SimpleShare NAS drive when you have multiple computers on the
LAN accessing the drive. This setup wizard allows you to manage
SimpleShare’s network name, administration username and
password, workgroup and membership. It also allows you to map
each shared folder on your SimpleShare NAS drive to a unique
drive letter on each computer.
The iShare setup wizard steps you through setting up SimpleShare
to allow remote users to access the drive from the Internet.
configuration of your SimpleShare NAS drive.
The Create Share Wizard is an easy-to-use utility that allows you to
create shared folders on your SimpleShare NAS drive without
having to run SimpleShare Administrator.
The Share Security Management Wizard allows you to set
password protection and share level remote access rights on
existing shared network folders. From this wizard, you may also
change SimpleShare’s system (global) remote access rights.
utility for configuring and managing your SimpleShare drive.
SimpleShare Administrator provides user access to SimpleShare’s
advanced setup options through the browser on your computer,
allowing you to manage the SimpleShare server, its shared folders,
disk drives and network configuration.
Using SimpleShare Manager About SimpleShare Manager | 33
Page 42

Launching SimpleShare Manager on a Windows PC
1
In the Address bar of your browser, enter
SimpleShare NAS drive (for example, “simpleshare”) or the IP address (for example,
“192.168.1.18”) of the drive, and then press Enter.
If the password request box does not appear, make sure SimpleShare is in Ready mode (blue
LED indicator is on) and the drive is properly connected to the network. Then, log onto
SimpleShare again.
2
In the login request box, in the User name field,
enter your administration username. In the
Password field, enter the administration
password.
If you have not changed SimpleShare’s default
login information, enter the default administration
admin
” and password “
3
username “
Click OK.
The SimpleShare Manager
Welcome page appears on
screen.
http://
simple
followed by the name of your
.”
Launching SimpleShare Manager on a Macintosh Computer
1
In Finder, open the Go menu and click Connect to Server.
2
In the Connect to Server window, complete either of these steps:
• In the Server Address field,
smb://
type
simpleshare_name
simpleshare_name is the
network name of your
SimpleShare NAS drive).
• Click Browse. In the window that appears, click Network, Workgroup, and then
select your SimpleShare NAS drive from the listed network resources.
(where
3
Click Connect to connect the drive.
34 | Using SimpleShare Manager About SimpleShare Manager
Page 43

4
In the dialog box that appears, open the
pull-down list and select the config
network folder. Click OK.
5
In the SMB/CIFS File System
Authentication box, leave the
Name and Password fields blank.
Click OK to connect to the folder.
The Config folder icon appears
and the folder opens on the
desktop. If the folder does not
open, double-click on its desktop
icon.
6
In the Config folder, double-click on the Configuration.html file.
7
In the login request box, in the User name field, enter your administration username.
In the Password field, enter the administration password.
If you have not changed SimpleShare’s default login information, enter the default
administration username “
8
Click Log In.
admin
” and password “
simple
.”
The SimpleShare Manager
Welcome page appears on
screen.
Using SimpleShare Manager About SimpleShare Manager | 35
Page 44

USING SIMPLESHARE MANAGER UTILITIES
This section contains instructions for using the wizards and utilities available in
SimpleShare Manager. Except as noted, SimpleShare Manager wizards and utilities run
the same on Windows PC and Macintosh computers.
Running the Initial Setup Wizard
The Initial Setup Wizard guides you through SimpleShare’s basic setup process. The
wizard assists you with basic setup tasks like naming your SimpleShare NAS drive,
changing its administration username and password and setting the drive’s workgroup
configuration. If you are running SimpleShare Manager on Windows, the wizard will also
assist you in mapping the shared network folders on SimpleShare to drive letters on your
computer.
To avoid possible software conflicts when running the Initial Setup Wizard, you must
temporarily disable any non-Windows firewalls and security software running on your
computer. After setup completes, your may turn the software back on.
1
On the SimpleShare Manager Welcome page, click Initial Setup Wizard.
2
On the Server Name
Setup page, in the
Machine Name field, you
may choose to keep the
current name or enter a
new name for your
SimpleShare NAS drive.
Click Next to continue.
The name you assign SimpleShare is a very important. This name uniquely identifies your
SimpleShare NAS drive on the network. Choose a name that is easy to remember. For
example, you can use your last name, a description of the type of data you plan to store on
the drive, or where the drive is located. If there is only one SimpleShare NAS drive on the
network, you may choose to keep its default name, “SimpleShare.”
3
On the Administration Security Setup page, in the Administration Username field,
you may choose to keep the current username or change the name.” In the
Administration Password field, you may choose to keep the current password or
change the password. If you change the password, re-enter the new password in the
Confirm Password field. Click Next to continue.
Passwords can be up to eight characters long and may contain any combination of
alphabetical (a-z and A-Z), numerical (1-9) and special char acters such as &, $, and >. Spaces
are not allowed.
36 | Using SimpleShare Manager Using SimpleShare Manager Utilities
Page 45

There are several ways to connect computers when creating a network. Most home and
small office environments use peer-to-peer networking, or workgroups. By default,
SimpleShare will be added as a member of the workgroup domain named “Workgroup.”
The Windows Workgroup Setup page allows you to change this setting.
4
On the Windows Workgroup
Setup page, in the
Workgroup Name field, you
may change SimpleShare’s
workgroup configuration or
choose to keep the current
configuration. Click Next to
continue.
On Windows computers, network resources, like NetFolder, are immediately accessible
through My Network Places. On Macintosh computers, users must connect to network
resources each time the computer is started. To make it easy to access your network
folders, the setup wizard can assist you with mapping network folders to drive letters on
your computer—making it possible to access the folder through My Computer (Windows
users)—or placing a desktop shortcuts to your network folders (Macintosh users).
5
Complete one of the following:
• If you are running setup on a Windows PC, complete the steps in “Mapping
NetFolder to a Windows PC”, below.
• If you are running setup on a Macintosh computer, complete the steps in under
“Placing a Desktop Shortcut to NetFolder on a Macintosh Computer” on page 38.
APPING NETFOLDER TO A WINDOWS PC
M
To map network folders, setup must run active content (ActiveX controls) on your computer.
ActiveX controls allow the web-based setup wizard to behave like a native executable
program and perform interactive operations on your computer.
1
If prompted, in the Information
Bar dialog box, click OK to allow
setup to run ActiveX controls on
your computer. Then, right-click
on the yellow banner at the top of
the screen and select Install
ActiveX Control
Using SimpleShare Manager Using SimpleShare Manager Utilities | 37
Page 46

2
On the Assigning Drive Letters to
Network Folders page, you may
choose to map the folder to the drive
letter currently displayed in the Map
to Local Drive pull-down list or
choose a different letter. If you don’t
want NetFolder mapped to your
computer, select None from the
pull-down list.
3
Click Next to continue.
4
On the Setup Complete page,
click Done to exit the wizard.
You have completed running the Initial
Setup Wizard and your SimpleShare
NAS drive is ready for use.
For information on setting
SimpleShare’s advanced configuration
options, see “Advanced Setup and
Management” on page 53.
LACING A DESKTOP SHORTCUT TO NETFOLDER ON A MACINTOSH COMPUTER
P
To create desktop shortcuts for network foldesr, setup must run active content (ActiveX
controls) on your computer. ActiveX controls allow the web-based setup wizard to behave
like a native executable program and perform interactive operations on your computer.
1
If prompted, in the Verify Certificate dialog box, click Yes to allow setup to run ActiveX
controls on your computer.
2
On the Creating Link to Network Folders page, select the folders for which you want
desktop shortcuts created. If you don’t want the folder(s) mapped to your computer,
leave all check boxes unchecked. Click Next to continue.
38 | Using SimpleShare Manager Using SimpleShare Manager Utilities
Page 47

3
On the Setup Complete page,
click Done to exit the wizard.
You have completed running the Initial Setup Wizard and your SimpleShare NAS drive is
ready for use. For information on setting SimpleShare’s advanced configuration options,
see “Advanced Setup and Management” on page 53.
Running the iShare Remote Access Setup Wizard
The iShare Remote Access Wizard guides you through the following tasks:
Preparing for iShare Setup (this page)
Assigning a Static IP Address on page 41
Registering the Domain Name on page 42
Setting Up the HTTP Communications Port on page 42
Except as noted, setting up iShare is the same on both Windows and Macintosh
computers. The procedures in this section show Windows XP screens and prompts.
However, non-Windows XP and Macintosh users will see similar screens and prompts.
REPARING FOR ISHARE SETUP
P
1
If not already running, launch SimpleShare Manager. For instructions, see
“Launching SimpleShare Manager on a Windows PC” or “Launching SimpleShare
Manager on a Macintosh Computer” on page 34.
2
On SimpleShare Manager’s Welcome page, click iShare Remote Access Setup
Wizard.
3
On the Welcome to the iShare Remote Access Setup Wizard page, click Next to
begin the setup process.
Using SimpleShare Manager Using SimpleShare Manager Utilities | 39
Page 48

4
The Status of iShare Remote Access page displays iShare’s current operating state
(OFF). Click Next to continue.
5
The Status of Internet Connection page checks to see if you are currently connected
to the Internet. If you are currently connected to the Internet, click Next.
If you are not connected to the Internet, log onto the Internet before proceeding. Otherwise,
the wizard will abort the setup process and return to the SimpleShare Manager Welcome
page.
6
When prompted, select Yes, I
want to set up my iShare
remote access for the first
time, and then click Next.
A dialog box appears describing SimpleShare’s current LAN IP protocol configuration.
The LAN IP address is the IP address assigned to SimpleShare by your router. By default,
SimpleShare’s LAN protocol is set to DHCP Client.
If you don’t plan to disconnect your SimpleShare NAS drive from the network or your router
is capable of remembering and reassigning SimpleShare the same IP address after being
disconnected, you may leave the LAN IP Protocol set to DHCP Client. If it is possible for
SimpleShare to be assigned a new IP address after being disconnected, you should allow
setup to change the LAN IP Protocol setting to Static.
7
After reading the message in the dialog box, complete one of these steps:
• To change SimpleShare’s LAN IP protocol setting to Static, click OK and continue
to “Assigning a Static IP Address” on page 41.
• To keep SimpleShare’s current LAN IP protocol configuration (DHCP Client),
click Cancel and skip to “Registering the Domain Name” on page 42.
40 | Using SimpleShare Manager Using SimpleShare Manager Utilities
 Loading...