


SIMPLESHARE
USER’S GUIDE

Copyright
©2005 by SimpleTech™, Inc. All rights reserved.
This guide is copyrighted by SimpleTech™ with all rights reserved. Information contained in this document, including but not limited to any instructions, descriptions and product specifications, is company private to SimpleTech and shall not be modified, used, copied, reproduced or disclosed in whole or in part, in any form or by any means, electronic or mechanical, for any purpose, without the written consent of SimpleTech.
Export Administration Regulation
This document may contain technical data controlled by the U.S. Export Administration Regulations, and may be subject to the approval of the U.S. Department of Commerce prior to export. Any export, directly or indirectly, in contravention of the U.S. Export Administration Regulation is prohibited.
Trademark Information
SimpleTech, DirectPath and SimpleTech are trademarks of SimpleTech, Inc. No right, license, or interest to such trademarks is granted hereunder, and you agree that no such right, license, or interest shall be asserted by you with respect to such trademark.
Other product and corporate names mentioned in this document are used for identification purposes only and may be trademarks or registered trademarks of their respective companies.
ii

Disclaimer of Liability
Information contained in this document, including but not limited to any instructions, descriptions and product specifications, is subject to change without prior notice.
SIMPLETECH, INC. PROVIDES NO WARRANTY WITH REGARD TO THIS GUIDE OR ANY OTHER INFORMATION CONTAINED HEREIN AND HEREBY EXPRESSLY DISCLAIM ANY IMPLIED WARRANTIES OF MERCHANTABILITY OR FITNESS FOR ANY PARTICULAR PURPOSE WITH REGARD TO ANY OF THE FOREGOING. SIMPLETECH ASSUMES NO LIABILITY FOR ANY DAMAGES INCURRED DIRECTLY OF INDIRECTLY FROM ANY TECHNICAL OR TYPOGRAPHICAL ERRORS OR OMMISSIONS CONTAINED HEREIN. IN NO EVENT SHALL SIMPLETECH BE LIABLE FOR ANY INCIDENTAL, CONSEQUENTIAL, SPECIAL, OR EXEMPLARY DAMAGES, WHETHER BASED ON TORT, CONTRACT OR OTHERWISE, ARISING OUT OF OR IN CONNECTION WITH THIS GUIDE OR ANY OTHER INFORMATION CONTAINED HEREIN OR THE USE THEREOF.
Contents herein are current as of the date of publication. No patent liability is assumed with respect to the use of the information contained herein.
This disclaimer of liability applies to all products, publications and services during and after the warranty period. Some states do not allow the excluding of incidental or consequential damages so the above limitation or exclusion may not apply to you.
iii

GETTING STARTED
Congratulations on purchasing your new high performance SimpleShare Office Storage Server.
SimpleShare makes it possible for you to easily add high performance storage to your home or small business network. SimpleShare is ideal for sharing data files, digital photos, and music with other users on your local network. In addition, with SimpleShare, everyone on the network has instant access to extra storage.
UNPACK AND INSPECT YOUR SHIPMENT
Upon receipt of the equipment:
•Unpack and inspect the contents for signs of damage. If the equipment has been damaged in transit, immediately report the extent of damage to the transportation company and to SimpleTech. Order replacement equipment, if necessary.
•Check the packing list to ensure complete and accurate shipment of each listed item. If the shipment is short or irregular, contact SimpleTech, as described in “Product Support” on page 104. If you must store the equipment for a prolonged period, store it in its original packaging.
Getting Started
iv

WHAT’S INCLUDED WITH SIMPLESHARE
The following items are included in the SimpleShare package. If any items are missing or damaged, please contact your SimpleShare reseller or retailer for replacements.
•SimpleShare Office Storage Server
•12 Volt DC Power Adapter
•Vertical Stands (2)
•CAT5e Ethernet Cable
•NASFinder Quick Setup CD
•SimpleShare Quick Installation Guide (printed)
•SimpleShare User's Guide (on NASFinder Quick Setup CD)
•NASFinder User's Guide (on NASFinder Quick Setup CD)
•Warranty Card
Getting Started
v

FEATURES AND BENEFITS
•Easy setup—no device drivers or configuration required (no network experience required)
•Web-based interface for setting up advanced features from networked computers
•Automatically adjusts to 10Mbps or 100Mbps Ethernet speeds
•Supports file sharing between Windows, Mac and Unix/Linux computers
•Built-in print server allows addition of a network printer
•Windows Domain and Workgroup configuration options
•Supports access to shared folders by group or individual users
•Expandable storage
•Acts as a stand alone DHCP server for your network
•RTC to keep the time during power off. Auto-sync with the Internet time server during bootup
•SMART for monitoring disk drive health
REGISTERING SIMPLESHARE
To register your SimpleShare, just complete and mail the registration card or go online and register your SimpleShare at http://www.simpletech.com/webspeed/registration.
Getting Started
vi

SIMPLESHARE INSTALLATION CD
The SimpleShare Installation CD contains the NASFinder configuration utility and user documentation for your SimpleShare Office Storage Server. The CD is configured to automatically run NasFinder when it is inserted into your CD-ROM drve. However, you can directly access the directories and files on the installation CD.
•SimpleShare Administrator - Provides a platform-independent, HTML-based tool for configuring and managing your SimpleShare Office Storage Server accelerator.
•Documentation - Contains the Readme and PDF files. See “SimpleShare Documentation” for details.
SIMPLESHARE DOCUMENTATION
•SimpleShare Quick Installation Guide - The guide provides general instructions on installing and setting up your SimpleShare Office Storage Server.
•SimpleShare User’s Guide - Describes your SimpleShare Office Storage Server, along with instructions on how to use SimpleShare Administrator to configure and manage the server. This guide also contains product support and warranty information, and product specifications.
•SimpleShare Online Help - Provides detailed online instructions on configuring and managing SimpleShare.
•NASFinder Online Help - Provides instructions and tips on using NASFinder to locate a SimpleShare server on your network and performing basic setup tasks.
Getting Started
vii
ABOUT THIS GUIDE
This user guide provides instructions for setting up and operating the SimpleTech DirectPath SimpleShare Office Storage ServerH Streaming Media Kit in the HP ProLiant DL380 G3 server. This guide also provides information on evaluating SimpleShare Office Storage Server performance.
Using This Guide
The following conventions are used in this manual:
•Currier type indicates screen text.
• Buttons and keys you press are indicated by small icons—such as Create Share or Enter .
•Items you select are in bold.
Getting Started
viii
Safety Icons
This guide contains the safety instructions that must be observed in order to avoid personal injury or damage to your equipment. The safety instructions have been classified according to the seriousness of the risk. All safety instructions must be read carefully and fully understood before installing the SimpleShare Office Storage Server or performing maintenance on your computer equipment. The following icons highlight these instructions as follows:
WARNING: This icon indicates the existence of a hazard that could result in serious bodily injury or death if the safety instruction is not observed.
CAUTION: This icon indicates the existence of a hazard that could result in equipment or property damage or equipment failure if the safety instruction is not observed.
NOTE: This icon identifies information that relates to the safe operation of the equipment of related items.
ESD: This icon indicates that a device or assembly is susceptible to damage from electrostatic discharge.
TIP: This icon identifies helpful hints and tips.
Getting Started
ix

EMISSION AND IMMUNITY CHARACTERISTICS
FCC Declaration of Conformity
This equipment has been tested and found to comply with the limits for a Class A digital device, pursuant to Part 15 of the FCC Rules. These limits are designed to provide reasonable protection against harmful interference when the equipment is operated in a commercial environment. This equipment generates, uses and can radiate radio frequency energy and, if not installed and used in accordance with the users manual, may cause harmful interference to radio communications. Operation of this equipment in a residential area is likely to cause harmful interference in which case the user will be required to correct the interference at his own expense.
EU Declaration of Conformity
The SimpleShare Office Storage Server carries the CE-Mark in accordance with the related European Directives and standards.
This is a Class A product. In a domestic environment, this product may cause radio interference in which case the user may be required to take adequate measures.
Getting Started
x
TABLE OF CONTENTS
Getting Started iv
What’s Included With SimpleShare v
Features and Benefits vi
Registering SimpleShare vi
Installing SimpleShare 1
System Requirements and Recommendations 1 Requirements 1
Recommendations 1 Installing SimpleShare Server 2
Setting Up SimpleShare for the First Time 3
Expanding SimpleShare’s Capabilities 10
Connecting a USB Printer 10
Connecting a USB Drive 11
Accessing Shares 12
Accessing SimpleShare From Windows 13
Accessing SimpleShare From Mac OS X 16
xi

Managing SimpleShare 18
Running SimpleShare Administrator 19 Setting the SimpleShare Network Name 20
Setting the Administration Username and Password 21 Setting the Date and Time Manually 22
Acquiring the Date and Time From Your Browser 24 Synchronizing the Date and Time with an NTP Server 25 Upgrading SimpleShare Firmware 27
Setting Up Email Alert Notification 28
Setting Up Popup Alert Notification 29
Adding SimpleShare to an Existing Workgroup 30 Adding SimpleShare to an Existing Domain 31 Restoring Factory Setting 32
Restarting SimpleShare 33
Setting File System Support on SimpleShare 34 Creating a Share 35
Deleting a Share 37
Renaming a Share 38
Enabling Security on an Existing Share 39 Disabling Security on an Existing Share 40 Renaming a Disk Drive 42
xii

Erasing a Disk Pool 43
Erasing a Disk Drive 44
Enabling Disk Power Management 46 Viewing Disk Drive Health Information 47 Running Disk Drive Self-Tests 49 Removing External Drives 51
Viewing Foreign Disk Information 53 Claiming Foreign Disk for SimpleShare 54 Claiming a Foreign Disk as FAT32 56 Claiming a Blank Disk for SimpleShare 58 Claiming a Blank Disk as FAT32 60
Checking Foreign Disk File System Integrity 62 Creating a Basic Pool 64
Creating a Mirror Pool 67
Creating a Striped Pool 71
Deleting (Wiping) a Pool 75 Renaming a Pool 77 Resizing a Pool 78
Adding a Mirror to an Existing Pool 80 Removing a Mirror or Spare 83 Creating an Encrypted Pool 85
xiii

Changing the Encryption Password 88 Disabling Pool Encryption 90 Mounting Encrypted Pools 92
DHCP Client Network Setup 94
DHCP Server Network Setup 95 Static IP Network Setup 97 Enabling the Print Server 98 Disabling the Print Server 100
Installing Printer Drivers on Windows Computers 101
Specifications 103
Product Support 104
SimpleTech Technical Support 104
Worldwide Headquarters 104
Certification and Warranty 105
FCC Compliance 105
Limited Warranty 106
Modifications 106
GPL Statement 106
xiv
INSTALLING SIMPLESHARE
Installing SimpleShare is easy. This guide assumes the user has a basic understanding of Personal Computers and networks.
SYSTEM REQUIREMENTS AND RECOMMENDATIONS
REQUIREMENTS |
RECOMMENDATIONS |
|
• Windows XP (Home and Professional), Windows 2000 |
• DHCP server |
|
(Professional and Server, Windows 2000 (Professional |
• Network router or switch |
|
and Server), Windows Me and 98SE |
||
|
||
• Intel Pentium III processor (or later) |
A DHCP server is not required. However, SimpleTech |
|
• 256 MB RAM |
strongly recommends using a DHCP server to assign IP |
|
addresses to the devices on your network. Otherwise, |
||
• Web browser (Internet Explorer 5.0 or above, Safari, |
depending on how your network is configured, you may |
|
have to manually setup the computers on your network to |
||
Linux Nautilus and Netscape 6.2.x or above) |
||
talk to SimpleShare. For detailed information on using a |
||
• Available network connection (10Base-T or 100Base-T) |
DHCP server, see DHCP Server Network Setup. |
|
|
Installing SimpleShare |
1 |
INSTALLING SIMPLESHARE SERVER
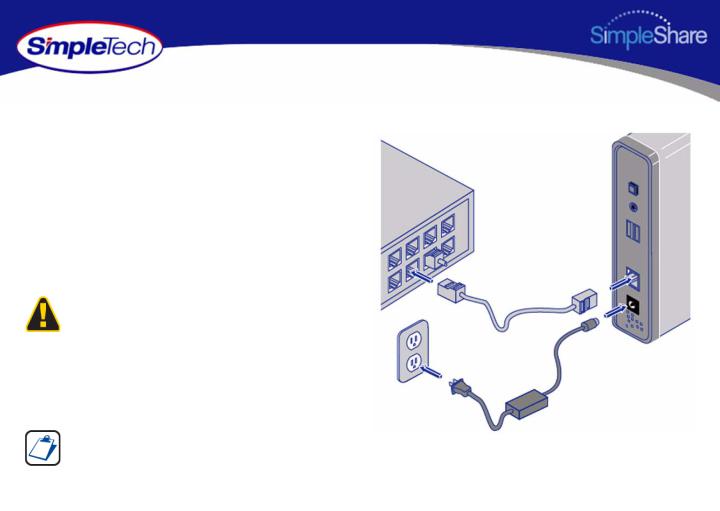
1Connect the provided Ethernet cable to the Network connector on SimpleShare’s rear panel. Connect the other end of the cable to your switch, router or directly to your computer.
2Connect the low voltage connector on the AC power adapter to SimpleShare’s DC-IN jack. Connect the power plug on the other end of the adapter to a live 120/240V electrical outlet, surge protector or UPS (uninterruptable power supply).
Only use the AC power adapter that came with SimpleShare. Using any power adapter, other than the one provided by SimpleTech, may damage SimpleShare and voids your warranty. SimpleTech assumes no liability for damage resulting from improper use.
3Momentarily press the Power push button to power on SimpleShare.
The only way to shut off power completely to SimpleShare is to disconnect the power plugs from the power source. Make sure the power cords for SimpleShare are within easy reach so that you can unplug SimpleShare when you need to do so.
Installing SimpleShare |
2 |
SETTING UP SIMPLESHARE FOR THE FIRST TIME
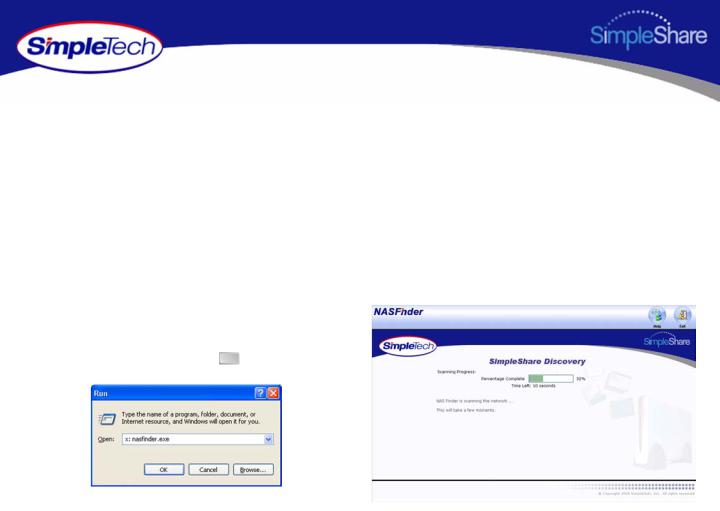
Once the SimpleShare server is connected and powered on, you can begin using it to share files and data with other network users immediately. However, if SimpleShare is installed on a complex network configuration that routes traffic to various network segments (subnets) using gateways and routers, locating SimpleShare using its network name might be difficult without assistance. In such cases, you can use NASFinder to locate your SimpleShare and perform basic configuration tasks like renaming your SimpleShare, changing its administration username and password and mapping the shared folders on SimpleShare to your computer.
1Insert the NASFinder Quick Setup CD in the CD-ROM drive on your computer. Depending on how your computer is configured, NASFinder may launch automatically. If NASFinder does not start automatically, start it manually by clicking on the Start menu, and then selecting the Run... option. In the Run dialog box, enter
x:nasfinder.exe (where x is the drive letter of the CD-ROM drive), and then click OK .
Installing SimpleShare |
3 |
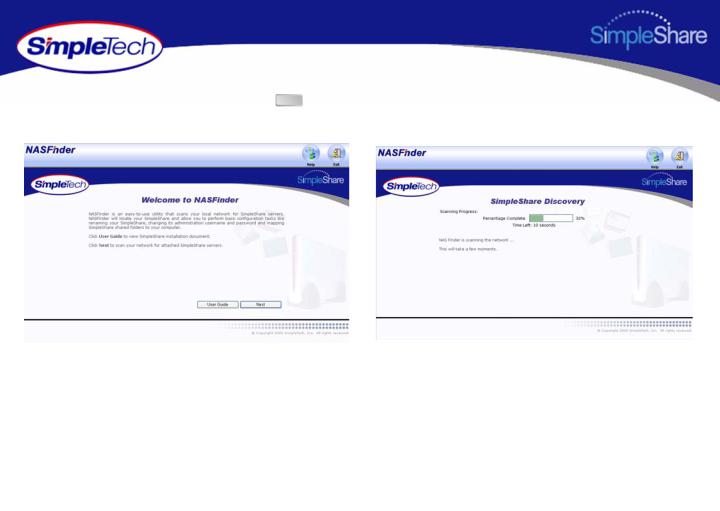
2On the Welcome to NASFinder page, click Next to start the SimpleShare Discovery and search your network for connected SimpleShare servers.
Installing SimpleShare |
4 |
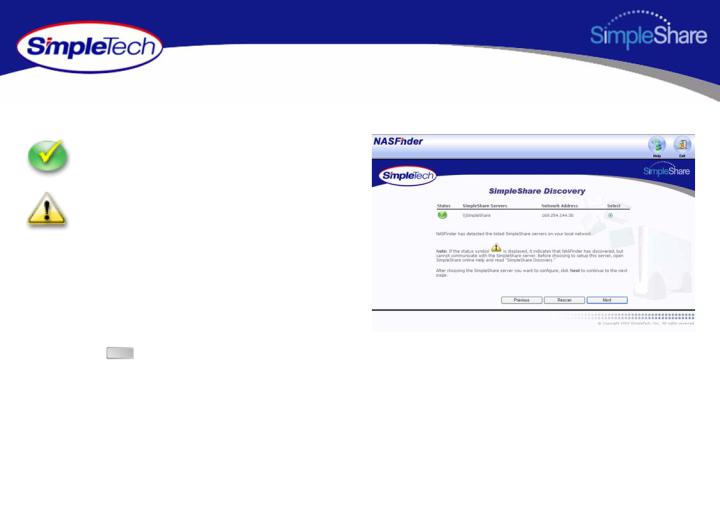
SimpleShare Discovery displays the network name, IP address and connection status of detected SimpleShare servers.
“Available” This icon indicates NASFinder has detected and is able to communicate with SimpleShare from your computer.
“Unavailable” This icon indicates NASFinder has detected, but cannot communicate with SimpleShare from your computer. Typically, this occurs when SimpleShare and the computer accessing SimpleShare are configured on different network segments or subnets.
If SimpleShare is unable to talk to your computer, review the NASFinder online help topic on SimpleShare Discovery before continuing this procedure.
3If there are multiple SimpleShare servers installed on your network, choose the one you want to configure and then click Next to continue.
Installing SimpleShare |
5 |

4In the login prompt, enter SimpleShare’s administration username and password. If you are configuring SimpleShare for the first time, enter the factory default username admin and password simple. If you want the system to remember your password, select Remember my password, then click OK to continue.
You are now ready to complete SimpleShare basic setup. In the future, you will be able to access SimpleShare by typing http://simpleshare_name in the address box of your Web browser (where simpleshare_name is the network name of your SimpleShare server.
Installing SimpleShare |
6 |
The Server Name Setup page allows you to change SimpleShare’s network name.
5In Machine Name, enter a new name for SimpleShare or choose to keep the current name.
Choose a name that is easy to remember. For example, you can use the owner’s last name, a description of the data SimpleShare will store, or where SimpleShare will be located. If there’s only one SimpleShare on your network, you can use its default name, “SimpleShare.”
The SimpleShare name can be up to 15 characters in length, containing any combination of alphanumeric (A-Z and 1-9) characters. You may also use the dash (-) character. Spaces and special characters are not allowed. If you share SimpleShare with MS-DOS computers, do not use more than eight characters in the SimpleShare name.
6 Click Next to continue.
Installing SimpleShare |
7 |
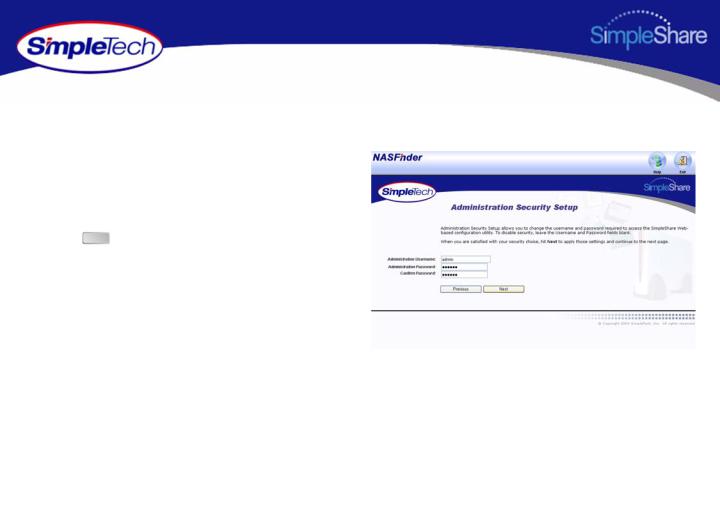
The Administration Security Setup page allows you to change the administration username and password required to access SimpleShare configuration data.
7Enter a new username and password for accessing SimpleShare. If you are logging onto SimpleShare for the first time, enter the default username “admin” and password “simple.” In Confirm Password, re-enter the new password to verify that it was entered correctly.
8Click Next to continue.
Installing SimpleShare |
8 |
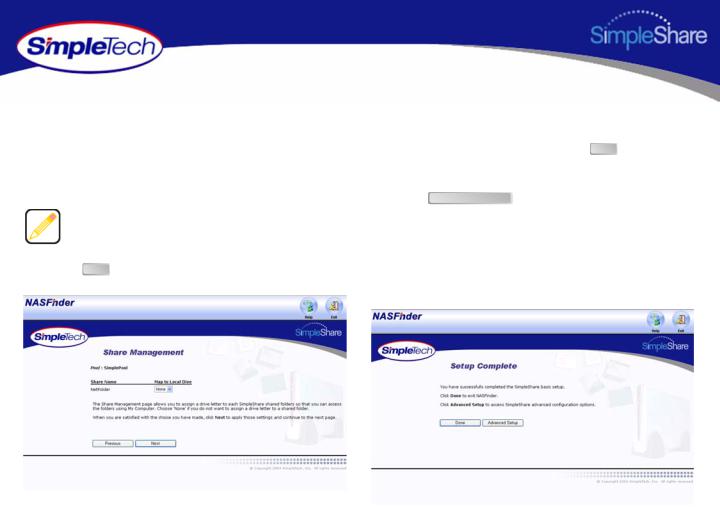
Share Management makes it easy to access your shared folders in Windows. Share Management assigns a drive letter to SimpleShare folders, allowing them to be accessed from My Computer.
9 Choose a drive letter from the Map to Local Drive list |
11 On the Setup Complete page, click Done to exit |
next to the share you want to map. For each share you |
NASFinder. If you need to perform more advanced |
don't want mapped to your computer, choose None. |
configuration tasks, such as creating additional shares, |
|
click Advanced Setup to run SimpleShare Administrator. |
The Map to Local Drive list only displays letters available on your computer.
10 Click Next after making your selection(s).
Installing SimpleShare |
9 |

EXPANDING SIMPLESHARE’S CAPABILITIES
CONNECTING A USB PRINTER
1Connect one end of a USB cable to the USB port on the printer. Connect the other end of the cable to one of the USB ports on SimpleShare.
2Connect AC power and power on the printer according to the instructions provided by the manufacturer.
3In the Administration menu, click Basic.
4Click Reboot to restart SimpleShare and apply your changes.
5In the confirmation dialog, click OK .
6Run SimpleShare Administrator to setup print server services on SimpleShare. See “Enabling the Print Server” on page 98.
If you are setting up SimpleShare for the first time, complete the basic setup before running SimpleShare Administrator.
Expanding SimpleShare’s Capabilities |
10 |

CONNECTING A USB DRIVE
1Connect one end of a USB cable to the USB port on the disk drive. Connect the other end of the cable to one of the USB ports on SimpleShare.
2Connect AC power and power on the disk drive according to the instructions provided by the manufacturer.
3Run SimpleShare Administrator to setup the new disk on SimpleShare. If you are setting up SimpleShare for the first time, complete the basic setup before running SimpleShare Administrator.
Expanding SimpleShare’s Capabilities |
11 |
ACCESSING SHARES
You can access the shares (shared folders) on SimpleShare from the Web browser on a Windows, Macintosh, Linux or Unix computer. This section contains detailed instructions for accessing SimpleShare data Windows and Macintosh computers. If you are operating in a Linux or Unix environment, refer to documentation for your specific operating system for instruction on accessing and mounting network shares.
SimpleTech highly recommends that you back up files the files on SimpleShare. SimpleTech is not responsible for any data loss, nor will SimpleTech perform any recovery on loss data files.
Accessing Shares |
12 |
ACCESSING SIMPLESHARE FROM WINDOWS
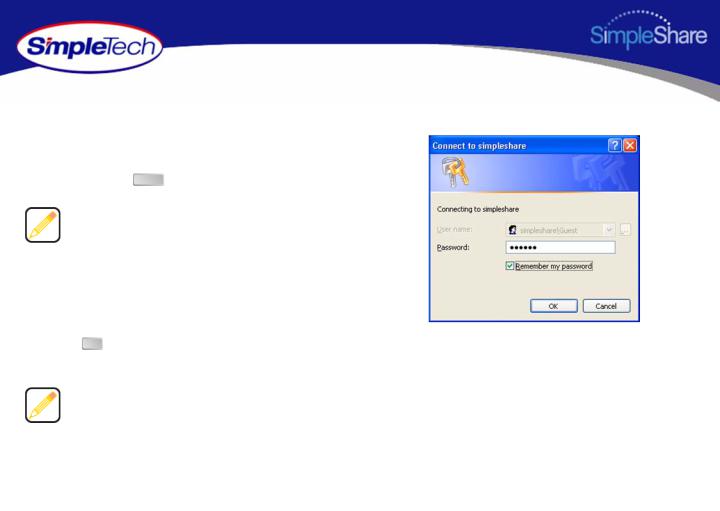
1In the Address box of your Web browser, type \\simpleshare_name (where simpleshare_name is the network name of your SimpleShare server), and then press the Enter key.
To access the shared folders, you must type backslash character when entering SimpleShare’s name.
2In the login prompt, enter your user password for accessing the shared folders on SimpleShare. If you want the system to remember your password in the future, select Remember my password.
3Click OK to continue. You will be logged onto SimpleShare as a guest user.
If your computer is unable to locate SimpleShare (logon dialog does not appear), check the connections, make sure SimpleShare is in Ready mode and properly connected to the network. Then, try to connect to SimpleShare again.
Accessing Shares |
13 |
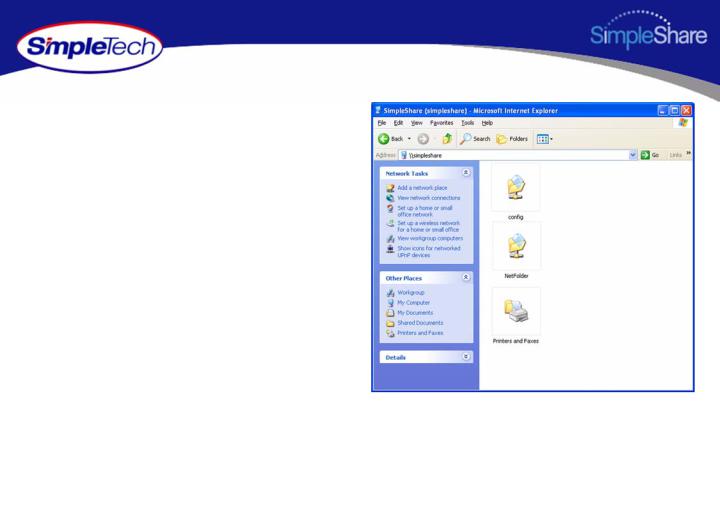
Internet Explorer appears displaying the SimpleShare’s root directory and the shared folders available on SimpleShare. You are now ready to save files to or retrieve files from SimpleShare.
To make it easier to access SimpleShare shared folders in the future, you can assign a drive letter to a share, allowing you to access the folder using My Computer. To map a shared folder, continue to Step 4 on page 15.
Accessing Shares |
14 |
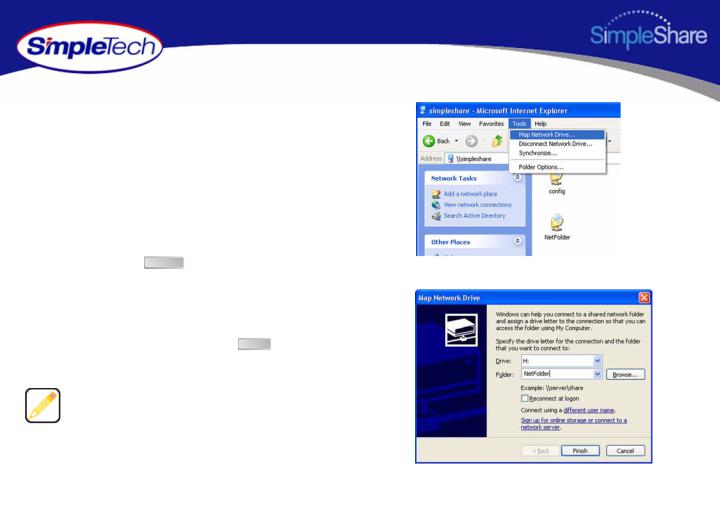
4In the Tools menu, click Map Network Drive.
5Open the Drive list and select a drive letter to assign to the shared folder you want to map to your computer (or accept the next available drive letter displayed in the list).
6In Folder, type \\simpleshare_name\share_name
(where SimpleShare_name is the network name of your SimpleShare server and share_name is the name of the shared folder you want to map to your computer). You can also use the Browse button to find the share.
7If you want your computer to reconnect to the shared folder every time you log on, select Reconnect at logon.
8After making your selections, click Finish to map the share to the drive letter.
Mapped shares are available only when SimpleShare is available. You can assign a share to a different drive letter by disconnecting from the drive and then reassigning it to a new drive letter.
Accessing Shares |
15 |

ACCESSING SIMPLESHARE FROM MAC OS X
1Open the Go menu in Finder and click Connect to Server.
2In the Connect to Server window, select your SimpleShare from the servers listed in the left pane.
If Workgroup names are listed, check the Workgroup in which your SimpleShare is a member. If you can't locate your SimpleShare, enter its URL in the Address box (where the URL consists of the protocol “smb://” and the network name or IP address of your SimpleShare).
3 After selecting your SimpleShare, click Connect.
Accessing Shares |
16 |
 Loading...