

Page 1

SIMPLESHARE NAS 1.1 QUICK START
NETWORK STORAGE DRIVE FOR MACINTOSH
Congratulations on purchasing the SimpleShare NAS
drive from SimpleTech
SimpleShare NAS (Network Attached Storage) drives
make it possible for you to easily add high-performance
storage to your home or small business network.
SimpleShare NAS is ideal for sharing data files, music,
digital photos, and videos with other users on the network.
In addition, with SimpleShare NAS, everyone on the
network have instant access to extra storage.
This quick start includes setup and file access information
for your SimpleShare NAS drive
• Easy setup wizard
• Microsoft® Windows® PC and Macintosh® compatibility
• iShare for accessing SimpleShare NAS from the Internet
• iShareGallery for creating your own photo gallery website
• ShareSorter drag n’ drop file sorting
• Integrated USB printer sharing
• HTML-based management software
• 10/100Base-T Ethernet connectivity
• Internal storage capacities of 500GB
• Expandable storage capacity—add up to 1 Terabyte
• SMART drive monitoring
• ...and more
®
.
Page 2
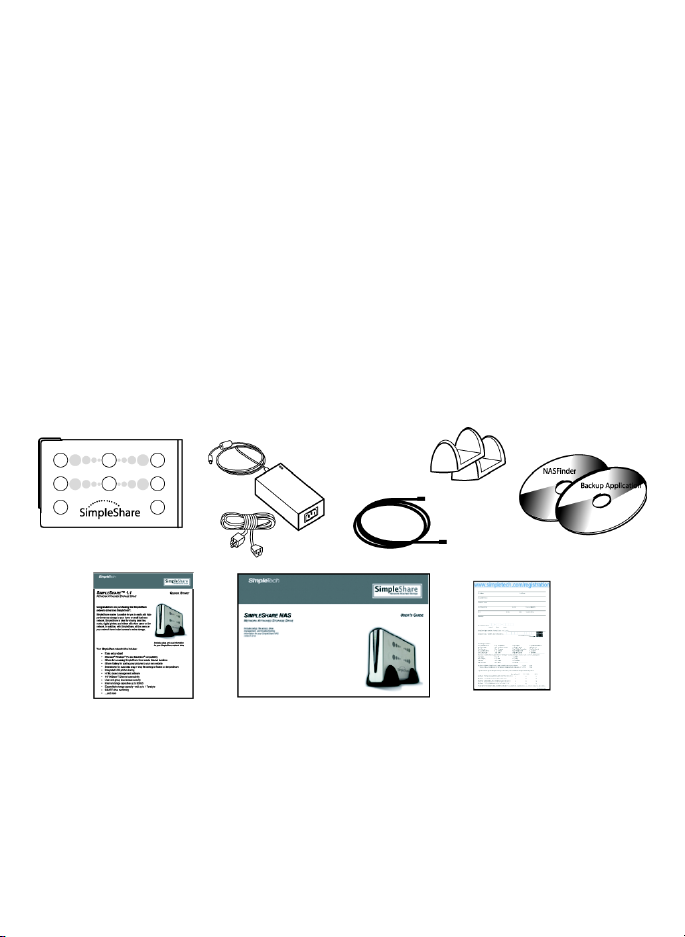
WHAT YOU SHOULD HAVE
The following items are included in your SimpleShare NAS kit:
• SimpleShare NAS drive
• 12V AC power adapter
• Vertical stand (2)
• CAT5e Ethernet cable
• NASFinder Quick Setup CD
• Backup Application CD
• SimpleShare NAS Quick Start (this guide)
• SimpleShare NAS User’s Guide
• Warranty card
If any item is missing, contact your local reseller or retailer for replacement. If you purchased
your SimpleShare NAS drive directly from SimpleTech, contact SimpleTech Technical Support.
2
Page 3
MINIMUM SYSTEM REQUIREMENTS
• iMac®, G3, G4, G5 or iBook
• 256 MB RAM (or as required by Mac OS)
• Mac OS® X (version 10.3 or later recommended)
• CD-ROM drive
• Web browser (Safari™, version 2.0 or later recommended)
• Available Ethernet port
• Internet connection for and system updates
®
INSTALLATION REQUIREMENTS
No drivers, special tools or equipment are required to install and setup your SimpleShare NAS
drive.
NETWORK REQUIREMENTS
• 10/100 TCP/IP-compliant network with DHCP (Dynamic Host Control Protocol) and
DNS (Domain Name System) servers
• Wired or wireless router or switch with an available 10/100 Ethernet port
• TCP/IP enabled on each computer accessing the drive
• File and Print sharing enabled on each computer accessing the SimpleShare NAS
drive
3
Page 4
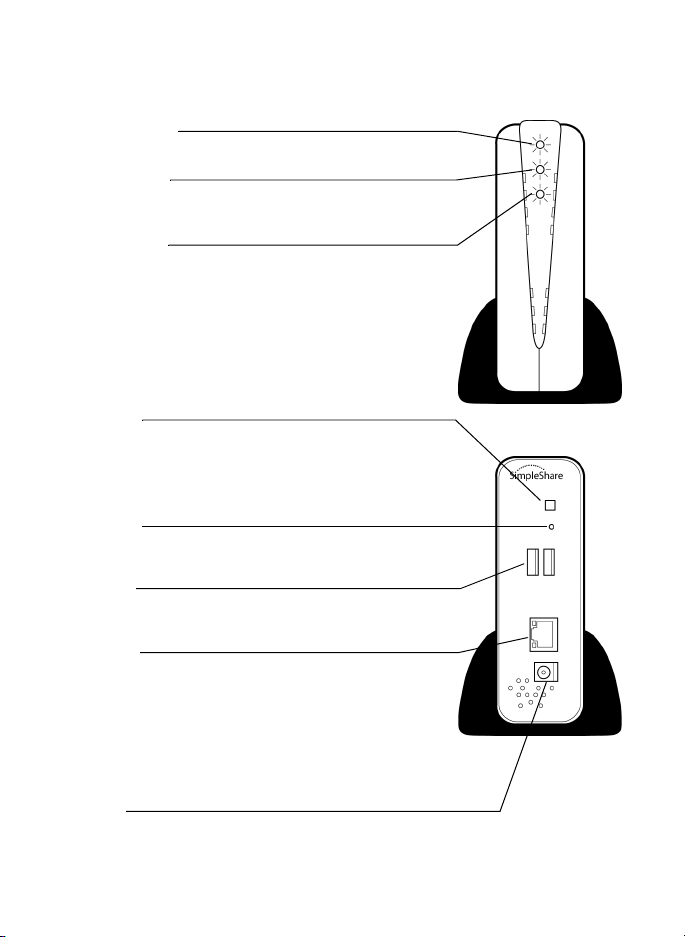
VISUAL TOUR
Front
Power LED (Amber)
Illuminates when SimpleShare NAS is On.
Ready LED (Blue)
Illuminates when SimpleShare NAS is in Ready (active)
mode.
HDD LED (Green)
Flashes to indicate disk drive read/write activity.
Security Lock Slot (not shown)
Located on the lower side of the case, this slot allows you
to attach a security cable or device (optional) to the
SimpleShare NAS drive.
Back
Power Button
If SimpleShare NAS is On, momentarily pressing the
Power button turns the drive Off. Pressing the Power
button for 10 seconds restarts the drive. If SimpleShare
NAS is Off, pressing the Power button turns the drive On.
Reset Button
Pressing the Reset for 8or more seconds restores
SimpleShare NAS to factory default settings.
USB Port (2)
Use the USB ports to connect external USB drives or a
USB printer.
Network Port
Use the network port to connect to the SimpleShare NAS
drive to an available port on your network, router or switch.
Includes integrated:
• Link LED (amber) illuminates to indicate network
connectivity.
• Activity LED (green) illuminates to indicate network traffic.
DC-IN Jack
Use the DC-IN jack to connect the AC power adapter.
4
Page 5

INSTALLING SIMPLESHARE NAS DRIVE
1
Place SimpleShare NAS in Your Work Area
The SimpleShare NAS drive can be used in a variety of home and office environments. When
choosing a location for your SimpleShare NAS drive, consider placing the drive where it will be
easy to reach. Make sure the area is large enough for the drive and any other items you need
to use, such as a printer or additional external storage. To avoid overheating, leave enough
space around the drive and other equipment to provide adequate ventilation.
The work area should be free from:
• Dust, moisture and direct sunlight
• Liquids and corrosive chemicals
Using the Vertical Stands
Depending on the amount of space available in your work area, you
can position your SimpleShare NAS drive horizontally or vertically.
When positioning the drive vertically, make sure to use the vertical
stands included in your kit.
Do not position the SimpleShare NAS drive vertically without
using the vertical stands. Otherwise, the drive may tip over and be
1 Position the SimpleShare NAS drive upside down.
2 Align one of the stands with the “dimple” at the forward end of
the case, and then press the stand onto the case until it snaps
in place. Repeat this step to install the second stand at the back
of the case.
5
Page 6

Using the Security Lock Slot
Your SimpleShare NAS drive includes a security slot on the
lower side of the case. The security slot is compatible with
most security locking cables and devices, and can be used
to secure your SimpleShare NAS drive to a heavy object
such as a desk.
2
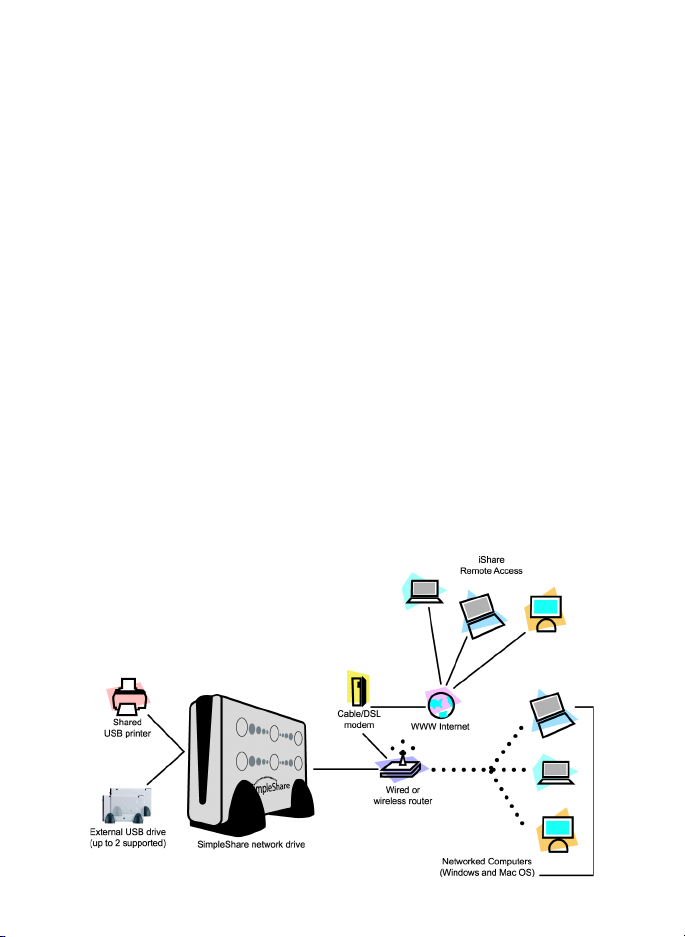
Connect to the Network
To installSimpleShare NAS on a local network requires the following:
• 10/100-compliant network with DNS and DHCP servers
• An available Ethernet port on the network, switch or router
• TCP/IP enabled on your computer and each computer accessing the drive
1 Plug one end of the Ethernet cable (provided) into an available port on your network, switch
or router.
2 Connect the opposite end of the Ethernet cable to the Network port on the SimpleShare
NAS drive.
3 Route the Ethernet cable so that it does not pose a hazard.
6
Page 7

3
Connecting AC Power
The following suggestions will help you avoid personal injury and damage to your SimpleShare
NAS drive.
• Only use the power adapter that came with your SimpleShare NAS drive. Using a different power adapter
may damage the SimpleShare NAS and voids your warranty.
• Always plug the power cables into grounded, three-hole outlets.
• Use a power filter/surge protector (not included) for AC power connections to your equipment.
• In the event of a severe electrical storm, disconnect all the power cables.
1 Connect the DC cable connector on the power adapter to the DC-IN jack on the
SimpleShare NAS drive.
2 Plug the three-pin socket on the power cable into the power adapter.
3 Plug the AC power plug on the opposite end of the power cable to a live 120/240V electrical
outlet, power strip or UPS (uninterruptible power supply).
4 Route the power cable so that it does not pose a hazard.
The SimpleShare NAS drive powers on and initializes as soon as AC power is applied. The
amber Power light comes on indicating SimpleShare NAS is receiving power. As the system
initializes, the green HDD light flashes indicating disk activity. After initialization completes, the
blue Ready light comes on. SimpleShare NAS takes about 1 minute to complete its power on
routine.
7
Page 8

SETTING UP AND ACCESSING SIMPLESHARE NAS
1
Run NASFinder
NASFinder searches your network for connected SimpleShare NAS drives. After locating your
drive, NASFinder launches SimpleShare Manager—allowing you to run the Initial Setup
Wizard.
1 Insert the NASFinder Quick Setup CD into
your computer’s CD-ROM drive.
2 Double-click on the NASFinder CD-ROM
desktop icon.
3 In the NASFinder folder that appears,
double-click on the NASFinder.htm
application icon.
4 On the Welcome to NASFinder page,
click Run NASFinder to start the
discovery process.
8
 Loading...