

Page 1

THERMOMÈTRE FRONTAL ET AURICULAIRE
SSOT 6 B2
THERMOMÈTRE FRONTAL
ET AURICULAIRE
Mode d’emploi
FOREHEAD & EAR
THERMOMETER
Operating instructions
IAN 106635
STIRN-UND-OHRTHERMOMETER
Bedienungsanleitung
Page 2

Avant de lire le mode d‘emploi, ouvrez les deux pages contenant les illustrations et familiarisez-vous ensuite avec toutes les
fonctions de l‘appareil.
Klappen Sie vor dem Lesen die beiden Seiten mit den Abbildungen
aus und machen Sie sich anschließend mit allen Funktionen des
Gerätes vertraut.
Before reading, unfold both pages containing illustrations and
familiarise yourself with all functions of the device.
FR / BE Mode d’emploi Page 5
DE / AT / CH Bedienungsanleitung Seite 35
GB Operating instructions Page 65
Page 3

A
3 81 2
B
10
9
11
12
13
14
15
16
17
4
5
22
21
20
19
18
6
23 25
24
7
Page 4

C
SET 12hr
(12/24)
SET 24hr
(12/24) SET hour SET minute
SET Year SET month SET day
D E
F
SET sleep
disable
Page 5

Introduction
Utilisation conforme à l’usage prévu ................ Page 7
Fourniture ............................................................ Page 8
Description des pièces et éléments ................... Page 8
Données techniques ........................................... Page 9
Sécurité
Instructions générales de sécurité ..................... Page 11
Instructions de sécurité ....................................... Page 14
Consignes de sécurité pour la pile.................... Page 14
Avant la mise en service
Retrait de la protection pile ............................... Page 16
Utilisation
Réglage de la date / de l’heure (ill. C) ............. Page 16
Mesures de températures .................................. Page 17
Fonctions / analyse des problèmes
Sélection de l’unité de température .................. Page 25
La fonction de mémoire (mode mémoire)......... Page 25
Remplacement de la pile ................................... Page 26
Solutions aux problèmes ................................... Page 27
Nettoyage et entretien ............................ Page 29
Garantie et S.A.V. ....................................... Page 30
Recyclage ......................................................... Page 32
Conformité ....................................................... Page 33
5 FR/BE
Page 6

Sont utilisés dans le présent mode d‘emploi /
sur l‘appareil les pictogrammes suivants:
Lire le mode d‘emploi!
Tenir compte des avertissements et
instructions de sécurité!
Risque d‘explosion!
V
mA
2015-01
6 FR/BE
Courant continu (type de courant et
de tension)
Milliampère
Danger de mort et d‘accidents pour les enfants et les enfants en bas-âge!
Produit médical de type BF
Année et mois de fabrication
Eliminez l‘emballage et l‘appareil dans le
respect de l‘environnement!
Page 7

Thermomètre frontal et auriculaire
Introduction
Toutes nos félicitations pour l’achat de votre
nouvel appareil. Vous avez choisi un produit
de grande qualité.
Le mode d’emploi fait partie de ce produit. Il contient des
remarques importantes concernant la sécurité, l’utilisation
et la mise au rebut. Avant la première mise en service, familiarisez-vous avec les fonctions de l’appareil. Lisez le
mode d’emploi suivant. Conservez ce mode d’emploi. Si
vous donnez l’appareil à des tiers, remettez-leur également
la totalité des documents.
Utilisation conforme à l’usage prévu
L’appareil est destiné à mesurer à l’intérieur la température corporelle sur l’oreille ou sur les tempes/le front, la
température de la pièce ainsi que les températures de surfaces domestiques. Il ne remplace aucunement un examen chez le médecin. Cet appareil est destiné uniquement
à un usage privé. Toute utilisation autre que celle décrite
ci-dessus ou modifi cation du produit est interdite et peut
engendrer des blessures et / ou un endommagement du
produit. Le fabricant n’assume aucune garantie ni responsabilité pour tous dommages résultant d’une utilisation de
l’appareil non conforme à l’usage prévu.
7 FR/BE
Page 8

Fourniture
1 x thermomètre frontal et auriculaire
(avec pile et capuchon
)
8
1 x mode d’emploi
Description des pièces et éléments
Tête de mesure
1
Touche «EAR»
2
(Mesure de la température dans l’oreille/mode scan)
Touche «FOREHEAD»
3
(Mesure de la température sur le front/les tempes)
Écran LCD
4
DEL rouge : Fièvre 38,0 °C - 42,9 °C
5
(100,4 °F - 109,2 °F)
DEL orange, légère augmentation de température
6
37,5 °C - 37,9 °C (99,5 °F - 100,3 °F)
DEL verte, pas de fi èvre 34,0 °C - 37,4 °C
7
(93,2 °F - 99,4 °F)
Capuchon de protection
8
Touche «MEM / SET»
9
(Interrogation de la mémoire etc.)
Couvercle du compartiment à pile
10
Pile
11
8 FR/BE
Page 9

Ecran à cristaux liquides
Symbole changement de pile
12
Symbole affi chage année
13
Symbole affi chage date
14
Symbole mode auriculaire
15
Symbole mode standard
16
Symbole mode scan
17
Affi chage de la température
18
Symbole mode frontal
19
Symbole nettoyage
20
Date et heure en mode standard
21
Symbole mode Sleep
22
Affi chage PM
23
Symbole mode Setup
24
Symbole mode Memory
25
Données techniques
Procédé de mesure: infrarouge (sans contact)
Alimentation électrique: pile lithium 3 V
CR2032
Consommation électrique: < 15 mA
Mémoire: 9 mesures de température
avec mention de la date,
de l’heure et du mode de
mesure (auriculaire ou frontal)
Echelles de température: °C (°Celsius)
°F (°Fahrenheit)
Affi chage de l’heure: format 12h / 24h
Coupure automatique: coupure automatique au
bout d’une minute
9 FR/BE
Page 10

Plage de mesure mode
auriculaire et frontal: 32 °C - 42,9 °C
(89,6 °F - 109,2 °F)
Exactitude de mesure: ± 0,2 °C (± 0,4 °F) pour la
plage 35,5 °C - 42,0 °C
(95,9 °F - 107,8 °F)
± 0,3 °C (± 0,5 °F) pour la
plage 32,0 °C - 35,4 °C
(89,6 °F - 95,8 °F) et pour la
plage 42,1 °C - 42,9 °C
(107,9 °F - 109,2 °F)
Plage de mesure
température ambiante: 5,0 °C - 59,9 °C
(41,0 °F - 139,8 °F)
Exactitude de mesure: ± 2,0 °C (± 4,0 °F)
Plage de mesure
mode scan: –22,0 °C - 80,0 °C
(–7,6 °F - 176 °F)
Exactitude de mesure: ± 2,0 °C (± 4,0 °F)
Température ambiante:
Mode auriculaire et scan: + 10,0 °C - + 40,0 °C
(50,0 °F - 104,0 °F)
Mode frontal: + 15,0 °C - + 40,0 °C
(59,0 °F - 104,0 °F)
Température de rangement: –10,0 °C - + 55,0 °C
(14,0 °F - 131,0 °F) à
20%RH* - 85%RH*
Pression atmosphérique: 700 ~ 1060 hPa
10 FR/BE
Page 11

Dimensions: env. 135 x 35 x 58 mm
(long. x larg. x haut.)
Poids: env. 54 g
*Relative humidity = humidité relative de l’air
Sécurité
CONSERVEZ POUR L’AVENIR L’ENSEMBLE DES INSTRUCTIONS DE SECURITE ET INSTRUCTIONS!
Instructions générales
de sécurité
AVERTISSEMENT !
RISQUE D’ACCIDENT ET
DANGER DE MORT POUR
LES ENFANTS ET LES ENFANTS EN BAS AGE!
Ne laissez jamais les enfants sans surveillance avec l’emballage. Ils risquent de
s’étouff er. Les enfants sous-estiment souvent
les risques et dangers. Tenez toujours les
enfants éloignés du produit.
AVERTISSEMENT !
DANGER DE
MORT! Les piles peuvent être avalées,
ce qui peut être mortel. En cas d’ingurgitation d’une pile, il faut immédiatement
consulter un médecin.
11 FR/BE
Page 12

Cet appareil peut être utilisé par des en-
fants dès l’âge de 8 ans ou des personnes souff rant d’un handicap physique ou psychomoteur ou encore des
personnes souff rant de défi ciences mentales ou ayant un manque de connaissances et d’expérience s’ils sont sous la
surveillance d’un adulte ou si l’usage de
l’appareil leur a été expliqué et ils sont
conscients des dangers en résultant. Ne
pas laisser les enfants jouer avec l’appareil. Il est interdit aux enfants de nettoyer
ou d’entretenir l’appareil sans surveillance.
N’exposez pas l’appareil
- à des températures extrêmes,
- à des vibrations importantes,
- à des sollicitations mécaniques importantes,
- aux rayons directs du soleil.
Risque d’endommagement de l’appareil
dans le cas contraire.
N‘oubliez pas que sont exclus de la ga-
rantie les endommagements résultant
d‘une manipulation incorrecte, du
nonrespect du mode d‘emploi ou de
l‘intervention sur l‘appareil de personnes non autorisées.
12 FR/BE
Page 13

Ne démontez en aucun cas l‘appareil.
Des réparations incorrectes peuvent être
la source de dangers importants pour
l’utilisateur. Ne faites eff ectuer toutes réparations que par des spécialistes.
Ne mettez pas l’appareil en service s’il est
endommagé. Il pourrait en résulter des
blessures et / ou des mesures inexactes.
Consultez un médecin si le thermomètre
affi che une température élevée! Dans
cette méthode de mesure, il y a fi èvre si
la température est supérieure à 38,0 °C
(100,4 °F). La diode rouge allumée 5
est un avertissement. Procédez plusieurs
fois à la mesure à un intervalle respectif
de 0,5 à 1 heure pour suivre l’évolution
de la température. Vos mesures faciliteront le diagnostic pour votre médecin.
N’utilisez pas le thermomètre dans des
conditions de température extrêmes et /
où à l’extérieur. Il en résulte des mesures
inexactes. Tenez compte des données
obligatoires pour la température am biante et la température de rangement
(voir «Données techniques»).
Ne pas toucher directement, ni souffl er
sur le capteur. Il en résulte des mesures
inexactes.
13 FR/BE
Page 14

Ne pas utiliser de téléphones mobiles à
proximité pendant l’utilisation du thermo-
mètre. Il peut en résulter des mesures
inexactes.
Instructions de sécurité
Cet appareil est destiné uniquement à
un usage privé. Il n’est donc pas soumis
à une obligation d’étalonnage.
Cessez d’utiliser l’appareil s’il est endom-
magé ou si les valeurs mesurées vous pa-
raissent irréalistes. Consultez le chapitre
«Fonctions / analyse des problèmes –
solutions aux problèmes» ou adressez-
vous à notre service après-vente.
Consignes de sécurité
pour la pile
Enlever la pile de l’appareil si celui-ci est
resté longtemps inutilisé.
PRUDENCE ! RISQUE D’EXPLOSION !
de recharger la pile !
14 FR/BE
Ne jamais tenter
Page 15

Veiller à insérer la pile en respectant la po-
larité correcte ! La polarité est indiquée
dans le boîtier à piles.
Au besoin, nettoyer les contacts de la
pile et de l’appareil avant l’insertion.
Ne pas jeter les piles dans les ordures
ménagères !
Chaque consommateur est tenu par la
loi à mettre les piles au rebut de ma-
nière adéquate !
ATTENTION! RISQUE D’EX-
PLOSION! Tenez les piles
hors de portée des enfants, ne
les jetez pas au feu, ne les courtcircuitez pas et ne les ouvre pas.
Retirez sans délai la pile de l’appareil si
elle est usée. En cas de nonrespect de
cette instruction, il se peut que la pile se
décharge au-delà sa tension fi nale. Il y
a alors risque d’écoulement de la pile.
Si la pile s’est écoulée dans l’appareil,
retirez-la immédiatement afi n d’éviter
que l’appareil ne soit endommagé!
Éviter tout contact avec la peau, les
yeux et les muqueuses. En cas de
contact avec l’acide de la pile, rincer
abondamment la zone à l’eau claire
et / ou consultez un médecin !
15 FR/BE
Page 16

Avant la mise en service
Retrait de la protection pile
Poussez vers le bas le couvercle du compartiment à
pile
.
10
Tirez le fi lm de protection au niveau de la languette
du compartiment à pile.
Repoussez le couvercle du compartiment à pile 10
sur le compartiment à pile jusqu’à ce que vous
l’entendiez s’encliqueter (ill. A).
– Lors de la mise en marche, l’appareil procède à une
syntonisation interne et à un autodiagnostic de l’écran
à cristaux liquides.
– Pour contrôler si tous les barres des chiff res sont cor-
rectement adressées, contrôlez lors de la mise en
marche, comparez la photo de l’écran LC
4
de votre
appareil avec le modèle (ill. B).
Utilisation
Réglage de la date / de l’heure (ill. C)
Ce réglage n’est nécessaire que lors de la première mise
en service et après remplacement de la pile.
1. Appuyez sur la touche «MEM / SET»
et maintenez-
9
la appuyée pendant deux secondes en mode standard.
Un signal sonore retentit. L’appareil est alors en mode Setup.
16 FR/BE
Page 17

2. Appuyez sur la touche «MEM / SET» 9 pour
sélectionner le mode 12h ou 24h.
3. Appuyez sur la touche «FOREHEAD»
3
. Les
heures clignotent et peuvent être corrigées à l’aide
de la touche «MEM / SET»
4. Appuyez à nouveau sur la touche «FOREHEAD»
.
9
3
Les minutes clignotent et peuvent être corrigées à
l’aide de la touche «MEM / SET»
.
9
Répétez les étapes 3. et 4. pour régler l’année, le mois
et le jour ou mettre en marche / couper le mode de veille.
Pour fi nir, appuyez sur la touche «FOREHEAD» 3.
Les paramètres sont alors validés et l’appareil retourne
en mode standard.
Mesures de températures
Mesure de la température ambiante
(mode standard)
Si vous avez terminé le réglage de l’heure et de la date et
que vous ne fassiez rien d’autre, l’appareil passe au bout
d’une minute en mode de veille pour économiser la pile.
A la livraison, le mode de veille est activé, ce qui indiqué
par le symbole
, et l’écran à cristaux liquides 4 s’éteint
complètement. Si le mode de veille est désactivé, l’appareil reste en marche et l’heure et la température ambiante
continuent d’être affi chées, et actualisées toutes les minutes. L’écran à cristaux liquides
affi che alternative-
4
ment l’heure et la date (ill. D).
.
17 FR/BE
Page 18

Prise de température (mode auriculaire)
Important! Il est recommandé de procéder à
3 prises de température consécutives dans la même
oreille et de partir du principe que le température la
plus élevée est la température exacte. La prise de température suivante peut être commencée lorsque l’affi chage
«
» disparaît.
N’utilisez pas le thermomètre si la prise de température
provoque des douleurs. Le conduit auditif pourrait être
endommagé.
N’utilisez pas le thermomètre en cas de maladies
ou de lésions de l’oreille externes (par exemple:
infl ammations du conduit auditif, blessures du pavillon).
L’état des points présentant une lésion ou maladie
pourrait s’aggraver.
N’utilisez pas le thermomètre immédiatement après
le bain ou la natation, dans le conduit auditif humide.
Il pourrait y avoir lésion du conduit auditif.
En raison du risque de contamination de la tête de
mesure
, nettoyez l’appareil après chaque utilisa-
1
tion.
Ne mesurez dans ce mode que la température dans
l’oreille, et non à un autre endroit du corps.
1. Si le mode de veille est actif, activez le thermomètre
avant la prise de température en appuyant sur une
touche quelconque.
2. Appuyez avec précaution sur le capuchon de protec-
tion
et retirez celui-ci sans forcer avec un léger
8
mouvement tournant.
18 FR/BE
Page 19

3. Vérifi ez que la tête de mesure 1 et le capteur de
mesure soient propres.
4. Nettoyez avec précaution le conduit auditif à l’aide
d’un coton tige.
5. Tirez le pavillon de l’oreille légèrement vers l’arrière
de la tête en biais vers le haut/vers l’arrière, afi n de libérer l’accès du conduit auditif et qu’il ne se trouve
aucun obstacle entre le capteur et le tympan.
6. Maintenez le pavillon ainsi légèrement étiré et intro-
duisez alors avec précaution la tête de mesure
1
dans le conduite auditif.
7. Appuyez brièvement sur la touche «EAR»
symbole
apparaît sur l’écran à cristaux liquides 4
. Le
2
et, après un signal sonore, la mesure commence.
8. La fi n de la mesure est indiquée par 2 signaux sonores.
9. Vous pouvez alors lire sur l’écran à cristaux liquides
l’état de la mesure. En même temps, l’une des 3 diodes
est allumée.
Avis: diode verte
: pas de fi èvre
7
34,0 °C - 37,4 °C (93,2 °F - 99,4 °F)
diode orange
: température élevée
6
37,5 °C - 37,9 °C (99,5 °F - 100,3 °F)
diode rouge
: fi èvre 38,0 °C - 42,9 °C
5
(100,4 °F - 109,2 °F)
10. L’affi chage peut avoir lieu aussi bien en «°C» qu’en
«°F» (voir «Fonctions / analyse des problèmes –
Sélection de l’unité de température»).
11. Attendez que l’affi chage «
» disparaisse avant
de procéder à une nouvelle mesure.
4
19 FR/BE
Page 20

Avis: L’appareil se coupe automatiquement s’il n’est pas
actionné pendant plus d’une minute. Si le mode de veille
est activé, l’écran à cristaux liquides
s’éteint. Si le
4
mode de veille est désactivé, l’appareil se met en mode
standard. Si le thermomètre a été utilisé dans des conditions
normales, le résultat de la dernière prise de température
est toujours mémorisé automatiquement avant la coupure.
La valeur mesurée est disponible avec la date, l’heure et
le mode de mesure si l’on actionne à nouveau la touche
«MEM / SET»
. L’appareil a 9 emplacements de mémoire
9
(voir le chapitre «Fonctions / analyse des problèmes – la
fonction de mémoire»).
Prise de température (mode frontal)
Important! Il est recommandé de procéder à
3 prises de température consécutives au même endroit
et de partir du principe que le température la plus élevée
est la température exacte.
En cas de températures ambiantes diff érentes, mettre
l’appareil 20 à 30 minutes dans la pièce où doit
avoir lieu la mesure afi n qu’il s’acclimate.
Détendez-vous pendant env. 5 minutes avant de
prendre votre température.
Pour un résultat exact, attendre au moins 30 minutes
après toutes activités physiques ou la prise d’un bain.
Veillez à ce que le front ou la tempe soient exempts
de blessures, sueur, produits cosmétiques ou crèmes.
Notez de quelle manière vous avez pris votre température et dites-le à votre médecin.
20 FR/BE
Page 21

1. Si le mode de veille est actif, activez le thermomètre
avant la prise de température en appuyant sur une
touche quelconque.
2. Appuyez avec précaution sur le capuchon de protec-
tion
et retirez celui-ci sans forcer avec un léger
8
mouvement tournant.
3. Vérifi ez que la tête de mesure
et le capteur de
1
mesure soient propres.
4. Tenez le capteur de mesure à un écart d’1 cm par
rapport au front ou à la tempe.
5. Pour déclencher la mesure, appuyez alors sur la
touche «FOREHEAD»
sur l’écran à cristaux liquides
. Le symbole apparaît
3
et, après un signal
4
sonore, la mesure commence.
6. La fi n de la mesure est indiquée par 2 signaux sonores.
7. Vous pouvez alors lire sur l’écran à cristaux liquides
le résultat de la mesure. En même temps, l’une des
3 diodes est allumée.
Avis: diode verte
pas de fi èvre
7
34,0 °C - 37,4 °C (93,2 °F - 99,4 °F)
diode orange
température élevée
6
37,5 °C - 37,9 °C (99,5 °F - 100,3 °F)
diode rouge
fi èvre 38,0 °C - 42,9 °C
5
(100,4 °F - 109,2 °F)
8. L’affi chage peut avoir lieu aussi bien en «°C» qu’en
«°F» (voir «Fonctions / analyse des problèmes –
Sélection de l’unité de température»).
9. Répétez les étapes 3. à 6. pour procéder à d’autres
prises de températures.
4
21 FR/BE
Page 22

Avis: L’appareil se coupe automatiquement s’il n’est pas
actionné pendant plus d’une minute. Si le mode de veille
est activé, l’écran à cristaux liquides
s’éteint. Si le
4
mode de veille est désactivé, l’appareil se met en mode
standard. Si le thermomètre a été utilisé dans des conditions
normales, le résultat de la dernière prise de température
est toujours mémorisé automatiquement avant la coupure.
La valeur mesurée est disponible avec la date, l’heure et
le mode de mesure si l’on actionne à nouveau la touche
«MEM / SET»
. L’appareil a 9 emplacements de mémoire
9
(voir le chapitre «Fonctions / analyse des problèmes – la
fonction de mémoire»).
Utilisation du thermomètre ménager
(mode de scan)
Le thermomètre peut également être utilisé en thermomètre
menager pour des mesures sans contact de températures dans
une plage de –22,0 °C à 80,0 °C (–7,6 °F - 176,0 °F).
ATTENTION! Ne pas utiliser ce mode de mesure
pour la prise de température médicale.
– Dans ce mode de mesure, c’est la température de surface
actuelle d’un objet qui est affi chée. Celle-ci peut diff érer de
la température intérieure, en particulier si cette surface est
exposée aux rayons du soleil ou au courant d’air!
Le thermomètre est de type tel qu’il procède à une
mesure exacte si son boîtier est à température ambiante.
Aussi, ne le tenez pas trop longtemps dans la main et
tenez-le éloignez des rayons directs du soleil!
22 FR/BE
Page 23

N’utilisez pas l’appareil immédiatement après nettoyage
de la tête de mesure
. Le froid provoqué par
1
l’évaporation du nettoyant peut fausser le résultat
de la mesure.
Exemples d’application:
- température du lait pour le biberon
- température de l’eau de bain
1. Si le mode de veille est actif, activez le thermomètre
avant la mesure en appuyant sur une touche quelconque.
2. Appuyez avec précaution sur le capuchon de protec-
tion
et retirez celui-ci sans forcer avec un léger
8
mouvement tournant.
3. Vérifi ez que la tête de mesure
et le capteur de
1
mesure soient propres.
4. Appuyez simultanément à plusieurs reprises sur la
touche «FOREHEAD»
et sur la touche «EAR» 2
3
jusqu’à ce que «Food» soit affi ché sur l’écran à
cristaux liquides
(ill. E).
4
5. Tenez la tête de mesure à 1 cm du liquide / de la
surface dont vous voulez mesurer la température.
6. Appuyez sur la touche «EAR»
pour déclencher
2
la mesure.
7. Vous pouvez alors lire sur l’écran à cristaux liquides
4
le résultat de la mesure (ill. E).
8. L’affi chage peut avoir lieu aussi bien en °C qu’en °F
(voir «Fonctions / analyse des problèmes – Sélection
de l’unité de température»).
23 FR/BE
Page 24

9. Appuyez à nouveau sur la touche «EAR» 2 pour
procéder à d’autres mesures.
10. L’appareil se coupe automatiquement s’il n’est pas
actionné pendant plus d’une minute. Il n’y a pas de
mise en mémoire dans ce mode de mesure.
Pour revenir au mode standard, procédez comme suit:
1. Appuyez simultanément à plusieurs reprises sur la
touche «FOREHEAD»
et sur la touche «EAR» 2
3
jusqu’à ce que la température ambiante, la date et
l’heure et le symbole
cristaux liquides
soient affi chés sur l’écran à
(ill. D).
4
2. Vous êtes à nouveau en mode standard.
24 FR/BE
Page 25

Fonctions / analyse des problèmes
Sélection de l’unité de température
Appuyez simultanément sur les touches «EAR» 2 et
«FOREHEAD»
et maintenez-les appuyées jusqu’à
3
ce que «°F» apparaisse derrière l’affi chage de
la température. Le passage de «°F» à «°C» est
possible de la même manière.
La fonction de mémoire
(mode mémoire)
IMPORTANT!
La mesure actuelle est toujours consignée sur le dernier
emplacement de mémoire. Si tous les emplacements de
mémoire sont occupés, la mesure la plus ancienne est
eff acée de la mémoire.
Les prises de température en mode auriculaire et frontal
sont mémorisées automatiquement dans l’appareil. Les
valeurs mesurées sont à nouveau disponibles avec la date,
l’heure et le mode de mesure si l’on actionne la touche
«MEM / SET»
valeur de la dernière mesure, appuyez 1 fois sur la touche
«MEM / SET»
mémoire), le numéro de la mesure, la date, l’heure et
le mode de mesure apparaissent sur l’écran à cristaux
en mode standard. Pour appeler la
9
. Le symbole «Memory» (mode de
9
25 FR/BE
Page 26

liquides 4 (ill. F). Une nouvelle pression sur la touche
«MEM / SET»
permet de faire affi cher l’emplacement
9
de mémoire suivant avec la valeur mesurée correspondante.
Il est possible de mémoriser au plus 9 valeurs mesurées.
Pour revenir au mode standard, procédez comme suit:
1. Appuyez simultanément à plusieurs reprises sur la
touche «FOREHEAD»
et sur la touche «EAR» 2
3
soient affi chés ce que la température ambiante, la
date et l’heure et le symbole
l’écran à cristaux liquides
soient affi chés sur
(ill. D).
4
2. Vous êtes à nouveau en mode standard.
Remplacement de la pile
L’appareil est équipé d’une pile au lithium (CR2032, 3 V )
permettant de très nombreuses mesures. Si la pile est usée,
un message de défaut correspondant vous en avertit
(voir «Fonctions / analyse des problèmes – solutions aux
problèmes»).
Poussez vers le bas le couvercle du compartiment à
pile
. Soulevez la pile 11 à l’aide d’un petit tournevis
10
pour la faire sortir.
Evitez obligatoirement de court-circuiter la pile. Il peut
y avoir court-circuit si le tournevis entre en contact en
même temps avec la pile et les pièces conductrices de
courant du compartiment à pile.
26 FR/BE
Page 27

Mettez la pile neuve dans le compartiment à pile.
Avis: Ce faisant, veillez à respecter la polarité. Le
marquage Plus de la pile doit regarder vers le haut.
Glissez la pile neuve sous l’ergot de métal et enfoncez-la
jusqu’à ce que vous l’entendiez s’encliqueter.
Repoussez le couvercle du compartiment à pile 10
sur le compartiment à pile jusqu’à ce que vous
l’entendiez s’encliqueter (ill. A).
Solutions aux problèmes
Si l’appareil ne peut pas procéder à une mesure dans la
plage prévue, il émet un message de défaut. Ce message
doit contribuer à résoudre le problème.
Problème Cause possible Solution
L‘appareil ne
réagit pas / se
remet automatiquement à zéro
lorsque l‘on retire le fi lm de
Pile vide? Remplacer la pile
Polarité de la
pile erronée?
Contact insuffi -
Retirer la pile, la
mettre en place
correctement
sant à la pile?
protection
Affi chage du
Pile faible Remplacer la pile
symbole de la
pile sur l‘écran
à cristaux
liquides
4
27 FR/BE
Page 28

Problème Cause possible Solution
Affi chage «Lo»
sur l‘écran à
cristaux liquides
(valeur me-
4
surée inférieure
à 32,0°C ou
89,6°F)
Affi chage «Hi»
sur l‘écran à
cristaux liquides
(valeur me-
4
surée supérieure à 42,9°C
ou 109,2°F)
Affi chage
«ErrE» sur
l‘écran à cristaux liquides
4
Affi chage
«ErrU» sur
l‘écran à cristaux liquides
4
Le thermomètre
est-il correctement
positionné dans
l’oreille ou au
niveau du front/
de la tempe ?
Contrôlez le mode
de mesure.
Température ambiante hors de la
plage 15,0 °C 40,0 °C / 59,0 °F 104,0 °F (mode
frontal) et 10,0 °C 40,0 °C / 50,0 °F 104,0 °F (mode
auriculaire et scan).
Pas de résultat à
la suite de la mesure
Suivez le mode
d’emploi pour
vous assurer du
bon positionnement dans l’oreille
ou au niveau du
front/de la tempe.
Suivez le mode
d‘emploi en ce
qui concerne la
manière de procéder correctement aux mesures.
Veillez à ce que la
température ambiante
soit dans une plage
de 15,0 °C - 40,0 °C
/ 59,0 °F - 104,0 °F
(mode frontal) et 10,0
°C - 40,0 °C / 50,0 °
F - 104,0 °F (mode
auriculaire et scan)
Suivez le mode
d‘emploi en ce
qui concerne la
manière de procéder correctement
aux mesures.
28 FR/BE
Page 29

Problème Cause possible Solution
Affi chage
«ErrH» sur
l‘écran à cristaux liquides
Affi chage
«ErrP» sur
Constat d‘un
problème pendant l‘autodiagnostic
4
Problème de
matériel
Contacter le
point S.A.V.
Contacter le
point S.A.V.
l‘écran à cristaux liquides
Nettoyage et entretien
4
Suite à plusieurs mesures de température, l’appareil vous
rappelle de nettoyer le capteur de mesure. Le symbole
nettoyage
apparait pour cela à l’écran LCD 4 et des
20
signaux acoustiques se font entendre. Pour éviter une
contamination avec des germes de maladie, la lentille
doit être essuyée après chaque utilisation avec un chiff on
doux humidifi é d’alcool médical à 70 %. L’utilisation
d’embouts hygiéniques n’est donc pas nécessaire. Attendez
ensuite au moins 30 minutes avant de procéder à une
nouvelle mesure. N’oubliez pas que, en raison du froid
provoqué par l’évaporation de l’alcool, même des quantités
minimes peuvent déjà fausser le résultat.
Nettoyez le boîtier à l’aide d’un chiff on doux légèrement
humide. En cas d’encrassements plus importants, il est
possible d’ajouter un nettoyant doux.
Conservez l’appareil dans un lieu sec et évitez l’exposition
aux rayons directs du soleil. L’appareil peut être rangé à des
températures de –10,0 °C à 55,0 °C (14,0 °F - 131,0 °F).
29 FR/BE
Page 30

Eviter des températures de plus de 80,0 °C! Pour la mesure, il est cependant nécessaire que l’appareil se soit
adapté suffi samment longtemps à la température ambiante, un message de défaut est émis dans le cas
contraire (voir «Fonctions / analyse des problèmes –
solution aux problèmes»). De même, pour la mesure,
une température ambiante de 5,0 °C à 59,9 °C (41,0 °F 139,8 °F) doit être respectée. Si la température ambiant
est en dehors de cette plage, un message de défaut est
émis (voir «Fonctions / analyse des problèmes – solution
aux problèmes»).
Si vous n’utilisez pas l’appareil pendant une durée
prolongée, retirez la pile.
Garantie et S.A.V.
Cet appareil bénéfi cie de 3 ans de garantie
à compter de la date d’achat. L’appareil a
été fabriqué avec soin et consciencieusement contrôlé avant sa distribution. Veuillez
conserver le ticket de caisse en guise de preuve
d’achat. Dans le cas où la garantie s’applique,
veuillez appeler le service après-vente compétent. Cette condition doit être respectée pour
assurer l’expédition gratuite de votre marchandise. Cette garantie concerne uniquement les vices
de fabrication et ne couvre pas les dommages de transport, les pièces d’usure ou les dommages subis par des
éléments fragiles, par ex. le commutateur ou les accus.
Ce matériel est exclusivement destiné à un usage privé et
30 FR/BE
Page 31

non commercial. La garantie est annulée en cas d’utilisation incorrecte et inappropriée, d’utilisation brutale et
en cas d’intervention qui n’aurait pas été réalisée par un
centre de service après-vente agréé.Cette garantie ne
constitue pas une restriction de vos droits légaux. La période sous garantie n‘est pas prolongée par la garantie du
fabricant. Ceci vaut également pour les pièces remplacées et réparées. Tous dommages et défauts éventuellement
déjà présents à l‘achat doivent être notifi és immédiatement
après le déballage, au plus tard deux jours après la date
d‘achat. Toutes réparations eff ectuées après la période
sous garantie sont payantes. Indépendamment de la
garantie commerciale souscrite, le vendeur reste tenu des
défauts de conformité du bien et des vices rédhibitoires
dans les conditions prévues aux articles L211-4 et suivants
du Code de la consommation et aux articles 1641 et
suivants du Code Civil.
FR
Service France
Tel.: 0800 919270
E-Mail: [email protected]
IAN 106635
BE
Service Belgique
Tel.: 070 270 171 (0,15 EUR/Min.)
E-Mail: [email protected]
IAN 106635
Heures de service de notre hotline :
du lundi au vendredi de 8 h à 20 h (HEC)
31 FR/BE
Page 32

Recyclage
L’emballage se compose de matières
recyclables qui peuvent être mises au
rebut dans les déchetteries locales.
Les possibilités de recyclage des produits usés sont à
demander auprès de votre municipalité.
Le produit est soumis à la Directive 2012 / 19 / EU.
Afi n de contribuer à la protection de l’environnement, veuillez ne pas jeter votre appareil usé
dans les ordures ménagères, mais le mettre au
rebut de manière adéquate. Renseignez-vous
auprès des services municipaux concernant les
heures d’ouverture des déchetteries.
Les piles défectueuses ou usées doivent être recyclées
conf. à la Directive 2006 / 66 / EC. Rendez les piles
et / ou l’appareil aux organismes de collectes proposés.
Les piles ne font pas partie des
ordures ménagères!
Rendez les piles et / ou le produit aux organismes de
collectes proposés.
32 FR/BE
Page 33

Conformité
En concordance avec les directives européennes suivantes,
le label CE
0197 :
Directive relative aux dispositifs médicaux
93/42/EEC, modifi ée par la directive 2007/47/EC.
La déclaration de conformité correspondante est
déposée chez l’importateur :
KOMPERNASS HANDELS GMBH
BURGSTRASSE 21
44867 BOCHUM
GERMANY
www.kompernass.com
33 FR/BE
Page 34

Fabricant:
Shenzhen Dongdixin
Technology Co., Ltd.
No. 3 Building XiliBaimang
Xusheng Industrial Estate
Nanshan, Shenzhen, China 518108
Tél.: +86 755 27 652 316
E-Mail: [email protected]
Mandataire CE:
Shanghai International
Holding Corp. GmbH (Europe)
Eiff estraße 80
20537 Hamburg, Germany
Tél.: +49 (0) 40 2513175
Téléc.: +49 (0) 40 255726
34 FR/BE
Page 35

Einleitung
Bestimmungsgemäße Verwendung ................... Seite 37
Lieferumfang ....................................................... Seite 38
Teilebeschreibung .............................................. Seite 38
Technische Daten ............................................... Seite 39
Sicherheit
Allgemeine Sicherheitshinweise ........................ Seite 41
Sicherheitshinweise ............................................ Seite 44
Sicherheitshinweise zu Batterien ....................... Seite 44
Vor der Inbetriebnahme
Batteriesicherung entfernen ............................... Seite 46
Betrieb
Datum / Uhrzeit einstellen (Abb. C) .................. Seite 46
Temperaturmessungen ....................................... Seite 47
Funktionen / Fehleranalyse
Temperatureinheit wählen ................................. Seite 55
Die Memory-Funktion (Memory-Modus) .......... Seite 55
Batteriewechsel .................................................. Seite 56
Behebung von Problemen ................................. Seite 57
Reinigung und Pflege................................ Seite 59
Garantie und Service ................................ Seite 60
Entsorgung ....................................................... Seite 62
Konformität ..................................................... Seite 63
35 DE/AT/CH
Page 36
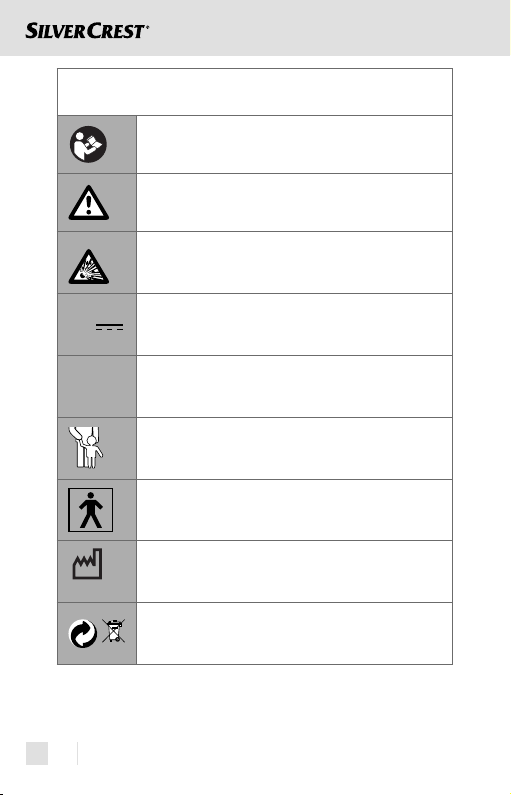
In dieser Bedienungsanleitung / am Gerät
werden folgende Piktogramme verwendet:
Bedienungsanleitung lesen!
Warn- und Sicherheitshinweise beachten!
Explosionsgefahr!
V
mA
2015-01
36 DE/AT/CH
Gleichstrom (Strom- und Spannungsart)
Milliampere
Lebens- und Unfallgefahr für
Kleinkinder und Kinder!
Medizinprodukt Typ BF
Fabrikationsjahr und -monat
Entsorgen Sie Verpackung und
Gerät umweltgerecht!
Page 37

Stirn-und-Ohr-Thermometer
Einleitung
Herzlichen Glückwunsch zum Kauf Ihres neuen
Gerätes. Sie haben sich damit für ein hochwer-
tiges Produkt entschieden.
Die Bedienungsanleitung ist Bestandteil dieses Produkts.
Sie enthält wichtige Hinweise für Sicherheit, Gebrauch
und Entsorgung. Machen Sie sich vor der ersten Inbetriebnahme mit den Funktionen des Gerätes vertraut. Lesen Sie
die nachfolgende Bedienungsanleitung.
Bewahren Sie diese Anleitung auf. Händigen Sie alle
Unterlagen bei Weitergabe des Gerätes an Dritte mit aus.
Bestimmungsgemäße Verwendung
Das Gerät ist im Innenbereich zur Messung von Körpertemperatur an Ohr oder Schläfe / Stirn, Messung der
Raumtemperatur sowie Messung von Oberfl ächentemperaturen im Haushalt vorgesehen. Es ersetzt keineswegs die
Untersuchungen des Arztes. Das Gerät ist ausschließlich
für den privaten Gebrauch bestimmt. Eine andere Verwendung als zuvor beschrieben oder eine Veränderung des
Produkts ist nicht zulässig und kann zu Verletzungen
und / oder Beschädigungen des Produkts führen. Für aus
bestimmungswidriger Verwendung entstandene Schäden
übernimmt der Hersteller keine Haftung.
37 DE/AT/CH
Page 38

Lieferumfang
1 x Stirn-und-Ohr-Thermometer
(inkl. Batterie und Schutzkappe
8
)
1 x Bedienungsanleitung
Teilebeschreibung
1
Messkopf
2
„EAR”-Taste
(Temperaturmessung im Ohr / Scan-Modus)
3
„FOREHEAD”-Taste
(Temperaturmessung an der Stirn / Schläfe)
4
LC-Display
5
LED rot: Fieber 38,0 °C - 42,9 °C
(100,4 °F - 109,2 °F)
6
LED orange: leichte Temperaturerhöhung
37,5 °C - 37,9 °C (99,5 °F - 100,3 °F)
7
LED grün: kein Fieber 34,0 °C - 37,4 °C
(93,2 °F - 99,4 °F)
8
Schutzkappe
9
„MEM / SET”-Taste (Abfrage der Speicher usw.)
10
Batteriefachdeckel
11
Batterie
38 DE/AT/CH
Page 39
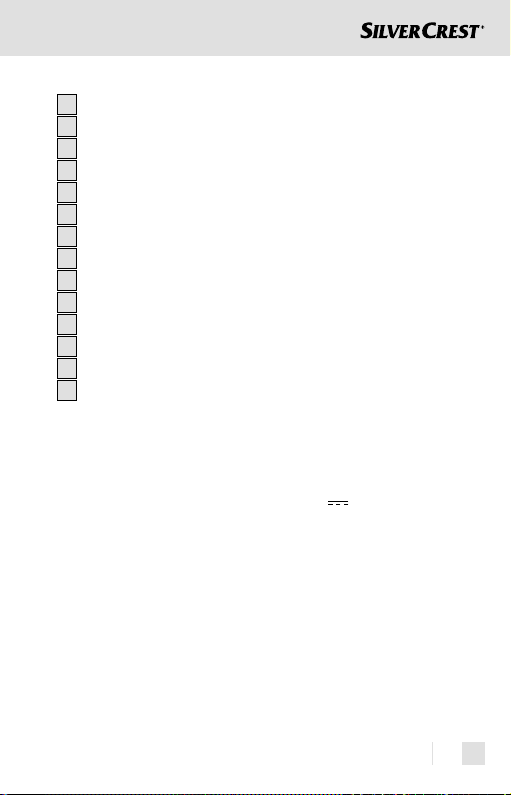
LC-Display
12
Symbol Batteriewechsel
13
Symbol Anzeige Jahr
14
Symbol Anzeige Datum
15
Symbol Ohren-Modus
16
Symbol Standard-Modus
17
Symbol Scan-Modus
18
Temperaturanzeige
19
Symbol Stirn-Modus
20
Symbol Reinigung
21
Datum und Zeit im Standard-Modus
22
Symbol Sleep-Modus
23
Anzeige PM
24
Symbol Setup-Modus
25
Symbol Memory-Modus
Technische Daten
Messverfahren: Infrarot (berührungsfrei)
Stromversorgung: Lithium-Batterie 3 V
CR2032
Stromverbrauch: < 15 mA
Speicher: 9 Temperaturmessungen mit Angabe
von Datum, Uhrzeit und Messmethode
(Ohren- oder Stirnmessung)
Temperaturskalen: °C (°Celsius)
°F (°Fahrenheit)
Uhrzeitanzeige: 12- / 24-Stunden-Format
Automatische
Abschaltung: Automatische Abschaltung
nach 1 Minute
39 DE/AT/CH
Page 40

Messbereich Stirnund Ohren-Modus: 32 °C - 42,9 °C (89,6 °F - 109,2 °F)
Messgenauigkeiten: ± 0,2 °C (± 0,4 °F) im Bereich von
35,5 °C - 42,0 °C (95,9 °F - 107,8 °F)
± 0,3 °C (± 0,5 °F) im Bereich von
32,0 °C - 35,4 °C (89,6 °F - 95,8 °F)
und im Bereich von 42,1 °C - 42,9 °C
(107,9 °F - 109,2 °F)
Messbereich
Raumtemperatur: 5,0 °C - 59,9 °C (41,0 °F - 139,8 °F)
Messgenauigkeit: ± 2,0 °C (± 4,0 °F)
Messbereich
Scan-Modus: –22,0 °C - 80,0 °C (–7,6 °F - 176 °F)
Messgenauigkeit: ± 2,0 °C (± 4,0 °F)
Umgebungstemperatur:
Ohren- und
Scan-Modus: + 10,0 °C - + 40,0 °C
(50,0 °F - 104,0 °F)
Stirn-Modus: + 15,0 °C - + 40,0 °C
(59,0 °F - 104,0 °F)
Lagertemperatur: –10,0 °C - + 55,0 °C
(14,0 °F - 131,0 °F) bei
20%RH* - 85%RH*
Atmosphärendruck: 700 ~ 1060 hPa
Maße: ca. 135 x 35 x 58 mm (L x B x H)
Gewicht: ca. 54 g
*Relative humidity = relative Luftfeuchte
40 DE/AT/CH
Page 41
Sicherheit
BEWAHREN SIE ALLE SICHERHEITSHINWEISE UND ANWEISUNGEN FÜR DIE
ZUKUNFT AUF!
Allgemeine Sicherheitshin-
weise
WARNUNG!
LEBENSUND UNFALLGEFAHR FÜR
KLEINKINDER UND KINDER! Lassen Sie Kinder niemals
unbeaufsichtigt mit dem Verpackungsma-
terial. Es besteht Erstickungsgefahr. Kinder unterschätzen häufi g die Gefahren.
Halten Sie Kinder stets vom Produkt fern.
WARNUNG!
LEBENSGEFAHR!
Batterien können verschluckt werden,
was lebensgefährlich sein kann.
Ist eine Batterie verschluckt worden,
muss sofort medizinische Hilfe in An-
spruch genommen werden.
Dieses Gerät kann von Kindern ab 8 Jah-
ren und darüber sowie von Personen mit
verringerten physischen, sensorischen
oder mentalen Fähigkeiten oder Mangel
41 DE/AT/CH
Page 42

an Erfahrung und Wissen benutzt werden, wenn sie beaufsichtigt oder bezüglich des sicheren Gebrauchs des Gerätes unterwiesen wurden und die daraus
resultierenden Gefahren verstehen. Kinder dürfen nicht mit dem Gerät spielen.
Reinigung und Benutzer-Wartung dürfen
nicht von Kindern ohne Beaufsichtigung
durchgeführt werden.
Setzen Sie das Gerät
- keinen extremen Temperaturen,
- keinen starken Vibrationen,
- keinen starken mechanischen Beanspruchungen,
- keiner direkten Sonneneinstrahlung aus.
Andernfalls droht eine Beschädigung
des Gerätes.
Beachten Sie, dass Beschädigungen
durch unsachgemäße Handhabung,
Nichtbeachtung der Bedienungsanleitung oder Eingriff durch nicht autorisierte
Personen von der Garantie ausgeschlossen sind.
Nehmen Sie das Gerät keinesfalls ausei-
nander.
Durch unsachgemäße Reparaturen können erhebliche Gefahren für den Benutzer
entstehen.
42 DE/AT/CH
Page 43

Lassen Sie Reparaturen nur von Fachkräf ten durchführen.
Nehmen Sie das Gerät nicht in Betrieb,
wenn es beschädigt ist. Verletzungen
und / oder ungenaue Messwerte können
die Folge sein.
Suchen Sie einen Arzt auf, wenn das Thermometer hohe Körpertemperatur-Messwerte
anzeigt! Fieber liegt bei dieser Messmethode oberhalb von 38,0 °C (100,4 °F) vor.
Die rot leuchtende LED 5 ist ein Warnhinweis. Messen Sie mehrmals im Abstand von
jeweils 0,5 bis 1 Stunde, um den Verlauf
der Temperatur zu verfolgen. Ihre Messwerte erleichtern dem Arzt die Diagnose.
Verwenden Sie das Thermometer nicht un-
ter extremen Temperaturbedingunge und /
oder im Außenbereich. Ungenaue Messergebnisse sind die Folge. Beachten Sie die
Vorgaben zu Umgebungs- und Lagertemperaturen (siehe „Technische Daten“).
Der Messfühler sollte weder direkt berührt,
noch angepustet werden. Ungenaue Messergebnisse sind die Folge.
Mobiltelefone sollten nicht in unmittelbarer
Nähe während der Nutzung des Thermometers verwendet werden. Ungenaue Messergebnisse können die Folge sein.
43 DE/AT/CH
Page 44
Sicherheitshinweise
Das Gerät ist ausschließlich für den pri-
vaten Gebrauch bestimmt. Es unterliegt
daher nicht der Eichpfl icht.
Verwenden Sie das Gerät nicht weiter,
wenn es beschädigt ist oder Ihnen die
Messwerte unrealistisch erscheinen. Ziehen Sie das Kapitel „Funktionen /
Fehleranalyse - Behebung von Problemen“ zu Rate bzw. wenden Sie sich an
unsere Servicestelle.
Sicherheitshinweise
zu Batterien
Entfernen Sie die Batterie, wenn sie län-
gere Zeit nicht verwendet worden ist,
aus dem Gerät.
VORSICHT! EXPLOSIONS-
GEFAHR! Laden Sie Batterien
niemals wieder auf!
Achten Sie beim Einlegen auf die richti-
ge Polarität! Diese wird im Batteriefach
angezeigt.
44 DE/AT/CH
Page 45
Reinigen Sie Batterie- und Gerätekontakt
vor dem Einlegen falls erforderlich.
Batterien gehören nicht in den Haus-
müll!
Jeder Verbraucher ist gesetzlich ver-
pfl ichtet, Batterien ordnungsgemäß zu
entsorgen!
VORSICHT! EXPLOSIONS-
GEFAHR! Halten Sie Batterien
von Kindern fern, werfen Sie Batterien nicht ins Feuer, schließen
Sie
Batterien nicht kurz und neh-
men Sie sie nicht auseinander.
Entfernen Sie eine erschöpfte Batterie
umgehend aus dem Gerät. Bei Nichtbeachtung kann die Batterie über ihre Endspannung hinaus entladen werden. Es
besteht dann die Gefahr des Auslaufens. Falls die Batterie in Ihrem Gerät
ausgelaufen sein sollte, entnehmen Sie
diese sofort, um Schäden am Gerät vorzubeugen!
Vermeiden Sie den Kontakt mit Haut,
Augen und Schleimhäuten. Bei Kontakt
mit Batteriesäure spülen Sie die betroff ene Stelle mit reichlich Wasser ab und /
oder suchen Sie einen Arzt auf!
45 DE/AT/CH
Page 46
Vor der Inbetriebnahme
Batteriesicherung entfernen
Schieben Sie den Batteriefachdeckel 10 nach unten.
Ziehen Sie die Schutzfolie an der Lasche aus dem
Batteriefach.
Schieben Sie den Batteriefachdeckel 10 wieder auf
das Batteriefach, bis er hörbar einrastet (Abb. A).
–
Beim Einschalten wird ein interner Abgleich und ein
Selbsttest des LC-Displays durchgeführt.
–
Um nachzuprüfen, ob alle Balken der Ziff ern richtig
angesteuert werden, überprüfen Sie beim Einschalten
das Bild des LC-Displays
4
Ihres Gerätes mit dem
Muster (Abb. B).
Betrieb
Datum / Uhrzeit einstellen (Abb. C)
Diese Einstellung ist nur bei der Erstinbetriebnahme und
nach Batteriewechsel erforderlich.
1.
Drücken und halten Sie die „MEM / SET”-Taste 9 für
zwei Sekunden im Standard-Modus gedrückt. Ein Signalton ertönt. Das Gerät befi ndet sich im Setup-Modus.
2.
Drücken Sie die „MEM / SET”-Taste 9, um zwischen
dem 12- bzw. 24-Stunden-Format zu wählen.
46 DE/AT/CH
Page 47
3. Drücken Sie die „FOREHEAD“-Taste 3. Die Stunden
blinken und können mit der „MEM / SET“-Taste
9
korrigiert werden.
4.
Drücken Sie die „FOREHEAD“-Taste 3 erneut. Die
Minuten blinken und können mit der „MEM / SET“-
9
Taste
korrigiert werden.
Wiederholen Sie die Schritte 3. und 4., um die Werte
für Jahr, Monat und Tag einzustellen bzw. den SleepModus ein- / auszuschalten.
Drücken Sie abschließend die „FOREHEAD“-Taste 3.
Die Einstellungen werden übergenommen und das
Gerät kehrt in den Standard-Modus zurück.
Temperaturmessungen
Raumtemperatur messen (Standard-Modus)
Wenn Sie die Einstellung der Uhrzeit und des Datums
abgeschlossen haben und nichts weiter unternehmen,
wechselt das Gerät zur Schonung der Batterie nach
1 Minute in den Sleep-Modus. Im Auslieferungszustand
ist der Sleep-Modus, angezeigt durch das Symbol
aktiviert und das LC-Display
4
wird komplett ausgeschaltet.
,
Bei deaktiviertem Sleep-Modus bleibt das Gerät eingeschaltet und es werden Uhrzeit und Raumtemperatur weiterhin
angezeigt und 1 x pro Minute aktualisiert. Das LC-Display
4
zeigt Uhrzeit und Datum wechselweise an (Abb. D).
47 DE/AT/CH
Page 48
Körpertemperatur messen (Ohren-Modus)
WICHTIG! Es wird empfohlen, 3 Messungen hinter-
einander am selben Ohr durchzuführen und dabei die
höchste Temperatur als Messwert anzunehmen. Die neue
Messung kann jeweils gestartet werden, wenn die Anzeige
„
“ erlischt.
Verwenden Sie das Thermometer nicht, wenn bei der
Messung Schmerzen auftreten. Der Gehörgang könnte geschädigt werden.
Verwenden Sie das Thermometer nicht bei äußeren
Ohrenerkrankungen (z.B.: Gehörgangsentzündungen,
Ohrmuschelverletzungen). Der Zustand der erkrankten
Stellen könnte sich verschlechtern.
Verwenden Sie das Thermometer nicht unmittelbar
nach dem Baden oder S chwimmen mit feuchtem
Gehörgang. Der Gehörgang könnte geschädigt werden.
Reinigen Sie wegen der Gefahr der Verunreinigung
des Messkopfes
1
das Gerät nach jedem Gebrauch.
Messen Sie in diesem Modus nur die Temperatur im
Ohr und an keiner anderen Körperstelle.
1.
Falls der Sleep-Modus aktiv ist, aktivieren Sie das
Thermometer vor der Messung durch Drücken einer
beliebigen Taste.
2.
Drücken Sie vorsichtig auf die Schutzkappe 8 und
entfernen Sie sie ohne Kraftaufwendung mit einer
leichten Drehbewegung.
3.
Überzeugen Sie sich, dass der Messkopf 1 und der
Messfühler sauber sind.
48 DE/AT/CH
Page 49
4. Reinigen Sie vorsichtig den Gehörgang des Ohres mit
einem Wattestäbchen.
5.
Ziehen Sie die Ohrmuschel leicht in Richtung Hinter-
kopf schräg nach oben / nach hinten, damit der
Gehörgang frei zugänglich wird und sich keine Hindernisse zwischen Messfühler und Trommelfell
befi nden.
6.
Halten Sie die Ohrmuschel im leicht gezogenen
Zustand und führen nun den Messkopf
1
vorsichtig
in den Gehörgang ein.
7.
Drücken Sie kurz die „EAR“-Taste 2. Es erscheint das
Symbol
im LC-Display 4 und nach einem Signalton
beginnt die Messung.
8.
Das Ende der Messung wird durch 2 Signaltöne
signalisiert.
9.
Nun können Sie das Messergebnis auf dem LC-Display
4
ablesen. Gleichzeitig leuchtet eine der 3 LEDs.
Hinweis: LED grün
7
: kein Fieber 34,0 °C - 37,4 °C
(93,2 °F - 99,4 °F)
LED orange
6
: leichte Temperaturerhöhung
37,5 °C - 37,9 °C (99,5 °F - 100,3 °F)
5
LED rot
: Fieber 38,0 °C - 42,9 °C
(100,4 °F - 109,2 °F)
10.
Die Anzeige kann sowohl in „°C“ als auch in „°F“
erfolgen (siehe “Funktionen / Fehleranalyse Temperatureinheit wählen“).
11.
Warten Sie, bis die Anzeige „ “ erlischt, bevor Sie
mit einer neuen Messung beginnen.
49 DE/AT/CH
Page 50
Hinweis: Das Ausschalten des Gerätes erfolgt automatisch,
wenn es länger als 1 Minute nicht betätigt wird. Bei aktiviertem Sleep-Modus schaltet sich das LC-Display
4
aus.
Bei deaktiviertem Sleep-Modus schaltet das Gerät in den
Standard-Modus. Wenn das Thermometer unter normalen
Bedingungen betrieben wurde, wird immer das Ergebnis der
jeweils letzten Messung vor dem Ausschalten automatisch
gespeichert. Der Messwert steht mit Datum, Uhrzeit und
Messmodus wieder zur Verfügung, wenn die „MEM / SET“-
9
Taste
erneut betätigt wird. Das Gerät hat 9 Speicherplätze (siehe Kapitel „Funktionen / Fehleranalyse - Die
Memory-Funktion“).
Körpertemperatur messen (Stirn-Modus)
WICHTIG! Es wird empfohlen, 3 Messungen hinter-
einander an derselben Stelle durchzuführen und dabei
die höchste Temperatur als Messwert anzunehmen.
Bei unterschiedlichen Raumtemperaturen das Gerät zur
„Akklimatisierung” mindestens 20 bis 30 Minuten in
den Raum legen, in welchem die Messung erfolgen soll.
Bevor Sie Ihre Körpertemperatur messen, sollten Sie
sich ca. 5 Minuten entspannen.
Körperliche Aktivitäten oder ein Bad sollten mindestens
30 Minuten zurückliegen, damit ein möglichst genaues
Messergebnis erzielt werden kann.
Achten Sie auch darauf, dass die Stirn bzw. Schläfe
sauber ist, frei von Verletzungen und sich weder
Schweiß, Kosmetika oder Salbe darauf befi ndet.
50 DE/AT/CH
Page 51
Merken Sie sich, mit welchem Messverfahren Sie die
Temperatur gemessen haben und teilen Sie dies auch
Ihrem Arzt mit.
1.
Falls der Sleep-Modus aktiv ist, aktivieren Sie das
Thermometer vor der Messung durch Drücken einer
beliebigen Taste.
2.
Drücken Sie vorsichtig auf die Schutzkappe 8 und
entfernen Sie sie ohne Kraftaufwendung mit einer
leichten Drehbewegung.
3.
Überzeugen Sie sich, dass der Messkopf 1 und der
Messfühler sauber sind.
4.
Halten Sie den Messfühler mit einem Abstand von
1 cm an Stirn oder Schläfe.
5.
Drücken Sie nun zum Starten der Messung auf die
„FOREHEAD”-Taste
im LC-Display
3
. Es erscheint das Symbol
4
und nach einem Signalton beginnt
die Messung.
6. Das Ende der Messung wird durch 2 Signaltöne
signalisiert.
7. Nun können Sie das Messergebnis auf dem LC-Display
4
ablesen. Gleichzeitig leuchtet eine der 3 LEDs.
Hinweis: LED grün
7
: kein Fieber 34,0 °C - 37,4 °C
(93,2 °F - 99,4 °F)
LED orange
6
: leichte Temperaturerhöhung
37,5 °C - 37,9 °C (99,5 °F - 100,3 °F)
5
LED rot
: Fieber -38,0 °C - 42,9 °C
(100,4 °F - 109,2 °F)
51 DE/AT/CH
Page 52

8. Die Anzeige kann sowohl in „°C“ als auch in „°F“
erfolgen (siehe “Funktionen / Fehleranalyse Temperatureinheit wählen“).
9. Wiederholen Sie Schritt 3. bis 6., um weitere Messungen
durchzuführen.
Hinweis: Das Ausschalten des Gerätes erfolgt automatisch, wenn es länger als 1 Minute nicht betätigt wird. Bei
aktiviertem Sleep-Modus schaltet sich das LC-Display
4
aus. Bei deaktiviertem Sleep-Modus schaltet das Gerät
in den Standard-Modus. Wenn das Thermometer unter
normalen Bedingungen betrieben wurde, wird immer das
Ergebnis der jeweils letzten Messung vor dem Ausschalten
automatisch gespeichert. Der Messwert steht mit Datum,
Uhrzeit und Messmodus wieder zur Verfügung, wenn die
„MEM / SET“-Taste
9
erneut betätigt wird. Das Gerät
hat 9 Speicherplätze (siehe „Funktionen / Fehleranalyse Die Memory-Funktion“).
Benutzung als Thermometer im Haushalt
(Scan-Modus)
Das Thermometer lässt sich auch im Haushalt für
berührungsfreie Temperaturmessungen im Bereich von
–22,0 °C - 80,0 °C (-7,6 °F - 176,0 °F) benutzen.
ACHTUNG! Diesen Modus nicht für Messungen
der Körpertemperatur verwenden.
–
Bei dieser Messung wird die aktuelle Oberfl ächentem-
peratur des Gegenstandes angezeigt.
52 DE/AT/CH
Page 53

Diese kann sich von seiner Innentemperatur unterscheiden, besonders, wenn die Oberfl äche der Sonneneinstrahlung oder einem Luftzug ausgesetzt ist!
Das Thermometer misst bauartbedingt den exakten Wert,
wenn sein Gehäuse Raumtemperatur angenommen hat.
Behalten Sie es zur Messung deshalb nicht zu lange
in der Hand und halten Sie es von direkter Sonnenstrahlung fern!
Benutzen Sie das Gerät nicht sofort nach der Reinigung
des Messkopfes
1
. Die Verdunstungskälte des Reini-
gungsmittels kann das Messergebnis verfälschen.
Beispiel-Anwendungen:
- Milchtemperatur im Babyfl äschchen
- Badewassertemperatur
1.
Falls der Sleep-Modus aktiv ist, aktivieren Sie das
Thermometer vor der Messung durch Drücken einer
beliebigen Taste.
2.
Drücken Sie vorsichtig auf die Schutzkappe 8 und
entfernen Sie sie ohne Kraftaufwendung mit einer
leichten Drehbewegung.
3.
Überzeugen Sie sich, dass der Messkopf 1 und
der Messfühler sauber sind.
4. Drücken Sie gleichzeitig die „FOREHEAD“-Taste
und die „EAR“-Taste
2
so oft, bis im LC-Display 4
3
„Food“ angezeigt wird (Abb. E).
53 DE/AT/CH
Page 54

5. Halten Sie den Messkopf in einer Entfernung von
1 cm an die Flüssigkeit und / oder Oberfl äche, deren
Temperatur Sie messen wollen.
6.
Drücken Sie die „EAR“-Taste 2, um die Messung zu
starten.
7.
Nun können Sie das Messergebnis auf dem LC-Display
4
ablesen (Abb. E).
8.
Die Anzeige kann sowohl in „°C“ als auch in „°F“
erfolgen (siehe “Funktionen / Fehleranalyse Temperatureinheit wählen“).
9.
Drücken Sie erneut die „EAR“-Taste 2, um weitere
Messungen durchzuführen.
10.
Das Ausschalten des Gerätes erfolgt automatisch, wenn
es länger als 1 Minute nicht betätigt wird. Eine Speicherung im Gerät erfolgt für diese Anwendung nicht.
Um in den Standard-Modus zurückzukehren, gehen Sie
wie folgt vor:
1. Drücken Sie gleichzeitig die „FOREHEAD“-Taste
und die „EAR“-Taste
2
so oft, bis im LC-Display 4
wieder Raumtemperatur, Datum und Uhrzeit, sowie
das Symbol
angezeigt werden (Abb. D).
2. Sie befi nden sich jetzt wieder im Standard-Modus.
3
54 DE/AT/CH
Page 55

Funktionen / Fehleranalyse
Temperatureinheit wählen
Drücken und halten Sie gleichzeitig die „EAR“-Taste
2
und die „FOREHEAD“-Taste 3, bis hinter der
Temperaturanzeige „°F“ erscheint. Ein Umschalten von
„°F“ in „°C“ ist mit der gleichen Prozedur möglich.
Die Memory-Funktion
(Memory-Modus)
WICHTIG!
Die aktuelle Messung wird stets auf dem letzten Speicherplatz abgelegt. Sind alle Speicherplätze belegt, wird immer
die älteste Messung aus dem Speicher entfernt.
Die Messungen im Ohren- und Stirn-Modus werden automatisch im Gerät gespeichert. Die Messwerte stehen mit
Datum, Uhrzeit und Messmodus wieder zur Verfügung, wenn
die „MEM / SET“-Taste
Drücken Sie 1 x die „MEM / SET”-Taste
der letzten Messung aufzurufen. Im LC-Display
das Symbol „Memory“ (Memory-Modus), die Nummer
der Messung, Datum, Uhrzeit und Messmodus (Abb. F).
Durch erneutes Drücken der „MEM / SET”-Taste
der nächste Speicherplatz mit dem dazugehörigen Messwert.
Es können maximal 9 Messwerte gespeichert werden. Um
in den Standard-Modus zurückzukehren, gehen Sie wie
folgt vor:
9
im Standard-Modus betätigt wird.
9
, um den Wert
4
erscheint
9
erscheint
55 DE/AT/CH
Page 56

1. Drücken Sie gleichzeitig die „FOREHEAD“-Taste 3
und die „EAR“-Taste
2
so oft, bis im LC-Display 4
wieder Raumtemperatur, Datum und Uhrzeit, sowie
das Symbol
angezeigt werden (Abb. D).
2. Sie befi nden sich jetzt wieder im Standard-Modus.
Batteriewechsel
Das Gerät ist mit einer Lithium-Batterie (CR2032, 3 V )
ausgestattet, die sehr viele Messungen ermöglicht. Ist die
Batterie leer, werden Sie durch eine entsprechende Fehlermeldung darauf aufmerksam gemacht (siehe „Funktionen /
Fehleranalyse - Behebung von Problemen“).
Schieben Sie den Batteriefachdeckel 10 nach unten.
Hebeln Sie mit einem kleinen Schraubendreher die
11
Batterie
heraus.
Vermeiden Sie unbedingt einen Kurzschluss der Batterie.
Ein Kurzschluss kann entstehen, wenn der Schraubendreher gleichzeitig mit der Batterie und leitenden Teilen im Batteriefach in Berührung kommt.
Setzen Sie die neue Batterie in das Batteriefach ein.
Hinweis: Achten Sie dabei auf die richtige Polarität.
Die Beschriftung der Batterie muss mit dem Pluszeichen
nach oben zeigen.
Schieben Sie die neue Batterie unter die Metallnase
und drücken Sie sie nach unten, bis sie hörbar einrastet.
Schieben Sie den Batteriefachdeckel 10 wieder auf
das Batteriefach, bis er hörbar einrastet (Abb. A).
56 DE/AT/CH
Page 57

Behebung von Problemen
Falls das Gerät eine Messung nicht im vorgesehenen
Bereich durchführen kann, gibt es eine Fehlermeldung
aus. Diese Meldung soll zur Problembehebung beitragen.
Fehler Problem Beseitigung
Gerät reagiert
nicht / setzt sich
automatisch
zurück beim
Entfernen der
Schutzfolie
Anzeige Batteriesymbol auf
LC-Display
Anzeige „Lo“
im LC-Display
(Messwert
4
unterhalb
32,0°C oder
89,6°F)
Anzeige „Hi“
auf LC-Display
(Messwert
4
über 42,9°C
oder 109,2°F)
Batterie leer? Neue Batterie
Batteriepolarität
falsch?
Kontakt zur Batterie
mangelhaft?
Schwache
Batterie
4
Thermometer richtig im Ohr oder
an Stirn / Schläfe
positioniert?
Überprüfen Sie
den Messmodus.
einsetzen
Batterie entfernen,
korrekt einsetzen
Neue Batterie
einsetzen
Befolgen Sie die
Bedienungsanleitung hinsichtlich
Positionierung im
Ohr oder an
Stirn / Schläfe.
Befolgen Sie die
Bedienungsanleitung hinsichtlich
korrekter
Messungen.
57 DE/AT/CH
Page 58

Fehler Problem Beseitigung
Anzeige „ErrE“
LC-Display
4
Umgebungstemperatur außerhalb
des Bereiches
15,0 °C - 40,0 °C /
59,0 °F - 104,0 °F
(Stirn-Modus) und
10,0 °C - 40,0 °C /
50,0 °F - 104,0 °F
(Ohren- und
Scan-Modus).
Sorgen Sie für
eine Umgebungstemperatur
im Bereich
15,0 °C - 40,0 °C /
59,0 °F - 104,0 °F
(Stirn-Modus) und
10,0 °C - 40,0 °C /
50,0 °F - 104,0 °F
(Ohren- und
Scan-Modus)
Anzeige „ErrU“
im LC-Display
4
Anzeige „ErrH“
im LC-Display
4
Anzeige „ErrP“
im LC-Display
4
58 DE/AT/CH
Kein Messergebnis nach Messung.
Befolgen Sie die
Bedienungsanleitung hinsichtlich
korrekter
Messungen.
Fehler während
Selbsttest festge-
Kontaktieren Sie
die Servicestelle.
stellt.
Hardwareproblem Kontaktieren Sie
die Servicestelle.
Page 59

Reinigung und Pfl ege
Nach einigen Temperaturmessungen erinnert Sie das
Gerät daran, den Messfühler zu reinigen. Hierzu erscheint
das Symbol Reinigung
20
im LC-Display 4 und
Signaltöne erklingen.
Die Linse in der Öff nung des Messfühlers ist das
empfi ndlichste Teil des Gerätes.
Seien Sie sehr vorsichtig, wenn eine Reinigung erforderlich
wird. Zur Vermeidung einer Verunreinigung mit Krankheitskeimen muss nach jedem Gebrauch die Linse mit einem
weichen Tuch, das mit 70 %-igem medizinischem Alkohol
befeuchtet ist, abgerieben werden. Die Verwendung von
Hygieneaufsätzen ist daher nicht notwendig. Warten Sie
danach mindestens 30 Minuten, bis eine neue Messung
erfolgen kann. Bedenken Sie, dass wegen der Verdunstungskälte des Alkohols auch schon kleinste Mengen das Ergebnis
verfälschen können.
Reinigen Sie das Gehäuse mit einem weichen, leicht
angefeuchteten Tuch. Bei stärkeren Verschmutzungen kann
dem Reinigungswasser auch ein mildes Reinigungsmittel
zugegeben werden.
Bewahren Sie das Gerät in einer trockenen Umgebung
auf und vermeiden Sie die Bestrahlung mit direktem
Sonnenlicht. Das Gerät kann bei Temperaturen von
–10,0 °C
- 55,0 °C (14,0 °F - 131,0 °F) gelagert werden.
Temperaturen über 80,0 °C sind zu vermeiden! Zum
Messen ist es jedoch unbedingt notwendig, dass das Gerät
ausreichend lange an die Raumtemperatur angepasst wird,
59 DE/AT/CH
Page 60

anderenfalls wird eine Fehlermeldung ausgegeben (siehe
„Funktionen / Fehleranalyse - Behebung von Problemen“).
Ebenso ist zum Messen eine Raumtemperatur von
5,0 °C
- 59,9 °C (41,0 °F - 139,8 °F) einzuhalten. Liegt
sie außerhalb dieses Bereiches, erfolgt eine Fehlermeldung (siehe „Funktionen / Fehleranalyse - Behebung von
Problemen“).
Entfernen Sie die Batterie, wenn Sie das Gerät längere
Zeit nicht einsetzen.
Garantie und Service
Sie erhalten auf dieses Gerät 3 Jahre Garantie
ab Kaufdatum. Das Gerät wurde sorgfältig
produziert und vor Anlieferung gewissenhaft
geprüft. Bitte bewahren Sie den Kassenbon als
Nachweis für den Kauf auf. Bitte setzen Sie sich
im Garantiefall mit Ihrer Servicestelle telefonisch
in Verbindung. Nur so kann eine kostenlose
Einsendung Ihrer Ware gewährleistet werden.
Die Garantieleistung gilt nur für Material- oder Fabrikationsfehler, nicht aber für Verschleißteile oder für Beschädigungen
an zerbrechlichen Teilen, z.B. Schalter oder Akkus. Das
Produkt ist lediglich für den privaten und nicht für den
gewerblichen Gebrauch bestimmt. Bei missbräuchlicher
und unsachgemäßer Behandlung, Gewaltanwendung und
bei Eingriff en, die nicht von unserer autorisierten ServiceNiederlassung vorgenommen wurden, erlischt die Garantie.
Ihre gesetzlichen Rechte werden durch diese Garantie
60 DE/AT/CH
Page 61
nicht eingeschränkt. Die Garantiezeit wird durch die Gewährleistung nicht verlängert. Dies gilt auch für ersetzte
und reparierte Teile. Eventuell schon beim Kauf vorhandene Schäden und Mängel müssen sofort nach dem Auspacken gemeldet werden, spätestens aber zwei Tage nach
Kaufdatum. Nach Ablauf der Garantiezeit anfallende Reparaturen sind kostenpfl ichtig.
DE
Service Deutschland
Tel.: 0800 5435 111 (Kostenfrei aus dem
dt. Festnetz/Mobilfunknetz)
E-Mail: [email protected]
IAN 106635
AT
Service Österreich
Tel.: 0820 201 222 (0,15 EUR/Min.)
E-Mail: [email protected]
IAN 106635
CH
Service Schweiz
Tel.: 0842 665566 (0,08 CHF/Min.,
Mobilfunk max. 0,40 CHF/Min.)
E-Mail: [email protected]
IAN 106635
Erreichbarkeit Hotline:
Montag bis Freitag von 8:00 Uhr – 20:00 Uhr (MEZ)
61 DE/AT/CH
Page 62

Entsorgung
Die Verpackung besteht aus umweltfreundlichen
Materialien, die Sie über die örtlichen Recyclingstellen entsorgen können.
Möglichkeiten zur Entsorgung des ausgedienten Produkts
erfahren Sie bei Ihrer Gemeinde oder Stadtverwaltung.
Das Produkt unterliegt der Richtlinie 2012/19/EU
(WEEE). Werfen Sie Ihr Produkt, wenn es ausgedient hat, im Interesse des Umweltschutzes
nicht in den Hausmüll, sondern führen Sie es
einer fachgerechten Entsorgung zu. Über Sammelstellen und deren Öff nungszeiten können Sie sich
bei Ihrer zuständigen Verwaltung informieren.
Defekte oder verbrauchte Batterien müssen gemäß Richtlinie
2006/66/EC recycelt werden. Geben Sie Batterien
und / oder das Gerät über die angebotenen Sammeleinrichtungen zurück.
Batterien gehören nicht
in den Hausmüll!
Geben Sie die Batterien und / oder das Produkt über die
angebotenen Sammeleinrichtungen zurück.
62 DE/AT/CH
Page 63

Konformität
In Übereinstimmung mit folgenden Europäischen Richtlinien
wurde auf dem Produkt das CE-Zeichen
angebracht:
Richtlinie für Medizinprodukte 93/42/EEC,
geändert durch die Richtlinie 2007/47/EC.
Die dazugehörige Konformitätserklärung ist beim
Importeur hinterlegt:
KOMPERNASS HANDELS GMBH
BURGSTRASSE 21
44867 BOCHUM
GERMANY
www.kompernass.com
0197
63 DE/AT/CH
Page 64

Hersteller:
Shenzhen Dongdixin
Technology Co., Ltd.
No. 3 Building XiliBaimang
Xusheng Industrial Estate
Nanshan, Shenzhen, China 518108
Tel.: +86 755 27 652 316
E-Mail: [email protected]
EU-Bevollmächtigter:
Shanghai International
Holding Corp. GmbH (Europe)
Eiff estraße 80
20537 Hamburg, Germany
Tel.: +49 (0) 40 2513175
Fax: +49 (0) 40 255726
64 DE/AT/CH
Page 65

Introduction
Intended use ......................................................Page 67
Scope of delivery .............................................. Page 68
Description of parts ...........................................Page 68
Technical data ...................................................Page 69
Safety
General safety instructions ...............................Page 71
Safety instructions ..............................................Page 74
Safety Instructions for the Battery ..................... Page 74
Before getting started
Removing the battery fuse ................................Page 76
Operation
Setting the date / time (Fig. C)..........................Page 76
Temperature measurements .............................. Page 77
Functions / error analysis
Selecting the temperature unit ..........................Page 84
The memory function (memory mode) ............. Page 84
Changing the battery ........................................Page 85
Problem-solving ................................................. Page 86
Cleaning and care ...................................... Page 88
Guarantee and Service ...........................Page 89
Disposal ............................................................ Page 90
Conformity ...................................................... Page 91
65 GB
Page 66

The following pictograms are used in these
directions for use or on the device itself:
Read the directions for use!
Please observe the warning and
safety instructions!
Risk of explosion!
V
mA
2015-01
66 GB
Direct current (type of current and voltage)
Milliampere
Danger to life and danger of accidents
for infants and children!
Medical device type BF
Year and month of manufacture
Dispose of the packaging and appliance
in an environmentally friendly way!
Page 67

Forehead & Ear Thermometer
Introduction
Congratulations on the purchase of your new
appliance. You have clearly decided in favour
of a quality product.
These operating instructions are a part of this product.
They contain important information in regard to safety,
use and disposal. Before starting the device up for the fi rst
time, familiarise yourself with its functions. Read the following directions for use. Please keep these instructions in a
safe place. When handing the device on to a third party,
hand all instructions on, too.
Intended use
The device is intended for indoor use for measuring the
body temperature at the ear or temple/forehead, measuring the room temperature and measuring surface temperatures in the household. In no way does it replace an examination by a qualifi ed doctor. This appliance is solely
intended for private use. Any use other than that previously described or any change to the product is not permitted
and may lead to injuries and / or damage to the product.
The manufacturer does not assume any liability for damage arising from improper use.
67 GB
Page 68

Scope of delivery
1 x Forehead and ear thermometer
(incl. battery and protective head guard
1 x Directions for use
Description of parts
Measuring head
1
“EAR” button
2
(Temperature measurement in the ear / scan mode)
“FOREHEAD” button
3
(Temperature measurement at forehead / temple)
LC display
4
Red LED: Fever 38.0 °C - 42.9 °C
5
(100.4 °F - 109.2 °F)
Orange LED: slightly elevated temperature
6
37.5 °C - 37.9 °C (99.5 °F - 100.3 °F)
Green LED: no fever 34.0 °C - 37.4 °C
7
(93.2 °F - 99.4 °F)
Protective cap
8
“MEM / SET” button (Interrogate memory etc.)
9
Battery compartment lid
10
Battery
11
)
8
68 GB
Page 69
LC display
Battery change symbol
12
Year display symbol
13
Date display symbol
14
Ear mode symbol
15
Standard mode symbol
16
Scan mode symbol
17
Temperature display
18
Forehead mode symbol
19
Cleaning symbol
20
Date and time in standard mode
21
Sleep mode symbol
22
PM display
23
Setup mode symbol
24
Memory mode symbol
25
Technical data
Measurement
method: Infrared (non-contact)
Electrical
power supply: Lithium battery 3 V
CR2032
Power consumption: < 15 mA
Memory: 9 temperature measurements with
details of date, time and measurement
method (ear or forehead measurement)
69 GB
Page 70

Temperature scale: °C (°Celsius)
°F (°Fahrenheit)
Time display: 12 / 24-hour format
Automatic switch-off : Automatic switch-off after 1 minute
Measurement range
forehead & ear mode: 32°C - 42.9°C (89.6°F - 109.2°F)
Measurement
accuracies: ± 0.2°C (± 0.4°F) in the range
from 35.5°C - 42.0°C
(95.9°F - 107.8°F)
± 0.3°C (± 0.5°F) in the range from
32.0°C - 35.4°C (89.6°F - 95.8°F)
and in the range from 42.1°C -
42.9°C (107.9°F - 109.2°F)
Measurement range
room temperature: 5.0°C - 59,9°C
(41.0°F - 139.8°F)
Measurement
accuracy: ± 2.0°C (± 4.0°F)
Measurement
range scan mode: –22.0°C - 80.0°C
(–7.6°F - 176°F)
Measurement
accuracy: ± 2.0°C (± 4.0°F)
Ambient temperature
Ear and scan mode: +10.0 °C - +40.0 °C
(50.0 °F - 104.0 °F)
Forehead mode: +15.0 °C - +40.0 °C
(59.0 °F - 104.0 °F)
70 GB
Page 71
Storage temperature: –10.0 °C - +55.0 °C
(14.0°F - 131.0°F) at
20 % RH* - 85 % RH*
Atmospheric pressure: 700 ~ 1060 hPa
Dimensions: approx. 135 x 35 x 58 mm (L x B x H)
Weight: approx. 54 g
*RH = relative humidity
Safety
PLEASE KEEP ALL SAFETY INFORMATION AND INSTRUCTIONS FOR
FUTURE USE!
General safety instructions
WARNING!
DANGER
TO LIFE AND DANGER OF
ACCIDENTS FOR INFANTS
AND CHILDREN! Never leave
children alone and unsupervised with
the packaging material. Danger of suff ocation. Children often underestimate
risks. Always keep children away
from the product.
71 GB
Page 72

WARNING!
DANGER TO LIFE!
Batteries can be swallowed, which may
represent a danger to life. If a battery has
been swallowed, medical help is required
immediately.
This device may be used by children
aged 8 over and by persons with reduced physical, sensory or mental capabilities or lack of experience and knowledge, provided that they are under
supervision or have been told how to use
the device safely and are aware of the
potential risks. Children must not play
with the device. Cleaning and user maintenance tasks must not be carried out by
children unless they are supervised.
Do not expose the device to
- extreme temperatures,
- strong vibrations,
- heavy mechanical loads,
- direct sunlight.
Otherwise there is a danger that the device will be damaged.
Please note that the guarantee does not
cover damage caused by incorrect handling, non-compliance with the operating
instructions or interference with the device by unauthorised individuals.
72 GB
Page 73

Under no circumstances should you take
the device apart. Improper repairs may
place the user in considerable danger.
Repairs should only be carried out by
specialist personnel.
Do not use the device if it is damaged.
Otherwise the consequence may be injuries and / or inaccurate readings.
Please consult a doctor if the thermome-
ter indicates that the body temperature
measured is high. With this measuring
method, a fever is indicated if the temperature is above 38.0 °C (100.4 °F).
The red LED 5 is a warning. Please take
several measurements at intervals of 0.5
to 1 hour in order to follow the progression of the temperature. The values you
measure will help your doctor make a
diagnosis.
Do not use the temperature under ex-
treme temperature conditions and / or
outdoors. This will result in inaccurate
measuring results. Please observe the details regarding
ambient and storage tem-
peratures (see “Technical data”).
The measurement sensor should not be
touched directly or be blown on. This will
result in inaccurate measuring results.
73 GB
Page 74
Mobile telephones should not be used in
the immediate vicinity when the thermom-
eter is being used. Otherwise the consequence may be inaccurate measurement
results.
Safety instructions
This appliance is solely intended for pri-
vate use. That is why it is not subject to
mandatory verifi cation.
Discontinue using the appliance if it is
damaged or if you feel that the meas-
ured values are unrealistic. Consult the
chapter “Functions/Error analysis - Trou-
bleshooting” for advice or contact our
service centre.
Safety Instructions
for the Battery
Remove the battery from the device if it
is not going to be used for a prolonged
period.
CAUTION! DANGER OF EXPLOSION!
never be recharged!
74 GB
The battery must
Page 75
Ensure correct polarity when inserting
the battery! This is indicated in the bat-
tery compartment.
If necessary, clean the battery and de-
vice contacts before inserting the battery.
Batteries must not be disposed of in the
normal domestic waste!
Every consumer is legally obliged to dis-
pose of batteries in the proper manner!
CAUTION! RISK OF EX-
PLOSION! Keep batteries
away from children; do not
throw batteries into a fi re; do not
short-circuit the batteries and do
not take them apart.
Avoid contact with the skin, eyes and
mucous membranes. Any parts of the
body coming into contact with battery
acid should be rinsed off with copious
amounts of water and / or a doctor
contacted if necessary!
Avoid contact with skin, eyes and mu-
cous membranes. Upon contact with
battery acid, rinse the aff ected area
with lots of water and / or consult a
doctor!
75 GB
Page 76
Before getting started
Removing the battery fuse
Push the battery compartment lid 10 downwards.
Pull the tab of the protective fi lm out of the battery
compartment.
Push the battery compartment lid 10 onto the battery
compartment until it clicks into place (Fig. A).
– When it is switched on, an internal alignment and a
self-test of the LC display are carried out.
– To verify that all of the bars of the numbers are being
managed correctly, when you switch on check the
display of the LC display
4
on your appliance
against the example (Fig. B).
Operation
Setting the date / time (Fig. C)
You only have to set the date and time when you operate
the appliance for the fi rst time and after you change the
battery.
1. Press and hold the “MEM / SET” button
down for
9
two seconds in standard mode. An acoustic signal
will sound. The device is now in set-up mode.
2. Press the “MEM / SET” button
to choose between
9
the 12-hour or 24-hour format.
3. Press the “FOREHEAD” button
and can be corrected with the “MEM / SET” button
76 GB
. The hours will fl ash
3
9
.
Page 77

4. Press the “FOREHEAD” button 3 again. The minutes
will fl ash and can be corrected with the “MEM / SET”
button
.
9
Repeat steps 3 and 4 to set the values for the year,
month and day or to switch the sleep mode on or off .
Finally, press the “FOREHEAD” button 3. The settings will
be taken over and the appliance reverts to standard mode.
Temperature measurements
Measuring room temperature (standard mode)
When you have fi nished setting the time and date and do
not carry out any further procedures, the device switches
to sleep mode after 1 minute in order to save the battery.
In the condition as supplied to the customer the sleep
mode is activated, as shown by the
display
is completely switched off . When the sleep
4
symbol, and the LC
mode is deactivated, the device remains switched on,
while the time and room temperature are still shown and
updated once a minute. The LC display
shows
4
the time and date alternately (Illustration D).
Measuring body temperature (ear mode)
IMPORTANT! It is advisable to carry out 3 meas-
urements in a row on the same ear and to take the highest
temperature as the measured value. A new measurement
can be taken when the display “
” goes out.
Do not use the thermometer if pain occurs when the meas-
urement is being taken. This could damage the ear canal.
77 GB
Page 78
Do not use the thermometer with external ear disorders
(e.g. infl ammation of the ear canal, injuries to the outer
ear). The condition of the aff ected areas could worsen.
Do not use the thermometer straight after bathing or
swimming when the ear canal is wet. This could damage the ear canal.
Due to the risk of contamination of the measuring
head
, clean the appliance after every use.
1
In this mode, only measure the temperature in the ear
and at no other place on the body.
1. If the sleep mode has been activated, activate the
thermometer again by pressing any button before
taking the measurement.
2. Carefully press on the protective cap
and remove it
8
with a gentle rotary motion and without using any force.
3. Check that the measuring head
and the measuring
1
sensors are clean.
4. Carefully clean the ear canal with a cotton bud.
5. Pull the outer ear, tilted slightly upwards/to the rear,
towards the back of his head, so that the ear canal is
freely accessible and there are no impediments between the measurement sensor and the eardrum.
6. Please keep the outer ear slightly extended and now
carefully insert the measuring head
7. Briefl y press the “EAR” button
appear in the LC display
4
into the ear canal.
1
. The symbol will
2
and the measurement
will start after an acoustic signal.
8. The end of the measurement is indicated by means of
2 acoustic signals.
78 GB
Page 79
9. Now you can read off the measurement result on the
LC display
. At the same time, one of the 3 LEDs
4
will come on.
Note: LED green
: no fever 34.0 °C - 37.4 °C
7
(93.2 °F - 99.4 °F)
LED orange
: slight increase in temperature
6
37.5 °C - 37.9 °C (99.5 °F - 100.3 °F)
LED red
: fever 38.0 °C - 42.9 °C
5
(100.4 °F - 109.2 °F)
10. Values can be displayed in °C as well as in °F
(see “Functions / error analysis - selecting the
temperature unit”).
11. Wait until the display “
” goes out before you
start taking a new measurement.
Note: The appliance automatically switches off if it is not
operated for longer than 1 minute. When the sleep mode
has been activated, the LC display
switches itself off .
4
When the sleep mode has been deactivated, the appliance
switches to standard mode. If the thermometer has been
operated under normal conditions, the result of the last
measurement taken before the appliance was switched off
is stored. The measured value is available again along
with information on the date, time and measurement mode
when the “MEM / SET” button
is pressed again. The
9
device has 9 storage spaces (see section on “Functions /
error analysis - the memory function”).
79 GB
Page 80

Measuring the body temperature
(forehead mode)
IMPORTANT! It is advisable to carry out 3 meas-
urements in a row at the same place and to take the
highest temperature as the measured value.
With diff erent room temperatures, let the appliance
lie in the room where the temperature is to be taken
for at least 30 minutes to “acclimatise” it.
Before measuring your body temperature, you should
relax for about 5 minutes.
If you have done any physical activity or taken a
bath, wait for at least 30 minutes before taking a
measurement in order to get a measurement that is
as accurate as possible.
Ensure that the forehead or temple is clean, free of
injuries and not covered with sweat, cosmetics or
ointment.
Take a note of what measurement method you used to
measure the temperature and inform your doctor of it.
1. If the sleep mode has been activated, activate the
thermometer again by pressing any button before
taking the measurement.
2. Carefully press on the protective cap
and remove it
8
with a gentle rotary motion and without using any force.
3. Check that the measuring head
and the measuring
1
sensors are clean.
4. Hold the measuring sensor 1 cm away from the
forehead or temple.
80 GB
Page 81
5. To start the measurement, press on the “FOREHEAD”
button
4
. The symbol will appear in the LC display
3
and the measurement will start after an acoustic
signal.
6. The end of the measurement is indicated by 2 acoustic
signals.
7. Now you can read off the measurement result on the
LC display
. At the same time, one of the 3 LEDs
4
will come on.
Note: LED green
no fever 34.0 °C - 37.4 °C
7
(93.2 °F - 99.4 °F)
LED orange
slight increase in temperature
6
37.5 °C - 37.9 °C (99.5 °F - 100.3 °F) LED red fever
38.0 °C - 42.9 °C (100.4 °F - 109.2 °F)
5
8. Values can be displayed in °C as well as in °F
(see “Functions / error analysis - selecting the
temperature unit”).
9. Repeat steps 3 to 6 to carry out further measurements.
Note: The appliance automatically switches off if it is not
operated for longer than 1 minute. When the sleep mode
has been activated, the LC display
switches itself off .
4
When the sleep mode has been deactivated, the appliance
switches to standard mode. If the thermometer has been
operated under normal conditions, the result of the last
measurement taken before the appliance was switched off
is stored. The measured value is available again along
with information on the date, time and measurement mode
when the “MEM / SET” button
is pressed again. The
9
appliance has 9 storage spaces (see “Functions / error
analysis - the memory function”).
81 GB
Page 82

Use as a household thermometer (scan mode)
The thermometer can also be used in the house for
non-contact temperature measurements in the range of
–22.0 °C - 80.0 °C (–7.6 °F - 176.0 °F).
Attention! Do not use this mode for measuring
body temperature.
– With this measurement, the current surface temperature
of the object is displayed. It can be diff erent from its
internal temperature, especially if the surface is exposed
to direct sunlight or a draught!
Due to its design, the thermometer measures the precise
value when its casing has adjusted to room temperature.
That is why you should not hold it in the hand for a
long time when you want to take a measurement and
why you should keep it away from direct sunlight!
Do not use the appliance immediately after cleaning
the measuring head
. The evaporative cooling eff ect
1
of the detergent may falsify the measuring result.
Sample applications:
- The temperature of milk in baby bottles
- The temperature of bathwater
1. If the sleep mode has been activated, activate the
thermometer again by pressing any button before
taking a measurement.
2. Carefully press on the protective cap
and remove
8
it with a gentle rotary motion and without using any
force.
82 GB
Page 83

3. Make sure that the measuring head 1 and the
measuring sensor are clean.
4. Press the “FOREHEAD” button
2
button
repeatedly at the same time until “Food”
is shown in the LC display
3
and the “EAR”
4
(Illustration E).
5. Hold the measuring head at a distance of 1 cm from
the liquid and / or surface whose temperature you
want to measure.
6. Press the “EAR” button
to start the measurement.
2
7. Now you can read off the measurement result on the
LC display
(Illustration E).
4
8. Values can be displayed in °C as well as in °F
(see “Functions / error analysis - selecting the
temperature unit”).
9. Press the “EAR” button
again to carry out further
2
measurements.
10. The appliance automatically switches off if it is not
operated for longer than 1 minute. This application is
not stored in the device.
In order to return to standard mode, proceed as follows:
1. Press the “FOREHEAD” button
2
button
display
repeatedly at the same time until the LC
4
again shows the room temperature, date
and time, as well as the
3
and the “EAR”
symbol (Illustration D).
2. You are now back in standard mode.
83 GB
Page 84
Functions / error analysis
Selecting the temperature unit
Press and hold down the “EAR” button 2 and the
“FOREHEAD” button
3
at the same time until “°F”
appears behind the temperature display. Switching
from “°F” to “°C” is possible with the same procedure.
The memory function (memory mode)
IMPORTANT!
The current measurement is always stored in the last storage
space. When all storage spaces have been occupied, the
oldest measurement is always deleted from the memory.
Measurements taken in ear and forehead mode are
automatically stored in the appliance. The measured
values are available again along with information on the
date, time and measurement mode when the “MEM / SET”
button
SET” button
is operated in standard mode. Press the “MEM /
9
once to retrieve the value of the last
9
measurement. The “Memory” symbol (memory mode), the
number of the measurement, date, time and measurement
mode will appear in the LC display
the “MEM / SET” button
the next storage space along
9
(Fig. F). By pressing
4
with its associated measured value will appear. A maximum
of 9 measurements can be stored.
In order to return to standard mode, proceed as follows:
84 GB
Page 85

1. Press the “FOREHEAD” button 3 and the “EAR”
2
button
display
and time, as well as the
repeatedly at the same time until the LC
4
again shows the room temperature, date
symbol (Illustration D).
2. You are now in standard mode again.
Changing the battery
The appliance is fi tted with a lithium battery (CR2032,
3 V
) that allows a lot of measurements to be taken. If
the battery is empty, you will be made aware of that by
means of an appropriate error message (see “Functions /
error analysis - problem-solving”).
Push the battery compartment lid 10 downwards.
Lever the battery
out with a small screwdriver.
11
Avoid short-circuiting the battery at all cost. A short-
circuit can occur if the screwdriver comes into contact
with the battery and the live parts in the battery
compartment at the same time.
Insert the new battery into the battery compartment.
Note: Ensure correct polarity. The plus sign on the
battery must point upwards.
Push the new battery under the metal nose and press
it down until it clicks into place.
Push the battery compartment lid 10 onto the battery
compartment until it clicks into place (Fig. A).
85 GB
Page 86
Problem-solving
If the appliance cannot take a measurement in the
designated range, it will generate an error message.
This message should help to solve the problem.
Error Problem Solution
Appliance
does not react / automatically resets
itself when
protective fi lm
is removed
Empty battery? Insert a new
battery
Wrong battery
polarity?
Removing battery and insert it
correctly
Faulty battery
contact?
Battery symbol on the LC
display
4
“Lo” on the
LC display
(measured
value below
32.0°C or
89.6°F)
86 GB
Weak battery Insert a new
Thermometer
correctly posi-
4
tioned in the ear
or on the forehead/temple?
battery
Pay heed to the
operating in-
structions in re-
gard to position-
ing in the ear or
on the fore-
head/temple.
Page 87
Error Problem Solution
“Hi” on the
LC display
4
(measured
value above
42.9°C or
109.2°F)
“ErrE” on the
LC display
4
Check the measurement mode.
Ambient temperature outside the
range of 15.0 °C
- 40.0 °C /
59.0 °F -
104.0 °F (forehead mode) and
10.0 °C -
40.0 °C /50.0 °F
- 104.0 °F (ear
and scan mode).
Please observe
the directions
for use with re-
gard to taking
correct measure-
ments.
Please ensure an
ambient tempera-
ture in the range
of 15.0 °C -
40.0 °C /
59.0 °F -
104.0 °F (fore-
head mode) and
10.0 °C -
40.0 °C/
50.0 °F -
104.0 °F (ear
and scan mode)
“ErrU” on the
LC display
4
No measurement result after
measurement.
Please observe
the directions
for use with re-
gard to taking
correct measure-
ments.
“ErrH” on the
LC display
4
“ErrP” in LC
display
4
Error detected
during self-test.
Hardware
problem
Contact the
service centre.
Contact the
service centre.
87 GB
Page 88

Cleaning and care
The device reminds you to clean the measuring sensor after taking several temperature measurements. When this
occurs, the cleaning symbol
and acoustic signals are heard. In order to avoid con-
4
appears in the LC display
20
tamination with germs, the lens has to be rubbed after
every use with a soft cloth that has been moistened with
70% medical alcohol. The use of hygiene attachments is,
therefore, not necessary. After that, wait for at least
30 minutes before taking another measurement. Please
keep in mind that due to the evaporative cooling eff ect of
the alcohol, even the smallest amounts can falsify the result.
Clean the housing with a soft, slightly damp cloth. In the
case of more severe soiling a mild detergent can also be
added to the water.Keep the appliance in a dry environment and protect from direct sunlight. The appliance can
be stored at temperatures of –10.0 °C - 55.0 °C
(14.0 °F - 131.0 °F). Temperatures over 80.0 °C are to
be avoided! In order to measure with it, however, it is necessary to let the appliance adjust to room temperature for
a suffi cient length of time - otherwise an error message
will be generated (see “Functions / Fault Analysis - Correction of Problems”). A room temperature of 5.0°C - 59.9°C
(41.0°F - 139.8°F) should also be maintained for the purposes of measurement. If the temperature is outside this
range, an error message is shown (see “Functions / Fault
Analysis - Correction of Problems”).
Remove the battery when not using the appliance for any
length of time.
88 GB
Page 89

Guarantee and Service
The warranty for this appliance is for 3 years
from the date of purchase. The appliance has
been manufactured with care and meticulously examined before delivery. Please retain
your receipt as proof of purchase. In the case
of a warranty claim, please make contact by
telephone with our Customer Service Department. Only in this way can a post-free despatch for your goods be assured.
The warranty covers only claims for material and manufacturing defects, but not for transport damage, wearing
parts or for damage to fragile components, e.g. buttons
or batteries. This product is for domestic use only and is
not intended for commercial use. The warranty is void in
the case of abusive and improper handling, use of force
and internal tampering not carried out by our authorised
service branch. Your statutory rights are not restricted
in any way by this warranty. The warranty period is not
extended by repairs made under the warranty. This applies also to replaced and repaired parts. Damages and
defects extant at the time of purchase must be reported
immediately after unpacking, resp. no later than two days
after the date of purchase.Repairs made after the lapse of
the warranty period are subject to charge.
89 GB
Page 90

GB
Service Great Britain
Tel.: 0871 5000 720 (£ 0.10/Min.)
E-Mail: [email protected]
IAN 106635
Hotline availability:
Monday to Friday 08:00 - 20:00 (CET)
Disposal
The packaging is made entirely of recyclable
materials, which you may dispose of at local
recycling facilities.
Contact your local refuse disposal authority for more
details of how to dispose of your worn-out product.
The product is subject to Directive 2012 / 19 / EU
(WEEE). In the interests of environmental protection, do not throw the product away with domestic waste when it is worn out, but take it to a
proper disposal facility. Contact your local
authority to fi nd out about collection centres
and their opening times.
90 GB
Page 91
Faulty or used batteries must be recycled in accordance with
Council Directive 2006 / 66 / EC. Take used batteries and /
or the appliance itself to the collection facilities provided.
Batteries should not be disposed of
with domestic waste!
Take batteries and / or the product itself to the collection
facilities provided.
Conformity
The CE Mark 0197 has been attached to this product
in accordance with the following European Directive:
Directive for Medical Products 93/42/EEC,
as amended by Directive 2007/47/EC.
The associated declaration of conformity has been
deposited with the importer:
KOMPERNASS HANDELS GMBH
BURGSTRASSE 21
44867 BOCHUM
GERMANY
www.kompernass.com
91 GB
Page 92

Manufacturer:
Shenzhen Dongdixin
Technology Co., Ltd.
No. 3 Building XiliBaimang
Xusheng Industrial Estate
Nanshan, Shenzhen, China 518108
Tel.: +86 755 27 652 316
E-Mail: [email protected]
EU Representative:
Shanghai International
Holding Corp. GmbH (Europe)
Eiff estrasse 80
20537 Hamburg, Germany
Tel.: +49 (0) 40 2513175
Fax: +49 (0) 40 255726
92 GB
Page 93

KOMPERNASS HANDELS GMBH
BURGSTRASSE 21
44867 BOCHUM
DEUTSCHLAND / GERMANY
www.kompernass.com
Version des informations · Stand der Informationen
Last Information Update: 09 / 2014
Ident.-No.: SSOT6B2-082014-2
IAN 106635
2
 Loading...