

Page 1
HOME TECH
6
CD/MP3 Player
KH 2337
CD/MP3 Player
Operating instructions
CY
KOMPERNASS GMBH
BURGSTRASSE 21 · D-44867 BOCHUM
www.kompernass.com
ID-Nr.: KH2337-01/10-V3
Page 2
KH 2337
0
9
8
7
6
5
4
3
2
1
q
w
e
r
t
z
u
i
o
p
a
s
d
Page 3

CONTENT PAGE
Intended Usage 2
Contents 2
Technical Data 2
Safety instructions 3
Operating components 4
Start-up 4
Placing...............................................................................................................................................4
Inserting the batteries .......................................................................................................................5
Providing mains power.....................................................................................................................5
General operation 5
Turning the device on/off, selecting sound source.......................................................................5
Adjusting the volume........................................................................................................................5
Using headphones ...........................................................................................................................5
Radio functions 6
CD/MP3 Functions 6
Inserting a CD...................................................................................................................................6
Removing the CD..............................................................................................................................6
Starting playback .............................................................................................................................6
Stopping playback ..........................................................................................................................6
Pause/continue playback ...............................................................................................................6
Next/previous title............................................................................................................................6
Selecting an album (MP3 only)......................................................................................................7
Title fast forward/backward............................................................................................................7
Repeat function (REPEAT) ................................................................................................................7
Repeat album (MP3 only) ...............................................................................................................7
Random playback (RANDOM)......................................................................................................7
Programme playing order ...............................................................................................................7
Cleaning 8
Non-functionality 8
Disposal 8
Warranty & Service 9
Importer 9
- 1 -
Page 4

CD/MP3 PLAYER
KH 2337
Read the operating instructions carefully before
using the appliance for the first time and preserve
this booklet for later reference. Pass the manual on
to whomsoever might acquire the appliance at a
later date. This documentation is copyright protected.
Every duplication resp. every copying, also as
extracts, as well as any reproduction of images,
even in an altered state, is only permitted with the
written consent of the manufacturer.
Intended Usage
The CD/MP3 Player is designed exclusively for the
playback of audio and MP3 CDs and for listening
to radio programmes. The CD/MP3 Player is not
intended for use in commercial or industrial environments. No warranty claims will be granted for
damage resulting from improper use!
Utilisation other than as described here is not permitted and it could lead to damages and injuries.
No liability will be accepted for damages resulting
from misuse or improper handling, the application
of force or unauthorised modifications.
Contents
Technical Data
This appliance fulfills, in regard to conformity with, the
fundamental requirements and other relevant provisions of the EMC Directive 2004/108/EC, the Low
Voltage Directive 2006/95/EC and the Ecodesign
Directive 2009/125/EC (Commission Regulation
1275/2008 Annex II, No .1).
MP3/CD Player with Radio
Rated voltage: 220-240 V~50 Hz
Power consumption
(in operation): 25 W
Power consumption
(OFF mode): < 1 W
Audio output power: 2 x 1.2 W RMS
Max. output voltage
at the headphone socket: 60 mV
Battery operation: 6 x 1.5 V Type C/LR14
(Baby cells)
Protection class: II
Operating temperature
range: +5°– +35°C
Storage temperature range: -20°– +50°C
Humidity: 5 – 90%
(no condensation)
Dimensions: 290 x 218 x147 mm
Weight: 1590 g approx.
1 CD/MP3 Player
1 Operating instructions
1 Power cable
Before putting the device into use check to ensure
that all of the items listed have been supplied and
that there are no visible signs of damage.
Frequency range radio:
MW (AM): 526.5 – 1606.5 kHz
UHF (FM): 87.5 – 108 MHz
The technical details of the device allow for a setable
frequency range outside of the permissible 87.5–
108 MHz and/or 526.5–1606.5 kHz. In different
countries various national regulations regarding the
allocated radio frequency range can exist. Please note
that information received outside of the assigned radio
frequency ranges may not be used, passed on to third
parties or otherwise misused.
CD drive
playable disc formats: CD, CD-R, CD-RW, MP3
- 2 -
Page 5

Safety instructions
• This device is not intended for use by individuals
(including children) with restricted physical, physiological or intellectual abilities or deficiences in
experience and/or knowledge unless they are
supervised by a person responsible for their safety
or receive from this person instruction in how the
device is to be used.
• Children should be supervised to ensure that
they do not play with the device.
• Do not permit small children to play with the
plastic packaging. There is a risk of suffocation!
• Keep batteries away from children. Children can
put batteries into their mouths and swallow them.
If a battery is swallowed medical assistance must
be sought immediately.
To avoid potentially fatal
electric shocks:
• Connect the device only to correctly installed
and earthed mains sockets. Ensure that the rating
of the local power supply tallies completely with
the details given on the rating plate of the device.
Caution with the power cable!
• Always grasp the power cable by the plug. Do
not pull on the cable itself and never touch the
power cable with wet hands, this could result in
a short circuit or you receiving an electrical
shock.
• Do not place the device, furniture or anything
else on the power cable and ensure that it does
not become clamped. Never tie knots in the power
cable and do not tie it together with other cables.
The power cable can cause a fire or an electrical
shock.
• The power plug must always be easily accessible,
so that the device can be quickly disconnected
from the mains power supply in the event of an
emergency.
• Arrange for defective power plugs and/or cables
to be replaced at once by qualified technicians
or our Customer Service Department.
• Arrange for customer service to repair or replace
connecting cables and/or devices that are not
functioning properly or have been damaged.
• Never immerse the device in water. Wipe it only
with a slightly damp cloth.
• Do not expose the device to rain and never use
it in a humid or wet environment.
• Make sure that the power cable does not become
wet during operation.
• You must not open the housing or repair the device
yourself. Should you do so, device safety can no
longer be assured and the warranty will become
void.
• Protect the device against drip and spray water.
Do not place any water-filled vessels (e.g. flower
vases) on the device.
Notice regarding disconnection
from mains-power
The function switch RADIO, OFF, CD/MP3 of this de-
vice does not completely disconnect the device
from the mains power. In addition the device
draws power in the OFF mode. To completely
disconnect the device from mains-power, the
power plug MUST be removed from the wall
socket.
Risk of fire!
• Do not use the device in the vicinity of hot surfaces.
• Do not place the device in locations that are exposed to direct sunlight, If you do, it may overheat
and become irreparably damaged.
• Do not leave the device unattended when in use.
• Never cover the ventilation slots of the device
while it is being used.
• Do not place any open sources of fire, like candles,
on the device.
- 3 -
Page 6

Risk of personal injury!
• Keep children away from the connecting cable
and the device. Children frequently underestimate
the dangers of electrical devices.
• Provide for a safe location for the device.
• Do not operate the device if it has sustained a
fall or is damaged. Arrange for the device to be
checked and/or repaired by qualified technicians.
• Keep batteries away from children. Children can
put batteries into their mouths and swallow them.
If a battery is swallowed, medical assistance
must be sought immediately.
Danger! Laser radiation!
This device is fitted with a "Class 1 Laser".
• Never open the device.
• Never attempt to repair the device. There is invisible laser radiation inside the device.
• Avoid all direct optical contact with the laser
beam, it could lead to serious eye injuries.
Thunderstorms!
Equipment connected to a power supply can
be damaged during a thunderstorm.
You should therefore always pull the power plug
from the power socket when there is a storm.
Information on surge voltage (EFT /
rapid electrical transition process)
and Electrostatic discharge:
In the case of malfunction due to an electrical
fast transient (power surge) and/or electrostatic discharge, the device must be returned to
default settings in order to re-establish normal
operation. The power supply may have to be
disconnected and then reconnected. The batteries
(if present) must be removed and then reinserted.
Note:
Take note that the rubber pads on the device
could leave traces on painted, sensitive or treated
surfaces. If possible place an anti-slip material
under the feet of the device.
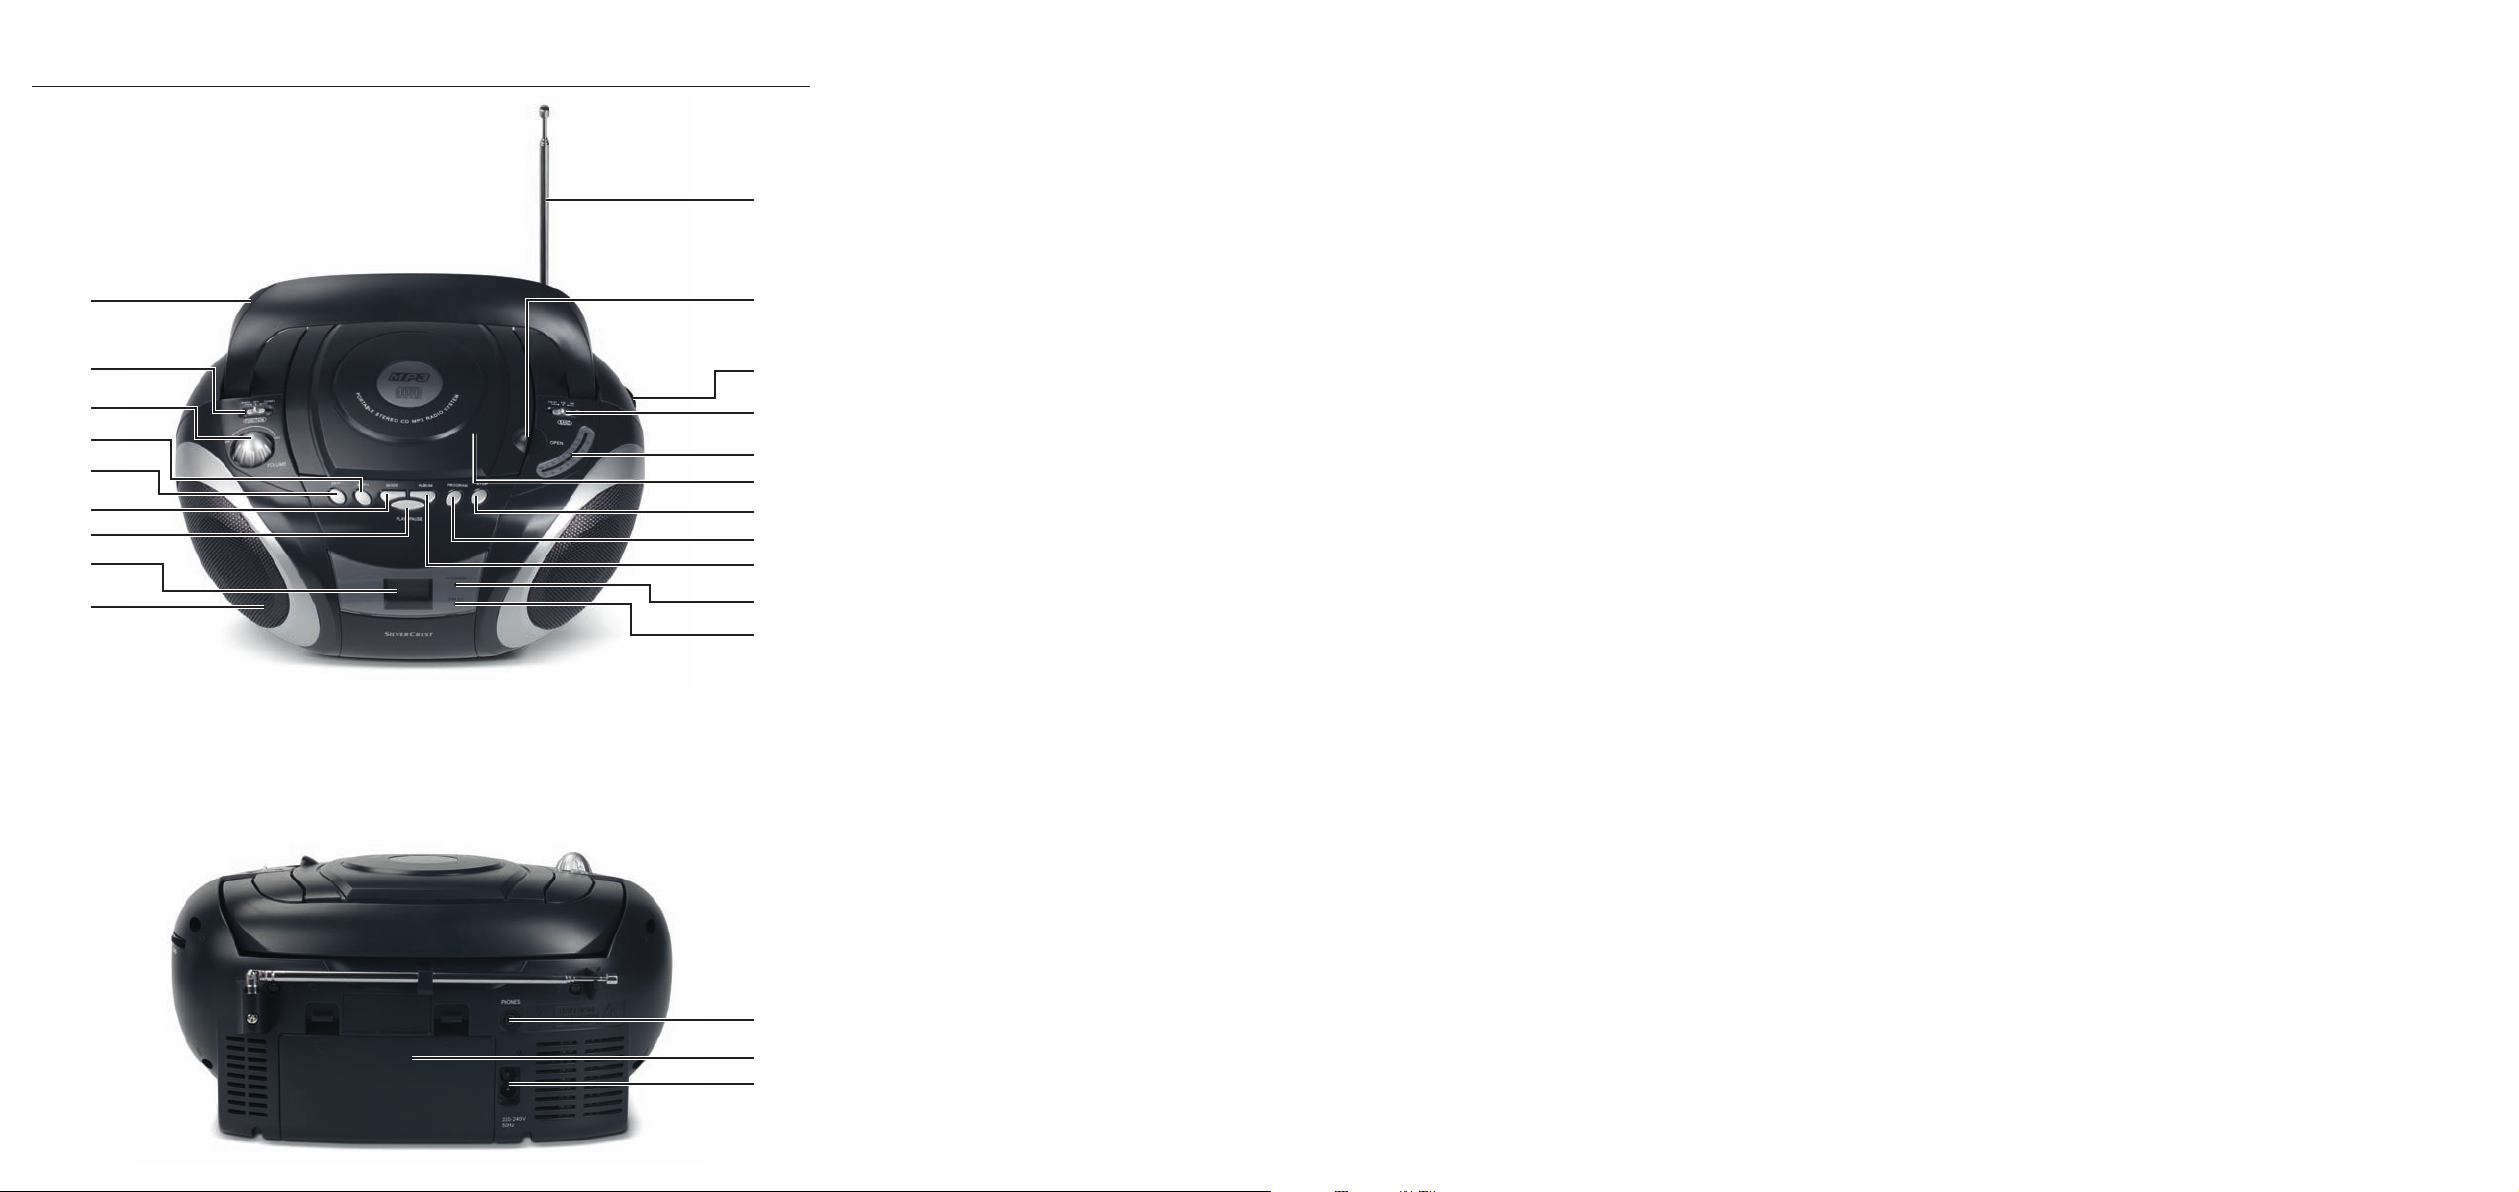
Operating components
Right and left speakers
q
Display
w
PLAY/PAUSE button
e
MODE button
r
SKIP - button
t
SKIP + button
y
Volume controller (VOLUME)
u
Function switch (RADIO, OFF, CD/MP3)
i
Carrying handle
o
Telescopic antenna
a
CD compartment knob
s
Tuning regulator
d
Band selection switch (FM ST./FM/AM)
f
Frequency scale
g
CD compartment
h
STOP button
j
PROGRAM button
k
ALBUM button
l
Power LED
;
FM ST. LED
2)
Headset connection (3.5 mm stereo jack)
2!
Battery compartment
2@
Mains cable connection
2#
Start-up
Placing
• Remove the CD/MP3 Player and accessories
from the packaging.
• Remove all transport restraints and adhesive
tape/films.
- 4 -
Important:
Do not permit small children to play with plastic
packaging. There is a risk of suffocation!
Page 7

• Place the CD/MP3 Player on a level horizontal
surface. Place the CD/MP3 Player in such a
way that the lid of the CD compartment is able
to fully open. At the same time the carrying
handle must be folded backwards.
Inserting the batteries
If you wish to operate the CD/MP3 Player with
batteries you must disconnect the mains power
cable from the device. For battery operation you
will require 6 x 1.5 V batteries of the type C/LR
(Batteries not supplied).
• Open the battery compartment on the rear panel
of the device.
• Place the batteries into the battery compartment
observing the polarity as depicted there.
• Carefully close the battery compartment cover
again until the cover locks into place.
Interaction with batteries
Leaking batteries can cause damage to the
CD/MP3 Player.
• If you do not intend to use the CD/MP3 Player
for an extended period of time, remove the batteries.
• Always change all batteries at the same time
and always use batteries of the same type.
• Do not attempt to recharge the batteries and
always insert batteries/power pack with the
correct polarity. The possibility of explosion
exists if the batteries are not replaced properly.
• Should the batteries leak, wear protective gloves
and clean the battery compartment with a dry
cloth.
Providing mains power
• Insert the plug of the mains cable into the mains
cable connection on the rear panel of the device.
• Insert the plug of the power cable into a wall
power socket.
The CD/MP3 Player detects when the mains cable
is connected to mains power and automatically
switches to mains power operation.
General operation
Turning the device on/off, selecting
sound source
You switch the device on by selecting, with the
functions switch, a sound source:
• CD/MP3
• RADIO
1.Slide the function switch to the position of your
desired sound source. The power LED lights up.
2.To switch the device off again slide the function
switch to the "OFF" position. The power LED
goes out.
Adjusting the volume.
You can adjust the sound volume with the volume
regulator.
• To increase the volume turn the volume controller
in a clockwise direction.
• To reduce the volume turn the volume controller
in a counter clockwise direction.
Using headphones
You can connect to the MP3/CD player with radio
headphones with a 3.5 mm stereo jackplug.
The headphones connection is located on the rear
panel of the device. When you have connected the
headphones, the loudspeakers are disconnected
and you will only hear sound via the headphones.
• Insert the jack plug of the headphones into the
headphone connection.
Important:
Listening to music with headsets for long
periods and at high volume levels can
lead to hearing damage!
- 5 -
Page 8

Radio functions
1. Lift the telescopic antenna and pull apart. Adjust
the antenna positioning so that radio reception
is optimal.
A reception antenna for receiving MW (AM) transmissions is built into the unit. In radio operation,
turn the whole device to a position where the best
radio reception is obtained.
2. Set the reception range (FM ST./FM/AM) with the
band selection switch. If you select the setting
FM ST and the radio station is receiveable in
stereo the FM ST. LED lights up.
3. Set the desired radio station by rotating the
tuning knob.
Removing the CD
• Press the STOP button and wait until the CD is no
longer turning.
The CD must no longer be turning when you
open the CD compartment. Otherwise it may
be irreparably damaged.
• To open the CD compartment touch the knob
of the CD compartment cover and lift the CD
compartment cover upwards.
• Remove the CD.
• You close the CD compartment by pressing the
cover of the CD compartment, with the knob,
downwards.
CD/MP3 Functions
Inserting a CD
• Select the CD/MP3 function with the function
switch.
• Fold the carrying handle backwards.
• To open the CD compartment touch the knob of
the CD compartment cover and lift the CD compartment cover upwards. In the display appears
the indicator "OP".
• Insert the CD, with the printed side upwards, in
the middle of the CD compartment, thereby ensuring that the CD lies with its hole in the middle
of the turntable's cone.
• To close the CD compartment press the cover of
the CD compartment, by the knob, downwards.
After a brief blinking of "- - --" the number of titles on
the CD and "CD" will appear in the display.
With an MP3 CD the number of the title appears for
a brief period and the indicator "MP3" is shown in
the display.
Starting playback
After a CD is inserted and the CD compartment has
been closed, playback of the CD starts automatically.
• If you want to restart a stopped CD press the
PLAY/PAUSE button.
In the display is shown and the first song is played.
Stopping playback
• Press the STOP button.
Pause/continue playback
• During playback press the PLAY/PAUSE button.
The indicator blinks in the display.
• To continue playback, press the button
once again.
PLAY/PAUSE
Next/previous title
• To playback one of the next titles of a CD, during
playback, press repeatedly the
the number of the desired title is shown.
• To playback one of the previous titles on a CD,
during playback, press repeatedly the
until the number of the desired title is shown in
the display.
SKIP + button until
SKIP - button
- 6 -
Page 9

Selecting an album (MP3 only)
With MP3 CDs you can select, if available, between
the different albums.
• Press the
album number is shown in the display.
• Playback starts automatically with the first title of
the selected album.
ALBUM button repeatedly until the desired
Title fast forward/backward
• During playback press one of the buttons SKIP -
and SKIP +.
• Keep this button pressed until the desired point
in the title has been reached.
Repeat function (REPEAT)
With the repeat function you can repeatedly playback indivdual titles of a CD or all of them.
• To repeat individual titles press the
In the display appears REP.
• To repeat all titles from a CD press the
once more.
In the display appears REP ALL.
• To end repeat playback press the
repeatedly until the notice REP ALL goes out.
MODE button.
MODE button
MODE button
Repeat album (MP3 only)
With MP3 CDs you can, if available, repeat playback albums.
• To repeat an entire album press repeatedly the
MODE button until REP ALBUM appears in the dis-
play.
• Select, with the buttons
sired album number.
• Playback starts automatically with the first title of
the selected album.
• To end repeat playback press the
peatedly until the notice REP ALBUM goes out.
SKIP+ or SKIP - , the de-
MODE button re-
Random playback (RANDOM)
With the random playback function you can playback individual titles on a CD in random order.
• To playback individual titles in any desired order
press the
appears in the display.
• To end random playback press the
repeatedly until the notice RAND goes out.
MODE button repeatedly until RAND
MODE button
Programme playing order
You can programme a playback order for up to
20 titles of an audio CD and/or 99 titles of an MP3
CD, in which the titles of a CD are to be played
back. This is only possible when the play function
has been stopped
• Press the
blinks.
In the display appears the notice P01 for the programme slot, whose title shall be the first to playback when playback starts.
• Select, with the buttons
sired title for the programme slot.
• To save the setting press the
In the display is shown the notice P02 for the programme slot 2.
• To programme in further tracks, repeat the steps
described above.
When all programme slots are occupied FUL will be
shown in the display.
• You start programmed playback by pressing the
PLAY/PAUSE button. The notice PROG appears
permanently.
The programmed title sequence is erased
when...
- You, during playback, press the STOP button twice.
The notice
- You open the CD compartment.
- The device is switched off and then back on.
PROGRAM button. The notice PROG
SKIP - and SKIP +, the de-
PROGRAM button.
PPRROOGG
goes out
- 7 -
Page 10

Cleaning
Non-functionality
Attention!
Risk of electric shock!
Before cleaning the device:
• First pull the mains plug from the mains socket.
• Never open the casing of the device.
There are no user-serviceable components inside.
• Clean the housing exclusively with a soft damp
cloth and a mild detergent. Ensure that moisture
cannot permeate into the device during cleaning!
• If necessary, clean the inside of the disc compartment exclusively with a clean dry brush
(e.g. a lens brush, obtainable at your local
photo shop). Never use a wet or damp cloth
to clean the inside of the CD compartment!
Warning!
Moisture penetrating into the device creates the
risk of electric shock! Additionally, the device
could become irreparably damaged!
• Store the device in a dry, dust free location.
• Do not attempt to dismantle the device or to carry
out repairs yourself. You could potentially damage
the sensitive electronic components.
• Repairs to your device may only be carried out
by qualified service personnel!
• No liability will be accepted for damage resulting
from improper use and/or the opening of the
device!
• In the event of a malfunction please get in touch
with our service partner in your country.
Disposal
Do not dispose of the device in your
normal domestic waste. This product
is subject to the European directive
2002/96/EC.
Dispose of the device through an approved disposal
facility or at your community waste centre.
Observe the currently applicable regulations.
In case of doubt, please contact your waste
disposal centre.
Disposal of batteries/power packs
Used batteries/power packs may not be disposed
of in household waste. Every consumer is legally
obliged to dispose of batteries at a collection site in
his community / city district or at a retail store.
The purpose of this obligation is to ensure that batteries
are disposed of in a non-polluting manner. Only dispose of batteries when they are fully discharged.
- 8 -
Dispose of all packaging materials in an
environmentally friendly manner.
Page 11

Warranty & Service
Importer
The warranty for this appliance is for 3 years from
the date of purchase. The appliance has been manufactured with care and meticulously examined before delivery. Please retain your receipt as proof of
purchase. In the event of a warranty claim, please
make contact by telephone with our Service Department. Only in this way can a post-free despatch for
your goods be assured.
The warranty covers only claims for material and
maufacturing defects, but not for transport damage,
for wearing parts or for damage to fragile components, e.g. buttons or batteries. This product is for
private use only and is not intended for commercial
use. The warranty is void in the case of abusive and
improper handling, use of force and internal tampering not carried out by our authorized service
branch. Your statutory rights are not restricted in
any way by this warranty.
The warranty period will not be extended by repairs
made under warranty. This applies also to replaced
and repaired parts. Any damage and defects extant
on purchase must be reported immediately after unpacking the appliance, at the latest, two days after
the purchase date. Repairs made after the expiration of the warranty period are subject to payment.
KOMPERNASS GMBH
BURGSTRASSE 21
44867 BOCHUM, GERMANY
www.kompernass.com
DES UK LTD
Tel.: 0871 5000 700
e-mail: support.uk@kompernass.com
Kompernass Service Ireland
Tel: 1850 930 412 (0,082 EUR/Min.)
Standard call rates apply. Mobile operators may vary.
e-mail: support.ie@kompernass.com
(£ 0.10 / minute)
- 9 -
Page 12

 Loading...