

Page 1
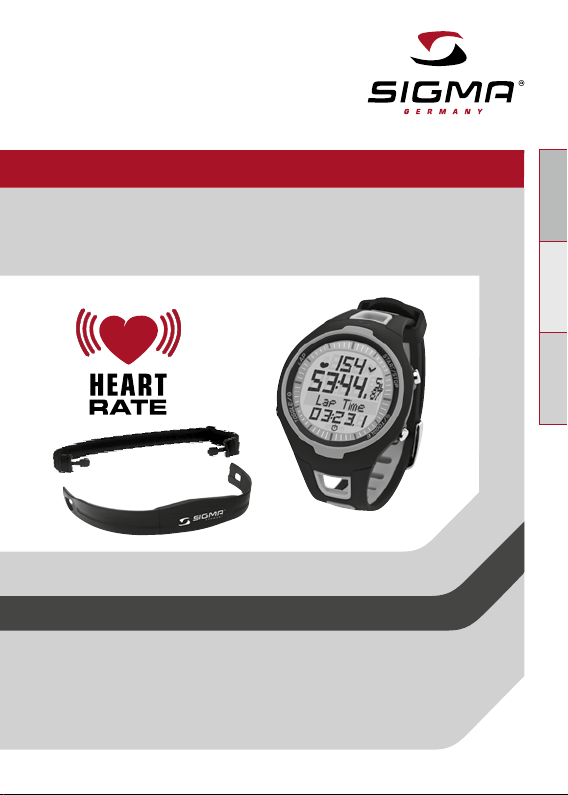
HEART RATE MONITOR
PC 15.11
DEUTSCH
ENGLISH
FRANÇAIS
DEUS/GBFR DEUS/GBFR
Page 2

CONTENTS
1 Foreword 38
2 Packaging contents 38
3 Safety guidelines 39
4 Overview 39
4.1 Activating the heart rate monitor 39
4.2 Attaching the chest belt 40
4.3 Before training 41
4.4 Pressing and holding down buttons 42
4.5 Overview of modes and functions 43
4.5.1 Sleep mode 44
4.5.2 Training mode 44
4.5.3 Lap view 45
4.5.4 Setting mode 46
5 Setting mode 47
5.1 Activating the setting mode 47
5.2 Display setup 47
5.3 Button assignment in the setting mode 47
5.4 Brief guide to device settings 48
5.5 Establishing device settings 48
5.5.1 Setting the language 48
5.5.2 Setting the date 49
5.5.3 Setting the time 50
5.5.4 Setting the gender 51
5.5.5 Setting the date of birth 51
5.5.6 Setting the weight 51
5.5.7 Setting the max. HR 51
5.5.8 Setting the training zone 52
5.5.9 Training with training zones 53
5.5.10 Setting up an individual training zone 53
5.5.11 Setting the total running time 55
5.5.12 Setting the total calories 56
5.5.13 Setting the contrast 56
5.5.14 Setting the button tones 56
5.5.15 Turning the zone alarm on and off 56
36
www.sigmasport.com
Page 3

CONTENTS
6 Training mode 57
6.1 Activating the training mode 57
6.2 Display setup 57
6.3 Button assignment in the training mode 58
6.4 Functions while training 58
6.5 Starting a training session 59
6.6 Interrupting a training session 60
6.7 Ending a training session 60
6.8 Training values after training 61
6.9 Resetting the training values 61
7 Training with laps 62
7.1 Using lap training 62
7.2 Summary of the last lap 63
7.3 Lap view 63
7.3.1 Activating the lap view mode 64
7.3.2 Display setup 64
7.3.3 Button assignment for the lap view 65
7.3.4 Displaying values for individual laps 66
7.4 FAQ (frequently asked questions and services) 66
8 Maintenance and cleaning 68
8.1 Changing the battery 68
8.2 Disposal 68
9 Technical data 69
10 Warranty 69
US/GB
37
Page 4
1 FOREWORD
Thank you for purchasing the SIGMA SPORT® PC 15.11 heart rate
monitor. Your new heart rate monitor will be a faithful training partner
for many years to come. You can use your heart rate monitor for many
different activities, including:
k Running
k Walking and Nordic Walking
k Hiking
k Swimming (HR measurement only)
The PC 15.11 heart rate monitor is a technically advanced instrument
that measures your precise heart rate.
Please read these instructions carefully to familiarize yourself with the
many functions of your new heart rate monitor and prepare for their
use.
SIGMA SPORT® wishes you the best of fun with your heart rate monitor.
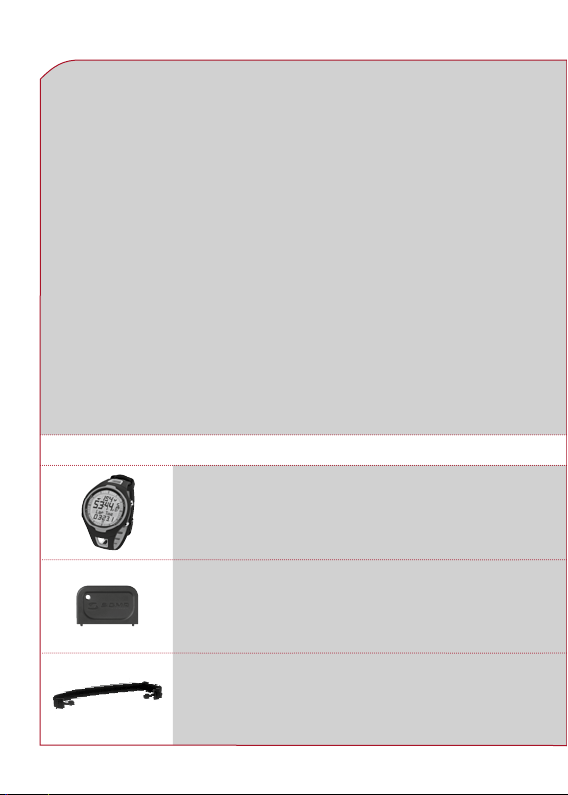
2 PACKAGING CONTENTS
PC 15.11 heart rate monitor
incl. battery
Battery compartment tool for battery changes
38
Tip: If you lose this tool, the battery compartment
can also be opened with the aid of a ballpoint pen.
Elastic belt
www.sigmasport.com
Page 5
2 PACKAGING CONTENTS
Transmitter
3 SAFETY GUIDELINES
k Consult your doctor before starting training in order to avoid
health risks. This particularly applies if you suffer from any
cardiovascular diseases or have not done any sport for a long time.
k Please do not use the heart rate monitor for diving; it is only
suitable for swimming.
k Do not press any buttons while under water.
4 OVERVIEW
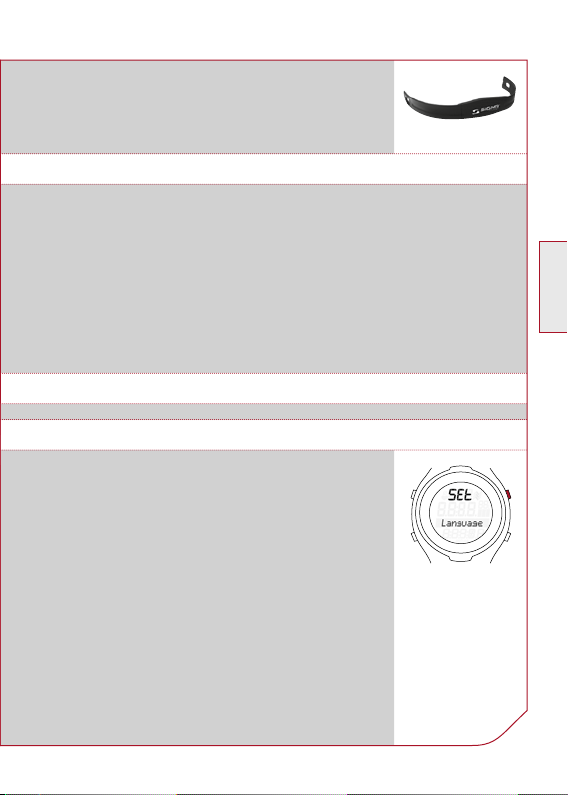
4.1 ACTIVATING THE HEART RATE MONITOR
Before you can train with your new PC 15.11,
you need to activate it.
To do this, hold down the START/STOP button for
5 seconds. Your PC 15.11 will automatically change
to setting mode. Use the TOGGLE (-) and TOGGLE (+)
buttons to scroll through the basic settings. Press
the START/STOP button to confirm your entry. Set
the basic settings such as the language, date and
time. Hold down the TOGGLE (+) button to exit the
setting mode.
For further information, please see section 5 “Setting
mode”.
US/GB
39
Page 6
4 OVERVIEW
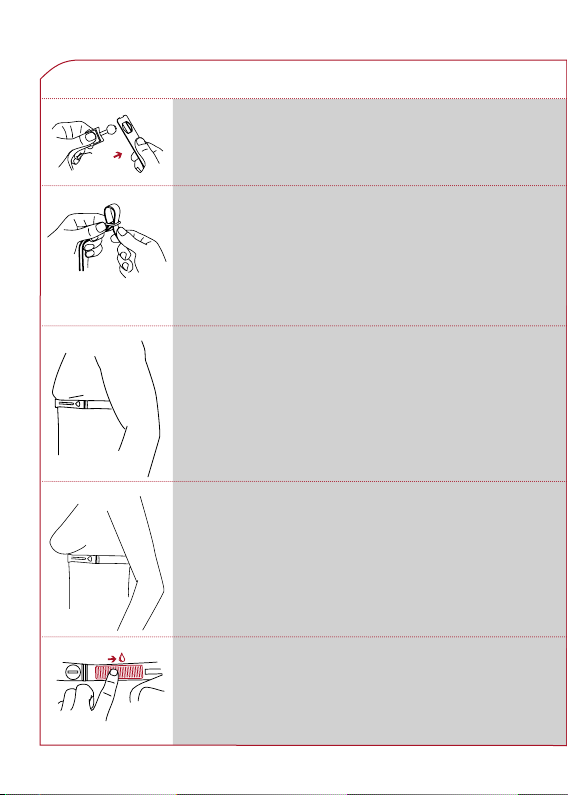
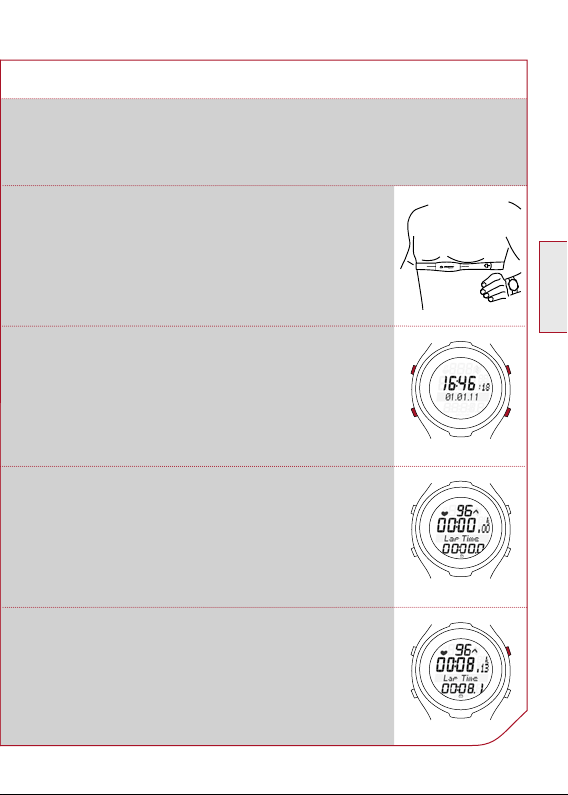
4.2 ATTACHING THE CHEST BELT
Attach the transmitter to the elastic belt.
The locking mechanism can be used to individually
adjust the belt length.
Ensure that you set the belt length so that the belt
is securely but not too tightly attached.
For men, attach the belt just below the pectoral
muscles.
It must be possible to read the SIGMA logo at the
front.
For women, attach the belt just below the breast.
It must be possible to read the SIGMA logo at the
front.
40
Lift the belt slightly from the skin and wet the rear
surface of the conductive ribbed rubber pads with
water or moisten the pads with saliva.
www.sigmasport.com
Page 7
4 OVERVIEW
4.3 BEFORE TRAINING
Before you can start training, you need to prepare the heart rate
monitor in the following manner:
1. Put on the chest belt and the PC 15.11.
2. Activate the PC 15.11 by pressing any button.
3. The heart rate monitor automatically switches
to training mode. Wait until your heart rate
is displayed before you start training.
US/GB
4. Start training.
Press the START/STOP button to start training.
41
Page 8
4 OVERVIEW
4.3 BEFORE TRAINING
5. To finish training, simply press the
START/STOP button. The stopwatch stops.
To reset the values to zero, press and hold the
START/STOP button. To exit the training mode,
press and hold the TOGGLE (-) button.
4.4 PRESSING AND HOLDING DOWN BUTTONS
The buttons on the heart rate monitor perform different actions
depending on how long you press them:
k Press button briefly
Activate or scroll through functions.
k Press and hold
Switch to another mode, reset training values.
Example: You have finished training and want to activate the sleep mode.
Hold down the TOGGLE (-) button.
42
Keep the TOGGLE (-) button held down.
The display will flash twice, indicating that
the training mode is deactivated.
www.sigmasport.com
Page 9

4 OVERVIEW
4.4 PRESSING AND HOLDING DOWN BUTTONS
The sleep mode will be displayed.
Release the TOGGLE (-) button.
4.5 OVERVIEW OF MODES AND FUNCTIONS
The heart rate monitor has three main modes (training mode,
setting mode and sleep mode). You can switch between these modes
by pressing and holding a button.
US/GB
Lap view
Setting mode
Training mode
Sleep mode
43
Page 10
4 OVERVIEW
4.5.1 SLEEP MODE
In sleep mode, only the time and date are displayed. To switch from
sleep mode to training mode, press and hold down any button.
4.5.2 TRAINING MODE
You will train in this mode.
LAP
k Laps/
intervals
TOGGLE
k Change the function
displayed
*Note: To provide you with a clearer
overview while training, the total values
are only displayed if the stopwatch is
not running.
44
www.sigmasport.com
START/STOP
k Stopwatch
TOGGLE
k Change the
function displayed
Page 11
4 OVERVIEW
4.5.3 LAP VIEW
The PC 15.11 can be used for lap training. The
values for the individual laps are saved in the heart
rate monitor. You can view the values in the lap view
after and during your training.
You can only activate the lap view from the training
mode. To do this, hold down the LAP button.
In lap view mode:
Use the LAP and START/STOP buttons to navigate
and scroll through the previous laps. Press the
TOGGLE (-) and TOGGLE (+) buttons to view the
heart rate and time values for each lap.
While training, the heart rate monitor briefly shows
you a summary of the last lap for each completed lap
(briefly press the LAP button). This enables you to
directly determine whether you are close to values
you are striving to achieve (pace table, target time).
US/GB
45
Page 12

4 OVERVIEW
4.5.4 SETTING MODE
This mode enables you to adjust the device settings.
k Use the TOGGLE (+) button to scroll forward from the language
to the zone alarm.
k Use the TOGGLE (-) button to scroll backward from the zone alarm
to the language.
Button tones
(On, Off)
Contrast
(5 levels)
Total Kcal
(Entry)
Total running time
(Entry)
46
Zone alarm
(On, Off)
Training zone
(Fat Burn, Fit Zone,
Individual)
www.sigmasport.com
Max. heart rate
(Calculated from gender,
age and weight.
Correction possible)
Language
(ES, FR, IT, GB, DE)
Date
(Entry, Format)
Time
(Entry, 12h, 24h)
Gender
(Male, Female)
Date of birth
(Entry)
Weight
(Entry)
Page 13

5 SETTING MODE
5.1 ACTIVATING THE SETTING MODE
Prerequisite: Your heart rate monitor must be in
training mode (see section 4.5 “Overview of modes
and functions”).
Hold down the TOGGLE (+) button. The display will
flash twice to indicate that the setting mode is now
active.
5.2 DISPLAY SETUP
1st line SET indicates that the setting mode
is active.
3rd line/ Submenu or the setting to be
4th line changed.
5.3 BUTTON ASSIGNMENT IN THE SETTING MODE
TOGGLE
Press:
Scroll
backward
Press and
hold:
Scroll
continuously
LIGHT
Press:
Light on
START/STOP
Press:
Select and confirm
TOGGLE
Press:
Scroll forward
Press and hold:
Scroll continuously
US/GB
47
Page 14

5 SETTING MODE
5.4 BRIEF GUIDE TO DEVICE SETTINGS
Device settings such as language, gender, date of birth, weight,
max. HR, contrast, button tones and zone alarm are all set in the
same manner: Select the device setting, change the value and save
the modified setting.
Prerequisite: Your heart rate monitor must be in setting mode
(section 5.1).
1 Press the TOGGLE (-) or TOGGLE (+) button repeatedly until you
reach the desired device setting.
2 Press the START/STOP button. The device setting value flashes.
3 Press the TOGGLE (-) or TOGGLE (+) button repeatedly until the
desired value is displayed.
4 Press the START/STOP button. The new device setting is saved.
You can now scroll to a different device setting.
5.5 ESTABLISHING DEVICE SETTINGS
5.5.1 SETTING THE LANGUAGE
Follow the steps described in section 5.4 “Brief guide to device
settings”.
48
www.sigmasport.com
Page 15

5 SETTING MODE
5.5.2 SETTING THE DATE
Prerequisite: Your heart rate monitor must be in setting mode.
Press the TOGGLE (+) button repeatedly until “Date”
appears on the display.
Press the START/STOP button. “Year” is displayed
and below it the preset year flashes.
Press the TOGGLE (-) or TOGGLE (+) button
repeatedly to set the year.
Press the START/STOP button. “Month” is displayed.
Press the TOGGLE (-) or TOGGLE (+) button
repeatedly to set the month.
Press the START/STOP button. “Day” is displayed.
Press the TOGGLE (-) or TOGGLE (+) button
repeatedly to set the day.
Press the START/STOP button. A date format is
displayed.
Select the desired date format by pressing the
TOGGLE (-) or TOGGLE (+) button.
US/GB
Press the START/STOP button. The data setting is
saved.
49
Page 16

5 SETTING MODE
5.5.3 SETTING THE TIME
Example: Winter time has changed to summer time and you want to
adjust the time on your heart rate monitor.
Prerequisite: Your heart rate monitor must be in setting mode.
Press the TOGGLE (+) button repeatedly until “Clock”
appears on the display.
Press the START/STOP button. “24H” is displayed
and flashes. Use the TOGGLE (-) or TOGGLE (+)
button to choose between 12-hour and 24-hour
format.
Press the START/STOP button. The time is displayed.
The hours entry flashes.
Press the TOGGLE (+) button. The hour increases
by one. Press the TOGGLE (-) button to decrease the
displayed hour by one.
Press the START/STOP button. The minute entry
flashes.
50
Press the START/STOP button. The new time is
saved.
www.sigmasport.com
Page 17

5 SETTING MODE
5.5.4 SETTING THE GENDER
Follow the steps described in section 5.4 “Brief guide to device
settings”. This device setting is taken into account when calculating
the maximum heart rate and calories. You should therefore ensure
that you set this value correctly.
5.5.5 SETTING THE DATE OF BIRTH
Follow the steps described in section 5.4 “Brief guide to device
settings”. This device setting is taken into account when calculating
the maximum heart rate and calories. You should therefore ensure
that you set this value correctly.
5.5.6 SETTING THE WEIGHT
Follow the steps described in section 5.4 “Brief guide to device
settings”. This device setting is taken into account when calculating
the maximum heart rate and calories. You should therefore ensure
that you set this value correctly.
5.5.7 SETTING THE MAX. HR
The maximum heart rate (max. HR) is determined by the heart rate
monitor on the basis of your gender, weight and date of birth.
Caution: On changing this value, you also change the training zones.
Only change the max. HR value if it has been determined by a reliable
test, such as performance diagnostics, max. HR test, etc.
US/GB
Follow the steps described in section 5.4 “Brief guide to device
settings”.
51
Page 18

5 SETTING MODE
5.5.8 SETTING THE TRAINING ZONE
You can choose from three training zones. The upper and lower limits
for the zone alarm are determined by the zone that you select.
Example: If you want to lose weight, select the “Fat Burn”.
Prerequisite: Your heart rate monitor must be in setting mode.
Press the TOGGLE (-) button repeatedly until
“Train. Zone” appears on the display.
Press the START/STOP button. The set training zone
is displayed.
Use the TOGGLE (+) button to scroll to “Fat Burn”.
Press the START/STOP button. The training zone is
set for all future training sessions.
Tip: To return to the training mode, press and hold the TOGGLE (+)
button.
52
www.sigmasport.com
Page 19

5 SETTING MODE
5.5.9 TRAINING WITH TRAINING ZONES
Your heart rate monitor has three training zones. The preset training
zones “Fat Burn” and “Fit Zone” are calculated from the maximum
heart rate. Each training zone has an upper and a lower heart rate limit.
k Fat Burn
This training is for the aerobic energy metabolism. Thanks to the
long duration and low intensity, more fat than carbohydrates is
burned or converted into energy. Training in this zone will help you
lose weight.
k Fit Zone
Your training is considerably more intensive in the Fitness Zone.
Training in this zone enhances your basic endurance level.
k Individual Training Zone
This zone is set up by you.
The procedure for selecting the training zone is described in section
5.5.8 “Setting the training zone”.
5.5.10 SETTING UP AN INDIVIDUAL TRAINING ZONE
Example: You would like to train in an individual training zone for a run
with a change of pace. The pulse range should lie between 120 and 160.
Prerequisite: Your heart rate monitor must be in setting mode.
US/GB
Press the TOGGLE (+) button repeatedly to scroll
until “Train. Zone” appears on the display.
53
Page 20

5 SETTING MODE
Press the START/STOP button. The set training zone
is displayed.
Use the TOGGLE (+) button to scroll to “Individual”.
Press the START/STOP button. “Lower limit” is
displayed. The registered value flashes.
Press the TOGGLE (-) button repeatedly until the
value is set to 120.
Press the START/STOP button. “Upper limit” is
displayed. The registered value flashes.
Press the TOGGLE (+) button repeatedly until the
value is set to 160.
54
Press the START/STOP button. The upper and
lower limits are set.
www.sigmasport.com
Page 21

5 SETTING MODE
5.5.11 SETTING THE TOTAL RUNNING TIME
Example: You have bought a heart rate monitor and want to take the
total running time of 5 hours and 36 minutes from your training diary.
Prerequisite: Your heart rate monitor must be in setting mode.
Press the TOGGLE (+) button repeatedly to scroll
until ‘Total time’ appears on the display.
Press the START/STOP button. You will see zeros
below the total time. The first three digits for the
hours flash.
Press the TOGGLE (+) button five times until 5 is
displayed.
Press the START/STOP button. The last two digits
for the minutes flash.
US/GB
Press the TOGGLE (+) button repeatedly until the
value is set to 36.
Tip: Hold down the TOGGLE (+) button to increase
the value quickly.
55
Page 22

5 SETTING MODE
5.5.11 SETTING THE TOTAL RUNNING TIME
Press the START/STOP button. The setting is saved.
5.5.12 SETTING THE TOTAL CALORIES
Follow the steps described in section 5.5.11 “Setting the total running
time”.
5.5.13 SETTING THE CONTRAST
Follow the steps described in section 5.4 “Brief guide to device
settings”.
Note: The contrast changes directly.
5.5.14 SETTING THE BUTTON TONES
Follow the steps described in section 5.4 “Brief guide to device
settings”.
5.5.15 TURNING THE ZONE ALARM ON AND OFF
Follow the steps described in section 5.4 “Brief guide to device
settings”.
56
www.sigmasport.com
Page 23

6 TRAINING MODE
6.1 ACTIVATING THE TRAINING MODE
To go to the training mode:
k From sleep mode
Press and hold any button.
k From setting mode
Press and hold the TOGGLE (+) button.
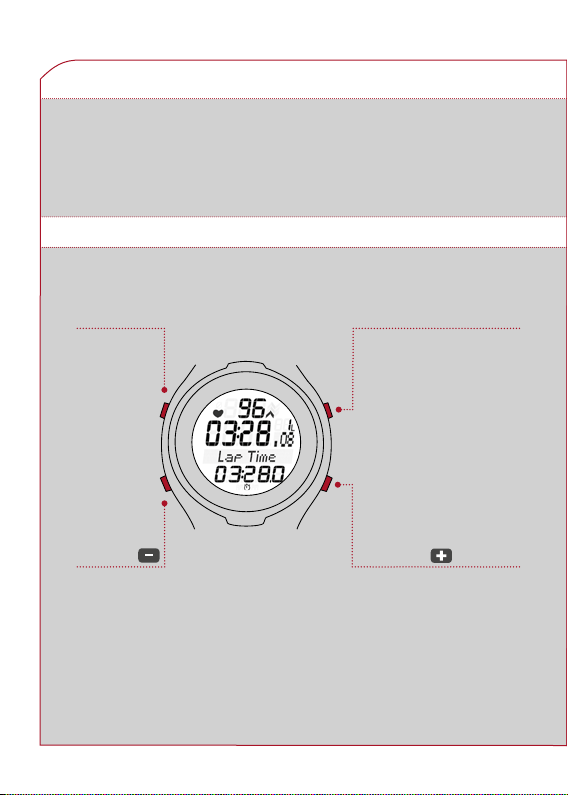
6.2 DISPLAY SETUP
k Current heart rate and zone indicator
(when using a training zone)
k This line displays both the training
time and the number of laps.
k Shows functions of TOGGLE (-) or
TOGGLE (+) – e.g. the running time,
lap time or calories.
k Arrow next to the HR value
In the example, the heart rate is below the selected training zone
and should be increased. If the heart rate is too high, the arrow
points down.
k Stopwatch icon
The training session has started and the stopwatch is running.
US/GB
57
Page 24

6 TRAINING MODE
k Stopwatch stopped
The stopwatch icon disappears. The function
has a gray background and the stopwatch has
stopped.
6.3 BUTTON ASSIGNMENT IN THE TRAINING MODE
LAP
Press:
Take the
lap time
Press and
hold:
Open the
lap view
TOGGLE
Press:
Change the
function displayed
Press and hold:
Switch to
sleep mode
6.4 FUNCTIONS WHILE TRAINING
The heart rate monitor measures many different training statistics but
cannot display them all at once. You can therefore view other functions
at the press of a button.
58
www.sigmasport.com
START/STOP
Press: Start/stop
the stopwatch
Press and hold:
Set the training values
to zero (reset)
TOGGLE
Press:
Change the
function displayed
Press and hold:
Activate the setting
mode
Page 25

6 TRAINING MODE
6.4 FUNCTIONS WHILE TRAINING
Use the TOGGLE (-) or TOGGLE (+) buttons to select
which function you want to see in the lower display
area.
Note: Calories, average and maximum heart rate are only calculated
when the stopwatch is running.
6.5 STARTING A TRAINING SESSION
Prerequisite: Your heart rate monitor must be in training mode.
Press the START/STOP button. The running time
begins.
A stopwatch icon appears at the bottom of the
display and the name of the measured value has
a light background.
US/GB
59
Page 26

6 TRAINING MODE
6.6 INTERRUPTING A TRAINING SESSION
You can pause and restart your training any time.
Press the START/STOP button. The stopwatch icon
disappears. The stopwatch stops.
Press the START/STOP button again. The stopwatch
icon reappears. The stopwatch restarts.
6.7 ENDING A TRAINING SESSION
You have finished your training run and also want to
end your training session on your heart rate monitor.
Press START/STOP button as soon as you want to
end your training. This prevents your average heart
rate or training time from being distorted.
Hold down the TOGGLE (-) button. You switch to
sleep mode. Only the time and date are displayed so
as to save the battery. The current training values
remain saved.
60
Note: If you have stopped training, your heart rate
monitor goes into sleep mode after five minutes.
www.sigmasport.com
Page 27

6 TRAINING MODE
6.8 TRAINING VALUES AFTER TRAINING
Prerequisite: You must be in training mode.
After training, you can view the measured values in the training mode
at your leisure. Use the START/STOP, TOGGLE (-) and TOGGLE (+)
buttons to scroll through the individual values. In addition to the current
training values, the heart rate monitor also shows summed values such
as:
k Total time
k Total calories
Note: Total values are available only when the stopwatch is stopped.
6.9 RESETTING THE TRAINING VALUES
Before you begin a new training session, you should set the training
values to zero as the heart rate monitor will otherwise continue to count
the values. The summed total values for time and calories remain saved.
Prerequisite: You must be in training mode.
Press and hold the START/STOP button. The display
flashes twice and all values are reset. You will then
see the training mode again.
US/GB
61
Page 28

7 TRAINING WITH LAPS
7.1 USING LAP TRAINING
Example: You regularly run two laps around a lake and want to do so
in different times. The PC 15.11 lap training function enables you to
determine the values for each lap.
1 Prerequisite:
You must be in training mode.
The stopwatch is not running and is set to zero.
2 Start first lap.
Press the START/STOP button.
The stopwatch is started.
3 Start next lap.
Press the LAP button. A new lap starts.
The display flashes.
Tip: While “Last lap” is flashing, a summary of the
last lap is shown.
4 Stop the training after the last lap.
Press the START/STOP button.
62
Tip: You can also use lap training when competing.
Press the LAP button at the end of each kilometer.
This enables you to compare the values for each
kilometer after your run.
www.sigmasport.com
Page 29

7 TRAINING WITH LAPS
7.2 SUMMARY OF THE LAST LAP
If you press the LAP button, the current lap will be
ended and a new lap automatically started. “Last lap”
flashes on the display and a summary of the last lap is
displayed for five seconds.
Summary of the last lap
Average heart rate
Training time
Scroll using the START/STOP button
Lap time
7.3 LAP VIEW
The training values for the individual laps can be seen in the lap view.
US/GB
63
Page 30

7 TRAINING WITH LAPS
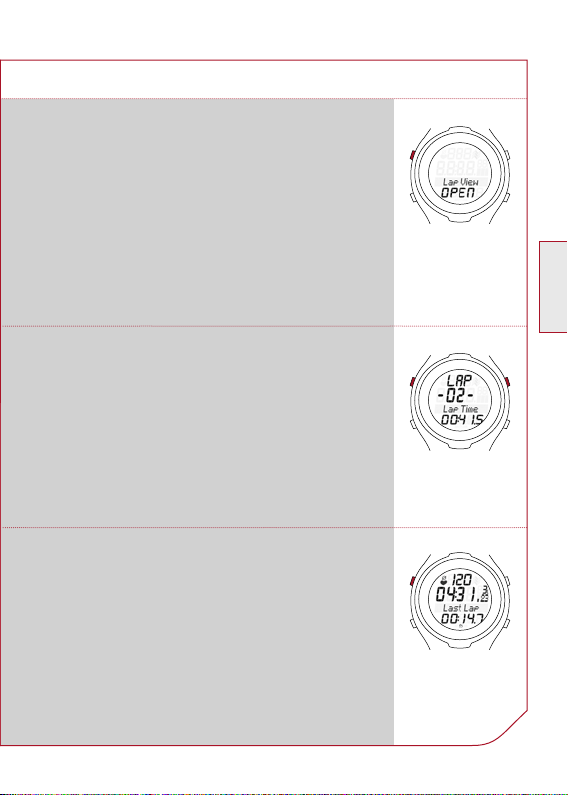
7.3.1 ACTIVATING THE LAP VIEW MODE
Prerequisite: Your heart rate monitor must be in
training mode.
Hold down the LAP button. The display will flash twice
to indicate that the lap view mode is now active.
7.3.2 DISPLAY SETUP
k Lap number
k Value
64
www.sigmasport.com
Page 31

7 TRAINING WITH LAPS
7.3.3 BUTTON ASSIGNMENT FOR THE LAP VIEW
LAP 6 LAP 5
LAP 7 LAP 4
LAP 8
LAP 9
LAP 10
Average
heart rate
Maximum
heart rate
LAP 3
LAP 2
US/GB
LAP 1
Hours
since start
Time
since start
Calories
65
Page 32

7 TRAINING WITH LAPS
7.3.4 DISPLAYING VALUES FOR INDIVIDUAL LAPS
You can re-view the different measured values for the individual laps.
Prerequisite: Your heart rate monitor must be in training mode.
1 Hold down the LAP button until the lap view opens.
A value from the last lap is displayed.
2 Select a lap.
Press the LAP or the START/STOP button to scroll through
the laps.
3 Press the TOGGLE (-) or TOGGLE (+) button to view the
corresponding lap values.
4 Exit lap view.
Hold down the LAP button. The training mode is displayed.
7.4 FAQ (FREQUENTLY ASKED QUESTIONS AND SERVICES)
What happens if I remove the chest belt during training?
The watch will no longer receive a signal. The screen will indicate “O”
and after a short period of time the PC 15.11 will go into sleep mode.
Does the SIGMA heart rate monitor completely switch off?
No – only the time and date are displayed in sleep mode so that you can
also use the heart rate monitor as a normal watch. The PC 15.11 uses
very little power in this state.
66
www.sigmasport.com
Page 33

7 TRAINING WITH LAPS
7.4 FAQ (FREQUENTLY ASKED QUESTIONS AND SERVICING)
The display responds sluggishly or shows a black coloration,
what is the reason for this?
The operating temperature may have been exceeded or fallen below.
Your heart rate monitor is designed for a temperature of 0°C to 55°C.
What should I do if the display is faint?
A faint display may be the result of a weak battery. The latter should be
replaced as soon as possible – battery type CR 2032 (ref. no. 00342).
Are SIGMA heart rate monitors waterproof and can they be used for
swimming?
Yes – the PC 15.11 is watertight up to 3 ATM (corresponds to a test
pressure of 3 bar). The PC 15.11 is suitable for swimming.
Please note: Do not press the buttons underwater as water can enter
the housing. Avoid using in sea water as malfunctions can occur.
US/GB
67
Page 34

8 MAINTENANCE AND CLEANING
8.1 CHANGING THE BATTERY
A CR 2032 battery (ref. no. 00342) is used in the
heart rate monitor and transmitter.
Prerequisite: You have a new battery and the battery
compartment tool.
1 Use the battery compartment tool to turn the
cover anti-clockwise until the arrow points to
OPEN.
Alternatively, you can also use a ballpoint pen.
2 Remove the cover.
3 Remove the battery.
4 Insert the new battery. The plus sign points
upward. Important: Ensure the polarity is correct!
5 Replace the cover. The arrow points to OPEN.
6 Use the battery compartment tool to turn the
cover clockwise until the arrow points to CLOSE.
7 Correct the time and date.
Important: Dispose of old batteries properly
(see section 8.2)
8.2 DISPOSAL
Batteries must not be disposed of with the household
LI
LI =
Lithium Ionen
waste (Battery Law). Please give the batteries to
a designated delivery station for their disposal.
68
Electronic devices must not be disposed of with
household waste. Please give the device to
a designated disposal agency.
www.sigmasport.com
Page 35

9 TECHNICAL DATA
9 TECHNICAL DATA
PC 15.11
k Battery type: CR2032
k Battery life: Average of 1 year
k Accuracy of the clock: Higher than ± 1 second/day
at an ambient temperature of 20°C.
k Heart rate range: 40-240
Chest belt
k Battery type: CR2032
k Battery life: Average of 2 years
10 WARRANTY
Warranty
We are liable for damages in accordance with the statutory regulations
in respect to our contractual partners. Batteries are excluded from the
warranty. For warranty claims, please contact the retailer from whom
you purchased your heart rate monitor or send your heart rate monitor
together with receipt of purchase and all accessory parts, with sufficient
postage paid, to:
SIGMA-ELEKTRO GmbH
Dr.- Julius -Leber-Straße 15
D-67433 Neustadt/Weinstraße
Germany
US/GB
Tel. + 49 (0) 63 21-9120-118
E-mail: service@sigmasport.com
If your warranty claim is valid, you will receive a replacement device.
A claim only exists for the current model at this time. The manufacturer
reserves the right to make technical changes.
69
Page 36

HEART RATE MONITOR
PC 15.11
SIGMA-ElEktro GmbH
Dr.- Julius- Leber-Straße 15
D- 67433 Neustadt /Weinstraße
Tel. + 49 (0) 63 21-9120 -0
Fax. + 49 (0) 63 21-9120 -34
E- mail: info@sigmasport.com
SIGMA SPort ASIA
Asia, Australia, South America, Africa
10F, No.192, Zhonggong 2
Xitun Dist., Taichung City 407, Taiwan
Tel. +886-4- 2358 3070
Fax. +886-4- 2358 7830
www.sigmasport.com
nd
Rd.,
SIGMA SPort USA
North America
3487 Swenson Avenue
St. Charles, IL 60174, U.S.A.
Tel. +1 630 - 761-1106
Fax. +1 630 -761 -1107
Service-Tel. 888-744-6277
 Loading...