

SIEMENS
Instruction Manual and Installation Instructions
en

Wash & Dry
Table of Contents
|
Operating
Instructions |
Information concerning waste disposal
Disposal of packaging Disposing of your old appliance |
5
5 5 |
|---|---|---|
| Protection of the environment / Hints and tips | 6 | |
|
General safety instructions
Before starting operation Using your washer dryer correctly When washing and drying please note Looking after your washer dryer |
7
7 8 8 |
|
| Your New washer dryer Control panel |
9
10 |
|
| Description of the washer dryer Operation and special features |
11
11 |
|
|
Preparing and sorting the laundry
Preparing the washing Sorting the laundry for washing Sorting the laundry for drying |
13
13 14 17 |
|
|
Detergents and cleaning products
Dosing detergent Filling detergent/ cleaning product |
19
19 21 |
|
| First wash | 22 | |
|
Programmes and functions
Programme selector Start/Stop button Short Wash button Delay Start button Drying button Delicate Drying button Spin button |
23
23 28 28 28 30 30 30 |
|
| Washing and drying |
32
33 34 35 |
| End of programme | 37 |
|---|---|
|
Cleaning and servicing the washer dryer
Housing and fascia Drum Detergent drawer Detergent pump Filter in the water inlet hose Descaling the washer dryer |
38
38 38 39 40 41 |
| What to do if | 42 |
| Customer service | 46 |
| Consumption data | 47 |
|
Installing, connecting and transporting
the washer dryer |
48
48 49 50 50 53 54 56 56 |
Index 57
Appendix
Installation
Instructions
With the purchase of your new Siemens washer dryer you have decided on a modern, high-quality domestic appliance.
This new washer dryer is the outcome of years of research. The leading-edge design and the quality of the production processes used to manufacture this product ensure it will give you many years of excellent service. Its concept satisfies all current and future washing and drying requirements.
Its low water, power and detergent consumption help protect the environment and reduce running costs to a minimum.
Water and power consumption has been reduced in all programmes. These results were achieved by means of a special washing system valid for all programmes and all fabrics. The drum is fitted with three external vanes that keep the water constantly circulating, thereby offering intensive and uniform washing whilst consuming less water. This ensures your laundry is washed and treated with utmost care.
The new washing system is so effective that normally dirty laundry can even be cleaned without a pre-wash cycle. Washing times have also been reduced. Prewashing is only recommended for very dirty laundry.
Each washer dryer which leaves our factory is chekked carefully to ensure that it functions properly and is in perfect condition. If you have any questions – especially with respect to installing and connecting your washer dryer – please do not hesitate to contact our customer service department.
Further information and a selection of our products can be found on our Internet page:
http://www.siemens-international.com
Please read these operating and installation instructions and all other information enclosed with the washer dryer and act accordingly.
Retain all documentation for subsequent use or for the next owner of the appliance.
4
Information concerning waste disposal
Disposal of packaging
Your new washer dryer was delivered to you in protective packaging. All utilised materials are ecologically harmless and recyclable. Please help by disposing of packaging in an environmentally friendly manner.
Please ask your dealer or inquire at your local authority about current means of disposal.
▲ Risk of choking!
Do not let children play with packaging and associated parts. Risk of choking on plastic film and collapsible cardboard boxes.
Disposing of your old appliance
Old appliances are not worthless rubbish! Valuable raw materials can be reclaimed by recycling old appliances.
▲ Danger of death!
Unplug mains plug on redundant appliances. Cut off mains cable and discard with mains plug.
Destroy the lock on the door. This will prevent children from locking themselves in the appliance and suffocating.
This appliance is labelled in accordance with European Directive 2002/96/EC concerning used electrical and electronic appliances (waste electrical and electronic equipment - WEEE).

The guideline determines the framework for the return and recycling of used appliances as applicable throughout the EU.
WEEE
Protection of the environment / Hints and tips
Your washer dryer uses water, energy and detergent efficiently, thereby protecting the environment and reducing your household costs. See page 47 for consumption values of your appliance.
Using your washer dryer in an efficient and environmentally friendly manner:
- Use the maximum recommended capacities. Do not exceed the maximum load.
- Do not use prewash for lightly to normally soiled washing.
- Dose detergent, load amount of laundry and adjust water hardness according to the degree of soiling. Comply with dosing recommendation and manufacturer's instructions.
- Choose the highest spin speed compatible with the type of laundry. The higher the speed the lower the drying time and, consequently, the lower the power consumption.
General safety instructions
Before starting operation
This washer dryer meets the relevant safety requirements.
- Install the washer dryer in accordance with the installation instructions, page 48.
- Remove and keep the transport protection devices.
- Do not connect the washer dryer if it has visible damage. If in doubt consult customer service or dealer.
- Read the enclosed documents carefully. They contain important information for installation, use, and safety of the appliance.
This washer dryer is intended for:
- use in the household only
- washing machine-washable textiles in water and drying this textiles
- operation with commercially available detergents and cleaning products which are suitable for use in washing machines.
Do not use the washer dryer if:
- the laundry has been treated with a solvent or has been colour-treated (e.g. stain remover, petroleum ether).
- the laundry contains dust, e.g. coal dust or flour
- the laundry contains foam/rubber
- the laundry contains traces of hairspray, nail varnish remover or similar substances.
Using your washer dryer correctly
When washing and drying please note
- Remove all objects from pockets, especially lighters.
- Do not leave children unsupervised with the appliance.
- Keep pets away from the appliance.
- Do not insert/pull out the mains plug with wet hands.
- Do not pull out the mains plug by tugging the cable.
- Caution when draining hot water.
- Do not climb onto the washer dryer.
- Do not lean on the open washer dryer door.
- Do not install the washer dryer in a room where there is a risk of freezing.
- Transit bolts must be in position for transport.
Looking after your washer dryer
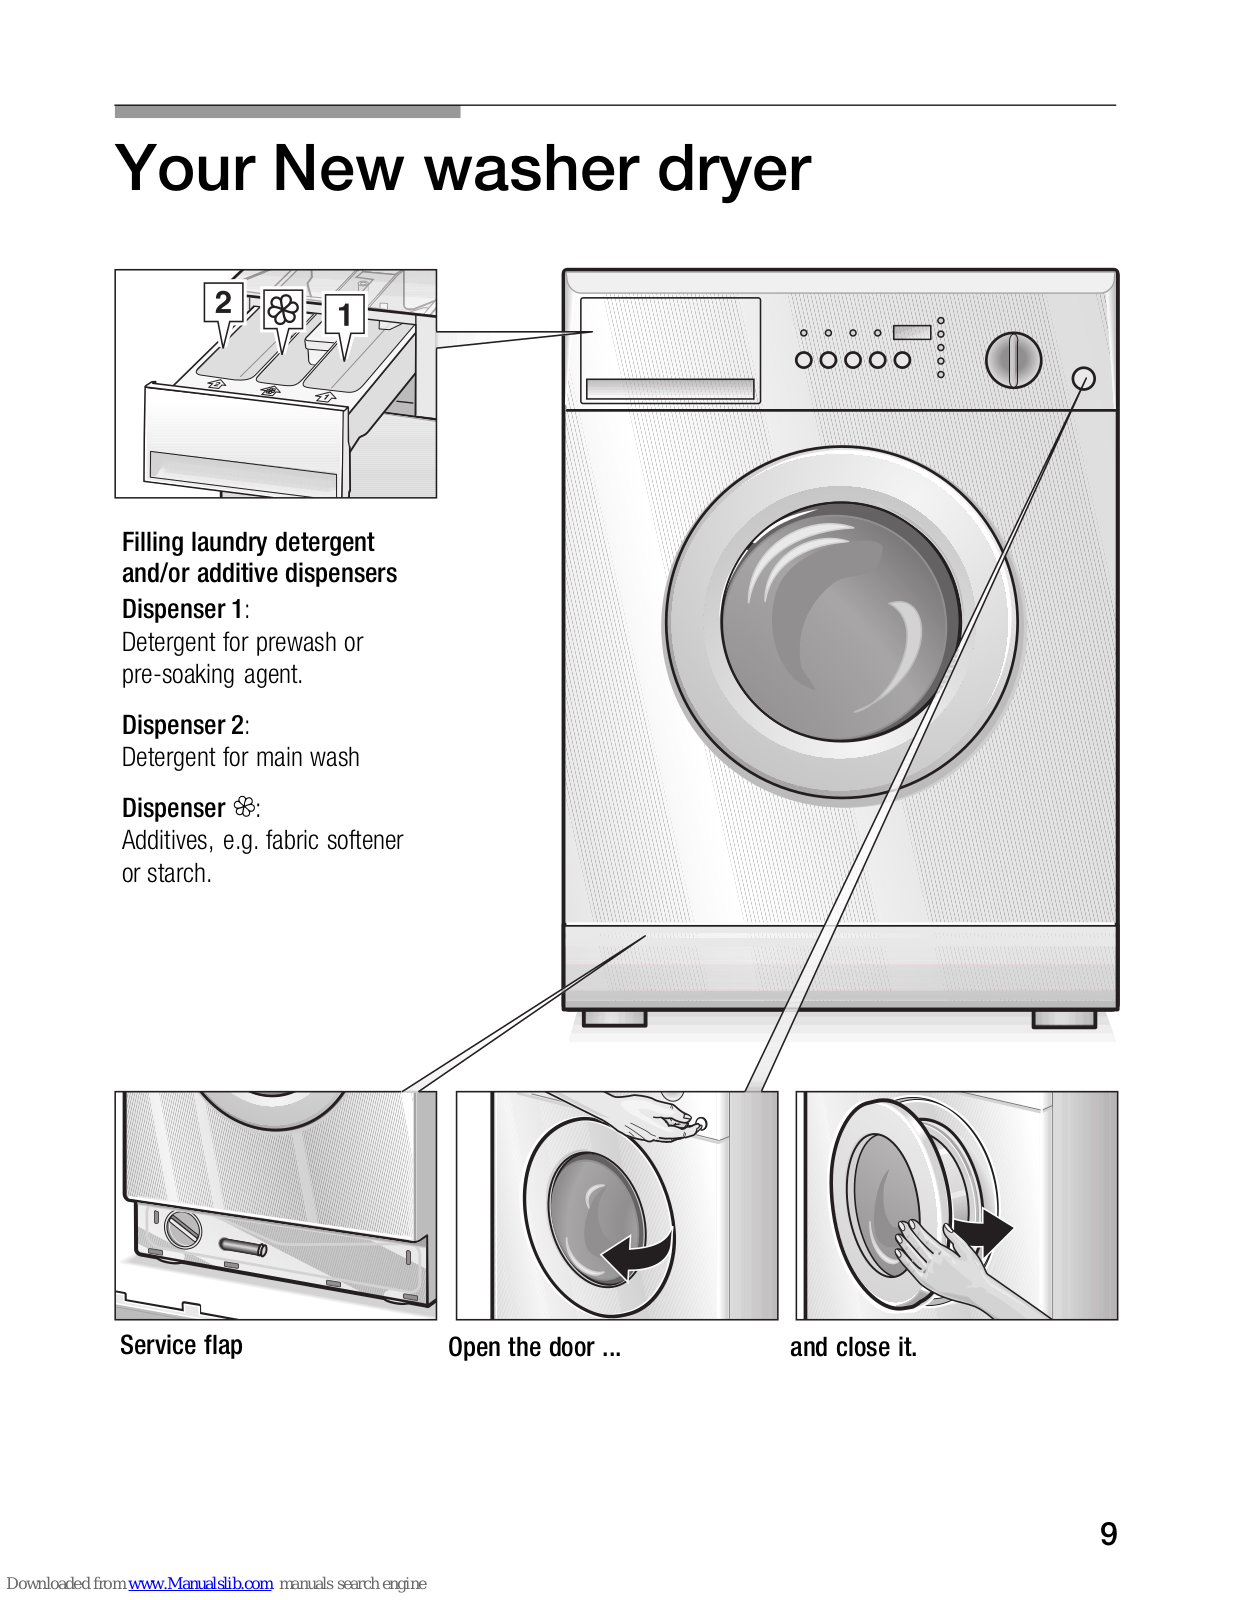
Your New washer dryer

Service flap
Open the door ...
and close it.
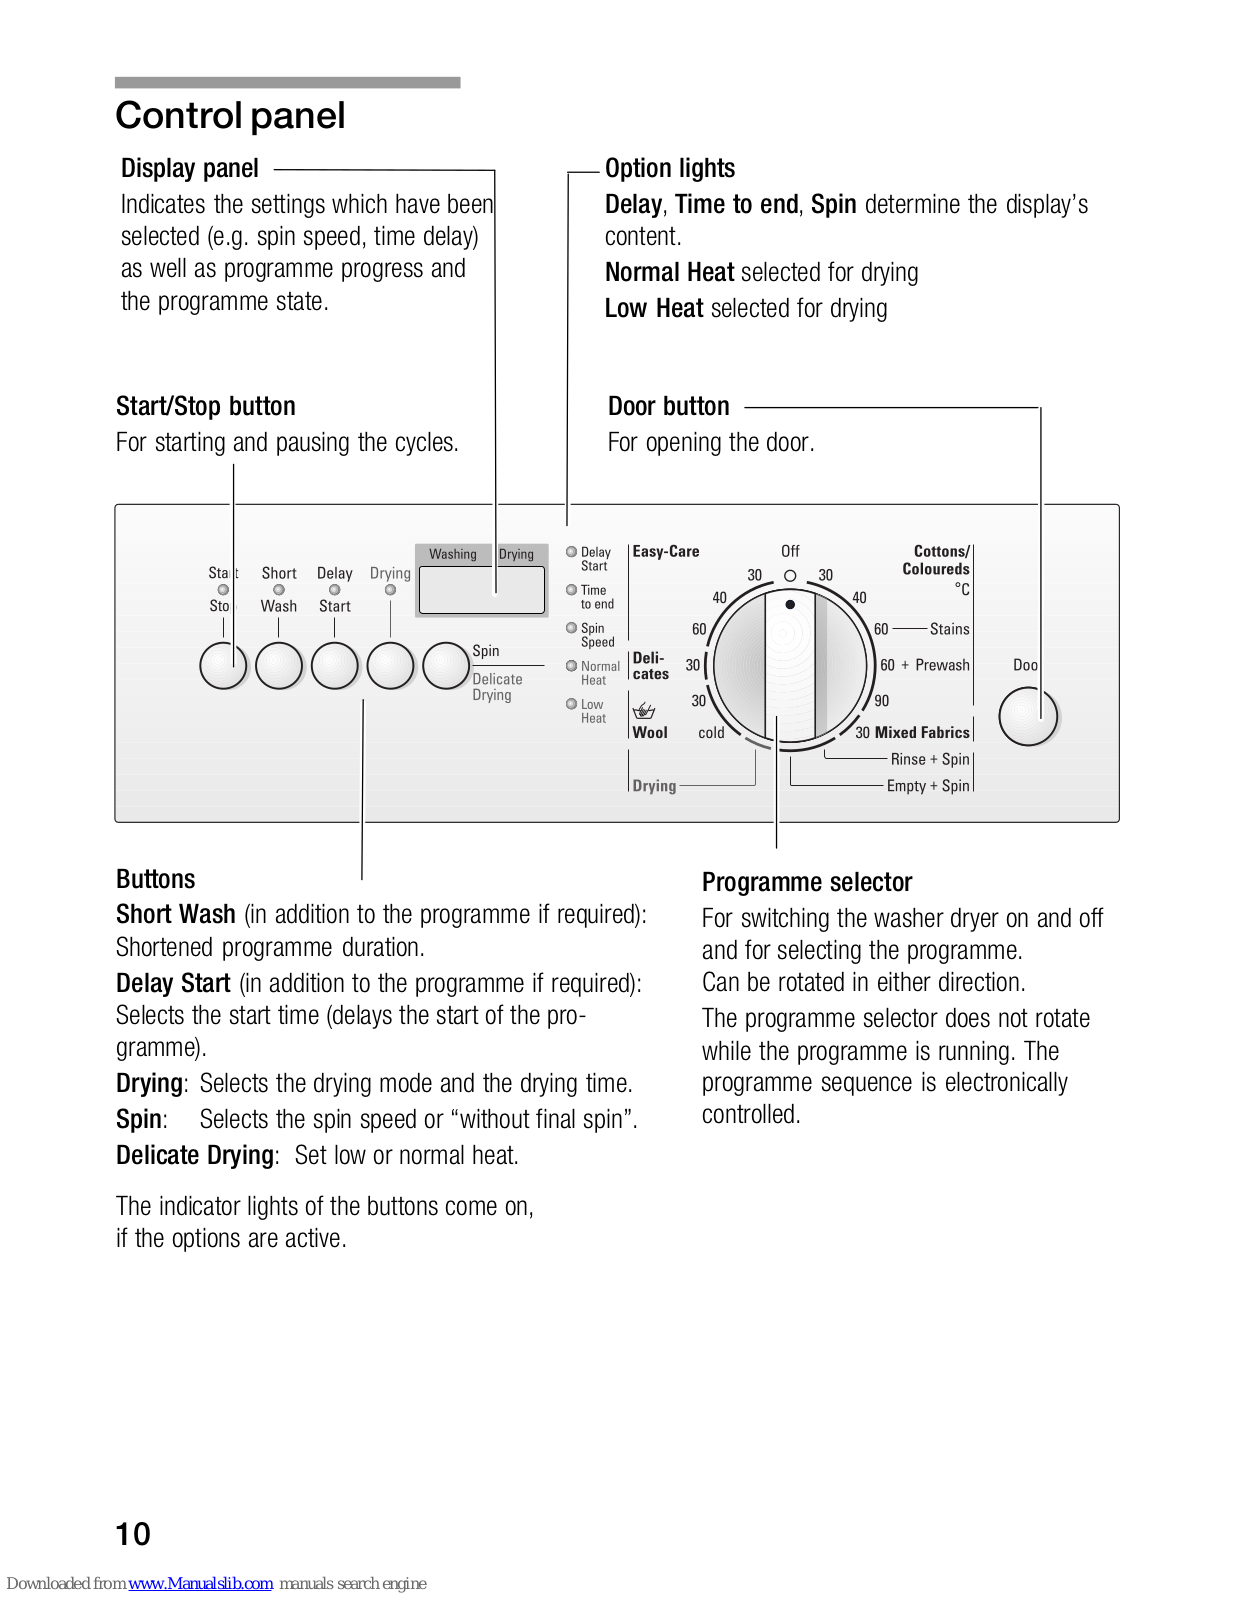
Control panel

Buttons
Short Wash (in addition to the programme if required): Shortened programme duration.
Delay Start (in addition to the programme if required): Selects the start time (delays the start of the programme).
Drying : Selects the drying mode and the drying time.
Spin: Selects the spin speed or "without final spin".Delicate Drying: Set low or normal heat.
The indicator lights of the buttons come on, if the options are active.
Programme selector
For switching the washer dryer on and off and for selecting the programme. Can be rotated in either direction.
The programme selector does not rotate while the programme is running. The programme sequence is electronically controlled.
Description of the washer dryer
Operation and special features
The door
our washer dryer allows the following programmes to be set:
- wash-only
- dry-only
- wash+dry
The complete wash+dry programme shifts automatically from the wash cycle to the dry cycle without further intervention.
Drying works on the principle of condensation. The condensation produced during the drying cycle runs via the drain hose to the catchment basin.
The tap must be left open and the drain hose properly connected during drying cycles.
The washer dryer is fitted with a safety device that prevents the door from opening while it is working.
Make sure there is no water in the tub and that the drum is not moving.
Opening the door at the end of a programme Wait until END appears on the display.
□ Press the Door button on the front panel.
| The signal | The acoustic signal indicates: |
|---|---|
|
|
|
Press the Short Wash and Delay Start button
simultaneously to activate or deactivate the signal. The display indicates In or IFF. |
|
| i The volume of the signal cannot be changed. | |
| Programme state |
Press the
Spin
button to show the programme state
in the display. After the topical spin speed the programm state will be visualized. |
|
If the washer dryer is in the washing cycle, the oo
symbol appears in the Washing display. |
|
| If the washer dryer is in the drying cycle, the aa symbol appears in the Drying display. |
Preparing and sorting the laundry
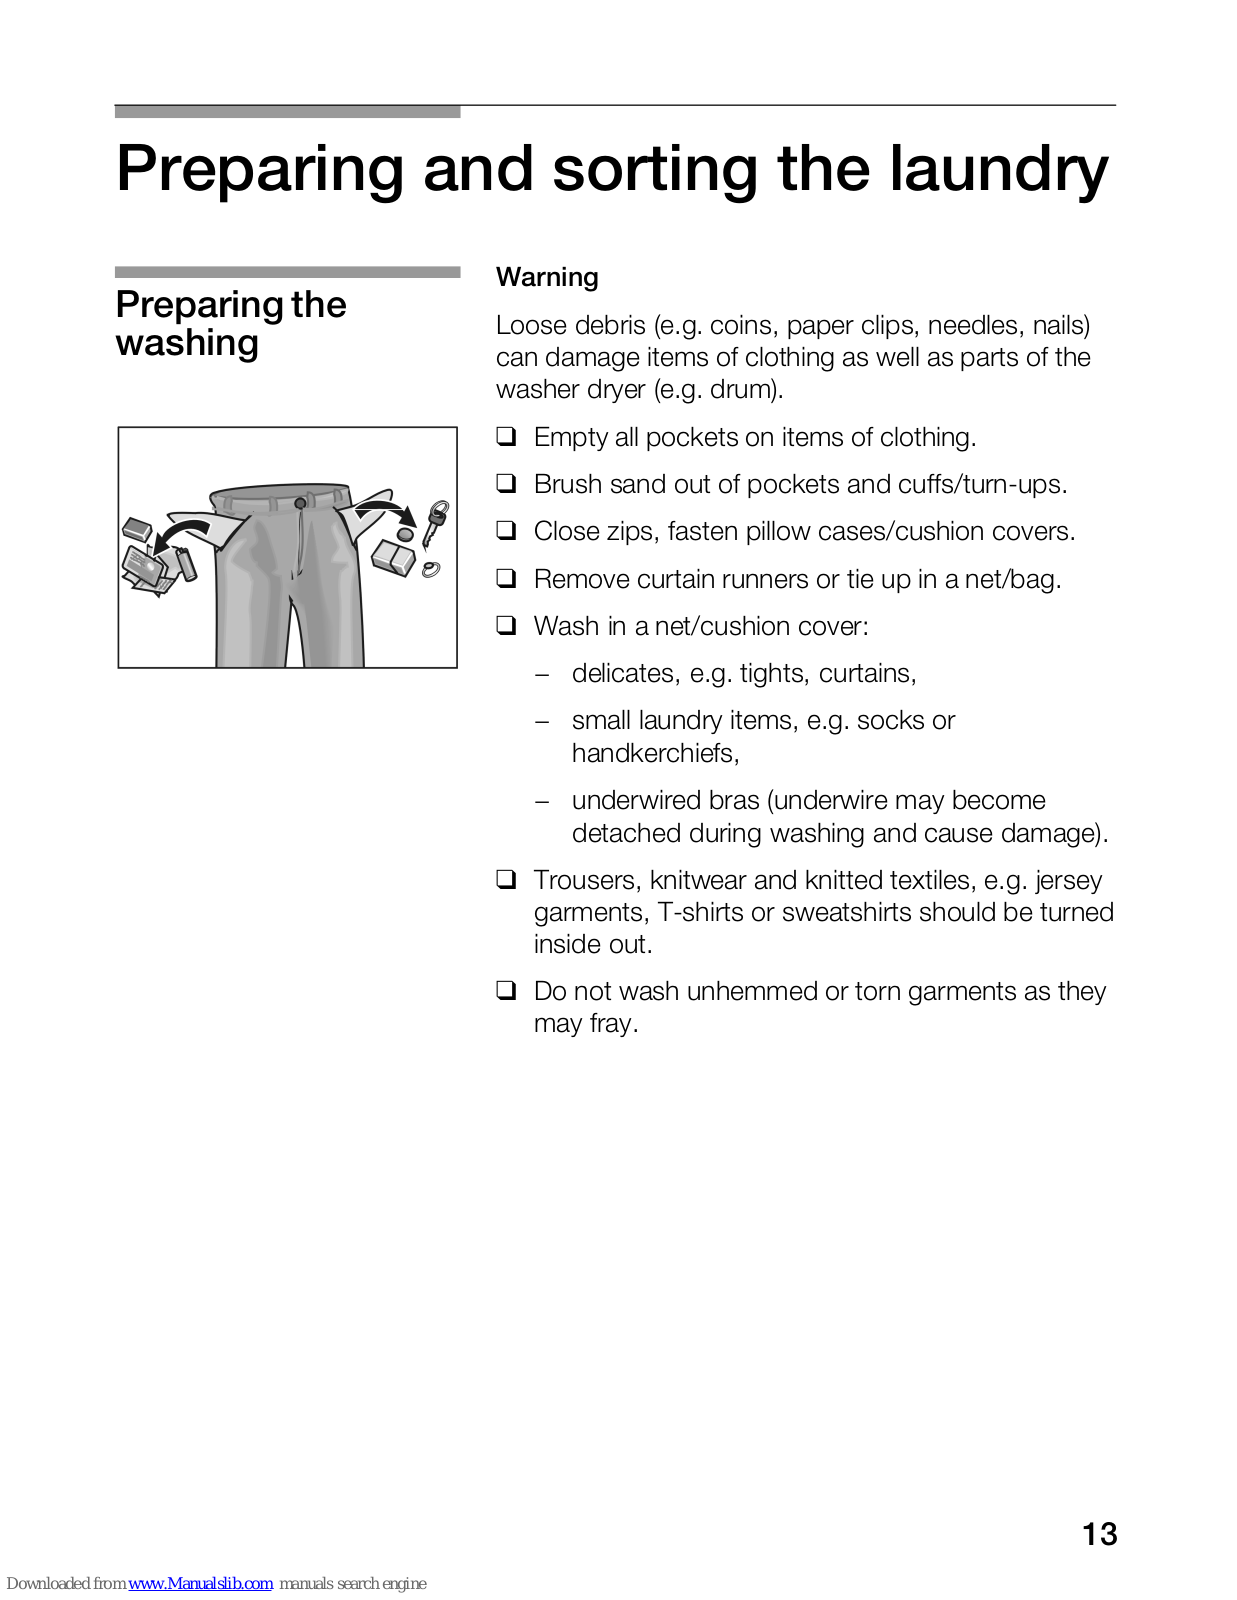
Preparing the washing

Warning
Loose debris (e.g. coins, paper clips, needles, nails) can damage items of clothing as well as parts of the washer dryer (e.g. drum).
- Empty all pockets on items of clothing.
- Brush sand out of pockets and cuffs/turn-ups.
- Close zips, fasten pillow cases/cushion covers.
- □ Remove curtain runners or tie up in a net/bag.
-
□ Wash in a net/cushion cover:
- delicates, e.g. tights, curtains,
- small laundry items, e.g. socks or handkerchiefs,
- underwired bras (underwire may become detached during washing and cause damage).
- Trousers, knitwear and knitted textiles, e.g. jersey garments, T-shirts or sweatshirts should be turned inside out.
- Do not wash unhemmed or torn garments as they may fray.
Warning
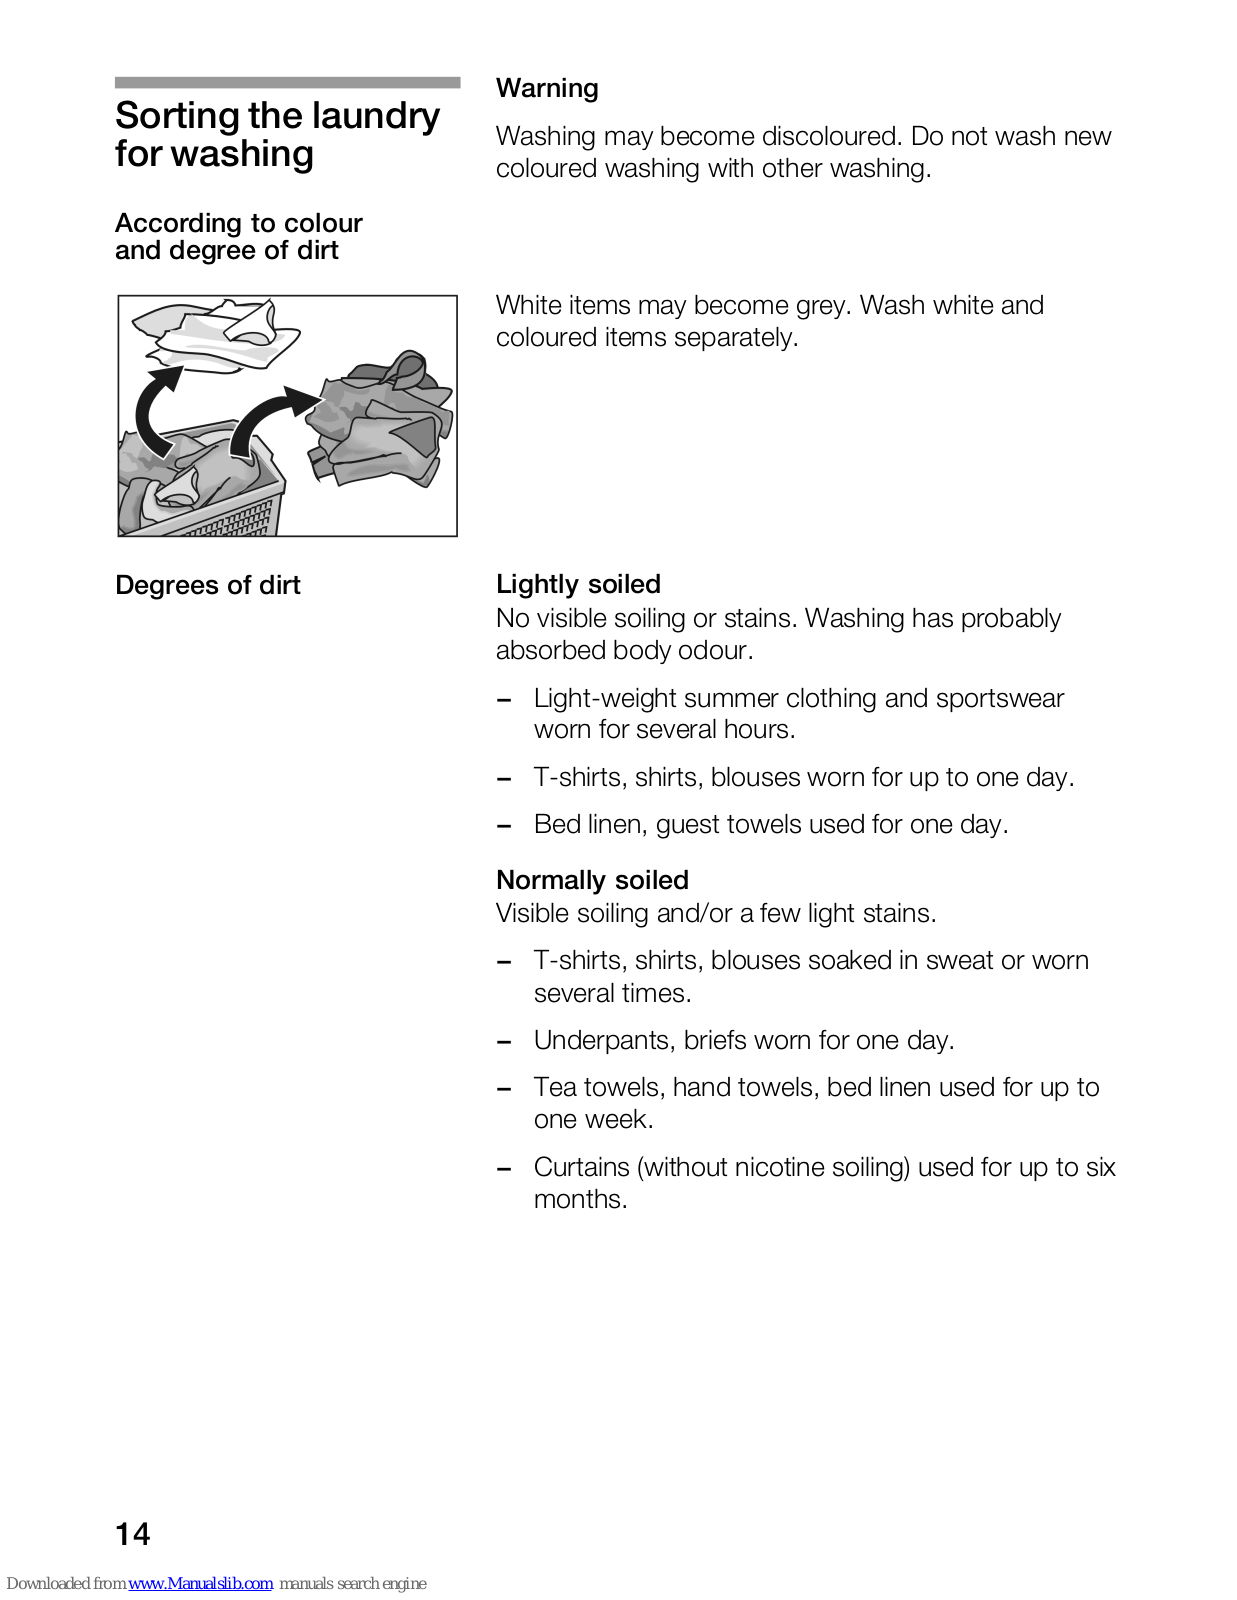
Sorting the laundry for washing
Washing may become discoloured. Do not wash new coloured washing with other washing.
According to colour and degree of dirt

White items may become grey. Wash white and coloured items separately.
Degrees of dirt
Lightly soiled
No visible soiling or stains. Washing has probably absorbed body odour.
- Light-weight summer clothing and sportswear worn for several hours.
- T-shirts, shirts, blouses worn for up to one day.
- Bed linen, guest towels used for one day.
Normally soiled
Visible soiling and/or a few light stains.
- T-shirts, shirts, blouses soaked in sweat or worn several times.
- Underpants, briefs worn for one day.
- Tea towels, hand towels, bed linen used for up to one week.
- Curtains (without nicotine soiling) used for up to six months.
Very soiled
Visible soiling and/or stains.
- Kitchen towels used for up to one week.
- Fabric serviettes.
- Baby bibs.
- Children's outer clothing or football iersevs and shorts soiled with grass and/or earth.
- Work clothes, e.g. mechanic's overalls, baker's and butcher's clothing.
Typical stains
- Skin grease, cooking oil/fat, sauces, mineral oil, wax (containing fat/oil).
- Tea, coffee, red wine, fruit, vegetables (which can be bleached).
- Blood, egg, milk, starch (containing protein, carbohydrate).
- Soot, earth, sand (pigments), tennis clothing soiled with red clay.
Removing stains
Remove/pretreat stains as soon as possible after they have occurred.
First dab with a soapy solution. Do not rub.
Then select the appropriate programme and wash the item

i Stubborn/dried in stains can sometimes only be removed by washing several times.
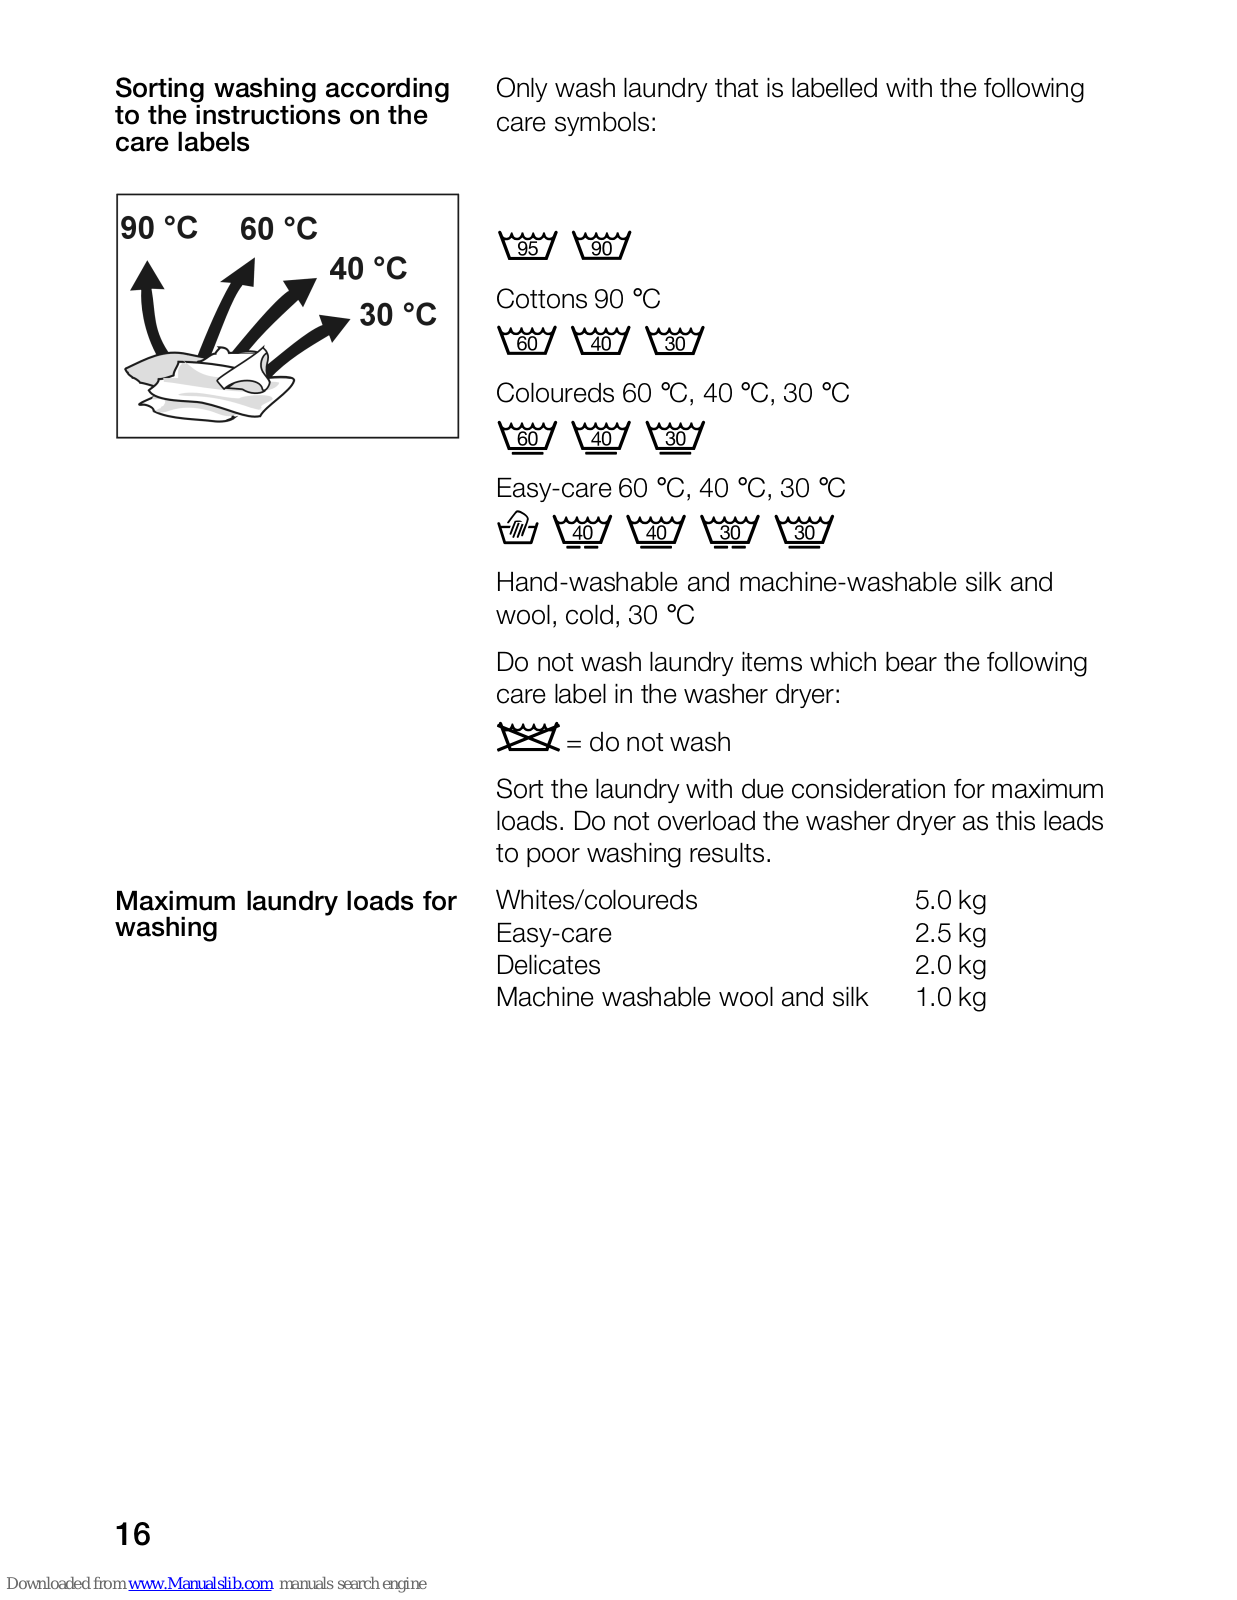
Sorting washing according to the instructions on the care labels
Only wash laundry that is labelled with the following care symbols:

795 790
Cottons 90 °C
Coloureds 60 °C, 40 °C, 30 °C
Easy-care 60 °C, 40 °C, 30 °C
Hand-washable and machine-washable silk and wool, cold, 30 °C
Do not wash laundry items which bear the following care label in the washer dryer:
= do not wash
Sort the laundry with due consideration for maximum loads. Do not overload the washer dryer as this leads to poor washing results.
Maximum laundry loads for washing
| Whites/coloureds | 5.0 kg |
|---|---|
| Easy-care | 2.5 kg |
| Delicates | 2.0 kg |
| Machine washable wool and silk | 1.0 kg |
Warning
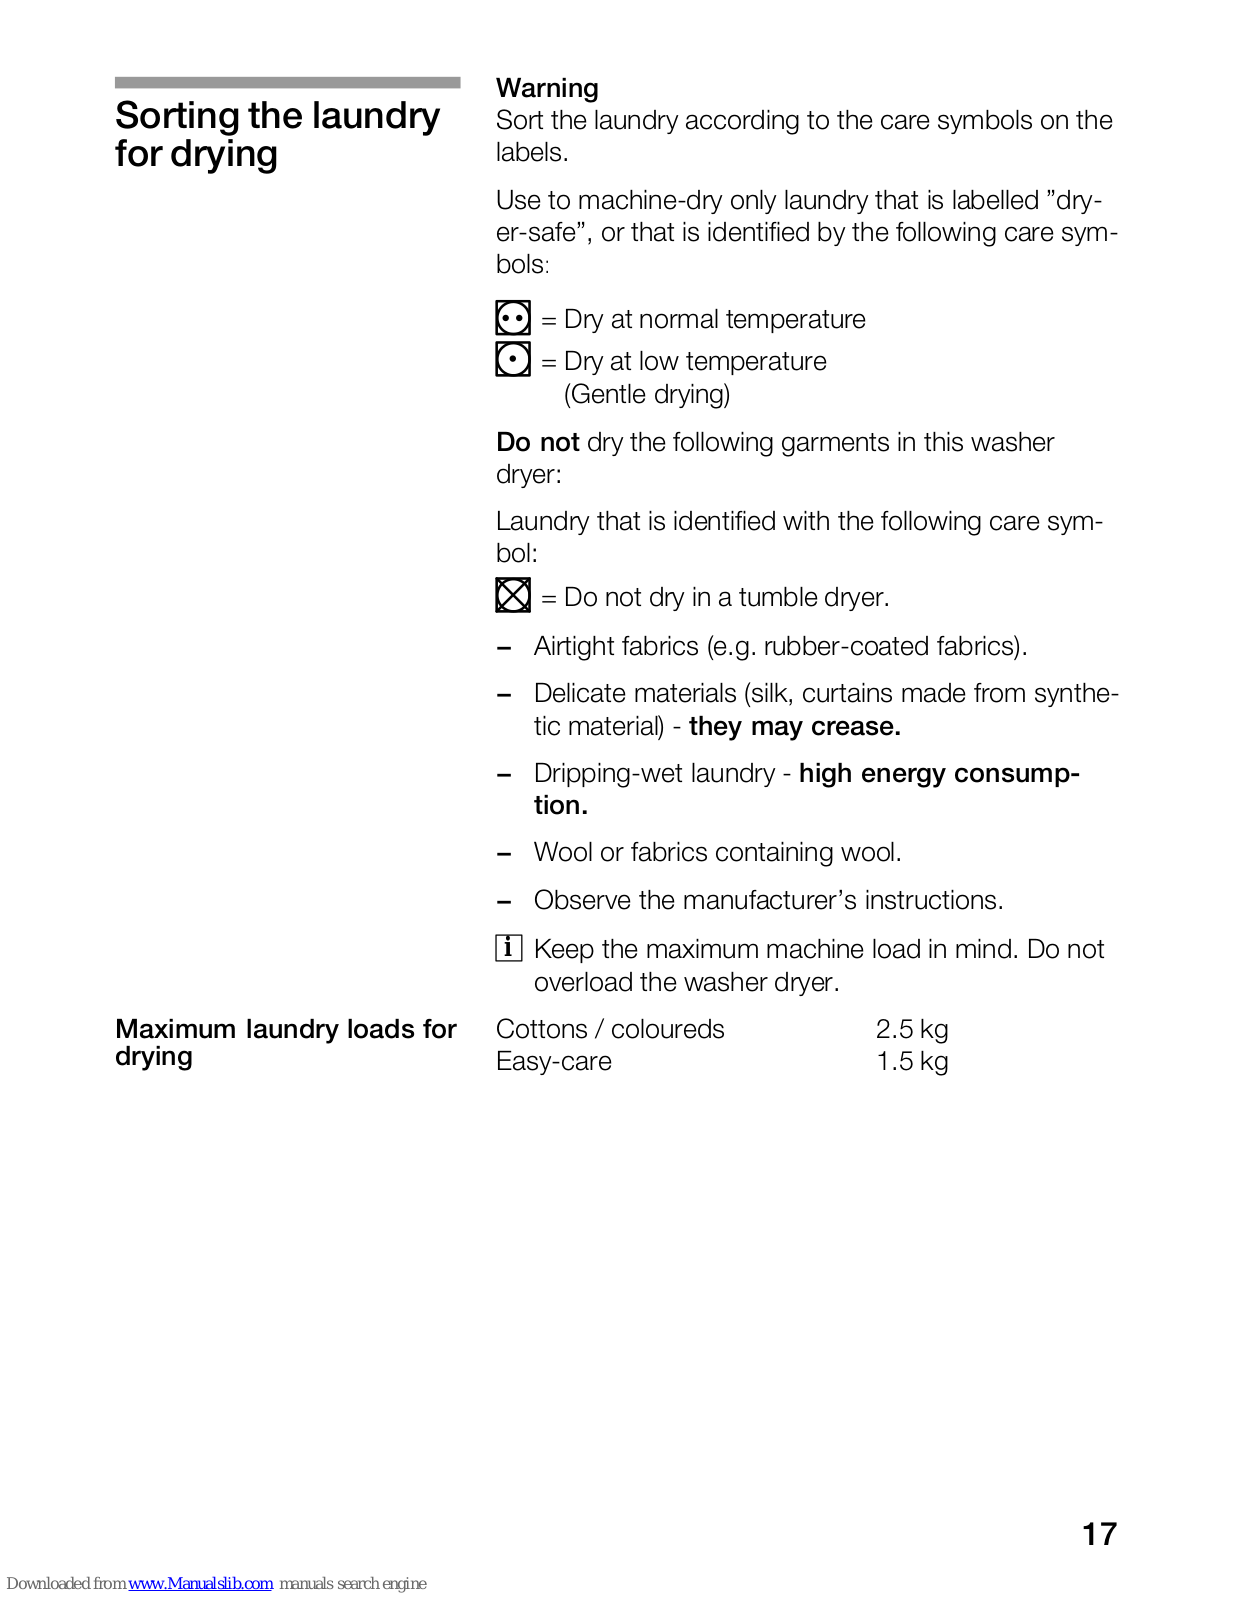
Sorting the laundry for drying
Sort the laundry according to the care symbols on the labels.
Use to machine-dry only laundry that is labelled "dryer-safe", or that is identified by the following care symbols:
| (• | •) | = |
|---|---|---|
| ~ |
= Dry at normal temperature
• = Dry at low temperature
(Gentle drying)
Do not dry the following garments in this washer dryer:
Laundry that is identified with the following care symbol:
X = Do not dry in a tumble dryer.
- Airtight fabrics (e.g. rubber-coated fabrics).
- Delicate materials (silk, curtains made from synthetic material) - they may crease.
- Dripping-wet laundry high energy consumption.
- Wool or fabrics containing wool.
- Observe the manufacturer's instructions.
i Keep the maximum machine load in mind. Do not overload the washer dryer.
Maximum laundry loads for drying
| Cottons / coloureds | 2.5 kg |
|---|---|
| Easy-care | 1.5 kg |
Energy conservation
Practical tips
It is advisable to wash cottons / coloureds always in full machine loads (5 kg), subsequently making smaller loads for drying.
- Only use the drying facility for laundry which has been washed, rinsed and spun.
- Easy-care laundry should have been spun at the relevant speed (see programme chart) before being tumble dried.
- □ For best results, sort the washing according to fibre type and desired level of dryness.
- Take delicate laundry out of the washer dryer whilst it is still slightly damp. Let it briefly dry out in the air as overdrying in the washer dryer may cause creasing.
- It is not necessary to iron the laundry immediately after drying. We recommend that before ironing items are folded or rolled up so that residual moisture can spread evenly through the laundry.
Detergents and cleaning products
| ▲ Risk of poisoning! | ||
|---|---|---|
| Dosing detergent | Keep detergents and cleaning products out of the reach of children. | |
| Dose detergent according to | ||
|
the water hardness. You can find out the water
hardness from your water utility company. |
||
| the specifications of the detergent manufacturer. | ||
| the amount of laundry. | ||
| the degree of soiling. | ||
| i The correct dosage reduces the impact on the environment and produces a good washing result. | ||
|
||
| i For the wool programme, only use ph-neutral detergents for woollens. | ||
Water hardness
| Hardness level | French degree fH | German degree dH |
|---|---|---|
| Soft | Up to 15° | Up to 8° |
| Moderately hard | 15° – 25° | 8° – 14° |
| Hard | 25° – 40° | 14° – 22° |
| Very hard | Over 40° | Over 22° |
Normal dirty washing
- Choose a programme without prewash.
- Pour the total quantity of detergent indicated on the packs into dispenser 2 of the detergent drawer.
Very dirty washing
- Choose a programme with prewash.
- Add ¼ of the recommended quantity of detergent into dispenser 1 of the detergent drawer and ¾ of the detergent into dispenser 2.
- i Use liquid detergents only for the main washing cycle, without prewash.
- Pour the recommended dose into the batcher supplied with the liquid detergent and place it inside the drum
or
- Pour the liquid detergent into dispenser 2 of the detergent drawer after fitting the relative red insert A.
- i The scale on the red insert will help you to use the right quantity of liquid detergent.
- i When dispenser 2 is used for powder detergent, the red insert A must be removed.
Liquid detergents and start time delay
Start time delay, page 28.
With time delay selection use a dosage container for liquid detergents, e.g. a ball, otherwise the liquid detergent will run slowly out of the soap dispenser and congeal. Take dosage container out of the drum at the end of the programme.
Dosing liquid detergent
Filling detergent/ cleaning product

Dispenser 1 Detergent for prewash.
Dispenser 2
Detergent for main wash.
Machine accessories include a red insert A that can be placed inside dispenser 2 to allow liquid detergent to be used.
Dispenser 🏵 (3)
Pour liquid additives such as starch and fabric softener.
The additives are automatically introduced into the tub during final rinsing.
- i The level of the liquids must not exceed the maximum limit, otherwise the trays will be emptied too soon.
- i Before pouring thick additives into the tray, dilute them with a little water to prevent them from obstructing the trap.
Dispenser 4 is used for bleach.
- i If there is a cover marked , this means that bleach cannot be used with this model of machine.
- D Pull out the detergent drawer.
- Devin detergent and/or cleaning product.
- Close the detergent drawer.
Scale-removers can be introduced into dispenser 1 and 2 according to the manufacturer's indications. First, add the detergent and then the scale-remover.
Scale-removers
First wash
The washer dryer was tested before leaving the factory. To remove any residual test water, wash the first time without any laundry.
- Check that the transport protection devices have been removed from the back of the washer dryer, page 50.
- Do not load any laundry.
- Close the door.
- Open the water tap.
- Pull out the detergent drawer all the way.
- Put half a measuring cup of normal detergent into dispenser 2.
- i Do not use any special detergents for woollens or delicates (foam formation).
- Close the detergent drawer.
- □ Set the programme selector to the required programme, e.g. Cottons 60 °C.
- Press the Start/Stop button.
- □ When the programme has ended, set the programme selector to the Off position.
- Open the door.
- i Leave the door ajar in order to allow the inside of the washer dryer to dry.
Programmes and functions
Programme selector
The programmes are set using the programme selector. This can be turned in either direction. The programme selector must not be set to intermediate positions between the indicated programmes.
Washing programmes
Cottons/Coloureds 30, 40, 60, 90 °C Intensive washing programmes for hard-wearing cottons, coloured garments or linen.
Maximum load: 5.0 kg
Cottons/Coloureds + Prewash 60 ° C For heavily soiled laundry with stains, and for work clothes/overalls.
Place 1/4 cup of detergent in chamber 1 .
Maximum load: 5.0 kg
Mixed Fabrics 30 °C
Time-optimised programme for lightly soiled cotton textiles and easy-care textiles. Different types of washing can be washed together. Even suitable for washing new textiles before they are worn for the first time.
i Wash white and coloured items separately. Do not wash new coloured washing with other washing.
Short washing time. Reduced spin speed Maximum load: 2.5 kg
Easy-Care 30, 40, 60 °C
For delicate synthetic fibres, blends or linen fabrics.
Prevents creasing Reduced spin speed Maximum load: 2.5 kg
Delicates 30 °C
For delicate, washable textiles, e.g. silk, satin, synthetic materials or blended fabrics (e.g. curtains). Delicates cycle at 30 °C for hand and machine washable silk.
i We do not recommend washing these textiles with other rougher textiles.
Reduced spin speed Maximum load: 2.0 kg
Wool ✓ cold, 30 °C Low heat (delicates) washing programme for machine-washable wool fabrics. We advise you not to wash these fabrics together with other, coarser fabrics.
Wash other wool types by hand of have them dry-cleaned.
Reduced spin speed Maximum load: 1.0 kg
Drying programmes
Normal Heat for resistant fabrics
white and coloured cottons and linens Load: 1.5 to 2.5 kg
Low Heat
for delicate fabrics
Easy-care (drip-dry) laundry, such as synthetics and fabric blends, as well as cotton with drip-dry finish, e.g. viscose rayon, cuprammonium rayon, modacrylic fibre and polyester
Load: 1.5 to 2.5 kg
i To spin warm laundry is more effective than cold one. Therefore there is a special spin cycle integrated in the drying programme.
The spin option is only possible for drying times ranging from 1 h 00 min to 2 h 00 min.
24
Special programmes
Rinse+Spin
For an additional rinse cycle turn the programme selector to Rinse+Spin . Select the required spin speed.
If the laundry is to be removed dripping wet, set the spin speed to 000 prior to starting this programme.
For use fabric softener or starch fill the additives in dispenser & (3) before starting the programme.
Softening
□ Fill the softener agent in dispenser ⊗ (3).
- □ Set programme selector to Rinse+Spin .
- D Press the Start/Stop button.
Starching
For cotton and linen items.
Do not use fabric conditioner before starching.
- Dissolve starching agent in water. Follow the manufacturer's instructions on the package.
- □ Fill the starch in dispenser (8) (3).
- □ Set programme selector to Rinse+Spin .
- D Press the Start/Stop button.
If the laundry is to be dried in the washer dryer subsequent to the starching cycle, add approx. 30 to 50 % more starch, and select the Empty+Spin programme with the maximum spin speed to attain the highest degree of water extraction.
Fluff removal (after the drying programme)
When drying particularly fluffy items such as new terry towels, the Rinse+Spin programme should be carried out to ensure that any deposits left by the fabric are removed and are not deposited on the clothes in the next wash.
Soaking
Only put items of the same colour into the drum.
Put detergent for soaking in chamber 1 . Follow the manufacturer's instructions on the package.
i If the soaking suds are to be retained for the main wash programme, a detergent suitable for drumtype washers must be used. (Risk of excessive foam formation!)
Set programme selector to Easy-care 30 or 40.
Press the Start/Stop button.
After approx. 15 minutes, set the programme selector to Off and allow laundry to soak in suds as long as desired.
i After one minute the loading door is unlocked. Suds may exit when opening!
To end the soaking programme:
- Pump away softening agent. Select spin speed suitable for your fabric. To avoid heavy foaming choose a wash programme with prewash after the spin cycle but do not put any detergent into compartment 1 .
- If the laundry is to be washed in the soaking water: Set the programme selector to the desired programme and start it without adding further detergent.
Dyeing
Your washer dryer offers only limited possibilities for dyeing.
Please use only environmentally friendly dyeing agents. Follow the manufacturer's instructions on application and suitability for washing machines.
Therefore, after each dyeing, run a 90 °C wash programme without laundry. Put 1/2 a measuring cup of normal detergent in chamber 2 .
▲ Laundry which is washed in the washer dryer after a dyeing programme may discolour as dye deposits may be left in the machine.
Bleaching
Only use this washer dryer for bleaching, if there is no cover on dispenser 4 marked X.
Pumping
To pump out rinsing water after "without final spin" (spin speed set to 000), page 31.
- U Turn the programme selector to Empty+Spin .
- □ Press Start/Stop button.
or
- to pump out and spin with the setting spin speed.
- U Turn the programme selector to Empty+Spin .
- Press Spin button to select the required spin speed, page 31.
- □ Press Start/Stop button.
| Press this button to start the selected programme. | |
|---|---|
| Start/Stop button | The Start/Stop I ED is constantly on from the start of |
| the programme until the end. | |
| Pausing the programme |
Press the
Start/Stop
button while the programme is
running, and keep it pressed until STOP appears in the display (approx. 3 seconds). While the programme is paused the LED Start/Stop flashes, with STOP and alternating in the display. |
| To resume the programme, press the Start/Stop button again. | |
| Stopping the programme | Press the Start/Stop button while the programme is running, and keep it pressed (approx. 8 seconds) until 0000 appears in the display. |
| Short Wash button | This button reduces the overall duration of the programme cycle (washing, rinsing, spinning). This function is suitable for washing smaller loads or lightly soiled items in a shorter time. |
|
Not suitable for programmes with pre-wash.
Not possible with wool and delicates washing programmes. |
|
| Delay Start button | You can set a delay period, in hours, before the programme is to start. Press the Delay button repeatedly until the required number of hours is displayed. |
|
The default value is 0 hours, 0 minutes. Each time the
button is pressed the delay is increased by 1 hour, up to 12 hours, and by 2 hours for the subsequent 12 hours, up to 24 hours. |
|
| Reset Delay time | Press the Delay button for approx. 3 sec |
| After setting the start time, press the Start/Stop button. The delayed start time countdown begins. | |
|
The
Delay
LED lights up while the start time is selected and remains on until the programme starts.
The Delay LED monitor flashes. |
|
| Once the set delay period has passed, the selected programme begins. |
| Changing the start time setting | Press the Delay button repeatedly until the required time is displayed. |
|---|---|
| Cancelling the start time | Press the Delay button repeatedly until 0:00 appears in the display. The Delay LED goes out. |
| When the button is pressed again, the upward time count begins again from 0:00 . | |
| Opening the door | The door can be opened during the delayed start time countdown, e.g. to add additional items for washing. |
| i Note the maximum load quantity. Do not overload the washer dryer. |
| Drying button | Press the button the required drying time, maximum 2:00 hours, is shown in the display. Press the button repeatedly to reduce the drying time |
|---|---|
| Reset Drying time | Press the Drying button for approx. 3 sec |
|
The
Normal Heat
LED lights up.
Intensive drying programme: for cotton and linen fabrics. |
|
|
The
Low Heat
LED lights up.
Delicate drying programme: for synthetics and delicate fabrics. |
|
| Guide values for drying times and temperatures |
Garments may shrink or crease if dried for too long.
Excessive drying times should be avoided for this reason, and also to prevent unnecessary energy |
i Warm items feel damper than cold ones. This could lead to incorrect assumptions.
| Washing load |
Hard-wearing
fabrics |
Easy-care fabrics | Drying result |
|---|---|---|---|
| 1.5 kg | 40 minutes | 80 minutes | Damp for ironing |
| 80 minutes | 100 minutes | Dry | |
| 2.5 kg | 80 minutes | 120 minutes | Damp for ironing |
| 100 minutes | _ | Dry |
Press the button to set low heat or normal heat.
Delicate Drying button
Combination of Washing and Drying Programmes
|
Drying
programmes |
Cottons/
Coloureds Mixed Fabrics |
Easy-Care
Delicates |
Wool | Dry-only |
|---|---|---|---|---|
| Normal Heat | 1- | _ | — | |
| Low Heat | / | _ | / |
| Spin button | Press this button to select the choice of the spin speed. |
|---|---|
| Press the button repeatedly to select the required spin speed. | |
| The following spin speeds are available: | |
| 000 rpm: |
Spin disabled and stop with tub full. The washer dryer
does not perform the final spin and ends the washing programme with water in the tub. To drain the water, page 27. |
| from 600 to 1400 rpm: | For cotton and coloured programmes, speed decreases by 100 rpm starting from max. 1400 down to 600 rpm |
| from 600 to 900 rpm: |
For
synthetics, delicates and woollens
programmes, speed decreases by 100 rpm starting from 900 down to 600 rpm. |
| The indicator LED lights up while the spin speed is being selected. | |
| If the option LED lights, the display indicates the selected spin speed. | |
|
i Drying times depend on the spin speed: the higher
the speed the lower the drying time and, conse- quently, the lower the power consumption. Choo- se the highest spin speed compatible with the type of laundry. |
|
| Unbalanced load detection system | The automatic unbalanced load detection system turns round the laundry several times to ensure even distribution. |
| If the laundry is very unevenly distributed, the final speed is reduced or there is no spin cycle for reasons of safety. |
Washing and drying
This washer dryer allows
- wash-only
- dry-only
- wash+dry
programmes to be set.
In the wash+dry programmes, the cycle shifts automatically from washing to drying without having to touch the controls to continue the cycle after washing.
Deress the Door button to open the door.
▲ Risk of explosion!
Laundry items which have been pretreated with detergents containing solvents, e.g. stain remover or cleaner's solvent, must be rinsed out thoroughly by hand before they are placed in the washer dryer, otherwise there is a risk of explosion!
Warning
Before loading the washer dryer, ensure that no foreign matter or pets are in the drum.
- Place the laundry loosely and unfolded in the drum. Mix large and small items.
- Please observe the maximum drum loads for the different wash and drying programmes, pages 23 and 24.
- □ Ensure that no items of laundry are jammed between the door and the rubber seal.
- Close the door by pressing it shut until it engages audibly.
- Measure and fill detergent for wash-only or wash+dry programmes.
- Open the water tap.
Opening the door
Loading the washer dryer
| Wash-only |
Set the programme selector to the required
programme e.g. Cottons 60 °C |
|---|---|
|
This switches the washer dryer on.
The display alternates between the remaining time and the spin speed setting. |
|
| Select the required spin speed, page 31. | |
|
Select additional functions for individual
programmes, e.g. short wash or a delayed start time. |
|
| The drying time must be set to 0:00. | |
|
|
| Pausing the washing programme | i Washing programmes can be paused at any time during the cycle. |
|
|
|
Resuming the programme:
Press the Start/Stop button again. |
|
| Stopping the washing programme | Press the Start/Stop button during the programme cycle and keep pressed until 0000 appears in the display (approx. 8 seconds). |
| Changing the washing programme |
Turn the programme selector, but do not set
to O Off. |
| The display alternates between STOP and | |
|
Starting a new programme:
Press the Start/Stop button. |
|
| i The display of the new remaining time may take a while to appear. | |
| i If the detergent compartment already contains detergent, the new programme skips the fill phase. | |
| Selecting a new programme |
|
| Dry-only | i The tap must remain open during the drying cycle, as cold water is needed. | ||||
|---|---|---|---|---|---|
| i The maximum permitted load for drying is 2.5 kg. | |||||
| i For hand-washed items select a separate spin cycle. | |||||
| Setting a drying | The washer dryer is switched off. | ||||
| programme | Set the programme selector to Drying . This switches the washer dryer on. | ||||
| Press the Drying button repeatedly until the required drying time is set, page 30. | |||||
| Press the Delicate Drying button to set low heat if desired, page 30. | |||||
|
Press the Start/Stop button.
The LED monitor lights up. The remaining time appears in the display. |
|||||
| Pausing the drying programme | i The drying programme can be paused at any time during the cycle. | ||||
|
Press the Start/Stop button for approx. 3 sec.
The display alternates between STOP and The Start/Stop LED flashes. |
|||||
|
Continuing the programme:
Press the Start/Stop button again. |
|||||
|
Opening the door
▲ Risk of burning! Depending on the drying programme, the washing can be very hot. |
|||||
| Press the Door button on the front panel. | |||||
| i The door can be opened after approx. 3 minutes. | |||||
| Stopping the drying programme | Press the Start/Stop button during the programme cycle and keep pressed until 0000 appears in the display (approx. 8 seconds). | ||||
Changing the drying programme
Wash+dry
Setting the complete washing+drying programme
- Press the Start/Stop button for approx. 3 seconds. The display alternates between STOP and ---. The Time to end LED flashes.
- Press the Drying button repeatedly until the required drying time is set.
- Press the Delicate Drying button to set low heat if desired, page 30.
Starting a new programme: Press Start/Stop button.
Complete washing and drying programmes for intensive and delicates washing programmes, page 30.
- i Note the maximum permitted load for drying. Do not overload the washer dryer.
- □ Select the washing programme.
- □ Select the required spin speed, page 31.
- Press the Drying button repeatedly until the required time is set, page 30.
- Press the Delicate Drying button to set low heat if desired, page 30.
Drying LED monitor lights up. The display alternates between the remaining time and the selected spin speed.
Press the Start/Stop button. One of the display LEDs (Normal Heat or Low Heat) lights up. The remaining time is displayed during washing and drying.
Pausing the programme
- i The washing+drying can be paused at any time during the cycle.
- Press the Start/Stop button for approx. 3 sec. The display alternates between STOP and ---. The Start/Stop LED flashes.
Continuing the programme: Press the Start/Stop button again.
Press the Start/Stop button during the programme cycle and keep pressed until 0000 appears in the display (approx. 8 seconds).
-
Turn the programme selector. Select the new programm, but do not set to O Off.
The display alternates between STOP and ---.
The Start/Stop LED flashes.
- Press the Drying button repeatedly until the required drying time is set.
- Press the Delicate Drying button if desired, page 30.
Starting the new programme: Press the Start/Stop button.
Cancelling the programme
Changing the washing programme
End of programme
The washing and drying programmes finish automatically. END appears in the display, and the Time to end LED lights up.
- u Turn the programme selector to O Off .
- Remove the washing from the drum.
- □ Leave the door open to allow the inside of the washer dryer to dry out.
- Turn off the tap.
At the start of the wash cycle, the spin speed was set to 000 . The washing is held in the last rinse water.
At the end of the washing programme the display alternates between STOP and 0000 (spin speed 0). The Spin LED lights up.
□ Set the programme selector to Empty+Spin.
Press the Start/Stop button.
The water is drained away. The washer dryer does not spin. The programme has ended when END appears in the display.
Remove the dripping wet washing.
or
- □ Set the programme selector to Empty+Spin .
- □ Press the Spin button repeatedly until the required spin speed is set, page 31.
- □ Press the Start/Stop button.
The water is drained away; The washer dryer spins. The programme has ended when END appears in the display.
- G Remove the laundry.
- □ Leave the door open to allow the inside of the washer dryer to dry out.
- Turn off the tap.
Without final spin
Cleaning and servicing the washer dryer
▲ Risk of electric shock!
First, always disconnect the appliance from the power supply.
Never clean the washer dryer with a water jet.
▲ Risk of explosion!
Never clean the washer dryer with solvents.
Warning
Use only mild detergents to clean the washer dryer. Never use sharp objects they will damage the surface! If required:
- Use a mild, non-abrasive detergent.
- □ Wipe dry with a soft cloth.
Remove residual foreign bodies from the drum and rubber seals.
If metal items (e.g. coins, paper clips, needles, nails) left in the drum have caused rust spots:
□ Use chlorine-free cleaning agents; comply with the manufacturer's instructions. Never use steel wool.


Detergent drawer

If there are detergent or cleaning product residues in the detergent drawer:
- □ Pull out the detergent drawer to its stop (position).
- □ Lift it slightly and
- □ then pull fairly vigorously.
- Clean the inside of the detergent drawer housing.
- B Remove the trap B .
- Clean the detergent drawer and insert B under running water and dry.
Housing and fascia
aloaded from www Manualslib com manuals se
38
- D Put back the trap B .
- □ Slide in the detergent drawer.
Detergent has not been completely pumped away. The pump may be blocked by foreign bodies or lint.
▲ Risk of scalding!
Allow hot detergent to cool.
Keep children and pets away from the washer dryer.
G Set the programme selector to O Off .
Proceed as follows, depending on the model:
Built-in appliance:
Using a coin, turn the plastic covers in an anti-clockwise direction.
Stand-alone appliance:
- Insert a small screwdriver into the slots on the service flap and gently prise upwards to release the upper part of the service flap.
- Gently pull the service flap forwards and then upwards to remove it completely.
- Draining the water
- Remove the drain hose from its holder and pull out of the housing.
- Pull out cover cap B and allow water to flow into a container positioned beneath it.
- i Depending on the water quantity it may be necessary to empty the container several times.
- □ When there is no more water flowing out, replace cover cap B and push the hose back into place.

Detergent pump

Replace the service flap and close firmly
Filter in the water inlet hose
- □ Unscrew pump cover D in an anti-clockwise direction. More water will flow out.
- Remove detergent residues, foreign bodies and lint from the inside, and clean the interior. The pump impeller must be able to turn freely.
- Remove detergent residues, foreign bodies and lint from the pump cover thread and pump housing.
- □ Replace the pump cover and screw firmly in place.
Proceed as follows, depending on the model:
Built-in appliance:
- First replace the lower part of the service flap. Using a coin, turn plastic cover a 1/4 turn anti-clockwise.
- i The slots in the covers must be horizontal.
Stand-alone appliance:
□ First replace the lower part of the service flap and then press it in place against the housing until it is heard to click into place.
If no water or insufficient water is running into the washer dryer:
First, reduce the water pressure in the inlet hose:
- Turn off the tap.
- G Switch off the washer dryer.
- • Remove the plug from the socket.
- Remove the hose from the tap.
- □ Clean the filter with a small brush or paint brush.
- Connect the hose.
- Open the water tap.
- Check whether water is leaking out of the end of the hose connected to the tap. If water is still discharged, check that the strainer is attached properly.

40
Descaling the washer dryer
Caution
Descaling agents contain acids which may corrode the components of the washer dryer and discolour the washing.
Provided that you use the correct amount of detergent, it is not necessary to descale the washer dryer.
If descaling is nevertheless required, please follow the instructions supplied by the manufacturer of the descaling agent.
What to do if ...
▲ Risk of electric shock!
Repairs must only be carried out by customer services or authorised technicians.
If repairs are needed, or if you cannot repair a fault yourself with the help of the following table:
- G Set the programme selector to O Off .
- Disconnect the washer dryer from the power supply.
- Turn off the tap.
- □ Call customer services, page 46.
| t | rror | codes | IN | the | displ | ay | |
|---|---|---|---|---|---|---|---|
| Error code | Possible cause | Remedial action | |
|---|---|---|---|
| OPEN | Door not closed properly. | Close the door. | |
|
You have added more washing.
Safety device has not yet locked. |
Wait for the safety device to lock. | ||
| E01 |
Defective Aquasure hose. Viewing
window red. |
Unplug from the mains; turn off the tap; replace the hose. | |
| E05 | No water for washing. |
|
|
|
Water loss in the washer dryer.
Detergent pump pumps constantly. |
Turn off the tap; wait for pumping to finish; unplug from the mains; call customer services | ||
| E05 | Water does not drain away. |
Check that:
- the drain hose is not kinked or twisted - the detergent pump is not blocked. Cleaning the pump, page 39. |
|
Other error codes are only for use by our customer service staff. Note the error code and quote it to the customer service representative.
| Fault | Possible cause | Remedial action | |
|---|---|---|---|
| Door cannot be opened. | Spin speed = 0 selected. | Select programme Empty+spin and start. | |
| Programme is running and/or door is locked for safety reasons. | Wait until END appears in the display. | ||
| Programme does not start. | The Start/Stop button has not been pressed. | Press the Start/Stop button. | |
| Delayed start time selected | None. Washer dryer starts on completion of the delay period. | ||
| Power failure selected delayed start time deleted | Reselect the delay period or start the programme immediately: Press the Start/Stop button. | ||
| Door not closed properly. | Close the door. | ||
| Plug not inserted properly into socket. | Insert plug correctly. | ||
| Spin speed cannot be selected. | Spin already in progress; spin speed cannot be set or changed during spinning. | spin speed Always select the spin speed before during the spin cycle starts. | |
| Maximum spin speed cannot be set. | Easy-care or wool programme has been selected. | Change programme as required. | |
| Detergent residues in the detergent drawer. | Damp or lumpy detergent. | Clean and dry the detergent drawer, page 38. | |
| Use the measure for liquid detergent. | |||
|
Detergent container
does not fill with water. |
Plug not inserted properly into socket. | Insert plug correctly. | |
| Washer dryer fills with water and continuously drains it away. | Drain hose fitted too low. Fit drain hose correctly, page 53 | ||
| No water can be seen in the drum. |
Not a fault.
During certain programmes the water level is below the visible range. |
||
| Water leaks from the | Supply hose screw fitting is leaking. | Tighten screw fitting. | |
| bottom of the appliance. | Drain hose is leaking. | Have the drain hose replaced by customer services. | |
| Fault | Possible cause | Remedial action | |
|---|---|---|---|
| Water does not drain. | Drain hose is twisted. | Fit the drain hose correctly. | |
| Detergent pump is blocked. | Clean the detergent pump, page 39. | ||
| Foam escapes from | Too much or incorrect detergent | Reduce amount of detergent. | |
| detergent drawer. | used. |
Only use detergent which is correct
for the type of textile, and designated for use in automatic washing machines. |
|
| Several attempts to start spinning. |
Not a fault.
Imbalance monitoring system attempts to even out poor washing distribution by spinning the washing several times. |
Always wash large and small items together. | |
| Washing is not spun properly. |
Large items are not distributed
evenly in the drum. Spin speed is automatically reduced for safety reasons. |
Always wash large and small items together. | |
| Washing results not satisfactory. | Soiling worse than expected. Select appropriate programme e.g. programme with pre-wa | ||
| Insufficient detergent used. | Measure detergent quantity in accordance with manufacturer's specifications. | ||
| Detergent residues on the washing. |
Some phosphate-free detergents
contain water-insoluble residues which appear on washing as light specks. |
Rinse washing again or change to
liquid detergent. Brush washing after drying. |
|
| Drying results not satisfactory. |
Not a fault.
Laundry pressed against the sides of the drum, forming a ring. |
Dig up the ring by hand.
Start a drying programme, page 34 |
|
| Water tap is closed. | Open the tap. | ||
| Maximum permitted load for drying is exceeded. | Reduce the laundry to the maximum permitted load of the selected programme. | ||
| The drying time is unsuitable. | Select the drying time in accordance with the programme. | ||
| Set a brief timed drying cycle. | |||
| Fault | Possible cause | Remedial action |
|---|---|---|
| Grey residues on the washing. | Soiling caused by ointment, grease or oil. |
Use maximum permissible detergent
amount and temperature for the next washing cycle; see the care label. |
| Programme terminated unexpectedly. | Start/Stop button pressed accidentally. | Press the button again to restart programme. |
| The display shows a |
Not a fault.
Programme status is displayed |
The washing or drying cycle is continued, page 12. |
| Nothing appears in the display. |
Programme will continue when
power supply is restored. If washing is removed during a power failure, first drain off the water, page 39. |
|
|
||
|
||
Customer service
Before you call customer service, please check whether you can eliminate the fault yourself, from page 42 onwards.
A technician who is called out to give advice will charge you, even if the appliance is still under guarantee.
You can find your nearest customer service in the enclosed address list. Please provide customer service with the product number (E-Nr.) and the production number (FD) of the appliance.
You can find these numbers in the box marked in bold outline on the identification plate on the doorframe.

Please write the numbers of your appliance here.
To prevent unnecessary call-outs, please assist customer service by quoting the product and production numbers. This will save you additional costs.

Consumption data
| Washing | |||
|---|---|---|---|
| Programme | Weight of washing | Result | |
| Coloureds 60 °C | 5.0 kg | Electricity: 1.1 kWh | |
| Water: 491 | |||
| Washing and drying | |||
| Cotton 60 °C (coloureds) | 5.0 kg | Electricity: 4.25 kWh | |
| and cupboard dry | 2 x 2.5 kg (for drying) | Water: 95 I | |
| Automatic washing/drying pro | DCess | ||
| Boil wash 90 °C | 2.5 kg | Electricity: 3.35 kWh | |
| + cotton cupboard dry | Water: 81 I | ||
| Coloureds 60 °C | 2.5 kg | Electricity: 2.70 kWh | |
| + cotton cupboard dry | Water: 72 I | ||
| Coloureds 40 °C | 2.5 kg | Electricity: 2.15 kWh | |
| + cotton cupboard dry | Water: 72 I | ||
| Easy-care 40 °C | 1.5 kg | Electricity: 1.90 kWh | |
| + easy-care cupboard dry | Water: 91 I | ||
| Drying | ||||
|---|---|---|---|---|
| Fabrics | Weight of washing | Drying time | Drying result |
Energy consump-
tion [kWh] |
|
Resistant
drying |
1.5 kg | 40 minutes | Damp for ironing | 0.7 |
| 80 minutes | Dry | 1.2 | ||
| 2.5 kg | 80 minutes | Damp for ironing | 0.9 | |
| 100 minutes | Dry | 1.4 | ||
|
Delicate
drying |
1.5 kg | 80 minutes | Damp for ironing | 0.8 |
| 100 minutes | Dry | 0.9 | ||
| 2.5 kg | 120 minutes | Damp for ironing | 1.0 |
Installing, connecting and transporting the washer dryer
Please install and connect the washer dryer in accordance with the enclosed installation and assembly instructions. Be sure to read the information contained in this chapter!
▲ Risk of injury!
The washer dryer is very heavy. Lift with caution.
Frozen hoses may tear/burst. Do not install the machine in an area where there is a risk of frost or outdoors.
The washer dryer may be damaged. Do not turn the washer dryer upside down and do not place it on its side. Do not lift the washer dryer by its projecting parts (e.g. door).
Check the washer dryer for damage caused during transportation. Do not connect the washer dryer if it has visible signs of damage. If in doubt, contact your local dealer.
Remove and keep transit bolts, page 50.
In addition to the instructions listed here, particular regulations issued by the relevant water and power utility companies may apply.
If in doubt, have the appliance connected by an electrician.
Stand-alone appliance
Bag inside the drum contains:
- Covers for holes left by removing the transport bolts.
- Separator for liquid detergent
- Wrench
- 1 24–40 mm Ø hose clip (specialist outlet) for connection to a siphon.
Safety information
Standard accessories
48

On the back of the washer dryer:
- Water drain hose.
- Water inlet hose
- Mains cable with plug.
Built-in appliance
i See the separate Installation and assembly instructions.
Supplied in addition to the stand-alone appliance inside the drum:
- a door template,
- utilities for the built-in installation.
Moisture in the drum is due to the final inspection which every washer dryer undergoes before it leaves the factory.
Spirit level for levelling the washer dryer.
Useful tools
Dimensions

Stand-alone appliance
- a = 596 mm
- b = 552 mm
- c = 850 mm
Built-in appliance
The dimensions are different from those of a stand-alone appliance. See separate installation and assembly instructions.
Transport protection devices
▲ Risk of damage!
Before using the washer dryer for the first time, completely remove the transport protection devices on the rear.
Store the transport protection devices for later transport (moving house).
- □ Loosen bolts with the 13-mm spanner until they are freely movable in the bushes.
- Remove complete transport protection devices (bolt with sleeve).

Insert the covers to prevent splashes or water getting inside the washer dryer, or touching parts under voltage.
Appliance stability is essential to ensure that the washer dryer does not "creep" during spin cycles.
The installation area must be firm, clean and level. Soft floor coverings, such as carpets or foam-backed floor coverings, and parquet flooring are unsuitable.
When the washer dryer is being installed it is important to ensure that the floor is capable of taking the loading that the washer dryer will impose. In particular with Floating Floors, often installed in apartment buildings, this washer dryer needs to be sited where the floor has been sufficiently braced so that the loads and vibration do not damage both the washer dryer and the floor.
Installation area
50
- Fix the supplied slide elements to the floor using double-sided adhesive tape. On porous surfaces (e.g. screed) use an appropriate adhesive.
- D Position the washer dryer on the slide elements.
- Moisten the slide elements with a mixture of water and washing-up liquid before pushing the washer dryer into position. Do not use grease and/or oils!
The washer dryer can be adjusted to various working heights using the hight adjustment frame* .
□ Fix the feet of the washer dryer in place using holding brackets **.
If the washer dryer is to be positioned on the floor above a wooden beam ceiling:
- Position washer dryer in a corner wherever possible.
- Screw a water-resistant board (at least 30 mm thick) firmly in place on the floor.
- □ Fix the feet of the washer dryer in place using holding brackets**.
If the washer dryer is to be positioned on a pedestal:
□ Fix the feet of the washer dryer in place using holding brackets **.
- * Hight adjustment frame is available from specialist dealers or customer service, order no. WZ 20420.
- ** Holding brackets (kit) are available from specialist dealers or customer service, order no. WX 9756.
Levelling

Level the washer dryer using the four adjustable feet and a spirit level.
All four feet must stand firmly on the ground. The washer dryer must not wobble.
- Release lock nut 1 using the wrench.
- Adjust the height by turning foot 2 . Maximum recommended height adjustment 10 mm.
- Screw the lock nut 1 tightly against the housing. Hold the foot tight and do not adjust the height.
Attention
Loud noises, vibrations and "creeping" are the consequences of incorrect alignment!
Hose and cable lengths
Connection on left side


Available in kit form from specialist outlets:
- Connecting kit plastic hose (approx. 2.50 m), order no. WZ 10130.
There are different hose and cable lenghts in built-in appliances. See the separate Installation and assembly instruction.
Connection on right side
Aquasecure extension hose
For built-in installation
Water connection
To prevent leaks or water damage, it is essential to follow the instructions in this chapter!
Caution
Operate the washer dryer with cold drinking water only. Do not connect the appliance to the mixer tap of an unpressurized hot-water boiler.
If in any doubt, have the water connection carried out by an authorized technician.
The water supply hose must not be:
- Bent or squashed.
- Modified or cut through (stability can no longer be guaranteed).
Plastic threads must only be tightened by hand. Do not remove the strainers from the water supply hose.
Observe the water pressure in the supply network:
- The water pressure should be between 0.5x10⁵ ... 9x10⁵ Pa (0.5 ... 9 bars) (when the tap is turned on, at least 8 litres of water is discharged per minute).
- A pressure reducing valve must be installed if the maximum water pressure is exceeded. Connect the water supply hose.
- Connect the water supply hose to the tap.
- i In the case of a defective Aquasure hose (water supply hose), the check eye 1 is red, for fault report, page 42.
After connecting the water inlet hose:
- Turn on the tap fully.
- □ Check the connection points for leaks.


Water drainage
Caution
Do not bend or pull the water drainage hose.
Height difference between the placement area and drainage point: max. 90 cm, min. 50 cm.
Drainage into a siphon:
Secure the connection point with a hose band clip of 24–40 mm diameter (from specialist stores).

Drainage into a wash basin:
Caution
The plug must not block the drain of the wash basin.
- Secure the water drainage hose so that it does not slide out.
- When water is being drained, check that the water flow is fast enough.
- i The water inlet and drain hoses can be turned to the right or left depending on installation requirements.
Transporting the washer dryer
Before you transport the washer dryer (e.g. when moving house)
- Turn off the tap.
- Reduce the water pressure in the water inlet hose, page 40.
- Drain off any residual water, page 39.
- Disconnect the machine from the power supply.
- Remove the hoses.
- Remove the covers.
- Installing transportation protection devices.
Caution:
The washer dryer must be connected correctly to an A.C. contactor socket.
The mains voltage must comply with the voltage information given on the identification plate. The connected load and the necessary fusing are shown on the identification plate.
Ensure that:
- the plug and the socket are compatible.
- the wire cross-section is sufficient.
- the earth system is installed in accordance with regulations.
If the mains cable needs altering, this should only be done by the after-sales service.
Do not use multiple plugs/connectors and/or extension cables.
Only use current-operated circuit breakers which are marked as follows:
Do not touch the plug with wet hands.
Always pull the plug grip to remove the plug from the socket.
Electrical connection
56
Index
Α
Additional options Delay Start, 10 Short Wash, 10 Aquasure hose, 42
В
Bleaching, 27 Built-in appliance, 49 Built-in installation, 53 Button Delay Start, 28 Door, 10 Drying, 10, 30 Short Wash, 12 Spin, 10, 31 Start/Stop, 10, 28 Buttons, 10
С
Care labels, 16 Cleaning and care Descaling, 41 Detergent drawer, 38 Drum, 38 Filter in the water inlet hose, 40 Housing and fascia, 38 Cleaning and servicing, Pump, 39 Connecting kit, 53 Consumption data, 47 Control panel, 10 Cottons/Coloureds, 23 Customer service, 46
D
Degrees of dirt, 14 Delay Start. 10. 12. 28 Delayed start time, 28 Delicate drving, 30, 35 Delicates. 24 Detergent. 19 Detergent drawer, 21, 38 Detergent pump. 39 Dimensions 49 Built-in appliance, 49 Stand-alone appliance, 49 Display panel, 10 Door. 11. 29 Open, 34 Door button, 10 Door template, 49 Dosina detergent, 19 Draining the water, 39 Dripping wet washing, 37 Dry, 30 Drv-only, 34 Drying programmes, 24, 30 Drving temperature, 30 Drying times, 30 Dveina. 27
Ε
Easy-care, 23 Electrical connection, 56 Error code, 42
F
Fault, 42 Filling detergent, 21 Filter in the water inlet hose, 40 First wash, 22 Fluff removal, 25 Functions, 23
Η
Hight adjustment frame, 51 Holding brackets, 51 Hose and cable lengths, 53
I
Identificationplate, 46 Installation area, 50 Intensive dry, 30
L
Laundry preparing, 13 remove, 13 sorting, 14, 17 LED Low Heat, 30 Normal Heat, 30 Levelling, 52 Liquid detergent, 20 Low Heat, 10, 30
Μ
Maximum laundry loads, 16, 17 Mixed Fabrics, 23
Ν
New selection, 33 No final spin, 37 Normal Heat, 10
0
Option lights, 10 Delay Start, 10 Low Heat, 10 Normal Heat, 10 Spin, 10 Time to end, 10
Ρ
Powder detergent, 20 Programme Change, 33, 35, 36 Pause, 28, 33, 36 Select, 23 Stop, 28, 33, 34, 36 Programme end, 33 Without final spin, 37 Programme selector, 10 Programme state, 12 Programmes, 23 Dry-only, 34 Wash-only, 33 Washing+drying, 35
R
Remedial action, 42 Removing stains, 15 Rinse+Spin, 25
S
Scale-removers, 21 Service flap, 39, 40 Short Wash, 12, 28 Signal, 12 Silk, 24 Soaking, 26 Special programmes, 25 Bleaching, 27 Dveina. 27 Fluff removal, 25 Pumping, 27 Soaking, 26 Softenina. 25 Starching, 25 Spin button, 12, 31 Spin Speed, 10 Stand alone appliance, 48 Standard accessories, 48 Starching, 25 Start. 28 Start/Stop, 10 Switch on, 33
Т
Time to end, 10 Transport protection devices, 50
Transporting the washer dryer, 56
U
Unbalanced load detection system, 31 Use, 32, 37
V
Viewing window, 42
W
Wash+dry, 35 Wash-only, 33 Washer dryer, 11 Washing programmes, 23, 33 Select, 33 New selection, 33 Water connection, 54 Water drainage, 55 Water hardness, 19 Wool, 24, 28
WDI1440 0107 EN 9000 243 274


 Loading...