

Operating and Care instructions
Notice d’utilisation et de maintenance
Instrucciones para la operación y cuidado
S18IW..

Contents
IMPORTANT SAFETY INSTRUCTIONS . . . . . . . . . . . . . . . . . . . . . . . . . . . . . . . . . . . . . . . . . . . . . . . . . . . . 3
Congratulations . . . . . . . . . . . . . . . . . . . . . . . . . . . . . . . . . . . . . . . . . . . . . . . . . . . . . . . . . . . . . . . . . . . . . . 4
Your new appliance . . . . . . . . . . . . . . . . . . . . . . . . . . . . . . . . . . . . . . . . . . . . . . . . . . . . . . . . . . . . . . . . . . . 5
Installation . . . . . . . . . . . . . . . . . . . . . . . . . . . . . . . . . . . . . . . . . . . . . . . . . . . . . . . . . . . . . . . . . . . . . . . . . . 6
Connection to the power supply . . . . . . . . . . . . . . . . . . . . . . . . . . . . . . . . . . . . . . . . . . . . . . . . . . . . . . . . . 6
Switching on the appliance . . . . . . . . . . . . . . . . . . . . . . . . . . . . . . . . . . . . . . . . . . . . . . . . . . . . . . . . . . . . . 7
Switching off and disconnecting the appliance . . . . . . . . . . . . . . . . . . . . . . . . . . . . . . . . . . . . . . . . . . . . . 7
Variable interior design . . . . . . . . . . . . . . . . . . . . . . . . . . . . . . . . . . . . . . . . . . . . . . . . . . . . . . . . . . . . . . . . 7
Control panel . . . . . . . . . . . . . . . . . . . . . . . . . . . . . . . . . . . . . . . . . . . . . . . . . . . . . . . . . . . . . . . . . . . . . . . . 8
Setting the temperature . . . . . . . . . . . . . . . . . . . . . . . . . . . . . . . . . . . . . . . . . . . . . . . . . . . . . . . . . . . . . . . . 9
Setup mode . . . . . . . . . . . . . . . . . . . . . . . . . . . . . . . . . . . . . . . . . . . . . . . . . . . . . . . . . . . . . . . . . . . . . . . . . 9
Settings which can be changed in Setup mode . . . . . . . . . . . . . . . . . . . . . . . . . . . . . . . . . . . . . . . . . . . . . 10
Vacation mode . . . . . . . . . . . . . . . . . . . . . . . . . . . . . . . . . . . . . . . . . . . . . . . . . . . . . . . . . . . . . . . . . . . . . . . 11
Sabbath mode . . . . . . . . . . . . . . . . . . . . . . . . . . . . . . . . . . . . . . . . . . . . . . . . . . . . . . . . . . . . . . . . . . . . . . . 11
Storing diagrams . . . . . . . . . . . . . . . . . . . . . . . . . . . . . . . . . . . . . . . . . . . . . . . . . . . . . . . . . . . . . . . . . . . . . 11
Practical tips for storing wine . . . . . . . . . . . . . . . . . . . . . . . . . . . . . . . . . . . . . . . . . . . . . . . . . . . . . . . . . . . 12
Drinking temperatures . . . . . . . . . . . . . . . . . . . . . . . . . . . . . . . . . . . . . . . . . . . . . . . . . . . . . . . . . . . . . . . . . 12
How to save energy . . . . . . . . . . . . . . . . . . . . . . . . . . . . . . . . . . . . . . . . . . . . . . . . . . . . . . . . . . . . . . . . . . . 12
Operating noises . . . . . . . . . . . . . . . . . . . . . . . . . . . . . . . . . . . . . . . . . . . . . . . . . . . . . . . . . . . . . . . . . . . . . 13
Cleaning the appliance . . . . . . . . . . . . . . . . . . . . . . . . . . . . . . . . . . . . . . . . . . . . . . . . . . . . . . . . . . . . . . . . 13
Odors . . . . . . . . . . . . . . . . . . . . . . . . . . . . . . . . . . . . . . . . . . . . . . . . . . . . . . . . . . . . . . . . . . . . . . . . . . . . . . 13
Warning messages via the display . . . . . . . . . . . . . . . . . . . . . . . . . . . . . . . . . . . . . . . . . . . . . . . . . . . . . . . 14
Appliance self-test . . . . . . . . . . . . . . . . . . . . . . . . . . . . . . . . . . . . . . . . . . . . . . . . . . . . . . . . . . . . . . . . . . . . 14
Resetting factory settings . . . . . . . . . . . . . . . . . . . . . . . . . . . . . . . . . . . . . . . . . . . . . . . . . . . . . . . . . . . . . . 14
Troubleshooting . . . . . . . . . . . . . . . . . . . . . . . . . . . . . . . . . . . . . . . . . . . . . . . . . . . . . . . . . . . . . . . . . . . . . . 15
Changing the bulb . . . . . . . . . . . . . . . . . . . . . . . . . . . . . . . . . . . . . . . . . . . . . . . . . . . . . . . . . . . . . . . . . . . . 15
Changing the filter . . . . . . . . . . . . . . . . . . . . . . . . . . . . . . . . . . . . . . . . . . . . . . . . . . . . . . . . . . . . . . . . . . . . 16
Service . . . . . . . . . . . . . . . . . . . . . . . . . . . . . . . . . . . . . . . . . . . . . . . . . . . . . . . . . . . . . . . . . . . . . . . . . . . . . 16
Warranty . . . . . . . . . . . . . . . . . . . . . . . . . . . . . . . . . . . . . . . . . . . . . . . . . . . . . . . . . . . . . . . . . . . . . . . . . . . . 17
Français . . . . . . . . . . . . . . . . . . . . . . . . . . . . . . . . . . . . . . . . . . . . . . . . . . . . . . . . . . . . . . . . . . . . . . . . . . . . . 18
Español . . . . . . . . . . . . . . . . . . . . . . . . . . . . . . . . . . . . . . . . . . . . . . . . . . . . . . . . . . . . . . . . . . . . . . . . . . . . . 36
2

IMPORTANT SAFETY INSTRUCTIONS
READ AND SAVE THESE INSTRUCTIONS!
WARNING
m
When using this appliance, always
exercise basic safety precautions,
including the following:
1. Use this appliance only for its
intended purpose as described
in this Owner's Manual.
2. This refrigerator must be
properly installed in accordance
with the Installation Instructions
before it is used.
3. Do not allow children to climb,
stand or hang on the shelves in
the refrigerator. They could
seriously injure themselves and
damage the refrigerator.
4. After your refrigerator is in
operation, do not touch the cold
surfaces in the refrigerator
compartment, particularly when
hands are damp or wet. Skin
may adhere to these extremely
cold surfaces.
5. Do not store or use gasoline or
other flammable vapors and
liquids in the vicinity of this or any
other appliance.
6. Unplug your refrigerator before
cleaning and making repairs.
NOTE: We strongly recommend
that any servicing be performed
by a qualified individual.
7. Before replacing a burned-out
light bulb, set the power switch
in the OFF position to turn off the
lights in order to avoid contact
with a live wire filament.
8. A burned-out light bulb may
break when being replaced.
NOTE: Setting the refrigerator
temperature controls to OFF
does not remove power to the
light circuit.
m WARNING
RISK OF CHILD ENTRAPMENT
Child entrapment and suffocation
are not problems of the past. Junked
or abandoned refrigeration products
are still dangerous... even if they will
sit for “just a few days.” If you are
getting rid of your old appliance,
please follow these instructions to
help prevent accidents.
Before you throw away your old
refrigeration product:
– Take off the doors.
– Leave the shelves in place so that
children may not easily climb
inside.
Electrical Connection
The appliance comes with an UL
listed, 3-wire power supply cord.
The appliance requires a 3-wire
receptacle.
The receptacle must be installed by
a licensed electrician only.
Grounding instruction
This appliance must be grounded.
In the event of a malfunction or
breakdown, grounding will reduce
the risk of electric shock by providing
a path of least resistance for the
electric current.
Improper connection of the
equipment grounding conductor
may result in electric shock. Have the
appliance checked by a qualified
electrician or service technician if you
are in doubt as to whether the
appliance has been properly
grounded.
Some local regulations may require
a separate ground. In such cases,
the required accessory ground wire,
clamp and screw must be
purchased separately.
Never ground the appliance to
plastic plumbing lines, gas lines or
water pipes.
3
CFC DISPOSAL
Your old refrigerator may have
a cooling system that used CFC's
(chlorofluorocarbons).
CFC's are believed to harm
stratospheric ozone.
If you are throwing away an old
refrigeration product, make sure the
CFC refrigerant is removed for
proper disposal by a qualified
servicer. If you intentionally release
this CFC refrigerant, you can be
subject to fines and imprisonment
under provisions of environmental
legislation.
IMPORTANT
Save these instructions for local
inspector's use. Observe all
governing codes and ordinances.
Note to installer –
Be sure to leave these instructions
with the consumer.
Note to consumer –
Keep these instructions with your
Owner's Manual for future reference.
Definitions
m
WARNING – This indicates that
death or serious injuries may
occur as a result of not observing
this warning.
m
CAUTION – This indicates that
minor or moderate injuries may
occur as a result of not observing
this warning.
WARNING
CAUTION
This symbol is used to draw the
user's attention to something in
particular.
m
m
Congratulations
With the purchase of your new wine
preservation unit you have opted for
a modern, high-quality domestic
appliance.
Only when they have reached the
right drinking temperature do good
wines first develop their aroma and
flavour for your full enjoyment.
Your new wine preservation unit
provides slowly and steadily the ideal
drinking temperature for your wines.
Both red and white wines can be
stored at the same time in the two
separately configurable temperature
zones.
Your new appliance is distinguished
by its economical energy
consumption.
Each appliance which leaves our
factory is inspected thoroughly to
ensure that it functions properly and
is in perfect condition.
If you have any questions -
particularly concerning installation
and connection of the appliance please do not hesitate to contact our
customer service, see section
"Service".
Further information and a selection of
our products can be found on our
home page.
Please read these operating
instructions as well as the installation
instructions and all information
enclosed with the appliance and
follow accordingly.
Retain all documents for subsequent
use or for the next owner.
General information
This appliance is designed to hold
and control the temperature of
drinks, in particular wines.
This appliance is designed for
domestic use only.
4
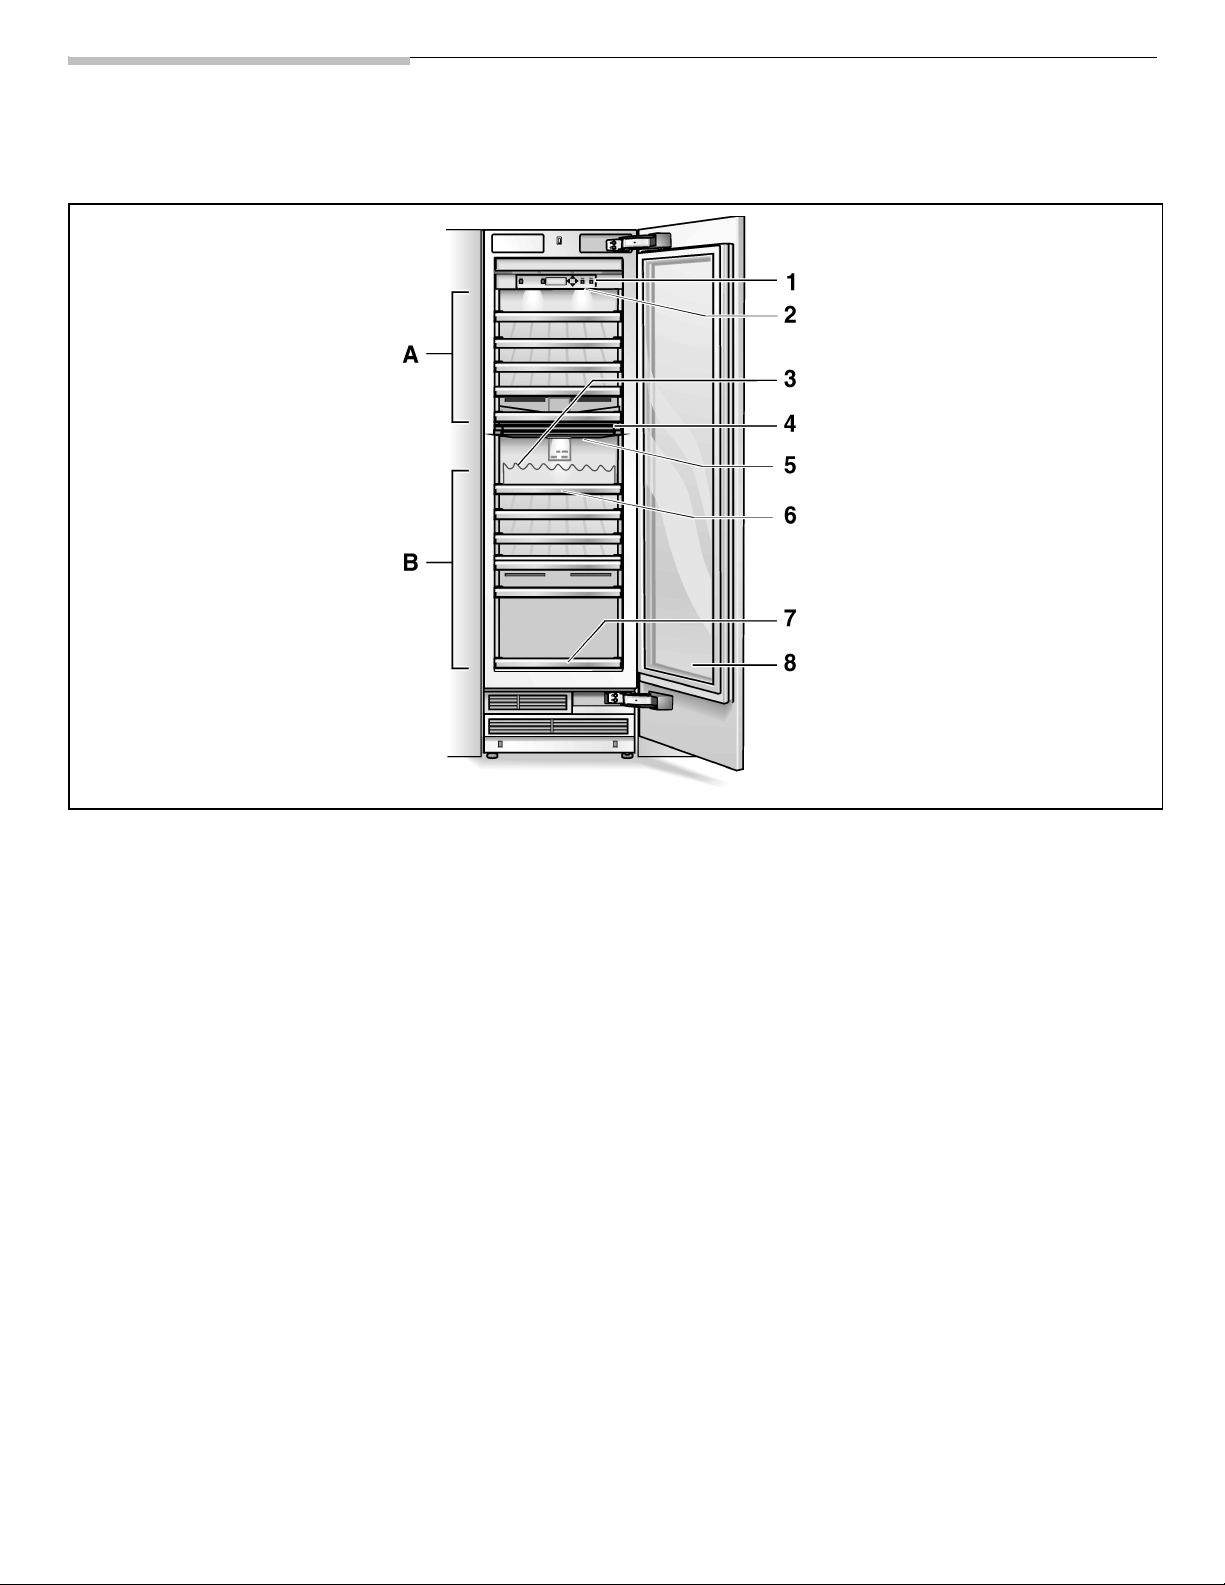
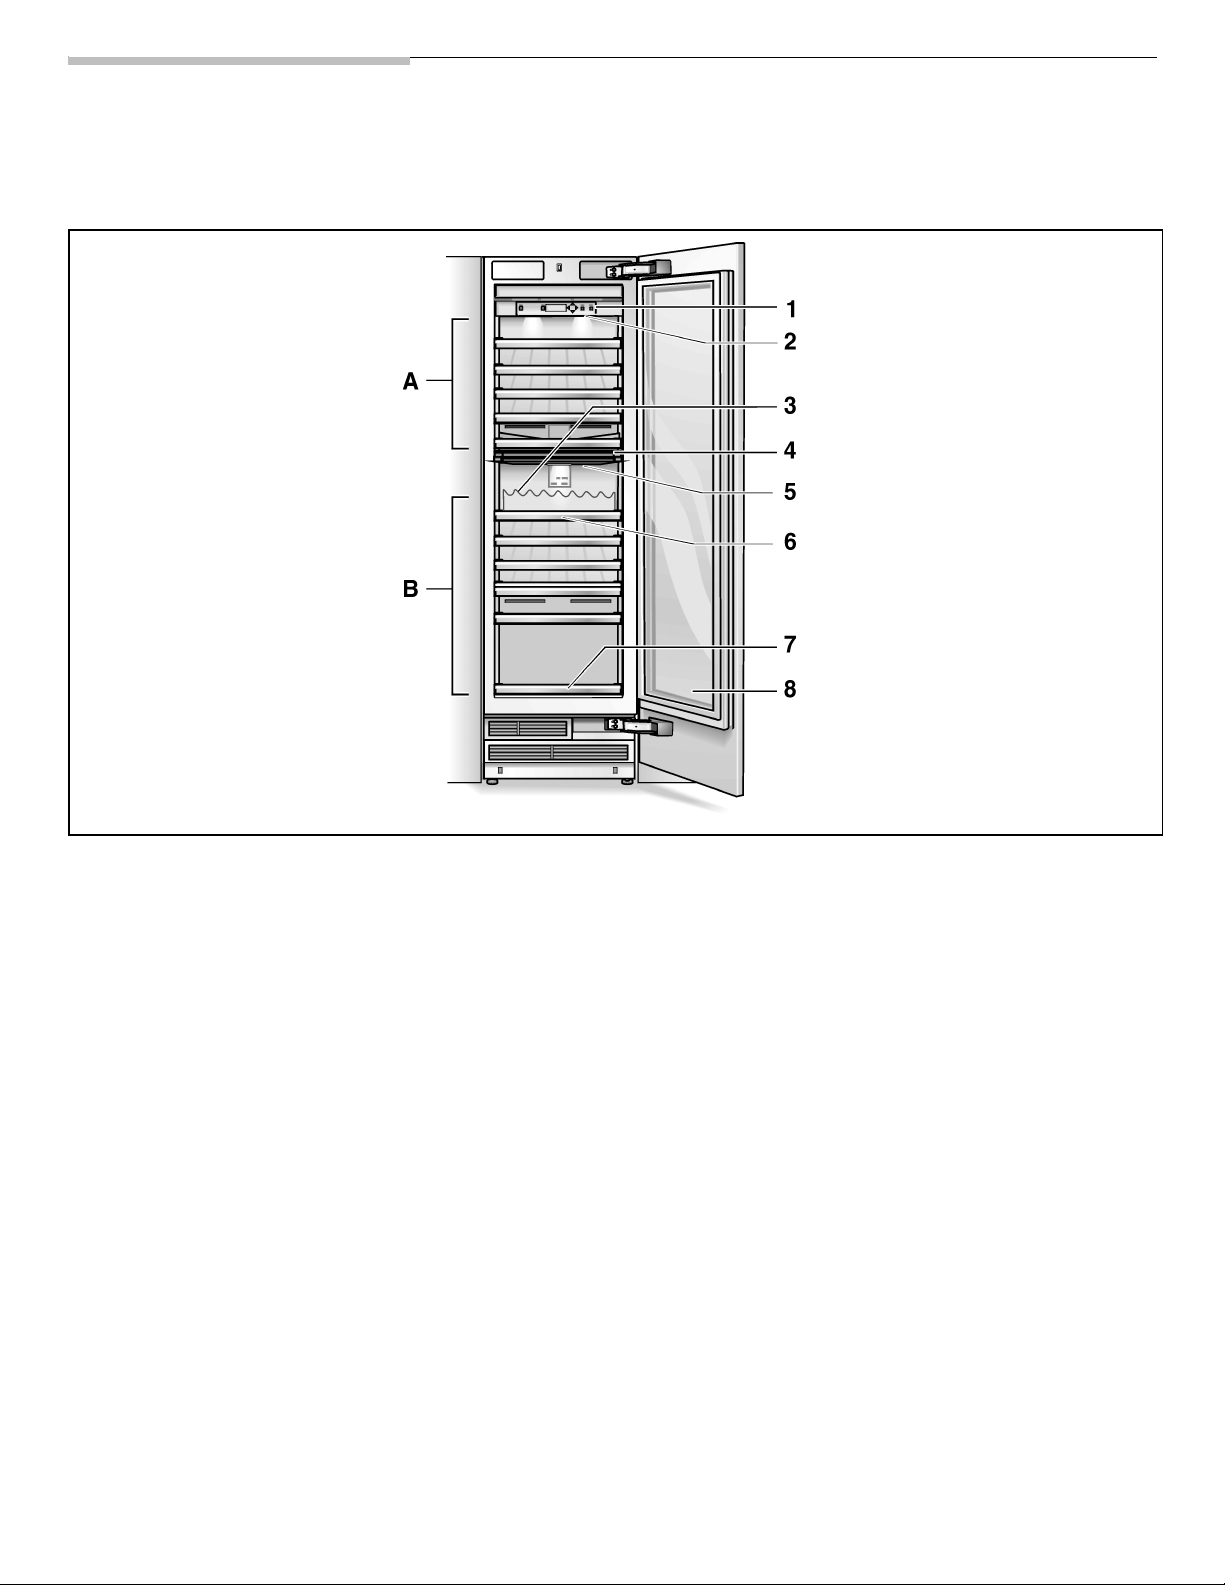
Your new appliance
These operating instructions refer to several models. Diagrams may vary.
A Top compartment
B Bottom compartment
1 Control panel
2 Interior Light for top
compartment
3 Presenter *
to show the label of bottles.
4 Divider
to separate the temperature
zones in the compartments
5 LED Presenter Light
for bottom compartment
6 Pull-out shelf
for lying storage of wine
bottles.
7 Pull-out shelf *
for standing storage of bottles
and jars.
8 Glass door
* optional accessory
5
Installation
m
Do not install the appliance:
– outdoors,
– in an environment with dripping
water,
– in rooms which are at risk of
frost.
The appliance is very heavy – for
empty weight see following table:
– Wine unit 18": 300 Ibs / 135 kg
WARNING
Installation room
The appliance should be installed in
a dry, well ventilated room.
The ambient temperature should not
drop below 55 °F (13 °C) or rise
above 110 °F (43 °C), otherwise
malfunctions may occur.
The installation location should not
be exposed to direct sunlight and not
placed near a heat source, such as
an oven, radiator, etc.
If installation next to a heat source is
unavoidable, use a suitable
insulating plate or observe the
following minimum distances from
the heat source:
– 1.2" (3 cm) from an electric
cooker,
– 12" (30 cm) from an oil or
solid-fuel cooker.
Installation cavity
It is important to observe the
specified dimensions of the
installation cavity for a trouble-free
installation of the appliance and for
the subsequent general view of the
furniture front.
In particular ensure that the cavity is
square. Squareness can be checked
by suitable means, e.g. spirit level,
diagonal measurements, etc.
m
Furniture/fixtures
The new appliance will be mounted
securely to adjacent and overhead
furniture/fixtures.
For this reason it is essential that all
attachable furniture/fixtures are
connected securely to the base or
the wall by suitable means.
Base
To ensure that the appliance is
installed securely and functions
properly, the base must be fiat and
level.
The base must be made of a hard,
rigid material.
The installation area must be the
same height as the rest of the room.
On account of the heavy weight of
a fully loaded appliance, a loadbearing base is required.
For fully-loaded weight see the
following table:
– Wine unit 18": 550 Ibs / 245 kg
If in doubt, contact an architect or
a building expert.
Installing and
connecting the
appliance
m
Have the appliance installed by an
electrician according to the
endosed installation instructions.
After installing the appliance, wait at
least before switching on the
appliance. During transit the oil in the
refrigeration system may have
moved.
Before switching on the appliance for
the first time, clean the inside of the
appliance.
CAUTION
m
Connection
to the power
supply
m
Avoid Electrical Shock Hazard
– Plug into a grounded 3 prong
outlet.
– Do not remove ground prong.
– Do not use an adapter.
– Do not use an extension cord.
Failure to follow these instructions
can result in death, fire, or
electrical shock.
Improper connection of the
equipment grounding conductor
may result in electric shock.
Have the appliance checked by
a qualified electrician or service
technician if you are in doubt as
to whether the appliance has been
properly grounded.
The appliance comes with an UL
listed, 3-wire power supply cord.
The appliance requires a 3-wire
receptacle.
The receptacle must be installed by
a licensed electrician only.
The receptacle must be fitted with
a 10 to 16 A fuse.
Please observe in this coherence the
following table:
Appliance MAX load
Wine unit 24
WARNING
at one time
"
2 Ampere
m
6
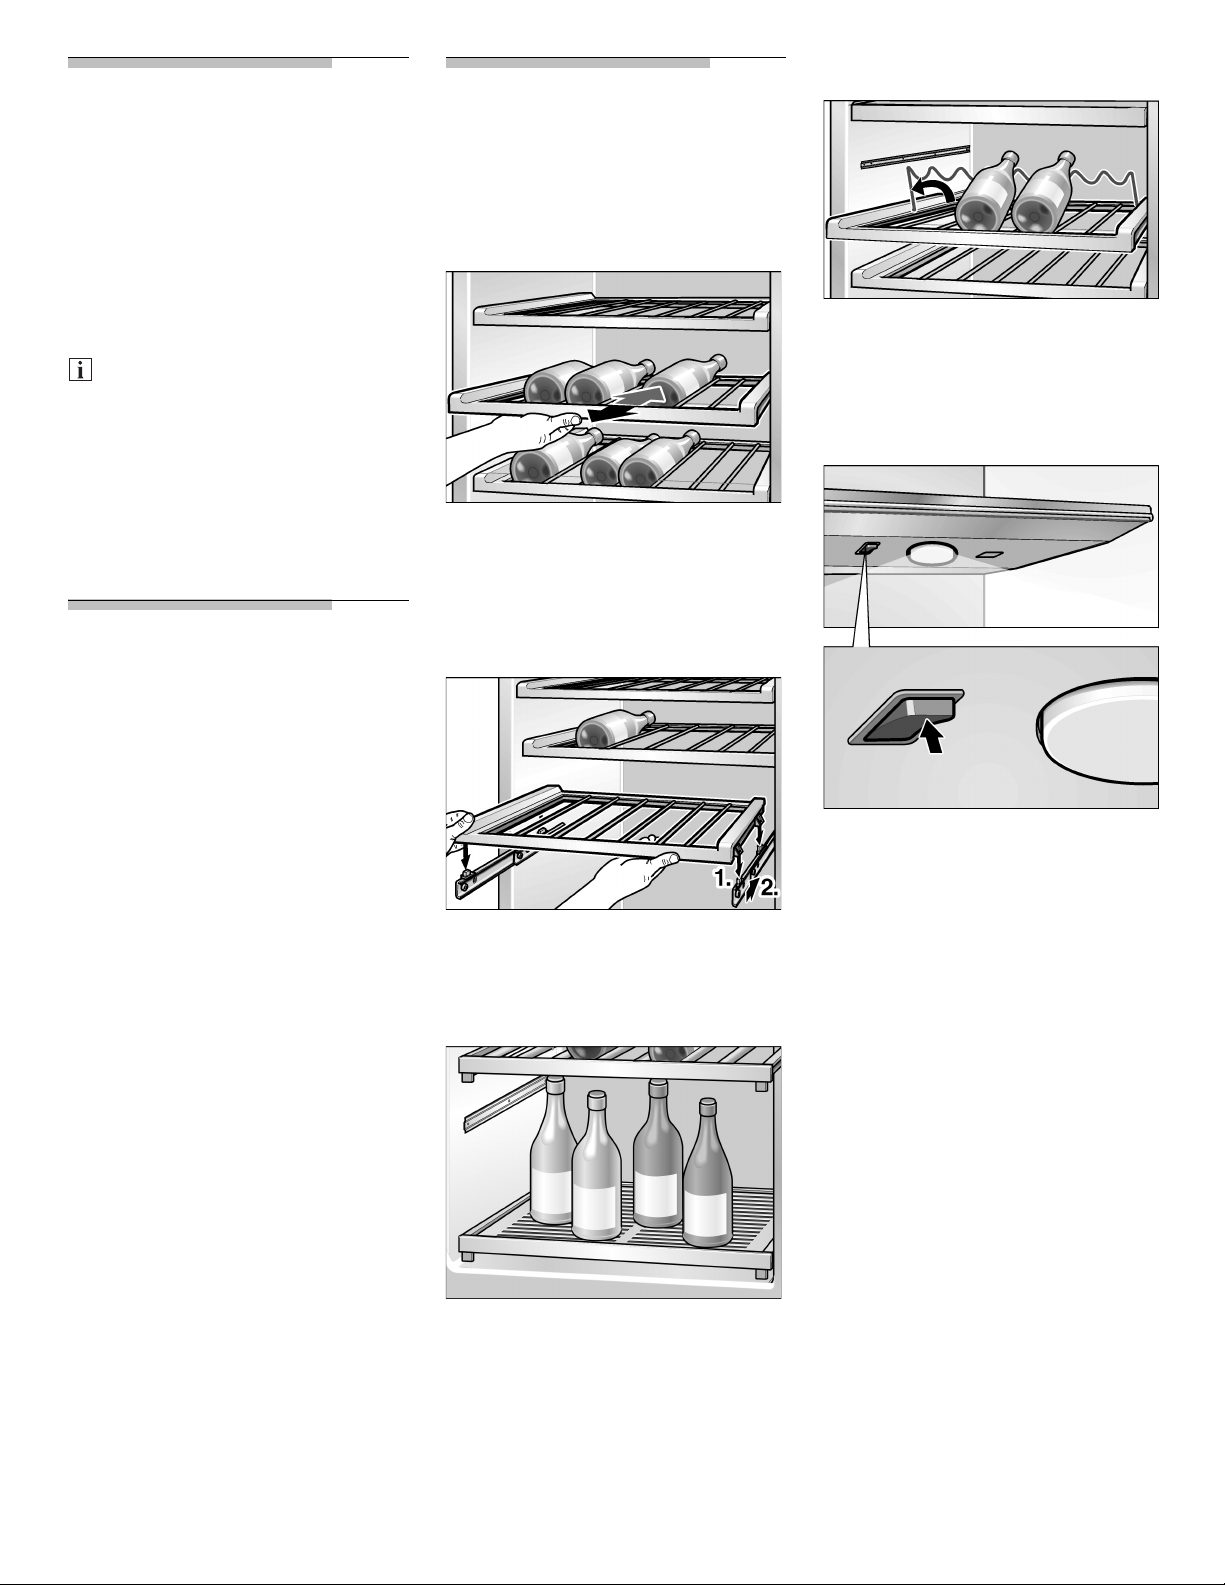
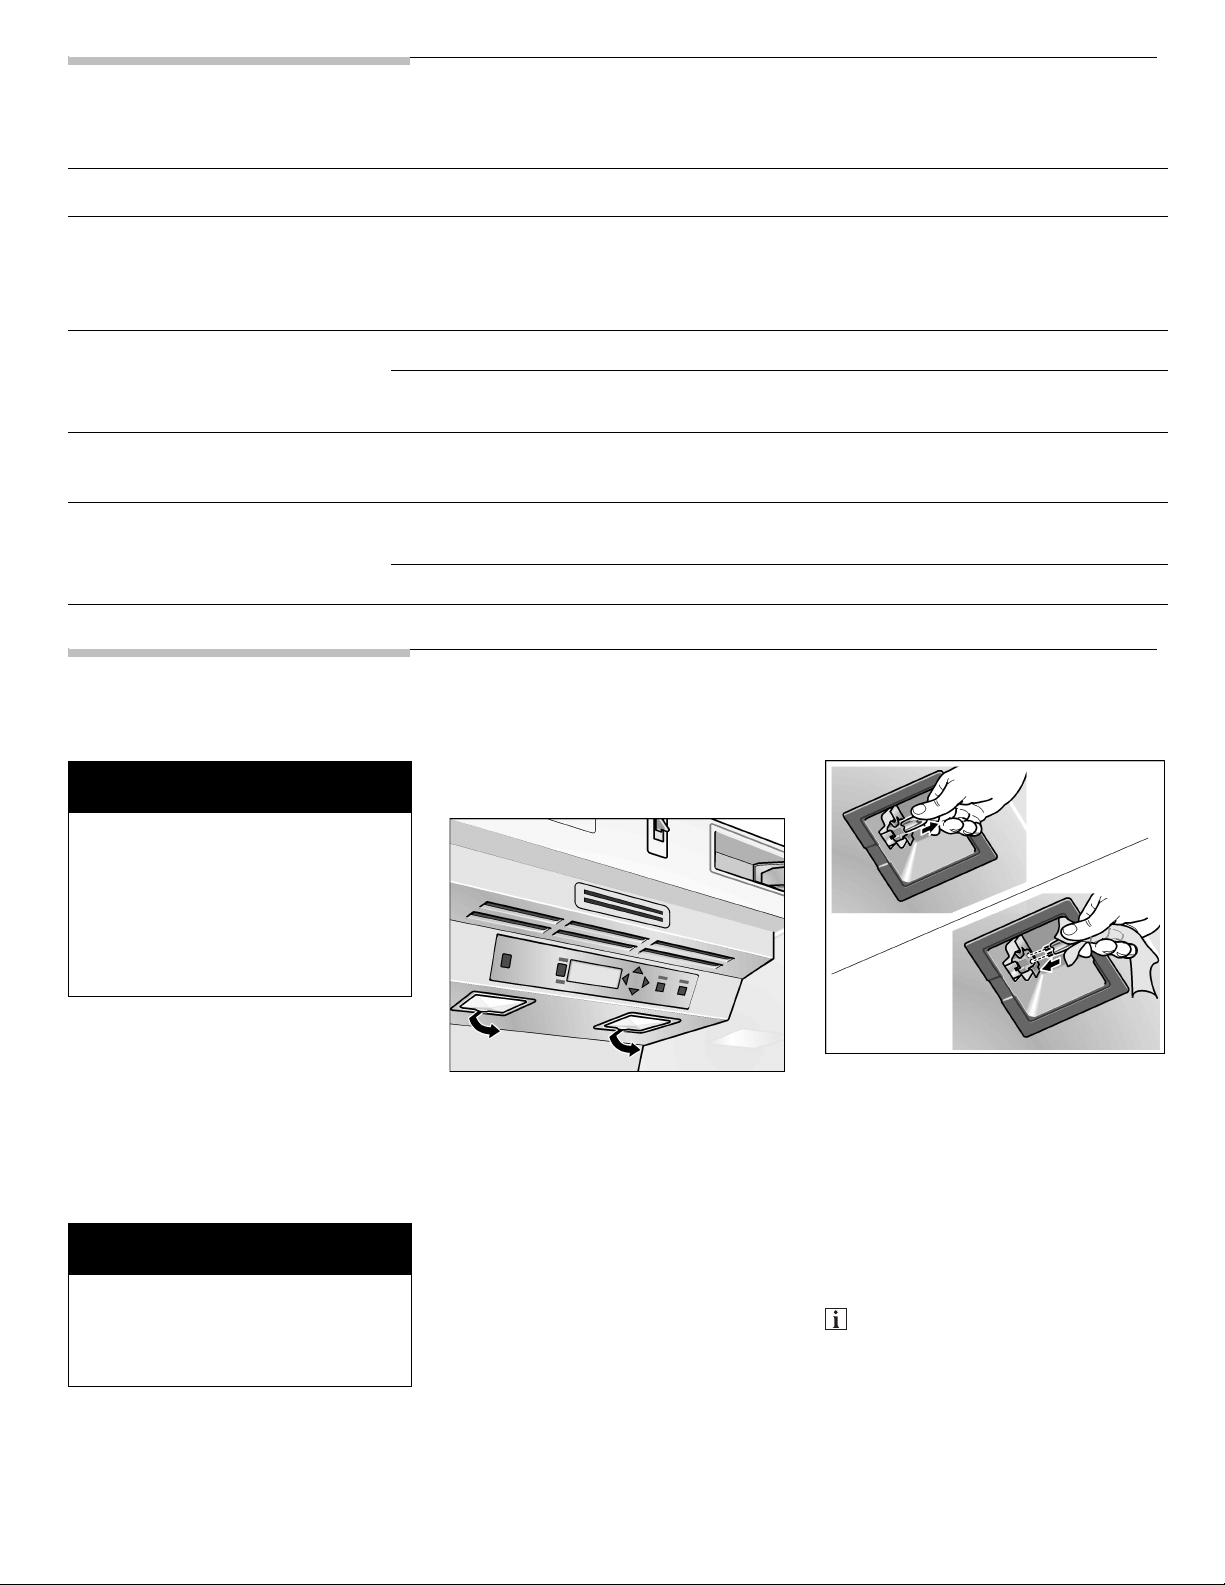
Presenter shelf
Switching on
the appliance
Press the power button.
When the appliance has been
switched on, the appliance begins to
cool down. When the doors are
open, the interior lights come on.
The preset temperatures
(factory settings) are reached
after approx. 2–8 hours.
Do not put any food in the
appliance beforehand.
To change the preset temperatures
Æ see “Setting the temperature”.
Switching off
Variable interior
design
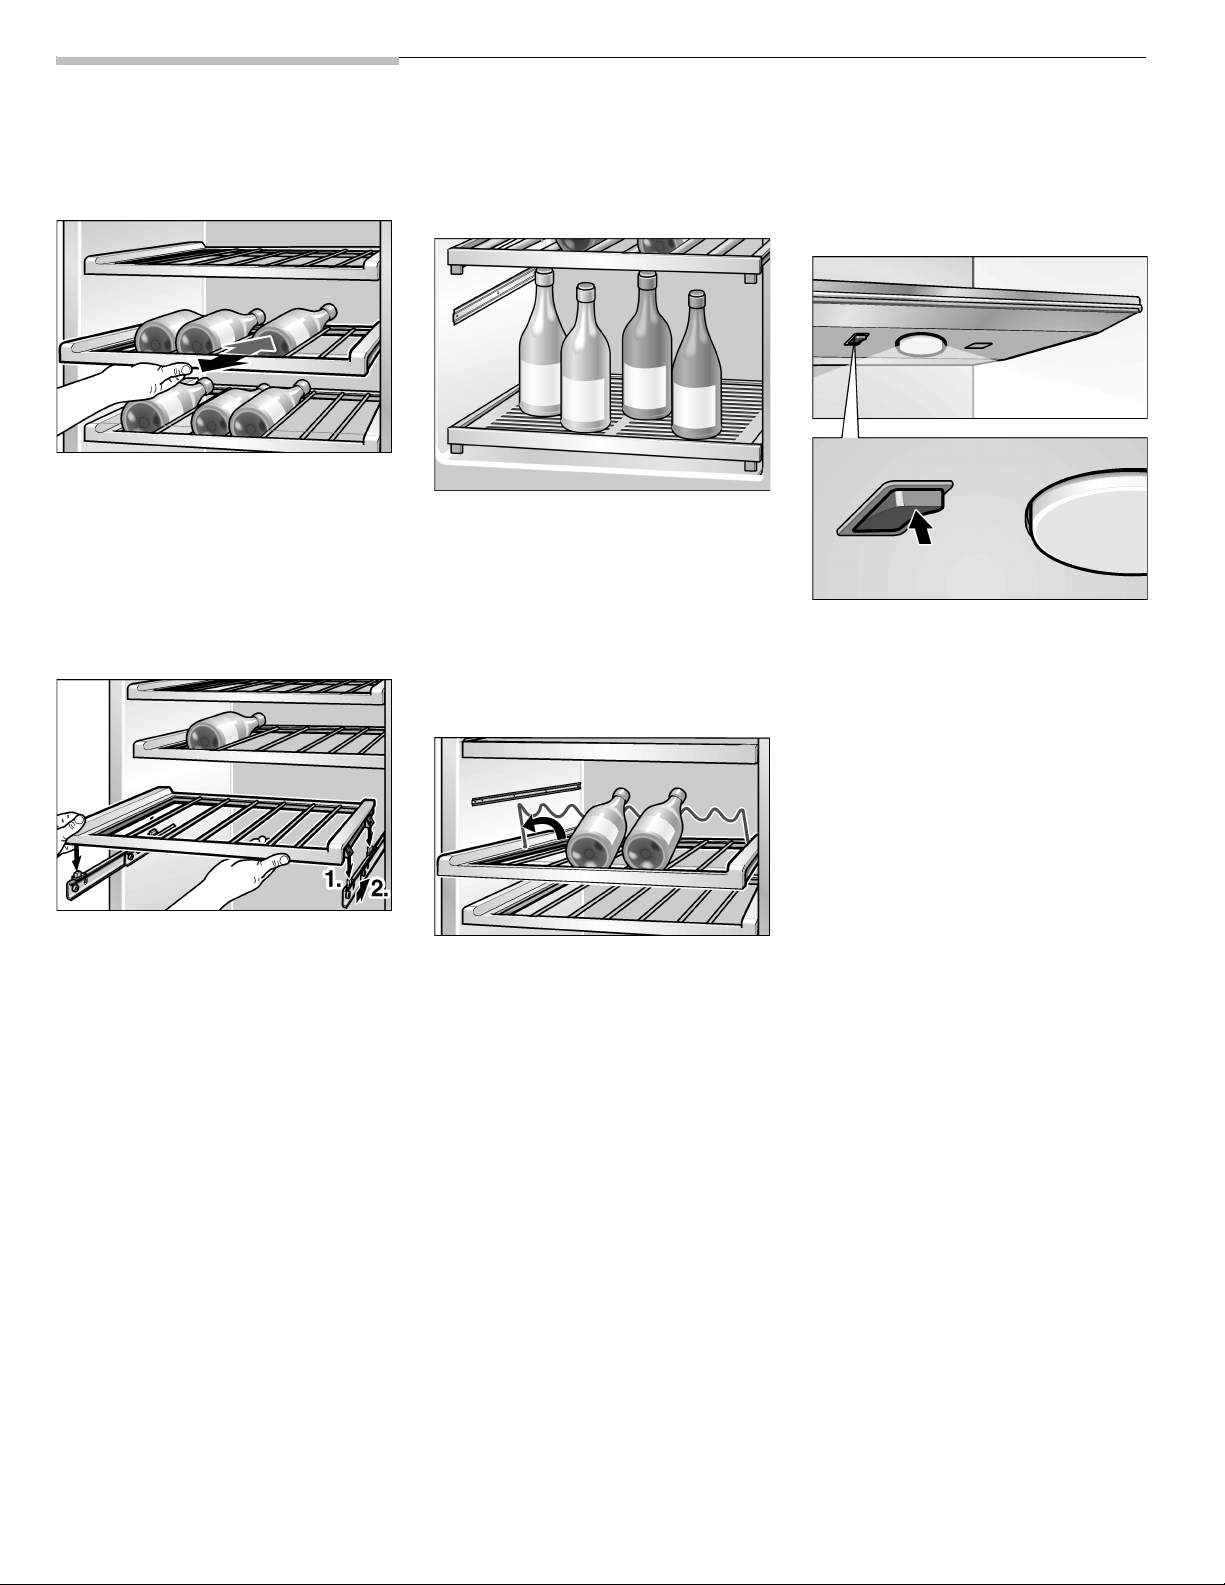
Pull-out shelfes
To use the presenter you have to
remove the top shelf in the bottom
compartment.
LED Presenter Light
Pull out the shelf at the front.
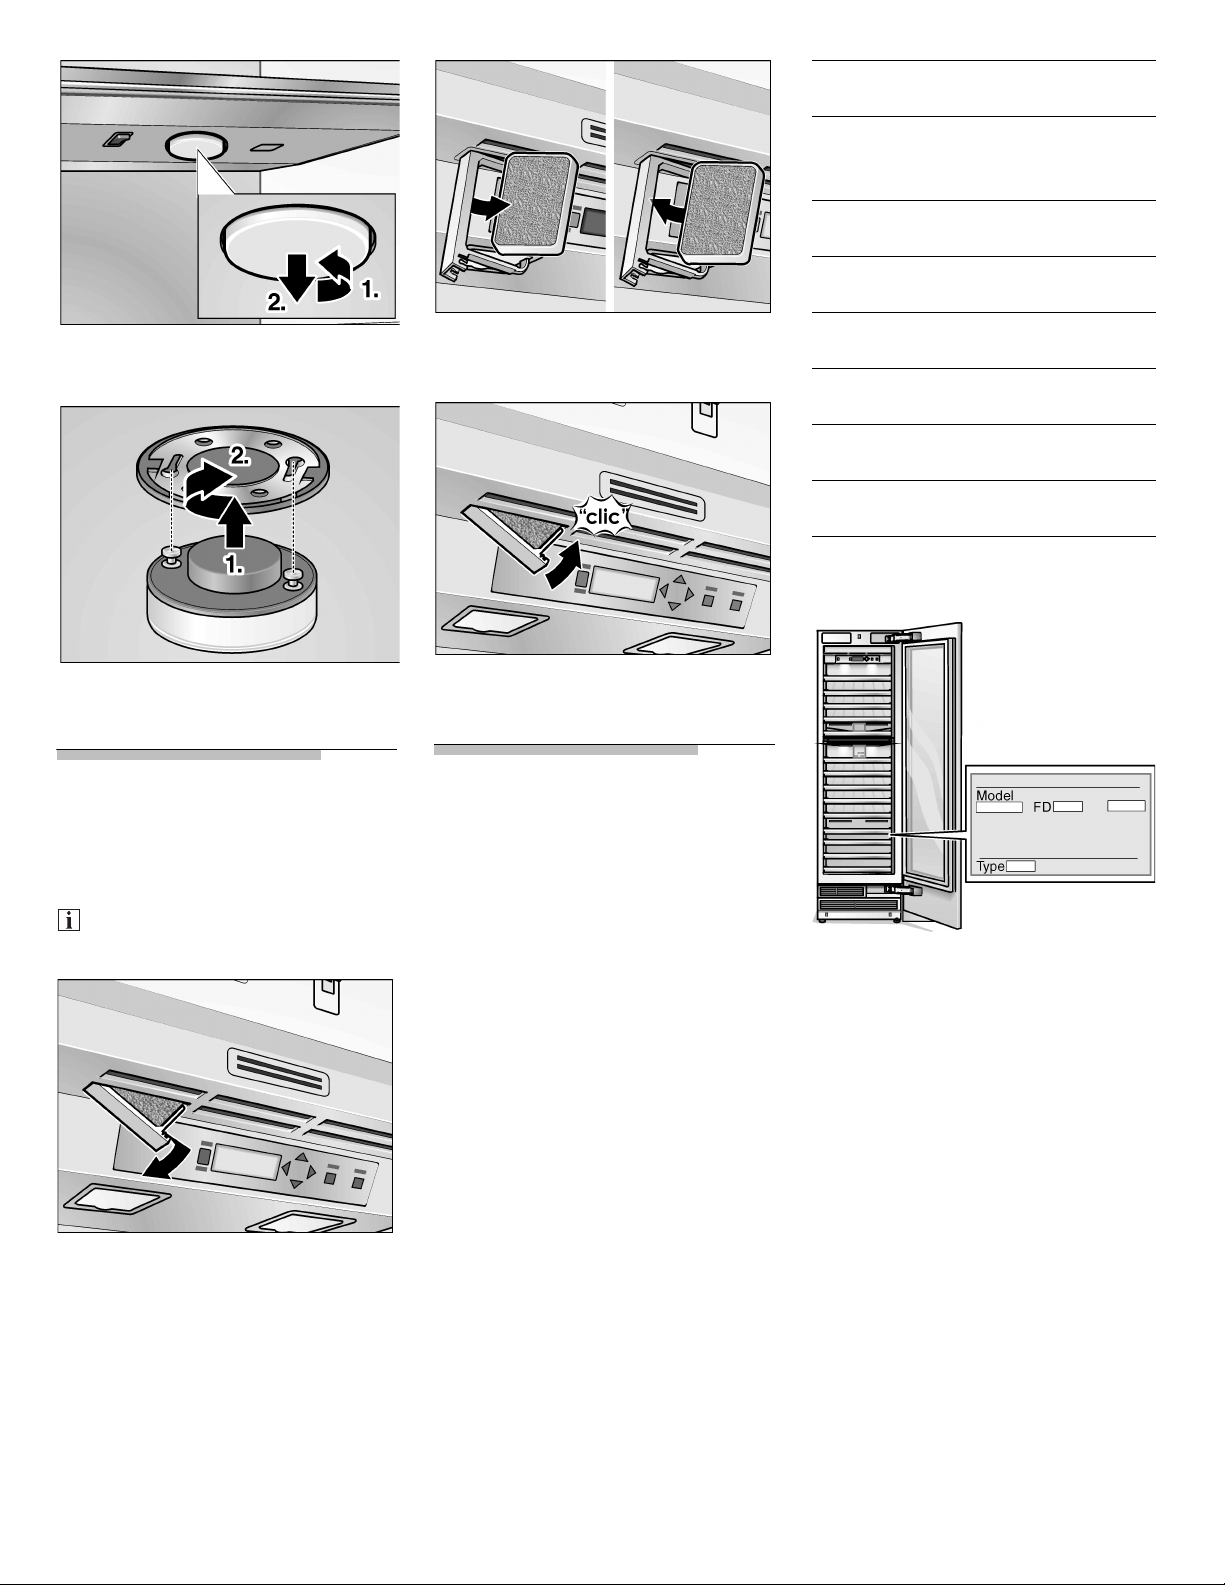
To remove the shelf:
Pull out the shelf and lift them.
Remove the shelf.
To insert the shelf:
and
disconnecting
the appliance
Switching off the
appliance
Press the power button.
Disconnecting the
appliance
If you do not use the appliance for
aprolonged period:
Take all perishable food out of
the appliance.
Pull out the mains plug or switch
off the fuse.
Clean the appliance interior
(see “Cleaning the appliance”).
To prevent odors, leave the
doors open.
Lift the shelf and reinsert in the
pullout.
For standing storage of bottles and
jars:
Remove the both lowest shelfes.
Insert the shelf for standing
storage (optional accessory) in
the lower pullout.
Switch the presenter light ON or
OFF.
If the LED presenter light is switched
on, it will be shining continuously also
when the appliance door is closed.
So wine bottles can be presented
adequately.
In OFF position, the LED lamp will be
switched by opening and closing the
door.
7
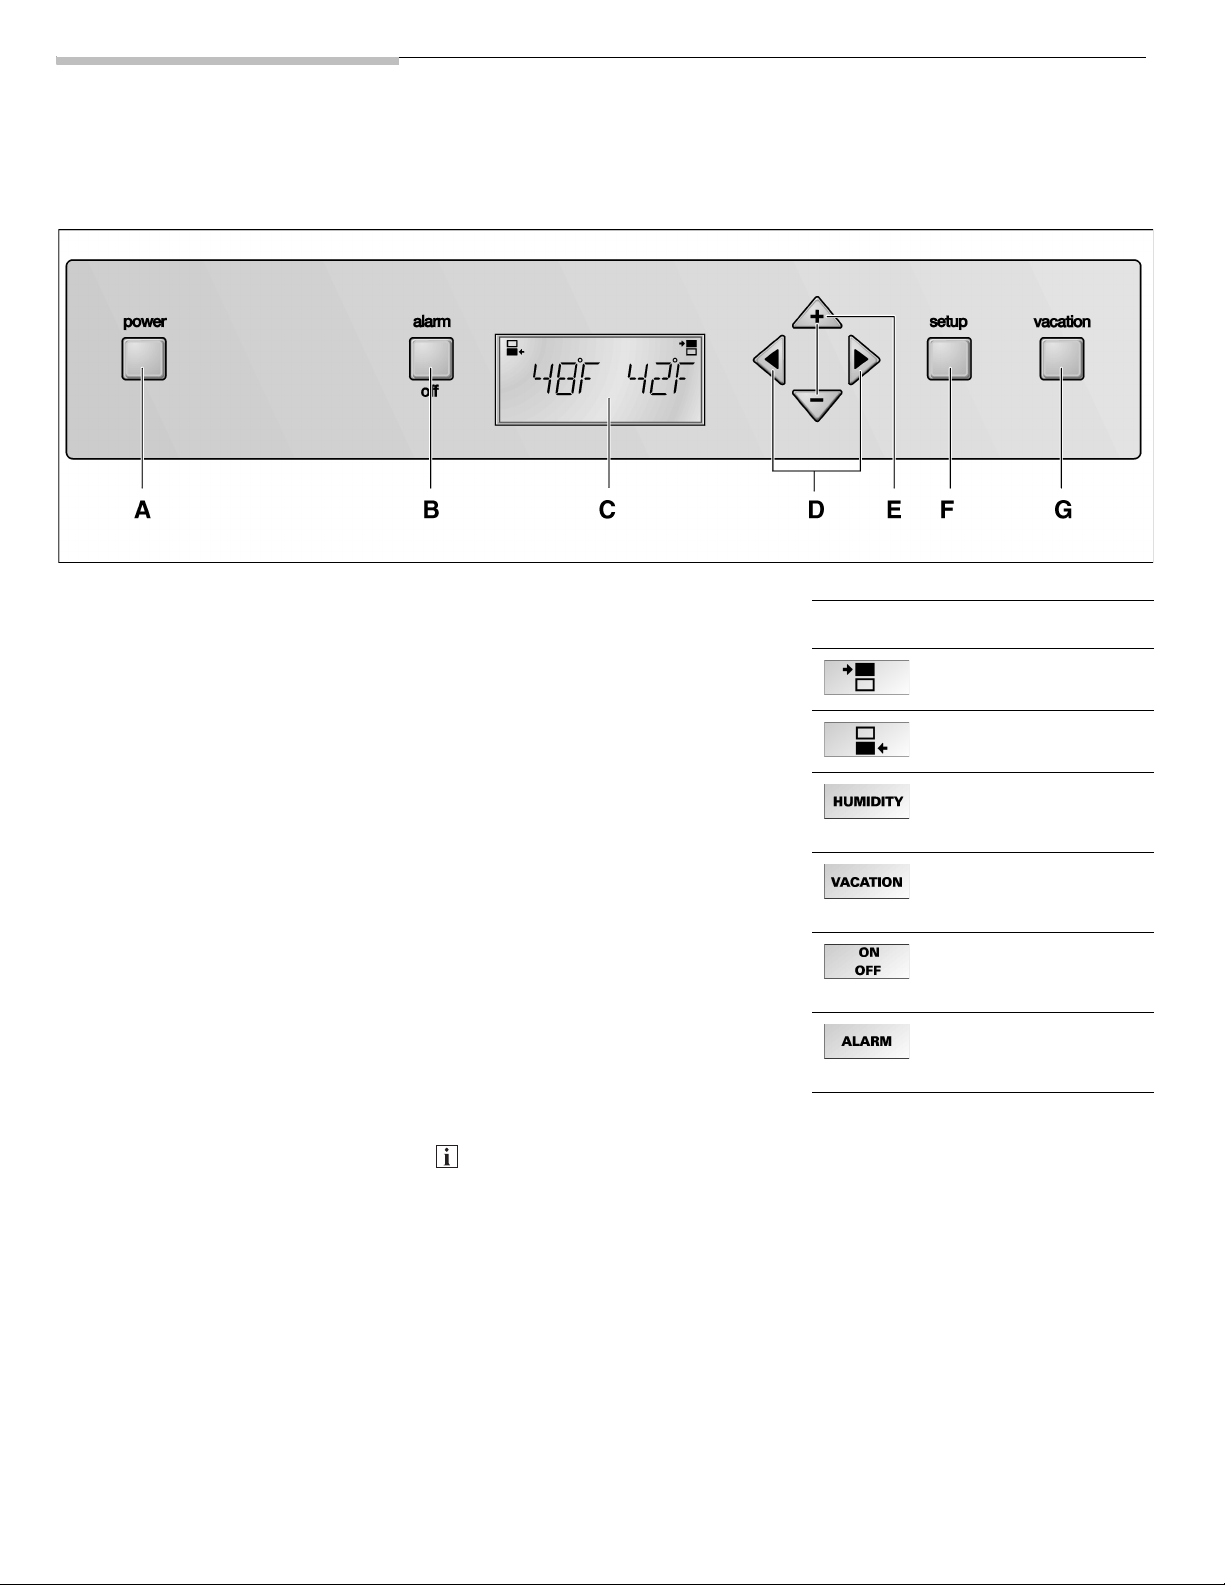
Control panel
To utilize all the functions of your appliance, we recommend that you familiarize yourself thoroughly with the control
panel and the setting options.
A power button
Switches the appliance on
and off.
m CAUTION!
The appliance is not isolated from
the mains when switched off by
the power button.
B alarm off button
Switches off the alarm.
See also the section on
“Warning message via the
display“.
CDisplay
The set required temperature
of the appliance is indicated
on the display. Activated
special functions are indicated
via symbols
In Setup mode the menus as
well as the setting options are
indicated on the display.
See section on “Setup mode”.
D
< > buttons
Select the menus in Setup
mode. See section on “Setup
mode”.
The required temperature
adjustment is activated with
the
< > buttons.
See section on “Setting the
temperature”.
.
E + – buttons
Select the available
parameters of the menu.
See section on “Setup mode”.
The displayed temperature of
the appliance is also changed
with the + – buttons.
See section on “Setting the
temperature”.
F setup button
This button activates and also
ends Setup mode. When
Setup mode is ended with the
setup button, the changed
settings are saved.
G vacation button
Switches Vacation mode on
and off. See section on
“Vacation mode”.
Each button depression is
acknowledged by a signal if the
ON setting is activated in Setup
mode, Sound menu (TONE).
Symbols at Display
Symbol for the top
compartment
Symbol for the bottom
compartment
The Humidity function
is activated,
seepage11.
The Vacation mode is
activated,
seepage11.
For the setting options
in the Setup mode,
seepage10.
A warning message
is displayed,
seepage14.
8
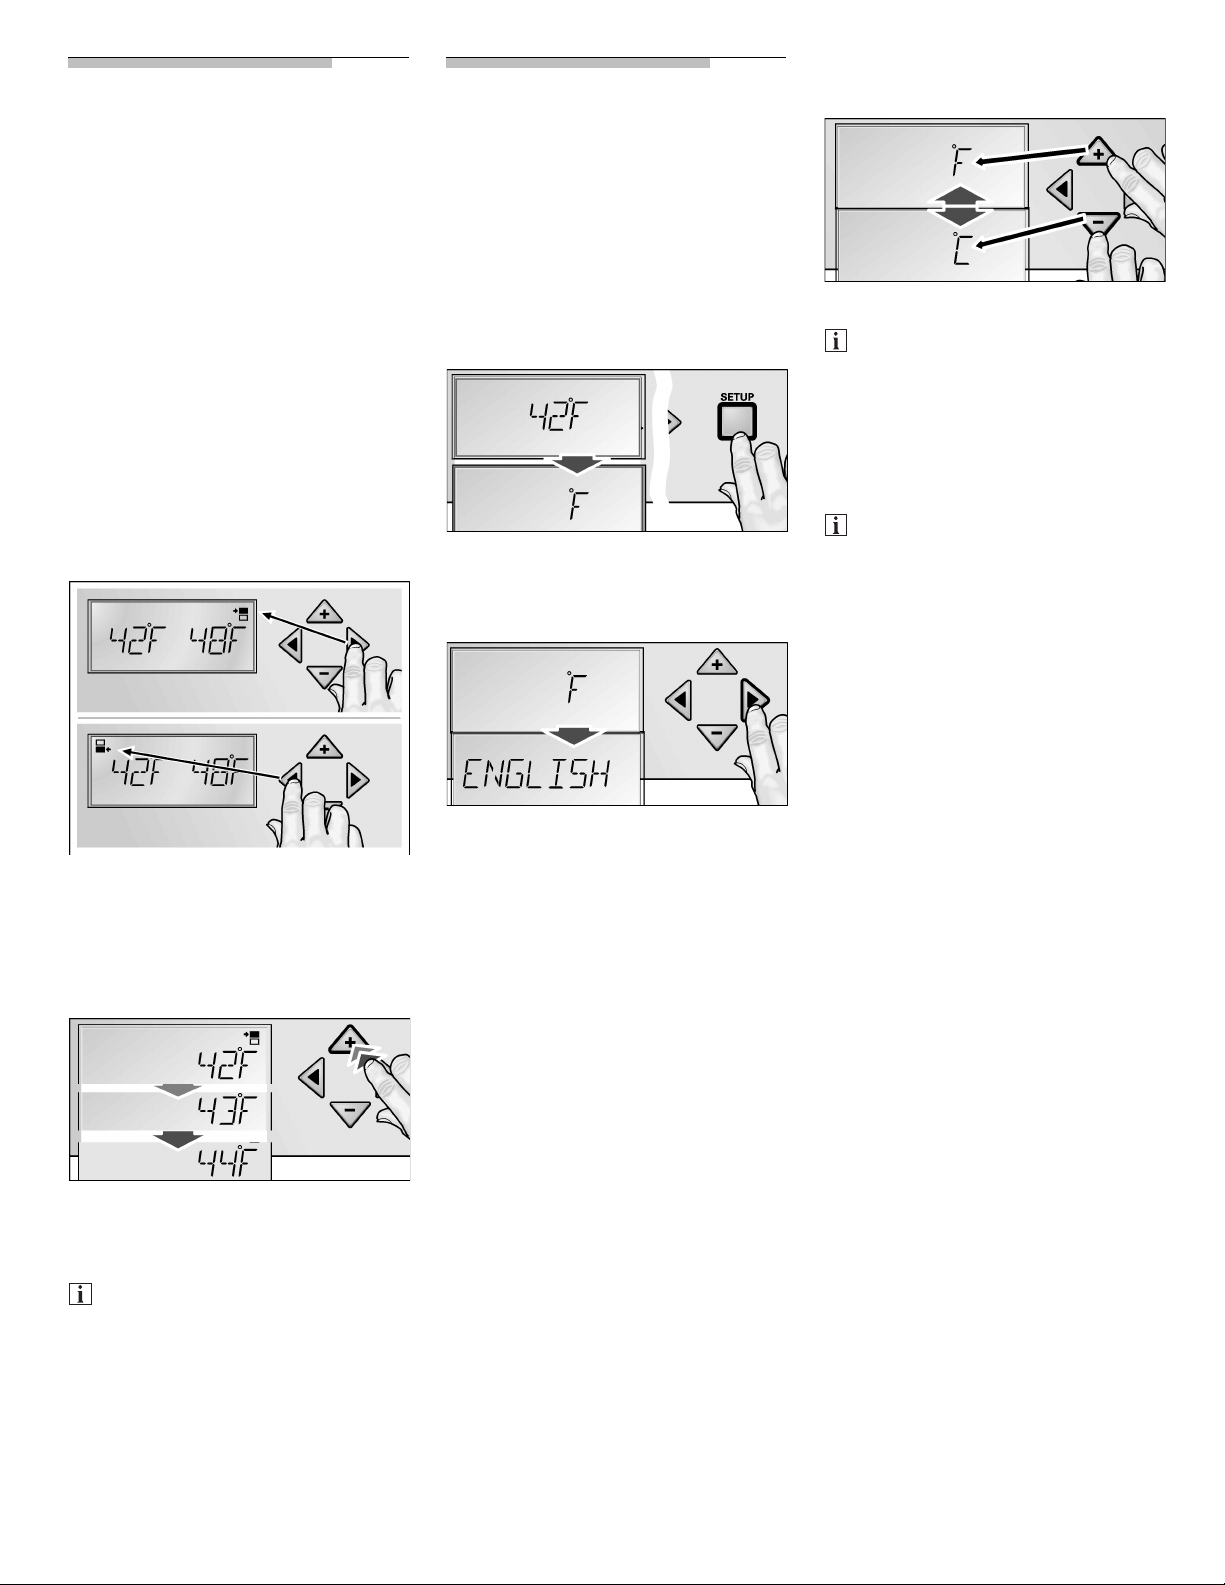
To select between the different
setting options within one menu:
Setting the
temperature
The temperature in both
compartments can be set
independently of each other from
41 °F to 64 °F (+5 °C to +18 °C).
We recommend a setting of
52 °F (+11 °C).
The temperature can be changed
with the + buttons (warmer) or –
(colder). The temperature can be
adjusted in 1 °F (0.5 °C) steps.
To adjust the required temperature:
Activate the Setup mode with
the
< or > buttons.
Setup mode
There are several menus for
adjusting the appliance functions to
individual requirements.
These adjustments can be made in
Setup mode.
To activate Setup mode:
Press the setup button.
The first menu (temperature unit) is
displayed.
To switch to the next menu:
Press the + or – button.
A modified setting is saved
when the next menu is selected
with the
To end Setup mode:
Press the setup button.
All modified settings are saved.
If no button is pressed within
12 seconds, Setup mode ends
automatically. All modified
settings are saved. The required
temperature is displayed again.
< or > button.
> for the top compartment.
< for the bottom compartment.
The adequate symbol is
displayed.
Set the required temperature
with the + (warmer) or – (colder)
buttons.
Depending on the model, the
appliance can also be switched
off or switched to Vacation
mode via the temperature
setting. When the highest
temperature has been reached,
OFF is displayed.
Press the < or > button.
The next menu and the current
setting (usually On/Off) are displayed.
9
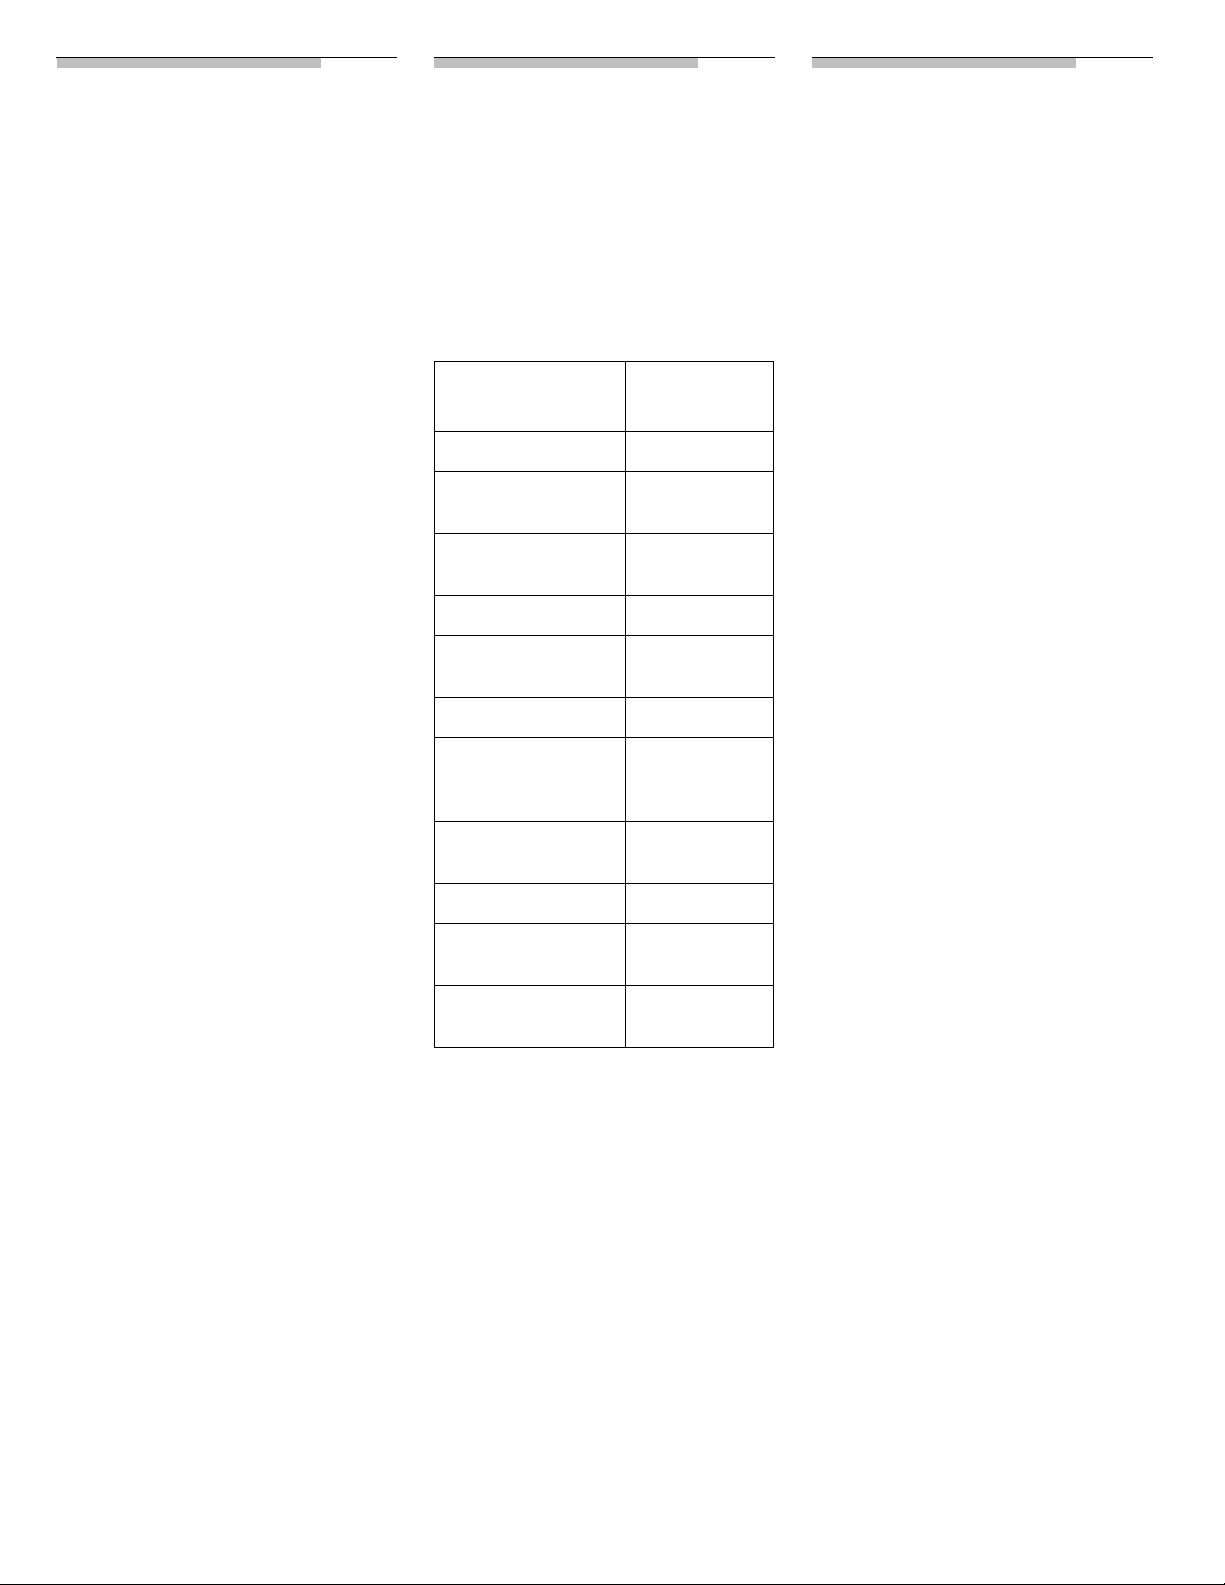
Settings which can be changed in Setup mode
Menu Setting options Displayed text
Temperature unit °F (degrees Fahrenheit)
°C (degrees Celsius)
Language English
French
Sound On / o
Off / p
Humidity (Top compartment) On / o
Off / p
Humidity (Bottom compartment) On / o
Off / p
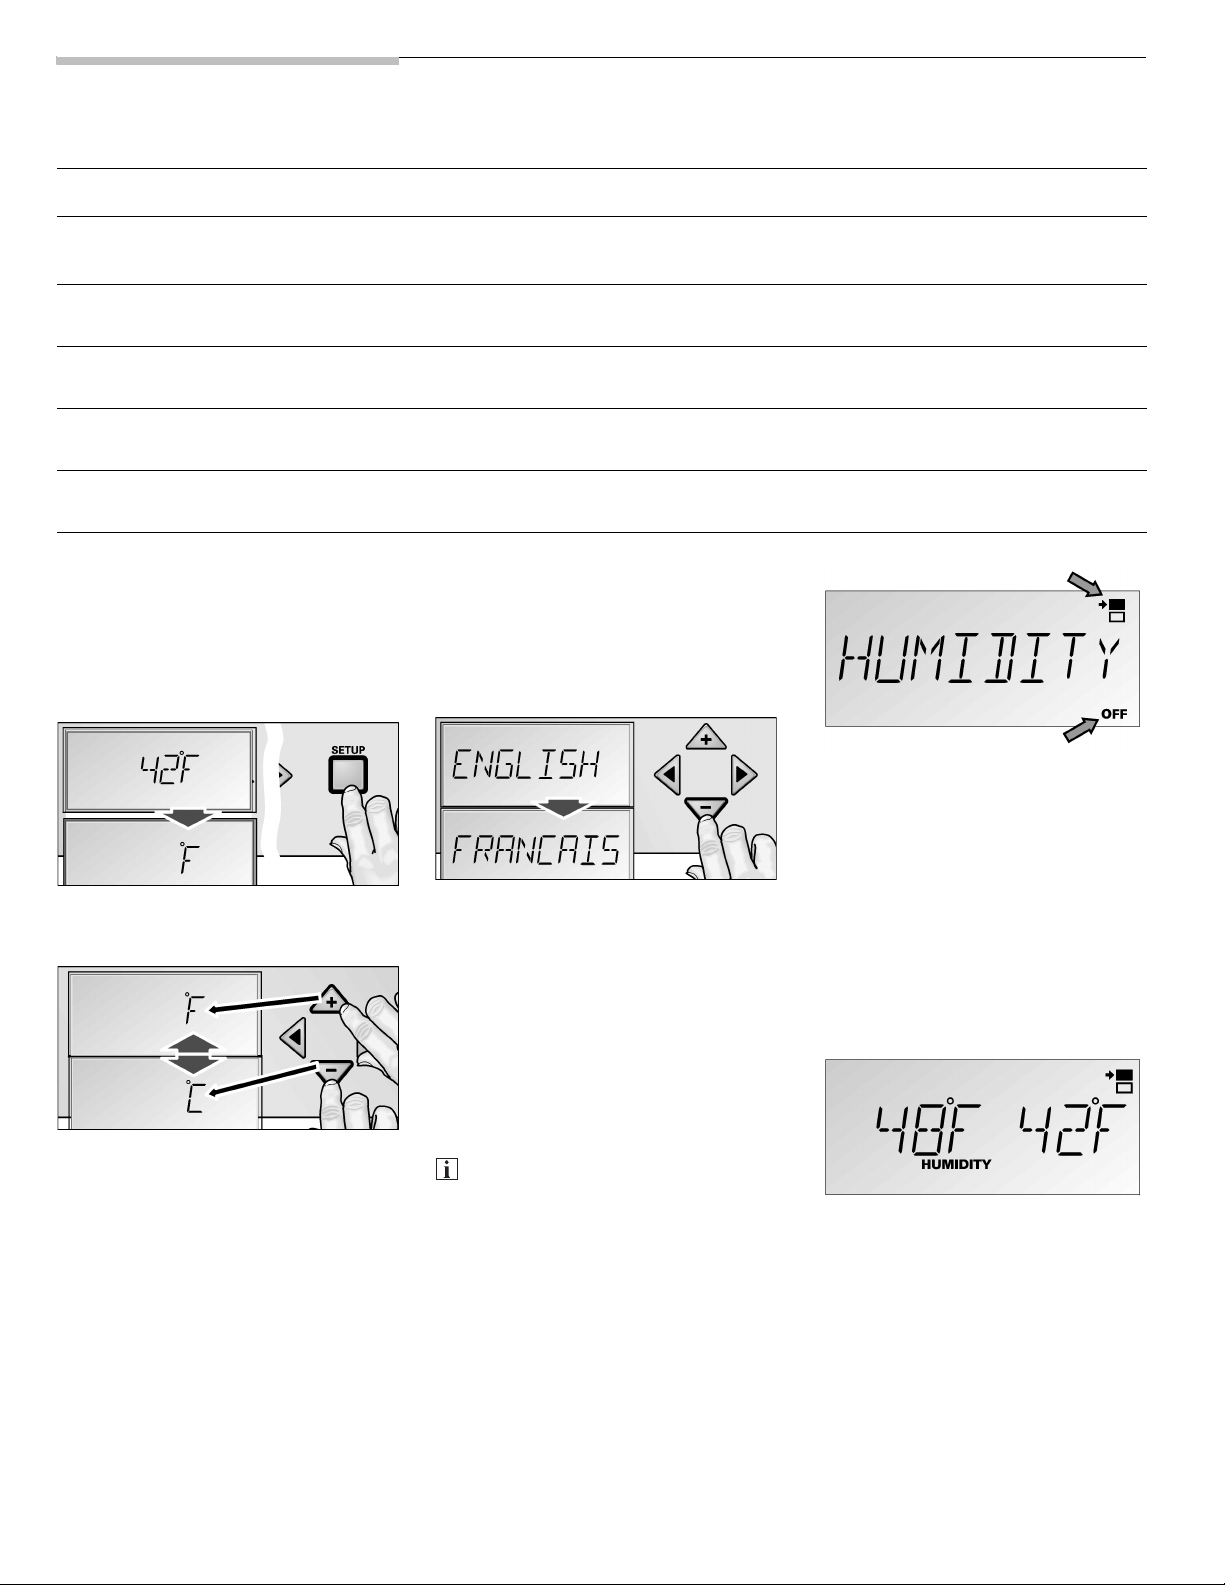
Temperature unit
The temperature can be displayed in
degrees Fahrenheit (°F) or degrees
Celsius (°C).
Press the setup button.
The first menu (temperature unit) is
displayed.
Alternatively the information can be
displayed in French.
Switch on Setup mode.
Press the > button until
ENGLISH is displayed.
Press the + or – button to switch
FRANCAIS.
to
Press the setup button to save
the setting.
Humidity
Independent of each other it is
possible to switch on an increased
humidity for both compartments.
Press the + or – button to switch
between degrees Fahrenheit (°
F) or degrees Celsius (°C).
Press the setup button to save
the setting.
Language setting
When the appliance has been
switched on, error messages and
settings in Setup mode are displayed
in English.
For further information about the
influence of humidity see
“Practical tips for storing wine”.
To switch on the increased humidity
for one of the compartments:
Switch on Setup mode.
°F
°C
ENGLISH
FRANCAIS
TONE
HUMIDITY
HUMIDITY
Press the > button until
HUMIDITY for the desired
compartment is displayed
(Sample: Top compartment).
The momentary status of the
function (
Press the + or – button to
change the status (
Press the setup button to save
the setting.
The HUMIDITY symbol is displayed.
The Humidity function is ended by:
– switching off the function in setup
mode
– switching off the appliance with
the power button.
ON/OFF) is displayed.
ON/OFF).
10
Vacation mode
18" Wine unit
70 wine bottles
If you are away for a prolonged
period, you can switch the appliance
to an energetically more favorable
mode.
The Vacation mode is also helpfull for
the longtime storage of wine.
When Vacation mode is active,
– the appliance switches to a
energetically more favorable
temperature set at the factory,
– the interior light switches off.
To switch on Vacation mode:
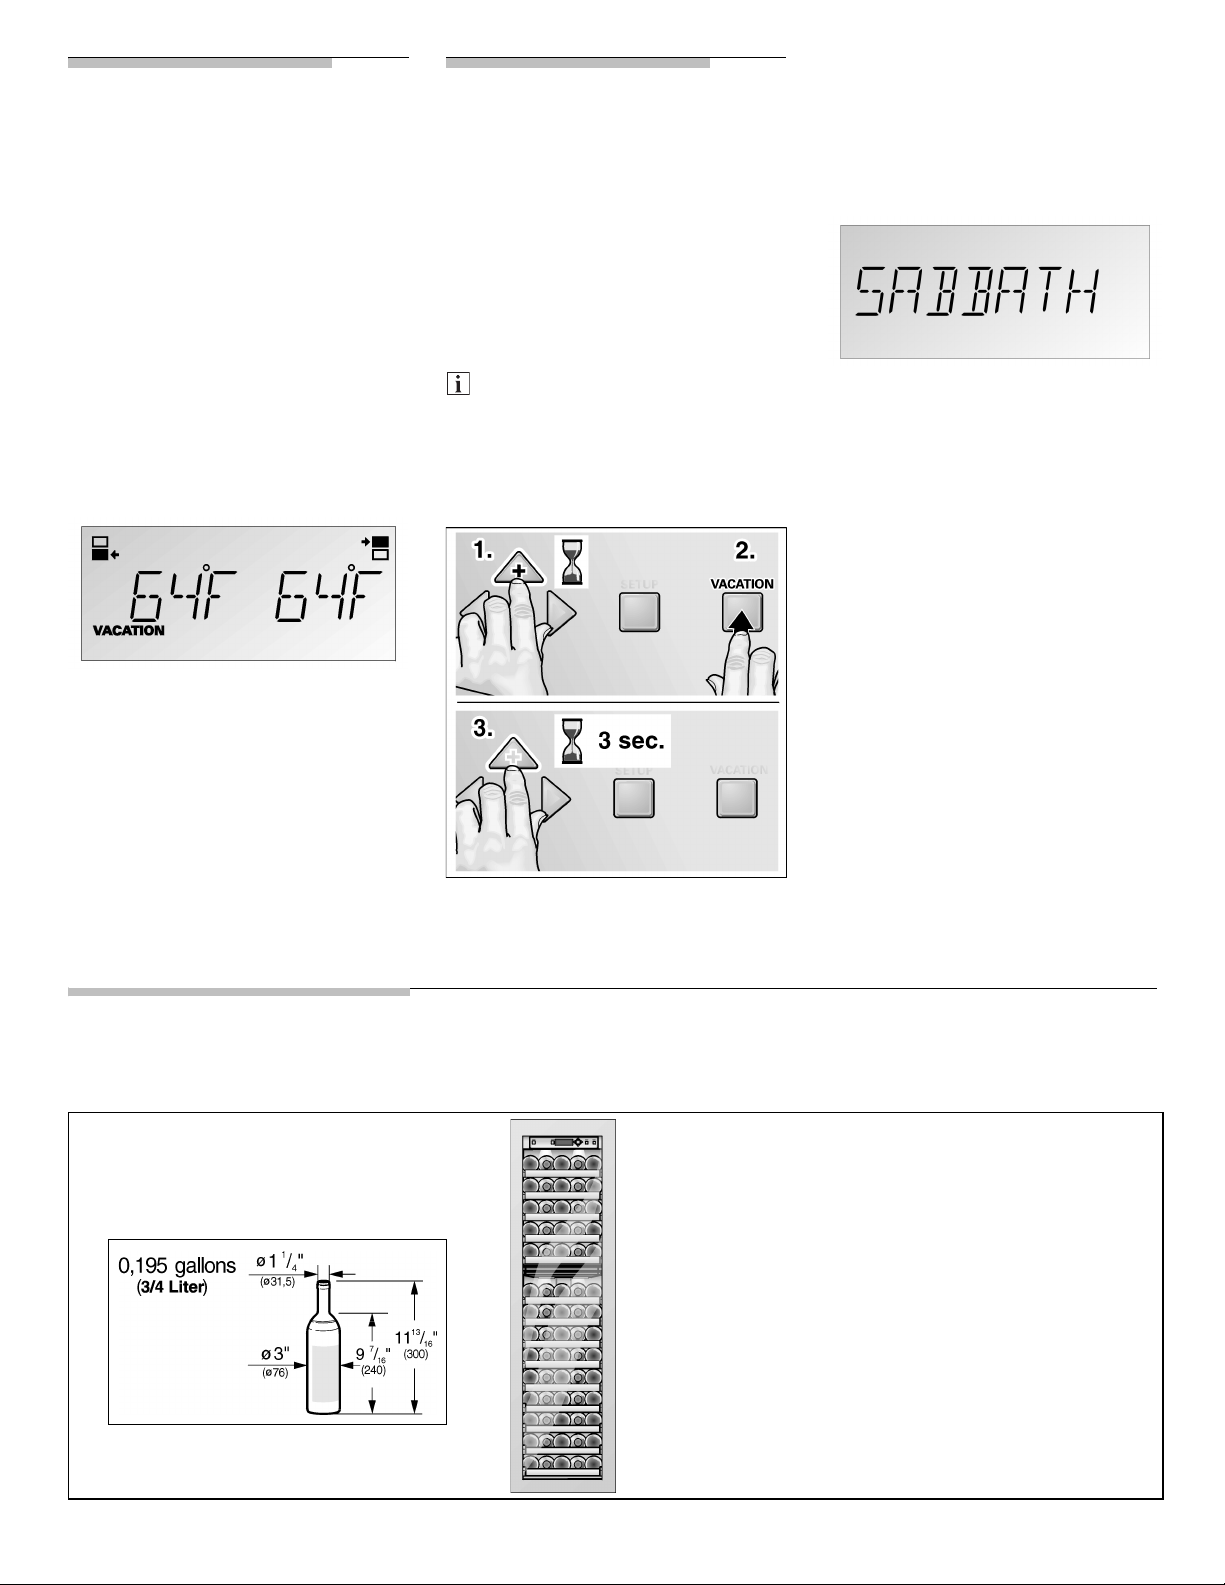
Sabbath mode
When Sabbath mode is active
– the acknowledge signal is
deactivated when the button is
pressed (if switched on),
– the interior light switches off,
– the background light of the
display is reduced.
If the presenter light is switched
on it will be shine when the
Sabbath mode is active. Switch
off the light manually.
To switch on Sabbath mode:
Press the vacation button.
Hold down the + button for
a further 3 seconds.
The VACATION symbol flashes
on the display.
SABBATH is displayed.
To end Sabbath mode, press the
vacation button. The previous
settings and temperature values are
used again.
Press the vacation button.
The VACATION symbol is displayed.
Instead of the required temperature,
the presetting temperature is
displayed.
To end Vacation mode, press the
vacation button. The previous
settings and temperature values are
used again.
Press and hold down the
+ button.
Storing diagrams
The diagrams present the storing of the following wine bottle:
11
Practical tips
Drinking
How to save
for storing wine
– Always unpack bottles of wine –
do not store in crates or boxes.
– Place old bottles so that the cork
is always wet. There should never
be an air gap between the wine
and the cork.
– The correct air humidity is a
decisive factor for conserving
wine well. Using the Humidity
function (see “Settings which can
be changed in Setup mode”) you
can raise the air humidity in the
compartments if necessary,
separately from one another. This
prevents the cork from possibly
drying out.
– Before you enjoy your wine, you
should first subject it slowly to
room temperature.
For example rosé takes about two
to five hours and red wine four to
five hours before they reach the
right drinking temperature. The
wine will then be at the correct
drinking temperature. Sparkling
wine and Champagne should be
cooled in the refrigerator shortly
before drinking.
– Remember that wine should
always be cooled slightly lower
than the ideal serving
temperature, as its temperature
increases by 34 °F to 36 °F
(+1 °C to +2 °C) as soon as it is
poured into a glass!
temperatures
The correct serving temperature is
crucial for the taste and therefore
your enjoyment of the wine.
We recommend serving wine at the
following drinking temperatures:
Type of wine Drinking
temperature
Bordeaux red 64 °F (18 ºC)
Côtes du Rhône
red/Barolo
Burgundy red/
Bordeaux red
Port 59 °F (15 ºC)
Young Burgundy
red
Young red wine 53,5 °F (12 ºC)
Young Beaujolais/
all white wines with
little residual sugar
Old white wines/
Chardonnay
Sherry 48 °F (9 ºC)
Young white wines
from late vintage
White wines Loire/
Entre-deux-Mers
62,5 °F (17 ºC)
61 °F (16 ºC)
57 °F (14 ºC)
52 °F (11 ºC)
50 °F (10 ºC)
46,5 °F (8 ºC)
44,5 °F (7 ºC)
energy
– Install the appliance in a dry,
ventilated room; do not expose to
direct sunlight and do not place
near a heat source (e.g. radiator,
cooker). If required, use an
insulating plate.
– AIIow warm food and drinks to
cool down before placing them in
the appliance.
– Defrost frozen food by placing it in
the refrigerator. The Iow
temperature of the frozen food will
refrigerate the food in the
refrigerator compartment.
– Open the appliance door as
briefly as possible!
12
Operating
noises
Quite normal noises
Grumbling – refrigerating unit is
running. Fan in the recirculating air
system is running.
Bubbling, humming or gurgling
noises – refrigerant is flowing
through the tubes.
Clicking – motor is switching on or
off.
Noises which can
easily be eliminated
The appliance is not level
Level the appliance with the aid of
a spirit level.
Use the height-adjustable feet or
place something underneath.
Shelfes wobble or stick
Check the removable parts and,
if required, reinsert them.
Bottles are touching each other
Move bottles or receptacles away
from each other.
Cleaning the
appliance
m
To avoid electrical shock which
can cause death or severe
personal injury, disconnect power
to appliance before cleaning.
After cleaning, reconnect power.
m
To avoid personal injuries or
property damage, observe the
following:
– Do not clean the appliance with
a steam cleaner.
– Do not let the water used for
cleaning drip onto the tight or
contro) panel.
– Do not use abrasive or acidic
cleaning agents or solvents
which may damage the
surfaces of the appliance.
– Never clean shelves and
containers in the dishwasher.
The parts may warp.
Switch off the appliance with
Clean the door seal with water
Clean the appliance with
WARNING
WARNING
the power button!
Pull out the mains plug or
switch off the fuse.
only and dry thoroughly.
lukewarm water and a little
dishwashing liquid.
Do not let the water used for
cleaning drip onto the control
panel or light.
m
m
After cleaning:
Reinsert the mains plug or
switch on the fuse. Switch on
the appliance with the power
button.
Have your supplier inform you
about special cleaning and care
information for appliance
surfaces.
Wipe appliance surfaces with
a damp cloth. Then immediately
wipe dry.
Odors
If the appliance is emitting
unpleasant odors:
Switch off the appliance with
the power button!
Pull out the mains plug or
switch off the fuse.
Clean the interior.
See section on “Cleaning the
appliance”.
Change the odor filter.
See section on “Changing the
odor filter”.
Thoroughly clean all packing
containers used in the
appliance.
Switch on the appliance again
with the power button.
After 24 hours check whether
the odors have been eliminated.
Check the ventilation openings
on the base panel. Remove dirt
with a vacuum cleaner.
13
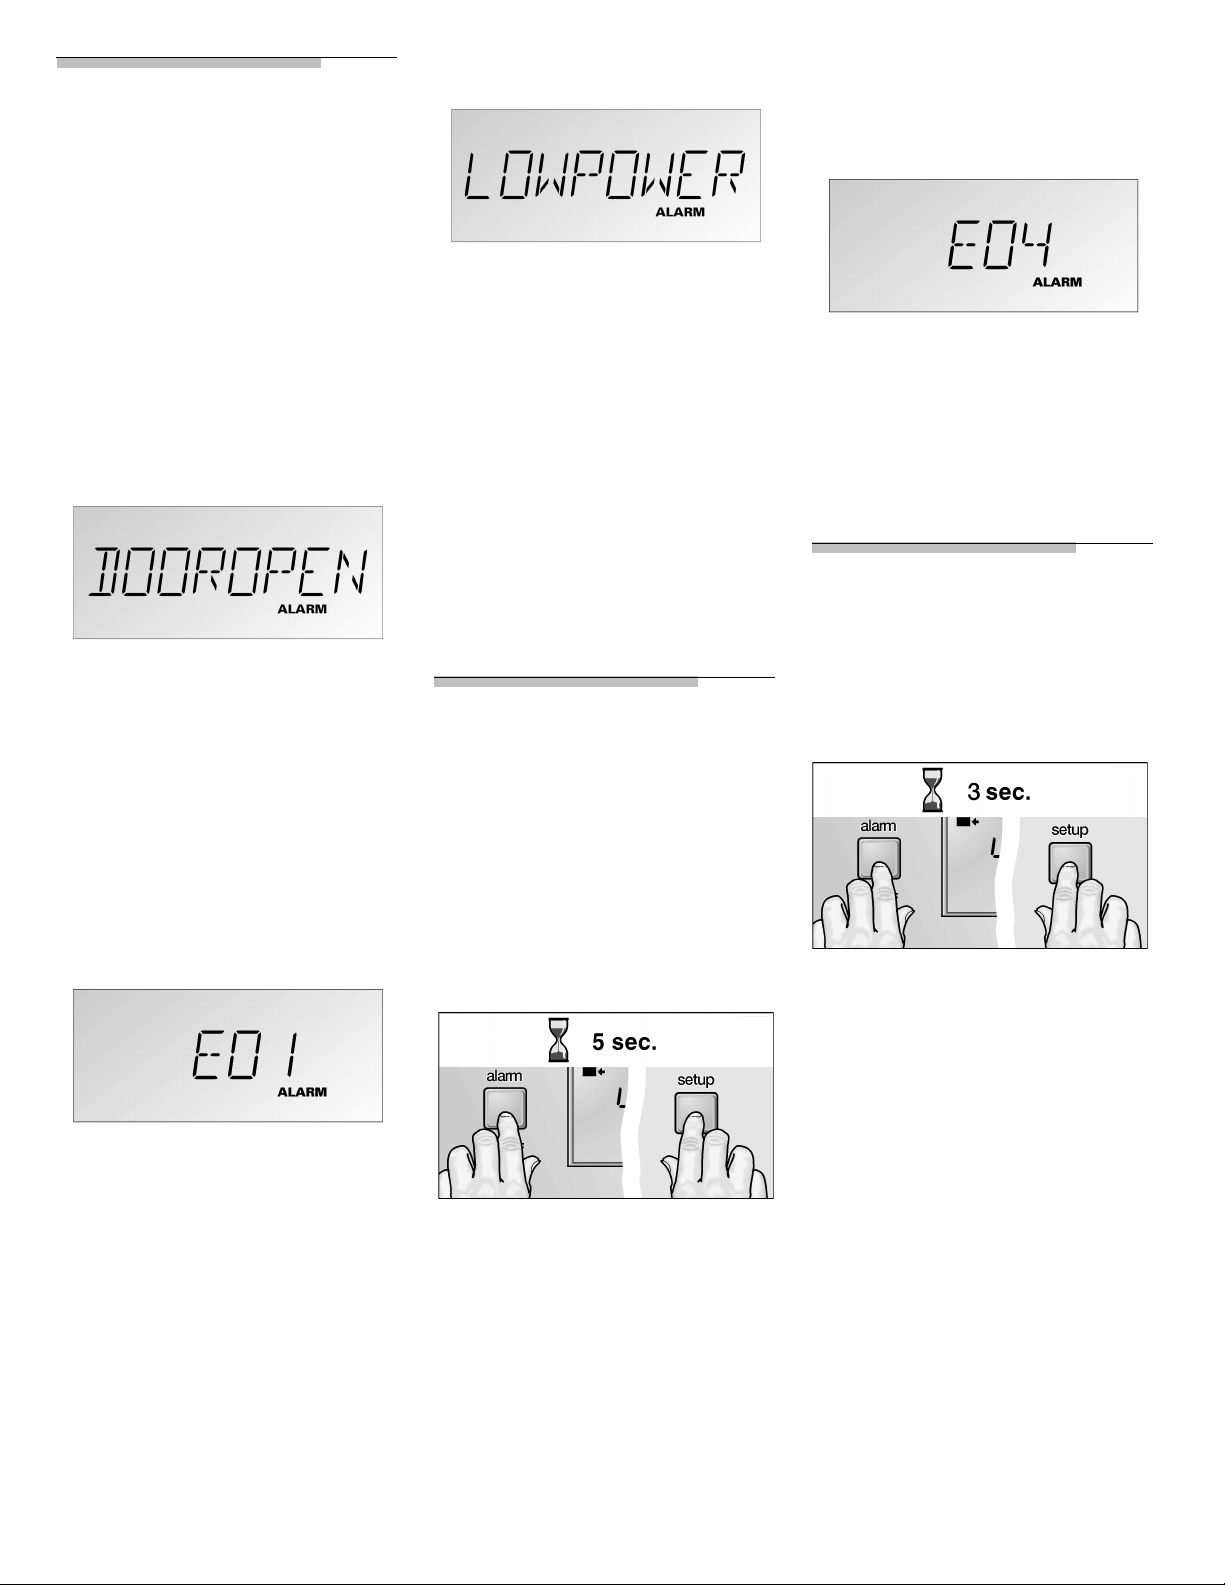
Warning
messages
via the display
Low voltage
If a fault is detected during the
self-test, the ALARM symbol and
a corresponding error message,
e.g. for a sensor fault, are displayed.
If several warning messages are
displayed simultaneously, deal with
each message individually.
While a warning message is
displayed, buttons cannot be
pressed.
Door alarm
Cause
– An appliance door has not been
closed properly or has been open
too long.
Remedial action
Close the door. The display goes
out.
Sensor fault
Cause
– A technical defect is possible.
The display light has gone out.
Cause
– The mains voltage has dropped
below the permitted limit value.
Remedial action
Buttons cannot be pressed. When
the mains voltage reaches the
stipulated value again, the warning
message goes out. If the warning
message is prolonged, inform your
power supply company.
Appliance
self-test
Before you call customer service,
conduct an appliance self-test.
Switch off the appliance and
wait 5 minutes. Keep the door
closed.
Switch on the appliance.
Inform customer service about the
error message.
If the appliance self-test does not
establish any faults, the required
temperature is displayed on
completion of the self-test.
Resetting
factory settings
Recommended after a change of
owner.
Simultaneously hold down the
setup and alarm off buttons for
3 seconds.
If the factory settings are reset:
– an appliance which is switched off
switches on,
– settings changed in Setup mode
are reset to factory settings.
Remedial action
Conduct an appliance self-test.
14
Simultaneously hold down the
setup and alarm off buttons for
5 seconds.
The self-test starts. Different
messages are display in succession.
Troubleshooting
Fault Possible cause: Remedial action
Appliance has no cooling
capacity. Interior light does not
function. The display does not
illuminate.
The refrigerating unit switches
on more and more frequently
and for longer.
The temperature in the both
compartment is too cold.
The interior light does not
function.
Power failure; the fuse has actuated;
the mains plug has not been inserted
properly.
Appliance door opened frequently. Do not open the door unnecessarily.
The ventilation openings have been
covered.
Temperature has been set too low. Select a warmer temperature (see “Setting
The bulb is defective. Change the bulb (see “Changing the
Light switch is sticking. Check whether it can be moved.
Changing the bulb
Halogen bulb type:
m
WARNING
m
20 W/12 V/socket G4
Check that the power is on. The fuse must
be switched on. Check that the mains
plug is plugged in.
Remove obstacles and dirt.
the temperature”)
bulb”).
To avoid electrical shock which
can cause death or severe
personal injury, disconnect power
to appliance before making
repairs.
After making repairs, reconnect
power.
Switch off the appliance with
the power button! Pull out the
mains plug or switch off the
fuse.
Interior light
(Top compartment)
m
Never touch a halogen bulb with
bare fingers.
When inserting a glass halogen
bulb, always hold with a soft cloth.
CAUTION
m
Release the cover and remove
from the clip.
Pull out the defective halogen
bulb.
Insert a new halogen bulb.
Touch the halogen bulb with
a soft cloth only.
Attach the cover and connect to
the clip.
LED Presenter light
(Bottom compartment)
A new LED is available from our
Customer Service.
15
Dealer name:
Address:
Phone number:
Purchase date:
Release the LED by turn in
clockwise direction.
Insert the new LED.
Changing the
filter
Replacement filters are available
from your dealer.
Open the filter holder.
Pull out used odor filter.
Insert a new odor filter.
Close the filter holder.
Service
If you need service, first see the
“Troubleshooting” section of this
book.
After checking “Troubleshooting”,
additional help can be found by
calling the Siemens Customer
Interaction Center,
1–800–944–2904 (toll-free),
from anywhere in the U.S.A.
In Canada, contact your designated
Siemens Canada service company
or call 1–800–944–2904.
Write down the following information
about your refrigerator to better help
you obtain assistance or service if
you ever need it.
Model number:
FD number:
Serial number:
Ty p e:
You will need to know your complete
model number and serial number.
You can find this information on the
model and serial number label
located on the inside wall of the
refrigerator compartment.
16

Warranty
TWO-YEAR FULL
WARRANTY
For two years from the date of
purchase, when this refrigerator
(excluding the water filter cartridges)
is operated and maintained
according to instructions attached to
or furnished with the product,
Siemens will pay for factory specified
replacement parts and repair labor
costs to correct defects in materials
or workmanship. Service must be
provided by a Siemens designated
service company.
Water filter cartridge: 30 day limited
warranty on water filter. For 30 days
from the date of purchase, when this
filter is operated and maintained
according to instructions attached to
or furnished with the product,
Siemens will pay for replacement
parts to correct defects in materials
and workmanship.
THIRD THROUGH SIXTH YEAR ~
FULL WARRANTY ON SEALED
REFRIGERATION SYSTEM
PARTS AS LISTED
In the third through sixth years from
the date of purchase, when this
refrigerator is operated and
maintained according to instructions
attached to or furnished with the
product, Siemens will pay for factory
specified replacement parts and
repair labor costs to correct defects
in materials or workmanship in the
sealed refrigeration system. These
parts are: compressor, evaporator,
condenser, dryer, and connecting
tubing. Service must be performed
by a Siemens designated service
company.
SEVENTH THROUGH TWELFTH
YEAR LIMITED WARRANTY ON
SEALED REFRIGERATION
SYSTEM
In the seventh through twelfth years
from date of purchase, when this
refrigerator is operated and
maintained according to instructions
attached to or furnished with the
product, Siemens will pay for factory
specified replacement parts to
correct defects in materials or
workmanship in the sealed
refrigeration system. These parts
are: compressor, evaporator,
condenser, dryer, and connecting
tubing.
Siemens will not pay for:
1. Service calls to correct the
installation of your refrigerator,
to instruct you how to use your
refrigerator, to replace house
fuses or correct house wiring or
plumbing, to replace light bulbs,
or to replace water filters other
than as noted above.
2. Repairs when your refrigerator is
used in other than normal,
single-family household use.
3. Pickup and delivery. Your
refrigerator is designed to be
repaired in the home.
4. Damage resulting from accident,
alteration, misuse, abuse, fire,
flood, improper installation, acts
of God, or use of products not
approved by Siemens or
Siemens Canada.
5. Any food or medicine Ioss due to
product failure.
6. Repairs to parts or systems
resulting from unauthorized
modifications made to the
appliance.
7. Removal and replacement of
trim or decorative panels that
interfere with servicing the
product.
8. Labor or parts installed by any
non-designated service
company during the full warranty
period, unless approved by
Siemens before service is
performed.
9. In Canada, travel or
transportation expenses for
customers who reside in remote
areas.
10. Any labor costs during the
limited warranty periods.
SIEMENS AND SIEMENS
CANADA SHALL NOT BE LIABLE
FOR INCIDENTAL OR
CONSEQUENTIAL DAMAGES.
Some states or provinces do not
allow the exclusion or limitation of
incidental or consequential
damages, so this exclusion or
limitation may not apply to you.
This warranty gives you specific legal
rights, and you may also have other
rights which vary from state to state
or province to province.
Outside the United States and
Canada, a different warranty may
apply. Contact your authorized
Siemens dealer to determine if
another warranty applies.
If you need service, first see the
“Troubleshooting” section of this
book. After checking “Troubleshooting”, additional help can be
found by checking the “Service”
section or by calling the Siemens
Customer Interaction Center,
1–800–944–2904 (toll-free), from
anywhere in the U.S.A. In Canada,
contact your designated Siemens
Canada service company or call
1–800–944–2904.
Keep this book and your sales slip
together for future reference.
You must provide proof of
purchase or installation date for
in-warranty service.
17

Table de matières
INSTRUCTIONS DE SÉCURITÉ IMPORTANTES . . . . . . . . . . . . . . . . . . . . . . . . . . . . . . . . . . . . . . . . . . . . 19
Félicitations . . . . . . . . . . . . . . . . . . . . . . . . . . . . . . . . . . . . . . . . . . . . . . . . . . . . . . . . . . . . . . . . . . . . . . . . . 20
Présentation de votre nouvel appareil . . . . . . . . . . . . . . . . . . . . . . . . . . . . . . . . . . . . . . . . . . . . . . . . . . . . 21
Installation . . . . . . . . . . . . . . . . . . . . . . . . . . . . . . . . . . . . . . . . . . . . . . . . . . . . . . . . . . . . . . . . . . . . . . . . . . 22
Raccordement à l'alimentation électrique . . . . . . . . . . . . . . . . . . . . . . . . . . . . . . . . . . . . . . . . . . . . . . . . . 22
Allumage de l'appareil . . . . . . . . . . . . . . . . . . . . . . . . . . . . . . . . . . . . . . . . . . . . . . . . . . . . . . . . . . . . . . . . . 23
Extinction et débranchement de l'appareil . . . . . . . . . . . . . . . . . . . . . . . . . . . . . . . . . . . . . . . . . . . . . . . . . 23
Aménagement variable de l'intérieur . . . . . . . . . . . . . . . . . . . . . . . . . . . . . . . . . . . . . . . . . . . . . . . . . . . . . 24
Panneau de commande . . . . . . . . . . . . . . . . . . . . . . . . . . . . . . . . . . . . . . . . . . . . . . . . . . . . . . . . . . . . . . . . 25
Réglage de la température . . . . . . . . . . . . . . . . . . . . . . . . . . . . . . . . . . . . . . . . . . . . . . . . . . . . . . . . . . . . . 26
Mode Configuration (Setup) . . . . . . . . . . . . . . . . . . . . . . . . . . . . . . . . . . . . . . . . . . . . . . . . . . . . . . . . . . . . 26
Réglages modifiables en mode Configuration (Setup) . . . . . . . . . . . . . . . . . . . . . . . . . . . . . . . . . . . . . . . . 27
Mode Vacances . . . . . . . . . . . . . . . . . . . . . . . . . . . . . . . . . . . . . . . . . . . . . . . . . . . . . . . . . . . . . . . . . . . . . . 28
Mode Sabbat . . . . . . . . . . . . . . . . . . . . . . . . . . . . . . . . . . . . . . . . . . . . . . . . . . . . . . . . . . . . . . . . . . . . . . . . 28
Schémas de rangement . . . . . . . . . . . . . . . . . . . . . . . . . . . . . . . . . . . . . . . . . . . . . . . . . . . . . . . . . . . . . . . . 29
Conseils pratiques pour stocker du vin . . . . . . . . . . . . . . . . . . . . . . . . . . . . . . . . . . . . . . . . . . . . . . . . . . . 29
Températures de dégustation . . . . . . . . . . . . . . . . . . . . . . . . . . . . . . . . . . . . . . . . . . . . . . . . . . . . . . . . . . . 29
Comment économiser de l'énergie . . . . . . . . . . . . . . . . . . . . . . . . . . . . . . . . . . . . . . . . . . . . . . . . . . . . . . . 30
Bruits de fonctionnement . . . . . . . . . . . . . . . . . . . . . . . . . . . . . . . . . . . . . . . . . . . . . . . . . . . . . . . . . . . . . . 30
Nettoyage de l'appareil . . . . . . . . . . . . . . . . . . . . . . . . . . . . . . . . . . . . . . . . . . . . . . . . . . . . . . . . . . . . . . . . 30
Odeurs . . . . . . . . . . . . . . . . . . . . . . . . . . . . . . . . . . . . . . . . . . . . . . . . . . . . . . . . . . . . . . . . . . . . . . . . . . . . . 31
Messages d'avertissement apparus à l'afficheur . . . . . . . . . . . . . . . . . . . . . . . . . . . . . . . . . . . . . . . . . . . . 31
Autodiagnostic de l'appareil . . . . . . . . . . . . . . . . . . . . . . . . . . . . . . . . . . . . . . . . . . . . . . . . . . . . . . . . . . . . 31
Remise de l'appareil sur ses réglages usine . . . . . . . . . . . . . . . . . . . . . . . . . . . . . . . . . . . . . . . . . . . . . . . 32
Dérangements et remèdes . . . . . . . . . . . . . . . . . . . . . . . . . . . . . . . . . . . . . . . . . . . . . . . . . . . . . . . . . . . . . 32
Changement de l'ampoule . . . . . . . . . . . . . . . . . . . . . . . . . . . . . . . . . . . . . . . . . . . . . . . . . . . . . . . . . . . . . . 33
Changement du filtre à odeurs . . . . . . . . . . . . . . . . . . . . . . . . . . . . . . . . . . . . . . . . . . . . . . . . . . . . . . . . . . 33
Service après-vente . . . . . . . . . . . . . . . . . . . . . . . . . . . . . . . . . . . . . . . . . . . . . . . . . . . . . . . . . . . . . . . . . . . 34
Garantie . . . . . . . . . . . . . . . . . . . . . . . . . . . . . . . . . . . . . . . . . . . . . . . . . . . . . . . . . . . . . . . . . . . . . . . . . . . . 35
English . . . . . . . . . . . . . . . . . . . . . . . . . . . . . . . . . . . . . . . . . . . . . . . . . . . . . . . . . . . . . . . . . . . . . . . . . . . . . . 2
Español . . . . . . . . . . . . . . . . . . . . . . . . . . . . . . . . . . . . . . . . . . . . . . . . . . . . . . . . . . . . . . . . . . . . . . . . . . . . . 36
18

INSTRUCTIONS DE SÉCURITÉ IMPORTANTES
VEUILLEZ LIRE ET CONSERVER CES INSTRUCTIONS !
AVERTISSEMENT
m
Lorsque vous utilisez cet appareil,
veuillez toujours prendre des
précautions de base, y compris
les suivantes :
1. N'utilisez cet appareil que dans
le but prévu tel que décrit dans le
présent manuel de l'utilisateur.
2. Avant utilisation, ce réfrigérateur
devra être correctement installé
en conformité avec les
instructions d'installation.
3. Ne permettez jamais aux enfants
de se servir des clayettes
comme marchepieds, de
s'y tenir debout dessus ou de
s'y suspendre. Ils risqueraient de
se blesser gravement et
d'endommager le réfrigérateur.
4. A partir du moment où votre
réfrigérateur fonctionne,
ne touchez plus les surfaces
froides à l'intérieur du
compartiment, ceci surtout si
vos mains sont humides ou
mouillées. La peau risquerait de
rester collée sur ces surfaces
extrêmement froides.
5. Ne stockez ni n'utilisez pas
d'essence ou d'autres liquides
et vapeurs inflammables
à proximité de cet appareil et de
tout autre.
6. Débranchez votre réfrigérateur
avant de nettoyer l'appareil ou
de faire des réparations.
REMARQUE : nous
recommandons vivement que
toute opération de service
après-vente soit réalisée par un
technicien qualifié.
7. Avant de remplacer une
ampoule grillée, amenez
l'interrupteur principal power
sur la position OFF pour mettre
l'éclairage hors tension et
supprimer ainsi le risque de
toucher un fil sous tension.
8. Une ampoule grillée peut se
briser pendant que vous la
remplacez.
REMARQUE : le fait de ramener
le thermostat du réfrigérateur sur
OFF ne met pas le circuit
d'éclairage hors tension.
m AVERTISSEMENT
RISQUE D'ENFERMEMENT POUR
LES ENFANTS
Les enfants risquent de s'enfermer
et de s'asphyxier dans l'appareil.
Il ne s'agit pas de problèmes du
passé. Les appareils de réfrigération
mis au rebut ou abandonnés
demeurent dangereux, même s'ils
ne sont là «que pour quelques jours».
Si vous êtes en train de vous
débarrasser de votre ancien
appareil, veuillez suivre les présentes
instructions et vous contribuerez
ainsi à prévenir des accidents.
Avant de mettre votre ancien
réfrigérateur au rebut :
– Enlevez ses portes.
– Laissez les clayettes à l'intérieur
pour empêcher que les enfants
puissent pénétrer facilement
dedans.
Branchement
électrique
L'appareil est livré avec un cordon
d'alimentation électrique à trois fils et
figurant dans la liste UL.
Cet appareil requiert d'être raccordé
à une prise femelle à trois fils.
L'installation de cette prise est une
opération exclusivement réservée
à un électricien agréé.
Instructions de
raccordement à la terre
Cet appareil devra être relié à la terre.
En cas de dysfonctionnement ou de
panne, le raccordement réduit le
risque de choc électrique en
fournissant au courant un chemin de
moindre résistance électrique.
Un branchement incorrect du fil de
raccordement à la terre peut
occasionner un choc électrique.
Si vous n'êtes pas sûr que l'appareil
est correctement relié à la terre,
faites-le vérifier par un électricien
agréé ou un technicien du service
après-vente.
Certaines réglementations locales
peuvent exiger un raccordement
à part à la terre. En pareils cas, vous
devrez acheter séparément les
accessoires requis : le fil de terre,
la bride et la vis.
Ne raccordez jamais l'appareil à des
conduites en plastique, conduites de
gaz ou conduites d'eau.
19

Mise au rebut des CFC
Votre ancien réfrigérateur était peutêtre équipé d'un système de
refroidissement qui faisait appel
à des CFC (chlorofluorocarbones).
Les CFC sont soupçonnés
d'endommager la couche
stratosphérique d'ozone.
Lorsque vous vous débarrassez d'un
ancien réfrigérateur, assurez-vous
au préalable que le fluide réfrigérant
à base de CFC en sera retiré ou qu'il
sera éliminé, dans les deux cas par
un technicien de service qualifié.
Le rejet de fluide réfrigérant à base
de CFC dans l'atmosphère vous
expose à des amendes et peines
d'emprisonnement en vertu des
dispositions prévues par la
législation.
IMPORTANT
Veuillez conserver ces instructions
pour usage par l'inspecteur local.
Veuillez observer tous les règlements
et ordonnances.
Remarque à l'intention de
l'installateur – Veillez bien à laisser
les présentes instructions au client.
Remarque à l'intention du
consommateur – Veuillez conserver
les présentes instructions avec votre
manuel de l'utilisateur. Ils vous
permettront de vous y reporter
ultérieurement.
Définitions
m
AVERTISSE-
MENT
AVERTISSEMENT – Cette
mention précède une instruction
assortie d'un danger de mort ou
de blessures graves si vous ne
respectez pas son contenu.
m
ATTENTION – Cette mention
précède une instruction assortie
d'un risque de blessures légères
ou de dégâts si vous ne respectez
pas son contenu.
ATTENTION
Ce symbole sert à attirer votre
attention sur un aspect
particulier.
m
m
Félicitations
En achetant cette nouvelle cave
à vin, vous venez d'opter pour un
appareil domestique moderne et de
haute qualité.
Ce n'est qu'après avoir atteint la
bonne température de dégustation
que les bons vins commencent
à développer leur arôme et leur
saveur pour votre plus grand plaisir.
Cette nouvelle cave à vin porte
lentement et constamment vos vins
à la température de dégustation
idéale. Les vins rouges et blancs
peuvent être stockés en même
temps dans deux zones de
température configurables
séparément.
Votre nouvelle cave à vin se distingue
par une consommation d'énergie
économique.
Avant de quitter notre usine, chaque
appareil est soigneusement vérifié
pour assurer qu'il fonctionne
correctement et se trouve en parfait
état.
Si vous souhaitez des précisions
concernant en particulier l'installation
et le raccordement de l'appareil,
n'hésitez pas à contacter le service
après-vente.
Sur notre site Web, vous trouverez
des informations avancées et tout un
choix de nos produits.
Veuillez lire les présentes instructions
d'utilisation, les instructions
d'installation ainsi que les
informations jointes à l'appareil,
et l'utiliser en les respectant.
Conservez tous ces documents car
ils pourront servir à un éventuel futur
propriétaire.
20
Information générale
L'appareil sert à réfrigérer des
boissons.
Cet appareil a été uniquement conçu
pour une utilisation domestique.
Présentation de votre nouvel appareil
Les présentes instructions d'utilisation valent pour plusieurs modèles. Il peut y avoir des différences entre les
illustrations et votre appareil.
A Compartiment du haut
B Compartiment du bas
1 Bandeau de commande
2 Éclairage intérieur du
compartiment du haut
3 Présentoir *
destiné à faire ressortir les
étiquettes des bouteilles.
4 Cloison diviseuse
pour établir une séparation
entre zones de température
dans les compartiments.
5 Éclairage par LED du
présentoir
pour le compartiment du bas.
6 Clayette amovible
pour ranger des bouteilles de
vin couchées.
7 Clayette sortante *
permettant de ranger debout
les bouteilles et les bocaux.
8 Porte en verre
* Accessoire en option
21
Installation
m
AVERTISSE-
MENT
N'installez pas cet appareil
– en plein air,
– dans un environnement très
humide
– dans des pièces exposées au
risque de gel.
L'appareil est très lourd.
Pour connaître les poids à vide,
reportez-vous au tableau suivant :
– Cave à vin 18" :
300 lbs / 135 kg
Local d'installation
Il faudra installer l'appareil dans une
pièce sèche et bien aérée.
La température ambiante ne doit pas
descendre en dessous de 55 °F
(13 °C) ni monter au-dessus de
110 °F (43 °C), faute de quoi
l'appareil risque de mal fonctionner.
L'emplacement ne doit pas être
directement exposé aux rayons
solaires ou proche de sources de
chaleur tels qu'une chaudière,
un radiateur, etc.
S'il n'y a pas moyen d'éviter une
installation à proximité d'une source
de chaleur, utilisez un panneau
isolant approprié ou respectez les
distances minimum suivantes par
rapport à la source de chaleur :
– 1,2" (3 cm) d'une cuisinière
électrique,
– 12" (30 cm) d'une chaudière au
fuel ou à combustible solide.
m
Cavité d'installation
Pour une installation sans incident de
l'appareil et pour qu'ensuite la
façade du meuble soit esthétique,
il est important que la cavité
d'installation ait bien les dimensions
spécifiées.
Assurez-vous en particulier que la
cavité est carrée. Vous pouvez le
vérifier avec des moyens appropriés,
par exemple un niveau à bulle, des
mesures en diagonale, etc.
Mobilier /
Appareillages
Le nouvel appareil sera monté de
façon sûre contre des meubles et
d'autres appareillages adjacents et
situés au dessus.
Pour cette raison, il est d'une
importance essentielle que tous les
meubles / appareillages susceptibles
d'être fixés puissent être connectés
de façon sûre au sol ou contre le mur
par des moyens appropriés.
Sol
Pour être sûr que l'appareil a été
installé de façon sûre et qu'il
fonctionne correctement, le sol doit
être plat et horizontal.
Le sol doit être constitué d'un
matériau dur et rigide.
La surface d'installation doit se
trouver au même niveau que le reste
de la pièce.
Compte tenu du poids élevé de
l'appareil lorsqu'il est plein, il faut que
le sol offre la portance nécessaire.
Pour connaître les poids des
appareils pleins, reportez-vous au
tableau suivant :
– Cave à vin 18" :
550 lbs / 245 kg
En cas de doute, contactez un
architecte ou un expert en bâtiment.
Installation et
raccordement de
l'appareil
m
Faites installer l'appareil par un
électricien agréé, qui respectera
ce faisant les instructions
d'installation ci-jointes.
Après avoir installé l'appareil,
attendez au moins une demi-heure
avant de le mettre sous tension.
Pendant le transport, l'huile du circuit
de réfrigération peut s'être déplacée.
Nettoyez l'intérieur de l'appareil
avant de le mettre sous tension pour
la première fois.
ATTENTION
m
Raccordement
à l'alimentation
électrique
m
AVERTISSE-
MENT
Risque de choc électrique
– Branchez la fiche mâle
à 3 broches de l'appareil dans
une prise à 3 orifices femelles
reliée à la terre.
– Ne retirez pas la broche de
raccordement à la terre.
– N'utilisez pas d'adaptateur.
– N'utilisez pas de prolongateur.
Le non-respect de ces
instructions s'assortit d'un danger
de mort, d'incendie ou de choc
électrique.
Un branchement incorrect du fil de
raccordement à la terre peut
occasionner un choc électrique.
Si vous n'êtes pas sûr que
l'appareil est correctement relié
à la terre, faites-le vérifier par un
électricien agréé ou un technicien
du service après-vente.
m
22
L'appareil est livré avec un cordon
d'alimentation électrique à trois fils et
figurant dans la liste UL.
Cet appareil requiert d'être raccordé
à une prise femelle à trois fils.
L'installation de cette prise est une
opération exclusivement réservée
à un électricien agréé.
Cette prise doit être protégée par un
fusible/disjoncteur supportant un
ampérage de 10 à 16 A.
Pour connaître l’ampérage
maximale, reportez-vous au tableau
suivant :
Appareil Intensité
absorbée
(maximale)
Cave à vin 24"
2 Amp
ère
Allumage de
l'appareil
Appuyez sur le bouton power.
Une fois que l'appareil se trouve
sous tension, il commence
à refroidir. L'éclairage est allumé
lorsque les portes se trouvent en
position ouverte.
Les températures préréglées
(réglages reçus en usine) sont
atteintes après environ
2 à 8 heures. Attendez tout ce
temps avant de ranger des
produits alimentaires dans
l'appareil.
Pour modifier les températures
réglées, reportez-vous à «Réglage
de la température».
Extinction et
débranchement
de l'appareil
Extinction de l'appareil
Appuyez sur le bouton power.
Débranchement de
l'appareil
Si l'appareil doit rester assez
longtemps sans servir :
Retirez tous les produits
alimentaires présents dedans.
Débranchez la fiche mâle de la
prise de courant ou ramenez le
disjoncteur en position éteinte.
Nettoyez l'intérieur de l'appareil
(voir «Nettoyage de l'appareil»).
Pour empêcher l'apparition
d'odeurs, laissez les portes
ouvertes.
23
Aménagement variable de l'intérieur
Clayettes extractibles
Saisissez l'avant de la clayette et
tirez.
Pour retirer complètement
la clayette :
Tirez-la complètement à vous et
soulevez-la. Enlevez-la ensuite.
Pour introduire la clayette :
Soulevez la clayette et réinsérez-
la dans la glissière.
Pour ranger les bouteilles et les
bocaux debout :
Retirez les deux clayettes du
bas.
Insérez la clayette permettant de
ranger debout (accessoire en
option) dans la glissière de sortie
inférieure.
Présentoir
Pour utiliser le présentoir, vous
devrez retirer l'étagère du haut dans
le compartiment du bas.
Éclairage par LED du
présentoir
L'interrupteur allume et éteint
(ON/OFF) l'éclairage du
présentoir.
Si vous allumez l'éclairage par LED
du présentoir, il reste allumé en
permanence, aussi lorque la porte
de l'appareil est fermée. Ceci permet
de présenter les bouteilles de façon
adéquate.
Sur la position OFF, l'éclairage par
LED s'allume lorsque vous ouvrez la
porte et s'éteint lorsque vous la
refermez.
24

Panneau de commande
Pour profiter de toutes les fonctions de votre appareil, nous recommandons que vous vous familiarisiez en profondeur
avec le panneau de commande et les possibilités de réglage.
ABouton power
Il sert à allumer et éteindre
l'appareil.
m AT TENTION!
Même après que vous avez éteint
l'appareil par le bouton power,
l'appareil reste connecté au
secteur électrique !
B Bouton alarm off
Ce bouton sert à éteindre une
alarme.
Voir la section intitulée
«Alarmes de l'appareil».
C Afficheur
La température réglée requise
de l'appareil apparaît
à l'afficheur. Les fonctions
spéciales activées sont
indiquées par des symboles.
En mode Configuration,
les menus ainsi que les
options de réglage
apparaissent à l'afficheur.
Voir la section intitulée «Mode
Configuration».
DBoutons
< >
Ces boutons servent
à sélectionner les menus en
mode Configuration. Voir la
section intitulée «Mode
Configuration».
Les boutons
< > servent
à activer l'ajustage requis de
température.
Voir la section intitulée
«Réglage de la température».
EBoutons + –
Ils servent à sélectionner les
paramètres disponibles du
menu. Voir la section «Mode
Configuration».
Les boutons + et – servent
aussi à modifier la température affichée par l'appareil.
Voir la section intitulée
«Réglage de la température»
F Bouton setup
Ce bouton sert à activer et
désactiver le mode
Configuration. Lorsque vous
mettez fin au mode
Configuration en appuyant sur
le bouton setup, l'appareil
enregistre les modifications
des réglages.
G Bouton vacation
Ce bouton sert à activer et
désactiver le Mode Vacances.
Voir la section intitulée «Mode
Vacances».
Si dans le menu Signal sonore
vous avez réglé le son sur On,
l'appareil émet un signal sonore
de confirmation chaque fois que
vous appuyez sur un bouton.
Symboles à l'afficheur
Symbole du
compartiment du haut
Symbole du
compartiment du bas
La fonction Humidité
a été activée.
Voir page 30.
Le mode Vacances
a été activée.
Voir page 28.
Options de réglage
dans le mode
Configuration.
Voir page 27.
Une alarme s'est
affichée.
Voir page 31.
25

Réglage de la
Mode Configu-
Pour sélectionner les différentes
options de réglage à l'intérieur d'un
même menu :
température
La température est réglable
différemment, dans les deux
compartiments, entre 41 °F et 64 °F
(+5 °C et +18 °C).
Nous recommandons de la régler sur
52 °F (+11 °C).
Vous pouvez modifier la température
par les boutons + (température plus
élevée) ou – (température moins
élevée). La température se règle par
pas de 1 °F (0,5 °C).
Pour ajuster l'appareil sur la
température voulue :
Activez le mode Configuration
par le biais des boutons
< ou >.
ration (Setup)
Plusieurs menus vous permettent
d'ajuster les fonctions de l'appareil
en fonction de vos besoins
personnels. Pour effectuer les
réglages correspondants, rendezvous dans le mode Configuration.
Pour activer le mode Configuration :
Appuyez sur le bouton setup.
Le premier menu (unité de
température) s'affiche.
Pour passer au menu suivant :
Appuyez sur le bouton + ou –.
Si vous avez modifié un réglage,
l'appareil l'enregistre dès que
vous passez au menu suivant
par le bouton
Pour quitter le mode Configuration :
Appuyez sur le bouton setup.
Cette action sauvegarde tous les
réglages modifiés.
Si vous n'appuyez sur aucun
bouton dans les 12 secondes,
le mode Configuration prend fin
automatiquement. Tous les
réglages modifiés sont
sauvegardés. La température
requise s'affiche à nouveau.
< ou >.
> Pour le compartiment du haut.
< Pour le compartiment du bas.
Le symbole approprié s'affiche.
Réglez l'appareil sur la tempé-
rature voulue à l'aide des boutons
+ (température plus élevée) ou –
(température moins élevée).
Selon le modèle d'appareil,
vous avez la possibilité de
l'éteindre ou de le commuter sur
le mode Vacances par le biais
du réglage de température.
Une fois que la température la
plus élevée a été atteinte,
la mention
OFF s'affiche.
Appuyez sur le bouton < ou >.
Le menu suivant et le réglage actuel
(On/Off habituellement) s'affichent.
26

Réglages modifiables en mode Configuration (Setup)
Menu Options de réglage Texte affiché
Unité de température °F (degrés Fahrenheit)
°C (degrés Celsius)
Langue Anglais
Français
Signal sonore On / o
Off / p
Humidité (compartiment du haut) On / o
Off / p
Humidité (compartiment du bas) On / o
Off / p
Unité de température
L'appareil peut afficher la température en degrés Fahrenheit (°F) ou en
degrés Celsius (°C).
Appuyez sur le bouton setup.
A titre d'alternative, vous pouvez les
faire afficher en français.
Activez le mode Configuration.
Appuyez sur le bouton > jusqu'à
ce que la mention
s'affiche.
Le premier menu (unité de
température) s'affiche.
Appuyez sur le bouton + ou –
pour commuter sur
Appuyez sur le bouton setup
pour enregistrer ce réglage.
ENGLISH
FRANCAIS.
°F
°C
ENGLISH
FRANCAIS
TONE
HUMIDITE
HUMIDITE
Appuyez sur le bouton > jusqu'à
ce que la mention
s'affiche pour le compartiment
voulu (celui du haut dans cet
exemple). L'état actuel de la
fonction s'affiche (
Appuyez sur le bouton + ou –
pour modifier le statut (
Appuyez sur le bouton setup
pour mémoriser le réglage.
HUMIDITE
ON/OFF).
ON/OFF).
Appuyez sur le bouton + ou –
pour commuter entre les degrés
Fahrenheit (°
Celsius(°
Appuyez sur le bouton setup
F) ou les degrés
C).
pour enregistrer ce réglage.
Réglage de la langue
Une fois que l'appareil a été mis sous
tension, les messages d'erreur et les
réglages en mode Configuration
s'affichent en anglais.
Humidité
Il est possible d'activer une hausse
de l'humidité différente dans chacun
des compartiments.
Pour plus de renseignements
sur l'influence de l'humidité, voir
la rubrique «Conseils pratiques
pour stocker le vin».
Pour activer l'augmentation
d'humidité dans l'un les
compartiments :
Commutez sur le mode Setup.
Le symbole
HUMIDITY (humidité)
s'affiche.
Pour mettre fin à la fonction Humidité :
– Éteignez cette fonction en mode
Setup.
– Éteignez l'appareil par le bouton
power.
27

Mode
Mode Sabbat
Vacances
Si vous devez vous absenter
pendant une période prolongée,
vous pouvez commuter l'appareil sur
un mode de consommation
d'énergie plus avantageux.
Le mode Vacances est également
utile si vous avez prévu de stocker
du vin à long terme.
Lorsque le mode Vacances est actif,
– L'appareil commute sur une
température plus favorable réglée
en usine,
– L'éclairage intérieur s'éteint.
Pour commuter l'appareil sur le
mode Vacances :
Lorsque le mode Sabbat est actif :
– Le signal sonore de confirmation
ne retentit pas (si vous l'aviez
activé) lorsque vous appuyez sur
le bouton.
– L'éclairage intérieur s'éteint.
– La luminosité du rétro-éclairage
diminue.
Pour activer le mode Sabbat :
Le rétro-éclairage de l'affichage
s'éteint. La mention
s'affiche.
Pour mettre fin au mode Sabbat,
appuyez sur le bouton vacation.
L'appareil se sert à nouveau des
réglages antérieurement effectués et
des températures antérieurement
réglées.
SABBATH
Appuyez sur le bouton
vacation.
Le symbole VACATION s'affiche.
La température préréglée s'affiche
à la place de la température requise.
Pour mettre fin au mode Vacances,
appuyez sur le bouton vacation.
L'appareil se sert à nouveau des
réglages antérieurement effectués et
des températures antérieurement
réglées.
Appuyez sur le bouton + et
maintenez-la appuyée.
Appuyez sur le bouton
vacation.
Maintenez la touche + appuyée
pendant 3 secondes supplémentaires. Le symbole
VACATION, affiché, clignote.
28

Schémas de rangement
18" Cave à vin
70 bouteilles de vin
Ces schémas valent pour des bouteilles présentant les dimensions suivantes :
Conseils
pratiques pour
stocker du vin
– Déballez toujours les bouteilles de
vin. Ne les conservez pas dans
des caisses ou boîtes
– Couchez les bouteilles anciennes
de sorte que le bouchon soit
toujours mouillé. Il faudrait qu'il
n'y ait jamais de poche d'air entre
le vin et le bouchon.
– Pour que les vins se conservent
bien, il est décisif que l'air
présente l'humidité correcte.
Avec la fonction Humidité (voir la
rubrique «Réglages modifiables
en mode Configuration»), vous
pouvez hausser si nécessaire
l'humidité de l'air dans les casiers,
indépendamment les uns des
autres. Ceci permet d'empêcher
un éventuel dessèchement des
bouchons.
– Avant de déguster votre vin,
il faudrait l'amener doucement
à la température de la pièce.
Le rosé par exemple a besoin de
deux à cinq heures, le vin rouge
de quatre à cinq heures avant
d'atteindre la bonne température de dégustation.
Ensuite, il se trouve à la
température de dégustation
correcte. Le mousseux et le
champagne demandent un bref
passage au réfrigérateur avant de
les boire.
– Souvenez-vous qu'il faut toujours
amener le vin à une température
légèrement inférieure à la
température idéale de service.
En effet, sa tempéra- ture
augmente de 34 °F à 36 °F
(+1 °C à +2 °C) dès qu'il a été
versé dans les verres !
Températures
de dégustation
La température de service correcte
joue un rôle crucial quant au goût du
vin, donc au plaisir que sa dégustation vous procurera.
Nous recommandons de servir le vin
aux températures de dégustation
suivantes :
Type de vin Température
de dégustation
Bourgogne rouge 64 °F (18 ºC)
Côtes du Rhône
rouge/Barolo
Bourgogne rouge/
Bordeaux rouge
Porto 59 °F (15 ºC)
Jeunes
Bourgogne rouges
Jeunes vins
rouges
Jeunes Beaujolais/
Tous les v i n s
blancs demi-secs
à secs
Vins blancs grand
âge/ Chardonnay
Sherry 48 °F (9 ºC)
Vins blancs
jeunes, depuis
ceux vendangés
tardivement
Vins blancs de la
vallée de la Loire /
Entre-deux-mers
62,5 °F (17 ºC)
61 °F (16 ºC)
57 °F (14 ºC)
53,5 °F (12 ºC)
52 °F (11 ºC)
50 °F (10 ºC)
46,5 °F (8 ºC)
44,5 °F (7 ºC)
29

Comment
économiser de
l'énergie
– Installez l'appareil dans un local
sec et aéré ; ne l'exposez pas aux
rayons solaires directs et ne le
placez pas près d'une source de
chaleur (radiateur, cuisinière par
exemple). Si nécessaire, utilisez
un panneau isolant.
– Laissez les boissons et aliments
chauds refroidir avant de les
ranger dans l'appareil.
– Pour décongeler les produits
alimentaires, rangez-les dans le
compartiment réfrigérateur. Leur
basse température réfrigère les
aliments déjà présents dans ce
compartiment.
– Laissez la porte de l'appareil
ouverte le moins longtemps
possible !
Bruits de
fonctionnement
Bruits parfaitement
normaux
Ronflement – Le réfrigérateur
fonctionne. Le ventilateur intégré
dans le circuit de circulation d'air
fonctionne.
Gargouillis, bourdonnements ou
clapotis légers – Le fluide
réfrigérant circule dans les tubulures.
Cliquetis sec – Le moteur s'allume
ou s'éteint.
Bruits faciles à supprimer
L'appareil n'est pas d'aplomb
Nivelez l'appareil à l'aide d'un niveau
à bulle.
Servez-vous des pieds ajustables en
hauteur de l'appareil ou placez
quelque chose sous les pieds.
Les étagères oscillent ou restent
coincées
Veuillez vérifier si les pièces
amovibles sont bien en assise et,
si nécessaire, insérez-les à nouveau.
Des récipients se touchent
Écartez légèrement les bouteilles et
les récipients les uns des autres.
m
AVERTISSE-
m
MENT
Pour éviter des dommages
corporels ou des dégâts matériels
veuillez respecter les instructions
suivantes :
– Ne nettoyez pas l'appareil avec
un nettoyeur à vapeur.
– Veillez bien à ce que l'eau de
nettoyage ne puisse pas
pénétrer dans l'éclairage ou sous
le panneau de commande.
– N'utilisez pas de détergents
abrasifs ou acides ni de solvants
car ils pourraient endommager la
surface de l'appareil.
– Ne nettoyez jamais les clayettes
et les bacs au lave-vaisselle car
ces pièces pourraient se
déformer.
Éteignez l'appareil par le
bouton power !
Débranchez la fiche mâle de la
prise de courant ou ramenez
le disjoncteur en position
éteinte.
Nettoyez le joint de la porte avec
de l'eau puis séchez-le
soigneusement.
Nettoyez l'appareil avec de l'eau
tiède et un peu de produit
à vaisselle.
Veillez bien à ce que l'eau de
nettoyage ne pénètre pas dans
le panneau de commande ou
l'éclairage.
30
Nettoyage de
l'appareil
m
Pour éviter tout choc électrique,
lequel peut occasionner des
blessures (brûlures!) graves ou la
mort, débranchez toujours la fiche
mâle de l'appareil avant de le
nettoyer. Après le nettoyage,
rebranchez la fiche mâle dans la
prise de courant.
AVERTISSE-
MENT
m
Vérifiez les orifices de ventilation
sur le panneau de base. Enlevez
les salissures avec un aspirateur.
Après le nettoyage :
Rebranchez la fiche mâle dans la
prise de courant ou renclenchez
le disjoncteur. Appuyez ensuite
sur le bouton power pour
allumer l'appareil.
Demandez à votre revendeur de
vous conseiller des produits de
nettoyage et d'entretien
spécialement destinés aux
surfaces de l'appareil.
Essuyez les surfaces de
l'appareil avec un essuie-tout
humide.

Odeurs
Remède
Fermez la porte. La mention
disparaît de l'afficheur.
Autodiagnostic
Si l'appareil dégage des odeurs
désagréables :
Éteignez l'appareil par le
bouton power !
Nettoyez l'intérieur.
Voir la section intitulée
«Nettoyage de l'appareil».
Vérifiez le filtre anti-odeurs.
Voir la section sur le
«Changement de filtre».
Pour empêcher l'apparition
d'odeurs, emballez les aliments
à odeur forte dans des récipients
hermétiques.
Rallumez l'appareil en appuyant
sur le bouton power.
24 heures plus tard, vérifiez si les
odeurs ont disparu.
Messages
d'avertissement
apparus
à l'afficheur
Si plusieurs messages d'avertissement s'affichent simultanément,
traitez-les individuellement.
Pendant l'affichage d'un message
d'avertissement, les boutons sont
inopérants.
Alarme «Porte ouverte»
Défaut capteur
Cause
– Présence possible d'un défaut
technique.
Remède
Soumettez l'appareil à un
autodiagnostic.
Tension trop basse
Cause
– La tension du secteur est
descendue en dessous du seuil
inférieur admis.
Remède
Les boutons sont inopérants.
Une fois que la tension du secteur
est revenue sur la valeur stipulée,
le message d'alarme s'éteint.
Si ce message reste affiché,
prévenez votre compagnie
distributrice d'électricité.
de l'appareil
Avant d'appeler le service aprèsvente, soumettez l'appareil à un
autodiagnostic.
Éteignez l'appareil et attendez
5 minutes. Maintenez les portes
fermées.
Rallumez l'appareil.
Appuyez simultanément sur les
boutons setup et alarm off
pendant 5 secondes.
L'autodiagnostic commence.
Différents messages s'affichent
pendant cette opération.
Si pendant l'autodiagnostic l'appareil
détecte un défaut, la mention
ALARM et un message d'alarme
correspondant (concernant un
capteur par exemple) s'affiche.
Indiquez ce message d'erreur au
service après-vente.
Si l'autodiagnostic ne fait ressortir
aucun défaut, la température requise
s'affiche à la fin de l'autodiagnostic.
Cause
– Une porte de l'appareil n'a pas
été refermée correctement ou est
restée ouverte trop longtemps.
31

Remise de l'appareil sur ses
réglages usine
Opération recommandée lorsque
l'appareil a changé de propriétaire.
Appuyez simultanément sur les
boutons setup et alarm off
pendant 3 secondes.
Après que l'appareil a été remis sur
ses réglages usine :
– L'appareil s'allume s'il se trouvait
en position éteinte.
– La fonction Super s'éteint.
– Les réglages modifiés en mode
Configuration reviennent sur les
valeurs qui ont été conférées
àlafabrication.
Dérangements et remèdes
Dérangement Cause possible Remède
L'appareil ne refroidit pas.
L'éclairage intérieur ne
fonctionne pas. Aucune mention
n'apparaît à l'afficheur.
Le groupe frigorifique s'allume
de plus en plus souvent et
pendant une plus longue
période.
La température régnant dans le
compartiment réfrigérateur est
trop basse. Vous avez réglé la
température trop basse.
L'éclairage intérieur ne
fonctionne pas.
Panne de courant ; le disjoncteur a
disjoncté ; la fiche mâle n'est pas
correctement enfoncée dans la prise.
Vous avez ouvert fréquemment la porte de
l'appareil.
Vous avez rangé de grandes quantités
d'aliments dans l'appareil.
Les orifices d'aération ne sont pas
dégagés.
Vous avez réglé la température trop
basse.
L'ampoule est défectueuse. Changez-la (voir «Changement de
Le commutateur d'éclairage est coincé. Vérifiez s'il y a moyen de le décoincer.
Vérifiez que le secteur est bien sous
tension. Réarmez le disjoncteur.
Vérifiez que la fiche mâle est bien
enfoncée dans la prise du secteur.
N'ouvrez pas la porte inutilement.
Enclenchez la fonction Super.
Retirez les obstacles et les salissures.
Haussez la température (voir «Réglage de
la température»).
l'ampoule»).
32
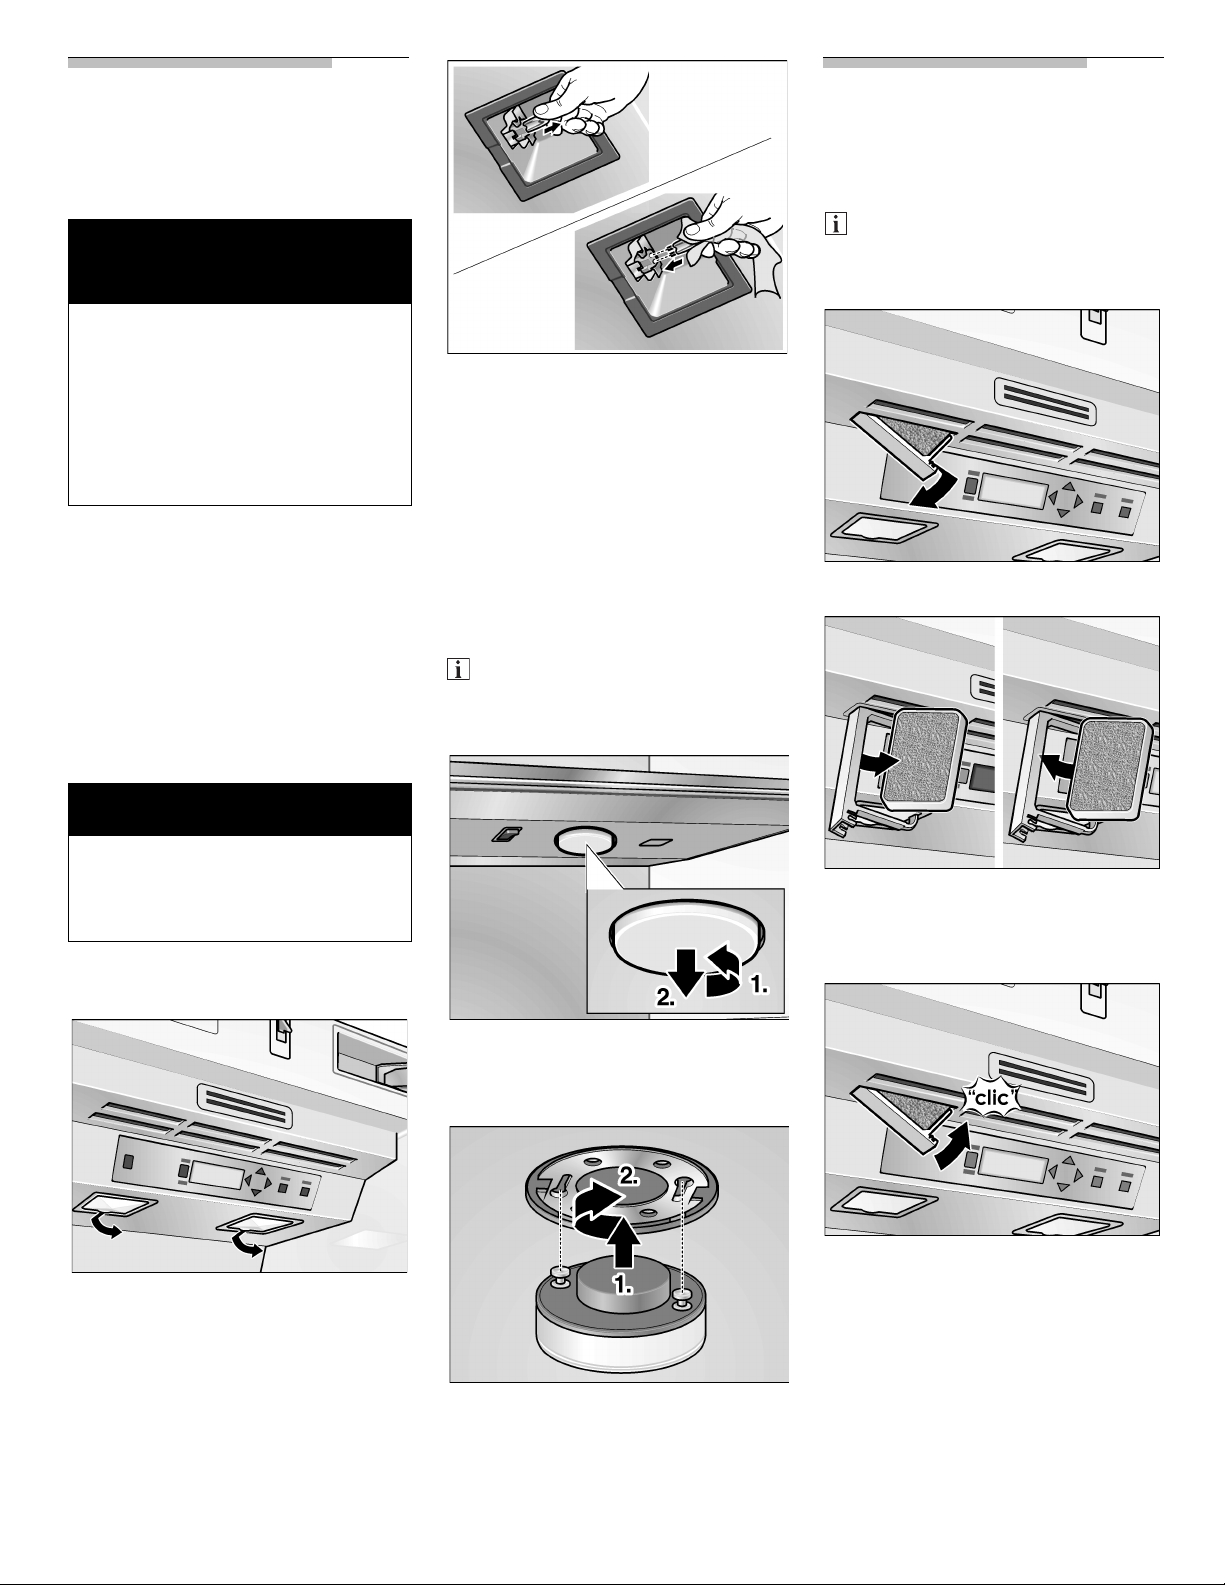
Changement de
Changement du
l'ampoule
m
AVERTISSE-
MENT
Pour éviter un choc électrique
susceptible d'occasionner des
blessures (brûlures!) graves ou la
mort, débranchez toujours
l'appareil du secteur électrique
avant d'effectuer des réparations.
Après les réparations, remettez
l'appareil sous tension.
Éteignez l'appareil par le
bouton power ! Débranchez la
fiche mâle de la prise de
courant ou ramenez le
disjoncteur en position
éteinte.
Ampoules halogènes
du haut
m
Insérez une ampoule halogène
neuve. Ne saisissez l'ampoule
qu'à l'aide d'un mouchoir doux
et sec uniquement.
Remettez le couvercle en place
et rattachez-le au clip.
LED d'éclairage du
présentoir
(Compartiment du bas)
Une LED neuve est disponible
auprès de votre service aprèsvente.
filtre à odeurs
Procurez-vous des filtres de
rechange auprès de votre
revendeur.
Ouvrez le porte-filtre.
m
Ne touchez jamais une ampoule
halogène avec les mains nues.
Saisissez-la toujours à l'aide d'un
chiffon doux
Type d'ampoule halogène :
20 W / 12 V / douille G4
Ouvrez le couvercle puis
Extrayez l'ampoule halogène
ATTENTION
détachez-le du clip.
défectueuse.
m
Extrayez le filtre à odeur usagé.
Mettez un filtre à odeur neuf
en place.
Pour détacher la LED, tournez-la
dans le sens des aiguilles d'une
montre.
Fermez le porte-filtre.
Insérez la LED neuve.
33

Service après-vente
Si vous devez recourir au service
après-vente, consultez d'abord la
section intitulée «Dérangements et
remèdes» dans ce manuel.
Après avoir vérifié son contenu,
vous trouverez une assistance
additionnelle en appelant le Siemens
Customer Interaction Center
1–800–944–2904 (numéro gratuit)
d'un point quelconque des USA.
Au Canada : contactez votre société
de service agréée par Siemens ou
appelez le 1–800–944–2904.
Veuillez noter séparément les
informations suivantes concernant
votre réfrigérateur. Elles vous
faciliteront l'obtention d'aide ou la
demande d'une intervention du
service après-vente si cela devait
être nécessaire.
Nom du revendeur :
Adresse:
Numéro de téléphone :
Date d'achat :
Numéro du modèle :
Numéro FD :
Numéro de série :
Type :
Vous devrez indiquer au technicien le
numéro complet du modèle et le
numéro de série complet.
Vous trouverez ces informations
(numéros de modèle et de série) sur
la plaque signalétique située contre
la paroi intérieure du compartiment
réfrigérateur.
34

Garantie
DEUX ANS DE
GARANTIE INTÉGRALE
Pendant une période de deux ans
à compter de la date d'achat, et
à condition que ce réfrigérateur
(cartouches de filtre à eau exclues)
soit utilisé et entretenu
conformément aux instructions
fixées contre ou livrées avec le
produit, Siemens assumera le coût
des pièces de rechange spécifiées
par l'usine et les frais de maind'œuvre nécessaires pour remédier
aux vices de matière et de
fabrication. Ce service devra être
accompli par une société de service
désignée par Siemens.
Cartouche de filtre à eau : le filtre
à eau bénéficie d'une garantie limitée
à 30 jours. Pendant une période de
30 jours à compter de la date
d'achat et à condition que ce filtre
soit utilisé et entretenu conformément aux instructions fixées contre
ou livrées avec le produit, Siemens
assumera le coût des pièces de
rechange pour remédier aux vices de
matière et de fabrication.
DE LA TROISIÈME À LA SIXIÈME
ANNÉE GARANTIE INTÉGRALE
SUR LES PIÈCES ÉTANCHES
TELLES QU'ÉNUMÉRÉES ET
COMPOSANT LE CIRCUIT DE
RÉFRIGÉRATION
De la troisième à la sixième année
consécutive à la date d'achat et
à condition que ce réfrigérateur soit
utilisé et entretenu conformément
aux instructions fixées contre ou
livrées avec lui, Siemens assumera le
coût des pièces de rechange
spécifiées par l'usine et les frais de
main-d'oeuvre nécessaires pour
remédier aux vices de matière et de
fabrication présents dans le circuit
étanche de réfrigération.
DE LA SEPTIÈME À LA
DOUZIÈME ANNÉE GARANTIE
LIMITÉE AU CIRCUIT ÉTANCHE
DE RÉFRIGÉRATION
De la septième à la douzième année
à compter de la date d'achat et
à condition que ce réfrigérateur soit
utilisé et entretenu conformément
aux instructions fixées contre ou
livrées lui, Siemens assumera le coût
des pièces de rechange spécifiées
par l'usine et les frais de maind'oeuvre nécessaires pour remédier
aux vices de matière et de fabrication
présents dans le circuit étanche de
réfrigération. Énumération des
pièces concernées: compresseur,
évaporateur, condenseur, sécheur
et tubulures de connexion.
Ce que Siemens ne prend pas en
charge :
1. Les interventions du service
après-vente pour corriger
l'installation de votre réfrigérateur, vous montrer comment
l'utiliser, remplacer les fusibles/
disjoncteurs ou rectifier le
câblage électrique ou les
fusibles/disjoncteurs, remplacer
les ampoules électriques,
ou remplacer les filtres à eau
autrement qu'indiqué plus haut.
2. Les réparations si votre
réfrigérateur a été utilisé à des
fins autres que celles propres
à un ménage normal composé
d'une seule famille.
3. L'enlèvement et la livraison de
l'appareil. Votre réfrigérateur a été
conçu pour être réparé chez vous.
4. Les dommages imputables à un
accident, une modification, un
usage à d'autres fins ou un
usage abusif, ainsi qu'un
incendie, des dégâts des eaux,
une installation incorrecte,
la force majeure ou l'utilisation
de produit non approuvés par
Siemens ou Siemens Canada.
5. Toute perte de produits alimen-
taires ou de médicaments en
raison d'un défaut de l'appareil.
6. Réparations de pièces ou de
circuits à la suite de
modifications non autorisées
apportées à l'appareil.
7. L'enlèvement et le remplace-
ment de garnitures ou panneaux
décoratifs qui gênent l'accomplissement des travaux de
service.
8. Les frais de main-d'œuvre ou de
pièces installées par toute
société de service non agréée
pendant la période de garantie
intégrale, sauf si Siemens
a donné son accord avant que
l'opération de service ne soit
accomplie.
9. Au Canada : les frais de
déplacement ou de transport
dans le cas des clients résidant
dans des zones reculées.
10. Tous frais de main-d'œuvre
pendant la période de garantie
limitée.
SIEMENS ET SIEMENS CANADA
DÉCLINENT TOUTE
RESPONSABILITÉ DES
DOMMAGES COLLATÉRAUX OU
CONSÉCUTIFS.
Certains États ou Provinces
n'admettent pas l'exclusion ou la
limitation des dommages collatéraux
ou consécutifs, de sorte qu'il se peut
que l'exclusion qui précède ne
s'applique pas à votre cas.
La présente garantie vous octroie
des droits légaux spécifiques ; vous
détenez peut-être d'autres droits,
lesquels peuvent varier d'un État
à l'autre ou d'une Province à l'autre.
Hors des États de l'Union et hors
du Canada, la garantie applicable
peut différer. Veuillez contacter
votre revendeur Siemens agréé
pour déterminer si s'applique un
autre règlement de garantie.
Si vous devez recourir au service
après-vente, consultez d'abord la
section intitulée «Dérangements et
remèdes» dans ce manuel.
Après avoir vérifié son contenu,
vous trouverez une assistance
additionnelle dans la section
«Service» ou en appelant le Siemens
Customer Interaction Center
1–800–944–2904 (numéro gratuit)
d'un point quelconque des USA.
Au Canada : contactez votre société
de service agréée par Siemens ou
appelez le 1–800–944–2904.
Conservez ce manuel et le dossier
de vente pour vous y reporter
ultérieurement. Pour que le
service sous garantie puisse être
accompli, vous devrez fournir une
preuve d'achat ou prouver la date
d'installation.
35

Índice
INSTRUCCIONES IMPORTANTES DE SEGURIDAD . . . . . . . . . . . . . . . . . . . . . . . . . . . . . . . . . . . . . . . . . 37
Felicitaciones . . . . . . . . . . . . . . . . . . . . . . . . . . . . . . . . . . . . . . . . . . . . . . . . . . . . . . . . . . . . . . . . . . . . . . . . 38
Su nuevo refrigerador . . . . . . . . . . . . . . . . . . . . . . . . . . . . . . . . . . . . . . . . . . . . . . . . . . . . . . . . . . . . . . . . . 39
Instalación . . . . . . . . . . . . . . . . . . . . . . . . . . . . . . . . . . . . . . . . . . . . . . . . . . . . . . . . . . . . . . . . . . . . . . . . . . 40
Conexión a la red de alimentación . . . . . . . . . . . . . . . . . . . . . . . . . . . . . . . . . . . . . . . . . . . . . . . . . . . . . . . 40
Encendido del electrodoméstico . . . . . . . . . . . . . . . . . . . . . . . . . . . . . . . . . . . . . . . . . . . . . . . . . . . . . . . . 41
Apagado y desconexión del electrodoméstico . . . . . . . . . . . . . . . . . . . . . . . . . . . . . . . . . . . . . . . . . . . . . 41
Diseño interior variable . . . . . . . . . . . . . . . . . . . . . . . . . . . . . . . . . . . . . . . . . . . . . . . . . . . . . . . . . . . . . . . . 41
Panel de control . . . . . . . . . . . . . . . . . . . . . . . . . . . . . . . . . . . . . . . . . . . . . . . . . . . . . . . . . . . . . . . . . . . . . . 42
Ajuste de la temperatura . . . . . . . . . . . . . . . . . . . . . . . . . . . . . . . . . . . . . . . . . . . . . . . . . . . . . . . . . . . . . . . 43
Modo de ajuste (Setup) . . . . . . . . . . . . . . . . . . . . . . . . . . . . . . . . . . . . . . . . . . . . . . . . . . . . . . . . . . . . . . . . 43
Ajustes que pueden modificarse en el modo correspondiente . . . . . . . . . . . . . . . . . . . . . . . . . . . . . . . . . 44
Modo vacación (Vacation) . . . . . . . . . . . . . . . . . . . . . . . . . . . . . . . . . . . . . . . . . . . . . . . . . . . . . . . . . . . . . . 45
Modo Sabbath . . . . . . . . . . . . . . . . . . . . . . . . . . . . . . . . . . . . . . . . . . . . . . . . . . . . . . . . . . . . . . . . . . . . . . . 45
Diagramas de almacenamiento . . . . . . . . . . . . . . . . . . . . . . . . . . . . . . . . . . . . . . . . . . . . . . . . . . . . . . . . . . 46
Consejos prácticos para el almacenamiento de vino . . . . . . . . . . . . . . . . . . . . . . . . . . . . . . . . . . . . . . . . 46
Temperaturas para beber el vino . . . . . . . . . . . . . . . . . . . . . . . . . . . . . . . . . . . . . . . . . . . . . . . . . . . . . . . . 46
Como economizar energía . . . . . . . . . . . . . . . . . . . . . . . . . . . . . . . . . . . . . . . . . . . . . . . . . . . . . . . . . . . . . . 47
Ruidos durante el funcionamiento . . . . . . . . . . . . . . . . . . . . . . . . . . . . . . . . . . . . . . . . . . . . . . . . . . . . . . . 47
Limpieza del electrodoméstico . . . . . . . . . . . . . . . . . . . . . . . . . . . . . . . . . . . . . . . . . . . . . . . . . . . . . . . . . . 47
Olores . . . . . . . . . . . . . . . . . . . . . . . . . . . . . . . . . . . . . . . . . . . . . . . . . . . . . . . . . . . . . . . . . . . . . . . . . . . . . . 47
Mensajes de advertencia visualizados en el display . . . . . . . . . . . . . . . . . . . . . . . . . . . . . . . . . . . . . . . . . 48
Control automático del electrodoméstico . . . . . . . . . . . . . . . . . . . . . . . . . . . . . . . . . . . . . . . . . . . . . . . . . 48
Ajustes de fábrica . . . . . . . . . . . . . . . . . . . . . . . . . . . . . . . . . . . . . . . . . . . . . . . . . . . . . . . . . . . . . . . . . . . . 48
Búsqueda de fallos . . . . . . . . . . . . . . . . . . . . . . . . . . . . . . . . . . . . . . . . . . . . . . . . . . . . . . . . . . . . . . . . . . . 49
Cambio de la lamparilla . . . . . . . . . . . . . . . . . . . . . . . . . . . . . . . . . . . . . . . . . . . . . . . . . . . . . . . . . . . . . . . . 49
Cambio del filtro contra olores . . . . . . . . . . . . . . . . . . . . . . . . . . . . . . . . . . . . . . . . . . . . . . . . . . . . . . . . . . 50
Servicio técnico . . . . . . . . . . . . . . . . . . . . . . . . . . . . . . . . . . . . . . . . . . . . . . . . . . . . . . . . . . . . . . . . . . . . . . 50
GARANTÍA . . . . . . . . . . . . . . . . . . . . . . . . . . . . . . . . . . . . . . . . . . . . . . . . . . . . . . . . . . . . . . . . . . . . . . . . . . 51
English . . . . . . . . . . . . . . . . . . . . . . . . . . . . . . . . . . . . . . . . . . . . . . . . . . . . . . . . . . . . . . . . . . . . . . . . . . . . . . 2
Français . . . . . . . . . . . . . . . . . . . . . . . . . . . . . . . . . . . . . . . . . . . . . . . . . . . . . . . . . . . . . . . . . . . . . . . . . . . . . 18
36

INSTRUCCIONES IMPORTANTES DE SEGURIDAD
¡LEA Y GUARDE ESTAS INSTRUCCIONES!
ADVERTECNCIA
m
Practique las precauciones básicas
de seguridad al utilizar este
electrodoméstico, incluyendo las
siguientes:
1. Utilice el electrodoméstico
exclusivamente para las
funciones para las que ha sido
previsto, según se describe en
este manual para el usuario.
2. Antes de usarlo, este
refrigerador debe instalarse
adecuadamente de acuerdo
con las instrucciones de
instalación.
3. No permita que los niños se
trepen, cuelguen o se paren
sobre los estantes del
refrigerador. Pueden lesionarse
seriamente y dañar el
refrigerador.
4. Una vez en operación, no toque
las superficies frías de su
refrigerador, especialmente si
están húmedas o mojadas.
La piel puede adherirse a las
superficies extremadamente
frías.
5. No almacene o utilice gasolina
u otros líquidos que produzcan
vapores inflamables en las
cercanías de este u otros
electrodomésticos.
6. Desconecte el refrigerador antes
de limpiarlo o efectuar
reparaciones.
NOTA: recomendamos
insistentemente hacer realizar
los trabajos de servicio técnico
por personal especializado.
7. Antes de reemplazar una
lamparilla quemada, coloque el
conmutador de power en OFF,
a fin de evitar el contacto con un
objeto bajo tensión.
8. Una lamparilla quemada puede
romperse al intentar cambiarla.
NOTA: colocar el control de
temperatura en OFF no
desconecta la tensión del
circuito de iluminación.
m ADVERTECNCIA
Peligro que un niño quede
encerrado
El encerramiento y asfixia de niños
no son problemas del pasado.
Productos descompuestos
o abandonados en el refrigerador,
también son peligrosos... Aún si se
los abandona »por unos pocos
días«.
Si usted se quiere deshacer de su
refrigerador, rogamos seguir estas
instrucciones para evitar accidentes.
Antes de deshacerse de su viejo
refrigerador:
– Quite las puertas.
– Deje los estantes en su lugar,
para que los niños no puedan
trepar al interior.
Conexión eléctrica
El electrodoméstico se entrega con
un conductor de alimentación de
3 cables, listado según UL.
El electrodoméstico requiere de un
tomacorriente de 3 conductores.
Este tomacorriente debe instalarlo
un electricista con la licencia debida.
Instrucciones de
puesta a tierra
Este electrodoméstico debe
conectarse a tierra.
En caso de un fallo en el
funcionamiento o una rotura,
la conexión a tierra reduce el riesgo
de descargas eléctricas, proveyendo
una vía de resistencia menor para la
corriente eléctrica.
Una conexión inadecuada del
conductor de puesta a tierra puede
ser causa de una descarga eléctrica.
Haga controlar el electrodoméstico
por un electricista calificado
o personal del servicio técnico si
tiene dudas respecto de una
conexión a tierra correcta.
Algunas prescripciones locales
pueden exigir una conductor de
puesta a tierra separado. En estos
casos el cable de puesta a tierra
accesorio, la sujeción y el tornillo
deben adquirirse por separado.
Nunca conecte a tierra el electrodoméstico a través de tuberías de
plástico, de gas o de agua.
37
Disposiciones
Definiciones
respecto del CFC
Su refrigerador antiguo puede estar
equipado con un sistema de
refrigeración que utiliza CFC
(clorofluorcarbon). Se cree que el
CFC daña el ozono contenido en la
estratosfera.
Si usted se deshace de su
refrigerador antiguo, asegúrese que
el CF se quite del mismo, para ser
tratado de acuerdo con las
disposiciones vigentes, por personal
debidamente calificado. Si usted
libera el agente refrigerador CFC
intencionalmente, puede ser objeto
de penalidades y prisión por
infracciones a la legislación de medio
ambiente.
IMPORTANTE
Guarde estas instrucciones para el
uso correspondiente de los
inspectores regionales. Observe
todas las reglamentaciones
y ordenanzas gubernamentales.
Nota para el instalador –
asegúrese de dejar estas
instrucciones a su cliente.
Nota para el consumidor –
Guarde estas instrucciones junto
a su manual del usuario para su uso
posterior.
m
ADVERTENCIA
ADVERTENCIA – Esto señaliza
que hay peligro de muerte
o lesiones graves ante el
incumplimiento de esta
advertencia.
m
ATENCIÓN – Esto señaliza que
pueden resultar lesiones menores
o daños debido al incumplimiento
de esta advertencia.
ATENCIÓN
Este símbolo se utiliza para
llamar la atención del usuario
respecto de algo en particular.
m
m
Felicitaciones
Con la compra de su conservadora
para vino, usted a adquirido un
electrodoméstico moderno y de alta
calidad.
Recién cuando los vinos han logrado
su temperatura correcta para ser
bebidos, desarrollan su aroma
y gusto para disfrutarlos
plenamente. Su conservadora para
vinos suministra lenta y continuamente la temperatura ideal para
beber el vino. Pueden almacenarse
simultáneamente vinos rojos
y blancos en dos compartimientos
que presentan dos zonas de
temperaturas programables por
separado.
Su electrodoméstico se distingue
por su consumo reducido de
energía.
Todo electrodoméstico que
abandona nuestra fábrica es
inspeccionado minuciosamente a fin
de garantizar su correcto
funcionamiento.
Si usted tiene preguntas, especialmente respecto de la instalación
y conexión del electrodoméstico,
no dude en ponerse en contacto con
nuestro servicio técnico,
ver »Servicio técnico«.
Por más información y oferta de
nuestros productos, rogamos
consultar nuestro sitio en el internet.
Rogamos leer estas instrucciones de
funcionamiento y de instalación y
toda la información contenida en el
electrodoméstico y obrar de acuerdo
con ellas.
Guarde todos los documentos para
su uso posterior o para el propietario
siguiente.
38
Información general
Este electrodoméstico fue diseñado
para mantener y controlar la
temperatura de las bebidas, en
especial del vino.
Este electrodoméstico está
diseñado para uso domiciliario
exclusivamente.
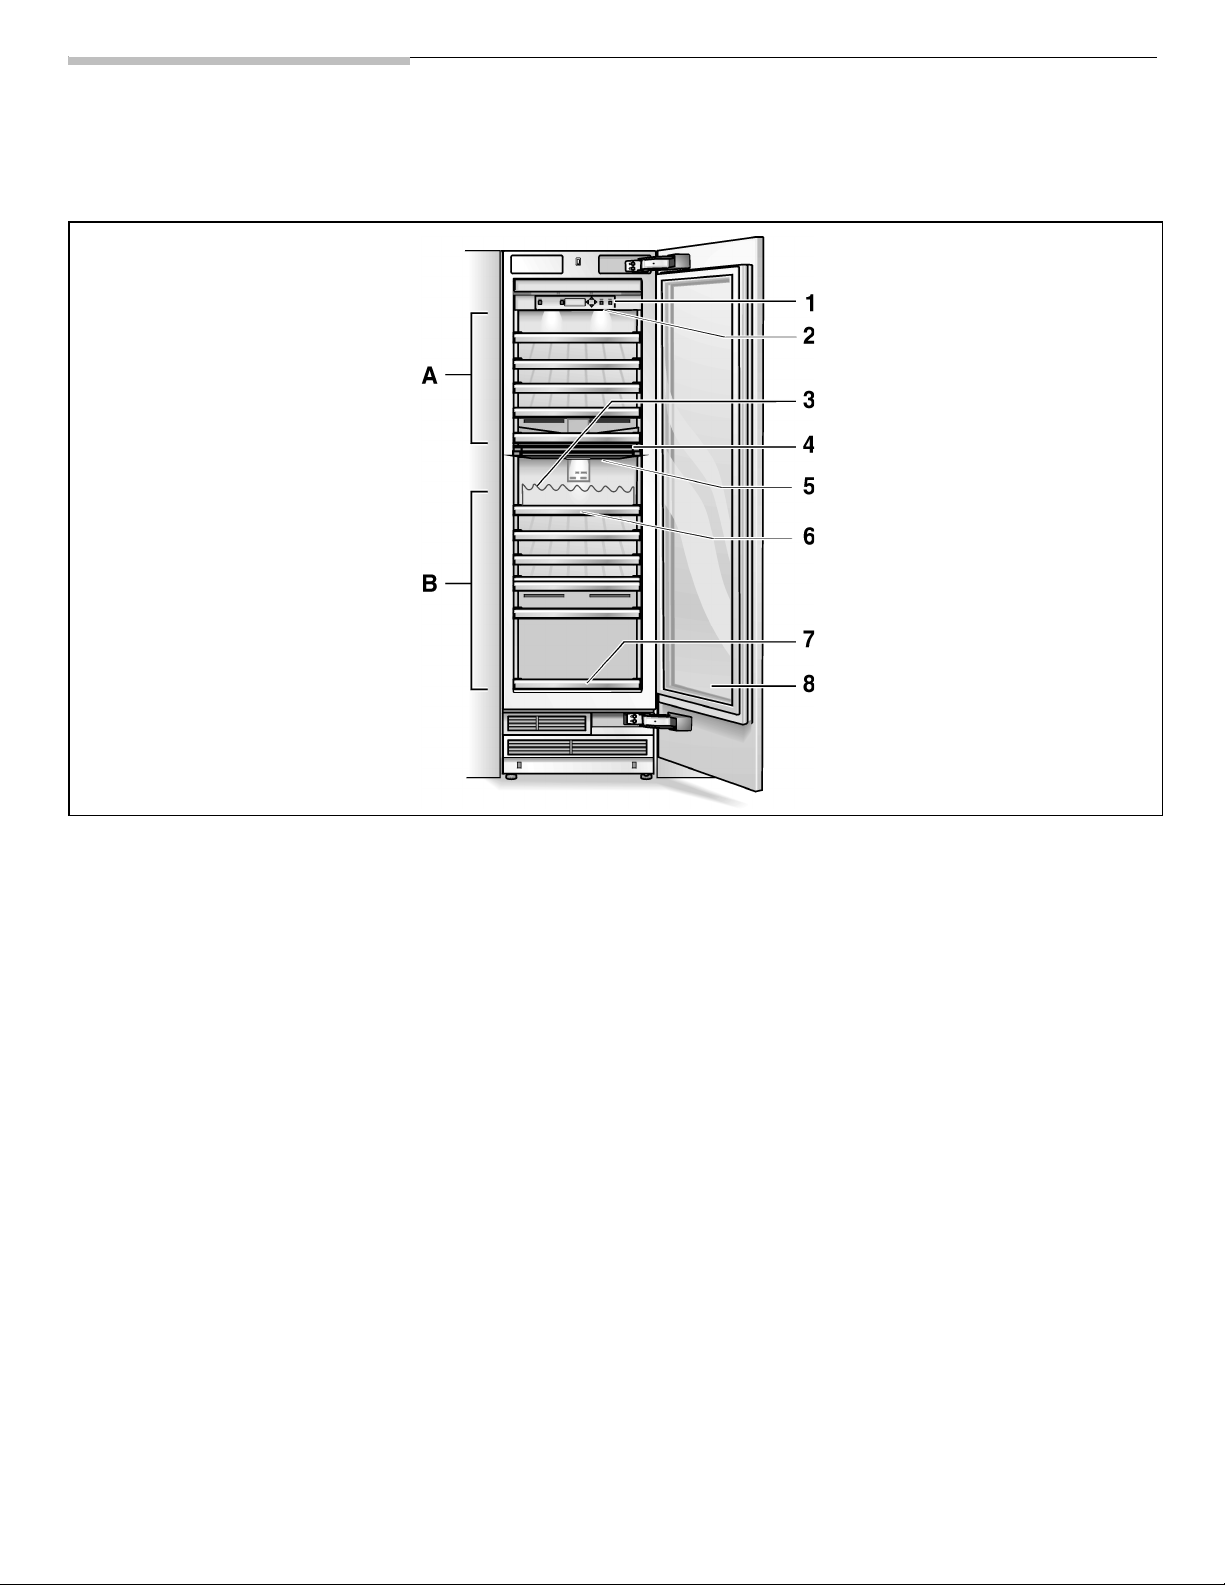
Su nuevo refrigerador
Estas instrucciones de funcionamiento hacen referencia a diversos modelos, mientras que las figuras pueden variar.
A Compartimiento superior
B Compartimiento inferior
1 Panel de control
2 Luz interior del
compartimiento superior
3 Presentador *
para presentar las etiquetas
de las botellas.
4 Divisor
para separar las zonas de
temperatura en los
compartimientos.
5 Iluminación a LED
para del compartimiento
inferior
6 Estante
para el depósito en posición
horizontal de botellas de vino.
7 Estante móvil *
para el almacenamiento en
posición vertical de botellas
y jarras.
8 Puerta de vidrio
* Accesorio opcional
39

Instalación
m
ADVERTENCIA
No instale el electrodoméstico:
– a la intemperie,
– en un ambiente donde gotee
agua,
– en ambientes con peligro de
heladas.
El electrodoméstico es muy
pesado. Consulte la tabla
siguiente por los pesos sin carga:
– Unidad de vino 18":
300 Ibs / 135 kg
Sitio para la instalación
El electrodoméstico debe instalarse
en un ambiente seco y bien
ventilado.
La temperatura el ambiente no debe
descender de los 55 °F (13 °C)
o aumentar más allá de los 110 °F
(43 °C). De lo contrario puede no
funcionar correctamente.
El lugar de emplazamiento no debe
estar expuesto a la luz solar directa,
ni cerca de una fuente de calor como
una estufa, radiador, et.
Si es inevitable instalarlo cerca de
una fuente de calor, utilice una placa
aislante adecuada o asegure una
distancia mínima respecto de la
fuente de calor:
– 1,2" (3 cm) de un horno eléctrico,
– 12" (30 cm) de un horno a aceite
o combustible seco.
Cavidad de instalación
Es importante observar las
dimensiones especificadas para la
cavidad de instalación a fin de
garantizar una instalación del
electrodoméstico sin problemas
y para una vista general adecuada
del mueble.
En general, debe asegurarse que la
cavidad está a escuadra. Esto puede
controlarse con herramientas
adecuadas, como un nivel de agua,
mediciones en diagonal, etc.
m
Muebles y adornos
El electrodoméstico se montará
seguramente integrándolo con
muebles o adornos.
Por esta razón es importante que
todos los muebles o adornos que se
sujeten estén firmemente montados
en la base o en las paredes con
elementos adecuados.
Base
Para asegurar que el electrodoméstico esté firmemente montado
y funciones correctamente, la base
de apoyo debe ser plana
y horizontal.
La base debe ser de material duro
y rígido.
La zona de instalación deben
presentar la misma altura que el
resto del ambiente.
Para dar cuenta del elevado peso del
electrodoméstico plenamente
cargado, se requiere que la base
resista la carga en cuestión.
Para el peso a plena carga, consulte
la tabla siguiente:
– Unidad de vino 24":
550 lbs / 245 kg
Si tiene dudas, consulte un
arquitecto o un experto en
construcción.
Instalación y conexión
del electrodoméstico
m
Haga instalar el electrodoméstico
por un electricista de acuerdo con
las instrucciones de instalación
que forman parte del volumen de
entrega.
Una vez instalado el electrodoméstico, espere un mínimo de
media hora antes de encenderlo.
Durante el transporte puede haberse
movido el aceite del sistema de
refrigeración.
Antes de encender el electrodoméstico por primera vez, limpie su
parte interior.
ATENCIÓN
m
Conexión a la
red de
alimentación
m
ADVERTENCIA
Peligro de descargas eléctricas
– Conéctelo a un tomacorrientes
de 3 conductores con conexión
a tierra.
– No desconecte el contacto de
toma de tierra.
– No utilice adaptadores.
– No utilice cables de
prolongación.
El incumplimiento de estas
instrucciones puede ser causa de la
muerte, incendios o descargas
eléctricas.
La conexión inadecuada de la
puesta a tierra del equipo puede
causar descargas eléctricas.
Haga controlar el electrodoméstico
por un electricista calificado o un
técnico de servicio si tiene dudas
respecto de la correcta conexión
a tierra del electrodoméstico.
El electrodoméstico se provee con
un cable de alimentación de
3 conductores, listado según UL.
El electrodoméstico necesita de un
tomacorriente de 3 conductores.
El tomacorriente debe haber sido
instalado por un electricista
autorizado.
La toma de corriente tiene que
estar protegida con un fusible de
10–16 amperios.
En combinación con ello consulte la
tabla siguiente:
Electrodoméstico Consumo
de corriente
(máx.)
Unidad de vino 24" 2 Ampere
m
40

Presentador
Encendido del
electrodoméstico
Presione el pulsador power.
Una vez encendido, el electrodoméstico comienza a enfriarse.
Si las puertas están abiertas, está
encendida la luz interior.
Las temperaturas ajustadas
(ajustadas en fábrica) se logran
después de 2 a 8 hs.
No coloque alimentos en el
electrodoméstico inicialmente.
Para cambiar las temperaturas
ajustada,
temperatura«.
Æ consulte »Ajustes de
Diseño interior
variable
Estantes para extraer
Para utilizar el presentador, deberá
extraer el estante superior del
compartimiento inferior.
Iluminación a LED del
presentador
Tire el estante hacia afuera,
sujetándolo de la parte anterior.
Para extraer el estante:
Tire el estante hacia afuera,
levantándolo. Extraiga el
estante.
Para colocar el estante:
Apagado
ydesconexión
del electrodoméstico
Apagado del
electrodoméstico
Presione el pulsador power.
Desconexión del
electrodoméstico
Si no utiliza el electrodoméstico por
un tiempo prolongado:
Quite todos los alimentos del
electrodoméstico.
Desconecte el enchufe principal
o desconecte el fusible.
Limpie el interior del electro-
doméstico (ver »Limpieza del
electrodoméstico«).
A fin de evitar olores, deje las
puertas abiertas.
Levante el estante e insértelo
nuevamente en las muescas.
Para el almacenamiento en posición
vertical de botellas y jarras:
Quite los dos estantes inferiores.
Coloque el estante para
almacenamiento en posición
vertical (accesorio opcional)
en el sitio inferior.
Enciende o apaga la iluminación
del presentador.
Si se enciende la iluminación a LED
del presentador, ésta permanece
encendida, aún con la puerta del
compartimiento cerrada. De esta
manera pueden presentarse
adecuadamente las botellas de vino.
En la posición OFF, la iluminación
a LED se enciende y apaga cuando
se abre o cierra la puerta.
41

Panel de control
Para utilizar todas las funciones de su electrodoméstico, recomendamos familiarizarse prolijamente con el panel de
control y sus posibles ajustes.
A Pulsador power
Enciende y apaga el
electrodoméstico.
m AT EN CIÓN
El electrodoméstico no está
desconectado de la red si se lo
apaga con el pulsador power.
B Pulsador alarm off
Desactiva la alarma.
Ver la sección »Alarmas del
electrodoméstico«.
CDisplay
La temperatura ajustada se
visualiza en el display del
electrodoméstico.
Las funciones especiales
ajustadas, se visualizan
a través de símbolos.
En el modo de ajuste, se
visualizan los menús y las
opciones ajustables en el
display.
Ver la sección »Modo de
ajuste«.
DPulsador
< >
Seleccionan los menús en el
modo de ajuste. Ver la
sección »Modo de ajuste«.
El ajuste de la temperatura
requerida se ejecuta mediante
los botones
< >. Ver la
sección »Ajuste de
temperatura«.
EPulsador + –
Seleccionan los parámetros
asequibles del menú.
Ver la sección »Modo de
ajuste«.
También se cambia la
temperatura indicada
mediante los botones + y –.
Ver la sección »Ajuste de la
temperatura«.
F Pulsador setup
Este pulsador inicia y desactiva el modo de ajustes.
Si se desactiva el modo de
ajuste mediante el pulsador
setup, se almacenan los
ajustes realizados.
G Pulsador vacation
Activa y desactiva la función
Vacation. Ver la sección
»Modo Vacation«.
Se da aviso de cada
accionamiento de un pulsador
a través de una señal sonora,
si se ha activado la opción ON
en el modo de operación de
ajuste, en el menú TONE.
Símbolos en el display
Símbolo para el
compartimiento
superior
Símbolo para el
compartimiento
inferior
La función de
humedad está
activada. Ver página 9
La función Vacation
está activada.
Ver página 45.
Opciones de ajuste en
el modo de ajuste. Ver
página 44.
Se visualiza una
alarma. Ver página 48.
42

Para conmutar entre los diferentes
ajustes dentro de un menú:
Ajuste de la
temperatura
La temperatura de los
compartimientos puede ajustarse
independientemente desde 41 °F
hasta 64 °F (+5 °C hasta +18 °C).
Recomendamos un ajuste
a52°F(+11°C).
La temperatura puede cambiarse
hacia valores mayores mediante el
pulsador + (más caliente) o – (más
frío). La temperatura puede ajustarse
en pasos de 1 °F (0.5 °C).
Para ajustar la temperatura
requerida:
Active el modo de ajuste con los
botones
< y >.
Modo de ajuste
(Setup)
Existen diversos menús para ajustar
las funciones del electrodoméstico a
los requerimientos individuales.
Estos ajustes pueden realizarse en el
modo Setup.
Para activar el modo Setup:
Presione el pulsador setup.
Se visualiza el primer menú
(unidades de temperatura).
Para conmutar al menú siguiente:
Presione el pulsador + o –.
Un ajuste modificado se
almacena al conmutar el menú
siguiente mediante el pulsador
< o >.
Para finalizar el modo de ajuste:
Presione el pulsador setup.
Se almacenan todos los ajustes
modificados.
Si no se presiona pulsador
alguno, el modo de ajuste
finaliza automáticamente a los
12 segundos. Se almacenan
todos los ajustes modificados.
Vuelve a visualizarse la
temperatura requerida.
> para el compartimiento
superior.
< para el compartimiento
inferior.
Se visualiza el símbolo
adecuado.
Ajuste la temperatura requerida
mediante los botones + (más
caliente) y – (más frío).
Según el modelo, el electrodoméstico puede apagarse
o conmutarse al modo
Vacación (Vacation) a través del
ajuste de temperatura.
Si se ha llegado a la temperatura más alta, se visualiza
OFF.
Presione el pulsador < o >.
Se visualiza el menú siguiente con el
ajuste correspondiente
(normalmente On/Off).
43

Ajustes que pueden modificarse en el modo
correspondiente
Menú Ajustes posibles Texto visualizado
Unidades de temperatura °F (grados Fahrenheit)
°C (grados Celsius)
Lenguaje Inglés
Francés
Sonido On / o
Off / p
Humedad (compartimiento superior) On / o
Off / p
Humedad (compartimiento inferior) On / o
Off / p
Unidades de
temperatura
La temperatura puede visualizarse
en grados Fahrenheit (°F) o grados
Celsius (°C).
Presione el pulsador setup.
Ajuste del idioma
Después del primer encendido del
electrodoméstico, los mensajes de
error y de las indicaciones en el
modo de ajuste (Setup) se visualizan
en inglés.
De modo alternativo, estos mensajes
pueden visualizarse en francés.
Conmute al modo de ajuste.
Presione el pulsador > hasta
que aparece
display.
Se visualiza el primer menú (unidad
de temperatura).
Presione el pulsador + o – para
conmutar al
Presione el pulsador setup para
Presione el pulsador + o – para
almacenar el ajuste.
cambiar de grados Fahren-
F) y grados Celsius (°C).
heit (°
Presione el pulsador setup para
almacenar el ajuste.
Humedad
Puede activarse la humectación en
cada uno de los compartimientos
independientemente.
Para más informaciones
respecto de la influencia de
humedad, consulte los
»Consejos prácticos para el
almacenamiento de vino«.
ENGLISH en el
FRANCAIS.
°F
°C
ENGLISH
FRANCAIS
TONE
HUMIDITY
HUMIDITY
Para activar una humedad
incrementada en uno de los
compartimientos
Active el modo de ajuste.
Presione el pulsador > hasta que
se visualice la leyenda
HUMIDITY para el comparti-
miento deseado (Ejemplo: compartimiento superior). Se visualiza
el estado momentáneamente
activo (
Presione el pulsador + o – para
cambiar el estado (
Presione el pulsador setup a fin
de almacenar ajuste.
Se visualiza el símbolo
La función Humedad se cancela:
– cancelándola en el modo de
ajuste (Setup),
– apagando el electrodoméstico
mediante el pulsador power.
ON/OFF) de la función.
ON/OFF).
HUMIDITY.
44

Modo vacación
Modo Sabbath
(Vacation)
Si usted está ausente por un tiempo
prolongado, puede conmutar al
electrodoméstico a un modo
energético más favorable.
El modo de Vacación también es
adecuado para el almacenamiento
de vinos por un período prolongado.
Cuando está activo del modo de
Vacación,
– el electrodoméstico conmuta
a una temperatura de trabajo
más adecuada desde el punto de
vista energético, que se ajusta en
fábrica,
– la luz interior se apaga.
Para conmutar el modo vacación:
Si está activo el modo Sabbath
– se desactiva la señal de
confirmación si se presiona un
pulsador (se estaba activa),
– la luz interior se apaga,
– la luz de fondo del display se
reduce.
Para conmutar el modo Sabbath:
Se apaga la iluminación de fondo del
display y se visualizará
Para cancelar el modo Sabbath,
presione el pulsador vacation.
Volverán a utilizarse los ajustes
y la temperatura anterior.
SABBATH.
Presione el pulsador vacation.
Se visualiza el símbolo correspondiente VACATION.
En vez de la temperatura requerida,
se visualiza la temperatura
preajustada para este modo.
Para cancelar el modo vacación,
presione el pulsador vacation.
Vuelven a visualizarse los ajustes y la
temperatura previos.
Accionar y mantener en esta
posición, el pulsador +.
Presione el pulsador vacation.
Mantener accionada el
pulsador +, durante
3 segundos. En el display
aparecerá la leyenda
VACATION.
45

Diagramas de almacenamiento
Unidad de vino de 18"
70 botellas de vino
Los diagramas visualizan el almacenamiento para las botellas de las siguientes características:
Consejos prácticos para el
almacenamiento
de vino
– Desempaque siempre las botellas
de vino. No la almacene en cestas
o cajas.
– Coloque botellas viejas de modo
que el corcho siempre esté
mojado por el vino. Nunca debe
haber una capa de aire entre el
vino y el corcho.
– Para una buena conservación,
la humedad del aire adecuada es
decisiva. Mediante la función
Humidity (consultar »Ajustes que
pueden modificarse en el modo
correspondiente«) puede
aumentar la humedad de los
diversos compartimientos
ligeramente en forma individual.
Esto evita un eventual secado de
los corchos.
– Antes de disfrutar su vino, déjelo
adquirir la temperatura ambiente
lentamente. Por ejemplo el vino
rosado necesita de dos a cuatro
horas para alcanzar la temperatura adecuada para beberlo,
mientras que el vino rojo requiere
de cuatro a cinco horas para ello.
Vino espumante o champan
deben enfriarse brevemente en el
refrigerador antes de beberlos.
– ¡Recuerde siempre que el vino
debe enfriarse a temperatura
levemente inferior a aquella a la
que se lo debe beber, ya que la
temperatura aumenta en 34 °F
o36°F (+1°C to +2°C) en el
momento de verterlo en la copa!
Temperaturas
para beber el
vino
La temperatura correcta para servir
el vino es crucial para el sabor y con
ello para disfrutar del vino.
Recomendamos servir el vino a las
siguientes temperaturas.
Tipo de vino Temperatura
de cata
Grandes vinos de
Burdeos, tintos
Côtes du Rhône
tíntos/Barolo
Grandes vinos
Burgunder, tintos/
Vino de Burdeos,
tinto
Vino de Oporto 59 °F (15 ºC)
Jóvenes vinos
Burgunder, tintos
Tintos jóvenes 53,5 °F (12 ºC)
Jóvenes vinos
Beaujolais/
Todos los blancos
con poco azúcar
residual
Blancos viejos/
Grandes vinos
Chardonnay
Vino de Jerez 48 °F (9 ºC)
Jóvenes blancos
a partir de la denominación alemana
»Spätlese«
(cosecha tardía)
Blancos Loire/
Entre-deux-Mers
64 °F (18 ºC)
62,5 °F (17 ºC)
61 °F (16 ºC)
57 °F (14 ºC)
52 °F (11 ºC)
50 °F (10 ºC)
46,5 °F (8 ºC)
44,5 °F (7 ºC)
46

Como economizar energía
– Instale el electrodoméstico en un
ambiente seco y bien ventilado.
No lo exponga a la luz solar
directa ni a la radiación de una
fuente de calor (p. ej. radiador
u horno). Si hace falta, utilice
placas aislantes.
– Permita que los alimentos
o bebidas calientes, se enfríen
antes de colocarlos en el
electrodoméstico.
– Descongele alimentos conge-
lados, colocándolos en el
refrigerador. La baja temperatura
de los alimentos congelados,
enfriará los alimentos contenidos
en los compartimientos.
– ¡Abra la puerta del refrigerador
tan poco tiempo como sea
posible!
Ruidos que pueden
eliminarse con
facilidad
El electrodoméstico no está
correctamente nivelado
Nivele el electrodoméstico mediante
un nivel de agua.
Utilice las patas ajustables,
o coloque algún objeto debajo de
las mismas.
Los estantes se tambalean o se
traban
Controle las partes móviles
y reinsértelas.
Los recipientes se tocan
mutuamente
Desplace botellas o contenedores
para que no se toquen.
Limpieza del
electrodoméstico
¡Apague el electrodoméstico
a través del pulsador power!
Desconecte el enchufe
ocorte el fusible.
Limpie la junta de la puerta con
agua limpia, secándola con
prolijidad.
Limpie el electrodoméstico con
agua tibia y un poco de solvente
lavavajillas.
No permita que el agua de la
limpieza gotee sobre la luz o el
panel de control.
Controle las aberturas de
ventilación el la base. Elimine la
suciedad mediante una
aspiradora.
Después de la limpieza:
Vuelva a conectar el enchufe o
conecte el fusible. Encienda el
electrodoméstico con el
pulsador power.
Su proveedor le proveerá
información respecto de la
limpieza y cuidado de su
electrodoméstico.
Friegue las superficies del
electrodoméstico mediante un
paño húmedo.
Ruidos durante
el funcionamiento
Ruidos normales
Zumbido – la unidad refrigeradora
está funcionando. El ventilador en el
sistema de circulación de aire está
en marcha.
Ruidos de burbujeo, gorgoteo,
borboteo – el refrigerante se mueve
a través de los tubos.
Cliqueo – el motor arranca o se
para.
m
ADVERTENCIA
Para evitar descargas eléctricas
que pueden causar lesiones serias
o aún la muerte, desconecte el
electrodoméstico antes de
limpiarlo. Una vez limpio, vuela
a conectarlo.
m
ADVERTENCIA
Para evitar lesiones personales
o daños materiales, tenga en
cuenta lo siguiente:
– No limpie el electrodoméstico
con un limpiador a vapor.
– No deje gotear el agua de la
limpieza sobre la luz o el panel
de control.
– No utilice agentes de limpieza
abrasivos o ácidos que puedan
dañar las superficies del
electrodoméstico.
– Nunca limpie los estantes
y gavetas en el lavavajillas.
Pueden deformarse.
m
m
Olores
Si el electrodoméstico emite olores
desagradables:
¡Apague el electrodoméstico
a través del pulsador power!
Limpie el interior.
Ver la sección »Limpieza del
electrodoméstico«.
Cambio del filtro contra olores.
Limpie prolijamente todos los
recipientes usados en el
electrodoméstico.
Vuelva a encender el
electrodoméstico a través del
pulsador power.
Controle después de 24 horas si
los olores han desaparecido.
47

Mensajes de
advertencia
visualizados en
el display
Bajo voltaje
Se ha apagado la luz del display.
El control automático comienza.
Se visualizan sucesivamente
diversos mensajes en el display.
Si se detecta una fallo, se visualizan
en el display, el símbolo de ALARM
y un mensaje de error correspondiente, pe. ej. de un sensor
defectuoso.
Si aparecen varios mensajes de
advertencia simultáneamente en el
display, trate a cada uno por
separado.
Mientras aparecen mensajes de
advertencia en el display, no pueden
operarse los botones.
Alarma de puerta
Causa
– La puerta de un electrodoméstico
no fue cerrada correctamente,
o bien estuvo abierta por
demasiado tiempo.
Solución:
Cierre la puerta. El display se
apagará.
Fallo de sensor
Causa
– Puede ser un defecto técnico.
Solución
Efectúe un autocontrol del
electrodoméstico.
Causa
– El voltaje de alimentación ha
descendido por debajo de los
niveles permitidos.
Solución
¡Los botones no pueden accionarse!
Si el voltaje vuelve a sus valores
normales, el mensaje de advertencia
se eliminará. Si el mensaje
permanece visible por mucho
tiempo, comuníquese con su
proveedor de energía.
Control automático del electrodoméstico
Antes de llamar al servicio técnico,
efectúe un control automático del
electrodoméstico.
Apague el electrodoméstico
y espere 5 minutos.
Mantenga la puerta cerrada.
Encienda el electrodoméstico.
Mantenga presionados
simultáneamente los botones
setup y alarm off durante
5 segundos.
Informe a su servicio técnico
respecto del mensaje de error.
Si el control automático no arroja
resultado de fallo alguno, la
temperatura requerida se visualiza
en el display, una vez concluido el
control.
Ajustes de
fábrica
Se recomienda después de un
cambio de propietario.
Mantenga presionados
simultáneamente los botones
setup y alarm off durante
3segundos.
Cuando se ha regresado a los
ajustes de fábrica:
– un electrodoméstico apagado se
enciende,
– los ajustes efectuados asumen
los valores de fábrica.
48
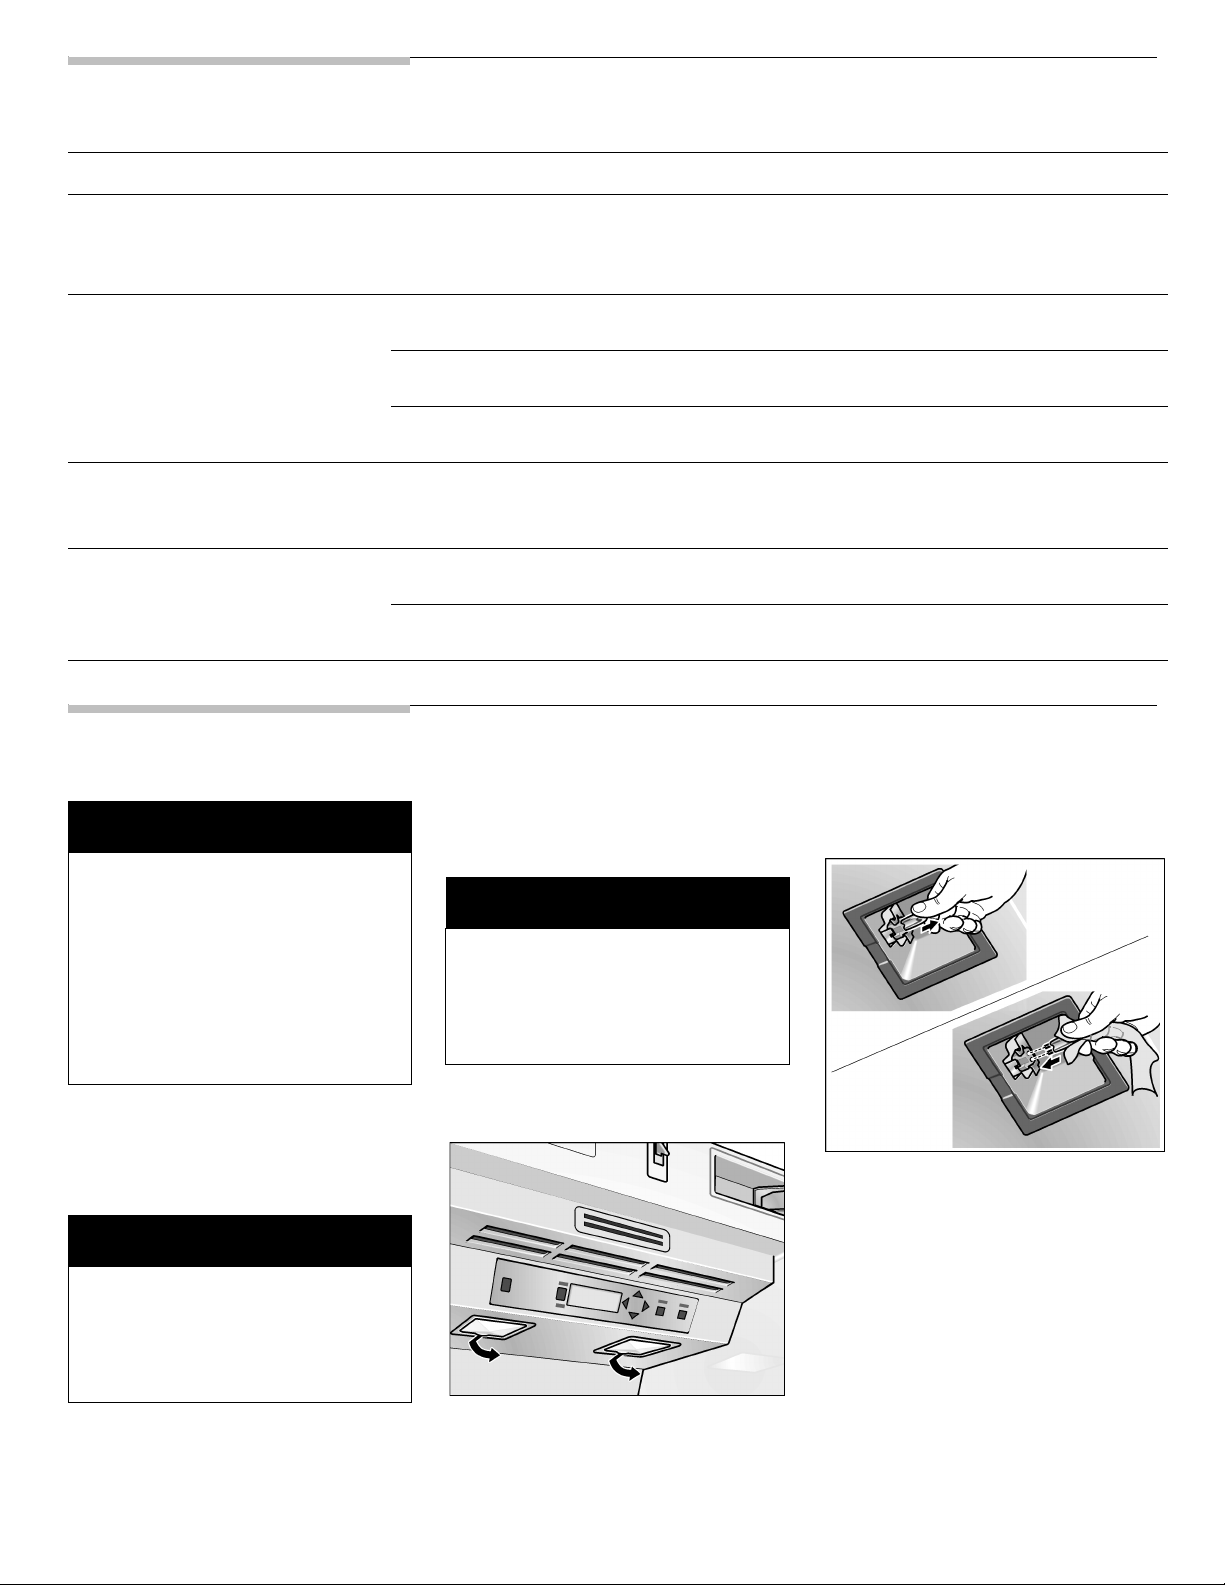
Búsqueda de fallos
Fallo Causa posible Solución
El electrodoméstico no enfría.
No se enciende la luz interior.
El display no visualiza nada.
La unidad de refrigeración
marcha cada vez con mayor
frecuencia y por tiempos más
prolongados.
La temperatura en el
compartimiento del refrigerador
es demasiado baja.
La luz interior no funciona.
Fallo en la alimentación. Se ha activado el
fusible. El enchufe no está correctamente
conectado.
La puerta del electrodoméstico se abre
con frecuencia.
Se han introducido grandes cantidades de
alimentos frescos en el electrodoméstico.
Están obstruidas las aberturas de
ventilación.
Se ha ajustado la temperatura a valores
demasiado bajos.
Está defectuosa la lamparilla. Cambia la lamparilla (ver »Cambio de la
El conmutador de encendido de la luz está
trabado.
Cambio de la lamparilla
Controle que esté encendida la
alimentación. Debe conmutarse el fusible.
Controle que el enchufe esté
correctamente conectado.
No abra la puerta innecesariamente.
Active la función Super.
Quite obstáculos y suciedad.
Ajuste una temperatura más elevada (ver
la sección »Ajuste de temperatura«).
lamparilla«).
Controle si lo puede destrabar.
m
ADVERTENCIA
A fin de evitar descargas
eléctricas que pueden causar
lesiones graves o aún la muerte,
desconecte la alimentación del
electrodoméstico antes de
efectuar reparaciones.
Una vez efectuadas las
reparaciones, vuelva a conectar
la alimentación.
¡Apague el electrodoméstico
con el pulsador power!
Desconecte el enchufe
o desactive el fusible.
m
Nunca toque el bulbo de una
lamparilla halógena con los dedos.
Siempre que coloque una
lamparilla halógena, tómela con
un paño suave.
ATENCIÓN
m
m
Lamparillas halógenas
en la parte superior
m
Nunca toque el bulbo de una
lamparilla halógena con los dedos.
Siempre que coloque una
lamparilla halógena, tómela con
un paño suave.
Tipo de las lamparillas:
20 W/12 V/ soporte G4
ATENCIÓN
m
Extraiga la lamparilla
defectuosa, tirando de ella.
Coloque una lamparilla nueva.
Sujete el bulbo de la lamparilla
únicamente mediante un paño
suave.
Coloque la cobertura
sujetándola con el clip.
Afloje la cobertura y quítela del
clip.
49
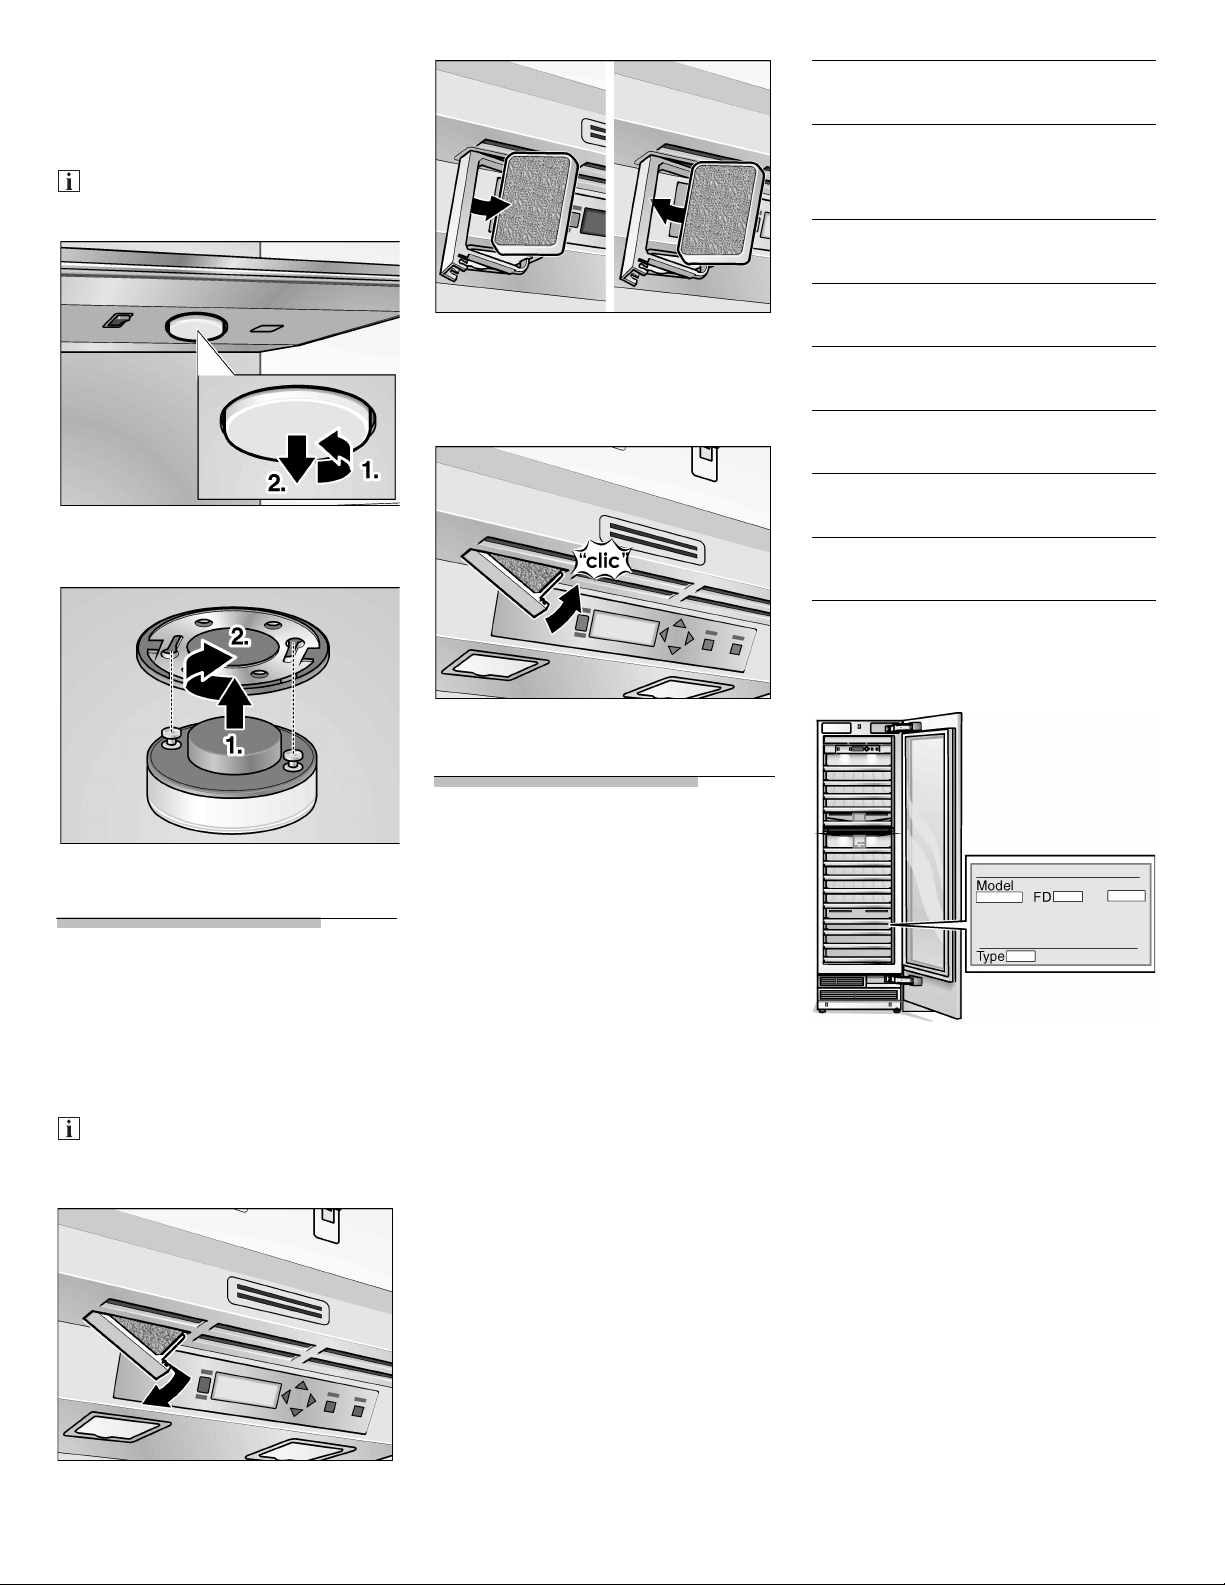
Iluminación a LED del
presentador (comparti-
Nombre del vendedor:
miento inferior)
Se puede obtener un LED nuevo
de nuestro servicio a clientes.
Quite el LED, girándolo en
sentido horario.
Extraer el elemento filtrante
gastado.
Colocar el elemento filtrante
nuevo.
Dirección:
Número de teléfono:
Fecha de compra:
Modelo número:
Número FD:
Número de serie:
Tipo:
Usted necesitará el número de
modelo completo, al igual que el
número de serie.
Coloque el LED nuevo.
Cambio del
filtro contra
olores
Los filtros de repuestos se
pueden adquirir a través de
nuestra cadena de distribuidores.
Coloque el soporte del filtro.
Servicio técnico
Si usted necesita de asistencia
técnica, consulte primero la sección
de »Búsqueda de fallos« en este
libro. Una vez controlada dicha
sección, encontrará ayuda adicional,
llamando al centro interactivo de
clientes Siemens, 1–800–944–2904
(libre de cargo) desde cualquier
punto de los Estados Unidos.
En Canadá consulte la compañía de
servicio de su zona, o llame al
1–800–944–2904.
Anote las informaciones siguientes
concerniente a su refrigerador, que
le ayudarán a obtener un servicio
técnico mejor en caso que lo
necesite.
Encontrará la información
concerniente al modelo y el número
de serie, en la placa que se
encuentra sobre la pared interior del
compartimiento del refrigerador.
Cerrar el soporte del filtro.
50

GARANTÍA
Garantía completa por
dos años
Siemens se hará cargo de los costes
por piezas de reemplazo de fábrica
y de taller de reparaciones debidas
a materiales defectuosos o fallos de
fabricación por dos años
(excluyendo los elementos filtrantes
del filtro de agua), siempre que el
refrigerador haya estado en
funcionamiento y mantenido de
acuerdo con las instrucciones que
acompañan o están incluidas en el
producto. El servicio técnico debe
ser prestado por una compañía de
servicio designada por Siemens.
Elemento filtrante del filtro de agua:
este elemento está cubierto por una
garantía limitada a 30 días.
Por 30 días a partir de la fecha de
compra, Siemens pagará por el
reemplazo de partes para la
corrección de fallos o debidas a fallos
en la fabricación, siempre que el filtro
haya estado en funcionamiento
y mantenido de acuerdo con las
instrucciones que acompañan
o están incluidas en el producto.
Garantía completa del tercer al
sexto año sobre el sistema de
refrigeración sellado
Del tercero al sexto año después de
la fecha de compra, siempre que el
refrigerador haya estado en
funcionamiento y mantenido de
acuerdo con las instrucciones que
acompañan o están incluidas en el
producto, Siemens se hará cargo de
los costes de las partes y de
reparación a fin de corregir fallos en
los materiales o en la construcción
del sistema sellado de refrigeración.
Estas partes son: el compresor,
el evaporador, el condensador,
el secador, y la tubería de conexión.
El servicio técnico debe ser prestado
por una compañía de servicio
designado por Siemens.
Garantía limitada del séptimo al
duodécimo año sobre el sistema
sellado de REFRIGERACIÓN
Del séptimo al duodécimo año
después de la fecha de compra,
siempre que el refrigerador haya
estado en funcionamiento
y mantenido de acuerdo con las
instrucciones que acompañan
o están incluidas en el producto,
Siemens se hará cargo de los costes
de las partes y de reparación a fin de
corregir fallos en los materiales o en
la construcción del sistema sellado
de refrigeración.
Estas partes son: el compresor,
el evaporador, el condensador,
el secador, y la tubería de conexión.
Siemens no se hará cargo de
costes resultantes de:
1. Llamados al servicio técnico para
la instalación de su refrigerador,
para instruirlo respecto del uso
del mismo, para cambiar fusibles
de la instalación domiciliaria
o reparar el cableado
domiciliario o la tubería
correspondiente, reemplazar
lamparillas o elementos filtrantes
diferentes a las mencionadas
anteriormente.
2. Reparaciones en caso que el
refrigerador no haya sido usado
en domicilios normales de una
sola familia.
3. Llevado o traído. Su refrigerador
está destinado a ser reparado
en su domicilio.
4. Daños resultantes de
accidentes, modificaciones, uso
inadecuado, abuso, fuego,
inundaciones, instalación
inadecuada, razones de fuerza
mayor, o el empleo de
productos no aprobados por
Siemens o Siemens Canadá.
5. Cualquier pérdida de alimentos
o medicinas debida a fallos en el
producto.
6. Reparaciones en partes
o sistemas, resultantes de
modificaciones no autorizadas
efectuadas en el electrodoméstico.
7. Desmontaje o reemplazo de
paneles decorativos o de
adorno que interfieran con el
servicio técnico del producto.
8. Tareas efectuadas o partes
instaladas durante el período de
garantía total, por cualquier
compañía de servicio no
designada por Siemens, salvo
que ello haya sido aprobado por
Siemens antes de la ejecución
de tales tareas.
9. Para Canadá, costes de viaje
o transporte para clientes
residentes en áreas remotas.
10. Cualquier coste por trabajos
durante lo períodos de garantía
limitada.
SIEMENS NO AUSMIRÁ
RESPONSABILIDAD ALGUNA
POR DAÑOS INCIDENTALES
O INDIRECTOS.
Algunos estados no permiten la
exclusión o limitación en caso de
daños incidentales o indirectos.
En este caso esta exclusión no es
aplicable en su caso. Esta garantía le
concede derechos legales
específicos y usted tendrá otros
derechos que varían de estado
a estado o provincia a provincia.
Fuera de los Estados Unidos
y Canadá, puede que se apliquen
otras garantías. Póngase en
contacto con su vendedor
autorizado Siemens, para
determinar si se aplican otras
garantías.
Si usted necesita de asistencia
técnica, consulte primero la sección
de »Búsqueda de fallos« en este
libro. Una vez controlada dicha
sección, encontrará ayuda adicional,
controlando la sección »Servicio
técnico« o llamando al centro
interactivo de clientes Siemens,
1–800–944–2904 (libre de cargo)
desde cualquier punto de los
Estados Unidos.
En Canadá consulte la compañía de
servicio de su zona, o llame al
1–800–944–2904.
Conserve este libro y su factura
de compra juntas para consultas
posteriores. Deberá presentar un
comprobante de la fecha de
compra o instalación para
servicios dentro del marco de la
garantía.
51

Subject to modification.
Sous réserve de modifications.
Se reserva el derecho a efectuar modificaciones.
9000 264 399
en, fr, es (8802)
 Loading...