

Siemens S18ID80NLP Operating Manual
Operating and Care instructions
Notice d’utilisation et de maintenance
Instrucciones para la operación y cuidado
S18ID..

Content
IMPORTANT SAFETY INSTRUCTIONS . . . . . . . . . . . . . . . . . . . . . . . . . . . . . . . . . . . . . . . . . . . . . . . . . . . . 3
Congratulations . . . . . . . . . . . . . . . . . . . . . . . . . . . . . . . . . . . . . . . . . . . . . . . . . . . . . . . . . . . . . . . . . . . . . . 4
Your new appliance . . . . . . . . . . . . . . . . . . . . . . . . . . . . . . . . . . . . . . . . . . . . . . . . . . . . . . . . . . . . . . . . . . . 5
Installation . . . . . . . . . . . . . . . . . . . . . . . . . . . . . . . . . . . . . . . . . . . . . . . . . . . . . . . . . . . . . . . . . . . . . . . . . . 6
Connection to the power supply . . . . . . . . . . . . . . . . . . . . . . . . . . . . . . . . . . . . . . . . . . . . . . . . . . . . . . . . . 6
Connecting the water . . . . . . . . . . . . . . . . . . . . . . . . . . . . . . . . . . . . . . . . . . . . . . . . . . . . . . . . . . . . . . . . . . 7
Switching on the appliance . . . . . . . . . . . . . . . . . . . . . . . . . . . . . . . . . . . . . . . . . . . . . . . . . . . . . . . . . . . . . 7
Switching off and disconnecting the appliance . . . . . . . . . . . . . . . . . . . . . . . . . . . . . . . . . . . . . . . . . . . . . 7
Door alarm . . . . . . . . . . . . . . . . . . . . . . . . . . . . . . . . . . . . . . . . . . . . . . . . . . . . . . . . . . . . . . . . . . . . . . . . . . 7
Variable interior design . . . . . . . . . . . . . . . . . . . . . . . . . . . . . . . . . . . . . . . . . . . . . . . . . . . . . . . . . . . . . . . . 7
Control panel . . . . . . . . . . . . . . . . . . . . . . . . . . . . . . . . . . . . . . . . . . . . . . . . . . . . . . . . . . . . . . . . . . . . . . . . 9
Setting the temperature . . . . . . . . . . . . . . . . . . . . . . . . . . . . . . . . . . . . . . . . . . . . . . . . . . . . . . . . . . . . . . . . 10
Super function . . . . . . . . . . . . . . . . . . . . . . . . . . . . . . . . . . . . . . . . . . . . . . . . . . . . . . . . . . . . . . . . . . . . . . . 10
Setup mode . . . . . . . . . . . . . . . . . . . . . . . . . . . . . . . . . . . . . . . . . . . . . . . . . . . . . . . . . . . . . . . . . . . . . . . . . 10
Settings which can be changed in Setup mode . . . . . . . . . . . . . . . . . . . . . . . . . . . . . . . . . . . . . . . . . . . . . 11
Vacation mode . . . . . . . . . . . . . . . . . . . . . . . . . . . . . . . . . . . . . . . . . . . . . . . . . . . . . . . . . . . . . . . . . . . . . . . 12
Sabbath mode . . . . . . . . . . . . . . . . . . . . . . . . . . . . . . . . . . . . . . . . . . . . . . . . . . . . . . . . . . . . . . . . . . . . . . . 12
Freezing and storing . . . . . . . . . . . . . . . . . . . . . . . . . . . . . . . . . . . . . . . . . . . . . . . . . . . . . . . . . . . . . . . . . . 12
Ice and water dispenser . . . . . . . . . . . . . . . . . . . . . . . . . . . . . . . . . . . . . . . . . . . . . . . . . . . . . . . . . . . . . . . 13
How to save energy . . . . . . . . . . . . . . . . . . . . . . . . . . . . . . . . . . . . . . . . . . . . . . . . . . . . . . . . . . . . . . . . . . . 16
Operating noises . . . . . . . . . . . . . . . . . . . . . . . . . . . . . . . . . . . . . . . . . . . . . . . . . . . . . . . . . . . . . . . . . . . . . 16
Defrosting . . . . . . . . . . . . . . . . . . . . . . . . . . . . . . . . . . . . . . . . . . . . . . . . . . . . . . . . . . . . . . . . . . . . . . . . . . . 16
Cleaning the appliance . . . . . . . . . . . . . . . . . . . . . . . . . . . . . . . . . . . . . . . . . . . . . . . . . . . . . . . . . . . . . . . . 17
Odors . . . . . . . . . . . . . . . . . . . . . . . . . . . . . . . . . . . . . . . . . . . . . . . . . . . . . . . . . . . . . . . . . . . . . . . . . . . . . . 17
Warning messages via the display. . . . . . . . . . . . . . . . . . . . . . . . . . . . . . . . . . . . . . . . . . . . . . . . . . . . . . . . 17
Appliance self-test . . . . . . . . . . . . . . . . . . . . . . . . . . . . . . . . . . . . . . . . . . . . . . . . . . . . . . . . . . . . . . . . . . . . 18
Resetting factory settings . . . . . . . . . . . . . . . . . . . . . . . . . . . . . . . . . . . . . . . . . . . . . . . . . . . . . . . . . . . . . . 18
Water filter . . . . . . . . . . . . . . . . . . . . . . . . . . . . . . . . . . . . . . . . . . . . . . . . . . . . . . . . . . . . . . . . . . . . . . . . . . 19
Troubleshooting . . . . . . . . . . . . . . . . . . . . . . . . . . . . . . . . . . . . . . . . . . . . . . . . . . . . . . . . . . . . . . . . . . . . . . 21
Changing the bulb . . . . . . . . . . . . . . . . . . . . . . . . . . . . . . . . . . . . . . . . . . . . . . . . . . . . . . . . . . . . . . . . . . . . 24
Service . . . . . . . . . . . . . . . . . . . . . . . . . . . . . . . . . . . . . . . . . . . . . . . . . . . . . . . . . . . . . . . . . . . . . . . . . . . . . 24
Warranty . . . . . . . . . . . . . . . . . . . . . . . . . . . . . . . . . . . . . . . . . . . . . . . . . . . . . . . . . . . . . . . . . . . . . . . . . . . . 25
Français . . . . . . . . . . . . . . . . . . . . . . . . . . . . . . . . . . . . . . . . . . . . . . . . . . . . . . . . . . . . . . . . . . . . . . . . . . . . . 26
Español . . . . . . . . . . . . . . . . . . . . . . . . . . . . . . . . . . . . . . . . . . . . . . . . . . . . . . . . . . . . . . . . . . . . . . . . . . . . . 50
2

IMPORTANT SAFETY INSTRUCTIONS
READ AND SAVE THESE INSTRUCTIONS!
WARNING
m
When using this appliance, always
exercise basic safety precautions,
including the following:
1. Use this appliance only for its
intended purpose as described
in this Owner's Manual.
2. This freezer must be properly
installed in accordance with the
Installation Instructions before it
is used.
3. Do not allow children to climb,
stand or hang on the shelves in
the freezer. They could seriously
injure themselves and damage
the freezer.
4. After your freezer is in operation,
do not touch the cold surfaces in
the freezer compartment,
particularly when hands are
damp or wet. Skin may adhere
to these extremely cold
surfaces.
5. Do not store or use gasoline or
other flammable vapors and
liquids in the vicinity of this or any
other appliance.
6. In freezers with an automatic
icemaker, avoid contact with the
moving parts of the ejector
mechanism, or with the heating
element located on the bottom
of the icemaker. Do not place
fingers or hands on the
automatic icemaking
mechanism while the freezer is
plugged in.
7. Unplug your freezer before
cleaning and making repairs.
NOTE: We strongly recommend
that any servicing be performed
by a qualified individual.
8. Before replacing a burned-out
light bulb, set the power switch
in the OFF position to turn off the
lights in order to avoid contact
with a live wire filament.
9. A burned-out light bulb may
break when being replaced.
NOTE: Setting the freezer
temperature controls to OFF
does not remove power to the
light circuit.
10. Do not refreeze frozen foods
which have thawed completely.
m WARNING
RISK OF CHILD ENTRAPMENT
Child entrapment and suffocation
are not problems of the past. Junked
or abandoned refrigeration products
are still dangerous... even if they will
sit for “just a few days”. If you are
getting rid of your old appliance,
please follow these instructions to
help prevent accidents.
Before you throw away your old
refrigeration product:
– Take off the doors.
– Leave the shelves in place so that
children may not easily climb
inside.
Electrical Connection
The appliance comes with an UL
listed, 3-wire power supply cord.
The appliance requires a 3-wire
receptacle.
The receptacle must be installed by
a licensed electrician only.
Grounding instruction
This appliance must be grounded.
In the event of a malfunction or
breakdown, grounding will reduce
the risk of electric shock by providing
a path of least resistance for the
electric current.
Improper connection of the
equipment grounding conductor
may result in electric shock. Have the
appliance checked by a qualified
electrician or service technician if you
are in doubt as to whether the
appliance has been properly
grounded.
Some local regulations may require
a separate ground. In such cases,
the required accessory ground wire,
clamp and screw must be
purchased separately.
Never ground the appliance to
plastic plumbing lines, gas lines or
water pipes.
3
CFC DISPOSAL
Your old freezer may have a cooling
system that used CFC's
(chlorofluorocarbons).
CFC's are believed to harm
stratospheric ozone.
If you are throwing away an old
refrigeration product, make sure the
CFC refrigerant is removed for
proper disposal by a qualified
servicer. If you intentionally release
this CFC refrigerant, you can be
subject to fines and imprisonment
under provisions of environmental
legislation.
IMPORTANT
Save these instructions for local
inspector's use. Observe all
governing codes and ordinances.
Note to installer –
Be sure to leave these instructions
with the consumer.
Note to consumer –
Keep these instructions with your
Owner's Manual for future reference.
Definitions
m
WARNING – This indicates that
death or serious injuries may
occur as a result of not observing
this warning.
WARNING
CAUTION
CAUTION – This indicates that
minor or moderate injuries may
occur as a result of not observing
this warning.
This symbol is used to draw the
user's attention to something in
particular.
m
Congratulations
With the purchase of your new
freezer you have opted for a modem,
high-quality domestic appliance.
Your freezer is distinguished by its
economical energy consumption.
Each appliance which leaves our
factory is inspected thoroughly to
ensure that it functions properly and
is in perfect condition.
If you have any questions –
particularly concerning installation
and connection of the appliance –
please do not hesitate to contact
our customer service, see section
“Service”.
Further information and a selection
of our products can be found on
our home page.
Please read these operating
instructions as well as the installation
instructions and all information
enclosed with the appliance and
follow accordingly.
Retain all documents for subsequent
use or for the next owner.
General information
This appliance is suitable for:
– storing frozen food,
– freezing food,
– making ice.
This appliance is designed for
domestic use only.
4

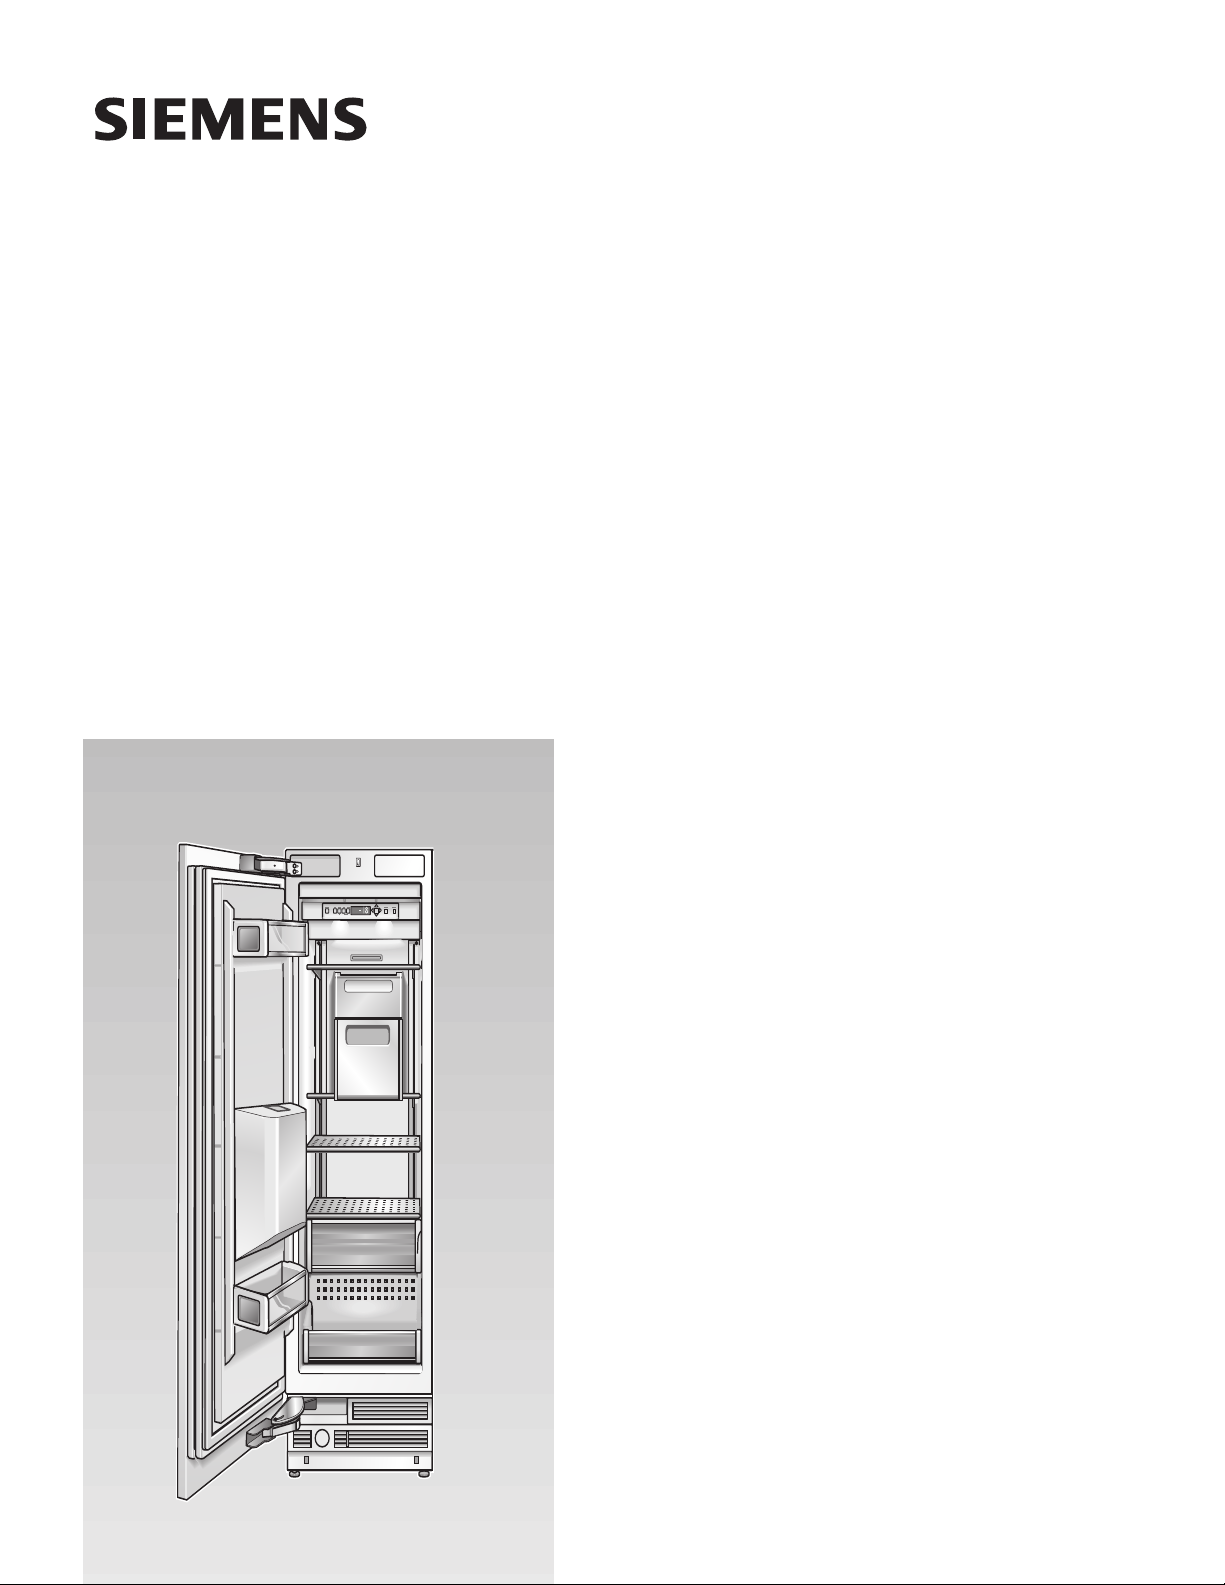
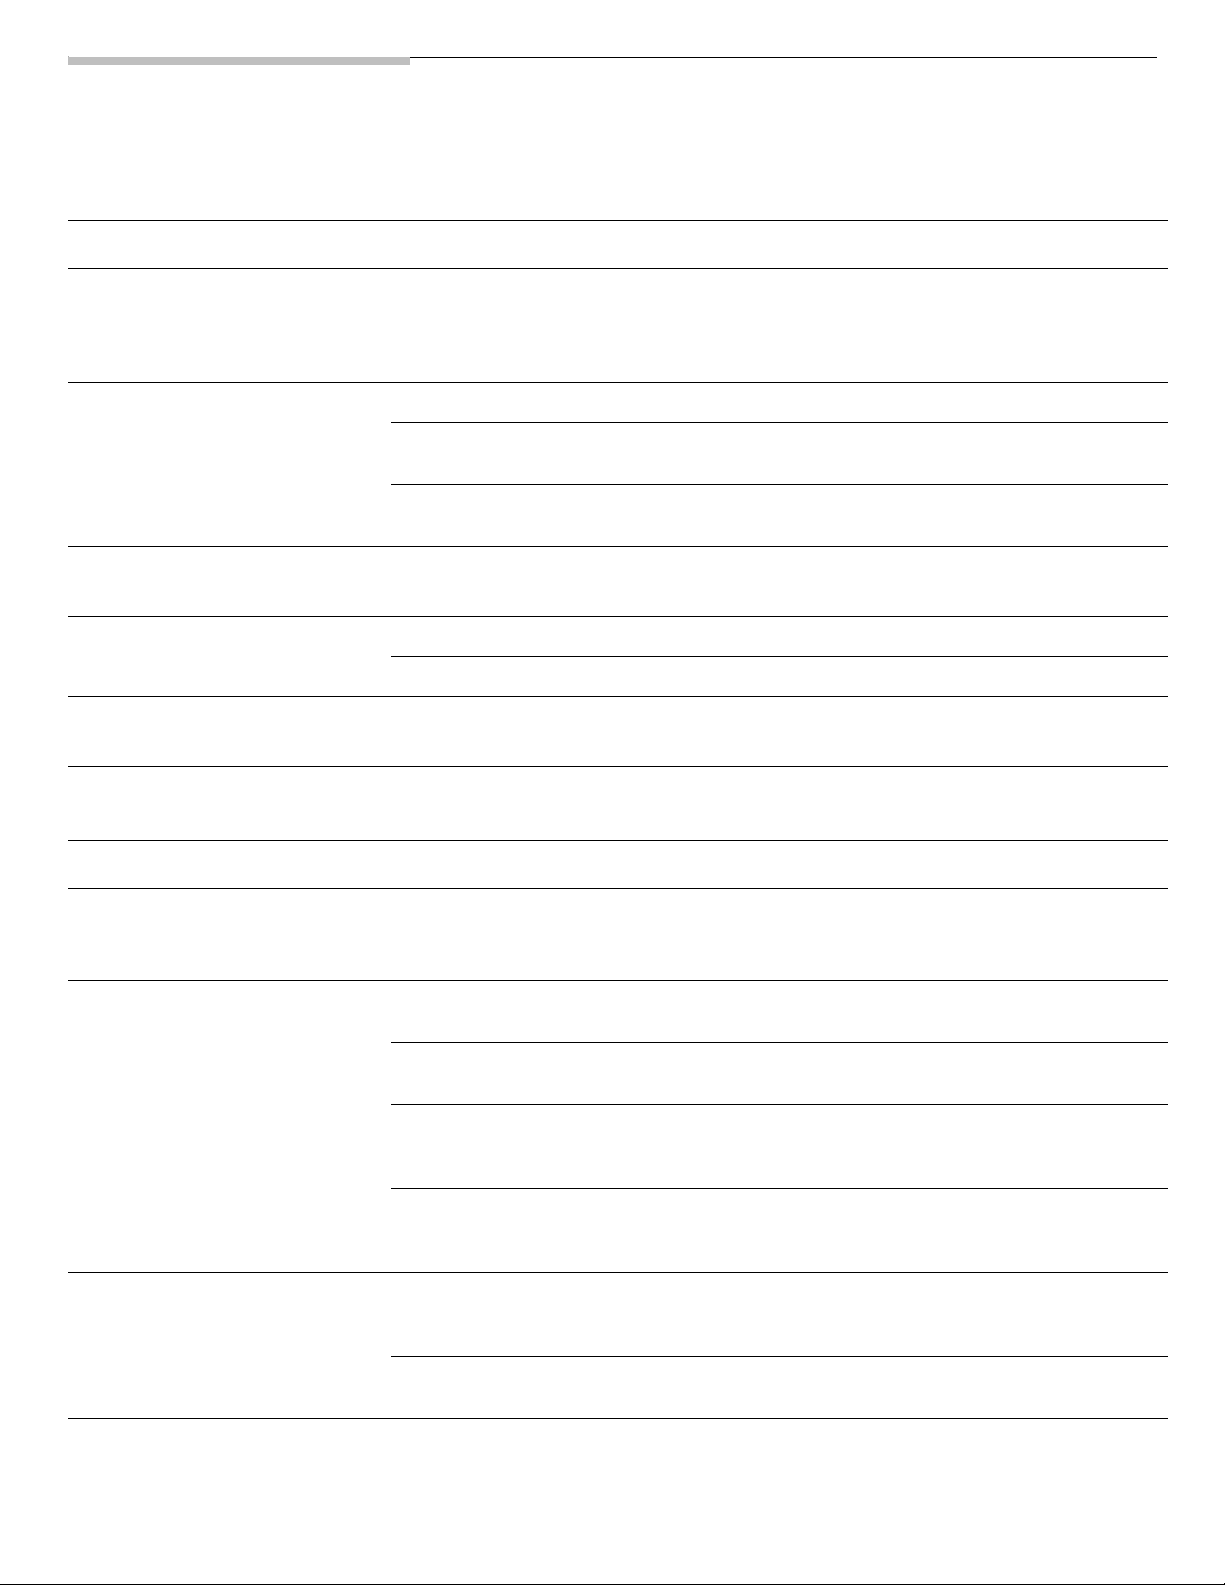
Your new appliance
These operating instructions refer to several models. Diagrams may vary.
1 Control panel
2 Ice maker
3 Ice cube container
4 Shelves
for storing frozen food
5 Freezer drawer
6 Water filter
7 Door storage bins
8 Ice and water dispenser
9 Control panel for the ice and
water dispenser
10 Water capture bowl and rest
(detachable)
5
Installation
Connection
m
Do not install the appliance:
– outdoors,
– in an environment with dripping
water,
– in rooms which are at risk of
frost.
The appliance is very heavy – for
empty weight see following table:
– Freezer 18": 255 Ibs / 115 kg
WARNING
m
Installation room
The appliance should be installed in
a dry, well ventilated room.
The ambient temperature should not
drop below 55 °F (13 °C) or rise
above 110 °F (43 °C), otherwise
malfunctions may occur.
The installation location should not
be exposed to direct sunlight and not
placed near a heat source, such as
an oven, radiator, etc.
If installation next to a heat source is
unavoidable, use a suitable
insulating plate or observe the
following minimum distances from
the heat source:
– 1.2" (3 cm) from an electric
cooker,
– 12" (30 cm) from an oil or
solid-fuel cooker.
Installation cavity
It is important to observe the
specified dimensions of the
installation cavity for a trouble-free
installation of the appliance and for
the subsequent general view of the
furniture front.
In particular ensure that the cavity is
square. Squareness can be checked
by suitable means, e.g. spirit level,
diagonal measurements, etc.
Furniture/fixtures
The new appliance will be mounted
securely to adjacent and overhead
furniture/fixtures.
For this reason it is essential that all
attachable furniture/fixtures are
connected securely to the base or
the wall by suitable means.
Base
To ensure that the appliance is
installed securely and functions
properly, the base must be fiat and
level.
The base must be made of a hard,
rigid material.
The installation area must be the
same height as the rest of the room.
On account of the heavy weight of
a fully loaded appliance, a loadbearing base is required.
For fully-loaded weight see the
following table:
– Freezer 18": 560 Ibs / 250 kg
If in doubt, contact an architect or
a building expert.
Installing and
connecting the
appliance
CAUTION
Have the appliance installed by an
electrician according to the
endosed installation instructions.
After installing the appliance, wait at
least before switching on the
appliance. During transit the oil in the
refrigeration system may have
moved.
Before switching on the appliance for
the first time, clean the inside of the
appliance.
to the power
supply
m
Avoid Electrical Shock Hazard
– Plug into a grounded 3 prong
outlet.
– Do not remove ground prong.
– Do not use an adapter.
– Do not use an extension cord.
Failure to follow these instructions
can result in death, fire, or
electrical shock.
Improper connection of the
equipment grounding conductor
may result in electric shock.
Have the appliance checked by
a qualified electrician or service
technician if you are in doubt as
to whether the appliance has been
properly grounded.
The appliance comes with an UL
listed, 3-wire power supply cord.
The appliance requires a 3-wire
receptacle.
The receptacle must be installed by
a licensed electrician only.
The receptacle must be fitted with
a 10 to 16 A fuse or higher.
Please observe in this coherence the
following table:
Appliance MAX load
Freezer 18" 3.5 Ampere
WARNING
at one time
m
6
Connecting the
Switching off
Variable interior
water
CAUTION
The manufacturer is not liable for
damage to property due to an
incorrect installation or water
connection.
A cold water connection is required
for operation of the automatic ice
maker. The water pressure must be
between 25 and 120 p.s.i.
(1.72–8.25 bar).
The installation must comply with
local plumbing regulations and local
and state laws.
A separate shut-off valve must be
installed for the appliance water
connection.
The shut-off valve for the water
connection must not be behind the
appliance. It is recommended to
place the shut-off valve directly next
to the appliance (base unit) or in
another easily accessible location.
Switching on
the appliance
Press the power button.
When the appliance has been
switched on, the appliance begins to
cool down. When the doors are
open, the interior lights come on.
The preset temperatures (factory
settings) are reached after approx.
2–8 hours. Do not put any food in
the appliance beforehand.
Do not use the first ice cubes
from the ice maker! Discard the
ice production of the first
24 hours after switching on the
icemaker.
To change the preset temperatures
Æ see “Setting the temperature”.
and
disconnecting
the appliance
Switching off the
appliance
Press the power button.
If switching off the appliance for
a period longer than 2 weeks,
remove the water filter. Before
switching on the appliance
again, install a new filter (see
“Exchanging the filter”).
Disconnecting the
appliance
If you do not use the appliance for
a prolonged period:
Shut off the water supply line
several hours before switching
off the appliance.
Remove and discard the water
filter. Secure the filter cap!
Take all food out of the freezer.
Pull out the mains plug or switch
off the fuse.
Empty the ice cube container.
Clean the appliance interior
(see “Cleaning the appliance”).
To prevent odors, leave the
doors open.
Door alarm
If one of the appliance doors is left
open, an alarm signal sounds after
one minute.
The alarm is switched off with the
alarm off button and by closing the
door. If the door has stili not been
closed properly, the alarm sounds
again after one minute.
design
You can re-arrange the shelves
inside the appliance and the
containers in the door as required.
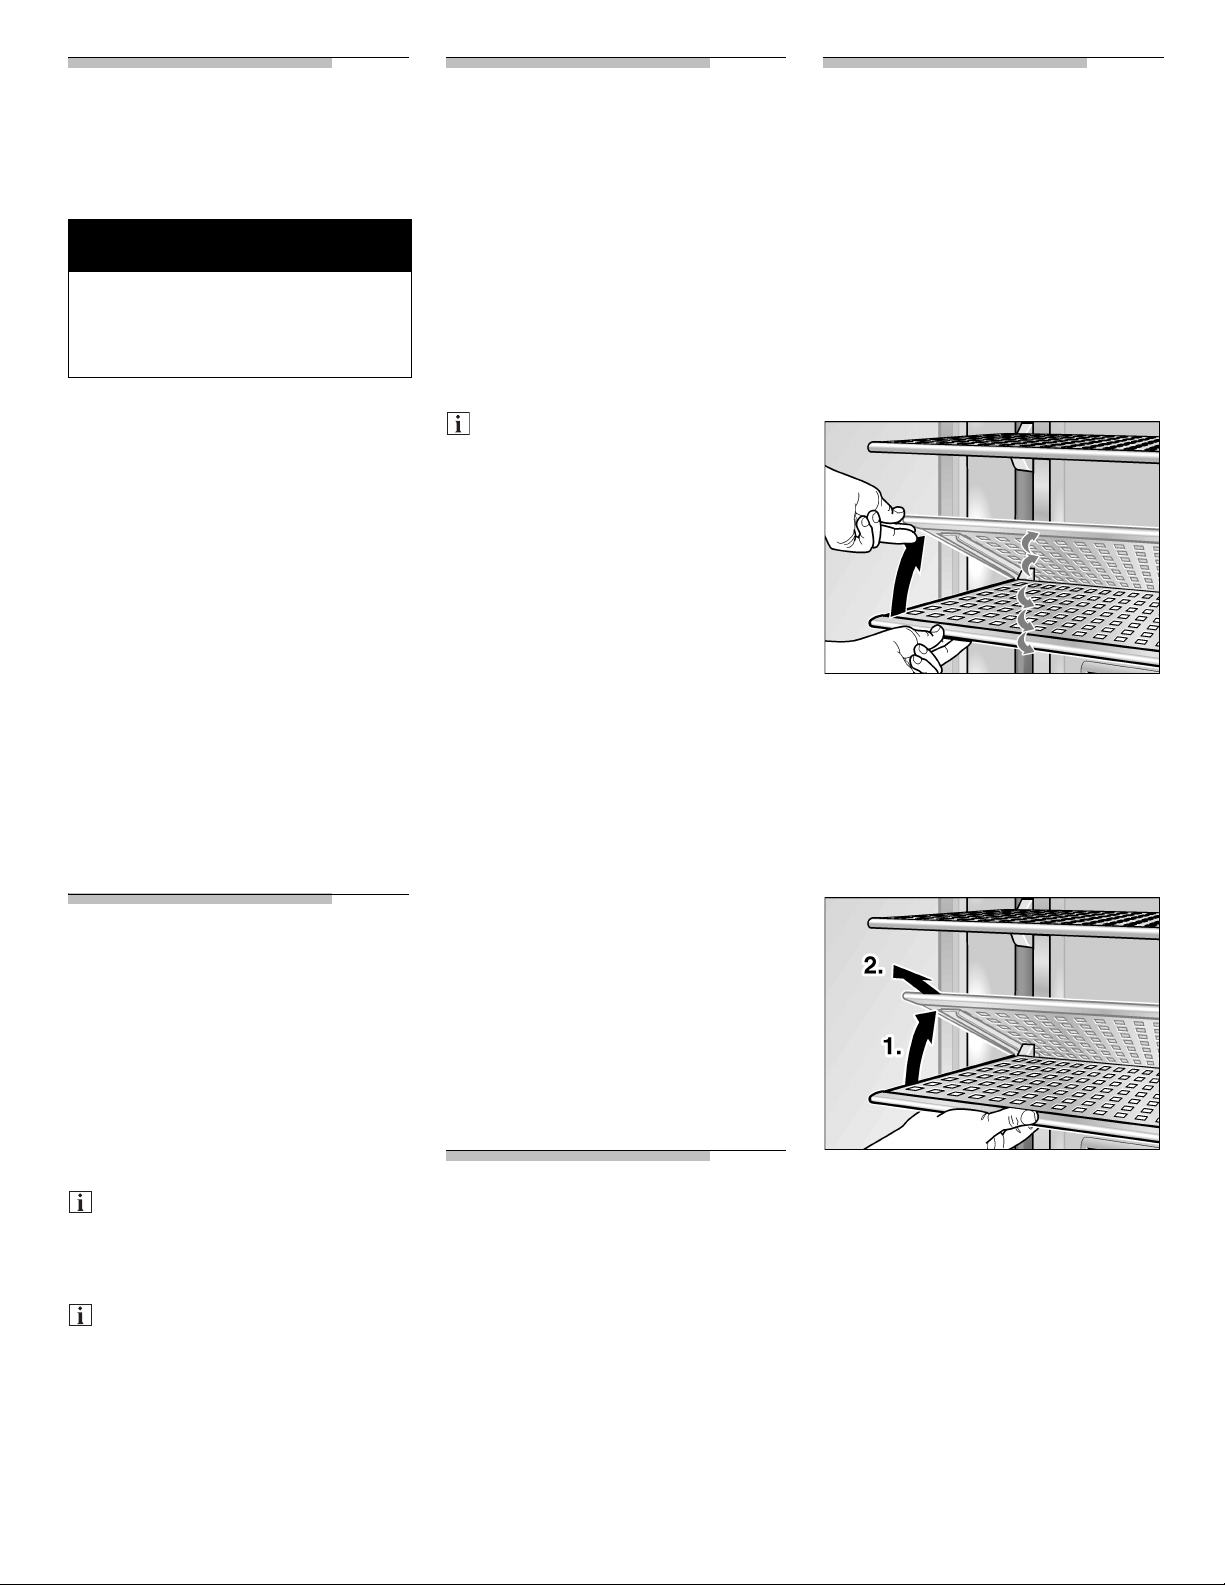
Shelves
The height of the shelves can be
adjusted.
Lift the shelf at the front and
move it up or down in the
guides.
Lower the shelf to the required
position and snap it into the
preset openings in the guide.
To remove the shelves:
Lift the shelf at the front, move it
as far as the openings on the
guide rail and remove.
7
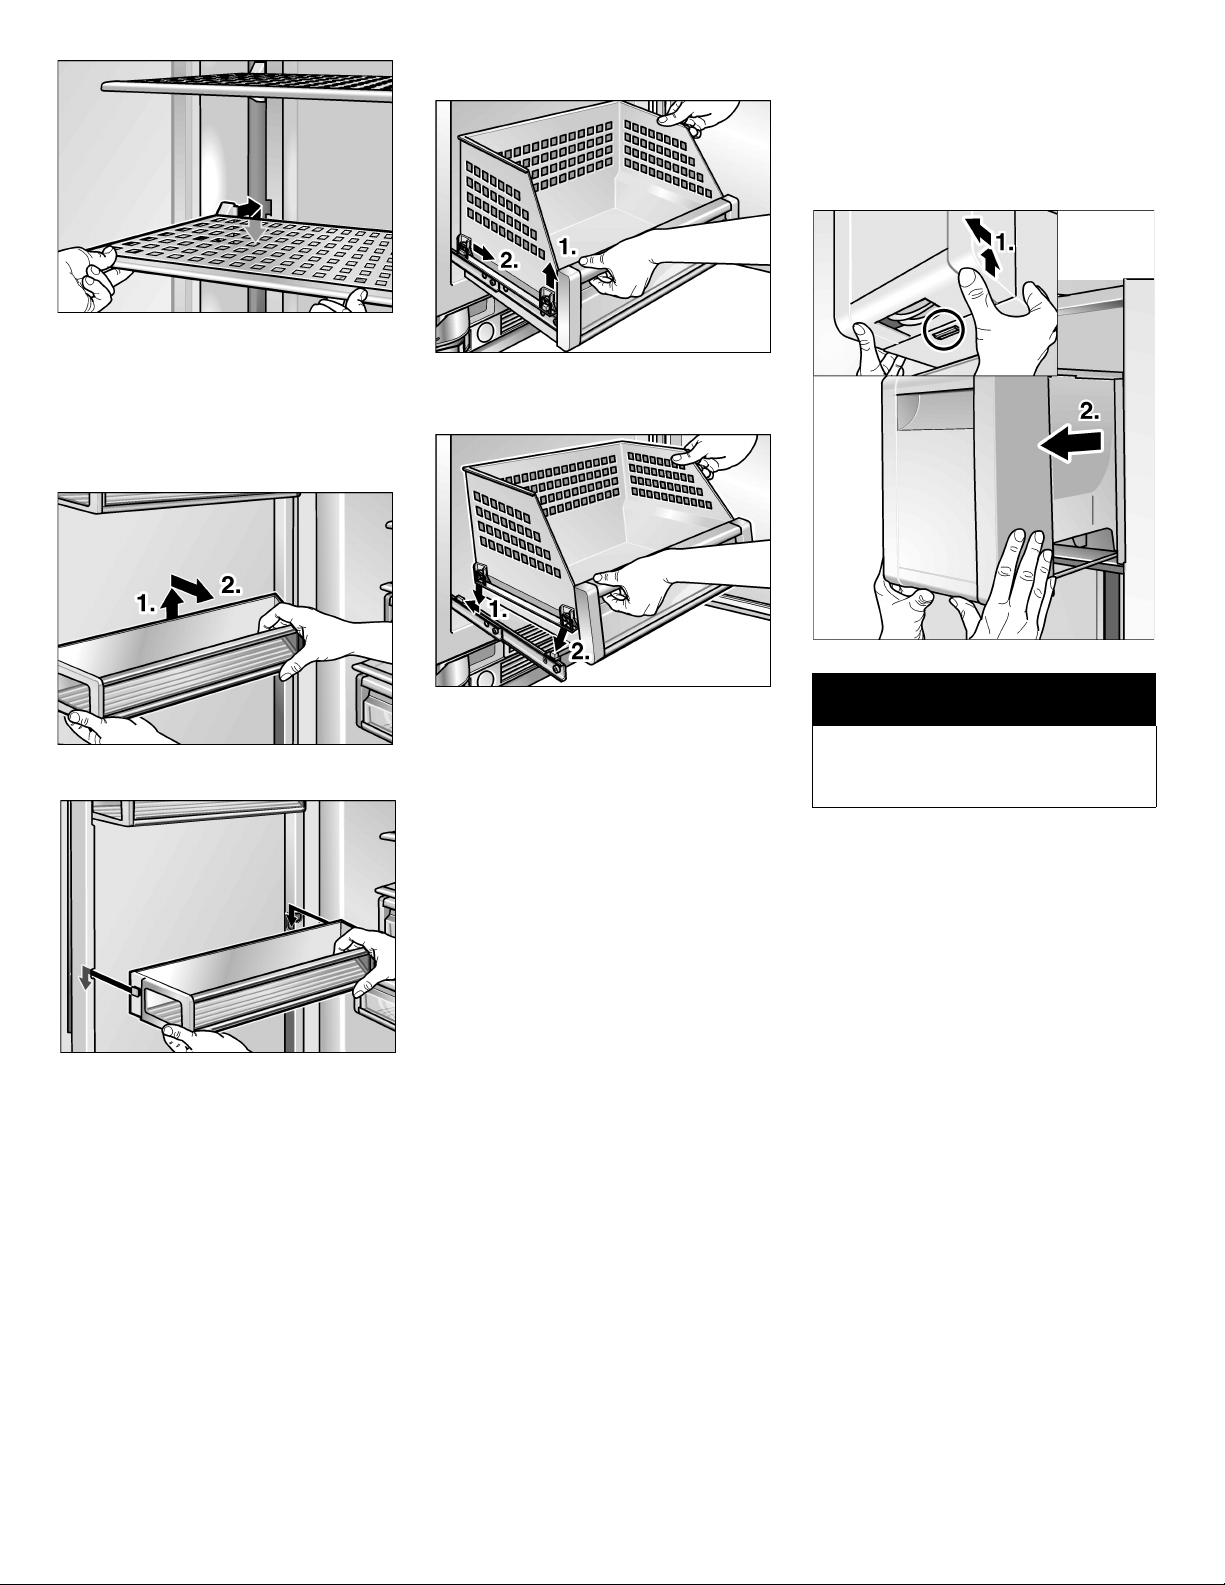
Insert the shelf at the required
height and press down.
Door storage
compartment
Drawers
To remove the drawers, lift them
slightly and remove.
Ice cube container
To store large quantities of fresh food
you can remove the ice cube
container (see “Ice and water
dispenser”).
Lift the container and remove.
Insert the container at the
required height and press down.
To replace the drawers, lift them
at the front slightly and reinsert in
the pullout.
Move the drawer upwards and
slide it backwards.
CAUTION
If the ice cube container is
removed you have to switch off
the ice maker before.
8
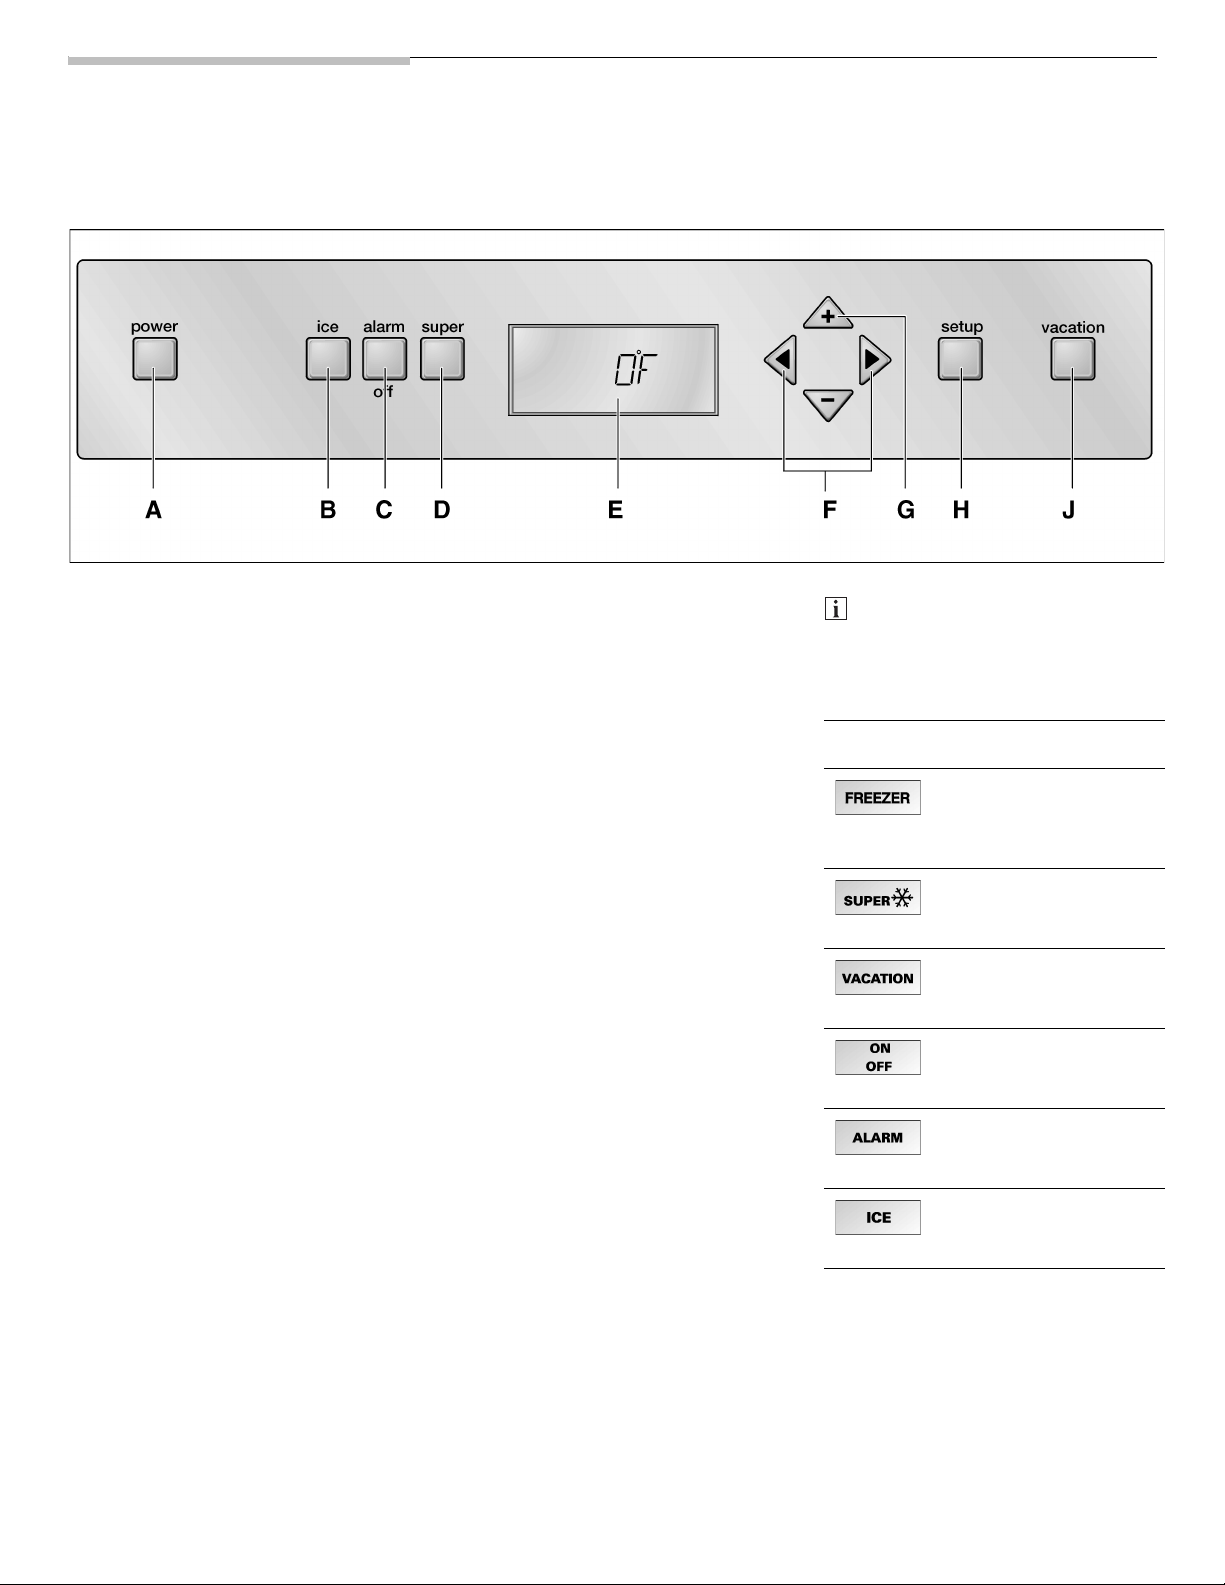
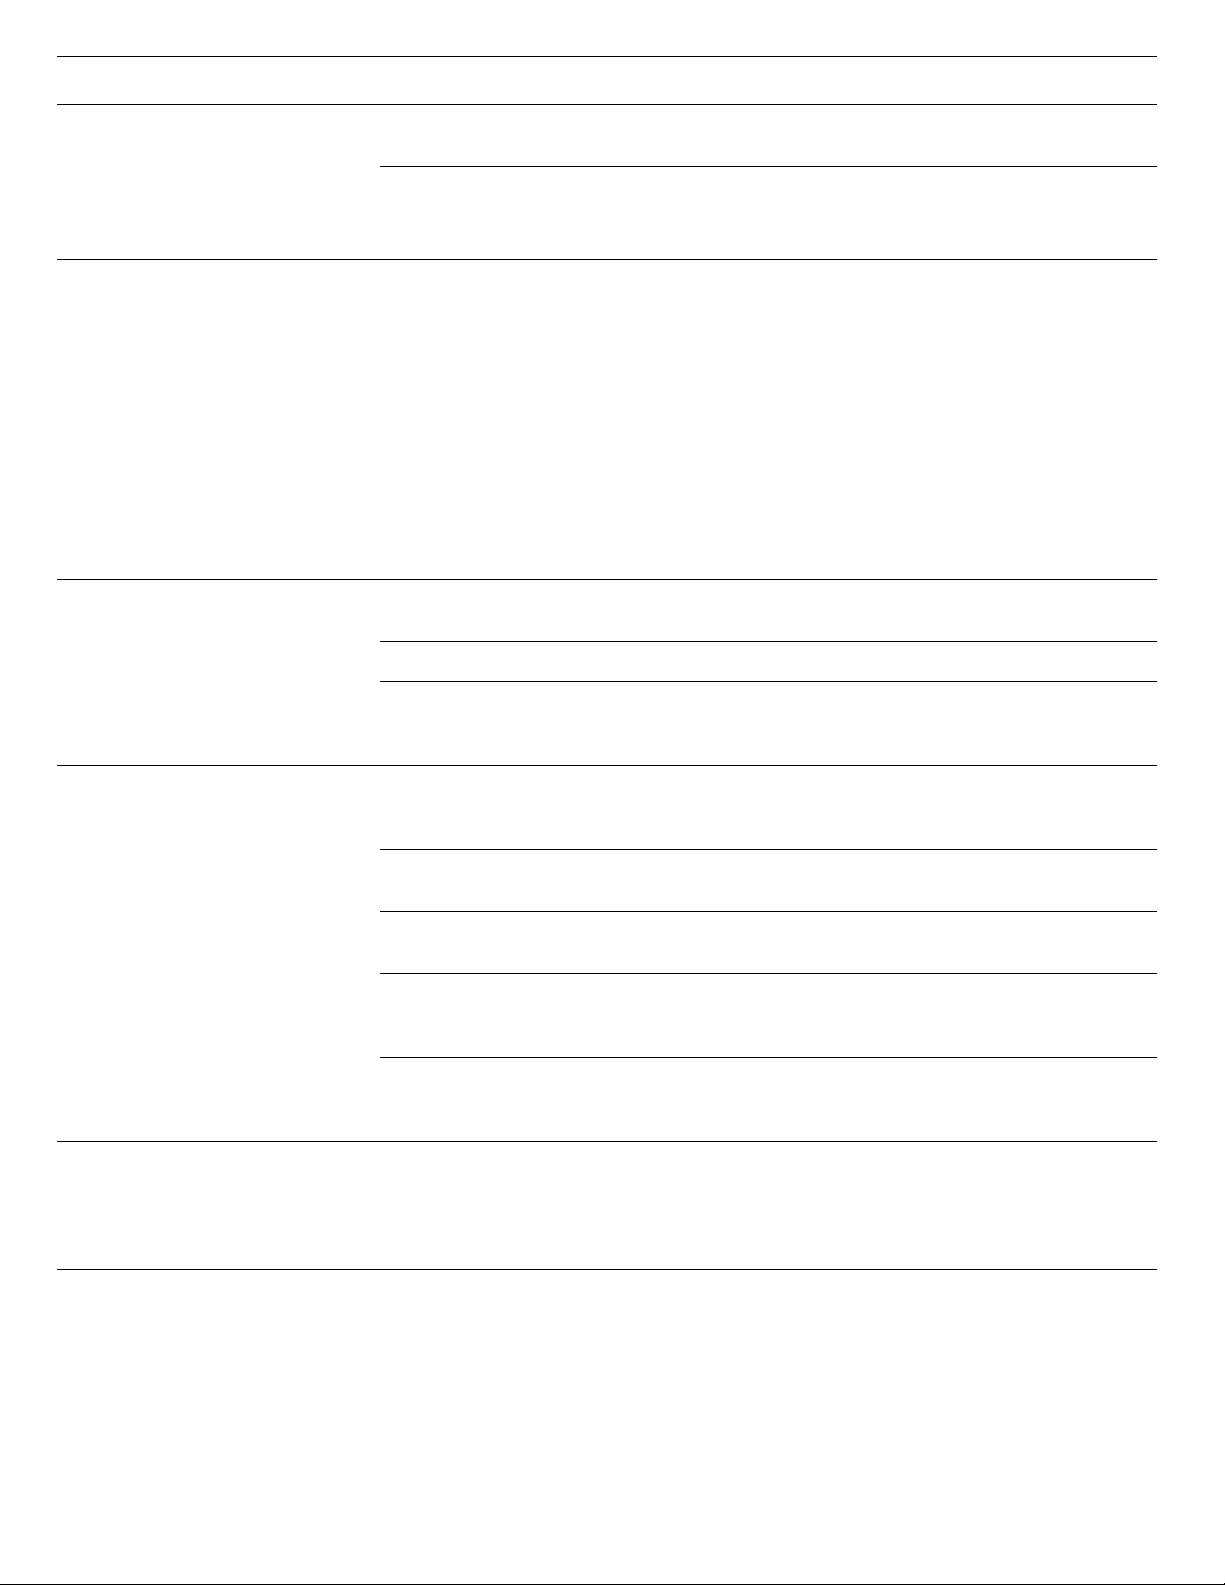
Control panel
To utilize all the functions of your appliance, we recommend that you familiarize yourself thoroughly with the control
panel and the setting options.
A power button
Switches the appliance on
and off.
m CAUTION!
The appliance is not isolated from
the mains when switched off by
the power button.
B ice button
Switches the ice maker on
and off. See also the section
on “Ice and water dispenser”.
C alarm off button
Used to switch off the warning
signal.
See section on “Warning
message via the display“.
D super button
Switches the Super function
on and off. See section on
“Super function”.
EDisplay
The set required temperature
of the appliance is indicated
on the display. Activated
special functions are indicated
via symbols, e.g. Super
function –
In Setup mode the menus as
well as the setting options are
indicated on the display.
See section on “Setup mode”.
SUPER $.
F
< > buttons
Select the menus in setup
mode. See section on “Setup
mode”.
The required temperature
adjustment is activated with
the
< > buttons.
See section on “Setting the
temperature”.
G + – buttons
Select the available
parameters of the menu.
See section on “Setup mode”.
The displayed temperature of
the appliance is also changed
with the + – buttons.
See section on “Setting the
temperature”.
H setup button
This button activates and also
ends Setup mode. When
Setup mode is ended with the
setup button, the changed
settings are saved.
J vacation button
Switches Vacation mode on
and off. See section on
“Vacation mode”.
Each button depression is
acknowledged by a signal if the
On setting is activated in Setup
mode, Sound menu (TONE).
Symbols at Display
Display for the freezer
compartment,
e.g. when setting the
temperature
Super function is
activated,
seepage10.
The Vacation mode is
activated,
seepage12.
For the setting options
in the Setup mode,
seepage11.
A warning message
is displayed,
seepage17.
The Ice maker is
switched on,
see page 15
9
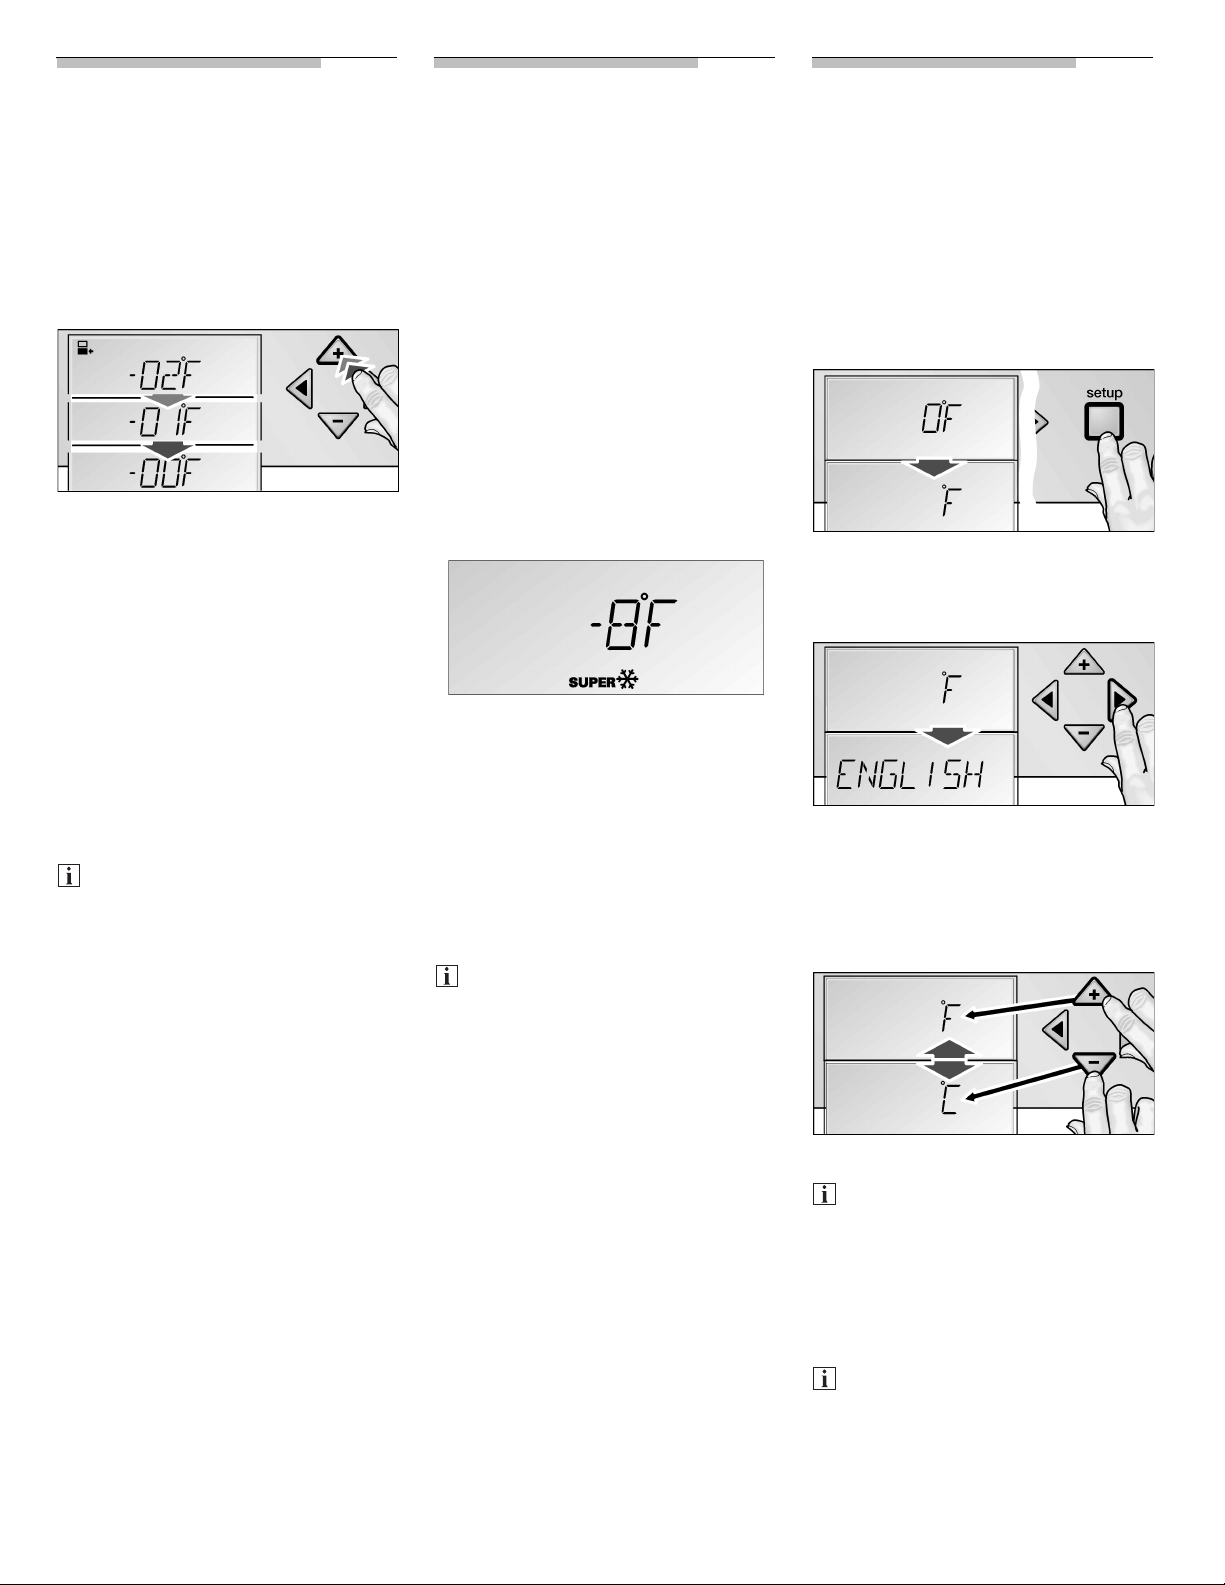
Setting the
Super function
Setup mode
temperature
The temperature can be set from
+7 °F to –9 °F (–14 °C to –23 °C).
We recommend a setting of
0°F(–18°C).
The temperature can be changed
with the + buttons (warmer) or –
(colder). The temperature can be
adjusted in 1 °F (0.5 °C) steps.
To adjust the required temperature:
Activate the Setup mode with
the
< or > buttons.
The FREEZER symbol is
displayed.
Set the required temperature
with the + (warmer) or – (colder)
buttons.
Depending on the model, the
appliance can also be switched
off or switched to Vacation
mode via the temperature
setting. When the highest
temperature has been reached,
OFF is displayed.
The Super function is used to freeze
large quantities of fresh food and
should be switched on some hours
before the fresh food is placed in the
freezer. In general, 4–6 hours is
adequate. If the maximum freezing
capacity is used, 24 hours are
required.
When the Super function is
activated, the appliance is cooled as
cold as possible to a preset
temperature set at the factory.
The function is activated by pressing
the super button.
The
SUPER $ symbol and the Super
temperature are displayed.
The function is ended:
– by pressing the super button
again,
– by activating the Eco function,
– by activating the Vacation mode,
– by activating the Sabbath mode.
After approx. 2 ½ days the
freezer automatically switches
back to the temperature set
before Super function.
There are several menus for
adjusting the appliance functions to
individual requirements.
These adjustments can be made in
Setup mode.
To activate Setup mode:
Press the setup button.
The first menu (temperature unit) is
displayed.
To switch to the next menu:
Press the < or > button.
The next menu and the current
setting (usually On/Off) are displayed.
To select between the different
setting options within one menu:
10
Press the + or – button.
A modified setting is saved
when the next menu is selected
with the
To end Setup mode:
Press the setup button.
All modified settings are saved.
If no button is pressed within
12 seconds, Setup mode ends
automatically. All modified
settings are saved. The required
temperature is displayed again.
< or > button.
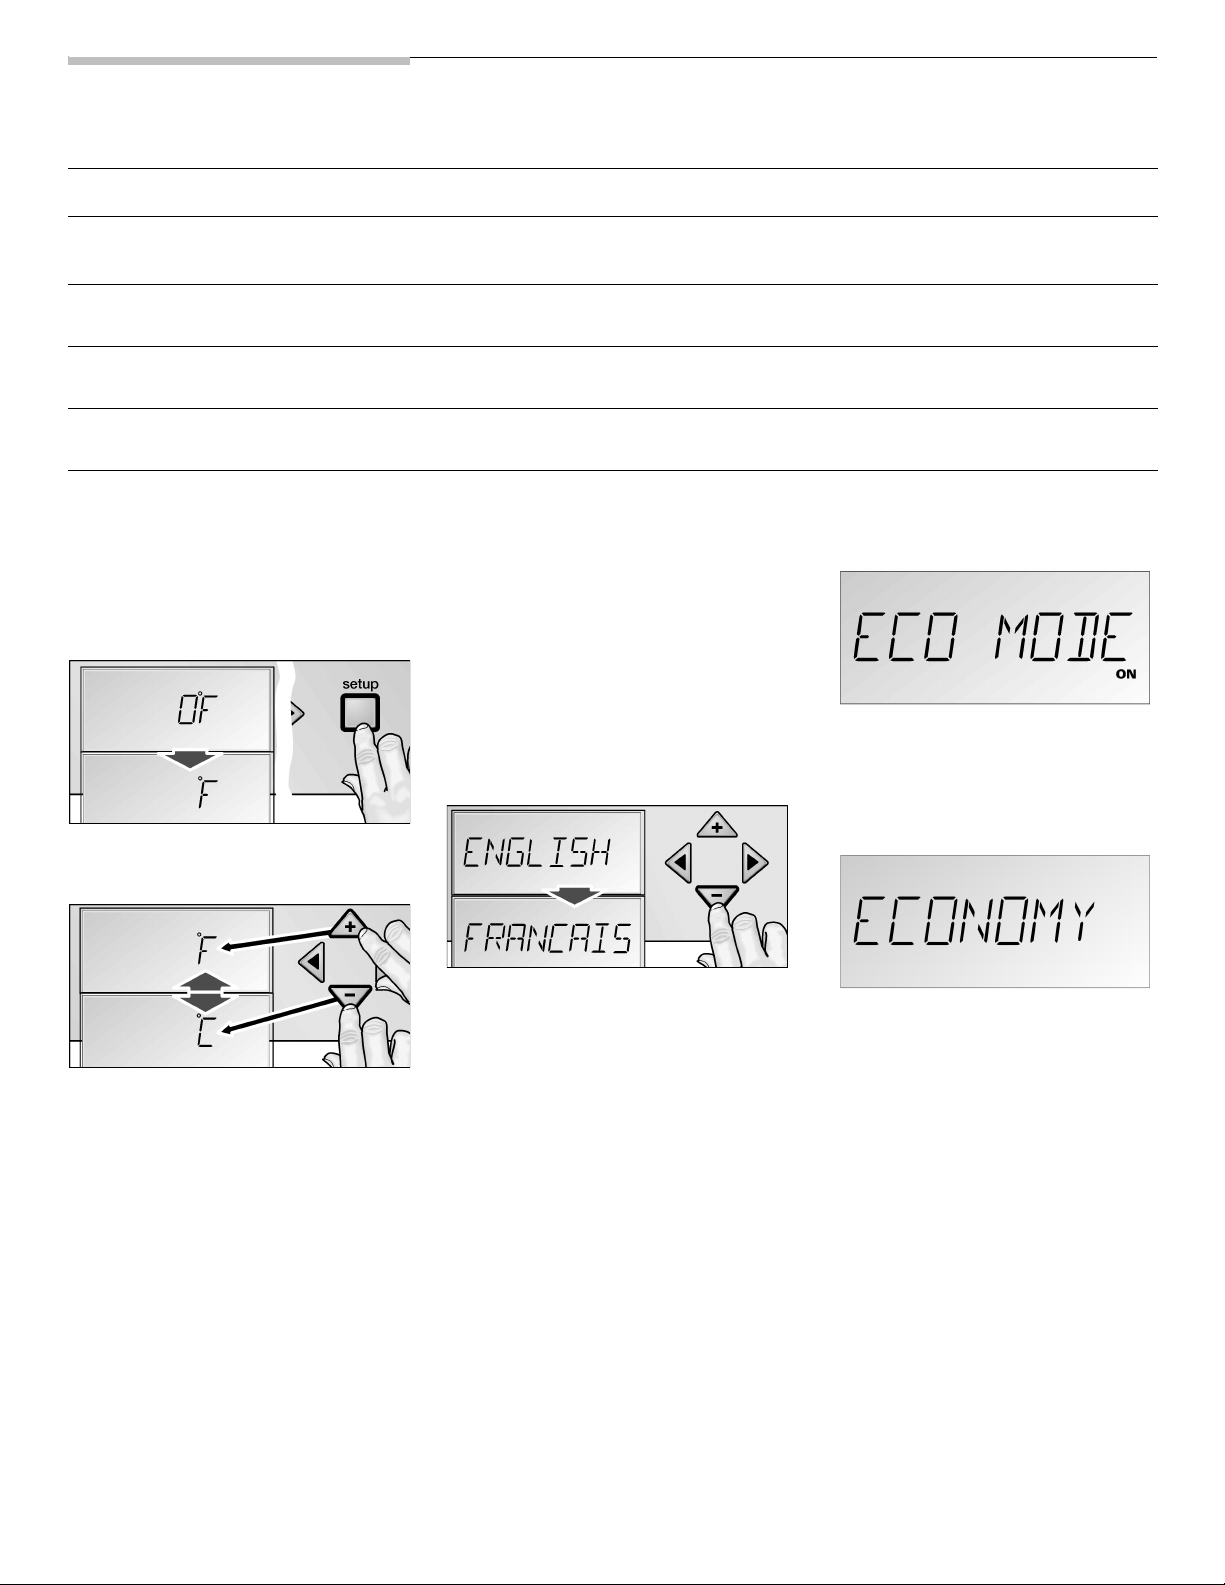
Settings which can be changed in Setup mode
Menu Setting options Displayed text
Temperature unit °F (degrees Fahrenheit)
°C (degrees Celsius)
Language English
French
Sound On / o
Off / p
Energy-saving mode (eco function) On / o
Off / p
Temperature unit
The temperature can be displayed in
degrees Fahrenheit (°F) or degrees
Celsius (°C).
Press the setup button.
Language setting
When the appliance has been
switched on, error messages and
settings in Setup mode are displayed
in English.
Alternatively the information can be
displayed in French.
Switch on Setup mode.
Press the > button until
ENGLISH is displayed.
The first menu (temperature unit) is
displayed.
°F
°C
ENGLISH
FRANCAIS
TONE
ECO MODE
The Economy function is activated in
Setup mode.
Press the + or – button to
change On/Off.
Press the setup button to save
the setting.
Press the + or – button to switch
between degrees Fahrenheit (°
F) or degrees Celsius (°C).
Press the setup button to save
the setting.
Press the + or – button to switch
to
FRANCAIS.
Press the setup button to save
the setting.
Energy-saving mode
When the Economy function (Eco) is
activated, the appliance switches to
an energy-saving mode.
This Economy functions set at the
factory to be energetically more
favorable. The background light of
the display is reduced also.
ECONOMY is displayed in the
standard display.
The function is ended by:
– switching off the Eco function in
Setup mode,
– activating the Super function,
– changing the required
temperature of the appliance,
– switching off the appliance with
the power button.
11
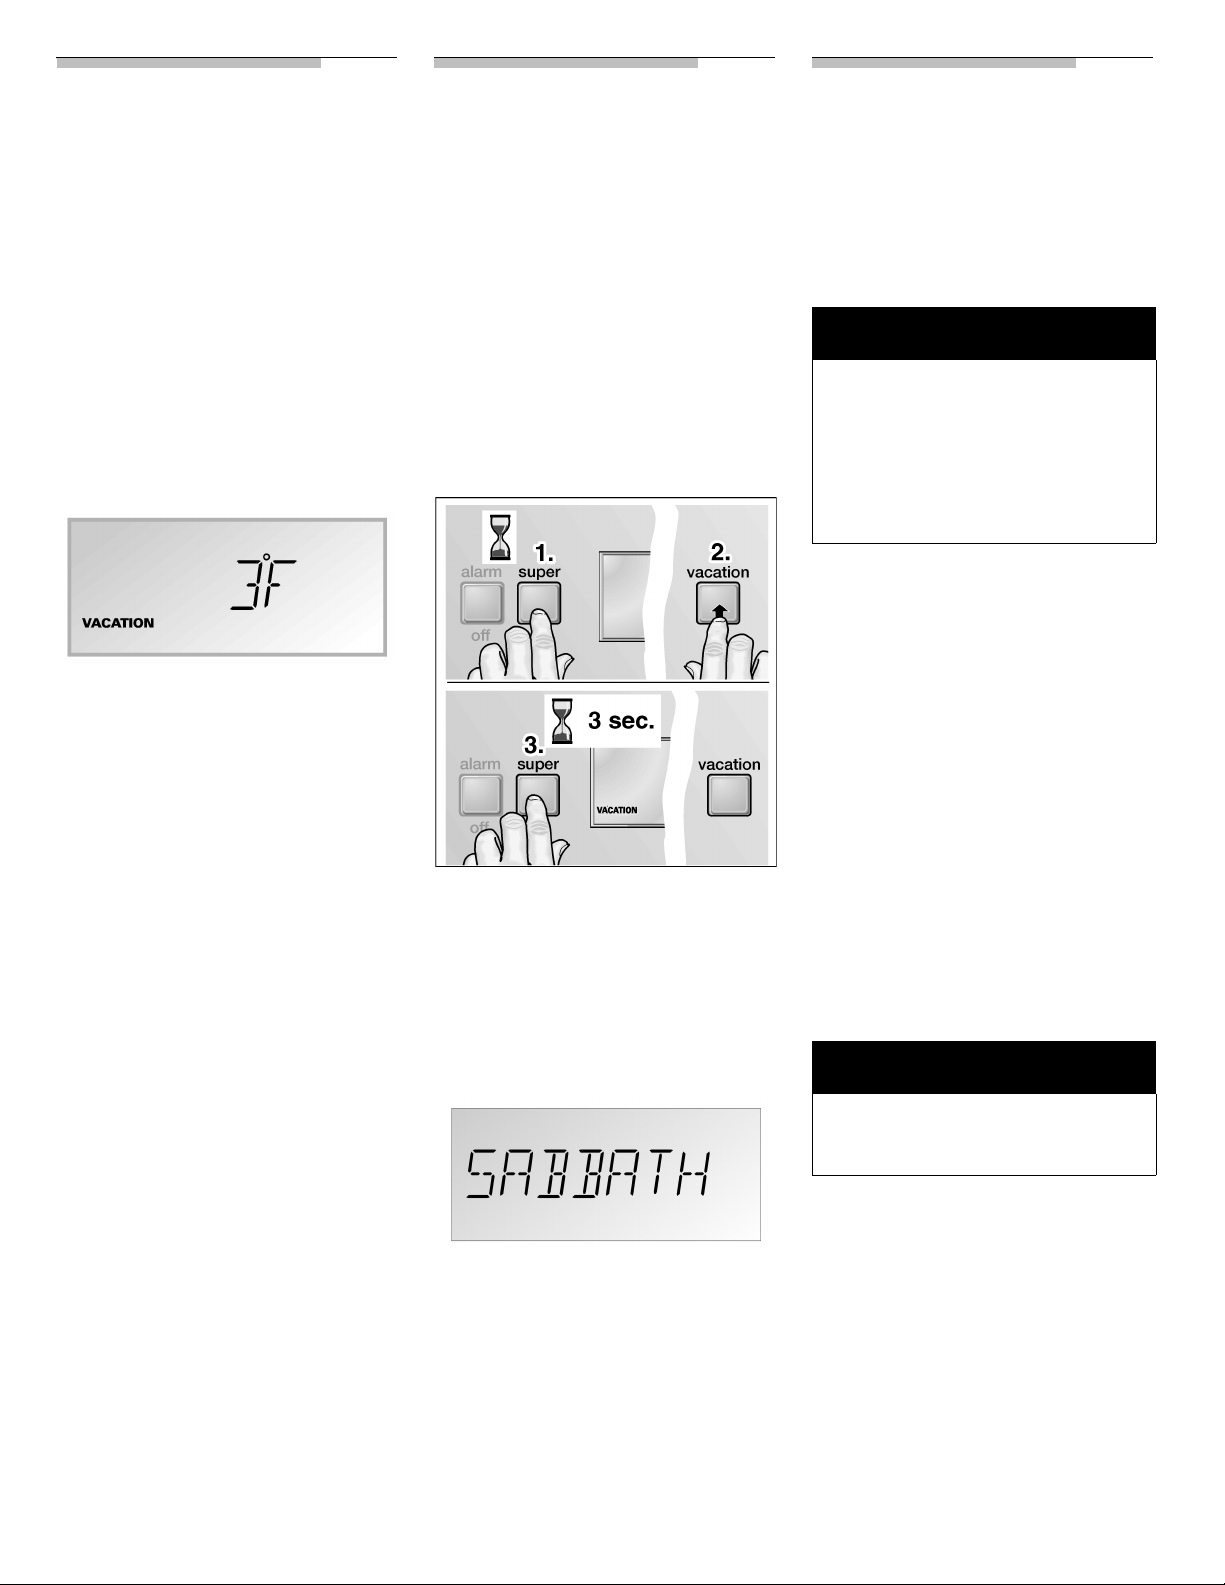
Vacation mode
Sabbath mode
Freezing and
If you are away for a prolonged
period, you can switch the appliance
to an energetically more favorable
mode. When Vacation mode is
active,
– the appliance switches to Eco
function (see section on “Energy-
saving mode”),
– the interior light switches off,
– the Super function ends
(if switched on).
To switch on Vacation mode:
Press the vacation button.
The VACATION symbol is displayed.
Instead of the required temperature,
the presetting temperature is
displayed.
To end Vacation mode, press the
vacation button. The previous
settings and temperature values are
used again.
When Sabbath mode is active
– the Super function ends
(if switched on),
– the ice maker switches off,
– the acknowledge signal is
deactivated when the button is
pressed (if switched on),
– the interior light switches off,
– the background light of the
display is reduced.
To switch on Sabbath mode:
Press and hold down the super
button.
Press the vacation button.
Hold down the super button for
a further 3 seconds.
The VACATION symbol flashes
on the display.
storing
Store the frozen
produce
CAUTION
Do not refreeze frozen food which
is thawing or which has thawed.
Boil or fry the food before
refreezing it.
No longer store the frozen
produce for the max. storage
period.
When purchasing deep-frozen food,
comply with the following:
– Check whether the packaging is
damaged.
– Check the sell-by date.
– The temperature of the super-
market freezer must be lower
than 0 °F (–18 °C). If not, the
storage life of the food is reduced.
– Purchase deep-frozen food last.
Wrap in newspaper or place in
a cold bag and take home.
– At home immediately place deep-
frozen food in the freezer
compartment. Use the deep-
frozen food before the sell-by
date runs out.
m
WARNING
m
12
SABBATH is displayed.
To end Sabbath mode, press the
vacation button. The previous
settings and temperature values are
used again.
Do not store explosive substances
in the appliance.
Risk of explosion!
Freezing food yourself
Freeze fresh, undamaged food only.
To prevent food from losing its
flavour or drying out, place in airtight
containers. Food should be frozen
solid as quickly as possible.
How to wrap food
correctly
Place the food in the wrapping.
Press out all the air.
Seal the wrapping.
Label the wrapping with the
contents and date.
The following products are not
suitable for wrapping food:
Wrapping paper, greaseproof paper,
cellophane, refuse bags and used
shopping bags.
The following products are
suitable for wrapping food:
Plastic film, polyethylene blown film,
aluminium foil and freezer tins. These
products can be purchased from
your dealer.
The following products are
suitable for sealing the wrapped
food:
Rubber bands, plastic clips, string,
cold-resistant adhesive tape or
similar.
Bags and polyethylene blown
film can be sealed with a film
sealer.
Thawing the frozen
food
Depending on the type and purpose
of the food, thaw:
– at room temperature,
– in the refrigerator,
– in an electric oven, with/without
hot air fan,
– in the microwave oven.
Foods Storage Time
Butter 6 to 9 months
Milk, Cream
Cottage cheese
Cream cheese
Hard cheese 4 to 6 months
Eggs
fresh, in shell
Raw yolks and whites
Mayonnaise Do not freeze!
Summer sausage
opened
unopened
Bacon 1 month
Luncheon meat 1 to 2 months
Vacuum-packed
diners, unopened
Corned beef 1 month
Beef, Veal, Lamb,
Pork
fresh
cooked
Poultry
fresh
cooked
Vegetables
Asparagus
Broccoli, green peas,
lima beans, cauliflower
Carrots,, beets and
turnips, lettuce
Onions, peppers
Fruits
Apples
Apricots, berries,
cherries
Grapes
Pineapples, cut
Source: United States Department of
Agriculture, FSIS
Not
recommended
Do not freeze!
6 to 9 months
1 to 2 months
1 to 2 months
3 to 4 months
(drained)
4 to 12 months
2 to 3 months
9 to 12 months
4 to 6 months
8 to 10 months
8 months
(cooked)
6 months
1 month
(whole)
6 to 12 months
Ice and water
dispenser
– Cooled water
– Ice cubes
– Crushed ice
can be dispensed as required.
m
WARNING
Do not use fragile receptacles for
dispensing water or ice - risk of
injury from broken glass!
Keep fingers clear of the
discharge opening.
Risk of injury from crusher
blades!
The ice and water dispenser will
not function unless the
appliance is connected to the
power and water supply.
When switching on your new
appliance, observe the following:
When the appliance has been
connected, there are still air bubbles
in the lines.
Run off drinking water and pour
away until water can be dispensed
without bubbles. Pour away the first
5 glasses.
When using the ice maker for the first
time, do not use the first 30-40 ice
cubes for reasons of hygiene.
m
13
Drinking water quality
All materials used in the drinks
dispenser are odourless and
tasteless.
If the water has an aftertaste, this
may be caused by:
– Mineral and chlorine content of
the drinking water.
– Material of the domestic water
line or connection line.
– Freshness of the drinking water
(if water has not been dispensed
for a long time, the water may
have a “stale” taste. In this case
dispense approx. one gallon of
water and pour away).
CAUTION
The enclosed water filter will filter
only particles out of the supply
water, not bacteria or microbes.
Do the ice cubes have
an unusual odor?
Ice is a porous material which can
absorb odors from the environment.
Ice cubes which have been in the ice
cube container for a long time may
absorb such odors, stick together
and slowly become smaller.
We recommend that these ice cubes
are no longer used.
Other means of preventing odors:
– The ice cube container should be
cleaned occasionally with warm
water.
– Check the contents of the freezer
for spoilt or out-of-date food.
All odorous foods should be
wrapped thoroughly or stored in
airtight containers to prevent the
build-up of odors.
– The water filter may have to be
replaced in some models.
– In some cases the quality of the
water connection in the house
should be checked.
Operating the ice
maker
As soon as the freezer has cooled
down to freezing temperature, the
ice cube tray fills with water. Cold air
is blown directly over the tray.
As soon as they are frozen, the ice
cubes fall into the ice cube container.
Occasionally the ice cubes stick
together. To separate the ice cubes
again a metal rod in the ice cube
container rotates in periodical cycles
(Agitation function).
When the ice cube container is full,
ice making switches off
automatically.
The ice maker can make approx.
125 ice cubes within 24 hours.
CAUTION
Do not place any bottles or food
for rapid cooling in the ice cube
container. The ice maker may
become blocked and be
damaged.
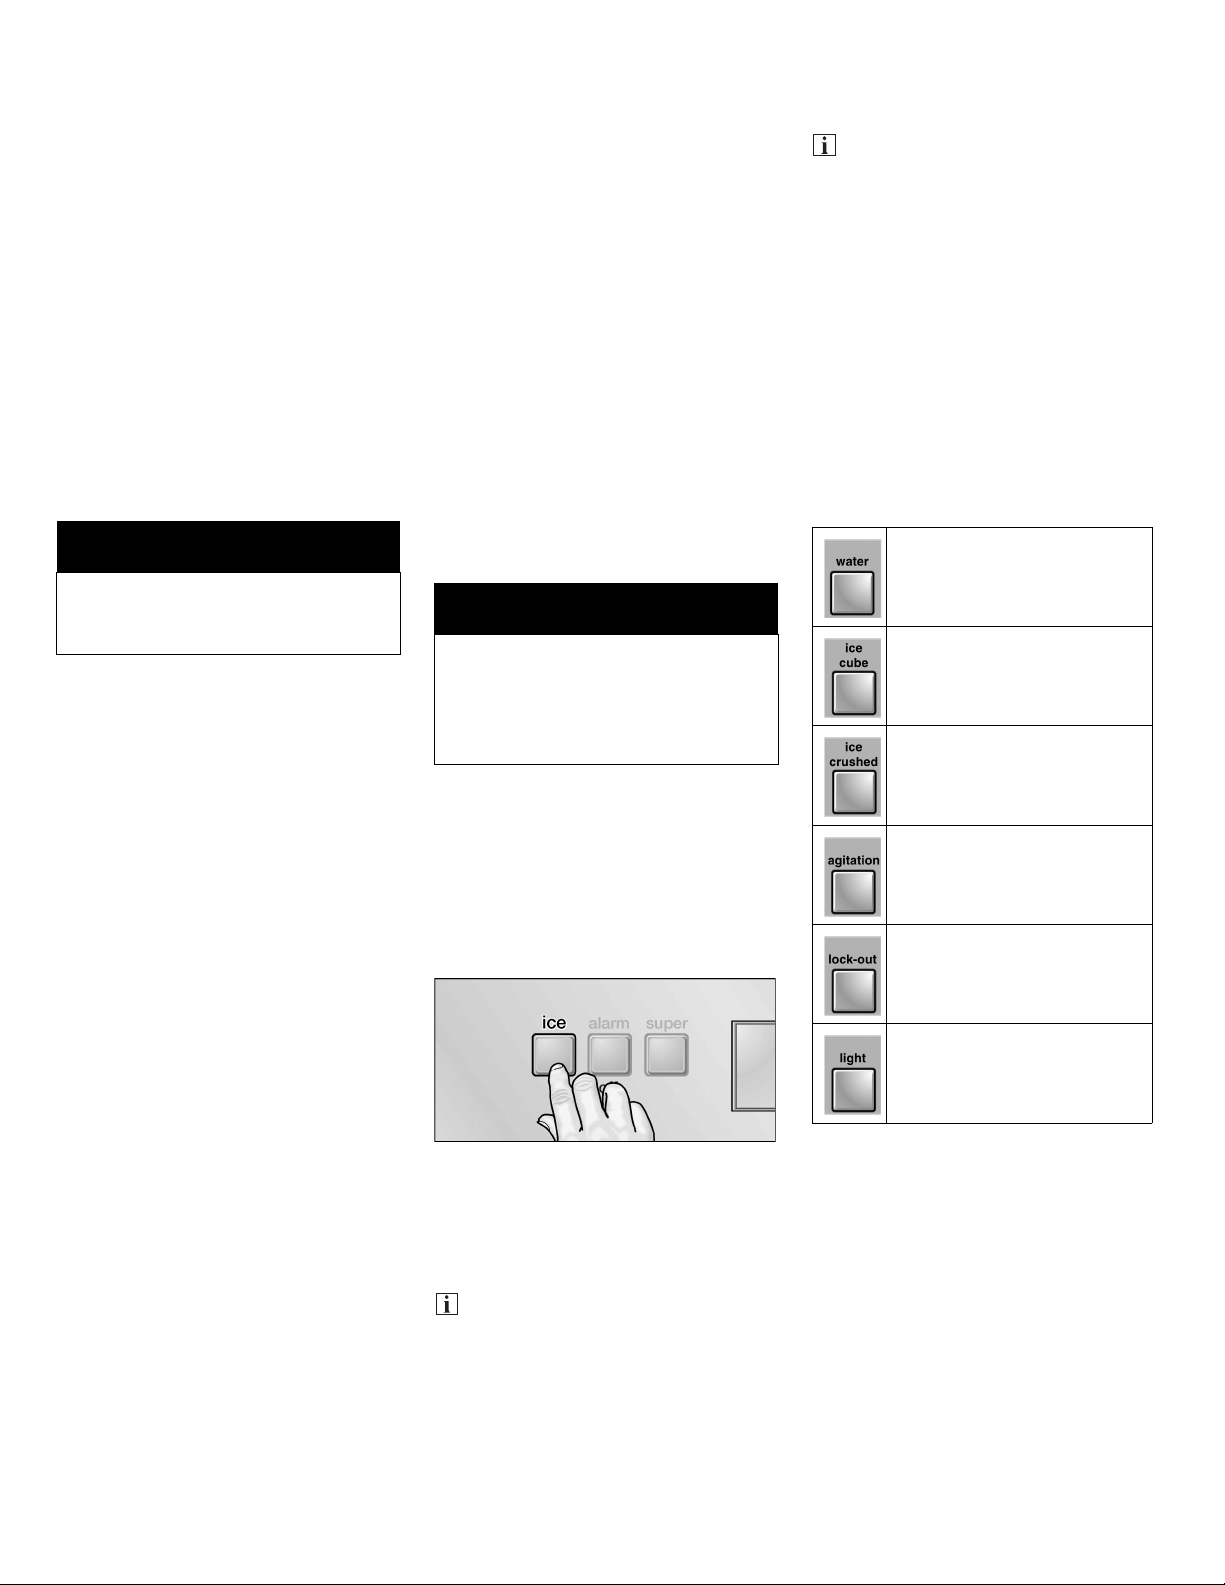
Switching on the ice
maker
Make sure that the ice cube
container is under the ice maker
and has been inserted as far as
possible.
Press the ice button on the
control panel (if not yet switched
on).
The ICE symbol is displayed.
When the appliance has been
switched on, it takes approx.
24 hours until the first batch of
ice cubes are ready.
Switching off the ice
maker
The water supply line must be
shut off several hours before the
appliance or ice maker is
switched off.
To switch off the ice maker:
Press the ice button.
Remove the ice cube container,
empty and re-insert. Ensure that
the ice cube container engages
with the support.
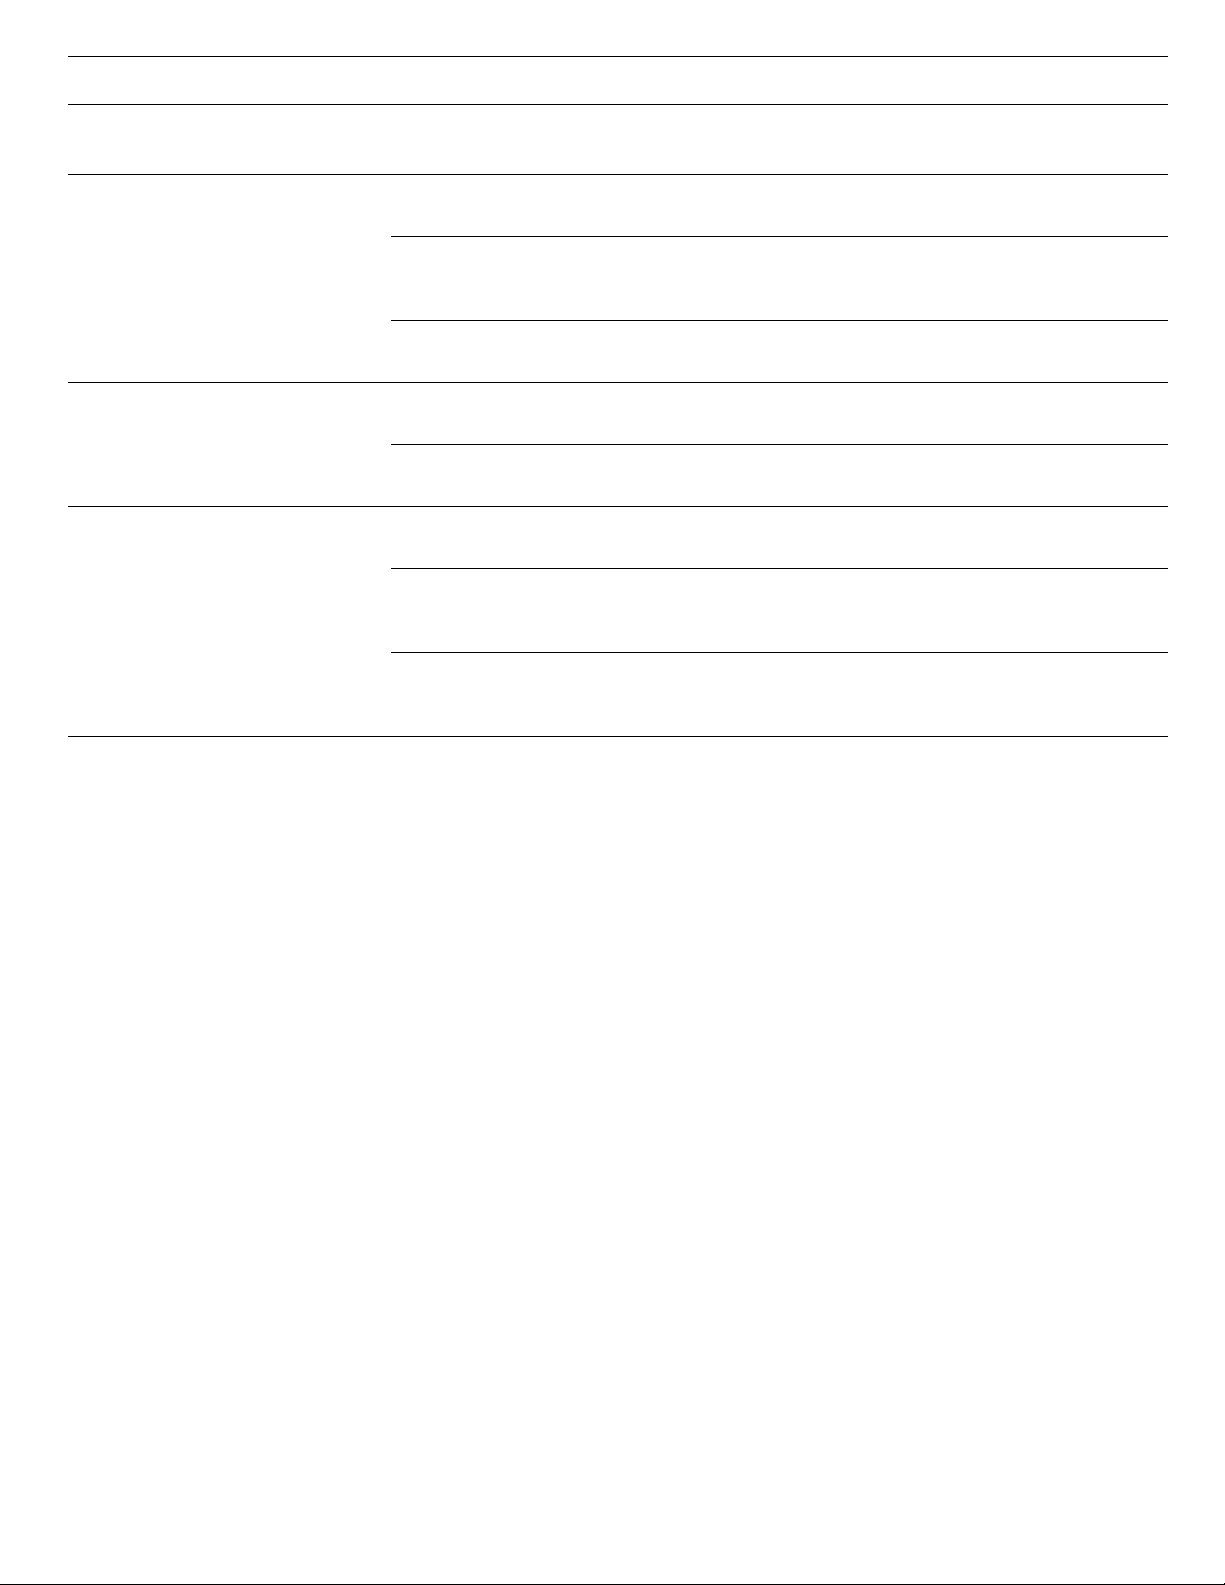
Buttons on the
dispenser key panel
Request button for water.
Request button for
ice cubes.
Request button for
crushed ice.
To switch off (on) the
Agitation function.
Lock button for the
dispenser key panel
(childproof lock).
To switch on (off) the
permanent function of
dispenser light.
14
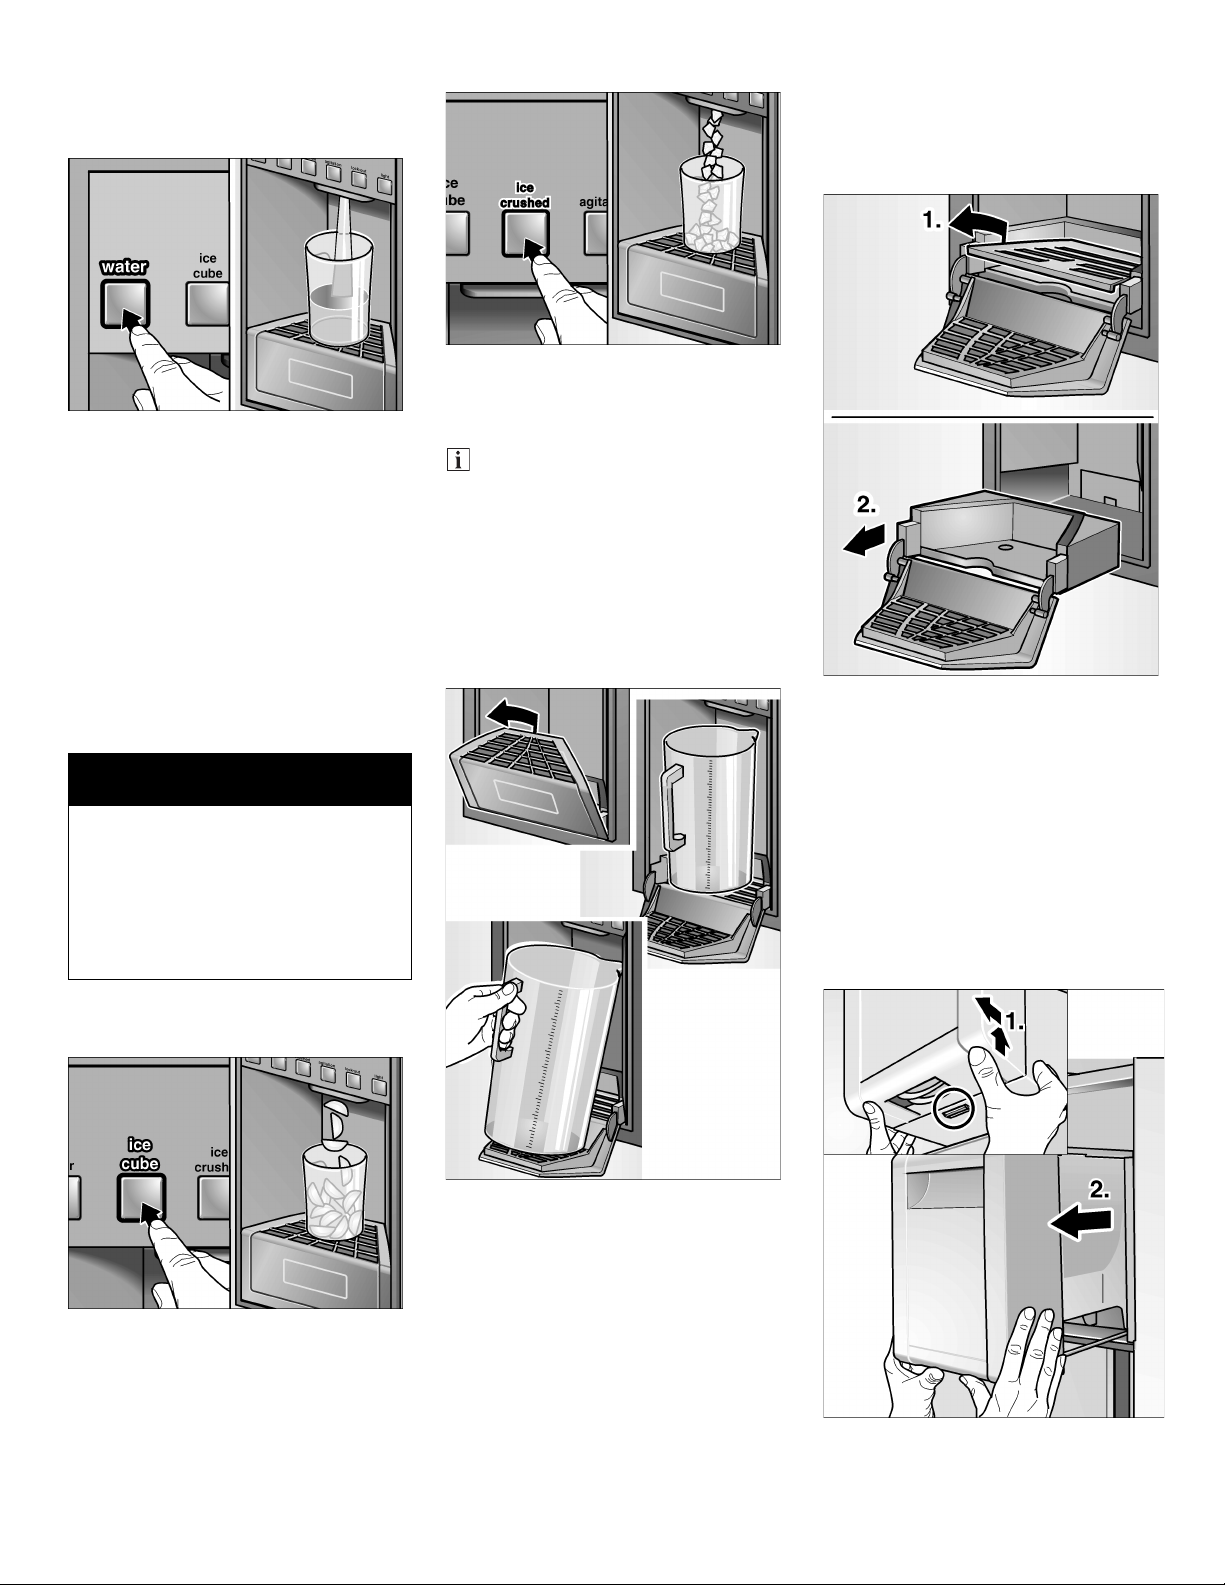
Dispensing water
Place a suitable jar on the drip
plate.
Press the button to request
water. The water stops running
when you release the button.
Tip:
The water from the water dispenser
is cooled to a palatable temperature.
If you would like the water colder,
place ice cubes in the glass before
dispensing the water.
Dispensing ice
CAUTION
Risk of damage!
Do not use the dispensing
function longer than 3 minutes
within a period of 15 minutes.
Wait few minutes before
requesting ice again.
Place a suitable jar on the drip
plate.
or
Press the button to request
crushed ice. The spending stops
when you release the button.
Release the button when the jar
is almost full. Ice in the
discharge may cause the
receptacle to overflow or block
the discharge.
Pull-down pitcher
holder
Removing and cleaning
the pitcher holder
Spilled water collects in the water
collecting tray of the pitcher holder.
The water collecting tray can be
emptied and cleaned by pulling out
the pitcher holder.
Removing and cleaning
the ice cube container
If ice cubes have not been dispensed
for a prolonged period, they will
shrink, have a stale taste and stick
together.
Press the button to request ice
cubes. The spending stops
when you release the button.
To request a larger quantity of water
or ice fold out the pitcher holder.
Now it is possible to place a bigger
jar.
Pull out the ice cube container.
A filled container is heavy!
15

Empty the container and clean
with lukewarm water.
Thoroughly dry the container
and screw conveyor to prevent
new ice cubes from sticking.
To re-insert push the ice cube
container all the way back onto
the supports until it locks into
position.
How to save
energy
– Install the appliance in a dry,
ventilated room; do not expose to
direct sunlight and do not piace
near a heat source (e.g. radiator,
cooker). If required, use an
insulating plate.
– AIIow warm food and drinks to
cool down before placing them in
the appliance.
– Defrost frozen food by placing it in
the freezer. The Iow temperature
of the frozen food will refrigerate
the food in the freezer
compartment.
– Open the appliance door as
briefly as possible!
Noises which can
easily be eliminated
The appliance is not level
Level the appliance with the aid of
a spirit level.
Use the height-adjustable feet or
piace something underneath.
Drawers, baskets or storage areas
wobble or stick
Check the removable parts and,
if required, reinsert them.
Receptacles are touching each
other
Move bottles or receptacles away
from each other.
Defrosting
If the container cannot be
pushed all the way back, twist
the screw conveyor in the
container.
Childproof lock
To prevent against uninteded use
activate the childproof lock.
Press the lock out button on
the dispenser key panel for
3 seconds.
Re-activate the dispenser buttons:
Press the lock out button for
3 seconds again.
The appliance is defrosted
automatically.
Operating
noises
Quite normal noises
Grumbling – refrigerating unit is
running. Fan in the recirculating air
system is running.
Bubbling, humming or gurgling
noises – refrigerant is flowing
through the tubes. Water is flowing
into the ice maker.
Clicking – motor is switching on or
off. Solenoid valve on the water
connection is opening/closing.
Rumbling – ice cubes are falling into
the ice cube container.
Rotating noises – to prevent the ice
cubes from sticking together, a metal
rod in the ice cube container rotates
in periodical cycles (Agitation
function).
16
Cleaning the
appliance
m
To avoid electrical shock which
can cause death or severe
personal injury, disconnect power
to appliance before cleaning.
After cleaning, reconnect power.
m
To avoid personal injuries or
property damage, observe the
following:
– Do not clean the appliance with
a steam cleaner.
– Do not let the water used for
cleaning drip onto the tight or
contro) panel.
– Do not use abrasive or acidic
cleaning agents or solvents
which may damage the
surfaces of the appliance.
– Never clean shelves and
containers in the dishwasher.
The parts may warp.
Switch off the appliance with
Clean the door seal with water
Clean the appliance with
Do not let the water used for
Check the ventilation openings
Wash the shelves and
Carefully remove persistent dirt
WARNING
WARNING
the power button!
Pull out the mains plug or
switch off the fuse.
only and dry thoroughly.
lukewarm water and a little
dishwashing liquid.
cleaning drip onto the control
panel or light.
on the base panel. Remove dirt
with a vacuum cleaner.
containers in lukewarm soapy
water and then rinse with clear
water.
with a soft plastic brush.
m
m
To prevent stains, dry shelves
and containers with a soft cloth
immediately after cleaning.
Check the ventilation openings
on the panel.
After cleaning:
Reinsert the mains plug or
switch on the fuse. Switch on
the appliance with the power
button.
Have your supplier inform you
about special cleaning and care
information for appliance
surfaces.
Wipe appliance surfaces with
a damp cloth. Then immediately
wipe dry.
Odors
If the appliance is emitting
unpleasant odors:
Switch off the appliance with
the power button!
Pull out the mains plug or
switch off the fuse.
Take all food out of the
appliance.
Clean the interior.
See section on „Cleaning the
appliance”.
Thoroughly clean all packing
containers used in the
appliance.
Pack strong-smelling food in
airtight containers to prevent the
build up of odors.
Switch on the appliance again
with the power button.
Stack food in the appliance.
After 24 hours check whether
the odors have been eliminated.
Warning
messages
via the display
If several warning messages are
displayed simultaneously, deal with
each message individually.
While a warning message is
displayed, buttons cannot be
pressed.
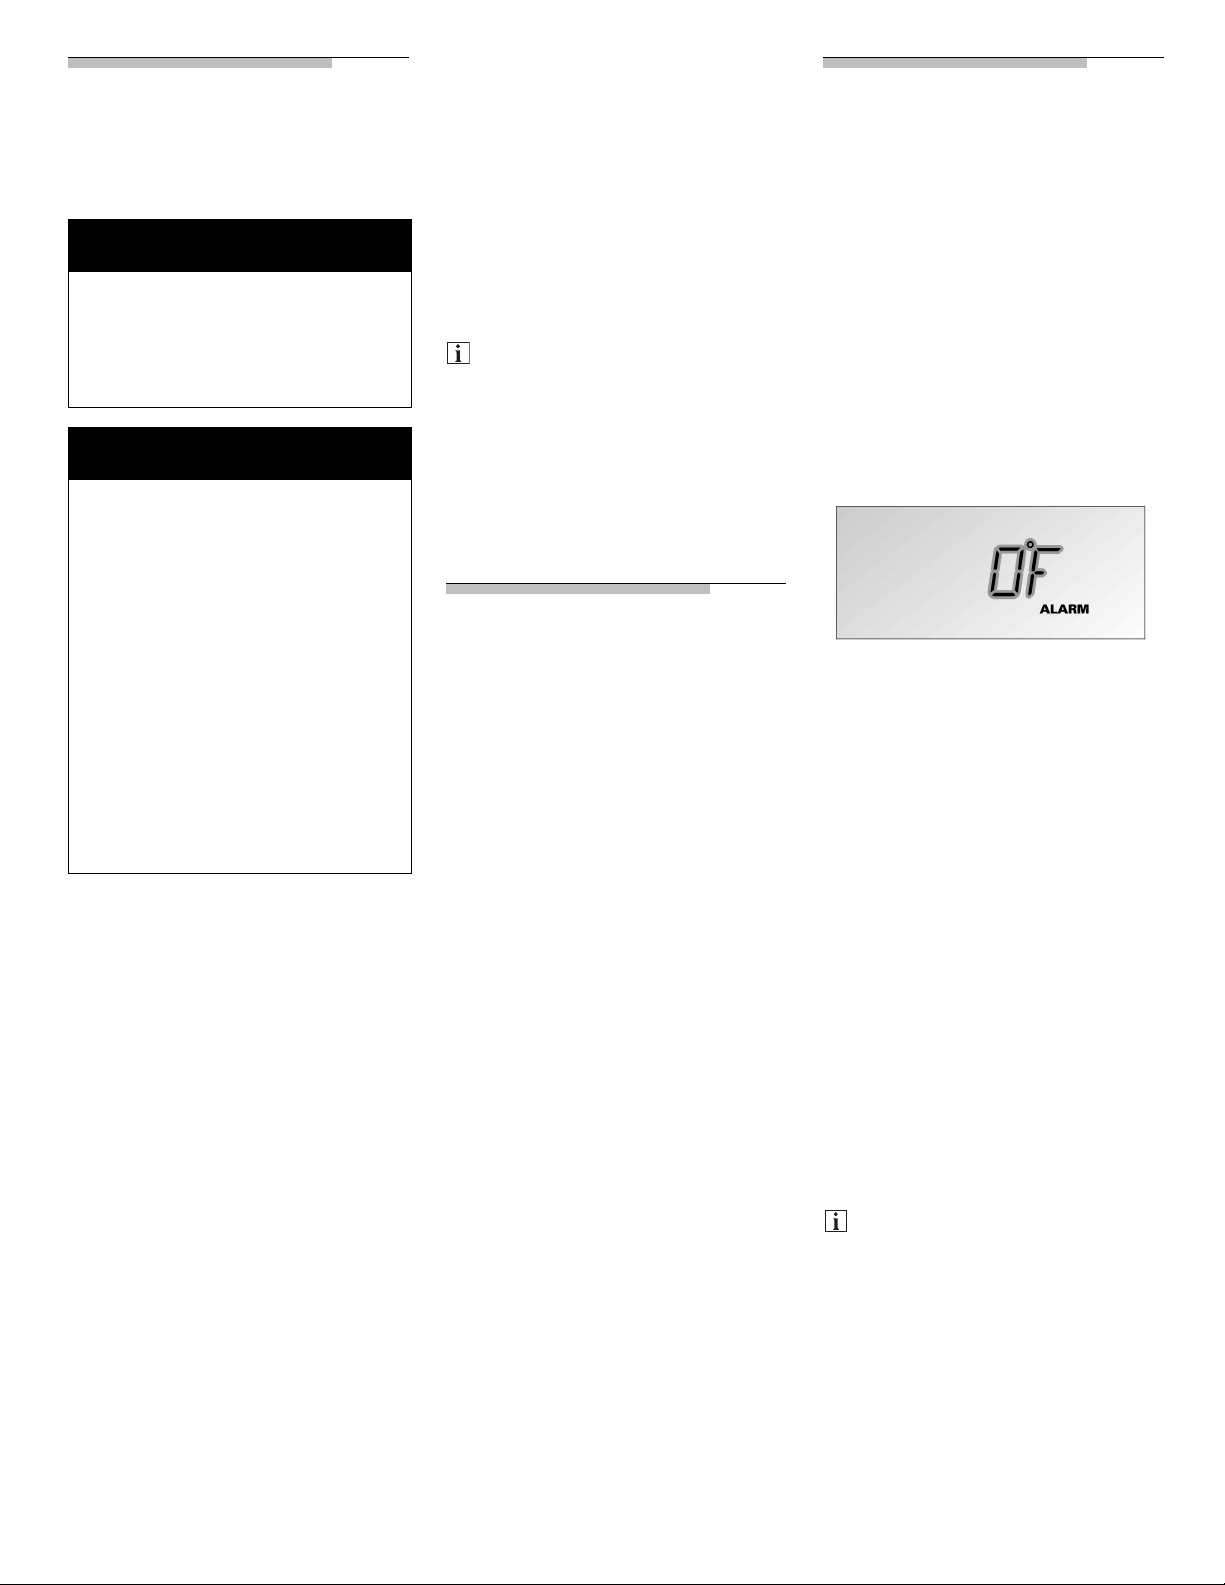
Temperature alarm
A temperature alarm is indicated by
the required temperature flashing
and the ALARM symbol coming on.
A signal also sounds if the Tone
function has been activated in Setup
mode.
Cause
– Power failure
– Large quantities of fresh produce
placed in the appliance
– Fault with the appliance
Remedial action
Press the alarm off button.
The signal stops. The highest
temperature in the appliance is
displayed for several seconds.
Determine the cause of the
temperature alarm.
When the required temperature
is reached again, the ALARM
symbol goes out and the signal
stops.
17
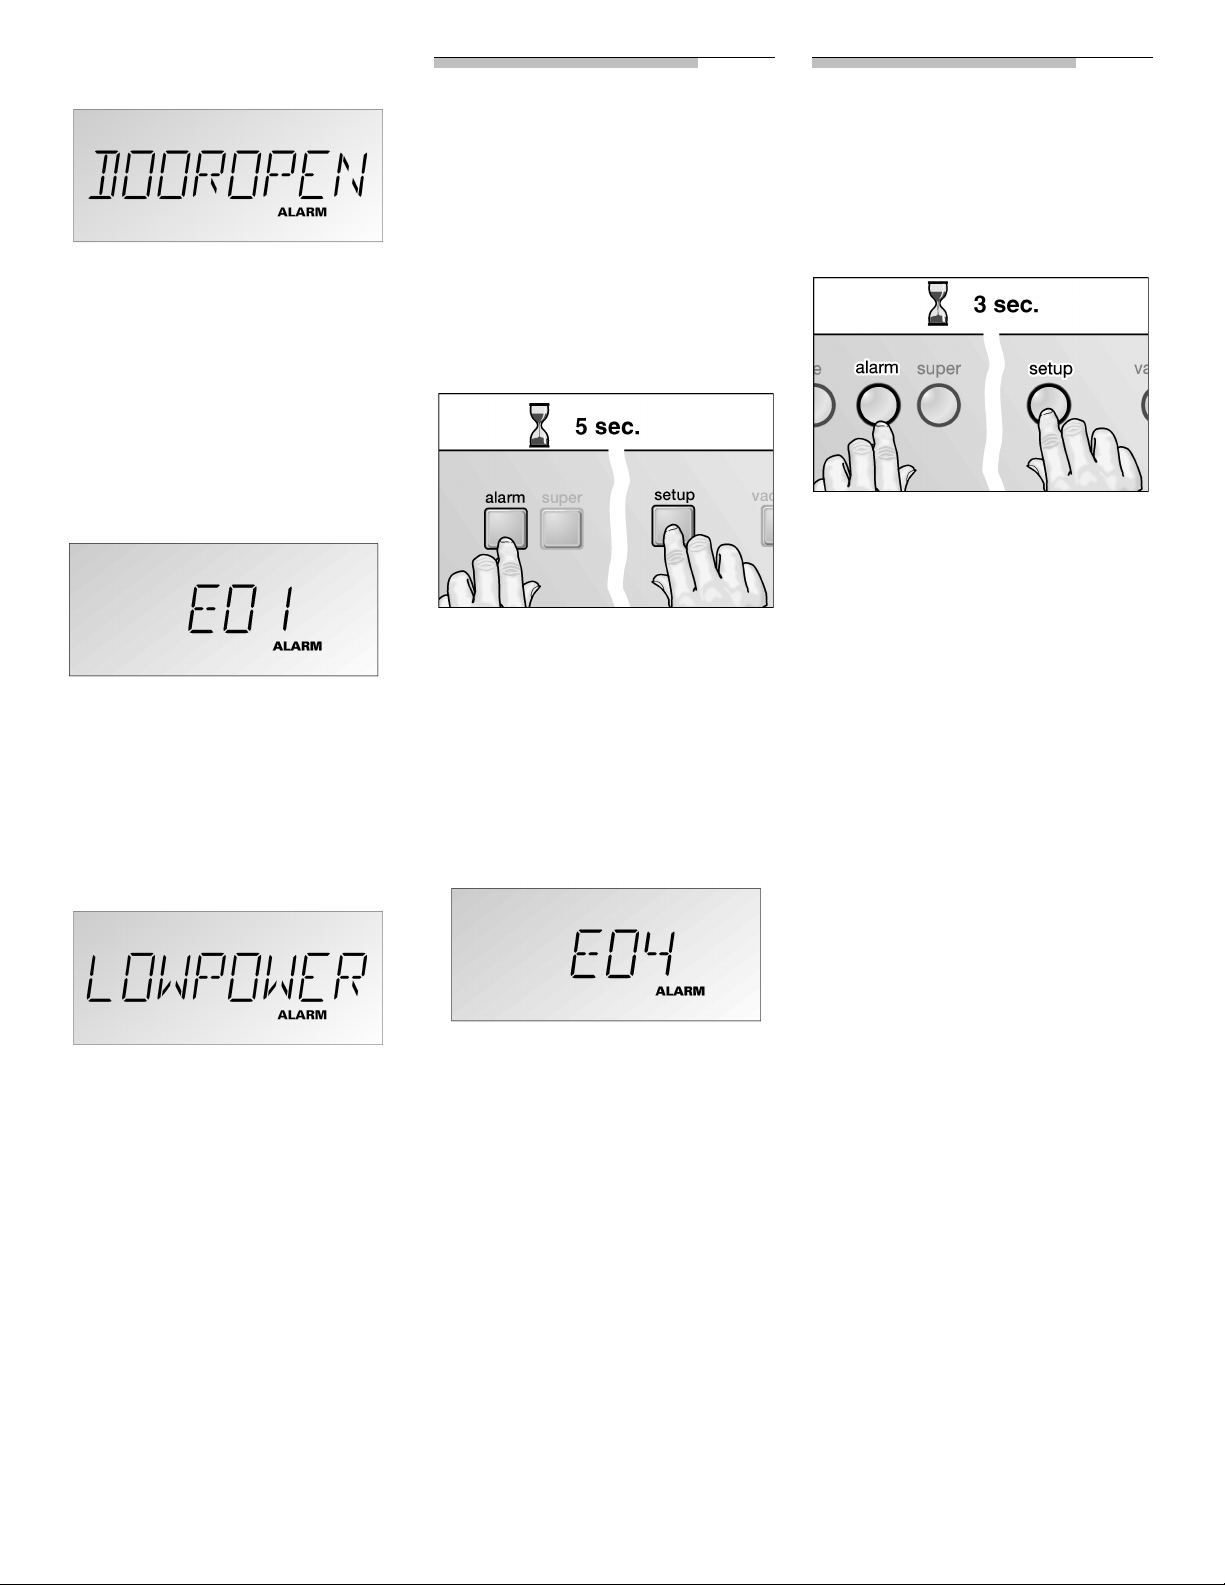
Door alarm
Cause
– An appliance door has not been
closed properly or has been open
too long.
Remedial action
Close the door. The display goes
out.
Sensor fault
Cause
– A technical defect is possible.
Remedial action
Conduct an appliance self-test.
Low voltage
Appliance
self-test
Before you call customer service,
conduct an appliance self-test.
Switch off the appliance and
wait 5 minutes. Keep the door
closed.
Switch on the appliance.
Simultaneously hold down the
setup and alarm off buttons for
5 seconds.
The self-test starts. Different
messages are display in succession.
If a fault is detected during the
self-test, the ALARM symbol and
a corresponding error message,
e.g. for a sensor fault, are displayed.
Resetting
factory settings
Recommended after a change of
owner.
Simultaneously hold down the
setup and alarm off buttons for
3 seconds.
If the factory settings are reset:
– an appliance which is switched off
switches on,
– the Super function switches off,
– settings changed in Setup mode
are reset to factory settings.
The display light has gone out.
Cause
– The mains voltage has dropped
below the permitted limit value.
Remedial action
Buttons cannot be pressed. When
the mains voltage reaches the
stipulated value again, the warning
message goes out. If the warning
message is prolonged, inform your
power supply company.
18
Inform customer service about the
error message.
If the appliance self-test does not
establish any faults, the required
temperature is displayed on
completion of the self-test.
Water filter
m
To avoid serious illness or death,
do not use water that is
microbiological or chemical unsafe
or of unknow quality without
adequate disinfection or other
treatment before or after use of
filter.
WARNING
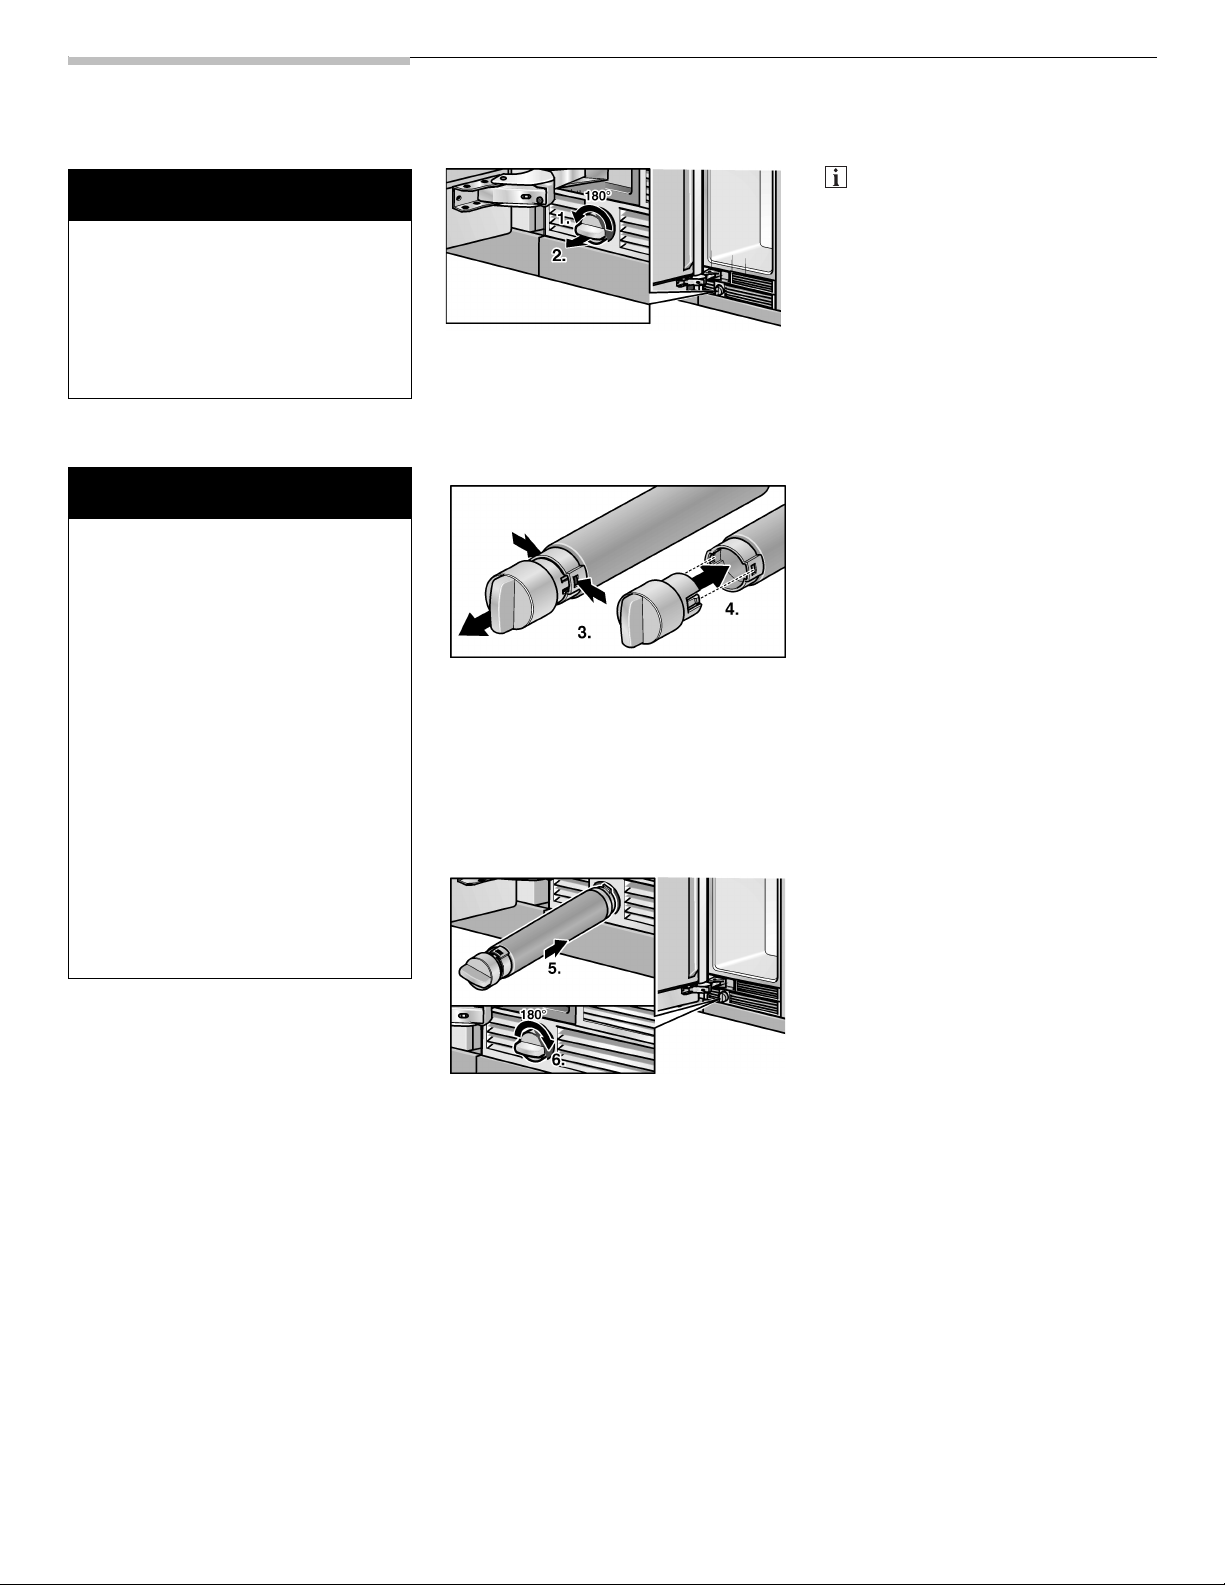
Exchanging the filter
m
– After installing a new water filter
always discard the ice
production of the first 24 hours
after swichting on the icemaker.
– If ice has not been used for a
prolonged time, discard all ice
cubes in the bin and discard the
ice production of the next
24 hours.
– If appliance or ice was not
actively used for several weeks
or months or ice cubes have an
unpleasant taste or odor,
change water filter.
– Air trapped in system may
cause water and cartridge to
eject. Use caution when
removing.
WARNING
m
m
1. Rotate the filter cap on the base
panel by 90°–180° in an anticlockwise direction.
2. Pull the used filter cartridge out
of the appliance.
3. Remove the cap from the used
filter.
Take a new filter cartridge out of
the packaging and remove the
protective cap.
4. Push the cap onto the new filter
cartridge.
The appliance might be used
without a “UltraClarity” water
filter. If you choose this option
replace the water filter by
a water filter substitute
cartridge. To purchase a water
filter substitute cartridge contact
your local dealer or call
1-800-578-6890.
The age of the filter is close to the
maximum life time. Order a new
“UltraClarity” water filter.
To purchase an “UltraClarity”
replacement water filter contact your
local dealer or call 1-800-578-6890.
The filter should be changed at least
every 6 months.
5. Push the filter cartridge with the
cap in a horizontal position all
the way into the opening in the
base panel.
6. Rotate the filter cartridge by
90–180° gently in a clockwise
direction until the cap is in
a horizontal position.
19
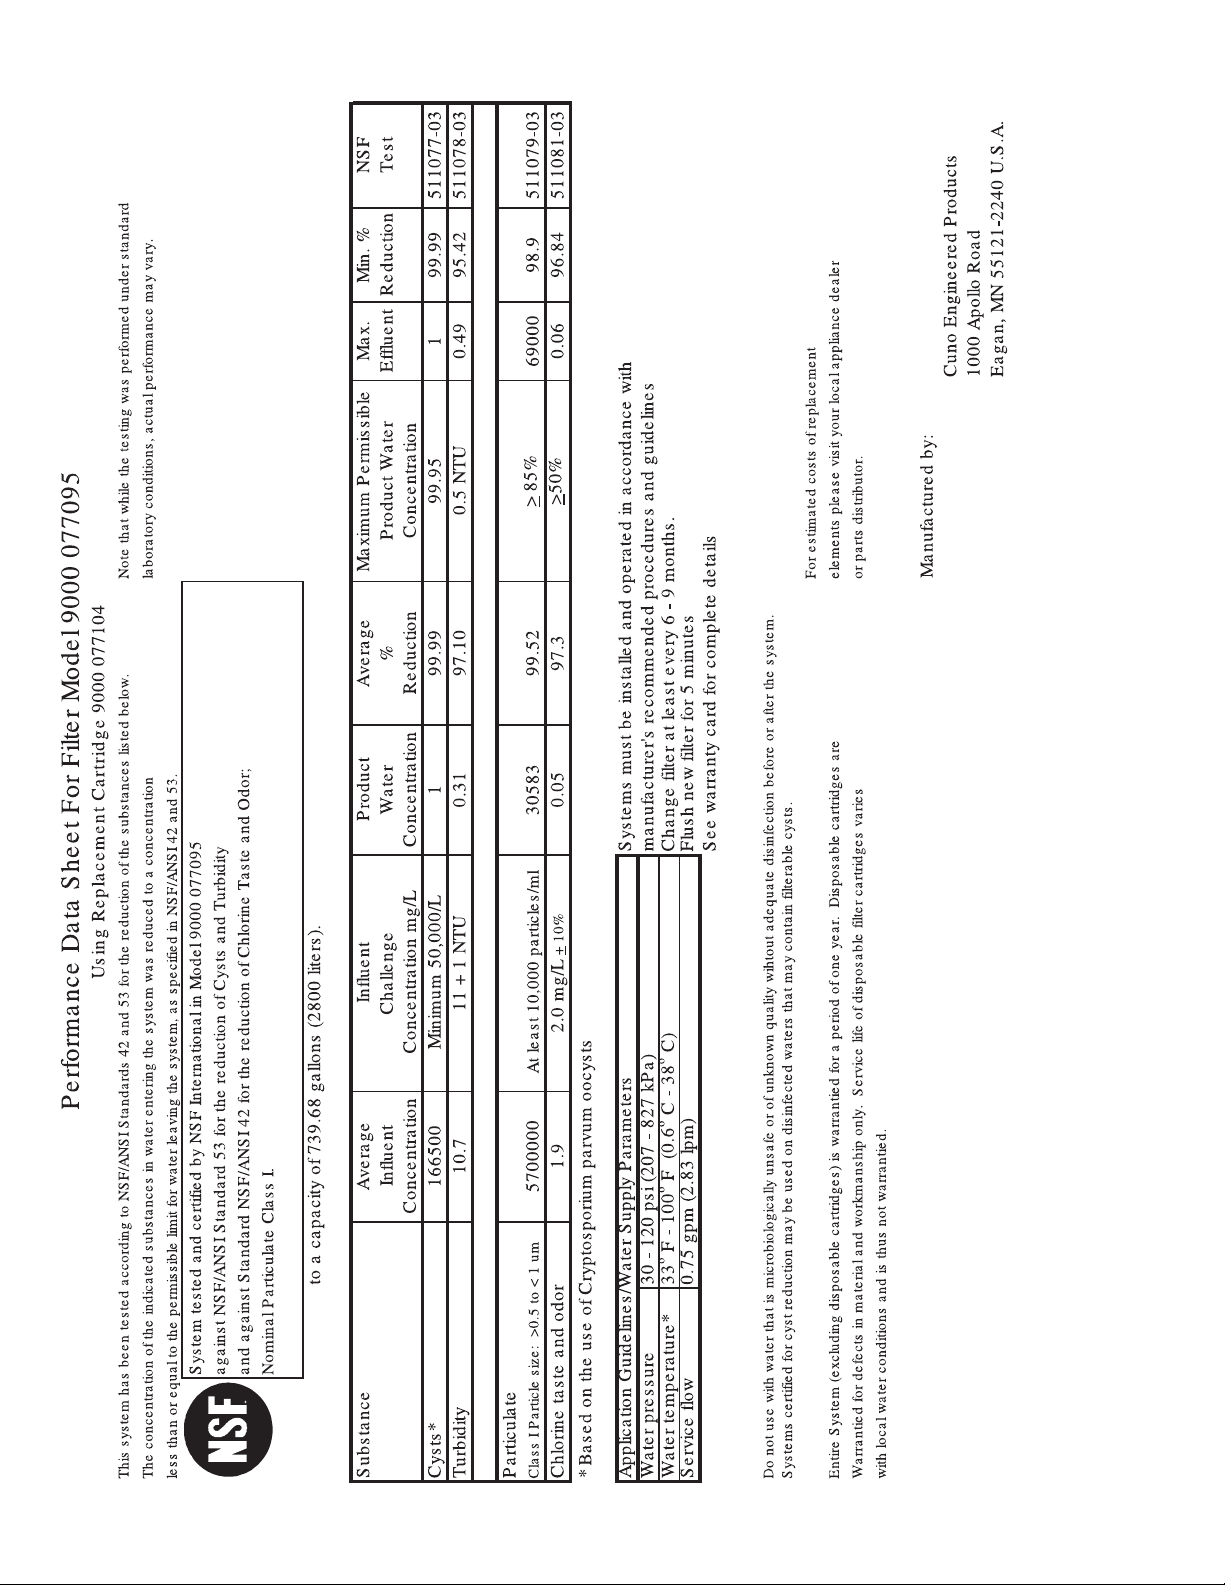
Filter - Product Data Sheet
20
Troubleshooting
Freezer
Fault Possible cause: Remedial action
Appliance has no cooling
capacity. Interior light does not
function. The display does not
illuminate.
The refrigerating unit switches
on more and more frequently
and for longer.
The temperature in the freezer
compartment is too cold.
The interior light does not
function.
The appliance is giving off
odors.
Power failure; the fuse has actuated;
the mains plug has not been inserted
properly.
Appliance door opened frequently. Do not open the door unnecessarily.
Large amounts of fresh food have been
put away.
The ventilation openings have been
covered.
Temperature has been set too low. Select a warmer temperature (see “Setting
The bulb is defective. Change the bulb (see “Changing the bulb”).
Light switch is sticking. Check whether it can be moved.
Strongly smelling food is not sealed. Clean the appliance. Pack strong-smelling
Check that the power is on. The fuse must
be switched on. Check that the mains plug is
plugged in.
Switch on Super function.
Remove obstacles and dirt.
the temperature”)
foods in airtight containers (see “Odors”).
Ice Maker
Fault Possible cause: Remedial action
Request of water is impossible,
but dispensing of ice does
function.
Ice maker and/or dispenser does
not appear to be running.
Small ice cubes over a prolonged
period.
Appliance failure.
The ice maker is not connected to the
power supply.
The childproof lock of dispenser is
activated.
The ice maker has no water supply. Ensure that the water supply line is connected
The freezer compartment temperature is
too high.
Other domestic appliances which use
water are in operation.
Water filter must be changed. Instructions for changing the water filter can be
Call customer service immediately.
Call customer service.
Switch off the childproof lock.
properly. If the water connection is accurat,
call customer service.
Check temperature of the freezer
compartment. If required, lower the
temperature.
Avoid using e.g. a dishwasher, washing
machine or shower at the same time.
found in the section “Water filter”.
21
Fault Possible cause: Remedial action
Small ice cubes over a prolonged
period.
Condensation forms on the
dispenser unit.
Ice cubes have an unpleasant
odor/flavor.
Wrong water pressure. Check water pressure. The water pressure must
be between 25 and 120 p.s.i. (1.72–8.25 bar).
A wrong water valve has been installed.
Self-tapping valves and
3
/16 inch (4.76 mm)
saddle valves reduce the water pressure and
may eventually block the pipe.
The ice maker is switched off (see
“Switching off the ice maker”). The
condensation heater does not function.
You have to activate the condensation heater.
Switch on the ice maker.
Simultaneously hold down the lock out
and the agitation buttons for 3 seconds.
The water light and the ice cube light flash
twice.
The ice maker is switch off and the
condensation heater works.
To re-activate the condensation heater:
Simultaneously hold down the lock out
and the agitation buttons for 3 seconds.
The water light and the ice cube light flash
once.
Ice which is stored for a long time may
absorb odors which impair their taste.
Dispose of old ice cubes. Use the ice maker
more frequently.
The ice cube container is dirty. Empty and wash out the ice cube container.
Unsealed packages in the freezer transfer
odor/flavor particles to the ice cubes.
Check whether the frozen food has been
packed in airtight containers. Clean the inside
of the appliance. See section on “Odors”.
Ice maker is not producing any
ice.
Ice is not dispensed.
The ice cube container is in the false
position.
Reinsert the container and slide it backwards to
the end position (see section “Variable interior
design”).
The water pressure is too low. Check water pressure. The water pressure must
be between 25 and 120 p.s.i. (1.72–8.25 bar).
The freezer compartment temperature is
too high.
Check temperature of the freezer compartment. If required, lower the temperature.
A wrong water valve has been installed. Self-tapping valves and 3/16 inch (4.76 mm)
saddle valves reduce the water pressure and
may eventually block the pipe.
The agitation function in the ice cube
container is switch off. The filling level
Pull-out and empty the ice cube container.
Remove the ice on the sensor.
sensor is blocked.
Two ice cubes can by chance be
attached to each other. These ice cubes,
Open the door.
Remove all of the ice out of the ice chute.
when joined together, can block the ice
chute so that no further ice can be
dispensed.
22
Fault Possible cause: Remedial action
The dispenser light does not
function.
The ice maker is not producing
enough ice or the ice cubes are
misshapen.
Ice is forming in the supply hose
to the ice maker.
Water is flowing out of the
appliance. Æ Close shut-off
valve immediately.
The bulb is defective. Change the bulb (see “Changing the bulb”).
The water pressure is too low. Check water pressure. The water pressure must
be between 25 and 120 p.s.i. (1.72–8.25 bar).
The freezer compartment temperature is
too low.
Change the water filter. Instructions for changing the water filter can be
The water pressure is too low. Check water pressure. The water pressure must
The freezer compartment temperature is
too low.
The water pipe in the appliance is
defective.
The water pressure is too low. The valve may leak if the water pressure is too
A wrong water valve has been installed. Self-tapping valves and 3/16 inch (4.76 mm)
Check temperature of the freezer
compartment. If required increase the
temperature.
found in the section “Water filter”.
be between 25 and 120 p.s.i. (1.72–8.25 bar).
Check temperature of the freezer compartment. If required increase the temperature.
Call customer service immediately.
low. The water pressure must be between
25 and 120 p.s.i. (1.72–8.25 bar).
saddle valves reduce the water pressure and
may eventually block the pipe.
23
 Loading...