

Siemens optiPoint 300 basic Operation And Andministration Manual

optiPoint 300 basic
IP Telephone
Operation and Andministration Manual
Information and
Communications

Copyright © Siemens AG, 2000
All rights reserved.
HiNet is a trademark of Siemens Aktiengesellschaft.
All other brand and product names may be trademarks of their respective holders.
Siemens AG provides this documentation without any warranty of any kind, either implied or expressed, including, but
not limited to, the implied warranties of merchantability or fitness for a particular purpose.

Contents
Safety
For your safety . . . . . . . . . . . . . . . . . . . . . . . . . . . . . . . . . . . . . . . . . . . 8
Protection of the telephone . . . . . . . . . . . . . . . . . . . . . . . . . . . . . . . . . . 8
Location of the telephone . . . . . . . . . . . . . . . . . . . . . . . . . . . . . . . . . . . 8
Product information
About these operating instructions . . . . . . . . . . . . . . . . . . . . . . . . . . . . 9
Intended use . . . . . . . . . . . . . . . . . . . . . . . . . . . . . . . . . . . . . . . . . . . . . 9
Product identification . . . . . . . . . . . . . . . . . . . . . . . . . . . . . . . . . . . . . . 9
Echo effect . . . . . . . . . . . . . . . . . . . . . . . . . . . . . . . . . . . . . . . . . . . . . 10
Service . . . . . . . . . . . . . . . . . . . . . . . . . . . . . . . . . . . . . . . . . . . . . . . . 10
Notes and symbols . . . . . . . . . . . . . . . . . . . . . . . . . . . . . . . . . . . . . . . 11
Safety . . . . . . . . . . . . . . . . . . . . . . . . . . . . . . . . . . . . . . . . . . . . . . . . 11
Symbols in the manual . . . . . . . . . . . . . . . . . . . . . . . . . . . . . . . . . . . 11
Product description . . . . . . . . . . . . . . . . . . . . . . . . . . . . . . . . . . . . . . . 12
Overview . . . . . . . . . . . . . . . . . . . . . . . . . . . . . . . . . . . . . . . . . . . . . . 12
Features . . . . . . . . . . . . . . . . . . . . . . . . . . . . . . . . . . . . . . . . . . . . . . 12
Layout of the telephone . . . . . . . . . . . . . . . . . . . . . . . . . . . . . . . . . . 13
Standard package . . . . . . . . . . . . . . . . . . . . . . . . . . . . . . . . . . . . . . 14
8
9
Display and controls
Display . . . . . . . . . . . . . . . . . . . . . . . . . . . . . . . . . . . . . . . . . . . . . . . . 15
Symbol keys . . . . . . . . . . . . . . . . . . . . . . . . . . . . . . . . . . . . . . . . . . . 16
Programmable keys . . . . . . . . . . . . . . . . . . . . . . . . . . . . . . . . . . . . . . 17
Control keys . . . . . . . . . . . . . . . . . . . . . . . . . . . . . . . . . . . . . . . . . . . . 17
Installation
Preparing the telephone . . . . . . . . . . . . . . . . . . . . . . . . . . . . . . . . . . . 18
Integrating the telephone into the communication environment . . . . . 19
Loading the application software . . . . . . . . . . . . . . . . . . . . . . . . . . . 19
18
15

HiPath system with DHCP server . . . . . . . . . . . . . . . . . . . . . . . . . . . 20
HiPath system without DHCP server . . . . . . . . . . . . . . . . . . . . . . . . 21
Label quick-dial keys . . . . . . . . . . . . . . . . . . . . . . . . . . . . . . . . . . . . . 22
Operation
Basic operation . . . . . . . . . . . . . . . . . . . . . . . . . . . . . . . . . . . . . . . . . . 23
Making a call . . . . . . . . . . . . . . . . . . . . . . . . . . . . . . . . . . . . . . . . . . . . 24
Dialling with handset picked up . . . . . . . . . . . . . . . . . . . . . . . . . . . . 24
Dialling with handset in cradle (on-hook dialling) . . . . . . . . . . . . . . 25
Incoming call . . . . . . . . . . . . . . . . . . . . . . . . . . . . . . . . . . . . . . . . . . . . 26
Incoming call while in idle mode . . . . . . . . . . . . . . . . . . . . . . . . . . . . 26
Second incoming call . . . . . . . . . . . . . . . . . . . . . . . . . . . . . . . . . . . . 27
Placing a second call (consultation) . . . . . . . . . . . . . . . . . . . . . . . . . . 28
Place a second call . . . . . . . . . . . . . . . . . . . . . . . . . . . . . . . . . . . . . . 28
Changing between callers . . . . . . . . . . . . . . . . . . . . . . . . . . . . . . . . 29
End consultation . . . . . . . . . . . . . . . . . . . . . . . . . . . . . . . . . . . . . . . . 29
Terminating a connection . . . . . . . . . . . . . . . . . . . . . . . . . . . . . . . . . . 30
Ending a call . . . . . . . . . . . . . . . . . . . . . . . . . . . . . . . . . . . . . . . . . . . 30
Your caller hangs up . . . . . . . . . . . . . . . . . . . . . . . . . . . . . . . . . . . . . 30
Changing the settings . . . . . . . . . . . . . . . . . . . . . . . . . . . . . . . . . . . . . 31
Turning on the speakerphone . . . . . . . . . . . . . . . . . . . . . . . . . . . . . . 31
Adjusting speakerphone volume . . . . . . . . . . . . . . . . . . . . . . . . . . . 31
Using the mute control . . . . . . . . . . . . . . . . . . . . . . . . . . . . . . . . . . . 32
Turning on the speakerphone . . . . . . . . . . . . . . . . . . . . . . . . . . . . . . 32
Enable call-waiting . . . . . . . . . . . . . . . . . . . . . . . . . . . . . . . . . . . . . . 33
Display elapsed call duration . . . . . . . . . . . . . . . . . . . . . . . . . . . . . . 33
Display your telephone number . . . . . . . . . . . . . . . . . . . . . . . . . . . . 33
Adjusting handset volume . . . . . . . . . . . . . . . . . . . . . . . . . . . . . . . . 34
Adjusting ringer volume . . . . . . . . . . . . . . . . . . . . . . . . . . . . . . . . . . 35
Adjusting display contrast . . . . . . . . . . . . . . . . . . . . . . . . . . . . . . . . . 36
Advanced dialling features . . . . . . . . . . . . . . . . . . . . . . . . . . . . . . . . . 37
Redial feature . . . . . . . . . . . . . . . . . . . . . . . . . . . . . . . . . . . . . . . . . . 37
Quick-dial feature . . . . . . . . . . . . . . . . . . . . . . . . . . . . . . . . . . . . . . . 37
Programming the unit . . . . . . . . . . . . . . . . . . . . . . . . . . . . . . . . . . . . . 38
Programming the quick-dial keys . . . . . . . . . . . . . . . . . . . . . . . . . . . 38
Editing the redial number . . . . . . . . . . . . . . . . . . . . . . . . . . . . . . . . . 39
23

Adjusting date/time . . . . . . . . . . . . . . . . . . . . . . . . . . . . . . . . . . . . . . 39
Customising the ringer . . . . . . . . . . . . . . . . . . . . . . . . . . . . . . . . . . . 40
Incoming call while in programming mode . . . . . . . . . . . . . . . . . . . . 42
Configuration and administration
Service mode . . . . . . . . . . . . . . . . . . . . . . . . . . . . . . . . . . . . . . . . . . . 44
Changing to service mode . . . . . . . . . . . . . . . . . . . . . . . . . . . . . . . . 44
Incoming call while in service mode . . . . . . . . . . . . . . . . . . . . . . . . . 46
Configuration . . . . . . . . . . . . . . . . . . . . . . . . . . . . . . . . . . . . . . . . . . . 47
Country setting . . . . . . . . . . . . . . . . . . . . . . . . . . . . . . . . . . . . . . . . . 47
DTMF dialling . . . . . . . . . . . . . . . . . . . . . . . . . . . . . . . . . . . . . . . . . . 47
Daylight Savings Time . . . . . . . . . . . . . . . . . . . . . . . . . . . . . . . . . . . 48
Key click . . . . . . . . . . . . . . . . . . . . . . . . . . . . . . . . . . . . . . . . . . . . . . 48
Administration . . . . . . . . . . . . . . . . . . . . . . . . . . . . . . . . . . . . . . . . . . . 49
Firmware version (read only) . . . . . . . . . . . . . . . . . . . . . . . . . . . . . . 49
Application version (read only) . . . . . . . . . . . . . . . . . . . . . . . . . . . . . 49
IP assignment by DHCP . . . . . . . . . . . . . . . . . . . . . . . . . . . . . . . . . . 50
GK discovery IP . . . . . . . . . . . . . . . . . . . . . . . . . . . . . . . . . . . . . . . . 50
HiPath . . . . . . . . . . . . . . . . . . . . . . . . . . . . . . . . . . . . . . . . . . . . . . . . 51
Telephone number . . . . . . . . . . . . . . . . . . . . . . . . . . . . . . . . . . . . . . 51
IP address . . . . . . . . . . . . . . . . . . . . . . . . . . . . . . . . . . . . . . . . . . . . 52
Subnet mask . . . . . . . . . . . . . . . . . . . . . . . . . . . . . . . . . . . . . . . . . . . 52
Gatekeeper’s IP address . . . . . . . . . . . . . . . . . . . . . . . . . . . . . . . . . 53
Download server’s IP address . . . . . . . . . . . . . . . . . . . . . . . . . . . . . 53
SNTP server IP address . . . . . . . . . . . . . . . . . . . . . . . . . . . . . . . . . . 54
Time zone offset . . . . . . . . . . . . . . . . . . . . . . . . . . . . . . . . . . . . . . . . 54
Terminal NIC MAC (read only) . . . . . . . . . . . . . . . . . . . . . . . . . . . . . 55
HiPath PIN . . . . . . . . . . . . . . . . . . . . . . . . . . . . . . . . . . . . . . . . . . . . 55
Administration from a web server . . . . . . . . . . . . . . . . . . . . . . . . . . . . 56
Diagnostics . . . . . . . . . . . . . . . . . . . . . . . . . . . . . . . . . . . . . . . . . . . . . 57
Display test . . . . . . . . . . . . . . . . . . . . . . . . . . . . . . . . . . . . . . . . . . . . 57
Keyboard test . . . . . . . . . . . . . . . . . . . . . . . . . . . . . . . . . . . . . . . . . . 57
Audio loop test . . . . . . . . . . . . . . . . . . . . . . . . . . . . . . . . . . . . . . . . . 58
RAM test . . . . . . . . . . . . . . . . . . . . . . . . . . . . . . . . . . . . . . . . . . . . . . 58
ROM test . . . . . . . . . . . . . . . . . . . . . . . . . . . . . . . . . . . . . . . . . . . . . 59
PING test . . . . . . . . . . . . . . . . . . . . . . . . . . . . . . . . . . . . . . . . . . . . . 60
MIB2 . . . . . . . . . . . . . . . . . . . . . . . . . . . . . . . . . . . . . . . . . . . . . . . . . 60
43

Terminal reset . . . . . . . . . . . . . . . . . . . . . . . . . . . . . . . . . . . . . . . . . . . 61
Telephone restart . . . . . . . . . . . . . . . . . . . . . . . . . . . . . . . . . . . . . . . 61
Restore factory default settings . . . . . . . . . . . . . . . . . . . . . . . . . . . . 61
Telephone not available . . . . . . . . . . . . . . . . . . . . . . . . . . . . . . . . . . 62
Download . . . . . . . . . . . . . . . . . . . . . . . . . . . . . . . . . . . . . . . . . . . . . . 63
The web pages
Introduction . . . . . . . . . . . . . . . . . . . . . . . . . . . . . . . . . . . . . . . . . . . . . 64
Authentication . . . . . . . . . . . . . . . . . . . . . . . . . . . . . . . . . . . . . . . . . . 64
Browser compatibility . . . . . . . . . . . . . . . . . . . . . . . . . . . . . . . . . . . . 64
Navigation . . . . . . . . . . . . . . . . . . . . . . . . . . . . . . . . . . . . . . . . . . . . . 64
User error handling . . . . . . . . . . . . . . . . . . . . . . . . . . . . . . . . . . . . . . 65
Overall structure . . . . . . . . . . . . . . . . . . . . . . . . . . . . . . . . . . . . . . . . 66
Pages . . . . . . . . . . . . . . . . . . . . . . . . . . . . . . . . . . . . . . . . . . . . . . . . . 67
Frameset . . . . . . . . . . . . . . . . . . . . . . . . . . . . . . . . . . . . . . . . . . . . . 67
Home page . . . . . . . . . . . . . . . . . . . . . . . . . . . . . . . . . . . . . . . . . . . . 68
HiPath administrator login . . . . . . . . . . . . . . . . . . . . . . . . . . . . . . . . 68
Local administrator login . . . . . . . . . . . . . . . . . . . . . . . . . . . . . . . . . . 69
Administration . . . . . . . . . . . . . . . . . . . . . . . . . . . . . . . . . . . . . . . . . . 69
General information . . . . . . . . . . . . . . . . . . . . . . . . . . . . . . . . . . . . . 70
Administrator settings . . . . . . . . . . . . . . . . . . . . . . . . . . . . . . . . . . . . 70
IP address and routing . . . . . . . . . . . . . . . . . . . . . . . . . . . . . . . . . . . 71
Gatekeeper information . . . . . . . . . . . . . . . . . . . . . . . . . . . . . . . . . . 72
Speech parameters . . . . . . . . . . . . . . . . . . . . . . . . . . . . . . . . . . . . . 72
Time & date . . . . . . . . . . . . . . . . . . . . . . . . . . . . . . . . . . . . . . . . . . . 73
File transfer . . . . . . . . . . . . . . . . . . . . . . . . . . . . . . . . . . . . . . . . . . . . 74
FTP username & password . . . . . . . . . . . . . . . . . . . . . . . . . . . . . . . 75
SNMP information . . . . . . . . . . . . . . . . . . . . . . . . . . . . . . . . . . . . . . 75
Download application . . . . . . . . . . . . . . . . . . . . . . . . . . . . . . . . . . . . 76
Save (upload) configuration . . . . . . . . . . . . . . . . . . . . . . . . . . . . . . . 76
Restore (download) configuration . . . . . . . . . . . . . . . . . . . . . . . . . . . 77
Restart terminal . . . . . . . . . . . . . . . . . . . . . . . . . . . . . . . . . . . . . . . . 77
Diagnostics . . . . . . . . . . . . . . . . . . . . . . . . . . . . . . . . . . . . . . . . . . . . 78
Change administrator password . . . . . . . . . . . . . . . . . . . . . . . . . . . . 79
64
Annex
80

Errors . . . . . . . . . . . . . . . . . . . . . . . . . . . . . . . . . . . . . . . . . . . . . . . . . 80
Error messages . . . . . . . . . . . . . . . . . . . . . . . . . . . . . . . . . . . . . . . . 80
Configurations . . . . . . . . . . . . . . . . . . . . . . . . . . . . . . . . . . . . . . . . . . 81
Country settings . . . . . . . . . . . . . . . . . . . . . . . . . . . . . . . . . . . . . . . . 81
Factory default settings . . . . . . . . . . . . . . . . . . . . . . . . . . . . . . . . . . . 82
Local functions . . . . . . . . . . . . . . . . . . . . . . . . . . . . . . . . . . . . . . . . . 82
Audio . . . . . . . . . . . . . . . . . . . . . . . . . . . . . . . . . . . . . . . . . . . . . . . . 82
Configuration . . . . . . . . . . . . . . . . . . . . . . . . . . . . . . . . . . . . . . . . . . 83
Administration . . . . . . . . . . . . . . . . . . . . . . . . . . . . . . . . . . . . . . . . . . 84
Diagnostics . . . . . . . . . . . . . . . . . . . . . . . . . . . . . . . . . . . . . . . . . . . . 84
Technical data . . . . . . . . . . . . . . . . . . . . . . . . . . . . . . . . . . . . . . . . . 85
Abbreviations . . . . . . . . . . . . . . . . . . . . . . . . . . . . . . . . . . . . . . . . . . 86
Index
87

Safety
For your safety
The IP telephone optiPoint 300 basic complies with the European
standard EN 60 950 which deals with the safety of information
technology appliances including electronic office equipment. This
device has been designed with safety in mind, thus protecting
both individuals and objects.
There is always the danger of small objects being swallowed by
young children. In the case of the optiPoint 300 basic, this applies
in particular to the connecting cord clip.
Please make sure that such items are not accessible to children.
Use only the enclosed power supply and the special LAN ca-
●
ble.
Never open the power supply enclosure.
●
Protection of the telephone
The telephone must not be used in bathrooms, etc. as it is not
●
splashproof.
Before connecting or disconnecting the LAN cable or the
●
headset cord, pull the power plug out of the plug receptacle
first.
Safety
Location of the telephone
●
The telephone should be operated in a controlled en vironment
with an ambient temperature between 5˚C and 40˚C (41˚F and
104˚F).
●
Do not install the telephone in a room where large quantities
of dust accumulate; this can considerably reduce the service
life of the telephone.
Do not expose the telephone to direct sunlight or any other
●
source of heat, as this is liable to damage the electronic equipment and the plastic casing.
Do not operate the telephone in damp environments such as
●
bathrooms.
8

Product information
About these operating instructions
These operating instructions will help you get to know the optiPoint 300 basic and to use its functions. The instructions contain
important information for safe and proper operation of the optiPoint 300 basic. Follo w them carefully to avoid improper oper ation
and get the most out of your multi-function telephone in a network
environment.
These operating instructions must be read and followed by every
person installing, operating or programming the optiPoint 300
basic.
For your own protection, please read the section dealing
with safety. F ollo w the safety instructions carefully in order to avoid endangering yourself or other persons and
to prevent damage to the unit.
These operating instructions are laid out in a user-oriented manner, which means that you are led through the operation of the
optiPoint 300 basic step by step – starting from the description of
simple basic functions, continuing through the setting of all operating parameters, and ending with the special functions and administrative tasks at the end of the manual. The separate quick reference guide brings together basic information on the most
commonly used functions.
Product information
Intended use
Product identification
The optiPoint 300 basic telephone is a desktop unit designed for
voice transmission and for connection to a LAN. It can be operated
also as a stand-alone unit. Any other use is regarded as not prescribed.
The identification details of your telephone are given on the nameplate containing the exact product desgination and serial number
on the bottom of the base unit. Please hav e these ready whenev er
you call our service department because of trouble with or defects
on the unit itself.
9

Echo effect
Service
Product information
In some cases, while using the telephone you may hear an echo,
which can be quite strong. This is not due to any design defect or
other fault with your IP telephone, but caused by the other client.
For example, if the echo occurs during a teleconf erence, it may be
that the loudspeakers and microphones need to be repositioned.
The Siemens service department can only help you
with trouble or defects on the unit itself.
Should you have any questions regarding the operation, your specialist retailer or network administrator will
gladly help you with the right answers.
For any questions regarding the telephone connection,
please contact your network provider.
In the case of any trouble or defects on the unit itself, please dial
the service number of your country.
10
Notes and symbols
Safety
Symbols in the manual
Product information
Information that is important for preventing injury or damages is
marked specially , as they are important instructions for correct use
of the unit.
This symbol indicates a hazard. Failure to follow the instructions given may result in injury or in damage to the
unit.
Key inf ormation important for the proper use of the unit
is marked with this symbol.
The operating steps of actions are shown as follows:
Lift the handset.
●
●
Dial the required number.
●
...
Where several diff erent options or possibilities are described, they
are shown like this:
– Option A
– Option B
– ...
11

Product description
Overview
Product information
The IP telephone optiPoint 300 basic is a modern multi-function
telephone set. It is designed to be connected to a data network,
and it is not directly connected with an ISDN system or to the
PSTN.
Y ou can use the optiP oint 300 basic in the same wa y as you would
use a normal telephone – the only difference being that you’re
making it via a data network. The telephone is equipped with an
Ethernet interface so that when using the TCP/IP protocol, you
can make the telephone calls both via your own intranet and via
the worldwide internet. Its conformity to international standards
such as H.323 makes it possible to use this telephone for video
conferences via a LAN. The optiPoint 300 basic supports other
standard protocols, optimizing data and voice transmission and
simplifying the associated network administration task. It is f or e xample possible to download updates of equipment software or extended features to the optiPoint 300 basic via an FTP server.
The optiPoint 300 basic is provided with a one-line display and
special function keys enabling a user-friendly operation. Thanks to
its advanced features, it can be customised to meet most user requirements.
Features
– numerical display
– time and date display
– speakerphone
– re-dial feature
– on-hook dialling
– programmable quick-dial keys
– selected dialling destination numbers storable to dialling keys
– caller identification
– consultation, alternating, waiting
– password protection for administrator tasks
– variable ringer melody, volume and sequence
– wall fastening device (optional)
12
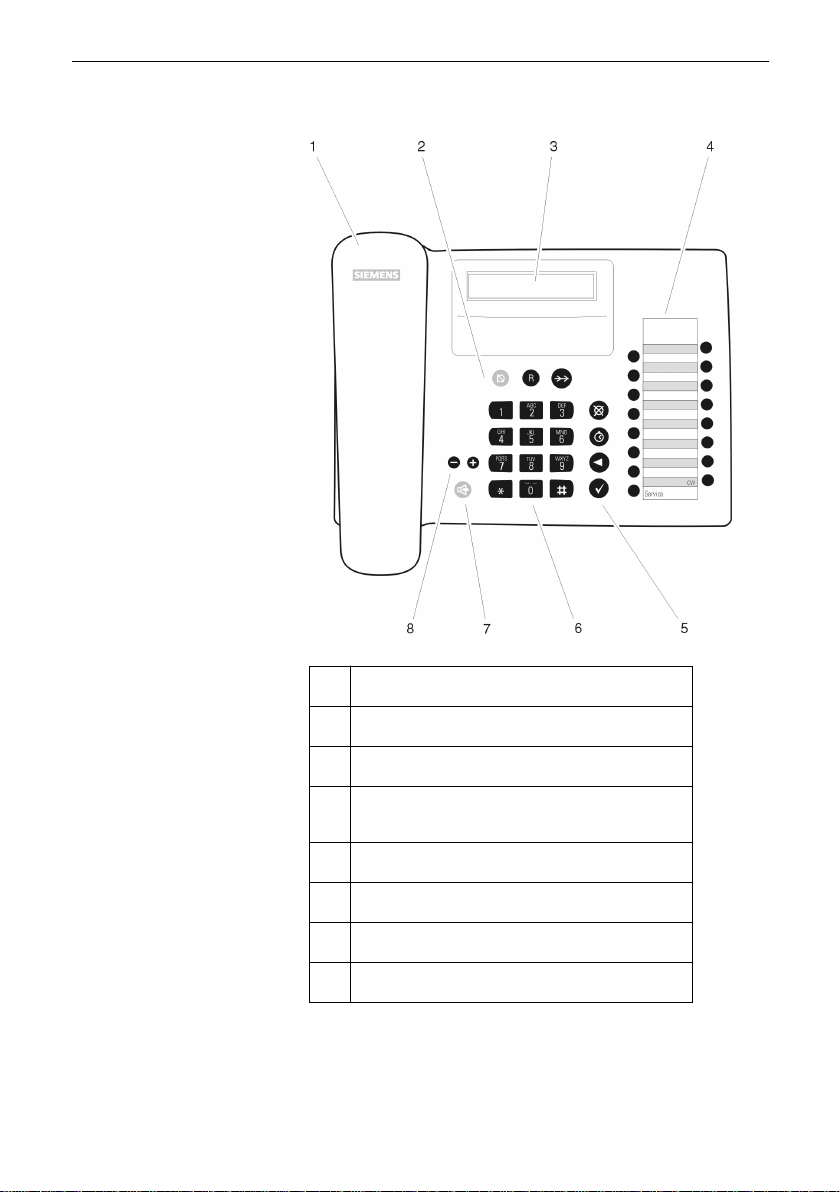
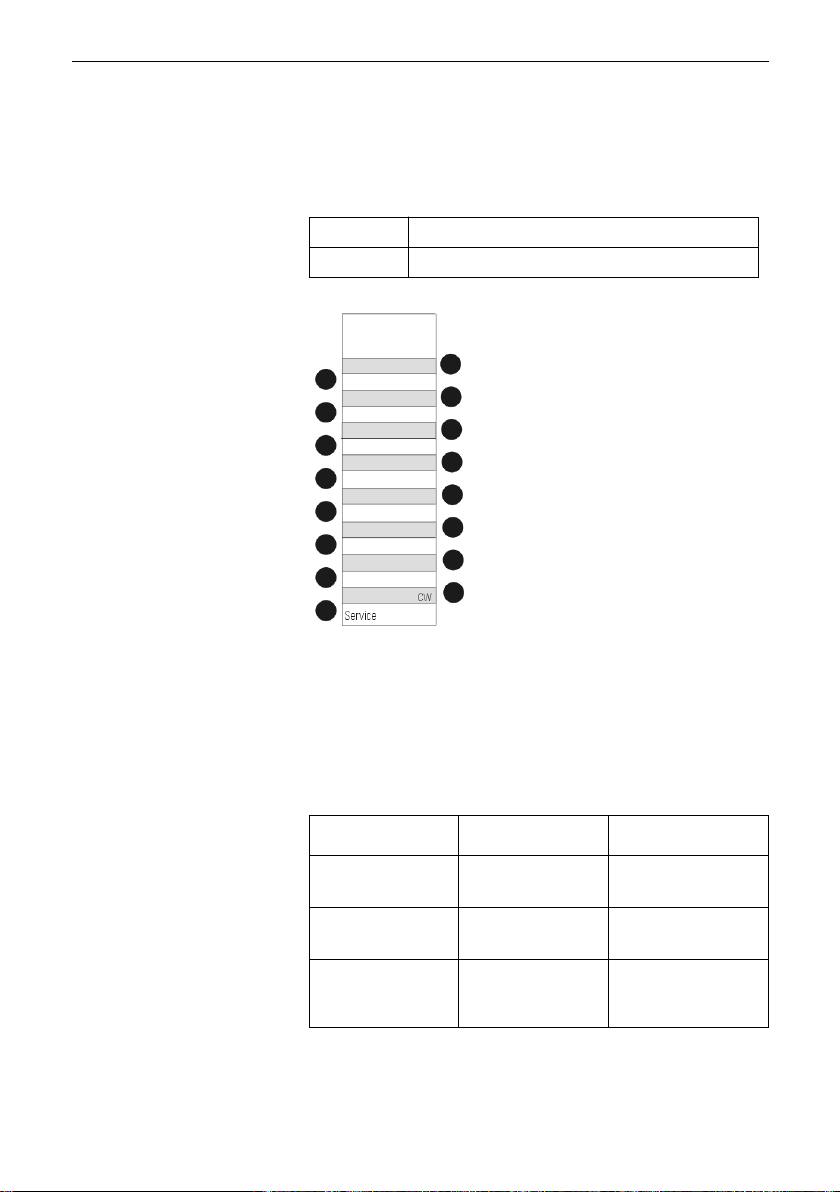
Layout of the telephone
Product information
1 handset
2 key block with 3 function keys
3 one-line numerical display
4 key block (fourteen quick-dial keys and two
special function keys)
5 key block with 4 function keys
6 dialling keypad
7 function key
8 two control keys
13
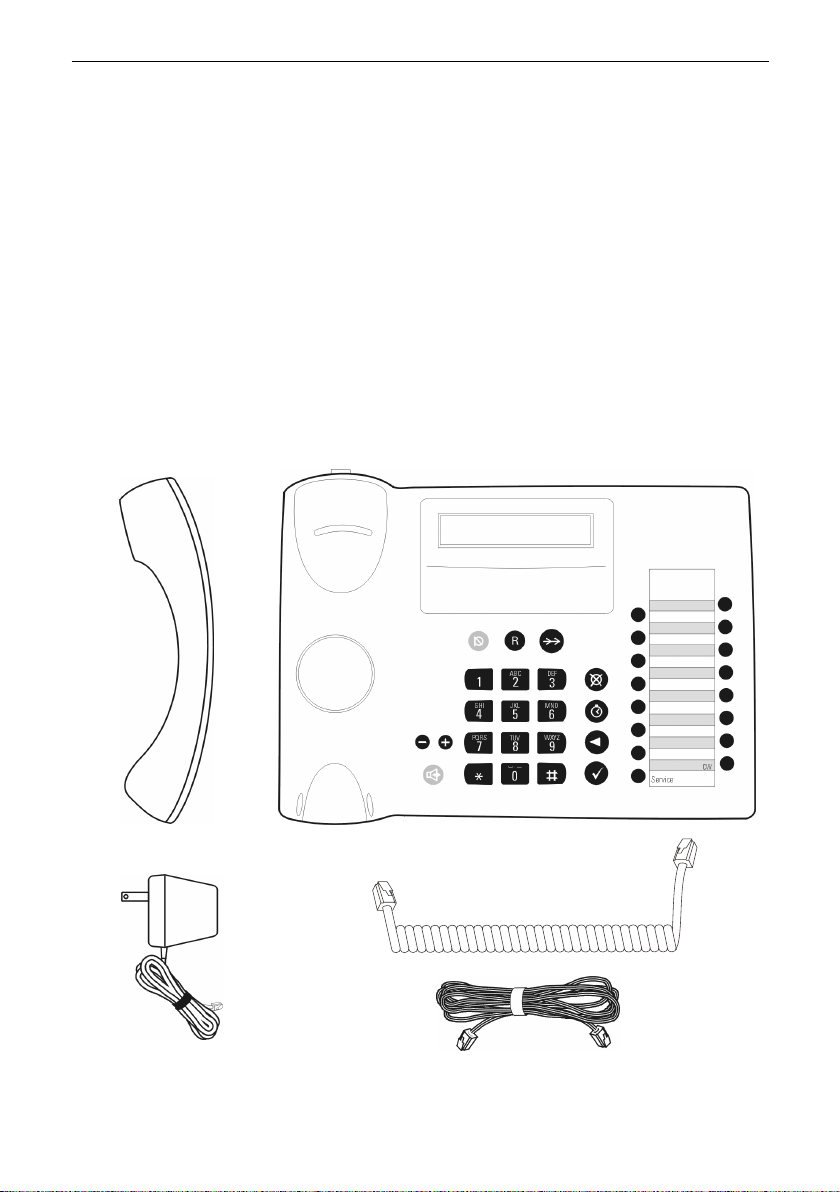
Standard package
Product information
The complete optiPoint 300 basic IP telephone package consists
of the following items:
– IP phone optiPoint 300 basic
– Handset
– Handset cord
– LAN cable
– Power supply unit
– Installation and Startup manual (not shown)
– Quick Reference Guide (not shown)
– CD ROM with the Operation and Administration Manual
(not shown)
– Set of overlays for programmable quick-dial keys (not shown)
14
Display and controls
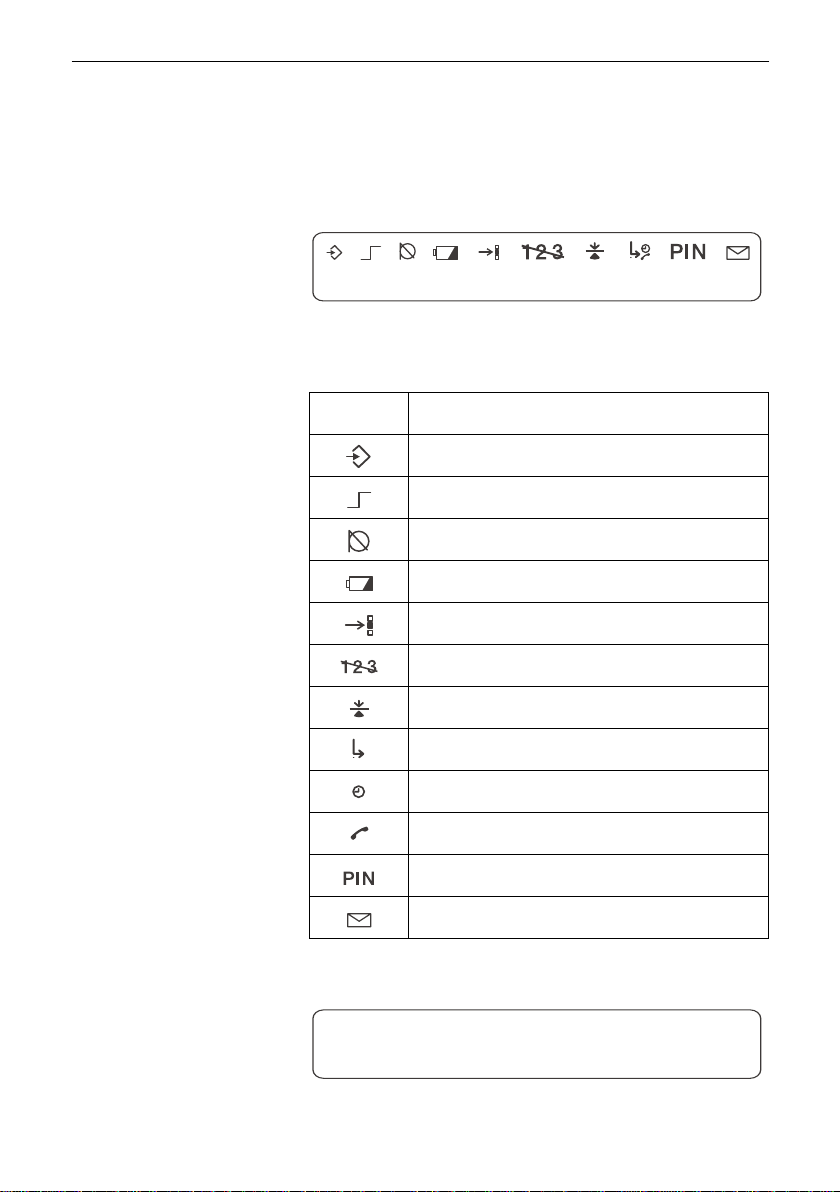
Display
The optiPoint 300 basic is provided with the following display:
Display and controls
12—01—00
The upper area of the display contains a number of symbols which
indicate the currently used function of the phone. The optiPoint
300 basic uses nine symbols out of the total of twelve available.
Pictograph
Explanation
Programming mode active
DTMF outband is active
Handset mute is on
Not used
Initialising data is being input
Not used
Call-waiting is enabled
In consultation or alternate mode
Elapsed call duration is being displayed
Caller identification not available
10—36P
Enter PIN
Not used
In idle mode the optiPoint 300 basic displays the current date on
the left side of the bottom line and the time of day on the right side.
12—01—00
2—36P
15

Symbol keys
Display and controls
The symbol keys on the telephone are used to control the individual operating steps or functions.
Symbol
q
R
h
<
?
j
+
-
Explanation
Turns mute on and off
– Put caller on hold to consult with someone else or
– Switch from one caller to another
– Redial previous number
– While in programming mode: edit last number
dialled
– Cancel current function, discard any changes.
– End consultation
– While calling: turn elapsed call duration display on
or off
– While in programming mode: set date and time
– Line editor mode:
- short press deletes the last character
- long press deletes the whole line
– Mask editor mode: position insert point (cursor)
– Dial the displayed number when handset is lifted
– While in programming mode or service mode:
confirm action
– While calling: switch loudspeaker on or off
– While in programming mode: change ringer setting
– While calling: increase loudspeaker volume
– While in idle mode: increase display contrast
– While calling: decrease loudspeaker volume
– While in idle mode: decrease display contrast
16
Programmable keys
Display and controls
The optiPoint 300 basic is equipped with fourteen programmable
quick-dial keys for frequently called numbers. In addition, there
are two special function keys: :
CW key Controls the call waiting function
Service key Controls the service and programming modes
Control keys
If you press one of these keys, the preprog rammed function is carried out.
The two control keys- and+ are located above thej key. Depending on the operating mode, you can vary the following settings:
--
Operating mode
Idle mode Reduce the display
Receiving a call Reduce the volume
Using the handset
to telephone
--
key
contrast
of the ringer tone
Reduce the volume
of the handset
loudspeaker
++
++
key
Increase the display
contrast
Increase the volume
of the ringer tone
Increase the volume
of the handset
loudspeaker
17
Installation
This chapter tells you how to connect the components of the optiPoint 300 basic telephone to one another prior to use.
Connecting the telephone to a LAN and configuring it for proper
operation are tasks of the network administrator. They are described in the chapter entitled "Configuration and administration".
Administrators who wish to install and configure IP phone telephony devices via a web interf ace will find detailed informations in the
chapter entitled "The web pages".
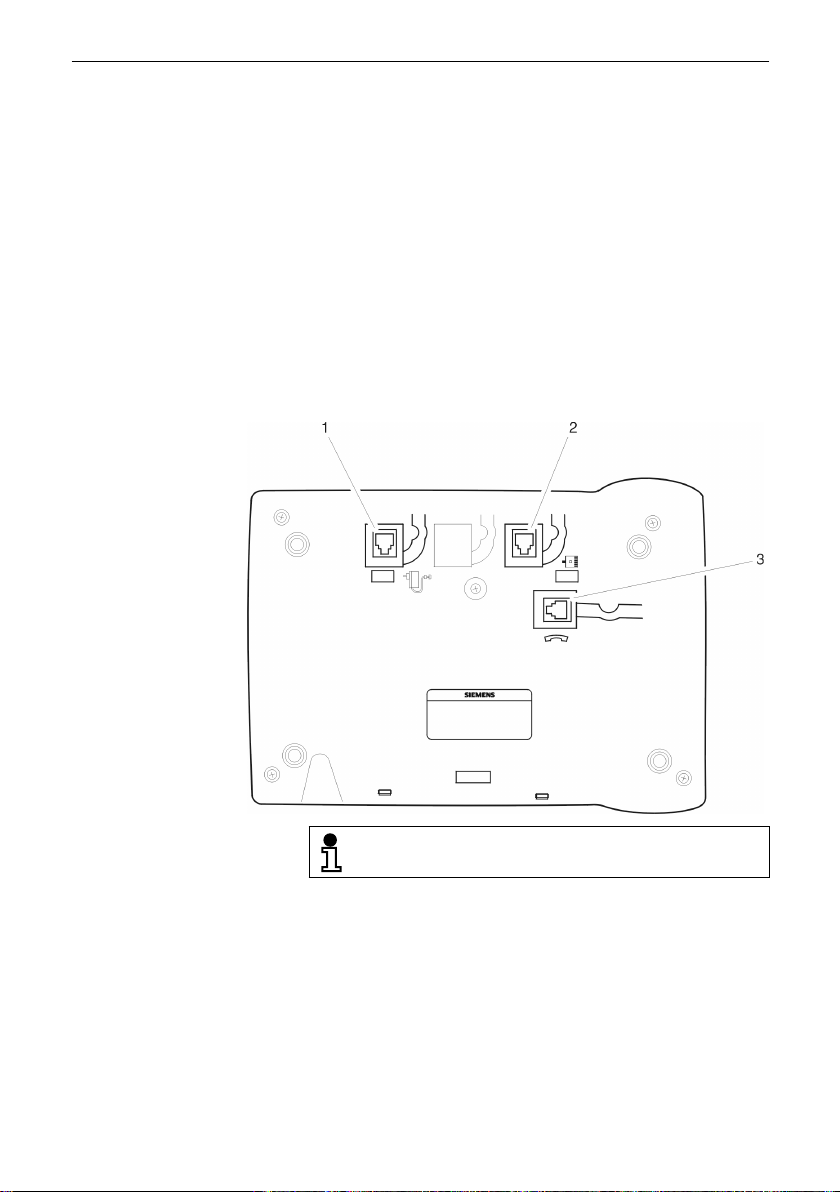
Preparing the telephone
To connect the telephone components, proceed as follows.
Installation
The two cable ends of the handset cord are equipped
with identical four-pin Western plugs (RJ 11).
Latch the Western plug of the handset cord in the handset
●
receptacle ("short" end).
Latch the other end of the cord in the receptacle (3) on the
●
bottom of the telephone ("long" end).
Feed the cord through the guide channel in the base unit.
●
●
Latch the LAN cord with the eight-pin Western plug (RJ 45) in
the receptacle (2) on the bottom of the telephone, and connect with LAN.
●
Feed the LAN cord through the guide channel in the base unit.
18
Installation
Latch the four-pin (red) Western plug (RJ 11) of the power
●
supply unit cord in the receptacle (1) on the bottom of the telephone.
Feed the power supply unit cord through the guide channel in
●
the base unit.
The Western plugs of all cable connections must
audibly snap into place.
Integrating the telephone into the communication environment
Like all terminal equipment connected to a LAN, the optiPoint 300
basic must have an IP address assigned. The procedure for setting up the network environment for the telephone is described below. Note that the optiPoint 300 basic can operate with a HiPath
5500/ 5300, but this is not mandatory.
If you have any questions concerning the LAN environment or the
terminology used, contact your network administrator.
Loading the application software
When the optiPoint 300 basic telephone is connected to power, it
automatically boots up, i.e. loads and executes the application
software. During the boot phase you will see three dashes scrolling across the display, from left to right:
– – –
If the boot phase cannot be completed successfully (because of
missing or defective application software), you will see:
b00t FA1LEd
In such a case, please ask your network administrator or call the
service.
After the boot phase, the telephone checks whether it is configured to automatically load basic settings from a DHCP server. If it
is, the boot process continues as described in “HiPath system with
DHCP server” on page 20. If it is not set to load settings from a
DHCP server, the boot process continues as described in “HiPath
system without DHCP server” on page 21.
19

HiPath system with DHCP server
The optiPoint 300 basic telephone comes with factory settings that
enable it to get an IP address automatically from the DHCP server, once it is connected to a LAN.
– – – – – – – – – – – – – – –
When the settings cannot be successfully downloaded from a
DHCP server, the error message “No IP” is displayed. Press the
Service key and switch the telephone to manual IP assignment as
described in “IP assignment by DHCP” on page 50. Then contin ue
as described in “HiPath system without DHCP server” on page 21.
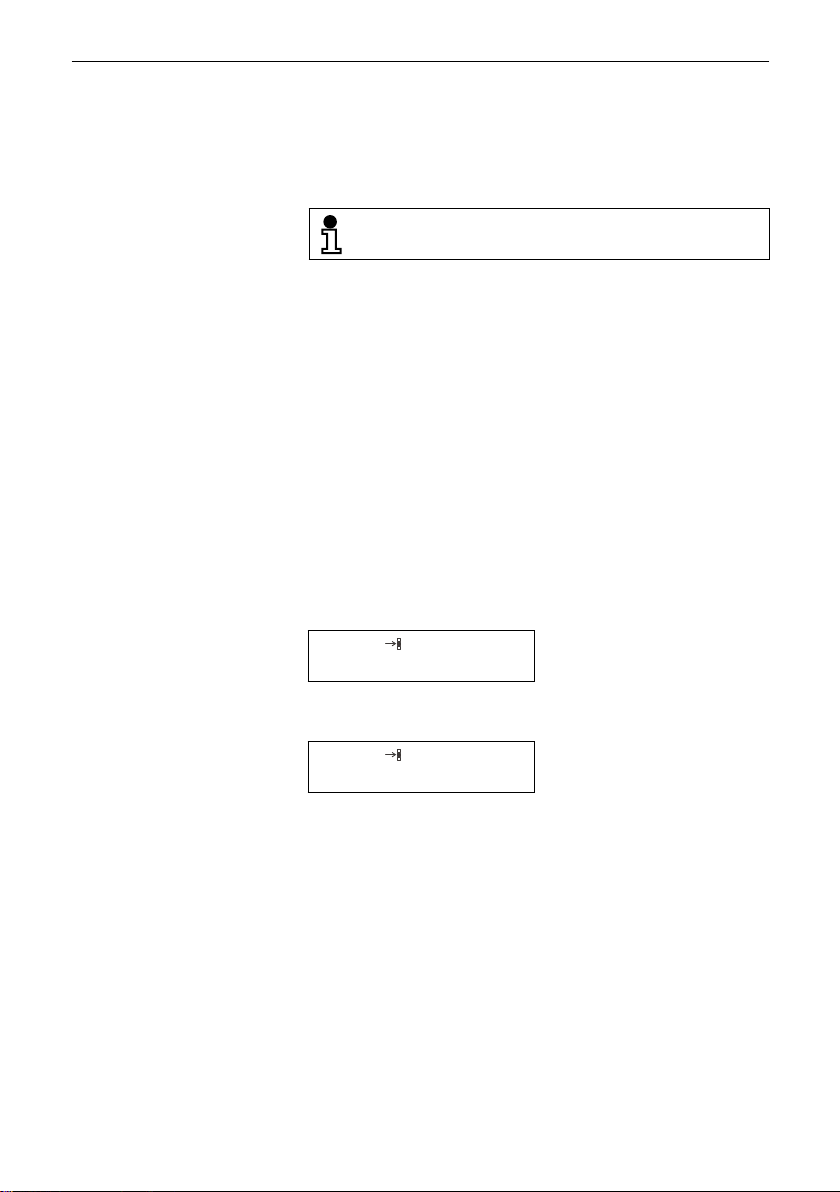
When the settings have been received correctly, you will be asked
to make some additional settings, as shown here:
– – – – – – – – – – – – – – –
Press the ? key (all other keys will be disabled).
– – – – – –
P2 _
You will hear a beep confirming successful completion. For five
seconds, the display will show:
While the phone searches
for a server, “DHCP” and
three scrolling dahes are
displayed.
symbols for programming
and for initialisation will
flash, as will the dash line
Enter the administrator's
PIN
?
Confirm your input
Enter the telephone num-
ber to be used
Confirm the telephone
?
number and exit the menu
Installation
P PA55Ed
After that, the telephone goes into idle mode.
12 – 03 – 00 12 – 34
Y ou ma y break off initialisation at any time by pressing the h key.
Any settings previously entered will be cancelled, and you will be
returned to the point at which you were asked to enter the administrator's PIN.
If an SNTP server is located within the HiPath environment, the telephone unit will automatically get the correct date and time from
it. Otherwise, y ou m ust manually enter this information, as described in the chapter entitled "Configuration and administration".
Initialisation successful
Idle mode
20
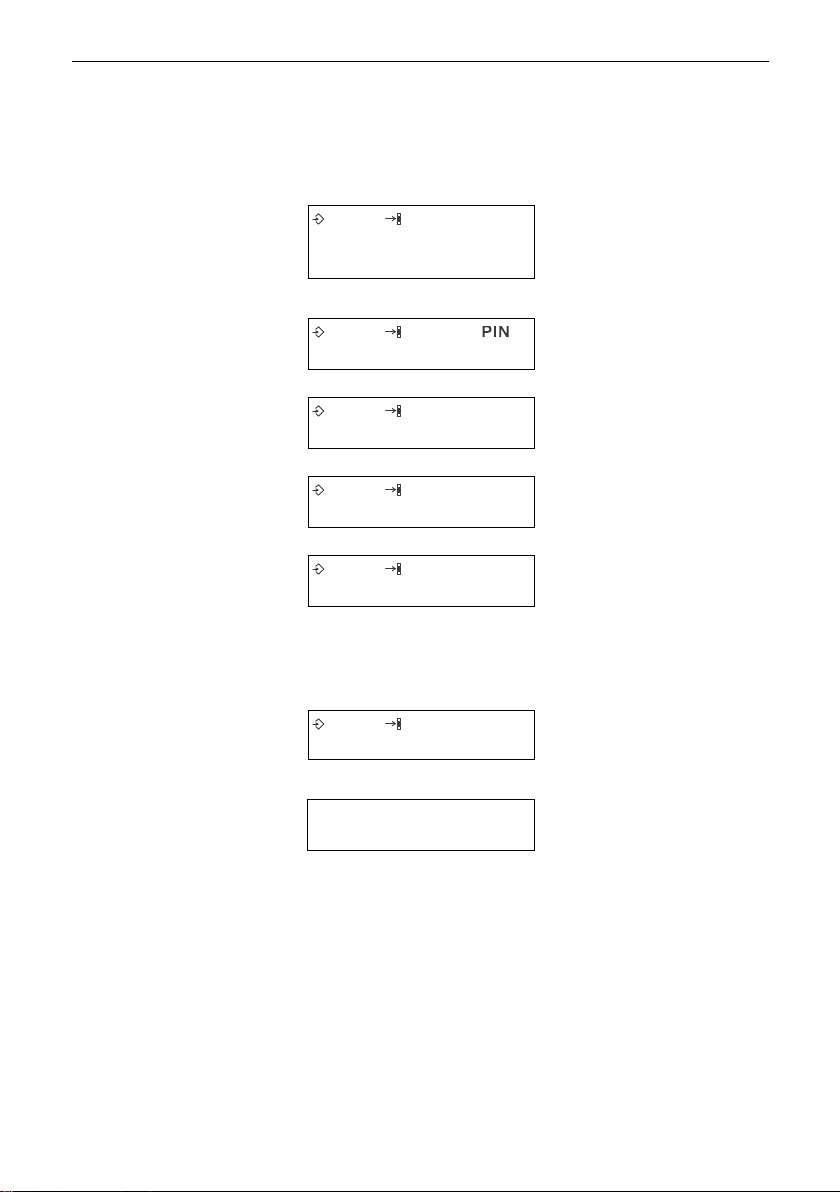
HiPath system without DHCP server
If there is no DHCP server in the environment, you will have to
manually enter an IP address and other required parameters using the keypad.
– – – – – – – – – – –
– – – –
Press the ? key (all other keys will be disabled).
– – – – – –
Flashing programming
and initialisation symbols,
flashing dash line
Enter the administrator's
PIN
?
Confirm your input
Installation
1P 132 075 100 169
P1 120 115 200 003
P2 _
You will hear a beep confirming successful completion. For five
seconds, the display will show:
P PA55Ed
After that, the telephone goes into idle mode.
12 – 03 – 00 12 – 34
Y ou ma y break off initialisation at any time by pressing the h key.
Any settings previously entered will be cancelled, and you will be
returned to the point at which you were asked to enter the administrator's PIN.
If an SNTP server is located within the HiPath environment, the telephone unit will automatically get the correct date and time from
it. Otherwise, y ou m ust manually enter this information, as described in the chapter entitled "Configuration and administration".
Enter the IP address
? Confirm your input
Enter the subnet mask IP
? Confirm your input
Enter the telephone number to be used
Confirm the telephone
?
number and exit the menu
Initialisation successful
Idle mode
21

Label quick-dial keys
Installation
To ease use of the quick-dial keys, you can remove the key overlays and label them in accordance with their intended function.
● Push forward the transparent foil cover of the labelling cards
and remove it.
● Take out the key overlays and write the required names or
functions on it.
● Place the labelling cards in the recess and fix the transparent
foil cover into place.
22

Operation
Basic operation
Operation
This chapter tells you how to use the optiPoint 300 basic telephone.
All of the optiPoint 300 basic functions are performed using the
telephone keys.
The unit can be used as a traditional telephone. Simply enter the
number you want to dial on the keypad. If you make a mistake,
erase it by pressing the < key. Hold the key down to erase the
complete number just entered, or to return to the start of the number.
You may also enter an IP address instead of a telephone number.
T o do this, separate the three-digit g roups of the address by pressing the asterisk separator *. In the display, this will show up as
the underline character _.
Specialised functions are selected using the appropriate symbol
keys. The meanings of the symbol keys depend on the conte xt, i.e.
the operating mode of the optiPoint 300 basic.
+ and- keys to increment or decrement a displayed
Use the
parameter (for example, to adjust the handset volume).
23
Making a call
Y ou can make a telephone call with the handset pic ked up or in the
cradle.
If you make a call with the handset picked up, the number you
want to call will be automatically dialled six seconds after you have
finished entering it. You can also press ? to start dialling immediately.
If you make a call with the handset still in the cradle, y ou must give
the signal to start dialling yourself, after entering the number.
Dialling with handset picked up
Operation
12 – 03 – 00 12 – 34
0089722_
132_075_200_
The number you have entered will be chec ked. If you hav e entered
an IP address incorrectly, the error tone will sound. You can then
correct the IP address.
When entering an IP address, you must separate the
three-digit groups of the address with asterisks. *. In the
display, this will show up as the underline character _.
Once the call has been placed, the standard display for an activ e
telephone connection will come on the screen.
008972212345
Idle mode
Pick up handset
Enter telephone number
or
enter IP address
Start dialling or
?
6 sec timeout
Active connection
24
Dialling with handset in cradle (on-hook dialling)
Operation
12 – 03 – 00 12 – 34
0089722_
093_324_5_
The number you have entered will be chec ked. If you hav e entered
an IP address incorrectly, the error tone will sound. You can then
correct the IP address.
When entering an IP address, you must separate the
three-digit groups of the address with asterisks, *. In the
display, this will show up as the underline character _.
Once the call has been placed, the standard display for an activ e
telephone connection will come on the screen.
008972212345
Idle mode
Enter telephone number
or
Enter IP address
Pick up handset to start
dialling
Active connection
25

Incoming call
An incoming call will be indicated by the ringer tone and by the display. If the optiPoint 300 basic is in idle mode, you will hear the
ringer and the display will show the caller's identification. Up to 20
digits can be displayed, so if the caller's number is longer than
this, only the last 20 places will be shown. If the caller has restricted calling line identification (CLIR), your unit will display the relevant symbol instead of the number.
If there is an incoming call and "CW" is off while the optiPoint 300
basic is in programming mode or service mode, the caller will hear
a busy signal. The programming or service in progress will not be
affected.
Incoming call while in idle mode
Picking up an incoming call
The optiPoint 300 basic rings and the caller identification comes
up on the display.
008972212345
If the caller has activated calling line identification restriction
(CLIR), only the handset symbol is shown:
Operation
Pick up the handset to answer the call.
26
Second incoming call
Picking up a second call
Operation
With the call-waiting feature enabled , you can use the telephone to receive a second incoming call without disconnecting the
first caller.
When you pick up the new call, the previous caller will be put on
background hold and the connection to the new caller becomes
the active connection.
Alternately, you may turn down the new call offer, in which case
the existing connection remains the active one. In this case the
new caller will hear a busy signal.
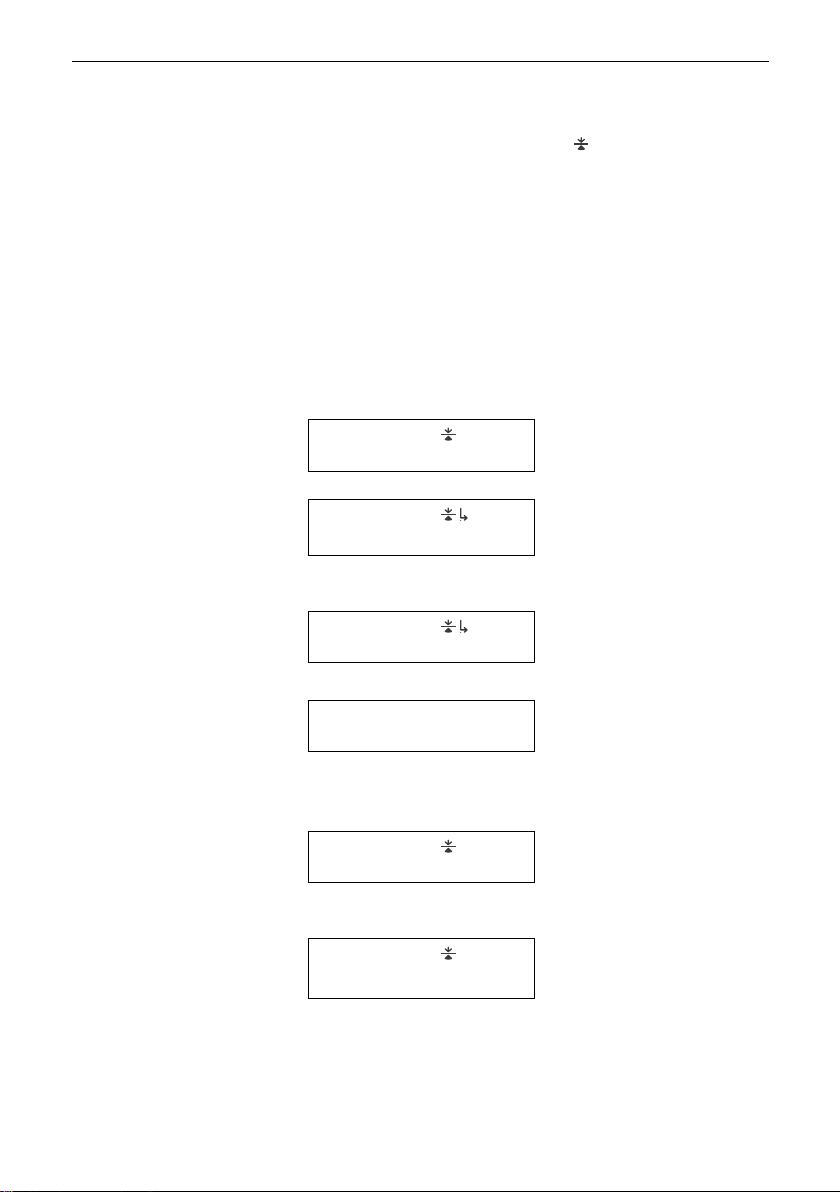
While you are on the line speaking to your first caller, the active
connection is displayed. If a second call comes in, you will see:
Call-waiting flashing, new
0093387654
2 – 0093387654
The first caller will be kept on hold as long as you keep the connection with the second one.
caller ID displayed
R CWtone, pick up new call
The second call is now
active, call-waiting stops
flashing
2 – 0093387654
The second call is ended and the first call is resumed.
008972212345
Turning down the second call offer
2 – 093387654
08972212345
h End the new call
The first call is the active
connection again
Call-waiting flashing, new
caller ID displayed
Turn down the offer of the
h
second call
Call-waiting stops flash-
ing, the first call is not
affected
27
 Loading...