

Siemens optipoint 200, Gigaset 200 User Manual
Putting the phone into operation
s
1
–
+
–
+
–
+
–
+
–
+
–
+
2
Be inspired
3
5 h
Issued by
Information and Communication mobile
Haidenauplatz 1
D-81667 Munich
© Siemens AG 2001
All rights reserved. Subject to availability.
Right of modification reserved.
Printed in Germany. (09/2001)
Siemens Aktiengesellschaft
http://www.my-siemens.com
Order no.A31008-G200-B101-1-7619
User guide
and safety information
A31008- G200- B101- 1- 7619
!
Gi gase t 200, G BR, A310 08-G2 0 0-B101-1-7619 UM SCHL_ V.F M 28 .09.01
-
-
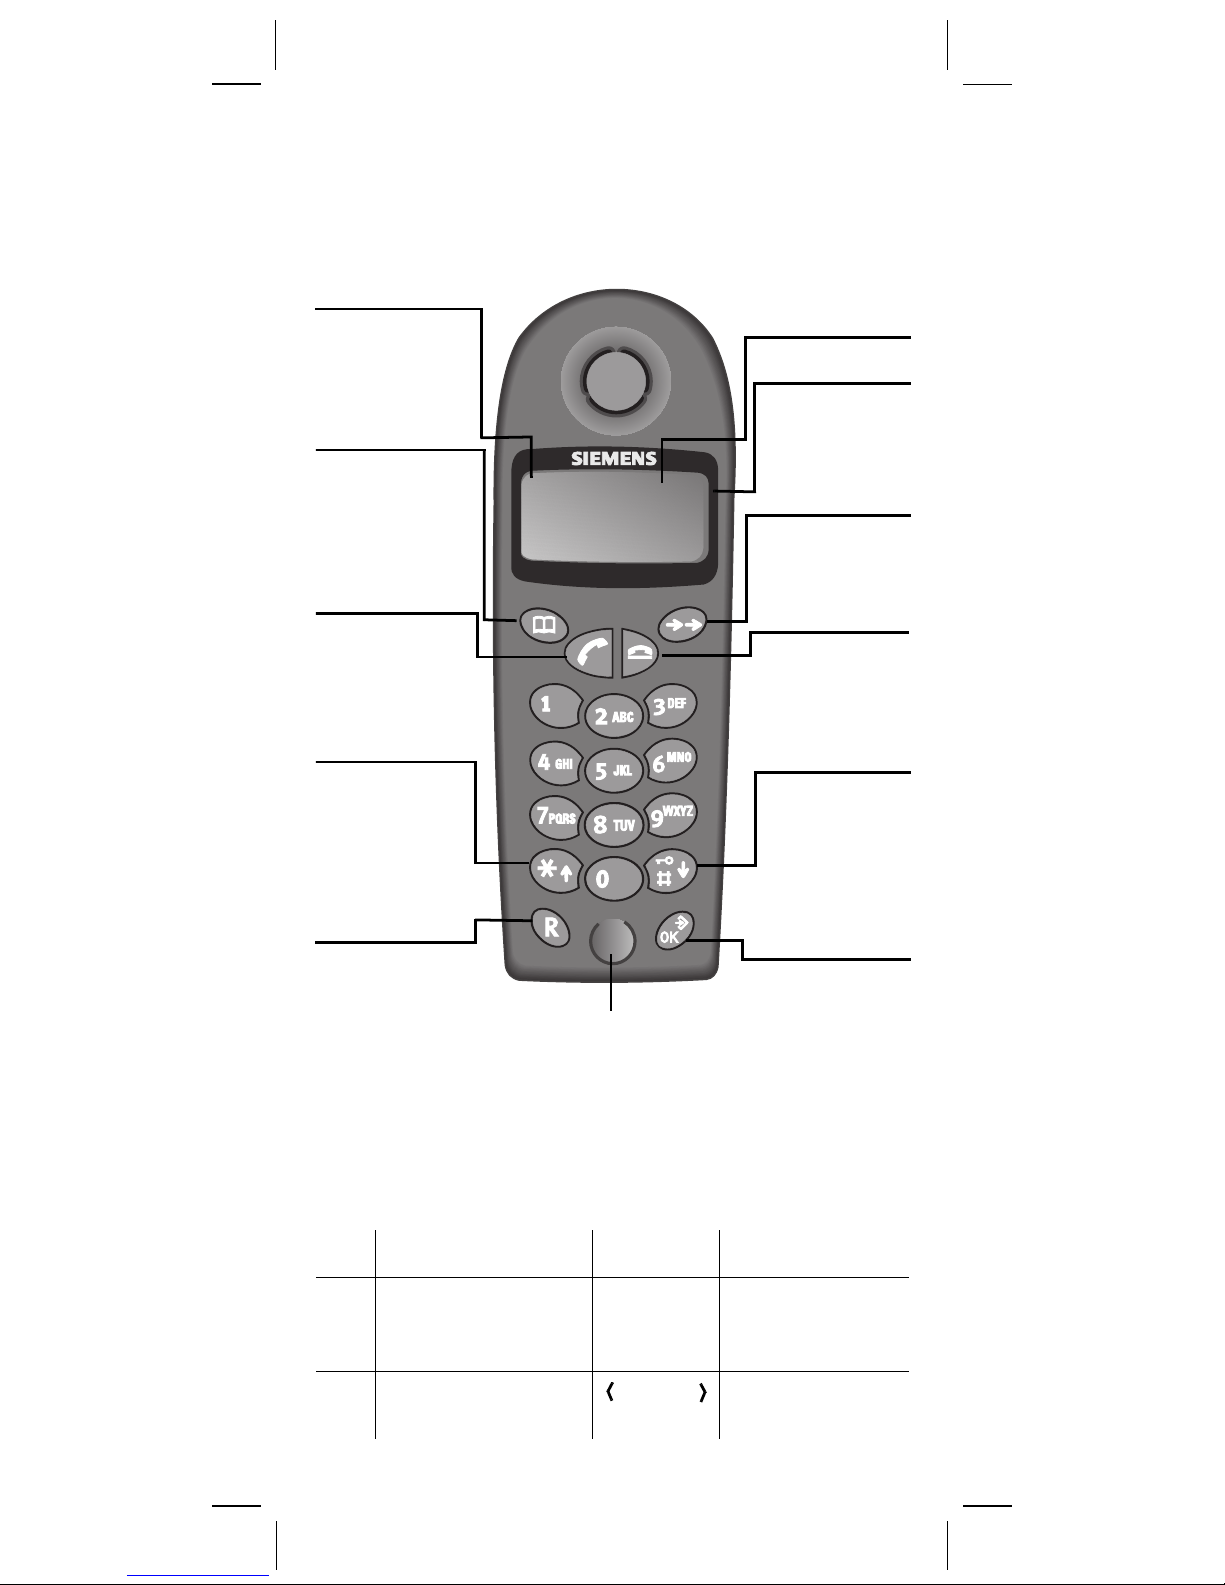
Brief overview of the handset
List item
Indicates the list
item for an entry
Phone book
key
- Open phone
book
- Call list item "0"
(hold down)
Off-hook key
-Answer call
- Dial call
number
Star key
- Page up
- Call multifrequency
signaling
method
(hold down)
E
Display
Battery status
H
empty
E
full
Redial key
Open redial list
On-hook key
- Terminate
call
- Cancel
function
Hash key
-Page down
- Activate/
deactivate
key lock
(hold down)
R key
R key function
(flash)
Dialing pause
(hold down)
Microphone
Set/OK key
- Open menu
- Confirm
(store) entry
Display symbols and special characters
Star (*)
Hash (#)
Key lock Phone list
2
R
P
NUMBER
R key
Pause
Hold down
R key
empty

Gi gaset 200, GB R, A310 0 8-G20 0 -B101-1-7619 UMS CHL_V.FM 28. 09.01
Congratulations
on purchasing your Siemens Gigaset!
In order to be able to use your phone with ease, read
the following pages to find out how it works.
3
Gi gaset 200, GB R, A310 0 8-G20 0 -B101-1-7619 UMS CHL_V.FM 28. 09.01
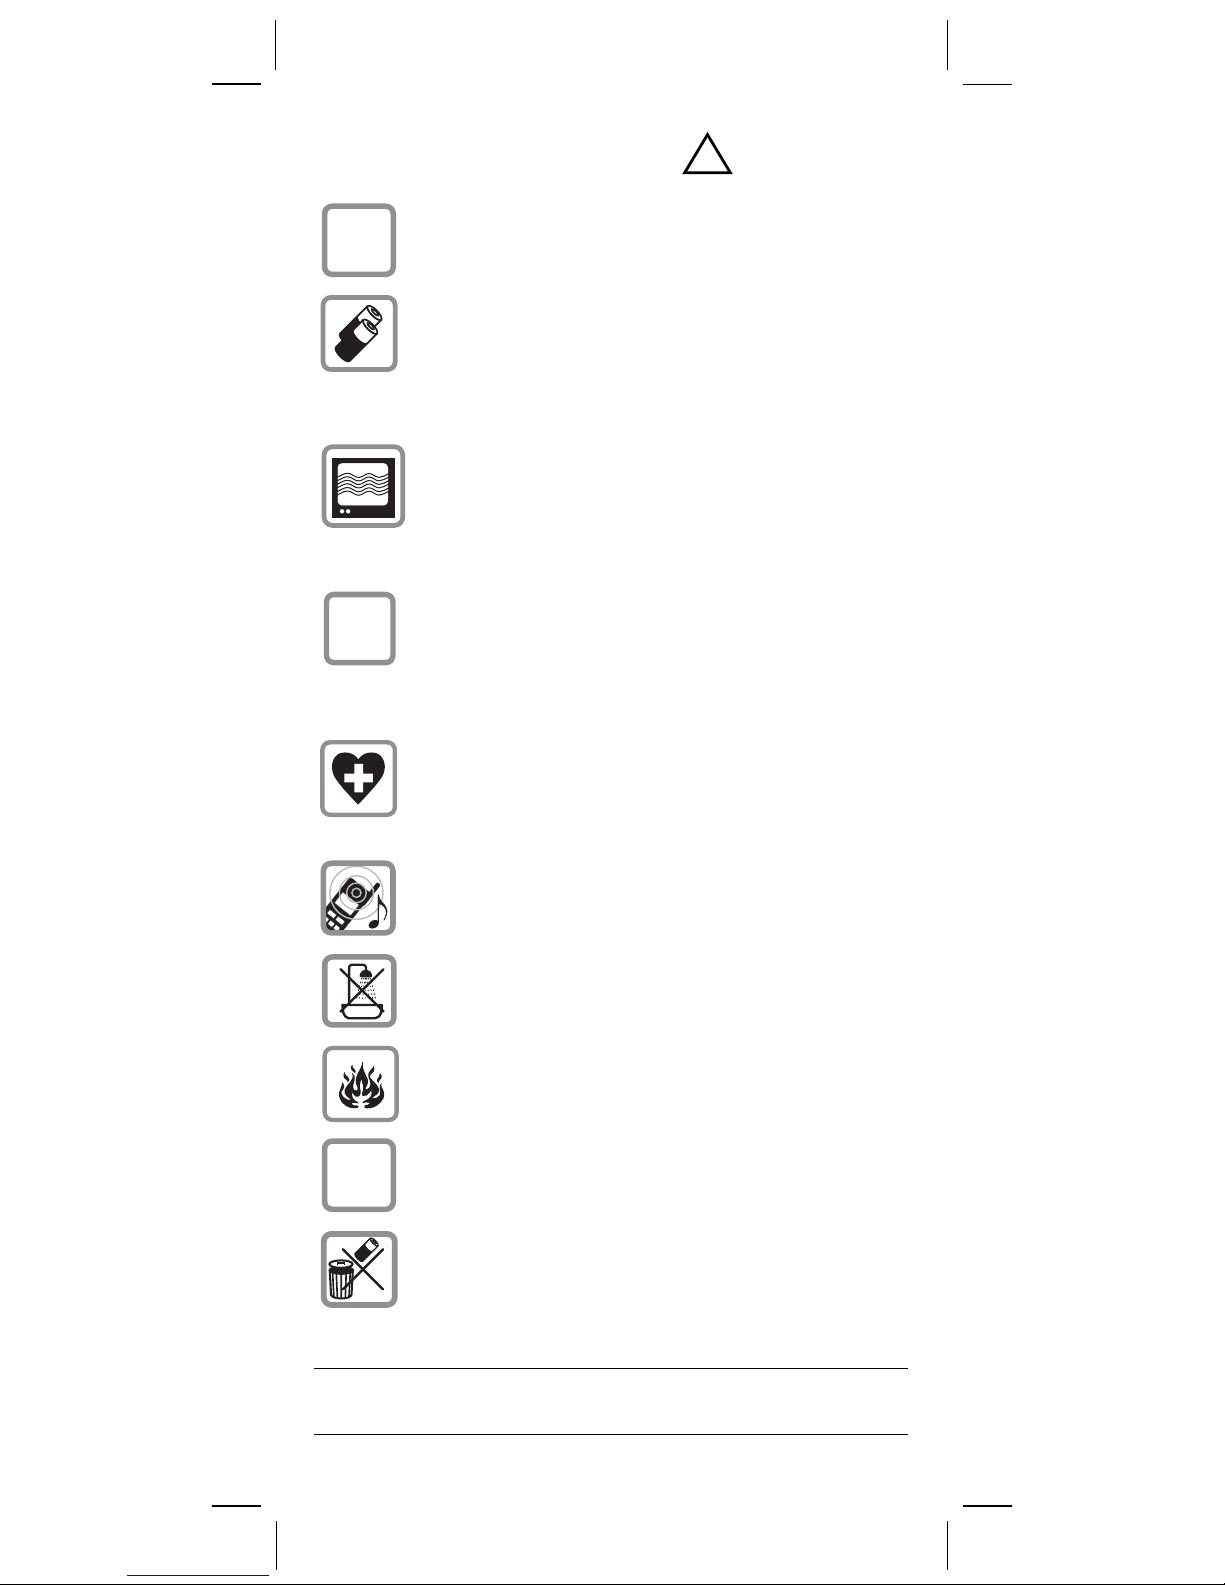
Safety information
Use
only the plug-in power supply unit
+
,
provided
device.
Use only
ies of the same type
use conventional (non-rechargeable) batteries, since these can injure you and damage
your health.
Do not position the device
ate vicinity of other devices
hi-fi systems, televisions, microwave ovens
or office equipment. This could cause mutual interference.
Ensure that you insert the rechargeable
batteries with the correct polarity and that
you use the type of battery specified in this
user guide (note the sign i
compartments of the handset)
, as indicated on the bottom of the
approved, rechargeable batter-
!
. In other words, never
in the immedi-
such as
n the battery
.
)
The operation of medical equipment may be
affected. Bear in mind the technical requirements of the environment (e.g. doctor's
office).
The handset can cause an unpleasant
buzzing sound in hearing aids. Do not hold
the handset too close to your ear.
Do not set up the base unit in bathrooms or
shower rooms.
Do not use the phone in potentially explosive environments (e.g. paint shops).
Do not pass your Gigaset on to a third party
without the user guide.
Dispose of batteries and your phone in an
environment-friendly manner.
8
4
Not all the functions described in this user
guide are available in all countries.

Gi gaset 200, GB R, A310 0 8-G20 0 -B101-1-7619 410_ JakobIVZ.fm 28 .09.01
Contents
Brief overview of the handset . . . . . . . 2
Safety information . . . . . . . . . . . . . . . . . 4
Putting your phone into operation . . . . 6
Making a phone call. . . . . . . . . . . . . . . 10
Calling . . . . . . . . . . . . . . . . . . . . . . . . . . . . . . . . . 10
Accepting a call. . . . . . . . . . . . . . . . . . . . . . . . . . 10
Redialing . . . . . . . . . . . . . . . . . . . . . . . . . . . . . . . 10
Displaying the caller's number (CLIP) . . . . . . . . . 11
Activating/deactivating the key lock . . . . . . . . . . 11
Phone book. . . . . . . . . . . . . . . . . . . . . . . . . . . . . 12
Registering the handset with the
base unit. . . . . . . . . . . . . . . . . . . . . . . . . 13
Settings of the handset . . . . . . . . . . . . 15
Volumes and tunes . . . . . . . . . . . . . . . . . . . . . . . 15
Changing the display language . . . . . . . . . . . . . . 16
Resetting the handset to the factory defaults . . 16
Settings of the base unit . . . . . . . . . . . 18
Signaling method . . . . . . . . . . . . . . . . . . . . . . . . 18
Flash times („R key“) . . . . . . . . . . . . . . . . . . . . . 18
Pulse/no-pulse ratio. . . . . . . . . . . . . . . . . . . . . . . 19
Deactivating and reactivating automatic
attenuation equalization . . . . . . . . . . . . . . . . . . . 19
Resetting the base unit to the factory defaults. . 20
Appendix . . . . . . . . . . . . . . . . . . . . . . . . 21
Caring for your phone . . . . . . . . . . . . . . . . . . . . . 21
Troubleshooting . . . . . . . . . . . . . . . . . . . . . . . . . 21
Range . . . . . . . . . . . . . . . . . . . . . . . . . . . . . . . . . 22
Guarantee . . . . . . . . . . . . . . . . . . . . . . . . . . . . . . 22
Service . . . . . . . . . . . . . . . . . . . . . . . . . . . . . . . . 23
Menu overview . . . . . . . . . . . . . . . . . . . 24
Index . . . . . . . . . . . . . . . . . . . . . . . . . . . . 26
Please also note the index– page 26!
5
Gi gaset 200, GB R, A310 0 8-G20 0 -B101-1-7619 VORBE REI.F M 28 .09.01
h
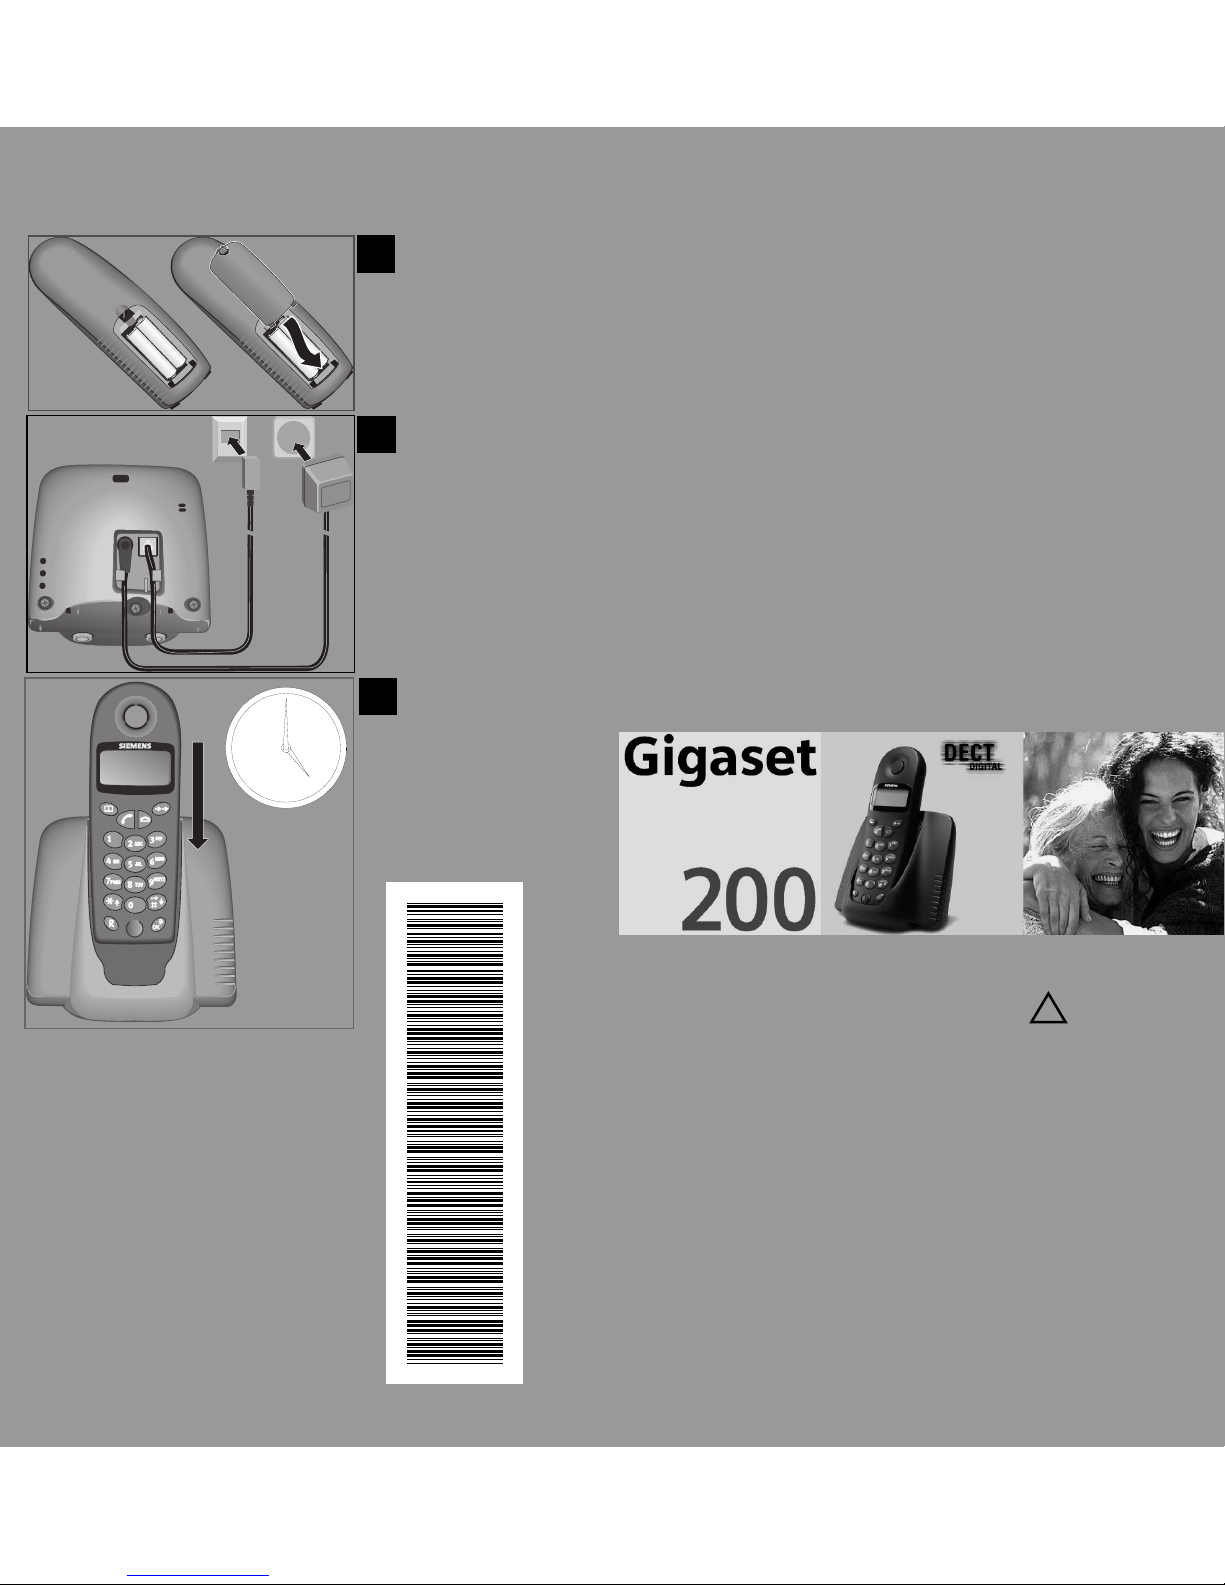
Putting your phone into operation
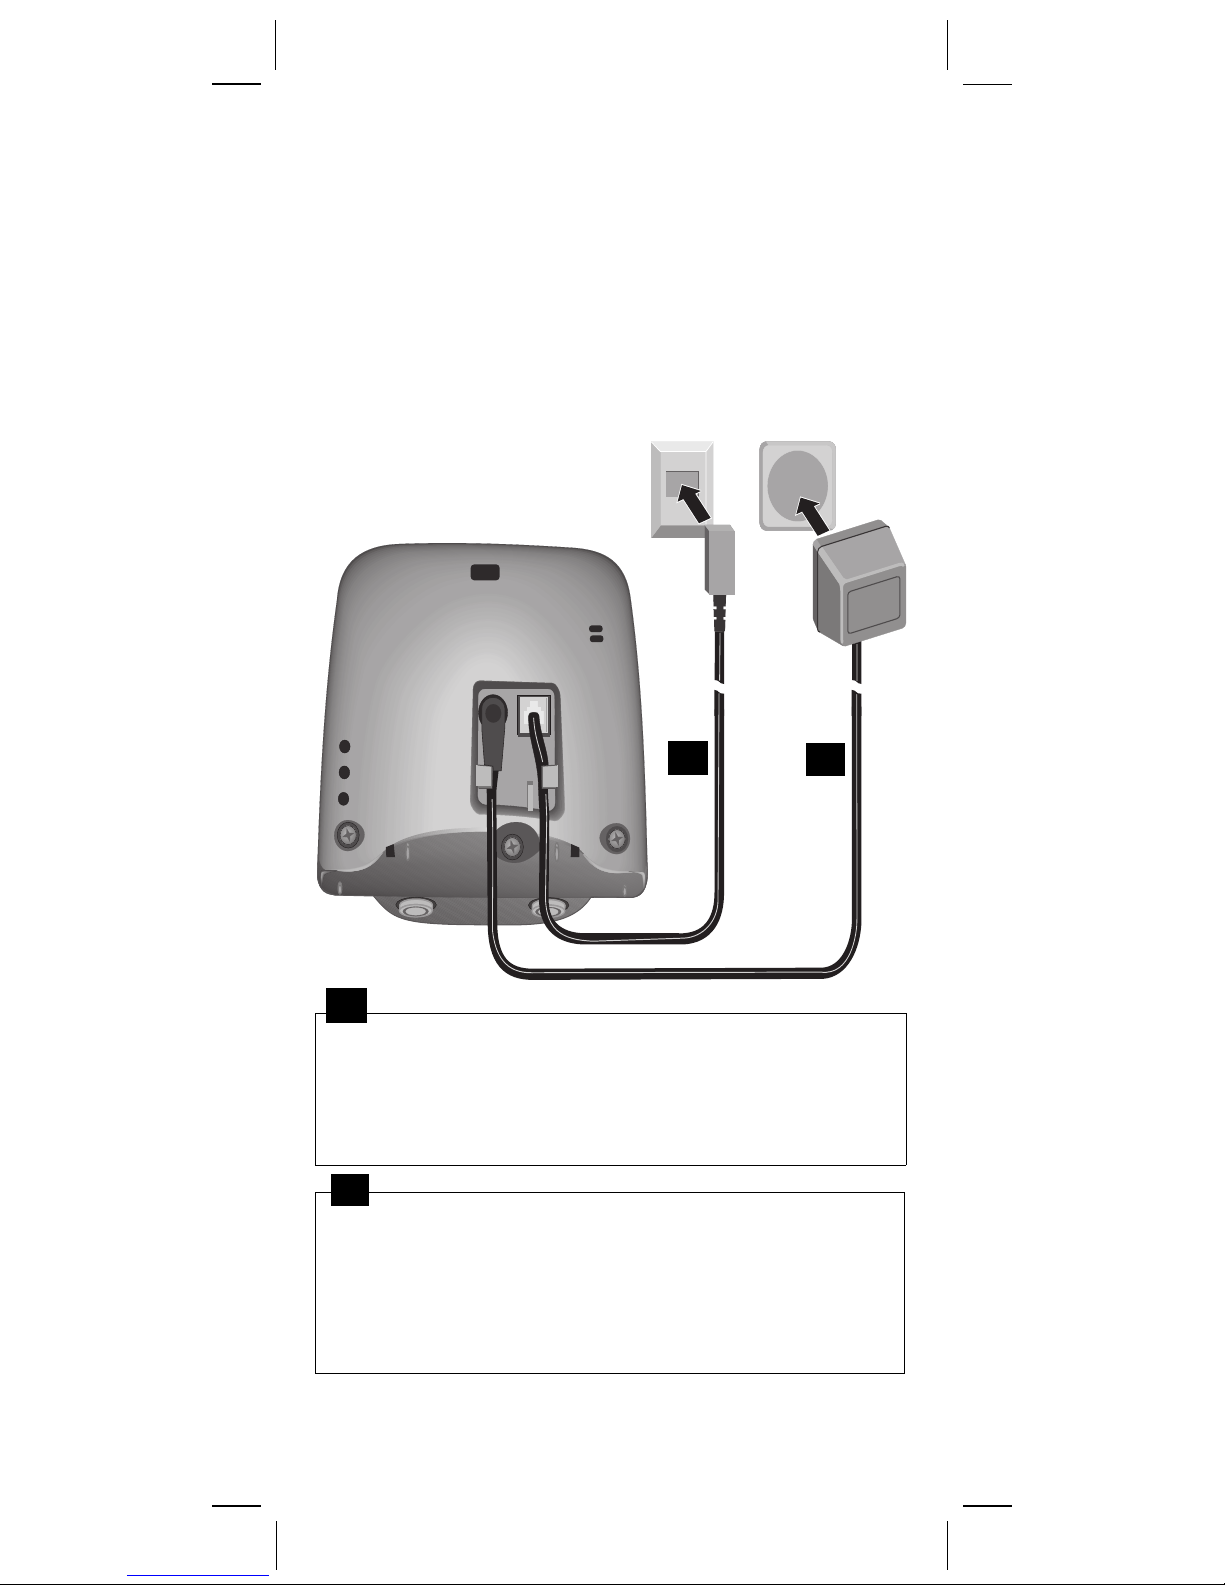
Step 1: Connect up the base unit
For the analog landline network
Plug-in power supply unit wit
power cable (220/230 V)*
Phone connector
with phone cable
1
1
Insert the small connector of the
●
line cord
the socket (engages).
Insert the cable in the cable duct.
●
Insert the phone connector in the phone socket.
●
2
Insert the small connector of the
●
power cable
into the socket.
Insert the cable in the cable duct.
●
Plug the 3-pin adaptor into a mains power socket
●
and switch on.
2
into
*Country-specific
6
Gi gaset 200, GB R, A310 0 8-G20 0 -B101-1-7619 VORBE REI.F M 28 .09.01
Use
●
!
only the plug-in power supply unit
provided
, as indicated on the bottom of
the base unit.
Important: new phone cable. Use only the
●
enclosed cable type.
If you purchase another cable, ensure that it
●
has the correct connector pin assignment.
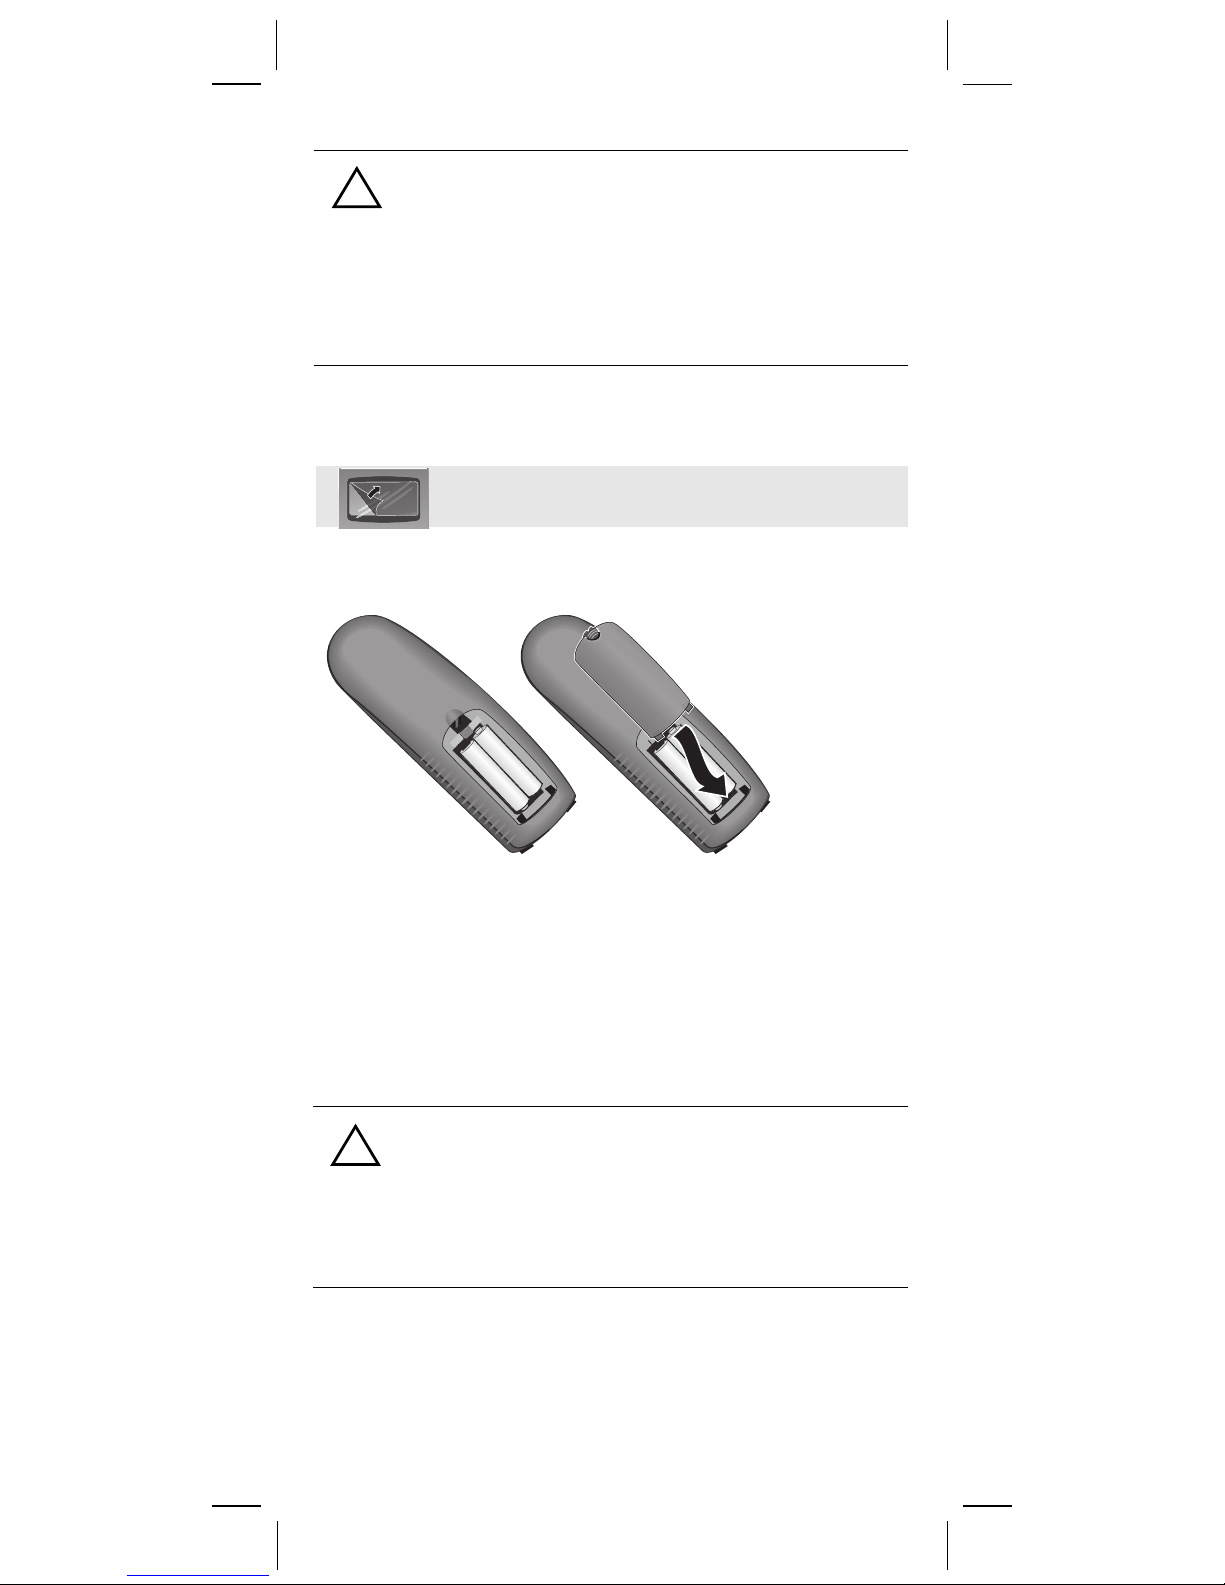
Step 2: Put the handset into operation
The display is protected by a plastic foil.
Please remove the protective foil.
Inserting the batteries
–
+
–
+
–
+
Insert the batteries with the
●
–
+
–
+
–
+
correct polarity
figure.
Put the lower end of the battery compartment cover
●
in position (see arrow), and press against the
_ribbing at the top until it engages.
To o p e n i t ,
●
!
●
lift the cover by the ribbing.
Use only
ies of the same type
approved, rechargeable batter-
. Otherwise you risk
damaging your health and the product.
Do not use charging units belonging to
●
other devices because they could damage
the batteries.
– see
7

Gi gaset 200, GB R, A310 0 8-G20 0 -B101-1-7619 VORBE REI.F M 28 .09.01
Step 3: Place the handset on
the base unit
In order to make calls, you need to register your handset with the base unit (to make it known to it). The following text appears on the display: "SEARCH BASE".
Put the handset on the base unit with the
visible
"REGISTER HS".
. The following text appears on the display:
C
display
It takes around
registered with the base unit. The idle display (battery
symbol) appears instead of the display "REGISTER
HS".
a minute
Step 4: Charge the batteries
Leave the handset on the base unit for around five
hours in order to charge the batteries. A charging
indicator on the handset shows that the batteries are
being charged:
Batteries empty
H
(symbol flashes)
Batteries
F
Your phone is now ready for operation; you can start
calling.
2
charged
/
3
for the handset to be
Batteries
G
charged
Batteries full
E
1
/
5 h
3
Note on the battery
8
8
●
●
●
After the batteries are charged for the first
time, you can put the handset back on the
base unit again after each call. Charging is
controlled electronically. This ensures that
the batteries are charged optimally and
economically.
The batteries become warm during charging; this is normal and not dangerous.
The charging status of the batteries is only
displayed correctly after an uninterrupted
charging/discharging process. You should
therefore avoid opening the battery
compartment unnecessarily.
Gi gaset 200, GB R, A310 0 8-G20 0 -B101-1-7619 VORBE REI.F M 28 .09.01
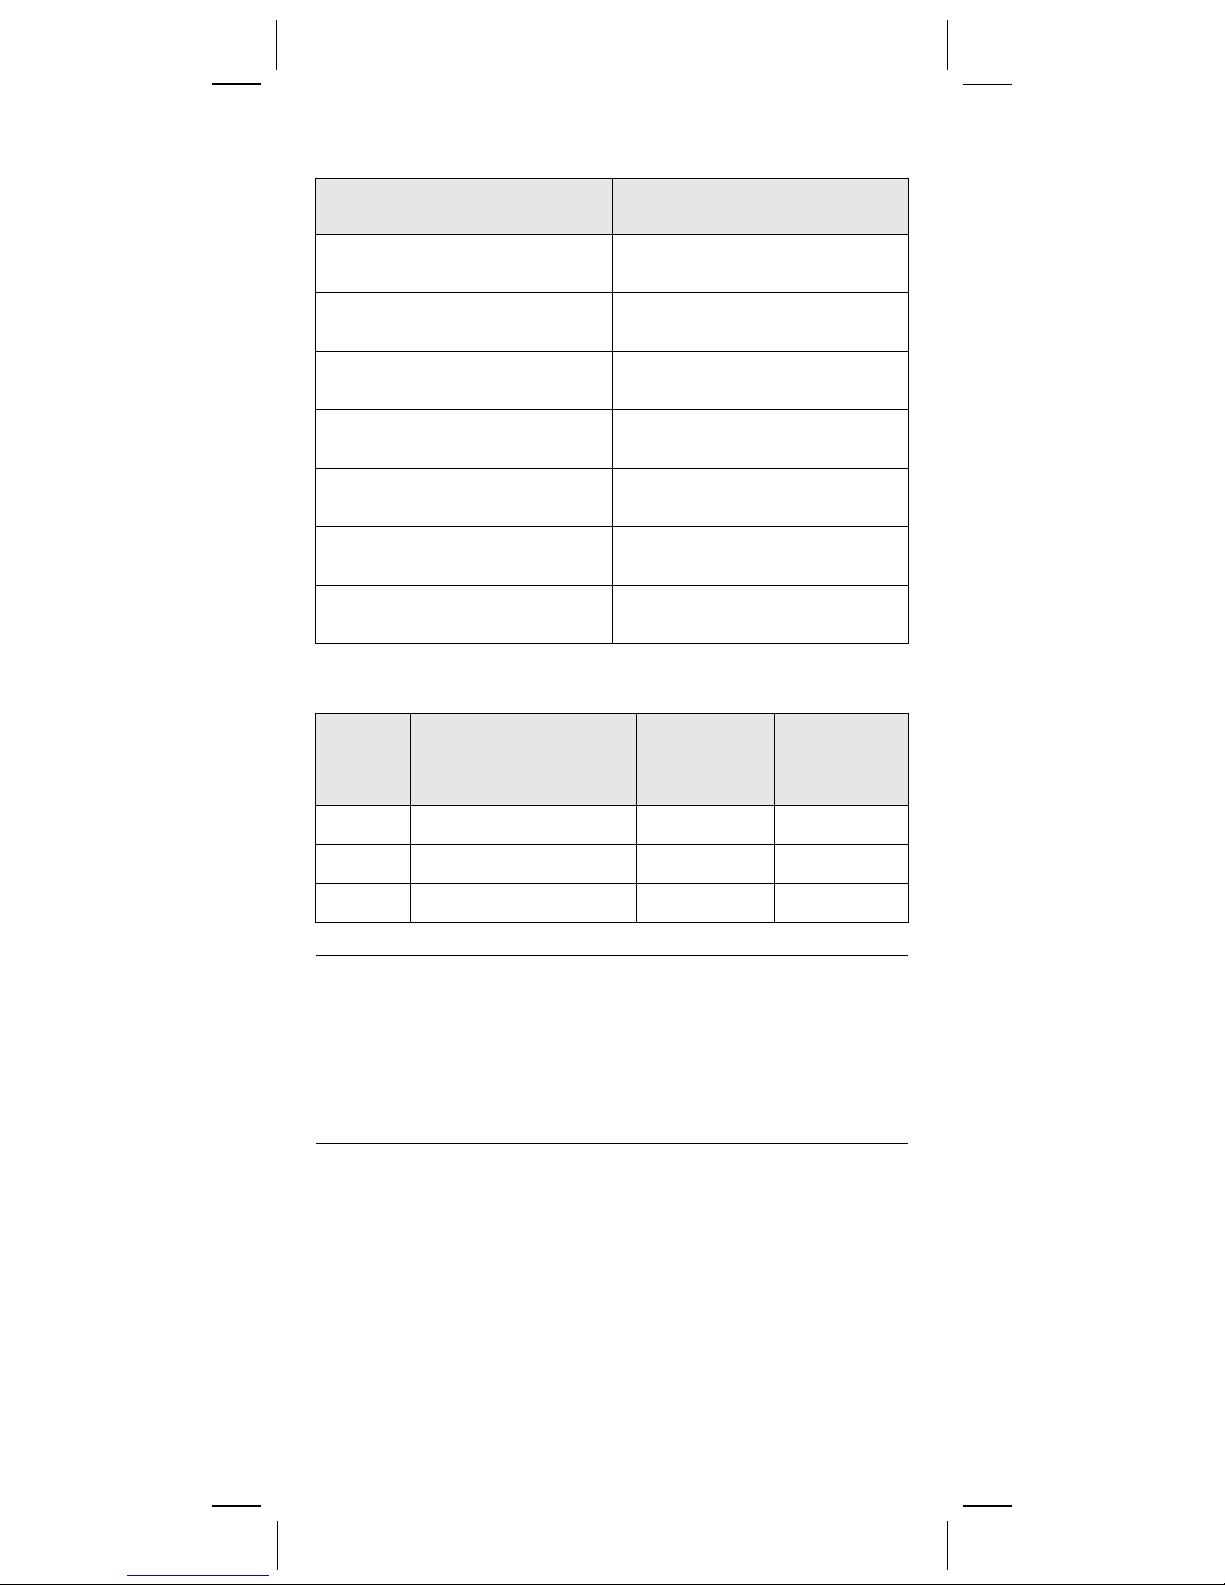
Recommended batteries
Nickel cadmium
(NiCd)
Sanyo N-3U
(700 mAh)
Mobile Power 700
(700 mAh)
Panasonic 600 DT
(600 mAh)
Emmerich 700
(700 mAh)
Nickel-metal hybrid
Saft RH 6 NiMH 1300
(1300 mAh)
Panasonic HHR-110 AA
(1100 mAh)
Panasonic Pro+ 1500
(1500 mAh)
Sanyo HR-3U
(1600 mAh)
GP GP130 AAHC
(1300 mAh)
Varta Phone Power
(1300 mAh)
Emmerich 1300
(1300 mAh)
Operating times/charging times
Capa-
city
(mAh)
Standby time
(hours)
Talk time
(hours)
(NiMH)
Charging
time
(hours)
700 Up to 200 (8 days) Over 10 Approx. 5
1200 Up to 320 (13 days) Over 17 Approx. 9
1600 Up to 400 (16 days) Over 23 Approx. 12
8
The first time you charge the batteries, we
recommend an uninterrupted charging time as
specified in the table, regardless of the charging
status displayed.
The charging capacity of the batteries decreases as the years go by due to technical reasons.
9
 Loading...