

Siemens HiPath 3000, openstage m3, openstage m3 ex plus, openstage m3 plus, openstage m3 ex Operating Instruction

Documentation
HiPath 3000
OpenStage M3 / M3 Plus
OpenStage M3 Ex / M3 Ex Plus
on HiPath Cordless Office
Operating Instructions
Siemens Enterprise Communications
www.siemens-enterprise.com

Safety notes
Safety notes
Using the OpenStage M3 Ex and OpenStage M3 Ex Plus handsets in potentially explosive working environments
This handset fulfils the requirements of the ATEX Directive and meets the
required EN and IEC standards (see the appendix in the operating manual).
See also the notes in the declaration of conformity.
OpenStage M3 Ex and OpenStage M3 Ex Plus were designed for use in
potentially explosive working environments (Ex zones) and in compliance
with fire prevention regulations. Local and operational factors may lead to
an explosive atmosphere in an Ex zone. Therefore, please observe the
following Ex safety notes:
Handset:
• The handset may only be operated in Ex zones where it is
certified. Refer to the appendix in the operating manual, the
device identification and the EC type examination certificate. A
copy of the prototype verification certificate ZELM 08 ATEX
0379 X can be found in the appendix of this operating manual.
• Users must check the handset for damage and verify that it is
operating correctly before using it in the Ex zone. A damaged
handset or a handset that is not fully functional may not be
brought into or used in the Ex zone.
• The following requirements must be met to satisfy the Ex
protection and IP rating IP 65 (casing protection) in an Ex zone:
– The battery compartment seal must not be damaged.
– The cover of the battery compartment must be tightly
screwed on.
• Deactivate the handset immediately and remove it from the Ex
zone if the following situations occur:
– You notice damage to the handset.
– If liquids have seeped into the handset.
• Repair a damaged handset immediately.
• Only service employees with Ex zone training and authorisation
should repair and service the handset.
• When swapping out a malfunctioning device/battery, the
technician must return the malfunctioning device/battery to the
manufacturer while specifying the customer data.
• Inappropriate use of the handset will result in revocation of its
certification for use in Ex zones.
2
Safety notes
Battery pack:
• Only use the approved battery pack (see page 167). Ex
authorisation is only valid and the handset can only be operated
if this battery pack is installed. Other battery packs are strictly
prohibited. If they are used, Ex protection is no longer valid.
• Never open the handset battery compartment in an Ex zone.
Battery pack removal, charging or transportation is not permitted
in these zones.
Charging the battery pack:
• The battery pack may only be charged:
– Outside the Ex zone
– While inside the handset
– Using the supplied charging unit.
• The charging unit should only be used outside the Ex zone.
Headset:
• A corded headset may not be used in the Ex zone. Only Ex
authorised Bluetooth headsets may be used. For more
information, consult your system administrator.
USB cable connection:
• Data may not be transferred via USB cable in the Ex zone.
3

Safety notes
Using OpenStage M3, OpenStage M3 Plus, OpenStage M3 Ex and OpenStage M3 Ex Plus
Attention:
• Do not use OpenStage M3 and OpenStage M3 Plus handsets
in potentially explosive environments!
• Please observe local safety regulations when using the handset.
• The ringer, signal tones and handsfree talking (speakerphone
mode) are played over the loudspeaker. Do not hold the handset
to your ear when it rings, when a signal tone is emitted or if
speakerphone mode is switched on. Otherwise you may
seriously and permanently impair your hearing.
• A transmitter signal is emitted by your handset. Please observe
local safety regulations.
• Handsets can interfere with the operation of medical
equipment. Please observe the technical requirements of the
relevant environment (hospital, for instance).
• The handset can cause unpleasant humming in hearing aids.
Caution:
• To avoid mutual interference, do not operate the handset in the
vicinity of electronic equipment.
• Only use the charging shell provided to charge the handset.
• If you give your handset to someone else, remember to include
the operating manual with it.
Using the battery pack for OpenStage M3 and OpenStage M3 Plus
Attention:
• Only use the original battery pack from the manufacturer of the
OpenStage M3/OpenStage M3 Plus!
• Do not use a standard rechargeable battery pack. This can result
in serious injury and material damage (risk of explosion,
degradation of battery pack cladding, functional interference and
handset damage).
• Avoid contact with fire and water.
4

Compliance with BGR 139 (personal alarm functionality)
Only for OpenStage M3 Plus and OpenStage M3 Ex Plus!
Notes:
• For BGR-compliant operation as a personal alarm signal device
with a voice communication capability (PNG-S), the handset
must operate in conjunction with an alarm server. Handset
operation without an alarm server is not BGR-compliant.
• The alarm functionality cannot be deactivated by the user.
Deactivation is only possible via a control call from the alarm
server.
• For compliance with BGR 139, the handset may only be
configured by specially qualified technicians. The PNG
configuration menu is PIN-protected to prevent unauthorised
configuration changes. The PIN should be kept secret.
Attention:
• The pre-alarm volume starts low and gradually rises until it
becomes very loud. Users should be aware of this.
• The battery pack must always be sufficiently charged for the
anticipated period of operation. The battery pack’s charging
capacity diminishes over its life. It should therefore be replaced
by specially qualified technicians when capacity levels become
insufficient (discharging accelerates over time). If necessary,
consult your safety officer.
Safety notes
5

Safety notes
WEEE mark
Notes:
• All electrical and electronic products should be
disposed of separately from the municipal waste
stream via designated collection facilities
appointed by the government or the local
authorities.
• The correct disposal and separate collection of
your old appliance will help prevent potential
negative consequences for the environment and human health.
It is a precondition for reuse and recycling of used electrical and
electronic equipment.
• For more detailed information about disposal of your old
appliance, please contact your city office, waste disposal
service, the shop where you purchased the product or your
sales representative.
The statements quoted above are only fully valid for equipment
which is installed and sold in the countries of the European Union
and is covered by the European Directive 2002/96/EC. Countries
outside the European Union may have other regulations regarding
the disposal of electrical and electronic equipment.
6
Controls, parts of the device
5
6
7
8
16
9
15
10
12
14
18
21
2
4
11
17
13
20
1
3
22
19
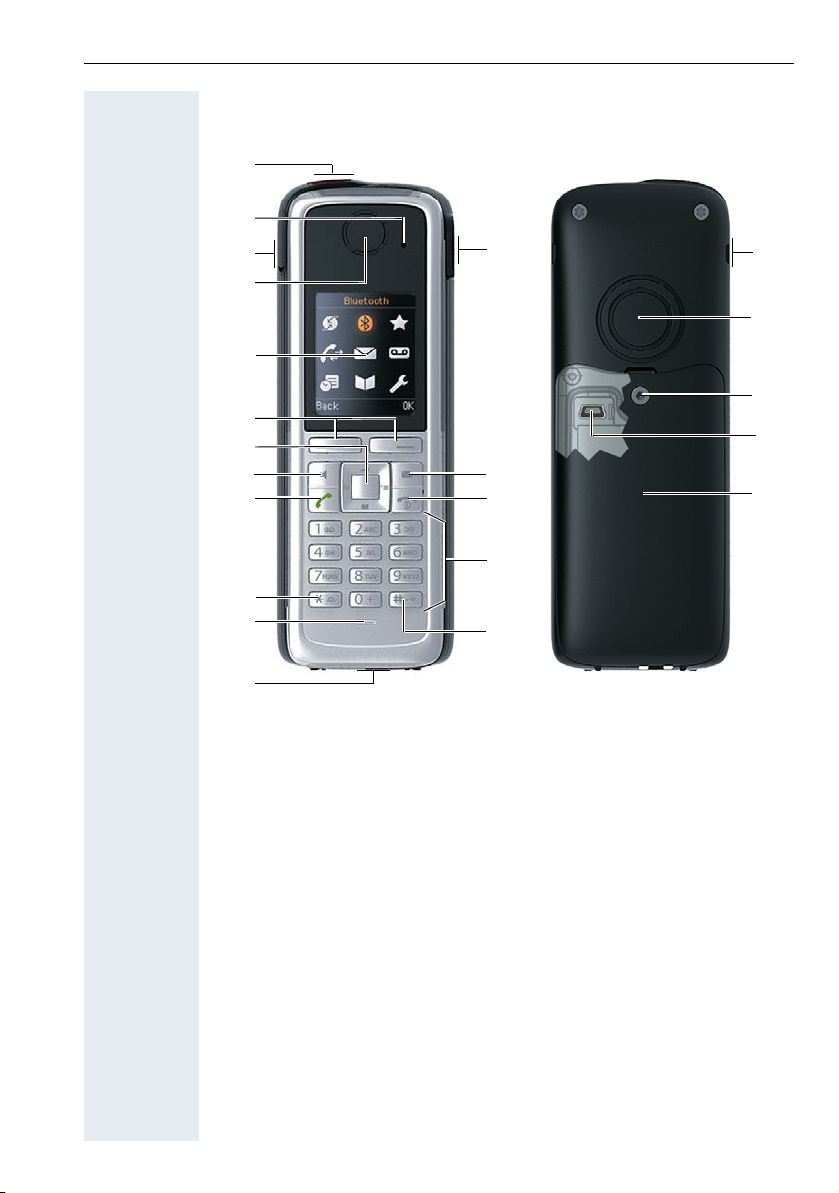
Controls, parts of the device
1 Alarm and emergency call
key (red)
2 LED for indicating mode
activation and alarm status
3 Example of a 2.5 mm jack
for headset (not for
OpenStage M3 Ex/
OpenStage M3 Ex Plus)
4 Earpiece 15 On-hook and on/off key
5 Display 16 Message key
6 Display keys 17 Volume key (+/-)
7Control key 18Battery cover
8 Speakerphone key 19 Mini USB connection (under battery
9 Talk key 20 Screw for battery cover
10 Star key 21 Tone ringing/speakerphone
11 Microphone 22 Notch for attachment clip (both sides)
How to use the keys: page 24
12 Jack for pull cord or dummy
connector
13 Hash key
14 Number keys
cover)
loudspeaker
7

Inhaltsverzeichnis
Contents
Safety notes. . . . . . . . . . . . . . . . . . . . . . . . . . . . . . . . . . .2
Using the OpenStage M3 Ex and OpenStage M3 Ex Plus handsets in
potentially explosive working environments . . . . . . . . . . . . . . . . . . . . . . 2
Using OpenStage M3, OpenStage M3 Plus, OpenStage M3 Ex and
OpenStage M3 Ex Plus . . . . . . . . . . . . . . . . . . . . . . . . . . . . . . . . . . . . . . 4
Using the battery pack for OpenStage M3 and OpenStage M3 Plus . . . 4
Compliance with BGR 139 (personal alarm functionality) . . . . . . . . . . . . 5
WEEE mark . . . . . . . . . . . . . . . . . . . . . . . . . . . . . . . . . . . . . . . . . . . . . . . 6
Controls, parts of the device . . . . . . . . . . . . . . . . . . . .7
Operating instructions . . . . . . . . . . . . . . . . . . . . . . . .13
Alarm functionality . . . . . . . . . . . . . . . . . . . . . . . . . . .13
Putting the handset into service . . . . . . . . . . . . . . . .14
Checking the package contents . . . . . . . . . . . . . . . . . . . . . . . . . . . . . . 14
Removing the protective cover . . . . . . . . . . . . . . . . . . . . . . . . . . . . . . . 14
Installing the charger . . . . . . . . . . . . . . . . . . . . . . . . . . . . . . . . . . . . . . . 14
Fitting the attachment clip. . . . . . . . . . . . . . . . . . . . . . . . . . . . . . . . . . . 15
Inserting the battery . . . . . . . . . . . . . . . . . . . . . . . . . . . . . . . . . . . . . . . 17
Charging and using the battery . . . . . . . . . . . . . . . . . . . . . . . . . . . . . . . 19
Inserting the dummy plug or connector . . . . . . . . . . . . . . . . . . . . . . . . 20
Connecting a corded headset . . . . . . . . . . . . . . . . . . . . . . . . . . . . . . . . 20
Connecting a USB data cable . . . . . . . . . . . . . . . . . . . . . . . . . . . . . . . . 21
Setting the handset display language . . . . . . . . . . . . . . . . . . . . . . . . . . 22
Setting the system display language. . . . . . . . . . . . . . . . . . . . . . . . . . . 23
Description of controls . . . . . . . . . . . . . . . . . . . . . . . .24
Function keys . . . . . . . . . . . . . . . . . . . . . . . . . . . . . . . . . . . . . . . . . . . . 24
Control key . . . . . . . . . . . . . . . . . . . . . . . . . . . . . . . . . . . . . . . . . . . . . . 25
Display keys . . . . . . . . . . . . . . . . . . . . . . . . . . . . . . . . . . . . . . . . . . . . . 26
Menu icons in the main menu. . . . . . . . . . . . . . . . . . . . . . . . . . . . . . . . 27
8

Inhaltsverzeichnis
Conducting calls – the basic functions . . . . . . . . . . 29
Activating/deactivating the handset. . . . . . . . . . . . . . . . . . . . . . . . . . . . 29
First seize the line, then dial . . . . . . . . . . . . . . . . . . . . . . . . . . . . . . . . . 30
Dial first, then seize the line . . . . . . . . . . . . . . . . . . . . . . . . . . . . . . . . . 31
Manual redial . . . . . . . . . . . . . . . . . . . . . . . . . . . . . . . . . . . . . . . . . . . . . 32
Callback . . . . . . . . . . . . . . . . . . . . . . . . . . . . . . . . . . . . . . . . . . . . . . . . . 33
Consultation. . . . . . . . . . . . . . . . . . . . . . . . . . . . . . . . . . . . . . . . . . . . . . 34
Answering or rejecting a call . . . . . . . . . . . . . . . . . . . . . . . . . . . . . . . . . 35
Picking up a call in a call pickup group. . . . . . . . . . . . . . . . . . . . . . . . . . 36
Ending a call. . . . . . . . . . . . . . . . . . . . . . . . . . . . . . . . . . . . . . . . . . . . . . 36
Forwarding calls. . . . . . . . . . . . . . . . . . . . . . . . . . . . . . . . . . . . . . . . . . . 37
Activating or deactivating the keypad lock . . . . . . . . . . . . . . . . . . . . . . 38
After leaving the radio network . . . . . . . . . . . . . . . . . . . . . . . . . . . . . . . 38
Conducting calls – enhanced functions . . . . . . . . . 39
Speakerphone mode . . . . . . . . . . . . . . . . . . . . . . . . . . . . . . . . . . . . . . . 39
Conducting calls with the headset . . . . . . . . . . . . . . . . . . . . . . . . . . . . 40
Corded headset . . . . . . . . . . . . . . . . . . . . . . . . . . . . . . . . . . . . . . . . 40
Cordless headset . . . . . . . . . . . . . . . . . . . . . . . . . . . . . . . . . . . . . . . 40
Number redial . . . . . . . . . . . . . . . . . . . . . . . . . . . . . . . . . . . . . . . . . . . . 43
Automatic redial. . . . . . . . . . . . . . . . . . . . . . . . . . . . . . . . . . . . . . . . 43
Deleting a redial entry or list . . . . . . . . . . . . . . . . . . . . . . . . . . . . . . 43
Adding a telephone number to the redial list. . . . . . . . . . . . . . . . . . 44
System speed dialling . . . . . . . . . . . . . . . . . . . . . . . . . . . . . . . . . . . . . . 45
System speed dialling, individual. . . . . . . . . . . . . . . . . . . . . . . . . . . . . . 46
System phonebook . . . . . . . . . . . . . . . . . . . . . . . . . . . . . . . . . . . . . . . . 47
Telephone database (LDAP) . . . . . . . . . . . . . . . . . . . . . . . . . . . . . . . . . 48
The handset's phonebook . . . . . . . . . . . . . . . . . . . . . . . . . . . . . . . . . . . 51
Saving an entry . . . . . . . . . . . . . . . . . . . . . . . . . . . . . . . . . . . . . . . . 52
Finding and dialling an entry . . . . . . . . . . . . . . . . . . . . . . . . . . . . . . 53
Dialling an entry with the speed dialling digit. . . . . . . . . . . . . . . . . . 53
Viewing an entry . . . . . . . . . . . . . . . . . . . . . . . . . . . . . . . . . . . . . . . 53
Changing an entry . . . . . . . . . . . . . . . . . . . . . . . . . . . . . . . . . . . . . . 54
Marking a VIP (Very Important Person) entry. . . . . . . . . . . . . . . . . . 55
Deleting an entry or phonebook. . . . . . . . . . . . . . . . . . . . . . . . . . . . 55
Displaying available memory . . . . . . . . . . . . . . . . . . . . . . . . . . . . . . 56
Sending an entry or phonebook to the handset or system . . . . . . . 56
Directed assignment of an MSN (multiple subscriber number) . . . . . . 58
Making calls using identification codes . . . . . . . . . . . . . . . . . . . . . . . . . 59
Using the handset as a second line. . . . . . . . . . . . . . . . . . . . . . . . . . . . 60
Deactivating the phone number display . . . . . . . . . . . . . . . . . . . . . . . . 61
Directed call transfer . . . . . . . . . . . . . . . . . . . . . . . . . . . . . . . . . . . . . . . 62
Activating/deactivating do not disturb . . . . . . . . . . . . . . . . . . . . . . . . . . 62
Call charge display. . . . . . . . . . . . . . . . . . . . . . . . . . . . . . . . . . . . . . . . . 63
Call tracing. . . . . . . . . . . . . . . . . . . . . . . . . . . . . . . . . . . . . . . . . . . . . . . 64
Entrance telephone . . . . . . . . . . . . . . . . . . . . . . . . . . . . . . . . . . . . . . . . 64
9

Inhaltsverzeichnis
TDS telephone data service. . . . . . . . . . . . . . . . . . . . . . . . . . . . . . . . . . 67
Activating control relays . . . . . . . . . . . . . . . . . . . . . . . . . . . . . . . . . . . . 68
Sending a signal to the network . . . . . . . . . . . . . . . . . . . . . . . . . . . . . . 69
External call forwarding with a multiple subscriber number . . . . . . . . . 69
Using night service . . . . . . . . . . . . . . . . . . . . . . . . . . . . . . . . . . . . . . . . 71
Using dual-tone multifrequency signalling. . . . . . . . . . . . . . . . . . . . . . . 72
Parking/activating calls. . . . . . . . . . . . . . . . . . . . . . . . . . . . . . . . . . . . . . 73
Conducting calls – with multiple users . . . . . . . . . .74
Call waiting . . . . . . . . . . . . . . . . . . . . . . . . . . . . . . . . . . . . . . . . . . . . . . 74
Call waiting tone off/on . . . . . . . . . . . . . . . . . . . . . . . . . . . . . . . . . . . . . 75
Disabling/enabling automatic call waiting . . . . . . . . . . . . . . . . . . . . . . . 76
Busy override . . . . . . . . . . . . . . . . . . . . . . . . . . . . . . . . . . . . . . . . . . . . 77
Transferring a call (joining). . . . . . . . . . . . . . . . . . . . . . . . . . . . . . . . . . . 77
Placing a call on hold . . . . . . . . . . . . . . . . . . . . . . . . . . . . . . . . . . . . . . . 79
Toggling (switching between calls) . . . . . . . . . . . . . . . . . . . . . . . . . . . . 79
Conducting a conference. . . . . . . . . . . . . . . . . . . . . . . . . . . . . . . . . . . . 80
Using the second call function . . . . . . . . . . . . . . . . . . . . . . . . . . . . . . . 83
Group functions . . . . . . . . . . . . . . . . . . . . . . . . . . . . . .84
Activating/deactivating group calls . . . . . . . . . . . . . . . . . . . . . . . . . . . . 84
Ringing group on . . . . . . . . . . . . . . . . . . . . . . . . . . . . . . . . . . . . . . . . . . 87
UCD (Universal Call Distribution). . . . . . . . . . . . . . . . . . . . . . . . . . . . . . 89
Mulap group (Multiple Line Application) . . . . . . . . . . . . . . . . . . . . . . . . 94
Message functions . . . . . . . . . . . . . . . . . . . . . . . . . . .96
Leaving a message/advisory message . . . . . . . . . . . . . . . . . . . . . . . . . 96
Sending/calling text messages . . . . . . . . . . . . . . . . . . . . . . . . . . . . . . . 98
Answering a message or voicemail message . . . . . . . . . . . . . . . . . . . . 99
Caller list . . . . . . . . . . . . . . . . . . . . . . . . . . . . . . . . . . . . . . . . . . . . . . . 102
Additional functions . . . . . . . . . . . . . . . . . . . . . . . . .104
Handset alarm clock function . . . . . . . . . . . . . . . . . . . . . . . . . . . . . . . 104
Handset appointment reminder function. . . . . . . . . . . . . . . . . . . . . . . 106
System appointment function . . . . . . . . . . . . . . . . . . . . . . . . . . . . . . . 109
Selecting a base . . . . . . . . . . . . . . . . . . . . . . . . . . . . . . . . . . . . . . . . . 111
Setting the base . . . . . . . . . . . . . . . . . . . . . . . . . . . . . . . . . . . . . . . . . 112
Speed dialling . . . . . . . . . . . . . . . . . . . . . . . . . . . . . . . . . . . . . . . . . . . 113
Changing display key assignments . . . . . . . . . . . . . . . . . . . . . . . . . . . 114
Data communication with the PC . . . . . . . . . . . . . . . . . . . . . . . . . . . . 115
10

Inhaltsverzeichnis
Bluetooth interface . . . . . . . . . . . . . . . . . . . . . . . . . . . . . . . . . . . . . . . 116
Activating/deactivating Bluetooth mode . . . . . . . . . . . . . . . . . . . . 116
Registering Bluetooth devices. . . . . . . . . . . . . . . . . . . . . . . . . . . . 117
Editing the list of known (trusted) devices. . . . . . . . . . . . . . . . . . . 118
Phonebook transfer . . . . . . . . . . . . . . . . . . . . . . . . . . . . . . . . . . . . 120
Setting the handset . . . . . . . . . . . . . . . . . . . . . . . . . . 121
Setting the speaker volume. . . . . . . . . . . . . . . . . . . . . . . . . . . . . . . . . 121
During a call . . . . . . . . . . . . . . . . . . . . . . . . . . . . . . . . . . . . . . . . . . 121
In idle status. . . . . . . . . . . . . . . . . . . . . . . . . . . . . . . . . . . . . . . . . . 122
Setting advisory tones . . . . . . . . . . . . . . . . . . . . . . . . . . . . . . . . . . . . . 123
Activating/deactivating the vibration alert . . . . . . . . . . . . . . . . . . . . . . 124
Setting the ringer. . . . . . . . . . . . . . . . . . . . . . . . . . . . . . . . . . . . . . . . . 125
Setting ringing tones and pictures with resource directory. . . . . . . . . 127
Viewing screensavers and caller pictures / Playing sounds. . . . . . 127
Renaming and deleting screensavers/caller pictures/sounds . . . . 128
Checking the available memory. . . . . . . . . . . . . . . . . . . . . . . . . . . 129
Activating or deactivating the ringer . . . . . . . . . . . . . . . . . . . . . . . . . . 130
Activating or deactivating the alerting tone . . . . . . . . . . . . . . . . . . . . . 130
Activating/deactivating automatic call answering . . . . . . . . . . . . . . . . 131
Setting the date and time . . . . . . . . . . . . . . . . . . . . . . . . . . . . . . . . . . 132
Setting the display. . . . . . . . . . . . . . . . . . . . . . . . . . . . . . . . . . . . . . . . 133
Setting the conversion list for vCard transfer . . . . . . . . . . . . . . . . . . . 137
Setting the menu view . . . . . . . . . . . . . . . . . . . . . . . . . . . . . . . . . . . . 137
Resetting the defaults . . . . . . . . . . . . . . . . . . . . . . . . . . . . . . . . . . . . . 139
Telephone blocking. . . . . . . . . . . . . . . . . . . . . . . . . . 141
Handset telephone lock. . . . . . . . . . . . . . . . . . . . . . . . . . . . . . . . . . . . 141
Telephone lock code programming . . . . . . . . . . . . . . . . . . . . . . . . . . . 142
Locking/unlocking the handset . . . . . . . . . . . . . . . . . . . . . . . . . . . . . . 143
Central telephone lock / Locking/unlocking other handsets . . . . . . . . 144
System functions . . . . . . . . . . . . . . . . . . . . . . . . . . . .145
Calling functions via the menu . . . . . . . . . . . . . . . . . . . . . . . . . . . . . . 145
Calling functions via codes . . . . . . . . . . . . . . . . . . . . . . . . . . . . . . . . . 145
Functions and codes . . . . . . . . . . . . . . . . . . . . . . . . . . . . . . . . . . . . . . 146
11

Inhaltsverzeichnis
Personal alarm functionality . . . . . . . . . . . . . . . . . .149
Alarm statuses. . . . . . . . . . . . . . . . . . . . . . . . . . . . . . . . . . . . . . . . . . . 149
Terms . . . . . . . . . . . . . . . . . . . . . . . . . . . . . . . . . . . . . . . . . . . . . . . . . 149
Alarm types (overview) . . . . . . . . . . . . . . . . . . . . . . . . . . . . . . . . . . . . 154
Activating monitoring. . . . . . . . . . . . . . . . . . . . . . . . . . . . . . . . . . . . . . 155
Prealarm. . . . . . . . . . . . . . . . . . . . . . . . . . . . . . . . . . . . . . . . . . . . . 155
Technical warning on the handset . . . . . . . . . . . . . . . . . . . . . . . . . 156
Sending an emergency alarm signal/calling for assistance . . . . . . 158
Deactivating monitoring. . . . . . . . . . . . . . . . . . . . . . . . . . . . . . . . . . . . 160
Function test when activating Alarm Mode and PNG Mode. . . . . . . . 161
Appendix . . . . . . . . . . . . . . . . . . . . . . . . . . . . . . . . . . .163
Troubleshooting. . . . . . . . . . . . . . . . . . . . . . . . . . . . . . . . . . . . . . . . . . 163
Cleaning the handset. . . . . . . . . . . . . . . . . . . . . . . . . . . . . . . . . . . . . . 165
General specifications . . . . . . . . . . . . . . . . . . . . . . . . . . . . . . . . . . . . . 166
Handset . . . . . . . . . . . . . . . . . . . . . . . . . . . . . . . . . . . . . . . . . . . . . 166
DECT . . . . . . . . . . . . . . . . . . . . . . . . . . . . . . . . . . . . . . . . . . . . . . . 166
Bluetooth . . . . . . . . . . . . . . . . . . . . . . . . . . . . . . . . . . . . . . . . . . . . 167
Battery . . . . . . . . . . . . . . . . . . . . . . . . . . . . . . . . . . . . . . . . . . . . . . 167
Handset operating times/charging times. . . . . . . . . . . . . . . . . . . . 167
Charging shells . . . . . . . . . . . . . . . . . . . . . . . . . . . . . . . . . . . . . . . 167
Accessories . . . . . . . . . . . . . . . . . . . . . . . . . . . . . . . . . . . . . . . . . . . . . 168
EU directive . . . . . . . . . . . . . . . . . . . . . . . . . . . . . . . . . . . . . . . . . . . . . 168
Writing and editing text . . . . . . . . . . . . . . . . . . . . . . . . . . . . . . . . . . . . 168
Setting upper/lower case or digits. . . . . . . . . . . . . . . . . . . . . . . . . 168
Writing names . . . . . . . . . . . . . . . . . . . . . . . . . . . . . . . . . . . . . . . . 169
Accessing additional functions via the PC interface . . . . . . . . . . . . . . 169
Declaration of conformity . . . . . . . . . . . . . . . . . . . . . . . . . . . . . . . . . . 170
Index. . . . . . . . . . . . . . . . . . . . . . . . . . . . . . . . . . . . . . .171
12

Operating instructions
Operating instructions
These operating instructions describe your handset and its functions on
your communications system.
All functions that can be performed via your handset are described here. If
some of the required functions are not available on your handset, it may be
due to one of the following:
• The function is not configured for you or your handset - please contact
your system administrator.
• Your communications platform does not feature this function - please
contact your contract partner for the communications system.
Alarm functionality
Only for OpenStage M3 Plus and OpenStage M3 Ex Plus!
OpenStage M3 Plus and OpenStage M3 Ex Plus offer personal alarm
functionality with voice communication capability. A device with this
functionality is also described in abbreviated form as PNG (personal alarm
device) or as PNG-S (personal alarm device with voice communication
capability).
A manual alarm can be triggered via an alarm key. Sensors detect non
movement, man down and escape states, which can be signalled as
automatic alarms.
An integrated time alarm function is used to determine whether the
person being monitored is still responsive. A pull cord is used to check
whether the OpenStage M3 Plus is still on the monitored person.
OpenStage M3 Plus and OpenStage M3 Ex Plus optionally monitor the
following operating functions:
• Battery charging
• Synchronicity with DECT base
• Communication with an alarm server
A technical warning is reported on the handset in the event of a
malfunction.
For more information on the alarm functionality please refer to Kapitel ,
“Personal alarm functionality”.
13

Putting the handset into service
Remove the protective cover from the display before
putting the handset into service.
Putting the handset into service
Checking the package contents
•Handset
• Battery pack
• Accessory pack containing the following:
– Battery cover
– Screw for battery cover
– Allen key
– Attachment clip
– Holder for attachment clip
– Dummy plug (OpenStage M3 and OpenStage M3 Ex only)
– Connector with cord for man down alarm (OpenStage M3 Plus and
OpenStage M3 Ex Plus only)
• Document "Information on Handset"
• Document "Safety Notes"
Removing the protective cover
Installing the charger
The charger is designed for operation in closed, dry rooms within a
temperature range of +5 °C to +45 °C.
Position the charger on a level, non-slip surface.
The phone's feet do not usually leave any marks on surfaces. However,
due to the multitude of different varnishes and polishes used on today's
furnishings, the occurrence of marks on the surfaces cannot be completely
ruled out.
Please note:
• Never expose the telephone to the influence of heat sources,
direct sunlight or other electrical devices.
• Protect your handset from moisture, dust, corrosive liquids and
fumes.
1. Connect the flat plug from the power adapter to the charger.
2. Plug the power adapter into the plug socket.
14
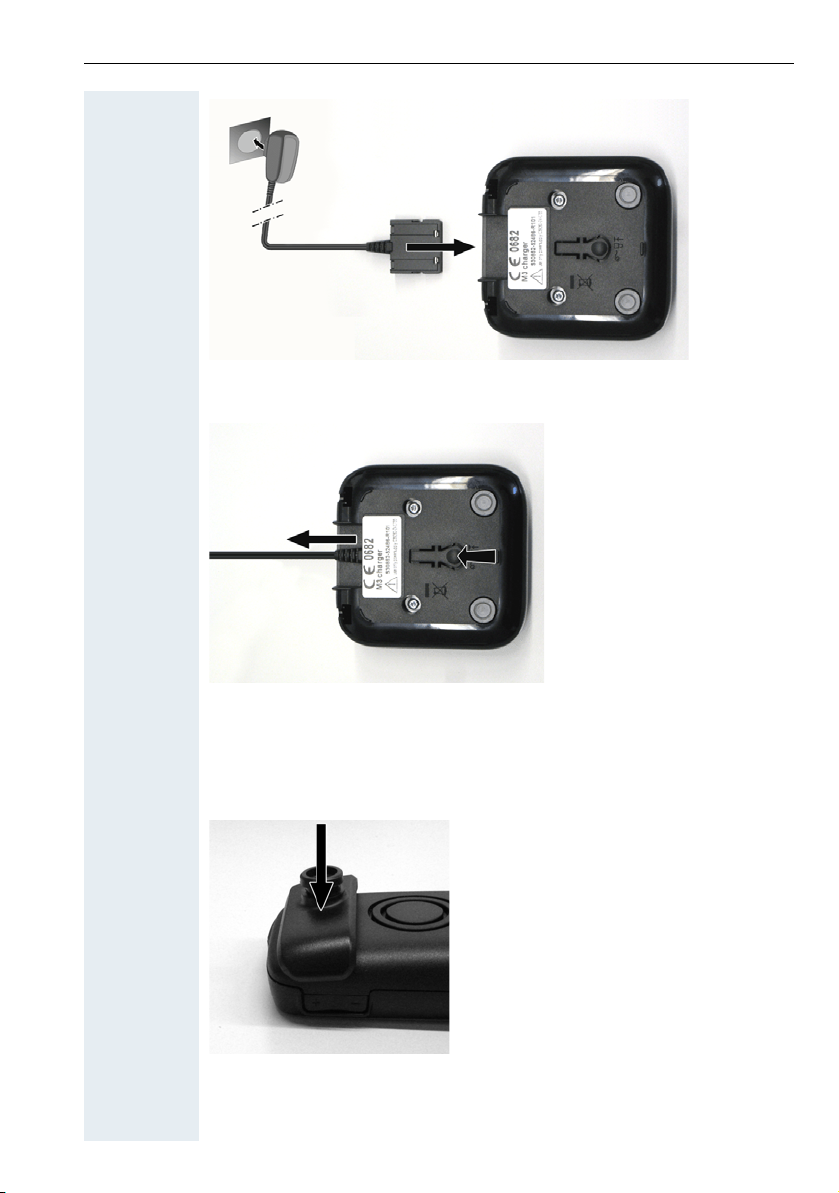
Putting the handset into service
1
2
To disconnect the flat plug from the charger, press the release button and
disconnect the flat plug.
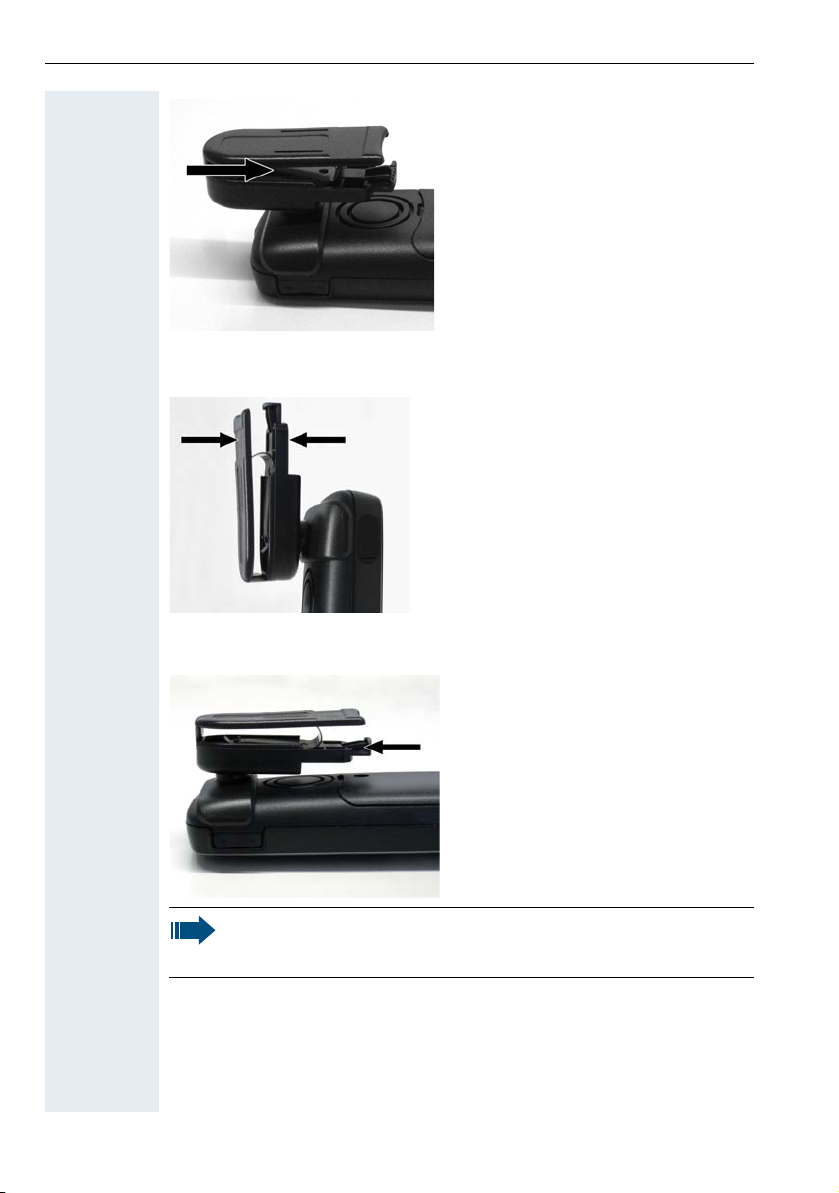
Fitting the attachment clip
1. Press the attachment clip pin on the back of the handset until the tabs
on the sides engage audibly in the recesses on the phone.
2. Slide the attachment clip onto the pin as it clicks audibly into place.
15
Putting the handset into service
3. Secure the handset with the attachment clip to the belt. To do this,
open the brackets by squeezing the free end and attach it to the belt.
To remove the handset, press the opener on the attachment clip and slide
the handset from the pin.
While you are wearing the handset on the belt you will be able to
read the display without having to remove the handset, see
page 135.
16
Putting the handset into service
1
2
3
Inserting the battery
The handset is supplied with an approved battery. The battery is not
charged when supplied. It is first charged in the handset.
• Do not remove the battery in Ex zones.
• Please observe the safety notes page 2.
• Only use approved batteries page 167.
• Open the battery compartment in a dust-free environment only.
• Your phonebook entries and all settings remain stored even if
you remove the battery. The date and time settings will be
reset.
• Only remove the battery if it is defective. The battery's life
diminishes each time it is removed.
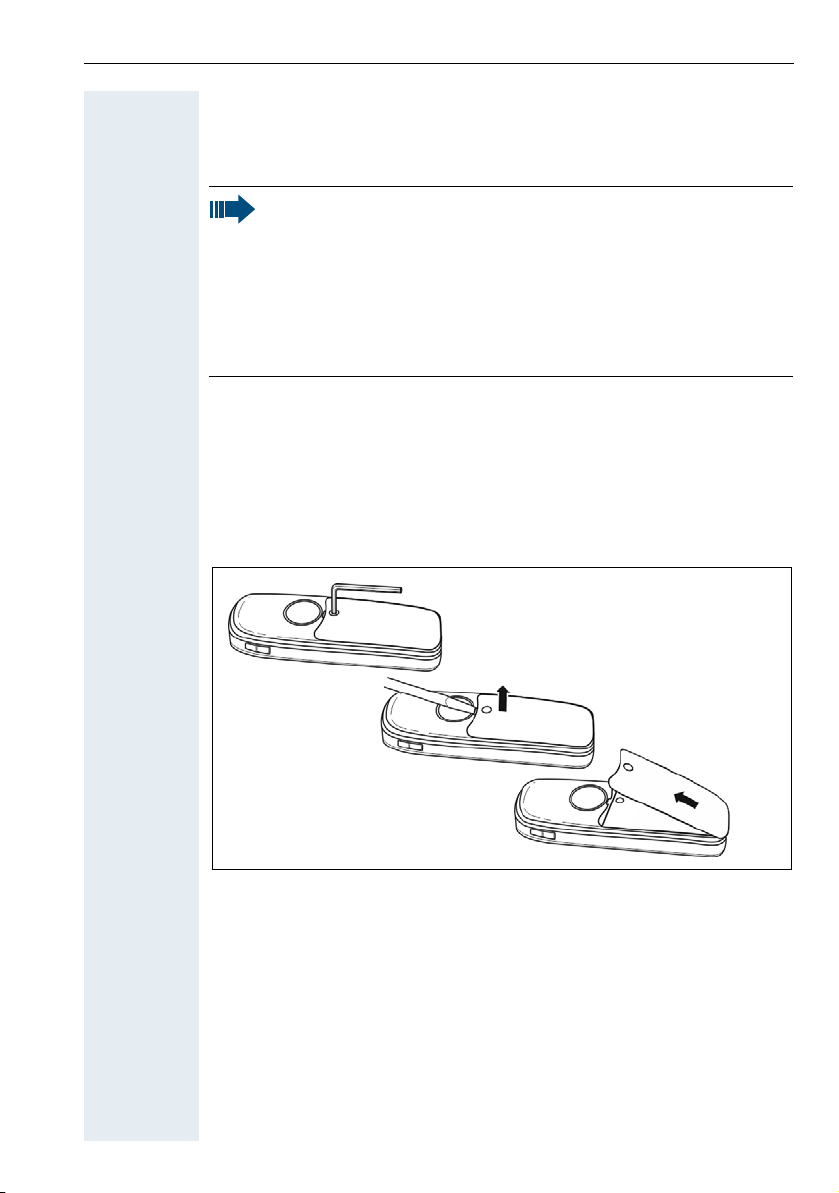
Opening the battery compartment
1. Loosen and remove the screw from the battery cover with the Allen
key.
2. Insert a suitable screwdriver into the recess between the housing and
battery cover, turn it and then raise the battery cover.
3. Lift up the battery cover from the housing.
Inserting the battery
Insert the battery pack (at an angle, nose first and the contacts facing
down). Then press it down into the compartment until the battery pack's
positioning clip firmly snaps into place.
17

Putting the handset into service
1
2
3
Closing the battery compartment
1. Replace the battery cover at the bottom of the housing into the
recesses.
2. Then press down the battery cover until it rests firmly on the seal.
3. Insert and tighten the Allen screw.
18
Putting the handset into service
Charging and using the battery
To charge the battery, insert the handset into the charging shell with the
keypad facing forwards.
Important:
Only place the handset in the designated charger. (For order
numbers see page 167).
The charging status is indicated by the charge status LED.
{ lighting white: charged over 66%
{ lighting white: charged between 34 % and 66 %
y lighting white: charged between 11% and 33%
y lighting red: charged below 11%
y flashing red: battery almost empty (less than 10 minutes talktime)
xy xy x{ x{ lighting white: battery being charged
• Initial charging: Charge the battery for at least 10 hours without
a break, regardless of the charging status icon.
• For future charging: you can replace your handset in the
charging shell each time it has been used. Charging is
electronically controlled which ensures that the battery is
charged optimally.
• The capacity of the Ex battery pack can diminish due to ageing
to the extent that it is no longer sufficient (increasingly faster
discharge) for the intended operating life. The Ex battery pack
must then be replaced by appropriately trained service
personnel.
19
Putting the handset into service
1
2
1
2
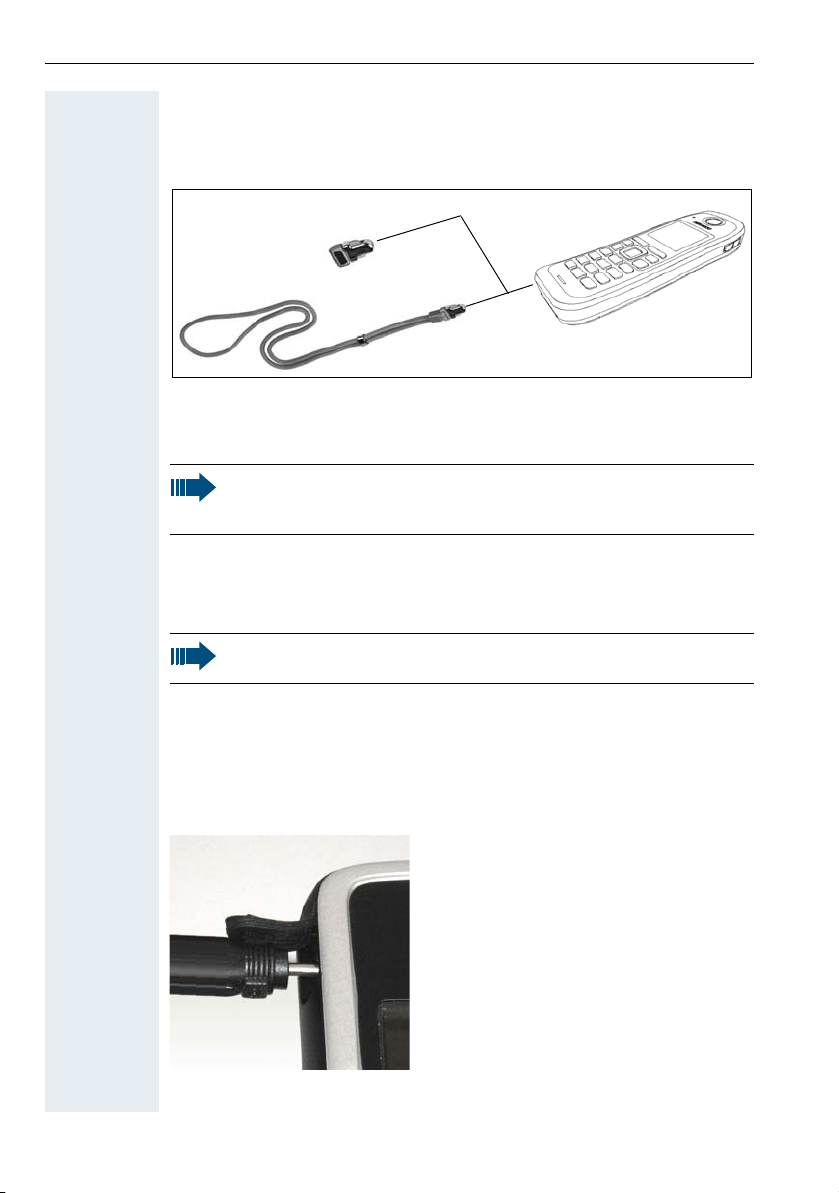
Inserting the dummy plug or connector
Insert the dummy connector (1) / connector with cord (2) into the recess
provided. Make sure the dummy connector is positioned correctly.
If you do not require the man down alarm function on the
OpenStage M3 Plus or OpenStage M3 Ex Plus you can also use the
connector without a cord as a dummy connector.
Regardless of whether or not a cord is used, the handset can be
placed with the connector inserted in the charger. Run the cord out
from the front of the charger.
Connecting a corded headset
Not for OpenStage M3 Ex and OpenStage M3 Ex Plus!
You can connect a headset with a 2.5 mm jack plug to the left side of your
handset.
1. To do this, open the rubber cover using your finger nail and bend it
outward.
2. Insert the jack plug into the socket.
The headset volume corresponds to the setting for the earpiece volume
20
page 121.
Putting the handset into service
1
2
Use a Bluetooth headset for Ex-proof equipment, page 116.
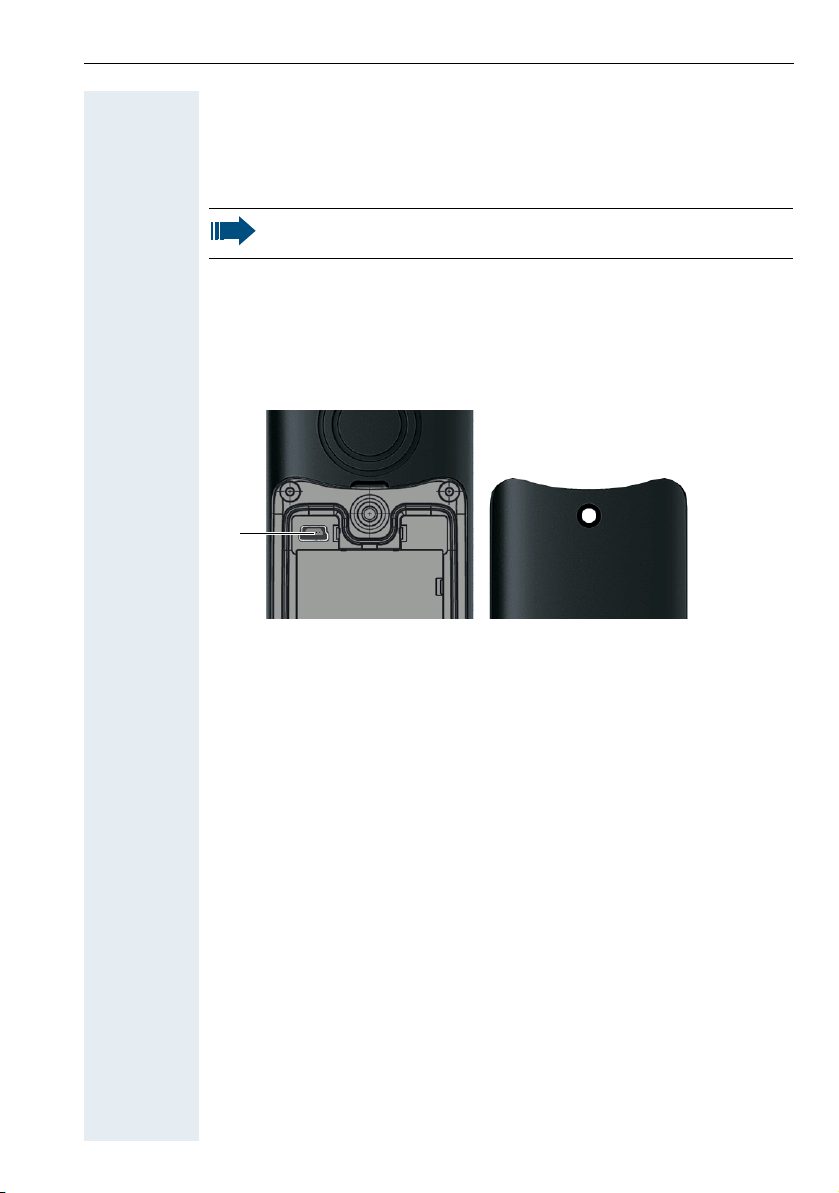
Connecting a USB data cable
The USB cable must not be connected in Ex zones!
You can connect a USB data cable into the port under the battery cover of
your handset.
1. To do this, open the battery cover, as when inserting the battery
page 17.
2. Insert the mini-USB plug into the socket.
21

Putting the handset into service
Settings
Ï
Language
Deutsch
English
Francais
Italiano
Espanol
Portugues
Nederlands
Dansk
Norsk
Svenska
Suomi
Cesky
Polski
Turkce
Ellinika
Magyar
Russkij
Hrvatski
Slovenscina
Romana
Srpski
Catala
Bulgarski
Bosanski
Ukrayinska
Arabic
Step by Step
[ Select the menu icon and confirm.
u v
[ Select the menu item and confirm.
st
[ Select and confirm the language you require.
st
Setting the handset display language
If your preferred language for handset display texts is
not set as the default, you can set this yourself.
Opening the main menu
v Open the handset's main menu.
Opening the first submenu
Opening the second submenu
Selecting a language
a Press the On-hook key to end the operation.
• If you inadvertently set a display language
that you do not understand, press "v
5" and then select the correct language.
• If you want to reset the default display
language: page 139.
• You can also change the language of the
display texts for the communications system:
page 23.
O
22

Putting the handset into service
Menu
Service?
More features?
*
48=
Select language?
11=German
...
Step by Step
Setting the system display language
If you wish to change the language of the display texts,
then you must also change the system language on the
handset. A different language can be set for every
handset on the system.
c or d Press and hold the Talk or Speakerphone key.
Open the system menu.
> < [Select the menu item and confirm.
> < [Select the menu item and confirm.
> < [Select the menu item and confirm.
> < [Select and confirm the language you require.
a Press the On-hook key to end the operation.
A description of further settings can be found
from page 121.
23

Description of controls
Description of controls
Function keys
The following function keys are available:
Key Name Usage
a
c
d
f
*
#
Alarm and
On-hook and
on/off key
Talk key • Answer a call
Speakerphone
key
Message list • Access message lists
Star key • When entering the phone number:
Hash key • When entering the phone number:
emergency call
key
• End a call
• Cancel functions
• Go back to the next menu level up
• Activate or deactivate the handset
• Dial a phone number
• Open the redial list
• Access telephone system functions
• Answer a call
• Dial a phone number
• Toggle between handset and
speakerphone mode
• Access telephone system functions
– Press and release: Insert "*"
– Press and hold: Insert "R"
• In editor mode (string): Show all
special characters
• In idle status: Press and hold to switch
on/off the ringer
– Press and release: Insert "#"
– Press and hold: Insert a dialling
• In editor mode (string): Toggle
between uppercase and lowercase
and digits
• In idle status: Press and hold to switch
on/off the keypad lock
• For triggering a manual alarm or
emergency call
pause (for example between the
prefix and the phone number or
when checking a mailbox)
24

Description of controls
Key Name Usage
Volume key (+/-)• Adjust the volume for ringtones
• When conducting a call: Adjust the
volume in handset and speakerphone
mode and for the headset
Control key
The control key is assigned different functions depending on the operating
situation:
Situation
In idle status Call volume Open the
During a call Call volume Open the
In the main
menu
In lists and
menus
In the input
field
Change values
t
Press top of
key
Select a menu
icon
Next-higher
item in the list
Move the
cursor up one
line
- -
The centre key (central key of control key) has an OK function for
confirming/adopting a selection.
s
Press bottom
of key
handset's
phonebook
handset's
phonebook
Select a menu
icon
Next-lower
item in the list
Move the
cursor down
one line
u
Press left side
of key
- Open the
- Select
Select a menu
icon
Next menu
level up, cancel
Move the
cursor to the
left
Reduce value Increase value
v
Press ri ght side
of key
handset's main
menu
"Loudspeaker
Vol", "GAP
DTMF", "Base
Settings"
Select a menu
icon
Select an entry
(OK)
Move the
cursor to the
right
25
Description of controls
Back Save
Current display key
functions
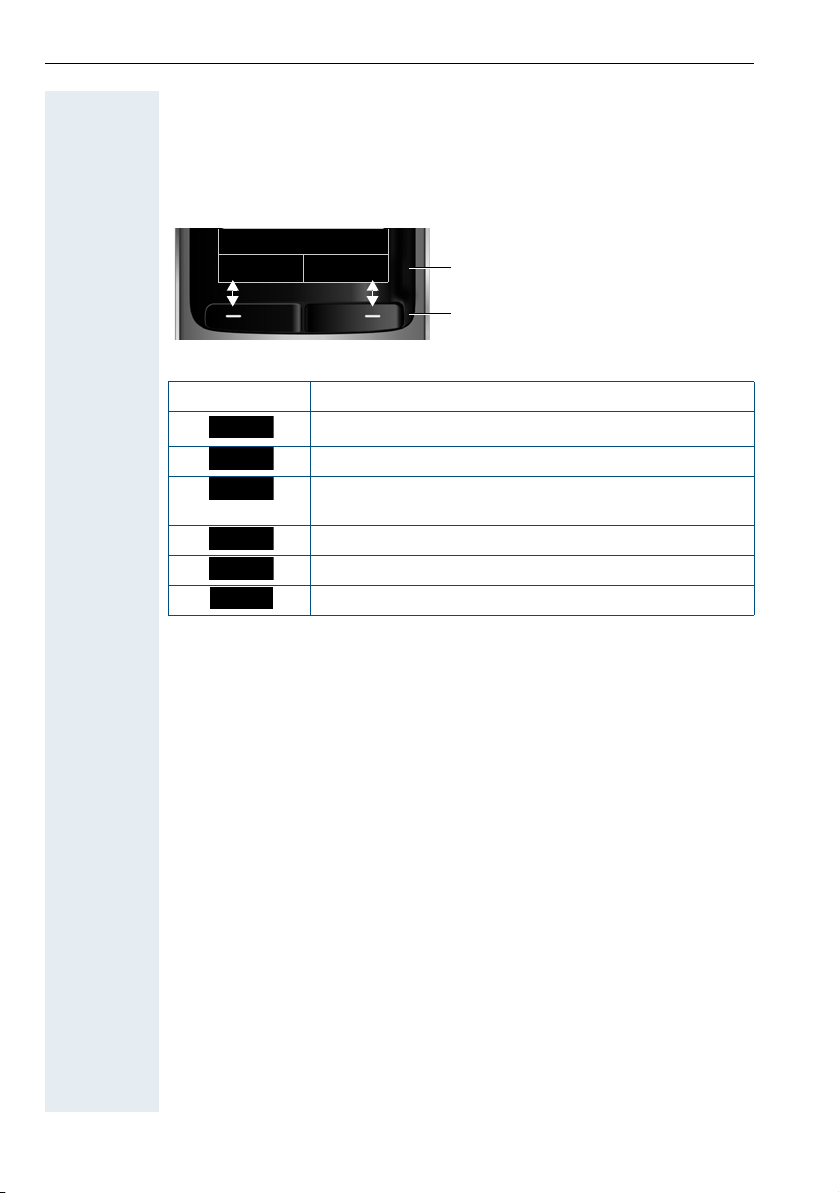
Display keys
Options
OK
Û
Back
Save
Þ
Display keys
The handset has two display keys, each with one or two functions. When
the key is allocated two functions, press the right or left side of the key to
select the corresponding function. The display key assignment depends
on the operating status.
Some important display keys include:
Icon Usage
Open a context-specific menu
Confirm your selection
Delete character by character/word by word from right
to left
Go back one menu level/cancel operation
Save input
Open redial list
26

Description of controls
·òÉ
ì
Ê
Ì
Menu icons in the main menu
v or w The handset's main menu can be opened by right-clicking or pressing the
centre key of the control key.
u v t s The menu icons are selected by pressing the left/right and top/bottom of
the control key.
Alternatively, you can also press one of the numerical keys, e. g.
"Alarm Clock" or
Menu options that are only available in expert mode are marked with the
icon. Expert mode can be set by switching the menu view from
•
simplified to complete. To set, see page 137.
Icon Name Usage
O for "Settings".
Resource
Directory
Bluetooth Configure Bluetooth interface:
Additional
Features
Alarm Clock Configure alarm call function.
Manage images and tones:
• Screensavers
• Caller Pictures
• Sounds
• Capacity
• Activation
• Search for Headset
• Search Data Device
• Known Devices
• Own Device
Alarm and emergency call
configuration:
• [Mode] Activation
• Configuration (only with Service
PIN)
• Operating Mode (only with Service
PIN, only with OpenStage M3 Plus
and OpenStage M3 Ex Plus)
• Display Rotate (only with
OpenStage M3 Plus and
OpenStage M3 Ex Plus)
For information on configuring and
selecting the operating mode, see the
"Alarm and Emergency Call
Configuration" Service Manual.
4 for
Call Lists Open call list if calls are available.
Voice Mail Call mailbox if voicemail calls are
available on the network answering
machine.
27

Description of controls
á
Â
Ï
Icon Name Usage
Organizer Manage appointments:
• Calendar
• Missed Alarms
Directory Manage phonebook.
Settings Configure handset:
•Date/Time
• Audio Settings
– Handset Volume
– Advisory Tones
–Vibration
– Ringtones (Handset)
• Display + Keypad
– Screensaver
– Large Font
– Colour Schemes
– Display Backlight
– Keypad Illumination
– Auto Keylock
• Language
• Registration
– Register Handset
– Select Base (only if registered on
several systems)
• Telephony
– Auto Answer
–Aera Codes
•System
– Handset PIN
– Handset Reset
– Base Reset
• Menu View
– Simplified
– Complete
28

Step by Step
Please enter
PIN:
Conducting calls – the basic functions
Conducting calls – the basic
functions
You can use your handset to make both internal and
external calls.
Internal calls are calls that
• you make within the range of a communications
system, for example, within your company,
• you make between networked communications
systems, for example, to different company
locations.
External calls are calls that you conduct with users of
the public telephone network.
Activating/deactivating the handset
a Press the On-hook key until the activation or
deactivation is confirmed by a signal.
PIN
If the default PIN has not been changed (0000), the
handset is ready for operation as soon as it is switched
on. If a PIN was set, it must be entered before the
handset can be operated.
o Enter the PIN.
[ Confirm your entry. The handset is ready to use.
Displaying the connection quality
The strength of the incoming signal is displayed by the
"receive field strength" icon in idle status:
| Flashing, no reception
Ò Low receive field strength
Ñ 50% receive field strength
i 75% receive field strength
Ð 100% receive field strength
The radio range is different indoors and outdoors
page 166. Please consult your system administrator
in the event of range problems.
29

Conducting calls – the basic functions
Busy
Please replace
handset.
Step by Step
c or d When the handset is in idle status: Press and hold the
Charging the battery
You may only use the charging shell provided for the
handset.
The handset charges when sitting in the charging shell,
even when deactivated.
If the handset deactivates because the battery is flat, it
automatically reactivates and is ready for operation as
soon as you place it in the charging shell. The charging
operation starts. If a PIN was set, it must be entered
first to allow charging to start.
Language
If your preferred language for the display texts is not
set, you can set this yourself page 22.
First seize the line, then dial
Talk or Speakerphone key.
30
o Enter the number you wish to dial. The user is called.
Typing errors cannot be corrected. In case of typing
errors: Press the On-hook key.
Either:
p The user answers. You are conducting the call.
Or:
The user is busy or rejects the call. You are routed to the
other party's mailbox (if configured) or can program a
callback request page 33.
a Press the On-hook key to end the operation.
 Loading...