

Page 1
Siemens Mobility Toolkit
for Java™ Development
User's Manual
Version 1.1, 05/2004
Copyright © 2004 Siemens AG
All rights reserved
Page 2

Information and Communication Mobile
Copyright
This publication is protected by copyright and distributed under licenses restrict-
ing its use, copying and distribution. No part of this publication may be reproduced
in any form by any means without prior written authorization of Siemens AG.
Offenders will be liable for damages. All rights are reserved in the event of the
granting of a patent or the registration of a utility model.
The products and technologies described herein may be protected by one or
more patents or patents pending in the United States or other countries.
Trademarks
Siemens AG is a registered trademark.
Sun, Java™, J2ME™, and all Java™-based marks are trademarks or registered
trademarks of Sun Microsystems, Inc. in the U.S. and other countries. Borland®
and JBuilder® are trademarks or registered trademarks of Borland Software Cor-
poration. All other trademarks, third-party brands and names are the property of
Hyperlinks
Disclaimer
their respective owners.
This publication may contain hyperlinks to the Web pages of third parties. Sie-
mens accepts no liability or responsibility for the contents of such Web pages and
Siemens does not take over such Web pages as its own. The use of such pages
shall be at the sole risk of the User.
This publication is provided "AS IS", without a warranty of any kind. All express or
implied representations and warranties, including any implied warranty of mer-
chantability, fitness for a particular purpose or non-infringement, are hereby ex-
cluded.
Siemens AG may make any improvements or changes in the product(s) or the
program(s) described in this publication at any time.
This document is subject to change without notice.
Siemens Mobility Toolkit Copyright © 2004 Siemens AG
- 2 -
Page 3

Information and Communication Mobile
Table of Contents
1 -Introduction.................................................................................................................................. 4
1.1 -Document's Purpose ........................................................................................................ 4
1.2 -Naming Conventions ........................................................................................................ 4
1.3 -Document's Overview....................................................................................................... 4
2 -System Requirements ................................................................................................................. 6
2.4 -Hardware Requirements................................................................................................... 6
2.5 -Software Requirements .................................................................................................... 6
3 -Siemens Mobility Toolkit............................................................................................................. 8
3.1 -Architectural Overview of the Emulator ............................................................................ 9
3.2 -SMTK Contents ..............................................................................................................10
3.2.1 -Launcher & Manager......................................................................................... 10
3.2.2 -SMTK documentation........................................................................................ 11
3.2.3 -J2ME™ API Library........................................................................................... 12
3.2.4 -Preverifier .......................................................................................................... 12
3.2.5 -Siemens Java™-enabled Mobile Phone Emulator Pack ................................... 12
3.3 -Siemens Mobility Toolkit (SMTK) Installation ................................................................. 13
3.3.1 -SMTK Core Package Installation ...................................................................... 13
3.3.2 -SMTK Emulator Pack Installation ...................................................................... 17
3.4 -Launcher Execution........................................................................................................ 20
3.5 -"SMTK Configuration and Management Utility" Execution ............................................. 21
3.5.1 -"Select target emulator" Page ........................................................................... 21
3.5.2 -"SMTK management" Page .............................................................................. 22
3.5.3 -"Integration with IDE’s" Page ............................................................................ 23
3.6 -Application Management System (AMS) on the Emulator ............................................. 23
3.6.1 -Installation of .jar Files Using .jad Files ............................................................. 24
3.7 -Loading an Application onto Siemens Java™-enabled Mobile Phones ......................... 25
3.7.1 -Local Loading of an Application onto the Mobile Phone ................................... 25
3.7.2 -Installing the Siemens Data Suite (SDS)........................................................... 26
3.7.3 -Loading the MIDlet into the Mobile Phone ........................................................ 26
3.7.4 -Over the Air (OTA) Downloading....................................................................... 27
3.7.5 -OTA Connection Scenarios............................................................................... 29
3.7.6 -Using SMS for OTA Download (OTA Push Method) ......................................... 32
3.7.7 -OTA Status Codes ............................................................................................ 33
3.8 -Running an Application on the Emulator ........................................................................ 34
3.8.1 -Via Command Window...................................................................................... 34
3.8.2 -Via Filesystem ................................................................................................... 35
3.8.3 -Via Surf & Fun ................................................................................................... 35
3.8.4 -Other Alternatives.............................................................................................. 36
3.9 -Log Files ......................................................................................................................... 36
3.10 -Command Line Parameters.......................................................................................... 36
3.11 -Differences Between the Mobile Phone and the Emulator ........................................... 39
3.11.1 -Performance Differences................................................................................. 39
3.11.2 -Technical Differences...................................................................................... 40
4 -IDE Integration ........................................................................................................................... 41
4.1 -Sun ONE Studio Integration ........................................................................................... 41
4.1.1 -Installing a new Emulator in Sun ONE Studio ................................................... 41
4.1.2 -Creating a new Project ...................................................................................... 42
4.1.3 -Coding an Application Program......................................................................... 46
4.1.4 -Compiling, Preverifying and Testing.................................................................. 47
4.1.5 -Debugging ......................................................................................................... 50
4.2 -JBuilder Integration......................................................................................................... 53
Siemens Mobility Toolkit Copyright © 2004 Siemens AG
- 1 -
Page 4

Information and Communication Mobile
4.2.1 -Setting the Emulator in JBuilder ........................................................................ 53
4.2.2 -Creating a new Project ...................................................................................... 55
4.2.3 -Compiling, Preverifying and Testing.................................................................. 58
4.2.4 -Debugging ......................................................................................................... 60
5 -General Features ....................................................................................................................... 63
5.1 -Emulator Start-up ........................................................................................................... 63
5.1.1 -Setting Up HTTP_PROXY and HTTP Profile .................................................... 65
5.1.2 -Setting Up WAP ................................................................................................ 67
5.2 -Filesystem Structure.......................................................................................................68
5.3 -Hot Keys ......................................................................................................................... 69
5.4 -Commands ..................................................................................................................... 69
5.5 -Additional Emulators Features ....................................................................................... 71
5.5.1 -Change microedition.locale ............................................................................... 71
6 -Specific Features ....................................................................................................................... 73
6.1 -CF62 Emulator ............................................................................................................... 73
6.1.1 -CF62 GUI Use / MMI Display ............................................................................ 73
6.1.2 -Mobile Features................................................................................................. 74
6.2 -C60 Emulator.................................................................................................................. 76
6.2.1 -C60 GUI Use / MMI Display .............................................................................. 76
6.2.2 -Mobile Features................................................................................................. 77
6.3 -MC60 Emulator............................................................................................................... 79
6.3.1 -MC60 GUI Use / MMI Display ........................................................................... 79
6.3.2 -Mobile Features................................................................................................. 80
6.4 -M55 Emulator ................................................................................................................. 82
6.4.1 -M55 GUI Use / MMI Display .............................................................................. 82
6.4.2 -Mobile Features................................................................................................. 83
6.5 -SL55 Emulator................................................................................................................ 85
6.5.1 -SL55 GUI Use / MMI Display ............................................................................ 85
6.5.2 -Mobile Features................................................................................................. 86
6.6 -S55 Emulator.................................................................................................................. 88
6.6.1 -S55 GUI Use / MMI Display .............................................................................. 88
6.6.2 -Mobile Features................................................................................................. 89
6.7 -C55/C(T)56/2128 Emulator ............................................................................................ 91
6.7.1 -C55 GUI Use / MMI Display .............................................................................. 91
6.7.2 -Mobile Features................................................................................................. 92
6.8 -M(T)50/M46/3118 Emulator............................................................................................ 94
6.8.1 -M50 GUI Use / MMI Display .............................................................................. 94
6.8.2 -Mobile Features................................................................................................. 95
6.9 -Sl45i/6688i Emulator ...................................................................................................... 97
6.9.1 -Sl45i GUI Use / MMI Display............................................................................. 97
6.9.2 -Mobile Features................................................................................................. 98
7 -Command Line Debug............................................................................................................. 100
8 -Additional Resources.............................................................................................................. 101
8.1 -Siemens Developer Portal............................................................................................ 101
8.2 -CLDC and MIDP Specification ..................................................................................... 101
8.3 -Sun J2ME™ Wireless Toolkit ....................................................................................... 101
A -Abbreviations ......................................................................................................................... 102
B -Application Source Code ....................................................................................................... 103
Siemens Mobility Toolkit Copyright © 2004 Siemens AG
- 2 -
Page 5

Information and Communication Mobile
Table of Figures
Figure 3.1:Siemens Mobility Toolkit architecture .................................................................................... 9
Figure 3.2:Siemens Java™-enabled mobile phone architecture .......................................................... 10
Figure 3.3:SMTK Core Installation Welcome screen ............................................................................ 13
Figure 3.4:Core Installation License Agreement screen ....................................................................... 14
Figure 3.5:SMTK Core Installation JDK Directory screen ..................................................................... 14
Figure 3.6:Core Installation Destination Folder screen......................................................................... 15
Figure 3.7:SMTK Core Installation Start Menu Folder Selection screen .............................................. 15
Figure 3.8:SMTK Core Installation Features Selection screen ............................................................. 16
Figure 3.9:SMTK Core Installation Additional Tasks Selection screen ................................................. 16
Figure 3.10:Core Installation Ready to Install screen ...........................................................................17
Figure 3.11:SMTK Core Installation Information screen ....................................................................... 17
Figure 3.12:SMTK Core Installation Finish screen ............................................................................... 18
Figure 3.13:Emulator Pack Installation Welcome screen ..................................................................... 19
Figure 3.14:SMTK Emulator Pack Installation License Agreement screen .......................................... 19
Figure 3.15:SMTK Emulator Pack Installation Complete screen .......................................................... 20
Figure 3.16:Launcher’s Window ........................................................................................................... 20
Figure 3.17:"Select target emulator" window ........................................................................................ 21
Figure 3.18:"SMTK management" window ........................................................................................... 22
Figure 3.19:"Integration with IDE's" page ............................................................................................. 23
Figure 3.20:Run a MIDlet from Surf&Fun ............................................................................................. 24
Figure 3.21:Download a MIDlet ............................................................................................................ 24
Figure 3.22:Finishing download and running ........................................................................................ 24
Figure 3.23:Reinstall an application...................................................................................................... 25
Figure 3.24:Windows Explorer accessing the Mobile ........................................................................... 26
Figure 3.25:J2ME™ Application download screen ............................................................................... 28
Figure 3.26:Destination Folder selection screen................................................................................... 28
Figure 3.27:Application Name selection ............................................................................................... 28
Figure 3.28:One dial-in number for WAP browsing .............................................................................. 30
Figure 3.29:Two different dial-in number for WAP browsing ................................................................ 31
Figure 3.30:Main screen ....................................................................................................................... 31
Figure 3.31:Menu screen ...................................................................................................................... 31
Figure 3.32:Setup screen...................................................................................................................... 32
Figure 3.33:Connectivity screen ........................................................................................................... 32
Figure 3.34:Data Services screen......................................................................................................... 32
Figure 3.35:MMS, WAP Data service selection .................................................................................... 32
Figure 3.36:MMS, WAP Data service rename ...................................................................................... 32
Figure 3.37:MMS, WAP Data service configuration.............................................................................. 32
Figure 3.38:Rename Confirmation Screen ........................................................................................... 33
Figure 3.39:GPRS settings selection .................................................................................................... 33
Figure 3.40:GPRS settings screen ....................................................................................................... 33
Figure 3.41:Start an Application............................................................................................................ 34
Figure 3.42:Filesystem menu item........................................................................................................ 35
Figure 3.43:JAVA directory ................................................................................................................... 35
Figure 3.44:Open a MIDlet.................................................................................................................... 35
Figure 3.45:Surf&Fun menu item.......................................................................................................... 35
Figure 3.46:Games & Fun..................................................................................................................... 35
Figure 3.47:Open a Folder.................................................................................................................... 36
Figure 4.1:"Runtime" in Explorer window.............................................................................................. 41
Figure 4.2:Add Emulator.." menu.......................................................................................................... 41
Figure 4.3:Emulator path selection screen ........................................................................................... 42
Figure 4.4:Runtime Tab properly set .................................................................................................... 42
Figure 4.5:"Project Manager" selection................................................................................................. 42
Figure 4.6:"Project Manager" window................................................................................................... 43
Siemens Mobility Toolkit Copyright © 2004 Siemens AG
- 1 -
Page 6

Information and Communication Mobile
Figure 4.7:New Project name ............................................................................................................... 43
Figure 4.8:Project Configuration screen ............................................................................................... 43
Figure 4.9:Project Selection tab in Explorer window.............................................................................44
Figure 4.10:Filesystem selection .......................................................................................................... 44
Figure 4.11:Select Local Directory screen ............................................................................................ 45
Figure 4.12:Local Directory mounting last screen................................................................................. 45
Figure 4.13:New File selection.............................................................................................................. 46
Figure 4.14:"HelloWorld" Template choosing ....................................................................................... 46
Figure 4.15:Directory choosing ............................................................................................................. 47
Figure 4.16:Main Class menu ............................................................................................................... 47
Figure 4.17:Main Class selection.......................................................................................................... 48
Figure 4.18:Execute Project menu........................................................................................................ 48
Figure 4.19:Emulator window example................................................................................................. 49
Figure 4.20:Add Breakpoint menu ........................................................................................................ 50
Figure 4.21:Add Breakpoint screen ...................................................................................................... 50
Figure 4.22:Breakpoint highlight example............................................................................................. 51
Figure 4.23:Debugging window ............................................................................................................ 51
Figure 4.25:Continue debug menu ....................................................................................................... 52
Figure 4.24:Reached breakpoint example ............................................................................................ 52
Figure 4.26:Configure JDKs menu........................................................................................................ 53
Figure 4.27:Configure JDKs screen...................................................................................................... 54
Figure 4.28:Target emulator screen...................................................................................................... 54
Figure 4.29:New Project menu ............................................................................................................. 55
Figure 4.30:Project Wizard - Project name Screen............................................................................... 55
Figure 4.31:Project Wizard - Project paths Screen...............................................................................56
Figure 4.32:Add Files/Packages menu ................................................................................................. 57
Figure 4.33:Select class files screen .................................................................................................... 57
Figure 4.34:Rebuild Project menu ........................................................................................................ 58
Figure 4.35:Run Project menu .............................................................................................................. 58
Figure 4.36:Set Main Class screen ....................................................................................................... 59
Figure 4.37:Emulator window launched................................................................................................ 59
Figure 4.38:Select breakpoint ............................................................................................................... 60
Figure 4.39:Toggle breakpoint .............................................................................................................. 60
Figure 4.40:Breakpoint marked............................................................................................................. 61
Figure 4.41:Debug Project menu .......................................................................................................... 61
Figure 4.42:Breakpoint highlighted ....................................................................................................... 62
Figure 4.43:Resume Program menu..................................................................................................... 62
Figure 5.1:Lauching Emulator............................................................................................................... 63
Figure 5.2:Selecting a Phone Model..................................................................................................... 63
Figure 5.3:Inserting SIM Card............................................................................................................... 64
Figure 5.4:“Commands” Window .......................................................................................................... 64
Figure 5.5:Set "CSD only mode"........................................................................................................... 65
Figure 5.6:Main Menu ........................................................................................................................... 65
Figure 5.7:Setup screen........................................................................................................................ 65
Figure 5.8:Connectivity screen ............................................................................................................. 66
Figure 5.9:Data Services screen........................................................................................................... 66
Figure 5.10: Mail,Java,Rms screen ...................................................................................................... 66
Figure 5.11:Options screen................................................................................................................... 66
Figure 5.12:Rename screen ................................................................................................................. 66
Figure 5.13:Mail,Java,Rms screen with a HTTP Profile ....................................................................... 66
Figure 5.14:Confirmation screen........................................................................................................... 67
Figure 5.15:HTTP Profile setup screen................................................................................................. 67
Figure 5.16:GPRS Settings screen....................................................................................................... 67
Figure 5.17:Connectivity screen ........................................................................................................... 67
Figure 5.18:Account settings screen..................................................................................................... 67
Figure 5.19:Set Up WAP....................................................................................................................... 68
Siemens Mobility Toolkit Copyright © 2004 Siemens AG
- 2 -
Page 7

Information and Communication Mobile
Figure 5.20:Set up WAP Homepage..................................................................................................... 68
Figure 5.21:Launch WAP Browser........................................................................................................ 68
Figure 5.22:Filesystem Structure .......................................................................................................... 68
Figure 5.23:Commands Window........................................................................................................... 69
Figure 5.24:SMS - TPDU Dialog Incoming Message............................................................................ 70
Figure 5.25:Command window - locale................................................................................................. 71
Figure 5.26:Change microedition.locale window .................................................................................. 72
Figure 6.2:C65 Emulator....................................................................................................................... 73
Figure 6.1: C60 Emulator...................................................................................................................... 76
Figure 6.2:MC60 Emulator.................................................................................................................... 79
Figure 6.3:M55 Emulator ...................................................................................................................... 82
Figure 6.4:SL55 Emulator ..................................................................................................................... 85
Figure 6.5:S55 Emulator ....................................................................................................................... 88
Figure 6.6:C55 Emulator....................................................................................................................... 91
Figure 6.7: M50 Emulator ..................................................................................................................... 94
Figure 6.8:Sl45i Emulator ..................................................................................................................... 97
Siemens Mobility Toolkit Copyright © 2004 Siemens AG
- 3 -
Page 8

Information and Communication Mobile Introduction
1 - Introduction
1.1 - Document's Purpose
This document is an operation guide for Siemens mobile phone emulators. It de-
scribes the emulators´ functionalities and how to use Siemens Mobility Toolkit.
1.2 - Naming Conventions
This document adopts the following naming conventions:
• File names and directory (folder) names are typed in bold characters.
• Names of user interface components (keys, menu items, specific windows
etc.) are typed in double quotes (" ").
• Some words or phrases may be typed in italic to attract the special attention of
the reader.
• References to books or other printed material are typed in bold and under-
lined.
1.3 - Document's Overview
Chapter 1 - Introduction
This chapter describes this document's structure, as well as its purpose.
Chapter 2 - System Requirements
This chapter describes the requirements in terms of hardware and software re-
quirements needed to run the emulator.
Chapter 3 - Siemens Mobility Toolkit
This chapter contains a description of the SMTK, including its components like
J2ME™ documentation and the emulator itself.
Chapter 4 - IDE Integration
This chapter contains a description of how to integrate SMTK to two of the leading
IDE tools, Sun ONE and JBuilder.
Chapter 5 - General Features
This chapter describes features and functionalities that are common to all Sie-
mens' emulators.
Chapter 6 - Specific Features
This chapter describes each emulators’ specific features.
Chapter 7 - Command Line Debug
This chapter shows how to debug an application without the need of an IDE.
Chapter 8 - Additional Resources
Siemens Mobility Toolkit Copyright © 2004 Siemens AG
- 4 -
Page 9

Information and Communication Mobile Introduction
This chapter points to where to obtain more information about J2ME™ develop-
ment tools and to obtain more Siemens mobile information.
Appendix A - Abbreviations
This chapter describe the meaning of the terms used in the document.
Appendix B - Application Source Code
The source code of an example application Hello.java.
Siemens Mobility Toolkit Copyright © 2004 Siemens AG
- 5 -
Page 10

Information and Communication Mobile System Requirements
2 - System Requirements
Development configuration comprising only Java 2 SDK and SMTK is intended
for use on Windows™ 95, Windows™ 98 (1st or 2nd edition), Windows™ NT 4.0
(Service Pack 5 or higher), Windows™ 2000 Professional, Windows™ 2000
Server, or Windows™ 2000 Advanced Server operating systems running on Intel
hardware. In non-English locales, only the Professional edition of Windows™
2000 is supported.
2.4 - Hardware Requirements
This configuration is intended for use on Windows™ 98 (1st or 2nd edition), Win-
dows™ NT 4.0 (Service Pack 5 or higher), Windows™ 2000 or Windows™ XP
operating systems running on Intel hardware.
• Intel® Pentium® 166MHz or compatible processor
• 128 MB RAM(minimum requirement)
• 120-240 MB hard disk space
- 50 MB – SMTK
- 70 MB – J2SE™ SDK
- 120 MB – J2SE™ SDK documentation
2.5 - Software Requirements
Software basic requirements are:
• Windows™ 95, Windows™ 98 (1st or 2nd edition), Windows™ NT 4.0 (Service
Pack 5 or higher), Windows™ 2000 Professional, Windows™ 2000 Server, or
Windows™ 2000 Advanced Server
• Sun Java Standard Edition (J2SE) SDK, version 1.3.1 or above
In general it can be used any integrated development environment (IDE) that sup-
ports development of Java applications. To use the debugging capabilities of the
SMTK PC-emulator, the IDE must support remote debugging. Borland™’s JBuild-
er 9 Mobile Edition and Sun Microsystems’ Sun ONE 5 (formely Forte for Java)
Community Edition, both support integration with SMTK.
At Sun Microsystems' Java portal on the URL http://java.sun.com/j2se/1.4.2/
download.html is possible to get the SDK installation files. It is Just download one
(as said, the minimal required version is 1.3.1, but a more stable version of the
J2SE SDK is 1.4.2_04) and execute the installation files.
Siemens Mobility Toolkit Copyright © 2004 Siemens AG
- 6 -
Page 11

Information and Communication Mobile System Requirements
At Sun Microsystems' Sun ONE portal on the URL http://forte.sun.com/ffj/down-
loads.html is possible to get the Sun ONE Mobile Edition(release 4, update 1 is
the last stable version, but SUN One Studio 5, early access release is also avail-
able). Download it and install.
Here is described the integration process with an earlier version (version 3), but
the modus operandi of the integration process with version 4 and 5 is the same.
At Siemens Developer Portal on the URL http://www.siemens-mobile.com/devel-
oper, in the session Developer Village, in the topic Tools, it's possible to obtain
the SMTK or a specific model. It's just needed to download the installation files
and execute them.
At Borland™ site on the URL http://www.borland.com/products/downloads/
download_jbuilder.html it's possible to get both Jbuilder Personal Edition and its
extension to J2ME™, called MobileSet. Download and install both. The JBuilder
must be at version higher than 5.
Siemens Mobility Toolkit Copyright © 2004 Siemens AG
- 7 -
Page 12

Information and Communication Mobile Siemens Mobility Toolkit
3 - Siemens Mobility Toolkit
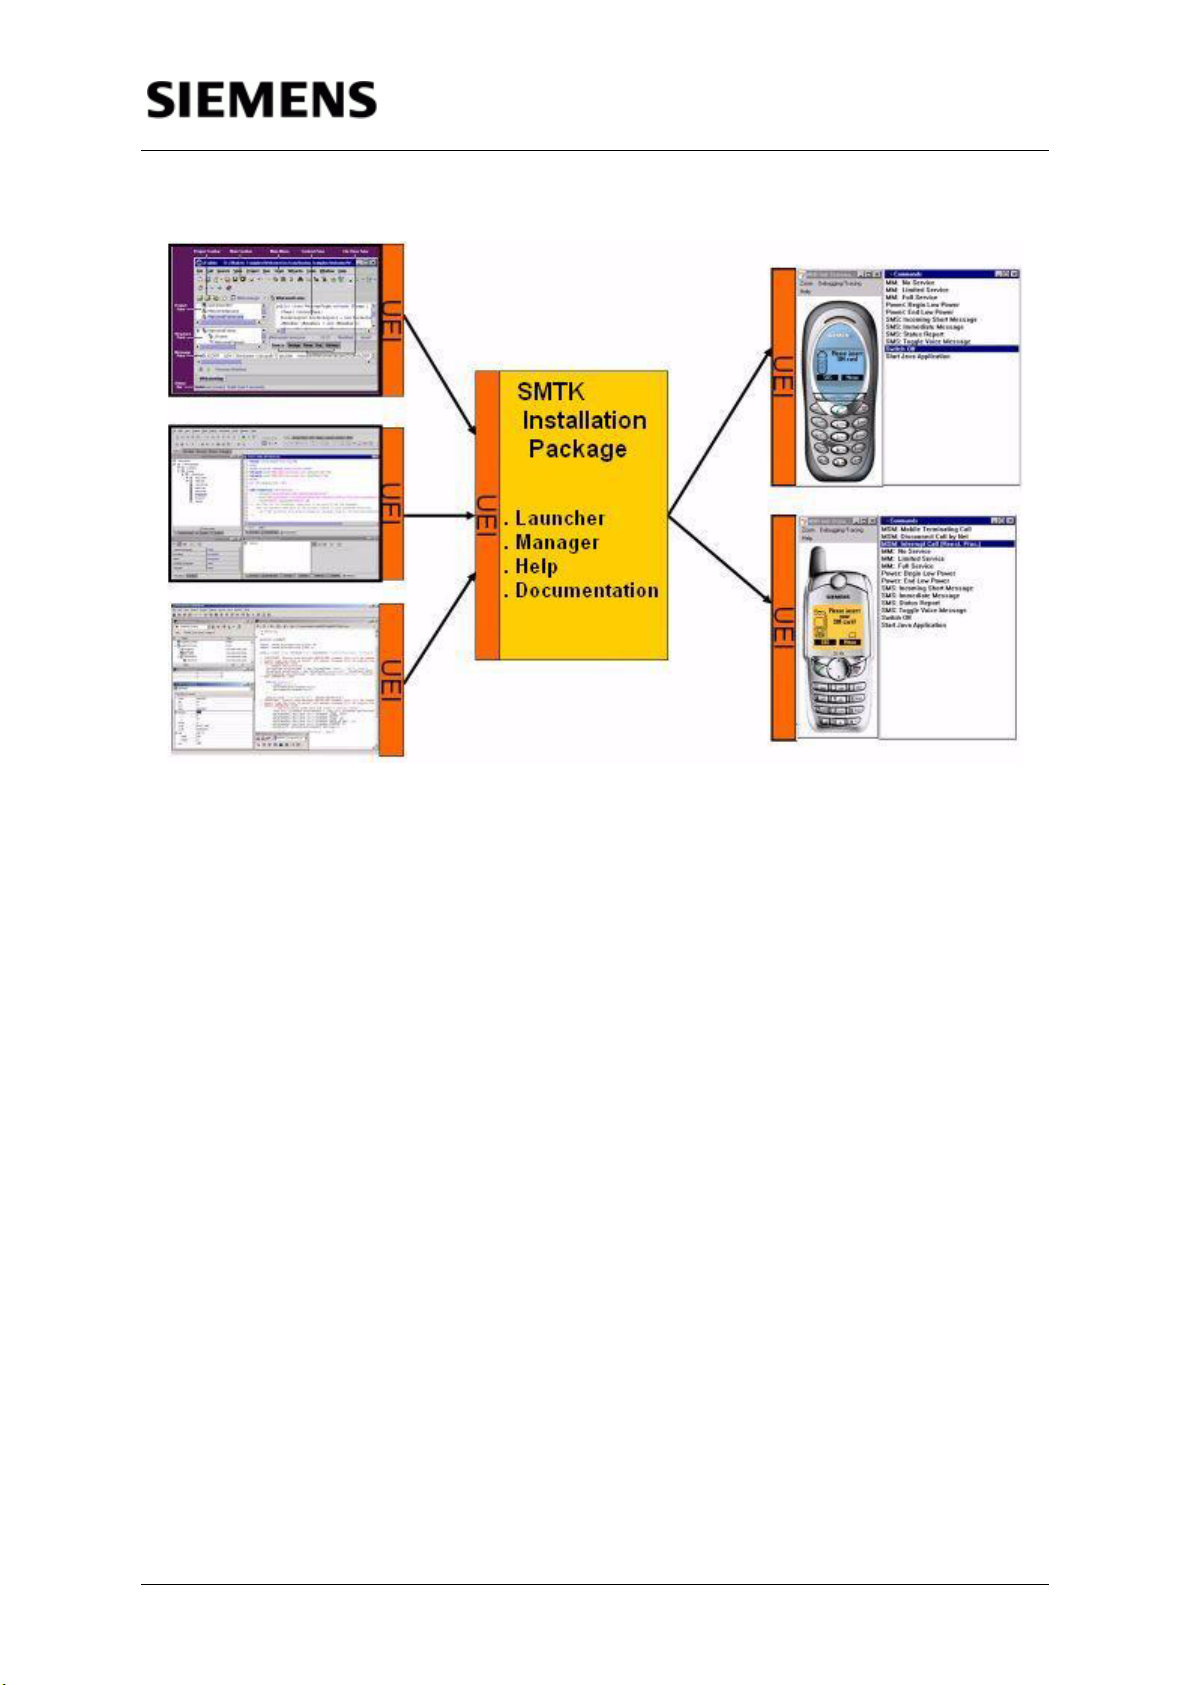
Siemens Mobility Toolkit (SMTK) brings several new features, improvements and
documentation(see figure 3.1). These features include:
• Improved SMTK installation structure;
• Easier IDE integration; you no longer need to integrate every single SMTK; just
integrate SMTK once and the rest is handled by the SMTK Manager tool deliv-
ered with SMTK;
• Single entry SMTK Launcher tool for launching the different installed SMTK
Emulator Packs;
• Improved online documentation capabilities supporting Windows Help. Online
Documentation available via Start Menu, SMTK Launcher and SMTK Man-
ager;
• Context help available in Launcher and Manager.
SMTK structure is divided in a basic package, called SMTK Core, and the SMTK
Emulator Packs.
NOTE: To use SMTK you have to download the SMTK Core installation pack-
age, plus at least one SMTK Emulator Pack installation package.
SMTK Core is the basic package. It contains basically integration tools and docs.
SMTK Core comes with the following items:
• The Launcher utility;
• The "SMTK Configuration and Management Utility" called Manager;
• The preverify.exe utility;
• On-line help;
• Documentation, including Siemens API Javadocs.
Each SMTK Emulator Pack contains a Siemens Java™-enabled mobile phone
emulator. Specific emulators are no longer launched directly from the IDE; in-
stead of this, a Launcher utility is activated by the IDE, which then launches the
emulator selected by the user.
The "SMTK Configuration and Management Utility" provides the following func-
tionalities:
1. Select a target device (specific SMTK Emulator Pack) for compilation;
2. Obtain version information about any specific SMTK Emulator Pack installed;
3. Request un-installation of an SMTK Emulator Pack;
4. Obtain the status of the SMTK integration with different IDEs.
Siemens Mobility Toolkit Copyright © 2004 Siemens AG
- 8 -
Page 13
Information and Communication Mobile Siemens Mobility Toolkit
Figure 3.1: Siemens Mobility Toolkit architecture
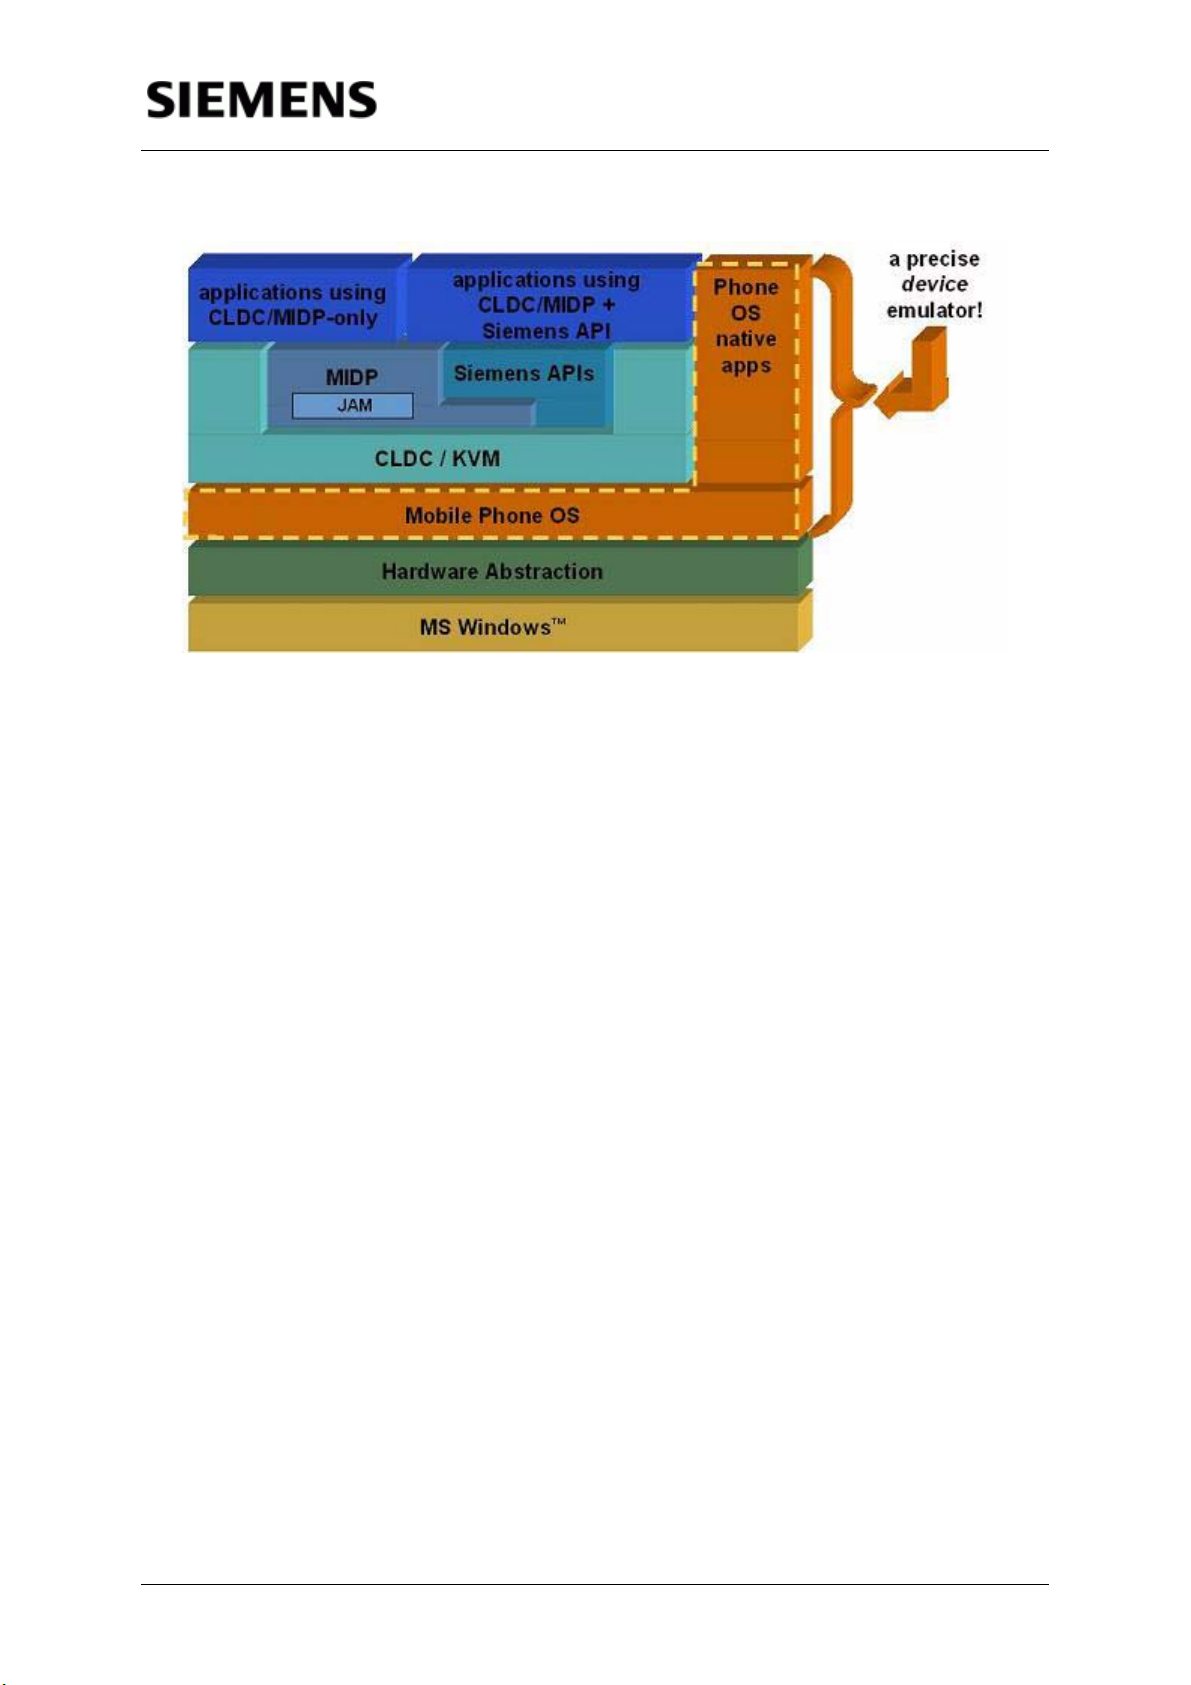
3.1 - Architectural Overview of the Emulator
The main development tool to test MIDlet applications on a J2ME™-enabled mo-
bile phone is the PC/Windows-based emulator (PC emulator). This emulator not
only mimics the behavior of the Java Virtual Machine (JVM) implemented in the
mobile phone, but also the behavior of the mobile phone itself as a cell phone de-
vice - as far as this is possible without the corresponding hardware.
The PC emulator has a carefully designed multi-layer architecture(as shown in
figure 3.2) and a realistic user interface. It offers application developers a behav-
ior and a look-and-feel very close to that of a real Siemens mobile phone, with the
exception of timing characteristics and of execution of some GSM-specific func-
tions.
The emulator is built upon the same code base as that used to build the firmware
of the Siemens mobile phone. To run the emulator on a PC, a hardware abstrac-
tion layer is introduced (i.e. an emulator of the mobile phone's hardware on a PC),
which translates firmware routines of the Mobile Phone into appropriate PC rou-
tines. The abstraction layer also emulates real actions on mobile phones periph-
erals (actions such as pressing a key on the mobile phone, or visualizing a text or
image on the mobile's display) by appropriate PC keyboard and mouse actions
applied to a realistic image of the Siemens mobile phone on the PC monitor.
Siemens Mobility Toolkit Copyright © 2004 Siemens AG
- 9 -
Page 14
Information and Communication Mobile Siemens Mobility Toolkit
Figure 3.2: Siemens Java™-enabled mobile phone architecture
One feature of this abstraction layer is the mapping of the file system onto the PC
file system (directory \filesystem of SMTK's installation).
3.2 - SMTK Contents
This section describes the main components of the SMTK. These include the
components of the SMTK Core and the SMTK Emulator Packs, as well as their
purposes and functionalities.
3.2.1 - Launcher & Manager
NOTE: The Launcher utility and the Manager utility are components of the
SMTK Core package.
3.2.1.1 - Launcher
In a PC development context, J2ME™ applications are tested on a Java™-ena-
bled mobile phone emulator. Siemens has an increasing number of mobile phone
models that are Java™-enabled, and the Launcher utility provides a unique em-
ulator launching tool for all the installed SMTK Emulator Packs.
When called, the Launcher calls the default Siemens Java™-enabled mobile
phone emulator (if not specified a specific model), passing the necessary param-
eters.
NOTE: The Launcher executable file (emulator.exe) is located in the <<SMTK
path>>\bin subfolder (replace <<SMTK path>> by the SMTK installation path).
Siemens Mobility Toolkit Copyright © 2004 Siemens AG
- 10 -
Page 15

Information and Communication Mobile Siemens Mobility Toolkit
3.2.1.2 - Manager
To manage SMTK configurations, the Manager utility (also called SMTK Config-
uration and Management Utility) performs the following groups of functions, rep-
resented on its graphical window by three tabs:
1. Selecting the target device (target phone emulator) for which applications will
be compiled and executed.
2. SMTK management.
3. Display the current status of SMTK integration with IDEs.
NOTE: The Manager executable file (prefs.exe) is located in the <<SMTK
path>>\bin subfolder (replace <<SMTK path>> by the SMTK installation path).
3.2.2 - SMTK documentation
SMTK comes with documents and Java source code of examples of Siemens-
specific API usage. These are useful materials which developers can use to learn
how to develop for Siemens Java™-enabled mobile phones.
NOTE: Siemens J2ME™ API Javadocs are now part of the SMTK Core pack-
age, as well as Siemens J2ME™ examples.
3.2.2.1 - Siemens J2ME™ API Javadocs
Siemens J2ME™ API implements CLDC 1.0 and MIDP 1.0 specifications. Be-
sides the required packages by these specifications, Siemens Java™-enabled
mobile phones also implement additional packages. These packages include bet-
ter support for graphics, sound and communication. All these packages (as well
as their classes and interfaces) are documented in the Javadoc format, and are
shipped together with SMTK Core. This documentation consists of HTML pages
containing the description of each class, with their methods and properties.
3.2.2.2 - Siemens J2ME™ Examples
SMTK delivers together with API documentation a set of J2ME™ examples, in the
form of Java source code. Each example within SMTK implements a different us-
age of API packages and classes. General Siemens API usage examples are de-
livered with SMTK Core, and Siemens Java™-enabled mobile phone's specific
functionality examples are delivered within each SMTK Emulator Pack. Together,
they have the purpose of teaching the developers how to use Siemens API in real-
life applications.
NOTE: Not all API methods and classes are covered with these examples
Siemens Mobility Toolkit Copyright © 2004 Siemens AG
- 11 -
Page 16

Information and Communication Mobile Siemens Mobility Toolkit
3.2.3 - J2ME™ API Library
SMTK includes the Siemens J2ME™ API library file. This file is a Java JAR file
(named api.jar and located in <<SMTK path>>\lib path) containing the Java class-
es, interfaces and exceptions of Siemens API. This library is required in the proc-
ess of compilation (both in command mode and by the IDEs) and execution of a
MIDlet.
NOTE: Each individual SMTK Emulator Pack has its own J2ME™ API Library.
3.2.4 - Preverifier
The CLDC specification defines a new Java virtual machine (VM), called the K
Virtual Machine, or KVM for short. The KVM is a complete new implementation of
a Java virtual machine, designed from the start to work on resource-constrained
devices.
For CLDC-based applications, there is a remaining task to be executed after
compiling the Java source code. This task involves changing how classes are ver-
ified, or checked for correctness. Instead of running the complete verification
process on the device itself, KVM assumes that most of the job is done offline.
This offline task is performed by a tool called preverifier.
The preverifier does the actual verification and inserts extra information into the
class files. (Note that the modifications are transparent to non-KVM virtual ma-
chines). When the application is launched, KVM looks for this information and
uses it to perform a much simpler verification, based on the data collected by the
preverifier.
NOTE: The preverifier is a component packed in the SMTK Core package.
3.2.5 - Siemens Java™-enabled Mobile Phone Emulator Pack
SMTK now requires each individual emulator (now called SMTK Emulator Pack)
to be installed separately after installing the SMTK Core. After installing the SMTK
Emulator Pack, the developer can instantly start creating and testing J2ME™ ap-
plications. To have a complete description of the available Siemens Java™-ena-
bled mobile phone emulators, please refer to the document named "SMTK
Emulator's Guide", available for download at Siemens Developer Portal in http://
www.siemens-mobile.com/developer.
Siemens Mobility Toolkit Copyright © 2004 Siemens AG
- 12 -
Page 17
Information and Communication Mobile Siemens Mobility Toolkit
3.3 - Siemens Mobility Toolkit (SMTK) Installation
This section describes the installation steps for the SMTK packages, which can
be downloaded at the Siemens Developer's Portal (refer to chapter 8 - Additional
Resources, section 8.1 - Siemens Developer Portal, for additional information).
To use SMTK you have to download the SMTK Core installation package, plus at
least one SMTK Emulator Pack installation package (refer to section 3.2 - SMTK
Contents for additional information on SMTK structure).
NOTE: To run SMTK Core and the SMTK Emulator Pack, Java™ 2 Standard
Edition Software Development Kit (J2SE™ SDK) version 1.3.1 or higher must
be already installed.
3.3.1 - SMTK Core Package Installation
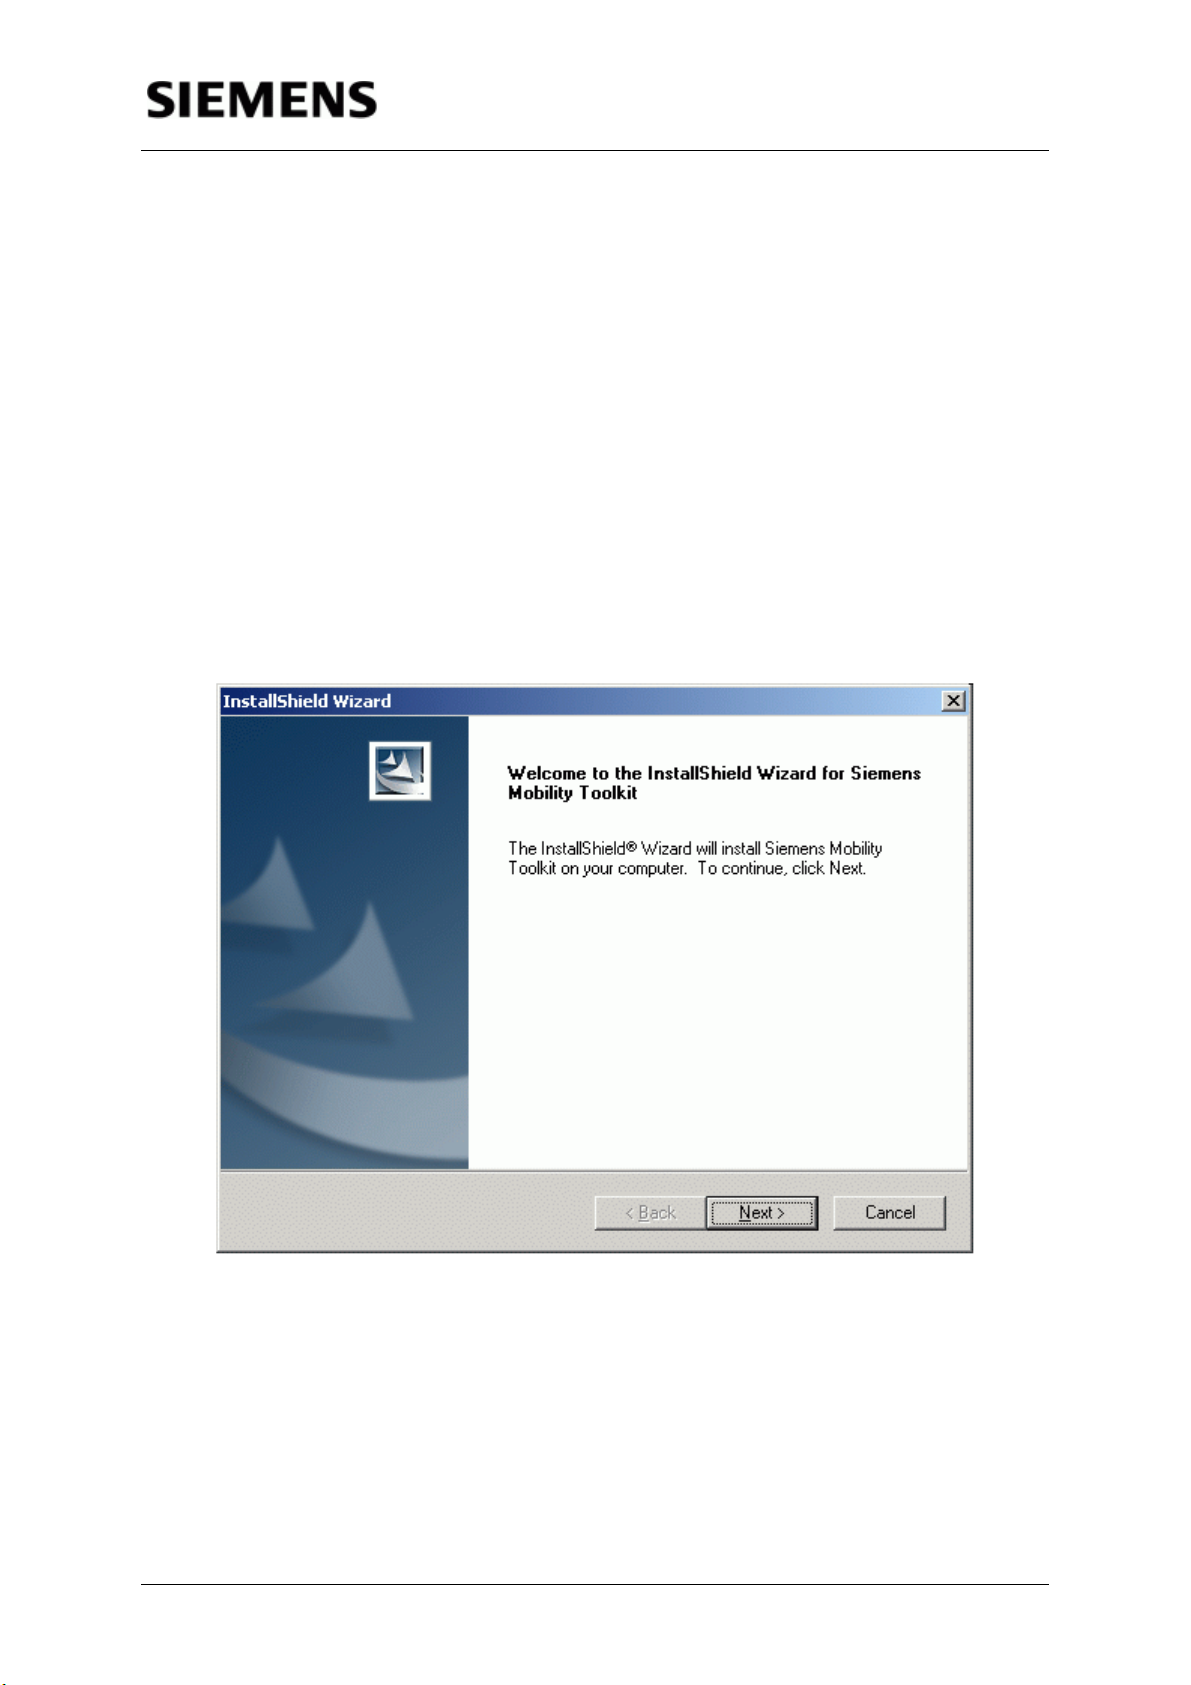
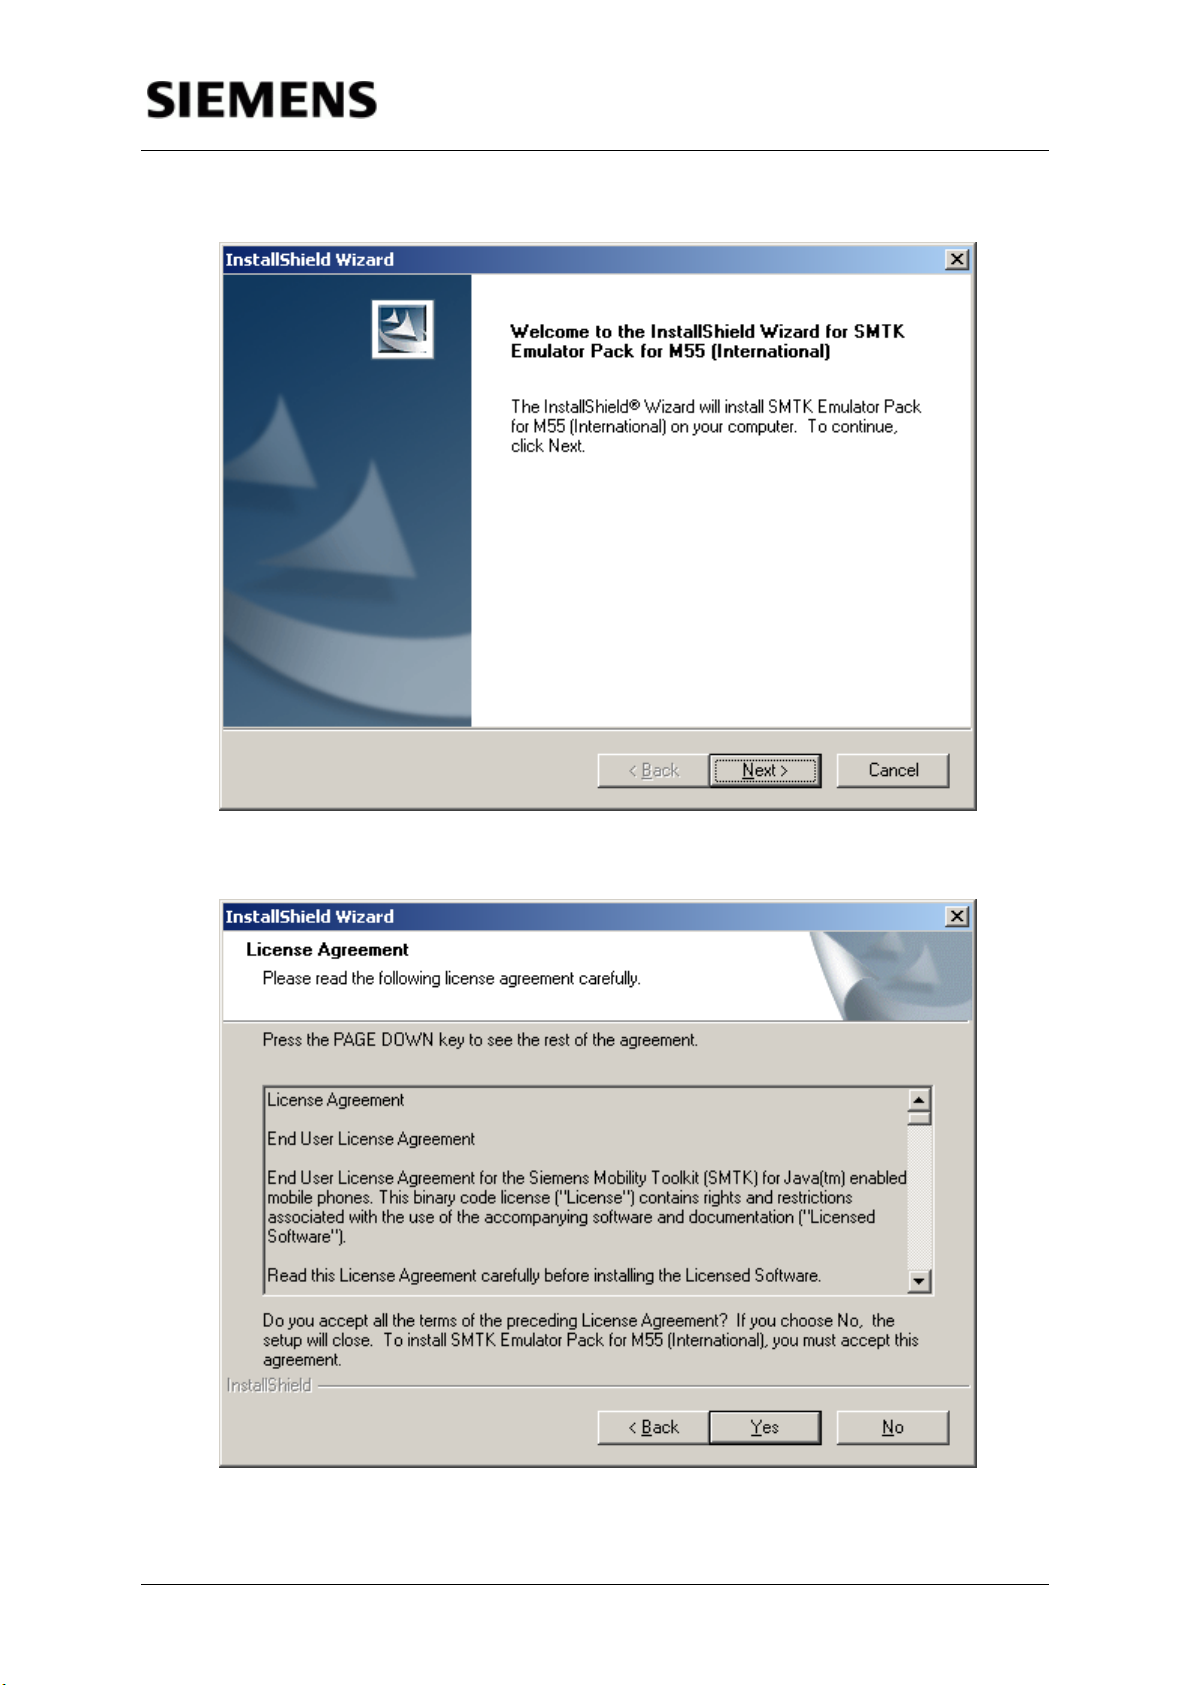
1. Start the SMTK Core installation by clicking "Next":
Figure 3.3: SMTK Core Installation Welcome screen
Siemens Mobility Toolkit Copyright © 2004 Siemens AG
- 13 -
Page 18
Information and Communication Mobile Siemens Mobility Toolkit
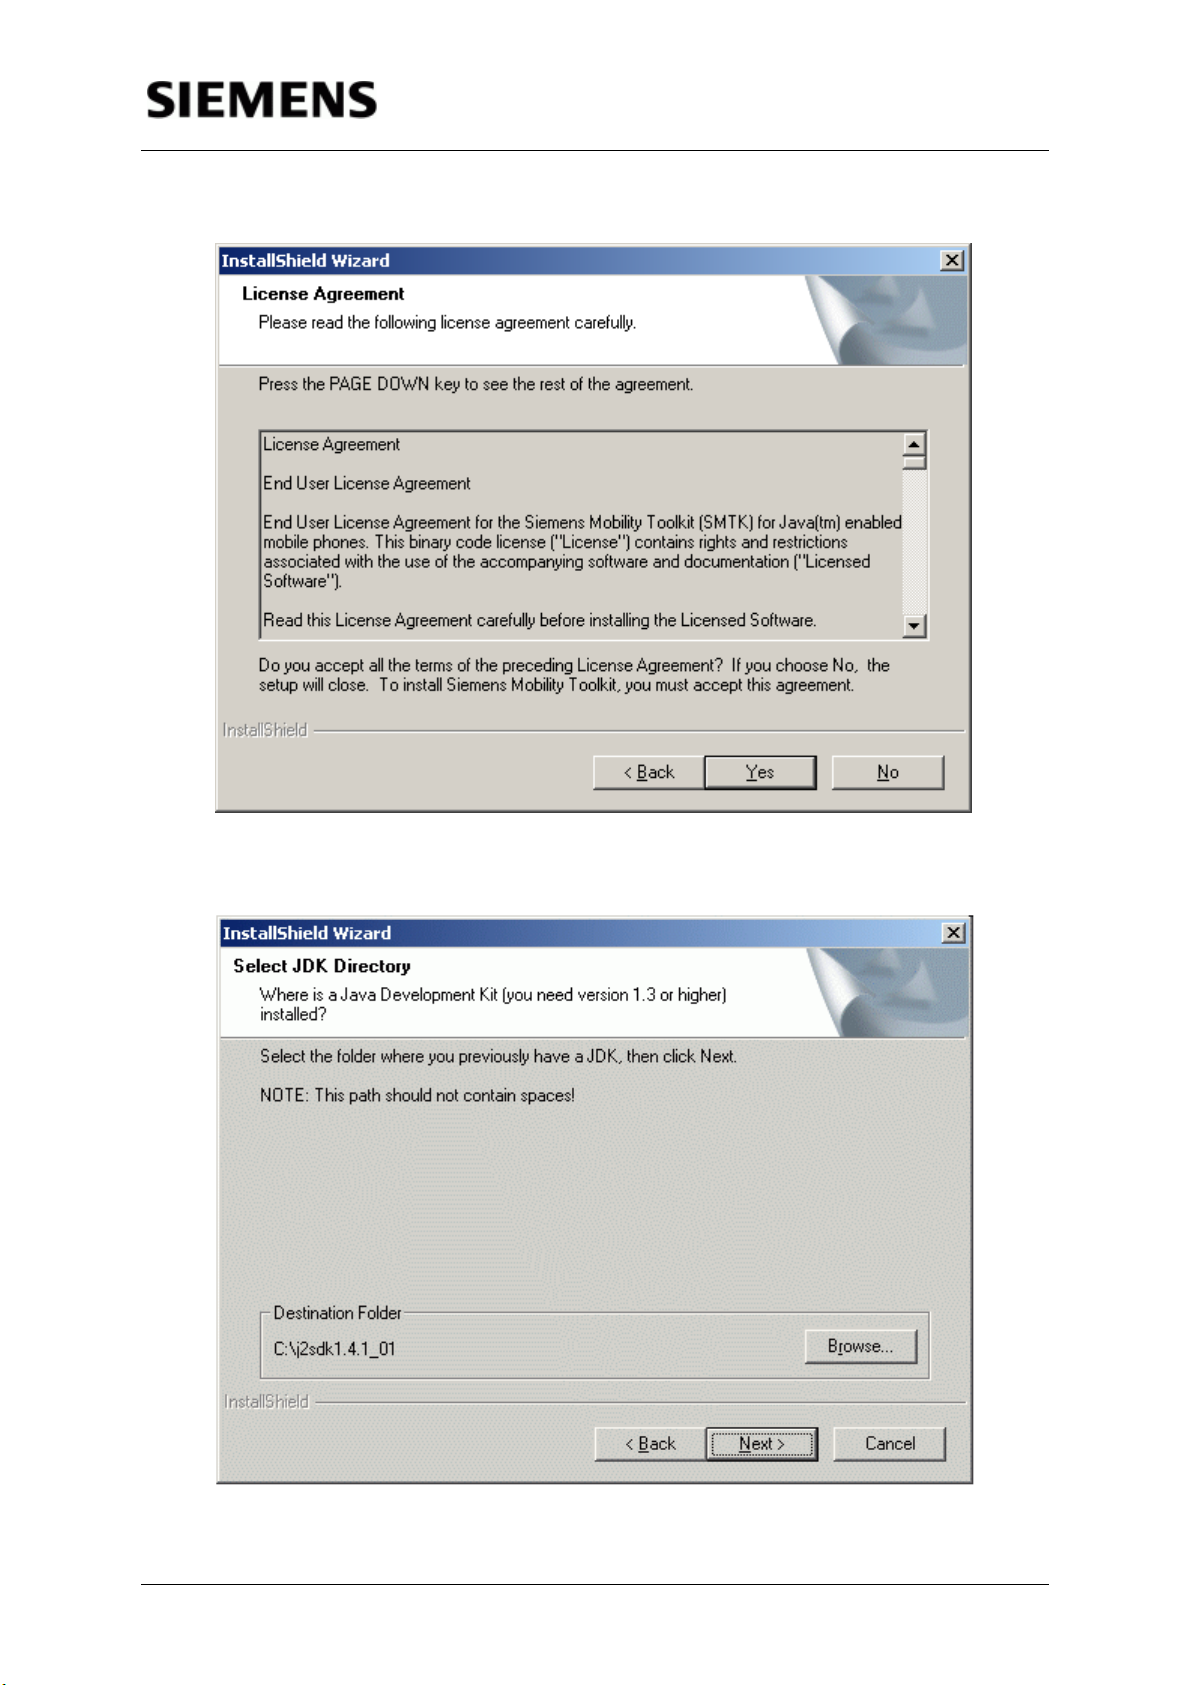
2. Accept the License Agreement (provided it is accepted):
Figure 3.4: Core Installation License Agreement screen
3. Select the JDK folder:
Figure 3.5: SMTK Core Installation JDK Directory screen
Siemens Mobility Toolkit Copyright © 2004 Siemens AG
- 14 -
Page 19
Information and Communication Mobile Siemens Mobility Toolkit
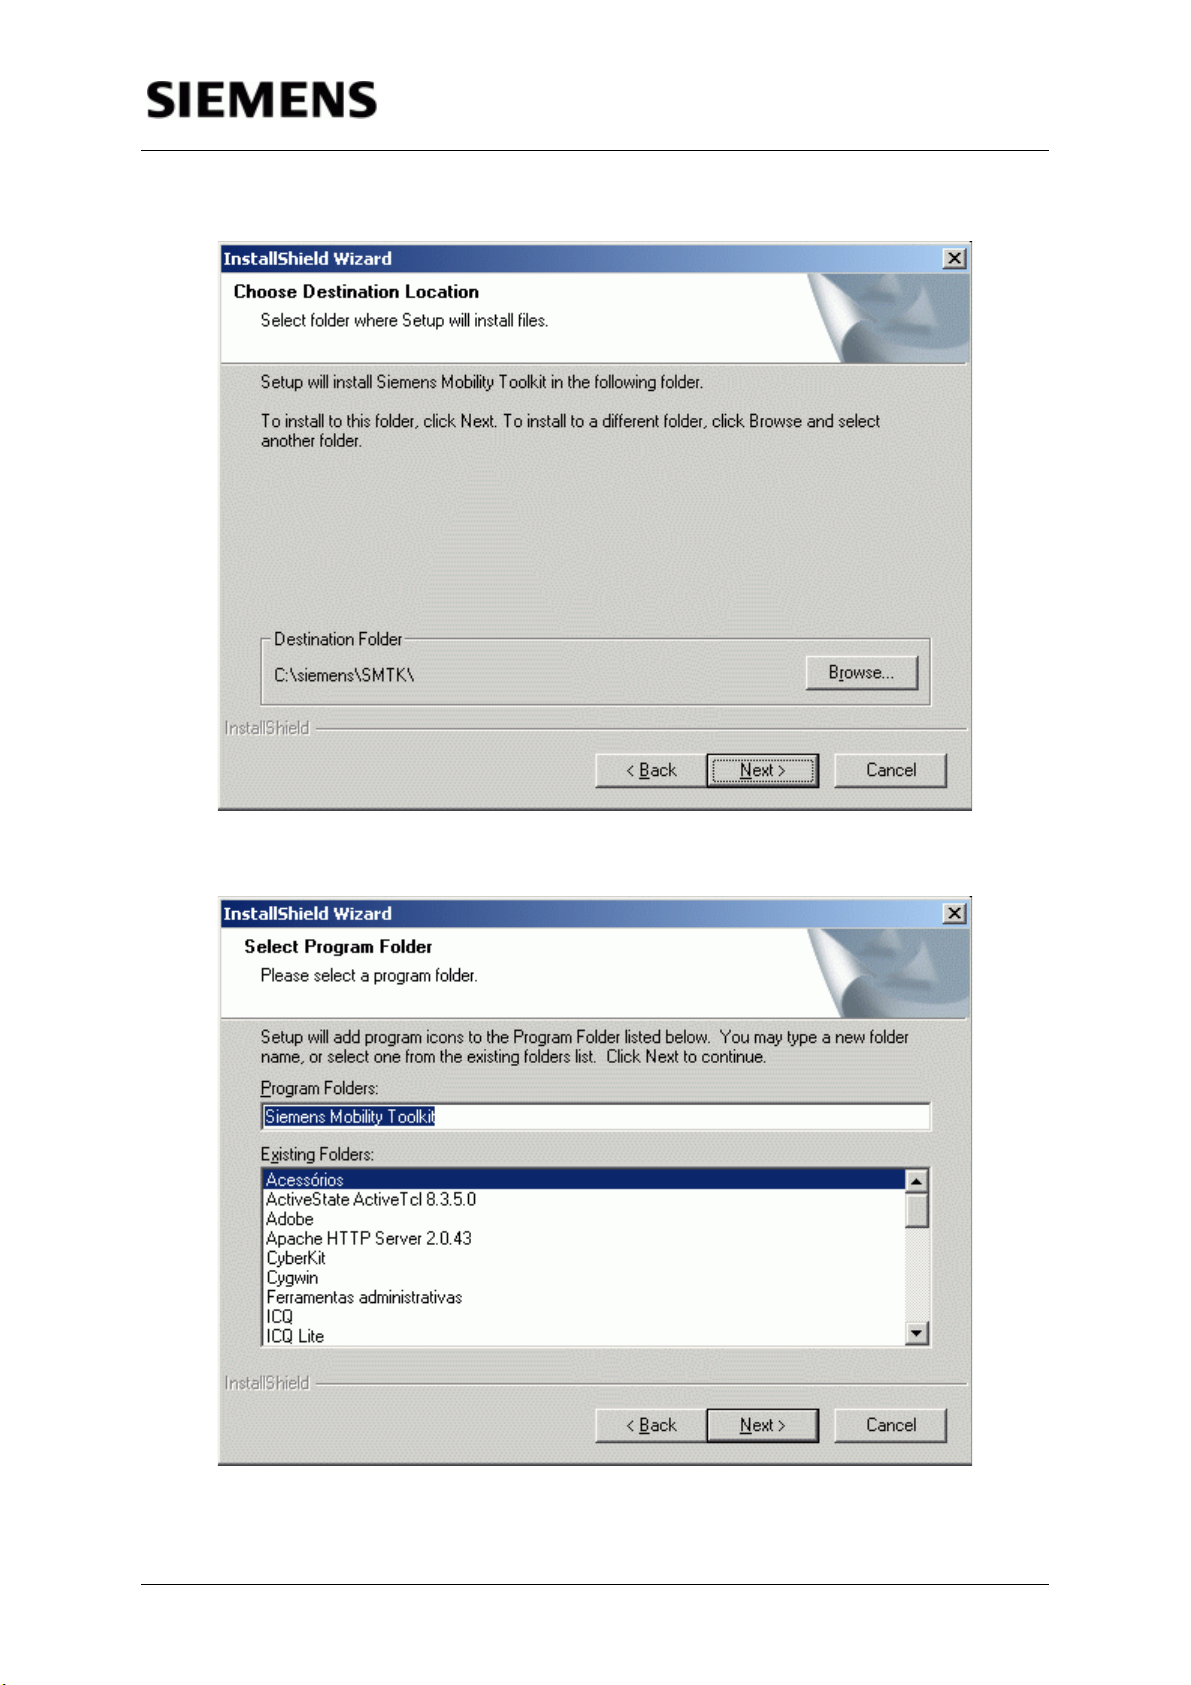
4. Select the destination folder:
Figure 3.6: Core Installation Destination Folder screen
5. Select Start Menu Folder, then click "Next":
Figure 3.7: SMTK Core Installation Start Menu Folder Selection screen
Siemens Mobility Toolkit Copyright © 2004 Siemens AG
- 15 -
Page 20
Information and Communication Mobile Siemens Mobility Toolkit
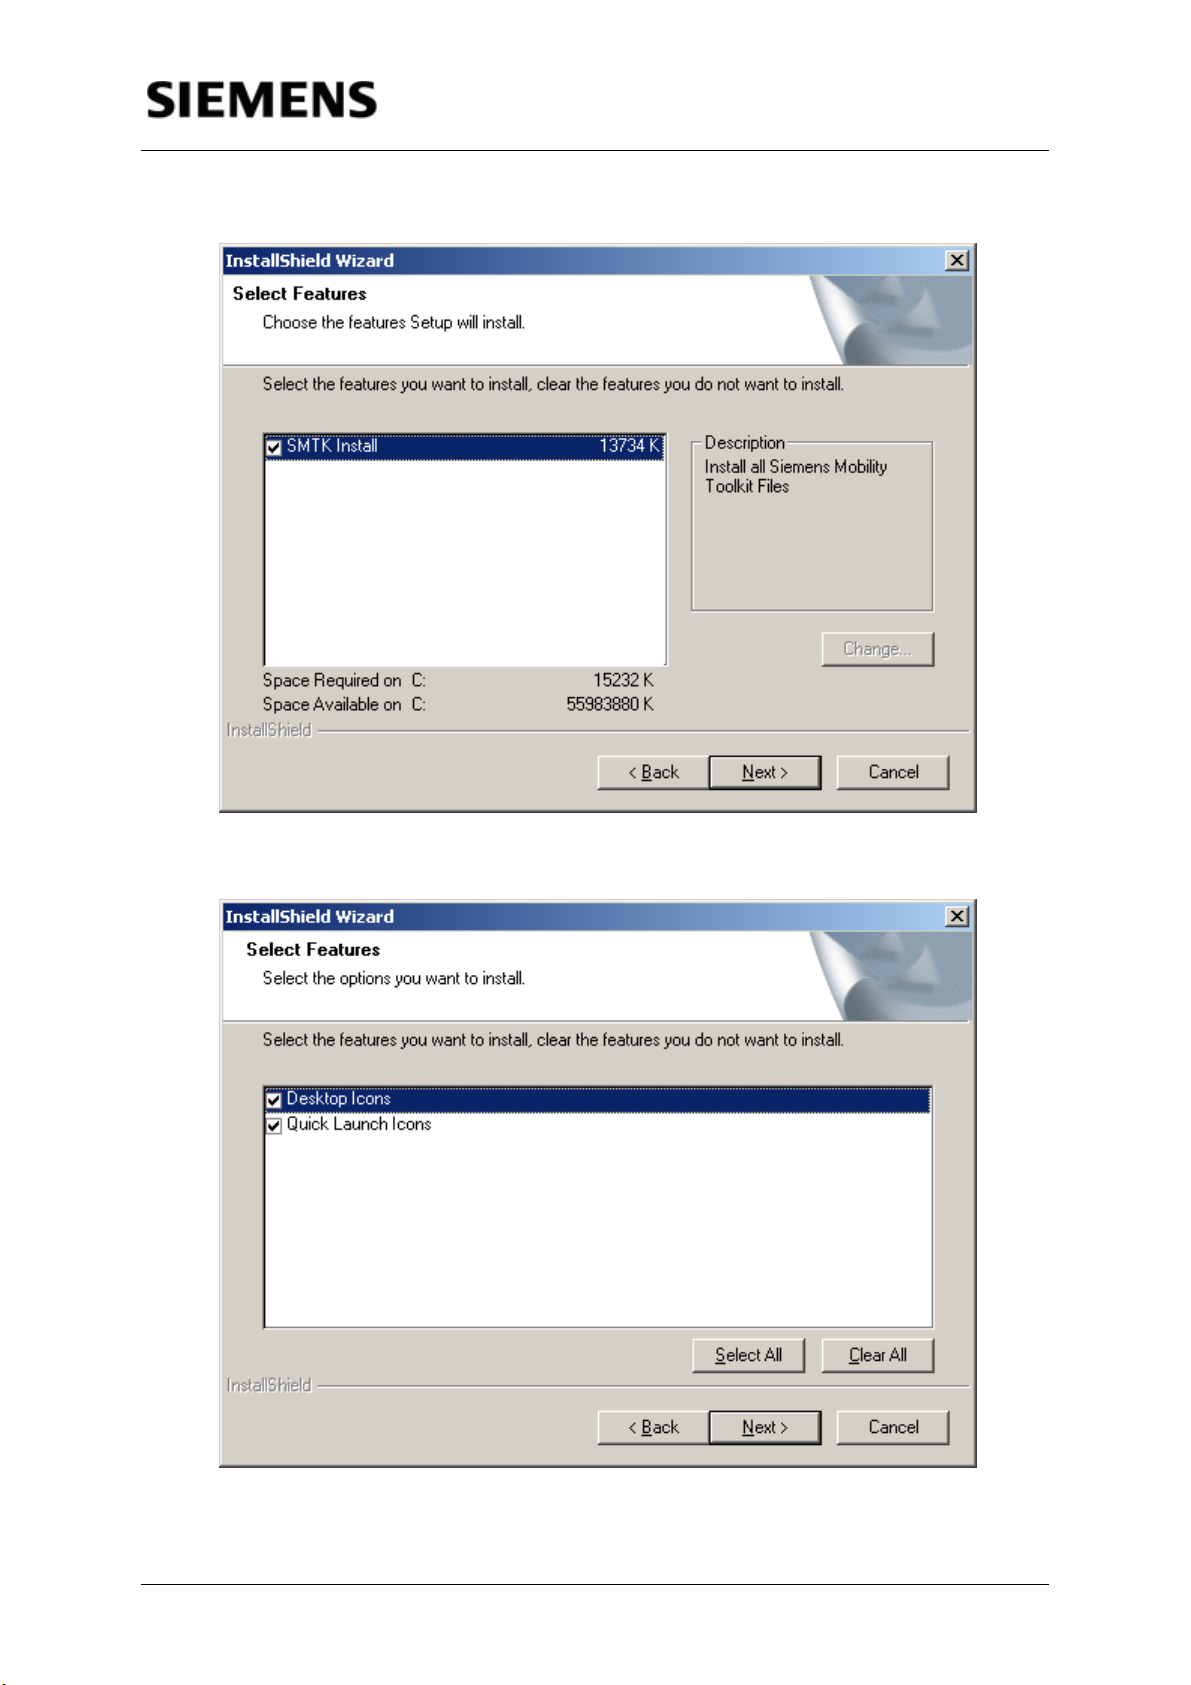
6. Select features to install:
Figure 3.8: SMTK Core Installation Features Selection screen
7. Select Additional Tasks:
Figure 3.9: SMTK Core Installation Additional Tasks Selection screen
Siemens Mobility Toolkit Copyright © 2004 Siemens AG
- 16 -
Page 21
Information and Communication Mobile Siemens Mobility Toolkit
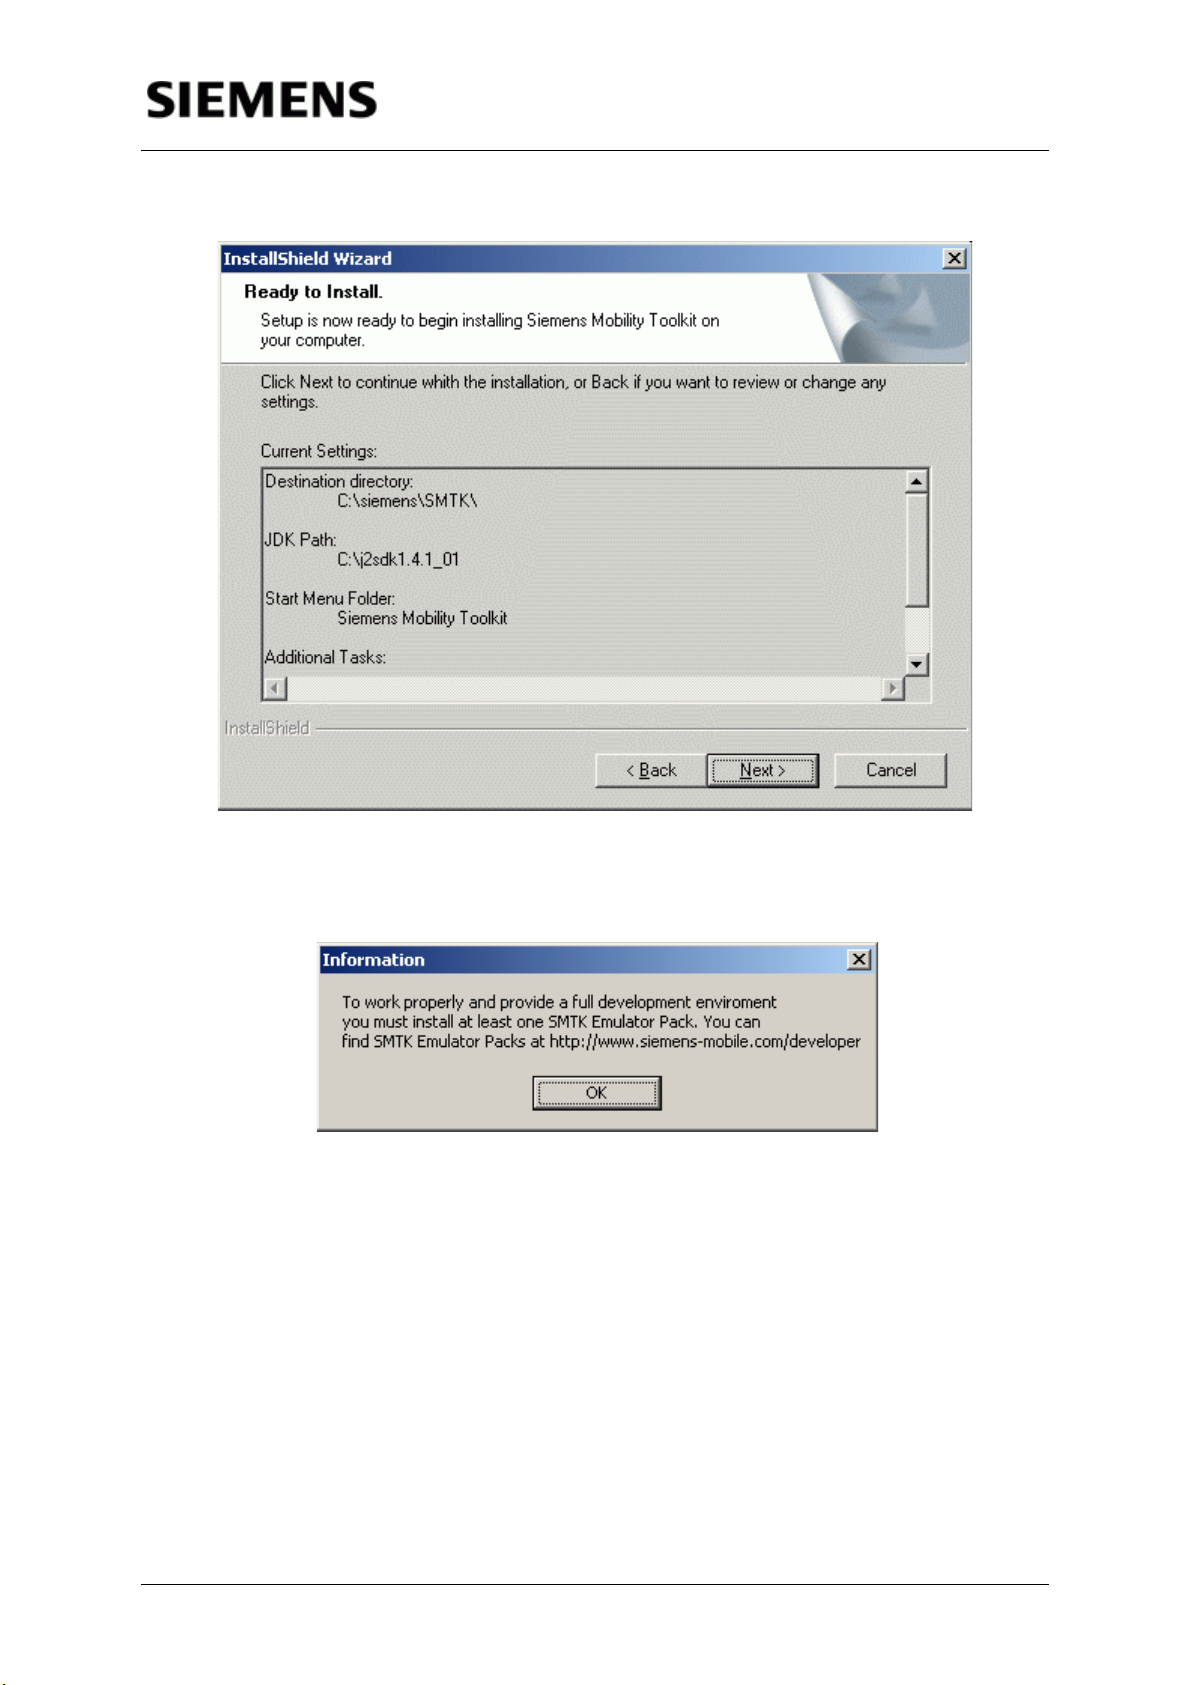
8. Check if the installation settings are correct, then click "Next":
Figure 3.10: Core Installation Ready to Install screen
9. SMTK Core Installation tool informs that one emulator add-on (SMTK Emulator Pack) must be present before using the SMTK Core features. Click on the
button "OK" to proceed:
Figure 3.11: SMTK Core Installation Information screen
10. Finish the SMTK Core Installation:
3.3.2 - SMTK Emulator Pack Installation
NOTE: For this demonstration, it will be assumed that you have obtained at
Siemens Developer Village portal on Web the SMTK M55 Emulator Pack in-
staller, for instance. Any other SMTK Emulator Pack can be used instead.
Siemens Mobility Toolkit Copyright © 2004 Siemens AG
- 17 -
Page 22

Information and Communication Mobile Siemens Mobility Toolkit
Figure 3.12: SMTK Core Installation Finish screen
Siemens Mobility Toolkit Copyright © 2004 Siemens AG
- 18 -
Page 23
Information and Communication Mobile Siemens Mobility Toolkit
1. Start installing the SMTK Emulator Pack by clicking "Next":
Figure 3.13: Emulator Pack Installation Welcome screen
2. Accept the License Agreement (provided it is accepted):
Figure 3.14: SMTK Emulator Pack Installation License Agreement screen
Siemens Mobility Toolkit Copyright © 2004 Siemens AG
- 19 -
Page 24
Information and Communication Mobile Siemens Mobility Toolkit
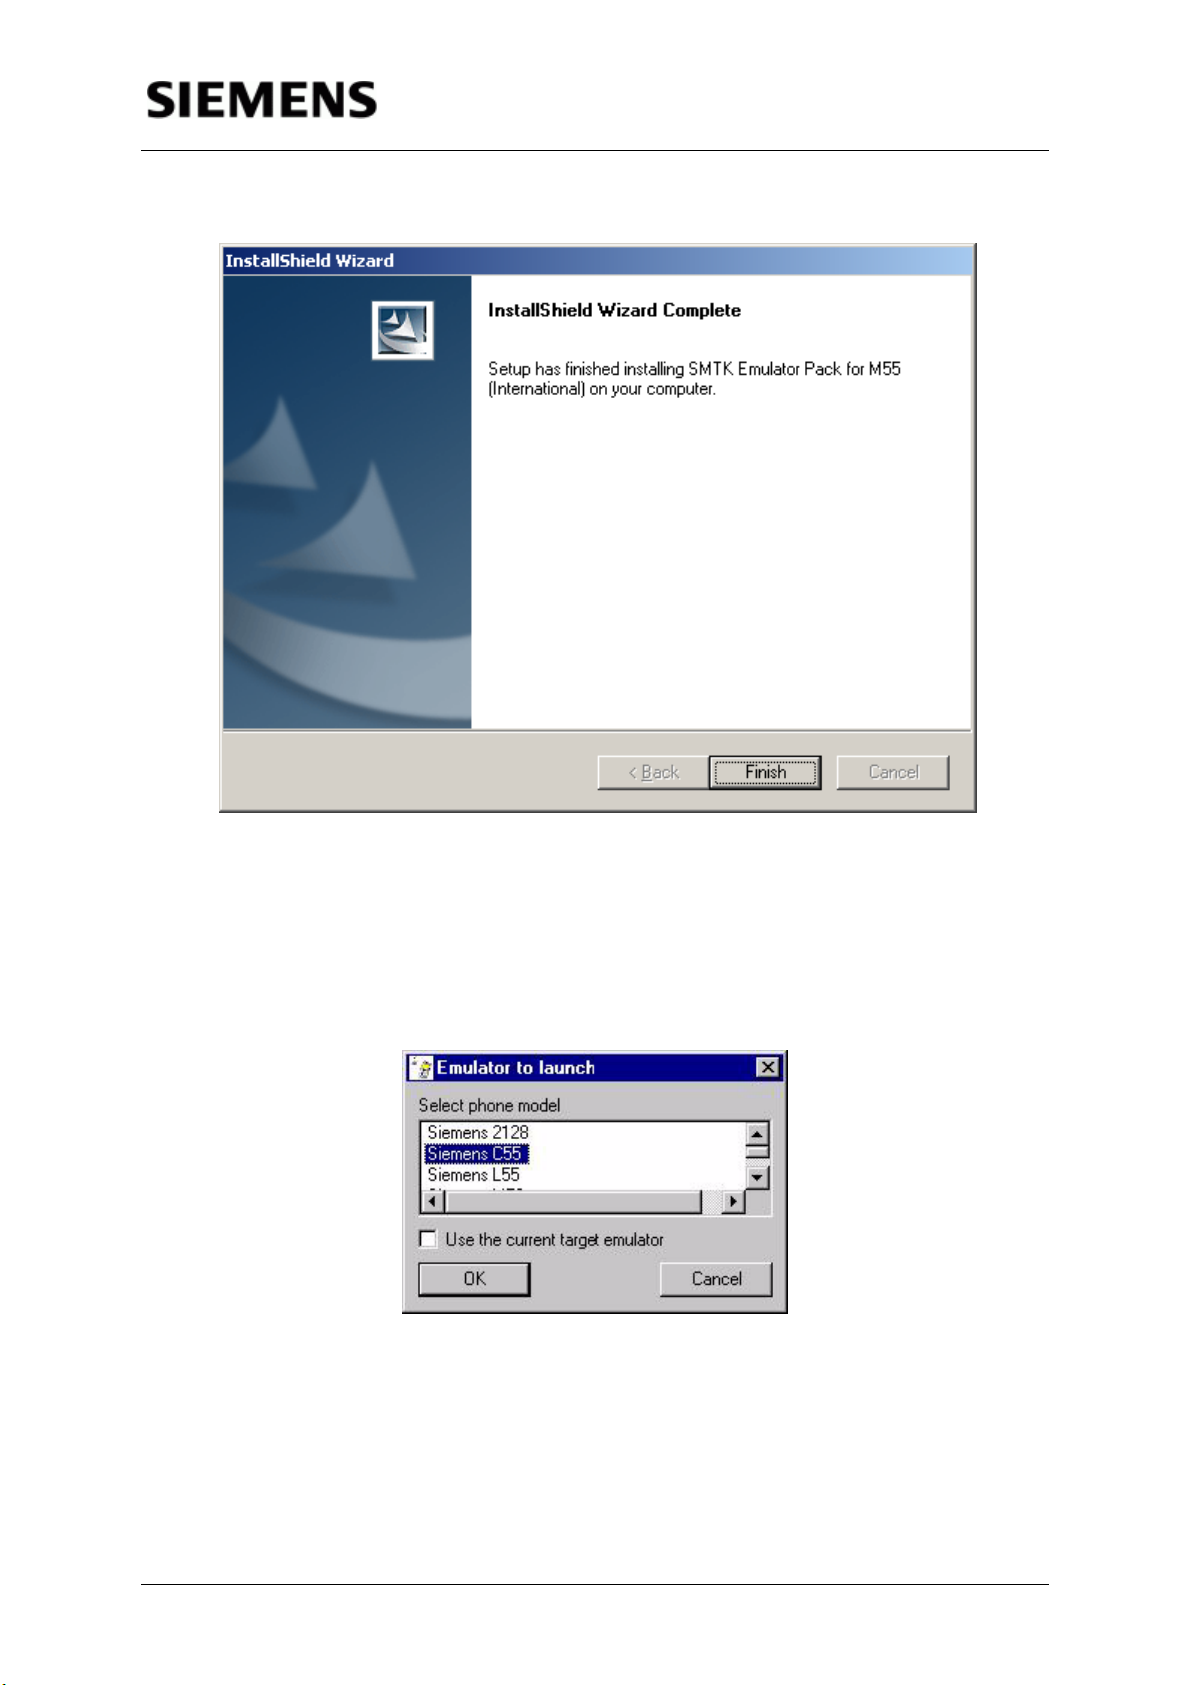
3. Finish the SMTK Emulator Pack installation:
Figure 3.15: SMTK Emulator Pack Installation Complete screen
3.4 - Launcher Execution
When the Launcher is started without specifying a phone emulator to launch, a
window appears, asking for the user to specify it.
Figure 3.16: Launcher’s Window
This happens only when the two following conditions are both met: the launcher's
command line has no -Xdevice argument, and the launcher had not been instruct-
ed to always use the target emulator as set by the SMTK Configuration and Man-
agement Utility.
Siemens Mobility Toolkit Copyright © 2004 Siemens AG
- 20 -
Page 25
Information and Communication Mobile Siemens Mobility Toolkit
The window displayed by the Launcher contains a list of all emulators installed,
and a check-box labeled "Use the current target emulator". Two options are given:
• Select one of the emulators in the list, while leaving the check-box unchecked.
This will result in launching the selected emulator for this execution only. The
target emulator is highlighted in the list as a proposed initial selection, which
may be modified by the user, or;
• Check the "Use the current target emulator" check-box. The current target
emulator will be launched for this execution, and every subsequent invocation
of the Launcher without specifying the "–Xdevice:<device_name>" argument
will perform without displaying this window. Switching off this operation mode
of the Launcher may only be done using the SMTK Configuration and Man-
agement Utility.
Starting the launcher without any installed SMTK Emulator Pack will lead Launch-
er to invoke a warning window, informing that there is no one registered emulator.
In this case, download at least one SMTK Emulator Pack from Siemens Develop-
er Portal and install it.
3.5 - "SMTK Configuration and Management Utility" Execution
Use this dialog for the following tasks:
• to set the target emulator for your applications compilation;
• to manage the SMTK emulators set;
• to manage the SMTK integration with IDEs.
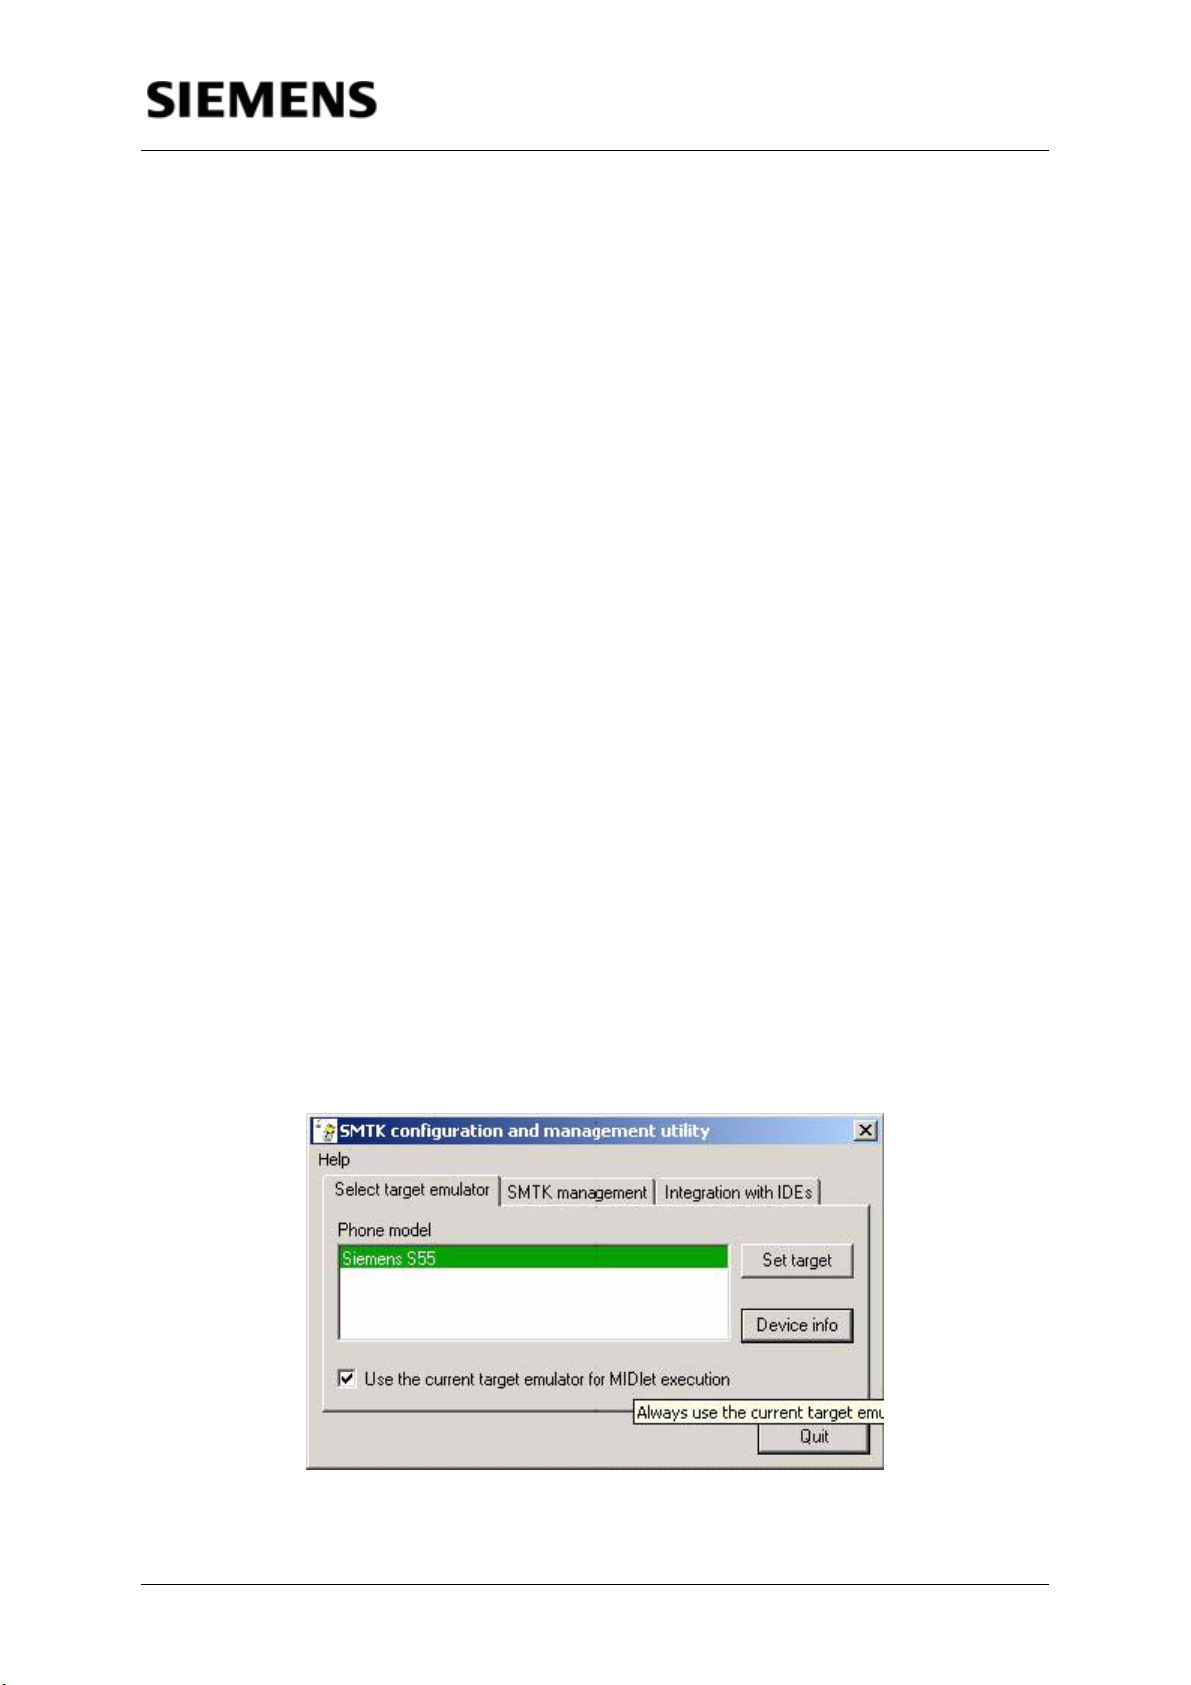
3.5.1 - "Select target emulator" Page
Figure 3.17: "Select target emulator" window
Siemens Mobility Toolkit Copyright © 2004 Siemens AG
- 21 -
Page 26
Information and Communication Mobile Siemens Mobility Toolkit
To select the target emulator for your applications compilation select the phone
model from installed models list and press "Set target" button. The current target
emulator is highlighted in the list by green background as shown in figure 3.17.
Use "Device info" button to see the device help information for selected model in
the list.
With the "Use the current target emulator for MIDlet execution" checkbox you can
control whether the current target model will be also used when the emulator is
launched without explicitly specified phone model, or the "Emulator to launch" di-
alog will appear in such case.
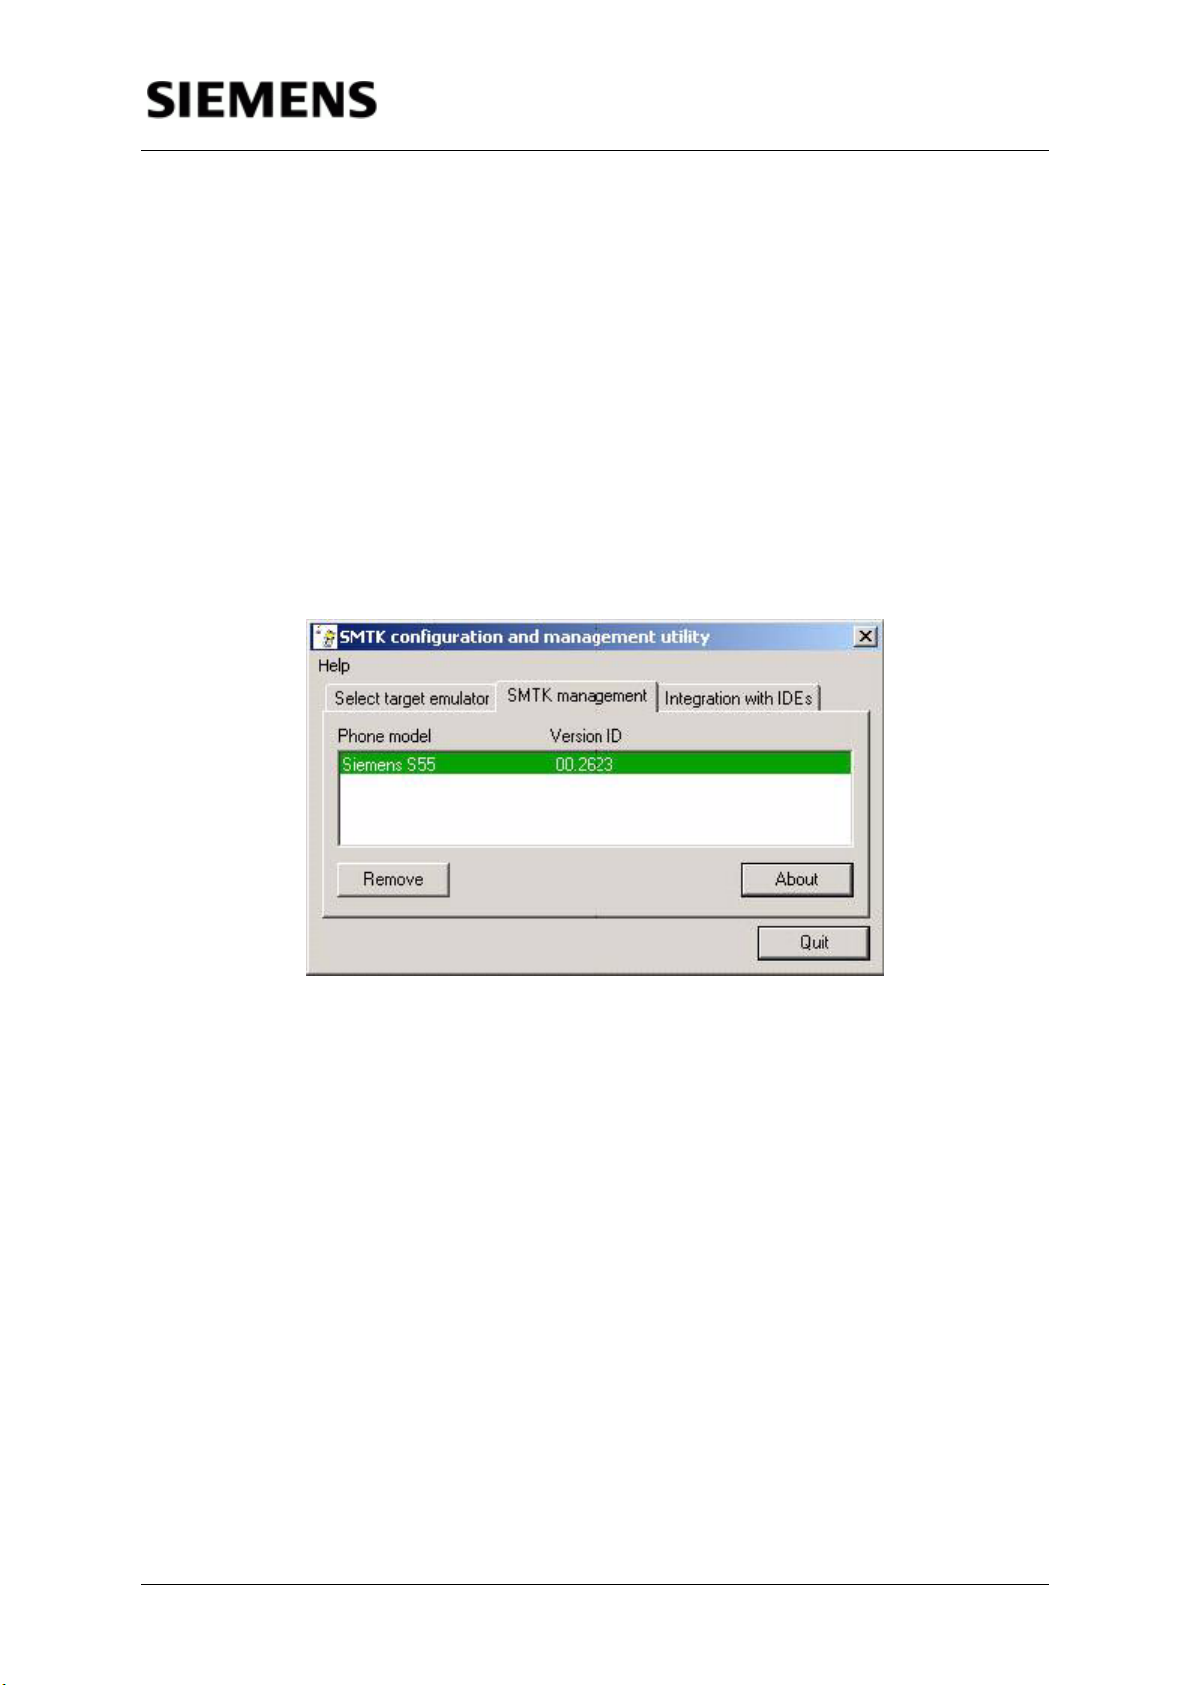
3.5.2 - "SMTK management" Page
Figure 3.18: "SMTK management" window
This page contains the installed phone models list with their emulators versions
displayed. The current target emulator is highlighted by green background.
• Use the "About" button to see the release notes for the selected emulator.
• Use the "Remove" button to remove the selected emulator from the SMTK.
Siemens Mobility Toolkit Copyright © 2004 Siemens AG
- 22 -
Page 27
Information and Communication Mobile Siemens Mobility Toolkit
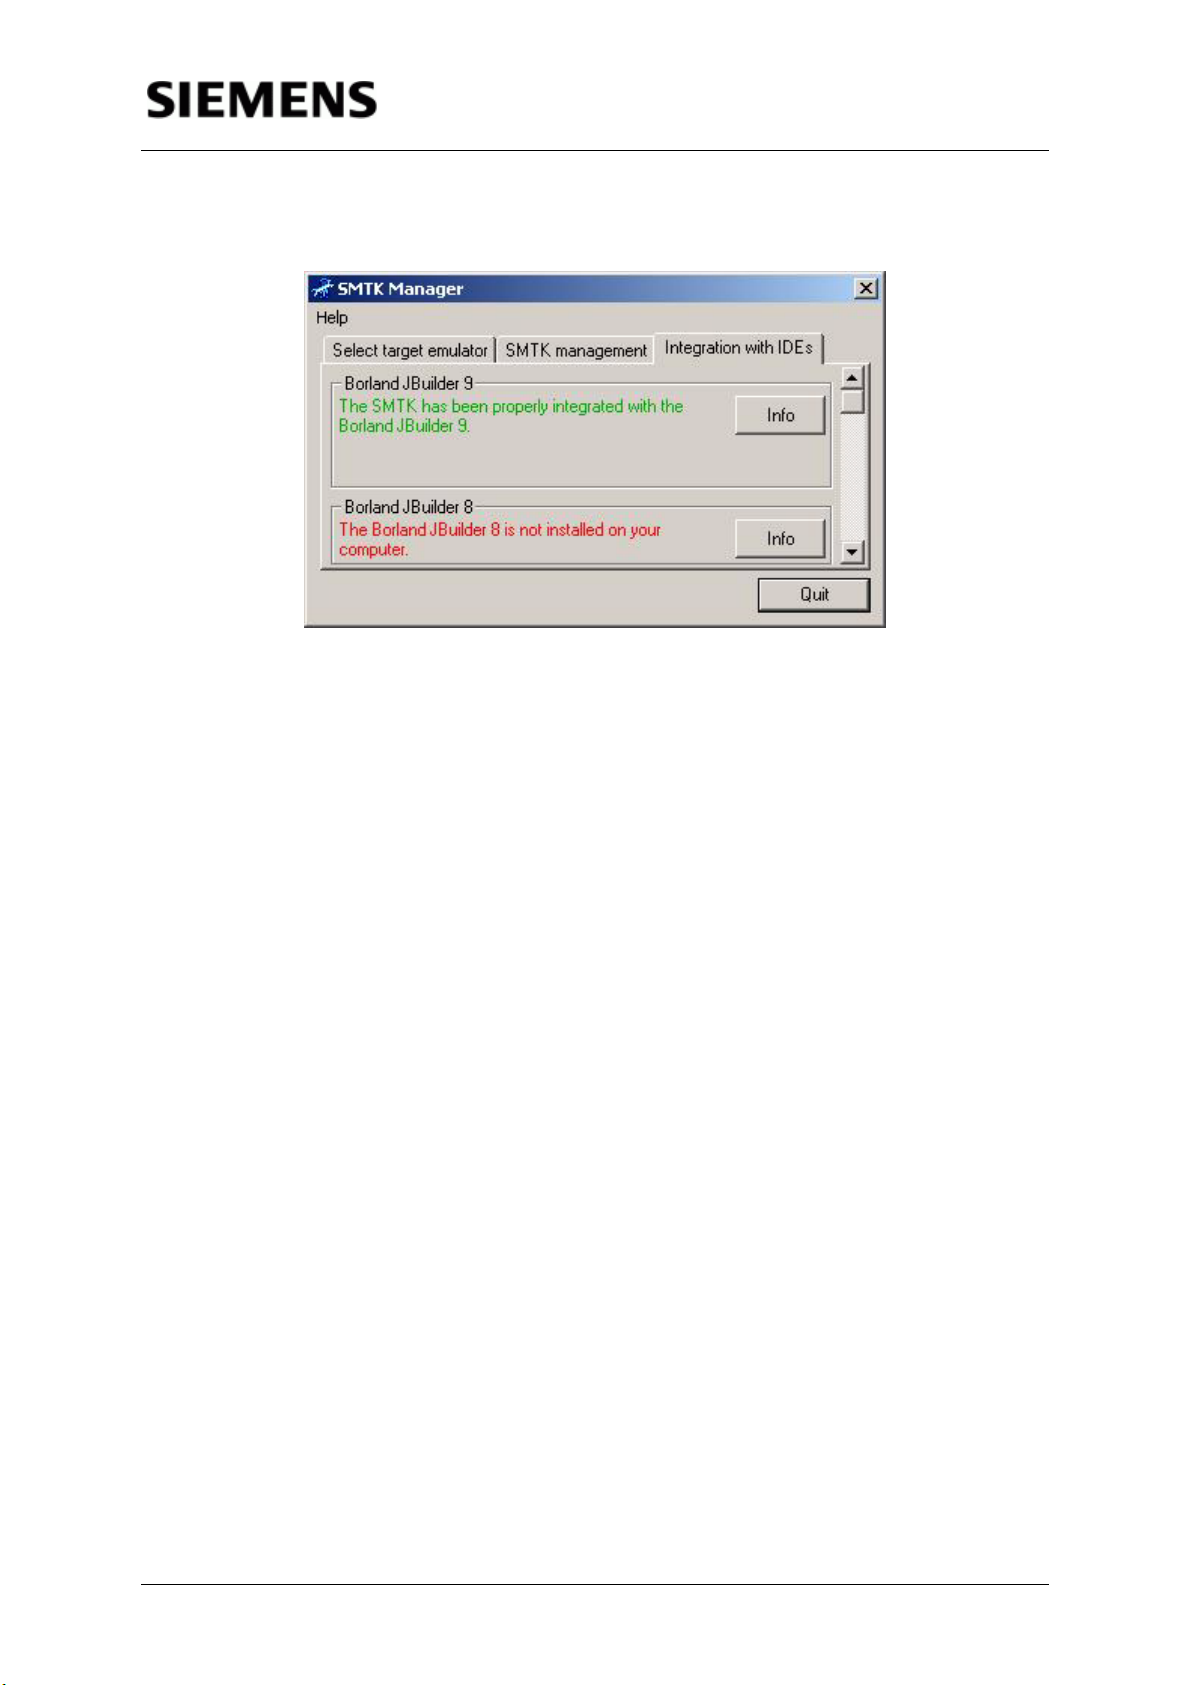
3.5.3 - "Integration with IDE’s" Page
Figure 3.19: "Integration with IDE's" page
This page contains the list of all IDEs supported by SMTK. Each list item has the
current integration with IDE status description (IDE is not installed, IDE is installed
but not integrated, IDE is integrated with SMTK). Also each item contains the but-
tons:
• "Info": Use this button to see the information about how to get IDE and about
IDE integration hints.
• "Start": This button appears only when the installation pack for integration with
IDE comes with SMTK. You may use this button to start the integration proce-
dure.
3.6 - Application Management System (AMS) on the Emulator
One of the emulator's features, already mentioned in section 3.1, is a mapping of
the file system of the mobile phone's Flash File System (FFS) into the file system
of the development PC. This means that the emulator's Application Management
System (AMS) "sees" the subdirectory / under the emulator's installation directory
as the "a:" device. This is done to imitate the real mobile phone's AMS, which also
considers the FFS as the "a:" drive. So, if the .jad file contains a line
MIDlet-Jar-URL: file://a:/java/jam/Hello/Hello.jar
the emulator's AMS will look for a "Hello.jar" file in the \java\jam\Hello subdirectory
under the emulator installation directory.
Siemens Mobility Toolkit Copyright © 2004 Siemens AG
- 23 -
Page 28
Information and Communication Mobile Siemens Mobility Toolkit
3.6.1 - Installation of .jar Files Using .jad Files
The following steps describe the process of installation of an application JAR (the
.jar file) file, in the situation where only the Descriptor file (the .jad file) is installed
in the mobile device.
NOTE: The "Hello World" example from Appendix B is used here.
1. Create a new directory for the application under the /Java/jam folder in the
emulator filesystem's installation directory, e.g. <<Filesystem path>>/Java/
jam/Hello. Copy the "Hello.jad" file into this new directory;
NOTE: Replace <<Filesystem>> for the /filesystem folder inside the emula-
tor's installation path.
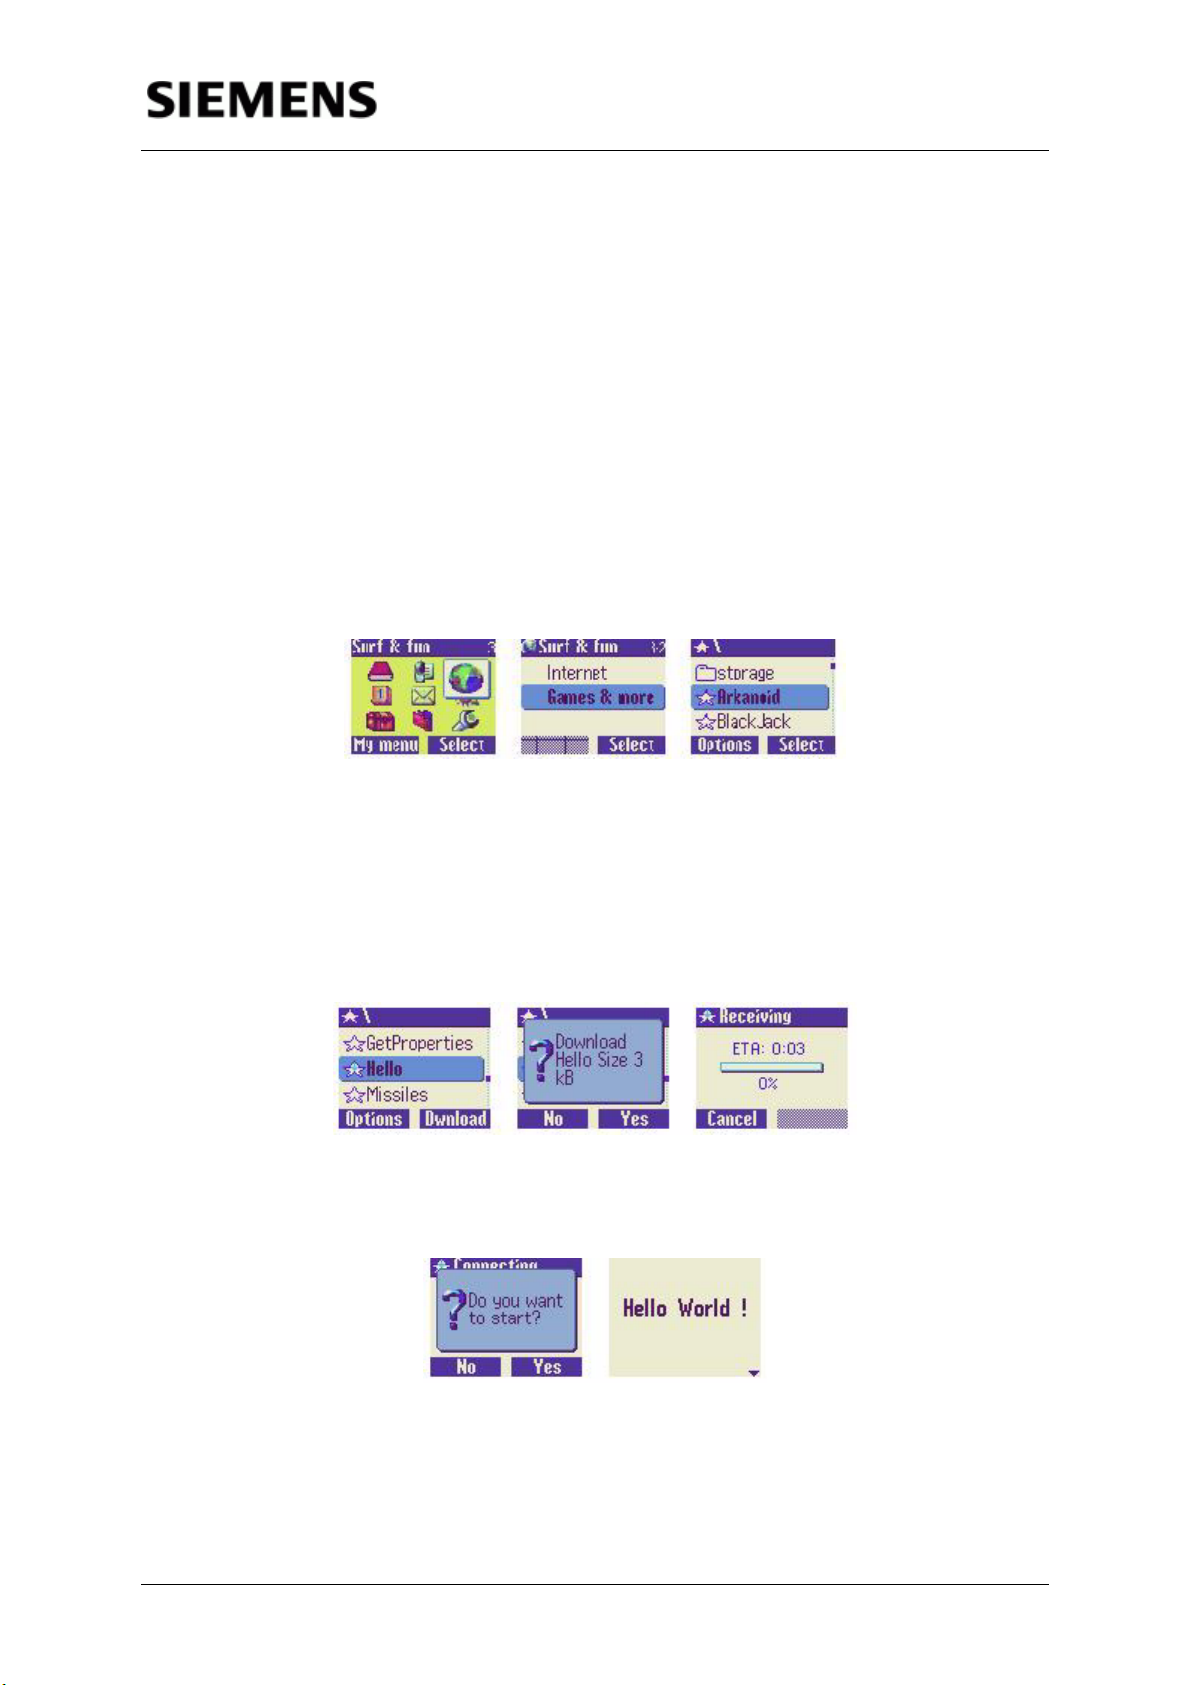
2. Start the emulator. Open the folder "Java", by using the right soft key and control keys;
Figure 3.20: Run a MIDlet from Surf&Fun
3. By navigating this screen, an item named Hello is seen marked with an icon
(blue filled). This item represents the Hello.jad file inside the Hello folder
under /Java/jam. Select it using the right soft key. This is understood as
requesting for downloading the application's .jar file (the "Hello.jar" file in our
case). The emulator's AMS will ask to confirm the request for download the
application. If answered "Yes", AMS will copy the "Hello.jar" file into the /
Java/jam/Hello directory.
Figure 3.21: Download a MIDlet
4. After finishing the download, the AMS ask the user if he wants to start running
the application. If answered "Yes", the MIDlet starts running.
Figure 3.22: Finishing download and running
5. At this time, the icon displayed at the left of the Hello item will change from the
star filled with blue to star not filled. This means that instead of having only
downloaded the JAD file, the user accepted to download the JAR file with the
application, and this MIDlet is persisted in the FFS.
Siemens Mobility Toolkit Copyright © 2004 Siemens AG
- 24 -
Page 29
Information and Communication Mobile Siemens Mobility Toolkit
To ensure correct reinstallation of the application in future, the URL in the appli-
cation's .jad file must point to a correct JAR file URL location. At that location, any
new version of the application will replace the previous one, and will thus be avail-
able for download by all mobile phones, without modifying the initial .jad file.
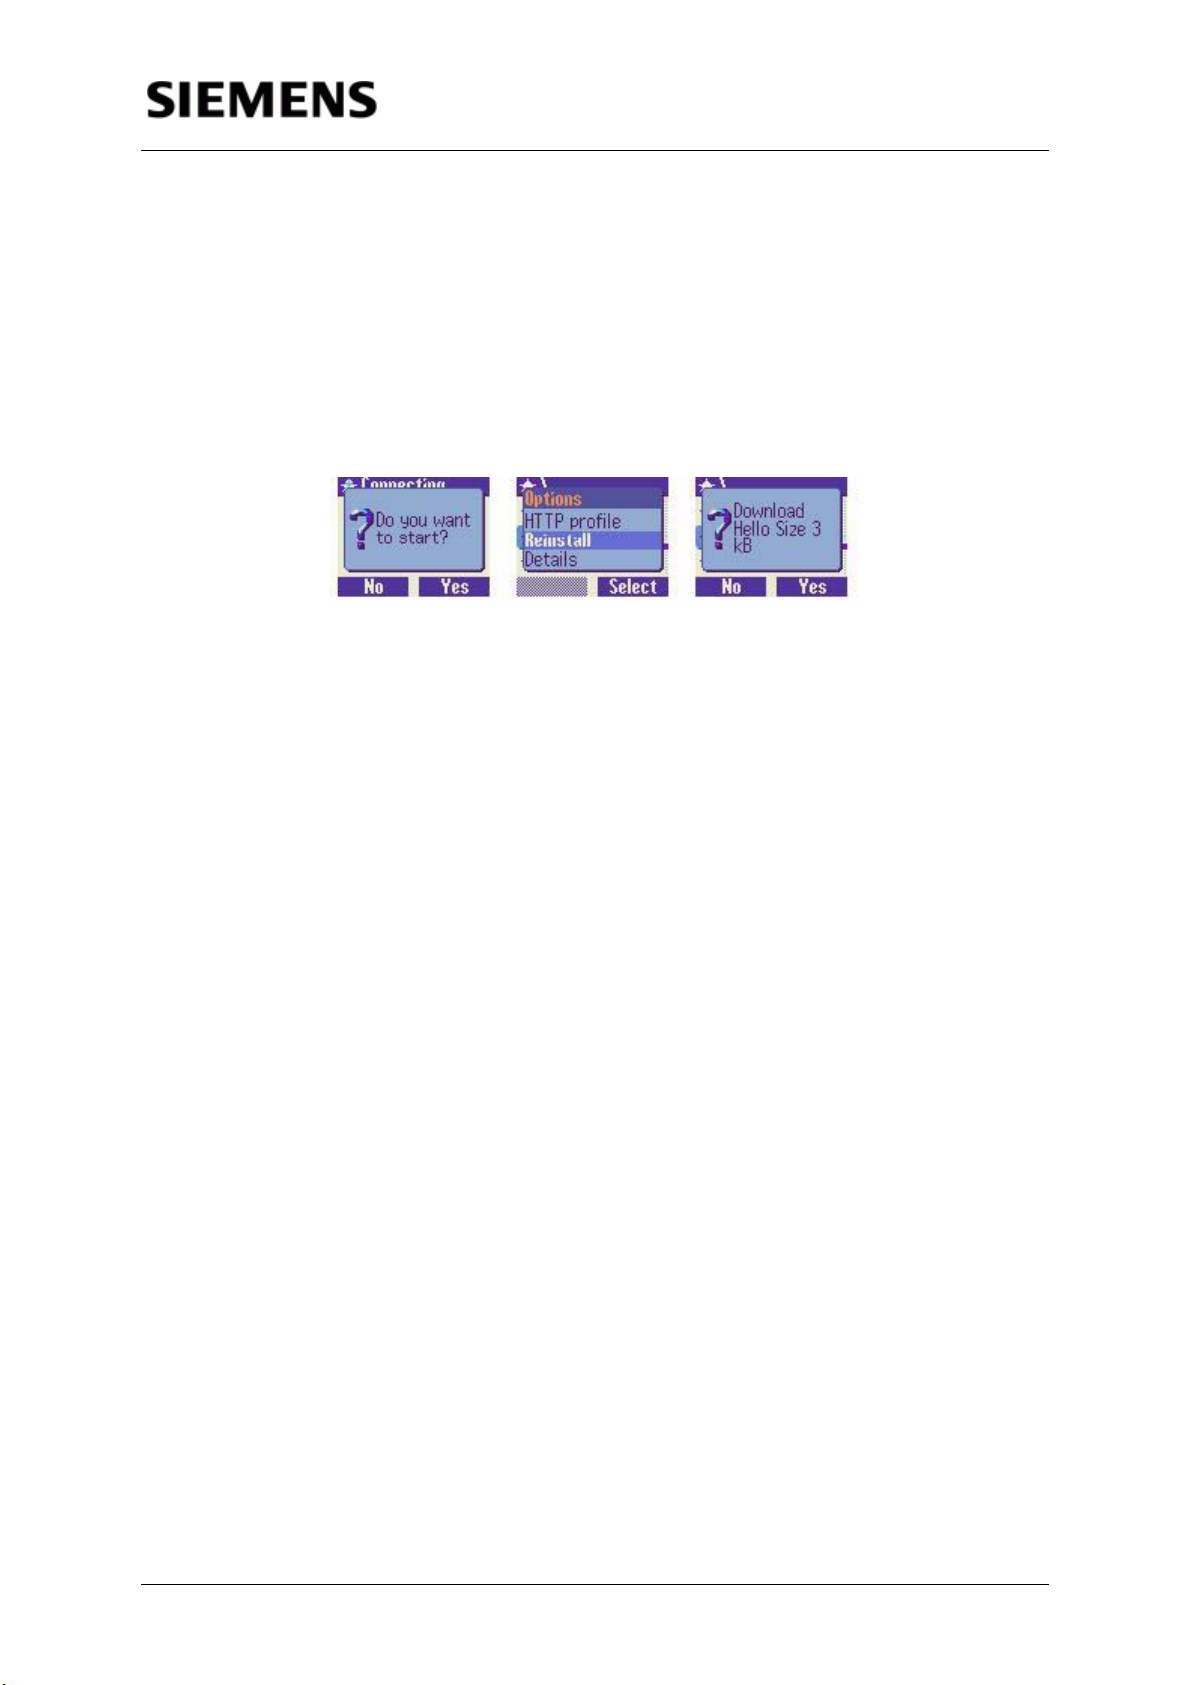
To reinstall an application, find its .jar file as above described; then open the "Op-
tions" pop-up window using the left soft key. Navigate the option list; select the
"Reinstall" option using the right soft key.
Figure 3.23: Reinstall an application
NOTE: AMS merely copies the application's .jar file into the application's /Java/
jam directory. The same result may be obtained on the emulator by "manually"
copying its .jad file and .jar file into that directory (e.g. by using the "Microsoft
File Explorer" utility). However, doing it with AMS as described above is very
useful as it gives a better idea of how it will be done on a real mobile phone,
and what the user will see on the mobile phone's display.
If a HTTP-URL is specified in the .jad file of an application, AMS can install this
application using an HTTP connection to that URL. To establish this HTTP con-
nection, the emulator uses an existing Internet connection on the PC.
3.7 - Loading an Application onto Siemens Java™-enabled Mobile Phones
3.7.1 - Local Loading of an Application onto the Mobile Phone
To load an application into a Siemens Java™-enabled mobile phone from a local
PC, the following components are needed:
• Siemens Java™-enabled mobile phone (for example, S55) with its communi-
cation port enabled (obtained via Siemens Developer Package);
• Serial data cable (obtained via Siemens Developer Package), IrDA port, USB
or BlueTooth adapter;
• Siemens Data Suite (SDS) installed (obtained via Siemens Developer Pack-
age).
Consider the loading procedure in detail, taking the «Hello, World» application
from Appendix B as an example.
Siemens Mobility Toolkit Copyright © 2004 Siemens AG
- 25 -
Page 30
Information and Communication Mobile Siemens Mobility Toolkit
Figure 3.24: Windows Explorer accessing the Mobile
3.7.2 - Installing the Siemens Data Suite (SDS)
The SDS is part of the Siemens Developer Package. This package delivers a Sie-
mens Java™-enabled mobile phone with its serial port enabled, a serial data ca-
ble (for connection between the mobile and the PC station) and a CD-ROM
including SDS, SMTK, Developers Notes, Reference Manuals, White papers,
IDEs and relevant product information. To obtain the Siemens Developer Pack-
age, access the Siemens Developer Portal at http://www.siemens-mobile.com/
developer.
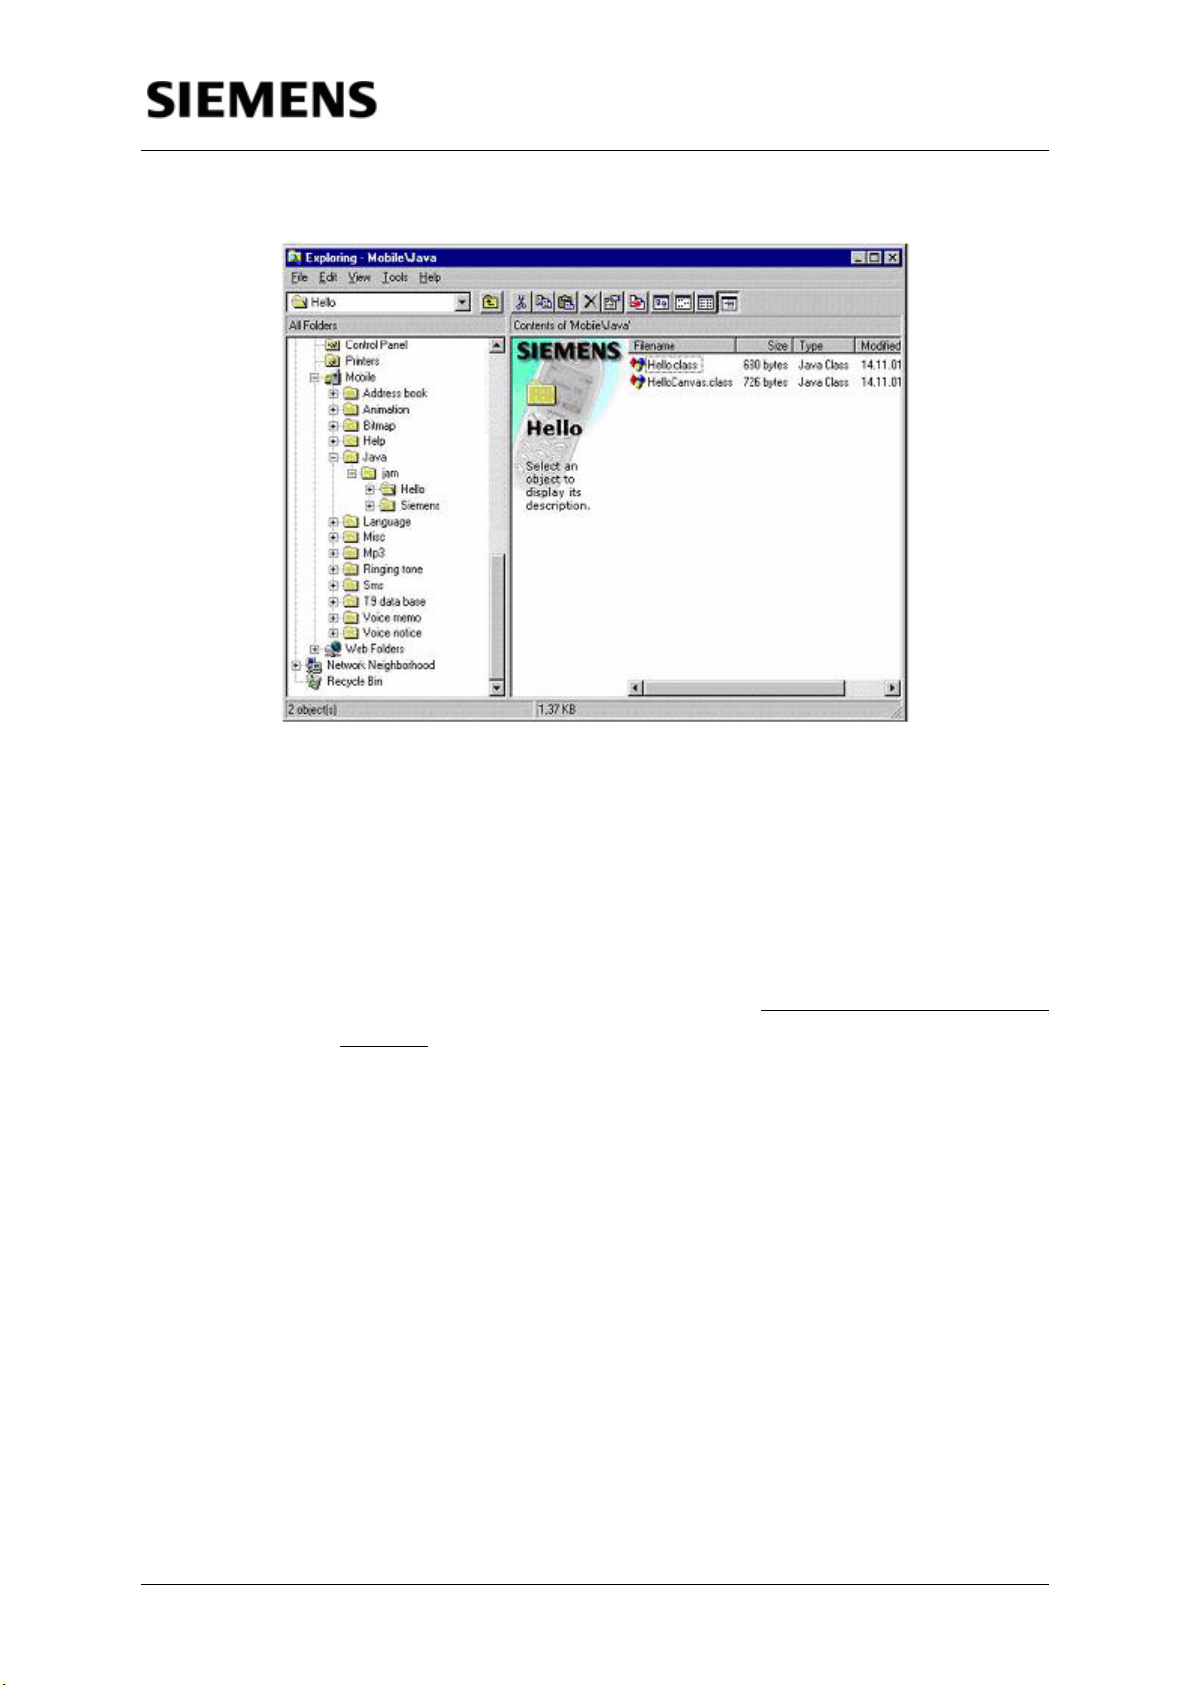
Once obtained Siemens Developer Package, attach the serial data cable to the
serial port of the PC and install the Siemens Data Suite (SDS). Plug in the mobile
phone into the S55 serial data cable. It is possible to use Windows Explorer to
gain access to the mobile's flash file system (FFS). The mobile phone will appear
as a new drive in Windows Explorer, named Mobile. The Java applications are
located under the path /Java/jam of this drive.
NOTE: The /Java/jam folder works as the root directory of the default class-
path. In other words, the KVM will search in this directory for the classes and
resources.
3.7.3 - Loading the MIDlet into the Mobile Phone
If you have used a JAR file to pack your application, just copy your JAR file to
/java/jam/<NewFolder>
Siemens Mobility Toolkit Copyright © 2004 Siemens AG
- 26 -
Page 31

Information and Communication Mobile Siemens Mobility Toolkit
, where NewFolder is the new folder created for the MIDlet, named with the same
MIDlet’s name.
NOTE: The "Hello World" application is a very simple one that does not use any
additional resources such as graphics, music or help files. If an application
makes use of such additional resources, copy all .class files of the application
and all the resource files it will use into the application's folder (created on the
Mobile drive as described above).
3.7.4 - Over the Air (OTA) Downloading
The over the air download is a two-step process.
3.7.4.1 - First step: WAP Browsing and .jad File Download
This step consists of browsing through application descriptions using WAP ac-
cess, and loading the .jad-file of a selected one. The following protocols are used
between the mobile phone and the network: WAP / UDP / IPv4 / PPP. The brows-
ing is done by a standard WAP browser on the mobile phone. Application descrip-
tions may have been prepared by standard WAP content generation tools and
stored on a content server. They are accessed by the mobile phone through a di-
alin server and a WAP gateway.
The WAP browser sends an "Accept: */*"-header to the WAP gateway. If a link on
a WAP deck points to a *.jad file, the file will be downloaded into the mobile
phone.
The WAP session will then be terminated and the .jad file will be handed over to
the Application management System (AMS).
Example of a .jad file:
MIDlet-1: BlackJack, /res/Icon.png, blackjack.BlackJack
MIDlet-Description: BlackJack
MIDlet-Jar-Size: 12536
MIDlet-Jar-URL: http://wherever.com/SiemensGames/bj.jar
MIDlet-Name: BlackJack
MIDlet-Vendor: Robby
MIDlet-Version: 1.0.1
MicroEdition-Configuration: CLDC-1.0
MicroEdition-Profile: MIDP-1.0
NOTE: How to configure the web server depends on which specific tool is be-
ing used. For example, if Tomcat is being used, make sure your web.xml file
includes the following lines:
<mime-mapping>
Siemens Mobility Toolkit Copyright © 2004 Siemens AG
- 27 -
Page 32

Information and Communication Mobile Siemens Mobility Toolkit
<extension>jad</extension>
<mime-type>text/vnd.sun.j2me.app-descriptor</mime-type>
</mime-mapping>
<mime-mapping>
<extension>jar</extension>
<mime-type>application/java-archive</mime-type>
</mime-mapping>
3.7.4.2 - Second step: downloading a .jar file
The .jar-file of a selected application is then loaded into the mobile phone over an
HTTP connection which is automatically opened by the Siemens Java™-enabled
mobile phone after the user's confirmation. The protocols used in this procedure
are: HTTP / TCP / IPv4 / PPP. The whole procedure consists of the following ac-
tions:
1. The AMS opens the .jad-file and asks the user for a download request confirmation In addition to the application's name, the user is now informed of the
proposed version and the size in KBytes of the .jar-file to be downloaded:
Figure 3.25: J2ME™ Application download screen
If the user confirms with "Yes", the AMS connects the mobile phone to the location described in MIDlet-Jar-URL.
2. The JAR file is downloaded into the mobile phone and stored on the Flash
File System (FFS) in a folder specified by the user (which is created under
the \Java directory):
Figure 3.26: Destination Folder selection screen
3. The user specifies the name of the application:
Figure 3.27: Application Name selection
4. The HTTP connection and the GPRS or CSD connection are terminated.
Siemens Mobility Toolkit Copyright © 2004 Siemens AG
- 28 -
Page 33

Information and Communication Mobile Siemens Mobility Toolkit
5. The user is informed about successful download, and prompted to run the
application.
3.7.5 - OTA Connection Scenarios
There are two download scenarios, which are quite similar; both are supported by
Siemens.
Scenario 2 (see 3.7.5.2) works exactly like Scenario 1 (see 3.7.5.1), but two dial
in numbers and two dial in servers are used instead of one.
Siemens supports both scenarios:
• If the same dial in profile for WAP and HTTP is selected, scenario 1 is active.
• If different dial in profiles are selected, scenario 2 is active.
The Network Operator may decide to use scenario 1 for a number of reasons:
• Simplicity of the configuration;
• Billing based on one dial in number is easier for the end customer to under-
stand when looking at the bill;
• Shorter transmission time for the end user because only one dial in necessary
There are a number of reasons why the Network Operator may decide to use
scenario 2;
• Reuse existing dial in for http and WAP without changing anything in the con-
figuration;
• Some operators have only opened ports 9200 to 9203 in their WAP dial in
server in order to avoid security issues in their WAP environments that come
with opening the http ports;
• Use IVR number for downloading application.
3.7.5.1 - Scenario 1: One Dial-in Number for WAP browsing and for HTTP Content Loading
Routing of both WAP and HTTP packets is done via the same dial-in server:
Siemens Mobility Toolkit Copyright © 2004 Siemens AG
- 29 -
Page 34

Information and Communication Mobile Siemens Mobility Toolkit
Figure 3.28: One dial-in number for WAP browsing
Siemens Mobility Toolkit Copyright © 2004 Siemens AG
- 30 -
Page 35

Information and Communication Mobile Siemens Mobility Toolkit
3.7.5.2 - Scenario 2: Two Different Dial-in Numbers for WAP and for HTTP
Scenario 2 works exactly in the same way as scenario 1, but two different dial-in
numbers and two dial-in servers are used instead of one (one for WAP, another
for HTTP):
Figure 3.29: Two different dial-in number for WAP browsing
3.7.5.3 - Configuration of the OTA Settings
The following is a step-by-step description on how to configure the OTA settings.
The example shows the settings for the D2-Vodafone operator, with a single dial-
in number for WAP:
1. Select "Menu" and then navigate to the option "Setup" and select it:
Figure 3.30: Main screen
Figure 3.31: Menu screen
Siemens Mobility Toolkit Copyright © 2004 Siemens AG
- 31 -
Page 36

Information and Communication Mobile Siemens Mobility Toolkit
2. In the menu that appears, select "Connectivity". Then, select "Data services":
Figure 3.32: Setup screen
Figure 3.33: Connectivity screen
3. Now, configure the WAP services selecting "MMS, Wap" option, and then
choose an empty profile. Rename it by selecting "Options" and "Rename".
When the new name is set, choose "Save".
Figure 3.34: Data Services screen
Figure 3.35: MMS, WAP Data service selection
Figure 3.36: MMS, WAP Data service rename
Figure 3.37: MMS, WAP Data service configuration
4. Edit the profile, by choosing "Edit". Confirm the changes and select "GPRS
settings". Finally, fill the form with the access point name (APN), login and
password:
3.7.6 - Using SMS for OTA Download (OTA Push Method)
It is possible to send anyone an SMS that contains a notice about new applica-
tions and the URL from where they can be downloaded, e.g.:
Siemens Mobility Toolkit Copyright © 2004 Siemens AG
- 32 -
Page 37

Information and Communication Mobile Siemens Mobility Toolkit
Figure 3.38: Rename Confirmation Screen
Figure 3.39: GPRS settings selection
Figure 3.40: GPRS settings screen
"Download the latest application from http://any.server.com/"
If the user reads this SMS, the URL will be highlighted. If the user then presses
the green "Send" key, the URL will be passed over to the WAP browser and will
be opened. The "OTA Push" procedure recognizes the following keywords with
their typing variants, when analyzing an URL received within an SMS:
Http:, http:, HTTP:, www., WWW., wap., Wap.
NOTE: For WAP, HTTP and GPRS settings please visit
http://www.my-siemens.com/customercare
3.7.7 - OTA Status Codes
After downloading a MIDlet, the server is notified about the download status by
using specific numeric codes.
The following OTA Status Codes are supported:
Code Short description Notes
200 Successful installation The user is being asked if he wants to
900 Success Download was successful.
start the downloaded MIDlet.
User is shown a "Do you want to start
application xzy" screen.
901 Insufficient Memory Insufficient memory to store the .jar file in
FFS memory.
User is shown a "Not enough memory on
FFS Card" screen.
Siemens Mobility Toolkit Copyright © 2004 Siemens AG
- 33 -
Page 38

Information and Communication Mobile Siemens Mobility Toolkit
902 User Cancelled When user has pressed the red end key
during the download.
904 JAR size mismatch Will be delivered to the server.
Nevertheless the application will be
installed and can be started because
experience shows that in most cases
only the editing of the size in the jad file
was wrong.
Not suported are:
Code Short description Notes
903 Loss of service Cannot be transmitted to the server
(Obviously)
905 Attribute mismatch
906 Invalid descriptor
When the errors 905/906 occur, in most cases it is impossible to notify the server
anyway, because it is unclear which server URL should be informed. (The WAP
session is already terminated and the http session cannot be brought up after
analysis of the jad file
3.8 - Running an Application on the Emulator
There are at least three ways to start an application on the emulator.
3.8.1 - Via Command Window
The "Start Java Application" command displays the standard window for selecting
the application file:
Figure 3.41: Start an Application
To start a .jar-packaged application, select the corresponding .jad or .jar file in this
window. To start a non-packaged application, select its main .class file.
Siemens Mobility Toolkit Copyright © 2004 Siemens AG
- 34 -
Page 39

Information and Communication Mobile Siemens Mobility Toolkit
3.8.2 - Via Filesystem
By selecting via Filesystem navigation, either an application packed inside a JAR
file or the main class file (the one that extends the class "MIDlet" in its source) can
be selected to start. To do this, follow these steps:
1. Select Filesystem in the "Menu"
Figure 3.42: Filesystem menu item
2. Navigate to the file, opening the necessary folders
3. Finally, select the MIDlet file and press the left soft key or press the right soft
3.8.3 - Via Surf & Fun
It's possible to go directly to the folder /Java/jam, where the MIDlets are located.
This is similar to the filesystem method, only differing that the application is start-
ed from that folder. To do that, follow these steps:
1. Select Surf & Fun in the menu:
Figure 3.43: JAVA directory
key and select Open.
Figure 3.44: Open a MIDlet
Figure 3.45: Surf&Fun menu item
2. Select Games & More:
Figure 3.46: Games & Fun
Siemens Mobility Toolkit Copyright © 2004 Siemens AG
- 35 -
Page 40

Information and Communication Mobile Siemens Mobility Toolkit
3. Navigate to the desired folder, and select the MIDlet file and press the left soft
key or press the right soft key and select Open:
Figure 3.47: Open a Folder
3.8.4 - Other Alternatives
There are also other ways to start an application as follow:
• Via command prompt
The process of starting an application is described in section 3.9, Command Line
Parameters.
• Via IDE tool
This starting process is described in Chapter 4 of thisdocument, and alson in the
IDE documentation.
3.9 - Log Files
Every time the virtual machine inside the emulator is running, a java.log file is cre-
ated in the directory where the emulator .exe file is located or in the directory
where the java class file has been started.
The java.log file contains tracing information about the results of the application
execution. Specific categories of data to be recorded in the java.log file by using
"-Xverbose:[<tracing options>]" options when starting the emulator. These op-
tions may also be selected and/or modified when the emulator is already running,
by using its "Debugging/Tracing" menu.
Additionally, the java.log file accumulates informations about uncaught excep-
tions. Refer to this file if unexpected interruptions of the program flow are experi-
enced, because the motivation of this problem can be an uncaught exception.
3.10 - Command Line Parameters
As it has been already stated, launching of a specific Siemens phone emulator is
performed using a special Launcher utility (the "Emulator.exe" file in the <<SMTK
path>>\bin subfolder).
The Launcher can be started from within an IDE. To be directly started, the fol-
lowing command should be entered in the command line console:
emulator [arguments] [<<APPLICATION>>]
Siemens Mobility Toolkit Copyright © 2004 Siemens AG
- 36 -
Page 41

Information and Communication Mobile Siemens Mobility Toolkit
The <<APPLICATION>> parameter, if present, specifies an application (a MIDlet)
whose execution will be started by the emulator once it is launched. If this param-
eter is not present, the emulator is launched, but no application execution is start-
ed. An example of usage is shown below:
emulator -Dhttp_proxy=192.168.1.20 -Xdescriptor:"c:\work\Hello.jad"
In the example above, the Hello MIDlet Suite is launched using its JAD file, and a
HTTP proxy is set.
NOTE: Since DOS prompt has a limited screen size, in order to read the dis-
played messages, use a pipe at the end of the emulator call in the prompt. To
do it, add a " | more" string at the end of the emulator call.
Possible values for the optional [arguments] parameter may be the following:
Arguments Function
-help Display a window containing list of available
command line arguments.
-Xdevice:<device_name> Launch the emulator specified by
<device_name>. If this argument is used jointly
with -Xquery, then -Xquery returns the properties of the specified device only.
-version This command is used by the IDE to get the
version information. In the standalone mode, it
only can be used when the Launcher is started
in the DOS-box.
-classpath Set the classpath of the root folder containing
the classes of the application.
-Xquery This command is used by the IDE to get information about all the devices installed, or, when
used jointly with the –Xdevice command, about
the device specified by the latter. In the standalone mode, it may only be used when the
Launcher is started in the DOS-box.
-D<property>=<value> Set <property> to <value>. An available property is http_proxy=<<address>>[:<<port>>],
where <<address>> is a valid IP address of a
HTTP proxy and <<port>> is an optional port
number.
-Xdebug Enables runtime debugging. -Xrunjdwp must
also be specified.
-Xverbose This is identical to specifying -Xverbose:allin
the command-line.
Siemens Mobility Toolkit Copyright © 2004 Siemens AG
- 37 -
Page 42

Information and Communication Mobile Siemens Mobility Toolkit
-Xverbose:<type1> [,<type2>
.., <typeN>]]
where <type> can be:
allocation Generates info about every allocation in the
gc Generates info about every de-allocation in the
gcverbose Generates info about detailed analysis the gar-
class Generates info about class loading, creation
classverbose Generates detailed information as the different
verifier Generates trace info of the KVM's internal
stackmaps Generates trace info of the behavior of stack
bytecodes Generates info about each bytecode as the
methods Generates info about entries and exit of every
methodsverbose Generates info about entry and exit of every
frames Generates info about stack frames when they
stackchunks Generates info about stack and stack chunk
exceptions Generates info about all thrown exceptions,
events Generates info about events (such as PEN-
threading Generates info about status of all threads in
monitors Generates information whenever the program
networking Generates detailed information for every net-
This is a request to the emulator being
launched to generate trace info and send it to
the java.log file. The trace info will be generated for every <type> of information. The list of
possible types is given hereafter. Multiple types
may be specified, by separating them by a single comma without spaces. All trace output can
be obtained by using the type all.
WARNING: Tracing all information is very verbose and the MIDlet will run extremely slow.
Java heap. Also generates overall heap usage
statistics.
Java heap.
bage collection process.
and initialization.
parts of a class file are loaded into the KVM.
class verifier.
maps
program executes.
method invoked.
method invoked. Slightly wordier than -Xverbose:methods.
are pushed and popped.
creation.
even if they are caught.
DOWN) as they are received by the KVM.
the system.
enters or exits a monitor.
work related method.
Siemens Mobility Toolkit Copyright © 2004 Siemens AG
- 38 -
Page 43
Information and Communication Mobile Siemens Mobility Toolkit
-Xrunjdwp: <name>=<value> Starts the JDWP debug session with various
sub-options. <name> is one of the options in
the table below. Appropriate values for <value>
are determined by the sub-option name. -Xdebug must also be specified. This command is
used by IDE to set up various debug modes.
where possible < name> values may be:
transport The transport mechanism used to communi-
cate with the debugger. The value dt_socket is
the only mechanism that is actually supported.
address The transport address for the debugger con-
nection, either in 'host:port' or 'port' formats. In
the port-only format, the host is assumed to be
localhost.
server Can take "y" and "n" values. When set to "y"
(yes), starts the debug agent as a server. The
debugger must connect to the port specified.
suspend Can take "y" and "n" values (default is "y").
Specifies whether or not the application execution should be suspended after establishing a
connection with the debugger.
-Xdescriptor:<jad_file> Runs an application using the specified Java
Application Descriptor (JAD) file.
All the Boolean options (except "traceall") can also be set or modified during the
emulator's operation. Settings which have been done in this way (from within the
emulator's window) are memorized by the emulator and restored at its next start,
unless explicitly modified in the command line.
3.11 - Differences Between the Mobile Phone and the Emulator
3.11.1 - Performance Differences
The emulator's performance strongly depends on the CPU speed, which in gen-
eral is much higher on a PC workstation than on a real Siemens mobile phone.
Performance characteristics of the emulator are higher than those of the mobile
phones, in particular in the following aspects:
• Higher execution speed;
• More rapid network access;
• Better graphics.
The only way to check the real timing of execution of an application is to run it on
a real mobile phone. It's strongly recommended to do this, at least for the final
testing of time-critical applications.
Siemens Mobility Toolkit Copyright © 2004 Siemens AG
- 39 -
Page 44

Information and Communication Mobile Siemens Mobility Toolkit
3.11.2 - Technical Differences
Most of the technical differences between the emulator and the mobile phone re-
sult from the absence of call processing functions on the emulator. Namely:
• An outgoing voice call cannot be done.
• An incoming voice call cannot be received. However, by using the "MSM:
Mobile terminating Call" command you can partly simulate interaction of this
event with normal performance of Java tasks on the mobile phone.
• An SMS message cannot be really sent, but the reception of SMS (text or
voice) message can be emulated by using SMS group of commands on the
emulator.
• TCP/IP/HTTP connections use cellular dial-up on the real mobile phone, while
on the emulator they go along an existing already established LAN/Internet
connection. Remember that if an HTTP proxy is used, then the
“HTTP_PROXY” environment variable must be appropriately set.
• WAP connections also use cellular dial-up on the real mobile phone, while on
the emulator they go along an existing network connection on the PC. This
modem has to support the “X3” AT-command.
Other differences relate to specific hardware components of the mobile phone,
which are either absent or emulated on the emulator, namely:
• The emulator cannot play MP3 files. (SL45i feature).
• The IrDA feature is absent on the emulator.
• The sound feature is only available if a MIDI compatible audio driver is
installed.
• The file system is emulated as a specific folder on the PC file system. There-
fore, the file system can be handled on the emulator in both the mobile phone-
specific manner and as an ordinary folder on a PC.
Siemens Mobility Toolkit Copyright © 2004 Siemens AG
- 40 -
Page 45
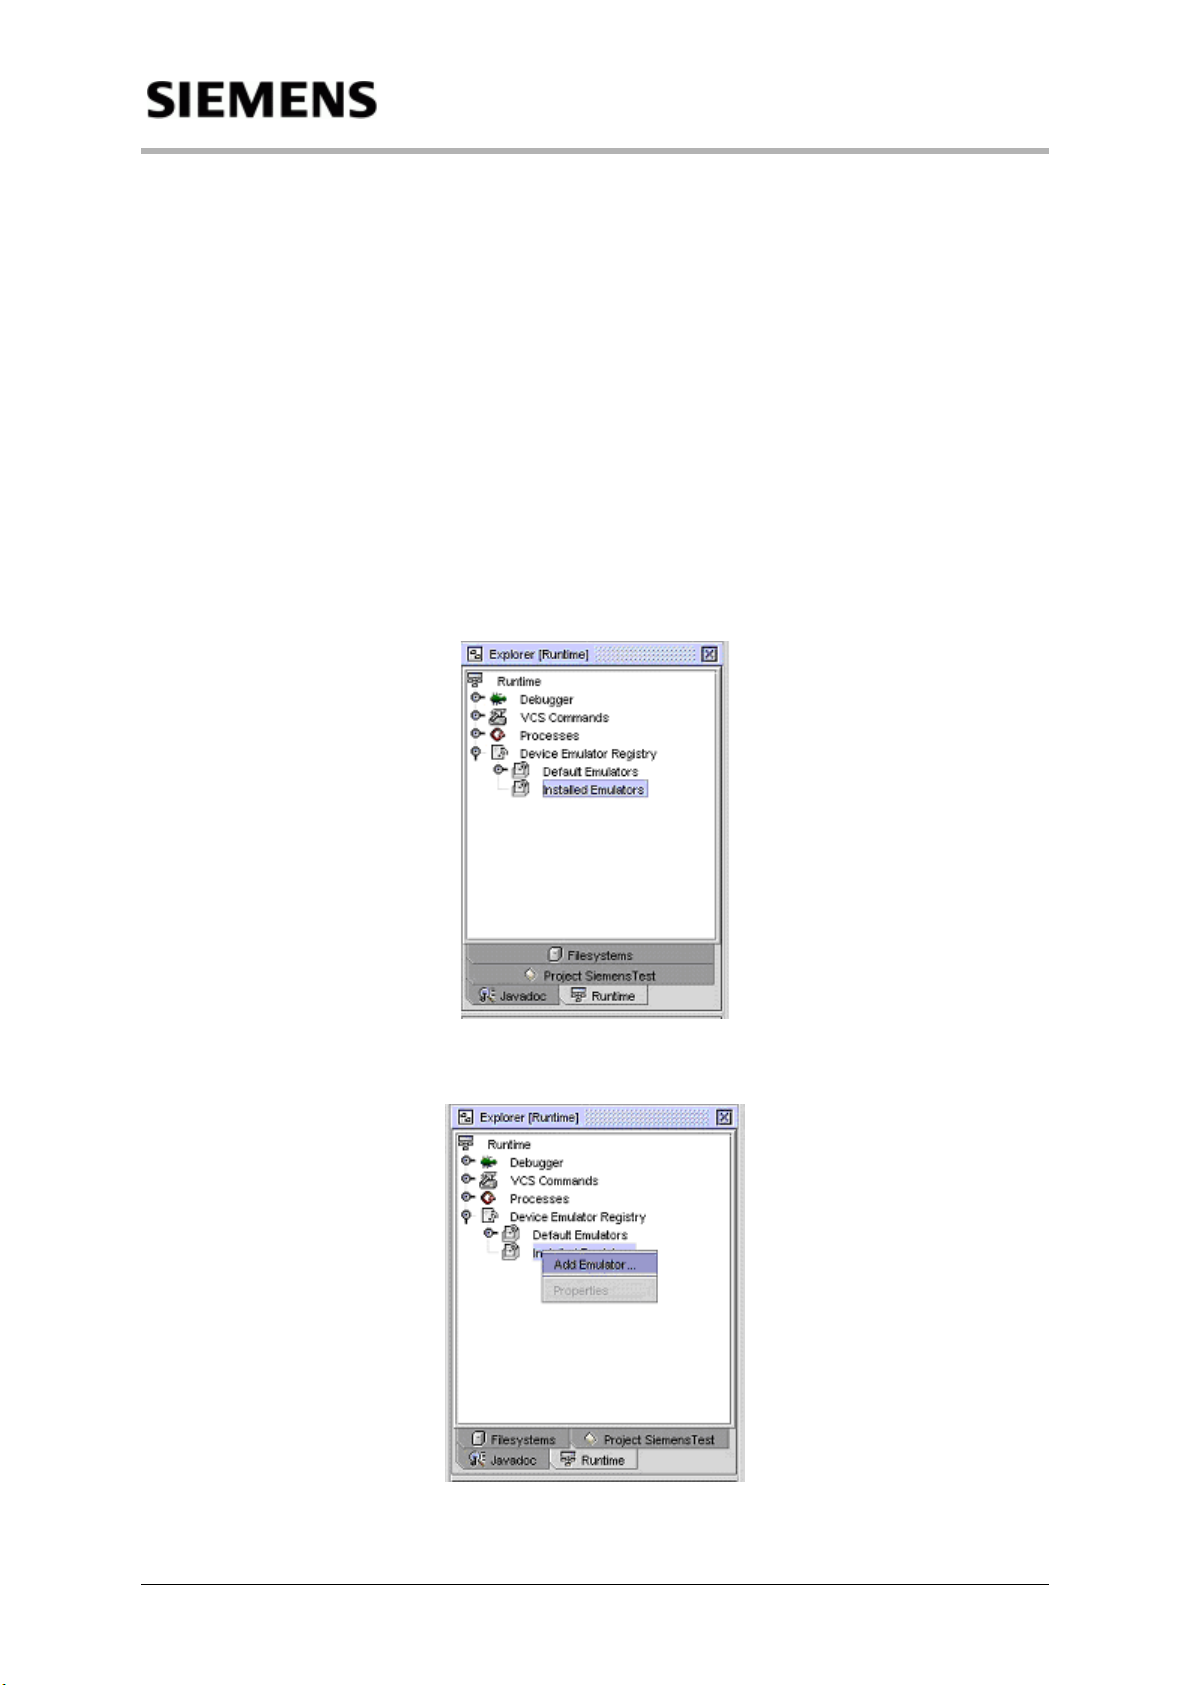
Information and Communication Mobile IDE Integration
4 - IDE Integration
4.1 - Sun ONE Studio Integration
The main steps of an application development process are reported in this sec-
tion, using a simple example inside Sun ONE Studio (formerly Forte for Java™)
ME. For a detailed description on how to use Sun ONE Studio, please refer to
Sun's documentation. The steps here described will require to create a new
project (e.g. "SiemensTest") and to use the source code of an existing Siemens-
provided application (e.g. "HelloWorld").
4.1.1 - Installing a new Emulator in Sun ONE Studio
1. Install SMTK Emulator, opening "Runtime" tab in "Explorer" folder:
Figure 4.1: "Runtime" in Explorer window
2. Right click "Installed Emulators", and select "Add Emulator":
Figure 4.2: Add Emulator.." menu
Siemens Mobility Toolkit Copyright © 2004 Siemens AG
- 41 -
Page 46

Information and Communication Mobile IDE Integration
3. Select the folder where SMTK Core is installed:
Figure 4.3: Emulator path selection screen
4. The SMTK Emulator Packs previously integrated with SMTK Core (in this
case, S55) are added:
Figure 4.4: Runtime Tab properly set
4.1.2 - Creating a new Project
1. Select "Project Manager" in the "Project" menu.
Figure 4.5: "Project Manager" selection
Siemens Mobility Toolkit Copyright © 2004 Siemens AG
- 42 -
Page 47
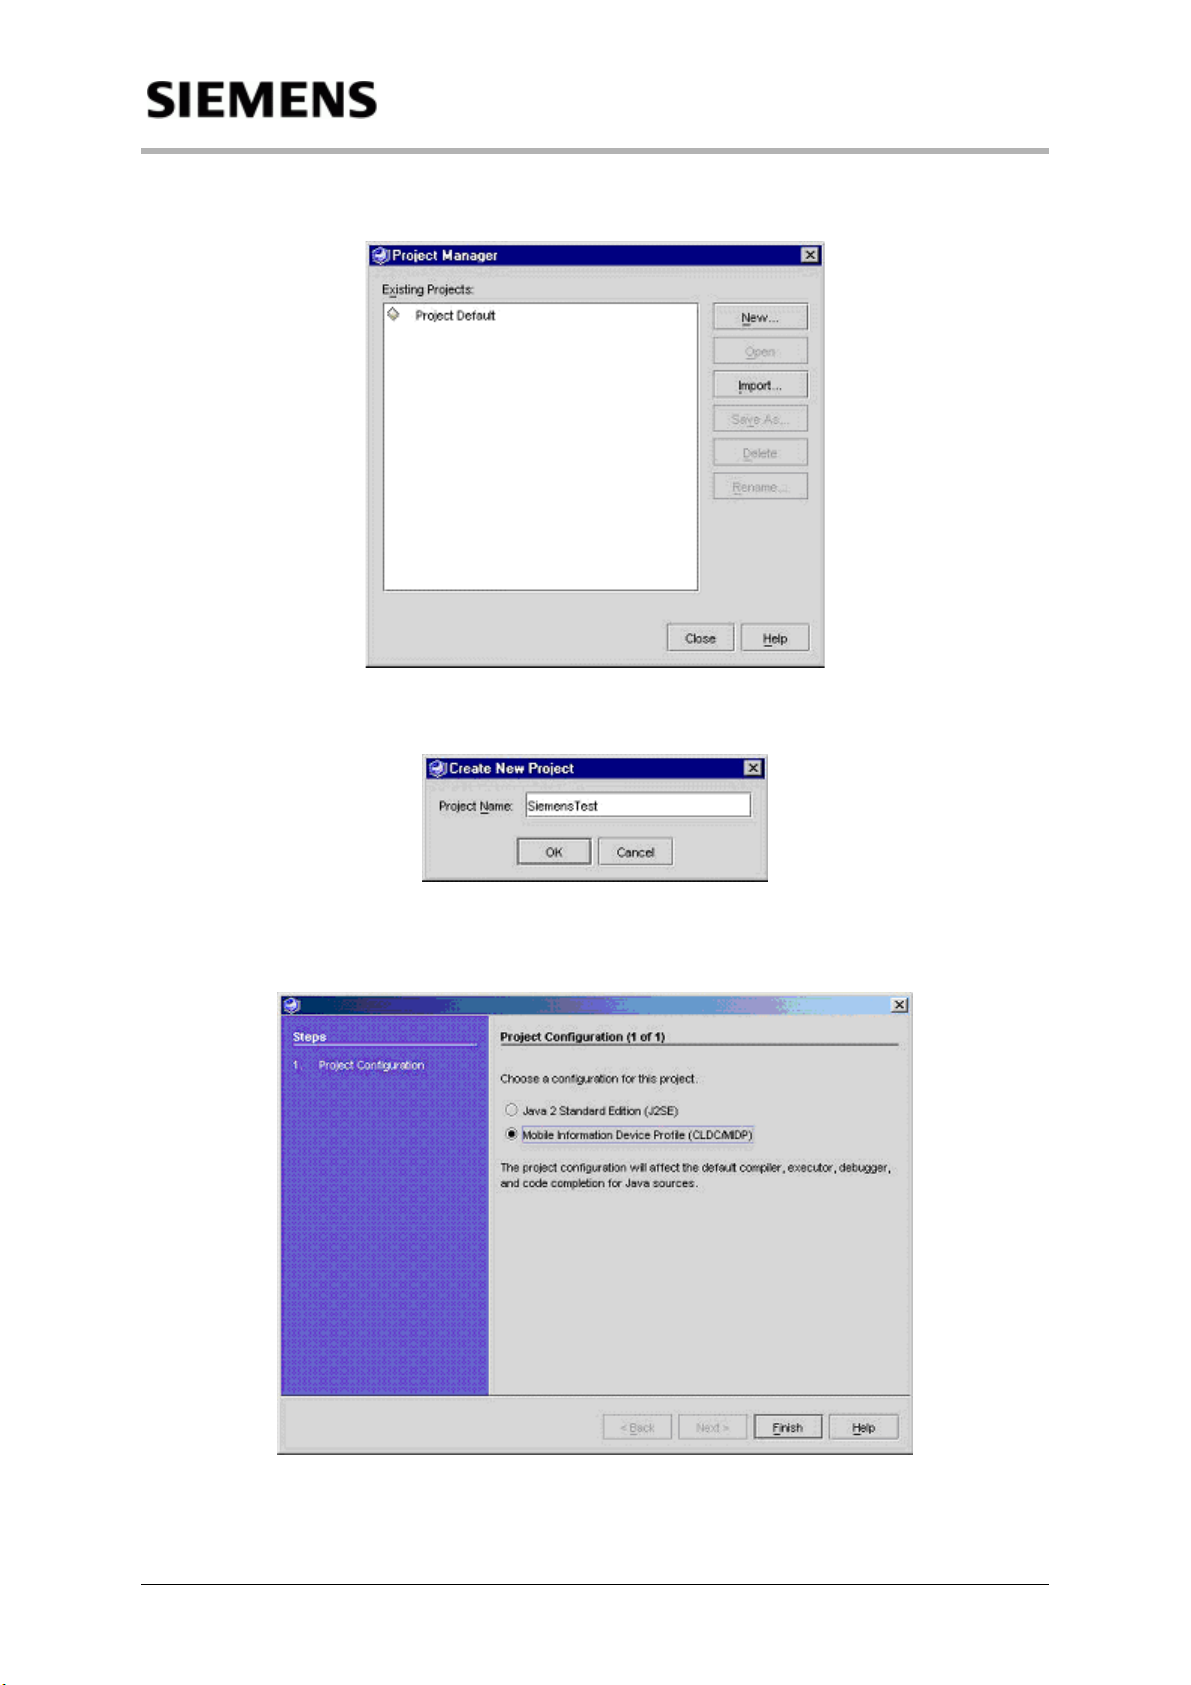
Information and Communication Mobile IDE Integration
2. Click "New" in the "Project Manager" window:
Figure 4.6: "Project Manager" window
3. Type a Project name (e.g. SiemensTest) and click "OK:
Figure 4.7: New Project name
4. Select the project configuration and press OK. In this case, select Mobile
Information Device Profile (MIDP):
Figure 4.8: Project Configuration screen
Siemens Mobility Toolkit Copyright © 2004 Siemens AG
- 43 -
Page 48

Information and Communication Mobile IDE Integration
5. Select Project SiemensTest in the "Explorer" window:
Figure 4.9: Project Selection tab in Explorer window
6. Select "MountFilesystem" in the "File" menu:
Figure 4.10: Filesystem selection
Siemens Mobility Toolkit Copyright © 2004 Siemens AG
- 44 -
Page 49
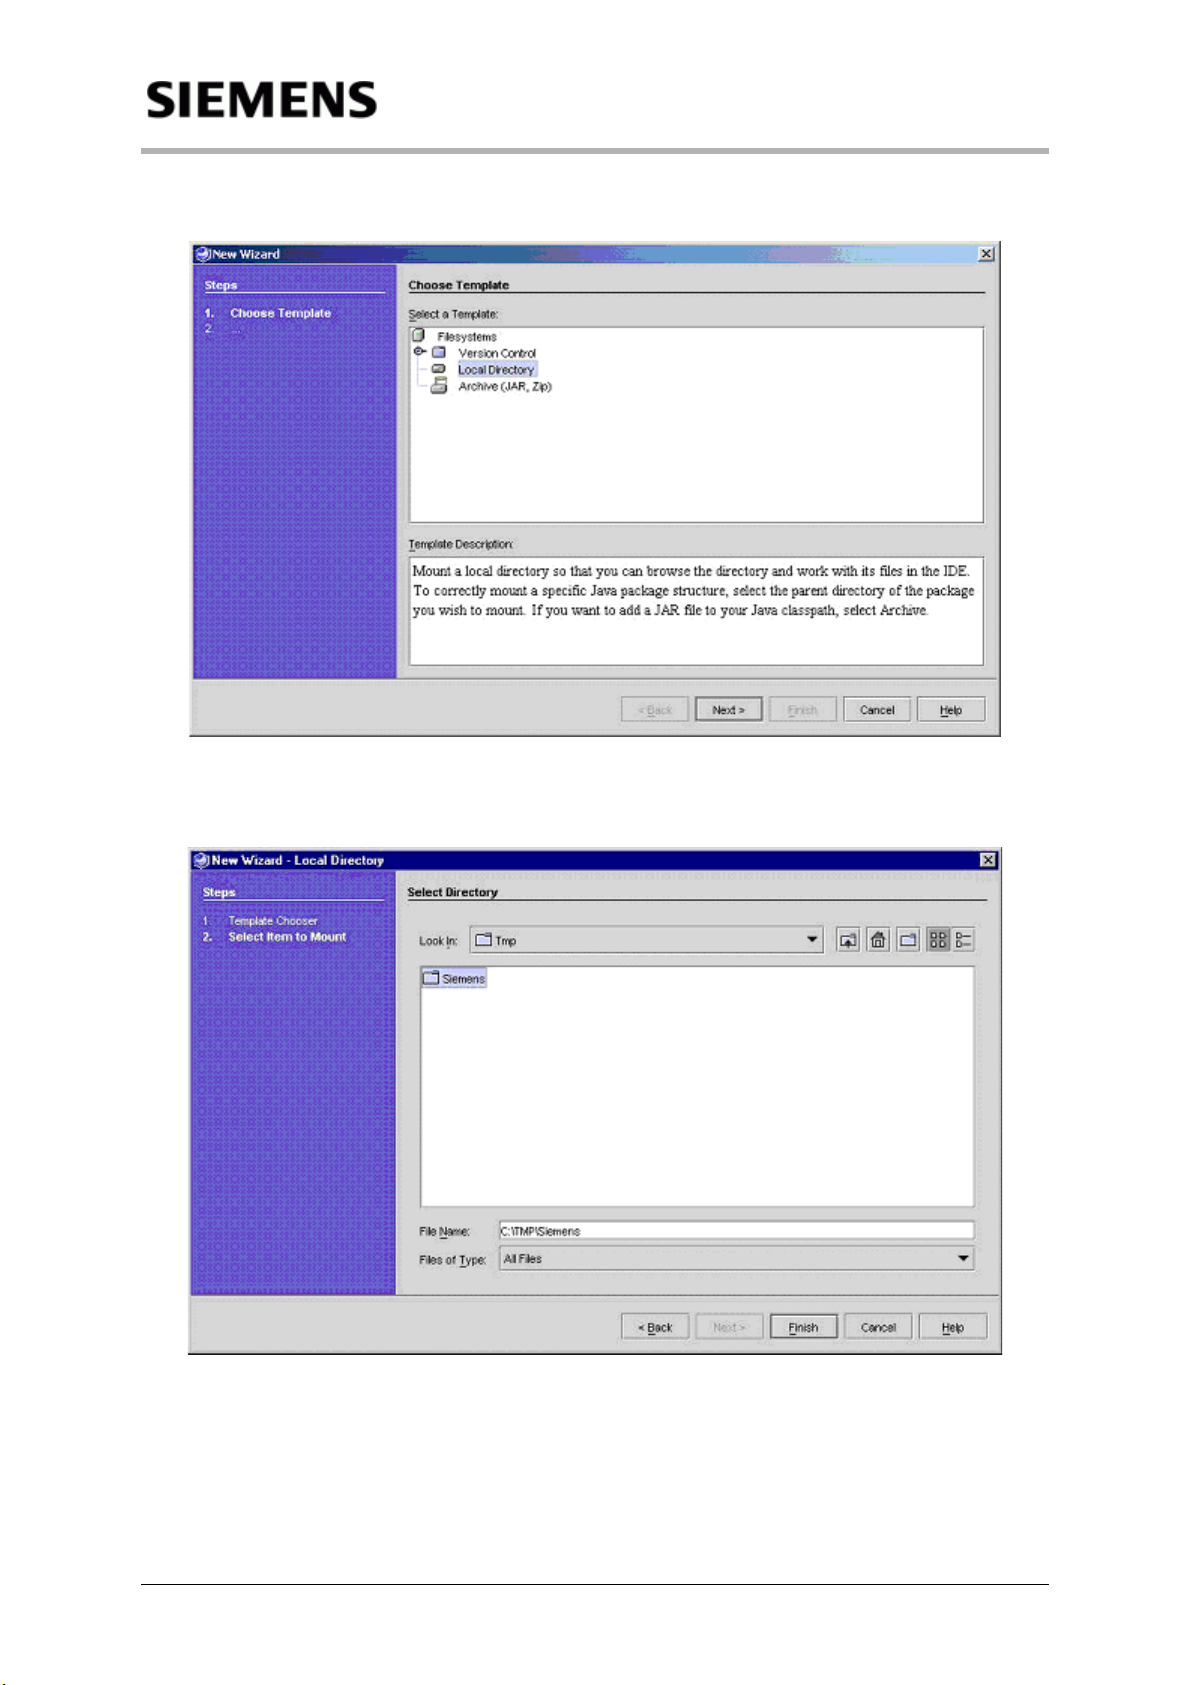
Information and Communication Mobile IDE Integration
7. Select the Local Directory template and click "Next":
Figure 4.11: Select Local Directory screen
8. Navigate to the desired directory (e.g. C:\SiemensTest), select it and press
"Finish".
Figure 4.12: Local Directory mounting last screen
Siemens Mobility Toolkit Copyright © 2004 Siemens AG
- 45 -
Page 50

Information and Communication Mobile IDE Integration
4.1.3 - Coding an Application Program
1. Select "New" in the "File" menu:
Figure 4.13: New File selection
2. Select "HelloWorld" Template and click "Next":
Figure 4.14: "HelloWorld" Template choosing
Siemens Mobility Toolkit Copyright © 2004 Siemens AG
- 46 -
Page 51

Information and Communication Mobile IDE Integration
3. Select a directory (e.g. C:\SiemensTest) and click "Finish":
Figure 4.15: Directory choosing
This completes the process of creating a project and a set of source files.
4.1.4 - Compiling, Preverifying and Testing
1. From the Project menu, select Set Main Class:
Figure 4.16: Main Class menu
Siemens Mobility Toolkit Copyright © 2004 Siemens AG
- 47 -
Page 52

Information and Communication Mobile IDE Integration
2. Select "class HelloWorld" and click "OK":
Figure 4.17: Main Class selection
3. From the "Project" menu, select "Execute Project":
Figure 4.18: Execute Project menu
Siemens Mobility Toolkit Copyright © 2004 Siemens AG
- 48 -
Page 53
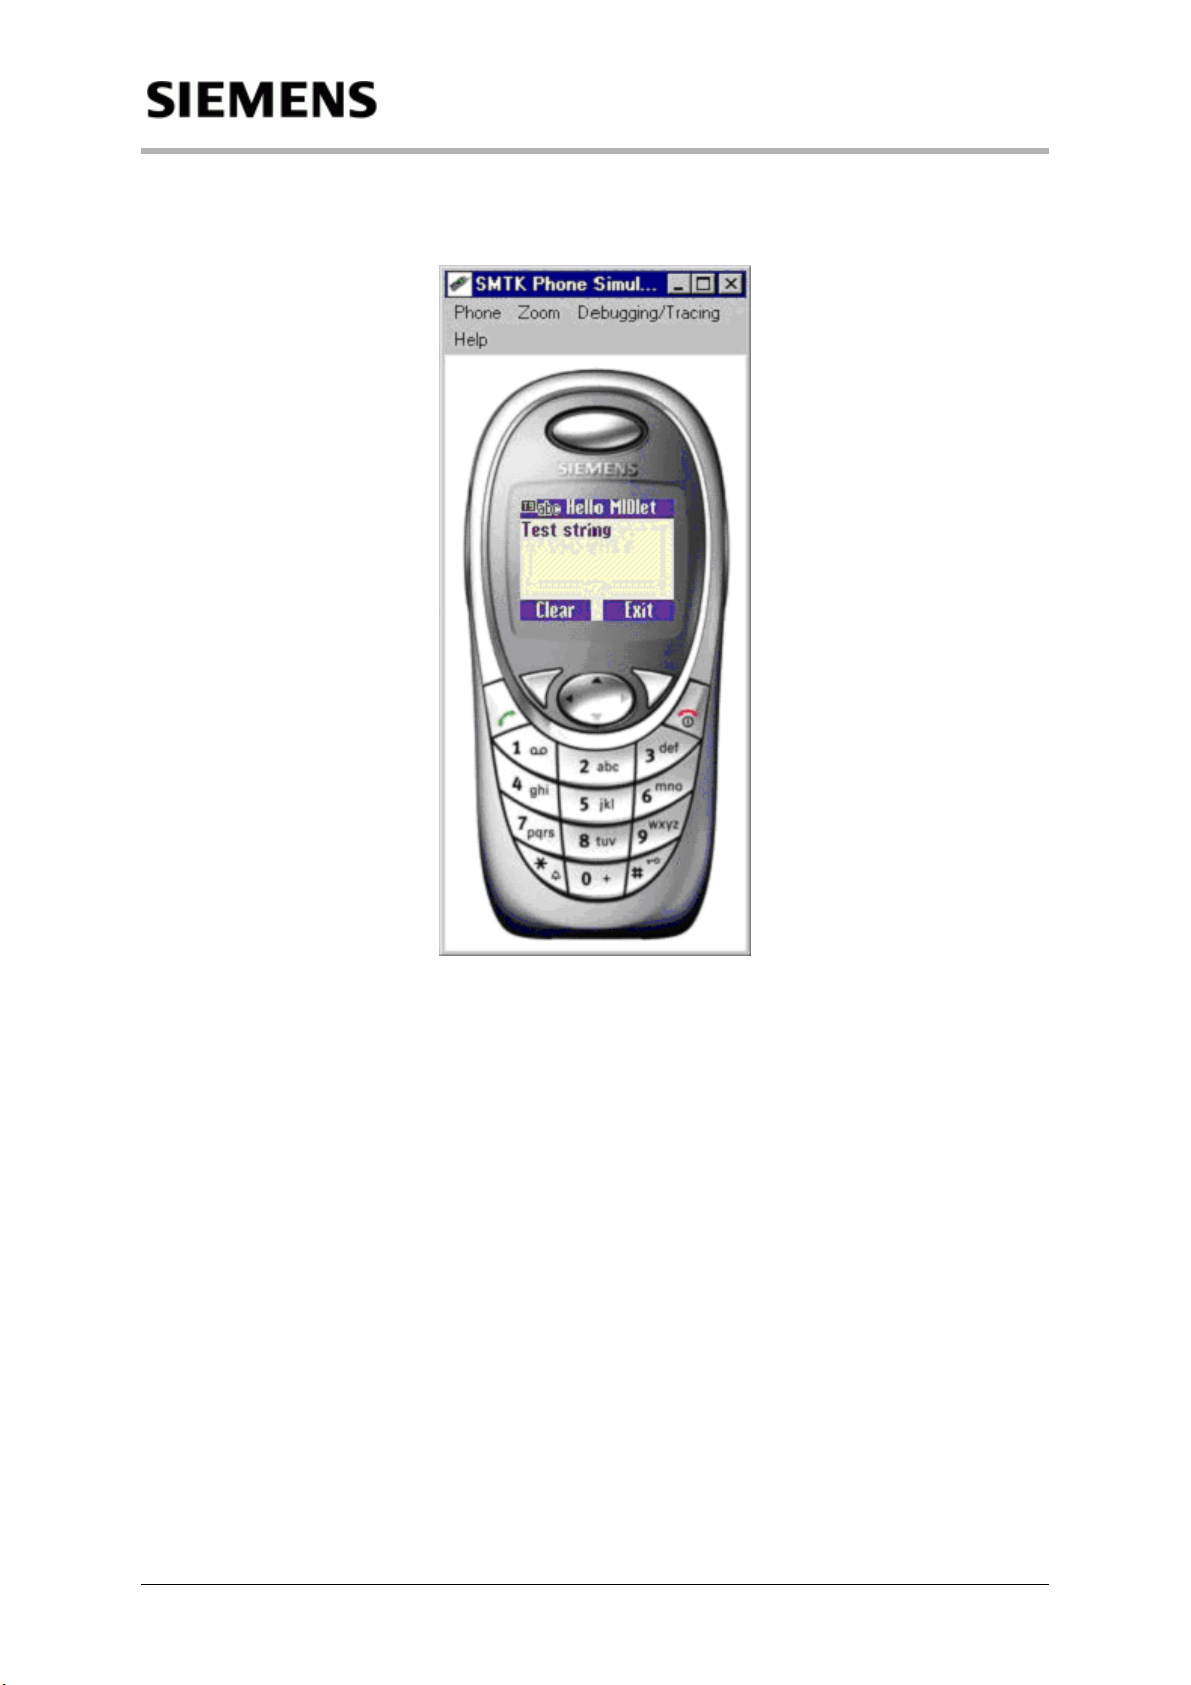
Information and Communication Mobile IDE Integration
4. The application will be loaded into the emulator, and then launched. Now start
testing the application on the emulator (in this example, the S55):
Figure 4.19: Emulator window example
Siemens Mobility Toolkit Copyright © 2004 Siemens AG
- 49 -
Page 54

Information and Communication Mobile IDE Integration
4.1.5 - Debugging
This subsection aims to illustrate how standard debugging features from Sun
ONE Studio may be used when debugging a Siemens Phone application.
1. After setting application main class select a source code line where to add a
breakpoint (in the "Source Editor" window). From the "Debug" menu, select
"Add Breakpoint":
Figure 4.20: Add Breakpoint menu
2. Check if the breakpoint setting is correct, then click "OK":
Figure 4.21: Add Breakpoint screen
Siemens Mobility Toolkit Copyright © 2004 Siemens AG
- 50 -
Page 55

Information and Communication Mobile IDE Integration
3. The line with a breakpoint will then be highlighted in red in the "Source Editor"
window:
Figure 4.22: Breakpoint highlight example
4. Now, to run the application in the debug mode, select "Start" in the "Debug"
menu:
Figure 4.23: Debugging window
5. The application will be loaded into the emulator and launched. It will execute
up to the breakpoint, where it will pause, and the breakpoint line will be highlighted in blue in the "Source Editor" window:
6. At this point, debugging features provided by Sun ONE Studio can be used,
and also the log file generation facilities included into the emulator.
7. It is possible to set up the emulator's log file options for a given project under
Sun ONE Studio using the following procedure:
a. In the "Project" menu, select "Settings".
b. A new window opens, entitled "Project Settings". Under "Execution Types"
select "Siemens Executions".
c. In the right frame of the same window, select "Properties".
d. Select "Midlet Executor Properties" and click the "…" button.
e. Another window will open, entitled "Property Editor". In the "Arguments
field", add new options describing the log file generation.
Siemens Mobility Toolkit Copyright © 2004 Siemens AG
- 51 -
Page 56

Information and Communication Mobile IDE Integration
Figure 4.24: Reached breakpoint example
NOTE: Careless execution of the procedure described above, and in particular
incorrect specification of log file options, may cause integration of the emulator
with Sun ONE Studio to fail.
8. To continue running the application, just select "Continue" in the "Debug"
menu:
Figure 4.25: Continue debug menu
Siemens Mobility Toolkit Copyright © 2004 Siemens AG
- 52 -
Page 57

Information and Communication Mobile IDE Integration
4.2 - JBuilder Integration
Below is described the installation procedure for JBuilder 7 Personal using Bor-
land's MobileSet. The procedure is the same for other JBuilder versions.
4.2.1 - Setting the Emulator in JBuilder
1. To configure SMTK Core, click "configure JDKs":
Figure 4.26: Configure JDKs menu
Siemens Mobility Toolkit Copyright © 2004 Siemens AG
- 53 -
Page 58

Information and Communication Mobile IDE Integration
2. Set JDK home path to SMTK Core path:
Figure 4.27: Configure JDKs screen
3. The emulator is shown on "Micro" tab, in "Target Device":
Figure 4.28: Target emulator screen
Siemens Mobility Toolkit Copyright © 2004 Siemens AG
- 54 -
Page 59

Information and Communication Mobile IDE Integration
NOTE: It is assumed that SMTK Core and at least one SMTK Emulator Pack
are already installed, so it is shown the default selected emulator.
4.2.2 - Creating a new Project
1. To create a Project in JBuilder, select "New Project" in the "File" menu:
Figure 4.29: New Project menu
2. Type the "Project name" (e.g. Test), select the directory and click "Next":
Figure 4.30: Project Wizard - Project name Screen
Siemens Mobility Toolkit Copyright © 2004 Siemens AG
- 55 -
Page 60

Information and Communication Mobile IDE Integration
3. At this stage, instead of writing our own application program, let us take one
of the examples which are provided with the SMTK. To do this, change the
default directory name in "Source Path" to the directory containing source
code files for those examples, and click "Finish":
Figure 4.31: Project Wizard - Project paths Screen
Siemens Mobility Toolkit Copyright © 2004 Siemens AG
- 56 -
Page 61

Information and Communication Mobile IDE Integration
4. Add source files, by selecting "Add Files/Packages…"in the "Project" menu:
Figure 4.32: Add Files/Packages menu
5. Select class files for one of the examples (e.g. "Arkanoid"). The main window
will then look like this:
Figure 4.33: Select class files screen
This completes the process of creating a project and a set of source files.
Siemens Mobility Toolkit Copyright © 2004 Siemens AG
- 57 -
Page 62

Information and Communication Mobile IDE Integration
4.2.3 - Compiling, Preverifying and Testing
1. From the "Project" menu, select "Rebuild Project <Name>". This starts compilation of the specified project, always followed by preverifying if no compilation errors have been found:
Figure 4.34: Rebuild Project menu
2. From the "Run" menu, select "Run Project":
Figure 4.35: Run Project menu
Siemens Mobility Toolkit Copyright © 2004 Siemens AG
- 58 -
Page 63

Information and Communication Mobile IDE Integration
3. Select "MIDlet", then set "Main class" to the name of the application's main
class (arkanoid.Arkanoid in our example) and click "OK':
Figure 4.36: Set Main Class screen
4. As a result, the application will be loaded into the emulator and launched.
Now start testing the application on the emulator (in this example, the S55
emulator):
Figure 4.37: Emulator window launched
Siemens Mobility Toolkit Copyright © 2004 Siemens AG
- 59 -
Page 64

Information and Communication Mobile IDE Integration
4.2.4 - Debugging
1. Having built the project, select a source code line where to put a breakpoint.
Figure 4.38: Select breakpoint
2. From the pop-up menu at this line, select "Toggle Breakpoint":
Figure 4.39: Toggle breakpoint
Siemens Mobility Toolkit Copyright © 2004 Siemens AG
- 60 -
Page 65
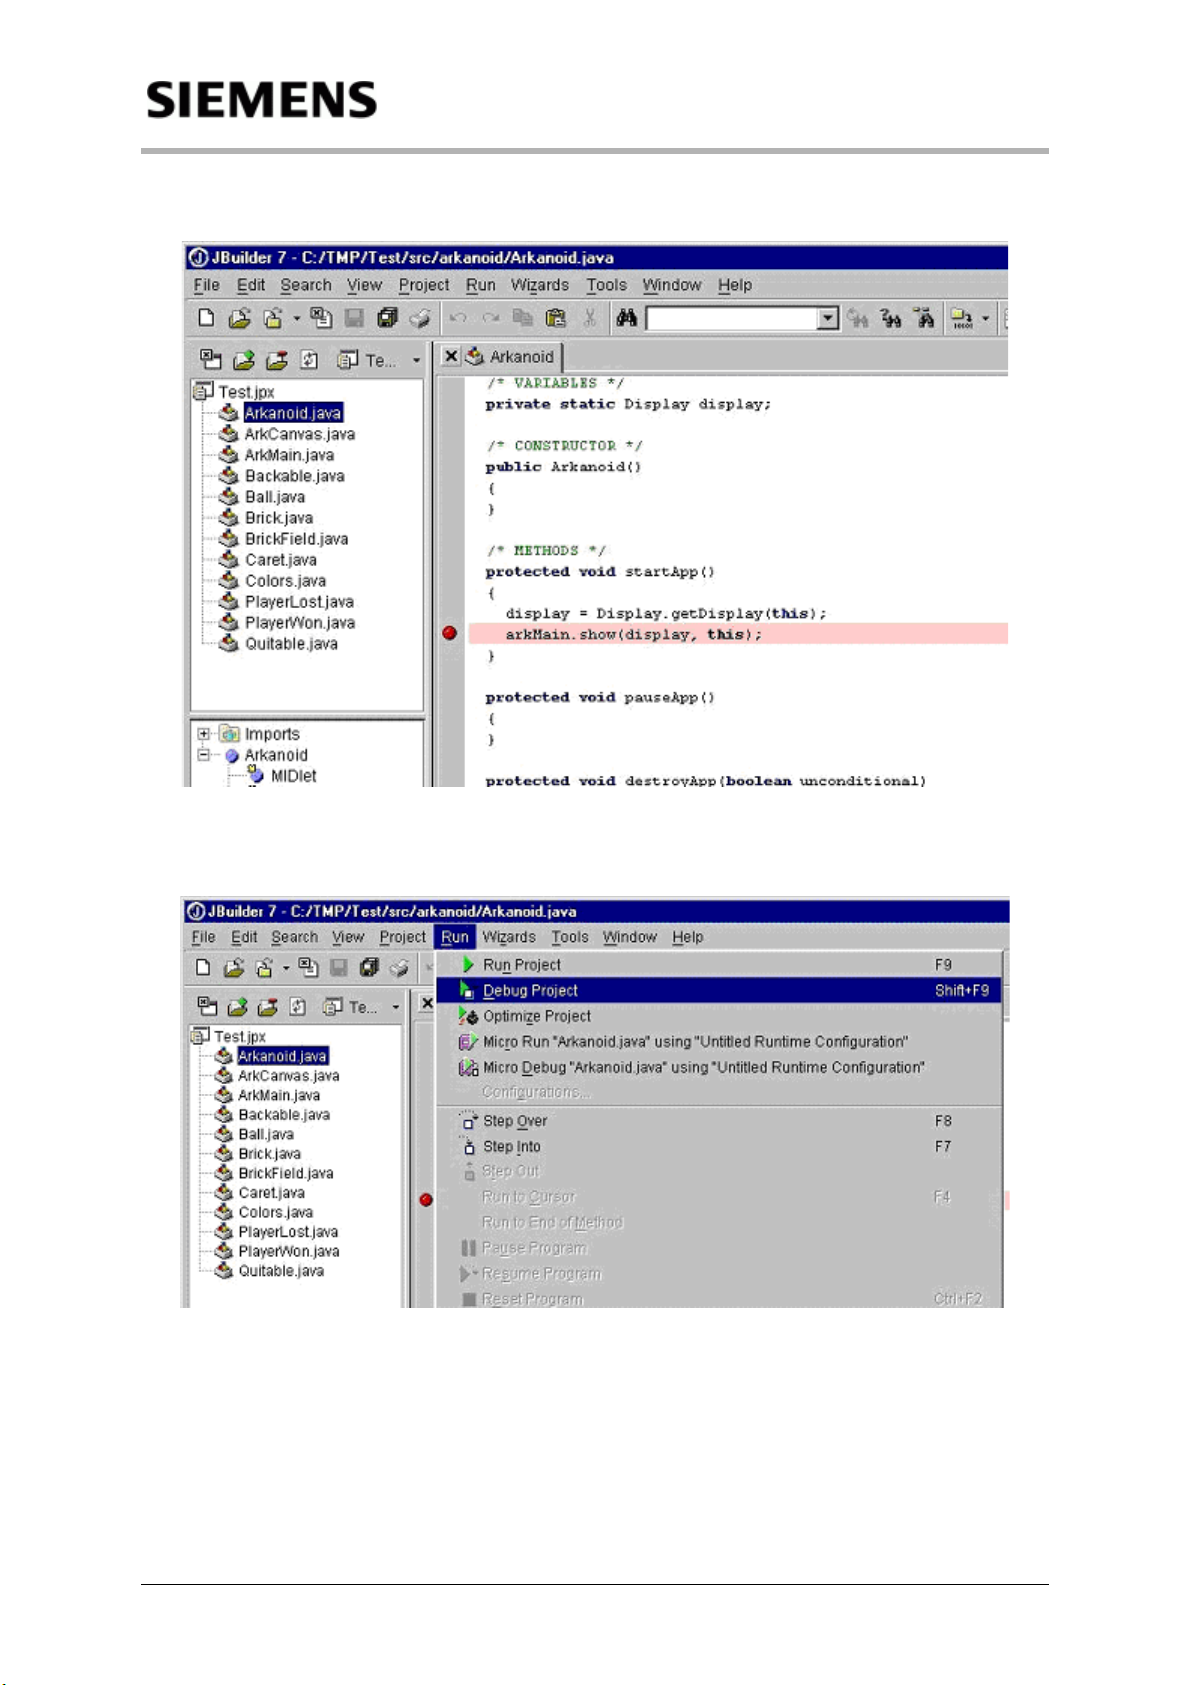
Information and Communication Mobile IDE Integration
3. The line with a breakpoint will then be highlighted in red:
Figure 4.40: Breakpoint marked
4. Now, to run the application in the debug mode, select "Debug Project" in the
"Run" menu:
Figure 4.41: Debug Project menu
Siemens Mobility Toolkit Copyright © 2004 Siemens AG
- 61 -
Page 66

Information and Communication Mobile IDE Integration
5. The application will be loaded into the emulator and launched. It will execute
up to the breakpoint, where it will pause, and the breakpoint line will be highlighted in blue:
Figure 4.42: Breakpoint highlighted
6. To continue running the application, just select "Resume Program" in the
"Run" menu:
Figure 4.43: Resume Program menu
NOTE: At this point, JBuilder's debugging features can be used, as well as the
logfile generation facilities included into the emulator
Siemens Mobility Toolkit Copyright © 2004 Siemens AG
- 62 -
Page 67

Information and Communication Mobile General Features
5 - General Features
5.1 - Emulator Start-up
The Launcher utility provides a unique emulator launching tool for all the installed
SMTK Emulator Packs.
It's possible to excute the Launcher utility from the Start Menu, or clicking on the
desktop icon, as shown below:
Figure 5.1: Lauching Emulator
It's also possible to launch the emulator from a console, using the following com-
mand:
emulator [arguments] [<<APPLICATION>>]
The <<APPLICATION>> parameter, if present, is the name of the main class,
.JAR or .JAD file of the user application. The application is started just after the
emulator has been launched.
When the Launcher is started without specifying a phone emulator to launch, a
window appears, asking for the user to specify it.
Figure 5.2: Selecting a Phone Model
This happens only when the two following conditions are both met: the launcher's
command line has no -Xdevice argument, and the launcher had not been instruct-
ed to always use the target emulator as set by the SMTK Configuration and Man-
agement Utility.
Siemens Mobility Toolkit Copyright © 2004 Siemens AG
- 63 -
Page 68

Information and Communication Mobile General Features
The window displayed by the Launcher contains a list of all emulators installed,
and a check-box labeled "Use the current target emulator". Two options are given:
• Select one of the emulators in the list, while leaving the check-box unchecked.
This will result in launching the selected emulator for this execution only. The
target emulator is highlighted in the list as a proposed initial selection, which
may be modified by the user, or;
• Check the "Use the current target emulator" check-box. The current target
emulator will be launched for this execution, and every subsequent invocation
of the Launcher without specifying the "-Xdevice:<device_name>" argument
will perform without displaying this window. Switching off this operation mode
of the Launcher may only be done using the
• SMTK Configuration and Management Utility.
Starting the launcher without any installed SMTK Emulator Pack will lead Launch-
er to invoke a warning window, informing that there is no one registered emulator.
In this case, download at least one SMTK Emulator Pack from Siemens Develop-
er Portal and install it.
In order to have the full functionality, follow these steps below:
1. Launch the emulator and press F9 to simulate the SIM card insertion:
Figure 5.3: Inserting SIM Card
2. Select "MM: Full Service" on the Commands window:
Figure 5.4: “Commands” Window
Siemens Mobility Toolkit Copyright © 2004 Siemens AG
- 64 -
Page 69

Information and Communication Mobile General Features
3. Select Mode / yes to switch off the "CSD only mode":
Figure 5.5: Set "CSD only mode"
5.1.1 - Setting Up HTTP_PROXY and HTTP Profile
TCP/IP/HTTP connections use cellular dial-up on the real handset, while on the
emulator they go along an already existing LAN/Internet connection. If an HTTP
proxy is used, then the “HTTP_PROXY” environment variable must be appropri-
ately set. The "HTTP_PROXY" can be set either from command line or as an ar-
gument of Launcher utility (see Programmer´s Reference for further information).
If an HTTP-URL has been specified in the .jad file of an application, the Applica-
tion Management System (AMS) will download the .jar file of the application using
an HTTP connection to that URL.
But if this same application is tested on a real device, a valid HTTP Profile must
be configured, in order to allow the J2ME™ application to work correctly. To con-
figure the HTTP Profile on the mobile phone in order to accept J2ME™ applica-
tions establishing HTTP connections, proceed as follows:
1. In the main menu, select "Setup":
Figure 5.6: Main Menu
2. In the "Setup" menu, select "Connectivity":
Figure 5.7: Setup screen
Siemens Mobility Toolkit Copyright © 2004 Siemens AG
- 65 -
Page 70

Information and Communication Mobile General Features
3. In the "Connectivity" menu, select "Data services":
Figure 5.8: Connectivity screen
4. In the "Data services" menu, select "Mail,Java,Rms":
Figure 5.9: Data Services screen
5. In the "Mail,Java,Rms" menu, navigate to an empty profile and select
"Options":
Figure 5.10: Mail,Java,Rms screen
6. In the “Options” menu, select "Rename":
Figure 5.11: Options screen
7. Name this profile, e.g. "my-http-profile", and save it by selecting “Save“:
Figure 5.12: Rename screen
8. The “Mail,Java,Rms” is shown again. Navigate to the "my-http-profile" and
select "Edit":
Figure 5.13: Mail,Java,Rms screen with a HTTP Profile
Siemens Mobility Toolkit Copyright © 2004 Siemens AG
- 66 -
Page 71

Information and Communication Mobile General Features
9. A confirmation screen will be shown, informing that any changes promoted on
that profile may affect J2ME™ applications. Select "Yes":
Figure 5.14: Confirmation screen
10. In the next screen, activate the "GPRS settings" my selecting “On“, and then
edit this option by selecting “Edit“:
Figure 5.15: HTTP Profile setup screen
11. In the "GPRS settings" screen, fill the form with your provider's settings and
save it by selecting “Save”:
12. Go to the "Connectivity" screen again, and select the "HTTP profile" option:
13. Finally, set the "my-http-profile" profile as the "Provider" option, and select
“OK“ to finish the process:
5.1.2 - Setting Up WAP
The following steps setup the WAP browser on the emulator:
Figure 5.16: GPRS Settings screen
Figure 5.17: Connectivity screen
Figure 5.18: Account settings screen
1. Select "Surf & fun->Internet", the Openwave screen will appear, followed by
Start Menu:
Siemens Mobility Toolkit Copyright © 2004 Siemens AG
- 67 -
Page 72

Information and Communication Mobile General Features
Figure 5.19: Set Up WAP
2. On "Start Menu", select "Profiles", and set the IP address from the proxy, the
Port and a WAP homepage.
Figure 5.20: Set up WAP Homepage
3. To launch the browser, select "Homepage":
Figure 5.21: Launch WAP Browser
5.2 - Filesystem Structure
A mapping of the mobile phone's filesystem can be accessed via a "screen Ex-
plorer". The filesystem can be accessed selecting Menu -> filesystem, and then
navigate through the folders and files. Selecting the left soft key the folders/exe-
cute files are opened. With the selection of the right soft button it is possible to
select to open, move, copy, paste, delete and rename the files and folders.
Figure 5.22: Filesystem Structure
Java files normally are allocated at the path /Java/jam, and generally each MIDlet
has its own folder under this path.
Siemens Mobility Toolkit Copyright © 2004 Siemens AG
- 68 -
Page 73

Information and Communication Mobile General Features
Actually, no support is given to access this filesystem via J2METM applications,
but tin the future, it will be offered.
5.3 - Hot Keys
Besides the on-screen keypad and the commands, the following hot keys are pro-
posed as an alternative way to operate the emulator:
Key Function
F3 Starts a phone call (green, Call key)
F4 Terminates a phone call (red, On/Off/End key)
F5 Left soft key
F8; Enter; PageDown Right soft key
F9 Simulates insertion of a SIM card into phone
Cursor keys Control keys
Numeric keypad Numeric phone key pad
* Phone star key
#; / Phone hash key
These keys are only active when the MMI-window is the active one.
5.4 - Commands
The “Commands” window contains the commands that can be used to simulate
some environmental events.
To execute any of these commands, double-click on its line in the “Commands”
window.
Figure 5.23: Commands Window
Siemens Mobility Toolkit Copyright © 2004 Siemens AG
- 69 -
Page 74

Information and Communication Mobile General Features
The commands are described below:
Group Command Simulated Event
MSM Mobile Terminating Call A call to the mobile phone
Disconnect Call by Net Call disconnected by the network
Interrupt Call (Reest. Proc.) Simulation of interrupt call
MM No Service No network service is available
Limited Service Limited service (no Internet access)
Full Service All the network services are available
Power Begin Low Power Battery is empty
End Low Power Battery is charged
SMS Incoming Short Message Simulation of receiving a new SMS message
Immediate Message Simulation of receiving a new immediate
message
Status Report Simulation of receiving a new status report
message
Toggle Voice Message Simulation of receiving a new voice mes-
sage
Switch Off Turn the phone off and close the emulator
Start Java Application Start a J2ME™ application (.jad or .jar file)
Note: for specific features, see the “features” section of the desired model.
All the above commands, except the last two, simulate environmental events.
They are divided into four groups: MSM, MM, Power and SMS. Commands in the
MSM group simulate events related to incoming phone calls. Commands in the
MM group simulate the presence or absence of network services. Commands in
the Power group simulate the charge status of the mobile phone battery. Finally,
SMS groups commands simulate reception of text and voice messages. The first
two of these commands (“Incoming Short Message” and “Immediate Message”)
display a window for specifying transport protocol parameters and a message
text:
Figure 5.24: SMS - TPDU Dialog Incoming Message
Siemens Mobility Toolkit Copyright © 2004 Siemens AG
- 70 -
Page 75

Information and Communication Mobile General Features
The following parameters, which correspond to appropriate parameters in the
“Deliver” TPDU (Transfer Protocol Data Unit) of the SMS protocol, may be spec-
ified:
• message type indicator (“TP-Type” button);
• originating address (“TP-OA” button);
• protocol identifier (“TP-PID” button);
• data coding scheme (“TP-DCS” button);
• service centre time stamp (“TP-SCTS” button);
• user data (“TP-UD” button).
For full specification of the SMS service and protocol, see the ETSI TS 100
901(V7.4.0) standard. It can be downloaded a full text of this standard, free of
charge, after filling a registration form at the ETSI site http://www.etsi.org
the “ETSI Publications Download Area”, and search for “TS 100 901” in “Standard
type and doc No”.
The previous SMS window also allows to store a SMS message in a file, or to load
it from a file.
5.5 - Additional Emulators Features
5.5.1 - Change microedition.locale
The C60 and MC60 emulators have a new feature available from the “Commands
Window” as follow:
. Go to
Figure 5.25: Command window - locale
Siemens Mobility Toolkit Copyright © 2004 Siemens AG
- 71 -
Page 76

Information and Communication Mobile General Features
Choosing the highlighted option, it is possible to set the locale as shown below:
Figure 5.26: Change microedition.locale window
As the previous window shows, this setting neither changes the phone´s display
language nor the available fonts: it only switches the return value of System.get-
Property(“microedition.locale”). The return value follows ISO standard format.
Siemens Mobility Toolkit Copyright © 2004 Siemens AG
- 72 -
Page 77

Information and Communication Mobile Specific Features
6 - Specific Features
6.1 - CF62 Emulator
6.1.1 - CF62 GUI Use / MMI Display
The "MMI-Display" represents the user interface of the target device. The figure
below contains the definitions of the keys on the CF62 emulator’s image:
Figure 6.2:C65 Emulator
Menu Options Function
Phone LCD colors
Zoom 100% or 200%
Debugging/Tracing A two-level pull-down menu to turn on/off different boolean options.
Help Contains, in particular, the About option, which gives information about
the current version of the emulator.
Siemens Mobility Toolkit Copyright © 2003 Siemens AG
- 73 -
Page 78

Information and Communication Mobile Specific Features
6.1.2 - Mobile Features
Technical Specifications
Network frequency Triband 900/1800/1900
Voice encoding FR, HR, EFR, AMR
Weight (in gramme) 85
Volume (cm³) 78
Dimensions(L x W x H in mm) 82 x 45 x 22
Display 132 x 176 64k colors
Standy-by time (with standard battery) (max in
hours) 220
Talk time (with standard battery) (max in
hours) 6
Standard battery Li-Ion 600 mAh
Charging time (max in hours) 2
Integrated Antenna External loop
SIM card Plug-in(3V)
Special Features
JAVATM Wireless Technology yes
GPRS Multislot Class 10, Coding scheme 1-4
Mobile Internet Access WAP 1.2.1, parts of 2.0
Voice Dialing yes
Voice Recording yes
Built-in data and fax modem yes
Soft-Data Link yes
Infrared interface (IrDA) no
Bluetooth
Voice memory no
Organizer yes
MS Outlook
Remind function yes
Date and time in Display yes
Alarm function yes
Currency converter yes
Calculator yes
Stopwatch yes
Messaging SMS, MMS
Intelligent typing (T9) yes
Redial list yes
List of calls (received/missed) yes
Date and time stamp for missed calls yes
Menu animations yes
Menu format Normal + Jumbo
User profiles yes
Softkey programmable yes
Call wait/call hold yes
Conference call yes
Call forwarding yes
Display call timer and cost yes
Keypad lock yes
TM
interface no
TM
98/2000 synchronization yes
Siemens Mobility Toolkit Copyright © 2003 Siemens AG
- 74 -
Page 79

Information and Communication Mobile Specific Features
Ringer melodies mono/polyphonic(preinstalled) 16 polyphonics
Melody composer no
MP3-Player no
Silent alert yes
Calling Line Identification (CLI) yes
Calling faces yes
Calling symbols yes
Call filter yes
Games yes
SIM application toolkit class 3
Colour variants (may vary by country) cool silver
Handsfree talking yes
Integrated FM Radio no
Video Recorder no
Camera Clip-on QuickPic with flash as accessory
CLDC Version 1.0
MIDP Version 1.0
WMA no
MMAPI no
Bluetooth API no
3D Game API no
Location API no
Heap Memory 728 Kb
Siemens Mobility Toolkit Copyright © 2003 Siemens AG
- 75 -
Page 80

Information and Communication Mobile
6.2 - C60 Emulator
6.2.1 - C60 GUI Use / MMI Display
The "MMI-Display" represents the user interface of the target device. The figure
below contains the definitions of the keys on the C60 emulator’s image:
Figure 6.1: C60 Emulator
Menu Options Function
Zoom 100% or 200%
Debugging/Tracing A two-level pull-down menu to turn on/off different boolean options.
Help Contains, in particular, the About option, which gives information about
the current version of the emulator.
Siemens Mobility Toolkit Copyright © 2004 Siemens AG
- 76 -
Page 81

Information and Communication Mobile
6.2.2 - Mobile Features
Technical Specifications
Network frequency Triband
Voice encoding AMR, ADPCM
Weight (in gramme) 85
Volume (cm³) 91
Dimensions(L x W x H in mm) 110 x 47 x 23
Display 4096 colors, 5 lines, 101 x 80 pixels
Standy-by time (with standard battery) (max in
hours)
Talk time (with standard battery) (max in hours) 5
Standard battery Li-Ion 700 mAh
Charging time (max in hours) 2
Integrated Antenna yes
SIM card Plug-in(3V)
Special Features
MP3-Player no
TM
JAVA
Wireless Technology
GPRS yes
Mobile Internet Access WAP 1.2.1
Address book (no. of entries) no
Telephone book (SIM card) (no. of entries) Max 250
Telephone book in the phone (no. of entries) Max 500
Voice Dialing yes
Voice Recording yes
Built-in data and fax modem yes
Soft-Data Link yes
Infrared interface (IrDA) no
Bluetooth
TM
interface
Voice memory yes
Organizer yes
MS Outlook
TM
98/2000 synchronization
Remind function yes
Date and time in Display yes
Alarm function yes
Currency converter yes
Calculator yes
Stopwatch yes
SMS (Short Message Service) yes
Intelligent typing (T9) yes
Picture Messaging EMS/MMS EMS/MMS
Redial list yes
List of calls (received/missed) yes
Date and time stamp for missed calls yes
Menu animations yes
Menu format Normal + Jumbo
User profiles yes
Softkey programmable yes
Call wait/call hold yes
Conference call yes
Call forwarding yes
Display call timer and cost yes
Keypad lock yes
250
yes
no
yes
Siemens Mobility Toolkit Copyright © 2004 Siemens AG
- 77 -
Page 82

Information and Communication Mobile
Ringer melodies mono/polyphonic(preinstalled, no)
Melody composer yes
Silent alert yes
Calling Line Identification (CLI) yes
Calling faces yes
Calling symbols yes
Call filter yes
Games yes
SIM application toolkit Class 3
USIM application toolkit no
Colour variants (may vary by country) 3
Handsfree talking yes
Integrated FM Radio no
Camera Built-in
JAVA API supported audio files MIDI-0, MIDI-1
Poly, 16
Siemens Mobility Toolkit Copyright © 2004 Siemens AG
- 78 -
Page 83

Information and Communication Mobile
6.3 - MC60 Emulator
6.3.1 - MC60 GUI Use / MMI Display
The "MMI-Display" represents the user interface of the target device. The figure
below contains the definitions of the keys on the MC60 emulator’s image:
Figure 6.2: MC60 Emulator
Menu Options Function
Phone LCD colors
Zoom 100% or 200%
Debugging/Tracing A two-level pull-down menu to turn on/off different boolean options.
Help Contains, in particular, the About option, which gives information about
the current version of the emulator.
Siemens Mobility Toolkit Copyright © 2004 Siemens AG
- 79 -
Page 84

Information and Communication Mobile
6.3.2 - Mobile Features
Technical Specifications
Network frequency Triband
Voice encoding AMR, ADPCM
Weight (in gramme) 86
Volume (cm³) 88
Dimensions(L x W x H in mm) 109 x 46 x 21
Display 4096 colors, 7 lines, 101 x 80 pixels
Standy-by time (with standard battery) (max in
hours)
Talk time (with standard battery) (max in hours) 5
Standard battery Li-Ion 700 mAh
Charging time (max in hours) 2
Integrated Antenna yes
SIM card Plug-in(3V)
Special Features
MP3-Player no
TM
JAVA
Wireless Technology
GPRS yes
Mobile Internet Access WAP 1.2.1
Address book (no. of entries) no
Telephone book (SIM card) (no. of entries) Max 250
Telephone book in the phone (no. of entries) Max 500
Voice Dialing yes
Voice Recording yes
Built-in data and fax modem yes
Soft-Data Link yes
Infrared interface (IrDA) no
Bluetooth
TM
interface
Voice memory yes
Organizer yes
MS Outlook
TM
98/2000 synchronization
Remind function yes
Date and time in Display yes
Alarm function yes
Currency converter yes
Calculator yes
Stopwatch yes
SMS (Short Message Service) yes
Intelligent typing (T9) yes
Picture Messaging EMS/MMS EMS/MMS
Redial list yes
List of calls (received/missed) yes
Date and time stamp for missed calls yes
Menu animations yes
Menu format Normal + Jumbo
User profiles yes
Softkey programmable yes
Call wait/call hold yes
Conference call yes
Call forwarding yes
Display call timer and cost yes
Keypad lock yes
250
yes
no
yes
Siemens Mobility Toolkit Copyright © 2004 Siemens AG
- 80 -
Page 85

Information and Communication Mobile
Ringer melodies mono/polyphonic(preinstalled, no)
Melody composer yes
Silent alert yes
Calling Line Identification (CLI) yes
Calling faces yes
Calling symbols yes
Call filter yes
Games yes
SIM application toolkit Class 3
USIM application toolkit no
Colour variants (may vary by country) 3
Handsfree talking yes
Integrated FM Radio no
Camera Built-in
JAVA API supported audio files MIDI-0, MIDI-1, and WAV (ADPCM)
Poly, 16
Siemens Mobility Toolkit Copyright © 2004 Siemens AG
- 81 -
Page 86

Information and Communication Mobile
6.4 - M55 Emulator
6.4.1 - M55 GUI Use / MMI Display
The "MMI-Display" represents the user interface of the target device. The figure
below contains the definitions of the keys on the M55 emulator’s image:
Figure 6.3: M55 Emulator
Menu Options Function
Phone LCD colors
Zoom 100% or 200%
Debugging/Tracing A two-level pull-down menu to turn on/off different boolean options.
Help Contains, in particular, the About option, which gives information about
the current version of the emulator.
Siemens Mobility Toolkit Copyright © 2004 Siemens AG
- 82 -
Page 87

Information and Communication Mobile
6.4.2 - Mobile Features
Technical Specifications
Network frequency Triband
Voice encoding FR, EFR, HR, AMR
Weight (in gramme) 87
Volume (cm³) 71
Dimensions(L x W x H in mm) 100.8 x 45.6 x 20.9
Display 4096 colors, 7 lines, 101 x 80 pixels
Standy-by time (with standard battery) (max in
hours)
Talk time (with standard battery) (max in hours) 5
Standard battery Li-Ion 700 mAh
Charging time (max in hours) 2
Integrated Antenna yes
SIM card Plug-in(3V)
Special Features
MP3-Player no
TM
JAVA
Wireless Technology
GPRS yes
Mobile Internet Access WAP 1.2.1
Address book (no. of entries) Max 500 (Flex. Memory)
Telephone book (SIM card) (no. of entries) Max 250 (SIM dependent)
Telephone book in the phone (no. of entries) Max 500(Flex. Memory)
Voice Dialing yes
Voice Recording yes
Built-in data and fax modem yes
Soft-Data Link yes
Infrared interface (IrDA) no
Bluetooth
TM
interface
Voice memory yes
Organizer yes
MS Outlook
TM
98/2000 synchronization
Remind function yes
Date and time in Display yes
Alarm function yes
Currency converter yes
Calculator yes
Stopwatch yes
SMS (Short Message Service) / up to 760 characteres
Intelligent typing (T9) yes
Picture Messaging EMS/MMS EMS/MMS
Redial list yes
List of calls (received/missed) yes
Date and time stamp for missed calls yes
Menu animations yes
Menu format Normal + Jumbo
User profiles yes
Softkey programmable yes
Call wait/call hold yes
Conference call yes
Call forwarding yes
Display call timer and cost yes
250
yes
no
yes
yes/yes
Siemens Mobility Toolkit Copyright © 2004 Siemens AG
- 83 -
Page 88

Information and Communication Mobile
Keypad lock yes
Ringer melodies mono/polyphonic(preinstalled, no)
Melody composer yes
Silent alert yes
Calling Line Identification (CLI) yes
Calling faces yes
Calling symbols yes
Call filter yes
Games yes
SIM application toolkit Class 2 + 3 USSD
USIM application toolkit no
Colour variants (may vary by country) 4
Handsfree talking yes
Integrated FM Radio no
Camera Clip-on
JAVA API supported audio files MIDI-0, MIDI-1, and ADPCM (WAV file with
Poly, 25
Intel DVI format)
Siemens Mobility Toolkit Copyright © 2004 Siemens AG
- 84 -
Page 89

Information and Communication Mobile
6.5 - SL55 Emulator
6.5.1 - SL55 GUI Use / MMI Display
The "MMI-Display" represents the user interface of the target device. The figure
below contains the definitions of the keys on the SL55 emulator’s image:
Figure 6.4: SL55 Emulator
Menu Options Function
Phone LCD colors
Zoom 100% or 200%
Debugging/Tracing A two-level pull-down menu to turn on/off different boolean options.
Help Contains, in particular, the About option, which gives information about
the current version of the emulator.
Siemens Mobility Toolkit Copyright © 2004 Siemens AG
- 85 -
Page 90

Information and Communication Mobile
6.5.2 - Mobile Features
Technical Specifications
Network frequency Triband
Voice encoding FR, EFR, HR, AMR
Weight (in gramme) 79
Volume (cm³) 63
Dimensions(L x W x H in mm) 81.6 x 44.5 x 21.9
Display 4096 colors, 7 lines, 101 x 80 pixels
Standy-by time (with standard battery) (max in
hours)
Talk time (with standard battery) (max in hours) 3.5
Standard battery Li-Ion 700 mAh
Charging time (max in hours) 2
Integrated Antenna yes
SIM card Plug-in(3V)
Special Features
MP3-Player no
TM
JAVA
Wireless Technology
GPRS yes
Mobile Internet Access WAP 1.2.1
Address book (no. of entries) Max 500 (Flex. Memory)
Telephone book (SIM card) (no. of entries) Max 250 (SIM dependent)
Telephone book in the phone (no. of entries) Max 500(Flex. Memory)
Voice Dialing yes
Voice Recording yes
Built-in data and fax modem yes
Soft-Data Link yes
Infrared interface (IrDA) yes
Bluetooth
TM
interface
Voice memory yes
Organizer yes
MS Outlook
TM
98/2000 synchronization
Remind function yes
Date and time in Display yes
Alarm function yes
Currency converter yes
Calculator yes
Stopwatch yes
SMS (Short Message Service) / up to 760 characteres
Intelligent typing (T9) yes
Picture Messaging EMS/MMS EMS/MMS
Redial list yes
List of calls (received/missed) yes
Date and time stamp for missed calls yes
Menu animations yes
Menu format Normal + Jumbo
User profiles yes
Softkey programmable yes
Call wait/call hold yes
Conference call yes
Call forwarding yes
Display call timer and cost yes
200
yes
no
yes
yes/yes
Siemens Mobility Toolkit Copyright © 2004 Siemens AG
- 86 -
Page 91

Information and Communication Mobile
Keypad lock yes
Ringer melodies mono/polyphonic(preinstalled, no)
Melody composer no
Silent alert yes
Calling Line Identification (CLI) yes
Calling faces yes
Calling symbols yes
Call filter yes
Games yes
SIM application toolkit Class 2 + 3 USSD
USIM application toolkit no
Colour variants (may vary by country) 2
Handsfree talking yes
Integrated FM Radio no
Camera Clip-on
JAVA API supported audio files MIDI-0, MIDI-1, and SMAF (Yamaha sound
Poly, 20
format)
Siemens Mobility Toolkit Copyright © 2004 Siemens AG
- 87 -
Page 92

Information and Communication Mobile
6.6 - S55 Emulator
6.6.1 - S55 GUI Use / MMI Display
The "MMI-Display" represents the user interface of the target device. The figure
below contains the definitions of the keys on the S55 emulator’s image:
Figure 6.5: S55 Emulator
Menu Options Function
Phone LCD colors
Zoom 100% or 200%
Debugging/Tracing A two-level pull-down menu to turn on/off different boolean options.
Help Contains, in particular, the About option, which gives information about
the current version of the emulator.
Siemens Mobility Toolkit Copyright © 2004 Siemens AG
- 88 -
Page 93

Information and Communication Mobile
6.6.2 - Mobile Features
Technical Specifications
Network frequency Triband
Voice encoding FR, EFR, HR, AMR
Weight (in gramme) 85
Volume (cm³) 69
Dimensions(L x W x H in mm) 101 x 42 x 18
Display 256 colors, 7 lines, 101 x 80 pixels
Standy-by time (with standard battery) (max in
hours)
Talk time (with standard battery) (max in hours) 6
Standard battery Li-Ion 700 mAh
Charging time (max in hours) 2
Integrated Antenna yes
SIM card Plug-in(3V)
Special Features
MP3-Player no
TM
JAVA
Wireless Technology
GPRS yes
Mobile Internet Access WAP 1.2.1
Address book (no. of entries) Max 500 (Flex. Memory)
Telephone book (SIM card) (no. of entries) Max 250 (SIM dependent)
Telephone book in the phone (no. of entries) Max 500(Flex. Memory)
Voice Dialing yes
Voice Recording yes
Built-in data and fax modem yes
Soft-Data Link yes
Infrared interface (IrDA) yes
Bluetooth
TM
interface
Voice memory yes
Organizer yes
MS Outlook
TM
98/2000 synchronization
Remind function yes
Date and time in Display yes
Alarm function yes
Currency converter yes
Calculator yes
Stopwatch yes
SMS (Short Message Service) / up to 760 characteres
Intelligent typing (T9) yes
Picture Messaging EMS/MMS EMS/MMS
Redial list yes
List of calls (received/missed) yes
Date and time stamp for missed calls yes
Menu animations yes
Menu format Normal + Jumbo
User profiles yes
Softkey programmable yes
Call wait/call hold yes
Conference call yes
Call forwarding yes
Display call timer and cost yes
300
yes
no
yes
yes/yes
Siemens Mobility Toolkit Copyright © 2004 Siemens AG
- 89 -
Page 94

Information and Communication Mobile
Keypad lock yes
Ringer melodies mono/polyphonic(preinstalled, no)
Melody composer no
Silent alert yes
Calling Line Identification (CLI) yes
Calling faces yes
Calling symbols yes
Call filter yes
Games yes
SIM application toolkit Class 2 + 3 USSD
USIM application toolkit no
Colour variants (may vary by country) 2
Handsfree talking yes
Integrated FM Radio no
Camera Clip-on
JAVA API supported audio files MIDI-0, MIDI-1, and SMAF (Yamaha sound
Poly, 20
format)
Siemens Mobility Toolkit Copyright © 2004 Siemens AG
- 90 -
Page 95

Information and Communication Mobile
6.7 - C55/C(T)56/2128 Emulator
6.7.1 - C55 GUI Use / MMI Display
The "MMI-Display" represents the user interface of the target device. The figure
below contains the definitions of the keys on the C55 emulator’s image:
Figure 6.6: C55 Emulator
Menu Options Function
Zoom 100% or 200%
Debugging/Tracing A two-level pull-down menu to turn on/off different boolean options.
Help Contains, in particular, the About option, which gives information about
the current version of the emulator.
Siemens Mobility Toolkit Copyright © 2004 Siemens AG
- 91 -
Page 96

Information and Communication Mobile
6.7.2 - Mobile Features
Technical Specifications
Network frequency Dual band
Voice encoding FR, EFR, HR, AMR
Weight (in gramme) 80
Volume (cm³) 69
Dimensions(L x W x H in mm) 100.8 x 44 x 21
Display 5 lines, 64 x 101 pixels
Standy-by time (with standard battery) (max in
hours)
Talk time (with standard battery) (max in hours) 6
Standard battery Li-Ion 700 mAh
Charging time (max in hours) 2
Integrated Antenna yes
SIM card Plug-in(3V)
Special Features
MP3-Player no
TM
JAVA
Wireless Technology
GPRS yes
Mobile Internet Access WAP 1.2.1
Address book (no. of entries) no
Telephone book (SIM card) (no. of entries) Max 250 (SIM dependent)
Telephone book in the phone (no. of entries) Max 500(Flex. Memory)
Voice Dialing yes
Voice Recording yes
Built-in data and fax modem no
Soft-Data Link yes
Infrared interface (IrDA) no
Bluetooth
TM
interface
Voice memory no
Organizer no
MS Outlook
TM
98/2000 synchronization
Remind function yes
Date and time in Display yes
Alarm function yes
Currency converter yes
Calculator yes
Stopwatch no
SMS (Short Message Service) / up to 760 characteres
Intelligent typing (T9) yes
Picture Messaging EMS/MMS EMS
Redial list yes
List of calls (received/missed) yes
Date and time stamp for missed calls yes
Menu animations no
Menu format Normal + Jumbo
User profiles yes
Softkey programmable yes
Call wait/call hold yes
Conference call yes
Call forwarding yes
Display call timer and cost yes
300
yes
no
no
yes/yes
Siemens Mobility Toolkit Copyright © 2004 Siemens AG
- 92 -
Page 97

Information and Communication Mobile
Keypad lock yes
Ringer melodies mono/polyphonic(preinstalled, no)
Melody composer no
Silent alert yes
Calling Line Identification (CLI) yes
Calling faces yes
Calling symbols yes
Call filter yes
Games yes
SIM application toolkit Class 2 + 3 USSD
USIM application toolkit no
Colour variants (may vary by country) 4
Handsfree talking yes
Integrated FM Radio no
Camera no
JAVA API supported audio files MIDI-0 and ADPCM (WAV file with Intel DVI
Poly, 20
format)
Siemens Mobility Toolkit Copyright © 2004 Siemens AG
- 93 -
Page 98

Information and Communication Mobile
6.8 - M(T)50/M46/3118 Emulator
6.8.1 - M50 GUI Use / MMI Display
The "MMI-Display" represents the user interface of the target device. The figure
below contains the definitions of the keys on the M50 emulator’s image:
Figure 6.7: M50 Emulator
Menu Options Function
Zoom 100% or 200%
Debugging/Tracing A two-level pull-down menu to turn on/off different boolean options.
Help Contains, in particular, the About option, which gives information about
the current version of the emulator.
Siemens Mobility Toolkit Copyright © 2004 Siemens AG
- 94 -
Page 99

Information and Communication Mobile
6.8.2 - Mobile Features
Technical Specifications
Network frequency Dual band
Voice encoding FR, EFR, HR
Weight (in gramme) 97
Volume (cm³) 82
Dimensions(L x W x H in mm) 109 x 46 x 23
Display 5 lines, 64 x 101 pixels
Standy-by time (with standard battery) (max in
hours)
Talk time (with standard battery) (max in hours) 6
Standard battery Li-Ion 650 mAh
Charging time (max in hours) 2
Integrated Antenna yes
SIM card Plug-in(3V)
Special Features
MP3-Player no
TM
JAVA
Wireless Technology
GPRS yes
Mobile Internet Access WAP 1.2.1
Address book (no. of entries) no
Telephone book (SIM card) (no. of entries) Max 250 (SIM dependent)
Telephone book in the phone (no. of entries)
Voice Dialing no
Voice Recording no
Built-in data and fax modem yes
Soft-Data Link yes
Infrared interface (IrDA) no
Bluetooth
TM
interface
Voice memory no
Organizer no
MS Outlook
TM
98/2000 synchronization
Remind function yes
Date and time in Display yes
Alarm function yes
Currency converter yes
Calculator yes
Stopwatch no
SMS (Short Message Service) / up to 760 characteres
Intelligent typing (T9) yes
Picture Messaging EMS/MMS EMS
Redial list yes
List of calls (received/missed) yes
Date and time stamp for missed calls yes
Menu animations no
Menu format Normal + Jumbo
User profiles yes
Softkey programmable yes
Call wait/call hold yes
Conference call yes
Call forwarding yes
Display call timer and cost yes
Keypad lock yes
260
yes
no
no
yes/yes
Siemens Mobility Toolkit Copyright © 2004 Siemens AG
- 95 -
Page 100

Information and Communication Mobile
Ringer melodies mono/polyphonic(preinstalled, no)
Melody composer no
Silent alert yes
Calling Line Identification (CLI) yes
Calling faces yes
Calling symbols yes
Call filter yes
Games yes
SIM application toolkit Class 2 + 3 USSD
USIM application toolkit no
Colour variants (may vary by country) 2
Handsfree talking no
Integrated FM Radio no
Camera no
JAVA API supported audio files MIDI-0
Mono, 20
Siemens Mobility Toolkit Copyright © 2004 Siemens AG
- 96 -
 Loading...