

Page 1
Kühlschrank
Refrigerator
Réfrigérateur
Frigorifero
Koelkast
KI51R.. KI41R.. KI31R.. KI21R..
Gebrauchsanleitung
de
User manual
en
Notice d’utilisation
fr
Register your product on My Siemens and discover
exclusive services and offers.
siemens-home.bsh-group.com/welcome
The future moving in.
Istruzioni per l'uso
it
Gebruiksaanwijzing
nl
Siemens Home Appliances
Page 2
1
2
3
5
6
7
4
1 2 4 53
1
2
Page 3
3 4
5 6
7 8
9 10
Page 4
11 12
Page 5

Inhaltsverzeichnis
de
Sicherheit ........................................6
Allgemeine Hinweise ........................6
Bestimmungsgemäßer Ge-
brauch ..............................................6
Einschränkung des Nutzerkrei-
ses....................................................6
Sicherer Transport............................7
Sichere Installation ...........................7
Sicherer Gebrauch ...........................8
Beschädigtes Gerät........................11
Sachschäden vermeiden ..............13
Umweltschutz und Sparen ...........13
Verpackung entsorgen...................13
Energie sparen ...............................13
Aufstellen und Anschließen .........14
Lieferumfang...................................14
Gerät aufstellen und anschließen...14
Kriterien für den Aufstellort.............14
Gerät für den ersten Gebrauch
vorbereiten......................................15
Gerät elektrisch anschließen..........15
Kennenlernen................................15
Gerät...............................................15
Bedienelemente .............................16
Ausstattung...................................16
Ablage ............................................16
Variable Ablage..............................16
Ausziehbare Ablage .......................16
Obst- und Gemüsebehälter mit
Feuchtigkeitsregler.........................16
Butter- und Käsefach......................17
Türabsteller.....................................17
Zubehör..........................................17
Zusatzfunktionen ..........................18
Super-Kühlen .................................18
Alarm..............................................18
Türalarm .........................................18
Kühlfach ........................................18
Tipps zum Einlagern von Le-
bensmitteln ins Kühlfach ................18
Kältezonen im Kühlfach .................19
Aufkleber OK..................................19
Abtauen .........................................19
Abtauen im Kühlfach......................19
Reinigen und Pflegen ...................19
Gerät zum Reinigen vorbereiten ....19
Gerät reinigen.................................20
Tauwasserrinne und Ablaufloch
reinigen...........................................20
Ausstattungsteile entnehmen .........20
Störungen beheben ......................22
Funktionsstörungen........................22
Hinweise im Anzeigefeld ................22
Temperaturproblem........................23
Geräusche......................................23
Gerüche..........................................24
Geräteselbsttest durchführen.........25
Lagern und Entsorgen..................25
Gerät außer Betrieb nehmen..........25
Altgerät entsorgen..........................25
Kundendienst................................25
Erzeugnisnummer (E-Nr.) und
Fertigungsnummer (FD) .................26
Technische Daten .........................26
Grundlegende Bedienung ............17
Gerät einschalten ...........................17
Hinweise zum Betrieb.....................17
Gerät ausschalten ..........................17
Temperatur einstellen.....................17
5
Page 6

de Sicherheit
Sicherheit
Beachten Sie die Informationen zum Thema Sicherheit, um Ihr Gerät sicher gebrauchen zu können.
Dieses Gerät entspricht den einschlägigen Sicherheitsbestimmungen für Elektrogeräte und ist funkentstört.
Allgemeine Hinweise
Hier finden Sie allgemeine Informationen zu dieser Anleitung.
¡ Lesen Sie diese Anleitung sorgfältig. Nur dann können Sie das
Gerät sicher und effizient verwenden.
¡ Diese Anleitung richtet sich an den Benutzer des Geräts.
¡ Beachten Sie die Sicherheitshinweise und die Warnhinweise.
¡ Bewahren Sie die Anleitung sowie die Produktinformationen für
einen späteren Gebrauch oder Nachbesitzer auf.
¡ Prüfen Sie das Gerät nach dem Auspacken. Schließen Sie das
Gerät bei einem Transportschaden nicht an.
Bestimmungsgemäßer Gebrauch
Um das Gerät sicher und richtig zu verwenden, beachten Sie die
Hinweise zum bestimmungsgemäßen Gebrauch.
Dieses Gerät ist nur für den Einbau bestimmt. Installationsanleitung beachten.
Verwenden Sie das Gerät nur:
¡ gemäß dieser Gebrauchsanleitung.
¡ um Lebensmitteln zu kühlen.
¡ im privaten Haushalt und in geschlossenen Räumen des häusli-
chen Umfelds.
¡ bis zu einer Höhe von maximal 2000m über dem Meeresspie-
gel.
Einschränkung des Nutzerkreises
Vermeiden Sie Risiken für Kinder und gefährdete Personen.
Dieses Gerät kann von Kindern ab 8 Jahren und darüber und von
Personen mit reduzierten physischen, sensorischen oder mentalen Fähigkeiten oder Mangel an Erfahrung und/oder Wissen be-
6
Page 7
Sicherheit de
nutzt werden, wenn sie beaufsichtigt oder bezüglich des sicheren
Gebrauchs des Geräts unterwiesen wurden und die daraus resultierenden Gefahren verstanden haben.
Kinder dürfen nicht mit dem Gerät spielen.
Reinigung und Benutzerwartung dürfen nicht durch Kinder ohne
Beaufsichtigung durchgeführt werden.
Kinder jünger als 8 Jahre vom Gerät und der Anschlussleitung
fernhalten.
Kinder ab 3Jahren und jünger als 8Jahre dürfen das Kühl-/Gefriergerät be- und entladen.
Sicherer Transport
Beachten Sie diese Sicherheitshinweise, wenn Sie das Gerät
transportieren.
WARNUNG‒Verletzungsgefahr!
Das hohe Gerätegewicht kann beim Anheben zu Verletzungen
führen.
▶
Das Gerät nicht alleine anheben.
Sichere Installation
Beachten Sie diese Sicherheitshinweise, wenn Sie das Gerät installieren.
WARNUNG‒Stromschlaggefahr!
Unsachgemäße Installationen sind gefährlich.
▶
Das Gerät nur gemäß den Angaben auf dem Typenschild
anschließen und betreiben.
▶
Das Gerät nur über eine vorschriftsmäßig installierte Steckdose mit Erdung an ein Stromnetz mit Wechselstrom anschließen.
▶
Das Schutzleitersystem der elektrischen Hausinstallation
muss vorschriftsmäßig installiert sein.
▶
Nie das Gerät über eine externe Schaltvorrichtung versorgen, z. B. Zeitschaltuhr oder Fernsteuerung.
7
Page 8
de Sicherheit
▶
Wenn das Gerät eingebaut ist, muss der Netzstecker der
Netzanschlussleitung frei zugänglich sein, oder falls der
freie Zugang nicht möglich ist, muss in der festverlegten
elektrischen Installation eine allpolige Trennvorrichtung nach
den Errichtungsbestimmungen eingebaut werden.
▶
Beim Aufstellen des Geräts darauf achten, dass die Netzanschlussleitung nicht eingeklemmt oder beschädigt wird.
WARNUNG‒Brandgefahr!
¡ Eine verlängerte Netzanschlussleitung und nicht zugelassene
Adapter zu verwenden, ist gefährlich.
▶
Keine Verlängerungskabel oder Mehrfachsteckdosenleisten
verwenden.
▶
Wenn die Netzanschlussleitung zu kurz ist, den Kundendienst kontaktieren.
▶
Nur vom Hersteller zugelassene Adapter verwenden.
¡
Portable Mehrfachsteckdosenleisten oder portable Netzteile
können überhitzen und zum Brand führen.
▶
Keine portablen Mehrfachsteckdosenleisten oder portable
Netzteile hinter dem Gerät platzieren.
Sicherer Gebrauch
Beachten Sie diese Sicherheitshinweise, wenn Sie das Gerät verwenden.
WARNUNG‒Stromschlaggefahr!
¡ Eine beschädigte Isolierung der Netzanschlussleitung ist ge-
fährlich.
▶
Nie die Netzanschlussleitung mit heißen Geräteteilen oder
Wärmequellen in Kontakt bringen.
▶
Nie die Netzanschlussleitung mit scharfen Spitzen oder
Kanten in Kontakt bringen.
▶
Nie die Netzanschlussleitung knicken, quetschen oder verändern.
8
Page 9
Sicherheit de
¡ Eindringende Feuchtigkeit kann einen Stromschlag verursa-
chen.
▶
Das Gerät nur in geschlossenen Räumen verwenden.
▶
Nie das Gerät großer Hitze und Nässe aussetzen.
▶
Keinen Dampfreiniger oder Hochdruckreiniger verwenden,
um das Gerät zu reinigen.
WARNUNG‒Erstickungsgefahr!
¡ Kinder können sich Verpackungsmaterial über den Kopf zie-
hen oder sich darin einwickeln und ersticken.
▶
Verpackungsmaterial von Kindern fernhalten.
▶
Kinder nicht mit Verpackungsmaterial spielen lassen.
¡ Kinder können Kleinteile einatmen oder verschlucken und da-
durch ersticken.
▶
Kleinteile von Kindern fernhalten.
▶
Kinder nicht mit Kleinteilen spielen lassen.
WARNUNG‒Explosionsgefahr!
¡ Elektrische Geräte innerhalb des Geräts können explodieren,
z.B. Heizgeräte oder elektrische Eisbereiter.
▶
Keine elektrischen Geräte innerhalb des Geräts betreiben.
¡ Mechanische Einrichtungen oder sonstige Mittel können den
Kältekreislauf beschädigen, brennbares Kältemittel kann austreten und explodieren.
▶
Zum Beschleunigen des Abtauvorgangs keine anderen mechanischen Einrichtungen oder sonstigen Mittel als die vom
Hersteller empfohlenen benutzen.
¡ Produkte mit brennbaren Treibgasen und explosiven Stoffen
können explodieren, z.B. Spraydosen.
▶
Keine Produkte mit brennbaren Treibgasen und explosiven
Stoffen im Gerät lagern.
WARNUNG‒Brandgefahr!
Die Dämpfe brennbarer Flüssigkeiten können sich entzünden
(Verpuffung).
▶
Hochprozentigen Alkohol nur dicht verschlossen und stehend lagern.
9
Page 10

de Sicherheit
WARNUNG‒Verletzungsgefahr!
¡ Verletzung der Augen durch Austritt von brennbarem Kältemit-
tel und schädlichen Gasen.
▶
Rohre des Kältemittelkreislaufs und Isolierung nicht beschädigen.
¡ Das Gerät kann kippen.
▶
Nicht auf Sockel, Auszüge oder Türen treten oder darauf
abstützen.
WARNUNG‒Verbrennungsgefahr!
Einzelne Teile des Geräts werden bei Betrieb heiß.
▶
Nie die heißen Teile berühren.
▶
Kinderfernhalten.
VORSICHT‒Gefahr von Gesundheitsschäden!
Um die Verunreinigung von Lebensmitteln zu vermeiden, sind
die folgenden Anweisungen zu beachten.
▶
Wenn die Tür für eine längere Zeit geöffnet wird, kann es zu
einem erheblichen Temperaturanstieg in den Fächern des
Gerätes kommen.
▶
Die Flächen, die mit Lebensmitteln und zugänglichen Ablaufsystemen in Berührung kommen können, regelmäßig
reinigen.
▶
Rohes Fleisch und Fisch in geeigneten Behältern im Kühlschrank so aufbewahren, dass es andere Lebensmittel nicht
berührt oder auf diese tropft.
▶
Wenn das Kühl-/Gefriergerät längere Zeit leer steht, das Gerät ausschalten, abtauen, reinigen und die Tür offen lassen,
um Schimmelbildung zu vermeiden.
10
Page 11
Sicherheit de
Beschädigtes Gerät
Beachten Sie diese Sicherheitshinweise, wenn Ihr Gerät beschädigt ist.
WARNUNG‒Stromschlaggefahr!
¡ Ein beschädigtes Gerät oder eine beschädigte Netzanschluss-
leitung ist gefährlich.
▶
Nie ein beschädigtes Gerät betreiben.
▶
Nie ein Gerät mit gerissener oder gebrochener Oberfläche
betreiben.
▶
Nie an der Netzanschlussleitung ziehen, um das Gerät vom
Stromnetz zu trennen. Immer am Netzstecker der Netzanschlussleitung ziehen.
▶
Wenn das Gerät oder die Netzanschlussleitung beschädigt
ist, sofort den Netzstecker der Netzanschlussleitung ziehen
oder die Sicherung im Sicherungskasten ausschalten.
▶
Den Kundendienst rufen. →Seite25
▶
Nur dafür geschultes Fachpersonal darf Reparaturen am
Gerät durchführen.
¡ Unsachgemäße Reparaturen sind gefährlich.
▶
Nur dafür geschultes Fachpersonal darf Reparaturen am
Gerät durchführen.
▶
Nur Original-Ersatzteile dürfen zur Reparatur des Geräts verwendet werden.
▶
Wenn die Netzanschlussleitung dieses Geräts beschädigt
wird, muss sie durch den Hersteller oder seinen Kundendienst oder eine ähnlich qualifizierte Person ersetzt werden,
um Gefährdungen zu vermeiden.
WARNUNG‒Brandgefahr!
Bei Beschädigung der Rohre können brennbares Kältemittel
und schädliche Gase austreten und sich entzünden.
▶
Feuer und Zündquellen vom Gerät fernhalten.
▶
Den Raum lüften.
11
Page 12

de Sicherheit
▶
Das Gerät ausschalten. →Seite17
▶
Den Netzstecker der Netzanschlussleitung ziehen oder die
Sicherung im Sicherungskasten ausschalten.
▶
Den Kundendienst rufen. →Seite25
12
Page 13

Sachschäden vermeiden de
Sachschäden vermeiden
Sachschäden vermeiden
Um Sachschäden an Ihrem Gerät,
Zubehör oder Küchengegenständen
zu vermeiden, beachten Sie diese
Hinweise.
ACHTUNG!
¡ Durch Verschmutzungen mit Öl
oder Fett können Kunststoffteile
und Türdichtungen porös werden.
▶
Kunststoffteile und Türdichtungen öl- und fettfrei halten.
¡ Durch Benutzung der Sockel, Aus-
züge oder Gerätetüren als Sitzfläche oder Steigfläche kann das Gerät beschädigt werden.
▶
Nicht auf Sockel, Auszüge oder
Türen treten oder darauf abstützen.
Umweltschutz und Sparen
Umweltschutz und
Sparen
Schonen Sie die Umwelt, indem Sie
Ihr Gerät ressourcenschonend gebrauchen und wiederverwendbare
Materialien richtig entsorgen.
Energie sparen
Wenn Sie diese Hinweise beachten,
verbraucht Ihr Gerät weniger Strom.
Wahl des Aufstellorts
Beachten Sie diese Hinweise, wenn
Sie Ihr Gerät aufstellen.
¡ Das Gerät vor direkter Sonnenein-
strahlung schützen.
¡ Das Gerät mit möglichst großem
Abstand zu Heizkörpern, Herd und
anderen Wärmequellen aufstellen:
– 30mm Abstand zu Elektro-
oder Gasherden halten.
– 30cm Abstand zu Öl- oder
Kohleherden halten.
Das Gerät muss bei niedrigeren
Umgebungstemperaturen seltener
kühlen.
¡ Eine Nischentiefe von 560mm
verwenden.
¡ Keine Lüftungsöffnungen abde-
cken oder zustellen.
¡ Den Raum täglich lüften.
Die Luft an der Rückwand des Geräts erwärmt sich nicht so stark.
Das Gerät muss seltener kühlen.
Verpackung entsorgen
Die Verpackungsmaterialien sind umweltverträglich und wiederverwertbar.
▶
Die einzelnen Bestandteile getrennt nach Sorten entsorgen.
Informationen über aktuelle Entsorgungswege erhalten Sie bei Ihrem
Fachhändler sowie Ihrer Gemeinde- oder Stadtverwaltung.
Energie sparen beim Gebrauch
Beachten Sie diese Hinweise, wenn
Sie Ihr Gerät verwenden.
Hinweis:Die Anordnung der Ausstattungsteile hat keinen Einfluss auf den
Energieverbrauch des Geräts.
¡ Keine Lüftungsöffnungen abde-
cken oder zustellen.
Die Luft an der Rückwand des Ge-
räts erwärmt sich nicht so stark.
13
Page 14
de Aufstellen und Anschließen
5
¡ Die Gerätetür nur kurz öffnen.
¡ Gekaufte Lebensmittel in einer
Kühltasche transportieren und
schnell ins Gerät legen.
¡ Warme Lebensmittel und Getränke
erst abkühlen lassen, dann ins Gerät stellen.
¡ Um die Kälte des Gefrierguts zu
nutzen, das Gefriergut zum Auftauen ins Kühlfach legen.
Die Luft im Gerät erwärmt sich
nicht so stark.
Das Gerät muss seltener kühlen.
¡ Zwischen den Lebensmitteln und
zur Rückwand immer etwas Platz
lassen.
¡ Die Lebensmittel luftdicht verpa-
cken.
Die Luft kann zirkulieren und die
Luftfeuchtigkeit bleibt konstant.
Aufstellen und Anschließen
Aufstellen und
Anschließen
Wo und wie Sie Ihr Gerät am besten
aufstellen, erfahren Sie hier. Außerdem erfahren Sie, wie Sie das Gerät
an das Stromnetz anschließen.
Lieferumfang
Prüfen Sie nach dem Auspacken alle
Teile auf Transportschäden und die
Vollständigkeit der Lieferung.
Bei Beanstandungen wenden Sie
sich an Ihren Händler oder an unseren Kundendienst →Seite25.
Die Lieferung besteht aus:
¡ Einbaugerät
¡ Ausstattung und Zubehör
¡ Installationsmaterial
1
¡ Installationsanleitung
¡ Gebrauchsanleitung
¡ Kundendienstheft
¡ Garantiebeilage
2
¡ Energielabel
¡ Produktdatenblatt
¡ Informationen zu Energieverbrauch
und Geräuschen
Gerät aufstellen und anschließen
Voraussetzung:Der Lieferumfang
des Geräts ist überprüft. →Seite14
1. Die Kriterien für den Aufstellort des
Geräts beachten. →Seite14
2. Das Gerät gemäß beiliegender In-
stallationsanleitung installieren.
3. Das Gerät für den ersten Ge-
brauch vorbereiten. →Seite15
4. Das Gerät elektrisch anschließen.
→Seite15
Kriterien für den Aufstellort
Beachten Sie diese Hinweise, wenn
Sie Ihr Gerät aufstellen.
WARNUNG
Explosionsgefahr!
Wenn das Gerät in einem zu kleinen
Raum steht, kann bei einem Leck
des Kältekreislaufs ein brennbares
Gas-Luft-Gemisch entstehen.
▶
Das Gerät nur in einem Raum aufstellen, der mindestens ein Volumen von 1m3 pro 8g Kältemittel
hat. Die Menge des Kältemittels
steht auf dem Typenschild.
→Abb.1/
Das Gewicht des Geräts kann je
nach Modell ab Werk bis zu 50kg
betragen.
1
Je nach Geräteausstattung
2
Nicht in allen Ländern
14
Page 15
5
5
1
2
3
4
5
6
7
Kennenlernen de
Um das Gewicht des Geräts zu tragen, muss der Untergrund ausreichend stabil sein.
Zulässige Raumtemperatur
Die zulässige Raumtemperatur hängt
von der Klimaklasse des Geräts ab.
Die Klimaklasse steht auf dem Typenschild. →Abb.1/
Klimaklasse Zulässige Raumtemperatur
SN 10°C…32°C
N 16°C…32°C
ST 16°C…38°C
T 16°C…43°C
Das Gerät ist innerhalb der zulässigen Raumtemperatur voll funktionsfähig.
Wenn Sie ein Gerät der Klimaklasse
SN bei kälteren Raumtemperaturen
betreiben, können Beschädigungen
am Gerät bis zu einer Raumtemperatur von 5°C ausgeschlossen werden.
Nischenmaße
Beachten Sie die Nischenmaße,
wenn Sie Ihr Gerät in die Möbelnische einbauen. Bei Abweichungen
können Probleme bei der Geräteinstallation auftreten.
Nischentiefe
Bauen Sie das Gerät in der empfohlenen Nischentiefe von 560mm ein.
Bei einer geringeren Nischentiefe erhöht sich die Energieaufnahme geringfügig. Die Nischentiefe muss mindestens 550mm betragen.
Nischenbreite
Für das Gerät ist eine Innenbreite der
Möbelnische von mindestens
560mm notwendig.
Gerät für den ersten Gebrauch vorbereiten
1. Das Informationsmaterial entneh-
men.
2. Die Schutzfolien und Transportsi-
cherungen, z.B. Klebestreifen und
Karton entfernen.
3. Das Gerät zum ersten Mal reini-
gen. →Seite20
Gerät elektrisch anschließen
1. Den Netzstecker der Netzan-
schlussleitung des Geräts in eine
Steckdose in der Nähe des Geräts
stecken.
Die Anschlussdaten des Geräts
stehen auf dem Typenschild.
→Abb.1/
2. Den Netzstecker auf festen Sitz
prüfen.
a Das Gerät ist jetzt betriebsbereit.
Kennenlernen
Kennenlernen
Lernen Sie die Bestandteile Ihres Geräts kennen.
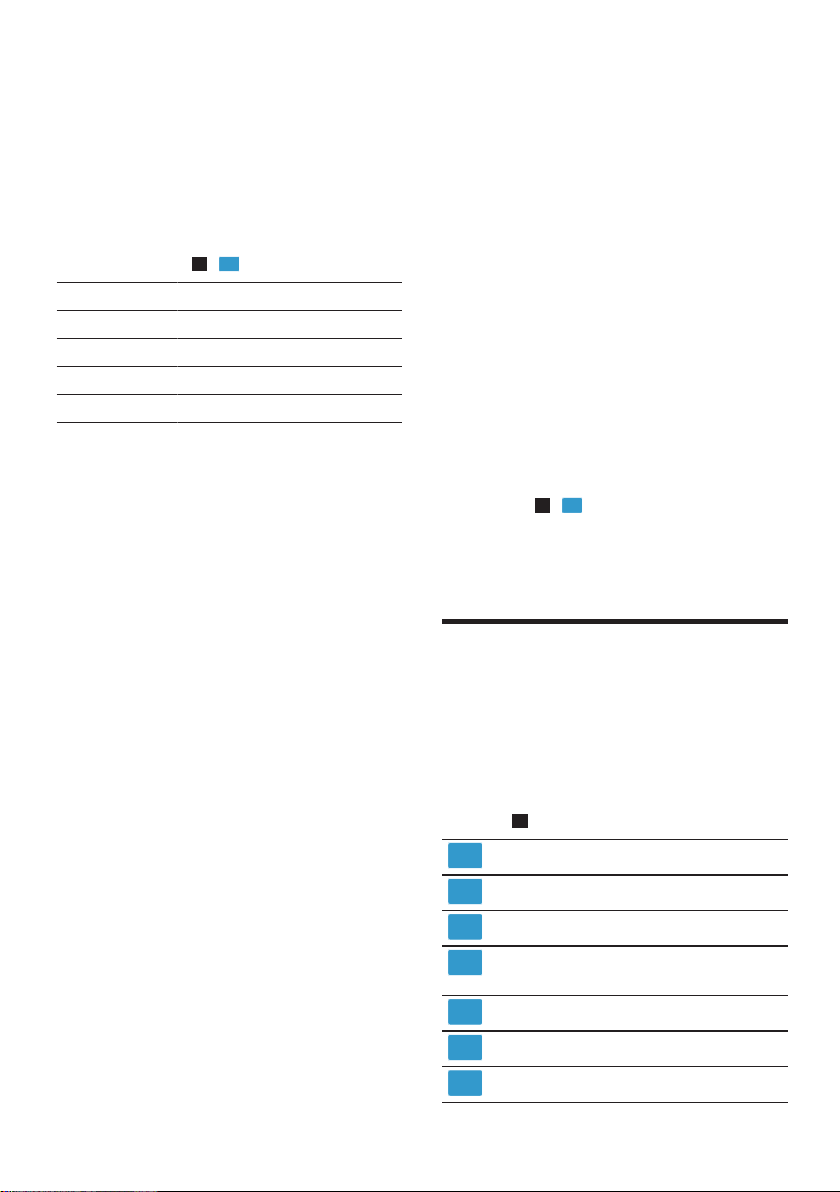
Gerät
Hier finden Sie eine Übersicht über
die Bestandteile Ihres Geräts.
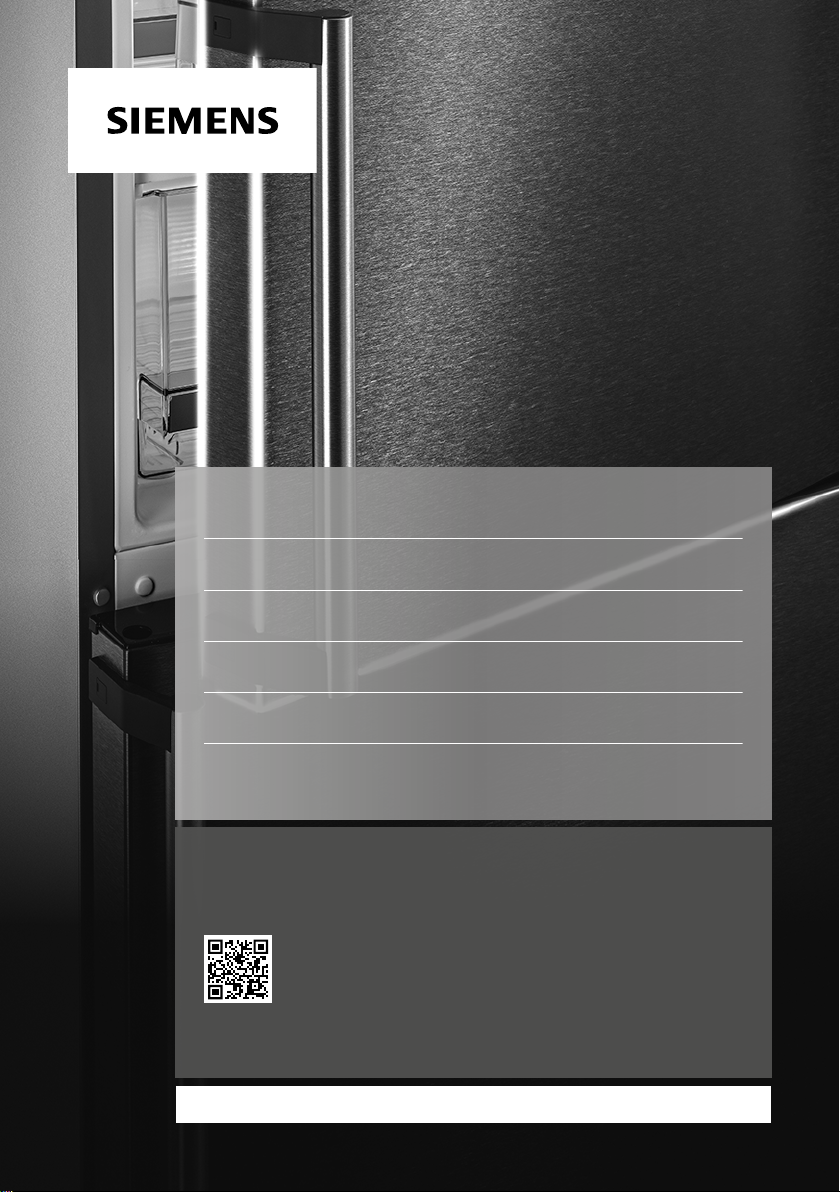
→Abb.
1
Bedienelemente
Variable Ablage →Seite16
Ausziehbare Ablage →Seite16
Obst- und Gemüsebehälter mit Feuch-
tigkeitsregler →Seite16
Typenschild
Butter- und Käsefach →Seite17
Türabsteller für große Flaschen
15
Page 16
de Ausstattung
1
2
3
4
5
Hinweis:Abweichungen zwischen Ihrem Gerät und den Abbildungen sind
hinsichtlich Ausstattung und Größe
möglich.
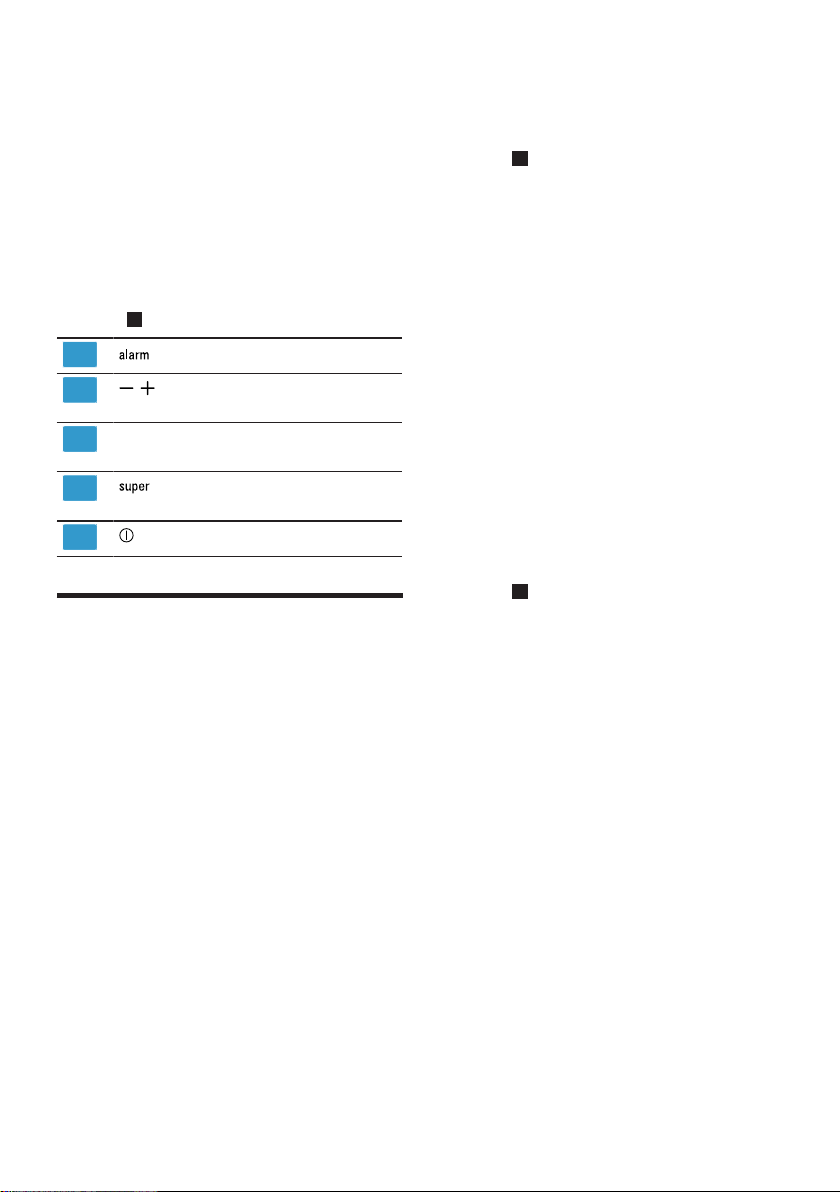
Bedienelemente
Über die Bedienelemente stellen Sie
alle Funktionen Ihres Geräts ein und
erhalten Informationen zum Betriebszustand.
→Abb.
Ausstattung
2
schaltet den Warnton ab.
/ stellt die Temperatur des Kühl-
fachs ein.
Zeigt die eingestellte Temperatur des
Kühlfachs in °C an.
schaltet Super-Kühlen ein oder
aus.
schaltet das Gerät ein oder aus.
Ausstattung
Hier erhalten Sie einen Überblick
über die Ausstattungsteile Ihres Geräts und deren Verwendung.
Die Ausstattung Ihres Geräts ist modellabhängig.
Ablage
Um die Ablagen nach Bedarf zu variieren, die Ablage entnehmen und an
anderer Stelle wieder einsetzen.
→"Ablage entnehmen", Seite20
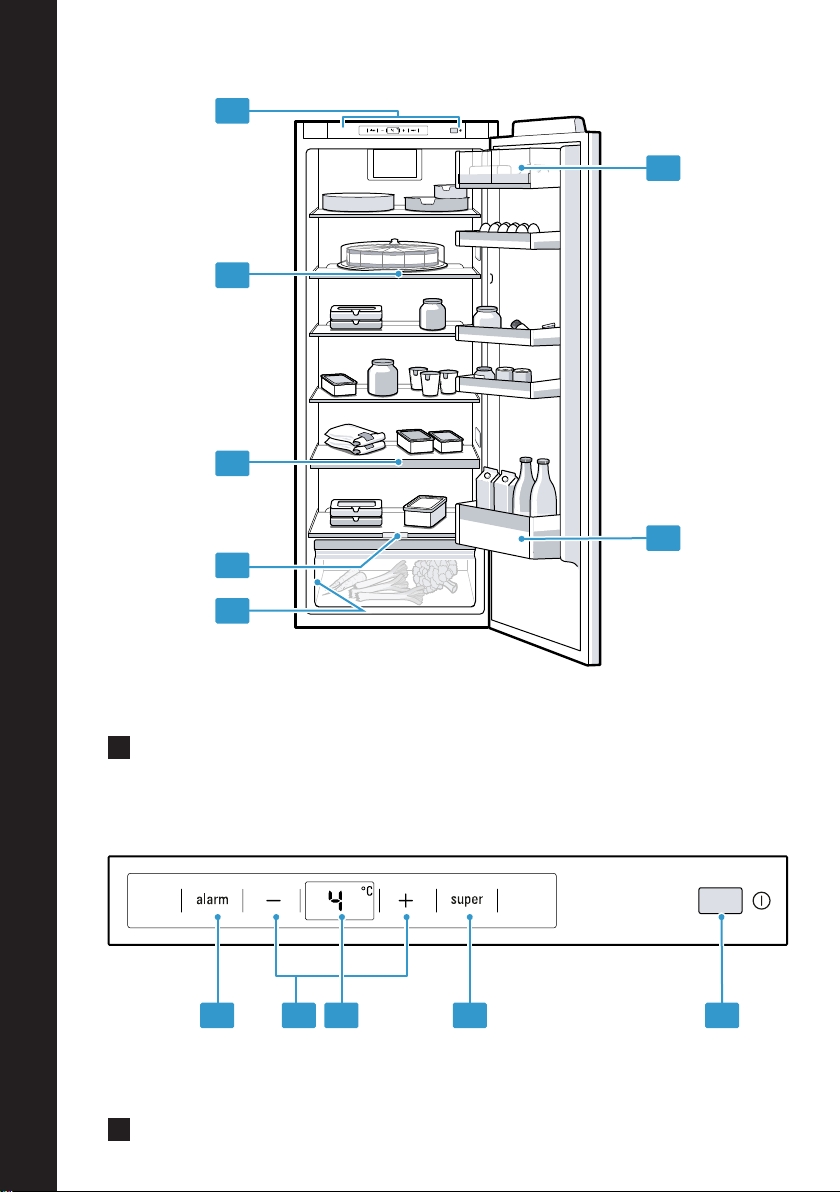
Variable Ablage
Nutzen Sie die variable Ablage, um
auf der darunter liegenden Ablage
hohes Kühlgut zu lagern, z.B. Kannen oder Flaschen. Sie können den
vorderen Teil der variablen Ablage
herausnehmen und unter den hinteren Teil der Ablage schieben.
→Abb.
3
Ausziehbare Ablage
Um sich eine bessere Übersicht zu
verschaffen und Lebensmittel schneller zu entnehmen, die Ablage herausziehen.
Obst- und Gemüsebehälter mit Feuchtigkeitsregler
Lagern Sie frisches Obst und Gemüse im Obst- und Gemüsebehälter.
Über den Feuchtigkeitsregler und eine spezielle Abdichtung können Sie
die Luftfeuchtigkeit im Obst- und Gemüsebehälter anpassen. Damit können Sie frisches Obst und Gemüse
bis zu zweimal länger einlagern als
bei konventioneller Lagerung.
→Abb.
Die Luftfeuchtigkeit im Obst- und
Gemüsebehälter nach Art und Menge
der einzulagernden Lebensmittel
einstellen:
¡ Niedrige Luftfeuchtigkeit bei über-
¡ Höhere Luftfeuchtigkeit bei über-
Je nach Lagermenge und Lagergut
kann sich im Obst- und Gemüsebehälter Kondenswasser bilden.
Das Kondenswasser mit einem trockenen Tuch entfernen und die Luftfeuchtigkeit über den Feuchtigkeitsregler anpassen.
Damit die Qualität und das Aroma erhalten bleiben, lagern Sie kälteempfindliches Obst und Gemüse außerhalb des Geräts bei Temperaturen
von ca. 8°C bis 12°C.
4
wiegender Lagerung von Obst und
hoher Beladung.
wiegender Lagerung von Gemüse
sowie bei Mischbeladung oder geringer Beladung.
16
Page 17

Grundlegende Bedienung de
Kälteempfindliches
Obst
¡ Ananas
¡ Banane
¡ Mango
¡ Papaya
¡ Zitrusfrüchte
Kälteempfindliches
Gemüse
¡ Auberginen
¡ Gurken
¡ Zucchini
¡ Paprika
¡ Tomaten
¡ Kartoffeln
Butter- und Käsefach
Lagern Sie Butter und Hartkäse im
Butter- und Käsefach.
Türabsteller
Um den Türabsteller nach Bedarf zu
variieren, den Türabsteller entnehmen
und an anderer Stelle wieder einsetzen.
→"Türabsteller entnehmen",
Seite20
Zubehör
Verwenden Sie Originalzubehör. Es
ist auf Ihr Gerät abgestimmt. Hier erhalten Sie einen Überblick über das
Zubehör Ihres Geräts und dessen
Verwendung.
Das Zubehör Ihres Geräts ist modellabhängig.
Eierablage
Lagern Sie Eier sicher auf der Eierablage.
Flaschenhalter
Der Flaschenhalter verhindert, dass
Flaschen beim Öffnen und Schließen
der Gerätetür kippen.
→Abb.
5
Grundlegende Bedienung
Grundlegende Bedienung
Hier erfahren Sie das Wesentliche zur
Bedienung Ihres Geräts.
Gerät einschalten
1. drücken.
a Das Gerät beginnt zu kühlen.
2. Die gewünschte Temperatur ein-
stellen. →Seite17
Hinweise zum Betrieb
¡ Wenn Sie das Gerät eingeschaltet
haben, wird die eingestellte Temperatur erst nach mehreren Stunden erreicht. Bevor die Temperatur
nicht erreicht ist, keine Lebensmittel einlegen.
Gerät ausschalten
▶
drücken.
a Das Gerät kühlt nicht mehr.
Temperatur einstellen
Nachdem Sie das Gerät eingeschaltet haben, können Sie die Temperatur
einstellen.
Kühlfachtemperatur einstellen
▶
So oft / drücken, bis die Temperaturanzeige die gewünschte
Temperatur zeigt.
Die empfohlene Temperatur im
Kühlfach beträgt 4°C.
→"Aufkleber OK", Seite19
17
Page 18
de Zusatzfunktionen
Zusatzfunktionen
Zusatzfunktionen
Erfahren Sie, über welche einstellbaren Zusatzfunktionen Ihr Gerät verfügt.
Super-Kühlen
Beim Super-Kühlen kühlt das Kühlfach so kalt wie möglich. Dadurch
kühlen Lebensmittel und Getränke
schnell durch.
Schalten Sie Super-Kühlen vor dem
Einlagern großer Lebensmittelmengen ein.
Hinweis:Wenn Super-Kühlen eingeschaltet ist, kann es zu vermehrten
Geräuschen kommen.
Super-Kühlen einschalten
▶
drücken.
a leuchtet.
Hinweis:Nach ca. 15Stunden schaltet das Gerät auf Normalbetrieb.
Super-Kühlen ausschalten
▶
drücken.
a Die zuvor eingestellte Temperatur
wird angezeigt.
Alarm
Alarm
Ihr Gerät verfügt über Alarm-Funktionen.
Türalarm
Wenn die Gerätetür länger offen
steht, schaltet sich der Türalarm ein.
Warnton (Türalarm) ausschalten
▶
Die Gerätetür schließen oder
drücken.
a Der Warnton ist ausgeschaltet.
Kühlfach
Kühlfach
Im Kühlfach können Sie Fleisch,
Wurst, Fisch, Milchprodukte, Eier, fertige Speisen und Backwaren aufbewahren.
Die Temperatur im Kühlfach können
Sie von 2°C bis 8°C einstellen.
Die empfohlene Temperatur im Kühlfach beträgt 4°C.
→"Aufkleber OK", Seite19
Durch die Kühllagerung können Sie
auch hoch verderbliche Lebensmittel
kurz‑ bis mittelfristig lagern. Je tiefer
die gewählte Temperatur ist, desto
länger bleiben die Lebensmittel
frisch.
Tipps zum Einlagern von Lebensmitteln ins Kühlfach
Beachten Sie die Tipps, wenn Sie Lebensmittel in Ihr Kühlfach einlagern.
¡ Damit die Frische und Qualität der
Lebensmittel länger erhalten bleiben, nur frische und unversehrte
Lebensmittel einlagern.
¡ Bei Fertigprodukten und abgefüll-
ten Waren das vom Hersteller angegebene Mindesthaltbarkeitsdatum oder Verbrauchsdatum nicht
überschreiten.
¡ Um Aroma, Farbe und Frische zu
erhalten oder Geschmacksübertragungen und Verfärbungen der
Kunststoffteile zu vermeiden, Lebensmittel gut verpackt oder abgedeckt einlagern.
¡ Warme Speisen und Getränke erst
abkühlen lassen, bevor Sie diese
in das Kühlfach stellen.
18
Page 19

Abtauen de
Kältezonen im Kühlfach
Durch die Luftzirkulation im Kühlfach
entstehen unterschiedliche Kältezonen.
Kälteste Zone
Die kälteste Zone ist zwischen dem
seitlich eingeprägten Pfeil und der
darunter liegenden Ablage.
Tipp:Lagern Sie empfindliche Lebensmittel in der kältesten Zone, z.B.
Fisch, Wurst und Fleisch.
Wärmste Zone
Die wärmste Zone ist an der Tür
ganz oben.
Tipp:Lagern Sie unempfindliche Lebensmittel in der wärmsten Zone,
z.B. Hartkäse und Butter. Käse kann
so sein Aroma weiter entfalten, die
Butter bleibt streichfähig.
Aufkleber OK
Mit dem Aufkleber OK können Sie
prüfen, ob im Kühlfach die für Lebensmittel empfohlenen sicheren
Temperaturbereiche von +4°C oder
kälter erreicht sind.
Der Aufkleber OK ist nicht bei allen
Modellen enthalten.
Wenn der Aufkleber nicht OK zeigt,
Temperatur schrittweise verringern.
→"Kühlfachtemperatur einstellen",
Seite17
Nach Inbetriebnahme des Geräts
kann es bis zu 12Stunden dauern,
bis die eingestellte Temperatur erreicht ist.
Korrekte Einstellung
Abtauen
Abtauen
Beachten Sie die Informationen,
wenn Sie Ihr Gerät abtauen wollen.
Abtauen im Kühlfach
Im Betrieb bilden sich an der Rückwand des Kühlfachs funktionsbedingt
Tauwassertropfen oder Reif. Die
Rückwand im Kühlfach taut automatisch ab.
Tauwasser oder Reif laufen über die
Tauwasserrinne in das Ablaufloch zur
Verdunstungsschale und müssen
nicht abgewischt werden.
Damit das Tauwasser ablaufen kann
und Geruchsbildung vermieden wird,
beachten Sie folgende Informationen:
→"Tauwasserrinne und Ablaufloch
reinigen", Seite20.
Reinigen und Pflegen
Reinigen und Pflegen
Damit Ihr Gerät lange funktionsfähig
bleibt, reinigen und pflegen Sie es
sorgfältig.
Gerät zum Reinigen vorbereiten
Erfahren Sie, wie Sie Ihr Gerät zum
Reinigen vorbereiten.
1.
Das Gerät ausschalten. →Seite17
2. Das Gerät vom Stromnetz trennen.
Den Netzstecker der Netzanschlussleitung ziehen oder die Sicherung im Sicherungskasten ausschalten.
3. Alle Lebensmittel herausnehmen
und an einem kühlen Ort lagern.
Wenn vorhanden, Kälteakkus auf
die Lebensmittel legen.
4. Wenn eine Reifschicht vorhanden
ist, diese abtauen lassen.
19
Page 20

de Reinigen und Pflegen
5. Alle Ausstattungsteile aus dem Ge-
rät nehmen. →Seite20
Gerät reinigen
Reinigen Sie das Gerät wie vorgegeben, damit es nicht durch eine
falsche Reinigung oder ungeeignete
Reinigungsmittel beschädigt wird.
WARNUNG
Stromschlaggefahr!
¡ Eindringende Feuchtigkeit kann
einen Stromschlag verursachen.
▶
Keinen Dampfreiniger oder
Hochdruckreiniger verwenden,
um das Gerät zu reinigen.
¡ Flüssigkeit in der Beleuchtung
kann gefährlich sein.
▶
Das Spülwasser darf nicht in die
Beleuchtung gelangen.
ACHTUNG!
¡ Ungeeignete Reinigungsmittel kön-
nen die Oberflächen des Geräts
beschädigen.
▶
Keine harten Scheuerkissen
oder Putzschwämme verwenden.
▶
Keine scharfen oder scheuernden Reinigungsmittel verwenden.
▶
Keine stark alkoholhaltigen Reinigungsmittel verwenden.
¡ Wenn Sie Ausstattungsteile und
Zubehör im Geschirrspüler reinigen, können sich diese verformen
oder verfärben.
▶
Nie Ablagen und Behälter im
Geschirrspüler reinigen.
1. Das Gerät zum Reinigen vorberei-
ten. →Seite19
2. Das Gerät, die Ausstattungsteile
und die Türdichtungen mit einem
Spültuch, lauwarmem Wasser und
etwas pH‑neutralem Spülmittel reinigen.
3. Mit einem weichen, trockenen
Tuch gründlich nachtrocknen.
4. Die Ausstattungteile einsetzen.
5. Das Gerät elektrisch anschließen.
→Seite15
6.
Das Gerät einschalten. →Seite17
7. Die Lebensmittel einlegen.
Tauwasserrinne und Ablaufloch reinigen
Damit das Tauwasser ablaufen kann,
reinigen Sie die Tauwasserrinne und
das Ablaufloch regelmäßig.
▶
Die Tauwasserrinne und das Ablaufloch vorsichtig reinigen, z.B.
mit einem Wattestäbchen.
→Abb.
6
Ausstattungsteile entnehmen
Wenn Sie die Ausstattungsteile
gründlich reinigen wollen, entnehmen
Sie diese aus Ihrem Gerät.
Ablage entnehmen
▶
Die Ablage herausziehen und entnehmen.
Ausziehbare Ablage entnehmen
1. Die ausziehbare Ablage herauszie-
hen, bis die Rastnase ausrastet.
→Abb.
2. Die Ablage absenken und seitlich
herausschwenken.
Türabsteller entnehmen
▶
Den Türabsteller nach oben anheben und entnehmen.
→Abb.
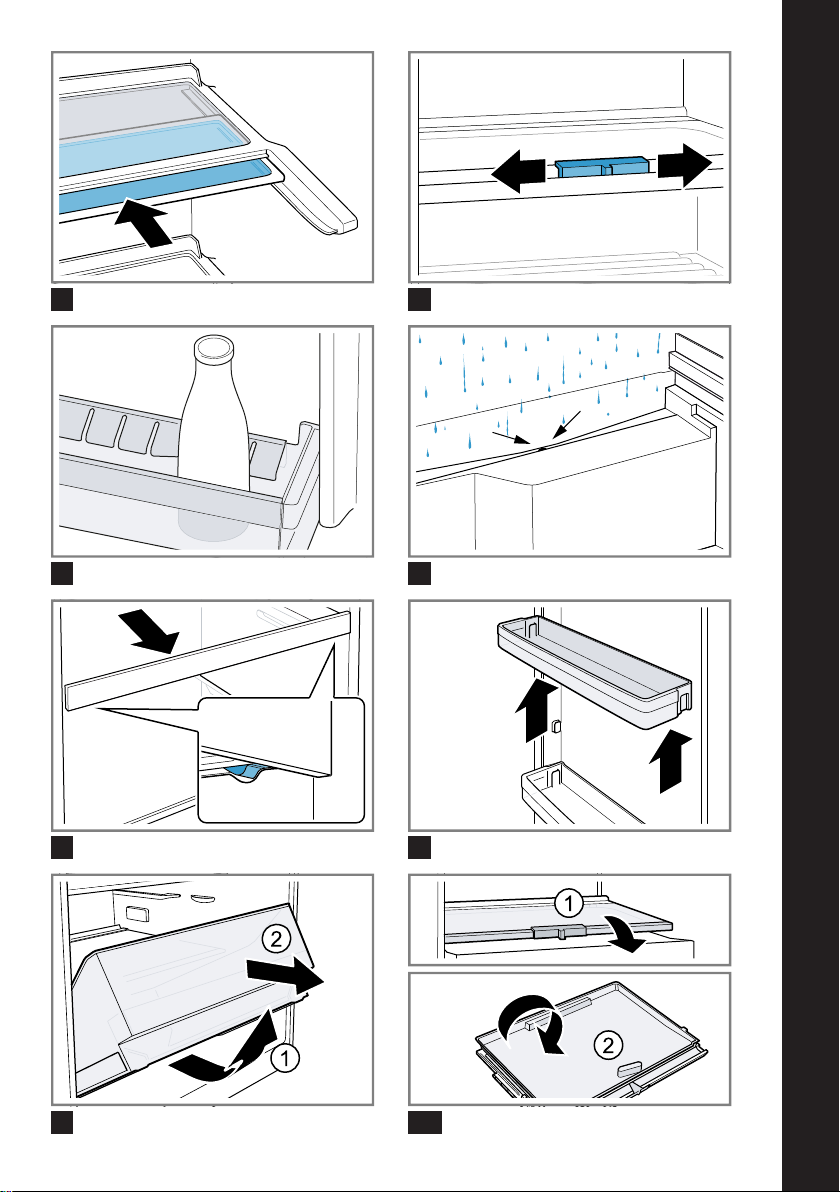
Obst- und Gemüsebehälter entnehmen
1. Den Behälter bis zum Anschlag
herausziehen.
7
8
20
Page 21

2. Den Behälter vorne anheben
und entnehmen .
→Abb.
9
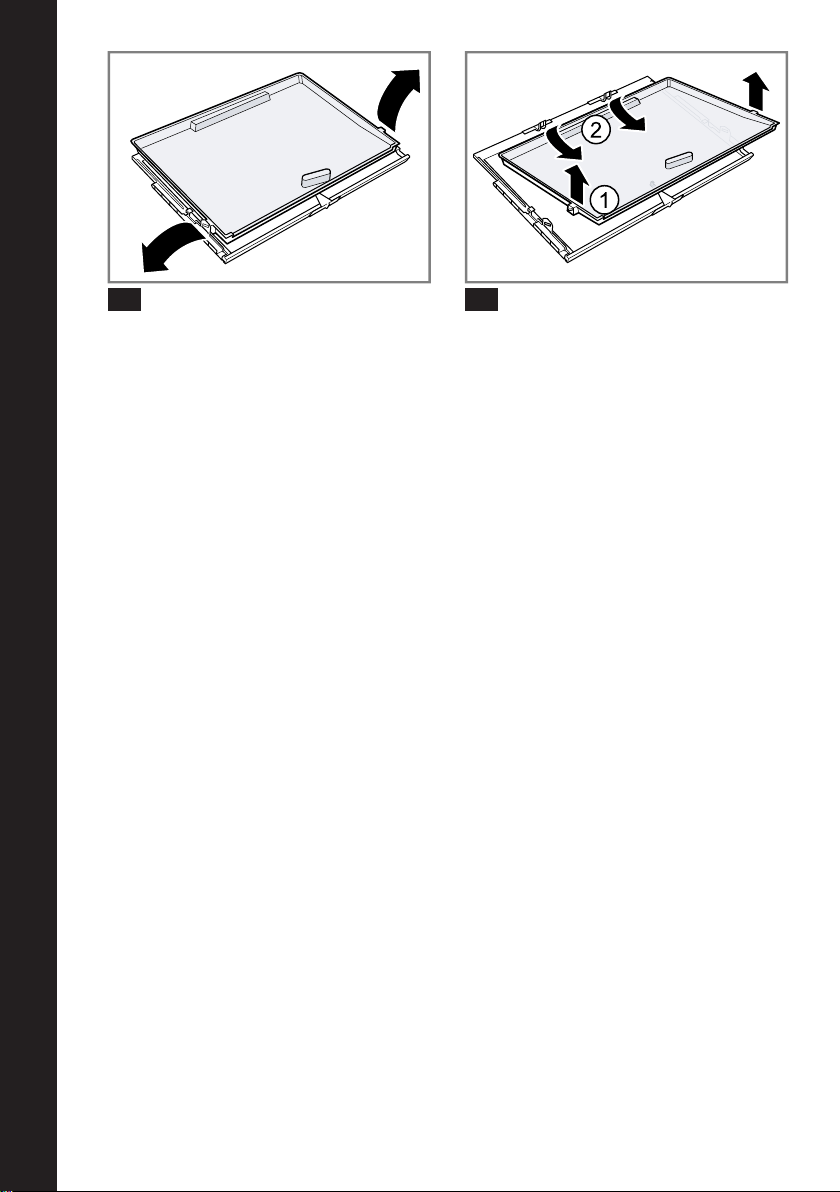
Ablage über dem Gemüsebehälter entnehmen
1. Den Obst- und Gemüsebehälter
herausziehen.
2. Die Ablage entnehmen und um-
drehen .
→Abb.
3. Die Befestigungen der unteren
10
Glasplatte nach außen drücken.
→Abb.
4. Die Glasplatte vorne anheben
11
und hinten herausziehen .
→Abb.
12
Reinigen und Pflegen de
21
Page 22
de Störungen beheben
Störungen beheben
Störungen beheben
Kleinere Störungen an Ihrem Gerät können Sie selbst beheben. Nutzen Sie die
Informationen zur Störungsbehebung, bevor Sie den Kundendienst kontaktieren. So vermeiden Sie unnötige Kosten.
WARNUNG
Stromschlaggefahr!
Unsachgemäße Reparaturen sind gefährlich.
▶
Nur dafür geschultes Fachpersonal darf Reparaturen am Gerät durchführen.
▶
Nur Original-Ersatzteile dürfen zur Reparatur des Geräts verwendet werden.
▶
Wenn die Netzanschlussleitung dieses Geräts beschädigt wird, muss sie
durch den Hersteller oder seinen Kundendienst oder eine ähnlich qualifizierte
Person ersetzt werden, um Gefährdungen zu vermeiden.
Funktionsstörungen
Störung Ursache Störungsbehebung
Gerät funktioniert nicht.
Keine Anzeige leuchtet.
Netzstecker sitzt nicht fest.
Sicherung wurde ausgelöst.
Strom ist ausgefallen. 1. Prüfen Sie, ob Strom vorhanden ist.
Gerät kühlt nicht, Anzeigen
und Beleuchtung leuchten.
Ausstellungsmodus ist eingeschaltet.
LED-Lampe ist defekt. Unterschiedliche Ursachen
sind möglich.
Kältemaschine schaltet häufiger und länger ein.
Gerätetür wurde häufig geöffnet.
Lüftungsöffnungen sind verdeckt.
Boden des Kühlfachs ist
nass.
Tauwasserrinne oder Ablaufloch sind verstopft.
▶
Schließen Sie den Netzstecker an.
▶
Prüfen Sie die Sicherungen.
2. Kälteakkus, wenn vorhanden, auf
die oberste Ablage legen.
▶
Führen Sie den Geräteselbsttest
durch. →Seite25
a Nach Ablauf des Geräteselbsttest
geht das Gerät in den Normalbetrieb über.
▶
Rufen Sie den Kundendienst.
→"Kundendienst", Seite25
▶
Öffnen Sie die Gerätetür nicht unnötig.
▶
Entfernen Sie Hindernisse vor den
Lüftungsöffnungen.
▶
Reinigen Sie die Tauwasserrinne
und das Ablaufloch. →Seite20
Hinweise im Anzeigefeld
Störung Ursache Störungsbehebung
Meldung mit "D" oder "E" erscheint im Display.
22
Die Elektronik hat einen Fehler erkannt.
▶
Rufen Sie den Kundendienst.
→"Kundendienst", Seite25
Page 23
Störungen beheben de
Störung Ursache Störungsbehebung
Warnton ertönt und
leuchtet.
Unterschiedliche Ursachen
sind möglich.
Gerätetür ist offen.
▶
Drücken Sie .
a Der Alarm wird ausgeschaltet.
▶
Schließen Sie die Gerätetür.
Temperaturproblem
Störung Ursache Störungsbehebung
Temperatur weicht stark von
der Einstellung ab.
Unterschiedliche Ursachen
sind möglich.
1. Schalten Sie das Gerät aus.
→Seite17
2. Schalten Sie das Gerät nach ca.
5Minuten wieder ein. →Seite17
‒ Wenn die Temperatur zu
warm ist, prüfen Sie die Temperatur nach ein paar Stunden erneut.
‒ Wenn die Temperatur zu kalt
ist, prüfen Sie die Temperatur am Folgetag erneut.
Geräusche
Störung Ursache Störungsbehebung
Gerät brummt. Kein Fehler. Ein Motor läuft,
Keine Handlung notwendig.
z.B. Kälteaggregat, Ventilator.
Gerät blubbert, surrt oder
gurgelt.
Gerät klickt. Kein Fehler. Motor, Schalter
Kein Fehler. Kältemittel fließt
durch die Rohre.
Keine Handlung notwendig.
Keine Handlung notwendig.
oder Magnetventile schalten
ein oder aus.
Gerät macht Geräusche. Gerät steht uneben.
▶
Richten Sie das Gerät mit Hilfe einer Wasserwaage aus. Falls nötig
legen Sie etwas unter.
Ausstattungsteile wackeln
oder klemmen.
▶
Prüfen Sie die herausnehmbaren
Ausstattungsteile und setzen Sie
diese eventuell neu ein.
Flaschen oder Gefäße berühren sich.
▶
Rücken Sie die Flaschen oder Gefäße auseinander.
23
Page 24

de Störungen beheben
Gerüche
Störung Ursache Störungsbehebung
Gerät riecht unangenehm. Unterschiedliche Ursachen
sind möglich.
1. Bereiten Sie das Gerät zum Reini-
gen vor. →Seite19
2. Reinigen Sie das Gerät. →Seite20
3. Reinigen Sie alle Lebensmittelver-
packungen.
4. Um Geruchsbildung zu vermeiden,
verpacken Sie stark riechende Lebensmittel luftdicht.
5. Prüfen Sie nach 24Stunden, ob es
erneut zu Geruchsbildung gekommen ist.
24
Page 25
Lagern und Entsorgen de
Geräteselbsttest durchführen
1.
Das Gerät ausschalten. →Seite17
2. Das Gerät nach ca. 5Minuten wie-
der einschalten. →Seite17
3. Innerhalb von 10Sekunden nach
dem Einschalten für 3 bis
5Sekunden gedrückt halten.
a Der Geräteselbsttest startet.
a Während des Geräteselbsttests er-
tönt zwischendurch ein langes
akustisches Signal.
a Wenn nach Ende des Geräte-
selbsttest 2 akustische Signale ertönen und die Temperaturanzeige
die eingestellte Temperatur zeigt,
ist Ihr Gerät in Ordnung. Das Gerät
geht in den Normalbetrieb über.
a Wenn nach Ende des Geräte-
selbsttests 5 akustische Signale
ertönen und für 10Sekunden
blinkt, den Kundendienst benachrichtigen.
Lagern und Entsorgen
Lagern und Entsorgen
Erfahren Sie hier, wie Sie Ihr Gerät
für die Lagerung vorbereiten. Außerdem erfahren Sie, wie Sie Altgeräte
entsorgen.
Gerät außer Betrieb nehmen
Altgerät entsorgen
Durch umweltgerechte Entsorgung
können wertvolle Rohstoffe wiederverwendet werden.
WARNUNG
Gefahr von Gesundheitsschäden!
Kinder können sich im Gerät einsperren und in Lebensgefahr geraten.
▶
Um Kindern das Hineinklettern zu
erschweren, Ablagen und Behälter
nicht aus dem Gerät nehmen.
▶
Kinder vom ausgedienten Gerät
fernhalten.
1. Den Netzstecker der Netzan-
schlussleitung ziehen.
2. Die Netzanschlussleitung durch-
trennen.
3. Das Gerät umweltgerecht entsor-
gen.
Dieses Gerät ist entsprechend
der europäischen Richtlinie
2012/19/EU über Elektro- und
Elektronikaltgeräte (waste electrical and electronic equipment
– WEEE) gekennzeichnet.
Die Richtlinie gibt den Rahmen
für eine EU-weit gültige Rücknahme und Verwertung der Altgeräte vor.
1.
Das Gerät ausschalten. →Seite17
2. Das Gerät vom Stromnetz trennen.
Den Netzstecker der Netzanschlussleitung ziehen oder die Sicherung im Sicherungskasten ausschalten.
3.
Das Gerät abtauen. →Seite19
4.
Das Gerät reinigen. →Seite20
5. Die Gerätetür offen lassen.
Kundendienst
Kundendienst
Wenn Sie Fragen haben, eine Störung am Gerät nicht selbst beheben
können oder das Gerät repariert werden muss, wenden Sie sich an unseren Kundendienst.
Viele Probleme können Sie durch die
Information zur Störungsbehebung in
dieser Anleitung oder auf unserer
Webseite selbst beheben. Falls dies
nicht der Fall ist, wenden Sie sich an
unseren Kundendienst.
25
Page 26
de Technische Daten
5
5
Wir finden immer eine passende Lösung und versuchen unnötige Besuche der Kundendiensttechniker zu
vermeiden.
Wir stellen sicher, dass Ihr Gerät mit
Original-Ersatzteilen von geschulten
Kundendiensttechnikern im Garantiefall und nach Ablauf der Herstellergarantie repariert wird.
Aus Sicherheitsgründen darf nur geschultes Fachpersonal Reparaturen
am Gerät durchführen. Der Garantieanspruch erlischt, wenn Reparaturen
oder Eingriffe von Personen vorgenommen werden, die hierzu von uns
nicht ermächtigt sind, oder wenn unsere Geräte mit Ersatzteilen, Ergänzungs- oder Zubehörteilen versehen
werden, die keine Originalteile sind
und dadurch ein Defekt verursacht
wird.
Funktionsrelevante Original-Ersatzteile gemäß der entsprechenden Ökodesign-Verordnung erhalten Sie bei
unserem Kundendienst für die Dauer
von mindestens 10 Jahren ab dem
Inverkehrbringen Ihres Geräts innerhalb des Europäischen Wirtschaftsraums.
Hinweis:Der Einsatz des Kundendiensts ist im Rahmen der jeweils lokal geltenden Herstellergarantiebedingungen kostenlos. Die Mindestdauer der Garantie (Herstellergarantie für Privatverbraucher) im Europäischen Wirtschaftsraum beträgt 2 Jahre (mit Ausnahme von Dänemark und
Schweden, dort beträgt die Dauer 1
Jahr) gemäß den geltenden lokalen
Garantiebedingungen. Die Garantiebedingungen haben keine Auswirkungen auf andere Rechte oder Ansprüche, die Ihnen nach lokalem Recht
zustehen.
Detaillierte Informationen über die
Garantiezeit und die Garantiebedingungen in Ihrem Land erhalten Sie
bei unserem Kundendienst, Ihrem
Händler oder auf unserer Webseite.
Wenn Sie den Kundendienst kontaktieren, benötigen Sie die Erzeugnisnummer (E-Nr.) und die Fertigungsnummer (FD) Ihres Geräts.
Die Kontaktdaten des Kundendiensts
finden Sie im beiliegenden Kundendienstverzeichnis oder auf unserer
Webseite.
Erzeugnisnummer (E-Nr.) und Fertigungsnummer (FD)
Die Erzeugnisnummer (E-Nr.) und die
Fertigungsnummer (FD) finden Sie
auf dem Typenschild des Geräts.
→Abb.1/
Um Ihre Gerätedaten und die Kundendienst-Telefonnummer schnell
wiederzufinden, können Sie die Daten
notieren.
Technische Daten
Technische Daten
Kältemittel, Nutzinhalt und weitere
technische Angaben befinden sich
auf dem Typenschild.
→Abb.1/
Weitere Informationen zu Ihrem Modell finden Sie im Internet unter https://www.bsh-group.com/
energylabel1. Diese Webadresse verlinkt auf die offizielle EU-Produktdatenbank EPREL, deren Webadresse
zum Zeitpunkt der Drucklegung noch
nicht veröffentlicht war. Bitte folgen
Sie dann den Anweisungen der Modelsuche. Die Modellkennung ergibt
sich aus den Zeichen vor dem
Schrägstrich der Erzeugnisnummer
(E-Nr.) auf dem Typenschild. Alterna-
1
Gilt nur für Länder im Europäischen Wirtschaftsraum
26
Page 27

tiv finden Sie die Modellkennung
auch in der ersten Zeile des EU-Energielabels.
Technische Daten de
27
Page 28

en
Table of contents
Safety.............................................30
General information........................30
Intended use...................................30
Restriction on user group...............31
Safe transport.................................31
Safe installation ..............................31
Safe use .........................................32
Damaged appliance.......................34
Preventing material damage ........36
Environmental protection and
saving energy................................36
Disposing of packaging .................36
Saving energy.................................36
Installation and connection..........37
Scope of delivery............................37
Installing and connecting the ap-
pliance............................................37
Criteria for the installation loca-
tion..................................................37
Preparing the appliance for the
first time..........................................38
Connecting the appliance to the
electricity supply.............................38
Familiarising yourself with
your appliance...............................38
Appliance .......................................38
Controls ..........................................39
Features.........................................39
Shelf................................................39
Variable shelf..................................39
Extendable shelf.............................39
Fruit and vegetable container
with humidity control ......................39
Butter and cheese compartment ...40
Door racks......................................40
Accessories....................................40
Basic operation .............................40
Switching on the appliance............40
Operating tips.................................40
Switching off the appliance ............40
Setting the temperature..................40
Additional functions .....................41
Super cooling ................................41
Alarm..............................................41
Door alarm .....................................41
Refrigerator compartment............41
Tips for storing food in the refri-
gerator compartment .....................41
Chill zones in the refrigerator
compartment ..................................42
"OK" sticker ....................................42
Defrosting......................................42
Defrosting in the refrigerator
compartment ..................................42
Cleaning and servicing.................42
Preparing the appliance for
cleaning..........................................42
Cleaning the appliance ..................43
Cleaning the condensation
channel and drainage hole ............43
Removing the fittings......................43
Troubleshooting............................45
Malfunctions ...................................45
Information on display panel..........46
Temperature problem.....................46
Noise ..............................................46
Odours............................................47
Conducting an appliance self-
test..................................................48
Storage and disposal....................48
Switching off the appliance ............48
Disposing of old appliance ............48
Customer Service..........................48
Product number (E-Nr.) and pro-
duction number (FD) ......................49
28
Page 29

Technical data...............................49
en
29
Page 30

en Safety
Safety
Please read the safety information to ensure that you use the appliance safely.
This appliance complies with the relevant safety regulations for
electrical appliances and is fitted with noise suppression.
General information
You can find general information about this instruction manual
here.
¡ Read this instruction manual carefully. Only this will ensure you
use the appliance safely and efficiently.
¡ This manual is intended for the user of the appliance.
¡ Follow the safety instructions and warnings.
¡ Keep the instruction manual and the product information safe
for future reference or for the next owner.
¡ Check the appliance after unpacking it. Do not connect the ap-
pliance if it has been damaged in transit.
Intended use
Read the information on intended use to ensure that you use the
appliance correctly and safely.
This appliance is only intended to be fully fitted in a kitchen. Observe the special installation instructions.
Only use this appliance:
¡ As specified in this instruction manual.
¡ For chilling food.
¡ In private households and in enclosed spaces in a domestic en-
vironment.
¡ Up to an altitude of max. 2000m above sea level.
30
Page 31

Safety en
Restriction on user group
Avoid risks to children and vulnerable persons.
This appliance may be used by children aged 8 or over and by
people who have reduced physical, sensory or mental abilities or
inadequate experience and/or knowledge, provided that they are
supervised or have been instructed on how to use the appliance
safely and have understood the resulting dangers.
Children must not play with the appliance.
Cleaning and user maintenance must not be performed by children unless they are being supervised.
Keep children under the age of 8 years away from the appliance
and power cable.
Children above the age of three years old and younger than eight
years old may load and unload the the fridge-freezer.
Safe transport
Follow these safety instructions when transporting the appliance.
WARNING‒Risk of injury!
The high weight of the appliance may result in injury when lifted.
▶
Do not lift the appliance on your own.
Safe installation
Follow these safety instructions when installing the appliance.
WARNING‒Risk of electric shock!
Improper installation is dangerous.
▶
Connect and operate the appliance only in accordance with
the specifications on the rating plate.
▶
Connect the appliance to a power supply with alternating
current only via a properly installed socket with earthing.
▶
The protective conductor system of the domestic electrical
installation must be properly installed.
▶
Never equip the appliance with an external switching
device, e.g. a timer or remote control.
31
Page 32

en Safety
▶
When the appliance is installed, the mains plug of the
power cord must be freely accessible. If free access is not
possible, an all-pole isolating switch must be installed in the
permanent electrical installation according to the installation
regulations.
▶
When installing the appliance, check that the power cable is
not trapped or damaged.
WARNING‒Risk of fire!
¡ It is dangerous to use an extended power cord and non-ap-
proved adapters.
▶
Do not use extension cables or multiple socket strips.
▶
If the power cord is too short, contact Customer Service.
▶
Only use adapters approved by the manufacturer.
¡
Portable multiple socket strips or portable power supply units
may overheat and cause a fire.
▶
Do not position portable multiple socket strips or portable
power supply units behind the appliance.
Safe use
Follow these safety instructions when using the appliance.
WARNING‒Risk of electric shock!
¡ If the insulation of the power cord is damaged, this is danger-
ous.
▶
Never let the power cord come into contact with hot appliance parts or heat sources.
▶
Never let the power cord come into contact with sharp
points or edges.
▶
Never kink, crush or modify the power cord.
¡ An ingress of moisture can cause an electric shock.
▶
Only use the appliance in enclosed spaces.
▶
Never expose the appliance to intense heat or humidity.
▶
Do not use steam- or high-pressure cleaners to clean the
appliance.
32
Page 33

Safety en
WARNING‒Risk of suffocation!
¡ Children may put packaging material over their heads or wrap
themselves up in it and suffocate.
▶
Keep packaging material away from children.
▶
Do not let children play with packaging material.
¡ Children may breathe in or swallow small parts, causing them
to suffocate.
▶
Keep small parts away from children.
▶
Do not let children play with small parts.
WARNING‒Risk of explosion!
¡ Electrical devices within the appliance may explode (e.g. heat-
ers or electric ice makers).
▶
Do not operate electrical devices within the appliance.
¡ Mechanical devices or other devices may damage the refri-
geration circuit; flammable refrigerant may escape and explode.
▶
To accelerate the defrosting process, do not use any other
mechanical devices or devices other than those recommended by the manufacturer.
¡ Products which contain flammable propellants and explosive
substances may explode, e.g. spray cans.
▶
Do not store products which contain flammable propellants
(e.g. spray cans) or explosive substances in the appliance.
WARNING‒Risk of fire!
The vapours from flammable liquids may catch fire (explosion).
▶
Store high-percentage alcohol tightly closed and standing
up.
WARNING‒Risk of injury!
¡ Injury to the eyes caused by escaping flammable refrigerant
and hazardous gases.
▶
Do not damage the pipes of the refrigerant circuit or the insulation.
33
Page 34

en Safety
¡ The appliance may tip.
▶
Do not stand or support yourself on the base, runners or
doors.
WARNING‒Risk of burns!
Individual parts of the appliance become hot during operation.
▶
Never touch these hot parts.
▶
Keep children at a safe distance.
CAUTION‒Risk of harm to health!
To prevent food from being contaminated, you must observe
the following instructions.
▶
If the door is open for an extended period of time, this may
lead to a considerable temperature increase in the compartments of the appliance.
▶
Regularly clean the surfaces that may come into contact
with food and accessible drain systems.
▶
Store raw meat and fish in suitable containers in the refrigerator so that they do not touch or drip on other food.
▶
If the fridge/freezer is empty for an extended period of time,
switch off the appliance, defrost it, clean it and leave the
door open to prevent the formation of mould.
Damaged appliance
Follow the safety instructions if your appliance is damaged.
WARNING‒Risk of electric shock!
¡ If the appliance or the power cord is damaged, this is danger-
ous.
▶
Never operate a damaged appliance.
▶
Never operate an appliance with a cracked or fractured surface.
▶
Never pull on the power cord to unplug the appliance. Always unplug the appliance at the mains.
▶
If the appliance or the power cord is damaged, immediately
unplug the power cord or switch off the fuse in the fuse box.
▶
Call Customer Service. →Page48
34
Page 35

Safety en
▶
Repairs to the appliance should only be carried out by
trained specialist staff.
¡ Improper repairs are dangerous.
▶
Repairs to the appliance should only be carried out by
trained specialist staff.
▶
Only use genuine spare parts when repairing the appliance.
▶
If the power cord of this appliance is damaged, it must be
replaced by the manufacturer, the manufacturer's Customer
Service or a similarly qualified person in order to prevent
any risk.
WARNING‒Risk of fire!
If the tubes are damaged, flammable refrigerant and harmful
gases may escape and ignite.
▶
Keep naked flames and ignition sources away from the appliance.
▶
Ventilate the room.
▶
Switch off the appliance. →Page40
▶
Unplug the appliance from the mains or switch off the circuit breaker in the fuse box.
▶
Call after-sales service. →Page48
35
Page 36

en Preventing material damage
Preventing material damage
Preventing material damage
Follow these instructions to prevent
material damage to your appliance,
accessories or other objects in your
kitchen.
ATTENTION!
¡ Contamination with oil or fat may
cause plastic parts and door seals
to become porous.
▶
Keep plastic parts and door
seals free of oil and grease.
¡ Using the base, runners or appli-
ance doors as a seat surface or
climbing surface may damage the
appliance.
▶
Do not stand or support yourself
on the base, runners or doors.
Environmental protection and saving energy
Environmental protection
and saving energy
Help protect the environment by using your appliance in a way that conserves resources and by disposing of
reusable materials properly.
Disposing of packaging
Saving energy
If you follow these instructions, your
appliance will use less power.
Selecting the installation location
Follow these instructions when installing your appliance.
¡ Keep the appliance out of direct
sunlight.
¡ Install the appliance as far away
as possible from heating elements, cookers and other heat
sources:
– Maintain a 30mm clearance to
electric or gas cookers.
– Maintain a 30cm clearance to
oil or solid-fuel cookers.
The appliance needs to cool less
frequently at low ambient temperatures.
¡ Use a niche depth of 560mm.
¡ Do not cover or block ventilation
openings.
¡ Ventilate the room daily.
The air on the back wall of the appliance does not warm up so intensely.
The appliance must cool less frequently.
The packaging materials are environmentally compatible and can be recycled.
▶
Sort the individual components by
type and dispose of them separately.
Information about current disposal
methods are available from your
specialist dealer or local authority.
36
Saving energy during use
Follow these instructions when using
your appliance.
Note:The arrangement of the fittings
does not affect the energy consumption of the appliance.
¡ Do not cover or block ventilation
openings.
The air on the back wall of the ap-
pliance does not warm up so intensely.
Page 37

5
Installation and connection en
¡ Open the appliance door only
briefly.
¡ Transport purchased food in a
cool bag and place in the appliance quickly.
¡ Allow warm food and drinks to
cool down before placing them in
the appliance.
¡ Thaw frozen food in the refriger-
ator compartment to utilise the low
temperature of the food.
The air in the appliance does not
warm up so intensely.
The appliance must cool less frequently.
¡ Always leave some space
between the food and to the back
panel.
¡ Pack the food airtight.
The air can circulate and the air
humidity remains constant.
Installation and connection
Installation and connection
You can find out where and how best
to install your appliance here. You
will also learn how to connect your
appliance to the power supply.
¡ Installation material
¡ Installation instructions
¡ Operating instructions
¡ Customer service booklet
¡ Warranty enclosure
2
¡ Energy label
¡ Product data sheet
¡ Information on the energy con-
sumption and noises
Installing and connecting the appliance
Requirement:The scope of delivery
of the appliance is checked.
→Page37
1. Observe the criteria for the appli-
ance's installation location.
→Page37
2. Install the appliance in accordance
with the enclosed installation instructions.
3. Prepare the appliance for first use.
→Page38
4. Electrically connect the appliance.
→Page38
Criteria for the installation location
Follow these instructions when installing your appliance.
Scope of delivery
After unpacking all parts, check for
any transport damage and check the
completeness of the delivery.
If you have any complaints, contact
your dealer or our after-sales service
→Page48.
The delivery consists of the following:
¡ Built-in appliance
¡ Equipment and accessories
1
Depending on the appliance specifications
2
Not in all countries
WARNING
Risk of explosion!
If the appliance is in a space that is
too small, a leak in the refrigeration
circuit may result in a flammable mixture of gas and air.
▶
Only install the appliance in a
space with a volume of at least
1m3 per 8g refrigerant. The
1
volume of refrigerant is indicated
on the rating plate. →Fig.1/
37
Page 38

en Familiarising yourself with your appliance
5
5
1
2
3
4
5
The weight of the appliance ex works
may be up to 50kg depending on
the model.
The subfloor must be of sufficient stability to bear the weight of the appliance.
Permitted room temperature
The permitted room temperature depends on the appliance's climate
class.
The climate class can be found on
the rating plate. →Fig.1/
Climate class Permitted room temperat-
ure
SN 10°C to 32°C
N 16°C to 32°C
ST 16°C to 38°C
T 16°C to 43°C
The appliance is fully functional within
the permitted room temperature.
If an appliance with climate class SN
is operated at colder room temperatures, the appliance will not be damaged up to a room temperature of
5°C.
Niche dimensions
Observe the niche dimensions if you
install your appliance in the furniture
recess. If this is not the case, problems may occur when installing the
appliance.
Niche depth
Install the appliance in the recommended niche depth of 560mm.
If the niche depth is smaller, the energy consumption increases slightly.
The niche depth must be a minimum
550mm.
Niche width
An inside niche width of at least
560mm is required for the appliance.
Preparing the appliance for the first time
1. Remove the informative material.
2. Remove the protective foil and
transit bolts, e.g. remove the adhesive strips and carton.
3. Clean the appliance for the first
time. →Page43
Connecting the appliance to the electricity supply
1. Insert the mains plug of the appli-
ance's power cable in a socket
nearby.
The connection data of the appliance can be found on the rating
plate. →Fig.1/
2. Check the mains plug is inserted
properly.
a The appliance is now ready for
use.
Familiarising yourself with your appliance
Familiarising yourself
with your appliance
Familiarise yourself with the parts of
your appliance.
Appliance
You can find an overview of the parts
of your appliance here.
→Fig.
1
Controls
Variable shelf →Page39
Extendable shelf →Page39
Fruit and vegetable container with hu-
midity control →Page39
Rating plate
38
Page 39

6
7
1
2
3
4
5
Features en
Butter and cheese compartment
→Page40
Door storage compartment for large
bottles
Note:Deviations between your appliance and the diagrams may differ
with regard to their features and size.
Controls
The controls are used to configure all
functions of your appliance and to
obtain information about the operating status.
→Fig.
Features
2
switches the warning signal off.
/ sets the temperature of the refri-
gerator compartment.
Displays the set temperature for the
refrigerator compartment in°C.
switches Super cooling on or off.
switches the appliance on or off.
Features
Here you can see an overview of the
features of your appliance and their
use.
The features of your appliance depend on the model.
Shelf
To vary the shelves as required, remove the shelf and re-insert it elsewhere.
→"Removing the shelf", Page43
Variable shelf
Use the variable shelf to the store tall
items, e.g. cans or bottles, on the
shelf below. You can remove the
front section of the variable shelf and
slide it below the rear part of the
shelf.
→Fig.
3
Extendable shelf
In order to achieve an improved overview and to remove food more
quickly, remove the shelf.
Fruit and vegetable container with humidity control
Store fresh fruit and vegetables in the
fruit and vegetable container.
You can adjust the humidity in the
fruit and vegetable container via the
humidity controller and a special
seal. This allows fresh fruit and vegetables to be stored for twice as long
as with conventional storage.
→Fig.
The air humidity in the fruit and
vegetable container can be set
according to the type and amount of
food to be stored:
¡ Low humidity required when
¡ Higher humidity required when
Condensation may form in the fruit
and vegetable container depending
on the food and quantity stored.
Remove the condensation with a dry
cloth and adjust the air humidity in
the vegetable container using the humidity controller.
To ensure that the quality and aroma
are retained, store fruit and vegetables that are sensitive to cold outside of the appliance at temperatures
of approx. 8°C to 12°C.
4
primarily storing fruit or if the appliance is very full.
primarily storing vegetables as well
as when the appliance is filled with
mixed items or is not very full.
39
Page 40

en Basic operation
Fruit that is sensitive
to cold
Vegetables that are
sensitive to cold
¡ Pineapples
¡ Bananas
¡ Mangoes
¡ Papayas
¡ Citrus fruits
¡ Aubergines
¡ Gherkins
¡ Courgettes
¡ Peppers
¡ Tomatoes
¡ Potatoes
Butter and cheese compartment
Store butter and hard cheese in the
butter and cheese compartment.
Door racks
To adjust the door racks as required,
remove the door rack and re-insert
elsewhere.
→"Removing door racks", Page43
Accessories
Only use original accessories. These
have been made especially for your
appliance. Here you can find an overview of your appliance's accessories
and how to use them.
The accessories for your appliance
depend on the model.
Egg tray
Store eggs safely on the egg tray.
Bottle holder
The bottle holder prevents bottles
from falling over when the appliance
door is opened and closed.
→Fig.
5
Basic operation
Basic operation
You can find out everything you need
to know about operating your appliance here.
Switching on the appliance
1. Press .
a The appliance begins to cool.
2. Set the required temperature.
→Page40
Operating tips
¡ Once you have switched on the
appliance, the set temperature is
only reached after several hours.
Do not put in any food in the appliance until the temperature is
reached.
Switching off the appliance
▶
Press .
a The appliance stops cooling.
Setting the temperature
After you have switched on the appliance, you can set the temperature.
Setting the refrigerator compartment temperature
▶
Press / repeatedly until the temperature display shows the required temperature.
The recommended temperature in
the refrigerator compartment is
4°C.
→""OK" sticker", Page42
40
Page 41

Additional functions en
Additional functions
Additional functions
Find out which additional functions
which can be used for your appliance.
Super cooling
Super cooling cools the refrigerator
compartment to make it as cold as
possible. This cools food and drinks
quickly through.
Switch on Super cooling before placing large quantities of food in the
freezer compartment.
Note:When Super cooling is
switched on, increased noise may
occur.
Switching on Super cooling
▶
Press .
a lights up.
Note:After approx. 15hours, the appliance switches to normal operation.
Switching off Super cooling
▶
Press .
a The previously set temperature is
displayed.
Alarm
Alarm
Your appliance is equipped with
alarm functions.
Door alarm
If the appliance door is open for a
longer period, the door alarm
switches on.
Refrigerator compartment
Refrigerator compartment
You can keep meat, sausage, fish,
dairy products, eggs, ready meals
and pastries in the refrigerator compartment.
You can set the temperature in the
refrigerator compartment from 2°C
to 8°C.
The recommended temperature in
the refrigerator compartment is 4°C.
→""OK" sticker", Page42
The refrigerator compartment can
also be used to store highly perishable foods in the short to medium
term. The lower the selected temperature, the longer the food remains
fresh.
Tips for storing food in the refrigerator compartment
Follow the tips if you store food in
your refrigerator compartment.
¡ To ensure that the freshness and
quality of the food is retained for
longer, only store fresh and unspoiled food.
¡ In the case of ready-made
products and bottled goods, do
not exceed the best-before date or
use-by date specified by the manufacturer.
¡ To retain aroma, colour and fresh-
ness or to prevent taste transfer
and discolouration of the plastic
parts, store food well wrapped or
covered.
¡ Leave warm food and beverages
to cool down before placing them
in the refrigerator compartment.
Switching off the warning signal (door alarm)
▶
Close the appliance door or press
.
a The warning tone is switched off.
41
Page 42

en Defrosting
Chill zones in the refrigerator compartment
The air circulation in the refrigerator
compartment creates different chill
zones.
Coldest zone
The coldest zone is between the arrow stamped on the side and the
shelf underneath.
Tip:Store perishable food (e.g. fish,
sausage, meat) in the coldest zone.
Warmest zone
The warmest zone is at the very top
of the door.
Tip:Store food that does not spoil
easily in the warmest zone, e.g. hard
cheese and butter. Cheese can then
continue to release its aroma and the
butter will still be easy to spread.
"OK" sticker
The "OK" sticker lets you check
whether the refrigerator compartment
reaches the safe temperature ranges
of +4°C or colder recommended for
food.
The "OK" sticker is not included with
all models.
If the sticker does not indicate "OK",
gradually reduce the temperature.
→"Setting the refrigerator compart-
ment temperature", Page40
Once the appliance is switched on, it
may take up to 12hours until the set
temperature is reached.
Correct setting
Defrosting
Defrosting
Observe the information when you
want to defrost your appliance.
Defrosting in the refrigerator compartment
When the appliance is operating,
condensation droplets or frost form
on the rear panel of the refrigerator
compartment due to functional reasons. The back panel in the refrigerator compartment defrosts automatically.
Condensation or frost run through the
condensation channel into the drainage hole to the evaporation pan and
do not have to be wiped away.
To ensure that the condensation can
drain and odours do not form, observe the following information:
→"Cleaning the condensation chan-
nel and drainage hole", Page43.
Cleaning and servicing
Cleaning and servicing
To keep your appliance working efficiently for a long time, it is important
to clean and maintain it carefully.
Preparing the appliance for cleaning
Find out how to prepare your appliance for cleaning.
1. Switch off the appliance.
→Page40
2. Disconnect the appliance from the
power supply.
Unplug the appliance from the
mains or switch off the circuit
breaker in the fuse box.
3. Take out all of the food and store it
in a cool location.
42
Page 43

Cleaning and servicing en
Place ice packs (if available) onto
the food.
4. If there is a layer of hoarfrost, allow
this to defrost.
5. Remove all fittings from the appli-
ance. →Page43
Cleaning the appliance
Clean the appliance as specified to
ensure that it is not damaged by incorrect cleaning or unsuitable cleaning products.
WARNING
Risk of electric shock!
¡ An ingress of moisture can cause
an electric shock.
▶
Do not use steam- or high-pressure cleaners to clean the appliance.
¡ Liquid in the lighting can be dan-
gerous.
▶
The rinsing water must not run
into the light.
ATTENTION!
¡ Unsuitable cleaning products may
damage the surfaces of the appliance.
▶
Do not use hard scouring pads
or cleaning sponges.
▶
Do not use harsh or abrasive
detergents.
▶
Do not use cleaning products
with a high alcohol content.
¡ If you clean fittings and accessor-
ies in the dishwasher, this may
cause them to become deformed
or discolour.
▶
Never clean shelves or containers in the dishwasher.
1. Prepare the appliance for cleaning.
→Page42
2. Clean the appliance, the fittings
and the door seals clean with a
dish cloth, lukewarm water and a
little pH-neutral washing-up liquid.
3. Dry thoroughly with a soft, dry
cloth.
4. Insert the fittings.
5. Electrically connect the appliance.
→Page38
6. Switch on the appliance.
→Page40
7. Putting the food into the appliance.
Cleaning the condensation channel and drainage hole
Regularly clean the condensation
channel and drainage hole to ensure
that the condensation can drain.
▶
Carefully clean the condensation
channel and the drainage hole,
e.g. using a moistened cotton bud.
→Fig.
6
Removing the fittings
If you want to clean the fittings thoroughly, remove these from your appliance.
Removing the shelf
▶
Pull out and remove the shelf.
Removing the extendable shelf
1. Pull out the extendable shelf until
the locking catch is released.
→Fig.
2. Lower the shelf and swing it out to
the side.
Removing door racks
▶
Lift the door rack upwards and remove it.
→Fig.
7
8
43
Page 44

en Cleaning and servicing
Removing the fruit and vegetable container
1. Pull the container out all the way.
2. Lift the container at the front and
remove it .
→Fig.
9
Removing the shelf above the vegetable container
1. Pull out the fruit and vegetable
container.
2. Remove the shelf and rotate .
→Fig.
3. Press the fastenings for the lower
10
glass plate outwards.
→Fig.
4. Lift the glass plate at the front
11
and pull it out at the rear .
→Fig.
12
44
Page 45

Troubleshooting en
Troubleshooting
Troubleshooting
You can rectify minor faults on your appliance yourself. Read the troubleshooting information before contacting after-sales service. This will avoid unnecessary costs.
WARNING
Risk of electric shock!
Improper repairs are dangerous.
▶
Repairs to the appliance should only be carried out by trained specialist
staff.
▶
Only use genuine spare parts when repairing the appliance.
▶
If the power cord of this appliance is damaged, it must be replaced by the
manufacturer, the manufacturer's Customer Service or a similarly qualified
person in order to prevent any risk.
Malfunctions
Fault Cause troubleshooting
The appliance is not working.
No displays light up.
The mains plug has not been
inserted properly.
Fuse has been tripped.
The power has failed. 1. Check whether the power is on.
The appliance is not cooling,
the displays and lighting
Showroom mode is switched
on.
light up.
The LED lamp is defective. Different causes are pos-
sible.
The refrigeration unit is
switching on more frequently and for longer.
The appliance door was
opened frequently.
The ventilation openings are
covered up.
The base of the refrigerator
compartment is wet.
The condensation channel
or drainage hole are
blocked.
▶
Connect the mains plug.
▶
Check the fuses.
2. Place ice packs (if available) on the
top shelf.
▶
Carry out the appliance self-test.
→Page48
a Once the appliance self-test has
ended, the appliance switches to
normal operation.
▶
Call the after-sales service.
→"Customer Service", Page48
▶
Do not open appliance door unnecessarily.
▶
Remove any obstructions from in
front of the ventilation openings.
▶
Clean the condensation channel
and the drainage hole. →Page43
45
Page 46

en Troubleshooting
Information on display panel
Fault Cause troubleshooting
Message showing "D" or "E"
appears in the display.
A warning signal sounds and
lights up.
The electronics have detected a fault.
Different causes are possible.
The appliance door is open.
▶
Call the after-sales service.
→"Customer Service", Page48
▶
Press .
a The alarm is switched off.
▶
Close the appliance door.
Temperature problem
Fault Cause troubleshooting
The temperature differs
greatly from the setting.
Different causes are possible.
1. Switch off the appliance.
→Page40
2. Switch the appliance back on after
fiveminutes. →Page40
‒ If the temperature is too
warm, check the temperature
again after a couple of hours.
‒ If the temperature is too cold,
check the temperature again
on the following day.
Noise
Fault Cause troubleshooting
Appliance has a humming
sound.
The appliance bubbles,
buzzes or gargles.
The appliance clicks. Not a fault. Motor, switches
The appliance makes
noises.
46
Not a fault. A motor is running, e.g. refrigerating unit,
fan.
Not a fault. Refrigerant flows
through the pipes.
or solenoid valves are
switching on or off.
The appliance is not level.
Fittings wobble or stick.
Bottles or containers are
touching.
No action required.
No action required.
No action required.
▶
Align the appliance using a spirit
level. If required, place something
underneath it.
▶
Check the removable fittings and, if
required, replace these.
▶
Move the bottles or containers
away from each other.
Page 47

Odours
Fault Cause troubleshooting
The appliance has an unpleasant smell.
Different causes are possible.
1. Prepare the appliance for cleaning.
→Page42
2. Clean the appliance. →Page43
3. Clean all food packaging.
4. To prevent odours from forming,
store strong smelling food in airtight containers.
5. After 24hours, check whether
odours are still forming.
Troubleshooting en
47
Page 48

en Storage and disposal
Conducting an appliance selftest
1. Switch off the appliance.
→Page40
2. Switch the appliance back on after
approx. fiveminutes. →Page40
3. Within the first 10seconds after
switching on, press and hold 3
to 5seconds.
a The appliance self-test starts.
a While the appliance self-test is run-
ning, a long audible signal sounds.
a If, at the end of the appliance self-
test, two audible signals sound
and the temperature display indicates the set temperature, your appliance is OK. The appliance then
switches to normal operation.
a If, at the end of the appliance self-
test, five audible signals sound
and flashes for 10seconds, inform the after-sales service.
Storage and disposal
Storage and disposal
You can find out here how to prepare
your appliance for storage. You will
also find out how to dispose of old
appliances.
Disposing of old appliance
Valuable raw materials can be reclaimed by recycling.
WARNING
Risk of harm to health!
Children can lock themselves in the
appliance, thereby putting their lives
at risk.
▶
Leave shelves and containers inside the appliance to prevent children from climbing in.
▶
Keep children away from the redundant appliance.
1. Unplug the appliance from the
mains.
2. Cut through the power cord.
3. Dispose of the appliance in an en-
vironmentally friendly manner.
This appliance is labelled in accordance with European Directive 2012/19/EU concerning
used electrical and electronic
appliances (waste electrical and
electronic equipment - WEEE).
The guideline determines the
framework for the return and recycling of used appliances as
applicable throughout the EU.
Switching off the appliance
1. Switch off the appliance.
→Page40
2. Disconnect the appliance from the
power supply.
Unplug the appliance from the
mains or switch off the circuit
breaker in the fuse box.
3.
Defrost the appliance. →Page42
4.
Clean the appliance. →Page43
5. Leave the appliance door open.
48
Customer Service
Customer Service
If you have any queries, are unable to
rectify faults on the appliance yourself or if your appliance needs to be
repaired, contact Customer Service.
You can solve many problems yourself by consulting the information on
eliminating faults in this instruction
manual or on our website. If this is
not the case, contact our Customer
Service.
Page 49

5
5
Technical data en
We will always find an appropriate
solution and try to avoid unnecessary
visits being made by a Customer Service technician.
With any warranty claims we will
make sure that your appliance is repaired by trained Customer Service
technicians using original spare
parts, including after the manufacturer's warranty has expired.
For safety reasons repairs to the appliance should only be carried out by
trained specialist staff. The warranty
claim becomes void if repairs or interventions have been carried out by
persons not authorised by us for that
purpose or if our appliances have
been fitted with spare, supplementary
or accessory parts that were not
genuine parts and then resulted in a
defect.
Function-relevant genuine spare parts
according to the corresponding Ecodesign Order can be obtained from
Customer Service for a period of at
least 10 years from the date on
which your appliance was placed on
the market within the European Economic Area.
Note:Under the terms of the manufacturer's warranty applicable to the
location the use of Customer Service
is free of charge. The minimum duration of the warranty (manufacturer's
warranty for private consumers) in
the European Economic Area is 2
years (except for Denmark and
Sweden, where it is 1 year) according to the terms of warranty applicable to the location. The terms of
warranty do not affect other rights or
claims held by yourself under local
legislation.
Detailed information on the warranty
period and terms of warranty in your
country is available from our Customer Service, your retailer or on our
website.
If you contact Customer Service, you
will require the product number (ENr.) and the production number (FD)
of your appliance.
The contact details for Customer Service can be found in the enclosed
Customer Service directory or on our
website.
Product number (E-Nr.) and production number (FD)
You can find the product number (ENr.) and the production number (FD)
on the appliance's rating plate.
→Fig.1/
Make a note of your appliance's details and the Customer Service telephone number to find them again
quickly.
Technical data
Technical data
Refrigerant, cubic capacity and further technical specifications can be
found on the rating plate.
→Fig.1/
More information about your model
can be found online at https://
www.bsh-group.com/energylabel1.
This web address is linked to the official EU EPREL product database. At
the time of printing its web address
had not yet been published. Please
then follow the instructions on
searching for models. The model
identifier is made up of the characters before the slash in the product
number (E-Nr. ) on the rating plate.
1
Only applies to countries in the European Economic Area
49
Page 50

en Technical data
Alternatively you can also find the
model identifier in the first line of the
EU energy label.
50
Page 51

Table des matières
fr
Sécurité..........................................53
Indications générales .....................53
Utilisation conforme........................53
Limitation du groupe d’utilisa-
teurs................................................53
Prescriptions-d’hygiène-alimen-
taire.................................................54
Transport sûr ..................................55
Installation sûre ..............................55
Utilisation sûre................................56
Appareil endommagé.....................59
Prévenir les dégâts matériels.......61
Protection de l’environnement
et économies.................................61
Élimination de l'emballage .............61
Économies d’énergie .....................61
Installation et branchement..........62
Contenu de la livraison ..................62
Installation et raccordement de
l’appareil.........................................62
Critères pour le lieu d'installation...63
Préparation de l'appareil pour la
première utilisation .........................63
Raccordement électrique de
l’appareil.........................................63
Présentation de l’appareil.............64
Appareil ..........................................64
Éléments de commande ................64
Équipement ...................................64
Clayette...........................................64
Rangement variable de la
clayette ...........................................64
Clayette coulissante .......................65
Bac à fruits et légumes avec ré-
gulateur d’humidité.........................65
Casier à beurre et à fromage.........65
Compartiment dans la contre-
porte ...............................................65
Accessoires....................................65
Utilisation de base ........................66
Allumer l’appareil ...........................66
Remarques concernant le fonc-
tionnement de l’appareil.................66
Éteindre l'appareil...........................66
Régler la température ....................66
Fonctions additionnelles..............66
Super-réfrigération .........................66
Alarme............................................67
Alarme de porte .............................67
Compartiment réfrigération..........67
Conseils pour ranger des produits alimentaires dans le com-
partiment réfrigération ....................67
Zones froides dans le comparti-
ment réfrigération ...........................67
Autocollant «OK» .........................68
Dégivrage ......................................68
Dégivrage du compartiment ré-
frigération .......................................68
Nettoyage et entretien ..................68
Préparer l'appareil pour le net-
toyage.............................................68
Nettoyage de l’appareil ..................69
Nettoyer la rigole à eau de dégi-
vrage et le trou d'écoulement ........69
Retirer les pièces d’équipement ....69
Dépannage ....................................71
Dysfonctionnements.......................71
Remarques sur le bandeau d’af-
fichage............................................72
Problème de température ..............72
Bruits ..............................................72
Odeurs............................................73
Effectuer l'auto-test de l'appareil ....74
Entreposage et élimination ..........74
Mise hors service de l’appareil ......74
Éliminer un appareil usagé ............74
51
Page 52

fr
Service après-vente ......................74
Numéro de produit (E-Nr) et nu-
méro de fabrication (FD)................75
Caractéristiques techniques ........75
52
Page 53

Sécurité fr
Sécurité
Respectez les informations relatives à la sécurité afin d’utiliser
votre appareil en toute sécurité.
Cet appareil est conforme aux dispositions de sécurité applicables aux appareils électriques et il est déparasité.
Indications générales
Vous trouverez ici des informations générales sur la présente notice.
¡ Lisez attentivement cette notice. C’est en effet la seule manière
d’utiliser l’appareil de manière sûre et efficace.
¡ Cette notice d’utilisation s’adresse à l'utilisateur de l’appareil.
¡ Respectez les consignes de sécurité et les avertissements.
¡ Conservez la notice ainsi que les informations produit en vue
d’une réutilisation ultérieure ou pour un futur nouveau propriétaire.
¡ Contrôlez l’appareil après l’avoir déballé. Ne raccordez pas l’ap-
pareil si ce dernier a été endommagé durant le transport.
Utilisation conforme
Pour utiliser l’appareil correctement et en toute sécurité, respectez
les consignes d'utilisation conforme.
Cet appareil est conçu pour être encastré uniquement. Respecter
les instructions d'installation.
Utilisez l’appareil uniquement:
¡ en conformité avec la présente notice d’utilisation.
¡ pour réfrigérer des produits alimentaires.
¡ pour un usage privé et dans les pièces fermées d’un domicile.
¡ jusqu’à une altitude maximale de 2000m.
Limitation du groupe d’utilisateurs
Évitez les risques pour les enfants et les personnes à risque.
Les enfants de 8 ans et plus, les personnes souffrant d’un handicap physique, sensoriel ou mental ou ne détenant pas l’expérience et/ou les connaissances nécessaires pourront utiliser cet
53
Page 54

fr Sécurité
appareil à condition de le faire sous surveillance, ou que son utilisation sûre leur ait été enseignée et qu’ils aient compris les dangers qui en émanent.
Les enfants ne sont pas autorisés à jouer avec l'appareil.
Le nettoyage de l’appareil, et l’entretien par l’utilisateur, sont des
activités que les enfants ne peuvent pas effectuer sans surveillance.
Les enfants de moins de 8ans doivent être tenus à distance de
l’appareil et du cordon d’alimentation secteur.
Les enfants à partir de 3 ans et ceux âgés de moins de 8 ans
peuvent charger et décharger l'appareil de réfrigération/congélation.
Prescriptions-d’hygiène-alimentaire
Conformément à la réglementation française visant à empêcher la
présence de listeria dans le compartiment réfrigérateur, nous
vous remercions de respecter les consignes suivantes.
¡ Nettoyez fréquemment le compartiment intérieur du réfrigérateur
à l’aide d’un détergent non agressif, ne provoquant pas d’oxydation des pièces métalliques (utilisez par ex. de l’eau tiède additionnée d’un peu de produit à vaisselle).
Ensuite, désinfectez avec de l’eau additionnée de vinaigre ou
de jus de citron les surfaces que vous avez préalablement nettoyées, ou utilisez un produit germicide en vente dans le commerce et adapté aux réfrigérateurs (avant d’utiliser ce produit
sur les pièces métalliques, faites un test de compatibilité à un
endroit peu visible).
¡ Enlevez les emballages commerciaux avant de mettre les pro-
duits alimentaires dans le compartiment réfrigérateur (par ex. le
carton qui réunit les pots de yaourt).
¡ Pour éviter toute contamination entre des produits alimentaires
de nature différente, rangez-les bien séparés les uns des autres,
bien emballés ou rangés dans des récipients à couvercle.
¡ Avant de préparer des plats et de saisir des produits alimen-
taires, lavez-vous les mains. Avant de préparer d’autres plats, lavez-vous à nouveau les mains. Lavez-les encore une fois avant
de prendre un repas.
54
Page 55

Sécurité fr
¡ Lavez les ustensiles de cuisine dont vous venez de vous servir
avant de les réutiliser (cuillère en bois, planche de découpe,
couteau de cuisine, etc.).
Transport sûr
Respectez les consignes de sécurité lorsque vous transportez cet
appareil.
AVERTISSEMENT‒Risques de blessures!
Le soulèvement du poids élevé de l’appareil peut entraîner
des blessures.
▶
Ne soulevez jamais seul l’appareil.
Installation sûre
Respectez ces consignes de sécurité lorsque vous installez cet
appareil.
AVERTISSEMENT‒Risque d’électrocution!
Les installations non conformes sont dangereuses.
▶
Pour le raccordement et l’utilisation de l’appareil, respectez
impérativement les indications figurant sur la plaque signalétique.
▶
L’appareil doit être branché uniquement à une source d'alimentation CA à l'aide d'une prise murale correctement installée et reliée à la terre.
▶
Le système à conducteur de protection de l’installation électrique de la maison doit être conforme.
▶
N'alimentez jamais l'appareil par l'intermédiaire d'un appareil de commutation externe, par ex. une minuterie ou une
télécommande.
▶
Si l'appareil est encastré, la fiche du cordon d'alimentation
secteur doit être librement accessible ou, si un accès libre
est impossible, un dispositif de sectionnement tous pôles
doit être installé dans l'installation électrique fixe, conformément aux réglementations d'installation.
▶
Lors de l’installation de l’appareil, veiller à ce que le cordon
d’alimentation secteur ne soit pas coincé ni endommagé.
55
Page 56

fr Sécurité
AVERTISSEMENT‒Risque d’incendie!
¡ Un cordon d’alimentation secteur prolongé ainsi qu’un adap-
tateur non agréé sont dangereux.
▶
Ne pas utiliser de rallonge ni de bloc multiprise.
▶
Si le cordon d’alimentation secteur est trop court, contacter
le service après-vente.
▶
Utiliser uniquement des adaptateurs agréés par le fabricant.
¡
Les blocs multiprises ou blocs secteur portables peuvent surchauffer et provoquer un incendie.
▶
Ne pas placer de blocs multiprises ni de blocs secteur portables derrière l’appareil.
Utilisation sûre
Respectez les consignes de sécurité lorsque vous utilisez l’appareil.
AVERTISSEMENT‒Risque d’électrocution!
¡ Une isolation endommagée du cordon d’alimentation secteur
est dangereuse.
▶
Ne mettez jamais en contact le cordon d'alimentation secteur avec des sources de chaleur et des pièces chaudes de
l'appareil.
▶
Ne mettez jamais en contact le cordon d’alimentation secteur avec des arêtes vives ou des pointes.
▶
Ne pliez, n'écrasez et ne modifiez jamais le cordon d’alimentation secteur.
¡ L’infiltration d’humidité peut occasionner un choc électrique.
▶
Utiliser l’appareil uniquement dans des pièces fermées.
▶
Ne jamais exposer l’appareil à une forte chaleur ou humidité.
▶
Ne pas utiliser de nettoyeur vapeur ou haute pression pour
nettoyer l’appareil.
56
Page 57

Sécurité fr
AVERTISSEMENT‒Risque d’étouffement!
¡ Les enfants risquent de s’envelopper dans les matériaux
d’emballage ou de les mettre sur la tête et de s’étouffer.
▶
Conserver les matériaux d’emballage hors de portée des
enfants.
▶
Ne jamais laisser les enfants jouer avec les emballages.
¡ Les enfants risquent d’aspirer de petites pièces ou de les ava-
ler et de s’étouffer.
▶
Conserver les petites pièces hors de portée des enfants.
▶
Ne pas laisser les enfants jouer avec les petites pièces.
AVERTISSEMENT‒Risque d’explosion!
¡ Des appareils électriques à l'intérieur de l'appareil peuvent ex-
ploser, par ex. appareils de chauffage ou fabriques de glace
électriques.
▶
Ne pas utiliser d'appareils électriques à l'intérieur de l'appareil.
¡ Des équipements mécaniques ou d'autres produits peuvent
endommager le circuit de réfrigération, du fluide frigorigène
inflammable peut s'échapper et exploser.
▶
Pour accélérer le dégivrage, ne pas utiliser d'autres équipements mécaniques ou d'autres produits que ceux recommandés par le fabricant.
¡ Des produits contenant des gaz propulseurs inflammables et
des matières explosives peuvent exploser, par ex. bombes
aérosols.
▶
Ne pas stocker de produits contenant des gaz propulseurs
inflammables et des matières explosives dans l'appareil.
AVERTISSEMENT‒Risque d’incendie!
Les vapeurs des liquides inflammables peuvent s'enflammer
(déflagration).
▶
Ne conserver les bouteilles de boissons fortement alcoolisées qu’hermétiquement fermées et debout.
57
Page 58

fr Sécurité
AVERTISSEMENT‒Risques de blessures!
¡ Lésions oculaires dues à la fuite de fluide frigorigène inflam-
mable et de gaz nocifs.
▶
Veiller à ne pas endommager les tuyaux du circuit frigorifique ni la matière isolante.
¡ L'appareil peut basculer.
▶
Ne jamais se servir du socle, des glissières ou des portes
comme marchepied et ne pas s'appuyer dessus.
AVERTISSEMENT‒Risque de brûlure!
Certaines pièces de l'appareil deviennent très chaudes en
service.
▶
Ne jamais toucher les éléments chauds.
▶
Éloigner les enfants.
PRUDENCE‒Risque de préjudice pour la santé!
Pour éviter toute contamination des produits alimentaires, respecter les instructions suivantes.
▶
L'ouverture prolongée de la porte peut entraîner une importante augmentation de la température dans les compartiments de l'appareil.
▶
Nettoyer régulièrement les surfaces qui peuvent entrer en
contact avec des produits alimentaires et systèmes d'écoulement accessibles.
▶
Conserver la viande et le poisson crus dans des récipients
appropriés dans le compartiment réfrigération de sorte
qu'ils ne soient pas en contact avec d'autres aliments et
qu'ils ne coulent pas dessus.
▶
Si le réfrigérateur/congélateur reste vide pendant une
longue période, éteindre l'appareil, le dégivrer, le nettoyer et
laisser la porte ouverte, afin d'éviter la formation de moisissures.
58
Page 59

Sécurité fr
Appareil endommagé
Respectez les consignes de sécurité lorsque votre appareil est
endommagé.
AVERTISSEMENT‒Risque d’électrocution!
¡ Un appareil endommagé ou un cordon d’alimentation secteur
endommagé est dangereux.
▶
N'utilisez jamais un appareil endommagé.
▶
Ne jamais faire fonctionner l’appareil avec une surface fissurée ou cassée.
▶
Ne tirez jamais sur le cordon d'alimentation secteur pour
débrancher l'appareil du secteur. Débranchez toujours la
fiche du cordon d'alimentation secteur.
▶
Si l'appareil ou le cordon d'alimentation secteur est endommagé, débranchez immédiatement le cordon d'alimentation
secteur ou coupez le fusible dans le boîtier à fusibles.
▶
Appelez le service après-vente. →Page74
▶
Seul un personnel dûment qualifié peut entreprendre des
réparations sur l'appareil.
¡ Les réparations non conformes sont dangereuses.
▶
Seul un personnel dûment qualifié peut entreprendre des
réparations sur l'appareil.
▶
Seules des pièces de rechange d'origine peuvent être utilisées pour réparer l'appareil.
▶
Afin d’écarter tout danger quand le cordon d’alimentation
secteur de cet appareil est endommagé, seul le fabricant
ou son service après-vente ou toute autre personne de qualification équivalente est habilité à le remplacer.
59
Page 60

fr Sécurité
AVERTISSEMENT‒Risque d’incendie!
En cas d'endommagement des tuyaux, du fluide frigorigène
inflammable et des gaz nocifs peuvent s'échapper et s'enflammer.
▶
Éloigner de l’appareil toute flamme ou source d’inflammation.
▶
Aérer la pièce.
▶
Éteindre l'appareil. →Page66
▶
Débrancher la fiche secteur du cordon d’alimentation secteur ou désactiver le fusible dans le boîtier à fusibles.
▶
Appeler le service après-vente. →Page74
60
Page 61

Prévenir les dégâts matériels fr
Prévenir les dégâts matériels
Prévenir les dégâts matériels
Pour éviter des dommages sur votre
appareil, ses ustensiles ou d’autres
objets de la cuisine, respectez ces
consignes.
ATTENTION!
¡ En cas de salissures provenant
d'huile ou de graisse, des pièces
en matière plastique et les joints
de porte peuvent devenir poreux.
▶
Veiller à ce que lespièces
enmatière plastique et les joints
de porte restent exempts d'huile
et de graisse.
¡ L'utilisation du socle, des glissières
ou des portes de l'appareil comme
surface d'assise ou comme marchepied peut endommager l'appareil.
▶
Ne jamais se servir du socle,
des glissières ou des portes
comme marchepied et ne pas
s'appuyer dessus.
Protection de l’environnement et économies
Protection de l’environnement et économies
Préservez l’environnement en exploitant les ressources avec parcimonie
et en éliminant correctement les matériaux recyclables.
Élimination de l'emballage
Les matériaux d'emballage sont compatibles avec l'environnement et recyclables.
▶
Éliminez les différents composants
séparément en fonction de leur
type.
Vous trouverez des informations
sur les circuits actuels d'élimination auprès de votre revendeur
spécialisé ou de l’administration
de votre commune/ville.
Eliminez l'emballage en respectant l'environnement.
Économies d’énergie
Si vous respectez ces consignes,
votre appareil consommera moins de
courant.
Choix du lieu d'installation
Respectez ces consignes lorsque
vous installez votre appareil.
¡ Protéger l’appareil contre l’enso-
leillement direct.
¡ Installer l’appareil aussi loin que
possible d’un radiateur, d’une cuisinière et d’autres sources de chaleur:
– Respecter une distance de
30mm par rapport aux cuisinières électriques ou à gaz.
– Respecter une distance de
30cm par rapport à un appareil
de chauffage au fuel ou au
charbon.
En présence de températures ambiantes assez basses, l’appareil
doit réfrigérer moins souvent.
¡ Utiliser une profondeur de niche
de 560mm.
¡ Ne pas couvrir ni boucher les ori-
fices d'aération.
¡ Aérer quotidiennement la pièce.
L'air sur la paroi arrière de l'appareil ne s'échauffe pas aussi fortement.
L'appareil doit réfrigérer moins
souvent.
61
Page 62

fr Installation et branchement
Économiser de l'énergie lors de l'utilisation
Respectez ces consignes lorsque
vous utilisez votre appareil.
Remarque:L'agencement des
pièces d'équipement n'a aucune influence sur la consommation d'énergie de l'appareil.
¡ Ne pas couvrir ni boucher les ori-
fices d'aération.
L'air sur la paroi arrière de l'appa-
reil ne s'échauffe pas aussi fortement.
¡ N'ouvrir la porte de l'appareil que
brièvement.
¡ Transporter les produits alimen-
taires achetés dans un sac isotherme et les ranger rapidement
dans l'appareil.
¡ Attendre que les boissons et plats
chauds aient refroidi avant de les
ranger dans l’appareil.
¡ Pour profiter du froid des produits
congelés, ranger les produits
congelés pour les décongeler
dans le compartiment réfrigération.
L'air dans l'appareil ne s'échauffe
pas aussi fortement.
L'appareil doit réfrigérer moins
souvent.
¡ Toujours laisser un peu de place
entre les produits alimentaires et
la paroi arrière.
¡ Emballer les produits alimentaires
de manière hermétique.
L'air peut circuler et l'humidité de
l'air demeure constante.
Installation et branchement
Installation et branchement
Apprenez où et comment installer
votre appareil. Apprenez également
comment brancher votre appareil sur
le secteur.
Contenu de la livraison
Après avoir déballé le produit, contrôlez toutes les pièces pour détecter
d’éventuels dégâts dus au transport
et vérifiez si la livraison est complète.
En cas de réclamation, veuillez vous
adresser à votre revendeur ou à
notre service après-vente
→Page74.
La livraison comprend:
¡ Appareil encastrable
¡ Équipement et accessoires
¡ Matériel d'installation
¡ Notice d’installation
¡ Notice d’utilisation
¡ Carnet de service après-vente
¡ Document annexe de la garantie
¡ Label énergétique
¡ Fiche technique du produit
¡ Informations relatives à la consom-
mation d’énergie et aux bruits
Installation et raccordement de l’appareil
Condition préalable:Le contenu de
la livraison de l'appareil est contrôlé.
→Page62
1. Respecter les critères pour le lieu
d'installation de l'appareil.
→Page63
2. Installer l'appareil selon la notice
d'installation jointe.
1
2
1
Selon l'équipement de l'appareil
2
Pas dans tous les pays
62
Page 63

5
5
5
Installation et branchement fr
3. Préparer l'appareil pour la pre-
mière utilisation. →Page63
4. Raccordement électrique de l'ap-
pareil. →Page63
Critères pour le lieu d'installation
Respectez ces consignes lorsque
vous installez votre appareil.
AVERTISSEMENT
Risque d’explosion!
Si l’appareil est installé dans une
pièce trop petite, une éventuelle fuite
du circuit de réfrigération pourrait
donner lieu à un mélange de gaz et
d’air inflammable.
▶
Installer l'appareil uniquement
dans une pièce ayant un volume
minimum de 1m3 par 8g de fluide
frigorigène. La quantité de fluide
frigorigène est indiquée sur la
plaque signalétique. →Fig.1/
Selon le modèle, le poids de l'appareil départ usine peut atteindre 50kg.
Le plancher doit être assez stable
pour supporter le poids de l’appareil.
Température ambiante admissible
La température ambiante admissible
dépend de la classe climatique de
l’appareil.
La classe climatique figure sur la
plaque signalétique de l'appareil.
→Fig.1/
Classe climatique
SN 10°C…32°C
N 16°C…32°C
ST 16°C…38°C
T 16°C…43°C
L'appareil est entièrement opérationnel dans la plage de température ambiante admissible.
Température ambiante admissible
Si vous utilisez un appareil de la
classe climatiqueSN à des températures ambiantes plus basses, il n'est
pas exclu que l’appareil subisse des
dommages en présence d'une température ambiante atteignant +5°C.
Dimensions de niche
Respectez les dimensions de niche,
lorsque vous encastrez votre appareil
dans la niche. En cas de divergences, des problèmes peuvent survenir lors de l’installation de l’appareil.
Profondeur de niche
Encastrez l'appareil dans la profondeur de niche recommandée de
560mm.
Si la niche est moins profonde, la
consommation d'énergie augmente
légèrement. La profondeur de niche
doit être d'au moins 550mm.
Largeur de niche
Une largeur intérieure de la niche
d’au moins 560mm est nécessaire
pour cet appareil.
Préparation de l'appareil pour la première utilisation
1. Retirer le matériel d'informations.
2. Retirer les films protecteurs et les
sécurités de transport, par ex. les
bandes adhésives et le carton.
3. Nettoyage de l'appareil pour la
première fois. →Page69
Raccordement électrique de l’appareil
1. Branchez la fiche mâle du cordon
d’alimentation secteur de l’appareil
dans une prise de courant proche
de l’appareil.
Vous trouverez les données de
raccordement de l’appareil sur la
plaque signalétique. →Fig.1/
63
Page 64

fr Présentation de l’appareil
1
2
3
4
5
6
7
1
2
3
4
5
2. Vérifiez le bon positionnement de
la fiche mâle.
a Maintenant, l’appareil est prêt à
fonctionner.
Présentation de l’appareil
Présentation de l’appareil
Découvrez les composants de votre
appareil.
Appareil
Vous trouverez ici un aperçu des
composants de votre appareil.
→Fig.
Remarque:Selon l'équipement et la
taille, des divergences sont possibles
entre votre appareil et les illustrations.
1
Éléments de commande
Rangement variable de la clayette
→Page64
Clayette coulissante →Page65
Bac à fruits et légumes avec régula-
teur d’humidité →Page65
Plaque signalétique
Casier à beurre et à fromage
→Page65
Compartiment dans la contreporte
pour grandes bouteilles
Affiche la température réglée du compartiment de réfrigération en °C.
active ou désactive la fonction Su-
per-réfrigération.
allume ou éteint l'appareil.
Équipement
Équipement
Vous trouverez ici un aperçu des
pièces d'équipement de votre appareil et de leur utilisation.
L'équipement de votre appareil dépend du modèle de celui-ci.
Clayette
Pour varier les clayettes selon les besoins, retirer la clayette et la replacer
à un autre endroit.
→"Retirer la clayette", Page69
Rangement variable de la clayette
Utilisez le rangement variable de la
clayette pour ranger sur la clayette située immédiatement en dessous des
aliments réfrigérés hauts, par ex. pichets ou bouteilles. Vous pouvez retirer la partie avant de la clayette variable et la pousser sous la partie arrière de la clayette.
→Fig.
3
Éléments de commande
Les éléments de commande vous
permettent de régler toutes les fonctions de votre appareil et vous
donnent des informations concernant
son état de fonctionnement.
→Fig.
64
2
éteint l'alarme sonore.
/ règle la température du compar-
timent réfrigérateur.
Page 65

Équipement fr
Clayette coulissante
Extraire la clayette pour obtenir un
meilleur aperçu et retirer plus rapidement les aliments.
Bac à fruits et légumes avec régulateur d’humidité
Stockez les fruits et légumes frais
dans le bac à fruits et légumes.
Le régulateur d’humidité et un joint
spécial vous permettent d’adapter
l’humidité de l’air dans le bac à fruits
et légumes. Les fruits et légumes
frais se conservent ainsi jusqu'à deux
fois plus longtemps qu’avec un mode
de rangement conventionnel.
→Fig.
Régler l’humidité de l’air régnant dans
le bac à fruits et légumes en fonction
de la nature et de la quantité des
produits à ranger:
¡ Faible humidité de l’air en cas de
¡ Humidité de l’air plus élevée en
Suivant la quantité et la nature des
produits stockés, de l’eau peut se
condenser dans le bac à fruits et légumes.
Éliminer l’eau condensée avec un essuie-tout sec et adapter l'humidité de
l’air à l'aide du régulateur d’humidité.
Afin de conserver la qualité et
l'arôme, rangez les fruits et légumes
craignant le froid hors de l'appareil à
des températures comprises d'env.
8°C à 12°C.
4
stockage prédominant de fruits et
de chargement important.
cas de stockage prédominant de
légumes ainsi qu'en cas de chargement mixte ou de faible chargement.
¡ Agrumes
Légumes craignant le
froid
¡ Aubergines
¡ Concombres
¡ Courgettes
¡ Poivrons
¡ Tomates
¡ Pommes de terre
Casier à beurre et à fromage
Rangez le beurre et le fromage à
pâte dure dans le casier à beurre et
à fromage.
Compartiment dans la contreporte
Pour varier le compartiment dans la
contreporte selon les besoins, retirer
celui-ci et le replacer à un autre endroit.
→"Retirer le compartiment dans la
contreporte", Page69
Accessoires
Utilisez les accessoires d'origine. Ils
ont été spécialement élaborés pour
votre appareil. Vous trouverez ici un
aperçu des accessoires fournis avec
votre appareil et de leur utilisation.
Les accessoires de votre appareil dépendent de son modèle.
Bac à œufs
Rangez les œufs sur le bac à œufs.
Porte-bouteilles
Le porte-bouteilles empêche ces dernières de se renverser lors de l'ouverture et de la fermeture de la porte
de l'appareil.
→Fig.
5
Fruits craignant le
froid
¡ Ananas
¡ Bananes
¡ Mangues
¡ Papayes
65
Page 66

fr Utilisation de base
Utilisation de base
Utilisation de base
Cette section contient des renseignements essentiels sur la manipulation
de votre appareil.
Allumer l’appareil
1. Appuyer sur .
a L’appareil commence à réfrigérer.
2. Régler la température souhaitée.
→Page66
Remarques concernant le fonctionnement de l’appareil
¡ Lorsque vous avez allumé l'appa-
reil, la température réglée n'est atteinte qu'au bout de plusieurs
heures. Ne ranger aucun produits
alimentaires avant que la température n'ait été atteinte.
Éteindre l'appareil
▶
Appuyer sur .
a L’appareil ne réfrigère plus.
Régler la température
Après avoir allumé l'appareil, vous
pouvez régler la température.
Fonctions additionnelles
Fonctions additionnelles
Découvrez les fonctions additionnelles dont votre appareil dispose.
Super-réfrigération
Avec Super-réfrigération, le compartiment réfrigération refroidit au maximum. Les aliments et les boissons
refroidissent de ce fait rapidement.
Désactivez Super-réfrigération avant
de ranger de grandes quantités d'aliments.
Remarque:Lorsque Super-réfrigération est activé, il est possible que
l'appareil fonctionne plus bruyamment.
Activer Super-réfrigération
▶
Appuyer sur .
a s'allume.
Remarque:Au bout d'environ 15
heures, l'appareil revient en service
normal.
Désactiver Super-réfrigération
▶
Appuyer sur .
a La température réglée auparavant
s’affiche.
Réglage de la température du compartiment réfrigération
▶
Appuyer à plusieurs reprises sur
/ jusqu'à ce que l'affichage de la
température indique la température
souhaitée.
La température recommandée
dans le compartiment réfrigération
est de 4°C.
→"Autocollant «OK»", Page68
66
Page 67

Alarme fr
Alarme
Alarme
Votre appareil est doté de fonctions
d'alarme.
Alarme de porte
L’alarme de porte retentit lorsque la
porte de l’appareil reste ouverte longtemps.
Désactiver l'alarme sonore (alarme de porte)
▶
Fermer la porte de l'appareil ou
appuyer sur .
a L'alarme sonore est désactivée.
Compartiment réfrigération
Compartiment réfrigération
Le compartiment réfrigération permet
de conserver la viande, la charcuterie, le poisson, les produits laitiers,
les œufs, les plats pré-cuisinés et les
pâtisseries.
Vous pouvez régler la température
dans le compartiment réfrigération
entre 2°C et 8°C.
La température recommandée dans
le compartiment réfrigération est de
4°C.
→"Autocollant «OK»", Page68
En raison dustockage aufroid, vous
pouvez aussi ranger desdenrées
très périssables àcourt etmoyen
terme. Plus la température choisie
est basse, plus les aliments restent
frais plus longtemps.
Conseils pour ranger des produits alimentaires dans le
compartiment réfrigération
Respectez les conseils lorsque vous
rangez des aliments dans votre compartiment réfrigération.
¡ Afin de maintenir encore plus long-
temps la fraîcheur et la qualité des
aliments, ne ranger que des produits alimentaires frais et intacts.
¡ Pour les produits tout prêts et li-
quides conditionnés, ne pas dépasser la date de conservation minimum ou la date de consommation indiquée par le fabricant.
¡ Afin de maintenir l'arôme, la teinte
et la fraîcheur ou d'éviter des
transmissions de goût et de couleurs des pièces en plastique, ranger les produits alimentaires bien
emballés ou couverts.
¡ Laisser refroidir les boissons et
produits alimentaires chauds avant
de les placer dans lecompartiment réfrigération.
Zones froides dans le compartiment réfrigération
L'air circulant dans le compartiment
réfrigération engendre des zones différemment froides.
Zone la plus froide
Lazone laplus froide est située entre
la flèche imprimée sur le côté et la
clayette située en dessous.
Conseil:Rangez les aliments fragiles dans la zone la plus froide, par
ex. poisson, charcuterie et viande.
Zone la moins froide
La zone la moins froide se trouve
complètement en haut, contre la
porte.
67
Page 68

fr Dégivrage
Conseil:Rangez des produits alimentaires insensibles dans la zone la
moins froide, parex. le fromage à
pâte dure et le beurre. Le fromage
peut ainsi continuer à développer
son arôme, et le beurre reste tartinable.
Autocollant «OK»
L'autocollant «OK» vous permet de
vérifier si les plages de températures
sûres de +4°C ou moins recommandées pour les aliments sont atteintes dans le compartiment réfrigération.
L'autocollant OK n'est pas compris
sur tous les modèles.
Si l'autocollant n'indique pas «OK»,
abaisser progressivement la température.
→"Réglage de la température du
compartiment réfrigération", Page66
Après la mise en service de l'appareil, ce dernier peut nécessiter jusqu'à 12heures pour atteindre la température réglée.
Réglage correct
Dégivrage
Dégivrage
Respectez les informations, si vous
voulez dégivrer votre appareil.
Dégivrage du compartiment réfrigération
En cours de fonctionnement, des
gouttelettes d'eau de condensation
ou du givre se forment contre la paroi arrière du compartiment réfrigéra-
tion. La paroi arrière dans le compartiment réfrigération se dégivre automatiquement.
L'eau de dégivrage ou du givre
s'écoulent par la rigole d'écoulement
de l'eau de condensation dans le
trou d'écoulement pour gagner le
bac d'évaporation et ne doivent pas
être essuyés.
Pour que l'eau de dégivrage puisse
s'écouler librement et pour éviter
toute apparition d'odeur, respectez
les informations suivantes:
→"Nettoyer la rigole à eau de dégi-
vrage et le trou d'écoulement",
Page69.
Nettoyage et entretien
Nettoyage et entretien
Pour que votre appareil reste longtemps opérationnel, nettoyez-le et entretenez-le avec soin.
Préparer l'appareil pour le nettoyage
Découvrez comment préparer votre
appareil pour le nettoyage.
1.
Éteindre l'appareil. →Page66
2. Débrancher l’appareil du réseau
électrique.
Débrancher la fiche secteur du
cordon d’alimentation secteur ou
désactiver le fusible dans le boîtier
à fusibles.
3. Sortir tous les aliments et les ran-
ger dans un endroit frais.
Si présent, poser l’accumulateur
de froid sur les aliments.
4. Si une couche de givre s'est for-
mée, la faire dégivrer.
5. Retirer toutes les pièces d'équipe-
ment de l'appareil. →Page69
68
Page 69

Nettoyage et entretien fr
Nettoyage de l’appareil
Nettoyez l'appareil comme indiqué,
afin qu'il ne soit pas endommagé par
un nettoyage incorrect ou des produits de nettoyage inappropriés.
AVERTISSEMENT
Risque d’électrocution!
¡ L’infiltration d’humidité peut occa-
sionner un choc électrique.
▶
Ne pas utiliser de nettoyeur vapeur ou haute pression pour
nettoyer l’appareil.
¡ La présence de liquide dans
l'éclairage peut être dangereuse.
▶
L’eau de nettoyage ne doit pas
pénétrer dans l’éclairage.
ATTENTION!
¡ Des produits nettoyants inappro-
priés peuvent endommager les
surfaces de l’appareil.
▶
Ne pas utiliser de tampon en
paille métallique ni d’éponge à
dos récurant.
▶
Ne pas utiliser de produits de
nettoyage agressifs ou récurants.
▶
N’utilisez pas de nettoyants fortement alcoolisés.
¡ Si vous nettoyez les pièces d'équi-
pement et les accessoires au lavevaisselle, ceux-ci risquent de se
déformer ou de déteindre.
▶
Ne jamais nettoyer les clayettes
et les récipients au lave-vaisselle.
1. Préparer l'appareil pour le net-
toyage. →Page68
2. Nettoyer l'appareil, les pièces
d'équipement et les joints de porte
avec une lavette, de l'eau tiède et
du produit à vaisselle présentant
un pH neutre.
3. Sécher ensuite minutieusement
avec un chiffon doux et sec.
4. Mettre en place les pièces d'équi-
pement.
5. Raccordement électrique de l'ap-
pareil. →Page63
6.
Allumer l'appareil. →Page66
7. Ranger les aliments.
Nettoyer la rigole à eau de dégivrage et le trou d'écoulement
Pour que l'eau de dégivrage puisse
s'écouler, nettoyez régulièrement la
rigole à eau de dégivrage et le trou
d'écoulement.
▶
Nettoyer la rigole à eau de dégivrage et le trou d'écoulement avec
précaution, par ex. à l'aide d'un coton-tige.
→Fig.
6
Retirer les pièces d’équipement
Si vous désirez nettoyer soigneusement les pièces d'équipement, retirez
celles-ci de votre appareil.
Retirer la clayette
▶
Tirer la clayette et la retirer.
Retirer la clayette coulissante
1. Retirer la clayette coulissante jus-
qu'à ce que le taquet d'arrêt se débloque.
→Fig.
2. Abaisser la clayette et la faire bas-
culer latéralement pour l'extraire.
Retirer le compartiment dans la contreporte
▶
Soulever le compartiment dans la
contreporte vers le haut et le retirer.
→Fig.
7
8
69
Page 70

fr Nettoyage et entretien
Retirer le bac à fruits et légumes
1. Extraire le tiroir jusqu'en butée.
2. Soulever l'avant du bac et le reti-
rer .
→Fig.
9
Retirer la clayette audessus du bac
à légumes
1. Extraire le bac à fruits et légumes.
2. Retirer la clayette et la retourner
.
→Fig.
3. Pousser les fixations de la plaque
10
de verre inférieur vers l'extérieur.
→Fig.
4. Soulever l'avant de la plaque verre
11
et tirer à l'arrière .
→Fig.
12
70
Page 71

Dépannage fr
Dépannage
Dépannage
Vous pouvez corriger par vous-même les petits défauts sur votre appareil. Lisez
les renseignements de dépannage avant de contacter le service après-vente.
Vous évitez ainsi des coûts inutiles.
AVERTISSEMENT
Risque d’électrocution!
Les réparations non conformes sont dangereuses.
▶
Seul un personnel dûment qualifié peut entreprendre des réparations sur
l'appareil.
▶
Seules des pièces de rechange d'origine peuvent être utilisées pour réparer
l'appareil.
▶
Afin d’écarter tout danger quand le cordon d’alimentation secteur de cet appareil est endommagé, seul le fabricant ou son service après-vente ou toute
autre personne de qualification équivalente est habilité à le remplacer.
Dysfonctionnements
Dérangement Cause Résolution de problème
L’appareil ne fonctionne pas.
Aucun affichage ne s’allume.
L'appareil neréfrigère pas,
les affichages et l'éclairage
sont allumés.
La lampe LED est défectueuse.
Le groupe frigorifique s’enclenche plus souvent et plus
longtemps.
Le fond du compartiment réfrigération est mouillé.
Fiche secteur incorrectement branchée dans la prise
de courant.
Le fusible a grillé/disjoncté.
Une coupure de courant
s’est produite.
L’appareil se trouve en
mode Exposition.
Différentes causes sont possibles.
La porte de l'appareil a été
ouvert fréquemment.
Les orifices de ventilation
sont recouverts.
La rigole à eau de dégivrage
ou le trou d’écoulement sont
bouchés.
▶
Branchez la fiche secteur.
▶
Vérifiez les fusibles.
1. Vérifiez laprésence decourant.
2. Placer les accumulateurs de froid,
le cas échéant, sur la clayette supérieure.
▶
Lancez l'auto-test de l'appareil.
→Page74
a Une fois l'auto-test de l'appareil ef-
fectué, l’appareil passe en service
normal.
▶
Appelez le service après-vente.
→"Service après-vente", Page74
▶
N'ouvrez pas la porte de l'appareil
inutilement.
▶
Enlevez les obstacles devant les orifices d'aération.
▶
Nettoyez la rigole à eau de dégivrage et le trou d’écoulement.
→Page69
71
Page 72

fr Dépannage
Remarques sur le bandeau d’affichage
Dérangement Cause Résolution de problème
Le message avec "D" ou "E"
apparaît sur l'affichage.
Une alarme sonore retentit
et s'allume.
L’électronique a détecté un
défaut.
Différentes causes sont possibles.
Laporte de l'appareil est ou-
▶
Appelez le service après-vente.
→"Service après-vente", Page74
▶
Appuyez sur .
a L'alarme s'éteint.
▶
Fermez la porte de l'appareil.
verte.
Problème de température
Dérangement Cause Résolution de problème
Latempérature dévie fortement par rapport au réglage.
Différentes causes sont possibles.
1. Éteignez l'appareil. →Page66
2. Allumez à nouveau l'appareil après
env. 5 minutes. →Page66
‒ Si la température est trop éle-
vée, vérifiez-la à nouveau au
bout de quelques heures.
‒ Si la température est trop
basse, vérifiez-la à nouveau le
jour suivant.
Bruits
Dérangement Cause Résolution de problème
L'appareil bourdonne. Il ne s'agit pas d'un défaut.
Un moteur tourne, par ex.
groupe frigorifique, ventilateur.
L'appareil émet des bruits
de bulles, de ronronnement
ou de gargarisme.
L'appareil émet un bruit de
cliquetis.
Il ne s'agit pas d'un défaut.
Le fluide frigorigène circule
dans les tuyaux.
Il ne s'agit pas d'un défaut.
Le moteur, les interrupteurs
ou les électrovannes s’allument ou s’éteignent.
L'appareil émet des bruits. L’appareil ne repose pas
d’aplomb.
Les pièces d'équipement vacillent ou se coincent.
72
Aucune action nécessaire.
Aucune action nécessaire.
Aucune action nécessaire.
▶
Nivelez l'appareil à l'aide d'un niveau à bulle. Si nécessaire, insérez
quelque chose dessous.
▶
Vérifiez les pièces d'équipement
amovibles et les remettre éventuellement en place correctement.
Page 73

Dérangement Cause Résolution de problème
L'appareil émet des bruits. Des bouteilles ou récipients
se touchent.
▶
Éloigner les bouteilles ou les récipients les uns des autres.
Odeurs
Dérangement Cause Résolution de problème
L'appareil dégage une odeur
désagréable.
Différentes causes sont possibles.
1. Préparez l'appareil pour le net-
toyage. →Page68
2. Nettoyez l’appareil. →Page69
3. Nettoyez tous les emballages des
produits alimentaires.
4. Pour empêcher l'apparition
d'odeurs, mettez sous emballage
hermétique les produits alimentaires qui dégagent une forte odeur.
5. Au bout de 24 heures, vérifiez si
des odeurs se dégagent encore.
Dépannage fr
73
Page 74

fr Entreposage et élimination
Effectuer l'auto-test de l'appareil
1.
Éteindre l'appareil. →Page66
2. Allumer à nouveau l'appareil après
env. 5 minutes. →Page66
3. Dans les 10 secondes qui suivent
la mise sous tension, maintenir enfoncé pendant 3 à 5 secondes.
a L'auto-test de l'appareil démarre.
a Au cours de l'auto-test, un signal
sonore long retentit par intermittence.
a Si, à la fin de l'auto-test, 2 signaux
sonores retentissent et si l'affichage de la température indique la
température réglée, cela signifie
que votre appareil fonctionne correctement. L'appareil passe en service normal.
a Si, à la fin de l'auto-test, 5 signaux
sonores retentissent et si clignote pendant 10 secondes, informer le service après-vente.
Entreposage et élimination
Entreposage et élimination
Découvrez ici comment préparer
votre appareil pour le stockage. Découvrez également comment éliminer
les appareils usagés.
Mise hors service de l’appareil
1.
Éteindre l'appareil. →Page66
2. Débrancher l’appareil du réseau
électrique.
Débrancher la fiche secteur du
cordon d’alimentation secteur ou
désactiver le fusible dans le boîtier
à fusibles.
3.
Dégivrer l'appareil. →Page68
4.
Nettoyer l'appareil. →Page69
5. Laisser la porte de l’appareil ou-
verte.
Éliminer un appareil usagé
L'élimination dans le respect de l’environnement permet de récupérer de
précieuses matières premières.
AVERTISSEMENT
Risque de préjudice pour la santé!
Des enfants risquent de s’enfermer
dans l’appareil et de mettre leur vie
en danger.
▶
Pour compliquer la pénétration des
enfants dans l’appareil, ne pas retirer les clayettes et les bacs.
▶
Éloigner les enfants de l’appareil
qui a cessé de servir.
1. Débrancher la fiche du cordon
d’alimentation secteur.
2. Couper le cordon d’alimentation
secteur.
3. Éliminer l’appareil dans le respect
de l’environnement.
Cet appareil est marqué selon
la directive européenne
2012/19/UE relative aux appareils électriques et électroniques usagés (waste electrical
and electronic equipment WEEE).
La directive définit le cadre
pour une reprise et une récupération des appareils usagés applicables dans les pays de la
CE.
Service après-vente
Service après-vente
Si vous avez des questions, si vous
n’avez pas réussi à remédier par
vous-même à un dérangement qui af-
74
Page 75

5
5
Caractéristiques techniques fr
fecte l’appareil ou si l’appareil doit
être réparé, veuillez vous adresser à
notre service après-vente.
Vous pouvez résoudre vous-même
un grand nombre de problèmes en
consultant l’information de dépannage figurant dans la présente notice
d’utilisation et sur notre site Web. Si
ce n’est pas le cas, veuillez vous
adresser à notre service après-vente.
Nous nous efforcerons de toujours
trouver une solution adaptée et essayerons d’éviter la visite inutile d’un
technicien du service après-vente.
Pendant la période de garantie et
après expiration de la garantie du fabricant, nous nous assurons que
votre appareil est réparé avec des
pièces de rechange d’origine par des
techniciens du service après-vente.
Pour des raisons de sécurité, seul un
personnel qualifié est en droit d’effectuer des réparations sur l’appareil. La
garantie ne s’applique pas lorsque
des réparations ou manipulations
sont entreprises par des personnes
n’y étant pas autorisées par nous ou
lorsque nos appareils sont équipés
de pièces de rechange, complémentaires ou d’accessoires qui ne sont
pas des pièces d’origine et qui sont
à l’origine du problème.
Les pièces de rechange relatives au
fonctionnement de l’appareil et
conformes à l’ordonnance d’écoconception correspondante sont disponibles auprès de notre service aprèsvente pour une durée d’au moins 10
ans à partir de la mise sur le marché
de votre appareil dans l’Espace économique européen.
Remarque:L’intervention du service
après-vente est gratuite dans le
cadre de la garantie locale du fabricant en vigueur. La durée minimale
de la garantie (garantie du fabricant
pour consommateurs privés) dans
l’Espace économique européen est
de 2ans (à l’exception du Danemark
et de la Suède, où elle est de 1an),
selon les conditions de garantie locales en vigueur. Les conditions de
garantie n’ont aucune incidence sur
les autres droits ou recours qui vous
sont disponibles en vertu du droit local.
Pour des renseignements détaillés
sur ladurée etles conditions de la
garantie dans votre pays, adressezvous à notre service-client ou à votre
revendeur et consulteznotre site
Web.
Lorsque vous contactez le service
après-vente, vous avez besoin du numéro de produit (E-Nr.) et du numéro
de fabrication (FD) de votre appareil.
Vous trouverez les données de
contact du service après-vente dans
la liste ci-jointe ou sur notre site Web.
Numéro de produit (E-Nr) et numéro de fabrication (FD)
Le numéro de série (E-Nr.) et le numéro de fabrication (FD) sont indiqués sur la plaque signalétique de
l’appareil.
→Fig.1/
Pour retrouver rapidement les données de votre appareil ainsi que le
numéro de téléphone du service
après-vente, notez ces données.
Caractéristiques techniques
Caractéristiques techniques
La plaque signalétique mentionne le
fluide frigorigène, lacontenance utile
ainsi que d'autres indications techniques.
→Fig.1/
Vous trouverez de plus amples informations sur votre modèle sur Internet
à l'adresse https://www.bsh-
75
Page 76

fr Caractéristiques techniques
group.com/energylabel1. Cette
adresse Internet renvoie à la base de
données officielle de l'UE sur les produits EPREL, dont l'adresse Internet
n'avait pas encore été publiée au moment de la mise sous presse.
Veuillez suivre les instructions de la
recherche de modèle. L'identifiant du
modèle se base sur les caractères
précédant la barre oblique dans le
numéro de produit (E-Nr.) sur la
plaque signalétique. Vous pouvez
également trouver l'identifiant du modèle sur la première ligne du label
énergétique de l'UE.
1
Valable uniquement pour les pays de l’Espace économique européen
76
Page 77

Sommario
it
Sicurezza .......................................79
Avvertenze generali........................79
Utilizzo conforme all'uso previsto...79
Limitazione di utilizzo......................80
Trasporto sicuro .............................80
Installazione sicura.........................80
Utilizzo sicuro .................................81
Apparecchio danneggiato..............84
Prevenzione di danni materiali.....86
Tutela dell'ambiente e rispar-
mio .................................................86
Smaltimento dell’imballaggio .........86
Risparmio energetico .....................86
Installazione e allacciamento .......87
Contenuto della confezione ...........87
Installazione ed allacciamento
dell’apparecchio.............................87
Criteri per il luogo d'installazione...88
Preparazione dell'apparecchio
per il primo utilizzo .........................88
Collegamento elettrico dell'appa-
recchio............................................88
Conoscere l'apparecchio..............89
Apparecchio ...................................89
Elementi di comando .....................89
Dotazione.......................................89
Ripiano ...........................................89
Ripiano variabile.............................89
Ripiano estraibile............................89
Cassetto per frutta e verdura
con regolatore di umidità ...............89
Scomparto per burro e formag-
gio...................................................90
Balconcino controporta..................90
Accessori........................................90
Comandi di base ...........................90
Accensione dell’apparecchio.........90
Istruzioni per il funzionamento .......91
Spegnimento dell'apparecchio.......91
Regolazione della temperatura ......91
Funzioni supplementari................91
Super-raffreddamento ...................91
Allarme...........................................91
Allarme porta..................................91
Frigorifero......................................91
Consigli per la conservazione
degli alimenti nel frigorifero............92
Zone fredde nel frigorifero .............92
Adesivo OK ....................................92
Scongelamento .............................92
Scongelamento nel frigorifero........92
Pulizia e cura.................................93
Preparazione dell'apparecchio
per la pulizia ...................................93
Pulizia dell'apparecchio..................93
Pulizia del convogliatore dell'acqua di sbrinamento e del foro di
scarico............................................94
Rimozione degli accessori .............94
Sistemazione guasti......................95
Anomalie di funzionamento............95
Indicazioni sul display ....................96
Problema di temperatura ...............96
Rumori............................................96
Odori...............................................97
Esecuzione dell'autotest dell'ap-
parecchio........................................98
Stoccaggio e smaltimento............98
Messa fuori servizio dell'appa-
recchio............................................98
Rottamazione di un apparecchio
dismesso ........................................98
Servizio di assistenza clienti........99
Codice prodotto (E-Nr.) e codice
di produzione (FD) .........................99
77
Page 78

it
Dati tecnici...................................100
78
Page 79

Sicurezza it
Sicurezza
Osservare le informazioni sul tema della sicurezza per poter utilizzare l'apparecchio in modo sicuro.
Questo apparecchio èconforme alle vigenti norme disicurezza
per leapparecchiature elettriche ed èschermato contro iradiodisturbi.
Avvertenze generali
Qui sono riportate le informazioni generali relative a queste istruzioni.
¡ Leggere attentamente le presenti istruzioni. Solo così sarà pos-
sibile utilizzare l'apparecchio in modo sicuro ed efficiente.
¡ Queste istruzioni sono rivolte all'utente dell'apparecchio.
¡ Osservare le istruzioni di sicurezza e le avvertenze.
¡ Conservare le istruzioni e le informazioni sul prodotto per il suc-
cessivo utilizzo o per il futuro proprietario.
¡ Controllare l'apparecchio dopo averlo disimballato. Non collega-
re l'apparecchio se ha subito danni durante il trasporto.
Utilizzo conforme all'uso previsto
Per utilizzare l'apparecchio in modo sicuro e corretto, osservare le
indicazioni per l'utilizzo conforme all'uso previsto.
Questo apparecchio è concepito esclusivamente per l'incasso.
Osservare le istruzioni di installazione.
Utilizzare l'apparecchio soltanto:
¡ osservando queste istruzioni per l'uso;
¡ per cucinare alimenti.
¡ in case private e in locali chiusi in ambito domestico;
¡ fino a un'altitudine di massimo 2000m sul livello del mare.
79
Page 80

it Sicurezza
Limitazione di utilizzo
Evitare pericoli per i bambini e le persone a rischio.
Questo apparecchio può essere utilizzato da bambini di età pari o
superiore a 8 anni e da persone con ridotte facoltà fisiche, sensoriali o mentali o prive di sufficiente esperienza e/o conoscenza se
sorvegliati o già istruiti in merito all'utilizzo sicuro dell'apparecchio
e se hanno compreso i rischi da esso derivanti.
I bambini non devono giocare con l'apparecchio.
Ai bambini senza sorveglianza è vietato eseguire la pulizia e manutenzione di competenza dell’utente.
Tenere lontano dall'apparecchio e dal cavo di alimentazione i
bambini di età inferiore agli 8 anni.
I bambini da 3 a 8 anni possono caricare e scaricare il frigorifero/
congelatore.
Trasporto sicuro
Osservare le presenti istruzioni di sicurezza durante il trasporto
dell'apparecchio.
AVVERTENZA‒Pericolo di lesioni!
Il peso elevato dell'apparecchio può causare lesione durante
il sollevamento.
▶
Non sollevare l'apparecchio autonomamente.
Installazione sicura
Osservare le presenti istruzioni di sicurezza per installare l'apparecchio.
AVVERTENZA‒Pericolo di scossa elettrica!
Le installazioni effettuate in modo non appropriato costituiscono un pericolo.
▶
Collegare e utilizzare l’apparecchio solo in conformità con i
dati indicati sulla targhetta identificativa.
▶
Collegare l'apparecchio a una rete a corrente alternata soltanto con una presa con messa a terra installata a norma.
▶
Ilsistema delconduttore diprotezione dell’impianto elettrico
domestico deve essere installato anorma.
80
Page 81

Sicurezza it
▶
Non alimentare mai l'apparecchio da un commutatore esterno ad es. un timer esterno o un telecomando.
▶
Se l'apparecchio è incassato, la spina di alimentazione del
cavo di collegamento alla rete elettrica deve essere liberamente accessibile, oppure qualora non fosse possibile accedere liberamente alla spina, nell'impianto elettrico fisso
deve essere montato un dispositivo di separazione onnipolare conformemente alle norme di installazione.
▶
Durante l'installazione dell'apparecchio prestare attenzione
che il cavo di alimentazione non resti incastrato e non si
danneggi.
AVVERTENZA‒Pericolo di incendio!
¡ È pericoloso utilizzare un cavo di alimentazione con una pro-
lunga e un adattatore non ammesso.
▶
Non utilizzare cavi di prolunga o prese multiple.
▶
Se il cavo di alimentazione è troppo corto, contattare il servizio di assistenza clienti.
▶
Utilizzare esclusivamente gli adattatori approvati dal produttore.
¡
Le prese multiple portatili o gli alimentatori portatili possono
surriscaldarsi e provocare un incendio.
▶
Non collocare prese multiple portatili o alimentatori portatili
dietro l'apparecchio.
Utilizzo sicuro
Osservare le presenti avvertenze di sicurezza in caso di utilizzo
dell'apparecchio.
AVVERTENZA‒Pericolo di scossa elettrica!
¡ Un isolamento danneggiato del cavo di allacciamento alla re-
te costituisce un pericolo.
▶
Non mettere mai il cavo di allacciamento alla rete a contatto
con fonti di calore o parti dell'apparecchio calde.
81
Page 82

it Sicurezza
▶
Non mettere mai il cavo di allacciamento alla rete a contatto
con spigoli vivi.
▶
Non piegare, schiacciare o modificare mai il cavo di allacciamento alla rete.
¡ L'infiltrazione di umidità può provocare una scarica elettrica.
▶
Utilizzare l'apparecchio esclusivamente in luoghi chiusi.
▶
Non esporre mai l'apparecchio a calore e umidità eccessivi.
▶
Non lavare l'apparecchio con pulitori a vapore o idropulitrici.
AVVERTENZA‒Pericolo di soffocamento!
¡ I bambini potrebbero mettersi in testa il materiale di imballag-
gio o avvolgersi nello stesso, rimanendo soffocati.
▶
Tenere lontano il materiale di imballaggio dai bambini.
▶
Vietare ai bambini di giocare con materiali d’imballaggio.
¡ I bambini possono inspirare o ingoiare le parti piccole, rima-
nendo soffocati.
▶
Tenere i bambini lontano dalle parti piccole.
▶
Non lasciare che i bambini giochino con le parti piccole.
AVVERTENZA‒Pericolo di esplosione!
¡ Gli apparecchi elettrici all’interno di questo elettrodomestico
possono esplodere, ad esempio apparecchi diriscaldamento
o produttori di ghiaccio elettrici.
▶
Non utilizzare alcun apparecchio elettrico all'interno dell'elettrodomestico.
¡ Dispositivi meccanici o altri strumenti possono danneggiare il
circuito refrigerante, il refrigerante infiammabile può fuoriuscire ed esplodere.
▶
Per accelerare il processo di scongelamento non utilizzare
dispositivi meccanici o altri strumenti diversi da quelli consigliati dal produttore.
¡ I prodotti contenenti gas propellenti combustibili e sostanze
esplosive possono esplodere, per es. bombolette spray.
▶
Non conservare nell'apparecchio prodotti contenenti gas
propellenti combustibili e sostanze esplosive.
82
Page 83

Sicurezza it
AVVERTENZA‒Pericolo di incendio!
I vapori che si generano dai liquidi infiammabili potrebbero
prendere fuoco (deflagrazione).
▶
Conservare l'alcol ad alta gradazione soltanto in contenitori
ermetici e in posizione verticale.
AVVERTENZA‒Pericolo di lesioni!
¡ Pericolo di lesioni agli occhi dovute alla fuoriuscita di refrige-
rante infiammabile e gas nocivi.
▶
Non danneggiare i tubi del circuito refrigerante e l'isolamento.
¡ L’apparecchio può ribaltarsi.
▶
Non salire su zoccolo, parti estraibili o porte, né sostenersi
sugli stessi.
AVVERTENZA‒Pericolo di ustioni!
Singole parti dell'apparecchio si riscaldano durante il funzionamento.
▶
Non toccare mai le parti roventi.
▶
Tenere lontano i bambini.
CAUTELA‒Rischio di danni alla salute!
Osservare le seguenti indicazioni per evitare di sporcare gli
alimenti.
▶
Se la porta viene aperta per un periodo di tempo prolungato, si può verificare un notevole aumento di temperatura
all'interno degli scomparti dell'apparecchio.
▶
Pulire regolarmente le superfici che entrano in contatto con
gli alimenti e i sistemi di scarico accessibili.
▶
Conservare carne e pesce crudi in contenitori adatti nel frigorifero, in modo che non entrino in contatto con altri alimenti o non gocciolino su questi.
▶
Se il frigorifero/congelatore rimane vuoto per un lungo periodo, spegnere l'apparecchio, scongelarlo, pulirlo e lasciare aperta la porta per prevenire la formazione di muffa.
83
Page 84

it Sicurezza
Apparecchio danneggiato
Osservare le presenti istruzioni di sicurezza nel caso in cui l'apparecchio sia danneggiato.
AVVERTENZA‒Pericolo di scossa elettrica!
¡ Un apparecchio o un cavo di alimentazione danneggiati costi-
tuiscono un pericolo.
▶
Non mettere mai in funzione un apparecchio danneggiato.
▶
Non utilizzare mai un apparecchio con la superficie danneggiata.
▶
Non tirare mai il cavo di collegamento alla rete elettrica per
staccare l'apparecchio dalla rete elettrica. Staccare sempre
la spina del cavo di alimentazione.
▶
Se l'apparecchio o il cavo di alimentazione è danneggiato,
staccare subito la spina di alimentazione del cavo di alimentazione e spegnere il fusibile nella scatola dei fusibili.
▶
Rivolgersi al servizio di assistenza clienti. →Pagina99
▶
Solo il personale adeguatamente specializzato e formato
può eseguire riparazioni sull'apparecchio.
¡ Gli interventi di riparazione effettuati in modo non appropriato
rappresentano una fonte di pericolo.
▶
Solo il personale adeguatamente specializzato e formato
può eseguire riparazioni sull'apparecchio.
▶
Per la riparazione dell'apparecchio possono essere impiegati soltanto pezzi di ricambio originali.
▶
Al fine di evitare pericoli, se il cavo di alimentazione di questo apparecchio subisce danni deve essere sostituito dal
produttore, dal suo servizio di assistenza clienti o da persona in possesso di simile qualifica.
AVVERTENZA‒Pericolo di incendio!
In caso di danneggiamento dei tubi, il refrigerante infiammabile e i gas nocivi possono fuoriuscire e prendere fuoco.
▶
Tenere il fuoco e le fonti di calore lontani dall'apparecchio.
84
Page 85

Sicurezza it
▶
Ventilare l'ambiente.
▶
Spegnere l'apparecchio. →Pagina91
▶
Togliere la spina del cavo di alimentazione o disattivare il
fusibile nella scatola dei fusibili.
▶
Rivolgersi al servizio di assistenza clienti. →Pagina99
85
Page 86

it Prevenzione di danni materiali
Prevenzione di danni materiali
Prevenzione di danni materiali
Per prevenire danni materiali all'apparecchio, agli accessori o agli oggetti
da cucina, osservare le presenti avvertenze.
ATTENZIONE!
¡ Le parti di plastica e le guarnizioni
delle porte possono diventare porose a causa di sporco di olio o
grasso.
▶
Tenere le parti in materiale plastico e le guarnizioni delle porte
sempre libere da olio e grasso.
¡ Salendo o sedendosi sullo zocco-
lo, sugli elementi estraibili o sulle
porte, l'apparecchio può danneggiarsi.
▶
Non salire su zoccolo, parti
estraibili o porte, né sostenersi
sugli stessi.
Tutela dell'ambiente e risparmio
Tutela dell'ambiente e risparmio
Tutelate l'ambiente utilizzando l'apparecchio cercando di risparmiare le risorse e smaltendo correttamente i
materiali riutilizzabili.
Smaltimento dell’imballaggio
I materiali dell'imballaggio sono rispettosi dell'ambiente e possono essere riutilizzati.
▶
Smaltire lesingole parti distintamente secondo iltipo dimateriale.
Per informazioni sulle attuali procedure di smaltimento rivolgersi al rivenditore specializzato o al comune di competenza.
Risparmio energetico
Osservando queste avvertenze l'apparecchio consuma meno energia
elettrica.
Selezione del luogo d'installazione
Osservare le presenti indicazioni per
l'installazione dell'apparecchio.
¡ Proteggere l'apparecchio dalla lu-
ce diretta del sole.
¡ Disporre l'apparecchio alla mag-
giore distanza possibile da radiatori, piano cottura e altre fonti di
calore:
– Mantenere una distanza di 30
mm dai fornelli elettrici o a gas.
– Mantenere una distanza di 30
cm da stufe a olio o a carbone.
A temperature ambiente più basse
l'apparecchio deve raffreddare con
minore frequenza.
¡ Utilizzare una profondità della nic-
chia di 560 mm.
¡ Non coprire oppure ostruire le
aperture di ventilazione.
¡ Ventilare l'ambiente ogni giorno.
L'aria circolante lungo la parete
posteriore dell'apparecchio non si
riscalda eccessivamente.
L’apparecchio deve raffreddare
con minore frequenza.
Risparmio energetico durante l'utilizzo
Osservare le presenti indicazioni durante l'utilizzo dell'apparecchio.
Nota:La disposizione delle parti
dell'attrezzatura non influisce sul consumo di energia dell'apparecchio.
86
Page 87

Installazione e allacciamento it
¡ Non coprire oppure ostruire le
aperture di ventilazione.
L'aria circolante lungo la parete
posteriore dell'apparecchio non si
riscalda eccessivamente.
¡ Aprire la porta dell'apparecchio
solo brevemente.
¡ Trasportare gli alimenti acquistati
in una borsa termica e metterli subito nell'apparecchio.
¡ Lasciare raffreddare gli alimenti e
le bevande, se caldi, prima di introdurli nell’apparecchio.
¡ Per scongelare gli alimenti surge-
lati metterli nel frigorifero, in modo
da sfruttare il freddo che hanno
accumulato.
Si evita così un eccessivo riscaldamento dell'aria nell'apparecchio.
L’apparecchio deve raffreddare
con minore frequenza.
¡ Lasciare sempre un poco di spa-
zio fra gli alimenti e la parete posteriore.
¡ Conservare gli alimenti inconfezio-
ni ermetiche.
L'aria può così circolare e l'umidità
resta costante.
Installazione e allacciamento
Installazione e allacciamento
In questa sezione si trovano informazioni sul luogo e le modalità di installazione dell'apparecchio. e sull'allacciamento alla rete elettrica.
Contenuto della confezione
Dopo il disimballaggio controllare
che tutti i componenti siano presenti
e che non presentino danni dovuti al
trasporto.
In caso di contestazioni rivolgersi al
fornitore oppure al nostro servizio di
assistenza clienti →Pagina99.
La dotazione comprende:
¡ Apparecchio da incasso
¡ Attrezzatura e accessori
¡ Materiale di installazione
¡ Istruzioni per l'installazione
¡ Istruzioni per l'uso
¡ Libretto del centro di assistenza
tecnica autorizzato
¡ Allegato di garanzia
convenzionale
2
¡ Etichetta energetica
¡ Scheda informativa del prodotto
¡ Informazioni sul consumo energeti-
co e sui possibili rumori
1
1
In funzione dell'allestimento dell'apparecchio
2
Non in tutti i Paesi
Installazione ed allacciamento dell’apparecchio
Condizione indispensabile:Il conte-
nuto della confezione dell'apparecchio è controllato. →Pagina87
1. Osservare i criteri per il luogo d'in-
stallazione dell'apparecchio.
→Pagina88
2. Installare l'apparecchio secondo le
relative istruzioni fornite.
87
Page 88

it Installazione e allacciamento
5
5
5
3. Preparare l'apparecchio per il pri-
mo utilizzo. →Pagina88
4. Collegare elettricamente l'apparec-
chio. →Pagina88
Criteri per il luogo d'installazione
Osservare le presenti indicazioni per
l'installazione dell'apparecchio.
AVVERTENZA
Pericolo di esplosione!
Se l'apparecchio è collocato in un locale troppo piccolo, in caso di perdita del circuito refrigerante si può
creare una miscela infiammabile di
gas e aria.
▶
Collocare l'apparecchio soltanto in
un locale con un volume minimo di
1 m3 ogni 8 g di refrigerante.
Laquantità direfrigerante è indicata sulla targhetta identificativa.
→Fig.1/
A seconda del modello l'apparecchio
può pesare di fabbrica fino a 50 kg.
Per poter trasportare il peso dell'apparecchio, la base deve essere sufficientemente stabile.
Temperatura ambiente ammessa
La temperatura ambiente ammessa
dipende dalla classe climatica
dell'apparecchio.
La classe climatica è indicata nella
targhetta identificativa. →Fig.1/
Classe climatica
SN 10°C…32°C
N 16°C…32°C
ST 16°C…38°C
T 16°C…43°C
Nei limiti della temperatura ambiente
ammessa l'apparecchio èpienamente efficiente.
Temperatura ambiente ammessa
Se un apparecchio della classe climatica SN viene utilizzato atemperature ambiente inferiori, possono essere esclusi danni all’apparecchio fino
aduna temperatura ambiente
di+5°C.
Dimensioni nicchia
Quando si installa l'apparecchio in
una nicchia del mobile, rispettarne le
dimensioni. In caso contrario possono emergere problemi durante l'installazione dell'apparecchio.
Profondità della nicchia
Installare l'apparecchio nella nicchia
a una profondità consigliata di 560
mm.
Una minore profondità della nicchia
fa aumentare leggermente l'assorbimento di energia. La profondità della
nicchia deve essere di almeno 550
mm.
Larghezza della nicchia
Per l'apparecchio è necessaria una
larghezza interna della nicchia del
mobile di almeno 560cm.
Preparazione dell'apparecchio per il primo utilizzo
1. Rimuovere il materiale informativo.
2. Rimuovere la pellicola protettiva e i
blocchi di trasporto, come il nastro
adesivo e il cartone.
3. Pulire l'apparecchio per la prima
volta. →Pagina93
Collegamento elettrico dell'apparecchio
1. Inserire la spina del cavo di allac-
ciamento alla rete dell'apparecchio
a una presa vicina.
Idati di collegamento dell'apparecchio sono indicati sulla targhetta di
identificazione. →Fig.1/
88
Page 89

1
2
3
4
5
6
7
1
2
3
4
5
Conoscere l'apparecchio it
2. Controllare il corretto posiziona-
mento della spina.
a Ora l’apparecchio è pronto per il
funzionamento.
Conoscere l'apparecchio
Conoscere l'apparecchio
In questa sezione sono riportati i
componenti dell'apparecchio.
Apparecchio
Di seguito è riportata una panoramica dei componenti dell'apparecchio.
→Fig.
Nota:A seconda della dotazione e
delle dimensioni sono possibili differenze fra apparecchio e figure.
Elementi di comando
Gli elementi di comando consentono
di impostare tutte le funzioni dell'apparecchio e di ottenere informazioni
sullo stato di esercizio.
→Fig.
1
Elementi di comando
Ripiano variabile →Pagina89
Ripiano estraibile →Pagina89
Cassetto per frutta e verdura con rego-
latore di umidità →Pagina89
Targhetta identificativa
Scomparto per burro e formaggio
→Pagina90
Balconcino porta per grandi bottiglie
2
disattiva il segnale acustico.
/ regola la temperatura del frigori-
fero.
Indica in°C la temperatura impostata
del frigorifero.
attiva o disattiva Super-raffredda-
mento.
accende o spegne l'apparecchio.
Dotazione
Dotazione
Qui è disponibile una panoramica dei
pezzi della dotazione dell'apparecchio e del relativo utilizzo.
La dotazione dell'apparecchio dipende dal modello.
Ripiano
Per variare il ripiano secondo la necessità, rimuoverlo e reinserirlo in
un'altro punto.
→"Rimozione del ripiano",
Pagina94
Ripiano variabile
Utilizzare il ripiano variabile per riporre i prodotti alti, come bottiglie o
brocche, nel ripiano sottostante.
Estrarre la parte anteriore del ripiano
variabile espingerla sotto laparte
posteriore.
→Fig.
Ripiano estraibile
Per ottenere una migliore visuale e rimuovere più velocemente gli alimenti, estrarre il ripiano.
Cassetto per frutta e verdura con regolatore di umidità
Conservare frutta e verdura fresche
nell'apposito cassetto.
L'umidità dell'aria nel cassetto per
frutta e verdura può essere adattata
per mezzo delregolatore umidità edi
una speciale guarnizione. In questo
modo frutta everdura fresche posso-
3
89
Page 90

it Comandi di base
no essere conservate fino araddoppiare la durata rispetto alla conservazione tradizionale.
→Fig.
L'umidità dell'aria nel cassetto per frutta
e verdura può essere regolata
aseconda del tipo edella quantità
degli alimenti da conservare:
4
¡ Umidità inferiore per la conserva-
zione principalmente di frutta e carico elevato.
¡ Umidità maggiore per la conserva-
zione principalmente di verdure e
in caso di carico misto o carico ridotto.
A seconda della quantità e del prodotto conservato, nel cassetto per
frutta e verdura può formarsi condensa.
Rimuovere la condensa con un panno asciutto e adattare l’umidità
dell’aria con l'apposito regolatore.
Per mantenere la qualità e l'aroma,
conservare frutta e verdura sensibili
al freddo all'esterno dell'apparecchio
a temperature tra 8 °C e 12 °C.
Frutta sensibile al
freddo
¡ Ananas
¡ Banana
¡ Mango
¡ Papaya
¡ Agrumi
Verdura sensibile al
freddo
¡ Melanzane
¡ Cetrioli
¡ Zucchine
¡ Peperoni
¡ Pomodori
¡ Patate
Scomparto per burro e formaggio
Conservare il burro e il formaggio duro nei relativi scomparti.
Balconcino controporta
Per variare il balconcino controporta,
rimuoverlo e reinserirlo in un altro
punto.
→"Rimozione del balconcino contro-
porta", Pagina94
Accessori
Utilizzare gli accessori originali in
quanto prodotti appositamente per
questo apparecchio. Qui è disponibile una panoramica degli accessori
dell'apparecchio e del relativo utilizzo.
Gli accessori dipendono dal modello
di apparecchio.
Portauova
Conservare le uova nel portauova.
Fermabottiglie
Il fermabottiglie impedisce la caduta
delle bottiglie durante l’apertura o la
chiusura della porta.
→Fig.
Comandi di base
5
Comandi di base
Qui sono fornite le informazioni essenziali sull'utilizzo dell'apparecchio.
Accensione dell’apparecchio
90
1. Premere .
a L’apparecchio inizia a raffreddare.
2. Impostare la temperatura desidera-
ta. →Pagina91
Page 91

Funzioni supplementari it
Istruzioni per il funzionamento
¡ Una volta acceso, l'apparecchio
raggiunge la temperatura impostata soltanto dopo diverse ore. Prima
che la temperatura venga raggiunta non inserire alcun alimento al
suo interno.
Spegnimento dell'apparecchio
▶
Premere .
a L’apparecchio non raffredda più.
Regolazione della temperatura
Dopo aver acceso l'apparecchio, è
possibile regolare la temperatura.
Regolazione della temperatura del frigorifero
▶
Premere ripetutamente / finché
l'indicatore non indica la temperatura desiderata.
La temperatura consigliata all'interno del frigorifero è di 4 °C.
→"Adesivo OK", Pagina92
Funzioni supplementari
Funzioni supplementari
Scopri quali funzioni aggiuntive è
possibile impostare sull'apparecchio.
Super-raffreddamento
Con il Super-raffreddamento il frigorifero raffredda almassimo della potenza. In questo modo gli alimenti e
le bevande si raffreddano velocemente.
Attivare Super-raffreddamento prima
di riporre grandi quantità di alimenti.
Nota:Se Super-raffreddamento è attivato, il rumore dell'apparecchio aumenta.
Attivare Super-raffreddamento
▶
Premere .
a si accende.
Nota:Dopo 15 ore l'apparecchio
commuta afunzionamento normale.
Disattivare Super-raffreddamento
▶
Premere .
a Viene visualizzata la temperatura
regolata precedentemente.
Allarme
Allarme
L'apparecchio dispone di funzioni di
allarme.
Allarme porta
Se la porta dell'apparecchio resta
aperta a lungo, si attiva l'allarme porta.
Disattivazione del segnale acustico (allarme porta)
▶
Chiudere la porta dell'apparecchio
o premere .
a Il segnale acustico è disattivato.
Frigorifero
Frigorifero
Nel frigorifero è possibile conservare
carne, salsiccia, pesce, latticini, uova,
piatti pronti e prodotti da forno.
È possibile impostare la temperatura
nel frigorifero da 2 °C a 8 °C.
La temperatura consigliata all'interno
del frigorifero è di 4 °C.
→"Adesivo OK", Pagina92
Mediante conservazione in frigorifero
anche alimenti altamente deperibili
possono essere conservati abreve
91
Page 92

it Scongelamento
omedio termine. Minore è la temperatura selezionata, più a lungo rimangono freschi gli alimenti.
Consigli per la conservazione degli alimenti nel frigorifero
Osservare i consigli relativi alla conservazione degli alimenti nel frigorifero.
¡ Per mantenere più a lungo la fre-
schezza e la qualità degli alimenti,
conservare solo cibi freschi e intatti.
¡ Per i prodotti pronti e gli alimenti
confezionati non superare la data
minima di conservazione o la data
di consumo indicata dal produttore.
¡ Per mantenere aroma, colore e fre-
schezza o per evitare la trasmissione di sapori e lo scolorimento delle parti plastiche, imballare bene
gli alimenti o conservarli coperti.
¡ Lasciare raffreddare alimenti ebe-
vande caldi prima di introdurli nel
frigorifero.
Zone fredde nel frigorifero
Per via della circolazione dell'aria
all'interno del frigo si creano diverse
zone fredde.
Zona più fredda
La zona più fredda si trova fra la freccia impressa lateralmente eil sottostante ripiano.
Consiglio:Conservare nella zona più
fredda gli alimenti delicati, per esempio pesce, salsiccia, carne.
Zona meno fredda
La zona meno fredda è nella parte
più alta della porta.
Consiglio:Conservare gli alimenti
meno delicati nella zona meno fredda, ad es. formaggio duro e burro. Il
formaggio può così continuare a diffondere il suo aroma e il burro resta
spalmabile.
Adesivo OK
Con l'adesivo OK è possibile controllare se nel frigorifero sono stati raggiunti i range di temperatura sicuri
consigliati per gli alimenti di +4°C o
di temperatura inferiore.
L'adesivo OK non è compreso nella
fornitura di tutti i modelli.
Se l'adesivo non indica OK, ridurre
progressivamente la temperatura.
→"Regolazione della temperatura del
frigorifero", Pagina91
Dopo lamessa infunzione dell'apparecchio possono passare fino
a12ore prima che sia raggiunta
latemperatura impostata.
Corretta regolazione
Scongelamento
Scongelamento
Osservare le informazioni se si desidera scongelare l'apparecchio.
Scongelamento nel frigorifero
A seconda della funzione, durante il
funzionamento si formano gocce
d'acqua o brina sulla parete posteriore del frigorifero. La parete posteriore
del frigorifero si sbrina automaticamente.
L'acqua di sbrinamento o la brina
scorrono attraverso l'apposito convogliatore nel foro di scarico verso la
vaschetta di evaporazione e non devono essere rimosse.
Affinché l'acqua di sbrinamento possa defluire e per evitare la formazione di odori, osservare le seguenti in-
92
Page 93

Pulizia e cura it
formazioni:
→"Pulizia del convogliatore dell'ac-
qua di sbrinamento e del foro di scarico", Pagina94.
Pulizia e cura
Pulizia e cura
Per mantenere a lungo l'apparecchio
in buone condizioni, sottoporlo a una
cura e a una manutenzione scrupolose.
Preparazione dell'apparecchio per la pulizia
Di seguito sono indicate informazioni
per preparare l'apparecchio alla pulizia.
1. Spegnere l'apparecchio.
→Pagina91
2. Staccare l'apparecchio dalla rete
elettrica.
Togliere la spina del cavo di ali-
mentazione o disattivare il fusibile
nella scatola dei fusibili.
3. Estrarre tutti gli alimenti econser-
varli in un luogo fresco.
Se disponibili, mettere degli accu-
mulatori del freddo sugli alimenti.
4. Se è presente uno strato di brina,
lasciarlo scongelare.
5. Rimuovere tutte leparti dell'attrez-
zatura dall'apparecchio.
→Pagina94
Pulizia dell'apparecchio
Pulire l'apparecchio come indicato, in
modo da non danneggiarlo eseguendo una pulizia errata o utilizzando detergenti non idonei.
AVVERTENZA
Pericolo di scossa elettrica!
¡ L'infiltrazione di umidità può provo-
care una scarica elettrica.
▶
Non lavare l'apparecchio con
pulitori a vapore o idropulitrici.
¡ I liquidi che raggiungono l'interno
dell'unità d'illuminazione possono
essere nocivi.
▶
Evitare che l’acqua penetri
nell’unità di illuminazione.
ATTENZIONE!
¡ I detersivi non appropriati possono
danneggiare le superfici dell'apparecchio.
▶
Non utilizzare spugnette dure o
abrasive.
▶
Non usare prodotti corrosivi o
abrasivi.
▶
Non utilizzare detergenti a elevato contenuto di alcol,
¡ Lavando i pezzi dell'attrezzatura e
gli accessori in lavastoviglie, questi
si possono deformare o scolorire.
▶
Non lavare iripiani edi contenitori nella lavastoviglie.
1. Preparare l'apparecchio per la puli-
zia. →Pagina93
2. Pulire l'apparecchio, le parti dell'at-
trezzatura e le guarnizioni della
porta utilizzando un panno spugna,
acqua tiepida e una quantità esigua di detergente con pH neutro.
3. Asciugare a fondo con un panno
morbido e asciutto.
4. Inserire le parti dell'attrezzatura.
5. Collegare elettricamente l'apparec-
chio. →Pagina88
93
Page 94

it Pulizia e cura
6. Accendere l’apparecchio.
→Pagina90
7. Inserire gli alimenti.
Pulizia del convogliatore dell'acqua di sbrinamento e del foro di scarico
Per il libero deflusso dell’acqua di
sbrinamento, pulire regolarmente il
convogliatore dell’acqua e il foro di
scarico.
▶
Pulire attentamente il convogliatore
dell'acqua e il foro di scarico ad
esempio con un bastoncino cotonato.
→Fig.
6
Rimozione degli accessori
Se si vogliono pulire a fondo le parti
dell'attrezzatura, rimuoverle dall'apparecchio.
Rimozione del ripiano
▶
Estrarre il ripiano e rimuoverlo.
Rimozione del ripiano estraibile
1. Rimuovere il ripiano estraibile fin-
ché il nasello di arresto non si innesta.
→Fig.
2. Abbassare il ripiano e ruotarlo late-
ralmente.
7
2. Sollevare il contenitore da davanti
ed estrarlo .
→Fig.
9
Rimozione del ripiano sopra il cassetto verdura
1. Rimuovere il cassetto per frutta e
verdura.
2. Rimuovere il ripiano e capovol-
gerlo .
→Fig.
3. Spingere verso l'esterno i fissaggi
10
della lastra di vetro inferiore.
→Fig.
4. Sollevare la lastra di vetro da da-
11
vanti ed estrarla da dietro .
→Fig.
12
Rimozione del balconcino controporta
▶
Sollevare il balconcino controporta
ed estrarlo.
→Fig.
8
Rimozione del cassetto per frutta e verdura
1. Estrarre il cassetto fino a battuta.
94
Page 95

Sistemazione guasti it
Sistemazione guasti
Sistemazione guasti
I guasti minori possono essere sistemati autonomamente dall'utente. Utilizzare
le informazioni per la sistemazione dei guasti prima di contattare il servizio di
assistenza clienti. In questo modo si evitano costi non necessari.
AVVERTENZA
Pericolo di scossa elettrica!
Gli interventi di riparazione effettuati in modo non appropriato rappresentano
una fonte di pericolo.
▶
Solo il personale adeguatamente specializzato e formato può eseguire riparazioni sull'apparecchio.
▶
Per la riparazione dell'apparecchio possono essere impiegati soltanto pezzi
di ricambio originali.
▶
Al fine di evitare pericoli, se il cavo di alimentazione di questo apparecchio
subisce danni deve essere sostituito dal produttore, dal suo servizio di assistenza clienti o da persona in possesso di simile qualifica.
Anomalie di funzionamento
Anomalia Causa Eliminazione dell'anomalia
L'apparecchio non funziona.
Tutte lespie sono spente.
L'apparecchio non raffredda,
l'indicatore el'illuminazione
sono accesi.
La lampadina a LED è guasta.
La macchina frigorifera si accende più spesso e per periodi più lunghi.
Il fondo del vano frigorifero è
bagnato.
La spina d’alimentazione
non è inserita correttamente.
Èintervenuto il dispositivo di
sicurezza.
L'energia è mancata. 1. Controllare se vi è energia elettrica.
Il programma «dimostrativo»
è attivo.
Sono possibili diverse cause
scatenanti.
La porta dell'apparecchio è
stata aperta spesso.
Le aperture di ventilazione
sono coperte.
Il convogliatore dell’acqua di
sbrinamento o il foro di scarico sono otturati.
▶
Collegare la spina di alimentazione.
▶
Controllare i fusibili.
2. Se presenti, collocare accumulatori
del freddo sul ripiano più in alto.
▶
Eseguire l'autotest dell'apparecchio. →Pagina98
a Alla fine dell'autotest, l'apparecchio
passa al funzionamento normale.
▶
Rivolgersi al servizio di assistenza
clienti.
→"Servizio di assistenza clienti",
Pagina99
▶
Non aprire la porta dell'apparecchio
inutilmente.
▶
Rimuovere gli ostacoli che si trovano davanti alle aperture di ventilazione.
▶
Pulire il convogliatore dell’acqua di
sbrinamento e il foro di scarico.
→Pagina94
95
Page 96

it Sistemazione guasti
Indicazioni sul display
Anomalia Causa Eliminazione dell'anomalia
Sul display compare un messaggio con "D" o "E".
Il sistema elettronico ha riconosciuto un errore.
▶
Rivolgersi al servizio di assistenza
clienti.
→"Servizio di assistenza clienti",
Pagina99
Viene emesso un segnale
acustico e si accende.
Sono possibili diverse cause
scatenanti.
La porta dell'apparecchio
▶
Premere .
a L'allarme viene disattivato.
▶
Chiudere la porta.
èaperta.
Problema di temperatura
Anomalia Causa Eliminazione dell'anomalia
Latemperatura sidiscosta
notevolmente dall'impostazione.
Sono possibili diverse cause
scatenanti.
1. Spegnere l'apparecchio.
→Pagina91
2. Riaccendere l'apparecchio dopo cir-
ca 5 minuti. →Pagina90
‒ Se la temperatura ètroppo
elevata, controllarla di nuovo
dopo qualche ora.
‒ Se la temperatura ètroppo
bassa, controllarla dinuovo il
giorno seguente.
Rumori
Anomalia Causa Eliminazione dell'anomalia
L'apparecchio emette un
ronzio.
L'apparecchio emette rumori come gorgoglii o ronzii.
L'apparecchio scatta. Nessun guasto. Motore, in-
L'apparecchio produce dei
rumori.
96
Nessun guasto. Un motore è
in funzione, ad es. gruppo frigorifero, ventola.
Nessun guasto. Il refrigerante fluisce nei tubi.
terruttori ed elettrovalvole si
inseriscono o disinseriscono.
L’apparecchio non è correttamente livellato.
Le parti dell'attrezzatura traballano o si incastrano.
Nessun trattamento necessario.
Nessun trattamento necessario.
Nessun trattamento necessario.
▶
Posizionare l'apparecchio con una
livella a bolla d’aria. Se necessario,
mettere sotto uno spessore.
▶
Controllare le parti estraibili ed
eventualmente inserirle di nuovo
correttamente.
Page 97

Sistemazione guasti it
Anomalia Causa Eliminazione dell'anomalia
L'apparecchio produce dei
rumori.
Le bottiglie o le stoviglie si
toccano.
▶
Separare le bottiglie o le stoviglie.
Odori
Anomalia Causa Eliminazione dell'anomalia
L'apparecchio emana un
odore sgradevole.
Sono possibili diverse cause
scatenanti.
1. Preparare l'apparecchio alla pulizia.
→Pagina93
2. Pulire l'apparecchio. →Pagina93
3. Pulire tutte le confezioni degli ali-
menti.
4. Per impedire laformazione diodori,
sigillare ermeticamente gli alimenti
cheemanano forte odore.
5. Dopo 24 ore controllare se si è di
nuovo sviluppato odore.
97
Page 98

it Stoccaggio e smaltimento
Esecuzione dell'autotest dell'apparecchio
1. Spegnere l'apparecchio.
→Pagina91
2. Riaccendere l'apparecchio dopo
circa 5 minuti. →Pagina90
3. Entro 10secondi dopo l'accensio-
ne, mantenere premuto per 3 5secondi .
a Si avvia l'autotest dell'apparecchio.
a Durante l’autotest, di tanto in tanto
viene emesso un lungo segnale
acustico.
a Se al termine dell'autotest vengono
emessi 2 segnali acustici e viene
visualizzata la temperatura impostata, l'apparecchio funziona regolarmente. L'apparecchio passa al
funzionamento normale.
a Se al termine dell'autotest viene
emesso 5 volte il segnale acustico
e lampeggia per 10secondi,
informare il servizio di assistenza
clienti.
Stoccaggio e smaltimento
Stoccaggio e smaltimento
Di seguito sono indicate informazioni
per preparare l'apparecchio per l'immagazzinamento. Vi sono anche informazioni sulla rottamazione degli
apparecchi dismessi.
Messa fuori servizio dell'apparecchio
1. Spegnere l'apparecchio.
→Pagina91
2. Staccare l'apparecchio dalla rete
elettrica.
Togliere la spina del cavo di ali-
mentazione o disattivare il fusibile
nella scatola dei fusibili.
3. Scongelare l'apparecchio.
→Pagina92
4.
Pulire l'apparecchio. →Pagina93
5. Lasciare aperta la porta dell’appa-
recchio.
Rottamazione di un apparecchio dismesso
Uncorretto smaltimento nel rispetto
dell'ambiente permette direcuperare
materie prime preziose.
AVVERTENZA
Rischio di danni alla salute!
I bambini possono restare chiusi
nell'apparecchio, rischiando la vita.
▶
Per rendere difficile ai bambini l'ingresso nell'apparecchio, non rimuovere dal suo interno ripiani
econtenitori.
▶
Tenere ibambini lontano dall'apparecchio dismesso.
1. Staccare la spina del cavo di ali-
mentazione.
2. Tagliare il cavo di alimentazione.
3. Smaltire l'apparecchio nel rispetto
dell'ambiente.
Questo apparecchio dispone di
contrassegno ai sensi della direttiva europea 2012/19/UE in
materia di apparecchi elettrici
ed elettronici (waste electrical
and electronic equipment WEEE).
Questa direttiva definisce le norme per la raccolta e il riciclaggio degli apparecchi dismessi
valide su tutto il territorio
dell’Unione Europea.
98
Page 99

5
Servizio di assistenza clienti it
Servizio di assistenza clienti
Servizio di assistenza
clienti
In caso di domande, se non si riesce
a sistemare un guasto in autonomia
o se l'apparecchio deve essere riparato, rivolgersi al nostro servizio di
assistenza clienti.
Molti problemi possono essere risolti
autonomamente dall'utente utilizzando le informazioni sull'eliminazione
dei guasti riportate nelle presenti
istruzioni o disponibili sul nostro sito
Internet. Qualora ciò non fosse possibile, rivolgersi al nostro servizio di assistenza clienti.
Troviamo sempre una soluzione adeguata e cerchiamo di evitare visite
non necessarie da parte dei tecnici
dell'assistenza.
Assicuriamo che l'apparecchio venga
riparato con ricambi originali, da tecnici appositamente formati del servizio di assistenza clienti, sia durante
la copertura della garanzia del produttore sia allo scadere della stessa.
Per motivi di sicurezza solo il personale adeguatamente specializzato e
formato può eseguire riparazioni
sull'apparecchio. La garanzia decade
nel caso in cui vengano eseguiti interventi o riparazioni da parte di persone da noi non autorizzate o nel caso in cui i nostri apparecchi vengano
equipaggiati con ricambi, parti integrative e accessori non originali a
causa dei quali insorga un difetto.
I ricambi originali rilevanti per il funzionamento secondo il corrispondente regolamento Ecodesign sono reperibili presso il nostro servizio di assistenza clienti per un periodo di almeno 10 anni a partire dalla messa
in circolazione dell'apparecchio all'interno dello Spazio economico europeo.
Nota:L'intervento del servizio di assistenza clienti è gratuito nell'ambito
delle condizioni di garanzia del produttore applicabili a livello locale. La
durata minima della garanzia (garanzia del produttore per utenti privati)
nello Spazio economico europeo è di
2 anni (a eccezione di Danimarca e
Svezia, dove la durata è di 1 anno)
secondo le condizioni di garanzia applicabili a livello locale. Le condizioni
di garanzia non producono alcun effetto su altri diritti o rivendicazioni
spettanti conformemente al diritto locale.
Informazioni dettagliate sulla durata
della garanzia e sulle condizioni di
garanzia in ciascun Paese sono reperibili presso il nostro servizio di assistenza clienti, presso il proprio rivenditore o sul nostro sito Internet.
Quando si contatta il servizio di assistenza clienti sono necessari il codice prodotto (E-Nr.) e il codice di produzione (FD) dell'apparecchio.
I dati di contatto del servizio di assistenza clienti sono disponibili
nell'elenco dei centri di assistenza allegato o sul nostro sito Internet.
Codice prodotto (E-Nr.) e codice di produzione (FD)
Il codice prodotto (E-Nr.) e il codice
di produzione (FD) sono riportati sulla targhetta identificativa dell'apparecchio.
→Fig.1/
Annotare i dati dell'apparecchio e il
numero di telefono del servizio di assistenza clienti per ritrovarli rapidamente.
99
Page 100

it Dati tecnici
5
Dati tecnici
Dati tecnici
Il refrigerante, il contenuto utile ed altri dati tecnici sono indicati sulla targhetta identificativa.
→Fig.1/
Ulteriori informazioni sul modello
scelto sono disponibili sul sito Internet https://www.bsh-group.com/
energylabel1. Questo link rimanda alla pagina ufficiale del database europeo dei prodotti EPREL, il cui indirizzo non era ancora stato pubblicato al
momento della stampa. Seguire le indicazioni relative alla ricerca del modello. Si riconosce il modello dall'indicazione prima della barra della sigla
del prodotto (E) sulla targhetta. In alternativa, l'indicazione del modello si
trova anche nella prima riga dell'etichetta energetica UE.
1
Valido solo per i Paesi dello Spazio economico europeo
100
 Loading...