


EN Dear Customer,
Gigaset Communications GmbH is the legal successor to
Siemens Home and Office Communication Devices GmbH &
Co. KG (SHC), which in turn continued the Gigaset business
of Siemens AG. Any statements made by Siemens AG or
SHC that are found in the user guides should therefore be
understood as statements of Gigaset Communications
.
GmbH
We hope you enjoy your Gigaset.
DE Sehr geehrte Kundin, sehr geehrter Kunde,
FR Chère Cliente, Cher Client,
IT Gentile cliente,
NL Geachte klant,
ES Estimado cliente,
PT SCaros clientes,
die Gigaset Communications GmbH ist Rechtsnachfolgerin
der Siemens Home and Office Communication Devices
GmbH & Co. KG (SHC), die ihrerseits das Gigaset-Geschäft
der Siemens AG fortführte. Etwaige Erklärungen der
Siemens AG oder der SHC in den Bedienungsanleitungen
sind daher als Erklärungen der Gigaset Communications
GmbH zu verstehen.
Wir wünschen Ihnen viel Freude mit Ihrem Gigaset.
la société Gigaset Communications GmbH succède en droit
à Siemens Home and Office Communication Devices GmbH
& Co. KG (SHC) qui poursuivait elle-même les activités Gigaset de Siemens AG. Donc les éventuelles explications de Siemens AG ou de SHC figurant dans les modes d’emploi
doivent être comprises comme des explications de Gigaset
Communications GmbH.
Nous vous souhaitons beaucoup d’agrément avec votre
Gigaset.
la Gigaset Communications GmbH è successore della Siemens Home and Office Communication Devices GmbH &
Co. KG (SHC) che a sua volta ha proseguito l’attività della
Siemens AG. Eventuali dichiarazioni della Siemens AG o
della SHC nei manuali d’istruzione, vanno pertanto intese
come dichiarazioni della Gigaset Communications GmbH.
Le auguriamo tanta soddisfazione con il vostro Gigaset.
Gigaset Communications GmbH is de rechtsopvolger van
Siemens Home and Office Communication Devices GmbH &
Co. KG (SHC), de onderneming die de Gigaset-activiteiten
van Siemens AG heeft overgenomen. Eventuele uitspraken
of mededelingen van Siemens AG of SHC in de gebruiksaanwijzingen dienen daarom als mededelingen van Gigaset
Communications GmbH te worden gezien.
Wij wensen u veel plezier met uw Gigaset
la Gigaset Communications GmbH es derechohabiente de la
Siemens Home and Office Communication Devices GmbH &
Co. KG (SHC) que por su parte continuó el negocio Gigaset
de la Siemens AG. Las posibles declaraciones de la
Siemens AG o de la SHC en las instrucciones de uso se
deben entender por lo tanto como declaraciones de la Gigaset Communications GmbH.
Le deseamos que disfrute con su Gigaset.
Gigaset Communications GmbH é a sucessora legal da Siemens Home and Office Communication Devices GmbH &
Co. KG (SHC), que, por sua vez, deu continuidade ao sector
de negócios Gigaset, da Siemens AG. Quaisquer declarações por parte da Siemens AG ou da SHC encontradas nos
manuais de utilização deverão, portanto, ser consideradas
como declarações da Gigaset Communications GmbH.
Desejamos que tenham bons momentos com o seu Gigaset.
DA Kære Kunde,
FI Arvoisa asiakkaamme,
SV Kära kund,
NO Kjære kunde,
EL Αγ α πητή πελάτισσα, αγαπητέ πελάτη,
HR Poštovani korisnici,
.
SL Spoštovani kupec!
Gigaset Communications GmbH er retlig efterfølger til Siemens Home and Office Communication Devices GmbH &
Co. KG (SHC), som fra deres side videreførte Siemens AGs
Gigaset-forretninger. Siemens AGs eller SHCs eventuelle
forklaringer i betjeningsvejledningerne skal derfor forstås
som Gigaset Communications GmbHs forklaringer.
Vi håber, du får meget glæde af din Gigaset.
Gigaset Communications GmbH on Siemens Home and
Office Communication Devices GmbH & Co. KG (SHC)-yri-
tyksen oikeudenomistaja, joka jatkoi puolestaan Siemens
AG:n Gigaset-liiketoimintaa. Käyttöoppaissa mahdollisesti
esiintyvät Siemens AG:n tai SHC:n selosteet on tämän
vuoksi ymmärrettävä Gigaset Communications GmbH:n
selosteina.
Toivotamme Teille paljon iloa Gigaset-laitteestanne.
Gigaset Communications GmbH övertar rättigheterna från
Siemens Home and Office Communication Devices GmbH &
Co. KG (SHC), som bedrev Gigaset-verksamheten efter Siemens AG. Alla förklaringar från Siemens AG eller SHC i
användarhandboken gäller därför som förklaringar från
Gigaset Communications GmbH.
Vi önskar dig mycket nöje med din Gigaset.
Gigaset Communications GmbH er rettslig etterfølger etter
Siemens Home and Office Communication Devices GmbH &
Co. KG (SHC), som i sin tur videreførte Gigaset-geskjeften i
Siemens AG. Eventuelle meddelelser fra Siemens AG eller
SHC i bruksanvisningene er derfor å forstå som meddelelser
fra Gigaset Communications GmbH.
Vi håper du får stor glede av din Gigaset-enhet.
η Gigaset Communications GmbH είναι η νομική διάδοχος της
Siemens Home and Office Communication Devices GmbH &
Co. KG (SHC), η οποία έχει αναλάβει την εμπορική
δραστηριότητα Gigaset της Siemens AG. Οι δηλώσεις της
Siemens AG ή της SHC στις
επομένως δηλώσεις της Gigaset Communications GmbH.
Σας ευχόμαστε καλή διασκέδαση με τη συσκευή σας Gigaset.
Gigaset Communications GmbH pravni je sljednik tvrtke
Siemens Home and Office Communication Devices GmbH &
Co. KG (SHC), koji je nastavio Gigaset poslovanje tvrtke
Siemens AG. Zato sve izjave tvrtke Siemens AG ili SHC koje
se nalaze u uputama za upotrebu treba tumačiti kao izjave
tvrtke Gigaset Communications GmbH.
Nadamo se da sa zadovoljstvom koristite svoj Gigaset
uređaj.
Podjetje Gigaset Communications GmbH je pravni naslednik
podjetja Siemens Home and Office Communication Devices
GmbH & Co. KG (SHC), ki nadaljuje dejavnost znamke
Gigaset podjetja Siemens AG. Vse izjave podjetja Siemens
AG ali SHC v priročnikih za uporabnike torej veljajo kot izjave
podjetja Gigaset Communications GmbH.
Želimo vam veliko užitkov ob uporabi naprave Gigaset.
οδηγίες χρήσ
ης αποτ
ελούν
Issued by
Gigaset Communications GmbH
Schlavenhorst 66, D-46395 Bocholt
Gigaset Communications GmbH is a trademark
licensee of Siemens AG
© Gigaset Communications GmbH 2008
All rights reserved.
Subject to availability. Rights of modifications
reserved.
www.gigaset.com

CS Vážení zákazníci,
společnost Gigaset Communications GmbH je právním
nástupcem společnosti Siemens Home and Office
Communication Devices GmbH & Co. KG (SHC), která dále
přejala segment produktů Gigaset společnosti Siemens AG.
Jakékoli prohlášení společnosti Siemens AG nebo SHC, které
naleznete v uživatelských příručkách, je třeba považovat za
prohlášení společnosti Gigaset Communications GmbH.
Doufáme, že jste s produkty Gigaset spokojeni.
SK Vážený zákazník,
Spoločnosť Gigaset Communications GmbH je právnym
nástupcom spoločnosti Siemens Home and Office
Communication Devices GmbH & Co. KG (SHC), ktorá zasa
pokračovala v činnosti divízie Gigaset spoločnosti Siemens
AG. Z tohto dôvodu je potrebné všetky vyhlásenia
spoločnosti Siemens AG alebo SHC, ktoré sa nachádzajú v
používateľských príručkách, chápať ako vyhlásenia
spoločnosti Gigaset Communications GmbH.
Veríme, že budete so zariadením Gigaset spokojní.
PL Szanowny Kliencie,
Firma Gigaset Communications GmbH jest spadkobiercą
prawnym firmy Siemens Home and Office Communication
Devices GmbH & Co. KG (SHC), która z kolei przejęła
segment produktów Gigaset od firmy Siemens AG. Wszelkie
oświadczenia firm Siemens AG i SHC, które można znaleźć
w instrukcjach obsługi, należy traktować jako oświadczenia
firmy Gigaset Communications GmbH.
Życzymy wiele przyjemności z korzystania z produktów
Gigaset.
TR Sayın Müşterimiz,
Gigaset Communications GmbH, Siemens AG'nin Gigaset
işletmesini yürüten Siemens Home and Office
Communication Devices GmbH & Co. KG (SHC)'nin yasal
halefidir. Kullanma kılavuzlarında bulunan ve Siemens AG
veya SHC tarafından yapılan bildiriler Gigaset
Communications GmbH tarafından yapılmış bildiriler olarak
algılanmalıdır.
Gigaset'ten memnun kalmanızı ümit ediyoruz.
RO Stimate client,
Gigaset Communications GmbH este succesorul legal al
companiei Siemens Home and Office Communication
Devices GmbH & Co. KG (SHC), care, la rândul său, a
continuat activitatea companiei Gigaset a Siemens AG.
Orice afirmaţii efectuate de Siemens AG sau SHC şi incluse
în ghidurile de utilizare vor fi, prin urmare, considerate a
aparţine Gigaset Communications GmbH.
Sperăm ca produsele Gigaset să fie la înălţimea dorinţelor
dvs.
SR Poštovani potrošaču,
Gigaset Communications GmbH je pravni naslednik
kompanije Siemens Home and Office Communication
Devices GmbH & Co. KG (SHC), kroz koju je nastavljeno
poslovanje kompanije Gigaset kao dela Siemens AG. Stoga
sve izjave od strane Siemens AG ili SHC koje se mogu naći u
korisničkim uputstvima treba tuma
Gigaset Communications GmbH.
Nadamo se da ćete uživati u korišćenju svog Gigaset
uređaja.
BG Уважаеми потребители,
Gigaset Communications GmbH е правоприемникът на
Siemens Home and Office Communication Devices GmbH
& Co. KG (SHC), която на свой ред продължи бизнеса на
подразделението Siemens AG. По тази причина
всякакви изложения, направени от Siemens AG или
SHC, които се намират в ръководствата за
потребителя, следва да се разбират като изложения на
Gigaset Communications GmbH.
Надяваме се да ползвате с удоволствие вашия Gigaset.
izjave kompanije
čiti kao
RU Уважаемыи покупатель!
Компания Gigaset Communications GmbH является
правопреемником компании Siemens Home and Office
Communication Devices GmbH & Co. KG (SHC), которая,
ою очередь, приняла подразделение Gigaset в свое
в св
управление от компании Siemens AG. Поэтому любые
заявления, сделанные от имени компании Siemens AG
или SHC и встречающиеся в руководствах
пользователя, должны восприниматься как заявления
компании Gigaset Communications GmbH.
Мы надеемся, что продукты Gigaset удовлетворяют
вашим требованиям.
HU T
isztelt Vásárló!
A Siemens Home and Communication Devices GmbH & Co.
KG (SHC) törvényes jogutódja a Gigaset Communications
GmbH, amely a Siemens AG Gigaset üzletágának utódja.
Ebből következően a Siemens AG vagy az SHC felhasználói
kézikönyveiben található bármely kijelentést a Gigaset
Communications GmbH kijelentésének kell tekinteni.
Reméljük, megelégedéssel használja Gigaset készülékét.
Issued by
Gigaset Communications GmbH
Schlavenhorst 66, D-46395 Bocholt
Gigaset Communications GmbH is a trademark
licensee of Siemens AG
© Gigaset Communications GmbH 2008
All rights reserved.
Subject to availability. Rights of modifications
reserved.
www.gigaset.com

N
First steps

Contents
Contents
The Gigaset SX762 WLAN dsl . . . . . . . . . . . . . . . . . . 5
Local area networks with Gigaset products . . . . . . . . . . . . . . . . . . . . . . . . . . . . . . . . . . 6
Wired local area network (Ethernet) . . . . . . . . . . . . . . . . . . . . . . . . . . . . . . . . . . . . 7
Wireless local area network (WLAN) . . . . . . . . . . . . . . . . . . . . . . . . . . . . . . . . . . . . 8
Linking a wireless network to an Ethernet . . . . . . . . . . . . . . . . . . . . . . . . . . . . . . 10
Extending the wireless network coverage with a repeater . . . . . . . . . . . . . . . . . . 11
Internet telephony and connecting analogue phones . . . . . . . . . . . . . . . . . . . . . . . . 12
Features and applications . . . . . . . . . . . . . . . . . . . . . . . . . . . . . . . . . . . . . . . . . . . . . . 13
First steps . . . . . . . . . . . . . . . . . . . . . . . . . . . . . . . . . 15
Pack contents . . . . . . . . . . . . . . . . . . . . . . . . . . . . . . . . . . . . . . . . . . . . . . . . . . . . . . . . 15
System requirements . . . . . . . . . . . . . . . . . . . . . . . . . . . . . . . . . . . . . . . . . . . . . . . . . . 16
Overview of the installation steps . . . . . . . . . . . . . . . . . . . . . . . . . . . . . . . . . . . . . . . . 17
Setting up the Gigaset SX762 WLAN dsl . . . . . . . . . . . . . . . . . . . . . . . . . . . . . . . . . . . 18
Front panel . . . . . . . . . . . . . . . . . . . . . . . . . . . . . . . . . . . . . . . . . . . . . . . . . . . . . . . 18
Connecting and activating the Gigaset SX762 WLAN dsl . . . . . . . . . . . . . . . . . . . . . . 19
Ports on the rear panel . . . . . . . . . . . . . . . . . . . . . . . . . . . . . . . . . . . . . . . . . . . . . 19
Connecting to the splitter data port . . . . . . . . . . . . . . . . . . . . . . . . . . . . . . . . . . . 21
Connecting to the phone port . . . . . . . . . . . . . . . . . . . . . . . . . . . . . . . . . . . . . . . . 23
Connecting to the phone . . . . . . . . . . . . . . . . . . . . . . . . . . . . . . . . . . . . . . . . . . . . 24
Connecting to the PC . . . . . . . . . . . . . . . . . . . . . . . . . . . . . . . . . . . . . . . . . . . . . . . 24
Connecting to the mains power supply . . . . . . . . . . . . . . . . . . . . . . . . . . . . . . . . . 26
Checking the operating state . . . . . . . . . . . . . . . . . . . . . . . . . . . . . . . . . . . . . . . . . 27
Network configuration of the PCs . . . . . . . . . . . . . . . . . . . . . . . . . . . . . . . . . . . . . . . . 28
Making the basic settings . . . . . . . . . . . . . . . . . . . . . . . . . . . . . . . . . . . . . . . . . . . . . . 28
Connecting and configuring additional PCs (optional) . . . . . . . . . . . . . . . . . . . . . . . . 29
The user interface . . . . . . . . . . . . . . . . . . . . . . . . . . 30
Starting the user interface . . . . . . . . . . . . . . . . . . . . . . . . . . . . . . . . . . . . . . . . . . . . . . 30
The start screen . . . . . . . . . . . . . . . . . . . . . . . . . . . . . . . . . . . . . . . . . . . . . . . . . . . . . . 31
Connecting to the Internet manually . . . . . . . . . . . . . . . . . . . . . . . . . . . . . . . . . . . . . 32
Elements on the user interface . . . . . . . . . . . . . . . . . . . . . . . . . . . . . . . . . . . . . . . . . . 33
Basic Setup Wizard . . . . . . . . . . . . . . . . . . . . . . . . . . 34
Configuring Internet connections . . . . . . . . . . . . . . . . . . . . . . . . . . . . . . . . . . . . . . . . 35
Telephony . . . . . . . . . . . . . . . . . . . . . . . . . . . . . . . . . . . . . . . . . . . . . . . . . . . . . . . . . . . 36
Finishing the Basic Setup Wizard . . . . . . . . . . . . . . . . . . . . . . . . . . . . . . . . . . . . . . . . . 37
Security Setup Wizard . . . . . . . . . . . . . . . . . . . . . . . 38
Assigning a password . . . . . . . . . . . . . . . . . . . . . . . . . . . . . . . . . . . . . . . . . . . . . . . . . 39
SSID . . . . . . . . . . . . . . . . . . . . . . . . . . . . . . . . . . . . . . . . . . . . . . . . . . . . . . . . . . . . . . . 40
Setting up security functions for the wireless network . . . . . . . . . . . . . . . . . . . . . . . . 41
WPA2/WPA with pre-shared key (PSK) . . . . . . . . . . . . . . . . . . . . . . . . . . . . . . . . . . 42
WEP encryption . . . . . . . . . . . . . . . . . . . . . . . . . . . . . . . . . . . . . . . . . . . . . . . . . . . 43
2

Contents
Access control within the wireless network . . . . . . . . . . . . . . . . . . . . . . . . . . . . . . . . 45
Saving settings . . . . . . . . . . . . . . . . . . . . . . . . . . . . . . . . . . . . . . . . . . . . . . . . . . . . . . . 46
Configuring Advanced Settings . . . . . . . . . . . . . . . 47
Internet . . . . . . . . . . . . . . . . . . . . . . . . . . . . . . . . . . . . . . . . . . . . . . . . . . . . . . . . . . . .48
Internet selection . . . . . . . . . . . . . . . . . . . . . . . . . . . . . . . . . . . . . . . . . . . . . . . . . . 48
Internet Connection . . . . . . . . . . . . . . . . . . . . . . . . . . . . . . . . . . . . . . . . . . . . . . . . 50
DNS server . . . . . . . . . . . . . . . . . . . . . . . . . . . . . . . . . . . . . . . . . . . . . . . . . . . . . . . 52
MAC Address . . . . . . . . . . . . . . . . . . . . . . . . . . . . . . . . . . . . . . . . . . . . . . . . . . . . . 53
Firewall . . . . . . . . . . . . . . . . . . . . . . . . . . . . . . . . . . . . . . . . . . . . . . . . . . . . . . . . . . . . .54
Attack Detection . . . . . . . . . . . . . . . . . . . . . . . . . . . . . . . . . . . . . . . . . . . . . . . . . . . 54
Setting up access control to the Internet . . . . . . . . . . . . . . . . . . . . . . . . . . . . . . . . 55
Setting up the NAT function . . . . . . . . . . . . . . . . . . . . . . . . . . . . . . . . . . . . . . . . . . . . 57
Port Forwarding . . . . . . . . . . . . . . . . . . . . . . . . . . . . . . . . . . . . . . . . . . . . . . . . . . . 59
Opening the firewall for selected PCs (Exposed Host) . . . . . . . . . . . . . . . . . . . . . 60
Dynamic DNS . . . . . . . . . . . . . . . . . . . . . . . . . . . . . . . . . . . . . . . . . . . . . . . . . . . . . 61
Routing . . . . . . . . . . . . . . . . . . . . . . . . . . . . . . . . . . . . . . . . . . . . . . . . . . . . . . . . . . 62
LAN configuration . . . . . . . . . . . . . . . . . . . . . . . . . . . . . . . . . . . . . . . . . . . . . . . . . . . . 64
Assigning static IP addresses to individual PCs . . . . . . . . . . . . . . . . . . . . . . . . . . . 66
Configuring wireless connections . . . . . . . . . . . . . . . . . . . . . . . . . . . . . . . . . . . . . . . . 67
Security settings in the wireless network . . . . . . . . . . . . . . . . . . . . . . . . . . . . . . . 69
WPA2-PSK and WPA2-PSK / WPA-PSK . . . . . . . . . . . . . . . . . . . . . . . . . . . . . . . . . . . 70
WEP encryption . . . . . . . . . . . . . . . . . . . . . . . . . . . . . . . . . . . . . . . . . . . . . . . . . . . 72
Permitted clients . . . . . . . . . . . . . . . . . . . . . . . . . . . . . . . . . . . . . . . . . . . . . . . . . . 74
Setting up Internet telephony (VoIP) . . . . . . . . . . . . . . . . . . . . . . . . . . . . . . . . . . . . . . 76
VoIP settings . . . . . . . . . . . . . . . . . . . . . . . . . . . . . . . . . . . . . . . . . . . . . . . . . . . . . . 77
Extensions . . . . . . . . . . . . . . . . . . . . . . . . . . . . . . . . . . . . . . . . . . . . . . . . . . . . . . . 79
Dialing Plans . . . . . . . . . . . . . . . . . . . . . . . . . . . . . . . . . . . . . . . . . . . . . . . . . . . . . . 83
USB . . . . . . . . . . . . . . . . . . . . . . . . . . . . . . . . . . . . . . . . . . . . . . . . . . . . . . . . . . . . . . . . 85
File Server . . . . . . . . . . . . . . . . . . . . . . . . . . . . . . . . . . . . . . . . . . . . . . . . . . . . . . . 86
Print Server . . . . . . . . . . . . . . . . . . . . . . . . . . . . . . . . . . . . . . . . . . . . . . . . . . . . . . . 88
Call guide . . . . . . . . . . . . . . . . . . . . . . . . . . . . . . . . . 89
Advanced options . . . . . . . . . . . . . . . . . . . . . . . . . . . . . . . . . . . . . . . . . . . . . . . . . . . . 90
Toggling telephone calls . . . . . . . . . . . . . . . . . . . . . . . . . . . . . . . . . . . . . . . . . . . . 90
Conference call between three participants . . . . . . . . . . . . . . . . . . . . . . . . . . . . . 91
Call answering and forwarding . . . . . . . . . . . . . . . . . . . . . . . . . . . . . . . . . . . . . . . 92
Call waiting and call reject if busy . . . . . . . . . . . . . . . . . . . . . . . . . . . . . . . . . . . . . 93
Special functions . . . . . . . . . . . . . . . . . . . . . . . . . . . . . . . . . . . . . . . . . . . . . . . . . . . . . 93
Confirmation tones . . . . . . . . . . . . . . . . . . . . . . . . . . . . . . . . . . . . . . . . . . . . . . . . . . . 93
Administration . . . . . . . . . . . . . . . . . . . . . . . . . . . . . 94
Regional Options . . . . . . . . . . . . . . . . . . . . . . . . . . . . . . . . . . . . . . . . . . . . . . . . . . . . . 94
Internet Time . . . . . . . . . . . . . . . . . . . . . . . . . . . . . . . . . . . . . . . . . . . . . . . . . . . . . 95
System Password . . . . . . . . . . . . . . . . . . . . . . . . . . . . . . . . . . . . . . . . . . . . . . . . . . . . . 96
System management . . . . . . . . . . . . . . . . . . . . . . . . . . . . . . . . . . . . . . . . . . . . . . . . . . 97
Backing up and restoring a configuration . . . . . . . . . . . . . . . . . . . . . . . . . . . . . . . . . . 97
3

Contents
Backing up configuration data . . . . . . . . . . . . . . . . . . . . . . . . . . . . . . . . . . . . . . . . . . 98
Restoring the saved data . . . . . . . . . . . . . . . . . . . . . . . . . . . . . . . . . . . . . . . . . . . . 98
Restoring factory settings . . . . . . . . . . . . . . . . . . . . . . . . . . . . . . . . . . . . . . . . . . . 98
Reboot . . . . . . . . . . . . . . . . . . . . . . . . . . . . . . . . . . . . . . . . . . . . . . . . . . . . . . . . . . . . .98
Updating firmware . . . . . . . . . . . . . . . . . . . . . . . . . . . . . . . . . . . . . . . . . . . . . . . . . . . . 99
System Log . . . . . . . . . . . . . . . . . . . . . . . . . . . . . . . . . . . . . . . . . . . . . . . . . . . . . . . . . 100
Status information . . . . . . . . . . . . . . . . . . . . . . . . . 101
Overview . . . . . . . . . . . . . . . . . . . . . . . . . . . . . . . . . . . . . . . . . . . . . . . . . . . . . . . . . . 101
Security . . . . . . . . . . . . . . . . . . . . . . . . . . . . . . . . . . . . . . . . . . . . . . . . . . . . . . . . . . . 102
Internet . . . . . . . . . . . . . . . . . . . . . . . . . . . . . . . . . . . . . . . . . . . . . . . . . . . . . . . . . . . 103
Local Network . . . . . . . . . . . . . . . . . . . . . . . . . . . . . . . . . . . . . . . . . . . . . . . . . . . . . . 104
Wireless Network . . . . . . . . . . . . . . . . . . . . . . . . . . . . . . . . . . . . . . . . . . . . . . . . . . . . 105
Telephony . . . . . . . . . . . . . . . . . . . . . . . . . . . . . . . . . . . . . . . . . . . . . . . . . . . . . . . . . . 106
Device . . . . . . . . . . . . . . . . . . . . . . . . . . . . . . . . . . . . . . . . . . . . . . . . . . . . . . . . . . . . . 106
Installing the printer port for network printers . 108
Introduction . . . . . . . . . . . . . . . . . . . . . . . . . . . . . . . . . . . . . . . . . . . . . . . . . . . . . . . . 108
Installing a standard TCP/IP printer port under Windows XP/2000 . . . . . . . . . . . . . . 109
Installing a printer on the TCP/IP port retrospectively . . . . . . . . . . . . . . . . . . . . . . . . 115
Instructions for setting up a printer on the PC . . . . . . . . . . . . . . . . . . . . . . . . . . . . . 116
Appendix . . . . . . . . . . . . . . . . . . . . . . . . . . . . . . . . . 117
Troubleshooting . . . . . . . . . . . . . . . . . . . . . . . . . . . . . . . . . . . . . . . . . . . . . . . . . . . . . 117
Deactivating the HTTP proxy and configuring a pop-up blocker . . . . . . . . . . . . . . . 121
Windows XP . . . . . . . . . . . . . . . . . . . . . . . . . . . . . . . . . . . . . . . . . . . . . . . . . . . . . 121
Windows 2000, Windows 98 / ME . . . . . . . . . . . . . . . . . . . . . . . . . . . . . . . . . . . . 122
Specifications . . . . . . . . . . . . . . . . . . . . . . . . . . . . . . . . . . . . . . . . . . . . . . . . . . . . . . . 123
Authorisation . . . . . . . . . . . . . . . . . . . . . . . . . . . . . . . . . . . . . . . . . . . . . . . . . . . . . . . 124
Guarantee Certificate . . . . . . . . . . . . . . . . . . . . . . . . . . . . . . . . . . . . . . . . . . . . . . . . . 125
Open Source Software . . . . . . . . . . . . . . . . . . . . . . . . . . . . . . . . . . . . . . . . . . . . . . . . 126
Glossary . . . . . . . . . . . . . . . . . . . . . . . . . . . . . . . . . 127
Index . . . . . . . . . . . . . . . . . . . . . . . . . . . . . . . . . . . . 141
4
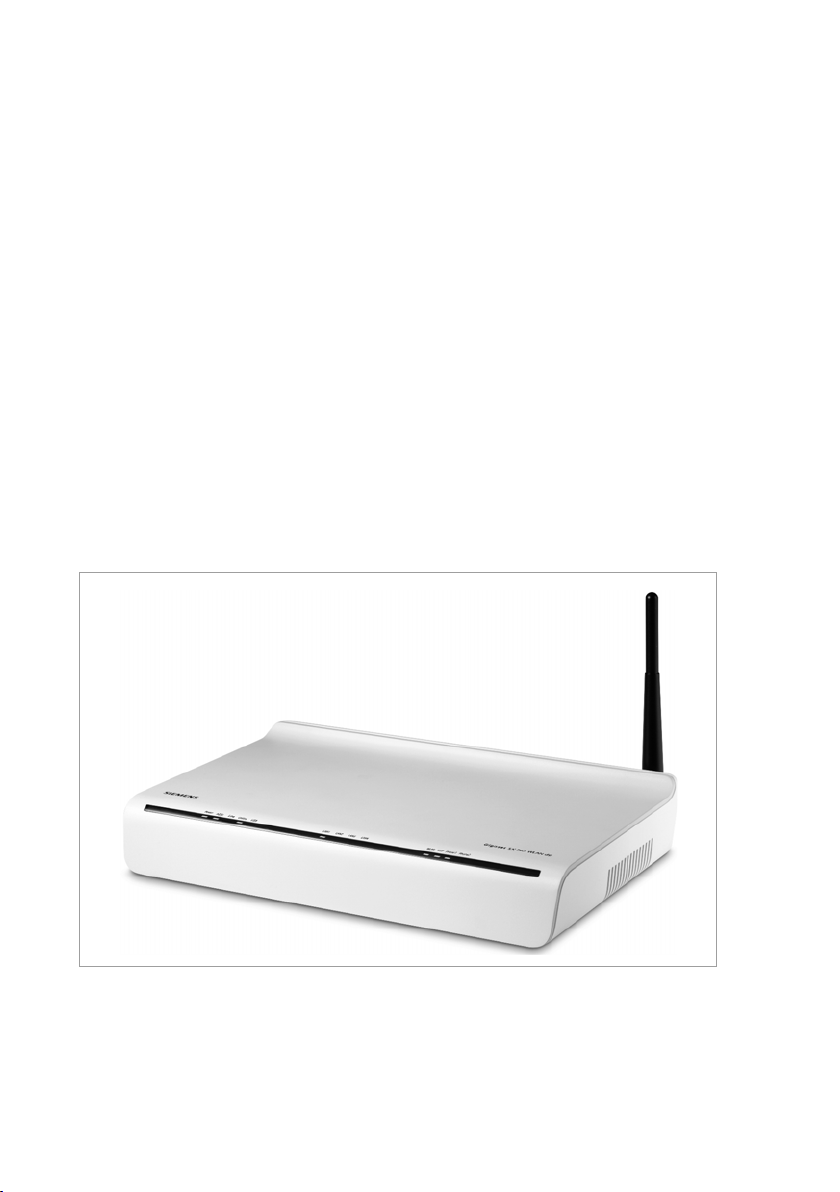
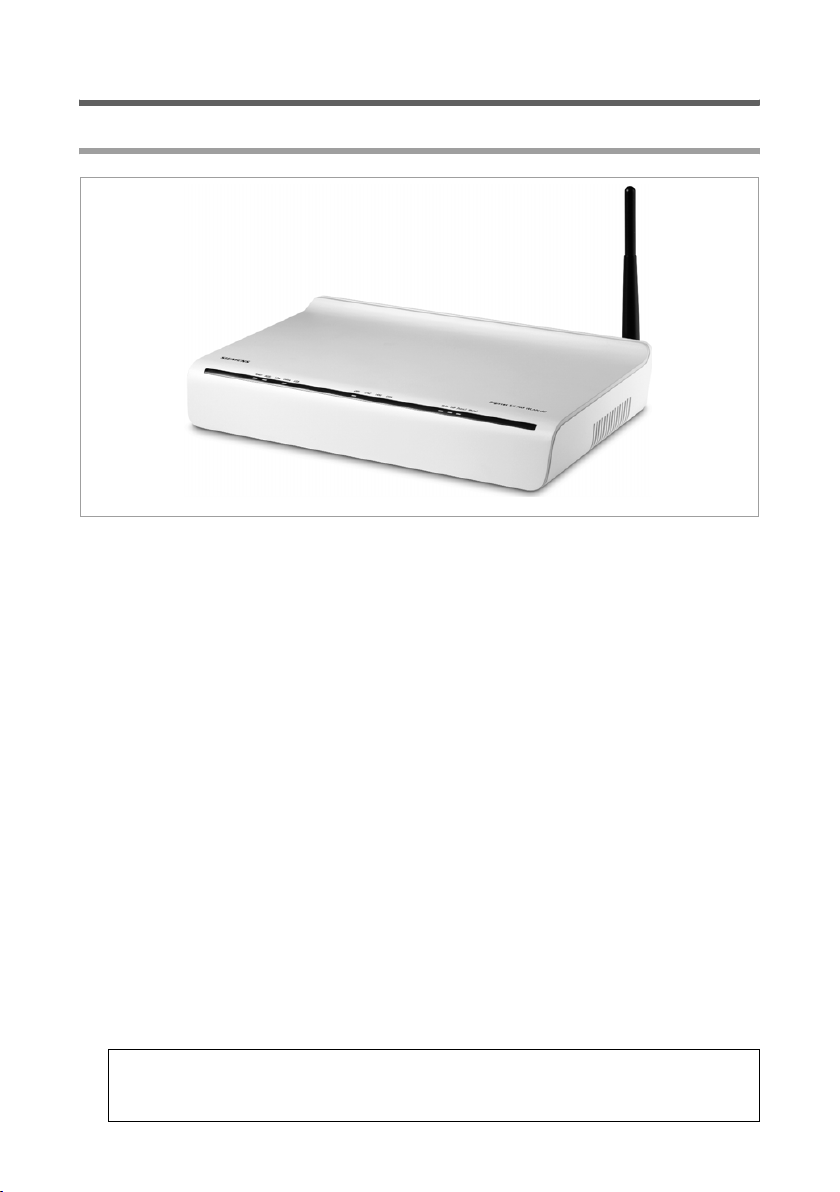
The Gigaset SX762 WLAN dsl
The Gigaset SX762 WLAN dsl
The Siemens Gigaset SX762 WLAN dsl is a powerful but simple communications device
for connecting your PC or local area network (LAN) to the Internet (via DSL). It contains
an integrated ADSL modem (ADSL /ADSL2+) enabling you to access the Internet easily.
You can connect your PC wirelessly to the Gigaset SX762 WLAN dsl and create a wireless
local area network (WLAN). For network security, wireless transmission can be
encrypted using the WPA standard or 64/128-bit WEP.
The Gigaset SX762 WLAN dsl also offers the functions of a PABX for Internet telephony
(VoIP) and fixed network telephony. You can connect up to two traditional analogue terminals and then use these analogue phones both to make calls via the Internet or also
via an existing analogue telephone line. In addition, you can operate SIP clients (wireless SIP telephones and PCs with appropriate software) as PABX extensions and therefore also make calls via the Internet or fixed network.
The Gigaset SX762 WLAN dsl allows several users to access the Internet simultaneously.
A single user account can be shared if your Internet service provider permits this. If you
want to surf the Internet and make calls using the Internet at the lowest possible cost,
the Gigaset SX762 WLAN dsl is a convenient and simple solution.
The Gigaset SX762 WLAN dsl has an extensive range of functions but remains simple to
use. It can be configured and operational within a few minutes.
5
The Gigaset SX762 WLAN dsl
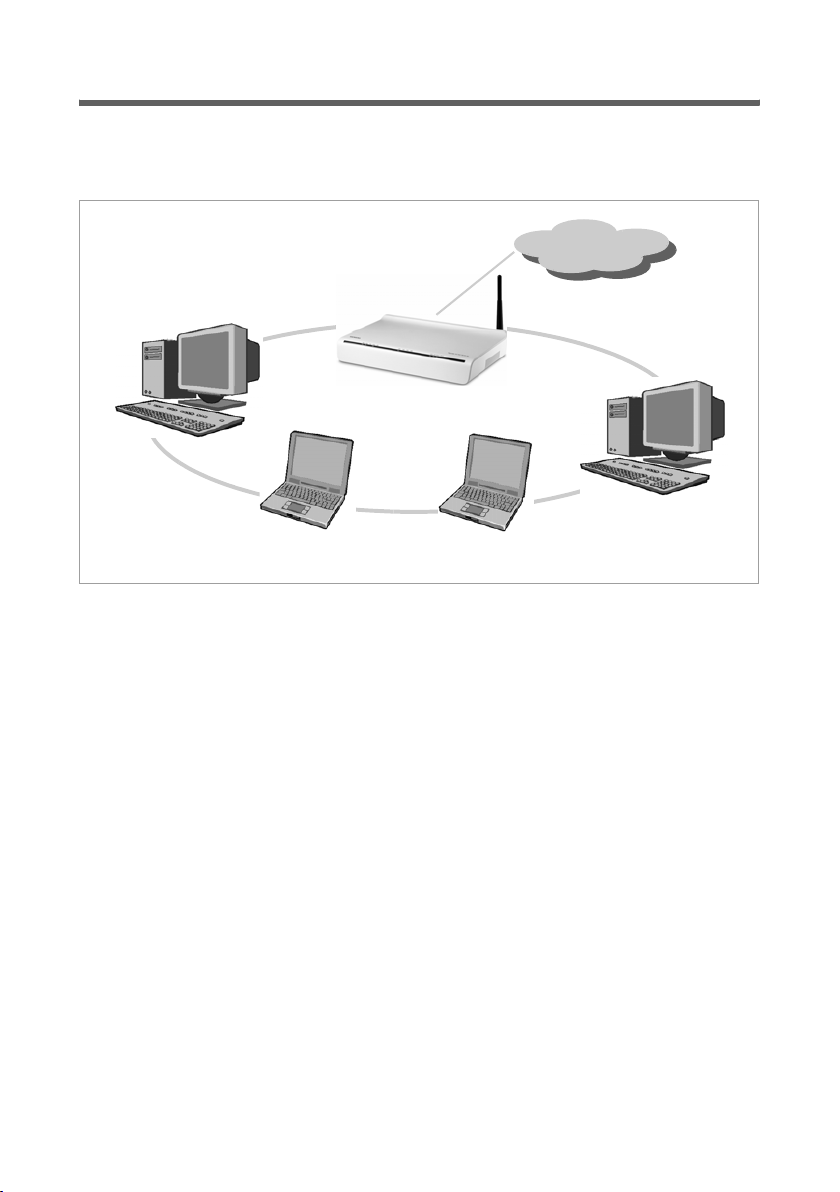
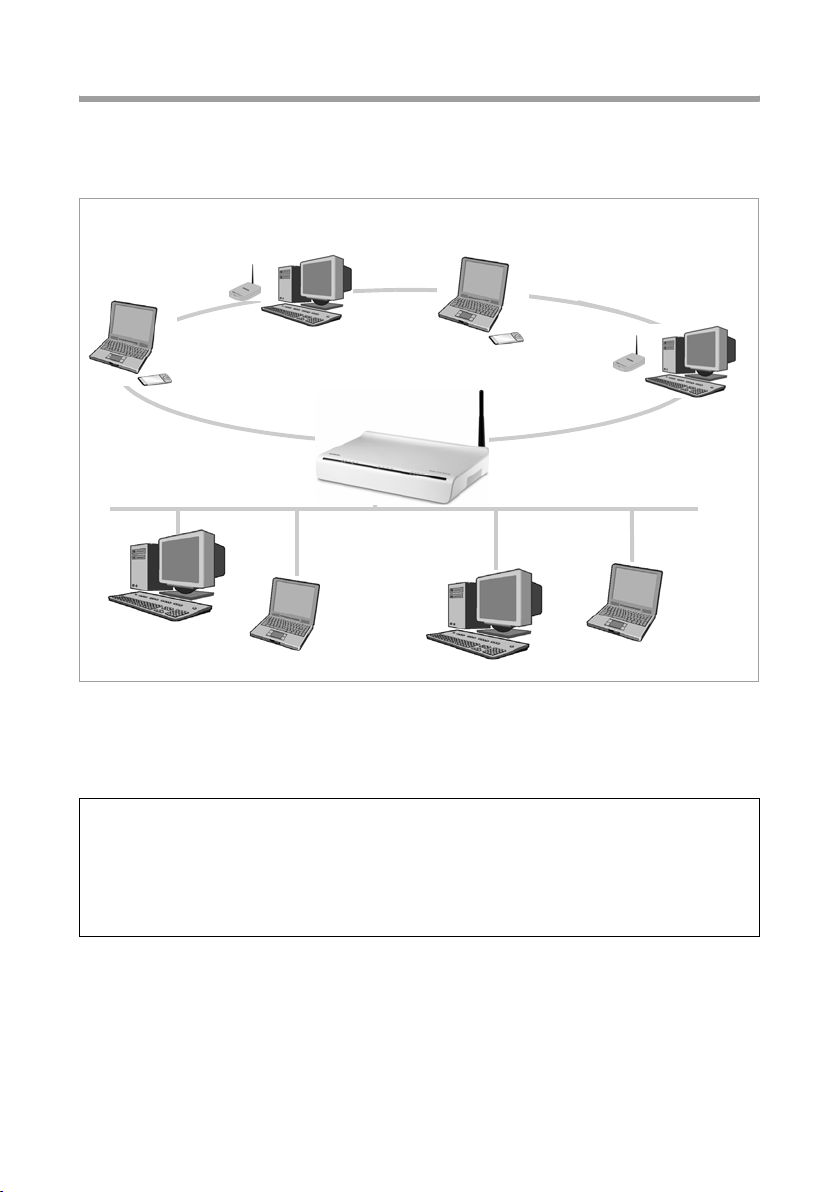
Local area networks with Gigaset products
You can use the Siemens Gigaset SX762 WLAN dsl to set up a local area network, for
example a home network. All PCs in this network can communicate with each other and
have access to the Internet.
Gigaset SX762 WLAN dsl
Windows ME
Local Network
There are various ways in which you can set up the network using a Gigaset SX762
WLAN dsl.
u Set up a wired local area network (Ethernet) and allow the connected PCs access to
the Internet (page 7).
u Set up a wireless local area network (WLAN) and allow the connected PCs access to
the Internet (page 8).
u Set up a local area network comprising wireless and wired network components
(page 10).
Internet
Windows 2000
6
The Gigaset SX762 WLAN dsl
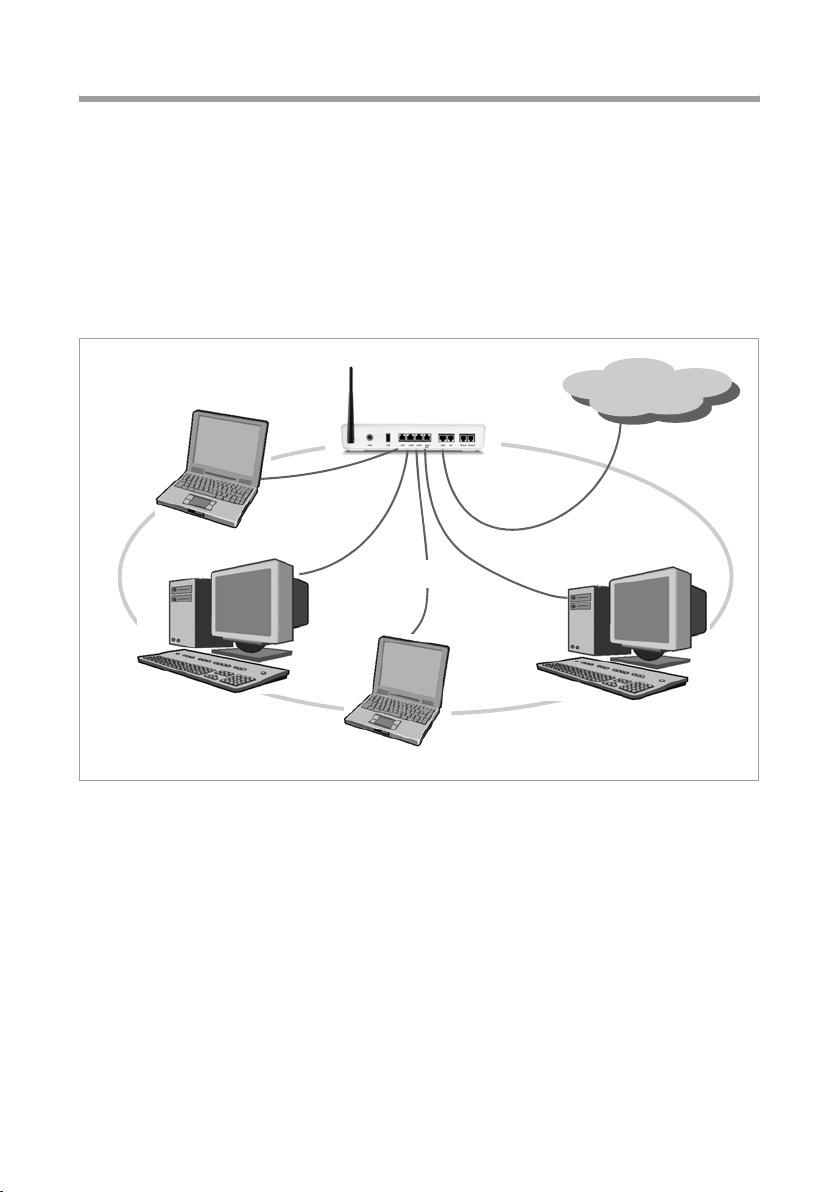
Wired local area network (Ethernet)
In a wired local area network, PCs communicate with one another via an Ethernet cable.
When the Siemens Gigaset SX762 WLAN dsl is used, it establishes the connection
between the PCs. For this it has four Ethernet LAN ports for connecting four PCs. The
PCs have to be equipped with a network port (Ethernet). New PCs frequently already
have this port. For older PCs you need to install an Ethernet network card. The PC and
the Ethernet LAN port on the Gigaset SX762 WLAN dsl are connected using an Ethernet
cable (CAT5). There is one supplied. You can obtain additional Ethernet cables from your
retailer.
The Gigaset SX762 WLAN dsl allows all PCs to access the Internet simultaneously.
Internet
Ethernet
7

The Gigaset SX762 WLAN dsl
Wireless local area network (WLAN)
In a wireless local area network (WLAN), PCs are linked without wires or cables. The PCs
have to be equipped with a wireless local area network adapter (WLAN adapter), for
example a Gigaset USB Adapter 108.
We generally differentiate between two types of wireless network:
u Infrastructure mode
u Ad-hoc mode
Infrastructure mode
Infrastructure mode connects wireless and wired networks with one another. In addition to the mobile stations, infrastructure mode needs an access point such as the
Gigaset SX762 WLAN dsl. In infrastructure mode, the stations in the network always
communicate via this access point. The access point sets up the wireless network on a
permanent basis. Each station that wants to be part of the wireless network must first
register with the access point before it can exchange data.
The access point establishes the connection between the mobile stations of a wireless
network and a wired LAN (Ethernet) or the Internet. In this case this is described as the
device's router functionality. The router sends data packets that are not addressed to stations within the network "outside" and forwards data packets originating from "outside"
to the appropriate station within the network.
You can use the Gigaset SX762 WLAN dsl to connect
u wirelessly networked PCs to the Internet and
u wirelessly networked PCs to an Ethernet network.
Infrastructure mode is the default configuration for the Gigaset SX762 WLAN dsl.
Ad-hoc mode
An ad-hoc network is a wireless network that has been configured without an access
point or a router. The mobile network components that communicate with each other
directly and wirelessl y for m the network o n an "ad-hoc " basis, i.e. as and when requ ired.
All the stations in the network have the same rights. Ad-hoc networks are used wherever communications networks have to be set up quickly and there is no existing network infrastructure, and where the participants are on the move.
8
The Gigaset SX762 WLAN dsl
Linking wireless networks with the Internet
The Gigaset SX762 WLAN dsl has an ADSL interface that permits all stations within its
local area network to access the Internet simultaneously. To be able to use this functionality, you need a DSL connection obtainable from an Internet service provider. Find out
whether your service provider supports parallel access by several PCs.
Internet
)))(((
(((
(((
(((
WAN
(((
9
The Gigaset SX762 WLAN dsl
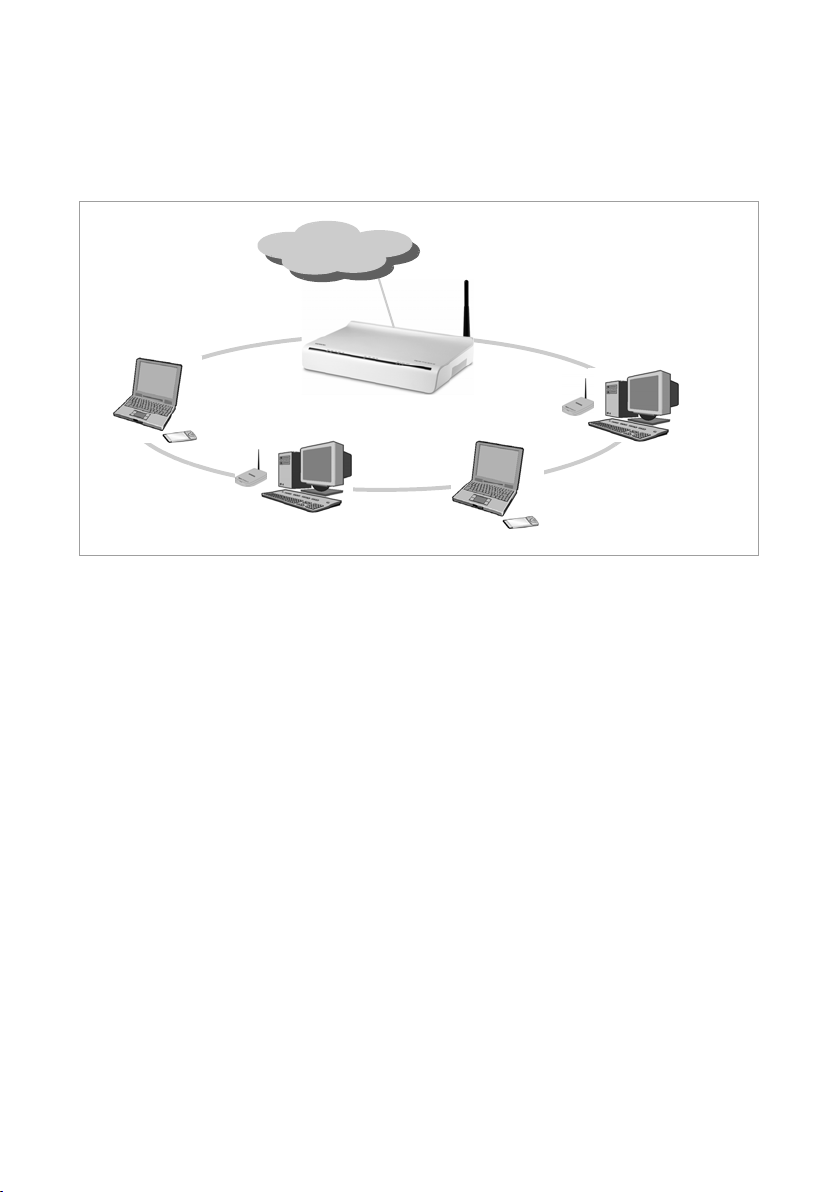
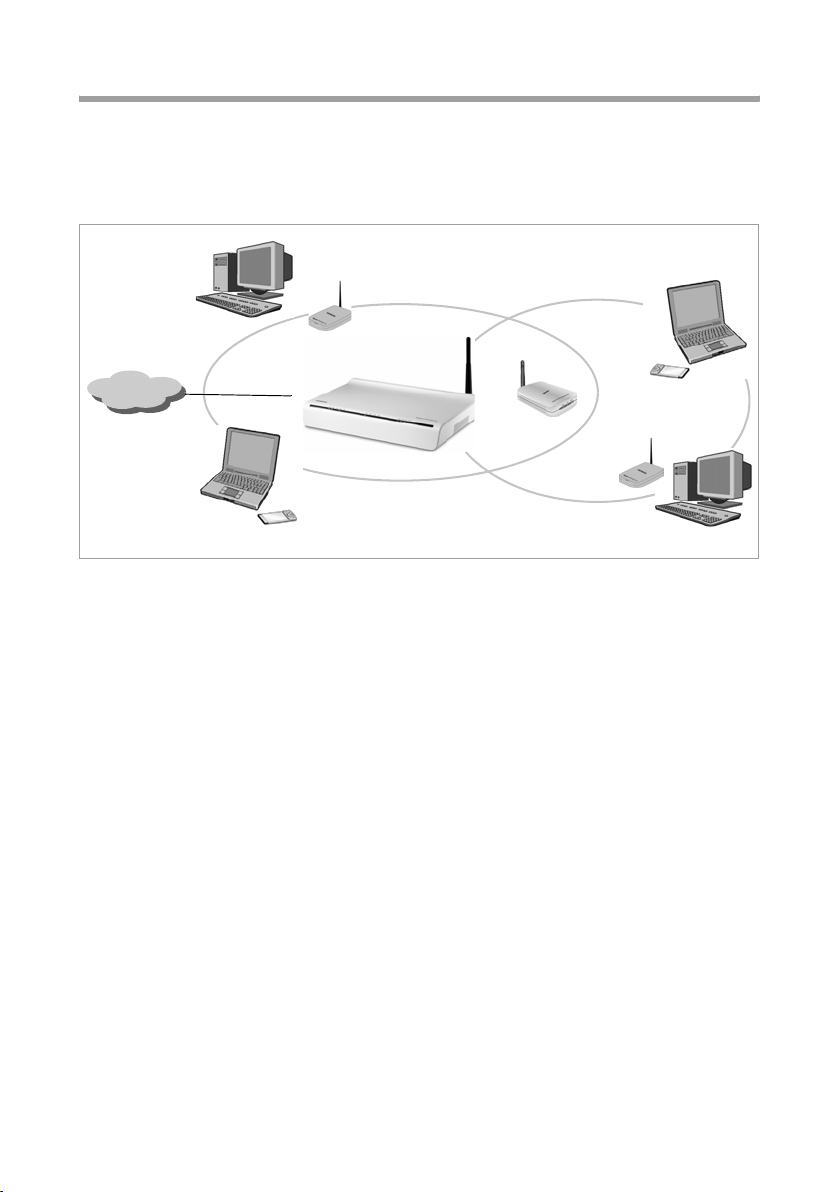
Linking a wireless network to an Ethernet
Wireless local area networks can work easily together with existing Ethernet networks.
If you wish to connect mobile stations to an existing wired network, you must group
together all mobile stations into a wireless local area network in infrastructure mode.
(((
(((
(((
The Gigaset SX762 WLAN dsl has four Ethernet interfaces (LAN ports). Up to four PCs
can be connected directly to these LAN ports.
All PCs can access the Internet via the Gigaset SX762 WLAN dsl.
Please remember:
You can also connect an Ethernet router to a LAN port to access a larger Ethernet. If
you want to link the Gigaset WLAN network to an existing network, a large number of
settings have to be applied. Therefore we cannot provide a general example for this
use; the configuration depends greatly on the networks in question. We advise having
the configuration of such a network carried out by a specialist.
WLAN (wireless)
)))(((
Access point
Ethernet
(wired)
(((
10
The Gigaset SX762 WLAN dsl
Extending the wireless network coverage with a repeater
Using the Gigaset WLAN Repeater, you can extend your wireless network's coverage. Set
it up within the range of your network. The repeater will now transmit data traffic into
its own wireless area. This technology allows you to set up wireless networks that cover
a much larger area than is possible with a single Gigaset SX762 WLAN dsl.
(((
Internet
)))
PCs to be connected in a wireless local area network via a repeater must be equipped
with a wireless network adapter or a USB adapter.
WLAN
)))
)))
Gigaset WLAN
)))
)))
Repeater
(((
(((
11
The Gigaset SX762 WLAN dsl
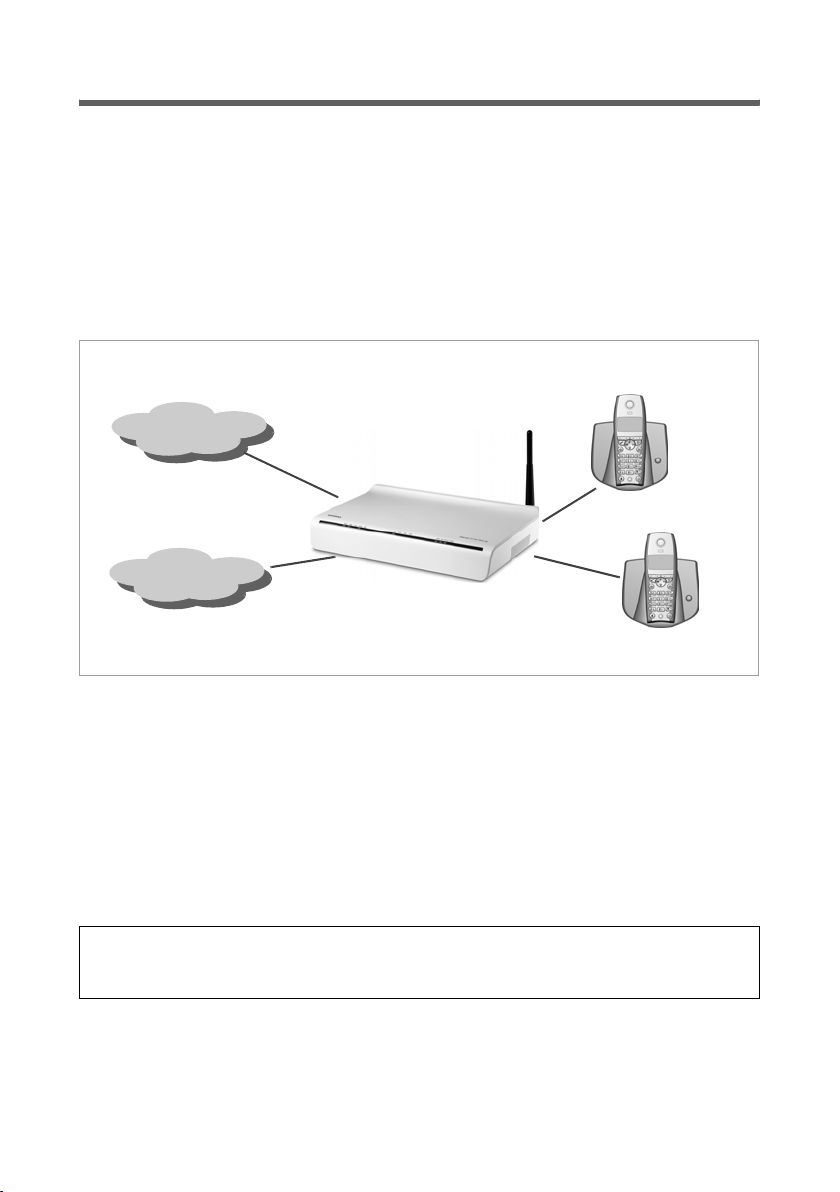
Internet telephony and connecting analogue phones
The Gigaset SX762 WLAN dsl allows a combination of analogue fixed network telephony and Internet telephony (VoIP) over DSL for two analogue telephones and four other
wired or wireless VoIP telephones or SIP clients.
This provides you with the full benefits of both technologies. You can make use of the
low-cost call rates of Internet telephony without any additional equipment. In addition,
you have the option of using your analogue fixed network connection. The type of calls
that are cheaper for you will depend on what calls you make and when you make them,
and the rates offered by your service provider. The Gigaset SX762 WLAN dsl gives you
complete freedom of choice at any time.
Internet
Fixed network
You can choose whether to connect any two analogue phones, a fax machine or an
answering machine to the phone ports. You can configure these ports using the Gigaset
SX762 WLAN dsl.
The PABX of the Gigaset SX762 WLAN dsl allows you to connect wireless SIP phones
(WLAN handsets) and PCs with SIP clients (software for Internet telephony) as extensions. You can use all functions of your PABX for Internet telephony also.
You will need the relevant access data for your VoIP provider to configure Internet
telephony.
Please remember:
You can only be reached via the Internet (VoIP) when an active Internet connection
is established. You can still be called any time via the fixed network, however.
12

The Gigaset SX762 WLAN dsl
Features and applications
The Gigaset SX762 WLAN dsl's wide range of features makes it ideal for a large number
of applications, such as:
u Internet access
The Gigaset SX762 WLAN dsl allows several users to have Internet access via the
integrated ADSL /ADSL2+ modem.
– Since many DSL providers permit communication with end users via the PPPoE
protocol, the Gigaset SX762 WLAN dsl has an integrated Client for this protocol,
so you no longer have to install this service on your PC.
– The Gigaset SX762 WLAN dsl supports shared Internet access for up to 252 users.
This means several users in your network can surf the Internet at the same time,
all using the same Internet account.
u Setting up a local area network
The Gigaset SX762 WLAN dsl offers the following possibilities:
– Four devices connected via Ethernet ports with a transmission speed of 10 or
100 Mbps (with automatic recognition).
– Up to 252 mobile terminals connected via a radio interface with a transmission
speed of up to 54 Mbps. It complies with IEEE 802.11g standard and can work
with all products that satisfy Standard IEEE 802.11b or 802.11g.
– Using the Gigaset SX762 WLAN dsl makes it easy to set up a network at home or
in small offices. For example, users can exchange data or share resources in the
network, such as a file server or printer. You can connect a USB hard disk or a
printer to the USB interface of the Gigaset SX762 WLAN dsl and make them available to all users in your network.
The Gigaset SX762 WLAN dsl supports DHCP for dynamic IP configuration of the
local area network, and DNS for domain name mapping.
u Connecting phones and Internet telephony
The Gigaset SX762 WLAN dsl permits
– Internet telephony via the DSL port.
– Fixed network telephony via the analogue port.
– Connection of two analogue phones for Internet telephony and for fixed network
calls as well as connection of wireless SIP phones and PCs with SIP clients for
Internet telephony.
– Connection of an answering machine or fax.
Data transfer for VoIP is handled by the SIP protocol with high connection and voice
quality. If the Internet connection has been interrupted or you do not want to make
a call via VoIP, you can simply make a call on the fixed network.
13

The Gigaset SX762 WLAN dsl
u Security functions
The Gigaset SX762 WLAN dsl offers comprehensive security measures:
– Firewall protection against unauthorised access from the Internet
All PCs in the local area network use the Public IP address of the Gigaset SX762
WLAN dsl for their Internet connections, which makes them 'invisible' on the
Internet. The Gigaset SX762 WLAN dsl only allows access from the Internet if it
has been requested from the local area network.
With the firewall, the Gigaset SX762 WLAN dsl also offers comprehensive protec-
tion against hacker attacks.
– Service filtering
The Gigaset SX762 WLAN dsl can filter Internet access. Here you determine which
PCs may access which Internet services.
– Access control and encryption for the local area network
You can use various encryption methods and authentication methods (WEP, WPA/
WPA2, 802.1x MAC access control) to prevent unauthorised access to your wire-
less LAN or make data illegible to unauthorised parties.
u Offering your own services on the Internet
– If you want to offer your own services on the Internet, you can set up the Gigaset
SX762 WLAN dsl as a virtual server without permitting further access to the local
area network.
– DMZ (Exposed Host)
This allows you to release a PC in your local area network for unlimited access
from the Internet. Note that in this case your local area network will no longer be
adequately protected against Internet attacks.
– You can connect a USB hub to the USB port on your Gigaset SX762 WLAN dsl and
thereby at the same time provide a printer and a storage medium for all clients in
your local area network.
14

First steps
First steps
Pack contents
The package contains the following components:
u 1 Gigaset SX762 WLAN dsl,
u 1 mains adapter (230 V/12V 1.5A DC),
u 1 LAN cable (CAT5, yellow),
u DSL cable (CAT5, black, connection to splitter),
u 1 telephone cable (green, connection to splitter),
u 1 telephone cable (Switzerland-specific, connection to splitter),
u 1 CD with this user guide,
u 1 supplementary sheet with information about security and disposing of the device,
u 1 installation guide.
15
First steps
System requirements
You require the following components to operate your Gigaset SX762 WLAN dsl:
u A PC with
– an 802.11g or 802.11b compatible wireless Network adapter
Note:
An 802.11b-compatible network adapter has a maximum transmission speed of
11 Mbps. An 802.11g-compatible network adapter has a maximum transmission
speed of 54 Mbps.
or
–an Ethernet port (10Base-T or 100Base-TX).
A Web browser such as Microsoft Internet Explorer V 6.0 or higher or Mozilla Firefox
V 1.0 or higher for configuring your Gigaset SX762 WLAN dsl.
Note:
We recommend you use the Gigaset SX762 WLAN dsl with the Windows XP operating
system because only then are all system requirements for using the device fulfilled.
u To access the Internet you require
– a DSL port (splitter),
– the access data for your Internet service provider.
u For Internet telephony you also require
– the access data for your VoIP service provider and
– a phone for connecting to the Gigaset SX762 WLAN dsl or a PC with a SIP client
or a VoIP telephone.
For experienced users
The default settings for the Gigaset SX762 WLAN dsl are:
– IP address: 192.168.254.254
– Subnet mask: 255.255.255.0
– SSID: ConnectionPoint
– Radio channel: 6
– Default password of the configuration user interface: admin
Caution: By default there is no e ncr yption active . P le ase be s ure to make yo ur netwo rk
secure. You will find information about this in the section entitled "Configuring wireless connections" on page 67.
Trademarks
Microsoft, Windows 98/SE, Windows ME, Windows 2000, Windows XP and Internet
Explorer are registered trademarks of the Microsoft Corporation.
Mozilla Firefox is a registered trademark of the Mozilla Organisation.
16

First steps
Overview of the installation steps
1. First install an Ethernet network card or a wireless Network adapter such as the
Gigaset PC Card 54 in the PCs you want to connect to the Gigaset SX762 WLAN dsl.
The installation is described in the user guides for these products.
Please remember:
When installing wireless network adapters, use the default SSID for the Gigaset
SX762 WLAN dsl: ConnectionPoint.
2. Then make the necessary connections (PCs, phones, splitter) on the Gigaset SX762
WLAN dsl and activate the device (page 19).
3. Before the PCs can communicate with the Gigaset SX762 WLAN dsl and with each
other in a local network, you may have to change your network settings (page 28).
Configure these network settings on one PC first so that it can establish a connec-
tion to the Gigaset SX762 WLAN dsl. You can then use this PC to configure the device. To find out how to do this, refer to the section entitled "Configuring the local
area network" on the CD-ROM.
4. With a wireless connection, you establish the link from the PC's wireless network
adapter to the Gigaset SX762 WLAN dsl. This is described in the user guide for the
network adapter.
5. Then configure the Gigaset SX762 WLAN dsl to activate the device's Internet access
(refer to the section entitled "Basic Setup Wizard" on page 34). To do this you will
need the access data for your Internet service provider.
u If you want to connect more PCs to the Gigaset SX762 WLAN dsl, configure their net-
work settings and set up the local area network accordingly (refer to the section entitled "Configuring the local area network" on the CD-ROM).
u If you want to use the Gigaset SX762 WLAN dsl for Internet telephony, you must con-
figure your VoIP provider's registration data (refer to the section entitled "Setting up
Internet telephony (VoIP)" on page 76).
u If you wish to use other functions of the Gigaset SX762 WLAN dsl, for example the
comprehensive security features, use the Security Setup (page 38) or the Advanced
Setup (page 47).
17
First steps
Setting up the Gigaset SX762 WLAN dsl
Front panel
The Gigaset SX762 WLAN dsl can be set up in any suitable location in the home or office.
You do not need any special wiring. However, you should comply with the following
guidelines:
u Operate the Gigaset SX762 WLAN dsl only indoors within a temperature range of
0 to +40 °C. Do not position the Gigaset SX762 WLAN dsl near sources of heat. Do
not cover the ventilation slots. High temperatures can damage the device.
u A mains socket for 220/230 V~ and a connection socket for the splitter or LAN must
be available in the place where you set up the Gigaset SX762 WLAN dsl.
u Do not position the device in the immediate vicinity of stereo equipment, TV sets,
microwave ovens or the like. This may cause interference.
u Position the Gigaset SX762 WLAN dsl so that it is as near to the centre of your wire-
less network as possible. The general rule is: The higher you place the antennae, the
better the performance. Make sure that the place where you position the Gigaset
SX762 WLAN dsl offers optimum reception throughout the house, apartment or
office.
u Position the Gigaset SX762 WLAN dsl so that it cannot fall down and damage the
antennae. Position the Gigaset SX762 WLAN dsl on a non-slip surface.
u Do not place the Gigaset SX762 WLAN dsl on any furniture surface that could be
affected by the heat from the device.
u Lay the cables so that nobody can trip over them. You should not cover the cables
with anything.
Please remember:
Network connections (LAN) via cables and telephone lines may only be set up
with the Gigaset SX762 WLAN dsl within enclosed rooms.
18
First steps
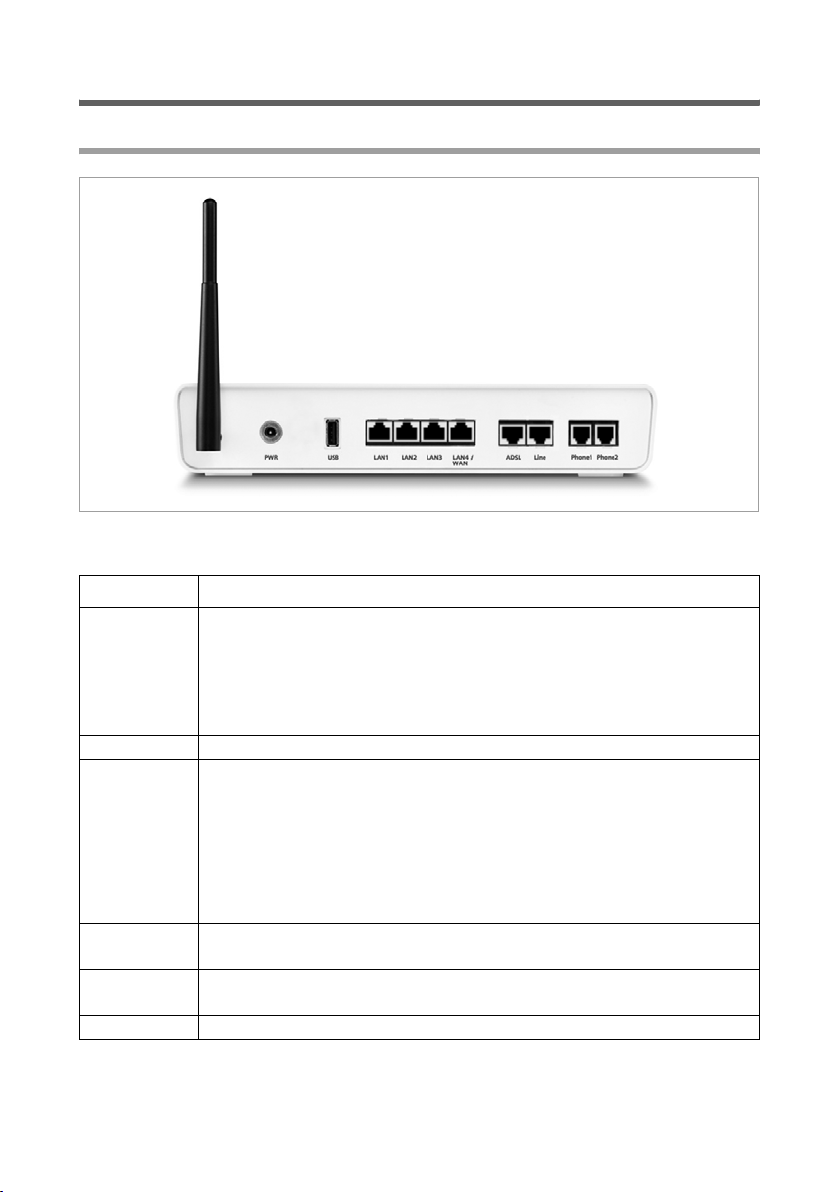
Connecting and activating the Gigaset SX762 WLAN dsl
Ports on the rear panel
The rear panel of the Gigaset SX762 WLAN dsl houses the ports.
Element Description
PWR Socket for the mains adapter supplied
Warning: Using the wrong power supply unit may damage the
Gigaset SX762 WLAN dsl.
Depending on the device variant, there may be an on/off button
beside the PWR port.
USB USB port for printer or USB memory.
LAN1 –
LAN4/WAN
(yellow)
ADSL
(black)
Line (green) Socket for connecting the phone line to the telephone port on the
Phone1/2 Sockets for connecting two phones, fax or answering machine
Four 10/100 Mbps switch ports with automatic recognition (RJ-45).
You can connect up to four devices with Ethernet ports (such as PCs, a
Hub or Switch).
You can connect an external modem (e.g. a VDLS or cable modem) to
the LAN4 port. The integrated ADLS modem is then deactivated. You
will find additional information on the configuration settings on
page 48.
DSL socket for connecting the integrated modem to the DSL port of the
splitter
splitter
19
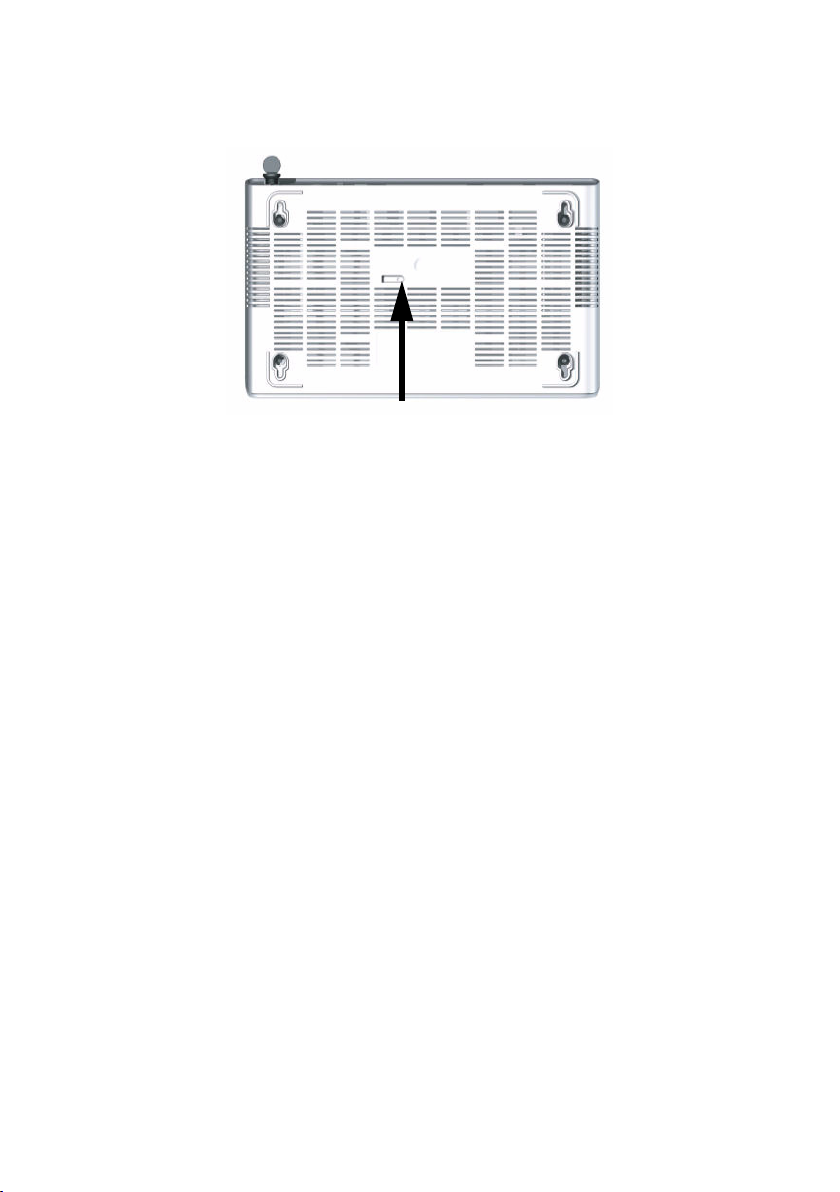
First steps
Reset button
The underside of the Gigaset SX762 WLAN dsl houses the reset button.
Reset button
Reboot function: Press and hold the right end of the button for more than 1 second but
less than 5 seconds to reboot the device. This does not affect the configuration settings.
Reset function: Press and hold the right end of the button for at least 5 seconds to
return all settings to factory settings.
Warning: This will clear all the configuration settings you have made since the initial
startup.
Updated firmware will not be affected.
20

First steps
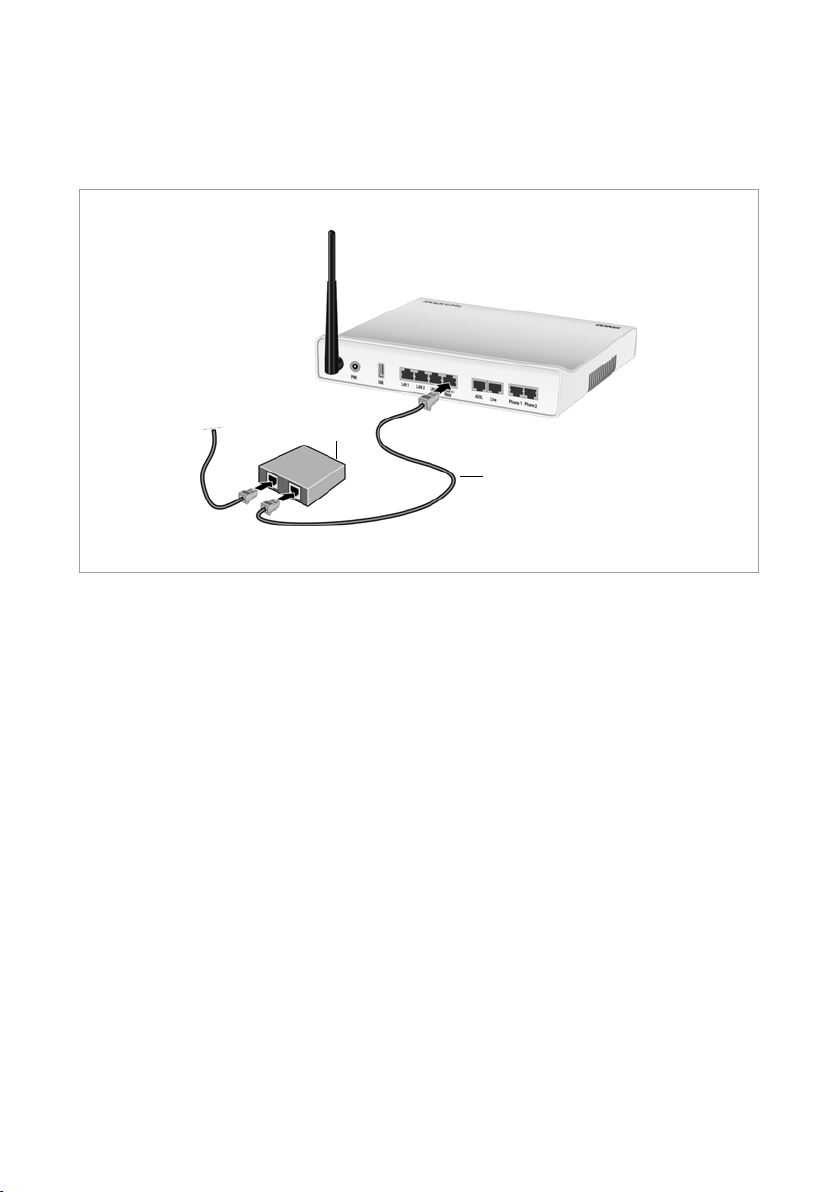
Connecting to the splitter data port
You can operate the Gigaset SX762 WLAN dsl in two different operating modes in order
to set up an Internet connection:
– with an integrated ADSL modem
– with an external modem, such as a VDSL or cable modem
Using the integrated ADSL modem
ì Connect the ADSL port (black) on the Gigaset SX762 WLAN dsl to the ADSL socket
on the splitter. To do this, use the DSL cable supplied (black).
Splitter
DSL cable (black)
21
First steps
Using an external modem
ì Connect the LAN4/WAN port on the Gigaset SX762 WLAN dsl with an external
modem. To do this, use the cable supplied (black).
ì Then connect this modem to the relevant communications port (e.g. splitter).
Modem
Cable (black)
22
First steps
Connecting to the phone port
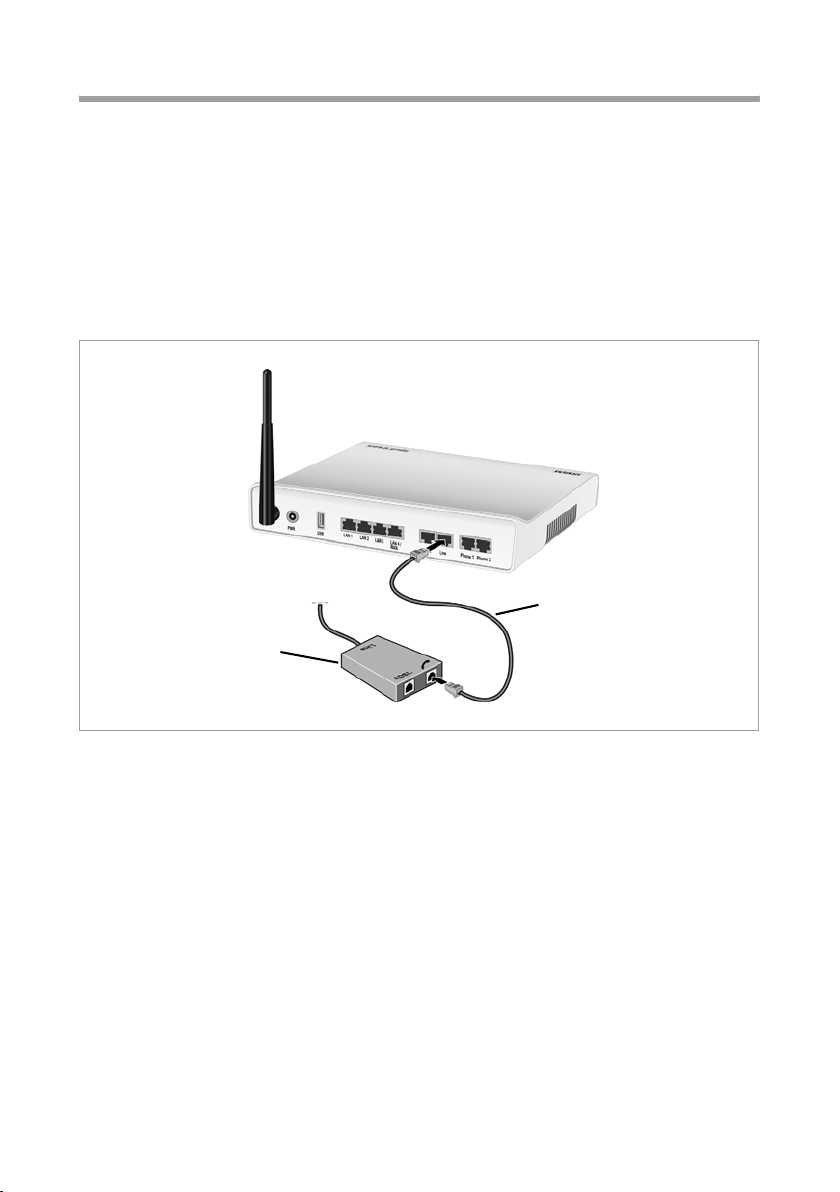
To make conventional calls via the fixed network, you must connect your Gigaset SX762
WLAN dsl with the phone port of the splitter.
Analogue phone port
ì Connect the Gigaset SX762 WLAN dsl with the splitter as follows:
– Insert one plug of the telephone cable supplied (green) into the Line port
(green) on the Gigaset SX762 WLAN dsl.
– Plug the other connector on the telephone cable into the phone socket on the
splitter.
Telephone cable
Splitter
23
First steps
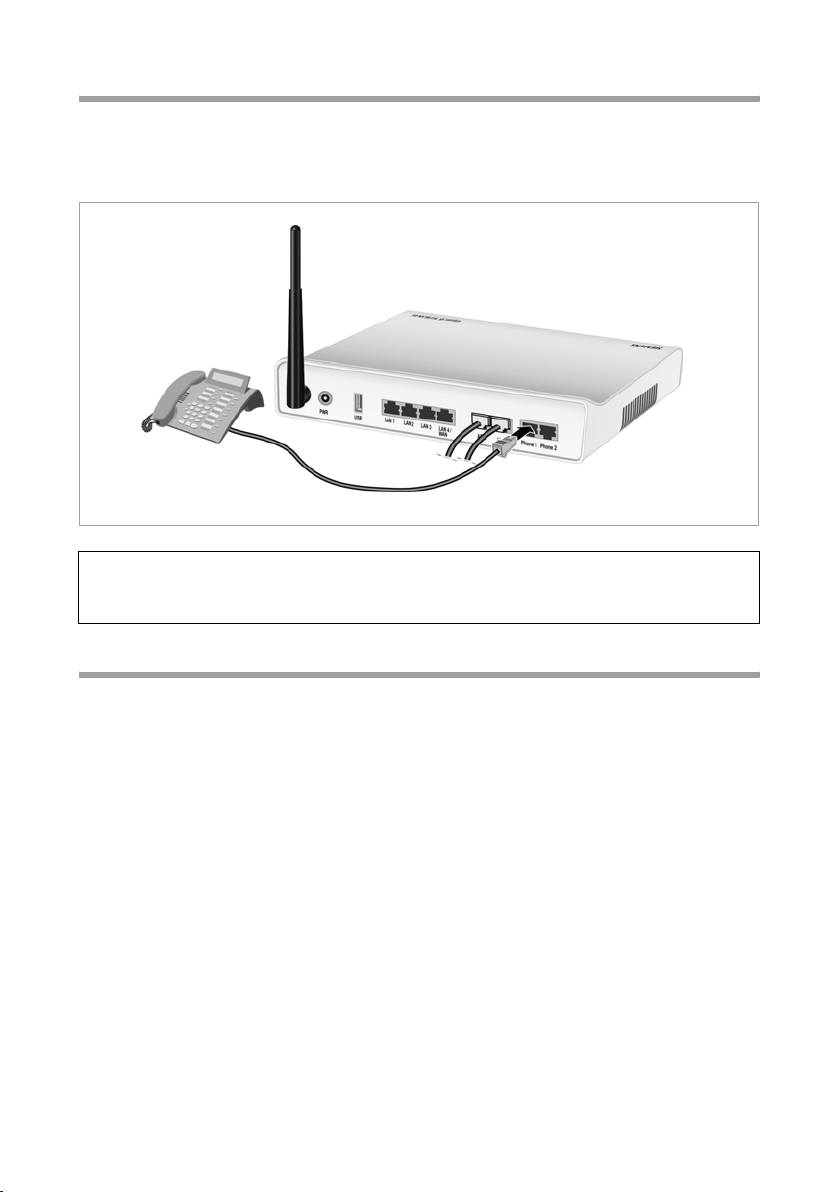
Connecting to the phone
ì Connect the Gigaset SX762 WLAN dsl with the analogue phone as follows:
– Insert the plug of the telephone into the Phone 1 or Phone 2 port on the Gigaset
SX762 WLAN dsl.
Note:
You cannot make calls in the event of a power failure. Emergency numbers are also
not accessible in this case.
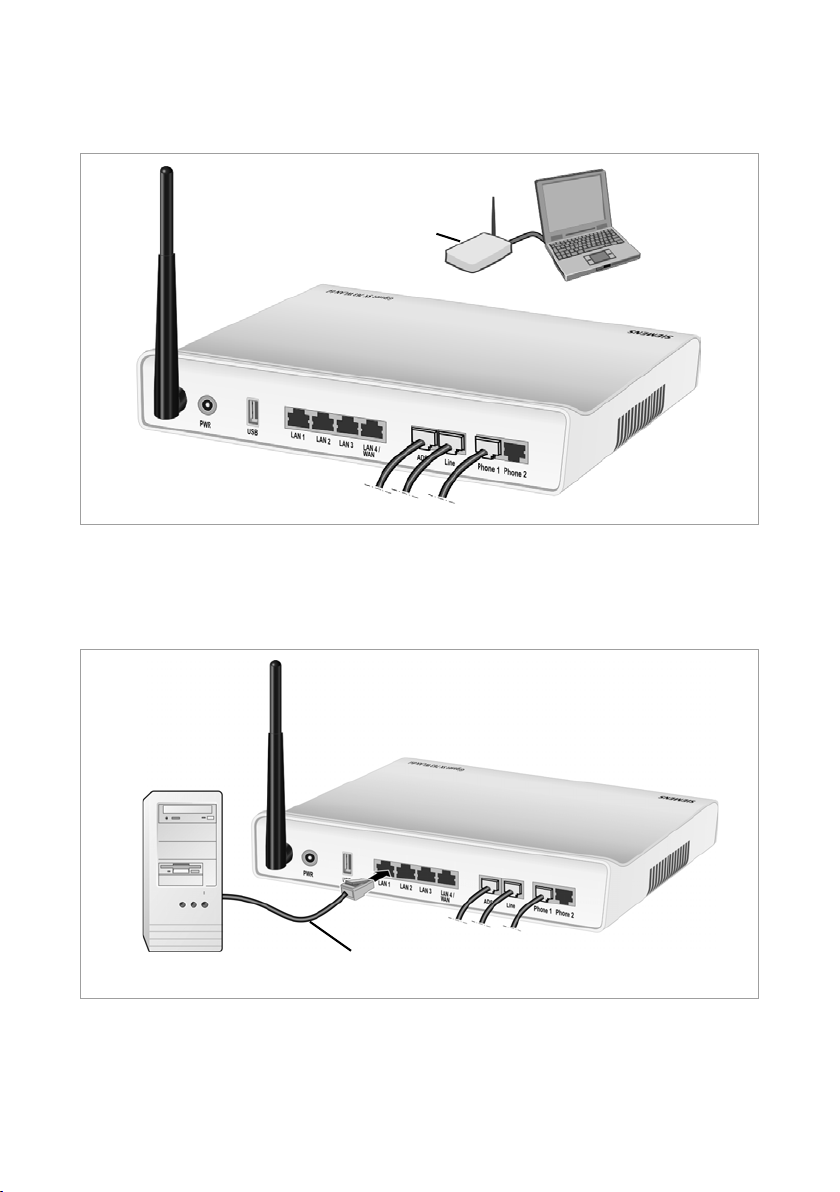
Connecting to the PC
You can connect wired or wireless PCs to your Gigaset SX762 WLAN dsl to create a local
area network (LAN).
First connect just one PC to the Gigaset SX762 WLAN dsl. You can then carry out the
general configuration. (If you wish to connect more PCs, please turn to page 29.)
Wireless
A wireless connection is made using a wireless network adapter that must be installed
in your PC. This can be an 802.11g or 802.11b-compatible wireless network adapter.
Owing to the superior range and the high data throughput, we recommend that you use
the Gigaset PC Card 54 or the Gigaset USB Adapter 54.
A wireless network is defined by assigning an identical SSID to all the devices.
ì You should therefore enter the SSID for the Gigaset SX762 WLAN dsl in your network
adapter configuration. The default SSID for the Gigaset SX762 WLAN dsl is ConnectionPoint.
If you use a wireless network adapter from the Gigaset range, enter the SSID using the
Gigaset WLAN Adapter Monitor.
24
First steps
If the correct SSID has been entered in your PC's wireless network adapter, the wireless
link will be established automatically as soon as you connect your Gigaset SX762 WLAN
dsl to the mains (page 26).
(((
WLAN adapter
Wired
ì Connect one of the LAN ports (LAN1 – LAN4, yellow) on the Gigaset SX762 WLAN
dsl to the Ethernet network card in your PC. To do this, use the other LAN cable supplied (CAT5, yellow).
LAN cable (yellow)
25
First steps
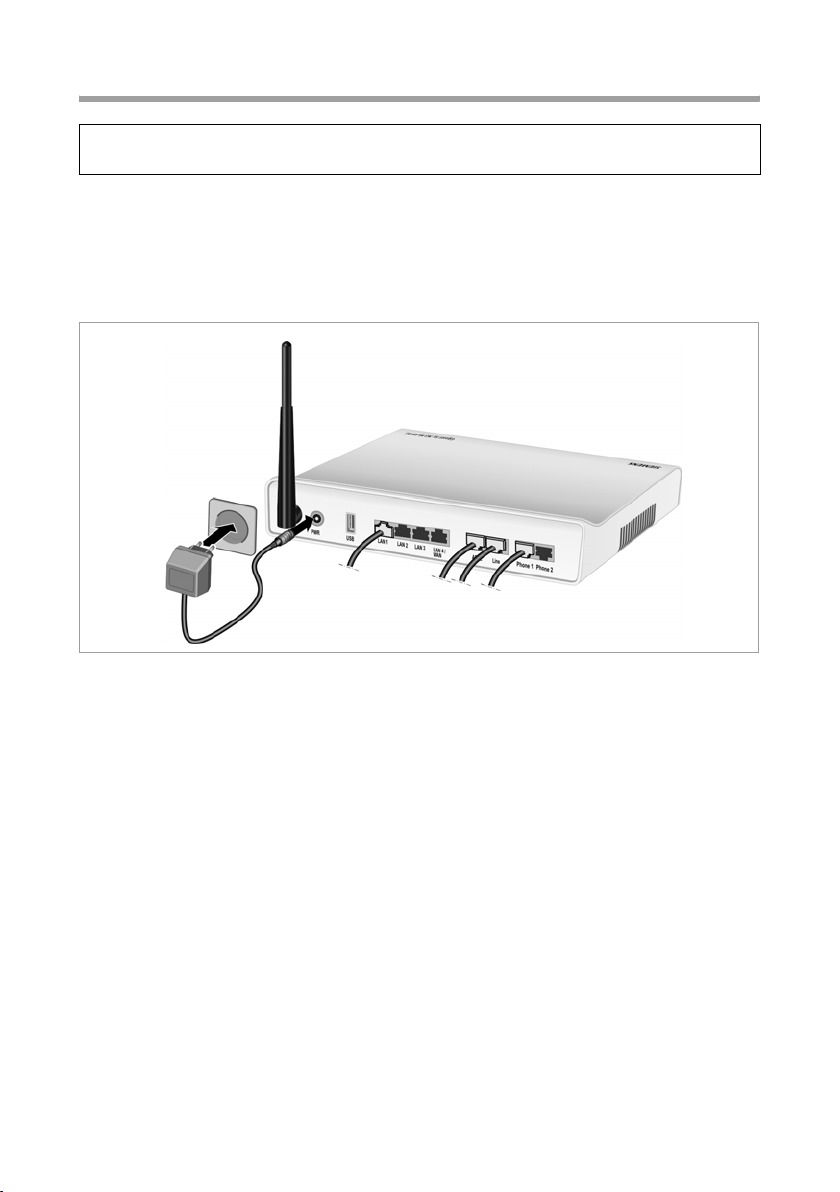
Connecting to the mains power supply
Please remember:
Only use the mains adapter supplied with the device (12V 1.5A DC).
ì Connect the mains adapter cable to the PWR socket on the Gigaset SX762 WLAN dsl.
ì Plug the mains adapter into a mains socket.
ì If your device has an on/off button, switch on the device.
The Gigaset SX762 WLAN dsl is now switched on and ready for operation.
26
First steps
Checking the operating state
Your Gigaset SX762 WLAN dsl is now ready for use. The LED displays on the front panel
of the Gigaset SX762 WLAN dsl provide information about the operating state:
The LEDs (from left to right) have the following functions:
LED State Status
On (green) The Gigaset SX762 WLAN dsl is connected to the mains.
Power
ADSL
Line
Online
USB
LAN1 –
LAN4
WLAN
VoIP
Off The Gigaset SX762 WLAN dsl is disconnected from the
mains.
On A DSL connection is established.
Flashing The DSL line is being synchronised. The synchronisation
phases are shown as slow flashing (registering) and fast
flashing (training).
If no DSL cable is connected, the LED will flash at uniform
intervals.
Off DSL is deactivated.
On One of the connected phones' receivers has been lifted for a
call (fixed network telephony).
Flashing The phone is ringing and a fixed network call is being
received or someone is waiting on the line.
Off There is currently no fixed network connection.
On Connection to the Internet has been established.
Off There is no Internet connection.
On (green)
Flashing
Off There is no device connected.
On A device is connected to the relevant LAN port.
Flashing The relevant LAN port is sending or receiving data (traffic).
Off There is no device connected.
On The radio interface is active.
Flashing The Gigaset SX762 WLAN dsl is sending or receiving data on
Off The radio interface has been deactivated or no radio signal
On At least one port is configured for VoIP and VoIP access is
Flashing A call is currently being made via the Internet.
Off There is currently no connection for Internet telephony or no
A device is connected to the Gigaset SX762 WLAN dsl via the
USB port.
The device connected on the USB port is using too much
power (see (page 120)).
the radio interface.
is being received.
registered with the provider.
VoIP port has been configured.
27

First steps
LED State Status
On The receiver of the phone connected to the port has been
Phone 1/
Phone 2
When the device is ready for use, the LEDs light up as follows:
u The Power LED on the front lights up.
u The ADSL LED flashes to indicate that the DSL connection is being synchronised.
Once this process is complete, the ADSL LED lights up permanently.
u The WLAN LED lights up to indicate that the Gigaset SX762 WLAN dsl is ready to
establish wireless connections.
The radio link to a PC that is connected by means of a wireless network adapter is
opened automatically provided the network adapter has been configured with the
same SSID as the Gigaset SX762 WLAN dsl. It can take a few seconds for the wireless
connection to be established. The WLAN LED flashes when data is sent or received
via this connection.
u The LAN LEDs light up if a device is connected to the corresponding LAN port.
If this is not the case, refer to the section entitled Troubleshooting on (page 117).
Flashing The phone is ringing and a call is being received or a call is
Off No phone is connected or the connection is idle.
lifted.
being conducted.
Network configuration of the PCs
In order to communicate via the Gigaset SX762 WLAN dsl, the network configuration
may have to be set up on the connected PCs.
With
u Windows XP or
u Windows 2000
operating systems, this usually takes place automatically provided you have not made
any changes to the standard settings for the network configuration.
With Windows 98/SE, you have to carry out the network configuration.
The description of the network configuration can be found on the CD-ROM in the document entitled "Configuring the local area network".
Making the basic settings
You can now make the basic settings for Internet access using the user interface of the
Gigaset SX762 WLAN dsl (page 30).
If you want to connect additional PCs to the Gigaset SX762 WLAN dsl, please read the
next section.
28

First steps
Connecting and configuring additional PCs (optional)
Once you have configured one PC as described above you can connect additional PCs to
the Gigaset SX762 WLAN dsl. You will need an additional cable for each PC you want to
connect via cable. For the wireless connection of ad dit ion al P Cs, you will n eed a wi reless
network adapter.
Wireless
ì Install wireless network adapters in each other PC as described in the corresponding
user guide, making sure that the SSID of all wireless network components (Gigaset
SX762 WLAN dsl and network adapters) is identical. If you have not changed the
SSID in the Basic Setup Wizard wizard, the default setting will be ConnectionPoint.
ì If necessary, set up the network for each newly connected PC (page 28).
Wired
ì Connect the network cards of each additional PC to a free LAN port (LAN1 – LAN4)
on the Gigaset SX762 WLAN dsl using an Ethernet cable.
ì Make sure that the corresponding LAN LED on the front of your Gigaset SX762
WLAN dsl flashes.
ì If necessary, set up the network for each newly connected PC (page 28).
ì Reboot the additional PCs.
29

The user interface
The user interface
You have connected a PC to the Gigaset SX762 WLAN dsl and possibly made the settings
in the local area network. You can now configure the Gigaset SX762 WLAN dsl using this
PC from the user interface of the Gigaset SX762 WLAN dsl. We recommend for initial
configuration that you connect the PC in wired mode. As Internet browser we recommend Microsoft Internet Explorer V 6.0 or higher, or Mozilla Firefox V 1.0 or higher.
Note:
To start the configuration environment, you may need to deactivate the HTTP proxy
for your browser.
If you use Windows XP Service Pack 2, you will need to configure the popup blocker.
You will find additional information on these two points on "Deactivating the HTTP
proxy and configuring a pop-up blocker" on page 121.
If you use a firewall, it must allow connection to the Gigaset SX762 WLAN dsl. For
details, refer to the user guide for your firewall. If necessary, deactivate the firewall
while you configure your Gigaset SX762 WLAN dsl.
Starting the user interface
To access the user interface of the Gigaset SX762 WLAN dsl:
ì Start your Internet browser.
ì Enter the IP address of the Gigaset SX762 WLAN dsl in the browser's address field:
http://sx762 or http://192.168.254.254
The login screen appears:
For your security, the configuration program is protected with a password. The default
password generally required is admin.
ì Enter the password.
ì Click OK.
30

The user interface
Note:
For security reasons you should change this password at a later stage (page 39).
A page with security information will appear. You can skip this when configuring the
device for the first time. If you carry out all the general and security settings using the
wizard as described below, your device and network will be fully protected. If not, the
next t ime yo u log on you will be informed of security gaps in the confi guration program.
ì Click OK.
The start screen
The start screen is the starting point for all configuration and administration procedures.
Start screen functions
You can start the following actions on the start screen:
u When you have configured an Internet connection for the first time, you can view
the selected connection service, view the status of the Internet connection, choose
a different connection service and connect to the Internet manually.
u Open the Status menu to obtain status information about the Gigaset SX762 WLAN
dsl (page 101),
u Call up the wizard for the basic configuration (Basic Setup Wizard, page 34),
u Call up the Security Setup Wizard (page 38),
u Open the Advanced Settings menu for additional configuration options (page 47).
You can call up the wizards, the Advanced Settings menu and status information at any
time and on any user interface screen using the tabs at the upper margin of the user
interface.
31

The user interface
The configuration program comprises the following functions:
Basic Setup Wizard Use this wizard to make the settings required for connecting
to the Internet and to set up the data for Internet telephony.
This is described from page 34.
Security Setup Wizard This wizard allows you to take security precautions against
unauthorised access to the Gigaset SX762 WLAN dsl and the
local network. You can assign a password and set up encryption for wireless traffic. This is described from page 38. To
protect your network, we strongly recommend that you
carry out this setup.
Advanced Settings Additional functions are offered in the Advanced Settings
menu. You can configure your PABX for fixed network /
Internet telephony, back up and restore the configuration
data, set up the Gigaset SX762 WLAN dsl as a virtual server
for the network and much more. These configuration steps
are optional and can be carried out at a later stage. This is
described from page 47.
Status You can view information about the configuration and sta-
tus of the Gigaset SX762 WLAN dsl in the Status menu. This
is described from page 101.
Connecting to the Internet manually
Once you have configured your Internet access (see page 35 and page 50), the Internet
connection is established permanently. If neccessary, you can disconnect the connection and re-establish it manually on the start screen.
To establish or end an Internet connection manually:
ì Open the start screen of the Gigaset SX762 WLAN dsl as described on page 30.
If you have already started the user interface, click the start screen tab at the top left
of the window.
If you have not yet started the user interface, do so now and log on.
ì Click Connect to establish a connection to the Internet.
ì Click Disconnect if you no longer need the connection.
32

The user interface
Elements on the user interface
The user interface screens contain the following elements:
Button Log Off
The Log Off button is always displayed on the right of the user interface. If you click Log
Off, the session is ended and the login screen appears again.
Help
Click the question mark to display explanations about the current
user interface screen.
Buttons and icons used by the wizards
The wizards use graphic icons to show which steps you have already
carried out.
As soon as you have changed the configuration on a screen you can activate the new
setting by clicking Next >. The < Back button returns you to the previous configuration
step, and Cancel returns you to the start screen.
Buttons in the Advanced Settings menu
OK Transfers the settings you have made to the
Gigaset SX762 WLAN dsl configuration.
Cancel Deletes all the entries on a screen since the last time you clicked OK.
This button is not available for the initial configuration of the device.
Other buttons may be displayed depending on the function in question. These are
explained in the relevant sections.
33

Basic Setup Wizard
Basic Setup Wizard
The Basic Setup Wizard wizard guides you step by step through the general configurati on o f th e Gi gas et SX76 2 WL AN dsl . Th is i ncl ude s settin gs for yo ur I nternet and Interne t
telephony access.
Connection to the Internet is established via the Gigaset SX762 WLAN dsl for all PCs connected to it. You need your Internet service provider's access data for the configuration.
Please have this data to hand.
Note:
The Basic Setup Wizard will reconfigure your Internet settings if you have already set
these. This does not affect the WLAN and LAN settings.
The access data is saved in the Gigaset SX762 WLAN dsl during configuration. Before
passing the device on to somebody else or having your dealer replace it, you should
always first restore the factory settings (page 98). Otherwise, unauthorised persons
may use your Internet access data at your expense.
ì Select the Basic Setup Wizard option on the start screen to start the configuration.
ì Click Next >.
34

Basic Setup Wizard
Configuring Internet connections
You will find the access data you require for configuring the Internet connection in the
documentation you received from your Internet service provider (ISP).
You can perform the initial configuration of your Internet connection on this screen. If
you want to change the data later on, you can do this in the Advanced Settings
(page 48) menu.
If you have connected an external modem, you also have to perform the initial configuration of your Internet connection in the Advanced Settings (page 48) menu.
Note:
Connection to the Internet is only possible if you have entered all the data for your
Internet service provider correctly.
ì Select your service provider from the Service provider selection menu. If your pro-
vider is not listed, you can use the Other option.
ì Enter the data you have been given by your service provider for User name and
Password. Enter the password again to confirm it.
ì If your service provider provides you with the NAT service select the option NAT
service. Else choose Non NAT service.
35

Basic Setup Wizard
In the case that you are not provided with the NAT service you have to enter the following additional data:
–In the Router IP address field enter the Public IP address of your Gigaset SX762
WLAN dsl as given by your service provider.
–In the Subnet mask field enter the given Subnet mask.
ì If you have entered all data, click Test Set tings to check the Internet connection.
An attempt is made to set up an Internet connection. The result is shown in a window.
If the connection could be set up successfully, the Close button appears.
ì Click the Close button to return to the Basic Setup Wizard.
ì Click Next >.
Telephony
You will find the access data you require for configuring Internet telephony (VoIP) in the
documentation you received from your service provider.
ì Select the option On for VoIP account if you wish to use Internet telephony (default
setting).
ì Select your service provider from the Service provider selection menu. If your pro-
vider is not listed, you can use the Other option.
ì Enter the data you have been given by your service provider for SIP User name and
SIP Password. Enter the password again to confirm it.
ì Pressing Show Additional Settings will show additional VoIP settings as shown on
the VoIP settings page in the Advanced Settings (see page 78).
ì If you wish to delete the entered data, click the Clear button.
36

Basic Setup Wizard
ì Confirm your selection with Next >.
Finishing the Basic Setup Wizard
The basic settings now are completed. You can change your settings before saving it, if
required.
ì If you want to change the settings, click < Back.
ì If you want to confirm the settings, click Finish to close the Basic Setup Wizard.
The Gigaset SX762 WLAN dsl is now configured and ready to connect to the Internet.
The Security Setup Wizard then opens automatically. We strongly recommend using
the Security Setup Wizard to protect your Gigaset SX762 WLAN dsl against attacks. If you
want to carry this out at a later stage, deactivate I would like to run the Security Setup
Wizard now.
If you have selected Non NAT service during the Internet connection configuration (see
page 35) no IP address translation takes place as described in section "Setting up the
NAT function" on page 57. In this case a PC which you want to provide Internet services
(e.g. Web or FTP service) is accessed from the Internet via its own IP address. You may
have to change the network settings of the PC so that the IP address is in line with the
router’s IP address and subnet mask. For detailed information how to do this, refer to
the document entitled "Configuring the local area network" on the CD-ROM.
37

Security Setup Wizard
Security Setup Wizard
The Security Setup Wizard offers you additional settings for improving your network
security. You can:
u Assign a password for configuring the Gigaset SX762 WLAN dsl (page 39),
u Change the SSID for your wireless network (page 40),
u Set up the Encryption for the wireless network (page 41),
u Limit access to the wireless network to certain PCs (page 45).
The user interface of the Gigaset SX762 WLAN dsl guides you step by step through the
security configuration. Once you have completed a screen, click Next >. If you want to
make any changes or check your entries again, click < Back.
ì Select the Security Setup Wizard option on the start screen or on the tab to start
the security configuration if you did not make the security settings immediately after
setting up the basic settings.
ì Click Next >.
38

Security Setup Wizard
Assigning a password
In the first step of the configuration you can change the password for the user interface.
When the device is supplied, the configuration of your Gigaset SX762 WLAN dsl is protected with the admin password. To prevent unauthorised changes to the configuration, you should change the password at regular intervals.
ì Enter the old password in the Current password field.
ì Enter the new password in the New password field and repeat the entry in the
Confirm new password field.
The password may contain up to 20 characters. Note case sensitivity. Avoid proper
names and all too obvious words. Use a combination of letters, digits and special
characters.
Note:
If you ever forget your password you will have to return the Gigaset SX762 WLAN
dsl to its factory settings (page 98). Please bear in mind that this will restore all
settings to the factory configuration. The password will again be admin.
u To go to the next step, click Next >
39

Security Setup Wizard
SSID
For the wireless network components to be able to communicate with one another, you
must use the same SSID (Service Set Identifier).
The default SSID for the Gigaset SX762 WLAN dsl is ConnectionPoint. For security reasons you should change this SSID and deactivate SSID broadcast.
If this option is enabled, the Gigaset SX762 WLAN dsl will send the SSID in all data transfers and the SSID of the Gigaset SX762 WLAN dsl will be displayed on PCs that have a
wireless network adapter. In this case, unauthorised persons could use the SSID to gain
access to your network.
ì Enter a character string of your choice in the SSID field. The SSID is case sensitive. It
can contain up to 32 characters. Use a combination of letters, digits and special characters.
Note:
The connection to the wireless network adapters will be interrupted until the new
SSID has also been entered.
ì Deactivate SSID broadcast and make a note of the SSID. You will need this to con-
nect your PC to the Gigaset SX762 WLAN dsl at a later time.
ì Click Next >.
40

Security Setup Wizard
Setting up security functions for the wireless network
In the next step you can set up the encryption and authentication methods for your
wireless network.
Wireless networks are even more susceptible to eavesdropping than wired networks.
With conventional network adapters, an intruder only needs a device with a WLAN
adapter (e.g. a notebook or a PDA [Personal Digital Assistant]) with an appropriately
configured network card in order to eavesdrop on every communication made via a
nearby wireless LAN.
The Gigaset SX762 WLAN dsl makes use of effective encryption methods to prevent
unauthorised eavesdropping as far as possible.
You can use the following security mechanisms:
u WPA2-PSK or WPA2-PSK/WPA-PSK (page 42)
u WEP encryption (Wired Equivalent Privacy, see page 43)
We recommend that you use WPA2-PSK if it is supported by all components in your wireless network.
You will find further options for setting up data encryption and authentication in the
Advanced Settings menu (page 69).
41

Security Setup Wizard
WPA2/WPA with pre-shared key (PSK)
WPA is a more advanced procedure than WEP for protecting wireless networks. Dynamic
keys, based on TKIP (Temporal Key Integration Protocol) offer increased security. The
new standard WPA2 uses AES (Advanced Encryption Standard) for encryption.
WPA-PSK is a special WPA mode for private users and users in small companies without
their own authentication server. After a certain period of time (Rekey interval), encryption keys are automatically generated with the pre-shared key, automatically changed
("rekeying") and authenticated between the devices.
Note:
Every PC (network adapter) that requires access to a WPA-protected wireless network
must also support WPA. Information about this can be found in the operating manual
for your network adapter.
ì Select WPA2-PSK if WPA2 is supported by all components in the wireless network.
ì Select WPA2-PSK / WPA-PSK if some or all components in the wireless network only
support WPA.
ì Enter a key of your choice in the Pre-shared key field (min. 8 to max. 63 characters)
and confirm it by repeating the entry. You must set up the same pre-shared key for
all wirelessly connected PCs. Use a combination of letters, digits and special characters.
ì To go to the next step, click Next >
42

Security Setup Wizard
WEP encryption
WEP (Wired Equivalent Privacy) is an encryption for radio signals in wireless networks
and meets the IEEE 802.11 standard.
If you transmit data wirelessly and not all components in your wireless network support
the higher security standard WPA (page 42), we recommend that you activate WEP
Encryption.
You can choose either the standard 64-bit key or the more robust 128-bit key. The keys
are generated in hexadecimal or in ASCII format. You must use the same keys for encryption and decryption for the Gigaset SX762 WLAN dsl and all your wireless network
adapters.
ì Select the Key length: 64 bits or 128 bits.
ì Select the Input type, i.e. whether the key is to be entered manually or generated
automatically by means of a Passphrase.
43

Security Setup Wizard
Manual key entry
ì Select the Key type, Hex or ASCII.
If you select Hex as the key type you can use the characters 0 to 9 and A to F.
– With a 64-bit encryption depth, the key is 10 characters long.
– With a 128-bit encryption depth, the key is 26 characters long.
If you select ASCII as the key type, you can use the characters 0 to 9, A to Z, a to z
plus the special characters in the ASCII character set.
– With a 64-bit encryption depth, the key is 5 characters long.
– With a 128-bit encryption depth, the key is 13 characters long.
ì Confirm the key by entering it again in the Confirm key field.
Generating a key by means of a Passphrase
ì Enter a Passphrase (up to 32 characters) and confirm it by entering it again. The key
is generated automatically.
Note:
u It is very important that you make a note of the key or passphrase. You will need
this information to configure the wireless network adapters properly.
u You have to change the WEP encryption in the wireless network adapters for the
connected PCs in the same way, otherwise they will not be given access to the
Gigaset SX762 WLAN dsl wireless network.
ì To go to the next step, click Next >
44

Security Setup Wizard
Access control within the wireless network
In this step you can specify which PCs will have wireless access to the Gigaset SX762
WLAN dsl and hence to the LAN. Access control is based on the MAC address of the PC
network adapters. You can enter the MAC addresses for the PCs manually or select these
from the list of PCs that are currently logged in.
Access control is disabled by default. This means that all PCs that use the correct SSID
can be logged in.
ì Next to the MAC address filter, select On to activate the MAC filter.
Entering MAC addresses manually
ì Enter the MAC address of the network adapter. You will find this address on the
underside of the device.
ì Enter the name of the PC.
ì Click the Add button to add the entry to the list.
Selecting from the list of logged-in PCs
ì Select the required PC from the Known wireless clients list. All PCs that were
already entered manually on the router with the MAC address are displayed.
ì Click the Add button to add the selected PC to the list.
45

Security Setup Wizard
Note:
If you activate MAC access control, you must at least add the PC on which you are
configuring the Gigaset SX762 WLAN dsl to the list. Otherwise, you will have no
access to the user interface and will receive an appropriate error message.
If you have inadvertently denied all PCs access to the Gigaset SX762 WLAN dsl,
you have two options:
u You can completely reset the Gigaset SX762 WLAN dsl (page 20).
u You can connect a PC to the Gigaset SX762 WLAN dsl using one of the LAN
connections (by cable). As MAC access control only affects PCs that are connected wirelessly, you can use this PC to change the configuration.
ì To go to the next step, click Next >
Saving settings
On the next screen you end the wizard and save the settings. You will be informed of
any security risks that still exist.
ì Click Finish to end the wizard.
The settings will now be activated on the Gigaset SX762 WLAN dsl.
Note:
You must now configure the WEP or WPA key for the wireless network adapter of the
PC that has been configured with other values. After this you can again wirelessly log
on to the Gigaset SX762 WLAN dsl.
46

Configuring Advanced Settings
Configuring Advanced Settings
In the Advanced Settings menu, you can configure all the options for the Gigaset
SX762 WLAN dsl. If required, you can also change the settings you made using the wizard. The following table contains the options available in this menu.
Menu Description
Internet This menu comprises all the setting options relating to the
Internet. In particular, you can do the following:
u Check and change the configuration for Internet access
(page 50) or specify a preferred DNS server (page 52),
u Configure the firewall, i.e. a number of security and special
functions, for example access control from local PCs to the
Internet,
u Make the NAT settings required to provide your own serv-
ices on the Internet (page 57),
u Set up routing for your Internet connection services
(page 62),
u Set up dynamic DNS for a fixed Internet address on the
device (page 61).
Local Network You can c hange th e Private IP address of the Gigaset SX762
WLAN dsl here and make settings on the DHCP server
(page 64).
Wireless Network You can configure the options for wireless communication
(SSID and encryption) here and restrict access to the Gigaset
SX762 WLAN dsl (page 67).
Tel eph ony You can make the settings for Internet telephony (VoIP) here
and configure your extensions (page 76).
USB You can make the settings here for operating an external data
carrier, a file server or a print server on the USB port (page 85).
Administration You can make or change various system settings here, for
example assign a password (page 96).
In addition, you can also back up the data on the Gigaset SX762
WLAN dsl or load new firmware (page 97).
47

Configuring Advanced Settings
Internet
If you have configured the Gigaset SX762 WLAN dsl using the two wizards, you have
also configured the WAN connection (Internet access). You can check or change these
settings in the Internet menu.
This menu also offers you a wide range of possibilities for setting up security settings
and limiting access to the Internet as well as for providing your own services on the
Internet.
You can carry out the following via the Internet menu:
u Activate/deactivate the Internet connection and edit the virtual connection parame-
ters (for further information see below),
u Check and edit the Internet connection of the Gigaset SX762 WLAN dsl (for further
information see below),
u Make DNS server settings (page 52),
u Enter the PC's registered MAC address for Internet access (WAN interface, see
page 53),
u Protect the network against unauthorised external access (firewall, see page 54),
u Provide your own services on the Internet (NAT, see page 57),
u Set up dynamic DNS (page 61),
u Set up routing for your Internet connection services (page 62).
Internet selection
You can activate or deactivate the Internet connection for the Gigaset SX762 WLAN dsl
on this screen. You can choose the connection type and set up and edit a number of connection services.
ì Select Internet from the Advanced Settings menu.
48

Configuring Advanced Settings
ì Select the appropriate option to activate or deactivate the Internet function of the
Gigaset SX762 WLAN dsl.
ì Choose the desired Connection type for your Internet connection:
– Choose the ADSL if you are using the integrated ADSL modem of the Gigaset
SX762 WLAN dsl.
–Choose Ethernet if you are setting up the connection to the Internet via an Eth-
ernet network connection (e.g. if you are using an external modem with an Ethernet connection).
If you change the connection type, you must also modify your Internet access settings accordingly (page 50).
Configure multiple connection services
Your Internet service provider can permit you to set up a number of Connection serv-
ices. You can set up these services here. You can configure rules for using these services
under the Routing option (page 62).
ì Select the appropriate option to activate or deactivate Configure multiple connec-
tion services.
If you have already configured an Internet connection (e.g. in the Basic Setup Wizard),
this is shown as Connection service selected to edit. This is then also displayed on
other pages of the Internet menu.
ì For an ADSL connection, make the following settings:
– Enter the values for VPI / VCI for each connection service that you have received
from your Internet service provider.
– Enter a description to identify the respective connection service.
– Click Add to create a new entry.
– Click Delete to delete an entry.
– Click OK to save and apply the changes.
ì For an Ethernet connection, make the following settings:
– Enter the values for VLAN tag for each connection service that you have received
from your Internet service provider.
– Choose the desired Priority for each connection service in comparison with the
other connection services.
– You can choose between 0 and 7 for the Priority, whereby 0 is the highest priority.
–Click Add to create a new entry.
–Click Delete to delete an entry.
–Click OK to save and apply the changes.
49

Configuring Advanced Settings
Internet Connection
You can set up or change the configuration of your Internet connection on this screen.
All the settings you make here must coincide with the features your Internet service provider makes available to you. False information can lead to problems with your Internet
connection.
ì If you want to set up or change the settings for the Internet connection, select
Internet Connection from the Advanced Settings – Internet menu.
All settings apply for the displayed connection service that you selected for editing on
the Advanced Settings – Internet (page 48) screen. If you only set up one connection
service, no selection is displayed.
ì Select your service provider from the Service provider selection menu. If your pro-
vider is not listed, you can use the Other option.
ì Enter the data you have been given by your service provider for User name and
Password. Enter the password again to confirm it.
ì If your service provider provides you with the NAT service select the option NAT
service. Else choose Non NAT service.
In the case that you are not provided with the NAT service you have to enter the following additional data:
–In the Router IP address field enter the Public IP address of your Gigaset SX762
WLAN dsl as given by your service provider.
50

Configuring Advanced Settings
–In the Subnet mask field enter the given Subnet mask.
ì Click Test Settings to check the settings.
An attempt is made to set up an Internet connection. The result is shown in a separate window.
ì Click the Close button, which is shown if the test was successful.
ì Click OK to apply the settings.
Note:
If you have selected Non NAT service during the Internet connection configuration
no IP address translation takes place as described in section "Setting up the NAT function" on page 57. In this case a PC which you want to provide Internet services (e.g.
Web or FTP service) is accessed from the Internet via its own IP address. You may have
to change the network settings of the PC so that the IP address is in line with the
router’s IP address and subnet mask. For detailed information how to do this, refer to
the document entitled "Configuring the local area network" on the CD-ROM. Additionally, you should install a firewall software on the PCs, e.g. by using the Windows operating system resources.
51

Configuring Advanced Settings
DNS server
DNS is a decentralised service that assigns PC names or Internet addresses (Domain
names) and IP addresses to one another. A DNS server has to administer this information
for each server or each LAN with an Internet connection.
Your Internet service provider will usually provide you with a DNS server that makes this
assignment when an Internet connection is set up. If necessary, you can define the DNS
server such that it is used manually for the Internet connections.
ì In the Advanced Settings – Internet – Internet Connection menu, select DNS
Servers.
All settings apply for the displayed connection service that you selected for editing on
the Advanced Settings – Internet (page 48) screen. If you only set up one connection
service, this information is not displayed.
ì Activate the Use custom DNS servers function by selecting On.
ì Enter the IP addresses for your preferred DNS servers (Preferred DNS server and
Alternate DNS server).
ì Click OK to apply the settings.
52

Configuring Advanced Settings
MAC Address
If you already had Internet access through the same Internet service provider before
connecting the Gigaset SX762 WLAN dsl, it is possible that the MAC address of one of
your PCs was used for registration when the connection was being set up. In this case,
you must either replace the current MAC address with the MAC address registered with
the Internet service provider or ask your Internet service provider to register a MAC
address for you.
Carry out the following steps:
ì Connect a PC to the Gigaset SX762 WLAN dsl and open the configuration environ-
ment.
ì In the Advanced Settings – Internet – Internet Connection menu, select MAC
Address.
All settings apply for the displayed connection service that you selected for editing on
the Advanced Settings – Internet (page 48) screen. If you only set up one connection
service, this information is not displayed.
ì Specify which MAC address is to be used for the Internet connection:
– Use default device MAC address: You can leave this default setting if the MAC
address of the Gigaset SX762 WLAN dsl is used for connecting to the Internet.
– Use MAC address of this PC: Select this option if the MAC address of the cur-
rently connected PC has previously been registered for connecting to the Internet
or if you have re-registered the MAC address of the PC on which you are currently
working.
– Use custom MAC address: Select this option if you have asked your Internet
service provider to register a new MAC address and this is not the MAC address of
the PC on which you are currently carrying out the configuration.
ì Click OK to apply the settings.
53

Configuring Advanced Settings
Firewall
The firewall functions of the Gigaset SX762 WLAN dsl include various security functions
for the local network.
You can carry out the following:
u Protect the network against hacker attacks (for information see below),
u Block access by individual PCs to selected services (page 55).
The firewall functions for the Gigaset SX762 WLAN dsl are activated and configured in
the factory. If you want to deactivate the firewall, carry out the following steps:
ì In the Advanced Settings – Internet menu, select Firewall.
ì Click the required option.
ì Click OK to apply the settings.
Attack Detection
If the firewall functions of the Gigaset SX762 WLAN dsl are activated, the device monitors and limits access to incoming data traffic via the DSL connection with a function
called "Stateful Packet Inspection" (SPI). This allows the Gigaset SX762 WLAN dsl to
detect and prevent certain types of attack from the Internet, such as Denial-of-Service
(DoS). DoS attacks are aimed at devices and networks with Internet connections. The
aim is not so much to steal data as to paralyse the computer or network to such an
extent that the network resources are no longer available. A typical hacker attack
involves, for example, a remote computer acting in place of the paralysed device and
receiving the data intended for the device.
You can use the Attack Detection function to change the standard firewall settings and
arrange to be notified by e-mail about any attempted hacker attacks.
ì In the Advanced Settings – Internet – Firewall menu, select Attack Detection.
54

Configuring Advanced Settings
ì Select the security level for the firewall:
–The Medium default level offers high security and hardly limits functionality of
certain applications.
–The High level offers maximum security and may limit functionality for certain
applications.
–The Low level offers maximum functionality but may provide low security.
ì Click OK to apply the settings.
Setting up access control to the Internet
The Access Control function allows you to block access to various services for one or
more PCs. You can permit or block access to services at certain times.
ì In the Advanced Settings – Internet – Firewall menu, select Access Control.
ì Activate the Access Control function by selecting On.
You have the following setting options for Access Control:
Access Rules
You can limit access to the Internet for all or only for certain clients in the network. You
can assign a Schedule rule to each access rule, thereby allowing or blocking access to
URLs and services.
ì Click Add to create an access rule.
55

Configuring Advanced Settings
ì Select the Access rule type from the list:
– Apply to all clients: The rule applies to all PCs in the network.
– Specify IP address or Specify MAC address: The rule applies to a PC you have
selected via the IP address or MAC address.
ì Enter a name for the Comment for the access rule.
ì Define the Access level.
You can choose Deny access to the Internet or Allow web browsing. If you select
Custom, you can make the following settings:
ì If you wish to create a Service filter, choose one of the following options.
–In Filtering mode, specify whether the selected services are to be allowed or
blocked.
– Select the Services that are to be allowed or blocked.
Select the Protocol and enter the appropriate Port (a single port number,
several port numbers separated by commas, port blocks consisting of two port
numbers separated by a dash, or any combination of these, for example 80,90-
140,180). The Description that is displayed helps you to identify different serv-
ices.
– You can also select services from the Predefined applications list.
– Click Add to create a new entry with the entered data or for the selected, prede-
fined application.
– Click Delete to delete an entry.
ì Click OK to apply the settings.
56

Configuring Advanced Settings
Setting up the NAT function
Note:
This function is only available if your service provider provides you with the NAT
service and NAT service has been selected during Internet connection configuration
(see page 35).
The Gigaset SX762 WLAN dsl comes equipped with the NAT (Network Address Translation) function. With address mapping, several users in the local network can access the
Internet via one or more public IP addresses. All the local IP addresses are assigned to
the router's public IP address by default.
One of the characteristics of NAT is that data from the Internet is not allowed into the
local network unless it has been explicitly requested by one of the PCs in the network.
Most Internet applications can run behind the NAT firewall without any problems. For
example, if you request Internet pages or send and receive e-mails, the request for data
from the Internet comes from a PC in the local network, and so the router allows the
data through. The router opens precisely one port for the application. A port in this con-
text is an internal PC address, via which the data is exchanged between the Internet and
a client on a PC in the local network. Communicating via a port is subject to the rules of
a particular protocol (TCP or UDP).
If an external application tries to send a call to a PC in the local network, the router will
block it. There is no open port via which the data could enter the local network.
Some applications, such as games on the Internet, require several links, i.e. several ports
so that the players can communicate with each other. In addition, these applications
must also be permitted to send requests from other users on the Internet to users in the
local network. These applications cannot be run if Network Address Translation (NAT)
has been activated.
Using port forwarding (the forwarding of requests to particular ports) the router is
forced to send requests from the Internet for a certain service, for example a game, to
the appropriate port(s) on the PC on which the game is running.
Port triggering is a special variant of port forwarding. Unlike port forwarding, the
Gigaset SX762 WLAN dsl forwards the data from the port block to the PC which has previously sent data to the Internet via a certain port (trigger port). This means that
approval for the data transfer is not tied to one specific PC in the network, rather to the
port numbers of the required Internet service.
Where configuration is concerned, this means:
u You have to define a so-called trigger port for the application and also the protocol
(TCP or UDP) that this port uses. You then assign the public ports that are to be
opened for the application to this trigger port.
u The router checks all outgoing data for the port number and protocol. If it identifies
a match of port and protocol for a defined trigger port, then it will open the assigned
public ports and notes the IP address of the PC that sent the data. If data comes back
from the Internet via one of these public ports, the router allows it through and
57

Configuring Advanced Settings
directs it to the appropriate PC. A trigger event always comes from a PC within the
local network. If a trigger port is addressed from outside, the router simply ignores it.
Note:
u An application that is configured for port triggering can only be run by one user in
the local network at a time.
u As long as the public ports are open, they can be used by unauthorised persons to
gain access to a PC in the local network.
When the Gigaset SX762 WLAN dsl is supplied, the NAT function (Network Address
Translation) is activated, i.e. all IP addresses of PCs in the local network are converted to
the router's public IP address when accessing the Internet.
You can use the NAT settings to configure the Gigaset SX762 WLAN dsl to carry out the
following tasks:
u Set up the Gigaset SX762 WLAN dsl as a virtual server by configuring Port Forward-
ing (page 59),
u Open the firewall for selected PCs (page 60).
Note:
For the functions described below, the IP addresses of the PCs must remain
unchanged. If the IP addresses of the PCs are assigned via the DHCP server of the
Gigaset SX762 WLAN dsl, you must select Never expires (page 65) as the setting in
the Local Network menu entry for the Lease time or assign static IP addresses for the
PCs.
You can activate or deactivate the NAT function (by default the NAT function is activated).
ì In the Advanced Settings – Internet menu, select Address Translation (NAT) and
then select the required option.
58

Configuring Advanced Settings
Port Forwarding
If you configure Port Forwarding, the Gigaset SX762 WLAN dsl outwardly assumes the
role of the server. It receives requests from remote users under its public IP address and
automatically redirects them to local PCs. The private IP addresses of the servers on the
local network remain protected.
Internet services are addressed via defined port numbers. The Gigaset SX762 WLAN dsl
needs a mapping table of the port numbers to redirect the service requests to the servers that actually provide the service.
Port Forwarding has been configured for this purpose.
ì To set up port forwarding for a service, select Port Forwarding from the Advanced
Settings – Internet – Address Translation (NAT) menu.
ì Select the required application from the Predefined applications list.
ì Activate Enabled by ticking the check box.
ì Click the Add button. The data for the required service is entered on the screen.
ì Click the Delete button to delete an entry.
If the application you require is not in the list, you must manually enter the relevant data
on the screen:
ì Select the protocol for the service you are providing from the Protocol list.
ì Under Public port, enter the port number(s) of the service you are providing.
You c an use
– a single port number,
– several port numbers separated by commas,
– port blocks consisting of two port numbers separated by a dash, or
– any combination of these (for example 80,90-140,180).
ì In the Local port field, enter the internal port number to which service requests are
to be forwarded.
You can only specify one port number here.
59

Configuring Advanced Settings
ì Enter the IP address of the PC that provides the service in the Local IP address field.
Example: The Web server has been configured to react to requests on port 8080.
However, the requests from web sites enter the Web server via port 80 (standard
value). If you add the PC to the forwarding table and define port 80 as the public
port and port 8080 as an internal port, all requests from the Internet are diverted to
the service with the port number 80 on the Web server of the PC you have defined
with port 8080.
ì Comment: Enter a description that makes it easy to identify different entries.
ì Activate Enabled by ticking the check box.
ì Click the Add button to add a new entry.
ì Click the Delete button to delete an entry.
ì Click OK to apply the settings.
Opening the firewall for selected PCs (Exposed Host)
You can set up a client in your local network to be a so-called "exposed host" (DMZ). Your
device will then forward all incoming data traffic from the Internet to this client. You can
then, for example, operate your own Web server on one of the clients in your local network and make it accessible to Internet users.
As the exposed host, the local client is directly visible to the Internet and therefore particularly vulnerable to attacks (e.g. hacker attacks). Only activate this function if it is
absolutely necessary (e.g. to operate a Web server) and other functions (e.g. port forwarding) are not adequate. In this case you should take appropriate measures for the
clients concerned.
Note:
Only one PC per public IP address can be set up as an Exposed Host (see also the section entitled Port Forwarding on page 59).
ì To set up a PC as an exposed host, select Exposed Host from the Advanced Settings
– Internet – Address Translation (NAT) menu.
ì Enter the Local IP address of the PC that is to be enabled as an Exposed Host.
ì Enter a name for the PC in the Comment field.
60

Configuring Advanced Settings
ì Activate Enabled by ticking the check box.
ì Click the Add button to add the entry to the list.
ì Click the Delete button to delete the entry from the list.
ì Apply the settings by clicking OK.
Dynamic DNS
Any service you provide on the Internet can be accessed via a Domain name. Your
router's Public IP address is assigned to this domain name. If your Internet service provider assigns the IP address for your local network's WAN connection dynamically, the IP
address of the router can change. The assignment to the domain name will no longer
be valid and your service will no longer be available.
In this case you must ensure that the assignment of the IP address to the domain name
is updated regularly. This task is performed by the dynamic DNS service (DynDNS). You
can use the DynDNS service to assign the Gigaset SX762 WLAN dsl an individual fixed
domain name on the Internet even if it does not have a static IP address.
Various Internet service providers offer a free DynDNS service.
If you use the service of a DynDNS provider, your service can be reached on the Internet
as a subdomain of one of the DynDNS service domains.
One possible service is DynDNS.org (http://www.DynDNS.org). If you have activated
the device's DynDNS function, it will monitor its public IP address. When this changes,
the device will open a connection to DynDNS.org and update its IP address there.
Note:
You must have an account with the service you have chosen (e.g. DynDNS.org)
before you can use the DynDNS function. Follow the instructions on the
provider's web site. Then enter the user data when configuring the router.
To use the router's DynDNS function, select Dynamic DNS from the Advanced Settings
– Internet menu.
ì Activate the Dynamic DNS function.
61

Configuring Advanced Settings
ì Select a service from the Service provider list.
ì Enter Domain name, User name and Password. You will have received all the nec-
essary information when you registered with your Service provider.
ì Click OK to apply the settings.
Routing
Your Internet service provider can permit you to set up a number of connection services.
The entire data traffic between your local network and the Internet uses the first connection service (route) by default. After setting up various connection services
(page 48), you can change this default route and set up additional routes by assigning
data traffic to other connection services. Rules are provided to assist you in doing this,
which define criteria for deciding which data traffic is assigned to which connection
service.
ì Activate or deactivate Policy-based routing for your Internet connection.
62

Configuring Advanced Settings
ì Choose the Policy type, i.e. how you would like to define the various routes for data
traffic between your local network and the Internet:
–Choose Specify interface to specify routes for clients in your local network
depending on the port used for connecting to your device (e.g. LAN port or wire-
less network connection).
–Choose Specify IP address or Specify MAC address to specify routes for clients
depending on your IP address or MAC address.
If you choose Specify MAC address, you can select PCs from the list of known
clients.
ì Specify the routes for data traffic between your local network and the Internet:
–Enter the Connector, the local IP address or the MAC address of the clients in the
local network that are to use the respective route.
If you specify routes by entering the MAC address, you can also enter the device
name in order to identify the individual clients.
– For each route, choose the Connection service that th e re spe ctive cl ien t is to use
to connect to the Internet.
A default route is used for all non-listed clients.
ì Click Delete to delete an entry.
ì Click Add to create a new entry with the entered data or for the selected client.
ì Click OK to save and apply the changes.
ì Click Cancel to reject the changes.
63

Configuring Advanced Settings
LAN configuration
You can use the LAN configuration to define an IP address for the Gigaset SX762 WLAN
dsl and configure the DHCP server.
ì Select Advanced Settings – Local Network.
Defining the private IP address for the Gigaset SX762 WLAN dsl
On this screen you can change the device's IP address. The preset IP address is
192.168.254.254. This is the Private IP address of the Gigaset SX762 WLAN dsl. This is
the address under which the device can be reached in the local network. It can be freely
assigned from the block of available addresses. The IP address under which the Gigaset
SX762 WLAN dsl can be reached from outside is assigned by the Internet service provider. The default Subnet mask for the local network administered by the Gigaset SX762
WLAN dsl is 255.255.255.0.
ì If you want to assign a different IP address to the Gigaset SX762 WLAN dsl, enter
your chosen IP address in the boxes next to IP address.
Please make sure to note which subnet mask is set when assigning the IP address. If
you are retaining the default subnet mask, the first three parts of the IP address must
be identical for all network components (including routers).
64

Configuring Advanced Settings
We recommend that you use an address from a block that is reserved for private use.
This address block is 192.168.1.1 to 192.168.255.254.
ì Adjust the Subnet mask if necessary.
The Subnet mask specifies how many address parts of the IP address must be iden-
tical for all network components (including routers).
Notes:
u You can only change the last part of the subnet mask at the moment (even if fur-
ther parts are displayed as editable).
u New settings can only be made after the Gigaset SX762 WLAN dsl has been
rebooted. If necessary, reconfigure the IP address on your PC (including one that
is statically assigned) so that it matches the new configuration.
Configuring the DHCP server
The Gigaset SX762 WLAN dsl has a DHCP server for which the factory setting is active.
Consequently, the IP addresses of the PCs are automatically assigned by the Gigaset
SX762 WLAN dsl.
Note:
u If the DHCP server for the Gigaset SX762 WLAN dsl is activated, you can configure
the network setting on the PC so that the option Obtain an IP address automatically is set up. For further information, refer to the section entitled "Configuring
the local area network" on the CD-ROM.
u If you deactivate the DHCP server, you will have to assign a static IP address for the
PCs that use the network settings.
ì To activate the DHCP server, select On.
ì If the DHCP server is active, you can define a Lease time. The least time indicates
how long the client may use the allocated IP configuration.
Note:
If you select Never expires, the IP addresses are never changed. Activate this
option if you want to make NAT or firewall settings using the IP addresses of the
PCs; otherwise you have to assign static IP addresses to these PCs.
ì Define the range of IP addresses the Gigaset SX762 WLAN dsl should use to auto-
matically assign IP addresses to the PCs. Define the First issued IP address and the
Last issued IP address.
ì If you want to define a different Default gateway in your local area network instead
of the Gigaset SX762 WLAN dsl, enter the IP address of this default gateways in the
relevant boxes.
65

Configuring Advanced Settings
Entering the DNS server
DNS is a decentralised service that assigns PC names or Internet addresses (Domain
names) and IP addresses to one another. A DNS server must administer this information
for each server or for each LAN with an Internet connection.
Your Internet service provider will usually provide you with a DNS server that makes this
assignment when an Internet connection is set up. If necessary, you can manually
define the DNS server to be used for the Internet connections.
ì Enter the IP addresses for your preferred DNS servers (Preferred DNS server and
Alternate DNS server).
ì You can define the name of a domain (Windows workgroup) in the Domain name
field.
Assigning static IP addresses to individual PCs
Even if you have activated the DHCP server, you can still assign a static IP address to individual PCs (e.g. when setting up these PCs for NAT functions).
ì Enter the MAC address of the PC to which you want to assign a static IP address.
ì Enter the IP address you wish to assign to the PC.
ì Click the Add button to add the entry to the list.
ì Click the Delete button to delete the entry from the list.
ì Apply the settings by clicking OK.
66

Configuring Advanced Settings
Configuring wireless connections
If PCs are communicating wirelessly via the Gigaset SX762 WLAN dsl, you should also
improve the security of your wireless network. This configuration is made via the
Advanced Settings – Wireless Network menu. You can carry out the following here:
u Activate the wireless module of the Gigaset SX762 WLAN dsl (for information see
below),
u Set up the channel and SSID (page 67),
u Specify transmission mode and range settings for the wireless network (page 68),
u Switch on the repeater function (Wireless Distribution System, WDS) (page 69),
u Set up Encryption for wireless transmissions (page 69),
u Restrict access to the LAN of the Gigaset SX762 WLAN dsl (page 74) and
ì In the Advanced Settings menu, select Wireless Network.
ì Select On for the Wireless Network (default setting).
Devices can only log in wirelessly if the WLAN module of the Gigaset SX762 WLAN
dsl is activated.
You can now make the settings for the wireless network.
Channel
All clients in the network use the set radio channel for wireless data transfer. You can
choose between various channels, depending on your current location.
ì Select Automatic so that the best channel for transmitting the data is used automat-
ically.
67

Configuring Advanced Settings
SSID
For the wireless network components to be able to communicate with one another, you
must use the same SSID (Service Set Identifier).
The default SSID for the Gigaset SX762 WLAN dsl is ConnectionPoint. For security reasons you should change this SSID and deactivate SSID broadcast (for information see
below).
Enter a character string of your choice. The SSID is case sensitive. It can contain up to 32
characters. Use a combination of letters, digits and special characters.
Note:
The connection to the wireless network adapters will be interrupted until you have
entered the new SSID in them as well.
SSID broadcast
If thi s op tio n is ena ble d (d efa ult setting ), t he G iga set SX76 2 WL AN dsl wil l se nd t he SSID
in all data transfers and the SSID of the Gigaset SX762 WLAN dsl will be displayed on PCs
that have a wireless network adapter. In this case, hackers could use the SSID to detect
your network.
If you deactivate SSID broadcast, the SSID of the Gigaset SX762 WLAN dsl will not be
displayed. This increases protection against unauthorised access to your wireless network. Make a note of the SSID. You will need it to log on to the PC.
To protect your wireless network, you should also enable encryption of data transmissions (page 69).
ì Select Off to deactivate SSID broadcast.
Tra n smissi o n mode
The IEEE 802.11g standard permits data transfer up to 54 Mbit/s, and the IEEE 802.11b
standard up to 11 Mbit/s. Choose IEEE 802.11g only to ensure the best possible data
transfer rates in your network. To operate clients with older wireless network adapters
in your network, select IEEE 802.11b/g (mixed).
ì Select the required transmission mode for your wireless network.
Sending power
ì Select the required sending power for your device.
It is recommended that you select a sending power with a range to suit the spatial
environment of your local network. A much greater range makes it easier to eavesdrop on your wireless data transfer.
XR (extended range)
By activating XR, wireless data transfer is also enabled in the border areas of your wireless network, though at a very slow data transfer rate. The switch to XR mode happens
automatically if there is a weak signal and if the remote station is likewise XR-enabled.
ì Activate or deactivate XR for your wireless network to increase the range.
ì Click OK to apply the settings.
68

Configuring Advanced Settings
WDS (repeater function)
If you use a repeater to e xtend th e ra nge in your w ire less net work, yo u mu st a cti vate th e
Wireless Distribution System (WDS) function.
Security settings in the wireless network
If you are sending data over radio channels, we recommend that you activate encryption (WEP or WPA) on the components in the wireless network. WPA offers greater security than WEP. You should therefore select WPA encryption if it is supported by all components in your wireless network.
WPA is a more efficient method than WEP for protecting wireless networks. Dynamic
keys, based on TKIP (Temporal Key Integration Protocol) offer increased security. The
new WPA2 standard is based on AES.
WPA also supports the use of an authentication server.
ì In the Wireless Network menu, select Encryption & Authentication.
The following security mechanisms are currently available:
u WPA2-PSK and WPA2-PSK/WPA-PSK (page 70)
u WAP2 and WPA2/WPA with authentication server (page 71)
u WEP encryption (Wired Equivalent Privacy, see page 72)
69

Configuring Advanced Settings
WPA2-PSK and WPA2-PSK / WPA-PSK
WPA with pre-shared key (WPA-PSK)
WPA-PSK is a special WPA mode for private users and users in small companies without
their own authentication server. After a certain period of time (Rekey interval), encryption keys are automatically generated with the pre-shared key, automatically changed
("rekeying") and authenticated between the devices.
The standard of encryption available to you depends on the components in the wireless
network. Every PC (network adapter) that requires access to a WPA-protected wireless
network must also support WPA. To find out whether and how you can use WPA on your
PC, read your network adapter's user guide. If all components support WPA2, select
WPA2-PSK. If you are using network adapters that only support WPA, select WPA2-PSK
/ WPA-PSK. The entries described below are identical for both options.
ì Select the required option in the Security field.
ì Enter a key in the Pre-shared key field (up to 32 characters) and confirm it by enter-
ing it again. Use a combination of letters, digits and special characters.
ì Apply the settings by clicking OK.
70

Configuring Advanced Settings
WPA and WPA2 with authentication server
In large networks (e.g. in companies) WPA enables the use of an additional authentication service. In this case, user access is controlled by user accounts and passwords, in
addition to WPA encryption. A RADIUS server acts as an authentication server. You can
select the new WPA2 standard if it is supported by all components in your wireless net-
work. Select WPA2 / WPA if you are using devices that only support WPA.
ì Select the required option in the Security field.
ì Enter the IP address of the RADIUS server in the RADIUS server IP address field.
ì Enter the port of the RADIUS server in the RADIUS server port field.
ì In the RADIUS server secret key field, enter a keyword that conforms to the con-
ventions of the RADIUS servers that the server is to use for authentication.
ì Click OK to apply the settings.
71

Configuring Advanced Settings
WEP encryption
If WPA is not supported by all components in your wireless network, we recommend
that you activate WEP Encryption on the components.
ì Choose the WEP option in the Security field.
ì Select the Authentication type:
–Select Shared to require that each client log in to the network with a specified
key.
–Select Open to permit data transfer within the wireless network without the need
to enter a key.
You can choose either the standard 64-bit key or the more robust 128-bit key. The keys
are generated in hexadecimal or in ASCII format. You must use the same keys for encryption and decryption for the Gigaset SX762 WLAN dsl and all your wireless network
adapters.
ì Select the Key length: 64 bits or 128 bits.
ì Select the Input type, i.e. whether the key is to be entered manually or generated
automatically by means of a Passphrase.
72

Configuring Advanced Settings
Manual key entry
ì Select the Key type, Hex or ASCII.
If you select Hex as the key type you can use the characters 0 to 9 and A to F.
– With a 64-bit encryption depth, the key is 10 characters long.
An example of a valid key: 1234567ABC
– With a 128-bit encryption depth, the key is 26 characters long.
An example of a valid key: 234567ABC8912345DEF1234567
If you select ASCII as the key type, you can use the characters 0 to 9, A to Z, a to z
plus the special characters in the ASCII character set.
– With a 64-bit encryption depth, the key is 5 characters long.
An example of a valid key: GIGA1
– With a 128-bit encryption depth, the key is 13 characters long.
An example of a valid key: GIGASET_SX76x
ì Enter up to four keys in fields Key 1 to Key 4 and confirm them by entering them
again in fields Confirm key 1 to Confirm key 4.
ì Select one of the four keys as the Default key.
Note:
u It is very important that you make a note of the key(s) that have been entered
or generated. You will need this information to configure the wireless network
adapters properly.
u When you have concluded the configuration, you must change the WEP
encryption in the wireless network adapters for the connected PCs in the same
way as they will not otherwise be given access to the wireless network of the
Gigaset SX762 WLAN dsl.
ì Click OK to apply the settings.
73

Configuring Advanced Settings
Generating a key by means of a Passphrase
ì Enter a Passphrase (up to 32 characters) and confirm it by entering it again. The key
is generated automatically.
ì Click OK to apply the settings.
Permitted clients
On this screen you can specify the PCs that are to have wireless access to the
Gigaset SX762 WLAN dsl and hence to your LAN and WLAN.
In the Advanced Settings – Wireless Network menu, select Allowed Clients.
The default setting for access control is deactivated. This means that all PCs that use
the correct SSID can be logged in.
Access control is based on the MAC addresss of the PC network adapters.
ì Activate access control by selecting On in the MAC address filter field.
74

Configuring Advanced Settings
Entering PCs manually:
ì Enter the MAC address and Device name of the required PCs in the appropriate
fields.
ì Click the Add button to add the entry to the list.
ì Click the Delete button to delete the entry from the list.
Note: Only following deletion is the entry transferred to the list of known MAC
addresses.
ì Apply the settings by clicking OK.
Selecting from the list of logged-in PCs
ì Select the required PC from the Known wireless clients list. All PCs that were
already entered manually on the router with the MAC address are displayed.
ì Click the Add button to add the selected PC to the list.
ì Apply the settings by clicking OK.
Note:
If you activate MAC access control, you must at least add the PC on which you are
configuring the Gigaset SX762 WLAN dsl to the list. Otherwise, you will have no
access to the user interface and will receive an appropriate error message.
If you have inadvertently denied all PCs access to the Gigaset SX762 WLAN dsl,
you have two options:
u You can completely reset the Gigaset SX762 WLAN dsl (page 20).
u You can connect a PC to the Gigaset SX762 WLAN dsl using one of the LAN
connections. As MAC access control only affects PCs that are connected wirelessly, you can use this PC to change the configuration.
75

Configuring Advanced Settings
Setting up Internet telephony (VoIP)
The Gigaset SX762 WLAN dsl allows you to make telephone calls via the Internet using
an analogue telephone and also via the fixed network as usual. For Internet telephony
(VoIP), you require access authorisation from your service provider and the relevant
access data. To make calls, you have to enter this data along with other configuration
settings under Advanced Settings in the Tel ephony - VoIP menu.
You can connect a base station for handsets or fax machines to the two telephone ports
of the Gigaset SX762 WLAN dsl analogue phone. In addition, you can set up additional
extensions for Internet and fixed network calls using SIP clients (as WLAN handsets or in
wired or wireless mode on PCs).
The menu comprises the following entries:
u VoIP: Enter the basic data from your service provider here (page 77).
u Extensions: Set up the functions for internal extensions here (page 79).
u Dialling plans: Specify numbers here that are to be dialled only via the fixed net-
work or only via the Internet. You can also enter a call-by-call provider for the fixed
network (page 83).
Note:
If you do not specify any of your own dialling plans, then the default settings will
be used as entered in the Telep hony menu under Dialing Plans. Emergency numbers are directed via the fixed network, while all other calls are made via the
Internet.
Important information:
u You cannot make calls if there is a power failure, even the emergency numbers are
not accessible then.
u If VoIP is not set up, you will always make calls via the fixed network. The dialling
plans will not apply in this case (page 83).
u Check these dialling plans (page 83) and change them if you have agreed special
phone tariffs with another provider.
u Do not change the default setting for the Internet connection mode (= "permanent
connection") if you are using VoIP (page 35). You can only be called via VoIP if this
setting is used. Remember, though, that this setting can result in high connection
costs if you have agreed a time-based tariff with your Internet service provider.
76

Configuring Advanced Settings
VoIP settings
You will receive the access and configuration data for Internet telephony from your service provider.
ì In the Advanced Settings – Telep hony menu, select VoIP.
ì Select On if you wish to use Internet telephony (default setting).
ì If you have already configured Internet telephony in the Basic Setup Wizard, your
VoIP account will be shown with User name and SIP domain in addition to VoIP
accounts. If you want to change a previously configured VoIP account, click Edit
(page 78).
ì If you want to configure additional VoIP accounts, click Add (page 78).
If you have configured VoIP settings in the Basic Setup Wizard the data for your VoIP
account is shown in this line. You can edit this data or add new data for additional
accounts.
ì You can generally accept the default settings for Voice Quality:
– Upstream rate: The upstream transmission rate (upstream bandwidth) varies
depending on the provider and DSL tariff and is normally much lower than the
transmission rate for downstream data traffic. If there is upstream data traffic at
the same time over the DSL line, the voice quality may not be optimum.
To ensure optimum voice quality, you can use the Upstream rate option to
define the bandwidth, which is to be used as a maximum for your VoIP connec-
tion. The default value is 1000 kbit/s and should suffice under normal
circumstances.
You can change these values if necessary, but you have to find out first how high
your upstream transmission rate is. Most providers supply tools for administering
77

Configuring Advanced Settings
your DSL connection, which should tell you this information. Otherwise, you will
find plenty of Web sites on the Internet that provide such tools.
Enter a value for Upstream rate, which is 90 percent of your available band-
width.
– Voice activity detection: If this function is activated, no data will be transmitted
during breaks in speech during a telephone call.
– Echo canceller delay: If you hear your own voice as an echo during VoIP tele-
phone calls, you should choose a different value from the list.
– Fixed gain control (input/output): To adjust the volume for call input or output,
simply enter a different value. The smaller the value, the lower the volume.
Setting up or modifying a VoIP account
78

Configuring Advanced Settings
ì Select the option On for VoIP account if you wish to use Internet telephony (default
setting).
ì Select your service provider from the Service provider selection menu or select the
Other option.
ì Enter the data you have received from your service provider:
If you choose the preconfigured service provider, the only options to be set are
SIP User name and SIP Password.
ì If you wish to view, add or modify data, click the Show Additional Settings button.
Leave the default settings for the parameters SIP domain, SIP realm, SIP listen
port, Proxy server address, Proxy server port, Registrar server address, Registrar server port, Voice codecs and Out-of-band DTMF unless your service provider
has provided you with other data.
ì Click the OK button to apply the settings.
Extensions
Your Gigaset SX762 WLAN dsl allows you to configure up to six internal extensions that
you can use for making calls via the fixed network or via VoIP. Two of these extensions
are connected to your Gigaset SX762 WLAN dsl via the Phone 1 and Phone 2 ports, while
the remaining extensions are connections for SIP clients. You can assign each extension
the relevant line (fixed network or VoIP account) for incoming and outgoing calls and
make other settings for each extension (e.g. call waiting, call forwarding, caller display).
The process for configuring extensions, which use the two telephone ports of the
Gigaset SX762 WLAN dsl, is somewhat different to that for the SIP extensions. The latter
must be VoIP telephones, which are connected in wired or wireless mode to the Gigaset
SX762 WLAN dsl, or PCs with a SIP client, which are connected to the Gigaset SX762
WLAN dsl.
ì In the Advanced Settings – Telep hony menu, select Extensions.
79

Configuring Advanced Settings
Phone connectors
The two telephone ports Phone 1 and Phone 2 of the Gigaset SX762 WLAN dsl have the
internal phone number *1 or *2.
ì Click Edit to adapt the settings for an entry (page 81).
SIP Proxy Server
In addition to the telephones connected to your Gigaset SX762 WLAN dsl, you can configure wireless VoIP phones (WLAN handsets) or PCs with SIP clients in your local network with the assistance of the SIP proxy servers integrated as internal extensions in
your device and then use these to make calls via the fixed network or via VoIP.
Use the IP address displayed in your local network for registering your wireless VoIP
phones or your other SIP clients with your SIP proxy server.
Port
The default port via which wireless VoIP phones or other SIP clients register with the SIP
proxy server is entered here.
SIP client accounts
ì Make the extension settings for each SIP user account, which is used for registering
wireless VoIP phones and other SIP clients with the SIP proxy server of your device.
The User name and Extension number are displayed for identifying the individual
telephone ports. These extensions have the internal phone numbers *3 to *6.
80

Configuring Advanced Settings
ì Click Edit to adjust the settings for an entry (see below).
ì Click Delete to delete an entry.
Configuring extensions
The Extension shows either the selected port of the Gigaset SX762 WLAN dsl (Phone 1
or Phone 2) or the SIP client. The Extension number for the extension is preset and is
displayed as a call number.
ì Enter a name for identifying the port in the User name field. You can also leave the
default setting for Phone 1 and Phone 2.
ì Select the Phone number from the list (your VoIP service provider or one of your
VoIP service providers) for this extension or choose the entry Fixed line.
The list of numbers for Internet telephony is the one you set up in the VoIP menu
(page 77). All outgoing calls are directed by default via this phone number. Incoming calls for the selected phone number are signalled.
ì Select Receive calls for all numbers if you wish to receive all incoming calls on all
extensions.
ì You can configure Divert calls with the following options for the Phone 1 and
Phone 2 ports:
– Divert always: Each call for the extension is forwarded to the extension selected
in the Divert calls to field.
– When busy: A call for the extension is forwarded to the selected extension if the
extension is busy.
– No reply: A call for the extension is forwarded to the selected extension if the call
is not answered.
81

Configuring Advanced Settings
ì Select the Call waiting option if you want to permit a signal for an incoming call
while you are on a call. (Only for Phone 1 and Phone 2 ports).
ì Select the Call pickup option to have the option to accept all incoming calls on this
extension.
ì Select Hide own number for outgoing calls (CLIR) if you want to prevent the
number of this extension being displayed for outgoing calls. (Only for Phone 1 and
Phone 2 ports).
Note:
Many service providers either do not support this function at all or only unreliably. Contact your service provider if you want to be certain that CLIR, for example,
is actually supported.
ì Click OK to apply the settings.
82

Configuring Advanced Settings
Dialing Plans
On this screen you can:
u Enter your area code,
u Define for Internet telephony whether the area code should be automatically
dialled,
u Specify whether certain phone numbers or prefixes are to be dialled via the Internet
or the fixed network,
u Enter a call-by-call provider for the fixed network.
ì To make these settings, select the menu entry Dialing Plans in the
Advanced Settings – Teleph ony menu.
ì Area code
Enter the Area code for your current location.
ì Predial area code for local calls through VoIP
If you activate this function, the area code will be dialled automatically when you
make a local call via a VoIP provider. This will save you having to enter the area code
which was previously always necessary with VoIP.
ì Wait for dial tone on fixed line
Only activate this function if it is necessary for the smooth functioning of your
Gigaset SX762 WLAN dsl within the telephone network.
ì If you wish to make all fixed network calls via a call-by-call provider, activate the
Preselection function.
83

Configuring Advanced Settings
ì Enter the provider's number in the Preselection number field.
ì Choose whether you want to use dialling plans.
ì In the Phone number field, enter an individual number or also the first digits of
phone numbers (e. g. 0800 or a specific area code) for which the dialling plan is to
apply.
ì In the Connection type selection field, you can specify whether the entered number
is always to be called via the fixed network or the selected VoIP account.
ì You can enter a description for the dialling plan in the Comment field.
ì Click Delete to delete the dialling plan. You can add a new dialling plan by clicking
the Add button.
You can define up to a maximum of 20 dialling plans.
ì Click OK to apply the settings.
Notes:
u Dialling plans may already be predefined for certain emergency phone num-
bers depending on the country. These can be changed as required.
u If you do not specify any dialling plans, the default settings will be used.
u If VoIP (Internet telephony) is not set up, you will always make calls via the
fixed network. The dialling plans will not apply in this case.
84

Configuring Advanced Settings
USB
Using your device's USB port, you and other users in the local network can
u share USB mass storage (page 86) or
u use a USB printer (page 88).
Notes:
u If you connect a USB hub to the USB port of the Gigaset SX762 WLAN dsl, you can
connect and use a USB memory and a USB printer at the same time.
u If connecting a device without its own power supply directly to the USB port,
please note that the power consumption must not exceed 500 mA.
u The Gigaset SX762 WLAN dsl supports USB V 2.0. Devices that support USB V 1.1
may also be connected.
ì Go to the Advanced Settings – USB menu.
ì Select the On option for USB.
ì Click OK to activate the USB port.
If a USB device is connected, its Status is displayed.
85

Configuring Advanced Settings
File Server
The device's integrated FTP server allows you to manage folders and files in a connected
USB mass storage (for example a USB stick or a USB hard disk) and make them available
to all users in the local network and on the Internet.
Connect a USB data carrier to the Gigaset SX762 WLAN dsl via the USB port.
Note:
The Gigaset SX762 WLAN dsl only supports hard disks with the FAT 32 file system.
Only one partition is possible.
ì In the Advanced Settings – USB menu, select File Server.
ì Choose On for Local FTP service if you want to make data available in the local net-
work.
PCs in the network access the USB mass storage via FTP:
To do this, open the Internet browser and enter the following address:
ftp://192.168.254.254
If you have changed the IP address of the Gigaset SX762 WLAN dsl (see page 64),
enter the new address instead of 192.168.254.254.
86

Configuring Advanced Settings
ì Choose On for Remote FTP service if you also want to make data available on the
Internet.
Internet users can access your USB mass storage by entering the public IP address in
the Internet browser. As Internet service providers often change this each time
someone dials in, it is worth using dynamic DNS (page 61) in addition.
ì The Port field contains the port number via which local PCs and Internet users can
access your data. You should not change the default port number without very good
reason.
If you use a different port number, note that active FTP mode is then no longer possible. The FTP clients then have to be converted to passive FTP mode.
You can allow access for both FTP services generally or only for selected users with a
user name and password.
ì For Access (read only), select whether all users are to be able to read your data in
Anonymous mode or whether only one Specified user is to be allowed.
ì Specify whether Access (full control) to your data is disabled or whether a
Specified user may read, edit and delete your data.
ì Enter the name in the Specified user field. Define different user names for the dif-
ferent types of access and directory.
ì Enter the password for the user and confirm it by entering it again in the field below.
Please note that this is case-sensitive. Avoid using proper names and obvious terms.
Instead, use uppercase and lowercase letters, numbers and special characters.
ì Click OK to apply the changes.
87

Configuring Advanced Settings
Print Server
Your device's integrated print server allows you to offer a USB printer to all users in the
local network.
Notes:
u The Windows XP or Windows 2000 operating system is a prerequisite for using the
print server.
u Only printer functionality is supported in the case of multifunction devices (com-
bination of printer, scanner or fax). You can obtain additional information by contacting the hotline or else on the Internet (see Quick Start Guide).
If you wish to use this function, you must first connect a USB printer to your device's USB
port. The device must be shown on the screen. You can check the status of the connection to the USB printer in the Advanced Settings – USB menu.
ì Activate your device's integrated print server.
Users can set up the connected printer by entering the current IP address of the Gigaset
SX762 WLAN dsl on the PC.
ì Click OK to apply the changes.
You will find information on setting up a printer connected to the Gigaset SX762 WLAN
dsl in Section "Installing the printer port for network printers" on page 108.
88

Call guide
Call guide
Your Gigaset SX762 WLAN dsl allows you to make calls via the Internet (VoIP) and your
fixed line. A description of how to configure your Gigaset SX762 WLAN dsl for using the
telephone functions is provided in sections "Telephony" on page 36 and "Setting up
Internet telephony (VoIP)" on page 76.
This chapter describes the function keys on your phone and the Internet telephony settings with which you can use the various telephony options. Please note that the functions described are only fully available if you have configured Internet telephony and
have registered with your service provider.
External connections are calls via your fixed line or via the Internet (VoIP).
Internal connections are calls between the phones connected to the router or calls on
PCs or cordless phones which are registered as software SIP clients on the device.
Please note:
With the exception of the first four key combinations, the key combinations specified
in this chapter only apply for telephones on the Phone1 and Phone2 ports. The key
combinations *1..*6, **, *99* and *01 to *06 phone number can also be entered
on a SIP client. Please refer to the operating manual for your SIP client for the other
functions.
Making calls
Key combination Effect Description
Choose the phone number of the
*1 ...*6
**
*99*
*00 Phone number
*01 to *06
Phone number
Call for an internal
extension
Call all internal numbers
Answer a call from a
different phone
Switching from VoIP
to fixed network for
a call
Switching to a VoIP
extension for a call
desired extension (analogue phone or
SIP extension, *1,..*6) to make an
internal call.
Choose ** to call all internal extensions.
If a call arrives at a different telephone
set or on a port configured as an
answering machine, you can accept
th is call on you r phone by pre ssin g the
key combination *99*.
To make a call on a VoIP extension via
the fixed network, simply enter 0.
If you want to make a call on a VoIP or
fixed network extension via a (different) VoIP extension, you can use this
VoIP connection by entering *0 and
the number of the desired extension
(1 ... 6) (e.g. *04 for the fourth
extension).
89

Call guide
Key combination Effect Description
Dial *31# before the number if you
*31# number
*51#
#51#
*#*51#
*##51#
Calling line identification restriction
Calling line identification restriction as
default
Cancel calling line
identification restriction as default
Calling line identification restriction as
default (at
exchange)
Cancel calling line
identification restriction default (at
exchange)
want to prevent your number being
displayed to the other party for the
current call.
Dial *51# to prevent your number
being displayed to the other party permanently.
You have opted to suppress the display
of your number by default (see
above): Dial #51# to cancel this
default.
Dial *#*51# to prevent your number
being displayed to the other party permanently. In contrast to the above setting, this setting is forwarded to the
exchange and is activated there.
You have opted to suppress the display
of your number by default (see ab ove,
at exchange): Dial *##51# to cancel
this default setting at the exchange.
Advanced options
The functions described in this section, which are available to you when making calls via
your Gigaset SX762 WLAN dsl, apply both for external calls and for internal calls. The
functions described below are dependent on the connected terminal in the case of VoIP
extensions.
Please remember:
When using the signal button R, always wait until you hear a dialling tone before you
enter the phone number for a consultation call or complete the key combination for
the respective function.
Toggling telephone calls
Key combination Effect Description
R
Consultation
Phone number
Press R to initiate a consultation with
another phone number during a call.
Dial the desired (internal or external)
number for the consultation.
90

Key combination Effect Description
Press R2 to accept an incoming call
during a call. The connection to the
Accept call waiting/
R2
R0 Reject call waiting
R1
toggle between two
calls
Ter m i nate one c a ll
and return to the
waiting call
first call is put on hold.
If you terminate the first call beforehand, your phone rings and you can
take the second call as usual.
By pressing R2 again, you can toggle
to the waiting caller.
Press R0 to reject an incoming call
during a call.
The second call is rejected automatically after 120 seconds have elapsed.
Press R1 to end the current call. You
then switch to the waiting call. The
second call is ended automatically
when you replace the receiver.
Conference call between three participants
Key combination Effect Description
When you are making a call and a sec-
R3 Conference call
End the conference
R2
R4
call and continue
calls separately
End conference call
and set up the connection between call
parties
End conference call
ond call is waiting (see above), press
R3 to enable a conference call
between you and the two call parties.
Press R2 to end the conference call.
You are then connected to the previously active call again and the previous waiting call is now in the wait
state again.
If you press R4 during a conference
call, you end your call and set up a
connection between the other two
external call parties. You can then
replace the receiver. In the case of an
internal conference call, you simply
need to hang up.
Replace the receiver to terminate all
calls.
Call guide
91

Call guide
Call answering and forwarding
Key combination Effect Description
Dial *21*, the desired internal phone
number to which all calls are to be
forwarded that are received on this
*21*[number]#
#21#
*61*[number]#
#61#
*67*[number]#
#67#
#77#
Forward to internal
phone number
Delete call forwarding
Call forwarding to
internal number if
absent
Delete call forwarding if absent
Call forwarding to
internal number if
line busy
Delete call forwarding if absent
Delete all call forwarding settings
extension, and then press the # key.
Example: You want to set up call forwarding from your phone to a second
internal phone number.
Dial *21**2#.
Use the key combination #21# to
delete internal call forwarding, which
you set up as described above.
Dial *61*, the desired internal phone
number to which all calls are to be
forwarded that are received on this
extension, and then press the # key.
The call is forwarded after 20 seconds
with this key combination.
Use the key combination #61# to
delete internal call forwarding (if
absent), which you set up as
described above.
Dial *67*, the desired internal phone
number to which all calls are to be
forwarded that are received on this
extension, and then press the # key.
The call is forwarded with this key
combination if the line is busy.
Use the key combination #67# to
delete internal and external call forwarding (if line busy), which you set
up as described above.
Use the key combination #77# to
delete all call forwarding settings
described above.
92

Call guide
Call waiting and call reject if busy
Use the key combination *43# to
*43# Allow call waiting
#43# Delete call waiting
*26# Reject all calls
#26#
Notes:
u If you additionally enter *# in each case before the key combination shown in the
table, the settings will be forwarded directly to the exchange and will be activated
there.
u The phone numbers of waiting calls are not displayed even if the caller permits
this.
Delete the reject calls
setting
allow call waiting when the line is
busy.
Dial #43# to disable call waiting if
busy again.
Use the key combination *26# to
specify that all calls are to be rejected.
This is only possible if call waiting is
disabled.
Use the key combination #26# to
delete the reject all calls setting.
Special functions
Key combination Effect Description
This shortcut key allows the WLAN
*52#
#52#
Enable
WLAN function
Disable
WLAN function
function of your Gigaset SX762 WLAN
dsl to be enabled without you having
to open the configuration program.
This shortcut key allows the WLAN
function of your Gigaset SX762 WLAN
dsl to be disabled again.
Confirmation tones
If you activate a service attribute, for example set up call forwarding, you will hear a positive confirmation tone if successful and a negative confirmation tone if unsuccessful.
Positive confirmation tone Ascending tone sequence at 6-second intervals
Negative confirmation tone Regular sequence of short low-frequency tones
93

Administration
Administration
The Gigaset SX762 WLAN dsl user interface includes several helpful functions for
administration. You can:
u Make regional settings (see below)
u Change the system password (page 96)
u Set up system management (page 97)
u Back up and, if necessary, restore configuration data (page 97)
u Reset the Gigaset SX762 WLAN dsl to the factory settings (page 98)
u Reboot the device (page 98)
u Update firmware (page 99)
u Make the settings for the system log (page 100)
u View information about the configuration and status of the Gigaset SX762 WLAN dsl
(page 101)
Regional Options
For operating your Gigaset SX762 WLAN dsl, you can select the location, time zone and
format for entering the time and date, and you can also configure a time server for the
Internet time (system time).
ì In the Advanced Settings – Administration menu, select Regional Options.
94

Administration
ì Select the country you are currently in from the list. You can set the time so that it
automatically switches to summer time or the Time zone, as required.
If you have already configured the basic settings, you can change these here.
ì Select the required option or choose the Time zone for your location.
ì Select the required format for entering the date and time from the Date format and
Time format lists.
Internet Time
The System time of the device is automatically synchronised with the time server on
the Internet. The time of the Last synchronization with time server is displayed for
your information.
ì If you would like to use your own time server, activate the On option next to the Use
custom time servers field.
ì Enter the Internet address of the time server in the Preferred time server or Alter-
nate time server fields.
ì Click OK to apply the settings.
95

Administration
System Password
You can assign a System Password to the Gigaset SX762 WLAN dsl user interface and
specify the period after which a session is to be automatically ended if no further entry
is made.
ì In the Advanced Settings – Administration menu, select System Password.
After installation, the Gigaset SX762 WLAN dsl user interface is protected by the
System Password admin. To prevent unauthorised changes being made to the configu-
ration, you should set a new System Password from time to time. You may already have
set a System Password when you set up the Security Setup Wizard. If so, you can
change it here.
ì Enter the old System Password in the Current password field.
ì Enter a new system password in the New password field and repeat it in the
Confirm new password field.
The System Password may contain up to 20 characters. The System Password is case
sensitive. Avoid proper names and all too obvious words. Use a combination of letters,
digits and special characters.
Note
If you forget your System Password, you have to reset the Gigaset SX762 WLAN dsl
(page 20). This returns all your settings to the factory configuration. This means the
system password is changed back to admin.
Idle time before log off setting:
ì Enter the number of minutes after which the configuration program is to be ended
if no further entry is made. The default is 10 minutes. If you enter 0, the program
will never be ended automatically.
ì Click OK to apply the settings.
96

Administration
System management
Your Gigaset SX762 WLAN dsl offers you the option of using phone-based management
in addition to the configuration program that you access via a PC in your local network.
Backing up and restoring a configuration
When the Gigaset SX762 WLAN dsl has been configured, it is recommended that you
back up the settings. This means you can restore the settings at any time if they are accidentally deleted or overwritten.
You can also reset the configuration to the factory settings. You should always do this
before handing the device to an external person.
u In the Advanced Settings – Administration menu, select Save & Restore.
97

Administration
Backing up configuration data
ì For Ta sk, activate the Save configuration option.
You can then set the location in which the backup file is to be saved in a file selection
window.
ì Select a local directory on your PC where you want to save the configuration file and
enter a file name.
ì Click Save.
The current configuration data is now saved in the specified file.
Restoring the saved data
ì For Ta sk, activate the Restore configuration option.
ì In the file system, select the backup file that you want to use to restore the configu-
ration.
A window will appear prompting you to confirm the procedure.
ì Click OK. The configuration will now be updated.
Restoring factory settings
You can reset the Gigaset SX762 WLAN dsl to the factory settings. You should do this
before making the device available to others or exchanging it through the dealer. Otherwise unauthorised persons may use the Internet access data at your expense.
ì Select Reset configuration to factory default settings and click OK.
A window will appear prompting you to confirm the procedure.
Note:
If the Gigaset SX762 WLAN dsl is not operating properly, you can reboot it. It should
then be ready for use again (page 20).
Please remember that when the device is fully reset, all the configuration settings are
returned to the factory settings. This means that you will have to completely reconfigure the Gigaset SX762 WLAN dsl.
Reboot
If the Gigaset SX762 WLAN dsl is not operating properly, you can reboot it. It should
then be ready for use again.
In the Administration menu, select Reboot.
Click OK to reboot the device.
98
 Loading...