

Page 1

EN Dear Customer,
Gigaset Communications GmbH is the legal successor to
Siemens Home and Office Communication Devices GmbH &
Co. KG (SHC), which in turn continued the Gigaset business
of Siemens AG. Any statements made by Siemens AG or
SHC that are found in the user guides should therefore be
understood as statements of Gigaset Communications
.
GmbH
We hope you enjoy your Gigaset.
DE Sehr geehrte Kundin, sehr geehrter Kunde,
FR Chère Cliente, Cher Client,
IT Gentile cliente,
NL Geachte klant,
ES Estimado cliente,
PT SCaros clientes,
die Gigaset Communications GmbH ist Rechtsnachfolgerin
der Siemens Home and Office Communication Devices
GmbH & Co. KG (SHC), die ihrerseits das Gigaset-Geschäft
der Siemens AG fortführte. Etwaige Erklärungen der
Siemens AG oder der SHC in den Bedienungsanleitungen
sind daher als Erklärungen der Gigaset Communications
GmbH zu verstehen.
Wir wünschen Ihnen viel Freude mit Ihrem Gigaset.
la société Gigaset Communications GmbH succède en droit
à Siemens Home and Office Communication Devices GmbH
& Co. KG (SHC) qui poursuivait elle-même les activités Gigaset de Siemens AG. Donc les éventuelles explications de Siemens AG ou de SHC figurant dans les modes d’emploi
doivent être comprises comme des explications de Gigaset
Communications GmbH.
Nous vous souhaitons beaucoup d’agrément avec votre
Gigaset.
la Gigaset Communications GmbH è successore della Siemens Home and Office Communication Devices GmbH &
Co. KG (SHC) che a sua volta ha proseguito l’attività della
Siemens AG. Eventuali dichiarazioni della Siemens AG o
della SHC nei manuali d’istruzione, vanno pertanto intese
come dichiarazioni della Gigaset Communications GmbH.
Le auguriamo tanta soddisfazione con il vostro Gigaset.
Gigaset Communications GmbH is de rechtsopvolger van
Siemens Home and Office Communication Devices GmbH &
Co. KG (SHC), de onderneming die de Gigaset-activiteiten
van Siemens AG heeft overgenomen. Eventuele uitspraken
of mededelingen van Siemens AG of SHC in de gebruiksaanwijzingen dienen daarom als mededelingen van Gigaset
Communications GmbH te worden gezien.
Wij wensen u veel plezier met uw Gigaset
la Gigaset Communications GmbH es derechohabiente de la
Siemens Home and Office Communication Devices GmbH &
Co. KG (SHC) que por su parte continuó el negocio Gigaset
de la Siemens AG. Las posibles declaraciones de la
Siemens AG o de la SHC en las instrucciones de uso se
deben entender por lo tanto como declaraciones de la Gigaset Communications GmbH.
Le deseamos que disfrute con su Gigaset.
Gigaset Communications GmbH é a sucessora legal da Siemens Home and Office Communication Devices GmbH &
Co. KG (SHC), que, por sua vez, deu continuidade ao sector
de negócios Gigaset, da Siemens AG. Quaisquer declarações por parte da Siemens AG ou da SHC encontradas nos
manuais de utilização deverão, portanto, ser consideradas
como declarações da Gigaset Communications GmbH.
Desejamos que tenham bons momentos com o seu Gigaset.
DA Kære Kunde,
FI Arvoisa asiakkaamme,
SV Kära kund,
NO Kjære kunde,
EL Αγ α πητή πελάτισσα, αγαπητέ πελάτη,
HR Poštovani korisnici,
.
SL Spoštovani kupec!
Gigaset Communications GmbH er retlig efterfølger til Siemens Home and Office Communication Devices GmbH &
Co. KG (SHC), som fra deres side videreførte Siemens AGs
Gigaset-forretninger. Siemens AGs eller SHCs eventuelle
forklaringer i betjeningsvejledningerne skal derfor forstås
som Gigaset Communications GmbHs forklaringer.
Vi håber, du får meget glæde af din Gigaset.
Gigaset Communications GmbH on Siemens Home and
Office Communication Devices GmbH & Co. KG (SHC)-yri-
tyksen oikeudenomistaja, joka jatkoi puolestaan Siemens
AG:n Gigaset-liiketoimintaa. Käyttöoppaissa mahdollisesti
esiintyvät Siemens AG:n tai SHC:n selosteet on tämän
vuoksi ymmärrettävä Gigaset Communications GmbH:n
selosteina.
Toivotamme Teille paljon iloa Gigaset-laitteestanne.
Gigaset Communications GmbH övertar rättigheterna från
Siemens Home and Office Communication Devices GmbH &
Co. KG (SHC), som bedrev Gigaset-verksamheten efter Siemens AG. Alla förklaringar från Siemens AG eller SHC i
användarhandboken gäller därför som förklaringar från
Gigaset Communications GmbH.
Vi önskar dig mycket nöje med din Gigaset.
Gigaset Communications GmbH er rettslig etterfølger etter
Siemens Home and Office Communication Devices GmbH &
Co. KG (SHC), som i sin tur videreførte Gigaset-geskjeften i
Siemens AG. Eventuelle meddelelser fra Siemens AG eller
SHC i bruksanvisningene er derfor å forstå som meddelelser
fra Gigaset Communications GmbH.
Vi håper du får stor glede av din Gigaset-enhet.
η Gigaset Communications GmbH είναι η νομική διάδοχος της
Siemens Home and Office Communication Devices GmbH &
Co. KG (SHC), η οποία έχει αναλάβει την εμπορική
δραστηριότητα Gigaset της Siemens AG. Οι δηλώσεις της
Siemens AG ή της SHC στις
επομένως δηλώσεις της Gigaset Communications GmbH.
Σας ευχόμαστε καλή διασκέδαση με τη συσκευή σας Gigaset.
Gigaset Communications GmbH pravni je sljednik tvrtke
Siemens Home and Office Communication Devices GmbH &
Co. KG (SHC), koji je nastavio Gigaset poslovanje tvrtke
Siemens AG. Zato sve izjave tvrtke Siemens AG ili SHC koje
se nalaze u uputama za upotrebu treba tumačiti kao izjave
tvrtke Gigaset Communications GmbH.
Nadamo se da sa zadovoljstvom koristite svoj Gigaset
uređaj.
Podjetje Gigaset Communications GmbH je pravni naslednik
podjetja Siemens Home and Office Communication Devices
GmbH & Co. KG (SHC), ki nadaljuje dejavnost znamke
Gigaset podjetja Siemens AG. Vse izjave podjetja Siemens
AG ali SHC v priročnikih za uporabnike torej veljajo kot izjave
podjetja Gigaset Communications GmbH.
Želimo vam veliko užitkov ob uporabi naprave Gigaset.
οδηγίες χρήσ
ης αποτ
ελούν
Issued by
Gigaset Communications GmbH
Schlavenhorst 66, D-46395 Bocholt
Gigaset Communications GmbH is a trademark
licensee of Siemens AG
© Gigaset Communications GmbH 2008
All rights reserved.
Subject to availability. Rights of modifications
reserved.
www.gigaset.com
Page 2

CS Vážení zákazníci,
společnost Gigaset Communications GmbH je právním
nástupcem společnosti Siemens Home and Office
Communication Devices GmbH & Co. KG (SHC), která dále
přejala segment produktů Gigaset společnosti Siemens AG.
Jakékoli prohlášení společnosti Siemens AG nebo SHC, které
naleznete v uživatelských příručkách, je třeba považovat za
prohlášení společnosti Gigaset Communications GmbH.
Doufáme, že jste s produkty Gigaset spokojeni.
SK Vážený zákazník,
Spoločnosť Gigaset Communications GmbH je právnym
nástupcom spoločnosti Siemens Home and Office
Communication Devices GmbH & Co. KG (SHC), ktorá zasa
pokračovala v činnosti divízie Gigaset spoločnosti Siemens
AG. Z tohto dôvodu je potrebné všetky vyhlásenia
spoločnosti Siemens AG alebo SHC, ktoré sa nachádzajú v
používateľských príručkách, chápať ako vyhlásenia
spoločnosti Gigaset Communications GmbH.
Veríme, že budete so zariadením Gigaset spokojní.
PL Szanowny Kliencie,
Firma Gigaset Communications GmbH jest spadkobiercą
prawnym firmy Siemens Home and Office Communication
Devices GmbH & Co. KG (SHC), która z kolei przejęła
segment produktów Gigaset od firmy Siemens AG. Wszelkie
oświadczenia firm Siemens AG i SHC, które można znaleźć
w instrukcjach obsługi, należy traktować jako oświadczenia
firmy Gigaset Communications GmbH.
Życzymy wiele przyjemności z korzystania z produktów
Gigaset.
TR Sayın Müşterimiz,
Gigaset Communications GmbH, Siemens AG'nin Gigaset
işletmesini yürüten Siemens Home and Office
Communication Devices GmbH & Co. KG (SHC)'nin yasal
halefidir. Kullanma kılavuzlarında bulunan ve Siemens AG
veya SHC tarafından yapılan bildiriler Gigaset
Communications GmbH tarafından yapılmış bildiriler olarak
algılanmalıdır.
Gigaset'ten memnun kalmanızı ümit ediyoruz.
RO Stimate client,
Gigaset Communications GmbH este succesorul legal al
companiei Siemens Home and Office Communication
Devices GmbH & Co. KG (SHC), care, la rândul său, a
continuat activitatea companiei Gigaset a Siemens AG.
Orice afirmaţii efectuate de Siemens AG sau SHC şi incluse
în ghidurile de utilizare vor fi, prin urmare, considerate a
aparţine Gigaset Communications GmbH.
Sperăm ca produsele Gigaset să fie la înălţimea dorinţelor
dvs.
SR Poštovani potrošaču,
Gigaset Communications GmbH je pravni naslednik
kompanije Siemens Home and Office Communication
Devices GmbH & Co. KG (SHC), kroz koju je nastavljeno
poslovanje kompanije Gigaset kao dela Siemens AG. Stoga
sve izjave od strane Siemens AG ili SHC koje se mogu naći u
korisničkim uputstvima treba tuma
Gigaset Communications GmbH.
Nadamo se da ćete uživati u korišćenju svog Gigaset
uređaja.
BG Уважаеми потребители,
Gigaset Communications GmbH е правоприемникът на
Siemens Home and Office Communication Devices GmbH
& Co. KG (SHC), която на свой ред продължи бизнеса на
подразделението Siemens AG. По тази причина
всякакви изложения, направени от Siemens AG или
SHC, които се намират в ръководствата за
потребителя, следва да се разбират като изложения на
Gigaset Communications GmbH.
Надяваме се да ползвате с удоволствие вашия Gigaset.
izjave kompanije
čiti kao
RU Уважаемыи покупатель!
Компания Gigaset Communications GmbH является
правопреемником компании Siemens Home and Office
Communication Devices GmbH & Co. KG (SHC), которая,
ою очередь, приняла подразделение Gigaset в свое
в св
управление от компании Siemens AG. Поэтому любые
заявления, сделанные от имени компании Siemens AG
или SHC и встречающиеся в руководствах
пользователя, должны восприниматься как заявления
компании Gigaset Communications GmbH.
Мы надеемся, что продукты Gigaset удовлетворяют
вашим требованиям.
HU T
isztelt Vásárló!
A Siemens Home and Communication Devices GmbH & Co.
KG (SHC) törvényes jogutódja a Gigaset Communications
GmbH, amely a Siemens AG Gigaset üzletágának utódja.
Ebből következően a Siemens AG vagy az SHC felhasználói
kézikönyveiben található bármely kijelentést a Gigaset
Communications GmbH kijelentésének kell tekinteni.
Reméljük, megelégedéssel használja Gigaset készülékét.
Issued by
Gigaset Communications GmbH
Schlavenhorst 66, D-46395 Bocholt
Gigaset Communications GmbH is a trademark
licensee of Siemens AG
© Gigaset Communications GmbH 2008
All rights reserved.
Subject to availability. Rights of modifications
reserved.
www.gigaset.com
Page 3

s
Be inspired
ENGLISH
Page 4
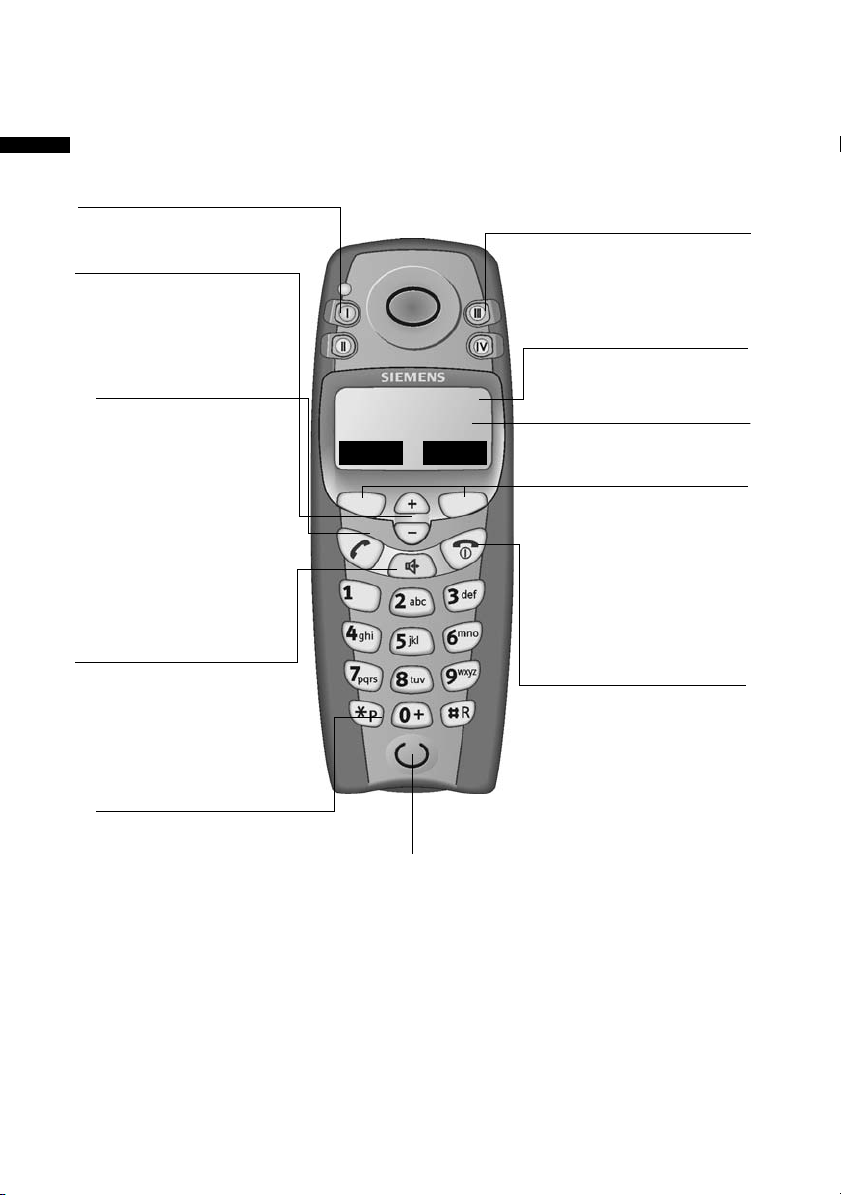
Brief overview
Brief overview
SOS/direct dial key (I)
Control keys
◆ Navigation
◆ Volume
Talk key
◆ Accepting a
call
◆ Initiate dialling
◆ Switch from
handsfree to
"earpiece" mode
Handsfree key
Switch from
"earpiece" to
handsfree mode
Star key
◆ Ringer on/off
(long press)
◆ When entering text:
toggles between
upper/lower case
and digits
=
REDIAL MENU
Microphone
Direct dial keys
(II to IV)
Battery display
Screen
with icons
Function keys
Access to the
functions displayed
on the screen
End call and
On/Off key
◆ End call
◆ Cancel function
(press briefly)
◆ Handset on/off
(hold down)
Illustration of a handset that is registered to a base with SMS
functionality.
2
Page 5

Contents
Contents
Brief overview . . . . . . . . . . . . . . . . . . . . . . . . . . . . . . . . . . . . . 2
Safety precautions . . . . . . . . . . . . . . . . . . . . . . . . . . . . . . . . . . 5
Special features of the Gigaset E 1 . . . . . . . . . . . . . . . . . . . . 6
Preparing to use your phone . . . . . . . . . . . . . . . . . . . . . . . . . 7
Inserting the batteries . . . . . . . . . . . . . . . . . . . . . . . . . . . . . . . 7
Placing the handset into the base station and
charging the batteries . . . . . . . . . . . . . . . . . . . . . . . . . . . . . . . . 8
Manual registration . . . . . . . . . . . . . . . . . . . . . . . . . . . . . . . . . . 9
Attaching the belt clip . . . . . . . . . . . . . . . . . . . . . . . . . . . . . . 10
Activating/deactivating the handset . . . . . . . . . . . . . . . . . . . . 11
Operating the telephone, menu overview . . . . . . . . . . . . . 12
Control keys on the handset . . . . . . . . . . . . . . . . . . . . . . . . . . 12
Function keys . . . . . . . . . . . . . . . . . . . . . . . . . . . . . . . . . . . . . . 13
Making calls . . . . . . . . . . . . . . . . . . . . . . . . . . . . . . . . . . . . . . 14
Making external calls and ending a call . . . . . . . . . . . . . . . . . 14
Answering a call . . . . . . . . . . . . . . . . . . . . . . . . . . . . . . . . . . . . 14
Handsfree . . . . . . . . . . . . . . . . . . . . . . . . . . . . . . . . . . . . . . . . 15
Making internal calls . . . . . . . . . . . . . . . . . . . . . . . . . . . . . . . . 16
Using the directory, direct dial keys and other lists . . . . . . 17
Directory . . . . . . . . . . . . . . . . . . . . . . . . . . . . . . . . . . . . . . . . . 17
Direct dial keys . . . . . . . . . . . . . . . . . . . . . . . . . . . . . . . . . . . . . 20
Last number redial list . . . . . . . . . . . . . . . . . . . . . . . . . . . . . . . 21
Calls list . . . . . . . . . . . . . . . . . . . . . . . . . . . . . . . . . . . . . . . . . . 22
Handset settings . . . . . . . . . . . . . . . . . . . . . . . . . . . . . . . . . . 23
Changing language . . . . . . . . . . . . . . . . . . . . . . . . . . . . . . . . . 23
Setting the date and the time . . . . . . . . . . . . . . . . . . . . . . . . . 24
Set the display font size, large . . . . . . . . . . . . . . . . . . . . . . . . . 24
Activate or deactivate automatic auto answer . . . . . . . . . . . . 25
3
Page 6

Contents
Adjusting the loudspeaker volume . . . . . . . . . . . . . . . . . . . . . . 25
Changing the ringer tone . . . . . . . . . . . . . . . . . . . . . . . . . . . . . 27
Activating/deactivating advisory tones . . . . . . . . . . . . . . . . . . . 29
Setting profiles . . . . . . . . . . . . . . . . . . . . . . . . . . . . . . . . . . . . . 31
Phone number statement . . . . . . . . . . . . . . . . . . . . . . . . . . . . . 32
Restoring the handset to factory settings . . . . . . . . . . . . . . . . 33
Appendix . . . . . . . . . . . . . . . . . . . . . . . . . . . . . . . . . . . . . . . . . 35
Care . . . . . . . . . . . . . . . . . . . . . . . . . . . . . . . . . . . . . . . . . . . . . . 35
Contact with liquid . . . . . . . . . . . . . . . . . . . . . . . . . . . . . . . . . . 35
Service (Customer Care) . . . . . . . . . . . . . . . . . . . . . . . . . . . . . . 35
Specifications . . . . . . . . . . . . . . . . . . . . . . . . . . . . . . . . . . . . . . 37
Character set chart . . . . . . . . . . . . . . . . . . . . . . . . . . . . . . . . . . 38
Warranty Certificate Ireland . . . . . . . . . . . . . . . . . . . . . . . . . . . 39
Accessories . . . . . . . . . . . . . . . . . . . . . . . . . . . . . . . . . . . . . . . . 41
Index . . . . . . . . . . . . . . . . . . . . . . . . . . . . . . . . . . . . . . . . . . . . . 42
4
Page 7
Safety precautions
Safety precautions
Use only the power unit supplied, as indicated on the
$
underside of the base station.
Fit only the recommended rechargeable batteries
(page 37) of the same type! Use no other types of
batteries or non-rechargeable batteries, as they could
damage health and cause personal injury.
‹
Ensure correct polarity when fitting rechargeable
batteries, and use the battery type according to these
Œ
instructions (you will see polarity symbols in the handset's
battery compartments)
The operation of medical appliances may be affected. Be
aware of the technical conditions within the particular
environment (e.g. doctor's practice).
The handset may cause an intrusive 'hum' in hearing aids.
!
.
Do not install the base in bathrooms or shower rooms
(page 35). The handset and base are not watertight.
Do not use the phone in environments subject to
explosion hazard (e.g. auto paint shops).
If you give your Gigaset to someone else, make sure you
ƒ
also give them the operating manual.
Dispose of the batteries and phone in accordance with
environmental regulations.
i
Not all of the functions described in these instructions
are available in all countries.
5
Page 8

Special features of the Gigaset E 1
Special features of the Gigaset E 1
◆ Large keys
◆ Large display of text and symbols on screen
◆ Additional function Jumbo Font (large print)
◆ Direct dial keys
◆ Handsfree
◆ Phone number statement (only for CLIP activation) for
– Incoming calls
– Calls list
◆ Profiles for special requirements
– Seeing
– Hearing
– Entering
◆ Control keys for volume control
◆ Extended setting options for
–Volume,
–Tone melody
– Key clicks
–Key tones
◆ Connection for microphone set (microphone set not included
in scope of delivery)
6
Page 9
Preparing to use your phone
Preparing to use your phone
The pack contains: one Gigaset E 1 handset, one charger, a power
supply unit with power cord, one belt clip for the handset, two
batteries, one set of operating instructions.
Removing protective film
The screen is protected by a plastic film. Please remove the
protective film!
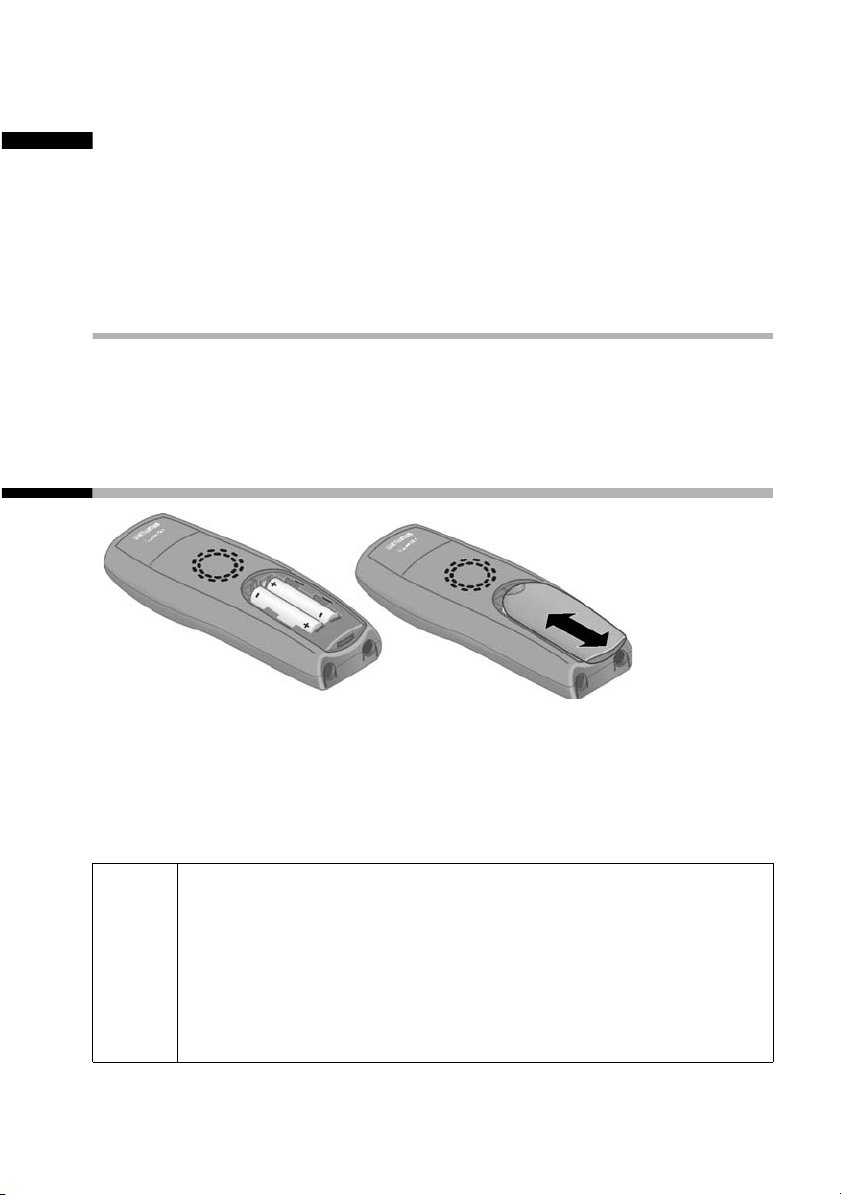
Inserting the batteries
◆ Insert the batteries the right way round – see illustration left.
◆ Place the cover on the battery compartment about 3 mm
down from the latch and push it up until it clicks into position.
◆ To open the battery cover, press on the chequered area and
slide down.
Use only the rechargeable batteries recommended by
Siemens on page 37! Never use conventional batteries
(non-rechargeable) or other battery types as this may
W
cause significant damage to health and property. For
example, the jacket of the battery could be destroyed
(hazardous). The phone could also malfunction or be
damaged.
7
Page 10
Preparing to use your phone
Placing the handset into the base station and charging the batteries
When you place the handset into the E 150 base, the handset will
register automatically to the base. Do the following:
1. Place the handset with the screen facing up in the base
station.
2. Wait till the handset has registered automatically to the base.
The automatic registration takes around one minute. While
this is happening, Registration Procedure flashes in the
screen. After registration, the idle screen is displayed.
3. Now leave the handset in the charger for the batteries to
charge - the batteries are supplied uncharged. Battery charging
is indicated in the top right of the screen by the battery icon
flashing.
Should automatic registration be interrupted, register the
handset manually as described starting on page 9.
For the initial charge we recommend a continuous,
uninterrupted charging period of five hours, whatever
W
The battery charging status is correctly displayed only after
uninterrupted charging/discharging. You should therefore
avoid removing the batteries unnecessarily and ending the
charging process prematurely.
8
battery display is indicated. After a while the charge
capacity of the batteries will decrease for technical
reasons.
Page 11

Preparing to use your phone
◆ The battery charging status is only displayed
– during charging
– when the batteries are empty
◆ If the batteries are almost empty, you will hear the
battery warning tone (if activated, page 30). In idle
status, the icon = also flashes on screen and
i
Battery warn. Please load is displayed.
◆ Once initial charging is complete, you can replace
your handset in the charger after each call. This
ensures that the batteries are charged in a way that
maximises their life.
◆ The batteries heat up during charging. This is
normal and not dangerous.
Manual registration
If automatic registration is interrupted, or if you want to use your
E 1 handset on another GAP base, you must register the handset
manually. Your Gigaset E 1 can only be registered on one base.
You must initiate handset registration on the handset and on the
base.
1. On the handset
Press the function key to open the
menu.
Select the menu item and confirm.
Select the menu item and confirm.
[_________________________________________]
s Settings
[_________________________________________]s Handset
§MENU§
§OK§
§OK§
9
Page 12
Preparing to use your phone
[_________________________________________]s Tab Handset
§OK§
~ §OK§
2. On the base
Please refer to the operating instructions for the base to find out
how to initiate handset registration on the base.
Select the menu item and confirm.
Enter the system PIN of the base (0000)
and confirm.
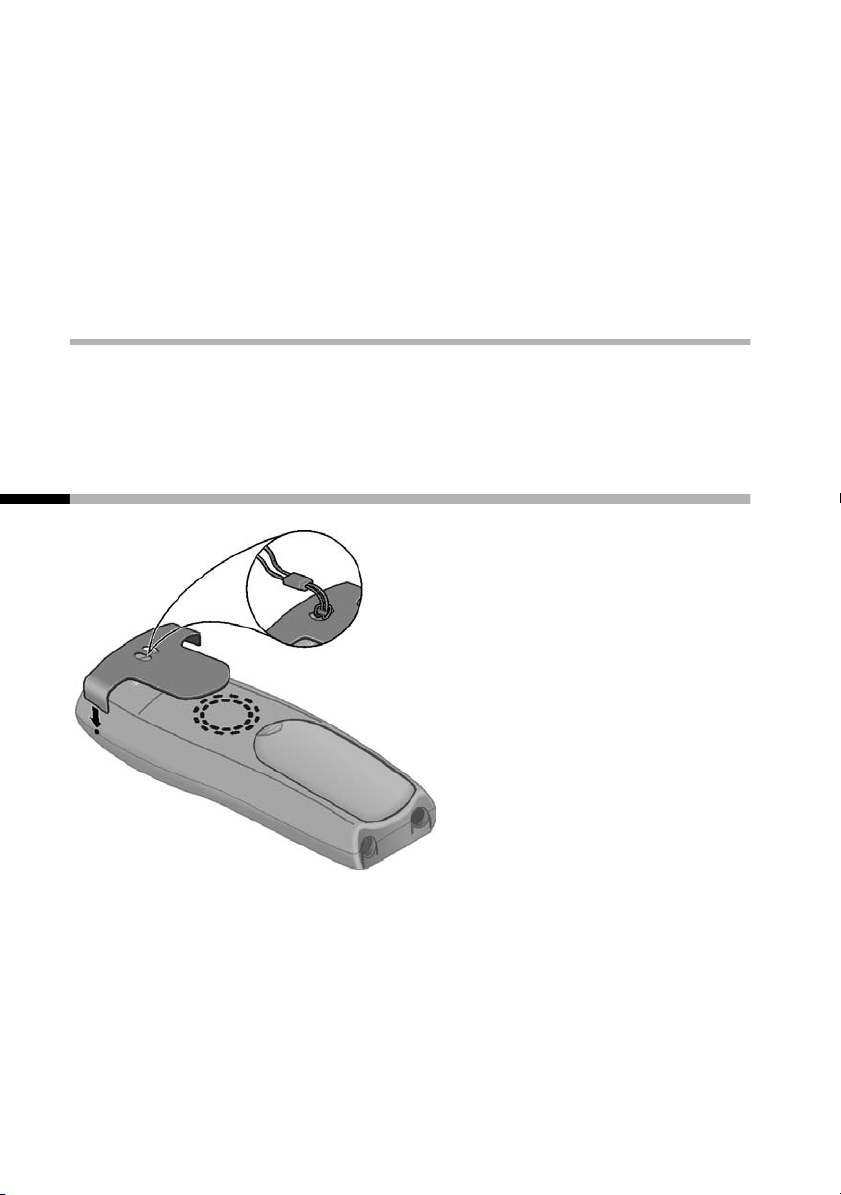
Attaching the belt clip
Push the belt clip onto the back of the handset until the lugs click
into the recesses on either side of the handset. You can also attach
a strap to carry the handset in your hand or around your neck.
10
Page 13

Preparing to use your phone
Activating/deactivating the handset
To activate the handset press the end call key a. You will hear a
confirmation tone (rising tone sequence). The handset activates
automatically when placed in the charging shell.
To deactivate the handset, press the end call key a in idle status
and hold (confirmation tone).
11
Page 14
Operating the telephone, menu overview
Operating the telephone, menu overview
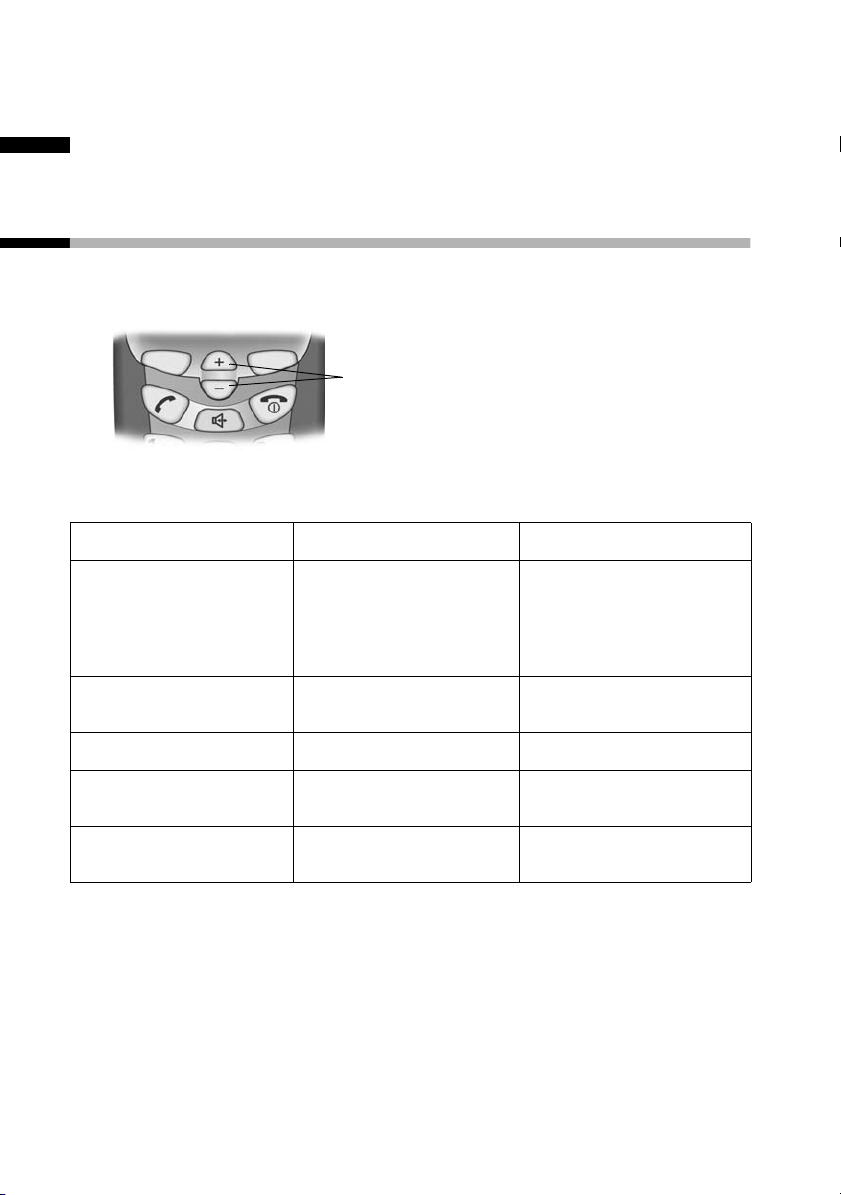
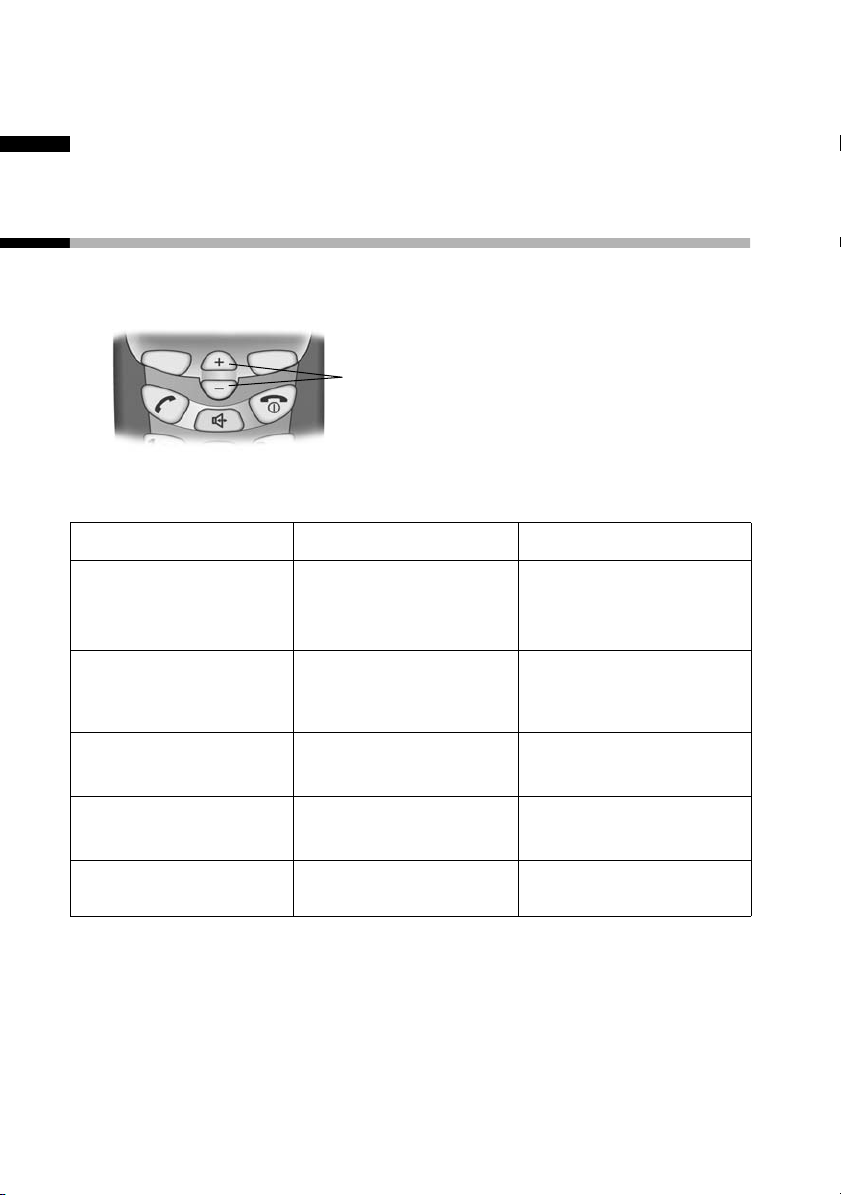
Control keys on the handset
The control keys have different functions, depending on the
particular operating situation of the handset.
Control keys
Different functions of the control key.
ts
In idle status and
when the
telephone is
ringing
Increase the volume
of the ringer
Decrease the volume
of the ringer
When making calls
In lists and menus Scroll up. Scroll down.
In an input field
In handsfree mode
12
Increase the
earpiece volume.
Move the cursor to
the left.
Increase the
handsfree volume.
Decrease the
earpiece volume.
Move the cursor to
the right.
Decrease the
handsfree volume.
Page 15

Operating the telephone, menu overview
Function keys
The function keys are the right and left keys just below the
screen. Their function changes depending on the particular
operating situation. The current function is displayed in the
screen directly above the key to which it relates. If you can scroll
in a list, the icon also appears in the screen å.
Example
REDIAL MENU
Function keys
The various display symbols have the following meanings:
Screen icon Meaning when pressed
§Accept§
§Silence§
§REDIAL§
§OK§
§MENU§
å
§ESC§
§Delete§
Answer a call.
Deactivate ringer on handset.
Automatic redial key: Open the list of the last
10 numbers you dialled.
Confirm menu function or confirm an input and
store.
Activates the main menu when in standby.
Open a status-dependent menu while making a
call.
Move the keys t s upwards or downwards.
Go back one menu level, or cancel the operation.
Delete input from right to left one character at a
time.
13
Page 16

Making calls
Making calls
Making external calls and ending a call
External calls are calls using the public telephone network.
~ c
Inserting a dialling pause
You can insert a dialling pause between the prefix and the actual
telephone number. Press and hold the hash key P. Now enter the
telephone number.
Making an external call: Enter the
phone number and press the talk key.
The number is dialled.
Or:
You can also first press the talk key c
(you hear a dial tone) and then enter
the phone number.
Ending the call: Press the end call key.
a
You can use the end call key a to
cancel dialling.
Answering a call
Your telephone rings, the call is displayed on the screen and
the d key flashes on the handset.
Press c (or d), to take the call.
If the handset is in the charger and the Auto Answer function is
activated (page 25), then you just need to lift the handset out of
the charger to take the call.
14
Page 17

Making calls
Handsfree
You can make calls without having to hold the handset. Other
persons can also participate in the call.
You should inform your caller that you intend to use the handsfree
function before you activate it.
Activating/deactivating handsfree
To activate: press d handsfree key.
To deactivate: press c talk key.
As soon as you terminate the handsfree mode you switch to
'earpiece mode' and continue the call on the handset.
Adjusting the volume while in handsfree mode
s t
Decrease or increase the volume.
15
Page 18
Making calls
Making internal calls
Internal calls are free calls between handsets that are registered
with the same base. To make an internal call, one of the direct dial
keys must be programmed for an internal call (see page 20).
Making an internal call
V ... Y
[_____________________________________________________________]
Call all?
§Yes§
[_____________________________________________________________]
Call all
[_____________________________________________________________]
Internal Connected
i
Answering an internal call
[_____________________________________________________________]Internal Connected
If no one answers, the handset goes into idle status.
While in idle status, press any direct dial
key programmed for internal calls.
Confirm.
The internal call was answered by
another user.
Answer a call.
c
i
If an internal call is answered, the screens of all other
registered handsets show Internal busy.
16
Page 19

Using the directory, direct dial keys and other lists
Using the directory, direct dial keys and
other lists
Directory
The directory makes dialling easier for you. You call up the
directory via the menu.
You can save up to 30 phone numbers in the directory.
Refer to the Character Set Chart (page 38) to see how to enter
text correctly.
Storing a telephone number in the directory
§MENU§
[_________________________________________]
Directory §OK§
§MENU§
[_________________________________________]
New Entry §OK§
~ §OK§
~ §OK§
a
Press the function key to open the main
menu.
Confirm. The directory is opened.
Press the function key to open the
directory menu.
Confirm.
Enter phone number and confirm.
Enter the name and confirm.
The entry is stored.
Long press (back to idle status).
17
Page 20

Using the directory, direct dial keys and other lists
Dial with the directory
§MENU§
[_________________________________________]Directory §OK§
either ...
s
or ...
~
s
Edit, copy, and delete an entry in the directory, and delete list
Press the function key to open the main
menu.
Confirm. The directory is opened.
Scroll to the entry:
Select entry.
Press the key. The number is dialled.
c
Enter the first letter:
Enter the first letter of the name you
require.
Select entry.
Press the key. The number is dialled.
c
§MENU§
[_________________________________________]
Directory §OK§
s §MENU§
either ...
18
Press the function key to open the main
menu.
Confirm. The directory is opened.
Scroll to the required entry and press
the function key.
Edit an entry in the directory:
Page 21

Using the directory, direct dial keys and other lists
[_________________________________________]s Edit Entry
OK
~ §OK§
~ §OK§
or ...
s
[_____________________________________________________________]
Copy and Modify
§OK§
or ...
[_________________________________________]s Delete Entry
§OK§
or ...
Select the menu item and confirm.
Change the number and confirm.
Edit the name and confirm.
The entry is stored
Copy and modify an entry in the
directory
Select…
and confirm.
Delete a single entry:
Select the menu item and confirm. The
entry is deleted.
Delete the entire directory:
[_________________________________________]
s Delete List
... then
§OK§
§Yes§
a
Select the menu item and confirm.
Press the function key to confirm the
prompt.
Long press (back to idle status).
19
Page 22

Using the directory, direct dial keys and other lists
Direct dial keys
Using the 4 direct dial keys you can save especially important
phone numbers, e.g., emergency numbers. You dial the saved
number by pressing the corresponding direct dial key.
Refer to the Character Set Chart (page 38) to see how to enter
text correctly.
Save/change direct dial keys
You can assign the direct dial keys external phone numbers or the
internal call function (see page 16).
§MENU§
[_________________________________________]s Settings
§OK§
[_________________________________________]
s Direct Dial. Keys
§OK§
[_________________________________________]
s I: <no entry>
§MENU§
either ...
[_________________________________________]Edit Entry §OK§
~ §OK§
Press the function key to open the main
menu.
Select the menu item and confirm.
Select the menu item and confirm.
Select the direct dial key (I to IV).
Press the function key to open the
menu.
Store an external phone
Confirm.
Enter phone number and confirm.
20
~ §OK§
Enter the name and confirm.
The entry is stored.
Page 23

Using the directory, direct dial keys and other lists
or ...
[_________________________________________]
s Activate Internal Call
§OK§
If your phone is connected to a PABX you may have to enter the
access code (outside line code) as the first digit of your entry
(refer to the operating instructions of your PABX).
Program an internal call
Select the menu item and confirm.
The entry is stored
Long press (back to idle status).
a
Last number redial list
The last 10 phone numbers you dialled are in the last number
redial list. Numbers dialled multiple times only appear once. If you
have saved names for these numbers in the directory, then these
names will be displayed. You can use the last number redial list to
redial the telephone numbers.
Dialling telephone numbers from the last number redial list
§REDIAL§
s c
Editing, deleting, or copying phone number to the directory
§REDIAL§
s §MENU§
Open the last number redial list.
Scroll to the required entry and press
the talk key. The phone number is
dialled.
Open the last number redial list.
Scroll to the required entry and press
the function key.
21
Page 24

Using the directory, direct dial keys and other lists
either ...
[_____________________________________________________________]
Use Number
§OK§
or ...
s
[_____________________________________________________________]
Copy to Directory
§OK§
§OK§
~ §OK§
or ...
[_________________________________________]
s DeleteEntry
§OK§
Change a number:
Confirm.
Copy phone number to the directory:
Select. …
and confirm.
Confirm the number.
Enter the name and confirm.
The entry is stored.
Delete a single telephone number:
Select the menu item and confirm.
If there still entries on the list, press the
a
key and hold (back to idle status).
or ...
[_________________________________________]s Delete List
§OK§
Delete the entire last number redial
list:
Select the menu item and confirm.
Calls list
New calls are signaled using the mail symbol ’ in the screen.
Press the function key to open the list.
22
Page 25

Handset settings
Handset settings
Your handset is pre-set for you when delivered. You can change
these settings individually.
Changing language
You can view the texts in different languages.
§MENU§
[_________________________________________]
s Settings
§OK§
[_________________________________________]s Language
§OK§
s §OK§
If you set the wrong language in error, press MENU§
Now select the correct language with s and press §OK§ to
confirm your choice.
Press the function key to open the
menu.
Select the menu item and confirm.
Select the menu item and confirm. The
current language is checked ‰ (the
default setting is English).
Select a language and confirm.
Long press (back to idle status).
a
4 I
.
23
Page 26

Handset settings
Setting the date and the time
Date and time settings are essential if you want to know exactly
when calls were received.
[_________________________________________]s Settings
[_________________________________________]s Date/Time
§MENU§
§OK§
§OK§
~ §OK§
~ §OK§
Press the function key to open the
menu.
Select the menu item and confirm.
Select the menu item and confirm.
Enter the date:
Enter day/month/year and confirm.
Example: For 20.05.2003 enter
2 Q Q 5 Q I.
Enter the time:
Enter hours/minutes and confirm.
Example: For 9.35, enter Q O I 5.
Set the display font size, large
You can change the digits on the screen to large print.
(Default settings: deactivated).
§MENU§
[_________________________________________]s Settings
§OK§
24
Press the function key to open the
menu.
Select the menu item and confirm.
Page 27

Handset settings
[_________________________________________]s Jumbo Font
§OK§
Confirm to deactivate or activate the
function (‰ = On).
Long press (back to idle status).
a
Activate or deactivate automatic auto answer
You use this function when you want to be able to take your
handset out of the charging shell. You must then no longer press
the talk key or the handsfree key (factory settings: On).
§MENU§
[_________________________________________]s Settings
§OK§
[_________________________________________]s Handset
§OK§
Press the function key to open the
menu.
Select the menu item and confirm.
Select the menu item and confirm.
[_____________________________________________________________]
Auto Answer
§OK§
Confirm to deactivate or activate the
function (‰ = On).
Long press (back to idle status).
a
Adjusting the loudspeaker volume
You can set the earpiece volume, the headphone volume of the
microphone set, and the volume for handsfree talking is on five
levels (1–5) – you can even do this while an call is in progress.
25
Page 28

Handset settings
Setting in idle status
§MENU§
[_________________________________________]s Audio
§OK§
either ...
[_________________________________________]
Handset Volume §OK§
t s §OK§
or ...
s
[_____________________________________________________________]
Handsfree Volume
§OK§
t s §OK§
Press the function key to open the
menu.
Select the menu item and confirm.
Set the earpiece volume:
Confirm. You will hear a tone in the
currently volume.
Select the earpiece volume and
confirm.
Set the handsfree volume:
Select. …
and confirm.
Select the handsfree volume and
confirm.
or ...
[_____________________________________________________________]
Headset Volume
t s §OK§
26
s
§OK§
a
Set the headphone volume:
Select. …
and confirm.
Select headphone volume and confirm.
Long press (back to idle status).
Page 29

Adjustments during a call
Handset settings
t s
§OK§
You are only adjusting the volume for the operating mode that
you are currently using (volume of the handset, handsfree
volume, or volume of the headphones for the microphone set).
If you do not confirm the change in volume, the current one, then
the setting is only applicable for the current call.
Changing the earpiece volume.
Confirm if you want to keep the setting.
Changing the ringer tone
You can assign internal and external calls with differing ringers. A
range of options is available:
◆ Five volume levels (1–5; e.g. volume level 2 = ‰) and switch
off ringer (display screen Ú).
◆ Ten melodies (1-10; melodies 1–3 are the 'classic ringer
tones'). Melody 1 is the best ringer to listen to.
Changing the ringer melody
§MENU§
[_________________________________________]s Audio
[_________________________________________]
s Ringer Melody
Press the function key to open the
menu.
Select the menu item and confirm.
§OK§
Select the menu item and confirm.
§OK§
27
Page 30

Handset settings
either ...
[_________________________________________]
External Calls §OK§
or ...
[_________________________________________]
s Internal Calls
§OK§
... then
[_________________________________________]Melody 1 §OK§
Changing the volume of the ringer
§MENU§
For external calls:
Confirm.
For internal calls:
Select the menu item and confirm.
Confirm melody, e.g., Melody 1
(‰ = On).
Long press (back to idle status).
a
Press the function key to open the
menu.
[_________________________________________]
s Audio
[_____________________________________________________________]Ringer Volume
28
§OK§
s
§OK§
t s §OK§
a
Select the menu item and confirm.
Select. …
and confirm.
Select volume and confirm. You will
hear the ringer in the currently volume.
Long press (back to idle status).
Page 31

Handset settings
◆ You can also change the volume of the ringer
directly while it is ringing by pressing the t or s
key. If you want to save the setting, confirm with
§OK§.
i
◆ Volume 0 means: ringer switched off..
◆ If the ringer is intrusive, press the key P. The
ringer is deactivated. You can take the call so long as
it is displayed on the screen.
Activating/deactivating advisory tones
Your handset uses 'advisory tones' to tell you about different
activities and statuses. The following advisory tones can be
activated and deactivated individually (the default setting is On).
On).
◆ Key click/tone: Every key press is confirmed
◆ Acknowledge tones:
– Confirmation tone (rising tone sequence): at the end of an
input or setting, when the handset is placed in the base and
when a new entry arrives in the calls list
– Error tone (a descending tone sequence): with incorrect
inputs
– End tone menu: when scrolling at the end of a menu
29
Page 32

Handset settings
◆ Battery warning tone: Repeated beep that displays that the
batteries need to be charged.
§MENU§
[_________________________________________]s Audio
§OK§
[_________________________________________]s Advisory Tones
§OK§
either ...
[_________________________________________]
Key Tones §OK§
or ...
[_________________________________________]
s Battery Warning
§OK§
or ...
Press the function key to open the
menu.
Select the menu item and confirm.
Select the menu item and confirm.
Activate/cancel key click:
Select the condition (Off, Beep, On)
and confirm (‰ = on).
Activate/cancel battery warning
tone:
Select condition (Off, On, While Call)
and confirm, e.g. On (ticked ‰).
Activate/cancel confirmation tones:
[_________________________________________]
s Confirm. Tones
... then
30
§OK§
a
Select the menu item and confirm (‰ =
On).
Long press (back to idle status).
Page 33

Handset settings
Setting profiles
Selecting one or multiple profiles can use several settings at the
same time (factory default: all off).
Profile Settings
Visual Jumbo numbers (large print)
Phone number statement, handset
Phone number statement, answering
machine
Key tone
Pin input tone
Acoustic Ringer tones with max. volume
Ringer tones with optimised frequency
Maximum earpiece volume
Maximum handsfree volume
Maximum volume headset
Motoric Screen is lighted longer during entries
Extended time period for entries in the
directory
§MENU§
[_________________________________________]
s Settings
§OK§
[_________________________________________]
s Profiles
§OK§
[_________________________________________]Visual §OK§
Press the function key to open the
menu.
Select the menu item and confirm.
Select the menu item and confirm.
Confirm to select or deselect the profile
(‰ = selected).
31
Page 34

Handset settings
[_________________________________________]s Acoustic
[_________________________________________]
s Motoric
§OK§
§OK§
Select and confirm to select or deselect
the profile (‰ = selected).
Select and confirm to select or deselect
the profile (‰ = selected).
Long press (back to idle status).
a
Phone number statement
You can have the number of a caller spoken (prerequirement: the
phone number is transferred).
Press the function key to open the
menu.
Select the menu item and confirm.
Confirm to deactivate or activate the
function (‰ = On).
[_________________________________________]
s Settings
[_________________________________________]s Caller ID Announced
§MENU§
§OK§
§OK§
32
i
Hold down (back to idle status).
a
The phone number statement applies both to
incoming calls as well as for calls in the calls list (see
page 22).
Page 35

Handset settings
Restoring the handset to factory settings
You can reset individual settings and changes you have made.
This will reset the settings to their original factory settings. Entries
in the directory, the calls list, the direct dial keys, and the
handset's registration on the base will be retained. Press a to
cancel the reset.
§MENU§
[_________________________________________]s Settings
§OK§
[_________________________________________]s Handset
§OK§
[_________________________________________]
s Handset reset
§OK§
s
[_____________________________________________________________]
Reset to defaults?
§Yes§
a
Press the function key to open the
menu.
Select the menu item and confirm.
Select the menu item and confirm.
Select the menu item and confirm.
Select. …
and confirm.
Hold down (back to idle status).
33
Page 36

Handset settings
Factory settings of the handset
Earpiece volume 1 page 25
Handsfree volume 3 page 25
Headphone volume 3 page 25
Ringer volume 5 page 27
Ringer melody 1 page 27
Auto answer Activated page 25
Battery tone/Key click/Confirmation tone Activated page 29
Display language English page 23
Last number redial list Empty page 21
34
Page 37
Appendix
Appendix
Care
Wipe the base and handset with a damp cloth (use no solvent) or
an antistatic cloth. Never use a dry cloth. This can cause static.
Contact with liquid
If the handset should come into contact with liquid, on no
account switch the device on. Remove all batteries
immediately.
Allow the liquid to drain out of the device, and then pat all parts
of the device dry.
Keep the handset with the batteries removed in a warm, dry place
for at least 72 hours. In many cases, you will then be able to use
it again.
!
Service (Customer Care)
Our online support on the Internet:
www.my-siemens.com/customercare
If you need any repair work, or have a guarantee claim to
submit, our
Service Center Ireland 18 50 77 72 77
will give you quick and reliable assistance. Keep your till receipt
handy.
35
Page 38

Appendix
You will find more service numbers in the section entitled
"Service" at the end of this booklet.
Replacement or repair services are not offered in countries where
our product is not sold by authorised dealers.
Country-specific features have been taken into account.
The E1 handset is licensed throughout the EU and in Switzerland.
The CE mark certifies conformity of the device with the essential
requirements of the R&TTE directive.
Excerpt from the original declaration:
"We, Siemens AG, declare, that the above mentioned product is
manufactured according to our Full Quality Assurance System
certified by CETECOM ICT Services GmbH with ANNEX V of the
R&TTE-Directive 99/5/EC. The presumption of conformity with the
essential requirements regarding Council Directive 99/5/EC is
ensured"
Senior Approvals Manager
The Declaration of Conformity (DoC) has been signed. In case of
need, a copy of the original DoC can be made available via the
company hotline.
36
Page 39

Specifications
Recommended batteries
Nickel-metal-hydride (NiMH):
◆ Sanyo Twicell 700
◆ Sanyo Twicell 650
◆ Panasonic 700 mAh
◆ GP 700 mAh
◆ YDT AAA SUPER 700
◆ VARTA PhonePower AAA 700 mAh
Handset operating times/charging times
Appendix
Capacity
(mAh)
Standby time
(hours)
Calling time
(hours)
Charging
time
(hours)
700 up to 100 up to 15 approx. 5
These operating and charging times apply only when using the
recommended batteries.
37
Page 40

Appendix
Character set chart
Standard characters
Press the relevant key repeatedly or hold it down
1x 2x 3x 4x 5x 6x 7x 8x 9x 10x 11x 12x 13x 14x
1
Space
â
1
£$¥¤
2 a bc2дбавгз
I
4
5
L
M
N
O
d ef3ëéèê
ghi4ïíìî
jkl5
m no6цсутфх
pqrs7ß
t uv8üúùû
wxyz9яэжше
Q .,?!0+-:¿¡“‘;_
Abc
P
#
Creating and editing text
You can create and edit text in a number of ways:
◆ Move the cursor to the left and right with the t s .
◆ Characters (to the left of the cursor) are deleted with §Delete§.
◆ Characters are added to the left of the cursor.
◆ To switch from upper case (first letter upper case, all other
letters lower case) to lower case, press P before you key in the
letter. Pressing P again switches from lower case letters to
digits. Press again to return to upper case letters.
◆ The first letter of the name of directory entries is automatically
capitalised, followed by lower case letters.
abc
-->
abc
123
#@\&§
/()<=>%
*
-->
38
Page 41

Appendix
Order of directory entries
1. Space (shown here as s)
2. Digits (0–9)
3. Letters (alphabetical)
4. Other characters
To work around the alphabetical order of the entries in the
directory, insert a space before the name. This entry then goes to
the first position (example: „sCarla"). You can also number the
entries with digits (e.g. "1Jane", "2Mary", "3John").
Warranty Certificate Ireland
◆ Without prejudice to any claim the user (customer) may have
in relation to the dealer or retailer, the customer shall be
granted a manufacturer's Guarantee under the conditions set
out below:
◆ In the case of new devices and their components exhibiting
defects resulting from manufacturing and/or material faults
within 24 months of purchase, Siemens shall, at its own option
and free of charge, either replace the device with another
device reflecting the current state of the art, or repair the said
device. In respect of parts subject to wear and tear (including
but not limited to, batteries, keypads, casing), this warranty
shall be valid for six months from the date of purchase.
◆ This Guarantee shall be invalid if the device defect is
attributable to improper care or use and/or failure to comply
with information contained in the user manuals. In particular
claims under the Guarantee cannot be made if:
– The device is opened (this is classed as third party
intervention)
– Repairs or other work is done by persons not authorised by
Siemens.
– Components on the printed circuit board are manipulated
– The software is manipulated
39
Page 42

Appendix
– Defects or damage caused by dropping, breaking, lightning
or ingress of moisture. This also applies if defects or damage
was caused by mechanical, chemical, radio interference or
thermal factors (e.g.: microwave, sauna etc.)
– Devices fitted with accessories not authorised by Siemens
◆ This Guarantee shall not apply to or extend to services
performed by the authorised dealer or the customer
themselves (e.g. installation, configuration, software
downloads). User manuals and any software supplied on a
separate data medium shall be excluded from the Guarantee.
◆ The purchase receipt, together with the date of purchase, shall
be required as evidence for invoking the Guarantee. Claims
under the Guarantee must be submitted within two months of
the Guarantee default becoming evident.
◆ Ownership of devices or components replaced by and returned
to Siemens shall vest in Siemens.
◆ This Guarantee shall apply to new devices purchased in the
European Union. For Products sold in the Republic of Ireland
the Guarantee is issued by Siemens Ireland Limited, Ballymoss
Road, Sandyford Industrial Estate, Dublin 18 - The Republic of
Ireland.
◆ Any other claims resulting out of or in connection with the
device shall be excluded from this Guarantee. Nothing in this
Guarantee shall attempt to limit or exclude a Customers
Statutory Rights, nor the manufacturer's liability for death or
personal injury resulting from its negligence.
◆ The duration of the Guarantee shall not be extended by
services rendered under the terms of the Guarantee.
◆ Insofar as no Guarantee default exists, Siemens reserves the
right to charge the customer for replacement or repair.
◆ The above provisions do not imply a change in the burden of
proof to the detriment of the customer.
To make a claim under this Guarantee, please contact the
Siemens helpdesk on 1850 777 277. This number is also to be
found in the accompanying user guide.
40
Page 43

Accessories
Accessories
Earpiece and microphone set
You can connect a commercially available earpiece and
microphone set via the universal 2.5 mm interface. For example,
an earpiece and microphone set M110 from Plantronics.
All accessories and batteries are available from your mobile phone
retailer. Or you can order direct online from the my-siemens
Online Shop: www.my-siemens.com.
The Online Shop also has the latest product information.
41
Page 44

Index
Index
A
Accessories . . . . . . . . . . . . . . 41
Acknowledge tones
Advisory tones. . . . . . . . . . . . 29
Answering a call
Auto answer
. . . . . . . . . . . . . 25
. . . . . . . . 29
. . . . . . . . . . 14
B
Batteries
Charging
Display . . . . . . . . . . . . . . . . .8
Inserting
Recommended
Battery tone . . . . . . . . . . . . . 30
Belt clip
. . . . . . . . . . . . . . . 8
. . . . . . . . . . . . . .5, 7
. . . . . . . . . . 37
. . . . . . . . . . . . . . . . . 10
C
Calling
External
Internal
Care of the telephone. . . . . . . 35
Change display language
Character set chart
Charge indicator (batteries). . . .8
Confirmation tone
Customer Care (Service)
Customer service . . . . . . . . . . 35
. . . . . . . . . . . . . . . 14
. . . . . . . . . . . . . . . 16
. . . . 23
. . . . . . . . . 38
. . . . . . 11, 29
. . . . . 35
Earpiece volume
End call
Error tone
. . . . . . . . . . . . . . . . 14
. . . . . . . . . . . . . . 29
. . . . . . . . . . 25
F
Factory settings of the
handset
. . . . . . . . . . 33
H
Handset
Activate/deactivate
Operating and charging
. . . . . . . . . . . . . . . 37
times
Phone number statement
Preparing to use. . . . . . . . . . 7
Restore factory settings
Setting
Handset at a glance. . . . . . . . . 2
Handset charging times
Handset operating time
Handsfree
Activate/deactivate
Volume
Hearing aids . . . . . . . . . . . . . . 5
. . . . . . . . . . . . . . . 23
. . . . . . . . . . . . 15, 25
. . . . . . . 11
. . 32
. . . . 33
. . . . . 37
. . . . . 37
. . . . . . . 15
I
Internal dialling . . . . . . . . . . 16
D
Date setting. . . . . . . . . . . . . . 24
Deactivating (handset) . . . . . . 11
Dialling pause
Direct dial keys
Directory
Copy and edit an entry
Delete an entry
Display and edit an entry . . . 18
Storing a number
Display font
. . . . . . . . . . . .14
. . . . . . . . . . 2, 20
. . . . . 18
. . . . . . . . . . 18
. . . . . . . . 17
. . . . . . . . . . . . . . 24
E
Earpiece mode. . . . . . . . . . 2, 15
42
J
Jumbo numbers . . . . . . . . . . 24
K
Key click. . . . . . . . . . . . . . . . 29
L
Language, see Changing display
language
Last number redial
Loudspeaker volume
Handset . . . . . . . . . . . . . . 25
. . . . . 13, 21
. . . . . . . 25
Page 45

Index
M
Mains adapter . . . . . . . . . . . . 5
Making calls
Answering a call
External
Internal
Medical appliances . . . . . . . . . 5
Melody
Menu
End tone
Guidance through the menu 12
Message key
. . . . . . . . . . . . . . 14
. . . . . . . . . . . . . . . 16
. . . . . . . . . . . . . . . . 27
. . . . . . . . . . . . . . 29
. . . . . . . . . 14
. . . . . . . . . . . . . 2
O
Online Shop. . . . . . . . . . . . . 41
P
Pack contents. . . . . . . . . . . . . 7
Phone number statement
. . . 32
R
Ringer
Set volume
Setting a melody
. . . . . . . . . . . . 27
. . . . . . . . 27
V
Volume
Earpiece volume
Handsfree
Loudspeaker (handset)
Ringer (handset)
. . . . . . . . . . 15, 25
. . . . . . . . . 25
. . . . 25
. . . . . . . . . 27
W
Warning tone, see Advisory
. . . . . . . . . . . . 29
tones
Warranty . . . . . . . . . . . . . . . 39
Writing digits
. . . . . . . . . . 2, 38
S
Safety precautions . . . . . . . . . 5
Service
Service making handset ready for
Set time by
Setting profiles . . . . . . . . . . . 31
Signal tone, see Advisory tones
Specifications
Speed dial list. . . . . . . . . . . . 20
Standard characters (Chart)
. . . . . . . . . . . . . . . . 35
service
. . . . . . . . . . . . 7
. . . . . . . . . . . . . 24
. . . . . . . . . . . . 37
. . 38
T
Telephone number
Pick from directory
Store (directory)
Tone
Battery tone
Confirmation
Error tone . . . . . . . . . . . . . 29
. . . . . . . . . . . 30
. . . . . . . 21
. . . . . . . . . 17
. . . . . . . . . . . 29
43
Page 46

s
Be inspired
DANSK
Page 47

Kort oversigt over håndsættet
Kort oversigt over håndsættet
Nødopkalds-/direkte
opkaldstast (I)
Kontroltaster
◆ Navigering
◆ Lydstyrke
Opkaldstast
◆ Besvar
opkald
◆ Start
opringningen
◆ Skift fra håndfri
funktion til brug
af håndsæt
Håndfri-tast
Skift fra brug af
håndsæt til håndfri
funktion
Stjerne-tast
◆ Ringetone til/fra
(langt tryk)
◆ Ved
tekstindtastning:
Skift mellem store
bogstaver, små
bogstaver og tal
=
Genkal. Menu
Mikrofon
Direkte
opkaldstaster
(II til IV)
Batteridisplay
Display
med symboler
Funktionstaster
Adgang til de
funktioner, der
vises i displayet
Afbryd- og
tænd/sluk-tast
◆ Afslut en samtale
◆ Afbryd
funktionen (tryk
kort)
◆ Tænd/sluk
håndsættet
(langt tryk)
Visning af håndsæt, som er tilmeldt en SMS-kompatibel
basestation.
2
Page 48

Indholdsfortegnelse
Indholdsfortegnelse
Kort oversigt over håndsættet . . . . . . . . . . . . . . . . . . . . . . . . 2
Sikkerhedsanvisninger . . . . . . . . . . . . . . . . . . . . . . . . . . . . . . 5
Særlige egenskaber i Gigaset E 1 . . . . . . . . . . . . . . . . . . . . . . 6
Ibrugtagning af telefonen . . . . . . . . . . . . . . . . . . . . . . . . . . . 7
Isætning af batterier . . . . . . . . . . . . . . . . . . . . . . . . . . . . . . . . . 7
Anbring håndsættet i basestationen, og oplad batterierne . . . 8
Manuel tilmelding . . . . . . . . . . . . . . . . . . . . . . . . . . . . . . . . . . . 9
Bælteklipsen sættes fast . . . . . . . . . . . . . . . . . . . . . . . . . . . . . 10
Aktivering/deaktivering af håndsæt . . . . . . . . . . . . . . . . . . . . 11
Anvendelse af telefonen og menuoversigt . . . . . . . . . . . . . 12
Kontroltaster på håndsættet . . . . . . . . . . . . . . . . . . . . . . . . . . 12
Funktionstaster . . . . . . . . . . . . . . . . . . . . . . . . . . . . . . . . . . . . 13
Brug af telefonen . . . . . . . . . . . . . . . . . . . . . . . . . . . . . . . . . . 14
Eksterne opkald og afslutning af samtalen . . . . . . . . . . . . . . . 14
Besvar opkald . . . . . . . . . . . . . . . . . . . . . . . . . . . . . . . . . . . . . . 14
Håndfri funktion . . . . . . . . . . . . . . . . . . . . . . . . . . . . . . . . . . . 15
Internt telefonopkald . . . . . . . . . . . . . . . . . . . . . . . . . . . . . . . . 15
Anvendelse af telefonbogen, direkte opkaldstaster og
andre lister . . . . . . . . . . . . . . . . . . . . . . . . . . . . . . . . . . . . . . . 17
Telefonbog . . . . . . . . . . . . . . . . . . . . . . . . . . . . . . . . . . . . . . . . 17
Direkte opkaldstaster . . . . . . . . . . . . . . . . . . . . . . . . . . . . . . . . 20
Genopkaldsliste . . . . . . . . . . . . . . . . . . . . . . . . . . . . . . . . . . . . 21
Opkaldsliste . . . . . . . . . . . . . . . . . . . . . . . . . . . . . . . . . . . . . . . 23
Indstil håndsæt . . . . . . . . . . . . . . . . . . . . . . . . . . . . . . . . . . . 24
Skift sprog . . . . . . . . . . . . . . . . . . . . . . . . . . . . . . . . . . . . . . . . 24
Indstil dato og klokkeslæt . . . . . . . . . . . . . . . . . . . . . . . . . . . . 25
Indstil displayskriften til store bogstaver . . . . . . . . . . . . . . . . . 26
Aktivering/deaktivering af automatisk besvarelse af opkald . 26
Indstilling af talelydstyrken . . . . . . . . . . . . . . . . . . . . . . . . . . . 27
Indstilling af ringetoner . . . . . . . . . . . . . . . . . . . . . . . . . . . . . . 29
Aktivering/deaktivering af servicetoner . . . . . . . . . . . . . . . . . 31
3
Page 49

Indholdsfortegnelse
Indstil profiler . . . . . . . . . . . . . . . . . . . . . . . . . . . . . . . . . . . . . . 32
Vis nummer . . . . . . . . . . . . . . . . . . . . . . . . . . . . . . . . . . . . . . . . 33
Nulstilling af håndsættet til standardindstillingen . . . . . . . . . . 34
Bilag . . . . . . . . . . . . . . . . . . . . . . . . . . . . . . . . . . . . . . . . . . . . . 36
Pleje . . . . . . . . . . . . . . . . . . . . . . . . . . . . . . . . . . . . . . . . . . . . . . 36
Kontakt med væske . . . . . . . . . . . . . . . . . . . . . . . . . . . . . . . . . . 36
Kundeservice (Customer Care) . . . . . . . . . . . . . . . . . . . . . . . . . 36
Tekniske data . . . . . . . . . . . . . . . . . . . . . . . . . . . . . . . . . . . . . . . 38
Tegnsættabel . . . . . . . . . . . . . . . . . . . . . . . . . . . . . . . . . . . . . . . 39
Producentens garanti . . . . . . . . . . . . . . . . . . . . . . . . . . . . . . . . 40
Tilbehør . . . . . . . . . . . . . . . . . . . . . . . . . . . . . . . . . . . . . . . . . . 41
Stikordsliste . . . . . . . . . . . . . . . . . . . . . . . . . . . . . . . . . . . . . . . 42
4
Page 50

Sikkerhedsanvisninger
Sikkerhedsanvisninger
Anvend kun den medfølgende strømforsyning som
$
beskrevet på undersiden af basestationen.
Læg kun anbefalede, genopladelige batterier (s. 38) af
samme type i! D vs. ingen andre batterityper eller ikkegenopladelige batterier, da disse kan forårsage helbredsog personskader.
‹
De genopladelige batterier skal anbringes, så batteriernes
poler vender rigtigt, og der skal bruges en batteritype, der
Œ
stemmer overens med denne betjeningsvejledning (der er
symboler i
Medicinske apparaters funktion kan blive påvirket.
Overhold de tekniske betingelser i det pågældende
område (f. eks. lægepraksis).
Håndsættet kan forårsage ubehagelige brummetoner i
høreapparater.
håndsættets batterirum)
!
.
Stil ikke basestationen i bade- eller bruserum (s. 36).
Håndsættet og basestationen er ikke beskyttet mod
vandstænk.
Anvend ikke telefonen i omgivelser, hvor der er fare for
eksplosioner (f. eks. malerværksteder).
Hvis du overlader din Gigaset til andre personer, skal
ƒ
betjeningsvejledningen følge med.
Bortskaf batterierne og telefonen miljømæssigt korrekt.
i
Det er ikke alle funktionerne, der er beskrevet i
betjeningsvejledningen, der er til rådighed i alle lande.
5
Page 51

Særlige egenskaber i Gigaset E 1
Særlige egenskaber i Gigaset E 1
◆ Store taster
◆ Stor visning af tekst og symboler i displayet
◆ Ekstra funktioner Stor skrift
◆ Direkte opkaldstaster
◆ Håndfri funktion
◆ Vis nummer (kun ved CLIP-aktivering) til
– indgående opkald
– Opkaldsliste
◆ Profiler til særlige krav
–Visning
– Akustisk
– Motorisk
◆ Kontroltaster til lydstyrkeregulering
◆ Udvidede indstillingsmuligheder til
–lydstyrke,
– tonemelodi
– tasteklik
–tastetoner
◆ Tilslutning til hovedtelefonsæt (hovedtelefonsæt medleveres
ikke)
6
Page 52

Ibrugtagning af telefonen
Ibrugtagning af telefonen
Pakken indeholder: et håndsæt Gigaset E 1, en lader, en
strømforsyning med netkabel, et bælteklips til håndsættet, to
batterier og en betjeningsvejledning.
Beskyttelsesfilmen fjernes
Displayet er beskyttet af en film. Fjern beskyttelsesfilmen!
Isætning af batterier
◆ Batterierne skal lægges i, så polerne vender rigtigt – se
billedet til venstre,
◆ Dækslet lægges på med ca. 3 mm mellemrum nederst og
skubbes derefter op indtil det klikker på plads.
◆ For at åbne dækslet skal du trykke på rillerne og skubbe ned.
Anvend kun genopladelige batterier, således som
anbefalet af Siemens på s. 38 ! Anvend under ingen
omstændigheder traditionelle (ikke-genopladelige)
W
batterier eller andre batterityper, da det ikke kan
udelukke alvorlige sundheds- og materialeskader.
F.eks. vil batterikappen kunne blive ødelagt (farligt).
Der kan også forekomme funktionsforstyrrelser eller
beskadigelse af apparatet.
7
Page 53
Ibrugtagning af telefonen
Anbring håndsættet i basestationen, og oplad batterierne
Når håndsættet anbringes i basestationen E 150, tilmeldes det
automatisk til basestationen. Fortsæt på følgende måde:
1. Anbring håndsættet med displayet opad i basestationen.
2. Vent, indtil håndsættet er blevet automatisk tilmeldt til
basestationen. Den automatiske tilmelding varer ca. et minut.
Under tilmeldingen blinker Tilmelding: i displayet. Efter
tilmeldingen vises standbydisplayet.
3. Lad nu håndsættet blive liggende i laderen, da batterierne ikke
er opladet ved leveringen. Opladningen af batterierne vises
øverst til højre på displayet med et blinkende batterisymbol.
Hvis den automatiske tilmelding afbrydes, tilmeldes håndsættet
manuelt, som beskrevet fra s. 9 og frem.
Første gang batterierne oplades, anbefaler vi, at de
W
oplades uafbrudt i fem timer – uafhængigt af
batteridisplayet! Batteriernes ladekapacitet reduceres
af tekniske årsager efter et stykke tid.
Batteriets opladningstilstand vises kun korrekt efter uafbrudt op/afladning. Du skal derfor ikke unødigt fjerne batteriet og så vidt
muligt ikke afslutte opladningen før tiden.
8
Page 54

Ibrugtagning af telefonen
◆ Batteriernes opladningstilstand vises kun
– under opladningen
– når batterierne er afladede
◆ Hvis batterierne er næsten tomme, hører du en
batteriadvarselstone (hvis denne er slået til, s. 31). I
i
standby-tilstand blinker symbolet = desuden i
displayet, og Batteri er tomt vises.
◆ Efter første opladning kan håndsættet lægges
tilbage i laderen efter hver samtale. Derved oplades
batterierne skånsomt.
◆ Batterierne opvarmes under opladningen. Dette er
normalt og helt ufarligt.
Manuel tilmelding
Hvis den automatiske tilmelding skulle blive afbrudt, eller hvis du
vil benytte dit håndsæt E 1 til en anden GAP-basestation, skal du
foretage manuel tilmelding. Din Gigaset E 1 kan dog kun tilmeldes
på én basestation.
Tilmeldingen af håndsættet skal påbegyndes på håndsættet og
basestationen.
1. På håndsættet
§Menu§
[_________________________________________]
s Indstil håndsæt
[_________________________________________]
s Håndsæt
§OK§
§OK§
Tryk på funktionstasten for at åbne
menuen.
Vælg og bekræft.
Vælg og bekræft.
9
Page 55

Ibrugtagning af telefonen
[_________________________________________]
s Registrer håndsæt
§OK§
~ §OK§
2. På basestationen
Hvordan du påbegynder tilmeldingen af håndsættet til
basestationen, står beskrevet i betjeningsvejledningen til
basestationen.
Vælg og bekræft.
Indtast og bekræft system-PIN-koden
på basestationen (0000).
Bælteklipsen sættes fast
Tryk på bælteklipsen på bagsiden af håndsættet, indtil „grebene“
på begge sider klikker på plads i hullerne. Du kan derefter påsætte
en snor, så håndsættet kan bæres i hånden eller om halsen.
10
Page 56

Ibrugtagning af telefonen
Aktivering/deaktivering af håndsæt
For at tænde skal du trykke på afbryd-tasten a. Der lyder en
bekræftelsestone (stigende tonesekvens). Når du anbringer
håndsættet i laderen, aktiveres det automatisk.
For at slukke skal du i standbytilstand trykke på afbryd-tasten a
længe (bekræftelsestone).
11
Page 57
Anvendelse af telefonen og menuoversigt
Anvendelse af telefonen og menuoversigt
Kontroltaster på håndsættet
Kontroltasterne har forskellige funktioner alt efter håndsættets
betjeningssituation.
Kontroltaster
Kontroltasternes forskellige funktioner.
ts
I standbytilstand
og når telefonen
ringer
Under
telefonopkald
På lister og i
menuer
I et
indtastningsfelt
I håndfri-modus
12
kan ringetonens
lydstyrke forhøjes.
kan lydstyrken i
håndsættet
forhøjes.
Blad op. Blad ned.
Flyt markøren til
venstre.
Forhøj den håndfrie
lydstyrke.
kan ringetonens
lydstyrke
formindskes.
lydstyrken i
håndsættet
formindskes.
Flyt markøren til
højre.
Formindsk den
håndfrie lydstyrke.
Page 58

Anvendelse af telefonen og menuoversigt
Funktionstaster
Funktionstasterne er den højre og venstre tast lige under
displayet. Deres funktion skifter afhængigt af
betjeningsituationen. Den aktuelle funktion vises på displayet
umiddelbart over displaytasterne. Når du kan bladre i en liste,
viser displayet symbolet å.
Eksempel
Genkal. Menu
Funktionstaster
De forskellige symboler har følgende betydning:
Displaysymbol
§Løft af§
§Tavs§
§Genkal.§
§OK§
§Menu§
å
§ESC§
§Slet§
Betydning ved tastetryk
Besvar opkald.
Slå ringetonen på håndsættet fra.
Genopkald: Åbn listen med de seneste 10
telefonnumre.
Bekræft menufunktionen eller gem indtastningen
ved at bekræfte.
Åbn hovedmenuen i standbytilstand.
Åbn en tilstandsafhængig menu under
telefonering.
Blad op eller ned med tasterne t s.
Et menuniveau tilbage eller afbryd forløb.
Slet indtastningen tegn for tegn fra højre mod
venstre.
13
Page 59

Brug af telefonen
Brug af telefonen
Eksterne opkald og afslutning af samtalen
Eksterne opkald er opkald via det offentlige telefonnet.
~ c
a
Tilføj opkaldspause
Du kan tilføje en opkaldspause mellem forvalgsnummer og
telefonnummer. Tryk længe på tasten P. Indtast derefter
telefonnummeret.
Eksterne opkald: Indtast
telefonnummeret, og tryk på
opkaldstasten. Nummeret ringes op.
Eller:
Du kan også først trykke på opkaldstasten c (du hører en klartone) og
derefter indtaste telefonnummeret.
Afslut samtalen: Tryk på afbrydtasten. Med afbryd-tasten a afbryder
du opkaldet.
Besvar opkald
Din telefon ringer, opkaldet vises på displayet, og tasten d på
håndsættet blinker.
Tryk påc (eller d) for at besvare opkaldet.
Når håndsættet står i laderen, og funktionen Auto svar er
aktiveret (s. 26), skal du bare tage håndsættet op af laderen for at
besvare opkaldet.
14
Page 60

Brug af telefonen
Håndfri funktion
Du kan føre samtaler uden at skulle holde håndsættet i hånden.
Også andre personer kan deltage i samtalen.
Inden du bruger den håndfri funktion, bør du informere din
samtalepartner om det.
Aktivering/deaktivering af håndfri funktion
aktivér: d Tryk på håndfri-tasten.
deaktivér: c Tryk på opkaldstasten.
Så snart håndfri-funktionen afsluttes, skifter du til „brug af
håndsæt“ og fører samtalen videre med håndsættet.
Ændring af lydstyrken under brug af håndfri funktion
s t
Skru ned eller op for lydstyrken.
Internt telefonopkald
Interne telefonopkald er gratis samtaler med andre håndsæt, som
du har tilmeldt den samme basestation. For at starte et internt
opkald, skal en af de direkte opkaldstaster være programmeret til
internt opkald (se s. 20).
15
Page 61

Brug af telefonen
Start internt opkald
V ... Y
[_____________________________________________________________]
Kald alle?
§Ja§
[_____________________________________________________________]
Kald alle
[_____________________________________________________________]
Intern samtale
i
Besvar internt opkald
[_____________________________________________________________]
Intern samtale
Er der ingen abonnent, der svarer, går håndsættet i
standbytilstand.
c
I standby-tilstand skal du trykke på den
direkte opkaldstast, som det interne
opkald er programmeret til.
Bekræft.
Det interne opkald blev besvaret af en
anden abonnent.
Besvar opkald.
16
i
Besvares et internt opkald, viser displayet på alle
tilmeldte håndsæt Intern nr. optaget.
Page 62

Anvendelse af telefonbogen, direkte opkaldstaster og andre
lister
Anvendelse af telefonbogen, direkte opkaldstaster og andre lister
Telefonbog
Telefonbogen gør det nemmere at ringe op. Telefonbogen
hentes med menuen.
I telefonbogen kan du gemme op til 30 telefonnumre.
Du kan se, hvordan du indtaster tekst korrekt i tegnsættabellen
(s. 39).
Gem et telefonnummer i telefonbogen
§Menu§
[_________________________________________]
Telefonbog §OK§
§Menu§
[_________________________________________]
Ny indtastning §OK§
~ §OK§
~ §OK§
a
Tryk på funktionstasten for at åbne
hovedmenuen.
Bekræft. Telefonbogen åbnes.
Tryk på funktionstasten for at åbne
telefonbogsmenuen.
Bekræft.
Indtast telefonnummeret, og bekræft.
Indtast navn og bekræft.
Indtastningen er gemt.
Tryk længe (tilbage til
standbytilstand).
17
Page 63

Anvendelse af telefonbogen, direkte opkaldstaster og andre
lister
Opkald ved hjælp af telefonbogen
§Menu§
[_________________________________________]
Telefonbog §OK§
enten ...
s
c
eller ...
~
s
c
Ændring, kopiering, sletning af telefonbogsopslag, og
sletning af listen
Tryk på funktionstasten for at åbne
hovedmenuen.
Bekræft. Telefonbogen åbnes.
Blad frem til opslaget:
Vælg opslag.
Tryk på tasten. Nummeret ringes op.
Indtast begyndelsesbogstavet:
Indtast begyndelsesbogstavet i det
navn, du søger.
Vælg opslag.
Tryk på tasten. Nummeret ringes op.
§Menu§
[_________________________________________]
Telefonbog §OK§
s §Menu§
18
Tryk på funktionstasten for at åbne
hovedmenuen.
Bekræft. Telefonbogen åbnes.
Gå til det ønskede opslag og tryk på
funktionstasten.
Page 64

Anvendelse af telefonbogen, direkte opkaldstaster og andre
lister
enten ...
[_________________________________________]
s Rediger indtastning
OK
~ §OK§
~ §OK§
eller ...
s
[_____________________________________________________________]
Kopiér og rediger
§OK§
eller ...
[_________________________________________]
s Slet indtastning
§OK§
Rediger opslag i telefonbogen:
Vælg og bekræft.
Rediger telefonnummeret, og bekræft.
Rediger navnet, og bekræft.
Indtastningen er nu gemt
Rediger og kopier opslag i
telefonbogen:
vælg...
og bekræft.
Slet enkelte opslag:
Vælg og bekræft. Opslaget er nu
slettet.
eller ...
[_________________________________________]
s Slet liste
... eller
§OK§
§Ja§
a
Slet hele telefonbogen:
Vælg og bekræft.
Tryk på funktionstastenfor at bekræfte
forespørgslen.
Tryk længe (tilbage til
standbytilstand).
19
Page 65

Anvendelse af telefonbogen, direkte opkaldstaster og andre
lister
Direkte opkaldstaster
Med de 4 direkte opkaldstaster kan du gemme særligt vigtige
telefonnumre, f.eks. nødopkaldsnumre. Du vælger det gemte
nummer ved at trykke på den pågældende direkte opkaldstast.
Du kan se, hvordan du indtaster tekst korrekt i tegnsættabellen
(s. 39).
Gem/rediger direkte opkaldstast
Du kan tildele den direkte opkaldstast eksterne telefonnumre eller
funktionen internt opkald (se s. 15).
§Menu§
[_________________________________________]
s Indstil håndsæt
§OK§
[_________________________________________]
s Direkte opkaldstast
§OK§
[_________________________________________]
s I: <tom>
§Menu§
enten ...
[_________________________________________]
Rediger indtastning §OK§
~ §OK§
Tryk på funktionstasten for at åbne
hovedmenuen.
Vælg og bekræft.
Vælg og bekræft.
Vælg en direkte opkaldstast (I til IV).
Tryk på funktionstasten for at åbne
menuen.
gem eksternt telefonnummer
Bekræft.
Indtast telefonnummeret, og bekræft.
20
~ §OK§
Indtast navn, og bekræft.
Indtastningen er gemt.
Page 66

Anvendelse af telefonbogen, direkte opkaldstaster og andre
lister
eller ...
[_________________________________________]
s Aktiverint. opkald
§OK§
Hvis din telefon er tilsluttet et telefonanlæg, skal du evt. indtaste
forvalgscifferet som første ciffer i telefonbogsopslaget (se
betjeningsvejledningen til telefonanlægget).
Programmer internt opkald
Vælg og bekræft.
Opslaget er gemt.
Tryk længe (tilbage til
a
standbytilstand).
Genopkaldsliste
Genopkaldslisten indeholder de 10 telefonnumre, der sidst er
blevet ringet til. Numre, der er valgt flere gange, vises kun en
gang. Hvis der også er gemt navne til disse numre i telefonbogen,
vises navnene. Du kan ringe op til disse telefonnumre igen via
genopkaldslisten.
Ring til telefonnumre fra genopkaldslisten
§Genkal.§
s c
Åbn genopkaldslisten.
Gå til det ønskede opslag og tryk på
opkalds-tasten. Telefonnummeret
ringes op.
21
Page 67

Anvendelse af telefonbogen, direkte opkaldstaster og andre
lister
Rediger, slet eller overfør telefonnummer til telefonbogen
§Genkal.§
s §Menu§
enten ...
[_____________________________________________________________]
Anvend nummer
§OK§
eller ...
s
[_____________________________________________________________]
Kopi til telefonbog
§OK§
§OK§
~ §OK§
Åbn genopkaldslisten.
Gå til det ønskede opslag og tryk på
funktionstasten.
Redigér telefonnummer:
Bekræft.
Overfør telefonnummeret til
telefonbogen:
Vælg...
og bekræft.
Bekræft nummeret.
Indtast navn, og bekræft.
Opslaget er nu gemt.
eller ...
[_________________________________________]
s Slet indtastning
22
§OK§
a
Slet enkelte telefonnumre:
Vælg og bekræft.
Hvis det ikke er alle opslagene der er
slettet, skal du trykke længe på tasten
(tilbage til standbytilstand).
Page 68

Anvendelse af telefonbogen, direkte opkaldstaster og andre
lister
eller ...
[_________________________________________]
s Slet liste
§OK§
Slet hele genopkaldslisten:
Vælg og bekræft.
Opkaldsliste
Nye opkald signaliseres med et brevsymbol ’ på displayet. Tryk
på funktionstasten for at åbne listen.
23
Page 69

Indstil håndsæt
Indstil håndsæt
Håndsættet er forindstillet fra fabrikken. Du kan ændre disse
indstillinger efter behov.
Skift sprog
Du kan få vist teksterne på forskellige sprog.
§Menu§
[_________________________________________]
s Indstil håndsæt
§OK§
[_________________________________________]
s Sprog
§OK§
s §OK§
a
Hvis du er kommet til at indstille et forkert sprog, som du ikke
forstår, skal du trykke på Menu§
Herefter vælger du det rigtige sprog med s og bekræfter med
§OK§.
Tryk på funktionstasten for at åbne
menuen.
Vælg og bekræft.
Vælg og bekræft. Det aktuelle sprog er
markeret med ‰ (standardindstilling:
engelsk).
Vælg sprog, og bekræft.
Tryk længe (tilbage til
standbytilstand).
4 I
.
24
Page 70

Indstil håndsæt
Indstil dato og klokkeslæt
Det er nødvendigt at indstille dato og klokkeslæt, så telefonen kan
vise, hvornår opkald er indgået.
§Menu§
[_________________________________________]
s Indstil håndsæt
[_________________________________________]
s Dato/tid
~ §OK§
~ §OK§
§OK§
§OK§
Tryk på funktionstasten for at åbne
menuen.
Vælg og bekræft.
Vælg og bekræft.
Indtast dato:
Indtast dag/måned/år og bekræft.
Eksempel: For den 20.05.2003
indtastes 2 Q Q 5 Q I.
Indtast klokkeslæt:
Indtast timer/minutter og bekræft.
Eksempel: For kl. 9.35 indtastes Q O
I 5
.
25
Page 71

Indstil håndsæt
Indstil displayskriften til store bogstaver
Du kan ændre tallene i displayet til stor skrift.
(fabriksindstilling: Fra).
§Menu§
[_________________________________________]
s Indstil håndsæt
[_________________________________________]
s Stor skrift
§OK§
§OK§
a
Tryk på funktionstasten for at åbne
menuen.
Vælg og bekræft.
Bekræft for at aktivere eller deaktivere
funktionen (‰ = Til).
Tryk længe (tilbage til
standbytilstand).
Aktivering/deaktivering af automatisk besvarelse af opkald
Denne funktion skal du bruge, når du vil besvare opkald nemt ved
bare at løfte håndsættet fra laderen. Du behøver da ikke længere
trykke på opkalds- eller håndfritasten (fabriksindstilling: Til).
§Menu§
Tryk på funktionstasten for at åbne
menuen.
[_________________________________________]
s Indstil håndsæt
[_________________________________________]
s Håndsæt
26
Vælg og bekræft.
§OK§
Vælg og bekræft.
§OK§
Page 72

Indstil håndsæt
[_____________________________________________________________]
Auto svar
§OK§
Bekræft for at aktivere eller deaktivere
funktionen (‰ = Til).
Tryk længe (tilbage til
a
standbytilstand).
Indstilling af talelydstyrken
Du kan indstille lydstyrken i håndsættet, i hovedtelefonsættet og
lydstyrken for håndfri funktion i fem niveauer (1–5) – også under
en samtale.
Indstil i standbytilstand
Tryk på funktionstasten for at åbne
menuen.
Vælg og bekræft.
[_________________________________________]
s Lydind
§Menu§
§OK§
enten ...
[_________________________________________]
Højttalerlydstyrke §OK§
t s §OK§
eller ...
s
[_____________________________________________________________]
Håndfrilydstyrke
§OK§
Indstil lydstyrken i håndsættet:
Bekræft. Du vil høre en tone i den
aktuelt indstillede lydstyrke.
Vælg lydstyrke for håndsæt, og
bekræft.
Indstil lydstyrken for den håndfri
funktion:
Vælg...
og bekræft.
27
Page 73

Indstil håndsæt
t s §OK§
eller ...
s
[_____________________________________________________________]
Headsetlydstyrke
§OK§
t s §OK§
a
Indstil under en samtale
t s
§OK§
Vælg lydstyrke for håndfri funktion, og
bekræft.
Indstil lydstyrke i hovedtelefon:
Vælg...
og bekræft.
Vælg lydstyrke i hovedtelefon og
bekræft.
Tryk længe (tilbage til
standbytilstand).
Skift lydstyrke i håndsættet.
Bekræft, hvis du vil bevare
indstillingen.
Du indstiller kun lydstyrken til den driftsart, som du bruger lige nu
(lydstyrke i håndsættet, lydstyrke til håndfri funktion eller
lydstyrke i hovedtelefonsættets højttalere).
Hvis du ikke bekræfter lydstyrkeændringen, gælder indstillingen
kun for den aktuelle samtale.
28
Page 74

Indstil håndsæt
Indstilling af ringetoner
Du kan indstille forskellige ringetoner til interne og eksterne
opkald. Du kan vælge mellem flere muligheder:
◆ Fem lydstyrker (1–5; f.eks. lydstyrke 2 = ‰) og ringetone slås
fra (displayvisning Ú).
◆ Ti melodier (1-10; melodi 1–3 er de „klassiske ringetoner“).
Melodi 1 er den mest hørbare ringetone.
Indstil ringetonemelodien
§Menu§
[_________________________________________]
s Lydind
§OK§
[_________________________________________]
s Ringetonemelodi
§OK§
enten ...
[_________________________________________]
Til ekst. opkald §OK§
eller ...
[_________________________________________]
s Til interne opkald
§OK§
... eller
Tryk på funktionstasten for at åbne
menuen.
Vælg og bekræft.
Vælg og bekræft.
For eksterne opkald:
Bekræft.
For interne opkald:
Vælg og bekræft.
29
Page 75

Indstil håndsæt
[_________________________________________]
Melodi §OK§
a
Indstil ringetonens lydstyrke
§Menu§
[_________________________________________]
s Lydind
§OK§
s
[_____________________________________________________________]
Ringetonelydstyrke
§OK§
t s §OK§
Bekræft melodi, f.eks. Melodi
(‰ = Til).
Tryk længe (tilbage til
standbytilstand).
Tryk på funktionstasten for at åbne
menuen.
Vælg og bekræft.
Vælg...
og bekræft.
Vælg lydstyrke, og bekræft. Du vil høre
ringetonen i den aktuelt indstillede
lydstyrke.
30
i
a
◆ Du kan også ændre ringetonernes lydstyrke, når
telefonen ringer, ved at trykke på tasten t eller s.
Hvis du vil gemme indstillingen, skal du bekræfte
med §OK§.
◆ Lydstyrken 0 betyder: Ringetonen er slået fra.
◆ Hvis ringetonen forstyrrer, skal du trykke længe på
tasten P. Ringetonen er nu slået fra. Opkaldet kan
stadig besvares, så længe det vises i displayet.
Tryk længe (tilbage til
standbytilstand).
Page 76

Indstil håndsæt
Aktivering/deaktivering af servicetoner
Håndsættet bruger lyde til at gøre opmærksom på forskellige
begivenheder og tilstande. Du kan aktivere eller deaktivere følgende
servicetoner uafhængigt af hinanden (standardtilstand: Til).
◆ Tastetr yk/-tone: Alle tastetryk bekræftes
◆ Kvitteringstoner:
– Bekræftelsestone (stigende tonesekvens): efter indtastning
eller indstilling, når håndsættet lægges i basestationen, og
når der indgår et nyt opslag i opkaldslisten
– Fejltone (faldende tonesekvens): ved indtastningsfejl
– Menusluttone: når du når til slutningen af en menu
◆ Batteriadvarselstone: Gentagen bippetone, der angiver, at
batterierne skal oplades.
§Menu§
[_________________________________________]
s Lydind
§OK§
[_________________________________________]
s Servivetoner
§OK§
enten ...
[_________________________________________]
Tasteklik §OK§
eller ...
[_________________________________________]
s Batteri lavt
§OK§
Tryk på funktionstasten for at åbne
menuen.
Vælg og bekræft.
Vælg og bekræft.
Aktivering/deaktivering af tastetryk:
Vælg, og bekræft betingelse (Fra,
Beep, Til) (‰ = Til).
Aktivering/deaktivering af
batteriadvarselstone:
Vælg, og bekræft betingelse (Fra, Til,
Under opkald), f.eks. Til (markeret
med ‰).
31
Page 77

Indstil håndsæt
eller ...
[_________________________________________]
s Bekræft.toner
... eller
§OK§
a
Aktivering/deaktivering af
kvitteringstoner:
Vælg og bekræft (‰ = Til).
Tryk længe (tilbage til
standbytilstand).
Indstil profiler
Når man vælger en eller flere profiler, kan man foretage flere
indstillinger samtidigt (fabriksindstilling: alle Fra).
Profil Indstillinger
Visuel Jumbo tal (stor skrift)
Vis nummer, håndsæt
Vis nummer, telefonsvarer
Tastelyd
PIN-indtastningslyd
Akustisk Ringetone med maks. lydstyrke
Ringetone med optimeret frekvens
Maksimal lydstyrke i håndsættet
Maksimal håndfri lydstyrke
Maksimal lydstyrke i hovedtelefonsæt
Motorisk Displayet lyser længere ved indtastninger
Forlænget tidsrum for indtastning i
telefonbog
32
Page 78

Indstil håndsæt
§Menu§
[_________________________________________]
s Indstil håndsæt
§OK§
[_________________________________________]
s Profiler
§OK§
[_________________________________________]
Visuel §OK§
[_________________________________________]
s Akustisk
§OK§
[_________________________________________]
s Motorisk
§OK§
a
Tryk på funktionstasten for at åbne
menuen.
Vælg og bekræft.
Vælg og bekræft.
Bekræft for at vælge eller fravælge
profilen (‰ = valgt).
Vælg, og bekræft for at vælge eller
fravælge profilen (‰ = valgt).
Vælg, og bekræft for at vælge eller
fravælge profilen (‰ = valgt).
Tryk længe (tilbage til
standbytilstand).
Vis nummer
Du kan få meddelt nummeret på den, der ringer op
(forudsætning: telefonnummeret overføres).
§Menu§
[_________________________________________]
s Indstil håndsæt
§OK§
Tryk på funktionstasten for at åbne
menuen.
Vælg og bekræft.
33
Page 79

Indstil håndsæt
[_________________________________________]
s Oplæs Nummer
i
Vis nummer gælder både for indgående opkald og
opkald i opkaldslisten (se s. 23).
§OK§
a
Bekræft for at aktivere eller deaktivere
funktionen (‰ = Til).
Tryk længe (tilbage til
standbytilstand).
Nulstilling af håndsættet til standardindstillingen
Du kan nulstille enkelte indstillinger og ændringer. Derved
indstilles alle indstillinger, som de oprindeligt var ved
fabriksindstillingen. Opslagene i telefonbogen, opkaldslisten og
direkte opkaldstasterne samt tilmeldingen af håndsættet til
basestationen bevares. Nulstillingen afbrydes med a.
§Menu§
Tryk på funktionstasten for at åbne
menuen.
[_________________________________________]
s Indstil håndsæt
[_________________________________________]
s Håndsæt
[_________________________________________]
s Håndsæt reset
34
Vælg og bekræft.
§OK§
Vælg og bekræft.
§OK§
Vælg og bekræft.
§OK§
Page 80

Indstil håndsæt
s
[_____________________________________________________________]
Gendan sta. indstill?
Håndsættets standardindstilling
Lydstyrke i håndsæt 1 s. 27
Lydstyrke ved håndfri funktion 3 s. 27
Lydstyrke i hovedtelefon 3 s. 27
Ringetonelydstyrke 5 s. 29
Ringetonemelodi 1 s. 29
Automatisk besvarelse af opkald aktiveret s. 26
Batteritone/tastetryk/kvitteringstone aktiveret s. 31
Displaysprog engelsk s. 24
Genopkaldsliste tom s. 21
Vælg...
og bekræft.
§Ja§
Tryk længe (tilbage til
a
standbytilstand).
35
Page 81

Bilag
Bilag
Pleje
Tør basestationen og håndsættet af med en fugtig klud (anvend
ikke opløsningsmidler) eller med en antistatisk klud. Anvend
aldrig en tør klud. En tør klud kan forårsage statisk elektricitet.
Kontakt med væske
Hvis håndsættet har været i kontakt med væske, må apparatet
under ingen omstændigheder tændes. Tag straks alle
batterier ud.
Lad væsken dryppe ud af håndsættet, og tør (dup) derefter alle
dele forsigtigt.
Opbevar håndsættet uden batterier på et tørt og varmt sted i
mindst 72 timer. Derefter kan apparatet i mange tilfælde tages i
brug igen.
!
Kundeservice (Customer Care)
Hvis brugen af telefonen giver anledning til spørgsmål, kan du få
fat i os via vores onlinesupport på web-adressen www.mysiemens.dk/service 24 timer i døgnet. Her kan du få enkel og let
tilgængelig hjælp ved tekniske spørgsmål og spørgsmål
vedrørende betjening af din telefon.
Du kan også kontakte vores
HelpDesk 35 25 86 00
Spørgsmål vedrørende det offentlige telefonnet bedes rettet til
den pågældende operatør.
36
Page 82

Bilag
Hvis en reparation er påkrævet, skal du henvende dig hos din
forhandler, eller hos et af vores serviceværksteder. Du kan finde
en oversigt over servicepartnere på følgende web-adresse:
www.my-siemens.dk/service
I lande, hvor vores produkt ikke sælges af autoriserede
forhandlere, tilbyder vi ikke ombytning eller reparation.
Yderligere servicenumre finder du bagest i denne
betjeningsvejledning under "Service".
I lande, hvor vores produkt ikke sælges af autoriserede
forhandlere, tilbyder vi ikke ombytning eller reparation.
E1 håndsættet er godkendt i EU og Schweiz. Der er taget hensyn
til særlige forhold i det enkelte land.
CE-mærkningen bekræfter, at apparatet er i overensstemmelse
med de grundlæggende krav i R&TTE-direktivet.
Uddrag fra originalerklæringen:
„We, Siemens AG, declare, that the above mentioned product is
manufactured according to our Full Quality Assurance System
certified by CETECOM ICT Services GmbH with ANNEX V of the
R&TTE-Directive 99/5/EC. The presumption of conformity with the
essential requirements regarding Council Directive 99/5/EC is
ensured“
Senior Approvals Manager
The Declaration of Conformity (DoC) has been signed. In case of
need a copy of the original DoC can be made available via the
company hotline.
37
Page 83

Bilag
Tekniske data
Anbefalede batterier
Nikkel-metal-hydrid (NiMH):
◆ Sanyo Twicell 700
◆ Sanyo Twicell 650
◆ Panasonic 700 mAh
◆ GP 700 mAh
◆ YDT AAA SUPER 700
◆ VARTA PhonePower AAA 700 mAh
Driftstider/opladningstider for håndsættet
Kapacitet
(mAh)
Standby-tid
(timer)
Samtaletid
(timer)
Opladningstid
(timer)
700 op til 100 op til 15 ca. 5
De nævnte drifts- og opladningstider gælder kun ved anvendelse
af de anbefalede batterier.
38
Page 84

Tegnsættabel
Standardskrift
Tryk flere gange eller i længere tid på den relevante tast
1x 2x 3x 4x 5x 6x 7x 8x 9x 10x 11x 12x 13x 14x
1
Mellemr
um
â
1
£$¥¤
2 a bc2дбавгз
Bilag
I
4
5
L
M
N
O
d ef3ëéèê
ghi4ïíìî
jkl5
m no6цсутфх
pqrs7ß
t uv8üúùû
wxyz9яэжше
Q .,?!0+-:¿¡“‘;_
Abc
P
#
abc
-->
abc
123
#@\&§
Redigering af tekst
Du har flere forskellige muligheder ved indtastning af en tekst:
◆ Flyt markøren med t s til venstre og højre.
◆ Du kan slette tegn (til venstre for markøren) med §Slet§.
◆ Tegn tilføjes til venstre for markøren (Cursor).
◆ Hvis du vil skifte fra store bogstaver (1. bogstav skrives med
stort, alle andre med småt) til små bogstaver, skal du inden
bogstavet indtastes trykke på P. Hvis du trykker på P igen,
skifter du fra små bogstaver til tal. Med endnu et tryk skifter du
fra tal til store bogstaver.
◆ Ved indtastning i telefonbogen skrives det første bogstav i
navnet automatisk med stort og resten med småt.
/ ( )<=>%
*
-->
39
Page 85

Bilag
Telefonbogopslagenes rækkefølge
1. Mellemrum (her vist med s)
2. Tal (0–9)
3. Bogstaver (alfabetisk)
4. Øvrige tegn
Hvis du vil omgå opslagenes alfabetiske rækkefølge, skal du
indsætte et mellemrum foran navnet. Dette opslag vil så komme
til at stå først (eksempel: „sKarla“). Du kan også give opslagene
numre (f.eks. „1Ute“, „2Karla“, „3Albert“).
Producentens garanti
Slutbrugeren ydes en af forhandleren uafhængig fabriksgaranti
på nedenstående vilkår:
◆ Hvis der inden for de første 24 måneder efter køb opdages
mangler på udstyret og de tilhørende komponenter som følge
af produktions- og materialefejl, kan Siemens frit vælge, om
man vil foretage ombytning med et nyt, tidssvarende udstyr
eller afhjælpe manglen gennem reparation. På dele som
udsættes for slidtage (batterier, tastatur og bælteclips) ydes 6
måneders produktgaranti.
◆ Garantien bortfalder, hvis manglen skyldes forkert anvendelse
og/eller manglende overholdelse af betjeningsvejledningens
instruktioner.
◆ Garantien kan ikke udstrækkes til at omfatte servicearbejde
udført af den autoriserede forhandler eller kunden selv (f.eks.
installation, konfigurering og downloadet software).
Vejledninger og software leveret på et særskilt datamedium er
heller ikke omfattet af garantien.
◆ Købskvitteringen skal sammen med købsdatoen anvendes ved
fastlæggelsen af, om en given reklamation ligger inden for
reklamationsperioden. Reklamationer under garantien skal
fremsættes senest to måneder efter, at manglen er blevet
opdaget.
40
Page 86

Tilbehør
◆ Siemens har ret til at beholde udstyr og komponenter, der
ombyttes eller returneres til Siemens.
◆ Garantien omfatter nyt udstyr købt inden for EU. For produkter,
solgt i Danmark, er garantien udstedt af Siemens Mobile A/S,
Dybendalsvænget 3, 2630 Tåstrup.
◆ Krav, der ikke er omfattet af garantien, kan ikke imødekommes.
Siemens kan ikke holdes ansvarlig for driftsforstyrrelser,
formuetab eller tab af data og software samt andre
informationer, som bruger selv har downloadet/indtastet.
◆ Hvis der ikke foreligger mangler, der er omfattet af denne
garanti, forbeholder Siemens sig ret til at debitere kunder for
ombytning eller reparation.
◆ Ovenstående regler ændrer ikke bevisbyrden til skade for
kunden.
Tilbehør
Hovedtelefonsæt
Du kan tilslutte andre hovedtelefonsæt til den universelle 2,5 mm
port, f.eks. hovedtelefonsæt M110 fra Plantronics.
Alt tilbehør og alle batterier kan fås i specialforretninger. Du kan
også foretage bestilling direkte på Internettet i my-siemens
online-shop: www.my-siemens.com.
Her kan du også få de seneste produktoplysninger.
41
Page 87

Stikordsliste
Stikordsliste
A
Advarselstone se Servicetoner. 31
Afslut en samtale
. . . . . . . . . . . . . 14
B
Batterier
anbefalede
. . . . . . . . . . . . . . . . . . 38
oplade . . . . . . . . . . . . . . . . . . . . . . . 8
sætte i
visning
. . . . . . . . . . . . . . . . . . . . . 5, 7
. . . . . . . . . . . . . . . . . . . . . . . 8
Batteritone . . . . . . . . . . . . . . . . . . . 31
Bekræftelsestone
Beskedtast
. . . . . . . . . . . . . . . . . . . . . 2
. . . . . . . . . 11, 31
Besvar opkald. . . . . . . . . . . . . . . . . 14
Besvarelse af opkald,
automatisk
. . . . . . . . . . . 26
Bælteklips . . . . . . . . . . . . . . . . . . . . 10
C
Customer Care (service). . . . . . . 36
D
Deaktivere (håndsæt) . . . . . . . . . 11
Direkte opkaldstaster
displayskrift
. . . . . . . . . . . . . . . . . . . 26
. . . . . . . .2, 20
Driftstid for håndsæt . . . . . . . . . . 38
F
Fabriksindstilling håndsæt. . . . . 34
fejltone . . . . . . . . . . . . . . . . . . . . . . . 31
G
Genopkald . . . . . . . . . . . . . . . . 13, 21
H
Høreapparater . . . . . . . . . . . . . . . . . 5
Håndfri funktion
aktivere/deaktivere
lydstyrke
. . . . . . . . . . . . . . . . 15, 27
Håndsæt
aktivere/deaktivere
. . . . . . . . . . 15
. . . . . . . . . . 11
drifts- og opladningstider
indstille
. . . . . . . . . . . . . . . . . . . . .24
. . . .38
nulstille til
standardindstilling
. . . . . . . . . . . . . . . . . . . . . . . . . . .34
tage i brug
. . . . . . . . . . . . . . . . . . . 7
Vis nummer . . . . . . . . . . . . . . . . .33
Håndsæt, brug af
. . . . . . . . . . . 2, 15
I
Ibrugtagning af telefonen . . . . . . 7
Indstil dato
Indstil klokkeslæt
. . . . . . . . . . . . . . . . . . . .25
. . . . . . . . . . . . . .25
Indstil profiler . . . . . . . . . . . . . . . . .32
Internt telefonopkald
. . . . . . . . . .15
K
Kort oversigt (håndsæt) . . . . . . . . 2
Kortvalgsliste. . . . . . . . . . . . . . . . . .20
Kundeservice
Kvitteringstoner
. . . . . . . . . . . . . . . . . .36
. . . . . . . . . . . . . . .31
L
Lydstyrke
højttaler (håndsæt)
. . . . . . . . . .27
håndfri funktion . . . . . . . . . 15, 27
lydstyrke i håndsæt
ringetone (håndsæt)
. . . . . . . . . .27
. . . . . . . . .29
Lydstyrke i håndsæt . . . . . . . . . . .27
M
Medicinske apparater. . . . . . . . . . . 5
Melodi . . . . . . . . . . . . . . . . . . . . . . . . 29
Menu
sluttone
. . . . . . . . . . . . . . . . . . . . .31
vejledning til menuen . . . . . . .12
O
Online-shop. . . . . . . . . . . . . . . . . . . 41
Opkald
eksterne
internt
. . . . . . . . . . . . . . . . . . . . .14
. . . . . . . . . . . . . . . . . . . . . .15
42
Page 88

Stikordsliste
Opkaldspause . . . . . . . . . . . . . . . . 14
Opladningstider for håndsæt
Opladningstilstand (batterier)
. . 38
. . .8
P
Pakkens indhold . . . . . . . . . . . . . . . .7
Pleje af telefonen
. . . . . . . . . . . . . 36
R
Ringetone
indstille lydstyrke
. . . . . . . . . . . 29
indstilling af melodi. . . . . . . . . 29
S
service . . . . . . . . . . . . . . . . . . . . . . . 36
Servicetoner. . . . . . . . . . . . . . . . . . 31
Signaltone se Servicetoner
Sikkerhedsanvisninger
. . . . . . . . . .5
Skift displaysprog. . . . . . . . . . . . . 24
Sprog se Skift displaysprog
Standardskrift (tabel)
Store tal
. . . . . . . . . . . . . . . . . . . . . . 26
. . . . . . . . . 39
Strømforsyning . . . . . . . . . . . . . . . . .5
T
Talelydstyrke . . . . . . . . . . . . . . . . . 27
håndsæt. . . . . . . . . . . . . . . . . . . . 27
Talindtastning
Tastetr yk
Tegnsættab el . . . . . . . . . . . . . . . . . 39
Tekniske data
Telefonbog
gem telefonnummer
kopiere og redigere opslag
slette opslag
vise og redigere opslag. . . . . . 18
Telefonen, bruge
besvar opkald
eksternt . . . . . . . . . . . . . . . . . . . . 14
internt
Telefonnummer
gemme (telefonbog)
overføre fra
telefonbogen
Tilbehør
. . . . . . . . . . . . . . 2, 39
. . . . . . . . . . . . . . . . . . . . . 31
. . . . . . . . . . . . . . . . . 38
. . . . . . . . 17
. . 18
. . . . . . . . . . . . . . . . 18
. . . . . . . . . . . . . . . 14
. . . . . . . . . . . . . . . . . . . . . . 15
. . . . . . . . 17
. . . . . . . . . . . . . 21
. . . . . . . . . . . . . . . . . . . . . . 41
Tone
batteritone
bekræftelse
. . . . . . . . . . . . . . . . . . 31
. . . . . . . . . . . . . . . . . 31
fejltone . . . . . . . . . . . . . . . . . . . . . 31
V
Vis nummer. . . . . . . . . . . . . . . . . . . 33
43
Page 89

s
Be inspired
SUOMI
Page 90

Yleiskuva luurista
Yleiskuva luurista
SOS-/pikavalintanäppäin (I)
Ohjausnäppäimet
◆ liikkuminen
◆ äänenvoimak-
kuus
Puhelunäppäin
◆ puheluun
vastaaminen
◆ valinnan aloitus
◆ vaihto
Uud.val MENU
handsfree-toiminnosta kuulokkeen käyttöön
Handsfree-näppäin
vaihto kuulokkeen
käytöstä handsfreetoimintoon
Tähtinäppäin
◆ soittoäänet päälle/
pois päältä
(paina pitkään)
◆ syötettäessä tekstiä:
Mikrofoni
vaihto isojen kirjainten, pienten kirjainten ja numeroiden
välillä
=
Pikavalintanäppäimet (II - IV)
Akun latausaste
Näyttö
ja symbolit
Toimintonäppäimet
Toimintonäppäimillä voit valita näytöllä näkyviä toimintoja.
Lopetus- ja
virtanäppäin
◆ puhelun lopetus
◆ toiminnon
keskeytys
(paina lyhyesti)
◆ luuri päälle/pois
päältä
(paina pitkään)
2
Page 91

Sisällysluettelo
Sisällysluettelo
Yleiskuva luurista . . . . . . . . . . . . . . . . . . . . . . . . . . . . . . . . . . 2
Turvaohjeet . . . . . . . . . . . . . . . . . . . . . . . . . . . . . . . . . . . . . . . 5
Gigaset E 1 -luurin erikoisuudet . . . . . . . . . . . . . . . . . . . . . . . 6
Puhelimen käyttöönotto . . . . . . . . . . . . . . . . . . . . . . . . . . . . . 7
Akkujen asettaminen luuriin . . . . . . . . . . . . . . . . . . . . . . . . . . 7
Luurin rekisteröinti tukiasemaan ja akkujen lataus . . . . . . . . . . 8
Manuaalinen rekisteröinti . . . . . . . . . . . . . . . . . . . . . . . . . . . . . 9
Vyöpidikkeen kiinnitys . . . . . . . . . . . . . . . . . . . . . . . . . . . . . . . 10
Luurin kytkeminen päälle/pois päältä . . . . . . . . . . . . . . . . . . . 10
Puhelimen käyttö ja valikko-opastus . . . . . . . . . . . . . . . . . . 11
Luurin ohjausnäppäimet . . . . . . . . . . . . . . . . . . . . . . . . . . . . . 11
Toimintonäppäimet . . . . . . . . . . . . . . . . . . . . . . . . . . . . . . . . . 12
Puhelut . . . . . . . . . . . . . . . . . . . . . . . . . . . . . . . . . . . . . . . . . . 13
Ulkopuhelun soittaminen ja puhelun lopetus . . . . . . . . . . . . . 13
Puheluun vastaaminen . . . . . . . . . . . . . . . . . . . . . . . . . . . . . . 13
Handsfree-toiminto (kädet vapaana) . . . . . . . . . . . . . . . . . . . 14
Sisäpuhelun soittaminen . . . . . . . . . . . . . . . . . . . . . . . . . . . . . 14
Puhelinluettelo, pikavalintanäppäimet ja muut listat . . . . 16
Puhelinluettelo . . . . . . . . . . . . . . . . . . . . . . . . . . . . . . . . . . . . . 16
Pikavalintanäppäimet . . . . . . . . . . . . . . . . . . . . . . . . . . . . . . . 19
Valinnantoistolista . . . . . . . . . . . . . . . . . . . . . . . . . . . . . . . . . . 20
Soittajalista . . . . . . . . . . . . . . . . . . . . . . . . . . . . . . . . . . . . . . . 22
Luurin asetukset . . . . . . . . . . . . . . . . . . . . . . . . . . . . . . . . . . 23
Kielen muuttaminen . . . . . . . . . . . . . . . . . . . . . . . . . . . . . . . . 23
Päivämäärän ja kellonajan määritteleminen . . . . . . . . . . . . . . 24
Näyttötekstien suurentaminen . . . . . . . . . . . . . . . . . . . . . . . . 25
Automaattinen puheluun vastaaminen päälle/pois päältä . . . 25
3
Page 92

Sisällysluettelo
Äänenvoimakkuuden muuttaminen . . . . . . . . . . . . . . . . . . . . . 26
Soittoäänten muuttaminen . . . . . . . . . . . . . . . . . . . . . . . . . . . 28
Merkkiäänet päälle/pois päältä . . . . . . . . . . . . . . . . . . . . . . . . . 30
Profiilin valinta . . . . . . . . . . . . . . . . . . . . . . . . . . . . . . . . . . . . . 31
Soittajan puhelinnumeron ilmoitus . . . . . . . . . . . . . . . . . . . . . 32
Luurin tehdasasetusten palautus . . . . . . . . . . . . . . . . . . . . . . . 33
Liite . . . . . . . . . . . . . . . . . . . . . . . . . . . . . . . . . . . . . . . . . . . . . . 35
Puhdistusohjeet . . . . . . . . . . . . . . . . . . . . . . . . . . . . . . . . . . . . . 35
Laitteen kastuminen . . . . . . . . . . . . . . . . . . . . . . . . . . . . . . . . 35
Asiakaspalvelu (Customer Care) . . . . . . . . . . . . . . . . . . . . . . . . 35
Tekniset tiedot . . . . . . . . . . . . . . . . . . . . . . . . . . . . . . . . . . . . . . 37
Merkkitaulukko . . . . . . . . . . . . . . . . . . . . . . . . . . . . . . . . . . . . . 38
Takuuehdot . . . . . . . . . . . . . . . . . . . . . . . . . . . . . . . . . . . . . . . . 39
Lisävarusteet . . . . . . . . . . . . . . . . . . . . . . . . . . . . . . . . . . . . . . 40
Hakemisto . . . . . . . . . . . . . . . . . . . . . . . . . . . . . . . . . . . . . . . . 41
4
Page 93

Turvaohjeet
Turvaohjeet
Käytä vain mukana toimitettua verkkolaitetta, jonka
$
tyyppikoodi on merkitty tukiaseman pohjaan.
Laita luuriin vain sallittuja, ladattavia, samantyyppisiä
akkuja (s. 37). Älä koskaan käytä muita akkutyyppejä tai
tavallisia (ei-ladattavia) paristoja, koska niiden käyttö luurissa voi olla vaarallista ja aiheuttaa henkilövahinkoja.
‹
Laita ladattavat akut oikein päin luuriin (ota huomioon
akkujen napaisuus) ja käytä tämän käyttöohjeen mukaista
Œ
akkutyyppiä (katso luurin akkukotelossa olevia merkintöjä).
Puhelin voi aiheuttaa häiriöitä terveydenhuollossa käytettäviin laitteisiin. Huomioi siis ympäristön (esim. sairaalan)
tekniset rajoitukset ja vaatimukset.
Luuri voi aiheuttaa kuulolaitteessa epämiellyttävän häiriöäänen.
!
Älä sijoita tukiasemaa kylpyhuoneeseen (s. 35). Luuri ja
tukiasema eivät ole roiskevesisuojattuja.
Älä käytä puhelinta räjähdysalttiissa ympäristössä (esim.
lakkaamossa).
Kun luovutat Gigaset-puhelimen toiselle henkilölle, anna
ƒ
myös käyttöohje.
Toimita vanhat akut ja puhelin asianmukaisiin keräyspisteisiin ympäristömääräysten mukaisesti.
i
Tässä käyttöohjeessa on kuvattu myös toimintoja, jotka
eivät välttämättä ole käytettävissä kaikissa maissa.
5
Page 94

Gigaset E 1 -luurin erikoisuudet
Gigaset E 1 -luurin erikoisuudet
◆ isot näppäimet
◆ näytöllä isot tekstit ja symbolit
◆ lisätoiminto “Isot kirjasimet” (normaalia suurempi tekstikoko)
◆ pikavalintanäppäimet
◆ handsfree-toiminto (kädet vapaana)
◆ puhelinnumeron ilmoitus (vain CLIP-toiminnolla)
– tulevissa puheluissa
– soittajalistalla
◆ profiilit tietyille asetuksille
–näyttö
– äänet
–syöttö
◆ ohjausnäppäimet äänenvoimakkuuden säätämistä varten
◆ mahdollisuus muuttaa asetuksia:
– äänenvoimakkuus
– soittoäänen sävel
– näppäinäänet
– kuittausäänet
◆ nappikuuloke-/sankaluuriliitäntä (nappikuuloke/sankaluuri ei
sisälly toimitukseen)
6
Page 95

Puhelimen käyttöönotto
Puhelimen käyttöönotto
Pakkauksen sisältö: Gigaset E 1 -luuri, laturi, verkkolaite ja sähköjohto, luurin vyöpidike, kaksi akkua ja käyttöohje.
Suojakalvon poisto
Näyttö on suojattu suojakalvolla. Vedä suojakalvo pois näytön
päältä.
Akkujen asettaminen luuriin
◆ Laita akut akkukoteloon oikein päin – katso vasen kuva.
◆ Aseta kansi akkukotelon päälle noin kolmen millimetrin pää-
hän yläreunasta ja työnnä kantta ylöspäin, kunnes se napsahtaa kiinni.
◆ Avaa kansi painamalla kannen karhennusta ja työntämällä
kantta alaspäin.
Käytä vain Siemensin suosittelemia (s. 37), ladattavia
akkuja. Älä koskaan käytä tavallisia (ei-ladattavia)
paristoja tai muita akkutyyppejä, sillä niiden käyttö luu-
W
rissa voi olla vaarallista ja aiheuttaa henkilö- tai aineellisia vahinkoja (esim. pariston tai akun kuori voi vioittua). Lisäksi laitteen toiminnassa voi esiintyä ongelmia
tai laite voi vioittua.
7
Page 96
Puhelimen käyttöönotto
Luurin rekisteröinti tukiasemaan ja akkujen lataus
Kun asetat luurin E 150 -tukiasemaan, luuri rekisteröityy automaattisesti tukiasemaan. Toimi seuraavasti:
1. Laita luuri näyttö ylöspäin tukiasemaan.
2. Odota, kunnes luuri on automaattisesti rekisteröitynyt tukiase-
maan. Automaattinen rekisteröityminen kestää noin minuu-
tin. Sen aikana näytöllä vilkkuu teksti Rekisteröityminen.
Rekisteröitymisen jälkeen näyttö siirtyy valmiustilaan.
3. Jätä luuri nyt akkujen latautumista varten laturiin, sillä akut eivät ole toimitustilassa ladattuja. Akkujen latautuessa luurin
näytön oikeassa yläkulmassa näkyvä akkusymboli vilkkuu.
Mikäli automaattinen rekisteröinti keskeytyy jostain syystä, voit
rekisteröidä luurin manuaalisesti (katso s. 9).
On suositeltavaa ladata akkuja ensimmäisellä kerralla
W
keskeytyksettä viisi tuntia – latauksen symbolista riippumatta. Akkujen latauskapasiteetti vähenee teknisistä syistä ajan myötä.
Akkujen latausaste näkyy oikein vain keskeytymättömän
lataus-/purkuvaiheen jälkeen. Sen vuoksi akkuja ei pidä turhaan
poistaa akkukotelosta, eikä keskeyttää latausta liian aikaisin.
◆ Akkujen latausaste näkyy vain
– latauksen aikana
– kun akut ovat tyhjät
◆ Kun akut ovat melkein tyhjät, kuulet akun varoitus-
äänen (mikäli kytketty päälle, s. 30). Kun luuri on
i
8
valmiustilassa, näytöllä vilkkuu lisäksi =-symboli ja
lukee Akku tyhjä. Lataa akku..
◆ Ensimmäisen latauskerran jälkeen voit laittaa luurin
jokaisen puhelun jälkeen takaisin laturiin. Akkuja ei
yliladata.
◆ Akut lämpenevät latauksen aikana. Se on normaalia
ja vaaratonta.
Page 97

Puhelimen käyttöönotto
Manuaalinen rekisteröinti
Mikäli automaattinen rekisteröinti keskeytyy jostain syystä, tai jos
haluat käyttää E 1 -luuria jossain muussa GAP-tukiasemassa,
sinun on rekisteröitävä luuri manuaalisesti. Gigaset E 1 -luurin voi
rekisteröidä vain yhteen tukiasemaan.
Luurin rekisteröintiä varten on suoritettava tiettyjä toimenpiteitä
sekä luurilla että tukiasemassa.
1. Luurilla
§MENU§
[_________________________________________]
s Asetukset
§OK§
[_________________________________________]s Luuri
§OK§
[_________________________________________]s Rekisteröi luuri
§OK§
~ §OK§
2. Tukiasemassa
Lue tukiaseman käyttöohjeesta, mitä rekisteröintitoimenpiteitä
tukiasemassa pitää tehdä.
Avaa valikko painamalla toimintonäppäintä.
Valitse ja vahvista.
Valitse ja vahvista.
Valitse ja vahvista.
Näppäile tukiaseman järjestelmä-PIN
(0000) ja vahvista.
9
Page 98

Puhelimen käyttöönotto
Vyöpidikkeen kiinnitys
Paina vyöpidike luurin taakse siten, että pidikkeen hakaset kiinnittyvät luurin sivuilla oleviin syvennyksiin. Lisäksi voit kiinnittää hihnan, jotta luuria voisi kuljettaa kädessä tai kaulassa.
Luurin kytkeminen päälle/pois päältä
Kytke luuri päälle painamalla lopetusnäppäintä a. Kuulet kuittausäänen (nouseva sävel). Kun laitat pois päältä kytketyn luurin
laturiin, se kytkeytyy automaattisesti päälle.
Kytke luuri pois päältä painamalla valmiustilassa lopetusnäppäintä a pitkään (kuittausääni).
10
Page 99
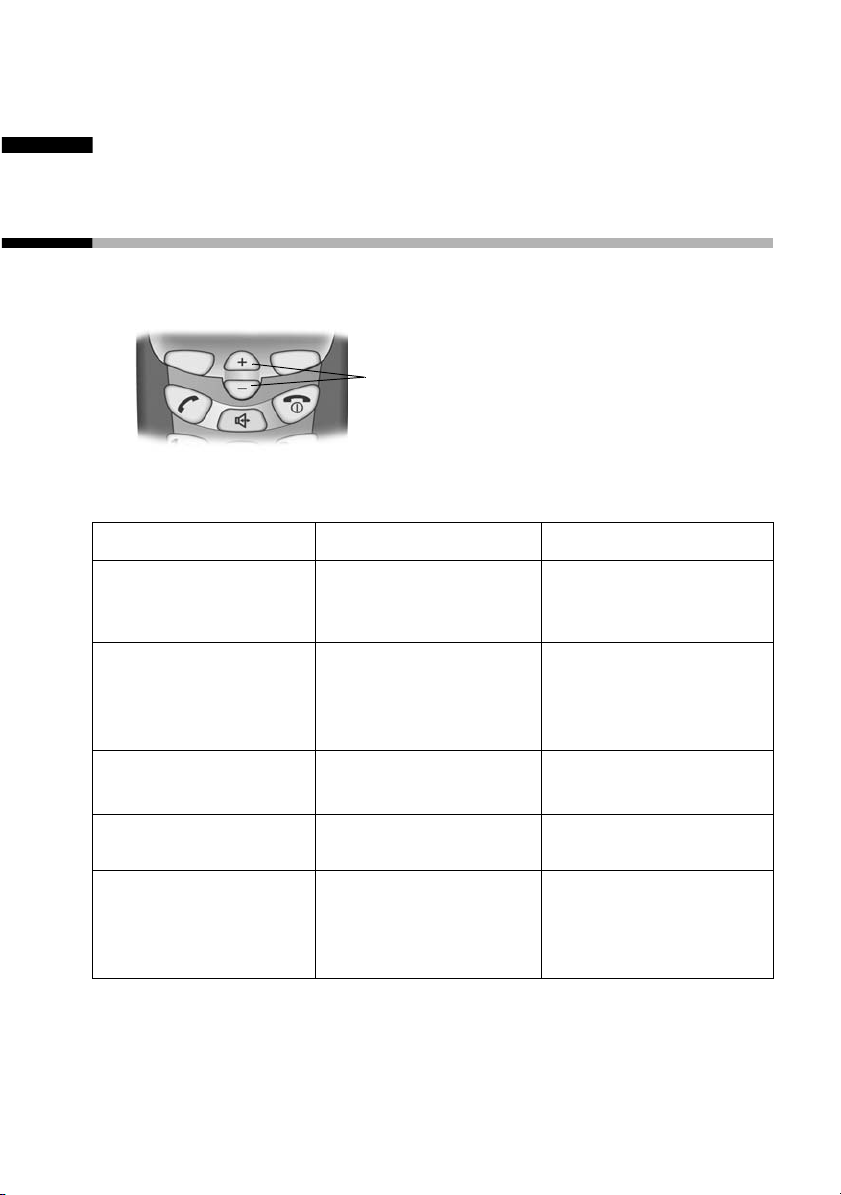
Puhelimen käyttö ja valikko-opastus
Puhelimen käyttö ja valikko-opastus
Luurin ohjausnäppäimet
Ohjausnäppäimillä voidaan suorittaa eri toimintoja luurin käyttötilanteesta riippuen.
ohjausnäppäimet
Ohjausnäppäinten toiminnot:
t s
Valmiustilassa ja
luurin soidessa
Puhelun aikana
Listoissa ja valikoissa
Syöttökentässä
Handsfree-tilassa
(kädet vapaana)
Soittoäänen voimakkuuden säätäminen
kovemmalle.
Kuulokkeen äänenvoimakkuuden säätäminen kovemmalle.
Siirtyminen ylöspäin.
Kohdistimen siirtäminen vasemmalle.
Kaiuttimen äänenvoimakkuuden säätäminen kovemmalle.
Soittoäänen voimakkuuden säätäminen
hiljaisemmalle.
Kuulokkeen äänenvoimakkuuden säätäminen hiljaisemmalle.
Siirtyminen alaspäin.
Kohdistimen siirtäminen oikealle.
Kaiuttimen äänenvoimakkuuden säätäminen hiljaisemmalle.
11
Page 100

Puhelimen käyttö ja valikko-opastus
Toimintonäppäimet
Näytön alla olevat oikea ja vasen näppäin ovat toimintonäp-
päimiä. Niiden toiminto vaihtelee käyttötilanteesta riippuen. Käytettävissä oleva toiminto näkyy näytöllä suoraan toimintonäppäimen yläpuolella. Mikäli sinun on kyseisessä tilanteessa mahdollista selata listaa, näytölle ilmestyy lisäksi symboli å.
Kuva:
Uud.val MENU
toimintonäppäimet
Näytöllä näkyvät tekstit ja symbolit tarkoittavat:
Näyttö Merkitys
§Vastaa§
§Äänet.§
§Uud.val§
§OK§
§MENU§
å
§Paluu§
§Poista§
Vastaaminen puheluun.
Luurin soittoäänen kytkeminen pois päältä.
Valinnantoisto: kymmenen viimeksi valittua
puhelinnumeroa sisältävän listan avaaminen.
Valikkotoiminnon hyväksyminen tai syötteen
tallennus.
Valmiustilassa päävalikon avaaminen.
Puhelun aikana tilannekohtaisen valikon
avaaminen.
Mahdollisuus siirtyä ylös-/alaspäin (selata vaihtoehtoja) näppäimillä t s.
Paluu edelliselle valikkotasolle tai tapahtuman
keskeytys.
Syötteen poisto merkki kerrallaan oikealta
vasemmalle.
12
 Loading...