

Siemens G2257 Installation Instructions Manual
CE1G2257xx 29.08.2002 1/18
G2257
REV16
Installationsanleitung Installation instructions
Instructions d’installation Istruzioni di montaggio
Instrucciones de montaje Installatie-aanwijzing
Installationsanvisning Installationsvejledning
Telepítési leírás Instrukcja montażu i uruchomienia
Montážní návod Οδηγίες εγκατάστασης
A
B
C
D
E
F
2/18 29.08.2002 CE1G2257xx
G
/ 4.2.1
1.
2.
1.
CLICK
2.
+
3.
CLICK
/ 4.2.2
/ 4.2.3
/ 4.2.3
°C
t
2211Z16
12 min
°C
t
2211Z16
PID 12
6 min
°C
t
2211Z16
PID 6
°C
t
0,5 °C
2211Z16
/ 4.2.4
CE1G2257xx 29.08.2002 3/18
Inbetriebsetzung
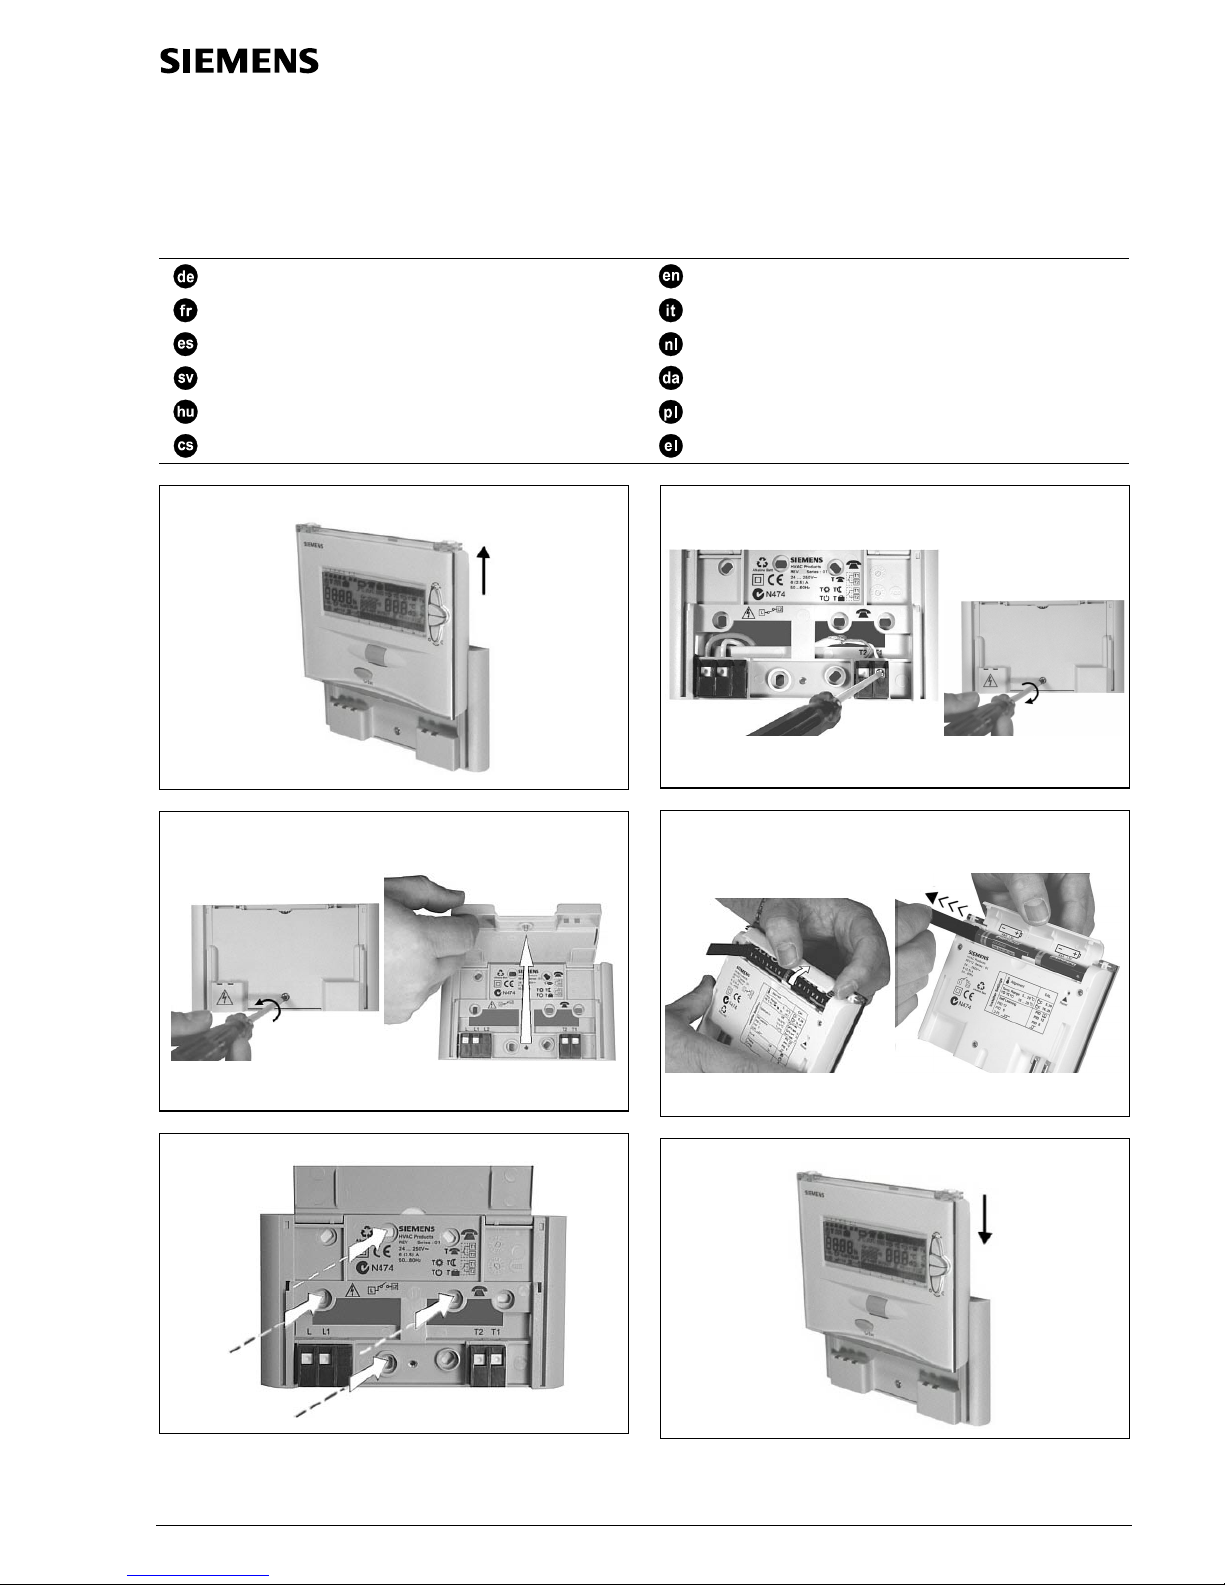
1 Montage
Gerät vom Sockel entfernen, Vorgehen gemäss Bild A. Für
die Montage Bilder B und C, siehe auch Montagehinweise
2 Verdrahtung prüfen
Die Anschlüsse sind im Kapitel "Anschlussschaltplan"
ersichtlich.Siehe auch Bild D.
Hinweis: Keine Litzen verwenden, nur Volldraht oder
Litzen mit Aderendhülsen.
3 Isolierstreifen entfernen
Sobald der schwarze Isolierstreifen am Batteriekontakt
entfernt wird, ist das Gerät in Betrieb. Siehe auch Bilder E.
4 Konfiguration
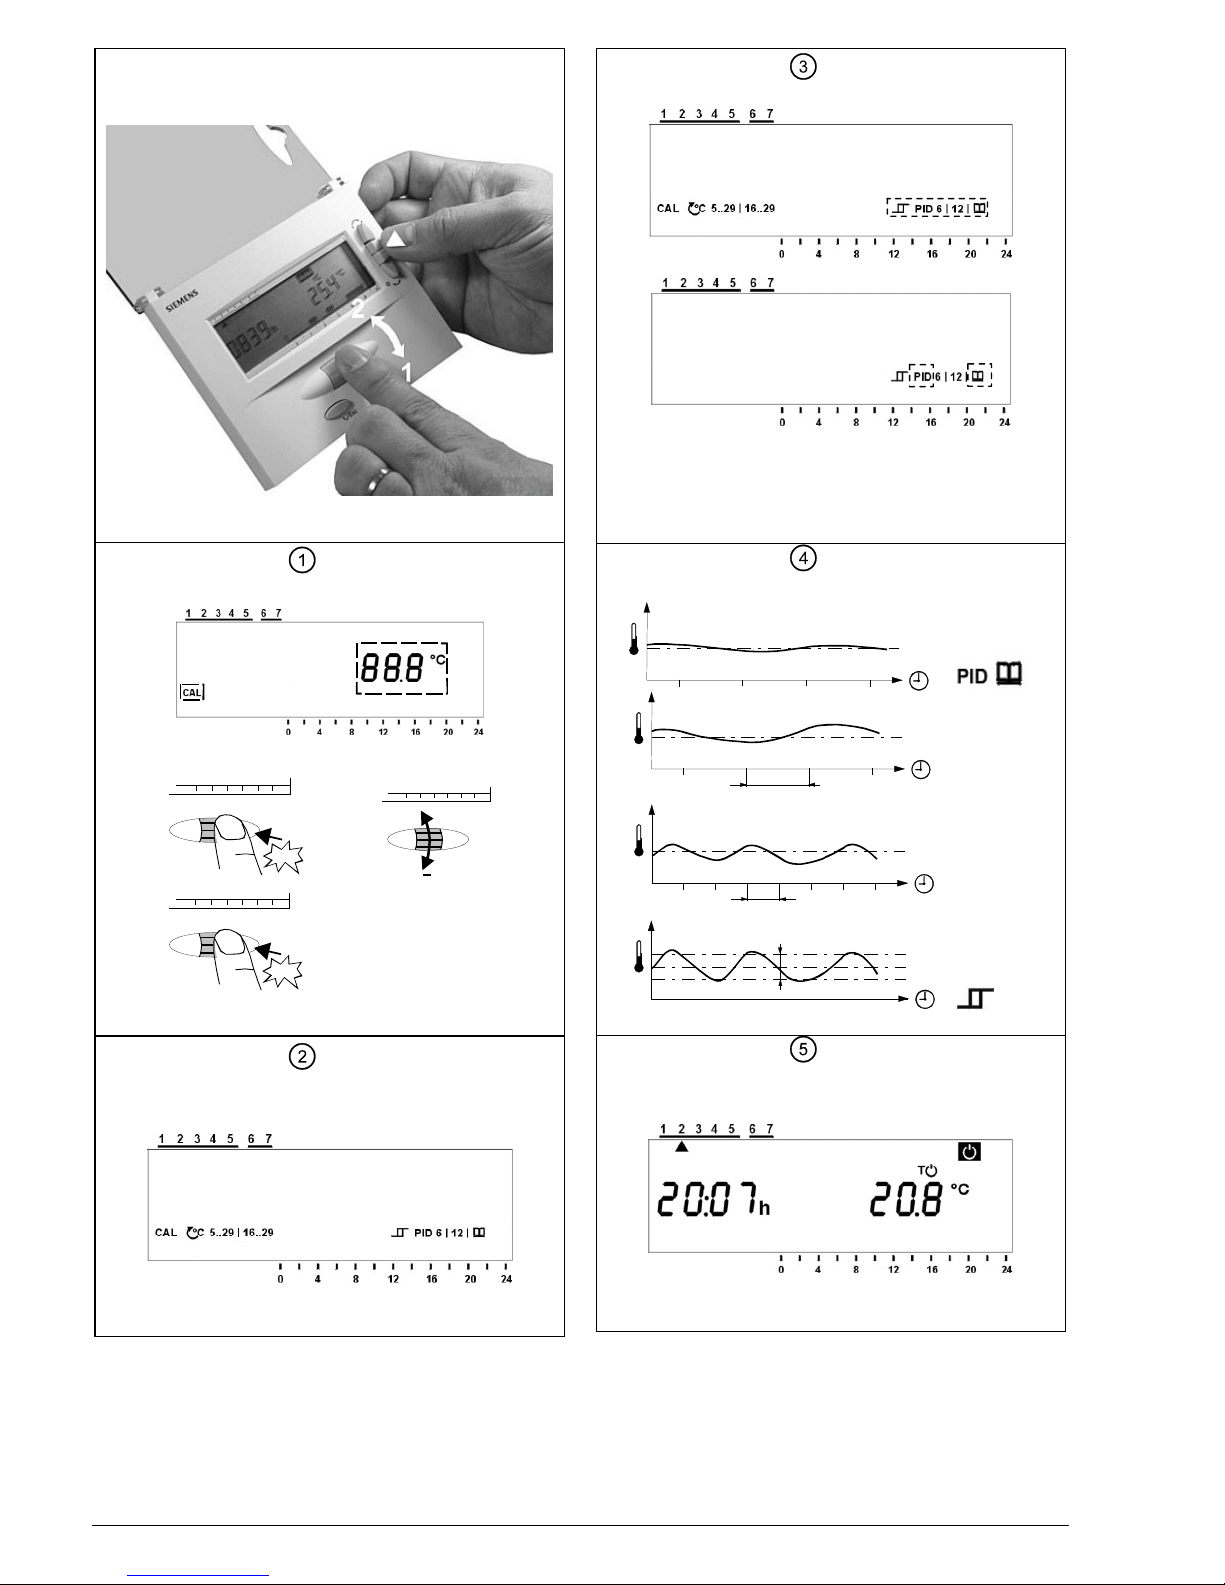
4.1 Einstieg in die Fachmannebene
Durch gleichzeitiges Drücken der Wärmer- und Kältertaste
sowie Rollen am Rollwahlschalter zuerst vom Display weg
und anschliessend gegen das Display, wird die
Fachmannebene freigegeben. Siehe auch Bild G.
4.2 Diverse Funktionen
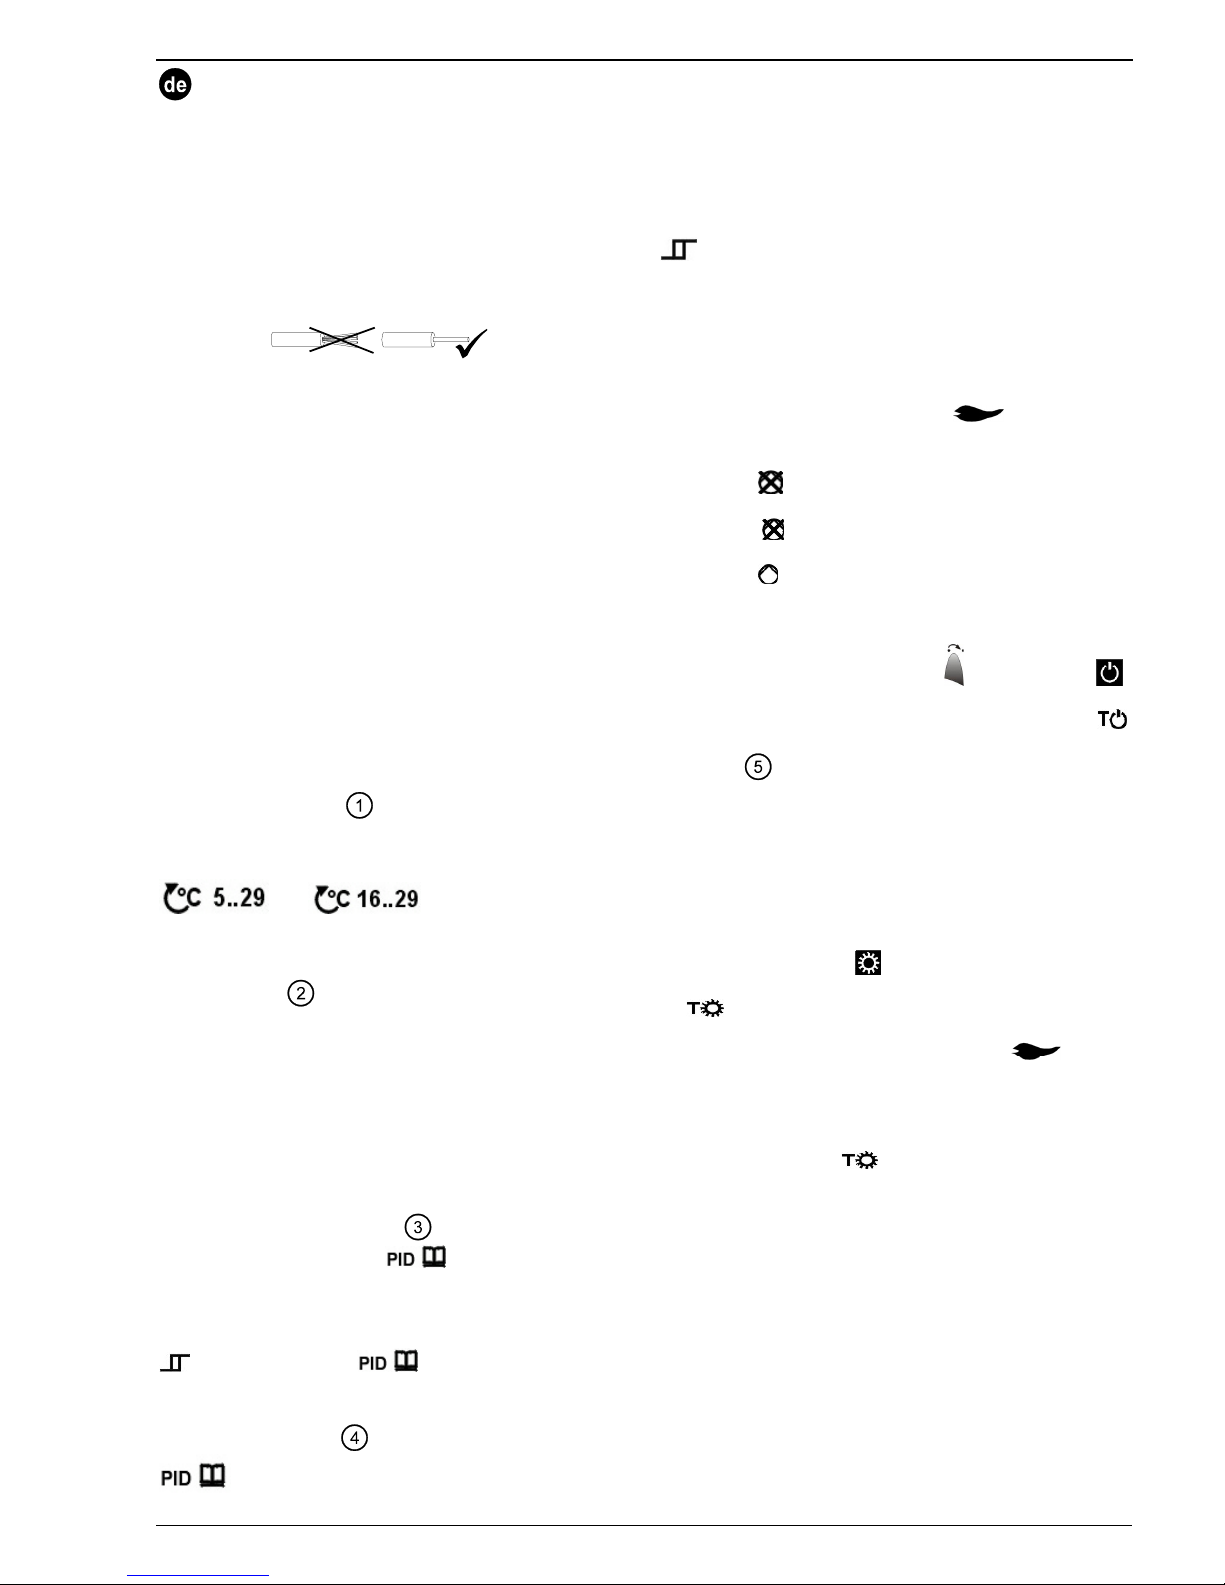
4.2.1 Fühler kalibrieren
Nach dem Aktivieren der Fachmannebene blinkt das
Symbol CAL. Durch Drücken auf den Rollwahlschalter
blinkt die aktuell gemessene Temperatur und kann nun
durch Rollen gegen das Display oder vom Display weg, um
max. ± 2 °C neu kalibriert werden. Eingabe speichern mit
einem Druck auf den Rollwahlschalter
(siehe auch Abbildung
).
4.2.2 Sollwert-Begrenzung
2 Einstellmöglichkeiten
oder
In der Fachmannebene kann vom blinkenden CAL Symbol
mit einer Rollbewegung gegen das Display auf das
Sollwertbegrenzungssymbol gewechselt werden (siehe
auch Abbildung
).
Durch Drücken akzeptieren. 5...29 °C blinkt
(Werkseinstellung). Durch Drücken akzeptieren oder mit
einer Rollbewegung weiter.
Es blinkt die Einstellung 16...29 °C.
Durch Drücken akzeptieren.
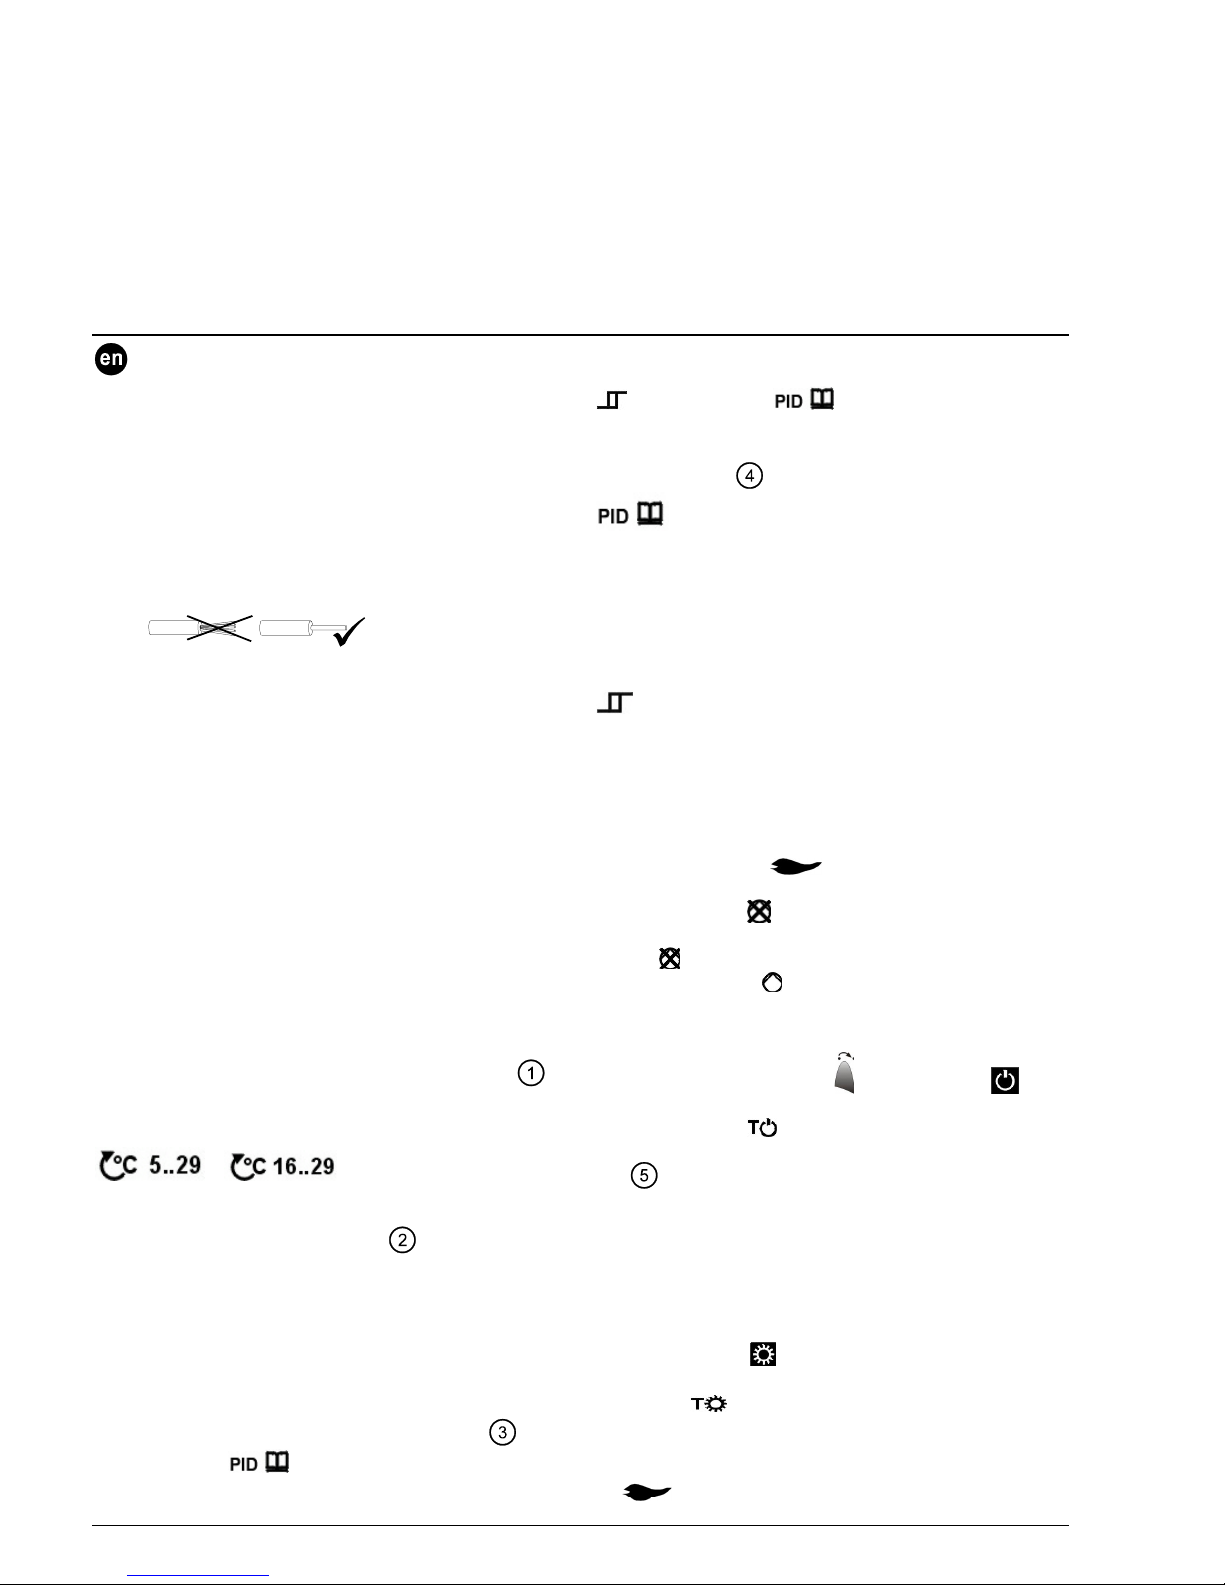
4.2.3 Regelverhalten
In der Fachmannebene kann vom blinkenden CAL Symbol
mit mehreren Rollbewegungen gegen das Display auf die
Symbole der verschiedenen Regelalgorithmen gewechselt
werden (siehe auch Abbildung
).
Durch Drücken akzeptieren.
(Werkseinstellung)
blinkt. Durch Drücken akzeptieren oder mit jeder weiteren
Rollbewegung gegen das Display die folgenden
Regelverhalten anwählen:
, PID 6, PID 12 oder . Gewünschtes
Regelverhalten durch Drücken akzeptieren.
Beschreibung des Regelverhaltens siehe anschliessend.
(siehe auch Abbildung
).
Self learning Adaptive Regelung:
Für alle Anwendungen (Werkseinstellung).
PID 12 Normale Regelstrecke:
Für Anwendungen an Orten mit normalen
Temperaturschwankungen.
PID 6 Schnelle Regelstrecke:
Für Anwendungen an Orten mit grossen
Temperaturschwankungen.
Schwierige Regelstrecke:
Reiner Zweipunktregler mit 0,5 °C Schaltdifferenz.
4.2.4 Periodischer Pumpenlauf
Diese Funktion schützt die Pumpe während längeren AUSPerioden vor einem möglichen Festsitzen. Der periodische
Pumpenlauf wird alle 24 Stunden um 12:00 Uhr für eine
Minute aktiviert (auf dem Display erscheint während dem
aktiven Pumpenlauf das Heizsymbol
).
In der Fachmannebene kann vom blinkenden CAL
Symbol mit einer Rollbewegungen vom Display weg auf
das Symbol
gewechselt werden (Werkseinstellung
periodischer Pumpenlauf AUS). Durch Drücken
akzeptieren.
blinkt (Werkseinstellung), durch Drücken
akzeptieren oder mit einer Rollbewegung weiter. Es blinkt
das Symbol
periodischer Pumpenlauf EIN. Durch
Drücken akzeptieren.
4.2.5 Frostschutzbetrieb
Mit dem Betriebsartenwahlschalter
auf das Symbol
Schalten. Muss der Standardwert von 5 °C verändert
werden, wird über das Temperaturmenü T der Sollwert
für Frostschutz geändert (siehe Bedienungsanleitung und
Abbildung
).
5 Gerät wieder auf Sockel schieben
Vorgehen gemäss Bild F.
6 Funktionskontrolle
a) Anzeige kontrollieren. Erscheint keine Anzeige muss
der Einbau und die Funktion der Batterien geprüft
werden
b) Betriebsart Komfort
c) Mit dem Temperaturmenü T den Temperatursollwert
auf 29 °C einstellen (siehe Bedienungsanleitung)
d) Das Relais und somit das Stellgerät müssen spätestens
nach einer Minute schalten. Das Symbol
erscheint auf dem Display. Ist dies nicht der Fall:
• Stellgerät und Verdrahtung prüfen
• Eventuell ist die Raumtemperatur höher als 29 °C
e) Sollwerttemperatur
wieder auf den ursprünglichen
Wert zurückstellen (Standardwert 19 °C oder eigene
Einstellung)
f) Gewünschte Betriebsart wählen
7 Reset
Benutzerdefinierte Daten:
Taste hinter der Nadelöffnung mindestens eine Sekunde
drücken: Dadurch werden die benutzerspezifischen
Einstellungen auf ihre Standardwerte zurückgesetzt (die
„Fachmann“-Einstellungen bleiben unverändert). Die Uhr
beginnt bei 12:00. Während der Resetzeit leuchten alle
Anzeigefelder des Displays, und können so überprüft
werden.
Alle benutzerdefinierten Daten plus Heizfachmann Einstellungen:
4/18 29.08.2002 CE1G2257xx
Taste hinter der Nadelöffnung zusammen mit der Wärmerund Kältertaste mindestens eine Sekunde drücken.
Nach diesem Reset werden die Werkseinstellungen neu
geladen (siehe auch Abschnitt „Werkseinstellungen“ in der
Bedienungsanleitung).
8 Hinweise
• REV16 ist ein elektronischer Raumtemperaturregler mit
Wochenschaltuhr.
• Der Regler gehört zur Softwareklasse A und ist für den
Gebrauch in einer Umgebung mit normalem
Verschmutzungsgrad vorgesehen.
• Sollten im Referenzraum thermostatische
Heizkörperventile installiert sein, müssen diese
vollständig geöffnet werden
• Der Fernbedienungskontakt muss getrennt, d.h. mit
einem separaten, abgeschirmten Kabel verdrahtet
werden
• Die örtlichen Vorschriften für Elektroinstallationen sind
einzuhalten
Commissioning
1 Mounting
Remove controller from its base by proceed according to
Fig. A.
For mounting, refer to Figs. B and C and “Mounting notes“.
2 Check wiring
For the electrical connections, refer to “Connection
diagram“ (also refer to Fig. D).
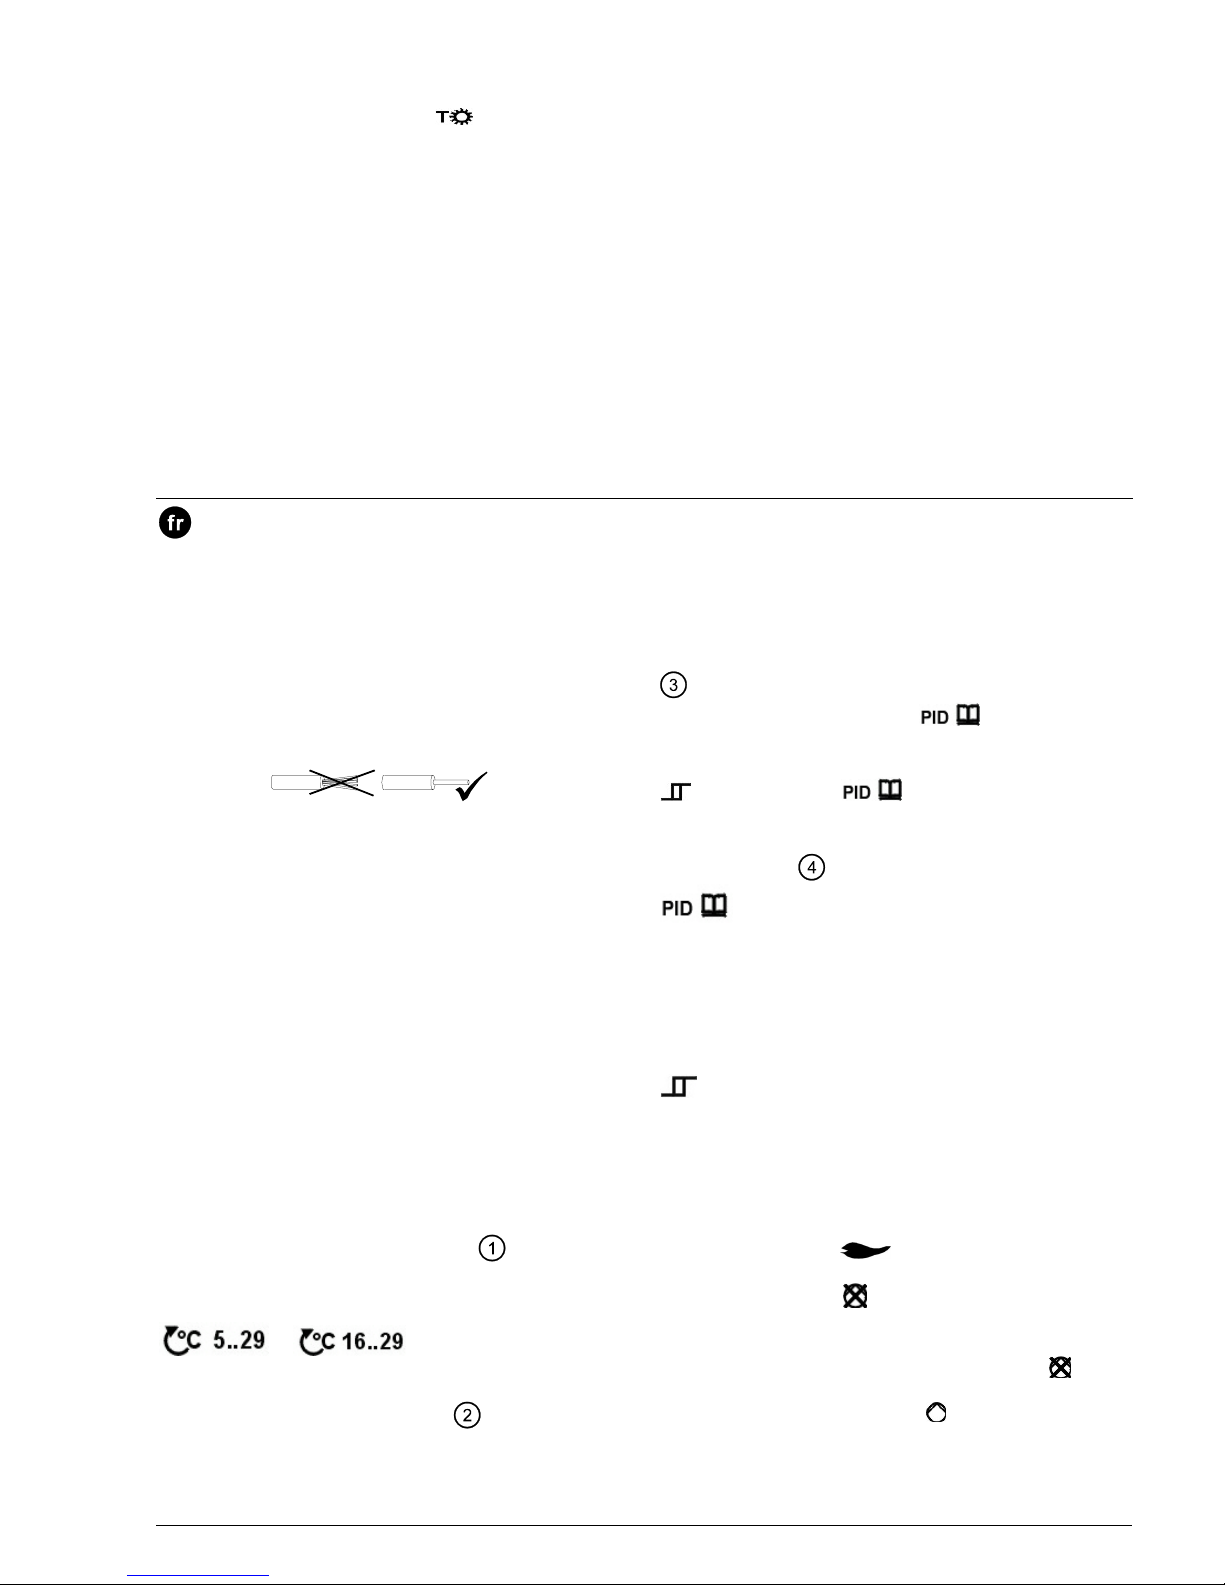
Note: do not use stranded wires, only solid wires or
stranded wires with ferrules.
3 Remove the battery transit tab
As soon as the battery transit tab is removed, the controller
starts to operate (also refer to Figs. E).
4 Configuration
4.1 Accessing the heating engineer level
The heating engineer level will be enabled by pressing
simultaneously the warmer and colder buttons and by
rolling the roller selector away from the display and then
toward the display (also refer to Fig. G).
4.2 Functions
4.2.1 Calibrating the temperature sensor
After activating the heating engineer level, the CAL symbol
will flash. When pressing the roller selector, the room
temperature currently measured flashes and can now be
recalibrated by a maximum of ± 2 °C by rolling either
toward the display or away from it. To store the re-
calibration, press the roller selector (also refer to Fig.
).
4.2.2 Setpoint limitation
There are 2 setting choices available:
or
On the heating engineer level, change from the flashing
CAL symbol to the setpoint limitation symbol by rolling
toward the display. (also refer to Fig.
).
Press to accept. 5...29 °C will flash (factory setting). Press
to accept or continue rolling.
Setting 16...29 °C will flash.
Press to accept.
4.2.3 Control mode
On the heating engineer level, change from the flashing
CAL symbol to the symbols of the various control modes
by rolling away from the display (also refer to Fig.
).
Press to accept.
(factory setting) will flash. Press
to accept (Fig. 3) or continue rolling toward the display to
select one of the following control modes:
, PID 6, PID 12 or . Press to accept the
required control mode.
A brief description of the control modes is given below
(also refer to Fig.
).
Self-learning, adaptive control:
Suited for all standard applications (factory
setting).
PID 12 Normal controlled systems:
For locations with normal temperature variations.
PID 6 Fast controlled systems:
For locations with significant temperature
variations.
Difficult controlled systems:
Proper on / off controller with a switching
differential of 0.5 C.
4.2.4 Periodic pump run
This function protects the pump against seizing during
longer off periods. Periodic pump run is activated for a
minute every 24 hours at 12:00 (when pump run is activated, the flame symbol
appears on the display).
On the heating engineer level, change from the flashing
CAL symbol to the
symbol by rolling once away from
the display (factory setting, periodic pump run off). Press to
accept.
will flash (factory setting). Press to accept or
continue rolling. The
symbol for periodic pump run on
will flash. Press to accept.
4.2.5 Frost protection mode
Use operating mode selector
to select symbol . If
the standard value of 5 °C need to be changed, the frost
protection setpoint
must be changed via temperature
menu T (refer to the Operating Instructions and also to
Fig.
).
5 Replacing the controller on its base
Proceed according to Fig. F.
6 Functional check
a) Check the display. If there is no display, check the
correct fitting and function of the batteries.
b) Comfort mode
c) Select temperature menu T and adjust the temperature
setpoint
to 29 °C (refer to the Operating
Instructions)
d) The relay must be energized and thus the actuating
device activated within one minute. Flame symbol
will appear on the display. If that is not the case:
CE1G2257xx 29.08.2002 5/18
• Check actuating device and wiring
• The room temperature is possibly above 29 °C
e) Reset the setpoint temperature
to the initial value
(standard value 19 °C or individual setting)
f) Select the required operating mode
7 Reset
User-defined data:
Press the button behind the pin opening for at least one
second: this resets the user-specific settings to their
default values (the heating engineer settings will not be
changed). The clock starts at 12:00. During the reset time,
all sections of the display light up, enabling them to be
checked.
All user-defined data plus the heating engineer
settings:
Press the button behind the pin opening together with the
warmer and colder buttons for at least one second.
After this reset, the factory settings will be reloaded (also
refer to section “Factory settings“ in the operating
instructions).
8 Notes
• REV16 is an electric weekly programmable room
temperature controller.
• The controler conforms to “Software Class A” and is for
use in “normal” pollution situation.
• If the reference room is equipped with thermostatic
radiator valves, they must be set to their fully open
position
• The remote operation contact must be wired with a
separate shielded cable
• Ensure that the local safety regulations and standards
for electrical installations are complied with
Mise en service
1 Montage
Retirer l'appareil de son socle. Procédez comme indiqué
dans la figure A. Pour le montage référez-vous aux figures
B et C, ainsi qu'aux instructions de montage.
2 Vérifier le câblage
Les raccordements peuvent être consultés au chapitre
"Schéma de raccordement". Voir également schéma D.
Nota: Ne pas utiliser des câbles plats, uniquement des fils
ronds ou des câbles avec embouts préfabriqués.
3 Retirer la bande d'isolante
Dès que la bande d'isolation est retirée du contact de
batterie, l'appareil se met en route. Voir également
schéma E.
4 Configuration
4.1 Accès au niveau chauffagiste
En appyuant simultanément les touches "plus chaud" et
"plus froid" et en tournant le navigateur d'abord dans le
sens opposé de l'afficheur et ensuite en direction de
l'afficheur, l'appareil libère l'accès au niveau "chauffagiste".
Voir aussi figure G.
4.2 Différentes fonctions
4.2.1 Ajuster la sonde
Dès l'entrée au niveau chauffagiste, le symbole CAL
clignote. En appuyant sur le nvigateur la température
actuelle clignote et peut être réajustée en tournant le
navigateur de ± 2 °C max. Valider l'entrée par une pression
sur le navigateur (voir également figure
).
4.2.2 Limitation de la consigne
2 possibilités de réglage
ou
Au niveau "chauffagiste" on peut passer du symbole CAL
au symbole de limitation de consigne en tournant le
navigateur vers l'afficheur (voir aussi
).
Accepter le menu par une pression sur le navigateur.
5...29 °C clignote (réglage d'usine). Accepter par une
pression sur le navigateur et continuer en tournant celui-ci.
Le réglage 16...29 °C clignote.
Valider par une pression sur le navigateur.
4.2.3 Mode de régulation
Au niveau chauffagiste, vous pouvez accéder aux
symboles des différents algorithmes de régulation en
tournant le navigateur à partir du symbole CAL (voir figure
).
Appuyer pour accepter le menu.
(Réglage par
défaut) clignote. Pour accepter, appyuer sur le navigateur
ou continuer en le tournant en direction de l'afficheur:
, PID 6, PID 12 ou . Accepter le comportement
de réglage souhaité par pression sur le navigateur
Description du comportement de réglage voir ci-après, voir
également figure
.
Self learning Régulation auto-adaptative:
Pour toutes les applications (réglages par défaut).
PID 12 Boucle de régulation normale:
Pour applications avec variations de température
normales.
PID 6 Boucle de régulation rapide:
Pour applications avec de fortes variations de
température.
Boucle de régulation difficile:
Régulateur tout ou rien avec différentiel 0,5 °C.
4.2.4 Dégommage des pompes
Cette fonction protège la pompe du grippage pendant les
périodes d'arrêt prolongé. La relance périodique de la
pompe est activée toutes les 24 heures à 12:00 h pendant
une minute (sur l'afficheur apparaît pendant ce temps le
symbole de chauffage
).
Au niveau "chauffagiste": passez du symbole CAL
clignotant au symbole
en tournant 2 fois le navigateur
dans le sens opposé de l'afficheur (réglage par défaut :
"Relance périodique de la pompe inactive").
Accepter le menu par pression sur le navigateur.
clignote (réglage par défaut), appuyer pour accepter ou
continuer de tourner. Le symbole
"Relance périodique
de pompe active" clignote. Accepter par une pression sur
le navigateur.
6/18 29.08.2002 CE1G2257xx
4.2.5 Régime hors-gel
Positionner -vous avec le sélecteur
sur le symbole .
Si la valeur par défaut de 5 °C doit être changée, aller
dans le menu température T et y modifier
(voir mode
d'emploi et figure
).
5 Replacer l'appareil sur le socle
Procédez comme indiqué figure F.
6 Contrôle des fonctions
a) Vérifiez l'affichage. SI l'afficheur reste vide, vérifier
l'emplacement et l'état des piles
b) Régime Confort
c) Régler dans le menu température T la consigne
sur 29 °C (voir mode d'emploi)
d) Le relais et par conséquent l'appareil commandé doit
commuter voire se mettre en marche après quelques
minutes. Le symbole
apparaît sur l'afficheur. Si
cela n'est pas le cas:
• Vérifer le câblage électrique et la liaison avec
l'appareil commandé
• La température ambiante est peut-être supérieure à
29 °C
e) Remettre sur la valeur initiale (valeur par défaut
19 °C ou réglage personnalisé)
f) Sélectionner le régime désiré
7 Réinitialisation (Reset)
Données utilisateur :
En appuyant sur le micro-contact situé derrière le trou
d'épingle durant au moins 1 seconde, les réglages
spécifiques utilisateur sont ramenées à leurs valeurs
standard (les réglages "chauffagiste" restent inchangées).
L'horloge revient à 12:00. Durant le délai de réinitialisation,
tous les champs de l'afficheur sont allumés, permettant
ainsi le contrôle des valeurs.
Réinitialisation de tous les réglages chauffagiste et
spécifiques utilisateur :
Appuyer simultanément sur le micro-contact situé derrière
le trou d'épingle et sur les touches "plus chaud" et "plus
froid" durant au moins 1 seconde.
Cette réinitialisation provoque le "rechargement" des
„Réglages d'usine“ (voir également le chapitre
correspondant du mode d'emploi).
8 Remarque
• Le REV16 est un régulateur électronique de
température ambiante avec une horloge hebdomadaire.
• Il fait partie de la classe A des logiciels et est prévu
pour un fonctionnement dans un environnement avec
un dégré d'encrassement normal.
• Si dans le local de référence les radiateurs sont dotés
de vannes thermostatiques, celles-ci doivent être
entièrement ouvertes
• Le contact de commande à distance doit être câblé
séparément, c'est-à-dire avec un câble blindé
Les réglementations locales pour les installations
électriques doivent être respectées
Messa in servizio
1 Installazione
Rimuovere il regolatore dalla basetta come mostrato in
fig. A.; per l’installazione procedere facendo riferimento
alle fig. B e C.
(fare rif. alle "Note di montaggio")
2 Collegamenti elettrici
Per i collegamenti elettrici, fare riferimento alla sezione
“schema di collegamento“ (rif. Fig. D e E).
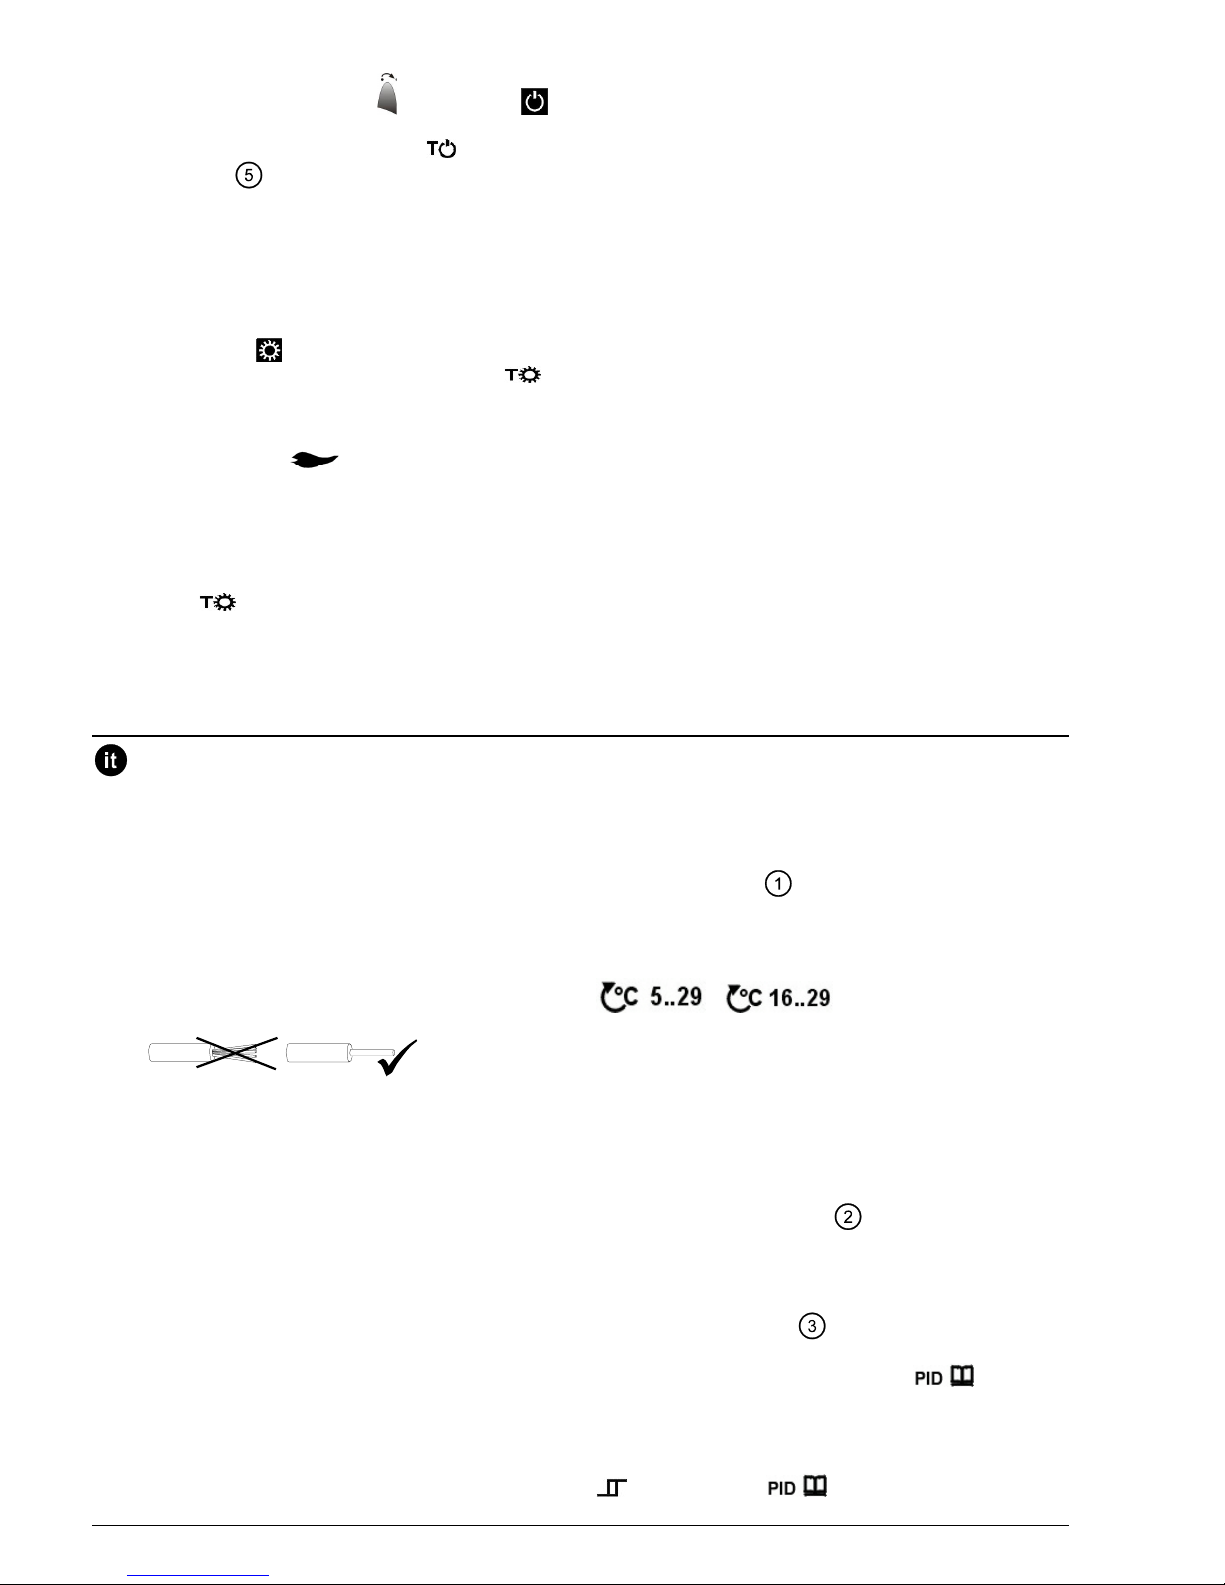
Note: si consiglia di utilizzare dei capicorda per effettuare i
collegamenti elettrici alla morsettiera del regolatore
3 Rimozione della linguetta di protezione
Rimuovendo la linguetta nera di protezione dalle batterie, il
regolatore si accende automaticamente. (rif. Fig. F).
4 Configurazione
4.1 Accesso al livello tecnico
Il livello tecnico si attiva premendo contemporaneamente i
pulsanti per la modifica del valore del setpoint (+ aumento
e - diminuzione) e facendo scorrere il tasto di scorrimento
prima verso il basso e poi verso l’alto. (rif. Fig. H).
4.2 Parametri di controllo
4.2.1 Calibrazione della sonda
Dopo aver attivato il livello tecnico, il display visualizza una
serie di parametri di controllo che possono essere
modificati. Il primo che appare, lampeggiando, sulla
sinistra è il simbolo CAL (calibrazione sonda). Premere il
pulsante di scorrimento per visualizzare la temperatura
ambiente attualmente misurata, a questo punto è possibile
ricalibrare la sonda per un massimo di ± 2 °C. Per
modificare il valore muovere il pulsante di scorrimento
verso l’alto (aumento) o verso il basso (diminuzione). Per
confermare la ricalibrazione premere il pulsante di
scorrimento. (rif. Fig.
).
4.2.2 Campo di lavoro del setpoint
Il regolatore permette di selezionare 2 differenti campi di
lavoro del setpoint:
o
Attivare il livello tecnico, una volta visualizzato a display il
simbolo CAL muovere il pulsante di scorrimento verso
l‘alto per passare al livello del campo di lavoro del setpoint.
A questo punto appare lampeggiando il campo di lavoro
5...29 °C (Impostazione di fabbrica). Premere il pulsante di
scorrimento per confermare oppure scorrere per
selezionare l’altro campo di lavoro disponibile.
L’altro campo di lavoro 16...29 °C appare lampeggiando.
Premere il pulsante di scorrimento per confermare il campo
di lavoro selezionato. (rif. Fig.
).
4.2.3 Modalità di regolazione PID
Una volta entrati nel livello tecnico, scorrere verso il basso
dal livello CAL fino ad arrivare al livello delle modalità di
regolazione PID. (rif. Fig.
).Premere il pulsante di
scorrimento per entrare nel parametro dove appare
lampeggiando il controllo autoadattante
(settaggio di fabbrica).
Premere il pulsante di scorrimento (fig.3) per confermare il
valore oppure scorrere verso il basso per selezionare una
tra le seguenti modalità di regolazione:
, PID 6, PID 12 o .
 Loading...