

Page 1

ENGLISH
MODEL
XL-DAB1H
MICRO COMPONENT SYSTEM
OPERATION MANUAL
XL-DAB1H Micro Component System consisting of XL-DAB1H (main unit) and CP-DAB1H (speaker system).
Accessory
Please confi rm that only the following accessory is
included.
Remote control x 1
Volume control
The sound level at a given volume setting depends on
speaker effi ciency, location and various other factors.
It is advisable to avoid exposure to high volume levels.
Do not turn the volume on to full at switch on. Listen to
music at moderate levels. Excessive sound pressure from
earphones and headphones can cause hearing loss.
Special note
Supply of this product does not convey a license nor imply any right to distribute content created with this product in
revenue-generating broadcast systems (terrestrial, satellite, cable and/or other distribution channels), revenue generating
streaming applications (via Internet, intranets and/or other networks), other revenue-generating content distribution
systems (pay-audio or audio-on-demand applications and the like) or on revenue-generating physical media (compact
discs, digital versatile discs, semiconductor chips, hard drives, memory cards and the like). An independent license for
such use is required. For details, please visit http://mp3licensing.com
MPEG Layer-3 audio coding technology licensed from Fraunhofer IIS and Thomson.
92L87501000701
10B R MW
1
Page 2

Special notes
WARNINGS:
When the ON/STAND-BY button is set at STAND-BY
●
position, mains voltage is still present inside the unit.
When the ON/STAND-BY button is set at STAND-BY
position, the unit may be brought into operation by
remote control.
This unit contains no user serviceable parts. Never
●
remove covers unless qualifi ed to do so. This unit
contains dangerous voltages, always remove mains
plug from the socket before any service operation and
when not in use for a long period.
To prevent fi re or shock hazard, do not expose this
●
appliance to dripping or splashing. No objects fi lled
with liquids, such as vases, shall be placed on the
apparatus.
Do not turn the volume on to full at switch on and listen
●
to music at moderate levels. Excessive sound pressure
from earphones and headphones can cause hearing
loss.
The voltage used must be the same as that specifi ed
●
on this unit. Using this product with a higher voltage
other than that which is specifi ed is dangerous and
may result in a fi re or other type of accident causing
damage. SHARP will not be held responsible for any
damage resulting from use of this unit with a voltage
other than that which is specifi ed.
CAUTION:
This product is classifi ed as a CLASS 1 LASER
●
product.
This product contains a low power laser device. To
●
ensure continued safety, do not remove any cover or
attempt to gain access to the inside of the product.
Refer all servicing to qualifi ed personnel.
Note for users in Australia:
Copyright may exist in material you wish to record. Copying
or broadcasting such material without permission of the
relevant licensees or owners of the copyright is prohibited
by law. SHARP is not in a position to authorise the copying
or broadcasting of copyright materials and nothing in this
OPERATION MANUAL should be implied as giving that
authority.
For other countries:
Audio-visual material may consist of copyrighted works
which must not be recorded without the authority of the
owner of the copyright. Please refer to the relevant laws
in your country.
E-1
Page 3
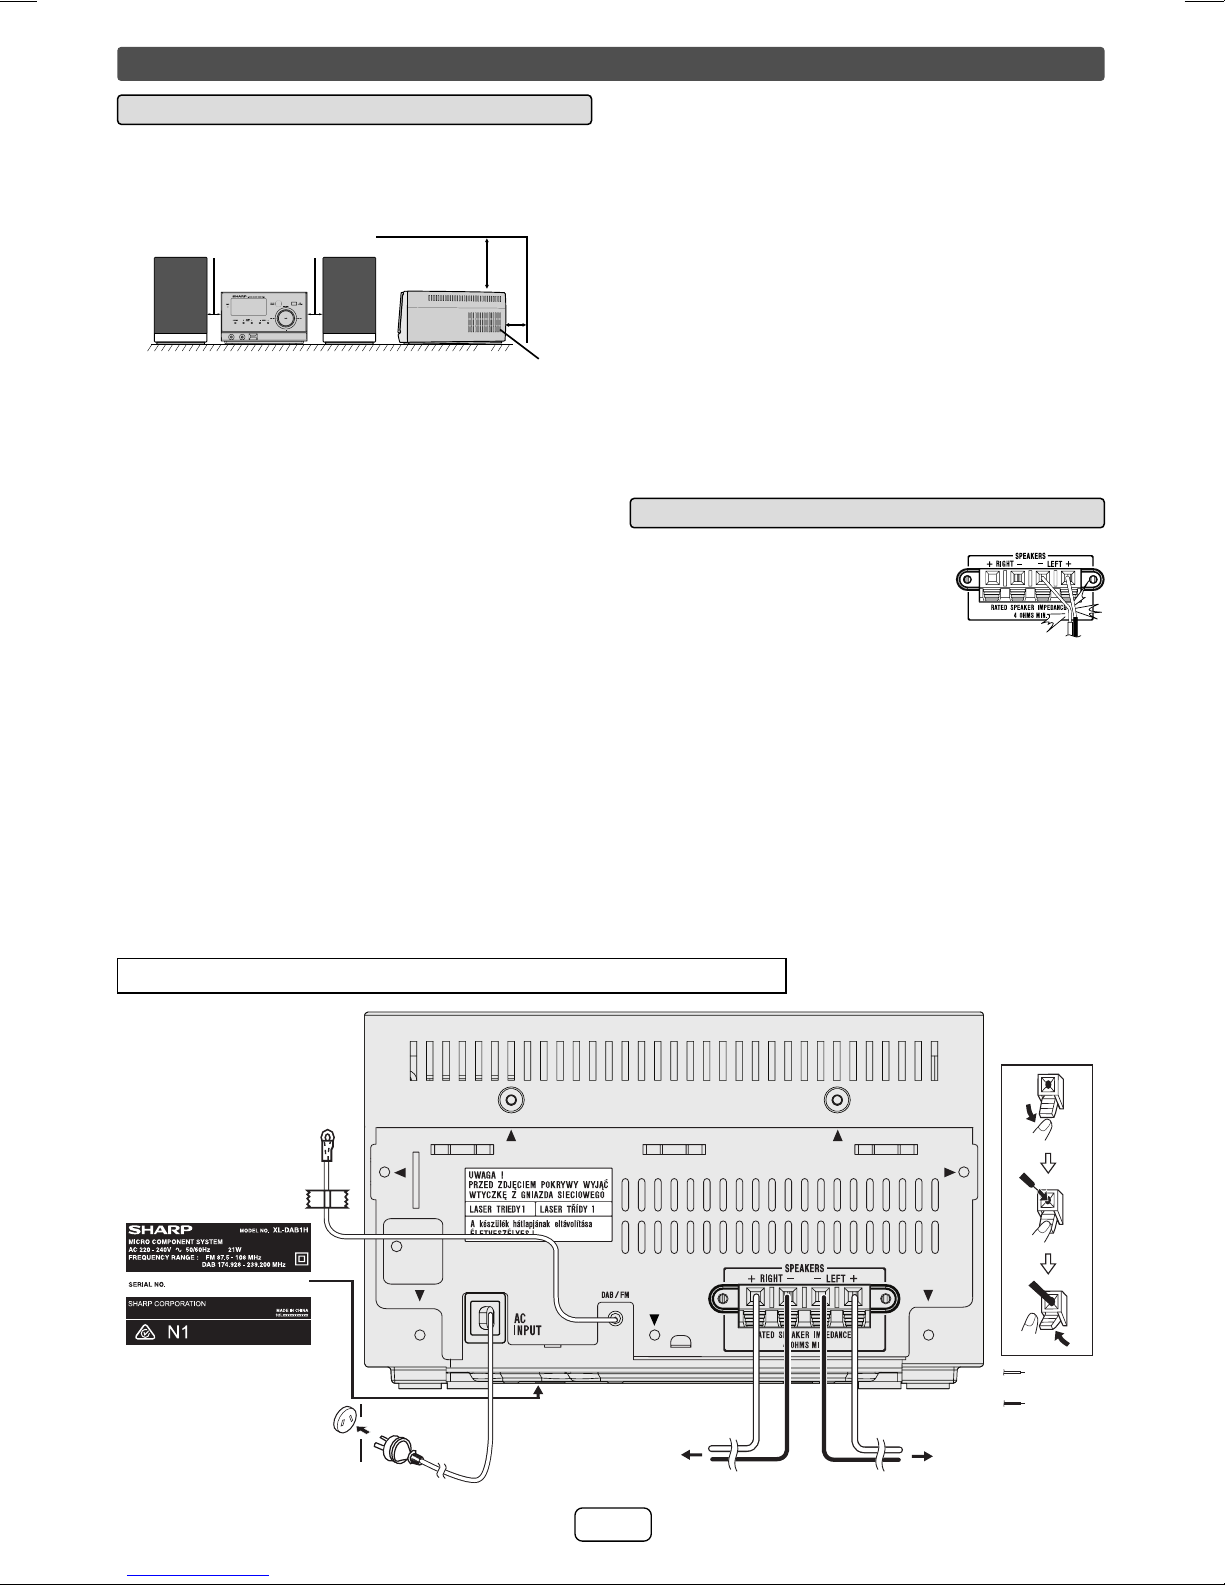
System connections
Precautions■
●
Please ensure that the equipment is positioned in a
well ventilated area and ensure that there is at least
10 cm (4”) of free space along the sides, top and back
of the equipment.
10 cm (4”) 10 cm (4”)
10 cm (4”)
10 cm (4”)
●
Use the unit on a fi rm, level surface free from
vibration.
●
Place the speakers at least 30 cm (12”) away from
any CRT TV to avoid colour variations across the TV
screen. If the variations persist, move the speakers
further away from the TV. LCD TV is not prone to such
variation.
●
Keep the unit away from direct sunlight, strong magnetic
fi elds, excessive dust, humidity and electronic/electrical
equipment (home computers, facsimiles, etc.) which
generate electrical noise.
●
Do not place anything on top of the unit.
●
Do not expose the unit to moisture, to temperatures
higher than 60°C (140°F) or to extremely low
temperatures.
●
If your system does not work properly, disconnect the
AC power lead from the wall socket. Plug the AC power
lead back in, and then turn on your system.
●
In case of an electrical storm, unplug the unit for
safety.
●
Hold the AC power plug by the head when removing it
from the wall socket, as pulling the lead can damage
internal wires.
The AC power plug is used as a disconnect device and
●
shall always remain readily operable.
Do not remove the outer cover, as this may result
●
in electric shock. Refer internal service to your
local SHARP service facility.
The ventilation should not be impeded by covering the
●
ventilation openings with items, such as newspapers,
tablecloths, curtains, etc.
No naked fl ame sources, such as lighted candles,
●
should be placed on the apparatus.
Attention should be drawn to the environmental
●
aspects of battery disposal.
This unit should only be used within the range of 5°C
●
- 35°C (41°F - 95°F).
The apparatus is designed for use in moderate
●
climates.
Speaker connection■
●
Connect the black wire to the
minus (–) terminal, and the red
wire to the plus (+) terminal.
●
Use speakers with an impedance
of 4 ohms or more, as lower
impedance speakers can
damage the unit.
Do not make a mistake when connecting the right and
●
left speakers. The right speaker is the one on the right
side when you face the unit.
●
Do not let the bare speaker wires touch each
other.
●
Do not allow any objects to fall into or to be placed in
the bass refl ex ducts.
●
Do not stand or sit on the speakers. You may be
injured.
Incorrect
Make sure to unplug the AC power cord before making any connections.
DAB/FM aerial
The spec label (*)
The spec label
illustration may be
different from the
actual label used.
(*) Label is located at
the bottom of the
unit.
Wall socket
(AC 220 - 240 V ~ 50/60 Hz)
Right
speaker
E-2
Red
Black
Left speaker
Page 4
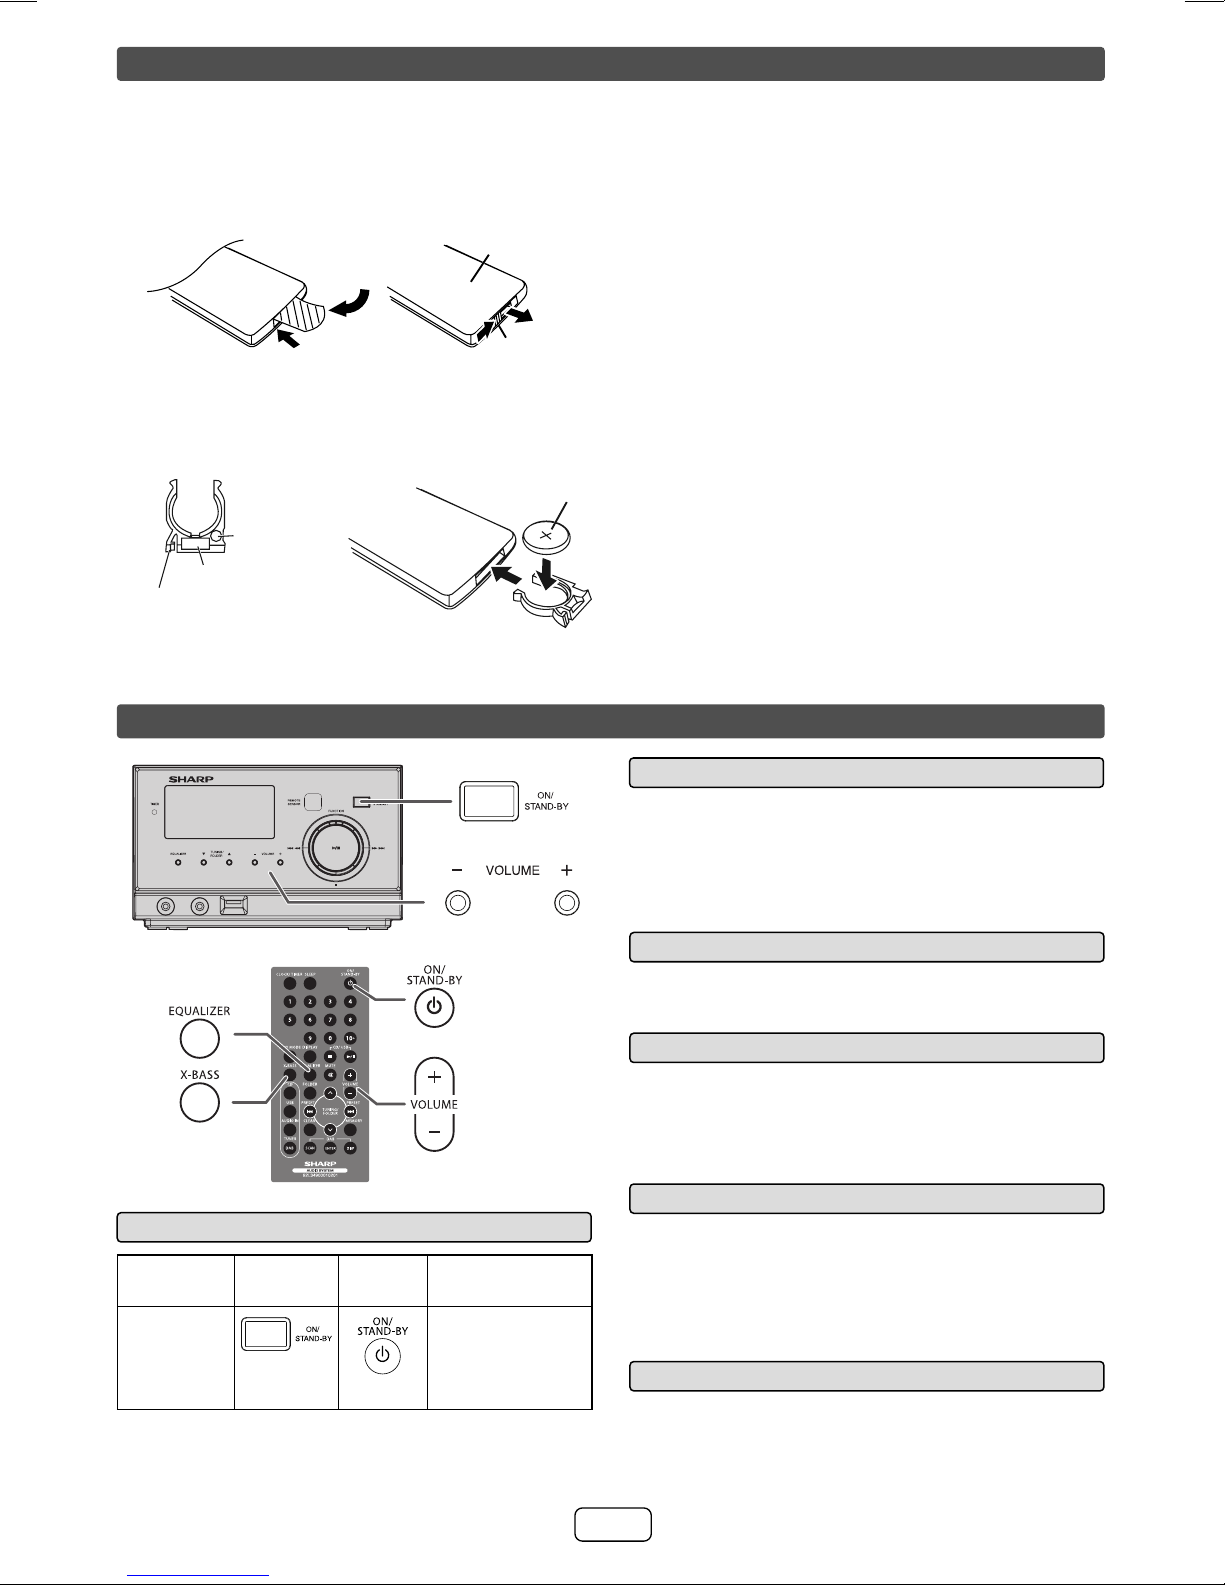
Remote control - battery installation
Note:
Before using remote control, please remove plastic shield
at battery holder.
Whilst pushing the locking tab towards the center of
1
the remote control, slide out the battery holder.
Plastic
Remote
control
Remove the old battery from the battery holder, insert
2
the new battery and then slide the battery holder back
into the remote control.
Battery holder
Polarity
(+) symbol
Battery type
Locking tab
shield
Battery holder
Back of remote
control
Locking tab
Positive (+)
side up
Precautions for battery use:
Remove the battery if the unit will not be used for long
periods of time. This will prevent potential damage due to
battery leakage.
Caution:
Do not use rechargeable battery (nickel-cadmium
●
battery, etc.).
Danger of explosion if battery is incorrectly replaced.
●
Replace only with the same or equivalent type.
●
Batteries (battery pack or battery installed) shall not
●
be exposed to excessive heat such as sunshine, fi re
or the like.
Installing the battery incorrectly may cause the unit to
●
malfunction.
Notes concerning use:
Replace the battery if the operating distance is
●
reduced or if the operation becomes erratic. Purchase
“CR 2025”, coin lithium battery.
Periodically clean the transmitter on the remote control
●
and the sensor on the unit with a soft cloth.
Exposing the sensor on the unit to strong light may
●
interfere with operation. Change the lighting or the
direction of the unit if this occurs.
Keep the remote control away from moisture, heat,
●
shock, and vibrations.
General control
MICRO COMPONENT SYSTEM XL-DAB1
To turn the power on■
Function Main unit
Power on/
off
Remote
control
Operation
Press to turn the
power on or to
go to stand-by
mode.
Volume auto set-in■
If you turn off and on the main unit with volume set to
●
16 or higher, the volume will start at 16.
If you turn the unit off then on again with the volume
●
level set to less than 16, it will turn on again at the
level set.
Volume control■
Press the VOLUME +/– button to increase or decrease the
volume.
Extra bass control (X-BASS)■
When the X-BASS button is pressed, the unit will enter the
extra bass mode which emphasises the bass frequencies
and “X-BASS” indicator will light up. To cancel the extra
bass mode, press the X-BASS button again.
Auto power off function■
The main unit will enter the stand-by mode after 15 minutes
of inactivity during:
CD/USB: In the stop or pause mode.
DAB: No reception of broadcast signal.
AUDIO IN: No detection of input signal.
Muting■
The volume is muted temporarily when pressing the
MUTE button on the remote control. Press again to restore
the volume.
E-3
Page 5
General control (continued)
FLAT
Function (on main unit only)■
When the FUNCTION button on main unit is pressed, the
current function will change to different mode. Press the
FUNCTION button repeatedly to select desired function.
CD USB
AUDIO IN
Note:
The backup function will protect the memorised function
mode for a few hours should there be a power failure or
the AC power lead becomes disconnected.
DAB
TUNER
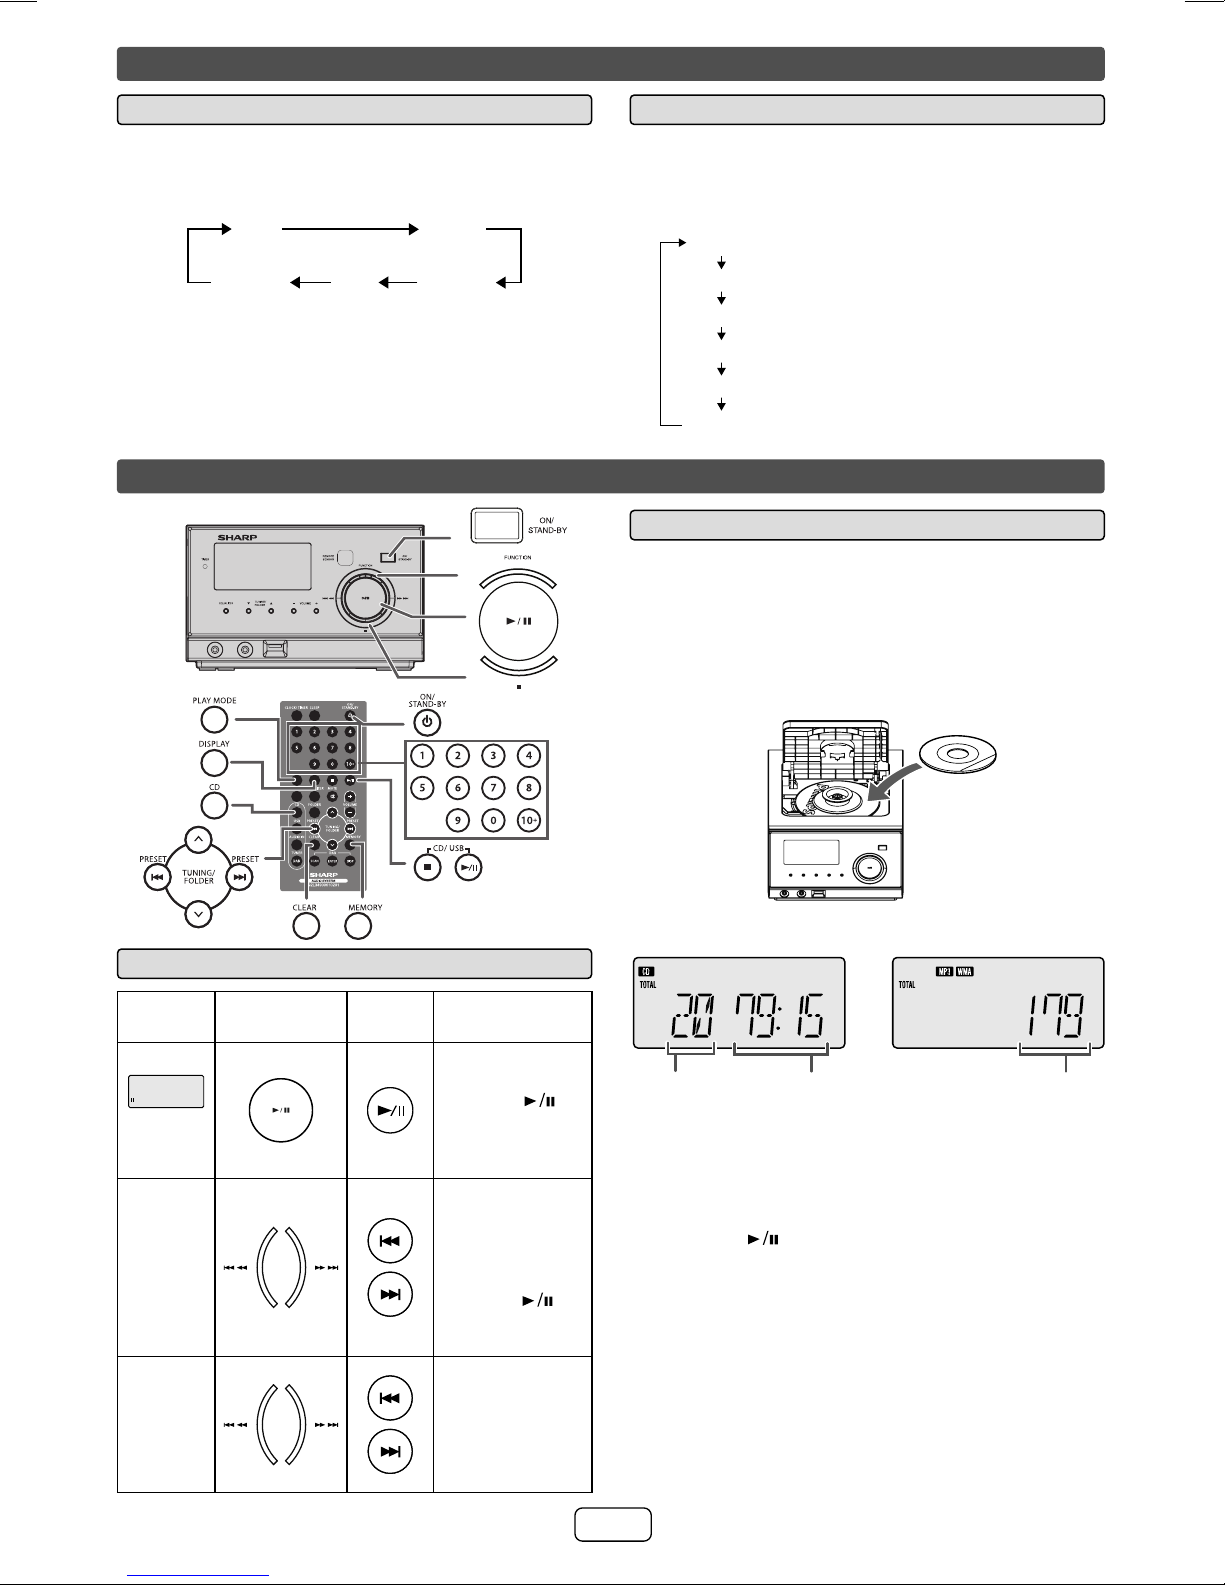
Listening to a CD or MP3/WMA disc
MICRO COMPONENT SYSTEM XL-DAB1
Equalizer■
When the EQUALIZER button is pressed, the current
mode setting will be displayed. To change to a different
mode, press the EQUALIZER button repeatedly until the
desired sound mode appears.
No equalisation.
ROCK
CLASSIC
POPS
VOCAL
JAZZ
For rock music.
For classical music.
For pop music.
Vocals are enhanced.
For jazz.
Disc playback■
Press the ON/STAND-BY button to turn the power on.
1
Press the CD button on the remote control or
2
FUNCTION button on the main unit repeatedly to
select CD function.
Open the disc compartment.
3
Place the disc on the disc tray, label side up.
4
Various disc functions■
Function
Pause
Track up/
down
Fast
forward/
reverse
Main
unit
Remote
control
Operation
Press in the
playback mode.
Press the
button to resume
playback from
the paused point.
Press in the
playback or stop
mode. If you
press the button
in the stop mode,
press the
button to start
the desired track.
Press and hold
down in the
playback mode.
Release the
button to resume
playback.
Close the disc compartment.
5
Total number
of tracks on
disc.
Due to the structure of the disc information, it takes
longer to read an MP3/WMA disc than a normal CD
(approximately 20 to 90 seconds).
Press the button to start playback. After the last
6
track is played, the unit will stop automatically.
Notes for CD or MP3/WMA discs:
When the end of the track is reached during fast
●
forward, the CD operation will be stopped. When
the beginning of the fi rst track is reached during fast
reverse, the unit will enter the playback mode.
Rewritable multi-session discs with unfi nished writing,
●
can still be played.
Total playing
time of the
disc.
Total number
of fi les (track)
on the disc.
E-4
Page 6
Listening to a CD or MP3/WMA disc (continued)
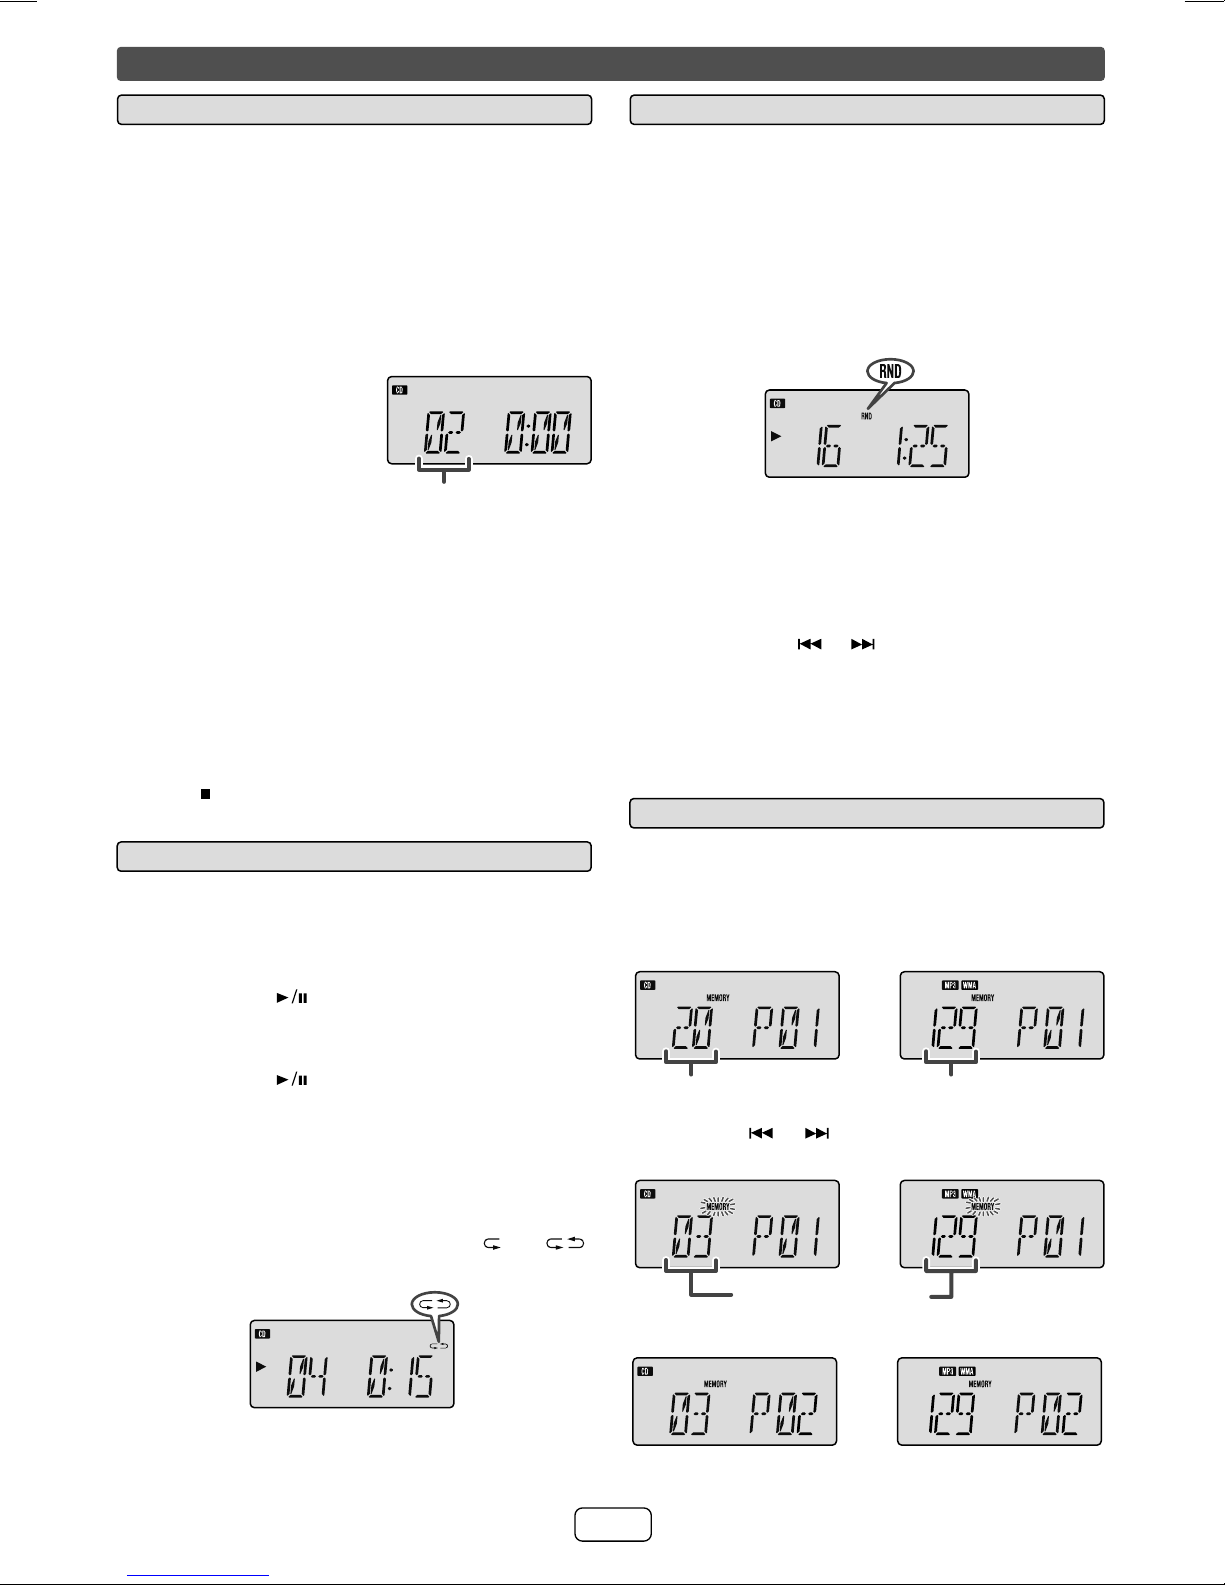
Direct track search■
By using the Direct Search buttons, the desired tracks on
the current disc can be played.
Use the Direct Search buttons on the remote control
to select the desired track whilst playing the selected
disc.
The Direct Search buttons allow you to select up to
●
number 9.
When selecting number 10 or higher, use the “10+”
●
button.
A. For example, to choose 13
Press the “10+” button once.
1
Press the “1” button.
2
Press the “3” button.
3
B. For example, to choose 130
Press the “10+” button twice.
1
Press the “1” button.
2
Press the “3” button.
3
Press the “0” button.
4
Notes:
A track number higher than the number of tracks on the
●
disc cannot be selected.
During random play, direct search is not possible.
●
To stop playback:
Press the
button on main unit or remote control.
Selected track number
Random play■
The tracks on the disc can be played in random order
automatically.
To random play all tracks:
Press and hold down PLAY MODE button on the remote
control until “RND” icon light up.
To cancel random play:
Press and hold the PLAY MODE button. “RND” icon will
disappear.
Notes:
During random playback, repeat function is not
●
possible. Selecting the repeat function will cancel the
random playback.
Playback will stop after all the tracks is played
●
randomly.
If you press the
●
you can move to the track selected next by the random
operation.
In random play, the unit will select and play tracks
●
automatically. (You cannot select the order of the
tracks.)
or button during random play,
Programmed play■
Repeat play■
Repeat play can play one track, all tracks or a programmed
sequence continuously.
To repeat one track:
Press the PLAY MODE button repeatedly until “RPT ONE”
appears. Press the button.
To repeat all tracks:
Press the PLAY MODE button repeatedly until “RPT ALL”
appears. Press the
To repeat all desired tracks:
Perform steps 1 - 6 in “Programmed play” section on pages
4 - 5 and then press the PLAY MODE button until “RPT
ALL” appears.
To cancel repeat play:
Press the PLAY MODE button again until “
disappears.
button.
” or “ ”
You can choose up to 32 selections for playback in the
order you like.
Whilst in the stop mode, press the MEMORY button
1
on the remote control to enter the programming save
mode.
Total tracks on CD Total tracks on MP3/WMA disc
Press the or button on the remote control to
2
select the desired track.
Selected track number
Press the MEMORY button to save the track number.
3
E-5
Page 7

Listening to a CD or MP3/WMA disc (continued)
Repeat steps 2 - 3 for other tracks. Up to 32 tracks
4
can be programmed. If you make a mistake, press
the CLEAR button whilst the “MEMORY” indicator is
fl ashing. Each time the button is pressed, one track will
be cleared, beginning with last track programmed.
5
Press the
6
Press the CD
will appear.
To cancel the programmed play mode:
Whilst in the stop mode and the “MEMORY” indicator is
lit, press the CLEAR button on the remote control. The
“MEMORY” indicator will disappear and all the programmed
contents will be cleared.
Adding tracks to the programme:
If a programme has been previously stored, the “MEMORY”
indicator will be displayed. Follow steps 1 - 4 to add tracks.
The new tracks will be stored after the last track of the
previous programme.
To check which tracks are programmed:
Whilst the unit is stopped in the programmed play mode,
press the
Notes:
●
When a disc is ejected, the programme is automatically
cancelled.
●
If you press the ON/STAND-BY button to enter the
stand-by mode or change the function from CD to
another, the programmed selections will be cleared.
●
During the programme operation, random play is not
possible. Selecting the random function will cancel the
programme playback.
button to start playback.
button. The total number in memory
or button.
Procedure to play back MP3/WMA disc
■
with folder mode on
To play back CD-R/RW.
Press the CD button, and load an MP3/WMA disc.
1
After disc is loaded, disc info will be displayed.
Total number of tracks
Press the FOLDER button and press the FOLDER (
2
or ) button to select desired playback folder. (Folder
mode on)
Total tracks in chosen folderFolder number
Select desired fi le to be played back by pressing the
3
or button.
Press the (CD ) button. Playback will start.
4
●
File name, Title, Artist and Album name are
displayed if they are recorded on the disc.
●
Press the FOLDER (
can be selected even though it is in playback mode.
It will continue playback mode with the fi rst track of
the selected folder.
●
Display content can be changed by pressing the
DISPLAY button.
File name display Title display
or ) button, and the folder
Counter display Artist display
Album display
Note:
If the track of “Copyright protected WMA fi le” or “Not
supported playback fi le” is selected during playback, “NO
SUPPORT” is displayed on unit display and the track is
skipped.
E-6
Page 8

Listening to USB mass storage device/MP3 player
MICRO COMPONENT SYSTEM XL-DAB1
Note:
This USB mass storage device or MP3 player is not
compatible with MTP and AAC fi le systems.
To play back USB/MP3 player with folder
■
mode off
Press the USB button on the remote control or
1
FUNCTION button on main unit repeatedly to select
USB function. Connect the USB memory device that
has MP3/WMA format fi les on the unit. When the USB
memory is connected to the main unit, the device
information will be displayed.
To play back USB/MP3 player with folder
■
mode on
Press the USB button on the remote control or
1
FUNCTION button on main unit repeatedly to select
USB function. Connect the USB memory device that
has MP3/WMA format fi les on the unit. When the
USB memory is connected to the main unit, the track
information will be displayed.
Press the FOLDER button, then press FOLDER (
2
or ) button to select desired playback folder. To start
playback, go to step 4. To change the playback folder,
press the FOLDER ( or ) button to select another
folder.
Select desired fi le to be played back by pressing the
3
or button.
Press the (USB ) button. Playback will start.
4
File name, Title, Artist and Album name are
●
displayed if they are recorded in the USB memory
device.
Display content can be changed by pressing the
●
DISPLAY button.
To remove USB memory device■
Press the (USB ) button to stop playback.
1
Press the button again and wait until “OK” is
2
displayed.
2
Select desired fi le to be played back by pressing the
or button.
Press the
3
●
File name, Title, Artist and Album name are
displayed if they are recorded in the USB memory
device.
●
Display content can be changed by pressing the
DISPLAY button.
Note:
To pause playback:
Press the
(USB ) button. Playback will start.
(USB ) button.
E-7
Disconnect the USB memory device from the USB
3
terminal.
Notes:
Always remove the USB memory device after “OK”
●
appears on the display. Improper removal of the USB
memory device may cause irregularities to happen.
Should this happen, turn off the unit and then turn it
●
on again.
SHARP will not be held liable for the loss of data whilst
●
the USB memory device is connected to the audio
system.
This USB memory’s format supports FAT 16 or FAT
●
32.
SHARP cannot guarantee that all USB memory
●
devices will work on this audio system.
USB cable is not recommended for use in this audio
●
system to connect to USB memory device. Use of the
USB cable will affect the performance of this audio
system.
Page 9

Listening to USB mass storage device/
MP3 player (continued)
Notes:
●
This USB memory cannot be operated via USB hub.
●
The USB terminal in this unit is not intended for a PC
connection but is used for music streaming with a USB
memory device.
●
External HDD-storage cannot be played back via USB
terminal.
●
If the data inside the USB memory is large, it may take
longer time for the data to be read.
The USB port is only intended for direct connection to
●
a USB memory device without any cable.
●
Playback order for MP3 fi les may differ depending on
the writing software used during fi le download.
●
Bitrate which is supported by MP3 is 32~320 kbps,
WMA is 64~160 kbps.
●
Playlists are not supported on this unit.
●
This unit can display File Name up to 16 characters.
●
Folders with non playable fi les are also counted.
●
The display playback time may not be displayed
correctly when playing back a variable bitrate fi le.
●
The ID3TAG information supported are TITLE, ARTIST
and ALBUM only. Title name, artist name and album
name can be displayed by pressing the DISPLAY
button during fi le playback or pause mode.
●
WMA meta tag also supports title, artist and album
name which are recorded in WMA fi les. Copyright
protected WMA fi les cannot be played back.
The following functions are the same as CD
operation:
Page
Direct track search ........................................................5
Repeat play ....................................................................5
Random play ..................................................................5
Programmed play .................................................... 5 - 6
Note:
If USB memory device is not connected, “NO MEDIA” will
be shown on the display.
Listening to the radio
MICRO COMPONENT SYSTEM XL-DAB1
Tuning■
Press the ON/STAND-BY button to turn the power on.
1
Press the TUNER button on the remote control or
2
FUNCTION button on the main unit repeatedly to
select tuner function.
3
Press the TUNING (
desired station.
●
Manual tuning:
Press the TUNING (
tune in to the desired station.
●
Auto tuning:
When the TUNING ( or ) button is pressed
for more than 0.5 seconds, scanning will start
automatically and the tuner will stop at the fi rst
receivable broadcast station.
Notes:
When radio interference occurs, auto scan tuning may
●
stop automatically at that point.
Auto scan tuning will skip weak signal stations.
●
or ) button to tune in to the
or ) button repeatedly to
To receive an FM stereo transmission:
Press the TUNER button to select stereo mode and
●
“ST” indicator will be displayed. “
an FM broadcast is in stereo.
●
If the FM reception is weak, press the PLAY MODE
button to extinguish the “ST” indicator. The reception
changes to monaural, and the sound becomes
clearer.
E-8
” will appear when
Page 10

Listening to the radio (continued)
Listening to the DAB+
To preset a station■
You can store FM stations in memory and recall them at
the push of a button. (Preset tuning)
Perform steps 1 - 3 in “Tuning”.
1
Press the MEMORY button.
2
3
Within 5 seconds, press the or button to select
the preset channel number. Store the stations in
memory, in order, starting with preset channel 1.
4
Press the MEMORY button to store that station
in memory. If the “MEMORY” and preset number
indicators disappear before the station is memorised,
repeat the operation from step 2.
5
Repeat steps 1 - 4 to set other stations, or to change
a preset station. When a new station is stored in the
memory, the station previously memorised for that
preset channel number will be erased.
Note:
The backup function protects the memorised stations for a
few hours should there be a power failure or the AC power
lead become disconnected.
To recall a preset station■
About DAB+ (Digital Audio Broadcasting)■
Digital Audio Broadcasting is a digital transmission system
where audio signals are converted to digital signals for
broadcasting. DAB+ is broadcast as a group of data called
multiplex (ensemble) which may contain one or more
stations (services). Each station contains a primary service
and there may be one or more secondary services.
This allows several programmes or services to be
transmitted on a single frequency.
DAB+ SIGNAL
MULTIPLEX
(ENSEMBLE)
SERVICES
SERVICES
COMPONENTS
(STATIONS)
Auto tune■
MICRO COMPONENT SYSTEM XL-DAB1
Press the PRESET ( or ) button for less than 0.5
seconds to select the desired station.
To scan the preset station■
The stations saved in the memory can be scanned
automatically. (Preset memory scan)
Press the PRESET (
1
0.5 seconds. The preset number will fl ash and the
programmed stations will be tuned in sequentially, for
5 seconds each.
2
Press the PRESET (
desired station is located.
or ) button for more than
or ) button again when the
To erase entire preset memory■
Press and hold the CLEAR button until “TUN CLR”
1
appears then press MEMORY button.
When turned on for the fi rst time, the unit scans radio
stations automatically to create a station list. You can make
the AUTOTUNE again when you move the unit to other
areas or add multiplex channels to the station list.
1
Press the TUNER/DAB button until “DAB” appears on
the display.
Press SCAN button on the remote control for more
2
than 3 seconds. AUTOTUNE scanning begins.
The scanning progress is
indicate by advancing asterisks.
The number of received station
E-9
Page 11

Listening to the DAB+ (continued)
Changing the information display
After the scan:
The stations will be stored in alphanumeric order and the
fi rst station on the list will be selected and you will hear it
through the speakers.
To listen to other stations, see “Selecting a station in
●
the station list” on page 10.
Notes:
All previous station list will be cleared.
●
If no station is found, “NO STN” appears.
●
Up to 99 appears for total received stations.
●
Selecting a station in the station list■
Once a DAB+ station is received, you can select stations
in the station list.
1
Press the TUNER/DAB button until “DAB” appears on
the display.
Whilst receiving a DAB+ station, press the TUNING
2
( or ) to select the desired station.
Display current station
You can switch DAB+ display information.
Press the DISP button.
Each time the button is pressed, the information display
changes in the following order.
When “NO SERV” appears, the DISP button does not
allow you to change the display.
[Station Name]
[Signal quality]
[Mode]
[Channel/Frequency]
[Scrolling text]
[Programme type]
[Multiplex name]
The name of the station
being selected
Within 10 seconds, press the ENTER button on the
3
remote control to tune into the desired station.
Manual tune■
You can manually store stations which AUTOTUNE cannot
fi nd. If reception is poor, you can adjust the sensitivity.
Manual tune is only available after Auto tune. Perform
AUTOTUNE fi rst.
Press the TUNER/DAB button until “DAB” appears on
1
the display.
Press the SCAN button once.
2
Within 10 seconds, press the
3
TUNING/FOLDER ( or ) to
select the DAB+ frequency.
Within 10 seconds, press the ENTER
4
button.
●
Reception sensitivity appears. The percentage
number indicate the current level.
●
If the level is too low, move the aerial or unit to
improve reception.
5
Press the ENTER button to store the station and exit
manual tune.
[Station Name]
Station name is displayed. (set by default)
[Scrolling text]
Information scrolls across the display when sent from the
station
[Programme type]
A description of the type of content being broadcast by
the station.
[Multiplex name]
The name of the multiplex (ensemble) which provides the
current service.
[Channel/Frequency]
The DAB+ channel and frequency for the station.
(Frequency is displayed to two decimal places)
[Mode]
The data transfer speed and channel type (stereo or
mono) appear.
[Signal quality]
The signal quality is displayed as a number (0 - 100).
[85-100: Good, 70-84: Fair, 0-69: Poor]
E-10
Page 12

Setting the clock (Remote control
only)
In this example, the clock is set for the 24-hour (00:00)
display.
1
Press the ON/STAND-BY button to turn to stand-by
mode.
2
Press and hold the CLOCK/TIMER button until “00:00”
appear.
Within 10 seconds, press the or button to adjust
3
the hour and then press the MEMORY button. Press
or button once to advance the time by 1
the
hour. Hold it down to advance continuously.
4
Press the
then press the MEMORY button. Press the
button once to advance the time by 1 minute. Hold it
down to advance continuously.
or button to adjust the minutes and
or
Timer and sleep operation (Remote
control only)
Timer playback:
The unit turns on and plays the desired source (CD, USB,
TUNER, DAB or AUDIO IN) at a preset time.
Timer playback■
Before setting timer:
1
Check that the clock is set to the correct time (refer
to the column on the left). If it is not set, you cannot
use the timer function.
For timer playback, load the disc to be played back.
2
Press the ON/STAND-BY button to turn the power on.
1
Press the CLOCK/TIMER button for about 2 seconds.
2
Within 10 seconds, press the
3
“ONCE” or “DAILY” and then press the MEMORY
button.
Press the or button to adjust the hours for timer
4
on and then press the MEMORY button.
Press the or button to adjust the minutes for
5
timer on and then press the MEMORY button.
or button to select
To confi rm the time display:
[When the unit is in the stand-by mode]
Press the CLOCK/TIMER button. The time display will
appear for about 5 seconds.
[When the power is on]
Press the CLOCK/TIMER button. The time display will
appear for about 5 seconds.
Note:
The “00:00” will appear when the AC power supply is
restored after a power failure or unplugging the unit. If
incorrect, readjust the clock as follows.
To readjust the clock:
Perform “Setting the clock” from step 1.
Press the or button to adjust the timer off (as in
6
step 4 and 5) and then press the MEMORY button.
To select the timer playback source (CD, TUNER, USB
7
or AUDIO IN), press the or button. Press the
MEMORY button.
When you select TUNER, select a station by pressing
the
or button, and then press the MEMORY
button. If a station has not been programmed, “NO
P-SET” will be displayed and timer setting will be
canceled.
E-11
Page 13

Timer and sleep operation (Remote control only) (continued)
Adjust the volume using the VOLUME + or VOLUME
8
– and then press the MEMORY button. (Do not turn the
volume up too high).
Press the ON/STAND-BY button to enter the power
9
stand-by mode. The TIMER red indicator lights up and
the unit is ready for timer playback.
When the preset time is reached, playback will start.
10
The volume will increase gradually until it reaches the
preset volume. The “ ” indicator will blink during timer
playback.
Checking the timer setting:
Press the CLOCK/TIMER button repeatedly to view as
follows:
Cancelling the timer setting:
Press the CLOCK/TIMER button for about 2 seconds.
Within 5 seconds, press
press MEMORY button.
Note:
After selecting the volume level and press the MEMORY
button to confi rm, it will change to last function.
or to select “OFF” and
Sleep timer
setting
Sleep operation will
automatically stop
Timer playback
setting
End time
Desired time5 - 120 minutes
Timer playback
start time
Enhancing your system
The connection cord is not included. Purchase a
commercially available cord as shown below.
MICRO COMPONENT SYSTEM XL-DAB1
Portable audio
player, etc.
Audio cable
(not supplied)
Sleep operation■
The radio, compact disc and USB can all be turned off
automatically.
1
Play back the desired sound source.
2
Press the SLEEP button.
3
Within 5 seconds, press the SLEEP button repeatedly
to select the time.
SLP 120 90 60 30 15 10 5
4
“SLEEP” will appear.
5
The unit will enter the power stand-by mode
automatically after the preset time has elapsed.
To confi rm the remaining sleep time:
Whilst “SLEEP” is indicated, press the SLEEP button. The
remaining time is displayed for about 10 seconds.
To cancel the sleep operation:
Press the ON/STAND-BY button whilst “SLEEP” is
indicated. To cancel the sleep operation without setting the
unit to the stand-by mode, proceed as follows.
Whilst “SLEEP” is indicated, press the SLEEP button
repeatedly until SLEEP indicator disappears.
To use timer and sleep operation together■
Sleep and timer playback:
For example, you can fall asleep listening to the radio and
wake up to CD in the next morning.
Set the sleep time (refer to the column on the left,
1
steps 1 - 5).
Whilst the sleep timer is set, set the timer playback
2
(steps 2 - 8, pages 10 - 11).
E-12
Listening to the playback sounds of
■
portable audio player, etc.
Use a connection lead to connect the portable audio
1
player etc. to the AUDIO IN socket.
Press the ON/STAND-BY button to turn the power on.
2
Press the AUDIO IN button on the remote control or
3
FUNCTION button repeatedly on main unit to select
AUDIO IN function.
Play the connected equipment. If volume level of the
4
connected device is too high, sound distortion may
occur. Should this happen, lower the volume of the
connected device. If volume level is too low, increase
the volume of the connected device.
Note:
To prevent noise interference, place the unit away from the
television.
Headphones■
Do not turn the volume on to full at switch on and listen
●
to music at moderate levels. Excessive sound pressure
from earphones and headphones can cause hearing
loss.
Before plugging in or unplugging the headphones,
●
reduce the volume.
Be sure your headphones have a 3.5 mm (1/8”)
●
diameter plug and impedance between 16 and 50
ohms. The recommended impedance is 32 ohms.
Plugging in the headphones disconnects the speakers
●
automatically. Adjust the volume using the VOLUME
control.
Page 14

Troubleshooting chart
Many potential problems can be resolved by the owner
without calling a service technician. If something is wrong
with this product, check the following before calling your
authorized SHARP dealer or service center.
General■
Symptom Possible cause
The clock is not
● Did a power failure occur?
set to the correct
time.
When a button is
● Set the unit to the power
pressed, the unit
does not respond.
No sound is
● Is the volume level set to
heard.
CD player
■
Symptom Possible cause
Playback does
●
not start.
Playback stops
●
in the middle or
is not performed
properly.
Playback sounds
● Is the unit located near
are skipped, or
stopped in the
middle of a track.
●
Reset the clock. (Refer page
11)
●
stand-by mode and then turn
it back on.
If the unit still malfunctions,
●
reset it. (Refer page 14)
●
“MIN”?
●
Are the headphones
connected?
●
Are the speaker wires
disconnected?
Is the disc loaded upside
●
down?
Does the disc satisfy the
●
standards?
Is the disc distorted or
●
scratched?
●
excessive vibrations?
Is the disc very dirty?
●
Has condensation formed
●
inside the unit?
USB■
Symptom Possible cause
Device cannot be
● Is there any MP3/WMA fi le
detected.
Playback does not
● Is it a copyright protected
start.
Wrong time display.
●
Wrong fi le name
●
display.
●
available?
Is the device properly
●
connected?
Is it an MTP device?
●
Does the device contain
●
AAC fi le only?
●
WMA fi le?
Is it a false MP3 fi le?
●
Is Variable Bitrate fi le
●
being played back?
Is the File Name written
●
in Chinese or Japanese
characters?
Condensation■
Sudden temperature changes, storage or operation in an
extremely humid environment may cause condensation
inside the cabinet (CD pickup, etc.) or on the transmitter
on the remote control. Condensation can cause the unit
to malfunction. If this happens, leave the power on with no
disc in the unit until normal playback is possible (about 1
hour). Wipe off any condensation on the transmitter with a
soft cloth before operating the unit.
Before transporting the unit■
Remove all CDs from the unit. Make sure there is no CD
in the disc tray. Then, set the unit to the power stand-by
mode. Carrying the unit with discs left inside can damage
the unit.
Remote control■
Symptom Possible cause
The remote control
● Is the AC power lead of the
does not operate.
●
unit plugged in?
Is the battery polarity
●
correct?
Is the battery dead?
●
Is the distance or angle
●
incorrect?
Does the remote control
●
sensor receive strong light?
Tuner■
Symptom Possible cause
The radio makes
● Is the unit placed near the TV
unusual noises
continuously.
●
or computer?
Is the FM aerial placed
●
properly?
Move the aerial away from
the AC power lead if it is
located nearby.
If problem occurs■
When this product is subjected to strong external
interference (mechanical shock, excessive static electricity,
abnormal supply voltage due to lightning, etc.) or if it is
operated incorrectly, it may malfunction.
If such a problem occurs, do the following:
1
Set the unit to the stand-by mode and turn the power
on again.
2
If the unit is not restored in the previous operation,
unplug and plug in the unit again, and then turn the
power on.
Note:
If neither operation above restores the unit, clear all the
memory by resetting it.
E-13
Page 15

Troubleshooting chart (continued)
Specifi cations
Factory reset, clearing all memory■
Press the ON/STAND-BY button to enter the power
1
stand-by mode.
Press the STOP button followed by ON/STAND-BY
2
button on main unit and hold it simultaneously for more
than 5 seconds until “CLR ALL” appears.
Caution:
This operation will erase all data stored in memory
including clock, timer settings, tuner preset, DAB+ preset
and CD program.
Care of compact discs■
Compact discs are fairly resistant to damage, however
mistracking can occur due to an accumulation of dirt on
the disc surface. Follow the guidelines below for maximum
enjoyment from your CD collection and player.
Do not write on either side of the disc, particularly the
●
non-label side from which signals are read. Do not
mark this surface.
Keep your discs away from direct sunlight, heat, and
●
excessive moisture.
Always hold the CDs by the edges. Fingerprints, dirt,
●
or water on the CDs can cause noise or mistracking.
If a CD is dirty or does not play properly, clean it with
a soft, dry cloth, wiping straight out from the centre,
along the radius.
NO YES
Correct
As part of our policy of continuous improvement, SHARP
reserves the right to make design and specifi cation
changes for product improvement without prior notice. The
performance specifi cation fi gures indicated are nominal
values of production units. There may be some deviations
from these values in individual units.
General■
Power source
Power consumption
Dimensions
Weight
(*) This power consumption value is obtained when the
main unit is in stand-by mode.
AC 220 - 240 V ~ 50/60 Hz
Power on: 21 W
Power stand-by: 0.4 W (*)
Width: 190 mm (7 - 1/2”)
Height: 115.7 mm (4 - 9/16”)
Depth: 230.4 mm (9 - 1/16”)
2.4 kg (5.31 lbs.)
Amplifi er■
Output power
Output
terminals
MPO: 14 W (7 W + 7 W) (10% T.H.D.)
RMS: 10 W (5 W + 5 W) (10% T.H.D.)
RMS: 8 W (4 W + 4 W) (1% T.H.D.)
Speakers: 4 ohms
Headphones: 16 - 50 ohms
(recommended: 32 ohms)
CD player■
Type
Signal readout
D/A converter
Frequency
response
Dynamic range
Single disc multi-play compact
disc player
Non-contact, 3-beam
semiconductor laser pickup
Multi bit D/A converter
20 - 20,000 Hz
90 dB (1 kHz)
Maintenance
Cleaning the cabinet■
Periodically wipe the cabinet with a soft cloth and a diluted
soap solution, then with a dry cloth.
Caution:
Do not use chemicals for cleaning (petrol, paint thinner,
●
etc.). It may damage the cabinet.
Do not apply oil to the inside of the unit. It may cause
●
malfunctions.
Speaker■
Type
Maximum input
power
Rated input power
Impedance
Dimensions
Weight
Tuner■
Frequency range
E-14
1-way type speaker system
8 cm (3”) Full range
10 W
5 W
4 ohms
Width: 111 mm (4 - 3/8”)
Height: 194 mm (7 - 5/8”)
Depth: 180 mm (7 - 1/16”)
1.3 kg (2.8 lbs.)/each
FM: 87.5 - 108 MHz
Page 16

Specifi cations (continued)
USB■
USB host
interface
Support fi le
Bitrate support
Other
File system
support
Complies with USB 1.1 (Full
●
Speed)/2.0 Mass Storage Class.
Support Bulk only and CBI
●
protocol.
MPEG 1 Layer 3
●
WMA (Non DRM)
●
MP3 (32 ~ 320 kbps)
●
WMA (64 ~ 160 kbps)
●
Maximum total number of MP3/
●
WMA fi les is 999.
Maximum total number of
●
folders is 99 INCLUSIVE of root
directory.
The ID3TAG information
●
supported are TITLE, ARTIST
and ALBUM only.
Supports ID3TAG version 1 and
●
version 2.
Support USB devices with
●
Microsoft Windows/DOS/FAT 16/
FAT 32.
2 kbyte block length for sector.
●
Display information table■
Notes on the display information:
Characters are displayed in Uppercase letters (A to Z),
●
numbers and symbols.
Display examples are as in table shown below.
●
DISPLAY DISPLAY INDICATESINDICATES
A
>, )
B
D
G
O
Q
R
{, [
,
.
/
\
?
DAB Frequency table (BAND III)■
Frequency Label Frequency Label
174.928 MHz 5A 208.064 MHz 9D
176.640 MHz 5B 209.936 MHz 10A
178.352 MHz 5C 211.648 MHz 10B
180.064 MHz 5D 213.360 MHz 10C
181.936 MHz 6A 215.072 MHz 10D
183.648 MHz 6B 216.928 MHz 11A
185.360 MHz 6C 218.640 MHz 11B
187.072 MHz 6D 220.352 MHz 11C
188.928 MHz 7A 222.064 MHz 11D
190.640 MHz 7B 223.936 MHz 12A
192.352 MHz 7C 225.648 MHz 12B
194.064 MHz 7D 227.360 MHz 12C
195.936 MHz 8A 229.072 MHz 12D
197.648 MHz 8B 230.784 MHz 13A
199.360 MHz 8C 232.496 MHz 13B
201.072 MHz 8D 234.208 MHz 13C
202.928 MHz 9A 235.776 MHz 13D
204.640 MHz 9B 237.488 MHz 13E
206.352 MHz 9C 239.200 MHz 13F
0
<, (
S
(zero)
1
2
5
6
8
’
”
:
;
}, ]
|, !
+
=
-
&
%
^, ~
$
@
`
Frequencies are displayed to two decimal places on
✽
this unit.
E-15
Page 17

FOR LOCATION ENQUIRIES WITHIN
AUSTRALIA
REGARDING YOUR LOCAL
SHARP APPROVED SERVICE CENTRE
VISIT OUR WEBSITE AT
www.sharp.net.au
OR CALL SHARP CUSTOMER CARE
1300 135 022
(LOCAL CALL COSTS APPLY WITHIN AUSTRALIA)
SHARP CORPORATION OF AUSTRALIA PTY LTD
FOR LOCATION ENQUIRIES WITHIN
NEW ZEALAND
REGARDING YOUR LOCAL
SHARP APPROVED SERVICE CENTRE
VISIT OUR WEBSITE AT
www.sharp.net.nz
CONTACT YOUR SELLING DEALER/RETAILER
OR CALL
SHARP CUSTOMER SERVICES
TELEPHONE: 09 573 0111
FACSIMILE: 09 573 0113
SHARP CORPORATION OF NEW ZEALAND LIMITED
SPform019(JUNE 2004)
E-16
Page 18

E-17
 Loading...