

Page 1
XE-A505 Quick Start Guide
REG
OPX/Z MGR
PGM
X1/Z1
X2/Z2
OFF
VOID
REG
OPX/Z MGR
PGM
X1/Z1
X2/Z2
OFF
VOID
REG
OPX/Z MGR
PGM
X1/Z1
X2/Z2
OFF
VOID
Retainer
Print head
release lever
Correct Incorrect
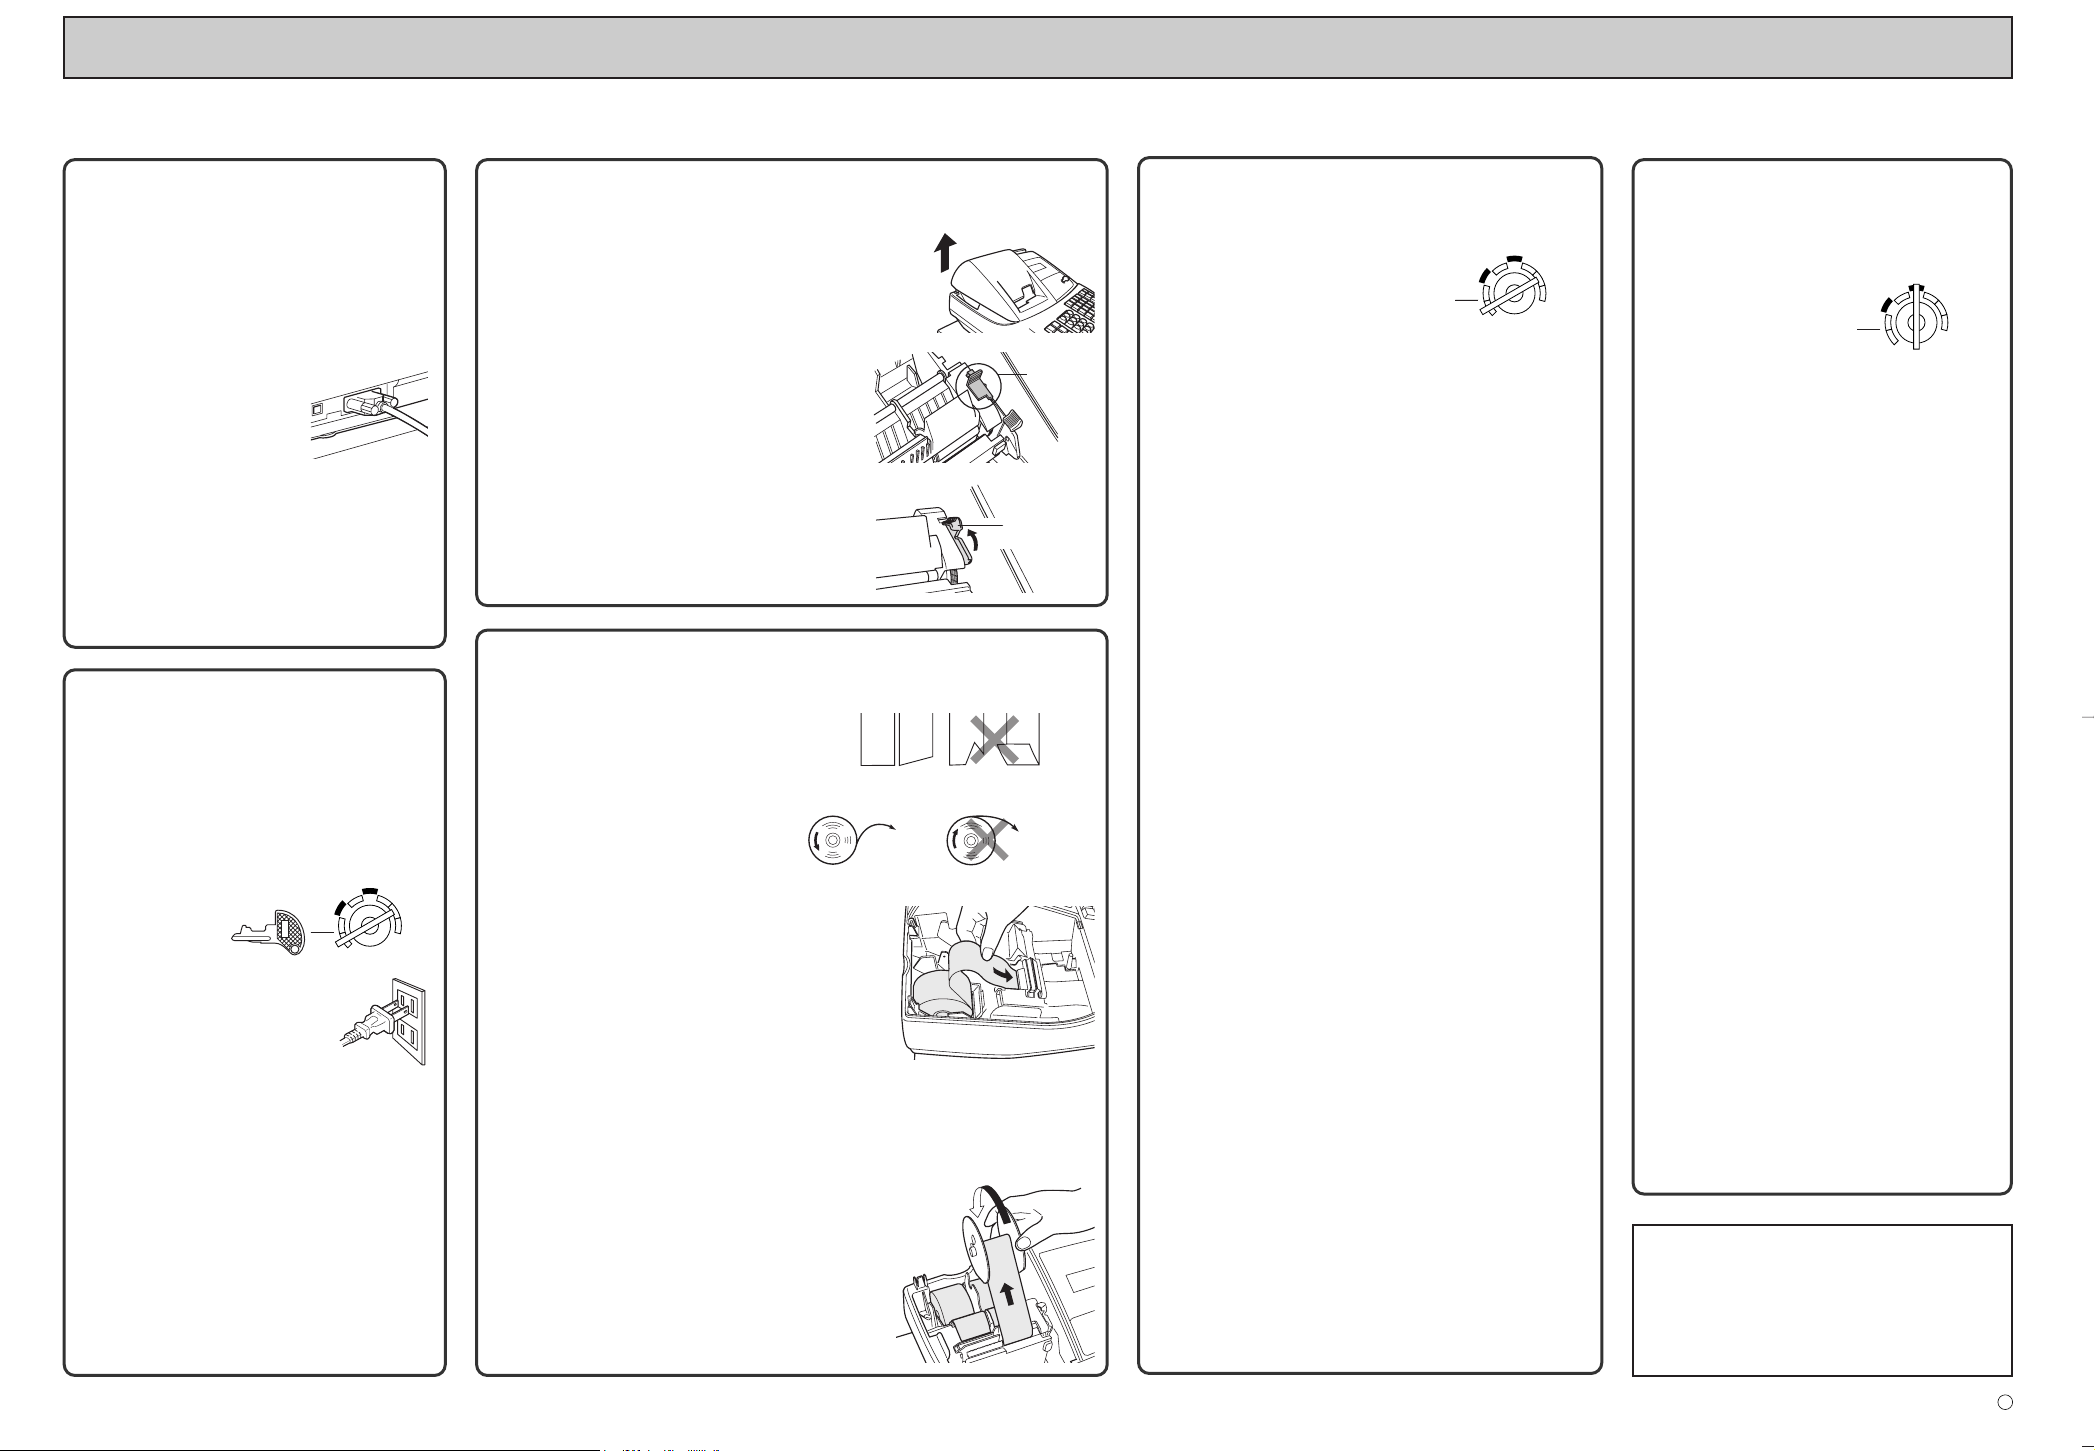
The following describes how to get the cash register ready for operation. Follow these steps before using the cash register for the first time.
Place the cash register on a stable, flat surface not subject to direct sunlight.
English
1
Abarcode scanner is provided with the cash
register. To use the scanner, connect the scanner
before turning on the register.
1. Open the Scanner port cover at the right side
of the register.
2. Insert the connector of the
barcode scanner into the
Scanner port, and tighten
both screws on the
connector.
CAUTION:
• Always unplug the power cord of the cash
register when you connect or disconnect the
barcode scanner.
• Never connect devices other than the barcode
scanner before changing the interface setting.
Otherwise malfunction of the cash register will
occur.
2
To ensure the cash register operates properly,
please use the following procedure:
1. Make sure the power cord plug is not inserted
into the AC outlet.
2. Insert the manager
(MA) key into the mode
switch and turn it
to the PGM
position.
3. While holding down both the
}
the plug into the AC outlet.
The buzzer will sound three
times and “
be displayed.
4. The cash register has now been initialized.
The register display will show “0.00” with
“PGM”.
CAUTION: To charge the rechargeable batteries,
NOTE: If you press a key by mistake, an error
Connecting the
Barcode Scanner
Initializing the Cash
Register
MA
key and the lkey, insert
MRS.
***
keep the power on for one or two
days. Leave the register with the
mode switch in a position other than
“OFF”.
message may be displayed. Press the
key to clear message after installing
l
paper rolls.
***
” will
Preparing the Cash Register
3
1. Push the printer cover forward and detach it.
2. Remove the white retainer at the position
shown in the illustration to the right.
NOTE: Please keep this retainer for future use
when transferring the cash register.
3. Move the print head release lever upwards as
shown in the illustration to the right.
Installing the Paper Rolls
4
1. Cut off approximately one revolution of each
paper roll.
Make sure the paper end is cut as shown in
the illustration to the right.
For receipt paper installation
2. Set a paper roll in the paper cradle of
the receipt side (left side) as shown in
the illustration to the right.
3. Insert the end of the paper into the paper chute
until it is caught by the printer auto-feed and
comes out the top of the printer. If the printer
does not catch the paper, feed the paper while
pressing
4. Cut off the excess paper with the paper cutter.
For journal paper installation
5. Set a paper roll in the paper cradle of the journal side as illustrated in step 2.
6. Insert the end of the paper into the paper chute until it is caught by the printer
auto-feed and comes out the top of the printer. If the printer does not catch the
paper, feed the paper while pressing
7. Insert the end of the paper into the slit in the takeup spool and wind the paper two or three turns
around the spool shaft. (Press
paper if required.)
8. Set the spool on the bearing, and press the
key to take up excess slack in the paper.
9. Replace the printer cover.
{
.
.
}
to feed more
}
}
Correct
To the printer
To the printer
Incorrect
Basic Programming
5
Set the mode switch to the PGM
position.
Setting the Date
Enter the date in 8 digits using the month-day-year format.
Then press
Example:
08262006 s
Setting the Time
Enter the time in 4 digits (“hhmm” format) using the 24 hour
system. Then press
Example:
1430 s
Time (2:30 p.m.)
Setting Tax Rates (%)
NOTE: If you are in an area that uses a tax table for tax
calculation, please refer to the programming section
in the instruction manual.
Specify a tax rate (%) for calculation of tax on each taxable
subtotal using the following sequence:
s➔9➔@
R ➔
@
where
R: Tax rate (0.0000% to 100.0000%)
Q: Minimum taxable amount (0.01 to 999.99)
(Smallest amount for which tax must be collected.)
*Up to 4 types of tax are programmable.
Example:
s9@
1@ 6P25@ 12 s A
Tax 1 Tax rate (6.25%) Min. taxable
Other Programming
The cash register is pre-programmed so it can be used with
minimal set-up. For optional features, please refer to the
instruction manual.
Initial settings:
Department 1 to 10: Taxable 1
Department 11 to 99: Non-taxable.
NOTE: To scan barcodes using the barcode scanner, their
preset unit prices, associated departments and item
labels should be programmed.
.
s
Date (August 26, 2006)
s
➔ Tax number (1 to 4)* ➔
➔ Q ➔
s➔A
.
amount ($0.12)
@
➔
Now, you are ready!
6
Before Starting Entries
• Set the mode switch to
the REG position.
Registration Example
1. Enter the price for the first department item.
For example for 5.00, enter
the appropriate department key.
For department 21 to department 40, press
first before pressing the department
D
key.
For department 41 and above, enter the
department number using numeric keys, and
press d, then enter the price and press
again.
2. Repeat step 1 for all the department items.
3. Press
4. Enter the amount received from the customer.
(You can omit this step if the amount tendered
is the same as the subtotal.)
5. Press
displayed (when the amount received was not
entered, total amount is displayed) and the
drawer is opened.
6. Tear off the receipt and give it to the customer
with his or her change.
7. Close the drawer.
Key operation
5:¡ 825D™
Price and dept. 1 Price and dept. 22
s 2:0 A
NOTE: When you scan a barcode using the
barcode scanner without programming,
the cash register goes into the learning
function mode. For details of this mode,
please refer to the instruction manual.
to display the amount due.
s
, and the change due is
A
Amount tendered
When an error occurs:
When an error occurs with an alarm sound, press
to clear the error. If you do not clear the
l
error, press Etwice. The transaction will be
finalized in subtotal void or cash sale.
Printed in China
(TCADH2512RCZZ) 1
5:
, and press
d
Page 2
Guía de inicio rápido de la XE-A505
REG
OPX/Z MGR
PGM
X1/Z1
X2/Z2
OFF
VOID
MA
REG
OPX/Z MGR
PGM
X1/Z1
X2/Z2
OFF
VOID
REG
OPX/Z MGR
PGM
X1/Z1
X2/Z2
OFF
VOID
Retenedor
Palanca de liberación
del cabezal de
impresión
Correcto Incorrecto
A la impresora
Incorrecto
A la impresora
Correcto
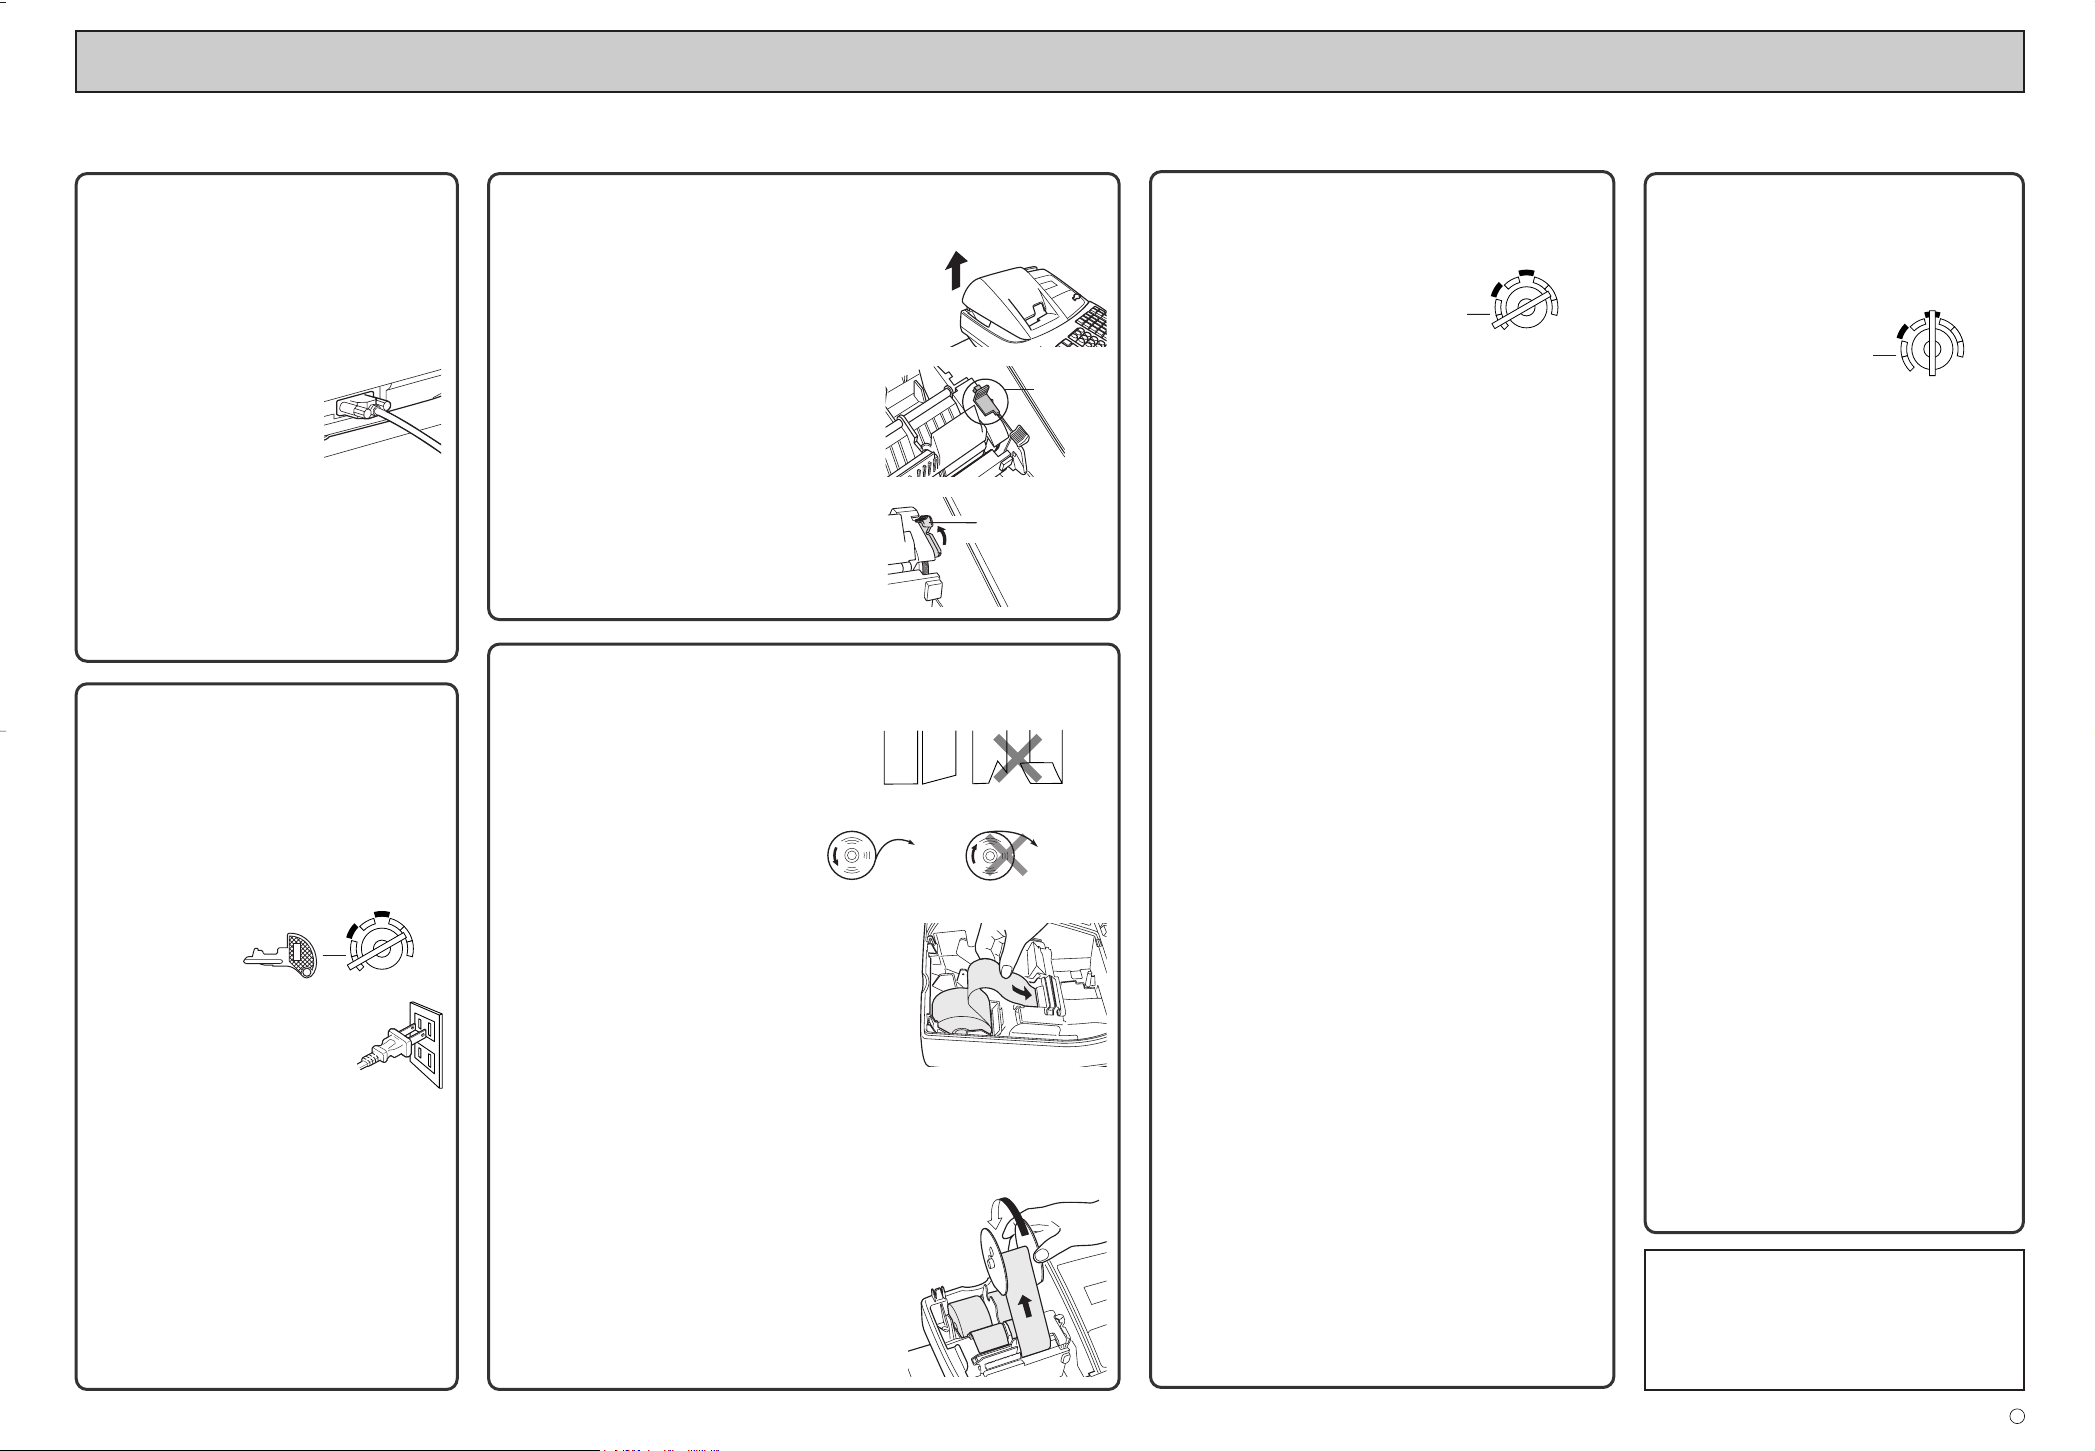
A continuación se describe la forma de dejar preparada la caja registradora para el funcionamiento. Siga estos pasos antes de emplear la caja registradora por primera vez.
Coloque la caja registradora en una superficie plana y estable que no esté sujeta a los rayos directos del sol.
Español
1
Un escáner de códigos de barras está provisto de
la caja registradora. Para emplear el escáner,
conéctelo antes de conectar la alimentación de la
caja registradora.
1. Abra la cubierta del puerto de escáner del lado
derecho de la caja
registradora.
2. Inserte el conector del
escáner de códigos de
barras en el puerto de
escáner, y apriete los dos
tornillos del conector.
PRECAUCION:
• Desenchufe siempre el cable de alimentación
de la caja registradora antes de conectar o
desconectar el escáner de códigos de barras.
• No conecte nunca equipos que no sean el
escáner de códigos de barras antes de cambiar
el ajuste de interfaz. De lo contrario, se
produciría mal funcionamiento de la caja
registradora.
2
Para asegurarse de que la caja registradora
funciona correctamente, emplee el siguiente
procedimiento:
1. Asegúrese de que la clavija del cable de la
alimentación no esté enchufada en la toma de
corriente de CA.
2. Inserte la llave de
administrador (MA) en
el selector de
modo y gírelo a
la posición PGM.
3. Mientras mantiene pulsadas la
tecla
la clavija en la toma de
corriente de CA. El zumbador
sonará tres veces y se
visualizará “
4. La caja registradora habrá quedado ahora
inicializada.
El visualizador de la caja registradora mostrará
“0.00” con “PGM”.
PRECAUCION: Para cargar las baterías, mantenga
NOTA: Si pulsa una tecla por error, es posible que
Conecte el escáner de
códigos de barras.
I
nicialice la caja
registradora.
y la tecla l, enchufe
}
MRS.
***
conectada la alimentación durante
uno o dos días. Deje la caja
registradora con el selector de modo
puesto en una posición que no sea
“OFF”.
se visualice un mensaje de error. Pulse la
tecla lpara borrar el mensaje después de
haber instalado rollos de papel.
***
”.
Prepare la caja registradora.
3
1. Empuje la cubierta de la impresora hacia delante y
sepárela.
2. Extraiga el retenedor blanco que hay en la
posición mostrada a la derecha.
NOTA: Guarde este retenedor para cuando
transporte la caja registradora en el futuro.
3. Mueva la palanca de liberación del cabezal de
impresión hacia arriba como se ilustra a la
derecha.
Instale rollos de papel.
4
1. Corte aproximadamente una vuelta de cada
rollo de papel.
Asegúrese de que el extremo del papel se
corte como se muestra a la derecha.
Para la instalación del papel de recibos
2. Ponga un rollo de papel en el soporte
del rollo de papel del lado de recibos
(lado izquierdo) como se ilustra a la
derecha.
3. Inserte el extremo del papel en la guía de papel
hasta que entre en el dispositivo de alimentación
automática de la impresora y salga por la parte
superior de la impresora. Si la impresora no
engancha el papel, haga avanzar el papel
mientras pulsa
4. Corte el papel sobrante empleando el cortador de
papel.
Para la instalación del papel de registro diario
5. Ponga un rollo de papel en el soporte del rollo de papel del lado de registro
diario como se ilustra en el paso 2.
6. Inserte el extremo del papel en la guía de papel hasta que entre en el dispositivo
de alimentación automática de la impresora y salga por la parte superior de la
impresora. Si la impresora no engancha el papel, haga avanzar el papel
mientras pulsa
7. Inserte el extremo del papel en la ranura del
carrete de toma y bobine el papel dos o tres
vueltas en torno al eje del carrete. (Pulse
hacer avanzar más el papel si es necesario.)
8. Coloque el carrete en el rodamiento, y pulse la
tecla
papel.
9. Vuelva a colocar la cubierta de la impresora.
para sacar la flojedad excesiva del
}
{
}
.
.
para
}
Programación básica
5
Ponga el selector de modo en la
posición PGM.
Ajuste de la fecha
Introduzca la fecha con 8 dígitos, usando el formato de
mes-día-año. Luego, pulse
Ejemplo:
08262006 s
Fecha (26 de agosto, 2006)
Ajuste de la hora
Introduzca la hora con 4 dígitos (formato “hhmm”), usando
el sistema de 24 horas. Luego, pulse
Ejemplo:
1430 s
Hora (2:30 p.m.)
Ajuste de las tasas de impuestos (%)
NOTA: Si usted reside en una zona que emplea una tabla
de impuestos para calcular los impuestos, consulte
la sección de programación del manual de
instrucciones.
Especifique una tasa de impuestos (%) para el cálculo de
los impuestos de cada subtotal imponible empleando la
secuencia siguiente:
s➔9➔@
➔
➔ R ➔
@
donde,
R: Tasa de impuestos (0,0000% a 100,0000%)
Q: Importe imponible mínimo (0,01 a 999,99)
(El importe más pequeño para el que deben cargarse
los impuestos.)
*Pueden programarse hasta 4 tipos de impuestos.
Ejemplo:
@
➔ Número de impuestos (1 al 4)*
➔ Q ➔
s9@
1@ 6P25@ 12 s A
Impuestos 1 Tasa de impuestos Importe imponible
Otras programaciones
La caja registradora viene ya programada para poderla
utilizar con la mínima configuración. Para funciones
opcionales, consulte el manual de instrucciones.
Ajustes iniciales:
Sección 1 a 10: Imponible 1
Sección 11 a 99: No imponible
NOTA: Para explorar códigos de barras empleando el
escáner de códigos de barras, se deben programar
sus precios unitarios preajustados, las secciones
asociadas y etiquetas de los artículos.
(6,25%) mínimo ($0,12)
.
s
s
s➔A
.
Ahora ya estará
6
preparado.
Antes de comenzar con los
registros
• Ponga el selector de
modo en la posición
REG.
Ejemplo de registro
1. Introduzca el precio del primer artículo de la
sección.
Por ejemplo, para 5,00 introduzca
pulse la tecla de la sección apropiada.
Para las secciones 21 a 40, pulse primero
antes de pulsar la tecla de sección.
D
Para la sección 41 y las posteriores,
introduzca el número de sección empleando
las teclas numéricas y pulse d, y luego
introduzca el precio y pulse de nuevo d.
2. Repita el paso 1 para todos los artículos de la
sección.
3. Pulse
correspondiente.
4. Introduzca el importe recibido del cliente.
(Puede omitirse este paso, si el importe
recibido es el mismo que el subtotal.)
5. Pulse
correspondiente (cuando el importe recibido
no se haya introducido, se visualizará el
importe total) y se abrirá el cajón.
6. Corte el recibo y déselo al cliente con la
vuelta.
7. Cierre el cajón.
Operación de teclas
5:¡ 825D™
Precio y sección 1 Precio y sección 22
s 2:0 A
NOTA: Cuando explora un código de barras
empleando el escáner de códigos de
barras sin programación, la caja
registradora se establece en este modo
de función de aprendizaje. Para los
detalles del modo, consulte el manual de
instrucciones.
para visualizar el importe
s
, y se visualizará la vuelta
A
Importe recibido
Cuando ocurre un error:
Cuando ocurre un error con un sonido de alarma,
pulse lpara borrar el error. Si no borra el error,
pulse Edos veces. La transacción se finalizará
en cancelación de subtotal o venta en metálico.
Impreso en China
(TCADH2512RCZZ) 1
5:
y
 Loading...