

Page 1

VC-MH741SM
VIDEO CASSETTE RECORDER OPERATION MANUAL
GB
GB
1- 35
ENGLISH
GB
●SHARP SUPER PICTURE
●4 HEAD LONG PLAY
●AUTO CLOCK
●AUTO TUNING
1
1- 35
PORTUGUÊSE
1- 35
SVENSKA
Page 2

Dear SHARP customer Thank you for buying this SHARP VCR. GIven proper care it will provide
GB
years of entertainment for the whole family. Please read this operation manual carefully before
attempting to operate the VCR.
Copyright
● Audio-visual material may consist of copyrighted works which must not be recorded without the
authority of the owner of the copyright. Please refer to the relevant laws in your Country.
● No part of this publication may be reproduced, stored or transmitted in any form without prior
permission from SHARP Electronics (UK) Ltd.
®
is a registered trademark of Gemstar Development Corporation.
The system is manufactured under licence from Gemstar Development Corporation.
THIS MANUAL COVERS A RANGE OF MODELS. ALL OF THE FEATURES MENTIONED MAY NOT
NECESSARILY APPLY TO YOUR VCR.
Estimado Cliente SHARP Gracias por adquirir este VCR de SHARP.
E
Si lo cuida correctamente, disfrutará durante años de sus características. Lea atentamente este manual
de funcionamiento antes de utilizar el VCR
Copyright
● Los materiales audiovisuales pueden componerse de obras que cuenten con copyright, que no
deben grabarse sin la autorización del propietario del copyright. Consulte las leyes
correspondientes de su país.
● Ninguna sección de este publicacíon podrá reproducirse, almacenarse ni transmitirse en forma
alguna sin la previa autorización de SHARP ELECTRONICS (EUROPE) GmbH.
®
es una marca registrada de Gemstar Development Corporation.
El sistema está fabricado bajo licencia de Gemstar Development Corporation.
ESTE MANUAL CUBRE VARIOS MODELOS.
TODAS LAS CARACTERÍSTICAS MENCIONADAS PUEDEN NO NECESARIAMENTE APLICARSE A SU
VCR.
Caro Cliente da SHARP
P
Obrigado por der adquirido este VÍDEOGRAVADOR SHARP.
Se o utilizar correctamente, proporcionará vários anos de diversão a toda a família. Leia
cuidadosamente este manual de instruções antes de utilizar o vídeogravador.
Direitos de autor
● O material audiovisual pode ser composto por trabalhos protegidos pelos direitos de autor, que não
podem ser gravados sem a autorização do proprietário dos direitos de autor. Consulte as leis
nacionais relecionadas com este assunto.
● Nenhuma parte desta publicação pode ser reproduzida, armazenada ou transmitida sob qualquer
forma sem permissão prévia da SHARP ELECTRONICS (EUROPA) GmbH.
®
é uma marca registrada da Gemstar Development Corporation.
O Sistema é produzido sob licenciamento da Gemstar Development Corporation.
ESTE MANUAL ABRANGE UMA GAMA DE MODELOS.
TODAS AS FUNÇÕES MENCIONADAS PODEM NÃO NECESSARIAMENTE APLICAR-SE AO SEU.
Bästa SHARP-kund Vi tackar dig för ditt köpav en Videobandspelare från SHARP.
S
Om du sköter videobandspelaren på rätt sätt kommer den att att skänka dig och hela din familj mycket
nöje under lång tid framöver. Studera denna bruksanvisning noggrant innan du använder
videobandspelaren.
Copyright
● Audiovisuella material och produkter kan lyda under upphovsrättslagen och får då inte spelas in utan tillstånd
från upphovsrättsinnehavaren. Kontrollera vilka lagar som gäller i ditt land.
● Denna skrift får inte toll någon del reproduceras, lagras eller spridas i någon form utan tillstånd från SHARP
ELECTRONICS (EUROPE) GmbH.
®
är ett registrerat varumärke tillhörande Gemstar Development.
Systemet tillverkas på licens från Gemstar Development Corporation.
DENNA BRUKSANVISNING GÄLLER FÖR FLERA OLIKA MODELLER.
OBSERVERA ATT ALLA FUNKTIONER OCH EGENSKAPER SOM BEHANDLAS
I TEXTEN KANSKE INTE AVSER JUST DIN MODELL.
(i)
Page 3

MENU SET
CLEAR
DISPLAY
STANDBY
DPSS
INPUT SELECT
CHANNEL
VIDEO CASSETTE RECORDER
SLOW
SV/V+
/TIMER
MODE OSD
INPUT
SELECT
CH
CH
OPERATE VOL
VOL
TV
TIMER
ON/OFF
AUDIO
OUT
SKIP
SEARCH
ZERO
BACK
TAPE
SPEED
TV/VCR
+
REC
PAUSE/STILL
REW FF
PLAY / X2
STOP
231
4
7
5
8
0
6
9
AM/PM
///
+
+
VCR REMOTE CONTROL
/
/
/
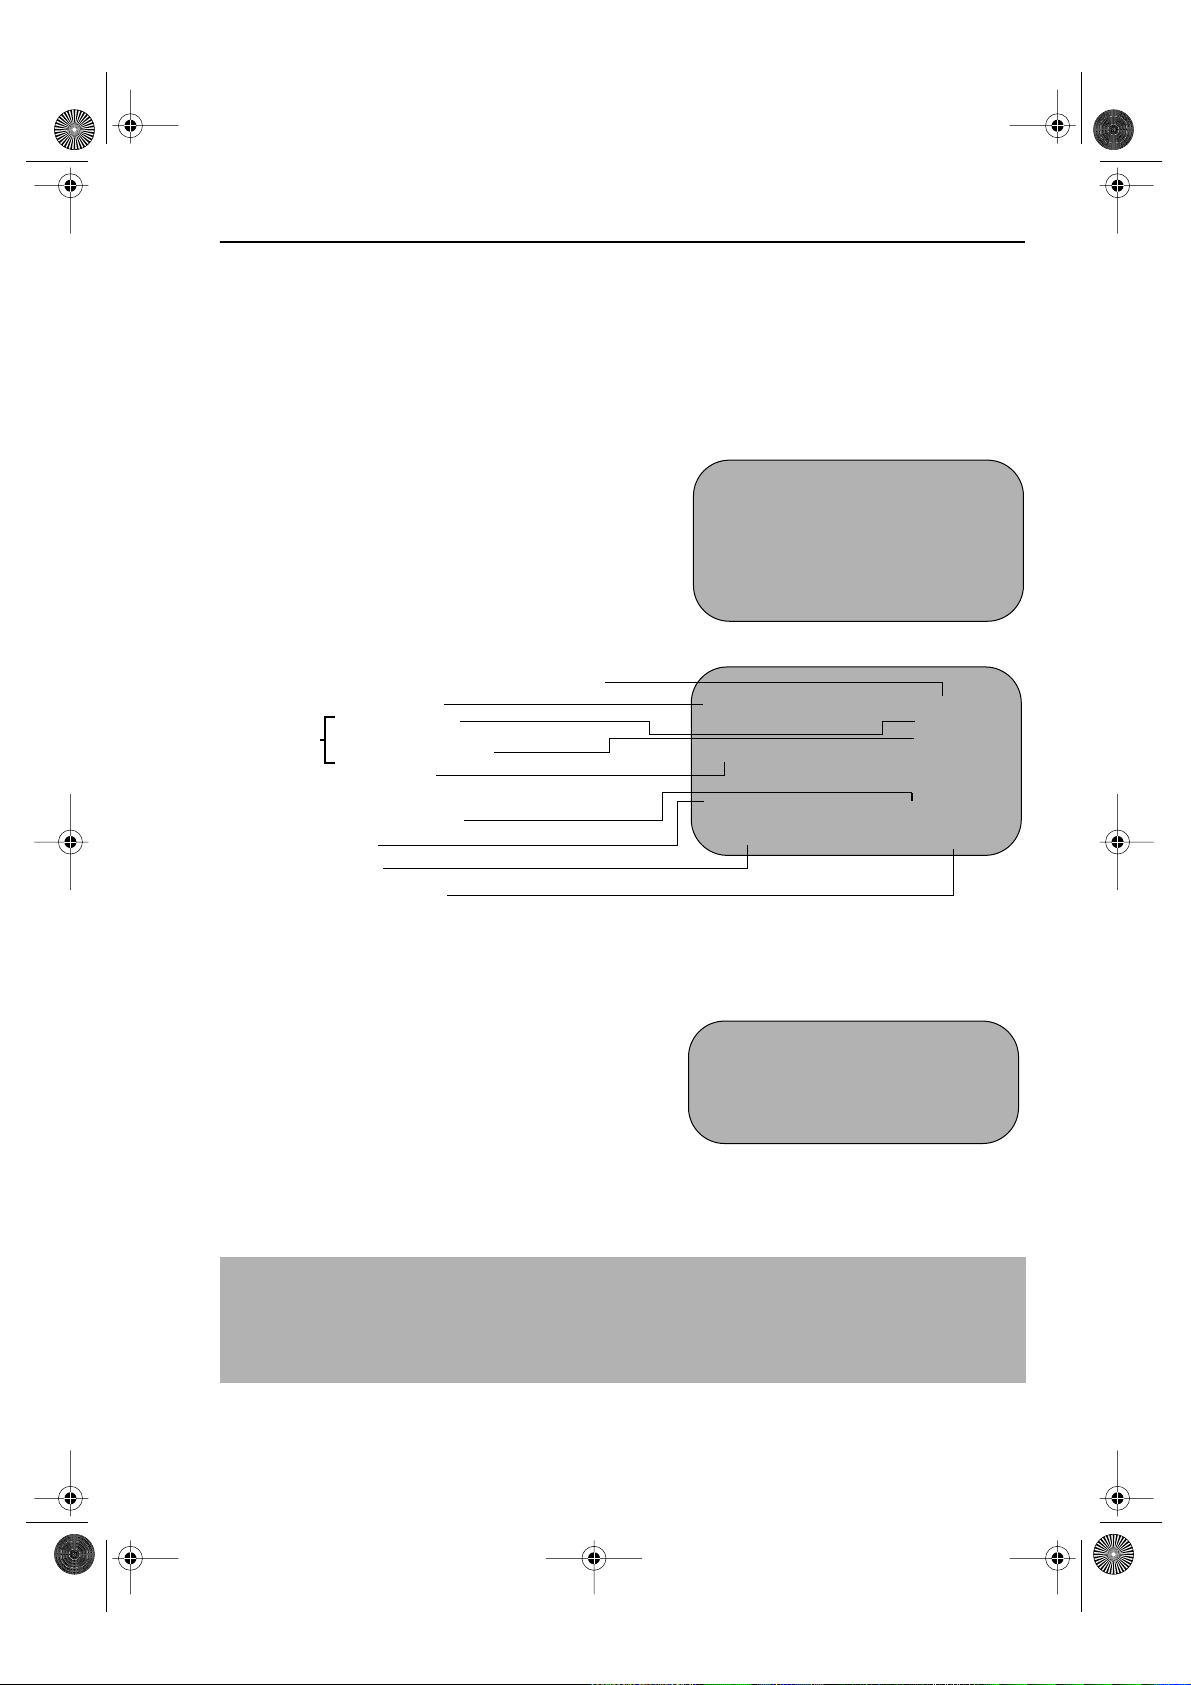
14. BASIC SHARP TV
2. INPUT SELECT
3. CHILD LOCK
4. TIMER ON/OFF
5.AUDIO OUT
7. SV/V+/TIMER
1. STANDBY
6. MENU
CONTROLS
15. VOLUME
16. ZERO BACK
17. SKIP SEARCH
18. SET
19. MENU SELECT
20. CLEAR
21. MODE ON SCREEN
DISPLAY
22. DISPLAY
23. CHANNEL
8. AM/PM or
24. INPUT SELECT
9. REWIND 25. FAST FORWARD
10. RECORD
11.STOP
26. PLAY/X2
27 PAUSE/STILL
12. TAPE SPEED
13. SLOW
28. DPSS
29. TV/VCR
/Slow speed
/
/
VCR FRONT PANEL/REMOTE CONTROL EQUIVALENT FUNCTIONS.
If you prefer, or if remote control batteries fail, you will need to use the VCR front panel controls. The only
differences in function are shown below:
FUNCTION
Moving UP/DOWN menu
Moving LEFT/RIGHT menu
OSD
OPERATION WITH REMOTE
CONTROL
[]buttons
[ ] buttons
OPERATION WITH VCR
FRONT PANEL
CHANNEL buttons.
Turn shuttle ring RIGHT/LEFT
(ii)
Page 4

This equipment complies with the requirements of Directives 89/336/EEC
GB
and 73/23/EEC as amended by 93/68/EEC.
Dieses Gerät entspricht den Anforderungen der EG-Richtlinien 89/336/EWG
D
und 73/23/EWG mit Änderung 93/68/EWG.
Ce matériel répond aux exigences contenues dans les directives
F
89/336/CEE et 73/23/CEE modifiées par la directive 93/68/CEE.
Dit apparaat voldoet aan de eisen van de richtlijnen 89/336/EEG en
NL
73/23/EEG, gewijzigd door 93/68/EEG.
Dette udstyr overholder kravene i direktiv nr. 89/336/EEC og 73/23/EEC med
DK
tillæg nr.93/68/EEC.
Quest’ apparecchio è conforme ai requisiti delle direttive 89/336/EEC e
I
73/23/EEC, come emendata dalla direttiva 93/68/EEC.
GR
Este equipamento obedece às exigências das directivas 89/336/CEE e
P
73/23/CEE, na sua versão corrigida pela directiva 93/68/CEE.
Este aparato satisface las exigencias de las Directivas 89/336/CEE y
E
73/23/CEE modificadas por medio de la 93/68/CEE.
Denna utrustning uppfyller kraven enligt riktlinjerna 89/336/EEC och
S
73/23/EEC så som kompletteras av 93/68/EEC.
Detta produ ktet oppfyller betin gelsen e i direktiven e 89/336/EEC og
N
73/23/EEC i en drin gen 93/68/EEC.
FIN
Tämä laite täyttää direktiivien 89/336/EEC ja 73/23/EEC vaatimukset, joita on
muutettu direktiivillä 93/68/EEC.
4
Page 5

741 eng.book Page 1 Tuesday, April 27, 1999 11:35 AM
CONTENTS
BEFORE USING YOUR VCR
Important notes on your VCR.......................................................................................................2
Unpacking the accessories........................................................................................................... 3
INSTALLING YOUR VCR
Connecting the cables ................................................................................................................. 4
Tuning the TV into the VCR............................................................................................................ 5
Auto installation..............................................................................................................................6
BASIC OPERATION
Important notes on your VCR and video tapes.........................................................................7
How to playback a video tape....................................................................................................7
Immediate recording................................................................................................................... 10
How to use to make a recording.............................................................................11
How to set a delayed recording................................................................................................ 13
ADVANCED OPERATION
Audio and your VCR (HiFi VCR’S ONLY)....................................................................................16
Connecting to audio equipment............................................................................................... 17
Playback of a video tape........................................................................................................... 18
Digital Display ............................................................................................................................... 20
Blue mute......................................................................................................................................21
Colour............................................................................................................................................ 21
Searching the video tape........................................................................................................... 22
Digital programme search system (DPSS).................................................................................22
Recording from other equipment.............................................................................................. 23
Decoder switching operation.....................................................................................................24
SPECIAL FEATURES ON YOUR VCR
Low power feature....................................................................................................................... 25
Child lock ...................................................................................................................................... 25
CUSTOMISED INSTALLATION
Manually tuning a channel.........................................................................................................26
Broadcast and CATV channels..................................................................................................27
Manually sorting channels .......................................................................................................... 28
Changing the on-screen display language ............................................................................. 31
Manually setting the clock..........................................................................................................31
MORE INFORMATION ABOUT YOUR VCR
VCR digital display.......................................................................................................................32
Selecting the output from the VCR............................................................................................ 32
On-screen display ........................................................................................................................ 33
Specifications................................................................................................................................34
Troubleshooting............................................................................................................................35
Pausing and slow motion........................................................................................ 8
Fast forwarding/rewinding a video tape.............................................................. 9
Checking, changing and cancelling a recording............................................15
Checking the amount of tape remaining..........................................................18
Playing back a video tape repeatedly.............................................................. 18
Playing back an NTSC tape.................................................................................19
Skip searching the video tape.............................................................................22
Sorting the channels into your preferred order.................................................. 28
Deleting channels ................................................................................................. 29
Re-naming channels............................................................................................. 30
GB-1
Page 6

741 eng.book Page 2 Tuesday, April 27, 1999 11:35 AM
BEFORE USING YOUR VCR
IMPORTANT NOTES ON YOUR VCR
IDEAL VCR LOCATION
PLACE THE VCR..
• ... on a flat level surface away from radiators
or other heat sources and out of direct
sunlight.
• ... and video tapes away from magnetic
sources such as speakers or microwave ovens.
• ... at least 8” (20cm) away from the TV.
• ... away from curtains, carpets or other
materials and allow ventilation space around
the VCR.
DO NOT...
• ... block the air-vent openings.
• ... expose the VCR to excessive dust,
mechanical vibration or shock.
• ... place any heavy object or liquid on top of
the VCR. If liquid drops inside the VCR unplug
immediately and contact your SHARP dealer.
Do not use the VCR.
• ... insert or drop anything into the tape
compartment or through the
air-vents, as this could result in serious
damage, fire or an electric shock.
POWER SOCKETS
• To avoid overheating or even fire, insert the
plug correctly into the socket.
DO NOT...
• ... overload power sockets, this may cause a
fire or electric shock.
• ... pull the power cord to disconnect the plug
from the mains.
• ... bind the power cords together.
• This VCR is not equipped with a mains power
switch. Accordingly, nominal current to drive
the clock is drawn at all times when the AC
power cord is plugged into a wall socket. If
the VCR is not to be used for an extended
period be sure to unplug the cord.
GB-2
Page 7

741 eng.book Page 3 Tuesday, April 27, 1999 11:35 AM
BEFORE USING YOUR VCR
UNPACKING THE ACCESSORIES
CHECK ALL THESE ACCESSORIES ARE SUPPLIED WITH YOUR VCR. CONTACT YOUR DEALER IF
ANY ARE MISSING.
REMOTE
CONTROL
(TYPE AA/R6/UM3)
BATTERIES (X2)
for the remote control unit.
For a more
detailed
picture of
your remote
control refer
to page (ii)..
VIDEO CASSETTE RECORDER
Battery cover
Remote Control
• Remote Control must be pointed towards the VCR to operate.
• Do not expose to liquid or shock.
• May not function if the VCR is in direct sunlight or any other strong light.
• Replace both alkaline batteries (type AA/R6/UM3) if the remote control
• Remove the batteries and keep in a safe place if you do not plan to use
• Remove and dispose of flat batteries safely and promptly.
• Incorrect use of batteries may cause them to leak or burst.
TO FIT THE BATTERIES INTO THE REMOTE
CONTROL
Remove the battery cover on the back of the remote control.
Fit the batteries: to and to . terminals. Place the
battery cover back into position.
fails.
the VCR for several months.
RF CONNECTION
CABLE
the TV.
connects the VCR to
GB-3
Page 8

741 eng.book Page 4 Tuesday, April 27, 1999 11:35 AM
INSTALLING YOUR VCR
CONNECTING THE CABLES
AERIAL OR
CATV CABLE
Connect the VCR to the
mains
Optional:
Satellite receiver or decoder to
the VCR using a scart lead to
LINE 2 IN/DECODER
socket on the VCR.
DECODER UNIT
Connect your
OR SATELLITE SYSTEM
Connect your existing aerial
cable to the
socket on your VCR.
Connect your TV
to the VCR using
the supplied rf
connection cable,
i.e. connect the
RF OUT
VCR
socket to the TV
AERIAL IN
socket.
ANTENNA IN
BACK OF
TELEVISION
Optional
have a scart lead connect it to your TV and
LINE 1 IN/OUT
SCART (not supplied). If you
socket on the VCR.
✔
The VCR is correctly connected.
GB-4
Page 9

741 eng.book Page 5 Tuesday, April 27, 1999 11:35 AM
INSTALLING YOUR VCR
TUNING THE TV INTO THE VCR
IMPORTANT NOTE: By pressing the STANDBY button, the VCR will toggle
between STANDBY and LOW POWER modes. The VCR display will not be
illuminated in low power mode.
Ensure your VCR is still in the STANDBY
1.
mode (not low power).
2.
Switch on the TV. Select an unused
channel on your TV for your VCR (there
may be a dedicated video channel refer
to your TV operation manual).
Press and hold the
3.
seconds. The VCR will search and display
the ideal RF channel.
MENU
button for 3
Example:
4.
Tune the selected channel on your TV
(refer to your TV manual) until the menu
screen appears.
5.
Press
SET
to store the RF channel and to
place the VCR back into STANDBY.
MENU SCREEN
TIMER
MODE
GRUNDE INSTELLUNG
MN :WÄHLEN
SET :E INGABE MENU :ENDE
NOTE:
• If you have a preferred channel, the RF channel can be set manually (21-69) after
Step 3 using [ / ] keys.
The TV is tuned to the VCR.
✔
GB-5
Page 10

741 eng.book Page 6 Tuesday, April 27, 1999 11:35 AM
INSTALLING YOUR VCR
AUTO INSTALLATION
Press
STOP
to switch on your VCR.
This model will automatically tune in the TV channels in your area, sort them into a standard
order and set the clock.
The screen opposite should be showing on your TV.
AUTO I NSTAL LAT I ON
Follow the instructions from the screens.
(Auto sort will take a few minutes to complete)
On completion, the MOVE MENU will appear
showing the present channel order. Press
exit.
MENU
to
PRESS SET KEY TO START
AUTOMAT I SCHE E I NSTEL LUNG
ZUM BEGINN,DIE SET-TASTE
DRÜCKEN .
SE T : E I NGABE ME NU :ENDE
If the clock is NOT automatically set, the clock
screen will appear., refer to
SETTING THE CLOCK
been set correctly, press DISPLAY until the time
appears on the display.
If you wish to customise the channel order refer to
MANUALLY SORTING CHANNELS
MANUALLY
. To check the clock has
.
If the screen above does not
appear, follow the procedure
VCR RESET below.
VCR RESET
Press
STOP
1.
2.
Press and hold
for 10 seconds.
The AUTO INSTALLATION screen should now be showing on your TV.
3.
4.
Follow the on-screen display to proceed with auto installation.
Refer to the
• Your VCR could not tune automatically - due to for example poor reception.
• You wish to re-arrange the channel order.
• You wish to change the time on the clock or if the VCR could not set the time.
to switch on the VCR.
MENU
and
CHANNEL
buttons together on the front of the VCR
CUSTOMISED INSTALLATION
chapter if
✔
All the programmes should now be correctly tuned in and the clock set.
GB-6
Page 11

741 eng.book Page 7 Tuesday, April 27, 1999 11:35 AM
BASIC OPERATION
IMPORTANT NOTES ON YOUR VCR AND VIDEO
TAPES
VIDEO TAPES
• If you use only good quality video tapes, generally it will not be necessary to clean the
video heads.
• If poor quality tapes are used, or if a tape is loaded after changing VCR location, oxide
from the tape may "clog" the video heads. This will cause the playback picture to be
"snowy", or even disappear.
• To remove minor contamination run a video tape in visual search mode. If this fails, you
will need to have the heads cleaned by a SHARP Service Facility. Please note, if cleaning
is necessary it is not covered by the guarantee.
• Use video tapes which carry the mark.
SECAMPAL
HOW TO PLAYBACK A VIDEO TAPE
BEFORE YOU PLAYBACK A VIDEO TAPE
Condensation forms in the VCR when it is moved out of or into a warm place.
If you try to playback or record, the video tape and VCR may be damaged.
Turn the VCR on and wait for about two hours until the VCR reaches room
temperature before operating.
PLAYBACK
Switch on your TV and select the video channel.
1.
2.
Carefully push a pre-recorded video
tape into the tape compartment.
This will switch the VCR on.
• If the record-protection tab has
been removed, the VCR will start
playback as soon as the video tape
has been loaded.
3.
To start playback, press
X2
().
PLAY/
Record protection tab
GB-7
Page 12

741 eng.book Page 8 Tuesday, April 27, 1999 11:35 AM
BASIC OPERATION
HOW TO PLAYBACK A VIDEO TAPE
SHARP SUPER PICTURE
normally set to ON. To turn
VCR front panel.
• For double speed playback (without sound), press
• To revert to normal playback, press
• To stop the video tape, press
• To eject the tape press
should enhance the picture quality during playback. It is
SHARP SUPER PICTURE
PLAY/X2
STOP
().
EJECT
on the VCR.
on or off press
PLAY/X2
( ) again.
SUPER P.
( ) again.
on the
PICTURE DISTURBANCE DURING PLAYBACK
This VCR has an automatic tracking system which reduces picture disturbance when you start
to playback a video tape. When auto-tracking is in operation flashes on the on-screen
display. If the picture still has disturbance you may need to manually track the video tape:
During PLAYBACK of a video tape.
• Press
• Press
CHANNEL
Tracking)
CHANNEL
or to position picture interference off the TV screen. (Manual
and buttons together to start Auto Tracking.
PAUSING AND SLOW MOTION
Press
1.
2.
• To minimise jitter whilst in pause mode press
• Press
3.
• Press
PLAY/X2
To pause the video tape, press
PLAY/X2
To playback in slow motion (without sound) press
motion speed can be adjusted using the or buttons next to the slow button.
Picture disturbance can be improved by using the
motion playback.
PLAY/X2 ( )to resume playback.
( ) to start the video tape playing.
PAUSE/STILL ()
CHANNEL
( ) to resume playback.
.
or .
SLOW
on the remote control. Slow
CHANNEL or during slow
NOTES:
• There will be picture interference and possibly a change to black and white picture
using Pause and Slow functions.
• PAUSE mode will disengage after about 5 minutes.
GB-8
Page 13

741 eng.book Page 9 Tuesday, April 27, 1999 11:35 AM
BASIC OPERATION
HOW TO PLAYBACK A VIDEO TAPE
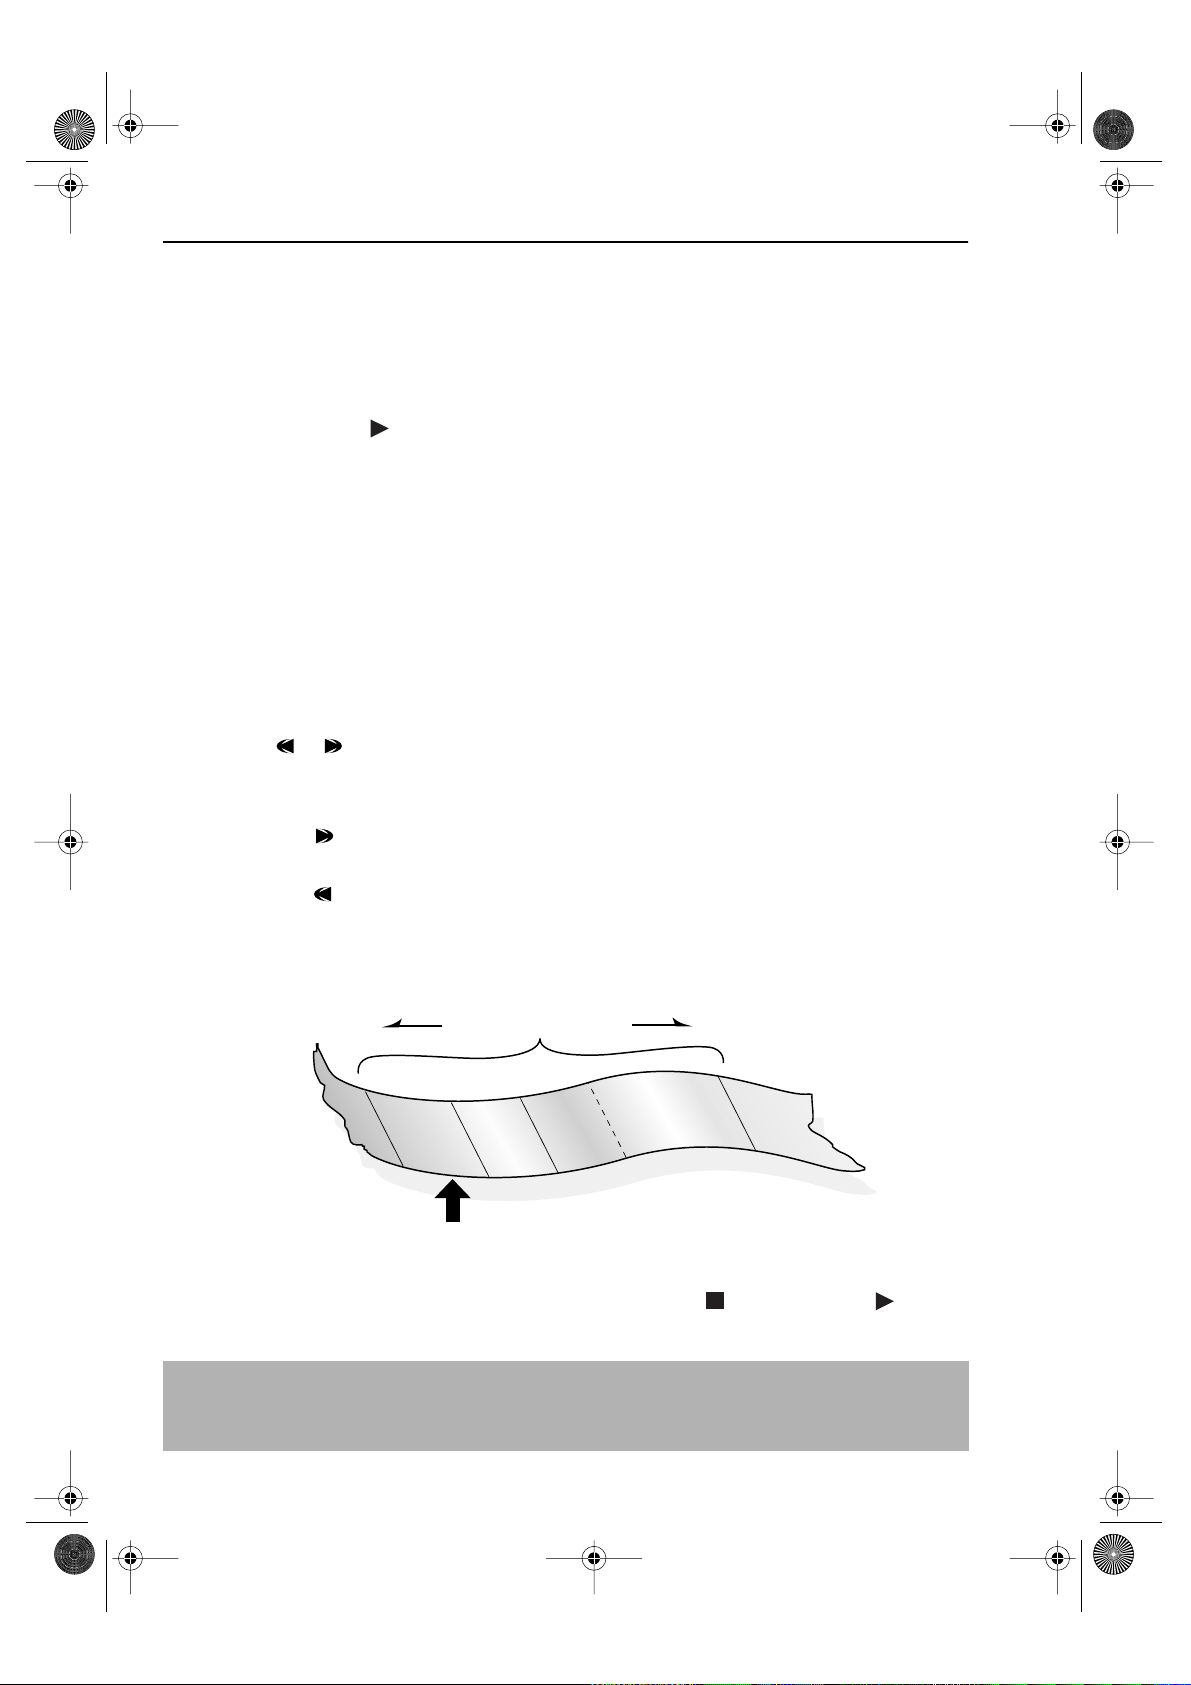
FAST FORWARDING/REWINDING A VIDEO TAPE
1.
Press STOP ( ) to stop the video tape.
2. Press FAST FORWARD ()/REWIND ( ) on the remote control or turn the
shuttle ring on the VCR to the Right/Left and release.
3. To stop fast forward/rewind, press STOP ().
FORWARD/REVERSE VISUAL SEARCH
1.
During playback, press FAST FORWARD ()/REWIND ( ) on the remote
control, or turn the shuttle ring fully to the Right/Left.
2. To lock search mode turn the shuttle far Right/Left and release.
3. To decrease the speed, press FAST FORWARD ()/REWIND ( ) again, or
turn the shuttle to the halfway position.
4. Press PLAY/X2 ( ) to resume playback.
NOTE:
• There will be picture interference and possibly a change to black and white picture
using Visual Fast Forward/Rewind functions.
GB-9
Page 14
741 eng.book Page 10 Tuesday, April 27, 1999 11:35 AM
BASIC OPERATION
IMMEDIATE RECORDING
SELECTION OF A CHANNEL
Select the channel by using the number buttons on the remote control, or select the
next/previous channel by pressing
To change between single digit and 2-digit channel numbers, press
For example, for channel 24, press
You can record the channel you are watching or a different channel.
1. Insert a video tape into your VCR.
2. Select the channel you wish to record on the VCR.
3. To start recording, press REC ().
4. To pause during recording, press PAUSE/STILL ().
5. To continue recording, press REC ().
6. To stop recording, press STOP ( ) once.
CHANNEL [or].
AM/PM .
AM/PM then press 2 4.
SIMPLE TIMED RECORDING:
1. To specify a stop time, press REC ().
STOP 15:30
2. Each additional press of REC ( ) will delay
the stop time by 10 minutes.
3. To stop recording at any time, press
STOP ( ) once.
NOTES:
• If the tape ends before the recording is complete the VCR will stop recording and
rewind, or eject if the VCR is in timer record mode.
• If the VCR ejects the video tape when you press
protected. i.e. record protection tab has been removed.
REC ( ) the tape is record
GB-10
Page 15

741 eng.book Page 11 Tuesday, April 27, 1999 11:35 AM
BASIC OPERATION
HOW TO USE TO MAKE A RECORDING
• If appears on the VCR display, press TIMER ON/OFF before starting.
• Check that the clock is displaying the correct time.
SHOWVIEW allows you to program the VCR to record up to eight programmes using the
SHOWVIEW numbers published in TV listings...
1. Press [SV/V+] on the remote control
2. Enter the SHOWVIEW number from the TV
listing using the
NUMBER BUTTONS.
NOTE:
• An ERROR message will appear if you have entered a number that is not a current
SHOWVIEW number. If this happens press
and enter the correct SHOWVIEW number
CLEAR to delete the numbers as required
3. Press [ / ] to select ONCE, WEEKLY, DAILY
4. If you want to make additional recordings at the same time each day or week, then use
[ / ] to select the WEEKLY, or DAILY option as appropriate.
5. Press SET to confirm..
SHOWVIEW NO. -
→
ONCE WE E KLY DA I L Y
NOTE:
• Check that the menu list agrees with the times shown in the TV listing. If it does not press
CLEAR to return to the SHOWVIEW menu, and re-enter the correct SHOWVIEW number
The first time that you use SHOWVIEW to make a
recording on each channel Preset, (PR) may be
highlighted on the menu.
6. Enter the channel you wish to record using
the
NUMBER BUTTONS, for example if
you wish to record channel 2 press
VCR will remember this for the future.
0 2. The
DATE PR START STOP
21/06 02 12:00 13:00 SP*
--/-- -- -:-- -:-- ---
--/-- -- -:-- -:-- ---
--/-- -- -:-- -:-- ---
PR : ZDF
OP :SELECT MN : CHANGE
SET :ENTER MENU: EXIT
1/2
NOTES:
You may also access the SHOWVIEW menu by the following procedure:
i. Press MENU.
ii. The SHOWVIEW option will be highlighted. Press SET to confirm.
Continue from step 2 above.
GB-11
Page 16

741 eng.book Page 12 Tuesday, April 27, 1999 11:35 AM
BASIC OPERATION
HOW TO USE TO MAKE A RECORDING
7.
If your VCR has long play facility
to change the
the [ / ] to highlight SP. Press [ / ]
to select standard play (SP) or long play (LP)
as required.
RECORDING SPEED, use
8. [See NOTE below]. For VPS/PDC setting use
[ / ] to highlight the final column. Using
the [ / ] will select VPS/PDC ON or OFF
(
✱ = ON - = OFF).
9. Press SET to confirm the programme. The
SHOWVIEW menu will reappear. If you wish to
enter further SHOWVIEW recordings repeat this
procedure.
10. When you have completed entering timer
settings, press
from the TV screen.
MENU to remove the menu
11. Press TIMER ON/OFF once to place the VCR
in TIMER STANDBY mode. will be shown on
the display.
and you wish
DATE PR START STOP
21/060212:0013:00SP*
--/-- -- -:-- -:-- ---
--/-- -- -:-- -:-- ---
--/-- -- -:-- -:-- ---
TAPE
OP :SELECT MN : CHANGE
SET :ENTER MENU: EXIT
DATE PR START STOP
21/060212:0013:00SP-
--/-- -- -:-- -:-- ---
--/-- -- -:-- -:-- ---
--/-- -- -:-- -:-- ---
VPS/PDC ✱:ON - :OFF
OP :SELECT MN : CHANGE
SET :ENTER MENU: EXIT
SPEED :SP/ LP
1/2
1/2
NOTES:
• VPS/PDC is a signal broadcast by some TV stations which adjusts the start and stop time
of your VCR recording. This ensures that if there is a change in broadcast time for your
programme the VCR will still record the whole programme. It is essential that the start
time as it appears in the TV listing is used to program the VCR, as this information is used
to identify the VPS/PDC signal corresponding to your programme.
• If flashes a video tape has not been inserted into the VCR.
• If the video tape is ejected when the VCR tries to record the record protection tab has
been removed.
• During recording, press
recordings to be made, the VCR will return to TIMER STANDBY.
STOP ( ) to cancel the recording. If there are further
GB-12
Page 17

741 eng.book Page 13 Tuesday, April 27, 1999 11:35 AM
BASIC OPERATION
HOW TO SET A DELAYED RECORDING
You can make a maximum of eight delayed recordings up to a year in advance.
The example shown is for 24-hour clock operation. 12-hour clock operation can be selected
from the manual clock setting menu.
12-hour clock am/pm can be selected using the
• If appears on the VCR display, press
• Check that the clock is displaying the correct time.
SETTING A RECORDING
For example: Recording a programme on channel 3 from 21:05 to 22:30 on July 9th.
1. Press STOP ( ) to switch on the VCR.
2. Press MENU .
3. Press [ / ] to select TIMER. Press SET to
confirm.
4. The position which is initially highlighted is the
next available timer record entry. Press
confirm this.
• The display will automatically show today's
date.
Either:
If this is the date you wish to make the
recording on, press
Or:
enter the recording date using the
[ / ] or the
Enter two digits for the day, then two for the
month. For example for July 9th, press
then
0 7 (July).
5. Then press SET to confirm.
6. If you want to make additional recordings at
the same time each day or week, use
[ / ] or select D (daily) or W (weekly).
Then press
SET to confirm.
7. Enter the channel using the [ / ] or the
NUMBER BUTTONS. For example to
record a programme on channel 3, press 0 3.
Then press
SET to confirm.
SET to confirm this.
NUMBER BUTTONS.
AM/PM button on the remote control.
TIMER ON/OFF before starting.
MENU SCREEN
TIMER
MODE
SET to
0 9 (9th),
SET UP
MN : SELECT
SET :ENTER MENU: EXIT
DATE PR START STOP
21/060212:0013:00SP*
9/07 -- -:-- -:-- ---
--/-- -- -:-- -:-- ---
--/-- -- -:-- -:-- ---
DATE PR START STOP
21/060212:0013:00SP*
9/07D -- -:-- -:-- ---
--/-- -- -:-- -:-- ---
--/-- -- -:-- -:-- ---
1/2
1/2
GB-13
Page 18

741 eng.book Page 14 Tuesday, April 27, 1999 11:35 AM
BASIC OPERATION
HOW TO SET A DELAYED RECORDING
8. Enter the start time using the [ / ] or the
NUMBER BUTTONS hours first then minutes
(when entering less than 10 minutes add a '0'
before the number), for example for 21:05 start,
press
2 1 0 5. Then press SET to confirm.
9. Enter the stop time, for example for 22:30 stop,
press
2 2 3 0.
10.
If your VCR has long play facility
change the
[ / ] to highlight SP. Press [ / ] to
select standard play (SP) or long play (LP) as
required.
RECORDING SPEED, use the
and you wish to
11. [See note below]. For VPS/PDC setting use the
[/] to highlight the final column. Using
the [ / ] will select VPS/PDC ON or OFF
(* = ON - = OFF).
12. Press SET to confirm.
• The MENU now shows all the timer settings you
have entered. If you wish to make additional
timer recordings, repeat this procedure.
13. When you have completed entering timer
settings, press
from the TV screen.
MENU to remove the menu
14. Press TIMER ON/OFF once to place the VCR
in TIMER STAND-BY mode. will be shown on
the display.
DATE PR START STOP
21/060212:0013:00SP*
9/07D03 21:05 -:-- SP*
--/-- -- -:-- -:-- ---
--/-- -- -:-- -:-- ---
DATE PR START STOP
21/060212:0013:00SP*
9/07D03 21:05 -:-- LP*
--/-- -- -:-- -:-- ---
--/-- -- -:-- -:-- ---
DATE PR START STOP
21/060212:0013:00SP*
9/07D03 21:05 22:30 LP-
--/-- -- -:-- -:-- ---
--/-- -- -:-- -:-- ---
1/2
1/2
1/2
NOTES:
• VPS/PDC is a signal broadcast by some TV stations which adjusts the start and stop time
of your VCR recording. This ensures that if there is a change in broadcast time for your
programme the VCR will still record the whole programme. It is essential that the start
time as it appears in the TV listing is used to program the VCR, as this information is used
to identify the VPS/PDC signal corresponding to your programme.
• If flashes a video tape has not been inserted into the VCR.
• If the video tape is ejected when the VCR tries to record the record protection tab has
been removed.
• During recording, press
recordings to be made, the VCR will return to TIMER STANDBY.
STOP ( ) to cancel the recording. If there are further
GB-14
Page 19

741 eng.book Page 15 Tuesday, April 27, 1999 11:35 AM
BASIC OPERATION
HOW TO SET A DELAYED RECORDING
CHECKING, CHANGING AND CANCELLING A RECORDING
CHECKING A RECORDING
1. If in TIMER STANDBY mode, press
TIMER ON/OFF to exit.
2. Press STOP to switch on the VCR.
3. Press MENU.
4. Press [ / ] to select TIMER. Press SET to
confirm
• All the delayed recordings in the VCRs memory
will be shown.
• You can check the settings and change or
cancel them.
CHANGING A RECORDING
1. Follow steps 1 to 4 of CHECKING A
RECORDING.
2. If you wish to change a delayed recording,
press [ / ] to highlight the recording,
then press
SET.
3. Press [ / ] to highlight the setting to be
changed and correct it by using the[ / ]
NUMBER BUTTONS.
or the
4. When all corrections are complete press SET,
then press
MENU.
MENU SCREEN
TIMER
MODE
SET UP
MN : SELECT
SET :ENTER MENU: EXIT
DATE PR START STOP
21/060212:0013:00SP*
--/-- -- -:-- -:-- ---
--/-- -- -:-- -:-- ---
--/-- -- -:-- -:-- ---
1/2
CANCELLING A RECORDING
1. Follow steps 1 to 4 of CHECKING A
RECORDING.
2. If you wish to cancel a delayed recording, press
[ / ] to highlight the recording to be
cancelled, then press
CLEAR.
DATE PR START STOP
21/060212:0013:00SP*
--/-- -- -:-- -:-- ---
--/-- -- -:-- -:-- ---
--/-- -- -:-- -:-- ---
1/2
3. Press MENU.
NOTE:
• If there are some programmes to be recorded, do not forget to press TIMER ON/OFF
button to return the VCR to TIMER STAND-BY mode.
GB-15
Page 20

741 eng.book Page 16 Tuesday, April 27, 1999 11:35 AM
ADVANCED OPERATION
AUDIO AND YOUR VCR (HiFi VCR’S ONLY)
HI-FI STEREO SOUND
Stereo sound is possible from this VCR if you have a stereo TV connected to the VCR with a
scart lead, or audio equipment connected with audio phono leads. The VCR is normally set
so that stereo sound is possible. The sound output from the VCR is controlled by the
AUDIO OUT button on the remote control. If you wish to change the sound output you can
use the
AUDIO OUT button as follows:
• Press
• Press
• Press
• Pressing
AUDIO OUT once. The LEFT audio channel will be sent to BOTH speakers. L will
appear on the VCR display.
AUDIO OUT twice. The RIGHT audio channel will be sent to BOTH speakers. R will
appear on the VCR display.
AUDIO OUT three times. The MONO track will be sent to BOTH speakers. L and R
will disappear from the VCR display.
AUDIO OUT a fourth time, normal Hi-Fi stereo sound will be heard. L and R will
appear on the VCR display.
NICAM Hi-Fi STEREO SOUND
Your VCR can receive and record programmes broadcast in NICAM or IGR sound (the factory
pre-set condition for NICAM is AUTO). NICAM or IGR sound may not be stereo, this depends
on the programme being received.
Audio is automatically recorded in two different ways:
(i) Hi-Fi: Using specialised rotary heads, two audio signals are recorded on to the tape. These
will be stereo, mono or bilingual depending on the sound being received.
(ii) Normal: A mono recording is also made on the conventional analogue audio track.
1. Press MENU to display the main menu on the
screen.
2. Press [ / ] to select MODE.
➝NICAM AUTO OFF
COLOUR AUTO PAL MESECAM
3. Press SET. NICAM will be selected.
4. Press [ / ] to select OFF.
5. Press SET, to return to the menu screen.
6. Press MENU, to exit to normal screen.
NOTES:
• If the tape being played back does not carry sound recorded on Hi-Fi tracks, L and R
will not appear on the display.
• lf the sound contains ‘crackling’ or ‘popping’ noises the sound quality may be
improved by adjusting the tracking using CHANNEL / .
• If the poor quality is for a long period the VCR will automatically select the mono track
and the sound will be in mono.
• Not all TV transmitters provide NICAM or IGR sound. In this case the VCR automatically
switches to receive the mono signal.
• NICAM sound may not be stereo.
GB-16
Page 21

741 eng.book Page 17 Tuesday, April 27, 1999 11:35 AM
ADVANCED OPERATION
AUDIO AND YOUR VCR (HiFi VCR’S ONLY)
CONNECTING TO AUDIO EQUIPMENT
The diagram below shows how to connect your VCR to audio equipment. When connected
in this way stereo sound is possible from the speakers.
BACK OF
TELEVISION
EXISTING AERIAL
CABLE
AUDIO OUT
L and R
AUDIO PHONO LEADS
(NOT SUPPLIED)
RF CONNECTION CABLE
SORTIE ANTENNE
+
AMPLIFIER
ANTENNA IN
ENTREE
RF OUT
AERIAL IN
RF-OUT
GB-17
Page 22

741 eng.book Page 18 Tuesday, April 27, 1999 11:35 AM
ADVANCED OPERATION
PLAYBACK OF A VIDEO TAPE
CHECKING THE AMOUNT OF TAPE REMAINING
When you load a video tape into the VCR it can calculate approximately the amount of
video tape remaining in hours and minutes. This is useful in determining whether or not there is
sufficient tape left to make a recording.
When a video tape is playing, the amount of tape remaining is calculated for you
automatically.
To display the amount of video tape remaining:
1. Load the video tape into the VCR
2. Press DISPLAY on the remote control as many times as necessary until “R” appears on
the VCR display. The tape will wind forward and then return to its original position. The
tape remaining will be shown on the VCR display in hours and minutes.
For example, if 1 hour 23 minutes is left on the tape:
Pr
NOTES:
• Do not interrupt the tape remaining calculation.
• If less than 5 minutes of tape remains the display will flash.
PLAYING BACK A VIDEO TAPE REPEATEDLY
You can set your VCR to automatically rewind at the end of playing a video tape and replay
the entire tape again. REPEAT will appear on the on-screen display when selected.
To use this feature:
1. Press MENU to display the main menu on the
screen.
2. Press [ / ] to select MODE.
3. Press SET.
4. Press [ / ] to select REPEAT.
MODE MENU SCREEN
BLUE MUTE AUTO OFF
➝REPEAT ON OFF
5. Press [ / ] to select ON.
6. Press SET.
MN : SELECT OP : CHANGE
S E T : E N T ER ME NU : E X I T
7. Press MENU to return to normal screen.
GB-18
Page 23

741 eng.book Page 19 Tuesday, April 27, 1999 11:35 AM
ADVANCED OPERATION
PLAYBACK OF A VIDEO TAPE
PLAYING BACK AN NTSC TAPE
NTSC (National Television Standards Committee) is a different TV standard to PAL and is used
in some Non-European Countries. Your VCR can playback pre-recorded NTSC tapes onto a
PAL system TV, but cannot record an NTSC signal onto a video tape.
Note that..
• You cannot record NTSC signals or dub NTSC tapes onto other VCRs from this VCR.
• You cannot use Slow speed, Still frame, Double Speed, Frame Advance or Tape
Remaining with a pre-recorded NTSC tape.
• On some televisions, the picture may appear in black and white or there may be no
picture. This does not indicate a fault with your VCR.
• On some televisions, the picture may shrink vertically causing black bands to appear at
the top and bottom of your screen.
• On some televisions, the played-back picture may roll vertically, this does not indicate a
fault with your VCR.
GB-19
Page 24

741 eng.book Page 20 Tuesday, April 27, 1999 11:35 AM
ADVANCED OPERATION
DIGITAL DISPLAY
TIME OF DAY
Shows current time of day, if the clock is set.
Press
DISPLAY until the time of day appears. For
example, 21:20 appears:
OPERATION MODE
Shows status of tape. Press DISPLAY until the display
appears, for example:
TAPE COUNTER AND ZERO BACK
Tape counter measures the current position of the video tape in real time. ZERO BACK uses the
tape counter to determine a specific point on a tape you may wish to return to.
Pr
Pr
1. Press DISPLAY until tape counter appears, for
example:
2. To identify the current position on a video tape
press
CLEAR and the tape counter will appear:
When you wish to return to this position on the video tape, press
rewind/advance to this point.
ZERO BACK. The tape will
NOTE:
• The tape counter will only operate on recorded sections of tape.
Pr
Pr
GB-20
Page 25

741 eng.book Page 21 Tuesday, April 27, 1999 11:35 AM
ADVANCED OPERATION
BLUE MUTE
The TV screen will be blue if a TV channel with no signal is selected, an unrecorded section of
tape is played or the quality of the recording on the tape is poor. Select OFF to disable this
feature.
1. Press MENU to display the main menu on the
screen.
2. Press [ / ] to select MODE.
MODE MENU SCREEN
NICAM AUT O OFF
COLOUR AUTO PAL MESECAM
BLUE MUTE AUTO OFF
3. Press SET.
4. Press [ / ] to select BLUE MUTE.
5. Press [ / ] to select OFF.
6. Press SET and then MENU to return to the
normal screen.
COLOUR
If the VCR is playing poor quality recording, the picture may turn black and white. Selecting
PAL/MESECAM may improve this (depending on the recording), although coloured speckles
may appear on black and white recordings.
1. Follow steps 1 to 3 from BLUE MUTE.
2. Press [ / ] to select COLOUR.
3. Press [ / ] to select AUTO/PAL or MESECAM
4. Press SET and then MENU to return to the normal screen.
GB-21
Page 26
741 eng.book Page 22 Tuesday, April 27, 1999 11:35 AM
ADVANCED OPERATION
SEARCHING THE VIDEO TAPE
SKIP SEARCHING THE VIDEO TAPE
You can search the tape in 30 second time intervals. To do this follow the procedure below:
1. Press PLAY/X2 ( ) to start the video tape playing.
2. Press SKIP SEARCH on the remote control.
The number of times you press
determines the forward search time.
• After searching, normal playback
will resume automatically
SKIP SEARCH
DIGITAL PROGRAMME SEARCH SYSTEM (DPSS)
Your VCR records a marker signal on the tape at the start of each recording. These signals can
be used later to locate the starting point of a recording.
DPSS to locate a previous programme or the next programme.
Press
For example,
/
1. Load the video tape into the VCR.
2. Press DPSS three times. A 3 will appear on the on-screen display, and the VCR will
fast forward to locate the third recording after the current one.
3. Press DPSS once. A -1 will appear on the on-screen display and the VCR will rewind
to locate the beginning of the current recording.
1 press = 30 seconds.
2 presses = 1 minute.
3 presses = 1 minute 30 seconds.
4 presses = 2 minutes.
Fast ForwardRewind
DPSS
Number
DPSS Signals
RECORDING 1
RECORDING 2
-1
Current tape position
RECORDING 3
+1
RECORDING 4
+2
RECORDING 5
+3
4. To cancel the search before it has finished, press STOP ( ) or PLAY/X2 ( ) .
NOTES:
• Recordings must be longer than 3 minutes..
• The starting point of playback may vary.
• This feature will only work with video tapes recorded on a VCR with the DPSS feature.
GB-22
Page 27
741 eng.book Page 23 Tuesday, April 27, 1999 11:35 AM
ADVANCED OPERATION
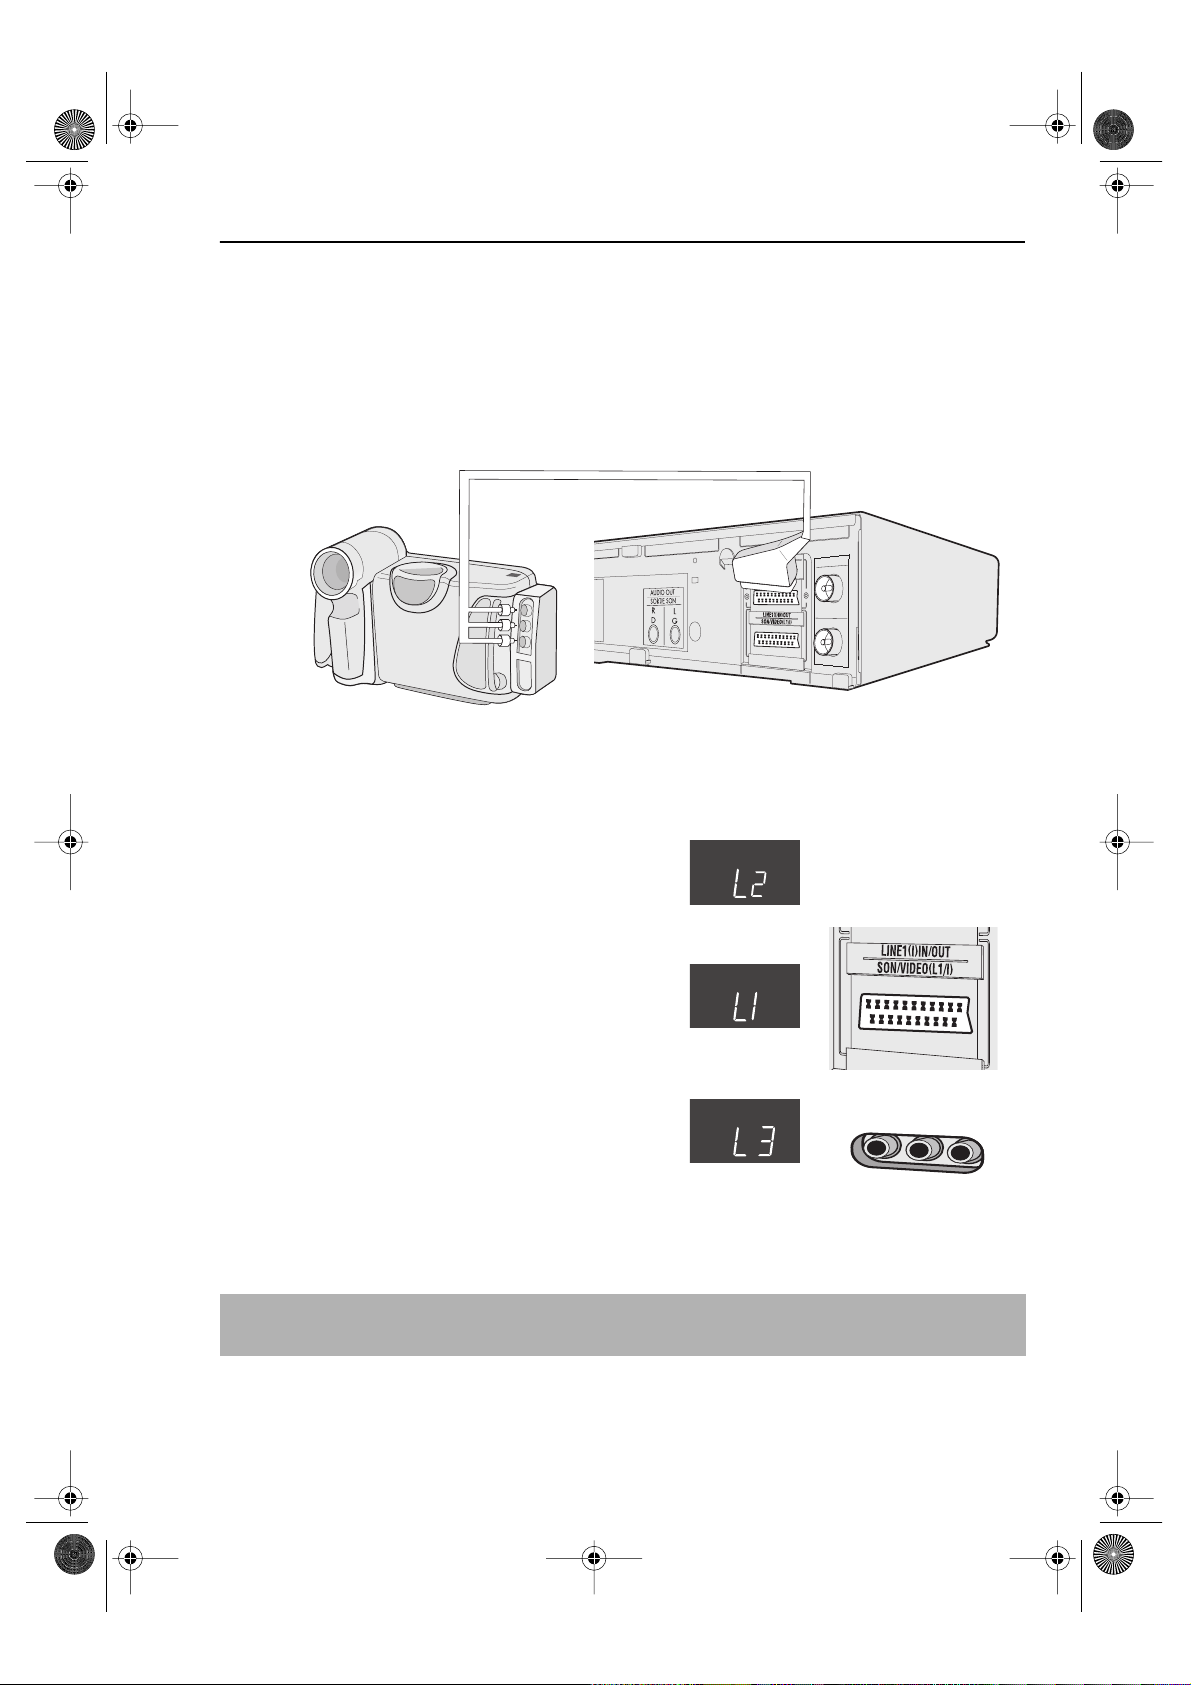
RECORDING FROM OTHER EQUIPMENT
You can record video and audio signals from various sources, for example a camcorder, onto
a video tape using your VCR.
For example, recording from a camcorder connected to LINE 2 IN/DECODER on your VCR:
Optional Scart connection (not supplied)
ANTENNA IN
ENTREE
RF OUT
SORTIE ANTENNE
Mono/Stereo Camcorder
1.
Load tape into the VCR.
Press
2.
INPUT SELECT
until the VCR display shows
3.
If you wish to record from a source connected to
LINE 1 IN/OUT, select
4.
If you wish to record from a source connected
on the remote control
.
L2
L1
.
with audio phono leads to the sockets on the
front of the VCR (if fitted), select
L3
.
L
N
I
E IN 3
V
DEO
I
L • AUDIO • R
NOTE:
• There are many different ways of connecting external equipment to your VCR. Please
refer to your equipment operation manuals for further information.
GB-23
Page 28

741 eng.book Page 24 Tuesday, April 27, 1999 11:35 AM
ADVANCED OPERATION
DECODER SWITCHING OPERATION
If you connect a separate decoder to the VCR connected to L2 as previously shown, you will
need to set the decoder function to ON in order to record the descrambled signal and/or
watch it on your TV. Now, when the VCR receives a scrambled signal it is output via LINE 2
terminal to the decoder. The decoder then outputs the descrambled signal back to LINE 2
terminal and the signal can be recorded. The VCR outputs the descrambled signal to your TV
through the LINE1 terminal and you can watch the descrambled picture.
When making recordings using a separate decoder connected as shown remember to leave
the decoder function ON.
If you connect a decoder unit to the VCR, the decoder unit provides a switching signal which
will automatically allow your TV to display the descrambled signal routed through the VCR. To
use this feature make sure that the VCR is connected to both TV and decoder unit by SCART
leads. Then:
• Press STANDBY to place the VCR in Stand-by mode, OR
• Press [TV/VCR] on the remote control to place the VCR in ‘VCR mode’. ‘VCR’ will
appear on the display.
If you switch the decoder function ON when connected to a decoder unit as shown you will
NOT be able to watch the descrambled picture in TV mode or in VCR mode.
GB-24
Page 29

741 eng.book Page 25 Tuesday, April 27, 1999 11:35 AM
SPECIAL FEATURES ON YOUR VCR
LOW POWER FEATURE
To meet new power regulations your VCR can be placed in LOW POWER mode. In LOW
POWER mode the VCR power consumption is reduced to below 2 Watt.
LOW POWER MODE
Press
1.
2.
The VCR power consumption will now be below 2 Watt.
STAND BY
Press
STAND BY
display will appear blank.
DISENGAGING LOW POWER MODE
Either
Press
Press
NOTES:
• With poor signal conditions an increase in noise may be observed on the screen in LOW
POWER mode.
• When entering STANDBY, noise may be observed.
• If a signal is input from an AV source, the VCR may not go into true LOW POWER mode.
• When disengaging low power mode from the VCR press the Standby button.
( ) to place the VCR in STANDBY mode.
( ) again to place the VCR in LOW POWER mode. The VCR digital
STAND BY
STOP
( ) to use the VCR.
( ) to return the VCR to STANDBY mode.
CHILD LOCK
You can lock your VCR with this feature. It will work even when the VCR is in standby,
preventing children from operating the VCR.
TO ENGAGE CHILD LOCK
Press and hold on the remote control for about 2 seconds.
flashes and then remains lit on the VCR display confirming that CHILD LOCK
has been activated.
Regardless of what other operating buttons are touched, the VCR will continue to operate in
its present mode. If CHILD LOCK is activated during playback, once the tape reaches its end,
the VCR will automatically rewind the tape, eject it, and turn the power off.
TO DISENGAGE CHILD LOCK
Press and hold for about 2 seconds.
starts flashing and then disappears. CHILD LOCK is disengaged.
NOTES:
• If you attempt to change modes by pressing another button while CHILD LOCK is on,
the indicator will flash on the VCR display.
• If power is interrupted for more than 1 hour (due to power failure etc), CHILD LOCK may
disengage.
Or
GB-25
Page 30

741 eng.book Page 26 Tuesday, April 27, 1999 11:35 AM
CUSTOMISED INSTALLATION
MANUALLY TUNING A CHANNEL
It should not be necessary to tune in a broadcast channel manually except in unusual
circumstances such as poor signal.
To manually tune in a channel follow the procedure below.
Press
1.
2.
3.
4.
5.
6.
7.
MENU
Press [ / ] to select SET UP. Press
SET
to confirm.
CHANNEL PRESET
highlighted. Press
Press [ / ] to select
Press to select CH or CC. This will
determine whether off air (CH) or cable
(CC) is tuned first. Note that both off air
and cable will be tuned regardless of the
setting.
Press [ / ] to start tuning in either
direction. Tuning will stop when a channel
is received. If it is not the desired channel,
press [ / ] to continue tuning.
Press [ / ] to select
TUNING
the sharpest colour picture is obtained.
.
will be
SET
.
CHANNEL
FINE
. Press and hold [ / ] until
CHANNEL PRESET
CHANNEL SORT
CLOCK
.
LANGUAGE
➔
PRESET 1
CHANNEL CH21
FINE TUNING
DECODER ON OFF
SKIP ON OF F
▲
▲
IMPORTANT NOTE:
8. If you connect an independent
decoder, you must press [ / ] to
select DECODER, then select [ / ] to
turn the decoder function ON.
9.
Press [ / ] to select SKIP.
The SKIP function determines whether the
channel can be selected when using the
CHANNEL
/ instead of the
NUMBER BUTTONS.
10. Press [ / ] to select ON or OFF for this
option.
11. Press SET to confirm.
12. Press MENU to leave this function.
GB-26
Page 31
741 eng.book Page 27 Tuesday, April 27, 1999 11:35 AM
CUSTOMISED INSTALLATION
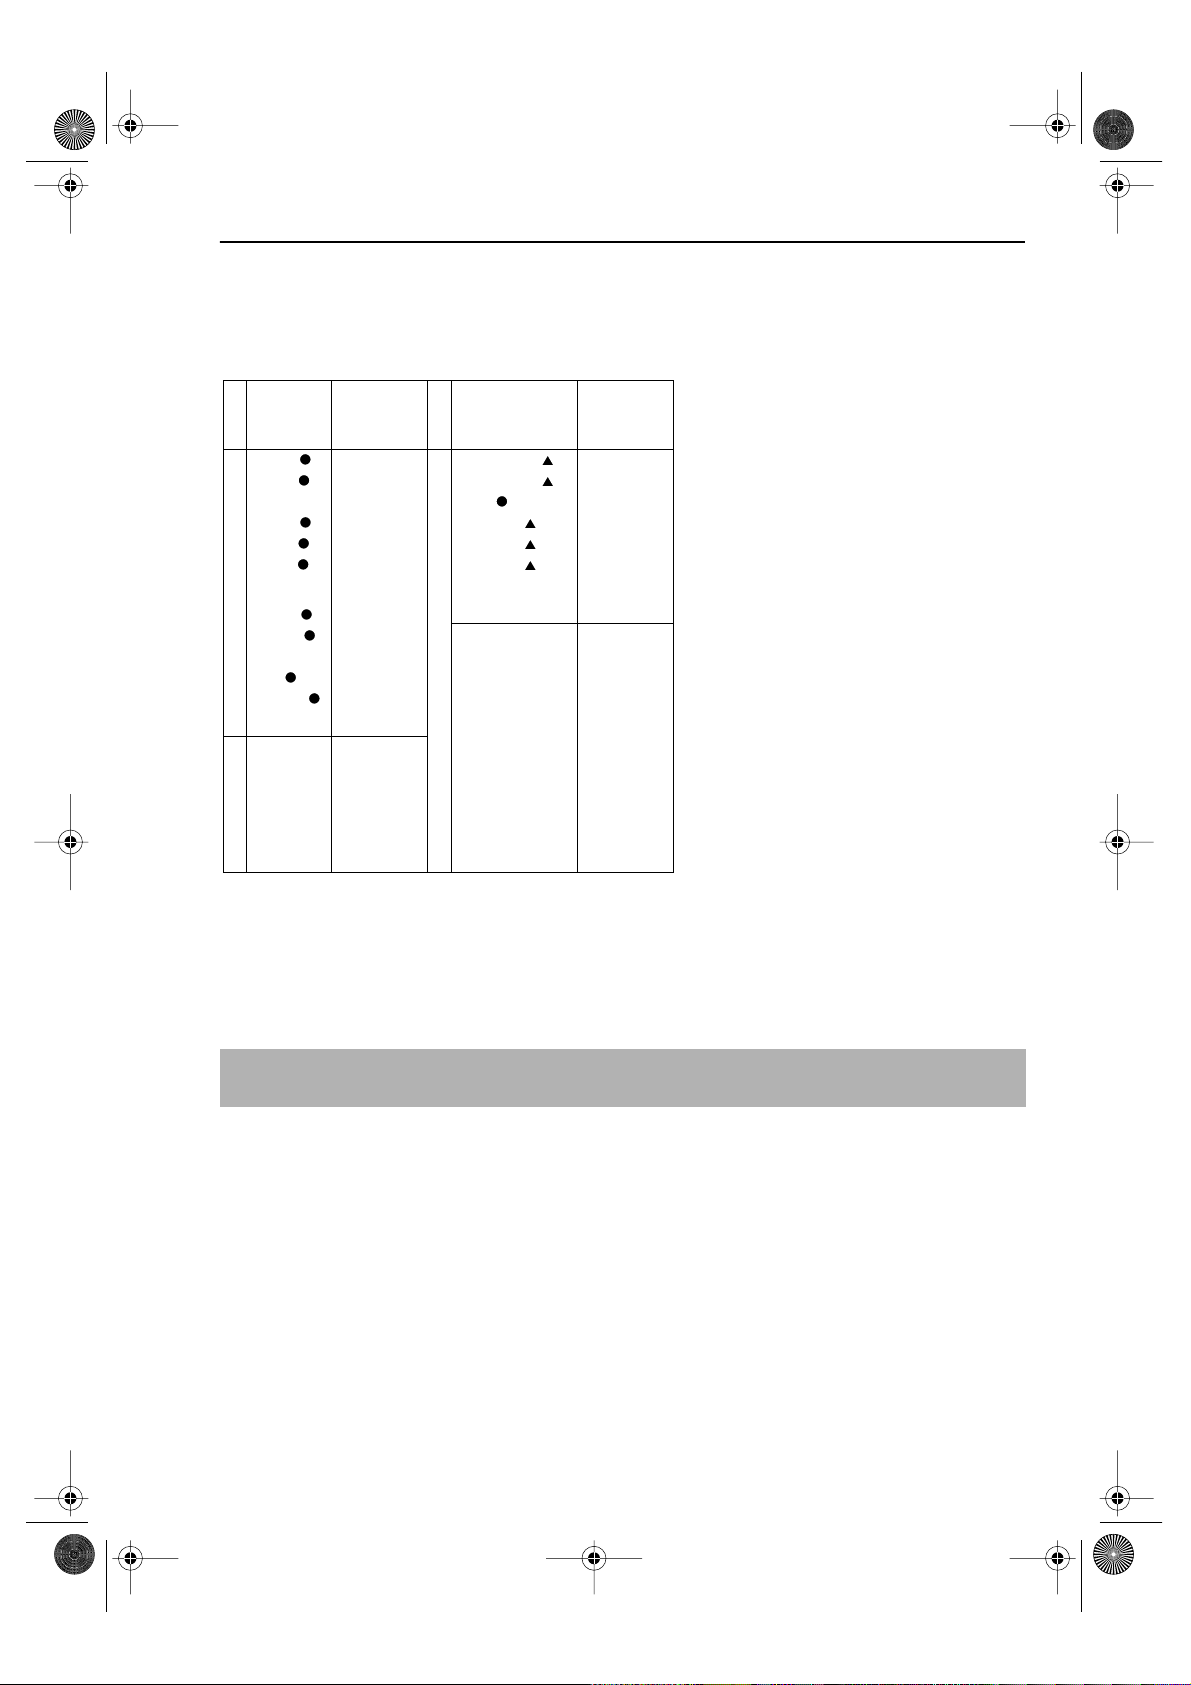
BROADCAST AND CATV CHANNELS
Real
Channel
Numbers
CH:02
CH:03
CH:04
CH:05
CH:06
CH:07
CH:08
CH:09
CH:10
CH:11
CH:12
CH:13
CH:21
CH:22
:
:
CH:68
CH:69
C
A
T
V
Station
Signals
S01/S21
S02/S22
C /S03/
S23
S24
S25
S1
S5
M1/S1
M2/S2
:
M10/S10
U1/S11
:
U10/S20
S21
:
S40
S41
Channel
Numbers
CH:75
CH:76
CH:77
CH:78
CH:79
CH:80
CH:85
CC:01
CC:02
CC:10
CC:11
CC:20
CC:21
CC:40
CC:41
V
H
F
U
H
F
Station
Signals
2/A
3/B
4
5/D
6/E
7/F
8
9/G
10/H
11/H1
12/H2
S11
21
22
:
:
68
69
● Available in Italy ▲ Available in Switzerland
Real
:
:
:
NOTE:
• The VCR has 84 programmable channel positions each of which can be set to any of
the broadcast and CATV channels shown in the table.
GB-27
Page 32

741 eng.book Page 28 Tuesday, April 27, 1999 11:35 AM
CUSTOMISED INSTALLATION
MANUALLY SORTING CHANNELS
SORTING THE CHANNELS INTO YOUR PREFERRED ORDER
When your VCR tunes in broadcast channels automatically it sorts them into a standard order
using teletext information. You can change the order of the channels with the following
procedure.
1. Press MENU.
2. Press [ / ] to select SET UP. Press SET to
confirm.
3. Press [ / ] to select CHANNEL SORT. Press
SET to confirm.
4. The MOVE position will be highlighted. Press
SET to confirm.
5. Press [ / / / ] to highlight the
channel to be moved. Press
SET to confirm.
6. Press [ / / / ] to highlight the new
position for the channel. Press
SET to confirm.
7. If any more channels are to be moved,repeat
procedure from step 5.
8. When all the channels are in your preferred
order, press
function.
MENU to leave the MENU
MENU SCREEN2.
MODE
SET UP
5.
MOVE 1/5
1ARD1 7 13
2ZDF 8 14
3RTL1 9 15
4RTL2 10 16
5NDR 3 11 17
61218
6.
MOVE 1/5
1NDR 3 713
2ARD 1 8 14
3ZDF 9 1 5
4RTL1 10 16
5RTL2 11 17
61218
GB-28
Page 33

741 eng.book Page 29 Tuesday, April 27, 1999 11:35 AM
CUSTOMISED INSTALLATION
MANUALLY SORTING CHANNELS
DELETING CHANNELS
If there is a channel you wish to delete from the VCR memory you can follow the procedure
below.
1. Press MENU.
2. Press [ / ] to select SET UP. Press SET to
confirm.
3. Press [ / ] to select CHANNEL SORT. Press
SET to confirm.
4. Press [ / ] to select CANCEL. Press SET to
confirm.
5. Press [ / / / ] to highlight the
channel to be cancelled.
6. Press SET twice to cancel the channel.
7. When all the channels you wish have been
cancelled, press
MENU.
MENU SCREEN2.
TIMER
MODE
SET UP
5.
CANCE L 1 / 5
1ARD1 7 13
2ZDF 8 14
3NDR 3 9 15
4RTL1 10 16
5RTL2 11 17
6CH5 12 18
6.
CANCE L 1 / 5
1ARD1 7 13
2ZDF 8 14
3RTL1 9 15
4RTL2 10 16
5CH5 11 17
6CH6 12 18
GB-29
Page 34

741 eng.book Page 30 Tuesday, April 27, 1999 11:35 AM
CUSTOMISED INSTALLATION
MANUALLY SORTING CHANNELS
RE-NAMING CHANNELS
When your VCR tunes in broadcast channels automatically, it names them using teletext
information. You can change the name of a channel with the following procedure.
1. Press MENU.
2. Press [ / ] to select SET UP.
Press
SET to confirm.
3. Press [ / ] to select CHANNEL SORT.
Press
SET to confirm.
4. Press [ / ] to highlight NAME.
Press
SETto confirm.
5. Press [ / / / ] to highlight the
channel to be named.
Press
SETto confirm.
6. Press [ / / / ) to rename the
channel.
Press
SET to confirm.
7. If any more channels are to be renamed,
repeat procedure from step 5.
8. When all the channels are named correctly,
press
MENU to leave the MENU function.
:
MODE
SET UP
MENU SCREEN2.
5.
1ARD1 7
2ZDF 8
3RTL1 9
4RT L2 10
5CH5 11
6CH6 12
:
NAME 1/5
6.
1ARD1 7
2ZDF 8
3RTL1 9
4CH 4 10
5CH5 11
6CH6 12
NAME 1/5
GB-30
Page 35

741 eng.book Page 31 Tuesday, April 27, 1999 11:35 AM
CUSTOMISED INSTALLATION
CHANGING THE ON-SCREEN DISPLAY LANGUAGE
Changing the language used by the on-screen display will not change the operation of the
VCR or make it suitable for any other broadcast standard.
1. Press MENU.
2. Press [ / ] to select SET UP. If the display is
not in a language you can understand, this is
the fourth option from the top. Press
confirm..
3. Press [ / ] to select LANGUAGE (the last
option).
4. Then press SET.
5. Press [ / / / ] to select your
language. Then press
SET to confirm.
MANUALLY SETTING THE CLOCK
The clock will normally be set using teletext information when your VCR automatically tunes in
the broadcast channels. If for any reason teletext signals are not present your VCR will not be
able to set the clock. This procedure will allow you to set the clock manually.
1. Press MENU. Press [ / ] to select SET UP.
Press
SET to confirm.
2. Press [ / ] to select CLOCK. Press SET to
confirm.
3. Press [ / ] to select either 12 or 24 hour
clock.
4. Press [ / ] to select TIME. Enter the time
using the
[ / ]. If the minutes are less than 10, enter
the leading 0. If using the 12 hour clock enter
AM or PM by pressing on the remote
control.
5. Press [ / ] to select DATE. Enter the date
using the
[ / ]. For example, for 1st April enter
01 04.
6. Press [ / ] to select YEAR. Enter the last two
digits of the year using the
BUTTONS or [ / ]. For example, for
1999 enter
7. Select * for AUTO CLOCK on/off (* is ON, - is
OFF). Then press SET to confirm.
NUMBER BUTTONS or
NUMBER BUTTONS or
99. For the year 2000 enter 00.
SET to
NUMBER
LANGUAGE
ENGLISH ESPAÑOL
DEUTSCH SVENSKA
FRANÇA I S NEDERLANDS
I TAL IANO
CLOCK
MODE T I ME DAT E YE AR
24H 0:00 1/01 00 *
MODE: 2 4H/ 1 2H
OP :SELECT MN : CHANGE
SET :ENTER MENU: EXI T
NOTE:
• If AUTO CLOCK is set to OFF (- is OFF) then you will need to update the clock for
daylight saving.
GB-31
Page 36

741 eng.book Page 32 Tuesday, April 27, 1999 11:35 AM
MORE INFORMATION ABOUT YOUR VCR
VCR DIGITAL DISPLAY
12 3 4 5 6 7 8 9
L
R
STOPOP
VCRAM PM
SPPrLP
12 11 10 13
VPSP
DC
D
1. TIMER indicator.
2. AUDIO OUTPUT indicators.
3. RECORDING indicator.
4. CHILD LOCK indicator.
5. AM/PM indicators.
6. STOP indicator.
7. VCR mode indicator.
8. PRESET CHANNEL indicator.
9. VIDEO PROGRAMMING SYSTEM/PROGRAMME DELIVERY CONTROL
indicator.
10. LONG PLAY indicator.
11. STANDARD PLAY indicator.
12. VIDEO TAPE indicator.
13. DECODER indicator.
NOTE:
• Some models do not have all the features shown, therefore, they will not appear on the
display.
SELECTING THE OUTPUT FROM THE VCR
If your VCR is connected to your TV with a scart lead, when you start to play a video tape the
VCR will automatically switch its output so that playback picture is shown on the TV.
In this case ‘VCR’ will appear on the VCR display.
You can manually override this by pressing
broadcast channel will be seen on the TV screen and ‘VCR’ will disappear from the VCR
display.
• Pressing
[TV/VCR] again will return the TV picture to the playback picture.
[TV/VCR] on the remote control. Now the TV
GB-32
Page 37
741 eng.book Page 33 Tuesday, April 27, 1999 11:35 AM
MORE INFORMATION ABOUT YOUR VCR
ON-SCREEN DISPLAY
All the information you need on the VCR status will be summarised on the on-screen display.
If you are recording, playing back a tape or watching a broadcast on the video channel you
can call up three standard on-screen displays. The display can be selected by pressing the
MODE OSD button on the remote control, 1,2,3 or 4 times.
1. AUTO, the current mode and channel
number will be displayed for 3 seconds when an
operation or number button is pressed.
2. FULL., all the active features will also be shown
on screen.
Programme number and channel
These
depend on
model
features
Tape Status
NICAM signal
Audio output mode
Tape speed
Tape remaining
Time
Date
Tape counter
1.
■ 1CH59
SP L R
NICAM
ST EREO
2.
■ 1CH59
SUPER P . ON N I CAM
SP L R
22:00 REM1:05
9/07/99 0:00.00
ST EREO
3. COUNTER, this display will show the tape
counter and amount of tape remaining.
3.
4. DISPLAY OFF, this will remove the display
from the screen.
REM 1:05
0:00.00
NOTES:
• The default time and date will not be displayed if the clock has not been set.
• The VCR will return to display
• If you are recording from this VCR to another, make sure you remove the display from
the screen otherwise it will be recorded.
1. each time it is switched on.
GB-33
Page 38

741 eng.book Page 34 Tuesday, April 27, 1999 11:35 AM
MORE INFORMATION ABOUT YOUR VCR
SPECIFICATIONS
Format: VHS PAL standard
Number of heads: Four heads
Video signal system:: PAL/MESECAM colour or monochrome signal:
625 lines
Hi-Fi audio recording
system:
Maximum playing time: 480 min. with E-240 video cassette in Long Play
Tape width: 12.7 mm
Tape speed: 23.39 mm/s Standard Play (SP): 11.70 mm/s
Antenna: 75 Ω unbalanced
Reception channels: VHF channel E2 - S41, UHF channel 21-69
RF output signal: UHF channel 21-69
Power requirement: AC 230V, 50 Hz
Power consumption: 16 W approx (Low power consumption ≤ 2W)
Operating temperature: 5 ˚C to 40 ˚C
Storage temperature: -20 ˚C to 55 ˚C
Video input: 1.0 Vp-p, 75 Ω
Video output: 1.0 Vp-p, 75 Ω
Audio input: Line1&2: -3.8 dBs, 10 kΩ, Line 3: -5.0 dBs, 47 kΩ
Audio output: Line1&2: -3.8 dBs, 1 kΩ Audio Out: -5.0 dBs, 1 kΩ
Hi-Fi audio: Dynamic range:~ 90 dBs typ. (SP); Frequency
Dimensions: 360(W) x 289(D) x 93(H) mm
Weight: 3.2 kg (approx)
Supplied accessories: 75 Ω HF Connection cable, operation manual,
Deep layer recording system conforming to
stereo Hi-Fi VHS standard.
(LP) mode
Long Play (LP)
response: 20 Hz - 20 kHz; Wow and
flutter: < 0.005% Wrm (JIS A)
remote control, AA/R6/UM3 battery (x2)
• Specifications are subject to change without notice as part of our policy of continuous
improvement.
• No liability is accepted for any inaccuracies or omissions in this publication, although
every possible care has been taken to make it complete and as accurate as possible.
GB-34
Page 39

741 eng.book Page 35 Tuesday, April 27, 1999 11:35 AM
TROUBLESHOOTING
TROUBLESHOOTING
PROBLEM ANSWER
Display is not working. • Make sure the VCR is not in LOW POWER mode.
VCR will not operate -
appears in VCR display.
• Make sure the power cord is plugged in.
• Make sure the wall socket has power (plug another
appliance in).
• Press the TIMER ON/OFF button to disengage timer.
VCR will not respond to
any commands.
Tape cannot be loaded. • Make sure there is no other tape in the VCR.
VCR cannot be
operated by remote
control.
No picture appears. • Make sure TV is set to the video channel.
Rewind is not possible. • Make sure tape is not at the start.
Picture does not change
even though
CHANNEL /
buttons are pressed.
Desired channel position
cannot be selected.
No colour or poor TV
picture on normal
viewing.
Playback picture is
snowy.
Tape is automatically
ejected when pressing
REC ( ) or TIMER
ON/OFF buttons.
Playback/ recording
does not playback in
stereo.
SHOWVIEW does not
record desired
programme.
• Check CHILD LOCK is not engaged.
• Safety device operating: unplug VCR for 2 hours.
• Make sure you are loading the tape correctly.
• Remote control is too far away from the main unit.
• Point the remote control at the VCR.
• Batteries are flat - replace both.
• Batteries have not been inserted correctly.
• VCR is positioned in strong light.
• Check all connecting cables.
• Make sure VCR is not in timer or menu mode.
• The channel position has been set to be skipped.
Cancel the skip mode for that channel.
• Make sure all the cables are connected properly.
• Make sure VCR power cord is properly plugged in.
• Adjust the tracking using CHANNEL /
buttons.
• Try another tape.
• The video heads may have been contaminated - refer
to a SHARP Service Facility.
• The record-protection tab has been removed.
• Ensure VCR is connected to a stereo TV and SCART
lead.
• Programme may not carry stereo.
• Broadcast does not carry VPS/PDC signal which alters
recording time.
• Check VPS/PDC mode is switched to ON.
• Ensure date and time are correctly set on the VCR.
GB-35
Page 40

SHARP CORPORATION
SHARP ELECTRONICS (EUROPE) GmbH
Sonninstraße 3, 20097 Hamburg, Germany
TINS-3577UMZZPrinted in U.K.
 Loading...