

Page 1
UX-B30 TELEFAX
UX-B30DE_GERMAN_G4441
MODELL
UX-B30
TELEFAX
BEDIENUNGSANLEITUNG
1. Installation
2. Sending Faxes
3. Receiving Faxes
4. Making Copies
5. Answering Machine Connection
6. Special Functions
7. Printing Lists
8. Maintenance
9. Troubleshooting
Page 2
all.book Page 1 Tuesday, June 1, 2004 4:24 PM
CAUTION:
For a complete electrical disconnection pull out the mains plug.
VORSICHT:
Zur vollständigen elektrischen Trennung vom Netz den Netzstecker ziehen.
ATTENTION:
Pour obtenir une mise hors-circuit totale, débrancher la prise de courant secteur.
AVISO:
Para una desconexión eléctrica completa, desenchufar el enchufe del tomacorriente.
VAR NI NG :
För att helt koppla från strömmen, dra ut stickproppen.
ATTENZIONE:
Per un totale scollegamento elettrico rimuovere la spina di corrente.
"The mains outlet (socket-outlet) shall be installed near the equipment and shall be easily accessible."
"De aansluiting op de stroomvoorziening (stopkontakt) moet nabij het apparaat zijn aangebracht en moet
gemakkelijk bereikbaar zijn."
Ett nätuttag (vägguttag) bör befinna sig nära utrustningen och vara lätt att tillgå.
La presa di corrente deve essere installata vicino all'apparecchio, e deve essere facilmente accessibile.
El tomacorriente principal se debe encontrar cerca del aparato y debe ser fácil de acceder a él.
"Die Netzsteckdose (Wandsteckdose) sollte in der Nähe des Geräts installiert werden und leicht zugänglich sein."
Stikkontakten skal være placeret nær faxen og være let tilgængelig.
Pääpistoke (pistokkeen poisto) tulee asentaa lähelle laitetta ja tulee olla helposti poistettavissa.
Stikkontakten må være montert i nærheten av utstyret og den må være lett tilgjengelig.
La prise de courant principale (d'alimentation) doit être située près de l'appareil et facilement accessible.
This equipment complies with the requirements of Directive 1999/5/EC.
Dieses Gerät entspricht den Anforderungen der EU-Richtlinie 1999/5/EG.
Cet appareil est conforme aux exigences de la directive 1999/5/CE.
Este aparato satisface las exigencias de las Directiva 1999/5/CE.
Quest’apparecchio è conforme ai requisiti delle direttiva 1999/5/CE.
Dit apparaat voldoet aan de eisen van de richtlijn 1999/5/EG.
Este equipamento obedece às exigências da directiva 1999/5/CE.
Η συσκευή αυτή ανταποκρίνεται στις απαιτήσεις των οδηγια 1999/5/ΕK.
Denna utrustning uppfyller kraven enligt direktiv 1999/5/EC.
Dette udstyr overholder kravene i direktiv 1999/5/EF.
Dette produktet oppfyller kravene i direktiv 1999/5/EC.
Tämä laite täyttää direktiivi 1999/5/EY.
Dieses Faxgerät kann an öffentliche Fernsprechnetze nach TBR21-Standard in Deutschland, Österreich und in
der Schweiz angeschlossen werden.
This is a facsimile product operating in German, Austrian and Swiss analogue public switched telephone networks which follow the TBR21 Standard.
The Declaration of Conformity can be viewed at the following URL address.
http://www.sharp.de/doc/UX-B30.pdf
Page 3

all.book Page 111 Tuesday, June 1, 2004 4:24 PM
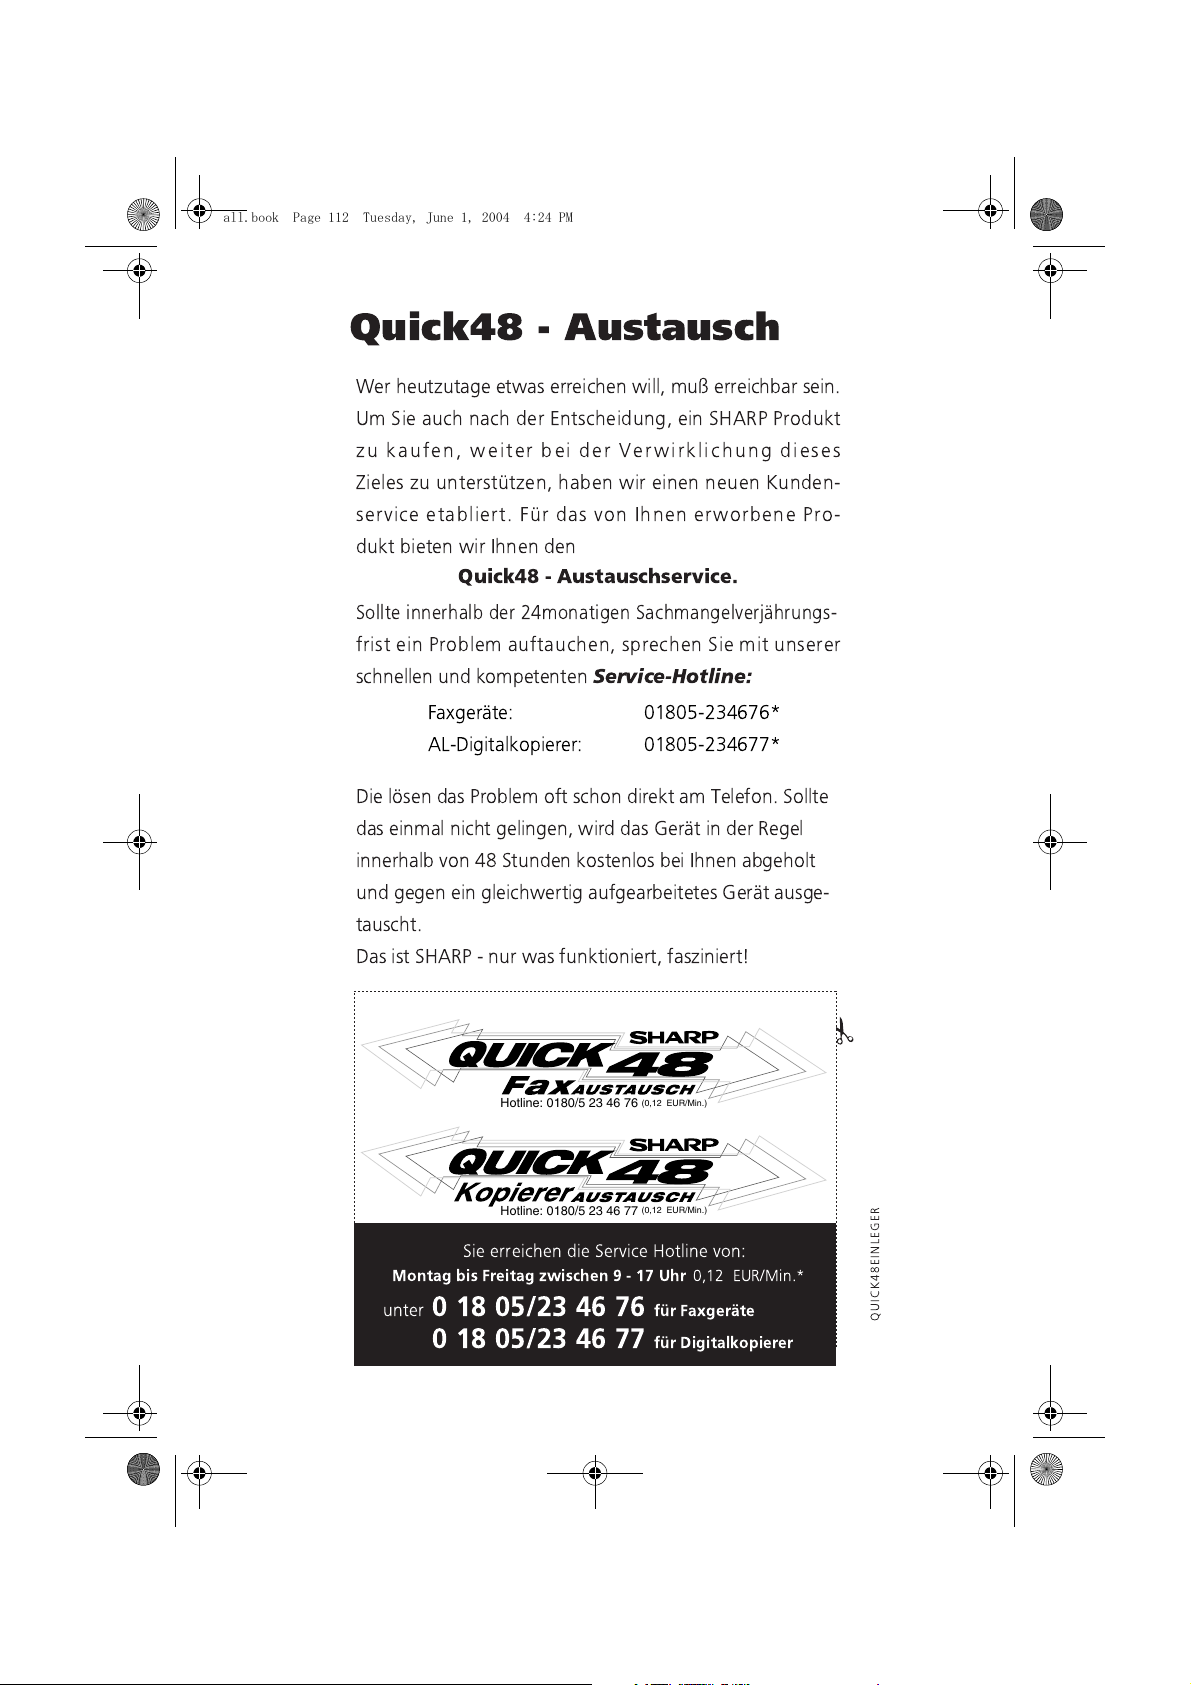
Quick48
)KIJ=KI?DIAHLE?A
Hotline: 0180/5 23 46 76
(0,12 EUR/Min.)
Hotline: 0180/5 23 46 77
(0,12 EUR/Min.)
Page 4
all.book Page 112 Tuesday, June 1, 2004 4:24 PM
! "
#
'$ ( &
(
$ %&
)* +,&
! ! -
-
Service-Hotline:
'/, 01203&)4*5657
8&9 - 01203&)4*5667
9 : ! ;!
<,
*2 (
! <, &
9 & ! !=
Hotline: 0180/5 23 46 76
(0,12 EUR/Min.)
Hotline: 0180/5 23 46 77
!
(0,12 EUR/Min.)
"#$%
01) AB7
>(?%*2(@8<
Page 5
all.book Page 1 Tuesday, June 1, 2004 4:24 PM
Introduction
Welcome, and thank you for choosing a SHARP inkjet fax machine! The
features and specifications of your inkjet fax are shown below.
Print cartridge yield*
(at 4% coverage**)
Paper tray capacity Approx. 100 A4-size sheets
Recording system Thermal inkjet
Print resolution
Effective printing width 203 mm max.
Memory size** 448 KB (approx. 24 average pages with ECM
Modem speed 14,400 bps with auto fallback to lower speeds.
Transmission time** Approx. 6 seconds (only when ECM is on)
Compatibility ITU-T (CCITT) G3 mode
Compression scheme MR, MH, MMR
Automatic dialling 30 numbers
Initial cartridge
Quality mode OFF: Approx. 300 A4 pages
Quality mode ON: Approx. 200 A4 pages
Replacement cartridge: SHARP UX-C70B
Quality mode OFF: Approx. 600 A4 pages
Quality mode ON: Approx. 400 A4 pages
(at room temperature; maximum stack height
should not be higher than the line on the tray)
× 600 dpi
600
turned off)
Telephone function Yes (cannot be used if power fails)
Applicable telephone line Public switched telephone network (TBR21) / PBX
Reception modes TEL/FAX, TEL, FAX, A.M.
*Quality mode is initially turned off. To turn on Quality mode, see page 21.
**Based on Sharp Standard Chart at standard resolution, excluding time for protocol signals
(i.e., ITU-T phase C time only).
1
Page 6

all.book Page 2 Tuesday, June 1, 2004 4:24 PM
Automatic document
feeder
10 pages max. (A4, 80 g/m
2
paper)
Input document size Automatic feeding:
Width: 148 to 216 mm
Length: 140 to 297 mm
Manual feeding:
Width: 148 to 216 mm
Length: 140 to 600 mm
Effective scanning width 210 mm max.
Scanning Resolution Horizontal: 8 lines/mm
Vertical:
Standard: 3.85 lines/mm
Fine /Halftone: 7.7 lines/mm
Super fine: 15.4 lines/mm
Halftone (grayscale) 64 levels
Contrast control Automatic/Dark selectable
Copy function Single/Multi/Sort (99 copies/page)
Display 16-digit LCD display
Power requirements 220-230 V AC, 50 Hz
Noise emission Less than 70 dBA (measured according to EN
27779 (DIN 45635))
Power consumption Standby: 5.3W
Maximum: 35 W
Operating temperature 15 - 32°C
Humidity 25 - 80% RH
Dimensions (without
attachments)
Width: 354 mm
Depth: 247 mm
Height: 138 mm
Weight (without
Approx. 3.2 kg
attachments)
2
Page 7
all.book Page 3 Tuesday, June 1, 2004 4:24 PM
As a part of our policy of continuous improvement, SHARP reserves the right to make design
and specification changes for product improvement without prior notice. The performance
specification figures indicated are nominal values of production units. There may be some
deviations from these values in individual units.
Important:
This fax machine is not designed for use on a line which has call waiting, call
forwarding, or certain other special services offered by your telephone company. If
you attempt to use the fax machine in conjunction with any of these services, you
may experience errors during transmission and reception of facsimile messages.
The fax machine is not compatible with digital telephone systems.
Important safety information
Do not disassemble this machine or attempt any procedures not described in this
manual. Refer all servicing to qualified service personnel.
Do not install or use the machine near water, or when you are wet. For example, do
not use the machine near a bath tub, wash bowl, kitchen sink or laundry tub, in a wet
basement, or near a swimming pool. Take care not to spill any liquids on the
machine.
Unplug the machine from the power outlet and telephone socket and consult a
qualified service representative if any of the following situations occur:
- Liquid has been spilled into the machine or the machine has been
exposed to rain or water.
- The machine produces odors, smoke, or unusual noises.
- The power cord is frayed or damaged.
- The machine has been dropped or the housing damaged.
Do not allow anything to rest on the power cord, and do not install the machine
where people may walk on the power cord.
This machine must only be connected to a 220-230 V, 50 Hz, earthed (2-prong)
outlet. Connecting it to any other kind of outlet will damage the machine.
Never insert objects of any kind into slots or openings on the machine. This could
create a risk of fire or electric shock. If an object falls into the machine that you
cannot remove, unplug the machine and consult a qualified service representative.
Do not place this machine on an unstable cart, stand or table. The machine could be
seriously damaged if it falls.
Never install telephone wiring during a lightning storm.
Never install telephone sockets in wet locations unless the socket is specifically
designed for wet locations.
3
Page 8

all.book Page 4 Tuesday, June 1, 2004 4:24 PM
Never touch bare telephone wires or terminals unless the telephone line has been
disconnected at the network interface.
Use caution when installing or modifying telephone lines.
Avoid using a telephone (other than a cordless type) during an electrical storm.
There may be a remote risk of electric shock from lightning.
Do not use a telephone to report a gas leak in the vicinity of the leak.
The power outlet must be installed near the equipment and must be easily
accessible.
4
Page 9
all.book Page 5 Tuesday, June 1, 2004 4:24 PM
Table of Contents
A Look at the Operation Panel 7
1. Installation 10
Unpacking Checklist. . . . . . . . . . . . . . . . . . . . . . . . . . . . . . . . . . . . . 10
Attachments . . . . . . . . . . . . . . . . . . . . . . . . . . . . . . . . . . . . . . . . . . . 11
Loading Printing Paper. . . . . . . . . . . . . . . . . . . . . . . . . . . . . . . . . . . 14
Connecting the Power Cord . . . . . . . . . . . . . . . . . . . . . . . . . . . . . . . 15
Installing the Print Cartridge . . . . . . . . . . . . . . . . . . . . . . . . . . . . . . . 16
Connecting the Telephone Line Cord. . . . . . . . . . . . . . . . . . . . . . . . 23
Entering Your Name and Fax Number . . . . . . . . . . . . . . . . . . . . . . . 25
Setting the Date and Time . . . . . . . . . . . . . . . . . . . . . . . . . . . . . . . . 27
Setting the Reception Mode . . . . . . . . . . . . . . . . . . . . . . . . . . . . . . . 29
Flash Select Setting for PBX . . . . . . . . . . . . . . . . . . . . . . . . . . . . . . 31
Setting the Display Language. . . . . . . . . . . . . . . . . . . . . . . . . . . . . . 32
Volume Adjustment . . . . . . . . . . . . . . . . . . . . . . . . . . . . . . . . . . . . . 33
2. Sending Faxes 37
Transmittable Documents. . . . . . . . . . . . . . . . . . . . . . . . . . . . . . . . . 37
Loading the Document . . . . . . . . . . . . . . . . . . . . . . . . . . . . . . . . . . . 38
Adjusting the Resolution and Contrast . . . . . . . . . . . . . . . . . . . . . . . 40
Sending a Fax by Normal Dialling . . . . . . . . . . . . . . . . . . . . . . . . . . 43
Sending a Fax by Automatic Dialling . . . . . . . . . . . . . . . . . . . . . . . . 44
Batch Page Numbering . . . . . . . . . . . . . . . . . . . . . . . . . . . . . . . . . . 53
Sending a Fax From Memory. . . . . . . . . . . . . . . . . . . . . . . . . . . . . . 54
3. Receiving Faxes 57
Using TEL/FAX Mode. . . . . . . . . . . . . . . . . . . . . . . . . . . . . . . . . . . . 57
Using A.M. Mode . . . . . . . . . . . . . . . . . . . . . . . . . . . . . . . . . . . . . . . 58
Using FAX Mode . . . . . . . . . . . . . . . . . . . . . . . . . . . . . . . . . . . . . . . 59
Using TEL Mode. . . . . . . . . . . . . . . . . . . . . . . . . . . . . . . . . . . . . . . . 60
Auto-Cordless Fax Control
(answering with an extension phone in TEL mode) . . . . . . . . . . . . . 62
Stiller Faxempfang . . . . . . . . . . . . . . . . . . . . . . . . . . . . . . . . . . . . . . 63
Optional Reception Settings. . . . . . . . . . . . . . . . . . . . . . . . . . . . . . . 64
5
Page 10
all.book Page 6 Tuesday, June 1, 2004 4:24 PM
Table of Contents
Substitute Reception to Memory. . . . . . . . . . . . . . . . . . . . . . . . . . . . 67
4. Making Copies 68
5. Answering Machine Connection 71
Preparations . . . . . . . . . . . . . . . . . . . . . . . . . . . . . . . . . . . . . . . . . . . 71
Using the Answering Machine Connection . . . . . . . . . . . . . . . . . . . . 71
Optional A.M. Mode Settings . . . . . . . . . . . . . . . . . . . . . . . . . . . . . . 73
6. Special Functions 77
Caller ID (Requires Subscription to Service) . . . . . . . . . . . . . . . . . . 77
Blocking Reception of Unwanted Faxes . . . . . . . . . . . . . . . . . . . . . .82
Polling (Requesting a Fax Transmission) . . . . . . . . . . . . . . . . . . . . . 83
PBX operations. . . . . . . . . . . . . . . . . . . . . . . . . . . . . . . . . . . . . . . . . 84
7. Printing Lists 85
8. Maintenance 89
Cleaning the Machine . . . . . . . . . . . . . . . . . . . . . . . . . . . . . . . . . . . . 89
Improving Print Quality . . . . . . . . . . . . . . . . . . . . . . . . . . . . . . . . . . . 92
9. Troubleshooting 97
Problems and Solutions . . . . . . . . . . . . . . . . . . . . . . . . . . . . . . . . . . 97
Messages and Signals . . . . . . . . . . . . . . . . . . . . . . . . . . . . . . . . . . 101
Clearing Paper Jams . . . . . . . . . . . . . . . . . . . . . . . . . . . . . . . . . . .104
Quick Reference Guide 106
Guide de référence rapide 107
Index 108w
6
Page 11
all.book Page 7 Tuesday, June 1, 2004 4:24 PM
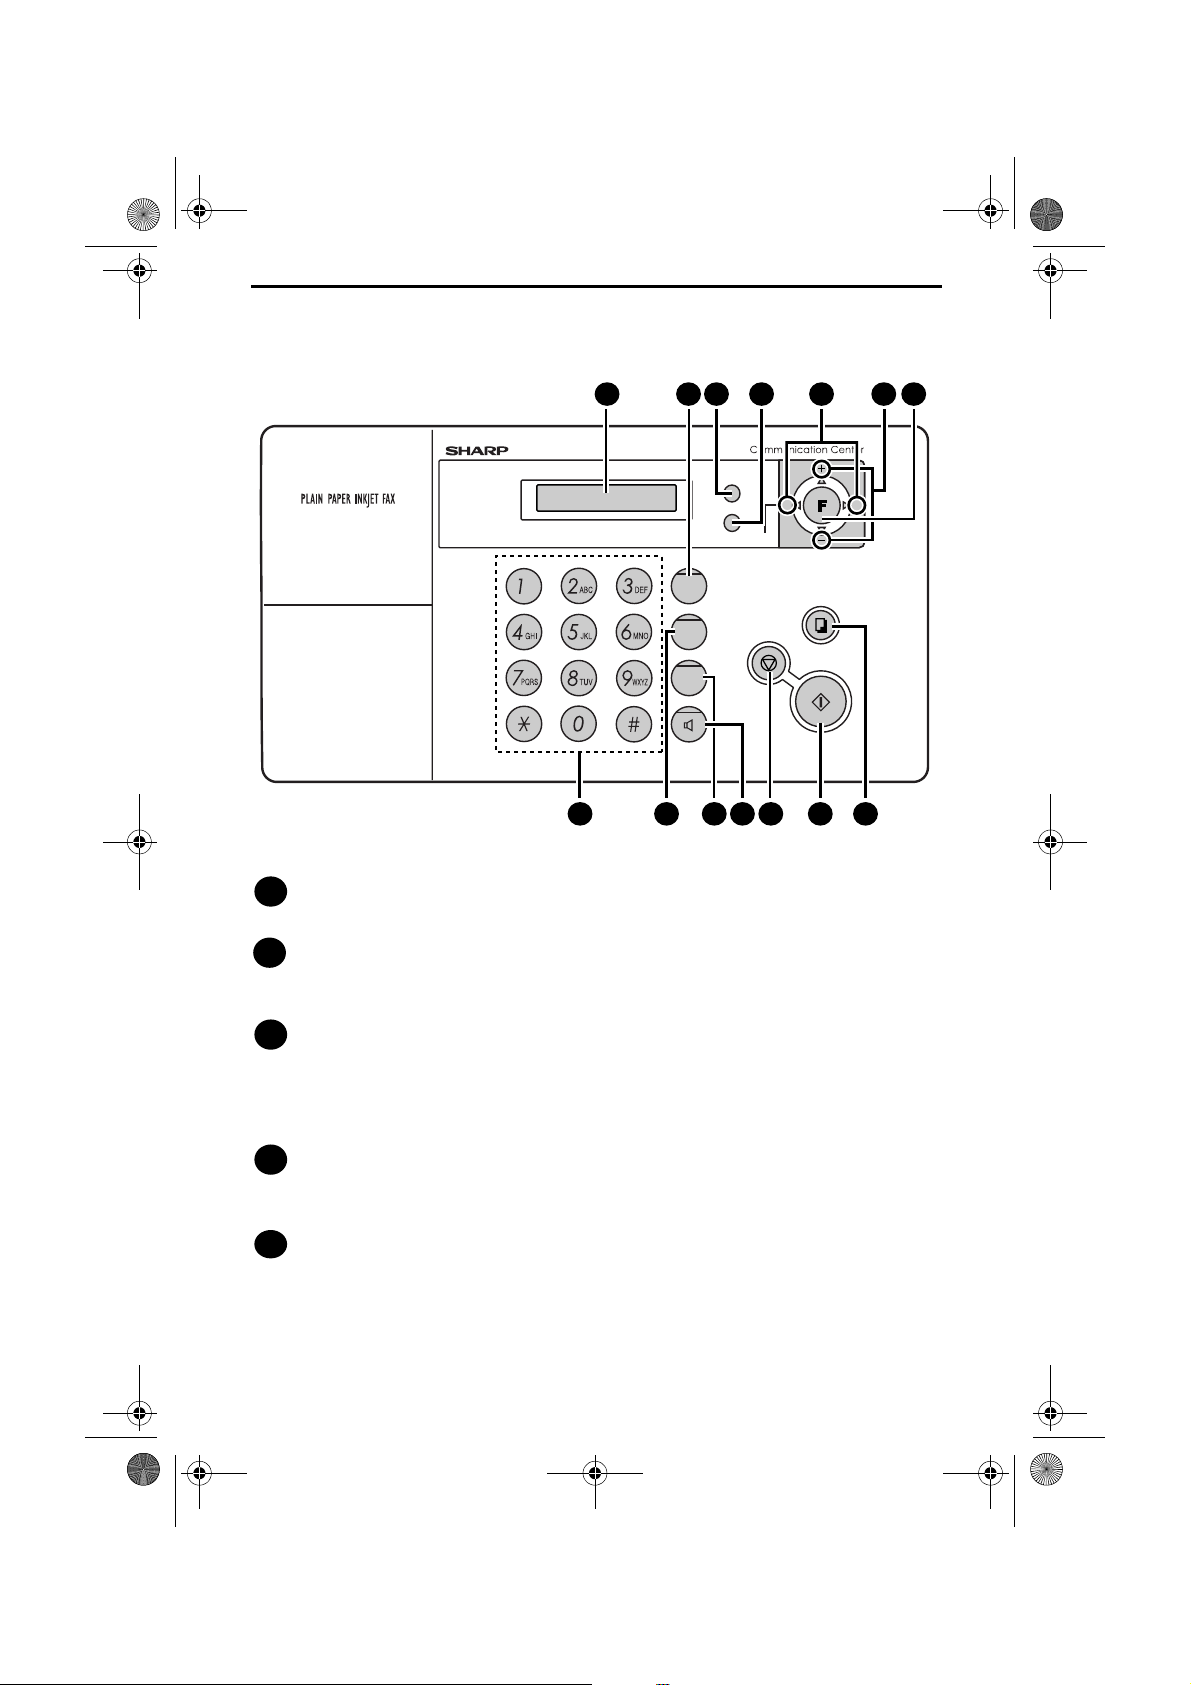
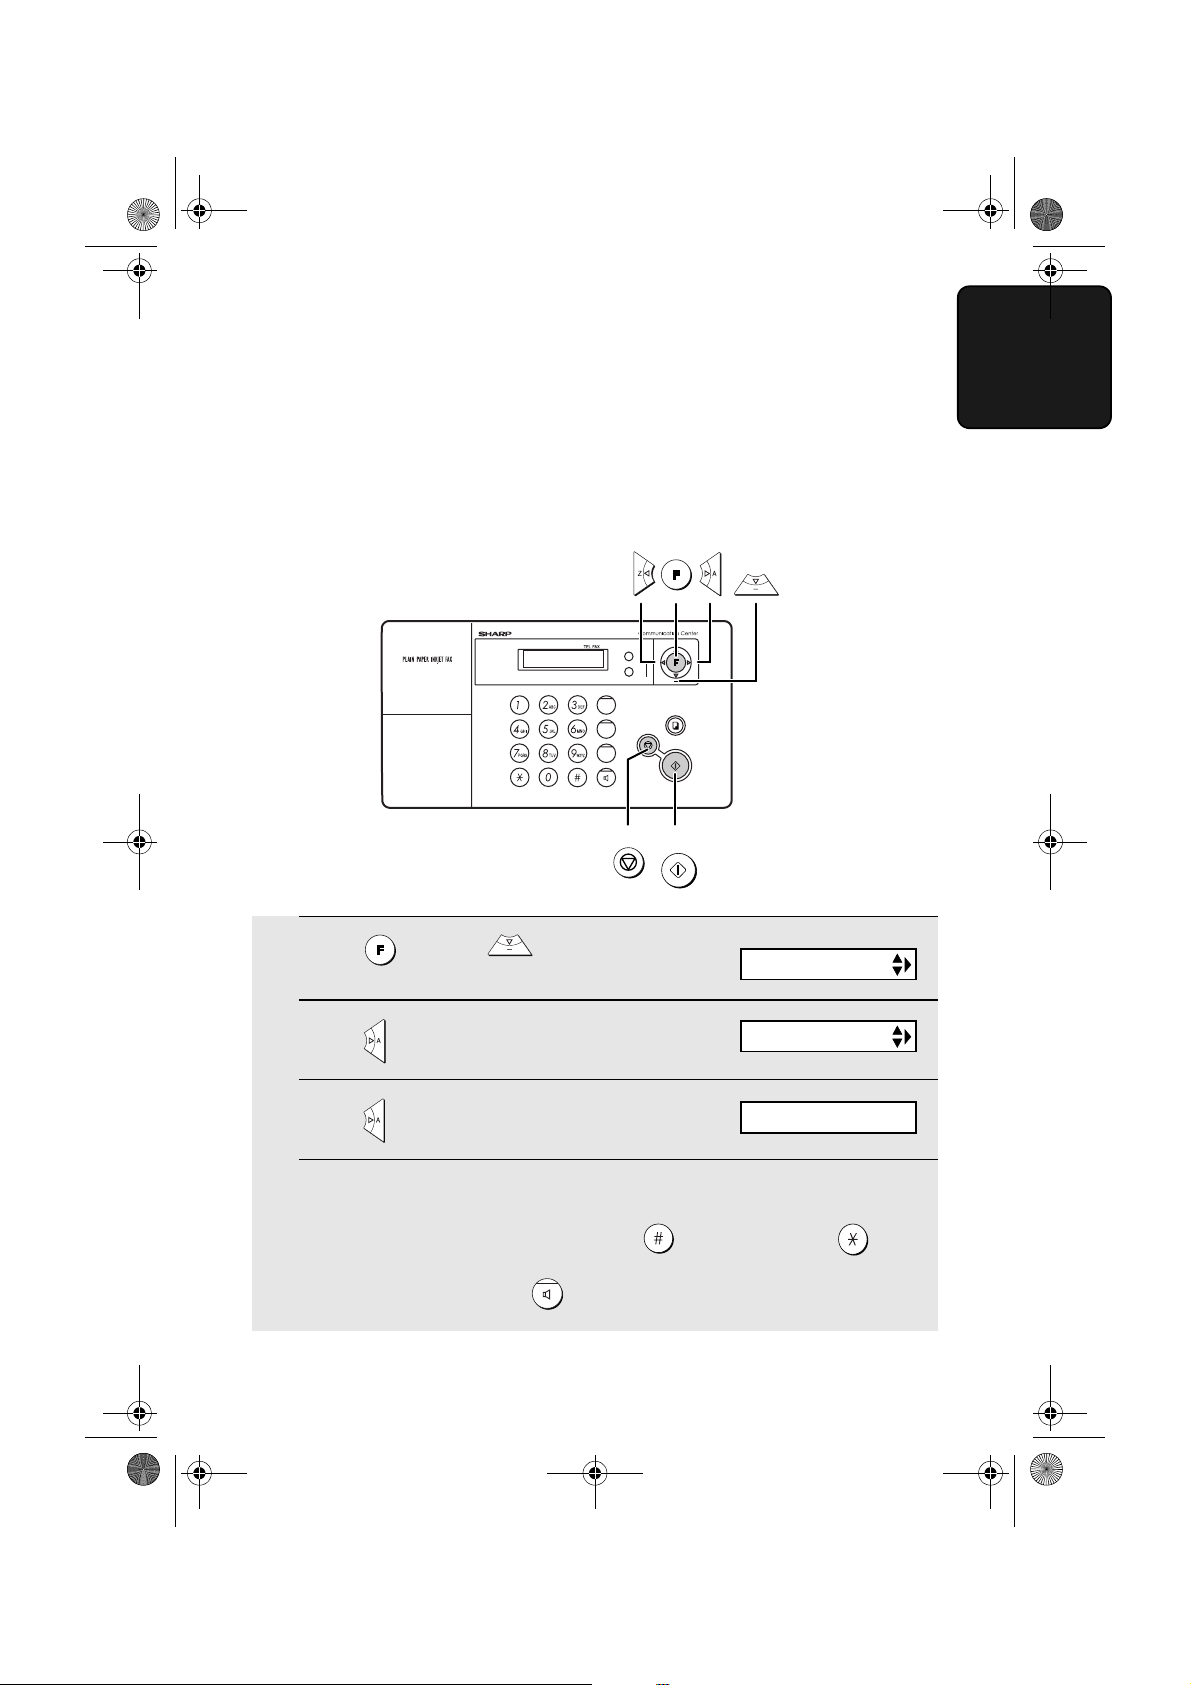
A Look at the Operation Panel
1 2 3 4
FAX
AB
R
ABRUF
HALTEN
AUFLÖS./
EMPFANG
PATRONE
WAHLW.WAHLW.
STOP
Z
KOPIE/
HILFE
START/
SPEICHER
TEL
TEL/FAX
7 8 9 10 11 12
Display
1
This displays messages and prompts to help you operate the machine.
R key
2
If you are on a Flash-type PBX, use this key to dial out (first press the R key
and then dial the number; page 43).
5 5 6
A
13
RESOLUTION/RECEPTION key
3
When a document is in the feeder, press this key to adjust the resolution for
faxing or copying (page 41). At any other time, press this key to select the
reception mode (an arrow in the display will point to the currently selected
reception mode; page 30).
INK key
4
Press this key before installing or replacing the print cartridge to move the
print cartridge holder to the cartridge replacement position (page 17).
Arrow keys
5
Use these keys to scroll through and select settings, and to search for autodial numbers (page 48).
7
Page 12
all.book Page 8 Tuesday, June 1, 2004 4:24 PM
FUNCTION key
6
Press this key followed by the arrow keys to select special functions and
settings.
Number keys
7
Use these keys to dial numbers, and enter numbers and letters when storing
auto-dial numbers.
POLL key
8
Press this key after dialling another fax machine to receive a document
(previously loaded in the other machine’s feeder) without assistance from the
operator of the other machine (page 83).
HOLD key
9
Press this key to put the other party on hold during a phone conversation
(page 63).
SPEAKER key
10
Press this key to listen to the line and fax tones through the speaker when
faxing a document (page 43).
Note: This is not a speakerphone. You must pick up the handset to talk with
the other party.
STOP key
11
Press this key to cancel an operation before it is completed.
START/MEMORY key
12
Press this key after dialling to begin fax transmission (page 44). Press this key
before dialling to send a fax through memory (page 54). The key can also be
pressed in the date and time display to show the percentage of memory
currently used.
COPY/HELP key
13
When a document is in the feeder, press this key to make a copy of the
document (page 69). At any other time, press this key to print out the Help
List, a quick reference guide to the operation of your fax machine.
8
Page 13
all.book Page 9 Tuesday, June 1, 2004 4:24 PM
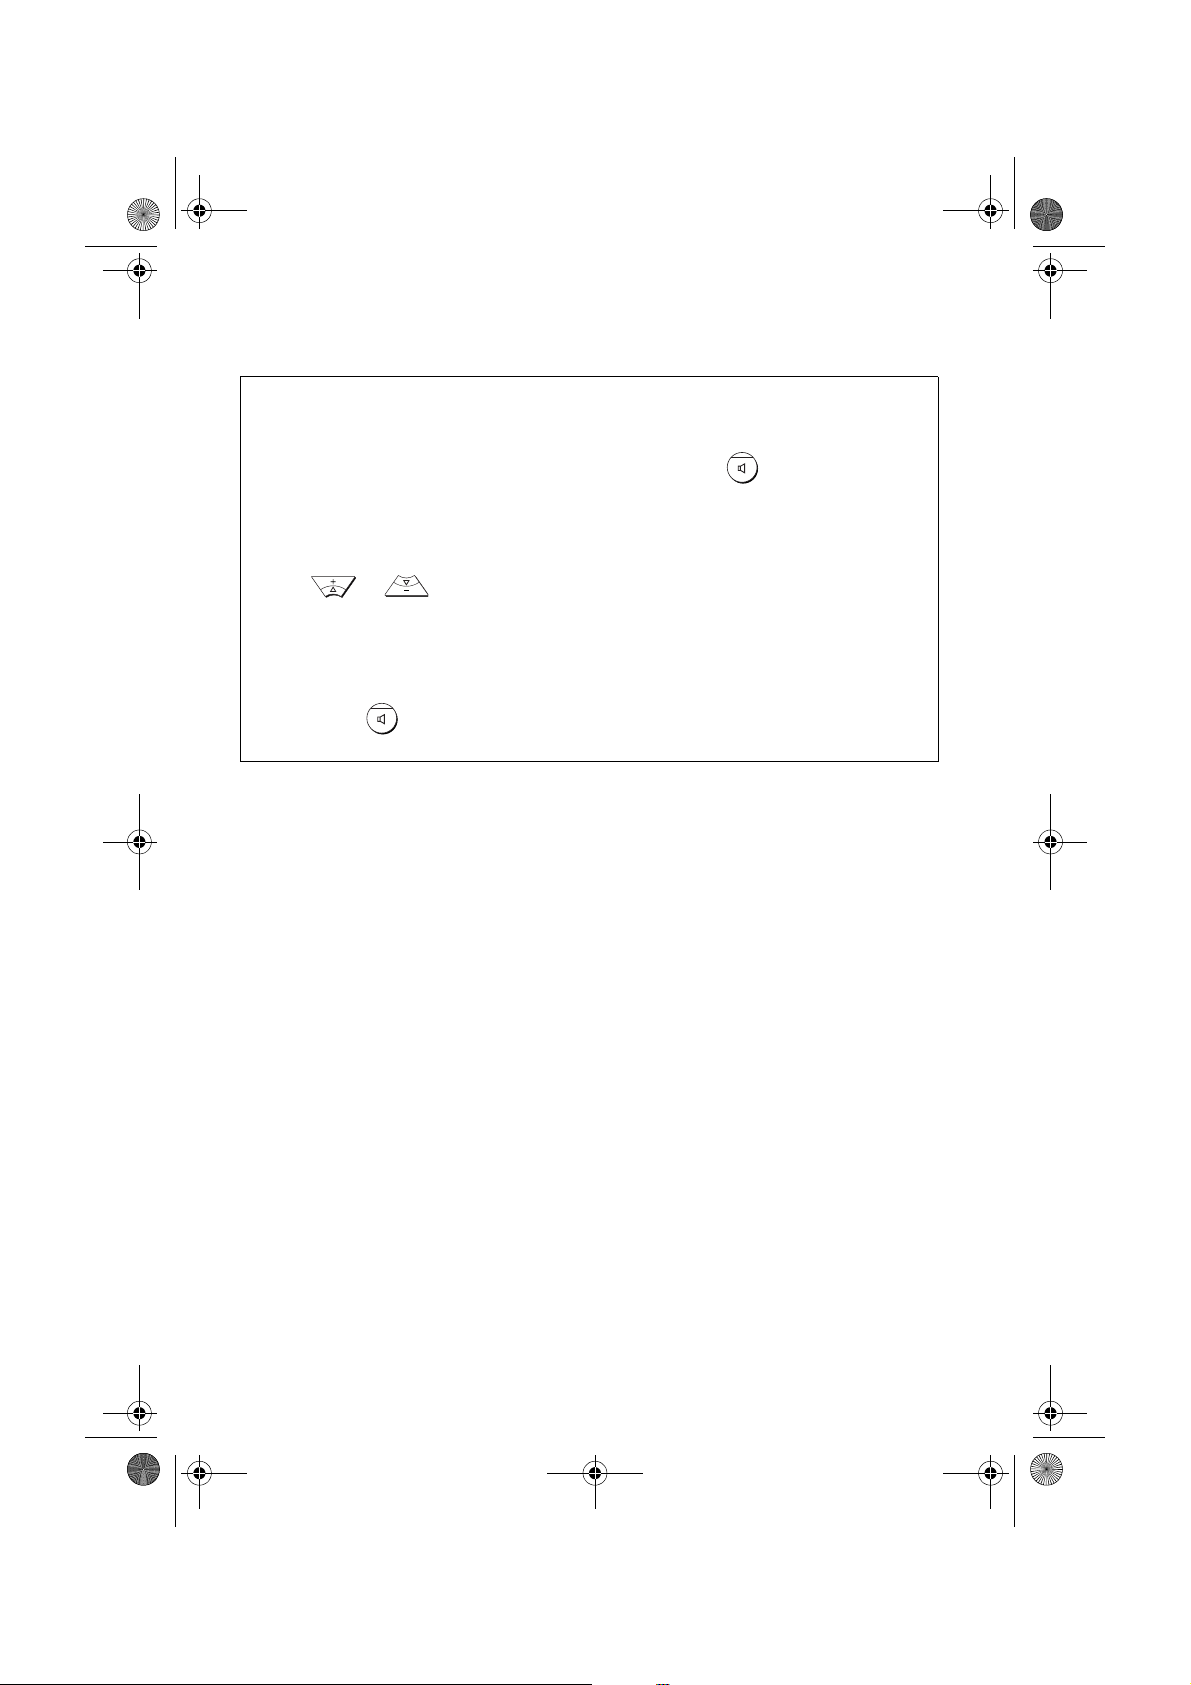
Monitoring phone conversations
When speaking through the handset, you can press to allow a third
person to listen to the conversation through the speaker. (To turn off the
speaker, press the key again.)
To adjust the volume of the speaker when monitoring a conversation, press
or (the volume reverts to the lowest setting each time the
handset is replaced).
Note that the speaker cannot be used for speaking; it is only for listening.
To avoid feedback (a loud howling sound), be sure to turn off the speaker
(press once again) before you replace the handset.
9
Page 14
all.book Page 10 Tuesday, June 1, 2004 4:24 PM
1. Installation
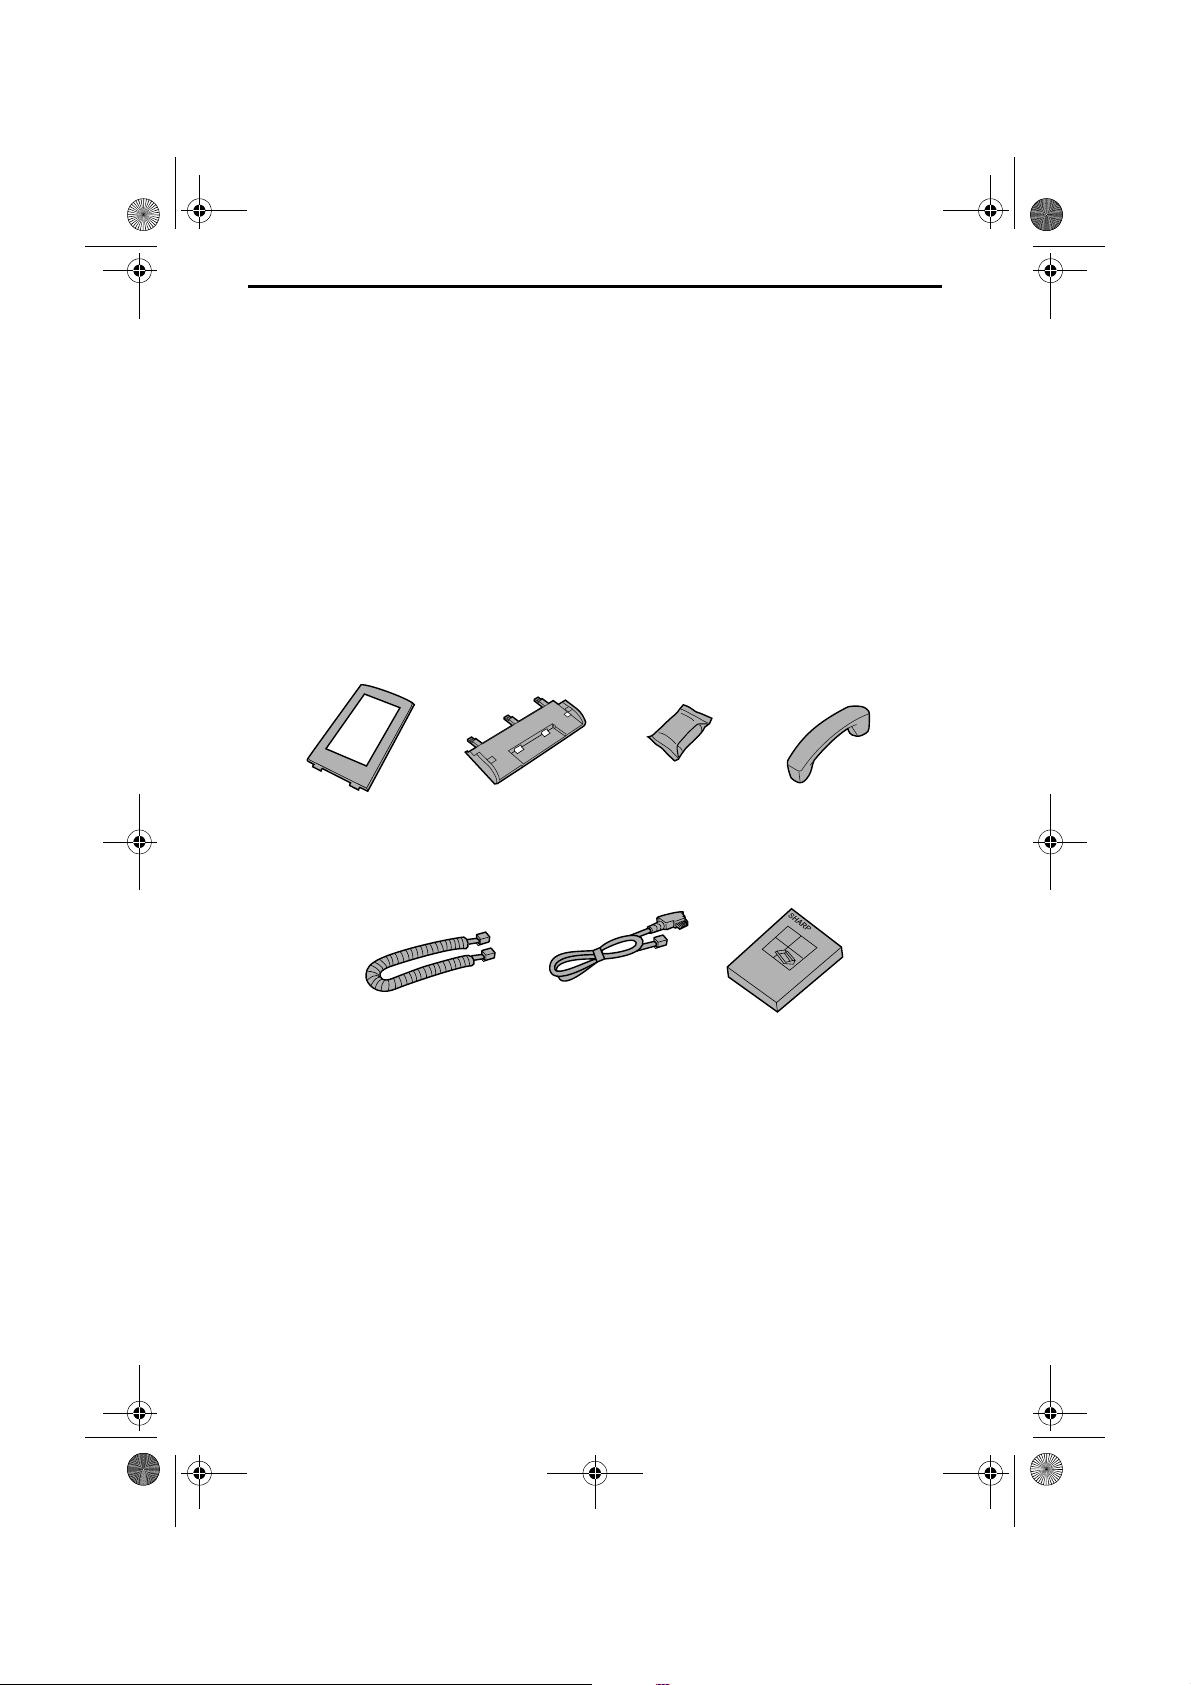
Unpacking Checklist
Before setting up, make sure you have all of the following items. If any
are missing, contact your dealer or retailer.
Paper tray
extension
Handset
cord
Paper tray
Telephone
line cord
Print
cartridge
Handset
Operation
manual
10
Page 15
all.book Page 11 Tuesday, June 1, 2004 4:24 PM
Attachments
Attachments
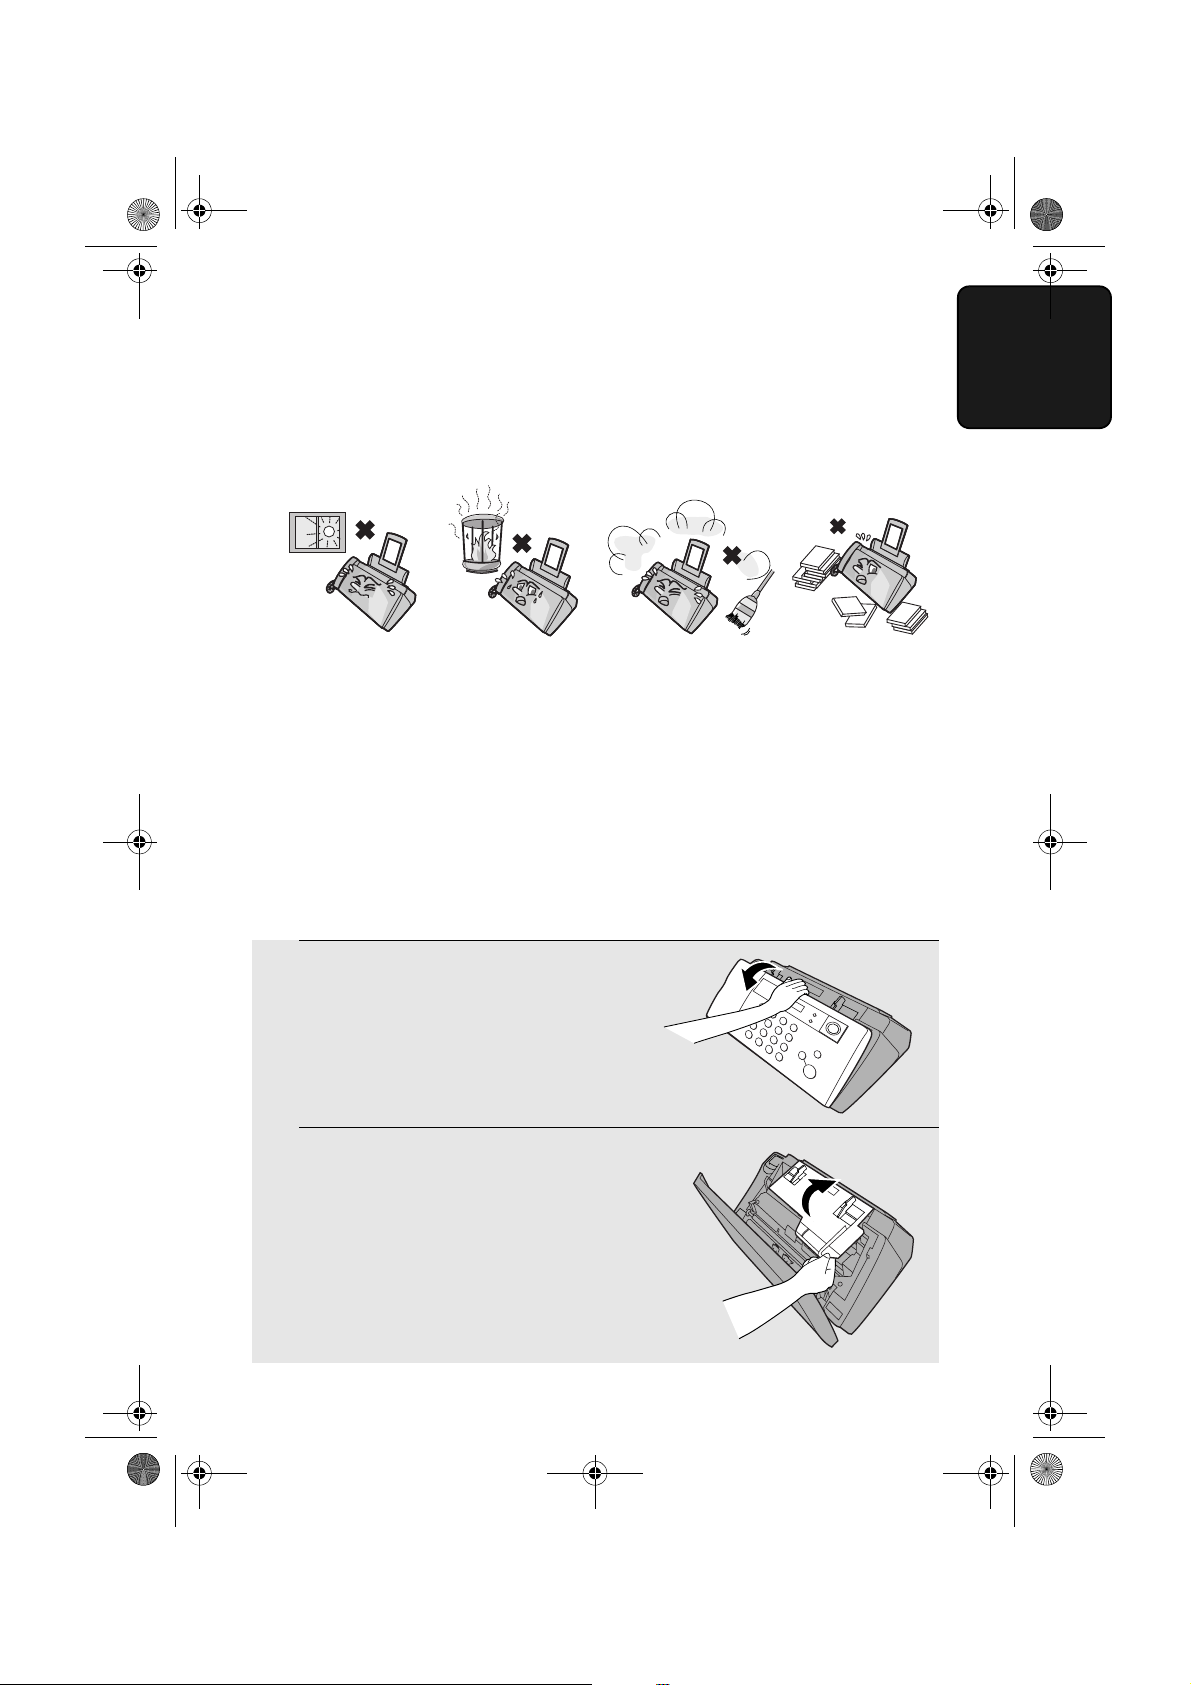
Points to keep in mind when setting up
Do not place
the machine in
direct sunlight.
About condensation
If the machine is moved from a cold to a warm place, it is possible that
condensation may form on the scanning glass, preventing proper scanning of
documents for transmission. To remove the condensation, turn on the power and
wait approximately two hours before using the machine.
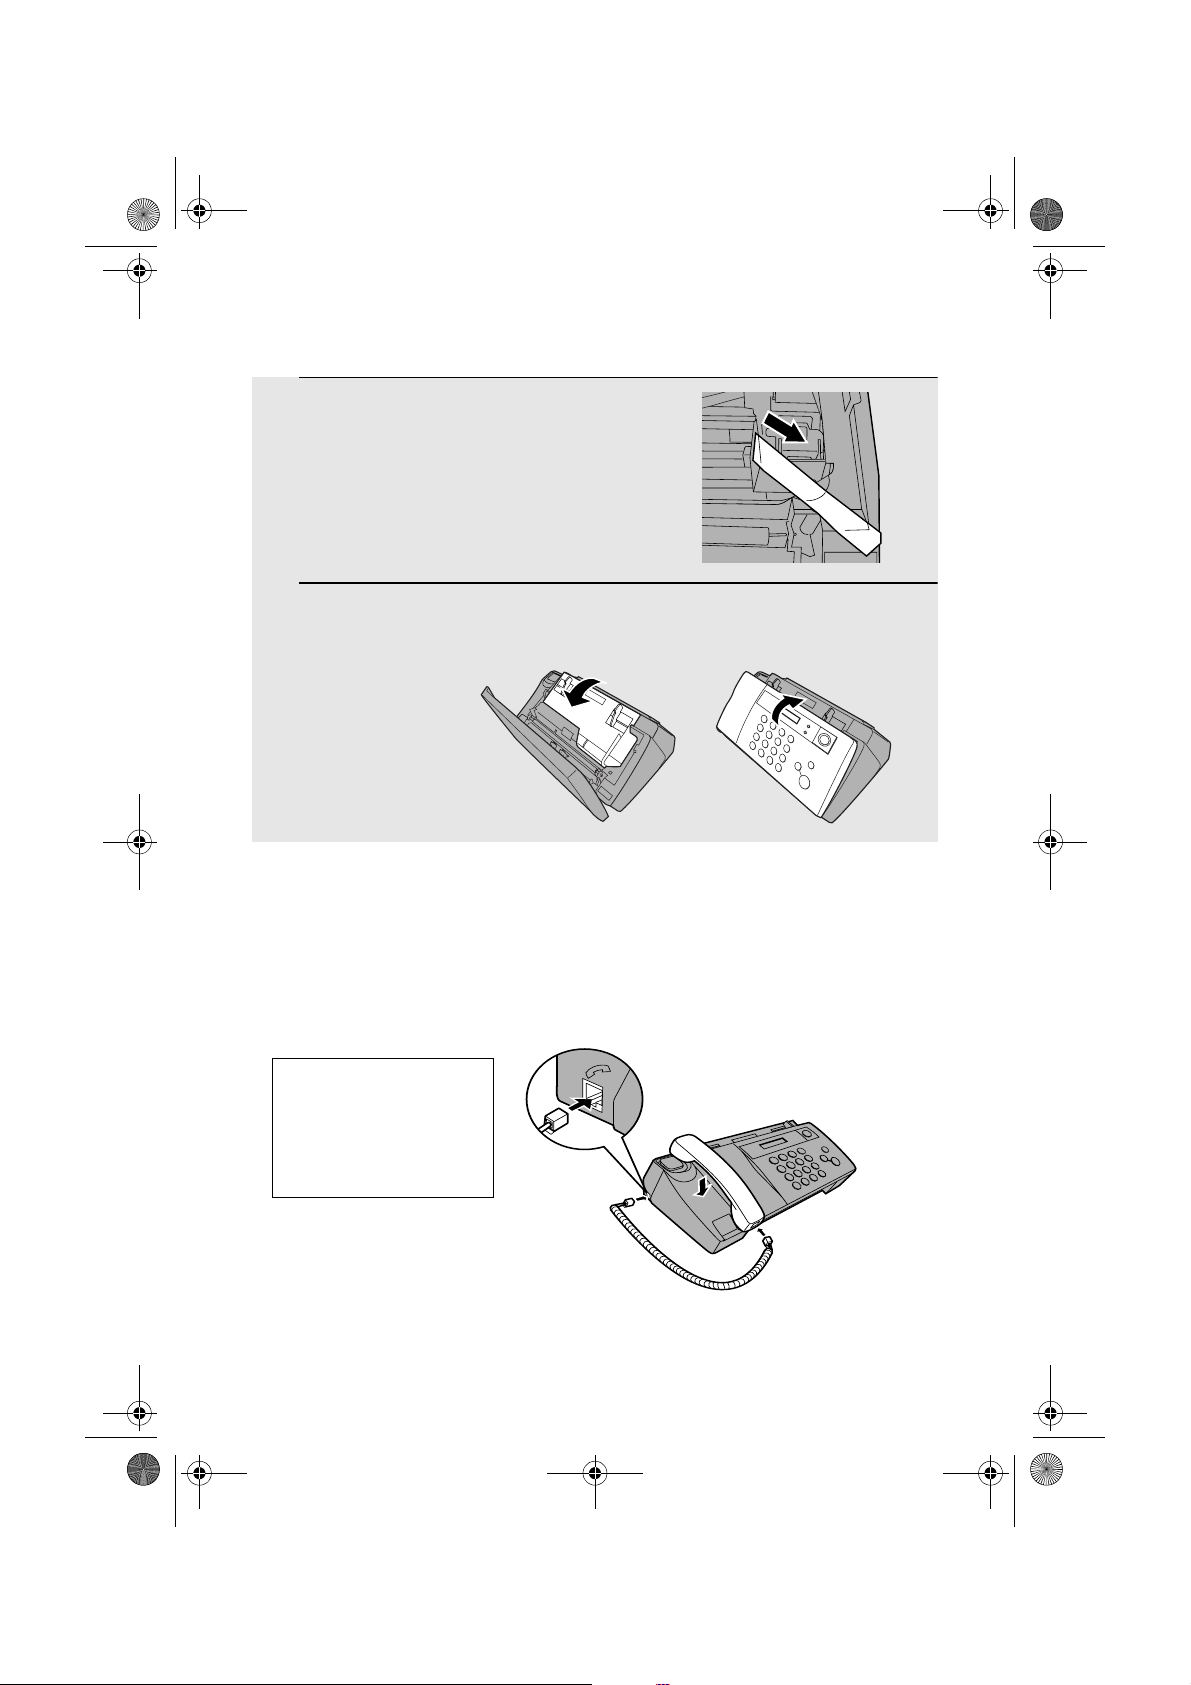
Removing the packing tape
1
Open the operation panel.
Do not place
the machine
near heaters or
air conditioners.
Keep dust away
from the machine.
1. Installation
Keep the area
around the
machine clear.
2
Open the print compartment cover.
11
Page 16
all.book Page 12 Tuesday, June 1, 2004 4:24 PM
Attachments
3
Remove the tape.
4
Close the print compartment cover and
then the operation panel.
Connecting the handset
Connect the handset as shown and place it on the handset rest.
♦ The ends of the handset cord are identical, so they will go into either
socket.
Make sure the handset
cord goes into the
socket marked with a
handset symbol on the
side of the machine!
Use the handset to make ordinary phone calls,
or to transmit and receive faxes manually.
12
Page 17

all.book Page 13 Tuesday, June 1, 2004 4:24 PM
Attaching the paper tray
Attach the paper tray.
Attachments
1. Installation
Attach the paper tray extension.
Insert
horizontally
Click!
and rotate up
Note: The paper tray extension
has a top side and a bottom side.
If the tabs do not go into the
holes, turn the support over.
Caution!
Do not touch or pull out the black plastic strip shown below. If the strip is
pulled out, paper will not feed correctly.
13
Page 18
all.book Page 14 Tuesday, June 1, 2004 4:24 PM
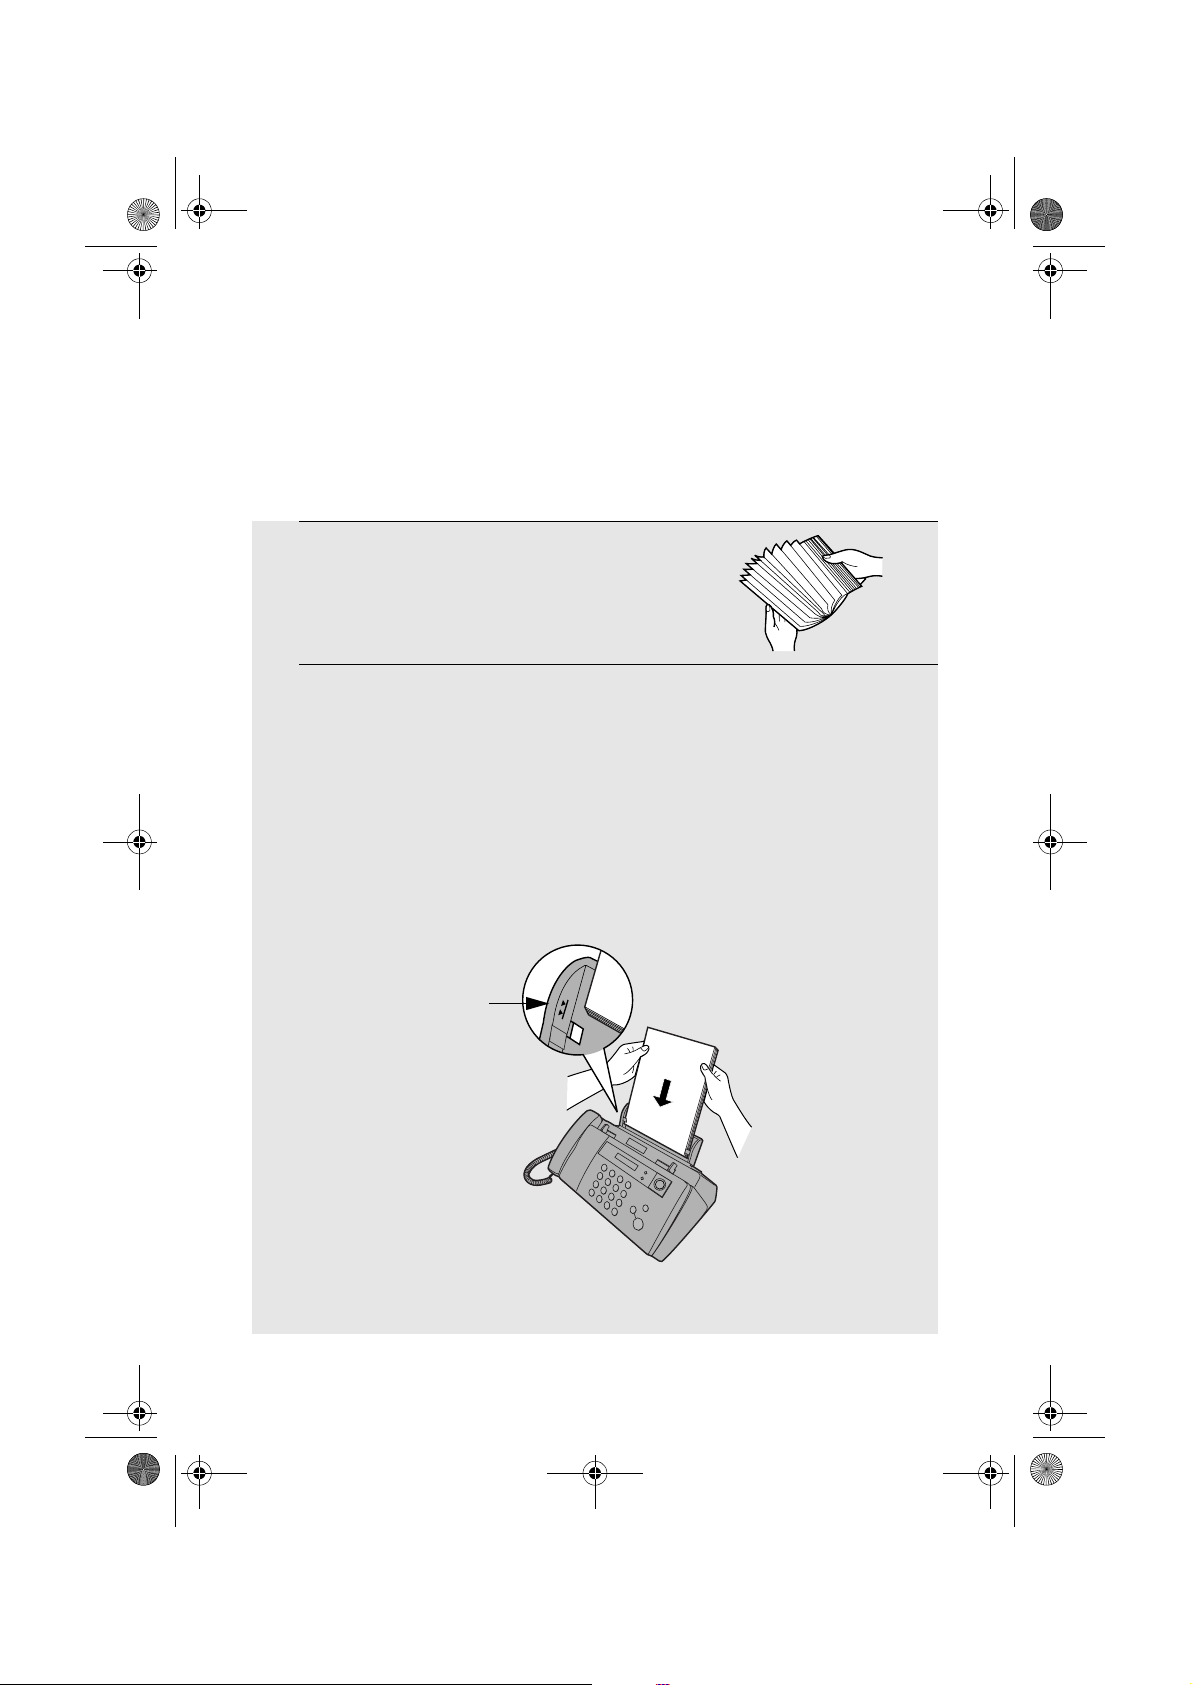
Loading Printing Paper
Loading Printing Paper
You can load up to 100 sheets of A4-size paper (60 - 80 g/m2) in the paper
tray (at room temperature; maximum stack height should not be higher than
the line on the tray).
1
Fan the paper, and then tap the edge
against a flat surface to even the stack.
Make sure the stack edges are even.
2
Insert the stack of paper into the tray,
• If paper remains in the tray, take it out and combine it into a single stack
with the new paper.
PRINT SIDE UP
.
• Be sure to load the paper so that printing takes place on the print side of
the paper. Printing on the reverse side may result in poor print quality.
•
GENTLY LOAD PAPER INTO THE PAPER TRAY
•
DO NOT FORCE IT DOWN INTO THE FEED SLOT
The stack
should not
be higher
than this line
Note: Do not use paper that has already been printed on, or paper that is curled.
.
.
14
Page 19
all.book Page 15 Tuesday, June 1, 2004 4:24 PM
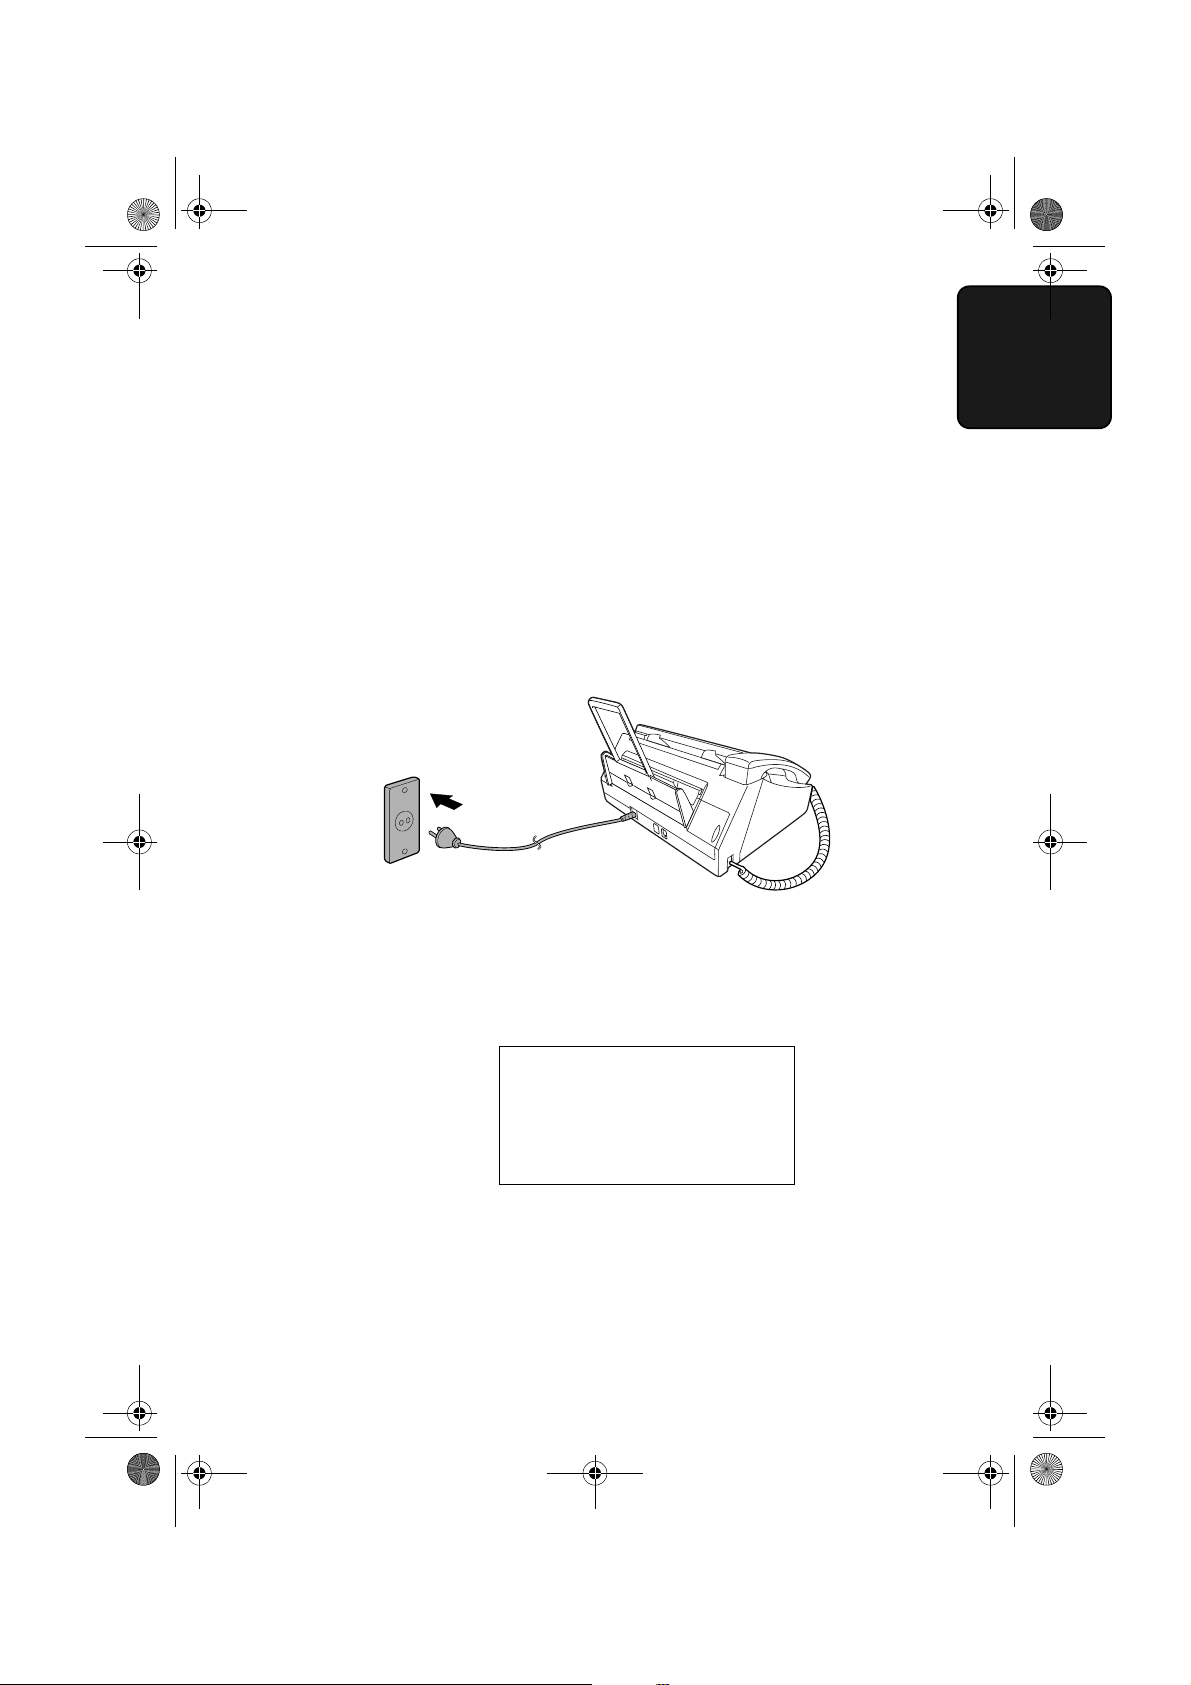
Connecting the Power Cord
Connecting the Power Cord
Plug the power cord into a 220-230 V, 50 Hz, earthed AC (2-prong) outlet.
Caution!
♦ Make sure you have removed all of the packing tape before plugging
in the power cord (see page 11). Plugging in the power cord without doing
so may damage the machine.
♦ The power outlet must be installed near the equipment and must be easily
accessible.
1. Installation
The machine does not have a power on/off switch, so the power is turned on
and off by simply plugging in or unplugging the power cord.
“CHECK CARTRIDGE” normally
appears in the display the first
time you plug in the machine.
This message appears until you
install the print cartridge.
Note: If your area experiences a high incidence of lightning or power surges,
we recommend that you install surge protectors for the power and telephone
lines. Surge protectors can be purchased at most telephone specialty stores.
15
Page 20

all.book Page 16 Tuesday, June 1, 2004 4:24 PM
Installing the Print Cartridge
Installing the Print Cartridge
Follow these steps to install or replace the print cartridge.
♦ When replacing the print cartridge, be sure to use a SHARP UX-C70B
cartridge.
Print cartridge yield (at 4% coverage)
Initial cartridge
Quality mode OFF:
Quality mode ON: Approx. 200 A4 pages
Replacement cartridge (SHARP UX-C70B)
Quality mode OFF: Approx. 600 A4 pages
Quality mode ON: Approx. 400 A4 pages
Quality mode is initially turned off. To turn on Quality mode, see page 21.
Approx. 300 A4 pages
Caution!
Do not open the print compartment cover or insert your hand in the machine
while it is printing.
Note: Keep print cartridges sealed in their packages until you are ready to
install them. It is recommended that you do not use a cartridge that has been
left unused for a long time after opening, as the print quality may be
considerably degraded.
♦ Make sure the machine’s power cord is plugged in and paper is loaded
before installing or replacing the print cartridge.
♦ If a document is inserted in the feeder, remove the document before
installing or replacing the print cartridge (see page 39).
If PRINTER ERROR or PRINTER ERROR/CHECK PAPER appears...
In the event that the display shows either of the above messages, you must clear the
error before installing the print cartridge. The error can usually be cleared by pressing
STOP
, or if a paper jam has occurred, by removing the paper jam (see page 105).
16
Page 21
all.book Page 17 Tuesday, June 1, 2004 4:24 PM
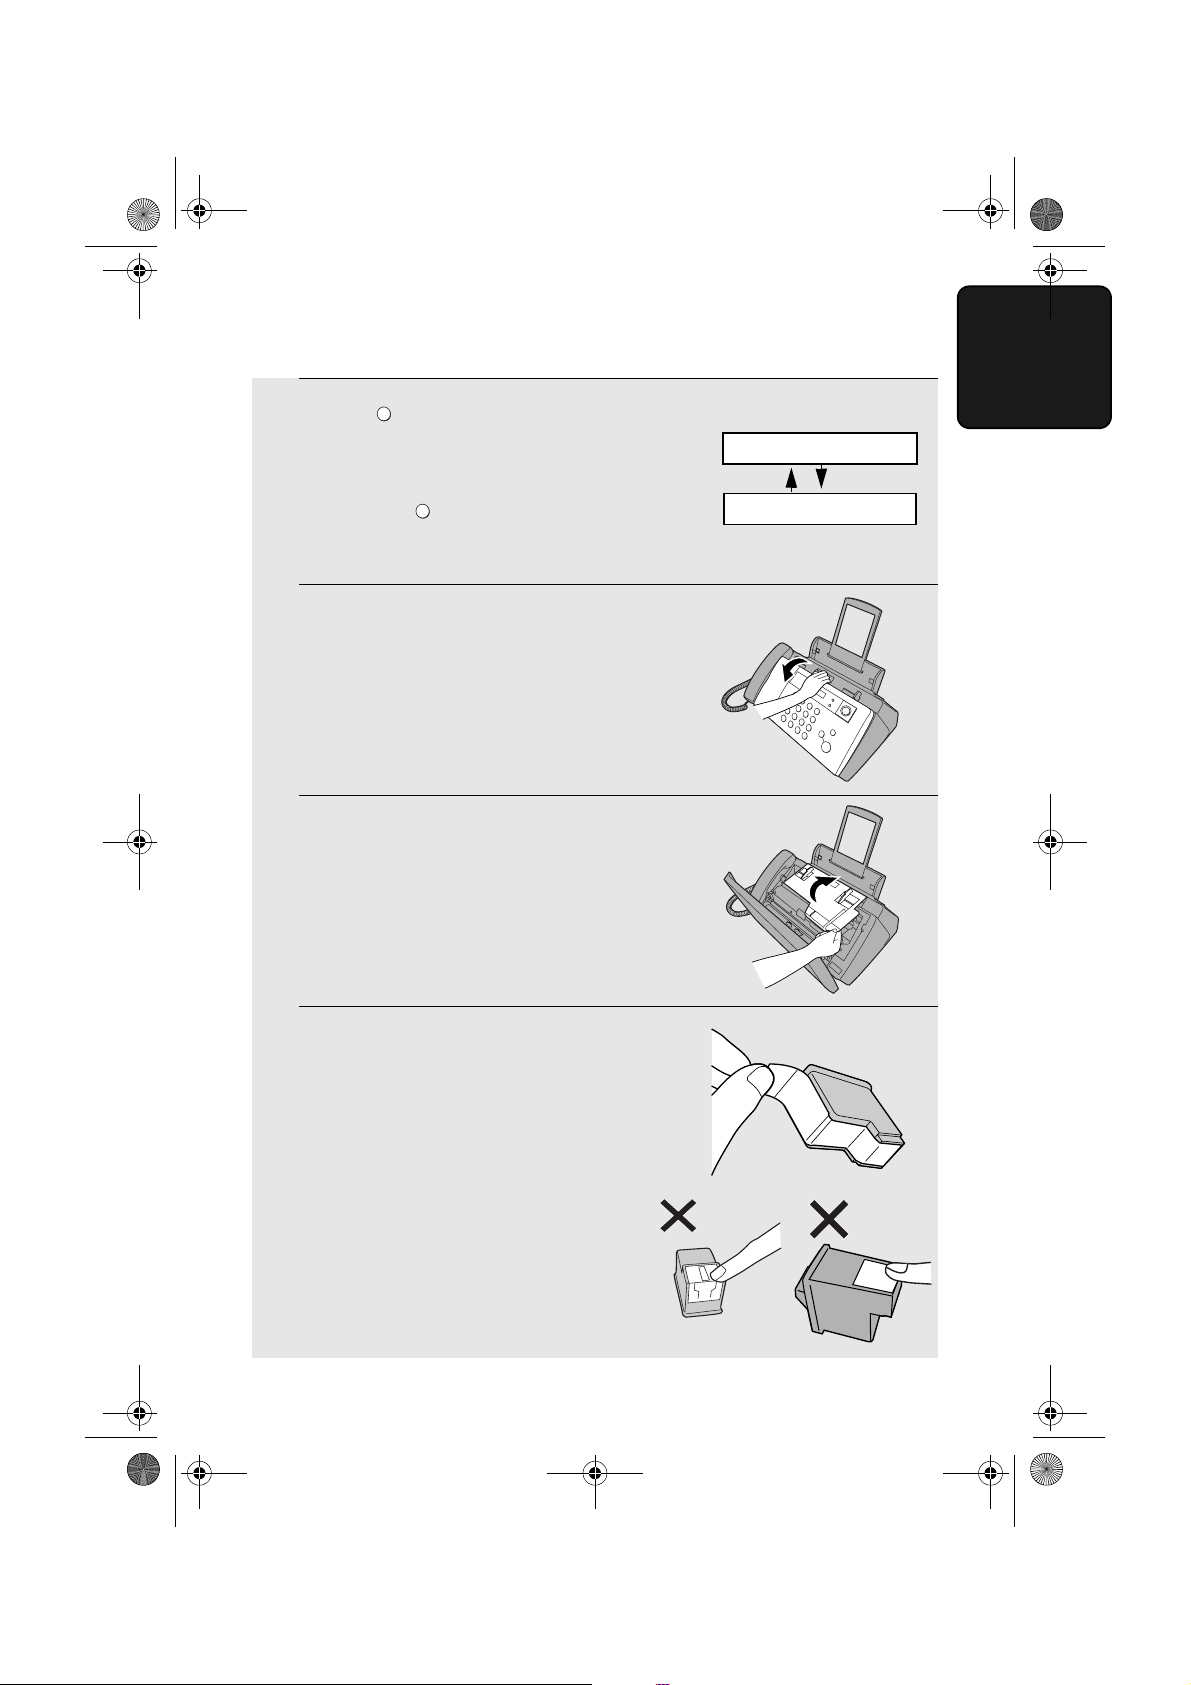
Installing the Print Cartridge
1
PATRONE
Press .
• Make sure the handset is on its cradle.
If the handset is not on the cradle,
pressing will have no effect.
PATRONE
Display:
REPLACE INK &
PRESS INK KEY
• The print cartridge holder moves to the cartridge replacement position.
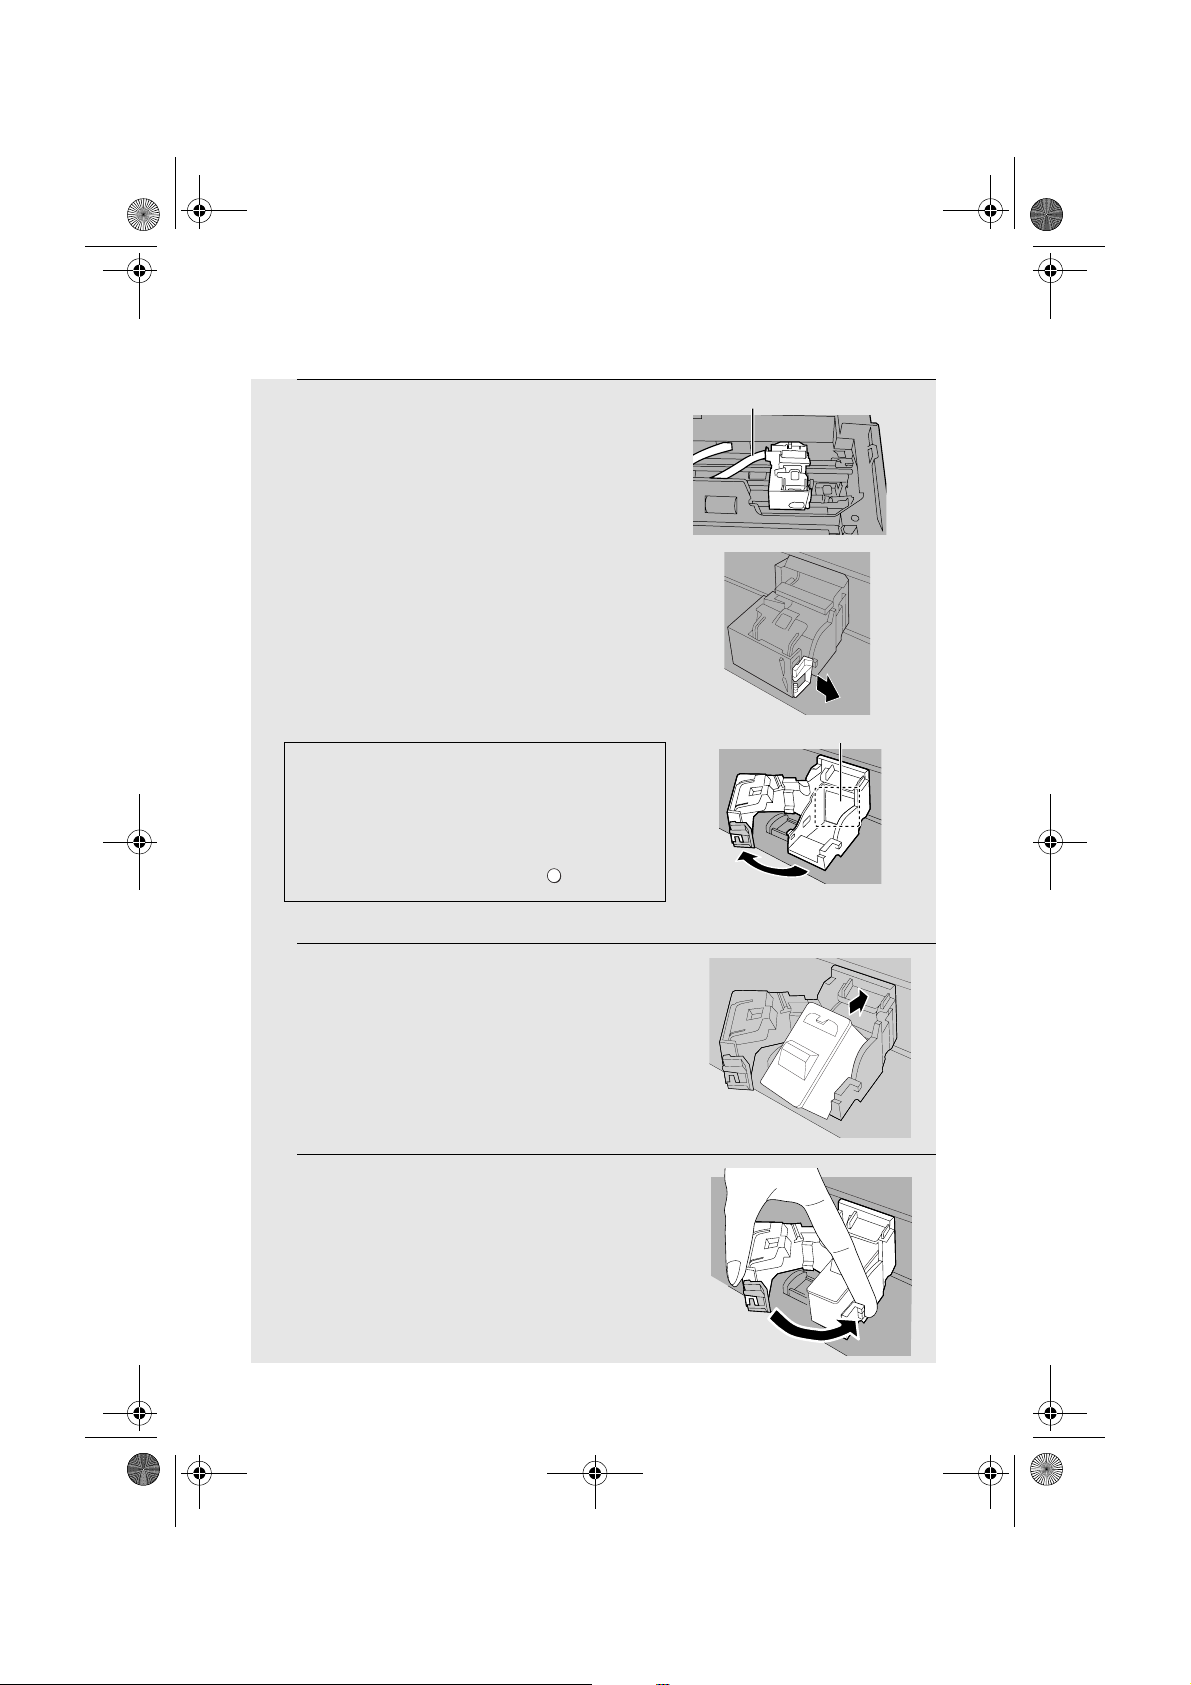
2
Open the operation panel.
3
Open the print compartment cover.
1. Installation
4
Remove
cartridge.
only
the tape from the new
• Important: Make sure you remove all
of the tape.
• CAUTION! DO NOT touch the gold
contact area on the cartridge.
17
Page 22
all.book Page 18 Tuesday, June 1, 2004 4:24 PM
Installing the Print Cartridge
5
Make sure the cartridge holder has
moved slightly away from the right side
of the compartment, and then pull the
green lever and open the cartridge
holder cover.
• If you are replacing the cartridge,
remove the old cartridge. If you are
going to use the old cartridge again,
place it in an air-tight container.
• CAUTION! DO NOT touch the contact
area inside the cartridge holder, or pull
on the cable that is connected to the
cartridge holder.
Note: If the print compartment cover is left open
for approximately 30 minutes with a cartridge
installed, the cartridge will automatically return
to its home position. To make the cartridge
return to the cartridge replacement position
when this has happened, press .
6
Insert the new print cartridge into the
cartridge holder.
PATRONE
Cable
Gold contact area
7
Place your index finger on the tab as
shown and close the cartridge holder
cover with your thumb. Make sure the
cover clicks into place.
18
Page 23
all.book Page 19 Tuesday, June 1, 2004 4:24 PM
Installing the Print Cartridge
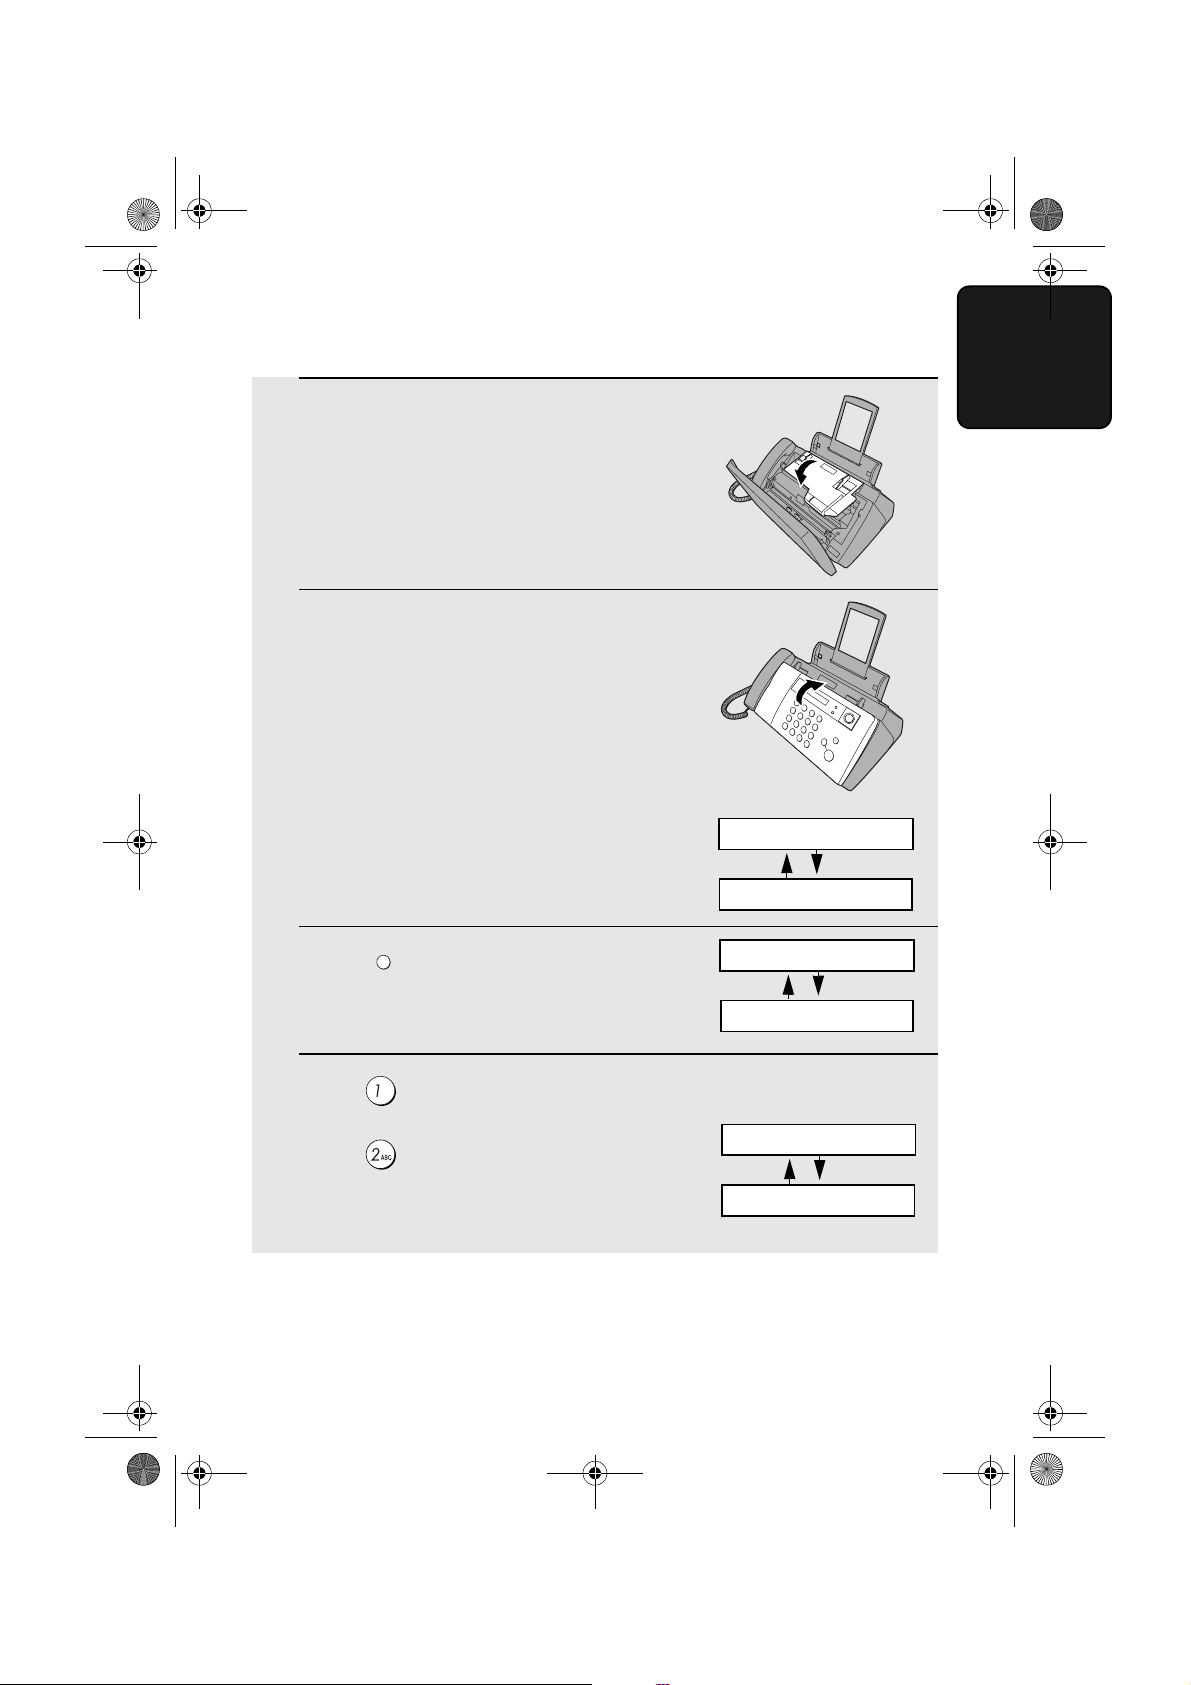
8
Close the print compartment cover.
9
Close the operation panel, pressing
down firmly to make sure it clicks into
place.
10
PATRONE
Press to make the print cartridge
holder return to its home position.
Display:
1. Installation
REPLACE INK &
PRESS INK KEY
CHANGE CARTRIDGE
1=NEW, 2=OLD
11
Press (NEW) if the cartridge you
installed is new.
Press (OLD) if the cartridge you
installed is old.
Display when “NEW” is
selected:
NEW CART. OK?
OK: PRESS START
19
Page 24
all.book Page 20 Tuesday, June 1, 2004 4:24 PM
Installing the Print Cartridge
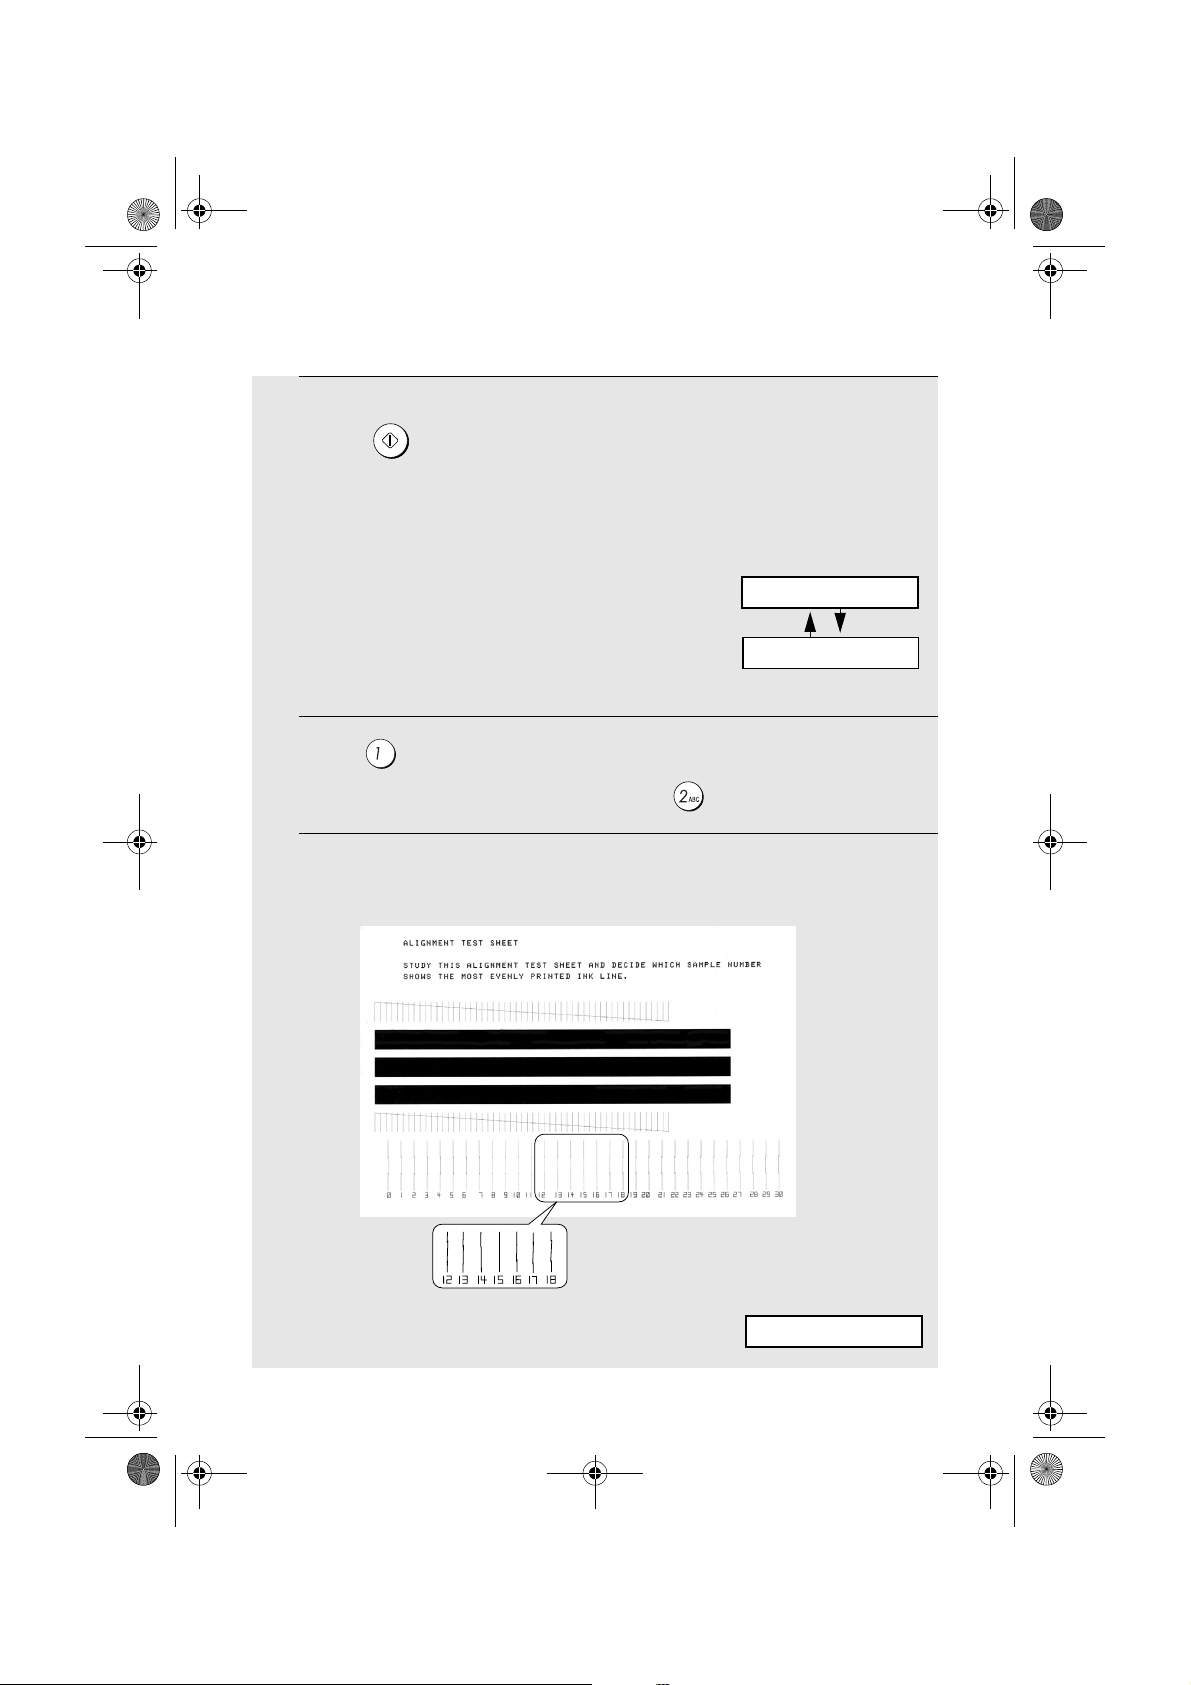
START/
SPEICHER
12
Press .
If you selected “OLD” in the previous
step, this completes the installation
procedure. (Note: If you find that print
quality is not satisfactory after
reinstalling the old cartridge, align the
cartridge as explained on page 92.)
If you selected “NEW”, the display will
show the alternating messages at
right. Continue with the following steps
to align the print cartridge.
13
Press to print an alignment page. (To enter an alignment value
without printing an alignment page, press .)
Display when “NEW” is
selected:
ALIGN CARTRIDGE
1=PRINT,2=SET
14
In the alignment page that the machine prints, locate the line that comes
closest to forming a completely straight line.
After the alignment page is
printed, the display shows:
In this example, “15” comes
closest to forming a straight line.
ENTER (0-30) 15
20
Page 25
all.book Page 21 Tuesday, June 1, 2004 4:24 PM
Installing the Print Cartridge
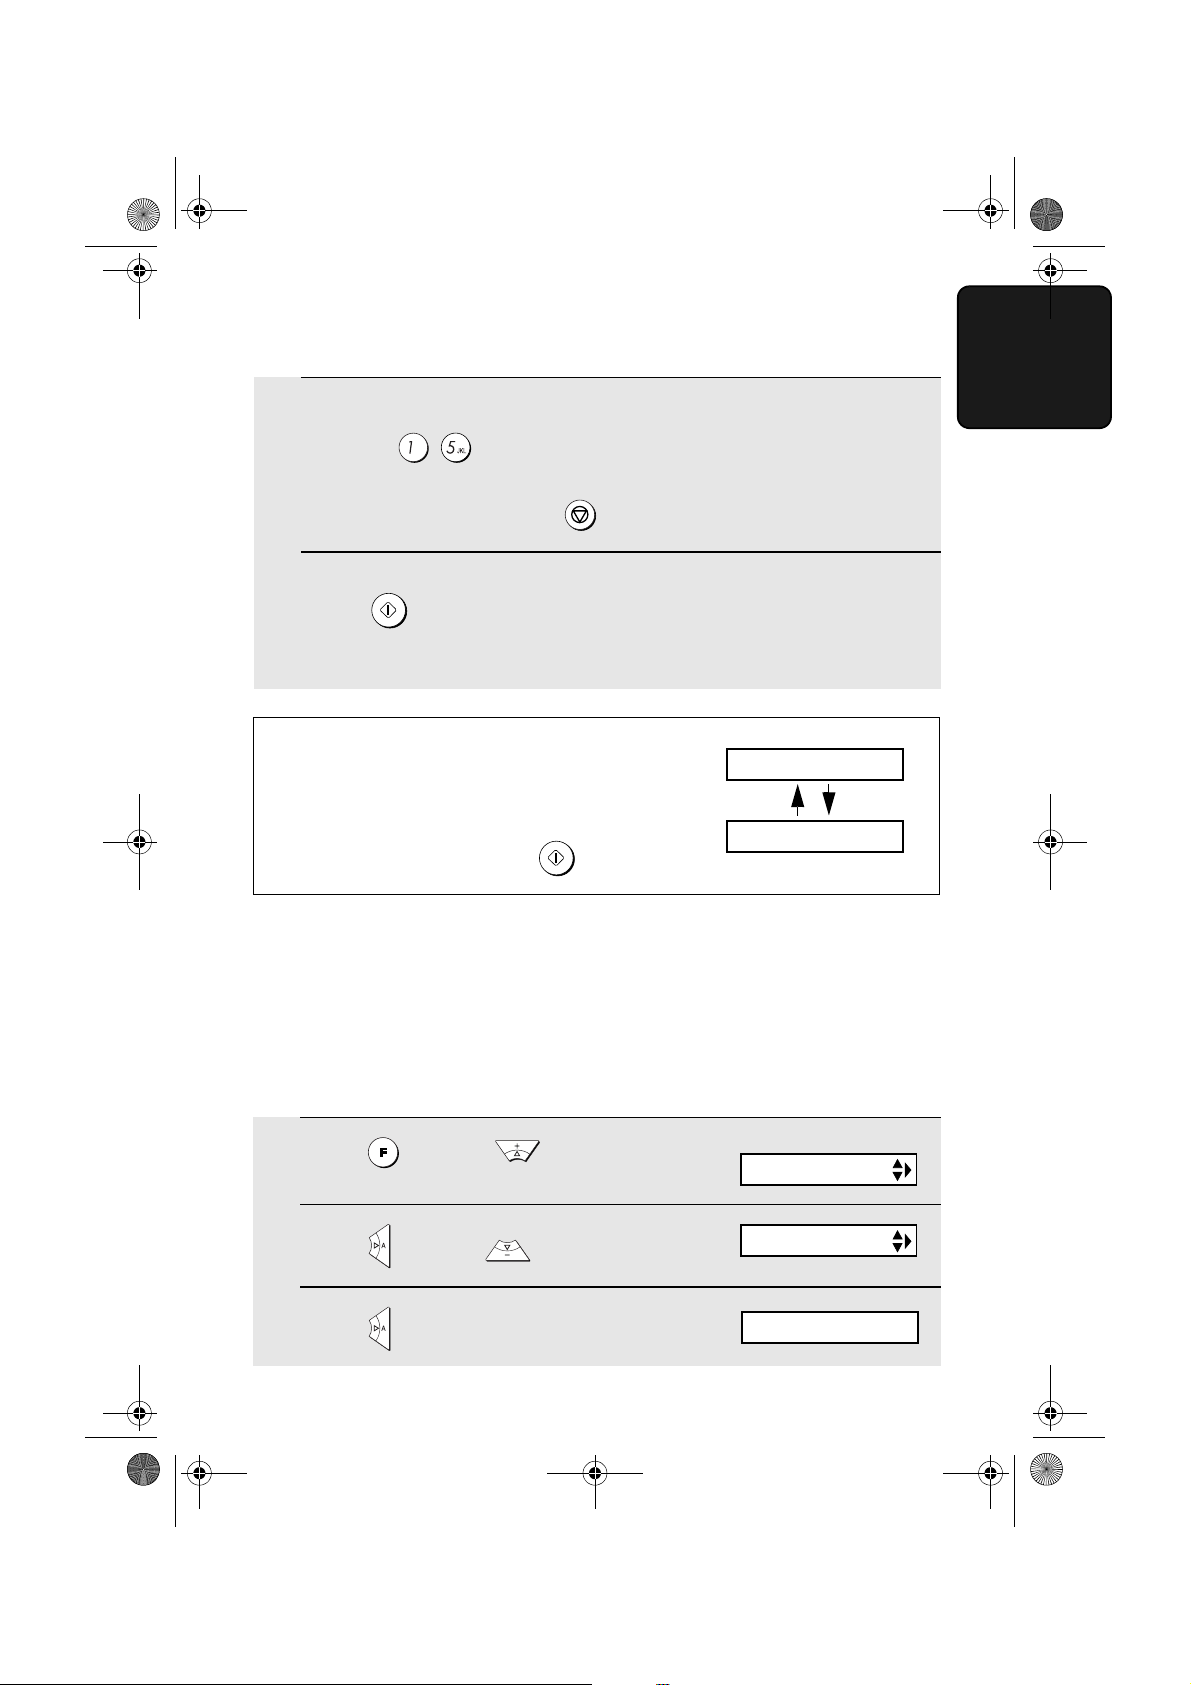
15
Press the number keys to enter the number of the straightest line.
Example:
STOP
• If you make a mistake, press and then repeat the entry.
START/
16
SPEICHER
Press .
• This completes the alignment procedure.
Note: If at any time the display shows the
alternating messages at right, check the printing
paper. If the tray is empty, add paper. If there is
paper in the tray, take it out and then reinsert it.
START/
When you are finished, press
SPEICHER
.
ADD PAPER &
PRESS START KEY
Quality mode(using more/less ink)
1. Installation
If you prefer a higher quality image when printing faxes and copies, turn on
Quality mode. If you wish to use less ink or speed up ink drying time, turn off
Quality mode.
♦ Quality mode is initially turned off.
1
Press once and twice.
2
Press once and twice.
3
Press once.
Display:
PRINT SET-UP
QUALITY MODE
1=ON, 2=OFF
21
Page 26
all.book Page 22 Tuesday, June 1, 2004 4:24 PM
Installing the Print Cartridge
4
Press to turn on Quality mode, or
The display briefly shows
your selection, then:
to turn it off.
5
STOP
Press to return to the date and time display.
HQ FAX PRINT
High-quality fax print setting (fast/slow printing of faxes)
The high-quality fax print setting controls the speed at which faxes are printed.
If you prefer a higher quality image at a slower printing speed, turn on this
setting. If you prefer a faster printing speed over image quality, turn off the
setting.
Note: This setting only affects the printing speed. It does not affect the
amount of ink used.
♦ The high-quality fax print setting is initially turned on.
Display:
1
Press once and twice.
2
Press once and 3 times.
PRINT SET-UP
HQ FAX PRINT
3
Press once.
4
Press to turn on high-quality fax
print, or to turn it off.
5
Press to return to the date and time display.
STOP
22
1=YES, 2=NO
The display briefly shows
your selection, then:
HQ COPY
Page 27
TEL.SET
TEL.LINE
all.book Page 23 Tuesday, June 1, 2004 4:24 PM
Connecting the Telephone Line Cord
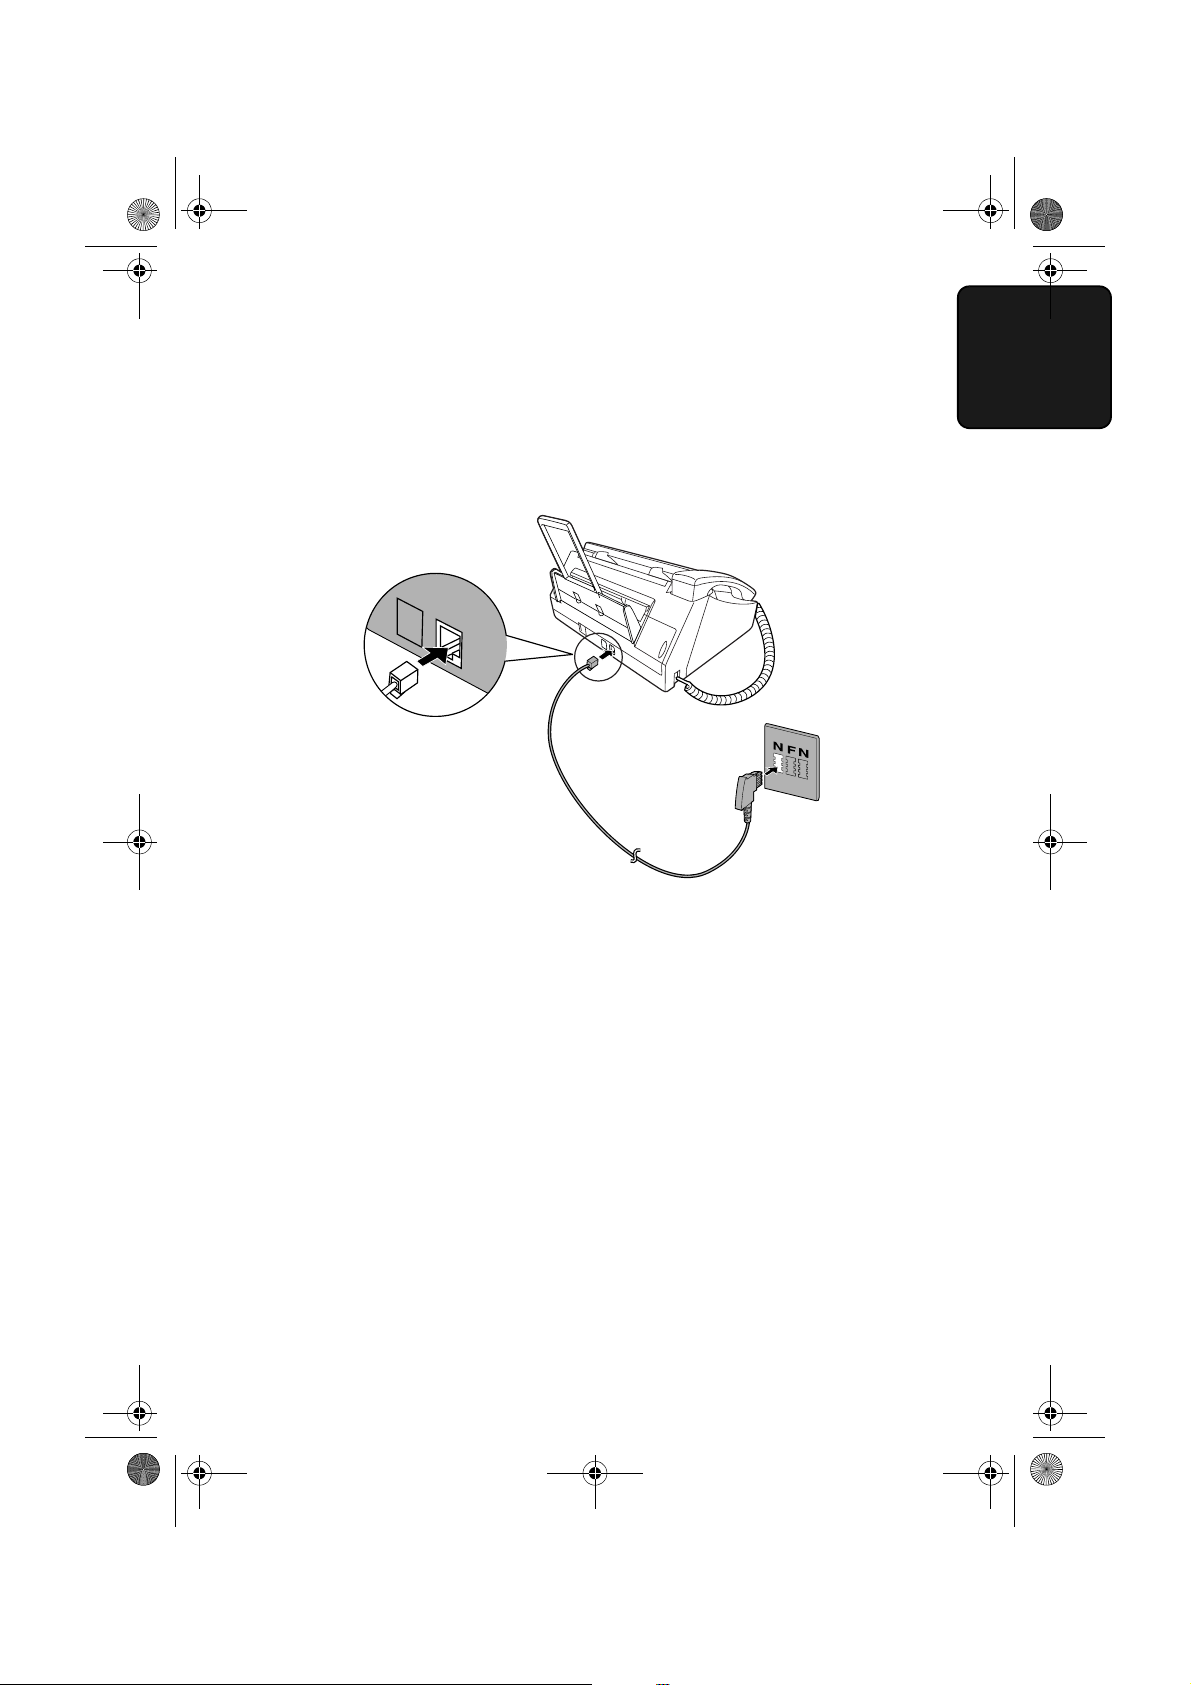
Connecting the Telephone Line Cord
Insert one end of the line cord into the socket on the back of the machine
marked TEL. LINE. Insert the other end into a wall telephone socket.
♦ Note for Germany:
In Germany, the machine is supplied with a N-coded line cable, enabling
you to use an extension (cordless) telephone on the same line. If you don't
have the standard NFN-outlet of TELEKOM, you can purchase an NFNadapter at your retailer.
1. Installation
23
Page 28
all.book Page 24 Tuesday, June 1, 2004 4:24 PM
Connecting the Telephone Line Cord
Other devices
If desired, you can use an answering machine or an extension telephone on
the same line as your fax. The answering machine or extension telephone can
be connected directly to the TEL. SET socket on your fax (note that this
socket is not available in some countries), or to another wall socket.
♦ Connecting an answering machine to the fax or a wall socket will allow you
to receive both voice and fax messages on the same line while you are out.
For details on using this feature, see Chapter 5.
♦ You can use an extension phone connected to the fax or a wall socket to
make and receive calls like any normal telephone. For details on receiving
faxes from the extension phone, see Chapter 3.
Germany:
The TEL. SET socket is not available on the fax. We recommend that you plug
the answering machine line cable into the right connector of the TAE wall
outlet, a (e.g.: cordless) telephone into the middle connector and fax line cord
into the left connector.
Switzerland, Austria:
An extension phone cannot be used. An answering machine can be used if it
is connected to a wall socket (the TEL. SET socket is not available).
24
Page 29
all.book Page 25 Tuesday, June 1, 2004 4:24 PM
Entering Your Name and Fax Number
Entering Your Name and Fax Number
Before you begin sending faxes, enter your name and fax (telephone) number.
You also need to set the date and time.
Once you enter this information, it will automatically appear at the top of each
fax page you send.
AUFLÖS./
EMPFANG
Z
WAHLW.WAHLW.
STOP
START/
SPEICHER
KOPIE/
HILFE
START/
SPEICHER
A
Display:
ENTRY MODE
1
Press once and twice.
TEL/FAX
PATRONE
AB
R
ABRUF
HALTEN
STOP
1. Installation
2
Press once.
3
Press once.
4
Enter your fax number by pressing the number keys (max. 20 digits).
OWN NUMBER SET
ENTER FAX #
• To insert a space between digits, press . To enter “+”, press .
• To clear a mistake, press .
25
Page 30
all.book Page 26 Tuesday, June 1, 2004 4:24 PM
Entering Your Name and Fax Number
START/
5
6
SPEICHER
Press .
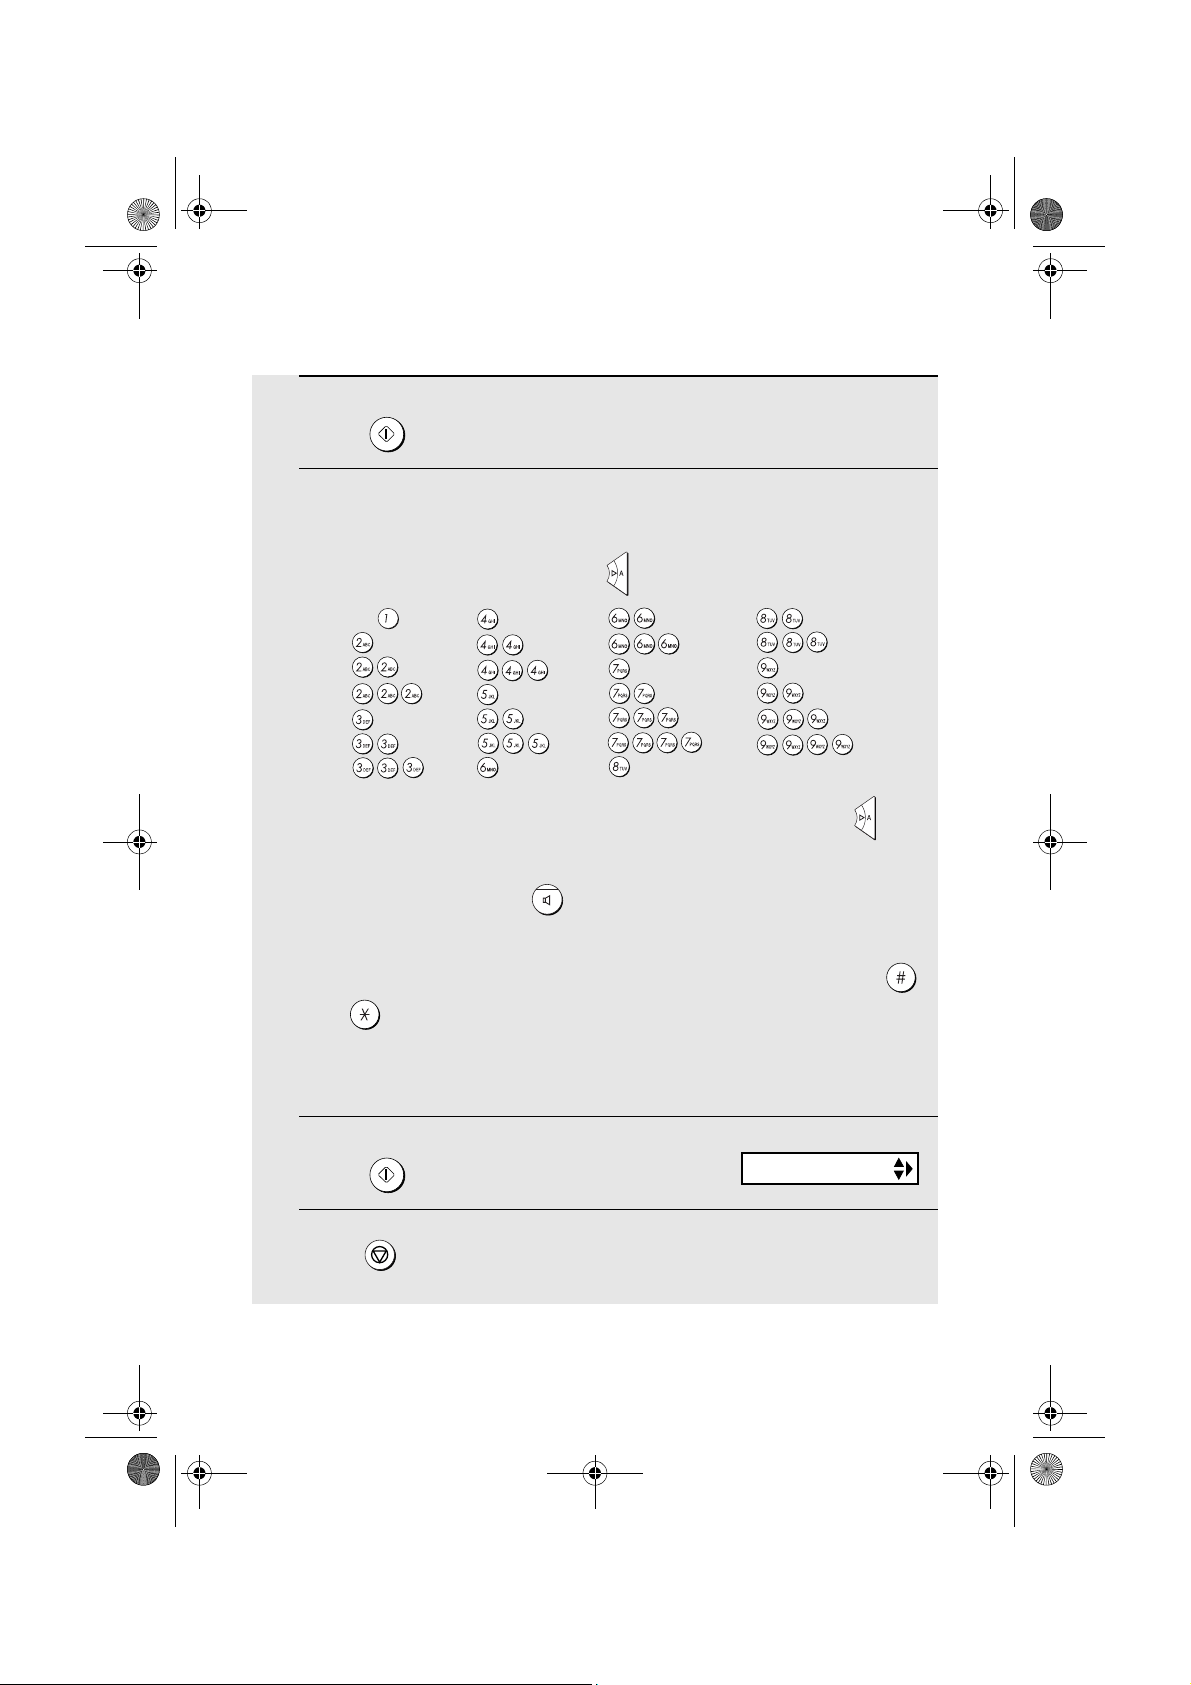
Enter your name by pressing number keys for each letter as shown in
the chart below. Up to 24 characters can be entered.
Example: SHARP = 7777 44 2 777 7
SPACE =
A =
B =
C =
D =
E =
F =
G =
H =
I =
J =
K =
L =
M =
N =
O =
P =
Q =
R =
S =
T =
U =
V =
W =
X =
Y =
Z =
♦ To enter two letters in succession that require the same key, press after
entering the first letter.
♦ To clear a mistake, press .
♦ To enter a lower case letter, continue pressing the key for the letter until the
lower case letter appears. To enter one of the following symbols, press
or repeatedly:
. / ! " # $ % & ’ ( ) + + , - : ; < = > ? @ [ ¥ ] ^ _ ' { | } ) ( Ä Ö Ü ä ö ü
(Note: Characters particular to the selected display language will appear at
the end of the symbol list.)
Display:
DATE&TIME SET
7
Press .
START/
SPEICHER
8
STOP
Press to return to the date and time display.
26
Page 31

all.book Page 27 Tuesday, June 1, 2004 4:24 PM
Setting the Date and Time
Setting the Date and Time
The date and time appear in the display and are printed at the top of every
page you fax. Set the date and time as shown below.
AUFLÖS./
EMPFANG
Z
WAHLW.WAHLW.
KOPIE/
HILFE
STOP
START/
SPEICHER
START/
SPEICHER
A
Display:
ENTRY MODE
1
Press once and twice.
PATRONE
TEL/FAX
AB
R
ABRUF
HALTEN
STOP
1. Installation
2
Press once and once.
The currently set date
3
Press once.
4
Enter a two-digit number for the day (“01” to “31”).
Example: the 5
th
appears (example):
DATE&TIME SET
DATE 15-08-2004
DATE 05-08-2004
• To correct a mistake, press to move the cursor back to the mistake and
then enter the correct number.
27
Page 32

all.book Page 28 Tuesday, June 1, 2004 4:24 PM
Setting the Date and Time
5
Enter a two-digit number for the month (“01” for January, “02” for
February, “12” for December, etc.).
Example: January
DATE 05-01-2004
6
Enter the year (four digits).
Example: 2004
7
Enter a two-digit number for the hour (“00” to “23”) and a two-digit
number for the minute (“00” to “59”).
Example: 9:25
START/
8
9
SPEICHER
Press to start the clock.
STOP
Press to return to the date and time display.
Note: The time setting will change automatically at the beginning and end of
summertime.
The currently set time
appears (example):
TIME 12:19
05-JAN 09:25
ANTI JUNK #
28
Page 33

all.book Page 29 Tuesday, June 1, 2004 4:24 PM
Setting the Reception Mode
Setting the Reception Mode
The machine has four modes for receiving incoming faxes:
FAX mode:
Select this mode when you only want to receive faxes on your line. The fax
machine will automatically answer all calls and receive incoming faxes.
TEL mode:
This mode is the most convenient for receiving phone calls. Faxes can also be
received; however, all calls must first be answered by picking up the fax's
handset or an extension phone connected to the same line.
TEL/FAX mode:
This mode is convenient for receiving both faxes and voice calls. When a call
comes in, the fax will detect whether it is a voice call (including manually
dialled faxes), or an automatically dialled fax. If it is a voice call, the fax will
make a special ringing sound to alert you to answer. If it is an automatically
dialled fax, reception will begin automatically.
A.M. mode:
Use this mode only if you have connected an answering machine to the fax
(see Chapter 5). Select this mode when you go out to receive voice messages
in your answering machine and faxes on your fax machine.
1. Installation
29
Page 34

all.book Page 30 Tuesday, June 1, 2004 4:24 PM
Setting the Reception Mode
Setting the reception mode
Make sure a document
AUFLÖS./
EMPFANG
press until the arrow in the display points to the desired mode.
is not loaded in the document feeder
AUFLÖS./
EMPFANG
, and then
TEL
01-JAN 10:30
TEL/FAX
TEL
TEL/FAX
TEL
TEL/FAX
TEL
TEL/FAX
AUFLÖS./
EMPFANG
Z
PATRONE
AB
R
ABRUF
HALTEN
A
WAHLW.WAHLW.
KOPIE/
HILFE
STOP
START/
SPEICHER
AUFLÖS./
EMPFANG
01-JAN 10:30
01-JAN 10:30
01-JAN 10:30
TEL/FAX
For more information on receiving faxes in FAX, TEL and TEL/FAX modes,
see Chapter 3. For more information on using A.M. mode, see Chapter 5.
FAX
AB
FAX
AB
FAX
AB
FAX
AB
30
Page 35

all.book Page 31 Tuesday, June 1, 2004 4:24 PM
Flash Select Setting for PBX
Flash Select Setting for PBX
Note: This setting is normally only used in Germany. In other countries, you
can try changing the setting if you encounter difficulty with the default setting.
If your fax machine is connected to a PBX and the PBX uses the “Flash”
method to connect to an outside line, you must select the appropriate Flash
Select setting depending on whether your PBX line is a normal telephone line
or a high-speed line.
1
Press once and 3 times.
2
Press once and 7 times.
3
Press once.
4
Select (SHORT TIME) if your PBX
line is a normal telephone line.
Select (LONG TIME) if your PBX
line is a high-speed line.
Display:
OPTION SETTING
FLASH SELECT
1: SHORT TIME
The display briefly shows
your selection, then:
FAX SIGNAL RX
1. Installation
5
STOP
Press to return to the date and time display.
31
Page 36

all.book Page 32 Tuesday, June 1, 2004 4:24 PM
Setting the Display Language
Setting the Display Language
If desired, you can change the language used in the display, reports and lists.
Press the keys on the operation panel as follows:
1
Press once and 3 times.
2
Press once and 8 times.
3
Press once.
4
Press or until the desired language appears in the display.
START/
5
SPEICHER
Press .
Display:
OPTION SETTING
LANGUAGE
• The machine will beep and the display will change to the selected
language.
6
STOP
Press to return to the date and time display.
32
Page 37

all.book Page 33 Tuesday, June 1, 2004 4:24 PM
Volume Adjustment
You can adjust the volume of the speaker and ringer using the up and down
arrow keys.
TEL/FAX
AB
ABRUF
HALTEN
Volume Adjustment
1. Installation
AUFLÖS./
EMPFANG
Z
PATRONE
R
A
WAHLW.WAHLW.
KOPIE/
HILFE
STOP
START/
SPEICHER
Speaker
1
Press .
2
Press or to select the
desired volume level.
• Press again to turn off the speaker.
Display:
SPEAKER: HIGH
SPEAKER: MIDDLE
SPEAKER: LOW
33
Page 38

all.book Page 34 Tuesday, June 1, 2004 4:24 PM
Volume Adjustment
Ringer
1
Press or to select the
desired volume level.
(Make sure has not been pressed
and a document is not loaded in the
feeder.)
Display:
RINGER: HIGH
RINGER: MIDDLE
• The ringer will ring once at the selected
level.
2
If you selected RINGER: OFF OK ? to
START/
turn off the ringer, press .
Note: When the reception mode is set to TEL, the ringer will still ring at LOW
if turned off.
SPEICHER
RINGER: LOW
RINGER: OFF OK ?
34
Page 39

all.book Page 35 Tuesday, June 1, 2004 4:24 PM
Volume Adjustment
Error beep off
The machine normally sounds three beeps to alert you when an error occurs
during transmission, reception, or copying. The machine also sounds a
double-beep when you press an invalid key on the operation panel. If you wish
to turn off the error beep, follow the steps below.
1
Press once and 3 times.
2
Press once and 3 times.
3
Press once.
4
Press to turn on the error beep or
to turn off the error beep.
5
STOP
Press to return to the date and time display.
Display:
OPTION SETTING
ERROR BEEP
1=YES, 2=NO
The display briefly shows
your selection, then:
END BEEP
1. Installation
End beep off
The fax machine normally sounds one long beep when transmission,
reception, or copying ends normally. If you wish to turn off the end beep,
follow the steps below.
1
Press once and 3 times.
2
Press once and twice.
Display:
OPTION SETTING
END BEEP
35
Page 40

all.book Page 36 Tuesday, June 1, 2004 4:24 PM
Volume Adjustment
3
Press once.
4
Press to turn on the end beep or
to turn off the end beep.
5
STOP
Press to return to the date and time display.
1=YES, 2=NO
The display briefly shows
your selection, then:
KEY TONE
Key tone off
The fax machine normally sounds a beep (key tone) each time you press a
key on the operation panel. If you wish to turn off the key tone, follow the steps
below.
1
Press once and 3 times.
2
Press once and once.
Display:
OPTION SETTING
KEY TONE
3
Press once.
4
Press to turn on the key tone or
to turn off the key tone.
5
36
STOP
Press to return to the date and time display.
1=YES, 2=NO
The display briefly shows
your selection, then:
FINE PRIORITY
Page 41

all.book Page 37 Tuesday, June 1, 2004 4:24 PM
2. Sending Faxes
Transmittable Documents
Size and weight
Minimum document size:
Minimum size Minimum weight
148 mm
140 mm
52 g/m²
Maximum document size:
The maximum size and weight of documents that you can load in the
document feeder depend on how many sheets you load.
10 sheets at once:
Size: A4
(210 x 297 mm)
Weight: 80 g/m
2
Letters or graphics
within 4 mm of the top
and bottom edges of a
document will not be
scanned.
1 sheet at a time (manual feeding):
Size: 210 x 600 mm
Weight: 157 g/m
4 mm
2
Letters in the
shaded area will
210 mm
not be scanned.
Faxes
2. Sending
4 mm
37
Page 42

all.book Page 38 Tuesday, June 1, 2004 4:24 PM
Loading the Document
Other restrictions
♦ The scanner cannot recognise yellow, greenish yellow, or light blue ink.
♦ Ink, glue, and correcting fluid on documents must be dry before they pass
through the document feeder.
♦ All clips, staples, and pins must be removed from documents before loading
in the feeder. If these are not removed, they may damage the machine.
♦ Documents which are patched, taped, torn, smaller than the minimum size,
carbon backed, easily smudged, or have a slick coated surface should be
photocopied, and the copy loaded in the feeder.
Loading the Document
Up to 10 A4-size sheets can be placed in the feeder at once. The sheets will
automatically feed into the machine starting from the bottom sheet.
♦ If you need to send or copy more than the maximum number of sheets,
place the additional sheets gently and carefully in the feeder just before the
last sheet is scanned. Do not try to force them in, as this may cause doublefeeding or jamming.
♦ If your document consists of several large or thick sheets which must be
loaded one at a time, insert each sheet into the feeder as the previous
sheet is being scanned. Insert gently to prevent double-feeding.
1
Adjust the document guides to the
width of your document.
38
Page 43

all.book Page 39 Tuesday, June 1, 2004 4:24 PM
2
Insert the document face down in the
document feeder. The top edge of the
document should enter the feeder first.
• READY TO SEND will appear in the
display.
3
Adjust the resolution and/or contrast settings as explained on page 40,
then dial the receiving machine as explained on page 43.
Removing a document from the feeder
If you need to remove a document from the feeder, open the operation panel.
Important!
Do not try to remove a document without opening the operation panel. This
may damage the feeder mechanism.
Loading the Document
Faxes
2. Sending
1
Open the operation panel.
2
Remove the document.
3
Close the operation panel, pressing
down firmly on both front corners to
make sure it clicks into place.
39
Page 44

all.book Page 40 Tuesday, June 1, 2004 4:24 PM
Adjusting the Resolution and Contrast
Adjusting the Resolution and Contrast
If desired, you can adjust the resolution and contrast before sending a
document.
♦ The default resolution setting is STANDARD and the default contrast setting
is AUTO.
♦ You must adjust the settings each time you don’t want to use the default
settings.
Note: The resolution and contrast settings are only effective for sending a
document. They are not effective for receiving a document.
Resolution settings
STANDARD Use STANDARD for ordinary documents. This
setting gives you the fastest and most
economical transmission.
FINE Use FINE for documents containing small letters
or fine drawings.
SUPER FINE Use SUPER FINE for documents containing
very small letters or very fine drawings.
HALF TONE Use HALF TONE for photographs and
illustrations. The original will be reproduced in
64 shades of gray.
Contrast settings
AUTO Use AUTO for normal documents.
DARK Use DARK for faint documents.
40
Page 45

all.book Page 41 Tuesday, June 1, 2004 4:24 PM
1
Load the document(s).
• The document must be loaded before
the resolution and contrast can be
adjusted.
Adjusting the Resolution and Contrast
Faxes
2. Sending
AUFLÖS./
2
EMPFANG
Press one or more times until the
desired resolution and contrast
settings appear in the display.
• The first time you move through the list
of resolution settings, the contrast
setting AUTO will appear next to each
resolution setting. The second time you
move through the list, the contrast
setting DARK will appear.
Note: In order to transmit in SUPER FINE resolution, the receiving fax machine
must also have that resolution. If it doesn’t, your machine will automatically step
down to the next best available setting.
Display:
STANDARD :AUTO
FINE :AUTO
SUPER FINE :AUTO
HALF TONE :AUTO
STANDARD :DARK
FINE :DARK
SUPER FINE :DARK
HALF TONE :DARK
41
Page 46

all.book Page 42 Tuesday, June 1, 2004 4:24 PM
Adjusting the Resolution and Contrast
Changing the default resolution
If desired, you can change the default resolution for faxing documents to
FINE. Follow the steps below.
1
Press once and 3 times.
2
Press once.
3
Press once.
4
Press to set the default resolution
to FINE, or to set it to STANDARD.
5
STOP
Press to return to the date and time display.
Display:
OPTION SETTING
FINE PRIORITY
1=YES, 2=NO
The display briefly shows
your selection, then:
NUMBER OF RING
42
Page 47

all.book Page 43 Tuesday, June 1, 2004 4:24 PM
Sending a Fax by Normal Dialling
Sending a Fax by Normal Dialling
With Normal Dialling, you pick up the handset (or press ) and dial by
pressing the number keys.
♦ If a person answers, you can talk with them through the handset before
sending the fax. (If you pressed , you must pick up the handset to talk.)
♦ Normal Dialling allows you to listen to the line and make sure the other fax
machine is responding.
1
Load the document(s).
AUFLÖS./
• If desired, press to set the
resolution and/or contrast.
EMPFANG
Faxes
2. Sending
READY TO SEND
2
Pick up the handset or press .
Listen for the dial tone.
3
Dial the number of the receiving
machine by pressing the number keys.
or
• If you are on a Flash-type PBX and are
dialing out, press , wait for the
connection to the outside line, and then
dial the number.
4
Wait for the connection. Depending on the setting of the receiving
machine, you will either hear a fax tone or the other person will answer.
R
43
Page 48

all.book Page 44 Tuesday, June 1, 2004 4:24 PM
Sending a Fax by Automatic Dialling
• If the other person answers, ask them to press their Start key (if you
pressed , pick up the handset to speak with them). This causes the
receiving machine to issue a fax tone.
5
When you hear the fax tone, press . Replace the handset.
• Important: Remove the document as soon as it exits the machine.
Otherwise, ink from received faxes and copies may soil the document.
• If the transmission is completed successfully, the machine will beep once.
• If an error occurs, the machine will beep three times and print a Transaction
Report to inform you of the problem (see page 87).
Note: If the transmission is unsuccessful and DOCUMENT JAMMED appears
in the display, remove the document as explained on page 104. (This may
occur if the other fax machine doesn’t respond properly when you attempt to
send the document.)
START/
SPEICHER
Sending a Fax by Automatic Dialling
You can store your most frequently dialled fax or phone numbers in the
machine for automatic dialling. Up to 30 numbers can be stored.
♦ Auto-dial numbers are dialled by pressing until the desired number
START/
appears in the display, and then .
Storing fax and phone numbers for automatic dialling
1
Press once and once.
44
SPEICHER
Display:
<NEW NUMBER>
Page 49

all.book Page 45 Tuesday, June 1, 2004 4:24 PM
Sending a Fax by Automatic Dialling
2
Press once.
3
Enter the fax or phone number by pressing the number keys. Up to 32
digits can be entered. (Note: A space cannot be entered.)
ENTER FAX #
• To clear a mistake, press .
• If a pause is required between any of the digits to access a special service
or an outside line, press . The pause appears as a hyphen. Several
pauses can be entered in a row.
• If you are on a Flash-type PBX and are storing a number for an outside line,
press , press to insert a pause, and then enter the fax or voice
number. (When you dial the auto-dial number, you will automatically dial out
without the need to press the key.)
R
R
• If you are on a PBX that requires dialing a number to dial out and are
storing a number for an outside line, enter the number, press to insert
a pause, and then enter the number of the receiving machine. (When you
dial the auto-dial number, you will automatically dial out without the need to
dial the number for an outside line.)
Faxes
2. Sending
4
Press .
START/
SPEICHER
45
Page 50

all.book Page 46 Tuesday, June 1, 2004 4:24 PM
Sending a Fax by Automatic Dialling
5
Enter a name by pressing number keys for each letter as shown in the
chart below. Up to 15 characters can be entered. (If you do not wish to
enter a name, go directly to Step 6.)
Example: SHARP = 7777 44 2 777 7
SPACE =
A =
B =
C =
D =
E =
F =
G =
H =
I =
J =
K =
L =
M =
N =
O =
P =
Q =
R =
S =
T =
U =
V =
W =
X =
Y =
Z =
♦ To enter two letters in succession that require the same key, press after
entering the first letter.
♦ To enter a lower case letter, continue pressing the key for the letter until the
lower case letter appears.
♦ To enter one of the following symbols, press or repeatedly:
. / ! " # $ % & ’ ( ) + + , - : ; < = > ? @ [ ¥ ] ^ _ ' { | }
(Note: Characters particular to the selected display language will appear at
the end of the symbol list.)
START/
6
SPEICHER
Press .
) ( Ä Ö Ü ä ö ü
Display:
<NEW NUMBER>
7
Return to Step 2 to store another number, or press to return to the
STOP
date and time display.
• To confirm that an auto-dial number has been stored correctly, print out the
Telephone Number List as explained on page 85.
46
Page 51

all.book Page 47 Tuesday, June 1, 2004 4:24 PM
Editing and clearing auto-dial numbers
If you need to make changes to a previously stored auto-dial number, or clear
a number, follow these steps:
Sending a Fax by Automatic Dialling
Display:
1
Press once and once.
2
Press or until the number that you wish to edit or clear
appears in the display.
3
Press .
4
Press for EDIT or for CLEAR.
<NEW NUMBER>
1=EDIT, 2=CLEAR
• If you selected CLEAR, go to Step 8.
5
If you selected EDIT, make the desired changes to the number.
• Press or to move the cursor to the digit or digits you wish to
change, and then enter the new digit. The new digit will replace the old
digit.
• If you do not wish to change the number, go directly to Step 6.
Faxes
2. Sending
6
Press .
START/
SPEICHER
47
Page 52

all.book Page 48 Tuesday, June 1, 2004 4:24 PM
Sending a Fax by Automatic Dialling
7
Make the desired changes to the name.
• Press or to move the cursor to the letter or letters you wish to
change, and then press the appropriate number key repeatedly until the
desired letter appears (see Step 5 on page 46). The new letter will replace
the old letter.
• If you do not wish to change the name, go directly to Step 8.
START/
8
SPEICHER
Press .
9
Return to Step 2 to edit or clear another number, or press to return
to the date and time display.
Using an auto-dial number
Once you have stored a fax or phone number, you can use it to send a fax or
make a phone call.
1
If you are sending a fax, load the
document(s).
AUFLÖS./
• If desired, press to set the
resolution and/or contrast.
2
Press (or ) until the name of the other party appears in the
display (if no name was stored, the number will appear).
EMPFANG
READY TO SEND
STOP
48
Page 53

all.book Page 49 Tuesday, June 1, 2004 4:24 PM
3
If you are sending a fax, press . Dialling and transmission begins.
• Important: Remove the document as soon as it exits the machine.
Otherwise, ink from received faxes and copies may soil the document.
• If the transmission is completed successfully, the machine will beep once.
• If an error occurs, the machine will beep three times and print a Transaction
Report to inform you of the problem (see page 87).
If you are making a phone call, lift the handset. Dialling begins. (If you
lifted the handset before searching for the number, press to begin
dialling.)
Sending a Fax by Automatic Dialling
START/
SPEICHER
START/
SPEICHER
Faxes
2. Sending
Sending a fax by Direct Keypad Dialling
You can also enter a full number with the number keys and then press the
START/
SPEICHER
key to begin dialling. You can use this method to dial a full number
when you don't need to speak to the other party before faxing.
1
Load the document(s).
AUFLÖS./
• If desired, press to set the
resolution and/or contrast.
EMPFANG
READY TO SEND
49
Page 54

all.book Page 50 Tuesday, June 1, 2004 4:24 PM
Sending a Fax by Automatic Dialling
2
Enter the number of the receiving machine by pressing the number
keys.
• If a pause is required between any of the digits to access a special service
or an outside line, press . The pause will appear as a hyphen. Several
pauses can be entered in a row.
• If you are on a Flash-type PBX and are dialing out, press , press
to insert a pause, and then enter the number of the receiving machine.
R
• If you are on a PBX and must dial a number to dial out, enter the number,
press to insert a pause, and then enter the number of the receiving
machine.
3
Check the display. If the number of the receiving machine shown is
START/
correct, press .
SPEICHER
STOP
• If the number is not correct, press to backspace and clear one digit at
a time, and then re-enter the correct digit(s).
50
Page 55

all.book Page 51 Tuesday, June 1, 2004 4:24 PM
Redial
You can automatically redial the last number dialled on the fax machine. This
procedure can be used to send a fax or make a phone call.
1
If you are sending a fax, load the
document(s).
AUFLÖS./
• If desired, press to set the
resolution and/or contrast.
2
Press once. <REDIAL> appears in the display, followed by the last
number dialled. Make sure the number that appears is the number you
wish to dial.
EMPFANG
Sending a Fax by Automatic Dialling
Faxes
2. Sending
READY TO SEND
START/
3
If you are sending a fax, press . Dialling begins.
If you are making a phone call, lift the handset. Dialling begins.
Note: If the transmission is unsuccessful and DOCUMENT JAMMED appears
in the display, remove the document as explained on page 104. (This may
occur if the other fax machine doesn’t respond properly when you attempt to
send the document.)
SPEICHER
Automatic redialling
If you use automatic dialling (including Direct Keypad Dialling) to send a fax
and the line is busy, the fax machine will automatically redial the number. The
fax machine will make three redial attempts at intervals of five minutes. During
this time, RECALLING will appear in the display, followed by a two-digit
number assigned to the fax job. You will not be able to dial any other locations
while the message appears.
51
Page 56

all.book Page 52 Tuesday, June 1, 2004 4:24 PM
Sending a Fax by Automatic Dialling
♦ You can press to clear the message and stop automatic redialling.
STOP
♦ Under certain conditions (for example if a person answers the call on a
telephone), automatic redialling may stop before three redialling attempts
are made.
Error Correction Mode
The fax machine is set to automatically correct any distortions in a
transmission due to noise on the telephone line before printing at the
receiving end. This function is called Error Correction Mode (ECM). ECM is
effective for both transmissions and receptions, and is only effective when the
other fax machine has ECM as well.
When there is considerable noise on the line, you may find that transmission
with ECM turned on takes longer than normal. If you prefer a faster
transmission time, you can try turning ECM off.
1
Press once and 3 times.
2
Press once and 4 times.
Display:
OPTION SETTING
ECM MODE
3
Press once.
4
Press to select YES, or to
select NO.
5
STOP
Press to return to the date and time display.
52
1=YES, 2=NO
The display briefly shows
your selection, then:
ERROR BEEP
Page 57

all.book Page 53 Tuesday, June 1, 2004 4:24 PM
Batch Page Numbering
You can change the page numbering of the transmitted document from simple
numbering ("P.01", "P.02", etc.) to batch numbering, which means that a slash
and the total number of pages being sent are added after each page number
(for example, "P. 01/05", "P.02/05", etc.). This allows the recipient to check for
missing pages.
1
Load the document(s).
Batch Page Numbering
Faxes
2. Sending
2
Press once and once.
3
Press once.
4
Enter the total number of pages (“01” to “99”) by pressing the numeric
keys.
Example: 5 pages
AUFLÖS./
5
If desired, press to set the resolution and/or contrast.
6
Dial the receiving machine and send the fax.
EMPFANG
Display:
PAGE COUNTER
ENTER # (01 - 99)
♦ If you need to cancel a batch number entry, remove the document from the
feeder or press .
STOP
♦ If the number of pages actually transmitted does not coincide with the batch
number entered, the alarm will sound and PAGE COUNT ERROR will
appear in the display. PAGE E. will also appear in the NOTE column of the
Transaction Report if printed.
53
Page 58

all.book Page 54 Tuesday, June 1, 2004 4:24 PM
Sending a Fax From Memory
Sending a Fax From Memory
You can scan a document into the fax’s memory and send the document from
memory. This increases transmission speed and allows you to send a fax to
multiple destinations in a single operation. After transmission, the document is
automatically cleared from memory.
Note: If a power failure occurs while sending a fax from memory, you will need
to repeat the operation.
Broadcasting (sending a fax to multiple destinations)
This function allows you to send the same fax to as many as 20 different
destinations in just one operation.
♦ When sending to multiple destinations, only auto-dial numbers can be used
to dial the numbers of the receiving machines.
1
Load the document(s).
AUFLÖS./
• If desired, press to set the
resolution and/or contrast.
START/
2
3
4
SPEICHER
Press .
Press or until the name of the destination appears in the display
(if no name was stored, the number will appear).
Press to store the destination.
EMPFANG
READY TO SEND
54
Page 59

all.book Page 55 Tuesday, June 1, 2004 4:24 PM
5
Repeat Steps 3 and 4 for each of the other destinations to which you
wish to send the fax (maximum of 20).
• To check your selected destinations, press to scroll through them. To
delete a destination, scroll to the destination and then press .
6
When you are ready to begin transmission, press .
• A Transaction Report is automatically printed out after Broadcasting is
completed. Check the "Note" column of the report to see if any of the
destinations are marked "Busy" or have a communication error code. If so,
send the document to those destinations again.
Sending a Fax From Memory
STOP
START/
SPEICHER
Faxes
2. Sending
Memory transmission
You can also send a fax through memory when sending to a single
destination. This is convenient when sending to destinations where the line is
often busy, as it saves you from waiting to pick up the original document and
frees the feeder for other operations.
START/
To send a fax through memory, load the document, press , and then
dial using one of the following methods:
♦ Press the number keys to enter the fax number and then press .
♦ Press repeatedly to select an auto-dial number and then press .
♦ Press once to select the last number dialled and then press .
SPEICHER
START/
SPEICHER
START/
SPEICHER
START/
SPEICHER
55
Page 60

all.book Page 56 Tuesday, June 1, 2004 4:24 PM
Sending a Fax From Memory
If the memory becomes full...
If the memory becomes full while the document is being scanned, MEMORY
IS FULL will appear in the display.
START/
♦ Press if you want to transmit the pages which have been stored up
SPEICHER
to that point in memory. The remaining pages will be ejected from the
feeder. After transmission, the memory will be cleared and you can transmit
the remaining pages. You will also need to transmit the page which was
being scanned when the memory filled up.
♦ Press if you want to cancel the entire transmission.
STOP
56
Page 61

all.book Page 57 Tuesday, June 1, 2004 4:24 PM
3. Receiving Faxes
Using TEL/FAX Mode
To select TEL/FAX mode,
AUFLÖS./
EMPFANG
press until the
arrow in the display
AUFLÖS./
EMPFANG
TEL
TEL/FAX
FAX
AB
points to TEL/FAX.
When the reception mode is set to TEL/FAX, your fax machine automatically
answers all calls on two rings (the number of rings can be changed as
explained on page 59). After answering, your fax monitors the line for about
five seconds to see if a fax tone is being sent.
♦ If your fax machine detects a fax tone (this means that the call is an
automatically dialled fax), it will automatically begin reception of the
incoming document.
♦ If your fax machine doesn't detect a fax tone (this means that the call is a
voice call or manually dialled fax), it will make a ringing sound (called
pseudo ringing) for 15 seconds to alert you to answer (the duration of
pseudo ringing can be changed as explained on the following page). If you
don't answer within this time, your fax will send a fax tone to the other
machine to allow the calling party to send a fax manually if they desire.
Note: Only the fax will alert you to voice calls or manually dialled faxes by
pseudo ringing. An extension phone connected to the same line will not ring
after the connection has been established.
Faxes
3. Receiving
57
Page 62

all.book Page 58 Tuesday, June 1, 2004 4:24 PM
Using A.M. Mode
Pseudo Ring Duration for Tel/Fax Mode
If desired, you can change the duration of pseudo ringing in Tel/Fax mode.
1
Press once and 3 times.
2
Press once and 4 times.
3
Press once.
4
Enter a number as follows for the desired duration:
15 seconds
30 seconds
60 seconds
120 seconds
5
STOP
Press to return to the date and time display.
Display:
OPTION SETTING
PSEUDO RING
1=15 SECONDS
The display briefly shows
your selection, then:
QUIET TIME
Using A.M. Mode
AUFLÖS./
AUFLÖS./
EMPFANG
EMPFANG
TEL
TEL/FAX
FAX
AB
To select A.M. mode, press until the arrow in the display points to A.M.
In A.M. mode, your fax machine will automatically receive voice messages
and faxes. See Chapter 5 for more details.
58
Page 63

all.book Page 59 Tuesday, June 1, 2004 4:24 PM
Using FAX Mode
Using FAX Mode
To select FAX mode, press
AUFLÖS./
EMPFANG
until the arrow in the
display points to FAX.
AUFLÖS./
EMPFANG
TEL
FAX
TEL/FAX
AB
When the reception mode is set to FAX, the fax machine will automatically
answer all calls on two rings (the number of rings can be changed as
explained below) and receive incoming faxes.
2 rings Fax reception
♦ If you pick up the handset before the machine answers, you can talk to the
other party and/or receive a fax as explained in
60.
Using TEL Mode
on page
♦ Make sure the operation panel is closed, or the paper may jam when
received faxes are printed.
Faxes
3. Receiving
Changing the number of rings
If desired, you can change the number of rings on which the fax machine
answers incoming calls in FAX and TEL/FAX mode. Any number from 2 to 5
can be selected.
1
Press once and 3 times.
Display:
OPTION SETTING
59
Page 64

all.book Page 60 Tuesday, June 1, 2004 4:24 PM
Using TEL Mode
2
Press once and once.
3
Press once.
4
Enter the desired number of rings (any
number from 2 to 5).
Example: 3 rings
5
STOP
Press to return to the date and time display.
Using TEL Mode
To select TEL mode,
AUFLÖS./
EMPFANG
press until the
arrow in the display
points to TEL.
AUFLÖS./
EMPFANG
NUMBER OF RING
ENTER (2-5) (2)
The display briefly shows
your selection, then:
FAX REMOT E #
TEL
FAX
TEL/FAX
AB
When the reception mode is set to TEL, you must answer all calls (even faxes)
by picking up the fax machine’s handset or an extension phone connected to
the same line.
60
Page 65

all.book Page 61 Tuesday, June 1, 2004 4:24 PM
Answering with the fax’s handset
Important: If a document is loaded in the machine’s feeder, remove it before
performing the steps below. (Fax reception is not possible when a document
is in the feeder.)
1
When the fax machine rings, pick up
the handset.
Using TEL Mode
2
If you hear a fax tone, wait until
the display shows RECEIVING and
then replace the handset.
If RECEIVING does not appear (or if you have set the Fax
Signal Receive setting to NO), press to begin reception.
3
If the other party first speaks with you
and then wants to send a fax, press
START/
SPEICHER
after speaking. (Press before the
sender presses their Start key.)
• When RECEIVING appears in the
display, hang up.
Beep
START/
SPEICHER
START/
SPEICHER
Faxes
3. Receiving
RECEIVING
RECEIVING
61
Page 66

all.book Page 62 Tuesday, June 1, 2004 4:24 PM
Auto-Cordless Fax Control (answering with an extension phone in TEL mode)
Auto-Cordless Fax Control
(answering with an extension phone in TEL
mode)
Important: If a document is loaded in the machine’s feeder, remove it before
performing the steps below. (Fax reception is not possible when a document
is in the feeder.)
You can also start fax reception in TEL mode by answering any extension
phone connected to the same line as the fax machine-even a cordless phone.
1
Answer the extension phone when it
rings.
2
If you hear a soft fax tone, wait until your fax responds (the extension
phone will go dead), then hang up.
Beep
Phone goes dead
3
If the fax doesn't respond, or if the other party first talks to you and then
wants to send a fax, press once and twice on the extension
phone (only on a tone dial phone). This signals the fax to begin
reception. Hang up.
• The above step is necessary if you have set the Fax Signal Receive setting
to NO.
• Your fax will not accept the signal to begin reception ( ) if a
document is loaded in its feeder.
62
Page 67

all.book Page 63 Tuesday, June 1, 2004 4:24 PM
Putting a call on hold
Stiller Faxempfang
To put the other party on hold during a phone conversation, press . When
this is done, they cannot hear you. You can put the handset back in the cradle
without breaking the connection. When you are ready to speak with the other
party again, pick up the handset. If you did not put the handset back in the
cradle, press again to resume conversation.
HALTEN
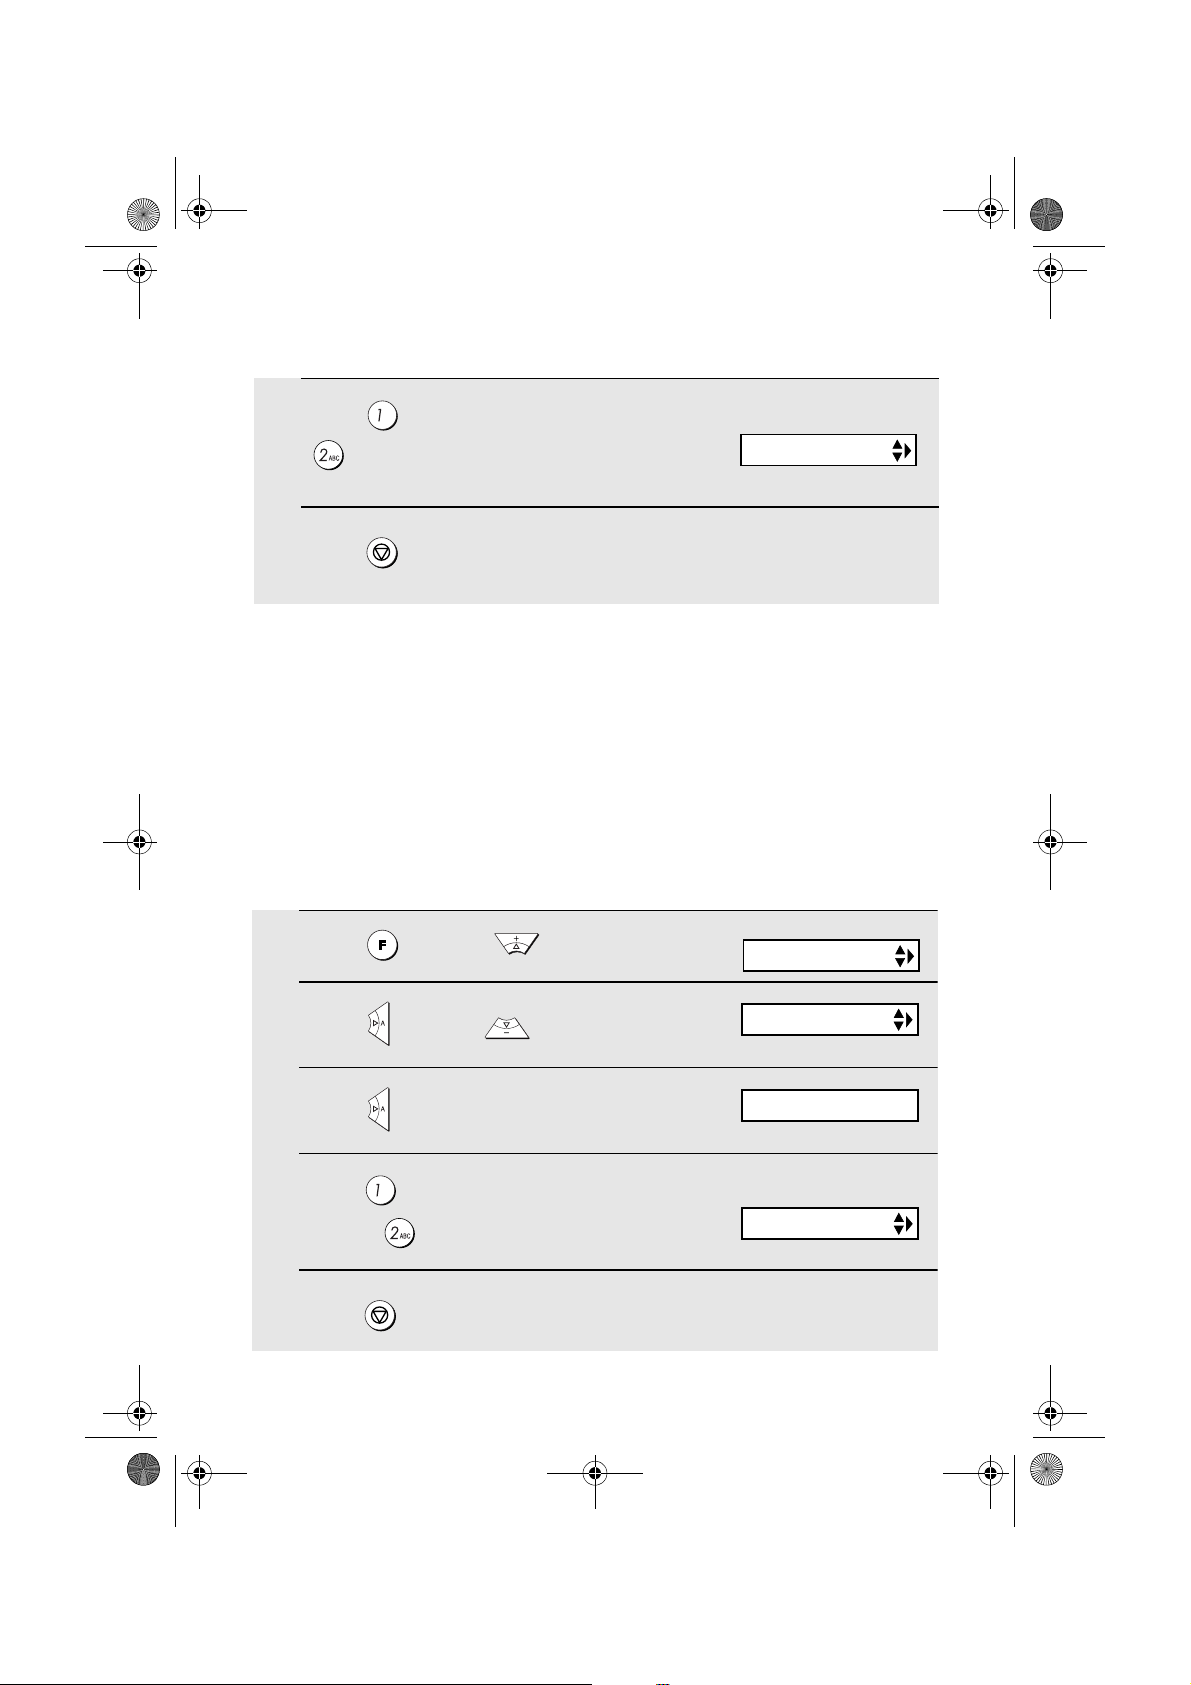
Stiller Faxempfang
Sie können das Gerät auch so einstellen, das es automatisch Faxe empfängt
ohne zu klingeln (stiller Faxempfang), aber z. B. Telefonanrufe durch leises
Klingeln anzeigt.
Sofern Sie dies wünschen, stellen Sie mit der Taste EMPFANGSART den
Modus TEL/FAX ein. Drücken Sie sooft die Taste LEISE, bis in der Anzeige
erscheint:
KLINGEL: AUS OK?
Drücken Sie die Taste START/SPEICHER zum Bestätigen. Ihr Gerät wird nun
alle Faxe ohne Klingelsignal empfangen. Im Falle eines Telefonanrufes wird
es leise klingeln.
Sofern Sie auch das Klingeln eines Telefonanrufes unterdrücken wollen,
stellen Sie vorher mit der Taste EMPFANGSART den Modus FAX ein. Hierbei
wird das Gerät den Anruf ohne Klingeln entgegennehmen und sofort ein
Faxempfangssignal senden (auch im Falle eines Telefonanrufes).
HALTEN
Faxes
3. Receiving
Sofern Sie Faxe still empfangen wollen und Anrufe auf einem zusätzlichen
externen Anrufbeantworter leiten möchten, stellen das Gerät auf den
Modus AB.
63
Page 68

all.book Page 64 Tuesday, June 1, 2004 4:24 PM
Optional Reception Settings
Optional Reception Settings
Fax Signal Receive
Your fax will automatically begin reception if you hear a soft fax tone after
answering a call on your fax or an extension phone. If you use a computer fax
modem to send documents on the same line, you must turn this function off in
order to prevent your fax from mistakenly attempting to receive documents
from the computer fax modem. Follow the steps below to change the setting.
1
Press once and 3 times.
2
Press once and 6 times.
3
Press once.
4
Press to turn on the function, or
to turn it off.
5
STOP
Press to return to the date and time display.
Display:
OPTION SETTING
FAX SIGNAL RX
1=YES, 2=NO
The display briefly shows
your selection, then:
CALLER-ID
64
Page 69

all.book Page 65 Tuesday, June 1, 2004 4:24 PM
Optional Reception Settings
Changing the number for remote fax activation
If desired, you can use a number other than 5 to activate fax reception from an
extension telephone. You can select any number from 0 to 9.
1
Press once and 3 times.
2
Press once and twice.
3
Press once.
4
Enter the desired number (any number
from 0 to 9).
Example:
5
STOP
Press to return to the date and time display.
Display:
OPTION SETTING
FAX REMOT E #
ENTER (0-9) (5)
The display briefly shows
your selection, then:
TRANSACTION
Faxes
3. Receiving
65
Page 70

all.book Page 66 Tuesday, June 1, 2004 4:24 PM
Optional Reception Settings
Reception Ratio
The fax has been set at the factory to automatically reduce the size of
received documents to fit the size of the printing paper. This ensures that data
on the edges of the document are not cut off. If desired, you can turn this
function off and have received documents printed at full size.
♦ If a document is too long to fit on the printing paper, the remainder will be
printed on a second page. In this case, the cut-off point may occur in the
middle of a line.
♦ Automatic reduction may not be possible if the received document is too
large, contains too many fine graphics or images, or is sent at high
resolution. In this case, the remainder of the document will be printed on a
second page.
1
Press once and twice.
2
Press once.
3
Press once.
4
Press to select AUTO, or to
select 100%.
5
STOP
Press to return to the date and time display.
Display:
PRINT SET-UP
RECEIVE RATIO
1=AUTO, 2=100%
The display briefly shows
your selection, then:
COPY CUT-OFF
66
Page 71

all.book Page 67 Tuesday, June 1, 2004 4:24 PM
Substitute Reception to Memory
Substitute Reception to Memory
In situations where printing is not possible, such as when your fax runs out of
paper, the print cartridge needs replacement, or the paper jams, incoming
faxes will be received to memory.
When you have received a document in memory, FAX RX IN MEMORY will
appear in the display, alternating with ADD PAPER & PRESS START KEY,
PAPER JAMMED, OUT OF INK, or PRINTER ERROR / CHECK PAPER.
START/
When you add paper (and press ), or clear the jam, or replace the print
SPEICHER
cartridge, the stored documents will automatically print out.
♦ If you received documents in memory because the fax ran out of paper, be
sure to add paper which is the same size as the paper previously used. If
not, the document print-out size may not match the size of the printing
paper.
Caution!
♦ When documents are stored in memory, do not turn the power off. This will
erase all of the contents.
Faxes
3. Receiving
67
Page 72

all.book Page 68 Tuesday, June 1, 2004 4:24 PM
4. Making Copies
Your fax machine can also be used to make copies. Single and multiple copies
(up to 99 per original) can be made, enabling your fax to double as a
convenience office copier.
1
Load the document(s) face down.
(Maximum of 10 sheets.)
AUFLÖS./
• If desired, press to set the
resolution and/or contrast.
(The default resolution setting for
copying is FINE.)
2
Select any of the following copy settings as needed:
EMPFANG
READY TO SEND
• Enlarge/reduce: Press or until the desired setting appears in
the display. Settings are 100%, 125%, 135%, 200%, 70%, 88%, 94%, and
AUTO (automatic adjustment to match the size of the paper). The default
setting is 100%.
Example: Press twice
COPY RATIO: 125%
• Number of copies per original: Press the number keys to enter a number
from 1 to 99. The default setting is 1.
Example: Press for two copies
2
• Sorted copies: To sort the copies as shown below under “Sorted”, first set
the number of copies per original (at least “2” copies must be set), and then
PATRONE
press .
Example: Two
copies each of
three originals
68
2 [SORT]
Sorted
(SORT COPY)
C
B
A
C
B
A
Originals
C
B
A
Not sorted
A
A
B
B
(MULTI COPY)
C
C
Page 73

all.book Page 69 Tuesday, June 1, 2004 4:24 PM
3
When you are ready to begin copying, press .
• Important: Remove the document as soon as it exits the machine.
Otherwise, ink from the copy may soil the document.
If MEMORY IS FULL appears...
If you place a large number of originals in the feeder, the memory may
become full before all pages can be scanned (the display will show MEMORY
IS FULL). If this happens, only the pages that were scanned will be copied
and the remaining pages will automatically feed out. Repeat the copy
procedure for the remaining pages, including the page that was being
scanned when the memory became full.
Note: It may not be possible to make a copy of an original if a high resolution
setting is used and/or the original contains so much detailed content that the
memory becomes full before scanning finishes.
Copy Cut-off
KOPIE/
HILFE
Making Copies
Copies
4. Making
When making a copy of a document that is longer than the printing paper, use
the copy cut-off setting to select whether the remaining part of the document
will be cut off or printed on a second page. The initial setting is YES (cut off
the remainder). To change the setting, follow the steps below.
1
Press once and twice.
2
Press once and once.
3
Press once.
Display:
PRINT SET-UP
COPY CUT-OFF
1=YES, 2=NO
69
Page 74

all.book Page 70 Tuesday, June 1, 2004 4:24 PM
Making Copies
4
Press to set copy cut-off to YES
(the remaining part of the document
will not be printed), or to set copy
cut-off to NO (the remaining part will
be printed on a second page).
5
STOP
Press to return to the date and time display.
The display briefly shows
your selection, then:
QUALITY MODE
High-quality copy setting (fast/slow printing of copies)
The high-quality copy setting controls the speed at which copies are printed. If
you prefer a higher quality image at a slower printing speed, turn on this
setting. If you prefer a faster printing speed over image quality, turn off the
setting.
Note: This setting only affects the printing speed. It does not affect the
amount of ink used.
♦ The high-quality copy setting is initially turned off.
1
Press once and twice.
Display:
PRINT SET-UP
2
Press once and 3 times.
3
Press once.
4
Press to turn on high-quality copy,
or to turn it off.
5
STOP
Press to return to the date and time display.
70
HQ COPY
1=YES, 2=NO
The display briefly shows
your selection, then:
ALIGN CART.
Page 75

all.book Page 71 Tuesday, June 1, 2004 4:24 PM
5. Answering Machine Connection
Preparations
If you have connected an answering machine to your fax as described in
Connections
transmissions on the same line while you are out. To use the connection, first
change the outgoing message of your answering machine, and then set the
reception mode of your fax to A.M. when you go out.
Changing the outgoing message
The outgoing message (OGM) of your answering machine should be changed
to inform callers who want to send a fax to press their Start key. For example,
your message might go as follows:
"Hello. You've reached the ABC company. No one is available to take your call
right now. Please leave a message after the beep or press your facsimile Start
key to send a fax. Thank you for calling."
in Chapter 1, you can receive both voice messages and fax
♦ It is advisable to keep the length of the message under 10 seconds. If it is
too long, you may have difficulty receiving faxes sent by automatic dialling.
♦ If your outgoing message must be longer than 10 seconds, leave a pause
of about four seconds at the beginning of the message. This will give your
fax a chance to detect fax tones sent when automatic dialling is used.
Using the Answering Machine Connection
When you go out, activate the answering machine connection as follows:
1
Set the reception mode to A.M.
AUFLÖS./
EMPFANG
TEL
TEL/FAX
Machine
5. Answering
FAX
AB
71
Page 76

all.book Page 72 Tuesday, June 1, 2004 4:24 PM
Using the Answering Machine Connection
2
Set your answering machine to auto answer.
♦ Your answering machine must be set to answer on a maximum of two rings.
If not, you may not be able to receive faxes sent by automatic dialling.
♦ If your answering machine has a toll saver function, make sure that it will
answer by the fourth ring.
Note: If your answering machine has a remote retrieval function, make sure the
code used to activate remote retrieval is different from the code used to activate
fax reception with an extension telephone (see page 65). If they are the same,
entering the code from an outside telephone to retrieve messages will cause the
fax machine to be activated.
How answering machine mode operates
While you are out, all of your incoming calls will be answered by your
answering machine and its outgoing message will play. Voice callers can
leave a message. During this time, your fax will quietly monitor the line. If your
fax detects a fax tone or a duration of silence greater than four seconds, it will
take over the line and begin reception.
♦ If the connection is not good or there is noise on the line, the answering
machine and/or fax machine may not respond properly.
♦ The call counter on your answering machine may indicate that voice
messages were received, when only fax messages were received.
♦ To prevent the fax from taking over the line and beginning reception if you
call in from an external phone or answer on an extension phone, press any
three keys (other than the code to activate fax reception, "5", "*", and "*")
on the dial pad of the phone. This can only be performed from a phone
capable of tone dialling.
When you return and turn off
your answering machine, be
sure to change the reception
mode back to TEL/FAX ,FAX,
or TEL!
72
Page 77

all.book Page 73 Tuesday, June 1, 2004 4:24 PM
Optional A.M. Mode Settings
If necessary, you can use the following settings to improve the response of the
answering machine connection to incoming calls.
Quiet Detect Time
This function causes the fax machine to take over the line and begin reception
if a certain duration of silence is detected after the answering machine
answers.
Time selections for the period of silence are 1 to 10 seconds. Quiet Detect
Time has been set to 4 seconds at the factory. This gives the best
performance with most answering machines; however, you may need to
adjust this setting depending on the disconnect time of your answering
machine.
Some answering machines may have unusually fast disconnect times (equal
to or very slightly less than 4 seconds), which means that the answering
machine may disconnect the line before fax reception can begin. In this case,
try a Quiet Detect Time setting of about 3 seconds.
Optional A.M. Mode Settings
If the fax machine is interrupting callers before they can leave a message, try
a longer Quiet Detect Time setting. If your outgoing message includes a
period of silence, make sure that the setting is longer than that period of
silence, or re-record your outgoing message to shorten the silence.
Note: Quiet Detect Time can be turned off by entering "00" for the time. Note,
however, that the fax machine will not be able to receive faxes sent manually by
Normal dialling.
To change the setting, follow the steps below.
1
Press once and 3 times.
2
Press once and 5 times.
Display:
OPTION SETTING
QUIET TIME
Machine
5. Answering
73
Page 78

all.book Page 74 Tuesday, June 1, 2004 4:24 PM
Optional A.M. Mode Settings
3
Press once.
4
Enter a number from 01 to 10, or enter
00 to turn off the function.
Example: 3 seconds
5
STOP
Press to return to the date and time display.
ENTER (00-10) 04
The display briefly shows
your selection, then:
QUIET START
74
Page 79

all.book Page 75 Tuesday, June 1, 2004 4:24 PM
Quiet Detect Start Time
This setting can be used to delay the start of the Quiet Detect Time function.
For example, if you want to insert a pause at the beginning of your answering
machine’s outgoing message to ensure clear detection of fax signals, you can
use this setting to delay the start of silence detection so that the pause will not
cause the fax to take over the line.
Quiet Detect Start Timing has been turned off (set to “00” seconds) at the
factory. If you want to use this function, turn it on by entering a 2-digit number
equal to the desired number of seconds of the delay. As general guide, the
delay time should be slightly longer than the pause before the outgoing
message.
Optional A.M. Mode Settings
1
Press once and 3 times.
2
Press once and 6 times.
3
Press once.
4
Enter a 2-digit number (from 01 to 15)
for the number of seconds of the delay,
or enter 00 to turn off the function.
Example: 3 seconds
5
STOP
Press to return to the date and time display.
Display:
OPTION SETTING
QUIET START
ENTER (00-15) 00
Machine
5. Answering
The display briefly shows
your selection, then:
ON A.M.FAILURE
75
Page 80

all.book Page 76 Tuesday, June 1, 2004 4:24 PM
Optional A.M. Mode Settings
On A.M.Failure
When this function is turned on, your fax will answer the call after 5 rings if the
answering machine for some reason fails to answer before that time. This
ensures that you will receive fax messages even if the answering machine’s
tape fills up or the answering machine is not turned on.
This function has been turned off at the factory. If you want to turn it on, follow
the steps below:
Note:
When this function is turned on, make sure that the answering machine is set to
answer on 4 rings or less. If it isn’t, the fax will always answer first, preventing
callers from leaving voice messages.
1
Press once and 3 times.
2
Press once and 7 times.
3
Press once.
4
Press to turn on the function, or
to turn it off.
5
STOP
Press to return to the date and time display.
Display:
OPTION SETTING
ON A.M.FAILURE
1=YES,2=NO
The display briefly shows
your selection, then:
LANGUAGE
76
Page 81

all.book Page 77 Tuesday, June 1, 2004 4:24 PM
6. Special Functions
Caller ID (Requires Subscription to Service)
If you subscribe to a caller identification service from your telephone
company, you can have the fax machine display the name and number of the
caller when you receive a call.
Important:
To use this function, you must subscribe to a caller identification service from
your telephone company. Note that your fax may not be compatible with some
caller identification services.
1
Press once and 3 times.
2
Press once and 5 times.
3
Press once.
4
Press (YES) to turn on Caller ID.
(To turn off Caller ID, press .)
5
STOP
Press to return to the date and
time display.
Display:
OPTION SETTING
CALLER-ID
1=YES, 2=NO
ECM MODE
Functions
6. Special
77
Page 82

all.book Page 78 Tuesday, June 1, 2004 4:24 PM
Caller ID (Requires Subscription to Service)
How Caller ID operates
When you receive a call, the name and phone number of the caller will appear
in the display, beginning just before the second ring. The information will
continue to be displayed until the line is disconnected.
Display example
JOHN DOE 5258693
Caller’s name Caller’s number
Note: Some caller ID services may not provide the name of the caller. In this
case, only the phone number will appear.
Display messages
One of the following messages will appear while the fax rings if caller
information is not available.
NO SERVICE No caller information was received from your telephone
CALLER-ID ERROR Noise on the telephone line prevented reception of
OUT OF AREA The call was made from an area which does not have a
PRIVATE CALL Caller information was not provided by the telephone
company. Make sure that the telephone company has
activated your service.
caller information.
caller identification service, or the caller’s service is not
compatible with that of your local phone company.
company at the caller’s request.
78
Page 83

all.book Page 79 Tuesday, June 1, 2004 4:24 PM
Viewing the Caller ID list
If you subscribe to a Caller ID service and have turned on the Caller ID
function, your fax machine will keep information on the most recent 30 calls
and faxes you have received. You can view this information, which consists of
the name and number of each caller, in the Caller ID List.
♦ After you have received 30 calls, each new call will delete the oldest call.
♦ All calls will be erased if you unplug the fax or a power failure occurs.
Follow the steps below to view the Caller ID List in the display. If desired, you
can immediately dial a number when it appears.
Caller ID (Requires Subscription to Service)
1
Press twice.
2
Press or to scroll through the list.
3
If you wish to dial one of the numbers in the list, scroll through the list
until the number appears in the display.
<REVIEW CALLS>
• Fax: If you wish to send a fax, load the
START/
document and then press .
Dialling and transmission begin.
SPEICHER
Fax:
• Voice call: If you wish to make a voice
call, pick up the handset (or press ).
Dialling begins automatically. (If you
pressed , pick up the handset when
the other party answers.)
4
STOP
Press when you have finished viewing the list.
Voice
call:
START/
SPEICHER
Functions
6. Special
79
Page 84

all.book Page 80 Tuesday, June 1, 2004 4:24 PM
Caller ID (Requires Subscription to Service)
To delete calls from the Caller ID list
If you want to delete a single call from the caller list, press while the call
appears in the display. If you want to delete all calls from the list, hold
down for at least 3 seconds while you are viewing any number in the list.
Priority Call
If you have turned on Caller ID, you can set the machine to make a special
ringing sound when you receive a call from a designated phone number. This
lets you know immediately who is calling without having to look at the display.
To use this function, enter the desired phone number by following the steps
below (only one phone number can be entered).
1
Press once and twice.
Display:
ENTRY MODE
2
Press once and once.
3
Press once.
4
Press to store a number.
(To clear a previously stored number, press and go to Step 6.)
5
Enter the number by pressing the number keys (max. 20 digits).
START/
6
7
80
SPEICHER
Press to store (or clear) the number.
STOP
Press to return to the date and time display.
PRIORITY #
1=SET, 2=CLEAR
OWN NUMBER SET
Page 85

all.book Page 81 Tuesday, June 1, 2004 4:24 PM
Blocking voice calls
If you have turned on Caller ID, you can use the Anti Junk Fax function
described in
voice calls as well as faxes from your specified Anti Junk Number.
In this case, when a voice call or a fax transmission comes in from the number
you have specified as a "Junk Number", your fax will break the connection as
soon as it receives the calling phone number from the caller ID service (before
the second ring).
To use this function, enter the number that you wish to block as explained in
Blocking Reception of Unwanted Faxes
be blocked.
Blocking Reception of Unwanted Faxes
Caller ID (Requires Subscription to Service)
in this chapter to block
(see page 82). Only one number can
81
Functions
6. Special
Page 86

all.book Page 82 Tuesday, June 1, 2004 4:24 PM
Blocking Reception of Unwanted Faxes
Blocking Reception of Unwanted Faxes
The Anti Junk Fax function allows you to block reception of faxes from a party
that you specify. This saves paper by not printing out unwanted "junk" faxes.
To use this function, follow the steps below to enter the fax number from which
you do not wish to receive faxes. One fax number can be entered.
1
Press once and twice.
2
Press once and twice.
3
Press once.
4
Press to store an Anti Junk number, or to clear a previously
stored number (if you are clearing a number, go to Step 6).
5
Enter the fax number by pressing the number keys (max. 20 digits).
START/
6
SPEICHER
Press and then press to return to the date and time display.
STOP
Display:
ENTRY MODE
ANTI JUNK #
1=SET, 2=CLEAR
82
Page 87

all.book Page 83 Tuesday, June 1, 2004 4:24 PM
Polling (Requesting a Fax Transmission)
Polling (Requesting a Fax Transmission)
Polling allows you to call another fax machine and have it send a document
(previously loaded in its feeder) to your machine without assistance from the
operator of the other machine.
Hint: Polling is useful when you want the receiving fax machine, not the
transmitting fax machine, to bear the cost of the call.
♦ To use the polling function, the other machine must be capable of being
polled.
♦ Before polling, make sure the other machine is set up to receive your
polling request.
♦ Your machine is not capable of being polled.
1
Dial the fax machine that you wish to poll using one of the following
methods:
• Enter the full number using the numeric keys.
• Pick up the handset (or press ) and dial the full number. Wait for the fax
answerback tone.
• Press or until the name (or number) of the other party appears in
the display.
2
ABRUF
Press .
• If you used the handset, replace it when POLLING appears in the display.
Reception will begin.
83
Functions
6. Special
Page 88

all.book Page 84 Tuesday, June 1, 2004 4:24 PM
PBX operations
PBX operations
If your fax is connected to a PBX, you can use it to perform the following
operations:
Making enquiry calls: During a call, you can put the other party on hold,
make a further call to a third party, and then go back to your original caller.
Transferring calls: You can transfer a call to another number on the same
PBX without operator assistance.
Making enquiry calls
1
During the telephone conversation, press . This puts the other
party on hold.
2
When you hear the dial tone, dial the number of the third party for the
enquiry call.
3
When you have finished the enquiry call, you will be automatically
returned to the original caller as soon as the third party hangs up.
R
Transferring calls
1
During the telephone conversation, press . This puts the other party
on hold.
2
When you hear the dial tone, dial the number to which you want to
transfer the call. When the other party answers, hang up, and the call
will be transferred.
R
• If the other party does not answer, press again to return to the original
caller.
84
R
Page 89

all.book Page 85 Tuesday, June 1, 2004 4:24 PM
7. Printing Lists
You can print lists showing settings and information entered in the fax
machine, and a report showing recent fax transactions. The lists and report
are described below. To print a list, follow these steps.
1
Press once and once.
2
Press once.
3
Press or until the desired list appears in the display.
4
Press once.
START/
5
SPEICHER
Press to print the list.
Display:
LISTING MODE
TEL # LIST
PRESS START KEY
85
Lists
7. Printing
Page 90

all.book Page 86 Tuesday, June 1, 2004 4:24 PM
Printing Lists
Telephone Number List
This list shows the fax and phone numbers that have been stored for
automatic dialling.
Setup List
This list shows your current selections for the FUNCTION key settings. The
list also shows your name and fax/telephone number as entered in the
machine, and a sample of the header printed at the top of every page you
transmit (HEADER PRINT).
Caller-ID List
This list shows information on your 30 most recently received calls and faxes.
(This list is only available if you are using the Caller ID function.)
Help List
This list provides a brief guide to the operation of the machine. Press
whilst no document is loaded in the feeder to print this list.
86
KOPIE/
HILFE
Page 91

all.book Page 87 Tuesday, June 1, 2004 4:24 PM
Transaction Report
This report is printed out automatically after an operation is completed to
allow you to check the result. Your fax machine is set at the factory to print out
the report only when an error occurs.
♦ The Transaction report cannot be printed on demand.
Headings in the Transaction Report
Printing Lists
SENDER/
RECEIVER
START The time at which transmission/reception started.
TX/RX TIME Total time taken for transmission/reception.
PAG ES Number of pages transmitted/received.
NOTE (One of the following notes will appear under NOTE in the
The name or fax number of the other machine involved in the
transaction. If that machine does not have an ID function, the
communication mode will appear (for example, "G3").
report to indicate whether the transaction was successful,
and if not, the reason for the failure.)
OK - Transmission/reception was successful.
P. FA IL - A power failure prevented the transaction.
JAM - The printing paper or document jammed, preventing
the transaction.
BUSY - The fax was not sent because the line was busy.
COM.E-X - (Where “X” is a number.) A telephone line error
prevented the transaction. See
CANCEL - The transaction was cancelled because the
STOP key was pressed, no document was in the feeder, or
the other machine requested transmission using a function
which your fax machine does not have. If you were
attempting to fax, make sure a document is in the feeder. If
you were receiving, contact the faxing party to see how they
are trying to send to you.
Line error
on page 97.
Lists
7. Printing
87
Page 92

all.book Page 88 Tuesday, June 1, 2004 4:24 PM
Printing Lists
Transaction Report print condition
You can change the condition under which a Transaction Report is printed out.
Follow the steps below.
1
Press once and 3 times.
2
Press once and 3 times
3
Press once.
4
Press a number from to to select the condition for printing.
ALWAYS PRINT A report will be printed after each
ERROR/MEMORY A report will be printed after an error or a
SEND ONLY A report will be printed after each
ERROR ONLY A report will be printed only when an error
NEVER PRINT A report will never be printed.
.
transmission, reception, or error.
memory operation.
transmission.
occurs.
Display:
OPTION SETTING
TRANSACTION
1:ALWAYS PRINT
(Selections appear alternately)
The display briefly shows
your selection, then:
5
STOP
Press to return to the date and time display.
88
PSEUDO RING
Page 93

all.book Page 89 Tuesday, June 1, 2004 4:24 PM
8. Maintenance
Cleaning the Machine
Cleaning the scanning glass and rollers
Clean the scanning glass and rollers frequently to ensure the quality of
transmitted images and copies.
1
Open the operation panel.
2
Push the green lever at the side of the white roller slightly to the right,
and then pull it forward and down.
8. Maintenance
3
Pull the left side of the white roller up
and then pull the roller to the left and
out of the machine.
• Place the roller in a stable position
where it will not accidentally fall to the
ground.
2
1
89
Page 94

2
all.book Page 90 Tuesday, June 1, 2004 4:24 PM
Maintenance
4
Wipe the scanning glass (exposed by
removing the white roller) and rollers
with a clean cloth.
• Make sure that all dirt and stains (such
as correcting fluid) are removed. Dirt
and stains will cause vertical lines on
transmitted images and copies.
If the scanning glass is difficult to clean
If you find it difficult to remove dirt from the scanning glass, you can try moistening
the swab with isopropyl alcohol or denatured alcohol. Take care that no alcohol
gets on the rollers.
5
Replace the white roller, inserting the right end first.
• When re-inserting the roller do not use excessive force to locate the right
hand end. This may result in damage to the machine.
1
6
Push the green lever up and back. Make sure that the small knob on the
lever goes into the hole on the side of the compartment.
90
Page 95

all.book Page 91 Tuesday, June 1, 2004 4:24 PM
7
Close the operation panel, pressing
down firmly to make sure it clicks into
place.
Cleaning the paper feed roller
A dirty paper feed roller will prevent the paper from feeding correctly. To clean
the roller, first remove the paper tray. The roller will be visible in the opening in
the rear of the machine. Hold the roller by pressing down on the white part
with your finger and wipe the black part with a clean, dry cloth. Rotate the
roller as needed to wipe the entire surface of the black part.
Maintenance
8. Maintenance
♦ If you find it difficult to remove dirt from the roller, moisten the cloth with
water and then wring it out thoroughly before wiping.
benzene, thinner, or other solvents.
Wipe here
Do not
Cleaning the housing
Wipe the external parts and surface of the machine with a dry cloth.
Caution!
Do not use benzene or thinner. These solvents may damage or discolor the
machine.
use alcohol,
91
Page 96

all.book Page 92 Tuesday, June 1, 2004 4:24 PM
Maintenance
Improving Print Quality
Aligning the print cartridge
If print quality is not satisfactory, first try aligning the print cartridge.
Note: Make sure that paper is loaded before beginning this procedure.
1
Press once and twice.
2
Press once and twice.
3
Press once.
4
Press to print an alignment page. (To enter an alignment value
without printing an alignment page, press .)
5
In the alignment page that the machine prints, locate the line that comes
closest to forming a completely straight line.
Display:
PRINT SET-UP
ALIGN CART.
1=PRINT,2=SET
In this example, “15”
comes closest to
forming a straight line.
92
After printing the alignment
page the display shows:
ENTER (0-30) 15
Page 97

all.book Page 93 Tuesday, June 1, 2004 4:24 PM
6
Press the number keys to enter the number of the straightest line.
Example:
Maintenance
8. Maintenance
• If you make a mistake, press and then repeat the entry.
STOP
START/
7
8
SPEICHER
Press .
STOP
Press to return to the date and time display.
CLEAN NOZZLES
Cleaning the print cartridge nozzles
If print quality is still not satisfactory after aligning the print cartridge, follow
these steps to clean the print cartridge nozzles.
1
Press once and twice.
2
Press once and once.
Display:
PRINT SET-UP
CLEAN NOZZLES
3
Press once.
4
Press .
START/
SPEICHER
PRESS START KEY
• The machine prints a test pattern similar to the one shown in the following
step.
93
Page 98

all.book Page 94 Tuesday, June 1, 2004 4:24 PM
Maintenance
5
Compare the diagonal line above the printed bars to the diagonal line
below the printed bars.
• Look for a break in the diagonal line above the bars. A break indicates
clogged nozzles.
Breaks in the
diagonal line at
the top of the
page indicate
clogged nozzles.
Unbroken lines at the bottom of the page
indicate the nozzles were cleaned.
6
If the bottom diagonal line still has breaks, repeat Steps 1 through 4 to
run the nozzle test again. Run the test a third time if necessary.
• If the print quality is satisfactory after running the nozzle test three times,
the nozzles are clean.
• If the print quality is still not satisfactory after running the test a third time,
continue with Step 7.
7
8
94
PATRONE
Press , open the operation panel, open the print compartment
cover, and remove and then reinstall the print cartridge (see the
procedure beginning on page 17).
Repeat the nozzle test. If the lines are still broken, wipe the nozzles as
explained in the following section.
Page 99

all.book Page 95 Tuesday, June 1, 2004 4:24 PM
Wiping the print nozzles and contacts
If you have cleaned the print nozzles as explained in the previous section at
least three times and print quality is still not satisfactory, try wiping the print
nozzles and contacts.
Maintenance
8. Maintenance
1
2
PATRONE
Press , open the operation panel, open the print compartment
cover, and remove the print cartridge (see the procedure beginning on
page 17).
•
CAUTION! DO NOT
contact area of the cartridge carriage with your fingers.
Dampen a clean cloth with water, and
gently wipe the nozzles and the gold-
coloured area around the nozzles.
Wipe in one direction only.
touch the gold contact area of the cartridge or the
• To dissolve dried ink, hold the damp
cloth against the nozzles for about
three seconds. Gently blot and wipe
dry.
• When finished, allow the gold-coloured
area to dry.
3
Dampen another section of clean cloth
with water, and gently wipe the
contacts and the gold-coloured area
around the contacts.
• To dissolve dried ink, hold the damp
cloth against the contacts for about
three seconds. Gently blot and wipe
dry.
• When finished, allow the gold-coloured
area to dry.
95
Page 100

all.book Page 96 Tuesday, June 1, 2004 4:24 PM
Maintenance
4
Reinstall the print cartridge and repeat the nozzle test as explained in
the previous section.
Cleaning the cartridge holder
A dirty print cartridge holder may cause smudges on your printed pages. To
clean the print cartridge holder, press , open the operation panel, open
the print compartment cover, and remove the print cartridge (see the
procedure beginning on page 17). Wipe
PATRONE
➊ on the holder with a damp cloth.
1
About the lithium battery:
The fax machine uses a lithium battery to retain settings and information
programmed in the machine when the power is turned off. Battery power is
consumed primarily when the power is off. With the power kept continuously off,
the life of the battery is about 5 years. If the battery dies, have your dealer or
retailer replace it. Do not try to replace it yourself.
96
 Loading...