

Page 1
Plasmacluster
SJ-P68M SJ-68M
SJ-P63M SJ-63M
REFRIGERATOR-FREEZER
OPERATION MANUAL
NO-FROST BUZDOLABI
KULLANMA KILAVUZU
CONTENTS
• DESCRIPTION ........................................ 2
• WARNING................................................ 3
• CAUTION................................................. 3
• INSTALLATION ....................................... 3
• OPERATION ............................................ 4
• STORING FOOD ..................................... 5
• CARE AND CLEANING .......................... 5
• WHAT TO DO BEFORE YOU CALL
FOR SERVICE......................................... 5
• SPECIFICATION ..................................... 10
• WIRING DIAGRAM ................................. 10
SJ-P68M
SJ-P63M
Thank you very much for buying this SHARP product. Before
using your SHARP refrigerator, please read this operation
manual to ensure that you gain the maximum benefit from it.
SHARP’› tercih etti¤iniz için teflekkür ederiz.SHARP
buzdolab›n›z› kullanmadan önce, en yüksek fayday› elde
edebilmek için bu kullanma k›lavuzunu iyice okuyunuz ve
verilen talimatlara uyunuz.
SJ-68M
SJ-63M
‹Ç‹NDEK‹LER
• TANITIM................................................... 6
• UYARILAR............................................... 7
•
D‹KKAT ED‹LMES‹ GEREKEN HUSUSLAR ..
• MONTAJ .................................................. 7
• ÇALIfiMA KOfiULLARI........................... 8
• BUZDOLABINDA Y‹YECEKLER‹N
SAKLANMASI ......................................... 9
• TEM‹ZL‹K VE BAKIM .............................. 9
• SERV‹S ÇA⁄IRMADAN ÖNCE NE
YAPILMALIDIR........................................ 9
• TEKN‹K ÖZELL‹KLER ............................ 10
• BA⁄LANTI fiEMASI................................ 10
7
Page 2
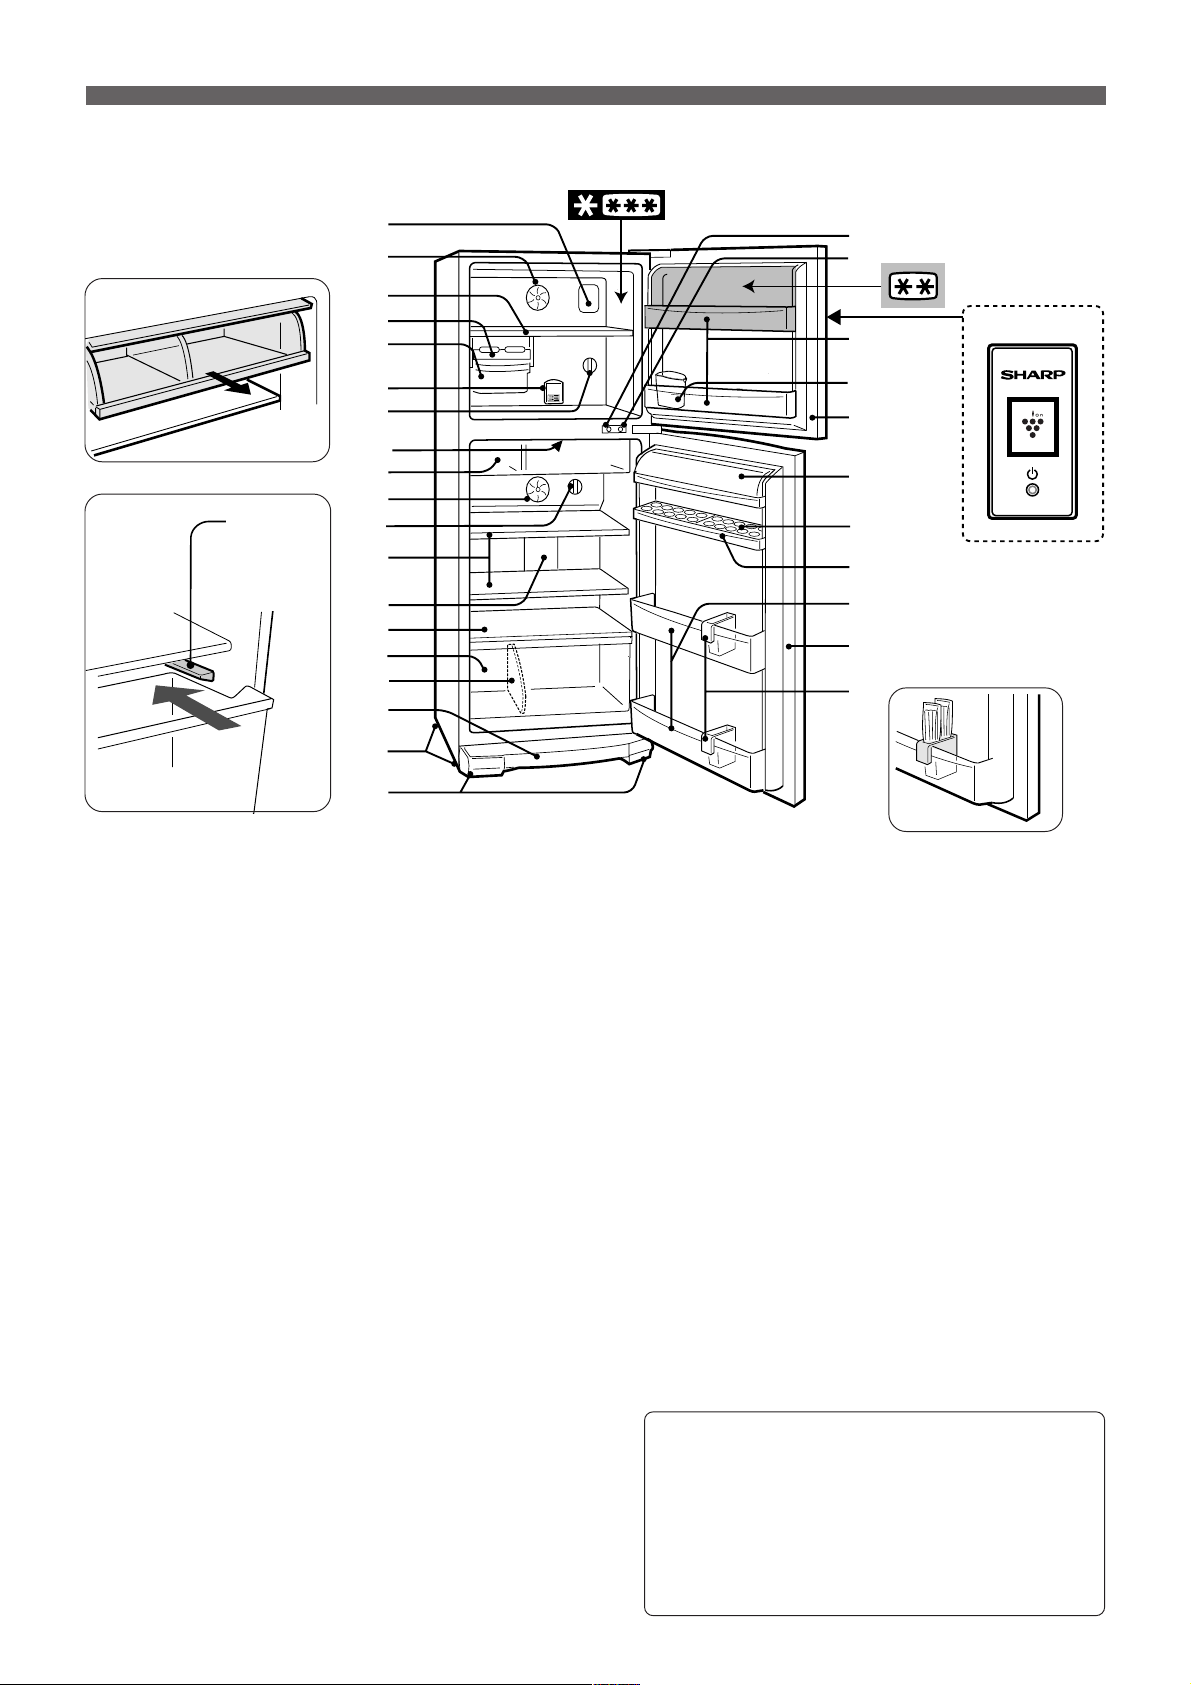
DESCRIPTION
1
19
20
21
22
23
24
25
26
27
28
3
2
4
5
7
6
6
8
9
10
11
12
13
14
17
18
15
16
23
29
Plasmacluster
8
rail14
1. Freezer light
2. Freezer fan
3. Freezer shelf
4. Ice cube maker
5. Ice cube box
6. Deodorizing unit
7. Freezer temp. control knob
8. Fresh case
The cover of Fresh case opens as the case is pulled.
9. Refrigerator fan
This refrigerator compartment is equipped with a special fan, that quickly and evenly cools the refrigerator
compartment should the inside temperature increase
when opening the door or for other reasons. During
normal operation the fan does not function.
10. Refrigerator temp. control knob
11. Refrigerator shelf
(68 type 3 shelves, 63 type 2 shelves)
12. Refrigerator light
13. Shelf
14. Vegetable crisper
Put the Vegetable crisper under the rail.
15. Separator plate
16. Evaporating pan & cover
17. Casters
18. Adjustable feet
19. Fan & light switch for freezer
20. Fan & light switch for refrigerator
21. Freezer pocket
22. Water supply cup
23. Magnetic door seal
24. Utility case
25. Egg holder
26. Free pocket
(68 type 2 pockets, 63 type 1 pocket)
27. Bottle pocket
28. Bottle guard
Prevents bottles,etc. from falling. Stick-type food
products can also be stored inside.
29. Plasmacluster panel
(Only for SJ-P68M, SJ-P63M)
Replacing the lamp bulbs
Replace lamp bulbs with same types.
Freezer: base E12, MAX 10W, T-20
Refrigerator: base E12, MAX 15W, T-20
Make sure that the rated voltage and wattage of the
lamp bulbs are correct when replacing. (Check the label near the bulbs.).
When replacing the lamp bulb, unplug the refrigerator
first to prevent electric shock.
2
Page 3
WARNING
1. This refrigerator is airtight. TO PREVENT FATAL ACCI-
DENTS TO CHILDREN, please completely remove the
door prior to discarding the refrigerator.
2. Highly volatile and inflammable materials such as ether,
petrol, propane gas, adhesive agents and pure alcohol
etc. are liable to explode. Do not store these materials
in the refrigerator.
3. To prevent damage to the outer cabinet, avoid contact
with lacquer, and paint, etc.
4. When cleaning your refrigerator, do not splash water di-
rectly on the outer cabinet or the interior. This may lead
to rusting and deterioration of the electrical insulation.
5. When cleaning any areas adjacent to electrical compo-
nents or replacing the lamp bulb, unplug the refrigerator
first to prevent electric shock.
6. Should electrical components be accidentally immersed
in water, unplug the refrigerator, dry the parts and contact your nearest service agent approved by SHARP.
CAUTION
1. Do not touch the compressor unit, as it can become ex-
tremely hot during operation.
2. If the power supply is accidentally disconnected, please
wait for at least 5 minutes before re-connecting the
power, as back pressure in the compressor may trip the
overload relay.
3. Avoid removing food from the freezer with your bare
hands. Directly touching products stored at sub-zero temperatures can result in frostbite.
4. To prevent accidental power disconnection, plug the re-
frigerator directly to the source. Do not use a double
adaptor as loss of power could lead to the spoiling of
the stored food.
5. Do not place bottles in the freezer as they may crack
when frozen.
6. Keep the door securely closed. If the door is left ajar,
the controlled inner temperature will rise, resulting in food
spoilage and increase in electricity costs.
7. Do not install the refrigerator in a damp or wet location
as this may cause damage to the insulation and a leak.
Condensation may also build on the outer cabinet and
cause rust.
8. When installing or moving the refrigerator, make sure
that you do not nip or kink the power cord. Damage of
the power cord may cause electric shock or fire.
9. Do not use this refrigerator when the power cord or plug
is damaged, or the outlet attachment is loose, as they
may cause electric shock or fire.
7. When disconnecting the power plug, do not touch the
pins of plug. This may cause electric shock.
8. This refrigerator is designed solely for the purpose of stor-
ing foodstuff for domestic use in accordance with the instructions given in this manual. Using the refrigerator for
other purposes might be harmful to persons or property.
9. This refrigerator is not suitable for the storage of materi-
als requiring precise temperatures. Deterioration of these
materials will be dangerous.
10. Dust deposited on the power plug may cause fire. Wipe
it off carefully.
11. Do not attempt to change or modify this refrigerator. This
may result in fire, electric shock or injury.
12. Information regarding disposal of the appliance
Flammable insulation blowing gases should be disposed
appropriately. Take the cabinet and doors to a recycling
plant for flammable insulation blowing gases.
10. Disconnect from the mains electricity supply by remov-
ing the mains plug from the electricity supply socket. Do
not remove by pulling the mains lead. This may cause
electric shock or fire.
11. Make sure that you leave adequate ventilation space
around the refrigerator to prevent the compressor from
overheating and stopping. Please follow the instructions
given for installation.
12. The refrigeration system behind and inside the refrigera-
tor contains refrigerant. If this system is punctured it could
result in serious damage to your refrigerator, therefore
do not allow any sharp objects to come into contact with
the refrigeration system.
13. Should the flexible supply cord be damaged, it must be
replaced by service agent approved by SHARP as a special cord is required.
14. In case of gas leak, ventilate the area by opening a win-
dow, etc. Do not touch the refrigerator or the power outlet.
15. Do not place heavy or easily broken objects on top of the
refrigerator. Objects may fall when opening or closing
the refrigerator, causing injury.
16. Do not place objects containing liquid on top of the re-
frigerator. Spillage may cause electric shock or fire.
17. Do not drop objects inside the refrigerator or strike the
inner wall. This may cause the inner surface to crack.
18. This refrigerator is not intended for use by young chil-
dren or infirm persons without supervision. Young children should be supervised to ensure that they do not
play with the refrigerator.
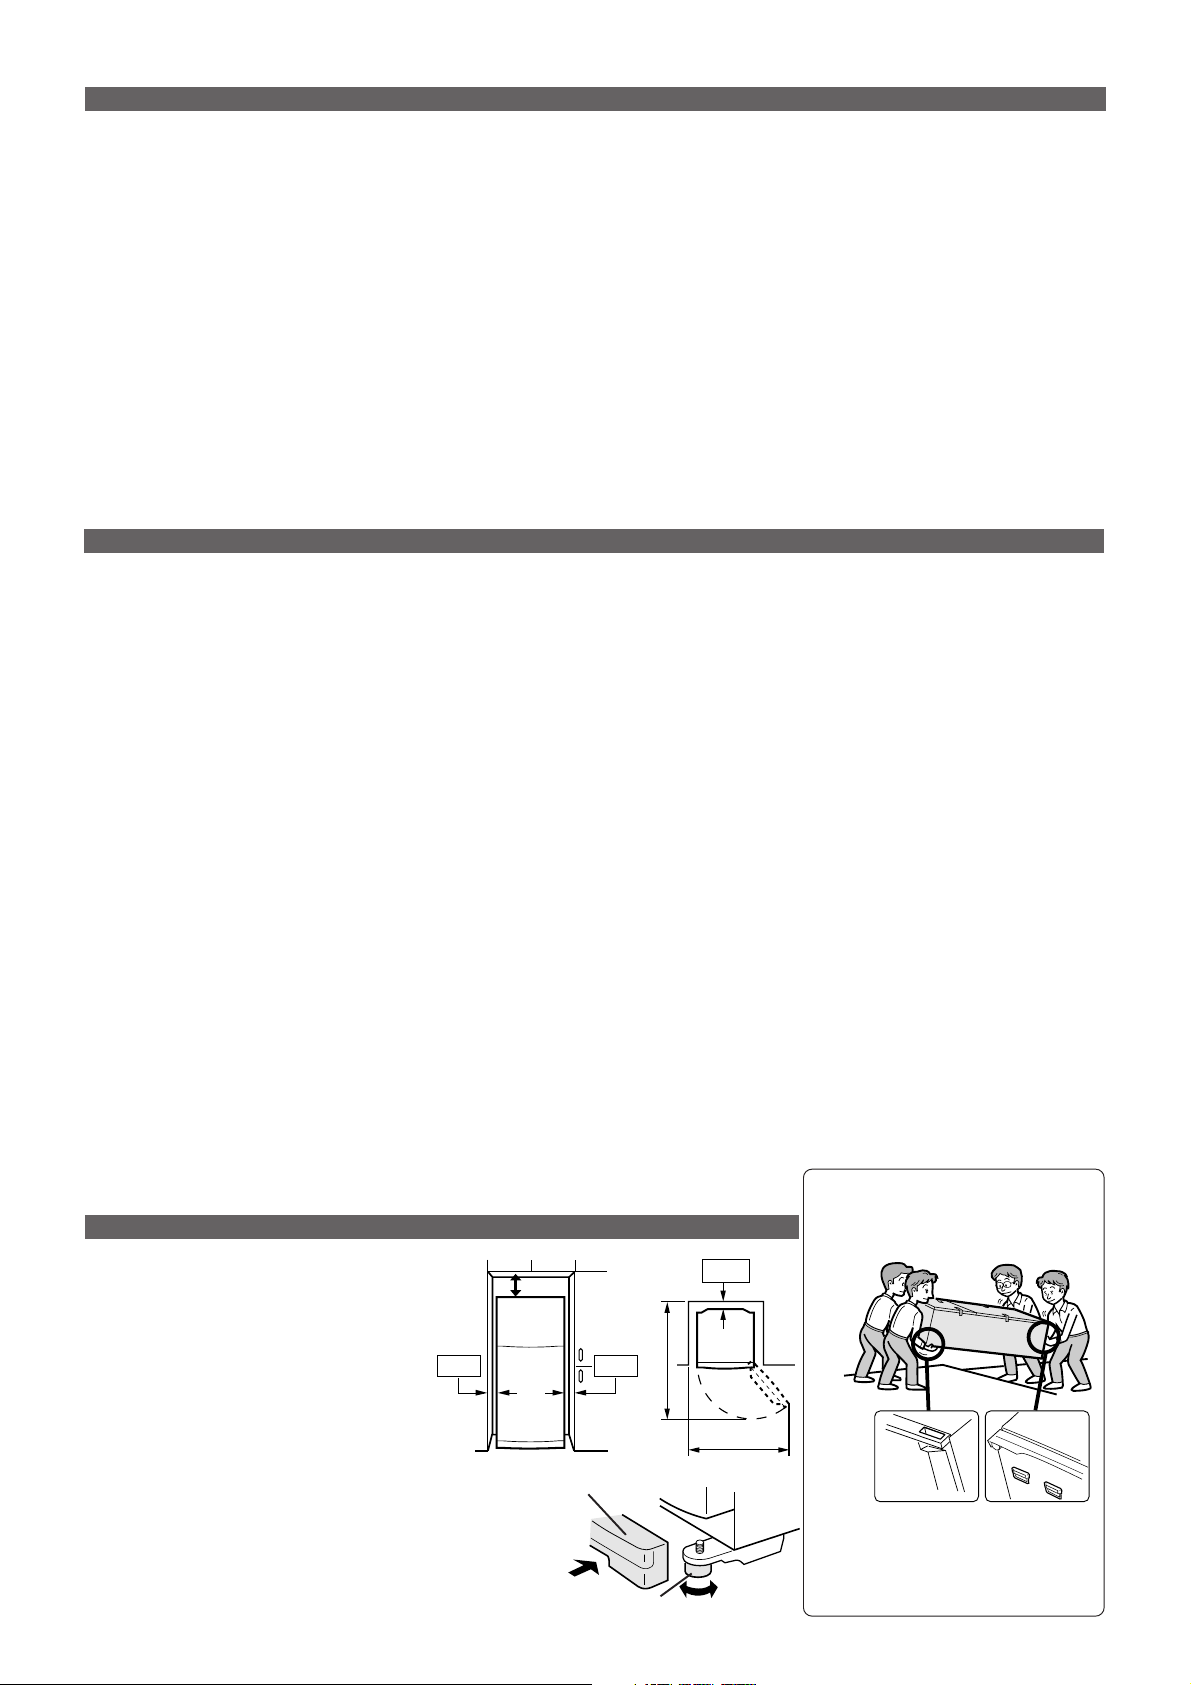
INSTALLATION
1.To ensure adequate ventilation for your
refrigerator, it is recommended to provide
space of 6cm on both sides and at the
back, and space of 9cm above the refrig-
Insufficient spacing will decrease
erator.
the cooling efficiency, resulting in unnecessary consumption of electricity.
2.Using the two front Adjustable feet, en-
sure that the refrigerator is positioned
firmly and level on the floor.
3.Clip Evaporating pan cover (supplied in-
side the refrigerator compartment) in position in front of the two Adjustable feet.
NOTE:
• Position your refrigerator so that the plug is accessible.
• Keep your refrigerator out of direct sunlight.
• Do not place next to heat generating appliance.
• Do not place directly on the ground. Provide suitable
stand.
6cm
Evaporating
pan cover
9cm
6cm
Adjustable foot
When transporting
Carry the refrigerator by holding the
handles located on the rear and
bottom.
6cm
148 cm
135 cm
Before using your refrigerator
Clean the inside parts with a cloth
soaked in warm water. If soapy water is used, wipe it off thoroughly.
3
Page 4
OPERATION
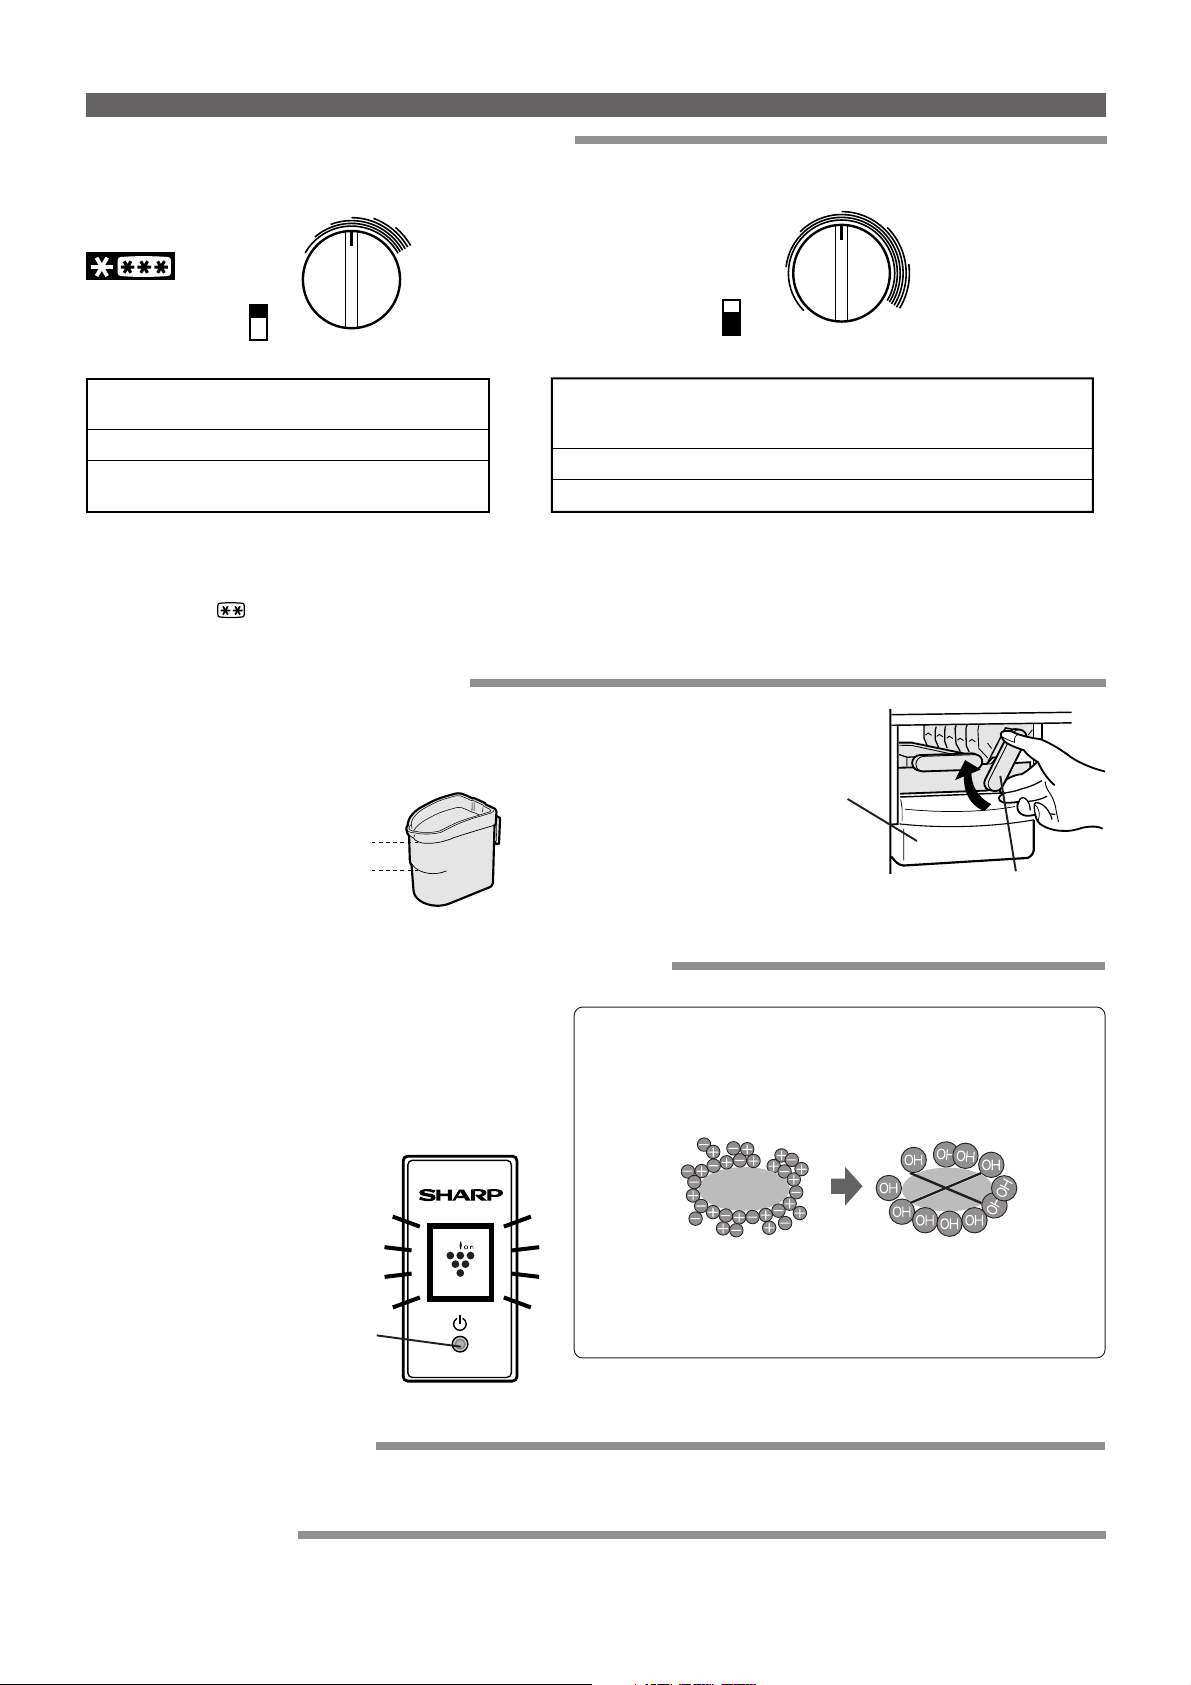
CONTROLLING TEMPERATURES
The refrigerator controls its temperature automatically. However, if needed, adjust the temperature as follows.
Freezer
compartment
MIN
MED
4
5
3
2
1
6
7
MAX
Coldest
Refrigerator
compartment
MIN
MED
4
3
2
1
5
6
7
MAX
Coldest
FREEZER TEMP. CONTROL
7(MAX)
For making ice rapidly or fast
freezing.
4(MED)
1(MIN)
For normal freezing.
When frozen food or ice cream is
not stored.
• If the refrigerator is operated for a long time with
FREEZER TEMP. CONTROL set at 7(MAX),
foods stored in the refrigerator compartment may
also freeze.
• 2 star section for storing frozen foods only.
(not freezing)
HINTS WHEN MAKING ICE
1.The included Water supply cup can be used to
measure the amount of water to pour into Ice
cube trays. Pouring too much water into the tray
will result in the ice cubes connecting to each
other when frozen.
Amount for both Ice cube trays
Amount for one Ice cube tray
REFRIGERATOR TEMP. CONTROL
7(MAX)
For keeping foods fresher tasting.
When the refrigerator does not provide sufficient
cooling.
4(MED)
1(MIN)
For normal operation.
When the refrigerator provides excessive cooling.
• If the refrigerator is operated for a long time with REFRIGERATOR TEMP. CONTROL set at 7 (MAX), foods stored in the refrigerator compartment may also freeze.
• Low ambient temperature may cause placed foods to freeze even
if REFRIGERATOR TEMP. CONTROL is set to 1 (MIN).
2.When the ice cubes are made, turn
the lever clockwise to empty the ice
into Ice cube box.
Ice cube box
NOTE:
To prevent damage to the Ice cube box,
do not make ice in the Ice cube box or
pour oil into it.
Lever
PLASMACLUSTER (Only for SJ-P68M, SJ-P63M)
The plasmacluster automatically starts operating
when the refrigerator is powered on.
1.Press “PLASMACLUSTER(ON/OFF) button”,
and the PLASMACLUSTER lamp goes out and
the plasmacluster turns off.
2.Press “PLASMACLUSTER(ON/OFF) button”
Notes about PLASMACLUSTER operation
The ionizer inside your refrigerator releases clusters of ions,
which are collective masses of positive and negative ions,
into the freezer and refrigerator compartment.
These ion clusters reduce airborne mold fungus.
again, and the PLASMACLUSTER lamp lights
up. The plasmacluster turns on.
mold
fungus
Plasmacluster
• There may be a slight odors in the refrigerator. This is the
smell of ozone generated by the ionizer. The amount of
ozone is minimal, and quickly decomposes in the refrig-
PLASMACLUSTER(ON/OFF)
button
erator.
DEODORIZING UNIT
A built-in unit which requires no manual operation because it automatically starts operating when the refrigerator is powered on.
DEFROSTING
Defrosting is fully automatic due to a unique energy saving system. Whereby the defrost cycle start time is proportional to
the running time of your refrigerator compressor, i. e., the less time the refrigerator compressor operates (during the winter
season or you’re away on holidays), the longer the time between each defrost cycle.
4
Page 5

STORING FOOD
Refrigeration reduces the rate of food spoilage. To
maximize the shelf life of perishable food products,
ensure that the food is of the freshest possible quality.
The following is a general guide to help promote longer
food storage.
Fruit / Vegetables
To minimize moisture loss, fruit and vegetables should
be loosely enclosed in a plastic material e.g. wrap,
bags ( do not seal ) and place in Vegetable crisper.
Those fruits and vegetables with thick skins e.g. oranges do not require wrapping.
Dairy Products & Eggs
• Most dairy products have a use by date on the outer
packaging which informs the recommended temperature and shelf life of the product.
• Eggs should be stored in the Egg holder.
Meats / Fish / Poultry
• Place on a plate or dish and cover with paper or plastic wrap.
• For larger cuts of meat, fish, or poultry, place to the
rear of the shelves.
• Ensure all cooked food is wrapped securely or placed
in an airtight container.
CARE AND CLEANING
NOTE:
• Evenly place the food on the shelves to allow the cooling air to
circulate efficiently.
• Hot foods should be cooled before storing. Storing hot foods
increases the temperature in the unit and increases the risk of
food spoilage.
• Do not block the outlet and inlet of the cool air
circulating circuit with foods or containers; otherwise the foods will not be evenly cooled
throughout the refrigerator.
Do not place food directly in front of
cold air outlet. This may lead to the
food freezing.
FOR BEST FREEZING
• Quality of foods should be fresh.
• Freeze small quantities of food at a time to freeze them quickly.
• Food should be properly stored or covered and the air should
be removed to seal tightly.
• Evenly place the food in the freezer.
• Label bags or containers to keep an inventory of freezing food.
IN
OUT
Some household cleaning chemicals may affect the inside surfaces and plastic shelves resulting
in splitting or cracks occurring.
When cleaning all plastic parts inside this refrigerator, only use diluted dishwashing liquid(soapy
water). Make sure that all plastic parts are thoroughly rinsed with water after cleaning.
1.Remove the shelves and pockets from the cabinet
and door. Wash them in warm soapy dishwashing
water; rinse in clean water and dry.
2.Clean the inside with a cloth soaked in warm soapy
dishwashing water. Then, use cold water to wipe off
soapy water.
3.Wipe the exterior with a soft cloth each time it is
soiled.
4.Clean Magnetic door seal with a toothbrush and
warm soapy dishwashing water.
5.Evaporating pan should be removed and cleaned
once a year.
NOTE:
• Do not use polishing powder, benzine, hot water etc.
• If undiluted detergent is used or soapy water is not
wiped off thoroughly, cracking of plastic parts can result.
• Wipe any food oils adhered to plastic components
as they can cause cracking of the plastic surface.
• The glass shelves weighs approximately 3kg each.
Hold firmly when removing from the cabinet or carrying.
Evaporating pan & cover;
How to remove
1.Hold both sides of Evapo-
rating pan cover and angling upward.
2.Pull Evaporating pan out.
How to set
1.Put Evaporating pan on
Radiator plate, then slide
it in completely.
2.Fit the pawls of Evaporat-
ing pan cover into the
holes of the cabinet, then
push the cover to attach.
Evaporating pan
Hole
Switching off your refrigerator
If you switch your refrigerator off when you are going away for
an extended period, remove all food, clean the interior thoroughly.
Remove the power cord plug from the power socket and leave
all doors open.
Evaporating pan cover
Pawl
WHAT TO DO BEFORE YOU CALL FOR SERVICE
Before you call for service, check the following point.
IT IS NORMAL for the refrigerator to produce the
following sounds.
• Loud noise produced by the compressor when operation starts --- Sound becomes quieter after a while.
• Loud noise produced once a day by the compressor
--- Operating sound produced immediately after automatic defrost operation.
• Sound of flowing fluid (gurgling sound, fizzing sound)
--- Sound of refrigerant flowing in pipes (sound may
become louder from time to time).
• Cracking or crunching sound --- Sound produced by expansion and contraction of inner walls and internal parts during
cooling.
• Squeaking sound --- Sound produced by expansion and contraction of internal parts.
IT IS NORMAL that the outside of a cabinet may be hot when
touched. The hot pipe is in the cabinet in order to prevent dew
generation.
IF YOU STILL REQUIRE SERVICE
Refer to your nearest service agent approved by SHARP.
5
Page 6

TANITIM
1
19
20
21
22
23
24
25
26
27
28
3
2
4
5
7
6
6
8
9
10
11
12
13
14
17
18
15
16
23
29
Plasmacluster
8
ray14
1. Dondurucu lambas›
2. Dondurucu vantilatörü
3. Dondurucu raf›
4. Buzmatik
5. Buz kutusu
6. Koku giderici
7. Dondurucu s›cakl›k kumanda
dü¤mesi
8. Taze muhafaza kabı
Taze muhafaza kabının kapa¤ı
çekilerek açılır.
9. So¤utucu fan›
So¤utucu bölmesi, kapn›n aç›lmas› veya baflka bir
sebeple iç s›cakl›¤›n artmas› durumunda, çabuk ve
her tarafta eflit so¤utmay› sa¤lamak üzere özel bir
fan ile donat›lm›flt›r. Sadece so¤utucu bölüm ›s›s›
yükseldi¤inde çal›fl›r.
10. Buzdolab› s›cakl›k kumanda dü¤mesi
11. So¤utucu raf›
(68 tipi ; 3 raf, 63 tipi ; 2 raf)
12. So¤utucu lambas›
13. Raf (Sebzelik üstü)
14. Sebze saklama bölümü
Sebze saklama bölümünü rayın altına koyun.
15. Bölme duvarı (Sebzelik Ay›r›c›)
16. Buharlaflt›rma kab› ve kapa¤›
17. Tekerlekler
18. Ayarlanabilen ayaklar
19. Dondurucu bölüm fan ve lamba
anahtar›
20. So¤utucu bölüm fan ve lamba
anahtar›
21. Dondurucu raf›
22. Su temin kab›
23. Manyetik kap› contas›
24. Kullan›fll› muhafaza
25. Yumurta kab›
26. Yumurta raflar›
(68 tipi ; 2 raflar›, 63 tipi ; 1 raflar›)
27. fiifle raflar›
28. fiifle ay›r›c›
fiifle ve benzeri fleylerin düflmesini önler. Uzun
yiyecek maddeleri de, bunun içinde saklanabilir.
29. Plasmacluster paneli
(Sadece SJ-P68M, SJ-P63M için)
Ayd›nlatma ampüllerinin de¤ifltirilmesi
Ayd›nlatma ampüllerini, ayn› modellerle de¤ifltirin.
Buzluk: base E12, MAX 10W
Buzdolab›: base E12, MAX 15W
Yerlefltirirken, ampüllerin voltaj›n›n ve vataj›n›n do¤ru
oldu¤undan emin olun.
Ampülü de¤ifltirirken ceryana kap›lmamak için önce
fifli çekiniz.
6
Page 7

UYARILAR
1. Bu buzdolab› hava geçirmez bir yap›ya sahiptir.
ÇOCUKLARA ÖLÜMCÜL KAZALARIN MEYDANA
GELMEMES‹ ‹Ç‹N, buzdolab›n› hurdaya atmadan önce
kap›s›n› tamamen sökünüz.
2. Eter, benzin, propan gaz›, yap›flkanlar ve saf alkol gibi uçucu
ve parlay›c› maddeler patlayabilir. Bu tip maddeleri
buzdolab›nda saklamay›n›z.
3. D›fl kabine zarar gelmemesi için cila ve boya gibi yan›c›
maddelerle temas›ndan kaç›n›n›z.
4. Buzdolab›n› temizlerken, d›fl k›sm›na veya iç k›sm›na direkt
olarak su s›çratmay›n›z. Elektrik izolasyon bozulabilir ve
paslanma meydana gelebilir.
Elektrikli parçalara yakın yerleri temizlerken veya aydınlatma
5.
ampülünü de¤ifltirirken, ceyrana kapılmamak için buzdolabının
fiflini prizden çekiniz.
6. Elektrikli aksam yanl›fll›kla su al›rsa, buzdolab›n› fiflten
çekiniz, parçalar› kurulay›n›z ve sonra en yak›n SHARP
Yetkili Servis Merkezi ile temas kurunuz.
7. Buzdolabını prizden çekerken fiflteki çubuklara
dokunmayınız. Bu ceyrana kapılmanıza neden olabilir.
8. Bu buzdolab› sadece k›lavuzdaki talimatlara göre evde
kullan›lan yiyeceklerin saklanmas› için tasarlanm›flt›r. Baflka
amaçlarla buzdolab›n›n kullan›lmas› can ve mal güvenli¤ine
zarar verebilir.
9. Bu buzdolab› hassas s›cakl›klarda saklanmas› gereken
maddeler için uygun de¤ildir.
10. Elektrik kablosu üzerinde biriken toz yang›na sebep olabilir.
Kabloyu iyice siliniz.
11. Bu buzdolab›n›n modelini de¤ifltirecek de¤ifliklikler
yapmay›n›z. Ayr›ca buzdolab›n› söküp tamir etmeye
kalk›flmay›n›z. Yang›n, elektrik çarpmas› ya da yaralanmalar
meydana gelebilir. Bu ifller, yetkili teknisyenler taraf›ndan
yap›lmal›d›r.
12. Aparatlar›n yok edilmesi ile ilgili bilgi
Yan›c› nitelikteki yal›t›m püskürtücü gazlar, uygun bir flekilde
yok edilmelidir.
Dıfl kabineyi ve kapıları, yanıcı nitelikteki yalıtım ve
püskürtücü gaz içermeleri nedeniyle geri kazanım
merkezlerine götürünüz.
D‹KKAT ED‹LMES‹ GEREKEN HUSUSLAR
1. Kompresöre elle dokunmay›n›z, çal›flma s›ras›nda çok s›cak
olabilir.
2. E¤er elektrik kazara kesilirse, tekrar açmadan önce en az
5 dakika bekleyiniz. Çünkü kompresördeki geri bas›nç afl›r›
yük termi¤ini devreye sokabilir.
3. Dipfrizdeki yiyecekleri ç›plak elle tutarak ç›karmay›n›z. S›f›r
alt› s›cakl›klarda saklanan ürünlere direkt olarak temas
edilmesi so¤uk ›s›rmalar›na sebep olabilir.
4. Buzdolab›n› do¤rudan do¤ruya ana prize ba¤lay›n›z. Çiftli
adaptör kullanmay›n›z, çünkü güç kayb› g›da maddelerinin
bozulmas›na sebep olabilir.
5. Dipfrize flifle koymay›n›z, çünkü donduklar› zaman
çatlayabilirler.
6. Dolap kap›s›n› s›k›ca kapay›n›z. E¤er kap› aral›k kal›rsa, iç
s›cakl›k artacak ve g›da maddelerinin bozulmas›na ve
elektrik maliyetinin artmas›na yol açacakt›r.
7. Bu buzdolab›n›, kaçaklara sebebiyet verecek bozukluklara
neden olaca¤› için, rutubetli ve ›slak yerlere yerle›tirmeyiniz.
Ayr›ca, buzdolab›n›n d›fl yüzeyinde bu¤u oluflabilir.
8. Buzdolab›n› kurarken veya tafl›rken, elektrik kablosunun
bükülmemesine veya k›vr›lmamas›na dikkat ediniz.
Kablonun zarar görmesi yang›n veya elektrik kaça¤›na
sebep olabilir.
9. Elektrik kablosu veya fifl hasarl› iken dolab› kullanmay›n›z.
Elektrik kaça¤›na veya tutuflmaya sebep olabilirsiniz.
10. Fiflten çekerken kablodan de¤il fiflten tutunuz. Kablodan
çekerseniz elektrik kaça¤› veya tutuflmaya sebep
olabilirsiniz.
11. Kompresörün afl›r› ›s›n›p durmamas› için buzdolab›n›n
etraf›nda havaland›rma için yeterli mesafe b›rak›n›z. Montaj
ile ilgili talimatlara bak›n›z.
12. Buzdolab›n›n arka ve iç k›sm›ndaki so¤utma sisteminde
so¤utucu gaz bulunur. E¤er bu sistemde bir çatlak meydana
gelirse, buzdolab›n›za büyük hasar verebilir. Dolay›s›yla
so¤utma sistemine keskin aletlerin temas etmemesine
dikkat ediniz.
13. Elektrik kablosu hasar görürse, özel bir kabloya gerek
duyulaca¤›ndan yetkili SHARP servisi taraf›ndan
de¤ifltirilmelidir.
14. Gaz kaça¤›nda pencere vs açarak oday› havaland›r›n›z.
Buzdolab›na veya prize dokunmay›n›z.
15. Buzdolab›n›n üst taraf›na a¤›r veya kolayca k›r›labilen
eflyalar koymay›n›z. Kapa¤› açarken bunlar düflüp
yaralanmalara sebep olabilir.
16. Buzdolab›n›n üst taraf›na içinde s›v› bulunan eflyalar
koymay›n›z. Içindeki s›v›lar döküldü¤ünde elektrik
çarpmalar›na veya yang›na sebep olabilir.
17. Buzdolab›n›n içinde, cisimleri düflürmeyin ve yan duvarlara
çarpmay›n. Bu, iç yüzeyde çatlaklara neden olabilir.
18. Bu buzdolab›, denetimsiz (nezaretsiz) olarak küçük
çocuklar›n ve takatsiz kiflilerin kullan›m› için
düflünülmemifltir. Küçük çocuklar, buzdolab› ile
oynamamalar›n› sa¤lamak için denetlenmelidirler.
MONTAJ
1.Buzdolab›n›n yeteri kadar havalanmas›n›
sa¤lamak için, arka taraf ile sa¤ ve solda
6cm, üstten ise 9cm boflluk b›rak›lmas›
önerilmektedir. Yetersiz havaland›rma
so¤utma veriminin düflmesine ve gereksiz
enerji sarfiyat›na neden olur.
2.Öndeki iki adet ayarlanabilir aya¤›
kullanarak, buzdolab›n›n zemine düz
oturmas›n› ve oynamamas›n› sa¤lay›n›z.
3.Buharlaflt›rma kab› kapa¤›n› (buzdolab›
bölmesinin içinde bulunan) iki ayarlama
aya¤›n›n ön taraf›ndaki yere ilifltirin.
NOT:
• Buzdolabınızı yerlefltirirken prize
ulaflmaya engel olmayacak
mesafede yerlefltiriniz.
• Buzdolab›n›z› direkt günefl ›fl›¤›na
maruz b›rakmay›n›z.
• Is› üreten cihazlar›n yan›na
yerlefltirmeyiniz.
• Yerlefltird›¤iniz zeminin düzgün
olmas›na dikkat ediniz.
9cm
6cm
Buharlafltırma
kab› kapa¤ı
Ayarlanabilen ayak
6cm
148 cm
6cm
135 cm
Tafl›nma s›ras›nda
Buzdolab›n›, arka ve alt k›s›mda
bulunan tutacaklar yard›m›yla
tafl›y›n.
Buzdolabınızı kullanmadan
önce
Ilık su ile ıslatılmıfl bezle iç kısımlarını
temizleyiniz. Eger sabunlu su
kullanılıyorsa iyice siliniz.
7
Page 8

ÇALIfiMA KOfiULLARI
SICAKLI⁄IN KONTROLÜ
Buzdolab› s›cakl›¤›n› otomatik olarak ayarlar. Ancak, e¤er gerekirse s›cakl›¤› afla¤›daki flekilde ayarlay›n›z.
Dipfriz
Bölmesi
MIN
MED
4
5
3
2
1
6
7
MAX
Coldest
So¤utucu
Bölmesi
MED
4
3
2
5
6
FREEZER TEMP. CONTROL
7(MAX)
Çabuk buz yapmak veya h›zl› dondurmak için.
4(MED)
Normal so¤utma için.
1(MIN)
Dondurumufl yiyecek veya dondurma konmad›¤›
zaman.
• E¤er buzdolab› dipfriz s›cakl›k dü¤mesi 7(MAX)
konumunda iken uzun süre çal›flt›r›l›rsa, so¤utucu
bölümünde saklanan yiyecekler de donabilir.
• 2 yıldızlı bölüm donmufl gıdaları saklamak içindir.
(Dondurmak için de¤ildir)
7(MAX)
Yiyecekleri daha taze saklamak ve/veya buzdolab› yeterli
so¤utma yapmad›¤› zaman kullan›l›r.
4(MED)
Normal so¤utma için.
1(MIN)
Buzdolab› afl›r› so¤utma yap›yorsa.
• So¤utucu s›cakl›k ayar dü¤mesi 7(MAX) konumda iken buzdolab› uzun
süre kullan›l›rsa, so¤utucu bölmesindeki yiyecekler de donabilir.
• So¤utucu s›cakl›k ayar adü¤mesi 1(MIN) konumunda olsa bile, düflük
oda s›cakl›¤› yiyeceklerin donmas›na sebep olabilir.
REFRIGERATOR TEMP. CONTROL
BUZ YAPARKEN D‹KKAT ED‹LECEK HUSUSLAR
1. Su temin kab›, buz tablas›na (buzluk) koyulacak su
miktar›n› ölçmek için kullan›labilir. Tablaya fazla su
koyulmas›, buzlar›n, donarken birbirine
yap›flmas›na neden olacakt›r.
Her iki buz tablas› için miktar
Tek buz tablas› için miktar
2.Buz olufltuktan sonra, kolu saat
yönünde çevirip, buzlar›, buz kutusu
boflalt›n.
Not:
Buz kutusunda, buz yapmay›n ve ya¤
koymay›n. Buz kutusu k›r›labilir.
‹çinde su bulundurmay›n. E¤er d›flar›ya
ç›kar›ld›¤›nda buzlar erimifl ise boflalt›p
kurulayarak yerine tak›lmal›d›r.
1
MIN
Buz kutusu
MAX
7
Coldest
Kol
‹YON‹KLEfiT‹R‹C‹ "PLASMACLUSTER" (Sadece SJ-P68M, SJ-P63M için)
Buzdolabı açıldı¤ında iyoniklefltirici "PLASMACLUSTER"
otomatik olarak çalıflmaya bafllar.
1.PLASMACLUSTER(Açma/Kapama) dü¤mesine
basın, PLASMACLUSTER ıflı¤ı söner ve
PLASMACLUSTER kapanır.
2.PLASMACLUSTER(Açma/Kapama) dü¤mesine
tekrar basın, PLASMACLUSTER ıflı¤ı yanar ve
PLASMACLUSTER açılır.
Plasmacluster
PLASMACLUSTER
(Açma/Kapama) dü¤mesi
‹yoniklefltirici "PLASMACLUSTER"
çalıfltırılması hakkında notlar
Buzdolabınızın içindeki iyoniklefltirici, artı ve eksi kutuplu
iyon demetlerini buzdolabının içine ve dondurucu kısımına
da¤ıtır.
Bu iyon demetleri havadaki küf mantarını azaltır.
Küf
mantarı
• Buzdolabının içinde hafif bir koku olabilir. Bu iyoniklefltirici
tarafından üretilen ozon kokusudur. Ozon miktarı çok
azdır ve hemen buzdolabı içinde ayrıfltırılır.
KOKU G‹DER‹C‹
Bu kısım buzdolabı çalıfltırıldı¤ı andan itibaren otomatik olarak çalıflmaya bafllar. Manuel olarak çalıfltırılmasına gerek yoktur.
DEFROST
Defrost ifllemi, özel bir enerji tasarruf sistemi sayesinde tamamen otomatiktir. Defrost iflleminin bafllama zaman›, buzdolab›
kompresörünün çal›flma süresi ile orant›l›d›r. Yani, buzdolab› kompresörü ne kadar az çal›fl›rsa (k›fl aylar›nda veya tatile ç›kt›¤›n›zda)
her bir defrost aras›ndaki süre o kadar uzun olacakt›r.
8
Page 9

BUZDOLABINDA Y‹YECEKLER‹N SAKLANMASI
So¤utma, yiyeceklerin bozulma h›z›n› azalt›r. Çabuk
bozulan yiyeceklerin raf ömrünü artt›rmak için, saklanacak
yiyce¤in mümkün oldu¤u kadar taze olmas›na dikkat
ediniz. Yiyeceklerin daha uzun süre saklanabilmesi için
afla¤›daki baz› genel kurallar verilmifltir.
Meyve / Sebze
Nem kayb›n› en alt düzeye indirmek için, meyve ve sebze,
plastik bir malzeme içinde gevflek bir flekilde paketlenmeli
(öme¤in torba, poflet vs.) ve a¤z› kapanmadan sebze
saklama bölümü. Kal›n kabuklu meyve ve sebzelerin
(örne¤in portakal) bir fleye sar›lmas›na gerek yoktur.
Süt Ürünleri ve Yumurta
• Bir çok süt ürününün d›fl ambalaj›nda en son kullanma
tarihi ile tavsiye edilen saklama s›cakl›¤› ve raf ömrü
yaz›l›d›r.
• Yumurtalar yumurta kab› saklanmal›d›r.
Et / Bal›k / Kümes Hayvanlar›
• Bir tepsiye veya kaba koyup, ka¤›t veya folyo ile kaplay›n.
• Büyük parça etleri, bal›k ve kümes hayvanlar›n› raflar›n
arka k›sm›na yerlefltiriniz.
• Piflmifl yiyeceklerin ve baharatl›, kokulu yemeklerin s›k›ca
paketlenmifl veya hava geçirmez kaplara konmufl
olmas›na dikkat ediniz.
NOT:
• So¤uk havan›n etkin bir flekilde dolaflmas› için, yiyecekleri raflar›n
üzerine da¤›tarak yerlefltiriniz.
• S›cak yiyecekler dolaba konmadan önce so¤utulmal›d›r. S›cak
yiyeceklerin saklanmas› buzdolab›n›n içindeki s›cakl›¤› artt›r›r ve
bozulma riskini yükseltir.
•
So¤uk hava dolafl›m devresinin girifl ve ç›k›fl›n› yiyecek
veya kaplarla kapatmay›n›z. Aksi halde buzdolab›
içindeki yiyecekler yeterince so¤umayacakt›r.
Yiyecekleri do¤rudan do¤ruya so¤uk
hava girifli önüne yerlefltirmeyiniz.
Yiyeceklerin donmas›na sebep
olabilirsiniz.
‹ÇER‹
DIfiARI
EN ‹Y‹ fiEK‹LDE DONDURMA ‹fiLEM‹ ‹Ç‹N
• Yiyecekler taze olmal›d›r.
• Yiyecekleri h›zl› dondurmak için, buzlu¤a her seferinde az miktarda
g›da koyunuz.
• Yiyecek maddeleri uygun bir flekilde paketlenmeli veya örtülmelidir,
ve içinde hava kalmamal›d›r.
• Yiyecekleri derin dondurucuya eflit flekilde da¤›tarak yerlefltiriniz.
• Dondurulan yiyecek maddesinin bir envanterini tutmak için poflet
veya kaplara etiket tak›n›z.
TEM‹ZL‹K VE BAKIM
Baz› ev temizlik maddeleri, iç yüzeye ve plastik raflar› etkileyip, çatlak ve yar›klar›n oluflmas›na sebebiyet
verebilir.
Buzdolab› içindeki tüm plastik parçalar› temizlemek için, sadece sabunlu su kullan›n. Temizlikten sonra,
tüm plastik parçalar›, tam olarak su ile durulay›n.
1. Raflar› ve cepleri kap› içinden ve gövdenin iç k›sm›ndan
ç›kar›n›z. S›cak sabunlu su içinde y›kay›n›z. Temiz suda
durulay›p kurutunuz.
2. ‹ç k›s›m› sabunlu suya bat›r›lm›fl ve s›k›lm›fl bir bezle
temizleyiniz. Daha sonra sabunlu suyu gidermek için
so¤uk su kullan›n›z.
3. Buzdolab›n›n d›fl k›sm›n›, kirlendi¤i zaman, yumuflak
bir bezle siliniz.
4. Manyetik kap› contas›n› bir difl f›rças› ile ve s›cak
sabunlu su ile temizleyiniz.
5. Buharlaflt›rma kab›, y›lda bir kez ç›kar›lmal› ve
temizlenmelidir.
NOT:
• Cila, benzin, s›cak su vs. kullanmay›n›z.
• E¤er saf deterjan kullan›lm›fl veya sabunlu su tam olarak
silinmemifl ise plastik k›s›mlarda çatlama meydana
gelebilir.
• Yüzeyin plastik k›s›mlar›nda çatlama meydana
getirmemeleri için, plastik k›s›mlarda oluflan her türlü
yiyecek ya¤›n› siliniz.
• Her bir cam raf, yaklafl›k 3kg a¤›rl›¤›ndad›r. Kabinden
ay›r›rken veya tafl›ma esnas›nda dikkatli olarak tutun.
Buharlafl
t›r
ma
kab› ve
kapa¤›;
Nas›l ayr›l›r
1.Buharlaflt›rma kab› kapa¤›n›
her iki taraftan tutup, yukar›
do¤ru kald›r›n.
2.Buharlaflt›rma kab›n› d›flar›
do¤ru çekin.
Buharlafltırma kab›
Buharlafltırma
Nas›l yerlefltirilir
1.
Buharlaflt›rma kab›n› radyatör
tabakas
tamamen içeriye do¤ru kayd
2.Buharlaflt›rma kab› kapa¤›n›n
kilit mandal›n›, kabin deliklerine
yerlefltirip iterek kapa¤›
yerlefltirin.
›n›
n üzerine koyup
›r›
n.
Kabin deli¤i
Buzdolab›n›n Kapat›lmas›
Uzun süre seyahate ç›karken buzdolab›n›z› kapatmak isterseniz,
içindeki tüm yiyecekleri ç›kar›n›z ve iç k›sm›n› iyice temizleyiniz.
Fifli prizden çekiniz ve her iki kapa¤› aç›k b›rak›n›z.
kab›
kapa¤ı
Kilit mandalı
SERV‹S ÇA⁄IRMADAN ÖNCE NE YAPILMALIDIR
Servis ça¤›rmadan önce afla¤›daki hususlar› kontrol
ediniz.
Buzdolab› için afla¤›daki seslerin olmas› NORMALD‹R.
• Çal›flmaya bafllad›¤›nda, kompresörün yüksek ses
ç›karmas› --- Ses, zamanla azalacakt›r.
• Kompresör taraf›ndan, günde bir defa yüksek ses
oluflturulmas› --- Otomatik defrost iflleminden sonra,
hemen oluflan çal›flma sesi.
• S›v› ak›fl sesi (l›k›r l›k›r ak›fl sesi, f›fl›rdama sesi) ---
Borularda dolaflan so¤utma maddesinin sesi (Zaman
zaman ses daha yüksek olabilir).
• G›c›rdama sesi --- Ses, so¤utma s›ras›nda, iç duvarlar›n ve içteki
plastik parçalar›n genleflme ve kas›lmas› ile oluflur.
• Çatırdama sesi --- Bu ses iç parçaların ve iç duvarların so¤uma
esnasında genleflmesi ve büzülmesi nedeni ile oluflur.
Dokundu¤unuz zaman gövdenin d›fl k›sm›n›n s›cak olmas›
NORMALD‹R. Çi¤lenmeyi önlemek için gövdenin iç k›sm›nda s›cak
borular vard›r.
HALA SERV‹SE ‹HT‹YACINIZ VARSA
En yak›n SHARP Yetkili Servisi’ni aray›n›z.
9
Page 10

SPECIFICATION (according to TS EN ISO 8561)
TEKN‹K ÖZELL‹KLER
MODELS
RATED VOLTAGE
RATED FREQUENCY
DEFROSTING CURRENT
RATED TOTAL GROSS VOLUME
RATED TOTAL STORAGE VOLUME
RATED SHELF AREA
ELECTRIC POWER COMSUMPTION
PERCENTAGE RUNNING TIME
QUANTITY OF ICE PRODUCED
CLIMATE CLASS
TEMPERATURE RISE TIME
(from -18 C to -9 C)
RATED FREEZING CAPACITY
SOUND NOISE LEVEL
MODELLER
NOM‹NAL VOLTAJ
NOM‹NAL FREKANS
DEFROST AKIMI
NOM‹NAL TOPLAM HACM‹
TOPLAM NOM‹NAL DEPOLAMA HACM‹
NOM‹NAL RAF ALANI
ELEKTR‹K TUKET‹M‹
ÇALIfiMA SÜRES‹ ORANI
ÜRET‹LEN BUZ M‹KTARI
‹KL‹M SINIFI
ISI ARTMA ZAMANI
(-18°c’den -9°c’ye kadar)
ANMA DONMA KAPAS‹TES‹
SES GÜRÜLTÜ SEV‹YES‹
(TS EN ISO 8561’e göre)
SJ-P68M, SJ-68M SJ-P63M, SJ-63M
V
~
Hz
A
L
L
2
cm
kWh/24h
%
kg/24h
h
kg
dB(A)
220-240
50
1.4
-
1.5
606
577
25500
2.6
55
2.5
T
8
8.0
41
220-240
50
1.4-1.5
566
535
21900
2.5
55
2.5
T
8
8.0
41
WIRING DIAGRAM
BA⁄LANTI fiEMASI
SJ-P68M, SJ-P63M
Main
PWB
Ana
Plug / Cord
Priz/Kablo
(G-Y)
PWB
Door
PWB
Kapı
PWB si
Plasmacluster
Plasmacluster
FLamp
F-Lambas›
(Br)
L
Lamp
Lamba
(S-B)
L
432
R-Fan
Heater
R-Vantilatör
Is›t›c›
R-Fan
Thermo.
R-Vantilatör
Te rm o
1
FM
R-Fan
Motor
R-
Vantilatör
Motoru
Door Switch
Kapı Anahtarı
F-Thermo.
F-Termo
Fan Motor
Vantilatör Motoru
FM
Thermo.Fuse
Termo Sigorta
(W)
(O)
Defrost Heater
Defrost Isıtıcı
Defrost Thermo.
Defrost Termo
Defrost Timer
Defrost Zamanlayıcı
34
(R)
(Bk)
2
(Y)
TM
1
(G)
Protector
Koruyucu
C
10
✳
PWB:Printed wiring board
PWB:Baskılı tel baglantı kartı
(B)
Running Capacitor
Çaliflma Kapasitcru
Starting relay
(P.T.C relay)
Bafllama rölesi
(P.T.C. röle)
M
A
Compressor
Kompresör
Page 11

Installation
Tesis alan›
MODELS
MODELLER
Outside Dimensions
D›fl Boyutlar›
(mm)
Installation Space
Tesis Alan›
(mm)
W
H
D
a
b
c
d
e
SJ-P68M
SJ-68M
760
1820
740
1910
800
880
1560
1290
SJ-P63M
SJ-63M
760
1720
740
1810
800
880
1560
1290
C
90
a
H
D
b
60 60
60
(Unit:mm)
(Birim: mm)
W
b
d
e
SJ-68M, SJ-63M
(Br)
F-
Lamp
Lamp
(G-Y)
Plug / Cord
Priz/Kablo
F-Lambas›
L
(S-B)
Lamba
2
(B)
L
R-Fan
Thermo.
R-Vantilatör
Te rm o
4
R-Fan
FM
Motor
R-Fan
Heater
R-Vantilatör
Is›t›c›
1
R-
Vantilatör
Motoru
Door Switch
Kapı Anahtarı
Running Capacitor
Çaliflma Kapasitcru
F-Thermo.
F-Termo
Fan Motor
Vantilatör Motoru
FM
Thermo.Fuse
Termo Sigorta
(W)
(O)
3
Defrost Heater
Defrost Isıtıcı
Defrost Thermo.
Defrost Termo
Defrost Timer
Defrost Zamanlayıcı
34
(R)
TM
2
1
(Bk)
(Y)
Starting relay
(P.T.C relay)
Bafllama rölesi
(P.T.C. röle)
(G)
Protector
Koruyucu
C
M
A
Compressor
Kompresör
CONNECTOR
KONNEKTÖR
CONNECTED IN TERMINAL BOX
TERM‹NAL KUTUSUNDA BA⁄LI
: BLUE(neutral)
B
MAV‹(nötr)
: BLACK
BK
S‹YAH
: BROWN(live)
BR
KAHVERANG‹ (canlı)
: GRAY
G
GR‹
: ORANGE
O
PORTAKAL RENG‹
: SKY-BLUE
SB
GÖK MAV‹
: RED
R
KIRMIZI
: YELLOW
Y
SARI
: WHITE
W
BEYAZ
: GREEN-YELLOW(earth)
G-Y
YEfi‹L-MAV‹ (toprak)
11
Page 12

SHARP CORPORATION
OSAKA, JAPAN
12
TINS-A595CBRZ 03GK TH
1
 Loading...