

Sharp PW-A9200 Quick Reference Manual
QUICK REFERENCE
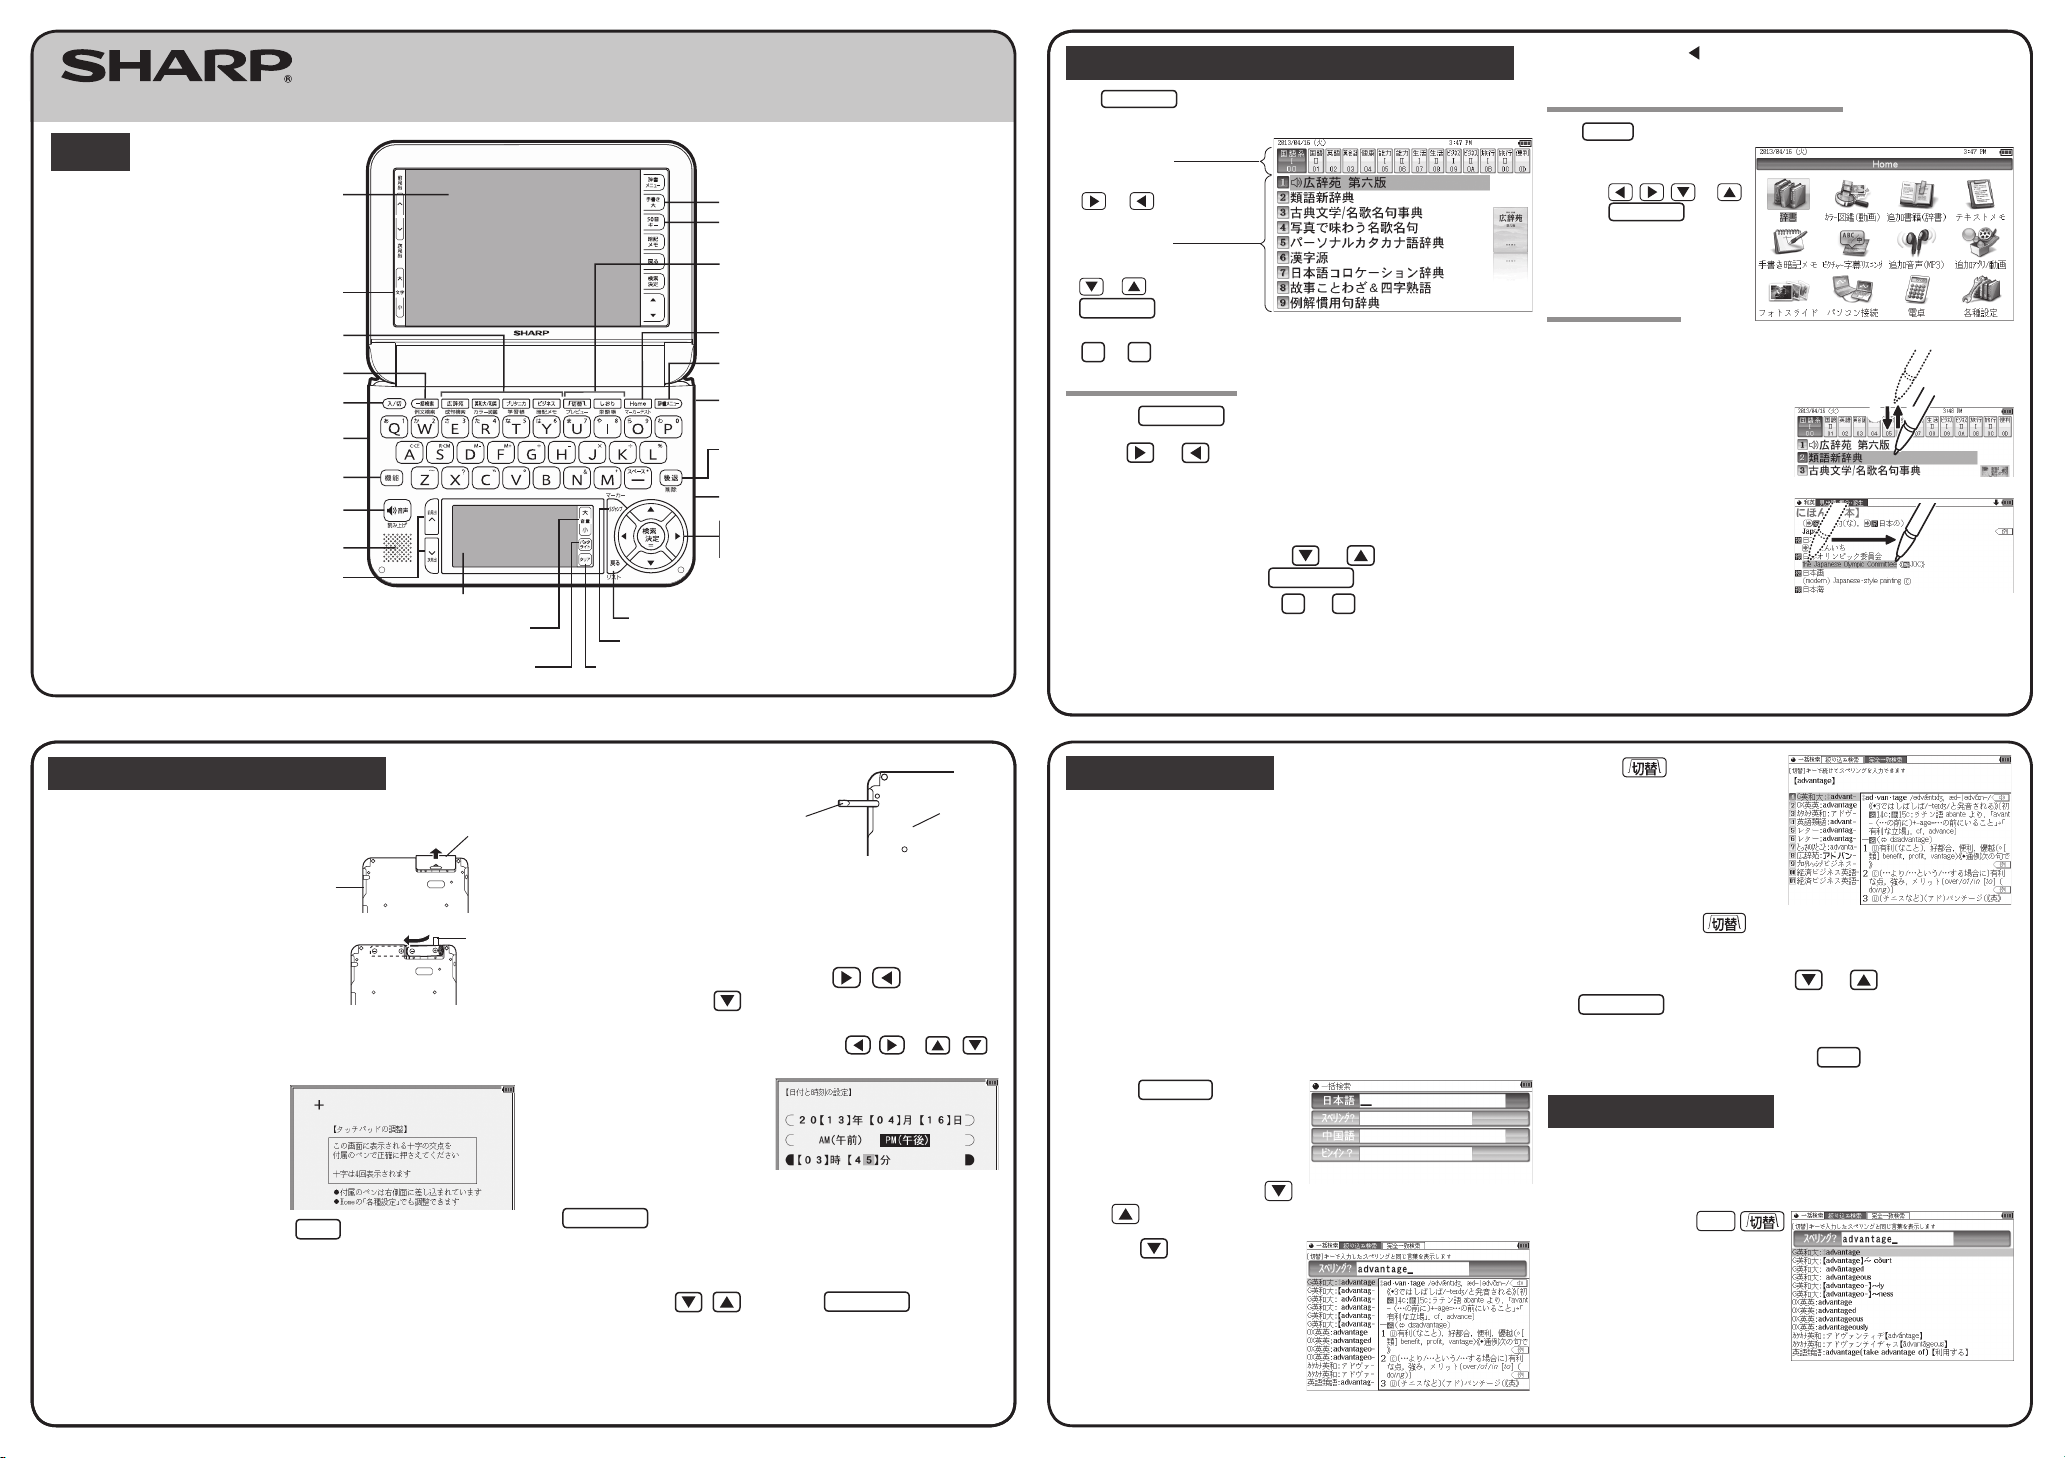
Global search key
Power ON/OFF key
Function key
Earphone jack (side)
Page scroll keys
Speaker
Volume control buttons
(volume up/down)
Audio key
Content selection keys
Handwriting pad
Escape key
Clear key
Stylus holder (side)
Utility keys for
dictionaries/functions
Large Handwriting button
Kana keys button
Search/enter key
Cursor keys
Terminal cover (side)
S-jump key
Back space key
Home key
Dictionary menu key
Display (main display)/
touch pad
Backlight button
Character size change
buttons
Layout
ELECTRONIC DICTIONARY
PW-A9200
11M C
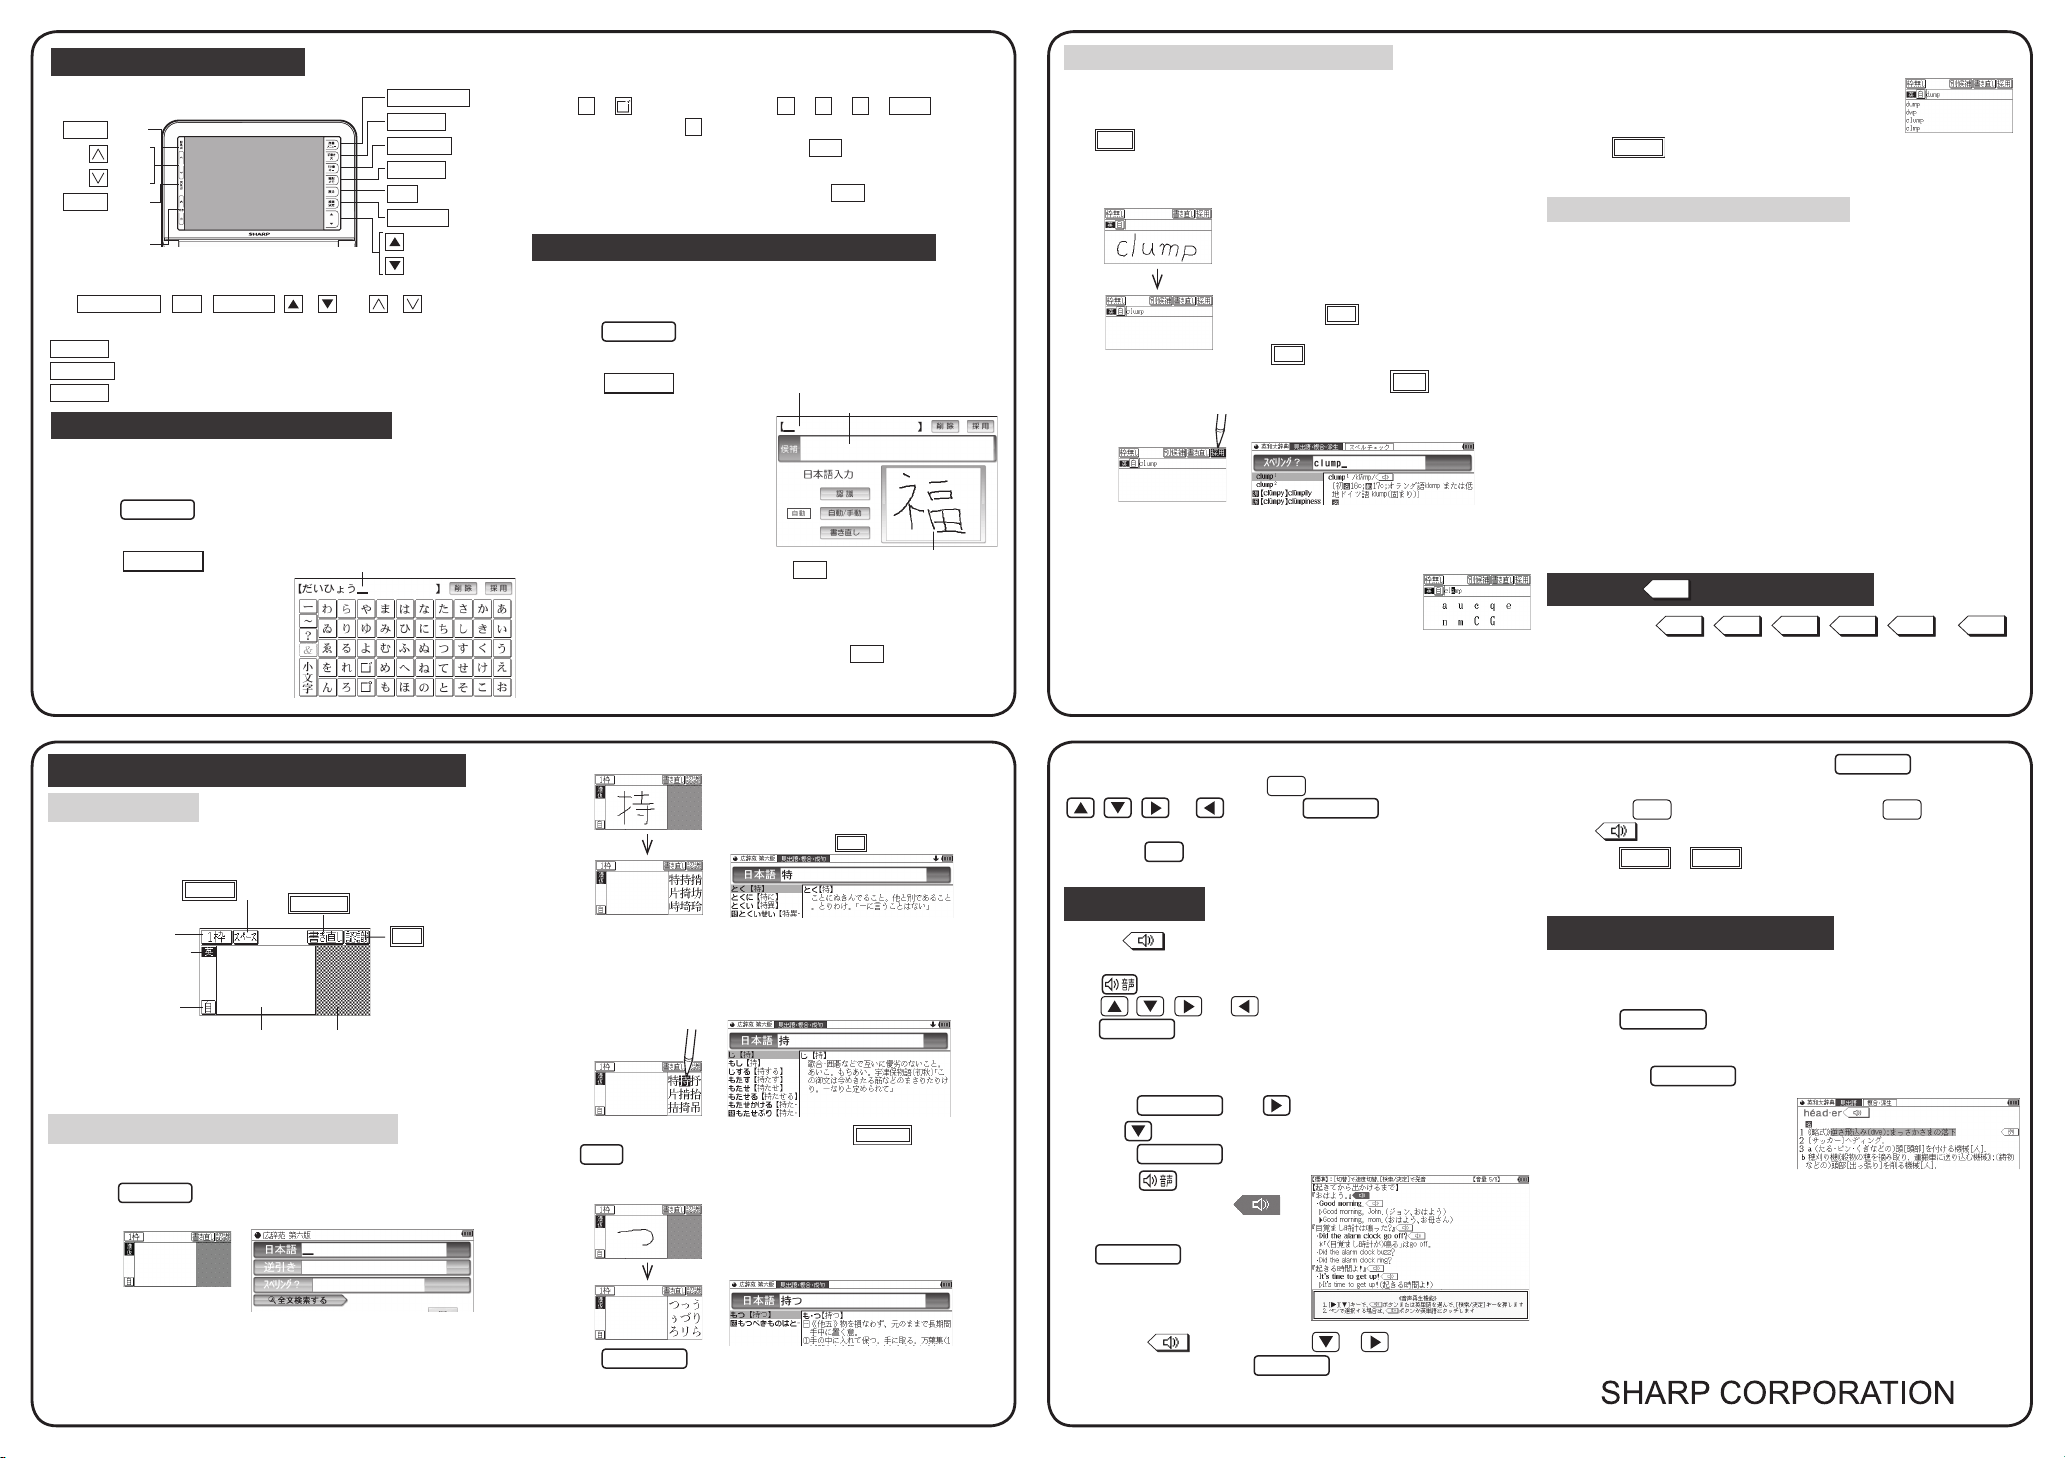
Selecting a content in the dictionary menu screen
辞書
Press
The dictionary menu screen appears.
Category menu
Selecting a menu item
1
2
Or, use the numeric keys to enter the category number to
3
Or, use the numeric keys (
メニュー
.
Select an item by pressing
or .
Individual menu
Select an item by pressing
or and then press
検索/決定
Or, select an item by typing
1
Press
Use or to select a category menu item.
select the item.
The individual menu for the selected category menu item is displayed
In the individual menu, use or to select the content/
function and then press
front of the content/function (1 to 9).
The selected content/function screen is displayed
.
Dictionary menu screen
to 9.
辞書
メニュー
.
The selected content/function screen can also be selected by touching the
•
relevant menu item.
(contents/functions selection display)
検索/決定
1
.
to 9) to enter the number in
.
.
When an item with on the right is selected, a submenu appears. Follow
the same steps as described above to select content from the submenu.
Selecting a function in the Home screen
Press
from the Home screen.
Move the cursor to the desired
icon using , , , or
and press
the icon to select it.
Touch operations
The PW-A9200 can be operated by touching the main screen with the stylus.
The following touch operations are
supported.
Single touch:
This is the operation of lightly touching or
pressing an item or button on the screen
and releasing it.
Drag:
This is the operation of moving the stylus
from one point on the screen to another
with the stylus touching the screen. This
is used for such purposes as widening the
range of selected characters.
If content is out of view at the top or bottom of the screen, the screen image
•
can be dragged up or down with the stylus to bring the content into view.
(Some content or screen images may not move.)
to display the Home screen. You can select and use unit functions
Home
検索/決定
or touch
①
②
Using the PW-A9200 for the first time
The provided batteries must be inserted before the unit is used.
Pull the battery cover in the
1
direction of the arrow and
remove.
Insert the provided batteries in
2
the correct orientation.
• Insert the batteries from above the ribbon.
Make sure that the tip of the ribbon is
not hidden under the batteries.
Replace the battery cover.
3
Open the unit.
4
The power turns on and the
touch pad adjustment screen
of the display (main display)
appears.
• If the power does not turn on, press
If the power still does not turn on, check the batteries and make sure they
are inserted in the correct orientation. Attach the battery cover correctly.
Back of
the unit
入/切
Pull out the stylus and use it to
5
accurately touch each center
(午後)
Stylus
Pull out the
stylus to use.
” with /
アルカリ乾電池
検索/決定
Battery cover
Ribbon
.
of the four “+” characters
displayed on the touch pad on
the display.
• When adjustment ends, the date and time setting screen appears.
Set the date and time.
6
Example: 2013/04/16 → Enter “13 04 16”
PM → Select “PM
3:45 → Press and enter “03 45”
• To enter numbers, touch the small screen on the keypad and enter the
numbers. If you enter an incorrect number, press / or /
to return to the number and enter the correct number.
Confirm that the information entered is correct and press
7
検索/決定
The setting screen for the batteries appears.
Select the type of batteries you are using (“
8
(alkaline)) with / and press
If you are using the provided alkaline batteries, select “
電池
The Home screen appears.
.
”.
Back of
the unit
”
.
アルカリ乾
Global search function
You can search for a word in multiple contents/dictionaries.
Enter a word into any of the “
spelling), “
the target dictionary.
As you type, the candidates for matching narrow (filter search). If there are still
many candidates after entering the whole word, you can switch to “exact search”
to browse only the exact word you wish to have defined (Except for the search
using Pinyin).
• Japanese kanji and Chinese (Simplified characters) characters have to be
entered by hand.
Example: Global search for the word “advantage.”
Press
1
The global search entry screen
appears.
Select the text field according the
entry character type by using
or .
Press and enter
2
“advantage” in the “
?”
グ
As you type, the candidates for
matching narrow.
中国語
一括検索
field.
” (Chinese), and “
.
” (Japanese), “
日本語
ピンイン
スペリン
スペリング
” (Pinyin) fields to search within
” (English
Press
3
“exact search”.
The list of words corresponding to
your entry appears.
To change the entry, press to return to the filter search screen and enter
again.
Select the desired word using or and press
4
検索/決定
The details screen of the word appears along with its definitions.
• To return to the previous screen, press
Preview display function
If many candidates are listed for a word and it is difficult to decide which word is
the correct one, the preview display will help you by providing a brief note about
each word.
Each time you press
“
プレビュー
candidates are listed, the preview
display will be shown on the right,
turned off, or shown on the bottom in
this order.
(The preview display is turned off in
this screen example.)
to search by
.
機能
” (preview) while
戻る
.
例,
解説
NOTE
図,
表
動画
Buttons in the main display
前見出
button
button
button
次見出
button
Character size
change buttons
辞書メニュー, 戻る, 検索/決定
The
the same functions as the keys with the same names.
手書き大
50音キー
暗記メモ
Use for handwriting entry in the main display screen.
:
Use for kana entry in the main display screen.
:
Shows the handwritten memo list screen.
:
, / , and / buttons have
Kana entry in the main display screen
Kana entry can be used to enter Japanese.
Example: Entering “
Press
1
The search entry screen appears. Select the Japanese entry area.
50音キー
Touch
2
The kana entry pad appears.
Enter “
3
だいひょう
kana entry pad.
広辞苑
だいひょう
.
.
” using the
” in the Koujien dictionary.
Entered character display area
辞書メニュー
手書き大
50音キー
暗記メモ
戻る
button
検索/決定
button
button
button
button
button
button
Touch the kana buttons in the order shown below. The entered characters will
button
appear in the entered character display area.
•
た→
•If you enter an incorrect character, touch the 削除 button. The character to the
When you have finished entering the characters, touch 採用. The characters in the
entered character display area move to the content entry area and searching takes place.
(“た” changes to “だ”)
changes to “ょ”)
left of the cursor is deleted.
う
→
→い→ひ→よ→
Handwriting entry in the main display screen
Follow the steps below to enter characters in the main display screen by handwriting.
Example: Entering “福” in the Koujien dictionary
広辞苑
Press
1
The search entry screen appears. Select the Japanese entry area.
手書き大
Touch
2
The handwriting entry pad appears
in the main display screen.
Write the kanji that you want to
3
look up in the handwriting area.
The handwriting entry pad appears
in the main display screen.
•For manual recognition or for immediate
recognition after writing the character, touch
•If a character other than the desired character appears in the entered character
display area, touch the character that you want to change to select it, and then
touch the correct character in the candidate display area.
When you have finished entering characters, touch 採用. The characters
entered in the entered character display area move to the content entry area
and searching takes place.
.
.
Entered character display area
Candidate list display area
認識
.
小文字
Handwriting area
(”よ
”
Entering characters using the frameless pad
Example: Enter the word “clump” in an English-Japanese dictionary
In the input screen of the English-Japanese dictionary, touch
1
2
If automatic recognition is set, the character will be
If manual recognition is set, write the final character
3
to change to the frameless pad.*
1枠
* You can only switch to the frameless pad when entering alphabet characters.
Use the stylus to write the word “clump” in the handwriting area.
recognized and a candidate character will appear in
the character entry display area 1 to 2 seconds after
the stylus has been removed.
and then touch 認識 to let it be recognized. For
longer words, enter up to twelve characters and
touch 採用 to transfer them to the entry area.
If the word is correctly recognized, touch 採用 to transfer it
to the entry area.
If the word is not correctly recognized, do the following:
4
<
Replacing characters
If the recognized number of characters is correct but
a character is incorrect, touch the incorrect character.
Candidate characters will appear below the word. Touch
the correct character and it will replace the incorrect
character.
>
<
Selecting from the candidates
If the number of recognized characters is incorrect
(and characters are incorrect), the separation between
the characters is not correctly recognized. In this case,
別候補
touch
from the candidates that appear below the word.
and select the correctly spelled word
>
Points on writing handwritten characters
Paying attention to the following points will ensure that handwritten characters are
easily recognized.
• Write each individual stroke clearly. Ensure that characters have the correct
number of strokes.
• Write clearly and do not use short or conventional forms. Avoid writing
sloping characters.
• On the single-frame or 3-frame pad, write lower case characters smaller to
distinguish between identical-looking upper and lower case characters such
as upper case “C” and lower case “c”. Small characters such as the small “っ”
should also be written smaller.
• Write English letters in block form and do not attach ornamentation to the
ends of strokes.
• When using frameless entry, write English characters separately, one at
a time. You cannot write in cursive style or return to previously formed
characters to add dots or crosses.
• When using frameless entry, write words on a single line. You cannot write
on two lines.
• When writing letters, do not press hard; always write lightly.
Using the mark on the screen
Appearance of the
mark on the details screen indicates more information related to the entry is
available, such as example sentences, explanations, notes, illustrations, diagrams,
tables, and videos.
,
,
, or
Entering characters using the handwriting pad
Parts and functions
The handwriting pad is set to enter characters when the cursor is in any part of
the character entry area.
[
Single-frame pad
Input pad display
Character entry type
indicator
Automatic/manual
recognition indicator
• You can also touch the input pad display and change to the 3-frame pad or
the frameless pad.
]
スペース
button
書き直し
Candidate list display areaHandwriting area (frame)
button
認識
button
Entering characters using the single-frame pad
Example: Entering “持つ” in the Koujien dictionary.
広辞苑
Press
1
The handwriting pad is now switched to enter kanji and kana.
.
Use the stylus to write “持” in the handwriting area.
2
The character shown in the candidate list display area
is also placed in the entry area so that the dictionary
search can proceed.
• When the manual recognition is used or when you
want to have the entry recognized soon after you
finished writing, press 認識.
If the character in the entry area is not the one you desired,
3
use the stylus to touch and select the desired character in
the list.
The character in the entry area changes.
• If you cannot find the character in the list, touch
to erase it and redraw it on the pad.
後退
Likewise, enter “つ” in the entry area.
4
•
When you start drawing, the previous entry is confirmed
and then erased.
検索/決定
Press
5
The details screen appears.
.
書き直し
or press
Touch this mark to display the stored contents. If there are multiple marks and you
want to check another mark, press
, , , or
displayed.
To exit, press
戻る
. By pressing
twice.
and highlight the desired mark with
戻る
検索/決定
, the contents are
By highlighting an English word and pressing
the word in English-Japanese dictionary and play back the audio.
◆
戻る
Press
◆
Use
desired level.
to stop the audio during play. Press
reverts to non-inverted.
音量小
or
to first set the volume to low, then adjust it to the
音量大
検索/決定
, you can look up
戻る
and the color of
Listen to audio
When the mark appears, audio of the displayed information can be played
back.
Press to select the first mark, and the color of the mark is inverted.
Press
press
, , , or
検索/決定
(or touch the mark) to play back the contents.
Example: Play back the audio using “
”.
辞典
Press
辞書
1
use to select “
Press
Press and the mark
2
becomes inverted (
メニュー
検索/決定
to move the highlight to the desired mark and
英会話とっさのひとこと
, use to select “
英会話とっさのひとこと辞典
英会話
”, and then
”.
until the details screen is displayed.
).
Each time you press
検索/決定
If several marks appear, press or to move the cursor to
the desired mark and press
, the audio plays.
検索/決定
.
Selecting functions by touching
You can select various functions by touching the screen with the stylus, (or highlighting
by dragging).
英和大/和英
Press
1
Enter the word (Eg.: “header”) in the “
2
and press
Touch the starting point “逆”
3
and drag to highlight the words
up to the end point “下”.
Touch the function to execute (Eg.: “
4
引きます
The marker color selection window appears.
Select the marker color to use (green, yellow, pink, orange,
5
purple).
The words are registered in the word dictionary and marked in the selected color.
• To select a different function such as Audio or S-jump, select the desired
function in Step 4 by touching it.
.
スペリング
検索/決定
.
マーカー (マーカーを
)” (mark user-selected words).
?
” field,
 Loading...