

Page 1

MODEL
MX-FX13
FACSIMILE EXPANSION KIT
OPERATION GUIDE
Page
• BEFORE USING THE FAX
FUNCTION.............................. 6
• BASIC OPERATIONS .......... 16
• ADVANCED TRANSMISSION
METHODS ............................ 31
• TRANSMISSION USING
F-CODES..............................52
• CONVENIENT METHODS OF
USE....................................... 64
• PROGRAMMING..................66
• TROUBLESHOOTING.......... 90
• SYSTEM SETTINGS............. 96
• APPENDIX.......................... 112
Be sure to become thoroughly familiar with this manual to gain
the maximum benefit from the product.
Before installing this product, be sure to read the cautions
sections of the Start Guide.
Be sure to keep all operation guides handy for reference
including this manual, the Start Guide and Operation Guide for
any optional equipment which has been installed.
Page 2

Telecommunication Line Cable:
Use only the line cable that was provided with the machine.
Notice for Users in Europe
Hereby , SHARP Electronics ( Europe) GmbH declares that this Facsimile Expansion Kit MX-FX13 is in compliance
with the essential requirements and other relevant provisions of Directive 1999/5/EC.
Par la présente, SHARP Electronics (Europe) GmbH déclare que l’app areil Fa csimile Expansio n Kit MX-FX13 est
conforme aux exigences essentielles et aux autres dispositions pertinentes de la directive 1999/5/CE.
Hiermit erklärt SHARP Electronics (Europe) GmbH, dass sich das Gerät Facsimile Expansion Kit MX-FX13 in
Übereinstimmung mit den grundlegenden Anforderungen und den übrigen einschlägigen Bestimmungen der
Richtlinie 1999/5/EG befindet.
С настоящето SHARP Electronics (Europe) GmbH декларира, че Facsimile Expansion Kit MX-FX13 отговаря
на съществените изисквания и другите приложими изисквания на Директива 1999/5/ЕС.
SHARP Electronics (Europe) GmbH tímto prohlašuje, že Facsimile Expansion Kit MX-FX13 splňuje základní
požadavky a všechna příslušná ustanoveni Směrnice 1999/5/ES.
Undertegnede SHARP Electronics (Europe) GmbH erklærer herved, at følgende udstyr Facsimile Expansion Kit
MX-FX13 overholder de væsentlige krav og øvrige relevante krav i direktiv 1999/5/EF.
Käesolevaga kinnitab SHARP Electronics (Europe) GmbH seadme Facsimile Expansion Kit MX-FX13 vastavust
direktiivi 1999/5/EÜ põhinõuetele ja nimetatud direktiivist tulenevatele teistele asjakohastele sätetele.
ΜΕ ΤΗΝ ΠΑΡΟΥΣΑ SHARP Electronics (Europe) GmbH ∆ΗΛΩΝΕΙ ΟΤΙ Facsimile Expansion Kit MX-FX13
ΣΥΜΜΟΡΦΩΝΕΤΑΙ ΠΡΟΣ ΤΙΣ ΟΥΣΙΩ∆ΕΙΣ ΑΠΑΙΤΗΣΕΙΣ ΚΑΙ ΤΙΣ ΛΟΙΠΕΣ ΣΧΕΤΙΚΕΣ ∆ΙΑΤΑΞΕΙΣ ΤΗΣ Ο∆ΗΓΙΑΣ 1999/5/ΕΚ.
Por la presente, SHARP Electronics (Europe) GmbH, declara que este Facsimile Expansion Kit MX-FX13 cumple
con los requisitos esenciales y otras exigencias relevantes de la Directiva 1999/5/EC.
SHARP Electronics (Europe) GmbH vakuuttaa täten että Facsimile Expansion Kit MX-FX13 tyyppinen laite on
direktiivin 1999/5/EY oleellisten vaatimusten ja sitä koskevien direktiivin muiden ehtojen mukainen.
Con la presente SHARP Electronics (Europe) GmbH dichiara che questo Facsimile Expansion Kit MX-FX13 è
con-forme ai requisiti essenziali ed alle altre disposizioni pertinenti stabilite dalla direttiva 1999/5/CE.
Alulírott, SHARP Electronics (Europe) GmbH nyilatkozom, hogy a Facsimile Expansion Kit MX-FX13 megfelel a
vonatkozó alapvetõ követelményeknek és az 1999/5/EC irányelv egyéb elõírásainak.
Ar šo SHARP Electronics (Europe) GmbH deklarē, ka Facsimile Expansion Kit MX-FX13 atbilst Direktīvas
1999/5/EK būtiskajām prasībām un citiem ar to saistītajiem noteikumiem.
Šiuo SHARP Electronics (Europe) GmbH deklaruoja, kad šis Facsimile Expansion Kit MX-FX13 atitinka esminius
reikalavimus ir kitas 1999/5/EB Direktyvos nuostatas.
Hierbij verklaart SHARP Electronics (Europe) GmbH dat het toestel Facsimile Expansion Kit MX-FX13 in
overeenstemming is met de essentiële eisen en de andere relevante bepalingen van richtlijn 1999/5/EG.
Niniejszym SHARP Electronics (Europe) GmbH deklaruje że Facsimile Expansion Kit MX-FX13 jest zgodny z
zasadniczymi wymaganiami i innymi właściwymi postanowieniami Dyrektywy 1999/5/EC.
Prin prezenta, SHARP Electronics (Europe) GmbH, declară că aparatul Facsimile Expansion Kit MX-FX13 este în
conformitate cu cerinţele esenţiale şi cu alte prevederi pertinente ale Directivei 1999/5/CE.
SHARP Electronics (Europe) GmbH týmto vyhlasuje, že Facsimile Expansion Kit MX-FX13 spĺňa základné
požiadavky a všetky príslušné ustanovenia Smernice 1999/5/ES.
SHARP Electronics (Europe) GmbH izjavlja, da je ta Facsimile Expansion Kit MX-FX13 v skladu z bistvenimi
zahtevami in drugimi relevantnimi določili direktive 1999/5/ES.
Härmed intygar SHARP Electronics (Europe) GmbH att denna Facsimile Expansion Kit MX-FX13 står I överensstämmelse
med de väsentliga egenskapskrav och övriga relevanta bestämmelser som framgår av direktiv 1999/5/EG.
SHARP Electronics (Europe) GmbH erklærer herved at utstyret Facsimile Expansion Kit MX-FX13 er i samsvar
med de grunnleggende krav og øvrige relevante krav i direktiv 1999/5/EF.
This equipment has been designed to work on the British analogue public switched telephone network.
This equipment has been tested according to the pan-European ES 203 021 regulation.
It will operate on all analogue telephone networks which comply with the ES 203 021.
Please contact your dealer or network operator, if you are not sure whether your network op erates according to ES
203 021.
Page 3
INTRODUCTION
Thank you for purchasing this product. This manual only explains the facsimile functions of the product. For safety
precautions and general information on using the machine such as loading paper, clearing misfeeds, and handling
peripheral units, see the Operation Guide for the machine.
For other functions, see the following manua ls as appropriate:
Copier function/Printer function
Network printer function/Network scanner function
Network Expansion kit option is installed).
The explanations in this manual assume that certain optional peripheral units are installed.
This manual refers to the Reversing single pass feeder as the "RSPF" and the single pass feeder as the "SPF".
Unless specific mention is made, both the RSPF and the SPF are referred t o simply as "SPF".
The fax function is not available in some countries and regions.
: See the Operation Guide.
: See the "Operation Guide(for Network Expansion kit)" (if the
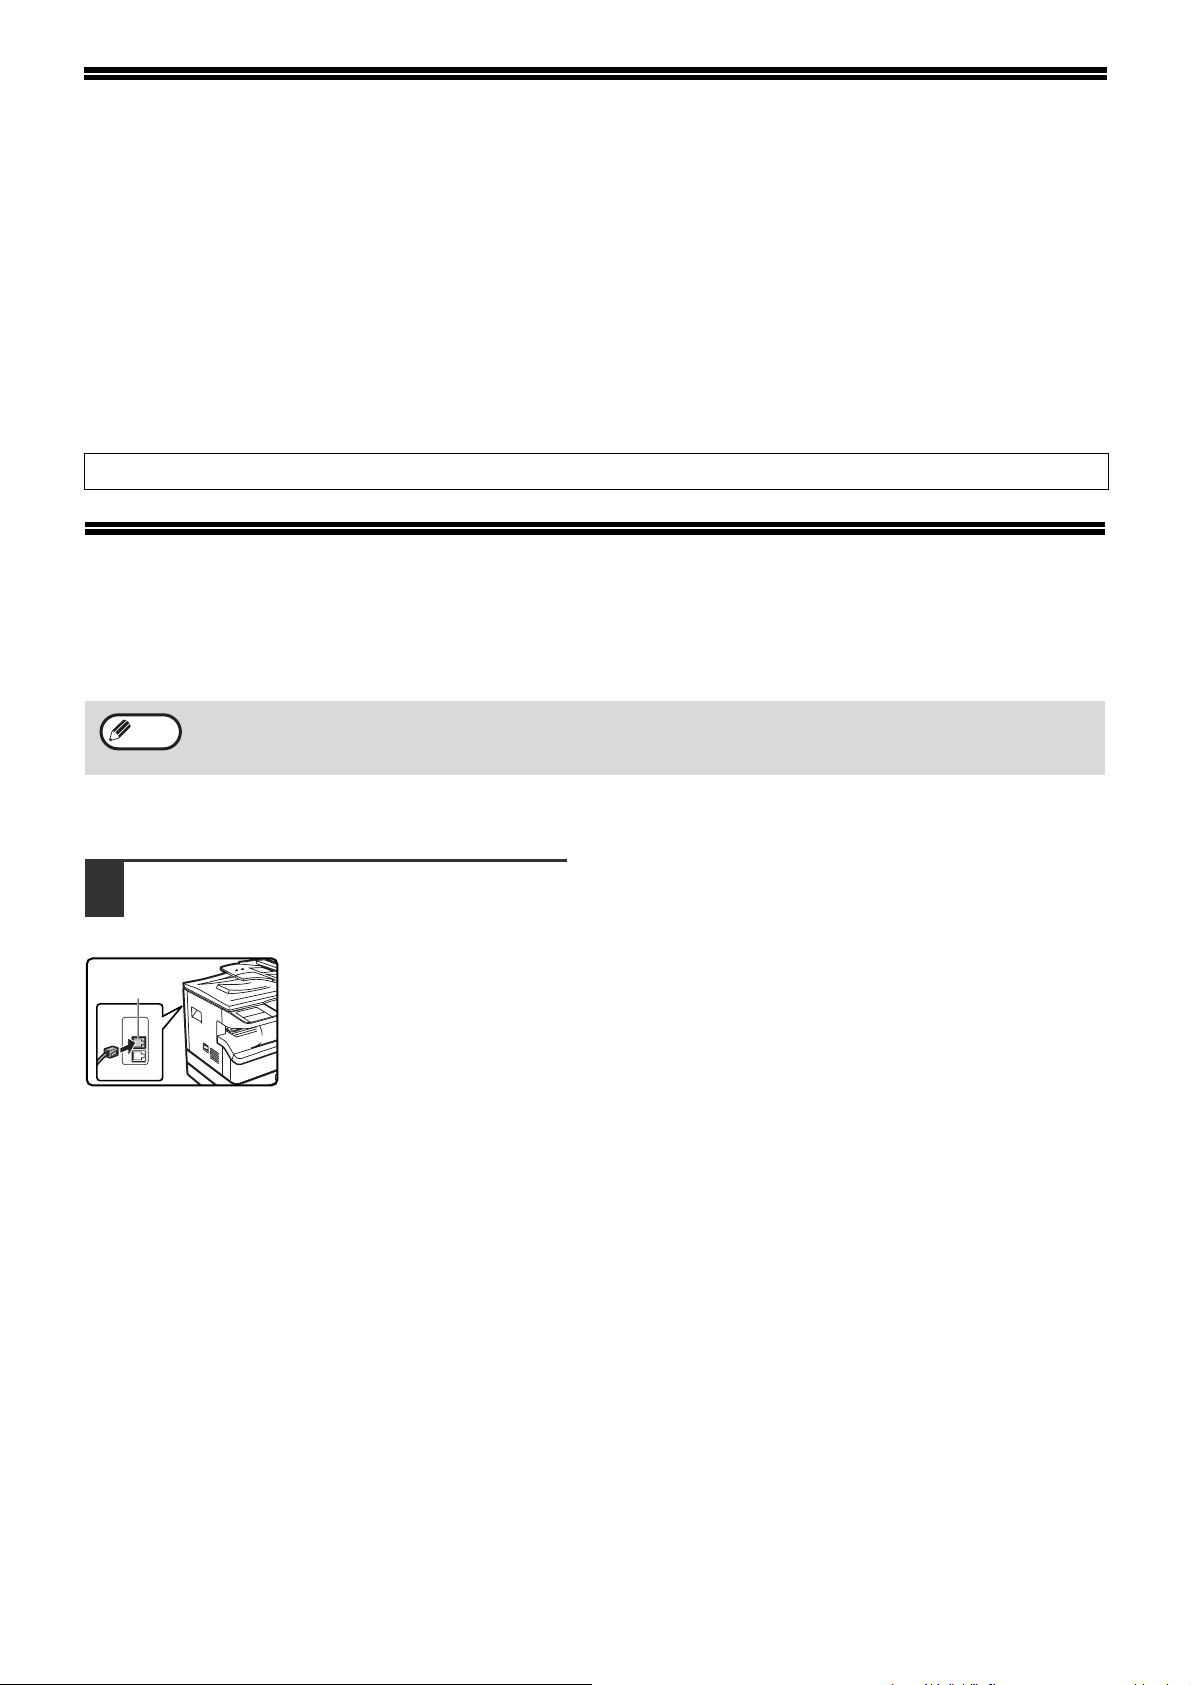
CONNECTING AN EXTENSION PHONE
You can connect a telephone to the machine and use it as an extension phone to place and receive calls like any
normal phone. Fax reception can also be activate d from an extension phone connected to the machine. (remote
operation)
Note
• If you connect a combination telephone/answering machine to the machine, you will not be able to use the
answering machine function.
• You can place calls from the phone even during a power failure.
CONNECTING AN EXTENSION PHONE
Insert the end of the extension phone
1
cord into the extension phone jack on
the left side of the machine.
Extension
phone jack
Make sure you hear a "click"
sound indicating that the cord is
securely connected.
1
Page 4

CONTENTS
INTRODUCTION........................................................................................................................................ 1
CONNECTING AN EXTENSION PHONE.................................................................................................. 1
TO USE THIS PRODUCT CORRECTLY AS A FACSIMILE..................................................................... 4
1
POINTS TO CHECK AND PROGRAM AFTER
INSTALLATION................................................. 6
PART NAMES AND FUNCTIONS..................... 7
● OPERATION PANEL........................................7
● FAX MODE (BASE SCREEN) ..........................9
● AUDITING MODE...........................................10
ORIGINALS...................................................... 11
● ORIGINALS THAT CAN BE FAXED...............11
PLACING THE ORIGINAL............................... 12
● USING THE SPF/RSPF..................................12
● USING THE DOCUMENT GLASS..................12
CHECKING THE SIZE OF A PLACED
ORIGINAL........................................................ 13
●
SELECTING RESOLUTION AND EXPOSURE
SETTINGS........................................................ 14
CONVENIENT DIALLING METHODS
(AUTO-DIALLING)...........................................15
2
SENDING A FAX ............................................. 17
●
● TRANSMISSION BY AUTO-DIALLING (RAPID
● SENDING A FAX BY SPEED DIALLING........19
●
●
● CANCELLING A FAX TRANSMISSION .........25
RECEIVING FAXES.........................................27
● RECEIVING A FAX......................................... 2 7
● FAX PRINT HOLD FUNCTION.......................29
BEFORE USING THE FAX FUNCTION
MANUALLY SETTING THE SCANNING SIZE
......13
BASIC OPERATIONS
BASIC PROCEDURE FOR SENDING FAXES
DIALLING AND GROUP DIALLING) ..............19
SEARCHING FOR A PROGRAMMED DESTINATION
(USING THE [ADDRESS] KEY)
FAXING A TWO-SIDED ORIGINAL
(MX-M182D/MX-M202D/MX-M232D)
...........................20
....................21
......17
3
SENDING THE SAME DOCUMENT TO MULTIPLE
DESTINATIONS IN A SINGLE OPERATION
(BROADCAST TRANSMISSION)
● USING BROADCAST TRANSMISSION........ 32
AUTOMATIC TRANSMISSION AT A SPECIFIED
TIME (TIMER TRANSMISSION)
● SETTING UP A TIMER TRANSMISSION...... 33
TRANSMISSION AND RECEPTION USING THE
POLLING FUNCTION...................................... 35
● USING THE POLLING FUNCTION ............... 36
● USING POLLING MEMORY.......................... 38
INCLUDING SENDER INFORMATION ON
FAXES ............................................................. 41
FAXING A DIVIDED ORIGINAL (DUAL PAGE
SCAN).............................................................. 42
ADDING A COVER SHEET/MESSAGE TO A
FAX TRANSMISSION...................................... 43
USING SETTINGS STORED AS A PROGRAM
● USING A PROGRAM..................................... 44
FORWARDING RECEIVED DATA TO A
NETWORK ADDRESS (INBOUND ROUTING
SETTINGS) ...................................................... 45
● CONFIGURING THE BASIC SETTINGS....... 45
● SETTINGS THE DESTINATION.................... 47
FORWARDING RECEIVED FAXES TO
ANOTHER MACHINE WHEN PRINTING IS NOT
POSSIBLE (FORWARDING FUNCTION)....... 49
● USING THE FORWARDING FUNCTION...... 49
SENDING A FAX DIRECTLY FROM A
COMPUTER (PC-Fax)..................................... 50
4
COMMUNICATION BETWEEN MACHINES
SUPPORTING F-CODES ................................ 52
●
● CREATING A BOX FOR F-CODE
ADVANCED TRANSMISSION METHODS
...................... 31
..................... 33
.... 44
TRANSMISSION USING F-CODES
BOXES AND SUB-ADDRESSES/PASSCODES
REQUIRED FOR F-CODE TRANSMISSION
TRANSMISSION............................................ 53
....... 52
2
Page 5

F-CODE POLLING MEMORY.......................... 54
●
HOW F-CODE POLLING MEMORY WORKS
● USING F-CODE POLLING MEMORY. ... ... .... . 5 5
● PROCEDURE FOR F-CODE POLLING.........57
F-CODE CONFIDENTIAL TRANSMISSION ... 59
● F-CODE TRANSMISSION (F-CODE
CONFIDENTIAL TRANSMISSION)................59
● PRINTING A DOCUMENT RECEIVED TO AN
F-CODE CONFIDENTIAL MEMORY BOX.....61
F-CODE RELAY BROADCAST
TRANSMISSION.............................................. 62
●
USING THE F-CODE RELAY BROADCAST
FUNCTION (your machine is the relay machine)
USING THE F-CODE RELAY REQUEST FUNCTION
●
(your machine requests a relay broadcast)
.......54
......63
...........63
CONTENTS
7
WHEN A TRANSACTION REPORT IS PRINTED
● INFORMATION APPEARING IN THE
VIEWING THE COMMUNICATION ACTIVITY REPORT
AT REGULAR INTERVALS (Communication activity
report)
WHEN AN ALARM SOUNDS AND A WARNING
MESSAGE IS DISPLAYED ............................. 92
● SELF-DIAGNOSTIC FUNCTION................... 93
●
PROBLEMS AND SOLUTIONS ...................... 94
TROUBLESHOOTING
...... 90
TYPE/NOTE COLUMN..................................90
.............................................................. 92
MESSAGES DURING NORMAL OPERATION
..... 93
5
CONNECTING AN EXTENSION PHONE........ 64
● USING AN EXTENSION PHONE...................64
● SETTING THE RECEPTION MODE ..............65
6
PROGRAMMING ............................................. 66
STORING, EDITING, AND DELETING AUTO DIAL
NUMBERS AND PROGRAMS
● STORING, EDITING, AND DELETING
● STORING, EDITING AND DELETING
PROGRAMMING, EDITING, AND DELETING
F-CODE MEMORY BOXES............................. 78
●
PRINTING LISTS OF PROGRAMMED
INFORMATION, SETTINGS, AND
COMMUNICATION ACTIVITY.........................85
ENTERING CHARACTERS............................. 86
● CHARACTERS THAT CAN BE ENTERED ....86
● CHANGING TO ENTRY MODE......................86
● CHARACTER ENTRY KEYS..........................87
● INITIAL PROCEDURE FOR ENTERING
CONVENIENT METHODS OF USE
PROGRAMMING
.......................... 66
AUTO-DIAL NUMBERS (RAPID KEYS, SPEED
DIAL NUMBERS, AND GROUP KEYS) .........66
PROGRAMS...................................................76
PROGRAMMING AN F-CODE MEMORY BOX
CHARACTERS ...............................................88
.....78
8
● ADMINISTRATOR SETTINGS LIST.............. 96
● ADMINISTRATOR SETTINGS MENU........... 97
PROCEDURE FOR USING THE SYSTEM
SETTINGS ....................................................... 98
● INITIAL PROCEDURE................................... 98
SYSTEM SETTINGS FOR THE FAX FUNCTION.....99
● LIST PRINT/SET............................................ 99
● INITIAL SETTING ........................................ 100
● SENDING FUNCTION................................. 105
● RCV. FUNCTION.......................... ... .... ........ 108
● POLLING SECURITY .................................. 111
9
SPECIFICATIONS ......................................... 112
INDEX ............................................................ 113
SYSTEM SETTINGS
APPENDIX
3
Page 6
T O USE THIS PR ODUCT CORRECTLY AS A FACSIMILE
Several points must be kept in mind when using this product as a facsimile.
Please note the following.
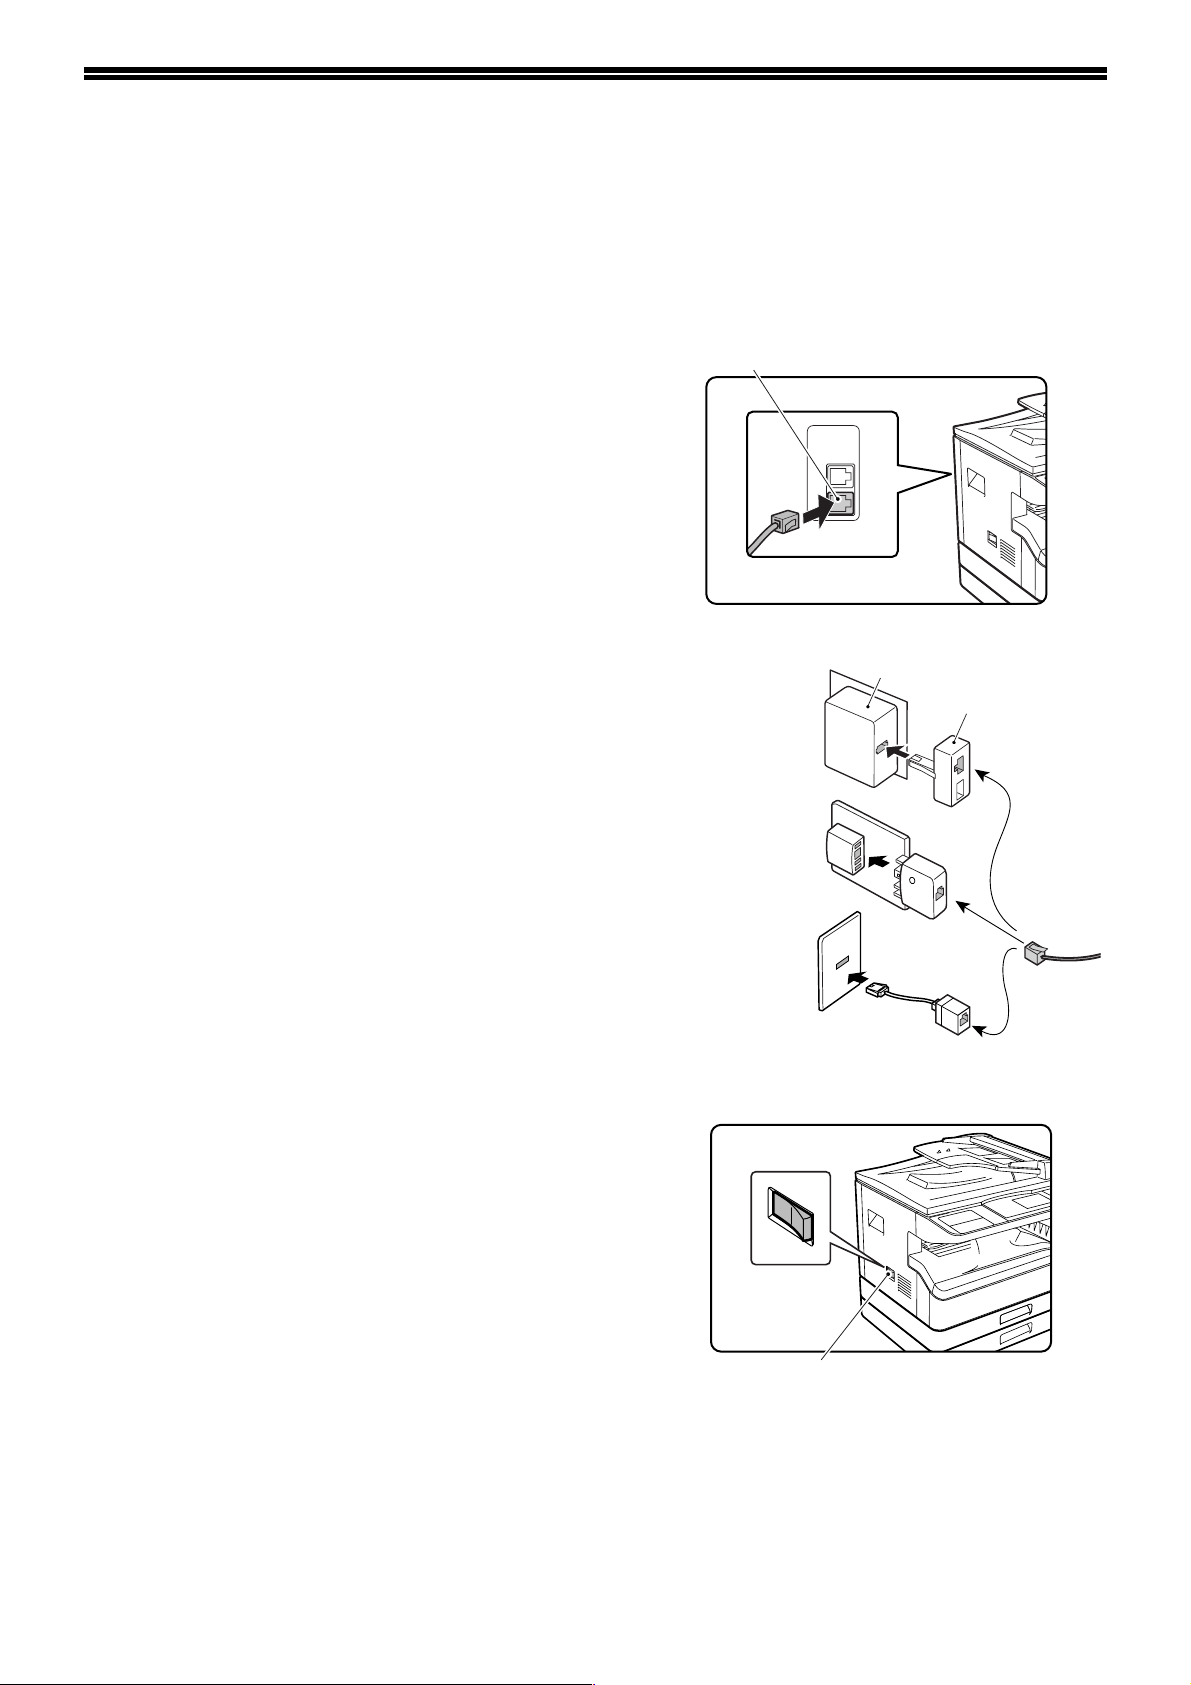
Line connection
Be sure to use the provided telephone line cord to connect
the machine to a telephone line jack. Insert one end of the
telephone line cord into the LINE jack on the left side of the
machine as shown. Insert the other end of the telephone
line cord into a telephone line jack.
Insert the plug firmly until you hear a "click".
LINE jack
In some countries, an adapter is required to connect the
telephone line cable to the wall telepho ne socket, as shown
in the illustration.
Power switch
Keep the machine power switch turned on at all times. Do
not turn off the power. If the power is turned off, the fax
function cannot be used.
When the power is off, the machine cannot receive faxes.
Before turning off the power, make sur e the machine is idle.
If the power is turned off while the machine is in operation, a
paper jam may occur. If settings are being configured, the
settings will be cancelled.
For United
Kingdom
For Australia
For New Zealand
Wall socket
Adapter
Power switch
Setting the date and time and programming your sender's name
and number
Before using the fax function, you must set the date and time and program your sender's name and number in the
machine. This procedure is explained in "POINTS TO CHECK AND PROGRAM AFTER INSTALLATION" on page 6
of this manual.
4
Page 7

TO USE THIS PRODUCT CORRECTLY AS A FACSIMILE
Lithium battery
A lithium battery in the machine is used to retain settings and programmed information such as auto-dial numbers
(page 66).
• When the battery dies, settings and programmed information will be lost, so please keep a record of this
information. (See "PRINTING LISTS OF PROGRAMMED INFORMATION, SETTINGS, AND COMMUNICATION
ACTIVITY" on page 85.)
• The life of the battery is approximately 5 years when the power switch is kept cont inuously off.
• When the battery dies, please contact your local Sharp dealer or authorised service representative for assistance
in disposing of this battery. The machine will not operate once the battery dies.
Please note
In the event of a thunderstorm, remove the power cord from the power outlet to ensure safety. Information will be
retained in memory even if the power cord is unplugged.
5
Page 8

BEFORE USING THE FAX
1
This chapter contains basic information about using th e fax fun ction of the m achine. Please rea d this chapter bef ore
using the fax function.
FUNCTION
POINTS TO CHECK AND PROGRAM AFTER INSTALLATION
After installing the machine and before usin g it as a fax mac hine , che ck th e follo win g po in ts an d prog ra m the
required information.
Set the date and time
The machine has an internal clock. It is important to set the c orre ct da te and time be ca use the y ar e use d for su ch
features as Timer Transmission (page 33).
The date and time are set in the system settings. (Page 104)
The date and time appear in the display. Ma ke sure the corre ct date and time ap pear. If the date and time are wrong,
please correct them.
Program the sender's name and sender's number
The name and fax number of the user of the machine is programmed in "OWN PASSCODE SET" (page 101) in the
system settings. (Only one name and number can be programmed.)
The programmed name and number are p rinted at the t op of each transmit ted fax page. The sender's number is also
used as an identification number when you use the Polling function to request transmission from another fax
machine (see "USING THE POLLING FUNCTION" on page 36).
Note
You can check your programmed name and nu mber by printing out the "Administrator Settings List" in the system
settings. (See "LIST PRINT" on page 99.)
Paper sizes that can be used for fax mode
The machine can use A3, B4, A4, A4R, B5, B5R, A5, 11" x 17", 8-1/2" x 14", 8-1/2" x 11", 8-1/2" x 11"R, and 5-1/2"
x 8-1/2"* size paper; however, 11" x 17", 8-1/2" x 14" and 5-1/2" x 8-1/2" size paper cannot be used in fax mode.
(Among INCH sizes, only 8-1/2" x 11" and 8-1/2" x 11"R can be used.) (If your machine use s inch-based paper
sizes, A3, B4, B5, B5R, and A5 size paper cannot be used in fax mode. (Among AB sizes, only A4 and A4R can be
used.)) For this reason, if only paper sizes that can be used in other modes but not in fax mode are loaded in the
machine, received faxes cannot be printed. (For other points regarding fax reception, see "RECEIVING FAXES"
page 27.)
* A5 (5-1/2" x 8-1/2") size paper can only be loaded in tray 1, regardless of the mode. A5 (5-1/2" x 8-1/2") paper cannot be
loaded in tray 2 or in the optional 250-sheet paper feed unit or 2 x 250-sheet paper feed unit.
Note
For the procedures for loading paper in the trays, see the Operation Guide for the machine.
6
Page 9
PART NAMES AND FUNCTIONS
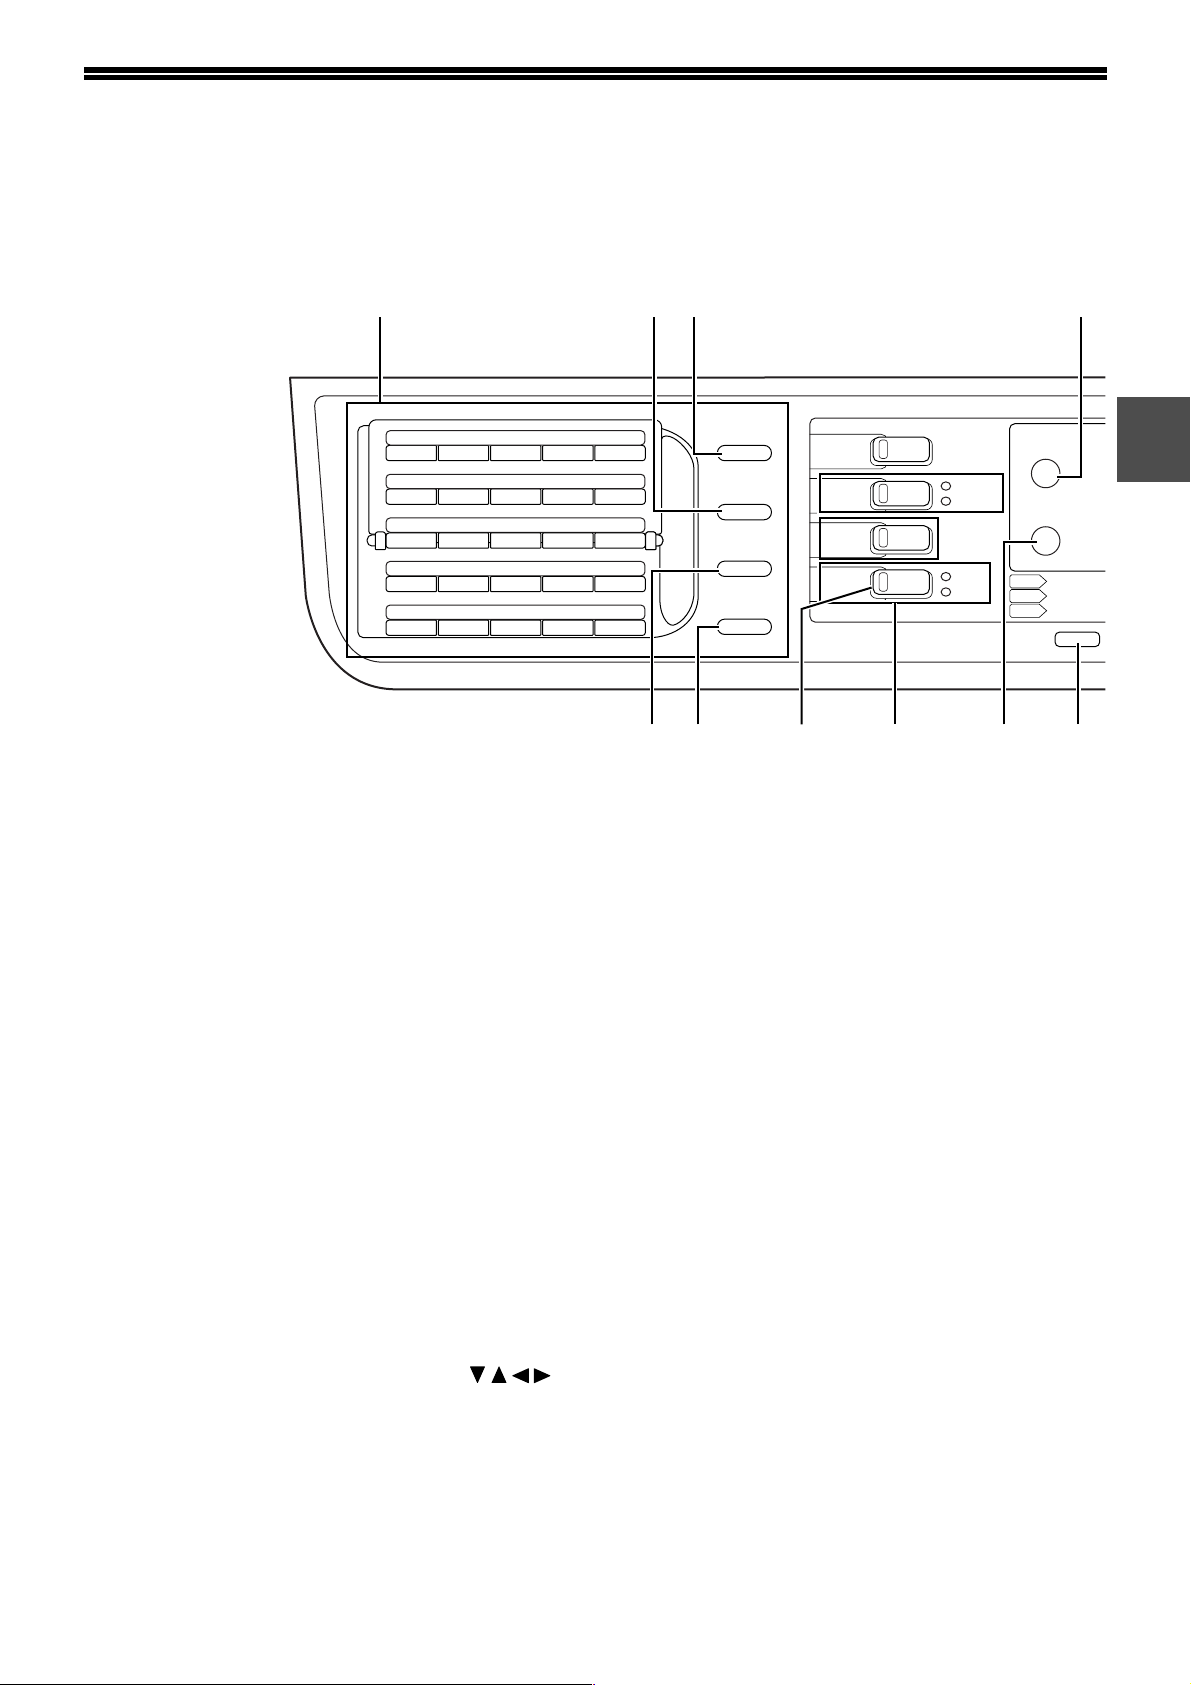
OPERATION PANEL
(1)
01 02 03 04 05
06 07 08 09 10
11 12 13 14 15
16 17 18 19 20
21 22 23 24 25
(1) Page pallet (page 86)
(2) [REDIAL/PAUSE] key (pages 15)
This is used to redial the last number dialled, and
enter a pause when entering a fa x number.
(3) [SPEAKER/SHIFT] key (pages 15, 86)
This is used to dial without lifting an extension
phone connected to the machine and to shift
between upper and lower case when entering
characters.
(4) [FAX STATUS] key (page 25)
This is used to cancel a fax transmission or a
stored fax transmission.
(5) Display (page 9)
This key displays the base screen and the
function setting screen.
SPEAKER
SHIFT
REDIAL/PAUSE
SPEED
SYMBOL
COMM. SETTING
SPACE/–
(11)(10)
COPY
PRINT
SCAN
FAX
(13)(12) (15)(14)
ON LINE
DATA
LINE
DATA
FAX STATUS
SPECIAL
FUNCTION
COPY
SCAN
FAX
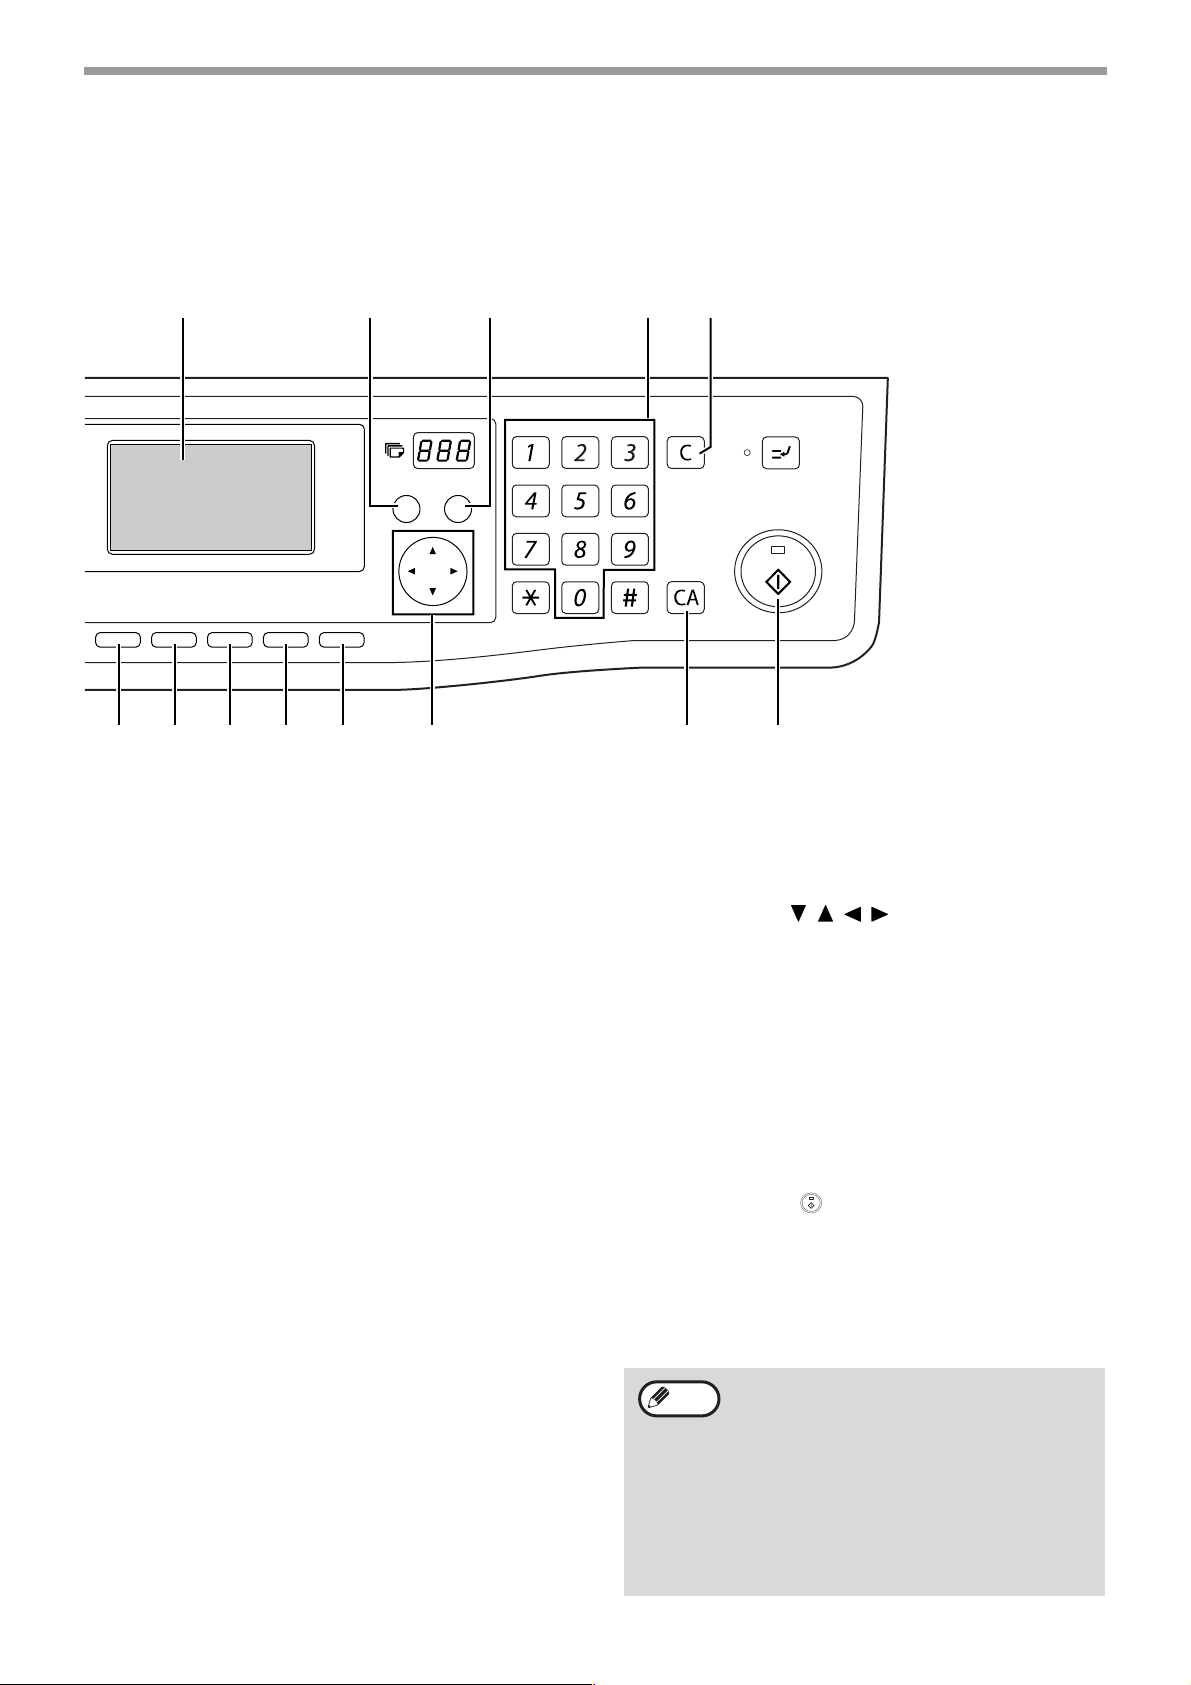
(9) [C] key
This is used to clear a mistake when entering fax
numbers, sub-addresses, passcodes, and
numerical settings. One digit is clear ed each ti me
the key is pressed.
When an original is being scanned, this key can
also be used to cancel scanning.
(10) [SPEED/SYMBOL] key (pages 15, 88)
This is used to dial by Speed dialling and to enter
a symbol when entering characters.
(11) [CO MM. SETTING/SPACE/-] key (page 22)
This is used to switch between memory
transmission and direct transmission, and to
switch between automatic reception and manual
reception. It is also used to enter a space or "-"
when entering characters.
(4)(3)(2)
EXPOSURE
COLOUR MODE
PROGRAM
1
(6) [BA CK] key
In a setting or programming screen, this key is
used to move back to the previous screen.
(7) [OK] key
This key is used to enter a setting that has been
selected with the arrow or other keys ( ).
(8) Numeric keys
These are used to enter fax numbers,
sub-addresses, passcodes, and numerical
settings. (See "BOXES AND
SUB-ADDRESSES/PASSCODES REQUIRED
FOR F-CODE TRANSMISSION" on page 52.)
(12) [FAX] key/FAX indicator/LINE indicator/DATA
indicator
Press to switch to fax mode. The base screen of
fax mode will appear in the display.
The LINE indicator lights up during transmission
or reception of a fax. When a fax has been
received, the DATA indicator blinks. (When there
is fax transmission data in memory, the DATA
indicator lights up.)
7
Page 10
BEFORE USING THE FAX FUNCTION
(5) (6) (7) (8)
ABC DEF
JKLGHI MNO
TUVPQRS WXYZ
@.-
READ-END
_
RESOLUTION
RESOLUTION
COPY RATIO
ADDRESS
ADDRESS
AUTO IMAGE
FORMA T
BROADCAST
2-SIDED COPYPAPER SELECT
OUTPUT
ORIGINAL SIZE
ORIGINAL SIZE
DUPLEX SCAN
DUPLEX SCAN
BACK
OK
ACC. #-C
(16) (17) (18) (19) (20) (21) (23)(22)
(13) [MODE SELECT] keys (step 1 on page 17)
(20) [DUPLEX SCAN] key (page 21)
These are used these keys to change modes.
(14) [SPECIAL FUNCTION] key
This key is used to select a special transmission
(21) Arrow keys ( )
or reception function, configure function settings,
and to store auto-dial numbers.
(9)
INTERRUPT
Press this key to use the duplex scan function.
(Only on models with a RSPF installed.)
These are used to select items and mov e thr ough
pages.
(15) [PROGRAM] key (page 44)
Press this key to use a program.
(16) [RESOLUTION] key (page 14)
This key is used to select resolution and exposure
settings.
(17) [ADDRESS] key (page 20)
This key is used to search for a fax destination
that has been stored as an auto-dial number in
the address book.
(18) [BROADCAST] key (page 31)
This is used to perform a broadcast transmission.
(19) [ORIGINAL SIZE] key (page 13)
This is used to set the size of the original to be
faxed.
(22) [CA] key
This is used to cancel a transmission or
programming operation. When pressed during an
operation, the operation is cancelled and the display
returns to the base screen described on page 9.
This key is also used to cancel a resolution, paper
size, or special function setting that was selected
when sending a fax.
(23) [START] key ( )
This is used at the following times:
(1) When starting transmission
(2) When scanning an original
(3) When starting manual reception
(4) When configuring and storing settings
Note
• When the auto power shut-off function is
activated, all indicators except the
[START] key indicator go off. For the
information on the auto power shut-off
function, see the Operation Guide for the
machine.
• For information on the keys and lights
which are used for the copy function and
other functions, see "Operation Panel" in
the manual for each function.
8
Page 11
BEFORE USING THE FAX FUNCTION
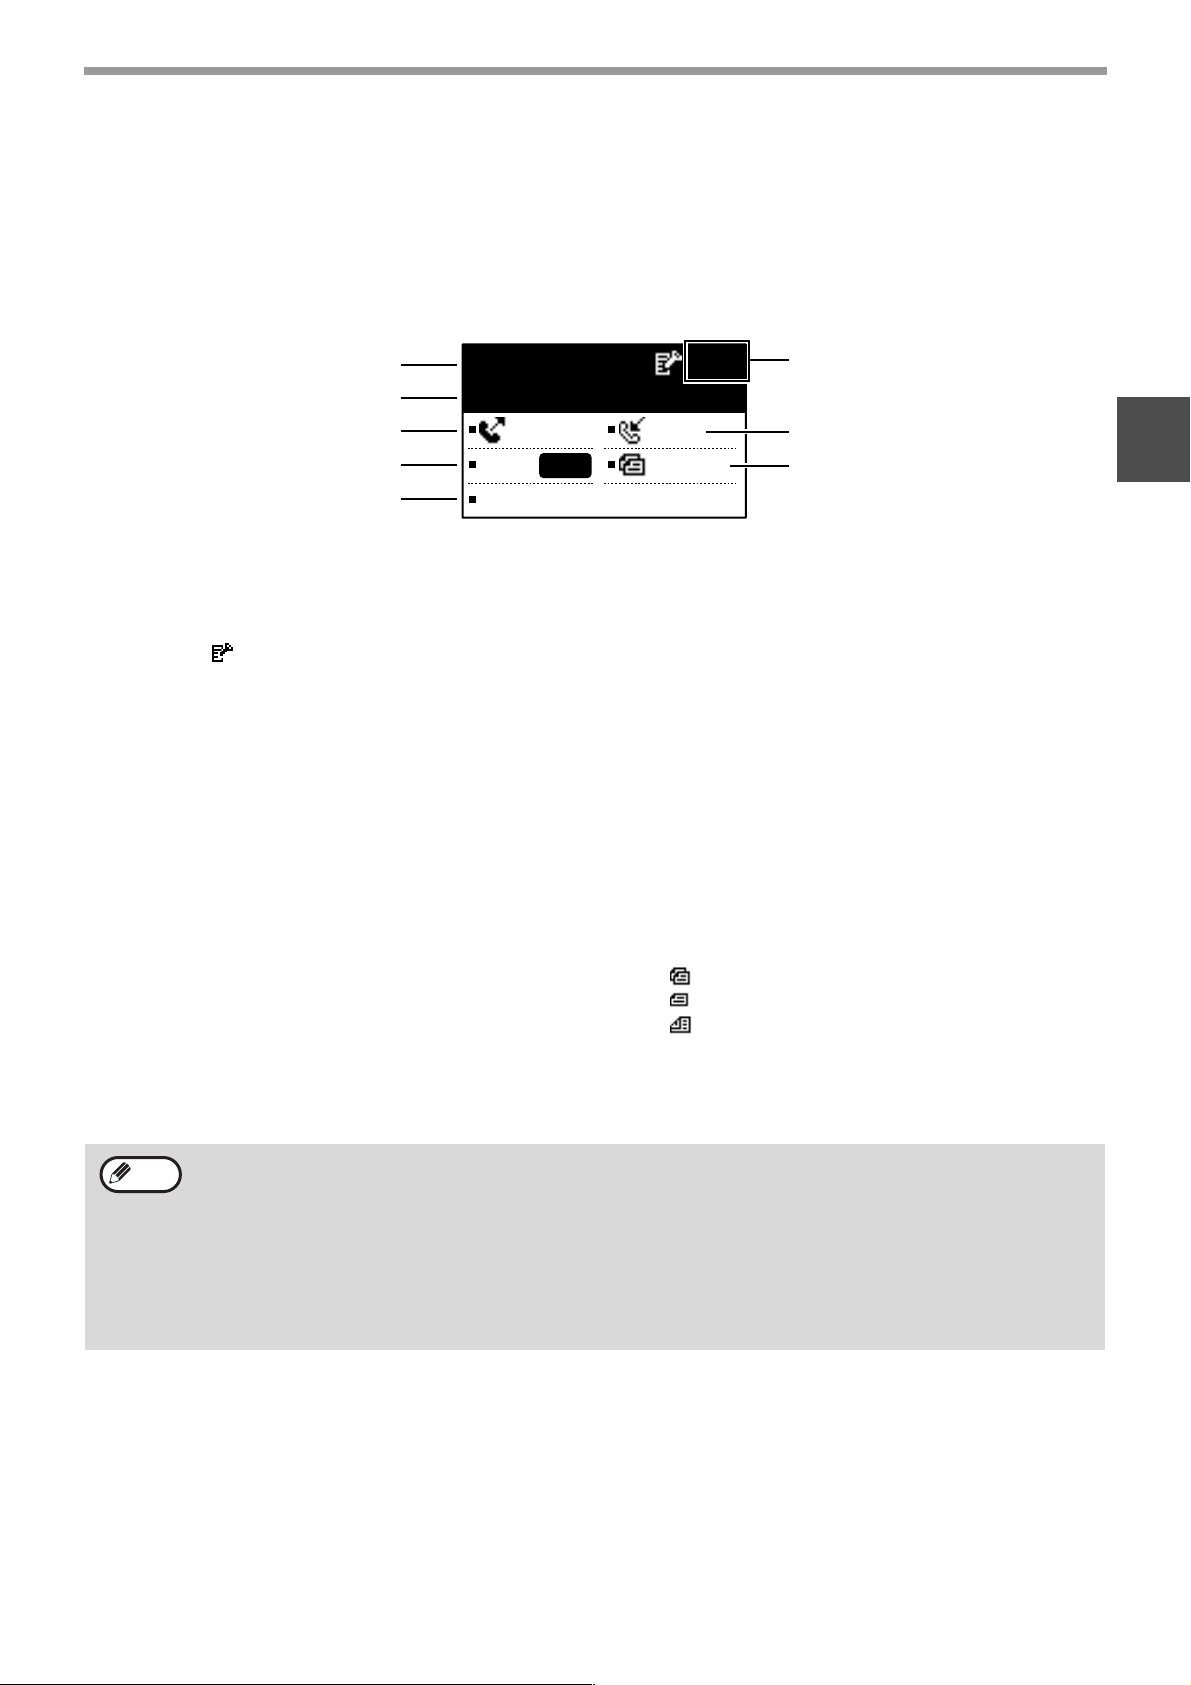
FAX MODE (BASE SCREEN)
The base screen of fax mode is displayed by pressing t he [FAX] key when the print m ode, copy mode , or scan mod e
screen appears.
The base screen of fax mode
(1)
(2)
(3)
(4)
(5)
(1) Message display
Messages appear here to indicate the current
status of the machine.
An icon ( ) appears to the right side when a
confidential fax has been received.
(2) Date and time display
This shows the date and time.
(3) Transmission mode display (page 22)
There are three transmission modes: memory
transmission, direct transmission, and manual
transmission. This shows the currently selected
transmission mode.
(4) Exposure display (page 14)
This shows the exposure for scanning the original
that has been selected with the [RESOLUTION]
key.
Stand-by. 96%
10 MAY MON 10:25 AM
MEMORY AUTO
CONT A4R
STANDARD
AUTO
(6)
(7)
(8)
(5) Resolution display (page 14)
This shows the resolution for scanning the
original that has been selected with the
[RESOLUTION] key.
(6) Free memory display
This shows the percentage of fax memory that is
free.
(7) Reception mode display (page 65)
There are two modes for receiving faxes:
automatic reception and manual reception. This
shows the currently selected reception mode.
(8) Original display (page 13)
This displays an icon to indicate the original
scanning mode when an original has been
placed.
:One-sided original scanning in the SPF.
:Document gl ass
:Two-sided original scanning in the RSPF.
This also shows the size of the placed original.
1
Note
The following functions operate even when copy mode is selected:
• Automatic reception (including F-code confidential reception)
• Timer Transmission
• Memory polled function
• Transmission of stored memory transmission jobs
• Voice calls (voice calls can be answered but not placed).
• Remote reception
• Manual reception
• Relay station function for F-code relay broadcast transmission
9
Page 12
BEFORE USING THE FAX FUNCTION
ABC DEF
JKLGHI MNO
TUVPQRS WXYZ
@.-
_
READ-END
ACC. #-C
OK
@.-
_
READ-END
ACC. #-C
AUDITING MODE
Accounts that can transmit faxes (up to 50) can be established and transmission ti me and other information can be
tracked for each account. The Acc. Usage List (page 99) can be printed out which shows the time used for
transmission and pages transmitted by each account.
• This function is enabled using "ACCOUNT CONTROL" and "ACCOUNT # SET" in the system settings. (Page 103 )
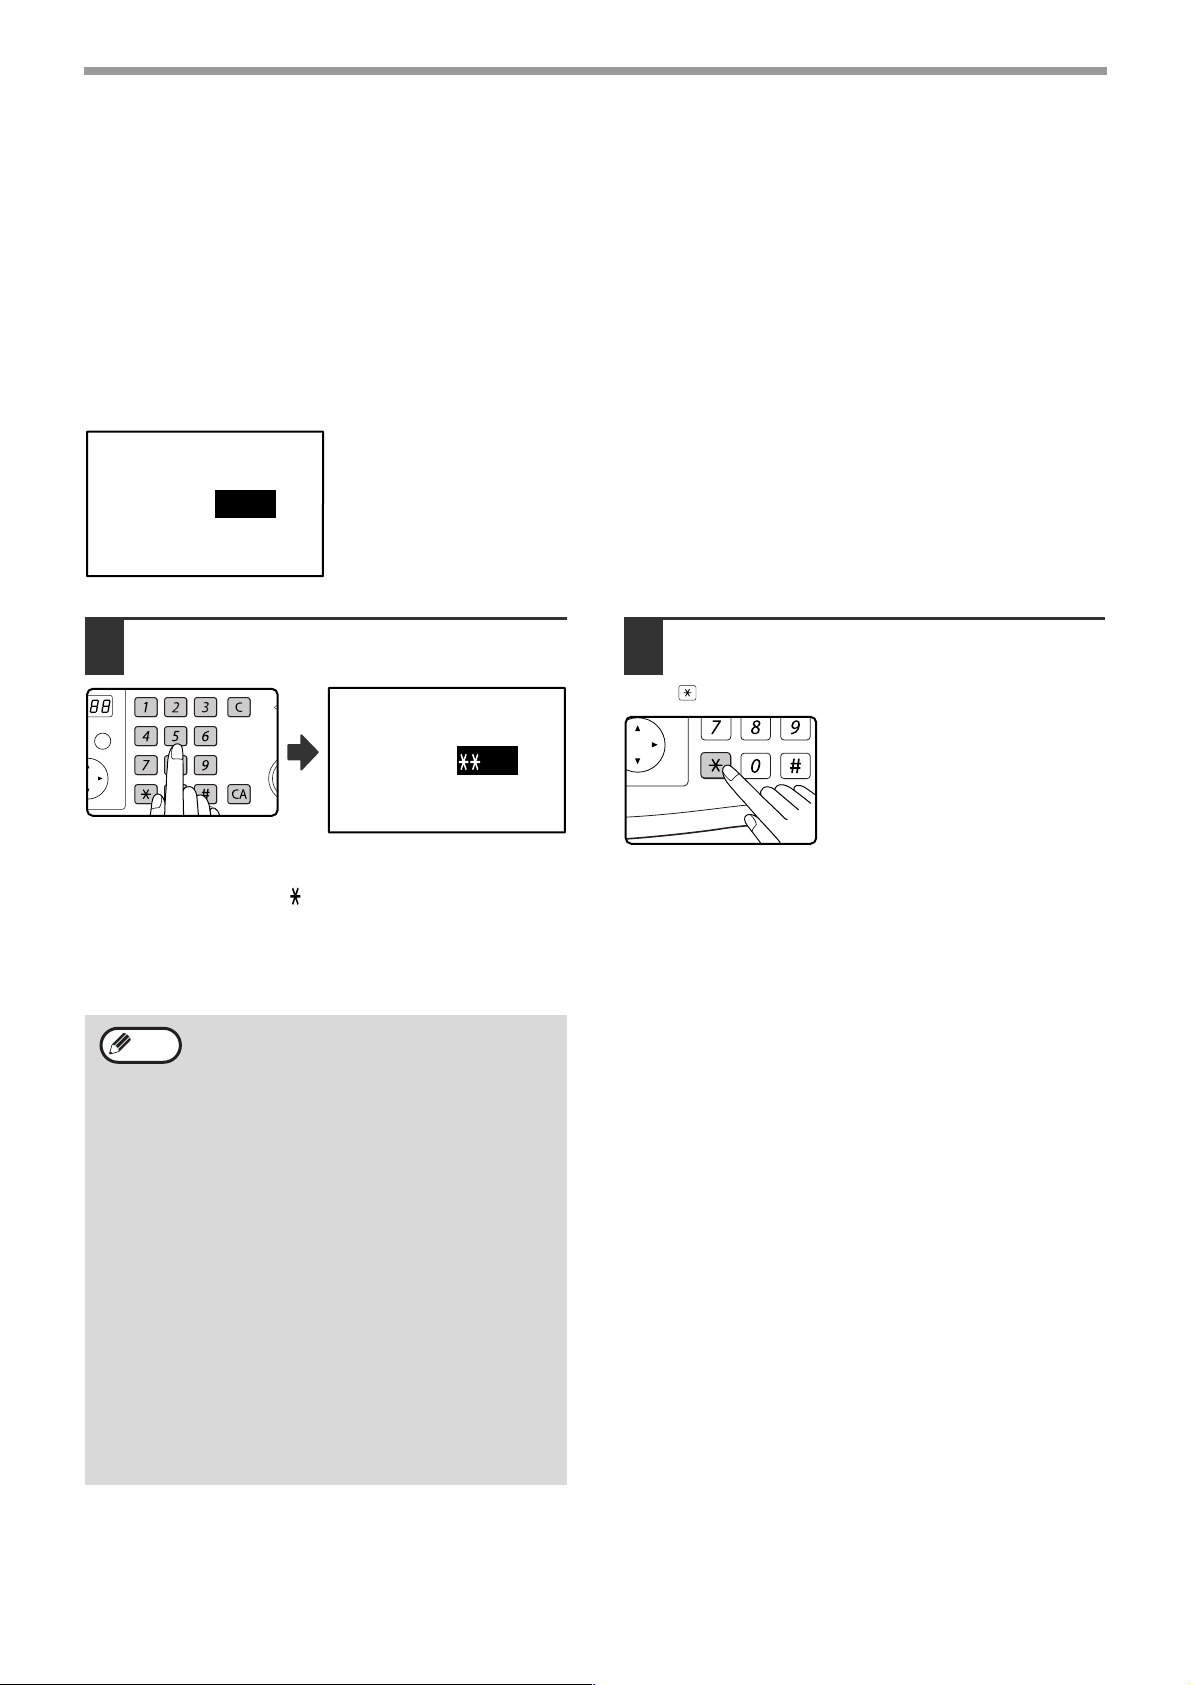
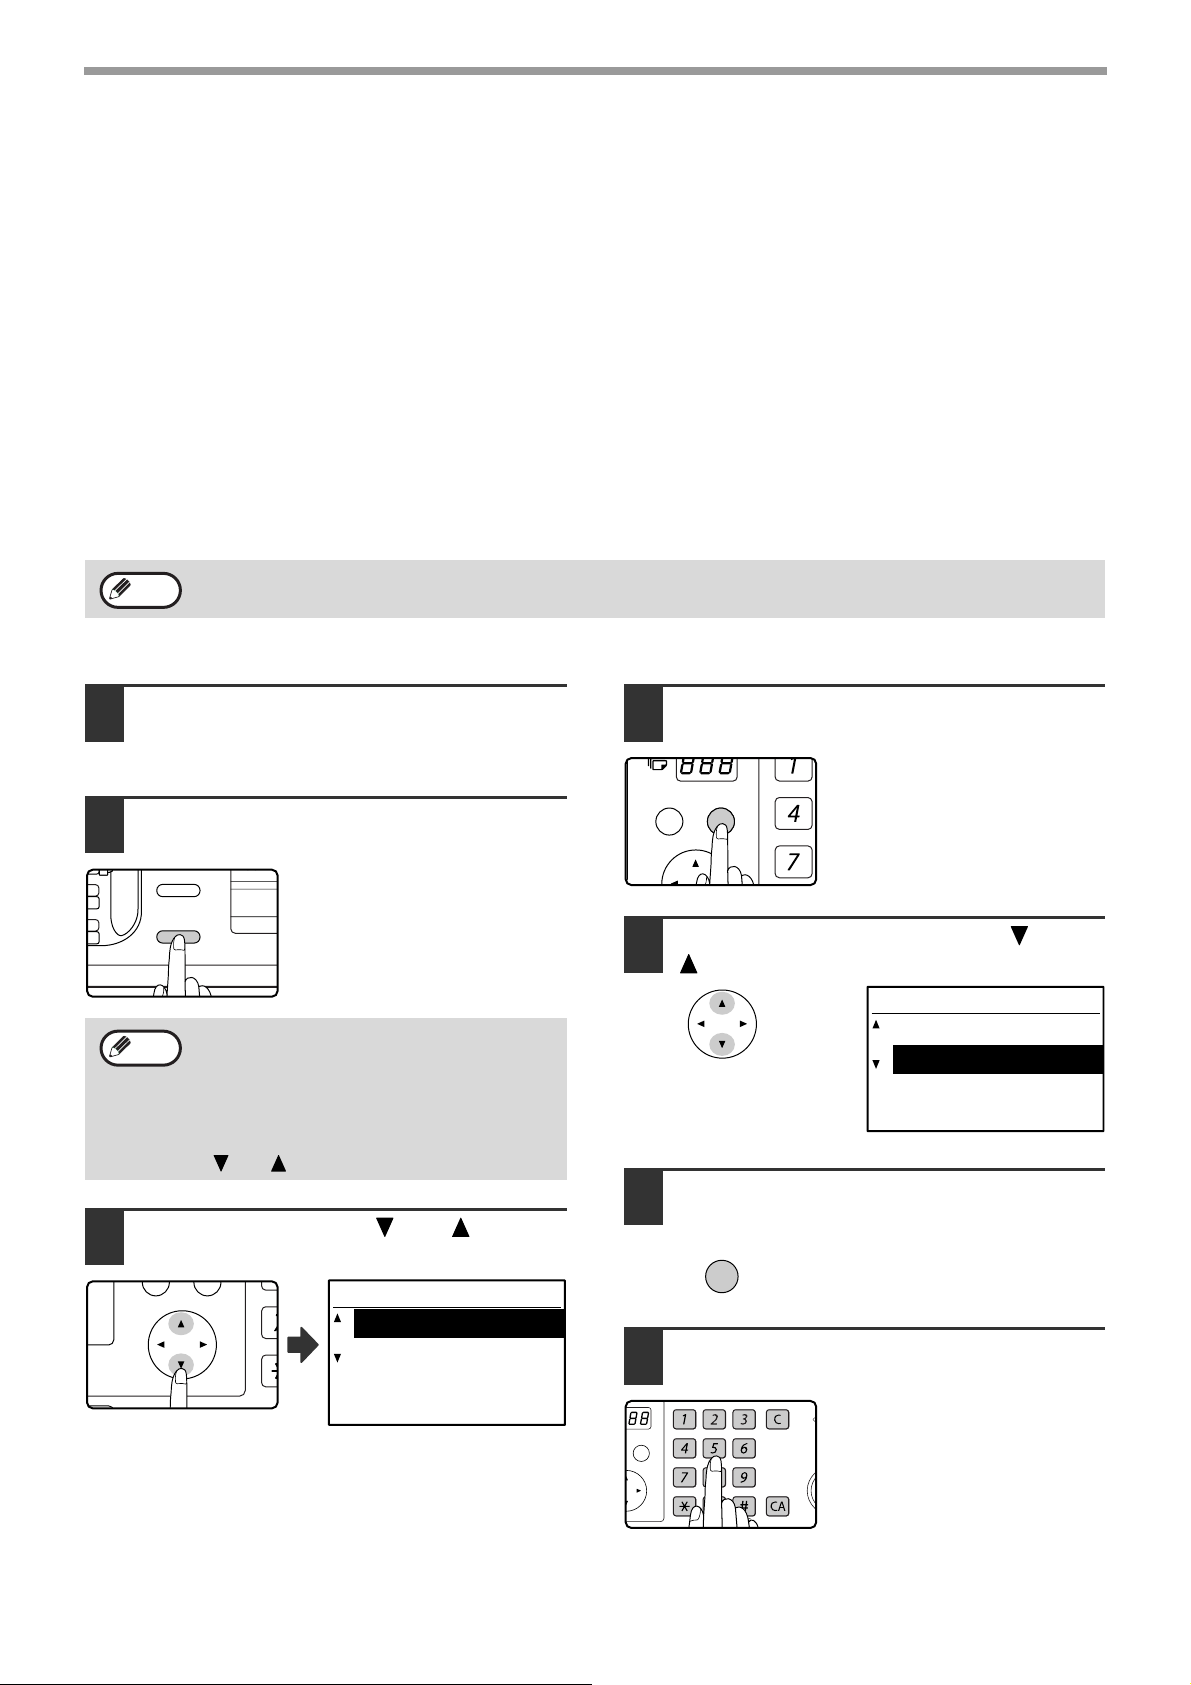
Using auditing mode
When auditing mode is turned on, the acco unt number entry screen is displayed. Enter your account number
(five-digit identification number) as explained below before performing a fax operation.
Enter your account
number.
ACCOUNT #:-----
Enter your account number (five
1
digits) with the numeric keys.
Enter your account
number.
ACCOUNT #: ---
• As the account number is entered, the hyphens "-"
change to asterisks " ". If you enter an incorrect
digit, press the [C] key and re-enter the correct digit.
• After you enter your account number, the base
screen of fax mode appears. (Page 9)
Note
• If you enter an account number for copy
mode has also been programmed for fax
mode, you can change to fax mode after
completing the copy operation and
continue with the fax operation without
re-entering your account number.
If you enter an account number for copy
mode that has not been programmed for
fax mode, enter your account number f or
fax mode after you press the [FAX] key to
change to fax mode.
• When "ACC. # SECURITY" in the system
settings (see the "System settings guide"
in the Operation Guide for the mach ine.) is
enabled, the message "Please see your
administrator for assistance." will appear
for one minute in the event that you enter
an incorrect or invalid account number
three times in a row. During that time
operation of the machine will not be
possible.
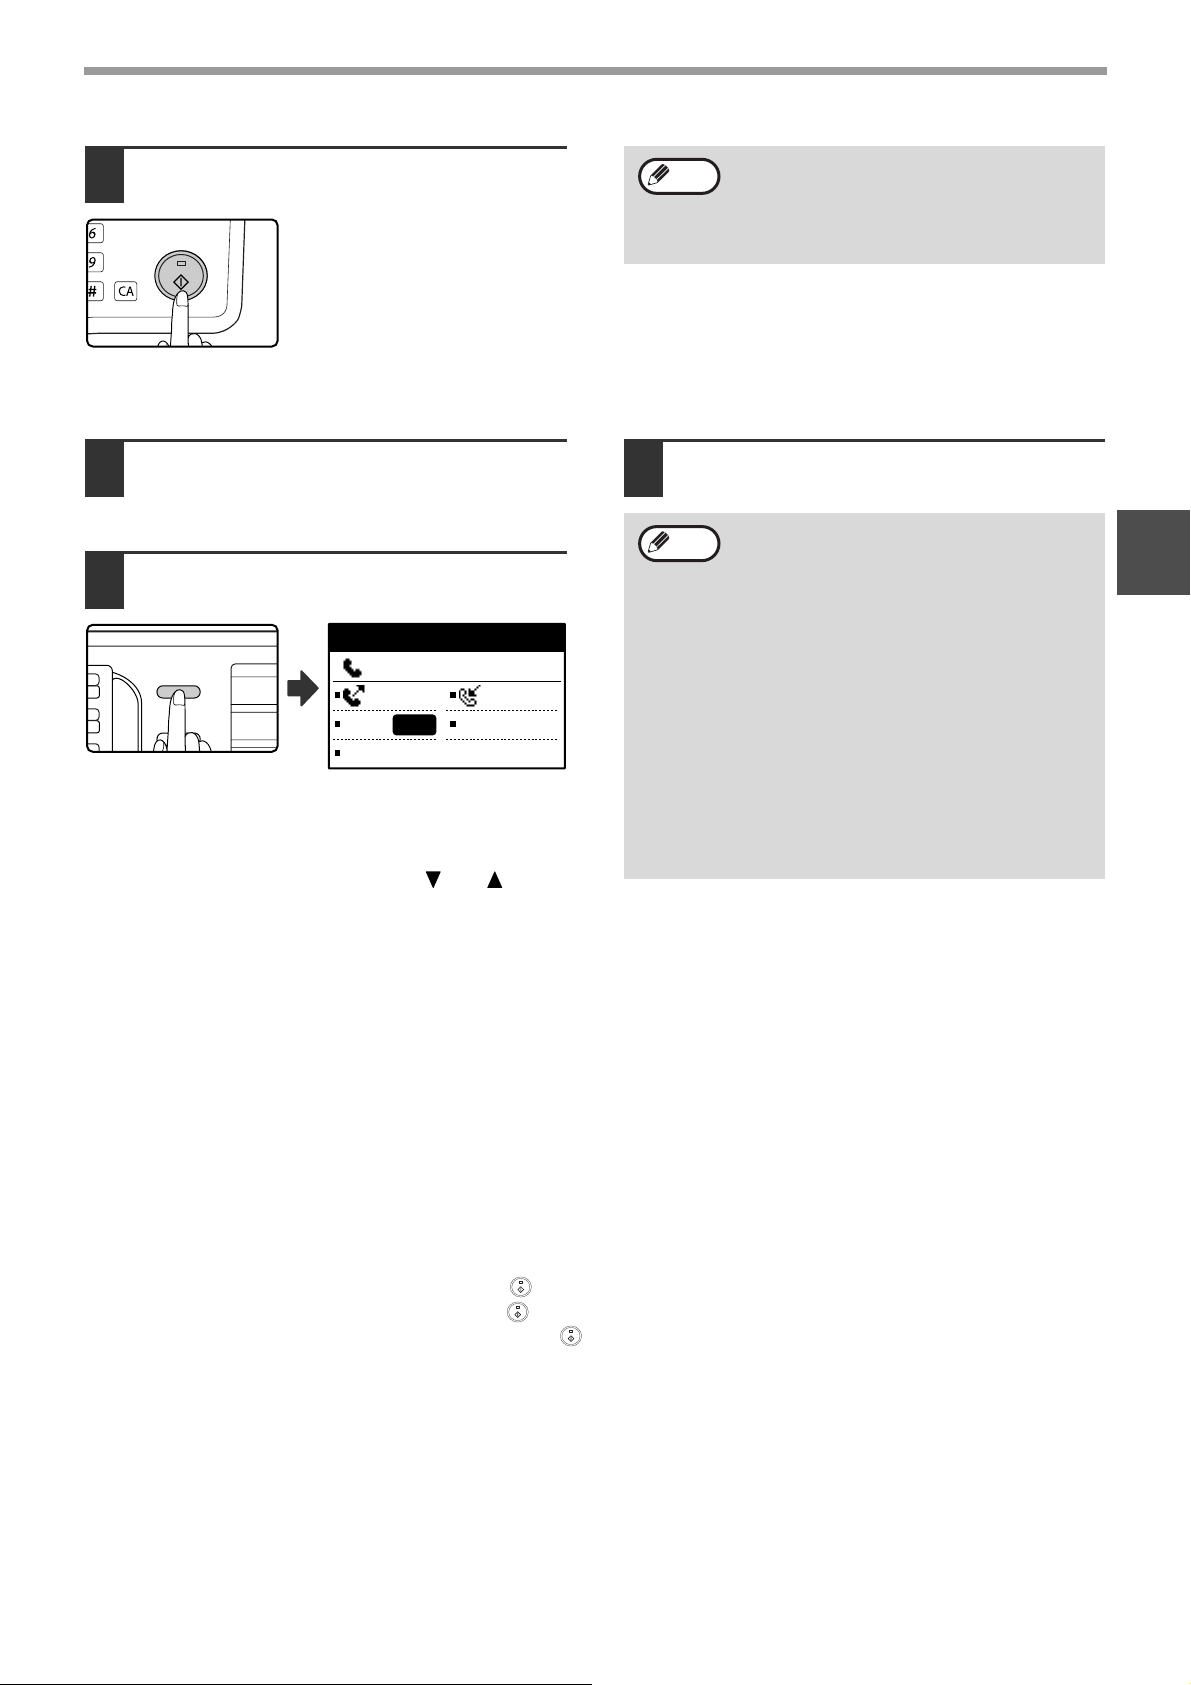
When you have completed the fax
2
operation, press the [ACC.#-C] key
().
10
Page 13
ORIGINALS
ORIGINALS THAT CAN BE FAXED
Original sizes
Minimum original size Maximum original size
Using the SPF/RSPF
Using the document glass
A5: 210 mm (width) x 148 mm (length)
(8-1/2" (width) x 5-1/2" (length))
A5R: 148 mm (width) x 210 mm (length)
(5-1/2" (width) x 8-1/2" (length))
297 mm (width) x 800 mm* (length)
(11" (width) x 31-1/2"* (length))
* Long documents can be
transmitted
297 mm (width) x 432 mm (length)
(11" (width) x 17" (length))
1
Note
*Long originals
Depending on the resolution setting and the width of the original, there may not be sufficient space in memory to
hold a long original. When a long original cannot be entirely scanned, select a lower resolution setting and/or
shorten the original.
• Originals that are not a standard size (A5, A4, A4R, B4, A3, 8-1/2" x 11", 8-1/2" x 11"R (5-1/2" x 8-1/2", 5-1/2"
x 8-1/2"R, 8-1/2" x 11", 8-1/2" x 11"R, 8-1/2" x 14", 11" x 17", A4, A4R if the machine uses inch-based paper
sizes)) can also be faxed.
• There are restrictions on originals that can be scanned using the SPF/RSPF. For more information, see
"NORMAL COPYING" in the Operation Guide for the machine.
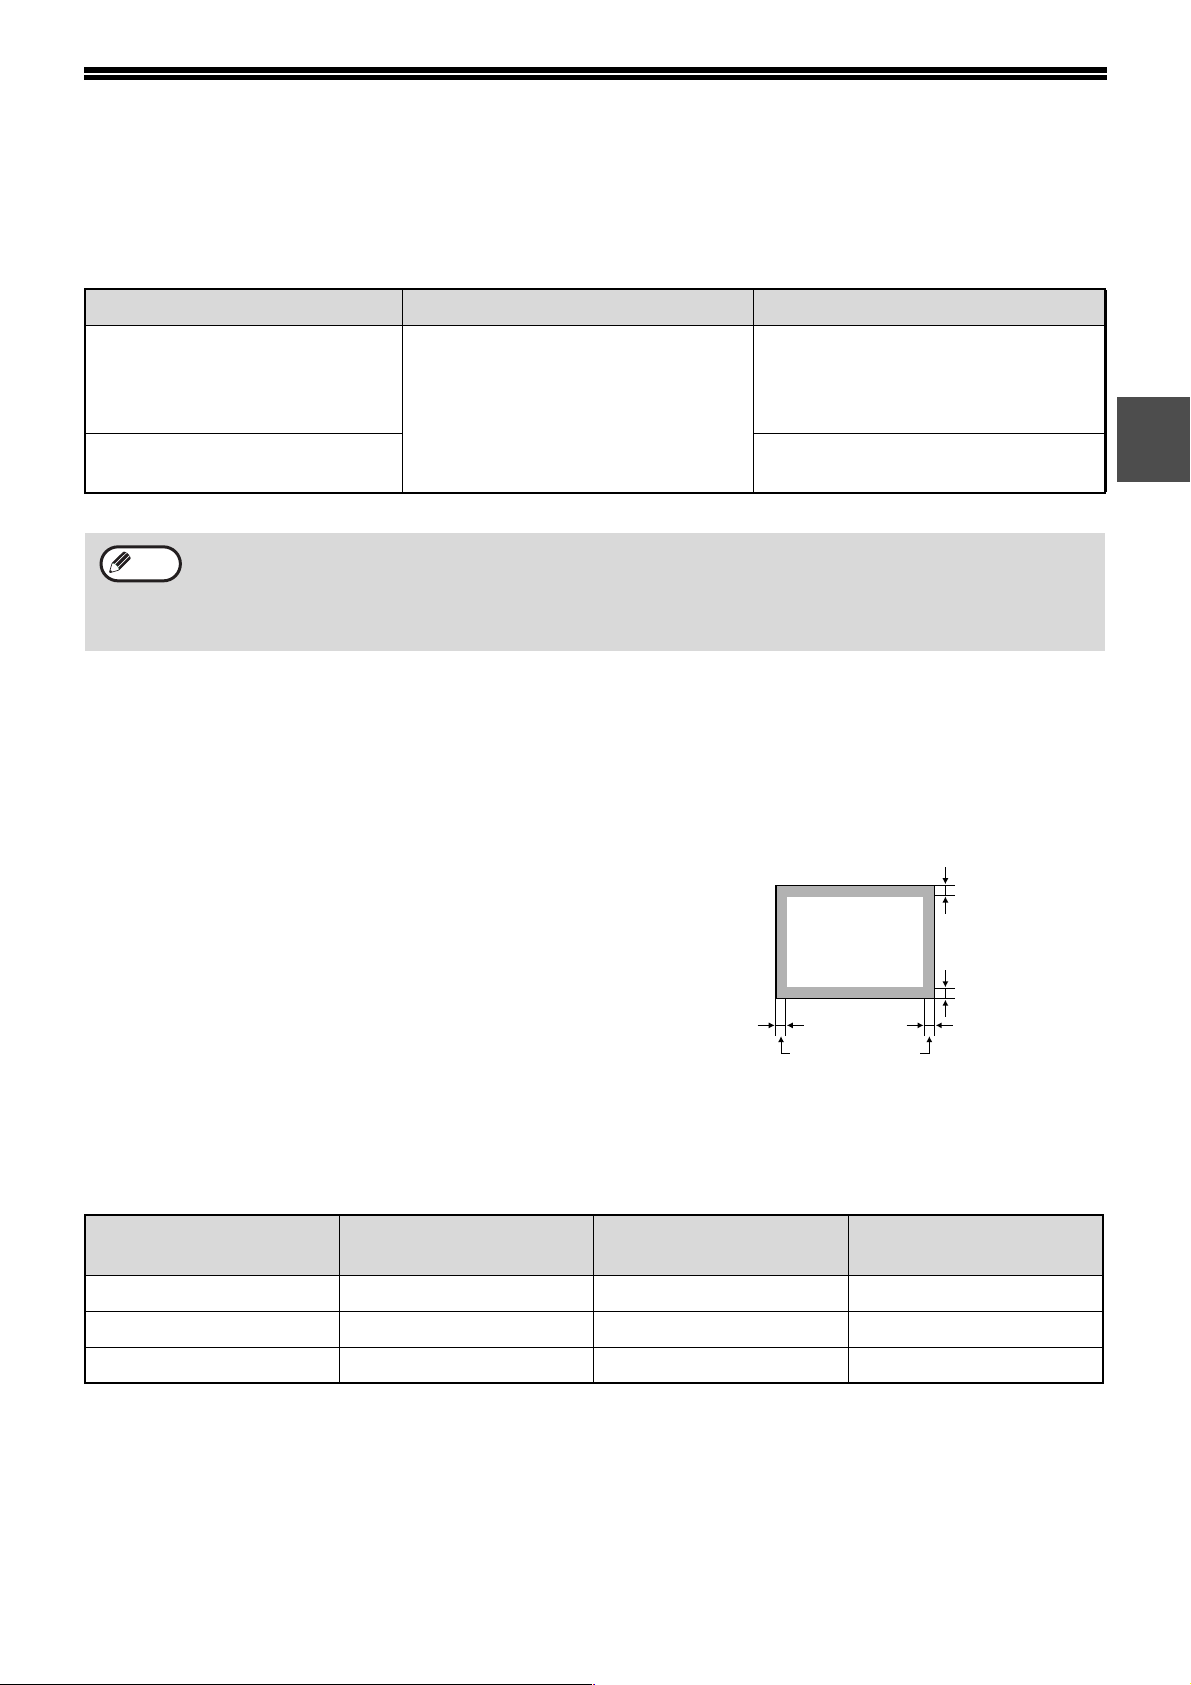
Scanning area of original
When faxing an original, note that the edges of the
original cannot be scanned.
Width of edges that cannot be scanned:
5 mm from top and bottom edges, 6 mm (or less) from left
and right edges
T o tal of 6 mm or
less
5 mm
5 mm
Automatic reduction of faxed document
If the size (width) of the faxed document is greater than the receiving machine's paper size, the size will be
automatically reduced.
Faxed document width
A3 (11" x 17") B4 (8-1/2" x 14") B4 (8-1/2" x 14") 1 : 0.78 (1 : 0.64)
A3 (11" x 17") A4 (8-1/2" x 11") A4R (8-1/2" x 11"R) 1 : 0.5 (1 : 0.5)
B4 (8-1/2" x 14") A4 (8-1/2" x 11") A4R (8-1/2" x 11"R) 1 : 0.64 (1 : 0.78)
You can turn off automatic reduction. In this case, the left and right edges will not be transmitted. (See "AUTO
REDUCE TX" on page 105.)
Receiving machine's
paper width
Size after reduction Ratio
11
Page 14
PLACING THE ORIGINAL
An original can be placed in the SPF/RSPF or on the document glass. Use the SPF/RSPF when faxing a large
number of sheet originals. Use the document glass to fax originals that cannot be scanned using the SPF/RSPF
such as thick or thin sheet originals, or books or other bound originals.
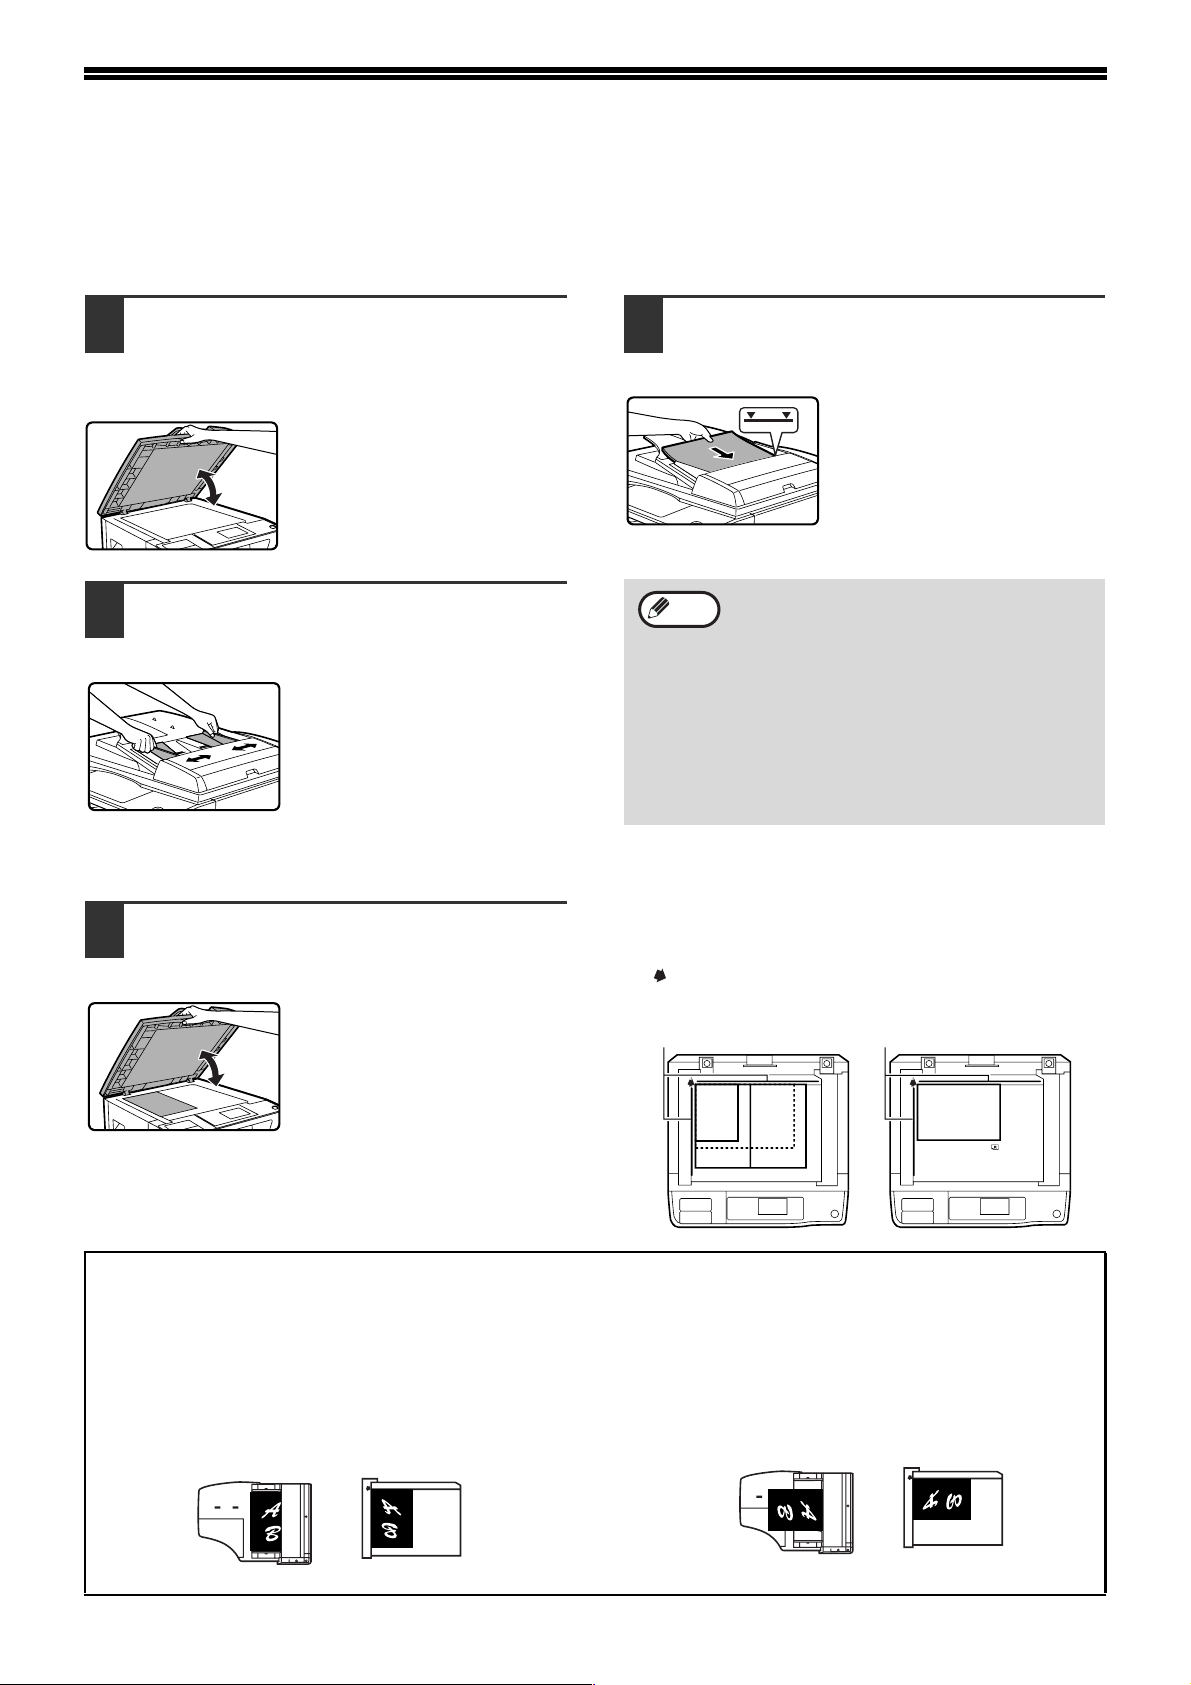
USING THE SPF/RSPF
Open the SPF/RSPF, make sure that
1
an original has not been left on the
document glass, and then gently
Align the edges of the document pages
3
and then insert the stack in the document
feeder tray so that the first page is face up.
close the SPF/RSPF.
Adjust the original guides on the
2
Note
document feeder tray to the width of
the document.
USING THE DOCUMENT GLASS
• Insert the originals all the way
into the document feeder tray.
• Make sure the stack does not
exceed the indicator line
(maximum of 40 sheets, or 30
sheets of 90 g/m
paper, thickness 4 mm (5/32")
or less).
• Do not load originals that are different
sizes even if the widths are the same. This
may cause misfeeds.
• Use the SPF/RSPF for long originals. The
document glass cannot be used.
• When inserting a long original, the original
should be in contact with the surface of
the document feeder tray. If the original is
not in contact with the surface of the
document feeder tray, an incorrect original
size may be detected.
2
(24 lbs.)
Open the SPF/RSPF, place the original
1
face down on the document glass,
and then gently close the SPF/RSPF.
•
If auto power shut-off has
activated, press the [START]
key, wait until the machine has
returned to normal operation,
and then place the original.
•
When transmitting a small
original such as a postcard, be
sure to press the [ORIGINAL
SIZE] key and set the original
size. (Page 13)
Regardless of the size of the original, place the original
in the far left corner of the document glass. (Align the
upper left-hand corner of the original with the tip of
the mark.) Place the original in t he appropriate
position for its size as shown below.
Document glass scale
A5
B4
A4
A3
Document glass scale
R
A4R
The difference between A4 (8-1/2" x 11") and A4R (8-1/2" x 11"R)
This manual uses both A4 (8-1/2" x 11") and A4R (8-1/2" x 11"R) to indicate paper and original sizes. The "R" is
used to distinguish the orientation of originals and paper. ("R" is used fo r this purpose for other sizes as well.)
[Example] Difference between the orientations of A4 (8-1/2" x 11") size and A4R (8-1/2" x 11"R) size
A4 (8-1/2" x 11") indicates an original placed as
follows:
Vertically oriented
Top
Top
A4R (8-1/2" x 11"R) indicates an original placed as
follows:
Horizontally oriented
12
Document feeder tray Document glass
Top
Document feeder tray Document glass
Page 15
CHECKING THE SIZE OF A PLACED ORIGINAL
RATIO
DUPLEX SCAN
DUPLEX SCAN
2-SIDED COPYAUTO IMAGE
FORMAT
BROADCAST
OUTPUT
ORIGINAL SIZE
ORIGINAL SIZE
PQ
ACC
GHI
PQRS
BACK
OK
When a standard-size* original is placed, the original size is automatically detected
(automatic original detection function) and displayed in the original display. Make sure
that the size has been detected correctly.
(1)When an original is placed, an icon appears to indicate the original scanning mode.
:One-sided scanning in the SPF.
:Scanning on the document glass
:Two-sided scanning in the RSPF.
(2)Displays the original size.
If a non-standard size original is placed or if you wish to change the scanning size,
follow the steps below to manually set the original scanning size.
Note
*Standard sizes
The following sizes are standard sizes: A3, B4, A4, A4R, A5 (11" x 17", 8-1/2" x 14", 8-1/2" x 11", 8-1/2" x 11"R,
5-1/2" x 8-1/2", if the machine uses inch-based paper sizes). If a non-standard size original is loaded (including
special sizes), the closest standard size may be displayed, or the original size may not appear at all.
In Taiwan, the following standard original sizes are detected by the automatic original detection function: A3, B4,
A4, A4R, B5, B5R, A5.
Stand-by. 100%
10 MAY MON 10:25 AM
MEMORY AUTO
CONT A4R
AUTO
STANDARD
(2)(1)
MANUALLY SETTING THE SCANNING SIZE
If you load an original that is not a standard size (such as a long original), or if the size is not detected correctly, be
sure to press the [ORIGINAL SIZE] key and set the original size manually.
Perform the following steps after placing the original in the document feeder tray or on the document glass (page 12).
Note
If a size is specified that is different from the actual original size when scanning a two-sided original in the RSPF,
a scanning error or a cut-off image may result.
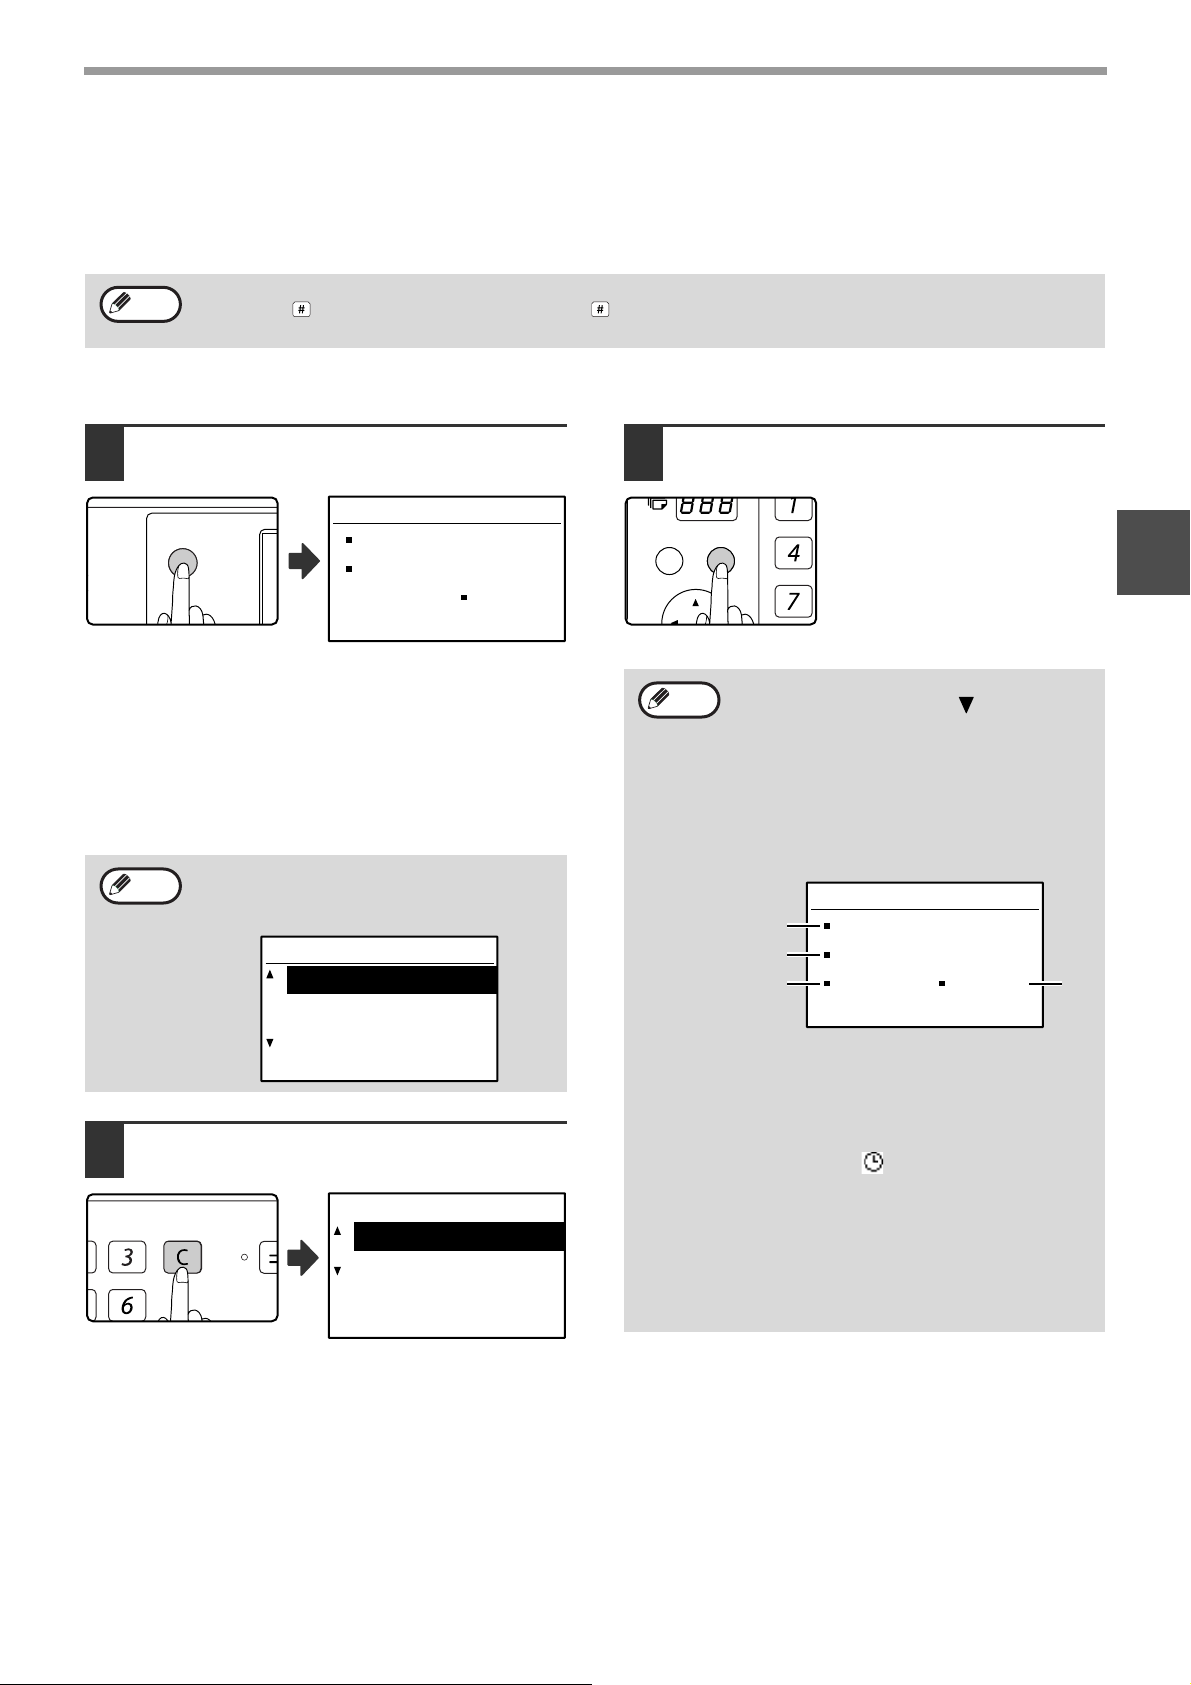
1
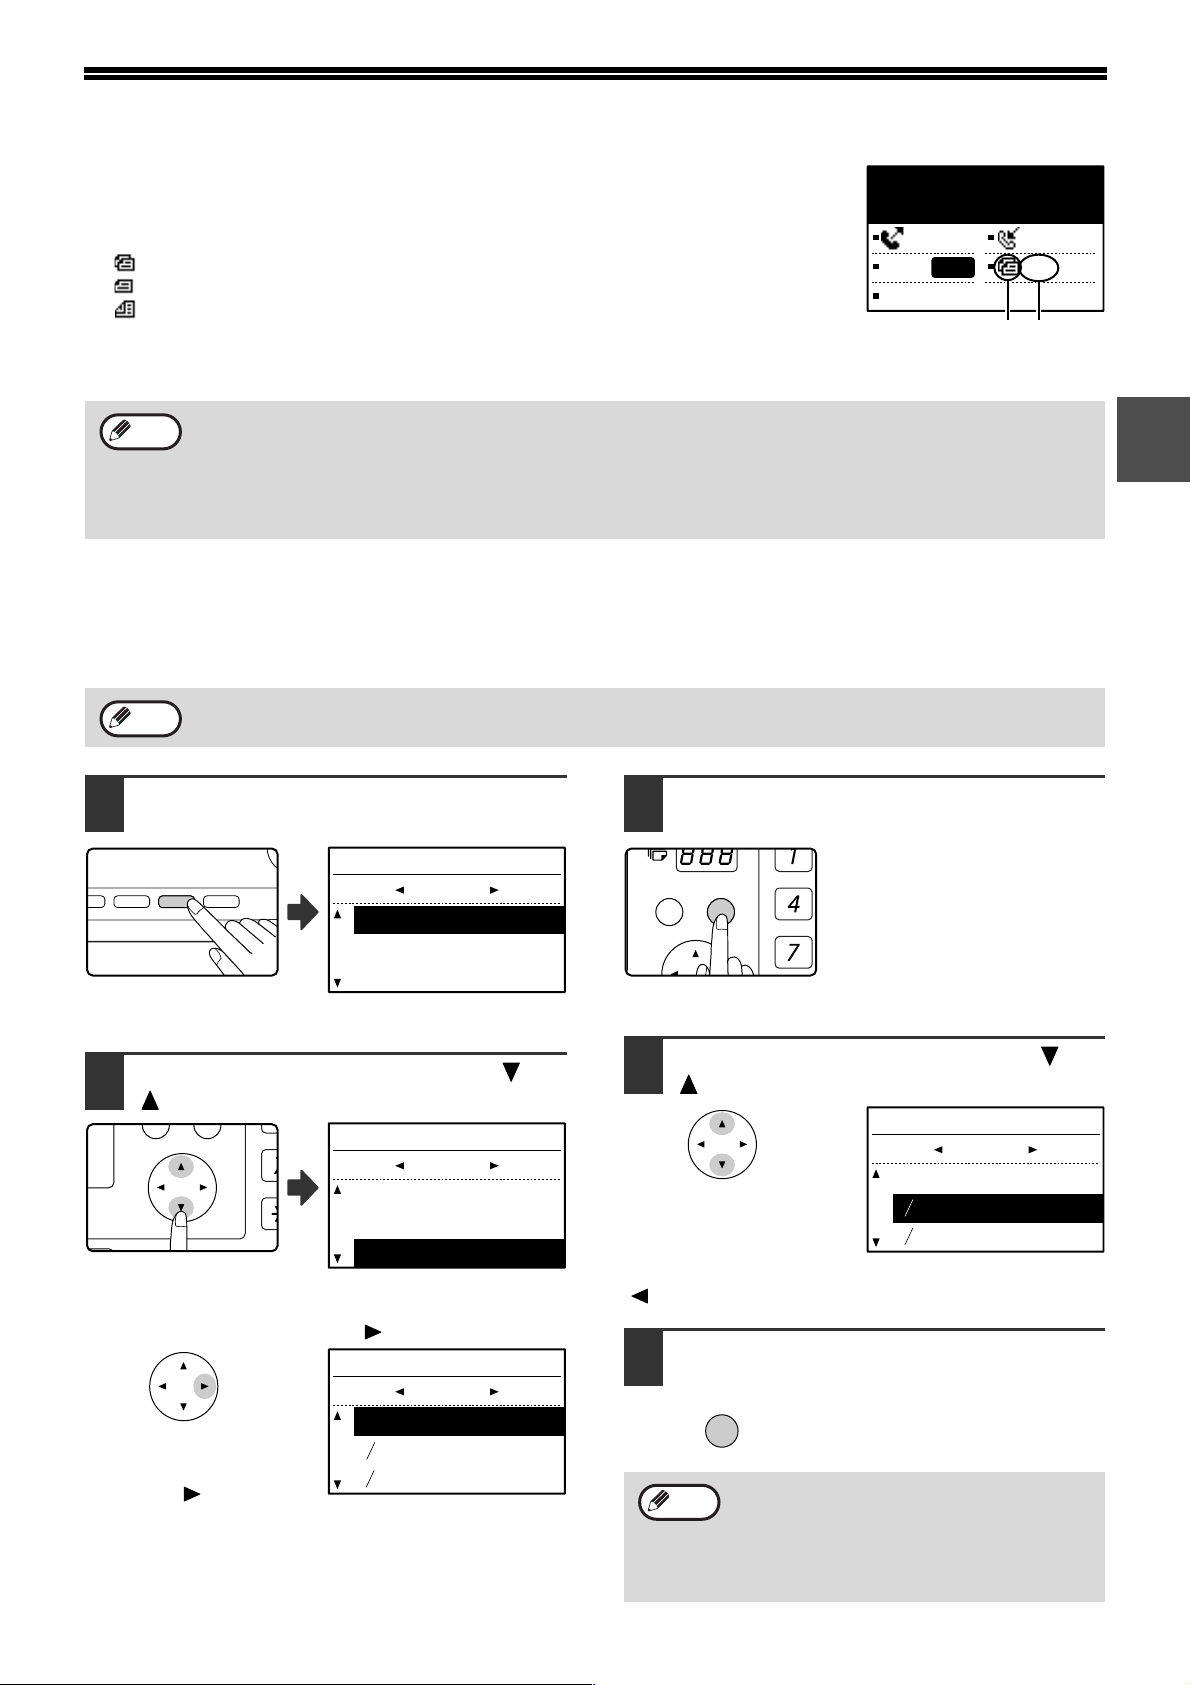
Press the [ORIGINAL SIZE] key.
1
ORIGINAL SIZE
AB
AUTO
A3
The original size
selection screen appears.
Select the original size with the [ ] or
2
[ ] key.
B4
ORIGINAL SIZE
AB
AUTO
A3
The selected original size
is highlighted.
To select an INCH size, press the [ ] key and go to step 4.
B4
ORIGINAL SIZE
INCH
AUTO
1
8 x11
2
1
8 x11R
When the [ ] key is
pressed, the original size
selection screen for INCH
sizes appears.
2
Press the [OK] key.
3
You will return to the base
screen and the selected original
size will appear in the original
display.
Selecting an INCH original size
Select the original size with the [ ] or
4
[ ] key.
ORIGINAL SIZE
INCH
AUTO
1
2
8 x11
1
2
8 x11R
To return to selection of AB original sizes, press the
[ ] key and return to step 2.
Press the [OK] key.
5
You will return to the base screen
and the selected original size will
appear in the original display.
Note
OK
To cancel a manual original scanning size
setting, press the [CA] key.
If it is not possible to select the actual original
size, select a size that is larger than the actual
original size. If a smaller size is selected, part
of the original will not be transmitted.
13
Page 16
SELECTING RESOLUTION AND EXPOSURE SETTINGS
COPY RATIO
ADDRESS
ADDRESS
EXPOSURE
COLOUR MODE
PROGRAM
PAPER SELECT
RESOLUTION
RESOLUTION
AUTO IMA
FORMA
BROADCA
FAX
PQ
ACC
GHI
PQRS
BACK
OK
The resolution and exposure can be adjusted to match the size and darkness of text on the original, or for an original such
as a photograph. To change the settings, follow the steps below after selecting fax mode and placing the original. (Page 12)
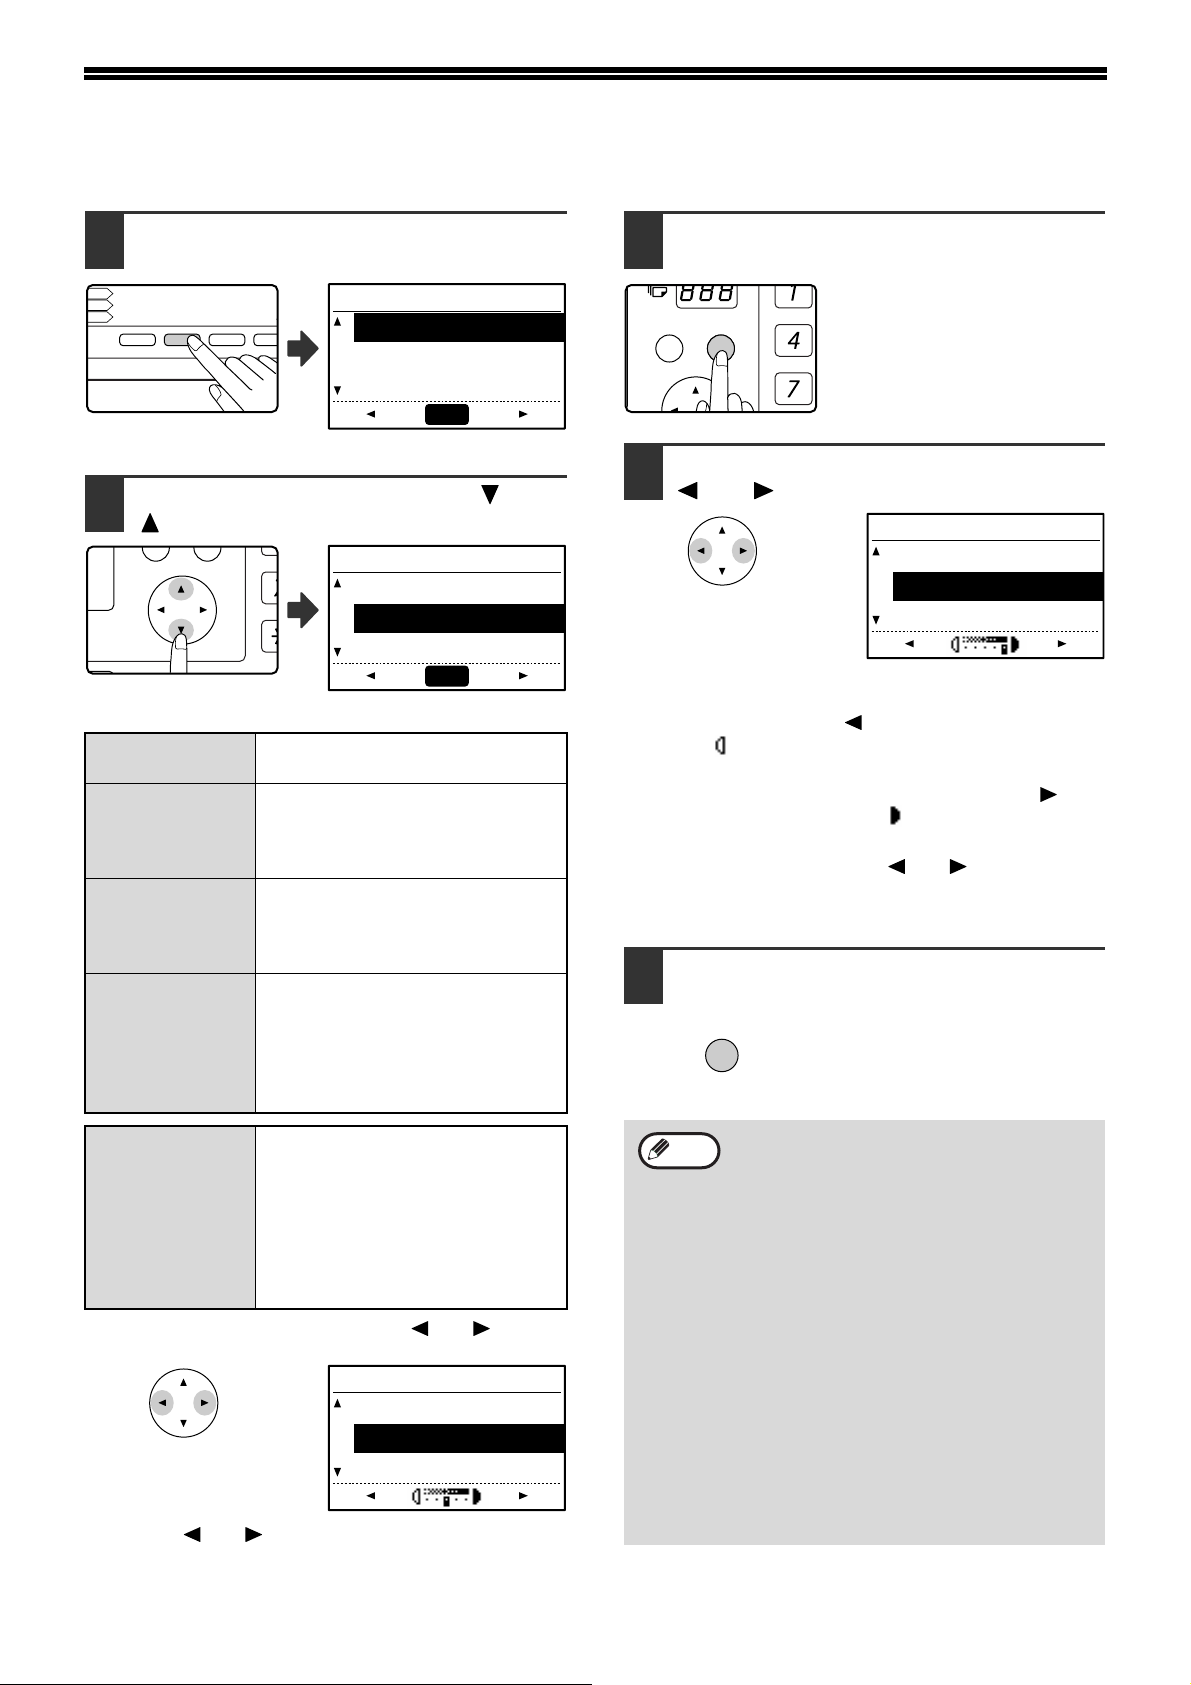
Press the [RESOLUTION] key.
1
RESOLUTION
STANDARD
FINE
SUPER FINE
The resolution selection
screen will appear.
Select the resolution with the [ ] or
2
[ ] key.
AUTO
RESOLUTION
STANDARD
FINE
SUPER FINE
The selected resolution is
highlighted.
STANDARD
FINE
SUPER FINE
ULTRA FINE
Use this setting for originals with
normal-size text.
Use this setting for originals with
small letters or detailed dra wings.
The original will be scanned at
twice the resolution of Standard.
Use this setting for originals with
intricate drawings or diagrams. A
higher-quality image will be
produced than with the Fine setting.
Use this setting for originals with
intricate drawings or diagrams.
This setting gives the best image
quality. However, transmission
will take longer than with the
other settings.
AUTO
Press the [OK] key.
3
You will return to the base
screen and the selected
resolution will appear in the
resolution display.
Select the desired exposure with the
4
[ ] or [ ] key.
RESOLUTION
STANDARD
FINE
SUPER FINE
• To select a light setting for a dark original such as a
newspaper, press the [ ] key to move the setting
toward ( ).
• To select a dark setting for a light original su ch as
writing in pencil or faint colour text, press the [ ] key
to move the setting toward ( ).
• When the exposure setting reaches the left side or
the right side, pressing the [ ] or [ ] key changes
the exposure display from the 5-step display to
"AUTO".
Press the [OK] key.
5
OK
You will return to the base
screen and the selected
exposure will appear in the
exposure display.
Use halftone if your original is a
(FINE/HALF
TONE)
(S-FINE/HALF
TONE)
(U-FINE/HALF
TONE)
To set the exposure next, press the [ ] or [ ] key
and go to step 4.
photograph or has gradations of
colour (such as a colour original).
This setting will produce a clearer
image than "FINE", "SUPER FINE",
or "ULTRA FINE" used alone.
When halftone is selected,
transmission will take longer.
RESOLUTION
STANDARD
FINE
SUPER FINE
When the [ ] or [ ] key is pressed, the exposure
display changes from "AUTO" to a 5-step display.
14
Note
• The default resolution setting is
"STANDARD" and the default exposure
setting is "AUTO". The default settings for
the resolution and exposure can be
changed in the system settings. (See
"RES. CON. SET" on page 105.) When
using the document glass to scan multiple
original pages, the exposure setting can
be changed each time you change pages.
When using the SPF/RSPF, the resolution
and exposure settings cannot be changed
once scanning has begun.
• Even if you send a fax using a high
resolution setting such as "FINE",
"SUPER FINE", or "ULTRA FINE", some
receiving fax machines may print the fax
at a lower resolution.
• To cancel a resolution or exposure
selection, press the [CA] key.
Page 17
CONVENIENT DIALLING METHODS (AUTO-DIALLING)
46 47 48 49 50
41 42 43 44 45
36 37 38 39 40
31 32 33 34 35
26 27 28 29 30
ABCDE
FGHI J
KLMNO
PQRST
SYMBOL
REDIAL/PAUSE
SPEED
COMM. SETTING
FAX
SCAN
PRINT
46 47 48 49 50
41 42 43 44 45
36 37 38 39 40
31 32 33 34 35
26 27 28 29 30
ABCDE
FGHI J
KLMNO
PQRST
SHIFT
SPEAKER
REDIAL/PAUSE
SPEED
SCAN
PRINT
COPY
SHIFT
SPEAKER
REDIAL/PAUSE
PRINT
COPY
The fax function includes a convenient auto dial feature (Rapid dialling, speed dialling and group dialling). By
programming frequently dialled numbers, you can call and send faxes to these locations by means of a simple
dialling operation (page 19). There are three types of auto-dialling: Rapid dialling, speed dialling, and group dialling.
To program auto-dial numbers, see page 66 .
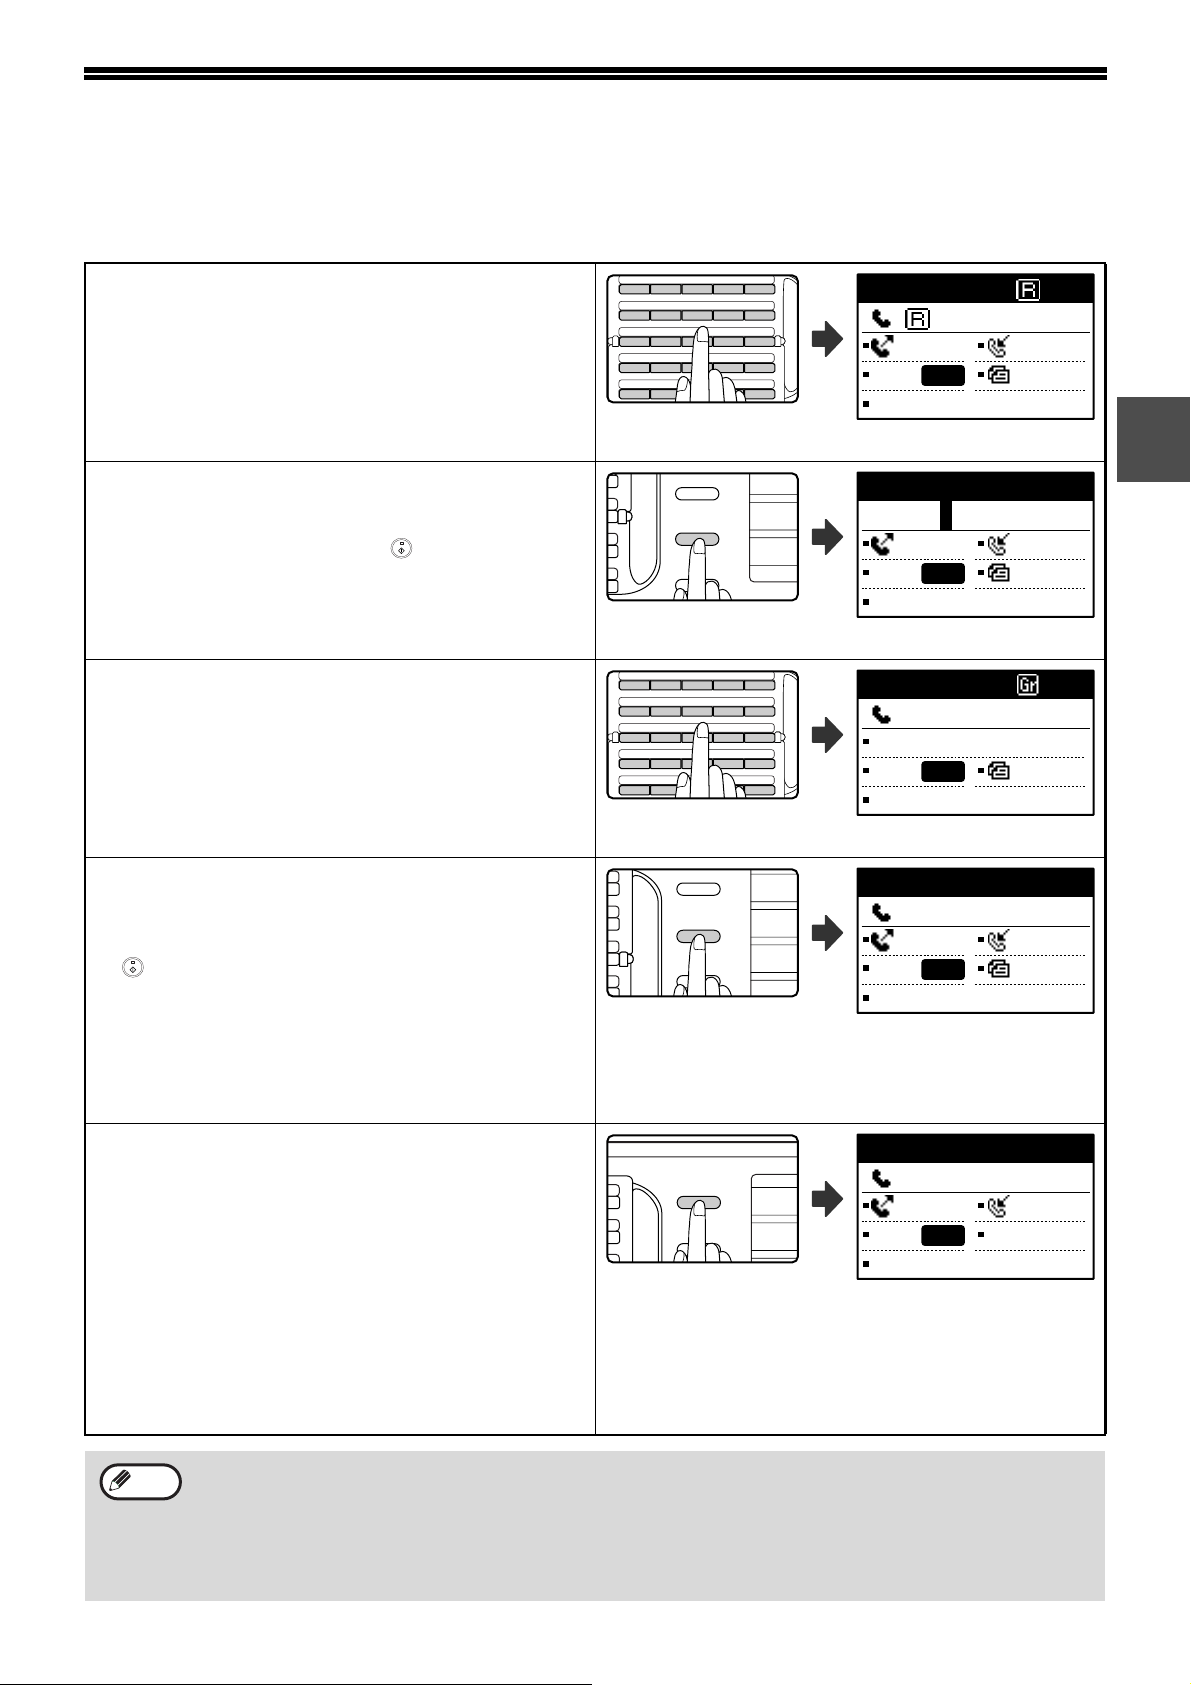
• Rapid dialling
A stored destination can be dialled by simply pressing
a Rapid key ([01] to [50]). A name up to 36 characters
in length can be programmed for the location (a
maximum of 12 characters are displayed).
When using F-code transmission, a sub-address and
passcode (page 52) can also be programmed . The programmed user
names appear.
• Speed dialling (300 stations)
A stored destination can be dialled by pressing the
[SPEED] key, entering a 3-digit number (000 to 299),
and pressing the [START] key ( ). A name
(maximum 36 characters) can be stored for each
destination.
When using F-code transmission, a sub-address and
passcode (page 52) can also be programmed.
The Speed number entry
screen appears.
• Group dialling
Multiple Rapid dial and/or Speed dial destinations can
be stored in a Rapid key fo r Group dialling.
Destinations can also be stored for Group dialling by
entering fax numbers with the numeric keys. This is
convenient for communicating with a group of other
fax machines. The programmed group
names appear.
XXXXXX
1234567890
MEMORY AUTO
CONT A4R
AUTO
STANDARD
1
Enter SPEED #.
SPEED:
MEMORY AUTO
CONT A4R
STANDARD
XXXXXX
:0123456789
BROADCAST
CONT A4R
STANDARD
___ (000-299)
AUTO
AUTO
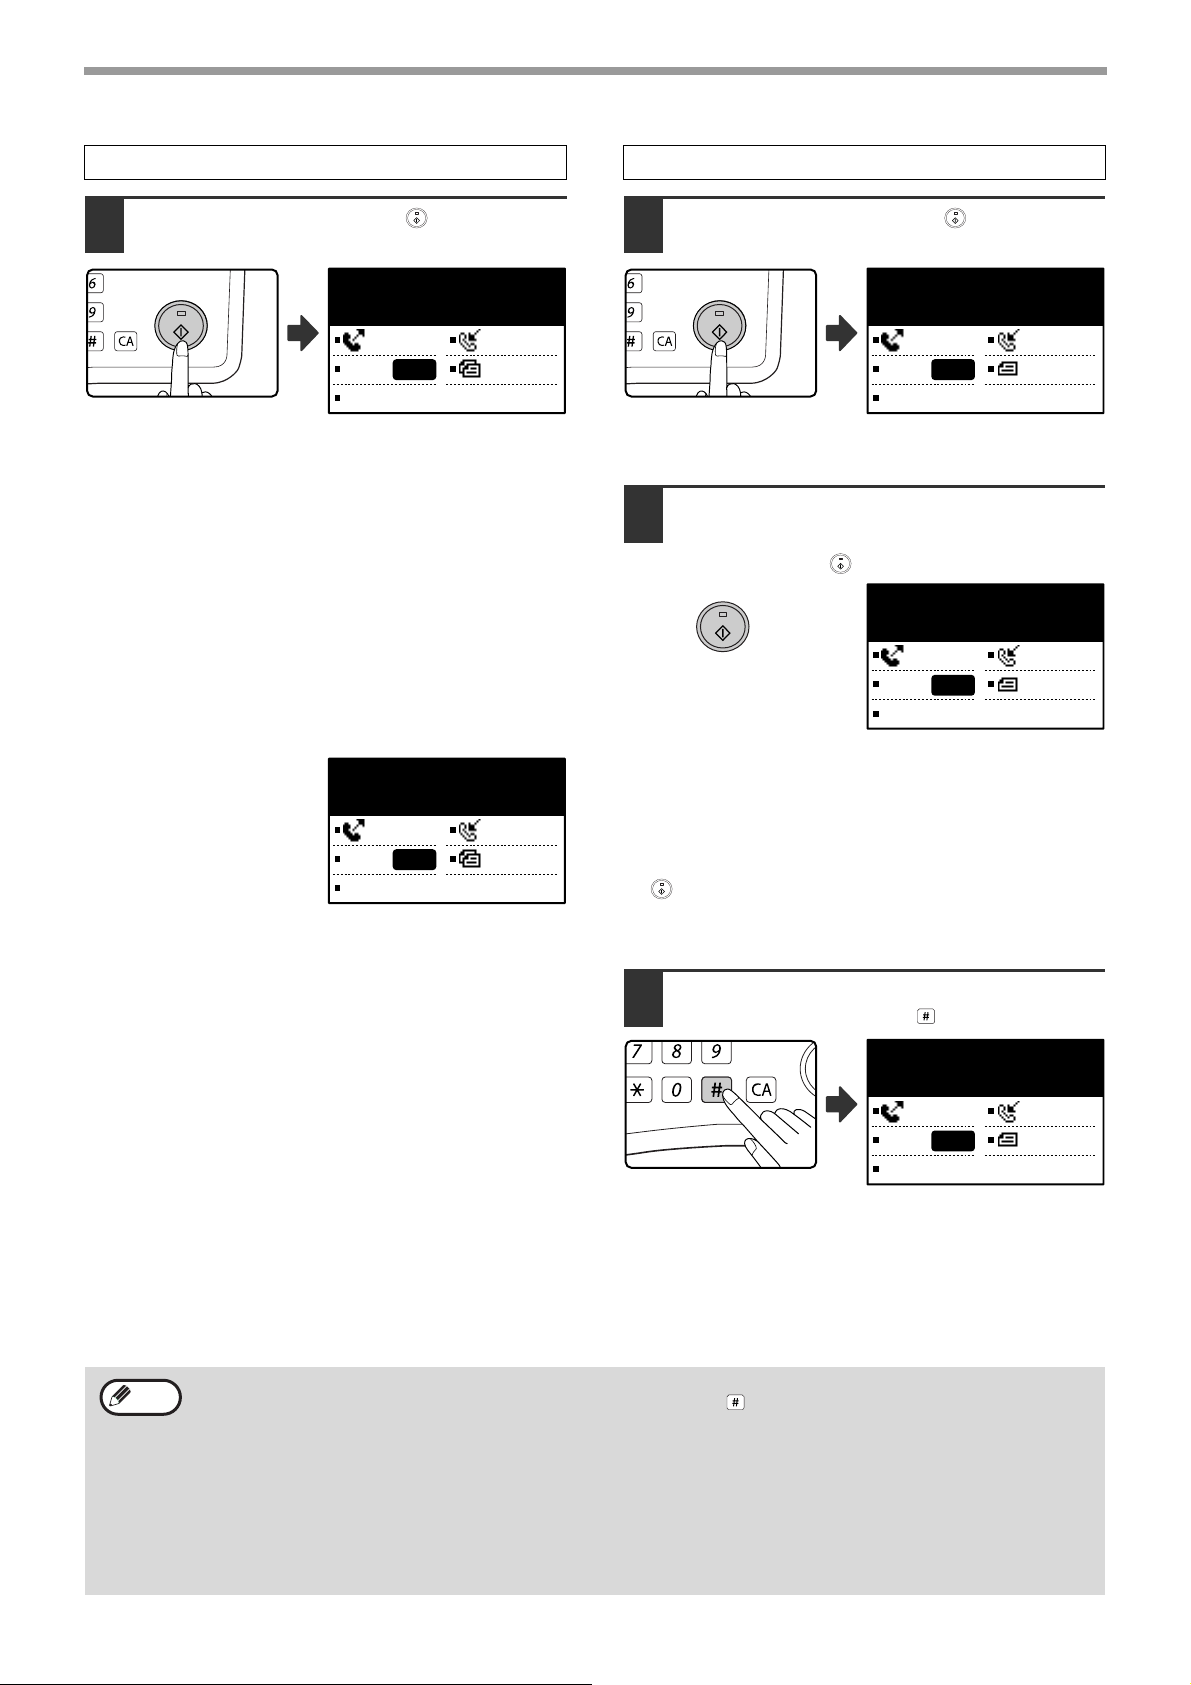
• REDIALLING
The machine retains the last fax or phone number
dialled. This number can be redialled by simply
pressing the [REDIAL] key and then the [ST A RT] key
().
•
If you pressed a numeric ke y during the pre vious call,
the [REDIAL] key may not dial the correct number.
• Redialling is not possible to broadcast transmi ssion
(page 31), serial polling (page 37), timer
transmission (page 33), group dialling (page 19), or
F-code transmission (page 59) destinations.
• ON-HOOK DIALLING
This feature allows you to dial without lifting an
extension phone co nnected to the machine . Press the
[SPEAKER] key, listen for the dial tone through the
speaker, and then dial.
• If a person answers, lift the extension phone to
answer. (You can only speak to the other party if an
extension phone is connected to the machine.)
• Faxes must be sent manually when using on-hook
dialling. (Page 23)
• On-hook dialling is not possible using a Rapid key
that includes a sub-address and passcode, or a
group dial key.
The last number dialled is
displayed.
Redialling. 100%
:0123456789
MANUAL AUTO
CONT A4R
AUTO
STANDARD
ENTER DIAL #
:
MANUAL AUTO
CONT
AUTO
STANDARD
Note
• A combined total of 50 Rapid dial and group dial keys can be stored, and 300 speed dial destinations can be
stored.
• Stored Rapid keys, group keys, and Speed dial destinations can be called up using a search name entered
when the key or destination was stored. (Page 20)
• To prevent dialling a wrong number and sending a fax to an incorrect destination, check the message display
carefully when you store the number. You can also check stored numbers by printing out the programmed
information after storing the number (page 85).
15
Page 18

BASIC OPERATIONS
2
This chapter explains the basic procedures for sending and receiving faxes.
There are three basic methods for fax transmission: memory transmission, direct transmission, and manual
transmission. When memory transmission is used, the document is temporarily stored in memory before being
transmitted. When direct transmission or manual transmission is used, the document is transmitted without being
stored in memory, The default transmission setting can be set to "MEMORY TX" or "DIRECT TX" using "SEND
MODE" (page 106) in the system settings. To manually switch between "MEMORY TX" and "DIRECT TX", use the
[COMM. SETTING] key. (See "Faxing by direct transmission" on page 22.)
The following explanations generally assume that memory transmission is being used.
16
Page 19
SENDING A FAX
C
S
F
LINE
DATA
FAX
SCAN
DUPLEX SCAN
DUPLEX SCAN
2-SIDED COPYAUTO IMAGE
FORMAT
BROADCAST
OUTPUT
ORIGINAL SIZE
ORIGINAL SIZE
COPY RATIO
ADDRESS
ADDRESS
EXPOSURE
COLOUR MODE
PROGRAM
PAPER SELECT
RESOLUTION
RESOLUTION
AUTO IMA
FORMA
BROADCA
FAX
ABC DEF
JKLGHI MNO
TUVPQRS WXYZ
@.-
_
READ-END
ACC. #-C
OK
SHIFT
SPEAKER
REDIAL/PAUSE
SPEED
SCAN
PRINT
COPY
BASIC PROCEDURE FOR SENDING FAXES
Make sure that the machine is in fax
1
mode.
The FAX indicator is lit when the
machine is in fax mode. If the
indicator is not lit, press the
[FAX] key. If auditing mode has
been enabled for the fax function
in the system settings, a
message will appear prompting you to enter your
account number when you switch to fax mode. Enter
your account number (5 digits) with the numeric keys.
(See "ACCOUNT CONTROL" on page 103.)
Place the original(s) in the document
2
feeder tray or on the document glass.
• Using the SPF/RSPF: page 12
• Using the document glass: page 12
If you are using the document glass to send
multiple pages, place the first page first.
Note
Check the original size. If the original
3
You cannot place originals both in the
SPF/RSPF and on the document glass and
send them in a single fax transmission.
is not a standard size or the size was
not detected correctly, press the
[ORIGINAL SIZE] key.
ORIGINAL SIZE
AB
AUTO
A3
B4
When the [ORIGINAL SIZE] key is pressed, the size
selection screen appears. See "MANUALLY SETTING
THE SCANNING SIZE" (page 13) to set the original
size.
Dial the fax number.
5
Stand-by. 100%
:0123456789
MEMORY AUTO
CONT A4R
AUTO
STANDARD
• The entered number appears in the message
display. Up to 50 digits can be entered. If you make
a mistake, press the [C] key and then enter the
correct number.
• Redialling and automatic dialling can also be used
(pages 15, 19).
Entering a pause
If a pause is necessary when
dialling out from a PBX or when
dialling an international number,
press the [REDIAL] key. (This
key functions as a pause key
when entering a number.)
If you press the [PAUSE] key once, a hyphen ("-")
appears and a 2-second pause* is inserted.
After entering a number, you can also press the
[PAUSE] key to enter a hyphen and then enter another
number using the numeric keys or a Rapi d key. (This
connects the numbers together, and is called Chain
dialling.)
* The duration of each pause can be changed
inthesystem settings. (See "PAUSE TIME" on page
100.)
Note
Group keys cannot be used for chain
dialling.
2
If needed, adjust the resolution and
4
exposure settings. (Page 14)
RESOLUTION
STANDARD
FINE
SUPER FINE
To adjust the resolution and exposure settings, press
the [RESOLUTION] key. (See "SELECTING
RESOLUTION AND EXPOSURE SETTINGS" on
page 14.)
AUTO
17
Page 20
BASIC OPERATIONS
_
_
@.-
_
READ-END
Using the SPF/RSPF
Press the [START] key ( ).
6
READING XX%
No.001 P-XXX
MEMORY AUTO
CONT A4R
AUTO
STANDARD
• Scanning begins.
• If the line is free, the machine will dial the receiving
machine and begin transmission as soon as the first
page is scanned. (Quick online transmission: page
24)
• If there is a previously stored job or a job is in
progress, or if the line is being used, all pages of the
original are scanned into memory and stored as a
transmission job. (This is called memory
transmission: the destination is automatically called
and the document transmitted after pr eviously stored
jobs are completed.)
Using the document glass
Press the [START] key ( ).
6
READING XX%
No.001 P-XXX
MEMORY AUTO
CONT A4R
AUTO
STANDARD
Scanning begins.
If you have another page to scan,
7
change pages and then press the
[START] key ( ).
[START]:CONTINUE
[#]:READ-END
MEMORY AUTO
CONT A4R
AUTO
STANDARD
If scanning is completed
normally, the following
screen is appears briefly
and then the display
returns to the base
screen.
READ END XX%
No.001 P-XXX
MEMORY AUTO
CONT A4R
AUTO
STANDARD
• Repeat this sequence until all pages have been
scanned.
• You can change the resolution and exposure
settings as needed for each. (page 14)
• If no action is taken for one minute (the [START] key
( ) is not pressed), scanning automatically ends
and the transmission job is stored. (This function can
be disabled in the system settings.)
After the last page is scanned, press
8
the [READ-END] key ( ).
Open the SPF/RSPF and remove the original. When
the original is removed or any key operation is
performed, the display returns to the base screen.
(The destination is automatically called and the
document transmitted after any previously stored jobs
are completed.)
READ END XX%
No.001 P-XXX
MEMORY AUTO
CONT A4R
AUTO
STANDARD
Note
18
• To cancel transmission
To cancel transmission while "READING" appears or before the key is pressed, press the [C] or [CA] key. T o
cancel a transmission job that is already stored, press the [FAX STATUS] key and cancel the job as explained
on page 25.
• A job number (3 digits) appears in the display with "READ END" when memory transmission is performed. If
you make a note of this number after performing a broadcast transmission, you can use the number to check
the results of the transmission in the transaction report or activity repor t.
• If the power is turned off or a power failure occurs while an original is being scanned in the SPF/RSPF, the
machine will stop and an original misfeed will occur. After power is restored, remove the original as explained
in "MISFEED IN THE SPF/RSPF" in the Operation Guide for the machine.
Page 21
BASIC OPERATIONS
46 47 48 49 50
41 42 43 44 45
36 37 38 39 40
31 32 33 34 35
26 27 28 29 30
ABCDE
FGHI J
KLMNO
PQRST
46 47 48 49 50
41 42 43 44 45
36 37 38 39 40
31 32 33 34 35
26 27 28 29 30
ABCDE
FGHI J
KLMNO
PQRST
SYMBOL
REDIAL/PAUSE
SPEED
COMM. SETTING
FAX
SCAN
PRINT
ABC DEF
JKLGHI MNO
TUVPQRS WXYZ
@.-
_
READ-END
ACC. #-C
OK
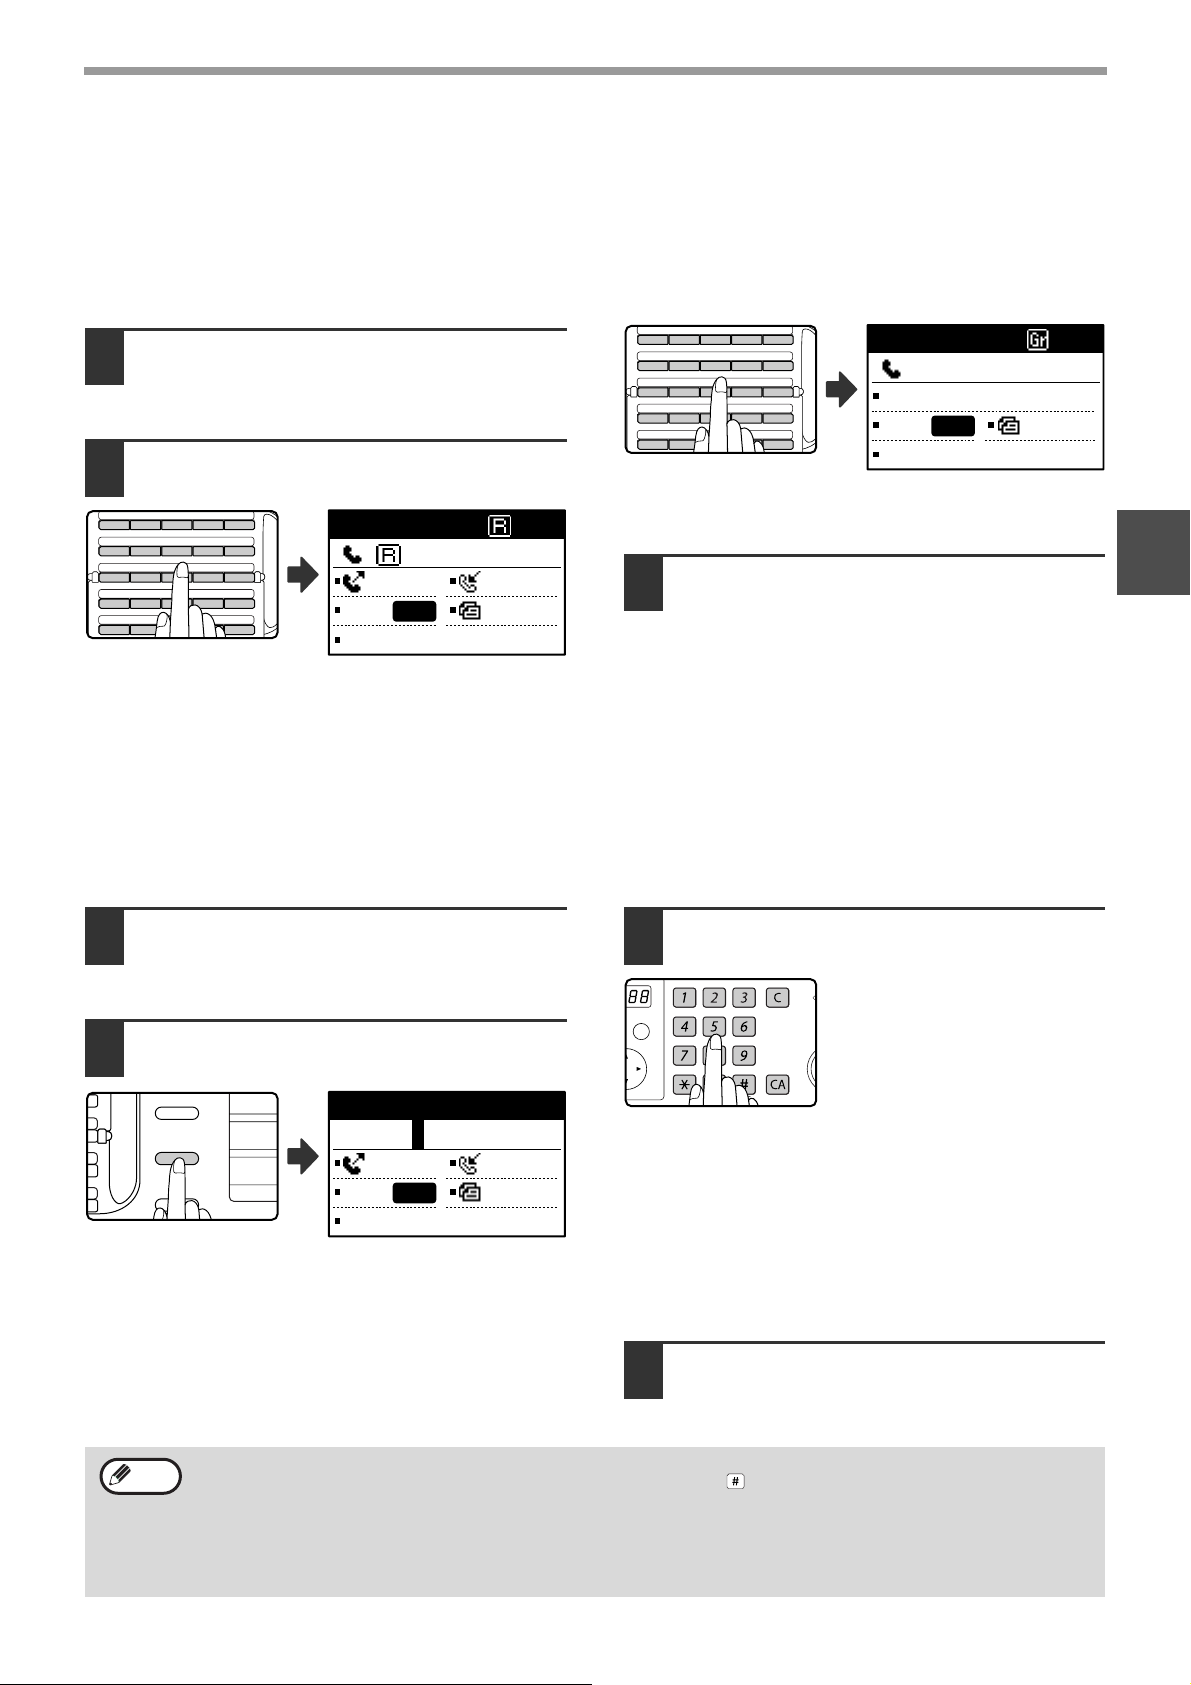
TRANSMISSION BY AUTO-DIALLING (RAPID
DIALLING AND GROUP DIALLING)
Fax numbers can be dialled by automatic dialling (Rapid dialling and group dialling) instead of pressing the numeric
keys. Follow the steps below to send a fax using an auto dial number. To use an auto di al number, the name and fax
number of the destination must first be stored. See page 15 for information on auto-dialling and page 66 for
information on programming auto-dial destinations.
Perform steps 1 to 4 of "BASIC
1
PROCEDURE FOR SENDING FAXES"
(page 17).
Press the Rapid key or group key for
2
the desired destination.
XXXXXX
The name programmed for the grou p can be displayed
by pressing the group key.
XXXXXX
:0123456789
BROADCAST
CONT A4R
AUTO
STANDARD
: 1234567890
Continue from step 6 of "BASIC
MEMORY AUTO
CONT A4R
AUTO
STANDARD
The name programmed for the destinatio n ca n be
displayed by pressing the Rapid key.
3
PROCEDURE FOR SENDING FAXES"
(page 18).
If an original has been placed, scanning of the
original will begin automatically without the need
to press the [START] key in step 6 on page 18.
SENDING A FAX BY SPEED DIALLING
In addition to Rapid dialling and group dialling, you can also send a fax by pressing the [SPEED] key and entering a
3-digit Speed Dial number. Follow the steps below to send a fax by Speed Dialling. The 3-digit Spee d Dial number is
entered with the numeric keys when programmed. (See "STORING, EDITING , AND DELETING AUTO DIAL
NUMBERS AND PROGRAMS" on page 66.)
.
Perform steps 1 to 4 of "BASIC
1
PROCEDURE FOR SENDING FAXES"
(page 17).
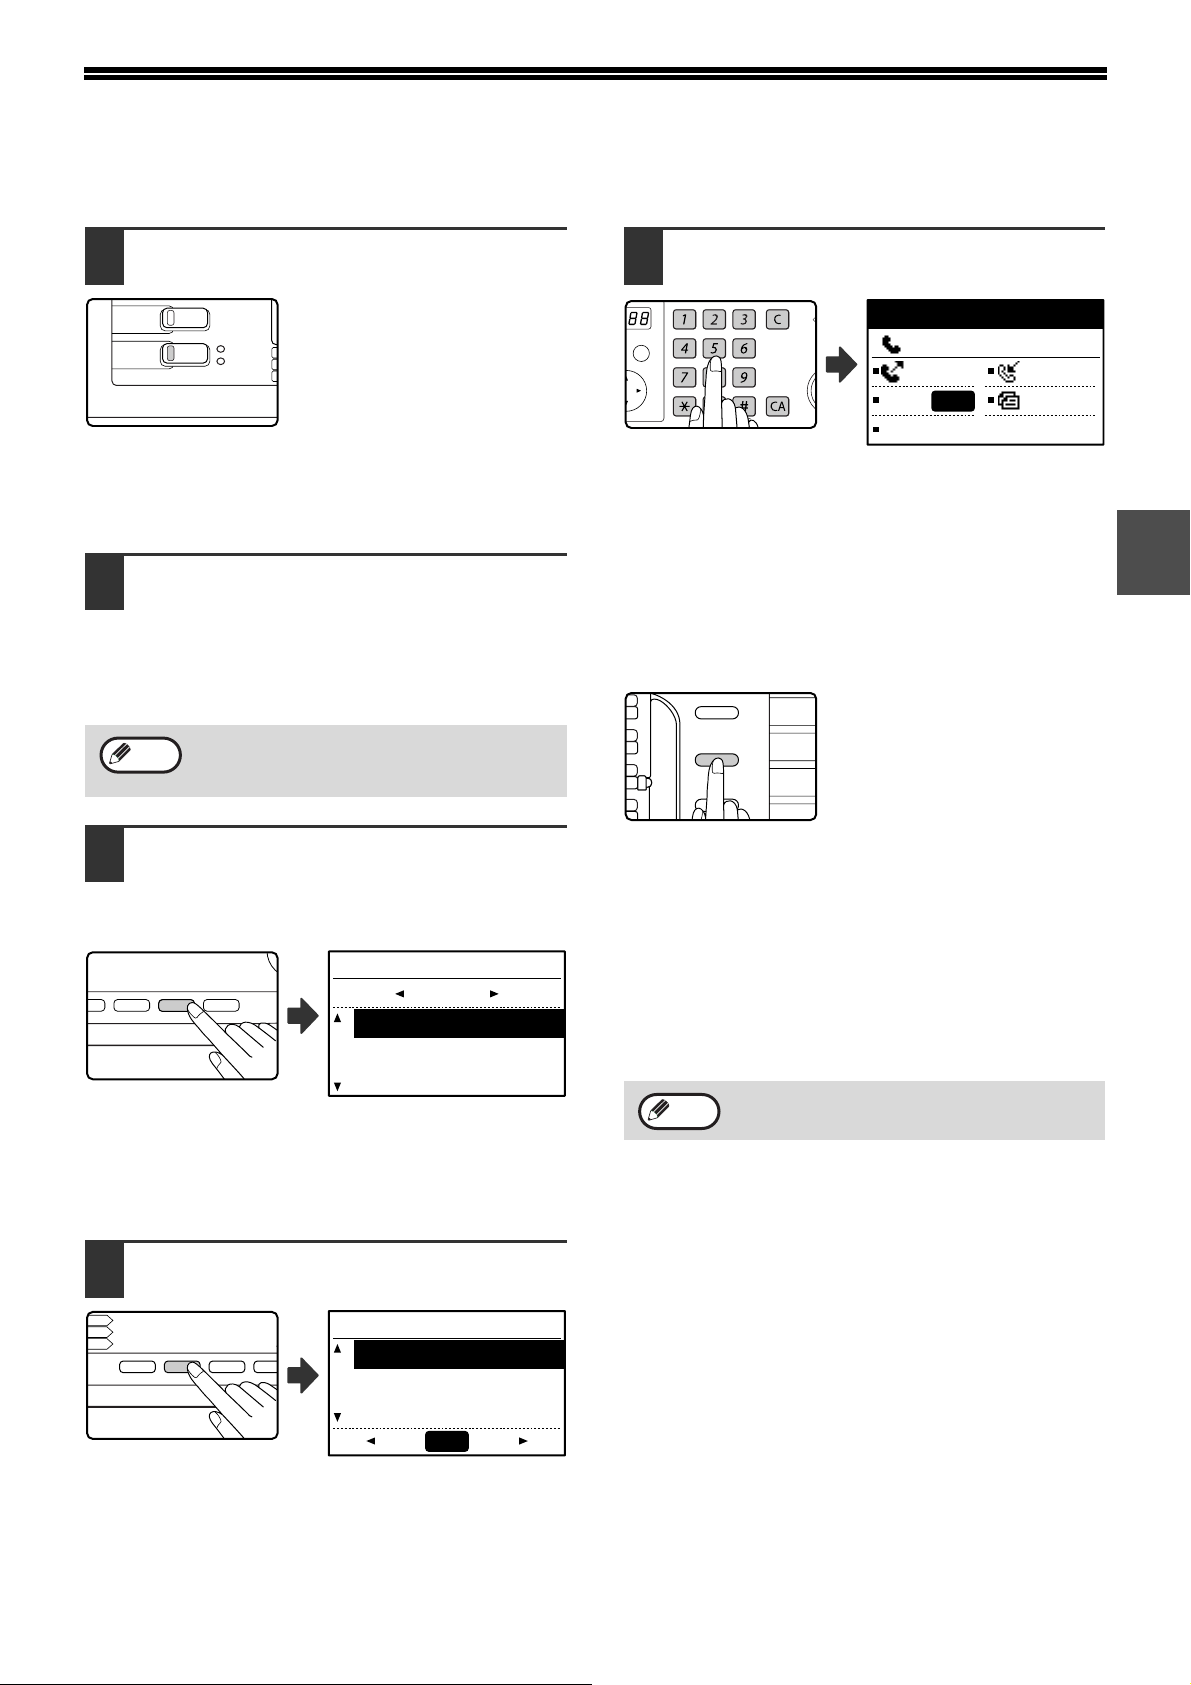
Press the [SPEED] key.
2
Enter SPEED #.
SPEED:
___
(000-299)
MEMORY AUTO
AUTO
The Speed Dial number
entry screen appears.
CONT A4R
STANDARD
Enter the 3-digit Speed Dial number
3
with numeric keys.
• Enter the 3-digit Speed Dial
number entered when the
Speed Dial number was
programmed. (See step 7 of
"Storing Rapid keys and
Speed Dial numbers" on page
67.)
• If you make a mistake, press the [C] key and then
enter the correct number. If you enter a 3-digit
number that is not programmed in the machine,
press the [C] key and then enter the correct n umber.
If you do not know the Speed Dial number, print out
the "SPEED # LIST". (See "PRINTING LISTS OF
PROGRAMMED INFORMATION, SETTINGS, AND
COMMUNICATION ACTIVITY" on page 85.)
2
Note
Continue from step 6 of "BASIC
4
PROCEDURE FOR SENDING FAXES"
(page 18).
• To cancel transmission
To cancel transmission while "READING" appears or before the key is pressed, press the [C] or [CA] key. T o
cancel a transmission job that is already stored, press the [FAX STATUS] key and cancel the job as explained
on (page 25).
• A job number (3 digits) appears in the display with "READ END" when transmission is performed. If you make
a note of this number after performing a broadcast transmission, you can use the number to check the results
of the transmission in the transaction report or activity report.
19
Page 22
BASIC OPERATIONS
COPY RATIO
ADDRESS
ADDRESS
GRAM
PAPER SELECT
RESOLUTION
RESOLUTION
AUTO IMAGE
FORMAT
BROADCAST
OUTP
ORIGINAL
ORIGINAL
46 47 48 49 50
41 42 43 44 45
36 37 38 39 40
31 32 33 34 35
26 27 28 29 30
ABCDE
FGHI J
KLMNO
PQRST
GHI
PQRS
BACK
OK
PQ
ACC
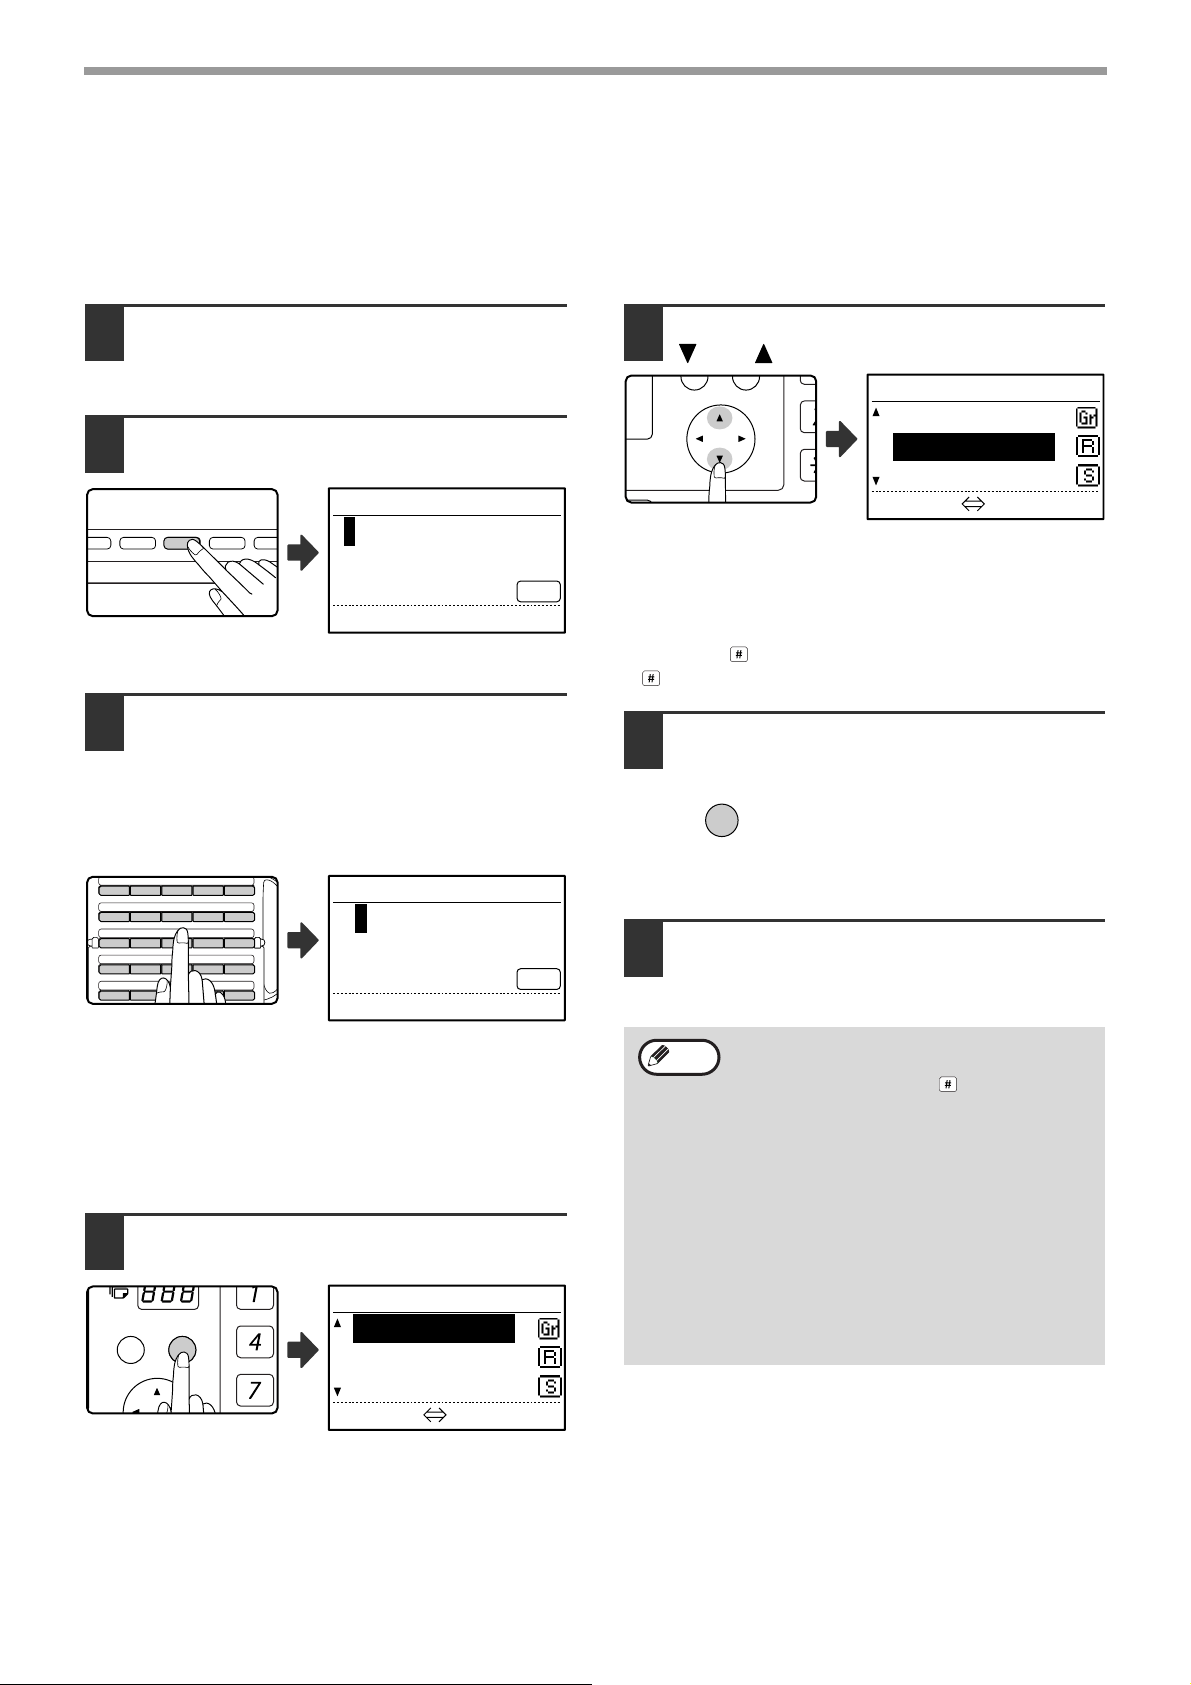
SEARCHING FOR A PROGRAMMED DESTINATION
(USING THE [ADDRESS] KEY)
At the time of dialling, you can enter letters to search for a destinat ion stored in a Rapid key, Speed Dial nu mbe r, or
Group key.
Perform steps 1 to 4 of "BASIC
1
PROCEDURE FOR SENDING FAXES"
(page 17).
Press the [ADDRESS] key.
2
KEY WORDS
ABC
The search letter entry
screen appears.
Enter the search letters with the letter
3
entry keys (page palette) (you can
also skip entry of search letters and
go directly to the next step to display
the first destination in the address
list).
KEY WORDS
A
ABC
[OK]:SEARCH
Up to 10 of the following types of characters can be
entered.
Upper case letters, lower case letters, numbers,
special characters (See "ENTERING CHARACTERS"
on page 86.)
Enter numbers with the numeric keys.
Press the [OK] key.
4
ADDRESS
Johnson
Parker
Stevens
The address list appears.
[#]:LIST DETAIL
Select the desired destination with the
5
[ ] or [ ] key.
ADDRESS
Johnson
Parker
Stevens
[#]:LIST DETAIL
• The search results appear in the following order:
upper case letters, lower case letters, special
characters, and numbers.
• If not all letters of the destination name appear,
press the key to display the full name. Press the
key once again to return to the original screen.
Press the [OK] key.
6
OK
Continue from step 6 of "BASIC
7
PROCEDURE FOR SENDING FAXES"
(page 18).
Note
• To cancel transmission
To cancel transmission while "READING"
appears or before the key is pressed,
press the [C] or [CA] key. To cancel a
transmission job that is already stored,
press the [FAX STATUS] key and cancel
the job as explained on page 25.
• A job number (3 digits) appears in the
display with "READ END" when
transmission is performed. If you make a
note of this number after performing a
broadcast transmission, you can use the
number to check the results of the
transmission in the transaction report or
activity report.
The selected destination is
entered.
20
Page 23
BASIC OPERATIONS
C
S
F
LINE
DATA
FAX
SCAN
DUPLEX SCAN
DUPLEX SCAN
2-SIDED COPYAUTO IMAGE
FORMAT
BROADCAST
OUTPUT
ORIGINAL SIZE
ORIGINAL SIZE
DUPLEX SCAN
DUPLEX SCAN
2-SIDED COPYMAGE
CAST
OUTPUT
ORIGINAL SIZE
ORIGINAL SIZE
PQ
ACC
GHI
PQRS
BACK
OK
FAXING A TWO-SIDED ORIGINAL
(MX-M182D/MX-M202D/MX-M232D)
Follow the steps below to automatically transmit both sides of a two-sided original. (This is only possible on models
that have an RSPF installed.)
Note
Do not use an original that is not a standard size (A3, B4, A4, A4R, A5, 8-1/2" x 11", 8-1/2" x 11"R (11" x 17",
8-1/2" x 14", 8-1/2" x 11", 8-1/2" x 11"R, A4, A4R if the machine uses inch-based paper sizes)).
Otherwise a scanning error or cut-off image may result.
Make sure that the machine is in fax
1
mode.
When the machine is in fax
mode, the [FAX] key indicator is
lit. If the indicator is not on, press
the [FAX] key. If auditing mode
has been enabled for the fax
function in the system settings, a
message will appear prompting
you to enter your account number when you switch to
fax mode. Enter your account number (five digits) with
the numeric keys. (See "ACCOUNT CONTROL" on
page 103.)
Place the original(s) in the document
2
feeder tray. (See "USING THE
SPF/RSPF" on page 12.)
Check the original size.
3
ORIGINAL SIZE
AB
AUTO
A3
B4
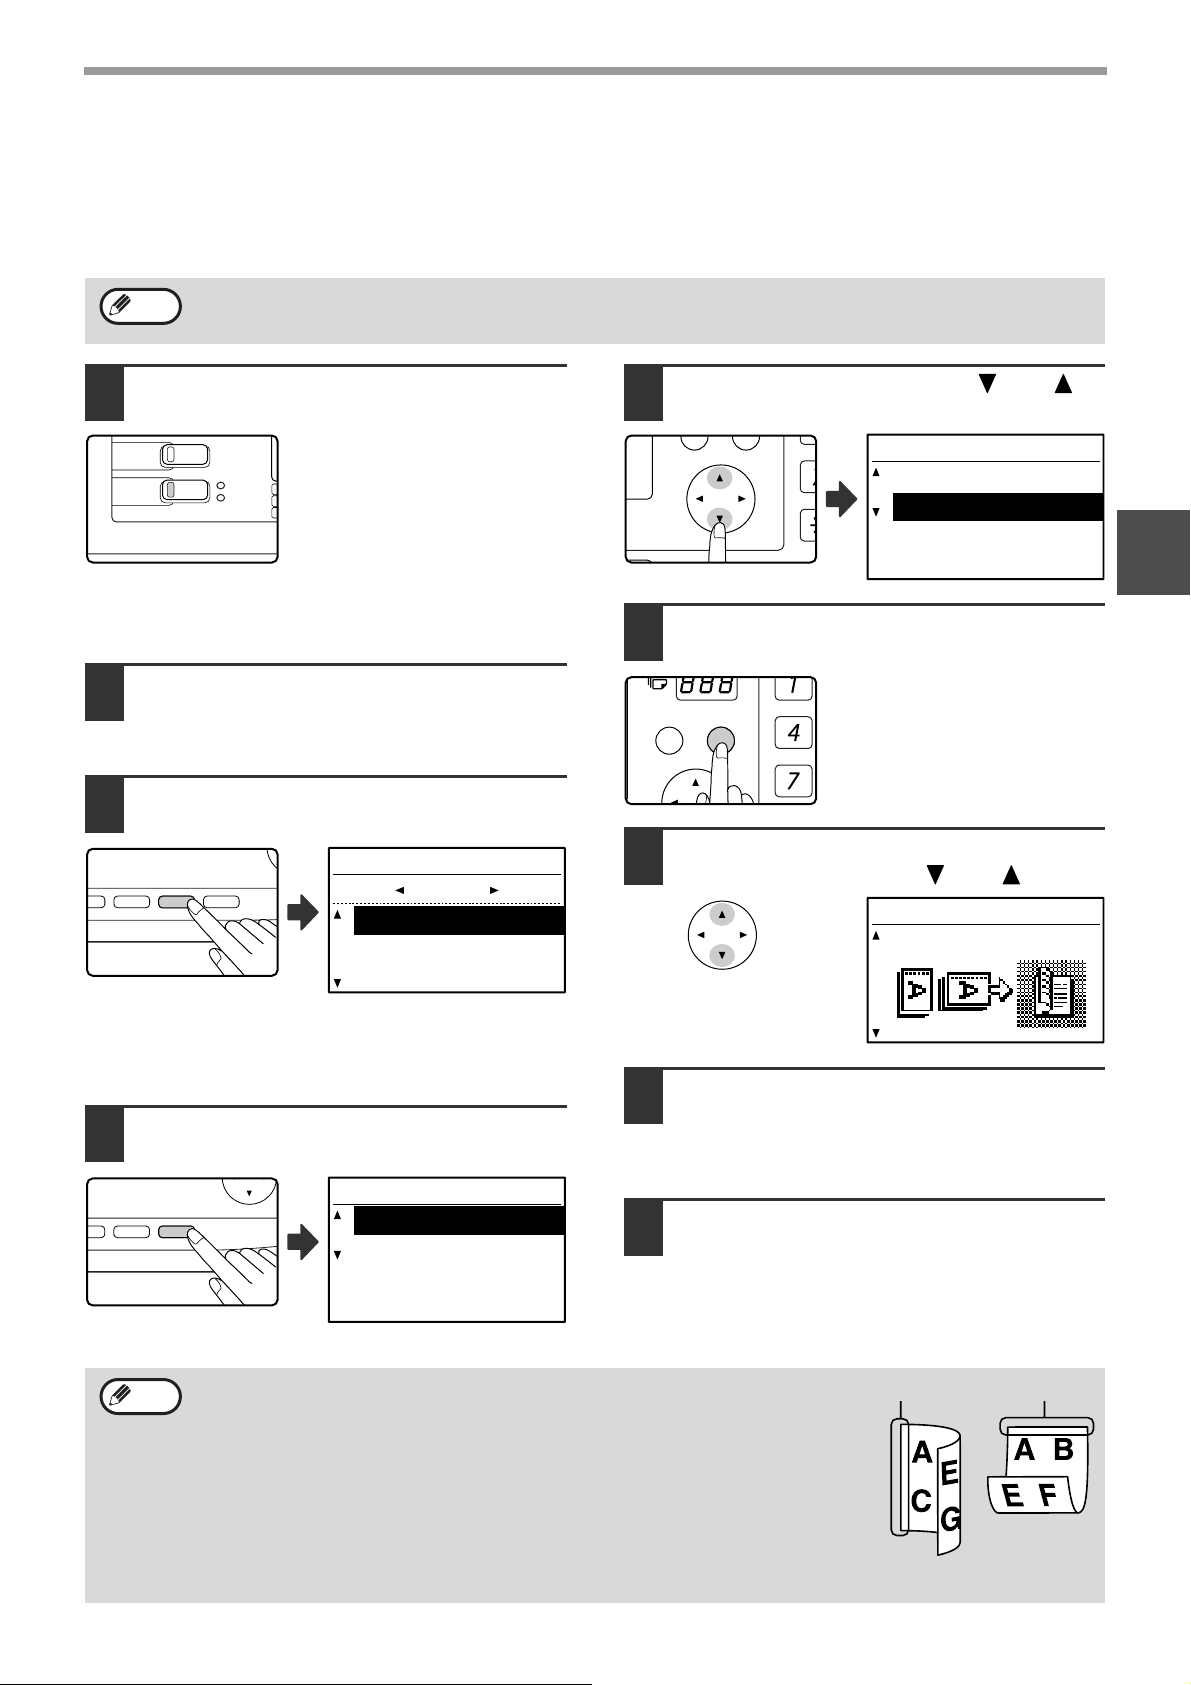
Select "2-SIDED" with the [ ] or [ ]
5
key.
DUPLEX SCAN
1-SIDED
2-SIDED
Press the [OK] key.
6
The duplex original type
selection screen appears.
Select book or tablet for the duplex
7
original type with the [ ] or [ ] key.
DUPLEX SCAN
BOOKLET
2
When the [ORIGINAL SIZE] key is pressed, the size selection
screen appears. If the original size was not correctly
detected, see "MANUALLY SETTING THE SCANNING
SIZE" (page 13) and set the correct original size.
Press the [DUPLEX SCAN] key.
4
DUPLEX SCAN
1-SIDED
2-SIDED
The duplex mode
selection screen appears.
• Booklets and tablets
Two-sided originals that are bound at the side are booklets, and two-sided originals
that are bound at the top are tablets.
• Duplex scanning is cancelled when the transmission is completed, or when the
[CA] key is pressed.
•
Duplex scanning of tw o-si ded originals is only po ssib le when an RSPF is us ed. Automatic
scanning of both sides of an original is not possible when the document glass is used.
•
Automatic scanning of both sides of an original longer than A3 (11" x 17") is not possible.
•
The image of the back side of the original is rotated 180 degrees if needed at the time of
transmission, and thus there is no need to change the orientation at the receiving machine.
• To cancel duplex scanning, select "1-SIDED" in step 5 and then press the [OK] key.
• When duplex scanning is enabled, dual page scan (page 42) cannot be enabled.
Note
Press the [OK] key.
8
You will return to the base screen and the duplex
scanning mode icon will appear.
Continue from step 4 of "BASIC
9
PROCEDURE FOR SENDING FAXES"
(page 17).
Booklet Tablet
21
Page 24
BASIC OPERATIONS
SYMBOL
SPACE/–
SPEED
COMM. SETTING
FAX
SCAN
PQ
ACC
GHI
PQRS
BACK
OK
ABC DEF
JKLGHI MNO
TUVPQRS WXYZ
@.-
_
READ-END
ACC. #-C
OK
Transmission settings (memory transmission mode and direct
transmission mode)
Transmission modes include memory transmission, where the original is temporarily scanned into memory before
transmission, and direct transmission, where the original is transmitted directly without being scanned into memory.
There are two types of memory transmission: "Storing a transmission" (page 23), where all pages of the original are
scanned into memory before transm ission b egins, a nd "Qu ick online transmission" (page 24), where the destination
is dialled after the first page is scanned and the remaining pages are transmitted as they are scanned.
During a memory transmission, it may happen that t he memory becomes full while the originals are being scanned.
(See "If the memory becomes full during transmission of a stored transmission job" on page 23 and "If the memory
becomes full during a quick online transmission" on page 24.) The number of pages that can be stored in memory
varies depending on the content of the pages, the transmission settings, and whether memory has been added.
If there are too many pages and memory transmission is not possible, you can press the [COMM. SETTING] key to
switch from memory transmission to direct transmission. When direct transmission is used, transmission begins after
the current job is completed, allowing you to give priority to a transmission job. As such, direct transmission is a
convenient means of performing an inte rrupt transm ission when there are a la rge numb er of sto red transmission job s.
To switch between memory transmission and direct transmission, see the following "Faxing by direct transmission".
Note
When transmission is performed manually using an extension phone connected to the machine or using on-hook
dialling, direct transmission is automatically selected. (Memory transmission is not possible.)
Faxing by direct transmission
Perform steps 1 to 4 of "BASIC
1
PROCEDURE FOR SENDING FAXES"
(page 17).
Press the [COMM.SETTING] key
2
The communication settings
screen appears.
Note
Select "TX" with the [ ] or [ ] key.
3
The communication settings screen can
also be displayed from the function selection
screen.
Press the [SPECIAL FUNCTION] key to
display the special function selection
screen, select "COMM. SETTING" with the
[ ] or [ ] key, and press the [OK] key.
Press the [OK] key.
4
Select "DIRECT TX" with the [ ] or
5
[ ] key.
SELECT SENDING
MEMORY TX
DIRECT TX
Press the [OK] key.
6
OK
22
COMM. SETTING
TX
RX
Dial the fax number.
7
Group dialling cannot be used.
Page 25
BASIC OPERATIONS
_
SHIFT
SPEAKER
REDIAL/PAUSE
PRINT
COPY
Press the [START] key.
8
When using the document
glass, multiple original pages
cannot be transmitted in a
single transmission.
Note
Faxing by manual transmission (using the [SPEAKER] key)
Perform steps 1 to 4 of "BASIC
1
PROCEDURE FOR SENDING FAXES"
Perform steps 7 and 8 of "Faxing by
3
direct transmission" (page 22 to 23).
(page 17).
Note
Press the [SPEAKER] key
2
ENTER DIAL #
:
MANUAL AUTO
CONT
AUTO
STANDARD
When this key is pressed, a message regarding
volume adjustment will appear briefly followed by the
dial entry screen. You can adjust the speaker volume
(high, middle, or low) by pressing the [ ] or [ ] key.
Note that this will not change the volume setting in the
system settings. Ringing will be heard from the
speaker on the left side of the machine (toward the
back) when the [SPEAKER] key is used for dialling.
• To change from "Direct Transmission"
back to "Memory Transmission", select
"MEMORY TX" in step 5.
• To cancel a direct transmission, press the
[C] key.
• To cancel dialling using the [SPEAKER]
key when you need to redial the number
or because transmission was interrupted,
press the [SPEAKER] key once again.
• As the original is not stored in memory
when direct transmission and manual
transmission are used, the following
functions cannot be used.
Broadcast transmission (page 31), timer
transmission (page 33), F-code relay
broadcast transmission (page 63), redial
(page 107), image rotation (page 105),
duplex scanning, dual pages, and others.
• When a fax is sent by direct transmission
or manual transmission, the fax is sent
after the connection with the receiving
machine is established.
2
Storing transmission jobs (memory transmission)
When the line is in use, the transmission job is temporarily stored in memory. When the current job and any
previously stored jobs are completed, transmission begins automatically. (This is called memo ry transmission .) T his
means that transmission jobs can be stored in memor y by perfo rming a tran smission operat ion while t he mach ine is
occupied with another transmission/reception operation. Up to 50 jobs can be stored in memory at once. After
transmission, the scanned document data is cleared from memory. You can check transmission jobs stored in
memory in the fax job status screen. (Page 26) Note that depending on the number of pages stored in memory and
the transmission settings, it may not be possible to store 50 jobs in memo ry.
• The procedure for storing a transmission job is the same as the procedure in "BASIC PROCEDURE FOR
SENDING FAXES" on page 17.
• If you have not yet pressed the [START] key ( ), you can cancel a transmission job by pressing the [C] key.
If you have already pressed the [START] key
•
original is still being scanned after the [START] key
transmission.
•
If you store a transmission job in direct transmission mode, you will not be able to store any further transmission jobs.
After transmission, the scanned document data is cleared from memory. You can check transmission jobs stored in
memory in the fax job status screen. (Page 26)
If the memory becomes full during transmission of a stored transmission job
If the memory becomes full while scanning the first page of a document, the trans mission job is automatic ally cancelled.
If the memory becomes full while scanning the second page or a fo llowing page, scanning stops. In this case, you
can either press the [C] key to cancel the transmission, or press the [OK] key to transmit only those pages which
were completely scanned.
()
, see "Cancelling a stored transmission job" (page 26). If the
()
is pressed, you can press the [C] key to cancel the
23
Page 26
BASIC OPERATIONS
Quick On-line
When you use the SPF/RSPF to send a multi-page document and there are no previously stored jobs waiting or in
progress (and the line is not being used), the machine dials the destin ation after the first page is scanned and begins
transmitting scanned pages while the rema ining pages are being scanned . This transmission method is called Quick
On-line. When a quick online transmission is being performed, the message display shows "READING" "DIALLING" - "COMM." - "SENDING" in that order until scanning of the remaining pag e s is com ple te d. When all
pages have been scanned, "READ END" appears before the above messages appear.
If the receiving party is busy, the quick online transmission will change into a stored transmission job (memory
transmission). (See "Storing transmission jobs (memory transmission)" on page 23.)
If the memory becomes full during a quick online transmission
If the memory becomes full while scanning the first page of a document, the transmission job is automatically
cancelled. If the memory becomes full while scanning the second pa ge or a following page, those pages which were
completely scanned will be transmitted.
Note
The machine is initially set (factory setting) to perform Quick On-line transmission. If desi red, you ca n disab le this
function in the system settings. (See "QUICK ON LINE TX" on page 106.) When an original is transmitted using
the following methods, the job will be stored in memory. (Quick On-line transmission will not be performed.)
• Sending a fax from the document glass.
• Broadcast transmission (page 31)
• Timer transmission (page 33)
• F-code transmission (page 52 in Chapter 4)
If the receiving party is busy
If the receiving party is busy, the transmission is tempor arily cancelled and then automatically re-attempted after a
brief interval. (Two attempts are made at an interval of 3 minutes.*
If you do not want the machine to re-attempt the transmission, press the [FAX STATUS] key and cancel the job.
(Page 26)
*1 The settings can be changed in the system settings. (See "RECALL SETTING (BUSY)" on page 106.)
*3 Varies depending on country and region.
1 *3
)
If a transmission error occurs
If an error occurs that prevents transmission or the receiving machine does not answer the call within 45 seconds*2 *3,
the transmission is stopped and then automatica lly re-attempted later. One attempt is made at an interval of 1
minute.*
job. (Page 26) This machine also supports error correction mode (ECM) and is set to automatically resend any part of
a fax that is distorted due to noise on t he line.
*2 The settings can be changed in the system settings. (See "RING TIMEOUT IN AUTO TX" (pa ge 107) and
*3 Varies depending on country and region.
2
) If you do not want the machine to re-attempt the tr ansmission, press the [FAX STATUS] key and can cel the
"RECALL SET (ERR)" (page 107).)
Image rotation
The machine is initially set to rotate a vertically-placed ( ) document 90° so that it is oriented horizontally ( )
before transmission (A4 (8-1/2" x 11") originals are rotated to A4R (8-1/2" x 11"R) and A5R originals are rotated to
A5). A4R (8-1/2" x 11"R) originals and A5 originals are not rotated. In Taiwan, B5R originals are also rotated to B5
(however, B5 originals are not rotated). If desired, you can disable the rotation function in the system settings as
explained on "ROTATE TX" (page 105).
Note
Place A5 size originals so that they are oriented vertically ( ). If oriented horizontally, ( A5R orientation), press
the [ORIGINAL SIZE] key and specify the correct original size (select "A5R") (See "MANUALLY SETTING THE
SCANNING SIZE" on page 13.)
24
Page 27
BASIC OPERATIONS
SPECIAL
FUNCTION
FAX STATUS
DATA
ON LINE
DEF
MNO
INTER
GHI
PQRS
BACK
OK
CANCELLING A FAX TRANSMISSION
To cancel a transmission that is in progress or a stored transmission job, follow the steps below. A transmission in
progress or a stored transmission job is cancelled from the fax status screen. (Printing of a received fax cannot be
cancelled.)
Note
To cancel a transmission while the original is being scanned ("READING" appears in the message display) or
before the key is pressed ([READ-END] key ( ) when scanning the original from the document glass), the
[C] or [CA] key can be pressed.
Cancelling a fax transmission
Press the [FAX STATUS] key.
1
COMM.
0123456789
MEMORY TX
No.XXX
• When a transmission is in progress, the job being
transmitted is displayed.
• If the displayed job is not the job that you wish to
cancel, it is likely that the job to be cancelled is a
stored job waiting for transmission. Press the
[BACK] key to display the fax status selection screen
and then follow the procedure in "Cancelling a stored
transmission job" on page 26 to cancel the job.
Note
Press the [C] key.
2
A screen asking you to
confirm cancellation of
the transmission
appears.
When a transmission is not in progress, the
following fax status selection screen
appears.
FAX STATUS
TX/RX JOBS
TX/RX RESERVE
TX/RX COMPLETED
Job cancelled.
YES
NO
Press the [OK] key.
3
Note
• If you do not wish to cancel the
transmission, press the [ ] key in the
screen of step 2, select "NO", and press
the [OK] key.
• You can check cancelled operations in the
Activity Report. "CANCEL" will appear in
the "TYPE/NOTE" column of the report.
Additional information on the display
during transmission
(A)
(B)
(C) (D)
(A) Destination name
The name of the destination appears if
programmed.
(B) Transmission method name
In the case of a timer transmission, the
timer icon " " appears at the beginning
of the transmission method name.
(C) Number of pages currently transmitted
Appears during sending.
(D) Document number
The document number assigned at the
time of scanning in memory
transmission mode appears.
The transmission is cancelled.
2
COMM.
0123456789
MEMORY TX
P-XXX No.XXX
25
Page 28
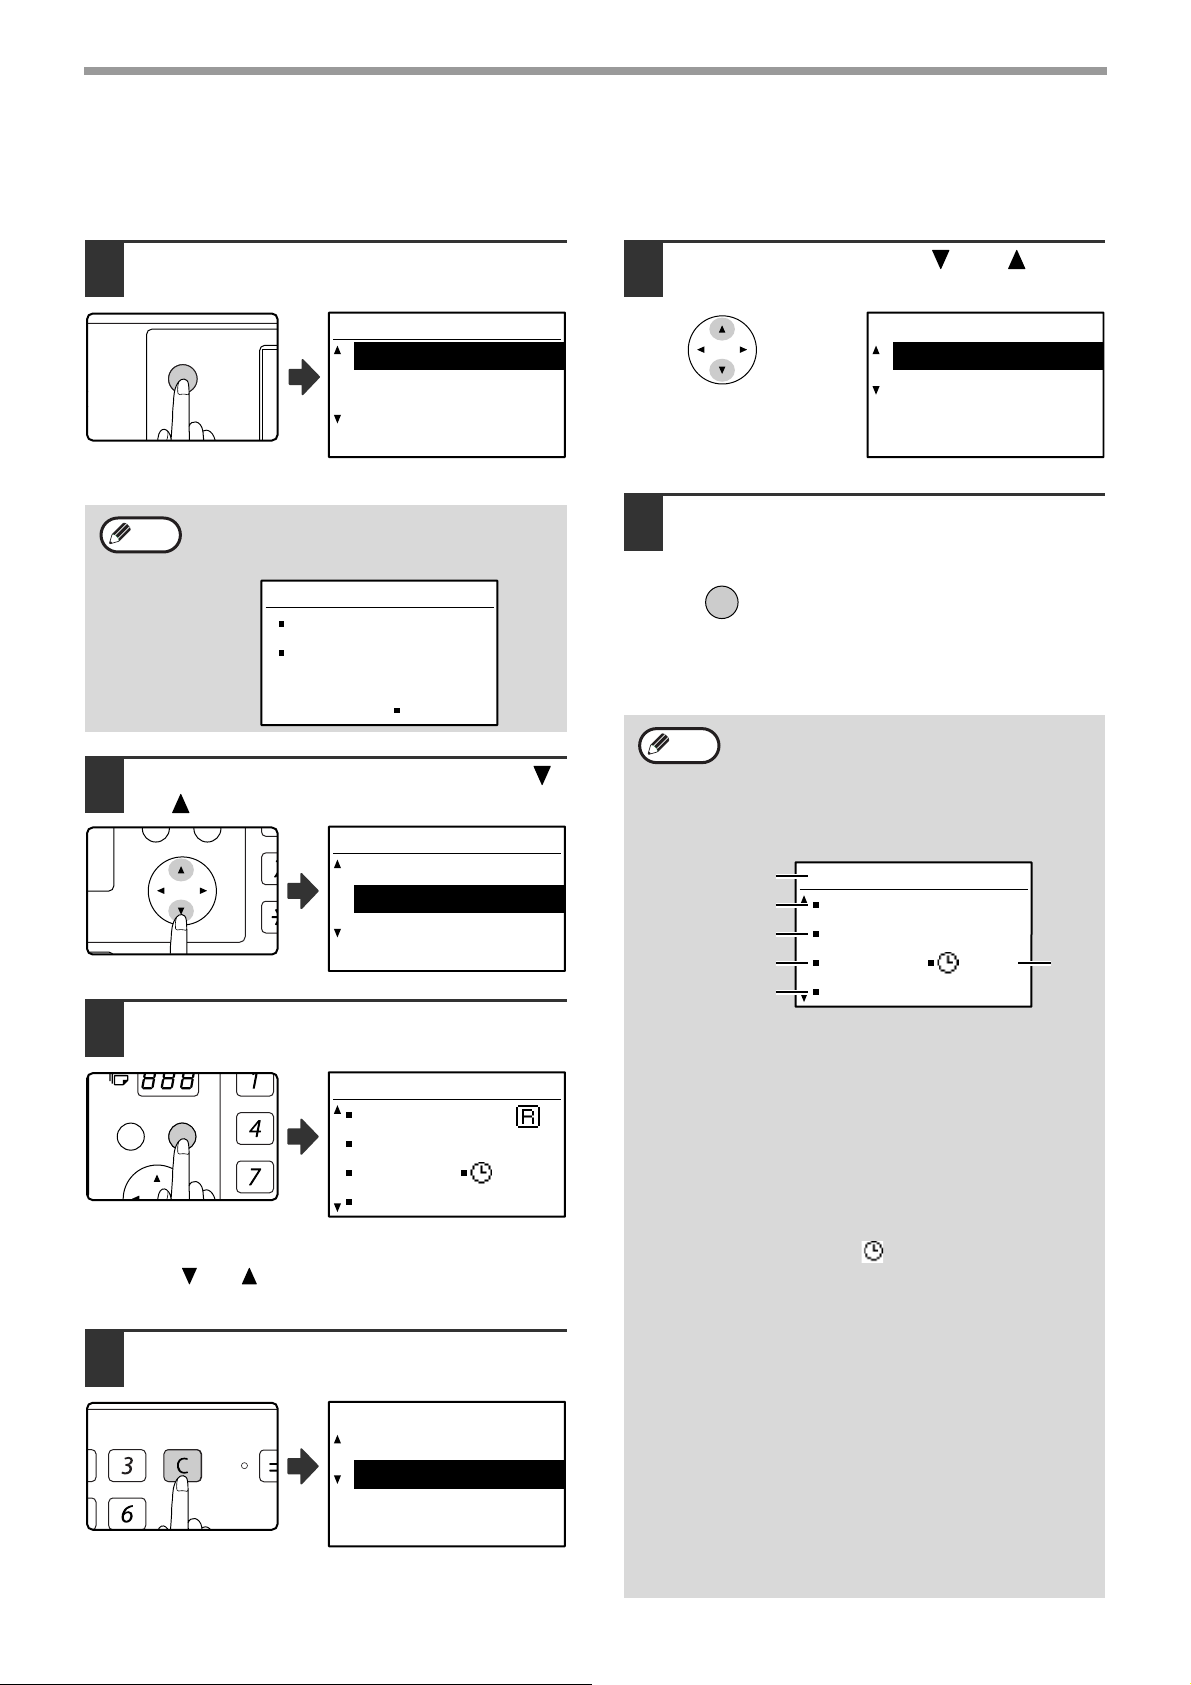
BASIC OPERATIONS
SPECIAL
FUNCTION
FAX STATUS
DATA
ON LINE
PQ
ACC
GHI
PQRS
BACK
OK
DEF
MNO
INTER
Cancelling a stored transmission job
If you do not wish to cancel a stored transmission job and only wish to check its status, press the [BACK] key instead
of the [C] key in step 4 to exit.
Press the [FAX STATUS] key.
1
FAX STATUS
TX/RX JOBS
TX/RX RESERVE
TX/RX COMPLETED
The fax job status screen
is displayed.
Note
When a transmission is in progress, the job
being transmitted is displa yed. Press the [BA CK]
key to display the fax status selection screen.
COMM.
0123456789
SERIAL POLL MODE
/XXX
Select "TX/RX RESERVE" with the [ ]
2
or [ ] key.
FAX STATUS
TX/RX JOBS
TX/RX RESERVE
TX/RX COMPLETED
Press the [OK] key.
3
WAITING XXX/XXX
SBC Co.
TX/RX RESERVE
P-XXX No.XX
The first stored
transmission job appears.
Press the [ ] or [ ] key until the transmission job that
you wish to cancel appears.
Press the [C] key.
4
09:55
Job cancelled.
YES
NO
Select "YES" with the [ ] or [ ] key.
5
Job cancelled.
YES
NO
Press the [OK] key.
6
OK
If you wish to cancel another transmission job, repeat
steps 1 through 6.
Note
You can check cancelled recall mode jobs in
the Activity Report. "CANCEL" will appear in
the "TYPE/NOTE" column of the report.
Contents of the stored job screen (screen of
step 3)
(A)
(B)
(C)
(D)
(F)
(A) Current status
(B) Destination
(C) Transmission method name
(D) Number of pages stored
(E) In the case of a timer transmission, the
(F) In the case of a timer transmission, the
The selected transmission job is
cancelled.
WAITING XXX/XXX
01234
TX
P-XXX No.XX
(E)
XX:XX
"WAITING" will appear next to stored
transmission jobs and timer transmission
jobs. "RECALL" will appear next to recall
mode jobs.
The name of the destination appears if
programmed.
In the case of a timer transmission, the
timer icon " " appears at the beginning
of the transmission method name.
In the case of a stored transmission job,
the document number assigned at the
time of scanning appears.
timer job number appears.
timer job number appears. "Prepared"
will appear for a stored transmission job.
The transmission cancel
confirmation screen
appears.
26
Status of completed jobs
To check the status of completed jobs,
select "TX/RX COMPLETED" in step 2 and
press the [OK] key in step 3.
Page 29
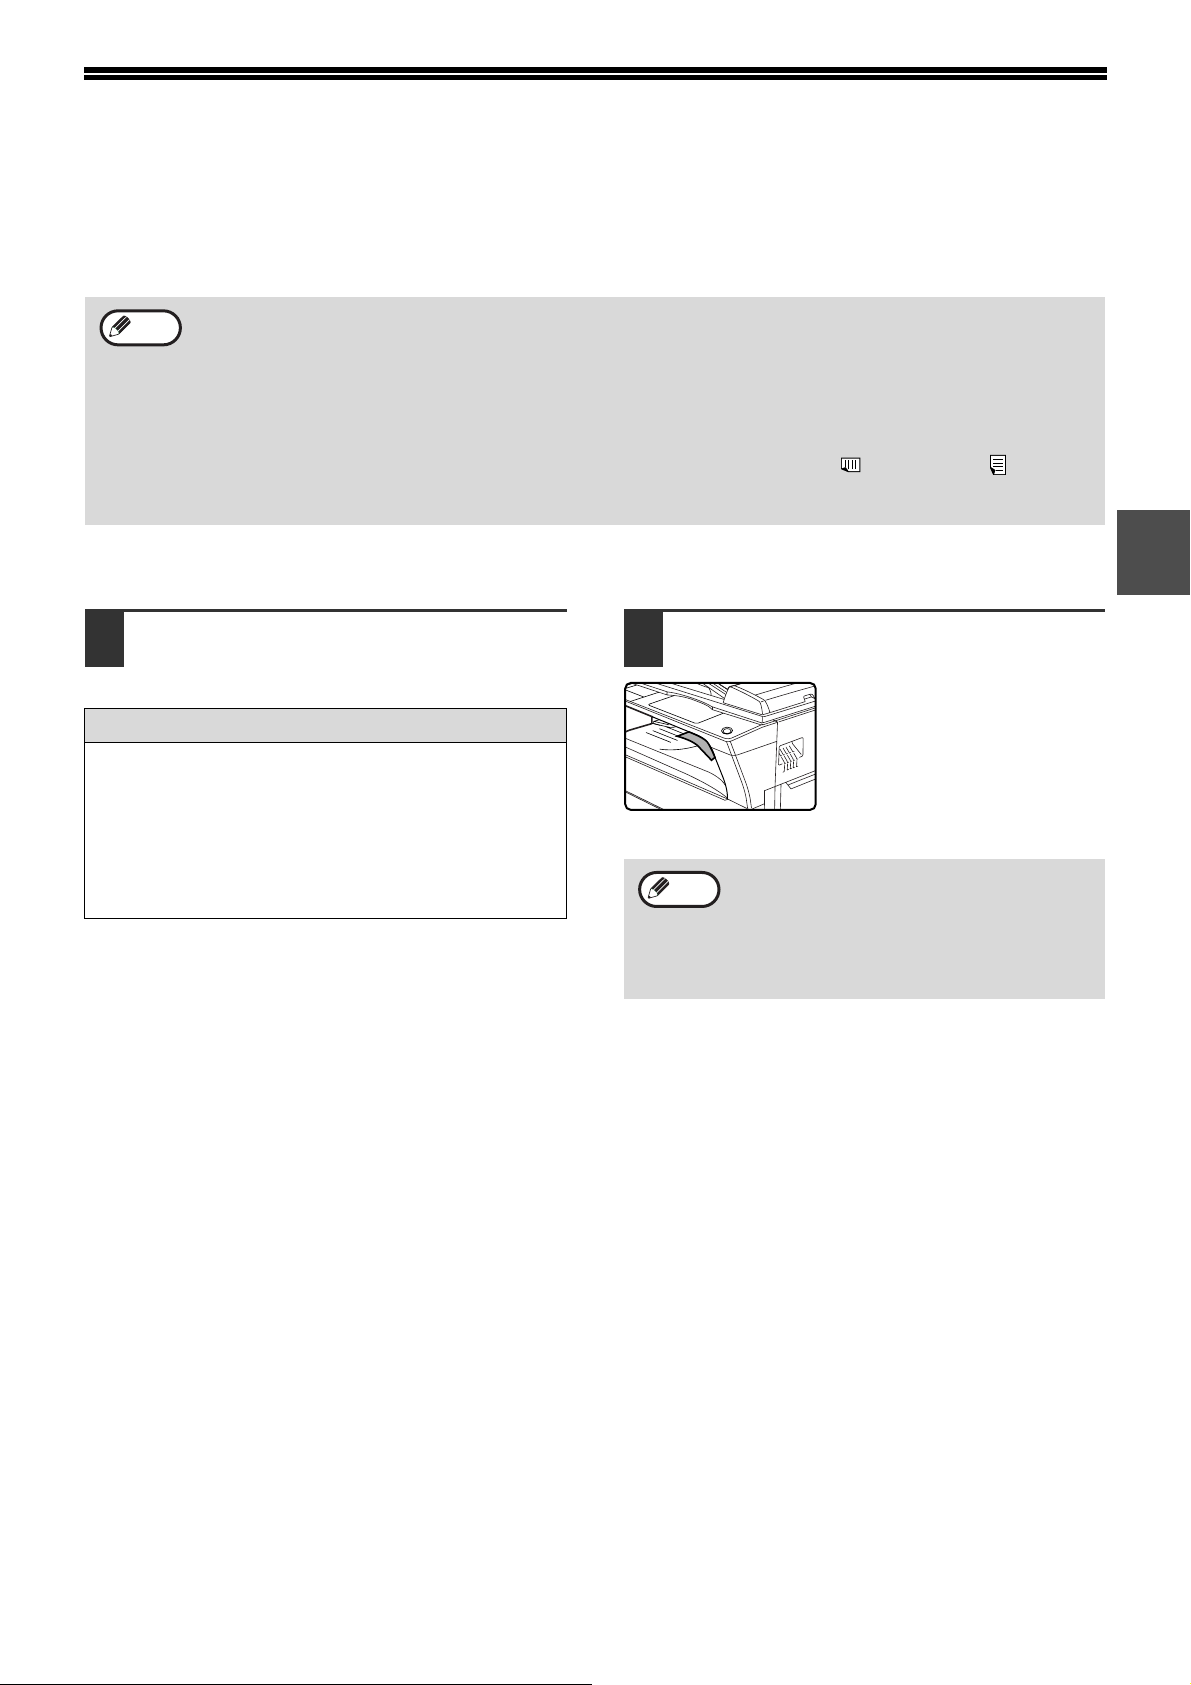
RECEIVING FAXES
When another fax machine sends a fax to your machine, your machine will ring*, automatically receive the fax, and
begin printing. (This is called automatic reception.)
If you do not wish to have received faxes printed immediately, use the print hold function to hold received faxes in
memory for printing at your convenience (all received faxes will be printed at once). To enable this function and print
received faxes, see "FAX PRINT HOLD FUNCTION" on page 29.
Note
• You can store a transmission job while fax reception is in progress. (See "Storing transmission jobs (memory
transmission)" on page 23.)
• To print received fax pages on both sides of the paper, enable "DUPLEX RECEPTION" (page 109) in the
system settings.
• If a extension phone is not connected to the machine, use automatic reception.
• In order to receive faxes, paper must be loaded in the paper tray. See "LOADING PAPER" in the Operation
Guide for the machine to load appropriate paper. Incoming faxes will be automatically adjusted to the
orientation of the printing paper, so there is no need to load both horizontally ( ) and vert ically ( ) oriented
paper. However, when a fax smaller than A4 (8-1/2" x 11") is received, the size of paper used to print the fax
will differ depending on the orientation (horizontal or vertical) of the original in the sending machine.
RECEIVING A FAX
The machine will ring* and reception
1
will automatically begin.
The LINE indicator lights up.
*Number of rings
The machine has been set to ring twice before
beginning automatic reception. You can change the
number of rings to any number from 0 to 9 in the
system settings. (See "#OF RINGS AT. RX" on
page 108.)
If the number of rings is set to 0, the machine will
receive faxes without ringing.
Reception ends.
2
Note
The job separator has a sensor that detects
when a tray is full. When approximately 100
sheets accumulate in a tray, a message
appears in the display and fax printing stops.
If this happens, remove the sheets. Printing
will resume momentarily.
2
• When reception ends, the
machine sounds a beep.
• When the optional job
separator tray kit is installed,
received faxes are output to
the job separator.
Earlier output of received data
If a fax cannot be printed because the machine is out of the appropriate paper and another fax is subsequently
received that can be printed, the subsequently received fax will be printed before the fax that cannot be printed.
This also happens when there are several faxes in memory that cannot be printed.
This function can be disabled in the system settings. (See "EARLIER OUTPUT" on page 110.)
27
Page 30

BASIC OPERATIONS
F-code confidential fax reception
When a fax has been received by F-code confidential fax reception, an icon ( ) will appear in the base screen of
fax mode (message display (1) on page 9). The icon also appears in fron t of the box in the F-code confidential box
name screen in the display. (Step 6 on page 61) Print the received fax as explained in "PRINTING A DOCUMENT
RECEIVED TO AN F-CODE CONFIDENTIAL MEMORY BOX" (page 61).
If received data cannot be printed
If the machine runs out of paper or toner, or a pap er misfe ed o ccurs, o r if t he machin e is pr inting a pr int or co py job ,
received faxes will be held in memory until printing becomes possible. The received faxes are automatically printed
when printing is possible. When received faxes are held in memory, the DATA ind icator at the upper right of the
[FAX] key blinks. You can also use the forwardin g function to have another fax machine print the received faxes.
(See "FORWARDING FUNCTION" on page 49.)
Note
In order to receive faxes, paper must be loaded in the paper tray. Load appropriate paper as explained in
"LOADING PAPER" in the Operation Guide for the machine. The difference between vertically and horizontally
oriented A4 and A4R paper (8-1/2" x 11" and 8-1/2" x 11"R paper), is automatically adjusted at the time of
reception, so there is no need to load paper in both orientations. However, when a fax smaller than A4 (8-1/2" x
11") is received, the size of paper used to print the fax will differ depending on the orientation (horizontal or
vertical) of the original in the sending machine.
• If you wish to use A5 (5-1/2" x 8-1/2") paper to receive faxes, load A5 (5-1/2" x 8-1/2") paper in tray 1 of the
machine and set the paper size to A5 (5-1/2" x 8-1/2"). Only tray 1 can be set to A5 (5-1/2" x 8-1/2") size.
• If you receive a fax that is larger than the loaded paper, the system setting uses "RECEIVED DATA PRINT
CONDITION" on page 109 to print it out in the following manner:
If "REDUCTION" is set up, the image is automatically reduced before printing.
If "DIVISION" is set up, the image is split onto multiple sheets of paper and printed on them at actual size.
If "ACTUAL SIZE" is set up, the image is printed at actual size without being sp lit.
*1 If the loaded paper is of the B5 size or less, the received image may not be printed depending upon the
width and length of the image data.
*2 The received image won't be printed until you load the paper larger than the actual size.
• In fax mode, printing is not possible on 11" x 17", 8-1/2" x 14", 5-1/2" x 8-1/2" sizes. (Among INCH sizes, only
8-1/2" x 11" and 8-1/2" x 11"R can be used for printing.) (If your machine uses inch-based paper sizes, A3, B4,
B5, B5R, and A5 size paper cannot be used in fax mode. (Among AB sizes, only A4 and A4R can be used for
printing.))
• If the paper runs out while a fax is being printed, printing will automatically continue using the closest size of
paper in another tray.
• If you change the size of paper loaded in a tray, change the tray's paper size setting.
• Faxes cannot be printed correctly if the actual paper size is different from the paper size setting. Be sure to set
the tray's paper size setting to the same paper size as the paper loaded in the tray. For example, if y ou receive
an A3 (11" x 17") size fax when B4 (8-1/2" x 14") paper is loaded in the tray and the tray's paper size setting is
A3 (11" x 17"), the fax will be printed on B4 (8-1/2" x 14") paper and part of the image may be cut off If the
paper loaded in the tray is larger than the paper size setting, paper larger than the recognized fax size will be
used. (A message prompting you to check the tray's paper size setting will appear.)
• Received faxes cannot be printed on paper inserted in the bypass tray.
*1
*1
*2
28
Page 31

BASIC OPERATIONS
EXPOSURE
COLOUR MODE
PAPER SE
RESOLUT
COPY
SCAN
SPECIAL
FUNCTION
LINE
DATA
DATA
ON LINE
PQ
ACC
GHI
PQRS
BACK
OK
FAX PRINT HOLD FUNCTION
Faxes are normally printed as soon as they are received.
This function is used to hold received faxes in memory rather than printing them as they are received. Faxes held in
memory are printed manually all at once.
Settings required for fax print hold
If a fax is received when auto power shut-off mode has activated ("POWER ON AND OFF" in the Operation Guide
for the machine), the machine returns to norma l operation in order to print the fax. For this reason, if faxes are
received at regular intervals, auto power shut-off will repeatedly activate and deactivate and less power will be
conserved.
If you wish to maximize the benefit of auto power shut-o ff at ni ght and o th er ti me s when p rin tin g of r eceive d fa xe s is
not immediately necessary, enable fax print hold. When fax print hold is ena bled, receiving faxes when auto power
shut-off has activated will not cause auto power shut-off to deactivate.
It is recommended that you enable and disable fax print hold as needed for your conditions of use; for example,
enable fax print hold during the night and disable it during the day.
2
Note
• When fax print hold is enabled and received fax e s are held in memory, the DATA indicator above the [FAX] key
on the operation panel blinks and a message appears in the display. (When the received faxes are printed, the
indicator stops blinking and the message no longer appears.)
• If the remaining free memory reaches 0%, fax receptio n will no longer be possible. For this reason, it is
important to constantly make sure that sufficient free memory remains and frequently print received faxes.
The percentage of free memory remaining appears in the base screen of fax mode. (Page 9)
Enabling fax print hold
Note
In Fax mode, press the [SPECIAL
1
FUNCTION] key.
Begin the following procedure from the base screen of
Fax mode.
Select "FAX PRINT HOLD" with the
2
[ ] or [ ] key.
If fax print hold is prohibited using "DISABLE FAX PRINT HOLD" (page 104) in the system settings, it will not be
possible to enable it.
Press the [SPECIAL
FUNCTION] key to display the
special function menu.
(To select fax mode, see step 1
on page 17.)
SPECIAL FUNCTION
FAX PRINT HOLD
TIMER MODE
SENDING OPTIONS
Press the [OK] key.
3
Select "SETTING" with the [ ] or [ ]
4
key.
FAX PRINT HOLD
PRINT HOLD DATA
SETTING
Press the [OK] key.
5
OK
29
Page 32

BASIC OPERATIONS
EXPOSURE
COLOUR MODE
PAPER SE
RESOLUT
COPY
SCAN
SPECIAL
FUNCTION
LINE
DATA
DATA
ON LINE
PQ
ACC
GHI
PQRS
BACK
OK
Select "ON" with the [ ] or [ ] key.
6
FAX PRINT HOLD
Press the [OK] key.
7
OK
ON
OFF
To disable fax print hold, select "OFF".
Printing received faxes held in memory
To print received faxes that are held in memory when fax print hold is enabled, follow the steps below.
In Fax mode, press the [SPECIAL
1
FUNCTION] key.
Begin the following procedure from the base screen of
Fax mode.
Press the [SPECIAL
FUNCTION] key to display the
special function menu.
(To select fax mode, see step 1
on page 17.)
Select "PRINT HOLD DATA" with the
4
[ ] or [ ] key.
FAX PRINT HOLD
PRINT HOLD DATA
SETTING
Select "FAX PRINT HOLD" with the
2
[ ] or [ ] key.
SPECIAL FUNCTION
FAX PRINT HOLD
TIMER MODE
SENDING OPTIONS
Press the [OK] key.
3
Press the [OK] key.
5
OK
Select "PRINT" with the [ ] or [ ]
6
key.
FAX PRINT HOLD
PRINT
CANCEL
Press the [OK] key.
7
OK
30
Page 33

ADVANCED TRANSMISSION
COPY RATIO
ADDRESS
ADDRESS
DUPLEX
DUPLEX
2-SIDED
AUTO IMAGE
FORMA T
BROADCAST
OUTPUT
ORIGINAL SIZE
ORIGINAL SIZE
3
This chapter explains advanced features that are designed for specific purposes and circumstances. Please read
those sections that are of interest to you.
METHODS
SENDING THE SAME DOCUMENT TO
MULTIPLE DESTINATIONS IN A SINGLE
OPERATION
This feature is used to send a fax to multiple destinations in a single operation. The original to be transmitted is
scanned into memory and then successively transmitted to the selected destinations. This feature is convenient for
such purposes as distributing a report to company branches. Up to 200 destinations can be selected. When
transmission to all destinations has been completed, the document is automatically cleared from memory.
Note
• If you frequently use broadcasting to send faxes to the same group of destinations, it is con venient to program
those destinations into a group key. Group key dialling is an automatic dialling function whereby multiple
destinations (Rapid keys, Speed Dial numbers, and full fax numbers entered with the numeri c keys) are
programmed into a Rapid key. The procedure for programming group keys is explained on page 66.
• When a group key is used to send a fax, the fax is broadcast (transmitted) to the destinations programmed in
the group key. For example, if five destination s are programmed in a group key and the key is pressed for a
broadcast transmission, the broadcast transmission will have five destinations.
(BROADCAST TRANSMISSION)
Sender
Select the broadcast
transmission function.
The document is scanned
into memory
Beep
Reception
Successive
transmission
Destination A
(recipient)
Beep
Destination B
(recipient)
Reception
Beep
Destination C
(recipient)
Reception
31
Page 34

ADVANCED TRANSMISSION METHODS
COPY RATIO
ADDRESS
ADDRESS
DUPLEX
DUPLEX
2-SIDED
AUTO IMAGE
FORMAT
BROADCAST
OUTPUT
ORIGINAL SIZE
ORIGINAL SIZE
31 32 33
26 27 28
ABC
FGH
GHI
PQRS
BACK
OK
USING BROADCAST TRANSMISSION
Perform steps 1 to 4 of "BASIC
1
PROCEDURE FOR SENDING FAXES"
(page 17).
Press the [BROADCAST] key.
2
ENTER RX STATION
:
The destination selection
screen appears.
Enter a full fax number with the
3
numeric keys or press an auto-dial
key (Rapid key, Speed Dial number, or
group key) to select the first
destination. (Page 19)
WXYZ
A destination selected with a Rapid key, Speed Dial
number, or group key is indicated by an icon and a
number. To clear an entry, press the [C] key.
To clear a mistake when
entering a full number with the
numeric keys, press the [C] key
to clear one digit at a time.
Press the [OK] key and then select the
4
next destination by entering a full fax
number or pressing an auto-dial key.
After entering a full number with
the numeric keys, press the
[OK] key to complete the entry.
If you pressed an auto-dial key
in step 3, it is not necessary to
press the [OK] key. You can
immediately press another auto-dial key for the next
destination. Repeat steps 3 and 4 to select the
remaining destinations.
Note
Continue from step 6 of "BASIC
5
• If you need to delete a number for which
entry has already been completed by
pressing the [OK] key, use the [ ] or [ ]
key to select the number and then press
the [C] key.
• If the selected destinations exceed the
display range of the message screen,
press the [ ] or [ ] key to scroll through
and check the destinations.
• Destinations can also be selected using
the address directory and the [REDIAL]
key. Note, howe ver, that the [REDIAL] key
can only be used to select the first
destination (it must be used before any
other destinations are selected).
• If you use two group keys that have 50
stations each, the total number of
destinations entered will be 100.
PROCEDURE FOR SENDING FAXES"
on page 18.
32
Note
To cancel a broadcast transmission
To cancel a broadcast transmission when
selecting destinations, press the [CA] key.
To cancel transmission after the
transmission procedure has been
completed, follow the procedure in
"CANCELLING A FAX TRANSMISSION"
(page 25).
Page 35

AUTOMATIC TRANSMISSION AT A
EXPOSURE
COLOUR MODE
PAPER SE
RESOLUT
COPY
SCAN
SPECIAL
FUNCTION
LINE
DATA
DATA
ON LINE
PQ
ACC
GHI
PQRS
BACK
OK
ABC DEF
JKLGHI MNO
TUVPQRS WXYZ
@.-
_
READ-END
ACC. #-C
OK
SPECIFIED TIME
This feature enables you to set up a transmission or polling operation to be performed automatically at a specified
time up to a week in advance. This is convenient when you will be out of the office or for transmission at off-peak
nighttime rates. A combined total of 50 timer transmission and memory transmission jobs can be stored.
Note
• After a timer transmission is performed, the information (image, destination, etc.) is automatically cleared from
memory.
• To perform a timer transmission, the original must be scanned into memory. It is not possible to leave the
original in the SPF/RSPF or on the document glass and have it scanned at the specified time of transmission.
• The date and time is set in the machine using the system settings. (See "DATE & TIME SET" on page 104.)
• Only one polling timer operation can be set up at a time. If you wish to set up multiple timer polling operations,
combine the machines to be polled into one serial polling operation with a timer setting (see "Serial polling" on
page 37).
(TIMER TRANSMISSION)
SETTING UP A TIMER TRANSMISSION
In Fax mode, press the [SPECIAL
1
FUNCTION] key.
When the [SPECIAL
FUNCTION] key is pressed, the
special function menu appears.
(To select fax mode, see step 1
on page 17.)
Use the numeric keys to select the
4
time at which you want the operation
to take place.
If you need to correct the
entered time, use the [ ] key to
move back.
I
3
Select "TIMER MODE" with the [ ] or
2
[ ] key.
SPECIAL FUNCTION
FAX PRINT HOLD
TIMER MODE
SENDING OPTIONS
If a time has been specified, a checkmark appears in
front of "TIMER MODE". To cancel a specified time,
press the [ ] key in the above display with "TIMER
MODE" highlighted.
Press the [OK] key.
3
TIME SETTING
09:25
(00-23)
TIME NOW: 09:25
Press the [OK] key.
5
OK
Select the day of the week with the [ ]
6
The specified time is set.
or [ ] key.
SELECT DAY
NO SELECT DAYS
MONDAY
TUESDAY
WEDNESDAY
The selected day is highlighted. If you select "NO
SELECT DAYS", the transmission will be performed
as soon as the specified time arrives. To return to the
[TIME SETTING] display, press the [BACK] key.
The current time appears in the screen. If the current
time is not correct, press the [CA] key to cancel the
operation and see "DATE & TIME SET" (page 104) to
correct the time setting.
33
Page 36

ADVANCED TRANSMISSION METHODS
Press the [OK] key.
7
OK
Note
• To cancel a timer operation after the above procedure has been completed, follow the procedure in
"CANCELLING A FAX TRANSMISSION" (page 25).
• A timer job number is automatically assigned to the operation. This number can be used to cancel a stored job.
(See the note "Contents of the stored job screen (screen of step 3)" on page 26.)
• Other operations can be performed after a timer operation is set up. If another operation is in progress when
the specified time arrives, the timer transmission will begin when the job in progress is completed.
The selected day is set.
Perform the desired fax operation.
8
The steps that follow will depend on the type of
operation.
The following operations can be performed as a
timer operation:
• Normal transmission (page 17)
• Broadcast transmission (page 31)
• Polling (page 35)
• Serial polling (page 37)
• F-code polling (page 57)
• F-code confidential transmission (page 59)
• F-code relay request transmis sio n (p ag e 63 )
34
Page 37

TRANSMISSION AND RECEPTION USING THE POLLING FUNCTION
The polling function allows your machine to call a fax machine that has a document ready for transmission and
initiate reception of the document. You can also perform t he reverse operat ion: scan a document int o the memory of
your machine so that another machine can call your machine and initiate reception of the document.
Calling the sending machine and asking the sending machine to fax a document is called "polling". Scanning a document into
memory and automatically sending it when the receiving machine calls and "polls" your machine is called "polling memory".
This function can only be used if the other machine is a Super G3 or G3 machine and supports the polling function.
Note
For information on polling and polling memory using F-codes, see "HO W F-CODE POLLING MEMORY W ORKS"
(page 54). Normal polling and memory polling are explained in this chapter.
Polling
This function allows your machine to call another fax machine and initiate reception of a document in that machine. A timer setting can
also be specified to have the operation take place at night or at another specified time. (See "TIMER TRANSMISSION" on page 33.)
The other machineYour machine
2) Permits polling of.
1) Polling (ask other machine
to send document)
4) Document data is automatically
sent to your machine
Group keys and the broadcast transmission function (page 31) can be used to successively poll multiple fax
machines in a single operation (this is called "serial polling"). Up to 200 machines can be polled.
In this case, the sequence of operations in the above diagram is successively repeated for each sending machine selected.
3) Document data previously
scanned into memory
3
Note
The receiving machine bears the expense (phone charges) of polling transmission.
Polling memory
This feature allows your machine to automatically send a document previously scanned into memory when another
machine calls and polls your machine.
Your machine The other machine
2) Permits polling of.
1) Polling
(request transmission)
4) Document data is
3) Document data previously
scanned into memory
automatically sent to
other machine
Note
The machine that requests transmission bears the expense (phone charges) of the call.
35
Page 38

ADVANCED TRANSMISSION METHODS
EXPOSURE
COLOUR MODE
PAPER SE
RESOLUT
COPY
SCAN
SPECIAL
FUNCTION
LINE
DATA
DATA
ON LINE
PQ
ACC
GHI
PQRS
BACK
OK
31 32 33
26 27 28
ABC
FGH
_
USING THE POLLING FUNCTION
When used in conjunction with the timer transmission function (page 33), only one polling job can be stored.
Note
In Fax mode, press the [SPECIAL
1
If the other machine is using polling security (see "Restricting polling access (polling security)" on page 40), your
fax number (sender's number) must be programmed in the system settings (see "OWN PASSCODE SET" on
page 101) and your number must also be programmed in the other machine.
FUNCTION] key.
When the [SPECIAL
FUNCTION] key is pressed, the
special function menu appears.
(To select fax mode, see step 1
on page 17.)
Select "SENDING OPTIONS" with the
2
[ ] or [ ] key.
SPECIAL FUNCTION
FAX PRINT HOLD
TIMER MODE
SENDING OPTIONS
Press the [OK] key.
3
Press the [OK] key.
5
OK
Enter the fax number of the other
6
machine with the numeric keys, press
a Rapid key, or specify a Speed Dial
number (a group key cannot be used).
WXYZ
A destination selected with a Rapid key or Speed Dial
number is indicated by an icon and a number. To clea r
an entry, press the [C] key.
To clear a mistake when
entering a full number with the
numeric keys, press the [C] key
to clear one digit at a time.
Select "POLLING" with the [ ] or [ ]
4
key.
SENDING OPTIONS
POLLING
SERIAL POLLING
SUB ADDRESS TX
Note
To cance l th e op e r at io n
During communication: Cancel as explained in "Cancelling a fax transmission" on page 25.
While the job is stored: Cancel as explained in "Cancelling a stored transmission job" on page 26.
Press the [OK] key.
7
OK
Press the [START] key.
8
"Polling reservation has been
set." appears in the screen.
After communicating with the
other machine, your machine
prints the received fax.
36
Page 39

ADVANCED TRANSMISSION METHODS
PQ
ACC
Serial polling
When performing serial polling, an auto-dial key that includes a sub-address or passcode (page 52) cannot be
selected.
Perform steps 1 to 3 of the polling
1
procedure (page 36).
Select "SERIAL POLLING" with the
2
[ ] or [ ] key.
SENDING OPTIONS
POLLING
SERIAL POLLING
SUB ADDRESS TX
About the steps that follow
See steps 5 to 8 of the polling procedure (page 36).
Before pressing the [START] key in step 8, repeat
steps 6 and 7 for each machine that you wish to poll.
When performing serial polling, a group key can also
be used in step 6 on page 36.
3
37
Page 40

ADVANCED TRANSMISSION METHODS
EXPOSURE
COLOUR MODE
PAPER SE
RESOLUT
COPY
SCAN
SPECIAL
FUNCTION
LINE
DATA
DATA
ON LINE
PQ
ACC
GHI
PQRS
BACK
OK
USING POLLING MEMORY
This function sends a document previously scanned into memory to a receiving machine when the receiving
machine calls and polls your machine. (If desired, you can restrict polling to fax machines whose fax number you
have programmed in your machine. See "Restricting polling access (polling security)" on page 40.) The machine has
"memory boxes", which are memory used for the regular polling memory function, F-code polling memory, F-code
confidential transmission, and F-code relay transmission (see "BOXES AND SUB-ADDRESSES/PASSCODES
REQUIRED FOR F-CODE TRANSMISSION" on page 52) The polling memory function explained here uses a
memory box called the "PUBLIC BOX".
Note
When using the polling memory function, do not set the rece ption mode to MANUAL. (See "SETTING THE
RECEPTION MODE" on page 65.)
Scanning a document into polling memory (the Public Box)
This section explains how to scan a document into the Public Box. If other documents have already been stored in
the Public Box, the new document will be appended to those documents. If the previous documents are no longer
needed, they can be replaced.
Follow steps 1 to 4 of "BASIC
1
PROCEDURE FOR SENDING FAXES"
(page 17) and then follow the steps
below.
Press the [SPECIAL FUNCTION] key.
2
Press the [SPECIAL
FUNCTION] key to display the
special function menu.
Select "ORIGINAL STORE" with the
3
[ ] or [ ] key.
Select "MEMORY POLLING" with the
5
[ ] or [ ] key.
SELECT READING
MEMORY POLLING
S.A.M-POLL ORIG
Press the [OK] key.
6
OK
SELECT SENDING
1 TIME
REPEAT
4
38
SPECIAL FUNCTION
COMM. SETTING
ORIGINAL STORE
PRINT
Press the [OK] key.
SPECIAL FUNCTION
ORIGINAL STORE
PRINT
ENTRY
• If there are no previously stored documents in the
Public Box, the above screen appears. If the above
screen appears, go to step 7.
• If there are previously
stored documents in the
Public Box, a screen will
appear to let you select
what action to take.
ORIGINAL
ADD
CHANGE
DELETE
PRINT
(1)If you wish to append the new document, select
"ADD" with the [ ] or [ ] key, press the [OK] key,
and then go to step 7.
(2)If you wish to replace the previous document with
the new document, select "CHANGE" with the [ ]
or [ ] key, press the [OK] key, and then go t o st e p
7.
Page 41

ADVANCED TRANSMISSION METHODS
_
PQ
ACC
GHI
PQRS
BACK
OK
Select "1 TIME" or "REPEAT" with the
7
[ ] or [ ] key.
SELECT SENDING
1 TIME
REPEAT
If you select "1 TIME", the document data is
automatically cleared from memory after your machine
is polled once. If you select "REPEAT", the document
data in memory can be used repeatedly.
If you selected "ADD" or "CHANGE" in step 6, the
transmission settings selected when the previous
document was scanned into the Public Box will be
replaced by the settings that you will select this time.
Press the [OK] key.
8
OK
Press the [START] key ( ).
9
• Scanning begins.
• If you are scanning from the
document glass and have
another page to scan, change
pages and press the [START]
key ( ). Repeat until all
pages have been scanned
and then press the key.
Make sure that the reception mode is
10
set to auto reception.
Transmission begins when the other machine
calls and polls your machine.
Note
To cancel scanning
To cancel scanning of a document while
scanning is in progress, press the [C] key. T o
erase the documents in the Public Box,
follow the procedure in "Deleting documents
from the Public Box" (page 40).
3
Printing documents in the Public Box
To check the document that is stored in the public box, follow these steps to print it out.
Follow steps 2 to 6 of "Scanning a
1
document into polling memory (the
Public Box)" (page 38) and then follow
the steps below.
Select "PRINT" with the [ ] or [ ]
2
key.
ORIGINAL
ADD
CHANGE
DELETE
PRINT
Press the [OK] key.
3
Printing begins automatically.
39
Page 42

ADVANCED TRANSMISSION METHODS
PQ
ACC
GHI
PQRS
BACK
OK
Deleting documents from the Public Box
This procedure is used to delete documents from the Public Box when they are no longe r needed.
Follow steps 2 to 6 of "Scanning a
1
document into polling memory (the
Public Box)" (page 38) and then follow
the steps below.
Select "DELETE" with the [ ] or [ ]
2
key.
ORIGINAL
ADD
CHANGE
DELETE
PRINT
Press the [OK] key.
3
DELETE
YES
NO
Select "YES" with the [ ] or [ ] key.
4
DELETE
YES
NO
To cancel the deletion, select "NO".
Press the [OK] key.
5
The documents are deleted
from the Public Box.
Note
OK
Deletion is not possible while the Public Box
is being used.
A screen appears asking you to confirm the deletion.
Restricting polling access (polling security)
If you wish to prevent unauthorised fax machines from polling your machine, enable the polling security function.
When this function is enabled, polling permission will only be granted if the fax number of the polling machine
(programmed in that machine as the sender's number) matches one of the fax numbers you have programmed in
your machine as passcode numbers. Up to 10 fax numbers can be programmed as passcode numbers.
To enable the polling security function and program passcode numbers, see "POLLING PASSCODE # MODE"
(page 111) in the system settings.
Note
• If you do not use the polling security function, the document will be sent to any fax machine that polls you.
• To use polling memory with pollin g security enabled, the sender's number of the polling machine must be
programmed in that machine and in your machine.
40
Page 43

INCLUDING SENDER INFORMATION ON FAXES
This function prints the date, time, your p rogrammed name, yo ur programmed f ax number, and th e transmitted page
number at the top centre of each page that you fax. All pages that you fax include this information.
Example of fax page printed out by the receiving machine
OCT-22-2011-SAT 03:00 PM SHARP PLANNING DIV. FAX No. 0666211221 P. 001/001
(1) (2) (3) (4)
(1)Date and time Date and time: programmed in the system settings (see "DATE & TIME SET" on page 104).
(2)Sender's name: programmed in the system settings (see "OWN PASSCODE SET" on page 101).
When Auditing mode (page 10) is being used fo r the fax function and "ACC. NAME PRINT" (page 106) is
enabled, the account name* of the account used to perform the transmission is used for the sender's name.
* The account name entered in step 6 of "ACCOUNT # SET" (page 103) in the system settings.
(3)Sender' number: programmed in the system settings (see "OWN PASSCODE SET" on page 101).
(4)Transmitted page number: 3-digit number appearing in the format, "page number/total pages". (Only the page
number appears if you use manual transmission, direct tr ansmission, or quick on-line transmission.) Printing of
the transmitted page number can be di sable d in the system setting s (see "PAG E COUNTER SET" on pag e 105) .
Position of sender information
You can select whether the sender information is added outside the document data or inside the document data in
the system settings (see "PRINT STATION # IN RCVD DATA" on page 106). The factory default setting is outside
the document data.
Direction of
transmission
Length of
scanned data
use the same size of paper, the printed fax ma y either
be reduced or split up and printed on two pages.
Outside the scanned data
(document data)
None of the transmitted
image is cut off; however,
the transmitted image is
longer than the scanned
Length of
image, and thus when both
transmitted data
the sender and the receiver
of paper, the printed fax will neither be reduced nor
split up and printed on two pages.
Direction of
transmission
Length of
Inside the scanned data
(document data)
The top edge of the
scanned image will be cut
off by the sender's
Length of
scanned data
information; however, when
both the sender and the
transmitted data
receiver use the same size
3
41
Page 44

FAXING A DIVIDED ORIGINAL
C
S
F
LINE
DATA
FAX
SCAN
EXPOSURE
COLOUR MODE
PAPER SE
RESOLUT
COPY
SCAN
SPECIAL
FUNCTION
LINE
DATA
DATA
ON LINE
PQ
ACC
GHI
PQRS
BACK
OK
When faxing a book or other bound document, you can use this function to divide the two open pages of the book
into two separate fax pages.
This function can only be used when the original is A3, B4, or A4R size (11" x 17" or 8-1/2" x 11"R size if the
machine uses inch-based paper sizes) is scanned using the document glass.
Your machine The other machine
Book or sheet original
Transmission to
When dual page scan is set,
other machine
[Example]
(DUAL PAGE SCAN)
Printed out as
two separate pages
the original is divided
into two pages when
scanned into memory
Selecting Dual Page Scan
Follow the steps below and then send the fax.
Make sure that the machine is in fax
1
mode
When the machine is in fax
mode, the FAX indicator is lit. If
the light is not on, press the
[FAX] key.
Press the [SPECIAL FUNCTION] key.
2
Scanned original size
A3
A4R
Inch-based machine
Scanned original size
11" x 17"
8-1/2" x 11"R
Dual Page Scan is selected when a checkmark
appears in the "DUAL PAGES" checkbox. To cancel
the selection when a checkmark appears, press the
[OK] key in the next step so that a checkmark d oes not
appear.
Press the [OK] key.
4
Transmitted document
Two A4 pages
Two A5 pages
Transmitted document
Two 8-1/2" x 11" pages
Two 5-1/2" x 8-1/2" pages
3
42
When the [SPECIAL
FUNCTION] key is pressed, the
special function menu appears.
Select "DUAL PAGES" with the [ ] or
[ ] key.
SPECIAL FUNCTION
SENDING OPTIONS
SENDING MENU
DUAL PAGES
[OK]:OFF
ON
Place the original on the document
5
glass (page 12) and perform the
transmission operation.
If you have more originals to scan after pressing the
[START] key ( ) and scanning the first original,
change originals and press the [START] key ( ).
Repeat until all originals have been scanned. Press
the key. (See steps 6 to 8 of "Using the document
glass" on page 18.)
Page 45

ADDING A COVER SHEET/MESSAGE TO
EXPOSURE
COLOUR MODE
PAPER SE
RESOLUT
COPY
SCAN
SPECIAL
FUNCTION
LINE
DATA
DATA
ON LINE
PQ
BACK
OK
EX SCAN
A FAX TRANSMISSION
This function automatically attaches an A4 (8-1/2" x 11") cover sheet to your fax transmissions. The cover sheet
shows the date and time, the destination name, the sende r's name and f ax numbe r, and t he number of pages in t he
transmission. A message can also be added to a transmission. One of the following messages can be selected:
"CONFIDENTIAL", "PLEASE DISTRIBUTE", "URGENT", "PLEASE CALL BACK", "IMPORTANT".
You r machine The receiving machine
Select a cover sheet /
message and transmit
the fax.
Note
• Select this function before each transmission. The selection is only effective for one transmission. After one
transmission, the function automatically turns off.
• Before adding a cover sheet, make sure that your sender's name and number have been programmed. (See
"OWN PASSCODE SET" on page 101.)
• This function cannot be used when performing a manual transmission, or when using memory polling (page
38), F-code memory polling (page 54), F-code confidential transmission (page 59), or F-code relay request
transmission (page 63).
• You can also enable a setting in the system settings to always add a cover sheet to transmissions (see "AUTO
COVER SHEET" on page 108).
Cover sheet / no message Cover sheet / message
AUTOMATIC COVER SHEET
DATE
-MAY-2011 WED 07:30 PM
: 11
: SERVICE CENTRE
T O
: SBC CO.
FROM
: 0666211221
FAX #
: 02PAGES WERE SENT
PAGES
(INCLUDING THIS PAGE)
A cover is automatically
added and the fax is printed.
AUTOMATIC COVER SHEET
IMPORTANT
DATE
MAY-2011 WED 07:30 PM
: 11: SERVICE CENTRE
T O
: SBC CO.
FROM
: 0666211221
FAX #
: 02PAGES WERE SENT
PAGES
(INCLUDING THIS PAGE)
The selected message is
printed at the top of the co ver
sheet.
No cover sheet / message
IMPORTANT
The selected message is
printed at the top of the
first sheet.
3
Selecting a cover sheet / message
In Fax mode, press the [SPECIAL
1
FUNCTION] key.
When the [SPECIAL
FUNCTION] key is pressed, the
special function menu appears.
(To select fax mode, see step 1
on page 17.)
Select "SENDING MENU" with the [ ]
2
or [ ] key.
SPECIAL FUNCTION
TIMER MODE
SENDING OPTIONS
SENDING MENU
Press the [OK] key.
3
To add a cover sheet, select "COVER
4
SHEET" with the [ ] or [ ] key. To
add a message, select the desired
message with the [ ] or [ ] key.
SENDING MENU
NO MESSAGE
CONFIDENTIAL
PLEASE DISTRIBUTE
COVER SHEET
If you do not wish to add a cover sheet, select "NO
CVR. SHEET".
If you do not wish to add a message, select "NO
MESSAGE".
Press the [OK] key.
5
Note
To cancel the cover sheet selection, press the key instead of the [OK] key in step 3.
43
Page 46

USING SETTINGS STORED AS A PROGRAM
C
S
F
LINE
DATA
FAX
SCAN
COPY RA
ADDRE
ADDRE
EXPOSURE
COLOUR MODE
PROGRAM
PAPER SELECT
RESOLUTION
RESOLUTION
COPY
SCAN
FAX
PQ
BACK
OK
EX SCAN
_
This function allows you to store the steps of an operation, including the destination and scanning settings, into a
program. This function is convenient when you frequently send documents, such as a daily report, to the same
destination. Up to nine programs can be stored.
When storing a program, a name (maximum 36 letters) can be assigned to the program.
For information on storing, editing, and deleting programs, see "STORING, EDITING AND DELETING PROGRAMS" on page 76.
The following settings can be stored in a program:
(1)Transmission method
Normal transmission (page 17), broadcast transmission (page 31), polling (page 35), serial polling (page 37),
F-code transmission (page 59), F-code polling (page 57)
(2)Cover sheet / message (page 43)
(3)Resolution and exposure (page 14)
(4)Dual page scan (page 42)
(5)Transmission settings (page 22)
When storing a broadcast transmission or serial polling operation in a program, up to 200 destination fax numbers can be stored.
Note
• A program differs from a timer transmission (page 33) in that it is not cleared from memory after transmission
takes place. A program thus allows you to repeatedly perform the same type of transmission. Note, however,
that programs do not allow you to establish a timer setting for transmi ssi on.
• A setting that can be stored in a program cannot be changed at the time that a program is used for a
transmission even if the setting is not stored in the program.
The only settings that can be selected when using a program are the original size, duplex scanning, and a timer setting.
•
USING A PROGRAM
In fax mode, place the original. (Page
1
12)
Skip this step if polling, serial
polling, or F-code polling is being
performed. If you are going to use
Dual Page Scan (page 42), place
the document on the Document
glass.
(To select fax mode, see step 1 on page 17.)
Press the [PROGRAM] key.
2
PROGRAM
A CORP.
B CORP.
- - - - - -
The program selection
screen appears.
Select the program that you wish to
3
use with the [ ] or [ ] key.
[#]:LIST DETAIL
PROGRAM
A CORP.
B CORP.
- - - - - [#]:LIST DETAIL
Press the [OK] key.
4
If needed, select the original size and
5
other settings, and then press the
[START] key ( ).
Transmission takes place according to t he program.
Note
Select settings that cannot be stored in a
program before you press the [START] key
( ) in step 5. These settings include the
original size (see "MANUALLY SETTING
THE SCANNING SIZE" on page 13), duplex
scanning (see "FAXING A TWO-SIDED
ORIGINAL
(MX-M182D/MX-M202D/MX-M232D)" on
page 21), and a timer setting (see
"AUTOMATIC TRANSMISSION AT A
SPECIFIED TIME (TIMER
TRANSMISSION)" on page 33).
If not all letters of the program name appe ar, press the
again to return to the original screen.
44
key to display all letters. Press the key once
Page 47

FORWARDING RECEIVED DATA TO A NETWORK ADDRESS (INBOUND ROUTING SETTINGS)
The received fax data can be automatically forwarded to a specified e-mail address. When this function is enabled,
you can forward the received data to a specified address without printing it.
Note
All Inbound Routing settings are configured in the Web page.
The following explanation assumes that the Web page has been accessed with administrator rights.
To activate Inbound Routing, configure the basic sett ings before specifying the destination.
• This function is available only when the network expansio n kit is installed.
• When a mobile telephone is set as a recipient, data may not be forwarded successfully depending on the type
of mobile telephone being used. Check in advance that the data can be sent to the mobile telephone and that
it can be displayed correctly.
CONFIGURING THE BASIC SETTINGS
Configure the basic settings of Inbound Routing.
Enabling the Inbound Routing function
In the menu frame, click [Inbound
1
Routing Settings].
Select [Enable] in [Inbound Routing].
2
Click the [Submit] button.
3
3
Changing the print style of received data
In the menu frame, click [Inbound
1
Routing Settings].
Select a print style in [Print Style
2
Setting].
Item Settings Description
Inbound Routing Enable, Disable Enable or disable the Inbound Routing function.
Print Style
Setting
Always Print,
Print at Error
Select a print style of received data.
Click the [Submit] button.
3
45
Page 48

ADVANCED TRANSMISSION METHODS
Set a file name for forwarding received data
Select the checkboxes of items used for the file name.
Items Serial Number, Sender Name, Date & Time, Session Page Counter, Unique Identifier, and Characters are
assigned to the file name in this order.
To add a desired text string, select the "Characters" checkbox and enter th e string in "Prese t of Charac ter" using up
to 64 characters.
In the menu frame, click [Inbound
1
Click the [Submit] button.
3
Routing Settings].
Select the item to be used as the file
2
name in "File Name Setting".
Item Setting (Default) Description
Serial Number Not selected Selecting this checkbox adds the unit serial number to the file
name.
Sender Name Selected Selecting this checkbox adds the sender name to the file name.
Date & Time Selected Selecting this checkbox adds the date and time to the file name.
Session Page
Counter
Unique Identifier Not selected Selecting this checkbox adds the unique identifier to the file
Characters Not selected To add a character string to the file name, select this checkbox
Preset of
Character
Not selected Selecting this checkbox adds the counter to the file name.
name.
and enter the text string in "Preset of Character" using up to 64
characters.
- Enter a text string to be used in "Characters" using up to 64
characters.
Setting whether to print the transaction report
Select whether to print the transaction report when forwarding received data.
In the menu frame, click [Inbound
1
Routing Settings].
Specify the print condition in
2
"Transaction Report Print Select
Setting".
Item Settings Description
Transaction
Report Print
Select Setting
Always Print,
Print at Error,
Do not Print
Select a print style of the transaction report.
Click the [Submit] button.
3
46
Page 49

ADVANCED TRANSMISSION METHODS
SETTINGS THE DESTINATION
Specify a sending source of received data and forwarding destina tion e-mail addresses to configure a forwarding
table.
Up to 10 forwarding tables can be configured.
For each forwarding table, set the following items:
Forward Condition (enabling/disabling forwarding, and the conditions to determine forwarding)
•
•
Sender number (fax number)
•
Forwarding destinations (e-mail addresses)
Note
• The names of the destination number (Forward destination 1 to 10) cannot be changed.
• Only the e-mail address can be specified for a forwarding destination. FTP, Desktop, and fax number cannot be
specified.
Viewing the destination list
In the menu frame, click [Inbound
1
Routing Settings].
Item Description
Inbound Routing Displays whether Inbound Routing fun ctio n is enabled.
Number Displays the forw arding destination number (Forward Destination 1 to 10).
Each of setup menu is displayed by clicking each number.
Forward Condition Displays the forward condition of the destination (enabling/disabling and determining
the destination setting).
[Delete] button To delete the f orw arding cond ition stor ed in a destination number, select the "Number"
checkbox of the d estination number and click the [Delete] button.
[Clear Checked] button Clicking this clears all "Number" checkboxes.
Click [Destination].
2
The destination list appears.
3
Settings the destination
In the menu frame, click [Inbound
1
Routing Settings].
Click [Destination].
2
The destination list appears.
Click the destination number to be
3
set.
The "Forwarding Destination" screen appears.
Select [Enable] in "Forward
4
Condition".
In "Forward Condition", select the
5
determining condition for forwarding.
Select [Forward (All)] or [Forward (Sender)].
If you wish to forward received data
6
from a specific sender, enter the
sender's fax number in "Sender
Number".
Enter the fax number using up to 20 digits.
To enter the fax number from the fax addresses
stored in the machine, click the [Select from
Address Book] button. The "Fax Destination"
screen appears, and you can select the sender's
number from the fax address list.
47
Page 50

ADVANCED TRANSMISSION METHODS
Enter the destination e-mail address
7
in "Forward Destination (Max.5)".
Up to five e-mail addresses can be specified as the
destination.
Three types of methods are available for entering the
destination. The set e-mail addresses are displaye d in
"Forwarding Destination Settings".
• Entering an e-mail address directly
Click the [Direct Entry] button. When the "Forwarding
Destination Settings (Direct Entry)" appears, enter
an e-mail address and click the [Submit] b utt on. The
e-mail address can include up to 64 single-byte
characters.
• Selecting an e-mail address from the global address
book
Click the [Global Address Search] button. The
"Global Address Search" screen appears.
You can select an e-mail address from the global
address book.
• Selecting an e-mail address from the address book
Click the [Select From Address Book] button. The
"Destination List" screen appears, an d you can
select an e-mail address from the e-mail address list.
Forward Condition
Note
Click the [Submit] button.
8
This stores the setting.
To delete a set e-mail address, select the
checkbox at the left of the e-mail address
you wish to delete, and then click the
[Delete] button.
Item Settings Description
Forward
Condition
Enable, Disable Enable or disable the destination to be set in this screen.
Forward (All)
(Sender)
, Forward
Select the determination condition for forwarding the received
FAX data.
Sender Number
Item Description
Fax No. Enter the sender's fax number if you have selected "Forward (Sender)" in "Forward
Conditions" setting. Up to 20 digits can be entered.
[Select From Address
Book] button
Click this button to select the fax number from the fax addresses stored in this
machine.
Forward Destination (Max. 5)
Item Description
Forwarding Destination
Settings
[Delete] button Deletes the selected destination.
Displays the stored destinations. If no destination is stored, "Not Set" appears.
[Direct Entry] button Click this button to enter an e-mail address directly.
[Global Address Search]
button
[Select From Address
Book] button
Click this button to select an e-mail address from the global address book.
Click this button to select an e-mail address from the e-mail address list stored in the
machine.
48
Page 51

FORWARDING RECEIVED FAXES TO
EXPOSURE
COLOUR MODE
PAPER SE
RESOLUT
COPY
SCAN
SPECIAL
FUNCTION
LINE
DATA
DATA
ON LINE
ANOTHER MA CHINE WHEN PRINTING IS
NOT POSSIBLE
When printing is not possible because of a paper , toner, or other problem, you can forward received f axes to another
fax machine if that machine has bee n appropria tely progr ammed in yo ur machine. T his function can be conveniently
used in an office or other workplace w here there is another fax machine co nnected to a different phone line . When a
fax has been received to memo ry, t he DA TA indica tor above the [FAX] ke y (see "If re ceived data ca nnot be prin ted"
on page 28) to blinks.
2) Printing not possible because of
paper or toner problem
Your machine
3) "Transfer" instruction
5) Printing
4) Automatic dialling and
transmission to programmed
transfer destination
(FORWARDING FUNCTION)
1) Fax transmission
to your machine
Other machine
3
Transfer destination
Note
• All received faxes are forwarded; a particular fax cannot be selected for forwarding. A fax received to a
confidential box (see "F-CODE CONFIDENTIAL TRANSMISSION" on page 59) cannot be forwarded.
• Faxes that have been received to memory by the fax print hold function (page 29) are also forwarded.
• The result of forw arding is indicated in the activity report (see "VIEWING THE COMMUNICATION ACTIVITY
REPORT AT REGULAR INTERVALS (Communication activity report)" on page 92).
USING THE FORWARDING FUNCTION
Programming the fax number of the forwarding destination
The number of the forwarding destination is programmed in the system settings (see "RECEIVED DATA FW.
STATION SET" on page 110). Only one fax number can be programmed. The forwarding function cannot be used
unless a number is programmed.
Forwarding received faxes
Make sure that the machine is in fax
1
mode.
When the machine is in fax mode, the FAX indicator is
lit. If the light is not on, press the [FAX] key.
Press the [SPECIAL FUNCTION] key.
2
Press the [SPECIAL
FUNCTION] key to display the
special function menu.
49
Page 52

ADVANCED TRANSMISSION METHODS
PQ
ACC
GHI
PQRS
BACK
OK
Select "RX DATA TRANSFER" with
3
the [ ] or [ ] key.
SPECIAL FUNCTION
PRINT
ENTRY
RX DATA TRANSFER
Press the [OK] key.
4
Select "TRANSFER" with the [ ] or
5
[ ] key.
RX DATA TRANSFER
:12345678901234
12345678901234
123456789012
TRANSFER
To cancel forwarding, select "NO TRANSFER".
Press the [OK] key.
6
OK
settings and begins forwarding the fax or faxes.
Note
• To cancel a forwarding operation
Press the [FAX STATUS] key, and then
cancel forwarding in the same way as a
regular fax transmission. (See
"CANCELLING A FAX TRANSMISSION"
on page 25.) The fax(es) that was going to
be forwarded will return to print standby
status in your machine.
• If forwarding is not possible because the
other machine is busy or a transmission
error occurs, recall attempts will be made
according to the recall times setting. If
forwarding is still not successful after the
set number of recall attempts are made,
the fax(es) will return to print standby
status in your machine.
• When forwarding is performed, all faxes
that have been received in memory to that
point are forwarded. The page that was
being printed when the problem occurred
and all following pages will be forwarded.
• After a fax is forwarded, the fax data is
automatically cleared from memor y.
The machine automatically dials
the forwarding number
programmed in the system
SENDING A FAX DIRECTLY FROM A COMPUTER (PC-Fax)
A document in a computer can be transmi tted via the machine as a fax. Faxes a re sent u sing the PC-Fa x function in
the same way as documents are printed. Select the PC- Fa x driver as the printer driver on your computer and then
select the Print command in the software application. Image data for transmission will be created and sent as a fax.
Fax transmission
For more information on using the PC-Fax function, see the "Oper ation Guide" that is installed along with the
PC-Fax driver.
Note
• To use the PC-Fax function, the PC-Fax driver must be installed. F or more inf ormation, see "INSTALLING THE
PC-FAX DRIVER (THAT A CCOMPANIES THE MACHINE)" on page 51.
• This function can only be used on a Windows
• This function can only be used for transmission. Faxes cannot be received to your computer.
®
computer.
50
Page 53

ADVANCED TRANSMISSION METHODS
INSTALLING THE PC-FAX DRIVER (THAT ACCOMPANIES THE MACHINE)
Note
Insert the "Software CD-ROM" that
1
accompanies the machine into your
computer's CD-ROM drive.
Click the "Start" button, click
2
"Computer", and then double-click the
CD-ROM icon ( ).
• In Windows XP, click the "start" button, click
• In Windows 2000, double-click "My Computer",
Double-click the [Setup] icon ( ).
3
Note
• The PC-Fax driver uses the printer driver port. Before installing the PC-Fax driver, be sure to install the MFP
driver (printer/scanner).
• To install this software, you must have administrator's rights.
"My Computer", and then double-click the
CD-ROM icon.
and then double-click the CD-ROM icon.
If the language selection screen appears
after you double click the [Setup] icon, select
the language that you wish to use and click
the [Next] button. (Normally the correct
language is selected automatically.)
Click the [Custom] button.
6
When MX-NB12 is installed
Standard
3
The "SOFTWARE LICENSE" window
4
will appear. Make sure that you
understand the contents of the license
agreement and then click the [Yes]
button.
Read the message in the "Welcome"
5
window and then click the [Next]
button.
Click the [Utility Software] button.
7
Click the [PC-Fax Driver] button.
8
In the port selection screen that appears when
the PC-Fax driver is being installed, select the
same port as the Printer driver that is already
installed.
When installing is finished, click the
9
"Close" button.
51
Page 54

TRANSMISSION USING
4
This chapter explains F-code transmission, which gives you a convenient means of performing advanced operations
such as relay broadcast transmission and confidential transmission. Please read those sections that are of interest
to you.
F-CODES
COMMUNICATION BETWEEN MA CHINES SUPPORTING F-CODES
This machine supports the "F-code" standard as established by the ITU-T*.
Operations such as relay broadcast transmission and confidential transmission previously could only be performed
with another Sharp fax machine; however, F-Code communication makes it possible to perform these operations
with fax machines of other manufacturers that support F-Code communication.
Before using the functions explained in this chapter, make sure that the other fax machine supports F-Code
communication and has the same functions as your machine. (Note that t he other machine ma y use different names
for some functions.)
* The ITU-T is a United Nations organization that establishes communications standards. It is a department of the International
Telecommunication Union (ITU), which coordinates global telecommunications networks and services.
BOXES AND SUB-ADDRESSES/PASSCODES
REQUIRED FOR F-CODE TRANSMISSION
"Boxes" can be created in the memory of fax machines that support F-Co de communication. These b oxes are used
to store faxes received from other machines and documents to be transmitted when a polling request is received. Up
to 30 boxes can be created for a variety of purposes, and a name can be assigned to each box. A "sub-address"
that indicates the box's location in memory must be programmed, and if desired, a passcode can also be
programmed to control access to the box. (A sub-address must be programmed, however, a passcode can be
omitted.)
MEMORY
Sub-address (location in memory)
Select any number up to 20 digits.
Box name (used to manage
boxes in your machine)
Select a name of up to 36
characters.
Passcode (key)
Select any number up to 20
digits. (Not required)
1115
0001
SBC CORP.
3321 1115
3333
Department
Manager
11245
Document
Group 1
4444
Reports
11111111
Public Box*
7732123
Product Planning
Dept.
010
Section
Manager
123456
7732123
Product Planning
Dept.
1115
7732123
Product
Planning
Dept.
*The public box is used for normal memory polling. (See "USING POLLING MEMORY" on page 38.)
52
Page 55

TRANSMISSION USING F-CODES
When communication occurs involving a box, the communication will only take place if the sub-address and
passcode that the other machine sends match the sub-address and passcod e programmed in your machine for that
box. Therefore, to allow communication, you must inform the ot her party of the sub-address and passcode of the
box. Likewise, to send a fax to a box in another machine or use po lling to retr ieve a docum ent f rom a box, you mu st
know the sub-address and passcode of that box. (Note that assigning names simply makes it easier to manage
boxes; you do not need to inform the other party of a box name.) However, you must inform the other party of the
sub-address and passcode for a box.
This machine uses the term "sub-address" for the location of the memory box and the term "passcode" for the
password that allows communication; however, other fax machin es of other manufacture rs may use di fferen t terms.
When asking the other party for a sub-address and passcode, you may find it useful to refer to the 3-character
alphabetical terminology used by the ITU-T.
Your machine ITU-T
F-code polling memory box F-code confidential box
Sub-address SEP SUB SUB
Passcode PWD SID SID
F-code relay broadcast function
CREATING A BOX FOR F-CODE TRANSMISSION
F-code operations that use boxes include F-code polling memory (page 54), F-code confidential transmission (page
59), and F-code relay broadcast transmission (page 62).
A box is created by programming a name for the box, and up to 10 boxes for each operation type can be created.
The information programmed in each box varies slightly depending on the type of operation. For
information on programming, editing, and deleting box es, see "PROGRAMMING, EDITING, AND DELETING
F-CODE MEMORY BOXES" on page 78.
After you have programmed a box, inform the other party of the box's sub-address and passcode.
Note
If you attempt to create a box when 10 boxes have already been created for that operation type, a
message will appear and you will not be able to create the box. Delete any unused boxes and then
create the new box. (See "
page 78.)
PROGRAMMING, EDITING, AND DELETING F-CODE MEMORY BOXES" on
4
53
Page 56

F-CODE POLLING MEMORY
F-code polling memory allows one fax machine to call another fax machine and initiate reception of a document that
has been scanned into the other machine's F-code polling memory box. Calling another machine and initiating
reception is called F-code polling, and scanning a document into a memory box for another machine to retrieve by
polling is called F-code polling memory. This function is approximately the same as regular polling (page 35);
however, it uses an F-code polling memory box and is always protected by means of the sub-address and
passcode.
HOW F-CODE POLLING MEMORY WORKS
Your machine The other machine
2) Check sub-address
and passcode
Match
Do not match
1) F-code polling
(transmission request)
Sub-address and passcode
are transmitted to your machine
Subaddress
Passcode
3) Polling memory
box opens
F-code polling (page 57) is when your machine calls another machine and ret rieves a document that was scanned
into the polling memory box of that machine (the reverse of the above diagram).
Note
• To perform polling or polling memory transmission without using an F-code, see page 35.
• To create an F-code polling memory box, see "PROGRAMMING F-CODE PUBLIC (POLLING MEMORY)
BOXES" (page 81) and "Scanning a document into polling memory (the Public Box)" (page 38).
• Unlike regular polling, the other machine's fax number is not used as a passcode for F-code polling memory.
The sub-address and passcode of the polling memory box are always used for polling security.
• The receiving machine bears the expense (phone charges) of the transmission.
Product Planning
4) Automatic transmission
of document data
to other machine
54
Page 57

TRANSMISSION USING F-CODES
PQ
ACC
GHI
PQRS
BACK
OK
USING F-CODE POLLING MEMORY
In order for another machine to retrieve a document from your machine, you must first scan the document into the
F-code polling memory box.
You can check the document in the memory polling box by printing it out.
(See "Checking and clearing document data in a bo x" on page 56.)
Note
When using F-code polling memory, do not set the reception mode to manual reception.
Scanning a document into an F-code polling memory box
The procedure for scanning a document into an F-code polling memory box (page 81) is in general the same as
"Scanning a document into polling memory (the Public Box)" on page 38.
Perform steps 1 through 4 of
1
"Scanning a document into polling
memory (the Public Box)" (page 38).
Select "S.A.M-POLL ORIG" with the
2
[ ] or [ ] key.
SELECT READING
MEMORY POLLING
S.A.M-POLL ORIG
Press the [OK] key.
3
4
Select the name of the polling memory
4
box with the [ ] or [ ] key.
SEL S.A. POLL BX
Document Plan
Document Tech
- - - - - [#]:LIST DETAIL
If not all letters of the programmed name appear,
press the key to display all letters. Press the key
again to return to the previous display.
About the steps that follow
See steps 6 through 10 in "Scanning a document
into polling memory (the Public Box)" (pages 38 to
39). Where "public box" (page 38) appears in the
procedure, substitute "F-code polling memory box".
55
Page 58

TRANSMISSION USING F-CODES
PQ
ACC
GHI
PQRS
BACK
OK
Checking and clearing document data in a box
The procedures for checking document data in an F-code polling memory box by printing the data and for clearing
the data are generally the same as in "Printing documents in the Public Box" (page 39) and "Deleting documents
from the Public Box" (page 40).
Perform steps 2 through 4 of
1
"Scanning a document into polling
memory (the Public Box)" on page 38.
Select "S.A.M-POLL ORIG" with the
2
[ ] or [ ] key.
SELECT READING
MEMORY POLLING
S.A.M-POLL ORIG
Press the [OK] key.
3
Select "PRINT" or "DELETE" with the
6
[ ] or [ ] key.
ORIGINAL
ADD
CHANGE
DELETE
PRINT
If you selected "PRINT", press the [OK] key to begin
printing.
If you selected "DELETE", go to step 7.
Press the [OK] key.
7
OK
DELETE
YES
NO
A screen appears asking you to confirm the deletion.
Select the name of the F-code memory
4
polling box with the [ ] or [ ] key.
SEL S.A. POLL BX
Document Plan
Document Tech
- - - - - [#]:LIST DETAIL
A checkmark appears next to the box name of boxes
that have document data.
If not all letters of the programmed name appear,
press the key to display all letters. Press the key
again to return to the previous display.
Press the [OK] key.
5
OK
Select "YES" with the [ ] or [ ] key.
8
DELETE
YES
NO
To cancel the deletion, select "NO".
Press the [OK] key.
9
The documents are deleted
from the F-code polling memory
box.
Note
OK
Deletion is not possible while the box is
being used.
56
Page 59

TRANSMISSION USING F-CODES
EXPOSURE
COLOUR MODE
PAPER SE
RESOLUT
COPY
SCAN
SPECIAL
FUNCTION
LINE
DATA
DATA
ON LINE
PQ
ACC
GHI
PQRS
BACK
OK
31 32 33
26 27 28
ABC
FGH
PROCEDURE FOR F-CODE POLLING
Make sure that a document has not been placed in the document feeder tray or on the document glass, and then
follow the steps below.
Note
In Fax mode, press the [SPECIAL
1
• You must know the sub-address (SEP) and passcode (PWD) of the other machine's F-code polling memory
box.
• Serial polling (selecting multiple fax machines to be polled using a group key, Rapid keys, and Speed Dial
numbers) is not possible when using F-code polling.
FUNCTION] key.
When the [SPECIAL
FUNCTION] key is pressed, the
special function selection
screen appears.
(To select fax mode, see step 1
on page 17.)
Select "SENDING OPTIONS" with the
2
[ ] or [ ] key.
SPECIAL FUNCTION
FAX PRINT HOLD
TIMER MODE
SENDING OPTIONS
Enter the fax number of the other
6
machine with the numeric keys, or
press a Rapid key, or dial a Speed Dial
number (a group key cannot be used).
WXYZ
A destination selected with a Rapid key or Speed Dial
number is indicated by an icon and a number. To clea r
an entry, press the [C] key.
Press the [OK] key.
7
OK
To clear a mistake when
entering a number with the
numeric keys, press the [C] key
to clear one digit at a time.
4
Press the [OK] key.
3
Select "SUB ADD POLLING" with the
4
[ ] or [ ] key.
SENDING OPTIONS
SERIAL POLLING
SUB ADDRESS TX
SUB ADD POLLING
Press the [OK] key.
5
OK
Enter the sub-address (up to 20 digits)
8
with the numeric keys.
WXYZ
• Characters that can be entered are numbers, "#",
and spaces. However, the initial char acter cannot be
a space.
• If you make a mistake, press the [C] key and re-enter
the correct digit(s).
• If you specified a Rapid key or Speed Dial number in
step 6 that has a sub-address programmed, the
sub-address will appear. Go to the next step without
entering a sub-address.
Press the [OK] key.
9
OK
57
Page 60

TRANSMISSION USING F-CODES
_
Enter a passcode (maximum 20 digits)
10
with the numeric keys.
WXYZ
• Characters that can be entered are numbers, "#",
and spaces. However, the initial character cannot be
a space.
• If you make a mistake, press the [C] key and re-enter
the correct digit(s).
• If the other machine has not programmed a
passcode, omit the passcode and go to the next
step.
• If you specified a Rapid key or Speed Dial number in
step 6 that has a passcode programmed, the
passcode will appear. Go to the next step without
entering the passcode.
Note
• To cancel the operation
During communication: Cancel as explained in "Cancelling a fax transmission" on page 25.
While the job is stored: Cancel as explained in "Cancelling a stored transmission job" on page 26.
• Only one F-code polling operation with a timer setting (page 33) can be stored.
Press the [OK] key.
11
OK
Press the [START] key ( ).
12
After communicating with the
other machine, your machine
will print the received document.
58
Page 61

F-CODE CONFIDENTIAL TRANSMISSION
F-Code confidential transmission provides a secure means of faxing confidential documents. The sub-address and
passcode programmed in the box restrict the recipi ents of the fax, and once receive d in the box, the fax can only be
printed by someone who knows the print passcode.
This function is convenient when sending important d ocuments tha t you o nly want a specif ic person to see , or whe n
multiple departments share a single fax mach ine.
The other machine
1) Document data, together
with a sub-address and passcode,
are sent to your machine.
Sub-address
2) Check sub-address
and passcode
Passcode
Match
Do not match
3) The fax is received to the F-code
confidential box (reception is permitted)
As the above diagram shows, receiving faxes to the machine's F-code confidential memory box is called F-code
confidential reception, and sending faxes to another machine's F-code confidential memory box is called F-code
confidential transmission.
Note
• This machine does not support Sharp 's previous confidential transmission function, which uses the
programmed sender's fax number and ID code.
• See pages 78 through 82 for the procedures for creating, editing, and deleting F-code confidential memory
boxes.
• Take care not to forget the print passcode that is programmed in the F-code confidential box. If you forget the
passcode, consult your Sharp dealer.
Your machine
SUZUKI
When data is printed
4-1)
Enter print passcode.
(4-digit number)
4-2)
Data is only
printed if correct
passcode is entered.
SUZUKI
4
F-CODE TRANSMISSION (F-CODE CONFIDENTIAL
TRANSMISSION)
To perform F-code confidential transmission, you must enter th e sub-address (SUB) and passcode (SID) after the
fax number of the receiving machine. (Omit the passcode if the other machine does not use a passcode.
To receive a fax sent by F-code confidential transmission (this is called F-code confidential reception), you must
inform the sending party of the sub-address ( SUB) and pa sscode (SID) of your co nfidential box. (Omi t the passcode
if a passcode is not programmed in the box.)
Note
An F-code confidential transmission can be used in combination with the broadcast transmission function (page
31) or the timer transmission function (page 33), and can be stored as a program (page 76).
59
Page 62

TRANSMISSION USING F-CODES
EXPOSURE
COLOUR MODE
PAPER SE
RESOLUT
COPY
SCAN
SPECIAL
FUNCTION
LINE
DATA
DATA
ON LINE
PQ
ACC
31 32 33
26 27 28
ABC
FGH
_
F-code confidential transmission
Follow steps 1 to 4 of "BASIC
1
PROCEDURE FOR SENDING FAXES"
(page 17) and then follow the steps
below.
Press the [SPECIAL FUNCTION] key.
2
When the [SPECIAL
FUNCTION] key is pressed, the
special function selection
screen appears.
Select "SENDING OPTIONS" with the
3
[ ] or [ ] key.
SPECIAL FUNCTION
FAX PRINT HOLD
TIMER MODE
SENDING OPTIONS
Press the [OK] key.
4
Press the [OK] key.
8
Enter the sub-address (maximum 20
9
digits) with the numeric keys.
WXYZ
• Characters that can be entered are numbers, "#",
and spaces. However, the initial char acter cannot be
a space.
• If you make a mistake, press the [C] key and re-enter
the correct digit(s).
• If you specified a Rapid key or Speed Dial number in
step 7 that has a sub-address programmed, the
sub-address will appear. Go to the next step without
entering a sub-address.
Press the [OK] key.
10
Enter the passcode (maximum 20
11
digits) with the numeric keys.
WXYZ
Select "SUB ADDRESS TX" with the
5
[ ] or [ ] key.
SENDING OPTIONS
SERIAL POLLING
SUB ADDRESS TX
SUB ADD POLLING
Press the [OK] key.
6
Enter the fax number of the other
7
machine with the numeric keys, or
press a Rapid key, or dial a Speed Dial
number (a group key cannot be used).
WXYZ
A destination selected with a Rapid key or Speed Dial
number is indicated by an icon and a num ber. To clear
an entry, press the [C] key.
60
To clear a mistake when
entering a number with the
numeric keys, press the [C] key
to clear one digit at a time.
• Characters that can be entered are numbers, "#",
and spaces. However, the initial char acter cannot be
a space.
• If you make a mistake, press the [C] key and re-enter
the correct digit(s).
• If you specified a Rapid key or Speed Dial number in
step 7 that has a passcode programmed, the
passcode will appear. Go to the next step without
entering the passcode.
Press the [OK] key.
12
Press the [START] key ( ).
13
• Scanning begins.
• If you are scanning from the document glass and
have another page to scan, change pages and press
the [START] key ( ). Repeat until all pages have
been scanned and then press the key.
Page 63

TRANSMISSION USING F-CODES
EXPOSURE
COLOUR MODE
PAPER SE
RESOLUT
COPY
SCAN
SPECIAL
FUNCTION
LINE
DATA
DATA
ON LINE
PQ
ACC
GHI
PQRS
BACK
OK
ABC DEF
JKLGHI MNO
TUVPQRS WXYZ
@.-
_
READ-END
ACC. #-C
OK
PRINTING A DOCUMENT RECEIVED TO AN F-CODE
CONFIDENTIAL MEMORY BOX
Faxes received in an F-code confidential memory box are printe d out b y enter ing the 4-digi t print passcod e (0000 to
9999) that was programmed when the box was created.
Note
In fax mode, press the [SPECIAL
1
• Make sure that a Transaction Report is set to print out in the system settings so that you will be informed when
a confidential document is received. (See "PRINT SELECTION (CONF. RECEPTION)" in "LIST SETTING" on
page 99.)
• Faxes received to an F-code confidential memory box are automatically cleared after printing.
• When a new fax is received to an F-code confidential box while a previously receiv ed fax is still stored in the
box, the new fax is appended after the previous fax.
FUNCTION] key.
When the [SPECIAL
FUNCTION] key is pressed, the
special function selection
screen appears.
(To select fax mode, see step 1
on page 17.)
Select "PRINT" with the [ ] or [ ]
2
key.
SPECIAL FUNCTION
COMM. SETTING
ORIGINAL STORE
PRINT
Press the [OK] key.
5
OK
Select the name of the F-code
6
confidential box with the [ ] or [ ]
key.
SUB ADD CONF BOX
A CORP.
B CORP.
C CORP.
D CORP.
4
Press the [OK] key.
3
Select "CONF. RX DATA" with the [ ]
4
or [ ] key.
PRINT
REPORT
CONF. RX DATA
Note
If received faxes remain in an F-code confidential memory box, the box cannot be deleted.
An icon ( ) appears next to each box that is holding a
received fax.
Press the [OK] key.
7
OK
Enter the 4-digit passcode with the
8
If no faxes have been received
to the F-code confidential box,
"No confidential receiving data."
will appear briefly.
numeric keys.
• If you make a mistake, press
the [C] key and re-enter the
correct digit(s).
• When the 4-digit passcode is
correctly entered, printing
begins.
61
Page 64

F-CODE RELAY BROADCAST TRANSMISSION
The F-Code relay broadcast function allows the machine to act as a relay machine fo r a broadcast transmission. Th e
end receiving machines are stored in the machine's F-Code relay memory box, and when the machine receives a
relay request from another F-Code machine, it will relay the fax to all of the stored end receiving machines.
The relay machine and the originating machine that requests the relay transmission must both support F-codes; however,
the end receiving machines programmed in the F-code relay broadcast memory box do not need to support F-codes.
Relay request machine (sends document)
1) Document is sent from
machine requesting
relay transmission
Sub-address
Passcode
Relay machine (your machine)
2) Check sub-address
and passcode
Match
S.F.
3) Document data is
read into relay broadcast
memory box
(reception is permitted).
4) Document is automatically transmitted
to end receiving machines programmed
in the relay broadcast memory box.
Does not match
Receiving machine CReceiving machine BReceiving machine A
The machine that originally sends the docum ent is calle d th e re lay re qu e st ma ch in e, an d the m achin e th at ha s a
memory box containing the end receiving machines and which relays the received document to those machines is
called the relay machine.
The relay machine also prints the document sent by the relay request machine.
For example, corporate headquarters in Seattle wants to send th e sam e docume nt to branch o ffice s in S an Fran cisco,
Oakland, Berkeley, and San Jose. If the San Francisco office creates a relay broadcast memory box and programs the
Oakland, Berkeley, and San Jose offices as end receiving destinations, th e o vera ll pho ne charges will be lower than if
the Seattle office uses the regular broadcast transmission function (page 31). If used together with a timer setting
(page 33) to take advantage of off-peak rates, the cost of tra nsmission ca n be further reduced.
Transmission by the relay machine is called "F-code relay broadcast transmission", and transmission from the relay
request machine to the relay machine is called "relay request transmission".
Note
• This machine does not support Sharp 's previous relay broadcast function, which uses the programmed
sender's number and relay ID code.
• Up to 10 F-code relay groups (boxes) can be programmed. A name (up to 36 characters long) and the end
receiving machines are programmed in each box. A combined total of 120 end receiving machines can be
programmed in all F-code relay groups (boxes). (If 120 end receiving machines are programmed in one F-code
relay group, no end receiving machines can be programmed in other F-code relay groups.)
End receiving machines can be stored using the num eric k eys, Rapid keys, Speed Dial numb ers, and group
•
keys. Auto-dial destinations that already have a sub-address and passcode programmed cannot be used.
• Only one relay group can be specified when making a relay request. Multiple relay groups cannot be
simultaneously selected.
• To create an F-code relay group (box) and store, edit, and delete end receiving machines, see pages 78, 80
and 83. When creating a box, a passcode (SID) can be omitted.
• The relay request machine only bears the expense of sending the document to the relay machine. The relay
machine bears the expense of sending the document to each of the end receiving machines.
62
Page 65

TRANSMISSION USING F-CODES
USING THE F-CODE RELAY BROADCAST FUNCTION
(your machine is the relay machine)
When a document is received from a relay request machine, the F-code relay broadcast function transmits the
document to the end receiving machines using a memory box only if the sub-address and passcode sent by the
relay request machine are correct.
To create, edit, or delete an F-code relay group (box), see pages 78, 80 and 83.
A document received from a relay request machine is initially stored in the box of your ma chine. Your machine (the
relay machine) also prints the document, thus the document is first stored as a print job and then as transmission
jobs to each of the programmed end receiving machines. The documen t data is automatically cleared after
transmission to all end receiving machines is completed.
Transmission to the end receiving machines cannot be stopped or cancelled.
USING THE F-CODE RELAY REQUEST FUNCTION
(your machine requests a relay broadcast)
Ask the operator of the other F-code machine (the relay machine) to create an F-code relay group (box) that
contains the end receiving machines to which you wish to send a fax, and ask for the sub-address (SUB) and
passcode (SID) of that box.
When you dial the relay machine to send the fax, enter the sub-ad dress and p asscode aft er the f ax number. The fax
will be stored in the relay machine's memory box, and the relay machine will call each of the programmed end
receiving machines and relay the fax to those machines. (If a passcode (SID) is not programmed in the box , enter
only the sub-address when dialling.)
To dial the relay machine, use the same procedure as in "F-CODE TRANSMISSION (F-CODE CONFIDENTIAL
TRANSMISSION)" (page 59).
4
63
Page 66

CONVENIENT METHODS OF
5
This chapter explains convenient functions that can be used when sending a fax, connecting an extension phone,
and other features that expand the scope of use of the fax machine. Please read those sections that are of interest
to you.
USE
CONNECTING AN EXTENSION PHONE
You can connect a telephone to the machine and use it as an extension phone to make and receive calls like any
normal phone. Fax reception can also be activate d from an extension phone connected to the machine. (Remote
operation)
Note
USING AN EXTENSION PHONE
Using an extension phone for voice calls
An extension phone connected to the machine ca n be used to place an d receive voice call s just like a normal phone.
If you connect a combination telephone/answering machine to the machine, you will not be able to use the
answering machine function.
Note
• If the fax reception mode is set to auto reception, you must lift the phone to answer a call before the machine
automatically begins reception. The machine is initially set to answer calls on two rings. The number of rings
can be changed to any number from 0 to 9 in the system settings. (See "#OF RINGS AT. RX" on page 108.)
• If you cannot hear a dial tone when you pick up the extension phone, the machine is sending or receiving a fax.
Replace the phone.
Activating fax transmission
Place the original on document glass or in the SPF/ RSPF, ad just the or iginal size, resolut ion, and ex posure set tings
as needed, and then follow the steps below.
Lift the extension phone and call the
1
receiving party.
Press the [START] key ( ).
2
Select "TX" with the [ ] or [ ] key
3
and then press the [OK] key.
Replace the phone.
4
64
Page 67

CONVENIENT METHODS OF USE
SYMBOL
SPACE/–
SPEED
COMM. SETTING
FAX
SCAN
PQ
ACC
GHI
PQRS
BACK
OK
SETTING THE RECEPTION MODE
The machine normally receives faxes automatically after ringing; however , when an extension phone is connected,
you can set the reception mode to MANUAL. This will allow you to talk to the other party first and then receive a fax.
This is convenient when you only have one telephone line and receive more voice calls than faxes. You must
answer all calls on the extension phone, and activate fax reception after you verify that a call is a fax transmission.
Press the [COMM. SETTING] key in
1
the initial state of Fax mode.
Select "RX" with the [ ] or [ ] key.
2
COMM. SETTING
TX
RX
Press the [OK] key.
3
Select "AUTO" or "MANUAL" with the
4
[ ] or [ ] key.
RCV. SETTING
AUTO
MANUAL
Press the [OK] key.
5
OK
Activating fax reception from an extension phone (remote reception)
After receiving a call on the extension phone, you can activate fax reception from the extension phone. This is called
"remote reception". After speaking, o r when yo u he ar a f ax to ne thr ou gh the exte nsion pho ne, pe rfor m t he fol l owing
procedure with the extension phone still lifted. (If you made the call, remote reception will not be possible.)
The following procedure is not possible if you are on a pulse dial line and your extension phone cannot produce
tone signals. To find out whether your extension phone can produce tone signals, refer to the manual for your
extension phone.
Press the key once and the
2
key twice on the extension phone.
Fax reception is activated.
Replace the extension phone.
3
The one-digit number that is used to activate fax reception from an extension phone (initially set to "5") is called
the "remote reception number". You can change this number to any number from 0 to 9 in the system settings.
(See "REMOTE RECEPTION" on page 102.)
1
Note
If you are on a pulse dial line, set your
phone to issue tone signals.
Refer to your phone's manual to set th e p ho ne t o
issue tone signals.
If your phone is already set to issue tone signals,
proceed to the next step.
Note
5
65
Page 68

PROGRAMMING
EXPOSURE
COLOUR MODE
PAPER SE
RESOLUT
COPY
SCAN
SPECIAL
FUNCTION
LINE
DATA
DATA
ON LINE
PQ
ACC
6
This chapter explains the procedures for programming auto dial keys (Rapid keys, Speed Dial numbers, and group
keys), programs, and F-code operations, and how to print out lists of programmed information.
PROGRAMMING
Auto dial numbers (Rapid keys, Speed Dial numbers, an d group keys), progr ams, and F-code operatio ns are stor ed
and edited at the operation panel of the machine . Th is cha p te r exp la i ns ho w to us e th e op er at ion pa ne l for th es e
procedures.
STORING, EDITING, AND DELETING AUTO DIAL NUMBERS AND PROGRAMS
This section explains the procedures for storing, editing, and deleting auto-dial numbers (Rapid keys, Speed Dial
numbers, and group keys) and programs, which simplify the transmission pro cedure. To use Rapid keys, Speed Dial
numbers, and group keys, see "TRANSMISSION BY AUTO-DIALLING (RAPID DIAL LING AND GROUP
DIALLING)" on page 19. To use a program, see "USING A PROGRAM" on page 44.
A combined total of 50 Rapid keys and group keys can be stored, 300 Speed Dial numbers, and 9 progr ams can be
stored. If you attempt to store more than this, a warning message will appear. In this case, delete any auto-dial
numbers or programs that are no longer needed (see page 73 to delete Rapid keys and Speed Dial numbers, page
75 to delete group keys, and page 77 to delete pro grams), and then store the new auto-dial number or program.
Note
To cancel a storing, editing, or deleting operation, press the [CA] key. You will retur n to the base screen.
STORING, EDITING, AND DELETING AUTO-DIAL
NUMBERS (RAPID KEYS, SPEED DIAL NUMBERS, AND
GROUP KEYS)
Auto dial numbers are stored in the auto dial storing screen. Follow the steps below to display the auto dial storing
screen, and then store an auto dial number.
In Fax mode, press the [SPECIAL
1
FUNCTION] key.
Begin the following procedure from the base screen of
Fax mode.
When the [SPECIAL
FUNCTION] key is pressed, the
function selection menu
appears.
(To select fax mode, see step 1
on page 17.)
Select "ENTRY" with the [ ] or [ ]
2
key.
SPECIAL FUNCTION
ORIGINAL STORE
PRINT
ENTRY
66
Page 69

PROGRAMMING
GHI
PQRS
BACK
OK
46 47 48 49 50
41 42 43 44 45
36 37 38 39 40
31 32 33 34 35
26 27 28 29 30
ABCDE
FGHI J
KLMNO
PQRST
SYMBOL
REDIAL/PAUSE
SPEED
COMM. SETTING
FAX
SCAN
PRINT
ABC DEF
JKLGHI MNO
TUVPQRS WXYZ
@.-
_
READ-END
ACC. #-C
OK
46 47 48 49 50
41 42 43 44 45
36 37 38 39 40
31 32 33 34 35
26 27 28 29 30
ABCDE
FGHI J
KLMNO
PQRST
Press the [OK] key.
3
Select "DIAL" with the [ ] or [ ] key.
4
ENTRY
DIAL
PROGRAM
SUB ADD SETTING
Press the [OK] key.
5
OK
[Storing Rapid keys and Speed Dial numbers]
To store a Rapid key or Speed Dial number, follow
steps 1 through 6 on pages 66 to 67 and then follow
the steps below.
Press a Rapid key ([01] to [50]) or
7
press the [SPEED] key.
• If you are storing a Rapid key, press the Rapid key
that you wish to use ([01] to [50]).
If you press a Rapid key that
has already been programmed,
a warning message will appear.
• If you are storing a Speed Dial number, press the
[SPEED] key and then enter the desired Speed Dial
number (000 to 299) with the numeric keys.
Select "RAPID/SPEED", "GROUP", or
6
"CHANGE/DELETE" with the [ ] or
[ ] key.
• To store an Rapid key or
Speed Dial number,
select "RAPID/SPEED"
and press the [OK] key.
Next, follow the steps in
"Storing a Rapid keys
and Speed Dial
numbers" at right.
• To store a group key,
select "GROUP" and
press the [OK] key. Next,
follow the steps in
"Storing a group key" on
page 71.
• To edit or delete a Rapid
key, Speed Dial number,
or group key, select
"CHANGE/DELETE"
and press the [OK] key.
Next, follow the steps in
"Editing and deleting
auto-dial numbers" on
page 72.
DIAL
RAPID/SPEED
GROUP
CHANGE/DELETE
DIAL
RAPID/SPEED
GROUP
CHANGE/DELETE
DIAL
RAPID/SPEED
GROUP
CHANGE/DELETE
Enter the fax number of the
8
destination with the numeric keys.
Example of a Rapid key
ENTER DIAL #
07
:
Up to 50 digits can be entered for the fax nu mbe r. If you ne ed
to insert a pause between any of the digits, press the
[REDIAL/PAUSE] key. The pause appears as a hyphen (-). To
set the duration of the pause, see "PAUSE TIME" (page 100).
Press the [OK] key.
9
OK
Enter the name of the destination (see
10
"ENTERING CHARACTERS" on page 86.
ENTER NAME
ABCDE
ABC
Up to 36 characters can be entered for the name. If you press
the [OK] key without entering a name, go directly to step 13. In
this case, a destination nam e w ill be as s ign e d au to m ati c al ly .
67
6
Page 70

PROGRAMMING
46 47 48 49 50
41 42 43 44 45
36 37 38 39 40
31 32 33 34 35
26 27 28 29 30
ABCDE
FGHI J
KLMNO
PQRST
PQ
ACC
GHI
PQRS
BACK
OK
Press the [OK] key.
11
OK
Enter search characters (see
12
"ENTERING CHARACTERS" on page
86).
KEY WORDS
ABCDE
ABC
[START]:ENTER
Up to 10 search characters can be entered.
Only "Uppercase" characters should be used in "KEY
WORD" to arrange the addresses in alphabetical
order.
The search characters function as a keyword if you
need to search for the destination when send ing a fax.
(Page 20)
To finish the storing procedure, press
13
the [START] key ( ). If you wish to
program an option such as an F-code,
chain dialling, transmission speed, or
international transmission mode,
press the [OK] key.
• If you pressed the [START] key ( ), you will
return to step 7. If you wish to store another
Rapid key or Speed Dial number, repeat steps
7 to 13. If you have finished storing auto-dial
numbers, press the [BACK] key.
• If you pressed the [OK] key, go to the
appropriate page for the option that you wish to
program.
To program F-code settings, see "F-code
settings" which follows.
To select "CHAIN DIAL", go to "Chain Dialling"
on page 69.
To set the "TRANSMISSION SPEED", go to
"Transmission speed setting" on page 70.
To set the "INTERNATIONAL TRANSMISSION
MODE", go to "International transmission mode
setting" on page 70.
Note
About the setting options
When storing and editing Rapid keys and Speed Dial numbers, you can also select the setting options below.
Chain dialling cannot be combined with any of the other setting options.
When you select a setting option, a checkmark appears in the setting option screen.
• F-code. . . . . . . . . . . . . . . . . . . . . . .A sub-address and passcode can be stored for F-code communication.
(See below.)
• Chain Dialling . . . . . . . . . . . . . . . . .You can enable or disable Chain Dialling for a Rapid key or Speed Dial
number. (Page 69)
• Transmission speed . . . . . . . . . . . .You can set the transmissio n speed to 33,600 bps (maximum speed),
14,400 bps (high speed), 9600 bps (middle speed), or 4800 bps (low
speed). The initial setting is 33,600 bps (maximum speed). (Page 70)
• International transmission mode. . .The international transmission mode can be set to "OFF" or one of modes
1 to 3. The initial setting is "OFF". (Page 70)
[F-code settings]
To program F-code settings, complete steps 1 t hrough
13 on pages 66 to 68 and then follow the steps below.
Select "SUB ADDRESS" with the [ ]
1
or [ ] key.
OTHERS
SUB ADDRESS
CHAIN DIAL
[ ]:CANCEL
[START]:ENTER
Press the [OK] key.
2
68
Page 71

PROGRAMMING
ABC DEF
JKLGHI MNO
TUVPQRS WXYZ
@.-
_
READ-END
ACC. #-C
OK
Enter a sub-address (maximum 20
3
digits) with the numeric keys.
SUB ADDRESS
:123
Characters that can be entered are numbers, " ", "#",
and spaces. If you make a mistake, press [C] key and
then re-enter the correct number.
When this step is referred to in the following
procedures, " ", "#", and spaces cannot be entered.
• PROGRAMMING AN F-CODE CONFIDENTIAL
BOX (step 11 on page 79)
•
Editing an F-code confidential box (step 17 on page 82)
• PROGRAMMING AN F-CODE RELAY GROUP
(step 11 on page 80)
• Editing an F-code relay group (step 15 on page 83)
• PROGRAMMING F-CODE PUBLIC (POLLING
MEMORY) BOXES (step 11 on page 81)
• Editing an F-code public box (step 15 on page 84)
Press the [OK] key.
4
[Chain Dialling]
To set an auto-dial number as a Chain Dial number,
complete steps 1 through 13 on pages 66 to 68 and
then follow the steps below.
Note
Select "CHAIN DIAL" with the [ ] or
1
When a number is set as a Chain Dial
number, the destination fax number entered
in step 8 on page 67 can be up to 48 digits
long.
[ ] key.
OTHERS
SUB ADDRESS
CHAIN DIAL
TX SPEED
[START]:ENTER
• If checkmark appears to the left of "CHAIN DIAL", it
is already selected.
• To exit, press the [START] key ( ).
Press the [OK] key.
2
Enter a passcode (maximum 20 digits)
5
with the numeric keys.
WXYZ
PASS CODE
:
• Characters that can be entered are numbers, " ",
"#", and spaces. If you make a mistake, press [C]
key and then re-enter the correct number.
• If desired, you can omit the passc od e.
When this step is referred to in the following
procedures, spaces cannot be entered .
• PROGRAMMING AN F-CODE CONFIDENTIAL
BOX (step 12 on page 79)
•
Editing an F-code confidential box (step 18 on page 82)
• PROGRAMMING AN F-CODE RELAY GROUP
(step 12 on page 80)
• Editing an F-code relay group (step 15 on page 83)
• PROGRAMMING F-CODE PUBLIC (POLLING
MEMORY) BOXES (step 12 on page 81)
• Editing an F-code public box (step 15 on page 84)
Press the [OK] key.
6
When you press the [OK] key, you return to the
option setting screen and a checkmark appears
to the left of "F-CODE".
To cancel the F-code setting, press the key to
remove the checkmark.
OK
Select "ON" or "OFF" with the [ ] or
3
[ ] key.
CHAIN DIAL
ON
OFF
If chain dialling was already selecte d in step 7 a nd you
wish to cancel the selection, select "OFF".
Press the [OK] key.
4
OK
After you select "ON" and press the [OK] key, you will return
to the option setting screen and a checkmark will appear to
the left of "CHAIN DIAL".
If you pressed the key, the checkmark will be removed
and chain dialling cancelled.
Return to step 13 on page 68.
5
6
Return to step 13 on page 68.
7
69
Page 72

PROGRAMMING
[Transmission speed setting]
To set the transmission speed, complete steps 1
through 13 on pages 66 to 68 and then follow t he steps
below.
Note
Select "TX SPEED" with the [ ] or [ ]
1
Set the transmission speed only when you
know what speed is most suitable, such as
when you are sending a fax to a foreign
country and telephone line conditions are
bad. If you do not know the line conditions,
do not change this setting.
key.
OTHERS
SUB ADDRESS
CHAIN DIAL
TX SPEED
[START]:ENTER
[International transmission mode setting]
To set the international transmission mode, complete
steps 1 through 13 on pages 66 to 68 and then follow
the steps below.
•
Note
Select "INTERNATIONAL TX" with the
1
When sending a fax to a foreign country,
telephone line conditions can sometimes
distort the fax or interrupt the transmission.
Selecting the right international transmission
mode can help alleviate these problems.
• If errors frequently occur when sending a
fax to a foreign country , try each of modes
1 to 3 and select the mode that enables
the best transmission.
[ ] or [ ] key.
OTHERS
CHAIN DIAL
TX SPEED
INTERNATIONAL TX
[START]:ENTER
Press the [OK] key.
2
OK
Select the desired transmission speed
3
with the [ ] or [ ] key.
TX SPEED
33600bps
14400bps
9600bps
4800bps
Press the [OK] key.
4
OK
Press the [OK] key.
2
OK
Select the desired mode with the [ ]
3
or [ ] key.
INTERNATIONAL TX
OFF
MODE 1
MODE 2
MODE 3
Press the [OK] key.
4
OK
Note
Return to step 13 on page 68.
5
If you select a speed other than 33,600 bps
(maximum speed), a checkmark will appear
next to "TX SPEED" when you return to the
option setting screen. This setting is not
effective for polling transmission.
To remove the checkmark and return the
transmission speed setting to "33,600 bps
(maximum speed)", press the key.
70
Note
Return to step 13 on page 68.
5
If you select a setting other than "O FF", a
checkmark will appear next to
"INTERNATIONAL TX" when you return to
the option setting screen.
To remove the checkmark and return the
international transmission mode to "OFF",
press the key.
Page 73

PROGRAMMING
46 47 48 49 50
41 42 43 44 45
36 37 38 39 40
31 32 33 34 35
26 27 28 29 30
ABCDE
FGHI J
KLMNO
PQRST
46 47 48 49 50
41 42 43 44 45
36 37 38 39 40
31 32 33 34 35
26 27 28 29 30
ABCDE
FGHI J
KLMNO
PQRST
GHI
PQRS
BACK
OK
46 47 48 49 50
41 42 43 44 45
36 37 38 39 40
31 32 33 34 35
26 27 28 29 30
ABCDE
FGHI J
KLMNO
PQRST
46 47 48 49 50
41 42 43 44 45
36 37 38 39 40
31 32 33 34 35
26 27 28 29 30
ABCDE
FGHI J
KLMNO
PQRST
SYMBOL
REDIAL/PAUSE
SPEED
COMM. SETTING
FAX
SCAN
PRINT
_
[Storing a group key]
To store a group key, follow steps 1 through 6 on
pages 66 to 67 and then follow the steps below.
Press a Rapid key ([01] to [50]).
1
Press the Rapid key ([01] to [50]) that you wish to
program as a group key.
If you press a Rapid key that
has already been programmed,
a warning message will appear.
Note
Group key dialling is an automatic dialling
function where by multiple destinations (Rapid
keys, Speed Dial numbers, and full fax numbers
entered with the numeric k e ys) are prog rammed
into a Rapid key. If you frequently send faxes to
the same group of destinations using broadcast
transmission, which is used to send the same
document to multiple destinations in a single
operation (page 31), it is convenient to program
those destinations into a group key.
Store the destinations using Rapid
5
keys, Speed Dial numbers, and the
numeric keys.
• To store a Rapid key, press the Rapid key that you
wish to use ([01] to [50]).
ENTER RX STATION
: 50,
If you press an incorrect key, press the [C] key and
then press the correct key.
• To store a Speed Dial number, press the [SPEED]
key and then enter the desired Speed Dial number
(000 to 299) with the numeric keys.
If you press an incorrect key,
press the [C] key and then
press the correct key.
Enter a group name (see "ENTERING
2
CHARACTERS" on page 86).
ENTER GROUP NAME
ABCDE
ABC
Up to 36 characters can be entered for the name. A
group name must be entered.
Press the [OK] key.
3
Enter search characters (see "ENTERING
4
CHARACTERS" on page 86).
KEY WORDS
ABCDE
• You can also enter a destination fax number with the
numeric keys. However, in this case, F-code, chain
dialling, transmission speed, and international
transmission mode options cannot be selected. If
you need to select an option for the destination,
store the destination in a Rapid key or Speed Dial
number and then store the destination in the grou p
key. Up to 50 digits can be entered for the fax
number. If you need to insert a pause between any
of the digits, press the [REDIAL/PAUSE] key to enter
a pause. The pause appears as a hyphen (- ). To se t
the duration of the pause, see "PAUSE TIME" (page
100). When you have finished entering the fax
number, press the [OK] key.
Repeat step 5 for all of the
6
destinations that you wish to store in
the group key.
Up to 150 destinations can be stored in a group
key. (However, note that when multiple group
keys are programmed, the total number of
destinations that can be stored in all group keys
is 200.)
Press the [START] key ( ).
7
6
Up to 10 search characters can be entered.
The search characters function as a keyword if you
need to search for the destination when sending a fax
(page 20).
ABC
The group key is stored.
71
Page 74

PROGRAMMING
PQ
ACC
GHI
PQRS
BACK
OK
46 47 48 49 50
41 42 43 44 45
36 37 38 39 40
31 32 33 34 35
26 27 28 29 30
ABCDE
FGHI J
KLMNO
PQRST
SYMBOL
REDIAL/PAUSE
SPEED
COMM. SETTING
FAX
SCAN
PRINT
ABC DEF
JKLGHI MNO
TUVPQRS WXYZ
@.-
_
READ-END
ACC. #-C
OK
46 47 48 49 50
41 42 43 44 45
36 37 38 39 40
31 32 33 34 35
26 27 28 29 30
ABCDE
FGHI J
KLMNO
PQRST
46 47 48 49 50
41 42 43 44 45
36 37 38 39 40
31 32 33 34 35
26 27 28 29 30
ABCDE
FGHI J
KLMNO
PQRST
[Editing and deleting auto-dial numbers]
To edit or delete an auto-dial number, follow steps 1 through
6 on pages 66 and 67 and then follow the steps below.
Note
A Rapid key or Speed Dial number cannot be
edited or cleared in the following cases:
• The Rapid key or Speed Dial number is
being used in a transmission in progress
or in a stored transmission.
• The Rapid key or Speed Dial number is
stored in a group key, program, or F-code
relay group.
● Editing a Rapid key or Speed Dial number
Select "RAPID/SPEED" with the [ ] or
1
[ ] key.
CHANGE/DELETE
RAPID/SPEED
GROUP
Press the [OK] key.
2
• To edit a Speed Dial number, press the [SPEED] key
and then enter the Speed Dial number (000 to 299)
that you wish to edit with the numeric keys.
Edit the destination fax number with
6
the numeric keys.
ENTER DIAL #
07
:0612345678
Move the cursor to the digit(s) that you wish to edit with the [ ] or
[ ] key, and then enter the correct digit(s) with the numeric keys.
To delete a digit, move the cursor to the digit that you wish to
delete with the [ ] or [ ] key and then press the [C] key.
Press the [OK] key.
7
Select "CHANGE" with the [ ] or [ ]
3
key.
RAPID/SPEED
CHANGE
DELETE
Press the [OK] key.
4
OK
Press a Rapid key ([01] to [50]) or the
5
[SPEED] key.
• To edit a Rapid key, press the Rapid key that you
wish to edit ([01] to [50]).
OK
Edit the name of the destination (see
8
"ENTERING CHARACTERS" on page 86).
ENTER NAME
ABCDE
Press the [OK] key.
9
OK
Edit the search characters (see
10
"ENTERING CHARACTERS" on page 86).
KEY WORDS
ABCDE
[START]:ENTER
ABC
ABC
72
Characters added in step 8 will appear at the end of
the previously stored search characters. (Maximum of
10 characters altogether.)
Page 75

PROGRAMMING
PQ
ACC
46 47 48 49 50
41 42 43 44 45
36 37 38 39 40
31 32 33 34 35
26 27 28 29 30
ABCDE
FGHI J
KLMNO
PQRST
SYMBOL
REDIAL/PAUSE
SPEED
COMM. SETTING
FAX
SCAN
PRINT
GHI
PQRS
BACK
OK
PQ
ACC
GHI
PQRS
BACK
OK
To finish the storing procedure, press
11
the [START] key ( ). If you wish to
program an option such as F-code,
chain dialling, transmission speed, or
international transmission mode,
press the [OK] key.
• If you pressed the [START] key ( ), go to step
5. If you wish to program another Rapid key or
Speed Dial number, repeat steps 5 to 11. To
exit, press the [BACK] key. Editing to that point
will be completed.
• If you pressed the [OK] key, go to the
appropriate page for the option t hat yo u wish to
edit. To program F-code settings, follow the
steps in "F-code settings" on pages 68 and 69.
To select "CHAIN DIAL", go to "Chain Dialling"
on page 69. To set the "TRANSMISSION
SPEED", go to "Transmission speed setting" on
page 70. To set the "INTERNATIONAL
TRANSMISSION MODE", go to "International
transmission mode setting" on page 70.
● Deleting a Rapid key or Speed Dial number
Select "DELETE" with the [ ] or [ ]
3
key.
SBC CO.
DELETE
NO DELETE
[#]:DETAIL
Note
Press the [OK] key.
4
If you select "NO DELETE", you can press
the key to check the destination name. If
you are deleting the destination, check the
destination name and then delete the
destination.
You will return to the screen of
step 2. If you wish to delete
another Rapid key or Speed
Dial number, repeat steps 2 to
4. To exit, press the [BACK]
key.
In step 3 on page 72, select "DELETE"
1
with the [ ] or [ ] key.
RAPID/SPEED
CHANGE
DELETE
Press a Rapid key ([01] to [50]) or the
2
[SPEED] key.
• To delete a Rapid key, press the Rapid key that you
wish to delete ([01] to [50]).
• To delete a Speed Dial number, press the [SPEED]
key and then enter the Speed Dial number (000 to
299) that you wish to delete with the numeric keys.
[Editing and deleting group keys]
To edit or delete a group key, follow steps 1 through 6
on pages 66 to 67 and then follow the steps below.
Note
A group key cannot be edited or deleted in
the following cases.
• The group key is stored in a program or
F-code relay group.
● Editing a group key
Select "GROUP" with the [ ] or [ ]
1
key.
CHANGE/DELETE
RAPID/SPEED
GROUP
Press the [OK] key.
2
6
73
Page 76

PROGRAMMING
46 47 48 49 50
41 42 43 44 45
36 37 38 39 40
31 32 33 34 35
26 27 28 29 30
ABCDE
FGHI J
KLMNO
PQRST
46 47 48 49 50
41 42 43 44 45
36 37 38 39 40
31 32 33 34 35
26 27 28 29 30
ABCDE
FGHI J
KLMNO
PQRST
46 47 48 49 50
41 42 43 44 45
36 37 38 39 40
31 32 33 34 35
26 27 28 29 30
ABCDE
FGHI J
KLMNO
PQRST
46 47 48 49 50
41 42 43 44 45
36 37 38 39 40
31 32 33 34 35
26 27 28 29 30
ABCDE
FGHI J
KLMNO
PQRST
_
Select "CHANGE" with the [ ] or [ ]
3
key.
GROUP
CHANGE
DELETE
Press the [OK] key.
4
OK
Press the group key (one of Rapid
5
keys [01] to [50]) that you wish to edit.
Edit the group name (see "ENTERING
6
CHARACTERS" on page 86).
ENTER GROUP NAME
ABCDE
Edit the stored information.
9
• To add a Rapid key or Speed Dial number, enter the
Rapid key ([01] to [50]) or Speed Dial number that
you wish to add.
A key or number that is already
in the group cannot be added.
• To delete a Rapid key or Speed Dial number, select
it with the [ ] or [ ] key and press the [C] key.
ENTER RX STATION
: 50,012345678
[START]:SET
• To delete a number entered with the numeric keys,
select a digit of the number with the [ ] or [ ] key
and press the [C] key. The entire number including
the selected digit will be deleted. To add a number,
select the place where you wish to add the number
with the [ ] or [ ] key, and then enter the number.
When you have finished adding or deleting the
number, press the [OK] key.
ENTER RX STATION
Press the [OK] key.
7
OK
Edit the search characters (see
8
"ENTERING CHARACTERS" on page
86).
KEY WORDS
ABCDE
ABC
ABC
: 50,98701234,
[OK]:ENTER
When you have finished editing the
10
destinations, press the [START] key ( ).
This completes the editing procedure.
74
Page 77

● Deleting a group key
PQ
ACC
GHI
PQRS
BACK
OK
46 47 48 49 50
41 42 43 44 45
36 37 38 39 40
31 32 33 34 35
26 27 28 29 30
ABCDE
FGHI J
KLMNO
PQRST
In step 3 on page 74, select "DELETE"
1
with the [ ] or [ ] key.
GROUP
CHANGE
DELETE
Press the [OK] key.
2
PROGRAMMING
Press the group key (one of Rapid
3
keys [01] to [50]) that you wish to edit.
Select "DELETE" with the [ ] or [ ]
4
key.
SBC CO.
DELETE
NO DELETE
[#]:DETAIL
Note
If you select "NO DELETE", you can press
the key to check the destination name. If
you are deleting the dest in a tion, check the
destination name and then delete the
destination.
6
Press the [OK] key.
5
Return to step 3. If you wish to delete another group
key, repeat steps 3 through 5. To exit, press the
[BACK] key.
OK
75
Page 78

PROGRAMMING
PQ
ACC
GHI
PQRS
BACK
OK
46 47 48 49 50
41 42 43 44 45
36 37 38 39 40
31 32 33 34 35
26 27 28 29 30
ABCDE
FGHI J
KLMNO
PQRST
STORING, EDITING AND DELETING PROGRAMS
You can store a transmission method*, cover sheet/message, transmission settings, dual pages, and/or
resolution/exposure settings in a program. This will allow you to use the settings for a transmission by means of a
simple operation (see "USING A PROGRAM" on page 44).
*Transmission methods: normal transmission, broadcast transmission, polling, serial polling, F-code transmission,
F-code polling
Note
To store a program, follow steps 1 through 6 on pages 66
to 67 and then follow the steps below.
Select "ENTRY" with the [ ] or [ ] key.
1
An original size setting, screen setting, and timer transmission setting cannot be stored in a program.
SPECIAL FUNCTION
ORIGINAL STORE
PRINT
ENTRY
Press the [OK] key.
2
Select "PROGRAM" with the [ ] or
3
[ ] key.
ENTRY
DIAL
PROGRAM
SUB ADD SETTING
• To edit a program, select "CHANGE" and press the
[OK] key. Next, follow the steps in "EDITING
PROGRAMS" on page 77.
• To delete a program, select "DELETE" and press the
[OK] key. Next, follow the steps in "DELETING
PROGRAMS" on page 77.
[STORING A PROGRAM]
Select the program that you wish to
6
store with the [ ] or [ ] key.
PROGRAM
XXXXXX
— — — — — —
— — — — — —
If you select a program that has already b een stored, a
message appears. Select a program that has not been
stored, or clear the program (page 77) and then se lect
it.
Press the [OK] key.
7
Enter a program name (see
8
"ENTERING CHARACTERS" on page
86).
Press the [OK] key.
4
Select "ENTER", "CHANGE", or
5
"DELETE" with the [ ] or [ ] key.
• To store a program, select "ENTER" and press the
[OK] key. Continue from step 6 of "STORING A
PROGRAM".
76
PROGRAM
ENTER
CHANGE
DELETE
PROGRAM NAME
ABCDE
ABC
Up to 36 characters can be stored for the name of the
program. A program name must be entered.
Press the [OK] key.
9
Page 79

PROGRAMMING
PQ
ACC
GHI
PQRS
BACK
OK
PQ
ACC
GHI
PQRS
BACK
OK
Select the program that you wish to
10
store with the [ ] or [ ] key.
PROGRAM
TX TYPE
SENDING MENU
[ ]:CANCEL
[START]:ENTER
• A transmission method, cover sheet/message,
resolution/exposure settings, dual pages, sender's
name, and transmission settings can be stored. A
transmission method must be stored. The storing
procedure cannot be completed unless a
transmission method is stored.
• For the procedures for selecting each of the settings,
refer to the explanations of the settings.
• To cancel a setting selection, select the setting that
you wish to cancel and then press the key.
• Some settings cannot be used in combination with
others. If you select a prohibited combination of
settings, a message will appear in the display.
To continue selecting another setting,
11
press the [OK] key.
When you have finished selecting settings, press the
[START] key ( ). You will return to step 8. If you wish
to store another program, repeat steps 8 to 11. To exit,
press the [BACK] key in step 8.
Note
[EDITING PROGRAMS]
If you need to edit a previously stored program, f ollow
these steps.
You can check the contents of a program
(transmission type, destination) by printing
the "PROGRAM LIST" (page 85).
Edit the program name (see
8
"ENTERING CHARACTERS" on page
86).
• See step 8 of "STORING A PROGRAM".
• If you do not wish to edit the program name, go
to the next step.
Press the [OK] key.
9
Select the stored setting that you wish
10
to edit with the [ ] or [ ] key.
• See steps 10 and 11 of "STORING A
PROGRAM".
• If you do not wish to edit the stored settings,
press the [START] key ( ) and then press the
[BACK] key to exit.
[DELETING PROGRAMS]
Before deleting a program, print the "PROGRAM LIST"
to check the contents. (Page 85) To delete a
previously stored program, follow these steps:
Select the program that you wish to
6
delete with the [ ] or [ ] key.
PROGRAM
XXXXXX
— — — — — —
— — — — — —
[#]:LIST DETAIL
If not all letters of the progra m name appea r, press the
key to display all letters. Press the key once
again to return to the original screen.
6
Select the program that you wish to
6
edit with the [ ] or [ ] key.
PROGRAM
XXXXXX
— — — — — —
— — — — — —
[#]:LIST DETAIL
If not all letters of the program name appe ar, press the
key to display all letters. Press the key once
again to return to the original screen.
Press the [OK] key.
7
Press the [OK] key.
7
Select "DELETE" with the [ ] or [ ]
8
key.
Press the [OK] key.
9
Return to step 6. To delete another program,
repeat steps 6 through 8. To exit, press the
[BACK] key.
77
Page 80

PROGRAMMING, EDITING, AND
EXPOSURE
COLOUR MODE
PAPER SE
RESOLUT
COPY
SCAN
SPECIAL
FUNCTION
LINE
DATA
DATA
ON LINE
PQ
ACC
GHI
PQRS
BACK
OK
DELETING F-CODE MEMORY BOXES
The procedure for programming a box for F-code transmission is explained here. There are three types of F-code
boxes: F-code public boxes (page 81), F-code confidential boxes (page 79), and F-code relay group boxes (page
80). F-code boxes are programmed, edited, and deleted as explained below.
PROGRAMMING AN F-CODE MEMORY BOX
A box name, sub-address, passcode, an d the ap p ro pr iate functions are programmed in an F-code box.
Note
In Fax mode, press the [SPECIAL
1
• When programming a new F-code box, a sub-address that is already programmed in another box cannot be
used. However, the passcode can be the same as a passcode used in another box.
• A passcode can be omitted.
• Up to 10 F-code boxes of each type can be programmed. If 10 F-code boxes of one type have already been
programmed, a warning message will appear and you will not be able to program a new box. Delete any
unused F-code boxes (page 81) and then program the new box.
FUNCTION] key.
Begin the following procedure from the base screen of
Fax mode.
When the [SPECIAL
FUNCTION] key is pressed, the
function menu screen appears.
(To select fax mode, see step 1
on page 17.)
Select "ENTRY" with the [ ] or [ ]
2
key.
SPECIAL FUNCTION
ORIGINAL STORE
PRINT
ENTRY
Press the [OK] key.
3
Select "SUB ADD SETTING" with the
4
[ ] or [ ] key.
ENTRY
DIAL
PROGRAM
SUB ADD SETTING
Press the [OK] key.
5
OK
Select "S.A. CONF. BOX", "S.A. RELAY
6
GRP", "S.A. MEM POLLING", or
"CHANGE/DELETE" with the [ ] or [ ] key.
•
To program an F-code
confidential box, select
"S.A. CONF. BOX" and
press the [OK] key. Next,
follow the steps in
"PROGRAMMING AN
F-CODE CONFIDENTIAL
BOX" on page 79.
• To program an F-code
relay group (box), select
"S.A. RELAY GRP" and
press the [OK] key. Next,
follow the steps in
"PROGRAMMING AN
F-CODE RELAY
GROUP" on page 80.
•
To program an F-code
public (polling memory)
box, select "S.A. MEM
POLLING" and press the
[OK] key. Next, follow the
steps in "PROGRAMMING
F-CODE PUBLIC
(POLLING MEMORY)
BOXES" on page 81.
•
To edit or delete an F-code
confidential box, F-code
relay group, or F-code
public box, select
"CHANGE/DELETE" and
then press the [OK] key.
Next, follow the steps in
"EDITING AND DELETING
F-CODE MEMORY
BOXES" on page 81.
SUB ADD SETTING
S.A. CONF. BOX
S.A. RELAY GRP
S.A. MEM POLLING
CHANGE/DELETE
SUB ADD SETTING
S.A. CONF. BOX
S.A. RELAY GRP
S.A. MEM POLLING
CHANGE/DELETE
SUB ADD SETTING
S.A. CONF. BOX
S.A. RELAY GRP
S.A. MEM POLLING
CHANGE/DELETE
SUB ADD SETTING
S.A. CONF. BOX
S.A. RELAY GRP
S.A. MEM POLLING
CHANGE/DELETE
78
Page 81

PROGRAMMING
PQ
ACC
GHI
PQRS
BACK
OK
46 47 48 49 50
41 42 43 44 45
36 37 38 39 40
31 32 33 34 35
26 27 28 29 30
ABCDE
FGHI J
KLMNO
PQRST
ABC DEF
JKLGHI MNO
TUVPQRS WXYZ
@.-
_
READ-END
ACC. #-C
OK
[PROGRAMMING AN F-CODE CONFIDENTIAL BOX]
Follow the steps below to program an F-code
confidential reception box. An F-code (sub-address
and passcode) for F-code confidential reception an d a
print passcode to print out received faxes are
programmed in each box. Up to 10 boxes can be
programmed. To check the contents of a progr am med
box, print the following list: "PRINT - REPORT - SUB
ADD SET LIST". (Page 85)
To program an F-code confidential box, follow steps 1
through 6 on page 78 and then follow the steps below.
Select an unused box ("- - - - - -") with
7
the [ ] or [ ] key.
S.A. CONF. BOX
SBC CO.
— — — — — —
— — — — — —
[OK]:STORE START
Press the [OK] key.
8
Enter a passcode (maximum 20 digits)
12
with the numeric keys.
See steps 5 and 6 on page 69.
Enter the print passcode (4 digits)
13
with the numeric keys.
ENTER CONF. CODE
____
(0000-9999)
The characters " " and "#" cannot be used. The print
passcode cannot be omitted. Take care not to forget
the programmed print passcode. If you forget the
passcode, consult your Sharp dealer.
Press the [OK] key.
14
OK
Enter a name for the F-code
9
confidential box (see "ENTERING
CHARACTERS" on page 86).
S.A.CONF.BX NAME
ABC
Up to 36 characters can be entered for the name. A
box name must be entered.
Press the [OK] key.
10
OK
Enter a sub-address (maximum 20
11
digits) with the numeric keys.
See steps 3 and 4 on page 69.
6
79
Page 82

PROGRAMMING
PQ
ACC
GHI
PQRS
BACK
OK
46 47 48 49 50
41 42 43 44 45
36 37 38 39 40
31 32 33 34 35
26 27 28 29 30
ABCDE
FGHI J
KLMNO
PQRST
31 32 33
26 27 28
ABC
FGH
GHI
PQRS
BACK
OK
_
[PROGRAMMING AN F-CODE RELAY GROUP]
This procedure is used to program an F-code relay
group box for relay broadcast of a received fax upon
receipt of an F-code relay request. Up to 10 boxes can
be programmed. An F-code (sub-address and
passcode) for reception of an F-code relay request
and the destinations to which the fax is to be relayed
are programmed in each box. To check the contents of
a programmed box, print the following list: "PRINT REPORT - SUB ADD SET LIST" (page 85).
To program an F-code relay group box, follow steps 1
through 6 on page 78 and then follow the steps below.
Select an unused box ("- - - - - -") with
7
the [ ] or [ ] key.
S.A. RELAY GRP
SBC CO.
— — — — — —
— — — — — —
[OK]:STORE START
Press the [OK] key.
8
Enter a passcode (maximum 20 digits)
12
with the numeric keys.
See steps 5 and 6 on page 69.
Enter the relay destinations. Enter full
13
fax numbers with the numeric keys
and/or press auto-dial keys (Rapid
keys, Speed Dial numbers, and group
keys) to select the destinations (page
19).
WXYZ
ENTER RX STATION
:
• To clear a mistake when entering a number with the
numeric keys, press the [C] key to clear one digit at a
time.
• A destination selected with a Rapid key, Speed Dial
number, or group key is indicated by an icon and a
number. To clear an entry, press the [C] key.
Enter a name for the F-code relay
9
group box (see "ENTERING
CHARACTERS" on page 86).
ENTER GRP NAME
ABC
Up to 36 characters can be entered for the name. A
box name must be entered.
Press the [OK] key.
10
OK
Press the [OK] key and then dial the
14
fax number of the next destination or
press an auto-dial key.
• After entering a full number
with the numeric keys, press
the [OK] key to complete the
entry. If you pressed an
auto-dial key in step 13, it is
not necessary to press the
[OK] key. You can
immediately press another
auto-dial key for the next
destination.
• Repeat steps 13 and 14 until
all destinations have been
entered.
Press the [START] key ( ) to end the
15
procedure.
Enter a sub-address (maximum 20
11
digits) with the numeric keys.
See steps 3 and 4 on page 69.
80
Page 83

PROGRAMMING
PQ
ACC
GHI
PQRS
BACK
OK
46 47 48 49 50
41 42 43 44 45
36 37 38 39 40
31 32 33 34 35
26 27 28 29 30
ABCDE
FGHI J
KLMNO
PQRST
PQ
ACC
GHI
PQRS
BACK
OK
PQ
ACC
GHI
PQRS
BACK
OK
[PROGRAMMING F-CODE PUBLIC (POLLING
MEMORY) BOXES]
This setting is used to program a box to store
document data for remote transmission when polled b y
a machine that supports F-Code co mmunication. Up to
10 boxes can be programmed.
To check the contents of a programmed box, print the
following list: "PRINT - REPORT - SUB ADD SET
LIST" (page 85).
To program an F-code public box, follow steps 1
through 6 on page 78 and then follow the steps below.
Select an unused box ("- - - - - -") with
7
the [ ] or [ ] key.
S.A. MEM POLLING
SBC CO.
— — — — — —
— — — — — —
[OK]:STORE START
Press the [OK] key.
8
[EDITING AND DELETING F-CODE MEMORY BOXES]
To edit or delete an F-code box (F-code confidential
box, F-code relay group box, or F-code public box),
follow steps 1 through 6 on page 78 and then follow
the steps below.
Note that an F-code confidential box or F-code public box
cannot be edited or deleted if it contains document data.
Select "S.A. CONF. BOX", "S.A.
7
RELAY GRP", or "S.A. MEM
POLLING" with the [ ] or [ ] key.
CHANGE/DELETE
S.A. CONF. BOX
S.A. RELAY GRP
S.A. MEM POLLING
Press the [OK] key.
8
Enter a name for the F-code public
9
box (see "ENTERING CHARACTERS"
on page 86).
S.A. M-POLL NAME
ABC
Up to 36 characters can be entered for the name. A
box name must be entered.
Press the [OK] key.
10
Enter a sub-address (maximum 20
11
digits) with the numeric keys.
See steps 3 and 4 on page 69.
• If you selected "S.A. CONF. BOX" in step 7, follow
the steps in "EDITING/DELETING AN F-CODE
CONFIDENTIAL BOX" below.
• If you selected "S.A. RELAY GRP" in step 7, follow
the steps in "EDITING AND DELETING F-CODE
RELAY GROUPS" on page 83.
• If you selected "S.A. MEM POLLING" in step 7,
follow the steps in "EDITING/DELETING F-CODE
PUBLIC BOXES" on page 84.
[EDITING/DELETING AN F-CODE CONFIDENTIAL BOX]
Select "CHANGE" or "DELETE" with
9
the [ ] or [ ] key.
S.A. CONF. BOX
CHANGE
DELETE
Press the [OK] key.
10
6
Enter a passcode (maximum 20 digits)
12
with the numeric keys.
See steps 5 and 6 on page 69.
• If you selected "CHANGE" in step 9, follow the steps
in "Editing an F-code confidential box" on page 82.
• If you selected "DELETE" in step 9, follow the steps
in "Deleting an F-code confidential box" on page 82.
81
Page 84

PROGRAMMING
PQ
ACC
GHI
PQRS
BACK
OK
ABC DEF
JKLGHI MNO
TUVPQRS WXYZ
@.-
_
READ-END
ACC. #-C
OK
PQ
ACC
GHI
PQRS
BACK
OK
ABC DEF
JKLGHI MNO
TUVPQRS WXYZ
@.-
_
READ-END
ACC. #-C
OK
● Editing an F-code confidential box
Select the name of the F-code
11
confidential box that you wish to edit
with the [ ] or [ ] key.
S.A. CONF. BOX
SBC CO.
— — — — — —
— — — — — —
[#]:LIST DETAIL
If not all letters of the box name appear, press the
key to display all letters. Press the key once again
to return to the original screen.
Press the [OK] key.
12
Edit the passcode (maximum 20
18
digits) with the numeric keys.
• See steps 5 and 6 on page 69.
• If you do not need to edit the passcode, press
the [OK] key and go to the next step.
Edit the print passcode (4 digits) with
19
the numeric keys.
• See steps 13 and 14 on page 79.
• If you do not need to edit the print passcode,
press the [OK] key.
● Deleting an F-code confidential box
Select the name of the F-code
11
confidential box that you wish to
delete with the [ ] or [ ] key.
S.A. CONF. BOX
SBC CO.
— — — — — —
— — — — — —
[#]:LIST DETAIL
Enter the print passcode (4 digits)
13
with the numeric keys.
ENTER CONF. CODE
____
(0000-9999)
Enter the correct print passcode that wa s programmed
when the confidential box was programmed.
Press the [OK] key.
14
Edit the name of the F-code
15
confidential box (see "ENTERING
CHARACTERS" on page 86).
• See step 9 on page 79.
• If you do not wish to edit the name, go to the
next step.
Press the [OK] key.
16
If not all letters of the box name appear, press the
key to display all letters. Press the key once again
to return to the original screen.
Press the [OK] key.
12
Enter the print passcode (4 digits)
13
with the numeric keys.
ENTER CONF. CODE
____
(0000-9999)
Enter the correct print passcode that was programmed
when the confidential box was programmed.
Press the [OK] key.
14
Edit the sub-address (maximum 20
17
digits) with the numeric keys.
• See steps 3 and 4 on page 69.
• If you do not need to edit the sub-address,
82
press the [OK] key and go to the next step.
Select "DELETE" with the [ ] or [ ]
15
key.
Press the [OK] key.
16
You will return to the screen of step 11. If you
wish to delete another box, repeat steps 11
through 14. To exit, press the [BACK] key.
Page 85

PROGRAMMING
PQ
ACC
GHI
PQRS
BACK
OK
PQ
ACC
GHI
PQRS
BACK
OK
PQ
ACC
GHI
PQRS
BACK
OK
[EDITING AND DELETING F-CODE RELAY
GROUPS]
Select "CHANGE" or "DELETE" with
9
the [ ] or [ ] key.
S.A. RELAY GRP
CHANGE
DELETE
Press the [OK] key.
10
• If you selected "CHANGE" in step 9, follow the steps
in "Editing an F-code relay group" which follows.
• If you selected "DELETE" in step 9, follow the steps
in "Deleting an F-code relay group" which follows.
Press the [OK] key.
14
OK
Edit the sub-address and passcode
15
(maximum 20 digits) with the numeric
keys.
• See steps 3 to 6 on page 69.
• If you do not need to edit the sub-address and
passcode, press the [OK] key and go to the
next step.
Edit the relay destinations.
16
See steps 13 to 15 on page 80.
● Deleting an F-code relay group
Select the name of the F-code relay
11
group (box) that you wish to delete
with the [ ] or [ ] key.
● Editing an F-code relay group
Select the name of the F-code relay
11
group (box) that you wish to edit with
the [ ] or [ ] key.
S.A. RELAY GRP
SBC CO.
— — — — — —
— — — — — —
[#]:LIST DETAIL
If not all letters of the box name appear, press the
key to display all letters. Press the key once again
to return to the original screen.
Press the [OK] key.
12
S.A. RELAY GRP
SBC CO.
— — — — — —
— — — — — —
[#]:LIST DETAIL
If not all letters of the box name appear, press the
key to display all letters. Press the key once again
to return to the original screen.
Press the [OK] key.
12
Select "DELETE" with the [ ] or [ ]
13
key.
Press the [OK] key.
14
6
Edit the name of the F-code relay
13
group (box) (see "ENTERING
CHARACTERS" on page 86).
• See step 9 on page 80.
• If you do not wish to edit the name, go to the
next step.
OK
You will return to step 11. If you
wish to delete another relay
group, repeat steps 11 through
14. To exit, press the [BACK]
key.
83
Page 86

PROGRAMMING
PQ
ACC
GHI
PQRS
BACK
OK
PQ
ACC
GHI
PQRS
BACK
OK
PQ
ACC
GHI
PQRS
BACK
OK
[EDITING/DELETING F-CODE PUBLIC BOXES]
Select "CHANGE" or "DELETE" with
9
the [ ] or [ ] key.
S.A. MEM POLLING
CHANGE
DELETE
Press the [OK] key.
10
• If you selected "CHANGE" in step 9, follow the steps
in "Editing an F-code public box" which follows.
• If you selected "DELETE" in step 9, follow the steps
in "Deleting an F-code public box" which follows.
Press the [OK] key.
14
OK
Edit the sub-address and passcode
15
(maximum 20 digits) with the numeric
keys.
• See steps 3 to 6 on page 69.
• If you do not need to edit the sub-address and
passcode, press the [OK] key and go to the
next step.
Press the [OK] key and then press the
16
[BACK] key to exit.
● Deleting an F-code public box
Select the name of the F-code public
11
box that you wish to delete with the [ ]
or [ ] keys.
● Editing an F-code public box
Select the name of the F-code public
11
box that you wish to edit with the
or
[]
key.
[]
S.A. MEM POLLING
SBC CO.
— — — — — —
— — — — — —
[#]:LIST DETAIL
If not all letters of the box name appear, press the
key to display all letters. Press the key once again
to return to the original screen.
Press the [OK] key.
12
S.A. MEM POLLING
SBC CO.
— — — — — —
— — — — — —
[#]:LIST DETAIL
If not all letters of the box name appear, press the
key to display all letters. Press the key once again
to return to the original screen.
Press the [OK] key.
12
Select "DELETE" with the [ ] or [ ]
13
key.
Press the [OK] key.
14
Edit the name of the F-code public box
13
(see "ENTERING CHARACTERS" on
page 86).
•
See step 9 of "PROGRAMMING F-CODE PUBLIC
(POLLING MEMORY) BOXES" (page 81).
• If you do not wish to edit the name, go to the
84
next step.
OK
You will return to step 11. If you
wish to delete another public box,
repeat steps 11 through 14. To
exit, press the [BACK] key.
Page 87

PRINTING LISTS OF PROGRAMMED
EXPOSURE
COLOUR MODE
PAPER SE
RESOLUT
COPY
SCAN
SPECIAL
FUNCTION
LINE
DATA
DATA
ON LINE
PQ
ACC
GHI
PQRS
BACK
OK
INFORMATION, SETTINGS, AND
COMMUNICATION ACTIVITY
You can print lists showing programmed information, settings, and communication activity.
The following lists can be printed.
• ACTIVITY REPORT:This report shows information on your most recent transmissions and receptions, including
communication time and the other party.
• TIMER LIST: This list shows timer transmissions and recall mode jobs.
• MEM. POLLING LIST:This list shows information on the documents and settings stored for memory polling and
F-code memory polling.
• RAPID # LIST:This list shows the information stored in each Rapid key that has been programmed.
• SPEED # LIST:This list shows the information stored in each Speed Dial number that has been programmed.
• GROUP LIST:This list shows the information stored in each group key that has been progr ammed.
• TELEPHONE # LIST:This list shows the destinations that have been stored in auto dial numbers in the order of
their search characters.
• PROGRAM LIST: This list shows the contents of each program that has been stored.
• SUB ADD SET LIST: This list shows the sub-addresses and passcodes that have been programmed for F-code
communication. (Note that print passcodes are not shown in the list.)
• CONF. RX LIST: This list shows the confidential box numbers that have received confidential faxes and the
number of pages received.
• INBOUND ROUTING LIST:This list shows various settings used at the time of inbound routing.
In Fax mode, press the [SPECIAL
1
FUNCTION] key.
Begin the following procedure from the base screen of
Fax mode.
When the [SPECIAL
FUNCTION] key is pressed, the
function selection menu
appears.
(To select fax mode, see step 1
on page 17).
Select "PRINT" with the [ ] or [ ] key.
2
SPECIAL FUNCTION
COMM. SETTING
ORIGINAL STORE
PRINT
Press the [OK] key.
3
Select "REPORT" with the [ ] or [ ]
4
key.
PRINT
REPORT
CONF. RX DATA
Press the [OK] key.
5
OK
Select the list that you wish to print
6
with the [ ] or [ ] key.
REPORT
ACTIVITY REPORT
TIMER LIST
MEM. POLLING LIST
RAPID # LIST
6
See the explanation of the lists that can be printed
above.
Press the [OK] key.
7
OK
• The list is printed (or is
stored).
• If the list does not contain any
data, it will not be printed.
85
Page 88

ENTERING CHARACTERS
This section explains how to enter and edit characters for names of rapid dial numbers, Speed Dial numbers, and
group keys, as well as account names, program names, and search characters for the address list.
CHARACTERS THAT CAN BE ENTERED
Characters that can be entered for names
The following characters can be entered:
• Up to 36 characters can be entered for a name.
However, up to 18 characters can be entered for a account name or sender's name.
• Upper case alphabet, lower case alphabet, numbers, special characters, symbols
Characters that can be used for search characters
The following characters can be used:
• Up to 10 characters can be entered for search characte rs.
• Upper case alphabet, lower case alphabet, numbers, special characters
Note
• Search characters are normally the first 10 characters of the name entered for a destination.
• Search characters are used when storing and using auto dial keys and numbers.
• When a destination name includes a symbol, the symbol cannot be stored as a search character.
• Search characters can be edited.
CHANGING TO ENTRY MODE
Open the Rapid key overlay to enter alphabetical characters.
When the Rapid key overlay is open
When the Rapid key overlay is open, characters can be entered. To toggle between upper case and lower case
letters, press the [SHIFT] key.
26 27 28 29 30
ABCDE
31 32 33 34 35
FGHI J
36 37 38 39 40
KLMNO
41 42 43 44 45
PQRST
46 47 48 49 50
UVW
XYZ
SP
When the Rapid key overlay is closed
Closing the Rapid key overlay stores characters that have been entered to that point.
SPEAKER
SHIFT
REDIAL/PAUSE
SPEED
SYMBOL
COMM. SETTING
SPACE/–
86
Page 89

PROGRAMMING
CHARACTER ENTRY KEYS
To enter characters, use the character entry keys on the operation panel. The characters entered by each key and
key functions are as follows.
Character
entry key
A
B
C
D
E
F
G
H
I
J
K
L
M
N
O
P
Q
R
S
T
U
V
W
XYZ
Characters and function Characters and function
A
B
C
D
E
F
G
H
I
J
K
L
M
N
O
P
Q
R
S
T
U
V
W
XYZ
Character
entry key
[SP]
[SHIFT]
[SYMBOL]
[SPACE/-]
Numeric
[C] (CLEAR)
[ ] [ ] [ ] [ ]
Use to enter special characters.
Use to toggle between upper case
and lower case letters.
Use to enter symbols.
Use to enter a space or a hyphen (-).
The display toggles between a space
and a hyphen each time you press the
key .
Use to enter numbers 1 through 0.
Clears the character selected with the
cursor.
Use to move the cursor vertically and
horizontally. Also used to move
through screen pages.
If you press the [ ] key when a
character is not entered, a space will
be entered.
Note
When you wish to enter characters assigned to the same key in succession, press the [] key after en tering the
first character to move the cursor and then enter the next character.
Example: Entering XY
Press the [XYZ] key once, press the
[] key once to move the cursor, and then press the [XYZ] key twice.
6
87
Page 90

PROGRAMMING
46 47 48 49 50
41 42 43 44 45
36 37 38 39 40
31 32 33 34 35
26 27 28 29 30
ABCDE
FGHI J
KLMNO
PQRST
ABC DEF
JKLGHI MNO
TUVPQRS WXYZ
@.-
_
READ-END
ACC. #-C
OK
SYMBOL
REDIAL/PAUSE
SPEED
COMM. SETTING
FAX
SCAN
PRINT
PQ
ACC
GHI
PQRS
BACK
OK
INITIAL PROCEDURE FOR ENTERING CHARACTERS
Entering alphabetical characters
(example: TPS)
Open the Rapid key overlay.
1
ENTER NAME
ABC
To switch between upper case letters and lower case
letters, press the [SHIFT] key.
Enter "T", "P" and "S" with the letter
2
keys.
ENTER NAME
TPS
ABC
The letters are stored and the cursor moves to the
space after the letters.
Note
To change a character, press the [C] key.
The character directly to the left of the
cursor is cleared.
If the cursor is over a character, that
character is cleared.
Entering symbols
Press the [SYMBOL] key.
1
SYMBOL
! " # % & ' (
) + , - . / :
; < = > ? @ [ \
1/ 2
Select the symbol that you wish to
2
enter with the [ ][ ][ ][ ] keys.
SYMBOL
! " # % & ' (
) + , - . / :
; < = > ? @ [ \
1/ 2
To move to the next page, move the cursor to the
bottom line and press the [ ] key. To move back to
the previous page, move the cursor to the top line and
press the [ ] key. You can also change pages by
pressing the [ ] key when the cursor is at the right
end of the bottom line, or the [ ] key when the cursor
is at the left end of the top line.
Press the [OK] key.
3
ENTER NAME
#
Entering numbers (example: 123)
Enter "1", "2", and "3" with the
1
numeric keys.
Note
88
ENTER NAME
123
• To change a character, press the [C]
key. The character directly to the left
of the cursor is cleared.
• If the cursor is over a character, that
character is cleared.
ABC
The symbol selected with the cursor is entered and
you return to the character entry screen.
Note
If the Rapid key overlay is opened or closed
while a symbol is being selected, the symbol
currently selected with the cursor is entered
and you return to entry mode.
ABC
Page 91

Entering special characters
49 50
44 45
XYZ
SP
SYMBO
SPACE
SPEE
COMM. SET
PQ
ACC
GHI
PQRS
BACK
OK
Special characters are entered with the Rapid key
overlay opened.
Press the [SP] key.
1
SPEC. CHARACTER
1/ 2
Select the special character that you
2
wish to enter with the [ ][ ][ ][ ]
keys.
SPEC. CHARACTER
PROGRAMMING
1/ 2
To move to the next page, move the cursor to the
bottom line and press the [ ] key. To move back to
the previous page, move the cursor to the t op lin e and
press the [ ] key. You can also change pages by
pressing the [ ] key when the cursor is at the right
end of the bottom line, or the [ ] key when the cursor
is at the left end of the top line.
Press the [OK] key.
3
ENTER NAME
ABC
The special character selected with the cursor is
entered and you return to the character entry screen.
Note
If the Rapid key overlay is closed while a
special character is being select ed , th e
special character currently selected with the
cursor is entered.
6
89
Page 92

TROUBLESHOOTING
7
This chapter contains information to help you make efficient use of the fax features of the machine, including
solutions to common problems.
WHEN A TRANSACTION REPORT IS PRINTED
The machine has been set to automatically print a transaction report to notify you of the result when a transmission
is not successful or when the Broadcast transmission function is used.
When transmission is not successful and a transaction report similar to the following is printed,
"FOLLOWING DATA CANNOT BE SENT. PLEASE HAND THIS REPORT TO XXX.", read the report and take
appropriate action.
The transaction report is set at the factory to print at the times indicated in grey below, however, the times at which
the report is printed can be changed in the system settings. (See "LIST SETTING - PRINT SELECTION" on page 99.)
• Normal transmission: ALWAYS PRINTS / /NEVER PRINTS
• Broadcast transmission: /ERROR ONLY/NEVER PRINTS
• Original image print setting*: ALWAYS PRINTS / /NEVER PRINTS
• Reception: ALWAYS PRINTS /ERROR ONLY/
• Confidential reception: /NEVER PRINTS
The Transaction Report shows the date of transmission, the time transmission began, the other party's name, the
duration of the operation, the number of pages, the type of transmission, the result, the department, and other
information.
ALWAYS PRINTS
ALWAYS PRINTS
ERROR ONLY
ERROR ONLY
NEVER PRINTS
* You can select whether or not part of the transmitted original is printed with transaction reports that are printed for normal
transmissions and broadcast transmissions.
Note
The list count appears in the "#" column of the Transaction Report and a serial number appears in the FILE
column. (These numbers are not related to the transaction.)
INFORMATION APPEARING IN THE TYPE/NOTE COLUMN
Information such as the type of transmission and type of error appears in the TYPE/NOTE column of the Transaction
Report or Activity Report (page 92). The following notes may appear.
Sending result Explanation
OK Transmission was completed successfully.
BUSY Transmission was not successful because the line was busy.
CANCEL A transmission was cancelled while in progress or a stored transmission job was
cancelled.
P. FAIL The power was turned off or a power failure occurred.
NO RX POLL A polling request was denied because the polling machine did not have its own fax
number programmed.
PASS CODE # ERR A polling request was denied because the other machine's fax number had not been
stored as a polling passcode in your machine .
ORIG ERROR When you attempted to send a fax from the SPF/RSPF in direct transmission mode,
a misfeed occurred.
ERRORXXXXXX Line conditions prevented the transmission from taking place normally.
First two digits of transmission error number: Indicates an error code from 00 to 31.
Last four digits of transmission error number: A code for use by service technicians.
90
Page 93

TROUBLESHOOTING
Sending result Explanation
XX-XX OK When group dialling, broadcast transmission, or F-code relay request transmission
was performed,
xxx- : Indicates total number of transmissions.
xxx OK : Indicates completed transmissions.
NO S ADD FUNC When an F-code transmission was attemp ted,
(1)The other machine did not have the F-code function.
(2)An F-code was not programmed in the other machine.
S ADD TX FAIL When an F-code transmission was attempted,
(1)The sub-addresses did not match.
(2)The passcodes did not match.
(3)An F-code public box was set.
SA POLL ERR When F-code public box transmission was attempted,
(1)The F-code public box specified by the sub-address did not exist.
(2)The sub-address specified a box other than an F-code public box.
PASSCODE# ERR When F-code public box transmission was attempted,
(1)The passcodes did not match.
Reception result Explanation
OK Reception was completed successfully.
P. FAIL The power was turned off or a power failure occurred.
MEMORY FULL The image memory became full during substitute reception to memory.
LENGTH OVER
NO RX ROLL When polling was attempted,
RX NO POLL When polling was attempted,
ERRORxx xxxx Line conditions prevented the reception from taking place normally.
XX-XX OK When serial polling ended normally,
NO SA POLLING When F-code polling was attempted,
The transmitted document was over 1500 mm long and therefore could not be received.
(1)Your fax number (sender's number) was not programmed in your machine.
(2)Your fax number was not progr ammed as a polling passcode number in the other
machine.
(1)The other machine did not have a polling function.
(2)The other machine did not have a document stored in polling memory.
First 2 digits of line error code: Error code from 00 to 31.
Last 4 digits of line error code: Code for use by service technicians.
xxx- : Indicates total number of transmissions.
xxx OK : Indicates completed transmissions.
(1)The other machine did not have an F-code polling memory function.
(2)An F-code was not programmed in the other machine.
(3)The other machine did not have a document stored in polling memory.
7
SA POL TX ERR When F-code polling was attempted,
(1)The sub-addresses did not match.
(2)The passcodes did not match.
(3)The other machine's F-code memory boxes were for F-code relay request
transmission or for F-code confidential transmission.
S ADD RX FAIL When F-code reception was attempted,
(1)The sub-addresses did not match or were not programmed.
(2)The passcodes did not match or were not programmed.
(3)An F-code polling memory box was programmed.
JUNK FAX ERR Fax reception was denied by the reception denial function.
91
Page 94

VIEWING THE COMMUNICATION ACTIVITY
REPORT AT REGULAR INTERVALS
(Communication activity report)
Your machine keeps a record of the most recent 50 tr ansactions (both transmissions and receptions) that were
performed. The record includes the date of the transaction, the ot her party's name, the du ration, and result. You can
have the report automatically printed when the number of transactions exceeds 50, or at a specified time. This
allows you to check the machine's activity at regular intervals.
The machine is initially set (factory default setting) to not print the report. To have the report printed, change the
setting in the system settings. (See "LIST SETTING - AUTO LI STING" on page 99.)
Note
• Refer to the table on "WHEN A TRANSACTION REPORT IS PRINTED" (page 90) for the notes that appear in
the TYPE/NOTE column.
• The activity report can also be printed out on demand. (See "PRINTING LISTS OF PROGRAMMED
INFORMATION, SETTINGS, AND COMMUNICATION ACTIVITY" on page 85.)
WHEN AN ALARM SOUNDS AND A WARNING MESSAGE IS DISPLAYED
When an error occurs during a transaction, an alarm will sound and a message will appear in the display. If one of
the following messages appears, follow the instructions in the table.
Message
(alarm sounds)
XXXXXX
Line error.
Maintenance required.
Call for service.
[OK]:RETURN
Meaning of message Solution Page
An error prevented
completion of the
transaction.
It is time for maintenance
and inspection.
Try the transaction again.
Contact your dealer.
–
–
Please return X
original(s).
[START]:CONTINUE
Open TRAY xx and
add xxxx paper.
[OK]:RETURN
Remove paper from
the output tray and
press [OK].
Clear paper path. A paper misfeed occurred
Close the
cover.
A misfeed occurred in the
SPF/RSPF.
A fax has been received
but the paper tray does not
have suitable paper.
The paper tray is open. Close the paper tray. –
The upper part of the job
separator is full of paper.
A job separator error
occurred.
in the output section.
A machine cover is open. Close the cover.
92
Reload the indicated
number of originals.
Add paper. "LOADING PAPER" in the
Operation Guide for the
Remove the paper.
Press the [CA] key to clear
the error.
Remove the misfed paper. "MISFEED REMOVAL" in
the Operation Guide for
12
machine
–
–
the machine
–
Page 95

TROUBLESHOOTING
Message
(alarm sounds)
Toner is low. Toner is low. Replace the toner
Add toner.
Can not copy or print.
[OK]:RETURN
Unfold original and
return XX
original(s) to the
document feeder.
[START]:CONTINUE
Meaning of message Solution Page
"REPLACING THE
cartridge.
There is no toner. Replace the toner
cartridge.
The detected original size
is smaller than the actual
original size, or a smaller
size has been selected.
Place the originals again
and make sure that the
size indicated in the
display is the same as the
actual original size.
TONER CARTRIDGE" in
the Operation Guide for
the machine
"REPLACING THE
TONER CARTRIDGE" in
the Operation Guide for
the machine
–
SELF-DIAGNOSTIC FUNCTION
The machine has a self-diagnostic function that automatically st ops operation if a problem occurs in the machine. If
a problem occurs in fax mode, the following display appears.
Message display Action
Call for service.
code:xx xx.
Main code
Sub code
Turn off the power and then turn it bac k on . If the er ror is n ot cl eared , not e th e 2-dig it
main code and the 2-digit sub-code and then contact your dealer.
MESSAGES DURING NORMAL OPERATION
Message Meaning of message
SENT xx%
No.001 P-xxx
READING xx%
No.001 P-xxx
Stand-by. 100%
22 AUG FRI 10:25
ENTER DIAL # This appears when the [SPEAKER] key has been pressed.
This appears when a direct transmission ends ("xx" indicates the number of pages).
The original is being scanned into memory (during memory transmission).
The machine is in the standby state.
7
93
Page 96

PROBLEMS AND SOLUTIONS
If you experience a problem with the fax function, first check the following table.
This section describes problems related to the fax function. For problems related to general operation of the
machine, see "TROUBLESHOOTING" in the Operation Guide for the machine.
Problem Check Solution Page
The machine does not
operate.
Dialling is not possible. Is the correct dial mode
Cannot send a fax. Does the receiving fax
Is the machine power
switch turned on?
Does the display show an
error message?
set for your line?
Is the telephone line
properly connected?
Is the machine power
switch turned on?
Is the machine in fax
mode?
machine have paper?
Does the receiving
machine suppor t G3
transmission?
Are the sub-address and
passcode correct? (When
using F-code
transmission)
Turn the power switch ON. "Power switch" on page 4
Clear the error as
instructed by the
message.
Check your line and set
the correct dial mode.
Check the connections. "Line connection" on page
Turn the power switch ON. "Power switch" on page 4
Press the [FAX] key to set
the machine to fax mode.
Check with the operator of
the receiving machine.
"WHEN AN ALARM
SOUNDS AND A
WARNING MESSAGE IS
DISPLAYED" on page 92
"DIAL MODE" on page
100
4
"BASIC PROCEDURE
FOR SENDING FAXES"
on page 17
–
The transmitted image
prints out blank at the
receiving side.
Is the receiving machine
ready to receive?
Are you using a
transmittable original size?
Was the original size
detected correctly?
The message "Reading
cancelled. Please retry
sending operation."
appears.
Was the original placed so
that the correct side is
scanned?
If the receiving machine is
using thermal paper, was
the thermal paper loaded
with the wrong side out?
Check the transmittable
sizes.
Check size of the original. "CHECKING THE SIZE
If you attempt
transmission while the
message "Warming-up."
appears, the transmission
may not take place
correctly. Repeat the
transmission.
Make sure the original is
placed so that the correct
side is scanned.
Check with the operator of
the receiving machine.
"ORIGINALS THAT CAN
BE FAXED" on page 11
OF A PLACED
ORIGINAL" on page 13
–
"PLACING THE
ORIGINAL" on page 12
–
94
Page 97

TROUBLESHOOTING
Problem Check Solution Page
The transmitted image is
distorted.
White or black lines
appear in the transmitted
image.
Transmission does not
take place at the sp ecified
time.
Printing does not take
place after reception.
Were line conditions poor
due to thunder or another
reason?
Were the resolution and
exposure settings
suitable?
Is the document glass or
the scanning glass for the
SPF/RSPF (the long,
narrow glass) dirty?
Is the machine's clock set
to the correct time?
Does an error message
appear regarding adding
paper, replenishing toner,
or a misfeed? (This means
that printing is not
possible.)
Is forwarding (Inbound
Routing function) selected
in the Web page for a
received fax?
Try the transmission
again. –
Check the resolution and
exposure settings.
Clean the document glass
or the scanning glass for
the SPF/RSPF.
Set the clock to the correct
time.
Restore printing capability
as instructed by the
display message. Printing
will begin.
If you need to print a
received fax, ask your
administrator.
When the Inbound Routing
function is enabled in the
Web pages, received faxes
are automatically forwarded
to a specified address. If
"Print at Error" is selected
when Inbound Routing is
enabled, received f a xes will
only be printed when an
error occurs.
"SELECTING
RESOLUTION AND
EXPOSURE SETTINGS"
on page 14
"ROUTINE
MAINTENANCE" in the
Operation Guide for the
machine
"DATE & TIME SET" on
page 104
"WHEN AN ALARM
SOUNDS AND A
WARNING MESSAGE IS
DISPLAYED" on page 92
–
A received fax prints out
blank.
The received image is
faint.
The received image is
distorted.
A dial tone is not heard
through the speaker.
The machine does not
ring.
Dialling is not possible. Is the telephone line
Telephone
Was the wrong sid e of th e
original scanned in the
transmitting machine?
Is the original faint? Ask the other party to
Were line conditions poor
due to thunder or another
reason?
Is the volume set to "low"? Set the speaker volume to
Has the ringer volume
been turned off?
properly connected?
If an extension phone is
connected to the machine,
has the "EXTENSION TEL"
setting been enabled?
Check with the operator of
the transmitting machine. –
re-send the fax using a
suitable exposure setting.
Ask the other party to
send the fax again. –
"SPEAKER VOLUME" on
"middle" or "high".
Set the ringer volume to
"low", "middle", or "high".
Check the connections. "Line connection" on page
Enable this setting. "EXTENSION TEL" on
page 101
"SPEAKER VOLUME" on
page 101
4
page 102
–
95
7
Page 98

SYSTEM SETTINGS
8
The system settings are used by the administrator (administrat or of the machine) to customize certain feat ures of the
machine to better meet the needs of users.
This section explains system settings for the fax features of the machine. For system settings that are for the copy
function, print function, and network scanner fu nction, see the respective manuals for those functions. For system
settings for general use of the machine, see the "SYSTEM SETTINGS GUIDE" in the Operation Guide for the
machine.
To use the system settings, the administrator password must be entered.
For the initial administrator password set at the factory, see the Start Guide.
Note
The system settings that can be used depend on what peripheral devices have been installed.
ADMINISTRATOR SETTINGS LIST
SYSTEM SETTINGS FOR THE FAX FUNCTION
Setting name Page
LIST PRINT/SET
LIST PRINT 99
LIST SETTING 99
INITIAL SETTING
PAUSE TIME 100
OWN PASSCODE SET 101
SPEAKER VOLUME 101
TX/RX END SOUND 101
TX/RX END SOUND LENGTH 101
EXTENSION TEL 102
DISTINCTIVE RING 102
PBX SETTING 102
REMOTE RECEPTIO N 102
ACCOUNT CONTROL 103
ACCOUNT # SET 103
DATE & TIME SET 104
AUTO SUMMER TIME SETTING 104
DISABLE FAX PRINT HOLD 104
SENDING FUNCTION
RES. CON. SET 105
AUTO REDUCE TX 105
ROTATE TX 105
PAGE COUNTER SET 105
SEND MODE 106
QUICK ON LINE TX 106
PRINT STATION # IN RCVD DATA 106
ACC. NAME PRINT 106
Setting name Page
RECALL SETTING (BUSY) 106
RECALL SET (ERR) 107
RING TIMEOUT IN AUTO TX 107
AUTO COVER SHEET 108
RCV. FUNCTION
#OF RINGS AT. RX 108
TRAY SELECTION 108
RECEIVED DATA PRINT CONDITION 109
AUTO RCV REDUCE TO REGULAR SIZE 109
DUPLEX RECEPTION 109
8 1/2x11 RX REDUCE PRINT 109
FW. RX DATA 110
RECEIVED DATA FW. STATION SET 110
EARLIER OUTPUT 110
ANTI JUNK F AX 110
ENTER JUNK FAX # 111
POLLING SECURITY
POLLING SECURITY 111
POLLING PASSCODE # MODE 111
96
Page 99

SYSTEM SETTINGS
ADMINISTRATOR SETTINGS MENU
The system settings are accessed via the following menu structure.
Refer to this menu when enabling or disabling the settings that are explained beginning on page 99.
Some settings contain an additional level of settings (a settings screen).
Level 1 Level 2 Level 3
FAX SETTINGS LIST PRINT/SET LIST PRINT
LIST SETTING
INITIAL SETTING DIAL MODE
PAUSE TIME
OWN PASSCODE SET
SPEAKER VOLUME
TX/RX END SOUND
Administrator P assword
TX/RX END SOUND LENGTH
EXTENSION TEL
DISTINCTIVE RING
PBX SETTING
REMOTE RECEPTION
ACCOUNT CONTROL
ACCOUNT # SET
DATE & TIME SET
AUTO SUMMER TIME SETTING
DISABLE FAX PRINT HOLD
SENDING FUNCTION RES. CON. SET
AUTO REDUCE TX
ROTATE TX
PAGE COUNTER SET
SEND MODE
QUICK ON LINE TX
PRINT STATION # IN RCVD DATA
ACC. NAME PRINT
RECALL SETTING (BUSY)
RECALL SET (ERR)
RING TIMEOUT IN AUTO TX
AUTO COVER SHEET
RCV. FUNCTION #OF RINGS AT. RX
TRAY SELECTION
RECEIVED DATA PRINT CONDITION
AUTO RCV REDUCE TO REGULAR SIZE
DUPLEX RECEPTION
8 1/2x11 RX REDUCE PRINT
FW. RX DATA
RECEIVED DATA FW. STATION SET
EARLIER OUTPUT
ANTI JUNK FAX
ENTER JUNK FAX #
8
POLLING SECURITY POLLING SECURITY
POLLING PASSCODE # MODE
97
Page 100

PROCEDURE FOR USING THE SYSTEM
EXPOSURE
COLOUR MODE
PAPER SE
RESOLUT
COPY
SCAN
SPECIAL
FUNCTION
LINE
DATA
DATA
ON LINE
PQ
ACC
GHI
PQRS
BACK
OK
ABC DEF
JKLGHI MNO
TUVPQRS WXYZ
@.-
_
READ-END
ACC. #-C
OK
SETTINGS
The system settings can be accessed from any mode (copy, fax, print, and scan mode). When the setting is
completed, you will return to the previous mode.
• Faxes cannot be sent or received while a system setting is being used.
• A system setting cannot be used while a fax is being sent or received, while a voice call is being made, or while a
received fax is being printed.
INITIAL PROCEDURE
Press the [SPECIAL FUNCTION] key.
1
Select "SYSTEM SETTINGS" with the
2
[ ] or [ ] key.
SPECIAL FUNCTION
DISPLAY CONTRAST
TOTAL COUNT
SYSTEM SETTINGS
Press the [OK] key.
3
Select "FAX" with the [ ] or [ ] key.
5
MODE SELECT
COPIER
PRINTER
SCANNER
FAX
To use a system setting for copy mode, select
"COPIER".
Press the [OK] key.
6
OK
Select a setting for the desired setting
7
as explained on the following pages.
Settings for the following functions are availab le:
LIST PRINT/SET (page 99)
INITIAL SETTING (page 100)
SENDING FUNCTION (page 105)
RCV. FUNCTION (page 108)
POLLING SECURITY (page 111)
Enter the five-digit administrator
4
password with the numeric keys.
Enter admin
password.
ADMIN PASSWORD:
-----
• As you enter each digit, "-" changes to " ".
• If make a mistake, press the [C] key and re-enter the
number.
• If this is the first time you are programm i ng the
administrator password, enter the factory default
code. (See "ADMINISTRATOR PASSWORD
NUMBER: FACTORY SETTING" in the Operation
Guide for the machine.
98
Press the [CA] key to exit the settings.
8
Note
• To move back to the previous screen,
press the [BACK] key.
• To cancel a setting before it is completed,
press the [CA] key.
• See "ENTERING CHARACTERS" (page
86) for the procedure for entering letters.
 Loading...