


FACSIMILE EXPANSION KIT
OPERATION GUIDE
MODEL
MX-FX13
Be sure to become thoroughly familiar with this manual to gain
the maximum benefit from the product.
Before installing this product, be sure to read the cautions
sections of the Start Guide.
Be sure to keep all operation guides handy for reference
including this manual, the Start Guide and Operation Guide for
any optional equipment which has been installed.
Page
• BEFORE USING THE FAX
FUNCTION.............................. 6
• BASIC OPERATIONS .......... 16
• ADVANCED TRANSMISSION
METHODS ............................ 31
• TRANSMISSION USING
F-CODES..............................52
• CONVENIENT METHODS OF
USE....................................... 64
• PROGRAMMING..................66
• TROUBLESHOOTING.......... 90
• SYSTEM SETTINGS............. 96
• APPENDIX.......................... 112

Telecommunication Line Cable:
Use only the line cable that was provided with the machine.
Notice for Users in Europe
This equipment has been designed to work on the British analogue public switched telephone network.
This equipment has been tested according to the pan-European ES 203 021 regulation.
It will operate on all analogue telephone networks which comply with the ES 203 021.
Please contact your dealer or network operator, if you are not sure whether your network operates according to ES
203 021.
Hereby , SHARP Electronics (Eur ope) GmbH declares that this Facsimile Exp ansion Kit MX-FX13 is in compliance
with the essential requirements and other relevant provisions of Directive 1999/5/EC.
Par la présente, SHARP Electronics (Europe) GmbH déclare que l’app areil Facsimile Expansion Kit MX- FX13 est
conforme aux exigences essentielles et aux autres dispositions pertinentes de la directive 1999/5/CE.
Hiermit erklärt SHARP Electronics (Europe) GmbH, dass sich das Gerät Facsimile Expansion Kit MX-FX13 in
Übereinstimmung mit den grundlegenden Anforderungen und den übrigen einschlägigen Bestimmungen der
Richtlinie 1999/5/EG befindet.
С настоящето SHARP Electronics (Europe) GmbH декларира, че Facsimile Expansion Kit MX-FX13 отговаря
на съществените изисквания и другите приложими изисквания на Директива 1999/5/ЕС.
SHARP Electronics (Europe) GmbH tímto prohlašuje, že Facsimile Expansion Kit MX-FX13 splňuje základní
požadavky a všechna příslušná ustanoveni Směrnice 1999/5/ES.
Undertegnede SHARP Electronics (Europe) GmbH erklærer herved, at følgende udstyr Facsimile Expansion Kit
MX-FX13 overholder de væsentlige krav og øvrige relevante krav i direktiv 1999/5/EF.
Käesolevaga kinnitab SHARP Electronics (Europe) GmbH seadme Facsimile Expansion Kit MX-FX13 vastavust
direktiivi 1999/5/EÜ põhinõuetele ja nimetatud direktiivist tulenevatele teistele asjakohastele sätetele.
ΜΕ ΤΗΝ ΠΑΡΟΥΣΑ SHARP Electronics (Europe) GmbH ∆ΗΛΩΝΕΙ ΟΤΙ Facsimile Expansion Kit MX-FX13
ΣΥΜΜΟΡΦΩΝΕΤΑΙ ΠΡΟΣ ΤΙΣ ΟΥΣΙΩ∆ΕΙΣ ΑΠΑΙΤΗΣΕΙΣ ΚΑΙ ΤΙΣ ΛΟΙΠΕΣ ΣΧΕΤΙΚΕΣ ∆ΙΑΤΑΞΕΙΣ ΤΗΣ Ο∆ΗΓΙΑΣ 1999/5/ΕΚ.
Por la presente, SHARP Electronics (Europe) GmbH, declara que este Facsimile Expansion Kit MX-FX13 cumple
con los requisitos esenciales y otras exigencias relevantes de la Directiva 1999/5/EC.
SHARP Electronics (Europe) GmbH vakuuttaa täten että Facsimile Expansion Kit MX-FX13 tyyppinen laite on
direktiivin 1999/5/EY oleellisten vaatimusten ja sitä koskevien direktiivin muiden ehtojen mukainen.
Con la presente SHARP Electronics (Europe) GmbH dichiara che questo Facsimile Expansion Kit MX-FX13 è
con-forme ai requisiti essenziali ed alle altre disposizioni pertinenti stabilite dalla direttiva 1999/5/CE.
Alulírott, SHARP Electronics (Europe) GmbH nyilatkozom, hogy a Facsimile Expansion Kit MX-FX13 megfelel a
vonatkozó alapvetõ követelményeknek és az 1999/5/EC irányelv egyéb elõírásainak.
Ar šo SHARP Electronics (Europe) GmbH deklarē, ka Facsimile Expansion Kit MX-FX13 atbilst Direktīvas
1999/5/EK būtiskajām prasībām un citiem ar to saistītajiem noteikumiem.
Šiuo SHARP Electronics (Europe) GmbH deklaruoja, kad šis Facsimile Expansion Kit MX-FX13 atitinka esminius
reikalavimus ir kitas 1999/5/EB Direktyvos nuostatas.
Hierbij verklaart SHARP Electronics (Europe) GmbH dat het toestel Facsimile Expansion Kit MX-FX13 in
overeenstemming is met de essentiële eisen en de andere relevante bepalingen van richtlijn 1999/5/EG.
Niniejszym SHARP Electronics (Europe) GmbH deklaruje że Facsimile Expansion Kit MX-FX13 jest zgodny z
zasadniczymi wymaganiami i innymi właściwymi postanowieniami Dyrektywy 1999/5/EC.
Prin prezenta, SHARP Electronics (Europe) GmbH, declară că aparatul Facsimile Expansion Kit MX-FX13 este în
conformitate cu cerinţele esenţiale şi cu alte prevederi pertinente ale Directivei 1999/5/CE.
SHARP Electronics (Europe) GmbH týmto vyhlasuje, že Facsimile Expansion Kit MX-FX13 spĺňa základné
požiadavky a všetky príslušné ustanovenia Smernice 1999/5/ES.
SHARP Electronics (Europe) GmbH izjavlja, da je ta Facsimile Expansion Kit MX-FX13 v skladu z bistvenimi
zahtevami in drugimi relevantnimi določili direktive 1999/5/ES.
Härmed intygar SHARP Electronics (Europe) GmbH att denna Facsimile Expansion Kit MX-FX13 står I överensstämmelse
med de väsentliga egenskapskrav och övriga relevanta bestämmelser som framgår av direktiv 1999/5/EG.
SHARP Electronics (Europe) GmbH erklærer herved at utstyret Facsimile Expansion Kit MX-FX13 er i samsvar
med de grunnleggende krav og øvrige relevante krav i direktiv 1999/5/EF.

1
INTRODUCTION
Thank you for purchasing this product. This manual only explains the facsimile functions of the product. For safety
precautions and general information on using the machine such as loading paper, clearing misfeeds, and handling
peripheral units, see the Operation Guide for the machine.
For other functions, see the following manual s as app ropr i a te:
Copier function/Printer function
: See the Operation Guide.
Network printer function/Network scanner function
: See the "Operation Guide(for Network Expansion kit)" (if the
Network Expansion kit option is installed).
The explanations in this manual assume that certain optional peripheral units are installed.
This manual refers to the Reversing single pass feeder as the "RSPF" and the single pass feeder as the "SPF".
Unless specific mention is made, both the RSPF and the SPF are referred to simply as "SPF".
CONNECTING AN EXTENSION PHONE
You can connect a telephone to the machine and use it as an extension phone to place and receive calls like any
normal phone. Fax reception can also be activated f rom an extension phone connected to the machine. (remote
operation)
CONNECTING AN EXTENSION PHONE
1
Insert the end of the extension phone
cord into the extension phone jack on
the left side of the machine.
Make sure you hear a "click"
sound indicating that the cord is
securely connected.
The fax function is not available in some countries and regions.
• If you connect a combination telephone/answering machine to the machine, you will not be able to use the
answering machine function.
• You can place calls from the phone even during a power failure.
Note
Extension
phone jack

2
CONTENTS
INTRODUCTION........................................................................................................................................ 1
CONNECTING AN EXTENSION PHONE.................................................................................................. 1
TO USE THIS PRODUCT CORRECTLY AS A FACSIMILE..................................................................... 4
1
BEFORE USING THE FAX FUNCTION
POINTS TO CHECK AND PROGRAM AFTER
INSTALLATION................................................. 6
PART NAMES AND FUNCTIONS..................... 7
● OPERATION PANEL........................................7
● FAX MODE (BASE SCREEN) ..........................9
● AUDITING MODE...........................................10
ORIGINALS...................................................... 11
● ORIGINALS THAT CAN BE FAXED...............11
PLACING THE ORIGINAL............................... 12
● USING THE SPF/RSPF..................................12
● USING THE DOCUMENT GLASS..................12
CHECKING THE SIZE OF A PLACED
ORIGINAL........................................................ 13
●
MANUALLY SETTING THE SCANNING SIZE
......13
SELECTING RESOLUTION AND EXPOSURE
SETTINGS........................................................ 14
CONVENIENT DIALLING METHODS
(AUTO-DIALLING)...........................................15
2
BASIC OPERATIONS
SENDING A FAX ............................................. 17
●
BASIC PROCEDURE FOR SENDING FAXES
......17
● TRANSMISSION BY AUTO-DIALLING (RAPID
DIALLING AND GROUP DIALLING) ..............19
● SENDING A FAX BY SPEED DIALLING........19
●
SEARCHING FOR A PROGRAMMED DESTINATION
(USING THE [ADDRESS] KEY)
...........................20
●
FAXING A TWO-SIDED ORIGINAL
(MX-M182D/MX-M202D/MX-M232D)
....................21
● CANCELLING A FAX TRANSMISSION .........25
RECEIVING FAXES.........................................27
● RECEIVING A FAX.........................................2 7
● FAX PRINT HOLD FUNCTION.......................29
3
ADVANCED TRANSMISSION METHODS
SENDING THE SAME DOCUMENT TO MULTIPLE
DESTINATIONS IN A SINGLE OPERATION
(BROADCAST TRANSMISSION)
...................... 31
● USING BROADCAST TRANSMISSION........ 32
AUTOMATIC TRANSMISSION AT A SPECIFIED
TIME (TIMER TRANSMISSION)
..................... 33
● SETTING UP A TIMER TRANSMISSION...... 33
TRANSMISSION AND RECEPTION USING THE
POLLING FUNCTION...................................... 35
● USING THE POLLING FUNCTION ............... 36
● USING POLLING MEMORY.......................... 38
INCLUDING SENDER INFORMATION ON
FAXES ............................................................. 41
FAXING A DIVIDED ORIGINAL (DUAL PAGE
SCAN).............................................................. 42
ADDING A COVER SHEET/MESSAGE TO A
FAX TRANSMISSION...................................... 43
USING SETTINGS STORED AS A PROGRAM
.... 44
● USING A PROGRAM..................................... 44
FORWARDING RECEIVED DATA TO A
NETWORK ADDRESS (INBOUND ROUTING
SETTINGS) ...................................................... 45
● CONFIGURING THE BASIC SETTINGS....... 45
● SETTINGS THE DESTINATION.................... 47
FORWARDING RECEIVED FAXES TO
ANOTHER MACHINE WHEN PRINTING IS NOT
POSSIBLE (FORWARDING FUNCTION)....... 49
● USING THE FORWARDING FUNCTION...... 49
SENDING A FAX DIRECTLY FROM A
COMPUTER (PC-Fax)..................................... 50
4
TRANSMISSION USING F-CODES
COMMUNICATION BETWEEN MACHINES
SUPPORTING F-CODES ................................ 52
●
BOXES AND SUB-ADDRESSES/PASSCODES
REQUIRED FOR F-CODE TRANSMISSION
....... 52
● CREATING A BOX FOR F-CODE
TRANSMISSION............................................ 53

3
CONTENTS
F-CODE POLLING MEMORY.......................... 54
●
HOW F-CODE POLLING MEMORY WORKS
.......54
● USING F-CODE POLLING MEMORY. ... ... ..... 5 5
● PROCEDURE FOR F-CODE POLLING.........57
F-CODE CONFIDENTIAL TRANSMISSION ... 59
● F-CODE TRANSMISSION (F-CODE
CONFIDENTIAL TRANSMISSION)................59
● PRINTING A DOCUMENT RECEIVED TO AN
F-CODE CONFIDENTIAL MEMORY BOX.....61
F-CODE RELAY BROADCAST
TRANSMISSION.............................................. 62
●
USING THE F-CODE RELAY BROADCAST
FUNCTION (your machine is the relay machine)
......63
●
USING THE F-CODE RELAY REQUEST FUNCTION
(your machine requests a relay broadcast)
...........63
5
CONVENIENT METHODS OF USE
CONNECTING AN EXTENSION PHONE........ 64
● USING AN EXTENSION PHONE...................64
● SETTING THE RECEPTION MODE ..............65
6
PROGRAMMING
PROGRAMMING ............................................. 66
STORING, EDITING, AND DELETING AUTO DIAL
NUMBERS AND PROGRAMS
.......................... 66
● STORING, EDITING, AND DELETING
AUTO-DIAL NUMBERS (RAPID KEYS, SPEED
DIAL NUMBERS, AND GROUP KEYS) .........66
● STORING, EDITING AND DELETING
PROGRAMS...................................................76
PROGRAMMING, EDITING, AND DELETING
F-CODE MEMORY BOXES............................. 78
●
PROGRAMMING AN F-CODE MEMORY BOX
.....78
PRINTING LISTS OF PROGRAMMED
INFORMATION, SETTINGS, AND
COMMUNICATION ACTIVITY.........................85
ENTERING CHARACTERS............................. 86
● CHARACTERS THAT CAN BE ENTERED ....86
● CHANGING TO ENTRY MODE......................86
● CHARACTER ENTRY KEYS..........................87
● INITIAL PROCEDURE FOR ENTERING
CHARACTERS ...............................................88
7
TROUBLESHOOTING
WHEN A TRANSACTION REPORT IS PRINTED
...... 90
● INFORMATION APPEARING IN THE
TYPE/NOTE COLUMN.................................. 90
VIEWING THE COMMUNICATION ACTIVITY REPORT
AT REGULAR INTERVALS (Communication activity
report)
.............................................................. 92
WHEN AN ALARM SOUNDS AND A WARNING
MESSAGE IS DISPLAYED ............................. 92
● SELF-DIAGNOSTIC FUNCTION................... 93
●
MESSAGES DURING NORMAL OPERATION
..... 93
PROBLEMS AND SOLUTIONS ...................... 94
8
SYSTEM SETTINGS
● ADMINISTRATOR SETTINGS LIST.............. 96
● ADMINISTRATOR SETTINGS MENU........... 97
PROCEDURE FOR USING THE SYSTEM
SETTINGS ....................................................... 98
● INITIAL PROCEDURE................................... 98
SYSTEM SETTINGS FOR THE FAX FUNCTION.....99
● LIST PRINT/SET............................................ 99
● INITIAL SETTING ........................................ 100
● SENDING FUNCTION................................. 105
● RCV. FUNCTION............................. ............ 108
● POLLING SECURITY ............. ... ... ... ............ 111
9
APPENDIX
SPECIFICATIONS ......................................... 112
INDEX ............................................................ 113

4
T O USE THIS PR ODUCT CORRECTLY AS
A FACSIMILE
Several points must be kept in mind when using this product as a facsimile.
Please note the following.
Line connection
Be sure to use the provided telephone line cord to connect
the machine to a telephone line jack. Insert one end of the
telephone line cord into the LINE jack on the left side of the
machine as shown. Insert the other end of the telephone
line cord into a telephone line jack.
Insert the plug firmly until you hear a "click".
In some countries, an adapter is required to connect the
telephone line cable to the wall telephone socket, as sho wn
in the illustration.
Power switch
Keep the machine power switch turned on at all times. Do
not turn off the power. If the power is turned off, the fax
function cannot be used.
When the power is off, the machine cannot receive fa xes.
Before turning off the power, make sure t he machine is idle.
If the power is turned off while the machine is in operation, a
paper jam may occur. If settings are being configured, the
settings will be cancelled.
Setting the date and time and programming your sender's name
and number
Before using the fax function, you must set the date and time and program your sender's name and number in the
machine. This procedure is explained in "POINTS TO CHECK AND PROGRAM AFTER INSTALLATION" on page 6
of this manual.
LINE jack
Adapter
Wall socket
For Australia
For New Zealand
For United
Kingdom
Power switch

5
TO USE THIS PRODUCT CORRECTLY AS A FACSIMILE
Lithium battery
A lithium battery in the machine is used to retain settings and programmed information such as auto-dial numbers
(page 66).
• When the battery dies, settings and programmed information will be lost, so please keep a record of this
information. (See "PRINTING LISTS OF PROGRAMMED INFORMATION, SETTINGS, AND COMMUNICATION
ACTIVITY" on page 85.)
• The life of the battery is approximately 5 years when the power switch is kept continuously off.
• When the battery dies, please contact your local Sharp dealer or authorised service representa tive for assistance
in disposing of this battery. The machine will not operate once the battery dies.
Please note
In the event of a thunderstorm, remove the power cord from the power outlet to ensure safety. Information will be
retained in memory even if the power cord is unplugged.

6
1
BEFORE USING THE FAX
FUNCTION
This chapter contains basic information about using the fax functi on of the machine . Please read t his chapter befor e
using the fax function.
POINTS TO CHECK AND PROGRAM
AFTER INSTALLATION
After installing the machine and before using it as a fax mac hin e , check th e follo win g po in ts an d pr og ra m the
required information.
Set the date and time
The machine has an internal clock. It is important to set the corre ct da te and time be ca use the y ar e use d for su ch
features as Timer Transmission (page 33).
The date and time are set in the system settings. (Page 104)
The date and time appear in the display. Make sure the correct date and time appe ar. If the date and time are wrong,
please correct them.
Program the sender's name and sender's number
The name and fax number of the user of the machine is programmed in "OWN PASSCODE SET" (page 101) in the
system settings. (Only one name and number can be programmed.)
The programmed name and number are p rinted at the top of each transmitte d fax page. The se nder's number is also
used as an identification number when you use the Polling function to request transmission from another fax
machine (see "USING THE POLLING FUNCTION" on page 36).
Paper sizes that can be used for fax mode
The machine can use A3, B4, A4, A4R, B5, B5R, A5, 11" x 17", 8-1/2" x 14", 8-1/2" x 11", 8-1/2" x 11"R, and 5-1/2"
x 8-1/2"* size paper; however, 11" x 17", 8-1/2" x 14" and 5-1/2" x 8-1/2" size paper cannot be used in fax mode.
(Among INCH sizes, only 8-1/2" x 11" and 8-1/2" x 11"R can be used.) (If your machine uses inch-based paper
sizes, A3, B4, B5, B5R, and A5 size paper cannot be used in fax mode. (Among AB sizes, only A4 and A4R can be
used.)) For this reason, if only paper sizes that can be used in other modes but not in fax mode are loaded in the
machine, received faxes cannot be printed. (For other points regarding fax reception, see "RECEIVING FAXES"
page 27.)
* A5 (5-1/2" x 8-1/2") size paper can only be loaded in tray 1, regardless of the mode. A5 (5-1/2" x 8-1/2") paper cannot be
loaded in tray 2 or in the optional 250-sheet paper feed unit or 2 x 250-sheet paper feed unit.
You can check your programmed name and number by printing out the "Administrator Settings List" in the system
settings. (See "LIST PRINT" on page 99.)
For the procedures for loading paper in the trays, see the Operation Guide for the machine.
Note
Note
7
1
PART NAMES AND FUNCTIONS
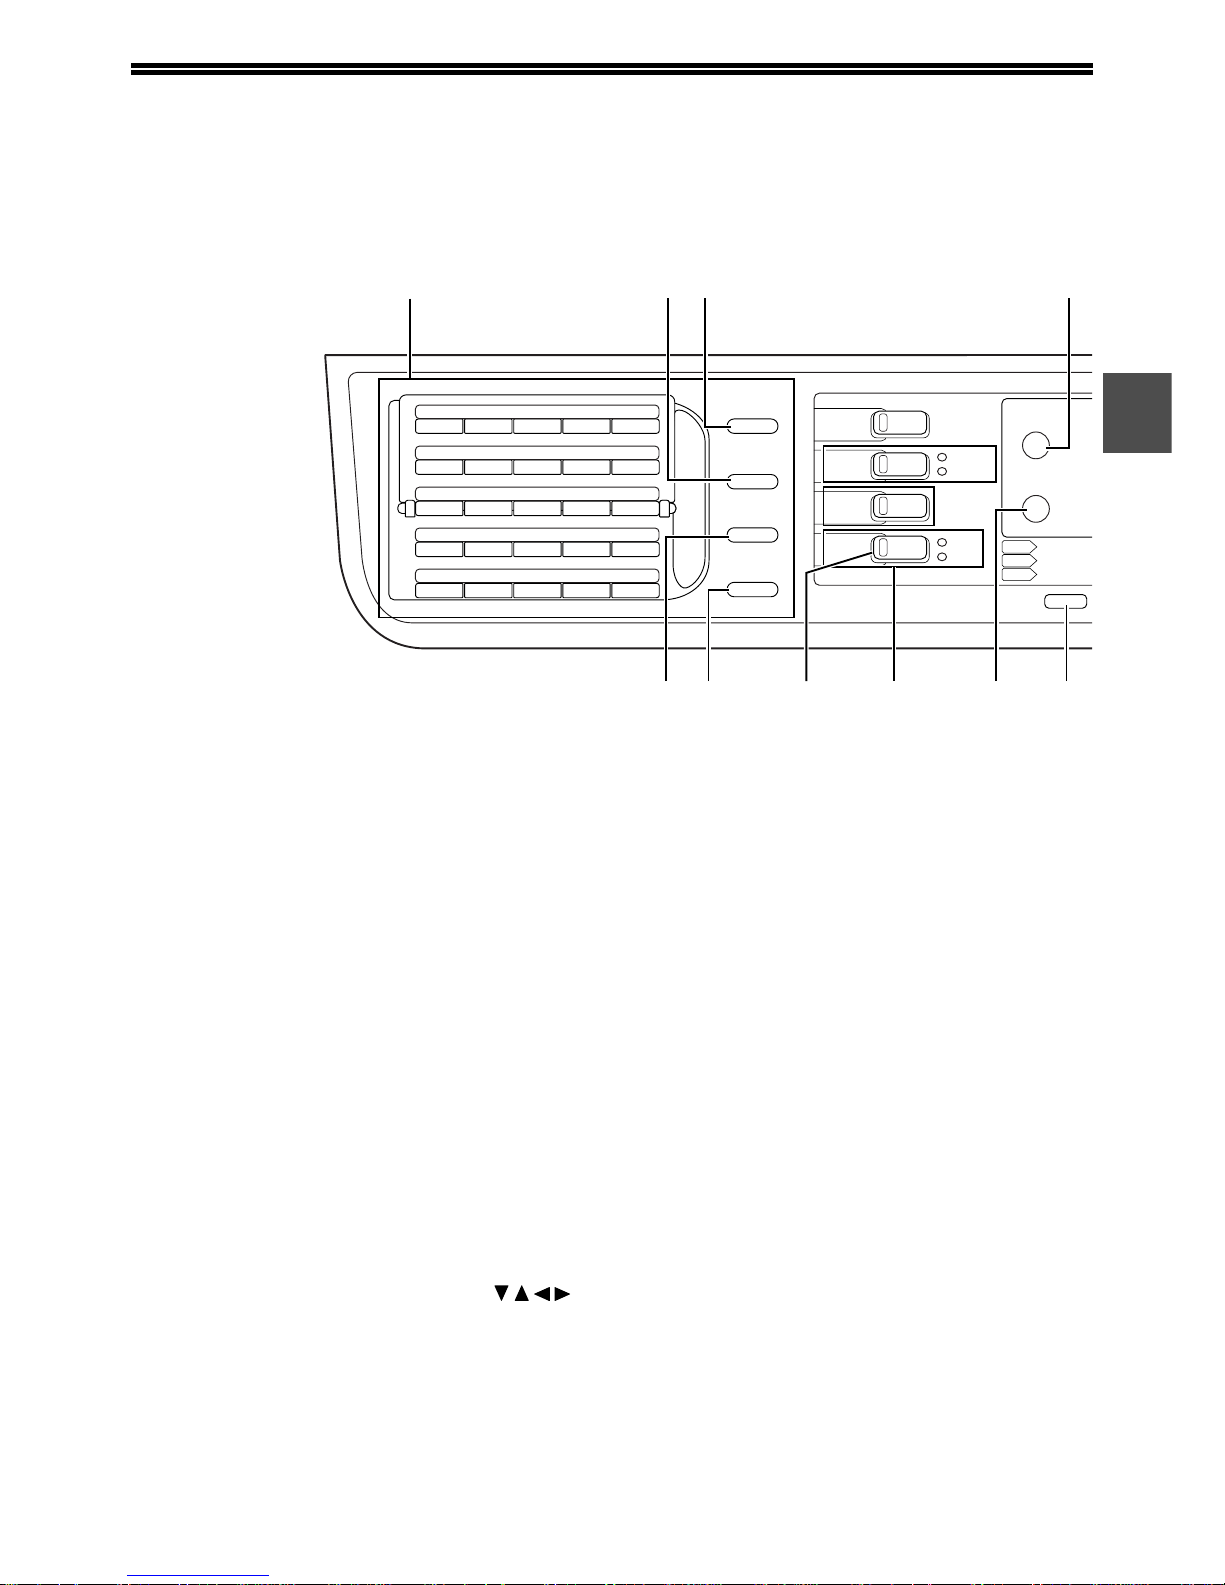
OPERATION PANEL
(1) Page pallet (page 86)
(2) [REDIAL/PAUSE] key (pages 15)
This is used to redial the last number dialled, and
enter a pause when entering a fax number.
(3) [SPEAKER/SHIFT] key (pages 15, 86)
This is used to dial without lifting an extension
phone connected to the machine and to shift
between upper and lower case when entering
characters.
(4) [FAX STATUS] key (page 25)
This is used to cancel a fax transmission or a
stored fax transmission.
(5) Display (page 9)
This key displays the base screen and the
function setting screen.
(6) [BACK] key
In a setting or programming screen, this key is
used to move back to the previous screen.
(7) [OK] key
This key is used to enter a setting that has been
selected with the arrow or other keys ( ).
(8) Numeric keys
These are used to enter fax numbers,
sub-addresses, passcodes, and numerical
settings. (See "BOXES AND
SUB-ADDRESSES/PASSCODES REQUIRED
FOR F-CODE TRANSMISSION" on page 52.)
(9) [C] key
This is used to clear a mistake when entering fax
numbers, sub-addresses, passcodes, and
numerical settings. One digit is cleared each time
the key is pressed.
When an original is being scanned, this key can
also be used to cancel scanning.
(10) [SPEED/SYMBOL] key (pages 15, 88)
This is used to dial by Speed dialling and to enter
a symbol when entering characters.
(11) [COMM. SETTING/SPACE/-] key (page 22)
This is used to switch between memory
transmission and direct transmission, and to
switch between automatic reception and manual
reception. It is also used to enter a space or "-"
when entering characters.
(12) [FAX] key/FAX indicator/LINE indicator/DATA
indicator
Press to switch to fax mode. The base screen of
fax mode will appear in the display.
The LINE indicator lights up during transmission
or reception of a fax. When a fax has been
received, the DATA indicator blinks. (When there
is fax transmission data in memory, the DATA
indicator lights up.)
21 22 23 24 25
16 17 18 19 20
11 12 13 14 15
06 07 08 09 10
01 02 03 04 05
EXPOSURE
COLOUR MODE
PROGRAM
COPY
SCAN
FAX
SPECIAL
FUNCTION
FAX STATUS
SHIFT
SYMBOL
SPACE/–
SPEAKER
REDIAL/PAUSE
SPEED
COMM. SETTING
LINE
DATA
DATA
ON LINE
FAX
SCAN
PRINT
COPY
(4)(3)(2)
(1)
(13)(12) (15)(14)
(11)(10)
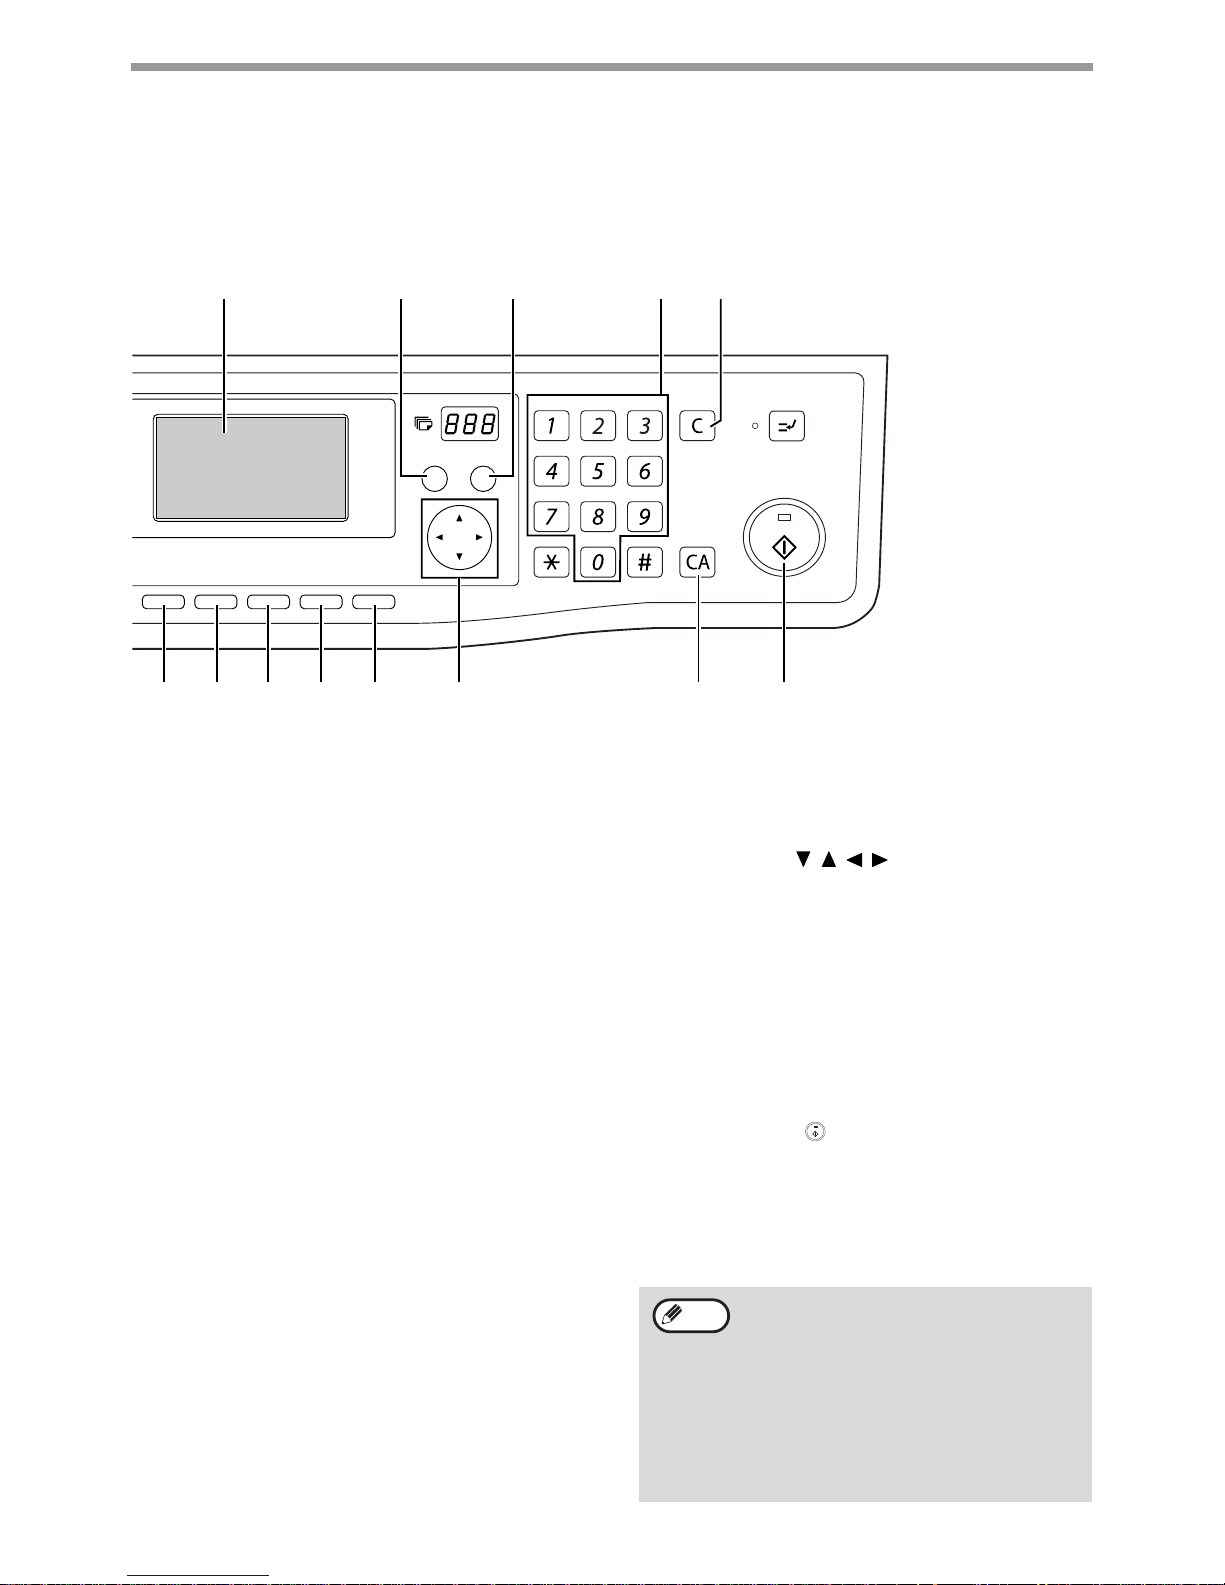
8
BEFORE USING THE FA X FUNCTION
(13) [MODE SELECT] keys (step 1 on page 17)
These are used these keys to change modes.
(14) [SPECIAL FUNCTION] key
This key is used to select a special transmission
or reception function, configure function settings,
and to store auto-dial numbers.
(15) [PROGRAM] key (page 44)
Press this key to use a program.
(16) [RESOLUTION] key (page 14)
This key is used to select resolution and exposure
settings.
(17) [ADDRESS] key (page 20)
This key is used to search for a fax destination
that has been stored as an auto-dial number in
the address book.
(18) [BROADCAST] key (page 31)
This is used to perform a broadcast transmission.
(19) [ORIGINAL SIZE] key (page 13)
This is used to set the size of the original to be
faxed.
(20) [DUPLEX SCAN] key (page 21)
Press this key to use the duplex scan function.
(Only on models with a RSPF installed.)
(21) Arrow keys ( )
These are used to select items and mov e throug h
pages.
(22) [CA] key
This is used to cancel a transmission or
programming operation. When pressed during an
operation, the operation is cancelled and the display
returns to the base screen described on page 9.
This key is also used to cancel a resolution, paper
size, or special function setting that was selected
when sending a fax.
(23) [START] key ( )
This is used at the following times:
(1) When starting transmission
(2) When scanning an original
(3) When starting manual reception
(4) When configuring and stor in g set tin gs
ABC DEF
JKLGHI MNO
TUVPQRS WXYZ
@.-
_
READ-END
ACC. #-C
BACK
OK
INTERRUPT
COPY RATIO
ADDRESS
ADDRESS
DUPLEX SCAN
DUPLEX SCAN
2-SIDED COPYPAPER SELECT
RESOLUTION
RESOLUTION
AUTO IMAGE
FORMA T
BROADCAST
OUTPUT
ORIGINAL SIZE
ORIGINAL SIZE
(5) (6) (7) (8)
(16) (17) (18) (19) (20) (21) (23)(22)
(9)
• When the auto power shut-off function is
activated, all indicators except the
[START] key indicator go off. For the
information on the auto power shut-off
function, see the Operation Guide for the
machine.
• For information on the keys and lights
which are used for the copy function and
other functions, see "Operation Panel" in
the manual for each function.
Note
9
BEFORE USING THE FAX FUNCTION
1
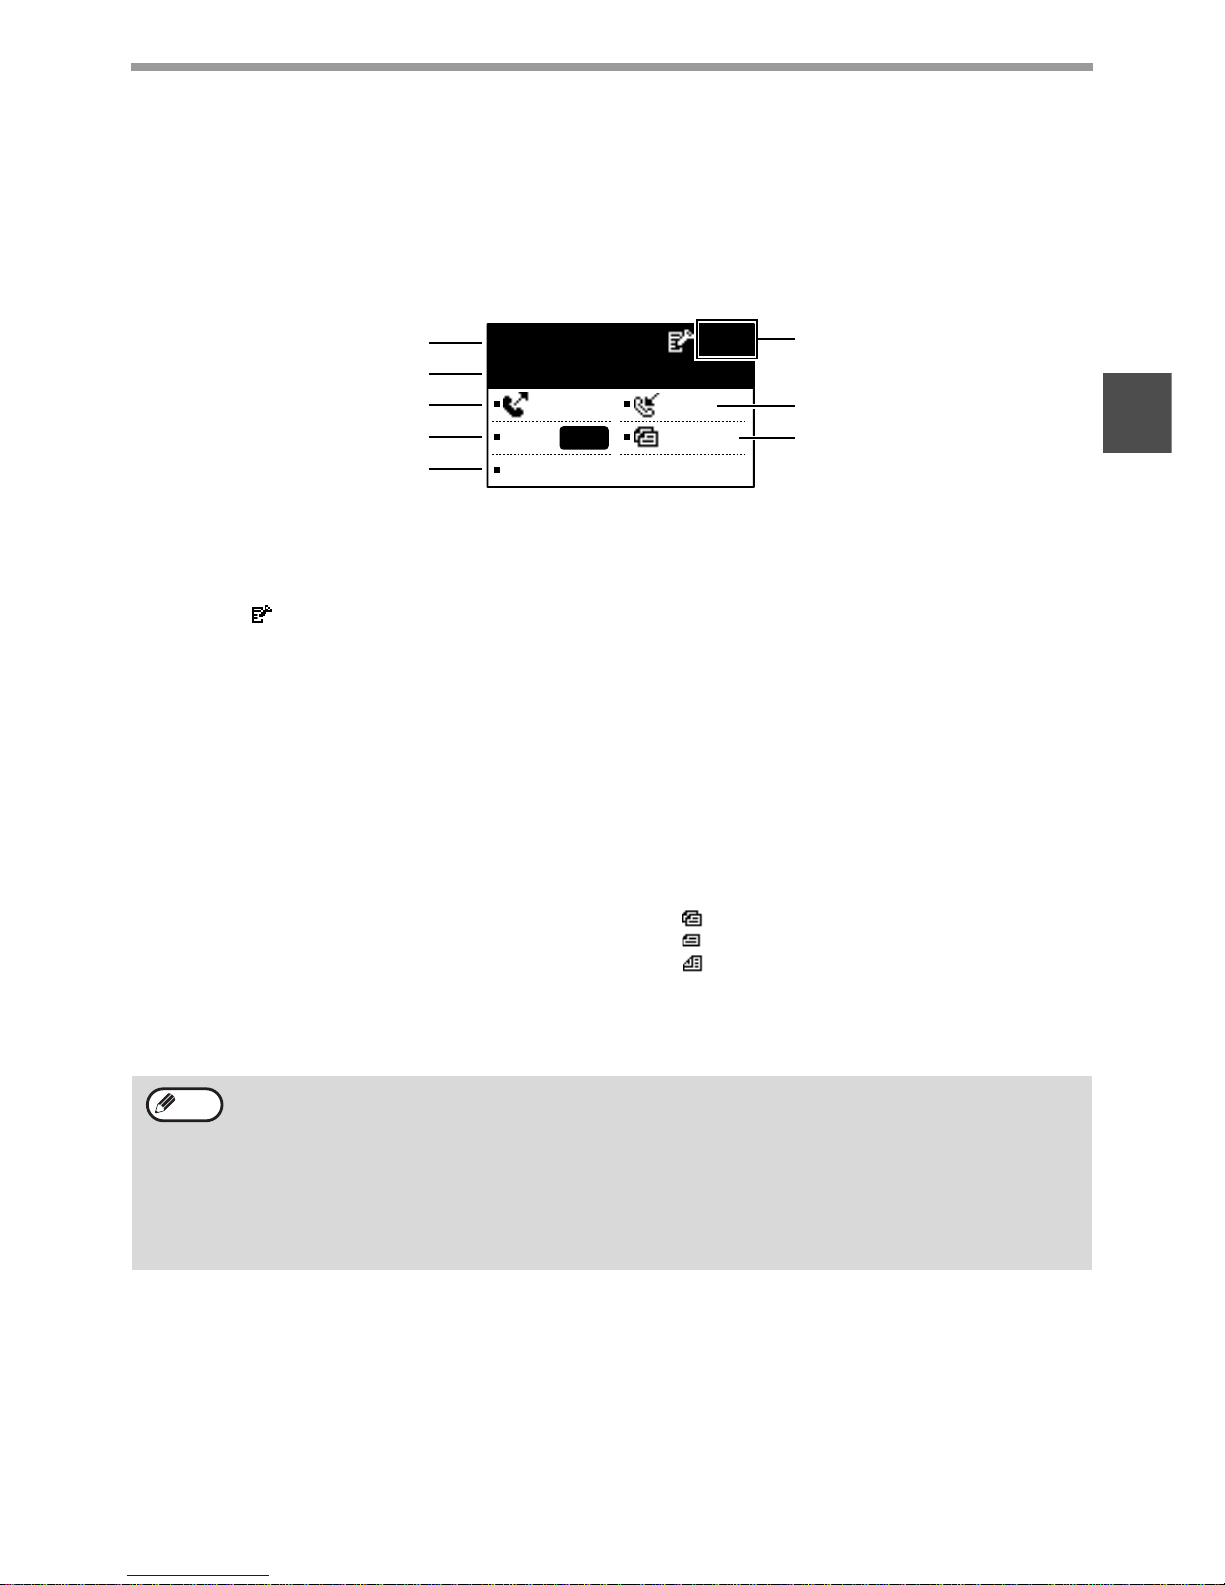
FAX MODE (BASE SCREEN)
The base screen of fax mode is displayed by pressing the [FAX] key when the print m ode, copy mode , or scan mode
screen appears.
The base screen of fax mode
(1) Message display
Messages appear here to indicate the current
status of the machine.
An icon ( ) appears to the right side when a
confidential fax has been received.
(2) Date and time display
This shows the date and time.
(3) Transmission mode display (page 22)
There are three transmission modes: memory
transmission, direct transmission, and manual
transmission. This shows the currently selected
transmission mode.
(4) Exposure display (page 14)
This shows the exposure for scanning the original
that has been selected with the [RESOLUTION]
key .
(5) Resolution display (page 14)
This shows the resolution for scanning the
original that has been selected with the
[RESOLUTION] key.
(6) Free memory display
This shows the percentage of fax memory that is
free.
(7) Reception mode display (page 65)
There are two modes for receiving faxes:
automatic reception and manual reception. This
shows the currently selected reception mode.
(8) Original display (page 13)
This displays an icon to indicate the original
scanning mode when an original has been
placed.
:One-sided original scanning in the SPF.
:Document glass
:Two-sided original scanning in the RSPF.
This also shows the size of the placed original.
Stand-by. 96%
10 MAY MON 10:25 AM
MEMORY AUTO
CONT A4R
STANDARD
AUTO
(2)
(3)
(4)
(5)
(1)
(7)
(8)
(6)
The following functions operate even when copy mode is selected:
• Automatic reception (including F-code confidential reception)
• Timer Transmission
• Memory polled function
• Transmission of stored memory transmission jobs
• Voice calls (voice calls can be answered but not placed).
• Remote reception
• Manual reception
• Relay station function for F-code relay broadcast transmission
Note
10
BEFORE USING THE FA X FUNCTION
AUDITING MODE
Accounts that can transmit faxes (up to 50) can be established and transmission time an d other information can be
tracked for each account. The Acc. Usage List (page 99) can be printed out which shows the time used for
transmission and pages transmitted by each account.
• This function is enabled using "ACCOUNT CONTROL" and "ACCOUNT # SET" in the system settings. (Page 103)
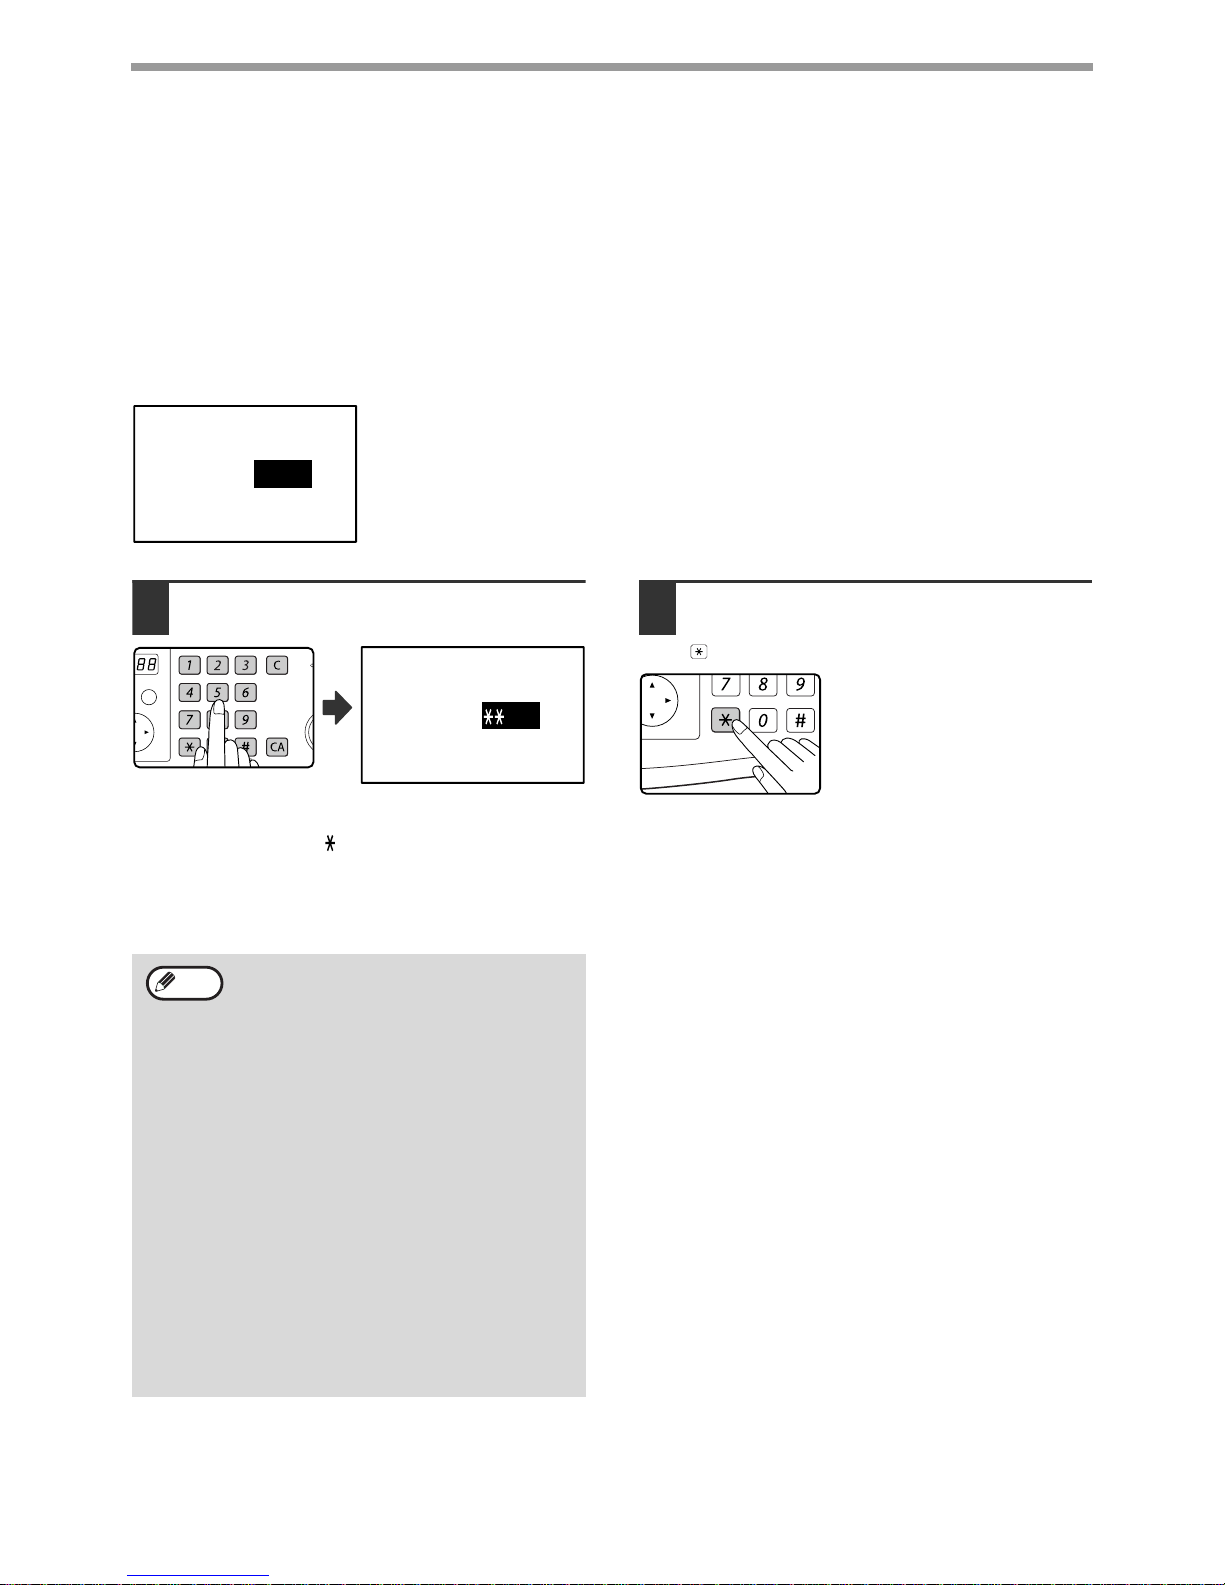
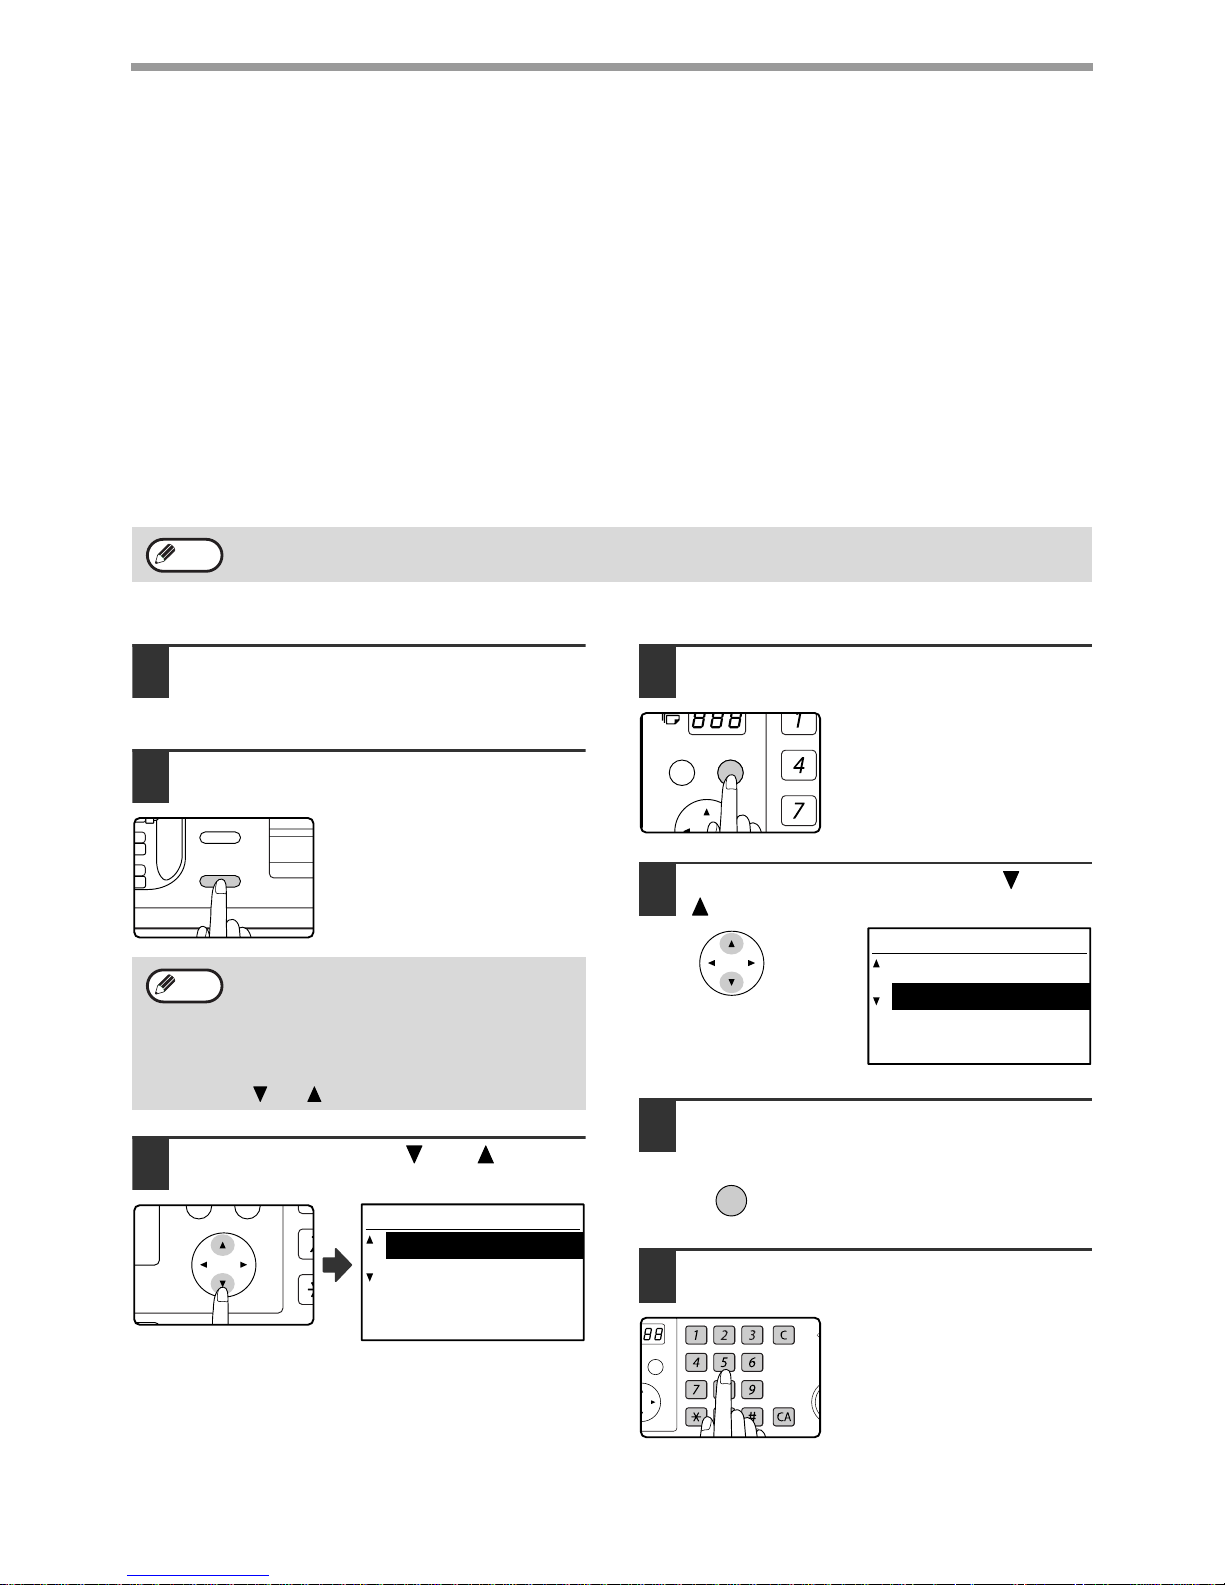
Using auditing mode
When auditing mode is turned on, the account number entry screen is displayed. Enter your account number
(five-digit identification number) as explained below before performing a fax operation.
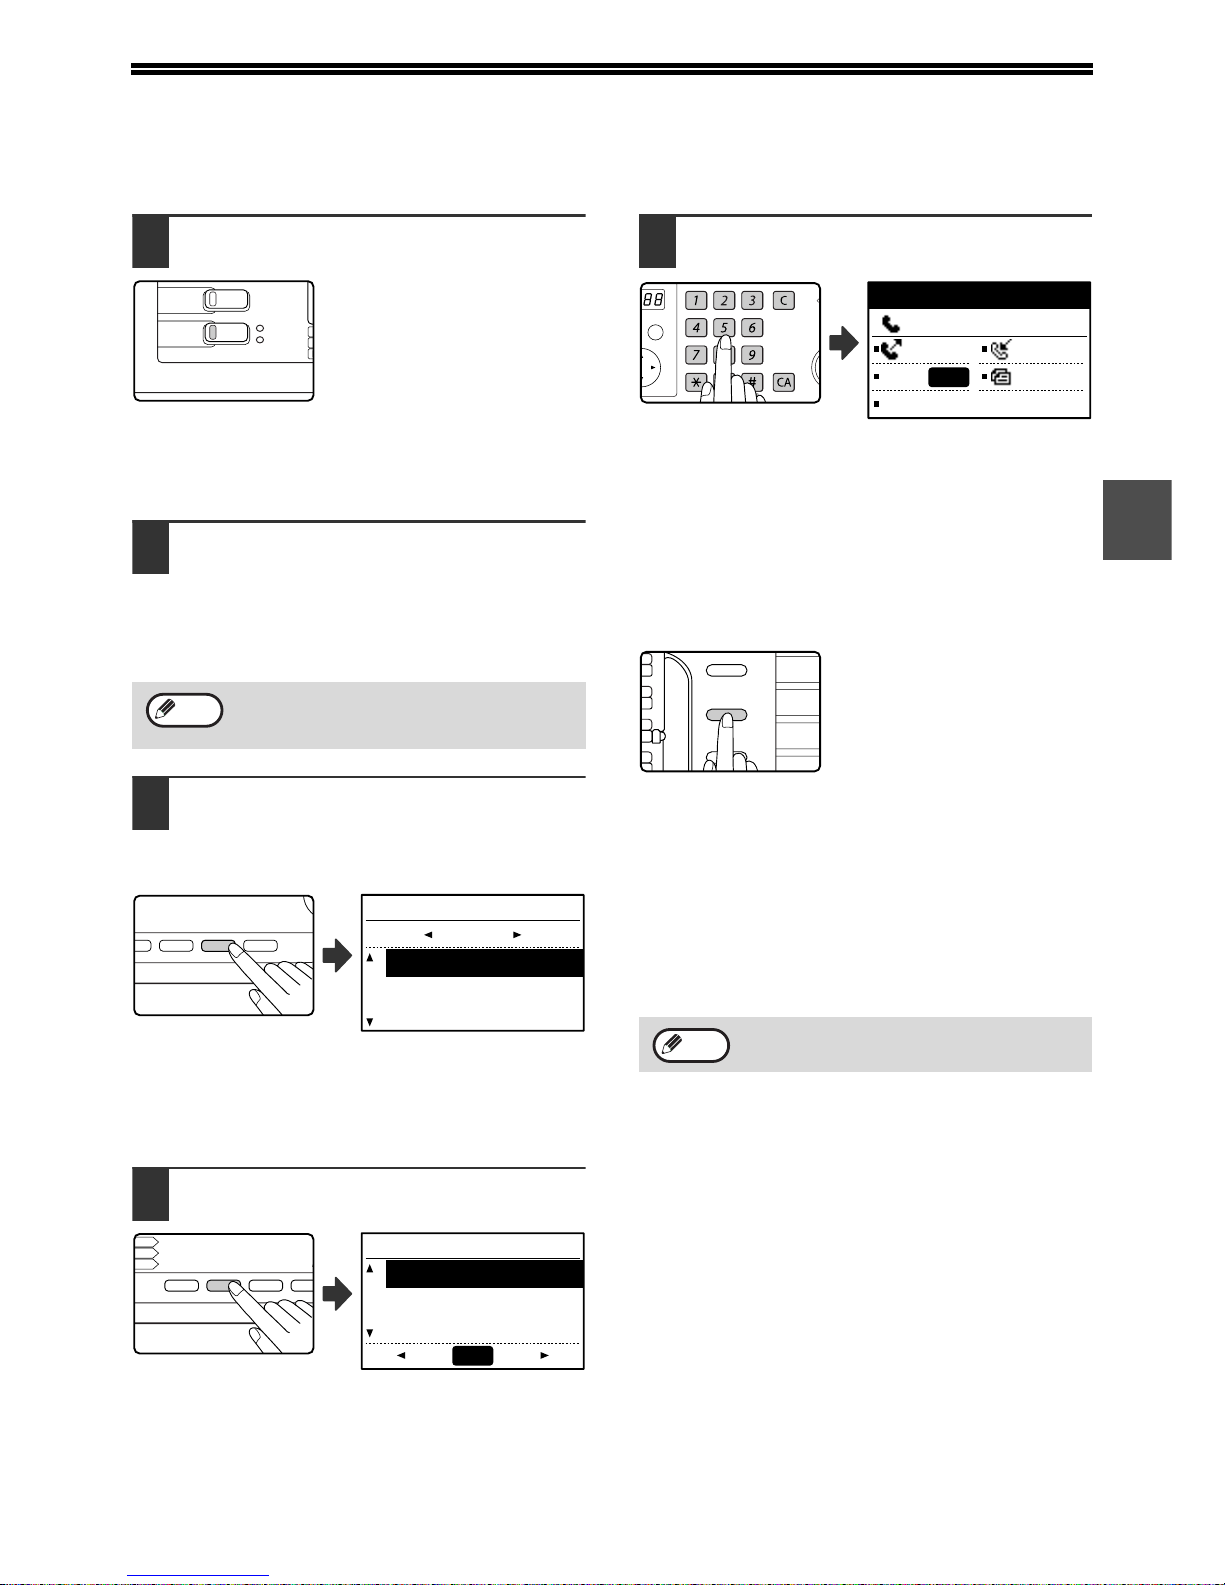
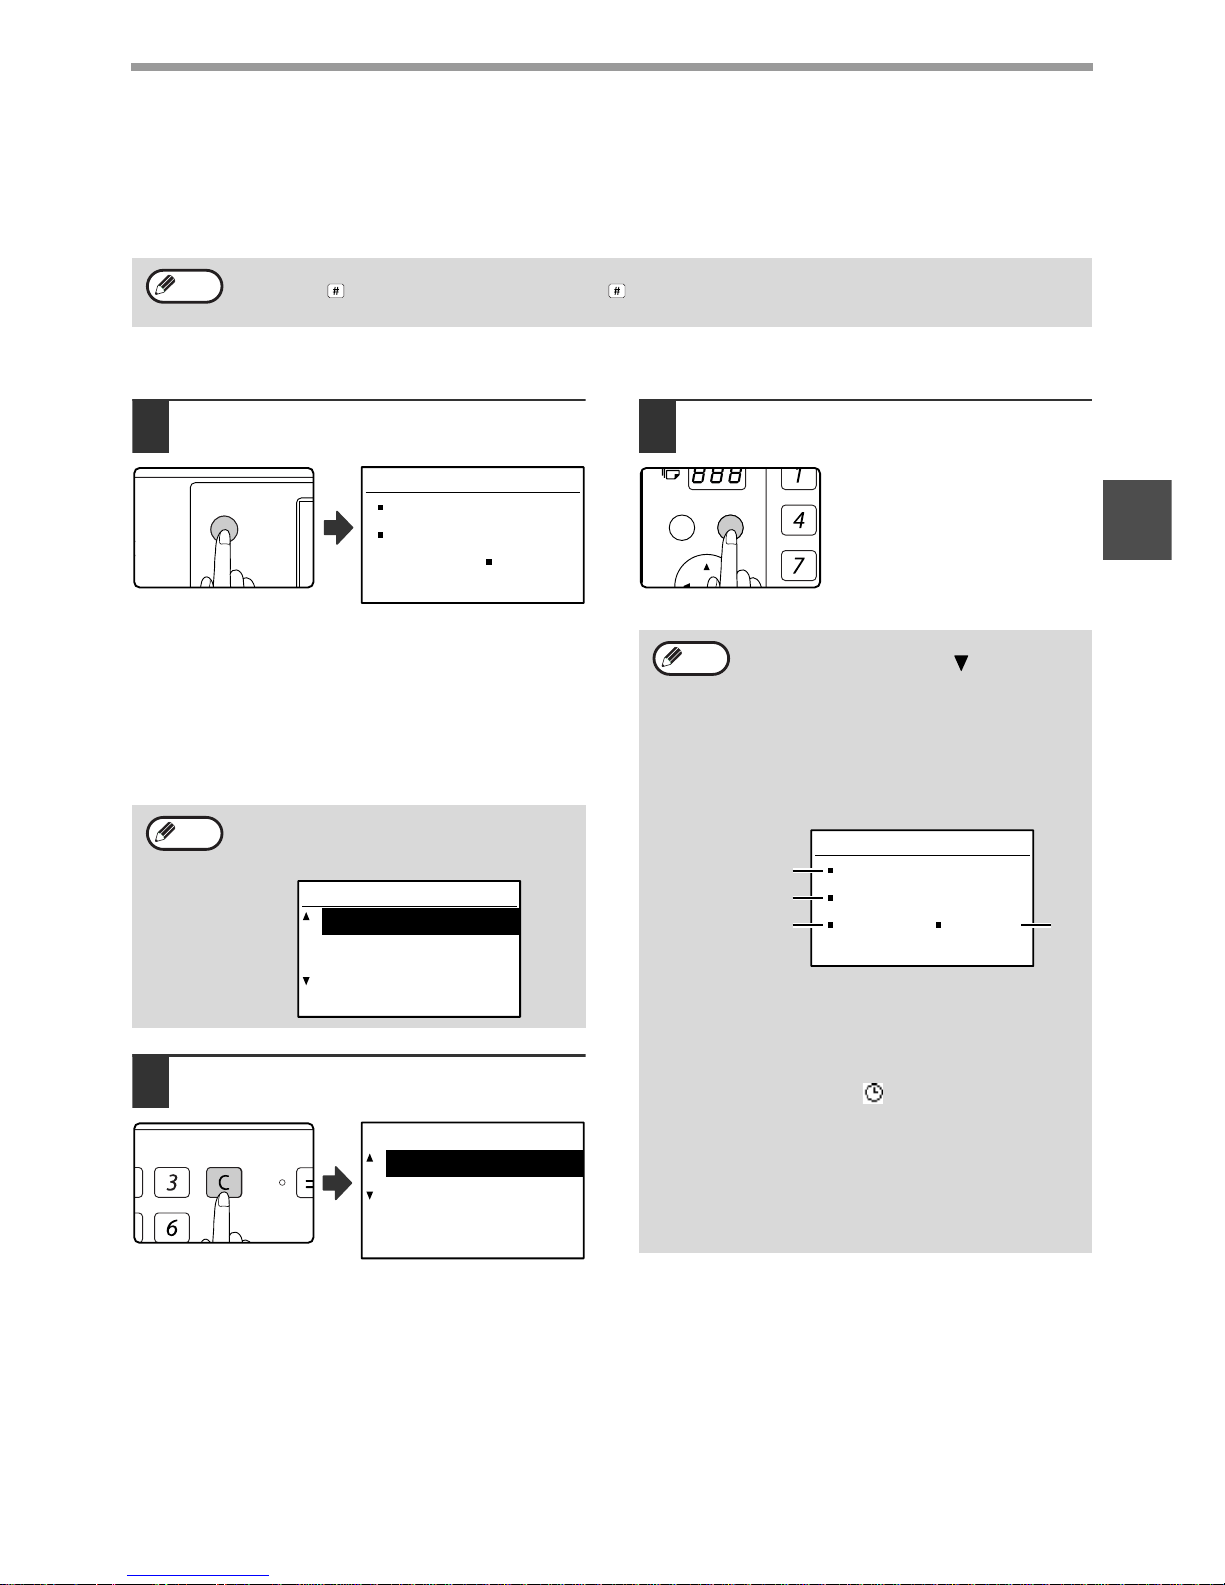
1
Enter your account number (five
digits) with the numeric keys.
• As the account number is entered, the hyphens "-"
change to asterisks " ". If you enter an incorrect
digit, press the [C] key and re-enter the correct digit.
• After you enter your account number, the base
screen of fax mode appears. (Page 9)
2
When you have completed the fax
operation, press the [ACC.#-C] key
().
Enter your account
number.
ACCOUNT #:-----
• If you enter an account number for copy
mode has also been programmed for fax
mode, you can change to fax mode after
completing the copy operation and
continue with the fax operation without
re-entering your account number.
If you enter an account number for copy
mode that has not been programmed for
fax mode, enter your account number for
fax mode after you press the [FAX] key to
change to fax mode.
• When "ACC. # SECURITY" in the system
settings (see the "System settings guide"
in the Operation Guide f or the machi ne.) is
enabled, the message "Please see your
administrator for assistance." will appear
for one minute in the event that you enter
an incorrect or invalid account number
three times in a row. During that time
operation of the machine will not be
possible.
ABC DEF
JKLGHI MNO
TUVPQRS WXYZ
@.-
_
READ-END
ACC. #-C
OK
Enter your account
number.
ACCOUNT #: ---
Note
@.-
_
READ-END
ACC. #-C
11
1
ORIGINALS
ORIGINALS THAT CAN BE FAXED
Original sizes
*Long originals
Depending on the resolution setting and the width of the original, there may not be sufficient space in memory to
hold a long original. When a long original cannot be entirely scanned, select a lower resolution setting and/or
shorten the original.
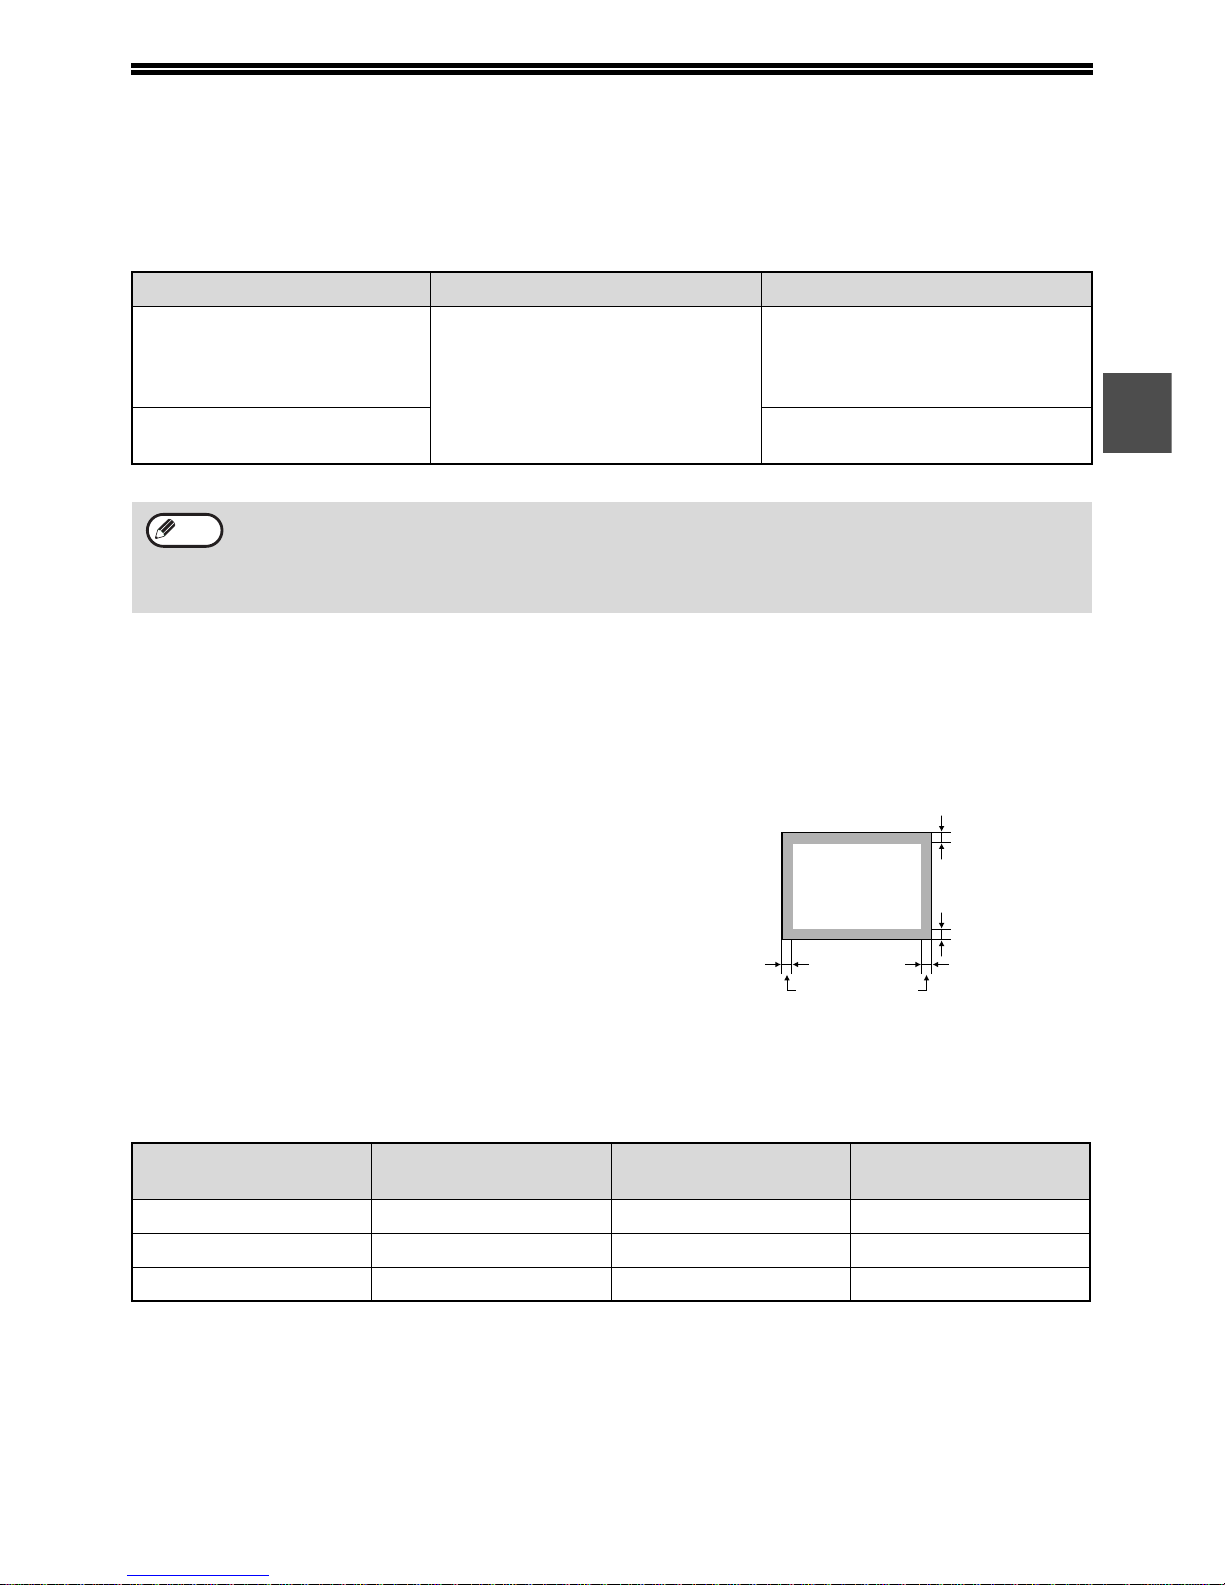
Scanning area of original
When faxing an original, note that the edges of th e
original cannot be scanned.
Width of edges that cannot be scanned:
5 mm from top and bottom edges, 6 mm (or less) from left
and right edges
Automatic reduction of faxed document
If the size (width) of the faxed document is greater than the receiving machine's paper size, the size will be
automatically reduced.
You can turn off automatic reduction. In this case, the left and right edges will not be transmitted. (See "AUTO
REDUCE TX" on page 105.)
Minimum original size Maximum original size
Using the SPF/RSPF
A5: 210 mm (width) x 148 mm (length)
(8-1/2" (width) x 5-1/2" (length))
A5R: 148 mm (width) x 210 mm (length)
(5-1/2" (width) x 8-1/2" (length))
297 mm (width) x 800 mm* (length)
(11" (width) x 31-1/2"* (length))
* Long documents can be
transmitted
Using the document glass
297 mm (width) x 432 mm (length)
(11" (width) x 17" (length))
• Originals that are not a standard size (A5, A4, A4R, B4, A3, 8-1/2" x 11", 8-1/2" x 11"R (5-1/2" x 8-1/2", 5-1/2"
x 8-1/2"R, 8-1/2" x 11", 8-1/2" x 11"R, 8-1/2" x 14", 11" x 17", A4, A4R if the machine uses inch-based paper
sizes)) can also be faxed.
• There are restrictions on originals that can be scanned using the SPF/RSPF. For more information, see
"NORMAL COPYING" in the Operation Guide for the machine.
Faxed document width
Receiving machine's
paper width
Size after reduction Ratio
A3 (11" x 17") B4 (8-1/2" x 14") B4 (8-1/2" x 14") 1 : 0.78 (1 : 0.64)
A3 (11" x 17") A4 (8-1/2" x 11") A4R (8-1/2" x 11"R) 1 : 0.5 (1 : 0.5)
B4 (8-1/2" x 14") A4 (8-1/2" x 11") A4R (8-1/2" x 11"R) 1 : 0.64 (1 : 0.78)
Note
5 mm
5 mm
T otal of 6 mm or
less

12
PLACING THE ORIGINAL
An original can be placed in the SPF/RSPF or on the document glass. Use the SPF/RSPF when faxing a large
number of sheet originals. Use the document glass to fax originals that cannot be scann ed using the SPF/RSPF
such as thick or thin sheet originals, or boo k s or o ther bound originals.
USING THE SPF/RSPF
1
Open the SPF/RSPF, make sure that
an original has not been left on the
document glass, and then gently
close the SPF/RSPF.
2
Adjust the original guides on the
document feeder tray to the width of
the document.
3
Align the edges of the document pages
and then insert the stack in the document
feeder tray so that the first page is face up.
• Insert the originals all the way
into the document feeder tray.
• Make sure the stack does not
exceed the indicator line
(maximum of 40 sheets, or 30
sheets of 90 g/m
2
(24 lbs.)
paper, thickness 4 mm (5/32")
or less).
USING THE DOCUMENT GLASS
1
Open the SPF/RSPF, place the original
face down on the document glass,
and then gently close the SPF/RSPF.
•
If auto power shut-off has
activated, press the [START]
key, wait until the machine has
returned to normal operation,
and then place the original.
•
When transmitting a small
original such as a postcard, be
sure to press the [ORIGINAL
SIZE] key and set the original
size. (Page 13)
Regardless of the size of the original, place the original
in the far left corner of the document glass. (Align the
upper left-hand corner of the original with the tip of
the mark.) Place the original in the ap propriate
position for its size as shown below.
• Do not load originals that are different
sizes even if the widths are the same. This
may cause misfeeds.
• Use the SPF/RSPF for long originals. The
document glass cannot be used.
• When inserting a long original, the original
should be in contact with the surface of
the document feeder tray. If the original is
not in contact with the surface of the
document feeder tray, an incorrect original
size may be detected.
Note
A4R
R
Document glass scale
A4
A3
B4
Document glass scale
A5
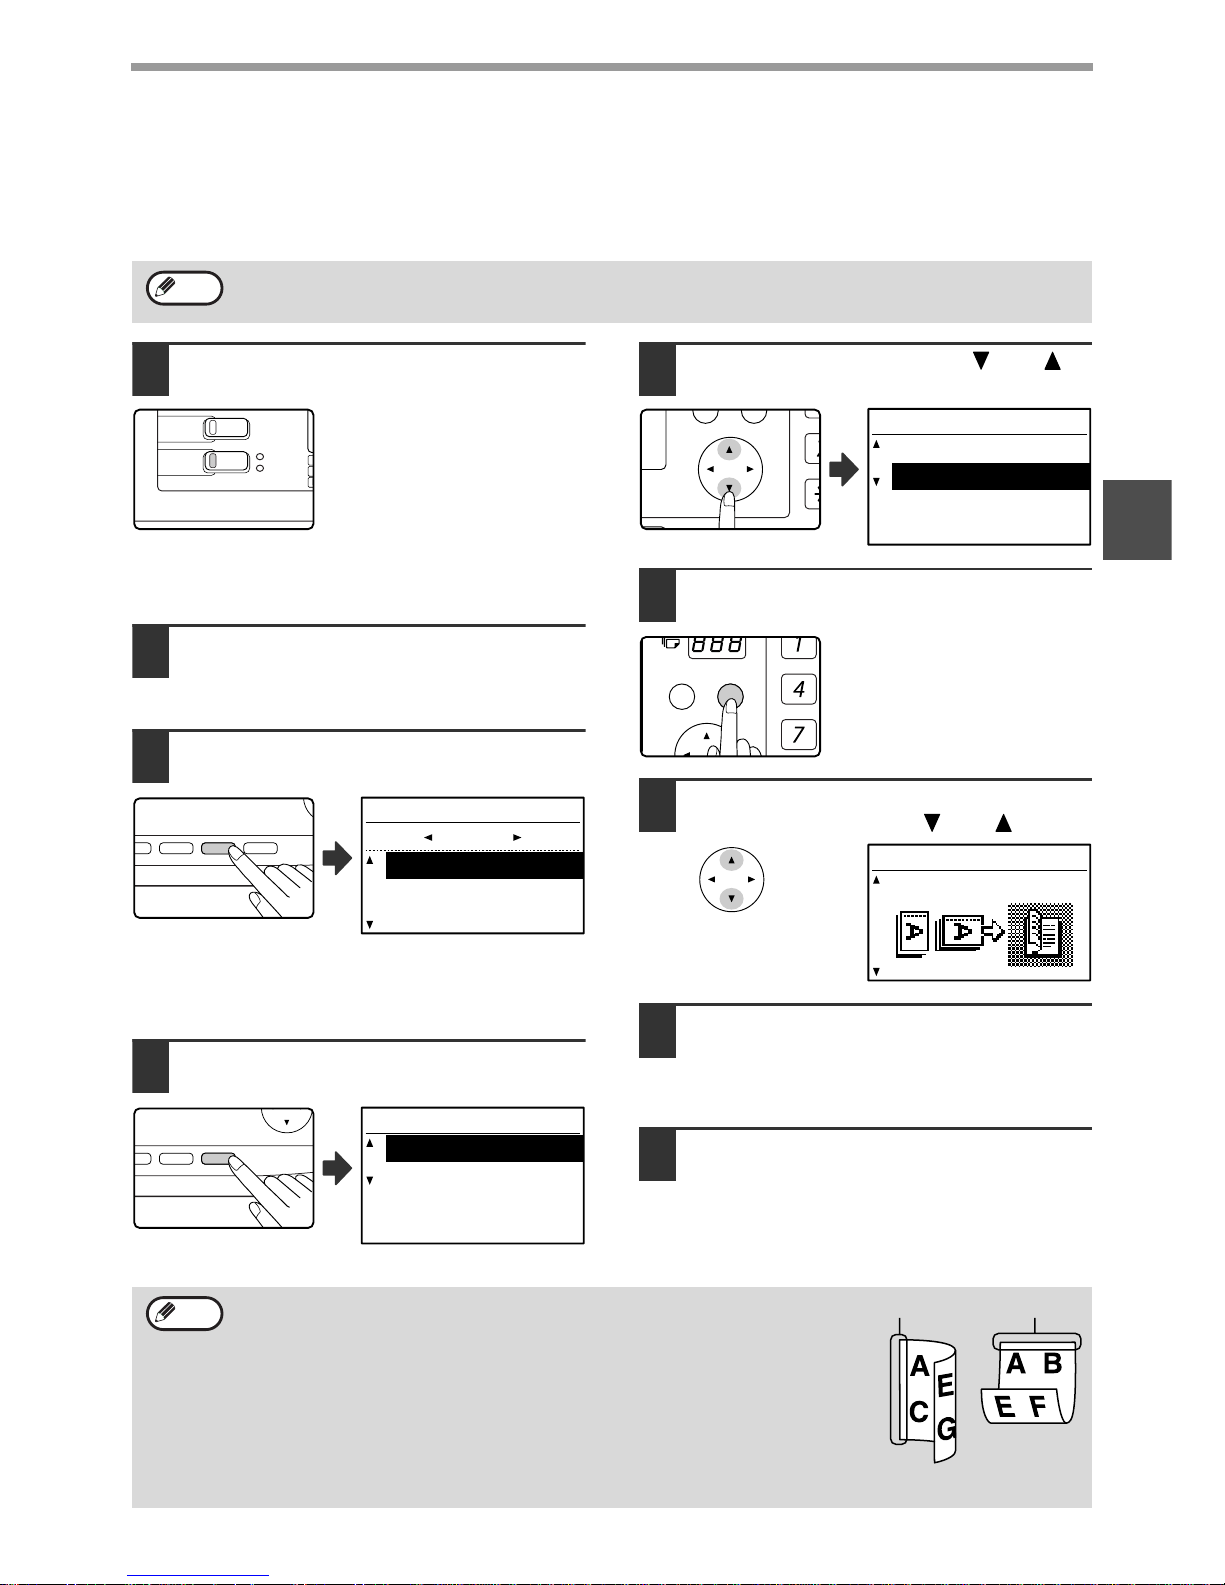
The difference between A4 (8-1/2" x 11") and A4R (8-1/2" x 11"R)
This manual uses both A4 (8-1/2" x 11") and A4R (8-1/2" x 11"R) to indicate paper and original sizes. The "R" is
used to distinguish the orientation of originals and paper. ("R" is used for th is purpose for other sizes as well.)
[Example] Difference between the orientations of A4 (8-1/2" x 11") size and A4R (8-1/2" x 11"R) size
A4 (8-1/2" x 11") indicates an original placed as
follows:
A4R (8-1/2" x 11"R) indicates an original placed as
follows:
Vertically oriented
Top
Document feeder tray Document glass
Top
Top
Horizontally oriented
Document feeder tray Document glass
13
1
CHECKING THE SIZE OF A PLACED ORIGINAL
When a standard-size* original is placed, the original size is automatically detected
(automatic original detection function) and displayed in the original display. Make sure
that the size has been detected correctly.
(1)When an original is placed, an icon appears to indicate the original scanning mode.
:One-sided scanning in the SPF.
:Scanning on the document glass
:Two-sided scanning in the RSPF.
(2)Displays the original size.
If a non-standard size original is placed or if you wish to change the scanning size,
follow the steps below to manually set the original scanning size.
MANUALLY SETTING THE SCANNING SIZE
If you load an original that is not a standard size (such as a long original), or if the size is not detected correctly, be
sure to press the [ORIGINAL SIZE] key and set the original size manually.
Perform the following steps after placing the original in the document feeder tray or on the document glass (page 12).
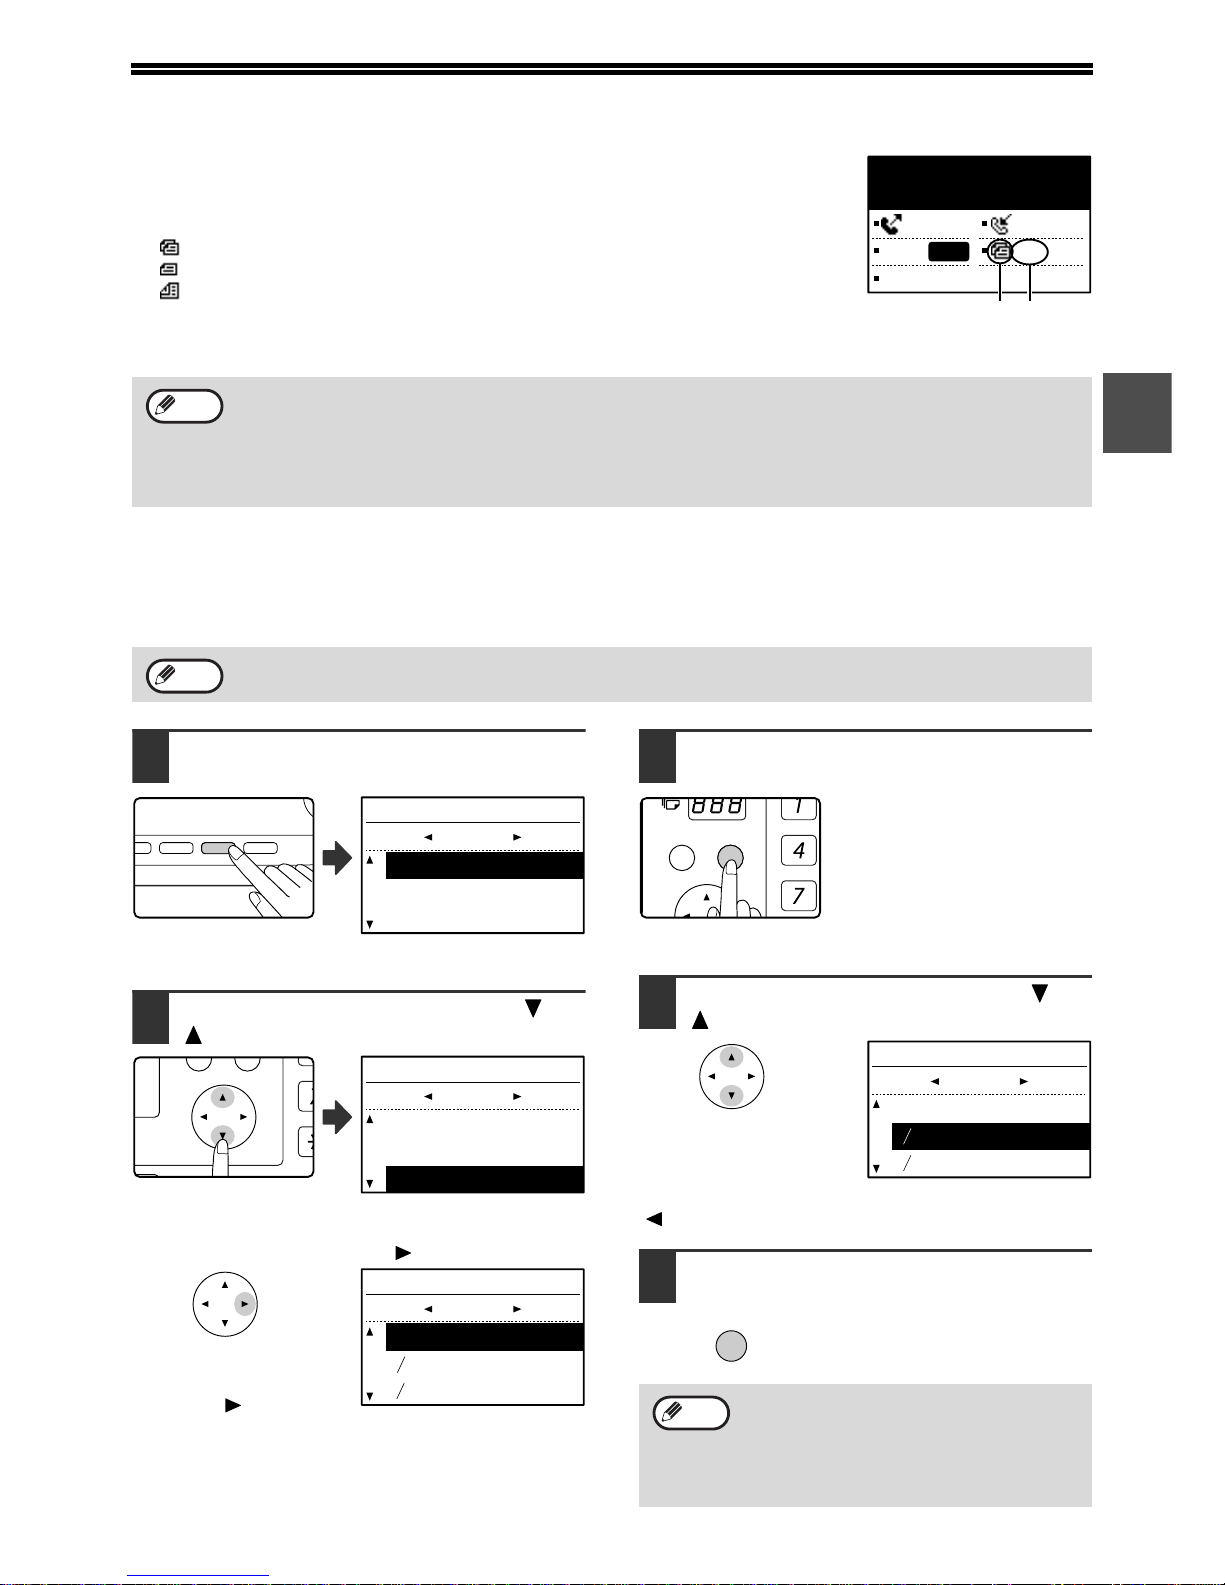
1
Press the [ORIGINAL SIZE] key.
The original size
selection screen appears.
2
Select the original size with the [ ] or
[ ] key.
The selected original size
is highlighted.
To select an INCH size, press the [ ] key and go to step 4.
When the [ ] key is
pressed, the original size
selection screen for INCH
sizes appears.
3
Press the [OK] key.
You will return to the base
screen and the selected original
size will appear in the original
display.
Selecting an INCH original size
4
Select the original size with the [ ] or
[ ] key.
To return to selection of AB original sizes, press the
[ ] key and return to step 2.
5
Press the [OK] key.
You will return to the base screen
and the selected original size will
appear in the original display.
*Standard sizes
The following sizes are standard sizes: A3, B4, A4, A4R, A5 (11" x 17", 8-1/2" x 14", 8-1/2" x 11", 8-1/2" x 11"R,
5-1/2" x 8-1/2", if the machine uses inch-based paper sizes). If a non-standard size original is loaded (including
special sizes), the closest standard size may be displayed, or the original size may not appear at all.
In Taiwan, the following standard original sizes are detected by the automatic original detection function: A3, B4,
A4, A4R, B5, B5R, A5.
If a size is specified that is different from the actual original size when scanning a two-sided original in the RSPF,
a scanning error or a cut-off image may result.
Stand-by. 100%
10 MAY MON 10:25 AM
MEMORY AUTO
CONT A4R
STANDARD
AUTO
(2)(1)
Note
Note
RATIO
DUPLEX SCAN
DUPLEX SCAN
2-SIDED COPYAUTO IMAGE
FORMAT
BROADCAST
OUTPUT
ORIGINAL SIZE
ORIGINAL SIZE
ORIGINAL SIZE
AUTO
A3
B4
AB
PQ
ACC
ORIGINAL SIZE
AUTO
A3
B4
AB
ORIGINAL SIZE
AUTO
8 x11
8 x11R
INCH
1
2
1
2
To cancel a manual original scanning size
setting, press the [CA] key.
If it is not possible to select the actual original
size, select a size that is larger than the actual
original size. If a smaller size is selected, part
of the original will not be transmitted.
GHI
PQRS
BACK
OK
ORIGINAL SIZE
AUTO
8 x11
8 x11R
INCH
1
2
1
2
OK
Note
14
SELECTING RESOLUTION AND EXPOSURE SETTINGS
The resolution and exposure can be adjusted to match the size and darkness of text on the original, or for an original such
as a photograph. To change the settings, follow the steps below after selecting fax mode and placing the original. (Page 12)
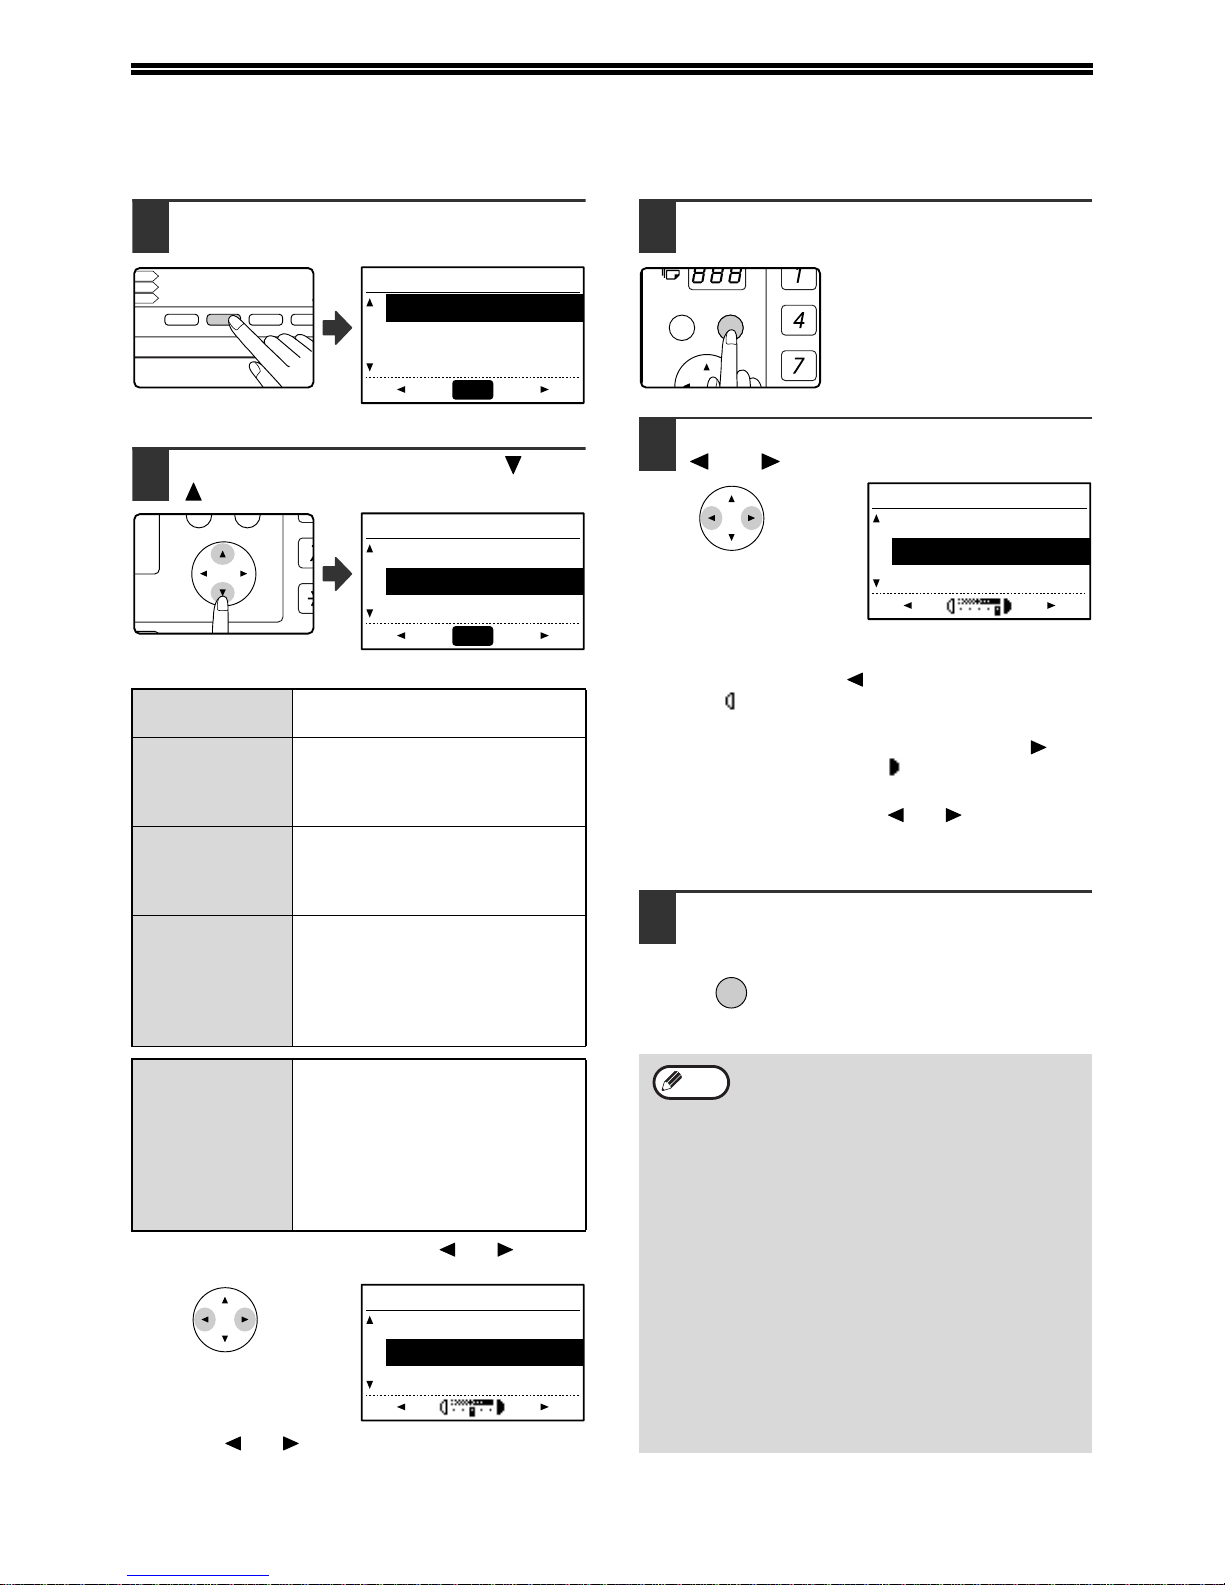
1
Press the [RESOLUTION] key.
The resolution selection
screen will appear.
2
Select the resolution with the [ ] or
[ ] key.
The selected resolution is
highlighted.
To set the exposure next, press the [ ] or [ ] key
and go to step 4.
When the [ ] or [ ] key is pressed, the exposure
display changes from "AUTO" to a 5-step display.
3
Press the [OK] key.
You will return to the base
screen and the selected
resolution will appear in the
resolution display.
4
Select the desired exposure with the
[ ] or [ ] key.
• To select a light setting for a dark original such as a
newspaper, press the [ ] key to move the setting
toward ( ).
• To select a dark setting for a light original such as
writing in pencil or faint colour text, press the [ ] key
to move the setting toward ( ).
• When the exposure setting reaches the left side or
the right side, pressing the [ ] or [ ] key changes
the exposure display from the 5-step display to
"AUTO".
5
Press the [OK] key.
You will return to the base
screen and the selected
exposure will appear in the
exposure display.
STANDARD
Use this setting for originals with
normal-size text.
FINE
Use this setting for originals with
small letters or detailed dra wings.
The original will be scanned at
twice the resolution of Standard.
SUPER FINE
Use this setting for originals with
intricate drawings or diagrams. A
higher-quality image will be
produced than with the Fine setting.
ULTRA FINE
Use this setting for originals with
intricate drawings or diagrams.
This setting gives the best image
quality. However, transmission
will take longer than with the
other settings.
(FINE/HALF
TONE)
(S-FINE/HALF
TONE)
(U-FINE/HALF
TONE)
Use halftone if your original is a
photograph or has gradations of
colour (such as a colour original).
This setting will produce a clearer
image than "FINE", "SUPER FINE",
or "ULTRA FINE" used alone.
When halftone is selected,
transmission will take longer.
COPY RATIO
ADDRESS
ADDRESS
EXPOSURE
COLOUR MODE
PROGRAM
PAPER SELECT
RESOLUTION
RESOLUTION
AUTO IMA
FORMA
BROADCA
FAX
RESOLUTION
STANDARD
FINE
SUPER FINE
AUTO
PQ
ACC
RESOLUTION
STANDARD
FINE
SUPER FINE
AUTO
RESOLUTION
STANDARD
FINE
SUPER FINE
• The default resolution setting is
"STANDARD" and the default exposure
setting is "AUTO". The default settings for
the resolution and exposure can be
changed in the system settings. (See
"RES. CON. SET" on page 105.) When
using the document glass to scan multiple
original pages, the exposure setting can
be changed each time you change pages.
When using the SPF/RSPF, the resolution
and exposure settings cannot be changed
once scanning has begun.
• Even if you send a fax using a high
resolution setting such as "FINE",
"SUPER FINE", or "ULTRA FINE", some
receiving fax machines may print the fax
at a lower resolution.
• To cancel a resolution or exposure
selection, press the [CA] key.
GHI
PQRS
BACK
OK
RESOLUTION
STANDARD
FINE
SUPER FINE
OK
Note
15
1
CONVENIENT DIALLING METHODS (AUTO-DIALLING)
The fax function includes a convenient auto dial feature (Rapid dialling, speed dialling and group dialling). By
programming frequently dialled numbers, you can call and send faxes to these locations by means of a simple
dialling operation (page 19). There are three types of auto-dialling: Rapid dialling, speed dialling, and group dialling.
To program auto-dial numbers, see page 66.
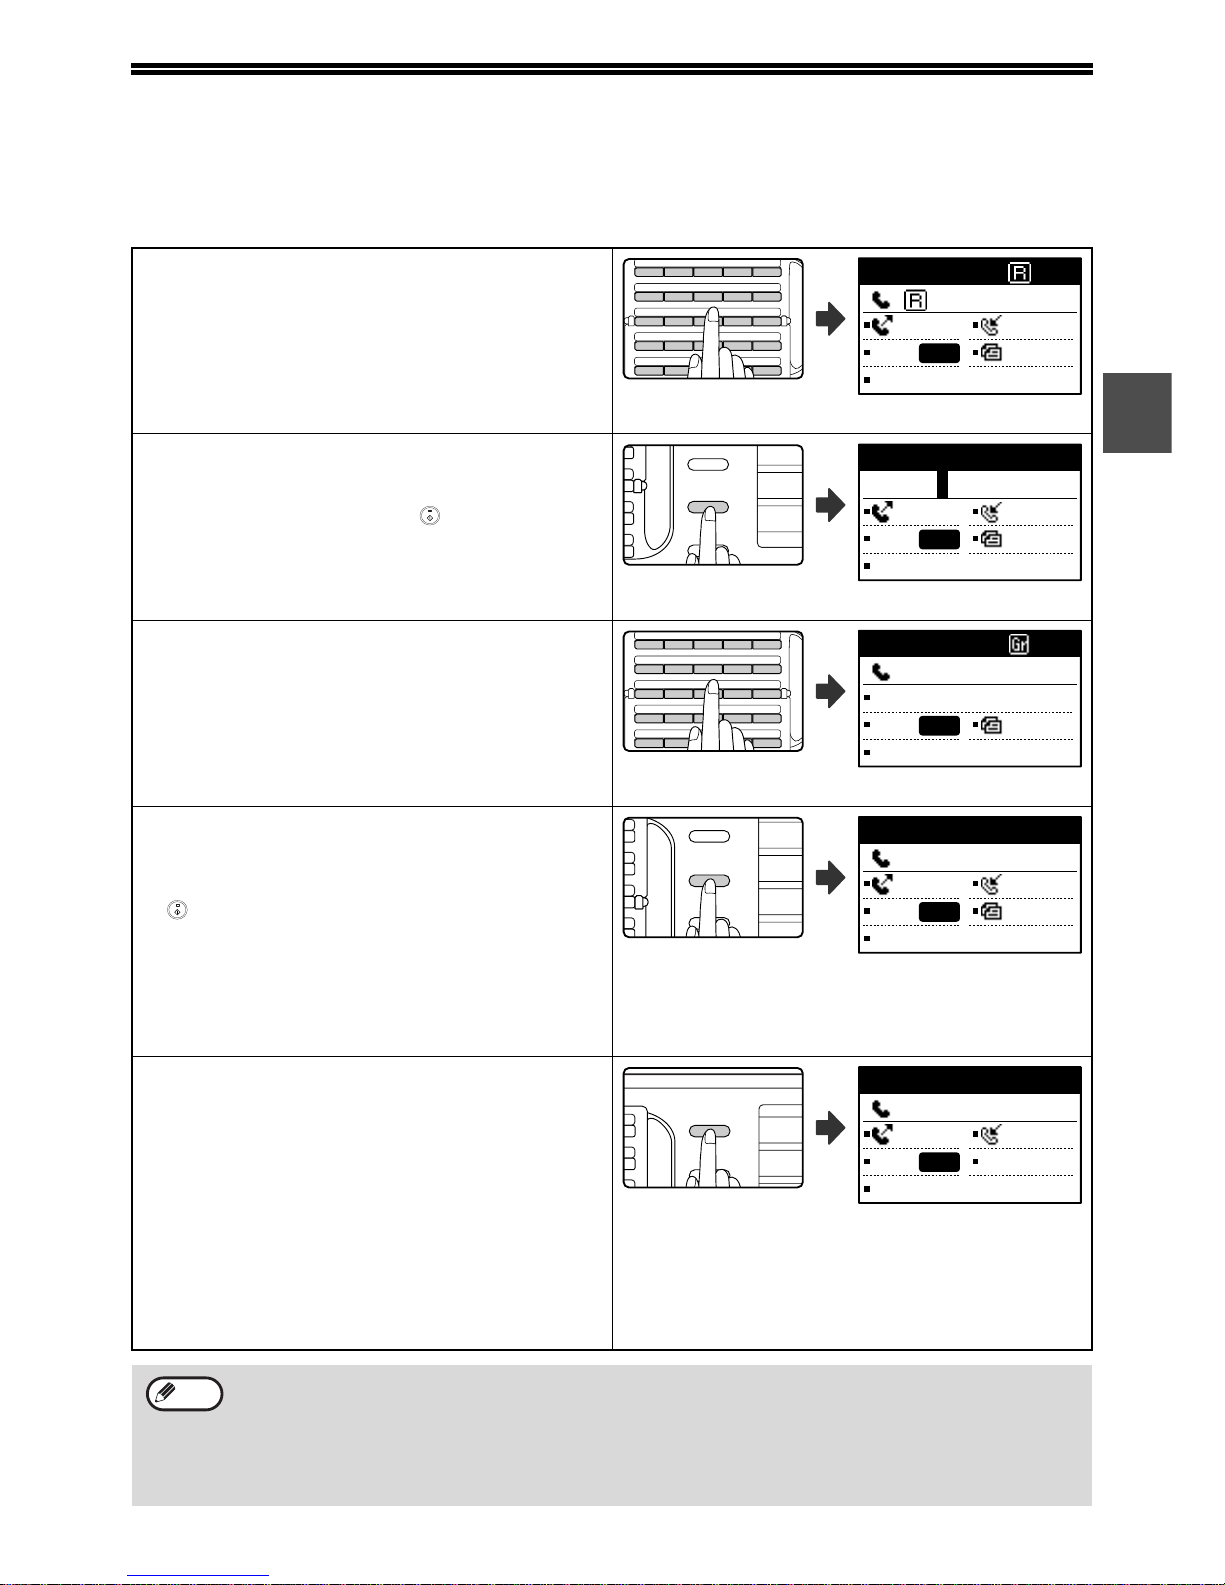
• Rapid dialling
A stored destination can be dialled by simply pressing
a Rapid key ([01] to [50]). A name up to 36 characters
in length can be programmed for the location (a
maximum of 12 characters are displayed).
When using F-code transmission, a sub-address and
passcode (page 52) can also be programmed . The programmed user
names appear.
• Speed dialling (300 stations)
A stored destination can be dialled by pressing the
[SPEED] key, entering a 3-digit number (000 to 299),
and pressing the [START] key ( ). A name
(maximum 36 characters) can be stored fo r each
destination.
When using F-code transmission, a sub-address and
passcode (page 52) can also be programmed.
The Speed number entry
screen appears.
• Group dialling
Multiple Rapid dial and/or Speed dial destinations can
be stored in a Rapid key for Group dialling.
Destinations can also be stored for Group dialling by
entering fax numbers with the numeric keys. This is
convenient for communicating with a group of other
fax machines. The programmed group
names appear.
• REDIALLING
The machine retains the last fax or phone number
dialled. This number can be redialled by simply
pressing the [REDIAL] key and then the [STA RT] key
().
•
If you pressed a numeric ke y during the prev ious call,
the [REDIAL] key may not dial the correct number.
• Redialling is not possible to broadcast transmi ssion
(page 31), serial polling (page 37), timer
transmission (page 33), group dialling (page 19), or
F-code transmission (page 59) destinations.
The last number dialled is
displayed.
• ON-HOOK DIALLING
This feature allows you to dial without lifting an
extension phone conn ected to the machine . Press the
[SPEAKER] key, listen for the dial tone through the
speaker, and then dial.
• If a person answers, lift th e extension phone to
answer. (You can only speak to the other party if an
extension phone is connected to the machine.)
• Faxes must be sent manually when using on-hook
dialling. (Page 23)
• On-hook dialling is not possible using a Rapid key
that includes a sub-address and passcode, or a
group dial key.
• A combined total of 50 Rapid dial and group dial keys can be stored, and 300 speed dial destinations can be
stored.
• Stored Rapid keys, group keys, and Speed dial destinations can be called up using a search name entered
when the key or destination was stored. (Page 20)
• To prevent dialling a wrong number and sending a fax to an incorrect destination, check the message display
carefully when you store the number. You can also check stored numbers by printing out the programmed
information after storing the number (page 85).
46 47 48 49 50
41 42 43 44 45
36 37 38 39 40
31 32 33 34 35
26 27 28 29 30
ABCDE
FGHI J
KLMNO
PQRST
XXXXXX
1234567890
MEMORY AUTO
CONT A4R
STANDARD
AUTO
SYMBOL
REDIAL/PAUSE
SPEED
COMM. SETTING
FAX
SCAN
PRINT
Enter SPEED #.
SPEED:
___ (000-299)
MEMORY AUTO
CONT A4R
STANDARD
AUTO
46 47 48 49 50
41 42 43 44 45
36 37 38 39 40
31 32 33 34 35
26 27 28 29 30
ABCDE
FGHI J
KLMNO
PQRST
XXXXXX
:0123456789
BROADCAST
CONT A4R
STANDARD
AUTO
SHIFT
SPEAKER
REDIAL/PAUSE
SPEED
SCAN
PRINT
COPY
Redialling. 100%
:0123456789
MANUAL AUTO
CONT A4R
STANDARD
AUTO
SHIFT
SPEAKER
REDIAL/PAUSE
PRINT
COPY
ENTER DIAL #
:
MANUAL AUTO
CONT
STANDARD
AUTO
Note

16
2
BASIC OPERATIONS
This chapter explains the basic procedures for sending and receiving faxes.
There are three basic methods for fax transmission: memory transmission, direct transmission, and manual
transmission. When memory transmission is used, the document is temporarily stored in memory before being
transmitted. When direct transmission or manual transmission is used, the document is transmitted without being
stored in memory, The default transmission setting can be set to "MEMORY TX" or "DIRECT TX" using "SEND
MODE" (page 106) in the system settings. To manually switch between "MEMORY TX" and "DIRECT TX", use the
[COMM. SETTING] key. (See "Faxing by direct transmission" on page 22.)
The following explanations generally assume that memory transmission is being used.
17
2
SENDING A FAX
BASIC PROCEDURE FOR SENDING FAXES
1
Make sure that the machine is in fax
mode.
The FAX indicator is lit when the
machine is in fax mode. If the
indicator is not lit, press the
[FAX] key. If auditing mode has
been enabled for the fax function
in the system settings, a
message will appear prompting you to enter your
account number when you switch to fax mode. Enter
your account number (5 digits) with the numeric keys.
(See "ACCOUNT CONTROL" on page 103.)
2
Place the original(s) in the document
feeder tray or on the document glass.
• Using the SPF/RSPF: page 12
• Using the document glass: page 12
If you are using the document glass to send
multiple pages, place the first page first.
3
Check the original size. If the original
is not a standard size or the size was
not detected correctly, press the
[ORIGINAL SIZE] key.
When the [ORIGINAL SIZE] key is pressed, the size
selection screen appears. See "MANUALLY SETTING
THE SCANNING SIZE" (page 13) to set the original
size.
4
If needed, adjust the resolution and
exposure settings. (Page 14)
To adjust the resolution and exposure settings, press
the [RESOLUTION] key. (See "SELECTING
RESOLUTION AND EXPOSURE SETTINGS" on
page 14.)
5
Dial the fax number.
• The entered number appears in the message
display. Up to 50 digits can be entered. If you make
a mistake, press the [C] key and then enter the
correct number.
• Redialling and automatic dialling can also be used
(pages 15, 19).
Entering a pause
If a pause is necessary when
dialling out from a PBX or when
dialling an international number,
press the [REDIAL] key. (This
key functions as a pause key
when entering a number.)
If you press the [PAUSE] key once, a hyphen ("-")
appears and a 2-second pause* is inserted.
After entering a number, you can also press the
[PAUSE] key to enter a hyphen and then enter another
number using the numeric keys or a Rapid ke y. (This
connects the numbers together, and is called Chain
dialling.)
* The duration of each pause can be changed
inthesystem settings. (See "PAUSE TIME" on page
100.)
You cannot place originals both in the
SPF/RSPF and on the document glass and
send them in a single fax tr a nsm ission.
C
S
F
LINE
DATA
FAX
SCAN
Note
DUPLEX SCAN
DUPLEX SCAN
2-SIDED COPYAUTO IMAGE
FORMAT
BROADCAST
OUTPUT
ORIGINAL SIZE
ORIGINAL SIZE
ORIGINAL SIZE
AUTO
A3
B4
AB
COPY RATIO
ADDRESS
ADDRESS
EXPOSURE
COLOUR MODE
PROGRAM
PAPER SELECT
RESOLUTION
RESOLUTION
AUTO IMA
FORMA
BROADCA
FAX
RESOLUTION
STANDARD
FINE
SUPER FINE
AUTO
Group keys cannot be used for chain
dialling.
ABC DEF
JKLGHI MNO
TUVPQRS WXYZ
@.-
_
READ-END
ACC. #-C
OK
Stand-by. 100%
:0123456789
MEMORY AUTO
CONT A4R
STANDARD
AUTO
SHIFT
SPEAKER
REDIAL/PAUSE
SPEED
SCAN
PRINT
COPY
Note
18
BASIC OPERATIONS
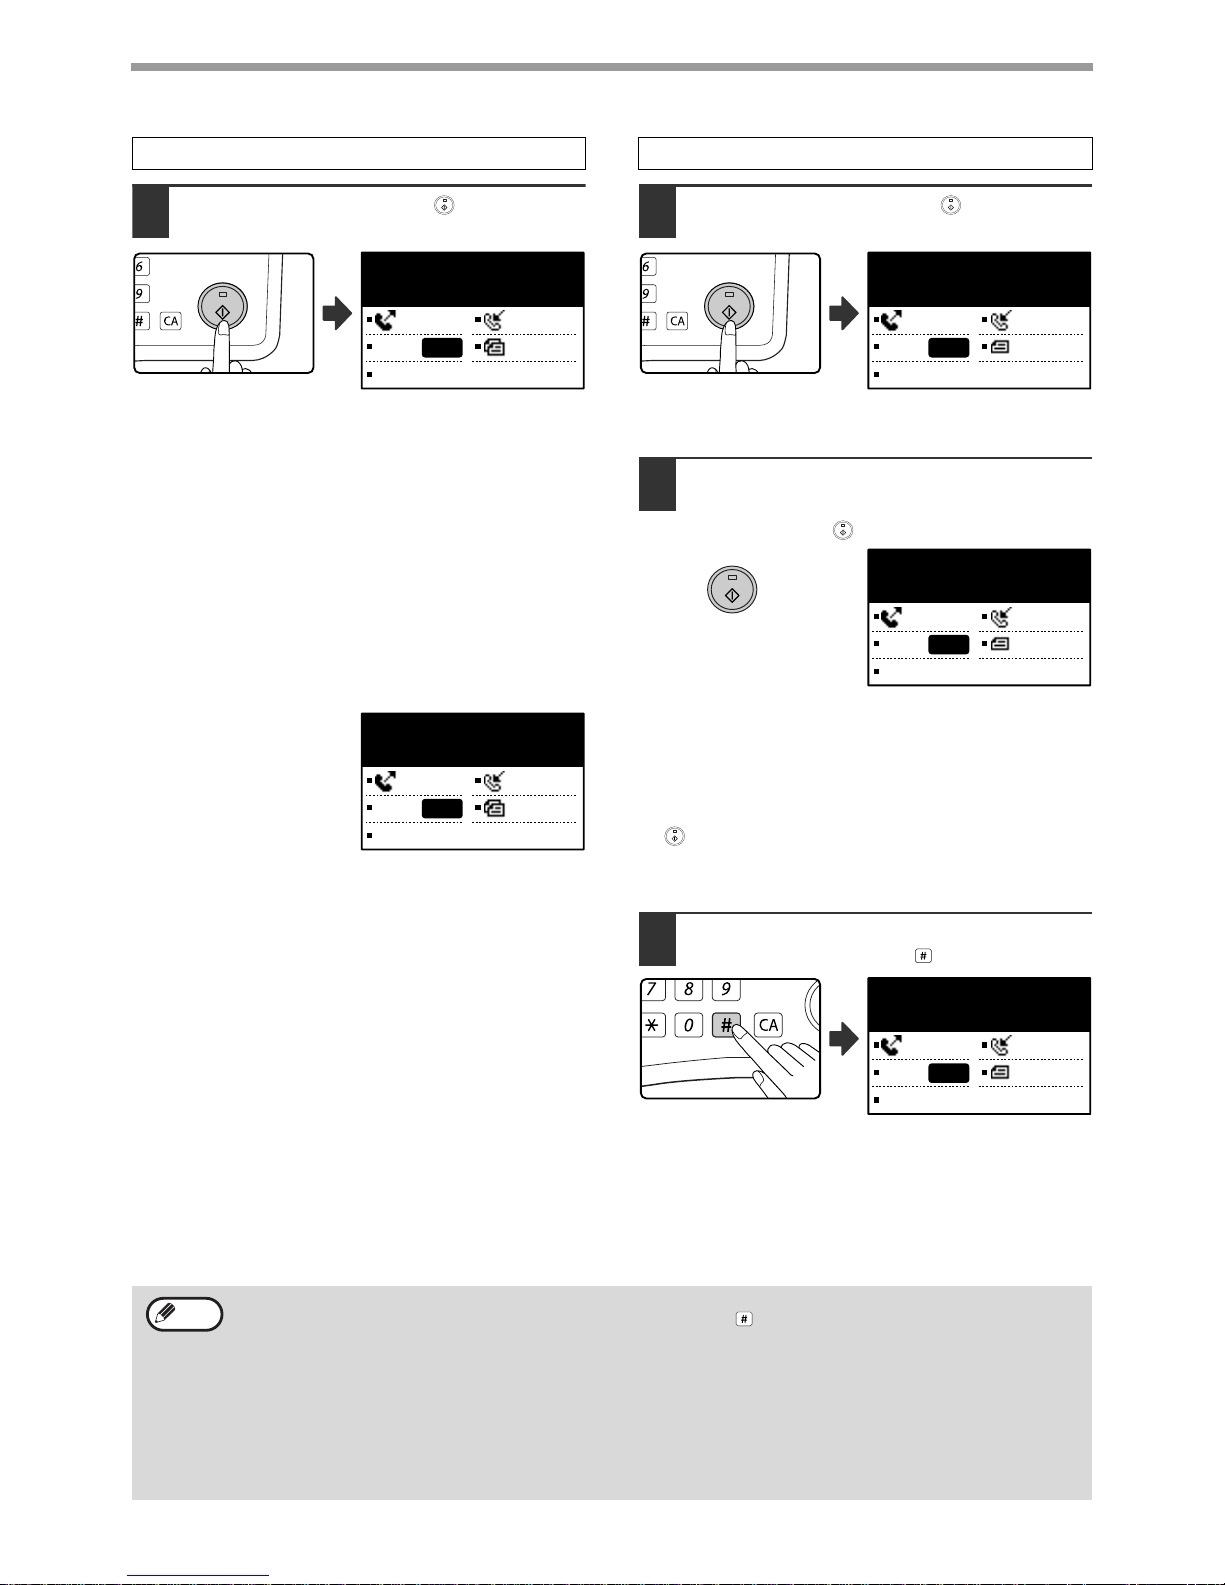
6
Press the [START] key ( ).
• Scanning begins.
• If the line is free, the machine will dial the receiving
machine and begin transmission as soon as the first
page is scanned. (Quick online transmission: page
24)
• If there is a previously stored job or a job is in
progress, or if the line is being used, all pages of the
original are scanned into memory and stored as a
transmission job. (This is called memory
transmission: the destination is automatically called
and the document transmitted after previously st ored
jobs are completed.)
If scanning is completed
normally, the following
screen is appears briefly
and then the display
returns to the base
screen.
6
Press the [START] key ( ).
Scanning begins.
7
If you have another page to scan,
change pages and then press the
[START] key ( ).
• Repeat this sequence until all pages have been
scanned.
• You can change the resolution and exposure
settings as needed for each. (page 14)
• If no action is taken for one minute (the [START] key
( ) is not pressed), scanning automatically ends
and the transmission job is stored. (This function can
be disabled in the system settings.)
8
After the last page is scanned, press
the [READ-END] key ( ).
Open the SPF/RSPF and remove the original. When
the original is removed or any key operation is
performed, the display returns to the base scr een.
(The destination is automatically called and the
document transmitted after any previously stored jobs
are completed.)
Using the SPF/RSPF
_
READING XX%
No.001 P-XXX
MEMORY AUTO
CONT A4R
STANDARD
AUTO
READ END XX%
No.001 P-XXX
MEMORY AUTO
CONT A4R
STANDARD
AUTO
Using the document glass
_
READING XX%
No.001 P-XXX
MEMORY AUTO
CONT A4R
STANDARD
AUTO
[START]:CONTINUE
[#]:READ-END
MEMORY AUTO
CONT A4R
STANDARD
AUTO
@.-
_
READ-END
READ END XX%
No.001 P-XXX
MEMORY AUTO
CONT A4R
STANDARD
AUTO
• To cancel transmission
To cancel transmission while "READING" appears or before the key is pressed, press the [C] or [CA] key. T o
cancel a transmission job that is already stored, press the [FAX STATUS] key and cancel the job as explained
on page 25.
• A job number (3 digits) appears in the display with "READ END" when memory transmission is performed. If
you make a note of this number after performing a broadcast transmission, you can use the number to check
the results of the transmission in the transaction report or activity report.
• If the power is turned off or a power failure occurs while an original is being scanned in the SPF/RSPF, the
machine will stop and an original misfeed will occur. After power is restored, remove the original as explained
in "MISFEED IN THE SPF/RSPF" in the Operation Guide for the machine.
Note
19
BASIC OPERATIONS
2
TRANSMISSION BY AUTO-DIALLING (RAPID
DIALLING AND GROUP DIALLING)
Fax numbers can be dialled by automatic dialling (Rapid dialling and group dialling) instead of pressing the numeric
keys. Follow the steps below to send a fax using an aut o dial number. To use an auto dial nu mber, the name and fax
number of the destination must first be stored. See page 15 for information on auto-dialling and page 66 for
information on programming auto-dial destinations.
1
Perform steps 1 to 4 of "BASIC
PROCEDURE FOR SENDING FAXES"
(page 17).
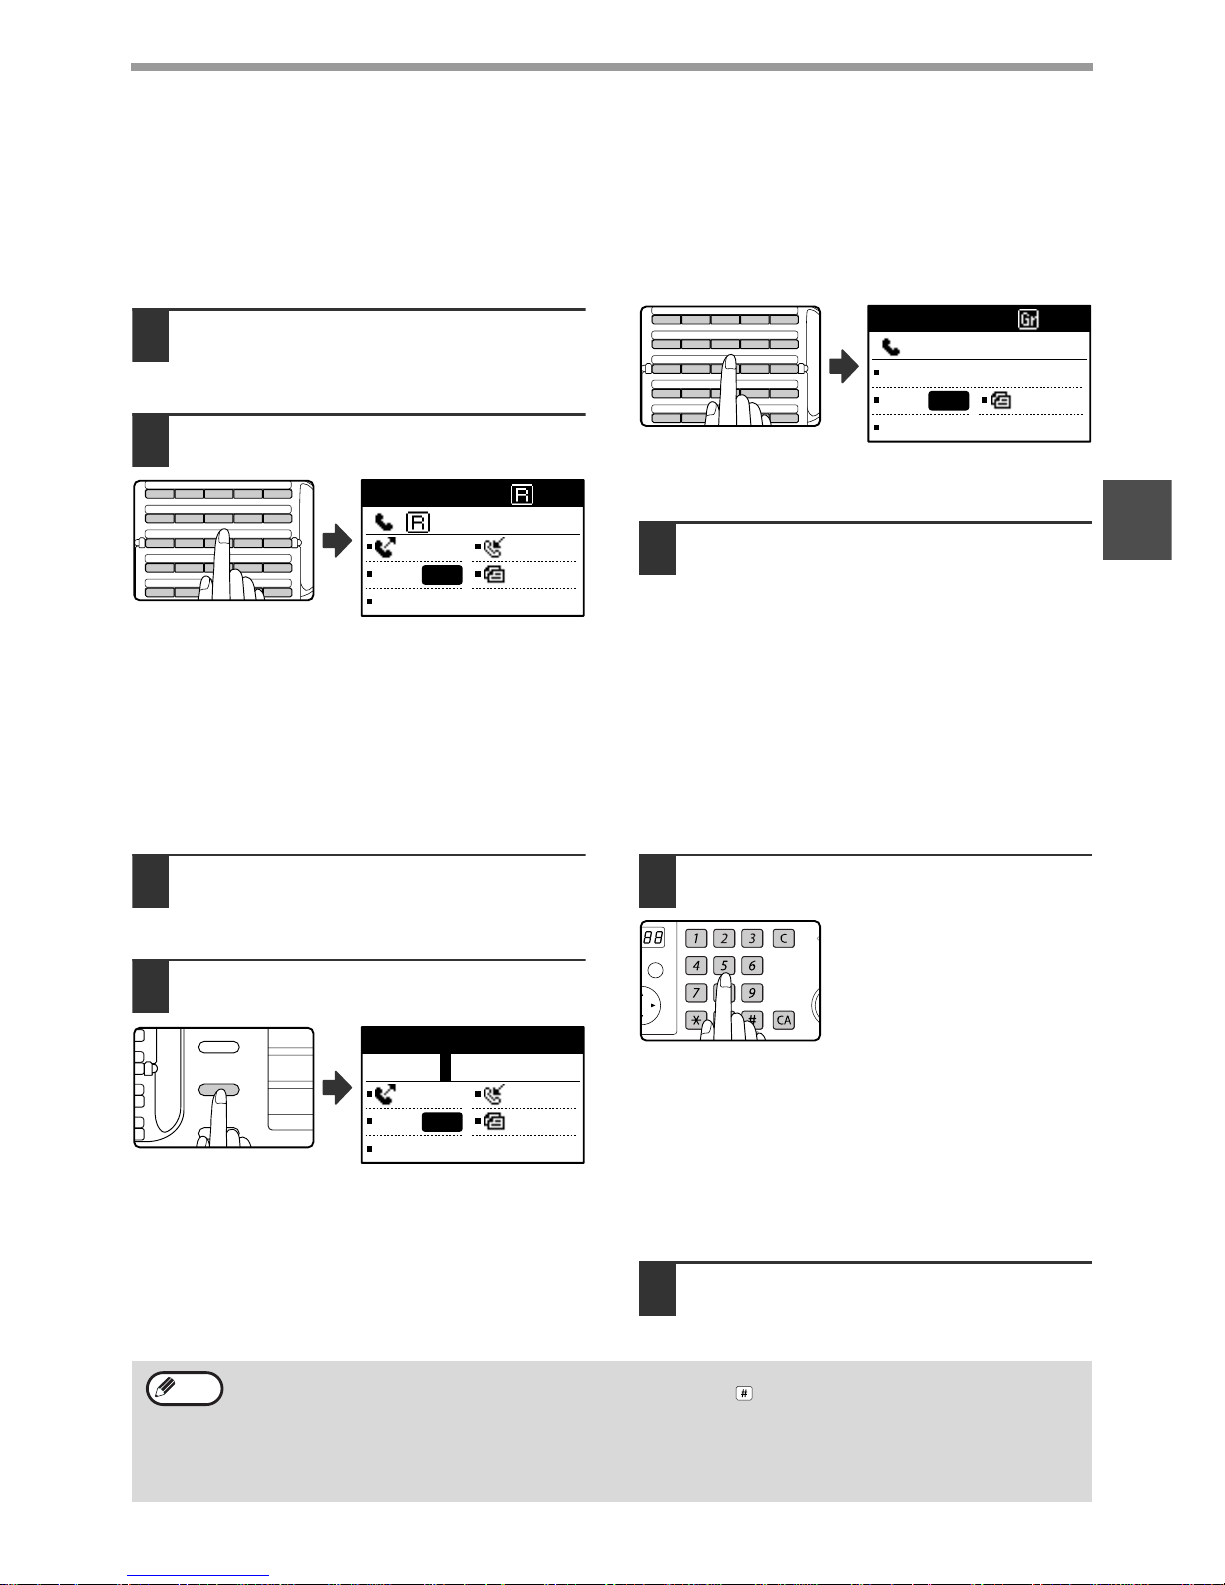
2
Press the Rapid key or group key for
the desired destination.
The name programmed for the destination ca n be
displayed by pressing the Rapid key.
The name programmed for the grou p can be displayed
by pressing the group key.
3
Continue from step 6 of "BASIC
PROCEDURE FOR SENDING FAXES"
(page 18).
If an original has been placed, scanning of the
original will begin automatically without the need
to press the [START] key in step 6 on page 18.
SENDING A FAX BY SPEED DIALLING
In addition to Rapid dialling and group dialling, you can also send a fax by pressing the [SPEED] key and entering a
3-digit Speed Dial number. Follow the steps below to send a fax by Speed Dialling. The 3-digit Speed Dial nu mber is
entered with the numeric keys when programmed. (See "STORING, EDITING, AND DELETING AUTO DIAL
NUMBERS AND PROGRAMS" on page 66.)
.
1
Perform steps 1 to 4 of "BASIC
PROCEDURE FOR SENDING FAXES"
(page 17).
2
Press the [SPEED] key.
The Speed Dial number
entry screen appears.
3
Enter the 3-digit Speed Dial number
with numeric keys.
• Enter the 3-digit Speed Dial
number entered when the
Speed Dial number was
programmed. (See step 7 of
"Storing Rapid keys and
Speed Dial numbers" on page
67.)
• If you make a mistake, press the [C] key and then
enter the correct number. If you enter a 3-digit
number that is not programmed in the machine,
press the [C] key and then enter the correct numb er.
If you do not know the Speed Dial number, print out
the "SPEED # LIST". (See "PRINTING LISTS OF
PROGRAMMED INFORMATION, SETTINGS, AND
COMMUNICATION ACTIVITY" on page 85.)
4
Continue from step 6 of "BASIC
PROCEDURE FOR SENDING FAXES"
(page 18).
46 47 48 49 50
41 42 43 44 45
36 37 38 39 40
31 32 33 34 35
26 27 28 29 30
ABCDE
FGHI J
KLMNO
PQRST
XXXXXX
: 1234567890
MEMORY AUTO
CONT A4R
STANDARD
AUTO
46 47 48 49 50
41 42 43 44 45
36 37 38 39 40
31 32 33 34 35
26 27 28 29 30
ABCDE
FGHI J
KLMNO
PQRST
XXXXXX
:0123456789
BROADCAST
CONT A4R
STANDARD
AUTO
SYMBOL
REDIAL/PAUSE
SPEED
COMM. SETTING
FAX
SCAN
PRINT
Enter SPEED #.
SPEED:
___
(000-299)
MEMORY AUTO
CONT A4R
STANDARD
AUTO
ABC DEF
JKLGHI MNO
TUVPQRS WXYZ
@.-
_
READ-END
ACC. #-C
OK
• To cancel transmission
To cancel transmission while "READING" appears or before the key is pressed, press the [C] or [CA] key. T o
cancel a transmission job that is already stored, press the [FAX STATUS] key and cancel the job as explained
on (page 25).
• A job number (3 digits) appears in the display with "READ END" when transmission is performed. If you make
a note of this number after performing a broadcast transmission, you can use the number to check the results
of the transmission in the transaction report or activity report.
Note
20
BASIC OPERATIONS
SEARCHING FOR A PROGRAMMED DESTINATION
(USING THE [ADDRESS] KEY)
At the time of dialling, you can enter letters to search for a destination stored in a Rapid key, Spe ed Dial nu mber, or
Group key.
1
Perform steps 1 to 4 of "BASIC
PROCEDURE FOR SENDING FAXES"
(page 17).
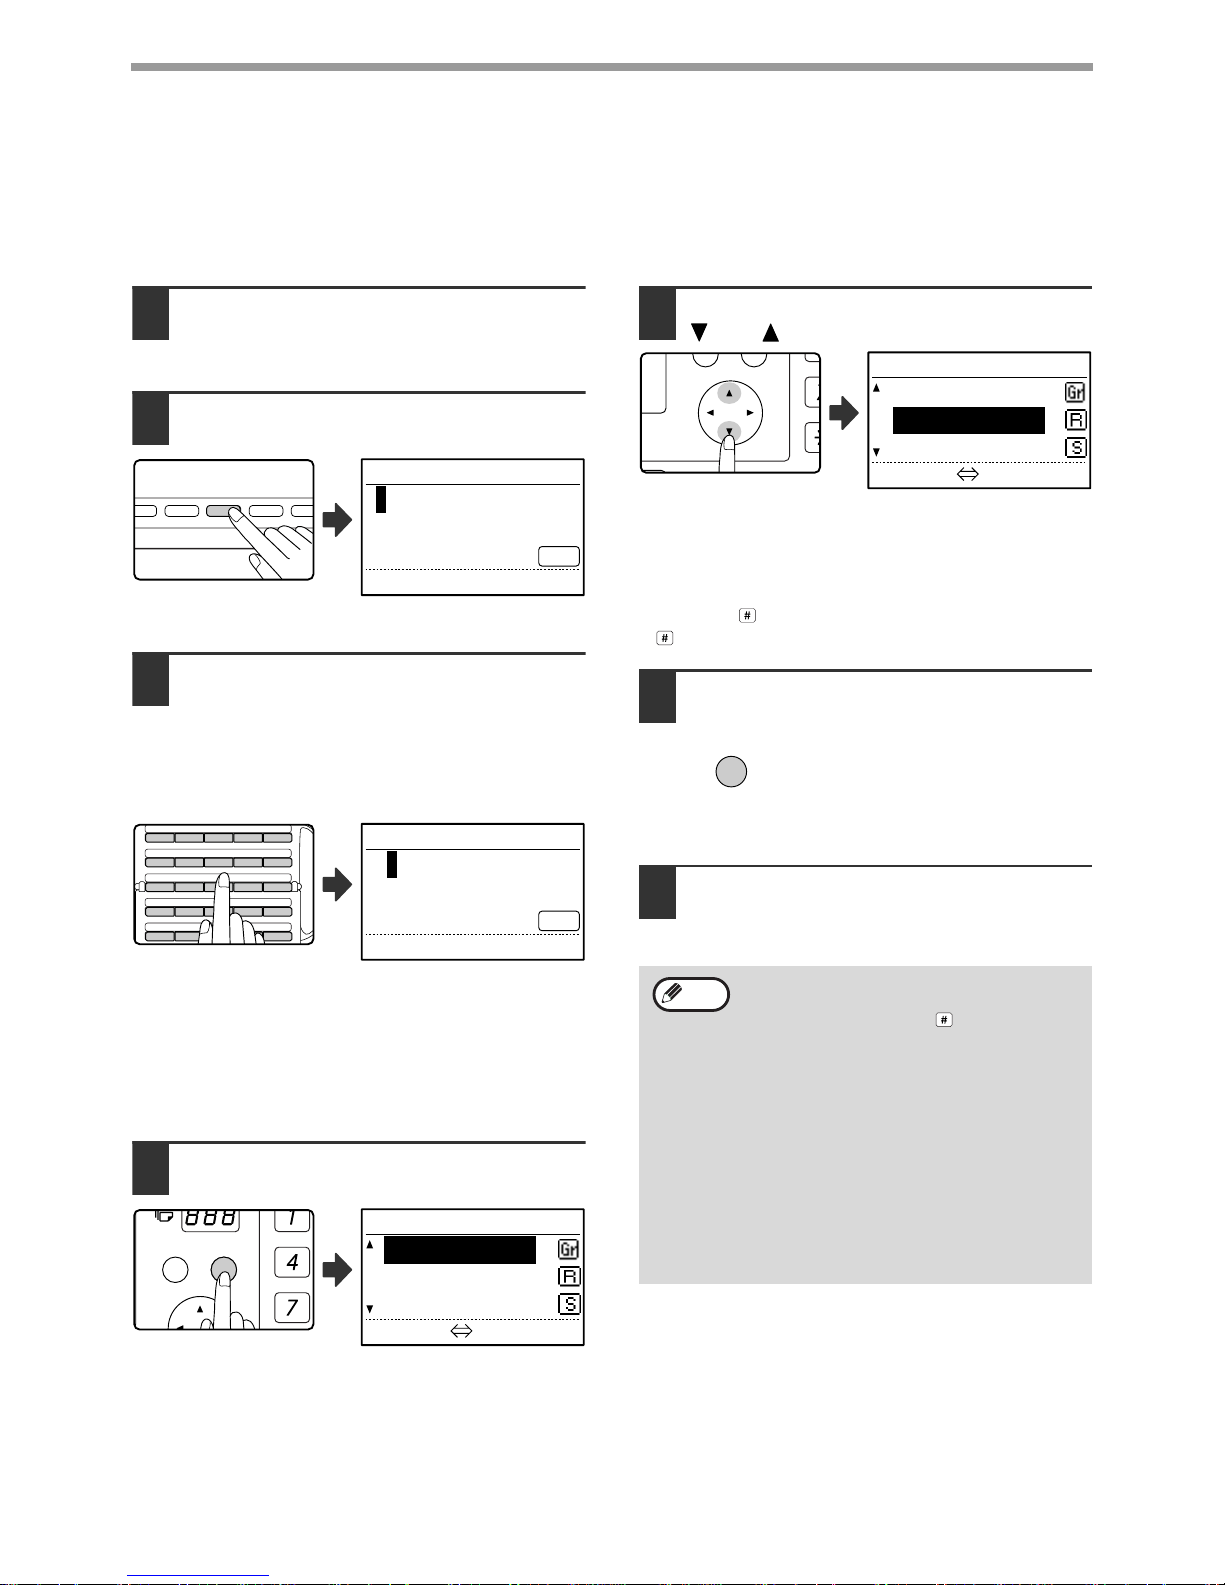
2
Press the [ADDRESS] key.
The search letter entry
screen appears.
3
Enter the search letters with the letter
entry keys (page palette) (you can
also skip entry of search letters and
go directly to the next step to display
the first destination in the address
list).
Up to 10 of the following types of characters can be
entered.
Upper case letters, lower case letters, numbers,
special characters (See "ENTERING CHARACTERS"
on page 86.)
Enter numbers with the numeric keys.
4
Press the [OK] key.
The address list appears.
5
Select the desired destination with the
[ ] or [ ] key.
• The search results appear in the following order:
upper case letters, lower case letters, special
characters, and numbers.
• If not all letters of the destination name appear,
press the key to display the full name. Press the
key once again to return to the original screen.
6
Press the [OK] key.
The selected destination is
entered.
7
Continue from step 6 of "BASIC
PROCEDURE FOR SENDING FAXES"
(page 18).
COPY RATIO
ADDRESS
ADDRESS
GRAM
PAPER SELECT
RESOLUTION
RESOLUTION
AUTO IMAGE
FORMAT
BROADCAST
OUTP
ORIGINAL
ORIGINAL
KEY WORDS
ABC
46 47 48 49 50
41 42 43 44 45
36 37 38 39 40
31 32 33 34 35
26 27 28 29 30
ABCDE
FGHI J
KLMNO
PQRST
KEY WORDS
A
[OK]:SEARCH
ABC
GHI
PQRS
BACK
OK
ADDRESS
Johnson
Parker
Stevens
[#]:LIST DETAIL
• To cancel transmission
To cancel transmission while "READING"
appears or before the key is pressed,
press the [C] or [CA] key. To cancel a
transmission job that is already stored,
press the [FAX STATUS] key and cancel
the job as explained on page 25.
• A job number (3 digits) appears in the
display with "READ END" when
transmission is performed. If you make a
note of this number after performing a
broadcast transmission, you can use the
number to check the results of the
transmission in the transaction report or
activity report.
PQ
ACC
ADDRESS
Johnson
Parker
Stevens
[#]:LIST DETAIL
OK
Note
21
BASIC OPERATIONS
2
FAXING A TWO-SIDED ORIGINAL
(MX-M182D/MX-M202D/MX-M232D)
Follow the steps below to automatically transmit both sides of a two-sided original. (This is only possible on models
that have an RSPF installed.)
1
Make sure that the machine is in fax
mode.
When the machine is in fax
mode, the [FAX] key indicator is
lit. If the indicator is not on, press
the [FAX] key. If auditing mode
has been enabled for the fax
function in the system settings, a
message will appear prompting
you to enter your account number when you switch to
fax mode. Enter your account number (five digits) with
the numeric keys. (See "ACCOUNT CONTROL" on
page 103.)
2
Place the original(s) in the document
feeder tray. (See "USING THE
SPF/RSPF" on page 12.)
3
Check the original size.
When the [ORIGINAL SIZE] key is pressed, the size selection
screen appears. If the original size was not correctly
detected, see "MANUALLY SETTING THE SCANNING
SIZE" (page 13) and set the correct original size.
4
Press the [DUPLEX SCAN] key.
The duplex mode
selection screen appears.
5
Select "2-SIDED" with the [ ] or [ ]
key.
6
Press the [OK] key.
The duplex original type
selection screen appears.
7
Select book or tablet for the duplex
original type with the [ ] or [ ] key.
8
Press the [OK] key.
You will return to the base screen and the duplex
scanning mode icon will appear.
9
Continue from step 4 of "BASIC
PROCEDURE FOR SENDING FAXES"
(page 17).
Do not use an original that is not a standard size (A3, B4, A4, A4R, A5, 8-1/2" x 11", 8-1/2" x 11"R (11" x 17",
8-1/2" x 14", 8-1/2" x 11", 8-1/2" x 11"R, A4, A4R if the machine uses inch-based paper sizes)).
Otherwise a scanning error or cut-off image may result.
Note
C
S
F
LINE
DATA
FAX
SCAN
DUPLEX SCAN
DUPLEX SCAN
2-SIDED COPYAUTO IMAGE
FORMAT
BROADCAST
OUTPUT
ORIGINAL SIZE
ORIGINAL SIZE
ORIGINAL SIZE
AUTO
A3
B4
AB
DUPLEX SCAN
DUPLEX SCAN
2-SIDED COPYMAGE
CAST
OUTPUT
ORIGINAL SIZE
ORIGINAL SIZE
DUPLEX SCAN
1-SIDED
2-SIDED
PQ
ACC
DUPLEX SCAN
1-SIDED
2-SIDED
GHI
PQRS
BACK
OK
DUPLEX SCAN
BOOKLET
• Booklets and tablets
T w o-sided originals that are bound at the side are booklets, and two-sided originals
that are bound at the top are tablets.
• Duplex scanning is cancelled when the transmission is completed, or when the
[CA] key is pressed.
•
Duplex scanning of tw o-side d originals is o nly possi b le wh en an RS PF is used . A uto matic
scanning of both sides of an original is not possib le when the document glass is used.
•
Automatic scanning of both sides of an original longer than A3 (11" x 17") is not possible.
•
The image of the back side of the original is rotated 180 degrees if needed at the time of
transmission, and thus there is no need to change the orientation at the receiving machine.
• To cancel duplex scanning, select "1-SIDED" in step 5 and then press the [OK] key.
• When duplex scanning is enabled, dual page scan (page 42) cannot be enabled.
Note
Booklet Tablet
22
BASIC OPERATIONS
Transmission settings (memory transmission mode and direct
transmission mode)
Transmission modes include memory transmission, where the original is temporarily scanned into memory before
transmission, and direct transmission, where the original is transmit ted directly without being scanned into memory.
There are two types of memory transmission: "Storing a transmission" (page 23), where all pages of the original are
scanned into memory before transmissio n begin s, a nd "Qu ick online transmission" (page 24), where the destination
is dialled after the first page is scanned and the remaining pages are transmitted as they are scanned.
During a memory transmission, it may happen that the memory becomes full while the originals are being scanned.
(See "If the memory becomes full during transmission of a stored transmission job" on page 23 and "If the memory
becomes full during a quick online transmission" on page 24.) The number of pages that can be stored in memory
varies depending on the content of the pages, the transmission settings, and whether memory has been added.
If there are too many pages and memory tran smission is not possible, you can press the [COMM. SETTING] key to
switch from memory transmission to direct transmission. When direct transmission is used, transmission begins after
the current job is completed, allowing you to give priority to a transmission job. As such, direct transmission is a
convenient means of performing an interrup t transmission whe n there ar e a large number of stored transmission job s.
To switch between memory transmission and direct transmission, see the following "Faxing by direct transmission".
Faxing by direct transmission
1
Perform steps 1 to 4 of "BASIC
PROCEDURE FOR SENDING FAXES"
(page 17).
2
Press the [COMM.SETTING] key
The communication settings
screen appears.
3
Select "TX" with the [ ] or [ ] key.
4
Press the [OK] key.
5
Select "DIRECT TX" with the [ ] or
[ ] key.
6
Press the [OK] key.
7
Dial the fax number.
Group dialling cannot be used.
When transmission is performed manually using an extension phone connected to the machine or using on-hook
dialling, direct transmission is automatically selected. (Memory transmission is not possible.)
Note
The communication settings screen can
also be displayed from the function selection
screen.
Press the [SPECIAL FUNCTION] key to
display the special function selection
screen, select "COMM. SETTING" with the
[ ] or [ ] key, and press the [OK] key.
SYMBOL
SPACE/–
SPEED
COMM. SETTING
FAX
SCAN
Note
PQ
ACC
COMM. SETTING
TX
RX
GHI
PQRS
BACK
OK
SELECT SENDING
MEMORY TX
DIRECT TX
OK
ABC DEF
JKLGHI MNO
TUVPQRS WXYZ
@.-
_
READ-END
ACC. #-C
OK
23
BASIC OPERATIONS
2
8
Press the [START] key.
When using the document
glass, multiple original pages
cannot be transmitted in a
single transmission.
Faxing by manual transmission (using the [SPEAKER] key)
1
Perform steps 1 to 4 of "BASIC
PROCEDURE FOR SENDING FAXES"
(page 17).
2
Press the [SPEAKER] key
When this key is pressed, a message regarding
volume adjustment will appear briefly followed by the
dial entry screen. You can adjust the speaker volume
(high, middle, or low) by pressing the [ ] or [ ] key.
Note that this will not change the volume setting in the
system settings. Ringing will be heard from the
speaker on the left side of the machine (toward the
back) when the [SPEAKER] key is used for dialling.
3
Perform steps 7 and 8 of "Faxing by
direct transmission" (page 22 to 23).
Storing transmission jobs (memory transmission)
When the line is in use, the transmission job is temporari ly stored in memory. When the current job and any
previously stored jobs are completed, transmission begins automatically. (Thi s is called memo ry tr ansmission.) T his
means that transmission jobs can be stored in me mory by p erform ing a tran smission o peration while the mach ine is
occupied with another transmission/reception operation. Up to 50 jobs can be stored in memory at once. After
transmission, the scanned document data is cleared from memory. You can check transmission jobs stored in
memory in the fax job status screen. (Page 26) Note that depending on the number of pages stored in memory and
the transmission settings, it may not be possible to store 50 jobs in memory.
• The procedure for storing a transmission job is the same as the procedure in "BASIC PROCEDURE FOR
SENDING FAXES" on page 17.
• If you have not yet pressed the [START] key ( ), you can cancel a transmission job by pressing the [C] key.
•
If you have already pressed the [START] key
()
, see "Cancelling a stored transmission job" (page 26). If the
original is still being scanned after the [START] key
()
is pressed, you can press the [C] key to cancel the
transmission.
•
If you store a transmission job in direct transmission mode, you will not be able to store any further transmission jobs.
After transmission, the scanned document data is cleared from memory. You can check transmission jobs stored in
memory in the fax job status screen. (Page 26)
If the memory becomes full during transmission of a stored transmission job
If the memory becomes full while scanning the first page of a document, the transmiss ion job is auto matically c ancelled.
If the memory becomes full while scanning the second page or a following p age, scanning stops. In this case, you
can either press the [C] key to cancel the transmissio n, or press the [OK] key to transmit only those pages which
were completely scanned.
_
• To change from "Direct Transmission"
back to "Memory Transmission", select
"MEMORY TX" in step 5.
• To cancel a direct transmission, press the
[C] key.
Note
SHIFT
SPEAKER
REDIAL/PAUSE
PRINT
COPY
ENTER DIAL #
:
MANUAL AUTO
CONT
STANDARD
AUTO
• To cancel dialling using the [SPEAKER]
key when you need to redial the number
or because transmission was interrupted,
press the [SPEAKER] key once again.
• As the original is not stored in memory
when direct transmission and manual
transmission are used, the following
functions cannot be used.
Broadcast transmission (page 31), timer
transmission (page 33), F-code relay
broadcast transmission (page 63), redial
(page 107), image rotation (page 105),
duplex scanning, dual pages, and others.
• When a fax is sent by direct transmission
or manual transmission, the fax is sent
after the connection with the receiving
machine is established.
Note
24
BASIC OPERATIONS
Quick On-line
When you use the SPF/RSPF to send a multi-page document and there are no previously stored jobs waiting or in
progress (and the line is not being used), the machine dials the destinat ion after the first page is scanne d and begins
transmitting scanned pages while the remaining pages are being scanned. This transmission method is called Quick
On-line. When a quick online transmission is being performed, the message display shows "READING" "DIALLING" - "COMM." - "SENDING" in that order until scanning of the remaining pag e s is com ple te d. When all
pages have been scanned, "READ END" appears before the above messages appear.
If the receiving party is busy, the quick online transmission will change into a stored transmission job (memory
transmission). (See "Storing transmission jobs (memory transmission)" on page 23.)
If the memory becomes full during a quick online transmission
If the memory becomes full while scanning the first page of a document , the transmission job is automatically
cancelled. If the memory becomes full while scanning the second page o r a following page, t hose pages which were
completely scanned will be transmitted.
If the receiving party is busy
If the receiving party is busy, the transmission is temporarily cancelled and then automatically re-attempted after a
brief interval. (Two attempts are made at an interval of 3 minutes.*
1 *3
)
If you do not want the machine to re-attempt the transmission, press the [FAX STATUS] key and cancel the job.
(Page 26)
*1 The settings can be changed in the system settings. (See "RECALL SETTING (BUSY)" on page 106.)
*3 Varies depending on country and region.
If a transmission error occurs
If an error occurs that prevents transmission or the receiving machine does not answer the call within 45 seconds*2 *3,
the transmission is stopped and then automatically re-attempted later. One attempt is made at an interval of 1
minute.*
2
) If you do not want the machine to re-attempt the transm ission, press the [FAX STATUS] key and cancel t he
job. (Page 26) This machine also supports error correction mode (ECM) and is set to automatically resend any part of
a fax that is distorted due to noise on the line.
*2 The settings can be changed in the system settings. (See "RING TIMEOUT IN AUTO TX" (page 10 7) and
"RECALL SET (ERR)" (page 107).)
*3 Varies depending on country and region.
Image rotation
The machine is initially set to rotate a vertically-placed ( ) document 90° so that it is oriented horizontally ( )
before transmission (A4 (8-1/2" x 11") originals are rotated to A4R (8-1 /2" x 11"R) and A5R originals are rotated to
A5). A4R (8-1/2" x 11"R) originals and A5 originals are not rotated. In Taiwan, B5R originals are also rotated to B5
(however, B5 originals are not rotated). If desired, you can disable the rotation function in the system settings as
explained on "ROTATE TX" (page 105).
The machine is initially set (factory setting) to perform Quick On-line transmission. If desir ed, you can di sable this
function in the system settings. (See "QUICK ON LINE TX" on page 106.) When an original is transmitted using
the following methods, the job will be stored in memory. (Quick On-line transmission will not be performed.)
• Sending a fax from the document glass.
• Broadcast transmission (page 31)
• Timer transmission (page 33)
• F-code transmission (page 52 in Chapter 4)
Place A5 size originals so that they are oriented vertically ( ). If oriented horizontally, ( A5R orientation), press
the [ORIGINAL SIZE] key and specify the correct original size (select "A5R") (See "MANUALLY SETTING THE
SCANNING SIZE" on page 13.)
Note
Note
25
BASIC OPERATIONS
2
CANCELLING A FAX TRANSMISSION
To cancel a transmission that is in progress or a stored transmission job, follow the steps below. A transmission in
progress or a stored transmission job is cancelled from the fax status screen. (P rinting of a received fax cannot be
cancelled.)
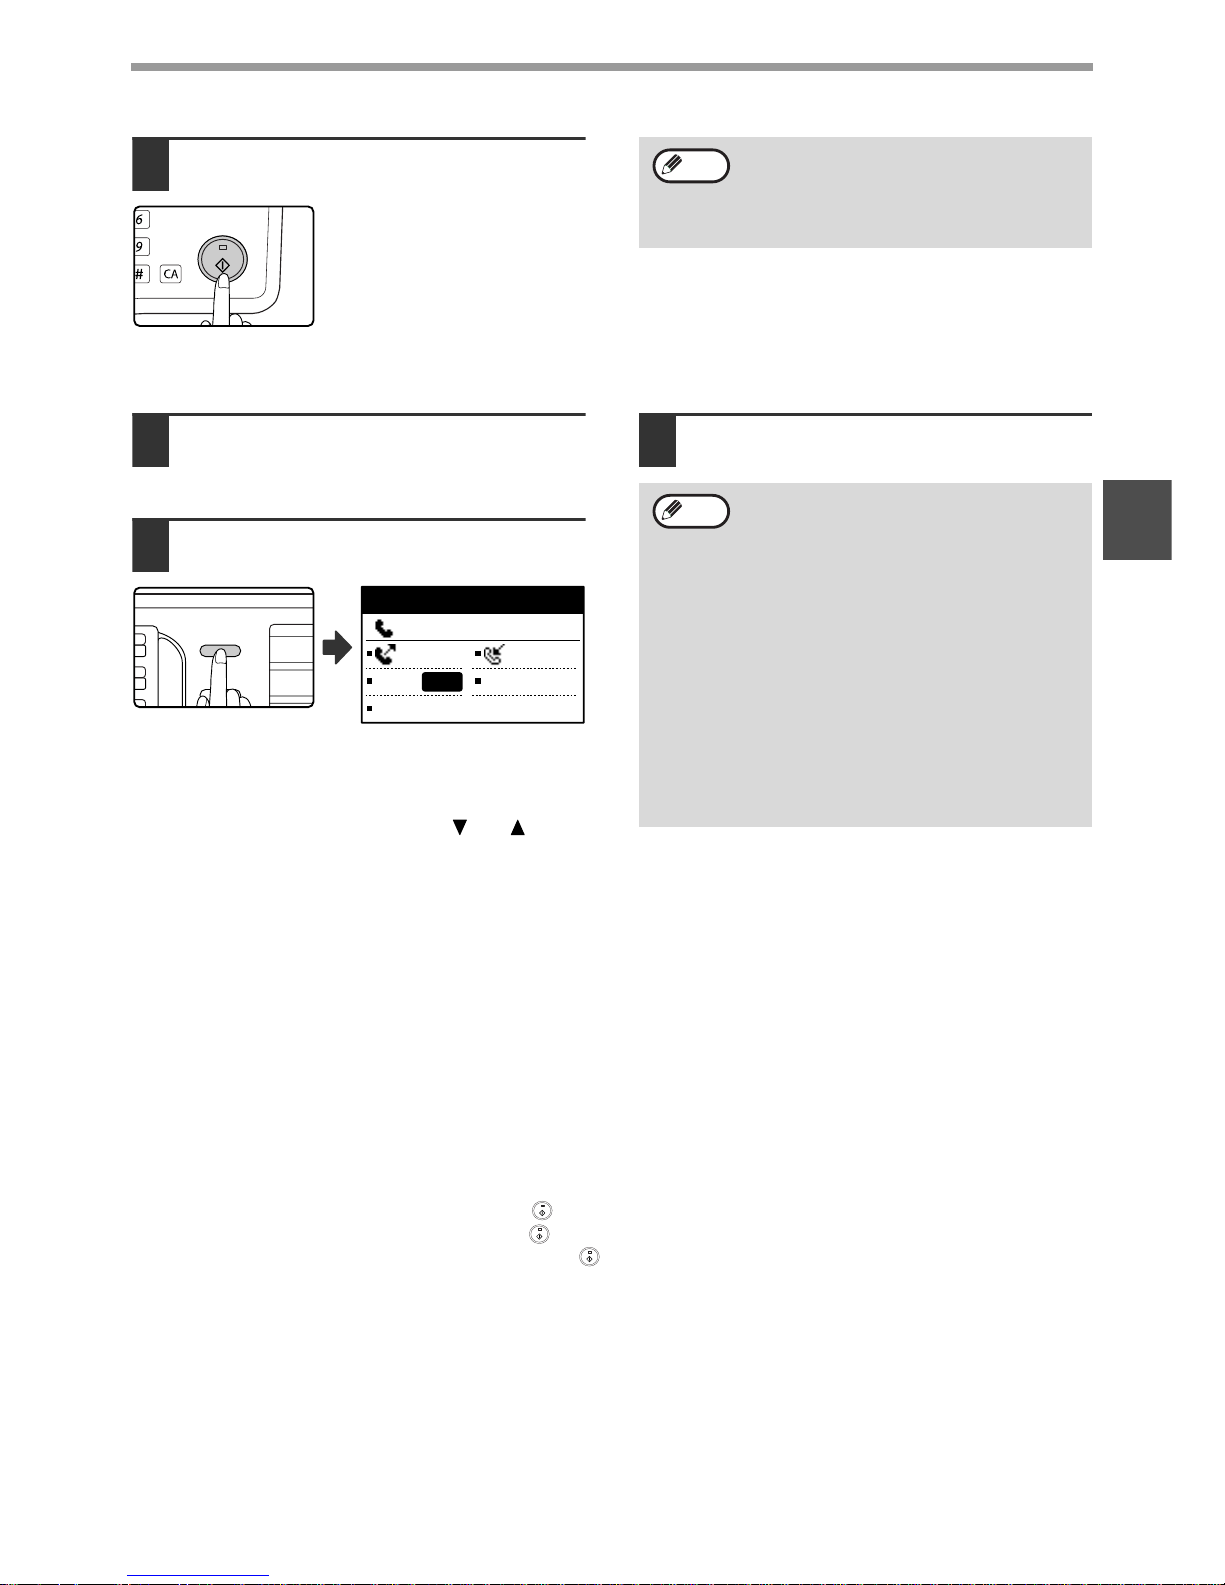
Cancelling a fax transmission
1
Press the [FAX STATUS] key.
• When a transmission is in progress, the job being
transmitted is displayed.
• If the displayed job is not the job that you wish to
cancel, it is likely that the job to be cancelled is a
stored job waiting for transmission. Press the
[BACK] key to display the fax status selection screen
and then follow the procedure in "Cancelling a stored
transmission job" on page 26 to cancel the job.
2
Press the [C] key.
A screen asking you to
confirm cancellation of
the transmission
appears.
3
Press the [OK] key.
The transmission is cancelled.
To cancel a transmission while the original is being scanned ("READING" appears in the message display) or
before the key is pressed ([READ-END] key ( ) when scanning the original from the document glass), the
[C] or [CA] key can be pressed.
Note
When a transmission is not in progress, the
following fax status selection screen
appears.
SPECIAL
FUNCTION
FAX STATUS
DATA
ON LINE
COMM.
0123456789
MEMORY TX
No.XXX
Note
FAX STATUS
TX/RX JOBS
TX/RX RESERVE
TX/RX COMPLETED
DEF
MNO
INTER
Job cancelled.
YES
NO
• If you do not wish to cancel the
transmission, press the [ ] key in the
screen of step 2, select "NO", and press
the [OK] key.
• You can check cancelled operations in the
Activity Report. "CANCEL" will appear in
the "TYPE/NOTE" column of the report.
Additional information on the display
during transmission
(A) Destination name
The name of the destination appears if
programmed.
(B) Transmission method name
In the case of a timer transmission, the
timer icon " " appears at the beginning
of the transmission method name.
(C) Number of pages currently transmitted
Appears during sending.
(D) Document number
The document number assigned at the
time of scanning in memory
transmission mode appears.
GHI
PQRS
BACK
OK
Note
COMM.
0123456789
MEMORY TX
P-XXX No.XXX
(A)
(B)
(C) (D)
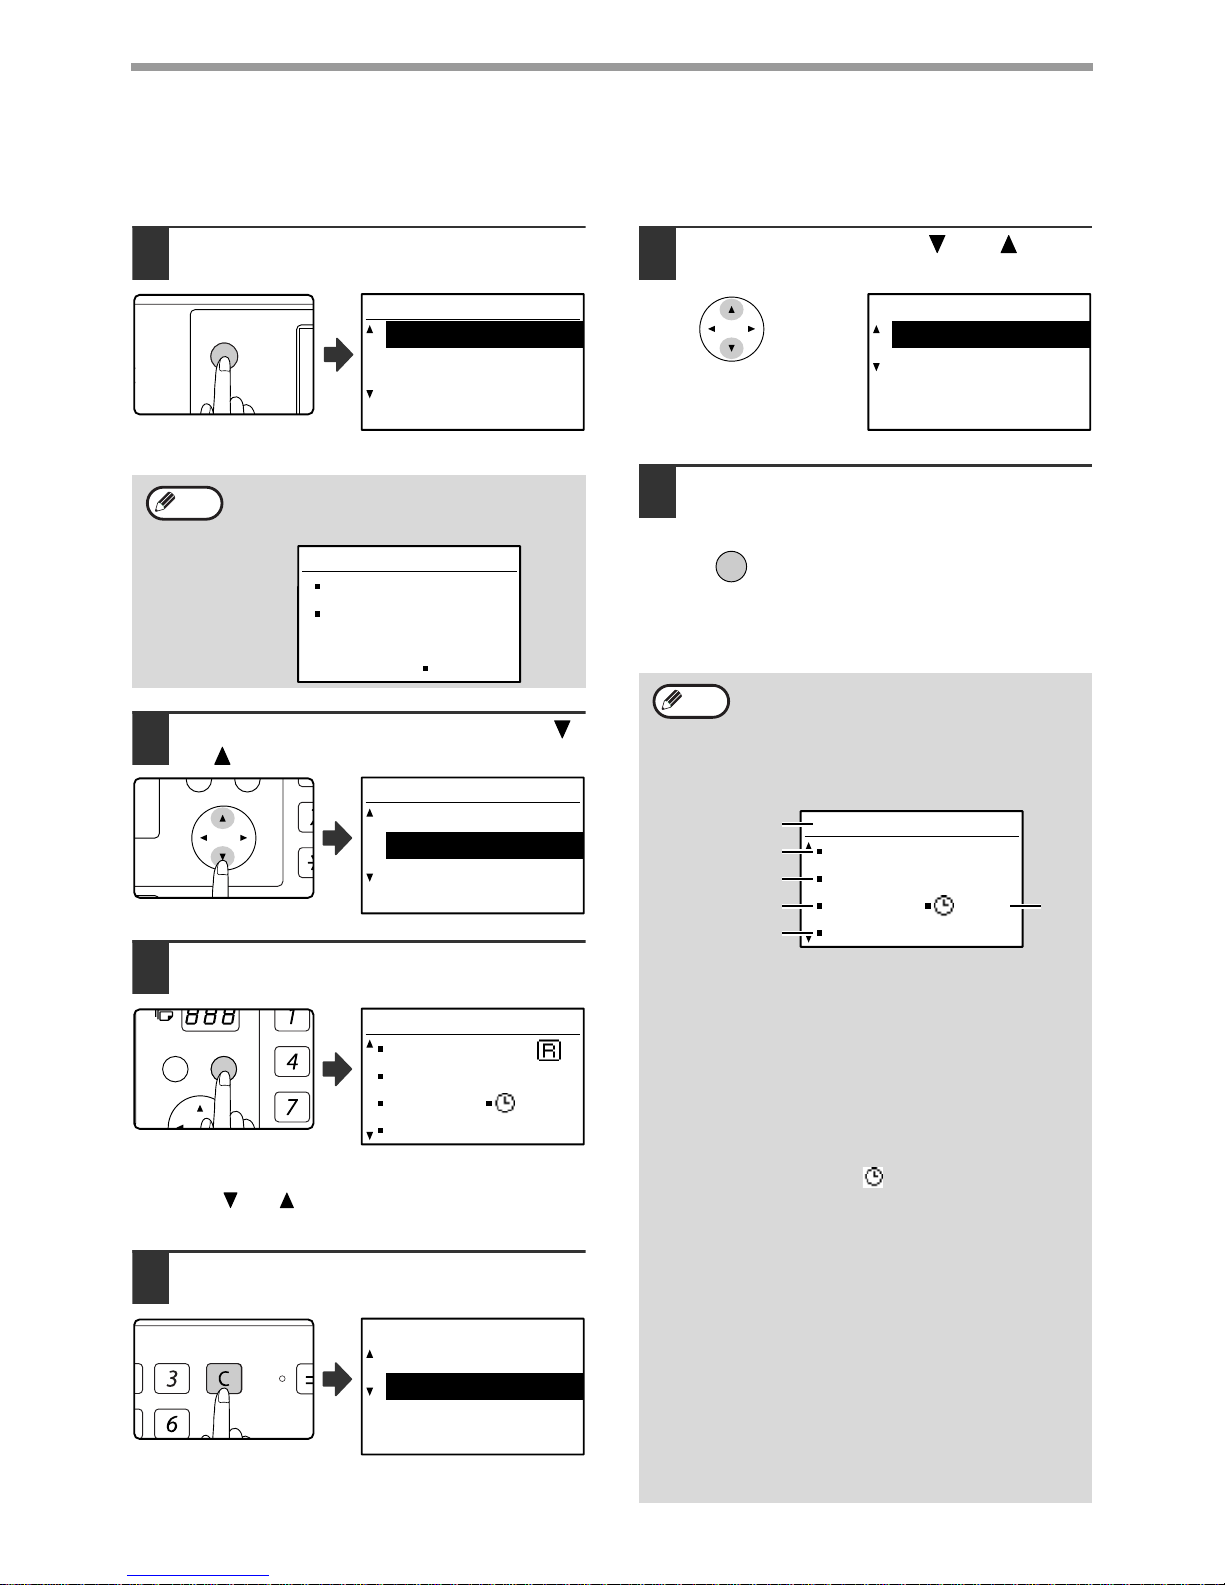
26
BASIC OPERATIONS
Cancelling a stored transmission job
If you do not wish to cancel a stored transmission job and only wish to check its status, press the [BACK] key instead
of the [C] key in step 4 to exit.
1
Press the [FAX STATUS] key.
The fax job status screen
is displayed.
2
Select "TX/RX RESERVE" with the [ ]
or [ ] key.
3
Press the [OK] key.
The first stored
transmission job appears.
Press the [ ] or [ ] key until the transmission job that
you wish to cancel appears.
4
Press the [C] key.
The transmission cancel
confirmation screen
appears.
5
Select "YES" with the [ ] or [ ] key.
6
Press the [OK] key.
The selected transmission job is
cancelled.
If you wish to cancel another transmission job, repeat
steps 1 through 6.
When a transmission is in progress, the job
being transmitted is display ed. Press the [BA CK]
key to display the fax status selection screen.
SPECIAL
FUNCTION
FAX STATUS
DATA
ON LINE
FAX STATUS
TX/RX JOBS
TX/RX RESERVE
TX/RX COMPLETED
Note
COMM.
0123456789
SERIAL POLL MODE
/XXX
PQ
ACC
FAX STATUS
TX/RX JOBS
TX/RX RESERVE
TX/RX COMPLETED
GHI
PQRS
BACK
OK
WAITING XXX/XXX
SBC Co.
TX/RX RESERVE
P-XXX No.XX
09:55
DEF
MNO
INTER
Job cancelled.
YES
NO
You can check cancelled recall mode jobs in
the Activity Report. "CANCEL" will appear in
the "TYPE/NOTE" column of the report.
Contents of the stored job screen (screen of
step 3)
(A) Current status
"WAITING" will appear next to stored
transmission jobs and timer transmission
jobs. "RECALL" will appear next to recall
mode jobs.
(B) Destination
The name of the destination appears if
programmed.
(C) Transmission method name
In the case of a timer transmission, the
timer icon " " appears at the beginning
of the transmission method name.
(D) Number of pages stored
In the case of a stored transmission job,
the document number assigned at the
time of scanning appears.
(E) In the case of a timer transmission, the
timer job number appears.
(F) In the case of a timer transmission, the
timer job number appears. "Prepared"
will appear for a stored transmission job.
Status of completed jobs
To check the status of completed jobs,
select "TX/RX COMPLETED" in step 2 and
press the [OK] key in step 3.
Job cancelled.
YES
NO
OK
Note
WAITING XXX/XXX
01234
TX
P-XXX No.XX
XX:XX
(B)
(C)
(A)
(D)
(F)
(E)
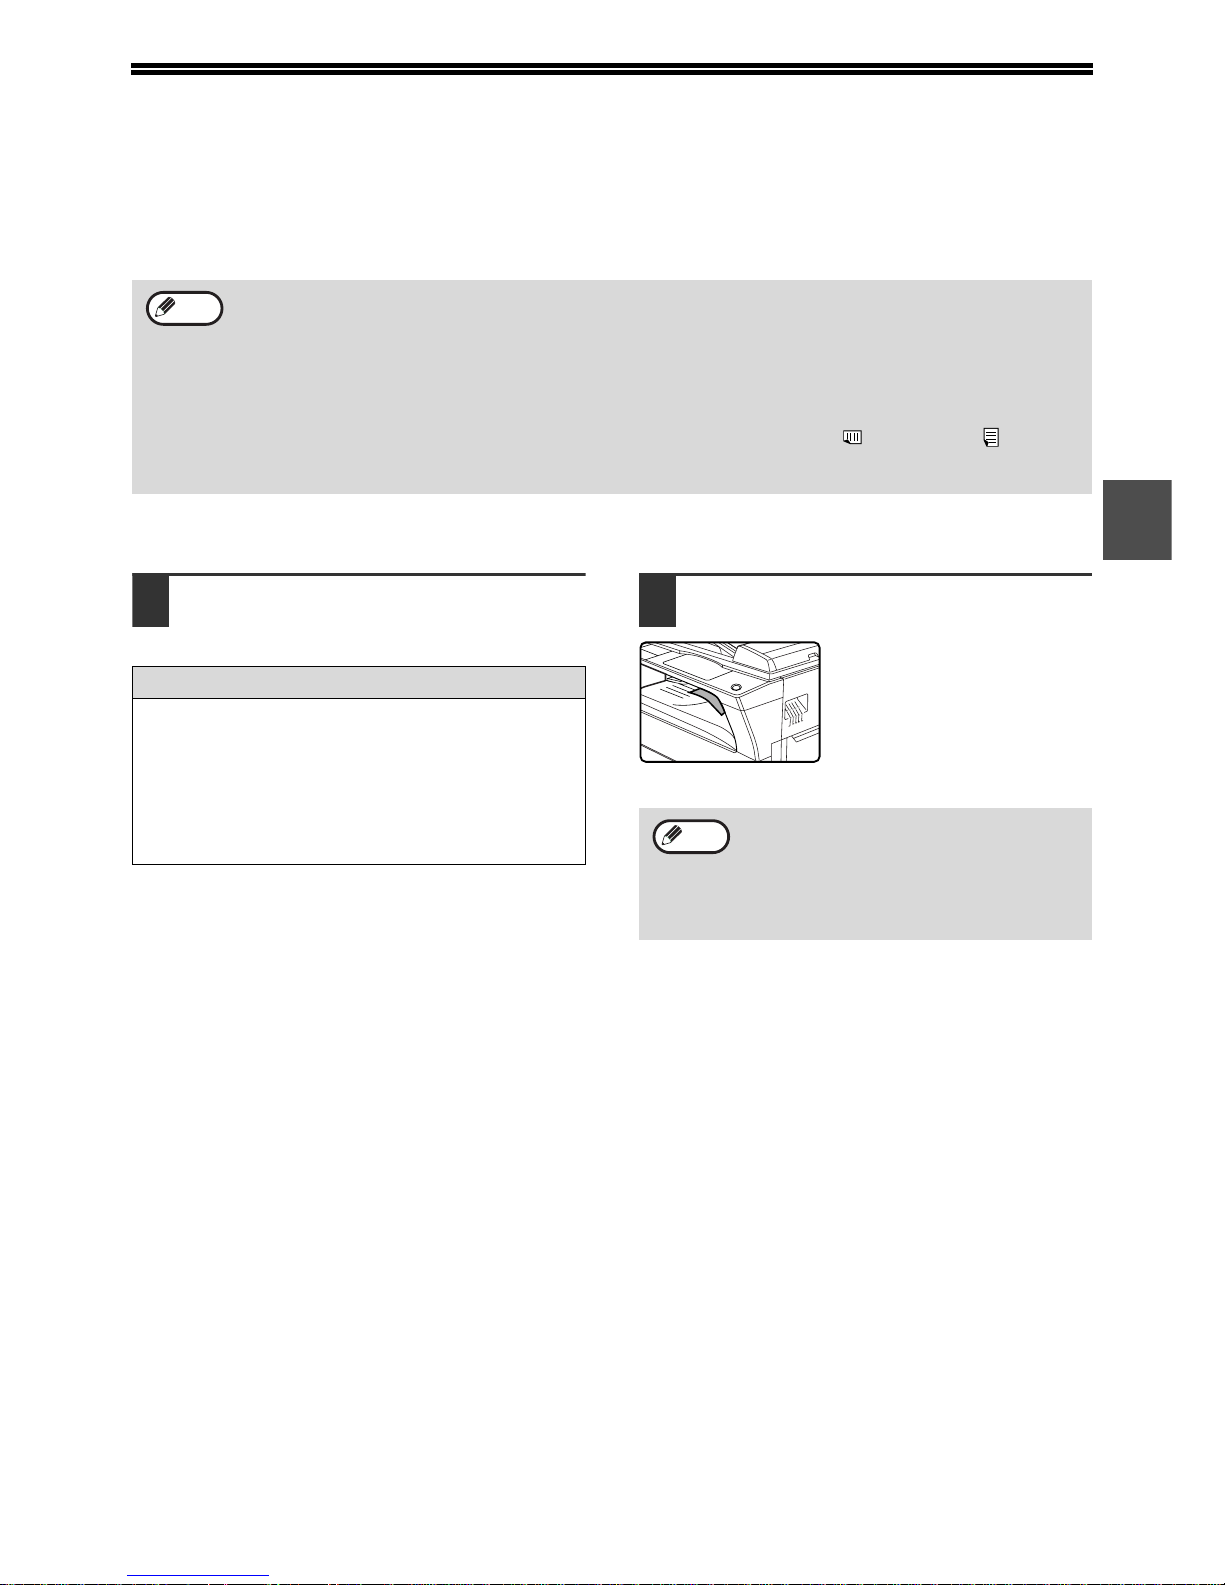
27
2
RECEIVING FAXES
When another fax machine sends a fax to your machine, your machine will ring*, automatically receive the fax, and
begin printing. (This is called automatic reception.)
If you do not wish to have received faxes printed immediately, use the print hold function to hold received faxes in
memory for printing at your convenience (all received faxes will be printed at once). To enable this function and print
received faxes, see "FAX PRINT HOLD FUNCTION" on page 29.
RECEIVING A FAX
1
The machine will ring* and reception
will automatically begin.
The LINE indicator lights up.
2
Reception ends.
• When reception ends, the
machine sounds a beep.
• When the optional job
separator tray kit is installed,
received faxes are output to
the job separator.
Earlier output of received data
If a fax cannot be printed because the machine is out of the appropriate paper and another fax is subsequently
received that can be printed, the subsequently received fax will be printed before the fax that cannot be printed.
This also happens when there are several faxes in memory that cannot be printed.
This function can be disabled in the system settings. (See "EARLIER OUTPUT" on page 110.)
• You can store a transmission job while fax reception is in progress. (See "Storing transmission jobs (memory
transmission)" on page 23.)
• To print received fax pages on both sides of the paper, enable "DUPLEX RECEPTION" (page 109) in the
system settings.
• If a extension phone is not connected to the machine, use automatic reception.
• In order to receive faxes, paper must be loaded in the paper tray. See "LOADING PAPER" in the Operation
Guide for the machine to load appropriate paper. Incoming faxes will be automatically adjusted to the
orientation of the printing paper, so there is no need to load both horizontally ( ) and verticall y ( ) oriented
paper. However, when a fax smaller than A4 (8-1/2" x 11") is received, the size of paper used to print the fax
will differ depending on the orientation (horizontal or vertical) of the original in the sending machine.
Note
*Number of rings
The machine has been set to ring twice before
beginning automatic reception. You can change the
number of rings to any number from 0 to 9 in the
system settings. (See "#OF RINGS AT. RX" on
page 108.)
If the number of rings is set to 0, the machine will
receive faxes without ringing.
The job separator has a sensor that detects
when a tray is full. When approximately 100
sheets accumulate in a tray, a message
appears in the display and fax printing stops.
If this happens, remove the sheets. Printing
will resume momentarily.
Note

28
BASIC OPERATIONS
F-code confidential fax reception
When a fax has been received by F-code confidential fax reception, an icon ( ) will appear in the base screen of
fax mode (message display (1) on page 9). The icon also appears in front o f the box in the F-code confidential box
name screen in the display. (Step 6 on page 61) Print the received fax as explained in "PRINTING A DOCUMENT
RECEIVED TO AN F-CODE CONFIDENTIAL MEMORY BOX" (page 61).
If received data cannot be printed
If the machine runs out of paper or toner, or a paper misfeed o ccu rs, or if the machine is pr int ing a print or copy job ,
received faxes will be held in memory until printing becomes possible. The received faxes are automatically printed
when printing is possible. When received faxes are held in memory, the DATA indicator at the upper right of the
[FAX] key blinks. You can also use the forwarding function to have another fax machine print the received faxes.
(See "FORWARDING FUNCTION" on page 49.)
In order to receive faxes, paper must be loaded in the paper tray. Load appropriate paper as explained in
"LOADING PAPER" in the Operation Guide for the machine. The difference between vertically and horizontally
oriented A4 and A4R paper (8-1/2" x 11" and 8-1/2" x 11"R paper), is automatically adjusted at the time of
reception, so there is no need to load paper in both orientations. Howev er, when a fax smaller than A4 (8-1/2" x
11") is received, the size of paper used to print the fax will differ depending on the orientation (horizontal or
vertical) of the original in the sending machine.
• If you wish to use A5 (5-1/2" x 8-1/2") paper to receive faxes, load A5 (5-1/2" x 8-1/2") paper in tray 1 of the
machine and set the paper size to A5 (5-1/2" x 8-1/2"). Only tray 1 can be set to A5 (5-1/2" x 8-1/2") size.
• If you receive a fax that is larger than the loaded paper, the system setting uses "RECEIVED DATA PRINT
CONDITION" on page 109 to print it out in the following manner:
If "REDUCTION" is set up, the image is automatically reduced before printing.
*1
If "DIVISION" is set up, the image is split onto multiple sheets of paper and printed on them at actual size.
*1
If "ACTUAL SIZE" is set up, the image is printed at actual size without being split.
*2
*1 If the loaded paper is of the B5 size or less, the received image may not be printed depending upon the
width and length of the image data.
*2 The received image won't be printed until you load the paper larger than the actual size.
• In fax mode, printing is not possible on 11" x 17", 8-1/2" x 14", 5-1/2" x 8-1/2" sizes. (Among INCH sizes, only
8-1/2" x 11" and 8-1/2" x 11"R can be used for printing.) (If your machine uses inch-based paper sizes, A3, B4,
B5, B5R, and A5 size paper cannot be used in fax mode. (Among AB sizes, only A4 and A4R can be used for
printing.))
• If the paper runs out while a fax is being printed, printing will automatically continue using the closest size of
paper in another tray.
• If you change the size of paper loaded in a tray, change the tray's paper size setting.
• Faxes cannot be printed correctly if the actual paper size is different from the paper size setting. Be sure to set
the tray's paper size setting to the same paper size as the paper loaded in the tray. For example, if y ou receiv e
an A3 (11" x 17") size fax when B4 (8-1/2" x 14") paper is loaded in the tray and the tray's paper size setting is
A3 (11" x 17"), the fax will be printed on B4 (8-1/2" x 14") paper and part of the image may be cut off If the
paper loaded in the tray is larger than the paper size setting, paper larger than the recognized fax size will be
used. (A message prompting you to check the tray's paper size setting will appear.)
• Received faxes cannot be printed on paper inserted in the bypass tray.
Note
 Loading...