

ENGLISH
SHARP CORPORATION
22-22 Nagaike-cho, Abeno-ku, Osaka 545-8522, Japan
In Europe represented by Sharp Electronics (Europe) Ltd.
4 Furzeground Way, Stockley Park
Uxbridge, Middlesex, UB11 1EZ, U.K.
http://www.sharp.eu
LC-32LD135V
LCD COLOUR TELEVISION
LCD ЦВЕТЕН ТЕЛЕВИЗОĞ
BARVNI LCD TELEVIZOR NAVODILA ZA UPORABO
FAREBNÝ LCD TELEVÍZOR NÁVOD NA OBSLUHU
OPERATION MANUAL
ĞЪКОВОДСТВО ЗА УПОТĞЕБА
БЪЛГАРСКИ
SLOVENŠČINA
SLOVENČINA
50232090
Contents
Safety Precautions ................................................. 1
Environmental Information ..................................... 2
TV - Features ......................................................... 3
Viewing the TV ...................................................... 3
TV Control button & Operation ............................... 3
Accessories included .............................................. 3
Viewing remote control ........................................... 4
Using a Conditional Access Module ....................... 6
Standby Notications .............................................. 6
Installing the Batteries to the Remote..................... 7
Connect Power & Antenna/Cable ........................... 7
Switching On/Off ..................................................... 7
First Time Installation.............................................. 7
Media Playback via USB Input ............................... 9
Changing Image Size: Picture Formats .................. 9
Using the Channel List ........................................... 9
Menu Features and Functions .............................. 10
Electronic Programme Guide (EPG) .................... 13
Recording a Programme ...................................... 13
Timeshift Recording ............................................. 14
Instant Recording ................................................. 14
Watching Recorded Programmes ....................... 14
Recording Conguration ....................................... 14
Teletext ................................................................. 15
Software Upgrade................................................. 15
Troubleshooting & Tips ......................................... 15
PC Typical Display Modes ................................... 16
Specications .............................................................17
Licence Notications............................................. 17
Supported File Formats for USB Media Browser ... 18
Supported DVI Resolutions .................................. 19
Safety Precautions
Please read these instructions fully
before installing or operating.
Preparation
Place the device on a solid even surface. For ventilation,
leave a free space of at least 10 cm all around the set.
To prevent any fault and unsafe situations, do not place
any objects on top of the set. Use this device in moderate
climates.Operation temperature and operation humidity:
5ºC up to 45ºC, 85% rel. humidity max. (not blocking
ventilation openings).
Intended Use
This device is used to receive and display TV
programmmes.The different connection options
make an additional expansion of the reception and
display sources possible (various external devices).
This device is only suitable for the operation in
dry interiors. This appliance is intended solely
for private domestic use and may not be used for
industrial and commercial purposes. We exclude
liability in principle, if the device is not used as
intended, or unauthorized modications have been
made. To operate your LED TV in extreme ambient
conditions may cause the damage of the device.
WARNING: Never let people (including
children) with physical, sensory or mental
abilities or lack of experience and / or knowledge
unsupervised use electrical device!
Children may not recognize dangers right!
The swallowing of batteries can be fatal. Keep
batteries always out of reach of small children.
If a battery is swallowed, immediately seek
medical attention. Keep the packaging lms out
of reach of children. Risk of suffocation.
Power source
• The TV should be operated only from a 220-240 V
AC, 50 Hz outlet.
• Warning: Do not leave your TV in standby or
operating mode when you leave your house.
Positioning the TV
• For ventilation, please leave a clear space of at least
10cm all around the TV.
• Do not block the ventilation openings.
• Do not place the TV on sloping or unstable surfaces,
the TV may tip over.
• To prevent damage to the TV, do not place any
objects on top of the TV.
• Only use the TV in moderate climates.
English - 1 -
Power cord and plug
• The power cord plug should be easily accessible.
In case of storms and lightning, when going on
holiday, or when the TV is not used for a long period
of time disconnect the power cord from the mains
power socket.
• The mains plug is used to disconnect TV set from the
mains and therefore it must remain readily operable.
• Do not place the TV, furniture, etc. on the power
cord or pinch the cord.
• Handle the power cord by the plug, do not unplug
the TV by pulling the power cord.
• Never touch the power cord/plug with wet hands
as this could cause a short circuit or electric shock.
• Never make a knot in the power cord or tie it with
other cords.
• Power cords should be placed in such a way that
they are not likely to be stepped on or driven over.
• A damaged power cord/plug can cause re or give
you an electric shock. When damaged it must be
replaced, this should only be done by qualied
personnel.
Moisture and Water
• Do not use this TV in a humid or damp place (avoid
bathrooms, the sink in the kitchen, and near the
washing machine).
• Do not expose this TV to rain or water, as this may
be dangerous.
• Do not place objects lled with liquids, such as
ower vases, on top of the TV. Avoid from dripping
or splashing.
• If any solid object or liquid falls into the cabinet,
unplug the TV and have it checked by qualied
personnel before operating it any further.
Ventilation
• The slots and openings on the TV set are intended
for ventilation and to ensure reliable operation.
• To prevent overheating, these openings must not be
blocked or covered in anyway.
Heat sources and Flames
• Do not expose the TV to direct sunlight or other
heat sources.
• The TV should not be placed near to open ames
and sources of intense heat such as an electric
heater.
• Ensure that no open ame sources,
such as lighted candles, are placed
on top of the TV.
Headphone Volume
• Excessive sound pressure from
earphones and headphones can cause
hearing loss, please take care.
English - 2 -
Wall Mounting (optional)
• To prevent injury, this TV must be securely attached
to the wall in accordance with the installation
instructions (if the option is available).
LCD Screen
• Occasionally, a few non-active pixels may appear
on the screen as a xed blue, green or red point.
Please note that this does not affect the performance
of your product.
• Take care not to scratch the screen with ngernails
or other hard objects.
Cleaning
• Before cleaning, unplug the TV from the wall socket.
• Do not use liquid or aerosol cleaners. Only use a
soft, dry cloth.
Environmental Information
This television is designed to consume less energy
to save environment. You not only help to save the
environment but also you can save money by reducing
electricity bills thanks to the energy efciency feauture
of this TV. To reduce energy consumption, you should
take the following steps:
You can use Power Save Mode setting, located in the
Picture Settings menu. If you set Power Save Mode
as Eco, the TV will switch to energy-saving mode
and luminance level of TV set will be decreased to
optimum level. Note that some picture settings will be
unavailable to be changed when the TV is in Power
Save Mode.
If Picture Off is selected, “Screen will be off in 15
seconds.” message will be displayed on the screen.
Select PROCEED and press OK to continue. The
screen will be off in 15 seconds. If you disable Power
Save Mode, Picture mode will be automatically set
to Dynamic.
When the TV is not in use, please switch off or
disconnect the TV from the mains plug. This will also
reduce energy consumption.
Disconnect power when going away for longer time.
It is highly recommended to activate Power Save Mode
setting to reduce your annual power consumption. And
also it is recommended to disconnect the TV from the
mains plug to save energy more when you do not use.
Please helps us to save environment by following
these steps.
Repair Information
Please refer all servicing to qualied personnel. Only
qualied personnel must repair the TV. Please contact
your local dealer, where you have purchased this TV
for further information.
TV - Features
• Remote controlled colour LED TV.
• Fully integrated digital/cable TV (DVB-T/C)
• HDMI connectors for digital video and audio.This
connection is also designed to accept high denition
signals.
• USB input.
• Programme recording.
• Programme timeshifting.
• 10000 programmes.
• OSD menu system.
• Scart socket for external devices (such as video, video
games, audio set, etc.).
• Stereo sound system.
• Teletext, fastext, TOP text.
• Headphone connection.
• Automatic programming system.
• Forward or backward manual tuning.
• Automatic power down after up to six hours.
• Sleep timer.
• Child lock.
• Automatic sound mute when no transmission.
• NTSC playback.
• AVL (Automatic Volume Limiting).
• PLL (Frequency Search).
• PC input.
• Plug&Play for Windows 98, ME, 2000, XP, Vista,
Windows 7.
• Game Mode (optional).
• Picture off function.
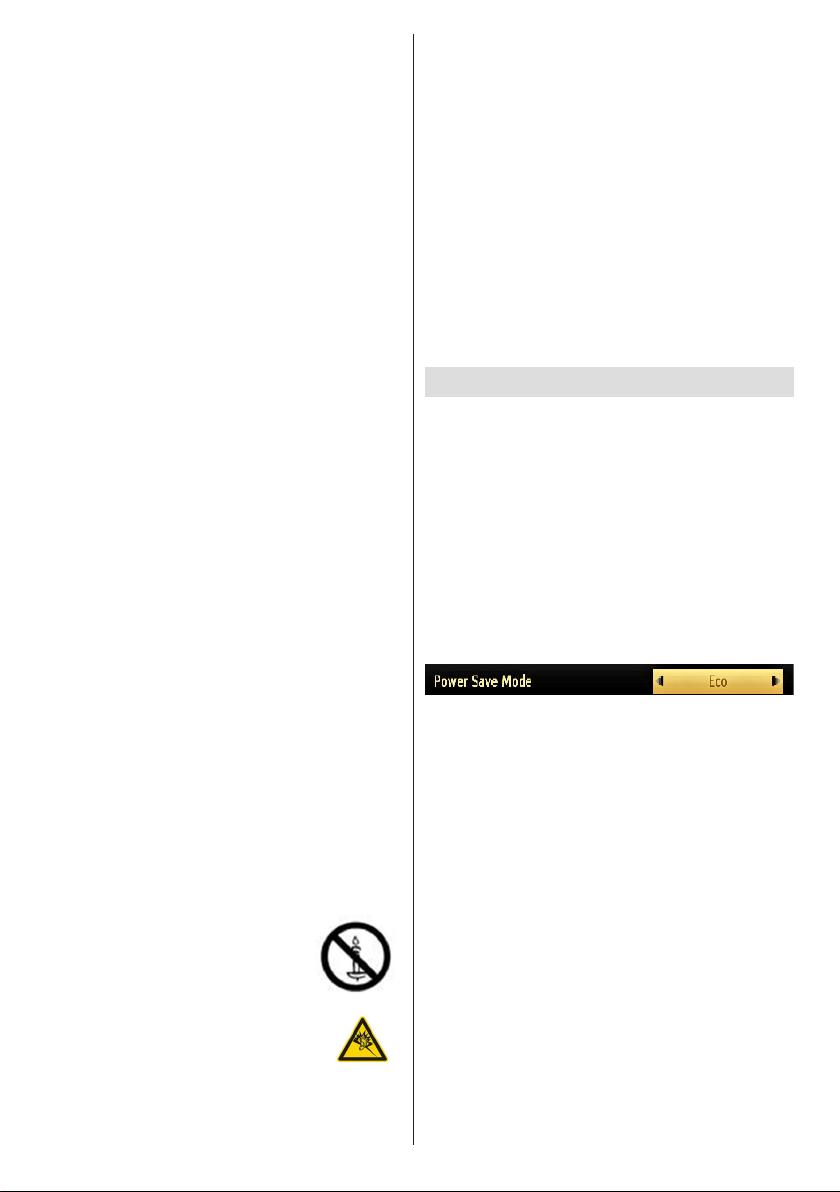
Viewing the TV
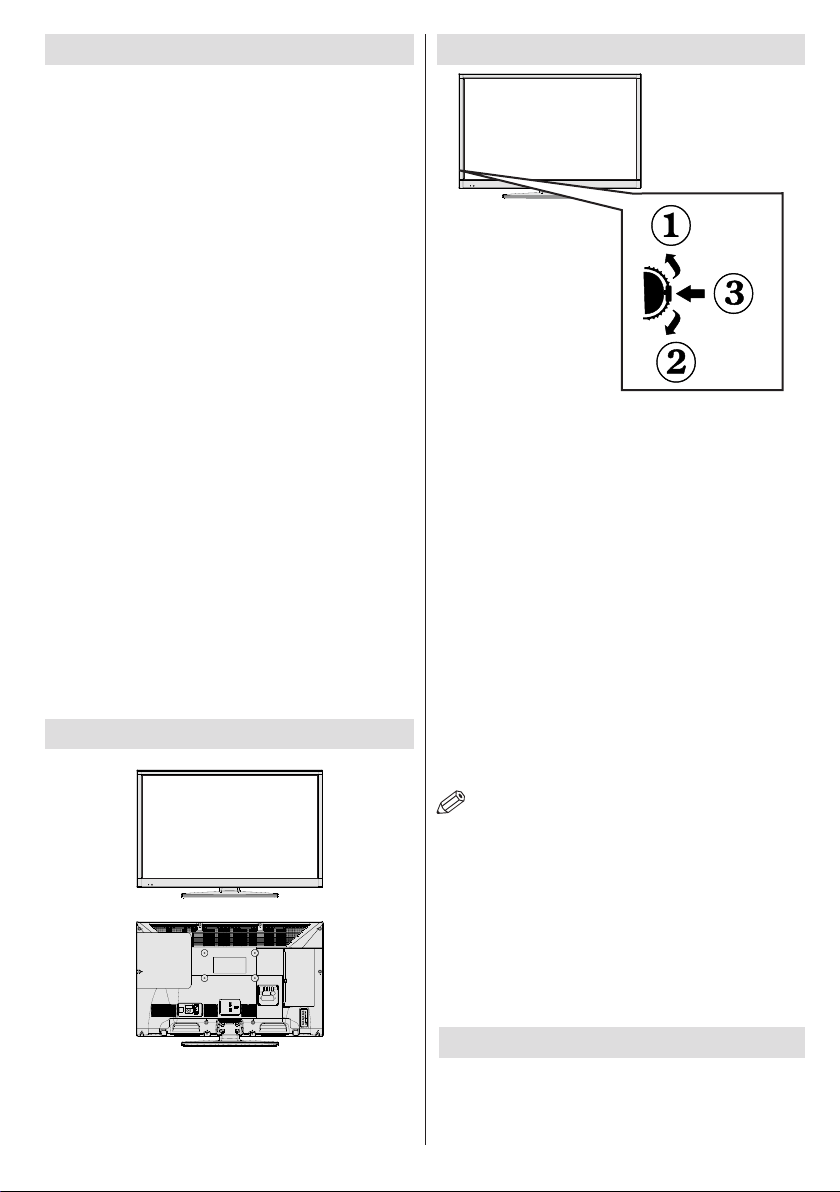
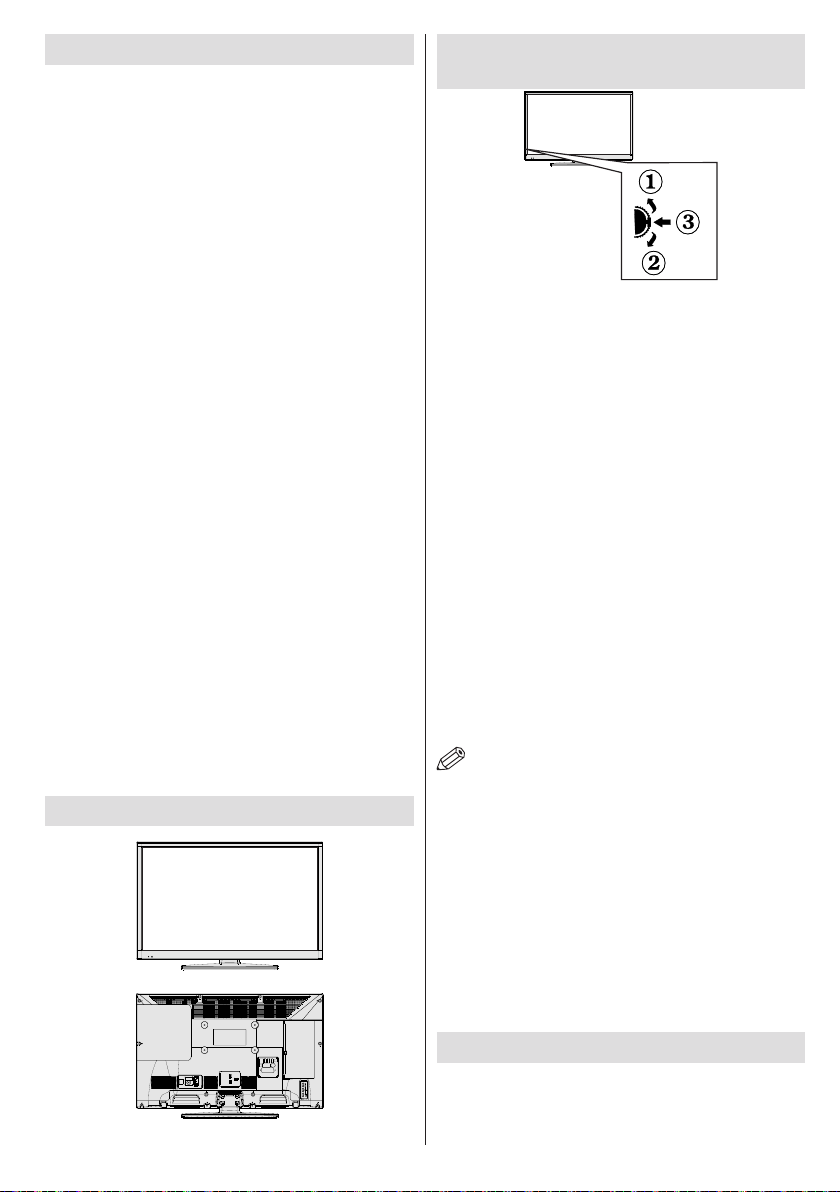
TV Control button & Operation
1.Up direction
2. Down direction
3. Programme/Volume / AV / Standby-On selection
switch
The Control switch allows you to control the Volume/
Programme/ Source and Standby-On functions of
the TV.
To change volume: Increase the volume by pushing
the button up. Decrease the volume by pushing the
button down.
To change channel: Press the middle of the button,
the channel information banner will appear on screen.
Scroll through the stored channels by pushing the
button up or down
To change source: Press the middle of the button
twice, the source list will appear on screen. Scroll
through the available sources by pushing the button
up or down.
To turn the TV off: Press the middle of the button
down and hold it down for a few seconds, the TV will
turn into standby mode.
NOTE: You can move the switch, upward or
downward to change the volume. If you want to
change the channel, press the middle of the switch
once (Position 3) and then move upward or downward.
If you press the middle of the switch once more, the
source OSD will be displayed. To select desired
source, move the switch upward or downward and
release. If you press the middle of the switch and
hold for a few seconds, the TV will switch to standby
mode. The Main menu OSD cannot be displayed via
the control buttons on the TV.
Accessories included
Remote Control
Batteries: 2 x AAA
Instruction Book
Side AV Connection Cable
English - 3 -

Viewing remote control
SLEEP
SCREEN
PRESETS
LANG.
FAV
EPG
SWAP
SOURCE
C
DISP.
SEARCH
MODE
INFO
CH
V
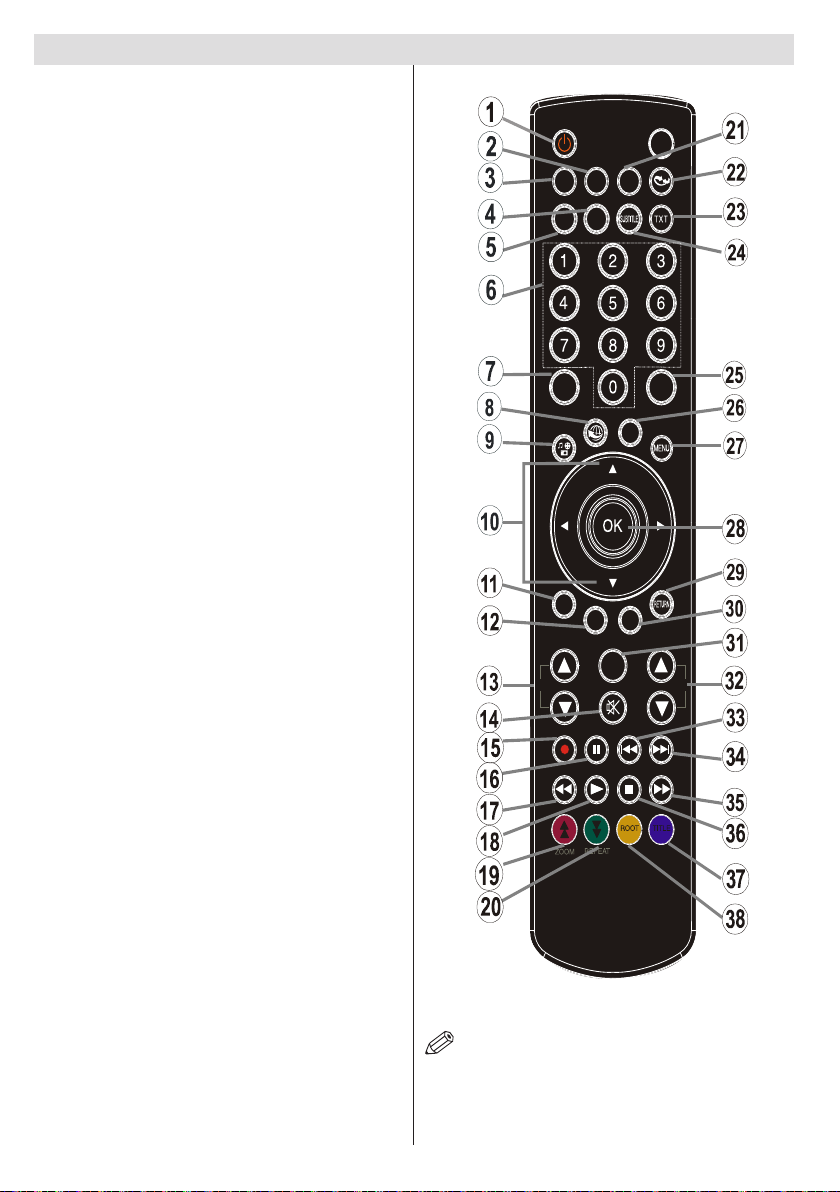
1. Standby
2. Image size
3. Sleep Timer
4. Mono/Stereo - Dual I-II / Currrent Language
(in DVB channels)
5. Favourite channels
6. Numeric buttons
7. Electronic programme guide(in DVB channels)
8. No function
9. Media Browser
10. Navigation buttons (Up/Down/Left/Right)
11. No function
12. Recordings library
13. Programme Down / Page up - Programme Up /
Page down
14. Mute
15. Programme recording
16. Pause (in Media Browser mode) / Timeshift
recording
17. Rapid reverse (in Media Browser mode)
18. Play (in Media Browser mode)
19. Red button
20. Green button
21. Picture mode selecion
22. No function
23. Teletext / Mix (in TXT mode)
24. Subtitle on-off (in DVB channels)
25. Previous programme
26. AV / Source selection
27. Menu on-off
28. Okay (Conrm) / Hold (in TXT mode)/ Channel
List
29. Exit / Return / Index page (in TXT mode)
30. No function
31. Info / Reveal (in TXT mode)
32. Volume Up / Down
33. No function
34. No function
35. Rapid advance (in Media Browser mode)
36. Stop (in Media Browser mode)
37. Blue button
38. Yellow button
NOTE: The Remote Control range is approximately
7m / 23ft.
English - 4 -
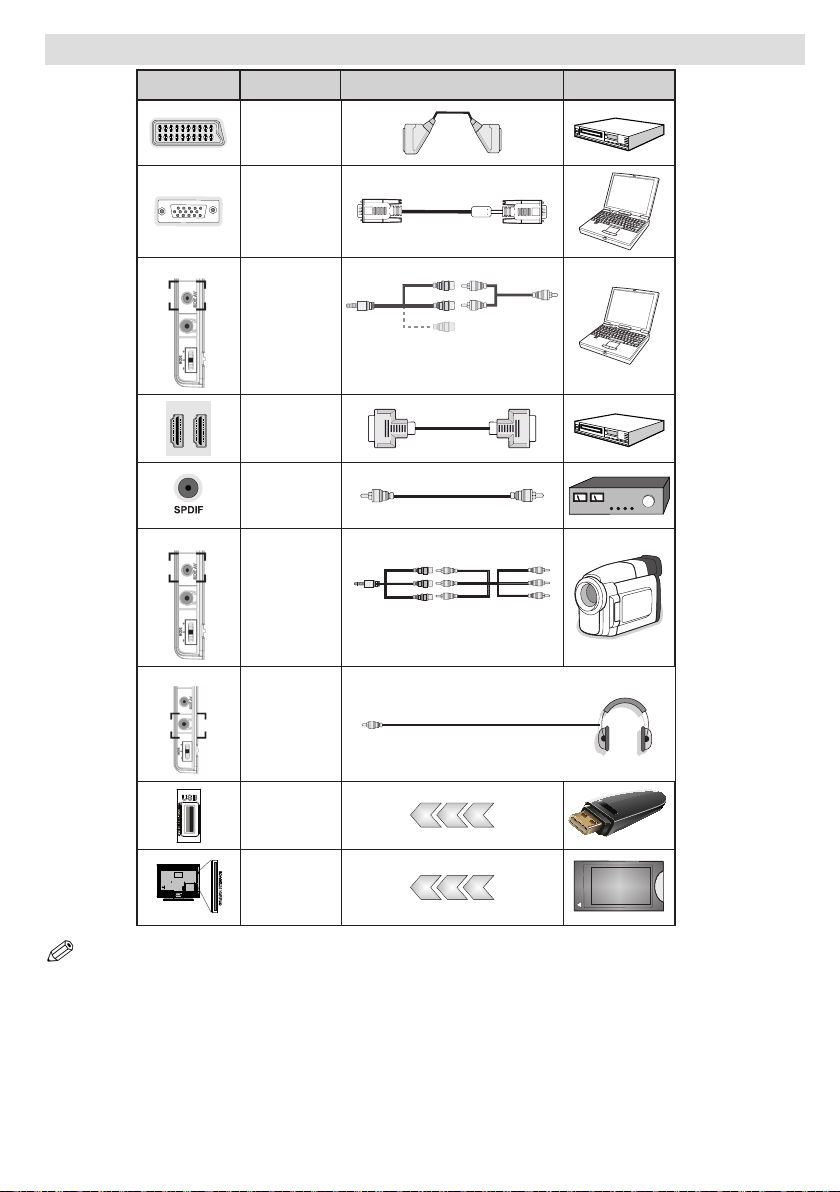
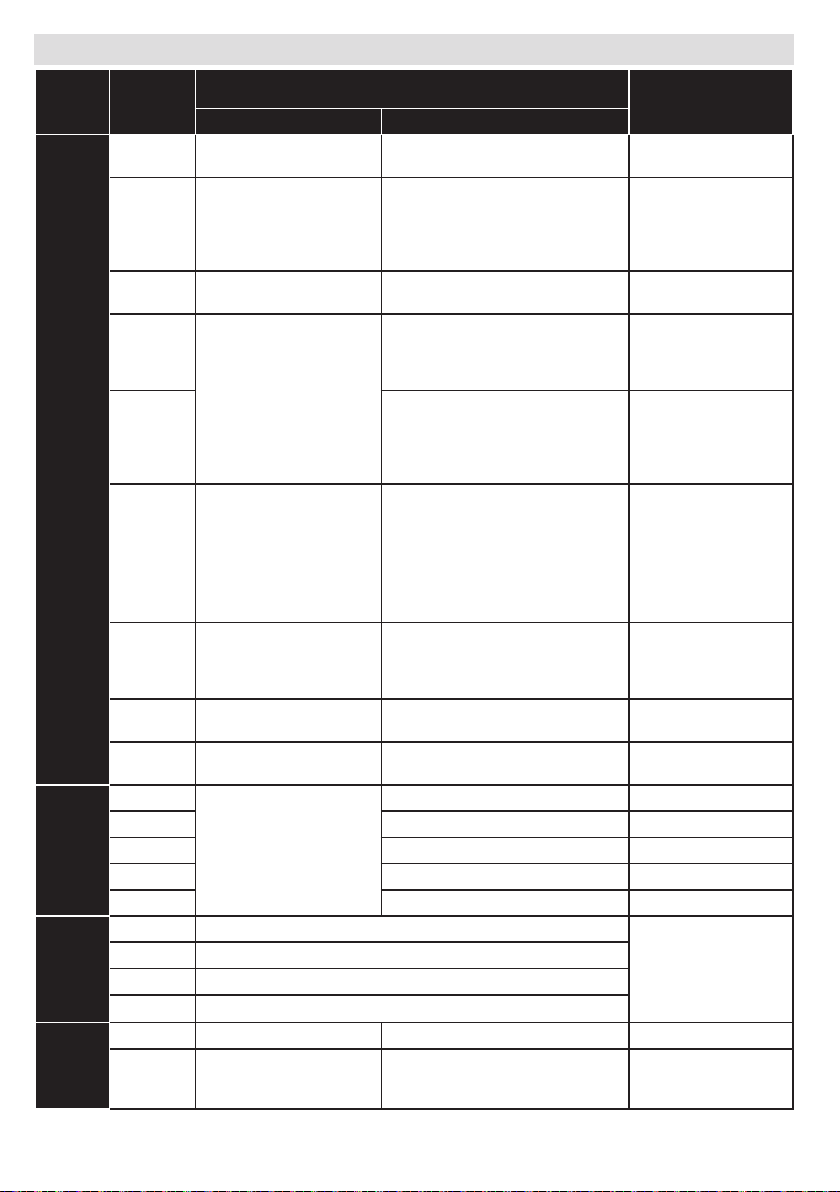
Viewing the Connections
Connector Type Cables Device
Scart
Connection
(back)
VGA
Connection
(back)
SIDE AV
PC/YPbPr
Audio
Connection
(side)
HDMI
Connection
(back)
SPDIFF
Connection
(back)
SIDE AV
Side AV
Connection
(side)
Side Audio/Video
Connection Cable
(Supplied)
AV Connection Cable
(supplied)
PC Audio Cable
(Not supplied)
HEADPHONE
Headphone
Connection
(side)
USB
Connection
(side)
CI
Connection
(side)
CAM
module
NOTE: When connecting a device via the Side AV input, you must use the supplied connection cables to enable connection.
See the illustrations above. | YPbPr can be used only when you connect a device that has a YPbPr output through the PC
input with YPbPr to PC cable (YPbPr to PC cable is not supplied). When the connection is made, switch to YPbPr source.
To enable PC audio, you will need to use PC/YPBPR AUDIO CONNECTION WHITE & RED inputs. | If an external device
is connected via the SCART socket, the TV will automatically switch to AV mode.| When receiving DTV channels (Mpeg4
H.264) or while in Media Browser mode, output will not be available via the scart socket. | When using the wall mounting
kit (optional), we recommend that you plug all your cables into the back of the TV before mounting on the wall. | Insert or
remove the CI module only when the TV is SWITCHED OFF. You should refer to the module instruction manual for details of
the settings. Insert the CAM and then the viewing card to the slot that is located in the terminal cover at the rear side of the
TV. The module should be correctly inserted, it is impossible to insert fully if reversed. The CAM or the TV terminal may be
damaged if the CAM is forcefully inserted.Each USB input of your TV supports devices up to 500mA. Connecting devices
that have current value above 500mA may damage your TV.
English - 5 -
Using a Conditional Access Module
IMPORTANT: Insert or remove the CI module only
when the TV is SWITCHED OFF.
In order to watch certain digital channels, a conditional
access module (CAM) can be necessary. This module
must be inserted in the CI slot of your TV.
1. Obtain the Conditional Access Module (CAM) and the
viewing card by subscribing to a pay channel company,
then insert those to the TV using the following procedure.
2. Insert the CAM and then the viewing card to the
slot that is located in the terminal cover at the rear
side of the TV.
3. The CAM should be correctly inserted, it is
impossible to insert fully if reversed. The CAM or
the TV terminal may be damaged if the CAM is
forcefully inserted.
4. Connect the TV to the mains supply, switch on
and then wait for few moments until the card is
activated.
5. When no module is inserted, “No Common
Interface module detected” message appears
on the screen.
You can refer to the module instruction manual for details
of the settings.
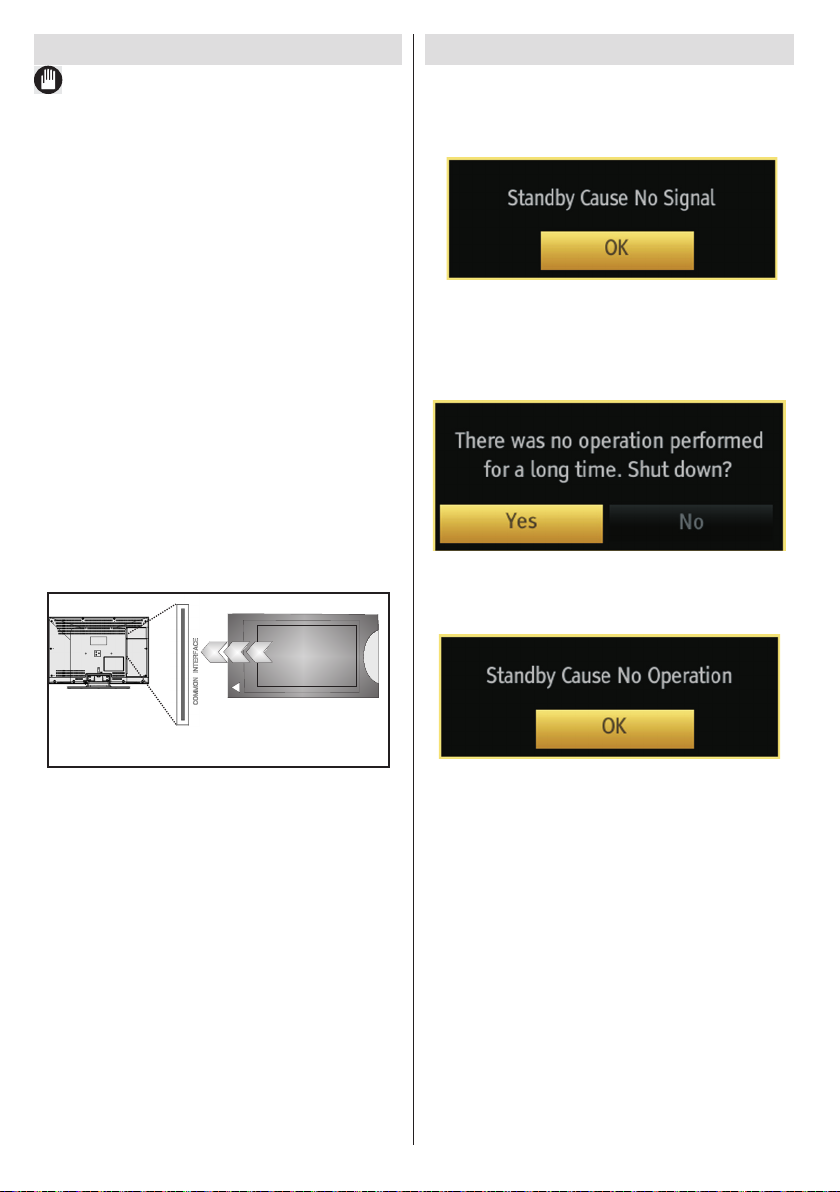
Standby Notications
If the TV does not receive any input signal (e.g. From
an aerial or HDMI source) for 5 minutes, the TV will
go into standby. When you next switch-on the TV, the
following message will be displayed:
When the Auto Tv Off timeout is reached, the following
message will be displayed on the screen. Select YES
to shut down the TV. Select NO to cancel. The TV
will switch off as well, if you do not make a selection
on this screen.
If the TV has been left on and not been operated for
4 hours, the TV will go into standby. When you next
switch-on, the following message will be displayed:
CAM
module
English - 6 -
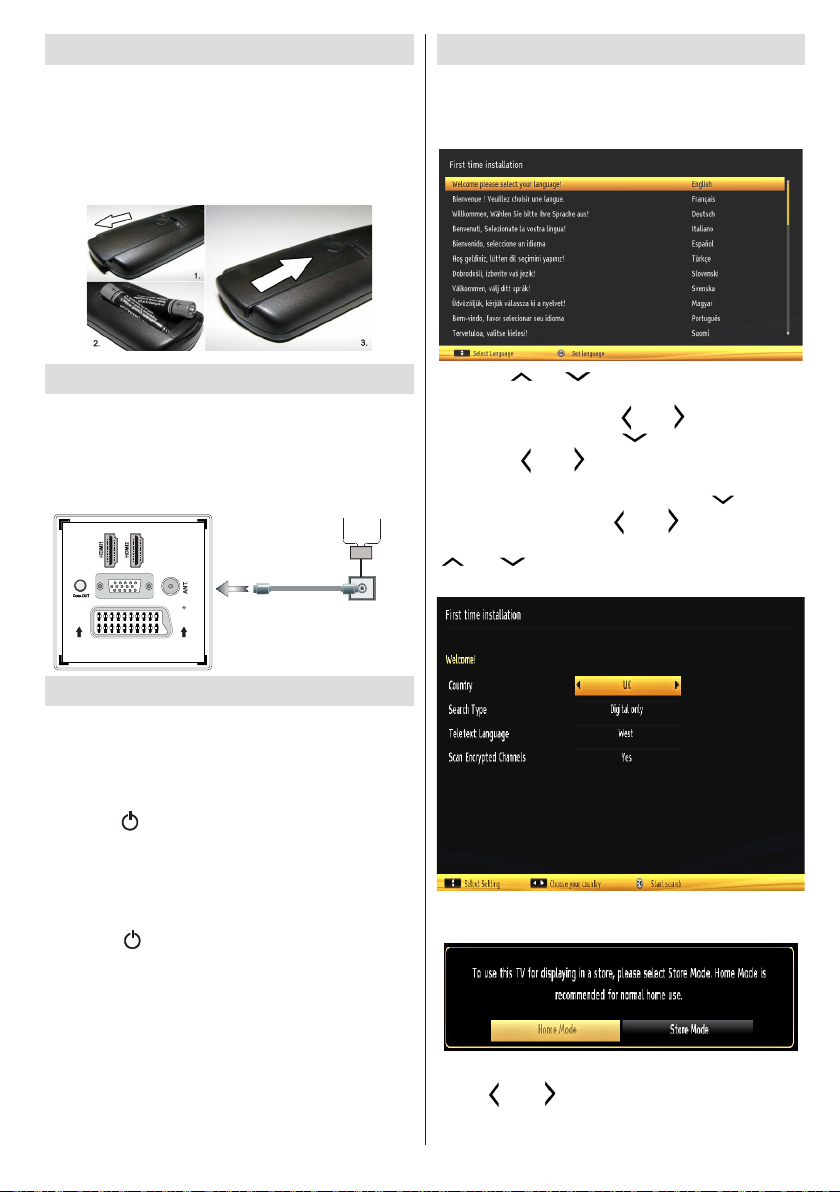
Installing the Batteries to the Remote
Aerial or Cable
1. Lift the cover on the back of the remote upward
gently.
2. Install two AAA batteries. Make sure to match the +
and - ends of the batteries in the battery compartment
(observe the correct polarity.
3. Replace the cover.
First Time Installation
When turned on for the rst time, the “language
selection” menu appears. The message “Welcome
please select your language!” is displayed in all
language options listed alphabetically.
Connect Power & Antenna/Cable
IMPORTANT: The TV set is designed to operate on
220-240V AC, 50 Hz socket. After unpacking, allow
the TV set to reach the ambient room temperature
before you connect the set to the mains. Plug the
power cable to the mains socket outlet.
VGA
SPDIF
SCART
227529
Switching On/Off
To Switch the TV On
Connect the power cord to the 220-240V AC, 50 Hz.
Then the standby LED lights up.
To switch on the TV from standby mode either:
Press the “ ” button, CH ^/ v or a numeric button on
the remote control.
Press the control switch located on the left side of the
TV. The TV will then switch on.
To Switch the TV Off
Press the “ ” button on the remote control or press
and hold the control switch on the TV until the TV
shuts down, so the TV will switch to standby mode
(Depends on the model).
To power down the TV completely, unplug the power
cord from the mains socket.
Note: When the TV is switched to standby mode, standby LED
can blink to indicate that features such as Standby Search,
Over Air Download or Timer is active. The LED can also blink
when you switch on the TV from standby mode.
English - 7 -
Press the “ ” or “ ” button to highlight the required
language, press OK button to select. “First Time
Installation” appears. Use “ ” or “ ” button to set the
required country, and press “ ” button to select Search
Type. Use “ ” or “ ” to set the desired search type.
Available search types are Digital and analog, digital
only and analog only. When set, press “ ” to select
Teletext Language. Use “ ” or “ ” button to set the
“Teletext Language” and select “Scan Encrypted” using
“ ” or “ ” button. You can set Scan Encrypted as
Yes if you want to scan coded stations.
Press OK button on the remote control to continue and
the following message will be displayed on the screen.
You can activate Store mode (optional) option by
using “ ” or “ ” button. If Store Mode (optional)
is selected, Store mode option will be available in
other settings menu and your TV’s features will be
illustrated on the top of the screen. A confirmation
screen will be displayed after selecting the
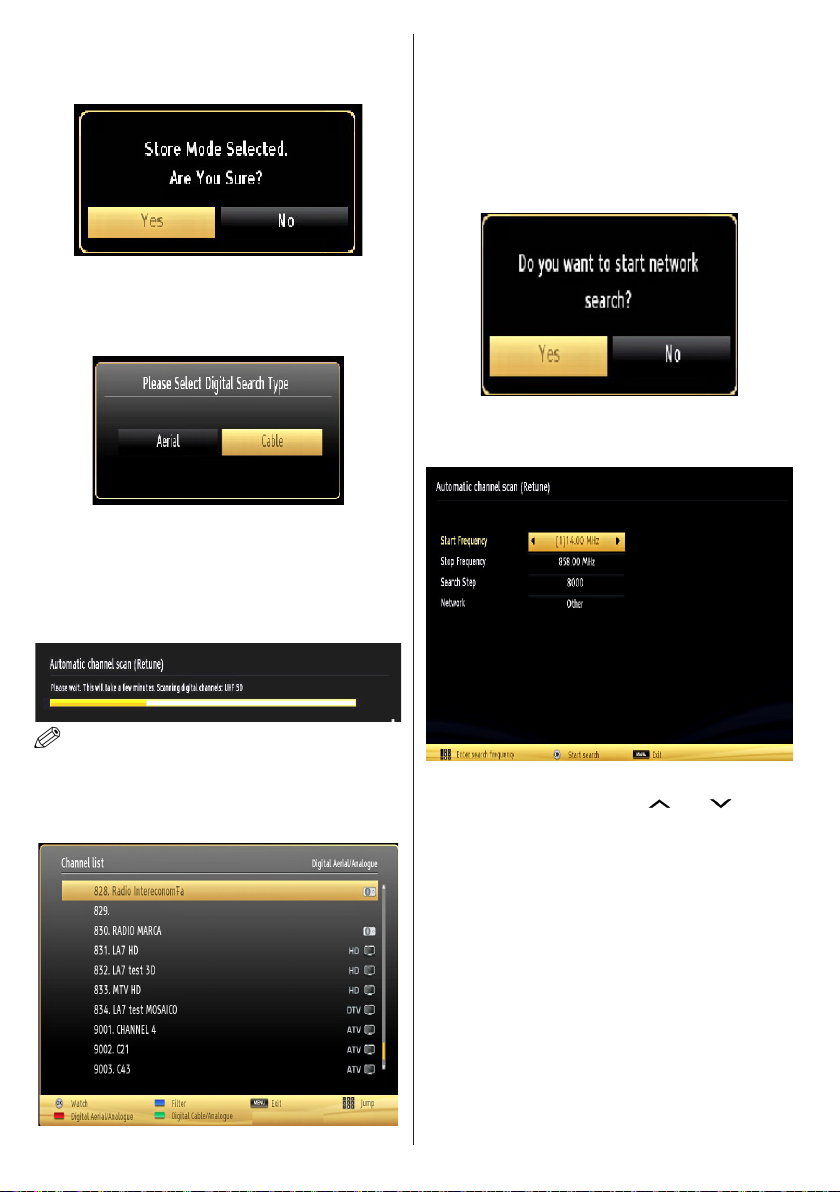
Store Mode (optional). Select YES to proceed.
If Home Mode is selected, Store mode (optional) will
not be available after the First Time Installation. Press
OK button on the remote control to continue and the
following message will be displayed on the screen.
You must select a search type to search and store
broadcasts from the desired source.
Aerial Installation
If you select AERIAL option from the Search Type
screen, the television will search for digital terrestrial
TV broadcasts.
Press OK button to quit channel list and watch TV.
(*) LCN is the Logical Channel Number system that
organizes available broadcasts in accordance with a
recognizable channel sequence.
Cable Installation
If you select CABLE option and press OK button on
the remote control to continue, the following message
will be displayed on the screen:
To continue please select YES and press OK. To
cancel operation, select NO and press OK.
NOTE: You can press MENU button to cancel.
After all the available stations are stored, Channel
List will be displayed on the screen. If you like the
sort channels, according to the LCN(*), please select
“Yes” and than press OK.
English - 8 -
You can select frequency ranges from this screen. For
highlighting lines you see, use “ ” or “ ” button.
You can enter the frequency range manually by using
the numeric buttons on the remote control.
Set Start and Stop Frequency as desired by using
numeric buttons on the remote control.
After this operation, you can set Search Step as 8000
KHz or 1000 KHz.
If you select 1000 KHz, the TV will perform search
process in a detailed way. Searching duration will
thus increase accordingly. When nished, press OK
button to start automatic search. The TV will search
and store available broadcasts.
(*) Network option will not be available for UK.
Media Playback via USB Input
You can connect a USB hard disk drive or USB
memory stick to your TV by using the USB inputs of
the TV. This feature allows you to play les stored in
a USB drive. 2.5” and 3.5” inch (hdd with external
power supply) external hard disk drives are supported.
IMPORTANT! You should back up your les before
making any connections to the TV set in order to
avoid any possible data loss. Manufacturer will not
be responsible for any le damage or data loss. It is
possible that certain types of USB devices (e.g. MP3
Players) or USB hard disk drives/memory sticks may
not be compatible with this TV. The TV supports FAT32
and NTFS disk formatting but recording will not be
available with NTFS formatted disks. Note: While
formatting a USB hard disk that has 1TB (Tera Byte)
or more le capacity, you can experience problems
with the formatting process.
Quickly plugging and unplugging USB devices, is a
very hazardous operation. Do not repeatedly quickly
plug and unplug the drive. This may cause physical
damage to the USB player and USB device itself. Do
not pull out USB module while playing a le.
Media Browser Menu
You can play photo, music, and movie les stored
on a USB disk by connecting it to your TV and using
the Media Browser screen. To do this, perform the
following: Connect a USB disk to one of the USB
inputs located on the side of the TV.
You can connect two USB devices to your TV. If both
USB devices include music, picture or video les, USB
selection OSD will be displayed on the screen. The
rst USB device connected to the TV will be named
as USB Drive1. Select a device by using “ ” or
“ ” button and press OK.
Press MENU button and select Media Browser tab by
using Left/Right and OK buttons. Main media browser
screen will be displayed. You can display the related
content by selecting the Video, Music or Picture tab.
Follow the button indications under each on screen
menu for media playback features.
You can set your Media Browser preferences by using
the Settings dialog.
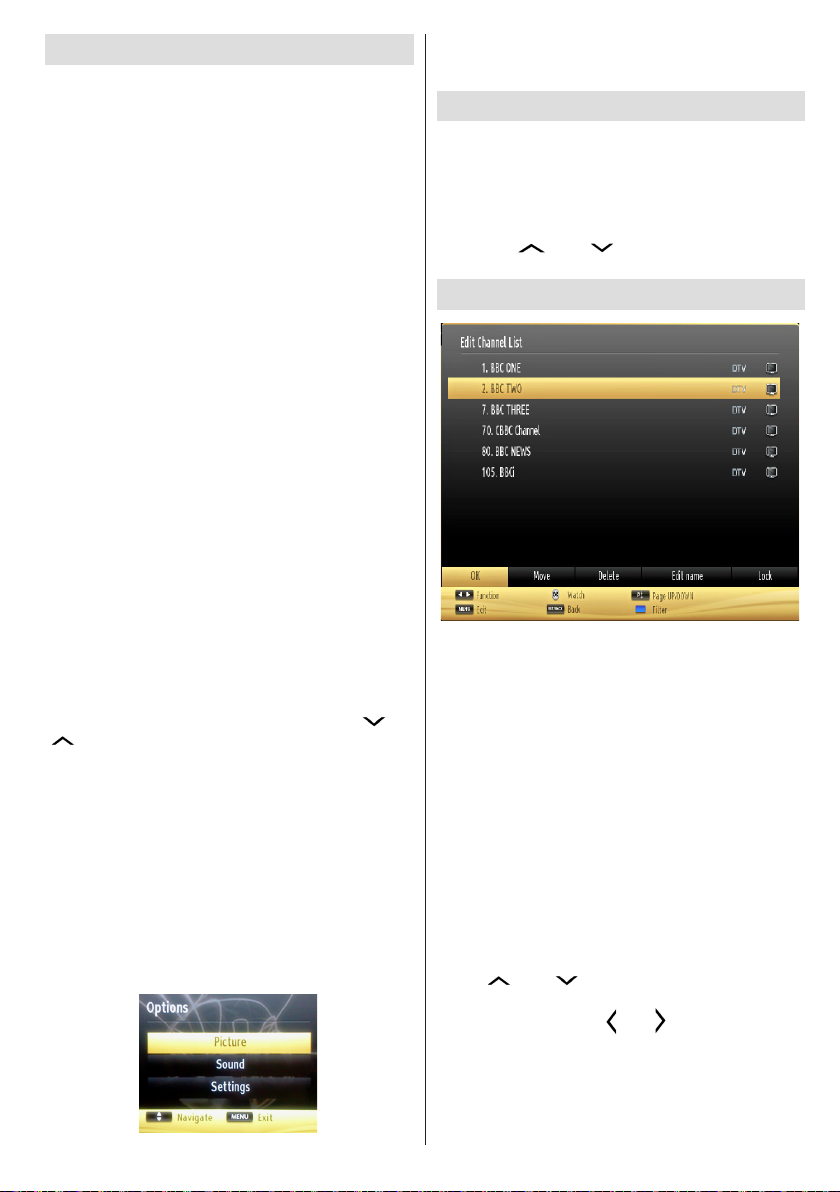
Using MENU button in Media Browser Mode
Pressing MENU button in Media Browser mode
displays the following menu screen:
You can access Picture, Sound and Settings menu
options using this screen. Press MENU again to exit
from this screen.
Changing Image Size: Picture Formats
Programmes can be watched in different picture
formats, depending on the transmission received.
You can change the aspect ratio (image size) of the
TV for viewing the picture in different zoom modes.
Press SCREEN button repeatedly to change the
image size. You can shift the screen up or down
by using “ ” or “ ” buttons while in, 14:9
Zoom, Cinema or Subtitle.
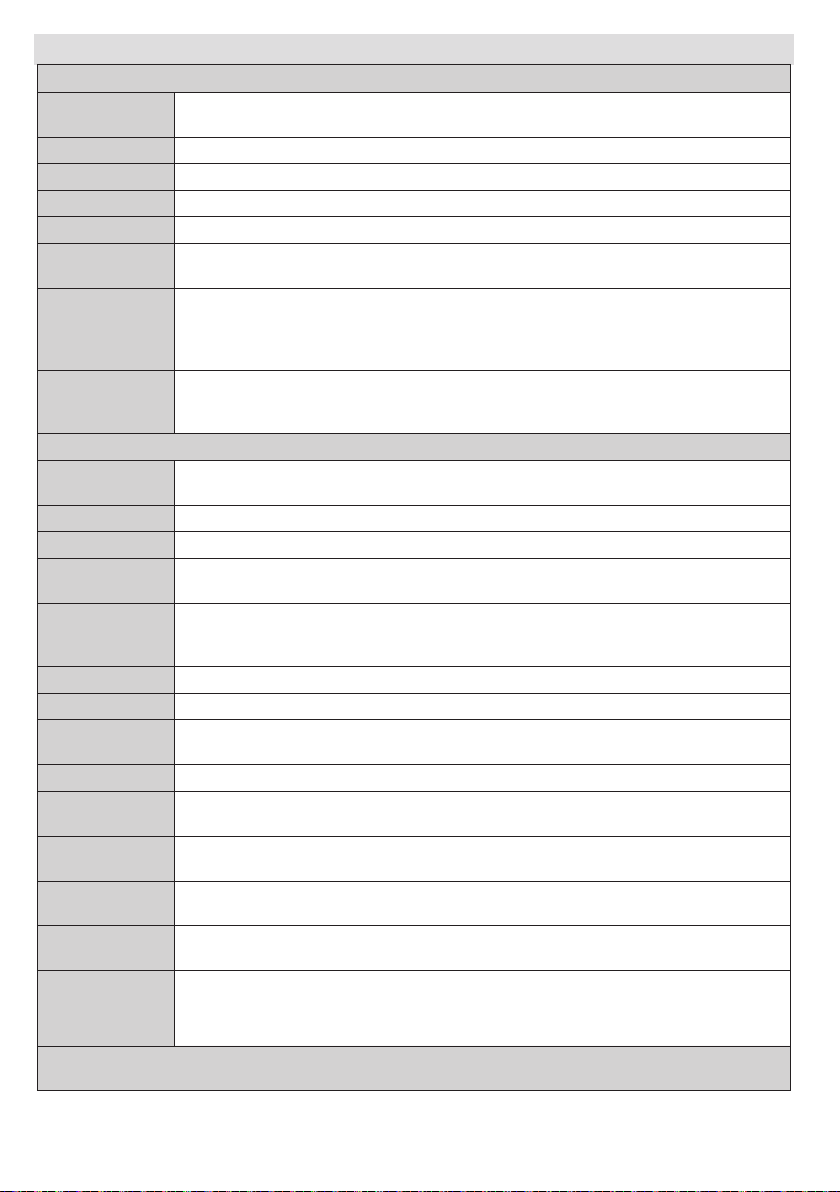
Using the Channel List
The TV sorts all stored stations in the Channel List.
You can edit this channel list, set favourites or set
active stations to be listed by using the Channel List
options. Press MENU button to view main menu.
Select Channel List item by using Left or Right button.
Press OK to view menu contents. Select Edit Channel
List to manage all stored channels. Use Up or Down
and OK buttons to select Edit Channel List. Press
Up or Down button to select the channel that will be
processed. Press Left or Right button to select a
function on Channel List menu. Use P+/P- buttons to
move page up or down. Press MENU button to exit.
Sorting Channel List
You can select broadcasts to be listed in the
channel list. To display specic types of broadcast,
you should use Active channel list setting. Select
Active channel list from the Channel list menu by
using “ ” or “ ” button. Press OK button to
continue. You can select a network type option
from the list by using “ ” or “ ” and OK buttons.
English - 9 -
Menu Features and Functions
Sharpness
Mode
Advanced Settings
Picture Zoom
(in PC mode)
(in PC mode)
(in PC mode)
(in PC mode)
be added to the Picture Settings while in PC mode.
Picture Menu Contents
Mode
Contrast Sets the lightness and darkness values of the screen.
Brightness Sets the brightness value for the screen.
Colour Sets the colour value, adjusting the colors.
Power Save
Backlight
(optional)
Noise
Reduction
For your viewing requirements, you can set the related mode option. Picture mode can
be set to one of these options: Cinema, Game, Sport, Dynamic and Natural.
Sets the sharpness value for the objects displayed on the screen.
To set Power Save Mode as Eco, Picture Off and Disabled. See the section, “Environmental
Information” in this manual for further information on Power Save Mode.
This setting controls the backlight level and it can be set to Auto, Maximum, Minimum
and Eco Mode. Backlight function will be inactive if Power Save Mode is set to On.
Backlight cannot be activated in VGA, Media Browser mode or while the picture mode
is set to Game.
If the broadcast signal is weak and the picture is noisy, use Noise Reduction setting
to reduce the noise amount. Noise Reduction can be set to one of these options: Low,
Medium, High or Off.
Dynamic
Contrast
Colour Temp Sets the desired colour tone.
HDMI True
Black
Film Mode
Skin Tone Adjust the desired skin tone.
Colour Shift Adjust the desired colour tone.
RGB Gain
Reset Resets the picture settings to factory default settings.
Autoposition
H Position
V Position
Dot Clock
Phase (in PC
mode)
While in VGA (PC) mode, some items in Picture menu will be unavailable. Instead, VGA mode settings will
You can change contrast rate by using dynamic contrast function. Dynamic contrast
can be set to one of these options: Low, Medium, High or Off.
Sets the picture size to Auto,16:9, Subtitle,14:9, 14:9 Zoom, 4:3 or Cinema.
While watching from HDMI source, this feature will be visible in the Picture Settings
menu. You can use this feature to enhance blackness in the picture.
Films are recorded at a different number of frames per second to normal television
programmes. Turn this feature on when you are watching lms to see the fast motion
scenes clearly.
Press OK button to edit RGB gain. You can congure the colour temperature values
using the RGB Gain feature.
Automatically optimizes the display. Press OK to optimize.
This item shifts the image horizontally to right hand side or left hand side of the screen.
This item shifts the image vertically towards the top or bottom of the screen.
Dot Clock adjustments correct the interference that appear as vertical banding in dot intensive
presentations like spreadsheets or paragraphs or text in smaller fonts.
Depending on the resolution and scan frequency that you input to the TV set, you may
see a hazy or noisy picture on the screen. In such a case you can use this item to get
a clear picture by trial and error method.
English - 10 -
Menu Features and Functions
Volume
Headphone
(Optional)
Install and Retune Menu Contents
Automatic Channel
Scan (Optional)
Sound Menu Contents
Adjusts volume level.
Equalizer:
Balance This setting is used for emphasizing left or right speaker balance.
Sound Mode
AVL
Headphone/Lineout
(Optional)
Dynamic Bass
Surround Sound
(Optional)
Digital Out Sets digital out audio type.
Scan (Retune)
In equalizer menu, the preset can be changed to Music, Movie, Speech, Flat,
Classic and User. Press the MENU button to return to the previous menu. Equalizer
menu settings can be changed manually only when the Equalizer Mode is in User.
Sets headphone volume.
You can select Mono, Stereo, Dual I or Dual II mode, only if the selected channel
supports that mode.
Automatic Volume Limiting (AVL) function sets the sound to obtain xed output
level between programmes (For instance, volume level of advertisements tend to
be louder than programmes).
When you connect an external amplier to your TV using the headphone jack, you
can select this option as Lineout. If you have connected headphones to the TV,
set this option as Headphone.
Enables or disables the Dynamic Bass.
Surround sound mode can be changed as On or Off.
Displays automatic tuning options.
Digital Aerial: Searches and stores aerial DVB stations.
Digital Cable: Searches and stores cable DVB stations.
Analogue: Searches and stores analogue stations.
Digital Aerial & Analogue: Searches and stores aerial DVB and analogue stations.
Digital Cable & Analogue: Searches and stores cable DVB and analogue stations.
Manual Channel Scan This feature can be used for direct broadcast entry.
Network Channel
Analogue Fine Tune
First Time
Installation
Clear Service List
(Optional)
Searches for the linked channels in the broadcast system.
You can use this setting for ne tuning analogue channels. This feature is not
available if no analogue channels are stored.
Deletes all stored channels and settings, resets TV to factory settings and starts
rst time installation. You can follow the instructions in the Initial Installation section
for more information on this process.
(*) This setting is visible only when the Country option is set to Denmark, Sweden,
Norway or Finland. Use this setting to clear channels stored.
English - 11 -
Settings Menu Contents
Conditional Access
Language
Parental
Timers
Recording
Conguration
Sources
Other Settings: Displays other setting options of the TV set:
Menu Timeout
Blue Background
Application
Version
Store Mode
(optional)
Date/Time
Scan Encrypted
Software Upgrade
Hard of Hearing
Audio Description
Auto TV Off
Standby Search
(optional)
Power Up Mode
Menu Features and Functions
Controls conditional access modules when available.
Congures language settings.
Congures parental settings.
Note: When Child Lock option is set as “ON”, TV can only be controlled by the remote
control handset. In this case the control panel button will not work.
Sets timers for selected programmes.
Displays recording conguration menu.
Sets date and time.
Note:
* The TV takes the time info via the broadcast. Correct time will be available on Date/
Time Settings, if the time info is provided in the broadcast.
If the TV is in no channel mode, Date/Time settings can be changed. However, if
there is a channel preset, only “Time Settings Mode” can be changed and if this is set
to Manual, Time Zone will be enabled.
* If the TV is switched to standby mode and switched on later and there is no broadcast
available, time information will not be updated. If there is a present broadcast; however,
time information will be taken via the broadcast. In other words, time information will be
available according to these priorities: The TV rst looks for the time info in the broadcast,
then to the user preference, and lastly to the teletext time information.
Enables or disables selected source options.
Changes timeout duration for menu screens.
When this setting is on, search process will locate the encrypted channels as well. If it is
set as Off, encrypted channels will not be located in automatic search or manual search.
Activates or deactivates blue background system when the signal is weak or absent.
To ensure that your TV always has the most update information, you can use this setting.
In order for the proper operation, please ensure that the TV is set to standby mode.
Displays application version.
If the broadcaster enables any special signal concerning the audio, you can set this
setting as On to receive such signals.
Audio description refers to an additional narration track for blind and visually impaired
viewers of visual media, including television and movies. You can use this feature,
only if the broadcaster supports that additional narration track.
You can set the timeout value of auto off feature.After the timeout value is reached
and the Tv is not operated for selected time , the TV will go off.
If you change Standby Search to Off, this function will be unavailable. To use Standby
search please make sure that you select Standby Search as On. If the Standby Search
is set to On, when the TV is in standby mode, available broadcasts will be searched.
If the TV locates any new or missing broadcasts, a menu screen will be displayed,
asking you whether or not to execute these changes. Channel list will be updated
and changed after this process. Please activate Standby Search setting in order to
enable your TV for automatically updating the broadcast frequency of the broadcaster,
broadcast denition and similar changes.
If you are displaying the TV in a store, you can activate this mode. While Store Mode
is enabled, some items in the TV menu may not be available to be set.
This setting congures the power up mode preference. Always On: The TV always switches
on when main on/off button is pressed. / Standby: The TV always powers up in Standby
mode. / Last State: The TV always switches on with the last selected channel/source.
English - 12 -
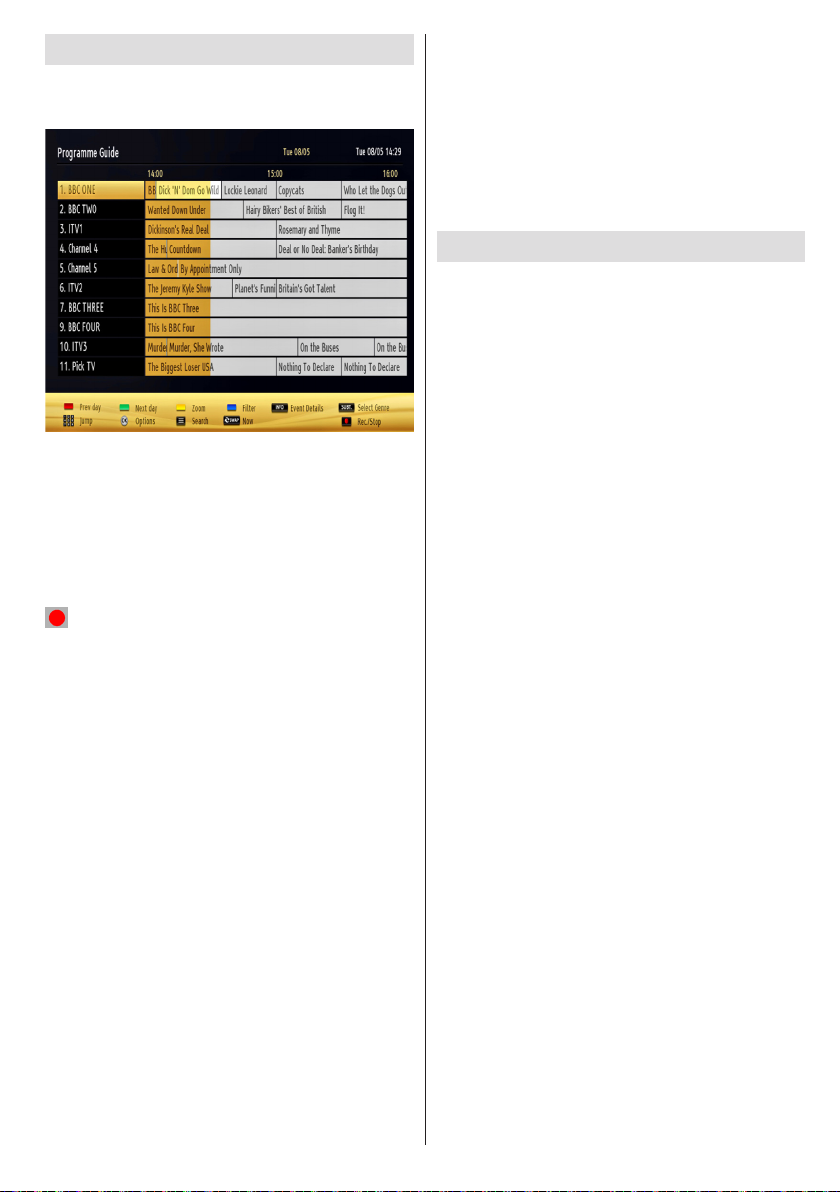
Electronic Programme Guide (EPG)
Some, but not all channels send information about the
current and next programmes. Press the EPG button
to view the EPG menu.
Up/Down/Left/Right: Navigate EPG.
OK: Displays programme options.
INFO: Displays, in detail information on programme
selected.
GREEN: Switches to List Schedule EPG.
YELLOW: Switches to Timeline Schedule EPG.
BLUE: displays ltering options.
(RECORD): the TV will start to record the
selected progamme. You can press again to stop
the recording.
IMPORTANT: To record a programme, you should first
connect a USB disk to your TV while the TV is switched off.
You should then switch on the TV to enable recording feature.
Otherwise, recording feature will not be available.
Note: Switching to a different broadcast or source is not
available during the recording.
Programme Options
In EPG menu, press the OK button to enter the Event
Options menu.
Select Channel
In EPG menu, using this option, you can switch to the
selected channel.
Record / Delete Record Timer
After you have selected a programme in EPG menu,
press the OK button and and Options screen will be
displayed. Select “Record” option and press the OK
button. After this operation, a recording becomes set
to the selected programme.
To cancel an already set recording, highlight that
programme and press the OK button and select the
option “Delete Rec. Timer”. The recording will be
cancelled.
Set Timer / Delete Timer
After you have selected a programme in EPG menu,
press the OK button and and Options screen will
be displayed. Select “Set Timer on Event” option
and press OK button. You can set a timer for future
programmes. To cancel an already set timer, highlight
that programme and press the OK button. Then select
“Delete Timer” option. The timer will be cancelled.
Note: It is not possible to record or set timer for two or more
individual events at the same time interval.
Recording a Programme
IMPORTANT: When using a new USB hard disk drive, it is
recommended that you rst format the disk using your TV’s
“Format Disk” option.
To record a programme, you should rst connect a
USB disk to your TV while the TV is switched off.
You should then switch on the TV to enable recording
feature.
For using recording function, you should connect a
USB disk or an external hard disk drive to the TV
and connected USB disk should have at least 1 GB
capacity and should have 2.0 speed compatibility.
If the connected USB device does not support 2.0
speed, an error message will be displayed.
Note: Recorded programmes are saved into the connected
USB disk. If desired, you can store/copy recordings on a
computer; however, these les will not be available to be
played on a computer. You can play the recordings only
via your TV.
Note: Lip Sync delay may occur during the timeshifting.
Radio record is not supported. The TV can record
programmes up to ten hours.
Recorded programmes are split into 4GB partitions.
If the writing speed of the connected USB disk is not
sufcient, recording may fail and timeshifting feaute
may not be available.
Recordings of HD programmes can occupy bigger
size on the USB disk depending on the broadcast’s
resolution. For this reason it is recommended
to use USB hard disk drives for recording HD
programmes.
Do not plug out the USB/HDD during the recording.
This may harm the connected USB/HDD.
Multipartiton support is available. Maximum two
different partitions are supported. If the disk have more
than two partitions, crash may occur. First partition
of the usb disk is used for PVR ready features. It also
must be formatted as primary partition to be used for
PVR ready features.
Some stream packets may not be recorded because
of signal problems, so sometimes video may freezes
during playback.
English - 13 -
Record, Play, Pause, Display (for PlayListDialog)
keys could not be used when teletext is ON. If a
recording starts from timer when teletext is ON,
teletext is automatically turned off. Also teletext
usage is disabled when there is ongoing recording
or playback.
Timeshift Recording
Press (PAUSE) button while watching a broadcast
for switching to timeshifting mode. In timeshifting
mode, the programme is paused and simultaneously
recorded to the connected USB disk. Press (PLAY)
button again to watch the paused programme from
the stopped moment. You will see the timeshift gap
between the real and the timeshifted programme in
the info bar.
Instant Recording
Press (RECORD) button to start recording an
event instantly while watching a programme. You can
press (RECORD) button on the remote control
again to record the next event on the EPG. In this
case, OSD will display the programmed events for
recording. Press (STOP) button to cancel instant
recording. Switching to a different broadcast or source;
and viewing Media Browser are not available during
the recording.
Watching Recorded Programmes
In the main menu, use “ ” or “ ” buttons to select
Media Browser. Highlight Recordings Library item
by using “ ” or “ ” button and press OK button to
enter. Recordings Library will then be displayed.
Select a recorded item from the list (if previously
recorded) by using “ ” / “ ” button. Press OK button
to view Play Options. Select an option by using “ ”
/ “ ” or OK buttons.
Press (STOP) button to stop a playback and return
to return to Recordings Library.
Slow Forward
If you press (PAUSE) button while watching
recorded programmes, slow forward feature will be
available. You can use button to slow forward.
Pressing button consecutively will change slow
forwarding speed.
Recordings Library
To view the list of recordings, select “Recordings
Library” and press the OK button. Recordings Library
will then be displayed with available recordings. All the
recordings are kept in a list in the recordings library.
(Resume): Recommences the recordings.
RED button (Delete) :Erases the selected
recording.
GREEN button (Edit): Makes changes on the
selected recording.
BLUE button (Sort): Changes the order of the
recordings. You can select from a wide range of
sorting options.
OK button: Activates play options menu:
INFO (Details): Displays the short extended programmes
in detail.
Recording Conguration
Select Recording Conguration item in the Settings
menu to congure recording settings.
Format Disk: You can use Format Disk feature for
formatting the connected USB disk. IMPORTANT:
Note that ALL the data stored on the USB disk will
be lost and then the disk format will be converted to
FAT32 if you activate this feature. If your USB disk
malfunctions, you can try formatting the USB disk. In
most cases formatting the USB disk will restore normal
operation; however, ALL the data stored on the USB
disk will be lost in such a case.
Note: If “USB is too slow” message is displayed on the
screen while starting a recording, try restarting the recording.
If you still get the same error, it is possible that your USB
disk does not meet the speed requirements. Try connecting
another USB disk.
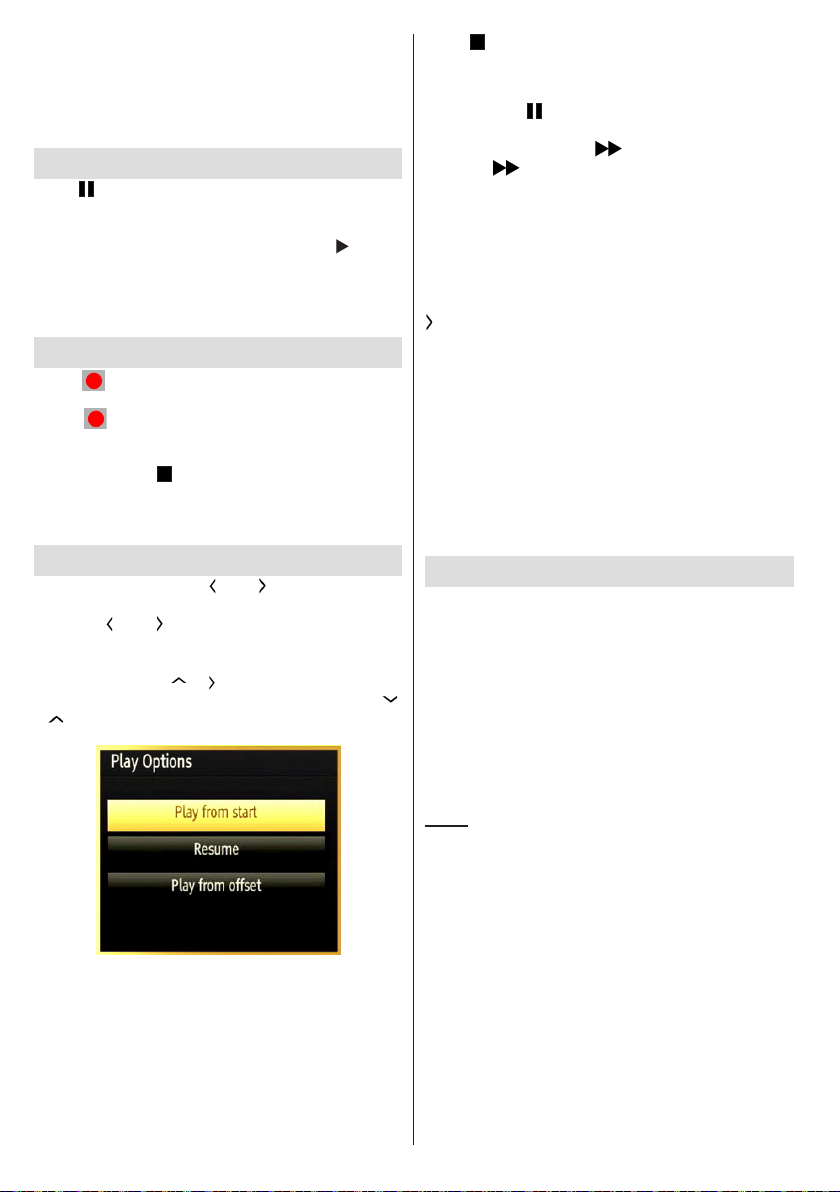
Available playback options:
• Play from start: Plays the recording from the
beginning.
• Resume: Recommences the recordings.
• Play from offset: Species a playing point.
Note: Viewing main menu and menu items will not be available
during the playback.
English - 14 -
Teletext
“TXT” Teletext / Mix: Activates teletext mode when
pressed once. Press again to place the teletext screen
over the programme (mix). Pressing again will quit
the teletext mode.
“RETURN” Index: Selects the teletext index page.
INFO” Reveal: Shows hidden information (e.g.
solutions of games).
“OK” Hold: Holds a text page when convenient. Press
again to resume.
“ ” / “ ” Subcode Pages: Selects subcode pages if
available when the teletext is activated.
P+ / P- and numbers (0-9): Press to select a page.
Note: Most TV stations use code 100 for their index pages.
Your TV supports both FASTEXT and TOP text
systems. When these systems are available, the
pages are divided into groups or topics. When
FASTEXT system is available, sections in a teletext
page will become colour-coded and can be selected
by pressing the coloured buttons. Press a coloured
button that corresponds to with your needs. The
coloured writings will appear, showing you which
coloured buttons to use when TOP text transmission
is present. Pressing “ ” or “ ” commands will
request the next or previous page respec tively.
Digital Teletext (for UK only)
• Press the “TXT” button. The digital teletext information
appears. Operate it with the coloured buttons, cursor
buttons and OK button.
The operation method may differ depending on the
contents of the digital teletext. Follow the instructions
displayed on digital teletext screen.
When the “TXT”button is pressed again, the TV returns
to television broadcasting.
English - 15 -
Software Upgrade
Your TV is capable of finding and updating new
software upgrades over broadcast channels. For
broadcast channels search, TV looks the available
channels stored in your settings. So before software
upgrade search, it is advised to auto search and
update all available channels.
1) Software upgrade search via user
interface
• It is possible manually to check if there is a new
software upgrade for your TV set.
• Simply navigate on your main menu. Choose
Settings and select Other Settings menu. In Other
Settings menu navigate on to the Software Upgrade
item and press OK button to open Upgrade Options
menu.
• In Upgrade Options menu select Scan for upgrade
and press OK button.
• If a new upgrade is found, it starts to download
the upgrade. A progress bar indicates the remaining
download progress. When download completes with
success a message is displayed for reboot to activate
new software. Press OK to continue with the reboot
operation.
2) 3.AM search and upgrade mode
• If Automatic scanning in Upgrade Options menu
is enabled, TV wakes up at 03:00 and searches
broadcast channels for new software upgrade. If new
software is found and downloaded successfully, with
next power up TV opens with new software version.
Note on reboot operation: Reboot is the last step in software
upgrade operation if download of new software is nished
successfully. During reboot TV makes nal initialization. In
reboot sequence panel power is closed and front led indicates
the activity with blinking. Around 5 minutes later TV restarts
with new software activated.
• If your TV fails to restart in 10 minutes, unplug power
for 10 minutes and re-plug again. TV should open with
new software safely. If you still can not get TV working,
please kindly repeat unplug and plug sequence a few
times more. If your set still can not operate, please call
the service personnel to x the problem for you.
Caution: While led is blinking during reboot do not unplug
your TV’s power. Doing this may cause your TV not to
re-open again and can only be xed by service personnel.
Troubleshooting & Tips
Image persistence - ghosting
Please note that ghosting may occur while displaying
a persistent image (still or paused image). LED TVs’
image persistence may disappear after a short time.
Try turning off the TV for a while. To avoid this, do not
leave the screen in still picture mode for extended
periods.
No power
If your TV has no power, please check the power cord
plug is connect to the mains power socket.
Poor picture
1. Have you selected the correct TV system?
2. Is your TV or house aerial located too close to a
non-earthed audio equipment or neon lights, etc.?
3. Mountains or high buildings can cause double
pictures or ghost images. Sometimes you can improve
the picture quality by changing the direction of the
aerial. Is the picture or teletext unrecognisable?
4. Check if you have entered the correct frequency.
5. Please retune the channels.
6. The picture quality may degrade when two devices
are connected to the TV at the same time. In such a
case, disconnect one of the devices.
No picture
1. No Picture means that your TV is not receiving a
transmission. Have you selected the correct button on
the remote control? Try once more. Also make sure
the correct input source has been selected.
2. Is the aerial connected properly?
3. Are the plugs connected tightly to the aerial socket?
4. Is the aerial cable damaged?
5. Are suitable plugs used to connect the aerial?
6. If you are in doubt, consult your dealer.
No sound
1. Has the TV been set to mute? To cancel mute, press
the “ ” button, or increase the volume level.
2. Sound is coming from only one speaker. Is the
balance set to one extreme? See Sound Menu
section.
Remote control - does not operate
Your TV no longer responds to the remote control. The
batteries may be exhausted, if so you can still use the
control buttons on the TV. (* Is only possible if they
are not blocked by parental control.)
Input sources - can not be selected
1. If you cannot select an input source, it is possible
that no device is connected.
2. Check the AV cables and connections if you have
tried to connect a device.
Recording Unavailable
To record a programme, you should rst connect
a USB disk to your TV while the TV is switched
off. You should then switch on the TV to enable
recording feature. Otherwise, recording feature will
not be available. If you cannot perform recording, try
switching off the TV and then re-inserting the USB
device while the TV is switched off.
English - 16 -
USB Is too Slow
If “USB is too slow” message is displayed on the
screen while starting a recording, try restarting
the recording. If you still get the same error, it is
possible that your USB disk does not meet the speed
requirements. Try connecting another USB disk.
Information for Users on Disposal of Old Equipment
and Batteries
[European Union only]
These symbols indicate that equipment with these
symbols should not be disposed of as general
household waste. If you want to dispose of the product
or battery, please consider the collection systems or
facilities for appropriate recycling.
Notice: The sign Pb below the symbol for batteries indicates
that this battery contains lead.
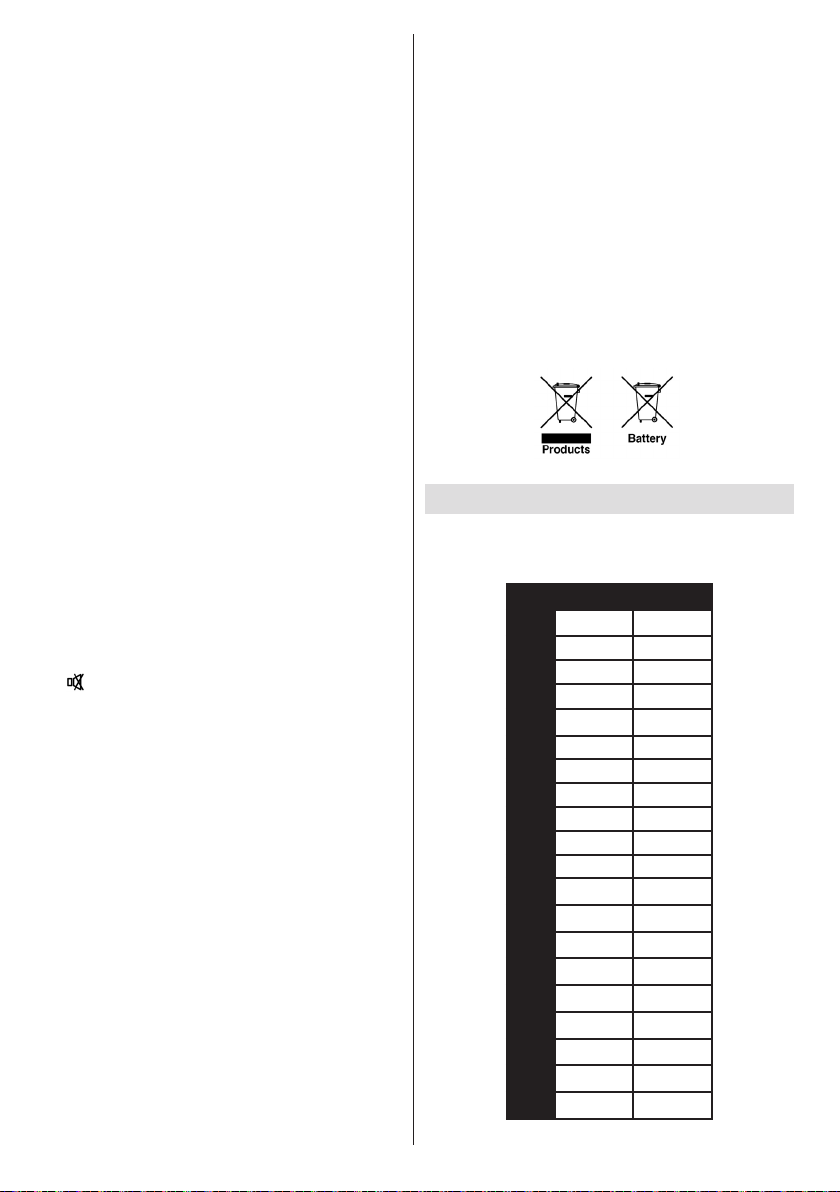
PC Typical Display Modes
The following table is an illustration of some of the
typical video display modes. Your TV may not support
all resolutions. Your TV supports up to 1920x1200.
Index Resolution Frequency
1 640x400 70Hz
2 640x350 85Hz
3 640x400 85Hz
4 640x480 60Hz
5 640x480 66Hz
6 640x480 72Hz
7 640x480 75Hz
8 640x480 85Hz
9 800x600 56Hz
10 800x600 60Hz
11 800x600 70Hz
12 800x600 72Hz
13 800x600 75Hz
14 800x600 85Hz
15 832x624 75Hz
16 1024x768 60Hz
17 1024x768 66Hz
18 1024x768 70Hz
19 1024x768 72Hz
20 1024x768 75Hz
21 1024x768 85Hz
22 1152x864 60Hz
23 1152x864 70Hz
24 1152x864 75Hz
25 1152x864 85Hz
26 1152x870 75Hz
27 1280x768 60Hz
28 1360x768 60Hz
29 1280x768 75Hz
30 1280x768 85Hz
31 1280x960 60Hz
32 1280x960 75Hz
33 1280x960 85Hz
34 1280x1024 60Hz
35 1280x1024 75Hz
36 1280x1024 85Hz
37 1400x1050 60Hz
38 1400x1050 75Hz
39 1400x1050 85Hz
40 1440x900 60Hz
41 1440x900 75Hz
42 1600x1200 60Hz
43 1680x1050 60Hz
44 1920x1080 60Hz
45 1920x1200 60Hz
CHANNEL INDICATOR
On Screen Display
RF AERIAL INPUT
75 Ohm (unbalanced)
OPERATING VOLTAGE
220-240V AC, 50 Hz.
AUDIO
German + Nicam Stereo
AUDIO OUTPUT POWER (W
) (10% THD) 2 x 6
RMS.
POWER CONSUMPTION (W) 80 W (max)
PANEL 16:9
Licence Notications
Manufactured under license from Dolby Laboratories.
TRADEMARK ACKNOWLEDGMENT
trademarks of Dolby Laboratories.
“HDMI, the HDMI logo and High-Denition Multimedia
Interface are trademarks or registered trademarks of
HDMI Licensing LLC.”
and the double-D symbol are
Specications
TV BROADCASTING
PAL/SECAM B/G D/K K’ I/I’ L/L’
DIGITAL RECEPTION
DVB-T MPEG2
DVB-T MPEG4 HD
DVB-T MHEG-5 Engine (for UK only)
DVB-C MPEG2
DVB-C MPEG4 HD
RECEIVING CHANNELS
VHF (BAND I/III)
UHF (BAND U)
HYPERBAND
NUMBER OF PRESET CHANNELS
10000
English - 17 -
Supported File Formats for USB Media Browser
Media Extension Format Notes
Video Audio
Movie dat, mpg,
Music .mp3
Photo .jpg .jpeg Baseline JPEG MAX WxH =
Subtitle
mpeg
dat, mpg,
mpeg
.vob MPEG2 MPEG1/2 Layer 1/2/3, AC3, LPCM 1080P@ 30fps 50Mbit/
.mkv MPEG1,2,4, XviD,
.mp4 .mov MPEG1/2 Layer 3, AAC/HEAAC,
.avi MPEG1,2,4
v H.264,
3gp,3g2 MPEG4, H.264 1920x1080 @ 30P
asf, wmv MPEG2,4, XviD, H.264,
OGG OGG
.wav LPCM
WMA/ASF WMA, WMA Pro
.m4a/ .aac AAC, HEAAC
.png Progressive JPEG
.bmp non-interlace
.png
sub - -
srt - -
Mpeg1,2 MPEG1/2 Layer 1/2/3, AAC/HEAAC,
MPEG2 ,H.264, VC1, AVS,
MVC
H.264,
VC1,WMV3,
Motion JPEG
Xvid
H.264,
VC1,WMV3,
Sorenson H.263
Motion JPEG
Sorenson H.263
VC1,WMV3
-
AC3/EAC3, LPCM/ADPCM
MPEG1/2 Layer 1/2/3, AAC/HEAAC,
AC3/EAC3, LPCM/ADPCM
MPEG1/2 Layer 1/2/3, AAC/HEAAC,
AC3/EAC3, LPCM,OGG
AC3/EAC3, LPCM/ADPCM
MPEG1/2 Layer 1/2/3, AAC/HEAAC,
AC3/EAC3, LPCM/ADPCM, WMA
MPEG1/2 Layer 3, AAC/HEAAC,
LPCM/ADPCM
MPEG1/2 Layer 1/2/3, AAC/HEAAC,
AC3/EAC3, LPCM, WMA
MPEG1 Layer 1/2/3 (MP3)
interlace
1080P@ 30fps 50Mbit/
sec
H.264:1080Px2@25fps
1080P@ 50fps MVC:
1080P@ 24fps Other:
1080P@ 30fps” 50Mbit/
sec
sec
H.264:1080Px2@25fps
1080P@ 50fps
Other:1080P@ 30fps
50Mbit/sec
H.264:
1080Px2@25fps
1080P@ 50fps Other:
1080P@ 30fps 50Mbit/
sec
H.264:
1080Px2@25fps
1080P@ 50fps Other:
1080P@ 30fps”
50Mbit/sec
H.264: 1080Px2@25fps
1080P@ 50fps Other:
1080P@ 30fps” 50Mbit/
sec
20Mbit/sec
1080P@ 30fps 50Mbit/
sec
14592x12288
Up to 8 MegaByte
English - 18 -
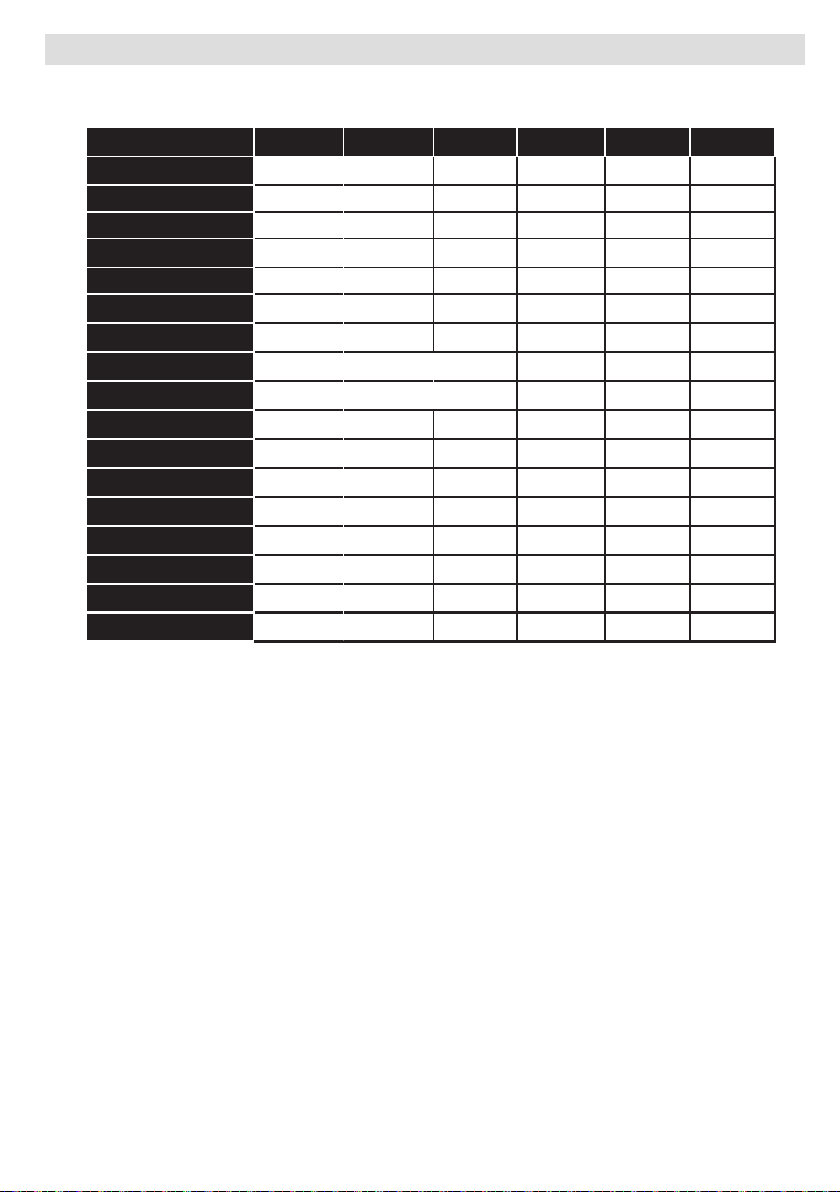
Supported DVI Resolutions
When connecting devices to your TV’s connectors by using DVI converter cables (not supplied), you can refer
to the following resolution information.
56Hz 60Hz 66Hz 70Hz 72Hz 75Hz
640x400
640x480
800x600
832x624
1024x768
1152x864
1152x870
1280x768
1360x768
1280x960
1280x1024
1400x1050
1440x900
1600x1200
1680x1050
1920x1080
1920x1200
þ þ þ þ
þ þ þ þ þ
þ þ þ þ þ
þ þ þ
þ
þ þ
þ þ
þ þ
þ þ
þ þ
þ
þ
þ
þ
þ
þ
þ
English - 19 -
СЪДЪРЖАНИЕ
Мерки за безопасност......................................... 20
Информация за опазване на околната среда ... 22
Характеристики на телевизора ......................... 23
Гледане на телевизия ........................................ 23
Бутон за управление на телевизора & работа ... 23
Включени аксесоари ........................................... 23
Преглед на дистанционното управление .......... 24
Използване на модул за условен достъп .......... 26
Известия за режим на готовност ....................... 26
Поставяне на батериите в дистанционното
управление .......................................................... 27
Включване към електрозахранването и антена/
кабел/ ................................................................... 27
Включване/Изключване ...................................... 27
Първоначална инсталация ................................27
Медийно възпроизвеждане през USB ..................
вход ...................................................................... 29
Промяна на размера на изображението:
Формати на изображението ............................... 30
Използване на списъка с канали ....................... 30
Характеристики на менюто и функции .............. 31
Електронен справочник за програмите (ЕСП) . . 34
Записване на програма ...................................... 34
Запис с изместване на времето ....................... 35
Незабавен запис ................................................. 35
Възпроизвеждане на записани програми ........ 35
Конфигуриране на записването ......................... 36
Телетекст ............................................................. 36
Обновяване на софтуера ................................... 37
Отстраняване на неизправности & съвети ....... 37
Типични екранни РС режими ............................ 39
Технически данни .....................................................39
Лицензи................................................................ 39
Поддържани файлови формати за USB
медийния браузър .............................................. 40
Поддържана DVI резолюция .............................. 41
Мерки за безопасност
Моля внимателно прочетете тези
инструкции
преди монтаж или експлоатация.
Подготовка
Поставете уреда върху здрава, равна повърхност.
За добра вентилация оставете поне 10 см свободно
пространство около уреда. За да се предотвратят
грешки и опасни ситуации, моля, не поставяйте
предмети върху горната част на уреда. Използвайте
уреда в умерени климатични условия. Работна
температура и влажност: 5ºC до 45ºC, 85%
относителна влажност макс. (не препречвайте
отворите за вентилация).
Използване по предназначение
Това устройство е предназначено за приемане
и възпроизвеждане на телевизионни програми.
Различните възможности за свързване увеличават
възможностите за приемане и възпроизвеждане
на възможни източници (различни външни
устройства). Този уред е подходящ за употреба
само в сухи закрити помещения. Този уред е
предназначен единствено за домашна употреба
и не може да бъде използван за индустриални
или търговски цели. По принцип не уважаваме
гаранционни искове, ако уредът не е бил
използван по предназначение или ако са му
правени непозволени модификации. Употребата
на Вашият LED-телевизор в екстремни условия
може да доведе до повреда на уреда.
ПРЕДУПРЕЖДЕНИЕ: Никога не
позволявайте на лица (включително лица) с
ограничени физически, сетивни или умствени
способности или на такива без опит/знания
да използват електрическия уред без надзор!
Децата може да не разпознаят надвисналата
опасност! Поглъщането на батерии може да е
с фатален край. Дръжте батериите на места,
недостъпни за деца. В случай на погълнати
батерии незабавно потърсете медицинска
помощ. Дръжте опаковките далече от деца.
Съществува опасност от задушаване.
Захранващ източник
• Уредът трябва да работи само с напрежение
220-240V АС и честота на тока 50Hz.
• Предупреждение: Не оставяйте Вашия
телевизор в режим на готовност или в работен
режим, когато напускате дома си.
Позициониране на телевизора
• За добра вентилация оставете поне 10 см
свободно пространство около уреда.
български - 20 -
• Не блокирайте вентилационните отвори.
• Не поставяйте телевизора върху наклонени или
нестабилни повърхности, телевизорът може да
се преобърне.
• За да предпазите телевизора от повреда, не
поставяйте предмети върху телевизора.
• Използвайте телевизора само в умерени
климатични условия.
Захранващ кабел и щепсел
• Щепселът на захранващия кабел трябва
да е леснодостъпен. В случай на бури и
светкавици, когато отивате на почивка или когато
телевизорът няма да се използва дълго време,
изключете захранващия кабел от контакта на
електрическата мрежа.
• Щепселът на кабела се използва за изключване
на телевизора от електрическата мрежа и затова
той трябва да е винаги годен за употреба.
• Не поставяйте телевизора, мебели и др. Върху
захранващия кабел или не прищипвайте кабела.
• Хванете захранващия кабел за щепсела, не
изключвайте телевизора, дърпайки кабела.
• Никога не докосвайте захранващия кабел/
щепсела с мокри ръце, тъй като това може да
предизвика късо съединение или токов удар.
• Никога не правете възел на захранващия кабел
или не го връзвайте с други кабели.
• Захранващите кабели трябва да бъде поставени
по такъв начин, че да се избегне опасността от
настъпването им.
• Повреден захранващ кабел/щепсел може
да предизвика пожар или да ви удари токов
удар. Ако са повредени, сменете ги незабавно,
което трябва да се извърши от квалифициран
персонал.
Влага и вода
• Не използвайте телевизора на влажно и мокро
място (избягвайте банята, мивката в кухнята, или
в близост до пералната машина).
• Не излагайте телевизора на дъжд или вода, тъй
като това може да е опасно.
• Не поставяйте предмети, пълни с вода, като напр.
вази с цветя, върху телевизора. Пазете уреда от
капки или пръски.
• В случай, че някой твърд предмет или течност
попадне в кутията, извадете кабела от мрежата и
проверете уреда в квалифициран сервиз, преди
отново да го използвате.
Вентилация
• Слотовете и отворите на телевизора са
предназначени за вентилация и да се осигури
надеждната му работа.
• За да се предотврати прегряване, тези отвори
не трябва да бъдат блокирани или покрити по
никакъв начин..
Източници на топлина и пламъци
• Не излагайте телевизора на пряка слънчева
светлина или други източници на топлина.
• Телевизорът не трябва да се поставя в близост
до открит пламък и източници на интензивна
топлина, като електрически
бойлер.
• Уверете се, че върху телевизора
няма поставени открити
източници на огън, напр.,
запалени свещи.
Сила на звука на
слушалките
• Прекаленото звуково налягане
от слушалките и наушници може
да доведе до загуба на слух, моля бъдете
внимателни.
Монтиране на стена (опция)
• За да се избегнат наранявания, този телевизор
трябва да бъде надеждно закрепено на стената
в съответствие с инструкциите за монтаж (ако
тази опция е налична).
LCD екран
• От време на време няколко неактивни пиксела
може да се появят на екрана като фиксирана
синя, зелена или червена точка. Моля, обърнете
внимание на факта, че това не влияе на работата
на вашия продукт.
• Внимавайте да не издраскате телевизора с нокти
или други остри предмети.
Почистване
• Преди почистване изключете телевизора от
електрическата мрежа.
• Не използвайте течни или аерозолни почистващи
препарати. Използвайте само мека,суха кърпа.
български - 21 -
Информация за опазване на
околната среда
Този телевизор консумира малко енергия. Така Вие
ще помогнете не само на опазването на околната
среда, но и ще спестите средства, намалявайски
сметките си за електроенергия. За да намалите
потреблението на електроенергия, изпълнете
следните стъпки:
Използвайте режим Пестене на електроенергия в
меню Настройки на изображението. Ако настроите
режима за пестене на електроенергия на Eco,
телевизорът ще превключи на икономичен режим
на работа, а нивото на осветеност на телевизора
ще бъде сведено до минимално ниво. Имайте
предвид, че някои от настройките на изображението
няма да са налични, когато телевизорът е в режим
на пестене на електроенергия.
Ако сте избрали "Изкл. изображение", съобщението
“Екранът ще изгасне след 15 сек.” ще се появи
на екрана. Изберете ПРОДЪЛЖИ и натиснете
OK, за да продължите. Екранът ще изгасле след
15 секунди. Ако изключите режима "Пестене
на електроенергия", режим "ИЗображение"
автоматично ще се настрои на "Динамично".
Моля, изключете телевизора или извадете
щепсела от контакта, когато не го използвате. Това
също така ще намали консумацията на енергия.
Ако ще отсъствате за по-дълъг период от време,
изключете телевизора от контакта.
Силно Ви препоръчваме да активирате режима
за пестене на електроенергия, за да намалите
годишната си консумация на електроенергия.
Освен това Ви препоръчваме да изключвате
телевизора от контакта, когато не го използвате,
за да пестите електроенергия.
Моля помогнете ни да опазим околната среда като
следвате гореописаните стъпки.
Информация за ремонт
Моля, обърнете се към квалифициран персонал за
обслужване. Телевизорът трябва да се ремонтира
само от квалифициран персонал. За повече
информация моля свържете се с дилъра, от когото
сте закупили телевизора.
български - 22 -
Характеристики на телевизора
• Цветен LED телевизор с дистанционно
управление.
• Изцяло вградена цифрова телевизия
(DVB-T/C)
• HDMI конектори за цифрово аудио и видео..
Тази връзка също така е проектирана да приема
сигнали с висока разделителна способност.
• USB вход.
• Записване на програма
• Изместване на времето на програма.
• 10000 програми.
• Система от екранни менюта.
• Скарт извод за включване на външни устройства
(като видео, видео игри, аудио уред и др.)
• Стерео звукова система.
• Телетекст, бърз текст, TOП текст.
• Извод за слушалки.
• Система за автоматично програмиране.
• Ръчна настройка напред и назад.
• Автоматично изключване след около шест часа.
• Таймер за автоматично изключване.
• Блокировка за деца.
• Автоматично изключване на звука при липса на
излъчване.
• NTSC възпроизвеждане
• AVL (автоматично ограничаване на силата на
звука)
• PLL (честотно търсене).
• PC вход.
• Plug&Play for Windows 98, ME, 2000, XP, Vista,
Windows 7.
• Режим Игри (опция).
• Функциа за изключване на изображението.
Гледане на телевизия
български - 23 -
Бутон за управление на
телевизора & работа
1.Нагоре
2. Надолу
3. Програма/Сила на звука / Бутон за включване
на режима на готовност
Превключвателят за управление ви позволява
са управлявате силата на звука/програмата/
източника и бутона за включане на режима на
готовност на телевизора.
За промяна на силата на звука: Увеличете
силата на звука чрез натискане на бутона.
Намалете силата на звука чрез натискане на
бутона.
За смяна на канала: Натиснете бутна в средата,
на екрана ще се появи информационната лента
с каналите. Превъртете запаметените чрез
натискане на бутона нагоре или надолу
За да смените източника: Натиснете бутна в
средата два пъти, на екрана ще се появи списък
с източниците. Превъртете през наличните
източници чрез натискане на бутона нагоре
или надолу.
За да изключите телевизора: Натиснете
средата на бутона и го задръжте за няколко
секунди, докато телевизорът премине в режим
на готовност.
ЗАБЕЛЕЖКА:Можете да местите бутона
нагоре или надолу за промяна на силата на
звука. Ако искате да смените канала, натиснете
превключвателя в средата веднъж (позиция 3)
и след това придвижете нагоре и надолу. Ако
натиснете бутона още веднъж в средата, на
екрана ще се появи екранно меню. За да изберете
желания източник, преместете превключвателя
нагоре или надолу и пуснете. Ако натиснете
в средата на бутона и задържите за няколко
секунди, телевизорът ще премине в режим на
готовност. Главното екранно меню не може
да се покаце от управляващите бутони на
дистанционното управление.
Включени аксесоари
Дистанционно управление
Батерии: 2 x AAA
Инструкции за употреба
Кабел за SIDE AV връзка
Преглед на дистанционното управление
SLEEP
SCREEN
PRESETS
LANG.
FAV
EPG
SWAP
SOURCE
C
DISP.
SEARCH
MODE
INFO
CH
V
1. Режим на готовност
2. Размер на изображението
3. Таймер за заспиване
4. Моно / Стерео - Dual I-II / Текущ език (в
цифрови канали)
5. Предпочитан канал.
6. Цифрови бутони
7. Справочник на електронните програми (в
цифрови канали)
8. Няма функция.
9. Медиен браузър
10. Навигационни бутони (Напред/Назад/
Наляво/Надясно)
11. Няма функция.
12. Библиотека на записите
13. Предишна програма / Следваща страница -
Следваща програма / Предишна страница
14. Спиране на звука
15. Записване на програма
16. Пауза (във видео режим на медийно
възпроизвеждане) / Запис с изместване на
времето
17. Бързо назад (в режим „Медиен браузър”)
18. Възпроизвеждане (в режим Медиен браузър)
19. Червен бутон
20. Зелен бутон
21. Избор на режим „Изображение”
22. Няма функция.
23. Телетекст / Смесен (в режим „Телетекст”)
24. Вклєчени/Изклєчени субтитри (във видео
канали)
25. Предишна програма
26. AV / Избор на източник
27. Вклєчено/Изклєчено менє
28. OК (Потвърждение) / Задържане (в режим
„Телетекст”) / Списък с канали
29. Изход / Връщане / Индексна страница (в
режим „Телетекст”)
30. Няма функция.
31. Информация / Разкриване (в режим
Телетекст)
32. Усилване/Намаляване на силата на звука
33. Няма функция.
34. Няма функция.
35. Бързо напред (в режим „Медийно
възпроизвеждане”)
36. Стоп (в режимМедийно възпроизвеждане)
37. Син бутон
38. Жълт бутон
български - 24 -
БЕЛЕЖКА: Обхватът на дистанционното
управление е около 7м / 23ft.

Преглед на конекторите
Конектор Тип Кабели Устройство
Скарт
връзка
(назад)
VGA
връзка
(назад)
Страничен
AV
Страничен
AV
PC/YPbPr
Аудио
връзка
(страничния)
HDMI
връзка
(назад)
SPDIFF
връзка
(назад)
Страничен
AV
връзка
(страничния)
Страничен видео/
аудио свързващ
кабел (Доставя)
AV свързващ кабел
(доставя се)
PC аудио кабел
(не се доставя)
СЛУШАЛКИ
Слушалки
връзка
(страничния)
USB
връзка
(страничния)
CI
връзка
(страничния)
CAM
module
БЕЛЕЖКА: Когато свързвате устройство през страничния AV вход, трябва да използвате включения в
доставката свързващ кабел. Виж горната илюстрация. | YPbPr може да се използва само когато свързвате
устройство, което има YPbPr изход през PC изхода с YPbPr към PC кабел (YPbPr към PC кабелът не се доставя).
Когато връзката е направена, включете YPbPr източника. За да разрешите аудио звукът на компютъра, трябва
да използвате PC/YPBPR АУДИО БЕЛИЯТ И ЧЕРВЕН вход. | Ако през СКАРТ жака е свързано външно устройство,
телевизорът автоматично ще премине в AV режим.| При приемане на DTV канали (Mpeg4 H.264) или докато
телевизорът е в режим „Медийно възпроизвеждане”, изходът няма да е на разположение през скарт жака. При
използване на комплекта за монтаж на стена (опция), Ви препоръчваме да включите всички кабели на гърба на
телевизора, преди да го монтирате на стената. | Свързвайте или разкачайте CI модула само когато телевизорът
е ИЗКЛЮЧЕН. За повече подробности за настройките можете да погледнете ръководството за експлоатация
на модула. Поставете Модула за условен достъп (CAM) и след това картата за гледане в слот, който се намира
под капака на терминала отзад на телевизора. Модулът трябва да бъде поставен правилно, не е възможно да го
пъхнете до края, ако е наопаки. CAM или извода на телевизора може да се повредят, ако CAM е поставен със сила.
Всеки USB вход на вашия телевизор поддържа устройства до 500mA. Свързването на устройства със стойност
на тока над 500mA могат да повредят телевизора ви.
български - 25 -

Използване на модул за условен
достъп
ВАЖНО: Свързвайте или разкачайте CI модула
само когато телевизорът е ИЗКЛЮЧЕН.
За да наблюдавате определени цифрови канали,
може да е необходим модул за условен достъп
(CAM). Този модул трябва да се вкара в CI слота
на Вашия телевизор.
1.Осигурете си Модул за условен достъп (Conditional
Access Module, CAM) и карта за гледане, като се
абонирате за платен канал, след това ги поставете
в телевизора чрез следната процедура.
2. Поставете Модула за условен достъп (CAM)
и след това картата за гледане в слот, който
се намира под капака на терминала отзад на
телевизора.
3. Модулът за условен достъп (CAM) трябва
да бъде поставен правилно, не е възможно д
го пъхнете до края, ако е наопаки. Модулът
за условен достъп (CAM) или терминалът на
телевизора може да се повредят, ако се използва
сила при вкарване на Модула за условен достъп
(CAM).
4.Свържете телевизора към главното
захранване, включете го и изчакайте малко,
докато картата се активира..
5. Ако няма поставен модул, на екрана се
появява съобщението “Не е открит модул на
общия интерфейс”.
За повече подробности за настройките можете
да погледнете ръководството за експлоатация на
модула.
Известия за режим на готовност
Ако телевизрът не получи входен сигнал (напр. от
антена или HDMI източник) в рамките на 5 минути,
телевизорът ще премине в режим на готовност.
Когато по-късно включите телевизора, на екрана
ще се появи следното съобщение:
При достигане на времето за автоматично
изключване на телевизора, на екрана юе се
появи следното съобщение. Изберете "ДА", за
да изключите телевизора. Изберете "НЕ", за да
отмените. Телевизорът ще се изключи, ако не
направите никакъв избор от този екран.
Ако телевизорът е бил оставен включен и не е
работил 4 часа, същият ще премине в режим на
готовност. Когато по-късно включите телевизора,
на екрана ще се появи следното съобщение:
CAM
module
български - 26 -

Поставяне на батериите в
Антена или кабел
дистанционното управление
1. Внимателно свалете капака на гърба на
дистанционното управление.
2.Поставете две батерии AAA. Уверете се, че +
и – краищата на батериите съвпадат (спазвайте
поляритета).
3.Поставете капака.
Включване към електрозахранването и
антена/кабел/
ВАЖНО: Телевизорът е проектиран да работи
при напрежение 220-240В на променлив ток с
честота 50 Hz. След като извадите телевизора
от опаковката, оставете го да достигне стайна
температура, преди да го включите към
електрическата мрежа. Включете щепсела на
захранващия кабел в контакта.
За изключване на телевизора
Натиснете бутона “ ” на дистанционното
управление или натиснете и задръжте контролния
превключвател на телевизора, докато телевизорът
се изключи, така че телевизорът да превключи в
режим на готовност (зависи от модела).
За да изклєчите напълно телевизора, извадете
захранващия кабел от мрежовия контакт.
Забележка: Когато телевизорът е вклєчен в режим
на готовност, индикаторът за Standby може да мига,
което показва, че функциите за търсене на режим на
готовност Търсене в режим на готовност, ефирно
изтегляне Ефирно сваляне или таймер Таймер"
са активни. (Светодиодът ще мига по време на
включването/изключването на режима „Готовност”)
Първоначална инсталация
Когато включите телевизора за първи път, ще
се появи менюто "Избор на език". Съобщението
„Добре дошли, моля изберете език!” се появява
в азбучен ред на всички езици.
VGA
SPDIF
SCART
227529
Включване/Изключване
За включване на телевизора
Включете захранващия кабел към 220-240V, AC
50 Hz.
Тогава ще светне светодиодът за режим на готовност.
За да включите телевизора в режим "Готовност" или:
Натиснете бутона “ ” CH ^/ v или цифров бутон от
дистанционното управление.
Натиснете контролния превключвател, разположен
на лявата страна на телевизора. Телевизорът ще
се включи.
български - 27 -
Натиснете бутона “ ” или “ ”, за да маркирате
желания от вас език и натиснете бутона OK, за да
изберете. Появява се „Първоначална инсталация”.
Използвайте бутона “ ” или “ ” за да настроите
желаната държава и натиснете “ ” бутона, за да
изберете "Тип на търсене". Използвайте “ ” или “ ”,
за да настроите желания тип на търсене. Наличните
типове на търсене са Цифров и аналогов, само
цифров и само аналогов. След като е настроен,
натиснете “ ”, за да избере "Език на телетекста".
Използвайте бутона “ ” или “ ”, за да настроите
“Език на телетекста” и изберете “Кодирано търсене”,
използвайки бутона “ ” или “ ”. Можете да
настроите "Кодирано търсене" на"Да", ако искате
да търсете кодирани станции.

От дистанционното управление натиснете бутона"OK",
за да продължите, а на екрана ще се появи следното
съобщение.
Можете да активирате опцията "Режим на
замапетяване" (опция), използвайки бутона
“ "или “ ”. Ако е избран "Режим на запаметяване",
опцията "Режим на запаметяване" ще е на
разполоение в менюто за допълнителните
настройки и функциите на вашия телевизор ще се
появят в горната част на екрана. След избиране
на "Режим за запаметяване" на екрана ще се
появи съобщение за потвърждение (опция).
Изберете "ДА", за да продължите.
Трябва да изберете типа търсене, за да търсите
и апаметявате предавания от желания източник.
Монтиране на антената
Ако от екрана Вид търсене сте избрали опцията
АНТЕНА, телевизорът ще започне търсене на
земни цифрови телевизионни предавания:
БЕЛЕЖКА: Можете да натиснете бутона MENU,
за да отмените.
След запаметяването на всички налични станции,
на екрана се появява списъка с каналите. Ако
искате да сортирате канали съгласно LCN (*), моля
изберете Yesи след това натиснете OK.
Ако е избран режим "Дом", режим "Запаметяване"
(опция) няма да е на разположение след
първоначалната инсталация. От дистанционното
управление натиснете бутона ОК, за да
продължите, а на екрана ще се появи следното
съобщение.
български - 28 -
Натиснете бутона OK, за да излезете от списъка
с канали и да гледате телевизия.
(*) LCN е система за локални номера на
каналите, която организира наличните
излъчвания в съответствие с разпознаваема
последователност на каналите.
Монтиране на кабел
Ако изберете опцията КАБЕЛ, от дистанционното
управление натиснете бутона ОК, за да
продължите, а на екрана ще се появи следното
съобщение:

За да продължите, моля изберете ДА и натиснете
ОК. За да отмените операцията, изберете НЕ и
натиснете ОК.
От този екран можете да изберете честотния
диапазон. За маркираните редове, които виждате,
използвайте бутона или
Можете също така да въведете номер, като
използвате цифровите бутони на дистанционното
управление.
Настройте Старт и Стоп на честотата от
цифровите бутони на дистанционното управление.
След приключване на настройката можете да
настроите стъпката на търсене на 8000 KHz
или 1000 KHz.
Ако сте избрали стъпка на търсене 1000 KHz,
телевизорът ще търси по-подробно. В следствие
на това продължителността на търсене ще
се увеличи. След като приключите, натиснете
бутона ОК, за да започнете автоматично търсене.
Телевизорът ще търси и запамети наличните
излъчвания.
(*) Опцията "Мрежа" не е налична за Обединеното
кралство.
български - 29 -
Медийно възпроизвеждане през
USB вход
Можете да свърете USB хард диск или USB флаш
памет към Вашия телевизор, използвайки USB
входовете на телевизора. Тази характеристика
Ви позволява да възпроизвеждате или файлове,
запаметени на USB устройството. Поддържат се
2,5” и 3,5” инчови (hdd с външно електрозахранване)
външни хард дискови устройства.
ВАЖНО! Трябва да направите резервно копие
на Вашите файлове, преди да ги свържете към
телевизора, за да избегнете възможна загуба
на данни. Производителят не носи отговорност
за каквито и да било повреди на файлове или
загуба на данни. Възможно е определени типове
USB устройства (напр. MP3 плейъри) или USB
хард дискове/ флаш памети да не са съвместими
с този телевизор. Телевизорът поддържа FAT32
и NTFS формати на дисковете, но записване
няма да може да се извърши на NTFS дискове..
Забележка: Докато форматирате USB хард диск
с размер 1TB (терабайт) или повече, може да
срещнете проблеми по време на процеса на
форматиране.
Бързото вклєчване и изклєчване на USB устройства
крие редица рискове. Не свързвайте и разкачайте
бързо устройството няколко последователни пъти.
Това може да предизвика физическа повреда
на USB плейъра и особено на самото USB
устройство. По време на възпроизвеждане на
файла не изваждайте USB модула.
Меню Медийно възпроизвеждане
Можете да възпроизвеждате снимки, музика,
и филмови файлове, които са записани на
USB диска, като го свържете към телевизора
и използвате екрана на медийния браузър.
За да направите това, направете следното:
Свържете USB диска към някой от USB входовете,
разположени отстрани на телевизора.
Можете да включите две USB устройства
едновременно във Вашия телевизор. Ако двете
USB устройства съдържат музика, снимки
или видеофайлове, на екрана ще се появи
съобщение за избор на USB. USB устройството,
което е свързано първо към телевизора, ще бъде
известно като USB Drive 1 Изберете устройство
с помощта на бутоните “ ” или “ ” и
натиснете ОК.
Натиснете бутона "MENU" и изберете папката
"Медиен браузър", използвайки бутони "Ляво/
Дясно" и "OK" . Ще се появи главния екран
на медийния браузър. Можете да покажете
съответното съдържание като изберете папката
Видео, МузикаMusic или Изображение. Следвайте
инструкциите на бутоните под всеки от екраните

на менюто за информация относно функциите за
възпроизвеждане на медии.
Можете да настроите настройките на Вашия
медиен браузър като използвате диалога
Настройки.
Използване на бутон "МЕНЮ" в режим
"Медиен браузър"
Натискането на бутон "MENU" в режим "Медиен
браузър" показва следното екранно меню:
Използвайки този екран можете да стигнете
до "Изображение", "Звук" и "Настройки".
Натиснете отново бутона "MENU", за да излезете
от този екран.
Промяна на размера на
изображението: Формати на
изображението
Програмите могат да се гледат в различни
формати на изображението, в зависимост от
приеманата програма. Можете да промените
съотношението на изображението (размера на
изображението) на телевизора за гледане на
програми в различните режими на мащабиране.
Натиснете бутона SCREEN неколкократно, за да
промените размера на изображението. Можете
да премествате изображението нагоре
или надолу като натискате бутоните “
” или “ ”, докато мащабирането на
изображението е, 14:9 мащаб, Кино или
Субтитри.
Използване на списъка с канали
Телевизорът сортира всички запаметени канали
в списъка с каналите . Можете да редактирате
този списък с каналите, да маркирате лєбимите
си канали или да настроите активните канали да
бъдат изброени с помощта на опциите в списъка
с каналите Channel List Натиснете бутона MENU,
за да видите в главното меню. Изберете позицията
Списък с каналите , като използвате бутоните
Ляво или Дясно. Натиснете OK, за да видите
съдържанието на менюто. Изберете Редактиране
на списъка с каналите, за да управлявате
запомнените канали. Иползвайте бутоните Нагоре
или Надолу и OK за да изберете Редактиране на
списъка с каналите. Натиснете бутона Нагоре
или Надолу, за да маркирате канала, който ще
бъде обработен. Натиснете бутона Ляво или
Дясно, за да изберете функция от менюто Списък
с канали. Използвайте бутоните P+/P-, за да
движите страницата нагоре или надолу. Натиснете
бутона MENU, за да излезете.
Сортиране на списъка с канали
Можете да изберете програмите, които да
се съдържат в списъка с каналите. За да
покажете специфични видове програми, трябва
да използвате настройката "Активен списък с
каналите". Изберете Активен списък с канали от
менюто Списък с канали с помощта на бутона
“ ” или “ ”. Натиснете бутона "OK", за да
продължите. Можете да изберете опцията за
типа на мрежата от списъка с помощта на
бутоните “ ” или “ ” и OK.
български - 30 -

Характеристики на менюто и функции
Контраст
Разширени настройки
цвета
изображението
Skin Tone
Цветова
тоналност
настройките за режим „VGA” ще бъдат добавени към менюто “Настройки на изображението”, докато
се намирате в този режим.
Меню “Picture Съдържание
Режим
Яркост Настройва яркостта на екрана.
Острота Настройва остротата на обектите, изобразявани на екрана.
Цвят Настройва цвета, настройва Цветова.
Режим на
пестене на
електроенергия
Задна подсветка
(по избор)
Намаляване на
шума
За задоволяване на Вашите изисквания към изображението, можете да изберете
съответния режим от менєто. Режима на изображението може да се настрои към
една от следните опции: Кино, Игра, спорт, Динамична и Естествена.
Настройва стойностите за осветеност и затъмнение на екрана.
за да настроите режима на пестене на електроенергия на Еко, Изключено изображение
или Изключен. За повече информация относно енергоспестяващия режим „Power
Save Mode” вижте раздел „Информация за опазване на околната среда” в настоящото
ръководство.
Тази настройка контролира нивото на задната подсветка и може да се настрои на
Автоматично, Максимум, Минимум и Еко. Ако режим „Пестене на електроенергия”
е включен, функцията „Задно осветяване” няма да се вижда. Опцията за задна
подсветка „Backlight” не може да се активира в режим VGA или Медиен браузър,
или докато изображението е в геймърски режим „Game”.
Ако излъчвания сигнал е слаб или изображението е шумно, използвайте настройката
“Намаляване на шума”, за да намалите нивото на шума. Динамичен контраст може
да се настрои към една от следните опции:Ниско, средно, високо или изклєчено.
Динамичен
контраст
Температура на
Мащабиране на
HDMI True Black
Режим “Филм”
RGB Gain
Нулиране
Звук в режим
Автопозици
ониране (PC)
Н позиция (PC)
V позиция (PC) V (Вертикалната) позиция премества образа вертикално нагоре или надолу по екрана.
Точкова честота
(PC)
Фаза (PC)
Докато е в режим VGA (PC), някои позиции от менєто „Picture” няма да са достъпни. Вместо това
Можете да променяте контраста, използвайки функцията за динамичен контраст.
Динамичен контраст може да се настрои към една от следните опции: Ниско, средно,
високо или изклєчено.
Настройва желания цветови тон.
Настройва размера на изображението на Автоматично, 16:9, Субтитри 14:9,
Мащабиране 14:9, 4:3 или Кино.
Докато гледате предаване, излъчвано от HDMI източник, тази функция ще е активна
в меню „Настройки на изображението”. Можете да използвате тази функция, за да
усилите черния цвят в изображението.
Филмите се записват при различен брой кадри за секунда като нормални телевизионни
програми. Включете тази функция по време на гледане на филм, за да видите ясно
бързите сцени.
Настройва желания телесни тон.
Настройва желания цветови тон.
Натиснете бутона OK за да редактирате RGB усилването. Можете да конфигурирате
стойностите за температурата на цветовете с помощта на функцията „RGB усилване”.
ъзстановяване на текущите “Настройки на изображението” към първоначалните
фабрични
Автоматично оптимизира дисплея. Натиснете бутона OK , за да оптимизирате.
Н (Хоризонталната) позиция премества образа хоризонтално надясно или наляво по
екрана.
С регулиране на Точковата честота се коригира интерференцията, която се явява като
вертикална лента при презентации с много точки, като електронни таблици, параграфи
или текст с дребен шрифт.
В зависимост от разрешаващата способност и честотата на сканиране, която
въвеждате в телевизора, може да се получат неясни изображения или шум в
картината на екрана. В такъв случай, може да използвате този елемент, за да получите
чисто изображение по метода на опита и грешката.
български - 31 -

Характеристики на менюто и функции
Съдържание на менюто Звук
Слушалки
(Опционално)
Цифров изход
каналите
(*)
Сила на звука Настройва нивото на звука.
В менєto “Еквалайзер”, предварителната настройка може да се промени на
Еквалайзер:
Баланс
Меню Звук
AVL
Слушалки/изход
(Опция)
Динамичен
бас(опционално)
Съраунд звук.
Автоматично
сканиране
на каналите
(Пренастройване)
Музика, Кино, Говор, Равно, Класическо или Потребител. Натиснете
бутона „MENU”, за да се върнете към предходното меню. Настройките на
меню “Еквалайзер” могат да се променят ръчно само, ако той е зададен
в режим “Потребителски”.
Тази функция се използва за подчертаване на звука от левия или десния
високоговорител.
Настройва силата на звука в слушалките.
Може да изберете режим Моно, Стерео, Двоен I или Двоен II, само ако
избрания канал поддържа този режим.
Функцията Автоматично ограничаване на силата на звука (AVL) настройва
звука за получаване на фиксирани изходни нива между програмите (например
силата на звука при рекламите е по-голяма от тази при стандартните
програми).
Ако към вашия телевизор свържете външен усилвател , използвайки буксата
на слушалките, можете да изберете тази връзка като “Външна линия”. Ако
към телевизора сте свързали слушалки, настройте тази опция на “Слушалки”.
Активира или деактивира функцията “Динамично усилване на баса”.
Режимът „Съраунд звук” може да се включа и изключва.
Настройва аудио типа на цифровия изход.
Съдържание на менюто Инсталиране и пренастройване
Показва опциите за автоматично настройване.
Цифрово ефирно: търси и запаметява ефирни DVB станции.
Цифрово кабелно: търси и запаметява ефирни DVB станции.
Аналогови: търси и запаметява аналоговите канали.
Цифрово ефирно & аналогово: Търси и запаметява ефирни DVB и
аналогови станции.
Цифрово кабелно & аналогово: Търси и запаметява кабелни DVB и
аналогови станции.
Ръчно сканиране на
Сканиране на
каналите на
мрежата
Аналогова фина
настройка
Първоначална
инсталация
Изтриване на
сервизния списък
Тази функция може да бъде използвана за директно въвеждане на канал.
Търси за свързани канали в системата на предавванията.
Можете да използвате тази настройка за фина настройка на аналоговите
канали. Тази функция не е налична, ако няма запаметени аналогови канали.
Изтрива всички запаметени канали и настройки, зарежда в телевизора
заводските настройки и започва процедурата по инасталиране за първи път.
Можете да следвате инструкциите в раздела Първоначална инсталация за
повече информация относно този процес.
(*) Тази настройка е видима само когато опцията “Държава” е настроена на
Дания, Швеция, Норвегия или Финландия. Използвайте тази настройка, за
да изтриете запаметените канали.
български - 32 -

позиции на менюто „Настройки”
Условен достъп Управлява условния достъп до модулите, когато е наличен.
Език
Таймери
Конфигуриране
на записването
Източници
Други настройки:Показва опциите на другите настройки на телевизора.
Меню „Таймаут”
Син фон на
екрана
Версия на
приложението
Автоматично
телевизора
Пълен режим
(опция)
Родителски
контрол
Дата/Час
Търсене на
кодирани канали
Обновяване на
софтуера
Недочуващи
Аудио описание
изключване на
Търсене в режим
на готовност
(опция)
Режим на
пестене на
електроенергия
Характеристики на менюто и функции
Конфигуриране на Езика на изображението.
Конфигуриране на настройките на изображението.
ВАЖНО: Когато е активирана опцията за заклєчване за деца „Child Lock”, телевизорът
може да се контролира чрез дистанционното управление. В този случай бутоните на
контролния панел.
Настройва таймерите за избраните програми.
Показва меню Конфигурация на записите
Източници
Настройване Дата/Време
Забележка:
Телевизорът взима информация за врето от предаването Точното време е налично в
“Настройки на дата/час”, ако информация за времето е налична в предаването.
Ако телевизорът не е в режим на канали, настройките за дата/час могат да се променят.
Освен това, ако има предварително зададен канал, само “Режим настройки на времето”
може да се промени, и, ако е настроен на “Ръчно”, настройката “Часова зона” ще е
активна.
Ако телевизорът е в режим на готовност и се включи по-късно и няма предаване,
информацията за времето няма да се актуализира. Ако има текущо предаване;
информацията за времето ще се вземе от предаването С други думи, информация за
времето ще има съгласно следните приоритети: телевизорът първо търси информация
за времето в предаването, след това съгласно предпочитанията на потребителя и найнакрая съгласно информацията за времето в телетекста.
Разрешава или забранява избраните опции източник.
Променя таймаут на екраните на менюто
Когато тази функция е включена, процесът на търсене ще локализира също и
кодираните канали. Ако тази функция е ИЗКЛЮЧЕНА, кодираните канали няма да бъдат
локализирани по време на автоматичното или ръчното търсене..
Активира или деактивира системата за син фон, когато сигналът е слаб или липсва.
За да сте сигурни, че Вашият телевизор винаги има най-новата информация,
използвайте тази настройка. За да осигурите правилна работа на уреда, уверете се,
че телевизорът е в режим „Готовност”.
Показва текущата версия на приложението.
Àко радиопредавателят позволява специфични сигнали, отнасящи се до звука, можете
да включите тази настройка, за да получавате такива сигнали.
Аудио описанието представлява описателен запис за слепи хора и хора с нарушено
зрение на визуален източник, включително телевизия и филми. Можете да използвате
тази функция, само ако се поддържа от телевизионния оператор.
Можете да настроите интервала за автоматичното изклєчване. След като зададеният
интервал бъде достигнат и телевизорът не е използван за определено време, той
ще се изклєчи.
Ако изключите функцията „Търсене в режим на готовност”, същата няма да е налична.
За да търсите в режим на готовност се уверете, че сте включили тази опция. Ако
включите търсенето в режим „Изчакване” , ще се търсят налични предавания. Ако
телевизорът открие нови или липсващи предавания, ще се появи екранно менє със
запитване дали желаете да приемете или не тези промени. Списъкът с канали ще се
актуализира и промени след този процес. Моля активирайте настройка „Търсене в
режим на готовност”, за да може телевизорът автоматично да актуализира честотата
на излъчване на предавателя, дефиницията на предаването и други подобни промени.
Можете да активирате този режим, ако гледате телевизор в магазин. Докато режим
“Магазин” е включен, някои позиции в менюто може да не са активни за настройване.
Тази настройка конфигурира предпочитания режим на захранване. Always On: Телевизорът
винаги се включва, когато се натисне основният бутон за включване / изключване. / Режим
на готовност Телевизорът винаги се включва в режим на готовност. / Последно състояние:
Телевизорът винаги се включва с последно избрания канал / източник.
български - 33 -

Електронен справочник за
програмите (ЕСП)
Някои, но не всички канали излъчват информация
за текущи и предстоящи програми. Натиснете
бутона EPG, за да видите меню "ЕСП".
Нагоре/Надолу/Наляво/Надясно: Разглеждате
ЕСП.
OK: Показва програмните опции.
ИНФОРМАЦИЯ: Показва детайлна информация
за избраната програма.
ЗЕЛЕН: Превключва в Списък на програмите на
ЕСП.
ЖЪЛТ: Превключва в Разписание на програмите
на ЕСП.
СИН: показва опциите за филтриране.
(ЗАПИС): телевизорът ще започне да записва
избраната програма. Можете да натиснете отново,
за да спрете записа.
ВАЖНО: За да запишете програма, първо трябва да
свържете USB диска към Вашия телевизор, докато
същият е изключен. След това трябва да включите
телевизора, за да активирате функцията за записване.
В противен случай функцията за записване няма да е
активна.
Забележка: По време на записа е невъзможно
превключването на друга програма или друг източник.
Програмни опции
В менюто ЕСП (EPG), натиснете бутона OK за да
влезете в менто Опции за събитията.
Избор на канал
В меню Електронен справочник за програмите,
използвайки ази функция Вие можете да
превключите на избран от Вас канал.
Задаване/Изтриване на таймер за запис
След като сте избрали програма в меню
„Електронен справочник на програмите”, натиснете
бутона OK и ще се появи екран с опции. Изберете
български - 34 -
опцията “Запис” и натиснете бутона OK. След тази
операция на избраната програма е зададен запис.
За да изтриете вече зададен запис, маркирайте
съответната програма и натиснете бутона ОК, след
което изберете опцията "Изтриване на таймер за
запис”. Записът ще се отмени.
Задаване на таймер/Изтриване на запис
След като сте избрали програма в меню
„Електронен справочник на програмите”, натиснете
бутона OK и ще се появи екран с опции. Изберете
опцията “Задаване на таймер за събитие”
и натиснете бутона OK. Можете да зададете
таймер на предстоящи програми. За да отмените
вече зададен таймер, маркирайте съответната
програма и натиснете бутона ОК. След това
изберете опцията “Изтриване на таймер”.
Таймерът ще се отмени.
Забележка: Не е възможно да запишете или настроите
таймер за две или повече отделни събития на един и
същ интервал от време.
Записване на програма
ВАЖНО: Когато използвате нов USB хард диск е
препоръчително първо да форматирате диска,
използвайки опцията на Вашия телевизор „Форматиране
на диск”.
За да запишете програма, първо трябва да
свържете USB диска към Вашия телевизор,
докато същият е изключен. След това трябва да
включите телевизора, за да активирате функцията
за записване.
За да използвате функцията за записване, трябва
да свържете USB диск или външен хард диск към
телевизора и свързаният USB диск трябва да е с
размер най-малко 1 GB и да има съвместимост на
скоростта от 2.0. Ако свързаното USB устройство
не поддържа скорост 2.0, на екрана ще се появи
съобщение за грешка.
Забележка: Записаните програми се записват
в свързания USB диск. Ако желаете, можете да
съхранявате/копирате записите на компютър; въпреки
това тези файлове няма до могат да се възпроизвеждат
на компютъра. Можете да възпроизвеждате файловете
през Вашия компютър.
Забележка: Lip Sync забавяне може да се появи по време
на изместването на времето. Радио запис не се
поддържа. Телевизорът може да записва програми
с продължителност до десет часа.
Записаните програми да разделени на дялове
от 4GB.
Ако скоростта на записване на свързания USB
диск не е достатъчна, записът може да не се
осъществи, а функцията за изместване на времето
няма да е налична.
Записването на HD програми може да заеме повече
място на USB диска, в зависимост от резолюцията

на излъчването. Поради тази причина за записване
на HD програми е препоръчително използването
на USB хард диск.
Не разкачайте USB диска/хард диска по време на
записа. Това може да повреди свързаният USB
диск/хард диск.
Могат да се поддържат няколко дяла. Поддържат
се до два различни дяла. Може да се появят
проблеми, ако дискът е разделен на повече от
два дяла. Първият дял на usb диска се използва
за PVR функциите. Освен това трябва да се
форматира като първи дял, за може да се използва
за PVR функциите.
Някои пакети от потока данни може да не могат
да бъдат записани поради проблеми със сигнала,
така че някои видео файлове могат да „замръзнат
" по време на възпроизвеждане.
Бутоните Запис, Възпроизвеждане, Пауза, Екран
(за PlayListDialog) не могат да се използват, когато
телетекстът е включен. Ако записът започва
с ВКЛЮЧВАНЕТО на таймера, телетекстът
автоматично се изключва. Следователно
използването на телетекста е невъзможно, когато
има текущо записване или възпроизвеждане.
Запис с изместване на времето
Натиснете бутона (ПАУЗА), докато гледате
програма, за да превключите в режим на
изместване на времето. В режим на изместване
на времето програмата е спряна, като
едновременно с това се записва на свързания USB
диск. Натиснете отново бутона
(Възпроизвеждане), за да започнете отново да
гледате спряната програма от момента на нейното
спиране. Ще видите изместването на времето
между истинската и изместената програма на
информационната лента.
Незабавен запис
Натиснете бутона (ЗАПИС), за да започне
текущият запис, докато гледате програма. Може
отново да натиснете бутона (ЗАПИС) от
дистанционното управление, за да запишете
следващото събитие в ЕПС. В този случай
съобщението ще покаже програмите за запис.
Натиснете бутона (СТОП), за да отмените
текущия запис. По време на записа не е възможно
превключването на друга програма или друг
източник и преглеждането на медийния браузър.
български - 35 -
Възпроизвеждане на записани
програми
В главното меню използвайте бутоните “ ” или
“ ”, за да изберете медийния браузър.
Маркирайте позиция Библиотека на записите,
използвайки бутона “ ” или “ ” и натиснете
бутона ОК, за да влезете. След това ще се появи
библиотеката на записите. От списъка изберете
записаната позиция (ако преди това е записана),
използвайки бутона “ ” / “ ” . Натиснете бутон
ОК, за да видите опциите за възпроизвеждане.
Изберете опция, използвайки бутоните “ ” /
“ ” или OK.
Налични опции за възпроизвеждане:
• Възроизвеждане от начало: възпроизвежда
отначало записа.
• Подновяване: възпроизвеждането започва
отначало.
• Възпроизвеждане от отместване: определя
точката на възпроизвеждане.
Забележка: По време на възпроизвеждането не може
да виждате главното меню и позициите от менюто.
Натиснете бутона (СТОП), за да спрете
възпроизвеждането и да се върнете към
библиотеката на записите.
Бавно напред
Натиснете бутона (ПАУЗА), докато гледате
записаните програми, на разположение ще е
функцията бавно напред. Може да използвате
бутона . Последователното натискане на
бутона променя скоростта за бавно напред.
Библиотека на записите
За да видите списъка със записите, изберете
“Библиотека на записите” и натиснете бутона OK.
След това ще се появи библиотеката на записите с
всички налични записи. Всички записи са запазени
в списък в библиотеката със записите.
(Подновяване): възпроизвеждането започва
отначало.
Червен бутон (изтриване):изтрива избрания
запис.

ЗЕЛЕН бутон (Редактиране): променя избрания
запис.
Син бутон (филтър): променя подредбата на
записите. Можете да избирате измежду множество
опции за сортиране.
Бутон OK: активира менюто за възпроизвеждане.
ИНФОРМАЦИЯ (детайли): показва програмите в
детайли.
Конфигуриране на записването
Изберете позиция „Конфигурация на записа”
в меню „Настройки”, за да конфигурирате
настройките на записа.
Форматиране на диск: Можете да използвате
функцията Форматиране на дискза да форматирате
свързания USB диск. ВАЖНО: Имайте предвид, че,
ако активирате тази функция, ВСИЧКИ записани на
USB диска данни ще бъдат изтрити, а дискът ще
е във формат FAT32. Ако USB дискът се повреди,
може да се опитате да го форматирате. В повечето
случаи форматирането на USB диска възвръща
нормалното му функциониране, но ВСИЧКИ
запаметени на него файлове се изтриват.
Забележка: Ако на екрана се появи съобщение “Твърде
бавно USB” при започване на запис, рестартирайте
записа. Ако все още се появява същата грешка,
възможно е USB диска да не отговаря на съответните
изисквания. Свържете друг USB диск.
Телетекст
“TXT” Телетекст/Смесено: При еднократно
натискане активира режим "Телетекст". Натиснете
повторно, за да поставите телетекст екрана над
програмата (смесен). Повторното натискане
изключва режим „Телетекст”.
Индекс “RETURN”: Избира индексната страница
на телетекста.
Разкриване на "ИНФОРМАЦИЯ": Показва скрита
информация (напр. решение за игра).
“OK” задържане: Задържа текстова страница,
когато това е необходимо. Натиснете отново, за
да възобновите.
“ ”/“ ” Подкодови страници: Избира подкодови
страници, ако са налице, когато функцията на
телетекста е активна.
P+ / P- и цифри (0-9): Натиснете, за да изберете
страница.
Забележка: Повечето телевизионни станции използват
код 100 за своите индексни страници.
Вашият телевизор поддържа както БЪРЗ ТЕКСТ,
така и ТОП текст системи. Ако тези системи са
налице, страниците се разделят на групи или теми.
Когато е налице системата БЪРЗ ТЕКСТ, отделни
секции от телетекст страницата ще са цветно
кодирани и ще могат да се избират с натискане
на оцветените бутони. Натиснете оцветения
бутон, който отговаря на Вашите нужди. Ще се
появат цветни надписи, които да Ви показват кой
оцветен бутон да натиснете, когато е налице TOP
текст. Натискането на командите “ ” или “ ”
ще извика следващата или предишната страница
респективно.
Цифров телетекст (само за
Великобритания)
• Натиснете бутона “TXT”. Информацията от
цифровия телетекст се появява. Работете с
цветните бутони, курсорните бутони и бутона OK.
Методът за навигация може да се различава в
зависимост от съдържанието на цифровия телетекст.
Следвайте инструкциите, показани на екрана на
цифровия телетекст.
Когато бутонът “TXT” бъде натиснат отново,
телевиазорът се връща към възпроизвеждане на
телевизионното предаване..
български - 36 -

Обновяване на софтуера
Вашият телевизор може да открива нови
версии и съответно да актуализира софтуера
през излъчваните канали. За търсене на
канали телевизорът търси налични канали,
запаметени във Вашите настройки. Така че преди
актуализацията на софтуера Ви препоръчваме
да пуснете автоматично търсене на канали и да
актуализирате всички намерени канали.
1) Търсене за актуализация на софтуер
чрез потребителски интерфейс
• Възможно е ръчно да проверите дали има нови
актуализации на софтуера на Вашия телевизор.
• Просто отидете в главното меню. Изберете
„Настройки” и изберете меню „Други настройки”.
В меню Други настройкиотидете на позиция
Software Upgrade Актуализация на софтуера и
натиснете бутона OK, за да отворите меню Опции
за актуализация.
• В меню Опции за актуализация изберете
Търсене на актуализация и натиснете бутона OK.
• Ако се открие нова актуализация, същата
започва да се сваля. Специална лента показва
напредъка на изтегляне на софтуера. Когато
свалянето приключи успешно, на екрана се изписва
съобщение за рестартиране на телевизора, за да
се активира новия софтуер. Натиснете бутона ОК,
за да продължите с рестартирането.
2) 3.AM търсене и режим на
актуализация
• Ако е разрешено Автоматично търсене в
менюОпции за актуализация, телевизорът ще се
събуди в 03:00 и започва претърсване на каналите
за нова актуализация на софтуера. Ако се открие
и свали успешно нова актуализация на софтуера,
при следващото пускане телевизорът вече ще
работи с новата версия на софтуера..
Забележка за рестартирането: Рестартирането е
последната стъпка в операцията за актуализация на
софтуера, ако изтеглянето на нов софтуер е успешно
завършено. По време на рестартиране, телевизорът
извършва последно инициализиране. По време на
рестартирането панелът на захранването е затворен
и предния светодиод показва чрез мигане, че е активен.
Около 5 минути по-късно телевизорът се рестартира
с новата актуализация на софтуера.
• Ако телевизорът не се рестартира след 10
минути, изключете телевизора от захранването
за 10 минути и след това го включете отново.
Телевизорът би трябвало да се активира
безопасно с новия софтуер. Ако все още не
можете да вклєчите телевизора, повторете
последователността от изклєчване и вклєчване
още няколко пъти. Ако телевизорът все още не
български - 37 -
работи, моля обадете се на оторизиран техник,
който да отстрани проблема.
Внимание: Докато светодиодът мига по време
на рестартирането, не изключвайте телевизора
от захранването. Това може да доведе до повреда,
която трябва да се отстрани от оторизиран
техник..
Отстраняване на неизправности &
съвети
Послесветене на изображението сянка
Моля имайте предвид, че може са появи сянка
докато се показва постоянна картина (неподвижна
или спряна картина). Постоянството на картината
на LED телевизорите може да изчезне след
известно време. Опитайте с изклєчване на
телевизора за известно време. За да се избегне
това, не оставяйте екрана в режим с неподвижна
картина за продължителни периоди от време.
Липса на захранване
Ако Вашията телевизор няма захранване, моля
проверете дали щепсела на захранващия кабел
е вклчен в контакта.
Лоша картина
1. Избрали ли сте правилната телевизионна
система?
2. Дали вашият телевизор или домашна антена
се намират твърде близо до незаземено аудио
оборудване или неоново осветление, и т.н.?
3. Планина или високи сгради може да предизвикат
появата на двойна картина или фантомни
изображения. Понякога можете да подобрите
качеството на картината чрез промяна на посоката
на антената. Дали картината или телетекстът са
напълно неразпознаваеми?
4. Проверете дали сте въвели правилната честота.
5 Настройте прецизно каналите.
6 Качеството на картината може да се влоши,
когато две устройства са едновременно свързани
към телевизора. В такъв случай, изключете едно
от двете устройства.
Няма изображение
1. Липсата на картина означава, че телевизорът
не приема никакъв сигнал. Дали сте избрали
правилния бутон на дистанционното управление?
Опитайте още веднъж. Също така се уверете, че е
избран правилният източник на входа.
2. Дали антената е правилно свързана?
3. Добре ли са поставени куплунзите в антенния
вход?
4. Дали е повреден кабелът на антената?
5. Дали са използвани подходящи щекери за
свързване на антената?

6 Ако имате съмнения, свържете се с Вашия
търговец.
Няма звук
1 Заглушен ли е звука на телевизора? За да
отмените заглушаването, натиснете бутона
“ ”или увеличете силата на звука.
2. Звукът се чува само от единия високоговорител.
Поставен ли е регулатора на баланса в някое от
крайните положения? Вижте раздела „Меню Звук”.
Дистанционно управление не
функционира
Телевизорът вече не отговаря на дистанционното
управление. Батериите може да се изтощени, ако е
така можете да използвате бутоните за управление
на телевизора. (* Възможно е само, ако те не са
блокирани от родителския контрол.)
Входни източници не могат да бъдат
избрани
1. Ако не можете да изберете входен източник,
може би не е свързано нито едно устройство.
2. Проверете AV кабелите и връзките, ако сте се
опитвали да свържете външно устройство.
Няма записи
За да запишете програма, първо трябва да
свържете USB диска към Вашия телевизор,
докато същият е изключен. След това трябва да
включите телевизора, за да активирате функцията
за записване. В противен случай функцията
за записване няма да е активна. Ако не може
да осъществите запис, опитайте да изключите
телевизора и след това отново да свържете USB
устройството, докато телевизорът е изключен.
USB е твърде бавно
Ако на екрана се появи съобщение “Твърде бавно
USB” при започване на запис, рестартирайте
записа. Ако все още се появява същата грешка,
възможно е USB диска да не отговаря на
съответните изисквания. Свържете друг USB диск.
Информация за потребителите относно
изхвърлянето на старо оборудване и батерии
[Само ÅÑ]
Тези символи указват, че електрическото и
електронното оборудване, както и батерията,
не трябва да се изхвърлят с битовите отпадъци
след приключване на експлоатационния ми
живот. Ако искате да депонирате продукта или
батерията, намерете пунктовете за събиране или
съоръженията, предназначени за рециклиране.
Забележка: Знакът Pb под символа за батериите
показва, че тази батерия съдържа олово.
Продукти Батерия
български - 38 -

Типични екранни РС режими
1
2
3
4
5
6
7
8
9
10
11
12
13
14
15
16
17
18
19
20
21
22
23
24
25
26
27
28
29
30
31
32
33
34
35
36
37
38
39
40
41
42
43
44
45
Следващата таблица показва някои от типичните
режими на видео екраните. Вашият телевизор
може да не поддържа всички разделителни
способности. Вашият телевизор поддържа
разделителни способности до 1920х1200.
Индекс Резолюция Честота
640x400 70Hz
640x350 85Hz
640x400 85Hz
640x480 60Hz
640x480 66Hz
640x480 72Hz
640x480 75Hz
640x480 85Hz
800x600 56Hz
800x600 60Hz
800x600 70Hz
800x600 72Hz
800x600 75Hz
800x600 85Hz
832x624 75Hz
1024x768 60Hz
1024x768 66Hz
1024x768 70Hz
1024x768 72Hz
1024x768 75Hz
1024x768 85Hz
1152x864 60Hz
1152x864 70Hz
1152x864 75Hz
1152x864 85Hz
1152x870 75Hz
1280x768 60Hz
1360x768 60Hz
1280x768 75Hz
1280x768 85Hz
1280x960 60Hz
1280x960 75Hz
1280x960 85Hz
1280x1024 60Hz
1280x1024 75Hz
1280x1024 85Hz
1400x1050 60Hz
1400x1050 75Hz
1400x1050 85Hz
1440x900 60Hz
1440x900 75Hz
1600x1200 60Hz
1680x1050 60Hz
1920x1080 60Hz
1920x1200 60Hz
Технически данни
ТЕЛЕВИЗИОННО ИЗЛЪЧВАНЕ
PAL SECAM B/G D/K K’ I/I’ L/L’
ЦИФРОВО ПРИЕМАНЕ
DVB-T MPEG2
DVB-T MPEG4 HD
DVB-T MHEG-5 Engine (само за Великобритания)
DVB-C MPEG2
DVB-C MPEG4 HD
ПОЛУЧАВАНЕ НА КАНАЛИ
VHF (BAND I/III)
UHF (BAND U)
HYPERBAND
БРОЙ НА ПРЕДВАРИТЕЛНО ЗАДАДЕНИТЕ
КАНАЛИ
10000
ИНДИКАТОР ЗА КАНАЛА
Екранно менє
RF ВХОД ЗА АНТЕНА
75 Ohm (небалансирано)
РАБОТНО НАПРЕЖЕНИЕ
220-240V променлив ток, 50 Хц
АУДИО
Немски + Nicam Стерео
МОЩНОСТ НА АУДИО ИЗХОД (W
2 x 6
) (10% THD)
RMS.
КОНСУМАЦИЯ НА ЕЛЕКТРОЕНЕРГИЯ (W) 80
W (макс.)
ПАНЕЛ 16:9
Лицензи
Произведен по лиценз на Dolby Laboratories
ЗАПАЗЕНА МАРКА
запазена марка на Dolby Laboratories.
"Лиценз HDMI, HDMI логото, and High-Definition
Multimedia Interface са търговска марка или
регистрирана търговска марка на HDMI Licensing,
LLC."
и символът двойно D са
български - 39 -

Поддържани файлови формати за USB медийния браузър
Медия Разширение Формат Бележки
Видео Аудио
Филм dat, mpg,
Музика .mp3
Снимки .jpg .jpeg Основен JPEG MAX WxH =
Субтитри
mpeg
dat, mpg,
mpeg
.vob MPEG2 MPEG1/2 Layer 1/2/3, AC3,
.mkv MPEG1,2,4, XviD,
.mp4 .mov MPEG1/2 Layer 3, AAC/
.avi MPEG1,2,4
v H.264,
3gp,3g2 MPEG4, H.264 1920x1080 @ 30P
asf, wmv MPEG2,4, XviD, H.264,
OGG OGG
.wav LPCM
WMA / ASF WMA, WMA Pro
.m4a/ .aac AAC, HEAAC
.png Прогресивен JPEG
.bmp non-interlace
.png
sub - -
srt - -
Mpeg1,2 MPEG1/2 Layer 1/2/3, AAC/
MPEG2 ,H.264, VC1, AVS,
MVC
H.264,
VC1,WMV3,
Motion JPEG
Xvid
H.264,
VC1,WMV3,
Sorenson H.263
Motion JPEG
Sorenson H.263
VC1,WMV3
-
HEAAC, AC3/EAC3, LPCM/
ADPCM
MPEG1/2 Layer 1/2/3, AAC/
HEAAC, AC3/EAC3, LPCM/
ADPCM
LPCM
MPEG1/2 Layer 1/2/3, AAC/
HEAAC,
AC3/EAC3, LPCM,OGG
HEAAC, AC3/EAC3, LPCM/
ADPCM
MPEG1/2 Layer 1/2/3, AAC/
HEAAC, AC3/EAC3, LPCM/
ADPCM, WMA
MPEG1/2 Layer 3, AAC/
HEAAC, LPCM/ADPCM
MPEG1/2 Layer 1/2/3, AAC/
HEAAC, AC3/EAC3, LPCM,
WMA
MPEG1 Layer 1/2/3 (MP3)
interlace
1080P@ 30fps 50Mbit/sec
H.264:1080Px2@25fps
1080P@ 50fps MVC:
1080P@ 24fps Други:
1080P@ 30fps” 50Mbit/
sec
1080P@ 30fps 50Mbit/sec
H.264:1080Px2@25fps
1080P@ 50fps
Other:1080P@ 30fps
50Mbit/sec
H.264:
1080Px2@25fps1080P@
50fps Other: 1080P@
30fps 50Mbit/sec
H.264: 1080Px2@25fps
1080P@ 50fps Other:
1080P@ 30fps” 50Mbit/
sec
H.264: 1080Px2@25fps
1080P@ 50fps Other:
1080P@ 30fps” 50Mbit/
sec
20Mbit/sec
1080P@ 30fps 50Mbit/
sec
14592x12288
До 8 мегабайта
български - 40 -

Поддържана DVI резолюция
При свързване на устройства към конекторите на вашия телевизор с помощта на DVI конвертор кабели,
(не се доставя), можете да се отнасят до следната информация резолюция.
56Hz 60Hz 66Hz 70Hz 72Hz 75Hz
640x400
640x480
800x600
832x624
1024x768
1152x864
1152x870
1280x768
1360x768
1280x960
1280x1024
1400x1050
1440x900
1600x1200
1680x1050
1920x1080
1920x1200
þ þ þ þ
þ þ þ þ þ
þ þ þ þ þ
þ þ þ
þ
þ þ
þ þ
þ þ
þ þ
þ þ
þ
þ
þ
þ
þ
þ
þ
български - 41 -

Vsebina
Varnostni ukrepi .................................................... 42
Okoljske informacije ............................................ 43
TV - Funkcije ....................................................... 44
Gledanje televizorja ............................................. 44
Nadzorno Tipka TV in delovanje ........................... 44
Priložen pribor ...................................................... 44
Pogled na daljinski upravljalnik............................. 45
Uporaba modula za pogojni dostop ...................... 47
Opozorilo za stanje pripravljenosti........................ 47
Vstavljanje baterij v daljinski upravljalnik .............. 48
Priključite napajanje in anteno/kabel .................... 48
Vklop/izklop .......................................................... 48
Prva namestitev .................................................... 48
Predvajanje medijev preko USB vhoda ................ 50
Spreminjanje velikosti slike: Formati slike ............ 50
Uporaba seznama kanalov ................................... 51
Lastnosti in funkcije menija................................... 52
Elektronski programski vodič (EPG) ..................... 55
Snemanje oddaje.................................................. 55
Snemanje s časovnim zamikom .......................... 56
Takojšnje snemanje .............................................. 56
Gledanje posnetih programov ............................. 56
Konguracija snemanja ........................................ 56
Teletekst ............................................................... 57
Posodabljanje programske opreme ...................... 57
Odpravljanje napak in nasveti .............................. 58
Tipični načini prikaza slike na PC ........................ 59
Specikacije ................................................................59
Obvestilo o licenci................................................. 59
Podprti formati datotek za USB brskalnika za
medije ................................................................... 60
Podprte DVI-ločljivosti .......................................... 61
Varnostni ukrepi
Prosimo, da pred namestitvijo
ali uporabo ta navodila v celoti
preberete.
Priprave
TV postavite na stabilno in ravno površino. Da bi
zagotovili ustrezno prezračevanje, pustite okoli
televizorja vsaj 10 cm prostora. Na ohišje sprejemnika
ne postavljate predmetov, da ne bi prišlo do okvar ali
nevarnih okoliščin. To napravo uporabljajte pri zmernih
klimatskih pogojih. Delovna temperatura in delovna
vlažnost: 5ºC do 45ºC, maks. 85% rel. vlažnost (ne
prekrivajte rež za prezračevanje).
Predvidena uporaba
Ta naprava je namenjena sprejemu in predvajanju
TV programov. Različne možnosti priključitve
omogočajo dodatno razširitev sprejema in prikaza
virov (različne zunanje naprave). Naprava je
namenjen uporabi v zaprtih in suhih prostorih.
Aparat je namenjen samo za zasebno domačo
uporabo in ne za industrijske ter komercialne
namene. Ne prevzemamo nikakršne odgovornosti
za škodo, ki bi nastala, če naprave ne uporabljate v
skladu z navodili ali na njej izvedete nepooblaščene
spremembe. LED-TV lahko poškodujte, èe ga
uporabljate v ekstremnih pogojih.
OPOZORILO: Nikoli ne dovolite osebam
(tudi otrokom) z omejenimi telesnimi, čutilnimi
ali duševnimi sposobnostmi ali osebam brez
izkušenj in /ali znanja uporabe te električne
naprave brez nadzora!
Otroci ne prepoznajo nevarnosti! Zaužitje baterij
je lahko usodno. Baterije hranite vedno izven
dosega otrok. Pri zaužitju baterije nemudoma
poiščite zdravniško pomoč. Embalažne folije
hranite izven dosega otrok. Nevarnost zadušitve.
Vir električne energije
• TV sprejemnik se lahko napaja samo iz vtičnic z
napetostjo 220-240 V, 50 Hz.
• Opozorilo: Ko boste odhajali od doma, svojega
televizorja ne puščajte prižganega ali v stanju
pripravljenosti.
Namestitev televizorja
• Da bi zagotovili ustrezno prezračevanje, pustite okoli
televizorja vsaj 10cm prostora.
• Ne pokrivajte rež za prezračevanje.
• Ne postavljajte televizorja na nagnjene ali poševne
površine, televizor se lahko prevrne.
• Na ohišje sprejemnika ne postavljate predmetov, da
ne bi prišlo do okvar.
Slovenščina - 42 -

• Televizor uporabljajte le v zmernih klimatskih
pogojih.
Napajalni kabel in vtikač
• Vtikač napajalnega kabla naj bo lahko dostopen. V
primeru neviht in bliskanja, ko odidete na počitnice
ali ko televizor ni v uporabi za dalj časa, izključite
napajalni kabel iz vtičnice.
• Vtikač se uporablja za izklop televizorja in zato mora
ostati pripravljen za uporabo.
• ne postavljajte sprejemnika ali kosov pohištva in
pazite, da kabla ne ukleščite.
• Z napajalnim kablom ravnajte tako, da ga držite za
vtikač, ne izključujte televizorja tako, da vlečete za
napajalni kabel.
• Nikoli se ne dotikajte napajalnega kabla / vtikača z
mokrimi rokami, kajti lahko pride do kratkega stika
ali električnega udara.
• Kabla nikoli ne vozlajte in nikoli ga ne zvežite skupaj
z drugimi kabli.
• Električni kabli morajo biti speljani tako, da se jih ne
da pohoditi ali povoziti.
• Poškodovan napajalni kabel/vtikač lahko povzroči
požar oziroma električni udar. Če je poškodovan, ga
je potrebno zamenjati. To lahko stori le usposobljena
oseba.
Vlaga in voda
• Naprave ne uporabljajte v vlažnih in mokrih
prostorih (izogibajte se kopalnicam, pomivalnemu
koritu v kuhinji ali bližine pralnih strojev).
• Televizorja ne izpostavljajte dežju ali vodi, saj je
to lahko nevarno.
• Na televizor ne postavljajte predmetov, napolnjenih
z vodo, kot so npr. vaze. Ne izpostavljajte je kapljanju
ali pljuskom.
• Če kakršenkoli predmet pade oziroma tekočina
steče v ohišje, televizor izključite iz omrežja in ga
dajte v pregled usposobljenemu serviserju, šele nato
ga lahko ponovno uporabljate.
Prezračevanje
• Reže in odprtine na televizorju so namenjene
prezraèevanju in zagotavljanju zanesljivega
delovanja.
• Rež in odprtin ne pokrivajte, da ne pride do
pregrevanja.
Vročina in plameni
• Ne izpostavljajte televizorja neposredni sončni
svetlobi ali drugim virom toplote.
• Televizorja ne postavljajte blizu odprtega ognja ali
virov toplote, kot so električni grelci.
• Zagotovite, da na televizorju ne bo virov odprtega
ognja, kot so npr. prižgane sveče.
Glasnost slušalk
• Preglasen zvok iz slušalk in
zvočnikov lahko povzroči izgubo
sluha. Prosimo, bodite previdni.
Slovenščina - 43 -
Montaža na zid (opcijsko)
• Za preprečitev nezgod mora biti naprava
trdno nameščena na steno v skladu z
navodili za namestitev (če je ta možnost
na voljo).
Zaslon LCD
• Obèasno se na zaslonu lahko prikažejo neaktivne
pike (piksli), kot modre, zelene ali rdeèe toèke.
Upoštevajte, da to ne vpliva na zmogljivosti vašega
izdelka.
• Pazite, da zaslona ne popraskate z nohti ali drugimi
trdimi predmeti.
Čiščenje
• Pred čiščenjem televizor izključite iz stenske
vtičnice.
• Ne uporabljajte tekočih čistil ali razpršil. Uporabljajte
mehko, suho krpo.
Okoljske informacije
Televizor je zasnovan tako, da porabi èim manj
energije ter tako prispeva k varovanju okolja.
Zahvaljujoč energetski učinkovitosti televizorja boste
pomagali ohranjati okolje in zmanjšali račun za
električno energijo. Da zmanjšate porabo energije,
sledite naslednjim korakom:
Uporabite nastavitev “Način varčevanja z energijo”, ki
je v meniju “Nastavitve slike”. Če način za varčevanje
energije nastavite na Eco, bo TV preklopil na način
za varčevanje energije in osvetlitev zaslona se bo
zmanjšala na optimalno raven. Upoštevajte, da
nekaterih nastavitev slike ne boste mogli spreminjati,
ko bo TV naèinu za varèevanje energije.
Če je izbrana funkcija izklopa slike, se bo pojavilo
sporočilo “Zaslon se bo izključil čez 15 sekund.”
Izberite NADALJUJ in pritisnite OK za nadaljevanje.
Zaslon se bo izključil čez 15 sekund. Če deaktivirate
način za varčevanje energije, se bo način slike
samodejno nastavil na dinamično.
Ko televizorja ne boste uporabljali, ga izklopite
ali odklopite iz omrežne vtiènice. Tako boste tudi
zmanjšali porabo energije.
Ko boste daljši čas odsotni, popolnoma izklopite
aparat iz omrežnega napajanja.
Zelo priporoèljivo je, da nastavitev za varèevanje
z energijo aktivirate ter tako zmanjšate svojo letno
porabo energije. Prav tako je priporoèljivo, da èe
televizor ne uporabljate, prekinete iz vtiènice zaradi
varèevanja z energijo.
Pomagajte nam pri ohranjanju okolja tako, da sledite
naslednjim korakom.
Informacije o popravilu
Popravilo vedno zaupajte le usposobljenemu osebju.
Popravilo televizorja lahko izvede samo usposobljeno
osebje. Za dodatne informacije se obrnite na trgovca,
pri katerem ste kupili televizor.

TV - Funkcije
• Barvni LED TV z daljinskim upravljanjem.
• Vgrajen sprejemnik za digitalno/kabelsko
TV (DVB-T/C).
• HDMI vtičnice za digitalni video in zvok. Ta
povezava je namenjena tudi sprejemanju signalov
v visoki ločljivosti.
• USB-vhod.
• Snemanje programa.
• Snemanje programa s časovnim zamikom.
• 10000 programov.
• Sistem zaslonskih menijev (OSD).
• Priključek SCART za zunanje naprave (kot so video,
igralne konzole, glasbeni stolp. itd.).
• Stereo-zvočni sistem.
• Teletekst, hitri teletekst, TOP-tekst.
• Priključek za slušalke.
• Samodejna nastavitev programov.
• Ročno iskanje kanalov naprej ali nazaj.
• Samodejni izklop po največ šestih urah.
• Merilec časa izklopa.
• Zaščita.
• Samodejna nastavitev na nemo, ko ni signala.
• NTSC predvajanje.
• AVL (samodejna omejitev glasnosti).
• PLL (fazno zaključena zanka za iskanje frekvenc).
• PC-vhod.
• Vtakneš in deluje (Plug&Play) za Windows 98, ME,
2000, XP, Vista in Windows.
• Igralni način (možnost).
• Funkcija izklopa slike.
Gledanje televizorja
Nadzorno Tipka TV in delovanje
1.Smer gor
2. Smer dol
3. Izbirno stikalo program / glasnost / AV / pripravljenost
Nadzorno stikalo vam omogoča nadzor funkcij za
glasnost / programe / vire in pripravljenost / vklop.
Če želite spremeniti glasnost: Povečajte glasnost
s pritiskom na gumb gor. Zmanjšajte glasnost s
pritiskom na gumb dol.
Če želite spremeniti kanal: Pritisnite srednji gumb,
na zaslonu se bo prikazala informacijska pasica z
informacijami o kanalu. Pomikajte se med shranjenimi
kanali s pritiskom na gumb gor ali dol.
Če želite spremeniti vir: Pritisnite srednji gumb
dvakrat, na zaslonu se bo prikazal seznam virov.
Pomikajte se med kanali, ki so na voljo, s pritiskom
na gumb gor ali dol.
Izklop TV sprejemnika: Pritisnite sredinski gumb
navzdol, ga držite nekaj sekund, in TV bo prešel v
stanje pripravljenosti.
OPOMBA: Da spremenite glasnost lahko
premaknete stikalo navzgor ali navzdol. Če želite
spremeniti kanale, enkrat pritisnite na sredini stikala
(položaj 3) in nato premaknite navzgor ali navzdol. Če
še enkrat pritisnete na sredini stikala, se bo prikazal
OSD vir. Da izberete želeni vir, premaknite stikalo
gor in dol in ga nato sprostite. Če pritisnete na sredini
stikala in držite nekaj sekund, se bo TV preklopil v
stanje pripravljenosti. S tipko za upravljanje ni mogoče
prikazati glavnega zaslonskega menija na televizorju.
Priložen pribor
Daljinski upravljalnik
Baterije: 2 X AAA
Knjižica z navodili
Stranski povezovalni kabel AV
Slovenščina - 44 -

Pogled na daljinski upravljalnik
SLEEP
SCREEN
PRESETS
LANG.
FAV
EPG
SWAP
SOURCE
C
DISP.
SEARCH
MODE
INFO
CH
V
1. Stanje pripravljenosti
2. Velikost slike
3. Samodejni izklop
4. Mono / stereo - dvojezièni zvok I-II / trenutni
jezik (v kanalih DVB)
5. Priljubljeni kanal.
6. Številčnica
7. Elektronski programski vodiè – EPG (v kanalih
DVB)
8. Brez funkcije
9. Brskalnik za medije
10. Smernimi tipkami (Gor/Dol/Levo/Desno)
11. Brez funkcije
12. Salvestiste nimekiri
13. Program gor / Stran gor-Program gor / stran dol
14. Nemo
15. Snemanje programa
16. Premor (v brskalniku za medije) /snemanje s
časovnim zamikom
17. Hitro previjanje nazaj (v video naèinu
medijskega brskalnika)
18. Predvajaj (v brskalniku za medije)
19. Rdeča tipka
20. Zelena tipka
21. Izbira načina slike.
22. Brez funkcije
23. Teletekst / mešano (v naèinu TXT)
24. Vklop-izklop podnapisov (v kanalih DVB)
25. Predhodni program
26. AV / izbira vira
27. Vklop - izklop menija
28. V redu (potrditev) / zadrži (naèinu TXT) /
seznama kanalov
29. Izhod / vrnitev / kazalo (v načinu TXT)
30. Brez funkcije
31. Informacije / odkrij (v TXT načinu)
32. Glasneje/tišje
33. Brez funkcije
34. Brez funkcije
35. Hitro previjanje naprej (v brskalniku za medije)
36. Ustavitev (v brskalniku za medije)
37. Modra tipka
38. Rumena tipka
OPOMBA: Domet daljinskega upravljalnika je približno
7 m.
Slovenščina - 45 -

Pregled Priključkov
Priključek Vrsta Kabli Naprava
Bočni AV
Bočni AV
Scart
Povezava
(zadaj)
VGA
Povezava
(zadaj)
PC/YPbPr
Audio
Povezava
(stranski)
HDMI
Povezava
(zadaj)
SPDIFF
Povezava
(zadaj)
Bočni AV
Povezava
(stranski)
Bočni povezovalni
kabel za avdio/video
(priložen)
Povezovalni kabel AV
(priložen)
Kabel PC-avdio (ni
priložen)
SLUŠALKE
Slušalke
Povezava
(stranski)
USB
Povezava
(stranski)
CI
Povezava
(stranski)
CAM
module
OPOMBA: Ko priključite napravo preko vhoda YPbPr ali stranskega AV vhoda, morate uporabiti priložene povezovalne
kable, da bo povezava omogočena. Glej zgornjo ilustracijo. | YPbPr način lahko uporabite samo, ko boste priključili napravo,
ki ima izhod YPbPr, preko PC vhoda s kablom YPbPr na PC.(YPbPr na PC–kabel ni priložen). Ko je povezava vzpostavljena,
preklopite na vir YPbPr. Da omogočite PC zvok, boste morali uporabiti PC/YPBPR BEL IN RDEČ vhod za zvočno pobezavo.
/ Če je zunanja naprava priključena na vtičnico SCART, bo televizor samodejno preklopil v način AV./ Pri sprejemu kanalov
DTV (Mpeg4 H.264) ali v brskalniku za medije izhod preko vtičnice Scart ne bo na voljo. / Pri uporabi seta za montažo na
zid (možnost) vam priporočamo, da priključite vse kable na televizor pred montažo na zid. / Vstavite ali odstranite modul CI
samo takrat, ko je TV IZKLOPLJEN. Za podrobne informacije o teh nastavitvah glejte navodila za uporabo modula. Vstavite
modul CAM in kartico v režo, ki je na pokrovu terminala na zadnji strani TV sprejemnika. Mora biti vstavljen pravilno, če ga
vstavite narobe, ga ne boste mogli popolnoma potisniti noter. CAM ali TV terminal se lahko okvarita, če se CAM vstavlja s
silo.Vsak vhod USB vašega TV podpira naprave moči do 500mA. Če boste priključevali naprave, ki imajo tok večji od 500mA,
lahko poškoduje vaš TV.
Slovenščina - 46 -

Uporaba modula za pogojni dostop
POMEMBNO: Vstavite ali odstranite modul CI samo
takrat, ko je TV IZKLOPLJEN.
Za ogled doloèenih digitalnih kanalov boste mogoèe
potrebovali modul za pogojni dostop (CAM). Ta modul
morate vstaviti v režo CI na vašem TV sprejemniku.
1. Pridobiti morate modul za pogojni dostop (CAM) in
vanj vstaviti kartico, ki jo dobite pri podjetju, ki oddaja
plačljivi kanal, vstavljanje poteka po naslednjem
postopku.
2. Vstavite modul CAM in kartico v režo, ki je na
pokrovu terminala na zadnji strani TV sprejemnika.
3. CAM mora biti vstavljen pravilno, če ga vstavite
narobe, ga ne boste mogli popolnoma potisniti noter.
Èe CAM potisnete s preveliko silo, lahko poškodujte
CAM ali TV terminal.
4. TV priključite na omrežno napajanje, vklopite ga
in počakajte nekaj trenutkov, da se kartica aktivira.
5. Če modul ni vstavljen, se na zaslonu izpiše Ni
moč zaznati modula skup. vmesnika.
Za podrobne informacije o teh nastavitvah glejte navodila
za uporabo modula.
CAM
module
Opozorilo za stanje
pripravljenosti
Če TV že 5 minut ne sprejema vhodnega signala
(npr. iz antenskega ali HDMI vira), bo TV prešel v
stanje pripravljenosti. Ko prihodnjič vklopite TV, se
bo prikazalo naslednje sporočilo:
Ko poteče čas za samodejni izklop televizorja, bo
na zaslonu prikazano naslednje zaslonsko sporočilo
(OSD): Za izklop televizorja izberite Da. Za preklic
izberite NE. Televizor se bo samodejno izklopil, tudi
če ne izberete na tem zaslonu.
Če je bil TV vklopljen in ga niste upravljali 4 ure, bo
TV prešel v stanje pripravljenosti. Ko ga prihodnjič
vklopite, se bo prikazalo naslednje sporočilo:
Slovenščina - 47 -

Vstavljanje baterij v daljinski
Antena ali kabelska
upravljalnik
1. Nežno dvignite pokrov na zadnji strani daljinca.
2. Namestite dve AAA bateriji. Poskrbite, da se
ujemajo konci baterij z + in – v prostorèku za baterije
(pazite na pravilno polarnost).
3. Zaprite pokrov.
Priključite napajanje in anteno/kabel
POMEMBNO: TV sprejemnik je narejen za delovanje
na napetosti 220-240 V AC, 50 Hz iz omrežne vtičnice.
Po razpakiranju počakajte, da se TV sprejemnik
ogreje na sobno temperaturo, preden ga priključite
na električno omrežje. Prikljuèite elektrièni kabel v
omrežno vtiènico.
VGA
SPDIF
SCART
227529
Opomba: Ko je TV v stanju pripravljenosti, lahko svetleča
dioda utripa in nakazuje delovanje funkcij, kot so Iskanje v
stanju pripravljenosti, Prenos po zraku ali Časovnik. Svetleèa
dioda lahko utripa, ko TV vklopite iz stanja pripravljenosti.
Prva namestitev
Ob prvem vklopu se prikaže meni “Izbira jezika“.
Sporočilo Dobrodošli, prosimo, da izberete vaš
jezik! se zaporedno izpiše na zaslonu vseh jezikovnih
možnostih v meniju na zaslonu (OSD).
Pritisnite tipko “ ” ali “ ” da osvetlite želen jezik,
nato pritisnite OK, da ga izberete. Prikaže se “Prva
namestitev”. S pritiskom na tipko “ ” ali “ ”, da izberete
želeno državo in pritisnite tipko “ ” da izberete vrsta
iskanja. Uporabite tipko “ ” ali “ ” za nastavitev želene
vrste iskanja. Vrste iskanja, ki so na voljo, so digitalne in
analogne, oziroma digitalne ali analogne. Ko nastavite,
pritisnite “ ”, da izberete jezik teleteksta. Uporabite
tipko “ ” ali “ ”, da nastavite “Jezik teleteksta” in izberite
“Iskanje kodiranih kanalov” s tipko “ ” ali “ ”. Če
želite iskati kodirane TV-postaje, nastavite možnost
Iskanje kodiranih kanalov na Da.
Vklop/izklop
Vklop TV sprejemnika
Elektrièni kabel prikljuèite na izmenièno napetost
220–240 V AC, 50 Hz.
Dioda LED za stanje pripravljenosti bo zasvetila.
TV sprejemnik lahko vklopite, ko je v stanju pripravljenosti,
na več načinov:
Na daljinskem upravljalniku pritisnite tipko “ ”, CH ^/
v ali tipko na številčnici.
Pritisnite kontrolno stikalo, ki se nahaja na levi bočni
strani televizorja. TV sprejemnik se bo prižgal.
Izklop TV sprejemnika
Pritisnite tipko “ ” na daljinskem upravljalniku ali
pritisnite in pridržite nadzorno stikalo TV, dokler
se TV ne izklopi, in televizor bo preklopil v stanje
pripravljenosti (odvisno od modela).
Če želite TV popolnoma izklopiti, izvlecite električni
kabel iz omrežne vtičnice.
Slovenščina - 48 -
Za nadaljevanje pritisnite tipko OK na daljinskem
upravljalniku in na zaslonu bo prikazano naslednje
sporočilo.

Način Skladišča lahko aktivirate z uporabo tipk “ ” ali
“ ”. Če je izbran način trgovina (opcija), bo možnost
Skladišče na voljo v drugih menijih za nastavitve
in funkcije vašega televizorja bodo prikazane na
zgornjem delu zaslona. Po izbiri načina Trgovina
se bo prikazalo potrditveno okno (opcijsko). Za
nadaljevanje pritisnite DA.
Če je nastavljen način Doma, način Skladišče
(opcijsko) ne bo na voljo po prvi namestitvi. Za
nadaljevanje pritisnite tipko OK na daljinskem
upravljalniku in na zaslonu bo prikazano naslednje
sporočilo.
Za izhod iz seznama kanalov in gledanje televizije
pritisnite tipko OK.
(*) LCN pomeni sistem logičnega številčenja kanalov,
ki organizira kanale, ki so na voljo, v skladu z
razpoznavnim zaporedjem kanalov.
Namestitev za kabelsko TV
Če izberete možnost KABEL in za nadaljevanje
pritisnite tipko OK na daljinskem upravljalniku, bo na
zaslonu bo prikazano naslednje sporočilo:
Izbrati morate vrsto iskanja za iskanje in shranjevanje
kanalov iz različnih virov.
Namestitev antene
Če na zaslonu Vrsta iskanja izberete možnost
ANTENA, bo TV poiskal kanale digitalne prizemne TV.
OPOMBA: Za preklic pritisnite tipko MENU.
Po shranitvi vseh dostopnih kanalov se bo na zaslonu
pojavil seznam kanalov. Če želite seznam kanalov
razvrstiti skladno z logično številko kanala (LCN),
izberite Da in nato pritisnite OK.
Slovenščina - 49 -
Za nadaljevanje izberite DA in pritisnite OK. Da
postopek prekličete, izberite NE in pritisnite OK.

Na tem zaslonu lahko izberete frekvenène razpone.
Za označevanje vrstic uporabite tipko “ ” ali “ ”.
Frekvenèni razpon lahko vnesete tudi roèno s
številènico na daljinskem upravljalniku.
S številčnico na daljinskem upravljalniku nastavite
začetno in končno frekvenco.
Po zaključku postopka lahko nastavite Korak iskanja
na 8000 kHz ali 1000 kHz.
Èe izberete možnost 1000 kHz, bo TV izvedel
podroben postopek iskanja. S tem se bo skladno
povečalo tudi trajanje iskanja. Ko končate izbiro, za
začetek samodejnega iskanja pritisnite tipko OK.
Televizor bo poiskal in shranil kanale, ki so na voljo.
(*) Možnost omrežja ne bo na voljo v nastavitvi UK.
Predvajanje medijev preko USB vhoda
Z uporabo USB-vhodov lahko na vaš TV sprejemnik
prikljuèite trdi disk USB ali pomnilnik USB. Ta funkcija
omogoča predvajanje datotek, ki so shranjene na USB
pogonu. Podprti so 2,5 in 3,5 palčni zunanji trdi diski
(z zunanjim napajalnikom).
POMEMBNO! Preden napravo priklopite na TV,
naredite varnostno kopijo datotek, da se izognete
morebitni izgubi podatkov. Proizvajalec ne prevzema
nikakršne odgovornosti za poškodbo datotek ali
izgubo podatkov. Nekatere vrste naprav USB (npr.
MP3 predvajalniki) ali trdih diskov USB / pomnilniških
ključkov USB mogoče ne bodo združljive s tem TV
sprejemnikom. Televizor podpira FAT32 in NTFS
formatiranje diskov, a snemanje je na voljo le
na diskih, ki so formatirani s sistemom NTFS.
Opomba: Med formatiranjem trdega diska USB
z zmogljivostjo 1 TB (terabajt) ali več lahko med
postopkom formatiranja naletite na težave.
Hitro prikljuèevanje in izkljuèevanje USB-naprav je
zelo nevarno. Ne priključujte in izključujte pogona
ponavljajoče. To lahko povzroči zično poškodbo
USB predvajalnika in same naprave USB. Med
predvajanjem datoteke ne smete izvleèi USB-enote
iz prikljuèka.
Meni brskalnika za medije
S prikljuèitvijo USB diska na vaš TV in s pomoèjo
zaslona medijskega brskalnika lahko predvajate
fotograje, glasbo in lmske datoteke, ki so na njem
shranjene. Z ta namen naredite naslednje: Povežite
USB disk na enega od USB vhodov, ki se nahaja na
bočni strani TV.
Na TV lahko prikljuèite dve USB-napravi. Če obe
napravi USB vsebujeta datoteke z glasbo, slikami
in videoposnetki, bo na zaslonu prikazan izbirni
zaslonski meni za USB. Prva na TV priključena
naprava USB, bo poimenovana kot USB-pogon
1(USB Drive1). S pritiskom na tipko “ ” ali
“ ” izberite napravo in pritisnite OK.
Pritisnite tipko MENU in izberite s tipkami levo /
desno in OK zavihek medijski brskalnik. Prikazan bo
glavni zaslon brskalnika za medije. Prikažete lahko
povezane vsebine z izbiro zavihka video, glasba
ali slike. Za funkcije predvajanja medijev sledite
navedbam za tipko pod vsakim menijskem zaslonu.
Z uporabo pogovornega okna za nastavitve lahko
namestite preference brskalnika za medije.
Uporaba tipke MENU in Način medijskega
brskalnika
Če pritisnete tipko MENU v načinu medijskega
brskalnika, se prikaže naslednji menijski zaslon:
Do možnosti menijev Slika, Zvok in Nastavitve lahko
dostopate z uporabo tega menija. Ponovno pritisnite
tipko MENU, da zapustite ta zaslon.
Spreminjanje velikosti slike: Formati
slike
Programe lahko gledate v razliènih formatih slike,
kar je odvisno od prejetega signala. Razmerje
stranic (velikost slike) TV-slike lahko spremenite z
različnimi načini povečave. Za spreminjanje velikosti
slike večkrat pritisnite tipko SCREEN. Zaslon lahko
premikate gor ali dol s pritiskom na tipko “ ” ali
“ ”, v načinu Zoom 14:9, Kino ali podnapisi.
Slovenščina - 50 -

Uporaba seznama kanalov
TV sprejemnik razvrsti vse shranjene kanale v seznam
kanalov. Seznam kanalov lahko uredite, nastavite
priljubljene ali aktivne kanale, ki jih potem lahko vidite
s pomočjo možnosti seznama kanalov. Za vstop v
glavni meni pritisnite tipko MENU. Izberite element
Seznam kanalov s pritiskom na tipki levo ali desno.
Pritisnite OK, da si ogledate vsebino menija. Za
upravljanje vseh shranjenih kanalov izberite Uredi
seznam kanalov. S tipkami Gor, Dol in OK izberite
možnost Uredi seznam kanalov. Pritisnite tipke gor
ali dol, da izberete kanal, ki bodo obdelani. Pritisnite
tipko desno ali levo, da izberete funkcijo v meniju
Seznam kanalov. Pritisnite tipke P+/P- za pomikanje
strani gor ali dol. Pritisnite tipko MENU za izhod iz
menija.
Razvrščanje seznama kanalov
Na seznam kanalov lahko uvrstite razliène
programe. Za prikaz specičnih vrst programov
uporabite nastavitve seznama aktivnih kanalov.
Z uporabo tipke “ ” ali“ ” izberite seznam
aktivnih kanalov v meniju Seznam kanalov. Za
nadaljevanje pritisnite OK. Z uporabo tipk “ ”
ali “ ” in tipke OK lahko iz seznama izberete
možnost tipa omrežja.
Slovenščina - 51 -

Lastnosti in funkcije menija
Kontrast
Barva
energijo
Napredne nastavitve
Toplota barve
HDMI
naèinu)
(in PC mode)
Frekvenca
PC naèinu)
nastavitve načina VGA dodane pod Nastavitve slike v načinu PC.
Vsebina menija slik
Način
Svetlost Nastavi vrednosti svetlosti za zaslon.
Ostrina Nastavi vrednost ostrine za predmete, prikazane na zaslonu.
Način
varčevanja z
Osvetlitev
ozadja (izbirno
Zmanjšanje
motenj
Način lahko nastavite glede na zahteve. Način prikaza slike lahko nastavite na eno od
naslednjih možnosti: Kino,Igra,Dinamièno, Sport and Naravno.
Nastavi vrednosti za svetlost in temnost zaslona.
nastavi vrednosti barve s prilagajanjem barv.
Nastavite Način varčevanja z energijo na Eko, Izklop slike in Onemogoèeno Za več informacij
o naèinu varèevanja z energijo glejte v tem priroèniku poglavje Okoljske informacije.
Nastavitev nadzira stopnjo osvetlitve ozadja in jo lahko nastavite na Samodejno,
Maksimalno, Minimalno in Eko način. Funkcija ne bo vidna, èe boste naèin varèevanja
z energijo nastavili na vklopljeno. Osvetlitve ozadja ni mogoče aktivirati v načinu VGA
ali v brskalniku medijev ter takrat, ko je slikovni način nastavljen na Igra (Game).
Če je signal šibak in na sliki opazite motnje, uporabite nastavitev Zmanjšanje motenj,
da zmanjšate kolièino motenj. Zmanjšanje motenj lahko nastavite na eno od naslednjih
možnosti: Nizko, Srednje, Visoko ali Izklop.
Dinamični
kontrast
Povečava slike Nastavi sliko na Avto, 16:9, Podnapisi, 14:9, Povečava 14:9, 4:3 ali Kino.
Prava èrnina
Filmski način
Barva kože Nastavi želeni ton barve kože.
Odstopanje
barv
RGB Gain
Ponastavitev Ponastavi nastavitve slike na tovarniške nastavitve.
Avtomatski
položaj (v PC
naèinu)
H položaj (v PC
V Position
osveževanja (v
Faza (v PC
naèinu)
Nekateri elementi v meniju za sliko ne bodo dosegljivi, ko boste v naèinu VGA (PC). Namesto tega bodo
S funkcijo za dinamièni kontrast lahko spremenite raven kontrasta. Dinamični kontrast
lahko nastavite na eno od naslednjih možnosti: Nizko, Srednje, Visoko ali Izklop.
Nastavi želeni ton barve.
Ta funkcija bo vidna med gledanjem vira HDMI v meniju Nastavitve slike. To funkcijo
lahko uporabite, da izboljšate prikaz črnine na sliki.
Filmi so posneti z različnim številom slik na sekundo glede na običajne televizijske programe.
Funkcijo lahko vklopite, da v lmih bolje vidite scene s hitrim gibanjem.
Nastavi želeni ton barve.
Za urejanje RGB koristi pritisnite tipko OK: Barvno temperaturo lahko določite s pomočjo
funkcije RGB Gain.
samodejno izboljša prikaz slike na zaslonu. Za izboljšavo pritisnite OK.
ta element premika sliko vodoravno (horizontalno) na levo ali desno stran zaslona.
ta element premakne sliko navpièno (vertikalno) gor ali dol.
Nastavitev Frekvenca osveževanja lahko popravi napake, ki se pojavijo kot navpièni
(vertikalni) trakovi v slikah z visoko loèljivostjo, kot so preglednice, besedilo ali odstavki z
majhnimi èrkami.
odvisno od loèljivosti in frekvence izrisa, ki ga pošiljate TV sprejemniku, lahko pride do
meglene slike ali motenj na zaslonu. V takem primeru lahko uporabite ta element, da
izboljšate sliko s poskušanjem.
Slovenščina - 52 -

Lastnosti in funkcije menija
Vsebina menija za zvok
Slušalke
(možnost)
Digitalni izhod
kanalov
Glasnost Prilagodi stopnjo glasnosti.
V meniju izenačevalnika lahko spremenite lastnosti zvoka, izbirate lahko med
Izenačevalnik:
Balans To nastavitev uporabite, če želite poudariti levi ali desni zvočnik.
Zvočni način
načini Glasba, Film, Govor, Ravno, Klasično in Uporabnik. Za vrnitev v prejšnji
meni pritisnite tipko MENU. Nastavitve izenaèevalnika lahko spreminjate roèno
samo, ko je Naèin izenaèevalnika v naèinu Uporabnik.
Nastavi glasnost slušalk.
Izbirate lahko med Mono, Stereo in dvojezičnima načinoma Dual I ali Dual II samo,
če izbrani kanal podpira ta način.
AVL
Slušalke / Izhod
(Lineout)
(Možnost)
Dinamièni nizki toni
Zvok slušalk
(možnost)
Samodejno iskanje
kanalov (ponovna
nastavitev)
Ročno iskanje
kanalov
Omrežno iskanje
Funkcija Samodejna omejitev glasnosti (AVL) omogoča, da se glasnosti različnih
programov izravnajo (npr. oglasi so glasnejši od oddaj).
Ko povežete zunanji ojačevalnik na vaš TV prek priključka za slušalke, lahko
izberete to možnost kot izhod. Če ste povezali slušalke na TV, nastavite to možnost
kot slušalke.
Vključi ali izključi možnost dinamičnih nizkih tonov.
Način za prostorski zvok lahko nastavite na vklopljeno ali izklopljeno.
Nastavi vrsto zvoka za digitalni izhod.
Vsebina menijev Namestitev in Ponovna nastavitev
Prikaže samodejno možnosti iskanja kanalov.
Digitalni antenski: Poišče in shrani antenske kanale DVB.
Digitalni kabelski: Poišče in shrani kabelske kanale DVB.
Analogno: Poišče in shrani analogne kanale.
Digitalni antenski in analogni: Poišče in shrani antenske kanale DVB in
analogne kanale.
Digitalni kabelski in analogni: Poišče in shrani kabelske kanale DVB in
analogne kanale.
Ta funkcija se uporablja za neposredni vnos programov (kanalov).
Poišče vezane kanale v sistemu kanalov.
Analogna na
nastavitev
Prva namestitev
Brisanje seznama
storitev (*)
To nastavitev lahko uporabite za no analogno nastavitev kanalov. Ta funkcija ni
na voljo, če ni shranjenih analognih kanalov.
Izbriše vse shranjene kanale in nastavitve, TV ponastavi na tovarniške nastavitve in
zažene prvo namestitev. Za več informacijo o tem postopku lahko sledite navodilom
v odseku Začetna namestitev.
(*) To nastavitev lahko vidite samo, ko je možnost Država nastavljena na Danska,
Švedska, Norveška ali Finska. To nastavitev uporabite, da izbrišete shranjene
kanale.
Slovenščina - 53 -

Nastavitve vsebine menija
Pogojni dostop
Jezik
Starševski nadzor
Časovniki
Konguracija
snemanja
Viri
Druge nastavitve: Prikaže druge nastavitve TV sprejemnika:
prikaza menijev
Modro ozadje
opreme
Različica
Aplikacije
Samodejni izklop
sprejemnika
Način nastavitve
(možnost)
Datum / čas
Lastnosti in funkcije menija
Nadzoruje module za pogojni dostop, ko so na voljo.
Prilagodi nastavitve jezika.
Nastavi nastavitve za starševski nadzor.
Opomba: Ko je možnost Zaklepanje pred otroki nastavljena na vklopljeno (“ON”), se TV
lahko upravlja samo z daljincem. V tem primeru gumb nadzorne plošče ne bo deloval.
Nastavi časovnike za izbrane programe.
Prikazuje meni konguracija snemanja.
Nastavi datum in čas.
Opomba:
* Televizor prevzame podatek o času preko oddajnika. Točen čas bo na voljo v nastavitvah
Datum / čas, če je podatek o času podan preko oddajnika.
Če je TV v načinu brez kanal, se v nobenem primeru ne more spremeniti nastavitve Datum
/ čas. Vendar, če je pristen kanal se le Način nastavitve časa lahko spremeni, in če je ta
možnost nastavljena na ročno bo Časovni pas omogočen.
* Če se televizor preklopi v stanje pripravljenosti in se vklopi kasneje in ni na voljo oddajnika,
podatki o času ne bodo posodobljeni. Če je prisoten oddajnik, bo informacija o času sprejeta
preko tega oddajnika. Z drugimi besedami, podatki o času bodo na voljo v skladu s temi
prednostnimi nalogami: TV najprej poišče za informacije o času v oddajniku, nato nastavitve
uporabnika, in na koncu informacije o času v teletekstu.
Aktivira ali deaktivira izbrane možnosti virov.
Časovna omejitev
Iskanje kodiranih
kanalov
Posodabljanje
programske
Za naglušne
Avdio opis
televizijskega
Iskanje v stanju
pripravljenosti
(možnost)
Način varčevanja z
energijo:
Spreminja trajanje časovne omejitve za prikaz menijev.
Ko je ta namestitev vključena, bo postopek iskanja našel tudi kodirane kanale. Če možnost
izklopite, med samodejnim ali roènim iskanjem kodirani kanali ne bodo poiskani.
Aktivira ali deaktivira sistem za modro ozadje, ko je signal šibek ali, ko ga ni.
S to nastavitvijo lahko zagotovite, da bo vaš sprejemnik vedno posodobljen z najnovejšimi
informacijami. Za pravilno delovanje postavite TV sprejemnik na stanje pripravljenosti.
Prikaže različico aplikacije.
Če mreža oddaja poseben signal za zvok, lahko to nastavitev nastavite na Vklop (On),
da boste lahko sprejemali take signale.
Avdio opis se nanaša na dodatno zvočno sled s komentarjem za slepe in slabovidne
gledalce z opisi vizualnih medijev, vključno s televizijo in lmi. Funkcijo lahko uporabite
samo, če program podpira dodatne zvočne komentarje.
Lahko postavite vrednost èasovne kontrole za funkcijo samodejnega izklopa. Po doseženi
vrednosti èasovne kontrole, ko se TV ne bo upravljal, se bo izklopil.
Če Iskanje v stanju pripravljenosti nastavite na izklopljeno, ta funkcija ne bo na voljo. Da
boste lahko funkcijo Iskanje v stanju pripravljenosti uporabili, poskrbite, da bo nastavljena
na vklopljeno. Če je iskanje v stanju pripravljenosti vklopljeno, se bodo iskale vse
postaje oddajnikov, ki so na voljo, ko bo TV v stanju pripravljenosti. Če TV najde nove
ali manjkajoče kanale, se bo prikazal zaslonski meni, ki vas bo pozval, da spremembe
potrdite. Seznam kanalov bo posodobljen in spremenjen po tem postopku. Prosimo,
aktivirajte nastavitev za Iskanje v pripravljenosti, da bi vaš televizor samodejno posodabljal
frekvenco kanala televizijskega programa, opredelitve kanala in podobne spremembe.
Če prikazujete TV v trgovini, lahko vključite ta način. Medtem ko je omogočen način Store,
nekateri elementi v meniju televizorja ne bodo na voljo za nastavitev.
Ta nastavitev nastavi želje glede načina napajanja. Vedno prižgano: TV se vedno vklopi, ko
pritisnete glavni gumb on/off. /Stanje pripravljenosti: TV se vedno prižge v stanje pripravljenosti.
/Zadnje stanje: TV se vedno vklopi z zadnje izbranim programom oz. Virom.
Slovenščina - 54 -

Elektronski programski vodič (EPG)
Informacije o programih, ki jih oddajajo nekateri
programi, so prikazane na zaslonu. Pritisnite tipko
EPG za ogled menija EPG.
Gor/Dol/Levo/Desno: Krmarjenje EPG.
OK: Prikaz možnosti za programa.
INFO: Prikaže podrobne informacije o izbranem
kanalu.
ZELENA: Preklopi na Seznam urnika EPG.
RUMENA: Preklopi na Časovno premico EPG.
MODRA: prikaže možnosti za ltriranje.
(SNEMAJ): TV sprejemnik bo posnel izbrano
oddajo. Da ustavite snemanje, pritisnite ponovno.
POMEMBNO: Za snemanje programa morate najprej na
TV sprejemnik priključiti disk USB, ko je TV ugasnjen. Nato
vklopite TV, da omogočite funkcijo snemanja. Drugaèe ta
funkcija ne bo na voljo.
Opomba: Med snemanjem ne boste mogli preklopiti na drug
program ali vir in videti brskalnika za medije.
Možnosti za program
V meniju EPG pritisnite tipko OK, da vstopite v meni
Možnosti za dogodek.
Izberi kanal
V meniju EPG lahko uporabite to možnost, da
preklopite na izbrani kanal.
Snemanje / brisanje časovnika snemanja
Ko ste v meniju EPG izbrali program (oddajo),
pritisnite tipko OK in prikazan bo zaslon Možnosti.
Izberite možnost “Snemaj”in pritisnite tipko OK. Po
izvedbi postopka je za izbrano oddajo nastavljeno
snemanje.
Če želite preklicati že nastavljeno snemanje, poudarite
program in pritisnite tipko OK in izberite možnost
Izbriši čas za snemanje “Brisanje časovnika”.
Snemanje bo preklicano.
Nastavitev časovnika / brisanje časovnika
Ko ste v meniju EPG izbrali program (oddajo),
pritisnite tipko OK in prikazan bo zaslon Možnosti.
Izberite možnost Nastavi časovnik za dogodek
in pritisnite tipko OK. Časovnik lahko nastavite za
oddaje v prihodnosti. Če želite preklicati že nastavljen
opomnik, označite oddajo in pritisnite tipko OK.
Izberite možnost Brisanje časovnika. Èasovnik bo
preklican.
Opomba: Èasovnika ni mogoèe nastaviti za dve oddaji v
istem èasovnem intervalu.
Snemanje oddaje
POMEMBNO: Ko boste uporabljali nov trdi disk USB,
priporoèamo, da disk najprej formatirate s funkcijo vašega
TV sprejemnika Formatiranje diska.
Za snemanje programa morate najprej na TV
sprejemnik priključiti disk USB, ko je TV ugasnjen.
Nato vklopite TV, da omogoèite funkcijo snemanja.
Za uporabo funkcije snemanja morate na TV priključiti
disk USB ali zunanji trdi disk, katerega zmogljivost
mora biti najmanj 1 GB in biti združljiv s standardom
hitrosti 2.0. Èe prikljuèena USB naprava ne podpira
hitrosti 2.0, se bo na zaslonu prikazalo sporoèilo o
napaki.
Opomba: Posneti programi se shranijo na priključeni USB
disk. Po želji lahko posnetke shranite ali prekopirate v
računalnik, vendar teh datotek ne boste mogli predvajati
v računalniku. Posnetke lahko predvajate le prek TV
sprejemnika.
Opomba: Med uporabo časovnega zamika bo morda prišlo
do zamika sinhronizacije govora Radio zapis ni podprt. TV
lahko snema programe do najveè deset ur.
Posneti programi so razdeljeni v razdelke velikosti
4 GB.
Če hitrost zapisovanja na priključen disk USB ni
zadostna, lahko snemanje ne uspe in funkcija
snemanja s časovnim zamikom morda ne bo na voljo.
Posnetki programov v visoki loèljivosti (HD) lahko
zasedejo veè prostora na disku USB, odvisno od
oddajane loèljivosti. Zato je priporoèljivo, da za
snemanje programov HD uporabite trde diske USB.
Med snemanjem ne smete izklopiti diskov USB / HDD.
To lahko škoduje prikljuèenemu disku USB / HDD.
Na voljo je podpora za več razdelkov diska (particij).
Podprti sta največ dve različni particiji. Če ima disk več
kot dve particiji, lahko pride do okvare. Prvi razdelek
diska USB se uporablja za pripravljene PVR funkcije.
Prav tako mora biti oblikovan (formatiran) kot primarno
particija, ki se uporablja za pripravljene PVR funkcije.
Nekateri paketi pretoka morda posnet zaradi težav
s signalom, tako da lahko med predvajanjem vèasih
video tudi zamrzne.
Slovenščina - 55 -

Tipke za snemanje, predvajanje, premor, prikaz
(v pogovornem oknu za seznam predvajanja) ni
mogoèe uporabiti, ko je teletekst VKLOPLJEN. Če
se snemanje začne zaradi časovnika, ko je teletekst
VKLOPLJEN, se bo teletekst samodejno izklopil.
Uporaba teleteksta je prav tako onemogočena, ko je
v teku snemanje ali predvajanje.
Snemanje s časovnim zamikom
Med gledanjem oddaje pritisnite gumb (PREMOR),
da preklopite v način snemanja s časovnim zamikom.
V načinu snemanja s časovnim zamikom je oddaja
začasno ustavljena in posneta na USB disk. Za
nadaljevanje gledanja od trenutka zaustavitve oddaje
ponovno pritisnite gumb (PREDVAJAJ). V
informacijski vrstici boste videli zamik med dejanskim
predvajanjem oddaje in predvajanjem oddaje posnete
s časovnim zamikom.
Takojšnje snemanje
Med gledanjem programa pritisnite tipko
(SNEMANJ), da takoj začnete s snemanjem
oddaje. Tipko (SNEMAJ) na daljinskem
predvajalniku lahko pritisnete znova, da boste posneli
naslednji dogodek na EPG. V tem primeru bodo v
zaslonskem meniju prikazane oddaje, ki so
programirane za snemanje. Za zaustavitev takojšnega
snemanja pritisnite tipko (STOP). Med snemanjem
ne boste mogli preklopiti na drug program ali vir in
videti brskalnika za medije.
Gledanje posnetih programov
Medijski brskalnik lahko izberete v glavnem meniju s
pomoèjo tipke “ ” ali “ ”. Označite element Knjižnica
snemanj z uporabo tipk “ ” ali “ ” in pritisnite OK, da
vstopite. Na zaslonu bo prikazan element Knjižnica
snemanj. S pritiskom na tipko “ ” / “ ” izberite
posnetek s seznama (če je bil posnet). Za ogled
Moznosti predvajanja, pritisnite tipko OK. S pritiskom
na tipko “ ” / “ ” ali OK izberite eno izmed možnosti.
Opomba: Med predvajanjem ne bost mogli videti glavnega
menija in elementov menija.
Pritisnite tipko (STOP), da zaustavite predvajanje
in se vrnete v Knjižnico snemanj.
Počasno premikanje naprej
Če med gledanjem posnetih oddaj pritisnite tipko
(PREMOR) bo funkcija za počasno premikanje
(previjanje) naprej na voljo. Za počasno premikanje
naprej lahko uporabite tudi tipko . Če večkrat
zaporedoma pritisnete tipko , spremenite hitrost
počasnega premikanja naprej.
Knjižnica snemanj
Da pogledate seznam posnetkov, izberite “Knjižnica
snemanj” in pritisnite tipko OK. Na zaslonu bo
prikazan element Knjižnica snemanj s posnetki, ki
so na voljo. Vsa snemanja lahko vidite na seznamu
v knjižnici snemanj.
(Jätka): Nadaljuje s predvajanjem posnetka.
RDEČA tipka (zbriši): Zbriši izbrani posnetek.
ZELENA tipka (Urejanje): Urejanje izbranega
snemanja.
MODRA tipka (Razvrščanje): Spremeni vrstni red
snemanj. Izbirate lahko med širokim razponom
možnosti za razvršèanje.
Tipka OK: Aktivira meni z možnostmi za predvajanje:
INFO (Podrobnosti): Prikaže kratek ali daljši opis
programov.
Konguracija snemanja
V meniju Nastavitve izberite element Konguracija
snemanja, da nastavite nastavitve za snemanje.
Oblikovanje (formatiranje) diska: Za oblikovanje
priključenega USB diska lahko uporabite funkcijo
Formatiraj disk. POMEMBNO: Upoštevajte, da bodo
VSI shranjeni podatki izgubljeni in disk bo formatiran v
FAT32, če aktivirate to funkcijo. Če ima vaš USB disk
okvaro, lahko poskusite oblikovati USB disk. V večini
primerov bo formatiranje diska USB povrnilo disk v
normalno delovanje; vendar bodo v tem primeru VSI
podatki, shranjeni na USB disku, izgubljeni.
Opomba: Če se bo na zaslonu, ko boste začeli s snemanjem,
prikazalo sporočilo USB je prepočasen, poskusite ponovno
zagnati snemanje. Če se enaka napaka ponavlja, mogoče
vaš USB disk ne izpolnjuje hitrostnih zahtev. Poskusite
priklopiti drug disk.
Možnosti za predvajanje, ki so na voljo:
• Predvajaj od zaèetka: Predvaja posnetek od
zaèetka.
• Nadaljuj: Nadaljuje s predvajanjem posnetka.
• Predvajaj od odmika: Doloèi zaèetek predvajanja.
Slovenščina - 56 -

Teletekst
“TXT” Teletekst/mešano: Če jo pritisnemo enkrat,
aktivira teletekst. Pritisnite ponovno, da bo teletekst
prikazan čez sliko programa (mešano). Če jo
pritisnemo ponovno, se teletekst izklopi.
“RETURN” Kazalo: Nastavi teletekst na stran s
kazalom.
“INFO” odkrij: Za razkrivanje skritih informacij (npr.
odgovorov v kvizih in igrah).
"OK" Ustavi: Ustavi stran, ko je to potrebno. Za
nadaljevanje jo pritisnite ponovno.
“ ”/“ ” Podstrani: Izbere podstrani, če so na voljo,
ko je teletekst aktiviran.
P+ / P- in številke (0-9): Pritisnite, da izberete stran.
Opomba: Večina TV postaj uporablja stran 100 za kazalo.
Vaš TV sprejemnik podpira sistema HITRI
TELETEKST in TOP-tekst . Če sta sistema na voljo,
so strani razdeljene v skupine ali vsebine. Ko je na
voljo sistem HITRI TELETEKST, bo del strani obarvan
in dostopen s pritiskom na barvne tipke. Pritisnite
na ustrezno barvno tipko. Na zaslonu bo prikazan
barvna pisava, ki vam kaže, katere barvne tipke
morate uporabiti, ko postaja oddaja TOP-tekst signal.
S pritiskom na tipko “ ” ali “ ” bo prikazana
naslednja ali predhodna stran.
Digitalni teletekst (Samo za VB)
• Pritisnite tipko “TXT”. Prikaže se informacija za digitalni
teletekst. Upravljate ga lahko z barvnimi tipkami,
smernimi tipkami in tipko OK.
Naèin upravljanja se lahko razlikuje in je odvisen od
digitalnega teleteksta. Sledite navodilom, prikazanim v
oknu digitalnega teleteksta.
Če se želite vrniti v TV način, pritisnite tipko “TXT”.
Slovenščina - 57 -
Posodabljanje programske
opreme
Vaš TV sprejemnik lahko najde in posodobi
programsko opremo z novimi nadgradnjami preko
oddajniških kanalov. Pri iskanju s pomočjo oddajniških
kanalov TV poišče kanale, ki so shranjeni v vaših
nastavitvah. Pred iskanjem posodobitev programske
opreme je priporoèljivo, da samodejno poiščete in
posodobite vse razpoložljive kanale.
1) Iskanje posodobitve programske
opreme preko uporabniškega vmesnika
• Če želite, lahko tudi ročno preverite, ali je na voljo
nova posodobitev programske opreme za vaš TV
sprejemnik.
• Pojdite v glavni meni. Izberite Nastavitve i n
nato meni Druge nastavitve. V meniju Druge
nastavitve se pomaknite do elementa Posodabljanje
programske opreme in pritisnite tipko OK, da odprete
meni Možnosti za nadgradnjo.
• V meniju Možnosti za nadgradnjo izberite Iskanje
posodobitev in pritisnite tipko OK.
• Če je posodobitev najdena, se začne njen prenos.
Vrstica napredovanja prikazuje, koliko je še do
konca prenosa. Ko se prenos uspešno zaključi, se
prikaže sporočilo za ponovni zagon, po katerem se
nova programska oprema aktivira. Za nadaljevanje
postopka ponovnega zagona pritisnite OK.
2) Način iskanja in posodobitve ob 3.00
zjutraj.
• Če je funkcija Samodejnega iskanja v meniju
Možnosti za nadgradnjo omogočena, se bo TV
zbudil ob 03.00 in preiskal oddajniške kanale za novo
posodobitev programske opreme. Če je bila nova
programska oprema najdena in prenesena uspešno,
se bo pri naslednjem vklopu TV sprejemnika naložila
nova razlièica programske opreme.
Opomba za postopek ponovnega zagona: Ponovni
zagon je zadnji korak pri posodobitvi programske opreme,
če je bil prenos nove programske opreme uspešen. Med
ponovnim zagonom opravi TV še zaključno inicializacijo.
Med postopkom ponovnega zagona se napajanje prekine in
sprednja svetleča dioda utripa. Približno 5 minut pozneje se
TV ponovno vklopi z aktivirano novo programsko opremo.
• Če se TV ne zažene ponovno v 10 minutah, izvlecite
vtičnico iz omrežnega napajanja za 10 minut in jo nato
ponovno priključite. TV se bo vklopil v varnem načinu z
novo programsko opremo. Če TV še vedno ne deluje,
še nekajkrat ponovite postopek izključitve in vključitve.
Èe sprejemnik še vedno ne deluje, poklièite servisno
osebje, ki bo težavo odpravilo.
Pozor: Med ponovnim zagonom, ko dioda utripa, ne
odklapljajte napajanja TV sprejemnika. V takem primeru
se lahko, zgodi, da se TV sprejemnik ne bo veè prižgal,
kar lahko popravi samo servisno osebje.

Odpravljanje napak in nasveti
Navidezna slika - motnje v sliki
Prosimo upoštevajte, da se lahko pojavijo motnje
pri prikazu mirujoče slike (mirujoča slika ali slika pri
premoru). Čez čas bo ta navidezna slika na LED TV
zaslonu izginila. Poskusite za kratek čas izklopiti
TV. Da se temu izognete, mirujoče slike ne puščajte
dolgo na zaslonu.
Ni električnega napajanja
Če vaš televizor nima električnega napajanja,
prosimo, preverite, ali je vtikač napajalnega kabla
vtaknjen v vtičnico.
Slaba slika
1. Ste izbrali pravilni TV sistem?
2. Ali je vaš TV sprejemnik ali hišna antena preblizu
neozemljene avdio naprave ali neonskih svetilk, itd.?
3. Visoke zgradbe in gore lahko povzročijo motnje v
sliki ali dvojno sliko. Včasih lahko izboljšate kakovost
slike s spremembo usmeritve antene. Je slika ali
teletekst slabe kakovosti?
4. Preverite, èe ste vnesli pravilno frekvenco.
5. Ponovno nastavite kanale.
6. Kakovost slike se lahko poslabša, ko sta na TV
hkrati priključeni dve zunanji napravi. V takem primeru
izklopite eno zunanjo napravo.
Ni slike
1. Ni slike pomeni, da vaš TV ne prejema signala. Ali
ste izbrali pravo tipko na daljinskem upravljalniku?
Poskusite še enkrat. Preprièajte se, da ste izbrali
pravilen vhodni vir.
2. Ali je antena pravilno prikljuèena?
3. So priključki na antenskem kablu dobro priključeni?
4. Je antenski kabel poškodovan?
5. So pravilni prikljuèki prikljuèeni na antenski kabel?
6. Če ste v dvomih, se posvetujte s svojim prodajalcem.
Ni zvoka
1. Je televizor nastavljen na nemo delovanje? Za
preklic nastavitve na nemo delovanje pritisnite tipko
“ ” ali povečajte glasnost.
2. Zvok prihaja le iz enega zvočnika Ali je ravnovesje
zvoka nastavljeno le na eno stran? Poglejte v meni
Zvok.
Daljinski upravljalnik ne deluje
TV se ne odziva, ko pritisnete tipke na daljinskem
upravljalniku. Če še vedno lahko uporabljate tipke na
televizorju, so morda izpraznjene baterije. (* Možno
le, če daljinski upravljalnik ni onemogočen zaradi
starševskega nadzora.)
Ni možno izbrati vhodnih virov
1. Če ne morete izbrati vhodnega vira, mogoče
nobena naprava ni priključena.
2. Preglejte AV-kable in priključke, če ste že poskusili
priključiti napravo.
Snemanje ni na voljo
Za snemanje programa morate najprej na TV
sprejemnik priključiti disk USB, ko je TV ugasnjen.
Nato vklopite TV, da omogočite funkcijo snemanja.
Drugače ta funkcija ne bo na voljo. Če snemanja
ne morete izvesti, poskusite izklopiti TV in ponovno
priključite USB napravo, ko je TV izklopljen.
USB je prepočasen
Če se bo na zaslonu, ko boste začeli s snemanjem,
prikazalo sporočilo USB je prepočasen, poskusite
ponovno zagnati snemanje. Če se enaka napaka
ponavlja, mogoče vaš USB disk ne izpolnjuje
hitrostnih zahtev. Poskusite priklopiti drug disk.
Informacije za uporabnike, ki se nanašajo na
odstranjevanje izrabljene opreme in baterij
[samo za Evropsko unijo]
Znaki pomenijo, da oprema, opremljena s temi
znaki, ne spada med gospodinjske odpadke. Če
želite izdelke ali baterije zavreči, vas prosimo, da za
to uporabite zbirne sisteme ali centre za ustrezno
reciklažo.
Obvestilo: Spodnji znak Pb na baterijah pomeni, da baterija
vsebuje svinec.
Izdelki Baterija
Slovenščina - 58 -

Tipični načini prikaza slike na PC
1
2
3
4
5
6
7
8
9
10
11
12
13
14
15
16
17
18
19
20
21
22
23
24
25
26
27
28
29
30
31
32
33
34
35
36
37
38
39
40
41
42
43
44
45
Naslednja tabela ponazori nekatere tipične načine
prikaza videa. Vaš TV sprejemnik mogoče ne
podpira vseh ločljivosti. Vaš TV podpira ločljivosti do
1920x1200.
Kazalo Ločljivost Frekvenca
640x400 70Hz
640x350 85Hz
640x400 85Hz
640x480 60Hz
640x480 66Hz
640x480 72Hz
640x480 75Hz
640x480 85Hz
800x600 56Hz
800x600 60Hz
800x600 70Hz
800x600 72Hz
800x600 75Hz
800x600 85Hz
832x624 75Hz
1024x768 60Hz
1024x768 66Hz
1024x768 70Hz
1024x768 72Hz
1024x768 75Hz
1024x768 85Hz
1152x864 60Hz
1152x864 70Hz
1152x864 75Hz
1152x864 85Hz
1152x870 75Hz
1280x768 60Hz
1360x768 60Hz
1280x768 75Hz
1280x768 85Hz
1280x960 60Hz
1280x960 75Hz
1280x960 85Hz
1280x1024 60Hz
1280x1024 75Hz
1280x1024 85Hz
1400x1050 60Hz
1400x1050 75Hz
1400x1050 85Hz
1440x900 60Hz
1440x900 75Hz
1600x1200 60Hz
1680x1050 60Hz
1920x1080 60Hz
1920x1200 60Hz
Specikacije
ODDAJNIŠKI TV SISTEM
PAL/SECAM B/G D/K K’ I/I’ L/L’
DIGITALNI SPREJEM
DVB-T MPEG2
DVB-T MPEG4 HD
DVB-T MHEG-5 Engine (samo za UK)
DVB-C MPEG2
DVB-C MPEG4 HD
SPREJEM KANALOV
VHF (F. PAS I / III)
UHF (F. PAS U)
HYPERBAND / NAPETOSTNA SINTEZA
ŠTEVILO PROGRAMOV, KI JIH LAHKO SHRANITE
10000
KAZALNIK KANALOV
Zaslonski prikaz
ANTENSKI RF VHOD
75 ohmov (neumerjeno)
DELOVNA NAPETOST
220–240 V AC, 50 Hz.
ZVOK
Nemški + Nicam Stereo
IZHODNA MOČ ZVOČNIKOV (W
RMS.
) 2 x 6
PORABA ELEKTRIČNE ENERGIJE (W) 80 W
(max)
PANEL 16:9
Obvestilo o licenci
Izdelano po licenci podjetja Dolby Laboratories.
POTRDITEV LASTNIŠTVA BLAGOVNE ZNAMKE
znamki podjetja Dolby Laboratories.
“HDMI, logotip HDMI in High-Definition Multimedia
Interface« so blagovne znamke ali registrirane blagovne
znamke v lasti HDMI Licensing LLC.”
in simbol dvojni-D sta blagovni
Slovenščina - 59 -

Podprti formati datotek za USB brskalnika za medije
Medij Pripona Format Opombe
Video Avdio
Film dat, mpg,
Glasba .mp3
Foto .jpg .jpeg Osnovni JPEG Najv. šxv= 14592x12288
Podnapisi
mpeg
dat, mpg,
mpeg
.vob MPEG2 MPEG1/2 Layer 1/2/3, AC3,
.mkv MPEG1,2,4, XviD,
.mp4 .mov MPEG1/2 Layer 3, AAC/
.avi MPEG1,2,4
v H.264,
3gp,3g2 MPEG4, H.264 1920x1080 @ 30P 20Mbit/
asf, wmv MPEG2,4, XviD, H.264,
OGG OGG
.wav LPCM
WMA / ASF WMA, WMA Pro
.m4a/ .aac AAC, HEAAC
.png Progresivni JPEG
.bmp brez prepletanja
.png
sub - -
srt - -
Mpeg1,2 MPEG1/2 Layer 1/2/3, AAC/
MPEG2 ,H.264, VC1, AVS,
MVC
H.264,
VC1,WMV3,
Motion JPEG
Xvid
H.264,
VC1,WMV3,
Sorenson H.263
Motion JPEG
Sorenson H.263
VC1,WMV3
-
HEAAC, AC3/EAC3, LPCM/
ADPCM
MPEG1/2 Layer 1/2/3, AAC/
HEAAC, AC3/EAC3, LPCM/
ADPCM
LPCM
MPEG1/2 Layer 1/2/3, AAC/
HEAAC,
AC3/EAC3, LPCM,OGG
HEAAC, AC3/EAC3, LPCM/
ADPCM
MPEG1/2 Layer 1/2/3, AAC/
HEAAC, AC3/EAC3, LPCM/
ADPCM, WMA
MPEG1/2 Layer 3, AAC/
HEAAC, LPCM/ADPCM
MPEG1/2 Layer 1/2/3, AAC/
HEAAC, AC3/EAC3, LPCM,
WMA
MPEG1 Layer 1/2/3 (MP3)
prepleteno
1080P@ 30fps 50Mbit/sek
H.264:1080Px2@25fps
1080P@ 50fps MVC:
1080P@ 24fps Ostale:
1080P@ 30fps” 50Mbit/
sek
1080P@ 30fps 50Mbit/sek
H.264:1080Px2@25fps
1080P@ 50fps
Ostale:1080P@ 30fps
50Mbit/sek
H.264:
1080Px2@25fps1080P@
50fps Ostale: 1080P@
30fps 50Mbit/sek
H.264: 1080Px2@25fps
1080P@ 50fps Ostale:
1080P@ 30fps” 50Mbit/
sek
H.264: 1080Px2@25fps
1080P@ 50fps Ostale:
1080P@ 30fps” 50Mbit/
sek
sek
1080P@ 30fps 50Mbit/
sek
Do 8 megabajtov
Slovenščina - 60 -

Podprte DVI-ločljivosti
Ko boste na priključke TV sprejemnika priključevali naprave s pomočjo kabla z DVI-pretvornikom (ni priložen),
glejte naslednje informacije o ločljivosti.
56Hz 60Hz 66Hz 70Hz 72Hz 75Hz
640x400
640x480
800x600
832x624
1024x768
1152x864
1152x870
1280x768
1360x768
1280x960
1280x1024
1400x1050
1440x900
1600x1200
1680x1050
1920x1080
1920x1200
þ þ þ þ
þ þ þ þ þ
þ þ þ þ þ
þ þ þ
þ
þ þ
þ þ
þ þ
þ þ
þ þ
þ
þ
þ
þ
þ
þ
þ
Slovenščina - 61 -

Contents
Bezpečnostné opatrenia ....................................... 62
Enviromentálne informácie .................................. 64
Funkcie TV .......................................................... 65
Sledovanie TV ..................................................... 65
Tlačidlá ovládania a prevádzka televízora............ 65
Dodávané príslušenstvo ....................................... 65
Informácie o diaľkovom ovládaní .......................... 66
Používanie modulu podmieneného prístupu ........ 68
Notikácie pohotovosti.......................................... 68
Inštalácia batérií do diaľkového ovládača ............ 69
Pripojte napájanie a anténu / kábel ...................... 69
Zapnutie/Vypnutie ................................................. 69
Prvá inštalácia ...................................................... 69
Prehrávanie Médií cez USB vstup ........................ 71
Zmena rozmerov obrazu: Formáty obrazu ........... 71
Použitie Zoznamu staníc ...................................... 72
Menu Vlastnosti a Funkcie ................................... 73
Elektronický programový sprievodca (EPG) ......... 76
Nahrávanie programu ........................................... 76
Nahrávanie Časového posunu (Timeshift) .......... 77
Okamžité nahrávanie............................................ 77
Pozeranie nahratých programov ......................... 77
Nastavenie Nahrávania ........................................ 77
Teletext ................................................................. 78
Aktualizácia softvéru............................................. 78
Riešenie problémov & Tipy ................................... 79
Typické režimy zobrazenia PC ............................ 80
Podporované formáty súborov v režime prehrávania
médií USB ............................................................ 81
Podporované rozlíšenia DVI ................................. 82
Slovenčina - 62 -
Bezpečnostné opatrenia
Prečítajte si tento návod celý pred
inštaláciou alebo uvedením do
prevádzky.
Príprava
Umiestnite prístroj na pevnú rovnú plochu. Na
zabezpečenie ventilácie je potrebné okolo televízora
ponechať približne 10 cm široký voľný priestor.
Aby ste predišli vzniku porúch a nebezpečných
situácií, neumiestňujte na zariadenie žiadne predmety.
Zariadenie je možné používať iba v miernej klíme.
Prevádzková teplota a vlhkosťou. 5°C až 45°C, 85%
rel. vlhkosť max (Neblokuje vetracie otvory).
Účel použitia
Toto zariadenie je určené pre príjem a zobrazenie
TV programov. Rôzne možnosti pripojenia umožňujú
doplnkové rozšírenie príjmu a zobrazenia zdrojov
(rôzne externé zariadenia). Toto zariadenie je
vhodné len pre prevádzku v suchých interiéroch.
Toto zariadenie je určené výhradne pre súkromné,
domáce využitie a nesmie sa používať pre
priemyselné a obchodné účely. V zásade vylučujeme
zodpovednosť, ak sa zariadenie nepoužíva podľa
určenia, alebo ak sa vykonajú neoprávnené úpravy.
Prevádzkovanie vášho LCD-TV v extrémnych
okolitých podmienkach môže spôsobiť poškodenie
zariadenia.
UPOZORNENIE: Nikdy nenechávajte
osoby (vrátane detí) s telesnou, zmyslovou
alebo mentálnou poruchou či s nedostatkom
skúseností a/alebo znalostí bez dohľadu
používať elektrické prístroje!
Deti nemusia správne rozpoznať
nebezpečenstvo! Prehltnutie batérií môže
byť smrteľné . Vždy skladujte batérie mimo
dosahu malých detí. V prípade prehltnutia
batérie okamžite vyhľadajte lekársku pomoc.
Udržujte obalový materiál mimo dosahu detí.
Nebezpečenstvo udusenia sa!
Napájací zdroj
• Televízor by sa mal prevádzkovať len z napájania
220_240 V AC, 50 Hz výstup.
• Upozornenie: Nenechávajte televízor
v pohotovostnom alebo prevádzkovom režime, keď
odídete z domu.
Umiestnenie televízora
• Ak váš televízor nemá žiadne napájanie, skontrolujte,
či je napájací kábel pripojený do napájacej zásuvky.
• Ventilačné ani iné otvory
• Neklaďte televízor na šikmé alebo nestabilné
plochy, televízor sa môže prevrátiť.

• Aby nedošlo k poškodeniu televízora, neklaďte
žiadne predmety na hornú stranu televízora.
• Televízor používajte len v miernom klimatickom
prostredí.
Napájací kábel a zástrčka
• Napájací kábel by mal byť ľahko prístupný. V prípade
búrky a bleskov, keď idete na dovolenku, alebo
keď televízor po dlhšiu dobu nepoužívate, odpojte
napájací kábel zo zásuvky.
• Zástrčka na napájacom kábli slúži na úplné
odpojenie televízora z elektrickej siete, a preto by
mala byť ľahko a rýchlo dostupná.
• Neumiestňujte televízor, nábytok atď. na napájací
kábel, ani kábel nijako nepritláčajte.
• uchopte sieťový kábel za zástrčku, neodpájajte TV
ťahom za napájací kábel.
• Nikdy sa nedotýkajte napájacieho kábla / zástrčky
s mokrými rukami, mohlo by dôjsť ku skratu alebo
úrazu elektrickým prúdom.
• Nikdy na napájacom kábli nerobte uzol, ani ho
nezväzujte s inými káblami.
• Napájacie káble musia byť vždy umiestnené tak, aby
na ne nikto nemohol stupiť alebo potknúť.
• Poškodený napájací kábel/zástrčka môže spôsobiť
požiar, alebo elektrický šok. Keď je poškodený,
musí byť vymenený, malo by to byť vykonané iba
kvalikovaným personálom.
Voda a vlhkosť
• Nepoužívajte tento televízor vo vlhkom alebo
mokrom prostredí (nepoužívajte v kúpeľni, v blízkosti
kuchynského drezu a práčky).
• Nevystavujte tento televízor dažďu alebo vode,
pretože to môže byť nebezpečné.
• Neumiestňujte žiadne predmety naplnené
tekutinami, napríklad vázy, na hornú časť televízora.
Vyhýbajte sa kvapkaniu alebo špliechaniu.
• Ak do skrinky spadne akýkoľvek pevný predmet
alebo tekutina, TV odpojte a dajte ho skontrolovať
kvalikovanému personálu predtým, než sa bude
znovu prevádzkovať.
Vetranie
• Štrbiny a otvory na TV zostave sú určené na vetranie
a pre zabezpečenie spoľahlivej prevádzky.
• Pre zabránenie prehriatiu tieto otvory nesmú byť
zablokované ani žiadnym spôsobom prikryté.
Zdroje tepla a plamene
• Nevystavujte televízor priamemu slnečnému
žiareniu alebo iným zdrojom tepla.
• Televízor by nemal byť umiestnený v blízkosti
otvoreného ohňa alebo iných zdrojov
tepla (napr. elektrického ohrievača).
• Uistite sa, že na vrchu televízora
nie je umiestnený žiadny zdroj
otvoreného ohòa, ako napríklad
zapálené sviečky.
Slovenčina - 63 -
hlasitosti slúchadiel
• Tlak nadmerného zvuku zo slúchadiel
môže spôsobiť stratu sluchu.
Montáž na stenu (voliteľné)
• Aby sa zabránilo poraneniu, tento televízor sa musí
bezpečne pripojiť k stene v súlade s inštalačnými
pokynmi (pokiaľ sú dostupné).
LCd obrazovka
• Príležitostne sa na obrazovke môže objaviť niekoľko
neaktívnych pixelov ako pevný modrý, zelený alebo
červený bod. Toto však neovplyvňuje prevádzku
výrobku.
• Dávajte pozor, aby ste nepoškriabali displej s
nechtami alebo inými tvrdými predmetmi.
Čistenie
• Pred čistením odpojte televízor zo zásuvky v stene.
• Nepoužívajte tekuté, ani aerosolové čistiace
prostriedky. Používajte len mäkkú a suchú handričku.

Enviromentálne informácie
Tento televízor je vyrobený s menšou spotrebou
energie, aby sa chránilo životné prostredie.
Nepomáhate len zachováva životné prostredie, ale
vďaka funkcii energetickej efektívnosti tohto TV,
môžete tiež ušetri peniaze znížením poplatkov za
účty za elektrinu. Pre zníženie spotreby energie by
ste mali podniknúť nasledujúce kroky:
Môžete použiť nastavenie Režim šetrenia energie,
nachádzajúci sa v Menu Obrazové. Ak nastavíte režim
šetrenia energie ako Eco,TV sa prepne na režim
šetrenia energie a úroveň osvetlenia TV zostavy sa
zníži na optimálnu úroveň. Všimnite si, že niektoré
obrazové nastavenia nebude možné zmeniť, keď je
TV v Režime šetrenia enrgie.
Ak je zvolená možnosť Vypnutá obrazovka, na
obrazovke sa zobrazí správa “Obrazovka sa vypne
do 15 sekúnd.” Zvoľte pokračovať a stlačte tlačidlo
OK pre pokračovanie. Obrazovka sa vypne za 15
sekúnd. Ak zakážete Power Save Mode, bude Picture
režim automaticky nastavený na Dynamic.
Keď sa TV nepoužíva, prosím TV vypnite, alebo ho
odpojte od sieťovej zásuvky. Toto tiež zníži spotrebu
energie.
Keď odchádzate na dlhší čas, odpojte napájanie.
Preto sa vysoko odporúča aktivovať nastavenie
Režimu šetrenia energie pre zníženie ročnej
spotreby energie. A tiež sa odporúča odpojiť TV zo
sieťovej zásuvky pre ušetrenie viac energie, keď TV
nepoužívate.
Prosím, pomôžte nám šetriť životné prostredie
sledovaním nasledujúcich krokov.
Informácie o oprave
Prenechajte všetky servisné práce odborníkom. TV
smie opravovať len kvalikovaný personál. Prosím,
pre viac informácií kontaktujte Vášho miestneho
predajcu, u ktorého ste tento TV zakúpili.
Slovenčina - 64 -

Funkcie TV
• Diaľkove ovládaný farebný LED TV.
• Plne integrovaný digitálna / káblová TV
(DVB-T/C)
• HDMI konektory pre digitálne video a audio. Toto
pripojenie je tiež vytvorené pre príjem signálov HD.
• USB vstup.
• Nahrávanie programu.
• Program časový posun.
• 10000 programov.
• Systém OSD menu.
• Zástrčka Scart pre externé zariadenia (ako video,
videohry, audio zostavu atď.).
• Zvukový stereo systém.
• Teletext, fastext, TOP text.
• Pripojenie slúchadiel.
• Automatický programovací systém.
• Ručné ladenie vpred alebo vzad.
• Automatické vypnutie po uplynutí šiestich hodín.
• Časovač spánku.
• Detská zámka.
• Automatické stlmenie zvuku, keď nie je prenos.
• Prehrávanie NTSC.
• AVL (Automatické obmedzenie hlasitosti).
• Funkcia PLL (vyhľadávanie frekvencie)..
• Vstup pre PC.
• Zapojenie a prehrávanie pre Windows 98, ME, 2000,
XP, Vista, Windows 7.
• Herný režim (voliteľné)
• Funkcia vynutia. obrazu.
Sledovanie TV
Tlačidlá ovládania a prevádzka
televízora
1.Smer nahor
2.Smer nahor
3.Prepínač pre Program / Hlas / AV / Pohotovostný
režim
Ovládací spínač umožňuje ovládať funkcie na
televízore ako sú Hlasitosť / Program / Zdroj a
Zapnutie televízora.
Ak chcete zmeniť hlasitosť: Zvýšte hlasitosť
stlačením tlačidla nahor. Znížte hlasitosť stlačením
tlačidla dole.
Ak chcete zmeniť kanál:: Stlačte stred tlačidla, na
obrazovke sa objaví informačný banner o kanáli.
Prechádzajte uložené kanály stlačením tlačidla nahor
alebo nadol
Ak chcete zmeniť zdroj: Stlačte stred tlačidla
dvakrát, na obrazovke sa objaví zoznam zdrojov.
Prechádzajte dostupné zdroje stlačením tlačidla
nahor alebo nadol.
Vypnutie televízora: Stlačte stred tlačidla a podržte
ho stlačený po dobu niekoľkých sekúnd, TV sa opäť
dostane do pohotovostného režimu.
POZNÁMKA: Spínačom môžete pohybovať,
nahor alebo nadol pre zmenu hlasitosti. Ak chcete
zmeniť kanály, stlačte raz stred spínača (Poloha 3)
a potom ho pohnite nahor alebo dolu. Ak stlačíte stred
spínača ešte raz, zobrazí sa zdrojové OSD. Ak chcete
vybrať požadovaný zdroj, presuňte prepínač nahor
alebo nadol a uvolnite ho. Ak stlačíte stred spínača
a podržíte niekoľko sekúnd, televízor sa prepne do
pohotovostného režimu. Hlavné menu OSD nie je
možné zobraziť pomocou ovládacích tlačidiel na
televízore.
Dodávané príslušenstvo
diaľkového ovládača
Batérie: 2 x AAA
Príručka s pokynmi
Bočný prípojný AV kábel
Slovenčina - 65 -

Informácie o diaľkovom ovládaní
SLEEP
SCREEN
PRESETS
LANG.
FAV
EPG
SWAP
SOURCE
C
DISP.
SEARCH
MODE
INFO
CH
V
1. Pohotovostný režim
2. Veľkosť obrazu
3. Časovač vypnutia
4. Mono-Stereo - Dual I-II / Aktuálny jazyk
(v kanály DTV)
5. Obľúbený kanál.
6. Číselné tlačidlá
7. Elektronický programový sprievodca (v DVB
kanálmi)
8. Žiadna funkcia
9. Prehliadač médií
10. Navigačných tlačidiel (Doľava/Doprava/Dole/
Hore)
11. Žiadna funkcia
12. Knižnica Nahrávok
13. Program Dole / Strana hore - Program hore /
Strana dole
14. Stlmiť
15. Nahrávanie programu.
16. Pozastaviť (vo video režime mediálneho
prehliadača)
17. Rýchly posun dozadu (vo video režime
mediálneho prehliadača)
18. Hrať (vo video režime mediálneho prehliadača)
19. Červené tlačidlo
20. Zelené tlačidlo
21. Výber režimu obrazu
22. Žiadna funkcia
23. Teletext/zmiešaný režim (v režime TXT)
24. Titulky zap-vyp ( v DVB kanály)
25. Predchádzajúci program
26. Výber AV/zdroja
27. Ponuka zapnutá/vypnutá
28. OK (Potvrdiť) / Podržať (v režime TXT) /
Zoznam kanálov
29. Ukončenie/Návrat / Hlavná stránka (v režime
TXT)
30. Žiadna funkcia
31. Info/Odhaliť (v režime TXT)
32. Zvýšenie/zníženie hlasitosti
33. Žiadna funkcia
34. Žiadna funkcia
35. Rýchly posun dopredu (vo video režime
mediálneho prehliadača)
36. Zastaviť (vo video režime mediálneho
prehliadača)
37. Modré tlačidlo
38. Žlté tlačidlo
POZNÁMKA: Dosah diaľkového ovládania je približne
7 m/23 ft.
Slovenčina - 66 -

Zobrazenie zapojení
Prípojka Typ kábel zariadenie
BOČNÉ-AV
BOČNÉ-AV
Skart
Pripojenie
(naspäť)
VGA
Pripojenie
(naspäť)
PC/YPbPr
Audio
Pripojenie
(bočné)
HDMI
Pripojenie
(naspäť)
SPDIFF
Pripojenie
(naspäť)
Bočné AV
Pripojenie
(bočné)
Bočný Audio / Video
prípojný kábel
(súčasť dodávky)
AV prípojný kábel
PC Audio kábel
(nie je súčasťou
dodávky)
SLĂšCHADLĂ
Slúchadlá
Pripojenie
(bočné)
USB
Pripojenie
(bočné)
CI
Pripojenie
(bočné)
CAM
module
POZNÁMKA: Pri pripájaní zariadenia cez bočný AV vstup, k vytvoreniu spojenia musíte použiť dodané prípojné káble. .
Pozri ilustrácie vyššie | | Režim YPbPr sa môže použiť, len keď pripojíte zariadenie, ktoré má YPbPr výstup cez PC vstup s
YPbPr k PC káblu (YPbPR k PC kábel sa nedodáva). Po pripojení prepnite na zdroj signálu YPbPr. | Ak chcete povoliť PC
audio, budete musíte použiť dodaný PC/YPBPR AUDIO PRÍPOJNÝ kábel s bielymi a červenými vstupmi. | Ak je externé
zariadenie pripojené cez SCART zásuvku, televízor sa automaticky prepne do režimu AV. || Pri príjme DTV kanálov (MPEG4
H.264), alebo v režime Media Browser, výstup nebude k dispozícii prostredníctvom konektoru scart |Pri použití montážnej
sady stenu (voliteľné príslušenstvo), odporúčame pripojiť všetky káble na zadnej strane televízora pred montážou na stenu |
Vložte alebo vyberte modul CI, keď je televízor VYPNUTÝ. Pozrite si príručku s pokynmi ohľadom detailov nastavení. Vložte
CAM a potom kartu pozerania do otvoru, ktorý je umiestnený v kryte svoriek na zadnej strane TV. Modul by sa mal vložiť
správne, nie je možné vložiť ho opačne. Terminál CAMERY alebo TV sa môže poškodiť, ak je CAMERA vložená nasilu.
Každý USB vstup na televízore podporuje zariadenia až do 500mA. Pri pripojení prístrojov, ktoré majú aktuálnu hodnotu
nad 500 mA môže dôjsť k poškodeniu televízora.
Slovenčina - 67 -

Používanie modulu podmieneného
prístupu
DÔLEŽITÉ: Vložte alebo vyberte modul CI, keď je
televízor VYPNUTI.
Aby ste pozerali určité digitálne kanály, možno bude
potrebný modul podmieneného prístupu (CAM).
Tento modul sa musí vložiť do CI zásuvky na vašom
televízore.
1.Ihneď, ako sa stanete zákazníkom, získate od
poskytovateľa modul podmieneného prístupu (CAM)
a kartu, ktorú musíte zasunúť do televízora podľa
nasledujúceho postupu.
2.Vložte CAM a potom kartu pozerania do otvoru,
ktorý je umiestnený v kryte svoriek na zadnej strane
TV.
3.CAM by mal byť vložený správne, je ho nemožné
úplne vložiť, ak je obrátene. Ak je CAM vkladaný
násilím, môže dôjsť k poškodeniu samotného
modulu alebo terminálu TV.
4.Pripojte televízor k elektrickej sieti, zapnite ho a
potom počkajte malú chvíľku, nech sa karta aktivuje.
5.Ak nie je vložený žiadny modul, objaví sa správa
znamenajúca "Nie je vložený žiadny modul pre
Common Interface".
Pozrite si príručku s pokynmi ohľadom detailov
nastavení.
CAM
module
Notikácie pohotovosti
Ak televízor neprijíma žiadny vstupný signál (napr.
z anténneho alebo HDMI zdroja) po dobu 5 minút,
televízor sa prepne do pohotovostného režimu. Pri
ďalšom zapnutí televízora, sa zobrazí nasledujúca
správa:
o dosiahnutí časového limitu Auto TV Vypnuté sa na
obrazovke objaví nasledujúca správa. Pre vypnutie
TV zvoľte ÁNO. Pre zrušenie zvoľte NIE. TV sa tiež
vypne, ak nevykonáte výber na tejto obrazovke.
Ak TV bolo ponechané zapnuté a nebolo s ním
manipulované po dobu 4 hodín, TV sa prepne do
pohotovostného režimu. Pri ďalšom zapnutí sa
zobrazí nasledujúca správa:
Slovenčina - 68 -

Inštalácia batérií do diaľkového
Antény / Kábla
ovládača
1.Zdvihnite kryt na zadnej strane diaľkového ovládača
jemne smerom hore.
2.Vložte dve AAA batérie. Uistite sa, že ste vložili +
a - póly batérií do priestoru pre batérie (dbajte na
správnu polaritu).
3.Vráťte kryt.
Pripojte napájanie a anténu / kábel
DÔLEŽITÉ: Televízor je určený na použitie s napätím
220 - 240 V striedavého prúdu s frekvenciou 50 Hz.
Po vybalení umožnite, aby TV zostava dosiahla okolitú
izbovú teplotu, predtým než ju zapojíte do siete.
Zapojte napájací kábel do výstupu sieťovej zásuvky.
VGA
SPDIF
SCART
227529
Zapnutie/Vypnutie
Zapnutie televízora
Pripojte sieťový kábel do zásuvky so striedavým napätím
220 – 240V a frekvenciou 50 Hz.
Rozsvieti sa kontrolné svetlo (LED) pohotovostného
režimu.
Zapnutie televízora z pohotovostného režimu:
Stlačte tlačidlo “ ” , CH ^/ v alebo číselné tlačidlo na
diaľkovom ovládaní.
Stlačte riadiaci prepínač umiestnený na ľavej strane
TV. Televízor sa zapne.
Pre vypnutie TV
Stlačte tlačidlo“ ” na diaľkovom ovládači alebo
stlačte tlačidlo alebo podržte spínač, kým sa televízor
nevypne,takže sa televízor prepne do pohotovostného
režimu(V závislosti od modelu).
Pre úplné vypnutie TV vypojte napájací kábel zo
zásuvky zdroja.
Slovenčina - 69 -
Poznámka: Keď sa TV prepne do režimu pohotovosti,
LED Napájania môže blikať pre indikáciu, že funkcie ako
Vyhľadávanie v pohotovosti, Sťahovanie Over Air alebo
Časovač sú aktívne. LED môže blikať aj pri zapnutí televízora
z pohotovostného režimu.
Prvá inštalácia
Po zapnutí po prvýkrát, sa objaví menu."voľba jazyka".
Správa Vitajte, zvoľte prosím jazyk!"vo všetkých
jazykových verziách uvedených abecedne.
Stlačte tlačidlo " " alebo " " a zvýraznite
požadovaný jazyk, stlačte tlačidlo OK pre výber objaví
sa "Prvá inštalácia". Pomocou tlačidla " " alebo
" " nastavte požadovanú krajinu, stlačte tlačidlo
" " a zvoľte Typ vyhľadávania. Použite „ “ alebo
„ “ pre nastavenie želaného typu vyhľadávania.
Dostupné typy vyhľadávania sú Digitálne a analógové,
len digitálne a len analógové. Po nastavení, stlačte
“ ” pre zvolenie Jazyka teletextu. Použite „ “ alebo
„ “ pre nastavenie "Jazyka teletextu" a vyberte "Snímanie
zakódovaných staníc" použitím tlačidla " " alebo
" ". Ak chcete snímať zakódované stanice, môžete
nastaviť Zašifrované snímanie ako Áno.
Pre pokračovanie stlačte tlačidlo OK na diaľkovom
ovládači a na obrazovke sa objaví nasledujúca
správa.

Môžete aktiváciu Možnosti Režim obchodu s použitím
tlačidla “ ” alebo “ ” (voliteľné). Ak je vybratý Režim
obchodu (voliteľné), možnosti Režim obchodu
bude dostupná v inom nastavení ponuky a funkcie
vášho TV budú zobrazené v hornej časti obrazovky.
Po vybratí Režimu obchodu bude zobrazená
potvrdzovacia obrazovka.(voliteľné) Vyberte
ÁNO pre pokračovanie.
Ak je vybratý Domáci režim(voliteľné), Režim
obchodu nebude dostupný po Prvej inštalácii. Pre
pokračovanie stlačte tlačidlo OK, na obrazovke sa
objaví nasledujúca správa.
Musíte zvoliť typ vyhľadávania k vyhľadaniu a uloženiu
vysielania z požadovaného zdroja.
Inštalácia v režime Anténa
Ak zvolíte možnosť ANTÉNA z obrazovky Typu
vyhľadávania, televízor bude vyhľadávať digitálne
pozemné TV vysielania.
Pre ukončenie zoznamu kanálov a pozeranie TV
stlačte tlačidlo OK.
(*) LCN je systém logického čísla kanálu, ktorý
organizuje dostupné vysielanie v súlade s vybraného
kanálovou sekvenciou
Inštalácia v režime Kábel
Ak zvolíte možnosť KÁBEL a potom stlačíte tlačidlo
OK na diaľkovom ovládači, na obrazovke sa objaví
nasledujúca správa:
Ak chcete pokračovať, zvoľte prosím ÁNO a stlačte
OK. Ak chcete operáciu zrušiť, zvoľte NIE a stlačte
OK.
POZNÁMKA: Ak voľbu chcete zrušiť, stlačte tlačidlo
MENU.
Po uložení všetkých dostupných staníc sa na
obrazovke zobrazí Zoznam kanálov. Ak chcete triediť
kanály podľa LCN (*), prosím, zvoľte "Áno" a potom
stlačte OK.
Slovenčina - 70 -
Z tejto obrazovky môžete zvoliť rozsahy frekvencie.
Na zvýraznenie riadku použite tlačidlo “ ” alebo
“ ” .

Môžete zadať rozsah frekvencií manuálne s použitím
číselných tlačidiel na diaľkovom ovládači.
Nastavte Start a Stop frekvenciupodľa potreby
pomocou numerických tlačidiel na diaľkovom ovládači.
Po tejto operácii môžete nastaviť Search Step
krokovanie vyhľadávania na 8 000 KHz alebo 1 000
KHz.
Ak zvolíte 1 000 KHz, TV vykoná proces vyhľadávania
podrobne. Trvanie vyhľadávania . sa takto Podľa toho
zvýši. Po skončení spustite stlačením tlačidla OK
automatické vyhľadávanie. TV bude vyhľadávať a
ukladať dostupné vysielanie.
(*) Pre Veľkú Britániu nie je modré tlačidlo k dispozícii.
Prehrávanie Médií cez USB vstup
Pomocou USB vstupu na televízore.k TV môžete
pripojiť USB pevný disk alebo USB memory stick.
Táto funkcia vám umožní prehrať súbory uložené na
zariadení USB. Externé pevné disky 2,5 "a 3,5" palca
(hdd s externým napájaním) sú podporované.
DÔLEŽITÉ! Pred vykonaním akýchkoľvek pripojení
k TV zostave môžete zálohovať Vaše súbory, aby
ste sa vyhli možnej strate údajov. Výrobca nepreberá
zodpovednosť za nijaké poškodenie alebo stratu
údajov. Niektoré typy zariadení USB (napríklad
prehrávače MP3) alebo pevné disky či pamäťové kľúče
USB nemusia byť s týmto televízorom kompatibilné.
TV podporuje formáty diskov FAT32 a NTFS, ale
nahrávanie nebude k dispozícii s diskami vo
formáte NTFS. Poznámka: Pri formátovaní pevného
disku USB s kapacitou 1 TB (terabajt) alebo viac sa
môžu poèas formátovania vypnutý problémy.
Rýchle zapájanie a odpájanie USB zariadení je
veľmi riskantné. Opakovane a rýchlo nezapájajte
a neodpájajte disk. Toto by mohlo spôsobiť fyzické
poškodenie USB prehrávaèa a hlavne samotného
USB zariadenia. USB modul nevyťahujte, zatiaľ čo
sa prehráva súbor.
Ponuka Prehliadač médií
Môžete prehrávať fotograe, hudbu a video súbory
uložené na USB disku jeho pripojením k televízoru
a pomocou obrazovky prehliadača médií. Vykonajte
nasledovné: Pripojte USB disk k jednému z USB
vstupov umiestnených na bočnej strane televízora.
K vášmu TV môžete pripojiť dve USB zariadenia. V
prípade, že oba USB zariadenia obsahujú hudobné,
obrázkové alebo video súbory, na obrazovke sa
zobrazí USB výber OSD. USB zariadenie, ktoré bolo
k TV pripojené ako prvé, bude nazvané USB Disk1.
Zariadenie vyberte pomocou tlačidla “ ” alebo
“ ” a stlačte OK.
Stlačte tlačidlo MENU a vyberte Media Browser
pomocou tlačidla vľavo / vpravo a OK Zobrazí sa
Prehliadač médií. Môžete zobraziť daný obsah
zvolením karty Video, Hudba alebo Obrázky.
Nasledujte indikácie tlačidiel na jednotlivých
obrazovkách menu pre funkcie prehrávania médií.
Môžete si nastaviť preferencie Prehliadača médií
Media Browser pomocou dialógu Nastavenia .
Použitie tlačidla PONUKA v Režime
prehliadaèa médií
Pri stlačení tlačidla PONUKA v Režime prehliadača
médií, sa zobrazí nasledovná obrazovka ponuky:
Prístup môžete získať cez voľby ponuky Obrázok,
Zvuk a Nastavenie použitím tejto obrazovky. Stlačte
tlačidlo MENU pre opustenie tejto obrazovky.
Zmena rozmerov obrazu: Formáty
obrazu
Programy je možné pozerať v rôznych obrazových
formátoch, v závislosti od prijímaného prenosu.
Veľkosť obrazu alebo pomer strán obrazu je možné
meniť podľa potreby pomocou rôznych režimov
zväčšenia. Stlačte opakovane tlačidlo SCREEN, čím
meníte veľkosť obrazu. Môžete posunúť obrazovku
nahor alebo nadol pomocou “ " alebo " "
tlačidla, v režime 14:9 Zoom, Kino alebo Titulky.
Slovenčina - 71 -

Použitie Zoznamu staníc
Televízor roztriedi všetky uložené stanice do Zoznamu
kanálov. Tento zoznam kanálov môžete editovať,
nastaviť obľúbené alebo nastaviť aktívne stanice,
ktoré budú v zozname, s použitím možností Zoznamu
kanálov. Stlačte tlačidlo MENU pre zobrazenie
hlavného menu. Vyberte položku zo Zoznamu
kanálov pomocou Ľavého alebo Pravého tlačidla.
Stlačte tlačidlo OK pre zobrazenie ponuky obsahu.
Pre riadenie všetkých uložených kanálov zvoľte
Editovať zoznam kanálov. Ak chcete vybrať položku
Editovať zoznam kanálov, stlačte tlačidlá Hore alebo
Dole a OK. Stlačte tlačidlo Hore alebo Dole a vyberte
kanál, ktorý má byť spracovávaný. Stlačte tlačidlo
Vľavo alebo Vpravo a vyberte funkciu v ponuke
Zoznam kanálov. Pre pohybovanie stranou hore alebo
dolu použite tlačidlá P+/P- Stlačte tlačidlo “MENU” pre
opustenie ponuky.
Triedenie zoznamu kanálov
Môžete zvoliť vysielanie, ktoré sa zaradí
do zoznamu kanálov. Pre zobrazenie špecického
typu vysielania by ste mali použiť nastavenie
Zoznamu aktívnych kanálov. Zvoľte Zoznam
aktívnych kanálov z menu Zoznamu kanálov
použitím tlačidla “ ” alebo “ ”. Stlačte
tlačidlo OK pre pokračovanie. Môžete si vybrať
možnosť typu siete zo zoznamu pomocou
tlačidla “ ” alebo “ a tlačidla OK.
Slovenčina - 72 -

Menu Vlastnosti a Funkcie
Kontrast
Jas
Ostrosť
energiou
Pokročilé nastavenia
kontrast
Teplota farieb
obrazu
Black (Skutočná
čierna)
Posun farby
Obnoviť
Zvuk v režime
PC mode)
režime PC)
režime PC)
režime PC)
režimu VGA pridajú k Obrazovým nastaveniam, pokým je v PC režime.
Pixellence Demo Mode
Režim
Farba Nastaví hodnotu farby, upraviac farby.
Režim šetrenia
Podsvietenie
(voliteľný).
Redukcia šumu
Na základe svojich požiadaviek na zobrazenie si môžete nastaviť príslušnú voľbu režimu.Obrazový
režim sa môže nastaviť na jednu z týchto možností: Kino, Herný, Dynamický a Prirodzený.
Nastaví hodnoty svetlosti a tmavosti obrazovky.
Nastaví hodnotu jasnosti pre obrazovku.
Nastaví hodnotu ostrosti pre predmety zobrazené na obrazovke.
Pre zvolenie Úsporného režimu ako sú Eco, Vypnúť obraz a Deaktivovaný stlaète tlaèidlo Pozrite si časť
„Enviromentálne informácie“ v tomto manuále ohľadom ďalších informácií o Režime šetrenia energiou.
Toto nastavenie ovláda stlačte podsvietenia a môže sa nastaviť na Automatické, Maximálne,
Minimálne a Ekonomický režim.Funkcia zadného podsvietenia bude neviditeľná, ak je Režim šetrenia
energie nastavený na zapnutý.. Podsvietenie sa nemôže aktivovať v režime VGA alebo v režime
Prehliadača médií, alebo pokiaľ je obrazový režim nastavený na Hra.
Ak je vysielací signál slabý a obraz hlučný, použite nastavenie Zníženie hluku pre zníženie množstva
hluku. Obrazový režim sa môže nastaviť na jednu z týchto možností: Nízka, Stredná, Vysoká alebo
Vypnutá.
Dynamický
Zväčšenie
HDMI True
Filmový režim
Farba povrchu Upravte želaný farebný tón.
RGB
ZOSILNENIE
PC (Sound in
H pozícia (v
H pozícia (v
Pixlové
kmitanie (v
Zvuk v režime
PC (Sound in
PC mode)
Zatiaľ čo je v režime VGA (PC), niektoré položky v Obrazovom menu nebudú dostupné. Namiesto toho sa nastavenia
Stupeò kontrastu môžete zmeni pomocou funkcie dynamického kontrastu. Dynamicki kontrast môže
nastaveni na jednu z tichto možností:Nízka, Stredná, Vysoká alebo Vypnutá.
Nastaví želaný farebný tón
Nastaví rozmer obrazu na Auto,16:9, Titulky,14:9, 14:9 Priblíženie, 4:3 alebo Kino.
Poèas pozerania z HDMI zdroja bude táto funkcia viditeľná v menu Nastavení obrazu. Môžete
použitím túto funkciu na zlepšenie čiernosti v obraze.
Filmy sa nahrávajú pri rôznych počtoch rámov na sekundu na normálne televízne programy. Zapnite túto
funkciu pri sledovaní lmov, aby sa lepšie zobrazovali rýchlo sa pohybujúce scény.
Upravte želaný farebný tón.
Stlačte tlačidlo OK pre editáciu RGB Môžete nastaviť hodnoty teploty farieb pomocou funkcie
zosilnenia RGB.
Resetuje nastavenia obrazu na štandardné nastavenia z továrne.
Automaticky optimalizuje displej. Pre optimalizovanie stlačte OK.
Táto položka posúva obraz horizontálne na pravú alebo doľava stranu obrazovky.
Táto položka posúva obraz po obrazovke po zvislej osi hore alebo dole.
Upravenia Bodových hodín opravujú interferenciu, ktorá sa objavuje ako vertikálne odstupòovanie v
bodových intenzívnych prezentáciách ako tabuľky alebo odstavce alebo text v menších fontoch.
V závislosti od rozlíšenia a snímkovacej frekvencie, ktorá ide do vstupu na televízore, môžete na
obrazovke vidieť zastrený alebo rušený obraz. V takom prípade môžete použiť túto funkciu a vyčistiť
obraz metódou pokusu a omylu.
Slovenčina - 73 -

Menu Vlastnosti a Funkcie
Režim Obsahu Nastavenia obrazu
(voliteľné)
Dynamické basy
(voliteľné)
Digitálny výstup
Menu Vlastnosti a Funkcie
kanálov
kanálov
(*)
Hlasitosť Upravuje úroveň hlasitosti.
V menu ekvalizéra je možné zmeniť prednastavenie na Hudba, Film, reč, Ploché,
Ekvalizér:
Rovnováha
Slúchadlá Nastaví hlasitosť sluchátiek.
Zvukový režim
AVL
Sluchátka/
Rozostavenie:
Zvuk slúchadiel
Automatické
snímanie kanálov
Klasické a Užívateľské. Stlačením tlačidla MENU sa vrátite do predchádzajúcej
ponuky. Nastavenie ponuky ekvalizéra je možné zmeniť iba vtedy, ak je ako režim
ekvalizéra nastavená možnosť Používateľ
Toto nastavenie sa používa na zvýraznenie vyváženia l‘avého alebo pravého
reproduktora.
Stlačením tlačidla si môžete vybrať z režimov Mono, Stereo, Dual I alebo Dual II,
ale iba ak ich zvolený kanál podporuje.
Funkcia Automatického obmedzenia hlasitosti (AVL) nastaví zvuk pre získanie
úroveò stabilného výkonu medzi programami (napríklad, úroveň hlasitosti reklám
zvykne byť hlasnejšia ako programy).
Keď pripojíte externý zosilňovač k vášmu TV s použitím konektora sluchátiek,
môžete zvoliť túto možnosť ako Rozostavenie Ak ste pripojili sluchátka k TV,
nastavte túto možnosť ako Sluchátka.
Aktivuje alebo deaktivuje Dynamické basy
Režim Priestorový zvuk je možné zmeniť ako Zapnutý alebo Vypnutý.
Nastavuje audio typ digitálneho výstupu.
Automaticky sa displej optimalizuje.
Digitálna anténa: Vyhľadáva a ukladá anténne DVB stanice.
Digitálny kábel: Vyhľadáva a ukladá káblové DVB stanice.
Analógové: Vyhľadáva a ukladá analógovéí stanice.
Digitálna anténa a anlógové: Vyhľadáva a ukladá anténne DVB stanice.
Digitálna káblová a anlógové: Vyhľadáva a ukladá anténne DVB stanice.
Manuálne snímanie
Sieové snímanie
Analógové jemné
ladenie
Prvá inštalácia
Vymazanie
Servisného zoznamu
Táto funkcia sa dá použiť na priamy vstup do vysielania.
Zobrazuje možnosti automatického ladenia
Vyhľadáva a uloží analógové stanice Vyhľadáva a ukladá káblové DVB a analógové
stanice
Vymaže všetky uložené kanály a nastavenia, prenastaví TV do továrenského
nastavenia a spustí prvú inštaláciu Môžete postupovať podľa pokynov v časti
Počiatočná inštalácia pre viac informácií o tomto procese
(*) Toto nastavenie bude viditeľná, len ak je možnos krajiny nastavená na Dánsko,
Švédsko, Nórsko alebo Fínsko. Pre vymazanie uložených kanálov použite toto
nastavenie.
Slovenčina - 74 -

Menu Vlastnosti a Funkcie
Podporované formáty súborov v režime
Podmienený
prístup
Jazyk
Časovače
nahrávania
Zdroje
Iné nastavenia: Zobrazí iné možnosti nastavenia televízora.
Časový limit
ponuky OSD
Modré pozadie
Automatické
vypnutie televízora
Režim obchodu
(voliteľné)
Ovláda moduly s podmieneným prístupom, ak sú dostupné.
Konguruje nastavenia jazyka.
Rodičovská
ochrana
Kongurovanie
Dátum/čas
Skenovať
kódované
Aktualizácia
softvéru
Verzia aplikácie Zobrazí verziu aplikácie.
Nedoslýchavý
Zvukový popis
Vyhľadávanie v
pohotovostnom
režime (voliteľné)
Režim zapnutia
Konguruje nastavenia rodičovskej ochrany.
Poznámka: Keď je možnosť Detský zámok nastavená na “ZAPNUTÉ”, TV je možné ovládať
len prostredníctvom diaľkového ovládača. V tomto prípade tlačidlo ovládacieho panela nebude
fungovať
Nastavuje časovače pre vybrané programy.
Zobrazí konguračné menu Nahrávania.
Nastaví čas a dátum.
Poznámka:
* TV získava časové info počas vysielania. Správny čas bude k dispozícii v Nastavenie dátumu/času,
ak informácia o čase je k dispozícii vo vysielaní.
Ak je televízor v režime bez kanála, môžete Dátum/Čas zmeniť. Avšak, ak je kanál nastavený, môžete
zmeniť iba Spôsob nastavenia času, a ak je nastavené na manuálne, povolí sa časová zóna.
* Ak je televízor prepnutý do pohotovostného režimu a zapne sa neskôr a nie je k dispozícii vysielanie,
informácie o čase nebudú aktualizované. Ak je prítomné vysielanie, časový údaj sa vezme cez
vysielanie. Inými slovami, časové informácie budú k dispozícii v súlade s týmito prioritami: TV hľadá
časové informácie najprv vo vysielaní, potom v užívateľských preferenciách a nakoniec v časových
informáciách teletextu.
Aktivuje alebo deaktivuje možnosti vybraných zdrojov.
Zmení trvanie časový limit pre obrazovky ponuky.
Keď je toto nastavenie zapnuté, pomocou procesu vyhľadávania sa zistia tiež kódované kanály. Ak
je nastavené na Vypnuté, zakódované kanály nebudú lokalizované automatickým, ani manuálnym
vyhľadávaním
Aktivuje alebo deaktivuje modré pozadie systému, keď je signál slabý alebo neprítomný.
Použite toto nastavenie, aby ste zabezpečili, že sa v televízore budú vždy nachádzať najaktuálnejšie
informácie. Aby sa zabezpečila správna prevádzka, skontrolujte, či je televízor nastavený do
pohotovostného režimu.
Ak poskytovateľ vysielania ponúka špeciálne zvukové služby, môžete ich po zapnutí tejto funkcie
používať.
Zvukový popis je doplňujúci hovorený záznam pre zrakovo postihnutých divákov vizuálnych
médií vrátane televízie a lmov. Túto funkciu môžete využívať iba vtedy, ak sa tento doplňujúci
záznam vysiela.
Môžete nastaviť hodnotu časového limitu funkcie auto vypnuté, potom ako sa dosiahne hodnota
èasového limitu a Tv sa neprevádzkuje počas zvolenej doby, Tv sa vypne.
Ak funkciu vyhľadávania v pohotovostnom režime vypnete, funkcia nebude dostupná. Pre použitie
Vyhľadávania v pohotovostnom režime sa uistite, aby ste zvolili Vyhľadávanie v pohotovostnom
režime ako Zapnuté. Ak je vyhľadávanie v pohotovostnom režime nastavené na Zapnuté, ak je
televízor v pohotovostnom režime, vyhľadajú sa vysielania ktoré sú k dispozícii. Ak televízor nájde
všetky nové alebo chýbajúce vysielania, zobrazí sa menu s otázkou, či chcete vykonať tieto zmeny.
Po tomto procese bude aktualizovaný a menený Zoznam kanálov. Prosíme, aktivujte nastavenie
Pohotovostné vyhľadávanie pre povolenie Vášho Televízora pre automatickú aktualizáciu vysielacej
frekvencie, denície a podobných zmien vysielača.
Ak je zobrazené TV v obchode, môžete tento režim aktivovať. Kým je aktivovaný Režim obchodu,
niektoré položky v TV menu nemusia byť dostupné pre nastavenie.
Toto nastavenie konguruje preferenciu režimu zapnutia. Vždy zapnutý: Zapnite hlavným vypínačom,
keď je televízor studený. / Standby (Pohotovostný režim): TV je v pohotovostnom režime vždy zapnuté. /
Posledný Stav: TV sa vždy zapne s posledným zvoleným kanálom / zdrojom.
Slovenčina - 75 -

Elektronický programový sprievodca
(EPG)
Niektoré, ale nie všetky kanály zasielajú informácie
o aktuálnych a nasledujúcich programoch. Stlačte
tlačidlo EPG pre zobrazenie EPG menu.
Hore / dole / doľava / doprava: Navigácia v EPG.
OK: Zobrazí možnosti triedenia.
INFORMÁCIE: Zobrazí podrobné informácie o
vybranom programe
ZELENÉ: Prepne na Zoznamový list EPG.
ŽLTÉ: Prepne na Zoznamový list EPG.
MODRÉ:zobrazí možnosti ltrovania.
NAHRÁVANIE: TV začne nahrávať vybrané
programy. Môžete stlačiť tlačidlo znova pre zastavenie
nahrávania.
DÔLEŽITÉ: Ak chcete nnahrať program, najskôr pripojte USB
disk k televízoru, kým je vypnutý. Potom TV zapnite, aby sa
spustila funkcia nahrávania. V opačnom prípade nebude
nahrávanie možné.
Poznámka: Prepínanie staníc či zdroja nie je počas
nahrávania dostupné.
Možnosti programu
V ponuke EPG stlačte tlačidlo OK pre vstup do ponuky
Možnosti udalosti.
Voľba kanálu
V ponuke EPG môžete pomocou tejto možnosti
prepnúť na vybraný kanál.
Zaznamenať /odstrániť časovač nahrávania
Po vybratí programu v ponuke EPG stlačte tlačidlo
OK, čím sa zobrazí obrazovka Možnosti. Vyberte
možnosť voľby "Nahrávať" a stlačte tlačidlo OK Po
tejto operácii bude na vybraný program nastavené
nahrávanie.
Ak chcete zrušiť už nastavené nahrávanie, označte
daný program, stlačte tlačidlo OK a vyberte možnosť
“Odstrániť časovač”. Nahrávania“. Nahrávanie
sa zruší.
Nastaviť /odstrániť časovač
Po vybratí programu v ponuke EPG stlačte tlačidlo
OK, čím sa zobrazí obrazovka Možnosti. Vyberte
možnosť “Nastaviť časovač” a stlačte tlačidlo OK
Môžete nastaviť časovač pre programy v budúcnosti.
Ak chcete zrušiť už nastavený časovač, zdôraznite
daný program a stlačte tlačidlo OK Potom vyberte
možnosť “Odstrániť časovač”. Časovač sa zruší.
Poznámka: V rovnakom časovom intervale nemožno
nahrávať ani nastavovať časovač pre dva alebo viac
samostatných programov.
Nahrávanie programu
DÔLEŽITÉ: Ak sa chystáte použiť nový pevný disk USB,
odporúčame ho najskôr naformátovať vybratím položky
„Formátovať disk“ v ponuke televízora.
Ak chcete nahrať program, najskôr pripojte USB disk
k televízoru, kým je vypnutý. Potom TV zapnite, aby
sa spustila funkcia nahrávania.
Pre použitie funkcie nahrávania by ste mali pripojiť
USB disk alebo jednotku externého disku k TV
a pripojený USB disk by mal mať kapacitu aspoň
1 GB a mal by mať rýchlostnú kompatibilitu 2.0. Ak
pripojené USB zariadenie nepodporuje rýchlosť 2.0,
zobrazí sa hlásenie o chybe.
Poznámka: Nahraté programy sa ukladajú na pripojenom
USB disku. V prípade potreby môžete tieto nahrávky
zálohovať/kopírovať do osobného počítača.. Nahrávky
môžete prehrávať len prostredníctvom vášho TV.
Poznámka: V priebehu èasového posunu sa môže vyskytnúť
posun Lip Sync. Nahrávanie Rádia nie je podporované.
TV môže nahrávať programy až do desiatich hodín.
Nahraté programy sú rozdelené do 4 GB segmentov.
Ak rýchlosť zápisu z pripojeného USB disku nie je
dostatočná, môže zlyhať nahrávanie a možnosť
časového posunu (timeshifting) nemusí byť k
dispozícii.
Nahrávky HD programov môžu obsadiť väčší priestor
na USB disku v závislosti od rozlíšenia vysielania.
Z tohto dôvodu sa odporúča používať jednotky USB
harddisku pre nahrávanie HD programov.
Počas nahrávania nevypájajte USB/HDD. Toto by
mohlo poškodiť pripojený USB/HDD.
Dostupná je podpora rozdelenia na viaceré časti.
Podporované sú maximálne dve rôzne rozdelenia. Ak
má disk viac ako dve rozdelenia, môže sa vyskytnúť
porucha. Prvé rozdelenie usb disku sa používa pre
funkcie PVR pripravenosti. Musí sa tiež formátovať
ako prvotné rozdelenie, ktoré sa má použiť pre funkcie
PVR pripravenosti.
Slovenčina - 76 -

Niektoré streamové bloky sa nemusia nahrať kvôli
problémom so signálom, takže video môže niekedy
počas prehrávania zmrznúť.
Keď je teletext ZAPNUTÝ, nemôžu sa používať
tlačidlá Nahrávať, Prehrať, Pauza, Zobraziť (pre
ListDialog). Ak sa nahrávanie spustí z časovača,
keď je teletext ZAPNUTÝ, teletext sa automaticky
vypne. Tiež sa deaktivuje používanie teletextu, keď
sa pokračuje v nahrávaní alebo prehrávaní.
Nahrávanie Časového posunu
(Timeshift)
Stlačením tlačidla (PAUZA) počas sledovania
vysielania prepnete do režimu časového posunu. V
režime časového posunu sa program pozastaví a
súčasne nahrá na pripojený disk USB. Opätovným
stlačením tlačidla (PREHRAŤ) môžete pokračovať
v sledovaní pozastaveného programu od bodu, kde
bol zastavený. V informačnom prúžku bude vidno
rozdiel medzi skutoèným programom a programom s
časovým posunom.
Okamžité nahrávanie
Stlačením tlačidla (NAHRÁVANIE) sa spustí
okamžité nahrávanie počas sledovanie programu.
Opätovným stlačením tlačidla (NAHRÁVANIE) na
diaľkovom ovládači sa nahrá aj ďalší program
v elektronickom programom sprievodcovi (EPG). V
takom prípade sa na obrazovke zobrazí zoznam
programov naprogramovaných na nahrávanie.
Stlačením tlačidla (STOP) sa okamžité nahrávanie
zruší. Prepínanie staníc či zdroja a používanie
prehliadača Media Browser nie je počas nahrávania
dostupné.
Pozeranie nahratých programov
Pre výber Prehliadača médií, v hlavnom menu,
použite " " alebo " ". Pomocou tlačidla “ ” alebo
“ ” zvýraznite knižnica nahrávok a stlačte tlačidlo
OK pre vstup. Zobrazí sa nápis knižnica nahrávok.
Zo zoznamu zvolte zaznamenanú položku (ak bola
predošle nahraté) pomocou tlačidiel “ ” / “ ” . Stlačte
tlačidlo OK pre zobrazenie Voľby prehrávania.
Vyberte možnosťpomocou tlačidla “ ” / “ ” alebo
tlačidlom OK.
Dostupné možnosti prehrávania:
• Prehrať od začiatku: Prehrá nahrávku od začiatku.
• Pokračovať: Obnoví prehrávanie nahrávky.
• Prehrať od bodu: Umožňuje určiť bod prehrávania.
Poznámka: Počas prehrávania nebude možné prezerať
hlavnú ponuku ani položky ponuky.
Stlačením tlačidla (STOP) sa prehrávanie zastaví
a na obrazovke sa opäť zobrazí Knižnica nahrávok.
Pomalé prehrávanie vpred
Stlačením tlačidla (POZASTAVIŤ) počas
prehrávania nahraných programov sa aktivuje funkcia
pomalého prehrávania vpred. Pomocou tlačidla
možno prehrávať obraz pomaly vpred. Viacnásobným
stlačením tlačidla sa zmení rýchlosť pomalého
prehrávania vpred.
Knižnica nahrávok
Pre zobrazenie zoznamu nahrávok, vyberte “Knižnica
nahrávok” a stlačte tlačidlo OK Zobrazí sa knižnica
nahrávok s dostupnými nahrávkami. Všetky nahrávky
sa zoraïujú do knižnice nahrávok.
(Pokračovať): Obnoví prehrávanie nahrávky.
ČERVENÉ tlačidlo (Odstrániť): Slúži na odstránenie
vybranej nahrávky.
ZELENÉ tlačidlo (Upraviť): Slúži na zmeny vo
vybranej nahrávke.
MODRÉ tlačidlo (Triediť): Zmení poradie nahrávok.
Na výber je viacero možností triedenia.
Tlaèidlo OK: Aktivuje ponuku možností prehrávania:
INFO (Podrobnosti): zobrazí podrobnosti o krátkych
rozšírených programoch.
Nastavenie Nahrávania
A chcete konfiguráciu nastavenia nahrávania,
v ponuke Nastavenie vyberte položku Nahrávky.
Formátovať disk: Môžete použiť voľbu Formátovať
disk pre formátovanie pripojeného USB disku.
DÔLEŽITÉ: Pamätajte, že aktivovaním tejto funkcie
sa stratia VŠETKY dáta uložené na disku USB a jeho
formát sa zmení na FAT32. Rovnako aj v prípade,
že disk USB nefunguje správne, sa môžete pokúsiť
disk naformátovať. Vo väčšine prípadov formátovanie
disku USB obnoví jeho normálnu prevádzku. VŠETKY
dáta uložené na disku USB sa však v tomto prípade
stratia.
Poznámka: Ak sa počas spúšťania záznamu zobrazí správa
„USB je príliš pomalé“ (USB is too slow), skúste znovu spustiť
nahrávanie. Ak sa opäť zobrazí rovnaká chyba, je možné, že
váš USB disk nespåòa požiadavky na prenosovú rýchlosť.
Skúste pripojiť iný disk USB.
Slovenčina - 77 -

Teletext
“TXT” Teletext / Mix: Aktivuje režim teletextu, keď
sa stlačí raz. Opätovným stlačením sa obrazovka
teletextu zobrazí nad programom (zmiešaný obraz).
Ďalším stlačením zrušíte režim teletextu.
Index „RETURN“ Zvolí indexovú stranu teletextu.
INFO” Reveal: Zobrazí skryté informácie (napríklad
riešenia hier).
„OK“ Podržanie: Podrží textovú stranu, keď je to
vhodné. Ďalším stlačením podržanie zrušíte.
“ ” / “ ” Kódované stránky: Zvolí subkódové strany,
keď sú dostupné pri aktivácii teletextu.
P+/P- a čísla (0-9): Stlačte pre voľbu stránky.
Poznámka: Väčšina televíznych staníc používa pre stránky
s obsahom kód 100.
Televízor podporuje systémy FASTEXT a TOP text.
Keď sú tieto systémy dostupné, strany sú rozdelené
do skupín alebo tém. Ak je k dispozícii systém
FASTEXT, časti v teletextu budú sfarbené a je
možné ich potom vybrať pomocou zodpovedajúceho
farebného tlačidla. Stlačte farebné tlačidlo, ktoré
zodpovedá vaším potrebám. Zobrazí sa sfarbený
nápis, ktorý ukazuje, ktoré farebné tlačidlo použiť,
keď je k dispozí cii vysielanie TOP text Stlačením
príkazov “ ” alebo “ ” vyžiadate ďalšiu alebo
predchádzajúcu stránku.
Digitálny teletext (len pre Veľkú Britániu)
• Stlačte tlačidlo “TXT”. Objavia sa informácie digitálneho
teletextu. Ten je možné ovládať pomocou farebných
tlačidiel, tlačidiel kurzora a tlačidla OK
Spôsob ovládania môže byť rôzny v závislosti na obsahu
digitálneho teletextu. Postupujte podľa pokynov na
obrazovke digitálneho teletextu.
Keď stlačíte tlačidlo “TXT”, televízor sa vráti na
sledovanie televízneho vysielania.
Aktualizácia softvéru
Váš TV je schopný nájsť a aktualizovať nové
aktualizácie softvéru cez vysielacie kanály. Pre
hľadanie vysielacích kanálov, TV vyhľadá dostupné
kanály uložené vo vašom nastavení. Takže pred
vyhľadávaním upgrade softvéru sa odporúča,
automaticky vyhľadať a aktualizovať všetky dostupné
kanály.
1) Vyhl‘adávanie aktualizácie softvéru cez
užívatel‘ké rozhranie
• Je možné manuálne skontrolovať, či je nejaká
aktualizácia softvéru pre Vašu TV zostavu.
Stačí prejsť na hlavné menu. Vyberte Nastavenia
a vyberte menu Ďalšie nastavenia. V menu Ďalšie
nastavenia navigujte k položke Aktualizácia
softvéru a stlačte tlačidlo OK pre otvorenie menu
Možnosti aktualizácie.
• V menu Možnosti aktualizácie zvoľte Snímať
aktualizáciu a stlačte tlačidlo OK.
Ak sa nájde nová aktualizácia,začne sa so sťahovaním
aktualizácie. Postupový ståpec indikuje zostávajúci
proces sť sťahovania. Po úspešnom ukončení
sťahovania sa zobrazí správa na reštartovanie
pre aktiváciu nového softvéru. Stlačte OK pre
pokračovanie s operáciou reštartu.
2) Režim vyhľadaním a aktualizácie o 3.
hodine
• Ak sa aktivuje Automatické snímanie v menu
Možnosti aktualizácie, TV sa zobudí o 03:00 hod. a
vyhľadá vysielacie kanály ohľadom novej aktualizácie
softvéru. Ak sa našiel a úspešne stiahol nový softvér,
pri ďalšom zapnutí sa TV otvorí s novou verziou
softvéru.
Poznámka k operácii reštartu: Reštartovanie je posledným
krokom operácie aktualizácie softvéru, ak sťahovania nového
softvéru prebehlo úspešne. Počas reštartovania TV vykoná
konečné inicializácie. Pri poradí reštartu sa napájanie panelu
uzatvorí a predné led indikuje aktivitu blikaním. Asi o 5 minút
neskôr sa TV reštartuje s novým aktivovaným softvérom.
Ak sa váš televízor nereštartuje znova za 10 minút,
odpojte napájanie po dobu 10 minút a znova zapojte.
TV by sa mal bezpečne Otvoriť s novým softvérom.
Ak stále nie je možné, aby TV fungoval, prosím,
láskavo zopakujte vypojenie a zapojenie niekolkokrát.
Ak zariadenie stále nefunguje,zavolajte opravára pre
vyriešenie problému.
Upozornenie: Kým LED bliká pri reštarte, neodpájajte
televízor zo zástrčky. Môže to spôsobiť to,že sa Váš
televízor nebude dať znova zapnúť a bude to možné
opraviť len pracovníkom servisu.
Slovenčina - 78 -

Riešenie problémov & Tipy
Dosvit obrazu - duchovia
Vezmite prosím na vedomie, že pri zobrazovaní
pretrvávajúceho obrazu sa môžu objaviť tiene (stály
alebo pozastavený obraz). Tieto pozostatky zmiznú
z obrazovky televízora LED po krátkom čase.
Skúste napríklad na chvíľku televízor vypnúť. Aby sa
tomu zabránilo, nenechávajte obrazovku v režime
statických snímok na dlhšiu dobu.
Bez napájania
Ak váš televízor nemá žiadne napájanie, skontrolujte
èi je napájací kábel pripojený do napájacej zásuvky.
Zlý obraz
1. Zvolili ste správny televízny systém?
2. Nie je váš televízor alebo anténa príliš blízko k
neuzemnenému audio zariadeniu alebo neónových
svetiel a pod?
3. Hory alebo vysoké budovy môžu spôsobovať
zdvojenie obrazu alebo „duchov“. Niekedy je možné
zlepšiť kvalitu obrazu zmenou smeru antény Je obraz
alebo teletext nerozoznateľný?
4. Skontrolujte,či ste zadali správnu frekvenciu.
5. Prosím, opäť nalaďte kanály.
6. Kvalita obrazu sa môže zhoršiť, ak sú dve
zariadenia pripojené k televízoru súčasne. V takom
prípade odpojte jedno zo zariadení.
Chýba obraz
1. Žiadny obraz znamená, že Váš TV neprijíma
prenos. Vybrali ste správne tlačidlo na diaľkovom
ovládaní? Skúste to ešte raz. Uistite sa taktiež, že
bol vybratý správny zdroj vstupu.
2. Je anténa správne pripojená?
3. Sú konektory pevne pripojené ku konektoru antény?
4. Nie je kábel antény poškodený?
5. Sú na pripojenie antény použité vhodné zástrčky?
6. Ak máte pochybnosti, obráťte sa na predajcu.
Žiadny zvuk.
1. Je televízor nastavený na stlmenie zvuku? Pre
zrušenie stlmenia, stlačte tlačidlo " ", alebo zvýšte
hlasitosť.
2. Zvuk vychádza len z jedného reproduktora. Je
rovnováha nastavená do extrémnu? Pozrite časť
Nastavenie zvuku.
Diaľkový ovládač nereaguje.
Váš TV viac neodpovedá na diaľkové ovládanie. Váš
TV viac neodpovedá na diaľkové ovládanie. (* Je
možné iba v prípade, že nie sú blokované rodičovskou
kontrolou.)
Vstupné zdroje - nie je možná voľba
1. Ak sa vám nedarí zvoliť zdroj vstupu, je možné, že
nie je pripojené žiadne zariadenie.
2. Ak ste sa pokúsili pripojiť zariadenie, skontrolujte
káble AV a pripojenie.
Nahrávka nedostupná
Ak chcete nahrať program, najskôr pripojte USB disk
k televízoru, kým je vypnutý. Potom TV zapnite, aby
sa spustila funkcia nahrávania. V opačnom prípade
nebude nahrávanie možné. Ak nemožno spustiť
nahrávanie, skúste televízor vypnúť a kým je vypnutý
znovu zasunúť USB zariadenie.
USB je príliš pomalé
Ak sa počas spúšťania záznamu zobrazí správa „USB
je príliš pomalé“, skúste znovu spustiť nahrávanie.
Ak sa opäť zobrazí rovnaká chyba, je možné, že váš
USB disk nespĺňa požiadavky na prenosovú rýchlosť.
Skúste pripojiť iný disk USB.
Informácie pre užívateľov o likvidácii starých
prístrojov a batérií
[Iba pre Európsku úniu]
Tieto symboly znamenajú, že zariadenie s týmito
symbolmi by nemalo byť likvidované ako bežný
komunálny odpad. Ak chcete likvidovať výrobok alebo
batérie, prosím, vyhľadajte vhodné zberné systémy
alebo zariadenia recykláciu.
Upozornenie: Značka Pb pod symbolom batérie znamená,
že batérie obsahujú olovo.
Výrobky Batéria
Slovenčina - 79 -

Typické režimy zobrazenia PC
1
2
3
4
5
6
7
8
9
10
11
12
13
14
15
16
17
18
19
20
21
22
23
24
25
26
27
28
29
30
31
32
33
34
35
36
37
38
39
40
41
42
43
44
45
Nasledujúca tabuľka uvádza niektoré typické
režimy obrazu. Váš televízor nemusí podporovať
iné rozlíšenia. Váš televízor podporuje rozlíšenie až
1920x1200.
Index Rozlíšenie Frekvencia
640x400 70Hz
640x350 85Hz
640x400 85Hz
640x480 60Hz
640x480 66Hz
640x480 72Hz
640x480 75Hz
640x480 85Hz
800 x 600 56Hz
800 x 600 60Hz
800 x 600 70Hz
800 x 600 72Hz
800 x 600 75Hz
800 x 600 85Hz
832x624 75Hz
1024 x 768 60Hz
1024 x 768 66Hz
1024 x 768 70Hz
1024 x 768 72Hz
1024 x 768 75Hz
1024 x 768 85Hz
1152x864 60Hz
1152x864 70Hz
1152x864 75Hz
1152x864 85Hz
1152x870 75Hz
1280x768 60Hz
1360x768 60Hz
1280x768 75Hz
1280x768 85Hz
1280x960 60Hz
1280x960 75Hz
1280x960 85Hz
1280x1024 60Hz
1280x1024 75Hz
1280x1024 85Hz
1400x1050 60Hz
1400x1050 75Hz
1400x1050 85Hz
1440x900 60Hz
1440x900 75Hz
1600x1200 60Hz
1680x1050 60Hz
1920x1080 60Hz
1920x1200 60Hz
Technické údaje
TELEVÍZNE VYSIELANIE
PAL/SECAM B/G D/K K’ I/I’ L/L’
DIGITÁLNY PRÍJEM
{}DVB-T MPEG2
DVB-T MPEG4 HD
DVB-T MHEG-5 Engine (len pre Vel‘kú Britániu)
DVB-C MPEG2
DVB-C MPEG4 HD
PRÍJEM KANÁLOV
VHF (PÁSMO I/III)
UHF (PÁSMO U)
HYPERPÁSMO (HYPERBAND)
POČET PREDVOLENÝCH KANÁLOV
10000
INDIKÁTOR KANÁLU
Zobrazenie na obrazovke
VSTUP RF ANTÉNY
75 Ohm (nevyrovnané)
PREVÁDZKOVÉ NAPÄTIE
220-240V AC, 50 Hz.
AUDIO
German + Nicam Stereo
ZVUKOVÝ VÝKON(W
RMS.RMS) (10% THD)
RMS
2 x 6
SPOTREBA ENERGIE (W) 80 W (max.)
PANEL 16:9
Oboznámenie s licenciou
Vyrobené v licencii Dolby Laboratories.
UZNANIE OBCHODNEJ ZNAČKY
písmena D sú obchodnými značky spoločnosti Dolby
Laboratories.
“HDMI, logo HDMI a High Definition Multi Media
Interface sú obchodné znaèky, alebo registrované
obchodné značky spoločnosti HDMI licensing, LLC.”
Názov a symbol dvojitého
Slovenčina - 80 -

Podporované formáty súborov v režime prehrávania médií USB
Médiá Rozšírenie Formát Poznámky
Video Audio
Film dat, mpg,
Hudba .mp3
Fotograa .jpg .jpeg Základný formát JPEG MAX ŠxV =
Titulky
mpeg
dat, mpg,
mpeg
.vob MPEG2 MPEG1/2 Layer 1/2/3, AC3,
.mkv MPEG1,2,4, XviD,
.mp4 .mov MPEG1/2 Layer 3, AAC/
.avi MPEG1,2,4
v H.264,
3gp,3g2 MPEG4, H.264 1920x1080 @ 30P
asf, wmv MPEG2,4, XviD, H.264,
OGG OGG
.wav LPCM
WMA/ASF WMA, WMA Pro
.m4a/ .aac AAC, HEAAC
.png Postupný formát JPEG
.bmp nevrstviť
.png
sub - -
srt - -
Mpeg1,2 MPEG1/2 Layer 1/2/3, AAC/
MPEG2 ,H.264, VC1, AVS,
MVC
H.264,
VC1,WMV3,
Motion JPEG
Xvid
H.264,
VC1,WMV3,
Sorenson H.263
Motion JPEG
Sorenson H.263
VC1,WMV3
-
HEAAC, AC3/EAC3, LPCM/
ADPCM
MPEG1/2 Layer 1/2/3, AAC/
HEAAC, AC3/EAC3, LPCM/
ADPCM
LPCM
MPEG1/2 Layer 1/2/3, AAC/
HEAAC,
AC3/EAC3, LPCM,OGG
HEAAC, AC3/EAC3, LPCM/
ADPCM
MPEG1/2 Layer 1/2/3, AAC/
HEAAC, AC3/EAC3, LPCM/
ADPCM, WMA
MPEG1/2 Layer 3, AAC/
HEAAC, LPCM/ADPCM
MPEG1/2 Layer 1/2/3, AAC/
HEAAC, AC3/EAC3, LPCM,
WMA
MPEG1 Layer 1/2/3 (MP3)
prekladaný
1080P@ 30fps 50Mbit/sek
H.264:1080Px2@25fps
1080P@ 50fps MVC:
1080P@ 24fps Ïalšie:
1080P@ 30fps” 50Mbit/
sek
1080P@ 30fps 50Mbit/sek
H.264:1080Px2@25fps
1080P@ 50fps
Ïalšie:1080P@ 30fps
50Mbit/sek
H.264:
1080Px2@25fps1080P@
50fps Ďalšie: 1080P@
30fps 50Mbit/sek
H.264: 1080Px2@25fps
1080P@ 50fps Ïalšie:
1080P@ 30fps” 50Mbit/
sek
H.264: 1080Px2@25fps
1080P@ 50fps Ïalšie:
1080P@ 30fps” 50Mbit/
sek
20Mbit/sek
1080P@ 30fps 50Mbit/
sek
14592x12288
Až do 8 MegaByte
Slovenčina - 81 -

Podporované rozlíšenia DVI
Keď pripájate zariadenia ku konektorom Vášho TV s použitím DVI konvertných káblov (nedodané), môžete
si pozrieť nasledujúce informácie o rozlíšení.
56Hz 60Hz 66Hz 70Hz 72Hz 75Hz
640x400
640x480
800x600
832x624
1024x768
1152x864
1152x870
1280x768
1360x768
1280x960
1280x1024
1400x1050
1440x900
1600x1200
1680x1050
1920x1080
1920x1200
þ þ þ þ
þ þ þ þ þ
þ þ þ þ þ
þ þ þ
þ
þ þ
þ þ
þ þ
þ þ
þ þ
þ
þ
þ
þ
þ
þ
þ
Slovenčina - 82 -
 Loading...