


MODEL
LC-32L450X LC-40L550X LC-40L650X
LCD COLOUR TELEVISION
OPERATION MANUAL
Only for LC-40L550X/ LC-40L650X

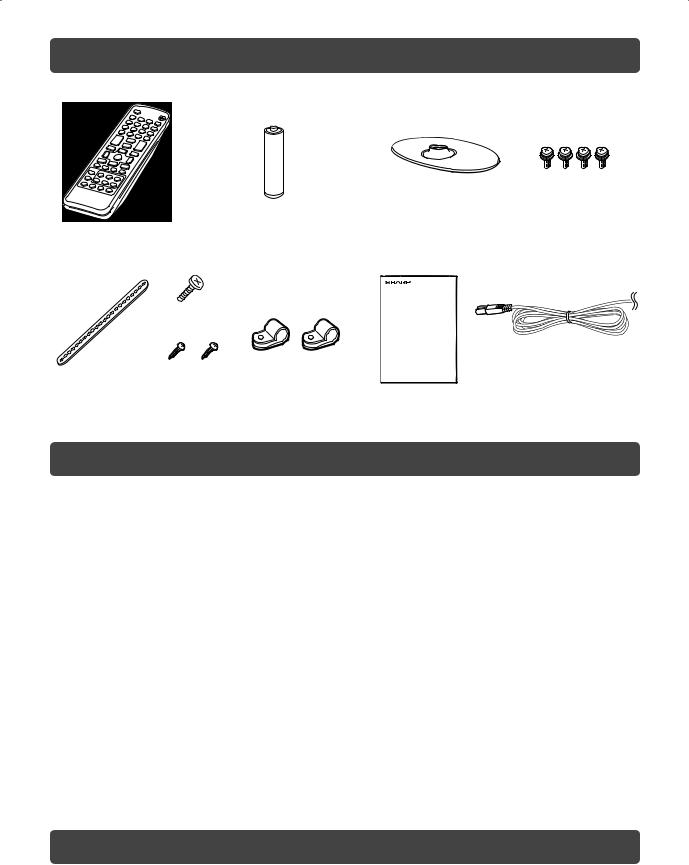
Supplied accessories
Remote control unit |
“AA” size battery (g1) |
Stand unit |
Stand base |
Screws (g 4) |
|
Safety restrains |
Operation manual |
AC cord |
|
|
|
(Only for LC-40L550X/ |
|
|
|
LC-40L650X) |
|
Screw for |
|
|
|
band |
|
|
Restraining |
Screws for |
Clamps |
|
|
|
||
band |
clamps |
|
|
Contents
|
Page |
Supplied accessories.............................................. |
1 |
Dear SHARP customer............................................ |
1 |
Important Safety Precautions ................................ |
2 |
Important information ............................................. |
2 |
Trademarks.............................................................. |
2 |
Attaching the stand................................................. |
3 |
Setting the TV .......................................................... |
3 |
Connecting external devices.................................. |
4 |
Remote control unit ................................................ |
5 |
Part names............................................................... |
6 |
Turning the TV on/off .............................................. |
7 |
Supplying electric power to the antenna .............. |
7 |
Initial auto installation............................................. |
7 |
Checking Signal information .................................. |
7 |
Auto installation....................................................... |
8 |
Programme setup ................................................... |
8 |
Selecting a preset AV mode ................................. |
10 |
Menu operation ..................................................... |
10 |
Picture menu.......................................................... |
11 |
Audio menu ............................................................ |
11 |
ECO menu .............................................................. |
12 |
|
Page |
Setup menu........................................................... |
12 |
Option menu ......................................................... |
14 |
Digital setup menu ............................................... |
16 |
Programme Guide ................................................ |
17 |
Info......................................................................... |
17 |
ATV (Analogue/DTV/RADIO buttons).................. |
18 |
Switching the analogue audio format ................ |
18 |
EPG ........................................................................ |
20 |
Picture and still image ......................................... |
21 |
Wide Mode ............................................................ |
21 |
Teletext function................................................... |
22 |
PC Control of the TV ............................................ |
22 |
PC compatibility chart ......................................... |
23 |
RS-232C commands list ...................................... |
23 |
USB Media Player................................................. |
24 |
Appendix ............................................................... |
28 |
Specifications ....................................................... |
29 |
Protection against overturning ........................... |
30 |
Dimensional drawings.......................................... |
31 |
CLEARING THE PASSWORD............................... |
32 |
Dear SHARP customer
Thank you for your purchase of the SHARP LCD colour TV product. To ensure safety and many years of trouble-free operation of your product, please read the Important Safety Precautions carefully before using this product.

 1
1

Important Safety Precautions
•Cleaning — Unplug the AC cord from the AC outlet before cleaning the product. Use a soft damp cloth to clean the product. Do not use liquid cleaners, aerosol cleaners or chemical cloth to clean it, as such materials may damage the product.
•Water and moisture — Do not use the product near water, such as bathtub, washbasin, kitchen sink, laundry tub, swimming pool and in a wet basement.
•Do not place vases or any other water-fi lled containers on this product. The water may spill onto the product causing fi re or electric shock.
•Stand — Do not place the product on an unstable cart, stand, tripod or table. Doing so can cause the product to fall, resulting in serious personal injuries as well as damage to the product. Use only a cart, stand, tripod, bracket or table recommended by the manufacturer or sold with the product. When mounting the product on a wall, be sure to follow the manufacturer’s instructions. Use only the mounting hardware recommended by the manufacturer.
•When relocating the product placed on a cart, it must be moved with utmost care. Sudden stops, excessive force and uneven fl oor surface can cause the product to fall from the cart.
•Ventilation — The vents and other openings in the cabinet are designed for ventilation. Do not cover or block these vents and openings since insuffi cient ventilation can cause overheating and/or shorten the life of the product. Do not place the product on a bed, sofa, rug or other similar surface, since they can block ventilation openings. This product is not designed for built-in installation; do not place the product in an enclosed place such as a bookcase or rack, unless proper ventilation is provided or the manufacturer’s instructions are followed.
•The LCD panel used in this product is made of glass. Therefore, it can break when the product is struck forcefully or with a sharp object. If the LCD panel is broken, be careful not to be injured by broken glass.
•Heat sources — Keep the product away from heat sources such as radiators, heaters, stoves and other heat-generating products (including amplifi ers).
•To prevent fi re, never place any type of candle or naked fl ames on the top or near the TV set.
•To prevent fi re or shock hazard, do not place the AC power cord under the TV set or other heavy items.
•Do not place heavy objects on this product or stand on it. Doing so could cause injury if the product overturns. Take special care near children and pets.
•The LCD panel is a very high technology product with 1,049,088 (only for LC-32L450X)/2,073,600 (only for LC-40L550X/ LC-40L650X) pixels, giving you fi ne picture details.
Due to the very large number of pixels, occasionally a few non-active pixels may appear on the screen as a fi xed point of blue, green or red.
This is within product specifi cations and does not constitute a fault.
•Precautions when transporting the TV
When transporting the TV, never carry it by holding or otherwise putting pressure onto the display. Be sure to always carry the TV by two people holding it with two hands — one hand on each side of the TV.
•Do not display a still picture for a long time, as this could cause an afterimage to remain.
•Install the product on the place where the AC cord can be unplugged easily from the AC outlet, or from the AC INPUT terminal on the rear of the product.
•If a television is not positioned in a suffi ciently stable location, it can be potentially hazardous due to falling. Many injuries, particularly to children, can be avoided by taking simple precautions such as:
• Using cabinets or stands recommended by the manufacturer of the television.
• Only using furniture that can safely support the television.
• Ensuring the television is not overhanging the edge of the supporting furniture.
• Not placing the television on tall furniture (for example, cupboards or bookcases) without anchoring both the furniture and the television to a suitable support.
• Not standing the televisions on cloth or other materials placed between the television and supporting furniture.
• Educating children about the dangers of climbing on furniture to reach the television or its controls.
Important information
This product qualifi es for ENERGY STAR when “Home” is selected for “TV location”.
Setting “TV Location” to “Home” allows the TV to achieve an energy-saving status for household use.
Trademarks
•TruSurround HD, SRS and  symbol are trademarks of SRS Labs, Inc. TruSurround HD technology is incorporated under license from SRS Labs, Inc.
•SRS TruSurround HDTM creates an immersive, feature-rich surround sound experience from two speakers, complete with rich bass, high frequency detail and clear dialog.
•“HDMI, the HDMI logo and High-Defi nition Multimedia Interface are trademarks or registered trademarks of HDMI Licensing LLC.”
•Manufactured under license from Dolby Laboratories. Dolby and the double-D symbol are trademarks of Dolby Laboratories.
•Products that have earned the ENERGY STAR® are designed to protect the environment through energy effi ciency.
•DivX®, DivX Certifi ed® and associated logos are registered trademarks of DivX, Inc. and are used under license.
•ABOUT DIVX VIDEO: DivX® is a digital video format created by DivX, Inc. This is an offi cial DivX Certifi ed device that plays DivX video. Visit www.divx.com for more information and software tools to convert your fi les into DivX video.
•ABOUT DIVX VIDEO-ON-DEMAND: This DivX Certifi ed® device must be registered in order to play DivX Video-on-Demand (VOD) content. To generate the registration code, locate the DivX VOD section in the device setup menu. Go to vod.divx.com with this code to complete the registration process and learn more about DivX VOD.

 2
2
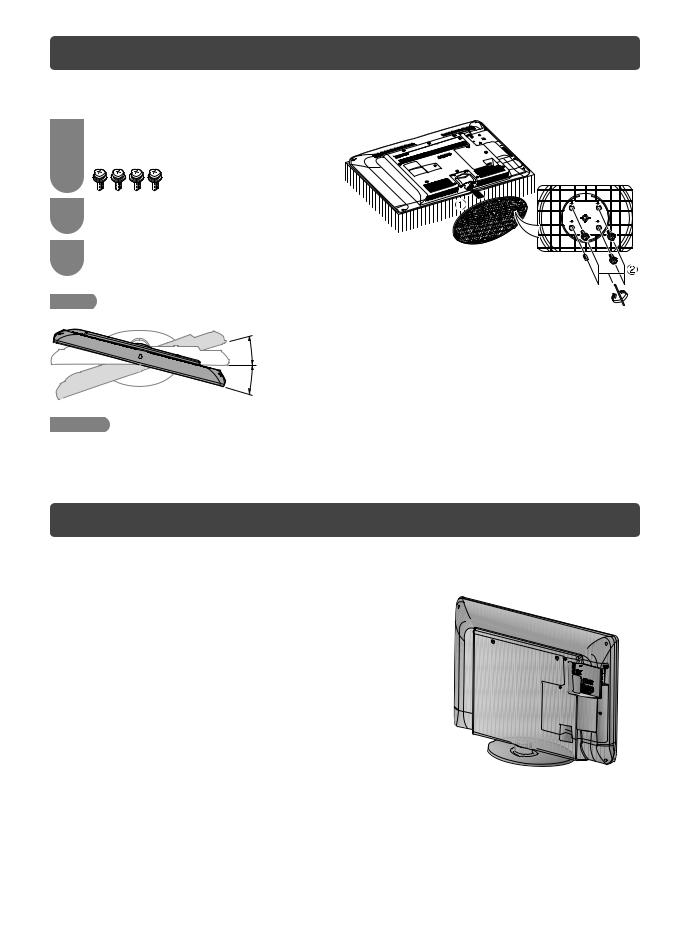
Attaching the stand
•Before attaching (or detaching) the stand, unplug the AC cord from the AC outlet.
•Before performing work spread cushioning over the base area to lay the TV on. This will prevent it from being damaged.
1 |
Confi rm the screws supplied with the TV. |
|
Screws (m4) |
|
(used in step 3) |
2 |
Insert the stand base to the stand post on the |
|
bottom of the TV. (1) |
3 |
Insert and tighten the 4 screws into the 4 holes |
|
on the bottom of the stand base. (2) |
 NOTE
NOTE
• To detach the stand, perform the steps in reverse order.


 Soft cushion
Screw 

Screw driver 

15°
15°
 CAUTION
•Adjust the screen with both hands. Put one hand on the TV and rotate the screen while steadying the stand with your other hand.
The TV can be rotated up to 15 degrees to the right or left.
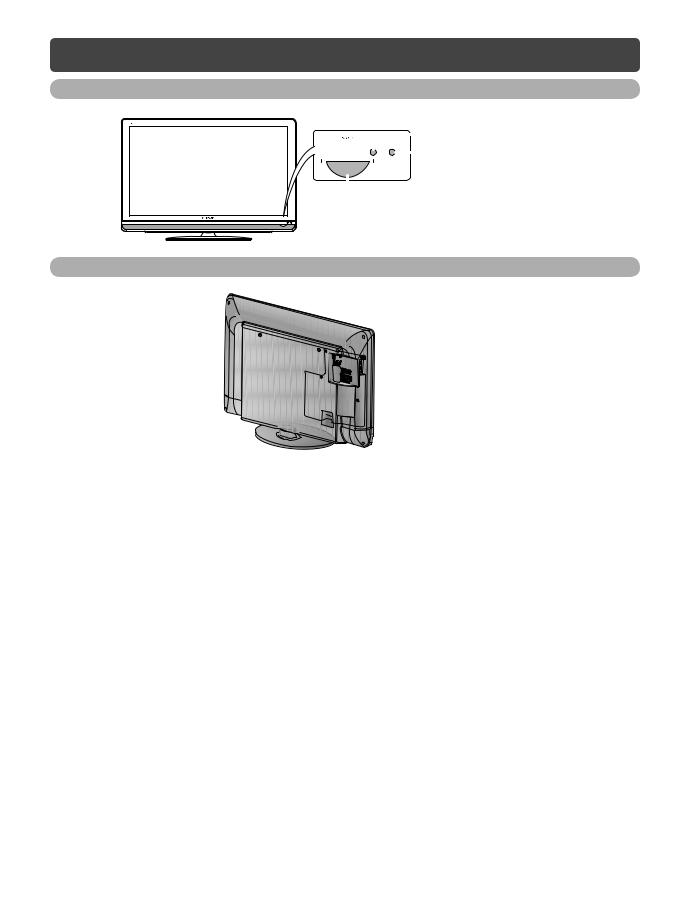
Setting the TV
Connecting the antenna cable
To enjoy a clearer picture, use an outdoor antenna.
Standard DIN45325 plug (IEC169-2) 75-ohm coaxial cable (round cable)
Connecting the AC cord
To AC INPUT terminal
AC INPUT
(Only for LC-40L550X/  LC40L650X)
Antenna cable (commercially available)
To antenna Room antenna terminal terminal (75-ohm type)
 CAUTION
•TO PREVENT RISK OF ELECTRIC SHOCK, DO NOT TOUCH UN-INSULATED PARTS OF ANY CABLES WITH THE AC CORD CONNECTED.
•The illustrations used throughout this manual are based on LC-40L550X.

 3
3

Connecting external devices
You can connect many types of external equipment to your TV, like a VCR, game console, camcorder, DVD player, Digital TV STB (Set Top Box) and PC. To view external source images, select the input source from TV/VIDEO on the remote control unit or TV/VIDEO on the TV.
 CAUTION
•To protect all equipment, always turn off the TV before connecting to a VCR, game console, camcorder, DVD player, Digital TV STB (Set Top Box), PC or other external equipment.
•Refer to the relevant operation manual (VCR, DVD player, etc.) carefully before making connections.
Connecting a VCR, game console or camcorder
A VCR, game console, camcorder and some other audiovisual equipment can be conveniently connected using the
INPUT 4/INPUT 5 or INPUT 6 terminals.
When using component cable (commercially available)
Y |
6 |
|
6 |
||
PB |
||
|
||
(CB) |
L |
|
PR |
||
AUDIO |
||
(CR) |
 R
R 
L
AUDIO
R
When using composite cable or S-VIDEO cable (commercially available)
S-VIDEO


or
L
AUDIO
R
VIDEO 

VCR/Game console/Camcorder |
VCR/Game console/Camcorder |
Connecting a DVD player/Digital TV STB (Set Top Box)
You can use the INPUT 1/ INPUT 2/ INPUT 3 (HDMI) or INPUT 6 terminals when connecting to a DVD player/ Digital TV STB (Set Top Box) and other audiovisual equipment.
When using HDMI-certified cable (commercially available)
DVD player/ Digital TV STB (Set Top Box)
When using component cable (commercially available)
Y |
6 |
|
6 |
||
PB |
||
|
||
(CB) |
L |
|
PR |
||
AUDIO |
||
(CR) |
 R
R 
L
AUDIO
R
DVD player/Digital TV STB (Set Top Box)
Connecting a PC
You can use the INPUT 7 (PC) terminals when connecting to a PC.
ANALOG
RGB
7
7
AUDIO (L/R)
Using Digital Audio Output
It is possible to output audio through the DIGITAL AUDIO OUTPUT terminal. PCM audio outputs from the terminal.
Optical fi bre cable (commercially available)
PC
To optical digital input of external audio devices
 NOTE
NOTE
•The DIGITAL AUDIO OUTPUT terminal usually outputs the same audio from the speakers. (The audio of the content you are viewing is output from the terminal.)
•The DIGITAL AUDIO OUTPUT terminal does not output some signals, depending on devices and software.
•The illustrations used throughout this manual are based on LC-40L550X.

 4
4
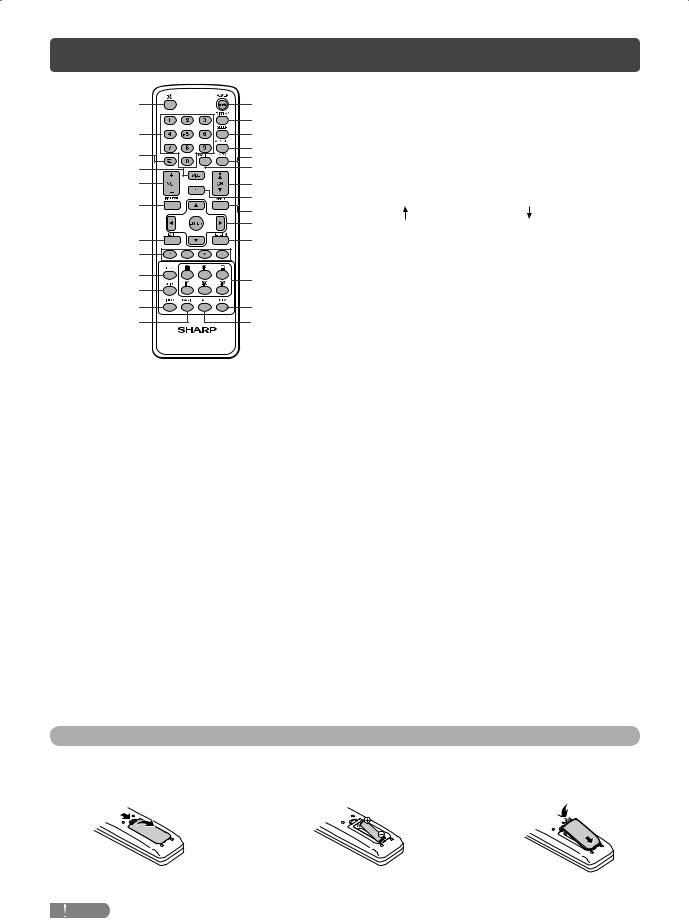
Remote control unit
1 |
13 |
|
|
14 |
|
2 |
15 |
|
3 |
16 |
|
17 |
||
4 |
18 |
|
5 |
19 |
|
6 |
20 |
|
21 |
||
|
||
|
22 |
|
7 |
23 |
|
8 |
|
|
9 |
24 |
|
10 |
||
|
||
11 |
25 |
|
12 |
26 |
1e (Mute)
Press e s Mutes sound.
Press e again s Restores sound.
Mute will be cancelled after 30 minutes. However, the TV will not suddenly output loud sound as the volume level
will be set to 0 automatically. Increase the volume level by pressing VOL k.
20 – 9
Set the channel.
TELETEXT mode: Set the page. (See page 22.)
3A (Flashback)
Press A to return to the previous selected channel or external input mode.
4WIDE
Change the wide image mode. (See page 21.)
5VOLk/VOLl
Set the volume.
(VOLk) Increase the volume. (VOLl) Decrease the volume.
6FREEZE
Freeze a motion picture on the screen. (See page 21.)
7EXIT
Return to the default screen.
8Colour (Red/Green/Yellow/Blue)
TELETEXT mode: Select a page. (See page 22.)
9EPG
DTV mode: To display EPG (Electronic Programme Guide) screen. (See pages 20 to 21.)
10GUIDE
DTV mode: Display the programme list. (See page 17.)
11INFO
DTV mode: Display the programme information. (See page 17.)
12RADIO
Press to access RADIO mode. (See page 18.)
13POWER (STANDBY/ON)
To switch the power on and off. (See page 7.)
14DISPLAY
Display the channel or input information.
15SLEEP
Set the Sleep timer.
0hr.30min.  1hr.00min.
  1hr.30min.
Off  2hr.30min.
  2hr.00min.
16AV MODE
Select an audio and video setting. (See page 10.)
17MPX
Select the sound multiplex mode.
18TV/VIDEO (INPUT SOURCE)
Select an input source.
19CHa/CHb
TV input mode: Select the channel. (CHa) Increase the channel number. (CHb) Decrease the channel number.
TELETEXT mode: Select the page. (See page 22.)
20PC
Directly select the PC terminal.
21MENU
Display the menu screen.
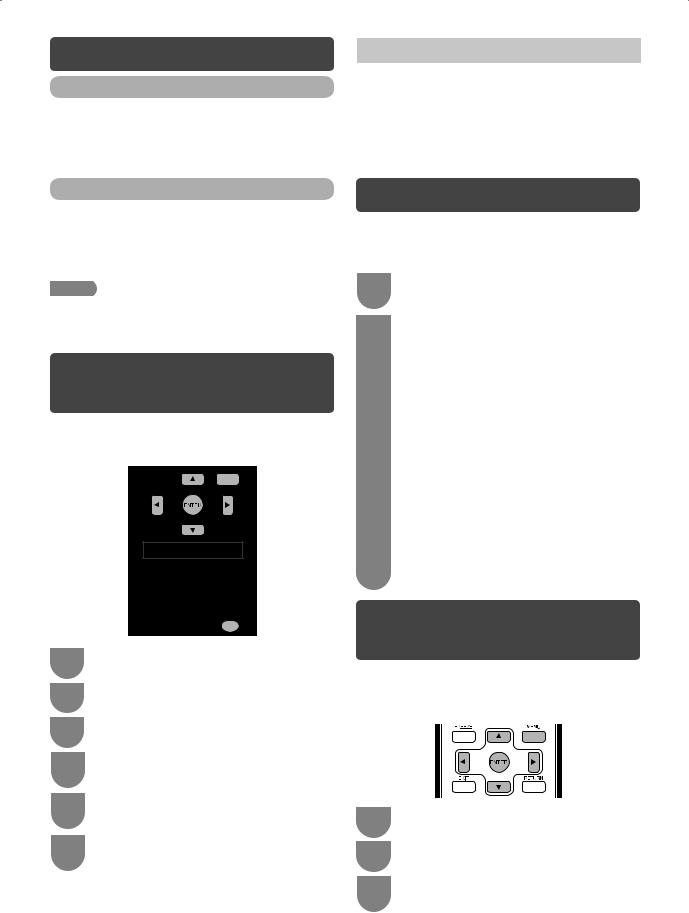
22a/b/c/d (Cursor)
Select a desired item on the setting screen.
ENTER
Execute a command.
23RETURN
MENU mode: Return to the previous menu screen.
24m (TELETEXT)
Select the TELETEXT mode. (all TV image, all TEXT image, TV/TEXT image) (See page 22.)
k (Reveal hidden for TELETEXT)
TELETEXT mode: Display hidden characters. (See page 22.)
[ (SUBTITLE for TELETEXT)
To turn the subtitles on. (See page 22.)
3 (Hold)
TELETEXT mode: Stop updating Teletext pages automatically. Press 3 again to release the hold mode. (See page 22.)
1 (Subpage)
Display the Teletext subpage directly when in Teletext mode. (See page 22.)
v (Top/Bottom/Full)
TELETEXT mode: Set the area of magnifi cation. (See page 22.)
25DTV
Press to access DTV mode. (See page 18.)
26ATV
Press to access ATV mode. (See page 18.)
Inserting the battery
Before using the TV for the fi rst time, insert a “AA” size battery (supplied). When the battery become depleted and the remote control fails to operate, replace the battery with new “AA” size battery.
1 Open the battery cover. |
2 Insert the supplied “AA” size battery. |
3 Close the battery cover. |
•Place battery with their terminals corresponding to the (e) and (f) indications in the battery compartment.
 CAUTION
• Battery (battery pack or batteries installed) shall not be exposed to excessive heat such as sunshine, fi re or the like.

 5
5
Part names
TV (Front)
|
|
|
|
|
OPC sensor |
|
|
|
|
|
|
||
|
|
|
|
|
Remote control sensor |
|
|
|
|
|
|
||
|
|
|
|
|||
|
|
|
|
|
||
|
|
|
||||
|
|
|
|
|||
POWER indicator |
||||||
Light off |
Power off |
|
||||
|
|
|
|
|
|
|
Lighted (Red) |
The TV is in standby mode. |
|
||||
|
|
|
|
|
|
|
Lighted (White) |
The TV is on. |
|
||||
|
|
|
|
|
|
|
TV (Rear)
6 7
8
9
10
|
1 |
POWER (On/Off) button |
|
2 |
MENU button |
|
3 |
TV/VIDEO button |
16 |
4 |
Channel up (r)/down (s) buttons |
|
5 |
Volume up (e)/down (f) buttons |
|
6 |
RS-232C terminal |
|
7 |
INPUT 7 (PC) terminals* |
17 |
8 |
DIGITAL AUDIO OUTPUT terminal |
|
9 |
INPUT 1 (HDMI) terminal* |
|
10 |
Antenna input terminal |
|
11 |
INPUT 4 terminals |
18 |
12 |
MONITOR OUT terminals |
13 |
INPUT 5 terminals |
|
|
14 |
INPUT 6 terminals |
|
15 |
INPUT 2 (HDMI) terminal |
1 |
16 |
USB terminal** |
17 |
INPUT 3 (HDMI) terminal |
|
2 |
18 |
Headphone jack ( 3.5 mm) |
|
|
|
3 |
|
|
4 |
|
|
5 |
|
|
11 |
12 |
13 14 |
15 |
*The INPUT 1 and INPUT 7 terminals can both use the same analogue audio input terminal. However, the proper item must be selected in the “PC audio select” menu. (See page 14.)
**USB terminal use for USB Media Player. (See page 24.)
•The illustrations in this operation manual are for explanation purposes and may vary slightly from the actual operations.
•The illustrations used throughout this manual are based on LC-40L550X.
Regarding the headphone jack
•Use headphones with a stereo mini plug ( 3.5 mm).
•Be sure to unplug headphones from the jack when they are not in use.
•The speakers do not output volume when headphones are plugged in.
•The “Audio” menu cannot be operated when headphones are plugged in.
Volume display when headphones are plugged in
20

 6
6
Turning the TV on/off
Turning on/off the power
•To turn on the power
Press POWER on the TV. (After a few seconds, an image appears with sound.)
•To turn off the power
Switch it off by pressing POWER on the TV.
Standby mode
•To standby mode
If the TV is switched on, you can switch it to standby by pressing POWER on the remote control.
•Switching on from standby
From standby, press POWER on the remote control.
 NOTE
NOTE
•If you are not going to use this TV for a long period of time, be sure to remove the AC cord from the AC outlet.
•Minor power is consumed when the unit is in standby mode.
Supplying electric power to the antenna
When you set-up the DTV antenna for the fi rst time, or connect the antenna to a community antenna, you need to proceed to set the antenna by following this manual.
1 |
Press DTV to access DTV mode. |
2 |
Press MENU and the MENU screen displays. |
3 |
Press c/d to select “Setup”. |
4 |
Press a/b to select “Digital programme |
|
setup” and then press ENTER. |
5 |
Press a/b to select “Antenna power” and |
|
then press ENTER. |
6 |
Press c/d to select “Yes” and then press |
|
ENTER. |
Selected item |
Description |
|
|
Yes |
Select “Yes” when your antenna is set- |
|
up and connected independently. |
|
|
No |
Select “No” when you do not need to |
|
supply voltage to your antenna, i.e. |
|
when your antenna is connected to |
|
a community antenna. (The factory |
|
default setting of this function is “No”.) |
|
|
Initial auto installation
When the TV powers on for the first time after purchase, the initial auto installation wizard appears. Follow the menus and make the necessary settings one after another.
1 |
Press POWER on the TV. |
|
• The initial auto installation wizard appears. |
2 |
Press c/d to select “HOME” or “STORE”, |
|
and then press ENTER. |
|
Press c/d to select your country channels |
listed on the screen, and then press ENTER. Press a/b/c/d to select “DTV”, “ATV” or “ATV + DTV”, and then press ENTER. Press a/b to select the desired sound system, and then press ENTER.
• Sound system is selectable when the signal search is set to “ATV” or “ATV + DTV” mode only.
• Auto installation will be executed.
• You do not need to do anything during the auto search.
• HOME: “STANDARD” will be the default value for the “AV mode” setting.
• STORE: “DYNAMIC (FIXED)” will be the default value for the “AV mode” setting. If the “AV mode” is changed, the TV will automatically switch back to “DYNAMIC (FIXED)” when there is no further change to TV setting for 30 minutes.
• To change the STORE mode to HOME mode, please refer to page 14 to reset the unit.
Checking Signal information
If you install a DVB-T antenna for the fi rst time or relocate it, you should adjust the alignment of the antenna to receive a good reception while checking the antenna setup screen.
1 |
Press MENU and the MENU screen displays. |
2 |
Press c/d to select “Setup”. |
3 |
Press a/b to select “Digital programme |
|
setup”, and then press ENTER. |

 7
7
Checking Signal information (Continued)
H Checking Signal information
Press a/b to select “Signal information”.
|
Auto search |
|
|
|
|
|
|
|
|
|
|
Manual search |
|
|
|
|
|
|
|
|
|
|
Manual adjust |
Channel number |
68 |
|
|
|
|
|
|
|
|
|
|
|
|
|
|
|
|||
|
Signal information |
Signal strength |
|
|
|
|
|
|
|
|
|
|
|
|
|
|
|
|
|
|
|
|
Antenna power |
|
|
|
|
|
|
|
|
|
|
|
|
|
|
|
|
|
|
|
|
|
|
Current 100 |
|
Maximum |
|
|
|
|||
|
|
|
|
100 |
|
|
||||
|
|
Signal quality |
|
|
|
|
|
|
|
|
|
|
|
|
|
|
|
|
|
|
|
|
|
|
|
|
|
|
|
|
|
|
|
|
|
Current |
98 |
|
|
Maximum |
|
|
|
|
|
|
|
|
98 |
|
||||
4 |
Position and align the antenna so that the |
|
||||||||
|
maximum possible values for “Signal strength” |
|||||||||
and “Signal quality” are obtained.
 NOTE
NOTE
•The values of “Signal strength” and “Signal quality” indicate when to check the appropriate alignment of the antenna.
Auto installation
You can run auto installation again, even after setting up the preset channels.
1 |
Press MENU and the MENU screen displays. |
||||||||||
2 |
Press c/d to select “Setup”. |
||||||||||
3 |
Press a/b to select “Auto installation”, and |
||||||||||
|
then press ENTER. |
||||||||||
4 |
If you have already set the password, enter it |
||||||||||
|
here. |
||||||||||
|
• See page 12 for setting a password. |
||||||||||
5 |
|
|
|
|
|
|
|
|
|
||
|
|
|
|
|
|
|
|
|
|
|
|
|
|
|
|||||||||
Press c/d to select “Yes”, and then press |
|||||||||||
|
ENTER. |
||||||||||
6 |
Press a/b/c/d to select “DTV”, “ATV” or |
||||||||||
|
“ATV + DTV”, and then press ENTER. |
||||||||||
|
Press a/b to select the desired sound |
||||||||||
|
system, and then press ENTER. |
||||||||||
|
• Sound system is selectable when the signal search |
||||||||||
|
|
is set to “ATV” or “ATV + DTV” mode only. |
|||||||||
You do not need to do anything during the auto search. Press MENU to exit.

 8
8
Programme setup
Digital settings
You can reconfi gure DTV services settings automatically or manually.
1 |
Press MENU and the MENU screen displays. |
||||||||||
2 |
Press c/d to select “Setup”. |
||||||||||
3 |
Press a/b to select “Digital programme |
||||||||||
|
setup”, and then press ENTER. If you have |
||||||||||
|
already set the password, enter it here. |
||||||||||
|
• See page 12 for setting a password. |
||||||||||
4 |
|
|
|
|
|
|
|
|
|
|
|
|
|
|
|||||||||
Press a/b to select the desired menu item, |
|||||||||||
|
and then press ENTER. |
||||||||||
5 |
Press c/d to select “Yes”, and then press |
||||||||||
|
ENTER. |
||||||||||
H Auto search (Digital)
Use this menu to add new services automatically after auto installation has been completed.
H Manual search (Digital)
Add new services within a specifi ed frequency band.
• Press c/d to select the frequency and then press ENTER.
H Manual adjust (Digital)
Confi gure various settings for each service using the Colour (R, G, B) buttons.
Digital programme setup]
|
|
|
|
|
|
|
|
|
|
|
|
|
|
|
|
|
|
|
|
|
|
|
|
|
|
|
|
|
|
|
|
|
|
|
|
|
|
|
|
|
|
|
|
|
|
|
|
|
|
|
|
|
|
|
|
|
|
|
|
|
|
|
|
|
|
|
|
|
|
|
|
|
|
|
|
|
|
|
|
|
|
|
|
|
|
|
|
|
|
|
|
|
|
|
|
|
|
|
|
|
|
|
|
|
|
|
|
|
|
|
|
|
|
|
|
|
|
|
|
1 |
Press a/b to select desired service. |
||||||
2 |
Press the colour button on the remote control |
||||||
|
|
corresponding with the item you want to |
|||||
|
|
reconfi gure. |
|
|
|
||
|
|
• Each time the colour button is pressed, you can |
|||||
|
|
|
switch the corresponding operation on/off. |
||||
|
Buttons for Manual adjust operation |
||||||
|
|
|
|
|
|
|
|
|
Menu |
|
Remote |
Description |
|||
|
|
control |
|||||
|
items |
|
|||||
|
|
buttons |
|
|
|
||
|
|
|
|
|
|
||
|
Lock |
|
R |
When the service is locked, |
|||
|
|
|
|
|
you must enter your password |
||
|
|
|
|
|
whenever you tune to the service. |
||
|
|
|
|
|
|
||
|
CH |
|
G |
Services with “Skip” are passed |
|||
|
Skip |
|
|
|
over when pressing r/s in the |
||
|
|
|
|
|
TV/remote control unit. |
||
|
|
|
|
|
|
||
|
Sort |
|
B |
The item position of services can be |
|||
|
|
|
|
|
sorted. |
||
|
|
|
|
|
|
|
|
Programme setup (Continued)
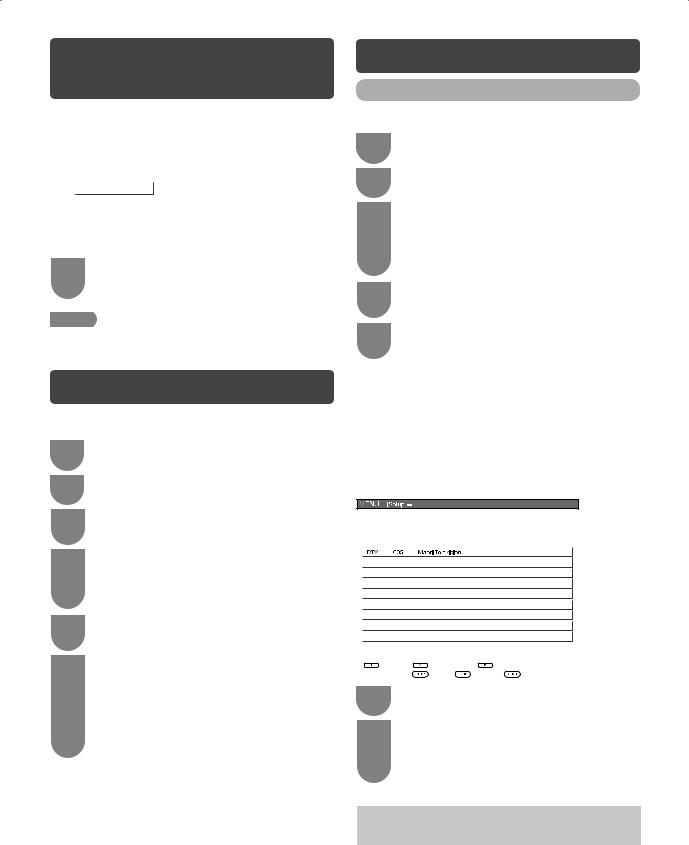
The item position of services can be sorted
1 Press a/b to select the service whose item position you want to move, and then press B.
DTV |
005 |
Maori Television |
|
|
|
|
|
|
DTV |
022 |
Parliament TV |
|
|
|
|
|
|
DTV |
100 |
Freeview I HD |
|
|
|
2 Press a/b to move it to the desired position, and then press ENTER.
DTV |
100 |
Freeview I HD |
|
|
|
DTV |
022 |
Parliament TV |
|
|
|
|
|
|
DTV |
005 |
Maori Television |
|
|
|
3 Repeat steps 1 and 2 until all desired service items are sorted.
Analogue settings
H Auto search (Analogue)
You can also automatically search by performing the procedure below. This is the same function as programme auto search in auto installation.
1 |
Press MENU and the MENU screen displays. |
||||||||||
2 |
Press c/d to select “Setup”. |
||||||||||
3 |
Press a/b to select “Analogue programme |
||||||||||
|
setup”, and then press ENTER. |
||||||||||
4 |
If you have already set the password, enter it |
||||||||||
|
here. |
||||||||||
|
• See page 12 for setting a password. |
||||||||||
5 |
|
|
|
|
|
|
|
|
|
||
|
|
|
|
|
|
|
|
|
|
|
|
|
|
|
|||||||||
Press a/b to select “Auto search”, and then |
|||||||||||
|
press ENTER. |
||||||||||
6 |
Press c/d to select “Yes”, and then press |
||||||||||
|
ENTER. |
||||||||||
|
Press a/b to select the desired sound |
||||||||||
|
system, and then press ENTER. |
||||||||||
|
You do not need to do anything during the |
||||||||||
|
auto search. Press MENU to exit. |
||||||||||
H Manual adjust (Analogue)
You can set some channel item manually.
1 |
Repeat steps 1 to 4 in Auto search. |
2 |
Press a/b to select “Manual adjust”, and |
|
then press ENTER. |
3 |
Press c/d to select “Yes”, and then press |
|
ENTER. |
4 |
Press a/b/c/d to select the channel you |
|
want to edit, and then press ENTER. |
• The selected channel information displays.
5 |
Press a/b to select the desired menu, and |
|
then press ENTER. |
6 |
Press a/b or c/d to select the desired item |
|
or adjust the item to the desired level. Press |
ENTER if necessary.
Search
The next channel will be search in order.
Fine
You can adjust the frequency to your desired position.
 NOTE
NOTE
•Adjust while checking the background picture as a reference.
•Instead of pressing c/d to adjust the frequency, you can set by directly entering the frequency number of the channel with 0 — 9.
a
•179.25 MHz: Press 1 s 7 s 9 s 2 s 5.
•49.25 MHz: Press 4 s 9 s 2 s 5 s ENTER.
Colour system
Select the optimum colour system to receive. (Auto, PAL, SECAM, NTSC 4.43, PAL-60)
Sound system (Broadcasting system)
Select the optimum sound system (Broadcasting system) to receive. (B/G, D/K, I)
Label
To enter the name of the channel. Maximum 5 alphanumeric can be input.
•Press a/b/c/d: To select a desired alphanumeric, and then press ENTER.
Repeat until the name is fully spelt out.
Search |
|
|
Broadcasting station name settings |
||||
Fine |
|
|
|
|
|
|
|
|
|
|
|
|
|
||
Colour system [ |
Auto |
] |
|
|
|
|
|
|
|
|
|
||||
Sound system [ |
B/G |
] |
A B C D E F G H I J |
CLEAR |
|||
|
|
|
|
|
|
|
|
Label |
[ |
] |
KLMNOPQRST |
BACK |
|||
|
|
|
|||||
Booster |
[ Off ] |
U V W X Y Z + – . _ |
|
||||
|
|
|
|
||||
Skip |
[ Off ] |
0 1 2 3 4 5 6 7 8 9 |
END |
||||
Lock |
[ Off ] |
||||||
|
|
|
|
||||
|
|
|
|
|
|
|
|
•To exit, select END and then press ENTER.
•If the wrong alphanumeric is entered, select CLEAR to clear, and then press ENTER.
Booster
Enhance the picture quality during weak signal. It is not recommended to turn on during strong signal condition. It may induced unwanted noise. (On, Off)
Skip
Channels with “Skip” set to “On” are passed over when using CHr/seven if selected while watching the image from the TV.
Lock
You can block the viewing of any channel.
 NOTE
NOTE
•See “Child lock” for setting a password.
•If “Lock” is set to “On” for a channel, “Child lock has been activated” is displayed when you select the channel, and the image and sound of the channel is blocked.
•When pressing ENTER while “Child lock has been activated” is displayed, password input menu will be displayed. Inputting the correct password lifts the child lock temporarily until the power is turned off.

 9
9
 Loading...