

HT-CN300H
HOME CINEMA COMMAND
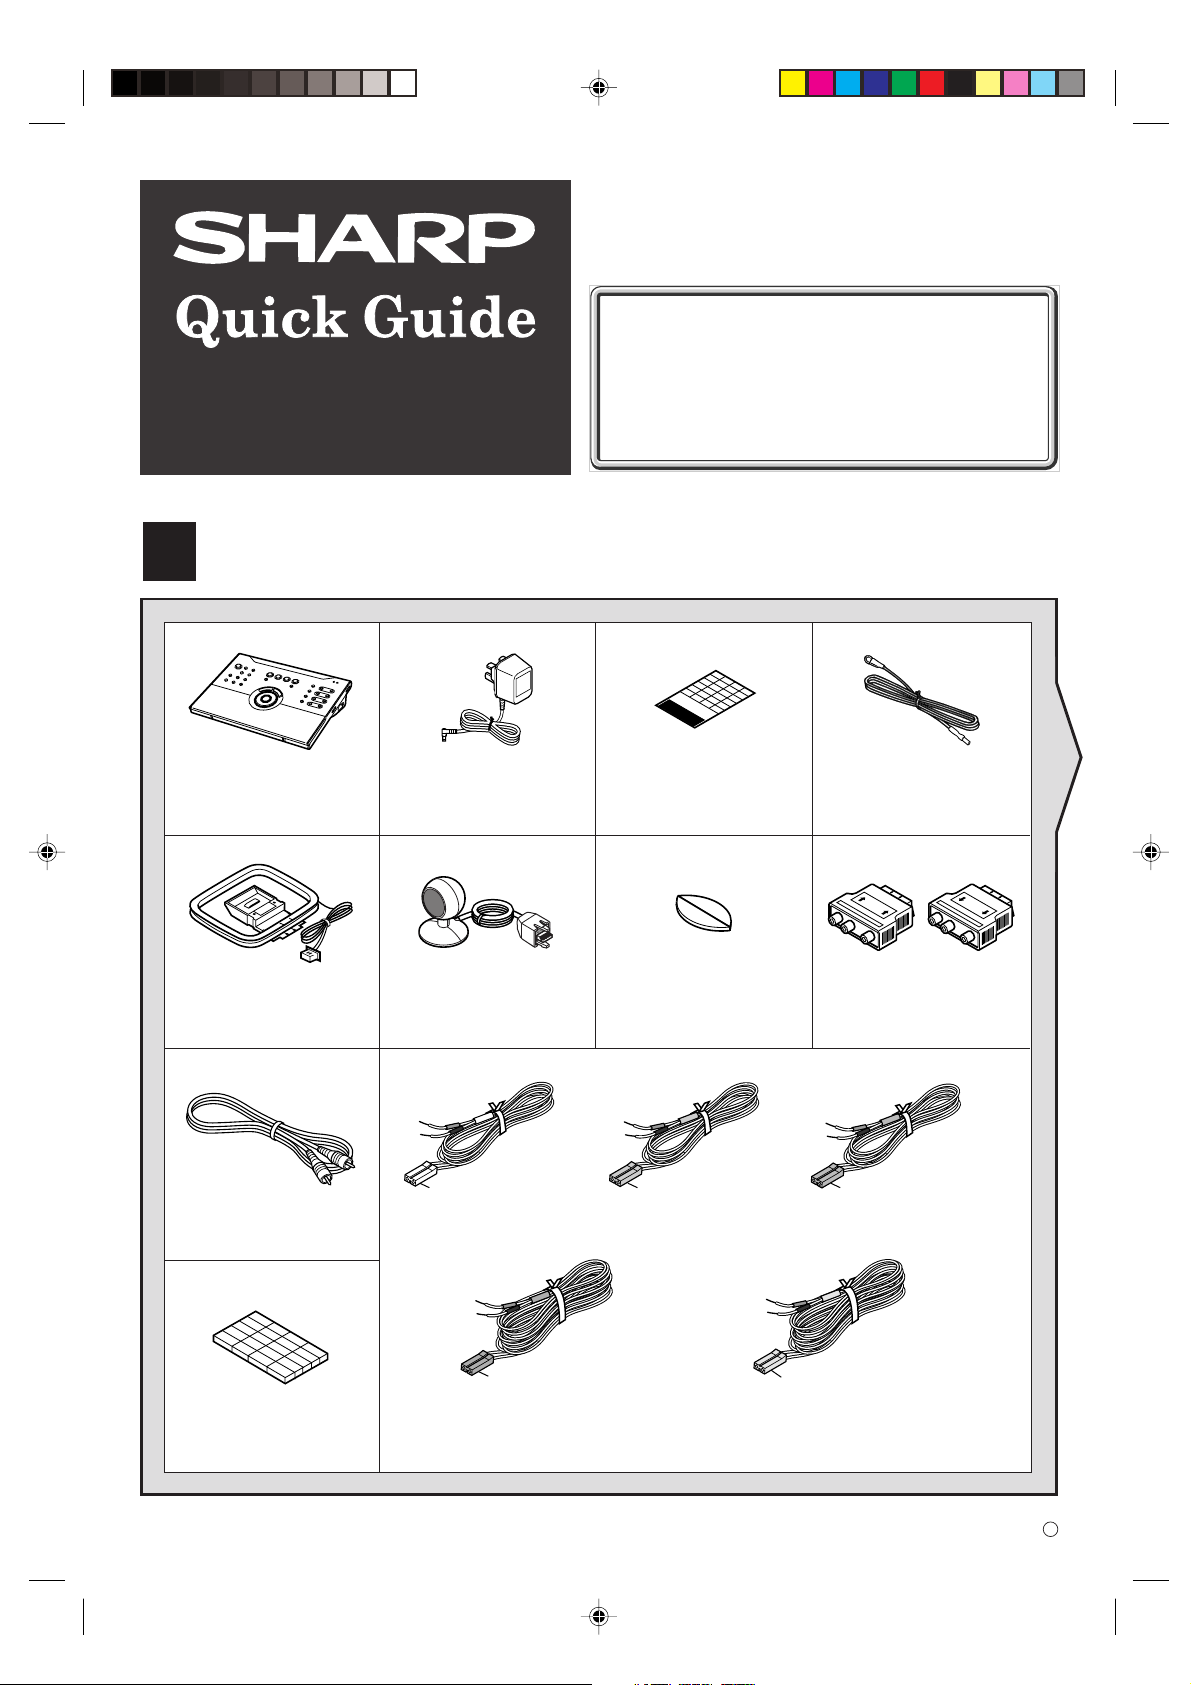
Accessories
1
This Quick Guide will help you to correctly install
and operate your system.
If you require any advice or assistance regarding
your Sharp product, please visit our web-site
www.sharp.co.uk/support.
Customers without Internet access may telephone
08705 274277 during office hours (or (01) 676 0648
if telephoning from Ireland).
0101
Remote control × 1
AM loop aerial × 1
Video cable × 1
AC adaptor for
remote control × 1
Remote control sensor × 1 Double-sided tape for
White
Front (left): 5 m (15')
Labels for
remote control × 1
remote control sensor × 1
Green
Centre: 5 m (15')
FM aerial × 1
IN
SCART adaptor × 2
(IN/OUT)
Red
Front (right): 5 m (15')
OUT
Speaker cushion × 20
Blue
Surround (left): 15 m (45')
Speaker connection lead × 5
– 1 –
Grey
Surround (right): 15 m (45')
TINSE0015BGZZ
02F Y HK 1
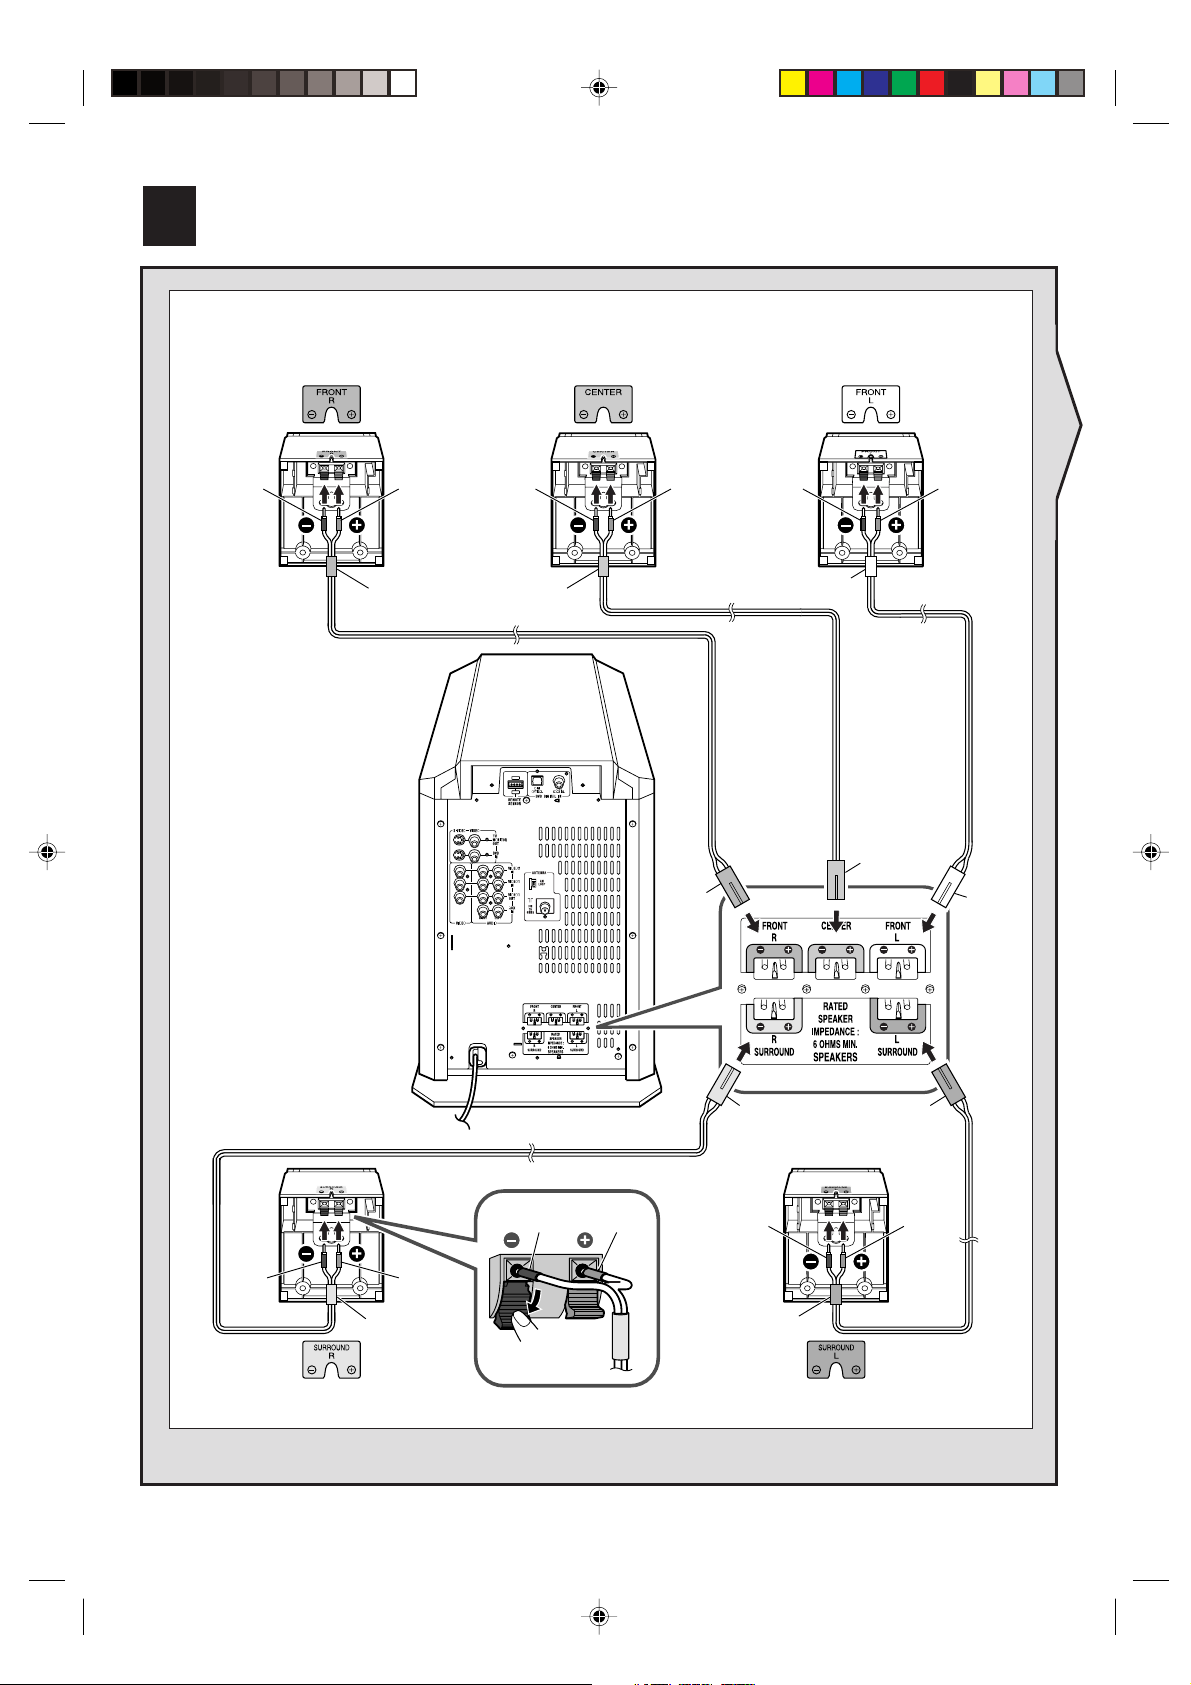
Speaker connections
2
Connect the cables to the sockets of matching colours.
Front speaker (right) Centre speaker Front speaker (left)
Black Red
Red
Main unit
(with subwoofer)
Black Red
Green
Red
Black Red
White
Green
White
Grey
Black Red
Black Red
Grey
Surround speaker (right) Surround speaker (left)
– 2 –
Black Red
Blue
Blue
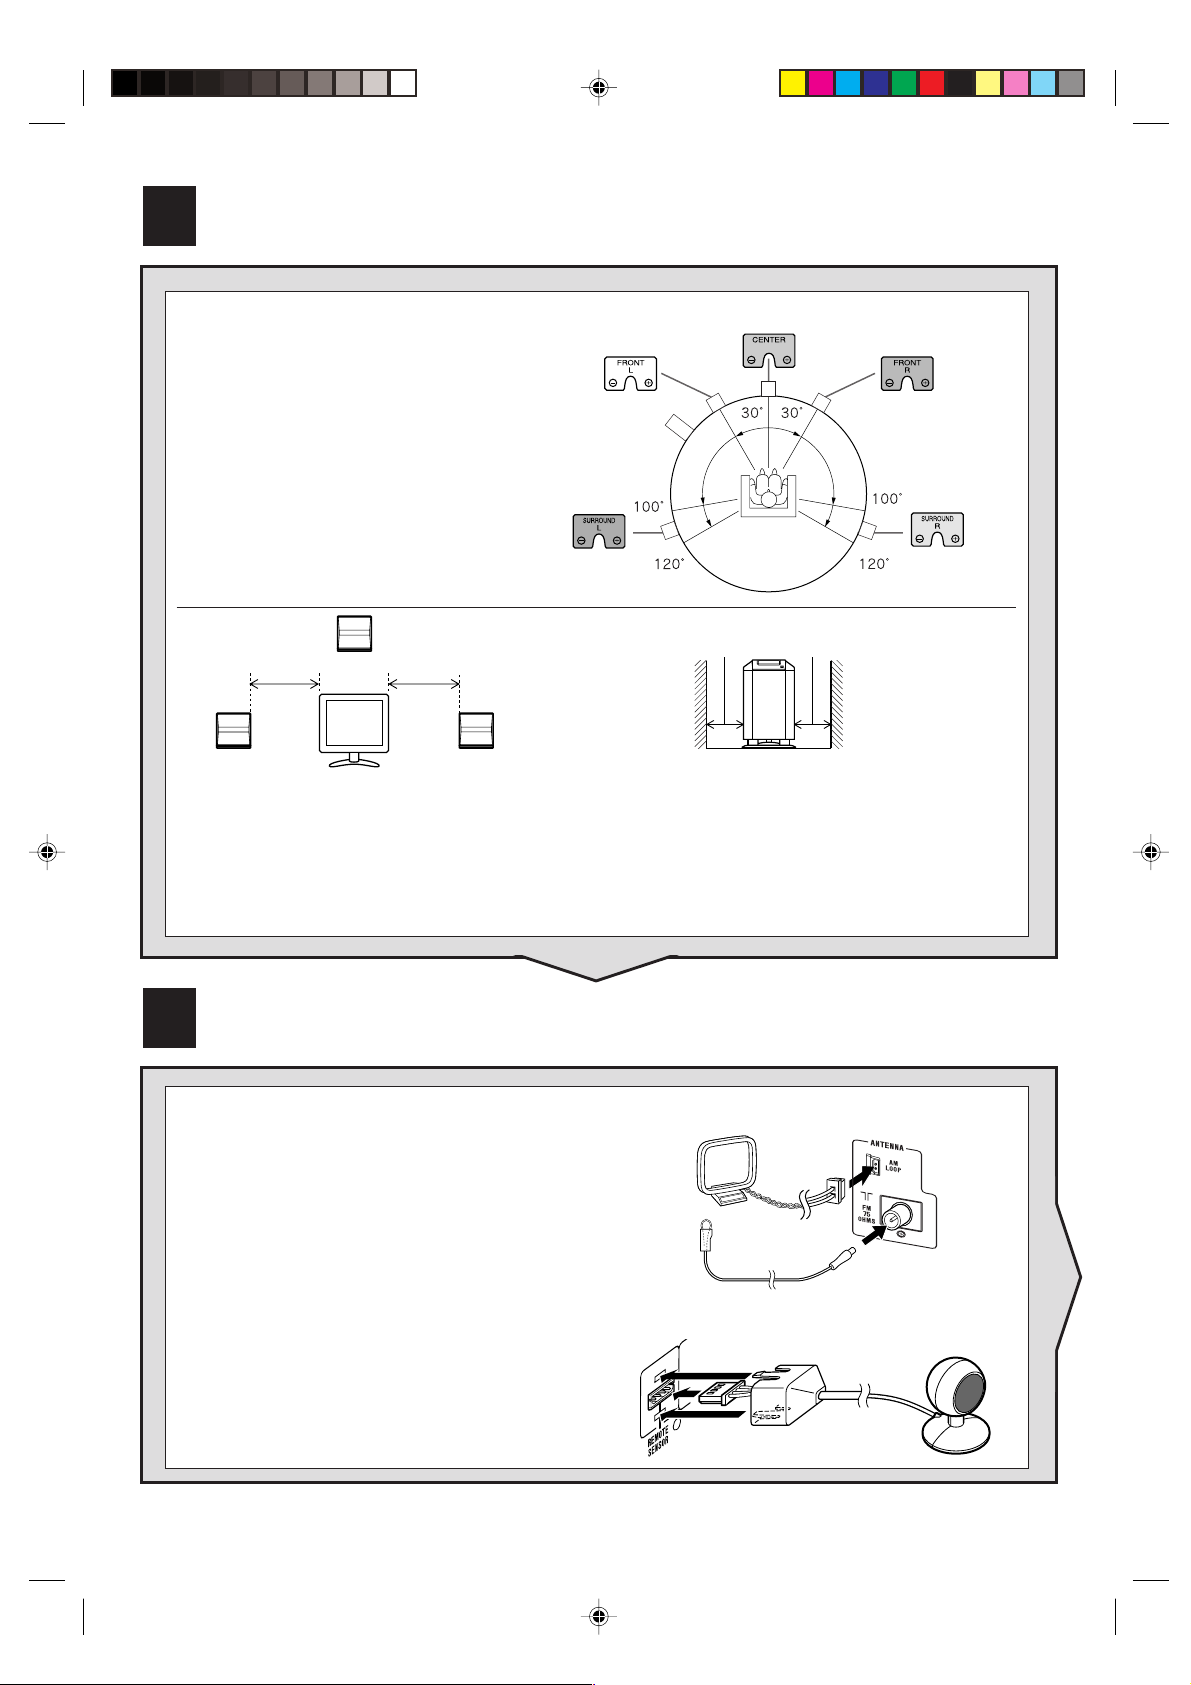
Speaker layout
3
The best surround effect will be
achieved by placing each speaker at
Front
speaker (left)
Centre speaker
Front speaker
(right)
the same distance from the listening
position.
Main unit
(subwoofer)
Surround
speaker (left)
Same distance
Front speaker
(left)
Centre speaker
Same distance
Front speaker
(right)
10 cm (4") 10 cm (4")
Main unit (subwoofer)
Notes:
● Place the TV halfway between the front speakers.
● It is recommended that the centre speaker be placed near the television.
● Keep the free space of at least 10 cm (4") along the side of the unit (subwoofer).
● Place the surround speakers at a position just above the height of your ears.
Surround
speaker (right)
Aerial and Remote control sensor connection
4
Supplied FM aerial:
Connect the FM aerial wire to the FM 75 OHMS
socket and position the FM aerial wire in the direction where the strongest signal can be received.
Supplied AM loop aerial:
Connect the AM loop aerial to the AM LOOP socket.
Position the AM loop aerial for optimum reception.
Place the AM loop aerial on a shelf, etc., or attach it
to a stand or a wall with screws (not supplied).
Remote control sensor
Connect the plug of the remote control sensor
and push the plug cover until it clicks.
– 3 –

Connecting other equipment
5
One video cable and two SCART adaptors are supplied.
Connecting the TV
Video cable (supplied)
S-video cable
To video input socket
To S-video input socket
Connecting the TV with SCART socket:
Use a supplied SCART adaptor (IN).
SCART adaptor (IN)
Video cable (supplied)
To SCART
socket
To video input socket
Connecting the DVD player
To connect to the video socket with the video cable:
Coaxial digital audio cable
Optical digital audio cable
Video cable
TV
TV
IN
LAUDIO VIDEOR
To video output socket
DVD player
To connect to the S-video socket with the S-video cable:
Coaxial digital audio cable
Optical digital audio cable
S-video cable
To S-video output socket
Connecting the VCR (VIDEO 1)
Video cable
Video cable:
Audio cable:
Audio cable
Audio cable
Video cable
Yellow
White (Left)
Red (Right)
To video
output socket
To video
input socket
– 4 –
To audio
output sockets
To audio
input sockets
DVD player
VCR
Yellow
White (Left)
Red (Right)

Connection example using a SCART adaptor:
To SCART socket
SCART
adaptor
(OUT)
To audio output
Audio cable
Video cable
Plugging in the main unit and the remote control
6
sockets
Wall socket
(AC 230 V, 50 Hz)
OUT
LAUDIO VIDEOR
To video
output
socket
Video cable
Wall socket
(AC 230 V, 50 Hz)
To SCART socket
Audio cable
SCART
adaptor
(IN)
To audio input
sockets
IN
LAUDIO VIDEOR
To video
input
socket
To 3.6 V DC
Input socket
Turning on your system
7
The first time the unit is plugged in, the
unit will enter the demonstration mode.
You will see words scroll.
1 Press the X-BASS button to cancel
the demonstration mode.
2 Press the ON/STAND-BY button on
the main unit or the ON/
button on the remote control to turn
the power on.
]]
] (STAND-BY)
]]
Power indicator
– 5 –

Listening to the radio
Press the TUNER/BAND button repeatedly to select the
1
desired frequency band (FM ST, FM or AM).
Press the or button to tune in to the desired station.
2
When the or button is pressed for more than 0.5 seconds, scanning will start automatically and the tuner will stop
at the first receivable broadcast station.
To receive an FM stereo transmission:
Press the TUNER/BAND button to display the "ST" indicator.
" " will appear when an FM broadcast is in stereo.
Operation buttons on the remote control
This remote control allows you to operate the main unit and other Sharp equipment.
By memorising remote control operations (learn function), you can operate various equipment.
Operation buttons for other equipment
Operation buttons for the main unit
MEMORY 1
MEMORY 2
Memory 1/2 buttons for other equipment
ST
Memory 1 buttons:
The remote control is set at the factory to operate the Sharp’s DVD, TV and VCR.
Memory 2 buttons:
No functions are stored at the factory setting.
Memorise the remote control signals (learn function) of your equipment before use.
– 6 –

Memorising operations in the Memory 2 buttons
for other equipment
You can assign only one function to each button. If you assign two functions to the button, the newer
one will be memorised (learn function).
Set the MEMORY 1/2 selector switch to MEMORY 2.
1
Move the LEARN/TRANSMIT selector switch to LEARN.
2
The red learn indicator will light up. Though the red and green
learn indicators light up alternately after approx. 15 seconds,
you can go on to the next step.
Press down the desired button on the remote control for 2
3
seconds or more.
The green learn indicator will flash (the red indicator remains lit).
Lights up Alternately light up
Lit Flashes
Within 10 seconds, press down for more than 2 seconds
4
the desired button on the remote control supplied with
other equipment to send the signal to the marking.
When the signal is sent to the remote control of the unit, the
green indicator will go off. When memorisation is completed,
it will light up.
Angle and distance
5 cm - 10 cm (2" - 4")
10˚
If the signal is not memorised correctly, the red learn indicator will flash.
Perform the operations from step 3 again.
Repeat steps 3 and 4 to memorise other buttons.
5
After memorisation is completed, move the LEARN/TRANSMIT selector switch to TRANSMIT.
6
You can use the remote control.
Goes offLit Lit Lights up
mark
Flashes
– 7 –

Memorising operations in the Memory 1 buttons for other equipment:
Set the MEMORY 1/2 selector switch to MEMORY 1 and perform steps 2 - 6 in "Memorising operations in the
Memory 2 buttons for other equipment".
Memorising operations in the operation buttons for other equipment:
Move the LEARN/TRANSMIT selector switch to LEARN.
1
Registrable buttons
Press down the desired button on the remote control for
2
2 seconds or more.
Perform steps 4 - 6 in "Memorising operations in the
3
Memory 2 buttons for other equipment".
Using the supplied labels:
6
Main features are already printed on the labels.
Write in other operations as you prefer.
If trouble occurs
When this product is subjected to strong external interference (mechanical shock, excessive static electricity, abnormal
supply voltage due to lightning, etc.) or if it is operated incorrectly, it may malfunction.
If such a problem occurs, do the following:
Clearing all the memory (reset): Main unit
1 Unplug the unit.
2 Whilst holding down the ON/STAND-BY button, plug in the AC power lead.
Release the ON/STAND-BY button when the “CLEAR AL” is displayed.
3 Press the ON/STAND-BY button again to turn the power on.
Caution:
This operation will erase all data stored in memory and restore various settings to the
initial status (default).
Clearing all the memory (initialisation): Remote control
1 Move the LEARN/TRANSMIT selector switch to LEARN.
The red learn indicator will light up. Though the red and green learn indicators light up alternately after approx. 15
seconds, you can go on to the next step.
2 Press the ON/] (STAND-BY) and CLEAR buttons simultaneously for more than 3 seconds.
Initialisation is completed when the red and green learn indicators light up alternately and then the red learn indicator
lights up.
3 Move the LEARN/TRANSMIT selector switch to TRANSMIT.
Caution:
This operation will reset all data stored in memory to the initial status (default).
– 8 –
 Loading...