

Page 1
FX-J80U
AIR PURIFIER
Wi-Fi CONNECT GUIDE
PURIFICADOR DE AIRE
GUÍA DE CONEXIÓN Wi-Fi
ENGLISHESPAÑOL
Page 2

ENGLISH
CONTENTS
SHARP AIR APPLICATION ............................................................. EN-1
BEFORE YOU BEGIN ..................................................................... EN-1
PART NAMES .................................................................................. EN-2
FLOW OF INITIAL SETTINGS ........................................................ EN-3
INITIAL CONNECTION SETTINGS
1 DOWNLOAD & SIGN UP
2 CONNECTION OF THE AIR PURIFIER AND A ROUTER
3
CONNECTION BETWEEN THE AIR PURIFIER AND A SMART DEVICE
TROUBLESHOOTING ..................................................................... EN-9
............................................................... EN-3
................ EN-4
EN-8
TRADEMARKS
“Wi-Fi®” is a registered trademark of Wi-Fi Alliance®.
“Android” is the trademark of Google Inc.
“iPhone”, “iPod touch”, “iPad” are the registered trademarks or trademarks of Apple Inc.
The other company names, corporate names, product names mentioned in the handling instructions are
trademarks and registered trademarks of each company.
Page 3
SHARP AIR APPLICATION
The Sharp Air application is a helpful tool that puts you in control of your indoor air
quality.
With the Sharp application,
• You can control your air purier from anywhere with your smart device to do things like
turn the air purier on and o, set a weekly schedule, and more!
• You can monitor indoor air quality in real time to stay in control, even if you're not
home.
• You can monitor remaining lter life and receive alerts when it's time to replace the
lters.
• You can enable and disable the optional, "Sharp Cloud" feature. When enabled, your
usage history will be used to adjust the Sensor Sensitivity settings of "Auto" Mode over
time in order to optimize your Air Purier's performance.
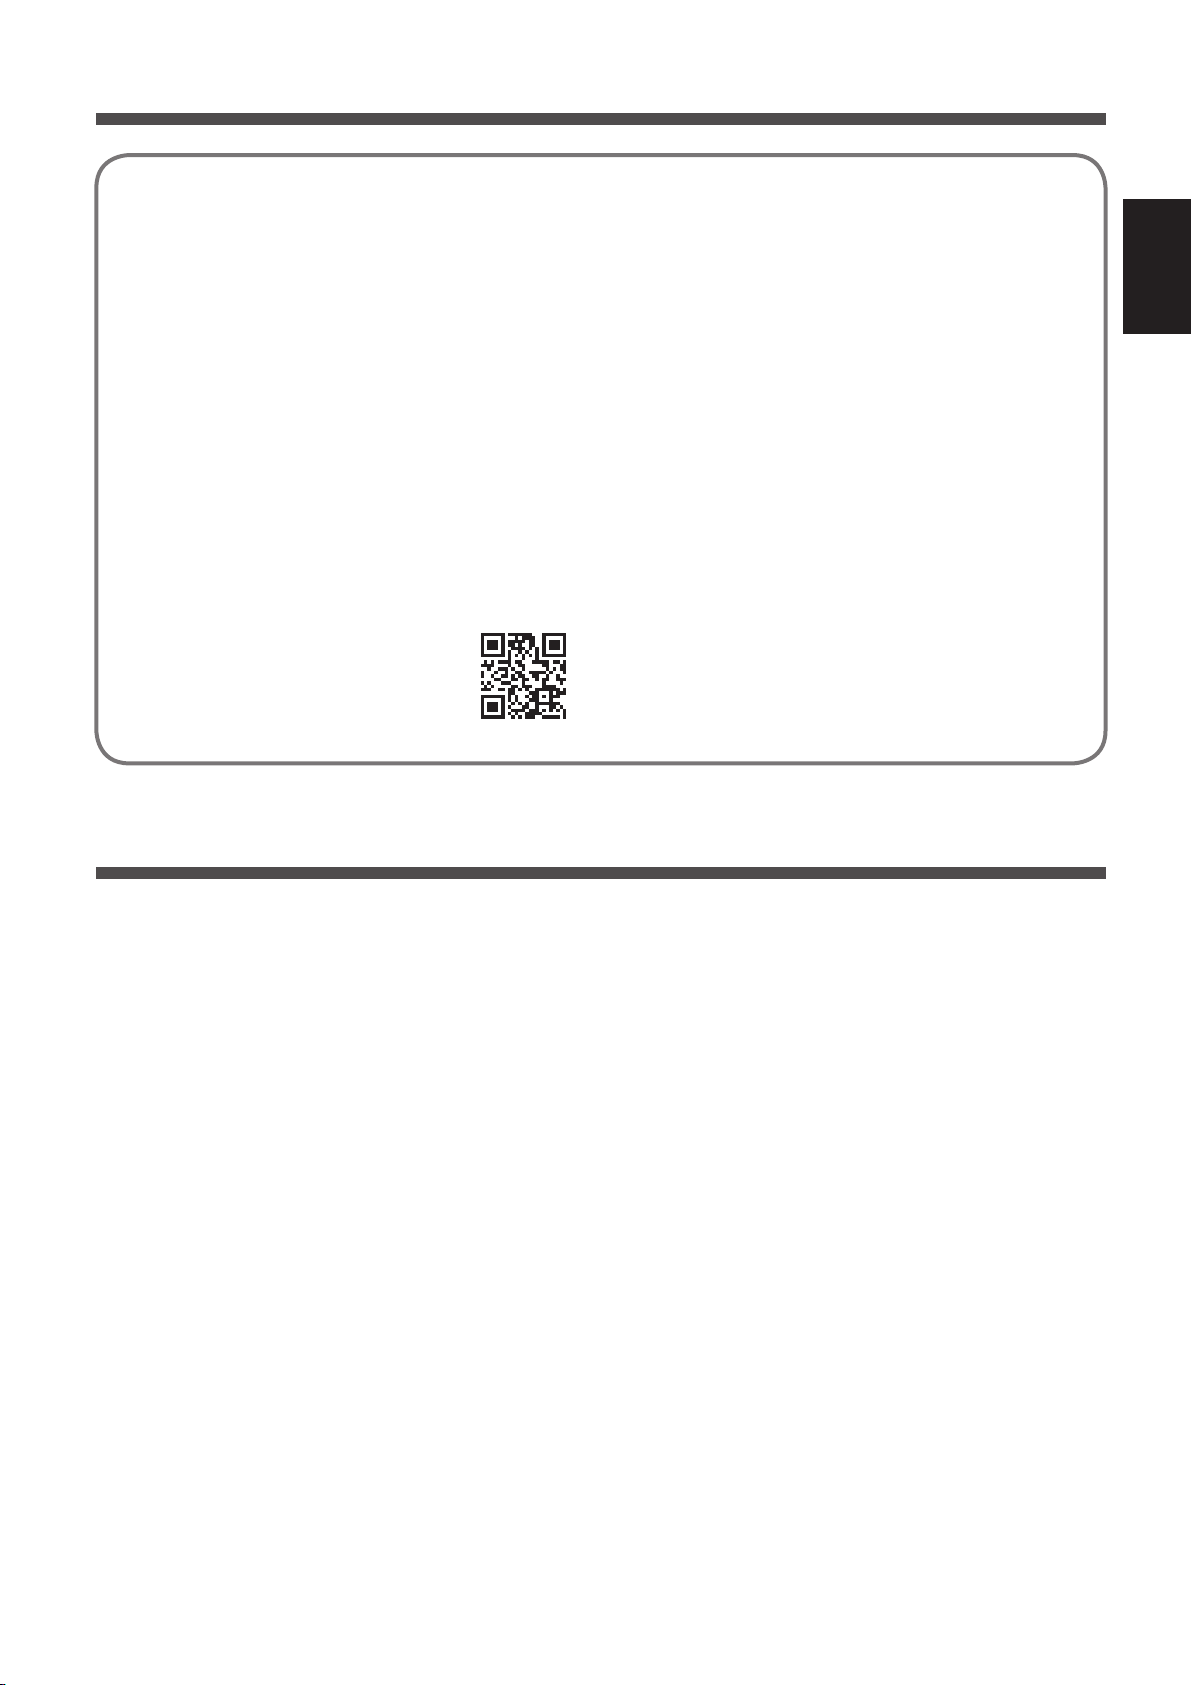
Scan the QR code for more
information about the Sharp
Air Application or visit
sharpusa.com
ENGLISH
BEFORE YOU BEGIN
Ensure your smart device is connected to a 2.4 GHz Wi-Fi Network.
• Wi-Fi Protected Setup (WPS) Access Point (Router)
The recommended encryption method is WPA2 (AES).
• Ensure your smart device meets minimum software requirements:
Smartphones / tablets of Android 8 or later
iPhones, iPod touch, iPads of iOS 12 or later
EN-1
Page 4
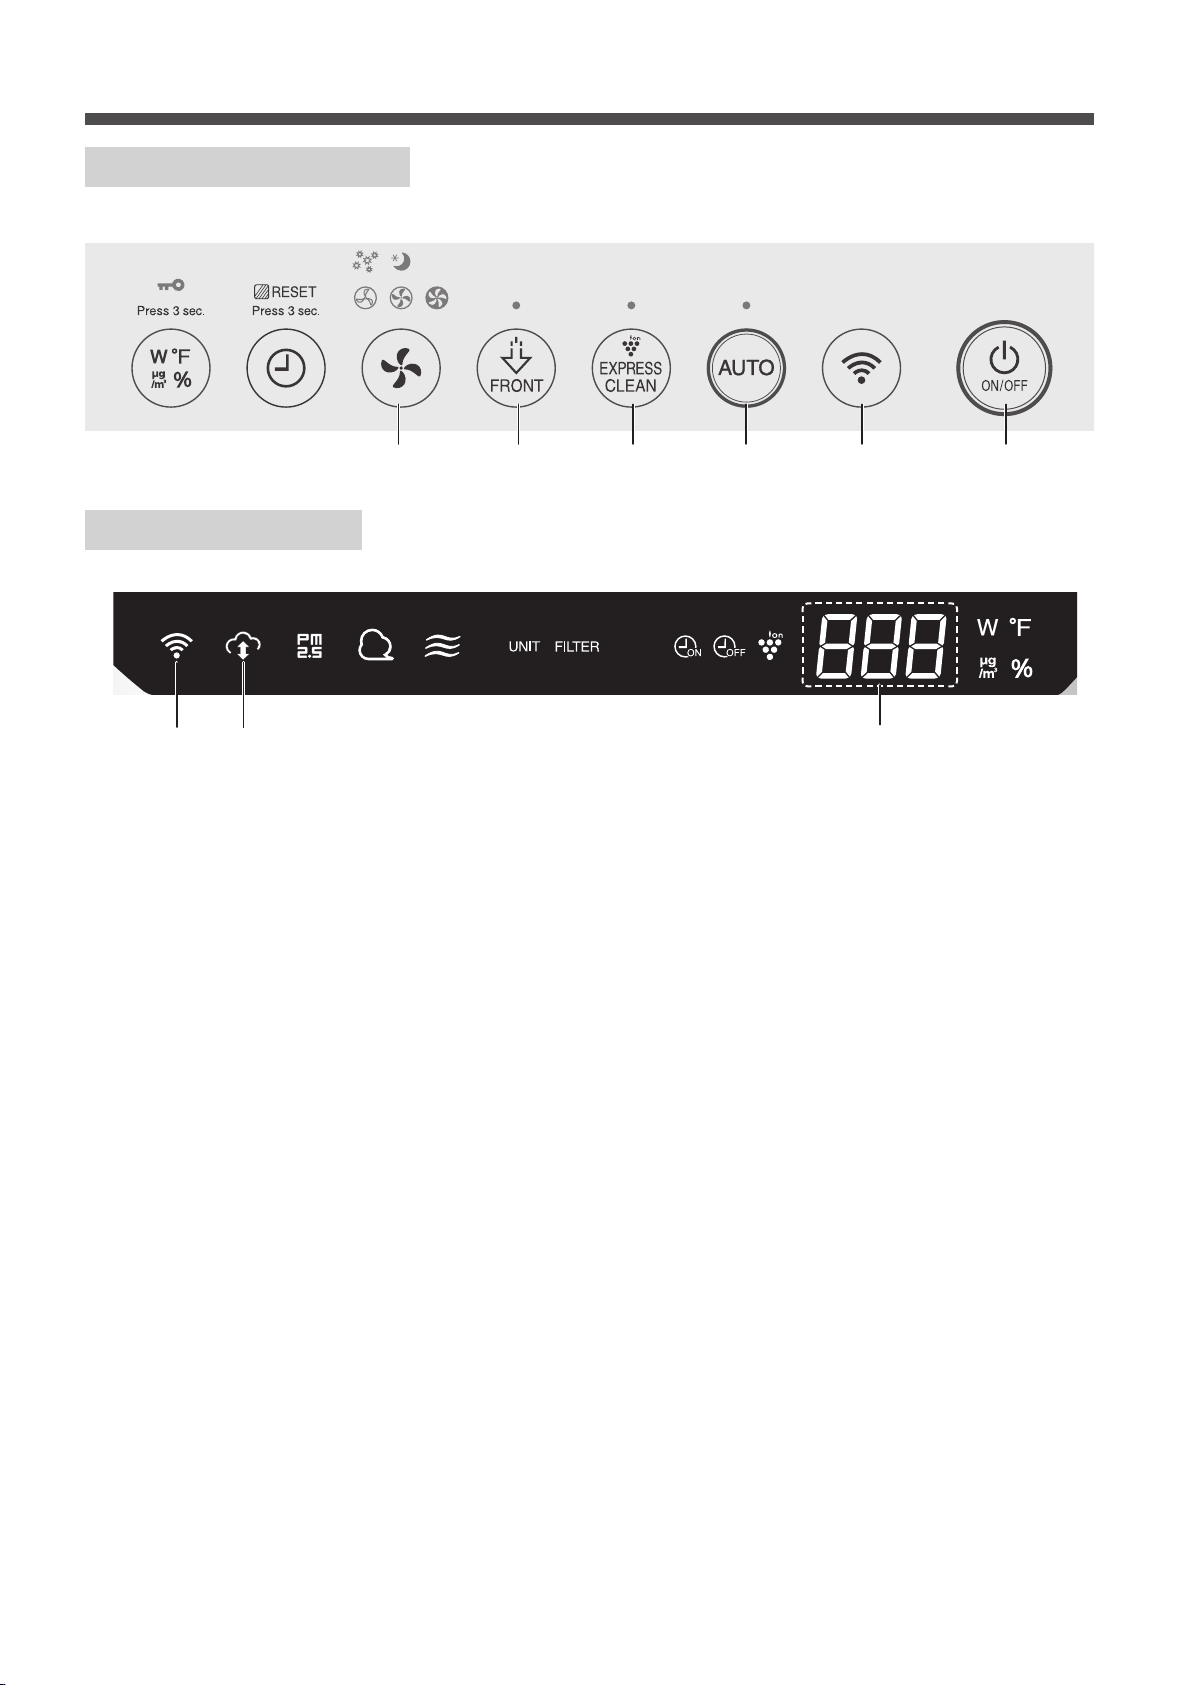
PART NAMES
OPERATION PANEL
FRONT DISPLAY
123456
89
1. POWER ON/OFF Button
2. Wi-Fi Button
3. AUTO Button
4. PLASMACLUSTER EXPRESS CLEAN Button
5. Plasmacluster Ion SPOT Button
6. FAN SPEED Button
7. DISPLAY
8. SHARP CLOUD Indicator
Illuminates when air purier is connected to Sharp's cloud service.
9. Wi-Fi Indicator
Illuminates when air purier is connected to a router.
7
EN-2
Page 5
FLOW OF INITIAL SETTINGS
1
DOWNLOAD & SIGN UP
2
CONNECTION OF THE AIR PURIFIER AND A ROUTER
3
CONNECTION BETWEEN THE AIR PURIFIER AND A SMART DEVICE
NOTE: When pairing the smart device to the air puri er, please ensure they are both connected to
the same router.
INITIAL CONNECTION SETTINGS
1
DOWNLOAD & SIGN UP
ENGLISH
1.
Install the Sharp Air application to
your smart device.
• Available to download from the Apple Store
or Google Play.
2.
Launch the Sharp Air application.
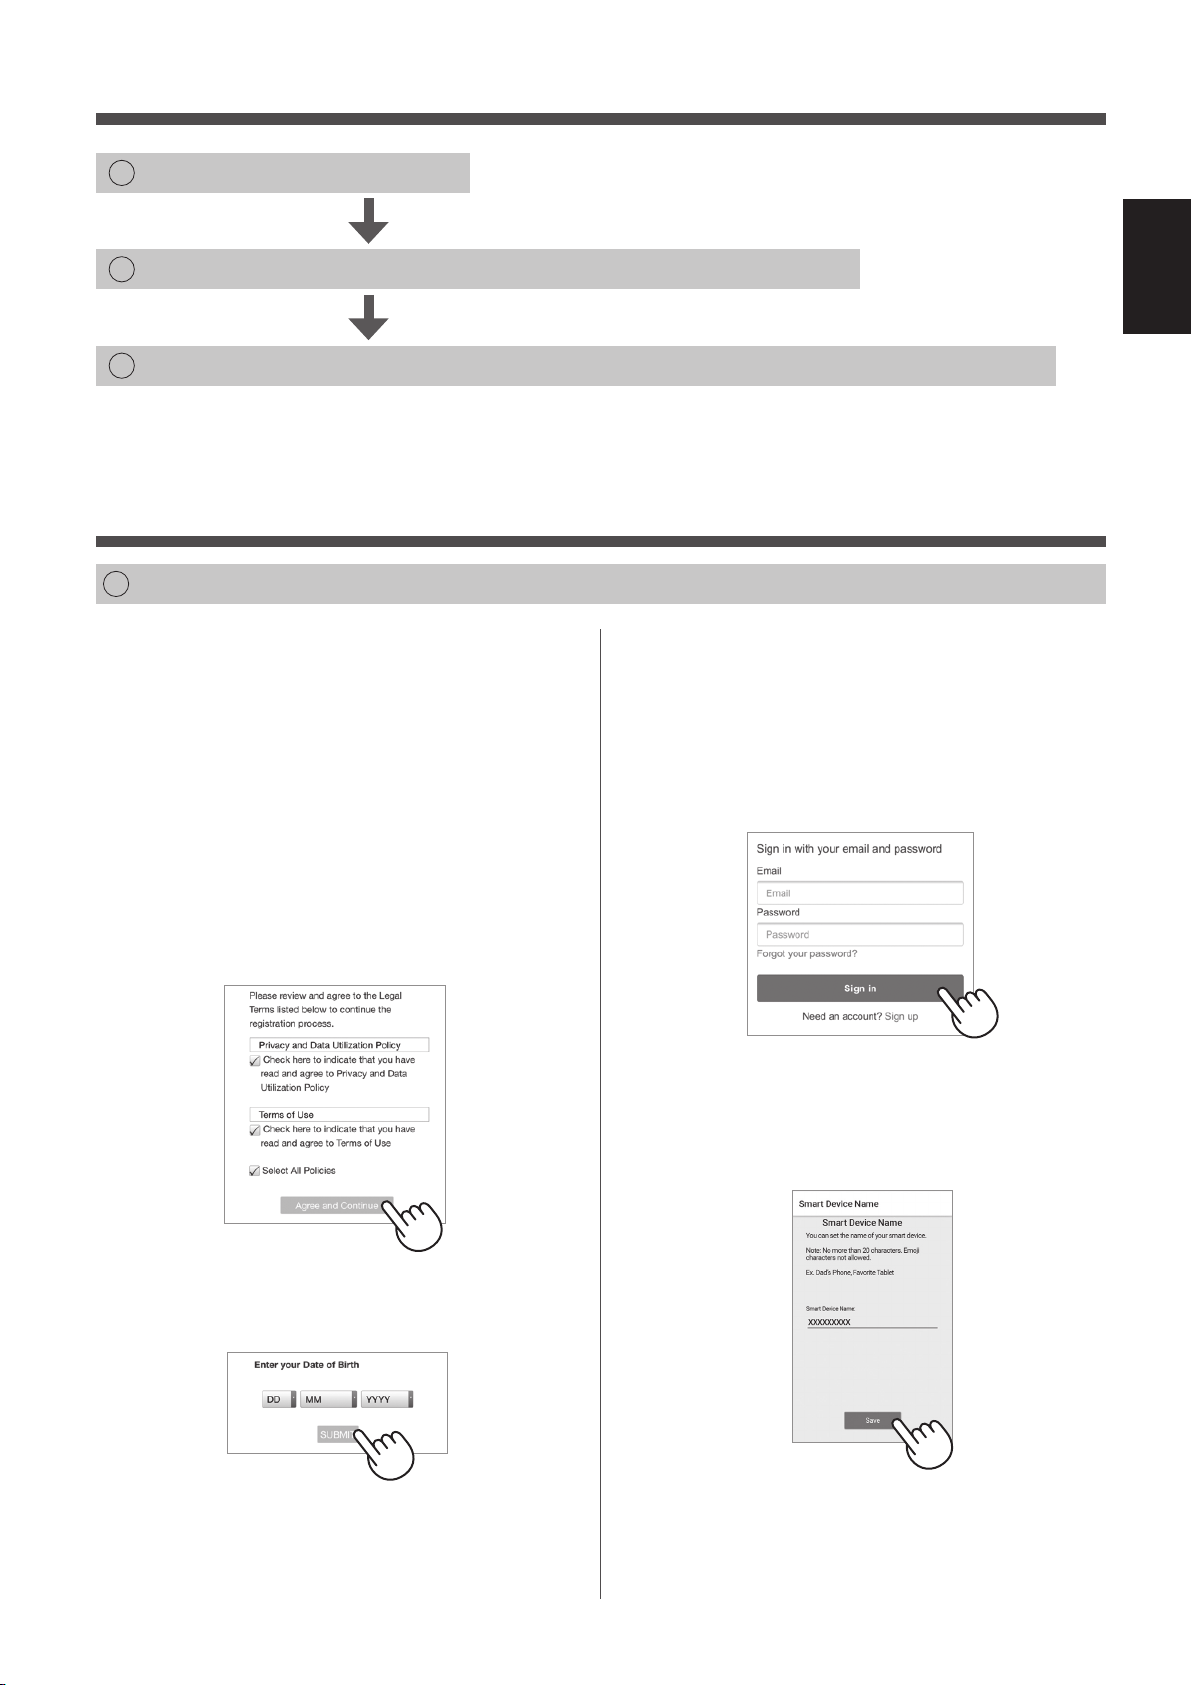
3.
Review the “Privacy and Data
Utilization Policy” and “Terms of
Use.” Once you review, check the
boxes and select “Agree and
Continue”.
5.
Sign in using your Sharp account
(Sharp ID) or click “Sign up” to
register if you are a new user.
• If you already have a Sharp account, enter
veri ed credentials and select “Sign in”.
• If you do not have a Sharp account, select
“Sign up” and follow on-screen instructions.
XXXX@XXX.XX
XXXXXXXXX
6.
Enter a name for your smart device
and tap “Save”.
• The model name of your smart device will
display.
4.
Enter Your Date of Birth and select
“SUBMIT”.
EN-3
Page 6

INITIAL CONNECTION SETTINGS
2
CONNECTION OF THE AIR PURIFIER AND A ROUTER
Please check whether the Wi-Fi Protected Setup (WPS) button function is available on the router.
If Wi-Fi Protected Setup (WPS) button is available: Proceed to (A)
If Wi-Fi Protected Setup (WPS) button is not available: Proceed to (B)
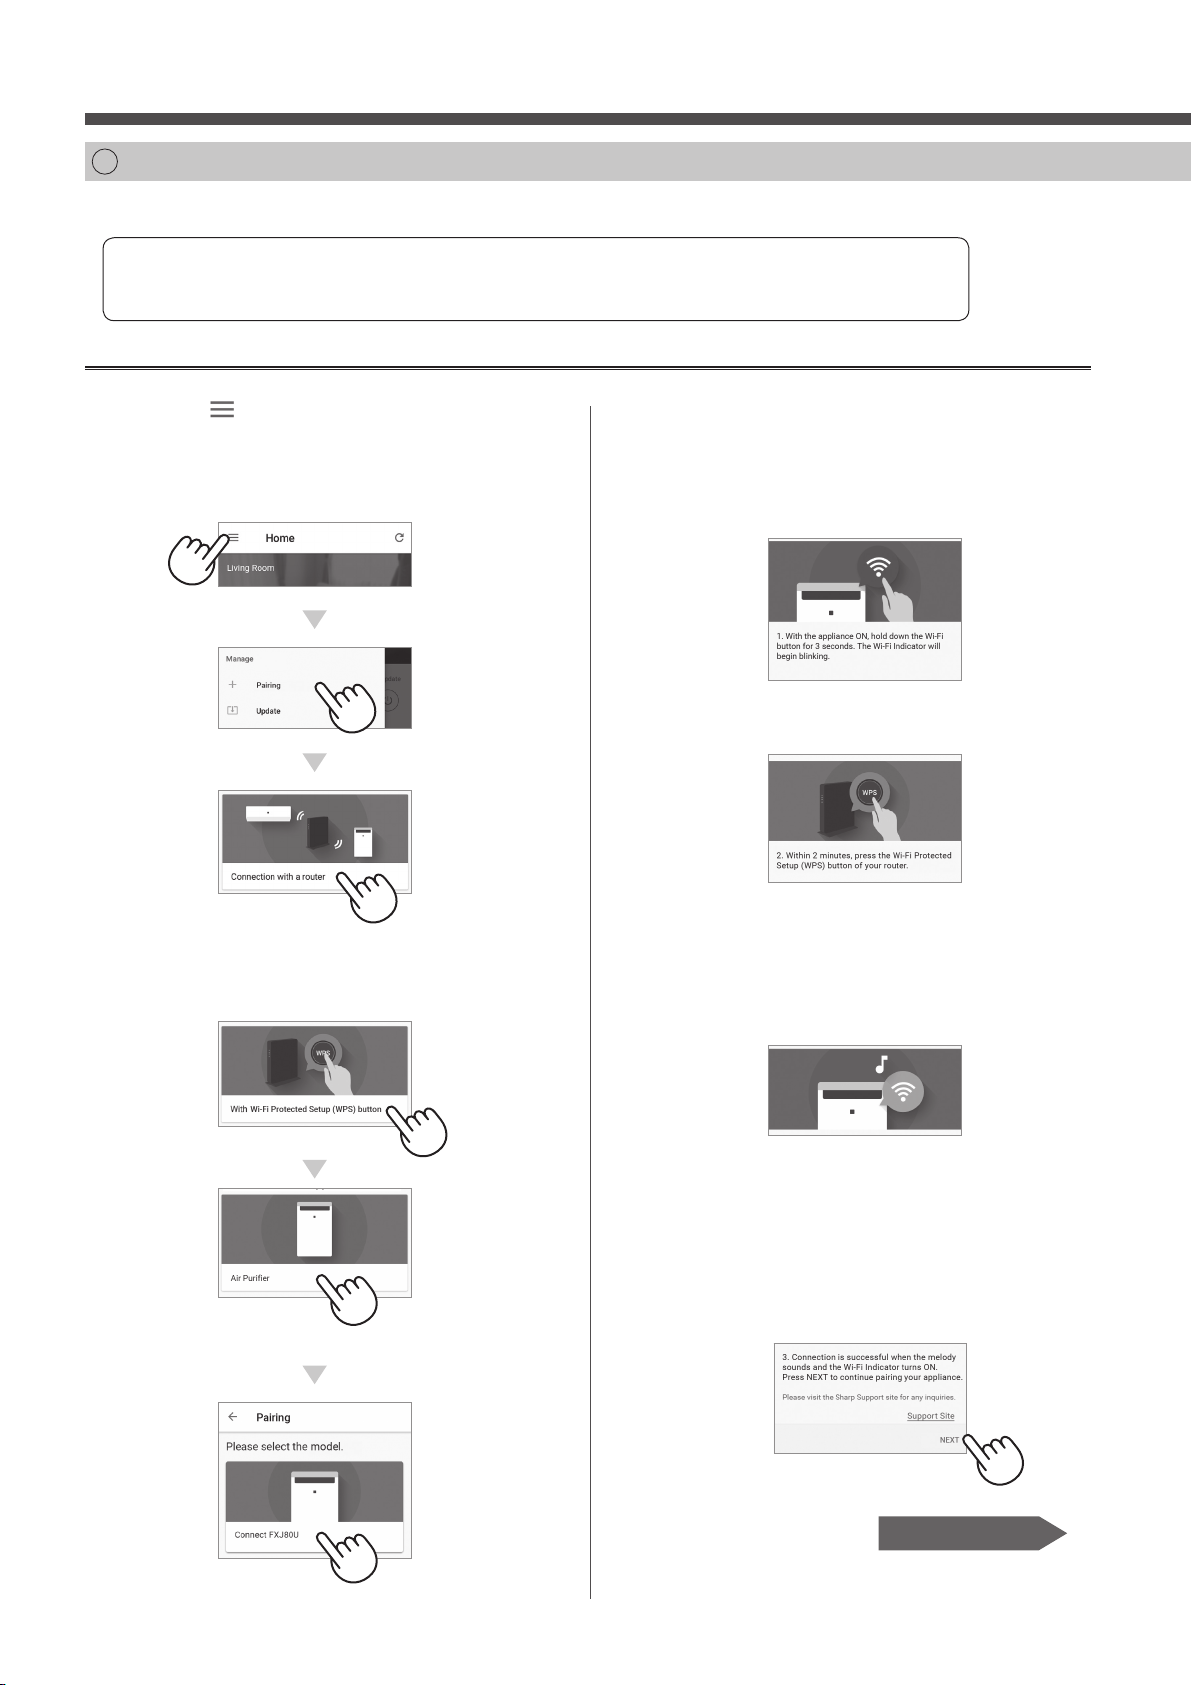
(A) The Wi-Fi Protected Setup (WPS) button function is available on the router.
1.
Tap “ ” at the upper left part of the
“Home” screen, and select “Pairing”
→ “Connection with a router”.
2.
Select “With Wi-Fi Protected Setup
(WPS) button” → “Air Purifi er” →
Select “FXJ80U”.
3.
Please follow instructions on
the app.
Hold down the Wi-Fi button for 3
i.
seconds with the product ON.
Within 2 minutes, press the Wi-Fi
ii.
Protected Setup (WPS) button of
the router.
• Please refer to the router operation manual
for how to handle the Wi-Fi Protected Setup
(WPS) button.
A melody will sound, and the Wi-Fi
iii.
indicator will light up.
EN-4
• It may take a few minutes to complete the
connection settings.
• If the connection settings cannot be
completed, it will beep 4 times and the light
of Wi-Fi indicator will be o . In that case,
please try again from Step 1.
Tap “NEXT”.
iv.
Page 8, Step 3
Page 7

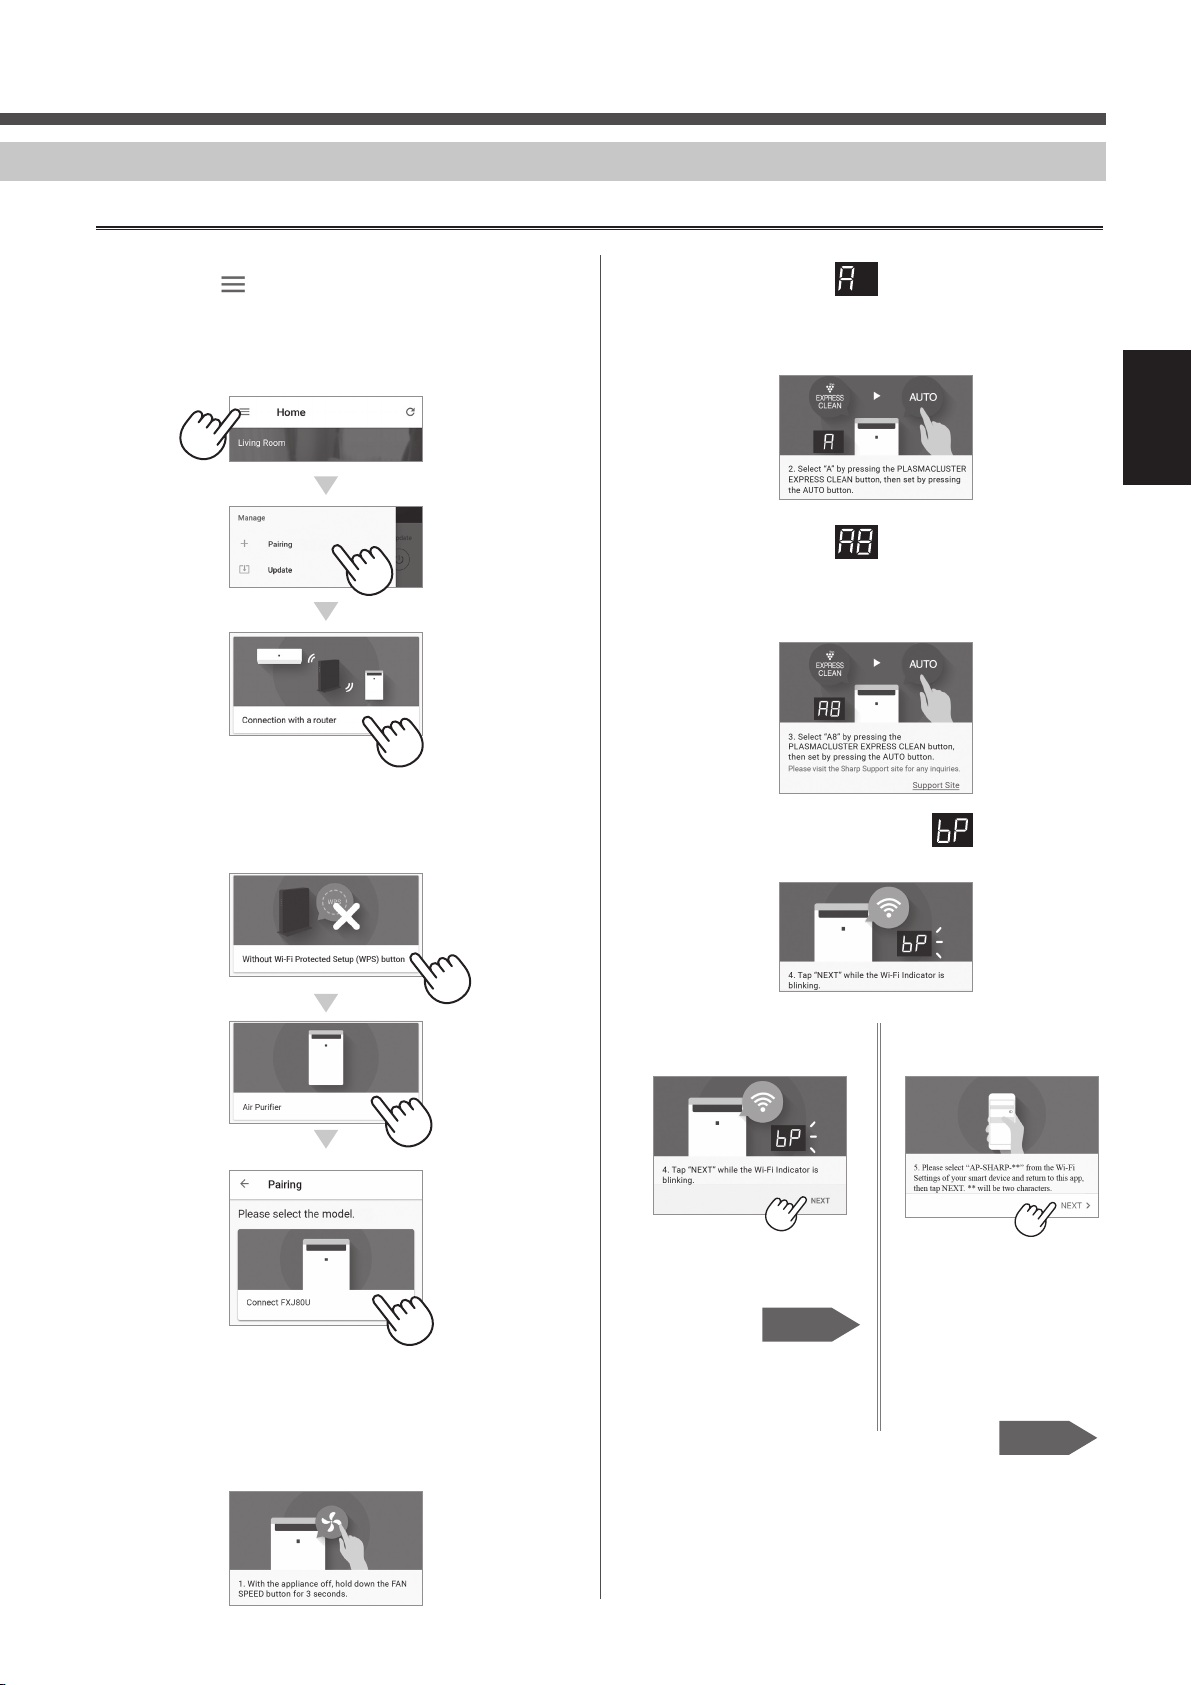
(B)
The Wi-Fi Protected Setup (WPS) button function is not available on the router.
1.
Tap “ ” at the upper left part of the
“Home” screen, and select “Pairing”
→ “Connection with a router”.
2.
Select “Without Wi-Fi Protected
Setup (WPS) button” → “Air Purifi er”
→ Select “FXJ80U”.
Select with the
ii.
PLASMACLUSTER EXPRESS
CLEAN button, and confi rm with
the AUTO button.
Select with the
iii.
PLASMACLUSTER EXPRESS
CLEAN button, and confi rm with
the AUTO button.
Wi-Fi indicator and will blink.
iv.
ENGLISH
3.
Follow instructions on the app.
Hold down the FAN SPEED button
i.
for 3 seconds with the product
OFF.
Android Devices
Tap “NEXT”.
Page 6
iOS Devices
Tap “NEXT” after
confi rming the
application screen.
Page 7
EN-5
Page 8
INITIAL CONNECTION SETTINGS
2
CONNECTION OF THE AIR PURIFIER AND A ROUTER
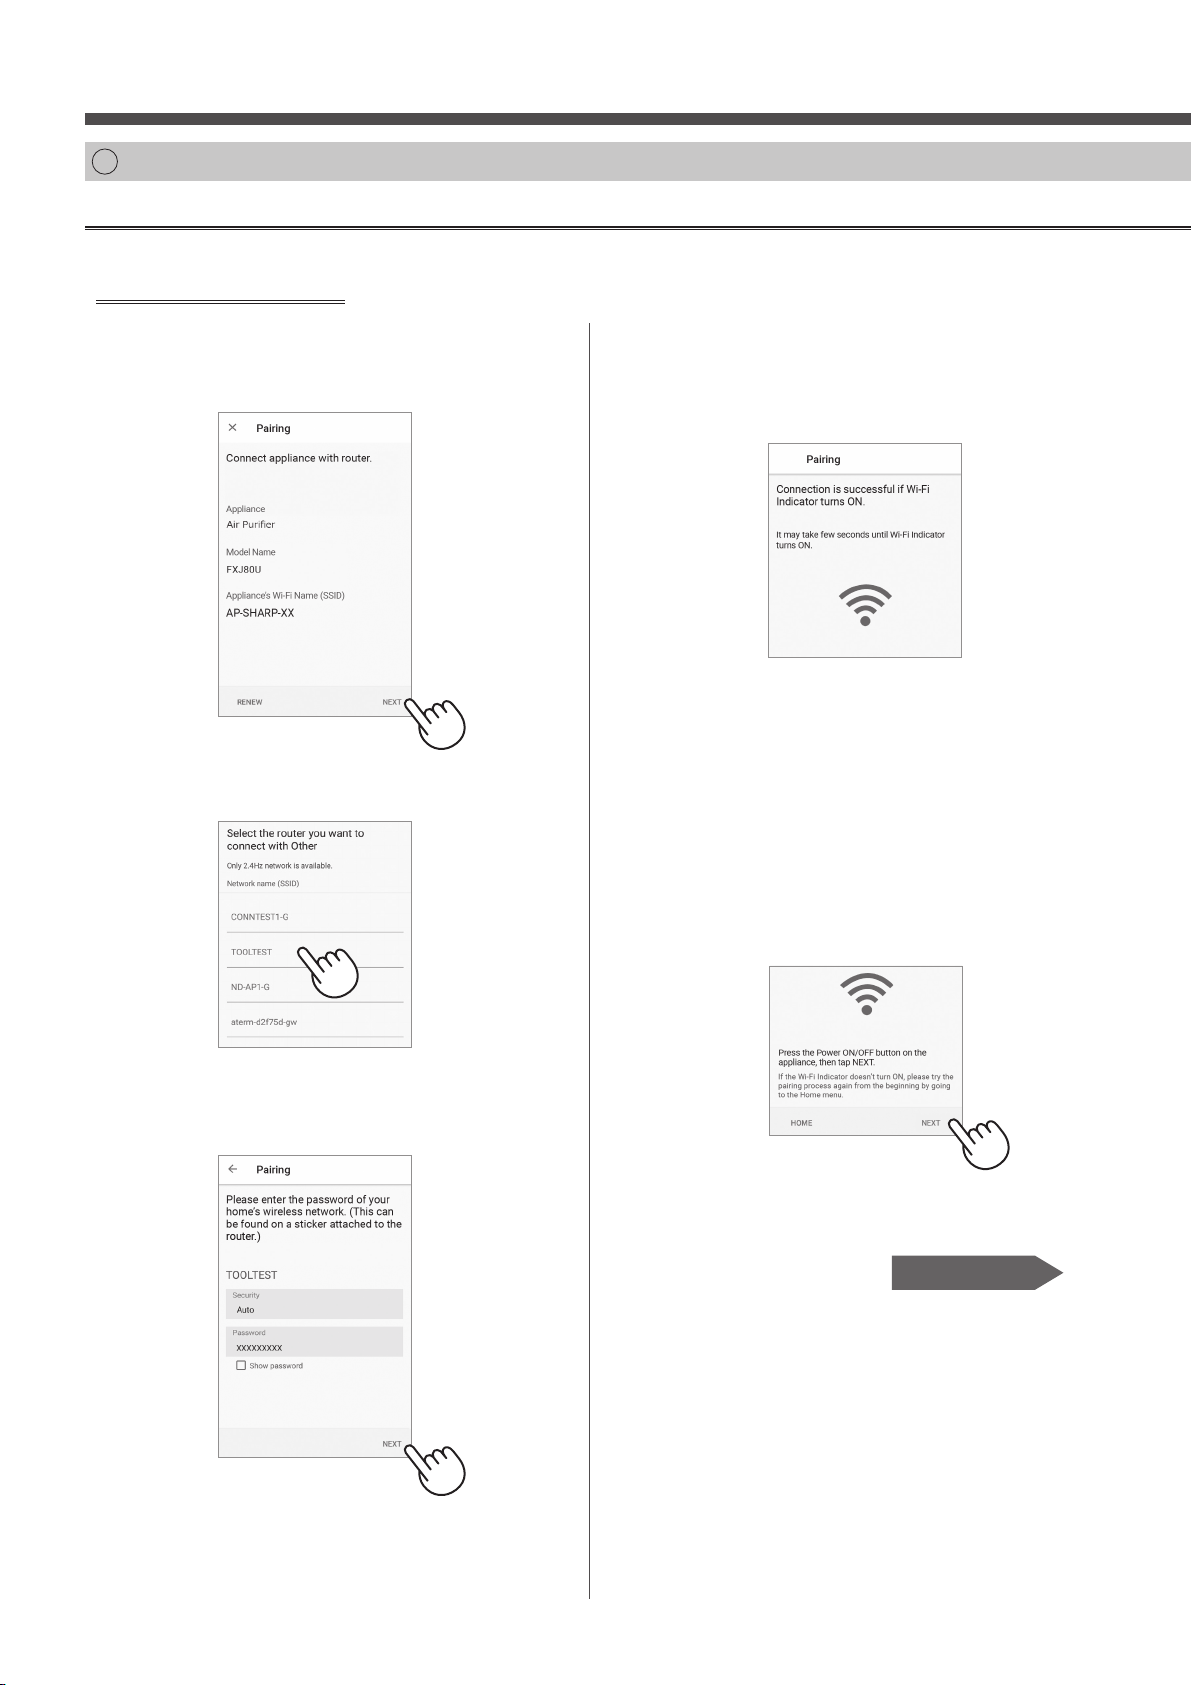
(B)
The Wi-Fi Protected Setup (WPS) button function is not available on the router.
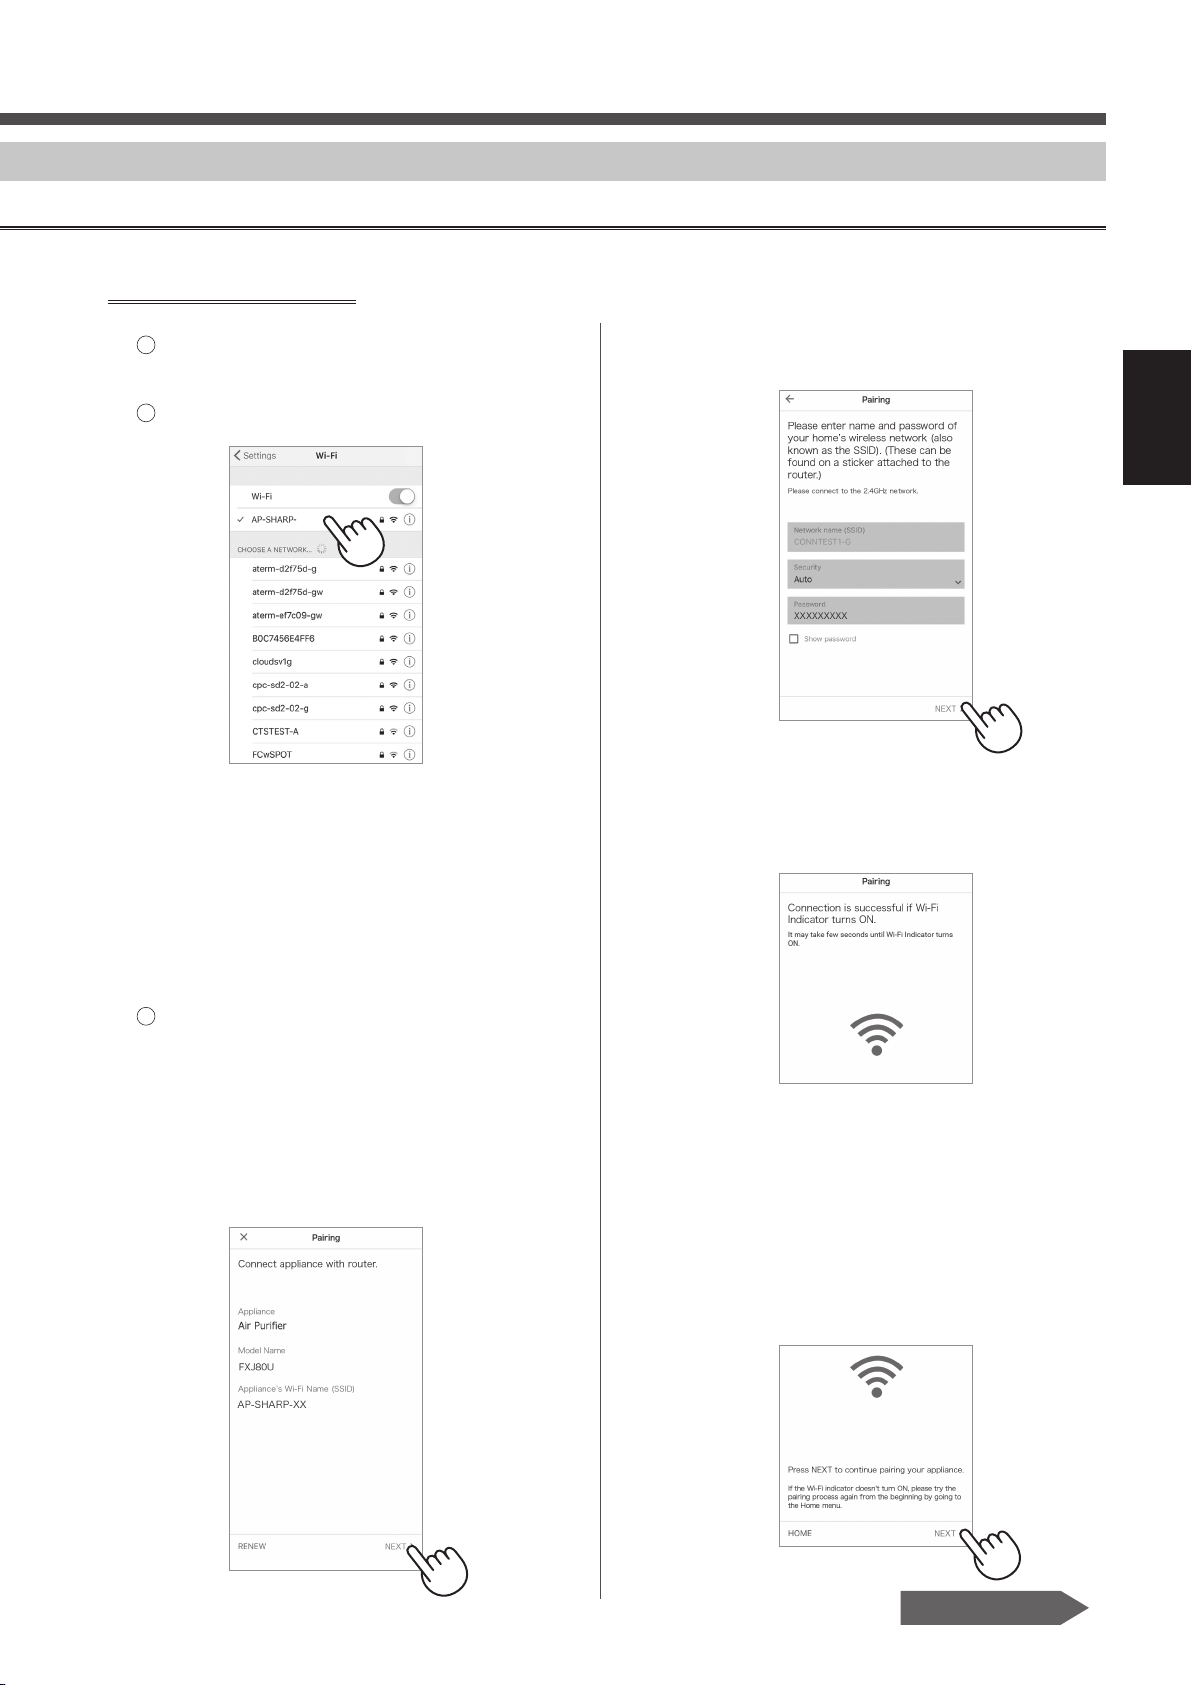
Android Devices
4.
Please confirm the model name of
the air purifier you want to connect
with router, then tap “NEXT”.
5.
Select the router.
7.
If following screen displays and
Wi-Fi indicator turns ON, your air
purifi er has successfully connected
to the router.
• It may take a few minutes to complete the
connection settings.
• If the connection settings cannot be
completed, the air puri er will beep 4 times
and the Wi-Fi indicator light will be o . In
that case, please try again from Step 1 on
page 5.
8.
Once connected, press POWER
ON/OFF button on your air purifier,
and tap “NEXT”.
6.
Enter router password then
tap “NEXT”.
Page 8, Step 3
EN-6
Page 9
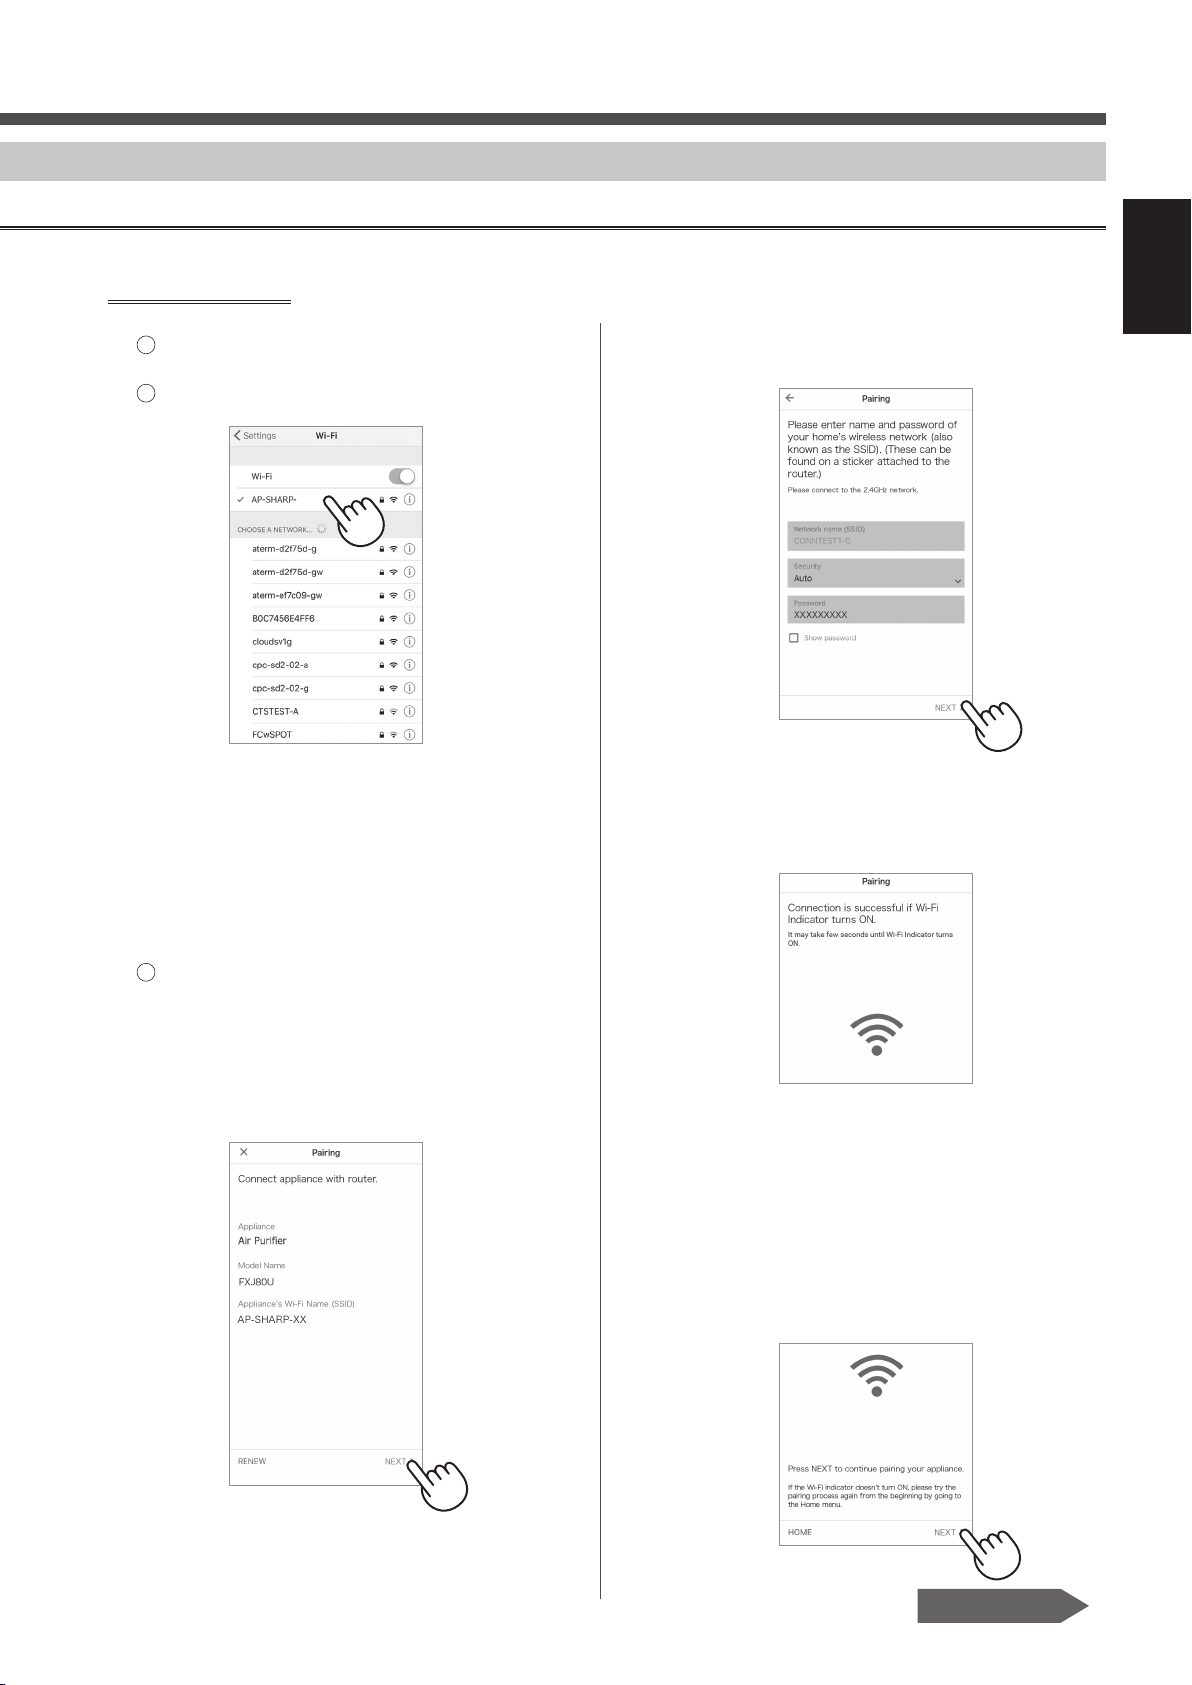
iOS Devices
ENGLISH
4.
1 Select Wi-Fi setting of your iOS
device.
2 Select “AP-SHARP-XX”.
××
XX is the last two letters of
•
the MAC address. Please refer
to Page 20 of the air purifier
Operation Manual when you want
to check the MAC address of your
air purifer.
6.
Please input SSID and password of
the router then tap “NEXT”.
7.
If following screen displays and
Wi-Fi indicator turns ON, your air
purifier has successfully connected
to the router.
3 Once connected to AP-SHARP-XX,
return to the Sharp Air application.
5.
Please confi rm the model name of
the air purifi er you want to connect
with router, then tap “NEXT”.
• It may take a few minutes to complete the
connection settings.
• If the connection settings cannot be
completed, your air puri er will beep 4 times
and the Wi-Fi indicator light will be o . In
that case, please try again from Step 1 on
page 5.
8.
Once connected, press POWER ON/
OFF button on your air purifi er, and
tap “NEXT”.
EN-7
Page 8, Step 3
Page 10

INITIAL CONNECTION SETTINGS
3
CONNECTION BETWEEN THE AIR PURIFIER AND A SMART DEVICE
1.
Connect your smart device to the
same router as the air purifi er.
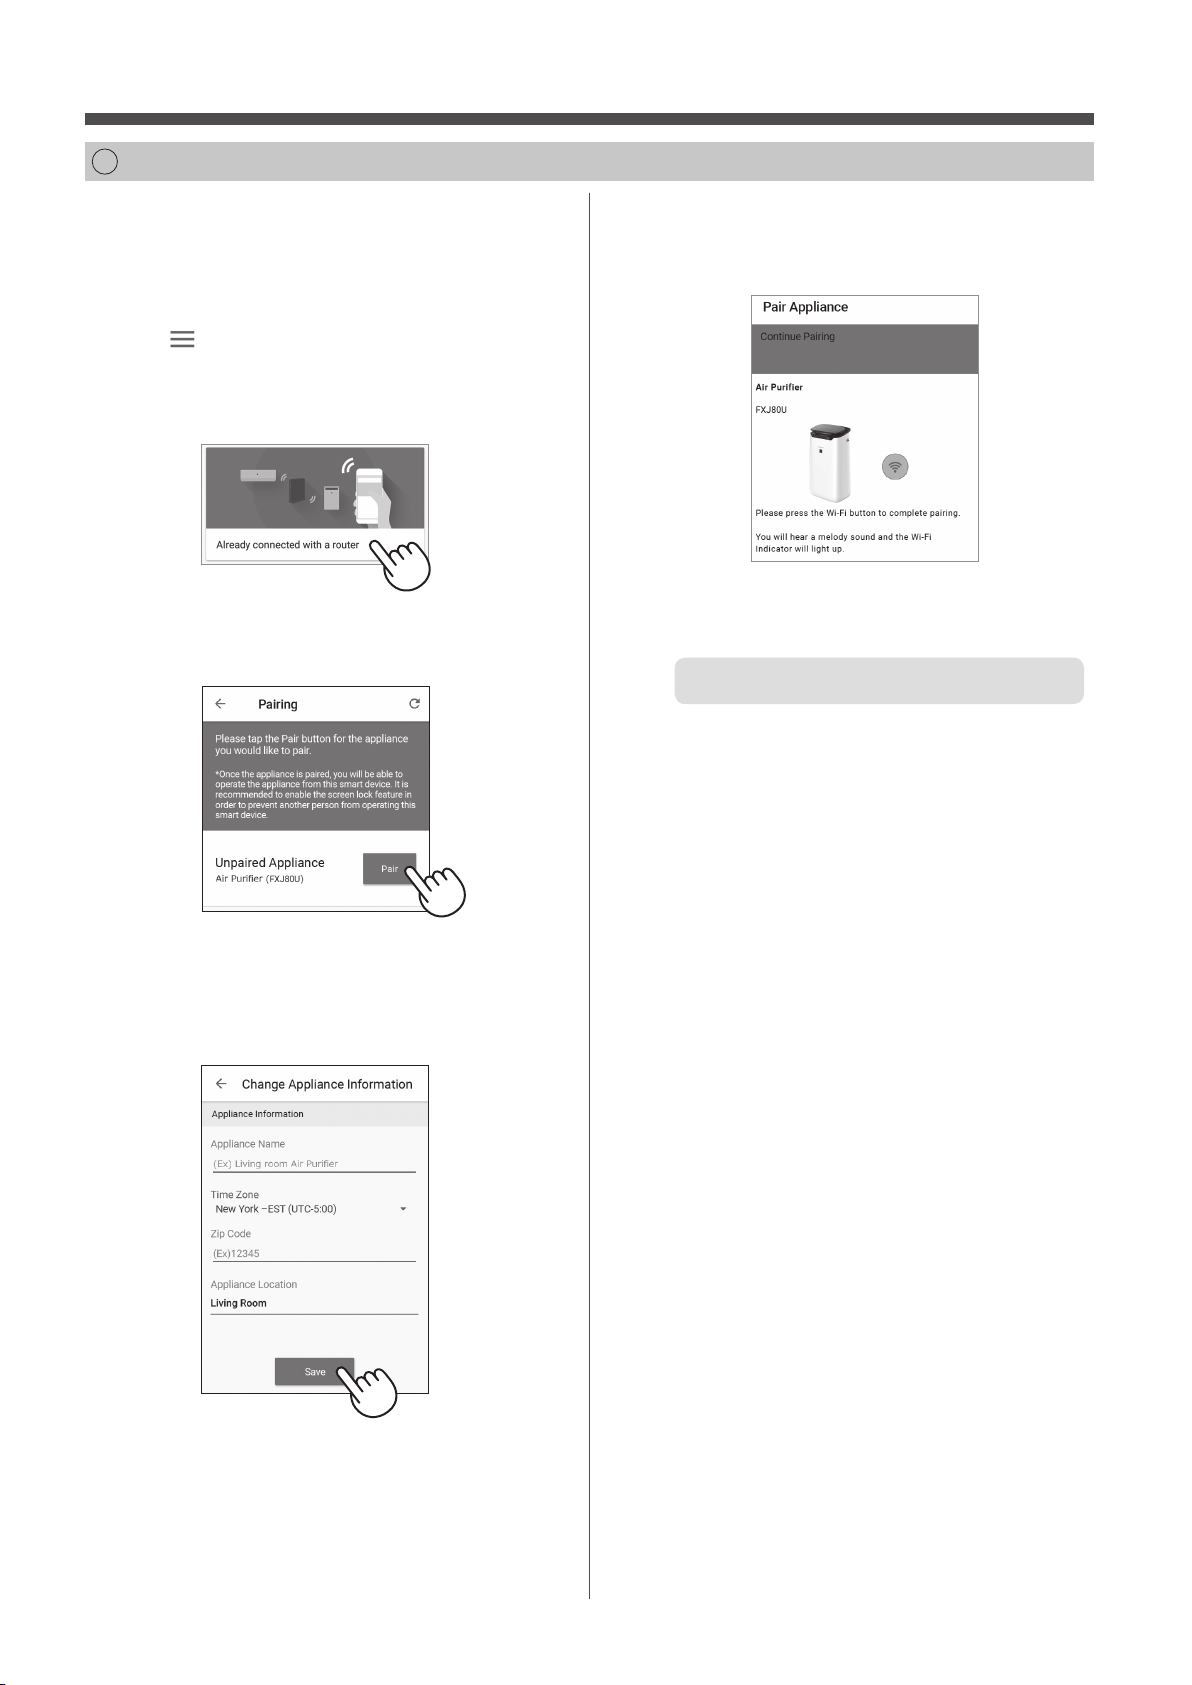
2.
Tap “ ” at the upper left part of the
“Home” screen of the Sharp Air
application, and select “Already
connected with a router”.
3.
Tap “Pair” for the air purifi er you
would like to pair.
5.
Press the Wi-Fi button on the air
purifi er within 3 minutes.
6.
The melody will sound, and the
Wi-Fi indicator will light up.
The initial settings are completed.
• If the settings cannot be completed, the
air puri er will beep 4 times, and the Wi-Fi
indicator will light up. In this case, please try
again from Step 2.
* For details of the application operating
procedure, please refer to “HELP” on the
application.
4.
Enter the air purifi er information and
tap “Save”.
• The Wi-Fi indicator of the air puri er will
blink.
* This screen will not be displayed, in case
the air puri er has been already registered
with other smart devices.
EN-8
Page 11

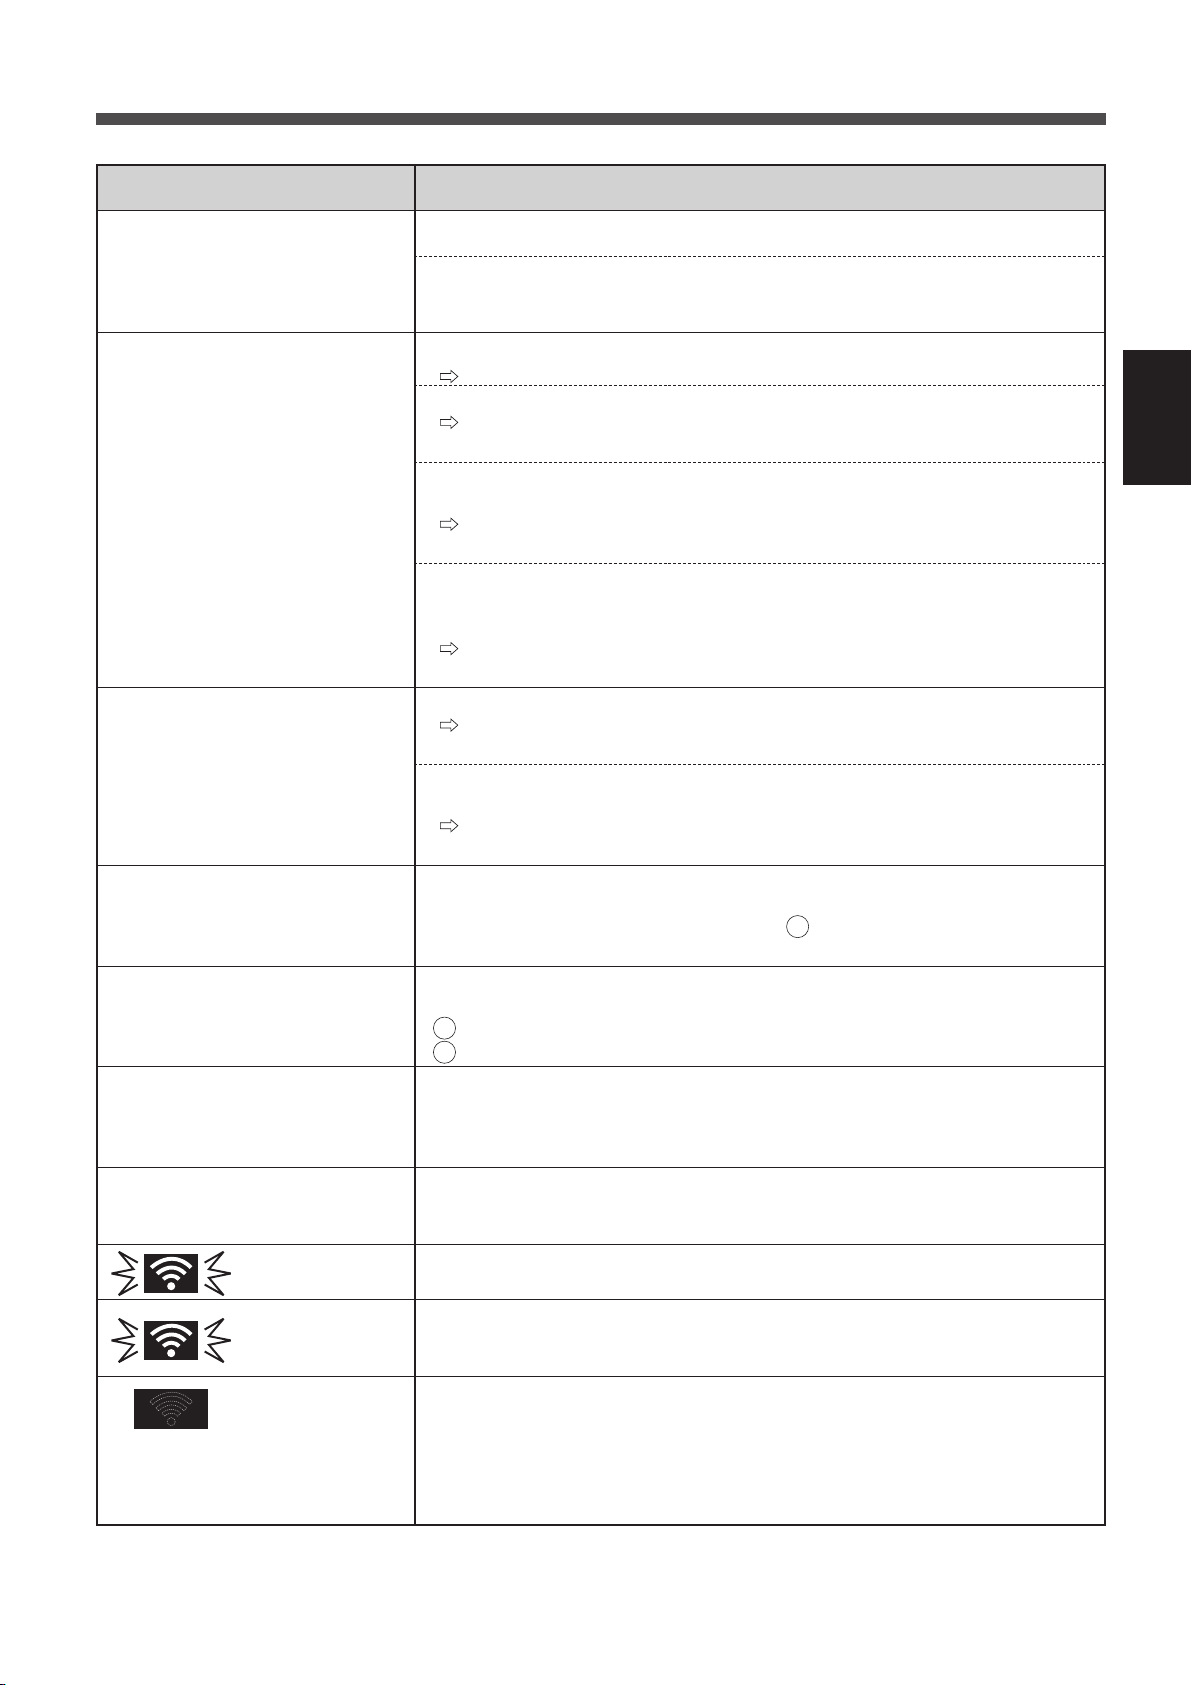
TROUBLESHOOTING
Please check the following details, before enquiring or requesting for repairs.
Problem Items to check
Wi-Fi connection of the air
purier and the router cannot
be performed.
The connection between the air
purier and your smart device
cannot be established.
Remote operation from a smart
device cannot be performed.
When changing the router
When changing the smart
device
When going to dispose or hand
over the air purier
In case of being handed over
from a third party
Blink slowly
Blink fast
O
• Please check the specications of the router in use.
• Please adjust the router and antenna direction, move the router and
antenna closer, and so on. After that, reswitch to turn on the router and
perform the initial settings again.
• Is the Wi-Fi connection icon appearing on your smart device monitor?
Please set up the connection on your smart device.
• Is the air purier and your smart device is connecting to the same router?
Please connect the air purier and your smart device to the same
router.
• Is the total number of smart devices being in use exceeding the maximum
number for registration on one air purier?
The maximum number of smart devices that can be registered on one
air purier is 5.
• Is the total number of products (air conditioners, air puriers, etc.) to be
registered with one smart device exceeding the maximum designated
number?
The maximum number of products to be registered with one smart
device is 10.
• Is the Wi-Fi indicator of the air purier on?
If the Wi-Fi indicator is o, please connect the air purier to the router.
(Page 4)
• Have the connection between the air purier and your smart device been
completed?
Please set up the connection between the air purier and your smart
device. (Page 8)
• It is necessary to reconnect the air purier to the router.
1. Hold down the Wi-Fi button for 3 seconds to stop the Wi-Fi function.
2. Perform “Initial Connection Settings : 2 Connection of the air purier
and a router”. (Page 4)
1. Delete the registration of the old smart device from designated application.
2. Use the new smart device to perform “Initial connection settings :
1 Download & Sign up” and “Initial connection settings :
3 Connection between the air purier and a smart device”. (Page 3, 8)
• Please perform the following steps, to prevent leak of personal information.
1. Delete the registration of the air purier from designated application.
2. Perform “A4: Initialization of Wi-Fi function” on Page 20 of the air purier
operation manual.
• To prevent unauthorized access from a third party,
Perform “A4: Initialization of Wi-Fi function” on Page 20
of the air purier operation manual.
• The Wi-Fi connection of the air purier and a router is in setup.
• The connection of the air purier and a smart device is in setup.
• Network error. Perform “A7: Display Wi-Fi network status” on Page 21 of
the air purier operation manual and check the status of Wi-Fi connection.
• The air purier cannot connect to the router.
• Perform “A7: Display Wi-Fi network status” on Page 21 of the air purier
operation manual and check the status of Wi-Fi connection.
• Has the power plug of the air purier come out of its power socket?
• Has the Wi-Fi function been stopped?
ENGLISH
EN-9
Page 12

ESPAÑOL
CONTENIDO
APLICACIÓN SHARP AIR ............................................................... ES-1
ANTES DE EMPEZAR ..................................................................... ES-1
NOMBRE DE LAS PARTES ............................................................ ES-2
FLUJO DE AJUSTES INICIALES ................................................... ES-3
AJUSTES DE CONEXIÓN INICIAL
1 DESCARGAR Y REGISTRARSE
2 CONEXIÓN DEL PURIFICADOR DE AIRE Y UN ROUTER
3
CONEXIÓN ENTRE EL PURIFICADOR DE AIRE Y UN DISPOSITIVO
INTELIGENTE
EN ESTA SITUACIÓN ...................................................................... ES-9
...............................................................................
................................................... ES-3
.............. ES-4
ES-8
MARCAS
“Wi-Fi®” es una marca registrada de Wi-Fi Alliance®.
“Android” es la marca comercial de Google Inc.
“iPhone”, “iPod touch”, “iPad” son marcas comerciales registradas o marcas comerciales de Apple Inc.
Los otros nombres de empresas, nombres corporativos, nombres de productos mencionados en las instrucciones
de manejo son marcas comerciales y marcas comerciales registradas de cada empresa.
Page 13

APLICACIÓN SHARP AIR
La aplicación Sharp Air es una herramienta útil que te pone en control de tu aire
interior Calidad
Con la aplicación Sharp,
• Puede controlar su puricador de aire desde cualquier lugar con su dispositivo
inteligente para hacer cosas como encender y apagar el puricador de aire, establecer
un horario semanal, y mucho más.
• Puede supervisar la calidad del aire interior en tiempo real para mantener el control,
incluso si no está en casa.
• Puede supervisar la vida restante del ltro y recibir alertas cuando llegue el momento
de reemplazar los ltros.
• Puede activar y desactivar la función opcional “Sharp Cloud”. Cuando está activado,
el historial de uso se utilizará para ajustar los ajustes de sensibilidad del sensor del
modo “Automático” a lo largo del tiempo con el n de optimizar el rendimiento de su
puricador de aire.
Escanee el código QR para
obtener más información
sobre la aplicación Sharp
Air o visite a sharpusa.com
ESPAÑOL
ANTES DE EMPEZAR
Asegúrese de que su dispositivo inteligente esté conectado a una red Wi-Fi de 2,4 GHz.
• Conguración Wi-Fi protegida (WPS) Punto de acceso (Router)
El método de cifrado recomendado es WPA2 (AES).
• Asegúrese de que su dispositivo inteligente cumpla con los requisitos mínimos de
software:
Smartphones / tabletas de Android 8 o posterior
iPhones, iPod touch, iPads de iOS 12 o posterior
ES-1
Page 14

NOMBRE DE LAS PARTES
PANEL DE OPERACIONES
PANTALLA FRONTAL
123456
89
1. Botón ENCENDIDO/APAGADO
2. Botón Wi-Fi
3. Botón AUTO
4. Botón LIMPIEZA RÁPIDA PLASMACLUSTER
5. Botón ión Plasmacluster SPOT
6. Botón velocidad del ventilador
7. PANTALLA
8. Indicador SHARP CLOUD
Se ilumina cuando el puricador de aire está conectado al servicio en la nube de Sharp.
9. Indicador Wi-Fi
Se ilumina cuando el puricador de aire está conectado a un router.
7
ES-2
Page 15

FLUJO DE AJUSTES INICIALES
1
DESCARGAR Y REGISTRARSE
2
CONEXIÓN DEL PURIFICADOR DE AIRE Y UN ROUTER
3
CONEXIÓN ENTRE EL PURIFICADOR DE AIRE Y UN DISPOSITIVO INTELIGENTE
NOTA: Al emparejar el dispositivo inteligente con el puri cador de aire, asegúrese de que ambos estén
conectados al mismo router.
AJUSTES DE CONEXIÓN INICIAL
1
DESCARGAR Y REGISTRARSE
ESPAÑOL
1.
Instale la aplicación Sharp Air a su
dispositivo inteligente.
• Disponible para descargar desde la Apple
Store o Google Play.
2.
Inicie la aplicación Sharp Air.
3.
Revise la “Privacy and Data
Utilization Policy” y los “Terms of
Use”. Una vez que los revise,
marque las casillas y seleccione
“Agree and Continue”.
5.
Inicie sesión con su cuenta de Sharp
(ID de Sharp) o haga clic en “Sign
up” para registrarse si es usuario
nuevo.
• Si ya tiene una cuenta Sharp, introduzca
credenciales veri cadas y seleccione “Sign
in”.
• Si no tiene una cuenta Sharp, seleccione
“Sign up” y siga las instrucciones en pantalla.
XXXX@XXX.XX
XXXXXXXXX
6.
Introduzca un nombre para su
dispositivo inteligente y toque
“Save”.
• Se mostrará el nombre del modelo de su
dispositivo inteligente.
4.
Introduzca su fecha de nacimiento y
seleccione “SUBMIT”.
ES-3
Page 16
AJUSTES DE CONEXIÓN INICIAL
2
CONEXIÓN DEL PURIFICADOR DE AIRE Y UN ROUTER
Compruebe si la función de botón Wi-Fi Protected Setup (WPS) está disponible en el router.
Si el botón Wi-Fi Protected Setup (WPS) está disponible: Proceda a (A)
Si el botón Wi-Fi Protected Setup (WPS) no está disponible: Proceda a (B)
(A)
La función de botón Wi-Fi Protected Setup (WPS) está disponible en el router.
1.
Pulse “ ” en la parte superior
izquierda de la pantalla “Home”, y
seleccione “Pairing” → “Connection
with a router”.
2.
Seleccione “With Wi-Fi Protected
Setup (WPS) button” → “Air Puri er”
→ Seleccione “FXJ80U”.
3.
Siga las instrucciones en la
aplicación.
Mantenga pulsado el botón Wi-Fi
i.
durante 3 segundos con el
producto ENCENDIDO.
En 2 minutos, pulse el botón Wi-Fi
ii.
Protected Setup (WPS) del router.
• Consulte el funcionamiento del router en el
manual del método para manejar el botón
Wi-Fi Protected Setup (WPS).
Sonará una melodía, y el indicador
iii.
Wi-Fi se iluminará.
ES-4
• La con guración de la conexión puede
tardar unos minutos en completarse.
• Si los ajustes de conexión no se pueden
completar, pitará 4 veces y la luz del
indicador Wi-Fi estará apagada. En ese
caso, inténtelo de nuevo desde el paso 1.
Pulse “NEXT”.
iv.
Página 8, Paso 3
Page 17
(B)
La función de botón Wi-Fi Protected Setup (WPS) está disponible en el router.
1.
Pulse “ ” en la parte superior
izquierda de la pantalla “Home” y
seleccione “Pairing” → “Connection
with a router”.
2.
Seleccione “Without Wi-Fi Protected
Setup (WPS) button” → “Air Puri er”
→ Seleccione “FXJ80U”.
Seleccione con el
ii.
botón LIMPIEZA RÁPIDA
PLASMACLUSTER y con rme con
el botón AUTO.
Seleccione con el
iii.
botón LIMPIEZA RÁPIDA
PLASMACLUSTER y con rme con
el botón AUTO.
El indicador Wi-Fi y
iv.
parpadearán.
ESPAÑOL
3.
Siga las instrucciones de la aplicación.
Mantenga pulsado el botón velocidad
i.
del ventilador durante 3 segundos
con el producto APAGADO.
Dispositivos Android
Pulse “NEXT”.
Página
6
Dispositivos iOS
Pulse “NEXT”
después de
con rmar la
pantalla de la
aplicación.
Página
7
ES-5
Page 18

AJUSTES DE CONEXIÓN INICIAL
2
CONEXIÓN DEL PURIFICADOR DE AIRE Y UN ROUTER
(B)
La función de botón Wi-Fi Protected Setup (WPS) no está disponible en el router.
Dispositivos Android
7.
4.
Confirme el nombre del modelo del
purificador de aire que desea
conectar con el router y, a
continuación, pulse “NEXT”.
××
Si se muestra la siguiente pantalla y
el indicador Wi-Fi se enciende, el
puri cador de aire se habrá
conectado con éxito al router.
5.
Seleccione el router.
6.
Introduzca la contraseña del router
y, a continuación, pulse “NEXT”.
• La con guración de la conexión puede
tardar unos minutos en completarse.
• Si los ajustes de conexión no se pueden
completar, el puri cador de aire pitará
4 veces y la luz indicadora Wi-Fi estará
apagada. En ese caso, inténtelo de nuevo
desde el paso 1 de la página 5.
8.
Una vez conectado, pulse el
botón ENCENDIDO/APAGADO del
purificador de aire, y pulse “NEXT”.
ES-6
Página 8, Paso 3
Page 19
Dispositivos iOS
4.
1 Selecciona la configuración de
Wi-Fi de su iOS.
2 Seleccione “AP-SHARP-XX”.
××
XX son las dos últimas letras
•
de la dirección MAC. Consulte
la página 18 del manual de
funcionamiento del purificador de
aire cuando desee comprobar la
dirección MAC de su purificador
de aire.
6.
Introduzca el SSID y la contraseña del
router y, a continuación, pulse “NEXT”.
7.
Si se muestra la siguiente pantalla y
el indicador Wi-Fi se enciende, el
purificador de aire se habrá
conectado con éxito al router.
ESPAÑOL
3 Una vez conectado a AP-SHARP-
XX, vuelva a la aplicación Sharp
Air.
5.
Con rme el nombre del modelo
del puri cador de aire que
desea conectar con el router y, a
continuación, pulse “NEXT”.
• La con guración de la conexión puede
tardar unos minutos en completarse.
• Si los ajustes de conexión no se pueden
completar, el puri cador de aire pitará
4 veces y la luz indicadora Wi-Fi estará
apagada. En ese caso, inténtelo de nuevo
desde el paso 1 de la página 5.
8.
Una vez conectado, pulse el botón
ENCENDIDO/APAGADO del puri cador
de aire, y pulse “
NEXT
”.
ES-7
Página 8, Paso 3
Page 20
AJUSTES DE CONEXIÓN INICIAL
3
CONEXIÓN ENTRE EL PURIFICADOR DE AIRE Y UN DISPOSITIVO INTELIGENTE
1.
Conecte su dispositivo inteligente al
mismo router que el puri cador de
aire.
Pulse “
izquierda de la pantalla “Home” de
la aplicación Sharp Air y seleccione
“Already connected with a router”.
2.
Pulse “Pair” para el puri cador de
aire que desea emparejar.
” en la parte superior
4.
Pulse el botón Wi-Fi del puri cador
de aire en 3 minutos.
5.
Sonará una melodía, y el indicador
Wi-Fi se iluminará.
Los ajustes iniciales están completos.
• Si los ajustes no se pueden completar,
el puri cador de aire pitará 4 veces y el
indicador Wi-Fi se encenderá. En este caso,
inténtelo de nuevo desde el paso 2.
* Para obtener más información sobre el
procedimiento operativo de la aplicación,
consulte “HELP” en la aplicación.
3.
Introduzca la información del
puri cador de aire y pulse “Save”.
• El indicador Wi-Fi del puri cador de aire
parpadeará.
* Esta pantalla no se mostrará, en caso
de que el puri cador de aire ya se
haya registrado con otros dispositivos
inteligentes.
ES-8
Page 21
EN ESTA SITUACIÓN
Compruebe los siguientes detalles, antes de consultar o solicitar reparaciones.
Problema Artículos para comprobar
No se puede realizar la
conexión Wi-Fi del puricador
de aire y del router.
No se puede establecer la
conexión entre el puricador de
aire y su dispositivo inteligente.
No se puede realizar la
operación remota desde un
dispositivo inteligente.
Al cambiar el router
Al cambiar el dispositivo
inteligente
Cuando se vaya a desechar o
entregar el puricador de aire
En caso de ser entregado por
un tercero
Parpadea lentamente
Parpadea rápido
Apagado
• Compruebe las especicaciones del router en uso.
• Ajuste el router y la dirección de la antena, mueva el router y la antena
más cerca, y así sucesivamente. Después de eso, vuelva a cambiar para
encender el router y realice las conguraciones iniciales de nuevo.
• ¿Aparece el icono de conexión Wi-Fi en el monitor de su dispositivo inteligente?
Congure la conexión en su dispositivo inteligente.
• ¿El puricador de aire y su dispositivo inteligente se conectan al mismo router?
Conecte el puricador de aire y su dispositivo inteligente al mismo
router.
• ¿El número total de dispositivos inteligentes en uso supera el número
máximo de registro en un puricador de aire?
El número máximo de dispositivos inteligentes que se pueden registrar
en un puricador de aire es 5.
• ¿El número total de productos (aires acondicionados, puricadores de
aire, etc.) para registrarse con un dispositivo inteligente excede el número
máximo designado?
El número máximo de productos a registrar con un dispositivo
inteligente es de 10.
• ¿Está activado el indicador Wi-Fi del puricador de aire?
Si el indicador Wi-Fi está apagado, conecte el puricador de aire al
router. (Página 4)
• ¿Se ha completado la conexión entre el puricador de aire y su dispositivo
inteligente?
Congure la conexión entre el puricador de aire y su dispositivo
inteligente. (Página 8)
• Es necesario volver a conectar el puricador de aire al router.
1.
Mantenga pulsado el botón Wi-Fi durante 3 segundos para detener la función Wi-Fi.
2. Realice “Ajustes de conexión inicial: 2 Conexión del puricador de aire
y un router”. (Página 4)
1. Elimine el registro del dispositivo inteligente antiguo de la aplicación designada.
2. Utilice el nuevo dispositivo inteligente para realizar “Ajustes de conexión iniciales:
1 Descargar y Registrarse” y “Ajustes de conexión iniciales:
3
Conexión entre el puricador de aire y un dispositivo inteligente”. (Página 3, 8)
• Realice los siguientes pasos para evitar la fuga de información personal.
1. Elimine el registro del puricador de aire de la aplicación designada.
2. Realice “A4: Inicialización de la función Wi-Fi” en la página 18 del
manual de operación del puricador de aire.
• Para evitar el acceso no autorizado de un tercero,
realice “A4: Inicialización de la función Wi-Fi” en la página 18
del manual de funcionamiento del puricador de aire.
• La conexión Wi-Fi del puricador de aire y un router está en conguración.
• La conexión del puricador de aire y un dispositivo inteligente está en conguración.
• Error de red. Realice “A7: Visualizar estado de red Wi-Fi” en la página
19 del manual de funcionamiento del puricador de aire y compruebe el
estado de la conexión Wi-Fi.
• El puricador de aire no se puede conectar al router.
• Realice “A7: Visualizar estado de red Wi-Fi” en la página 19 del manual
de funcionamiento del puricador de aire y compruebe el estado de la
conexión Wi-Fi.
•
¿El enchufe eléctrico del puricador de aire ha salido de su tomacorriente?
• ¿Se ha detenido la función Wi-Fi?
ESPAÑOL
ES-9
Page 22

MEMO
Page 23

MEMO
Page 24

SHARP ELECTRONICS CORPORATION
100 Paragon Drive, Montvale, NJ 07645, U.S.A.
Printed in Thailand
Impreso en Tailandia
TINS-B246KKRZ 19K-
1
 Loading...