

Page 1

MODEL
FO-P710
FO-A760
FACSIMILE
OPERATION MANUAL
Page 2

Datalight is a registered trademark of Datalight, Inc.
TM
FlashFX
Copyright 1993 - 2004 Datalight, Inc. All Rights Reserved.
U.S. Patent Office 5.860.082/6.260.156
is a trademark of Datalight, Inc.
Page 3

WARRANTY
Business Products
Congratulations on Your Purchase!
This Sharp product is warranted against faults in material and manufacture for the period
as stated in the table below.
In the event of any defect arising in the equipment during the warranty period, such
repairs should only be carried out by the Dealer from which the unit was originally
purchased or a Service Centre approved by Sharp to service this type of equipment.
These repairs would be carried out at no charge to the owner, subject to the conditions
specified herein.
The owner is responsible for any transportation and insurance costs if the product has to
be returned for repair.
This warranty does not extend to accessories or defects or injuries caused by or resulting
from causes not attributable to faulty parts or the manufacture of the product, including
but not limited to, defect or injury caused by or resulting from misuse, abuse, neglect,
accidental damage, improper voltage, liquid spillage, vermin infestation, software, use of
consumables other than those approved by Sharp or any alterations made to the product
which are not authorised by Sharp.
Please retain your sales documentation, as this should be produced to validate a
warranty claim.
This warranty is in addition to and in no way limits, varies or excludes any express and
implied rights and remedies under any relevant legislation in the country of sale. However
to the extent permitted by such legislation. Sharp excludes any liability for any indirect or
consequential damage arising from the purchase or use of the product.
To the extent permitted by law, Sharp excludes all implied warranties and conditions and
where the product is one that is not normally required for personal, domestic or
household use. Sharp limits its liability to repair or replacement (at Sharp's option) of
materials or workmanship which are found by Sharp to be defective.
WARRANTY PERIODS
Computers & Peripherals 12 months
Copiers & Ancillaries 6 months
Electronic Cash Registers 12 months
Facsimile 12 months
Projection Equipment 24 months (excluding lamps and air filters)
Information Display Panel 12 months
POS Terminals 12 months
Multi Function Device 12 months
R
T
S
SHARP CORPO
U
A
ABN 40 003 039 405
1 Huntingwood Drive
R
LIA PT
A
Huntingw
ATIO N
Y LIMIT
ood N
SP
O
F
E
SW
form01
D
2148
5
7)
0
0
2
N.
(JA
IMPORTANT NOTICE: This warranty applies to products sold in Australia
Page 4
FOR LOCATION ENQUIRIES WITHIN
AUSTRALIA
REGARDING YOUR LOCAL
SHARP APPROVED SERVICE CENTRE
VISIT OUR WEBSITE AT
www.sharp.net.au
OR CALL SHARP CUSTOMER CARE
1300 135 022
(LOCAL CALL COST APPLY WITHIN AUSTRALIA)
SHARP CORPORATION OF AUSTRALIA PTY LTD
SPform019(JUNE 2004)
Page 5

Table of Contents
Introduction 2
A Look at the Operation Panel 6
1. Installation 9
Unpacking Checklist. . . . . . . . . . . . . . 9
Setup . . . . . . . . . . . . . . . . . . . . . . . . . 9
Imaging Film. . . . . . . . . . . . . . . . . . . 10
Loading Paper . . . . . . . . . . . . . . . . . 12
Initial Settings. . . . . . . . . . . . . . . . . . 13
Setting the Reception Mode . . . . . . . 15
Volume Adjustment . . . . . . . . . . . . . 15
2. Sending Faxes 17
Transmittable Documents . . . . . . . . 17
Loading the Document . . . . . . . . . . . 17
Resolution and Contrast. . . . . . . . . . 18
Sending a Fax: Normal Dialling . . . . 19
Storing Numbers . . . . . . . . . . . . . . . 20
Sending a Fax: Auto Dialling . . . . . . 22
Making Phone Calls . . . . . . . . . . . . . 25
3. Receiving Faxes 26
Using TEL/FAX (T/F) Mode . . . . . . . 26
Using FAX Mode . . . . . . . . . . . . . . . 27
Using TEL Mode . . . . . . . . . . . . . . . 27
Using A.M. Mode (FO-A760) . . . . . . 29
Reception to Memory . . . . . . . . . . . . 29
5. Making Copies 38
6. Caller ID (Requires Service) 39
Activating Caller ID . . . . . . . . . . . . . . 39
Caller ID List . . . . . . . . . . . . . . . . . . . 39
Blocking Calls . . . . . . . . . . . . . . . . . . 41
7. Key Lock Function 43
8. Distinctive Ring (Requires
Service) 45
9. Maintenance 46
Cleaning the Machine . . . . . . . . . . . . 46
Cleaning the Print Head and Rollers 47
10. Troubleshooting 50
Problems and Solutions . . . . . . . . . . 50
Messages and Signals . . . . . . . . . . . 54
Clearing Paper Jams . . . . . . . . . . . . 57
Quick Reference Guide 60
Index 61
4. Answering System (FO-A760
only) 31
Recording an OGM . . . . . . . . . . . . . 31
Using the Answering System . . . . . . 31
Answering System Settings . . . . . . . 33
Override Ringing . . . . . . . . . . . . . . . 34
Remote Operations . . . . . . . . . . . . . 35
1
Page 6

Introduction
Specifications
Imaging film Initial sample roll (included with machine):
Yields approx. 20 A4 pages
Replacement roll (not included):
FO-31CR (33 m x one roll)
(one roll yields approx. 100 A4 pages)
Paper tray capacity
Recording system
Effective printing width 205 mm max.
Memory capacity
Modem speed 14,400 bps with auto fallback to lower speeds.
Transmission time* Approx. 9 seconds
Compatibility ITU-T (CCITT) G3 mode
Compression scheme MH, H2, MMR
Automatic dialling 100 numbers; 3 Rapid Keys
Effective scanning width 205 mm max.
Scanning resolution Horizontal: 8 pels/mm
Approx. 10 A4 sheets (80 g/m
(at room temperature)
Thermal transfer recording
FO-P710: Approximately 40 average pages
FO-A760: Approximately 50 average pages with no
voice messages recorded, or 15 minutes of voice
messages (including OGMs) with no documents in
memory (maximum of 30 voice messages).
Vertical:
Standard: 3.85 lines/mm
Fine /Halftone: 7.7 lines/mm
Super fine: 15.4 lines/mm
2
)
Halftone (greyscale) 64 levels
Applicable telephone line Analog public switched telephone network
*Based on Sharp Standard Chart at standard resolution, excluding time for protocol signals (i.e.,
ITU-T phase C time only)
2
Page 7

Reception modes
TEL/FAX,TEL, FAX, A.M.
(A.M. mode is only available on the FO-A760)
Automatic document
A4: 10 sheets max. (80 g/m
2
)
feeder
Contrast control Automatic/Dark selectable
Copy function Single / Multi (9 copies/page)
Display 16-digit LCD display
Power requirements 230-240 V AC, 50 Hz
Power consumption Standby: 1.5 W (only when Caller ID and distinctive ring
are set to NO)
Maximum: 90 W
Operating temperature 5 - 35°C
Humidity 30 - 85% RH
Dimensions (without
attachments)
Width: 296 mm
Depth: 180 mm
Height: 86 mm
Weight (without
Approx. 2.3 kg
attachments)
As a part of our policy of continuous improvement, SHARP reserves the right to make design and
specification changes for product improvement without prior notice. The performance
specification figures indicated are nominal values of production units. There may be some
deviations from these values in individual units.
Important: This machine is not designed for use on a line which has call waiting, call
forwarding, or certain other special services offered by your telephone company (errors
may occur during transmission and reception of faxes).
This machine is not compatible with digital telephone systems.
3
Page 8

Important safety information
For your safety, if any of your equipment is not operating properly or should any
physical damage occur to the equipment where internal parts may become exposed,
the equipment should be immediately disconnected from the phone line and then the
power line and returned to a SHARP authorised Service Centre for inspection, repair,
or disposal.
Installing or modifying telephone lines should only be done by an ACMA licensed
serviceman.
This facsimile machine is designed for use in Australia only.
Do not disassemble this machine or attempt any procedures not described in this
manual. Refer all servicing to qualified service personnel.
Do not install or use the machine near water, or when you are wet. For example, do not
use the machine near a bath tub, wash bowl, kitchen sink or laundry tub, in a wet
basement, or near a swimming pool. Do not spill any liquids on the machine.
Unplug the machine from the power outlet and telephone socket and consult a
qualified service representative if any of the following situations occur:
- Liquid has been spilled into the machine or the machine has been
exposed to rain or water.
- The machine produces odors, smoke, or unusual noises.
- The power cord is frayed or damaged.
- The machine has been dropped or the housing damaged.
Do not allow anything to rest on the power cord, and do not install the machine where
people may walk on the power cord.
This machine must only be connected to a
outlet. Connecting it to any other kind of outlet will damage the machine.
Never insert objects of any kind into slots or openings on the machine. This could
create a risk of fire or electric shock. If an object falls into the machine that you cannot
remove, unplug the machine and consult a qualified service representative.
Do not place this machine on an unstable cart, stand or table. The machine could be
seriously damaged if it falls.
Never install telephone wiring during a lightning storm.
Never install telephone sockets in wet locations unless the socket is specifically
designed for wet locations.
Never touch bare telephone wires or terminals unless the telephone line has been
disconnected at the network interface.
Use caution when installing or modifying telephone lines.
230-240 V AC, 50 Hz, earthed (3-prong)
4
Page 9

Avoid using a telephone (other than a cordless type) during an electrical storm. There
may be a remote risk of electric shock from lightning.
Do not use a telephone to report a gas leak in the vicinity of the leak.
The power outlet must be installed near the equipment and must be easily accessible.
WARNING NOTICE:
NO calls can be made to or from this fax machine during a mains power failure.
WARNING: Australian Communications and Media Authority (ACMA) regulations state
that no unauthorised changes or modifications to this equipment are permitted.
Note: Complies with ACMA standard AS/NZS CISPR22 regarding emission of
electromagnetic interference.
These limits are designed to provide reasonable protection against interference in an
installation. This equipment generates, uses, and can radiate radio frequency energy
and, if not installed and used in accordance with the instructions, may cause
interference. However, there is no guarantee that interference will not occur in a
particular installation.
If this equipment does cause interference to radio or television reception, which can be
determined by turning the equipment off and on, the user is encouraged to try to
correct the interference by one or more of the following measures:
- Reorient or relocate the receiving antenna.
- Increase the separation between the equipment and the receiver.
- Connect the equipment to an outlet on a different circuit to that which the receiver
is connected.
- Consult the dealer or an experienced radio/TV technician for help.
The Ringer Equivalence Number (REN) for this equipment is written on the back of the
machine. The sum of all Ringer Equivalence Numbers (REN's) on your telephone line
should not exceed 3 to assure correct service from your telephone company.
5
Page 10
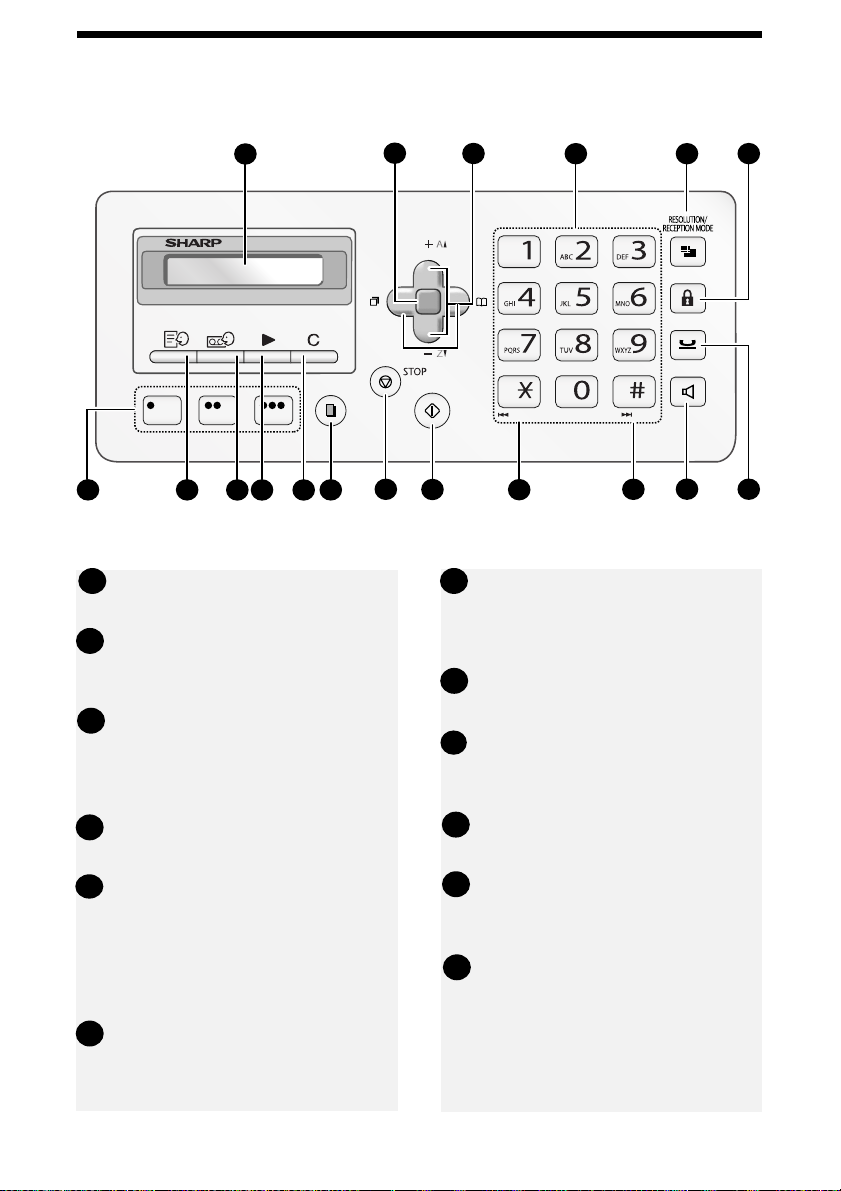
A Look at the Operation Panel
2
REDIAL
COPY/
HELP
2
3
F
START
14
REPEAT SKIP
15
4
1
7
8
9 10 11
12
Note: The above illustration shows the operation panel of the FO-A760.
Display: This displays messages to
1
help you operate the machine.
Rapid Keys: Numbers stored in the
7
phonebook can be assigned to
these keys for one-touch dialing (p.
Function key: Press this key
2
22).
followed by the arrow keys to select
special functions and settings.
MEMO key: Press to record a
8
memo (FO-A760 only).
Arrow keys: Use to scroll through
3
and select settings, and to search
for numbers in the phonebook (p.
22).
Forward Rec. key: Press to record
9
a greeting (outgoing message) (FOA760 only).
5
HOLD
1613
17
6
18
Number keys: Use to dial fax
4
numbers.
RESOLUTION/RECEPTION key
5
When a document is in the feeder,
press to adjust the scanning
resolution (p. 18). At any other time,
press to select the reception mode
(p. 15).
Key Lock key: Use to activate or
6
release the Key Lock function (p.
43).
PLAY key: Press to play messages
10
(FO-A760 only).
DELETE key: Press to delete
11
various data from the machine (FOA760 only).
COPY/HELP key: When a
12
document is in the feeder, press this
key to make a copy of the document
(p. 38). At any other time, press this
key to print out the Help List, a quick
reference guide to the operation the
machine.
6
Page 11

STOP key: Press to cancel an
13
operation before it is completed.
SPEAKER key: Press before
17
dialing to listen to the line and fax
tones through the speaker when
START key: Press after dialling to
14
send a fax (p. 19).
REPEAT key: Press while listening
15
to a message to repeat it (FO-A760
only).
SKIP key: Press while listening to a
16
message to skip it (FO-A760 only).
faxing (Normal Dialling, p. 19).
Note: This is not a speakerphone.
It cannot be used for speaking.
HOLD key (FO-A760)
18
HOLD/DELETE key (FO-P710):
Press during a call to put the call on
hold.
On the FO-P710, this key is also
used to delete various data from the
machine.
Sleep mode
The machine will automatically enter sleep mode if left unused for a certain period
of time. When this happens, only the time will appear in the display. To wake the
machine, simply press any key on the operation panel and wait briefly until the
machine returns to the normal state.
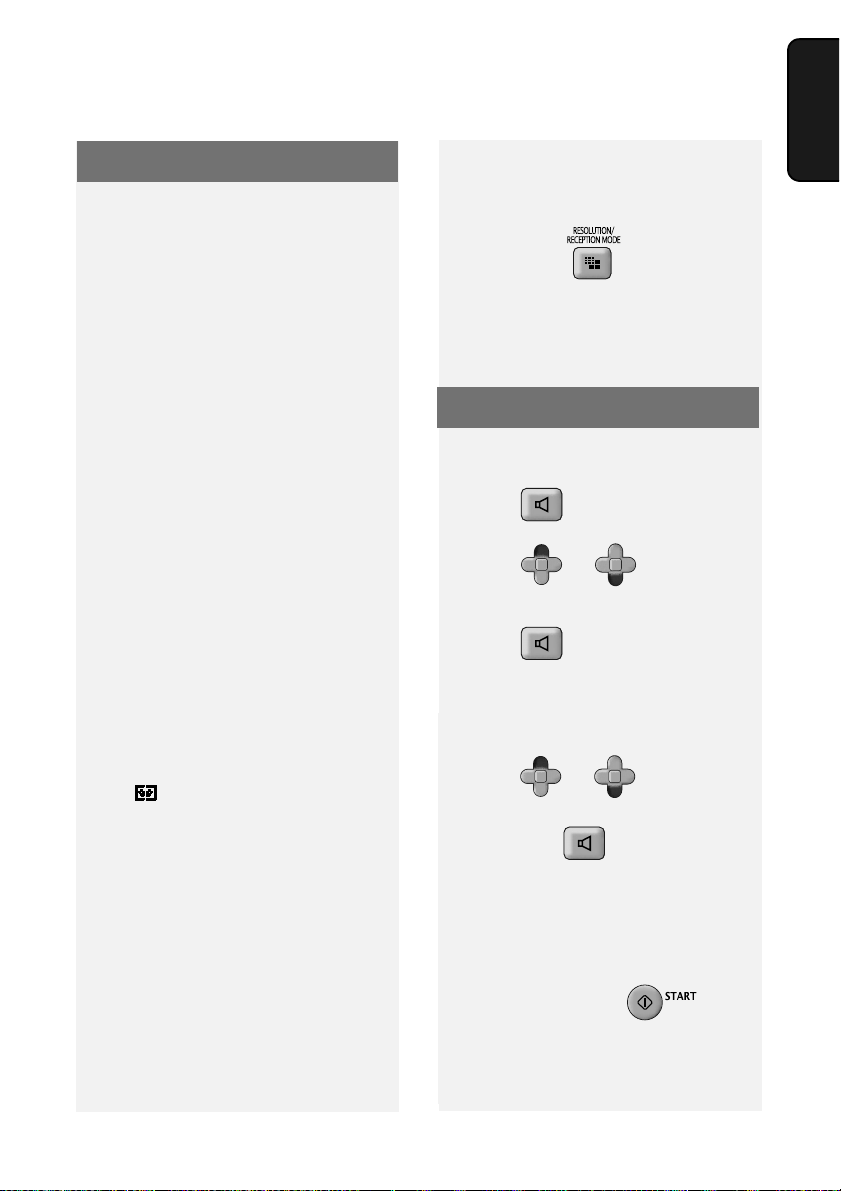
Monitoring phone conversations
When speaking through the handset, you can press to allow a third person
to listen to the conversation through the speaker. (To turn off the speaker, press the
key again.)
F
To adjust the volume of the speaker when monitoring a conversation, press
F
or (the volume reverts to the lowest setting each time the handset is
F
replaced).
Note that the speaker cannot be used for speaking; it is only for listening.
To avoid feedback (a loud howling sound), be sure to turn off the speaker (press
once again) before you replace the handset.
7
Page 12
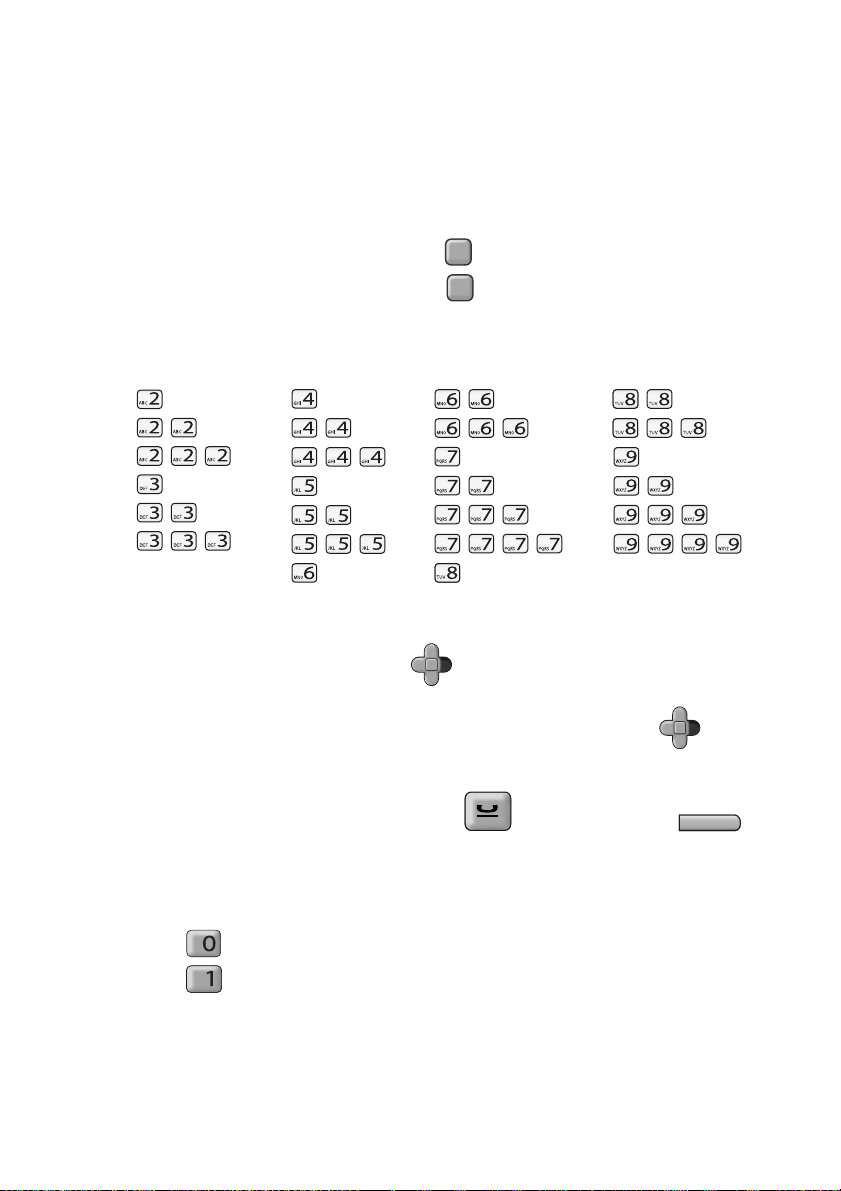
Entering letters
When the display prompts you to enter a name or other text, press the number
keys for each letter as shown below.
Note: To enter a number in a name, press and then press the desired number.
To switch back to letter entry mode, press again. (“ABC” appears at the right
F
F
of the display when letter entry mode is selected, and “123” appears when number
entry mode is selected. )
A =
B =
C =
D =
E =
F =
G =
H =
I =
J =
K =
L =
M =
Example: SHARP = 7777 44 2 777 7
♦ To enter two letters in succession that require the same key, press after
N =
O =
P =
Q =
R =
S =
T =
U =
8
TUV
V =
8
TUV
W =
X =
Y =
Z =
8
TUV
F
F
entering the first letter to move the cursor to the right.
♦ To backspace and clear a mistake, press on the FO-P710, or
C
on the FO-A760.
♦ To enter a lower case letter, continue pressing the key for the letter until the
lower case letter appears.
♦ Press repeatedly to enter , : ! ? & / ( ) [ ] (space)
Press repeatedly to enter @ . / - _
8
Page 13
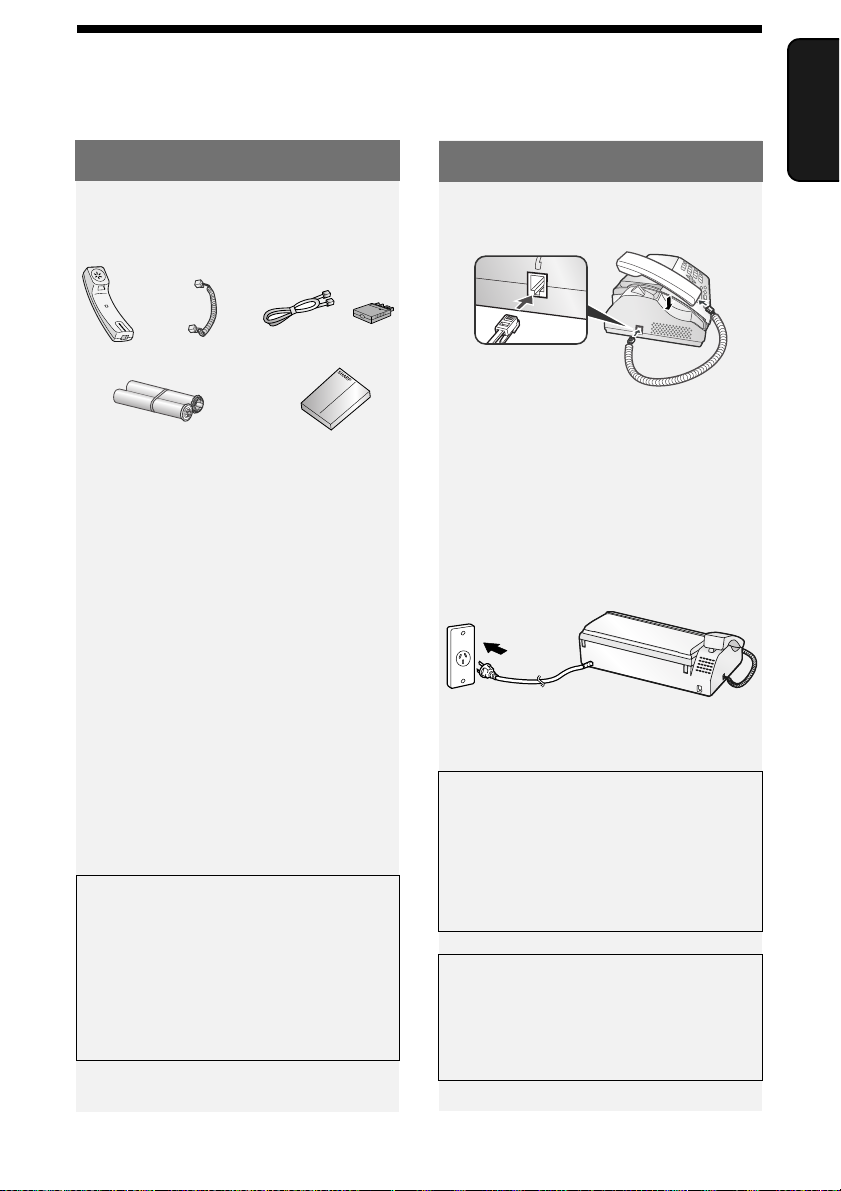
1. Installation
Unpacking Checklist
Unpacking Checklist
Handset
Sample roll of
imaging film (already
loaded in machine)
Handset
cord
Phone
line cord
Points to keep in mind when
setting up
Adapter
Manual
♦ Do not place the machine in direct
sunlight.
♦ Do not place the machine near
heaters or air conditioners.
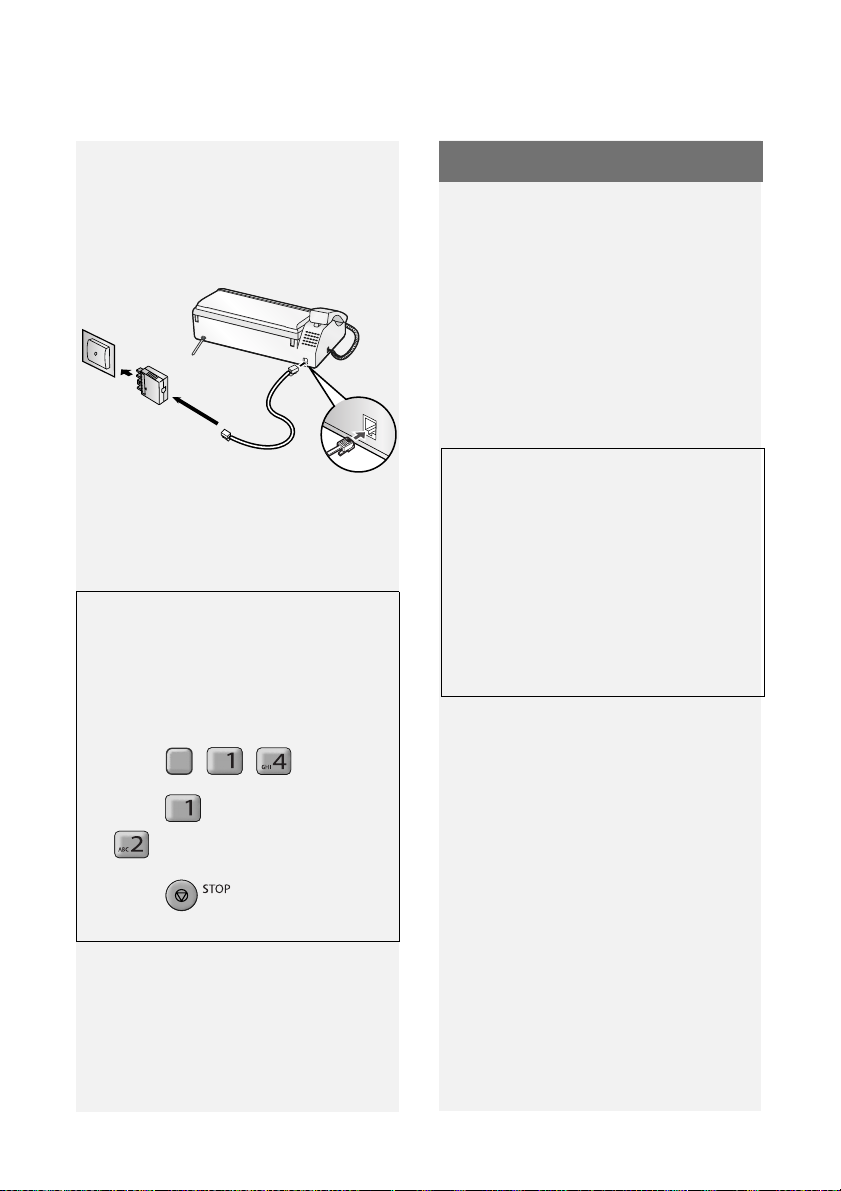
Setup
Connecting the handset
Connecting the power cord
Plug the power cord into a 230-240 V,
, earthed (3-prong) AC outlet.
50 Hz
♦ The power outlet must be installed
near the equipment and must be
easily accessible.
1. Installation
♦ Keep dust away from the machine.
♦ Keep the area around the machine
clear.
About condensation
If the machine is moved from a cold to a
warm place, condensation may form on
the scanning glass, preventing proper
document scanning. To remove the
condensation, turn on the power and
wait approximately two hours before
using the machine.
When disconnecting the machine,
always disconnect the phone line
before you disconnect the power cord.
When re-connecting the machine,
always connect the power cord before
connecting the phone line.
It is recommended that you install
surge protectors for the power and
telephone lines. Surge protectors can
be purchased at most telephone
specialty stores.
9
Page 14
Imaging Film
Connecting the phone line
Connect the phone line cord to the TEL.
LINE socket and a wall telephone
socket (use the provided adapter if
needed).
TEL.LINE
Wall socket
TEL. LINE
socket
Setting the Dial Mode
The machine is initially set for tone
dialling. If you are on a pulse dial line,
you must change the DIAL MODE
setting to pulse.
1 Press , , .
F
2 Press to select TONE, or
to select PULSE.
3 Press to exit.
Imaging Film
Checking the pre-loaded sample
roll
A sample roll of imaging film has been
pre-loaded in the machine. Perform
steps 1 to 2 and 5 to 7 of Replacing the
imaging film below to check the film and
make sure it is taut.
♦ The sample roll of imaging film can
print about 20 pages.
If [FILM END] appears
If [FILM END] appears in the display for
longer than 10 seconds, open the
machine (see Steps 1 and 2 of
Replacing the imaging film below) and
check the film. If the film has
completely wound onto the front spool,
replace the film. Otherwise, perform
Steps 5 to 7 of Replacing the imaging
film to remove slack.
Replacing the imaging film
Replacement film
Please purchase the following imaging
film:
SHARP FO-31CR (33 m x one roll)
Follow the steps below to replace the
imaging film.
10
Note: Before replacing the imaging
film, remove any paper from the paper
tray and push in the tray extension.
Page 15
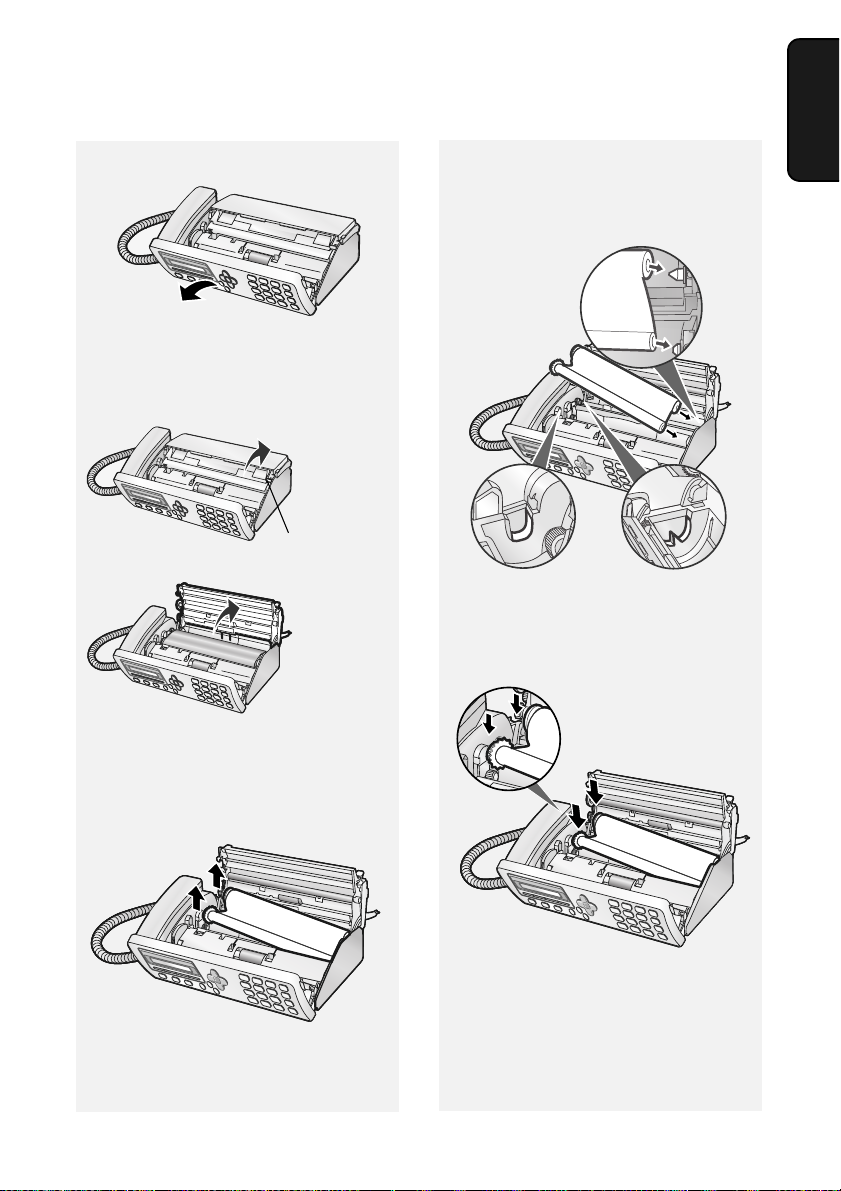
Imaging Film
1 Open the operation panel.
2 Press the release and open the print
compartment cover.
Press green release
4 Insert the new roll of film into the
print compartment:
a. Fit the right ends of the spools
onto the pins.
b. Place the left ends so that the
shafts of the gears fit into the
holders.
1. Installation
3 Remove the used roll from the
compartment, lifting the left ends of
the spools first.
11
Page 16
Loading Paper
5 Turn the front gear in the direction
shown until the film is taut.
• If there is a label on the film,
continue to turn the gear until the
label is no longer visible.
6 Close the print compartment cover.
• Press down on the marks on
both sides of the cover to make sure
it clicks into place.
Loading Paper
Approximately 10 sheets of A4-size
paper (80 g/m
paper tray (at room temperature).
2
) can be loaded in the
1 If the paper tray is closed, open it.
2 Pull out the tray extension.
7 Close the operation panel.
12
3 Fan the paper, and then tap the
edges against a flat surface to even
the stack.
Page 17
Initial Settings
4 Insert the stack of paper into the
tray, print side down.
• If paper remains in the tray, take it out
and combine it into a single stack
with the new paper.
• Printing on the reverse side of the
paper may result in poor print quality.
• Do not use paper that has already
been printed on or is curled.
Initial Settings
Setting the date and time
Set the date and time in the machine.
♦ The date and time will be printed
automatically at the top of all fax
pages you send. The date and time
also appear in the display.
1 Press , , .
F
• The currently set date appears
(example): [DATE 15-08-2008]
2 Enter a two-digit number for the day
("01" to "31").
Example: the 5th
[DATE 05-08-2008]
• To backspace and clear a mistake,
press on the FO-P710, or
C
on the FO-A760.
1. Installation
Note: If paper is left in the tray a long
time, it will become curled. Curled
paper will not feed properly and may
cause a paper jam.
When not using the machine:
When not using the machine, keep
the paper tray closed.
3 Enter a two-digit number for the
month ("01" for January, "02" for
February, "12" for December, etc.).
Example: January
[DATE 05-01-2008]
4 Enter the year (4 digits).
Example:
• The currently set time appears
(example): [TIME 12:19]
5 Enter a two-digit number for the hour
("00" to "23") and a two-digit number
for the minute ("00" to "59").
Example: 9:25
13
Page 18
Initial Settings
6 Press .
Display: [OWN NUMBER SET]
7 Press to exit.
Entering your fax number
Enter your fax number in the machine.
♦ Your entered fax number will be
printed automatically at the top of all
fax pages you send.
1 Press , ,
F
2 Press to select SET.
(To clear your number, press
twice and go to Step 5.)
3 Enter your fax number with the
number keys (max. 20 digits).
• To insert a space, press . To
enter “+”, press
• To backspace and clear a mistake,
Entering your name
Enter your name in the machine.
♦ Your entered name will be printed
automatically at the top of all fax
pages you send.
1 Press , , .
F
2 Press to select SET.
(To clear your name, press
twice and go to Step 5.)
3 Enter your name by pressing
number keys for each letter as
shown in the chart on page 8. Up to
24 characters can be entered.
• To backspace and clear a mistake,
press on the FO-P710, or
C
on the FO-A760.
4 Press .
Display: [DIAL MODE]
5 Press to exit.
press on the FO-P710, or
C
on the FO-A760.
4 Press .
Display: [OWN NAME SET]
5 Press to exit.
14
Page 19
Setting the Reception Mode
Setting the Reception Mode
The machine has the following modes
for receiving incoming faxes:
FAX mode:
Select this mode when you only want to
receive faxes on your line. The machine
automatically answers all calls and
receives incoming faxes.
TEL mode:
This mode is the most convenient for
receiving phone calls. Faxes can also
be received; however, all calls must
first be answered by picking up the
machine's handset.
TEL/FAX (T/F) mode:
This mode is convenient for receiving
both faxes and voice calls. The
machine answers all calls on a preset
number of rings. If the machine detects
that a call is a voice call (including a
manually dialled fax), it will make a
special ringing sound to alert you to
answer. If the machine detects that the
call is an automatically dialled fax, it will
begin reception.
A.M. () mode (FO-A760 only):
Select this mode when you go out and
want the machine’s answering system
to answer all calls. Voice messages will
be recorded, and fax messages will be
received automatically.
Setting the reception mode
To set the reception mode, make sure a
document is not loaded in the feeder,
and then press until the desired
mode appears in the display.
♦ For more information on receiving
faxes, see Chapter 3.
Volume Adjustment
Speaker volume
1 Press .
F
2 Press or to select the
F
desired level.
F
• Press again to turn off the
speaker.
Ringer volume
F
1 Press or to select
F
HIGH, MIDDLE, LOW, or OFF.
(Make sure has not been
pressed.)
F
• The ringer will ring once at the
selected level.
1. Installation
2 If you selected “OFF OK?” to turn
off the ringer, press .
Note: When the reception mode is set
to TEL, the ringer will still ring at LOW if
turned off.
15
Page 20
Volume Adjustment
Key Tone setting
The machine normally sounds a beep
each time you press a key on the
operation panel. This confirms that the
key has been correctly pressed.
If desired, you can turn off the beep
sound. Follow the steps below.
1 Press , , and .
F
2 Press (YES) to turn on the
beep sound.
Press (NO). to turn off the
beep sound.
3 Press to exit.
16
Page 21
2. Sending Faxes
Transmittable Documents
Minimum document size/weight
148 x 140 mm
2
52 g/m
Maximum document size/weight:
Loading up to 10 sheets at once:
A4 (210 x 297 mm)
2
80 g/m
Loading 1 sheet at a time:
210 x 356 mm
157 g/m
2
Transmittable Documents
Documents which are taped, torn,
♦
smaller than the minimum size,
carbon backed, easily smudged, or
have a slick, coated surface should be
photocopied, and the copy loaded in
the feeder.
♦ Documents that are curled or have a
wave-like pattern must be flattened.
Loading the Document
Up to 10 A4-size sheets can be placed
in the feeder at once. The sheets will
feed automatically starting from the
bottom sheet.
Faxes
2. Sending
The maximum scanning width is
205 mm, and the top and bottom 5 mm
of a document cannot be scanned.
Other restrictions
♦ The scanner cannot recognise yellow,
greenish yellow, or light blue ink.
♦ Remove all clips, staples, and pins
before loading documents in the
feeder (these will damage the
machine).
♦ Ink, glue, or correcting fluid on a
document must be dry before
scanning.
♦ To send or copy more than the
maximum number of sheets, place
the additional sheets gently in the
feeder just before the last sheet is
scanned. Do not force the sheets in,
as this may cause double-feeding or
jamming.
♦ For large or thick sheets that must be
loaded one at a time, insert each
sheet into the feeder as the previous
sheet is being scanned. Insert gently
to avoid double-feeding.
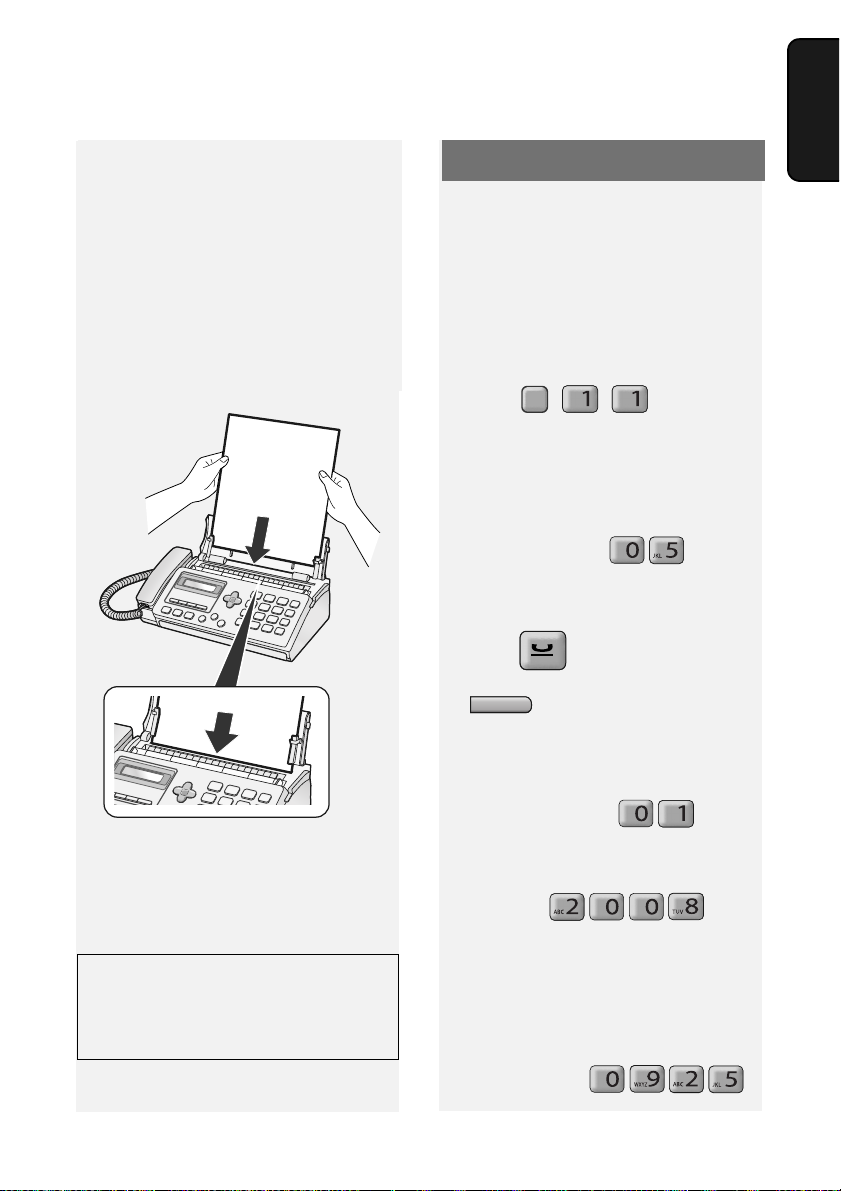
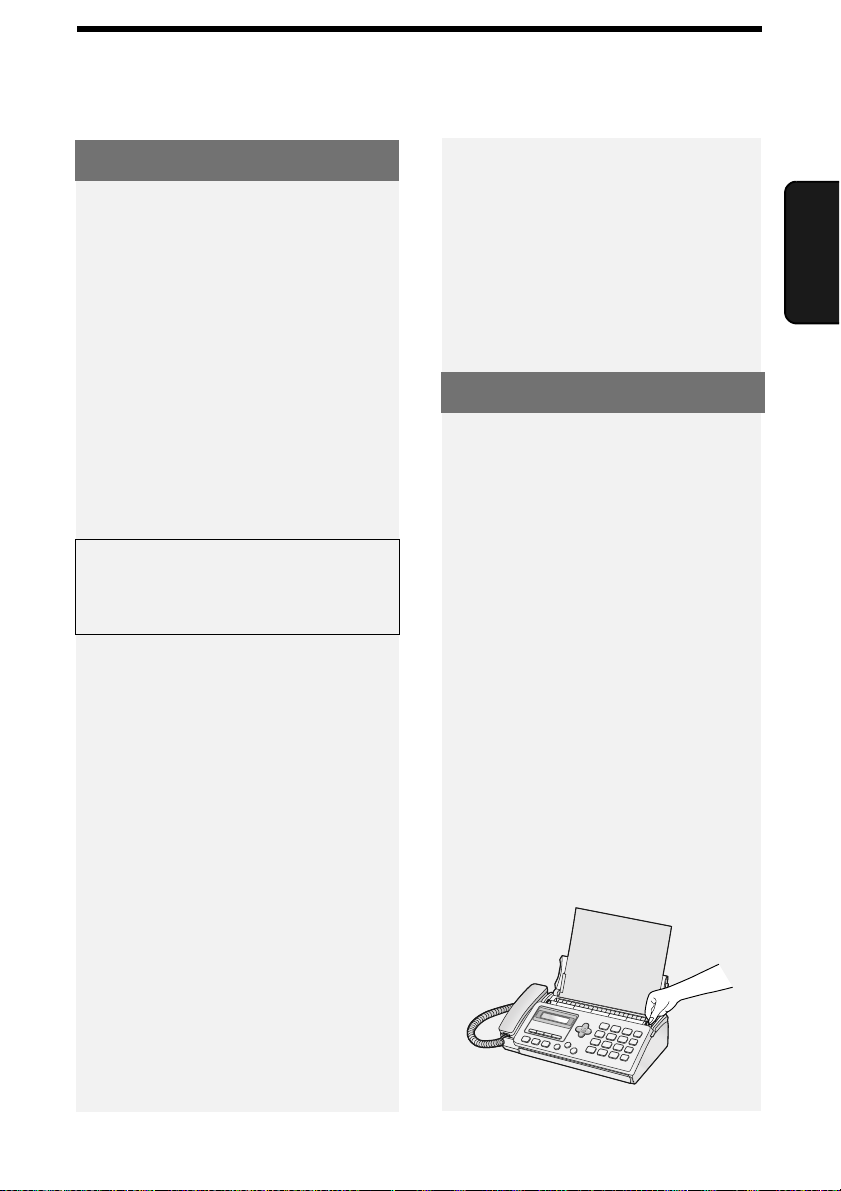
1 Adjust the document guides to the
width of your document.
17
Page 22

Resolution and Contrast
2 Place the document face down with
the top edge going in first, and
insert it all the way into the feeder.
Make sure that the roller draws the
document in.
• Display: [READY TO SEND].
3 Adjust the resolution and/or contrast
settings (p. 18), and then dial the
receiving machine (p. 19).
Removing a document from the
feeder
1 Press then . The
document will feed out.
F
2 If the document is jammed and
does not feed out, open the cover
and remove the document (see
Clearing a jammed document on
page 57).
Resolution and Contrast
You can adjust the resolution and
contrast before sending a document.
♦ The default resolution setting is
STANDARD. The default contrast
setting is AUTO.
♦ Adjust the settings each time you
don't want to use the default settings.
Note: The resolution and contrast
settings are only effective for sending;
not for receiving.
Resolution settings
STANDARD Use STANDARD for
ordinary documents.
This provides the fastest
transmission.
FINE Use FINE for documents
containing small letters
or fine drawings.
SUPER FINE Use SUPER FINE for
documents containing
very small letters or very
fine drawings.
HALF TONE Use HALF TONE for
photographs and
illustrations. The original
will be reproduced in 64
shades of gray.
• Caution: Attempting to remove a
jammed document without opening
the cover may damage the feeder
mechanism.
18
Page 23

Sending a Fax: Normal Dialling
Contrast settings
AUTO Use AUTO for normal
documents.
DARK Use DARK for faint
documents.
1 Load the document(s).
• The resolution/contrast cannot be
adjusted unless the document is
loaded.
2 Press one or more times
until the desired resolution and
contrast settings appear in the
display.
• The first time you move through the
list of resolution settings, the contrast
setting AUTO will appear next to
each resolution setting. The second
time you move through the list, the
contrast setting DARK will appear.
Note: In order to transmit in SUPER
FINE resolution, the receiving machine
must also have that resolution. If not,
your machine will automatically step
down to FINE.
Sending a Fax: Normal Dialling
With Normal Dialling, you pick up the
handset (or press ) and dial by
pressing the number keys.
♦ If a person answers, you can talk with
them through the handset before
sending the fax. (If you pressed
, you must pick up the handset
to talk.)
♦ Normal Dialling allows you to listen to
the line and make sure the other fax
machine is responding.
1 Load the document(s).
• If desired, press to set the
resolution and/or contrast.
2 Pick up the handset or press .
Listen for the dial tone.
3 Dial the fax number of the receiving
machine by pressing the number
keys.
4 Wait for the connection. Depending
on the setting of the receiving
machine, you will either hear a fax
tone or the other person will answer.
Faxes
2. Sending
• If the other person answers, ask
them to press their Start key (if you
pressed , pick up the handset
to speak with them). This causes the
receiving machine to issue a fax
tone.
19
Page 24

Storing Numbers
5 When you hear the fax tone, press
. Replace the handset.
• If the transmission is completed
successfully, the machine will beep
once.
• If an error occurs, the machine will
beep three times.
Note: If the transmission is
unsuccessful and the display shows
[DOCUMENT JAMMED], remove the
document as explained on page 57.
Storing Numbers
Storing fax and phone numbers
in the phonebook
You can store fax and phone numbers
in the machine’s phonebook for
automatic dialling. Up to 100 numbers
can be stored.
Follow the steps below to store a fax or
phone number.
1 Press , .
F
2 Enter the name of the destination or
other party by pressing number
keys for each letter as shown in the
chart on page 8. Up to 20
characters can be entered.
• To backspace and clear a mistake,
press on the FO-P710, or
C
on the FO-A760.
20
3 Press .
4 Enter the fax number with the
number keys (max. of 32 digits).
(Note: A space cannot be entered.)
• If a pause is required between any of
the digits, press . The pause
appears as a hyphen. Several
pauses can be entered in a row.
F
5 Press .
6 Press to exit.
Page 25

Storing Numbers
Printing the TEL # LIST
To print a list showing the fax and
phone numbers stored in the
phonebook, press , , ,
F
and then to select YES.
Assigning a number in the
phonebook to a Rapid Key
You can assign your most frequently
dialled numbers to the Rapid Keys.
Three Rapid Keys are available.
♦ When a number is assigned to a
Rapid Key, it can be dialled by simply
pressing the Rapid Key.
♦ To assign a number to a Rapid Key,
the number must first be stored in the
phonebook (page 20).
Follow the steps below to assign a
number in the phonebook to a Rapid
Key.
Changing the number assigned to a
Rapid Key: To change the number
assigned to a Rapid Key, simply repeat
the steps above to assign the new
number to the Rapid Key. The new
number will replace the old number.
Clearing a Rapid Key: To clear a
number from a Rapid Key, hold down
the Rapid Key until [CLEARED]
appears in the display.
Editing numbers in the
phonebook
To make changes to a number stored in
the phonebook, follow these steps:
1 Press , press or
F
F
F
F
until the number you wish to edit
appears, and press .
F
2 Make the desired changes to the
name.
• To move the cursor, press or
F
Faxes
2. Sending
1 Press , and then press
or until the number you wish
F
F
F
F
to assign to a Rapid Key appears.
2 Press the Rapid Key that you wish
to assign the number to.
Example:
F
. To backspace and clear a
mistake, press on the FO-
P710, or on the FO-A760.
C
To enter letters, see the chart on
page 8.
• If you do not wish to change the
name, go directly to Step 3.
3 Press .
21
Page 26

Sending a Fax: Auto Dialling
4 Make the desired changes to the
number.
• To backspace and clear a mistake,
press on the FO-P710, or
C
on the FO-A760.
• If you do not wish to change the
number, go directly to Step 5.
5 Press .
6 Press to exit.
Deleting numbers from the
phonebook
Deleting a single number:
1 Press , and then press
or until the number you wish
F
F
to delete appears.
F
F
2 FO-P710: Press twice.
FO-A760: Press twice.
C
Sending a Fax: Auto Dialling
Using an auto-dial number to
send a fax
1 Load the document(s).
If desired, press to set the
resolution and/or contrast.
2 Dial the fax number using one of the
methods below:
• Rapid Key Dialling: If the number is
assigned to a Rapid Key, press the
Rapid Key.
• Using the phonebook: Press
F
, and then or until
the name or number of the other
party appears in the display (names
will appear in alphabetical order).
To go directly to names that begin
with a particular letter, press the
appropriate number key one or more
times to enter that letter (see page
8).
When the desired destination
appears, press .
F
F
F
Deleting all numbers:
1 FO-P710: Press .
FO-A760: Press .
2 Press , .
22
C
• Direct keypad dialling: Press the
number keys to enter a full fax
number (to insert a pause between
digits, press ). When finished,
press .
F
Page 27

Sending a Fax: Auto Dialling
3 Dialling and transmission will take
place automatically.
• To cancel transmission, press
.
• If the transmission is completed
successfully, the machine will beep
once.
• If an error occurs, the machine will
beep three times.
Redial
The machine retains the most recent 20
numbers that have been dialled. You
can automatically redial any of these
numbers.
1 Load the document(s).
• If desired, press to set the
resolution and/or contrast.
2 Press .
Display: [<REDIAL>]
F
Note: If the transmission is
unsuccessful and [DOCUMENT
JAMMED] appears in the display,
remove the document as explained on
page 18.
Deleting redial numbers
Deleting a single redial number:
F
1 Press , and then press
or until the number you wish
F
F
F
to delete appears.
2 FO-P710: Press twice.
FO-A760: Press twice.
Deleting all redial numbers:
C
1 FO-P710: Press .
FO-A760: Press .
2 Press , .
C
Faxes
2. Sending
F
3 If needed, press or
F
F
until the desired number appears in
the display.
4 Press . Dialling begins.
• Make sure the desired number
appears before pressing ,
or redialling will not take place
(sometimes it takes several seconds
for the number to appear).
23
Page 28

Sending a Fax: Auto Dialling
Storing a redial number in the
phonebook
F
1 Press , and then or
you wish to store appears.
2 Press .
F
F
as needed until the number
F
F
3 Enter a name for the number (see
page 8).
4 Press .
5 The number will appear. Press
again to store it.
Automatic redialling
If you use the phonebook or a Rapid
Key to send a fax and the line is busy,
the machine will automatically make
three redial attempts at intervals of five
minutes.
Dial Tone Check
This setting determines whether or not
the machine checks for the presence of
a dial on the line before automatic
dialing.
Initial setting: NO
Note: If you set this setting to YES and
find that the machine is unable to dial,
change the setting to NO.
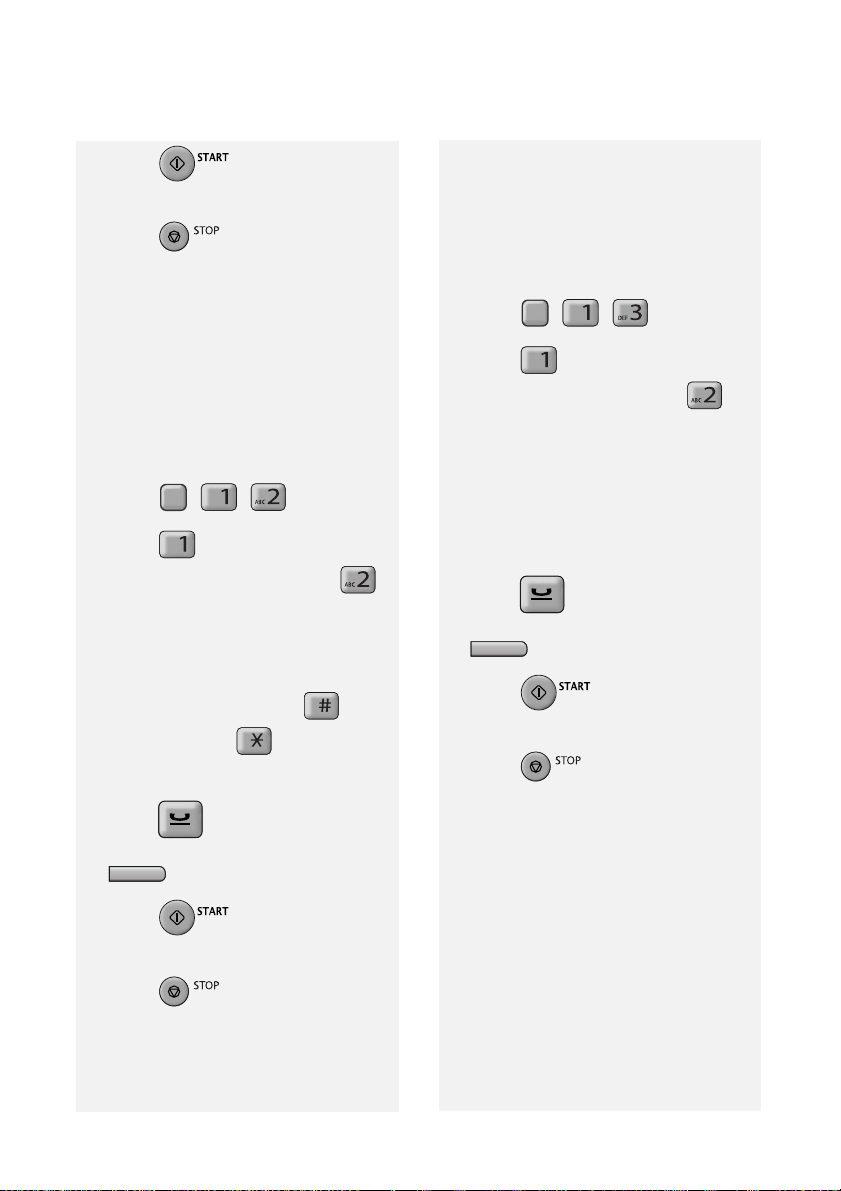
1 Press , , , and .
F
2 Press (YES) to have the
machine check for a dial tone.
Press (NO) to have the
machine not check for a dial tone.
3 Press to exit.
During this time, [RECALLING] will
appear in the display, followed by the
attempt number. You will not be able to
dial any other locations while the
message appears.
♦ To clear the message and stop
automatic redialling, press .
♦ Under certain conditions, automatic
redialling may stop before three
redialling attempts are made.
24
Page 29

Making Phone Calls
Making Phone Calls
Dialing using the keypad
1 Lift the machine’s handset.
2 Press the number keys to dial the
phone number.
Dialling using a Rapid Key
1 Lift the machine’s handset.
2 Press the Rapid Key to which the
number is assigned.
• You can also press the Rapid Key
first (the speaker will turn on and
dialing will begin), and then pick up
the handset.
Dialling using the phonebook
1 Press , and then or
F
F
until the name or number of
the other party appears in the
display (names will appear in
alphabetical order).
To go directly to names that begin
with a particular letter, press the
appropriate number key one or
more times to enter that letter (see
page 8).
F
F
Redialling
1 Press .
Display: [<REDIAL>]
2 Press or until the
desired number appears in the
display.
F
F
F
F
3 Lift the machine’s handset.
• Make sure the desired number
appears before lifting the handset, or
redialling will not take place
(sometimes it takes several seconds
for the number to appear).
Communication time display
While a fax is being sent or received,
and while you are using the handset
for a phone call, the amount of time the
line has been in use will appear in the
display. This can be used as a general
guideline to the length of the call.
Faxes
2. Sending
2 Lift the machine’s handset.
25
Page 30

Using TEL/FAX (T/F) Mode
3. Receiving Faxes
Using TEL/FAX (T/F) Mode
To select TEL/FAX mode, press
(with no document in the
feeder) until [T/F] appears in the
display.
When the reception mode is set to TEL/
FAX, the machine automatically
answers all calls on 2 rings (the number
of rings can be changed by changing
the Number of Rings setting on page
27). After answering, the machine
monitors the line for about five seconds
to see if a fax tone is being sent.
♦ If the machine detects a fax tone (this
means that the call is an automatically
dialed fax), it will automatically receive
the fax.
♦ If your machine doesn't detect a fax
tone (this means that the call is a
voice call or manually dialed fax), it
will make a special ringing sound
(called “pseudo ringing”) for 15
seconds to alert you to pick up the
machine’s handset. If you don't
answer within this time, the machine
will send a fax tone to the other
machine to allow the calling party to
send a fax manually.
Silent fax reception
To have the machine receive faxes
silently and signal voice calls only by
pseudo ringing (not regular ringing), set
the reception mode to TEL/FAX and
turn the ringer off as explained on page
15.
Pseudo ring duration
If desired, you can change the duration
of pseudo ringing in Tel/Fax mode.
Initial setting: 15 seconds
1 Press , , , and .
F
2 Press a number to select the
desired duration:
15 seconds
30 seconds
60 seconds
120 seconds
3 Press to exit.
Note: Only the machine will make the
special ringing sound. Another phone
connected to the same line will not ring
after the machine initially answers the
call.
26
Page 31

Using FAX Mode
Using FAX Mode
To select FAX mode, press
(with no document in the feeder) until
[FAX] appears in the display.
In FAX mode, the machine
automatically answers all calls on two
rings and receives incoming faxes.
♦ If you pick up a phone connected to
the same line before the machine
answers, you can talk to the other
party and receive a fax as explained in
Using TEL Mode on page 27.
Number of Rings setting
To change the number of rings on which
the machine answers calls in TEL/FAX
mode and FAX mode, follow the steps
below. Any number from 2 to 4 can be
selected..
Initial setting: 2 rings
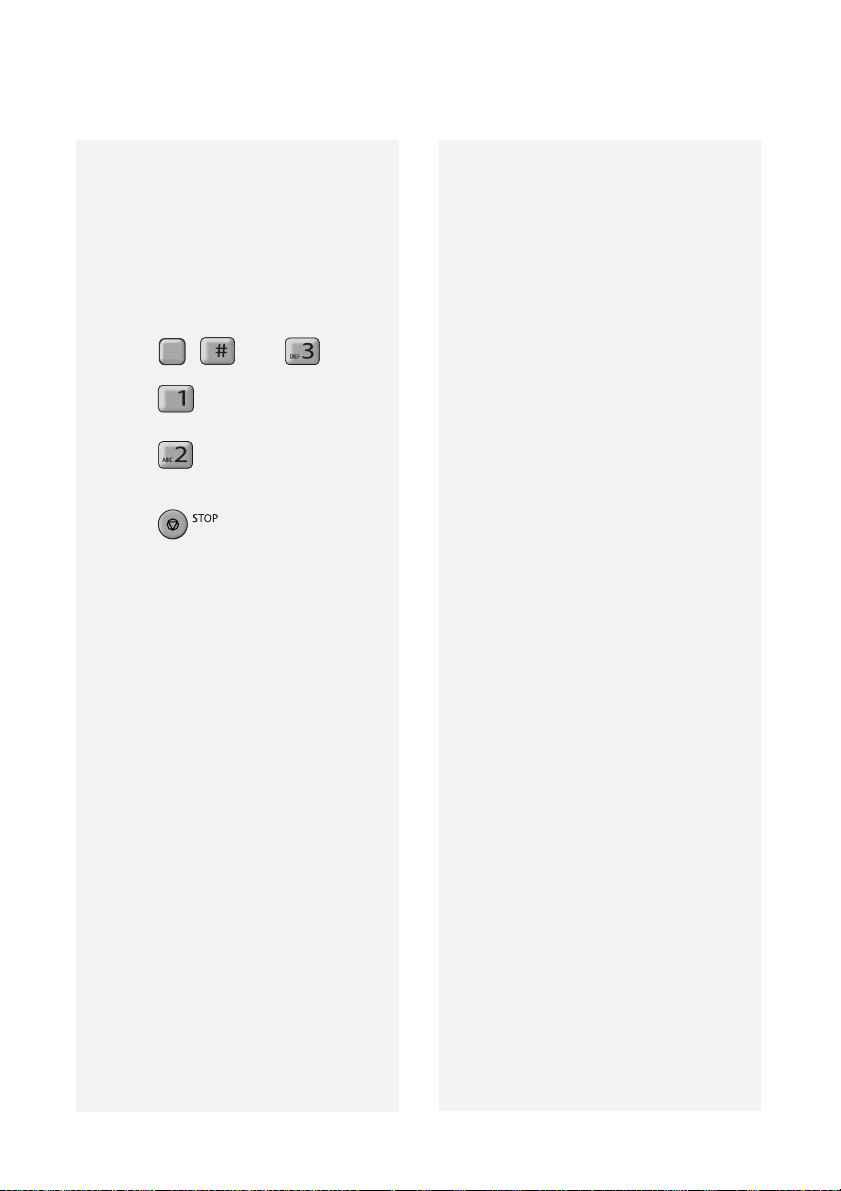
1 Press , , , and .
F
2 Enter the desired number of rings (2
to 4).
Example: (3 rings)
3 Press to exit.
Using TEL Mode
To select TEL mode, press
(with no document in the feeder) until
[TEL] appears in the display.
In TEL mode, you must answer all calls
(even faxes) by picking up the
machine’s handset.
Important: If a document is loaded in
the machine’s feeder, remove it before
performing the procedure below.
1 When the machine rings, pick up
the handset.
2 If you hear a fax tone, wait until the
display shows [RECEIVING] and
then replace the handset.
• If [RECEIVING] does not appear,
press to begin reception.
(This is necessary if you have set the
Fax Signal Receive setting to NO
(page 28).)
3 If the other party first speaks with
you and then wants to send a fax,
press after speaking.
(Press before the sender presses
their Start key.)
• When [RECEIVING] appears in the
display, hang up.
Faxes
3. Receiving
27
Page 32

Using TEL Mode
Putting a call on hold
To put the other party on hold during a
phone call, press . When this is
done, they cannot hear you. You can put
the handset back in the cradle without
breaking the connection. When you are
ready to speak with the other party
again, pick up the handset. If you did
not put the handset back in the cradle,
press again to resume
conversation.
Fax Signal Receive setting
The machine will automatically begin
reception if you hear a soft fax tone
after answering a call. If you prefer to
turn off automatic reception, follow the
steps below.
Initial setting: YES
1 Press , , , and .
F
Receive Ratio setting
Note: This setting applies to all
reception modes.
The machine is initially set to
automatically reduce the size of
received faxes to fit the size of the
printing paper. This ensures that the
edges of a fax are not cut off. If desired,
you can turn this function off and have
received documents printed at full size.
♦ If a document is too long to fit on the
printing paper, the remainder will be
printed on a second page. In this
case, the cut-off point may occur in
the middle of a line.
♦ Automatic reduction may not be
possible if the received document is
too large, contains too many fine
graphics or images, or is sent at high
resolution. In this case, the remainder
of the document will be printed on a
second page.
Initial setting: AUTO
2 Press (YES) to turn on
automatic reception.
Press (NO) to turn off
automatic reception.
3 Press to exit.
28
1 Press , , , and .
F
2 Press (AUTO) to have
received faxes automatically
reduced.
Press (100%) to have received
faxes printed at full size.
3 Press to exit.
Page 33

Using A.M. Mode (FO-A760)
Using A.M. Mode (FO-A760)
When A.M. mode ( ) is selected on
the FO-A760 to activate the answering
system, faxes are received
automatically. For more information,
see Chapter 4.
FO-P710 only:
Using the machine with an
existing answering system
If you have an answering system (in a
phone or other device) connected to
the same line as the machine and you
want to receive both faxes and voice
messages while you are out, follow
these steps.
1 Make sure that the machine’s Fax
Signal Receive setting is set to
YES (page 28). (This enables the
machine to automatically begin fax
reception if it detects a fax tone
after the answering system
answers a call.)
2 Make sure your answering
system’s greeting is no longer than
20 seconds, and insert several
seconds of silence at the beginning
of the greeting. (This will allow the
machine to clearly detect fax tones
when a fax is being sent.)
3 When you go out, make sure the
machine is set to TEL mode (press
until TEL appears in the
display
). (The machine should not
automatically answer calls; only the
answering system should answer.)
Reception to Memory
The machine is set to initially receive
faxes to memory and then automatically
print them out.
This allows reception to take place even
if there is no paper in the paper tray, or
when a problem occurs that prevents
printing such as no imaging film or a
paper jam. Received faxes are held in
memory until paper is loaded in the tray
or the printing problem is resolved. After
you load paper or otherwise resolve the
problem, press to print the
faxes.
♦ When there is no paper in the tray and
a fax has been received to memory,
[ADD PAPER & ]/[PRESS START
KEY] will appear. If a printing problem
has occurred, a message indicating
the problem will appear in the display.
♦ Received faxes are automatically
cleared from memory after they are
printed out.
♦ If the memory becomes full, fax
reception will not be possible (see
“Memory capacity” on page 2 for the
number of pages that can be held in
memory).
♦ When receiving a halftone fax, the
memory may become full before
reception is completed ([MEMORY IS
FULL] will appear). In this case,
change the Fax Receive setting to
“PAPER” (see page 30), and ask the
sender to send the fax again.
Faxes
3. Receiving
29
Page 34

Reception to Memory
Fax Receive setting
If you prefer that faxes not be received
to memory, follow the steps below to
change the Fax Receive setting to
“PAPER”.
♦ When the Fax Receive setting is
“PAPER”, fax reception will not take
place (a communication error will
occur) if a problem occurs that
prevents printing. However, there is no
concern that fax reception will be
prevented by the memory being full.
♦ When “PAPER” is selected, make
sure there is paper in the paper tray.
Initial setting: MEMORY
1 Press , , , and .
F
2 Press (MEMORY) to receive
faxes to memory before printing
them out.
Press to have received faxes
printed without receiving them to
memory.
Erasing received faxes from
memory
When received faxes are held in
memory due to a printing problem, you
can erase the faxes from memory
without printing them out.
Caution: When this procedure is
performed, the faxes will be lost.
1 FO-P710: Press .
FO-A760: Press .
2 Press , .
Checking how much memory is
currently in use
To check the percentage of memory
currently in use, press , . The
percentage will appear briefly in the
display.
C
F
3 Press to exit.
30
Page 35

Recording an OGM
4. Answering System (FO-A760 only)
Recording an OGM
The built-in answering system allows
you to receive both voice messages and
faxes while you are out.
♦ The answering system is only
available on the FO-A760.
♦ When no faxes are in memory, a
maximum of 15 minutes of voice
messages of any type, or a maximum
of 30 messages total, can be
recorded.
To use the answering system, you must
first record an outgoing message
(OGM). This is the greeting that the
machine plays after answering a call to
inform callers that they can leave a
message or send a fax.
Example:
“Hello. You've reached ______ . No one
is available to take your call right now.
Please leave a message after the beep
or press your facsimile Start key to send
a fax. Thank you for calling.”
1 Press .
4 When finished, replace the handset
or press .
Checking the outgoing message
To listen to the outgoing message,
press and .
♦ The outgoing message cannot be
erased. If you need to change it,
repeat the recording procedure.
Using the Answering System
Turning on the answering system
To turn on the answering system so that
callers can leave messages, press
until appears in the display
( indicates that A.M. mode is
selected).
♦ It will not be possible to set the
reception mode to A.M. mode if an
outgoing message has not been
recorded.
System
4. Answering
2 Lift the handset.
3 Press and speak into the
handset to record a message.
• The outgoing message can be up to
60 seconds long. While recording,
the display will show the time left to
record.
When A.M. mode is selected, the
machine automatically answers all calls
on 2 rings if it has received at least one
message, or on 4 rings if it has not
received any messages (see Toll Saver
on page 35), and plays your outgoing
message.
After the outgoing message plays,
callers can leave a message. If the
machine detects that a fax machine is
sending a fax tone, it will automatically
begin fax reception.
31
Page 36

Using the Answering System
Listening to your messages
1 Press .
2 The messages will play. While
messages are playing, you can do
any of the following:
• Repeat: To repeat a message or
move back to a previous message,
press (press repeatedly if
necessary).
REPEAT
• Skip: To skip forward to the next
message, press .
SKIP
• Change playback speed: Press
one or more times to
change the playback speed in the
order [FAS T] > [SLOW] > normal.
• Stop: To stop playback, press
.
Note: Playback will stop if you receive a
call or lift the handset.
Printing the Message list
To print a list showing the date and time
that each message was received, follow
the steps below.
1 Press , , .
F
2 Press to select YES.
Erasing received messages
Erasing a single message:
While the message is playing, press
C
twice.
Erasing all messages:
In the date and time display, press
C
, , .
Recording memos
You can record memos for yourself and
other users of the machine. Memos will
be played back with any other recorded
messages when is pressed.
1 Pick up the handset.
2 Press and speak into the
handset.
3 When you have finished speaking,
replace the handset or press
.
Recording phone conversations
(2-way recording)
To record a phone conversation as it
takes place, press to begin
recording. Press to stop
recording (recording will stop
automatically if you hang up). After you
hang up, you can play the conversation
(along with your other recorded
messages) by pressing .
32
Page 37

Answering System Settings
Answering System Settings
Call screening
Each time a caller calls and leaves a
message in the answering system, you
can have the caller’s voice broadcast
through the speaker.
♦ You can pick up the handset while the
caller is speaking to answer the call.
This allows you to monitor incoming
calls and take only those calls that you
wish to answer immediately.
Initial setting: YES
1 Press , , , and
F
2 Press (YES) to turn on Voice
Monitor.
Press (NO) to turn off Voice
Monitor.
3 Press to exit.
Maximum allowed recording time
The answering system is initially set to
allow each caller a maximum of 4
minutes to leave a message. If desired,
you can change this setting to 15, 30, or
60 seconds.
2 Press a number to select the
recording time:
15 seconds
30 seconds
60 seconds
4 minutes
3 Press to exit.
OGM Only mode
Turn on this function if you want your
outgoing message to play but do not
want to let callers leave messages.
(The machine will receive faxes sent by
automatic dialling.)
Initial setting: NO
1 Press , , , and
F
2 Press (YES) to turn on OGM
Only mode.
Press (NO) to turn off OGM
Only mode.
3 Press to exit.
System
4. Answering
1 Press , , , and .
F
33
Page 38

Override Ringing
Override Ringing
This function allows selected callers
using a touch-tone telephone to
override the answering system's
outgoing message and cause the
machine to make a special ringing
sound, alerting you that they are calling.
This is useful when you are near the
machine but only want to talk with
certain callers, taking all other calls on
the answering machine.
Programming the override code
To override the answering system, your
callers must enter a 3-digit override
code from their telephone. This code
has been set to "009" at the factory. If
you wish to change the code, follow the
steps below.
Important! Make sure the override
code is different from the remote code
(page 35).
1 Press , , , and .
F
2 Enter the desired 3-digit code.
3 Press .
Overriding the answering system
Your callers should follow the steps
below to override the answering
machine.
1 The caller calls your machine from a
tone dial telephone. When the
outgoing message begins, the caller
presses on their telephone.
• The caller will hear a short beep, and
the outgoing message will stop.
2 The caller enters the override code
and then .
• If an incorrect code is entered, the
caller will hear four beeps. He or she
must re-enter the correct code within
10 seconds or the line will be
disconnected.
3 Your machine will make a special
ringing sound. Pick up the handset
to answer the call.
• If you do not answer within 30
seconds, the outgoing message will
play again and the caller can leave a
message.
4 Press to exit.
34
Page 39

Remote Operations
Remote Operations
When you are out, you can call the
machine from any touch-tone telephone
and listen to your messages using the
remote commands.
Remote code
To listen to your messages from an
outside phone, you must enter a 3-digit
remote code. The remote code has
been set to "001" at the factory. If you
wish to use a different number, follow
the steps below.
1 Press , , , and .
F
2 Enter the desired 3-digit code.
3 Press .
4 Press to exit.
Toll Saver
When you call the machine to listen to
your messages, it will answer after two
rings if it has received at least one
message, or after four rings if it has not
received any messages.
This allows you to save money on
telephone charges, particularly if you
are calling long distance. If the machine
does not answer after two rings, you
can simply hang up before it answers,
saving yourself the cost of that call.
If you do not want to use the Toll Saver
function, you can turn it off by following
the steps below. In this case, the
machine will answer after the number of
rings set with the Number of Rings
setting (see page 27).
Initial setting: YES
1 Press , , , and
F
2 Press (YES) to turn on the Toll
Saver function.
Press (NO) to turn off the Toll
Saver function.
3 Press to exit.
Retrieving your messages
1 Call the machine from a touch-tone
telephone. When your outgoing
message begins, press on the
telephone.
• You will hear a short beep, and the
outgoing message will stop.
• If the machine is in FAX mode, press
immediately after the machine
answers (before you hear the fax
tone).
Note: If the machine’s memory is full,
the machine will answer after 20 rings
and the outgoing message will not play.
In this case, start from Step 2.
System
4. Answering
35
Page 40

Remote Operations
2 Enter your remote code number and
then press .
• You will hear a series of beeps equal
to the number of messages
recorded, or one long beep if four or
more messages have been received.
The machine will then play back the
messages. When all messages have
been played back, you will hear a
long beep.
• If no messages have been received,
you will hear a short beep. You can
either hang up, or perform any of the
remote operations described in the
following section.
3 While the messages are playing,
you can do any of the following:
• Repeat: Press , .
• Skip forward: Press , .
• Stop playback: Press , .
After stopping playback, you can
enter any of the remote commands
described in the following section.
• Play new messages only: First stop
playback by pressing , ,
and then press , .
• Erase all messages: Press ,
, .
• Repeat playback: Press ,
.
• Perform other operations: You ca n
enter any of the remote commands
described in the following section.
• Hang up: Before hanging up, press
twice if you want the machine
to resume normal operation
immediately (in some cases, the
machine may not accept new calls
for one or two minutes after you
hang up unless you press
twice).
Comments:
♦ If you enter an incorrect command, or
pause too long while entering a
command, you will hear 4 beeps. Reenter the correct command.
♦ If you wait more than 10 seconds
before entering a command, or enter
your remote code number incorrectly
twice in a row, you will be
disconnected.
• Erase: To erase the message you
are currently listening to, press ,
.
4 When you have finished listening to
your messages, you can do any of
the following:
36
Page 41

Remote Operations
Other remote commands
After listening to your messages, you
can enter any of the following
commands.
Note: The following commands cannot
be entered while messages are being
played. If you do not want to wait until
playback ends to enter a command, first
stop playback by pressing , ,
and then enter the command.
Changing the reception mode
♦ A.M. mode: , ,
♦ FAX mode: , ,
♦ TEL mode: , ,
Caution: If you select TEL mode, you
will not be able to enter any other
remote commands.
♦ TEL/FAX mode: , ,
Recording a “memo” (p. 32)
1 Press , .
2 When you hear a short beep, speak
into the telephone to record the
memo.
3 When you are finished, press ,
.
OGM Only mode (p. 33)
Turning on OGM Only mode:
Press , , .
Turning off OGM Only mode:
Press , , .
System
4. Answering
Recording a new outgoing message
1 Press , .
2 When you hear a short beep, speak
into the telephone to record the new
message.
• The message can be up to 60
seconds long. After 60 seconds, you
will hear a beep, and the new
message will play back. To stop
recording before 60 seconds
elapses, press , .
37
Page 42

5. Making Copies
The machine can be used as a
convenience copier. Follow the steps
below to make a copy.
♦ Multiple copies are possible (up to 9
per original page).
1 Load the original(s). (Maximum of
10 A4-size sheets.)
• The default resolution for copying is
FINE. To change the resolution or
contrast setting, press .
(Note: If STANDARD resolution is
selected, copying will take place at
FINE resolution.)
2 To set the number of copies per
original page, enter the desired
number with the number keys (any
number from 1 to 9).
(The default setting is “1”.)
Example: Press for five
copies.
3 When you are ready to begin
copying, press .
COPY/
HELP
38
Page 43

Activating Caller ID
6. Caller ID (Requires Service)
Activating Caller ID
Important: To use this function, you
must subscribe to a Caller ID service
from your phone company. The
machine may not be compatible with
some Caller ID services.
If you subscribe to a Caller ID service,
you can have the machine show the
name and number of the caller when
you receive a call. Follow the steps
below to activate this function.
1 Press , , and .
F
2 Press (YES) to turn on Caller
ID.
(To turn off Caller ID, press
(NO).)
3 Press to exit.
Note: Some caller ID services may not
provide the name of the caller. In this
case, only the phone number will
appear when you receive a call.
Display messages
One of the following messages will
appear while the machine rings if caller
information is not available.
NO
SERVICE
CALLER-ID
ERROR
UNAVAILABLE
PRIVATE Caller information was not
No caller information was
received. Make sure that
your service has been
activated.
Noise on the telephone
line prevented reception of
caller information.
The call was made from
an area which does not
have Caller ID service, or
the service is not
compatible with your
service.
provided at the caller’s
request.
Caller ID List
The machine keeps a log of the most
recent 20 calls and faxes you have
received (the Caller ID list). You can
view the list and automatically dial a
number from the list.
♦ The list is only available if you have
Caller ID service and have turned on
the Caller ID function.
6. Caller ID
♦ After you have received 20 calls,
each new call will delete the oldest
call.
39
Page 44

Caller ID List
1 Press twice.
F
Display: [<REVIEW CALLS>]
F
2 Press or to scroll
F
through the list
F
.
• To exit the list, press .
3 To dial a number, scroll until the
number appears and:
• Fax: Load the document and press
. Transmission will begin.
• Voice call: Pick up the handset.
Dialing will begin automatically.
Deleting calls from the list
Deleting a single call:
To delete a single call from the list,
display the call and
FO-P710: Press twice.
FO-A760: Press twice.
C
Printing the Caller ID list
To print the Caller ID list, follow the
steps below.
1 Press , , .
F
2 Press to select YES.
Storing a number in the Caller
ID list in the phonebook
F
1 Press twice, and then
or as needed until the
F
F
number you wish to store appears.
2 Press .
F
F
3 Enter a name for the number (see
page 8).
4 Press .
5 The number will appear. Press
again to store it.
Deleting all calls:
To delete all calls from the list, return to
the date and time display (press
), and then follow these steps:
1 FO-P710: Press .
FO-A760: Press .
2 Press , .
40
C
Page 45

Blocking Calls
Blocking Calls
Blocking “PRIVATE” calls
If you have Caller ID service and have
turned on the Caller ID function, you
can have the machine automatically
block all calls for which Caller ID
information is not provided at the
caller’s request (calls for which
“PRIVATE” appears).
♦ When this function is turned on, the
machine will break the connection as
soon as it receives Caller ID
information when a “PRIVATE” call is
received. The caller will hear a 3second high-pitch tone to signal the
call’s termination. The call will not
break off until the caller has hung up.
1 Press , , .
F
2 Press (YES) to turn on the
function. (To turn off the function,
press (NO).)
3 Press to exit.
Blocking “UNAVAILABLE” calls
If you have Caller ID service and have
turned on the Caller ID function, you
can have the machine automatically
block all calls for which “UNAVAILABLE”
appears.
♦ When this function is turned on, the
machine will break the connection as
soon as it receives Caller ID
information when an “UNAVAILABLE”
call is received. The caller will hear a
3-second high-pitch tone to signal the
call’s termination. The call will not
break off until the caller has hung up.
1 Press , , .
F
2 Press (YES) to turn on the
function. (To turn off the function,
press (NO).)
3 Press to exit.
Blocking calls from specified
numbers (Anti Junk numbers)
If you have Caller ID service and have
turned on the Caller ID function, you
can have the machine automatically
block calls from numbers that you
specify.
To use this function, enter the fax/phone
numbers that you want to block. Up to
30 numbers can be entered.
♦ When this function is turned on, the
machine will break the connection as
soon as it receives Caller ID
information when a call from one of
your specified numbers is received.
The caller will hear a 3-second highpitch tone to signal the call’s
termination. The call will not break off
until the caller has hung up.
1 Press , , , .
F F
2 Enter the number (maximum of 20
digits).
Note: Enter numbers only; hyphens
and spaces cannot be entered.
6. Caller ID
41
Page 46

Blocking Calls
3 Press .
4 Press to exit.
Deleting a single Anti Junk number:
1 Press , , .
2 Press or until the
number you wish to delete appears.
F
F
F
F
3 FO-P710: Press twice.
FO-A760: Press twice.
Deleting all numbers:
C
1 FO-P710: Press .
FO-A760: Press .
C
2 Press , .
Printing the Junk number list
To print a list of your currently stored
Anti Junk numbers, follow the steps
below.
1 Press , , .
F
2 Press to select YES.
42
Page 47

7. Key Lock Function
The Key Lock function is used to
prevent unauthorised operation of the
machine. When the Key Lock function is
activated, all operations are prohibited
except for the following:
♦ Phone calls can be made by picking
up the handset and dialling using one
of the Rapid Keys (page 25). Dialling
using the phonebook and by pressing
the number keys is prohibited. It is
recommended that you store
emergency phone numbers in the
Rapid Keys.
♦ A fax can be sent using a Rapid Key if
the handset is picked up before the
Rapid Key is pressed. When you hear
the fax tone from the receiving
machine, press to begin
transmission (if a person answers, ask
them to press their Start key).
can be pressed to adjust the
resolution before dialling, and
can be pressed to cancel an
operation.
♦ Faxes can be received automatically
when the reception mode is set to
FAX, TEL/FAX, or A.M. mode (page
15). Faxes can be received manually
by pressing when the call is
answered on the machine’s handset
(page 27).
To use the Key Lock function, you must
first store a 4-digit Key Lock code as
explained below, and then activate the
function as explained on the following
page.
Storing the Key Lock code
1 Press , , and .
F
2 Press (SET) to store the Key
Lock code.
• If [ALREADY STORED] appears in
the display, the Key Lock code has
already been programmed. If you
wish to change the code, you must
first delete the old code (see page
44) and then store the new code.
3 Enter the 4-digit number that you
wish to use for the Key Lock code.
4 Press .
5 Press to exit.
• Important: Be sure to keep a record
of the Key Lock code, as it must be
entered to deactivate the Key Lock
function and allow normal operation
of the machine. In the event that you
forget the code and have kept no
record, contact SHARP customer
service.
Function
7. Key Lock
43
Page 48

Activating the Key Lock
function
Note: Before activating the Key Lock
function, be sure to set up any Rapid
Key numbers (page 21) that you wish to
use after the Key Lock function is
activated.
To activate the Key Lock function, hold
down until [KEY LOCK] appears
in the display.
♦ If [SET LOCK CODE] appears in the
display, a Key Lock code has not been
stored. Store a Key Lock code and
then activate the Key Lock function.
♦ [<<<RINGING!>>>] will appear to
signal an incoming call if the ringer
has been turned off (page 15).
Releasing the Key Lock
Follow the steps below when you wish
to release the Key Lock and operate the
machine normally.
1 Hold down until [CANCEL
KEY LOCK]/[ENTER LOCK CODE]
appear alternately in the display.
2 Enter the Key Lock code.
3 Press .
[KEY LOCK] will appear in the display
while the Key Lock function is activated.
Only the operations described on page
43 can be performed.
The following messages may also
appear:
♦ [FAX RX IN MEMORY] will appear
when there is no paper in the tray and
a fax has been received to memory.
Release the Key Lock as explained
below, add paper, and press
to print the fax.
♦ [COM ERROR XX]: This will appear if
a line error occurs during fax
reception or transmission (see page
50). Press to clear the
message.
♦ If the Caller ID function has been
turned on (page 39), Caller ID
information will appear when a call is
received.
• [CANCELED] will briefly appear
followed by the date and time
display.
Clearing (changing) the Key
Lock code
In the event that you need to clear the
Key Lock code, follow the steps below.
♦ If you need to change the code, first
clear it and then store a new code.
1 Press , , and .
F
2 Press (CLEAR).
3 Enter the current Key Lock code.
4 Press .
5 Press to exit.
44
Page 49

8. Distinctive Ring (Requires Service)
Important: The distinctive ring
function can only be used if you
subscribe to a distinctive ring service
from your telephone company. Do not
turn on distinctive ring if you are on a
normal line, as the machine will not
operate properly.
If you subscribe to a distinctive ring
service from your telephone company
(such as Fax Duet in Australia), turn on
the distinctive ring function to have the
machine signal voice calls and faxes by
different ring patterns. The machine will
automatically receive faxes.
To turn on the distinctive ring function,
follow the steps below.
Initial setting: NO
When your fax number is dialled, the
machine will signal the call with a
special ringing sound, then answer
automatically and begin reception after
the number of rings set with the
Number of Rings setting (the initial
setting is 2 rings—see page 27).
When your voice number is dialled, the
machine will signal the call with the
normal ringing sound to let you know
that you must answer personally.
♦ If you turn on distinctive ring, the
machine will not operate in TEL/FAX
reception mode.
Ring
8. Distingtive
1 Press , , , and .
F
2 Press (YES) to turn on the
distinctive ring function.
Press (NO) to turn off the
distinctive ring function.
3 Press to exit.
4 Press to set the reception
mode to FAX (press until [FAX ]
appears in the display).
• The distinctive ring function will not
operate correctly unless the
reception mode is set to FAX.
45
Page 50

Cleaning the Machine
9. Maintenance
Cleaning the Machine
Cleaning the scanning glass
and rollers
Any dirt on the scanning glass and
rollers will degrade the quality of
transmitted documents and copies.
Clean these frequently as explained
below.
1 Open the operation panel.
2 Rotate the lever on the left side of
the roller forward so that it points
straight up
.
3 Pull the left side of the white roller
up out of its holder.
4 Wipe the scanning glass and rollers
with a clean cloth or swab.
46
• Make sure that all dirt and stains
(such as correcting fluid) are
removed. Dirt and stains will cause
vertical lines on transmitted images
and copies.
• If the scanning glass is difficult to
clean, try moistening the cloth with
isopropyl alcohol or denatured
alcohol. Take care that no alcohol
gets on the rollers.
Page 51

Cleaning the Print Head and Rollers
5 Replace the left end of the white
roller in its holder.
• If the right end of the roller came out
of its holder during cleaning, reinsert the right end into its holder
before replacing the left end.
6 Rotate the lever back down.
7 Close the operation panel.
9. Maintenance
Cleaning the Print Head and
Rollers
Clean the print head frequently to
ensure optimum printing performance.
Note: Remove any paper from the
paper tray and push in the tray
extension before cleaning the print
head.
1 Open the operation panel.
47
Page 52

Cleaning the Print Head and Rollers
2 Press the release and open the
print compartment cover.
Press green release
3 Remove the imaging film from the
compartment, lifting the left ends of
the spools first.
4 Wipe the print head and rollers with
a dry cloth. (If the head is difficult to
clean, try moistening the cloth with
water.)
Rollers
Print head
Caution:
• Do not use benzene, thinner, or
other solvents. Avoid touching the
print head with hard objects.
• The print head may be hot if the
machine has just received a large
number of documents. If this is the
case, allow the print head to cool
prior to cleaning.
5 Replace the imaging film:
a. Fit the right ends of the spools
onto the pins.
48
Page 53

Cleaning the Print Head and Rollers
b. Place the left ends so that the
shafts of the gears fit into the
holders.
6 Turn the front gear in the direction
shown until the film is taut.
8 Close the operation panel.
9. Maintenance
Cleaning the housing
Wipe the external parts and surface of
the machine with a dry cloth.
Caution: Do not use benzene or
thinner. These solvents may damage or
discolor the machine.
7 Close the print compartment cover.
• Press down on the marks on
both sides of the cover to make sure
it clicks into place.
About the lithium battery:
The machine uses a lithium battery to
retain settings and information
programmed in the machine when the
power is turned off. Battery power is
consumed primarily when the power
is off. With the power kept
continuously off, the life of the battery
is about 5 years. If the battery dies,
have your dealer or retailer replace it.
Do not try to replace it yourself.
49
Page 54

Problems and Solutions
10. Troubleshooting
Problems and Solutions
Line error
Problem Solution
COM ERROR XX appears
in the display.
(XX is a number used by
service technicians to
diagnose problems)
A line error occurs when your machine cannot
communicate correctly with another fax machine. The
error is usually due to a problem on the phone line.
Try faxing again. If unsuccessful, check the following:
• Check the connection. The cord from the TEL. LINE
socket to the wall socket should be no longer than two
meters.
• Make sure there are no modem devices sharing the
same telephone line.
• Check with the other party to make sure their fax
machine is functioning properly.
• Have your telephone line checked for line noise.
• Try connecting the machine to a different phone line.
• If the error persists, the machine may need service.
Dialling and transmission problems
Problem Solution
No dial tone when you
pick up the handset or
press .
• Make sure that the telephone line is properly
connected to both the TEL. LINE socket and the wall
socket (see page 10).
• Make sure that the telephone line is good.
50
Page 55

Problems and Solutions
Dialling is not possible. • Make sure the power cord is properly plugged into a
The power is on, but no
transmission takes place.
Nothing is printed at the
receiving end.
A distorted image is
received at the other end.
power outlet.
• Make sure that the telephone line is properly
connected to both the TEL. LINE socket and the wall
socket (see page 10).
• Make sure that the machine is set to the correct
dialing mode for your telephone line. See Setting the
Dial Mode on page 10.
• Make sure that the receiving machine has paper.
• If the receiving machine is in manual mode with no
attendant, reception will not be possible.
• Check the display for error messages.
• Pick up the handset and check for a dial tone. Dial the
receiving machine manually and make sure that it is
responding (you should hear a fax tone).
• Make sure that the document for transmission is
placed face down in the feeder.
• Noise on the telephone line may cause distortion. Try
sending the document again.
• Make a copy of the document on your machine. If the
copy is also distorted, your machine may need
service.
shooting
10. Trouble-
Reception and copying problems
Problem Solution
The printing paper does
not feed correctly, or multifeeds occur.
• Fan the paper before inserting it in the paper tray, and
tap the edges against a flat surface to even the stack.
(When adding paper, if paper still remains in the tray,
take it out and combine it with the new paper.)
• Make sure the paper is inserted straight in the tray.
• Do not insert more than 10 sheets of paper in the tray.
51
Page 56

Problems and Solutions
The printing paper comes
out blank when you try to
receive a document.
Print quality is poor. • It is important to select a paper that is appropriate for
The received document is
faint.
Received images are
distorted.
The quality of copies is
poor and/or dark vertical
lines appear.
• Make sure that the document is loaded properly in the
feeder of the transmitting machine. Make a copy or
print a report to confirm the printing ability of your
machine.
the thermal transfer printer in your fax. We
recommend using laser quality paper that has a very
smooth finish. Copier paper will work, but it
sometimes tends to yield a lighter print quality.
• Ask the other party to send higher contrast
documents. If the contrast is still too low, your fax
machine may need service. Make a copy or print a
report to check your machine’s printing ability.
• Noise on the telephone line may cause distortion.
Have the other party try sending the document again.
• The print head may be dirty. Clean the print head as
explained on page 47.
• Make a copy or print a report on your machine. If the
copy or report is also distorted, your machine may
need service.
• Any dirt or material on the scanning glass will cause
spots to appear on copies and transmitted faxes.
Clean the scanning glass as explained on page 46.
A received document or
copy prints out in strips.
ADD PAPER & /
PRESS START KEY
appears in the display.
52
• Make sure the operation panel is completely closed
(press down on both sides of the panel).
• The machine has received a fax to memory. Add
paper to the paper tray and press to print the
fax (see page 29).
Page 57

General problems
Problem Solution
Problems and Solutions
Nothing appears in the
display.
The machine does not
respond when you press
any of its keys.
Automatic document
feeding does not work for
transmission or copying.
• Make sure the power cord is properly plugged into a
power outlet.
• Connect another electrical appliance to the outlet to
see if it has power.
• If a beep sound is not made when you press the keys,
unplug the power cord and then plug it in again
several seconds later.
• Check the size and weight of the document (see
Transmittable Documents on page 17).
shooting
10. Trouble-
53
Page 58

Messages and Signals
Messages and Signals
Display messages
♦ If a message is longer than the display, the parts of the message will alternate.
♦ If you have turned on the Caller ID function, see page 39 for display messages
related to Caller ID.
ADD PAPER & /
PRESS START KEY
(alternating messages)
A.M. IN USE
(FO-A760 only)
COM ERROR XX
(XX is a number used by
service technicians to
diagnose problems)
COVER OPEN Open the operation panel and make sure that the print
DOCUMENT JAMMED The original document is jammed. See the following
FAX RX IN MEMORY This appears when the Key Lock function is activated
This appears when a fax has been received to memory
(page 29) because there is no paper in the tray. Add
paper and press to print the fax.
The answering system has answered a call and the
outgoing message is playing.
Transmission or reception was not successful. If this
message alternates with another message indicating a
problem, fix the problem and try the fax operation again.
If no other message appears, press to clear the
message and then try the fax operation again. If the
error persists, see Line Error on page 50.
compartment cover is completely closed (press down on
the marks on each side of the cover).
section, Clearing Paper Jams. Document jams will occur
if you load more than 10 pages at once or load
documents that are too thick (see page 17).
and a fax has been received to memory because there
is no paper in the paper tray. Release the Key Lock (see
page 44), add paper, and then press to print
the fax.
54
Page 59

Messages and Signals
FILM END Open the operation panel and the print compartment
KEY LOCK The Key Lock function has been activated. See page
MEMORY IS FULL The memory is full. This may occur during fax reception
MESSAGE #
(FO-A760 only)
NO # STORED This appears if you attempt to search for an auto-dial
ON HOOK DIAL
OVER HEAT The print head has overheated. Operation can be
cover and check the imaging film (see Replacing the
imaging film on page 10). If the film has completely
wound onto the front spool, replace the film. Otherwise,
make sure the film is loaded correctly and remove any
slack.
43.
if too much data is received before the pages can be
printed out. If faxes have been received to memory
because printing is not possible (an additional message
will indicate the problem), resolve the problem so that
printing can continue (see page 29).
The indicated number of messages are recorded in the
answering system.
number when none have been stored.
The key has been pressed and the fax machine is
waiting for you to dial.
continued after it cools.
10. Trouble-
shooting
PAPER JAMMED A paper jam has occurred. Remove the jam as
explained on page 59.
PRINT HEAD FAIL The print head has failed and requires service.
PRINTER ERROR A printer error has occurred. Try the operation again.
PRINTING The machine is preparing to or printing out a document
from memory.
55
Page 60

Messages and Signals
READY TO SEND A document has been loaded and the fax machine is
RECALLING This appears if you attempt to send a fax by automatic
waiting for you to begin faxing or copying.
dialling and the line is busy or the receiving fax machine
does not answer. Your fax machine will automatically
reattempt the call. (See Automatic redialling on page
24.)
Audible signals
Continuous tone 3 seconds Indicates the end of transmission,
reception, or copying.
Intermittent tone
(3 beeps)
Rapid intermittent
tone
5 seconds
(1 second on, 1
second off)
35 seconds
(0.7 seconds on,
0.3 seconds off)
Indicates incomplete transmission,
reception, or copying.
Indicates that the handset is off hook.
56
Page 61

Clearing Paper Jams
Clearing Paper Jams
Clearing a jammed document
If the original document doesn’t feed
properly during transmission or copying,
or [DOCUMENT JAMMED] appears in
the display, first try pressing then
. If the document doesn't feed out,
remove it as explained below.
Important: Do not try to remove a
jammed document without releasing it
as explained below. This may damage
the feeder mechanism.
F
1 Open the operation panel.
2 Rotate the lever on the left side of
the roller forward so that it points
straight up
.
3 Pull the left side of the white roller
up out of its holder.
shooting
10. Trouble-
57
Page 62

Clearing Paper Jams
4 Remove the document.
5 Replace the left end of the white
roller in its holder.
• If the right end of the roller came out
of its holder while you were removing
the document, re-insert the right end
into its holder before replacing the
left end.
6 Rotate the lever back down.
7 Close the operation panel.
58
Page 63

Clearing Paper Jams
Clearing jammed printing paper
Note: Remove any paper from the
paper tray and push in the tray
extension before removing jammed
printing paper.
1 Open the operation panel.
2 Press the release and open the print
compartment cover.
Press green release
4 Turn the front gear in the direction
shown until the film is taut.
5 Close the print compartment cover.
• Press down on the marks on
both sides of the cover to make sure
it clicks into place.
shooting
10. Trouble-
3 Remove the paper.
6 Close the operation panel.
59
Page 64

Quick Reference Guide
Sending Faxes
Place your document
(up to 10 pages) face
down in the document
feeder.
Normal Dialling
1. Lift the handset or press .
2. Dial the fax number.
3. Wait for the reception tone (if a person
answers, ask them to press their Start
key).
4. Press .
Dialling using the phonebook
1. Press , then
F
F
F
or until
F
the desired destination appears in the
display.
2. Press .
Rapid Key Dialling
1. Press the desired Rapid Key.
Recording an Outgoing
Message (FO-A760 only)
1. Press .
Receiving Faxes
Press until the desired reception
mode appears in the display.
FAX mo de: The fax machine automatically
answers and receives faxes.
TEL mode: Answer all calls (even faxes)
by picking up the handset. To begin fax
reception, press .
TEL/FAX(T/F) mode: The fax machine
automatically answers and receives faxes.
Voice calls are signalled by a special
ringing sound.
A.M. mode: (FO-A760 only)
Select this mode when you go out to
receive both voice messages and faxes.
Storing Auto Dial Numbers
1. Press , .
2. Enter a name by pressing number keys.
A =
B =
C =
D =
E =
F =
3. Press .
F
(To enter two letters in succession that
require the same key, press
F
after entering the first letter.)
G =
H =
I =
J =
K =
L =
M =
N =
O =
P =
Q =
R =
S =
T =
8
TUV
U =
8
TUV
V =
8
TUV
W =
X =
Y =
Z =
2. Lift the handset, press , and
speak into the handset.
3. When finished, press
60
4. Enter the fax number.
5. Press and then .
Page 65

Index
Index
A
A.M. reception mode, 15, 29
Answering system, using with machine
(FO-P710 only), 29
Audible signals, 56
Auto-dial numbers
Deleting, 22
Editing, 21
Storing, 20
Using, 22
C
Call screening, 33
Caller ID, 39
Caller ID list, 39
Contrast, 19
Copies, 38
D
Date, setting, 13
Dial mode, 10
Dial Tone Check, 24
Dialling
Automatic redialling, 24
Normal, 19
Phonebook, 22, 25
Rapid Key, 22, 25
Redialling, 23, 25
Display messages, 39, 54
Distinctive ring, 45
Document restrictions, 17
Document sizes, 17
H
Halftone setting, 18
Handset, 9
Hold, 28
Housing, cleaning, 49
I
Imaging film, checking and replacing, 10
Initial settings, 13
J
Jams, clearing, 57
K
Key lock function, 43
Key Tone setting, 16
L
Letters, entering, 8
Line error, 50
Loading paper, 12
Loading the document, 17
M
Memory use, checking, 30
Memory, substitute reception to, 29
N
Normal Dialling, 19
Number of Rings, 27
E
Erasing received faxes, 30
F
Fax Duet (distinctive ring), 45
Fax Receive setting, 30
FAX reception mode, 15, 27
Fax Signal Receive setting, 28
O
OGM only mode, 33
Override Ringing, 34
P
Paper jams, clearing, 57
Paper, loading, 12
Phone calls, 25
61
Page 66

Index
Phonebook
Deleting numbers, 22
Editing numbers, 21
Storing numbers, 20
Using to dial, 22, 25
Power cord, 9
Pseudo ring duration, 26
R
Rapid Key Dialling, 22, 25
Rapid Keys, assigning numbers to, 21
Reception mode
A.M., 15, 29
FAX, 15, 27
TEL, 15, 27
TEL/FAX, 15, 26
Recording time, 33
Redialling, 23, 25
Redialling, automatic, 24
Remote code, 35
Removing original document, 18
Resolution, 18
Ringer volume, 15
S
Scanning glass, cleaning, 46
Sender’s fax number, entering, 14
Sender’s name, entering, 14
Speaker volume, 15
Storing fax and phone numbers, 20
T
TEL reception mode, 15, 27
TEL. LINE socket, 10
TEL/FAX reception mode, 15, 26
Telephone line cord, 10
Time, setting, 13
Toll Saver function, 35
62
Page 67

REMOTE OPERATION CARD
The card below is provided as a quick guide to remote operation. Cut it out
and carry it with you when you go out.
Remote Operation Guide
1. Call your fax from a touch-tone telephone, and
press # when the outgoing message begins.
2. Enter your remote code: .
3. Press # .
4. After listening to your messages, you can either
hang up to save them, or enter one of the
commands on the reverse side.
Page 68

REMOTE COMMANDS
•PLAYBACK
Play messages ................. 7#
Move backward/repeat...... 2#
Skip forward...................... 5#
Stop .................................. 0#
Play new messages only .. 6#
(first stop playback)
• ERASING MESSAGES
Erase single message ...... 3#
Erase all messages .......... 33#
• RECORDING A MEMO
Start .................................. * #
End ................................... 0 #
• RECORDING A NEW OGM
Start .................................. 4 #
• FAX RECEPTION MODES
A.M. mode ........................ 81#
FAX mode......................... 82#
TEL mode......................... 83#
TEL/FAX mode................. 84#
• OGM ONLY MODE
Turn on ............................. 11#
Turn off ............................. 12#
Page 69

SHARP CORPORATION OF AUSTRALIA PTY.LTD.
A.C.N. 003 039 405
1 Huntingwood Drive, Huntingwood, Blacktown, N.S.W., 2148
SHARP CORPORATION
PRINTED IN THAILAND
(TINSE4610XHTZ)
 Loading...