

Page 1
MODEL
FO-NS2
Please keep this manual as the information
mentioned below is very important.
FO-NS2
APPLICATION
NUMBER
NIC
SERIAL
NUMBER
PRODUCT
KEY
Sharpdesk Serial Numbers
(5 Licenses)
NETWORK SCANNER
EXPANSION KIT
OPERATION MANUAL
1. Setting the IP Address
2.
Printing out the Network Settings
3.
Mail Server and DNS Server Settings
4.
Storing Network Scanning Destinations
5. Scan to E-mail Setup
6.
Scan to E-mail Using the E-mail Key
7.
Sending an Image Using a Rapid Key
or Speed Dial Number
8.
Installing the Network Scanner Software
9. Troubleshooting
Page 2

For detailed information on the software in the CD-ROM, please view the
user's guides (PDF format) that are included on the CD-ROM.
The explanations of screens and procedures in this manual are for Windows
98. The screens may vary depending on your Windows version and
configuration.
Warranty
While every effort has been made to make this operation manual as
accurate and helpful as possible, SHARP Corporation makes no warranty of
any kind with regard to its content. All information included herein is subject
to change without notice. SHARP is not responsible for any loss or
damages, direct or indirect, arising from or related to the use of this
operation manual.
© Copyright SHARP Corporation 2002. All rights reserved. Reproduction,
adaptation or translation without prior written permission is prohibited,
except as allowed under copyright laws.
Trademark information
• Sharpdesk is a trademark of Sharp Corporation.
• Microsoft, Windows, Windows NT, and Internet Explorer are trademarks of
Microsoft Corporation in the U.S.A. and other countries.
• Netscape Navigator is a trademark of Netscape Communications
Corporation.
• Acrobat and Adobe are trademarks of Adobe Systems Incorporated.
• Eastman Software is a trademark of Eastman Kodak Company.
• All other company names and product names appearing in this manual are
the trademarks of their respective owners.
Page 3

SOFTWARE LICENSE
PLEASE READ THIS LICENSE CAREFULLY BEFORE USING THE SOFTWARE.
BY USING THE SOFTWARE, YOU ARE AGREEING TO BE BOUND BY THE
TERMS OF THIS LICENSE.
1. License.
this License, whether on disk, in read only memory, or on any other media (the
"Software") and related documentation are licensed to you by SHARP. You own the disk
on which the Software is recorded but SHARP and/or SHARP'S Licensors retain title to
the Software and related documentation. This License allows you to use the Software on
one or more computers connected to a single printer and make one copy of the Software
in machine-readable form for backup purposes only. You must reproduce on such copy
the SHARP copyright notice, the copyright notice of SHARP'S Licensors and any other
proprietary legends of SHARP and/or its Licensors that were on the original copy of the
Software. You may also transfer all your license rights in the software, the backup copy of
the Software, the related documentation and a copy of this License to another party,
provided the other party reads and agrees to the terms and conditions of this License.
2. Restrictions.
proprietary material which is owned by SHARP and/or its Licensors and in order to protect
them you may not decompile, reverse engineer, disassemble or otherwise reduce the Software
to a human-perceivable form. You may not modify, network, rent, lease, loan, distribute or
create derivative works based upon the Software in whole or in part. You may not
electronically transmit the Software from one computer to another or over a network.
3. Termination.
any time by destroying the Software and related documentation and all copies thereof. This
License will terminate immediately without notice from SHARP and/or SHARP'S Licensors if
you fail to comply with any provision of this License. Upon termination you must destroy the
Software and related documentation and all copies thereof.
4. Export Law Assurances.
other technical data received from SHARP, nor the direct product thereof, will be exported
outside the United States except as authorized and as permitted by the laws and
regulations of the United States. If the Software has been rightfully obtained by you
outside of the United States, you agree that you will not re-export the Software nor any
other technical data received from SHARP, nor the direct product thereof, except as
permitted by the laws and regulations of the United states and the laws and the regulation
of the jurisdiction in which you obtained the Software.
5. Government End Users.
of the United States Government, the following provisions apply. The Government agrees:
6. Limited Warranty on Media.
recorded to be free from defects in materials and workmanship under normal use for a
period of ninety (90) days from the date of purchase as evidenced by a copy of the
receipt. The entire liability of SHARP and/or its Licensors and your exclusive remedy will
be replacement of the disk which fails to meet the limited warranty provided by this Clause
6. A disk will be replaced when it is returned to SHARP or a SHARP authorized
representative with a copy of the receipt. SHARP will have no responsibility to replace a
disk damaged by accident, abuse or misapplication.
The application, demonstration, system and other software accompanying
The Software contains copyrighted material, trade secrets and other
This license is effective until terminated. You may terminate this License at
You agree and certify that neither the Software nor any
If you are acquiring the Software on behalf of any unit or agency
(i) if the Software is supplied to the Department of Defense (DoD), the Software is
classified as "Commercial Computer Software" and the Government is acquiring
only "restricted rights" in the Software and its documentation as that term is
defined in Clause 252.227-7013 (c)(1) of the DFARS; and
(ii) if the Software is supplied to any unit or agency of the United States
Government other than DoD, the Government's rights in the Software and its
documentation will be as defined in Clause 52.227-19 (c)(2) of the FAR or, in the
case of NASA, in Clause 18-52.227-86 (d) of the NASA Supplement to the FAR.
SHARP warrants the disks on which the Software is
Page 4

ANY IMPLIED WARRANTIES ON THE DISKS, INCLUDING THE IMPLIED
WARRANTIES OF MERCHANTABILITY AND FITNESS FOR A PARTICULAR
PURPOSE, ARE LIMITED IN DURATION TO NINETY (90) DAYS FROM THE DATE OF
DELIVERY. THIS WARRANTY GIVES YOU SPECIFIC LEGAL RIGHTS, AND YOU MAY
ALSO HAVE OTHER RIGHTS WHICH VARY FROM JURISDICTION TO JURISDICTION.
7. Disclaimer of Warranty on Software.
use of the Software is at your sole risk. The software and related documentation are
provided "AS IS" and without warranty of any kind and SHARP and SHARP'S Licensor(s)
(for the purpose of provisions 7 and 8, SHARP and SHARP'S Licensor(s) shall be
collectively referred to as "SHARP") EXPRESSLY DISCLAIM ALL WARRANTIES,
EXPRESS OR IMPLIED, INCLUDING, BUT NOT LIMITED TO, THE IMPLIED
WARRANTIES OF MERCHANTABILITY AND FITNESS FOR A PARTICULAR
PURPOSE. SHARP DOES NOT WARRANT THAT THE FUNCTIONS CONTAINED IN
THE SOFTWARE WILL MEET YOUR REQUIREMENTS, OR THAT THE OPERATION
OF THE SOFTWARE WILL BE UNINTERRUPTED OR ERROR-FREE, OR THAT
DEFECTS IN THE SOFTWARE WILL BE CORRECTED. FURTHERMORE, SHARP
DOES NOT WARRANT OR MAKE ANY REPRESENTATIONS REGARDING THE USE
OR THE RESULTS OF THE USE OF THE SOFTWARE OR RELATED
DOCUMENTATION IN TERMS OF THEIR CORRECTNESS, ACCURACY, RELIABILITY,
OR OTHERWISE. NO ORAL OR WRITTEN INFORMATION OR ADVICE GIVEN BY
SHARP OR A SHARP AUTHORIZED REPRESENTATIVE SHALL CREATE A
WARRANTY OR IN ANY WAY INCREASE THE SCOPE OF THIS WARRANTY.
SHOULD THE SOFTWARE PROVE DEFECTIVE, YOU (AND NOT SHARP OR A
SHARP AUTHORIZED REPRESENTATIVE) ASSUME THE ENTIRE COST OF ALL
NECESSARY SERVICING, REPAIR OR CORRECTION, SOME JURISDICTIONS DO
NOT ALLOW THE EXCLUSION OF IMPLIED WARRANTIES, SO THE ABOVE
EXCLUSION MAY NOT APPLY TO YOU.
8. Limitation of Liability.
SHALL SHARP BE LIABLE FOR ANY INCIDENTAL, SPECIAL OR CONSEQUENTIAL
DAMAGES THAT RESULT FROM THE USE OR INABILITY TO USE THE SOFTWARE
OR RELATED DOCUMENTATION, EVEN IF SHARP OR A SHARP AUTHORIZED
REPRESENTATIVE HAS BEEN ADVISED OF THE POSSIBILITY OF SUCH DAMAGES.
SOME JURISDICTIONS DO NOT ALLOW THE LIMITATION OR EXCLUSION OF
LIABILITY FOR INCIDENTAL OR CONSEQUENTIAL DAMAGES SO THE ABOVE
LIMITATION OR EXCLUSION MAY NOT APPLY TO YOU.
In no event shall SHARP'S total liability to you for all damages, losses, and causes of
action (whether in contract, tort (including negligence) or otherwise) exceed the amount
paid by you for the Software.
9. Controlling Law and Severability.
Macintosh and Microsoft Windows, this license shall be governed by and construed in
accordance with the laws of the state of California and Washington, respectively. If for
any reason a court of competent jurisdiction finds any provision of this License, or portion
thereof, to be unenforceable, that provision of the License shall be enforced to the
maximum extent permissible so as to effect the intent of the parties, and the remainder of
this License shall continue in full force and effect.
10. Complete Agreement.
parties with respect to the use of the Software and related documentation, and
supersedes all prior or contemporaneous understandings or agreements, written or oral,
regarding such subject matter. No amendment to or modification of this License will be
binding unless in writing and signed by a duly authorized representative of SHARP.
UNDER NO CIRCUMSTANCES INCLUDING NEGLIGENCE,
This License constitutes the entire agreement between the
You expressly acknowledge and agree that
For a portion of the Software related with Apple
Page 5

Table of Contents
1. Setting the IP Address 6
Initializing the network interface board . . . . . . . . . . . . . . . . . . . . . . . . 8
2. Printing out the Network Settings 9
3. Mail Server and DNS Server Settings 10
Accessing the Web page in the machine . . . . . . . . . . . . . . . . . . . . . 10
Mail server and DNS server . . . . . . . . . . . . . . . . . . . . . . . . . . . . . . . 10
Setting Passwords . . . . . . . . . . . . . . . . . . . . . . . . . . . . . . . . . . . . . . 11
Network Scanning and Sender E-mail settings . . . . . . . . . . . . . . . . 11
4. Storing Network Scanning Destinations 12
Storing destinations in the Web page. . . . . . . . . . . . . . . . . . . . . . . . 13
Scan to FTP (Hyperlink) . . . . . . . . . . . . . . . . . . . . . . . . . . . . . . . . . . 14
Creating personal books in the Web page . . . . . . . . . . . . . . . . . . . . 14
Information on using Scan to Desktop . . . . . . . . . . . . . . . . . . . . . . . 15
5. Scan to E-mail Setup 16
6. Scan to E-mail Using the E-mail Key 19
7.
Sending an Image Using a Rapid Key or Speed Dial Number
Sending an image using a Rapid Key . . . . . . . . . . . . . . . . . . . . . . . 21
Sending an image using a Speed Dial number . . . . . . . . . . . . . . . . 23
Storing an e-mail address in a Rapid Key or Speed Dial number . . 25
Editing a Rapid Key or Speed Dial number . . . . . . . . . . . . . . . . . . . 27
Clearing a Rapid Key or Speed Dial number . . . . . . . . . . . . . . . . . . 27
21
1
Page 6

Table of Contents
8. Installing the Network Scanner Software 28
Software Programs . . . . . . . . . . . . . . . . . . . . . . . . . . . . . . . . . . . . . . 28
User's Guides for Software Programs. . . . . . . . . . . . . . . . . . . . . . . .29
Installing the software programs. . . . . . . . . . . . . . . . . . . . . . . . . . . . 30
Setting up Network Scanner Tool . . . . . . . . . . . . . . . . . . . . . . . . . . .31
Uninstalling a program . . . . . . . . . . . . . . . . . . . . . . . . . . . . . . . . . . . 34
If an additional FO-DC500/600 machine is installed on the network
. . . . . . 34
9. Troubleshooting 35
Error Message at the Communication Error . . . . . . . . . . . . . . . . . . . 36
2
Page 7

Specifications
Maximum original size 11"x19" (279 mm x483 mm)
Optical resolution 203 dpi
Resolution Standard: 203 x 98 dpi
Fine/Halftone: 203 x 196 dpi
Super fine: 203 x 391 dpi
Ultra fine: 406 x 391 dpi
Output modes 1 bit/pixel
File format File types: PDF, TIFF
Compression modes: G3, G4, None
Scan destinations E-mail, FTP servers, computer desktops
Management system Uses built-in Web server
Web browser Internet Explorer 4.0 or later, Netscape
Navigator 4.0 or later
Network protocol TCP/IP
LAN connectivity 10Base-T/100Base-TX
Supported mail system Mail servers supporting SMTP
Number of destinations FO-DC500: 1,659; FO-DC600: 3,259
As a part of our policy of continuous improvement, SHARP reserves the right to make
design and specification changes for product improvement without prior notice. The
performance specification figures indicated are nominal values of production units.
There may be some deviations from these values in individual units.
3
Page 8
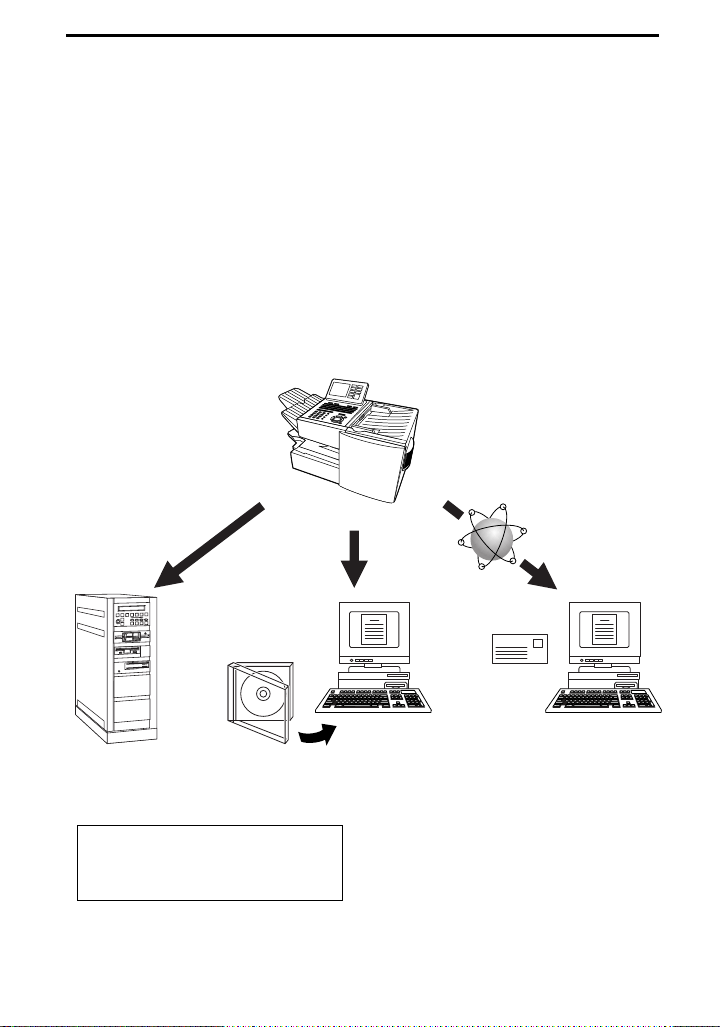
Introduction
The FO-NS2 Network Scanner Expansion Kit allows you to scan a
document and directly transmit the image to an e-mail address (Scan
to E-mail), FTP server (Scan to FTP), or computer desktop on your
network (Scan to Desktop). To use this option, the machine must be
connected to a network.
Depending on the file format selected for the image, the recipient can
view it with Adobe Acrobat Reader
as Imaging
An FTP server,
for downloading
by recipients at
their convenience
, or in the case of Scan to Desktop, SharpDesk.
Scan a document
and transmit the
image file to...
, any Tiff-compatible viewer such
Your computer
desktop, for
processing as
you desire
Any e-mail
address
Scan destinations can be stored in
Rapid Keys on the machine, for easy
one-touch scanning and transmission.
4
Page 9

Steps required for setup
The following steps are necessary to use the network scanner option. The
steps must be completed in the order shown.
1. Your dealer must install the FO-LN1 network interface kit and the FO-NS2
network scanner kit, and enter the network scanner product key. The machine
must be connected to the network.
2. Your network administrator must decide whether the machine will be
assigned a permanent IP address, or receive an address automatically from a
DHCP server (assigning a permanent IP address is recommended; if DHCP
is used, the lease time for the address should be set to unlimited). If a
permanent IP address is to be assigned, the network administrator must
determine what address will be used, and identify the subnet mask and
gateway. Once this information has been determined, the IP address setting
should be completed in the machine as explained on page 6.
❏ Permanent IP address ❏ DHCP server
IP address ( . . . ) Subnet mask ( . . . )
Gateway ( . . . )
3. The following information must be entered in the Web page in the machine
using a Web browser on a computer connected to the same network. This
procedure is explained on page 10. Obtain the information from your network
administrator.
-The IP address or host name of your e-mail server
IP address ( . . . ) Host name ( )
-The IP address of your DNS server ( )
-Your domain name ( )
-Your network administrator’s e-mail address ( )
4. Scan to E-mail setup must be completed as explained on page 16.
5. To use Scan to Desktop, you must install the Network Scanner Tool and
Sharpdesk programs in your computer. These programs are installed from the
CD-ROM that comes with the network scanner kit (see page 28 for installation
instructions). User’s guides in PDF format for the programs are also included
on the CD-ROM.
6. Destinations for Scan to E-mail and Scan to FTP can be programmed into
Rapid Keys and Speed Dial numbers using the Web page in the machine.
These procedures are explained on page 12.
also be programmed using the operation panel of the machine as explained
on page 25. To use a Rapid Key or Speed Dial number to transmit a scanned
document, see pages 21 and 23. To transmit a scanned document to an email address without using a Rapid Key or Speed Dial number, see page 19.
Scan to E-mail destinations can
5
Page 10
1. Setting the IP Address
Once your dealer has installed the network scanner option and the
machine is connected to the network, the network administrator or
administrator of the machine should use the following procedure to set
the IP address of the machine.
Note: Although “DHCP” is available as a setting for the IP address
(this means that the machine automatically obtains an address from a
DHCP server), it is recommended that a permanent IP address be
assigned to the machine. If DHCP must be used, it is recommended
that the DHCP lease time for the IP address be set to unlimited. To
check the IP address currently assigned to the machine when DHCP
is used, print out the network setting list as explained on page 9.
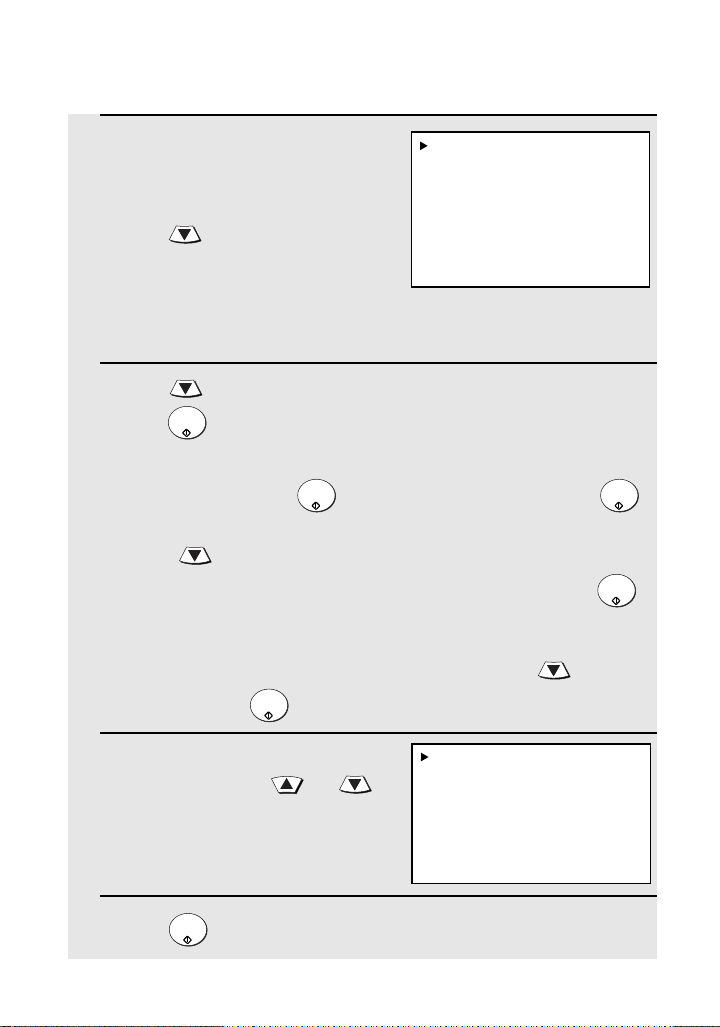
1
Press and then .
MENU
• Make sure that NETWORK
SETTING is selected in the display.
2
START/
Press .
ENTER
• Make sure that NETWORK
CONFIG SET is selected.
3
START/
Press .
ENTER
• Make sure that IP ADDRESS
SETTING is selected.
4
START/
Press .
ENTER
Display:
MENU MODE
5:PROGRAM/GROUP MODE
6:SERIAL POLLING MODE
7:MEMORY POLL MODE
8:NETWORK SETTING
NETWORK SETTING
1:NETWORK CONFIG SET
2:SCAN TO E-MAIL SET-UP
3:NETWORK SETTING LIST
NETWORK CONFIG SET
1:IP ADDRESS SETTING
2:INITIALIZE THE NIC
IP ADDRESS SETTING
ENABLE DHCP
1=YES
2=NO
6
Page 11
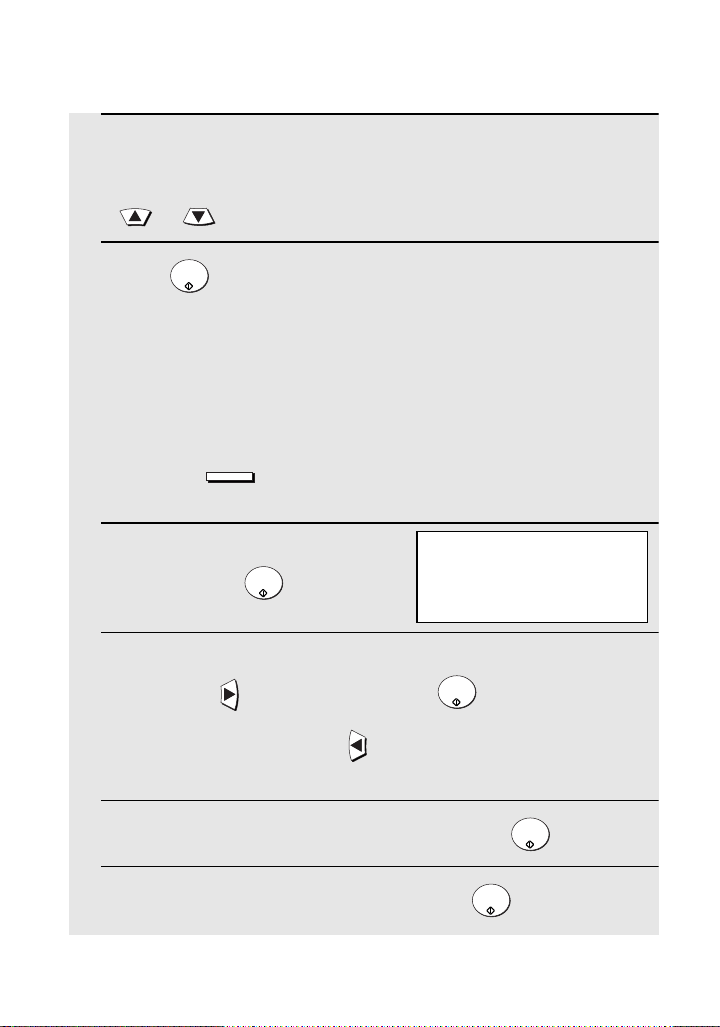
Setting the IP Address
5
If the machine will receive an IP address automatically from a
DHCP server, make sure that “YES” is selected (this will enable
DHCP).
If the machine will be assigned a permanent IP address, press
or to select “NO”.
6
START/
Press .
ENTER
• If you enabled DHCP by selecting “YES” in the previous step, this
completes the setting. Wait while the machine writes the setting to
the NIC board (“DO NOT POWER DOWN” will appear in the
display). When the display changes to “OK”, turn off the power of
the machine and then turn it back on to make the new setting take
effect. (Before turning off the power, make sure the machine is not
in the middle of a job: 1) check whether the machine is printing, and
JOB STATUS
2) press
sending or receiving a fax
7
If you are entering a permanent IP
address, press .
8
Enter the IP address of your machine (to move the cursor to the
right, press ). When finished, press .
and check the display to see if the machine is
.)
IP ADDRESS
START/
ENTER
[ ] [ ] [ ][ ]
START/
ENTER
• To correct a mistake, press to move the cursor back to the
mistake, and then enter the correct number.
9
Enter the IP subnet mask. When finished, press .
START/
ENTER
10
Enter the IP gateway. When finished, press .
START/
ENTER
7
Page 12
Setting the IP Address
11
Wait while the machine writes the setting to the NIC board (“DO
NOT POWER DOWN” will appear in the display). When the
display changes to “OK”, turn off the power of the machine and
then turn it back on to make the new settings take effect. (Before
turning off the power, make sure the machine is not in the middle
of a job: 1) check whether the machine is printing, and 2) press
JOB STATUS
and check the display to see if the machine is sending or
receiving a fax
.)
Initializing the network interface board
Normally the network interface board (NIC) does not need to be
initialized (returned to the factory default settings). In the event that
you do need to intialize the board, follow the Steps 1 to 3 of the
previous procedure to access “NETWORK CONFIG SET”, press
to select “INTIALIZE THE NIC”, and then press . Press to
select “YES” and then press . Wait while the machine writes the
START/
ENTER
setting to the NIC board (“DO NOT POWER DOWN” will appear in the
display). When the display changes to “OK”, turn off the power of the
machine and then turn it back on to make the new setting take effect.
(Before turning off the power, make sure the machine is not in the
middle of a job: 1) check whether the machine is printing, and 2) press
JOB STATUS
and check the display to see if the machine is sending or
receiving a fax
.)
START/
ENTER
8
Page 13
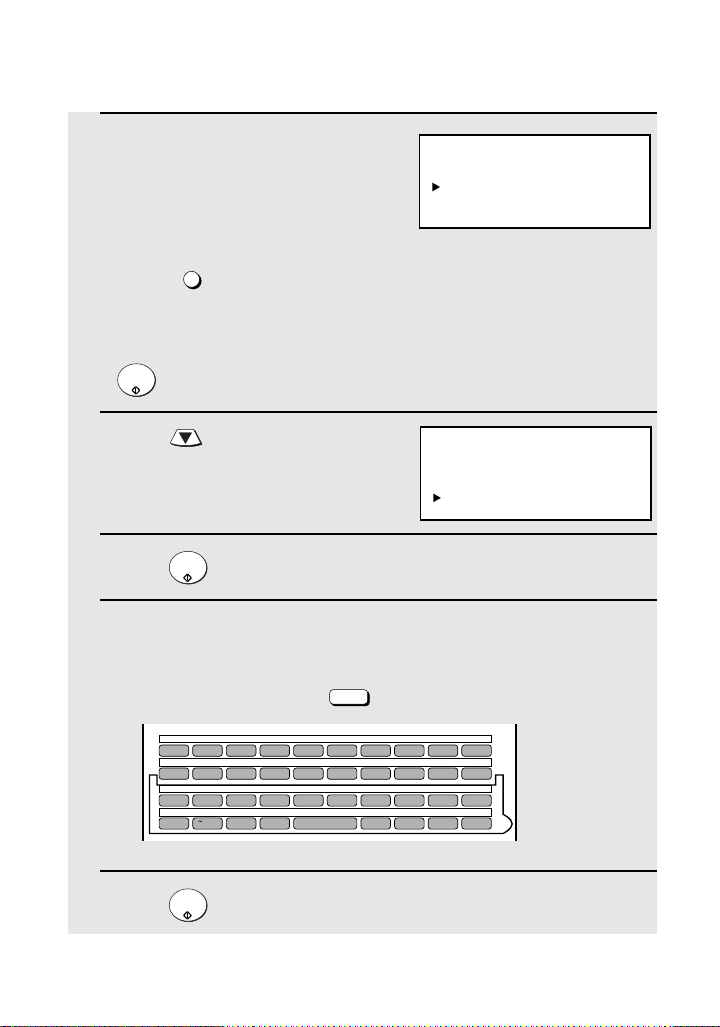
2. Printing out the Network Settings
You can print lists showing the current network settings and network
interface board settings.
♦ To check the IP address of the machine, select PRINT NETWORK
SETTINGS in Step 3 below.
1
Press and then .
MENU
• Make sure that NETWORK
SETTING is selected in the display.
2
START/
Press and then .
ENTER
• Make sure that NETWORK
SETTING LIST is selected.
3
4
START/
Press .
ENTER
Press or to select the list you want to print, and then
START/
press . (Note: “NIC” is an acronym for “network interface
ENTER
Display:
MENU MODE
5:PROGRAM/GROUP MODE
6:SERIAL POLLING MODE
7:MEMORY POLL MODE
8:NETWORK SETTING
NETWORK SETTING
1:NETWORK CONFIG SET
2:SCAN TO E-MAIL SET-UP
3:NETWORK SETTING LIST
NETWORK SETTING LIST
1:PRINT NETWORK SETTINGS
2:PRINT NIC INFORMATION
board”.)
9
Page 14

3. Mail Server and DNS Server Settings
Settings for your E-mail server and DNS server must be configured in
order to use the network scanner function. To configure the settings,
access the machine's Web page from a computer that is connected to
the same network as the machine. The Web page can be displayed
with your Web browser (Internet Explorer 4.0 or later, or Netscape
Navigator 4.0 or later).
Accessing the Web page in the machine
To access the Web page in the machine, type in the IP address of the
machine in your browser in the format http://XXX.XXX.X.X, where the
X’s are the IP address (the number of digits between periods will vary
depending on the address). If you need to check the IP address of the
machine, print out the network settings as explained on page 9.
Mail server and DNS server
To configure your mail server and DNS server settings, click
in the menu at the left of the Web page and enter the information in
DNS
the appropriate boxes.
Note that your DNS server must be entered if you enter a host name
instead of an IP address in E-mail Server under E-mail Setup. This is
also true if host names will be used for Scan to FTP or Scan to
Desktop destinations.
♦ If “DHCP” was selected for the IP address of the machine, the IP address of
the DNS server appears automatically and cannot be changed.
10
E-mail &
Page 15

Mail Server and DNS Server Settings
Setting Passwords
Passwords can be set to restrict Web page access and protect
settings. An administrator password and a user password can be set.
When the Web page is accessed with the administrator password, all
settings can be configured. When the Web page is accessed with the
user password, destinations in the Scanner Destination Management
menu can be stored, deleted, and edited; however, settings in the
Setup menu cannot be configured
and “Personal Address Book”)
To enable password protection, click Passwords in the Web page
menu and select the “Enable Password Protection of this Web
Site” checkbox. The passwords for “User” and “admin” are both
initially set to “Sharp”. If you wish to change a password, enter
“Sharp” in Old Admin Password, and then enter the new password
under User Password or Admin Password. A password must
consist of alphanumeric characters and be no more than 10
characters long. Passwords are case sensitive.
When you are finished, click Submit to store the new settings and
then turn the machine power off and then back on. The next time you
attempt to access the Web page, you will be prompted for the
password. For the User name, enter “user” if you are accessing the
page as a user, or “admin” if you are accessing the page as an
administrator.
For more information on setting passwords, click Help at the bottom of
the Web page menu.
(with the exception of “Sender E-mail”
.
Network Scanning and Sender E-mail settings
The network scanning settings allow you to select the method for
assigning a file name to a scanned image and enter a subject for Scan to
E-mail (the subject can also be entered from the operation panel of the
machine as explained in Scan to E-mail Setup on page 16).
Click Network Scanning in the menu and then configure the settings
as needed. When finished, be sure to click Submit to store the new
settings.
To enter the sender name and sender e-mail address that appear on
e-mail that you send, click Sender E-mail. The sender information
can be entered separately for each personal book and for the
COMMON book.
For detailed information on all the settings in the Web page, click
Help
.
11
Page 16

4.
Storing Network Scanning Destinations
Network scanning destinations can be stored in Rapid Keys and
Speed Dial numbers. The Rapid Keys and Speed Dial numbers can
be in a personal book or in the COMMON book.
♦ Scan to E-mail can be performed by manually entering the
destination e-mail address at the time of transmission, or by using a
Rapid Key or Speed Dial number. A Scan to E-mail destination can
be stored in a Rapid Key or Speed Dial number using the Web
page, or using the operation panel on the machine (to use the
operation panel, see page 25).
♦ To use Scan to FTP, the destination must be previously stored in a
Rapid Key or Speed Dial number. A Scan to FTP destination can
only be stored in a Rapid Key or Speed Dial number using the Web
page.
♦ To use Scan to Desktop, the Network Scanner Tool and Sharpdesk
programs must be installed in the destination computer. The
Network Scanner Tool automatically stores the computer as a Scan
to Desktop destination, and for this reason, the Web page should
not be used to store Scan to Desktop destinations. However, the
Web page can be used to change the selected file format for a Scan
to Desktop destination, copy a Scan to Desktop destination into a
different address book, or delete a Scan to Desktop destination if
the Network Scanner Tool has been uninstalled from the computer.
♦ Fax destinations can also be stored in Rapid Keys and Speed Dial
numbers using the Web page.
12
Page 17

Storing Network Scanning Destinations
Storing destinations in the Web page
To store a destination, click the desired destination type (
Fax
) under
Destination Management page, enter the destination name and select a
Destination Management
personal address book or the COMMON book. To select a Rapid Key or
Speed Dial number, select the
and select a Rapid Key or Speed Dial number from the list. Enter the
information required for the destination type, and click
To edit or delete a destination, click Destination Management in the
Web page menu, select the destination you wish to edit or delete, and
click Edit or Delete at the bottom of the page.
in the Web page menu. In the
Location Assigned Manually
E-mail, FTP
Submit
, or
checkbox
.
13
Page 18

Storing Network Scanning Destinations
For detailed information on setting up, editing, and deleting
destinations, click Help at the bottom of the Web page menu frame.
Scan to FTP (Hyperlink)
When using Scan to FTP to send an image to an FTP server, you can
also have notifications automatically sent by e-mail to selected recipients
informing them that the image has been posted on the server. The e-mail
will contain a hyperlink to the image file on the server, allowing the
recipients to open the file by simply clicking on the hyperlink (unless the
FTP server requires a password).
To use this feature, select the “Enable Hyperlink to FTP server to be emailed” checkbox when storing the Scan to FTP destination, and then
select the recipients for the e-mail from the E-mail Destination list.
Creating personal books in the Web page
To create a new personal book in the Web page, click Personal
Address Book in the Web page menu, and then click Add in the
Personal Address Book Setup page. Enter the required information
and click Submit.
14
Page 19

Storing Network Scanning Destinations
Information on using Scan to Desktop
Unlike the case where a scanner is directly connected to your
computer, scanning using Scan to Desktop cannot be directly initiated
from a scanning application in your computer. Instead, scanning is
begun by pressing the Rapid Key or Speed Dial number on the
machine that contains your computer as a Scan to Desktop
destination. To use Scan to Desktop, the Network Scanner Tool must
be running in your computer (it starts and runs automatically in the
background when you power up your computer).
Your computer is automatically stored as a Scan to Desktop
destination in a Rapid Key or Speed Dial number when you install the
Network Scanner Tool. After you install and set up the Network
Scanner Tool, access the Web page in the machine from your browser
on your computer, and click Destination Management in the menu to
see which Rapid Key or Speed Dial number your computer is stored
in. This will be the Rapid Key or Speed Dial number you will use to
scan documents to your computer.
15
Page 20

5. Scan to E-mail Setup
To use the Scan to E-mail function, the subject and sender information
(name and e-mail address) that appear when an image is sent to an email recipient must be entered, and the file format for the scanned image
must be selected. (Note: The file format set in this procedure does not
apply to Scan to E-mail using a Rapid Key or Speed Dial number.)
♦ The preset subject is “Scanned image from FO-DCXXX” (where
“XXX” is “500” or “600”), and the preset file format is “TIFF/G4”.
♦ You can enter a different sender name and select a different file
format at the time of transmission. The subject can only be changed
using the following procedure.
Important:
To use Scan to E-mail, sender information must be set using the
following procedure, or using the Web page as explained on page 11,
even if a sender is manually entered at the time of transmission.
Note: In the event that your e-mail server is unable to deliver a Scan
to E-mail transmission to a specified e-mail address, your server will
send notification to the sender’s e-mail address that you enter in the
following procedure or at the time of transmission.
1
Press and then .
MENU
• Make sure that NETWORK
SETTING is selected in the display.
Display:
MENU MODE
5:PROGRAM/GROUP MODE
6:SERIAL POLLING MODE
7:MEMORY POLL MODE
8:NETWORK SETTING
2
START/
Press and then or
ENTER
until SCAN TO E-MAIL SET-UP is
selected.
3
4
START/
Press .
ENTER
START/
Press .
ENTER
16
NETWORK SETTING
1:NETWORK CONFIG SET
2:SCAN TO E-MAIL SET-UP
3:NETWORK SETTING LIST
SCAN TO E-MAIL SET-UP
1:E-MAIL SUBJECT
2:E-MAIL SENDER
3:FILE FORMAT
Page 21

Scan to E-mail Setup
5
Enter the e-mail subject by pressing the letter entry keys (max. of
60 characters). (Make sure the Rapid Key overlay is flipped
down.)
01 02 03 04 05 06 07 08 09 10
Q / ! W / " E / # R / $ T / % Y / & U / ' I / ( O / ) P / =
11 12 13 14 15 16 17 18 19 20
SYMBOL
A / |S D F G / { H / } J / [ K / ] L / +
21 22 23 24 25 26 27 28 29 30
Caps Lock
Z / < X / > C V B N / * M / ? @ .com
31 32 33 34 35 36 37 38 39
SHIFT
/ ^ / / \ ; / :
Space
_
- . / , DEL
Note: The
markings above
some of the
Rapid Keys may
vary by country
and region.
• To enter a space, press .
• To change case, press .
• To clear a mistake, press .
Space
Caps Lock
DEL
• To enter a number, press the appropriate numeric key. To enter the
symbol on a letter key (the character to the right of the slash), press
SYMBOL
(“SYM” will appear in the display) and then the letter key
(press again to turn off symbol entry mode).
SYMBOL
• To move the cursor, press or . To switch between letter
insertion and letter replacement mode when the cursor is in the
middle of a sequence of letters, press .
6
START/
Press .
ENTER
• Make sure that E-MAIL SENDER is
selected.
7
8
START/
Press .
ENTER
Press the letter keys to enter the sender’s name (see Step 5)
MENU
SCAN TO E-MAIL SET-UP
1:E-MAIL SUBJECT
2:E-MAIL SENDER
3:FILE FORMAT
9
Press .
START/
ENTER
17
Page 22
Scan to E-mail Setup
10
Press the letter keys to enter your e-mail address (see Step 5).
11
START/
Press .
ENTER
• Make sure that FILE FORMAT is
selected.
12
13
START/
Press .
ENTER
Press or to select the desired combination of file
SCAN TO E-MAIL SET-UP
1:E-MAIL SUBJECT
2:E-MAIL SENDER
3:FILE FORMAT
FILE FORMAT SETTING
1=TIFF-G4
2=TIFF-G3
3=TIFF-NO COMPRESSION
4=PDF-G4
5=PDF-G3
format (TIFF or PDF) and compression method (G3, G4, or NO
COMPRESSION).
• TIFF is a bitmap format that can be compressed without loss of
data. TIFF images can be viewed by many viewer programs. PDF is
a widely used format that requires Adobe Acrobat Reader
• G4 provides the greatest amount of compression and works well
with most black and white files. If the recipient cannot open a G4compressed file or experiences other difficulties, try G3 or “NO
COMPRESSION”.
14
START/
Press and then press repeatedly to return to the date
ENTER
and time display.
STOP
to view.
18
Page 23
6. Scan to E-mail Using the E-mail Key
Use the e-mail key when you wish to manually enter the e-mail
address of a recipient for Scan to E-mail. The scanned image will be
sent as an e-mail attachment. A message can also be included as
explained in Steps 5 and 6.
Important:
To use Scan to E-mail, the setup procedures outlined on page 4 must
be completed. This includes setting a default sender as explained in
the procedure beginning on page 16 of this manual.
♦ If you need to change the e-mail subject, use the procedure on
page 16.
1
Load the document(s).
• SEND READY will appear in the
display.
•
RESOLUTION
Press and/or to set
the resolution and contrast if needed.
The default resolution is FINE. Note
that STANDARD and SUPER FINE
are primarily for faxing and are not
recommended for scanning.
2
Press .
e-mail
CONTRAST
Display:
SCAN TO E-MAIL
TO: [
3
Enter the e-mail address of the recipient by pressing the letter
entry keys (for details, see Step 5 on page 17; max. of 60
characters). (Make sure the Rapid Key overlay is flipped down.)
01 02 03 04 05 06 07 08 09 10
Q / ! W / " E / # R / $ T / % Y / & U / ' I / ( O / ) P / =
11 12 13 14 15 16 17 18 19 20
SYMBOL
A / |S D F G / { H / } J / [ K / ] L / +
21 22 23 24 25 26 27 28 29 30
Caps Lock
Z / < X / > C V B N / * M / ? @ .com
31 32 33 34 35 36 37 38 39
SHIFT
/ ^ / / \ ; / :
Space
_
- . / , DEL
Note: The
markings above
some of the
Rapid Keys may
vary by country
and region.
19
Page 24

Scan to E-mail Using the E-mail Key
4
5
START/
Press .
ENTER
If you wish to enter a message,
your name, or your return e-mail
address, or select the file format
for the document, press .
(If you wish to use the default
settings you entered on page 16
and do not need to enter a
1:START SCANNING
2:FROM
XXX
3:FILE FORMAT
XXX
4:MESSAGE
NO MESSAGE
message, go directly to Step 8.)
Your preset sender and file
format appear in “XXX”.
6
Press to select the option you want to change, and then
START/
press . Change the selected option as follows:
ENTER
• FROM
Enter your name, press , enter your e-mail address, and press .
START/
ENTER
• FILE FORMAT
Press to select the desired combination of file format (TIFF or PDF)
and compression (G3, G4 or NO COMPRESSION), and then press .
• MESSAGE
Use the letter entry keys to enter a message (see Step 5 on page
17; maximum of 256 characters). A line break can be entered by
pressing . When finished, press .
START/
ENTER
START/
ENTER
START/
ENTER
7
When you have finished changing
the options, press or to
select START SCANNING.
8
START/
Press . The document is scanned and transmitted.
ENTER
1:START SCANNING
2:FROM
XXX
3:FILE FORMAT
XXX
4:MESSAGE
NO MESSAGE
20
Page 25

7. Sending an Image Using a Rapid Key
or Speed Dial Number
Sending an image using a Rapid Key
Use this procedure to scan a document and send the image to an Email, FTP, or Desktop destination that has been stored in a Rapid Key.
Important: To use this procedure, the setup procedures outlined on
page 4 must be completed. In the case of Scan to E-mail, this includes
setting a default sender as explained in the procedure beginning on
page 16 of this manual.
♦ If you are sending the image to an e-mail destination and need to
change the subject, use the procedure on page 16.
1
Load the document(s).
• SEND READY will appear in the
display.
• Press and/or to
2
Press the appropriate Rapid Key.
RESOLUTION
set the resolution and contrast if
needed. The default resolution is
FINE. Note that STANDARD and
SUPER FINE are primarily for
faxing and are not recommended
for scanning.
CONTRAST
• The name of the recipient will appear in the display. (If the
destination is not correct, press .)
STOP
• If the destination is an FTP or Desktop destination, or if the
destination is an e-mail destination and you don’t need to enter a
message or change any of the e-mail options, this completes the
procedure.
21
Page 26
Sending an Image Using a Rapid Key or Speed Dial Number
3
If the destination is an e-mail
destination and you wish to enter a
message, or change the sender
name or e-mail address, or select
the file format for the document,
press
WITHIN 5 SECONDS
after pressing the Rapid Key in
Step 2.
1:START SCANNING
2:FROM
XXX
3:FILE FORMAT
XXX
4:MESSAGE
NO MESSAGE
(After 5 seconds, the document will
be scanned and transmitted using
the settings that were stored in the
Rapid Key.)
4
Press to select the option you want to change, and then
START/
press . Change the selected option as follows:
ENTER
• FROM
Enter your name, press , enter your e-mail address, and press .
START/
ENTER
• FILE FORMAT
Press to select the desired combination of file format (TIFF or PDF)
and compression (G3, G4 or NO COMPRESSION), and then press .
• MESSAGE
Use the letter entry keys to enter a message (maximum of 256
characters). A line break can be entered by pressing . When
finished, press .
START/
ENTER
START/
ENTER
START/
ENTER
5
When you have finished changing
the options, press or to
select START SCANNING.
6
START/
Press to begin scanning and transmission.
ENTER
22
1:START SCANNING
2:FROM
XXX
3:FILE FORMAT
XXX
4:MESSAGE
NO MESSAGE
Page 27

Sending an Image Using a Rapid Key or Speed Dial Number
Sending an image using a Speed Dial number
Use this procedure to scan a document and send the image to an Email, FTP, or Desktop destination that has been stored in a Speed Dial
number.
Important: To use this procedure, the setup procedures outlined on
page 4 must be completed. In the case of Scan to E-mail, this includes
setting a default sender as explained in the procedure beginning on
page 16 of this manual.
♦ If you are sending the image to an e-mail destination and need to
change the subject, use the procedure on page 16.
1
Load the document(s).
• SEND READY will appear in the
display.
• Press and/or to
RESOLUTION
CONTRAST
set the resolution and contrast if
needed. The default resolution is
FINE. Note that STANDARD and
SUPER FINE are primarily for
faxing and are not recommended
for scanning.
2
SPEED DIAL
Press and then enter the Speed Dial number by pressing
the numeric keys.
• If you enter less than 3 digits for the Speed Dial number, press
START/
to complete the entry.
ENTER
• Check the display to make sure the destination shown is correct (if
not, press and repeat Step 2).
STOP
23
Page 28

Sending an Image Using a Rapid Key or Speed Dial Number
3
If the destination is an e-mail
destination and you wish to enter a
message, your name, or your
return e-mail address, or select the
file format for the document, press
.
(If the destination is an FTP or
Desktop destination, or if you wish
1:START SCANNING
2:FROM
XXX
3:FILE FORMAT
XXX
4:MESSAGE
NO MESSAGE
to use the e-mail settings that were
stored in the Speed Dial number
and do not need to enter a
message, go directly to Step 6.)
4
Press to select the option you want to change, and then
START/
press . Change the selected option as follows:
ENTER
• FROM
Enter your name, press , enter your e-mail address, and press .
START/
ENTER
• FILE FORMAT
Press to select the desired combination of file format (TIFF or PDF)
and compression (G3, G4 or NO COMPRESSION), and then press .
• MESSAGE
Use the letter entry keys to enter a message (maximum of 256
characters). A line break can be entered by pressing . When
finished, press .
START/
ENTER
START/
ENTER
START/
ENTER
5
When you have finished changing
the options, press or to
select START SCANNING.
6
START/
Press to begin scanning and transmission.
ENTER
24
1:START SCANNING
2:FROM
XXX
3:FILE FORMAT
XXX
4:MESSAGE
NO MESSAGE
Page 29

Sending an Image Using a Rapid Key or Speed Dial Number
Storing an e-mail address in a Rapid Key or Speed Dial
number
This section explains how to store e-mail addresses in Rapid Keys
and Speed Dial numbers using the operation panel of the machine.
This will allow you to send documents to e-mail recipients without
having to manually enter the e-mail address each time.
♦ This procedure cannot be used to store an FTP or Desktop
destination (these can only be stored as explained on page 12).
1
Press and then or
MENU
until ENTRY MODE is selected in
the display.
2
START/
Press . Make sure that
ENTER
DESTINATION SETTING is
selected.
3
START/
Press . Make sure that SET is
ENTER
selected.
4
START/
Press .
ENTER
Display:
MENU MODE
1:RECEIVE MODE
2:LISTING MODE
3:ENTRY MODE
ENTRY MODE
01:DESTINATION SETTING
02:PASSCODE SETTING
03:OWN PASSCODE SET
DESTINATION SETTING
1=SET
2=CLEAR
DESTINATION SET
PRESS RAPID OR SPEED
25
Page 30
Sending an Image Using a Rapid Key or Speed Dial Number
5
To program a Rapid Key number,
press the Rapid Key that you wish
to use. (To select Rapid Keys 40
through 59, flip up the Rapid Key
overlay.)
DESTINATION SET
SELECT DESTINATION TYPE
1=FAX
2=E-MAIL
To program a Speed Dial number,
SPEED DIAL
press and then enter the
number that you wish to use (“1”
to “100” on the FO-DC500, or “1” to
“200” on the FO-DC600). (If you
enter less than three digits, press
START/
to complete the entry.)
ENTER
6
Press to select E-MAIL.
DESTINATION SET
SELECT DESTINATION TYPE
1=FAX
2=E-MAIL
7
8
START/
Press .
ENTER
Enter the e-mail address of the recipient by pressing the letter
entry keys (for details, see Step 5 on page 17; max. of 60
characters). (Make sure the Rapid Key overlay is flipped down.)
Space
DEL
_
- . / , DEL
• To clear a mistake, press .
01 02 03 04 05 06 07 08 09 10
Q / ! W / " E / # R / $ T / % Y / & U / ' I / ( O / ) P / =
11 12 13 14 15 16 17 18 19 20
SYMBOL
A / |S D F G / { H / } J / [ K / ] L / +
21 22 23 24 25 26 27 28 29 30
Caps Lock
Z / < X / > C V B N / * M / ? @ .com
31 32 33 34 35 36 37 38 39
/ ^ / / \ ; / :
SHIFT
9
START/
Press .
ENTER
26
Note: The
markings above
some of the
Rapid Keys may
vary by country
and region.
Page 31
Sending an Image Using a Rapid Key or Speed Dial Number
10
Enter the name of the party by pressing the letter entry keys
(max. of 20 characters). (Make sure the Rapid Key overlay is
flipped down.)
11
12
START/
Press .
ENTER
Press or to select the file format (TIFF or PDF) and
DESTINATION SET
SELECT FILE FORMAT
1=TIFF-G4
2=TIFF-G3
3=TIFF-NO COMPRESSION
4=PDF-G4
5=PDF-G3
compression method (G3, G4, or NO COMPRESSION) for the
document that will be sent as an e-mail attachment. (Note: You
can override this setting during the transmission procedure.)
13
14
START/
Press .
ENTER
Return to Step 5 to program another number, or press
repeatedly to return to the date and time display.
• If you programmed a Rapid Key number, you can write the name of
the destination on the label above the Rapid Key.
Editing a Rapid Key or Speed Dial number
To make changes in a Rapid Key or Speed Dial number, repeat the
programming procedure. Select the Rapid Key or Speed Dial number
for which you want to make changes in Step 5, and then change the
programmed information as needed in the following steps.
STOP
Clearing a Rapid Key or Speed Dial number
To clear a Rapid Key or Speed Dial number, select CLEAR in Step 3
of the programming procedure, press , select the Rapid Key or
Speed Dial number as explained in Step 5, and then press .
START/
ENTER
START/
ENTER
27
Page 32

8.
Installing the Network Scanner Software
To use the Scan to Desktop function, the following two software
programs must be installed in your computer (the destination
computer for Scan to Desktop). The programs are installed from the
CD-ROM that comes with the network scanner expansion kit.
♦ Sharpdesk (Desktop Document Management Software)
♦ Network Scanner Tool
Note:
Sharpdesk can be installed and used in 5 computers. If you need to
install Sharpdesk in more than 5 computers, please contact your Sharp
dealer.
Software Programs
For detailed information on each of the software programs, please
refer to the user's guides on the CD-ROM.
Sharpdesk (Desktop Document Management Software)
Sharpdesk lets you manage a variety of electronic information such
as scanned image data from the network scanner or documents
created using word processing or spreadsheet application software.
Some of the important features of Sharpdesk are:
♦ Sharpdesk works with your scanner to let you read paper
documents into your computer using a full-featured set of scanning
controls and options.
♦ Sharpdesk makes editing of your images and documents quick and
easy.
♦ A text image scanned into Sharpdesk can be converted into
editable text for use with your favorite word processor. Sharpdesk
uses an advanced Optical Character Recognition (OCR) engine
that even preserves your document layouts.
Note: For the best results, set the resolution to ULTRA FINE when
scanning a document for OCR conversion.
Network Scanner Tool
This is a utility that helps you use Scan to Desktop. It configures the
necessary settings in the network scanner and client computer to
receive data. In addition, Network Scanner Tool will automatically start
Sharpdesk when image data is received. The scanned image
received by your computer can be:
28
Page 33

Installing the Network Scanner Software
♦ Saved in a folder.
♦ Passed to an application set in the Network Scanner Tool.
♦ Sent as e-mail.
♦ Saved in Sharpdesk.
User's Guides for Software Programs
The Manual folder in the CD-ROM contains the Sharpdesk Installation
Guide, Sharpdesk User's Guide, and Network Scanner Tool User's
Guide. The guides are in PDF format.
Acrobat Reader Version 4.05 or later is needed to view the user's
guides. If not already installed in your computer, you can install
Acrobat Reader from the CD-ROM. (Note: If Acrobat Reader 3.0 is
already installed in your computer, uninstall it before installing the new
version from the CD-ROM.)
Installing Acrobat Reader
1
Quit any software applications and/or resident programs that are
running on your computer.
2
Insert the CD-ROM into your CD-ROM drive.
• If the Sharpdesk installation window appears, click Cancel to close
the window.
3
Double-click My Computer ().
4
Click the CD-ROM icon ( ) and select Open from the File menu.
5
Double-click the Acrobat folder, and then double-click “ar405eng.exe”
().
6
Follow the instructions on the screen.
29
Page 34

Installing the Network Scanner Software
Installing the software programs
Note the following when installing the software programs from the CD-ROM:
♦ Be sure to check the system requirements for installation of each of
the software programs in the user's guides and on the information
screen during installation.
♦ For detailed instructions for installing and setting up the programs,
see the Sharpdesk Installation Guide on the CD-ROM.
♦ If you perform a standard installation of Sharpdesk (select Typical
in the installation type selection screen), Network Scanner Tool will
also be installed. You can also select Custom installation and install
only Network Scanner Tool.
♦ If your computer does not currently have Internet Explorer version
5.5 or later installed, Sharpdesk will install a minimal version of
Internet Explorer 5.5 on your computer.
1
Quit any software applications and/or resident programs that are
running on your computer.
2
Insert the CD-ROM into your CD-ROM drive.
• If the Sharpdesk installation screen appears. go to Step 6.
• If the screen does not appear, continue with Step 3.
3
Double-click "My Computer" ( ).
4
Double-click the CD-ROM icon ( ).
5
Double-click the Sharpdesk folder, and then double-click SETUP
().
6
Follow the instructions on the screen.
• In the license number entry line in the user information screen,
enter the license number that appears on the cover of this manual.
30
Page 35

Installing the Network Scanner Software
• If you select Typical in the installation type screen, Network
Scanner Tool will also be installed. If you only wish to install
Network Scanner Tool, select Custom in the installation type
screen and then check only Network Scanner Tool.
• Sharpdesk Imaging is installed together with Sharpdesk. If Imaging
for Windows was previously installed, Sharpdesk Imaging will
overwrite Imaging for Windows.
• The Sharpdesk installation package contains Sharpdesk Imaging,
which is a version of Eastman Software's “Imaging for Windows
Professional Edition” that has been customized for the Sharp
Corporation. If Eastman Software's “Imaging for Windows
Professional Edition” has already been installed on your computer,
Sharpdesk Imaging will not be installed.
• “Imaging for Windows Professional Edition” and Sharpdesk Imaging
use common registry entries, and installing “Imaging for Windows
Professional Edition” after Sharpdesk has been installed may cause
abnormal operation. In this case, uninstall Sharpdesk and
Sharpdesk Imaging, and then install “Imaging for Windows
Professional Edition”. After that, reinstall Sharpdesk.
Setting up Network Scanner Tool
When installation of the software is completed, the Sharp Network
Scanner Tool Setup Wizard will appear. Follow these steps to set up
the Network Scanner Tool.
♦ The FO-DC500/600 is referred to as “Copier” in the windows of the
setup wizard.
1
When the Sharp Network Scanner Tool Setup Wizard appears, click
OK after confirming that the FO-DC500/600 is connected to the
network. Follow the on-screen instructions to complete the setup.
31
Page 36
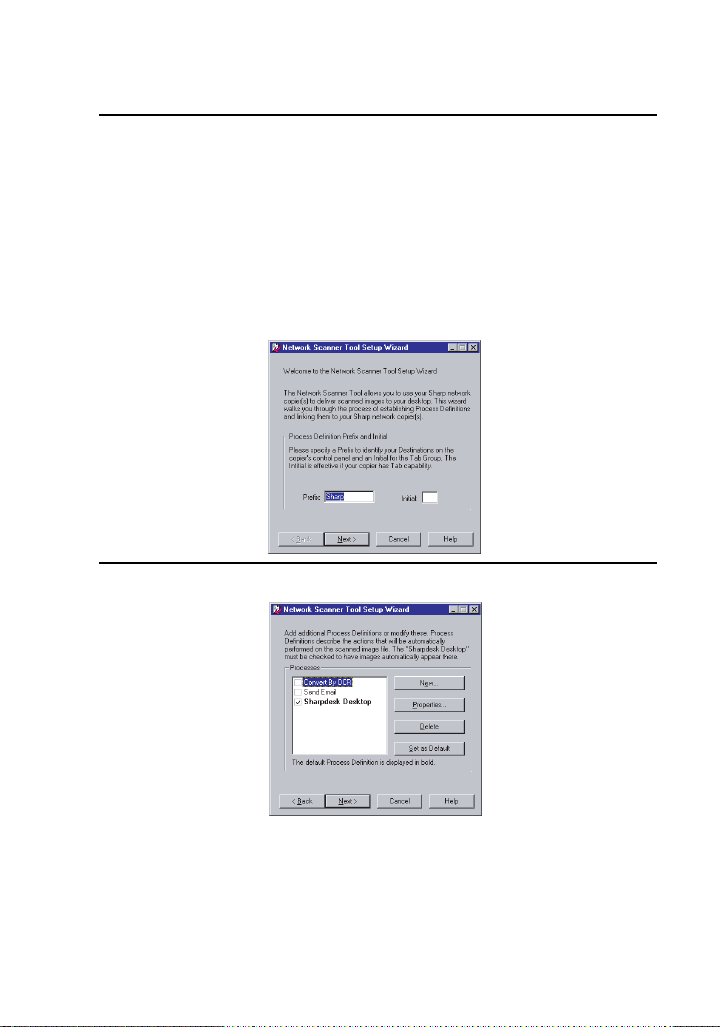
Installing the Network Scanner Software
2
Enter any name you wish for the Process Definition Prefix and any
letter for Initial, and click Next. Click Help for detailed information.
• The name of your computer initially appears in the Prefix box. If you
wish to change the prefix, enter a name in 6 characters.
• Enter any letter for the Initial (the initial is not used on the FO-
DC500/600, however, an entry is necessary).
• The Process Definition defines instructions for how the image will
be processed once it arrives at the computer.
3
Check the Process Definitions you wish to use and click Next.
• Network Scanner Tool is shipped with 3 pre-defined sets of
instructions called Process Definitions if you install both Sharpdesk
and Network Scanner Tool. The “Process Definition Prefix” that
was set in Step 2 appears in the displayed name of each process
(“Sharp” is used for the prefix in the examples below).
32
Page 37
Installing the Network Scanner Software
-Convert By OCR (name displayed: Sharp-OCR)
Converts a scanned file to an editable document.
-Send Email (name displayed: Sharp-Email)
Launches your default e-mail application so the file can be e-mailed.
-Sharpdesk Desktop (name displayed: Sharp-Desk),
Launches the Sharpdesk application (this is the default).
• Network Scanner Tool is shipped with 2 pre-defined Process
Definitions if you install only Network Scanner Tool.
-Send Email (name displayed: Sharp-Email),
-My Documents (name displayed: Sharp-MyDocs)
Stores the file in the “My Documents” folder in your computer (this
is the default).
4
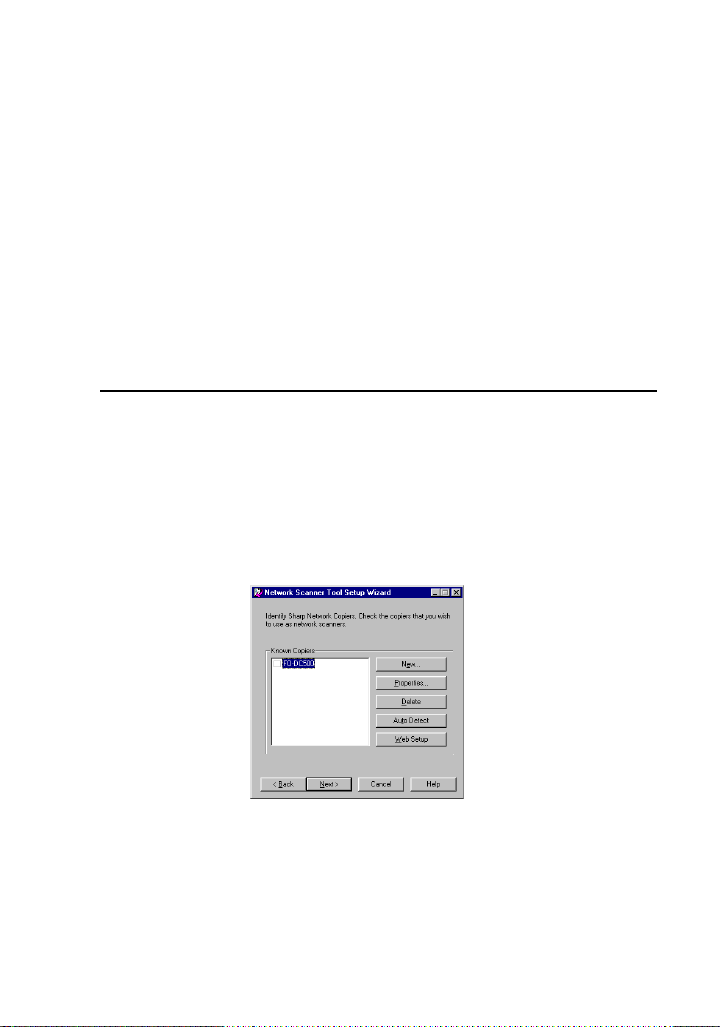
Select the machine (or machines) that you wish to use as a network
scanner. The name that initially appears is the machine name set
during the installation of the network scanning function. If a name was
not set, “FO-DC500(600)” (or a higher number if there are multiple
FO-DC500/600 machines on the network) will appear.
Click the
whether your computer uses an IP address or a host name on the
network (ask your network administrator if you do not know).
When finished, click Next.
Properties
button and then the
Advanced
button, and select
• The FO-DC500/600 is automatically detected on the network.
•
The settings in Steps 3 and 4 can be changed later by clicking the
Start
Windows
selecting
on-line Help or the Network Scanner Tool User's Guide in the CD-ROM.
button, pointing to
Network Scanner Tool Configuration
Programs, Sharpdesk
. For more details, see
and then
33
Page 38

Installing the Network Scanner Software
5
When the completion message appears, click Finish. The "Search
Setup Wizard" will appear next. Follow the on-screen instructions to
create an index database. For more information, see the Sharpdesk
Installation Guide and Sharpdesk User's Guide.
Uninstalling a program
You can uninstall the software with “Add/Remove Programs” in the
Windows Control Panel, or with the Sharpdesk Uninstaller.
♦
When Sharpdesk is uninstalled, Network Scanner Tool is also
uninstalled. Note that if Network Scanner Tool is uninstalled, you will no
longer be able to directly receive image data from the machine. Note
that the Sharpdesk desktop folder is not removed when you uninstall
Sharpdesk.
♦ If you uninstall Sharpdesk Imaging, you will not be able to open
image files unless you re-install the Windows accessory Imaging for
Windows.
♦ If you uninstall the programs, use the Web page in the machine to
clear the Rapid Key or Speed Dial number that contained your
computer as a Scan to Desktop destination.
Uninstalling the software programs with the Sharpdesk Uninstaller
Click
Start
Sharpdesk
the screen.
and then point to
, and then
Programs (All Programs
Uninstall Sharpdesk
in Windows XP),
. Follow the instructions on
If an additional FO-DC500/600 machine is installed on
the network
If an additional FO-DC500/600 machine is installed on your network
after you have installed Sharpdesk and the Network Scanner Tool, it is
not necessary to reinstall the software. Simply follow the steps below
to automatically detect the new machine.
1
Click the Start button, point to Programs, Sharpdesk, and then
Network Scanner Tool Configuration. Click the Copiers tab in the
window that appears.
2
Click the Auto Detect button. The names of the FO-DC500/600
machines on your network will be displayed. Select the name of the
34
Page 39

9. Troubleshooting
Problem: The recipient can not open the image data.
Check: Does the recipient have a software program (viewer) that
Solution: Try sending the image using a different file format (TIFF
Problem: Data sent does not reach the recipient.
Check: Is the image being sent to the correct address? When
Solution: Check the stored address and correct if necessary.
Problem: Scan to E-mail is not successful.
Check: The image might have exceeded the file size limit set by
Solution: Reduce the file size (decrease the number of scanned
is compatible with the format of the file sent?
or PDF) and/or compression method (uncompressed, G3
and G4).
using a Rapid Key or Speed Dial number, is the correct
address (e-mail address or FTP address) stored in the
Rapid Key or Speed Dial number?
* If Scan to E-mail is not successful, check to see if an
unsuccessful delivery message was sent to your
specified sender’s e-mail address. This may provide
details on the problem.
* To use Scan to Desktop, the Network Scanner Tool
must be installed.
your administrator for e-mail.
pages, use a lower resolution setting, or use a higher
compression level such as G4). Contact your
administrator to see if there is a file size limit for e-mail.
35
Page 40

Troubleshooting
Problem: Takes a long time to send an image.
Check: A large file size can greatly increase the amount of time
Solution: Reduce the file size (decrease the number of scanned
Problem: Cannot connect to the network.
Check: The Network Interface Board (NIC) has failed or is not
Solution:
required for transmission.
pages, use a lower resolution setting, or use a higher
compression level such as G4).
properly connected.
Make sure the NIC is operating properly and is connected to
the network cable. If the problem persists, contact your
administrator or authorized Sharp Dealer.
Error Message at the Communication Error
When a communication error has occurred during the sending the
scanned image data, the following error message with an error code
will appear in the display of the machine.
NET-SCAN ERROR CE-XX
Error Code Table
Error Code Description of the Error
CE-01 An optional network interface board is not installed or
CE-02 Cannot find the specified mail server or FTP server.
CE-03 The server has been down during the scanning of the
CE-04 An invalid account name or password for the FTP
CE-05
CE-00 Other error than the above mentioned has occurred.
36
out of order.
original.
server has been entered.
An invalid directory of the FTP server has been entered.
Page 41

Page 42

(Australia Only)
WARRANTY
Facsimile Products
Congratulations on Your Purchase!
This Sharp product is warranted against manufacturing defects for a period of twelve (12) months from
the date of original purchase.
In the event of any defect arising in the equipment during the warranty period, such repairs should only
be carried out by the Dealer from which the unit was originally purchased or a Service Centre approved
by Sharp to service this type of equipment. These repairs would be carried out at no charge to the
owner, subject to the conditions specified herein.
The owner is responsible for any transportation and insurance costs if the product has to be returned
for repair.
This warranty does not extend to accessories or defects or injuries caused by or resulting from causes
not attributable to faulty parts or the manufacture of the product, including but not limited to, defect or
injury caused by or resulting from misuse, abuse, neglect, accidental damage, improper voltage, liquid
spillage, vermin infestation, software, use of consumables other than those approved by Sharp, or any
alterations made to the product which are not authorised by Sharp.
Please retain your sales documentation, as this should be produced to validate a warranty claim.
This warranty is in addition to and in no way limits, varies or excludes any express and implied rights
and remedies under any relevant legislation in the country of sale. However, to the extent permitted by
such legislation, Sharp excludes any liability for any indirect or consequential damages arising from the
purchase or use of the product.
To the extent permitted by law, Sharp excludes all implied warranties and conditions and where the
product is one that is not normally required for personal, domestic or household use, Sharp limits its
liability to the repair or replacement (at Sharp's option) of materials or workmanship which are found by
Sharp to be defective.
For your reference, please enter the particulars of your purchase below and retain, with your purchase
documentation.
Model No.
Serial No.
Date of Purchase
Place of Purchase
SPform046 (Dec2001)
FOR LOCATION ENQUIRIES WITHIN
AUSTRALIA
REGARDING YOUR LOCAL
SHARP APPROVED SERVICE CENTRE
CALL SHARP
LOCAL CALL: 1 300 135 022
FACSIMILE:
SHARP CORPORATION OF AUSTRALIA PTY. LIMITED
1 Huntingwood Drive, Huntingwood NSW 2148
1
Important Notice: This warranty applies only to products sold in Australia
(02) 9672 1210
WEB: www.sharp.net.au
A.B.N. 40 003 039 405
Page 43

SHARP ELECTRONICS CORPORATION
Sharp Plaza, Mahwah, New Jersey 07430-1163
1-800-BE-SHARP
http://www.sharpusa.com
SHARP ELECTRONICS OF CANADA LTD.
335 Britannia Road East, Mississauga, Ontario L4Z 1W9
SHARP CORPORATION OF AUSTRALIA PTY.LTD.
1 Huntingwood Drive, Huntingwood, Blacktown, N.S.W., 2148
http://www.sharp.ca
A.C.N. 003 039 405
SHARP ELECTRONICS (NORDIC) AB
Box 14098 Gustavslundsvägen 12 S-167 14 Bromma, Sweden
Phone: (08) 634 3600
SHARP ELECTRONICS (EUROPE) GMBH
Sonninstraße 3, 20097 Hamburg, Deutschland
Telefon: (040) 2376-0
SHARP ELECTRONICS GES.M.B.H.
Handelskai 342, 1020 Wien, Österreich
Telefon: (0222) 72 719-0
SHARP ELECTRONICS (SCHWEIZ) AG
Langenwiesenstrasse 7, 8108 Dällikon, Switzerland
Phone: (01) 846-6111
SHARP ELECTRONICS ITALIA S.p.A.
Via Lampedusa 13, 20141 Milano, Italia
Telefono: +39 0289595-1
SHARP CORPORATION
PRINTED IN THAILAND
(TINSE4314XHTB)
 Loading...