

Page 1

MODEL
FO-IS115N
FACSIMILE
OPERATION MANUAL
Page 2

This equipment complies with the requirements of Directive 1999/5/EC
Dieses Gerät entspricht den Anforderungen der EU-Richtlinie 1999/5/EG.
Cet appareil est conforme aux exigences de la directive 1999/5/CE.
Quest’apparecchio è conforme ai requisiti delle direttiva 1999/5/CE.
Este aparato satisface las exigencias de las Directiva 1999/5/CE.
Este equipamento obedece às exigências da directiva 1999/5/CE.
Denna utrustning uppfyller kraven enligt direktiv 1999/5/EC.
Dette produktet oppfyller kravene i direktiv 1999/5/EC.
Tämä laite täyttää direktiivi 1999/5/EY.
Dette udstyr overholder kravene i direktiv 1999/5/EF.
Dit apparaat voldoet aan de eisen van de richtlijn 1999/5/EG.
Η συσκευή αυτή ανταποκρίνεται στις απαιτήσεις των οδηγια 1999/5/ΕK.
To urządzenie spełnia wymagania dyrektywy 1999/5/EC.
Toto zařízení je v souladu s požadavky směrnice rady 1999/5/EC.
Tento prístroj je v súlade s požiadavkami smernice rady 1999/5/EC.
Ta oprema je v skladu z zahtevami Direktive 1999/5/EC.
Ez a berendezés megfelel az 1999/5/EK Irányelvnek
Seade vastab direktiivi 1999/5/EÜ nõuetele.
Ši ierice atbilst tehniskam prasibam pec 1999/5/EC direktivas.
Šis prietaisas atitinka direktyvos 1999/5/EC reikalavimus.
Acest echipament este în conformitate cu cerinţele impuse prin Directiva 1999/5/EC.
Тов а оборудване отговаря на изискванията на Директива 1999/5/EО.
Bu ürün 1999/5 EC Direktiflerine uygundur.
Page 3

This is a facsimile product operating in analogue public switched telephone networks which follow the ES203021
Standard.
Dies ist ein Faxprodukt für den Betrieb in analogen Telefonnetzen, die den ES203021-Standard verwenden.
Ce télécopieur fonctionne sur les réseaux téléphoniques publiques commutés et analogiques qui respectent la
norme ES203021.
Questo apparecchio facsmile funziona sulle reti telefoniche commutate pubbliche che seguono lo standard
ES203021.
Se trata de un aparato telefax que funciona en redes telefónicas analógicas que cumplan las normas
ES203021.
Este é um aparelho de fax, que funciona nas redes telefónicas analógicas públicas comutadas, que adoptaram
a norma ES203021.
Denna faxapparat fungerar i analoga allmänna telefonnät vilka följer ES203021 standarden.
Dette er et telefaks-produkt som fungerer i analoge offentlige telefonnett som svarer til ES203021-standard.
Tämä telekopiotuote toimii analogisessa puhelinverkossa, joka noudattaa ES203021 standardia.
Dette fax-apparat, som kan betjenes på analoge offentlige telefonnet, som følger standarden ES203021.
Dit is een faxproduct dat werkt op het analoge openbaar geschakelde netwerk volgens de ES203021-standaard.
Αυτή είναι µια συσκευή φαξ που λειτουργεί σύµφωνα µε τα αναλογικά δηµόσια τηλεφωνικά δίκτυα µεταγωγής
που ακολουθούν το Πρότυπο ES203021.
To urządzenie pracuje w publicznej sieci telefonicznej zgodnie ze standartami ES203021.
Tento fax je kompatibilní s analogovými verejnými komutovanými telefonními sítemi, které splnují standard
ES203021.
Toto je telefaxové zariadenie, ktoré je urcené na používanie v verejnej telefónnej sieti, pre ktorú platí norma
ES203021.
Tisti telefaks deluje v analognih javnih telefonskih omrežjih, usklajenih s standardom ES203021.
Ez a fax termék a ES203021 szabványnak megfelelo analóg nyilvános kapcsolt telefonhálózatokban
muködtetheto.
Faksiseade töötab analoogtelefoni kommutaatorvõrkudes, mis vastavad ES203021 standardile.
Šī telefaksa ierīce var strādāt publiski komutējamos analogajos telefonu tīklos, kas atbilst standartam
ES203021.
Tai faksimilinis aparatas, veikiantis analoginiuose šiuolaikiškuose telefonų tinkluose, atitinkančiuose ES203021
standartą.
Acesta este un fax care operează în reţ
ES203021.
Това е факсова машина, която работи по аналоговите публични комутируеми телефонни мрежи,
следващи стандарта ES203021.
Bu faks makinesi analog telefon sisteminde çalışmak üzere ES203021 standartlarına uygundur.
elele telefonice analogice comutate publice care respectă standardul
Page 4

The Declaration of Conformity can be viewed at the following URL address.
Die Konformitätserklärung kann unter folgender URL-Adresse eingesehen werden.
Vous pouvez consulter la Déclaration de conformité sur Internet à l’adresse ci-dessous.
La Dichiarazione di conformità può essere consultata all‘indirizzo URL riportato di seguito.
El documento de Declaración de conformidad puede consultarse en la siguiente dirección URL.
A Declaração de Conformidade pode ser visualizada no seguinte endereço URL.
Överensstämmelsedeklarationen finns att läsa på följande URL-adress.
Samsvarserklæringen ("Declaration of Conformity") finner du på følgende URL-adresse.
Yhdenmukaisuusvakuutus on nähtävissä seuraavassa URL-osoitteessa.
Overensstemmelseserklæringen kan ses på følgende URL-adresse.
De Verklaring van Overeenstemming kan worden nagelezen op het volgende URL-adres.
Προβολή της ∆ήλωσης Συµµόρφωσης µπορεί να γίνει στην ακόλουθη διεύθυνση URL.
Deklaracja Zgodności jest dostępna pod adresem.
Prohlášení o shodě je k dispozici k prohlédnutí na následující adrese URL.
Vyhlásenie o zhode nájdete na nasledujúcej adrese URL.
Deklaracija o skladnosti se lahko najde na tistem URL naslovu.
A Megfelelosségi nyilatkozat megtekinthetik az alábbi URL címen.
Ühilduvusdeklaratsiooni on võimalik lugeda järgmisel URL-aadressil.
ū
Atbilstības deklarāciju var apl
Suderinamumo deklaraciją galite peržiūrėti šiuo URL adresu.
Declaraţia de conformitate poate fi vizualizată la următoarea adresă URL.
Декларацията за съвместимост можете да видите на следния URL адрес.
Bu uyumluluk raporunu aşağıdaki internet adresinde görebilirsiniz.
kot šajā tīmekĻa adresē.
http://www.sharp.de/doc/FO-IS115N.pdf
Page 5

Authorized representative responsible for the European Union Community Market
Autorisierter Vertreter für den Gemeinschaftsmarkt der Europäischen Union
Mandataire responsable du marché communautaire de l’Union Européenne
Rappresentante autorizzato responsabile per il mercato comunitario dell’Unione Europea
Mandatario responsable del mercado comunitario de la Unión Europea
Representante responsável autorizado pelo Mercado da Comunidade da União Europeia
Auktoriserad representant som ansvarar för EU-marknaden
Godkjent markedsrepresentant i Den Europeiske Union (EU)
Euroopan unionin yhteismarkkina-alueesta vastaava valtuutettu edustaja
Autoriseret repræsentant, ansvarlig for det indre marked i den Europæiske Union
Bevoegd vertegenwoordiger verantwoordelijk voor de communautaire markt van de Europese Unie
Υπεύθυνος εξουσιοδοτηµένος αντιπρόσωπος για την Κοινοτική Αγορά της Ευρωπαϊκής Ένωσης
Autoryzowany przedstawiciel odpowiedzialny za rynek Unii Europejskiej
Oprávnéný zástupce zodpovědný za trh EU
Oprávnený zástupca zodpovedný za trh Spoločenstva Európskej únie
Pooblaščeni predstavnik, odgovoren za skupni trg Evropske unije
Az Európai Unió közösségi piacával kapcsolatban illetékes megbízott képviselő
Volitatud esindaja, kes vastutab Euroopa Ühenduse turu eest
Pilnvarotais pārstāvis, kas ir atbildīgs par Eiropas Savienības kopējo tirgu
Įgaliotasis atstovas, atsakingas už Europos Sąjungos bendrijos rinką
Reprezentantul autorizat pentru Uniunea Europeană
Упълномощен представител, отговарящ за Общия пазар на EC
Avrupa Birliği Pazarından sorumlu yetkili temsilci
SHARP ELECTRONICS (Europe) GmbH
Sonninstraße 3, D-20097 Hamburg
Datalight is a registered trademark of Datalight, Inc.
TM
FlashFX
Copyright 1993 - 2004 Datalight, Inc. All Rights Reserved.
U.S. Patent Office 5.860.082/6.260.156
is a trademark of Datalight, Inc.
Page 6

Table of Contents
Table of Contents
Table of Contents 1
Introduction 3
Specifications . . . . . . . . . . . . . . . . . . . . . . . . . . . . . . . . . . . . . . . . . . . 3
A Look at the Operation Panel 8
1. Installation 12
Unpacking Checklist . . . . . . . . . . . . . . . . . . . . . . . . . . . . . . . . . . . . . 12
Basic Setup. . . . . . . . . . . . . . . . . . . . . . . . . . . . . . . . . . . . . . . . . . . .13
Installing the Toner Cartridge and Drum Cartridge. . . . . . . . . . . . . . 17
Loading Printing Paper . . . . . . . . . . . . . . . . . . . . . . . . . . . . . . . . . . . 22
Entering Your Name and Fax Number . . . . . . . . . . . . . . . . . . . . . . .23
Setting the Date and Time . . . . . . . . . . . . . . . . . . . . . . . . . . . . . . . . 24
Setting the Reception Mode . . . . . . . . . . . . . . . . . . . . . . . . . . . . . . . 26
Volume Adjustment. . . . . . . . . . . . . . . . . . . . . . . . . . . . . . . . . . . . . . 26
2. Network Scanning 28
Setting up Network Scanning . . . . . . . . . . . . . . . . . . . . . . . . . . . . . . 28
Storing E-mail Addresses . . . . . . . . . . . . . . . . . . . . . . . . . . . . . . . . . 36
Scan to E-mail Transmission . . . . . . . . . . . . . . . . . . . . . . . . . . . . . . 41
Network Settings. . . . . . . . . . . . . . . . . . . . . . . . . . . . . . . . . . . . . . . . 45
Scan to Folder. . . . . . . . . . . . . . . . . . . . . . . . . . . . . . . . . . . . . . . . . . 47
3. Sending Faxes 51
Transmittable Documents. . . . . . . . . . . . . . . . . . . . . . . . . . . . . . . . . 51
Loading the Document . . . . . . . . . . . . . . . . . . . . . . . . . . . . . . . . . . . 52
Adjusting the Resolution and Contrast . . . . . . . . . . . . . . . . . . . . . . .54
Sending a Fax by Normal (Manual) Dialling . . . . . . . . . . . . . . . . . . . 56
Sending a Fax by Automatic Dialling . . . . . . . . . . . . . . . . . . . . . . . . 59
4. Receiving Faxes 68
Using AUTO Mode . . . . . . . . . . . . . . . . . . . . . . . . . . . . . . . . . . . . . . 68
Using MANUAL Mode. . . . . . . . . . . . . . . . . . . . . . . . . . . . . . . . . . . . 69
Reception to Memory . . . . . . . . . . . . . . . . . . . . . . . . . . . . . . . . . . . . 70
1
Page 7

Table of Contents
5. Printing 71
Installing the Printer Driver . . . . . . . . . . . . . . . . . . . . . . . . . . . . . . . . 71
Printing a Document From an Application . . . . . . . . . . . . . . . . . . . . 73
Selecting Print Settings. . . . . . . . . . . . . . . . . . . . . . . . . . . . . . . . . . . 74
6. Making Copies 78
7. Special Functions 80
Broadcasting . . . . . . . . . . . . . . . . . . . . . . . . . . . . . . . . . . . . . . . . . . .80
Blocking Unwanted Faxes . . . . . . . . . . . . . . . . . . . . . . . . . . . . . . . .85
Duplex Scanning. . . . . . . . . . . . . . . . . . . . . . . . . . . . . . . . . . . . . . . . 87
Print Hold . . . . . . . . . . . . . . . . . . . . . . . . . . . . . . . . . . . . . . . . . . . . . 88
Receiving Faxes to E-mail/Folder . . . . . . . . . . . . . . . . . . . . . . . . . . . 92
Polling (Requesting a Fax) . . . . . . . . . . . . . . . . . . . . . . . . . . . . . . . . 95
Timer Transmission . . . . . . . . . . . . . . . . . . . . . . . . . . . . . . . . . . . .100
8. Option Settings 103
9. Checking Stored Information 108
Transaction Report . . . . . . . . . . . . . . . . . . . . . . . . . . . . . . . . . . . . .110
10. Maintenance 111
Cleaning the Scanning Glass and Rollers . . . . . . . . . . . . . . . . . . .111
Cleaning the Paper Feed Roller . . . . . . . . . . . . . . . . . . . . . . . . . . . 114
Replacing the Toner Cartridge . . . . . . . . . . . . . . . . . . . . . . . . . . . . 115
Replacing the Drum Cartridge . . . . . . . . . . . . . . . . . . . . . . . . . . . . 117
11. Troubleshooting 121
Problems and Solutions . . . . . . . . . . . . . . . . . . . . . . . . . . . . . . . . .121
Messages and Signals . . . . . . . . . . . . . . . . . . . . . . . . . . . . . . . . . . 126
Clearing Paper Jams . . . . . . . . . . . . . . . . . . . . . . . . . . . . . . . . . . .130
Index 135
2
Page 8

Introduction
Specifications
Print specifications
Toner cartridge yield*
(continuous printing,
5% page coverage,
A4 paper)
Drum cartridge yield*
(continuous printing,
5% page coverage,
A4 paper)
Paper tray capacity
Printer type Laser
Print resolution
Effective printing width 202 mm max.
PC print speed**
*The yields may vary depending on coverage and operating conditions.
**Measured based on A4-size continuous printing (3rd through 14th page), excluding warm-up
time.
Initial starter cartridge (included with machine):
Approx. 1500 pages
Replacement cartridge (FO-25DC):
Approx. 3000 pages
Initial starter cartridge (included with machine):
20,000 pages (average)
Replacement cartridge (FO-25DR):
20,000 pages (average)
2
Approx. 220 sheets (80 g/m
room temperature; maximum stack height should not be
higher than the line on the tray)
Recommended paper weight: 80 g/m
600
× 600 dpi (dots per inch)
(pages per minute) max.
11 ppm
A4-size copier paper at
2
Fax specifications
Memory capacity* Approximately 600 average pages
Modem speed 33,600 bps with auto fallback to lower speeds.
Transmission time* Approx. 3 seconds
Compatibility ITU-T (CCITT) Super G3, G3 mode
Compression scheme MR, MH, MMR
Applicable telephone line
Analog public switched telephone network
PBX
(ES203021) /
3
Page 9

Reception modes AUTO, MANUAL
Scanning Resolution Horizontal: 8 lines/mm
Vertical:
Standard: 3.85 lines/mm
Fine /Halftone: 7.7 lines/mm
Super fine: 15.4 lines/mm
Halftone (grayscale) 64 levels
Contrast control Automatic/Dark selectable
*Based on Sharp Standard Chart at standard resolution, excluding time for protocol signals (i.e.,
ITU-T phase C time only).
Network and general specifications
Automatic document
A4: 30 sheets max. (80 g/m
2
paper)
feeder
Input document size Automatic feeding:
Width: 148 to 216 mm
Length: 140 to 297 mm
Manual feeding:
Width: 70 to 216 mm
Length: 140 to 356 mm
Effective scanning width 208 mm max.
Storable transmission
destinations
Rapid Keys: 36
Speed Dial numbers: 114
Telephone function Yes (cannot be used if power fails)
Copy function Single/Multi/Sort (up to 99 copies per page)
Network interface 10 Base-T, 100 Base-TX
Network frame type IEEE802.2/IEEE802.3 Ethernet II
Network protocol TCP/IP
Scan to E-mail Ye s
Scan to Network Folder Ye s
File formats TIFF (G4), PDF (G4)
4
Page 10

Supported operating
Windows
®
2000, XP, Server 2003, Vista
systems (printer driver)
Display LCD display, 20 digits x 2 lines
Power requirements 220 - 230 V AC, 50 Hz
Noise emission Less than 70 dBA (measured according to EN ISO
7779)
Power consumption Standby: 8.5 W when not connected to a network
9.0 W when connected to a network
Maximum: 750 W
Operating temperature 10 - 30°C
Humidity 20 - 85% RH
Dimensions
(without attachments)
Width: 426 mm
Depth: 410 mm
Height: 208 mm
Weight
Approx. 7.1 kg
(with attachments)
As a part of our policy of continuous improvement, SHARP reserves the right to make design and
specification changes for product improvement without prior notice. The performance
specification figures indicated are nominal values of production units. There may be some
deviations from these values in individual units.
Important: This machine is not designed for use on a line which has call waiting, call
forwarding, or certain other special services offered by your telephone company (errors
may occur during transmission and reception of faxes).
This machine is not compatible with digital telephone systems.
5
Page 11

Important safety information
Do not disassemble this machine or attempt any procedures not described in this
manual. Refer all servicing to qualified service personnel.
Do not install or use the machine near water, or when you are wet. For example, do not
use the machine near a bath tub, wash bowl, kitchen sink or laundry tub, in a wet
basement, or near a swimming pool. Do not spill any liquids on the machine.
Unplug the machine from the power outlet and telephone socket and consult a
qualified service representative if any of the following situations occur:
- Liquid has been spilled into the machine or the machine has been
exposed to rain or water.
- The machine produces odors, smoke, or unusual noises.
- The power cord is frayed or damaged.
- The machine has been dropped or the housing damaged.
Do not allow anything to rest on the power cord, and do not install the machine where
people may walk on the power cord.
This machine must only be connected to a 220 - 230 V, 50 Hz, earthed outlet.
Connecting it to any other kind of outlet will damage the machine.
Never insert objects of any kind into slots or openings on the machine. This could
create a risk of fire or electric shock. If an object falls into the machine that you cannot
remove, unplug the machine and consult a qualified service representative.
Do not place this machine on an unstable cart, stand or table. The machine could be
seriously damaged if it falls.
Never install telephone wiring during a lightning storm.
Never install telephone sockets in wet locations unless the socket is specifically
designed for wet locations.
Never touch bare telephone wires or terminals unless the telephone line has been
disconnected at the network interface.
Use caution when installing or modifying telephone lines.
Avoid using a telephone (other than a cordless type) during an electrical storm. There
may be a remote risk of electric shock from lightning.
Do not use a telephone to report a gas leak in the vicinity of the leak.
The power outlet must be installed near the equipment and must be easily accessible.
The machine does not have a power on/off switch, so the power is turned on and off by
simply plugging in or unplugging the power cord.
6
Page 12

Trademark information
• Microsoft, Windows and Internet Explorer are trademarks of Microsoft
Corporation in the U.S.A. and other countries.
• Acrobat and Adobe are trademarks of Adobe Systems Incorporated.
• This product includes software developed by Computing Services at
Carnegie Mellon University (http://www.cmu.edu/computing/). Copyright (c)
1998 - 2003. Carnegie Mellon University. All rights reserved.
• All other company names and product names appearing in this manual are
the trademarks of their respective owners.
7
Page 13
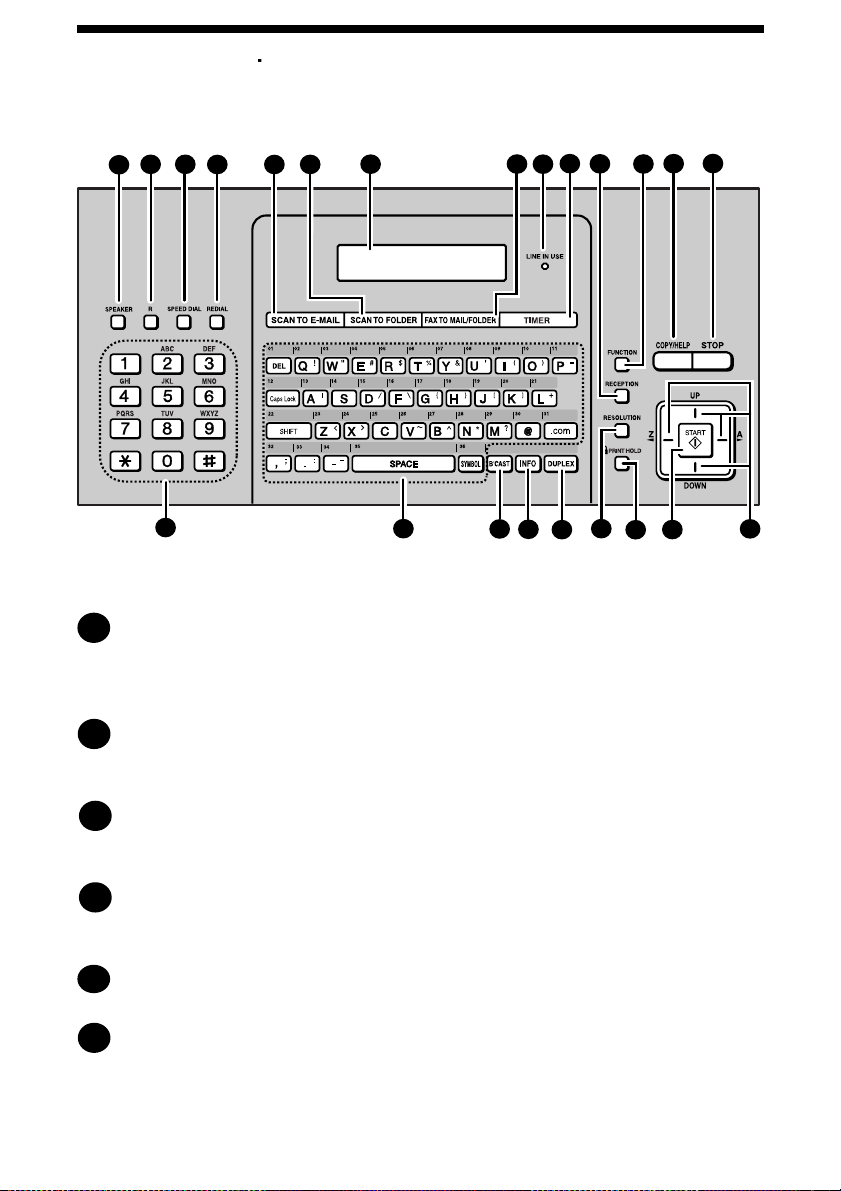
A Look at the Operation Panel
A Look at the Operation Panel
10
11
2
1
3
4
15
6
5
7
16
9
8
17
18
20
19
21
Note: Affix the Rapid Key labels as shown above.
SPEAKER key
1
Press to listen to the line and fax tones through the speaker when faxing
(p. 56).
Note: This is not a speakerphone. It cannot be used for speaking.
R key
2
If you are on a Flash-type PBX, use this key to dial out (first press the R key
and then dial the number).
13
12
14
22
23
SPEED DIAL key
3
Press to select a fax, e-mail, or network folder destination stored in a 3-digit
Speed Dial number (pp. 36, 64).
REDIAL key
4
Press to automatically redial the last number dialled (p. 66). This can also be
used to enter a pause when storing a fax number for automatic dialling (p. 60).
SCAN TO E-MAIL key
5
Press to send a document to an e-mail recipient (p. 41).
SCAN TO FOLDER key
6
Press to send a document to a folder on a computer on the same network as
the machine (p. 49).
8
Page 14

A Look at the Operation Panel
11
Display
7
This displays messages and prompts to help you operate the machine.
FAX TO MAIL/FOLDER key
8
Press to set up the Fax to Mail function, which automatically forwards
received faxes to an e-mail address (p. 92).
LINE IN USE light
9
This lights up when the machine is using the phone line to send or receive a
fax.
TIMER key
10
Press to store a fax transmission to be automatically performed at a specified
time (p. 100).
RECEPTION key
11
Press to select the reception mode (AUTO or MANUAL) for receiving faxes.
The selected mode will appear in the display (p. 26).
FUNCTION key
12
Press this key followed by the arrow keys to select special functions and
settings.
COPY/HELP key
13
When a document is in the feeder, press to make a copy (p. 78). At any other
time, press to print the Help List.
STOP key
14
Press to cancel an operation before it is completed.
Number keys
15
Use these keys to dial fax numbers, and enter numbers when storing
transmission destinations.
Rapid Keys / letter keys
16
A fax number, e-mail address, or network folder can be stored in each of these
keys for one-touch selection (attach the Rapid Key labels). When entering
text, the keys are used as letter keys.
BROADCAST key
17
Press to send to multiple fax or e-mail destinations (p. 80).
INFO key
18
Press to check various types of machine information.
DUPLEX key
19
Use to scan two-sided documents for transmission and copying (p. 87).
9
Page 15

A Look at the Operation Panel
RESOLUTION key
20
When a document is in the feeder, press to adjust the scanning resolution for
transmission (p. 54).
PRINT HOLD key
21
Press to set up and use the Print Hold function, which retains received faxes
in memory until the Print Hold Code is entered to print them out (p. 88).
START key
22
Press after dialling to send a fax (p. 56).
Arrow keys
23
Use to scroll through and select settings, and to search for stored
destinations.
10
Page 16
A Look at the Operation Panel
87
6
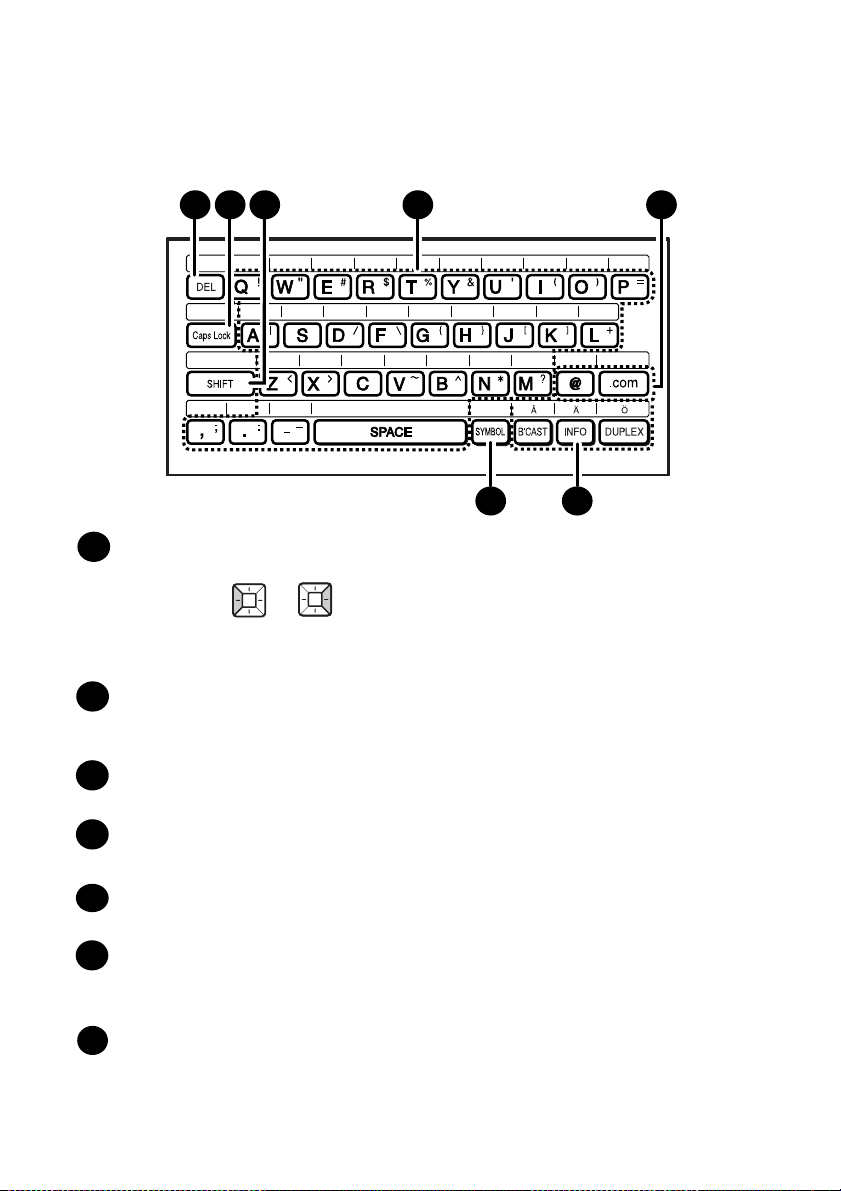
Letter keys
162 3 54
7
DEL key
1
Press to delete the character marked by the cursor (the cursor can be moved
by pressing or ). When the cursor is to the right of a line of text,
press to backspace and clear characters. To delete all entered characters,
hold down until all characters are cleared.
Caps Lock key
2
Press to enter upper case letters. Press again to return to lower case letter
entry.
SHIFT key
3
Hold down while pressing a letter key to temporarily change case.
Letter keys
4
Use to enter letters.
@key, .com key
5
Press to conveniently enter “@” and “.com” when entering an e-mail address.
SYMBOL key
6
Hold down while pressing a letter key to enter the symbol that appears on the
right side of the key.
Swedish national characters: These can be entered when the display
7
language is set to Swedish (pp. 103 and 105).
Note: Attach the Swedish national character label as shown above.
11
Page 17
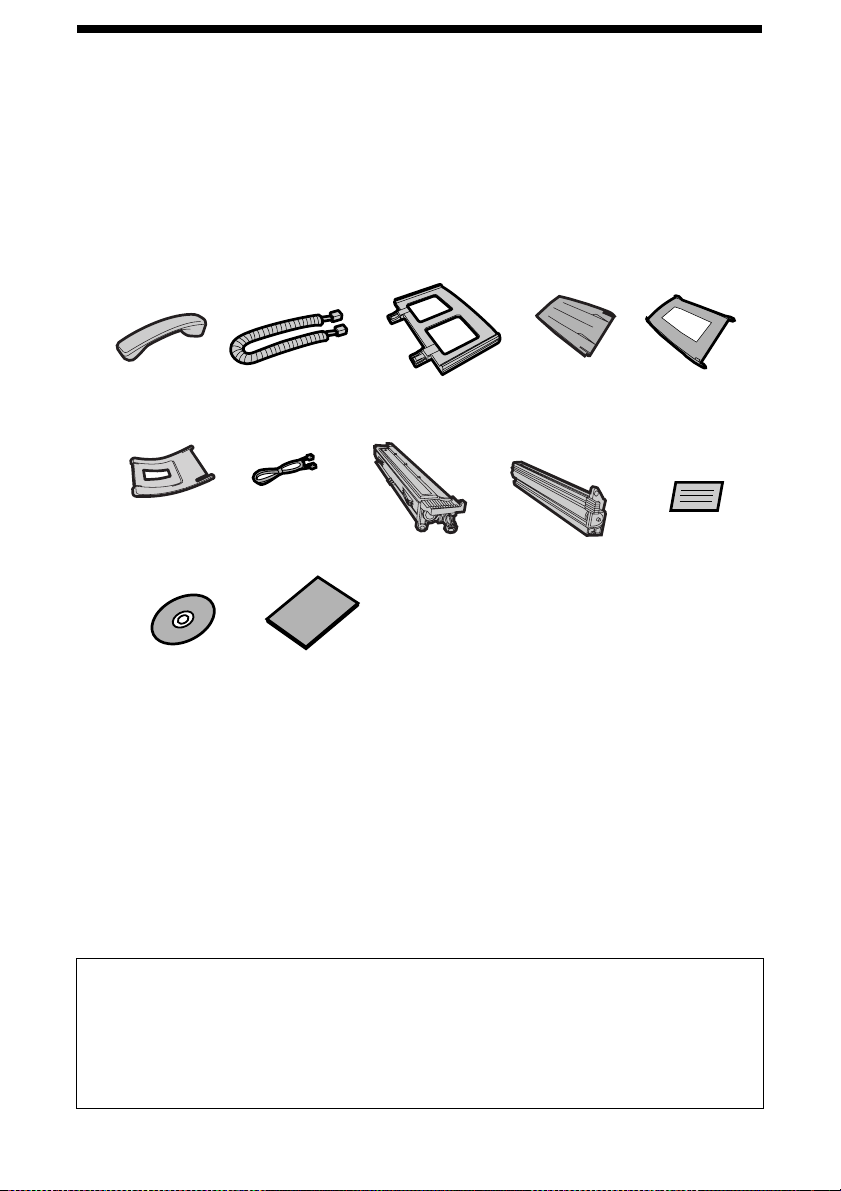
Unpacking Checklist
1. Installation
Unpacking Checklist
Handset
Document
exit tray
CD-ROM
Handset
cord
Telephone
line cord
Setup
Guide (3)
Paper tray
Toner cartridge
Points to keep in mind when setting up
♦ Do not place the machine in direct sunlight.
Received
document
tray
Drum
cartridge
Document
feeder tray
Rapid Key
labels
♦ Do not place the machine near heaters or air conditioners.
♦ Keep dust away from the machine.
♦ Keep the area around the machine clear.
About condensation
If the machine is moved from a cold to a warm place, condensation may form
on the scanning glass, preventing proper document scanning. To remove the
condensation, turn on the power and wait approximately two hours before
using the machine.
12
Page 18
Basic Setup
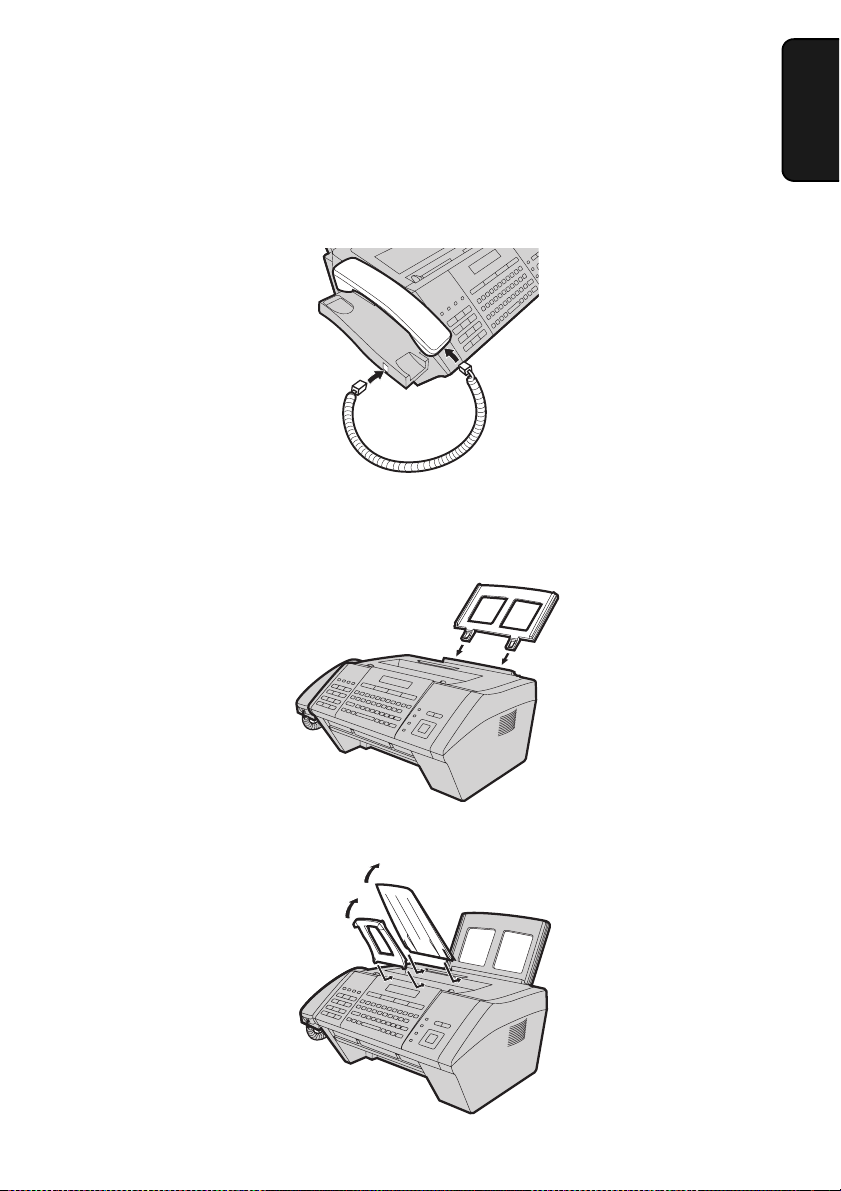
Basic Setup
Connecting the handset
Attaching the trays
Attach the paper tray.
1. Installation
Attach the document feeder tray and the received document tray.
Insert the trays
at an angle and
rotate back
13
Page 19
Basic Setup
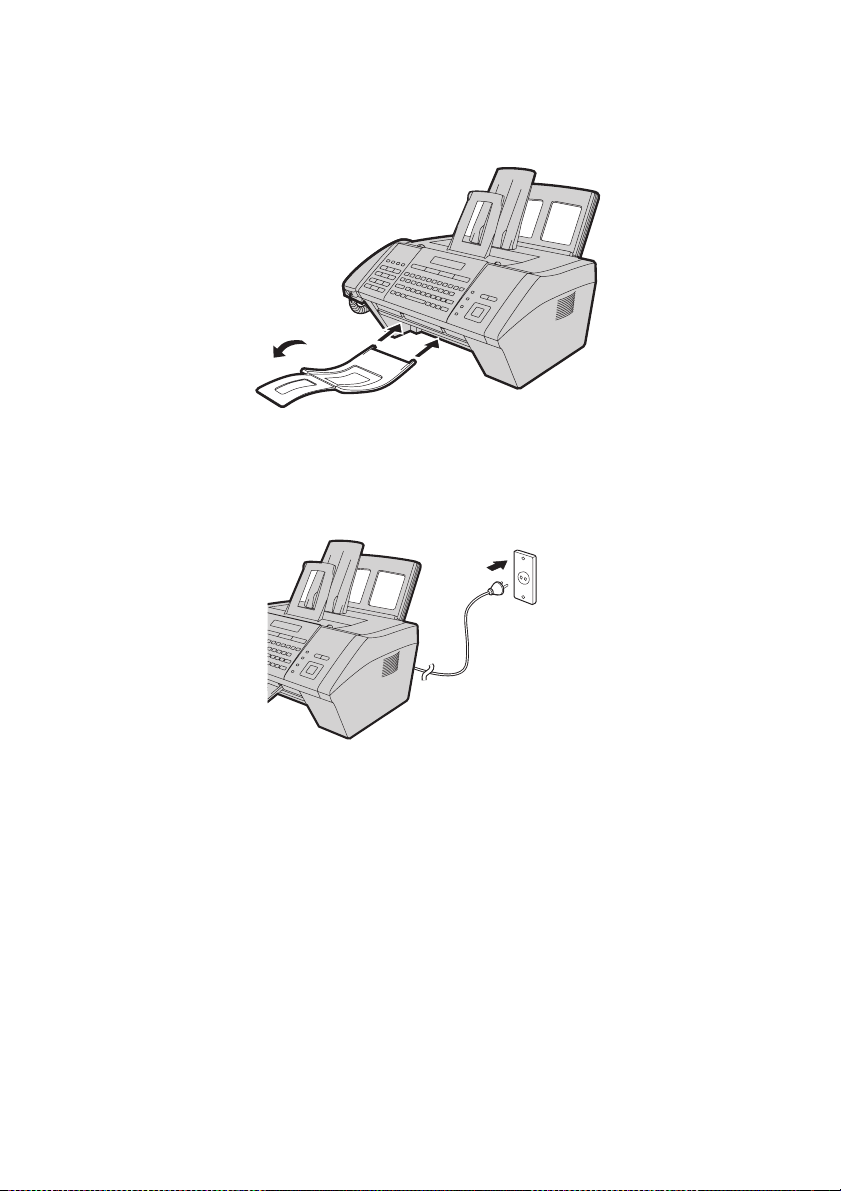
Attach the document exit tray.
After inserting
the tray, flip out
the extension
Connecting the power cord
Plug the power cord into a 220 - 230 V, 50 Hz, earthed AC outlet.
♦ Do not plug the power cord into any other kind of outlet. This will damage
the machine.
♦ The power outlet must be installed near the equipment and must be easily
accessible.
♦ Whenever you unplug the power cord, wait at least 5 seconds before
plugging it back in.
♦ When disconnecting the machine, unplug the telephone line cord before
unplugging the power cord.
♦ If your area experiences a high incidence of lightning or power surges, it is
recommended that you install surge protectors for the power and telephone
lines. Surge protectors can be purchased from your dealer or at most
telephone specialty stores.
14
Page 20
Basic Setup
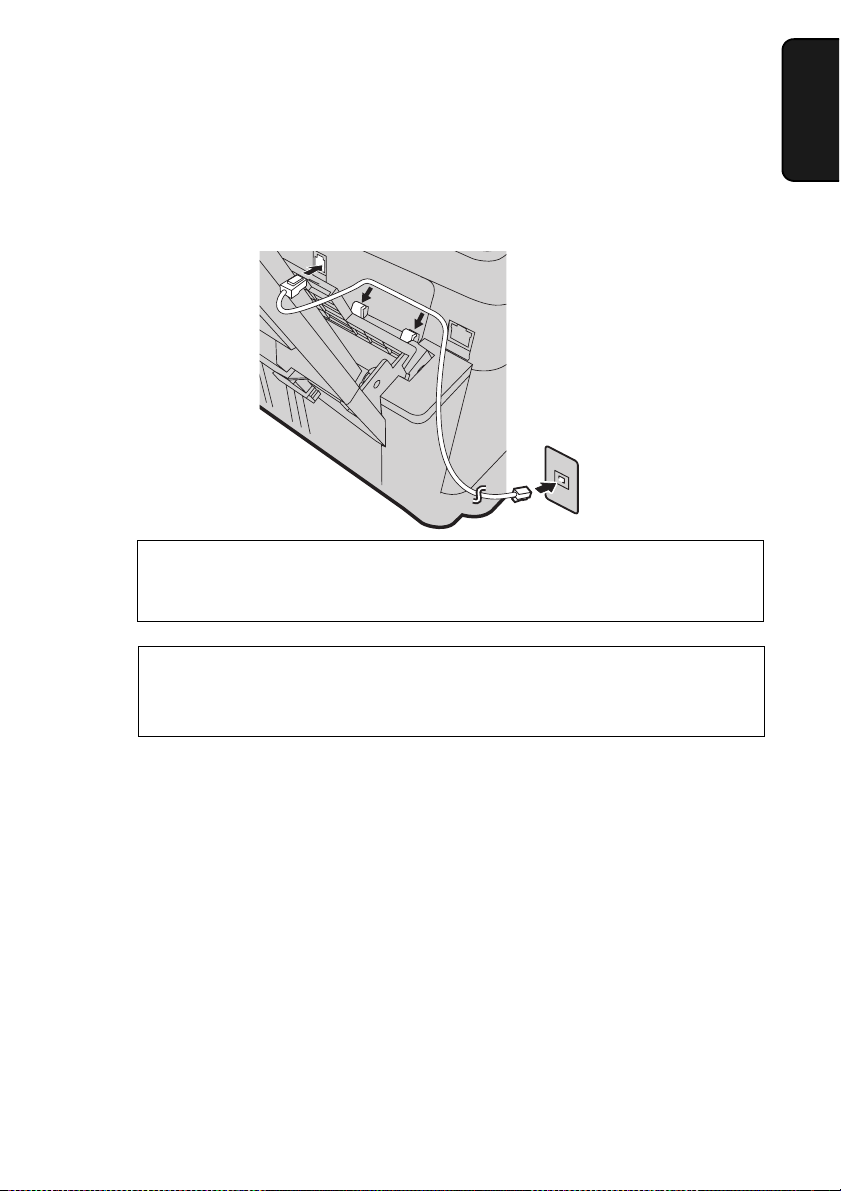
Connecting the telephone line cord
Insert one end of the line cord into the socket on the back of the machine
marked TEL. LINE. Insert the other end into a wall telephone socket.
If the machine is connected to a PBX, configure the “FLASH SELECT” and
“PBX CONNECTION” settings as explained on pp. 103, 104, and 106.
To change the language used in the display, reports, and lists, change the
“LANGUAGE SELECTION” setting as explained on pp. 103 and 105.
1. Installation
Affixing the Rapid Key labels
Affix each strip of Rapid Key labels above each row of letter keys as shown in
the panel illustration on page 8.
15
Page 21
Basic Setup
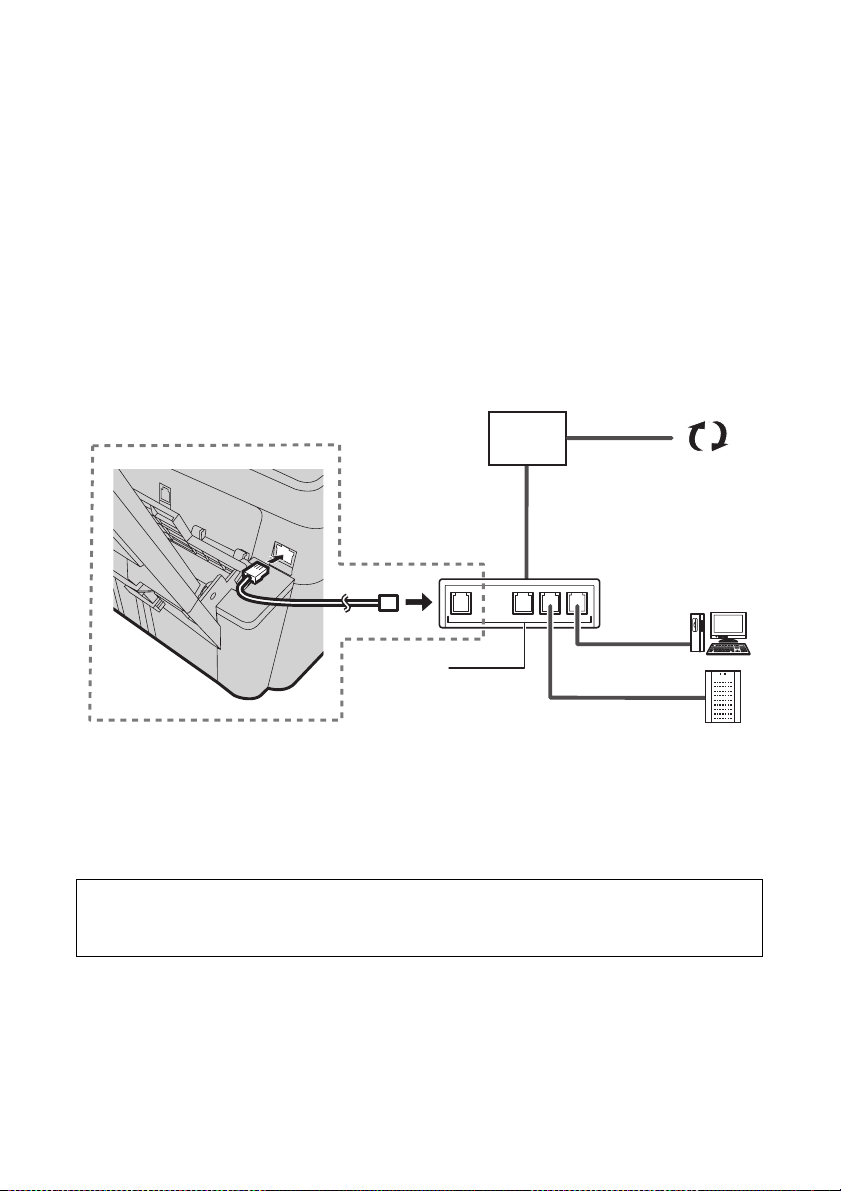
Connecting the machine to your network
To use the Scan to E-mail and Scan to Folder functions, and to use the
machine as a printer, you must connect the machine to an Ethernet network.
In addition, to use Scan to E-mail, the network must have an Internet
connection. A typical setup is shown below.
The machine is connected using an Ethernet cable (not included). Please
purchase a 10Base-T/100Base-TX straight-through (regular) cable.
Connect one end of the cable to the LAN port on the machine. Connect the
other end to a LAN port on your switch or hub.
Router
LAN cable
Internet
LAN cable
LAN ports
LAN cable
Switch/Hub
♦ If you are uncertain which port to connect the cable to, see the manual for
the router, switch or hub.
♦ The connections can be made with all devices powered on.
To communicate on your network, the machine must have an IP address. To set
the machine’s IP address and configure other network settings, see page 28.
16
Page 22
Installing the Toner Cartridge and Drum Cartridge
Installing the Toner Cartridge and Drum
Cartridge
The laser printer in the machine uses a toner cartridge and a drum cartridge.
♦ The starter toner cartridge included with the machine can print
approximately 1500 A4-size pages at 5% page coverage.
♦ When replacing the toner cartridge, use a SHARP FO-25DC toner
cartridge. One cartridge can print about 3000 A4-size pages at 5%
coverage.
♦ The drum cartridge (both starter and replacement) can print approximately
20,000 A4-size pages. When replacing the drum cartridge, use a SHARP
FO-25DR drum cartridge.
Follow the steps below to install the toner cartridge and the drum cartridge.
Note: The quality of the toner cartridge is guaranteed for 18 months after the
date of manufacture indicated on the package. The quality of the drum
cartridge is guaranteed for 24 months after the date of manufacture indicated
on the package.
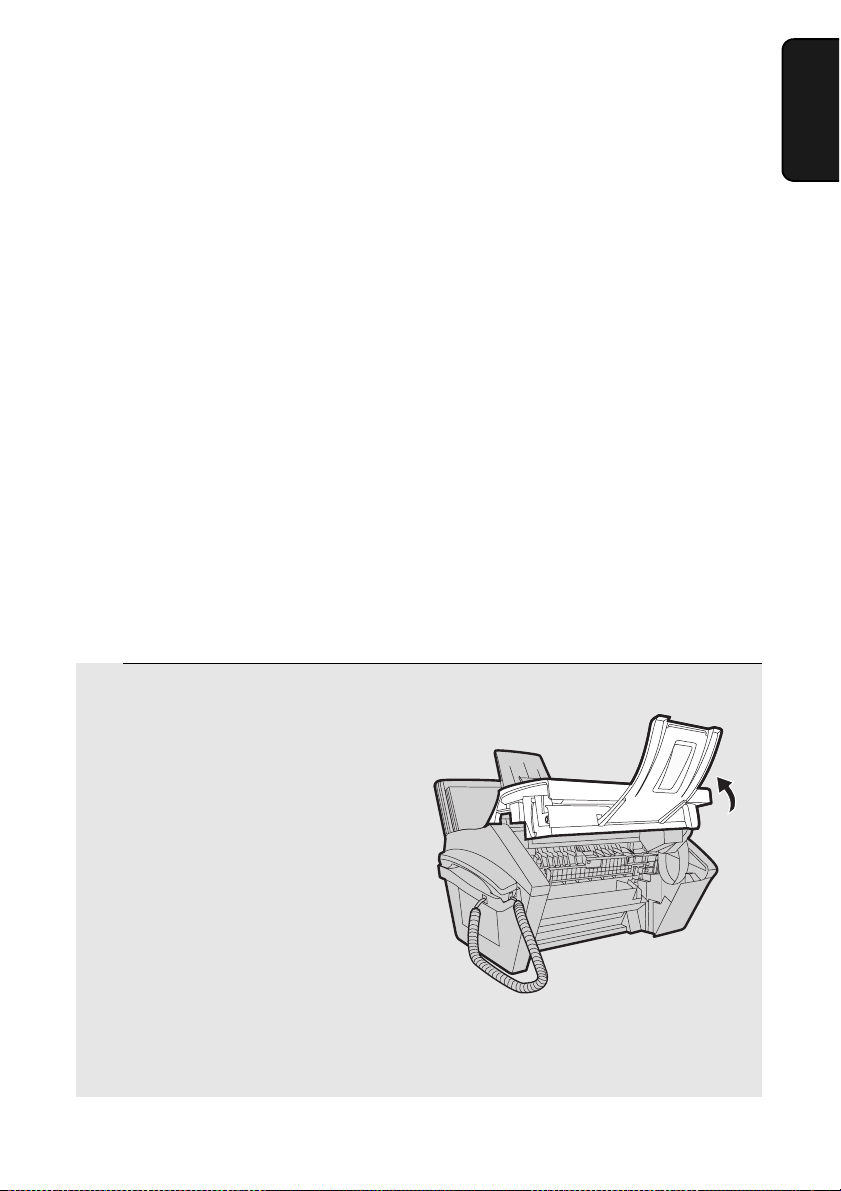
1 Open the top cover of the machine.
1. Installation
• Caution!
The fusing unit inside the print compartment becomes very hot during
operation. Do not touch the inside of the print compartment after the
machine has been in operation.
17
Page 23
Installing the Toner Cartridge and Drum Cartridge
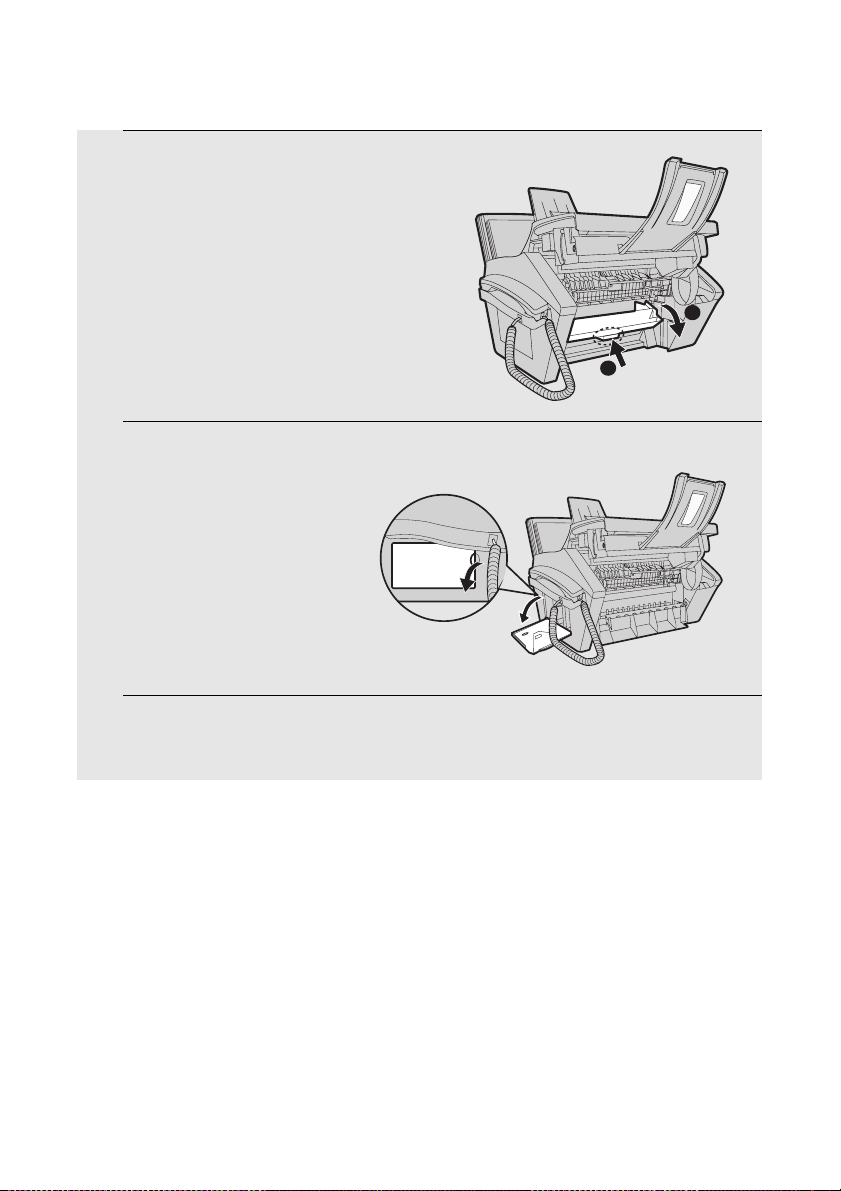
2 Press the release (➊) and open the
front cover (
➋).
1
3 Open the side cover.
2
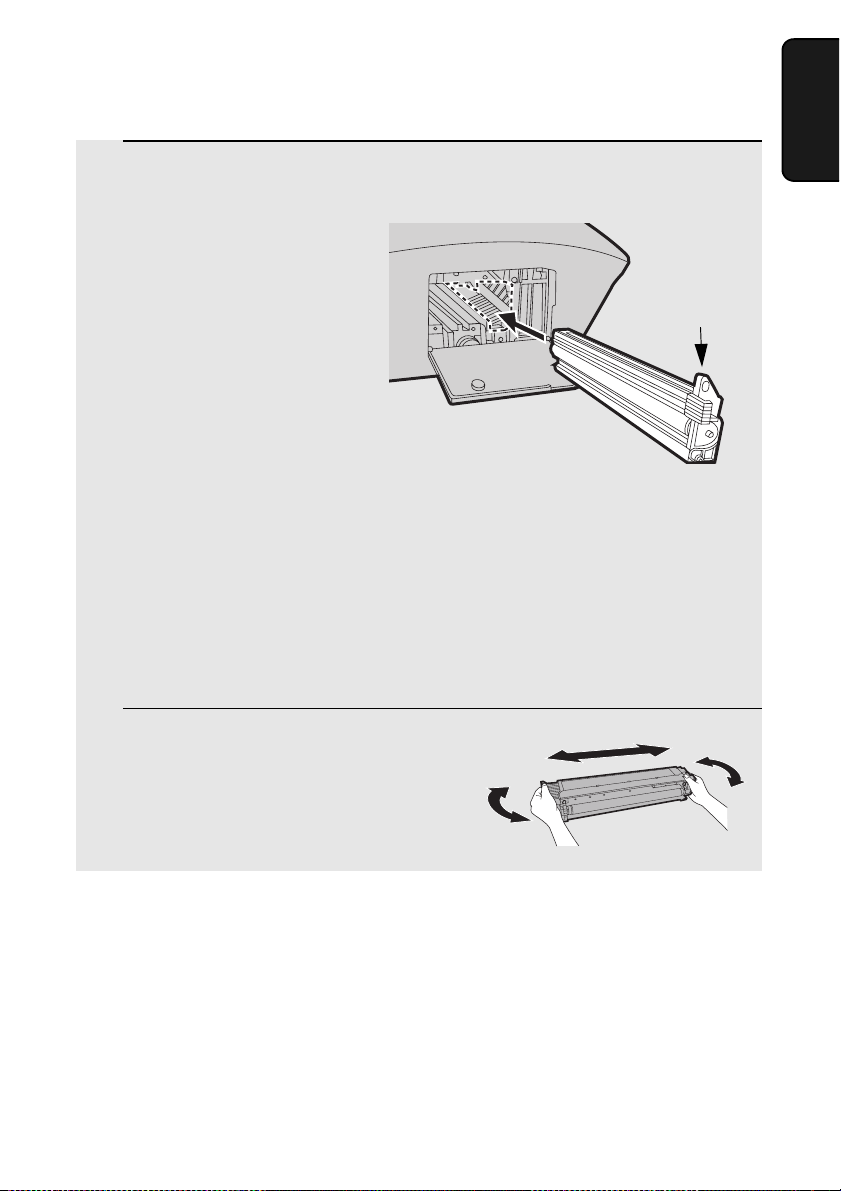
4 Remove the new drum cartridge from its packaging.
18
Page 24
Installing the Toner Cartridge and Drum Cartridge
5 Insert the drum cartridge into the print
compartment, sliding it along the
guides.
Grasp this
handle to
push the
cartridge in
• Do not touch or allow other objects to contact the drum (the green cylinder).
This may damage the drum. If fingerprints, dust, or other contaminants get
on the drum, wipe it gently with a clean cloth.
• Exposure to light for more than several minutes will damage the drum. Be
sure to insert the drum cartridge promptly into the machine.
• If you find it necessary to leave the cartridge out of the machine for more
than several minutes, wrap the cartridge in black paper.
6 Remove the new toner cartridge from
its packaging. Shake the cartridge side
to side four or five times to distribute
the toner evenly within the cartridge.
1. Installation
19
Page 25
Installing the Toner Cartridge and Drum Cartridge
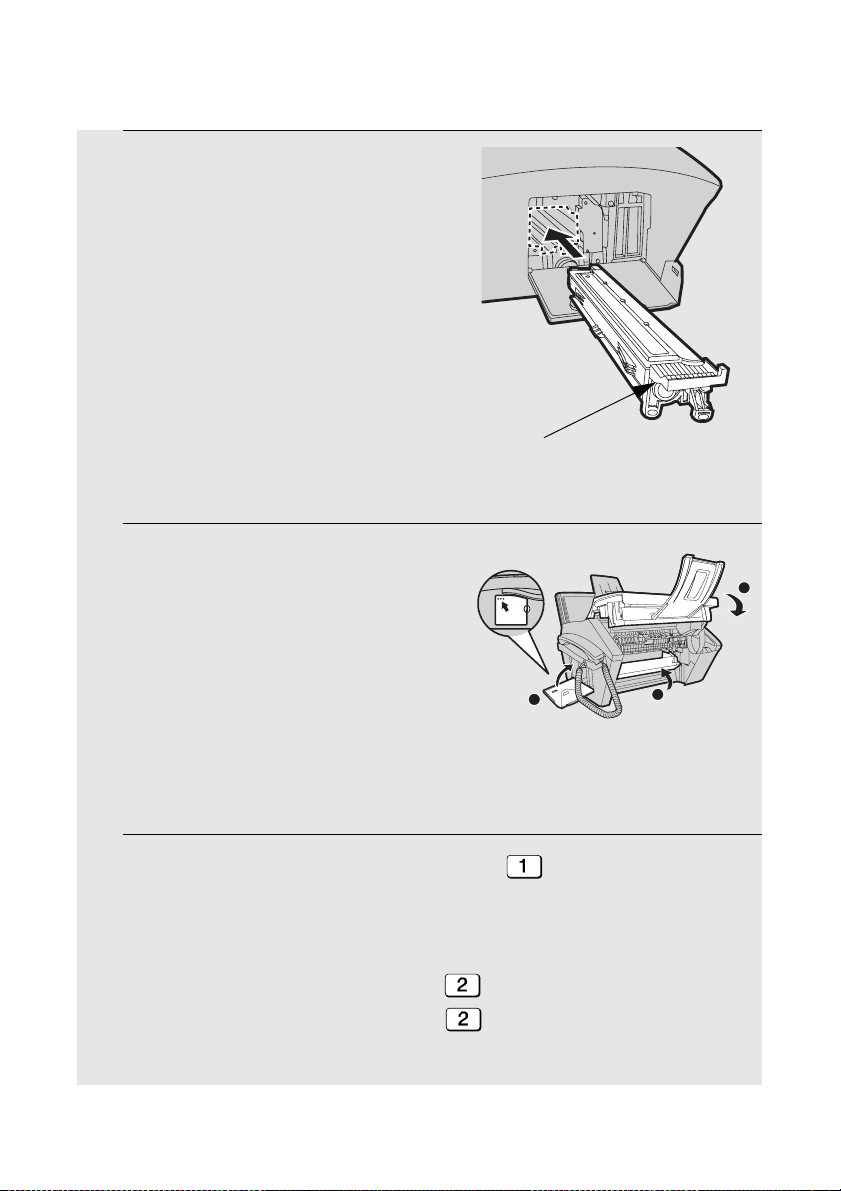
7 Grasp the cartridge handle and insert
the toner cartridge into the print
compartment, sliding it along the
guides.
• Make sure the cartridge “clicks” into
place.
• Do not touch the roller in the toner
cartridge.
Grasp this handle to
insert the cartridge
8 Close the side cover (➊), the front
➋), and the top cover (➌).
cover (
• When closing the side cover, press on
the dots to make sure the cover is
completely closed. Otherwise, light may
enter the print compartment and
damage the drum.
1
3
2
• The display will show:
[TONER EXCHANGED?
1 = NEW, 2 = OLD]
[
] /
9 If you installed a new toner cartridge, press to select NEW (this will
reset the toner counter to zero).
• If you temporarily removed and then replaced an old toner cartridge for
maintenance or other reason, press to continue using the previous
toner count. (Note: Be sure to press or the machine will not alert you
when the toner cartridge is out of toner.)
20
Page 26
Installing the Toner Cartridge and Drum Cartridge
10 Press .
START
11 If you installed a new drum cartridge, reset the drum counter as
explained below.
Resetting the drum counter
Each time you install a new drum cartridge, follow the steps below to reset the
drum counter to zero.
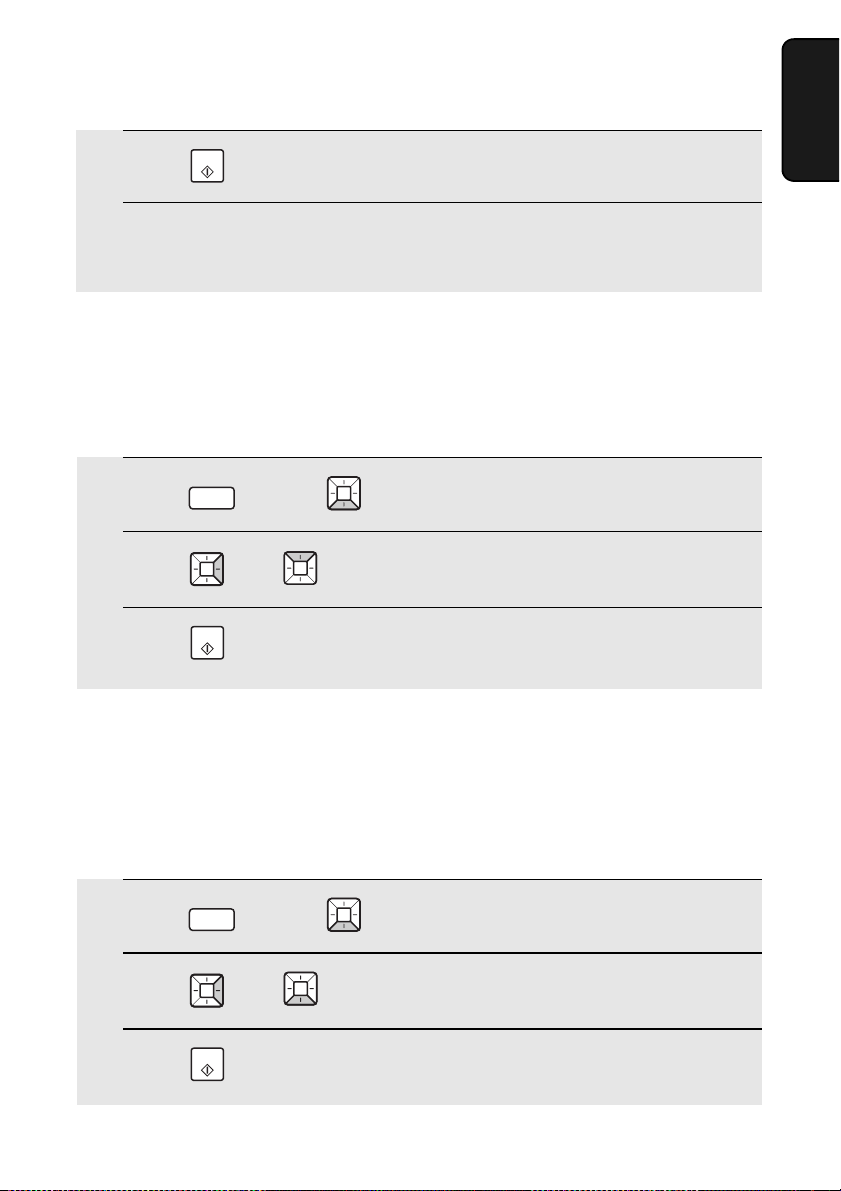
1 Press and then until [LIFE] appears in the display.
INFO
2 Press , then until [CLEAR DRUM COUNTER] appears.
3 Press .
START
1. Installation
Manually resetting the toner counter
When a new toner cartridge is installed, the toner counter is reset in Step 9 on
the previous page. The procedure below is normally not necessary; however,
it can be used in the event that you need to reset the toner counter manually.
1 Press and then until [LIFE] appears in the display.
INFO
2 Press , then until [CLEAR TONER COUNTER] appears.
3 Press .
START
21
Page 27
Loading Printing Paper
Loading Printing Paper
You can load A4-size paper in the paper tray.
Maximum number of sheets:
Approx. 220 sheets (80 g/m2 A4-size paper at room temperature)
Caution!
Do not use the blank side of paper that has already been printed on.
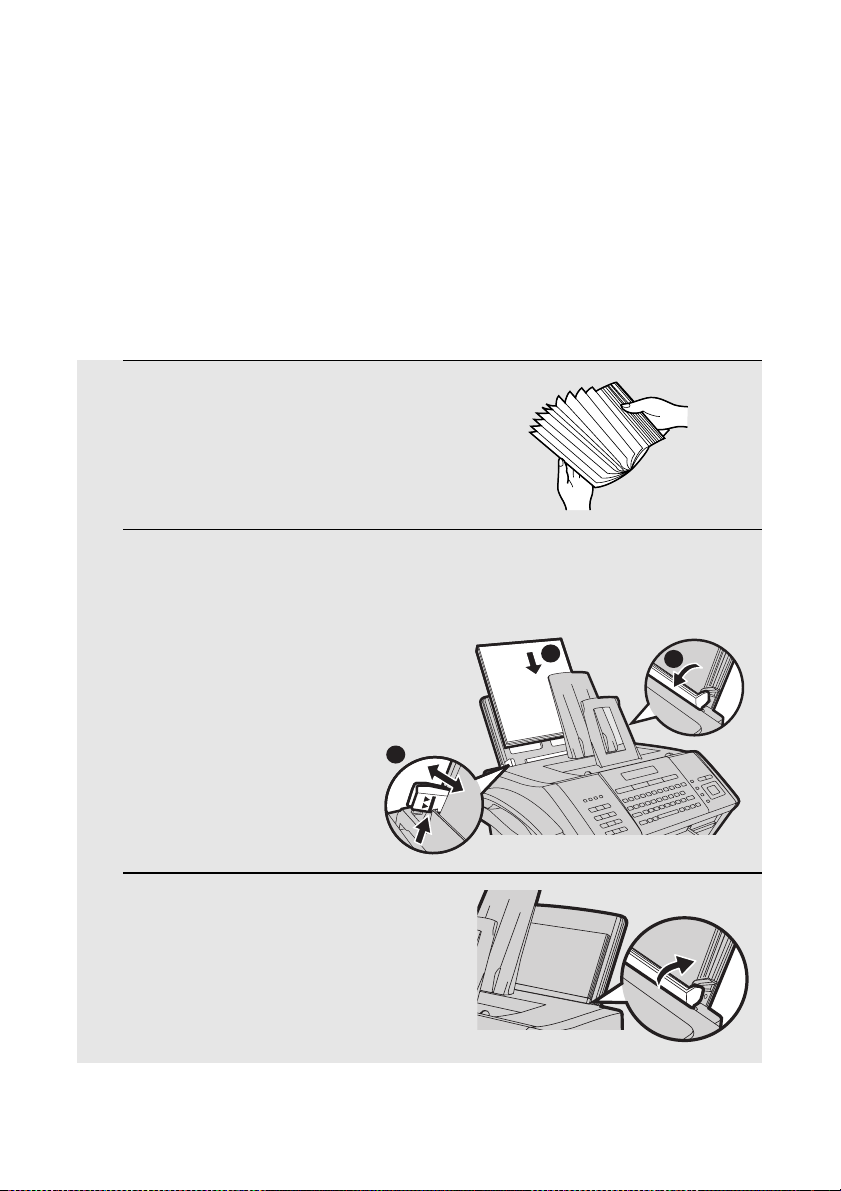
1 Fan the paper, and then tap the edges
against a flat surface to even the stack.
2 Pull the paper plate forward ➊. Squeeze the paper guide and
adjust it to the width of the paper
into the tray, print side up
➌.
➋. Insert the stack of paper
The maximum stack height
should not be higher than
the line on the paper guide
3 Push the paper plate back.
22
3
2
1
Page 28
Entering Your Name and Fax
Entering Your Name and Fax Number
Enter your name and fax number.
♦ Your entered name and fax number will be printed automatically at the top
of all fax pages you send.
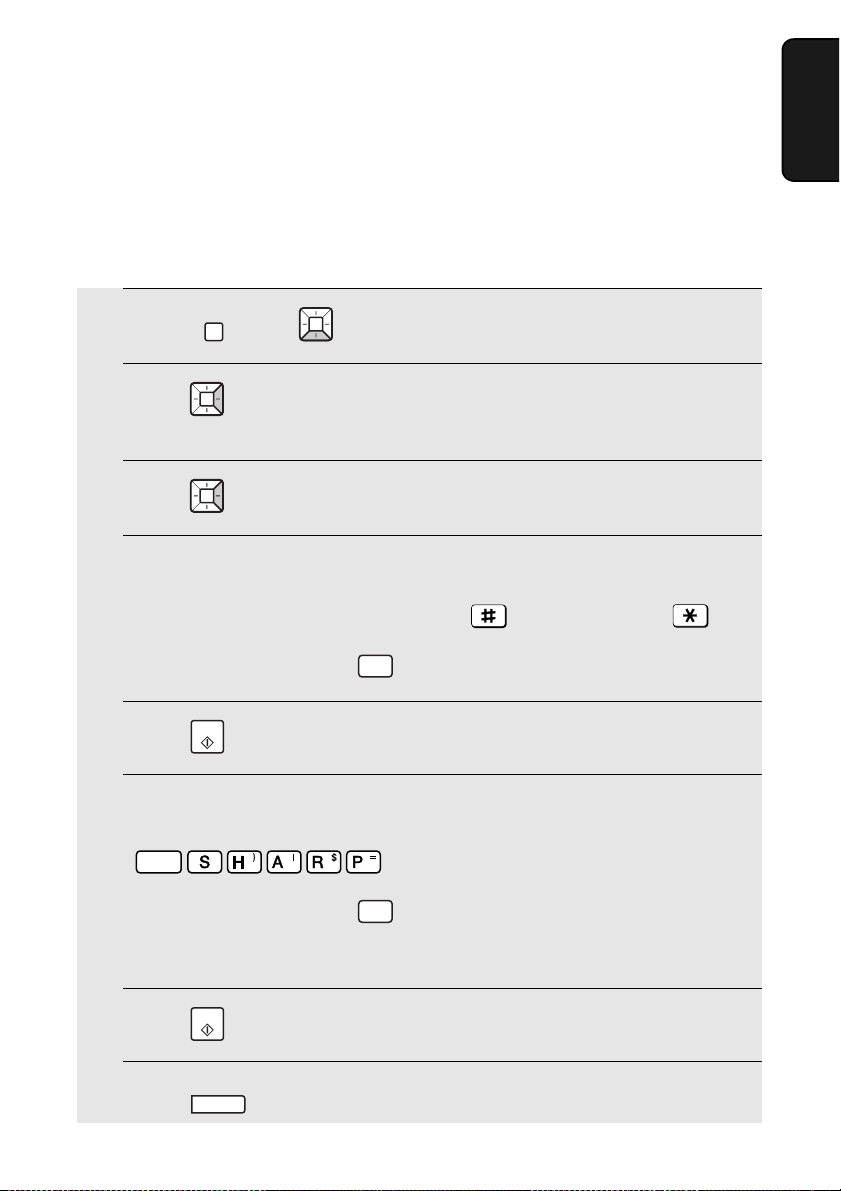
1 Press , then until [ENTRY MODE] appears in the display.
2 Press .
3 Press . [ENTER FAX #]
4 Enter your fax number by pressing the number keys (max. 20 digits).
FUNCTION
Display: [OWN NUMBER SET]
• To insert a space between digits, press . To enter “+”, press
• To clear a mistake, press .
DEL
1. Installation
5 Press .
START
6 Enter your name using the letter keys (max. 24 characters).
Example: SHARP
Caps Lock
• To clear a mistake, press
• For information on using the letter keys, see page 11.
7 Press . [DATE&TIME SET]
8 Press to exit.
START
STOP
DEL
23
Page 29
Setting the Date and Time
Setting the Date and Time
Set the date and time as explained below.
♦ The date and time will be printed automatically at the top of all fax pages
you send. The date and time also appear in the display.
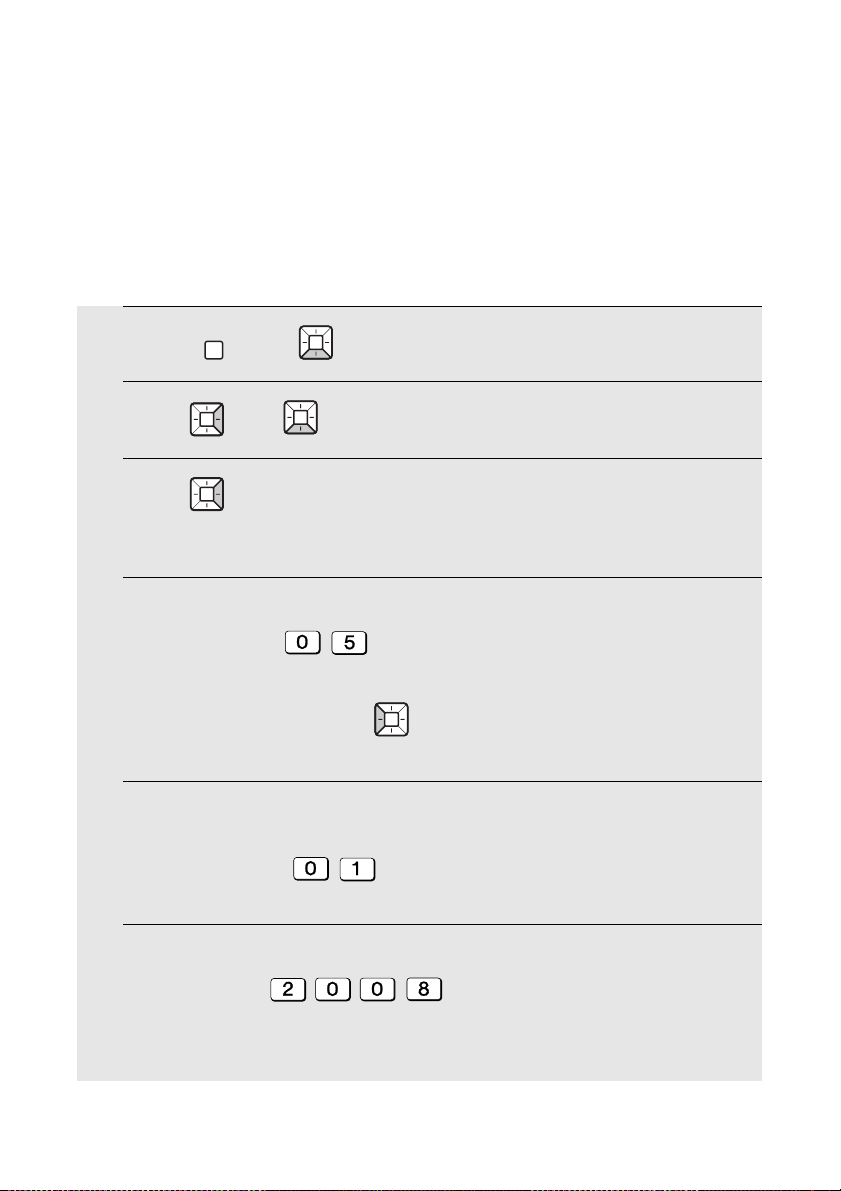
1 Press , then until [ENTRY MODE] appears.
FUNCTION
2 Press , then until [DATE & TIME SET] appears.
3 Press .
• The currently set date appears (example): [DATE 08-15-2008]
4 Enter a two-digit number for the day (“01” to “31”).
Example: the 5th
[DATE 05-15-2008]
• To correct a mistake, press to move the cursor back to the mistake
and enter the correct number.
5 Enter a two-digit number for the month (“01” for January, “02” for
February, “12” for December, etc.).
Example: January
[DATE 05-01-2008]
6 Enter the year (four digits).
Example: 2008
• The currently set time appears (example): [TIME 13:19]
24
Page 30
Setting the Date and Time
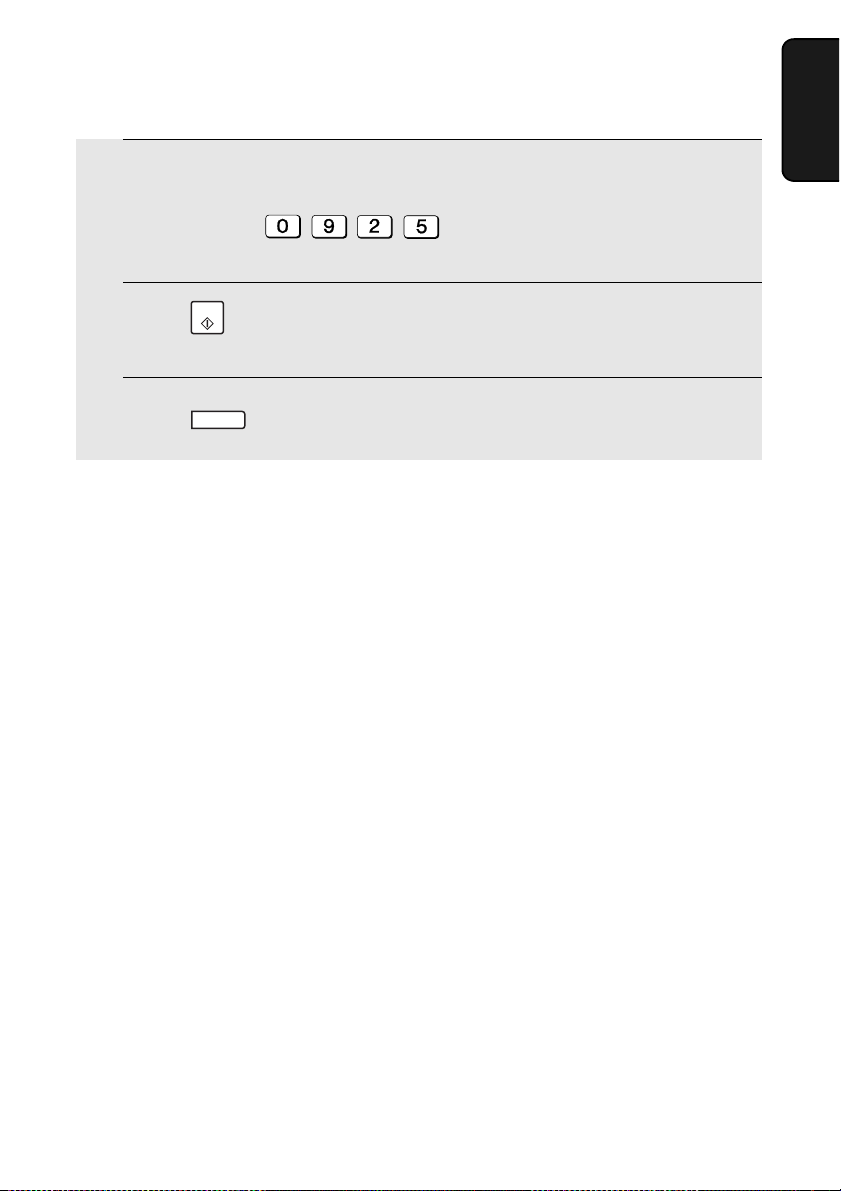
7 Enter a two-digit number for the hour (“00” to “23”) and a two-digit
number for the minute (“00” to “59”).
Example: 9:25
[05-JAN SAT 09:25]
8 Press to start the clock.
[ANTI JUNK #]
9 Press to exit.
Note: The time setting will change automatically at the beginning and end of
summertime.
START
STOP
1. Installation
25
Page 31

Setting the Reception Mode
Setting the Reception Mode
The machine has two modes for receiving incoming faxes:
AUTO mode:
Select this mode when you only want to receive faxes on the line connected to
the machine. The machine will automatically answer all calls on 1 ring and
begin fax reception.
MANUAL mode:
Select this mode when you want to receive both phone calls and faxes on the
line connected to the fax machine. All calls, including faxes, must be
answered by picking up the fax machine's handset.
To set the reception mode, press until the desired mode appears in
the display (“AUTO” or “MANU”).
For more information on receiving faxes, see Chapter 4.
RECEPTION
Volume Adjustment
You can adjust the volume of the speaker and ringer using the up and down
arrow keys.
Speaker volume
1 Press .
2 Press or to select HIGH, MIDDLE, or LOW.
SPEAKER
• To turn off the speaker, press again.
SPEAKER
26
Page 32

Volume Adjustment
Ringer
1 Press or to select HIGH, MIDDLE, LOW or OFF.
(Make sure has not been pressed and a document is not loaded in
the feeder.)
• The ringer will ring once at the selected level.
2 If you selected “OFF OK ?” to turn off the ringer, press .
SPEAKER
START
1. Installation
27
Page 33

Setting up Network Scanning
2. Network Scanning
Setting up Network Scanning
Introduction
The network scanning feature lets you scan a document and directly send the
image file to an e-mail recipient (Scan to E-mail), or to a folder on a computer
on your network (Scan to Folder).
♦ The scanned file can be in TIFF or PDF format.
♦ Scan to E-mail saves you the trouble of scanning a document into a
computer and sending the scanned file using an e-mail program. The
scanned document is automatically sent as an attachment to an e-mail
message.
Note: The Scan to E-mail function is not compatible with mail servers that require
security protection (SSL).
To use network scanning, the machine must be connected to an Ethernet
network as explained on page 16.
IP address
The machine requires an IP address to in order to communicate on your
network and the Internet.
If your network is set up to automatically assign IP addresses, you do not
need to do anything; the machine will automatically receive an IP address
when it is connected.
If your network requires that a static (permanent) IP address be assigned to
the machine, see Network Settings on page 45 to enter the IP address and
related information.
28
Page 34

Setting up Network Scanning
Checking your IP address and the connection
To check the machine’s IP address and verify that the machine is able to
communicate on the network, follow these steps.
1 Press , then until [NETWORK INFORMATION] appears.
INFO
2 Press .
• If the machine has automatically received an IP address and is able to
communicate, [IP ADDRESS/DHCP: ON] will appear on the top line of the
display, followed by the IP address on the bottom line. To show the
machine’s host name, press .
• If a static IP address has been entered in the machine and the machine is
able to communicate, [IP ADDRESS/DHCP: OFF] will appear on the top
line of the display, followed by the IP address on the bottom line. To show
the machine’s host name, press .
• If the machine was unable to receive an IP address automatically, or if the
router locked up after the machine received an IP address,
[IP ADDRESS/DHCP: FAIL] / [192.168. 1 .201] will appear. “192.168. 1
.201“ is an IP address that is assigned to the machine for diagnostic
purposes when connection fails (it cannot be used for regular
communication).
• If [NOW CONNECTING / CHECK LATER] appears, press to exit.
This message will appear if a cable is not connected or the machine has
not yet established communication on the network. Make sure a cable is
correctly connected, wait briefly, and then repeat the procedure again.
STOP
Scanning
2. Network
29
Page 35

Setting up Network Scanning
If the machine is unable to communicate...
♦ Check the Ethernet cable. Are the connections secure? Are you using
straight-through (not crossover) cable for 10Base-T/100Base-TX?
♦ There may be a problem in the router or other device to which the machine
is connected. Try removing and then restoring the power to the router (see
the manual for the router).
♦ If [IP ADDRESS/DHCP: FAIL] appears, remove and then reinsert the
Ethernet cable plug, and then check the IP address again. If the same
message appears, check the device that acts as the DHCP server on your
network (try removing and restoring the power). If your router is your DHCP
server, make sure that DHCP is enabled in the router settings. If your
network does not have a DHCP server, set a static IP address as explained
on page 45.
♦ If a static IP address has been set, make sure that the network settings
(page 45) are correct .
30
Page 36

Setting up Network Scanning
E-mail settings
Before the Scan to E-mail function can be used, you must configure the e-mail
settings.
The e-mail settings specify your outgoing (SMTP) mail server, as well as your
sender name, sender address, and other information that appears in the email to which scanned image files are attached.
♦ The e-mail settings are configured in the machine’s Web page. The
machine’s Web page can be accessed from any computer on the same
network as the machine.
Accessing the machine’s Web page
To access the Web page, you will need to know the machine’s host name or
IP address (usually it is most convenient to use the host name).
To check the machine’s host name or IP address, follow the procedure in
Checking your IP address and the connection (page 29), or print the Network
Settings List (page 108).
Type in the host name or IP address of the machine in the address bar of your
computer’s Web browser. The machine’s Web page will appear.
Scanning
2. Network
♦ For the Web browser, it is recommended that you use Internet Explorer 6.0
or higher.
Note: If the Web page is used while the machine is in operation, machine
operation may become unstable.
If password protection has been enabled for the Web page...
If your administrator has enabled password protection for the Web page, you
will need to enter the user name and password to open the Web page.
Regular users enter “user” in User Name and the user password in
Password. (If you do not know the user password, ask your administrator.)
The administrator enters “admin” in User Name and the administrator
password in Password.
31
Page 37

Setting up Network Scanning
To open the Web page, enter the IP
address or host name of the machine
in your browser’s address bar.
Click E-mail Setup to open the
e-mail settings.
Configuring the e-mail settings in the Web page
Select E-mail Setup in the menu frame of the Web page to open the E-mail
Setup screen.
Under SMTP Setup, enter the host name or IP address of your SMTP server
in SMTP Server.
32
Page 38

Setting up Network Scanning
For the Port Number, “25” is normally entered.
Under Authentication Option, select No authentication if your SMTP
server does not require authentication.
If your SMTP server requires SMTP authentication, select SMTP
Authentication and enter your User Name and Password.
If your mail service requires POP before SMTP authentication, select POP
before SMTP and enter the host name or IP address of your POP server in
POP Server. Enter the Port Number, your User Name, and Password.
Under E-mail Settings, enter the Sender Name that you wish to have appear
on e-mail sent from the machine, and the sender E-mail Address.
Note: The E-mail Address must be entered. This must be a valid e-mail
address. Responses to e-mail sent from the machine and any undelivered
mail reports will be sent to this address. It is normally convenient to use the email address of the administrator of the machine or other person in charge of
machine communication.
Enter an E-mail Subject and E-mail Message, and select the File Format
used for the scanned image.
Scanning
2. Network
♦ The Sender Name, E-mail Subject, E-mail Message, and File Format
that you enter in this screen are default settings. These settings will be
used if the sender does not specify this information at the time of
transmission.
♦ For further information on the settings in this screen, click Help in the menu
frame.
33
Page 39

Setting up Network Scanning
Using the machine’s operation panel to configure
e-mail settings
The machine’s operation panel can also be used to configure several of the email settings.
The settings that can be configured on the machine’s operation panel are
shown in the table on the next page. Follow the steps below to display the email settings, and then configure each setting as explained in the table.
1 Press , then until [E-MAIL SETTING] appears.
FUNCTION
2 Press , then repeatedly until the setting that you wish to
configure appears.
3 Press . (Note: This step is not necessary for the “FILE FORMAT”
setting.)
4 Enter the required information for the setting as explained in the table
on the next page.
5 After configuring the setting, the next e-mail setting will appear in the
display. You can configure the next setting, or press to exit.
STOP
34
Page 40

Setting up Network Scanning
E-mail settings on the machine’s operation panel
The e-mail settings that can be configured on the machine’s operation panel
are shown below. Enter the required information for each setting as explained
in the table (this is done in step 4 of the procedure on the previous page).
♦ The sender address is required (if not entered in the Web page). The other
settings are optional.
♦ Use the letter keys to enter text. For information on using the letter keys,
see page 11.
♦ The e-mail subject, e-mail message, and file format that are entered below
are default settings. They will be used if you do not specify these items at
the time of transmission.
Setting Description
SENDER
NAME
SENDER
ADDRESS
E-MAIL
SUBJECT
Enter the sender name that will appear in the e-mail message
(max. of 50 characters). When finished, press .
START
Enter your sender e-mail address (max. of 128 characters). When
finished, press . (Note: Be sure to enter a valid e-mail
START
address. Return e-mail and undelivered mail reports will be sent to
this address. In addition, some SMTP servers reject outgoing email if a valid sender e-mail address is not entered.)
Enter a default subject (max. of 128 characters). When finished,
START
press .
Scanning
2. Network
E-MAIL
MESSAGE
Enter a default message (max. of 256 characters). When finished,
START
press .
FILE FORMAT This sets the default format for scanned files sent by directly
entering an e-mail address, or by broadcasting. Press for
TIFF or for PDF.
Initial setting: TIFF
35
Page 41

Storing E-mail Addresses
Storing E-mail Addresses
You can store e-mail addresses in Rapid Keys and Speed Dial numbers.
♦ An e-mail address stored in a Rapid Key is selected by simply pressing that
key. A total of 36 Rapid Keys are available.
(Note: Attach the Rapid Key labels as shown on page 8.)
♦ An e-mail address stored in a Speed Dial number is selected by pressing
SPEED DIAL
Dial numbers are available.
E-mail addresses can be stored using the machine’s Web page or the
operation panel.
Using the Web page to store e-mail addresses
Open the machine’s Web page as explained on page 31.
To view a list of the Rapid Keys and Speed Dial numbers already in use, click
Destination Management in the menu frame. The screen below will appear.
and entering the 3-digit Speed Dial number. A total of 114 Speed
36
Page 42

Storing E-mail Addresses
To store a new e-mail address, click E-mail under Destination Management
in the menu frame. The screen below will appear.
Scanning
2. Network
Enter the name of the destination in Destination Name and select the Rapid
Key or Speed Dial number that you wish to use from the list. Type in the E-
mail Address of the destination and select the File Format of the scanned
image. (The file format selected here is a default format that will be used if a
file format is not specified at the time of transmission.)
When finished, click Submit.
Note: Polish national characters cannot be entered.
Editing or deleting a destination in the Web page
To edit or delete a previously stored destination, select the destination in the
Destinations List and then click Edit or Delete.
37
Page 43

Storing E-mail Addresses
Using the operation panel to store e-mail addresses
Follow the steps below to store an e-mail address using the machine’s
operation panel.
1 Press then .
FUNCTION
2 To store a number in a Rapid Key, press the desired Rapid Key.
To store a number in a Speed Dial number, press and enter the
desired Speed Dial number (the number must be 3 digits: enter “001” for
Speed Dial 1, “010” for Speed Dial 10, etc.).
Display: [SELECT DEST. TYPE]
• If you prefer to have the machine suggest an available Rapid Key / Speed
Dial number at the end of the procedure, press .
SPEED DIAL
3 Press to select “E-MAIL”.
Display: [E-MAIL # MODE]
4 Enter the e-mail address with the letter and number keys (max. of 128
characters).
• To clear a mistake, press .
• For information on using the letter keys, see page 11.
DEL
5 Press .
START
6 Enter the name of the destination (max. 20 characters).
7 Press .
Display: [FILE FORMAT]
38
START
Page 44

Storing E-mail Addresses
8 Select the default file format that will be used for scanned images if the
user does not specify a format at the time of transmission. Press
to select TIFF, or to select PDF.
9 If you selected a Rapid Key or Speed Dial number in Step 2, the display
will briefly show [STORED], and then [NEW NUMBER]. Go to Step 10.
If you did not select a Rapid Key or Speed Dial number in Step 2, the
display will show the next available Rapid Key or Speed Dial number. If
that number is acceptable, press and go to Step 10. If not, press
the desired Rapid Key, or press and enter the desired 3-digit
Speed Dial number, and go to Step 10.
START
SPEED DIAL
Scanning
2. Network
10 Return to Step 2 to store another e-mail address, or press to
exit.
STOP
Editing and clearing stored destinations
To make changes to a previously stored destination, or clear a destination,
follow these steps:
1 Press then .
FUNCTION
2 Select the destination that you wish to edit or delete using one of the
methods below:
• Rapid Key: If the destination is stored in a Rapid Key, press the Rapid Key.
• Speed Dial: If the destination is stored in a Speed Dial number, press
SPEED DIAL
(enter “001” for Speed Dial 1, “010” for Speed Dial 10, etc.).
and enter the 3-digit Speed Dial number with the number keys
39
Page 45

Storing E-mail Addresses
• Search: Press or until the destination appears in the display
and press .
Display: [1=EDIT, 2=CLEAR]
3 Press for “EDIT” or for “CLEAR”.
• If you pressed for “CLEAR”, press and go to Step 9.
START
4 If you selected “EDIT”, make the desired changes to the e-mail address.
• Press or to move the cursor to the character(s) you wish to
change, and then press the appropriate letter or number key. The new
character will replace the old character. You can also press to
backspace and clear characters.
DEL
• If you do not wish to change the address, go directly to Step 5.
5 Press .
START
6 Make the desired changes to the name.
• If you do not wish to change the name, go directly to Step 7.
7 Press .
Display: [FILE FORMAT]
START
8 Select the default file format that will be used for scanned images if the
user does not specify a format at the time of transmission. Press
to select TIFF, or to select PDF.
9 Return to Step 2 to edit or clear another destination, or press . to
exit.
40
STOP
Page 46

Scan to E-mail Transmission
Scan to E-mail Transmission
Follow the steps below to send a scanned document or image to an e-mail
recipient.
♦ The document will be sent as a file attachment to an e-mail message.
♦ You can specify the recipient by directly entering an e-mail address, or by
selecting an address that has been stored as explained in the previous
section.
1 Adjust the document guides to the
width of your document.
Scanning
2. Network
2 Insert the document face down in the
document feeder. The top edge of the
document should enter the feeder first.
• SEND READY will appear in the
display.
• Up to 30 A4-size sheets can be placed
in the feeder at once.
• For more information on loading the document, see page 52.
• If desired, press to set the resolution and contrast (see p. 54).
(The default resolution for Scan to E-mail is FINE.)
RESOLUTION
41
Page 47

Scan to E-mail Transmission
3 Enter the destination e-mail address using one of the following
methods:
• Press , and enter the address with the letter and number
keys (p. 11). When finished, press .
SCAN TO E-MAIL
START
• If the address has been stored in a Rapid Key, press the Rapid Key.
• If the address has been stored in a Speed Dial number, press and
SPEED DIAL
enter the Speed Dial number.
• To search for a stored address, press (this eliminates
stored fax numbers from the search), press or until the name or
address appears, and press .
Note: If [CHECK E-MAIL SETTING] appears, your SMTP server or sender
address has not been entered in the e-mail settings (p. 31).
START
SCAN TO E-MAIL
4 If you need to select or change any of the e-mail options, press and
go to Step 5 below. (Note that settings selected here are temporary. To
make permanent changes, see p. 31.)
If you do not wish to change the e-mail options, go directly to Step 7.
5 Press or until the desired option appears, and press
( is not necessary for the FILE FORMAT setting). Change the option
as explained below (use the letter keys to enter text and to delete
text; p. 11).
• E-MAIL SUBJECT: Enter a subject (max. 128 characters). When finished,
START
press .
• E-MAIL MESSAGE: Enter a message (max. 256 characters). When
finished, press .
42
START
DEL
Page 48

Scan to E-mail Transmission
• FILE FORMAT: Select the format of the scanned image file. Press for
TIFF or for PDF. (Make sure the recipient has an image viewer that
can show images in the selected format.)
• FILE NAME: To use an automatically generated file name for the scanned
file, press (AUTO). To assign a custom name, press (CUSTOM),
enter the desired name with the letter keys (max. 40 characters), and press
START
.
6 When you have finished configuring the e-mail options, press or
until the display shows [PRESS START TO SCAN].
Scanning
2. Network
7 Press to begin transmission.
Note: The recipient may have security settings in their e-mail program or virus
protection software that prevent the file attachment from being received or
opened. In this case, ask the recipient to try changing the settings.
START
43
Page 49

Scan to E-mail Transmission
Error messages
If transmission is not successful because the machine is unable to connect to
your mail server, one of the following error messages will appear.
[CONNECTION ERROR]
This appears when communication does not take place correctly on your local
network, usually due to a problem with the cable connections. Make sure that
the cable ends are securely inserted in the LAN ports. Make sure that the
correct cable is being used and that the cable is good. Make sure that your
router or hub is powered on.
[SERVER ERROR]
This appears when the machine cannot connect to your mail server or there is
no response from the mail server. Make sure the SMTP server setting is
correct (p. 31). If you have configured “POP before SMTP” settings in the Web
page, make sure these settings are correct.
[SERVER NOT FOUND] / [SMTP]
This appears when an incorrect host name is entered for your SMTP server.
Check the SMTP server setting (p. 31).
[SERVER NOT FOUND] / [DHCP]
This appears when the machine is unable to automatically obtain an IP
address. Restart your router or other device that acts as your DHCP server.
[SERVER ERROR] / [SMTP-AUTH]
This appears when your SMTP server requires SMTP authentication and the
SMTP authentication user name or password entered in the machine’s Web
page is not correct (p. 33).
[CABLE DISCONNECTED]
This may appear below any of the above messages. Check the same items as
in [CONNECTION ERROR] above.
If an undelivered mail report is sent to inform you that your e-mail
message was not successfully delivered, the report will be sent to the
sender address entered in the e-mail settings (page 31).
44
Page 50

Network Settings
Network Settings
If your network requires that you assign a static (permanent) IP address to the
machine, follow the steps below to disable DHCP (automatic IP address
assigment) and configure the network settings.
♦ Consult your network administrator for the information that must be
entered. After DHCP is disabled, the settings that must be configured
appear in the following order (these settings only appear when DHCP is set
to NO):
IP ADDRESS
SUBNET MASK
DEFAULT GATEWAY
DNS (PRIMARY)
DNS (SECONDARY)
1 Press , then until [NETWORK SETTING] appears.
FUNCTION
2 Press .
[DHCP] will appear.
3 Press for NO (the machine will not obtain an IP address
automatically).
• [IP ADDRESS] will appear.
(If you wish to configure a different setting, press or .)
Scanning
2. Network
4 Press .
5 Press the number keys to enter the required number.
• Three digits must be entered in each segment of the number (the segments
are separated by periods). If a segment does not have 3 digits, enter zeros
as needed.
Example: IP address = 192.168.1.2
You must enter: 192.168.001.002
45
Page 51

Network Settings
• If you make a mistake, press to move the cursor to the mistake and
enter the correct number.
6 When finished entering the number, press .
START
7 The next setting will appear in the display. Repeat Steps 4 through 6 to
configure the next setting, or press to exit.
Initializing the network settings
If you need to return the network settings to their initial state, follow the steps
below.
♦ Initializing the settings enables DHCP and clears the IP address and
related settings.
1 Press , then until [NETWORK SETTING] appears.
FUNCTION
STOP
2 Press , then until [INITIALIZE SETTINGS] appears.
3 Press .
Display: [INITIALIZE SETTINGS] / [IF OK, PRESS START]
START
4 Press .
46
START
Page 52

Scan to Folder
Scan to Folder
You can also scan and send a document directly to a folder on a computer on
your network.
To use this feature, you must first store the destination in a Rapid Key or
Speed Dial number. Follow the appropriate procedure below to store a Scan
to Folder destination.
♦ Scan to Folder can only be stored using the machine’s Web page. A
maximum of 12 Scan to Folder destinations can be stored.
Storing a Scan to Folder destination
To store a Scan to Folder destination, open the machine’s Web page as
explained on page 31.
Click Network Folder under Destination Management in the menu frame.
The screen below will appear.
Scanning
2. Network
Enter the name of the destination in Destination Name and select the Rapid
Key or Speed Dial number that you wish to use from the list.
47
Page 53

Scan to Folder
Type in the Folder Path (the name or IP address of the computer on which
the folder is located, followed by the path to the folder). For example, to
specify the “NetworkScanDocs” folder in the “Product Planning” folder on
“ComputerA”, type in the following:
\\ComputerA\Product Planning\NetworkScanDocs
Note: The folder must be set as a folder that is shared on the network in the
folder properties.
Enter the User Name and Password required to access the computer. If your
network environment requires that you enter the domain name with the user
name, enter the User Name in the format DomainName\UserName.
Select the File Format of the scanned image. (The file format selected here is
a default format that will be used if a file format is not specified at the time of
transmission.)
When finished, click Submit.
48
Page 54

Scan to Folder
Scan to Folder Transmission
Follow the steps below to send a scanned document to a network folder.
♦ The document will be sent as an image file. The file format can be selected
in Steps 4 and 5 below.
1 Insert the document face down in the
document feeder. The top edge of the
document should enter the feeder first.
• SEND READY will appear in the
display.
• Up to 30 A4-size sheets can be placed
in the feeder at once.
• For more information on loading the document, see page 52.
Scanning
2. Network
• If desired, press to set the resolution and contrast (see p. 54).
RESOLUTION
2 Select the destination using one of the following methods:
• If the destination has been stored in a Rapid Key, press the Rapid Key.
• If the destination has been stored in a Speed Dial number, press
SPEED DIAL
and enter the Speed Dial number.
• To search for the destination, press , press or
until the name or address appears, and press .
SCAN TO FOLDER
START
3 If you need to specify either of the file options, press and go to
Step 4 below. (Note that settings selected here are temporary. To make
permanent changes, change the settings in the Web page as explained
on pages 47 and 48.)
If you do not wish to change the file options, go directly to Step 6.
49
Page 55

Scan to Folder
4 Press or until the desired option appears, and then make a
selection for the option as explained below.
• FILE FORMAT: Select the format of the scanned image file. Press for
TIFF or for PDF.
• FILE NAME: To use an automatically generated file name for the scanned
file, press (AUTO). To assign a custom name, press (CUSTOM),
enter the desired name with the letter keys (max. 40 characters), and press
START
.
5 When you have finished configuring the file options, press or
until the display shows [PRESS START TO SCAN].
6 Press to begin transmission.
50
START
Page 56

Transmittable Documents
3. Sending Faxes
Transmittable Documents
Minimum document size and weight
Minimum size
70 mm
140 mm
Minimum weight
52 g/m²
Maximum document size and weight
The maximum size and weight of documents that you can load in the
document feeder depend on how many sheets you load.
Loading up to 30 sheets at once:
Size: A4 (210 x 297 mm)
Weight: 80 g/m
Loading 1 sheet at a time (manual feeding):
Size: 216 x 356 mm
Weight: 157 g/m
2
2
Faxes
3. Sending
Letters or graphics on the
edges of a document will
not be scanned.
(The maximum scanning
width is 208 mm, and the
top and bottom 4 mm of the
document cannot be
scanned.)
4 mm
208 mm
4 mm
Letters in the
shaded area will
not be scanned.
51
Page 57

Loading the Document
Other restrictions
♦ The scanner cannot recognise yellow, greenish yellow, or light blue ink.
♦ Ink, glue, and correcting fluid on documents must be dry before they pass
through the document feeder.
♦ All clips, staples, and pins must be removed from documents before loading
in the feeder. If these are not removed, they may damage the machine.
♦ Documents which are patched, taped, torn, smaller than the minimum size,
carbon backed, easily smudged, or have a slick coated surface should be
photocopied, and the copy loaded in the feeder.
Loading the Document
Up to 30 A4-size sheets can be placed in the feeder at once. The sheets will
automatically feed into the machine starting from the bottom sheet.
♦ If you need to send or copy more than the maximum number of sheets,
place the additional sheets gently and carefully in the feeder just before the
last sheet is scanned. Do not try to force the sheets in, as this may cause
double-feeding or jamming.
♦ For large or thick sheets that must be loaded one at a time, insert each
sheet into the feeder as the previous sheet is being scanned. Insert gently
to prevent double-feeding.
1 Adjust the document guides to the
width of your document.
52
Page 58

Loading the Document
2 Insert the document face down in the
document feeder. The top edge of the
document should enter the feeder first.
• SEND READY will appear in the
display.
Note: When inserting a large number
of pages in the feeder, slant the front
end of the stack so that the bottom
pages enter first.
3 Adjust the resolution and/or contrast settings as explained on page 54,
then dial the receiving machine as explained on page 56.
Faxes
3. Sending
53
Page 59

Adjusting the Resolution and Contrast
Adjusting the Resolution and Contrast
If desired, you can adjust the resolution and contrast before sending a
document.
♦ The default resolution setting for faxing is STANDARD. The default contrast
setting is AUTO.
♦ Adjust the settings each time you do not want to use the default settings.
Note: The resolution and contrast settings are only effective for sending a
document. They are not effective for receiving a document.
Resolution settings
STANDARD Use STANDARD for ordinary documents. This
setting gives you the fastest and most
economical transmission.
FINE Use FINE for documents containing small letters
or fine drawings.
SUPER FINE Use SUPER FINE for documents containing
HALF TONE Use HALF TONE for photographs and
very small letters or very fine drawings.
illustrations. The original will be reproduced in
64 shades of gray.
Contrast settings
AUTO Use AUTO for normal documents.
DARK Use DARK for faint documents.
54
Page 60

Adjusting the Resolution and Contrast
1 Load the document(s).
• The resolution/contrast cannot be
adjusted unless the document is
loaded.
2 Press one or more times until the desired resolution and
RESOLUTION
contrast settings appear in the display.
• The first time you move through the list of resolution settings, the contrast
setting AUTO will appear next to each resolution setting. The second time
you move through the list, the contrast setting DARK will appear.
Note: In order to transmit in SUPER FINE resolution, the receiving fax
machine must also have that resolution. If it doesn’t, your machine will
automatically step down to the next best available setting.
If you prefer to use FINE for the default resolution setting, change the “FINE
PRIORITY” setting (p. 103).
Faxes
3. Sending
55
Page 61

Sending a Fax by Normal (Manual) Dialling
Sending a Fax by Normal (Manual) Dialling
With Normal Dialing, you pick up the handset (or press ) and dial by
pressing the number keys.
SPEAKER
♦ If a person answers, you can talk with them through the handset before
sending the fax. (If you pressed , you must pick up the handset to
talk.)
SPEAKER
♦ Normal Dialing allows you to listen to the line and make sure the other fax
machine is responding.
1 Load the document(s).
• If desired, press to set the
resolution and/or contrast.
2 Pick up the handset or press . Listen for the dial tone.
RESOLUTION
SPEAKER
3 Dial the number of the receiving machine by pressing the number keys.
• If you are on a Flash-type PBX and are dialing out, press , wait for the
connection to the outside line, and then dial the number.
R
4 Wait for the connection. Depending on the setting of the receiving
machine, you will either hear a fax tone or the other person will answer.
• If the other party answers, ask them to press their Start key (if you pressed
SPEAKER
, pick up the handset to speak with them). The receiving machine will
issue a fax tone.
56
Page 62

Sending a Fax by Normal (Manual) Dialling
5 When you hear the fax tone, press . Replace the handset.
START
• If the transmission is completed successfully, the machine will beep once.
• If an error occurs, the machine will beep three times and print a Transaction
Report to inform you of the problem (see page 110).
Faxes
3. Sending
57
Page 63

Sending a Fax by Normal (Manual) Dialling
Page counter for Normal (manual) Dialling
When automatic dialling is used, a slash and the total number of pages is
automatically added to each page number on transmitted fax pages (for
example, "P. 1/5", "P.2/5", etc.). This allows the recipient to check for missing
pages.
If you wish to use this feature with Normal Dialling, you must set the total
number of pages manually. Follow the steps below.
1 Load the document(s).
2 Press , then until [PAGE COUNTER] appears in the display.
FUNCTION
3 Press .
Display: [ENTER # (01 - 99)]
4 Enter the total number of pages (“01” to “99”) with the numeric keys.
Example: 5 pages
5 If desired, press to set the resolution and/or contrast.
RESOLUTION
6 Follow Steps 2 to 5 of the Normal Dialling procedure to send the fax.
• To cancel a batch number entry, remove the document from the feeder or
press .
• If the number of pages actually transmitted is not the same as the batch
number entered, an alarm will sound and [PAGE COUNT ERROR] will
appear in the display. “PAGE E.” will also appear in the NOTE column of the
Transaction Report if printed.
STOP
58
Page 64

Sending a Fax by Automatic Dialling
Sending a Fax by Automatic Dialling
You can store your most frequently dialled fax numbers in Rapid Keys and
Speed Dial numbers.
♦ A number stored in a Rapid Key is dialled by simply pressing the Rapid Key.
A total of 36 Rapid Keys are available. (Note: Attach the Rapid Key labels
as shown on page 8.)
♦ A number stored in a Speed Dial number is dialled by pressing , the
3-digit Speed Dial number, and then . A total of 114 Speed Dial
numbers are available.
START
Storing fax numbers
Follow the steps below to store a fax number using the machine’s operation
panel.
♦ Fax numbers can also be stored using the machine’s Web page. Open the
Web page as explained on page 31, and click Fax under Destination
Management in the menu frame to open the Fax Destination Control
screen.
1 Press then .
FUNCTION
2 To store a number in a Rapid Key, press the desired Rapid Key.
To store a number in a Speed Dial number, press and enter the
desired Speed Dial number (the number must be 3 digits: enter “001” for
Speed Dial 1, “010” for Speed Dial 10, etc.).
Display: [SELECT DEST. TYPE]
SPEED DIAL
SPEED DIAL
Faxes
3. Sending
• If you prefer to have the machine suggest an available Rapid Key / Speed
Dial number at the end of the procedure, press .
59
Page 65

Sending a Fax by Automatic Dialling
3 Press to select “FAX”.
Display: [FAX # MODE]
4 Enter the fax or phone number by pressing the number keys (maximum
of 32 digits).
(Note: A space cannot be entered.)
• To clear a mistake, press .
DEL
• If a pause is required between any of the digits to access a special service
or an outside line, press . The pause appears as a hyphen (four
seconds per pause). Several pauses can be entered in a row.
REDIAL
• If you are on a PBX and the number you are storing is for an outside line,
and you have configured the PBX CONNECTION setting for automatic
connection to an outside line (p. 106), do not press the flash key ( ) at
the beginning of the number or enter the prefix for an outside line. If the
number you are storing is for a destination inside your PBX, press
before entering the number.
5 Press .
START
6 Enter the name of the destination (max. 20 characters).
• For information on using the letter keys, see page 11.
7 Press .
START
R
R
60
Page 66

Sending a Fax by Automatic Dialling
8 If you selected a Rapid Key or Speed Dial number in Step 2, the display
will briefly show [STORED], and then [NEW NUMBER]. Go to Step 9.
If you did not select a Rapid Key or Speed Dial number in Step 2, the
display will show the next available Rapid Key or Speed Dial number. If
that number is acceptable, press and go to Step 9. If not, press the
desired Rapid Key, or press and enter the desired 3-digit Speed
Dial number, and go to Step 9.
START
SPEED DIAL
9 Return to Step 2 to store another number, or press to exit.
STOP
Faxes
3. Sending
61
Page 67

Sending a Fax by Automatic Dialling
Editing and clearing auto-dial numbers
To make changes to a previously stored auto-dial number, or clear a number,
follow these steps:
1 Press then .
FUNCTION
2 Select the number that you wish to edit or delete using one of the
methods below:
• Rapid Key: If the number is stored in a Rapid Key, press the Rapid Key.
• Speed Dial: If the number is stored in a Speed Dial number, press
and enter the 3-digit Speed Dial number with the number keys (enter “001”
for Speed Dial 1, “010” for Speed Dial 10, etc.).
• Search: Press or until the name or number of the destination
appears in the display and press .
Display: [1=EDIT, 2=CLEAR]
3 Press for “EDIT” or for “CLEAR”.
• If you selected “CLEAR”, go to Step 7.
4 If you selected “EDIT”, make the desired changes to the number.
SPEED DIAL
• Press or to move the cursor to the digit or digits you wish to
change, and then enter the new digit. The new digit will replace the old
digit. You can also press to backspace and clear digits.
DEL
• If you do not wish to change the number, go directly to Step 5.
5 Press .
62
START
Page 68

Sending a Fax by Automatic Dialling
6 Make the desired changes to the name.
• Press or to move the cursor to the letter or letters you wish to
change, and then press the appropriate letter key. The new letter will
replace the old letter. You can also press to backspace and clear
letters.
• If you do not wish to change the name, go directly to Step 7.
DEL
7 Press .
8 Return to Step 2 to edit or clear another number, or press to exit.
START
STOP
Faxes
3. Sending
63
Page 69

Sending a Fax by Automatic Dialling
Using an auto-dial number to send a fax
1 Load the document(s).
• If desired, press to set the
resolution and/or contrast.
RESOLUTION
2 Select the fax number using one of the methods below:
• Rapid Key Dialling: If the number is stored in a Rapid Key, press the
Rapid Key.
• Speed Dialling: If the number is stored in a Speed Dial number, press
SPEED DIAL
number must be 3 digits: enter “001” for Speed Dial 1, “010” for Speed Dial
10, etc.). Make sure the correct destination appears in the display (if not,
press ), and then press .
and enter the Speed Dial number with the number keys (the
STOP
START
• Search Dialling: Press or until the name or number of the other
party appears in the display, and press .
START
3 Scanning, dialling, and transmission will take place automatically.
• To cancel transmission, press .
STOP
• If the transmission is completed successfully, the machine will beep once.
• If an error occurs, the machine will beep three times and print a Transaction
Report to inform you of the problem (see page 110).
64
Page 70

Sending a Fax by Automatic Dialling
Making a voice call with an auto-dial number
Rapid Key Dialing: Lift the handset and press the Rapid Key.
Speed Dialing: Lift the handset, press , and enter the Speed Dial
number with the number keys (the number must be 3 digits: enter “001” for
Speed Dial 1, “010” for Speed Dial 10, etc.).
Search Dialing: Press or until the name or number of the other
party appears, and lift the handset.
(You can also lift the handset first, search for the number, and then press
START
.)
SPEED DIAL
Sending a fax by Direct Keypad Dialling
Use this method to dial a full fax number without using the handset.
1 Load the document(s).
• If desired, press to set the
resolution and/or contrast.
RESOLUTION
Faxes
3. Sending
2 Enter the number of the receiving machine with the number keys.
• If a pause is required between any of the digits to access a special service
or an outside line, press . The pause appears as a hyphen (four
seconds per pause). Several pauses can be entered in a row.
• If you are on a PBX and are dialing a number inside your PBX, and you
have configured the PBX CONNECTION setting for automatic connection
to an outside line (p. 106), press before entering the number.
REDIAL
R
65
Page 71

Sending a Fax by Automatic Dialling
3 Check the display. If the number shown is correct, press .
• If the number is not correct, press to clear the incorrect digits, and
then re-enter the correct digit(s).
Using the REDIAL key
To redial the last number dialled on the machine, press . The speaker
will be automatically activated. To fax a document, press when you hear
the fax tone after the other machine answers.
Automatic redialling
If you use auto dialling (including Direct Keypad Dialling) to send a fax and the
line is busy, the machine will automatically make three redial attempts at
intervals of five minutes.
During this time, [RECALLING] will appear in the display, followed by the
attempt number.
STOP
REDIAL
START
START
♦ To clear the message and stop automatic redialling, press . If there
are multiple fax numbers being automatically redialled, only the number
that was attempted first will appear in the display. To cancel automatic
redialling of a different number, see Checking and cancelling stored fax
jobs on page 67.
Under certain conditions, automatic redialling may stop before three redialling
attempts are made.
66
STOP
Page 72

Sending a Fax by Automatic Dialling
Checking and cancelling stored fax jobs
If you use automatic dialling (including Direct Keypad Dialling) to send a fax
while the machine is busy with another job, the fax job will be stored in the
machine’s memory and performed after all previously stored jobs are finished.
To check what fax jobs are waiting in memory to be performed, or to cancel a
job, follow the steps below.
♦ Timer transmission jobs can also be checked and canceled using this
procedure.
1 Press .
INFO
2 Make sure that [TX JOBS] appears in the display and press .
3 Press or to scroll through the stored fax jobs.
• The top line of the display shows the memory number assigned to the job
and the time the job was stored. The bottom line alternately shows the
destination and the status of the job.
• [NO DATA] will appear if no jobs are currently stored in memory.
4 To cancel a job, display the job and press .
[IF CLEAR, PRESS START] will appear. Press again to clear the job.
5 Press to exit.
STOP
START
START
Faxes
3. Sending
67
Page 73

Using AUTO Mode
4. Receiving Faxes
Using AUTO Mode
To select AUTO mode, press until [AUTO] appears in the display.
In AUTO mode, the machine automatically answers all calls on 1 ring and
receives incoming faxes.
RECEPTION
♦ If you pick up the handset before the machine answers, you can talk to the
other party and receive a fax as explained in Using MANUAL Mode below.
To change the number of rings on which the machine answers calls, change
the “NUMBER OF RINGS” setting (pp. 103 and 104).
The machine automatically reduces received faxes as needed to fit the paper.
If you prefer to have all faxes printed at full size, change the “RECEIVE
RATIO” setting (pp. 103 and 107).
Important:
Do not let more than 100 sheets collect in the received document tray. Too
many sheets in the tray will cause paper jams.
68
Page 74

Using MANUAL Mode
Using MANUAL Mode
To select MANUAL mode, press until [MANU] appears in the
display.
In MANUAL mode, you must answer all calls (even faxes) by picking up the
machine’s handset.
RECEPTION
Answering on the machine’s handset
Important: If a document is loaded in the machine’s feeder, remove it before
performing the steps below.
1 When the machine rings, pick up the handset.
2 If you hear a soft fax tone, wait until the display shows [RECEIVING] and
then replace the handset.
♦ If [RECEIVING] does not appear (or if you have set the Fax Signal Receive
setting to NO (pp. 103, 104)), press to begin reception.
START
3 If the other party first speaks with you and then wants to send a fax,
START
press after speaking. (Press before the sender presses their Start
key.)
Faxes
4. Receiving
• When [RECEIVING] appears in the display, hang up.
69
Page 75

Reception to Memory
Reception to Memory
Incoming faxes will be received to memory when printing is not possible, such
as when the machine runs out of paper, the print cartridge needs
replacement, or the paper jams.
When you have received a fax in memory, [FAX RX IN MEMORY] will appear
in the display, alternating with a message that indicates the problem.
When you resolve the problem, the stored faxes will automatically print out.
♦ If you received faxes to memory because the machine ran out of paper, be
sure to add paper that is the same size as the paper previously used, or the
fax print-out size will not match the size of the printing paper.
70
Page 76

Installing the Printer Driver
5. Printing
Installing the Printer Driver
The machine can be used as a network printer.
♦ To use the machine as a network printer, it must be connected to your
network as explained on page 16, and it must be assigned an IP address
as explained on page 28.
The printer driver must be installed on each computer that will use the
machine as a printer. Follow the steps below to install the printer driver.
1 Insert the CD-ROM that accompanied the machine into your computer’s
CD-ROM drive.
2 In the initial screen that appears, click “Install Printer Driver”.
• If the initial screen does not automatically appear, run “Launch.exe” on the
CD-ROM. (Open “My Computer”, double-click your CD-ROM drive, and
double-click “Launch.exe”.)
• To select the language that will be used in the printer driver, click the
“Language Options” button.
3 Follow the instructions in the windows that appear to install the printer
driver.
• If multiple FO-IS115N machines are connected to your network, the printer
driver can only be installed for one machine at a time. (When the list of
detected machines appears during the installation, only one of the
machines can be selected.) If you wish to install the printer driver for all
connected machines, repeat the installation procedure for each machine.
(When repeating the installation, the SHARP FO-IS115N Setup
Maintenance program will appear after you click “Install Printer Driver” in
Step 2. Select Modify to repeat the installation.)
5. Printing
71
Page 77

Installing the Printer Driver
Removing the printer driver
To remove the installed printer driver, simply delete the icon of the printer from
the printers window (right-click the printer icon and select Delete).
If printer drivers are installed for multiple FO-IS115N machines, all printer
drivers can be removed at once using the CD-ROM that accompanied the
machine. Insert the CD-ROM into your computer’s CD-ROM drive, select
Install Printer Driver, and then select Remove in the FO-IS115N Setup
Maintenance screen that appears.
72
Page 78

Printing a Document From an Application
Printing a Document From an Application
1 When you are ready to print a document from an application on your
computer, select “Print” from the File menu.
• The Print dialog box appears.
2 Make sure that “SHARP FO-IS115N” is selected as the printer.
3 If you need to select the paper size or adjust any of the other print
settings, click Properties, Setup, or Printer in the Print dialog box (the
name of the button varies depending on the application).
• The Printing Preferences window appears. Adjust the settings as desired
(see pages 75 to 77) and then click OK.
4 Select the print range and adjust any other settings as desired in the
Print dialog box.
5 When you are ready to begin printing, click “Print” or “OK” in the Print
dialog box.
Note: When you adjust the print settings as explained above in Step 3, your
changes will only remain in effect while you are using the application. To make
permanent changes, see page 74.
5. Printing
73
Page 79

Selecting Print Settings
Selecting Print Settings
The print settings are selected in the Printing Preferences.
♦ To make temporary changes to the print settings, open the Printing
Preferences from an application as explained in Step 3 on page 73. The
settings will remain in effect only while the application is running.
♦ To make permanent changes to the print settings, open the Printing
Preferences from the Printers and Faxes folder (the Printers folder in
Windows
Windows
click Printers. Right-click the SHARP FO-IS115N icon and select Printing
Preferences.
Windows® XP / Server 2003: Click the start button, click Control Panel,
click Printers and Other Hardware, and then click Printers and Faxes. In
the Printers and Faxes window, click on the SHARP FO-IS115N icon and
select Printing Preferences from the File menu.
®
2000) as explained below:
®
Vista: Click the Start button, click Hardware and Sound, and
74
Windows® 2000: Click the Start button, point to Settings, and select
Printers. In the Printers window, click on the SHARP FO-IS115N icon and
select Printing Preferences from the File menu.
Page 80

Page Layout tab
Selecting Print Settings
N-up: This is used to print multiple reduced-size images on one sheet of
paper. Click the setting and select the desired number of images.
Print Quality: This determines the clarity of the printed image. Click the
setting and select the desired quality (a higher setting produces a clearer
image).
Watermark: This is used to print a watermark (a faint background image) on
each sheet of output. Click the setting and select the desired watermark. To
edit the selected watermark, click Edit Watermark.
To save your settings and close the window, click OK. To save your settings
without closing the window, click Apply. To cancel your settings and close the
window, click Cancel.
5. Printing
75
Page 81

Selecting Print Settings
Paper tab
Paper Size: Click the setting and select A4, Letter or Legal for the paper
size. (Make sure that the selected size of paper is loaded in the paper tray.)
Orientation: Select Portrait or Landscape to match the orientation of your
document.
Fit to Paper: Select this and then select a paper size to enlarge or reduce the
printed image to the selected paper size.
To save your settings and close the window, click OK. To save your settings
without closing the window, click Apply. To cancel your settings and close the
window, click Cancel.
76
Page 82

Advanced tab
Selecting Print Settings
Copy Count: To change the number of copies printed of each page of your
document, click this setting and enter the desired number.
Advanced Printing Features: Normally this is set to Enabled to allow you to
use the advanced printing features.
Halftoning: This is normally set to Auto Select to let the printer select the
best halftone setting.
To save your settings and close the window, click OK. To save your settings
without closing the window, click Apply. To cancel your settings and close the
window, click Cancel.
5. Printing
77
Page 83

6. Making Copies
The machine can be used as a convenience copier. Follow the steps below to
make copies.
Sorting copies
The machine is initially set to not sort copies. If you wish to have copies
sorted as shown below, change the “SORT COPY” setting to YES (pp. 103
and 107).
Originals
C
B
A
Sorted
A
(SORT COPY)
C
B
B
A
C
Not sorted (MULTI COPY)
A
B
A
B
C
C
Example: Two copies
each of three originals
1 Load the document(s). (Maximum of 30 A4 sheets.)
• If desired, press to set the resolution and/or contrast.
RESOLUTION
2 Select the following copy settings as needed:
• Enlarge/reduce: Press or to select 100%, 125%, 135%, 200%,
70%, 88% or 94%.
Default setting: 100%.
• Number of copies per original: Enter a number from 1 to 99.
Default setting: 1
Example: Press for two copies
3 When you are ready to begin copying, press .
78
COPY/HELP
Page 84

If [MEMORY FULL] appears...
If you place many originals in the feeder, the memory may become full before
all pages can be scanned (the display will show [MEMORY FULL]). If this
happens, only the pages that were scanned will be copied and the remaining
pages will automatically feed out. Repeat the copy procedure for the
remaining pages, including the page that was being scanned when the
memory became full.
Note: It may not be possible to make a copy of an original if a high resolution
setting is used and/or the original contains so much detailed content that the
memory becomes full before scanning finishes.
79
Copies
6. Making
Page 85

Broadcasting
7. Special Functions
Broadcasting
You can send the same document to as many as 50 fax or e-mail destinations
in just one operation.
♦ The destinations must be all fax or all e-mail. It is not possible to mix fax
and e-mail destinations.
♦ Only destinations stored in Rapid Keys and Speed Dial numbers can be
selected. (It is not possible to enter a full fax number or e-mail address.)
1 Load the document(s).
• If desired, press to set the resolution and/or contrast.
2 Press .
B'CAST
RESOLUTION
3 Press to broadcast to FAX destinations, or to broadcast to E-
MAIL destinations.
4 Select a destination using one of the following methods:
• Press a Rapid Key.
• Press and enter a 3-digit Speed Dial number.
• Press or until the desired destination appears in the display.
SPEED DIAL
5 Press to enter the destination.
6 Repeat Steps 4 and 5 for each of the other desired destinations
(maximum of 50).
80
Page 86

Broadcasting
• You can press to scroll through and check your entered destinations.
To delete a destination, press when it appears.
7 When you have finished selecting destinations, press .
DEL
START
• If you are broadcasting to fax destinations, transmission will begin.
• If you are broadcasting to e-mail destinations, you can press to select
e-mail options (see Steps 4 to 6 on page 42). When you are ready to begin
transmission, press .
START
• For fax, a Transaction Report is automatically printed out after
Broadcasting is completed. If any destinations in the "NOTE" column of the
report are marked "BUSY" or have a communication error code, you will
need to send the document to those destinations again.
If the memory becomes full...
If the memory becomes full during scanning, [MEMORY FULL] will appear in
the display.
♦ Press to send the pages which have been stored up to that point in
♦ To cancel the entire transmission, press .
START
memory (the remaining pages will automatically feed out). After
transmission, the memory will be cleared and you can send the remaining
pages. You will also need to send the page which was being scanned when
the memory filled up.
STOP
81
Functions
7. Special
Page 87

Broadcasting
Broadcasting using a Group Key
If the destinations to which you want to broadcast have all been stored in one
Group Key (see Storing destinations in Group Keys which follows), you can
perform the broadcast operation using the following simplified procedure:
1 Load the document(s).
• If desired, press to set the resolution and/or contrast.
RESOLUTION
2 Press the Group key.
• If the group is a fax group, transmission will begin.
• If the group is an e-mail group, you can press to select e-mail options
(see Steps 4 to 6 on page 42). When you are ready to begin transmission,
START
press .
Storing destinations in Group Keys
Follow the steps below to store a group of destinations in a Group Key.
♦ Any Rapid Key not already in use can be used as a Group Key. A key
cannot be simultaneously programmed as both a Group Key and a Rapid
Key.
♦ Up to 50 fax or e-mail destinations can be stored in one Group Key.
♦ The destinations must be all fax or all e-mail. It is not possible to mix fax
and e-mail destinations.
♦ Only Rapid Key and Speed Dial numbers can be stored in a Group Key. Full
numbers cannot be stored.
82
Page 88

Broadcasting
1 Press , then until [ENTRY MODE] appears.
FUNCTION
2 Press , then until [GROUP ENTRY] appears.
3 Press (SET) to store a group. (Press (CLEAR) to clear a group.)
4 Press the Rapid Key that you want to use as a Group Key. (If you are
clearing a Group Key, press the Group key that you want to clear and go
to Step 8.)
• If [ALREADY STORED] or [RAPID # STORED] appears, the key has
already been programmed. Clear the key or try another Rapid Key.
5 Select a destination using one of the following methods:
• Press a Rapid Key.
• Press and enter a 3-digit Speed Dial number.
• Press or until the desired destination appears in the display.
SPEED DIAL
6 Press to enter the destination.
7 Repeat Steps 5 and 6 for each of the other desired destinations
(maximum of 50).
• You can press to scroll through and check your entered destinations.
To delete a destination, press when it appears.
DEL
83
Functions
7. Special
Page 89

Broadcasting
8 When you have finished entering the destinations, press .
9 Press to exit.
STOP
START
84
Page 90

Blocking Unwanted Faxes
Blocking Unwanted Faxes
The Anti Junk Fax function blocks reception of faxes from fax numbers that
you specify.
To use this function, enter the fax numbers that you want to block. Up to five
numbers can be entered.
1 Press , then until [ENTRY MODE] appears.
FUNCTION
2 Press , then until [ANTI JUNK #] appears.
3 Press .
4 Press .
5 Enter the fax number with the number keys (max. 20 digits).
Note: Enter numbers only; hyphens and spaces cannot be entered.
6 Press .
7 Return to Step 4 to store another number, or press to exit.
♦ When a fax is blocked, a transaction report (page 110) will print to inform
START
STOP
you (unless “TRANSACTION LIST” on page 104 is set to “NEVER
PRINT”).
85
Functions
7. Special
Page 91

Blocking Unwanted Faxes
Editing and clearing Anti Junk numbers
1 Press , then until [ENTRY MODE] appears.
FUNCTION
2 Press , then until [ANTI JUNK #] appears.
3 Press .
4 Press or until the number you want to edit or clear appears in
the display.
5 Press .
6 Press for EDIT or for CLEAR.
• If you selected CLEAR, go to Step 8.
7 If you selected EDIT, make the desired changes to the number.
• Press or to move the cursor to the digit or digits you wish to
change, and then enter the new digit. The new digit will replace the old
digit. You can also press to backspace and clear digits.
DEL
8 Press .
9 Press to exit.
86
START
STOP
Page 92

Duplex Scanning
Duplex Scanning
Duplex Scanning is convenient for transmitting or copying two-sided
documents. When this function is selected, you simply feed all pages of the
document through the machine once, turn the stack of pages over, and feed
the stack through again. The machine will automatically sort the pages into
the correct order (front of 1st page, back of 1st page, front of 2nd page, back
of 2nd page, etc.).
♦ Note that any blank sides must be included when scanning the pages (if
the number of pages is not equal each time the machine scans the stack,
an error will result).
1 Load the documents. Make sure the pages are placed front-side down,
with the first page on the bottom.
• If desired, press to set the resolution and/or contrast.
2 Press and then .
DUPLEX
RESOLUTION
START
3 Perform all steps of the desired copy or transmission operation.
4 When all pages of the document have been scanned, turn the stack over
(do not change the page order) and load the stack again.
5 Press .
START
Functions
7. Special
87
Page 93

Print Hold
Print Hold
To prevent others from viewing or taking your received faxes, use the Print
Hold function. When this function is activated, received faxes are held in
memory without being printed. To print the faxes, a preset Print Hold code
must be entered.
Setting the Print Hold code
The Print Hold code is used to print received faxes. Follow the steps below to
set the Print Hold code.
♦ The Print Hold code can be any number from 5 to 8 digits in length.
1 Press , then until [PRINT HOLD CODE SET] appears.
PRINT HOLD
2 Press .
3 Enter a Print Hold code (5 to 8 digits).
4 Press .
START
• The machine will print the Print Hold code for your records.
88
Page 94

Activating Print Hold
Follow the steps below to activate Print Hold.
♦ Print Hold cannot be activated unless a Print Hold code has been set.
Print Hold
1 Press , then press until [ACTIVATE PRINT HOLD] appears.
PRINT HOLD
2 Press .
3 Press to select “YES”.
Printing received faxes
When the memory is holding one or more received faxes, [P RT. HOLD DATA
EXIST] will appear in the display. Follow the steps below to print the faxes.
1 Press .
Display: [HOLD DATA PRINT]
PRINT HOLD
2 Press .
3 Enter the Print Hold code.
3 Press .
START
• Printing will begin.
89
Functions
7. Special
Page 95

Print Hold
Deactivating Print Hold
To deactivate Print Hold, follow the steps below.
♦ Print Hold cannot be deactivated while received faxes are held in memory.
(while [PRT. HOLD DATA EXIST] ) appears in the display). First print the
received faxes and then deactivate Print Hold.
1 Press , then press until [ACTIVATE PRINT HOLD] appears.
PRINT HOLD
2 Press .
3 Press to select “NO”.
Display: [ENTER PASSCODE]
3 Enter the Print Hold code.
4 Press .
5 Press to exit.
START
STOP
90
Page 96

Clearing the Print Hold code
To clear the Print Hold code, follow the steps below.
♦ Print Hold must be deactivated (see page 90) before you can clear the Print
Hold code.
Print Hold
1 Press , then until [PRT. HOLD CODE CLEAR] appears.
PRINT HOLD
2 Press .
3 Enter the Print Hold code.
4 Press .
5 Press to exit.
START
• The display will briefly show [PRT. HOLD CODE CLEAR] / [CLEARED].
• If the wrong code is entered, [WRONG PASSCODE] will appear. Go back
to Step 3. (If the wrong code is entered 3 times in a row, you will return to
the standby display.)
STOP
91
Functions
7. Special
Page 97

Receiving Faxes to E-mail/Folder
Receiving Faxes to E-mail/Folder
If you have connected the machine to a network, you can have incoming faxes
from specified fax numbers (or all fax numbers) automatically converted to email and forwarded to designated e-mail recipients, or converted to image
files and forwarded to a network folder.
♦ This provides a convenient means of forwarding received faxes to someone
who is out of the office.
♦ This function can be used to send copies of all received faxes to an
administrator or network folder for centralized document storage.
Storing (or clearing) groups of originating fax numbers and
forwarding e-mail addresses
To use the Fax to E-mail/Folder function, you must first store one or more
groups of originating fax numbers and forwarding destinations (e-mail
address, network folder).
♦ One originating fax number and one forwarding destination can be stored in
each group. When a fax is received, the machine will check each stored
group, and if the originating number of the received fax matches the
originating fax number in one of the groups, the machine will forward the fax
to the forwarding destination in that group.
♦ You can also omit entry of an originating fax number in a group and have
faxes from all originating fax numbers forwarded to the forwarding
destination.
♦ Up to 30 groups can be stored.
♦ If the same originating fax number (or “TRANSFER ALL”) is stored in two or
more different groups, a network folder can only be specified as the
forwarding destination in one group; the forwarding destination of the other
group(s) must be an e-mail address.
1 Press .
FAX TO MAIL/FOLDER
2 Press until [FORWARDING ADDRESS] appears.
92
Page 98

Receiving Faxes to E-mail/Folder
3 Press to select “SET”.
• To clear a previously stored group, press .
4 Enter a 2-digit number from “01” to “30” (this number is used to identify
the group you will store).
• If you are clearing a group, enter the 2-digit number of the group you wish
to clear and go to Step 8
5 Enter the originating fax number.
• If you wish to have faxes from all originating fax numbers forwarded
(“TRANSFER ALL”), go directly to Step 6 without entering a fax number.
6 Press .
START
7 Specify the destination (e-mail address, network folder) to which you
wish to have the faxes forwarded using one of the methods below:
• Rapid Key Dialling: Press a Rapid Key.
• Speed Dialling: Press and enter a 3-digit Speed Dial number.
• Search Dialling: Press or until the destination appears in the
display.
8 Press . The group is stored.
START
• If [NETWORK FOLDER IS ALREADY USED] appears, the same
originating fax number (or “TRANSFER ALL”) has already been stored in a
group with a network folder. In this case, only an e-mail address can be
stored for the forwarding destination.
SPEED DIAL
93
Functions
7. Special
Page 99

Receiving Faxes to E-mail/Folder
Activating (and deactivating) Fax to E-mail/Folder
After you have stored one or more Fax to E-mail/Folder groups, follow the
steps below to activate the Fax to E-mail/Folder function.
1 Press .
FAX TO MAIL/FOLDER
Display: [ACT. FAX TO MAIL/FLDR]
2 Press to select “ON”.
• To deactivate the function, press to select “OFF”.
3 Press to exit.
STOP
Printing forwarded faxes
The machine is initially set to print received faxes that are forwarded. If you
prefer that the machine only print forwarded faxes when a forwarding error
occurs, follow the steps below.
1 Press .
FAX TO MAIL/FOLDER
2 Press until [PRINT RECEIVED FAX] appears.
3 To have all forwarded faxes printed, press (“ALWAYS PRINT”).
To have forwarded faxes printed only when a forwarding error occurs,
press to select “PRINT ERROR ONLY”.
4 Press to exit.
94
STOP
Page 100

Polling (Requesting a Fax)
Polling (Requesting a Fax)
Polling allows you to call another fax machine and have it send a document
(previously loaded in its feeder or in memory) to your machine without
assistance from the operator of the other machine.
Note: Polling is useful when you want the receiving fax machine, not the
transmitting fax machine, to bear the cost of the call.
♦ To use the polling function, the other machine must be capable of being
polled. Before polling, make sure the other machine is set up to receive
your polling request.
Enabling the polling key
To use Polling, you must first set “POLLING” to “YES” and select a Rapid Key
for use as the polling key in the Option Settings as explained on pages 103
and 105.
Using polling to request fax transmission
1 Dial the fax machine that you wish to poll using one of the following
methods:
• Enter the full number using the numeric keys.
• Press and enter a 3-digit Speed Dial number.
SPEED DIAL
• Pick up the handset (or press ) and dial the full number or press a
Rapid Key. Wait for the fax answerback tone.
SPEAKER
• Press or until the name (or number) of the other party appears
in the display.
2 Press the Rapid Key that you specified as the polling key in the Option
Settings.
• If you used the handset, replace it when POLLING appears in the display.
Reception will begin.
95
Functions
7. Special
 Loading...