

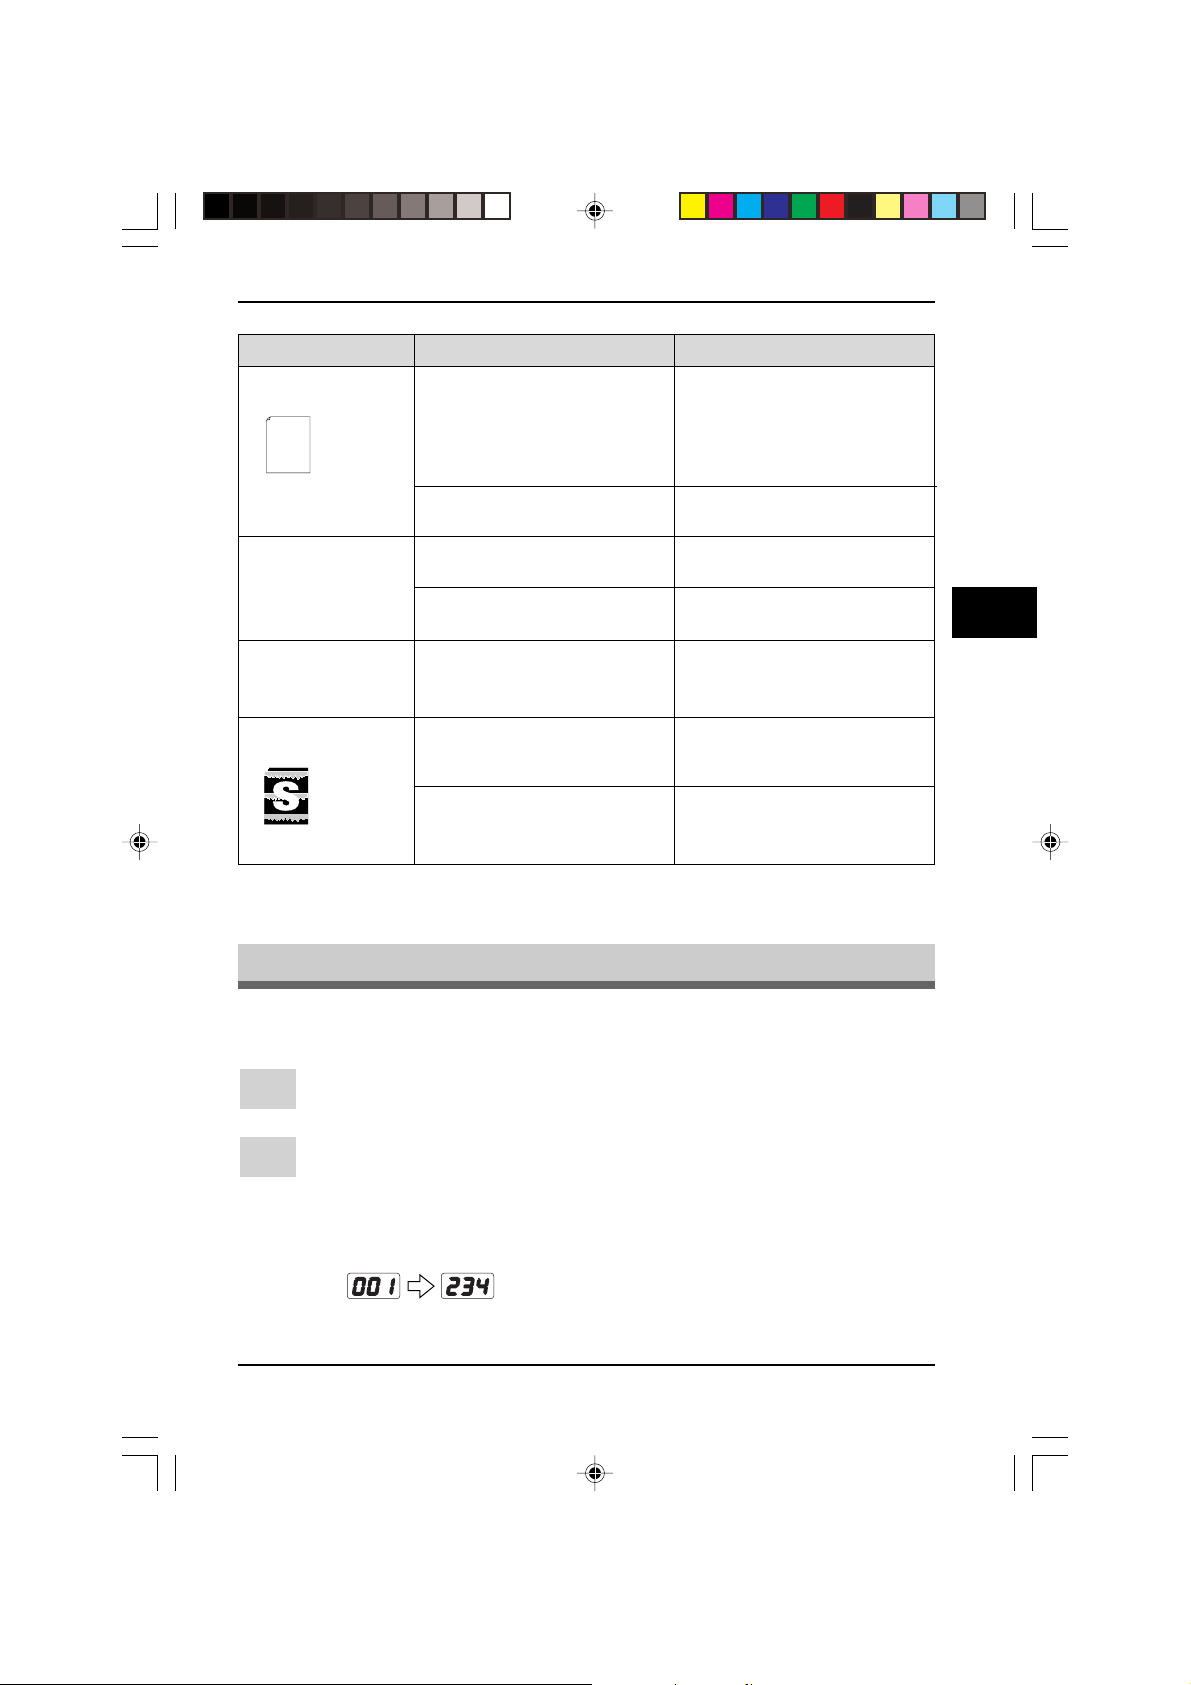
Copier trouble
Problem
Missing characters
Thank you very much for buying a SHARP laser printer. This manual
tells you how to set up, operate and maintain your new printer,
and contains advice on how to get the best performance from the printer.
The descriptions contained in this manual assume that you are familiar
with the operation of your computer and with how to send files to be printed.
Please use this manual along with the documentation for your computer
hardware and software.
Your new printer has been specially designed to give you high-quality,
trouble-free printing performance. The printer driver software lets the printer
communicate with your computer via an IEEE P1284 bidirectional parallel
interface, so you can control all aspects of printing from the Windows Printer
control panel on your computer screen. Printing speed is a maximum
4 pages per minute at resolutions of 300 x 300 dpi for
the JX-9200 and 600 x 600 dpi for the JX-9210.
Consideration has also been given to ecological and environmental factors.
Your printer features low power consumption, and after printing is
completed it switches to a standby mode which complies with
the US EPA Energy Star program. Moreover, no harmful ozone is
produced during printing, and the toner self-recycling technology
ensures that no toner is wasted. Printer operation is also very
quiet: the printer generates less than 45 dBA of acoustic noise
during printing, and during standby mode the noise level is no
higher than the background noise level.
Despite being packed with so many features, the printer is very compact.
Its footprint is no larger than a single A4 page, and the total weight is
approximately 5 kg, meaning that it is easy to transport and set up. The
100-sheet multipurpose tray is also located at the top of the printer to
save space and to make inserting the paper easy.
Most software applications will let you adjust the margins to have around
the edges of the paper that you will be printing on. The area inside the
margins then becomes the "printable area". The Windows Printer Driver
specifies the minimum values that you can set for these page margins.
These minimum margin settings vary depending on whether you are
printing from a Windows application or from a non-Windows application
in PCL emulation mode.
The following illustration and tables show the minimum settings that can
be made in your software applications in both Windows and PCL modes.
Double printing
(previous image
overlaps with current image)
Back of printout dirty
Faded graphics
Possible cause
The paper may be too damp
The drum may be dirty
Thick paper is used
The paper may be to dry
The transfer roller may be
dirty
Toner may be unevenly
distributed
Toner is low
Solution
Try copying or printing with a
diferent batch of paper. Do not
open packages of paper until
necessary so that the paper
does not absorb too much
moisture from the air. p. 128
Clean the drum. p.34
Feed thick paperone sheet at
a time. p.128
Try copying or printing with a
different batch of paper.
Copy or print a fewblank
pages to clean the transfer
roller.
Remove the TD cartridge and
gently shake it horizontally to
evenly distribute toner.p. 30
TD cartridge must be
replaced soon. Prepare a
new TD cartridge. p.29
5
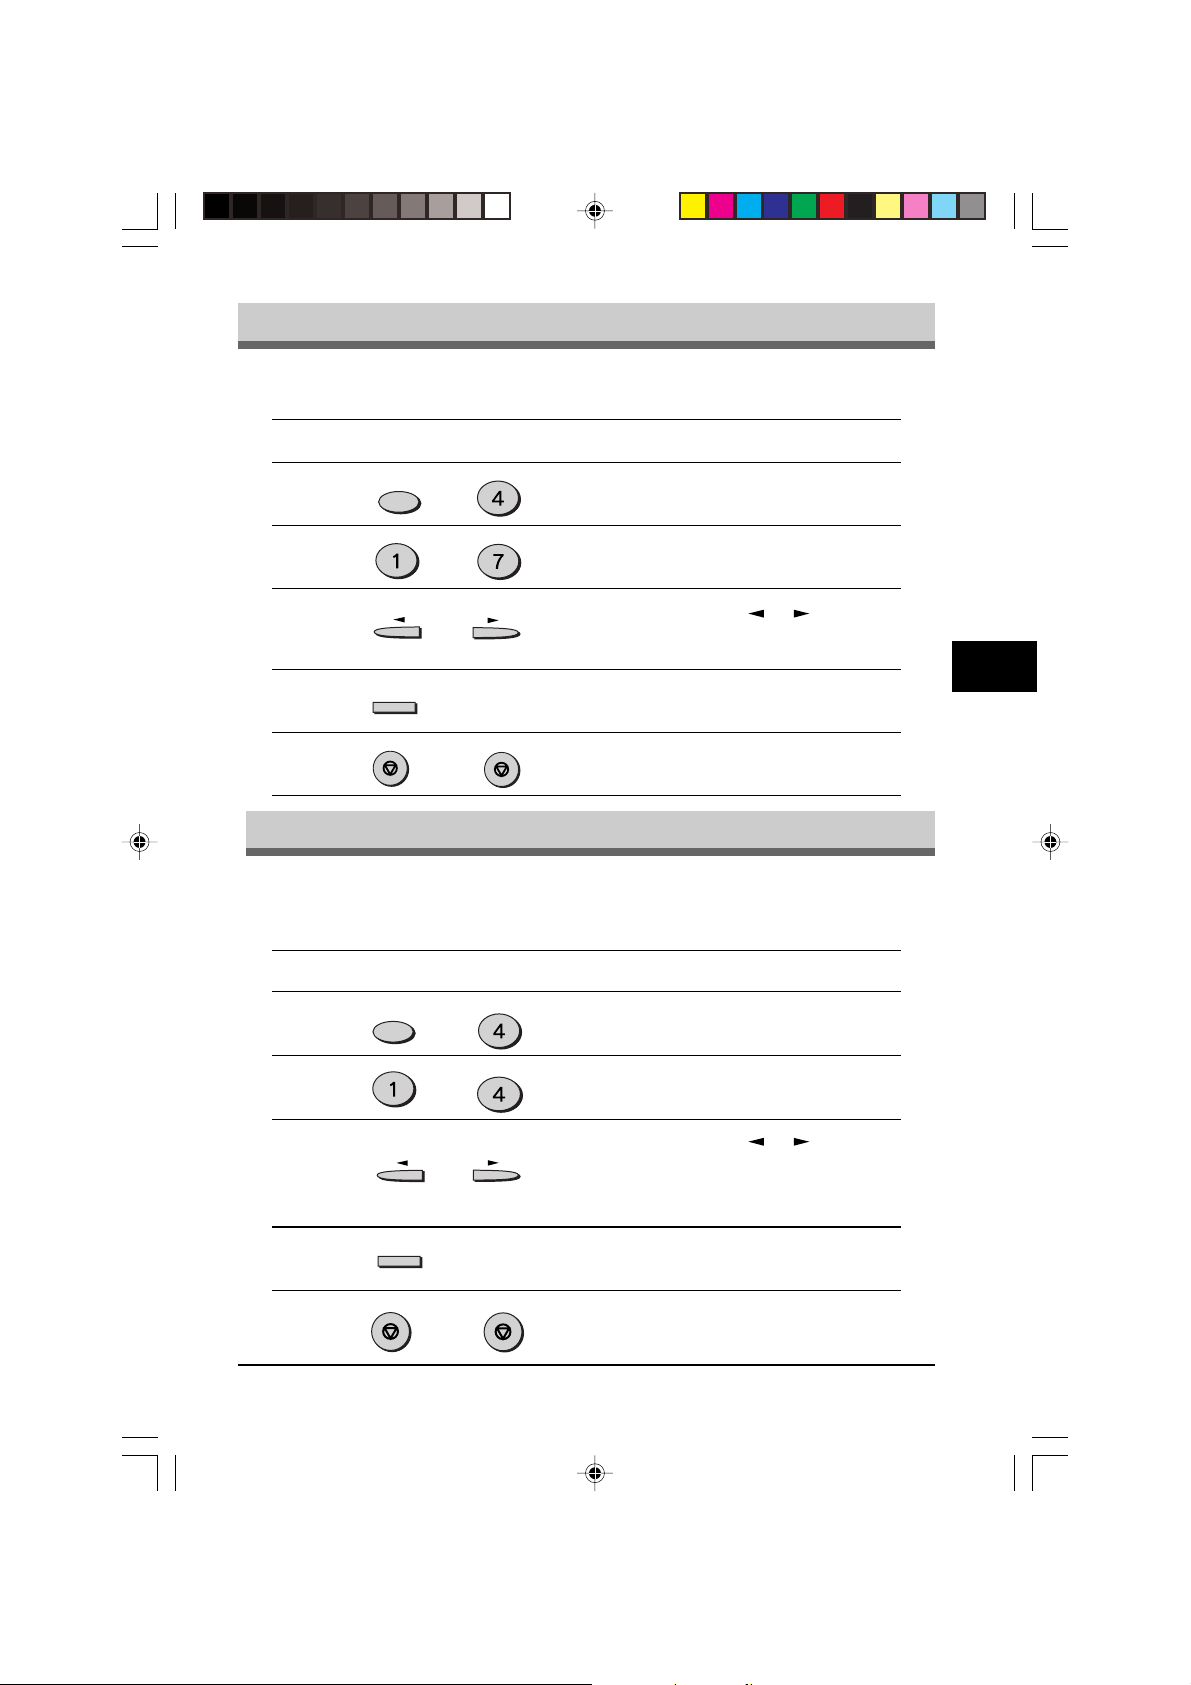
Displaying total number of copies
Use the following procedure to display the total number of copies.
Press the clear (>) key to reset the displa y to z ero.
1
Press and hold down the clear (>) key f or approximately 5 seconds. The
2
total number of copies will appear in two steps, each with three digits.
Example:
Total number of copies is 1,234.
PROBLEMS
SUK 05 MACHINE TROUBLE LEO.p65 30/03/00, 16:4741
41
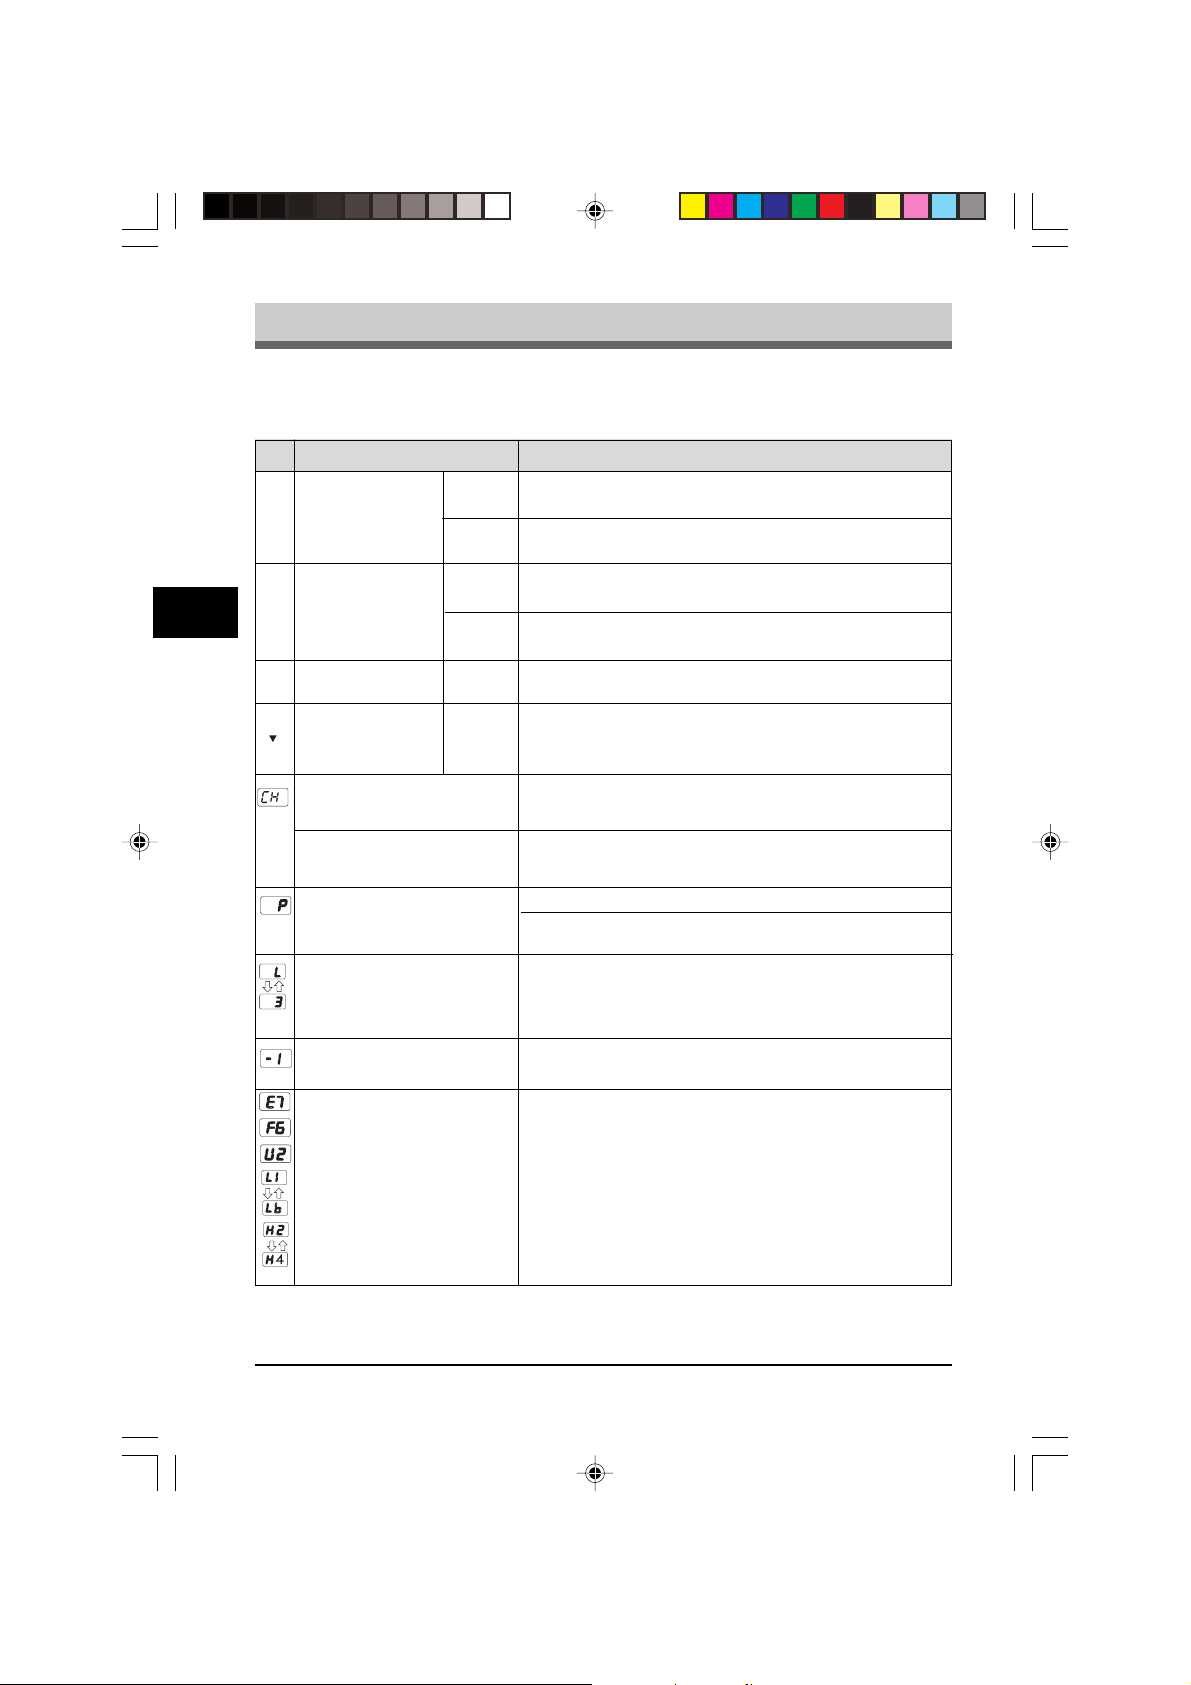
Status indiators
When the following indicators light up or blink on the operation panel or the following
displays appear in the display , solve the prob lem immediately referring to both the
table below and the relevant page.
5
Indication
Drum replacement
w
required indicator
TD cartridge
s
replacement
indicator
t
Misfeed indicator
SPF misfeed
indicator
” is blinking in the
“CH
display
” is steadily lit in the
“CH
display
” is blinking in the
“P
display
A letter and a number
appear alternately
” appears in the
“-1
display
A letter and a number
appear
Steadlily
lit
Blinking
Steadlily
lit
Blinking
Blinking
Blinking
Cause and remedy
Replacement of drum cartridge will be needed soon.
Obtain a new cartridge.
Drum cartridge must be replaced. Replace it with a new
one. p.31
Replacement of TD cartridge will be needed soon. Obtain
a new cartridge.
TD cartridge must be replaced. Replace it with a new
one. p.29
A misfeed has occurred. Remove the misfed paper
referring to the description of “Misfeed remov al. ” p.35
An original misfeed has occured in the SPF . Remove the
misfed originals referring to the description of “Misfeed in
the SPF . ” p .38
The TD cartridge is not installed. Check if the cartridge is
installed. p.30
Front cov er is open. Close the front cov er securely .
Paper tra y is empty . Load copy paper . p.12
A misfeed has occurred in the paper tray. Remo ve the
misfed paper . p. 35
The copier will not function. T urn the power switch off
and then switch it on, and if there is again an error , remove the power cord from the outlet, and contact your
authorized Service representative.
A misfeed has occured when using the SPF. Return one
original to the document feeder tray . p.38
T urn the power switch off . W ait 5 seconds approximately .
T urn the power switch on. If the problem still remains,
contact your authorized Service representative.
42
SUK 05 MACHINE TROUBLE LEO.p65 30/03/00, 16:4742
PROBLEMS
01 02 03 04 05
06 07 08 09 10
11 12 13 14 15
16 17 18 19 20/POLL
AUTO
MANUAL
A.M.
DEF
MNO
WXYZ
ABC
JKL
TUV
GHI
PQRS
SPEAKER
BOOK SEND
DOCUMENT
FAX STARTSTOP
REDIAL/PAUSE
SPEED/SEARCH
ENTER
RESOLUTION CONTRAST BROADCAST RECEPTION MODE
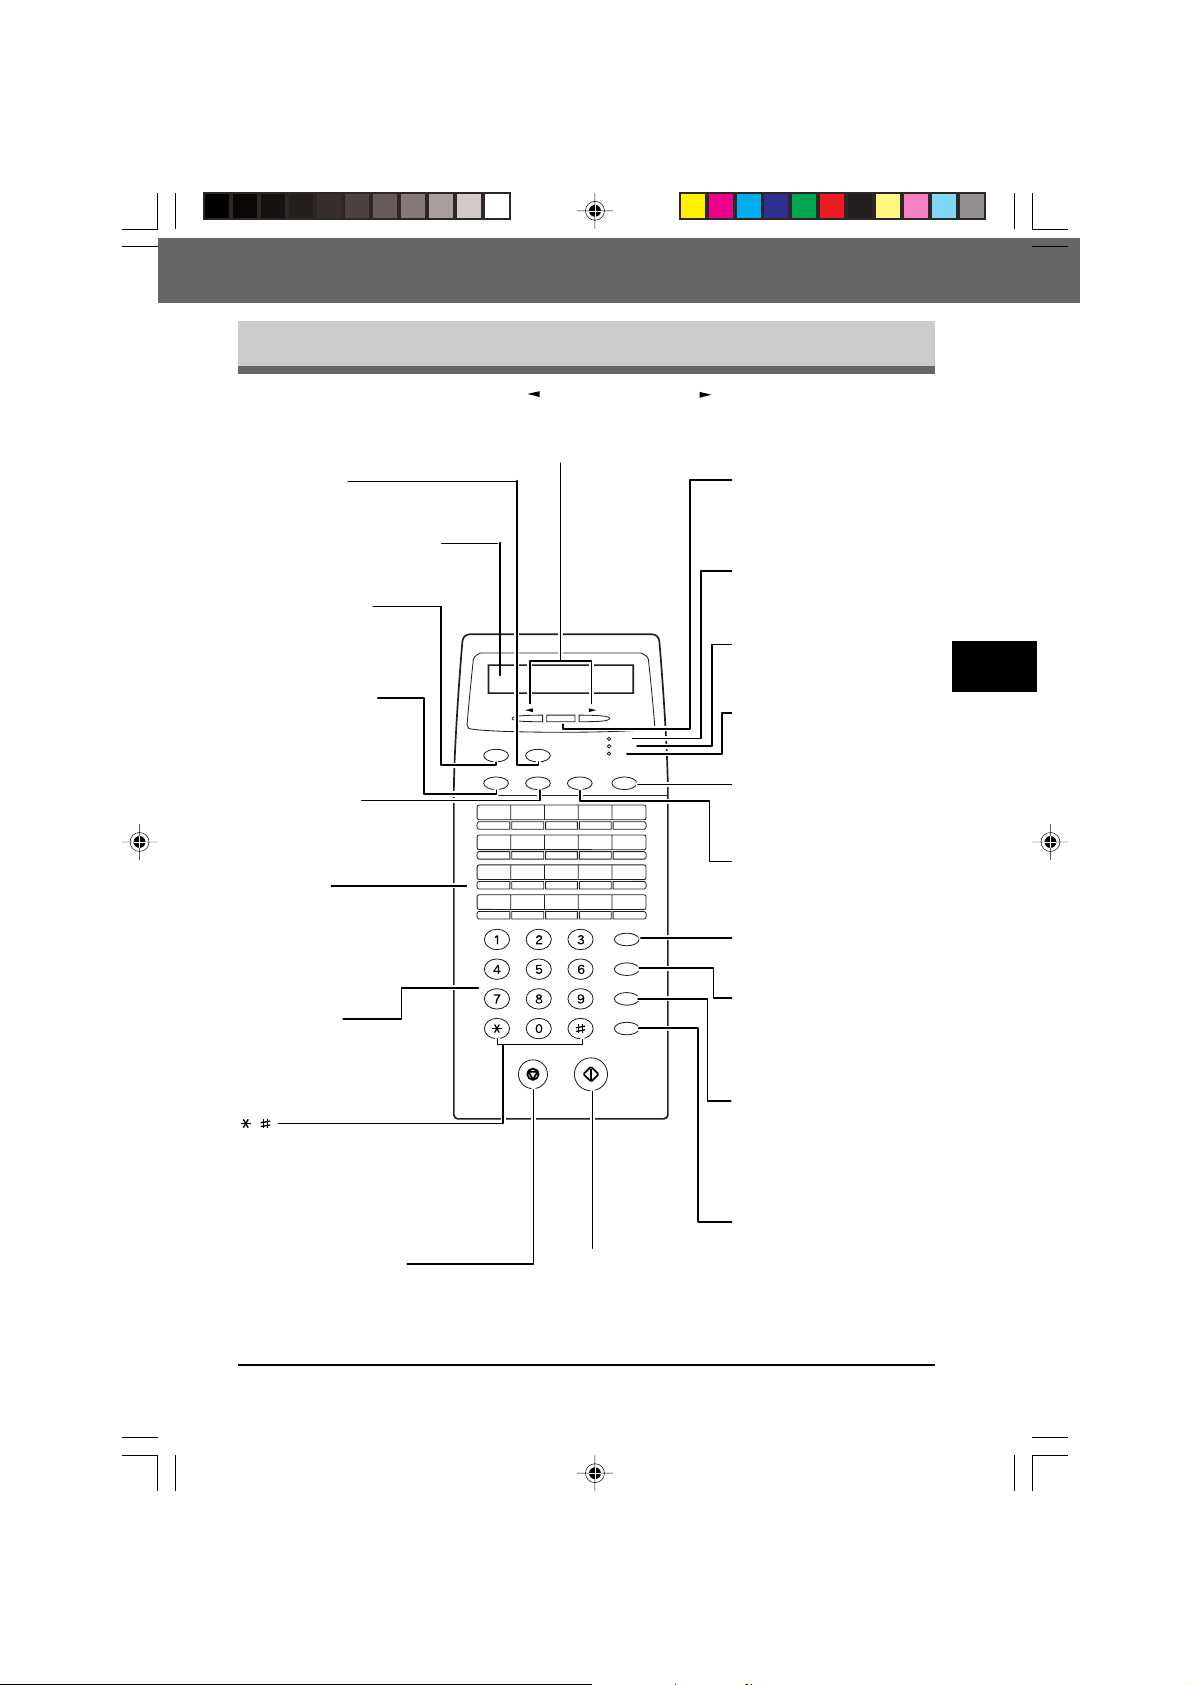
FUNCTION
Number keys
Press these keys to dial
numbers, and enter
numbers and letters
during number/name
storing procedures.
Rapid keys
Press one of these keys
to dial a fax or telephone
number automatically.
Press Rapid key 20 to
start polling. (Note that
you must attach the
Rapid key labels.)
FAX START key
Press this key to begin
sending a fax or manually
receiving a fax.
ENTER key
Press this key to decide an
item in a menu, or to enter
numbers and letters you
have typed in.
DOCUMENT key
Press this key to perform a
direct send fax transmission.
RECEPTION MODE key
Press this key to select
the mode of reception.
REDIAL/PAUSE key
Press this key to
automatically redial the last
number you dialed. Also,
press this key to insert a
pause when entering
numbers.
FUNCTION key
Press this key to
enter function
mode.
BROADCAST key
Press this key to send
documents to a group of
receiving fax machines.
RESOLUTION key
Press this key to
adjust the resolution
before sending faxes.
SPEAKER key
Press this key to begin
manual dialing. (To close the
line, press the SPEAKER
key again.)
AUTO light
This light indicates that the
machine will answer
the
machine
automatically.
MANUAL light
This light indicates that
the
machine
must be answered
manually.
A.M. light
This light indicates the
answering machine will answer
the line if properly connected.
CONTRAST key
Press this key to adjust
the contrast before
sending faxes.
BOOK SEND key
Press this key to fax a
document from the
original table.
STOP key
Press this key to stop an operation
before it is completed, or to delete
the number that was last input.
This key is also used to close the
line when manually dialing.
/
Press these keys to enter
symbols during the name
storing procedure.
Pres these keys to scroll
thoruh a menu. During
input mode, these keys are
also sometimes used
to
move the cursor
Left arrow key ( ) and right arrow key ( )
Press these keys to scroll through a menu. During
input mode, these keys are also sometimes used
to move the cursor.
SPEED/SEARCH key
Press this key to dial a two digit
Speed Dial number. During
character inputting, use this
key to delete an incorrect entry.
Press this key twice to search for
an automatic dialing number.
LIQUID CRYSTAL DISPLAY
This display shows the various message
during fax operation and programming.
SUK 06 INITIAL LEO.p65 30/03/00, 17:0043
6. INITIAL SETTINGS
A look at the operation panel
INITIAL SETTINGS
6
43
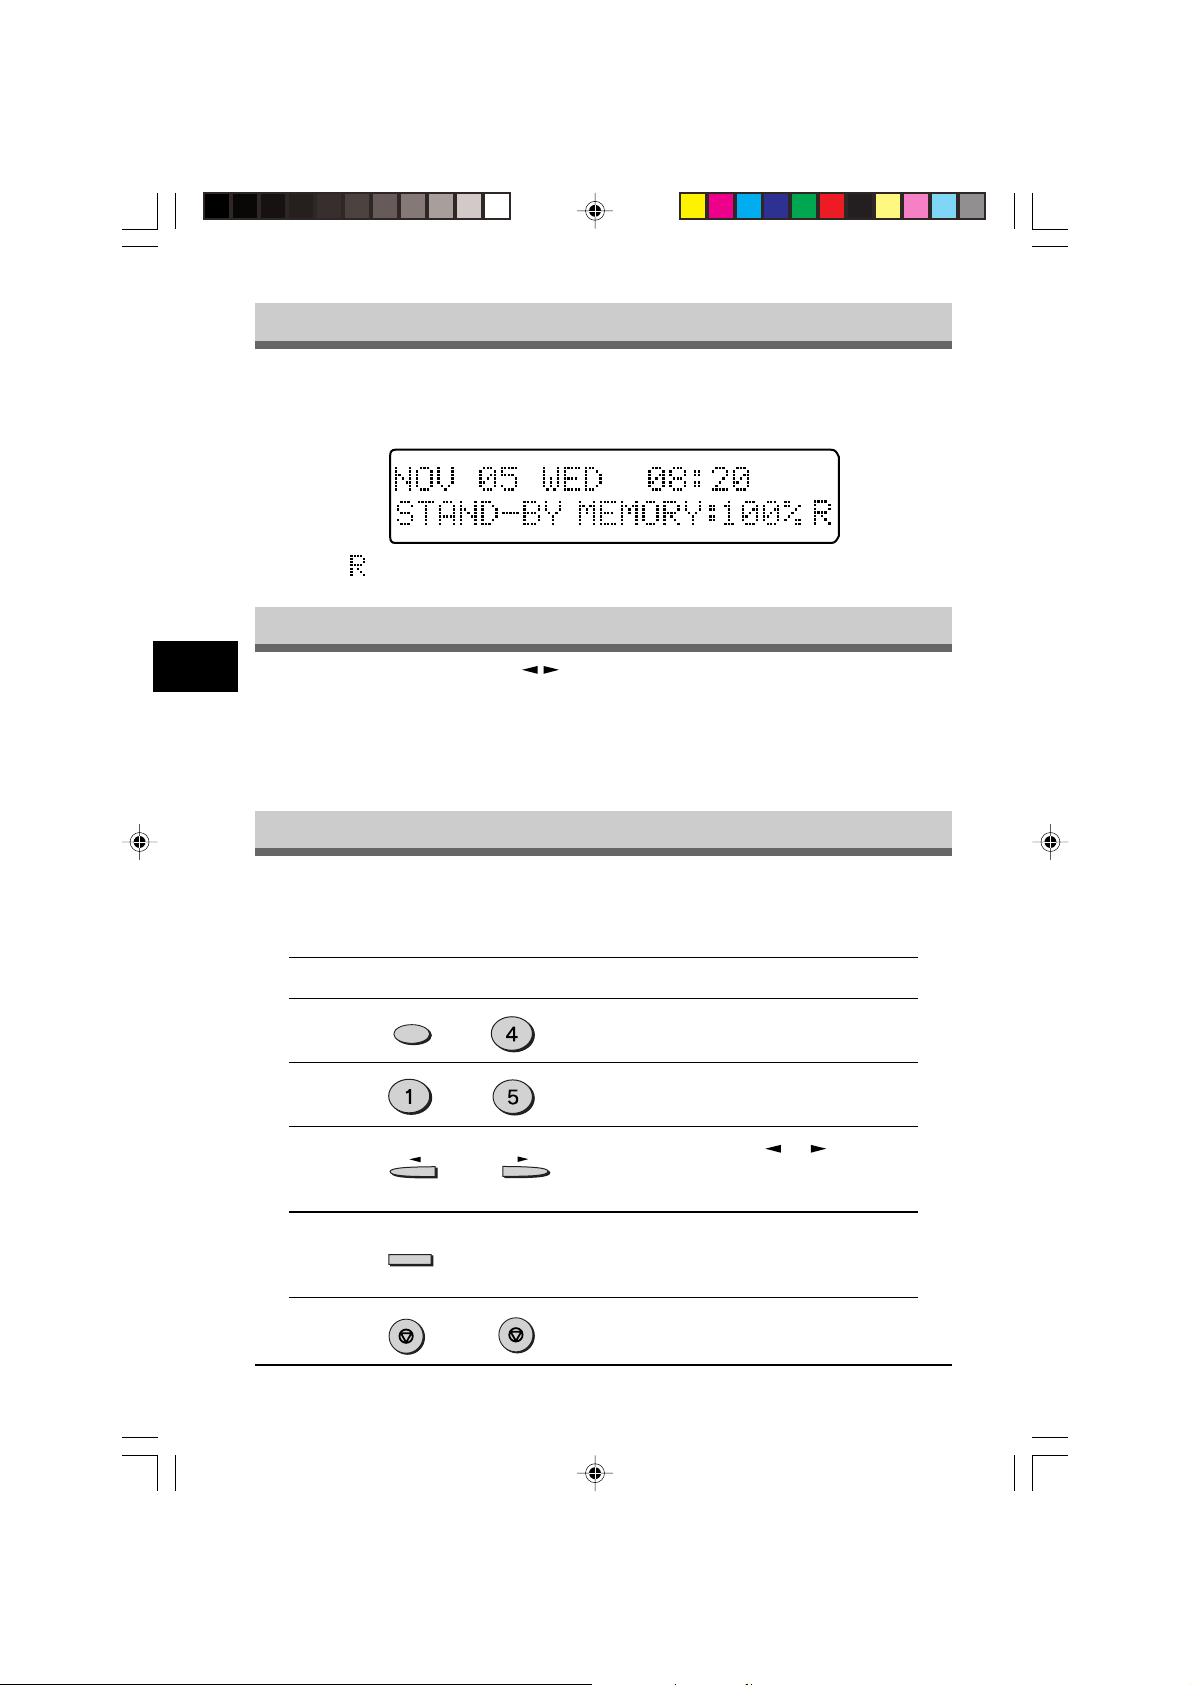
About the Liquid Crystal Display
The machine is equipped with a two-line liquid crystal display (LCD) on the
operation panel for displaying various messages and settings during operation.
This LCD can display up to 20 characters on each line. When the machine is
idle, the LCD shows the date, time, and the stand-by memory available.
Example:
Note: means this machine is in the Reverse Sending mode. It appears
when LCD shows “STAND-BY” or “SEND READ Y”.
Using the Arrow Keys
6
The left and right arrow ( ) keys on the operation panel of the machine
are very useful for scrolling through the various function lists and settings.
Once you have pressed the FUNCTION key, you can scroll through the ten
functions as desired. (See the Function mode at the top of the Quick Reference
Guide for the settings.) Pressing the ENTER key chooses the displayed
function. For many of the function lists, you can then use the arrow keys again
to scroll through the settings.
Adjusting the Beep Volume
Adjust the volume of both key beeps and alarm beeps (emitted at the end of
transmission and reception) using the procedure below .
Factory setting: 3 (MEDIUM)
Step Press these keys Comments
or
GHI
appear in the display.
JKL
appear in the display.
lower or raise the volume
to the desired level.
the display.
1 “OPTION SETTING” will
FUNCTION
2 “BEEP VOLUME” will
3 Press the or key to
4 “STORED” will appear in
ENTER
5 Press the STOP key twice
STOP
44
SUK 06 INITIAL LEO.p65 30/03/00, 17:0044
STOP
to exit.
INITIAL SETTINGS
Adjusting the Ringing Volume
Adjust the ringing volume of the machine using the procedure below .
Factory setting: 3 (MEDIUM)
Step Press these keys Comments
1 “OPTION SETTING” will
FUNCTION
2 “RINGING VOLUME” will
GHI
appear in the display.
PQRS
appear in the display.
3 Press the or key to
or
4 “STORED” will appear in
5 Press the STOP key twice
ENTER
STOP
STOP
lower or raise the volume
to the desired level.
the display.
to exit.
Setting the Length of Alarm Beeps
Y ou can select the length in seconds of the alarm beeps follo wing the procedure
below .
Factory setting: 1 (3SEC)
Step Press these keys Comments
or
GHI
appear in the display.
GHI
appear in the display.
set the alarm beeps to the
desired length or to turn
them off.
1 “OPTION SETTING” will
FUNCTION
2 “BEEP LENGTH” will
3 Press the or key to
6
4 “STORED” will appear in
5 Press the STOP key twice
SUK 06 INITIAL LEO.p65 30/03/00, 17:0045
ENTER
STOP
STOP
INITIAL SETTINGS
the display.
to exit.
45

Turning Key Beeps Off
If you prefer, you can choose to turn the key beeps off. T o do this, follow the
procedure below:
Factory setting: 1 (ON)
Step Press these keys Comments
1 “OPTION SETTING” will
FUNCTION
2 “KEY BEEPS” will appear
GHI
appear in the display.
PQRS
in the display.
6
or
ABC
beeps on, or 2 to turn
them off.
3 Press 1 to turn the key
4 Press the STOP key twice
STOP STOP
to exit.
Setting the Language
Y ou can select language of displa y and reports. T o do this , follow the procedure
below :
Step Press these keys Comments
or
GHI
appear in the display.
the display.
scroll the languages.
to exit.
STOP
to exit.
1 “OPTION SETTING” will
2 “LANGUA GE” will appear in
FUNCTION
ABC
3 Press the or key to
4 Press the ENTER key twice
5 Press the STOP key rwice
ENTER
STOP
Note:
After changing the language settings, it may take a few moments for the
display to actually change.
46
SUK 06 INITIAL LEO.p65 30/03/00, 17:0046
INITIAL SETTINGS

Fax Setup
How to Enter Characters
You can enter letters with the number keys. Letters are marked abov e each of
the number keys “2” through “9”. To enter a letter, press the appropriate key
repeatedly until the desired letter appears (the number of the key appears first,
followed by letters in the order marked above the key). The keys used for
entering characters are shown below .
ABC
GHI
PQRS
• To enter two characters in succession which require using the same key,
press the right arrow ( ) key once after entering the first character, and
then enter the second character.
• T o change one individual character to another , move the cursor to the character
you want to change and enter the new one . The new character will replace the
old one.
• Symbols can also be entered by pressing the “#” and “ ” keys:
JKL
TUV
DEF
MNO
WXYZ
6
Å Ä Æ Ø Ö Ü Ñ ß
• Pressing the “1” key on the number keypad enters a space.
SUK 06 INITIAL LEO.p65 30/03/00, 17:0047
Ò
Ù
INITIAL SETTINGS
47

Fax Setup
Entering Your Name and Fax Number
Note: You can view all of the items in the menu display by pressing the
FUNCTION key, then using the left and right arrow ( ) keys to
scroll through the function list. Pressing the ENTER key chooses the
displayed function. Procedures for inputting various items (name,
telephone number, date , etc.) are given as f ollows.
To have your name and fax number printed at the top of every page you
transmit, program them by pressing the operation panel ke ys as shown below .
• If you enter an incorrect character , press the left arrow ( ) key to move the
cursor back to the mistake, then enter the correct character. (To move the
cursor forward, press the right arr ow ( ) key .)
Use the following procedure to enter your name and fax number:
Step Press these keys Comments
6
1 “ENTRY MODE” will
2 “ENTER Y OUR F AX #” will
FUNCTION
DEF
DEF
appear in the display.
appear in the display.
3 Enter your own fax number
TUV
ABC
GHI
PQRS
PQRS
ABC
PQRS
DEF
(maximum 20 digits) by
pressing the number keys.
T o insert a space between
digits, press the “ ” key. T o
insert a “+”, press the “#”
(example: 18002374277) key .
4 “ENTER YOUR NAME” will
5 Enter your name by
ENTER
PQRS PQRS PQRS PQRS PQRS
GHI GHI
GHI
ABC
ABC
appear in the display.
pressing the appropriate
number keys as shown on
the left. Press each key
repeatedly until the
desired letter appears in
PQRS PQRS PQRS PQRS
the display (maximum of
24 characters). To enter a
space, press the 1 key
PQRS PQRS
twice. T o switch between
lower case and capital
letters, press the REDIAL
(example: SHARP) P A USE key once.
6 “STORED” will appear in
ENTER
the display.
7 Press the STOP key twice
STOP STOP
to exit.
48
SUK 06 INITIAL LEO.p65 30/03/00, 17:0048
INITIAL SETTINGS

Fax Setup
Setting the Date and Time
The date and time that appear in the display are printed at the top of each page
you transmit. Set the date and time by pressing the keys on the operation
panel as shown below . To correct a mistake, press the ST OP ke y to move the
cursor back to the mistake, and then enter the correct number.
Note: The machine supports the year 2000. T o prog ram such a date, enter the
last two digits; for example, the year 2000 is programmed by entering
“00”.
Use the following procedure to set the date and time:
Step Press these keys Comments
1 “ENTRY MODE” will
2 “ENTER YEAR” will appear
FUNCTION
ABC
DEF
appear in the display.
in the display.
6
3 Enter the last two digits of
the year . “ENTER MONTH”
(example: 2000) display.
4 Enter the month (2 digits:
PQRS
(example: July) display.
5 Enter the day of the month
JKL
(example: the fifth) in the display .
6 “ENTER TIME” will appear
7 Enter the hour (2 digits:
8 Enter the minute (2 digits:
9 The clock starts when you
10 Press the STOP key twice
ENTER
ABC
ENTER
STOP
DEF
STOP
INITIAL SETTINGS
will appear in the
“01” f or January , “02” f or
February , “12” for
December, etc.). “ENTER
DATE” will appear in the
(“01” to “31”). “PRESS
ENTER KEY” will appear
in the display.
“01” to “12”).
“00” to “59”).
press this button.
“STORED” will appear in
the display.
to exit.
49
SUK 06 INITIAL LEO.p65 30/03/00, 17:0049

Fax Setup
Auto Summer Time Setting
The machine can be set to adjust to time changes during the year, so that its
internal clock and all susequent notations of time (fax headers, programmed
times, etc.) are automatically adjusted. When the A uto Summer Time Setting
in on, the adjustments take place as shown below:
On the last Sunday of every March: 02:00 03:00
On the last Sunday of every October: 03:00 02:00
Use the procedure below to program the Auto Summer Time Setting:
Step Press these keys Comments
1 “ENTRY MODE” will
6
2 “AUT O SUMMER TIME”
FUNCTION
JKL
DEF
appear in the display.
will appear in the display.
3 Press 1 to turn the Auto
4 Press the STOP key twice
STOP STOP
or
ABC
Summer Time Setting on,
or 2 to turn it off.
to exit.
50
SUK 06 INITIAL LEO.p65 30/03/00, 17:0050
INITIAL SETTINGS

Fax Setup
Selecting the Reception Mode
Your machine has three modes for receiving incoming calls and fax es:
• AUT O mode:
Select this mode when you only want to receive faxes on your telephone
line. The machine will automatically answer all calls and receive incoming
faxes.
• MANUAL mode:
This is the most convenient mode for receiving phone calls if you have an
extension phone. To have true manual mode, the machine must be set to not
answer while in MANU AL mode (see “Setting the Number of Rings f or Manual
Reception” on the next page). You can also receive faxes; however, all calls
must first be answered by picking up the receiver on the extension phone or
telephone connected to the same line.
• A.M. mode:
Select this mode when an answering machine is connected to the machine
and you want the answ ering machine to answ er all calls. This allows you to
receive both voice messages and faxes while you are out.
To set the reception mode, press the RECEPTION MODE key until the light
next to the desired mode comes on.
ENTER
6
For more information on reception modes, refer to Chapter 8.
SUK 06 INITIAL LEO.p65 30/03/00, 17:0051
BOOK SEND
FUNCTION
RESOLUTION CONTRAST BROADCAST
INITIAL SETTINGS
AUTO
MANUAL
A.M.
RECEPTION MODE
51

Fax Setup
Setting the Number of Rings for Auto Reception
You can set the number of rings before the machine answers in AUTO mode
using the procedure below .
Factory setting: 2
Step Press these keys Comments
1 “OPTION SETTING” will
FUNCTION
2 “# OF RINGS AUT O” will
GHI
appear in the display.
ABC
appear in the display.
to
WXYZ
you would like to use (0 to
9).
6
3 Select the number of rings
4 “STORED” will appear in
ENTER
the display.
5 Press the STOP key twice
STOP
STOP
to exit.
Note: If an external telephone is connected, the external telephone will ring
one time when auto reception is set to 0 rings.
Setting the Number of Rings for Manual Reception
The number of rings before the machine answ ers in MANUAL mode can also
be set. If you do not want the machine to answer at all in MANUAL Mode,
select “0” in Step 3 below.
Factory setting: 0 (OFF)
Step Press these keys Comments
to
GHI
appear in the display.
DEF
appear in the display.
WXYZ
you would like to use (0 to
9).
1 “OPTION SETTING” will
FUNCTION
2 “# OF RINGS MAN. ” will
3 Select the number of rings
4 “STORED” will appear in
5 Press the STOP key twice
ENTER
STOP
52
SUK 06 INITIAL LEO.p65 30/03/00, 17:0052
the display.
STOP
to exit.
INITIAL SETTINGS

Fax Setup
Setting the Number of Recall Times
Y ou can select the n umber of times the machine will try to recall a busy number.
If you enter 00, the machine will not try to recall. Follow this procedure:
Factory setting: 02
Step Press these keys Comments
1 “OPTION SETTING” will
FUNCTION
GHI
appear in the display.
PQRS
2 “RECALL TIMES” will
appear in the display.
3 Enter the number of recall
to
WXYZ
4 “STORED” will appear in
5 Press the STOP key twice
ENTER
STOP
STOP
Setting the Recall Interval
The recall interval, the time the machine waits in between attempts to re-send
a fax to a busy number , can be set from 1 to 15 minutes. F ollow this procedure:
Factory setting: 05 (5 minutes)
Step Press these keys Comments
1 “OPTION SETTING” will
FUNCTION
2 “RECALL INTERV AL” will
GHI
TUV
times (“00” to “09”).
the display.
to exit.
appear in the display.
appear in the display.
3 Enter the recall interval
to
JKL
(“01” to “15”).
6
4 “STORED” will appear in
5 Press the STOP key twice
SUK 06 INITIAL LEO.p65 30/03/00, 17:0053
ENTER
STOP
STOP
INITIAL SETTINGS
the display.
to exit.
53

Fax Setup
Setting the Index Function
You can print an index mark along the edge of the pages in each job. This
makes it easy to separate different jobs on the output tr ay.
Separate faxes
with index marks.
6
Use the following procedure to set the index function.
Factory setting: 2 (OFF)
Step Press these keys Comments
1 “OPTION SETTING” will
2 “BA TCH INDEXING” will
3 Press 1 to turn on the
FUNCTION
or
GHI
appear in the display.
WXYZ
appear in the display.
ABC
index function, or 2 to turn
it off.
4 Press the STOP key twice
STOP
54
SUK 06 INITIAL LEO.p65 30/03/00, 17:0054
STOP
to exit.
INITIAL SETTINGS

Fax Setup
Setting Fine Resolution Priority
For most faxing jobs , you will most lik ely w ant to specify the resolution. However, y ou
can also set a default resolution when no setting is made using the RESOLUTION
key. When Fine Resolution Priority is turned on, all faxes will be sent in Fine Mode
unless otherwise specified. To turn on this function, follow the procedure below:
Factory setting: 2 (OFF)
Step Press these keys Comments
1 “OPTION SETTING” will
FUNCTION
GHI
appear in the display.
2 “FINE PRIORITY” will
appear in the display.
3 Press 1 to turn Fine
4 Press the STOP key twice
Setting Up the Machine for Use with a PC Modem
The machine is set to automatically begin reception if you pick up from an
extension telephone and the machine detects a fax tone . How ev er , if y ou are
using a modem on the same line, you must deactivate this function: otherwise
the machine will mistakenly attempt to receive the transmission from your
computer. To turn off the Fax Signal Receive function, follow the procedure
below.
Note: If you turn off the Fax Signal Receiv e function, be sure to activ ate the
Factory setting: 1 (ON)
Step Press these keys Comments
1 “OPTION SETTING” will
STOP
Remote Reception function. See “Using the Remote Reception Function”
on the next page for details on how to do this.
FUNCTION
or
ABC
Resolution Priority on, or 2
to turn it off.
STOP
to exit.
GHI
appear in the display.
6
2 “F AX SIGNAL RCV. ” will
3 Press 1 to turn Fax Signal
or
4 Press the STOP key twice
SUK 06 INITIAL LEO.p65 30/03/00, 17:0055
STOP
ABC
STOP
INITIAL SETTINGS
appear in the display.
Receive on, or 2 to turn it
off.
to exit.
55

Fax Setup
Using the Remote Reception Function
The machine’s Remote Reception f eature is designed to allow you to activate
fax reception from an extension telephone or a telephone directly connected
to the machine. The Remote Reception function operates e ven when the F AX
Signal Receive function is turned off. See “Setting Up the Machine for Use
with a PC Modem” on the pre vious page. When you hear the f ax tone, simply
press the one-digit Fax Remote Number (F actory setting: 5) and . Follow
the two procedures below to use this feature.
Notes:
•
If originals are set in the SPF , the machine does not ans wer when you press the
Fax Remote Number and . Ho we v er , if the originals are set in the SPF as
part of a copy job in progress, the mechine answers when y ou press the Fax
Remote Number and .
•
If you want to receive a fax while you are on an extension telephone, when
you hear a fax tone, press the one-digit Fax Remote Number and . To
ensure proper fax reception, hang up the extension phone only after you
have confirmed that fax reception has begun. Furthermore, there is no sound
6
when fax reception begins.
T urning on Remote Reception:
Factory setting: 1 (ON)
Step Press these keys Comments
1 “OPTION SETTING” will
FUNCTION
GHI
appear in the display.
2 “REMOTE RECEPTION”
will appear in the display.
or
ABC
Reception on, or 2 to turn
it off.
to exit.
GHI
appear in the display.
WXYZ
will appear in the display.
WXYZ
would like to use as the
Fax Remote Number .
INITIAL SETTINGS
3 Press 1 to turn Remote
4 Press the STOP key twice
Setting a Fax Remote Number:
Factory setting: 5
Step Press these keys Comments
1 “OPTION SETTING” will
STOP STOP
FUNCTION
2 “F AX REMOTE NUMBER”
3 Enter the number you
56
SUK 06 INITIAL LEO.p65 30/03/00, 17:0156

Fax Setup
4 “STORED” will appear in
ENTER
the display.
5 Press the STOP key twice
STOP
STOP
to exit.
PBX Setting
The machine is connected to a PBX, you can program machine to access
automatically public line outside PBX.
Factory setting: 2 (OFF)
Step Press these keys Comments
1 “OPTION SETTING” will appear
FUNCTION
ABC
GHI
in the display.
2 “PBX SETTING” will appear in the
display .
or
ABC
connected to a PBX.
3 Press 1 (YES) if the machine is
Press 2 (NO) if the machine is
connected to a public line.
4 “PBX SELECT” will appear in the
display .
ABC
or
This parameter permits to define
how connection of a call from a
PBX to an external line is made.
For more details about this mode,
see operation manual of your PBX
or contact support department of
PBX dealer.
Press 1 for “FLASH” mode.
Press 2 for “ID PBX” mode.
6
5 “PBX ID CODE” will appear in the
6 Press ENTER key to continue.
7 Press the STOP key twice to exit.
SUK 06 INITIAL LEO.p65 30/03/00, 17:0157
ENTER
STOP STOP
WXYZ
display .
Enter identification number of your
PBX (max. 3 digits)
INITIAL SETTINGS
57

Fax Setup
Storing Numbers for Automatic Dialing
Automatic Dialing is a quick and convenient way to dial by using only a Rapid key (Rapid Key
Dialing), or pressing the SPEED/SEARCH key and select the SPEED and entering a two digit
number (Speed Dialing).
To use Automatic Dialing, you must first store the full number. The wa y y ou store it depends on
whether you want to use it for Rapid Key Dialing or Speed Dialing:
Note:
If the machine is connected to a PBX, the numbers dialed in automatic dialing are
automatically transferred to the public line (you should not enter access
code, etc.) in order to obtain the external line in case if registred numbers. In
case of an internal number of the PBX, push the SPEAKER key in order to
insert the R character at the beginning of the number (when tou are in step 6,
as shown below) ; this will cancel the automatic dialing of the access code?
Storing numbers
Use the following procedure to store numbers for Rapid Key Dialing or Speed Dialing:
Step Press these keys Comments
6
1 “ENTRY MODE” will appear in
FUNCTION
DEF
the display.
2 “FAX NUMBER MODE” will
appear in the display.
3 “FAX NUMBER SET” will appear
in the display.
4 To store a Rapid key number,
press a Rapid key. To store a
01
Speed Dial number, press two
number keys (“00” to “99”).
“PRESS ENTER KEY” will
(example) appear in the display .
5 “ENTER FAX NUMBER” will
ENTER
appear in the display.
WXYZ
ABC
6 Enter the fax number (maximum
ABC
TUV
ABC
JKL
of 20 digits including pauses)
using the number keys.
(example: 2015298200)
7 “ENTER NAME” will appear in
ENTER
the display.
8 Enter the name of the location
JKL
ABC
GHI
or party by pressing number
keys as described in “How to
Enter Characters ” in this
. . .
chapter (max. of 20 characters).
If you do not want to enter a
(example) name, skip this step.
9 “CHAIN DIAL” will appear in the
ENTER
58
SUK 06 INITIAL LEO.p65 30/03/00, 17:0158
display.
INITIAL SETTINGS

Fax Setup
10 Press “1” if you want to
ABC
or
specify the number as a
Chain Dialing number (see
“Chain Dialing for Long
Numbers” in this section).
Otherwise, press “2”.
11 Return to Step 4 to store
STOP
Step 4 or
Note: You may need to add a pause between certain digits in the number to
allow time for connection. For example, if you are on a PBX telephone
system that requires an access number, such as “9”, to be dialed to
access an outside line, you will need to enter a pause between the
access number and the fax number of the other party. Pauses are entered
by pressing the REDIAL/PAUSE key (2 seconds per pause). If
necessary, several pauses can be entered in a row.
Use the following procedure to clear numbers:
STOP
. . .
Step Press these keys Comments
1 “ENTRY MODE” will appear in the
FUNCTION
DEF
another number, or press
the STOP key a number
of times until you exit. If
the number is a Rapid key
number, y ou can write the
name on the label above
the appropriate Rapid key .
display .
6
2 “F AX NUMBER MODE” will appear
3 Select CLEAR. “F AX NUMBER
ABC
4 T o clear a Rapid k ey number ,
01
(example) will appear in the display.
5 “CLEARED” will appear in the displa y.
6 Return to Step 4 to clear another
Step 4 or
SUK 06 INITIAL LEO.p65 30/03/00, 17:0159
ENTER
STOP
in the display.
CLEAR” will appear in the displa y .
press the appropriate Rapid key .
T o clear a Speed Dial number ,
enter the 2-digit number with the
number keys. “PRESS ENTER
KEY” will appear in the displa y. If
there is no number stored under
that Rapid key or Speed Dial
number, “NO NUMBER STORED”
STOP
. . .
number, or press the ST OP key a
number of times until you exit.
INITIAL SETTINGS
59

Fax Setup
Chain Dialing for Long Numbers
The maximum number of digits which may be entered when storing a fax
number is 20. If you need to store a number which is longer than 20 digits,
use Chain Dialing.
Chain Dialing allows you to combine two or more Automatic Dialing
numbers, or use an Automatic Dialing number followed by additional digits
entered manually with the number keys , to dial a single number . In addition
to being convenient for storing long numbers, it allows you to store an area
code or access code as an Automatic Dialing number .
For example, to store a 36 digit number for Automatic Dialing, you must
break it into two parts:
6
1. Store the first 20 digits into one Speed Dial number (“01”, for example)
using the storing procedure described in the preceding section, and press
“1” in Step 10 of that procedure to specify it as a Chain Dialing number
(this tells the machine to wait for the remainder of the telephone number
when dialing).
2. Store the remaining 16 digits into a separate Speed Dial number (“02”, for
example), and this time press “2” in Step 10 of the storing procedure to
specify that it is not a Chain Dial number (this tells the machine that the
final part of the number has been dialed).
In this way, you specify all parts of the number except the last as a Chain
Dial number.
Note: The maximum number of digits that can be dialed at one time by
Chain Dialing is 50.
60
SUK 06 INITIAL LEO.p65 30/03/00, 17:0160
INITIAL SETTINGS
 Loading...